Discover how WooCommerce order notes can streamline communication, fulfill special requests, and automate updates for smoother store operations.
Are you using WooCommerce order notes to streamline your store's order management?
Order notes allow you to collect custom instructions from customers, ensuring efficient handling of special requests.
Additionally, store admins can use order notes to communicate customer updates and share information about order management with team members.
In this blog, we will show you how to add a WooCommerce order notes field for customers.
Furthermore, we will also show how to send automated WooCommerce order notes email notifications to customers and store staff for improved order management.
Short on time? Watch the video 👇
Table of Contents
- 1 What are the WooCommerce Order Notes?
- 2 The Default WooCommerce Customer Order Notes Field
- 3 How to Add and Customize the WooCommerce Order Notes?
- 4 How to Hide/Remove the Order Notes Field on the Checkout Page?
- 5 Does WooCommerce Send an Order Note Notification Email?
- 6 How to Send Custom WooCommerce Order Note Emails to Customers?
- 7 How to Send Email Notification For Private Notes in WooCommerce?
- 8 How to Include Customer Note in WooCommerce Order Confirmation Email?
- 9 Importance of WooCommerce Order Notes
- 10 Start Using WooCommerce Order Notes For Efficient Order Management!
What are the WooCommerce Order Notes?
WooCommerce order notes are a powerful tool that facilitates effective communication about orders between customers and store administration.
Store admins can also use order notes to communicate with internal staff about order updates. Additionally, WooCommerce itself uses order notes to notify the store owner about different updates on a specific order.
There are three main types of order notes: customer notes, admin notes, and system-generated order notes. Let’s learn more about each of these:
1. Customer order notes
Users can add order notes during the checkout process. This useful feature allows customers to provide special instructions or requests related to their orders.
For example, a customer might leave a note asking for gift wrapping or specifying a delivery time.
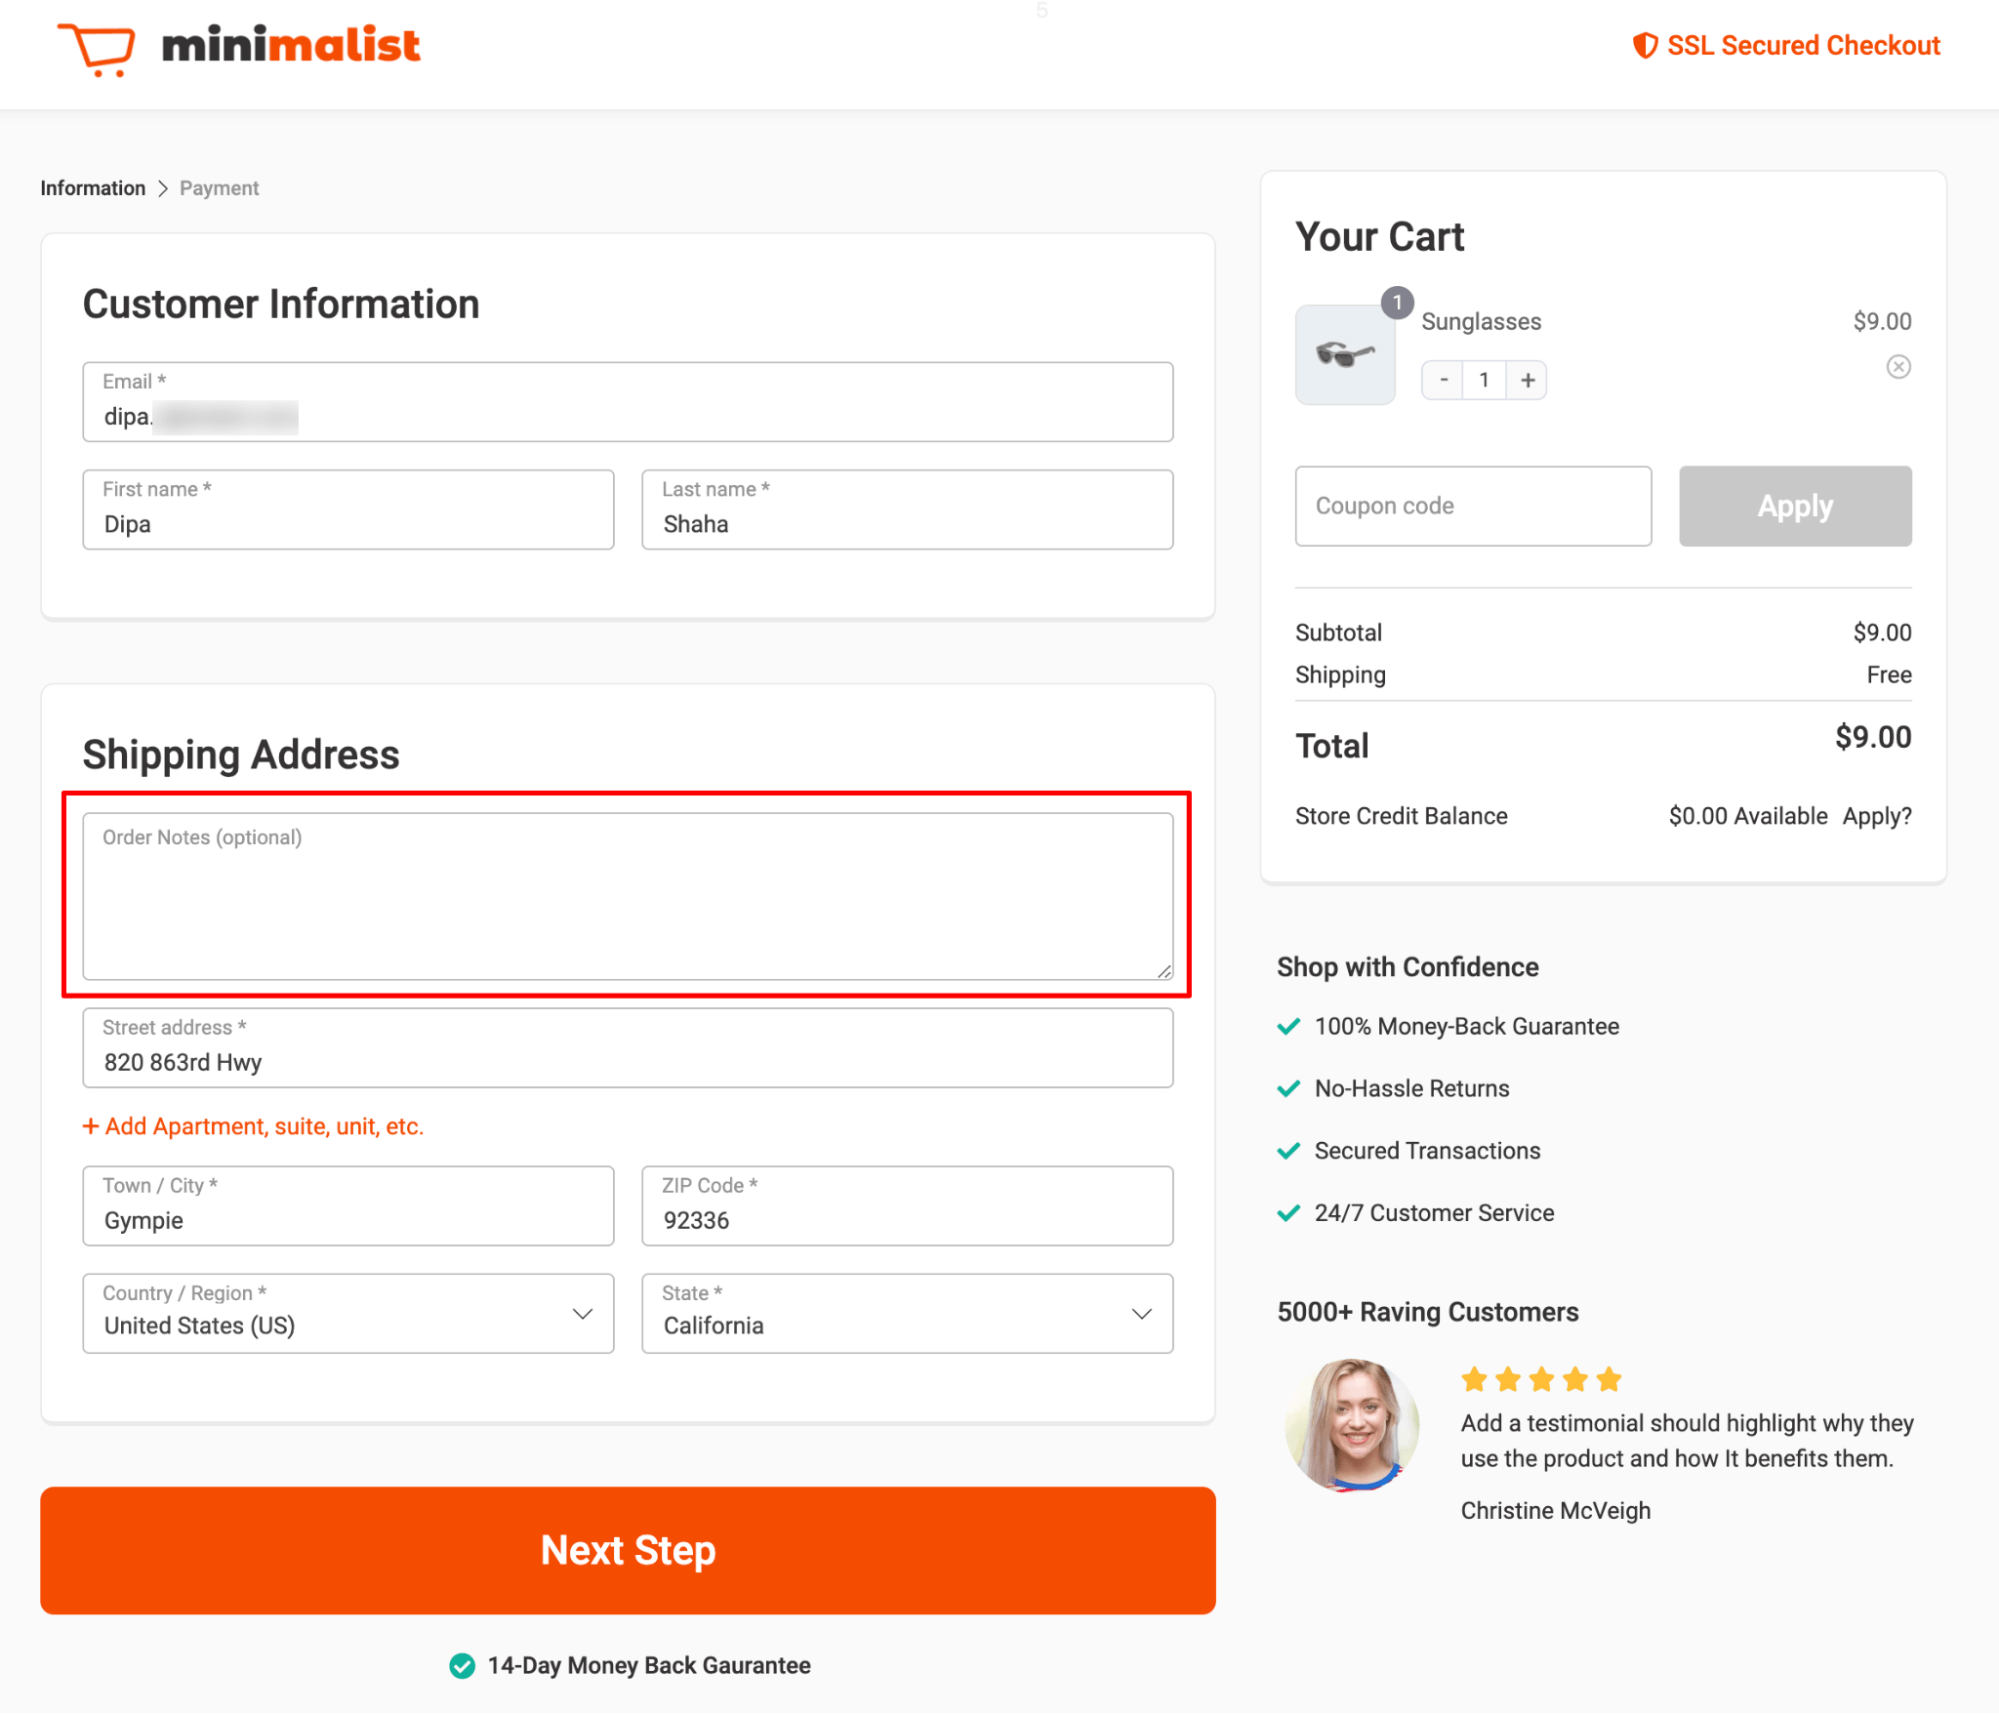
Here is an example of an order note field on the checkout page:
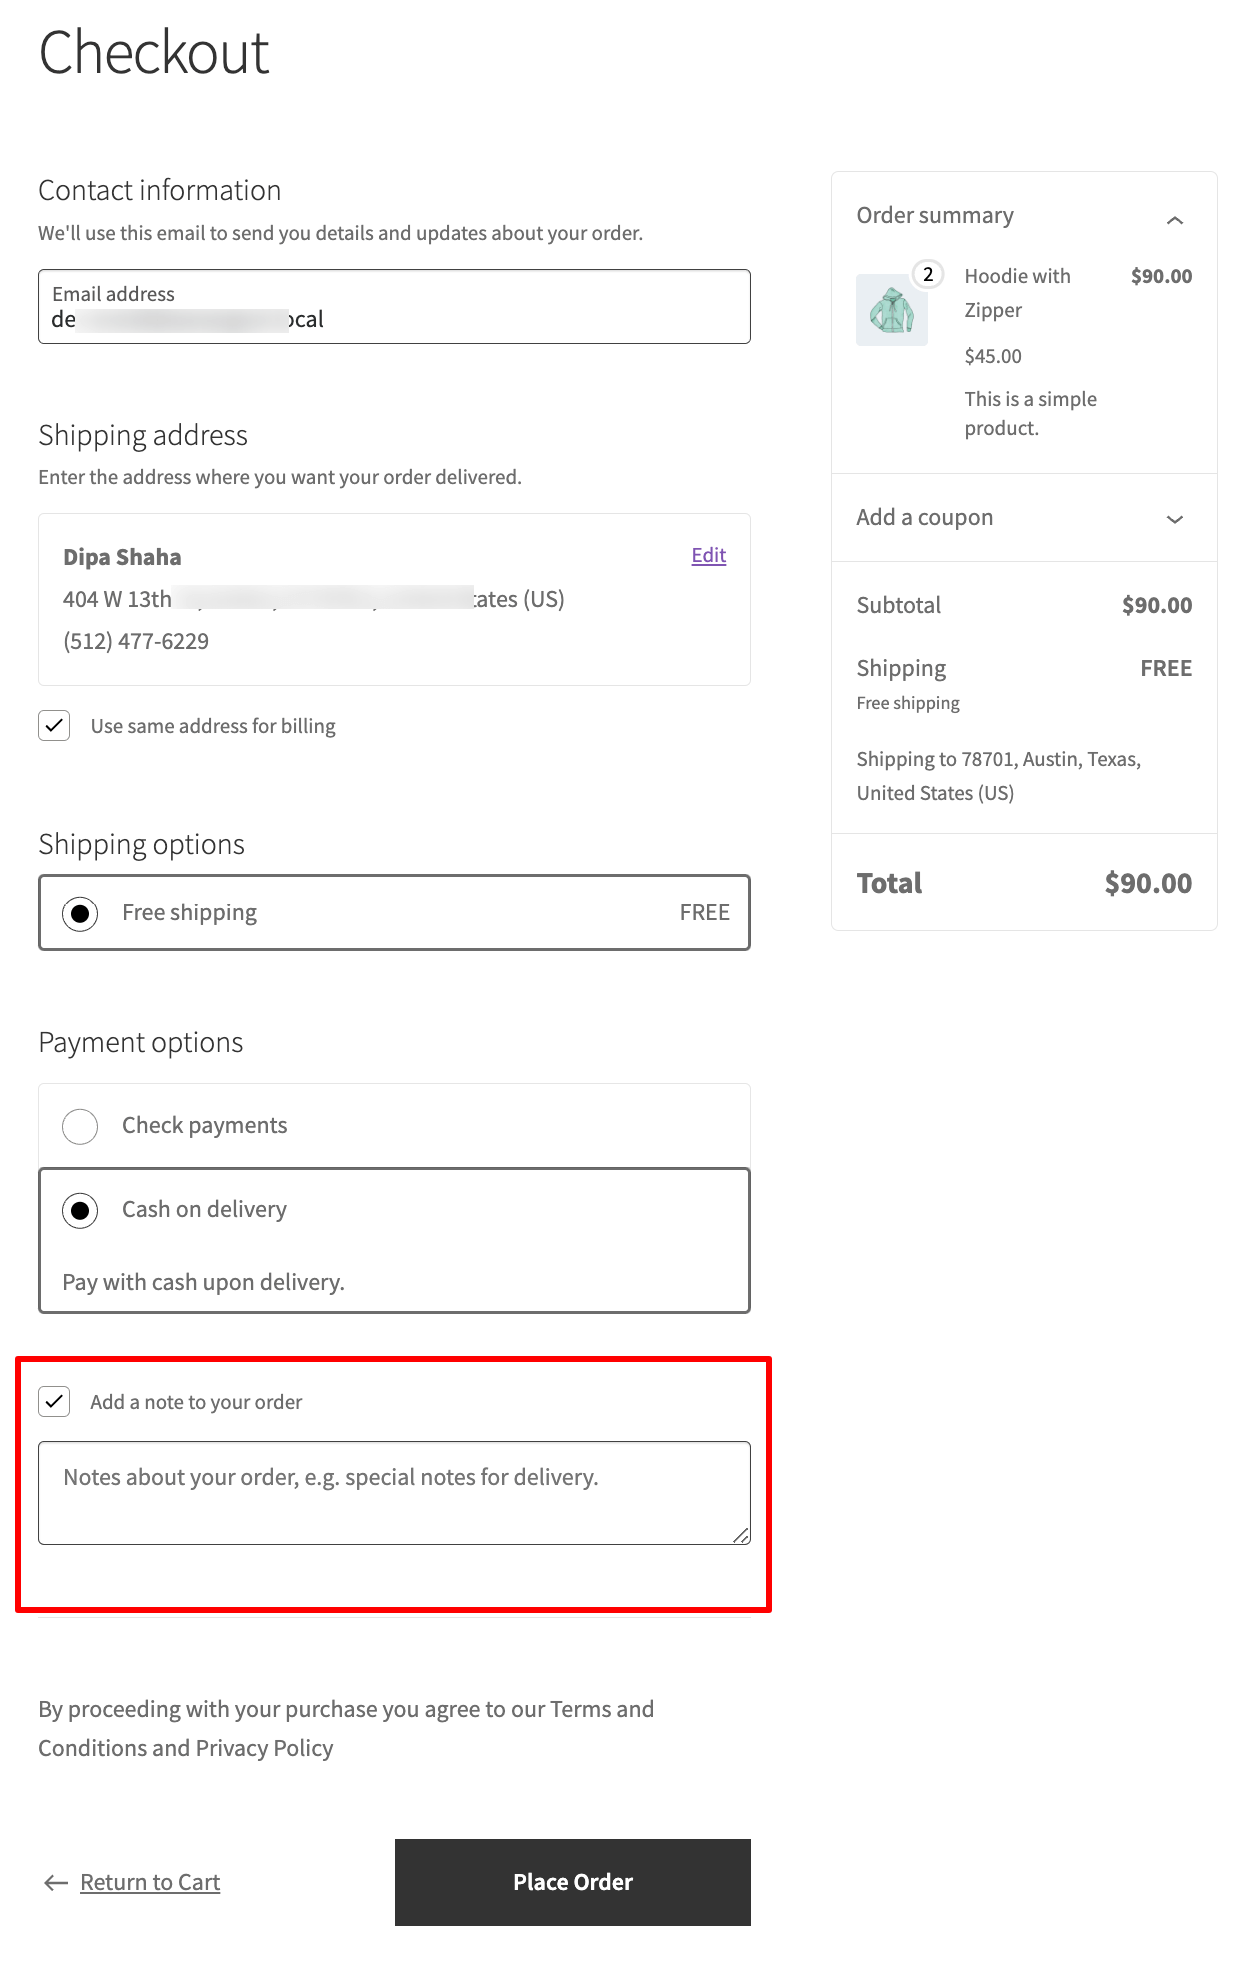
If the order is placed successfully, the WooCommerce order notes are in the order details in the field “Customer provided note”.

2. Admin order notes
From the store backend, the store admin can add two types of notes: Notes to customers and private notes.
- Note to Customer
The admin can add notes for the customer on any specific order. This can be done from the order details page under “order notes”.
To add the note, make sure to select the "Note to Customer” option from the dropdown and hit “Add.”
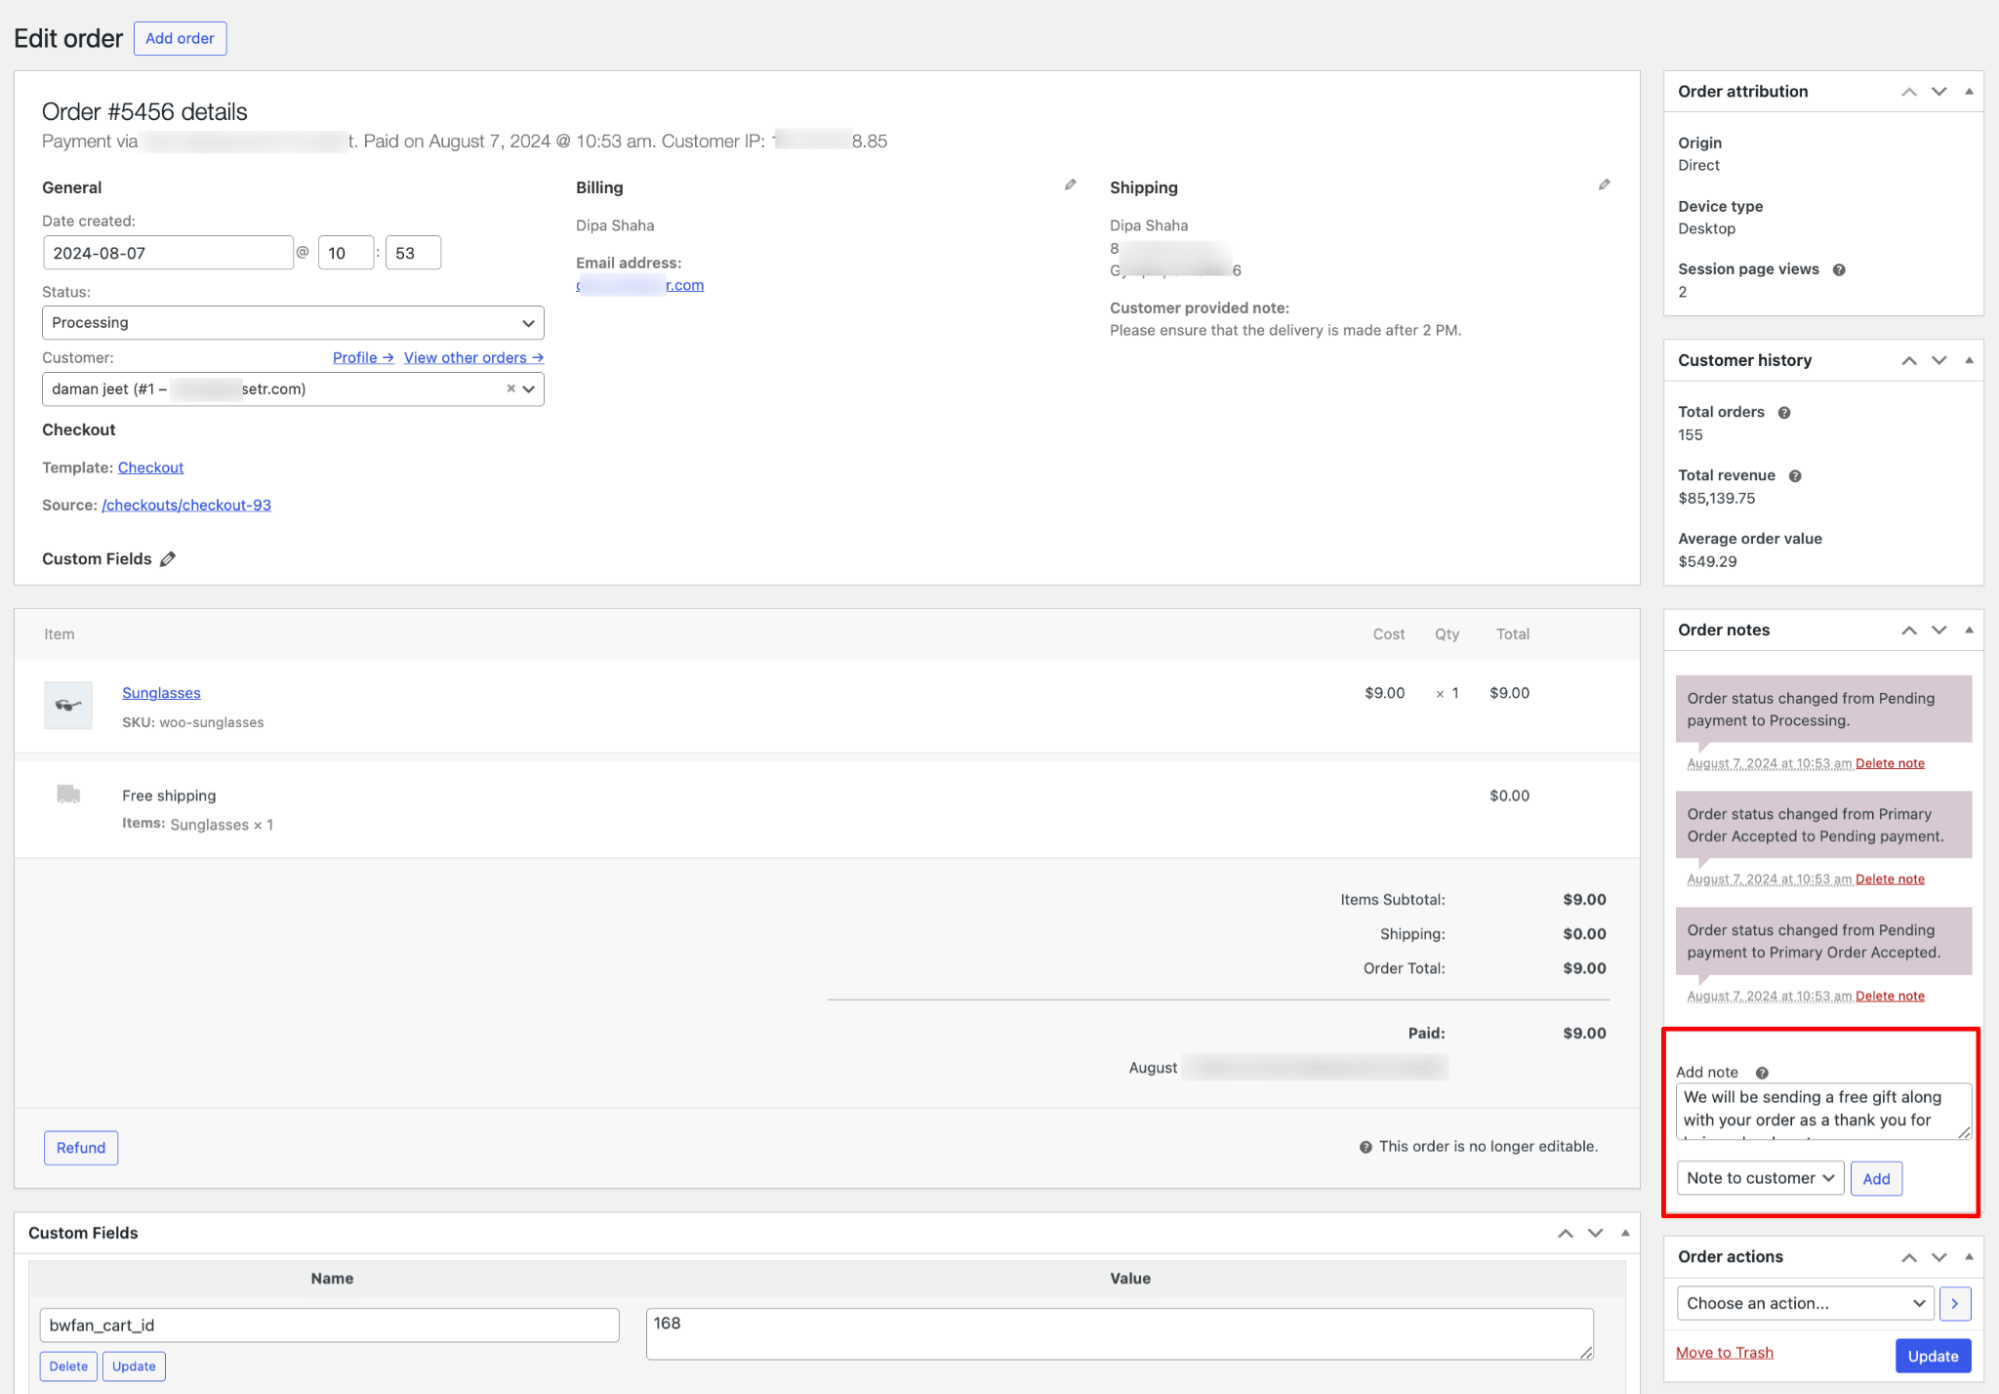
After you add the note, it will be added to the existing order notes in a different color.
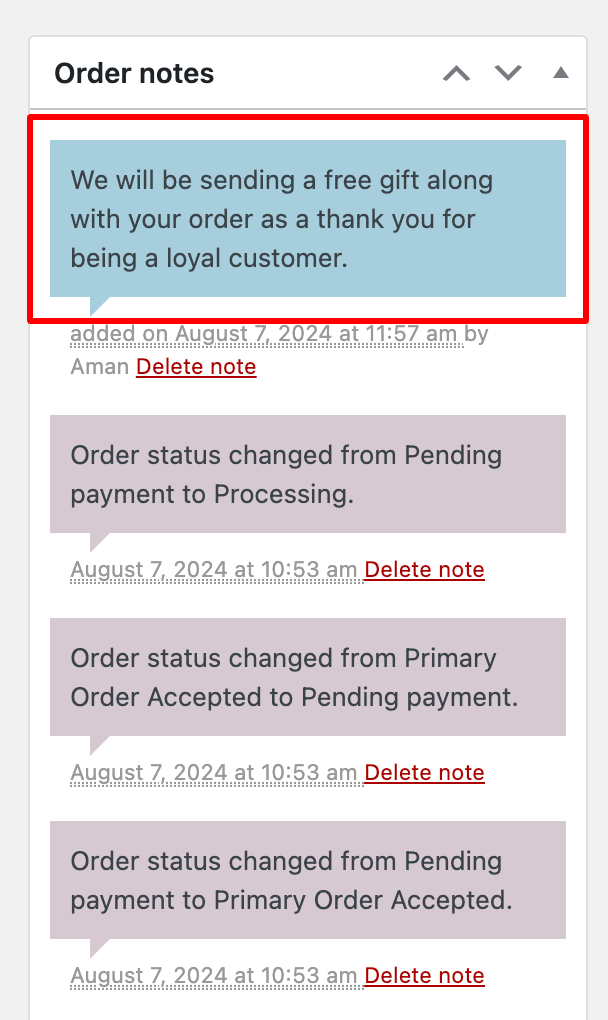
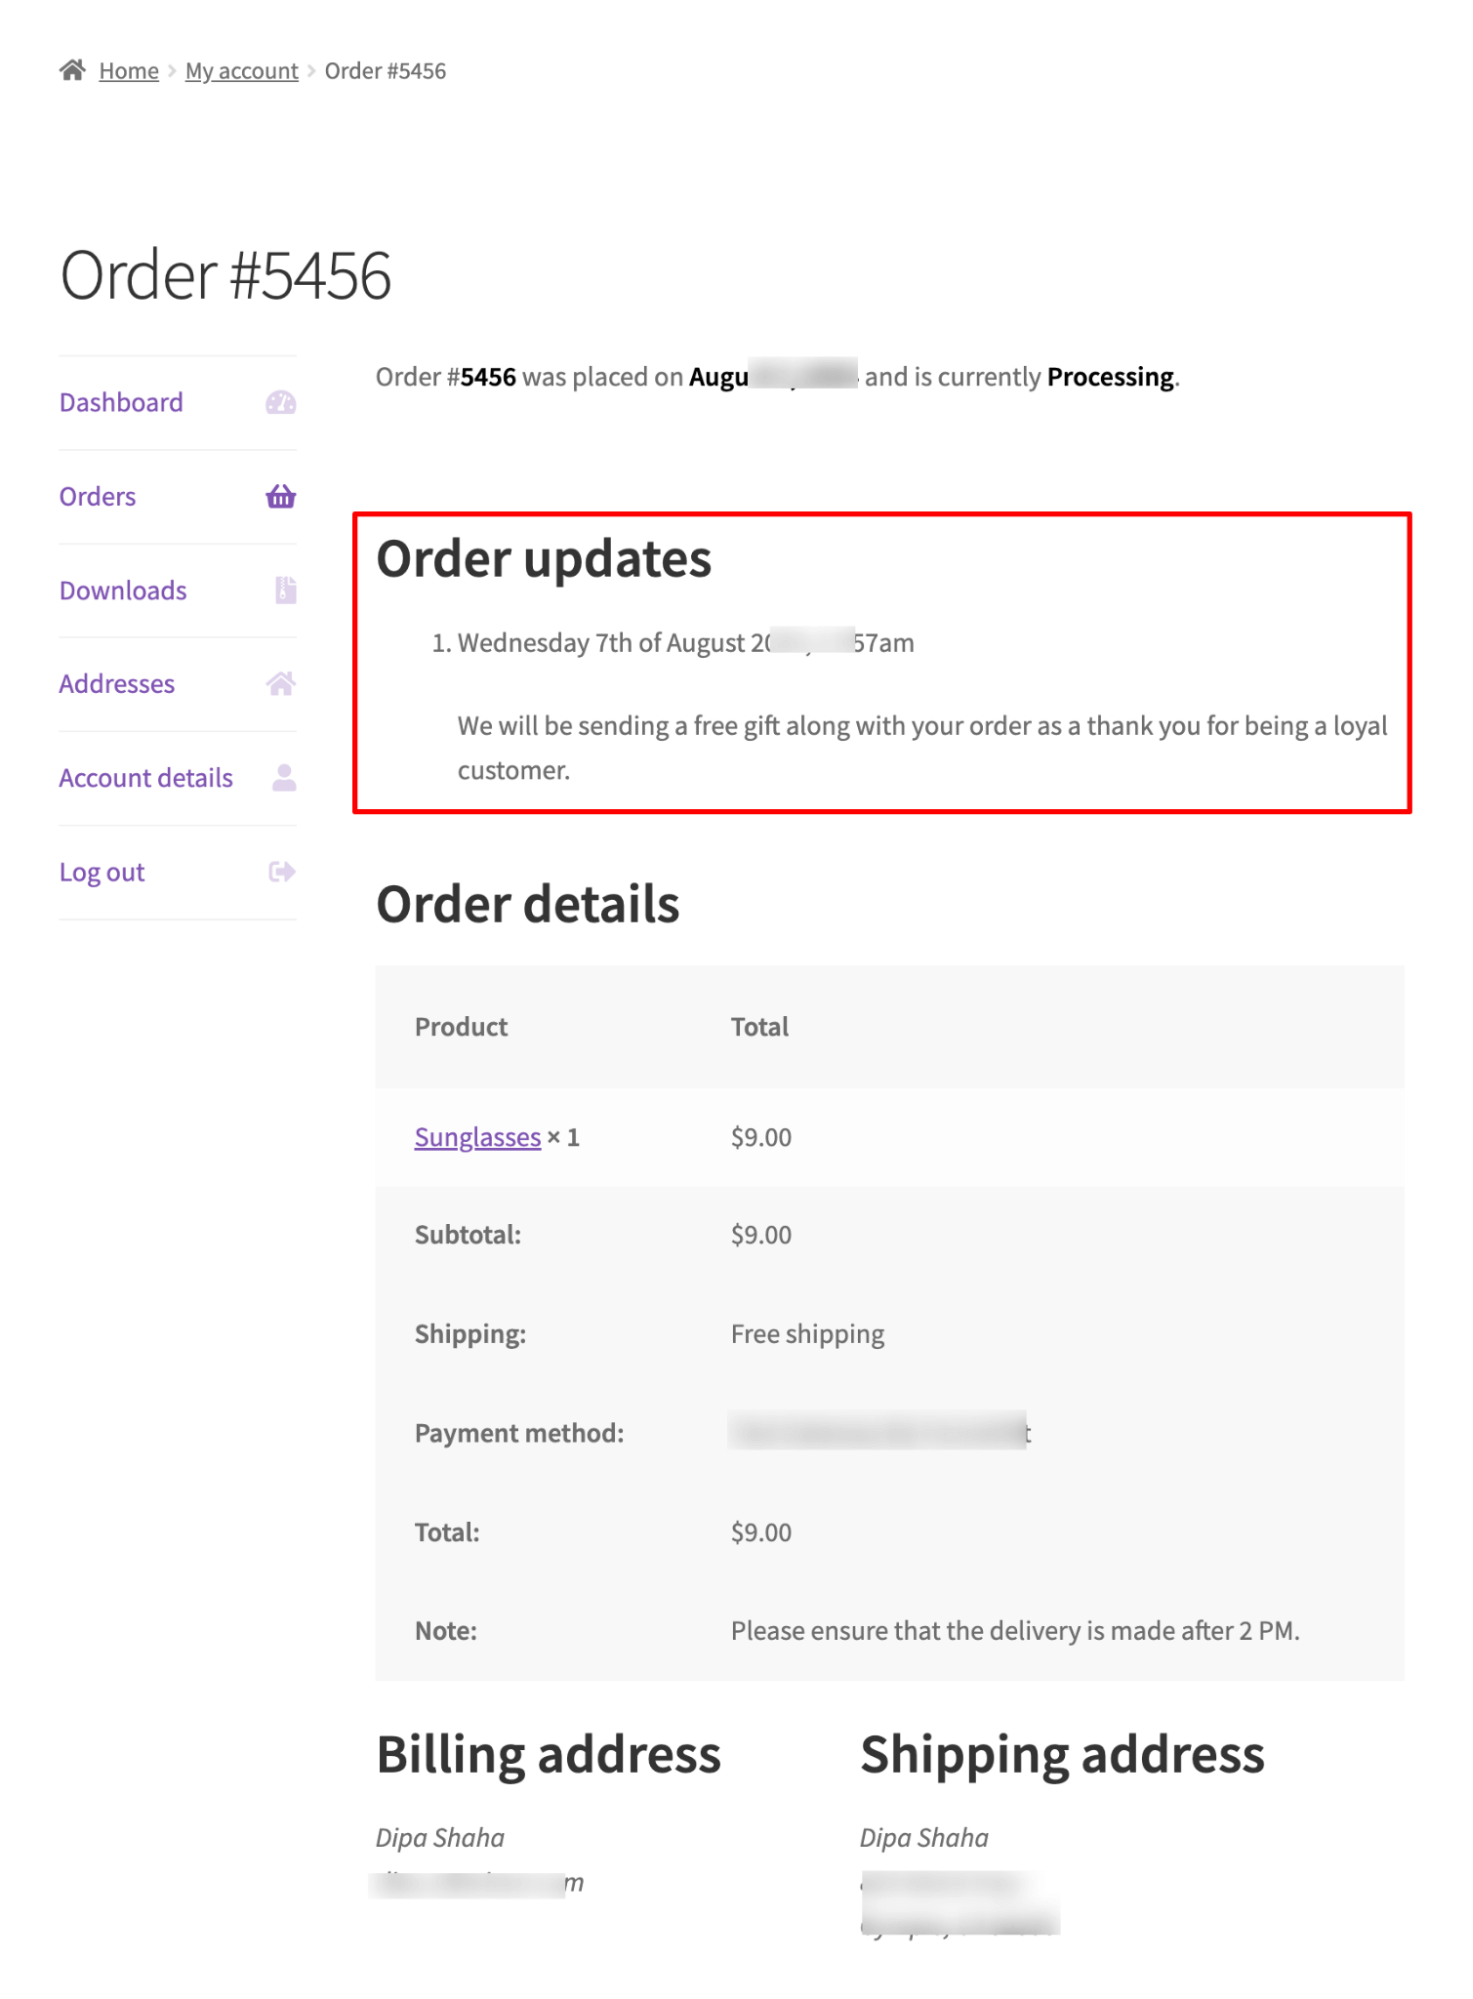
Customers can see these notes from their accounts. They just need to log in, go to Orders, and edit the recent order. Under “Order Updated,” they can see the notes provided by the store admin.
WooCommerce also sends an email to the customer when a “Note to customer” is added. We will talk about this email later in this blog.
- Private order notes
Along with adding a note to the customer, a store admin can also add a private note that can be accessed from the back end.
You can add private order notes from the order details page. But this time, make sure to choose the value “Private Note” from the dropdown.
The private note will be added to the existing order notes in a different order.
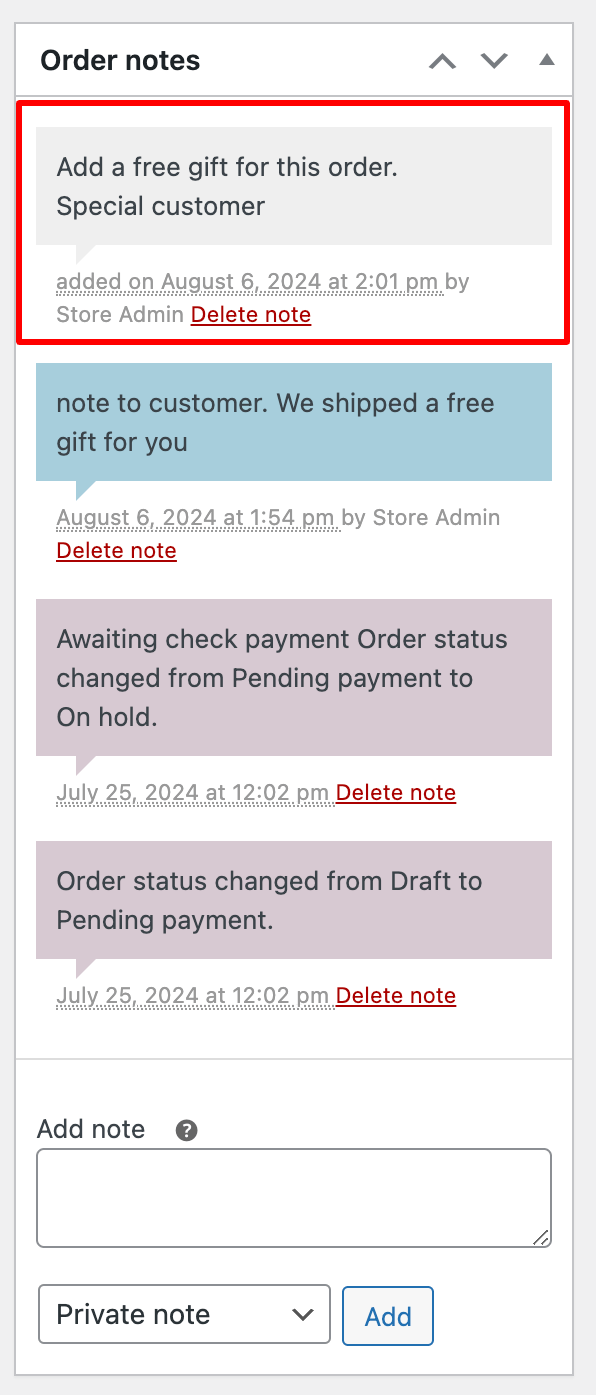
3. System-generated order notes
The WooCommerce system also adds order notes to notify the store admin about different order updates.
The system can add different order notes for different payments received, payments pending, payments failed, refunds processed, order status changed, etc.
You can find the system-generated notes in the Order Notes section, distinguished by their reddish background.
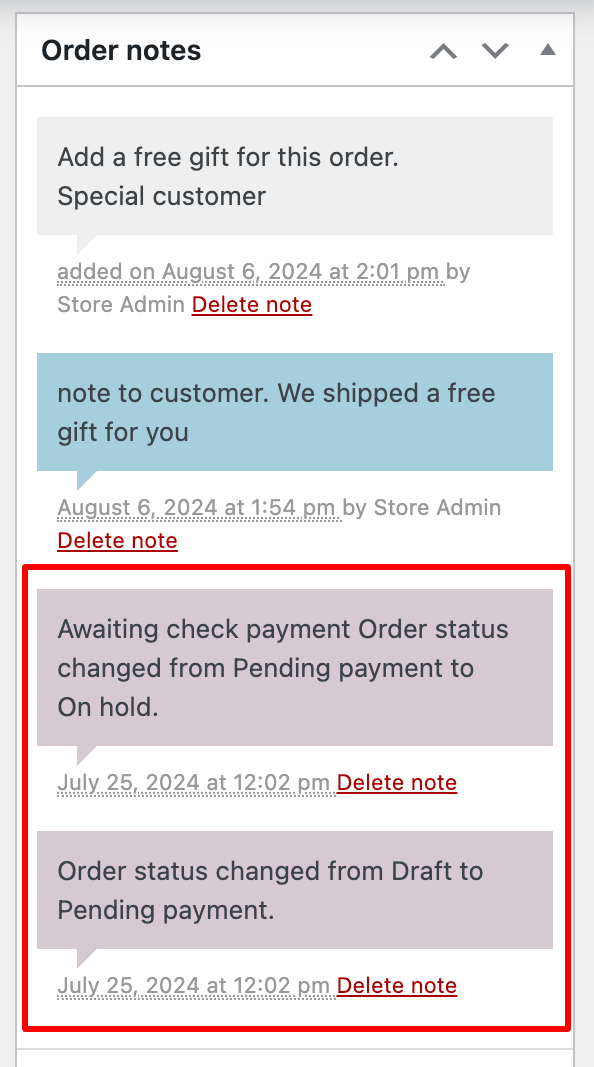
The Default WooCommerce Customer Order Notes Field
As we mentioned earlier, the WooCommerce checkout page, by default, provides a “Add a note to your order” field, which is a collapsible checkbox.
Once you check the field, you get a text field where customers can add the order note.
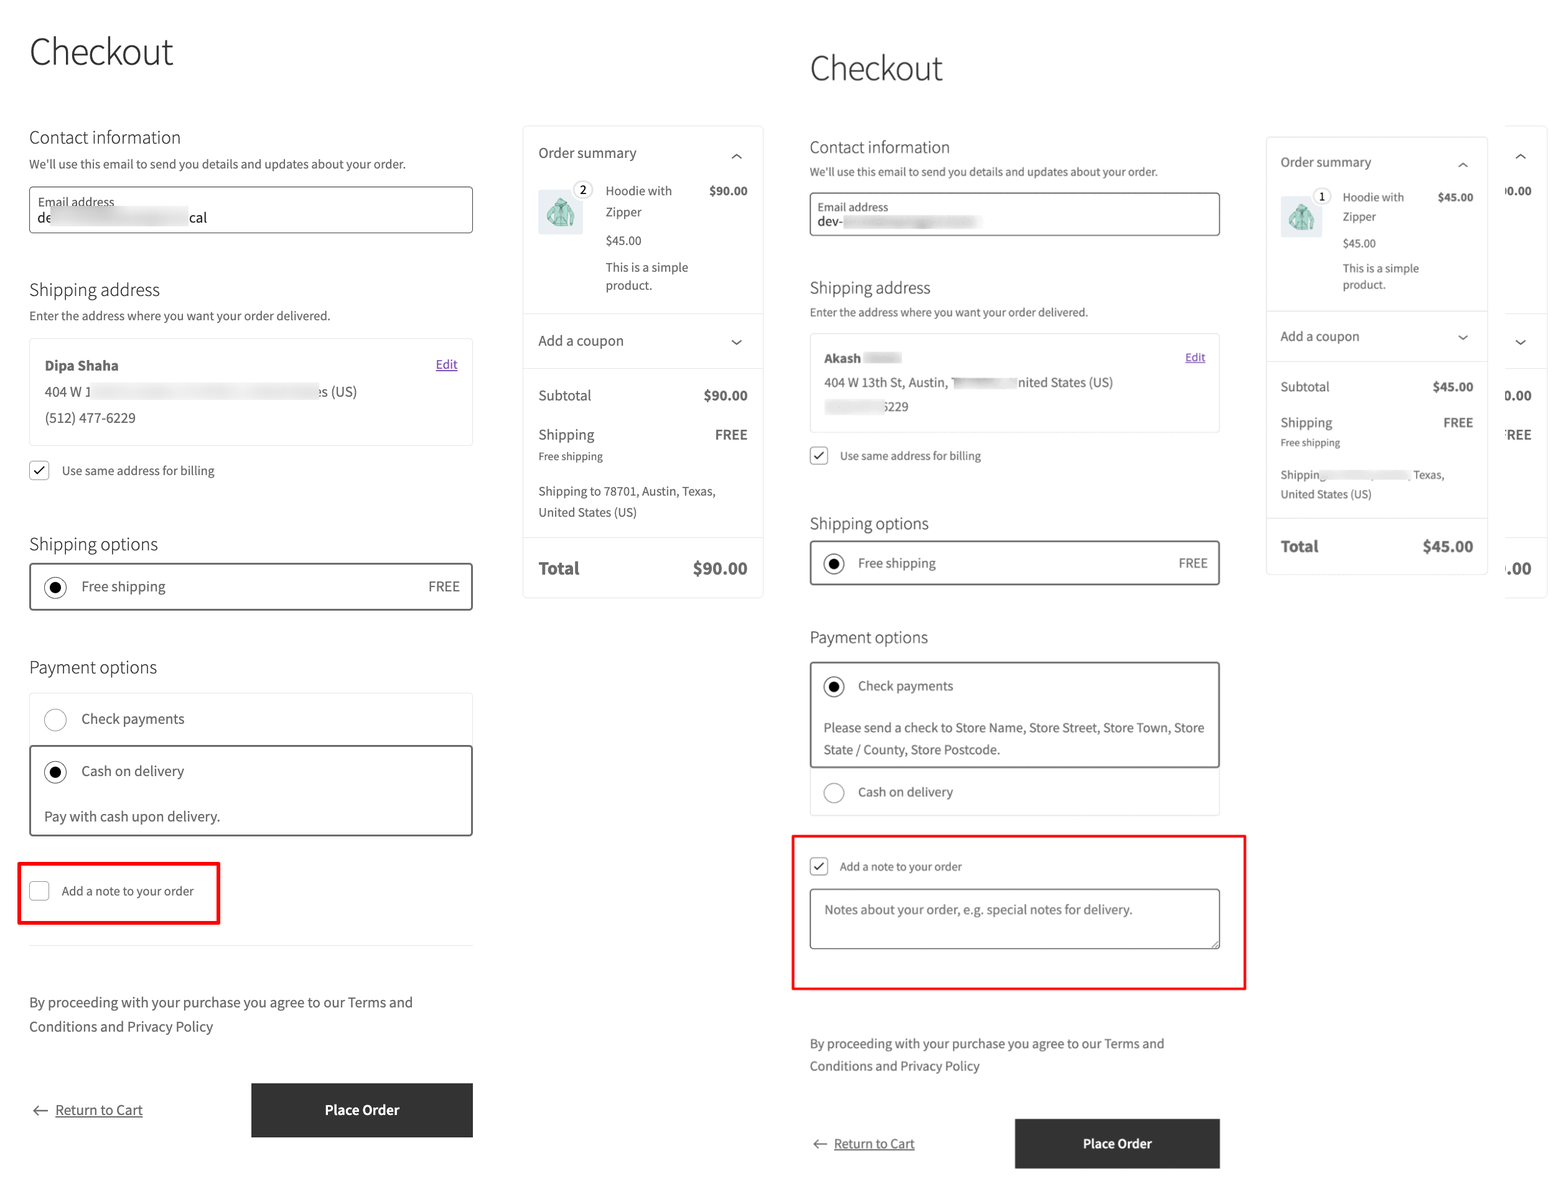
While this field works perfectly, you can’t customize its label or placeholder. Plus, you can’t also change the order of the field.
For this, you will need to use the additional plugin. To learn how you can customize the WooCommerce order notes field, move to the next section.
How to Add and Customize the WooCommerce Order Notes?
We will use FunnelKit Funnel Builder to customize the WooCommerce order note field on the checkout page.
This is the best sales funnel builder for WooCommerce. It allows you to replace the default checkout page with a modern, conversion-optimized custom checkout page.
FunnelKit Funnel Builder seamlessly integrates with the most popular page builders, allowing you to customize your checkout page effortlessly.
The best part is it includes pre- and post-purchase product recommendations, like order bumps and one-click upsells, to help boost your sales.
Make sure you install and activate both free and FunnelKit Pro.

Step 1: Create a custom store checkout with a prebuilt template
To create a sales funnel, go to FunnelKit ⇒ Store Checkouts and click on “Create Store Checkout”.
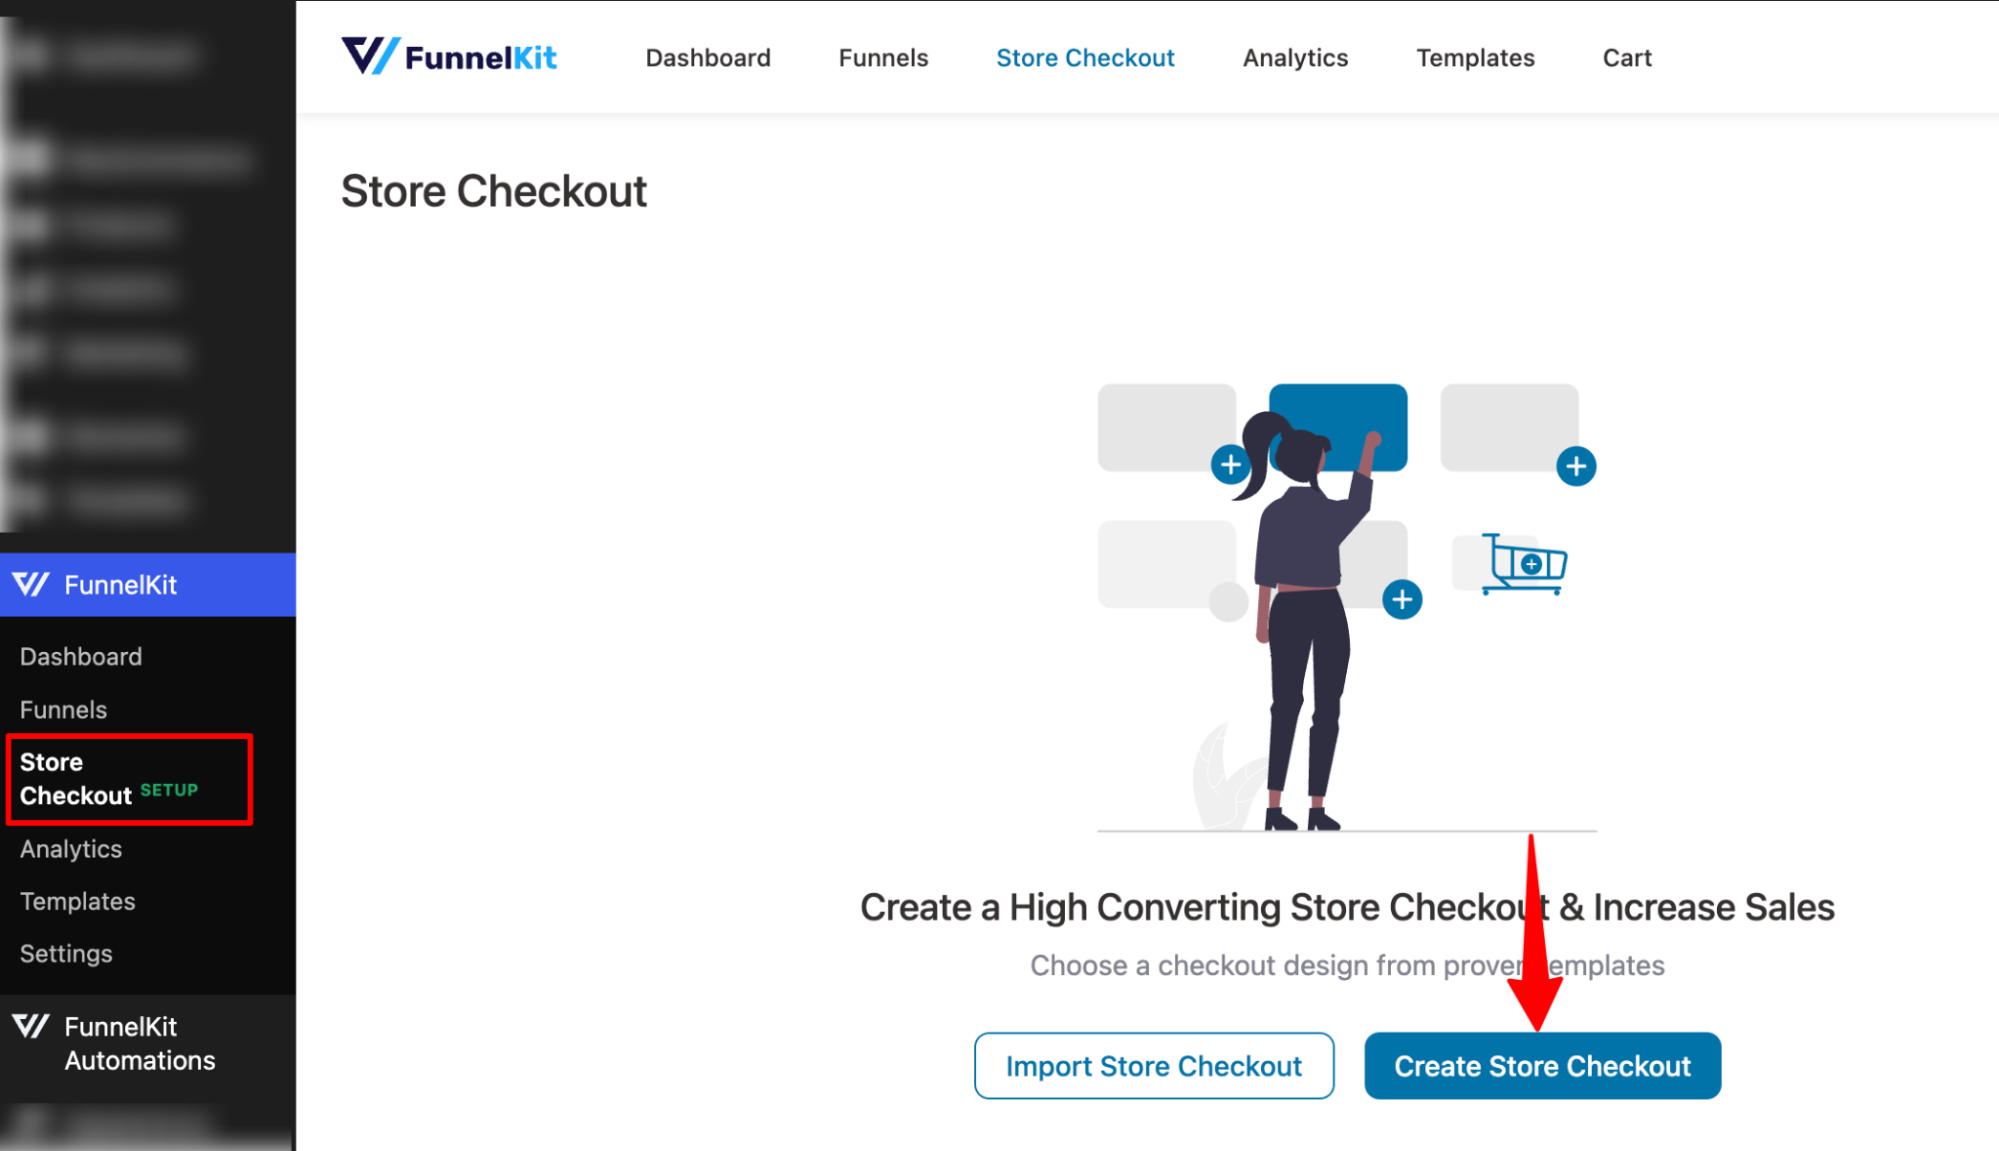
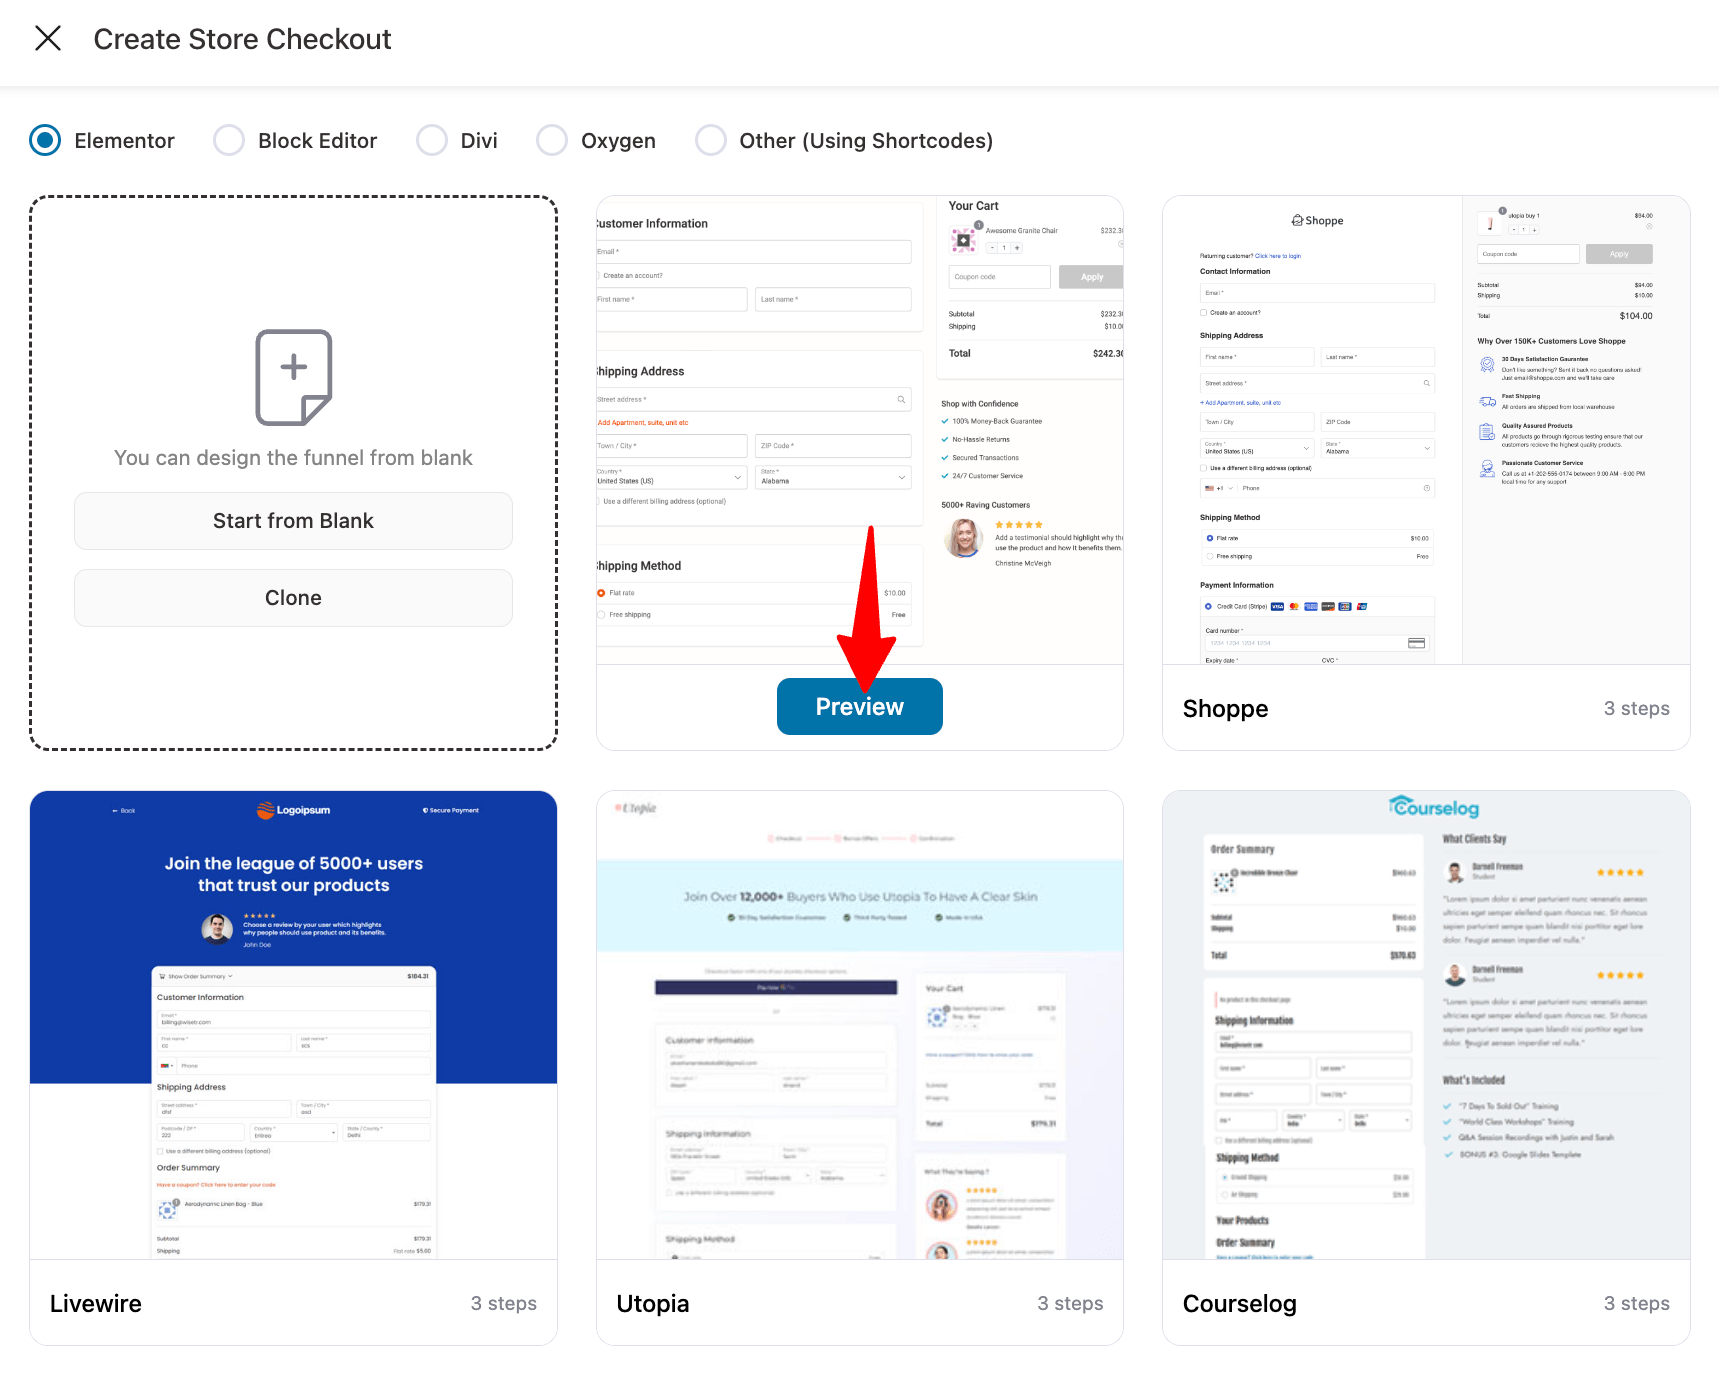
First, choose your favorite page builder.
We are going with the Elementor page builder and the Minimalist template. Hover on the template you like and hit “Preview”.
Now you can check all the pages that are included in this template: checkout, one-click upsell, and thank you.
Decide whether you want to add a single-step checkout page or a multi-page one. Here we are going with 2 step checkout.
Then click on the “Import This Funnel” button. Provide a name and click on “Done.”
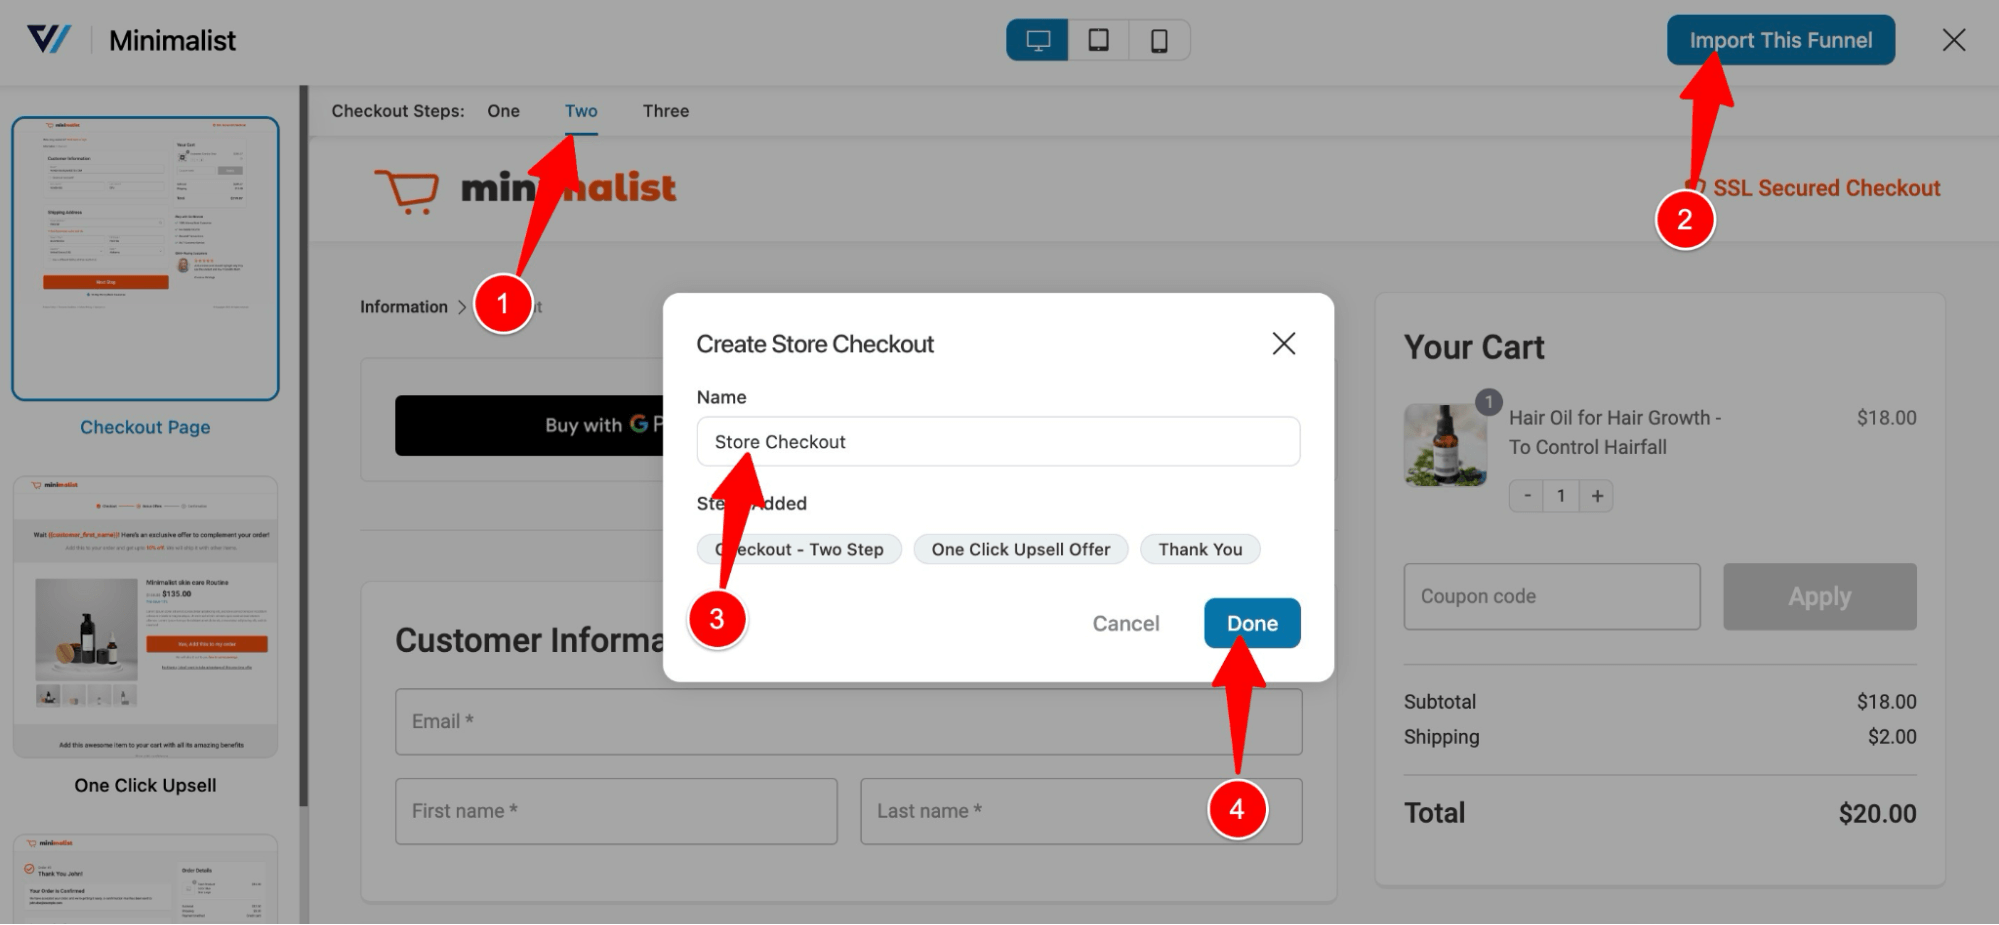
This will import three steps: checkout, one-click upsell, and thank you.
After importing, you can customize all the pages to fit your needs.
Step 2: Add a WooCommerce order note to the checkout page
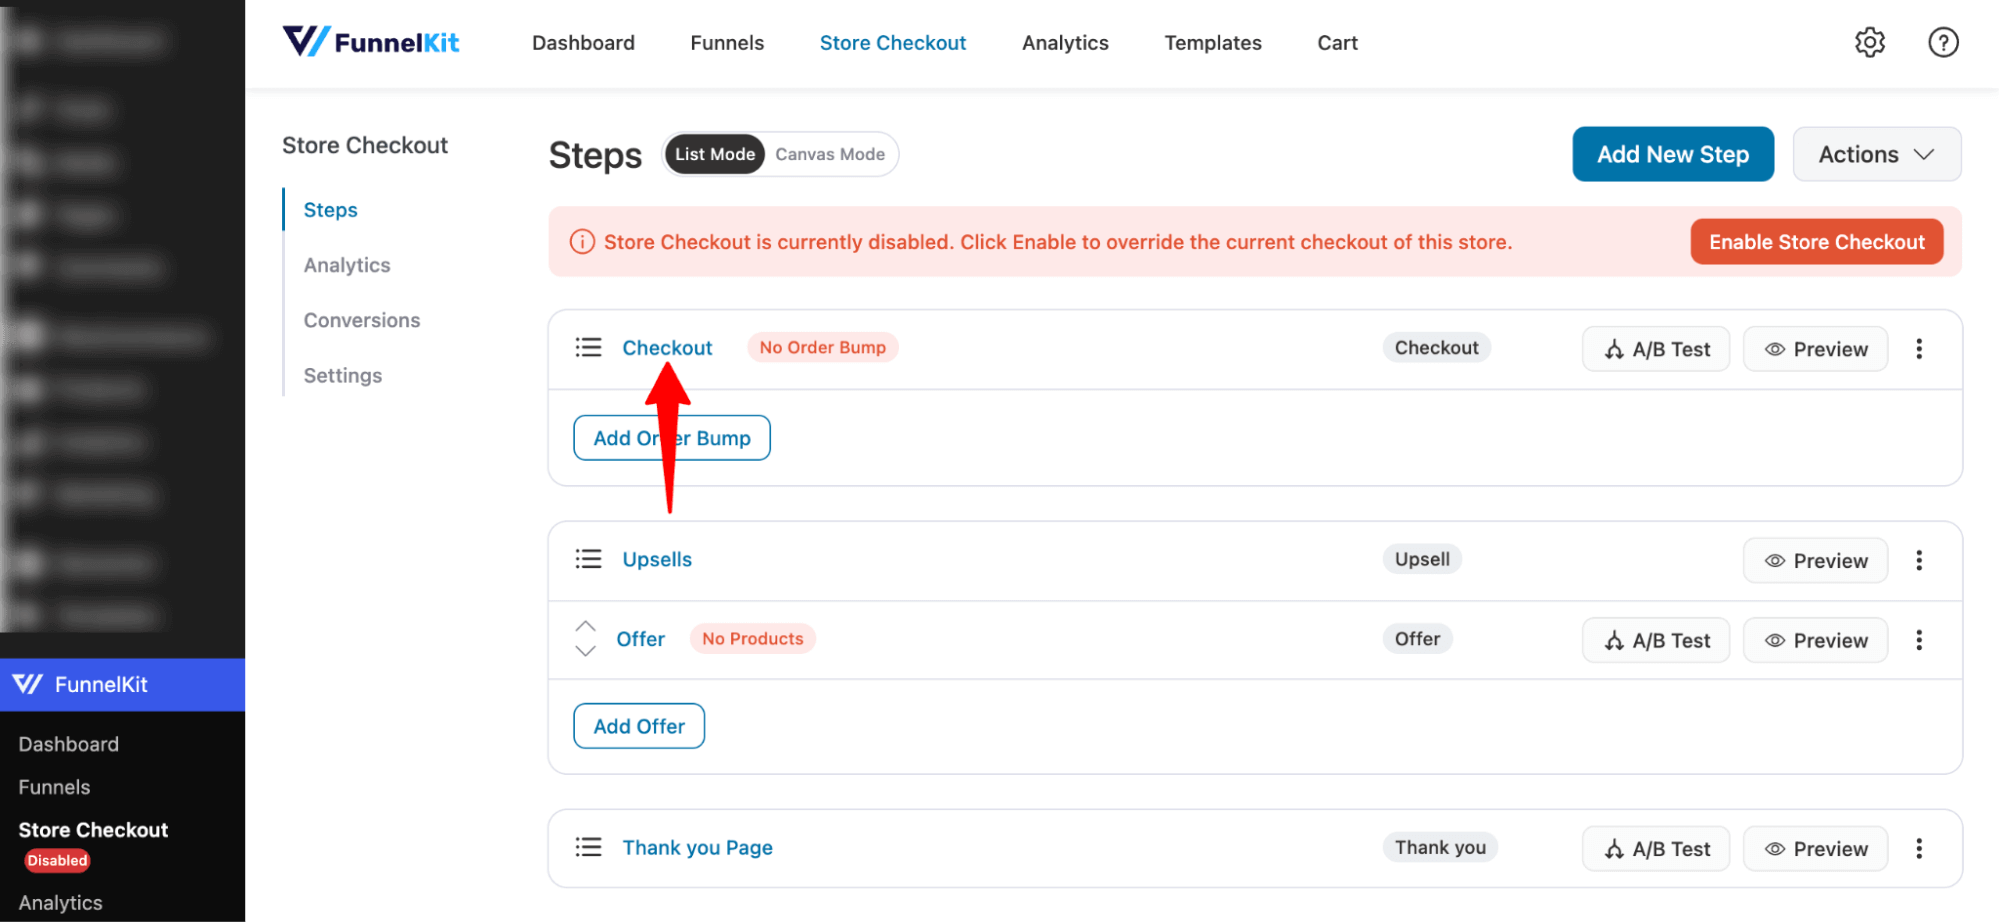
To add an order to note the checkout page, click on the checkout step.
You can click on the “Edit Elementor Template” option to customize the checkout page template.
Scroll down to the “Checkout Form Field” section. Under the Advanced section on the right side, you will find the field “Order Notes”. Simply drag and drop the order note to your checkout form.
Unlike the default checkout page, here you have to place the order note anywhere you want on the checkout page.
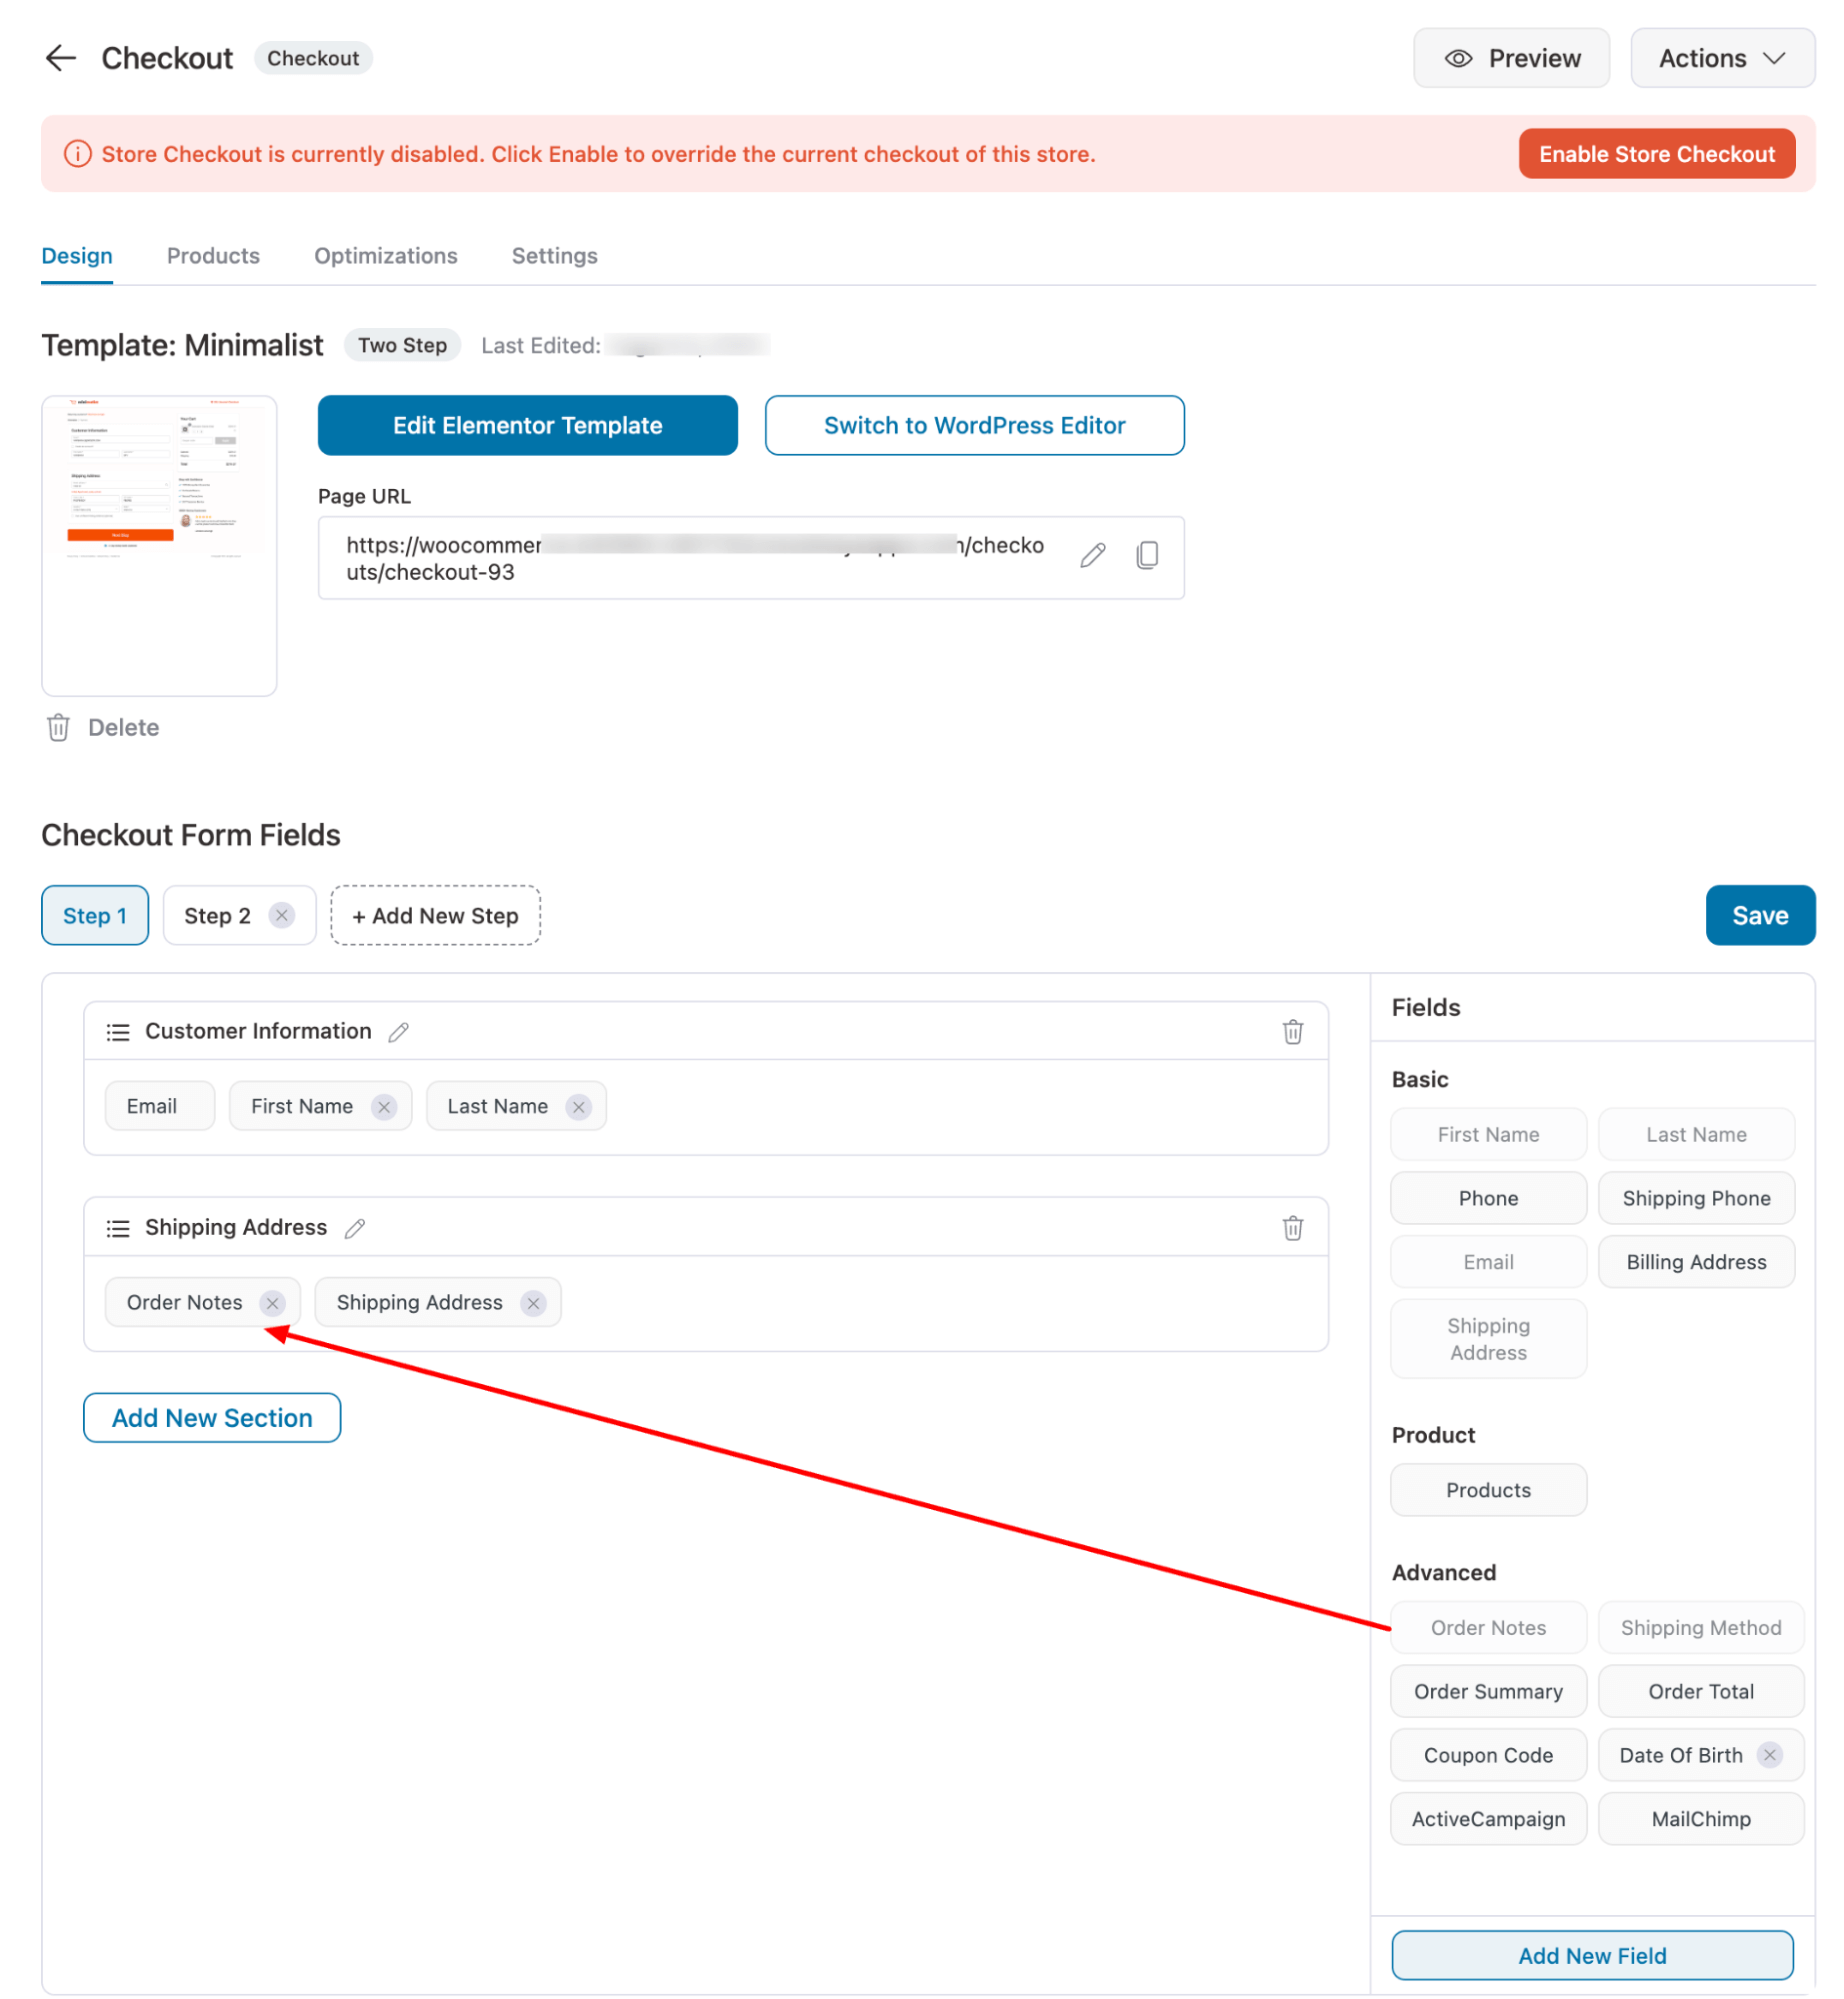
After adding the field, you can also change the order by simply dragging the field.
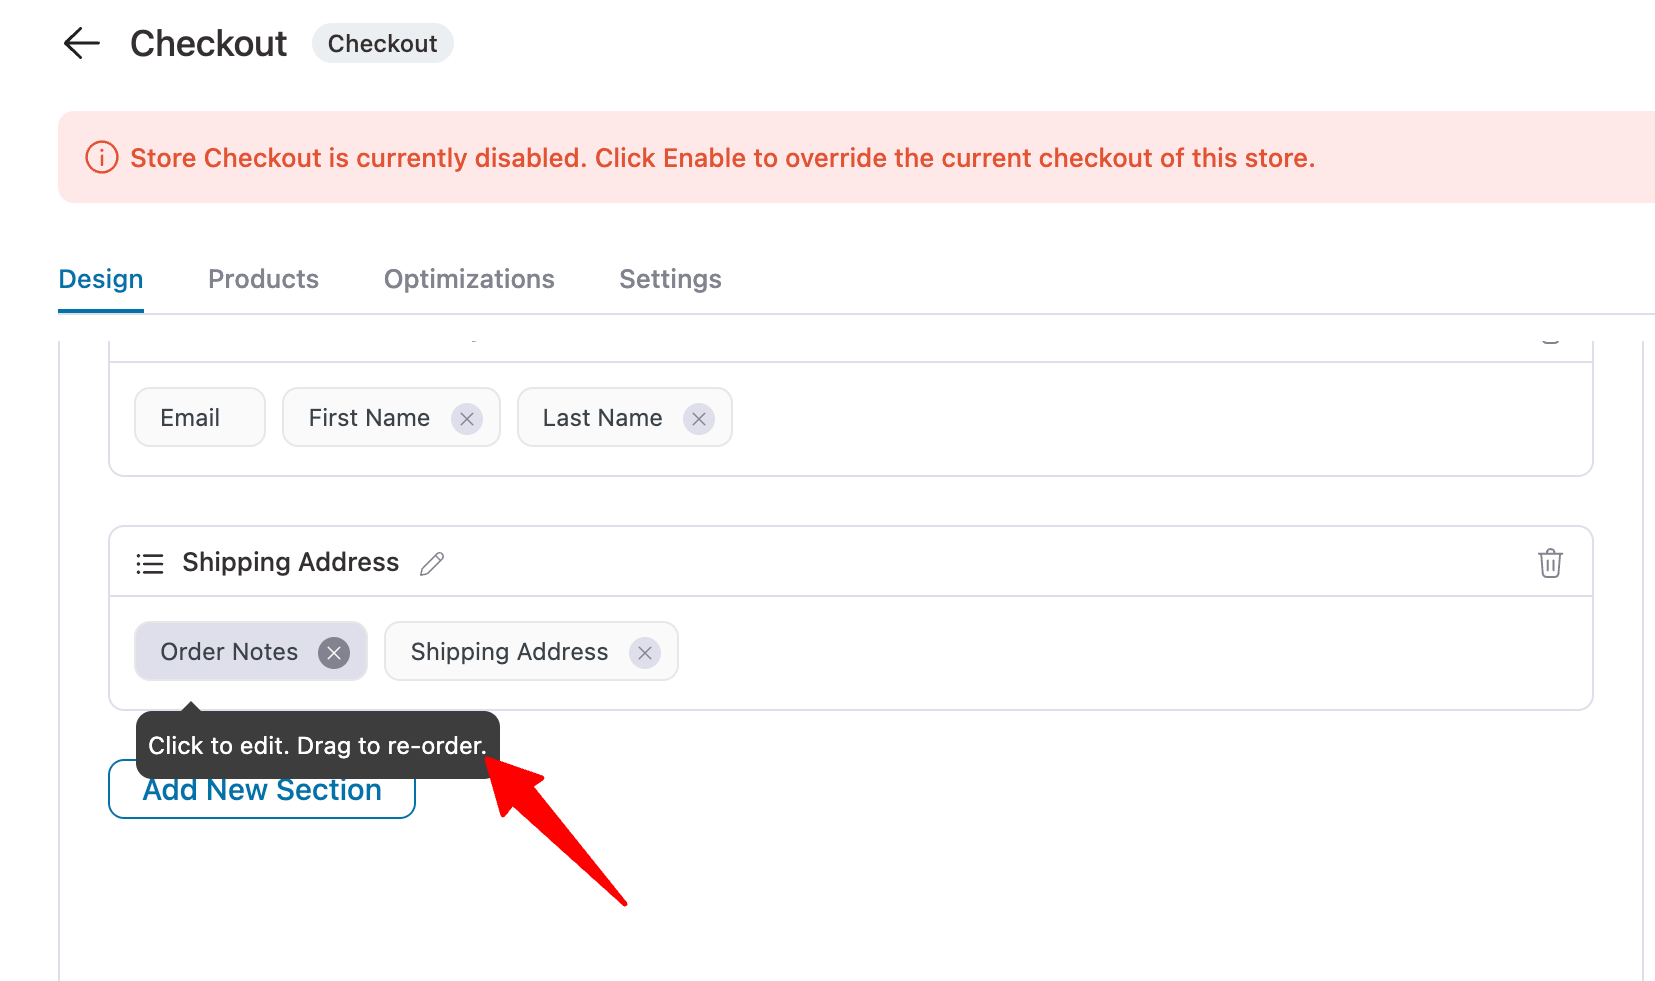
Step 3: Set the label and placeholder for order notes
Now click on the Order Notes to set the label and placeholder. You can also set a default value if you want.
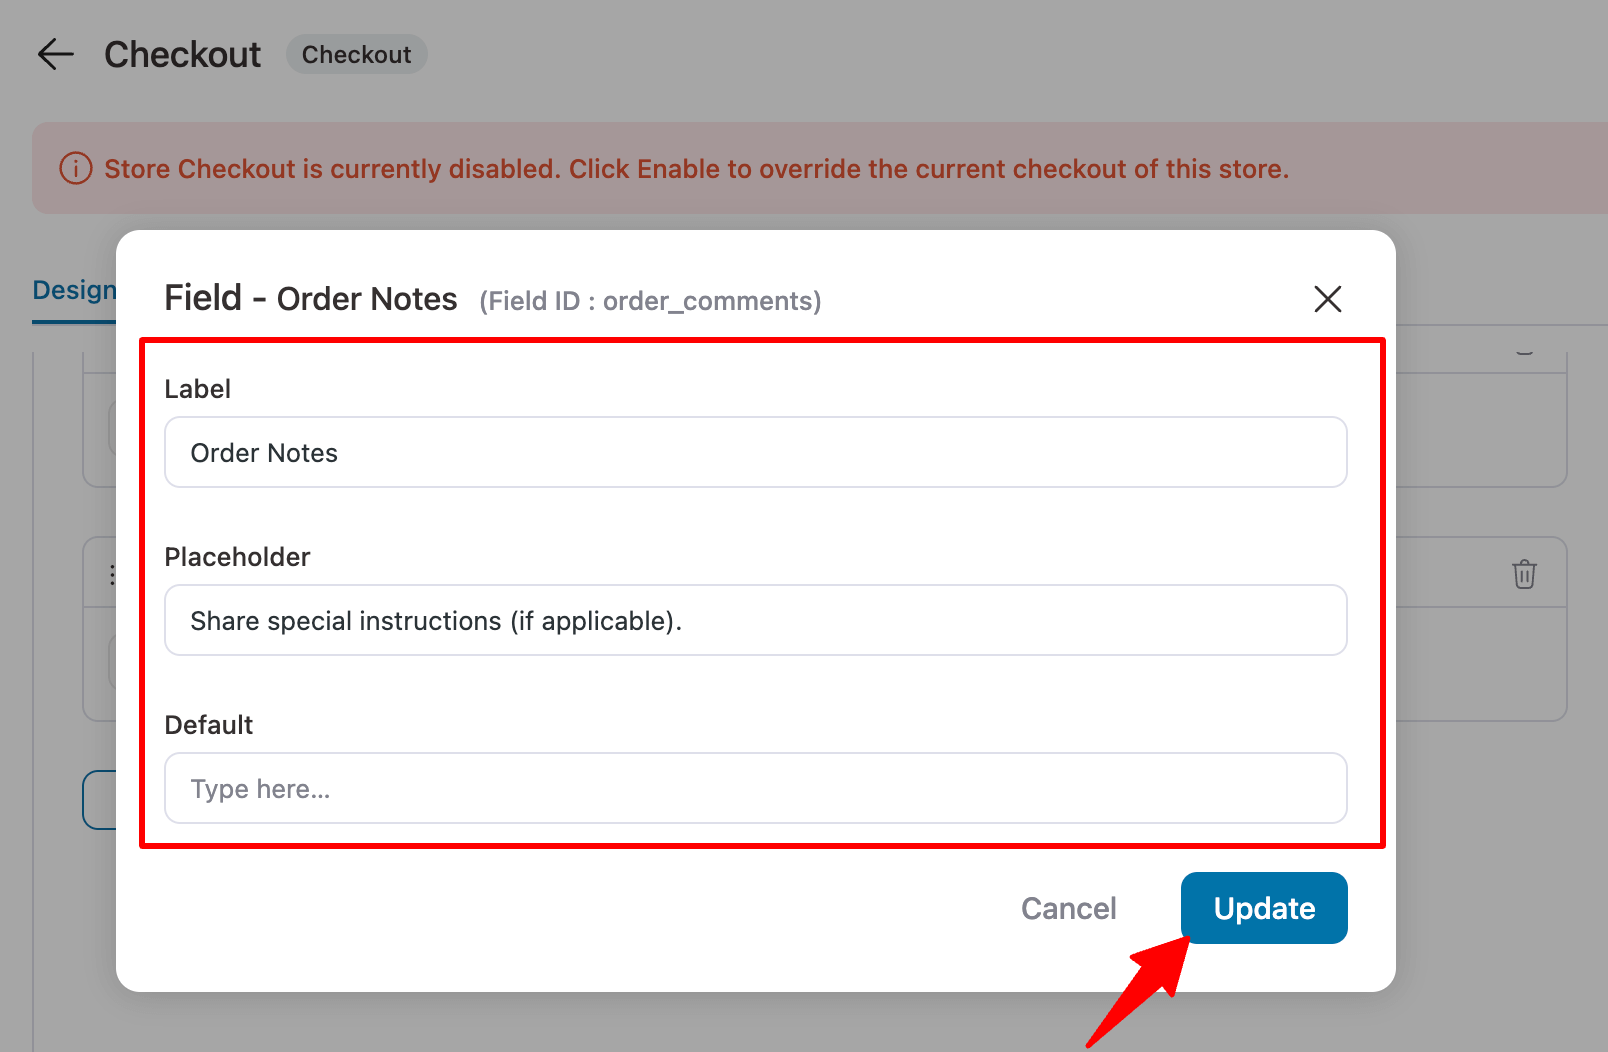
Make sure to hit “Update” to save the changes.
Step 4: Enable the store checkout
To activate the new checkout you just created, you need to enable the store checkout. To do this, hit the “Enable Store Checkout” button.
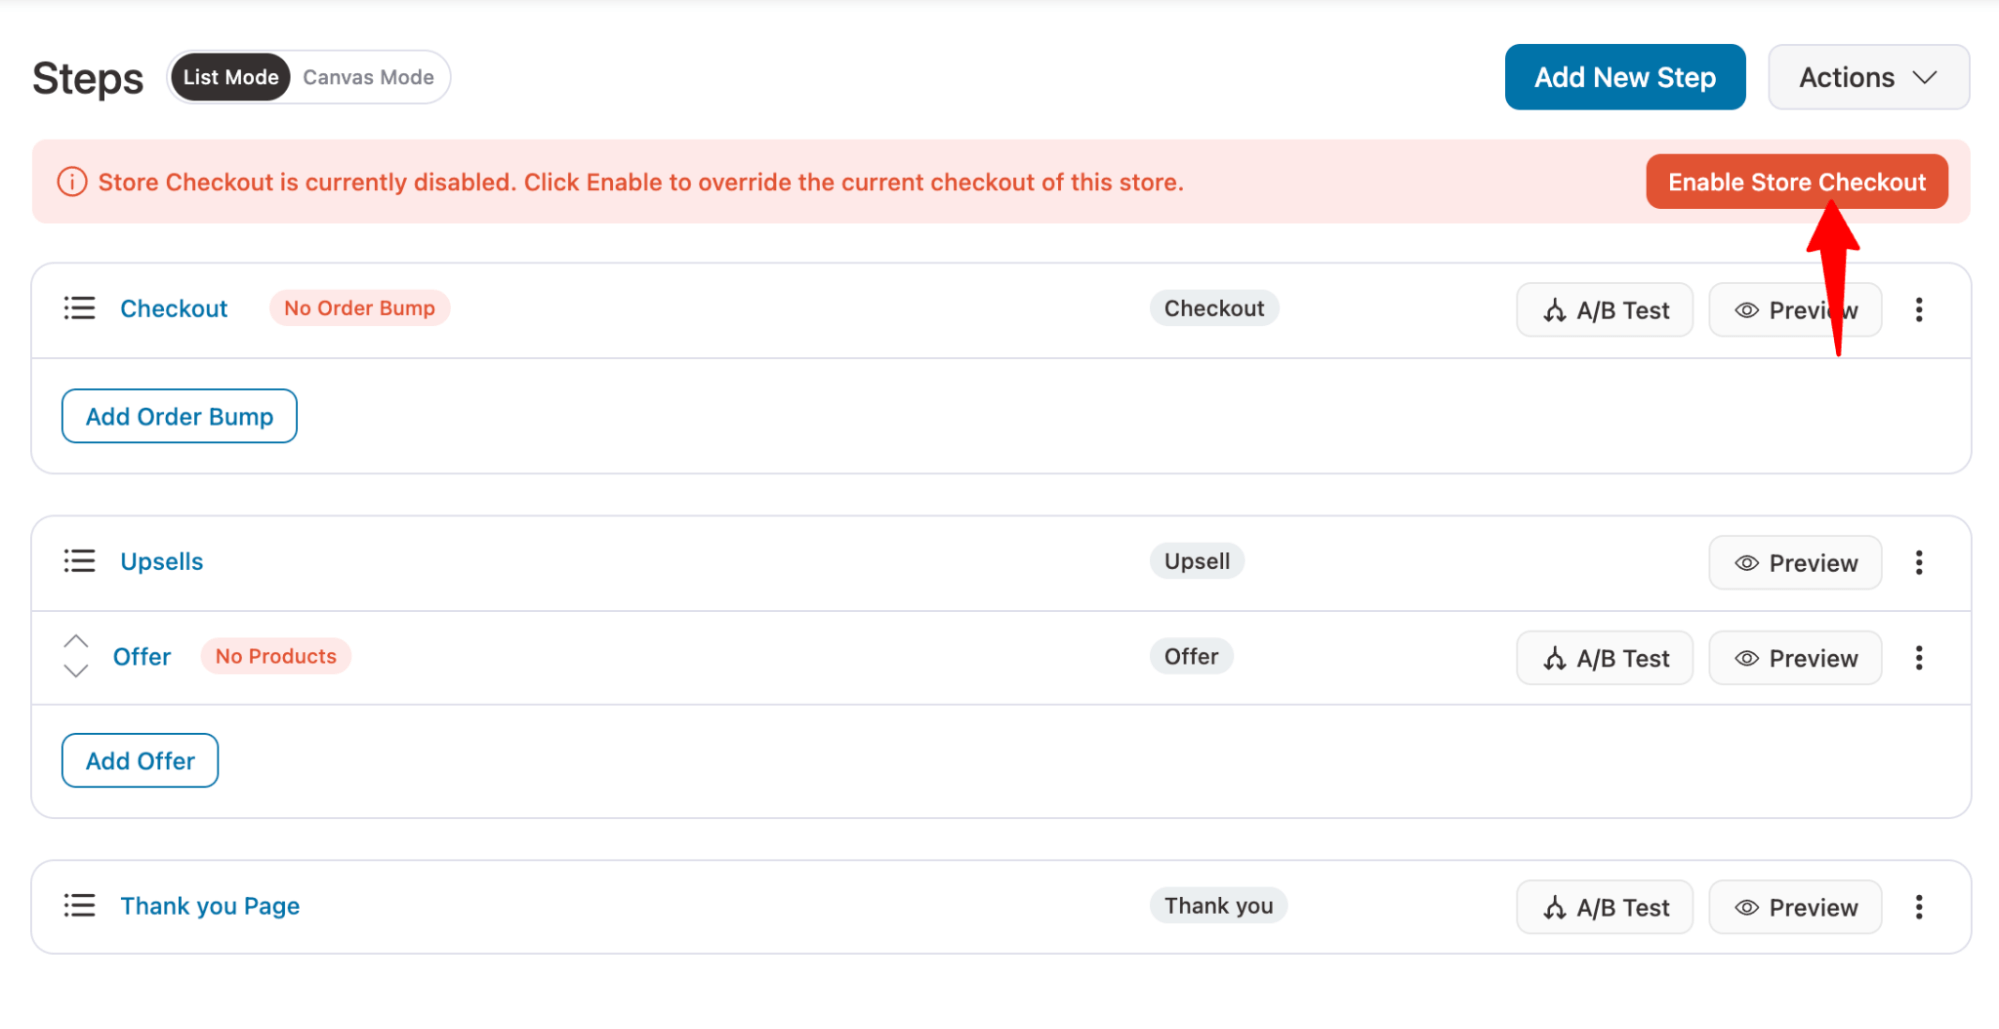
Now if you check the checkout page, the WooCommerce customer order notes should be available.
How to Hide/Remove the Order Notes Field on the Checkout Page?
If you build a checkout page with FunnelKit’s template, you won't need to remove it since most templates don't include this feature by default.
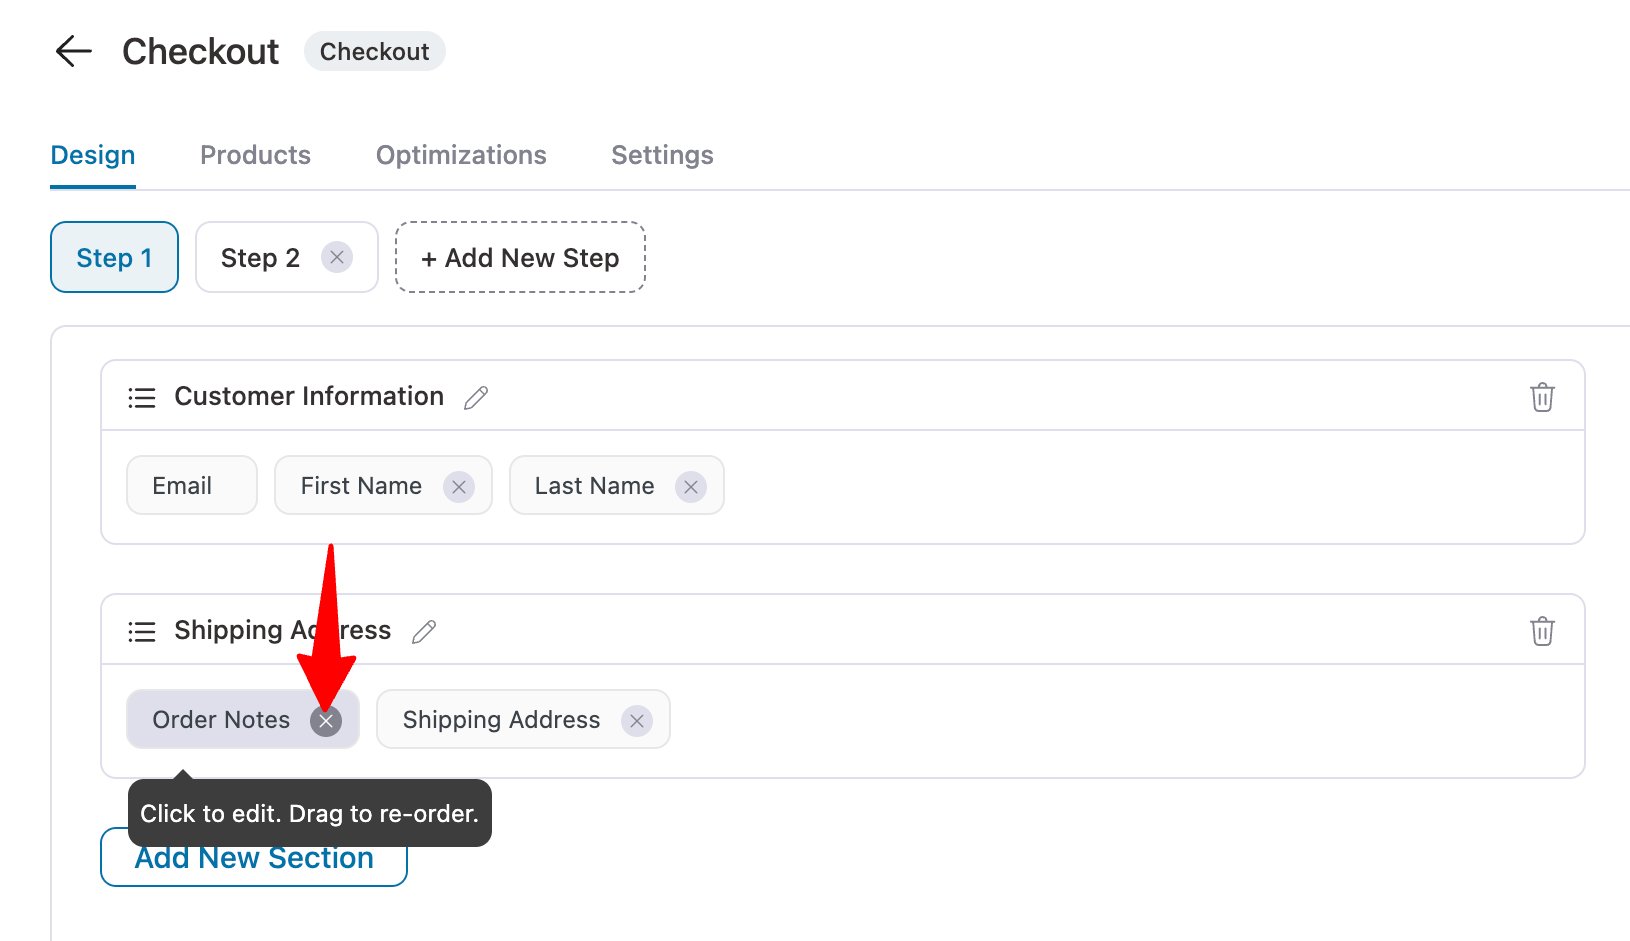
But if you added one but want to remove it from the store checkout, simply hover on it and hit the “X” icon.
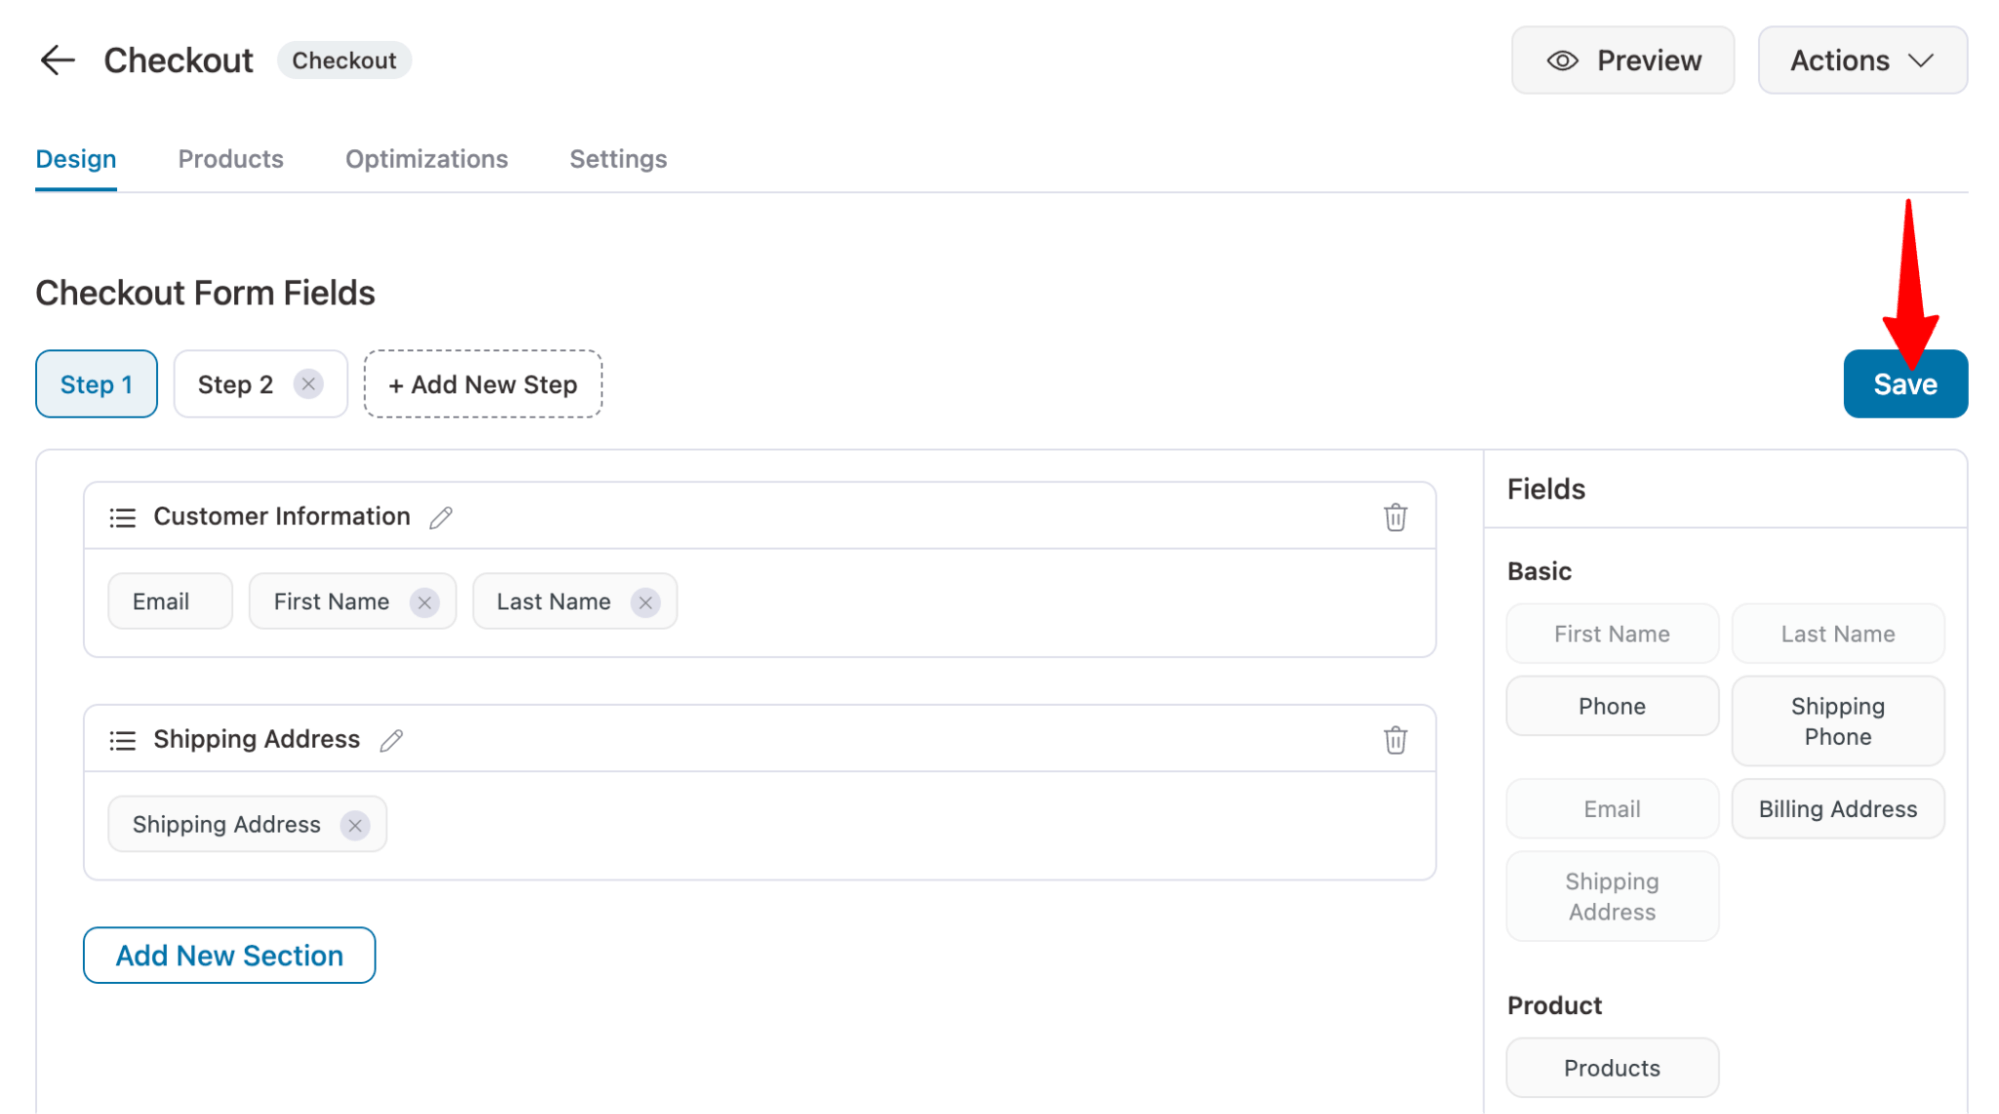
Don’t forget to Hit “Save” to remove the order notes from your WooCommerce checkout page successfully.
So far, we’ve covered how WooCommerce order notes work. While they’re great for communication, there’s always a chance that users or customers might miss them.
What’s the solution?
You can send email notifications to both customers and staff whenever an order note is added.
It’s a good idea to include the WooCommerce customer note in the order confirmation email. This ensures that any special instructions the customer provides are clearly communicated and not overlooked.
Now the question is, does WooCommerce send an email notification when an order note gets added?
To find the answer, move to the next section.
Does WooCommerce Send an Order Note Notification Email?
Well, WooCommerce sends an email to the customer when the store admin adds a note for a customer using the option “Note to Customer” under order notes.
However, you need to make sure the customer note email option is enabled. To do so go to WooCommerce ⇒ Settings ⇒ Emails and hit the option “Manage” on the Customer Note column.
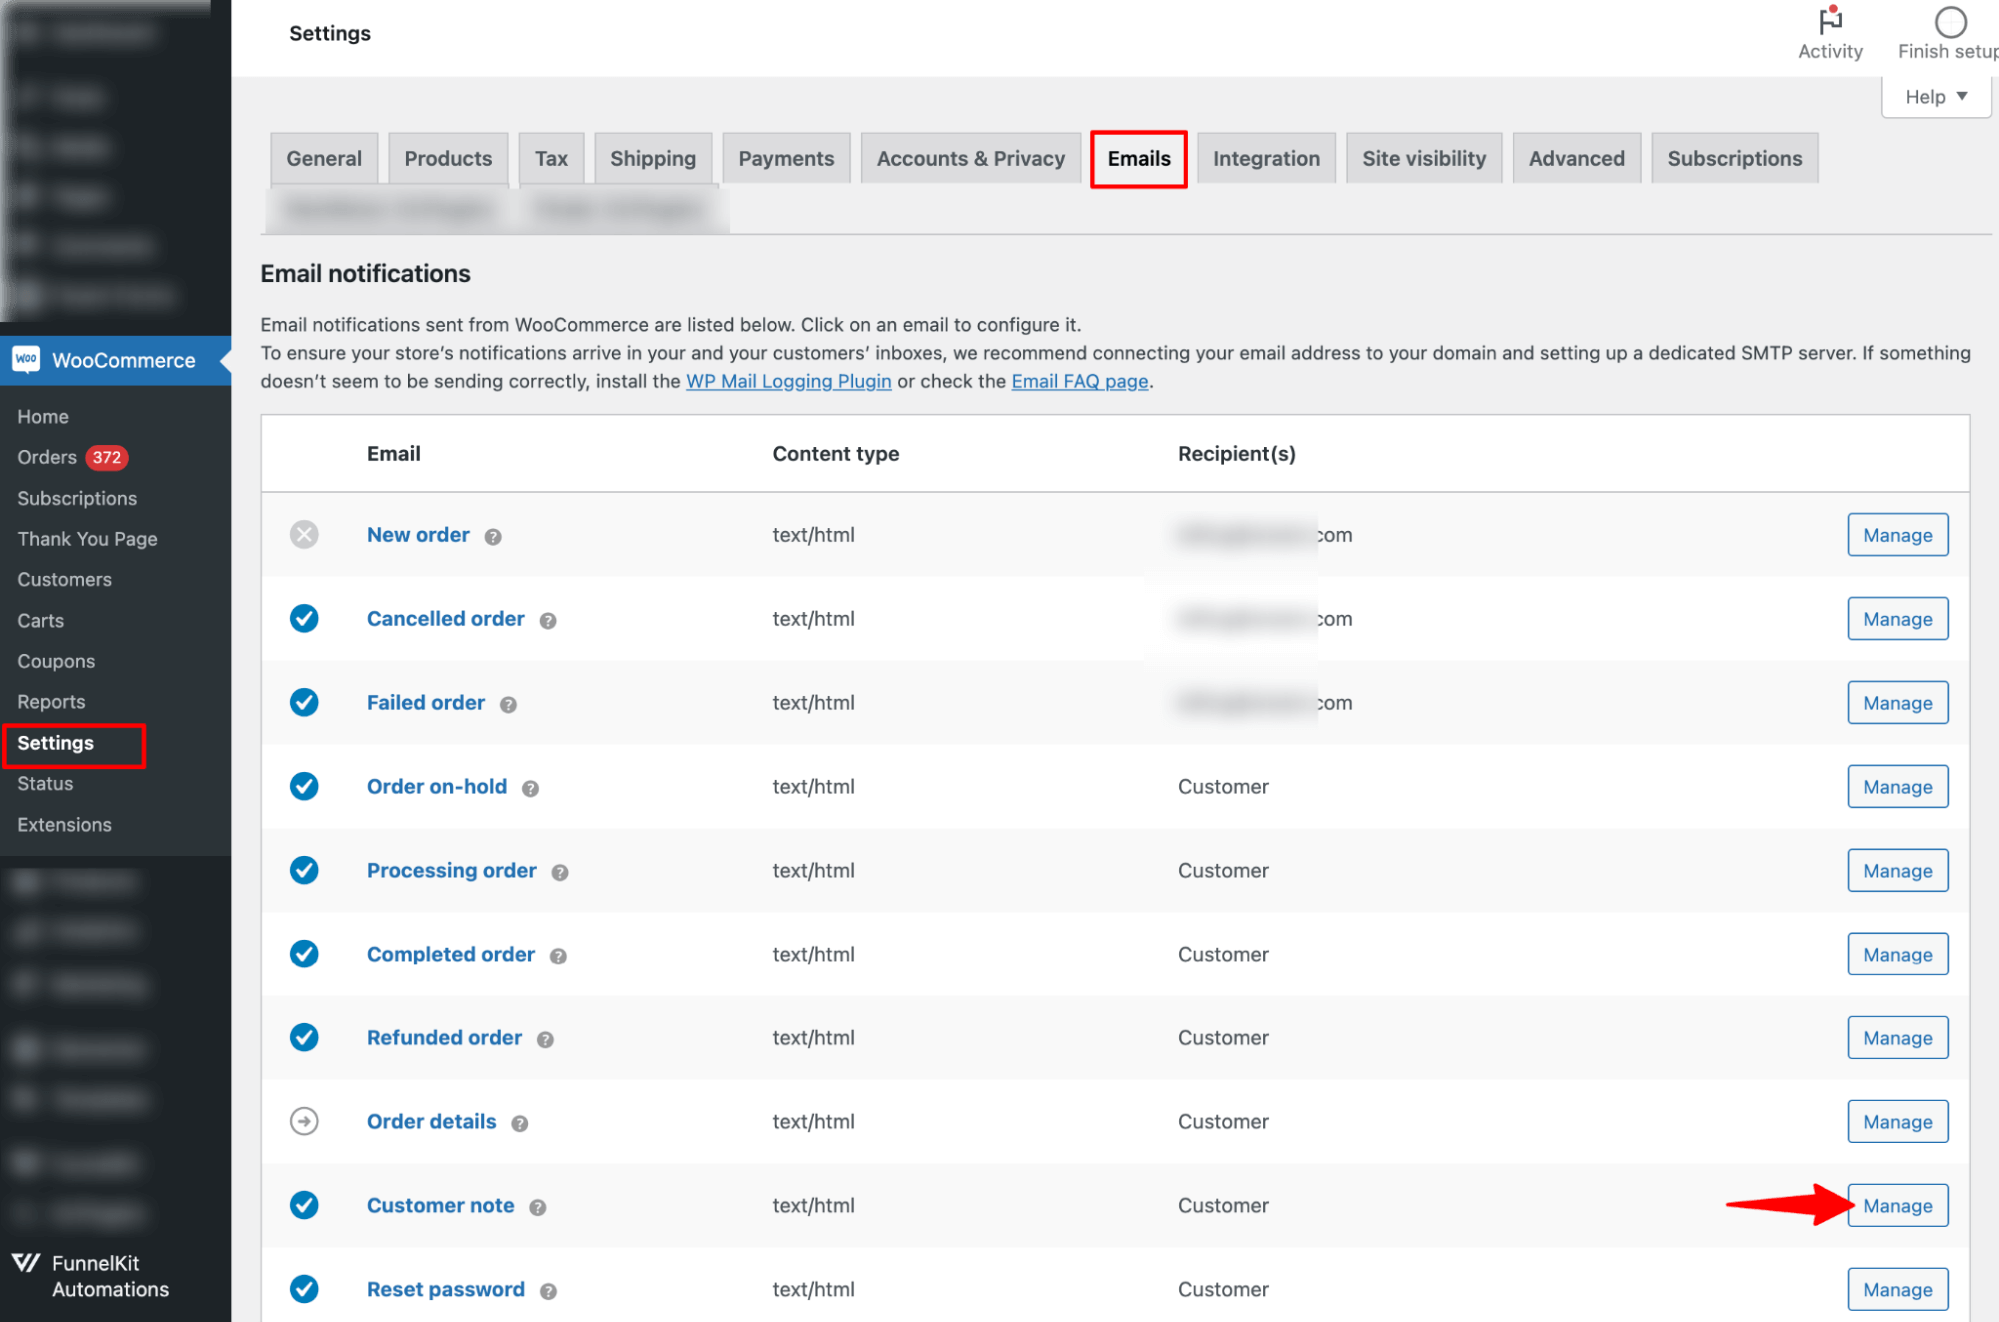
Next, check the option “ Enable this email notification”.
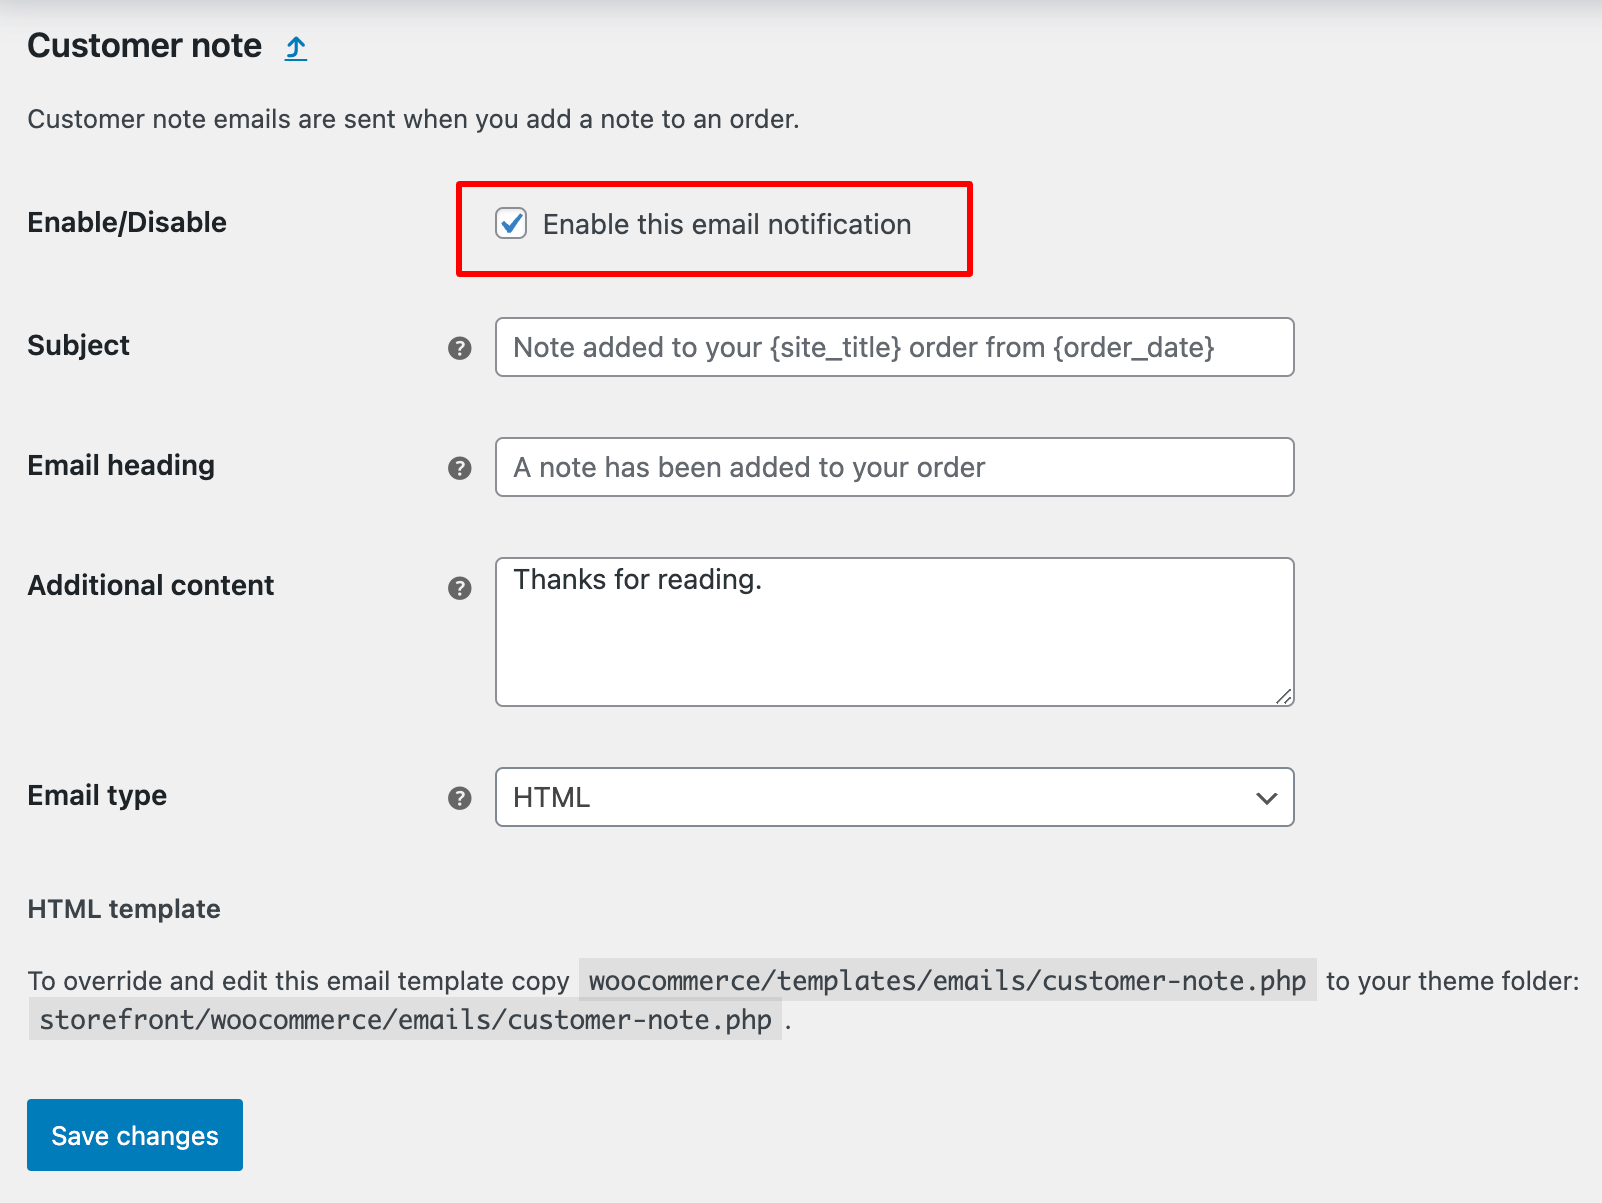
You can also customize the subject, email heading, and additional content.
Make sure to hit Save Changes.
Now whenever the store admin adds a note for customers, she/he will receive an email about the note.
The default email usually includes a note along with the related order details.
Here is a preview of default WooCommerce customer order note emails.
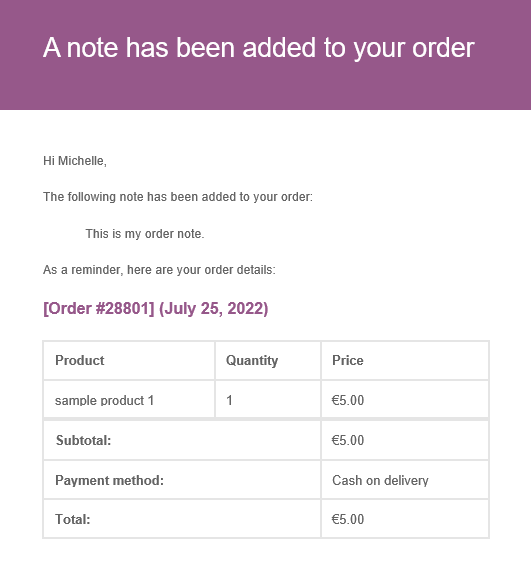
While you can add a logo and change the color of the Base, Background and
Body text, you can’t change the layout of this customer note email.
To learn how you can send a custom WooCommerce order note email, move to the next section.
How to Send Custom WooCommerce Order Note Emails to Customers?
To send custom WooCommerce order note emails, we will use FunnelKit Automations.
This is a complete WooCommerce CRM that allows you to send stunning emails about all WooCommerce events, such as orders created, order status changes, product reviews, abandoned carts, etc.
It comes with an advanced visual builder that allows you to create beautiful mobile-responsive emails. In case you don’t want to build an email from scratch, FunnelKit Automations also provides many prebuilt email templates that are easy to import.
Once you install and activate FunnelKit Automations, follow these steps to send custom WooCommerce order notes to email.
Step 1: Disable the default WooCommerce customer note email
After activating the FunnelKit automations, you need to disable the default customer note email so users don’t receive two emails.
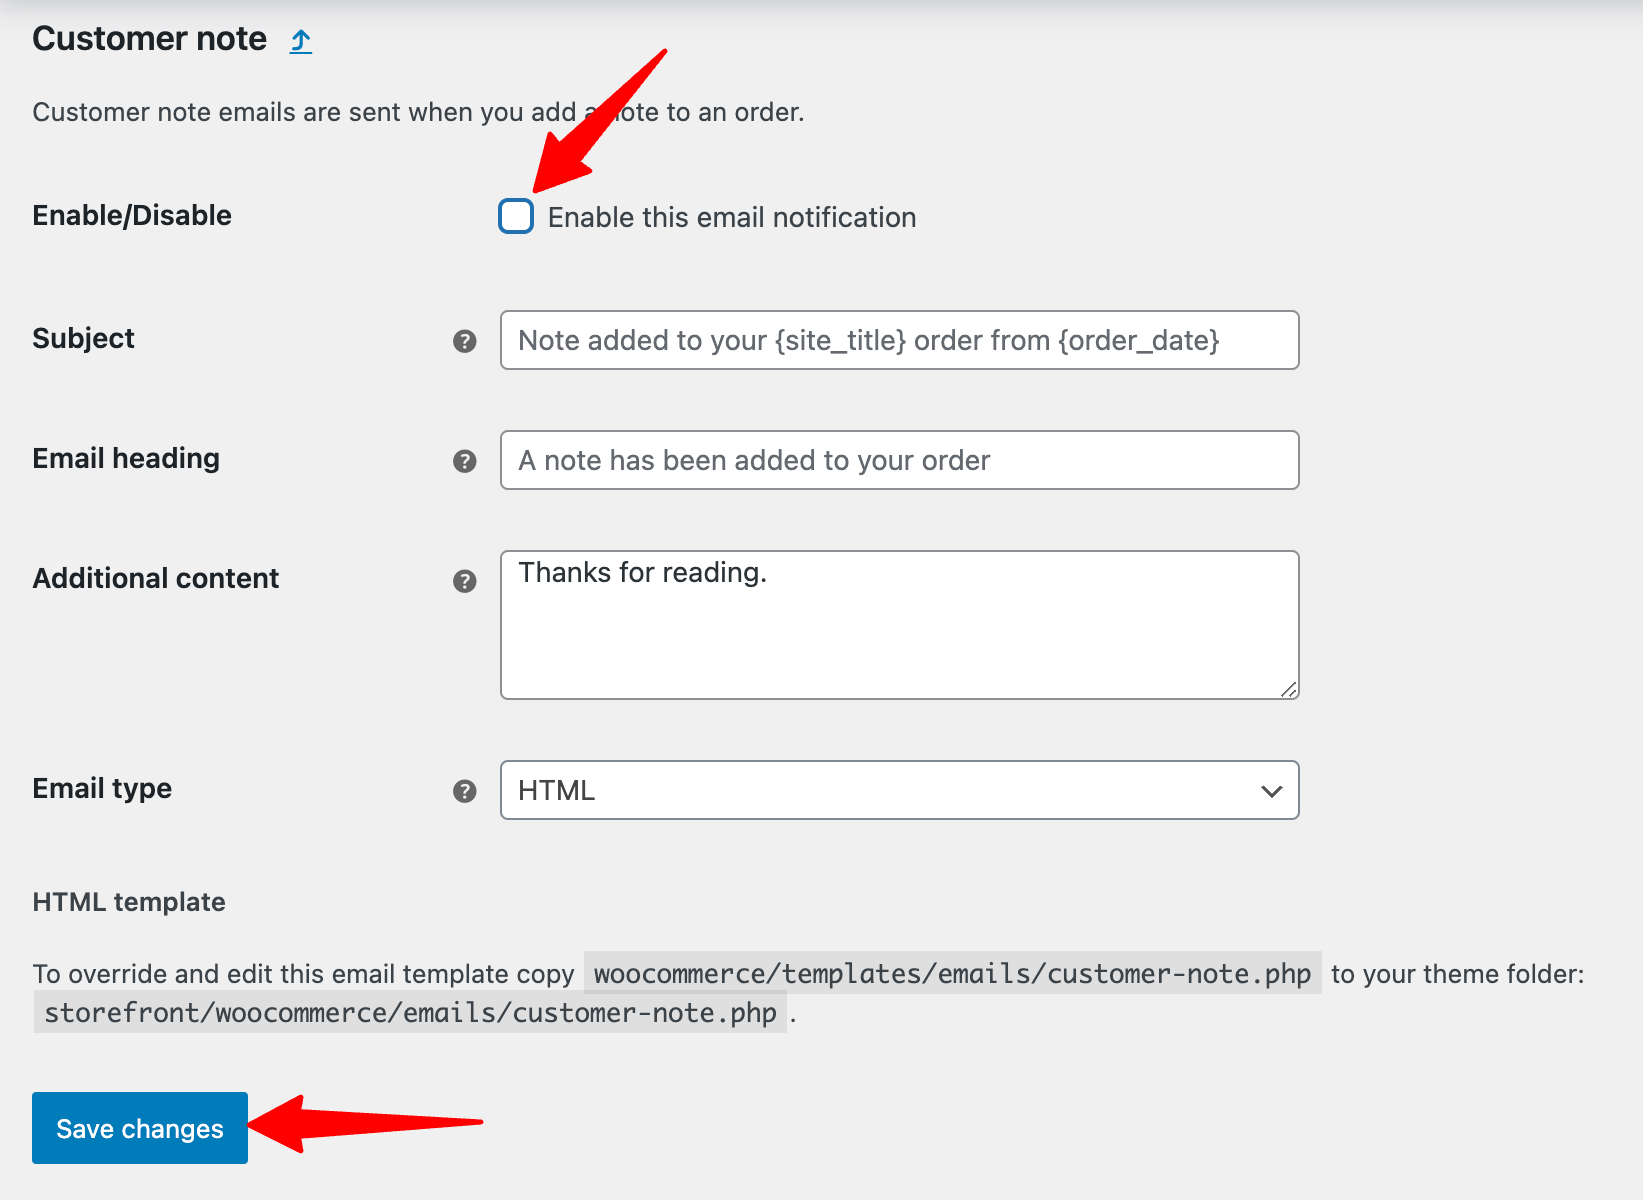
To do so, from WordPress Dashboard, go to WooCommerce ⇒ Settings ⇒ Emails tab and click on the go to manage option for a “Customer Note”.
Next, make sure to uncheck the option “Enable this email notification” and click on “Save Changes”.
Now, it’s time to automate this process.
Step 2: Add new automation
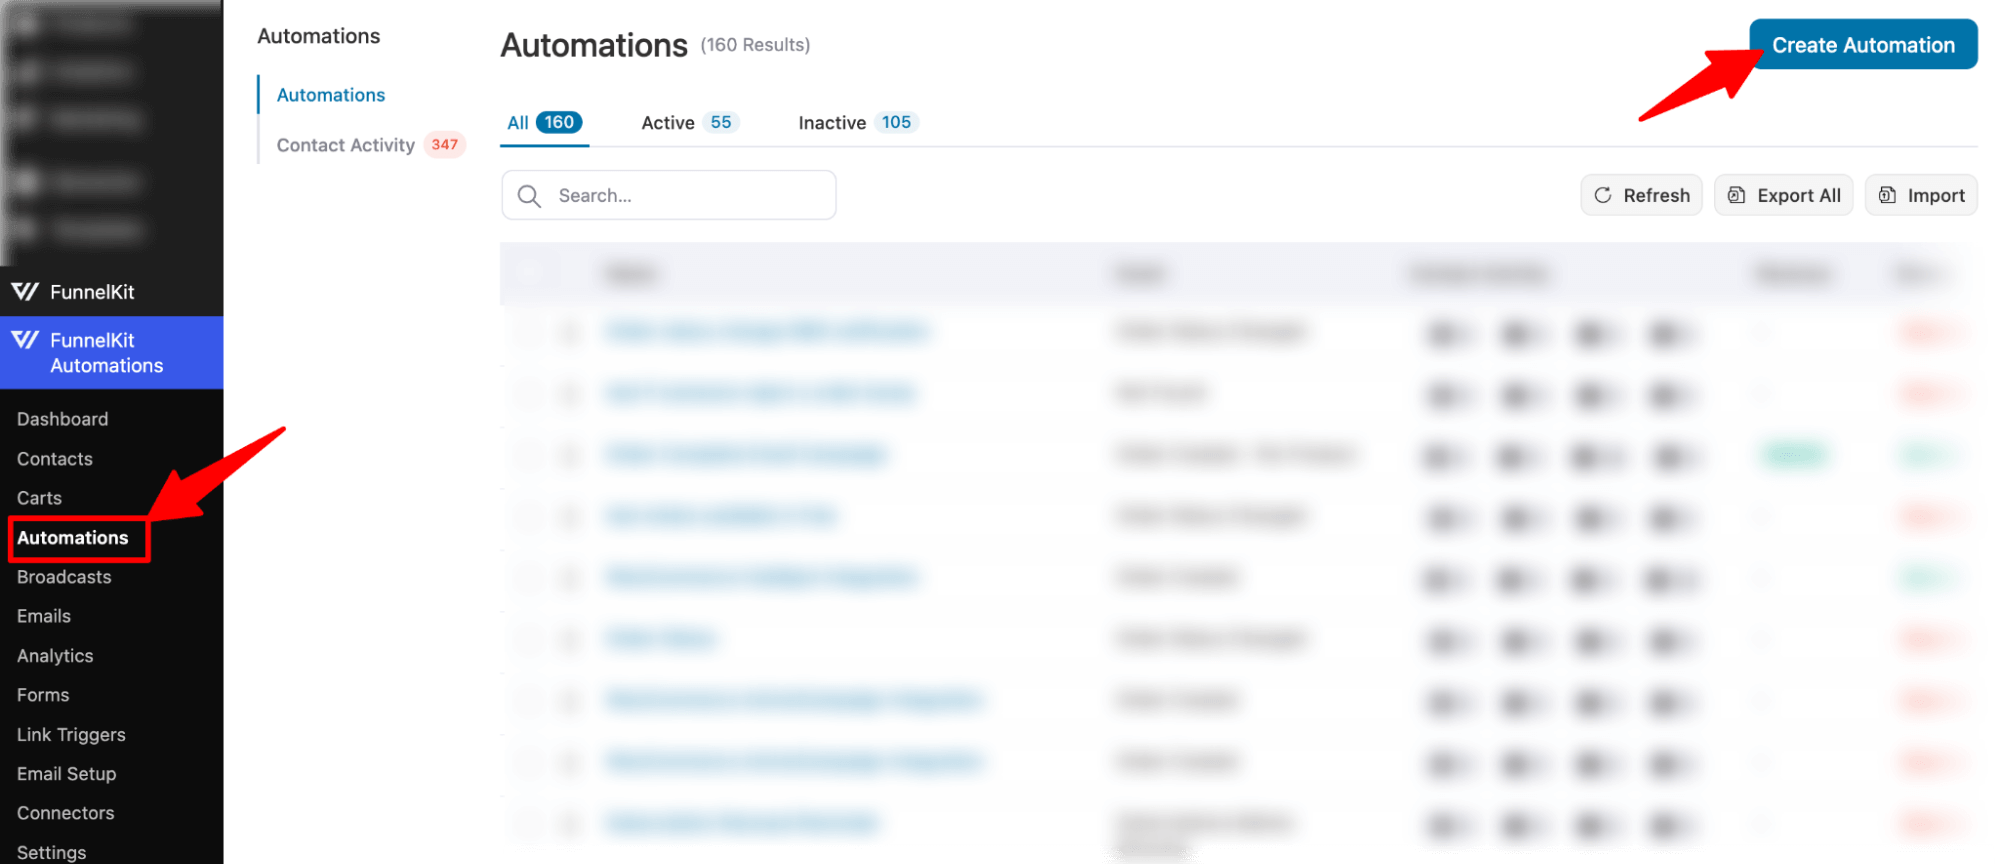
For that, navigate to FunnelKit Automations ⇒ Automations and then click on Create Automation.
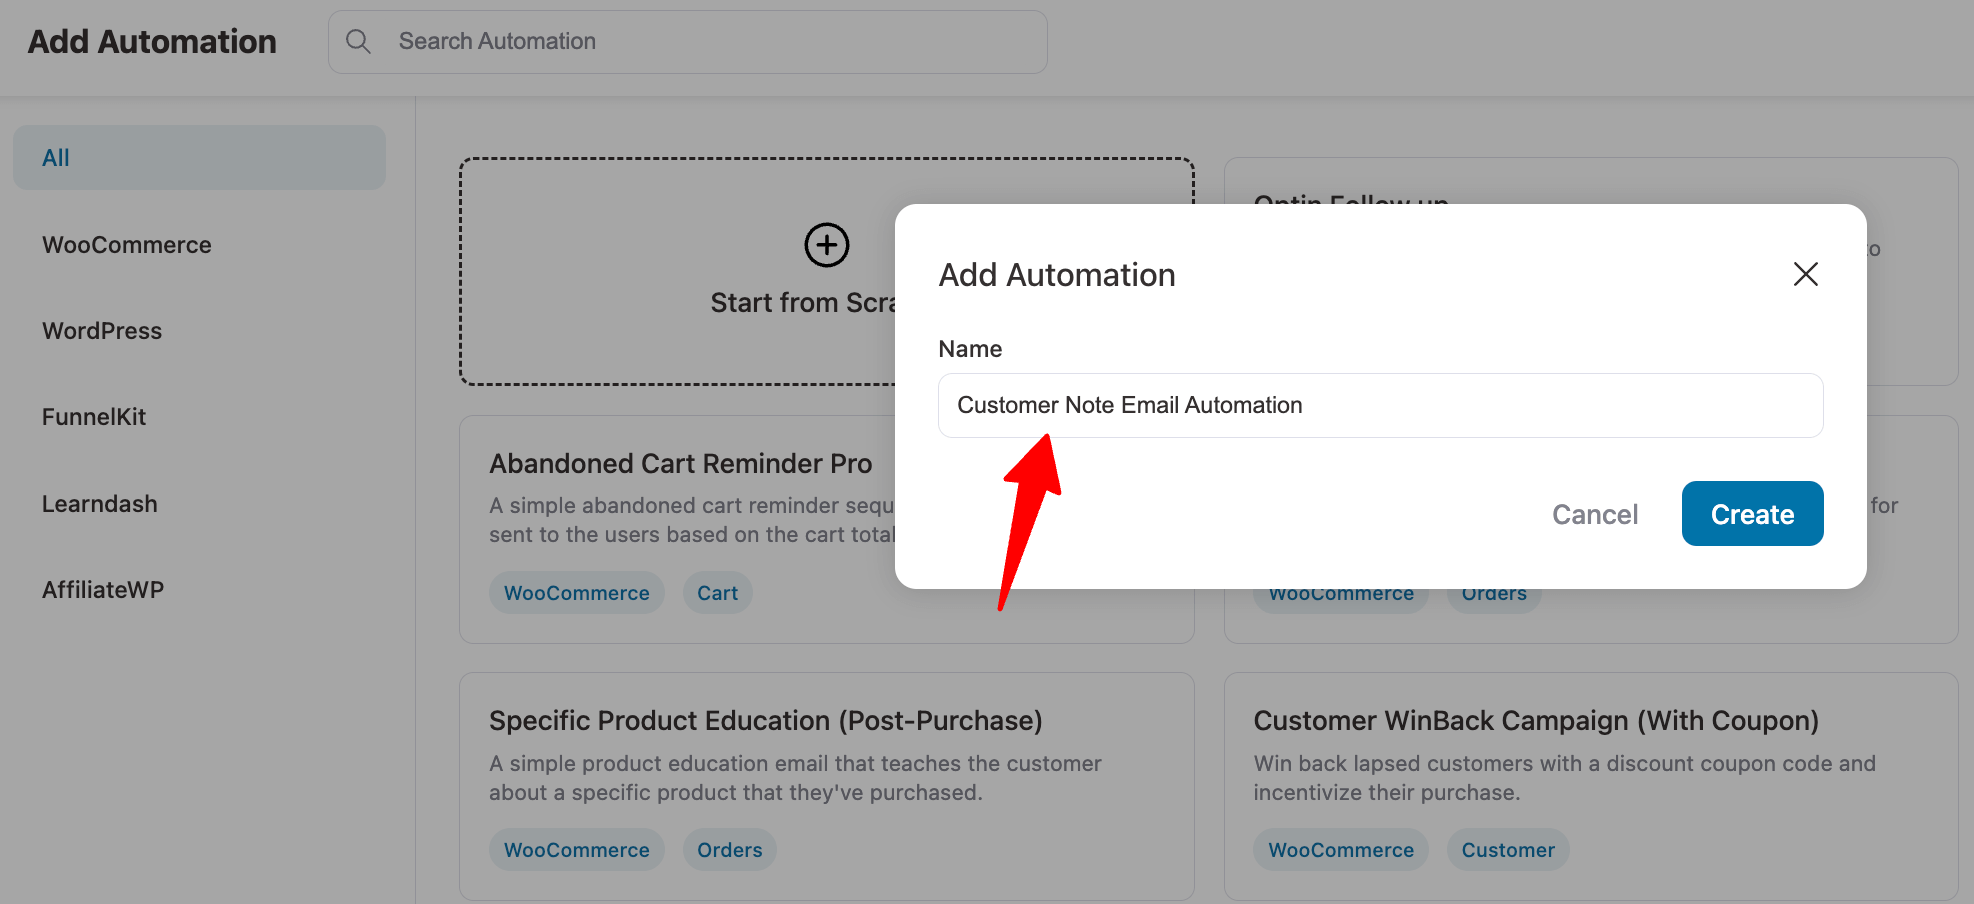
Next, click on the “Start From Scratch” option. Now, provide a name and click on Create.
Step 3: Select the ‘Order Notes Added’ trigger
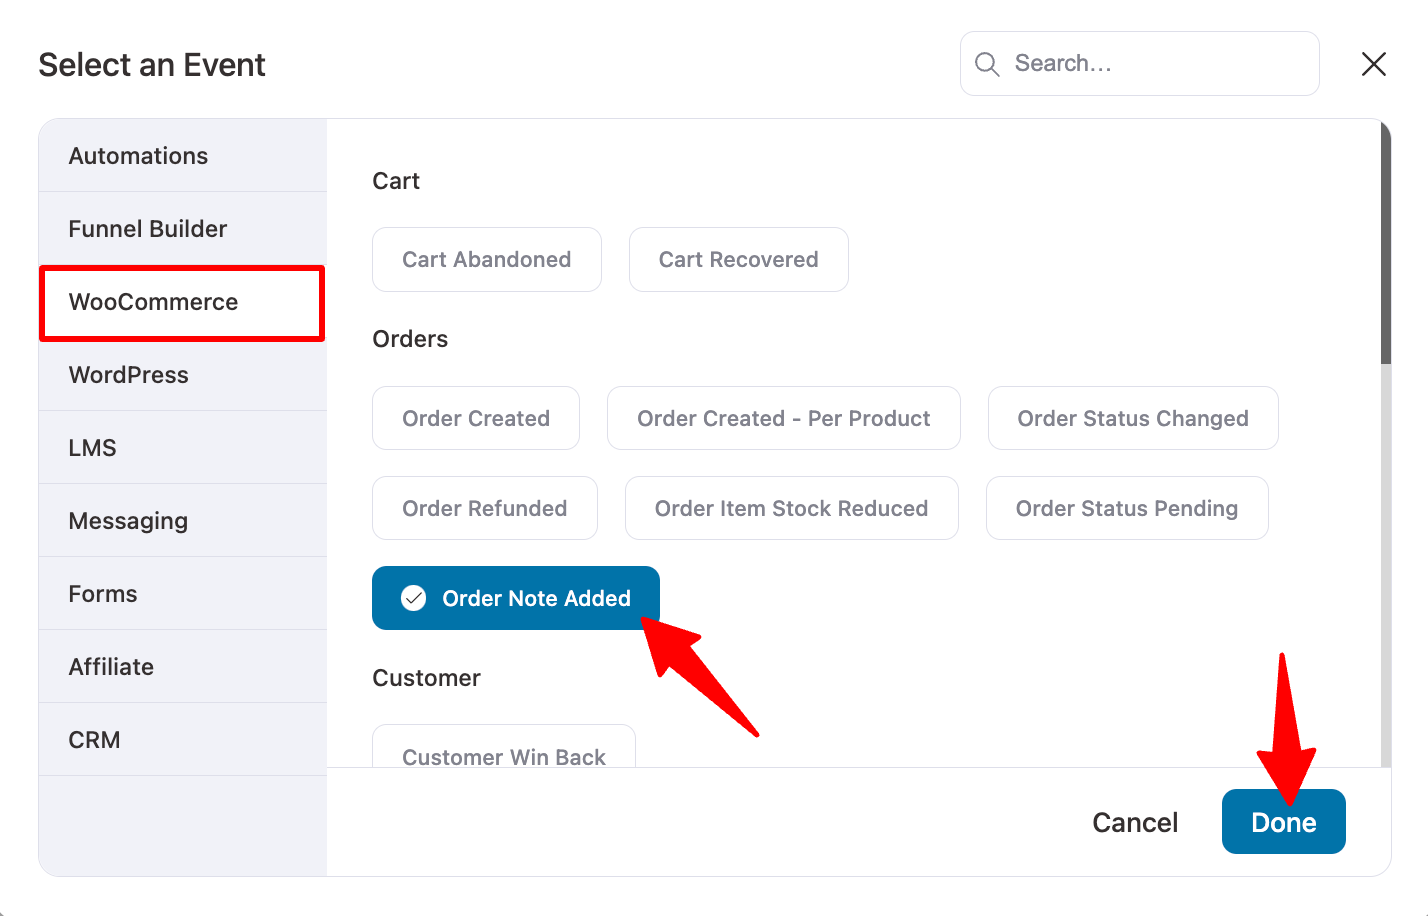
The next step is to select a trigger. Click on “Select Trigger,” and when the popup window appears, choose “Order Notes Added” under WooCommerce. Then, hit Done.
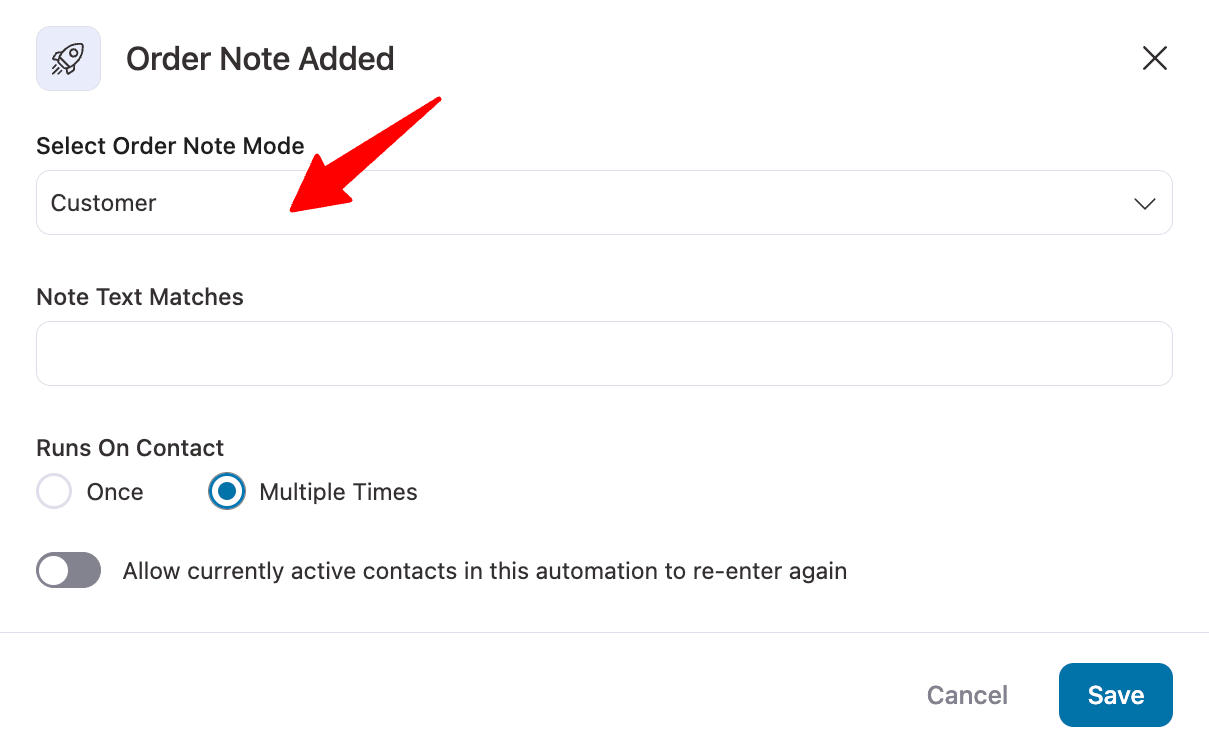
To configure the event, select the “Customer” option under order notes. Make sure to select the option “Multiple times” for the option “Run on contacts”.
This way, customers will receive an email notification for every note you add.
Hit “Save”.
Step 4: Set the send email action
Now, we will set the action to send the email. To do so, click on the “+” icon and select the “Action” step.
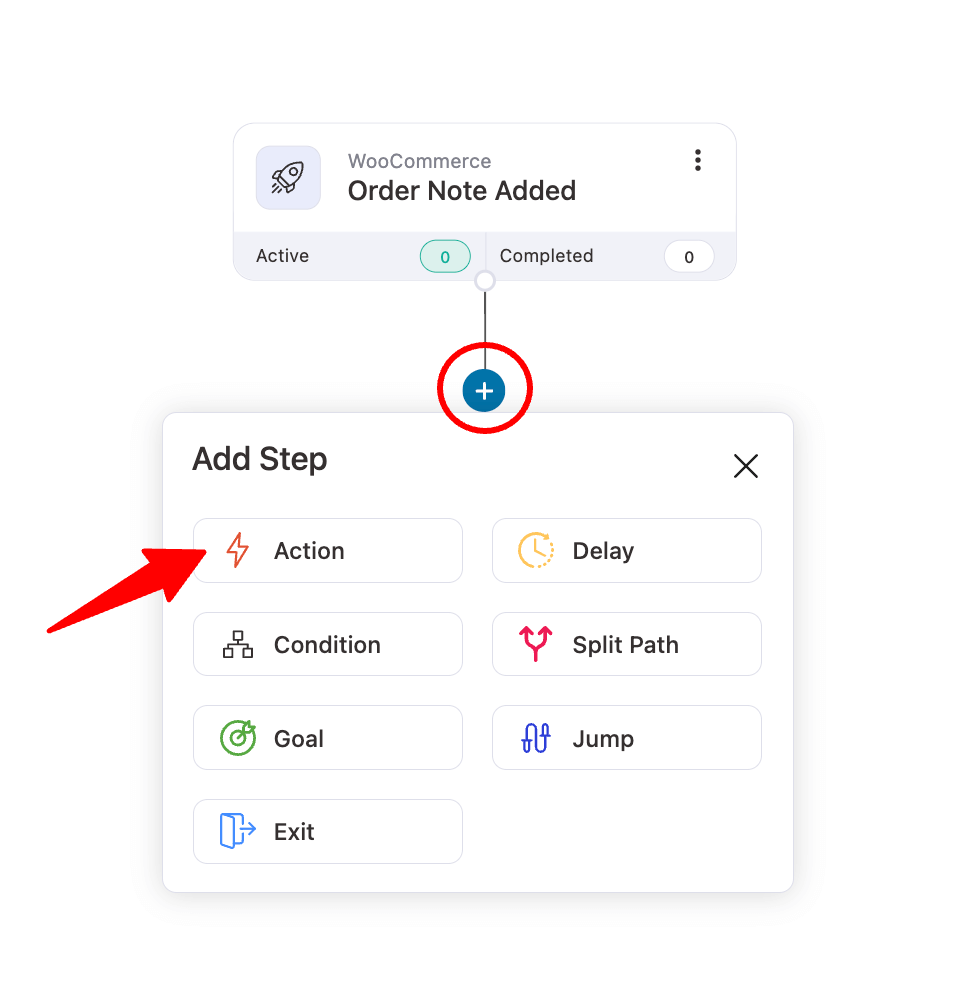
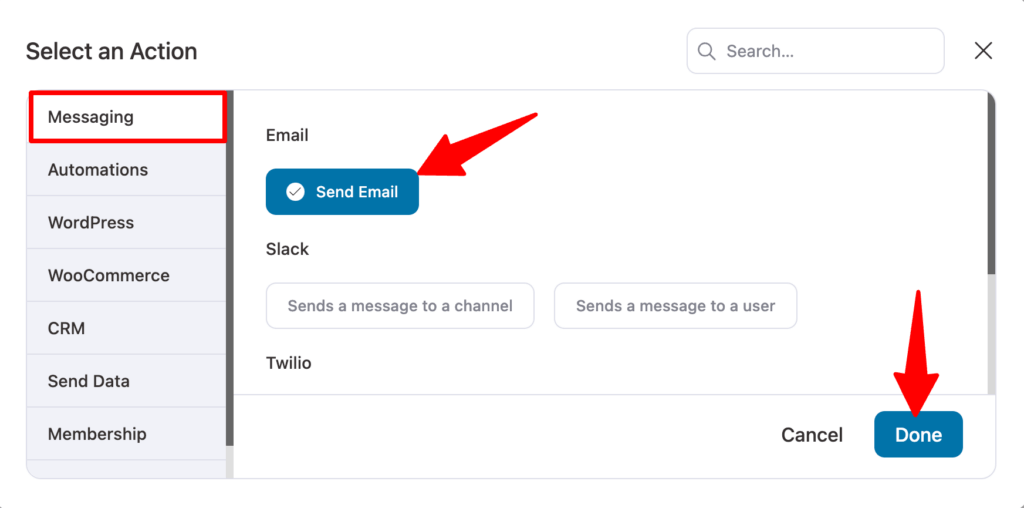
Now, under the Messaging Tab, select “Send Email” under email and click on Done.
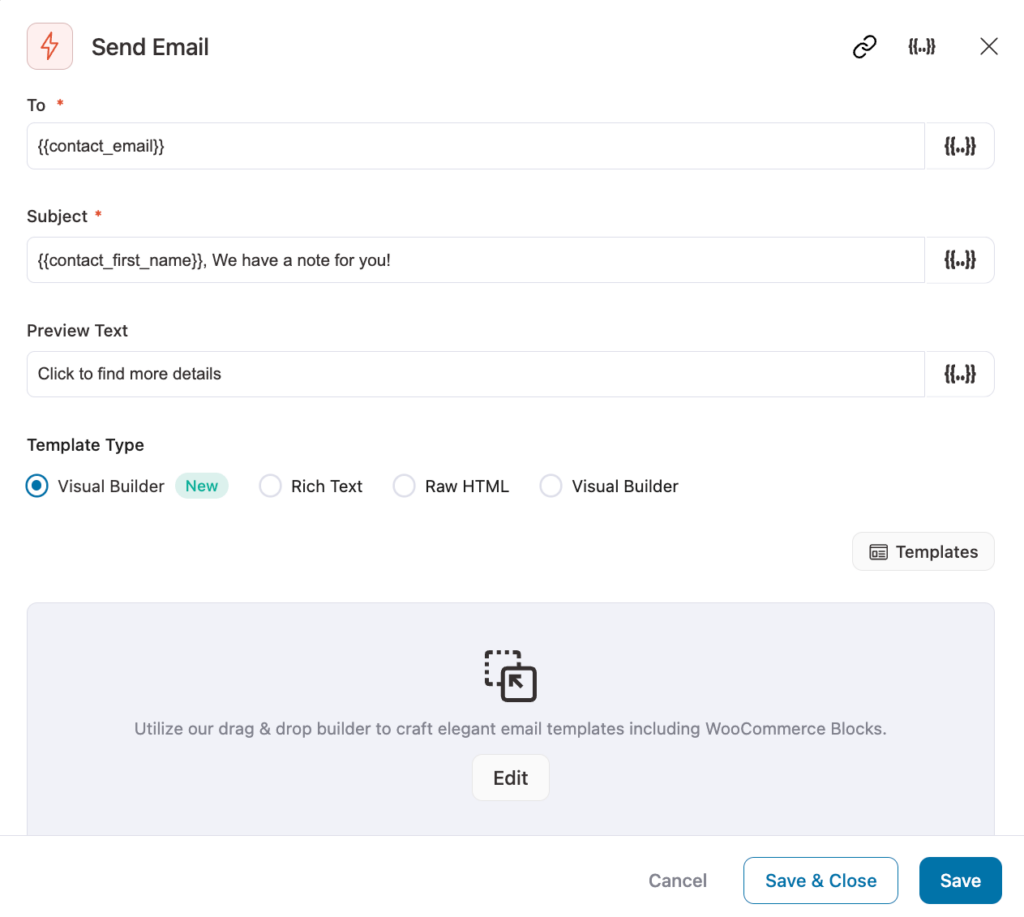
Now, let’s set up the email subject and preview. You can use a merge tag to personalize the subject and preview text.
Next, it’s highly recommended to use Visual Builder to design your email. In the email, you can use the merge tag “Current Order Note” to embed the order note.
Here is an email designed with the visual builder.
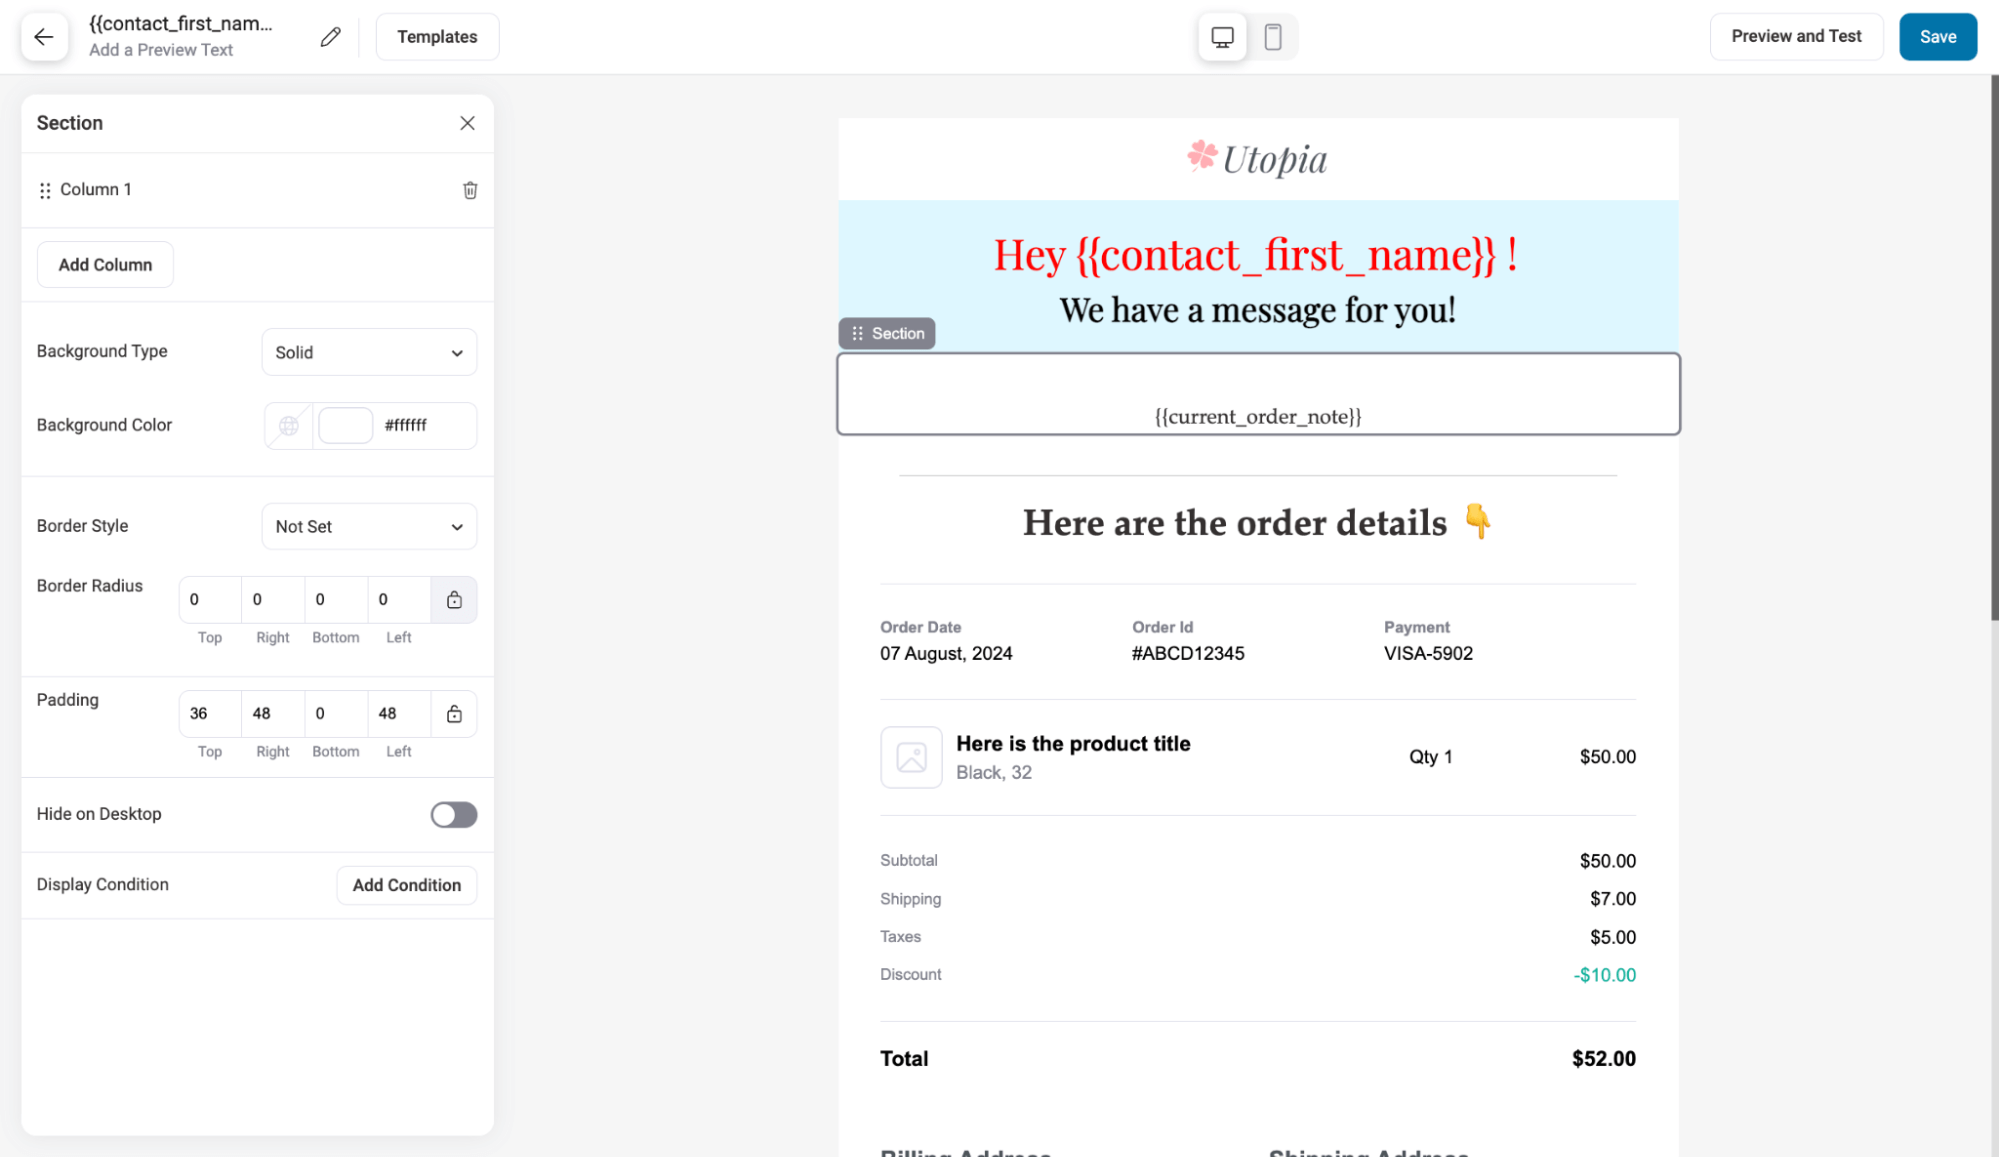
After making the changes, make sure to save the email template.
Step 5: Activate the automation
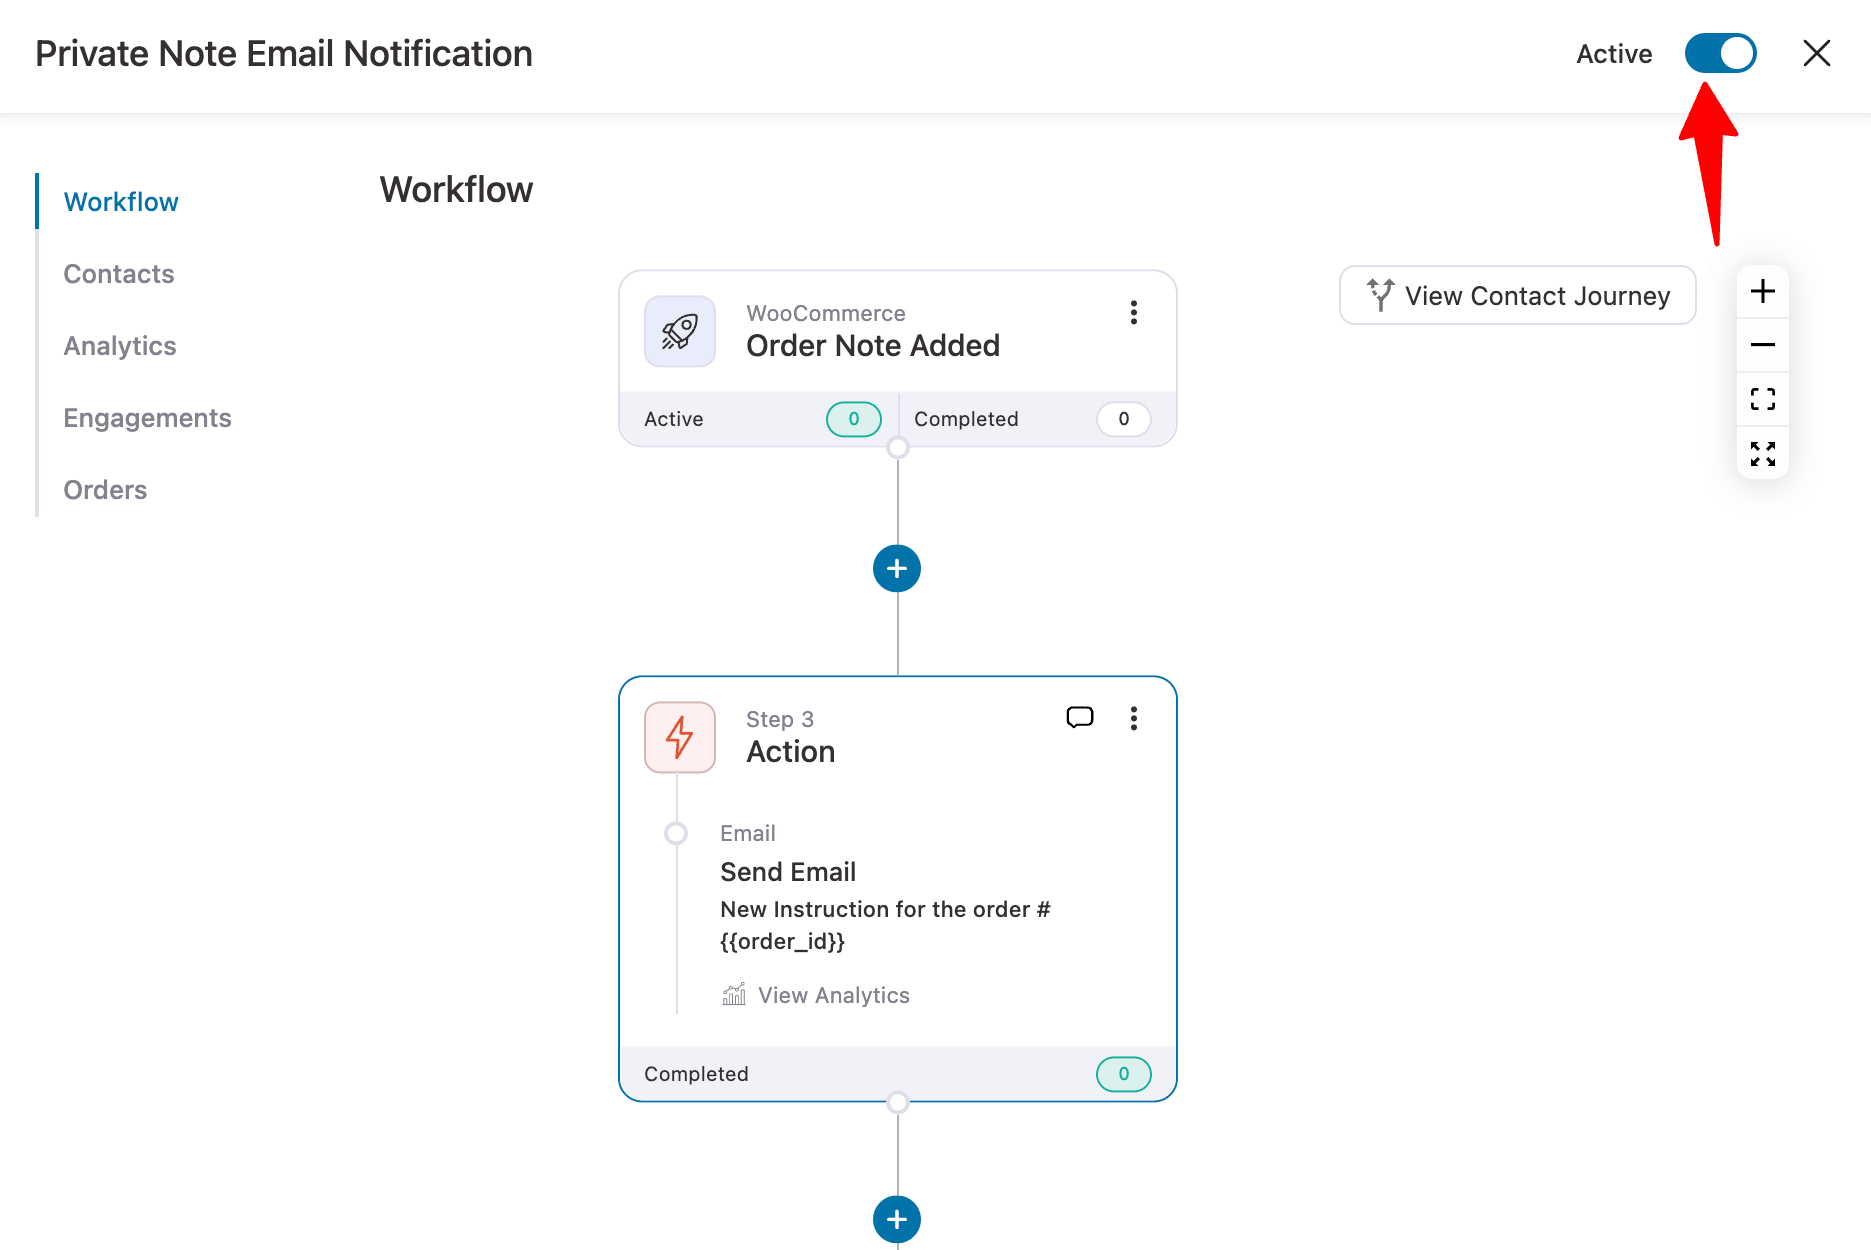
Turn the toggle button on the top-right corner to activate the automation. Once you activate it, customers will receive an email notification about the order note.
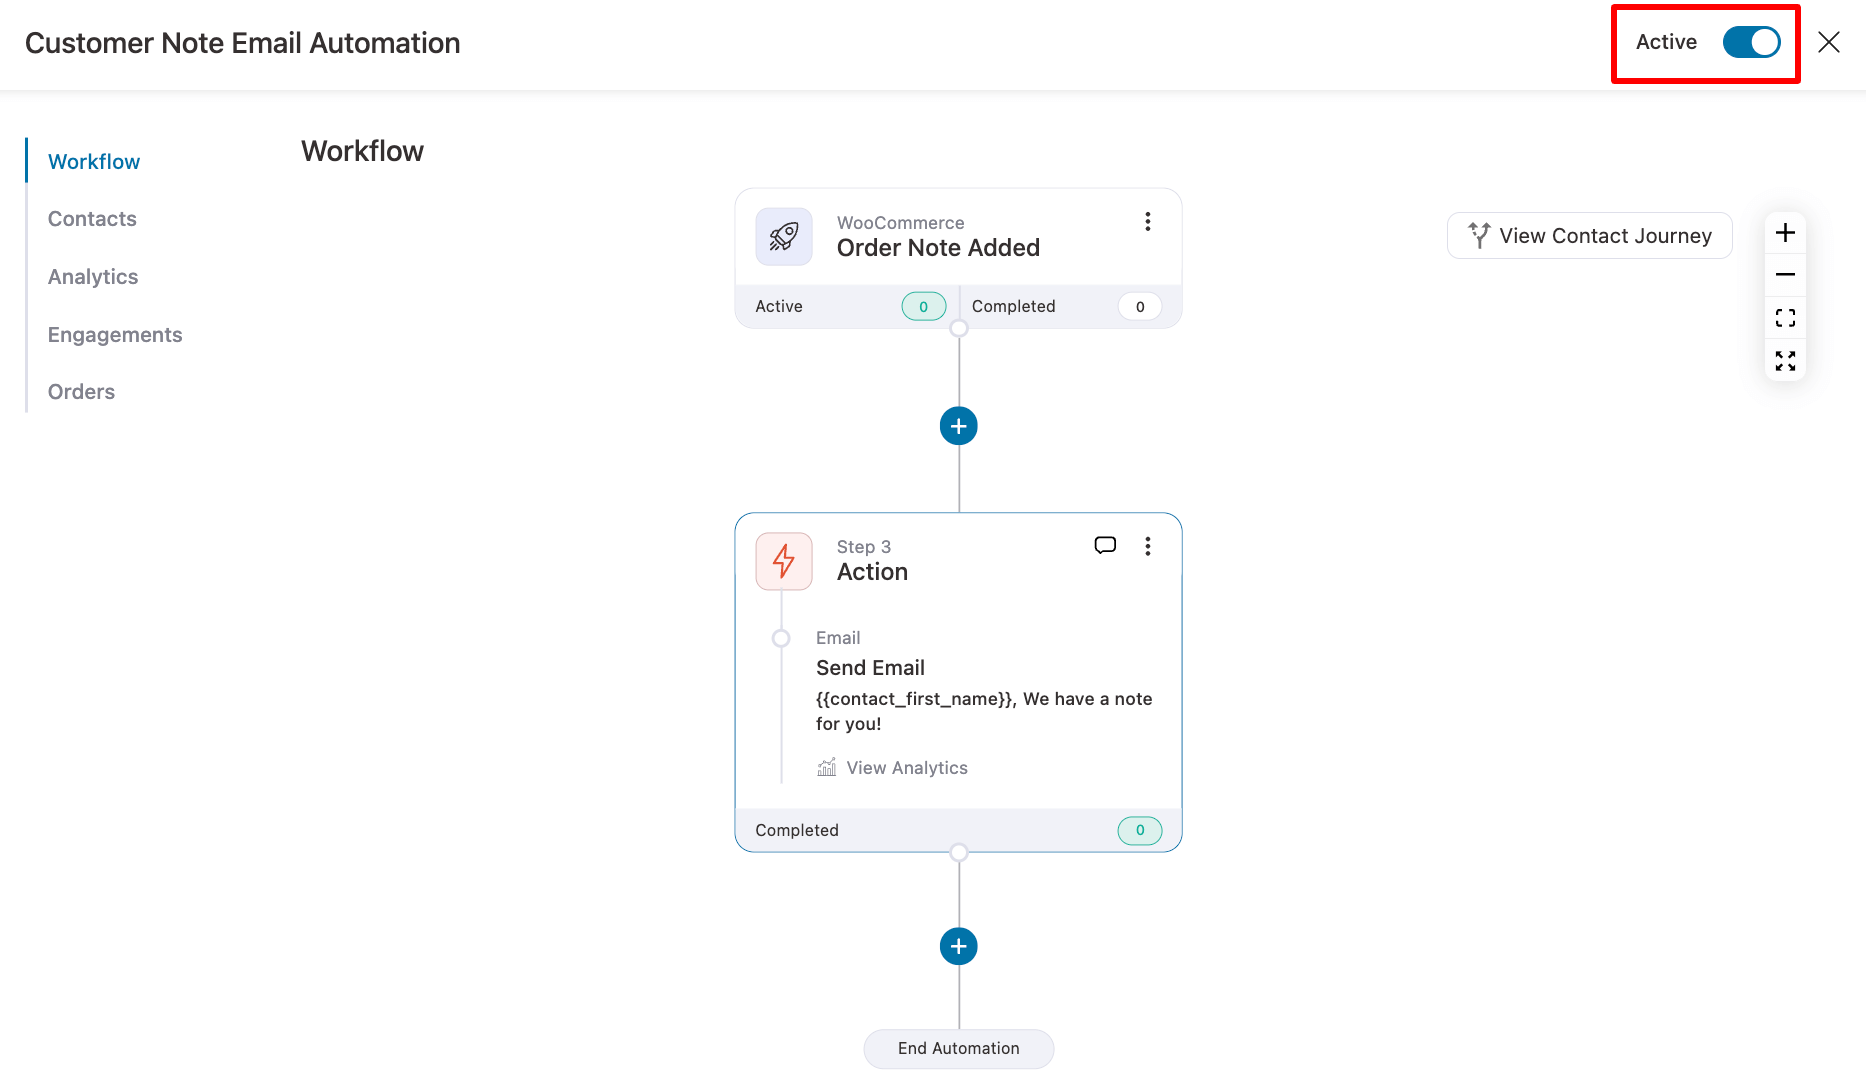
That’s it. Now your customers will receive a custom email notification for order notes and not the default one.
How to Send Email Notification For Private Notes in WooCommerce?
You can easily send email notifications to your staff every time you add a private note with FunnelKit Automations. The process is almost similar to sending a notification to the customers for customer notes.
You need to create a separate automation and add the “Order Note Added” event, but this time configure it for the private note option. For this, choose the value “Private” for the option “Select Order Note Mode.”
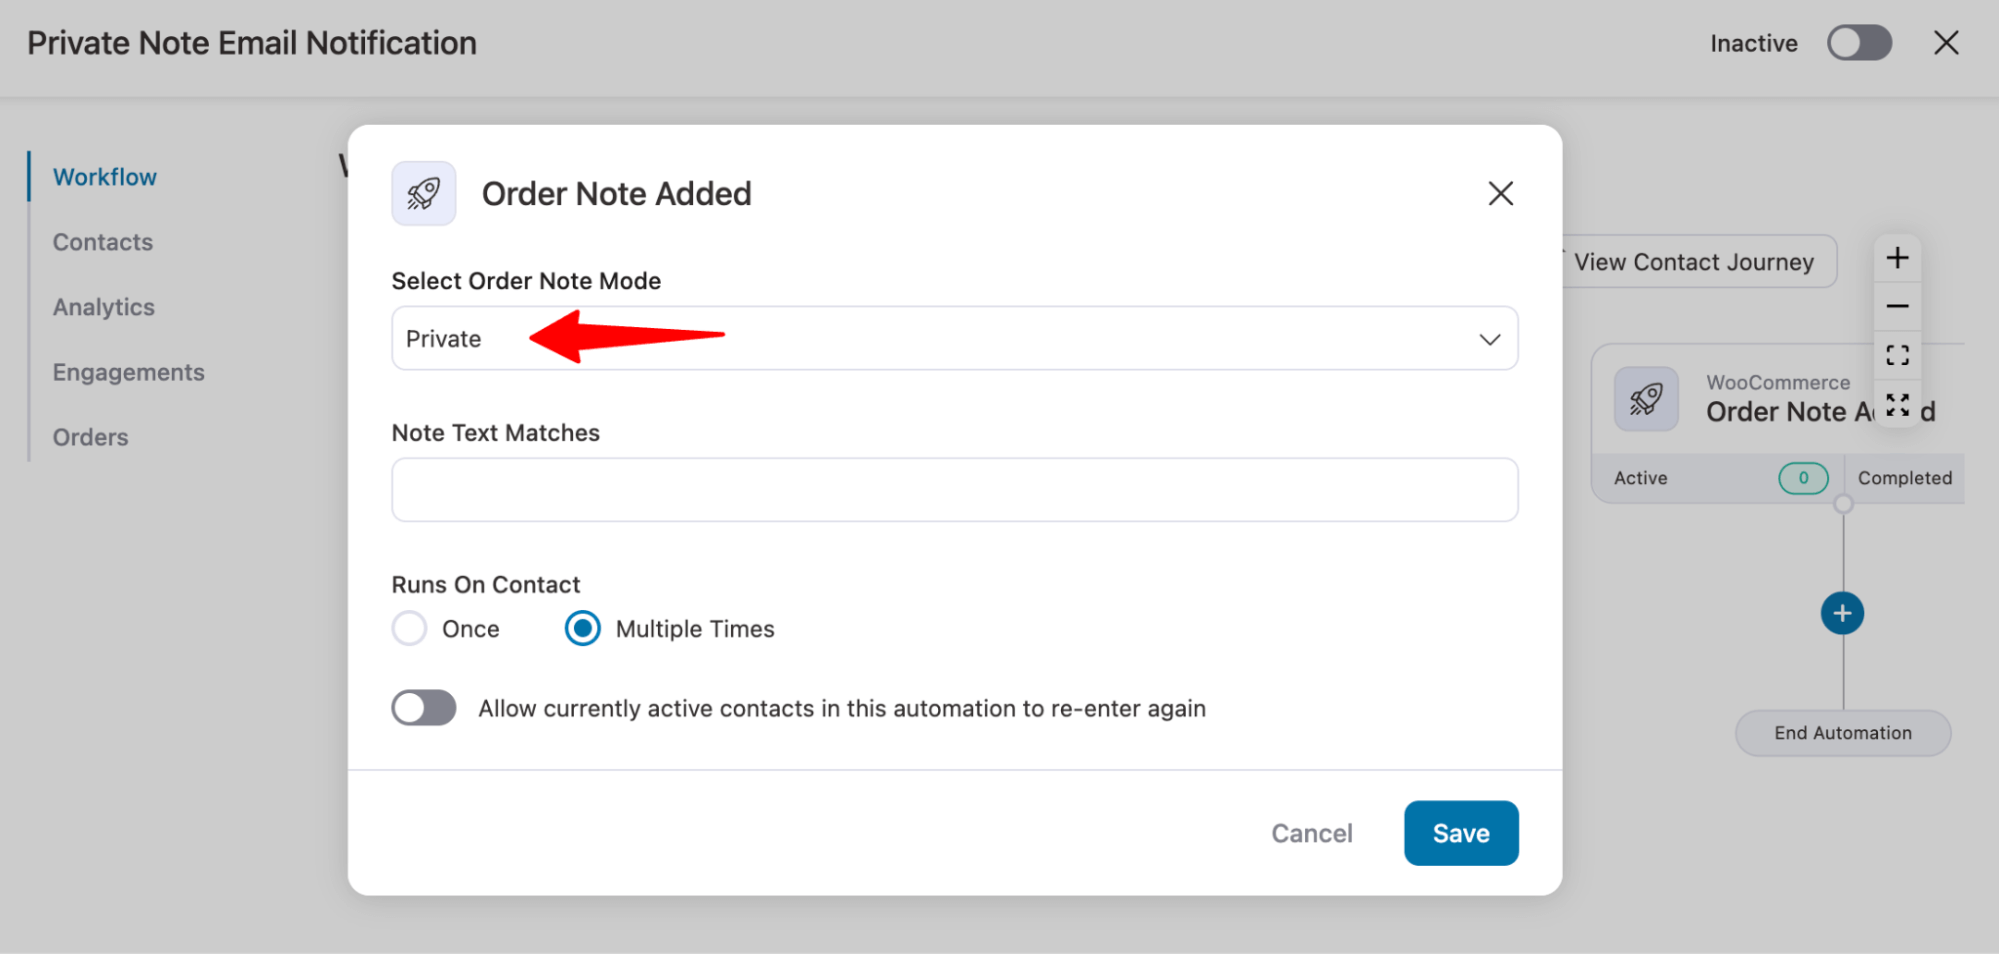
After configuring the trigger, you need to add a “Send Email” action and set up the email.
In the “To” field, enter the email addresses where you want to send the private note notifications. Use the merge tag to dynamically include the admin email. If you're adding multiple emails, separate them with a comma.
You can use another merge tag, like order IDs, to make the email subject or preview text more specific.
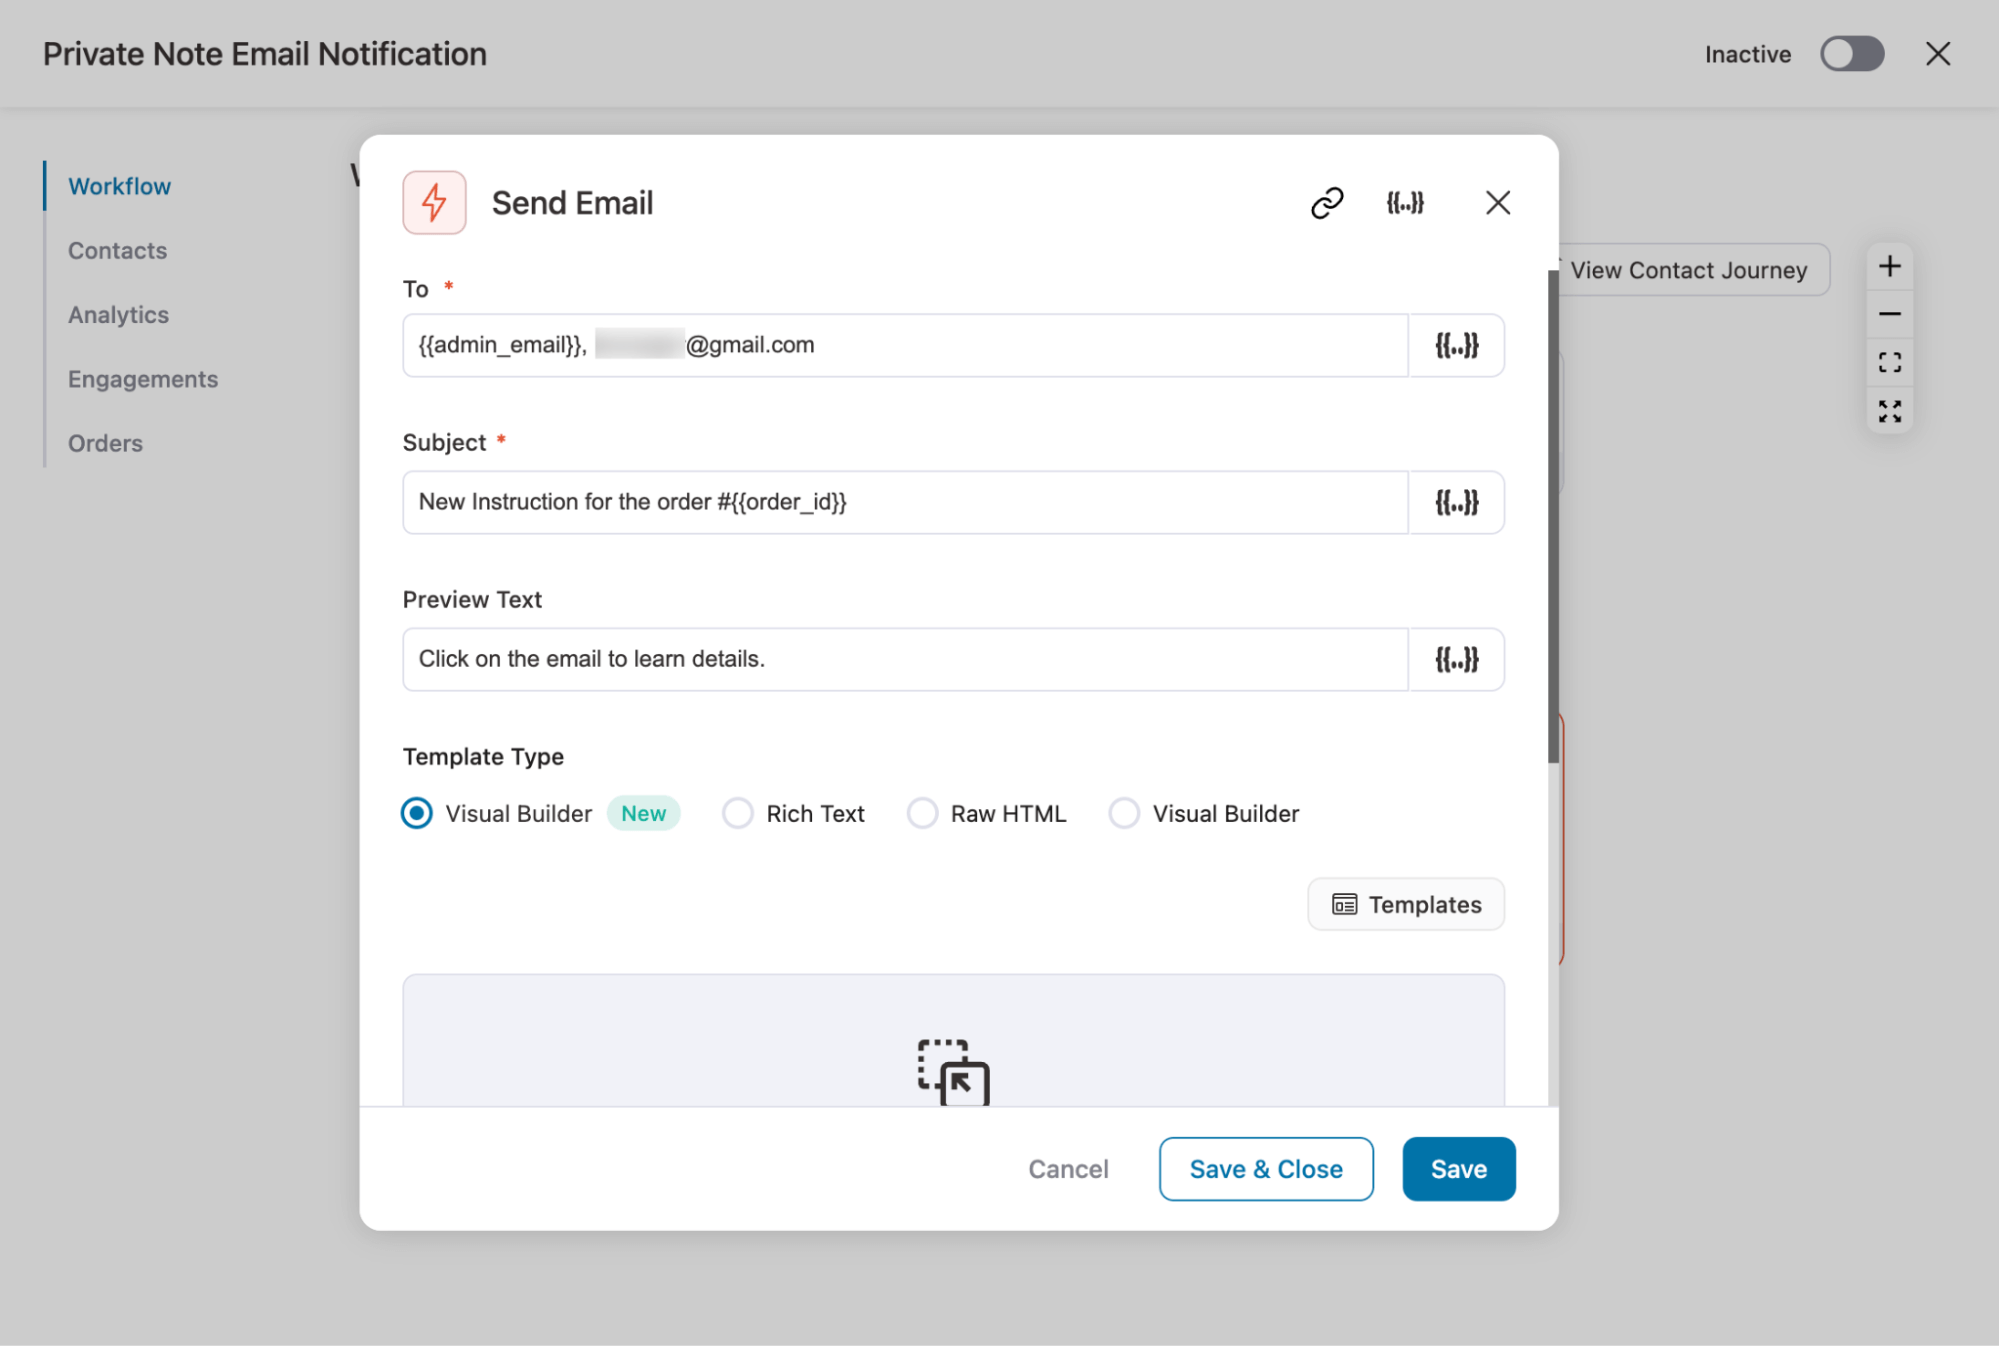
You can design the email body with Visual Builder, and to add the private note dynamically, use the merge tag “{{current_order_note}}”.
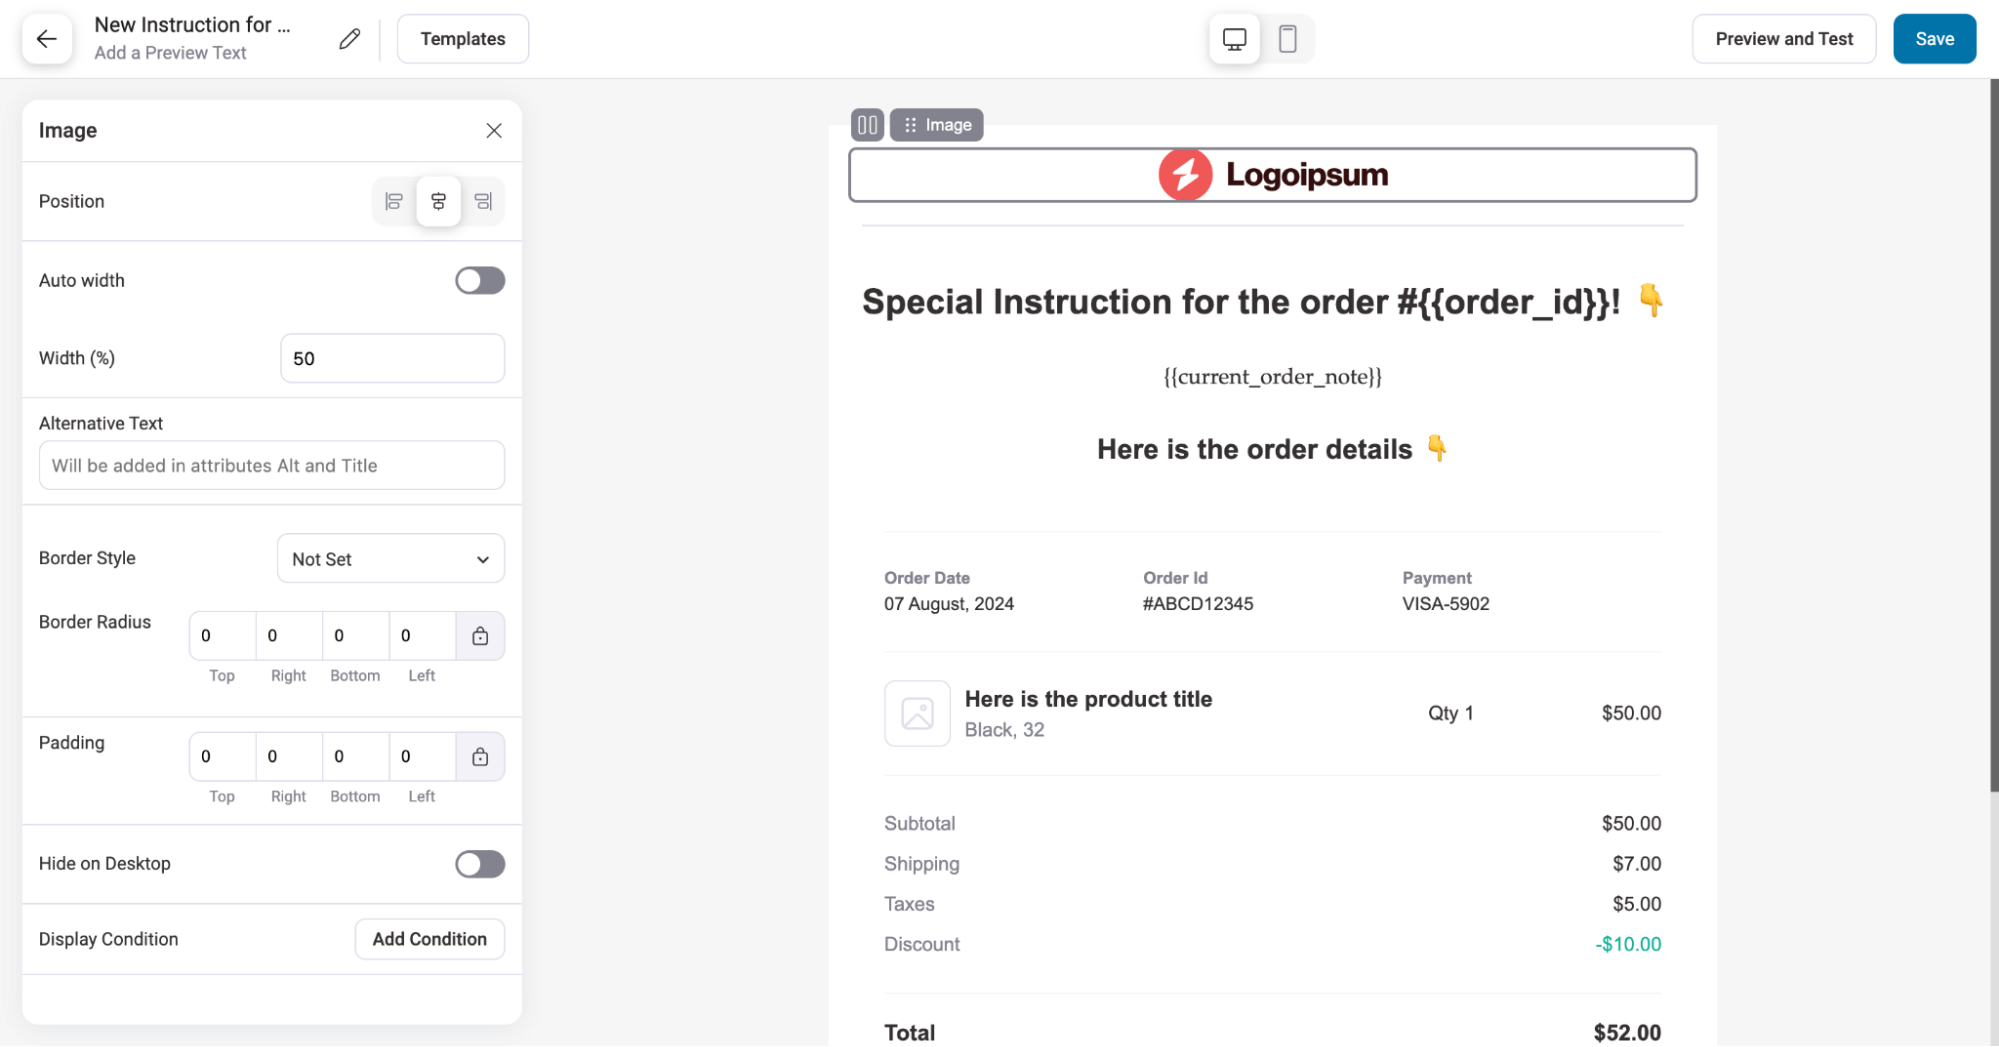
After making the changes, don’t forget to activate the automation.
How to Include Customer Note in WooCommerce Order Confirmation Email?
When a customer adds a special instruction or note for an order while placing an order, it becomes a part of the order summary. That’s why adding it to the order confirmation email is important.
As WooCommerce doesn’t include the order note in the confirmation email, you need to set up an order confirmation automation using FunnelKit Automations.
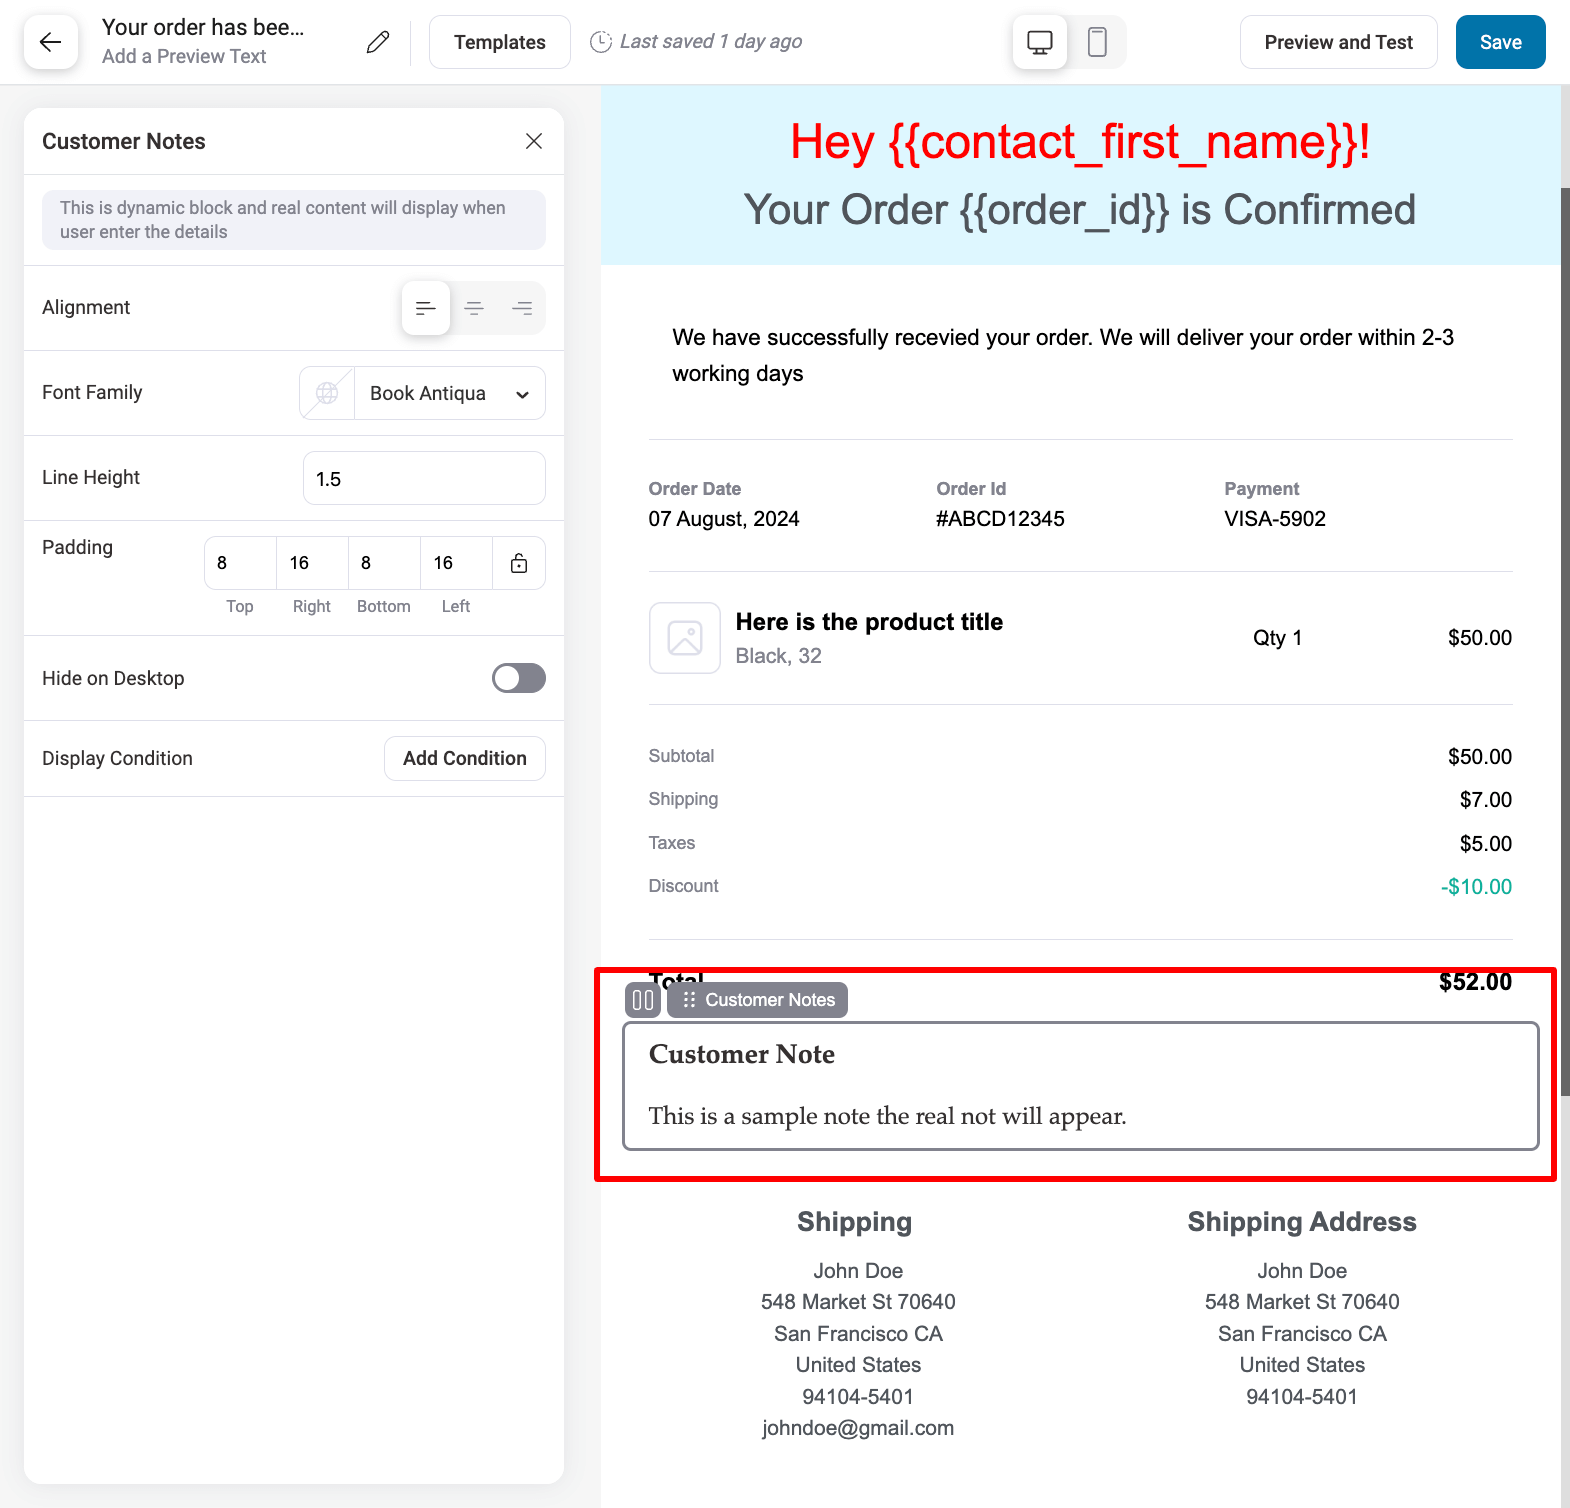
After adding the automation, add a send email action. In your email body, you can easily add the customer-provided order note using the block “Customer Notes”.
Importance of WooCommerce Order Notes
Each type of order note has its own purpose and helps you manage your WooCommerce store more efficiently.
Here are some of the benefits of WooCommerce order notes:
- Add important delivery details
With the WooCommerce order note field on the checkout page, customers can add important order or delivery details.
For instance, if they need the delivery to be made at a certain time because they won’t be available otherwise, they can specify it here.
- Share important information with your team
Store owners can use the private note feature to share essential information with their team using the private note feature.
For instance, if a customer requests faster delivery, you can add a note to your staff to prioritize processing that order.
- Enhance customer experience
Allowing customers to add special instructions and keeping them informed through order notes enhances their overall experience.
This way, they can communicate their specific needs, and you can ensure they stay updated on their order's progress.
- Better order management
You can keep a detailed record of all communications and instructions related to each order by using WooCommerce order notes.
This helps track order history and resolve any issues efficiently.
- Helps customer support
If a customer calls about special instructions, the support team can quickly check the order notes to see if the request was fulfilled.
This helps them handle the query more efficiently and provide accurate responses.
We hope you now understand how WooCommerce order notes can enhance order management and customer satisfaction.
Start Using WooCommerce Order Notes For Efficient Order Management!
WooCommerce order notes are an often-overlooked feature that can greatly streamline your order management process by facilitating efficient communication between store admins, customers, and other relevant departments.
We have shared all the details you need to make the most of WooCommerce order notes.
Our experts highly recommend using email notifications to make order notes more effective.
The main purpose of order notes is to communicate effectively, and email notifications help achieve this goal more efficiently.
So, start using order notes to your benefit and streamline order management of your WooCommerce store today!
Editorial Team
February 13, 2026WooCommerce shipping allows you to charge customers for delivery when they purchase from your store. You create different delivery areas, called shipping zones, and then decide how much to charge...
Editorial Team
February 12, 2026Have you ever noticed the cart icon at the top of many online stores? It’s more than just a design choice. It can greatly improve your customers' experience. A cart...

Editorial Team
February 6, 2026With increasing competition and rising ad budgets, acquiring new customers is difficult. Forbes reports that the conversion rate for new customers is just 5%-20%. On the other hand, repeat customers...


