Are you looking for a way to boost engagement with a WordPress newsletter campaign?
Creating and sending engaging newsletters regularly can help you increase the discoverability of your products and boost website traffic.
Sending out regular newsletters lets you stay in constant touch with your email subscribers.
Many marketers have confirmed that newsletters are STILL effective for marketing and a crucial component of their inbound marketing strategy.
In this 3-part WordPress email marketing process, you will learn how to:
- Create an aesthetic opt-in form
- Capture leads and build your email list
- Send beautiful newsletters consistently
So, let’s get started.
Table of Contents
Are WordPress Newsletters Effective in Marketing?
Newsletter campaigns are incredibly effective in promoting your products and content.
A well-timed WordPress newsletter campaign can work wonders for your business.
You can schedule a newsletter for every alternate day or maybe once a week.
This schedule will build curiosity among your subscribers, and they will look forward to reading your newsletters.
Every marketer knows that email marketing has the highest ROI (an ROI of $42 on every $1 spent), and 40% of B2B marketers stated that newsletters are an important part of their content marketing plan.
Here are some more insights:
- 81% of content marketers said that email newsletters are their most-used mode of content marketing (Content Marketing Institute, 2020)
- 1 out of 3 B2B marketers agree that newsletters are the most effective way to nurture leads (Content Marketing Institute, 2020)
- Vox reported that their newsletter recipients spend an average of 1 minute and 50 seconds on their website, compared to just 40 seconds of Facebook visitors.
- Washington Post’s newsletter has an average open rate of 30%
You can set up newsletter email campaigns to send out an email once a week or a month.
The purpose of the newsletter campaign might be to interact with your leads, promote your new products, roll out an update, or create a buzz about an upcoming sale.
So, in a nutshell, newsletter email campaigns ARE effective if done the right way.
And, YES, you do need to include newsletters in your marketing strategy.
If you are planning a sale for an upcoming festival, let's say Easter, then a WordPress newsletter campaign can be a highly effective marketing tactic.
But, before that, you do need to have an email list filled with quality leads to send the newsletters to, right?
So, let’s learn how to capture high-quality leads easily.
Part 1: Capture the Leads with an Opt-in Page
In WordPress email marketing, capturing leads and nurturing those leads are two of the most crucial components of any marketing strategy.
To run a successful WordPress newsletter email campaign, you first need to collect high-quality leads with the help of an opt-in page.
You can drive organic visitors to this page with a blog, paid traffic with Facebook/Instagram/Google Ads, or influencer marketing.
Once these visitors land on your opt-in page, you can collect the lead information with an inline form or a pop-up form.
An opt-in form is just the beginning of an effective lead generation sales funnel, but if done correctly, it can help you skyrocket your business and build a successful brand.
With FunnelKit (formerly WooFunnels), you can import a pre-built opt-in page template, tweak it to your liking, and go live in minutes.
If you prefer watching a video, then do watch this video to create your fantastic opt-in page.

1. Install and Activate FunnelKit from WordPress Plugins Dashboard
FunnelKit (formerly WooFunnels) is a WordPress funnel builder plugin that lets you build high-converting sales funnels. With FunnelKit, you get access to 100% mobile-responsive pre-built templates that perform flawlessly on any device.
Use FunnelKit to create:
- Beautiful opt-in and landing pages
- Optimized WooCommerce checkout pages (global and one-page checkouts)
- Highly targeted order bumps
- Rule-based one-click upsell offers
- Custom Thank You pages
In your WordPress dashboard, go to Plugins >> Add New. Once you are on the plugins repository, search for FunnelKit.
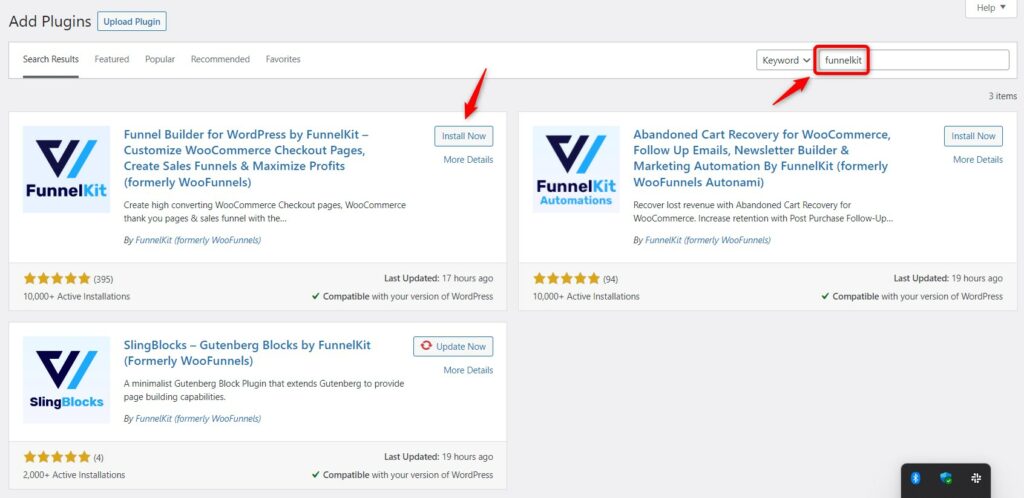
Once installed, you need to activate the FunnelKit Funnel Builder plugin.
You can create an entire sales funnel FOR FREE right inside WordPress using FunnelKit Funnel Builder Lite, but in this article, we are going to focus on capturing high-quality leads for our WordPress newsletter campaigns.
And you can do this with FunnelKit Funnel Builder Lite!
2. Import an Opt-in Page Template
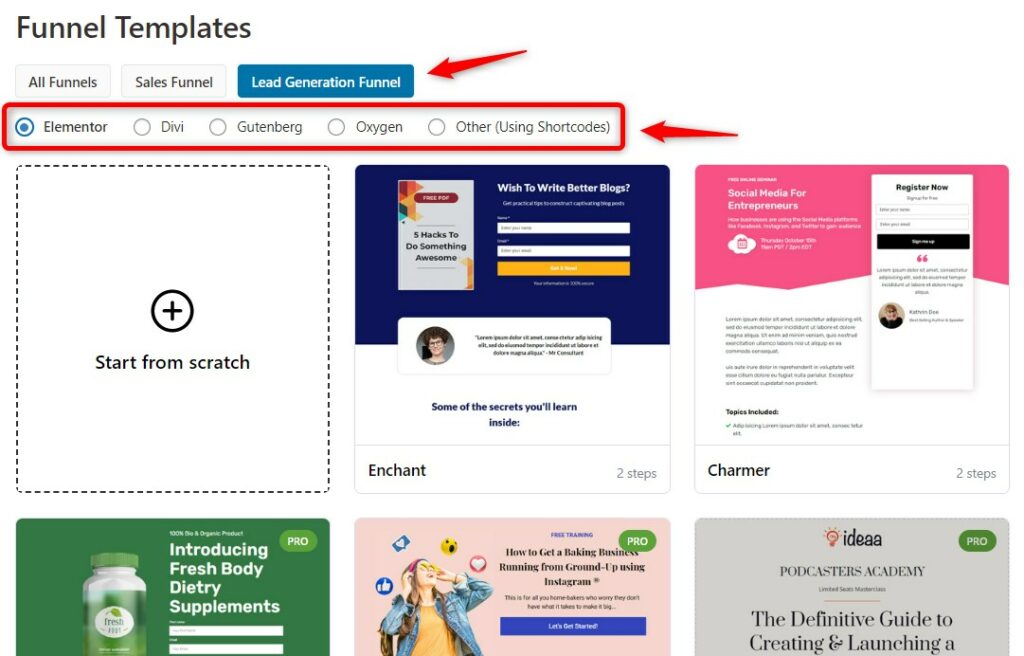
In the FunnelKit dashboard, go to the Funnels section and click on Add New Funnel.
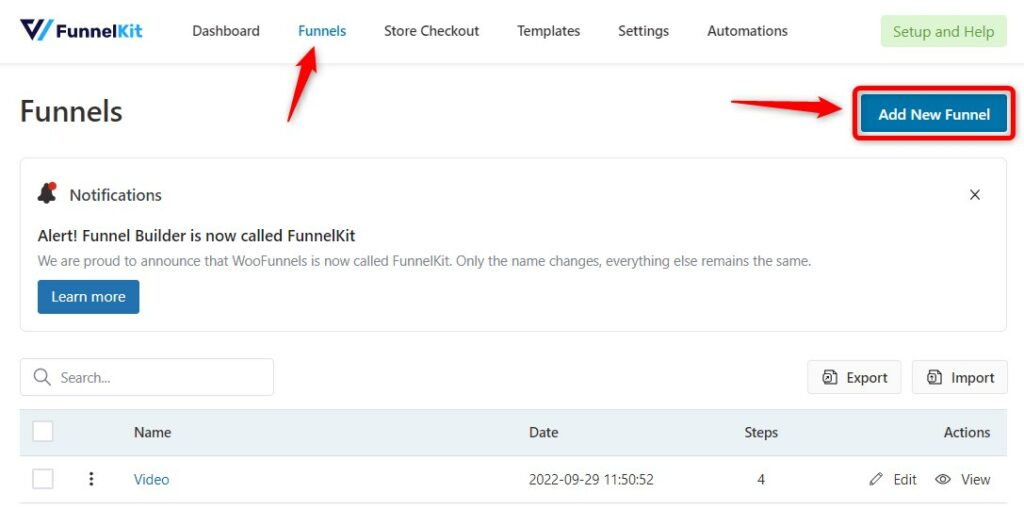
On the next page, click on Lead Generation pages, and select your favorite page builder. FunnelKit integrates with:
- Elementor
- Divi
- Oxygen
- Gutenberg
- Other Page Builders (using shortcodes)
We are going with the popular Elementor page builder.
With FunnelKit Funnel Builder Pro, you get popup forms as well. So, only when the user clicks on the CTA button, a pop-up form appears.
To choose popup, click on any template you want to import.
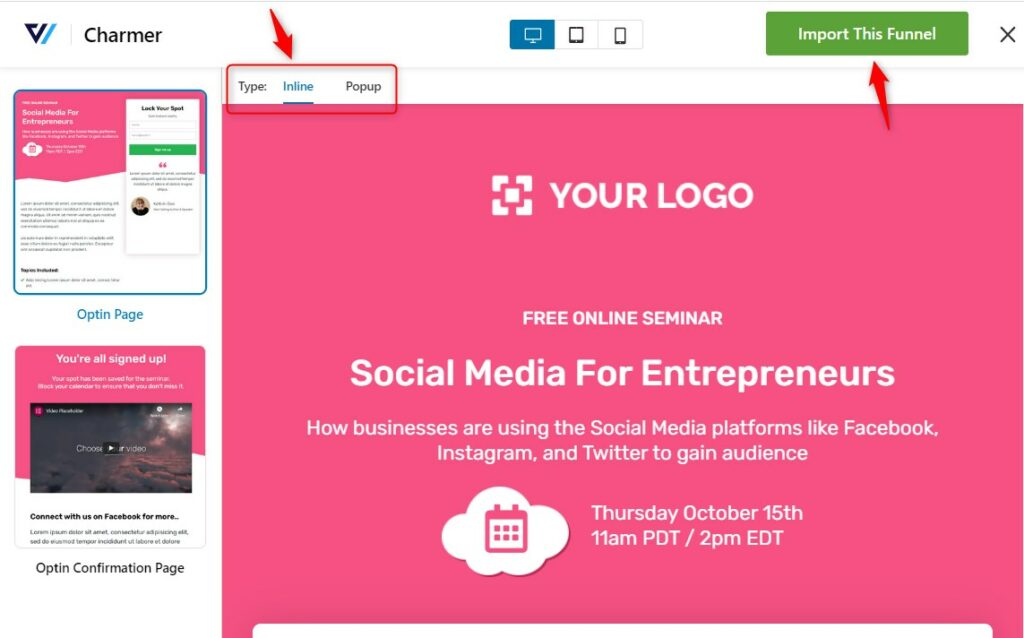
Here’s how a popup opt-in page functions - it gives you a cleaner page with a minimalistic design.

Here, we will select the 'Inline' form and import this template. This template comprises of two steps: Optin and Optin Confirmation page - both of them will get imported.
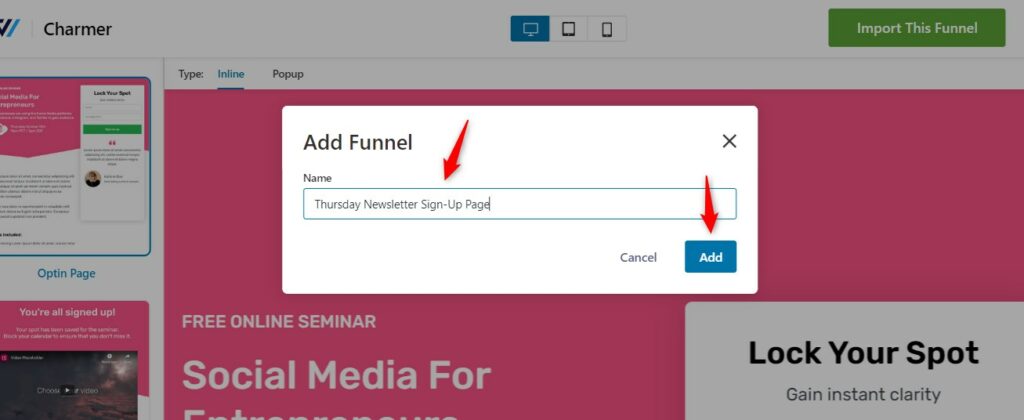
Next, enter the name of your funnel and click on 'Add'.
After you import the optin page template, you will see a dashboard. Click on Edit
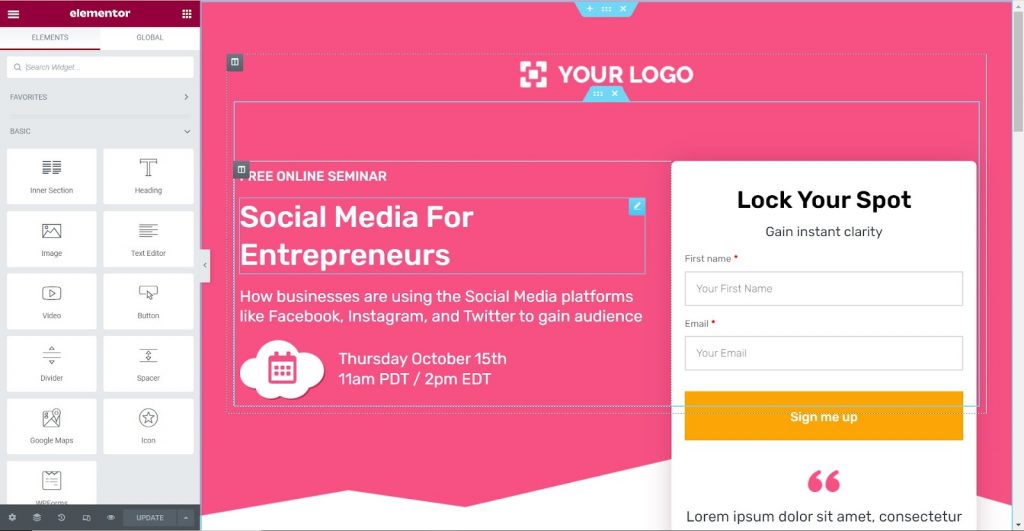
3. Customizing the Opt-in Page Using Elementor
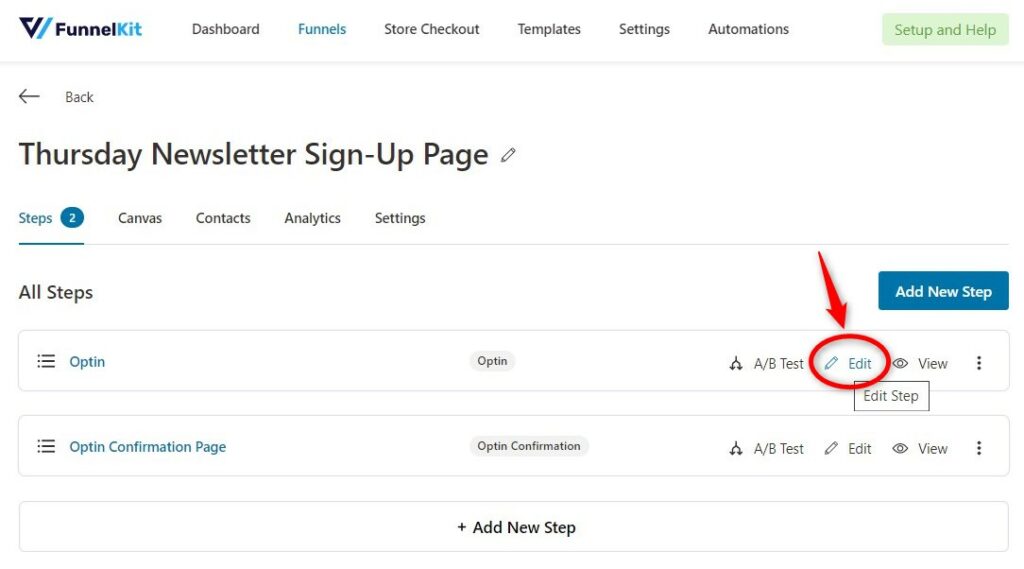
Once imported, you have the option to edit the page to make it look on-brand. Click on the three dots and then click on Edit and then Edit Template.
Elementor is a drag-and-drop builder that allows you to - swap the logo, modify colors and add widgets for headings, images, videos, icons, buttons, and more. So the pre-built opt-in page template is fully customizable.
On top of that, we've built the opt-in form widget for you to customize the form fully.
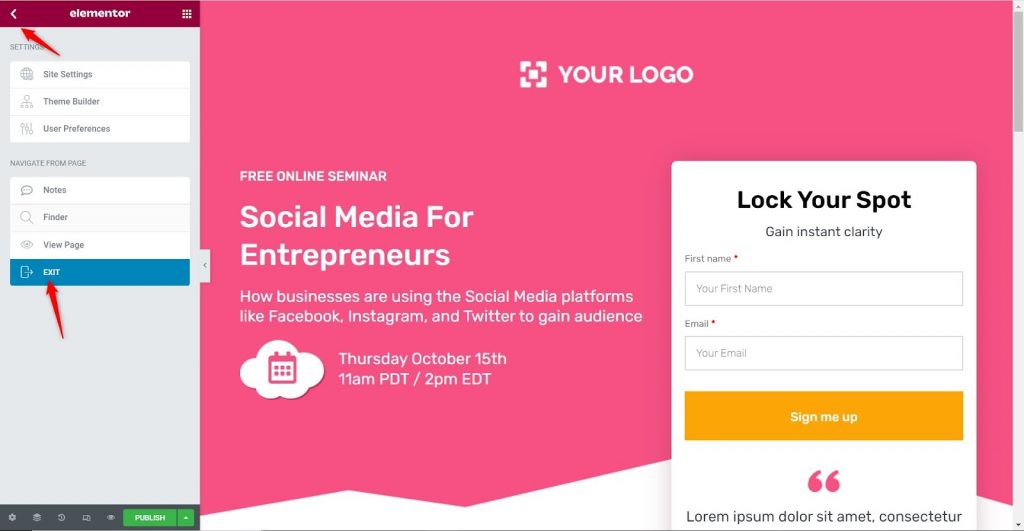
If you want to add more fields to your lead capture form, then come out of the Elementor edit mode, and click on Form.
Just drag and drop the fields that you want. With FunnelKit Funnel Builder Pro, you get more fields and the ability to add a custom field too.
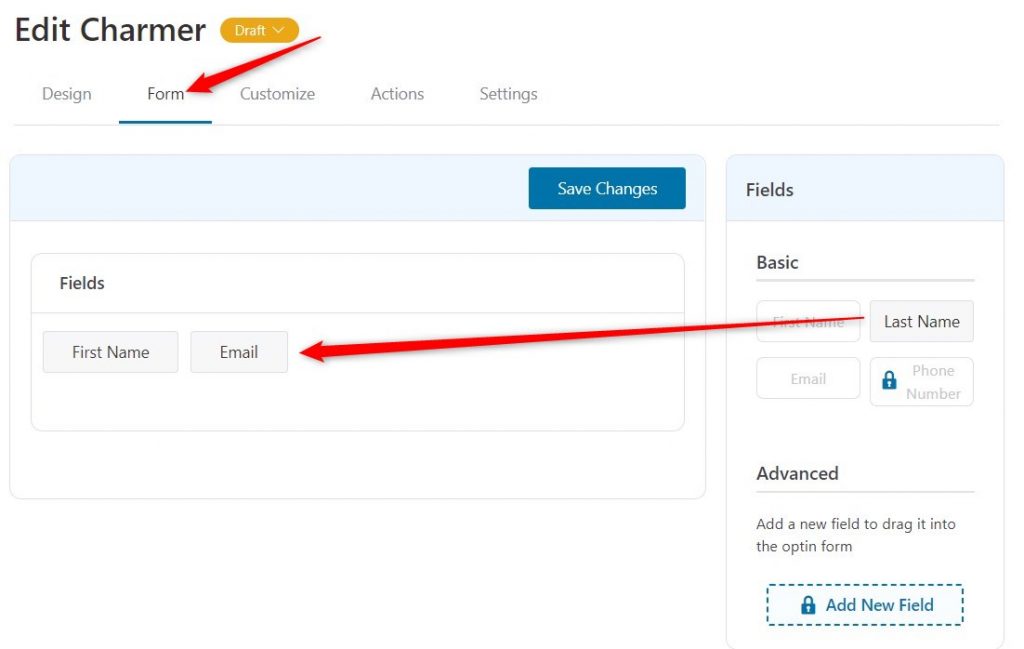
But in an opt-in form, only two fields - name and email address are recommended to reduce friction and increase quick conversions.
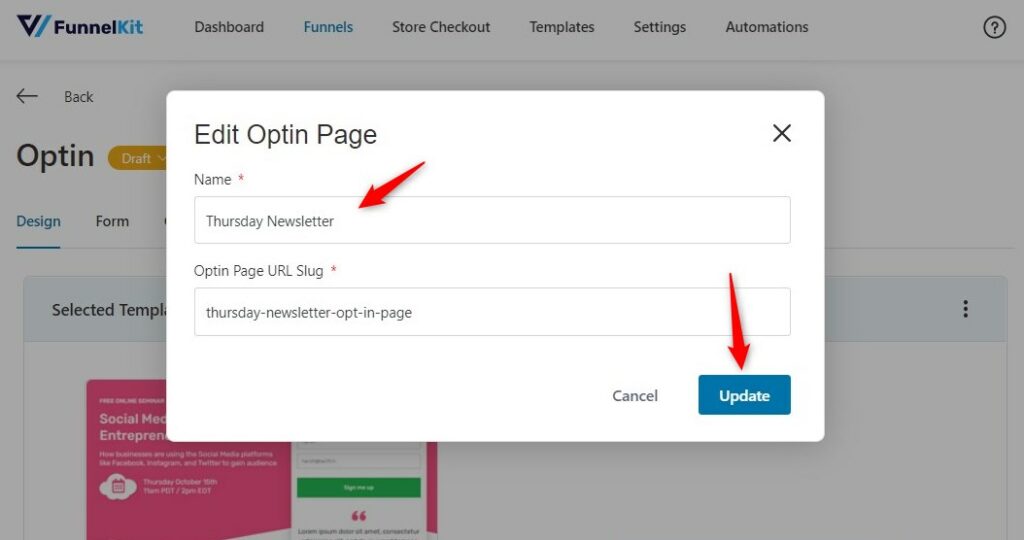
Before we integrate the opt-in page and its form with our WordPress newsletter plugin, the last thing you need to do is change its URL/name for easy distinction during integration.
Click on Published and then click on Edit.
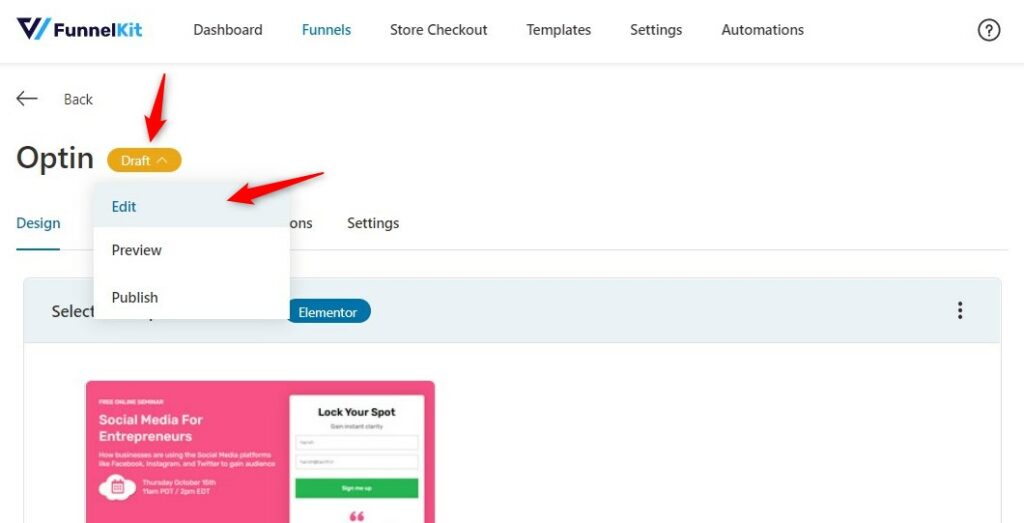
And then, change the name and the URL of the opt-in page. Once done, click on Update.
Part 2: Integrating the Opt-in Form
1. Install and Activate FunnelKit Automations Pro
FunnelKit Automations is a powerful WordPress marketing automation engine that lets you build advanced eCommerce marketing campaigns right from your WordPress dashboard.
FunnelKit Automations comes in two versions - Free (Lite) and Pro.
WordPress does not natively provide email marketing functionality, and thus FunnelKit Automations Pro allows you to integrate your lead capture form and set up an email newsletter campaign in WordPress.
The Free version comes with an ever-growing library of pre-built automations such as abandoned cart recovery, post-purchase email sequence, winback campaigns, and more.
However, you need the Pro version to unlock more pre-built automations and advanced customization options - and to create newsletter campaigns for your email subscribers.
Follow this document, where we’ve illustrated how to install FunnelKit Automations Pro step-by-step.
2. Integrate the Opt-in Form with FunnelKit Automations
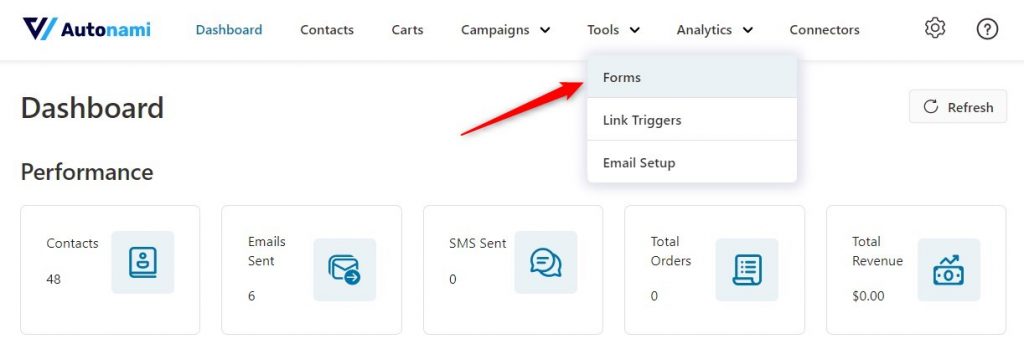
In the FunnelKit Automations dashboard, click on Tools and then go to Forms.
This integration will allow you to directly tag the leads who fill out your form and then use those tagged leads in your WordPress newsletter campaigns.
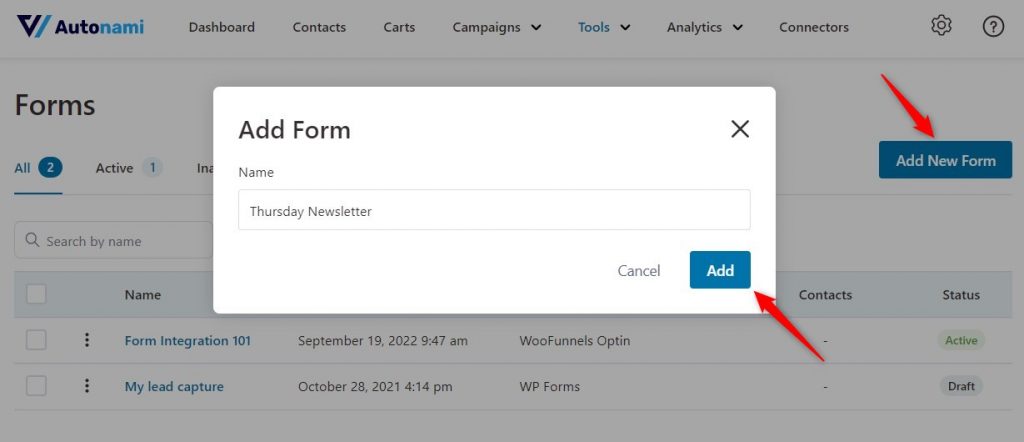
Under the Forms section, click on Add New Form. In the pop-up, add a suitable name to your new form.
After naming the form integration, click on the form builder that you’ve used to create your forms.
Since we’ve used FunnelKit Opt-in Form, we will choose the same.
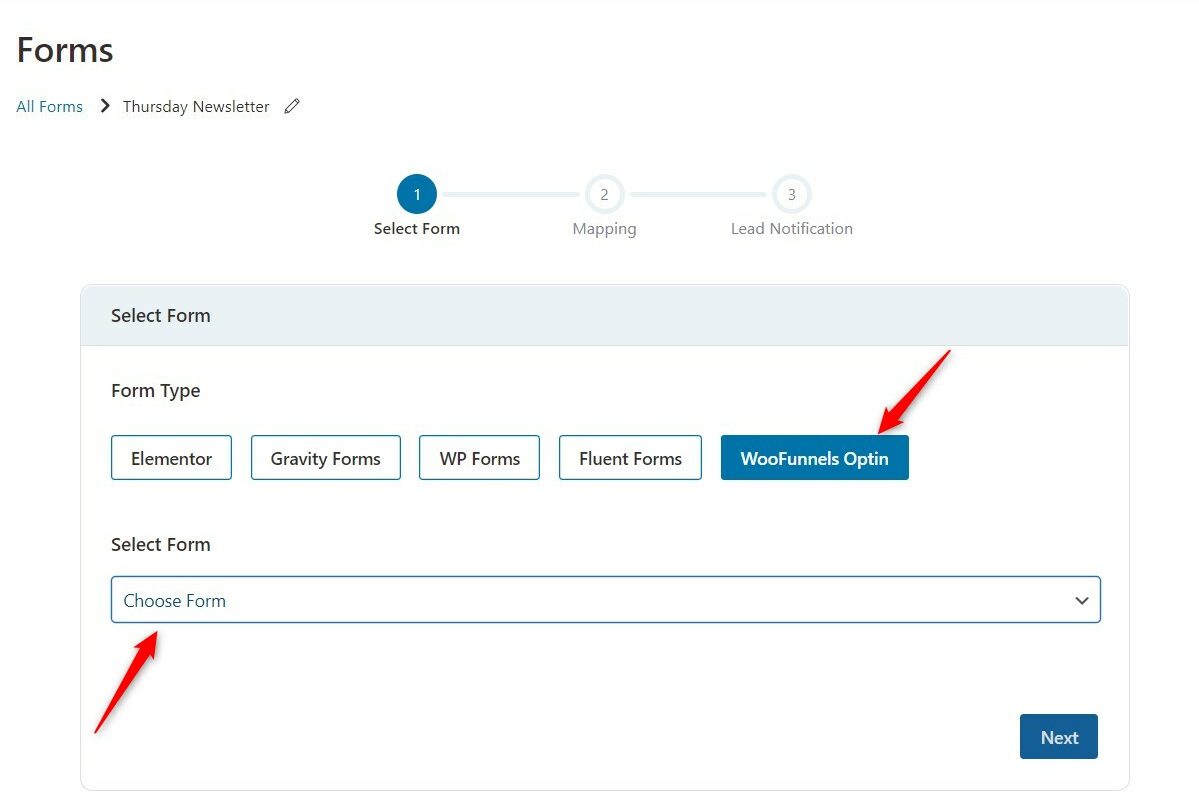
Select your form and click on Next.
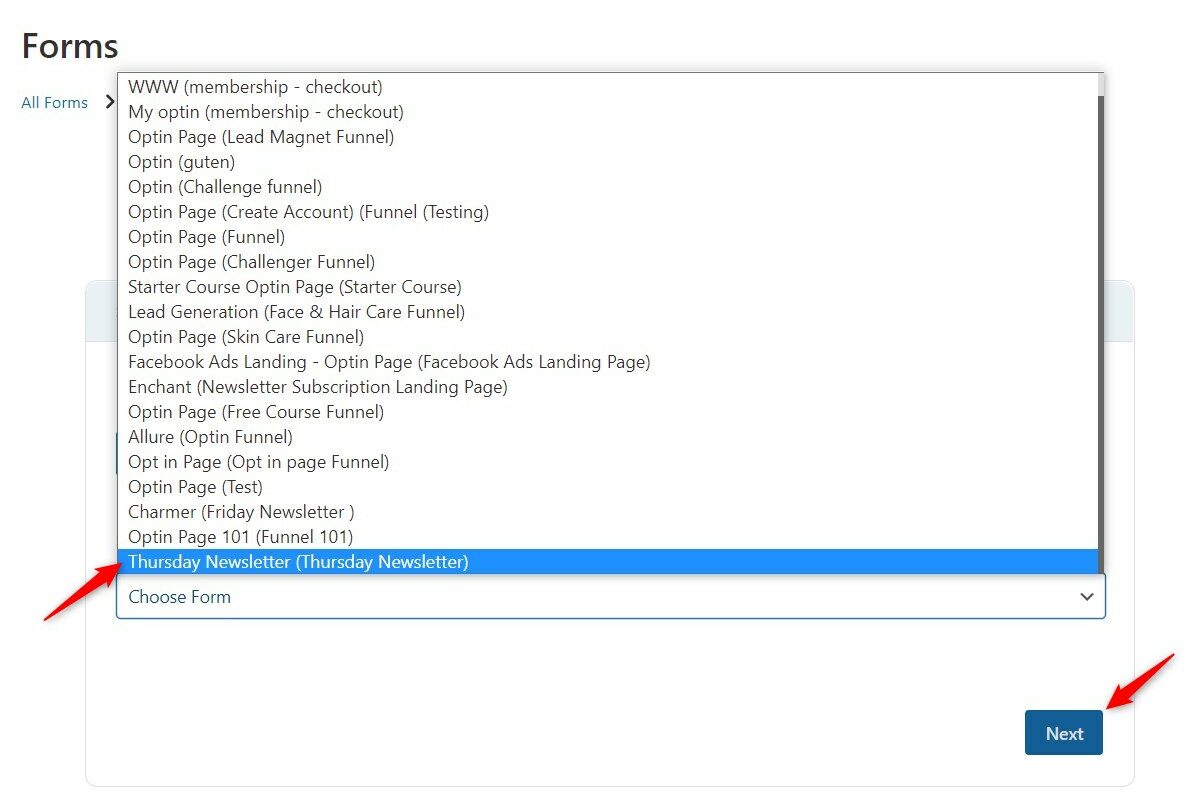
3. Mapping the Form Fields
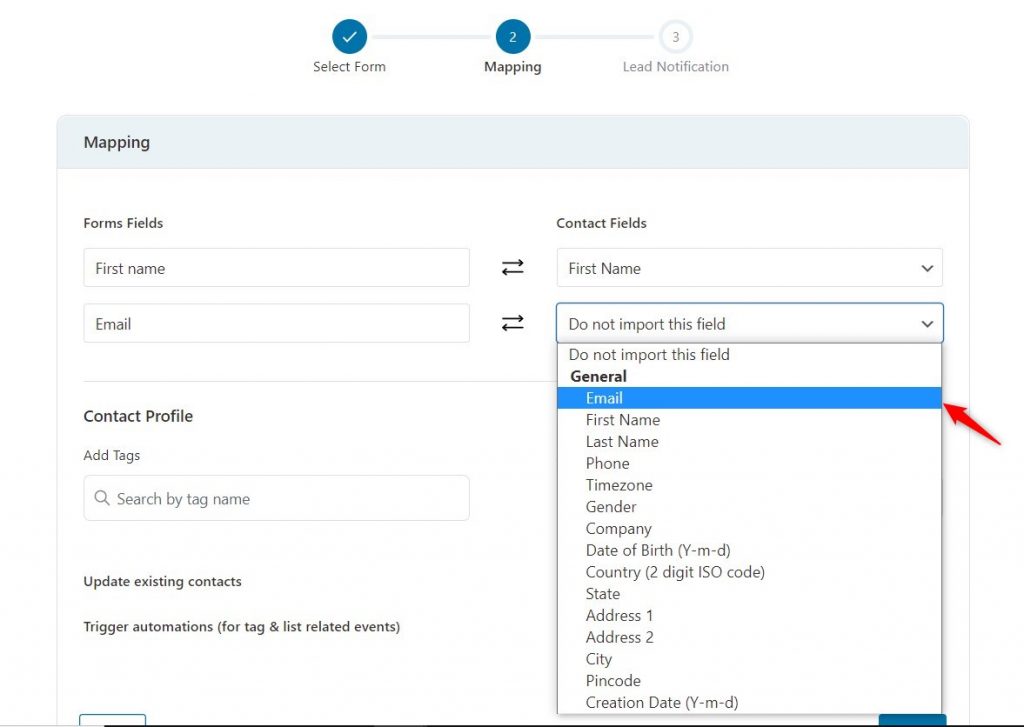
In the next step, map the fields. This basically means syncing your form fields with the FunnelKit Automations fields.
In this form, we will map the first name and the email fields.
After mapping the fields, auto-apply a new tag to the leads you acquire with this particular form.
To do this, under Contact Profile, add a tag. We are going to add Thursday Newsletter.
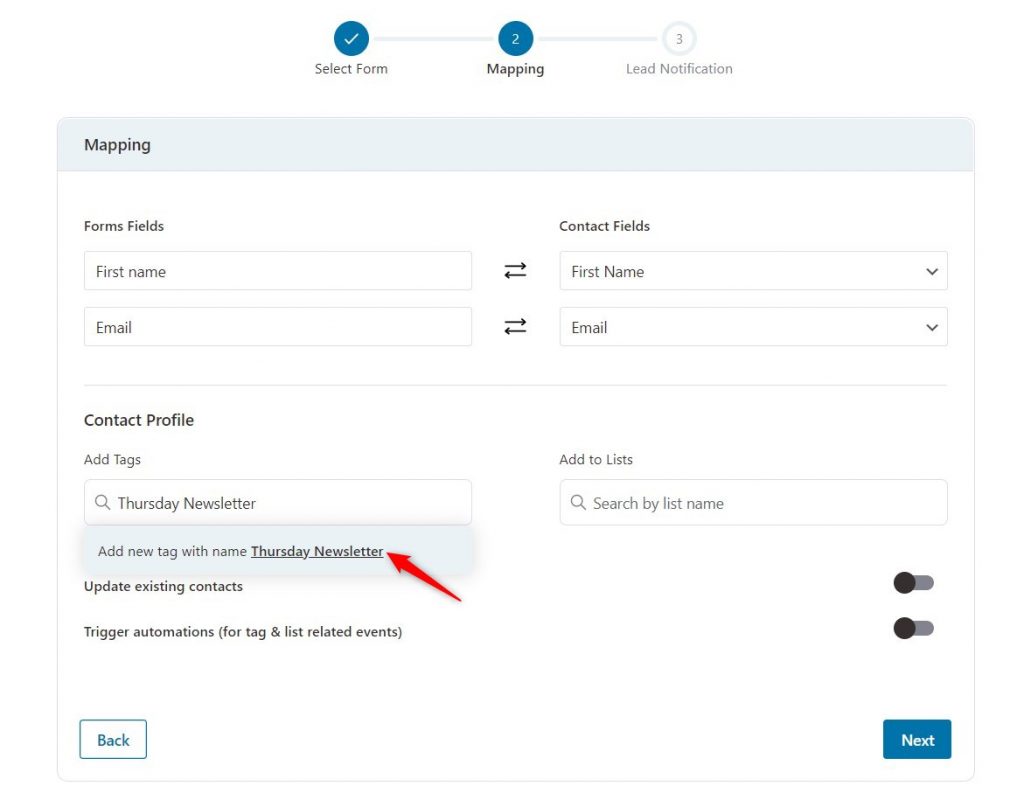
You can even add your contacts to a list and create customer segmentations for personalizing your marketing campaigns.
Once you’re done, click on Next.
In the next step, you can toggle on or off:
- Double Opt-in Email Notifications: Sends confirmation link to the leads. Once they click on the link, only then will they be counted as “email subscribers”.
- Auto-confirm Contacts: This will automatically mark new Contacts as Subscribed.
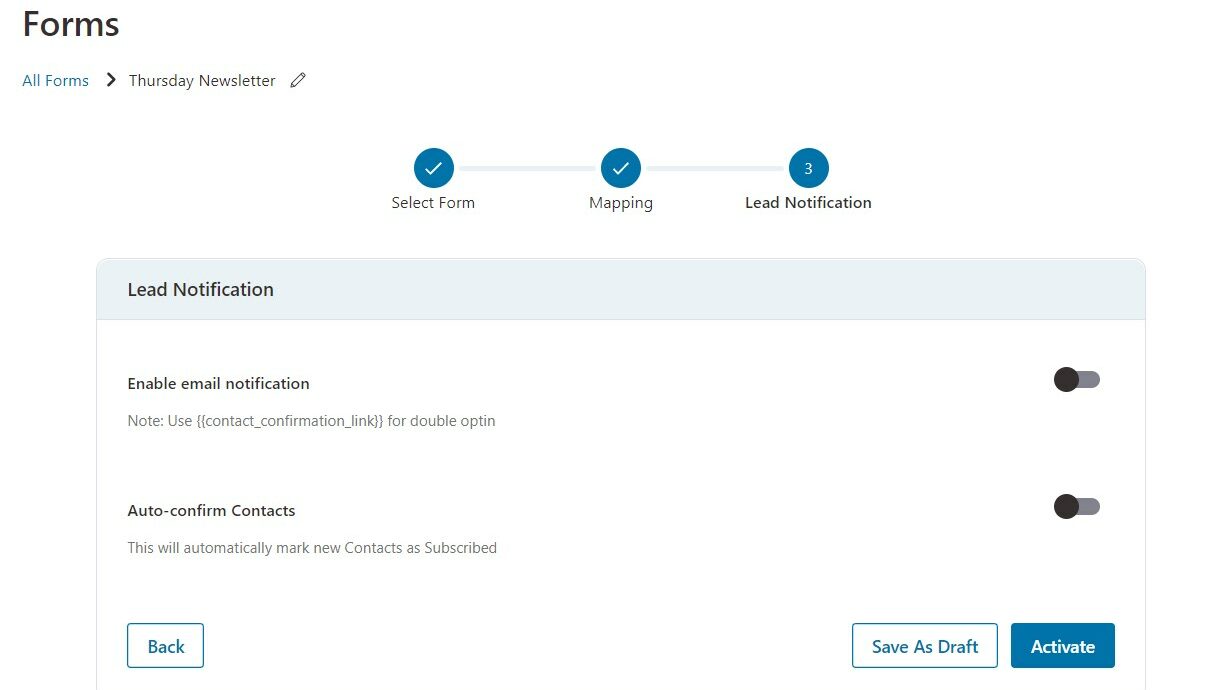
Click on Activate. Your form integration is successful.
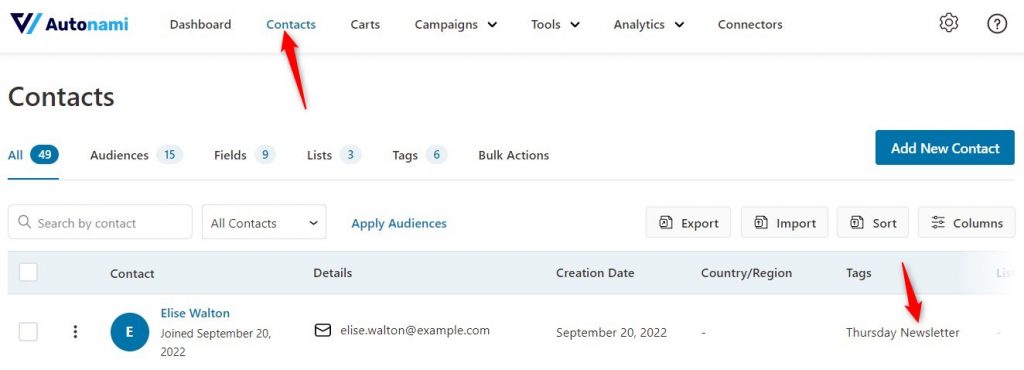
So, now whenever someone fills out the form, their contact will be automatically reflected in your Contacts section.
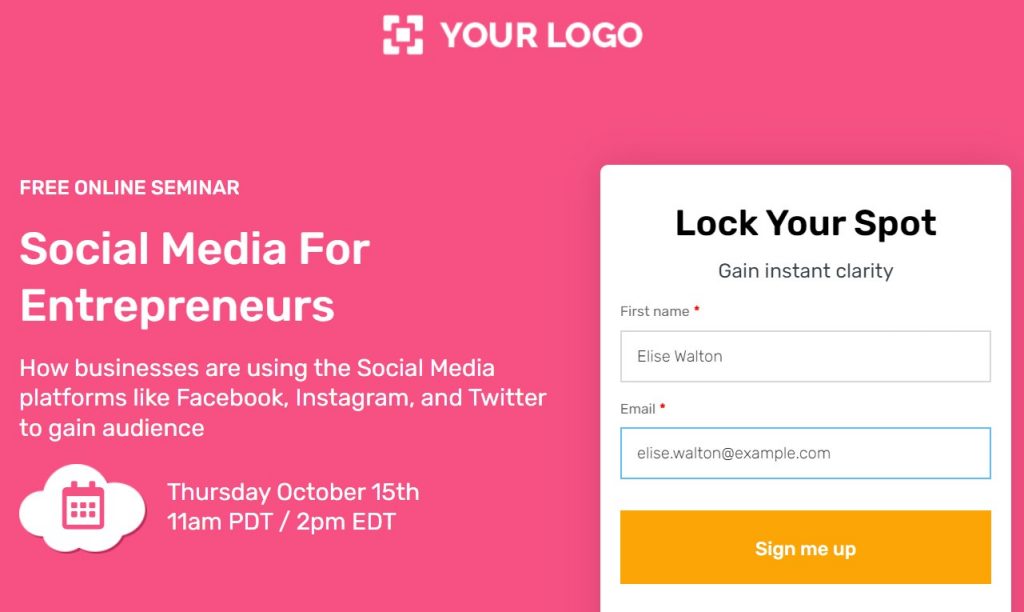
The contacts will be automatically tagged, thus allowing you to create WordPress newsletter campaigns with ease.
Part 3: Creating a Newsletter Campaign in WordPress
Now that you’ve collected leads, and tagged them to use in your newsletter campaigns, let’s create our WordPress newsletter campaign using FunnelKit Automations Pro.
1. Setting Up a WordPress Newsletter/Broadcast Campaign
Click on Campaigns, and then select Broadcast.
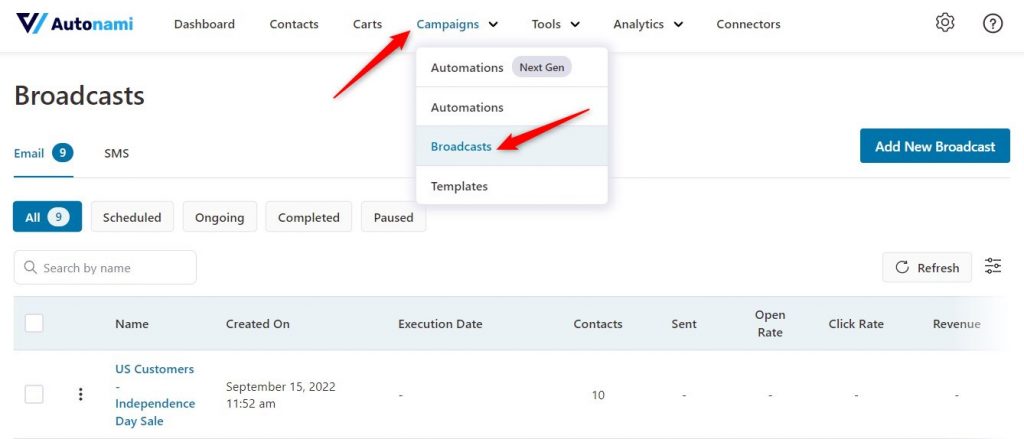
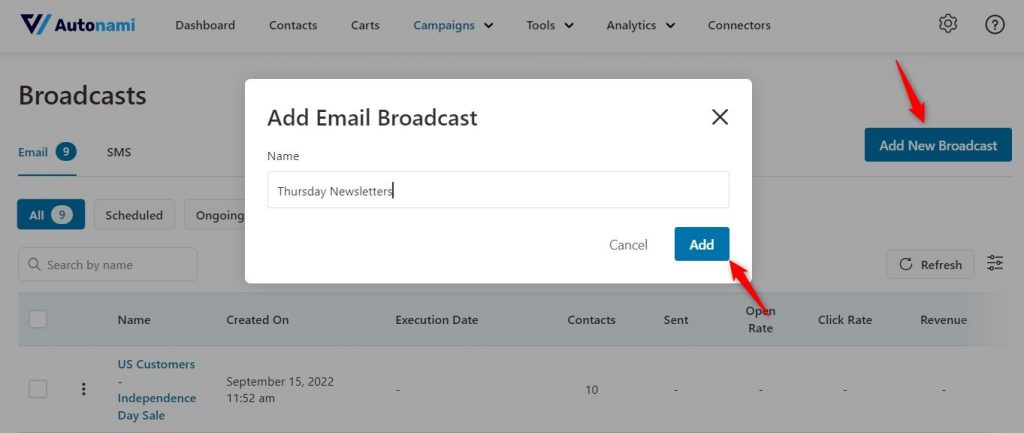
Click on Add New Broadcast, and then assign a suitable name to your newsletter campaign.
In the first step, select whether you want to send out a standard newsletter email or you want to A/B test your newsletters and then send the best-performing version.
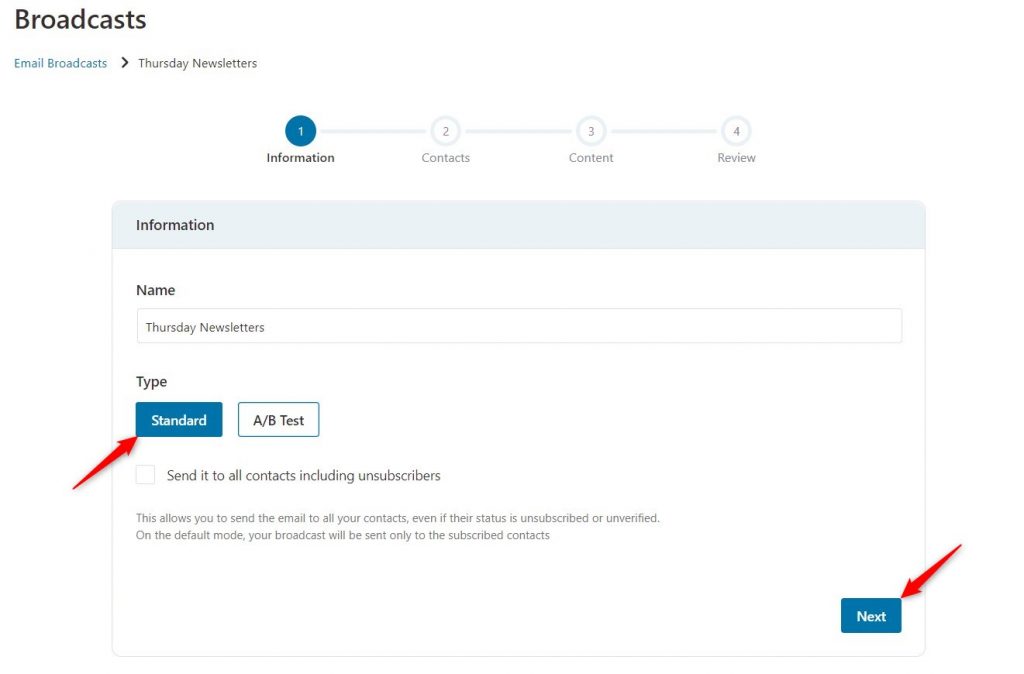
Once selected, click on Next.
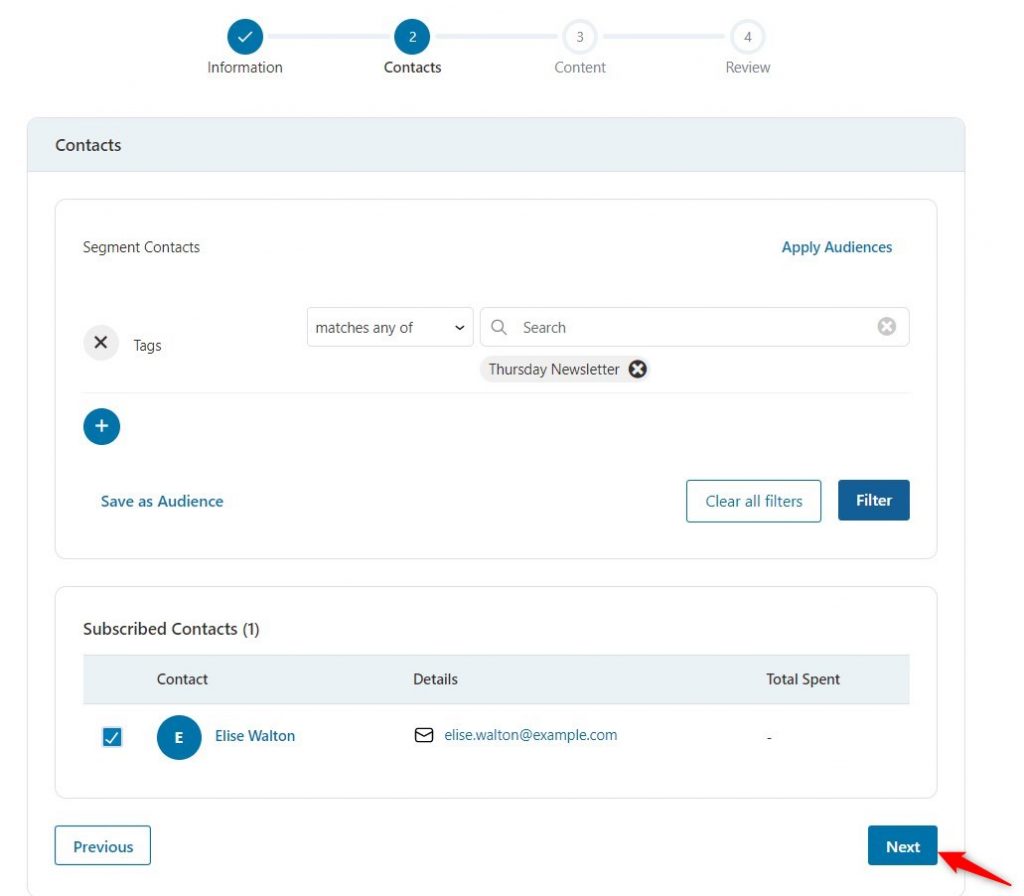
In the next step, click on the “+” icon and add a new filter. Select Segments.
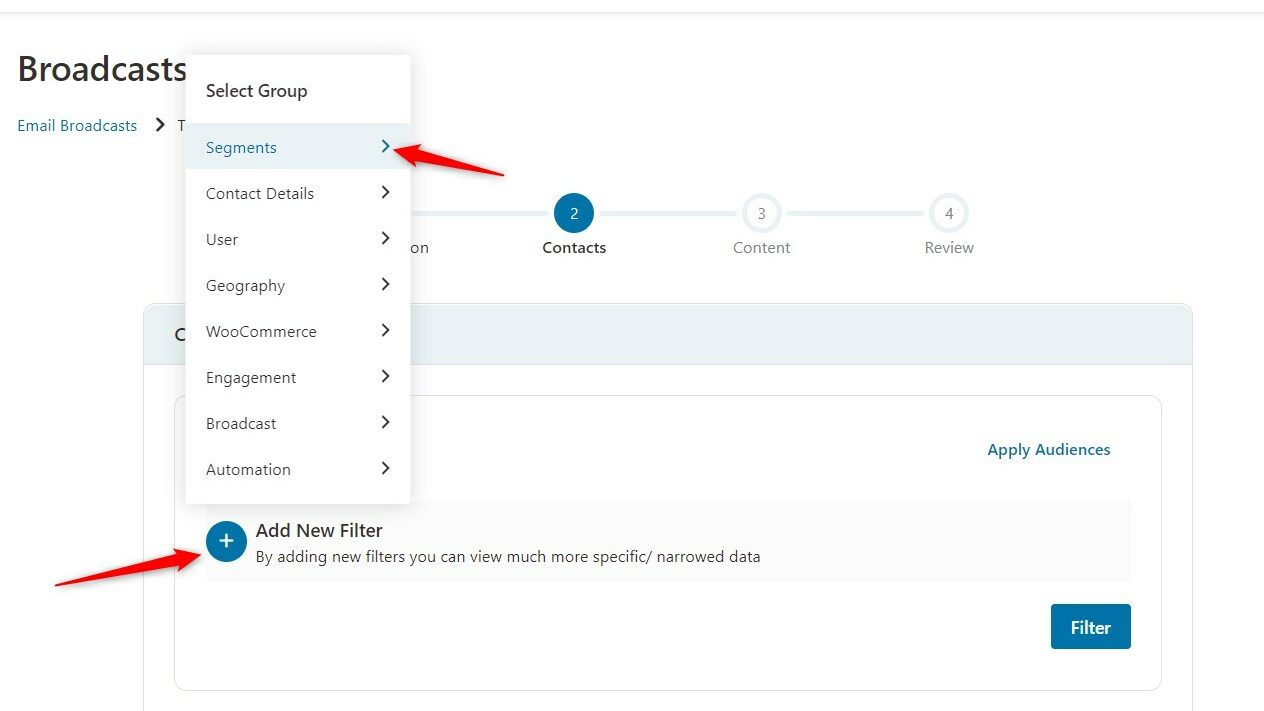
Under the Segments section, select Tags.
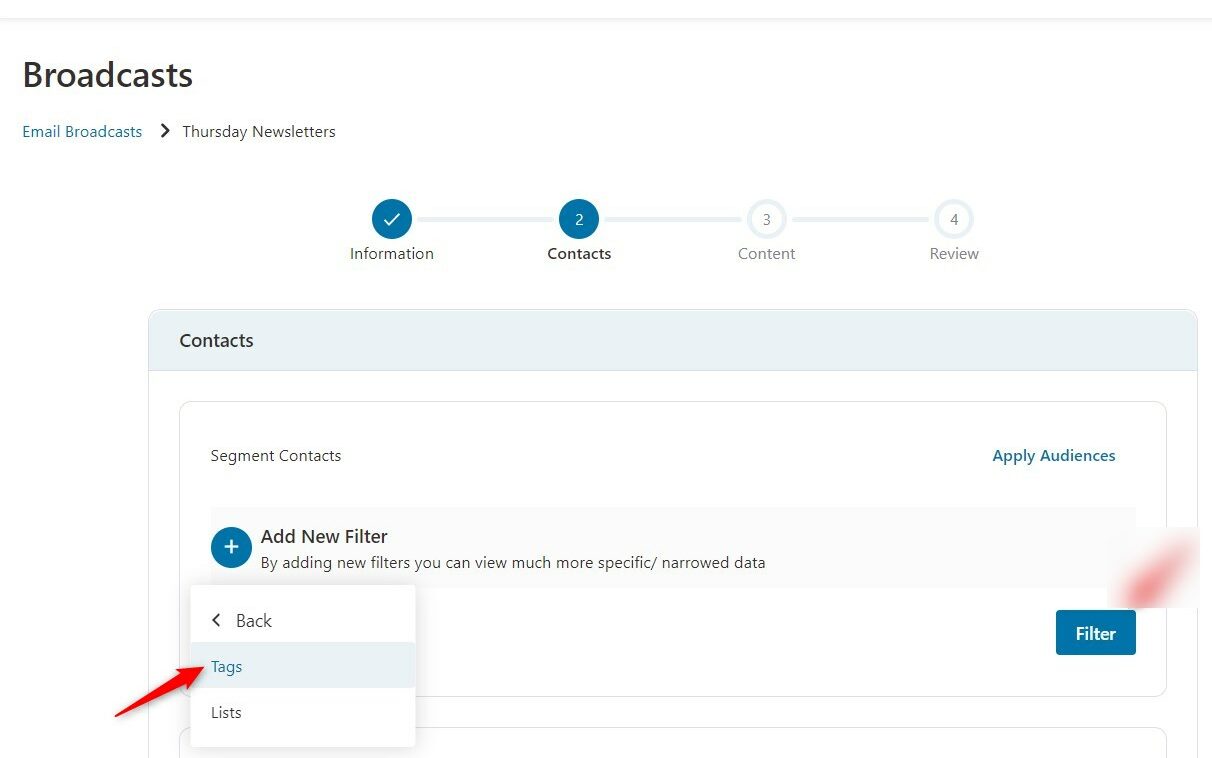
Now, select the tagged audience to whom you want to send the WordPress newsletter campaign. We are selecting our Thursday Newsletter tag.
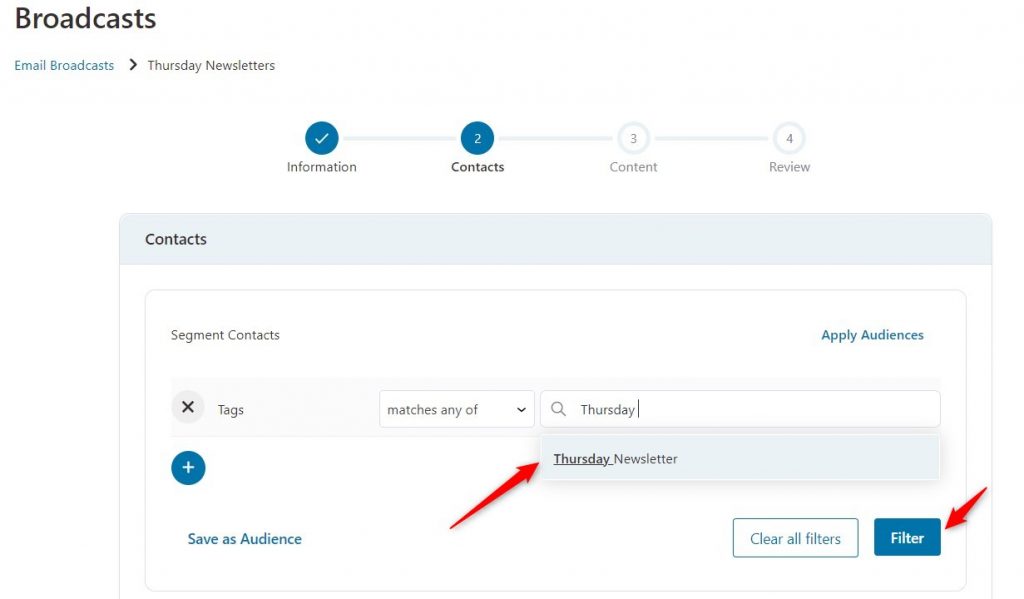
Select the tag and click on Filter. When you click on Filter, you will see a list of contacts tagged with the tag you selected. Click on Next.
2. Customizing the WordPress Newsletter Template and Content
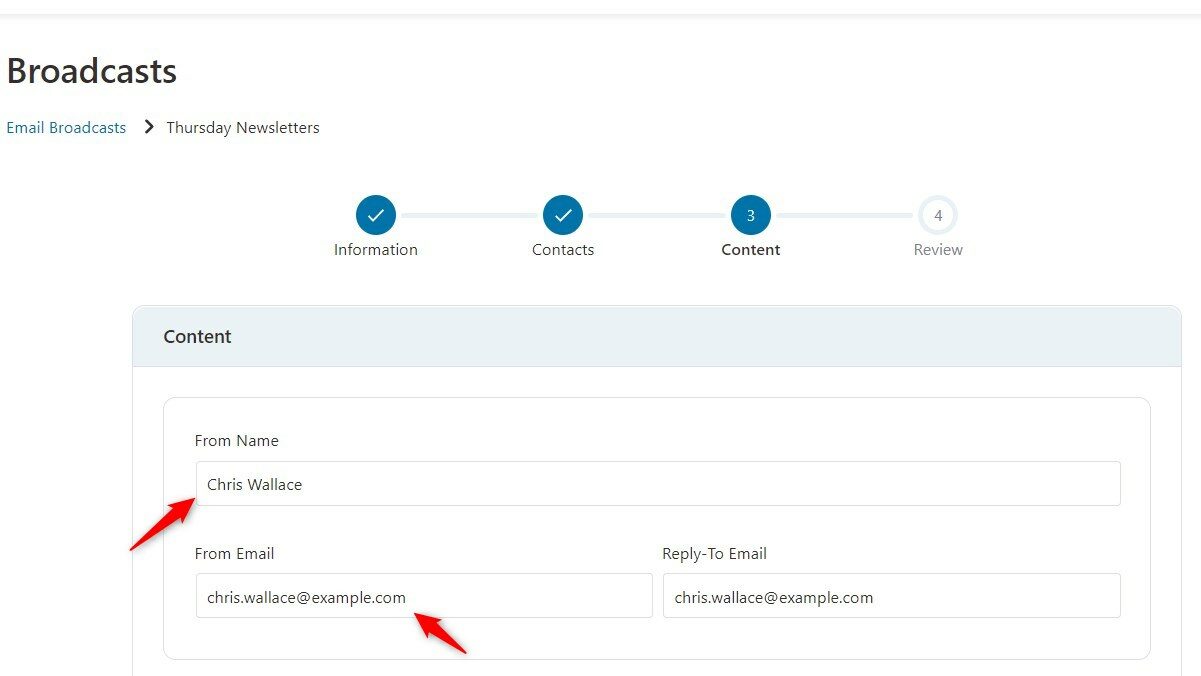
Under the Content step, customize the basic settings first - From Name, From Email, Reply-to Email.
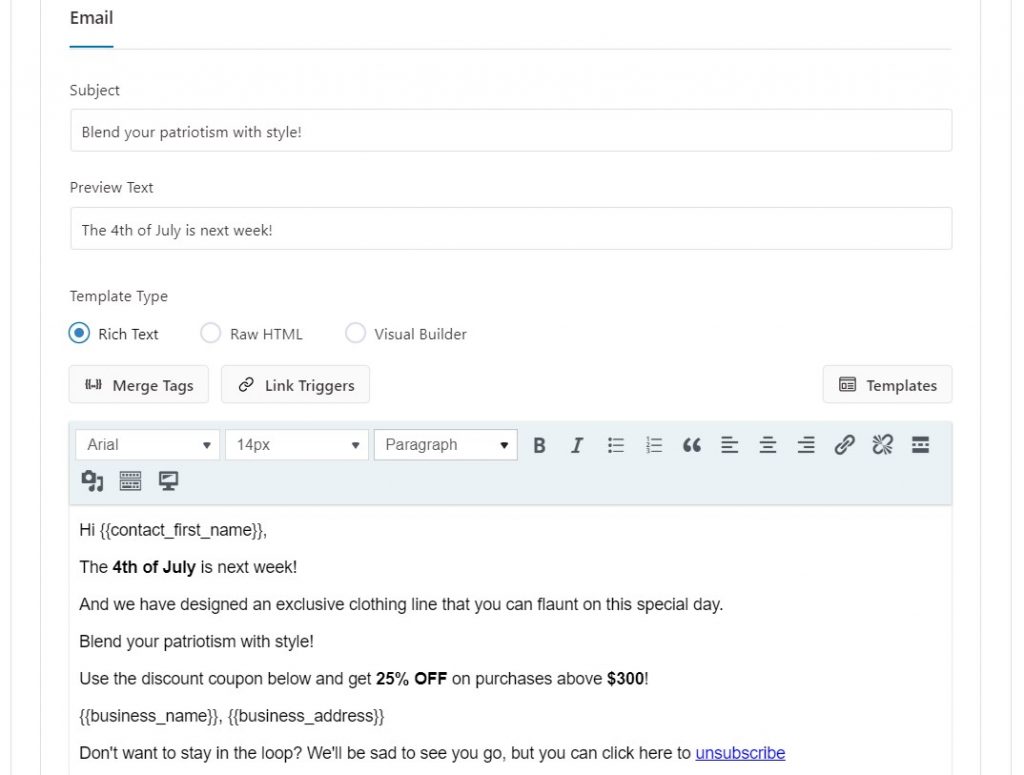
Scroll down below to customize your email content. Add a catchy subject line that stands out from other email subject lines in your contact’s inbox.
After that, add an enticing preview text and write your email. You can either create a simple text email like the one below.
Or, you can take inspiration from popular WordPress newsletter templates and use FunnelKit Automations’s in-built visual email builder to create your own.
Select Visual Email Builder and click on Start.
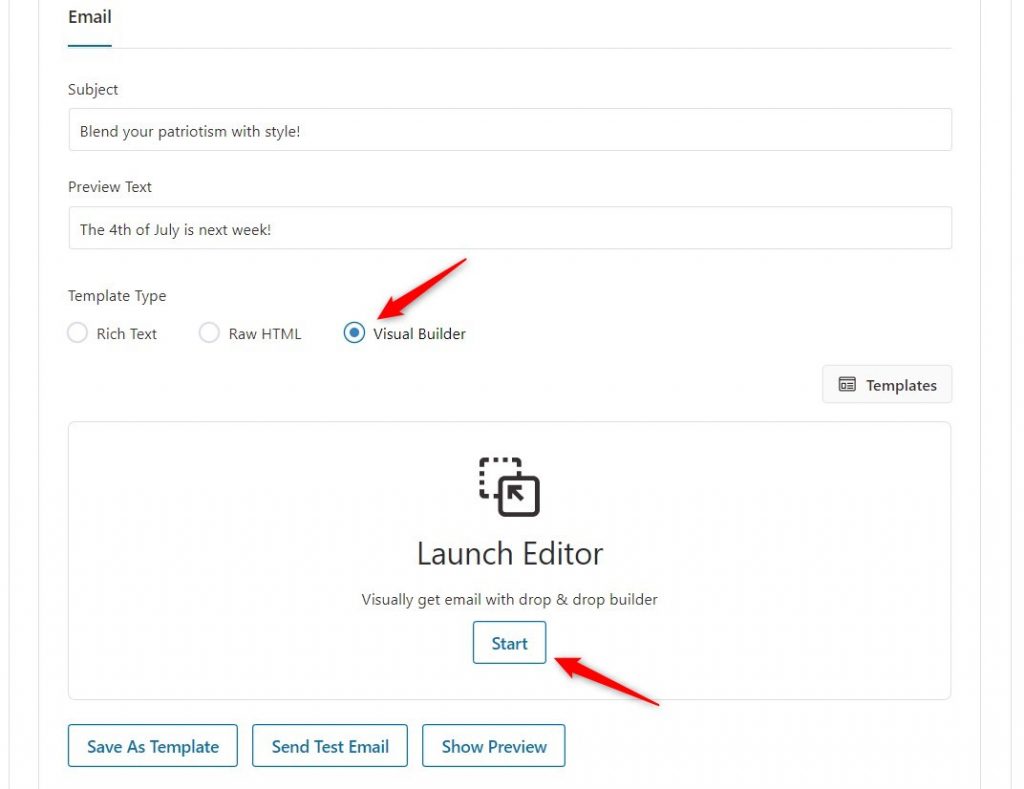
Start customizing your WordPress newsletter template.
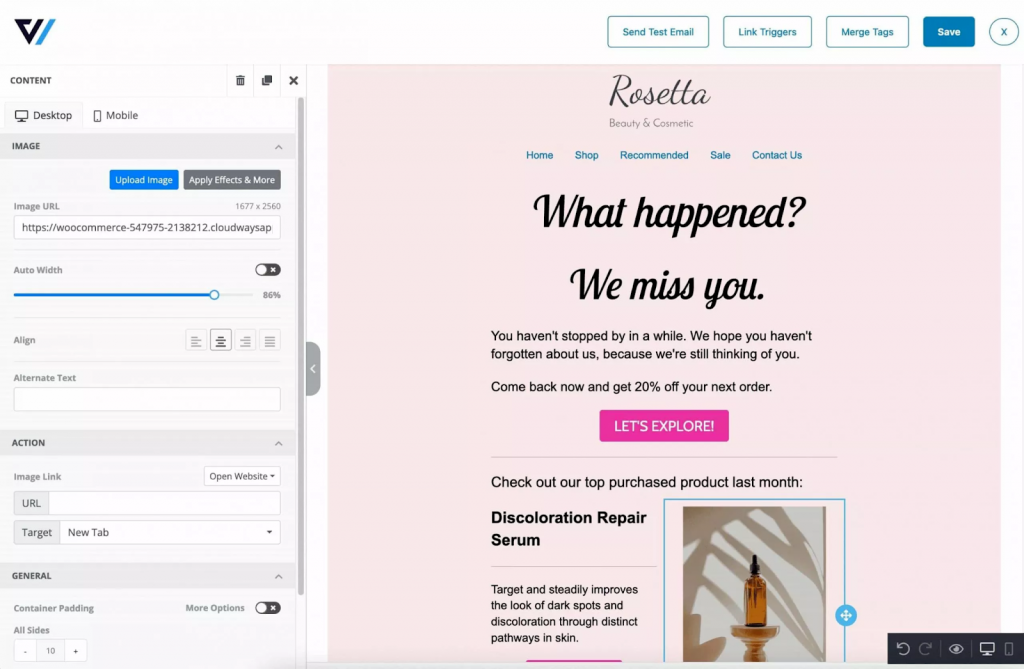
With the visual email builder, you get content blocks that you can just drag and drop on your canvas and design beautiful emails that connect better with your audience and shoot up your engagement rates.

You can add headings, text, images, videos, logos, and buttons, change colors, adjust size, try different fonts, send test emails, A/B test emails, and so much more!
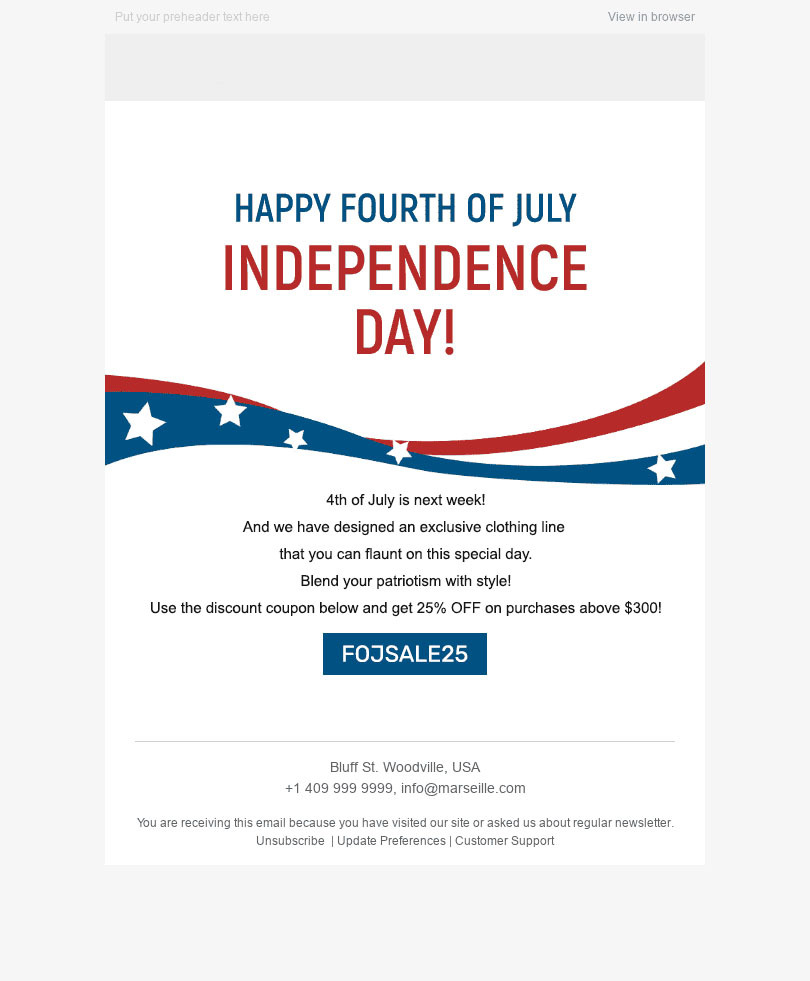
Look how we have created a beautiful and engaging newsletter email template with FunnelKit Automations’s drag-and-drop visual email builder.
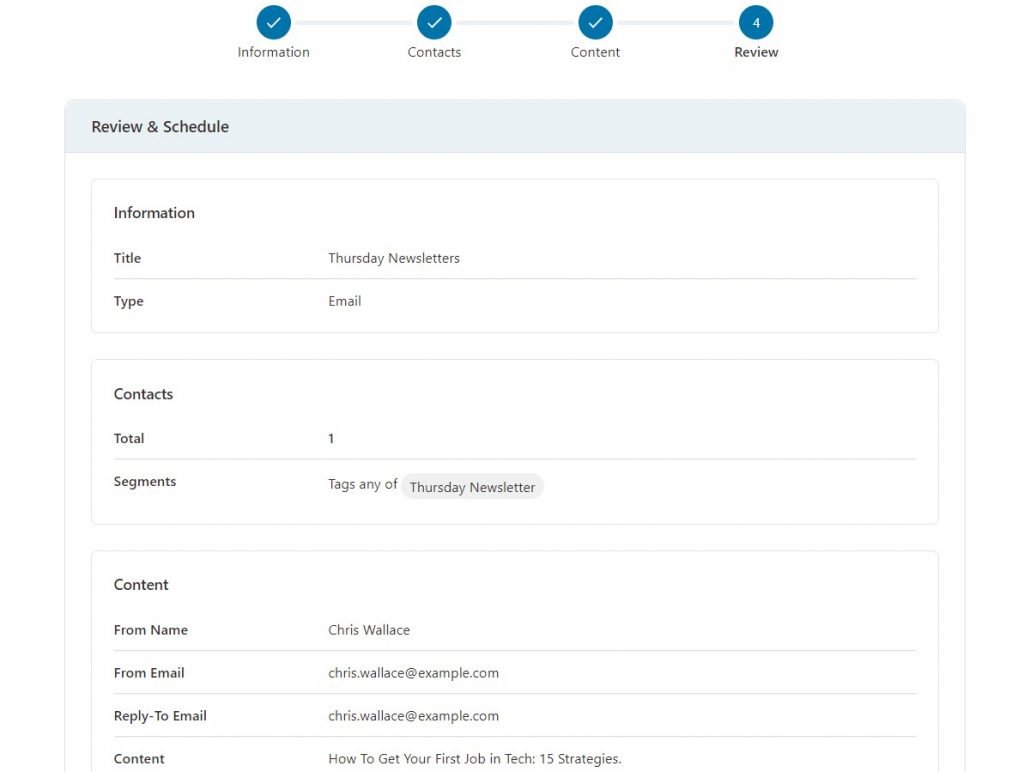
In the last step, review your WordPress newsletter campaign. Check the details and do any last-minute changes if you want any.
If you want to send the broadcast campaign immediately, click on Broadcast Now and then Send Now.
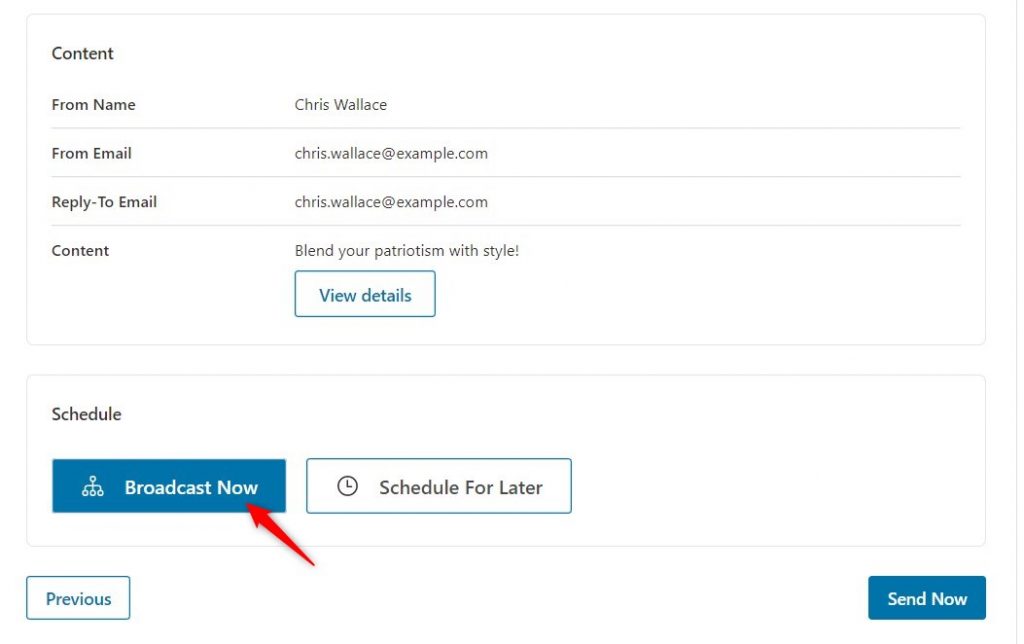
Or, you can Schedule for Later. You have both options at your fingertips.
Once the WordPress newsletter campaign is run for a certain period of time, you can see the campaign-related data and analytical insights to make proactive decisions.
4 Elements of an Effective Newsletter
Catchy Subject Line and Graphic Visuals
Subject lines are CRUCIAL!
We cannot emphasize enough the importance of a well-crafted subject line.
Marketing statistics say that an ideal subject line should be between 6 to 10 words.
Once you nail the subject line, you can add some graphic visuals to your email to make it aesthetically pleasing.
Aesthetic emails have better conversion rates than plain text emails, as they grab the recipient’s attention for a longer time and increase the chances of conversions.
With FunnelKit Automations’s in-built drag-and-drop email builder, you can easily create beautiful emails and send them to your customers.
Email Body
Emails are supposed to be short and straightforward.
Instead of brambling, you should be concise in your email body. It is said that an ideal newsletter email should not exceed 200 words.
Your newsletter is not a place to ramble; instead, you should focus on adding value to your customers as concisely as possible.
You can use snappy headlines and trendy jargon to captivate your reader and make them interact with your emails.
Personalization
According to Epsilon, 80% of consumers are more likely to purchase from a brand that provides personalized experiences.
Thus, you need to send relevant emails to your customers. If your customer has bought a shirt from your store, your newsletter emails should try to cross-sell trousers or shoes, not some SaaS product.
That might be a bad example, but you get the point, right?
A Strong Call-to-Action
Let’s be honest here; the reason why you are penning and sending out this newsletter is you want something out of it.
And for this, you need to have a strong CTA that incites your reader to take action.
The CTA might be a coupon code, a request to join your Facebook group or register for an upcoming webinar.
Look at the example below.

Are You Ready to Start Your WordPress Newsletter Email Campaign?
Whether you want to put the word out about your new products or share the latest trends hogging the limelight, a WordPress newsletter campaign can be one of the best marketing efforts you make for your business.
Using WooFunnel’s Funnel Builder and FunnelKit Automations in conjunction can help you capture leads more effectively and broadcast your business using a newsletter email campaign.
Change the colors, typography, and more according to your brand's needs. Write some persuasive copy to convert.
There you go!
Drive organic traffic to your blog or to your store and increase your revenue multifold.
Editorial Team
February 12, 2026First impressions matter, and in eCommerce, your welcome email is your first chance to shine. A WooCommerce welcome email is an automated message sent to new customers right after they...
Editorial Team
February 6, 2026With increasing competition and rising ad budgets, acquiring new customers is difficult. Forbes reports that the conversion rate for new customers is just 5%-20%. On the other hand, repeat customers...
Editorial Team
February 5, 2026Leveraging WooCommerce email marketing efficiently can help you skyrocket your sales and revenue. With over 64% of businesses already using email marketing to connect with customers, it's clear this approach...


