

If your WooCommerce checkout looks stuck in 2010, you are losing out on sales.
Shoppers today expect fast, clean, and branded checkout experiences, and the default WooCommerce page just doesn’t deliver.
That’s where Bricks Builder comes in.
Known for its powerful visual full-site editing, Bricks Builder has become popular among WordPress users for its unrivaled visual full-site editing ability.
Like any other website page, you can create custom WooCommerce pages with single-page or multi-step checkouts without knowing coding.
In this blog, we will provide a step-by-step guide for creating a custom WooCommerce checkout page with Bricks Builder.
Short on time? Watch the video 👇
Table of Contents
- 1 Bricks Builder and FunnelKit Funnel Builder: The Ideal Combination for Designing WooCommerce Checkout Page
- 2 The Bricks Elements for Customizing the WooCommerce Checkout
- 3 How to Create a Custom WooCommerce Checkout Page with Bricks Builder?
- 3.1 Step 1: Add a checkout page
- 3.2 Step 2: Customize the design of your WooCommerce Bricks checkout page
- 3.3 Step 3: Add any custom field (optional)
- 3.4 Step 4: Optimize the Bricks checkout page
- 3.5 Step 5: Add an order bump on the checkout page to boost AOV
- 3.6 Step 6: Offer a post-purchase one-click upsell
- 3.7 Step 7: Activate the store checkout
- 4 5 Best Practices to Boost Conversions of WooCommerce Bricks Checkout Pages
- 5 Frequently Asked Questions About WooCommerce Bricks Checkout
- 6 Ready to Create a Modern, Conversion-Optimized WooCommerce Checkout With Bricks?
Bricks Builder and FunnelKit Funnel Builder: The Ideal Combination for Designing WooCommerce Checkout Page
Bricks Builder is a powerful visual site builder for WordPress that helps you design custom WooCommerce pages without writing code. Pair it with FunnelKit Funnel Builder to turn your checkout into a high-converting, fully optimized experience.
With Bricks Builder, you get full-site visual editing, global styles, and flexbox layouts. On the other hand, with FunnelKit Funnel Builder, you can create a single- or multi-step checkout and optimize it for higher conversions.
Additionally, you can offer pre- and post-purchase upsells to boost the average order value of your store.
So basically, you get the ultimate design flexibility with Bricks Builder and all the AOV boosting features with FunnelKit Funnel Builder to ensure you secure more sales and your revenue hits the sky.
The Bricks Elements for Customizing the WooCommerce Checkout
FunnelKit Funnel Builder offers two drag-and-drop widgets to create your custom WooCommerce checkout page: Checkout Form and Mini cart.
Let’s have a look at both Bricks elements developed by FunnelKit:
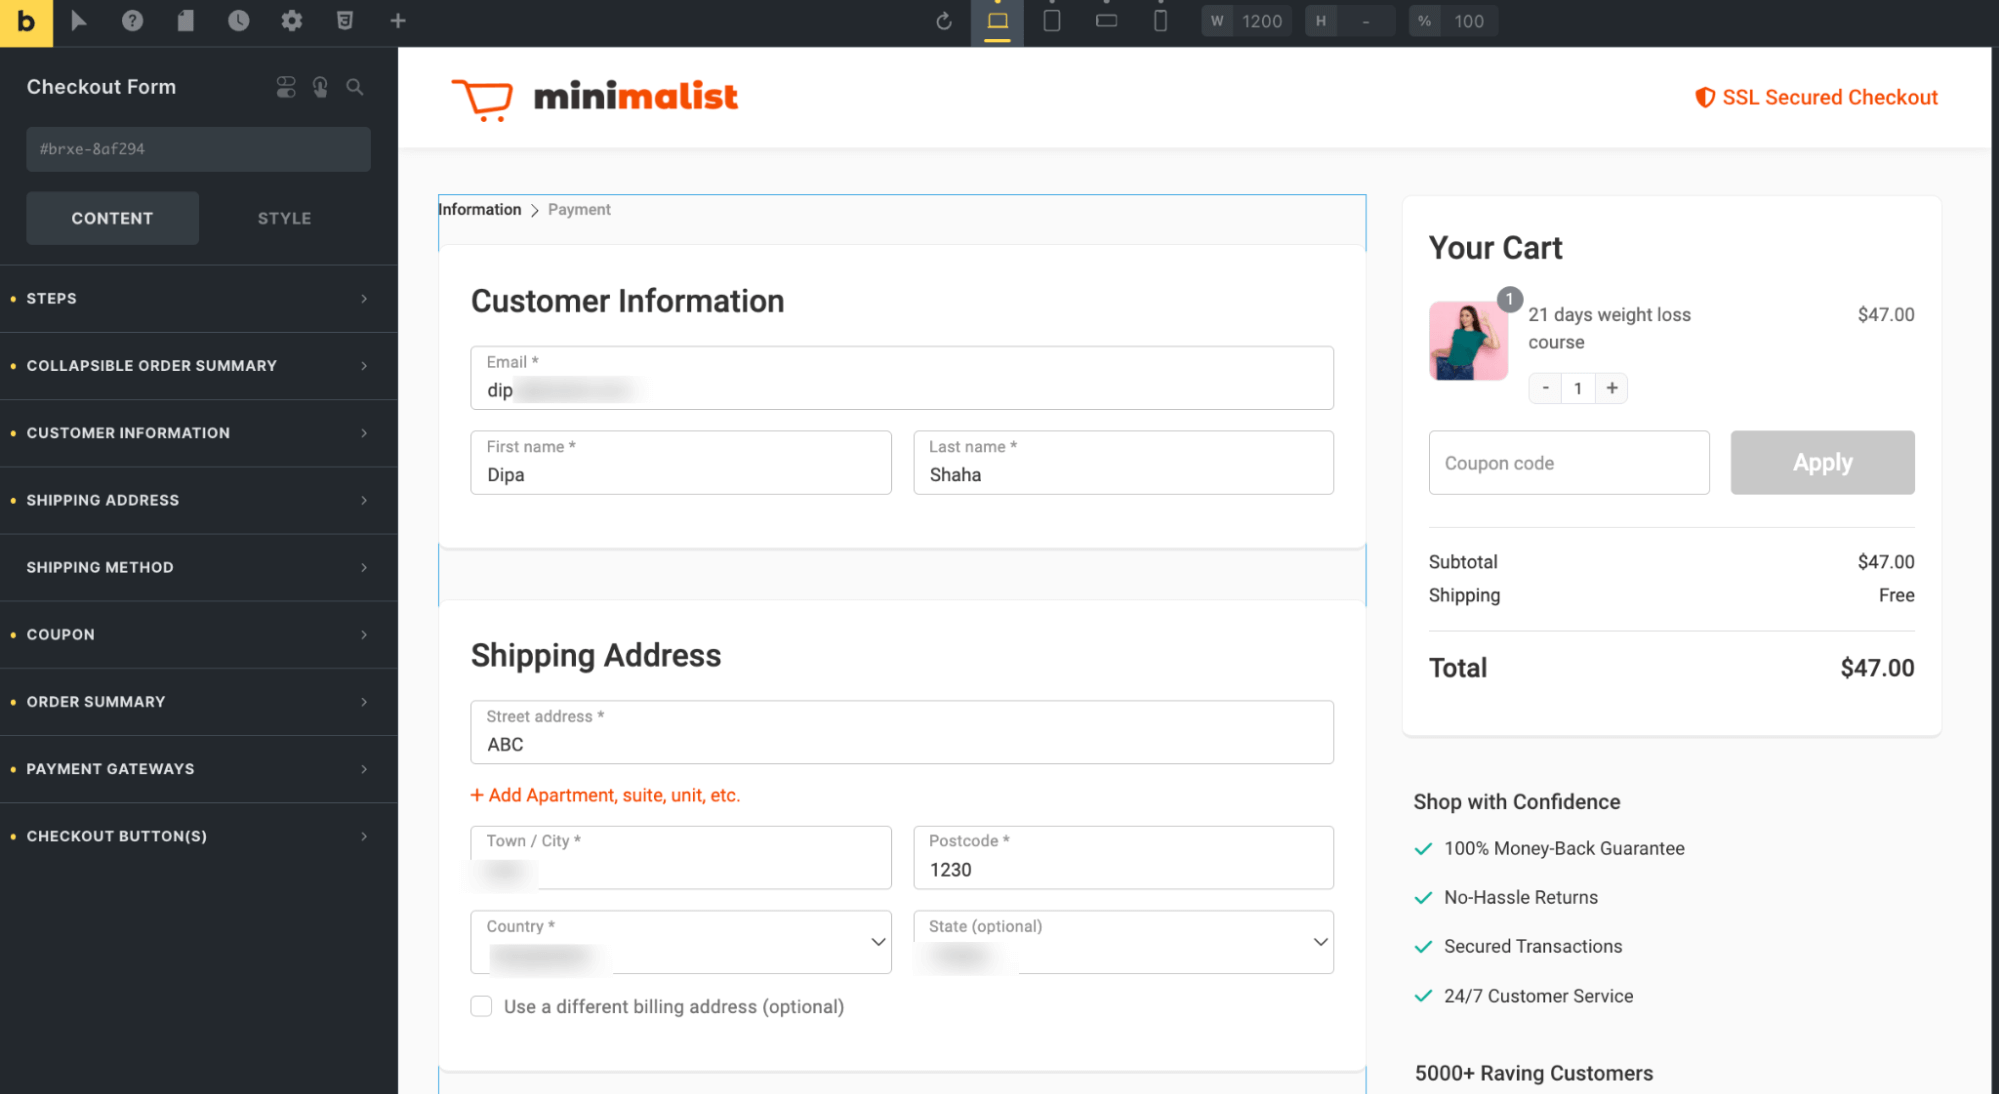
1. Checkout Form Bricks Element
FunnelKit’s checkout form element for Bricks adds everything from customer information to shipping address to the Place order button on your checkout page.
Here are the sections you can customize :
- Steps
- Collapsible order summary
- Customer information
- Shipping address
- Shipping method
- Coupon
- Order summary
- Payment gateways
- And the Checkout button.
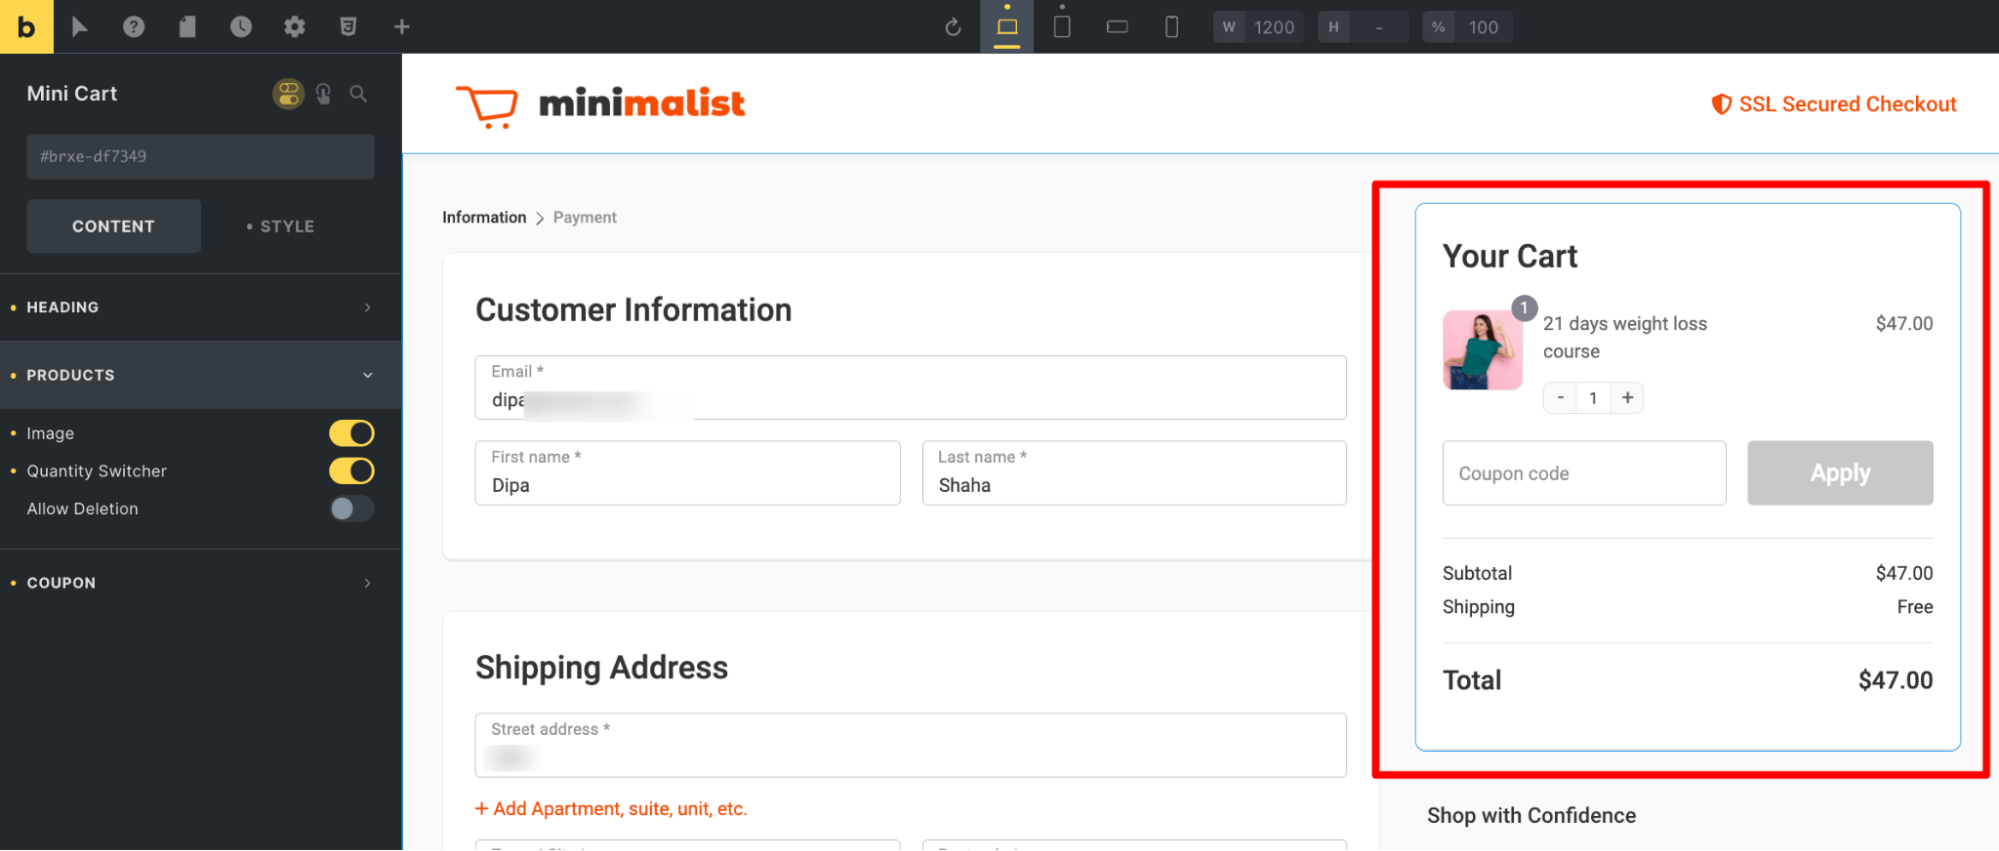
2. Mini Cart Bricks Widget
The Mini cart widget displays a cart summary, including cart item name, price, image quality, etc. FunnelKit Funnel Builder’s Mini cart also allows customers to update the number of items or remove any item they want.
This Bricks element also has a coupon code field where users can apply coupons to redeem discounts.
The Mini cart has three basic sections:
- Heading
- Products
- Coupon
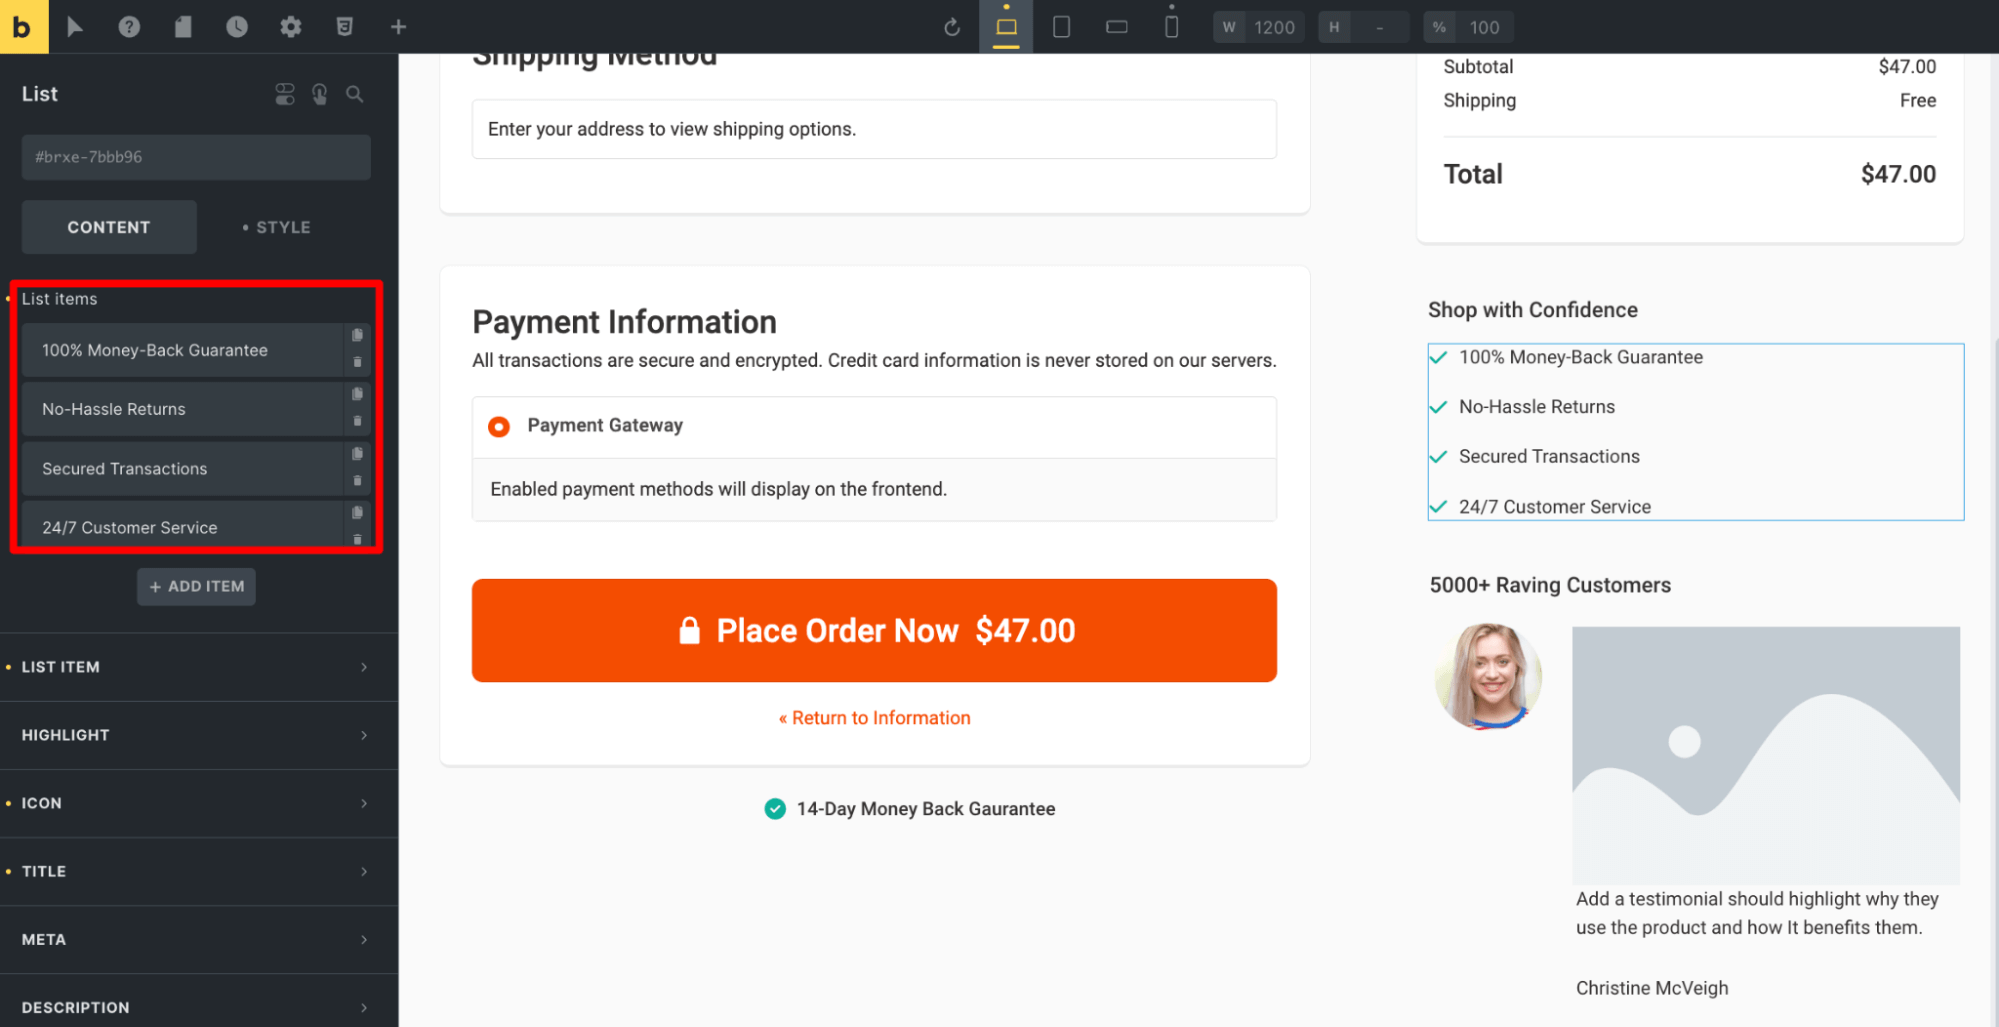
In addition to these two blocks, you can use other Bricks blocks to add more information, such as shipping policies, testimonials, etc., to make the checkout page more user-friendly.
Move to the next section to find out how to create a custom WooCommerce Bricks Checkout.
How to Create a Custom WooCommerce Checkout Page with Bricks Builder?
In this section, we will share how you can use FunnelKit Funnel Builder and Bricks to create a custom WooCommerce checkout page.
Make sure both these plugins are installed and activated on your WooCommerce store.
Now follow these steps:
Step 1: Add a checkout page
Go to FunnelKit ⇒ Store Checkout and click on the ‘Create Store Checkout’ button.
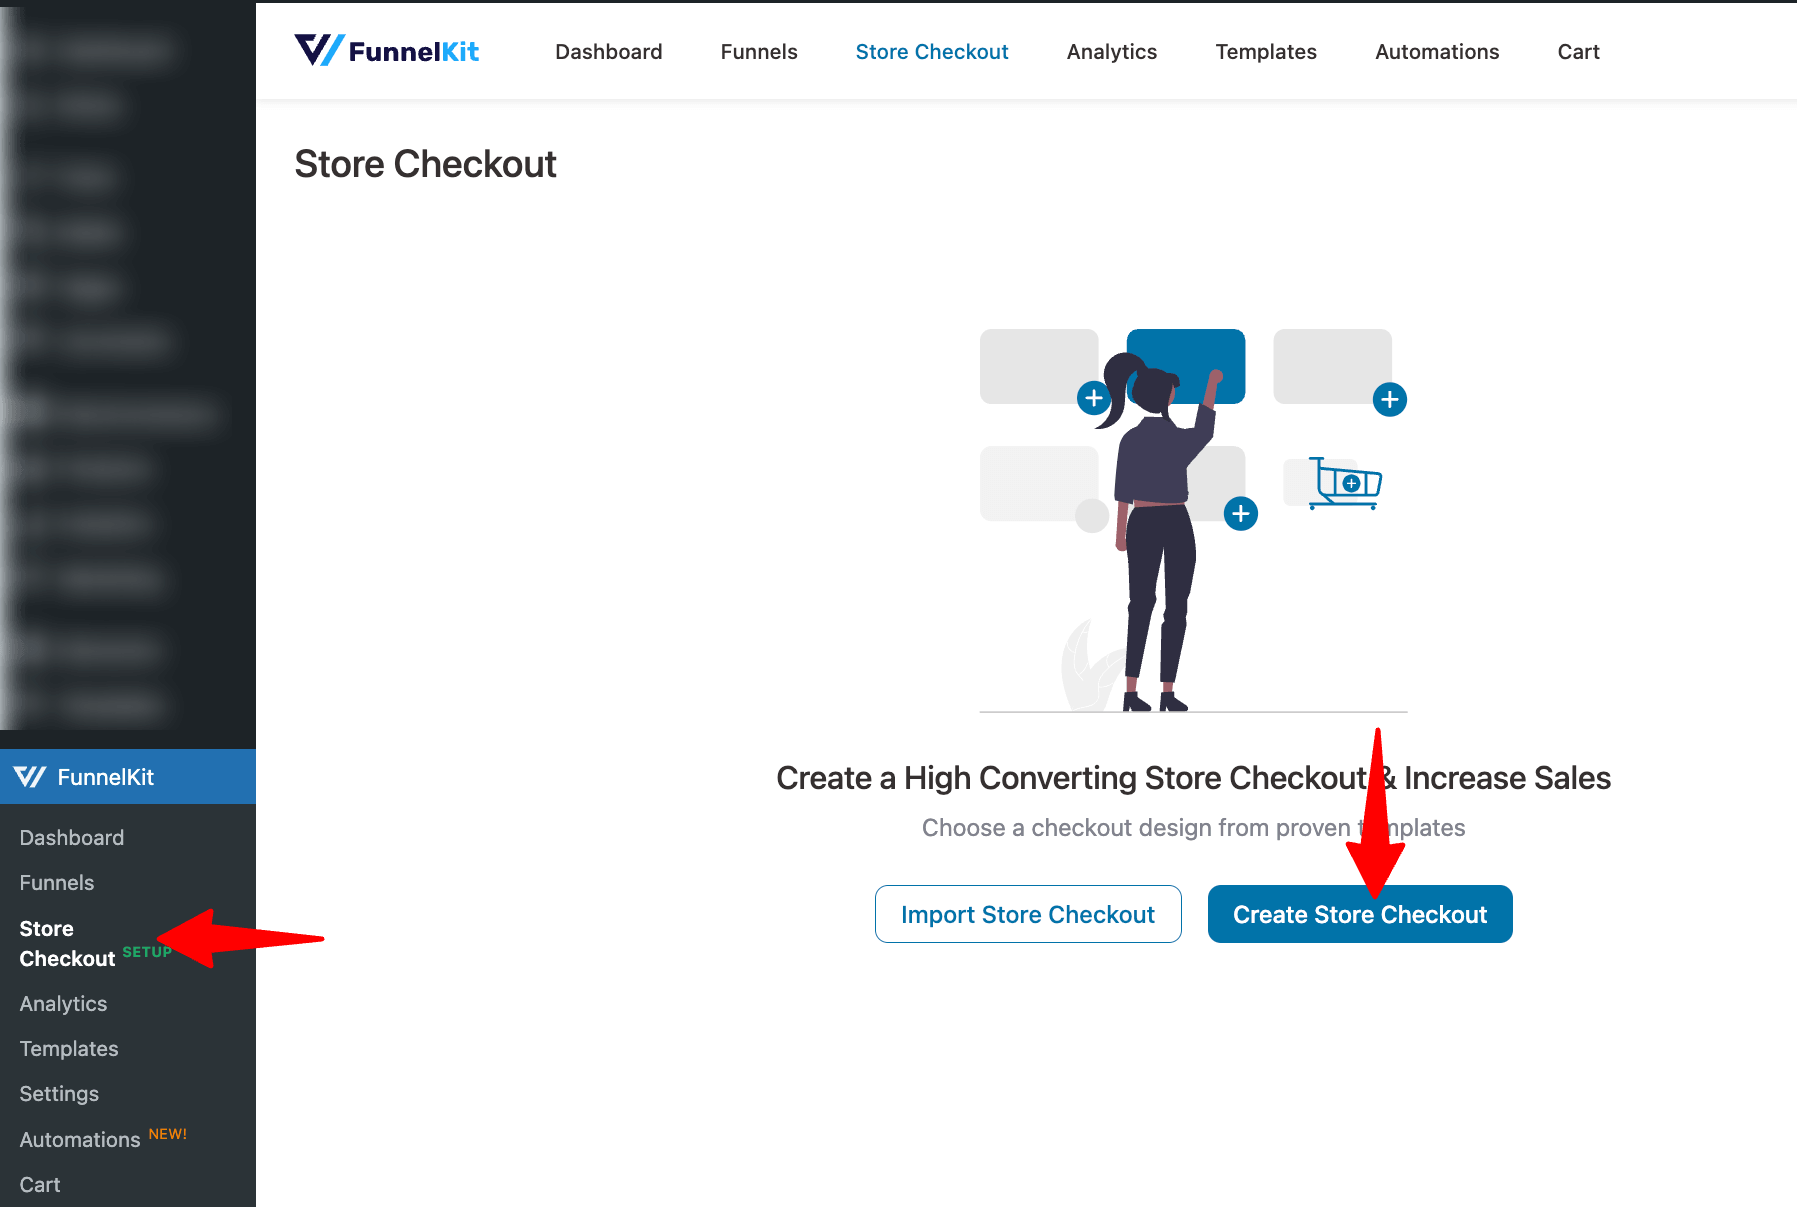
You’ll get directed to the templates page.
First, choose Bricks as your page builder. If you like any template, click on ‘Preview’ next to it.
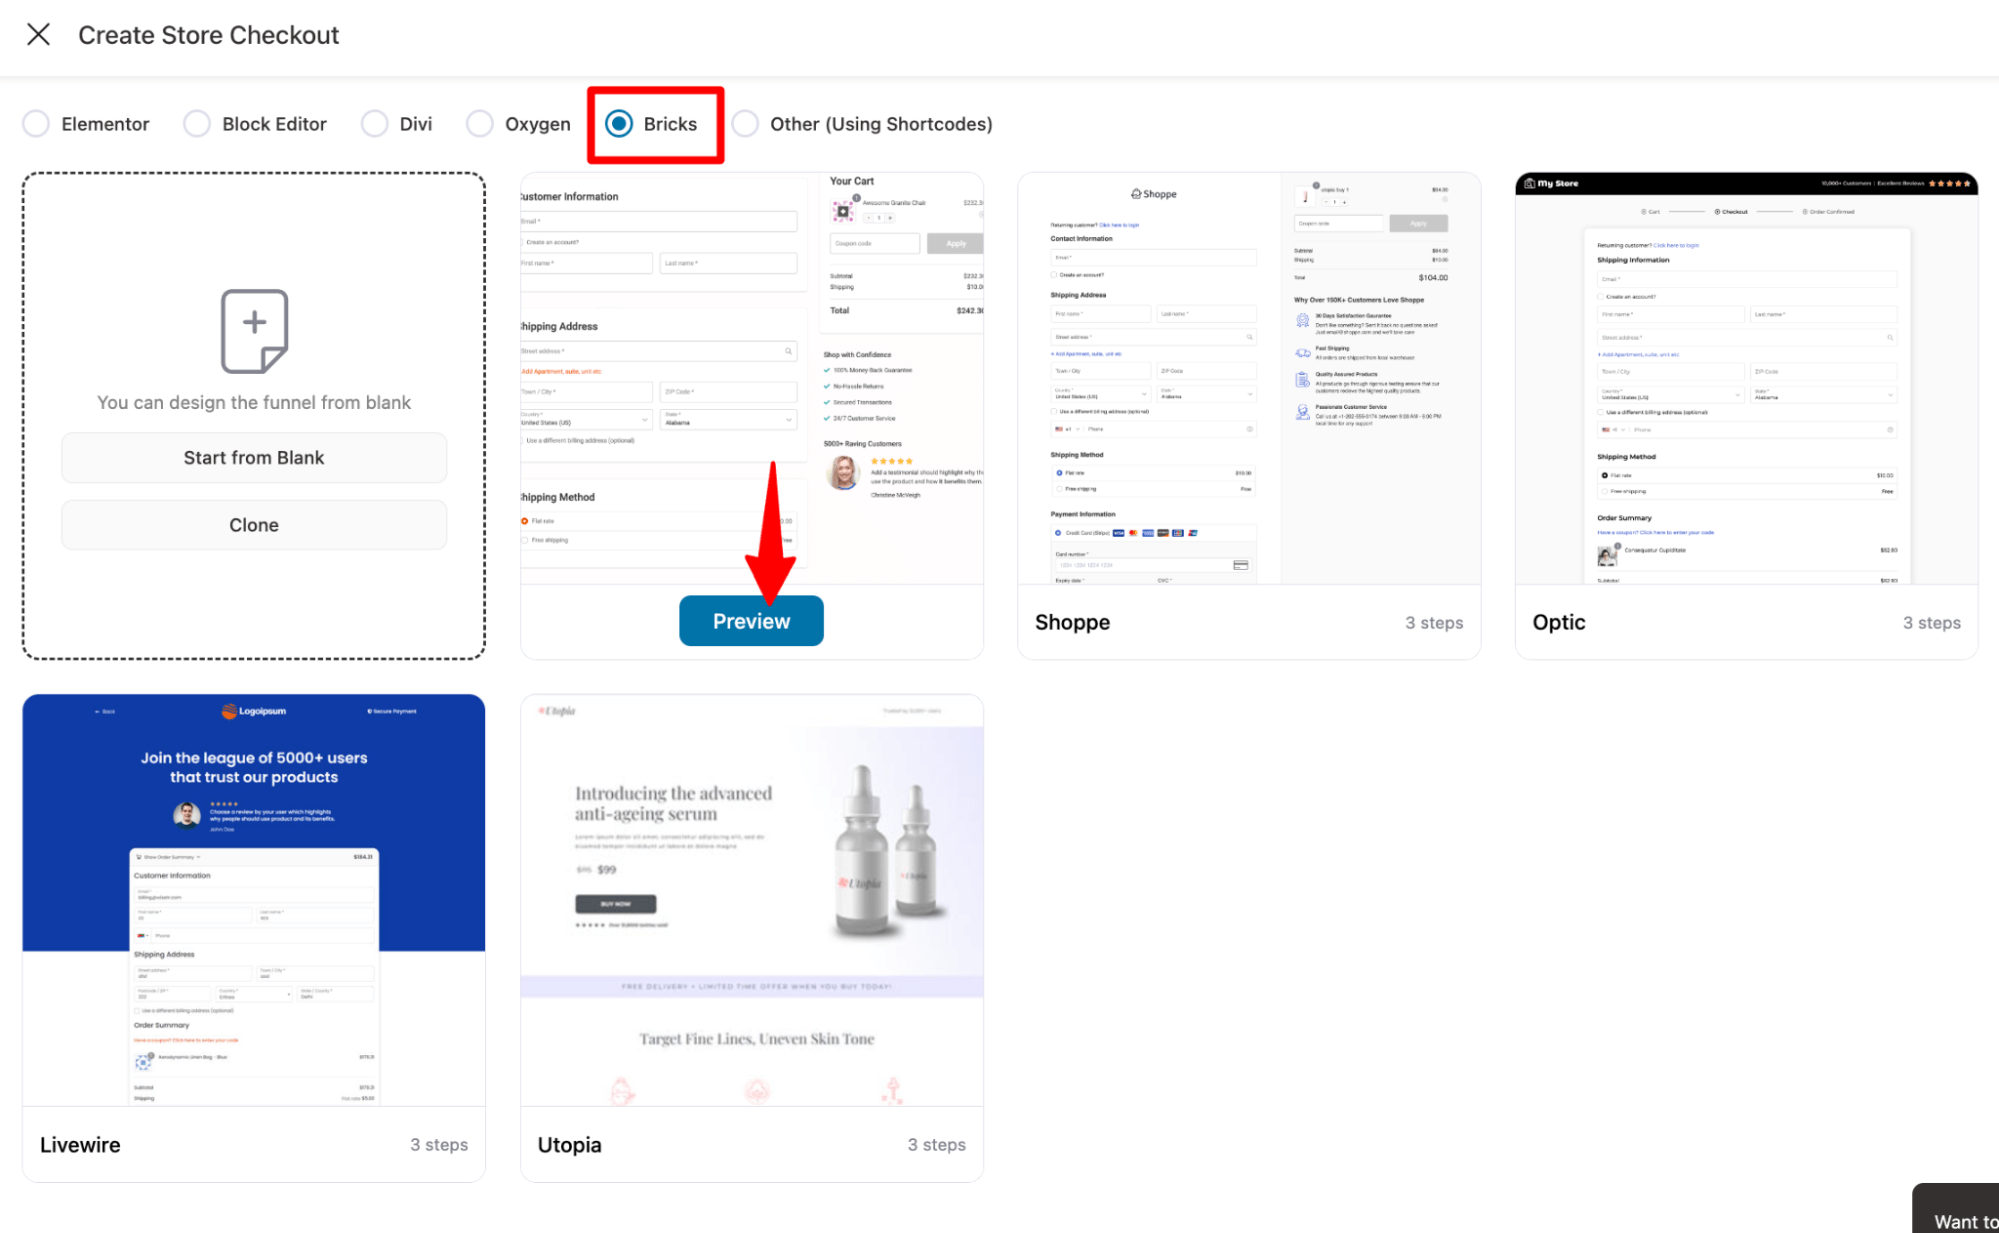
Next, choose the number of steps you want on your checkout page, i.e., one-step or multi-step.
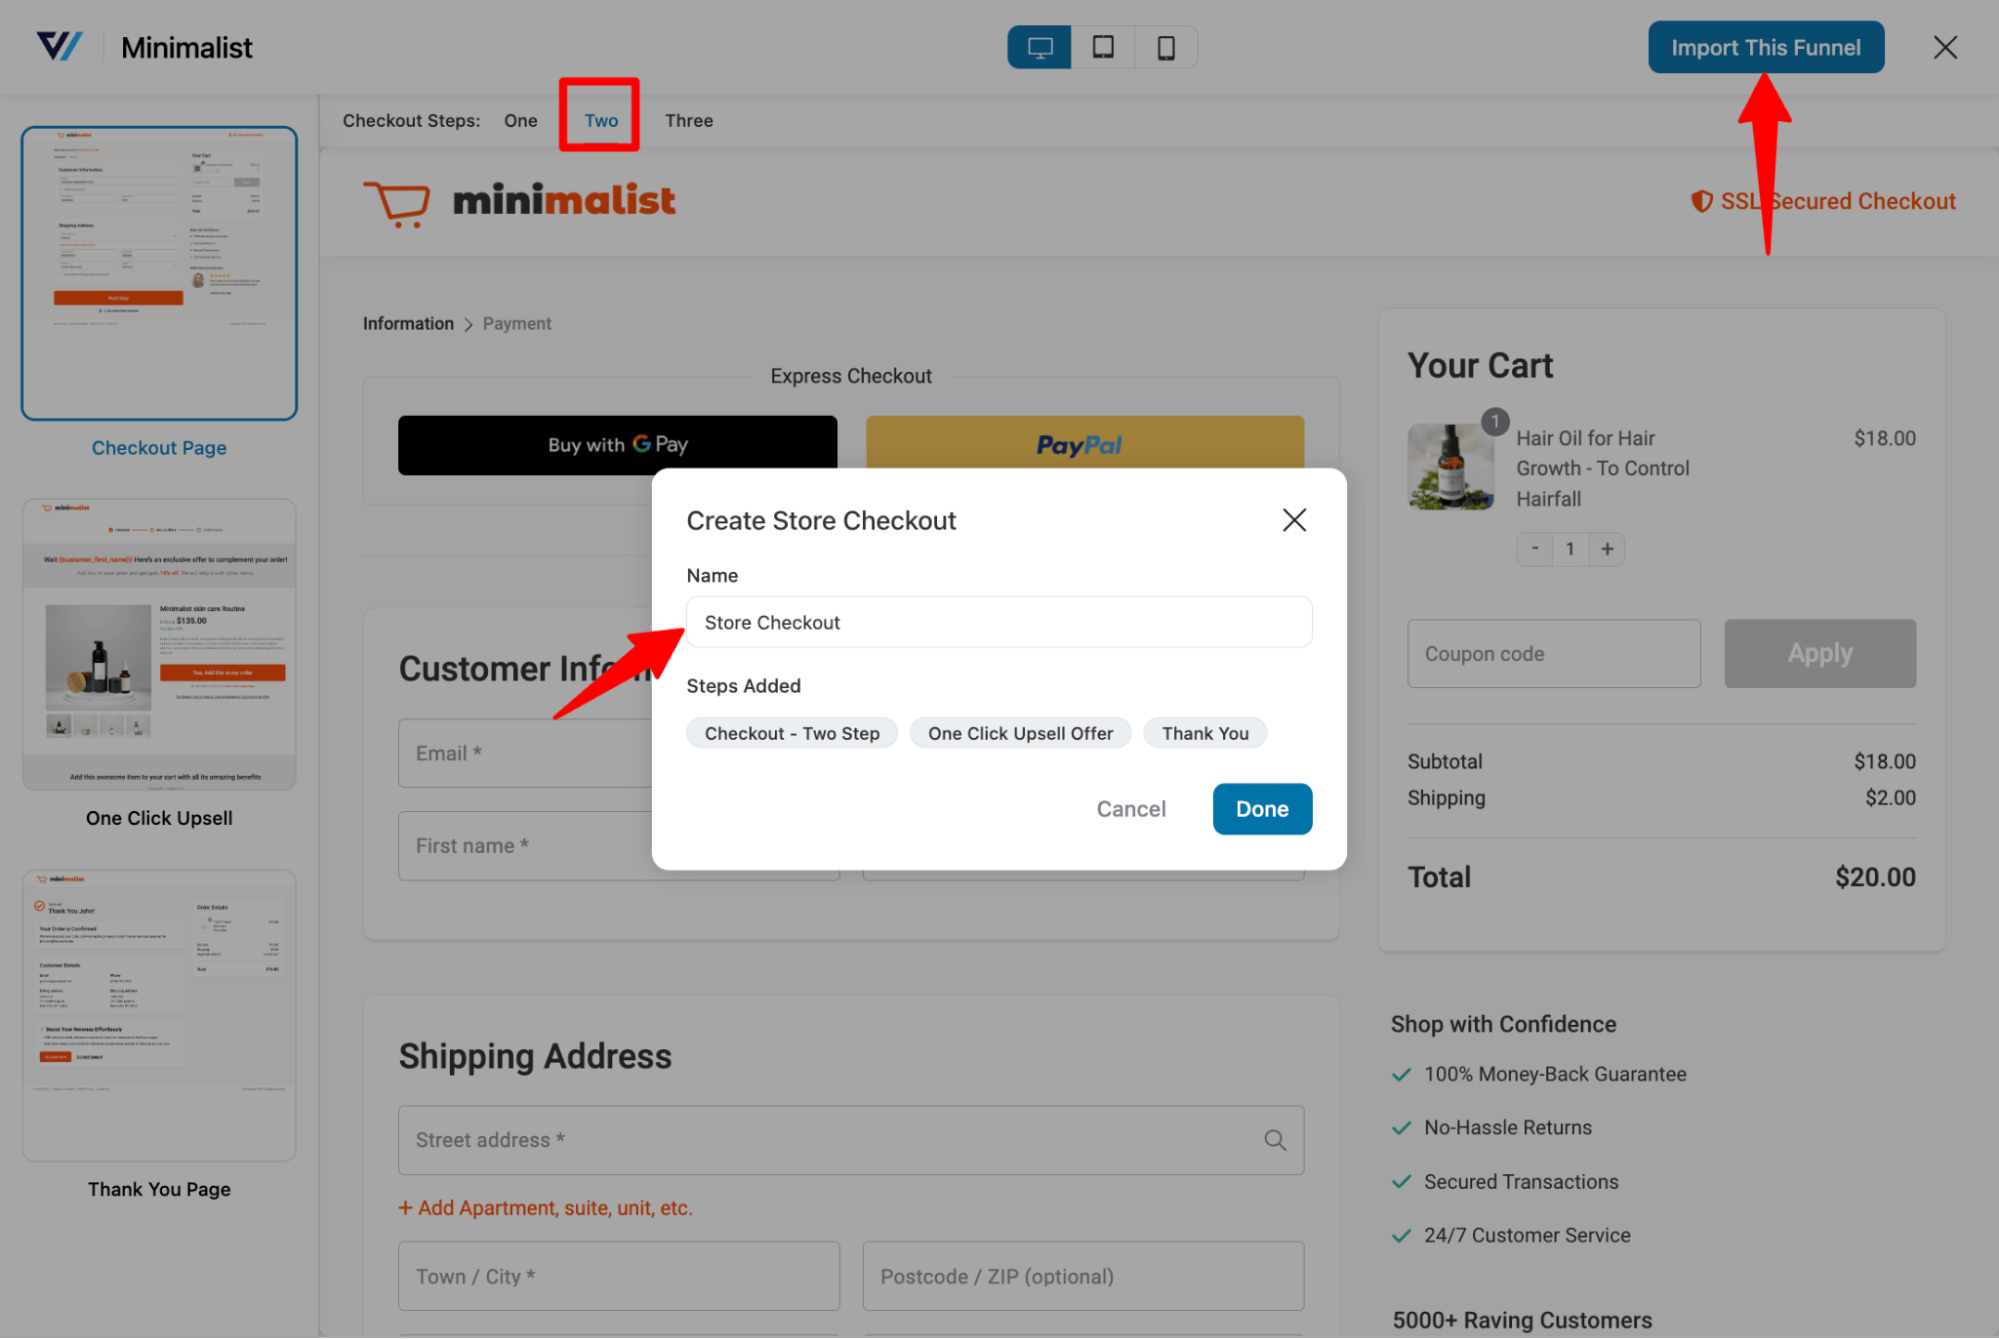
Here we will be importing the two-step Minimalist template for our WooCommerce Bricks checkout page. To do so, click on “Import this funnel”, provide a name, and hit Done.
Step 2: Customize the design of your WooCommerce Bricks checkout page
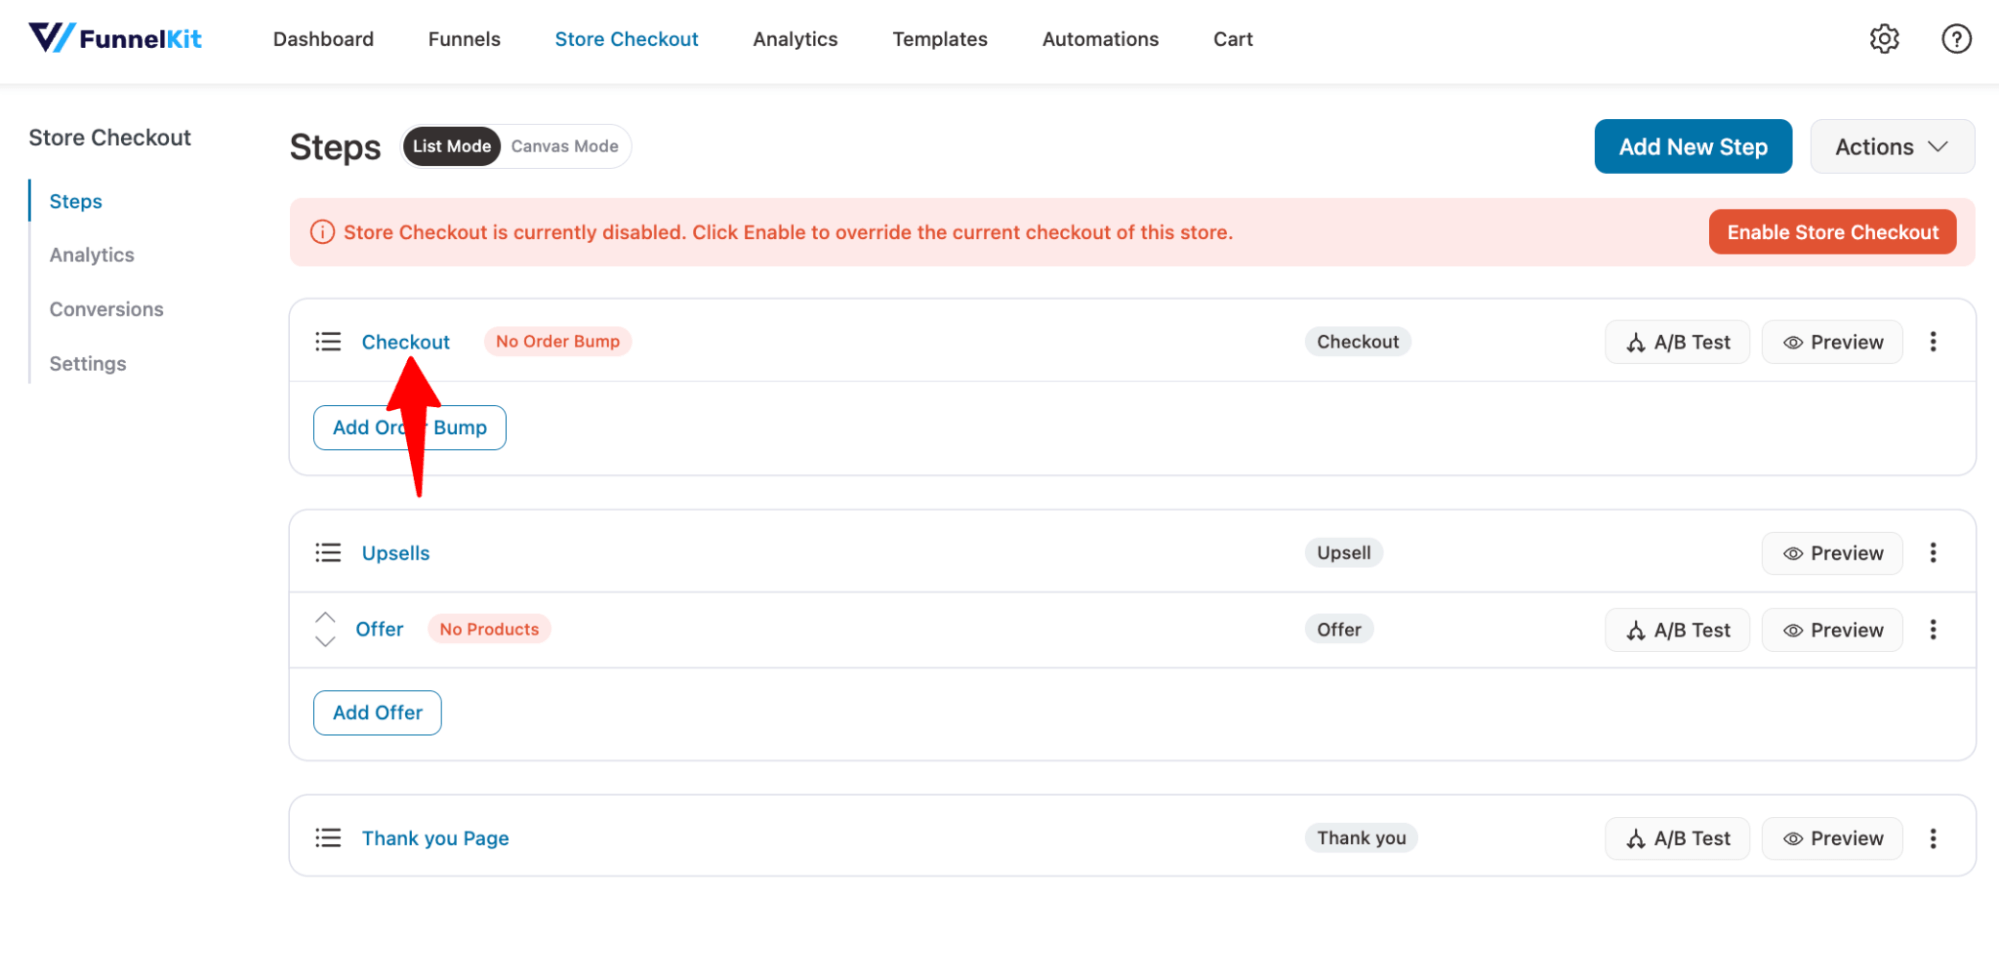
Click on the page to start editing your WooCommerce checkout with Bricks.
On the ‘Design’ tab, click on ‘Edit Bricks Template’ to start customizing your WooCommerce checkout page with Bricks.
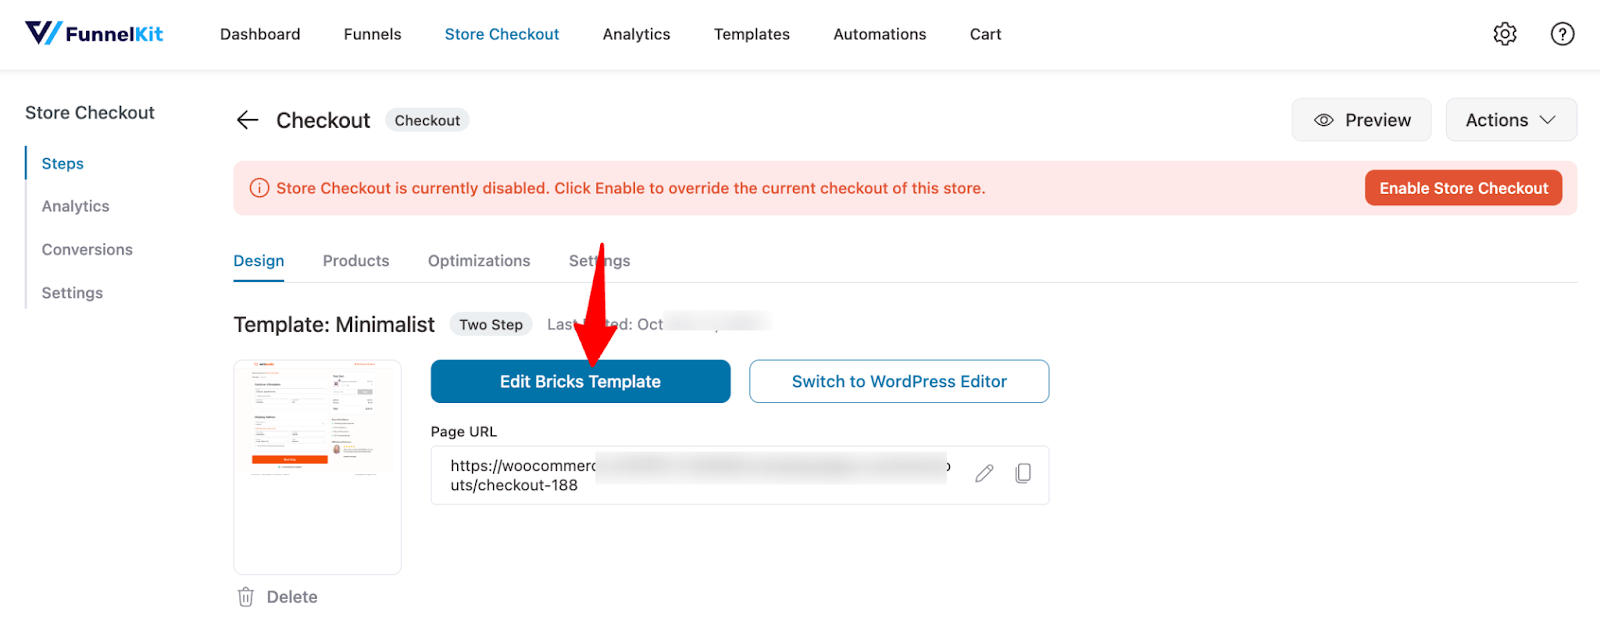
This page will load in Bricks.
You can now start customizing your WooCommerce Bricks checkout page using different widgets.
- Business logo
To change the logo, click on the icon and upload a new image from either the URL or media.
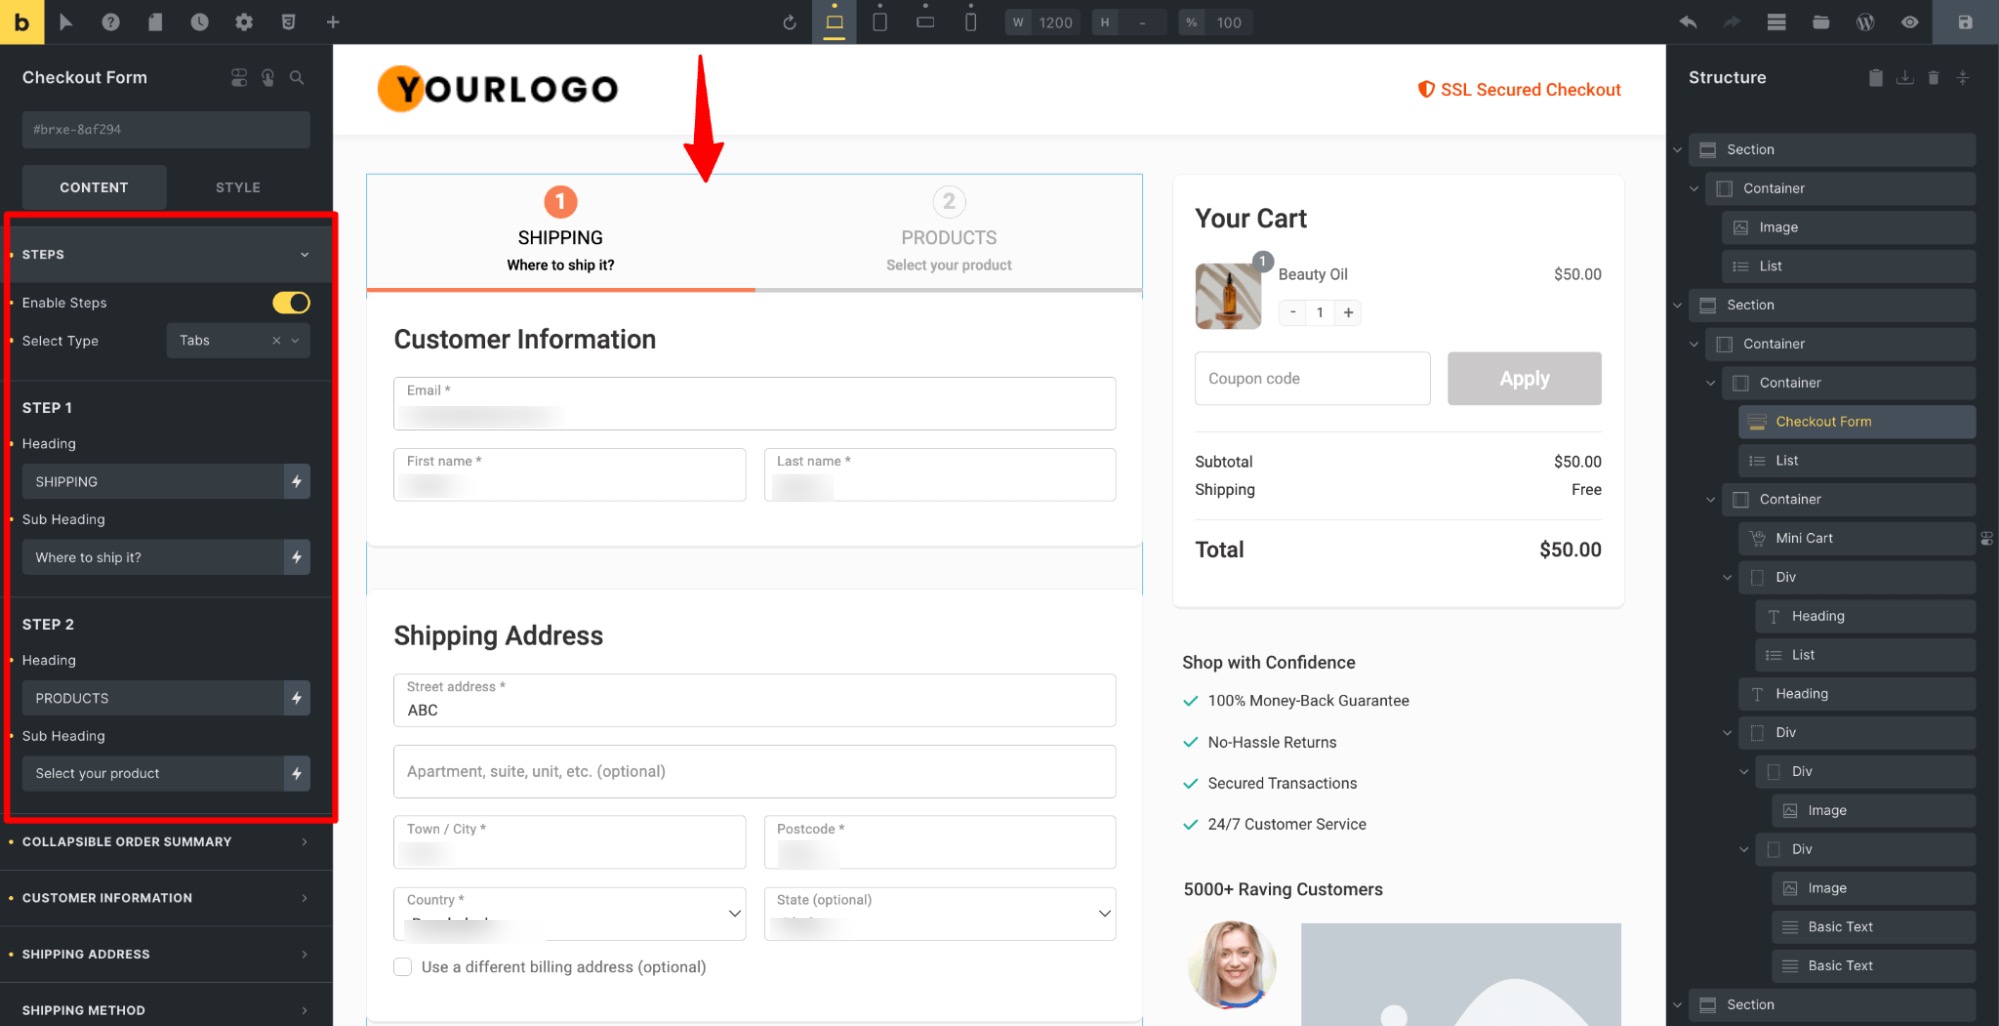
Now, click on the Checkout Form to customize the following options:
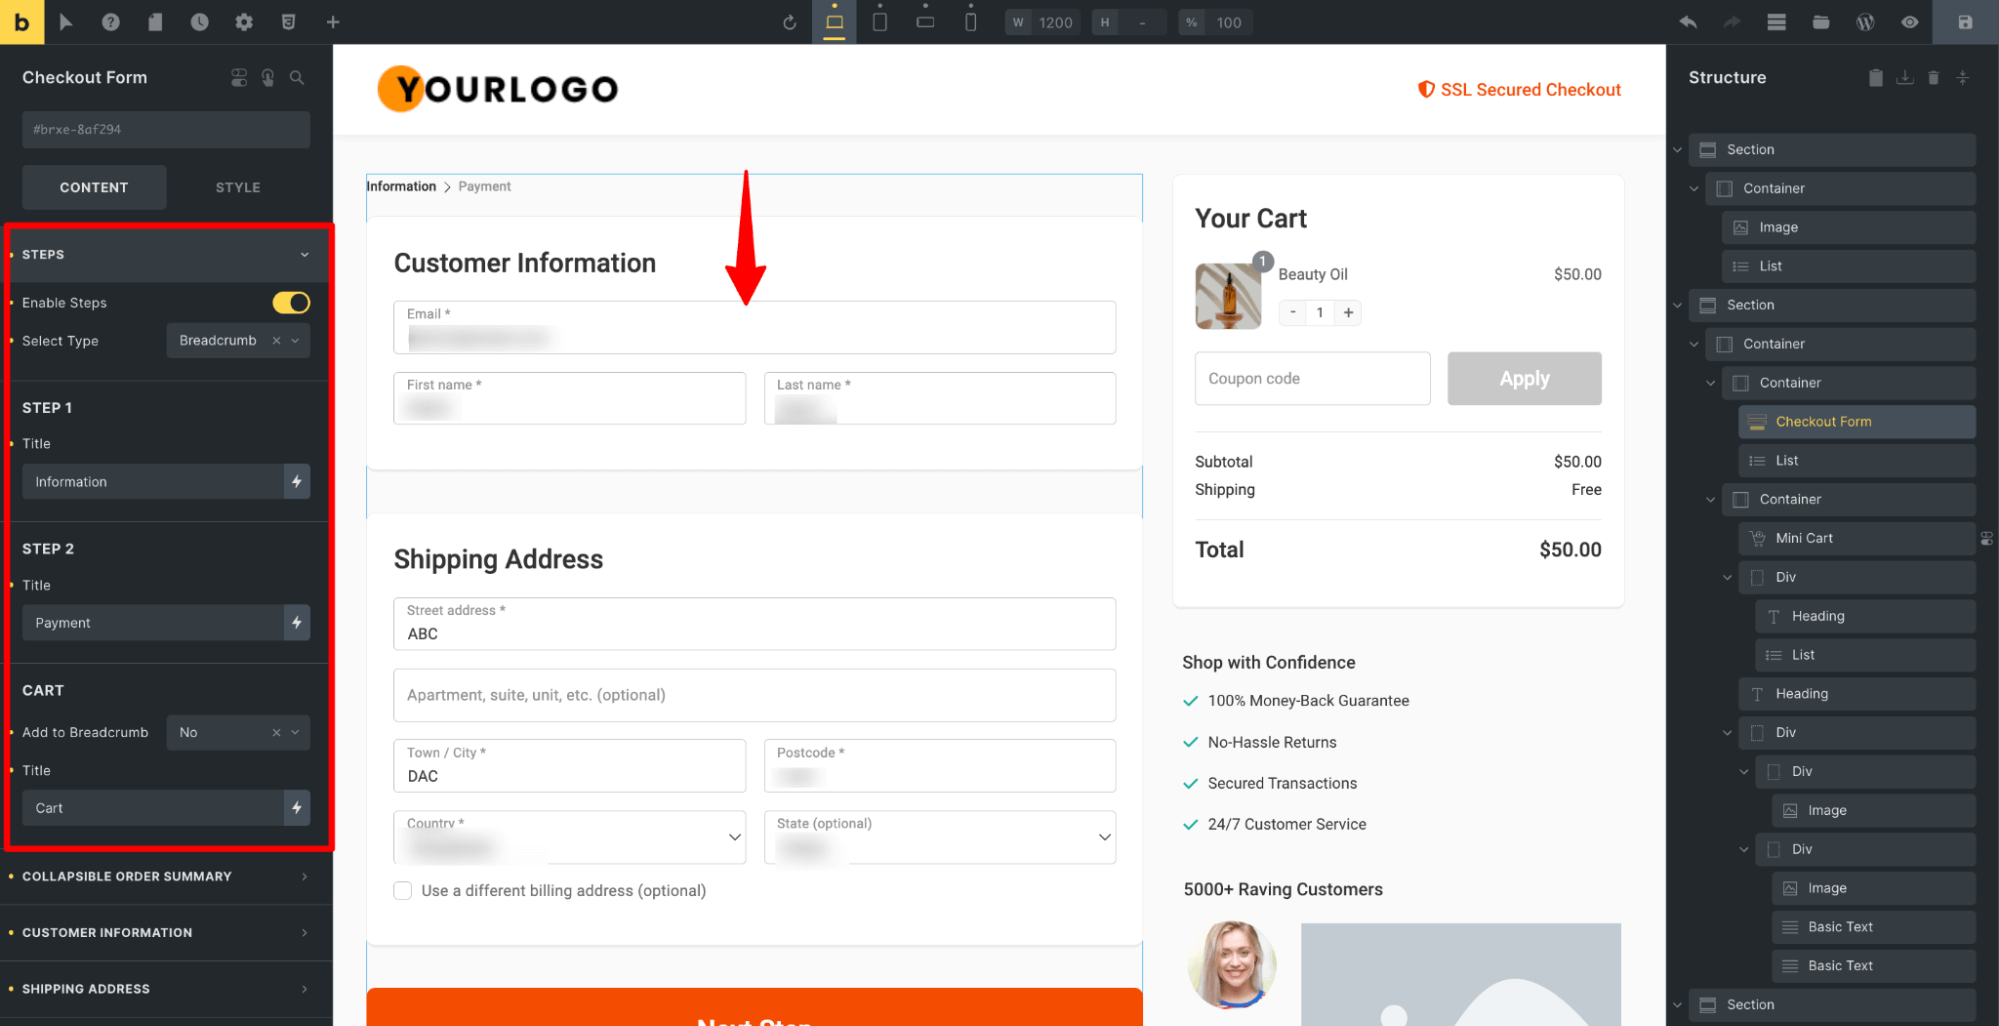
- Check out step headings
You can enable the steps and format them in the breadcrumb or tabs format. In case you choose tabs, you can customize the heading and subheading for each step.
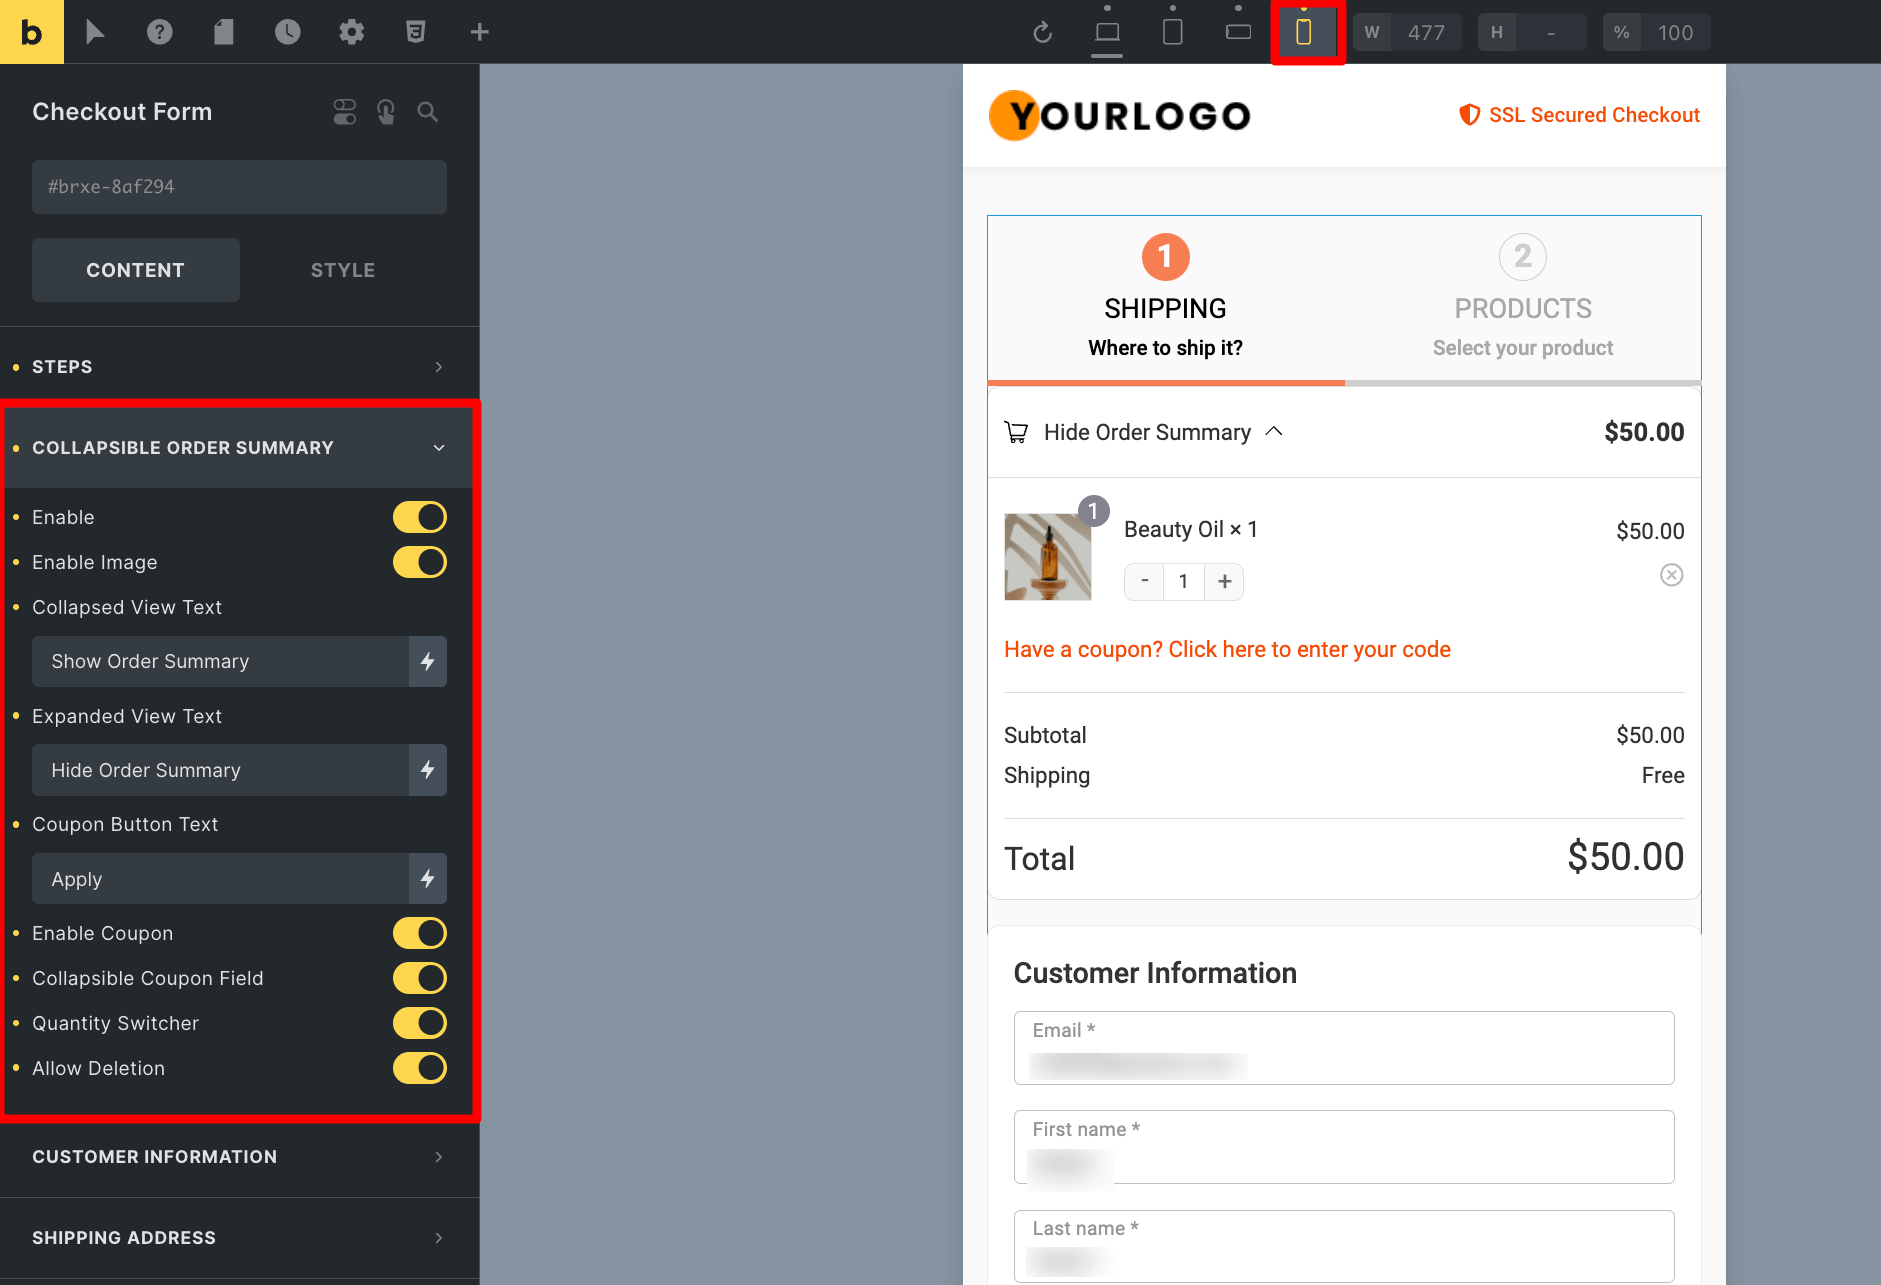
- Collapsible order summary
You can turn on the collapsible order summary if you want. Experts usually recommend adding it in a mobile view, as it makes it easier for people to check out the order summary without scrolling.
- Customer information
You can set the width for the email, including the first and last name.
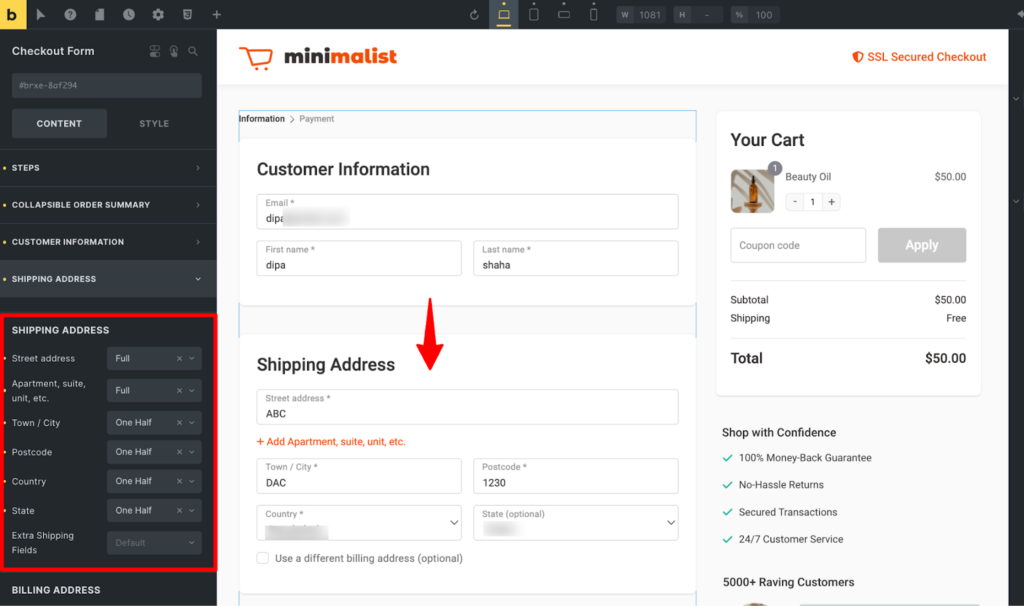
- Shipping address field width
Next, adjust the field widths of your checkout form.
Go to the ‘Customer Information’ or ‘Shipping Address’ section. You'll find the options to adjust the form field widths of your shipping and billing addresses to full, one-half, one-third, or two-thirds.x
You can customize the coupon button text as well.
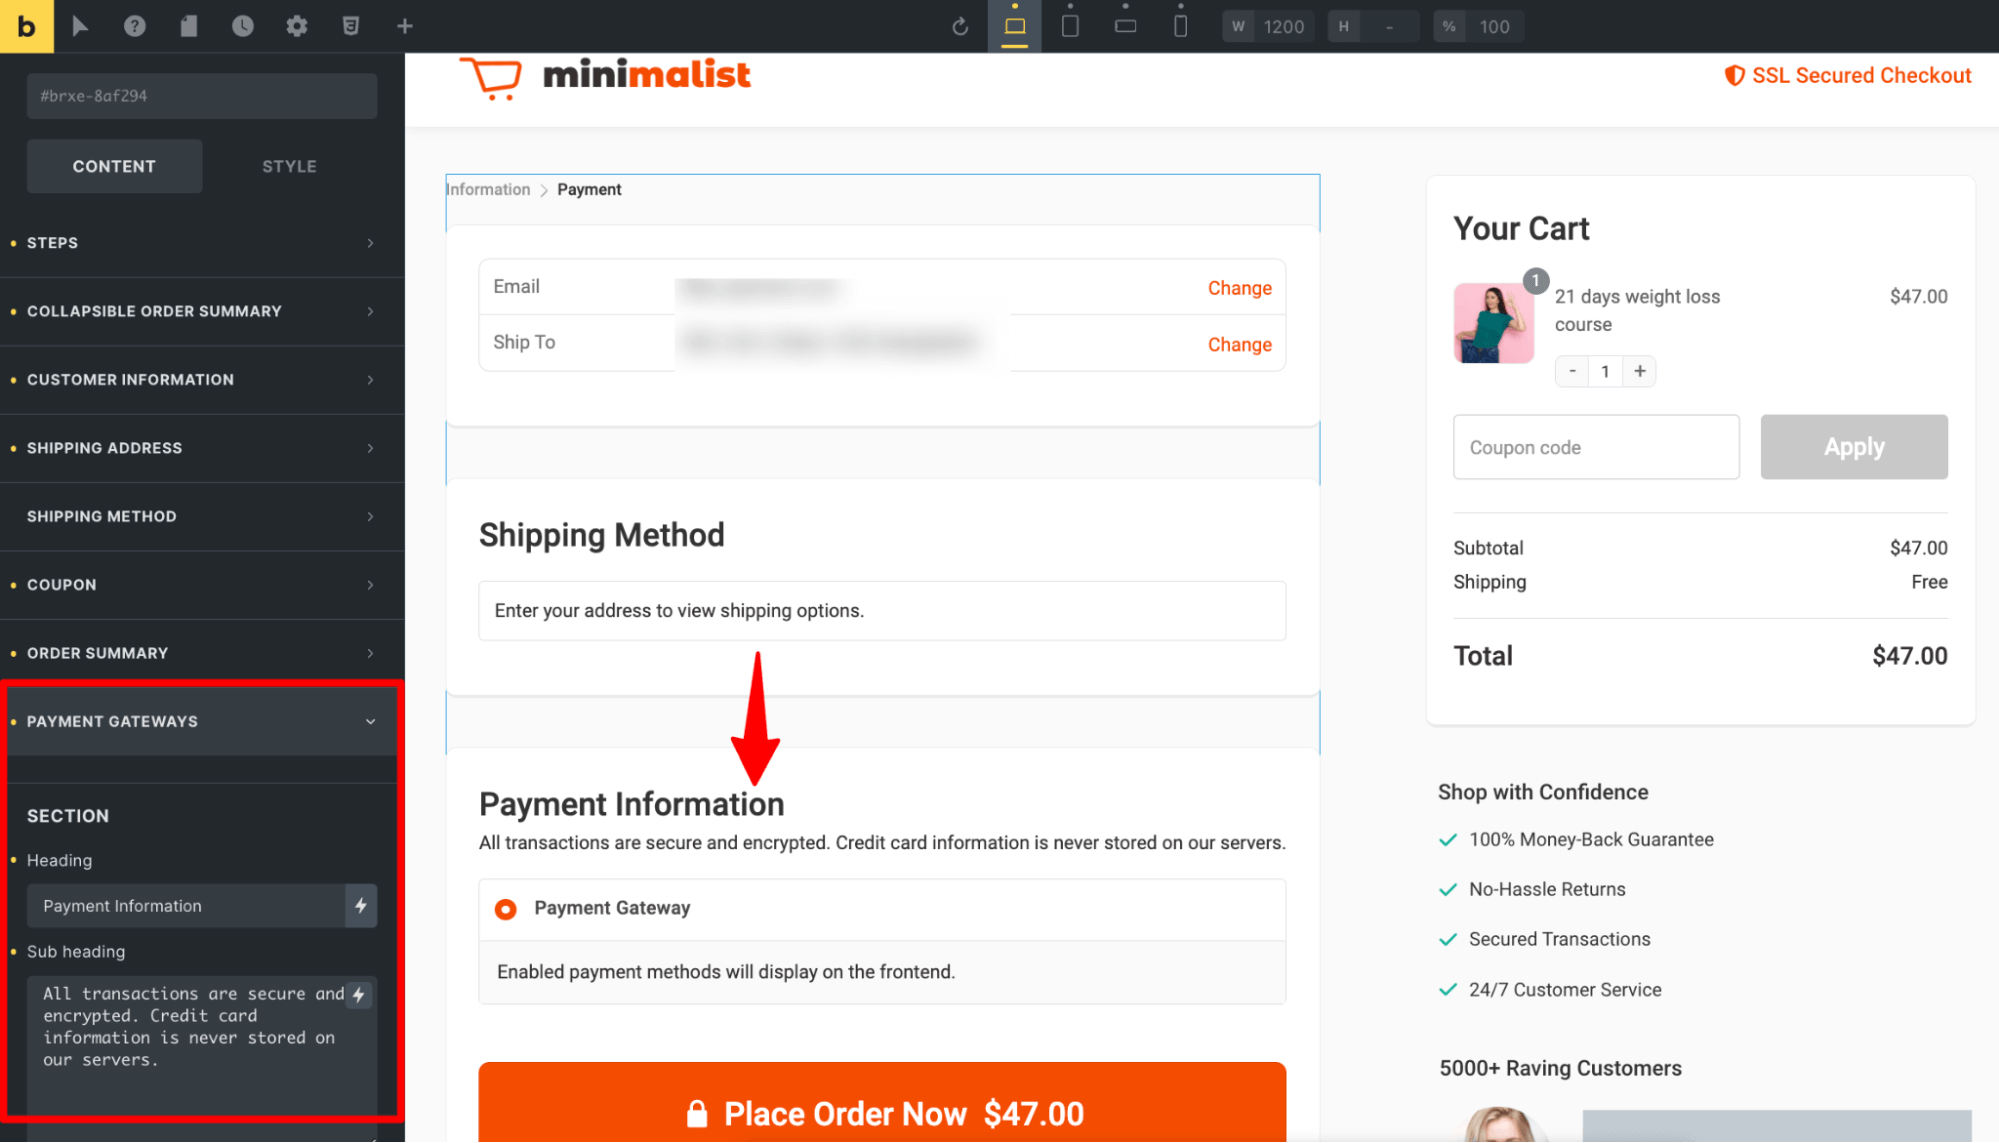
- Payment gateways
Add a custom heading and subheading for the payment information.
- Checkout button
As per the checkout button, you can add the button text and subtext. In case of multi-step checkout, you can set the step button text and subtext. In addition, set the return link text.

After checkout, click on the Mini Cart Block and customize the following options:
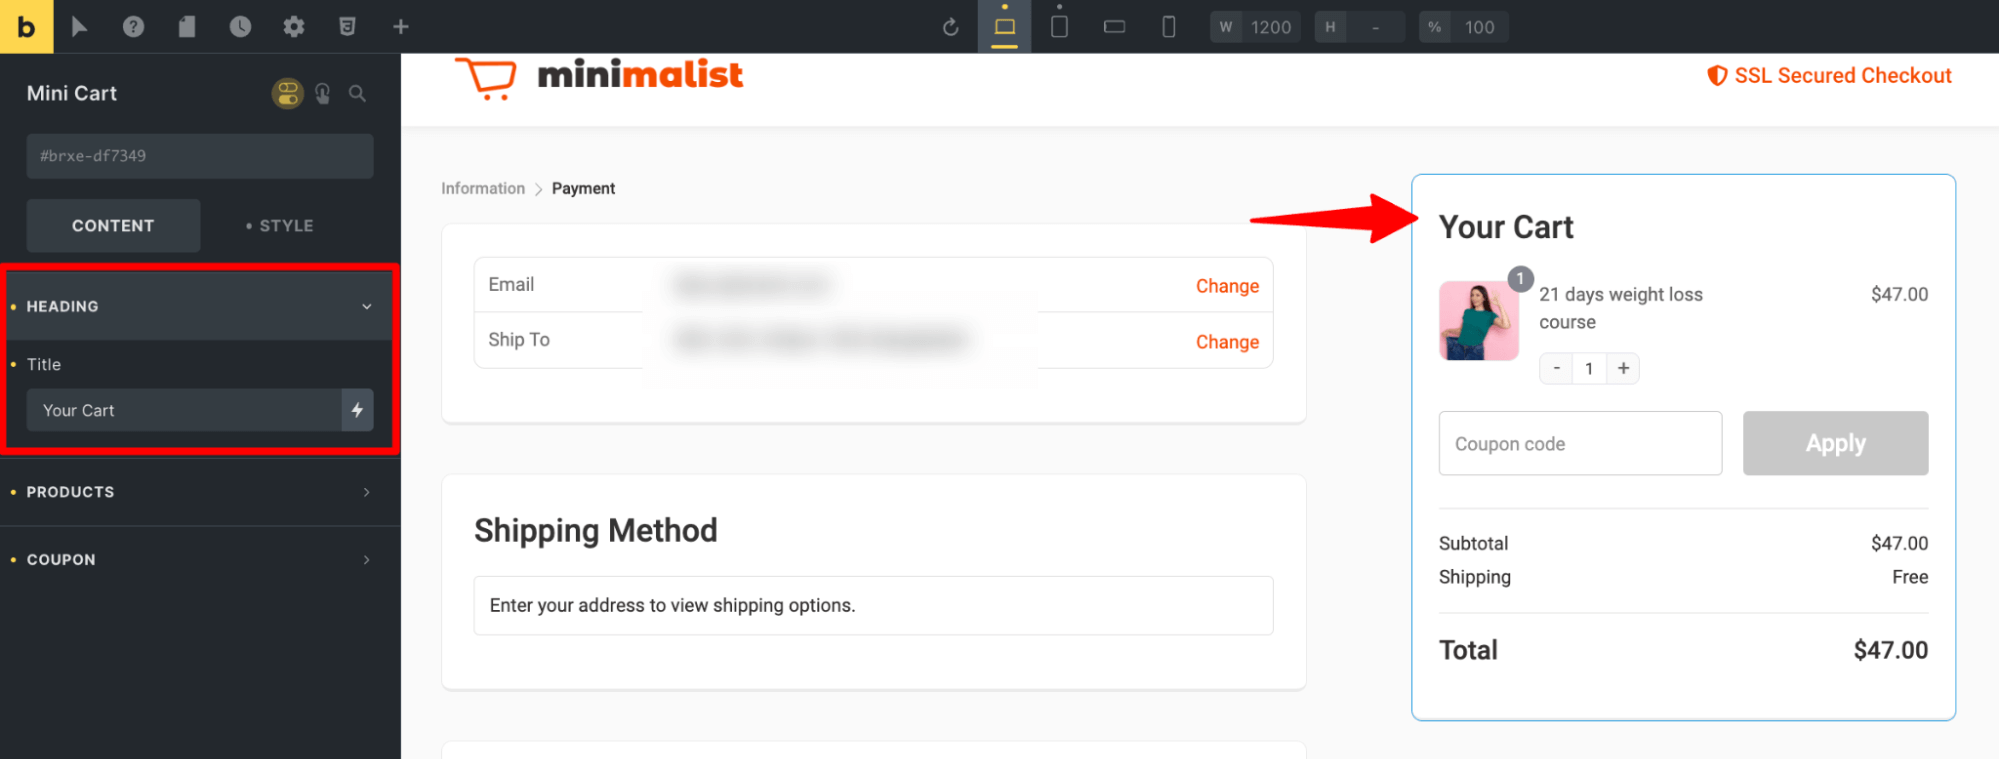
- Heading
Feel free to customize the mini cart heading text.
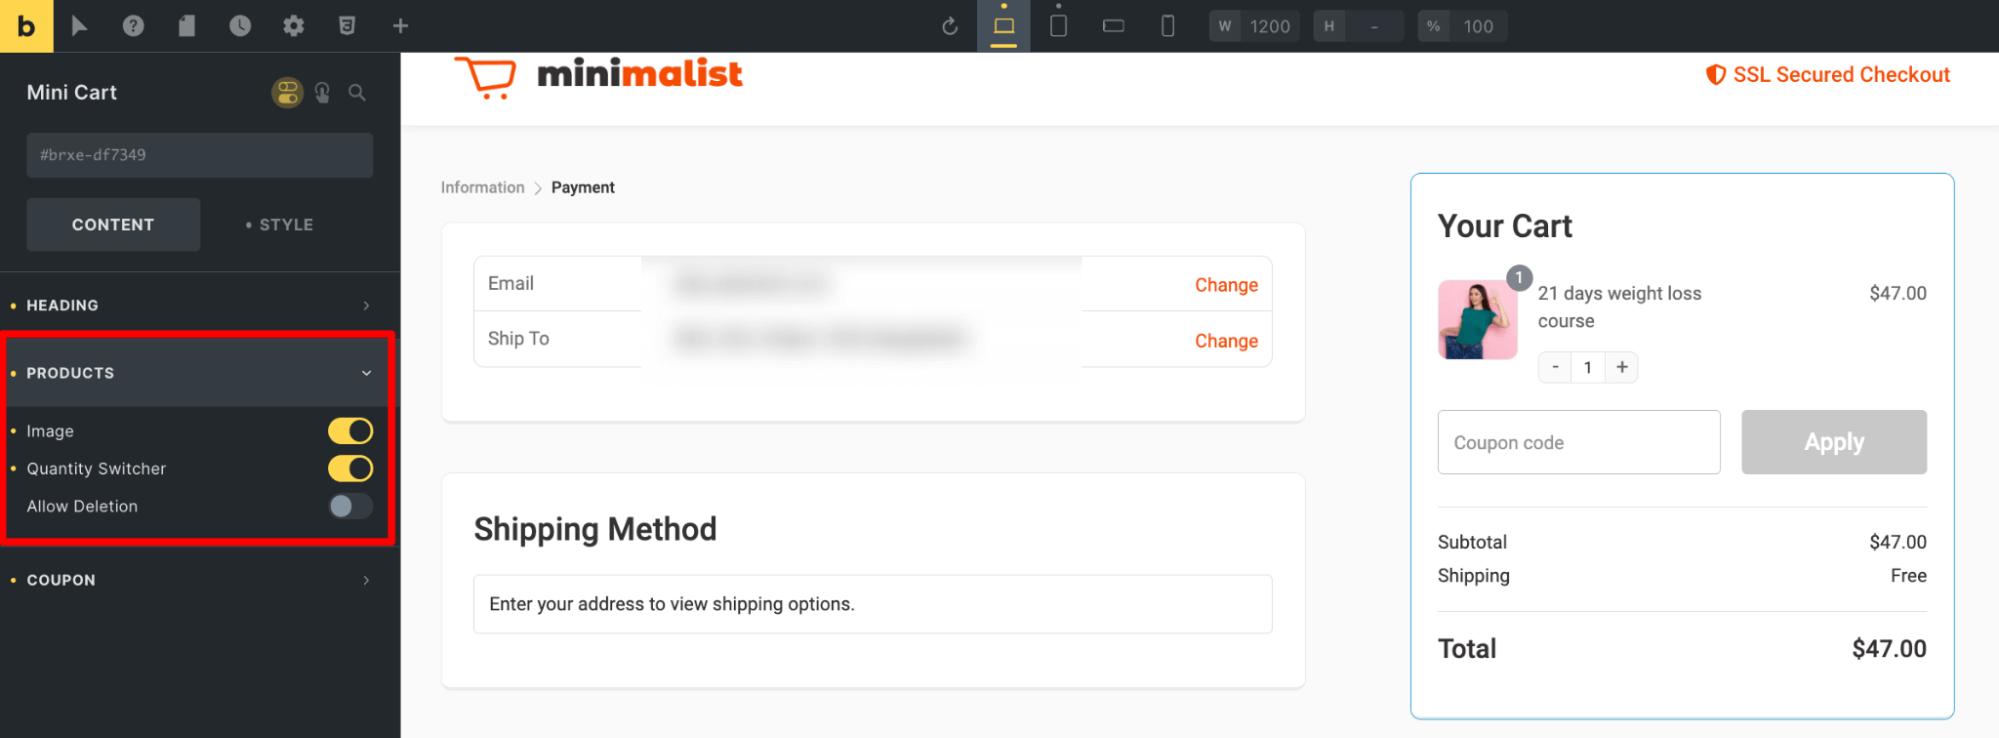
- Products
Under the Products section, you can enable image, quantity switcher, and also th option to delete any item front the cart.
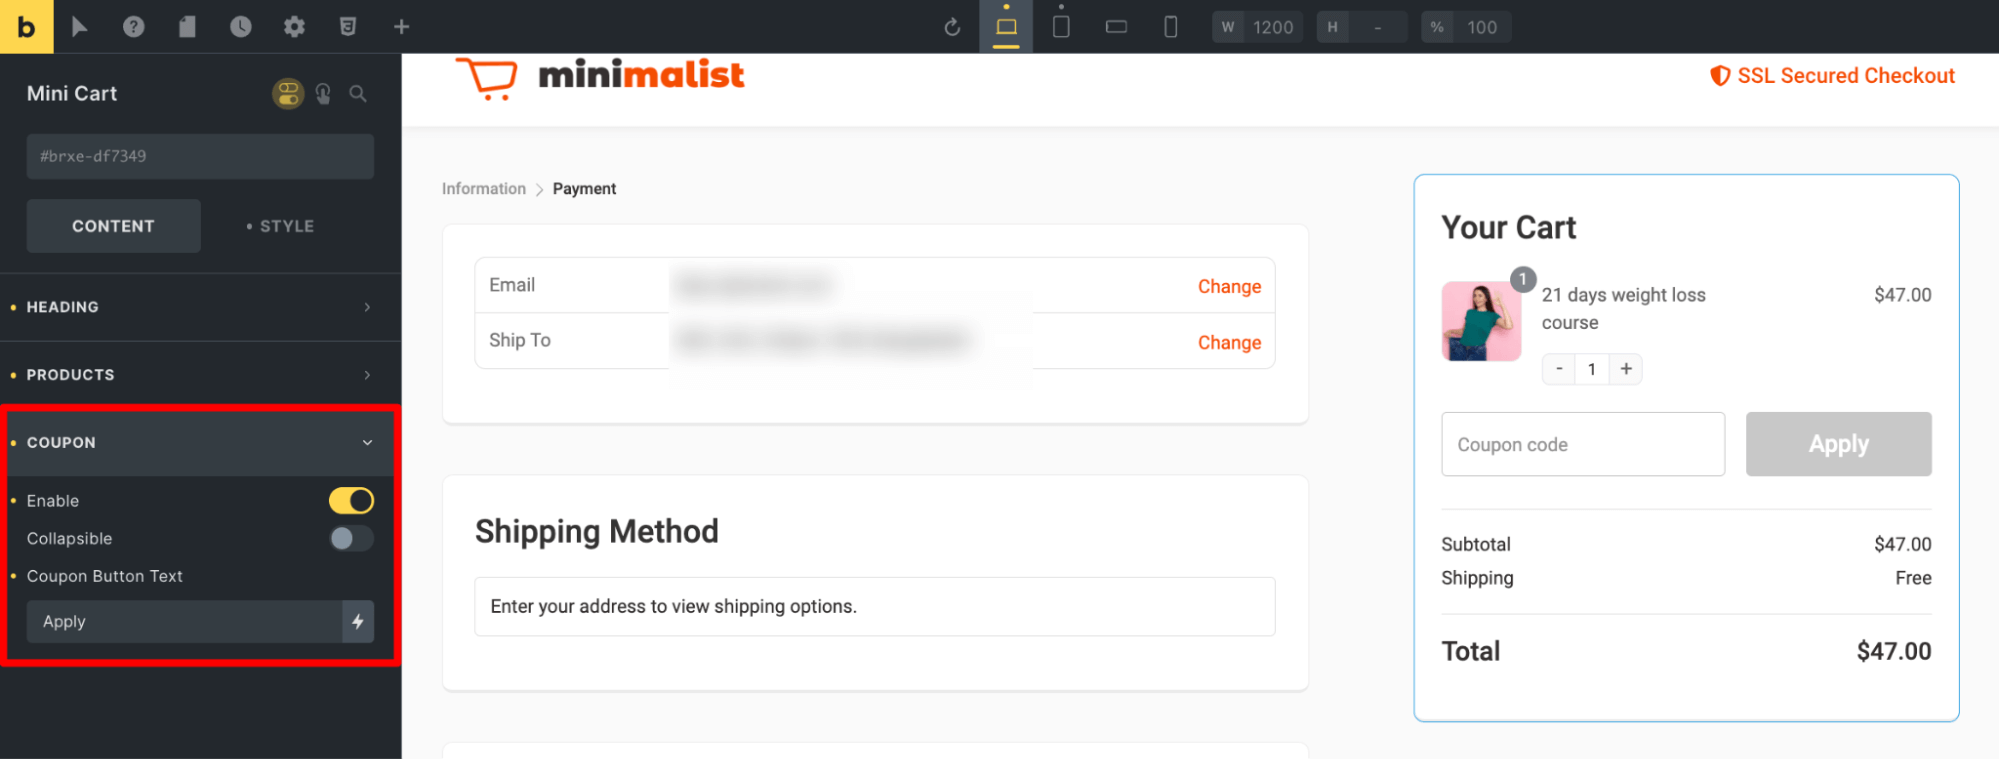
- Coupon
Expand the Coupon section to enable/disable it. You can make the coupon field collapsible if you want and set a custom button text.
- Other section
Similarly, you can adjust the shipping policy and testimonial section.
After customizing all the Bricks blocks on the checkout page, make sure to update the settings.
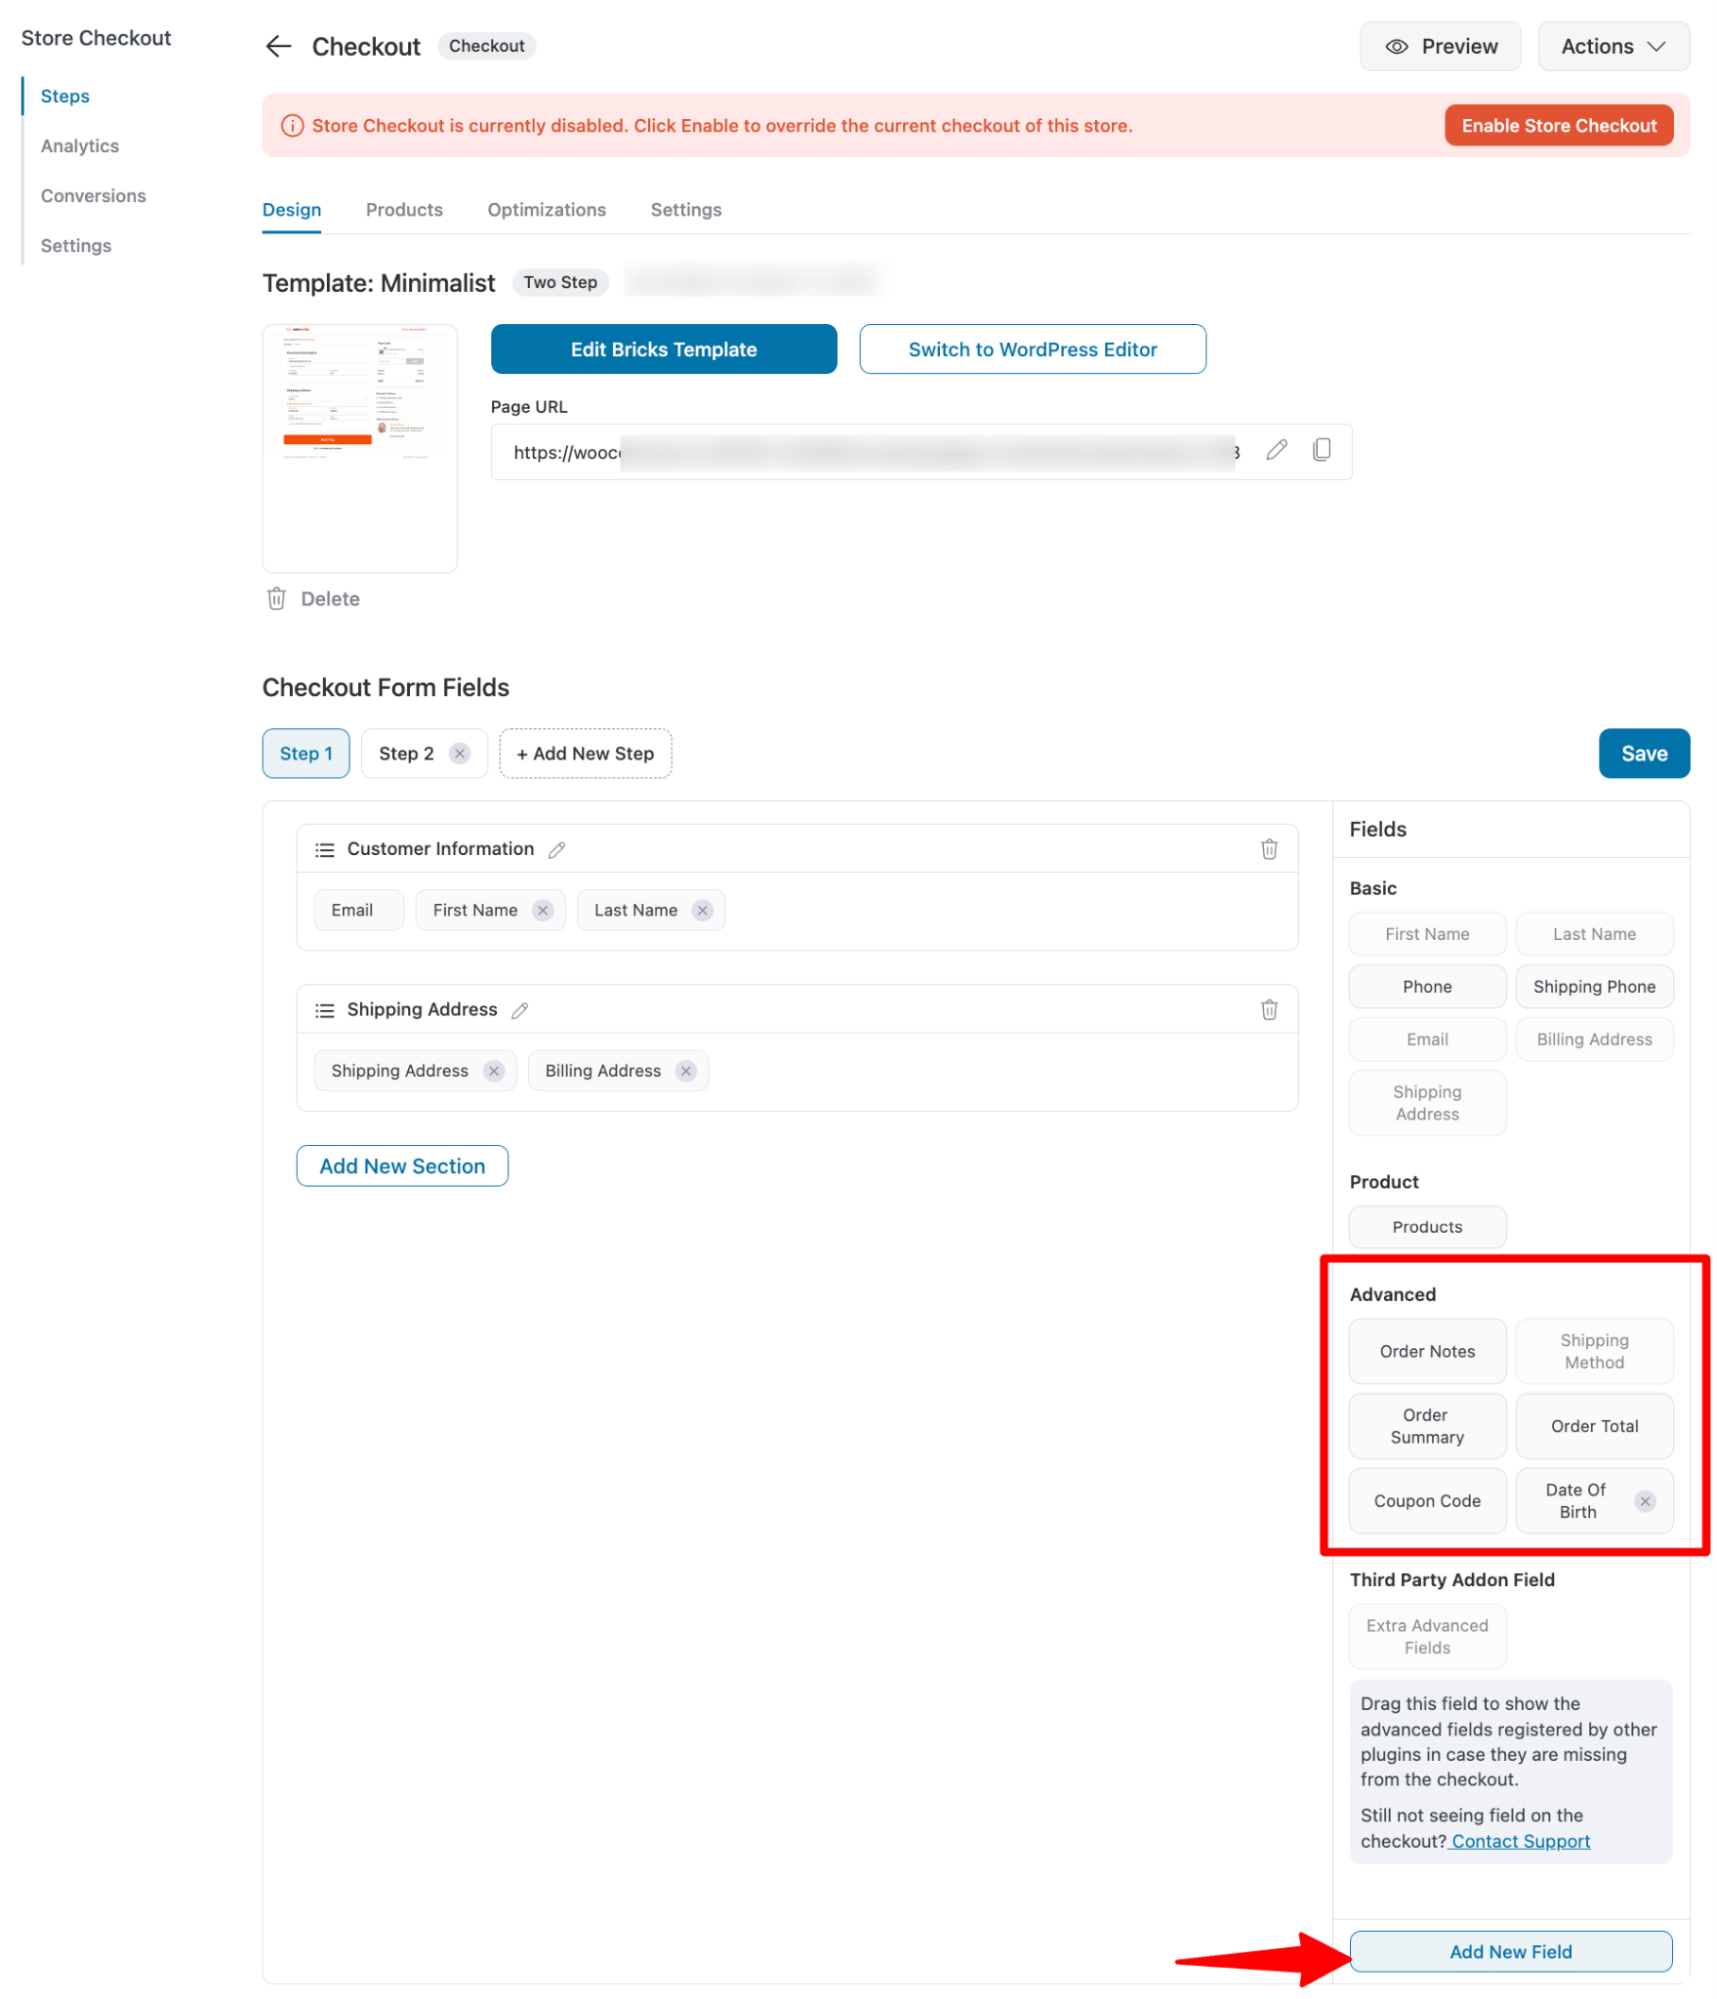
Step 3: Add any custom field (optional)
Now, on the design tab, scroll down to the Checkout Form Fields section. Here, you can reorganize the checkout fields, adding or removing anything you want.
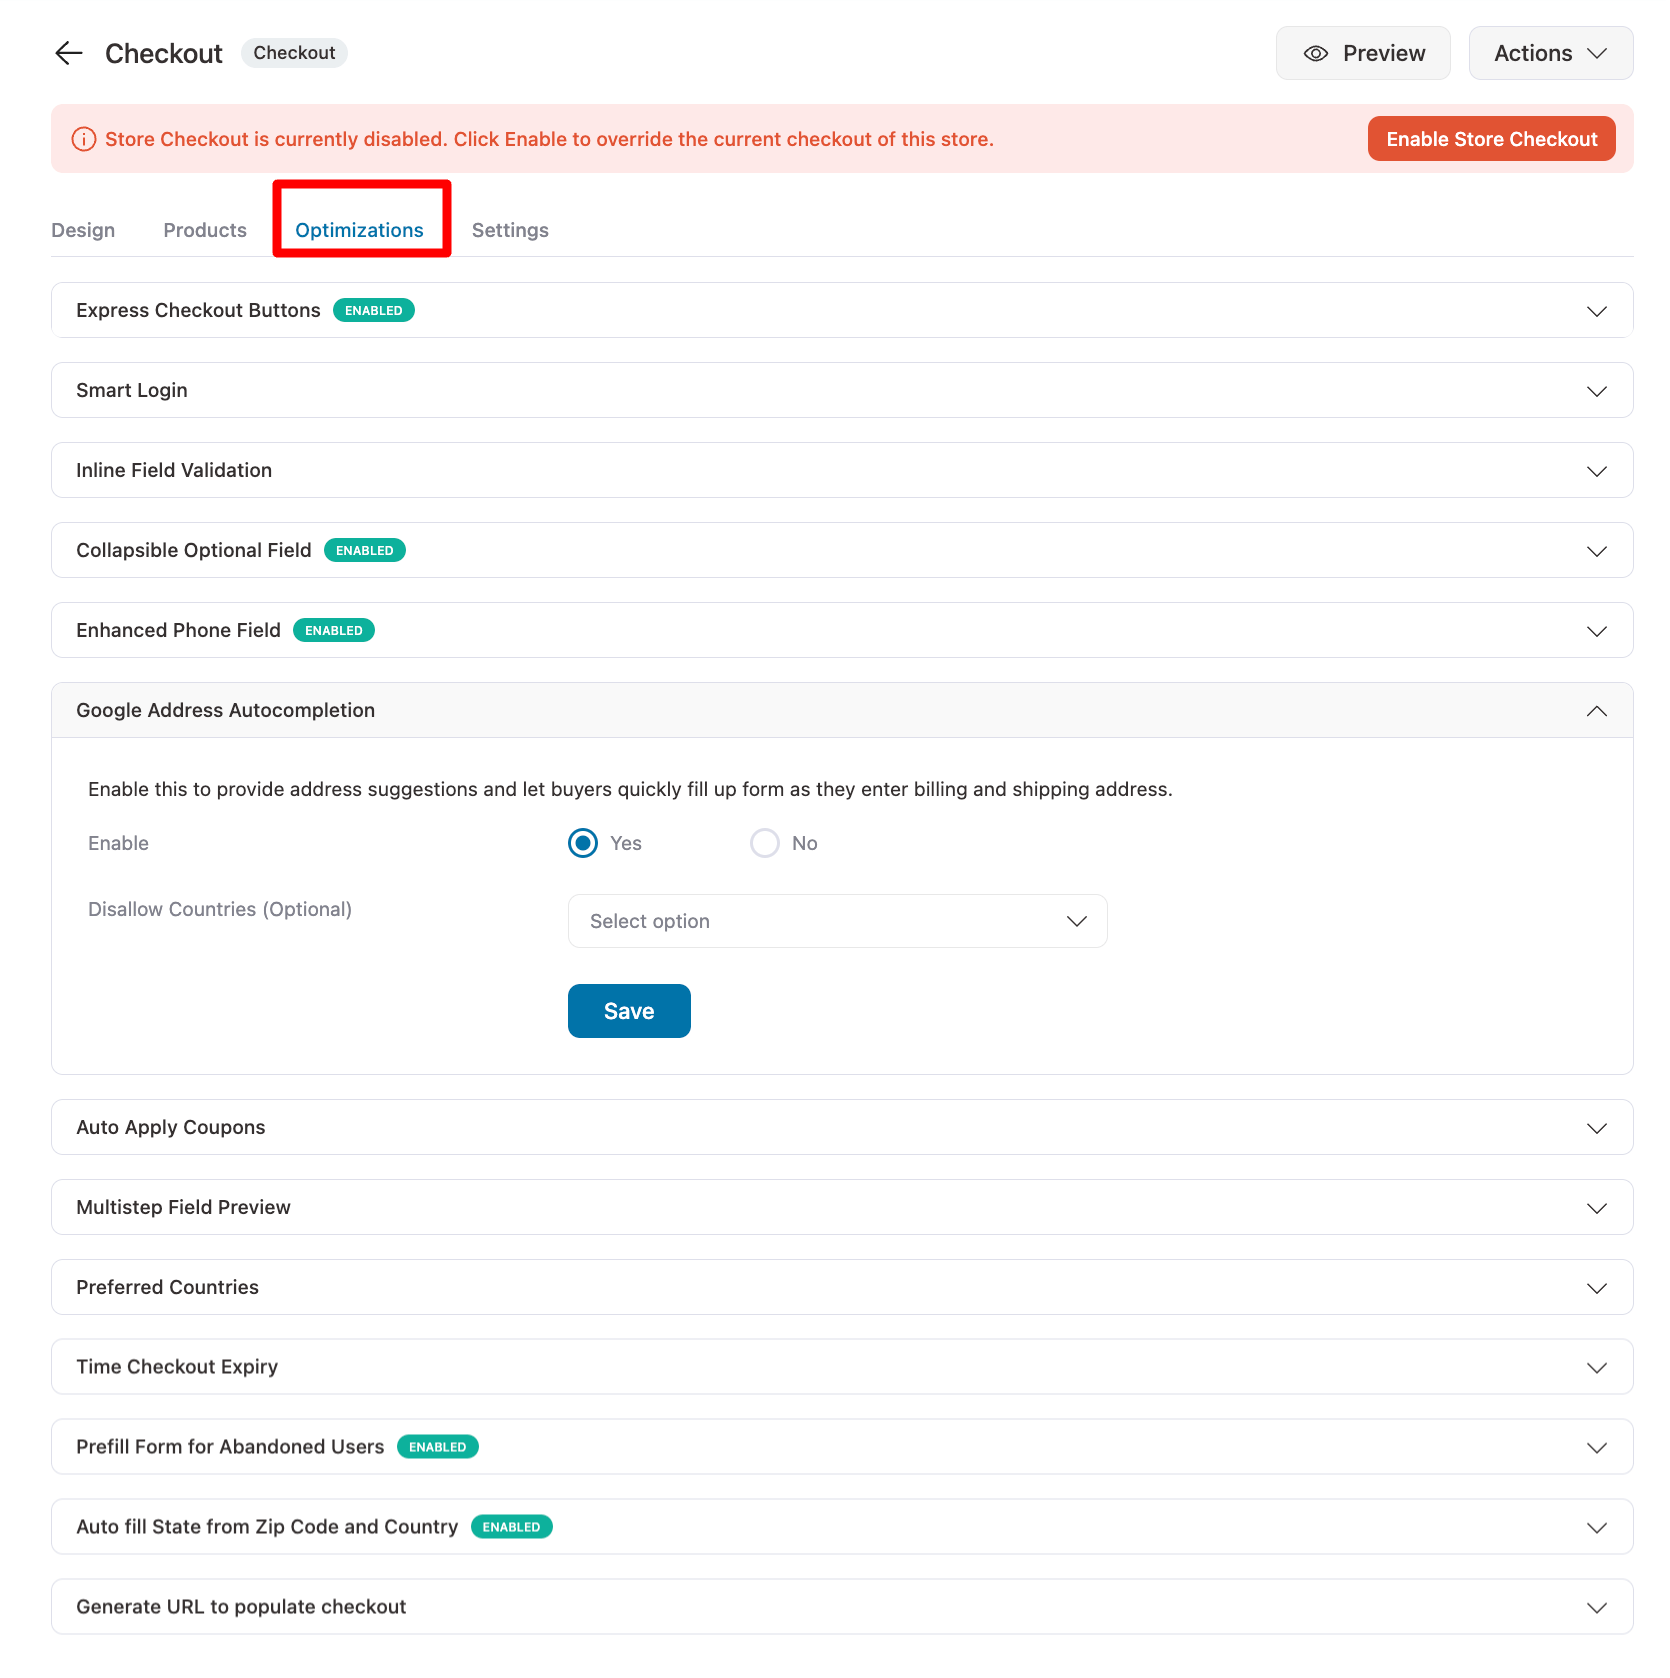
Step 4: Optimize the Bricks checkout page
Now move to the “Optimizations” tab and utilize these features to optimize your Bricks checkout page for conversion.
- Express payments: Enable one-click express payment options like Google Pay and Apple Pay.
- Google address auto-completion: Enable address auto-suggestions when users type their address field.
- Auto-apply coupons: Enter the coupon code and auto-apply it to incentivize your shoppers to purchase.
- Multi-step field preview: Skip back to the previous step and show a preview of fields entered by your users on the next step.
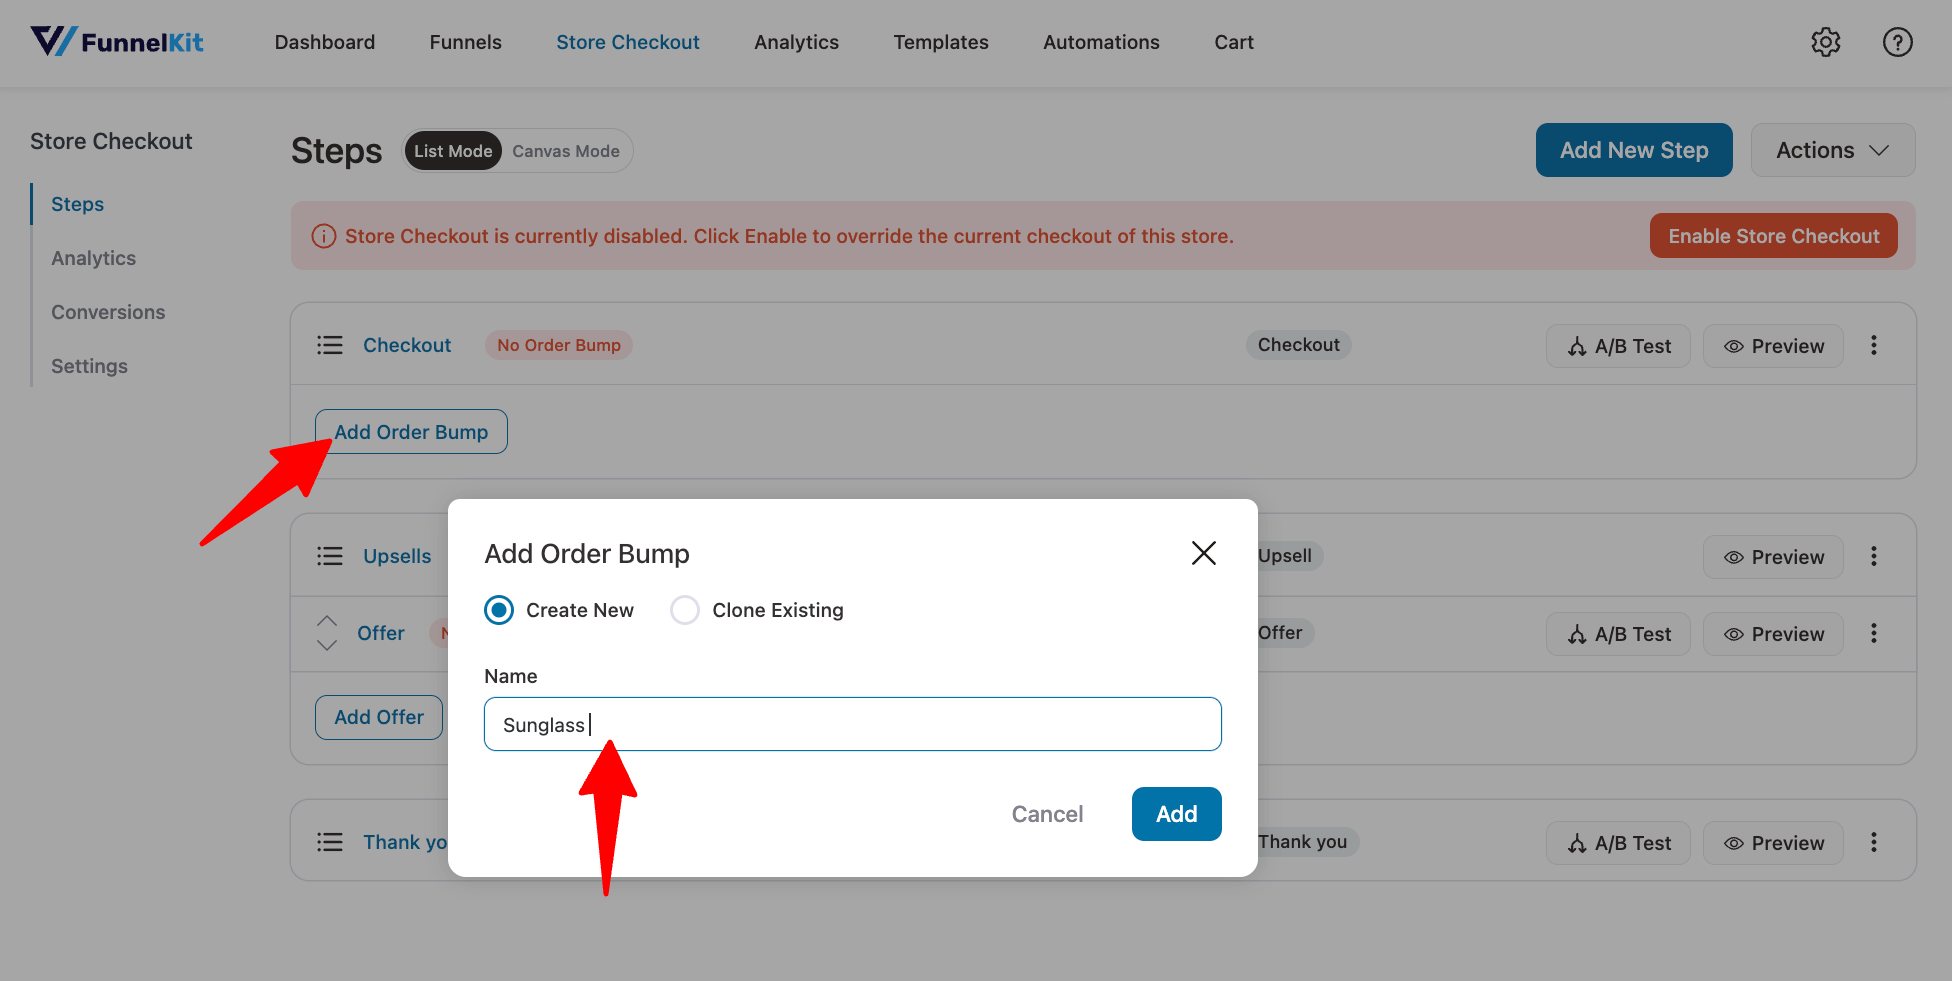
Step 5: Add an order bump on the checkout page to boost AOV
Order bumps are low-dollar offers that users can add to their cart with a single click on the checkout page. To add an order bump, hit “Add Order Bump”, provide a name, and click on “Add”.
Next, import the skin you like for your order bump.
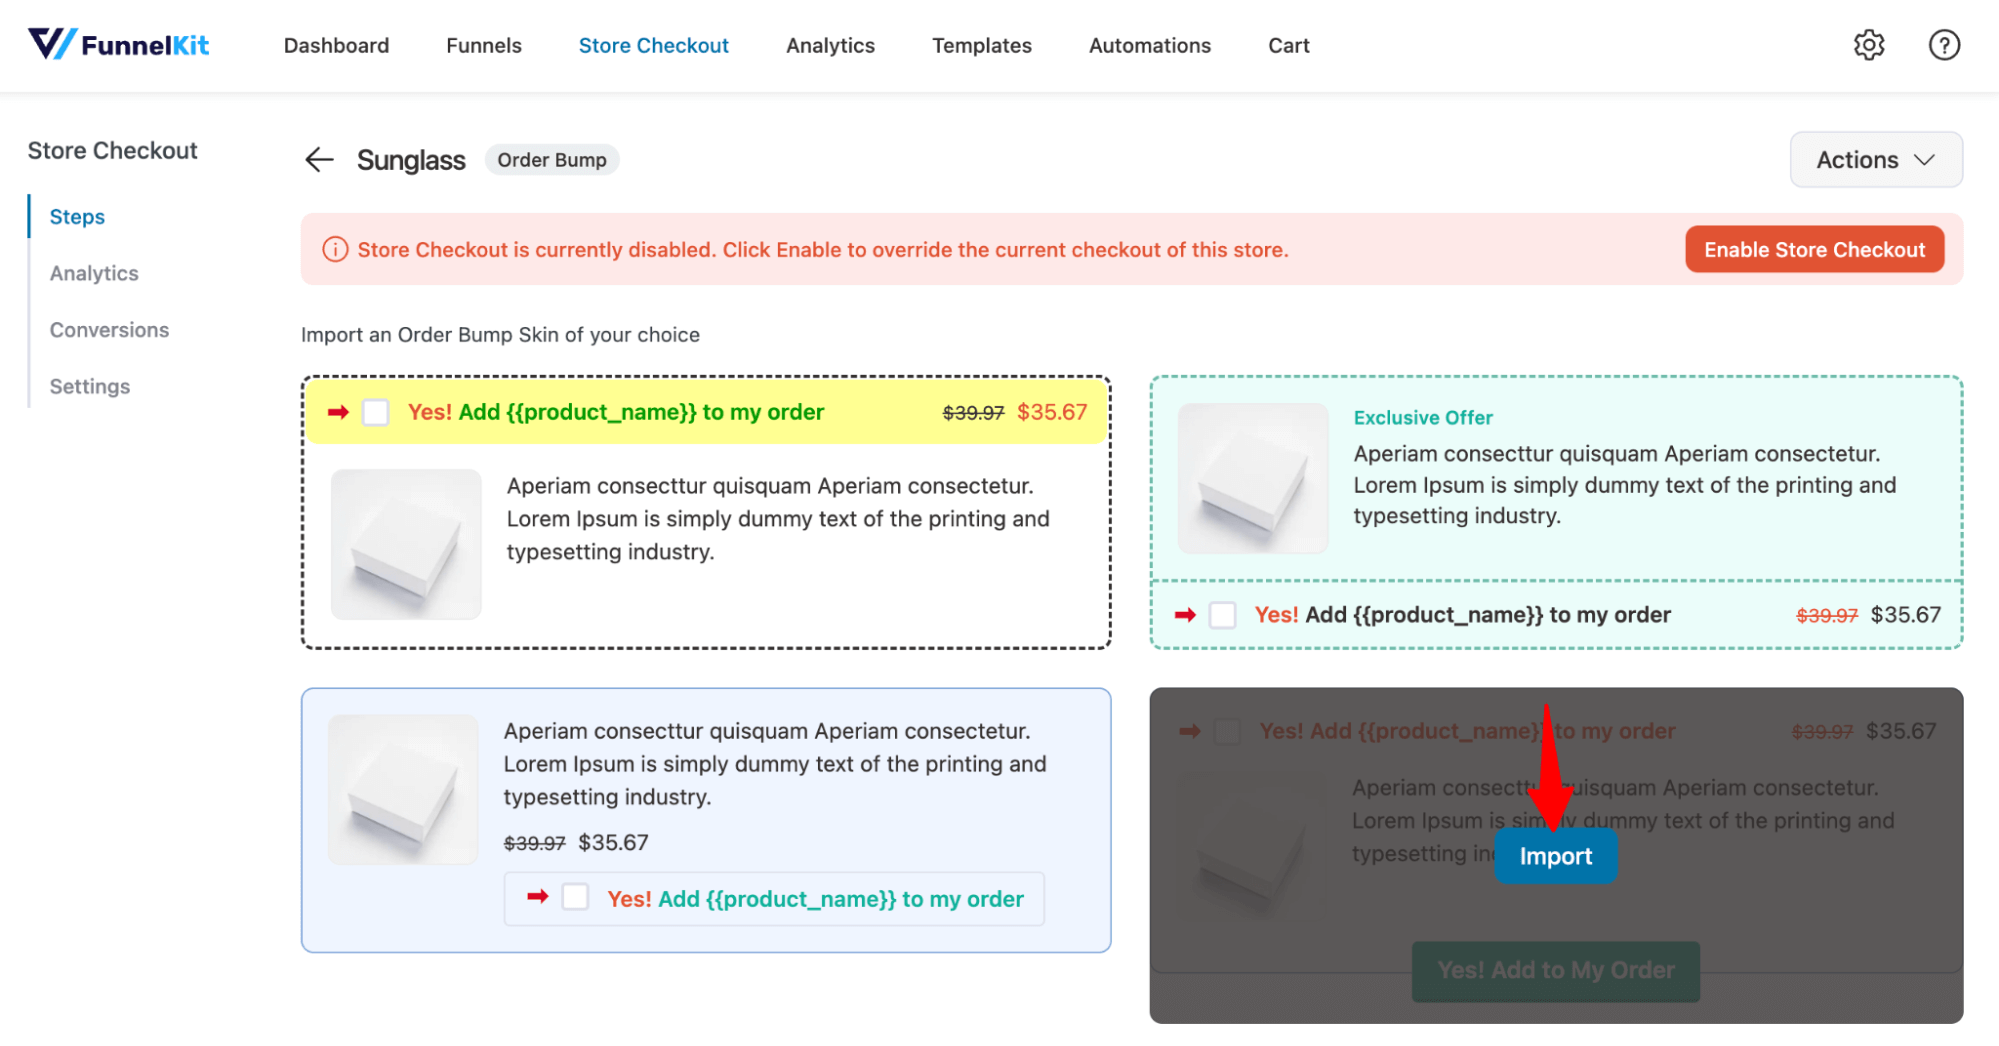
Now search and add the order bump and hit Add.
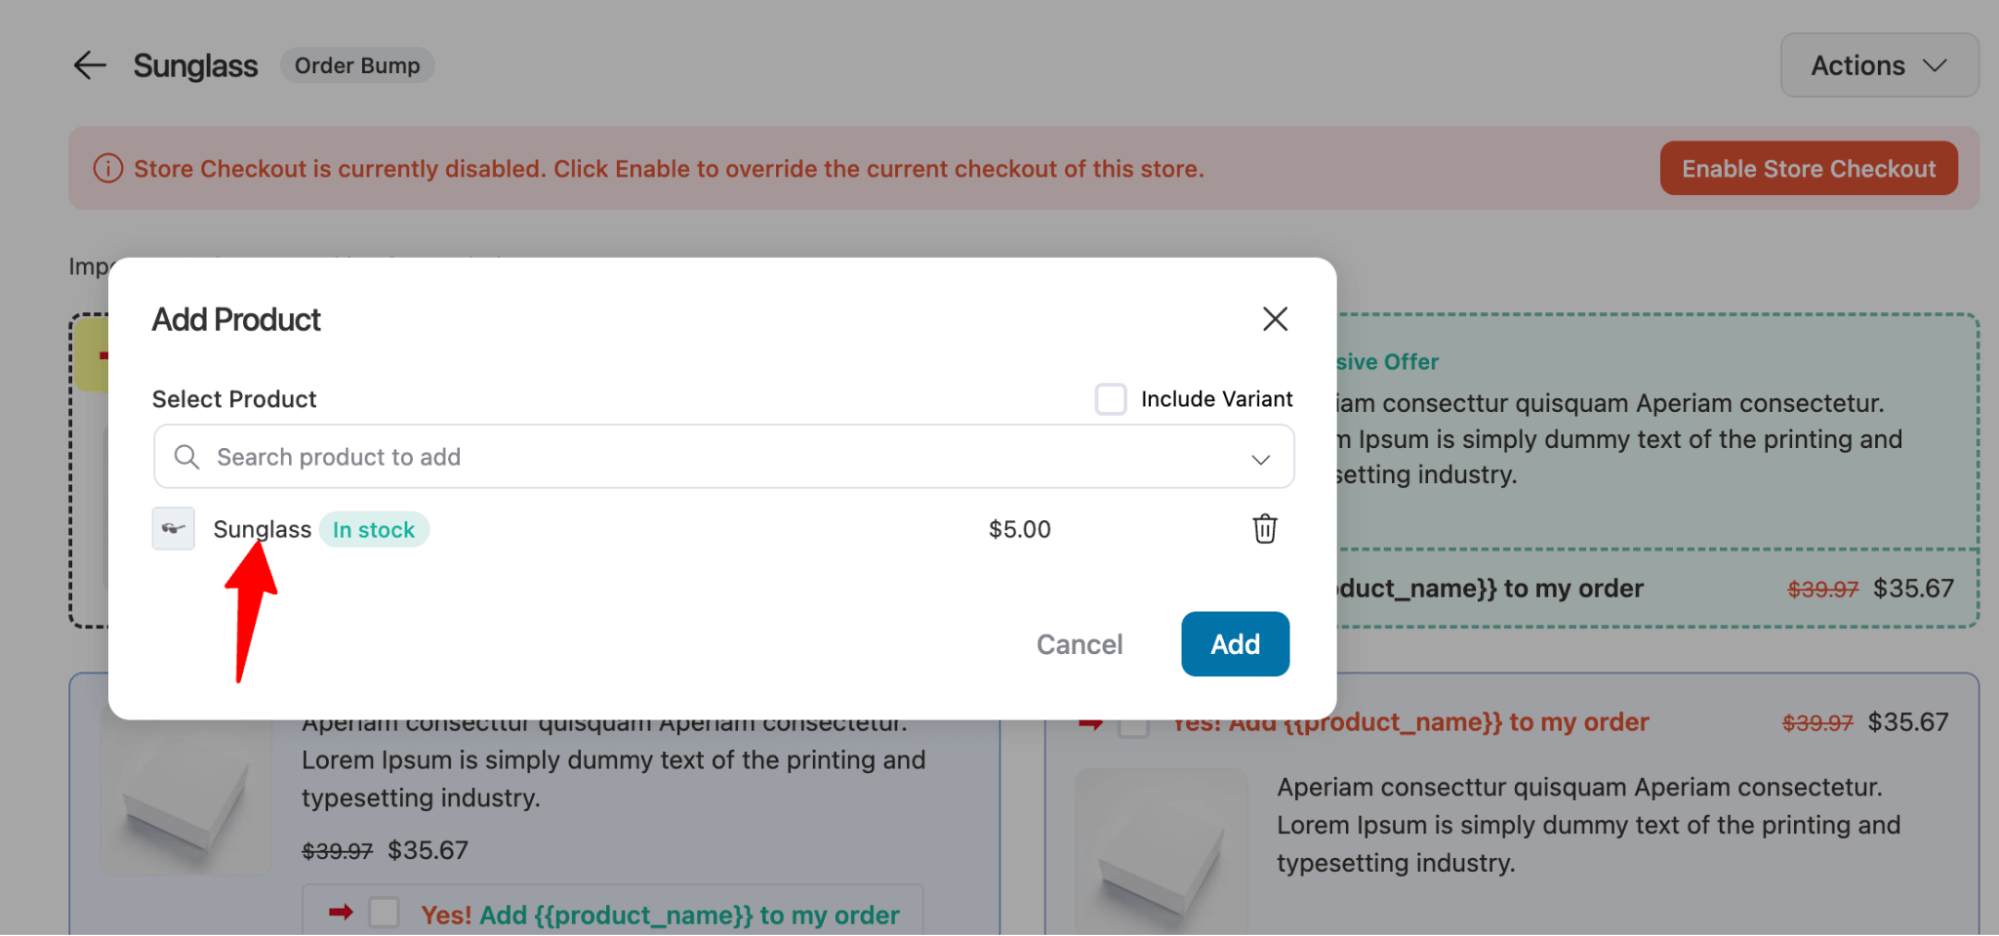
This will add your order bump on the checkout page.
Move to the products tab to set the quantity of the order bump. You can offer a discount if you want.
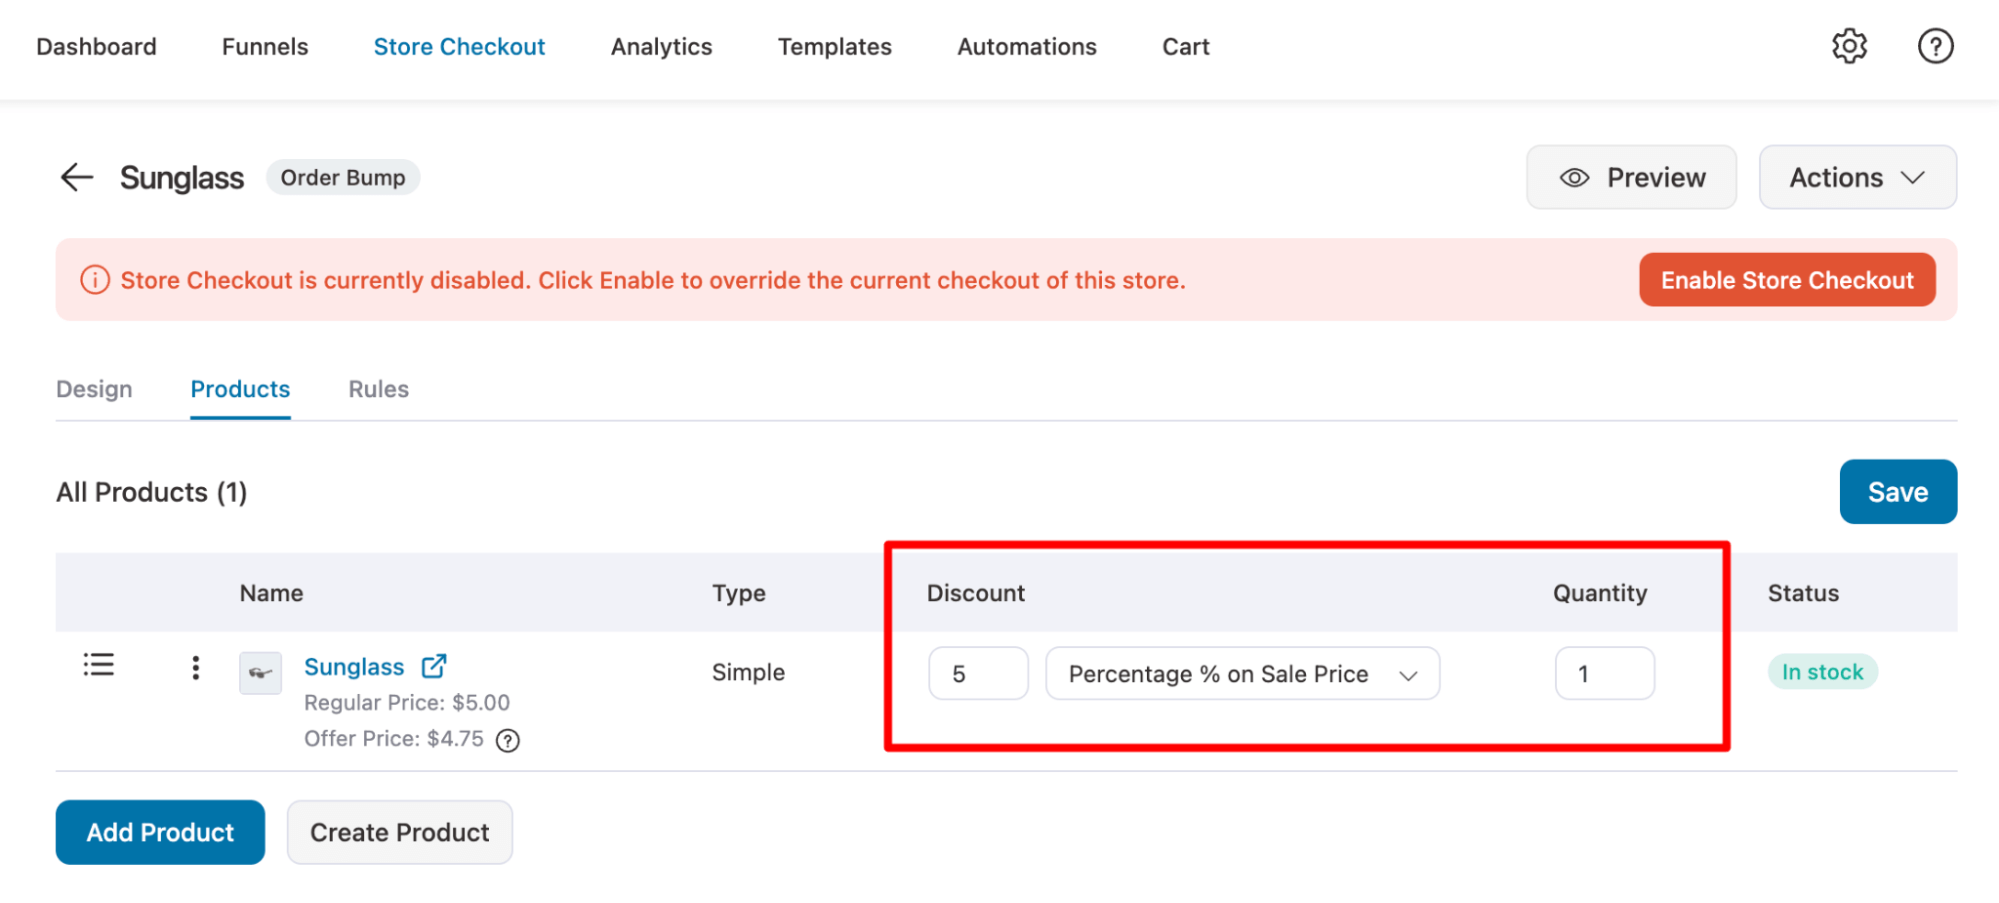
After setting up your order bump offer, make sure to hit Save to update.
Step 6: Offer a post-purchase one-click upsell
Like order bumps, you can also offer one-click upsells right after users have checked. ne-click upsells tokenizes the payment details so users aren’t required to share the details again, making it convenient for them to buy the product with a single click.
Hit on the Offer step to customize the one click upsell. On the design tab you can customize the upsell template and on the Products tab, you can add the product you want to offer as one click upsell.
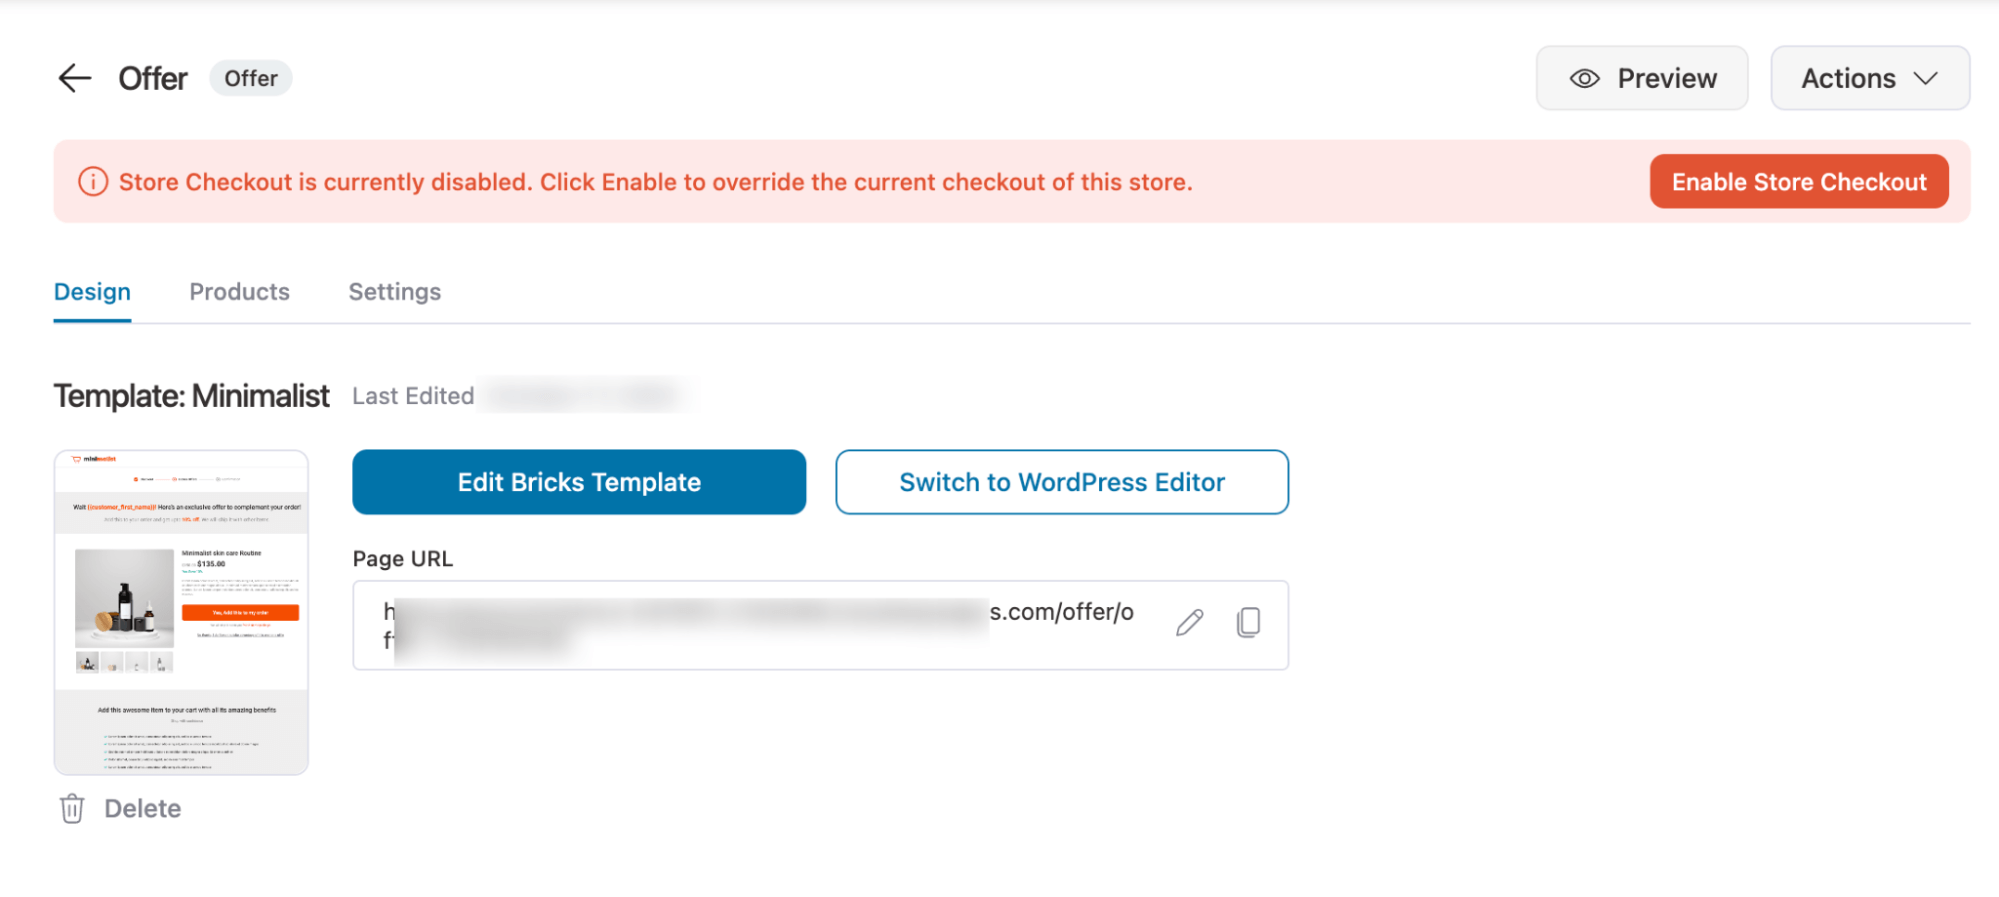
As one-click upsells, you can customize the order confirmation page as well.
Step 7: Activate the store checkout
Once you’ve saved all your changes, return to the funnel and hit the “Enable Store Checkout” button to activate the new store checkout with a custom WooCommerce Bricks checkout.
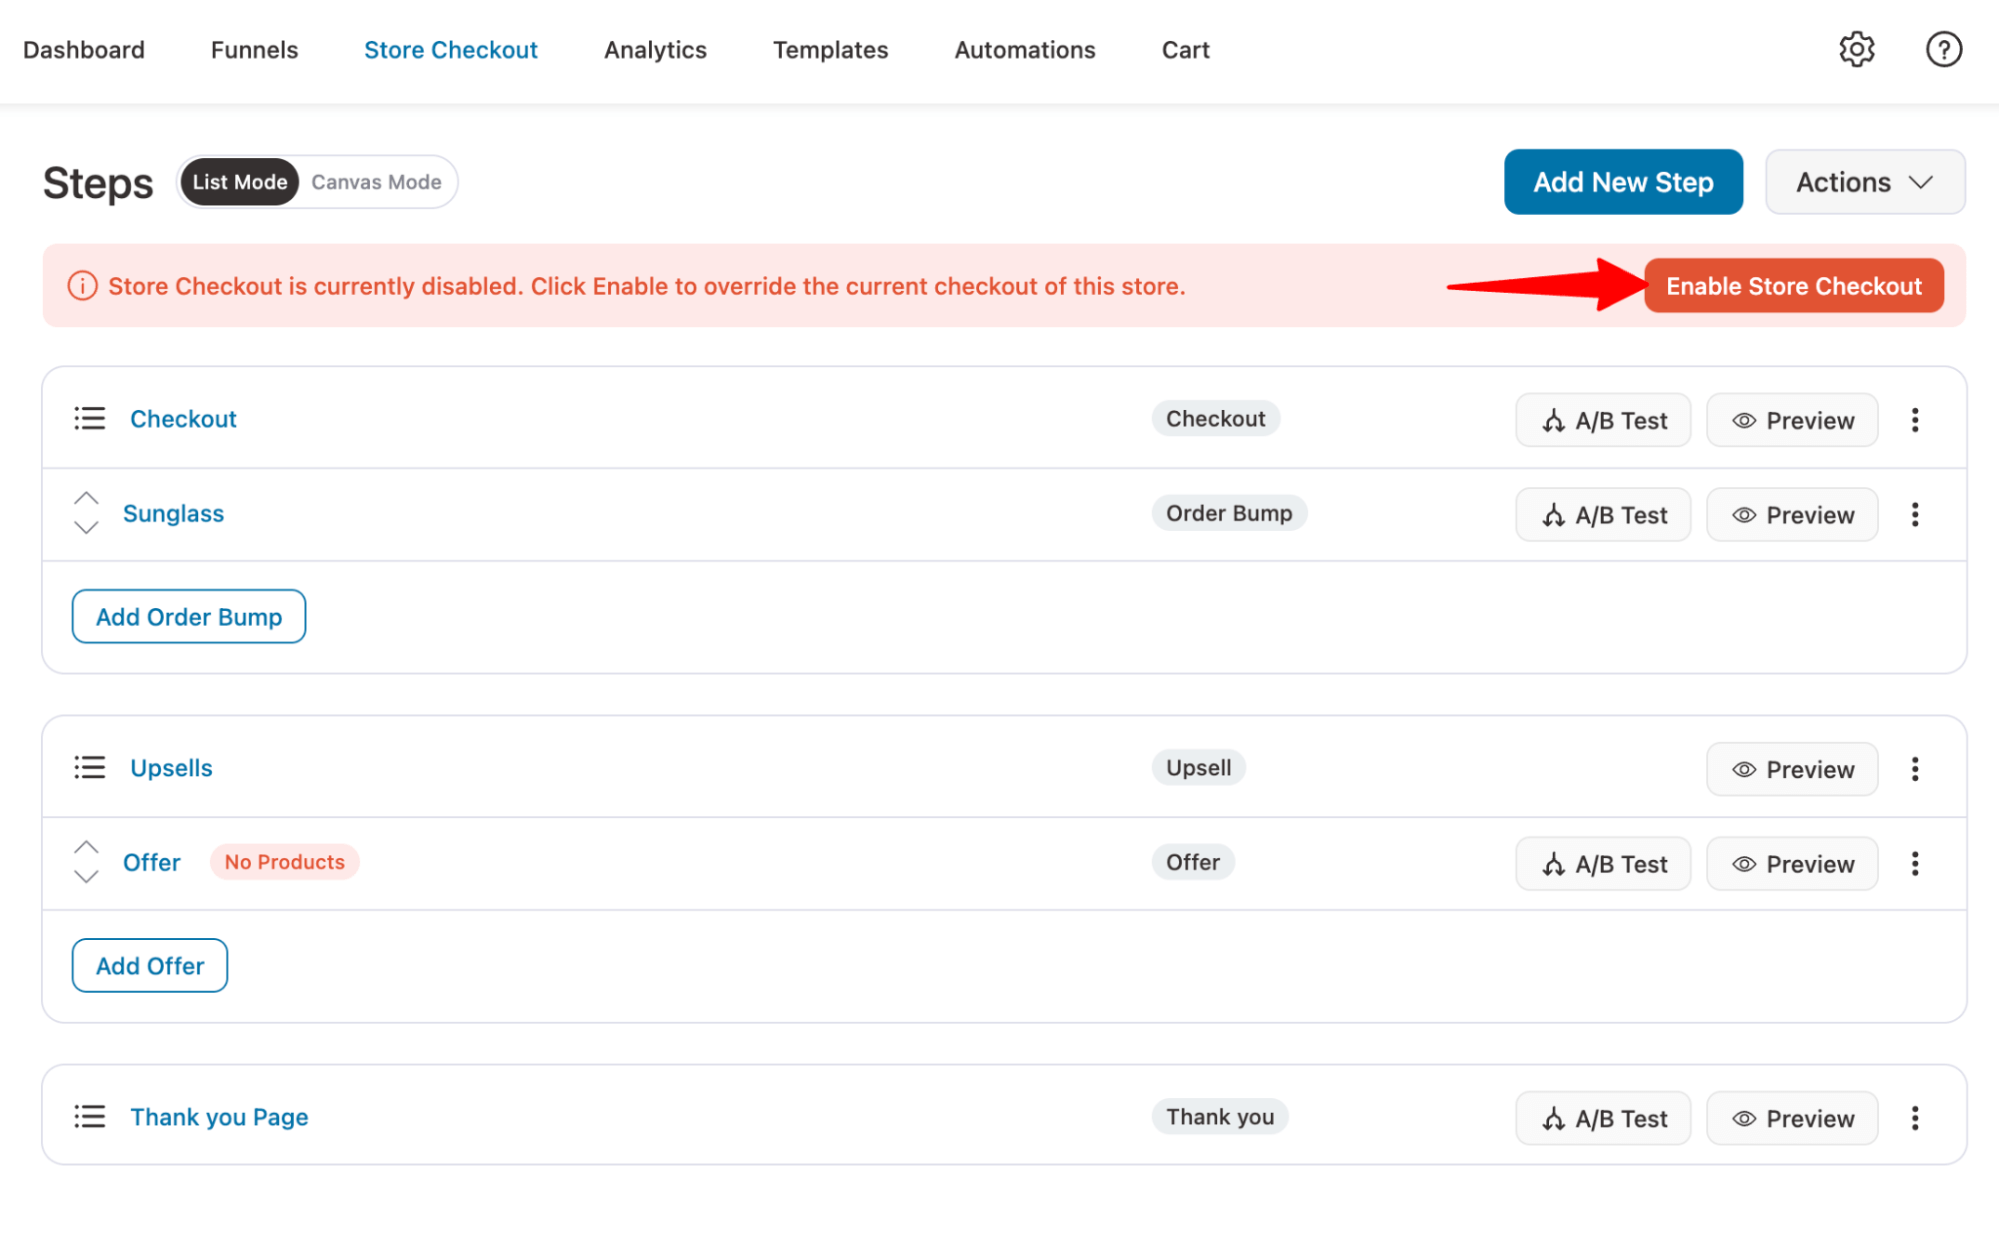
Here is the multi-step WooCommerce Bricks checkout we designed
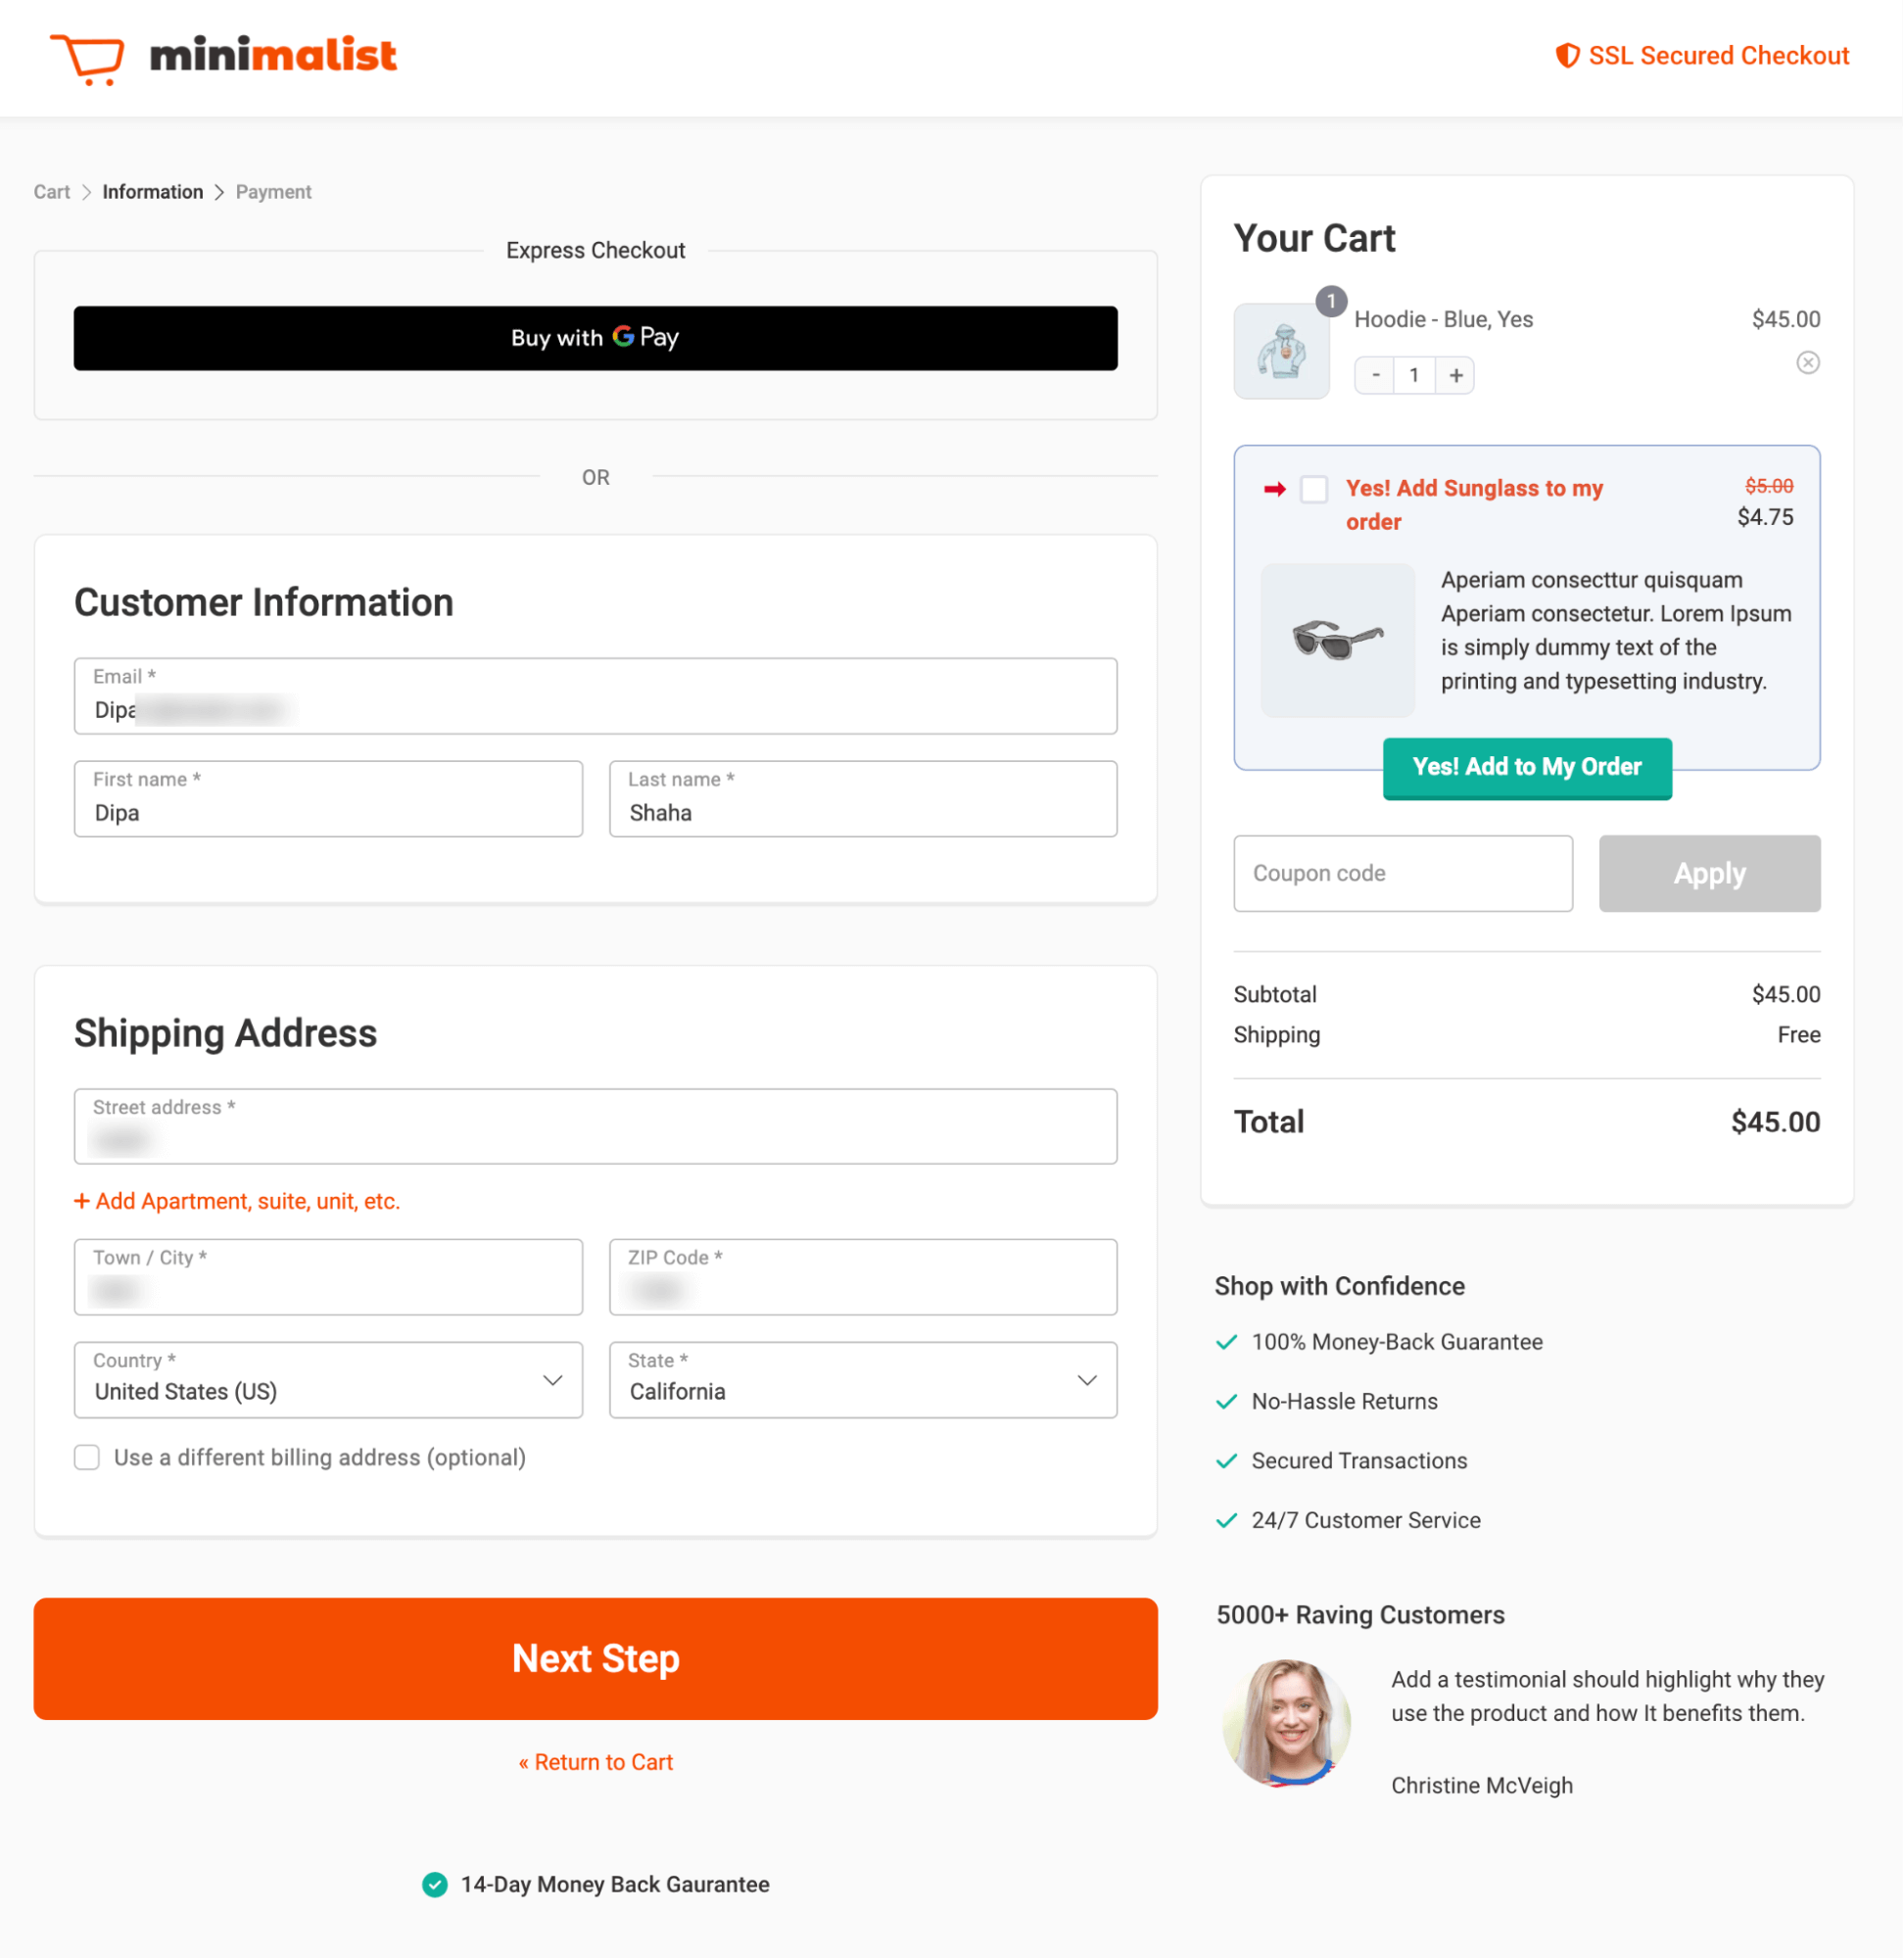
This is how you can create a modern-looking, user-friendly WooCommerce Bricks checkout using FunnelKit Funnel Builder.
5 Best Practices to Boost Conversions of WooCommerce Bricks Checkout Pages
Here are five best practices to enhance your store’s conversion rates and streamline the buying process:
1. Enable Google Address Autocomplete
Allow Google address autocomplete to help users enter the correct address faster and place their orders. This not only boosts conversions but also prevents losses caused by incorrect shipping addresses.
2. Make the optional field collapsible
Long checkout fields can overwhelm or distract users, resulting in cart abandonment. While multi-step checkout helps convert the long checkout process into user-friendly parts, it's always a good idea to make optional fields collapsible to shorten the form even further.
3. Make the checkout page device-responsive
Most people nowadays shop using their smartphones. So it’s super important that you ensure your WooCommerce Bricks checkout page is responsive for mobile devices.
Ensure that your checkout is responsive, loads quickly, and has a user-friendly interface on mobile devices.
4. Offer multiple payment methods
Many people abandon their carts because they can’t find a convenient payment option. So, make sure you provide enough payment methods for your target audience. Especially if you run a local business, make sure local payment gateways are available on your WooCommerce Bricks checkout.
5. Enable social proof and testimonials
Almost 88% of customers trust user reviews as much as personal recommendations. So, always try to add social proof or testimonials on your checkout page that encourage users to complete the order placement process faster.
Frequently Asked Questions About WooCommerce Bricks Checkout
- Why Customize the WooCommerce Checkout Page With Bricks Builder?
The default WooCommerce checkout page isn’t optimized for conversions. It lacks brand identity, is hard to customize, and doesn’t support key features like Google address autocomplete, custom fields, or on-page order bumps. Plus, it misses out on trust-building elements like testimonials and shipping policies. Customizing the page lets you streamline the experience, boost trust, and increase sales. For easy customization without coding, Bricks Builder is a great option.
- Is Bricks Builder compatible with all WooCommerce plugins and payment gateways?
Yes, Bricks Builder is compatible with popular WooCommerce plugins and payment gateways, including Stripe, PayPal, etc.
- Can I create a multi-step checkout using Bricks Builder in WooCommerce?
Yes, you can easily create a multi-step checkout in WooCommerce by using Bricks Builder with FunnelKit Funnel Builder.
- Do I need coding knowledge to customize the WooCommerce checkout with Bricks?
No, you don’t need to know any coding. Bricks Builder is a visual page builder, so you can customize the WooCommerce checkout page without any coding knowledge.
- Can I add custom fields to my WooCommerce checkout with Bricks Builder?
Yes, you can add custom fields to your WooCommerce checkout page using Bricks Builder and FunnelKit Funnel Builder. You can add any type of field, such as a text field, drop-down, radio, etc.
Ready to Create a Modern, Conversion-Optimized WooCommerce Checkout With Bricks?
As you have seen, creating a modern, conversion-optimized multi-step checkout is a breeze when you combine Bricks Builer with FunnelKit Funnel Builder.
The checkout page is the final and most crucial step in the buyer’s journey because if shoppers abandon it, all the efforts to get them there goes to waste.
That’s why experts always recommend paying special attention to your checkout page and optimizing it to maximize conversions.
Over 30,000 WooCommerce store owners use FunnelKit Funnel Builder to implement conversion-optimized checkouts and boost their sales. This tool increases conversions and helps raise average order value.
If you’re a Bricks Builder enthusiast looking to increase sales and revenue, FunnelKit Funnel Builder is the perfect solution.
So, get FunnelKit Funnel Builder today, pair it with your favorite Bricks Builder, and start boosting your conversions!

Editorial Team
July 7, 2026Are shoppers adding products to their cart and leaving before they buy? According to Baymard Institute research on checkout usability, 18% of shoppers who abandon their cart do so because...
Editorial Team
July 3, 2026Sometimes, the difference between a visitor leaving and placing an order comes down to something surprisingly small, like a better headline, a cleaner checkout, or a more compelling offer. That's...
Editorial Team
July 1, 2026Are you leaving money on the table by not fully leveraging your customers’ shopping behavior? Many store owners don’t realize that every time a customer adds a product to the...


