


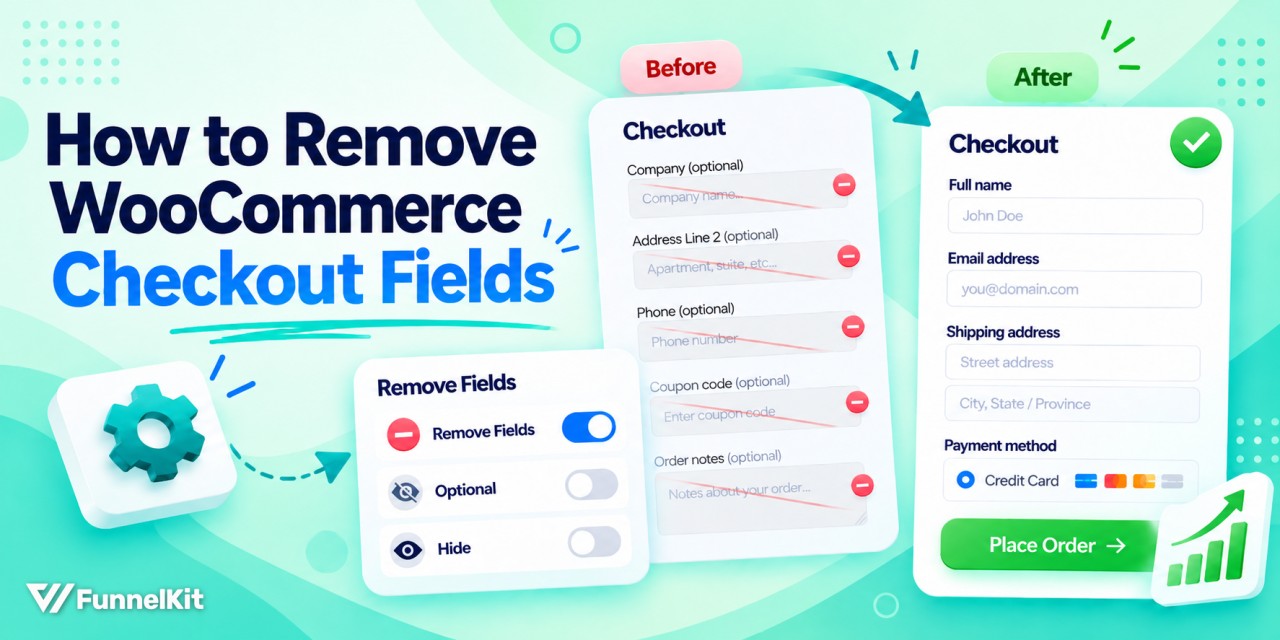
Removing checkout fields in WooCommerce is one of the fastest ways to simplify your store’s checkout and reduce cart abandonment.
Every extra field you ask customers to fill in adds friction and gives them another reason to leave.
But the catch is that WooCommerce now ships two different checkouts, i.e., the classic shortcode checkout and the newer Checkout Block.
The method you choose depends on which checkout your store uses.
A code snippet that works perfectly on the classic checkout often has no effect on the block checkout. That's where most store owners get stuck.
First, check which checkout you're using. It only takes a few seconds.
Then use the method that matches it in this guide: an editor toggle, a checkout field editor plugin, or a PHP snippet.
Quick Answer: You can hide Company, Address line 2, and Phone without code on either checkout. With the Checkout block, use its field toggles. With the classic checkout, use the WooCommerce Customizer.
For any other field, you'll need code or a plugin, and the right approach depends on which checkout you use.
Classic checkout uses the woocommerce_checkout_fields filter, while the Checkout Block doesn't support that filter and uses woocommerce_get_country_locale instead.
On either checkout, keep Email, Country, and the name fields unless you've tested every payment gateway and confirmed they work without them.
| Your checkout | Fastest method | Fields it can remove |
|---|---|---|
| Either (use method 1) | A checkout customizer plugin (no code) | Depends on the plugin's block support |
| Either (use method 2) | Editor toggles or Customizer (no code) | Company, Address line 2, Phone (limited) |
| Classic shortcode (method 3) | woocommerce_checkout_fields filter (PHP) | Any billing, shipping, or order field, one address at a time |
| Checkout Block (method 4) | woocommerce_get_country_locale filter (PHP) | Address, City, State, Postcode, Company, Phone (billing and shipping together) |
Table of Contents
- 1 First, Check Which Checkout Your Store Uses
- 2 Which WooCommerce Checkout Fields Are Safe to Remove?
- 3 Method 1: Use WooCommerce Checkout Customizer Plugin (Full Access)
- 4 Method 2: Hide Company, Address Line 2, and Phone Without Code (Limited)
- 5 Method 3: Remove Fields With PHP (Classic or Shortcode Checkout)
- 6 Method 4: Hide Fields on the WooCommerce Checkout Block
- 7 5 Best Practices to Keep a Shorter Checkout Converting
- 8 Checkout Field Still Showing or Still Required? 7 Fixes
- 9 Frequently Asked Questions
- 10 Stop Losing Sales to Unnecessary WooCommerce Checkout Fields!
First, Check Which Checkout Your Store Uses
Before you remove any fields, check which checkout you’re using. The checkout type determines which of the methods below will work.
WooCommerce made the Cart and Checkout blocks the default for stores created after version 8.3, released in November 2023.
So if a store launched in 2022 and hasn’t changed its checkout page, it’s likely still using the classic checkout. A store launched near 2024 is likely using the Checkout Block.
To check, open your Checkout page in the WordPress editor.
If you’re using a block theme, go to Appearance ⇨ Editor ⇨ Pages ⇨ Checkout.
With a classic theme, go to Pages ⇨ All Pages, then edit the Checkout page. Open List View to see which checkout is on the page.
- You see a block called Checkout, with inner blocks such as Contact Information, Shipping Address, and Payment Options. You’re using the Checkout Block.
- You see the [woocommerce_checkout] shortcode or a Classic Shortcode placeholder block. You’re using the classic checkout.
How to switch the Checkout Block back to the Classic Checkout
If your snippets aren’t doing anything, the Checkout Block may be the reason.
Switching back to the classic checkout makes the woocommerce_checkout_fields filter work again and can also restore compatibility with older checkout plugins.
- Open the Checkout page in the editor and select the Checkout block from List View.
- Click Transform on the left side of the block toolbar, then choose Classic Shortcode.
- Save the page, then repeat the same steps for your Cart page.
WooCommerce recommends switching the Cart and Checkout back together because the two blocks are designed to work as a pair.
If a plugin on your site is marked as incompatible with blocks, you may also see a one-click option to switch back in the block settings sidebar.
But there's a trade-off. You'll lose the checkout layout controls that come with the block editor, and newer features such as the Additional Checkout Fields API only work with the Checkout Block.
If you only want to remove a few checkout fields, there’s no need to switch back. You can stay with the Checkout Block and use Method 3 instead.
Which WooCommerce Checkout Fields Are Safe to Remove?
Most stores can remove three to five checkout fields, but some fields need to stay because payment processing, taxes, or order emails rely on them.
Baymard Institute found that the average checkout on large ecommerce sites had 11.3 form fields in 2024, even though most sites only need around 8.
The classic checkout uses the field keys below with the woocommerce_checkout_fields filter.
The Checkout Block uses the block keys with woocommerce_get_country_locale.
| Field | Classic key | Block key | Safe to remove? |
|---|---|---|---|
| billing_email | None (contact field) | No. Order emails go to it, and payment gateways rely on it. | |
| First name / Last name | billing_first_name, billing_last_name | first_name, last_name | No. Keep both for payments and order records. |
| Country / Region | billing_country | country | No. Sell to one country instead (see below). |
| Company name | billing_company | company | Yes, for most B2C stores. Keep it if you invoice businesses. |
| Address line 2 | billing_address_2 | address_2 | Yes. Hide it or remove it. |
| Phone | billing_phone | phone | Usually. Make it optional if your courier needs it. |
| Street address, City, State | billing_address_1, billing_city, billing_state | address_1, city, state | Only if you sell nothing but digital products, and only after a live test order. |
| Postcode / ZIP | billing_postcode | postcode | Make it optional instead. Card processors and tax tools often need it. |
| Order notes | order_comments | None (editor toggle) | Yes |
Shipping fields use the same names with a shipping_ prefix.
WooCommerce only shows them when the cart contains something that needs shipping, so they have their own section further down.
- Don't remove the Country field
WooCommerce treats it as required, and customers can’t complete an order without it. If you only sell to one country, go to WooCommerce ⇨ Settings ⇨ General and set Selling location(s) to Sell to specific countries.
The classic checkout will then show your country as a fixed value instead of a long dropdown.
Our guide to hiding the country field for single-country stores covers a few other options.
- On the Checkout Block, billing and shipping use the same set of fields
Hide a field there and it disappears from both forms. So, for example, you can’t hide the postcode for billing only.
- Check your payment gateway and tax setup before removing address fields
Some payment methods use the address for fraud checks and card validation.
Tax rules, including WooCommerce’s own, may also need the full address to calculate the correct rate.
If you’re unsure, make the field optional instead of removing it.
Method 1: Use WooCommerce Checkout Customizer Plugin (Full Access)
A checkout field editor lets you hide or remove fields from a settings screen instead of adding a code snippet.
Before installing one, check that it supports the Checkout Block.
Many field editors were built for the classic checkout, and their settings won’t affect a store using the Checkout Block.
| Plugin | Free | Block support | Conditional rules | Best for |
|---|---|---|---|---|
| FunnelKit Funnel Builder | Free version available | Replaces the checkout form, so the block/classic split doesn’t apply | Conditional field display | Rebuilding the whole checkout |
| Checkout & Store Toolkit | Yes | Yes, since v2. Block settings apply to billing and shipping together, and its order-notes removal is classic-only. | Virtual, downloadable, free, subtotal, product and category carts | Free field hiding on either checkout |
| Checkout Field Editor (ThemeHigh) | Free core, Pro available | Yes, through a separate Block Checkout Fields editor. Fields set up for classic don’t carry over. | Full rules on classic; fewer options on the block | Editing labels and adding fields |
| Flexible Checkout Fields (WP Desk) | Free core, Pro available | Classic only. Block stores need the separate Checkout Fields for Blocks plugin. | Pro on classic; paid add-on for blocks | Adding custom field types on classic |
If you’re rebuilding the checkout anyway, perhaps with a new layout, one-page or multi-step flow, or order bumps, a checkout builder makes more sense.
FunnelKit Funnel Builder avoids the block-versus-classic issue altogether.
It replaces the WooCommerce checkout form with its own and lets you hide or remove checkout fields from the editor.
FunnelKit has a free version on WordPress.org with checkout templates and a field editor.
Paid plans add features such as multi-step checkout layouts, checkout optimizations, A/B testing, and smart analytics.
Follow the step-by-step instructions below.
Step 1: Create the store checkout
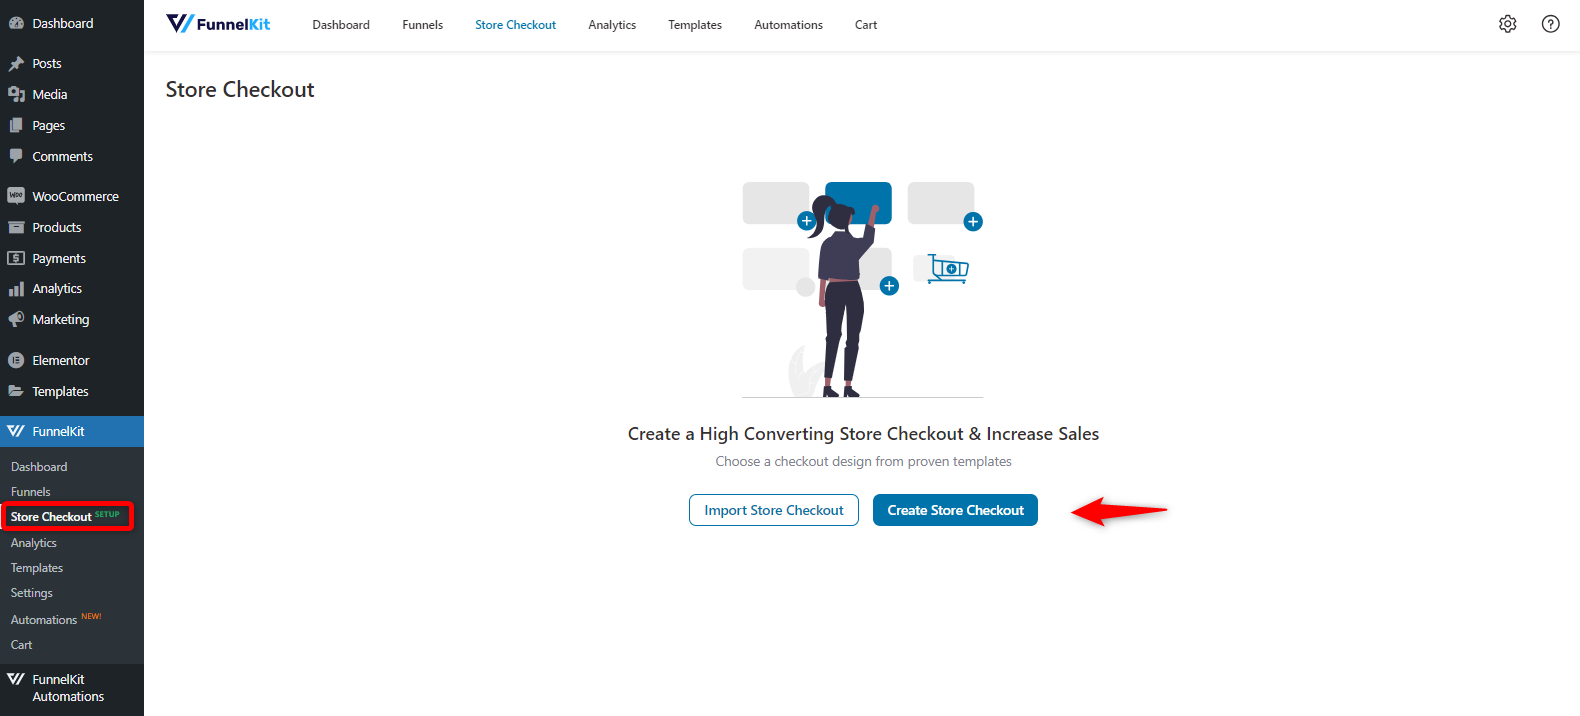
First, create a store checkout page by navigating to FunnelKit ⇨ Store Checkout and clicking on the 'Create Store Checkout' button.
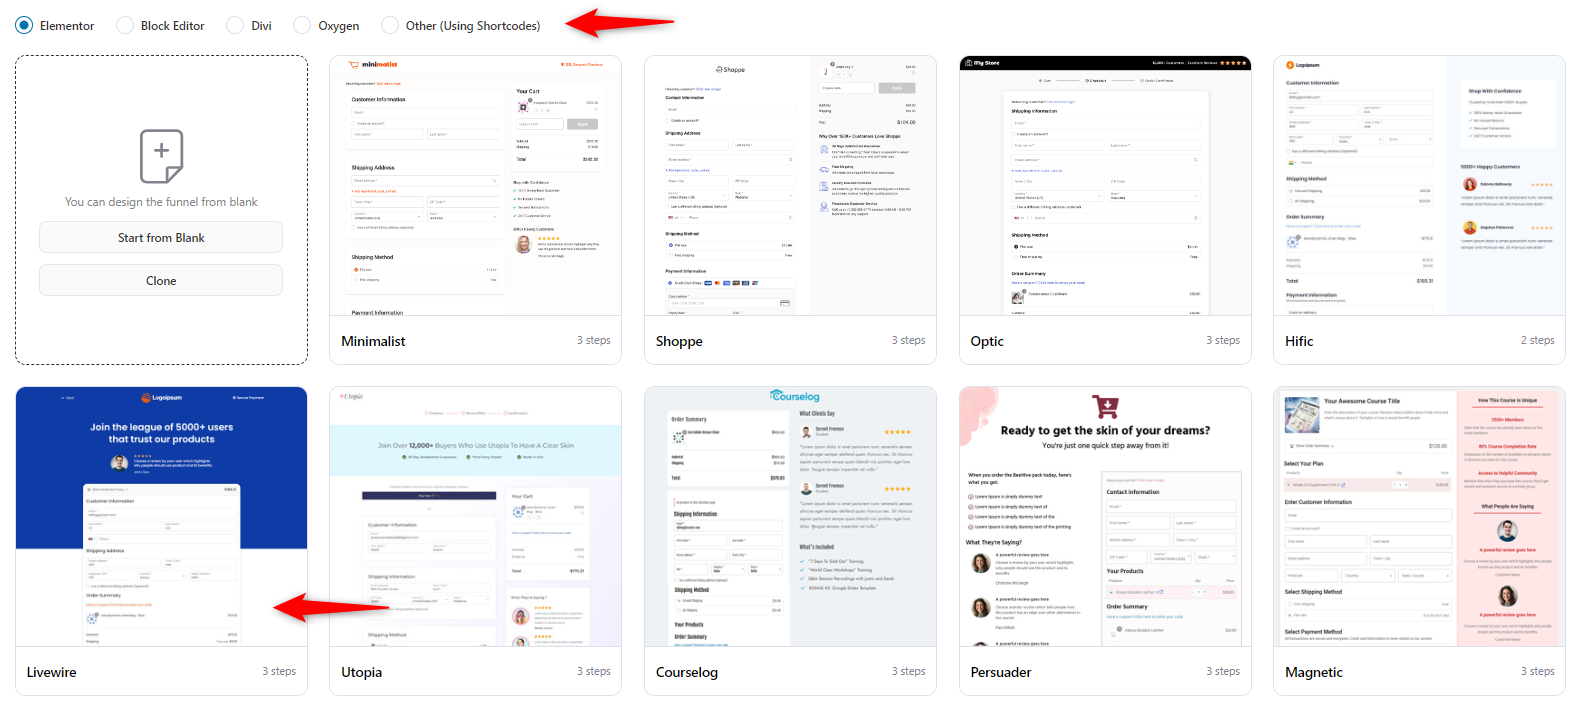
In the next step, choose your page builder and the template for your checkout page.

We’re selecting the “LiveWire” template and editing it with Elementor.
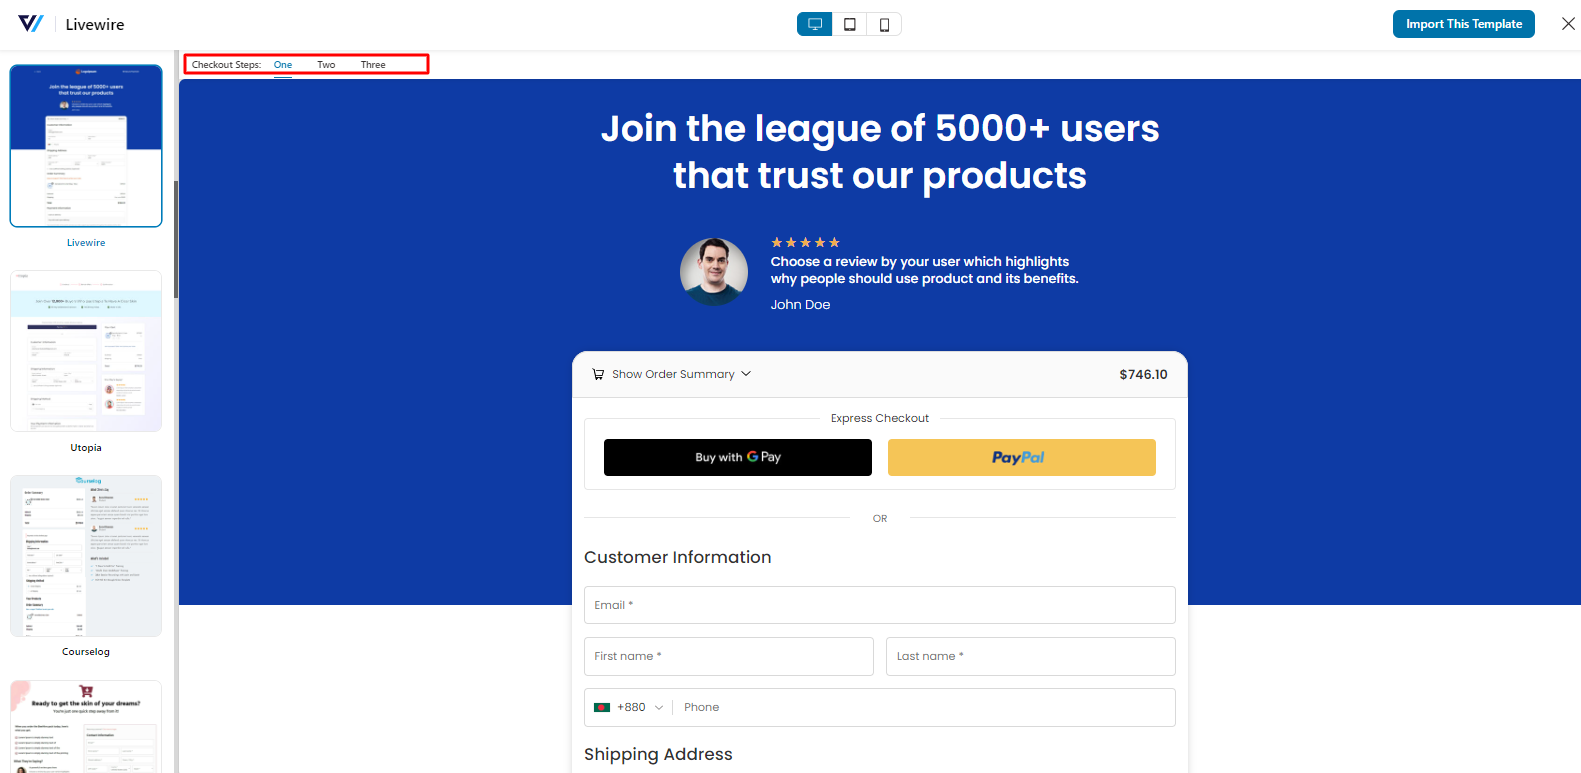
Review the template layout, including the number of steps you want on your checkout page and the design of the other pages.
After checking, click on the 'Import This Template' button.
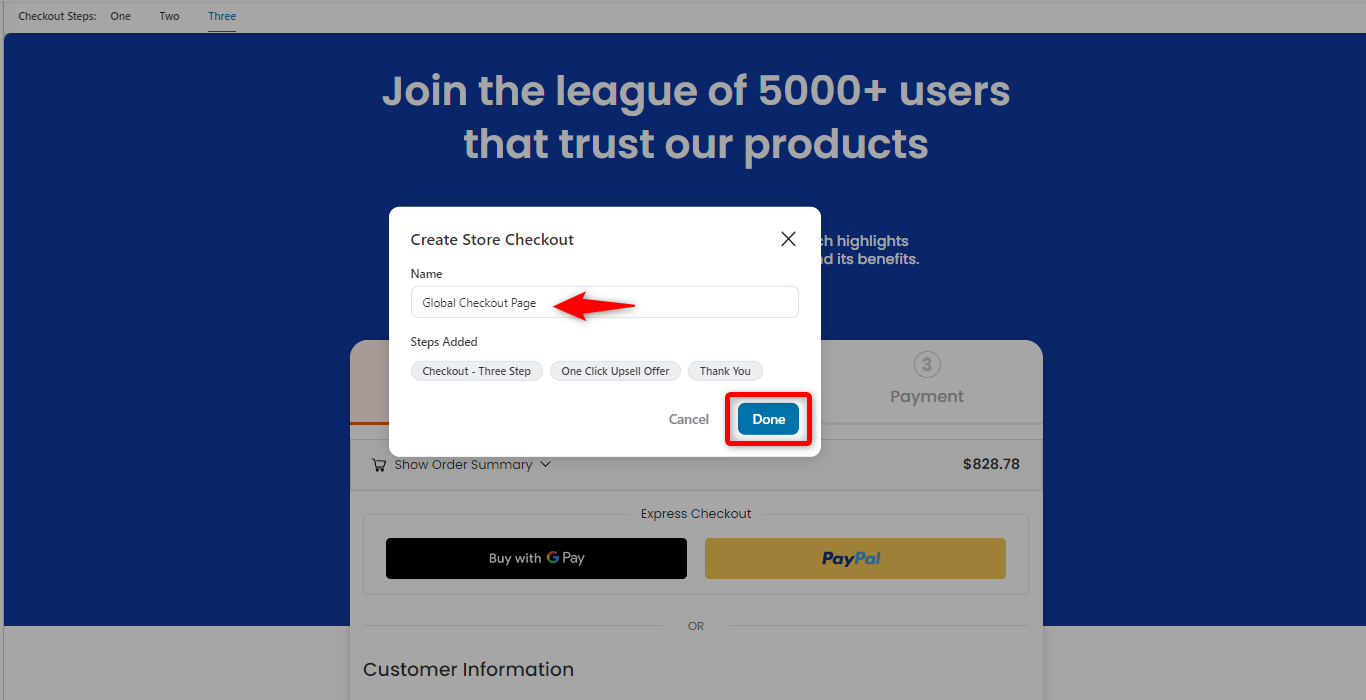
Provide the store checkout template name, then click the 'Done' button.
Step 2: Open the checkout field editor
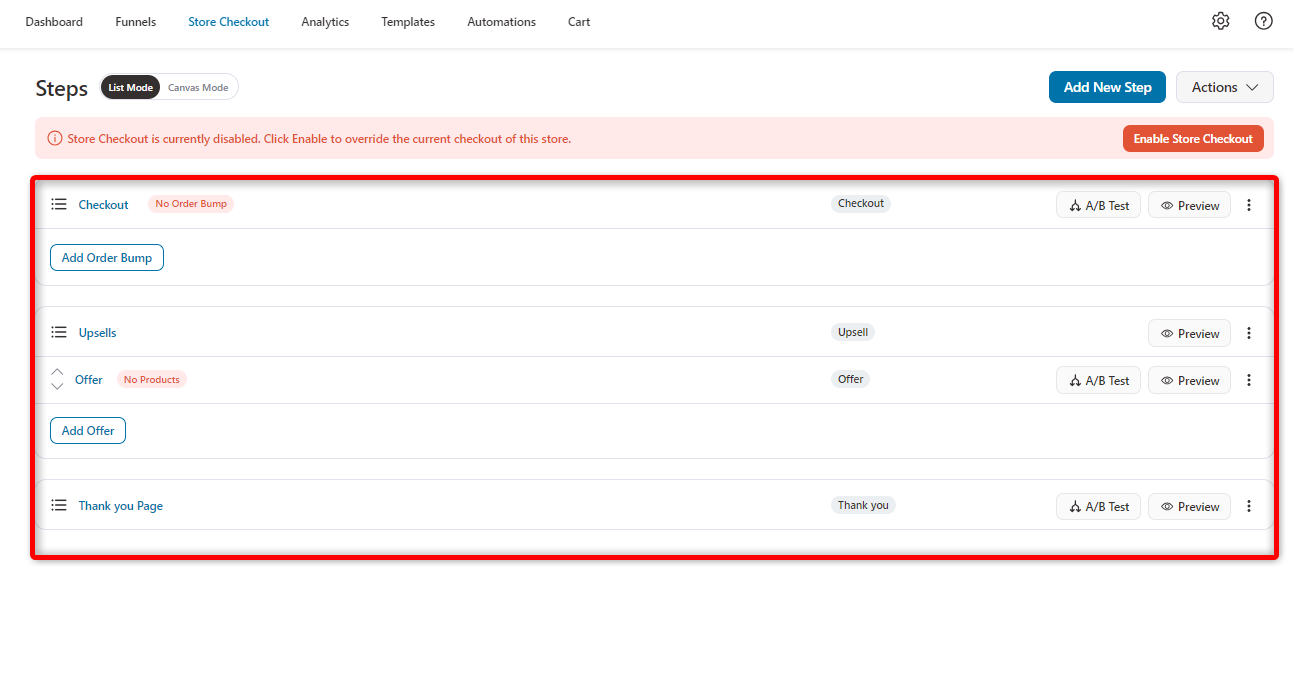
Click on the checkout page to start customizing it.
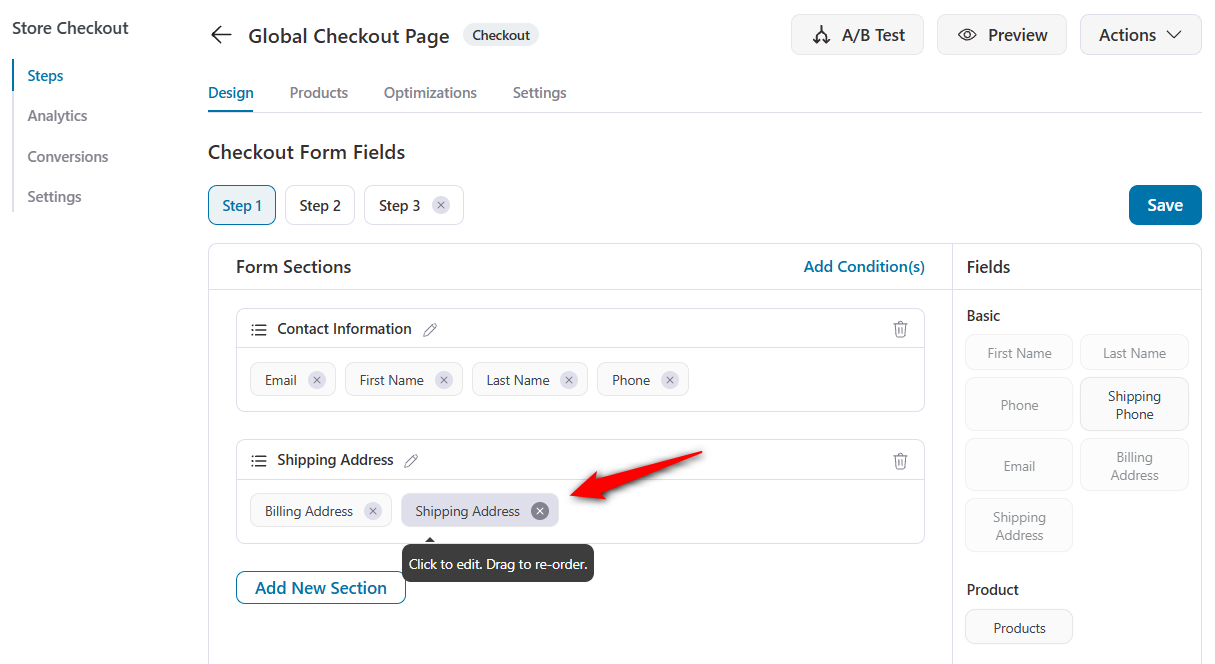
Scroll down the Checkout Form Fields.
Choose which fields you want to add or remove from your WooCommerce checkout form.
Step 3: Remove the unnecessary fields from the checkout page
From here, you can remove any fields you want. Click the cross icon to remove a field from the checkout form.
Suppose you sell digital products such as courses and subscriptions, and you want to remove the shipping address field from your checkout form.
To do so, just click on the cross icon.
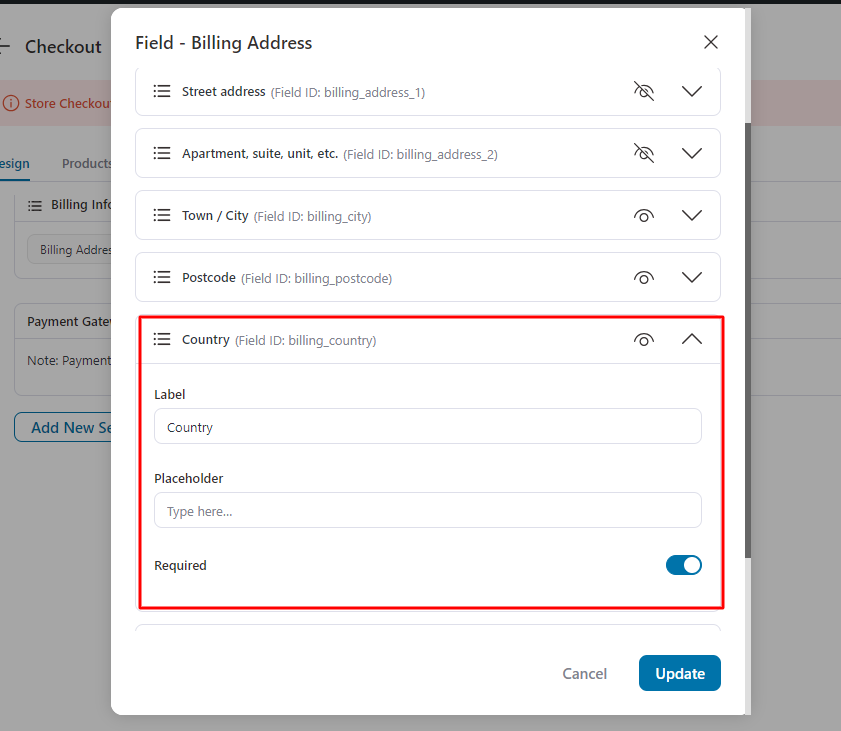
Now that you've removed the shipping address field, you can delete the billing fields from your checkout form too.
If you want only selected fields in your billing address, click the field and toggle any fields on or off using the eye icon.
Hit 'Update' once you’re done.
Step 4: Customize the remaining checkout fields
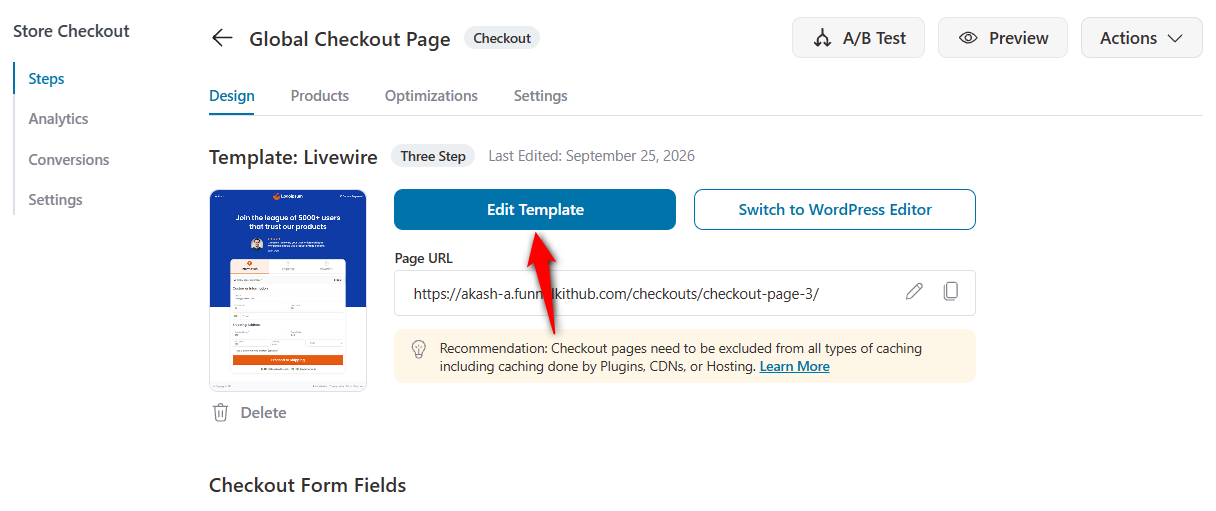
Now, click on the Edit Template button to customize the checkout page.
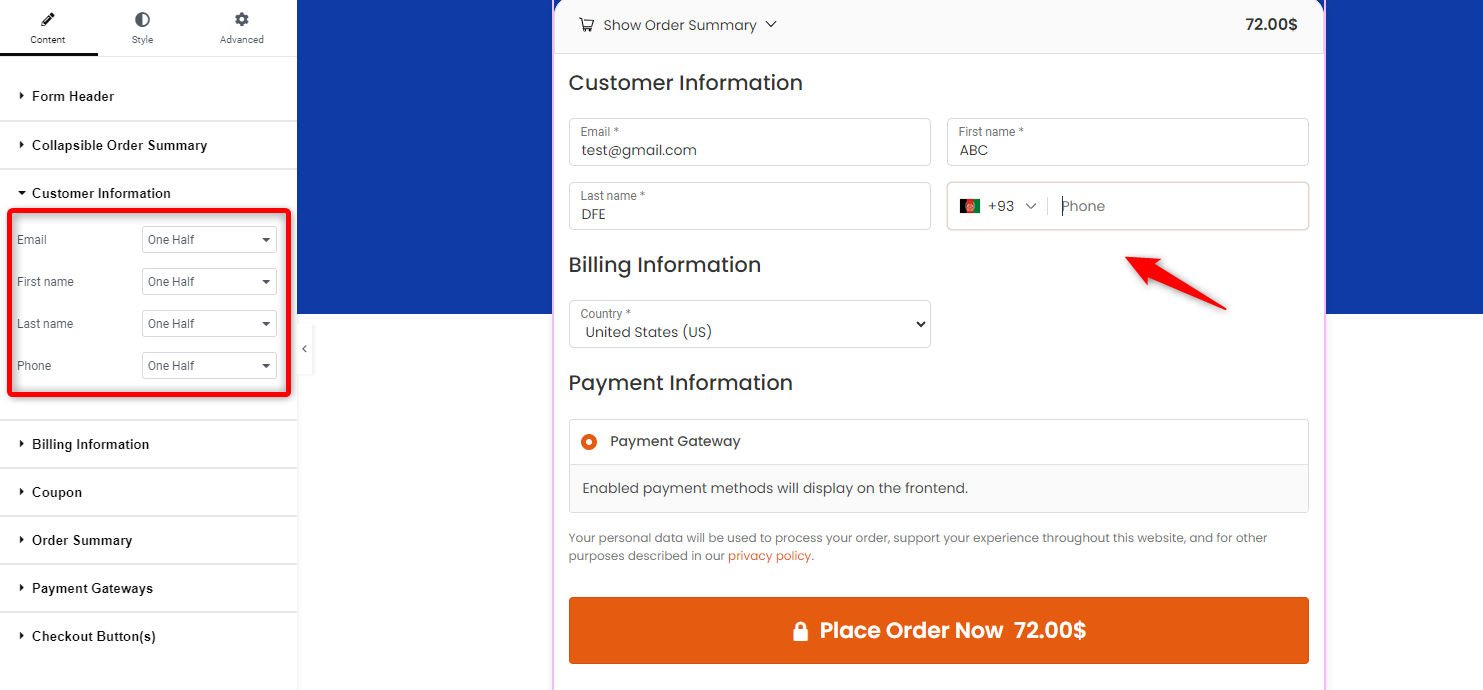
On the Elementor panel, you’ll get editing options for each section.
This means you can only adjust the field size from full to half (one-half).
Make sure to save the changes to update your checkout page.
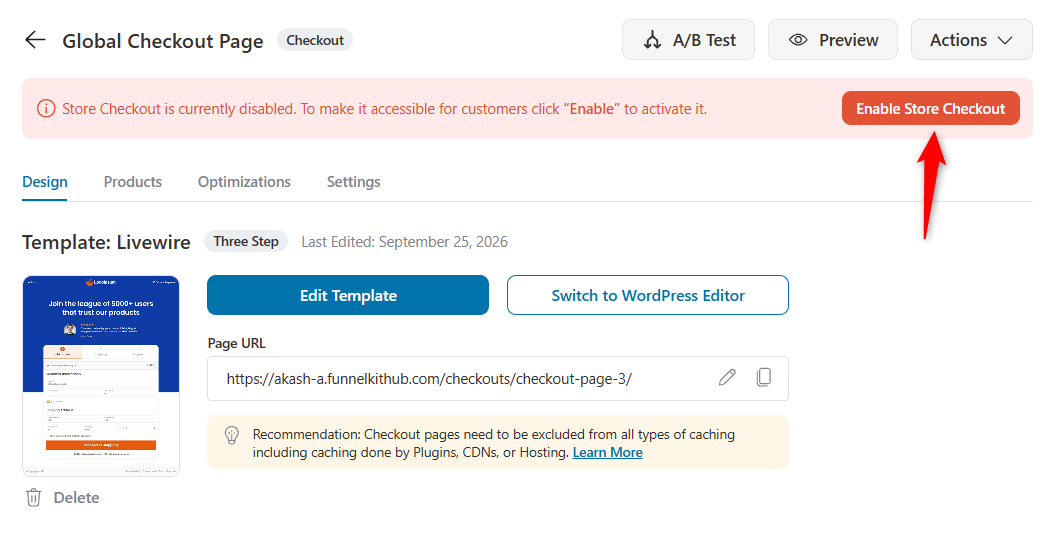
Activate your store checkout by clicking on the 'Enable Store Checkout' button.
To test, go to any product page, add the item to your cart, proceed to checkout, and place a test order.
Verify that the removed fields no longer appear and that the checkout flow works smoothly from start to finish.
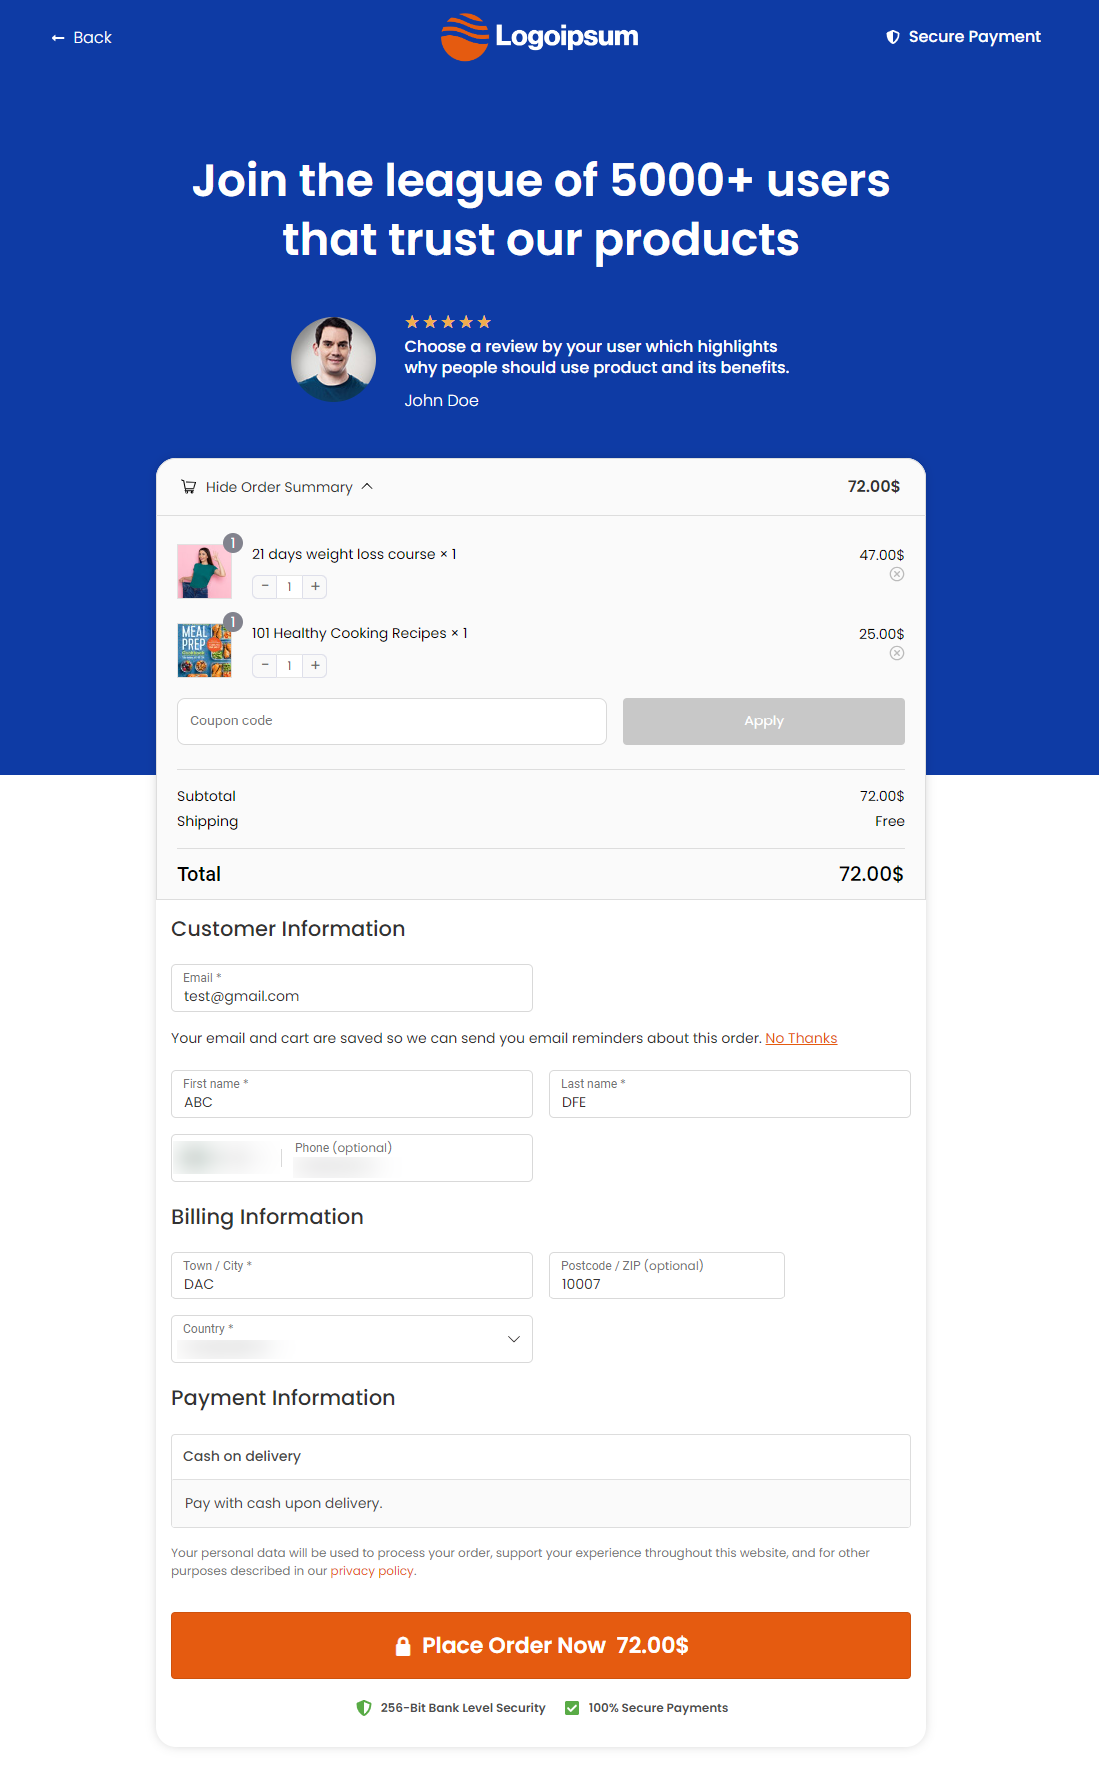
Test on both desktop and mobile devices. On mobile, confirm that the checkout form fits well on smaller screens and that customers can complete the entire form without excessive scrolling.

Method 2: Hide Company, Address Line 2, and Phone Without Code (Limited)
WooCommerce has built-in controls for three fields: Company, Address Line 2, and Phone.
You can set each one to Hidden, Optional, or Required without installing anything.
These three fields are handled differently from the rest. WooCommerce saves their settings as a site option that applies to both billing and shipping forms.
The Checkout Block toggles and Customizer dropdowns both update this same setting, so changing one also updates the other.
Address line 2 is often the first field worth removing. In Baymard’s testing, 30% of participants stopped at this field.
On the Checkout Block
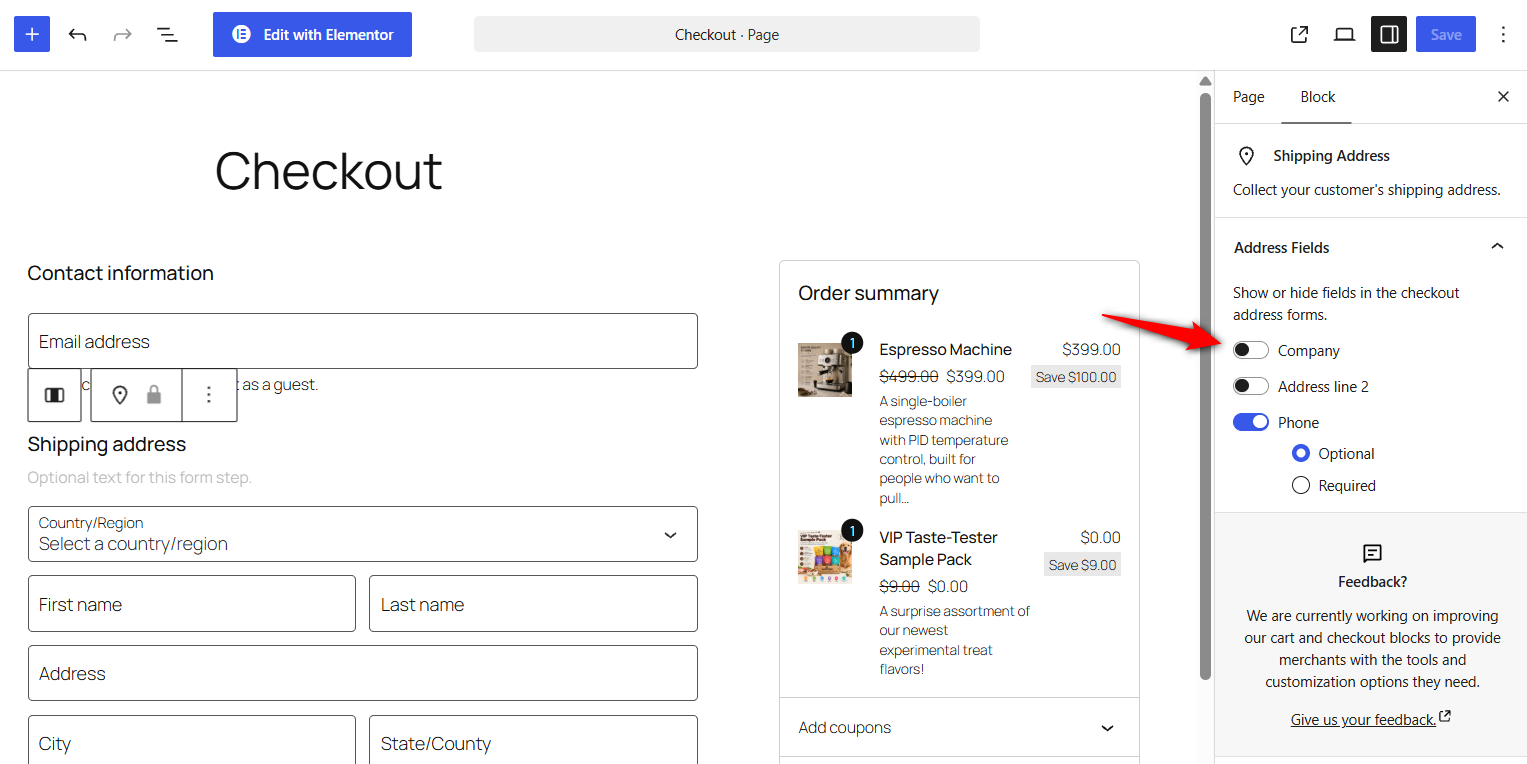
Open the Checkout page in the editor and select the Shipping Address or Billing Address block.
In the settings sidebar, switch off Company, Address line 2 (the block calls it “Apartment, suite, etc.”), and Phone. Then save.
You will see toggle options for Company name, Address line 2, and Phone form fields.
Either toggle them off or set each one to optional, then click 'Save'.
On the Classic Checkout
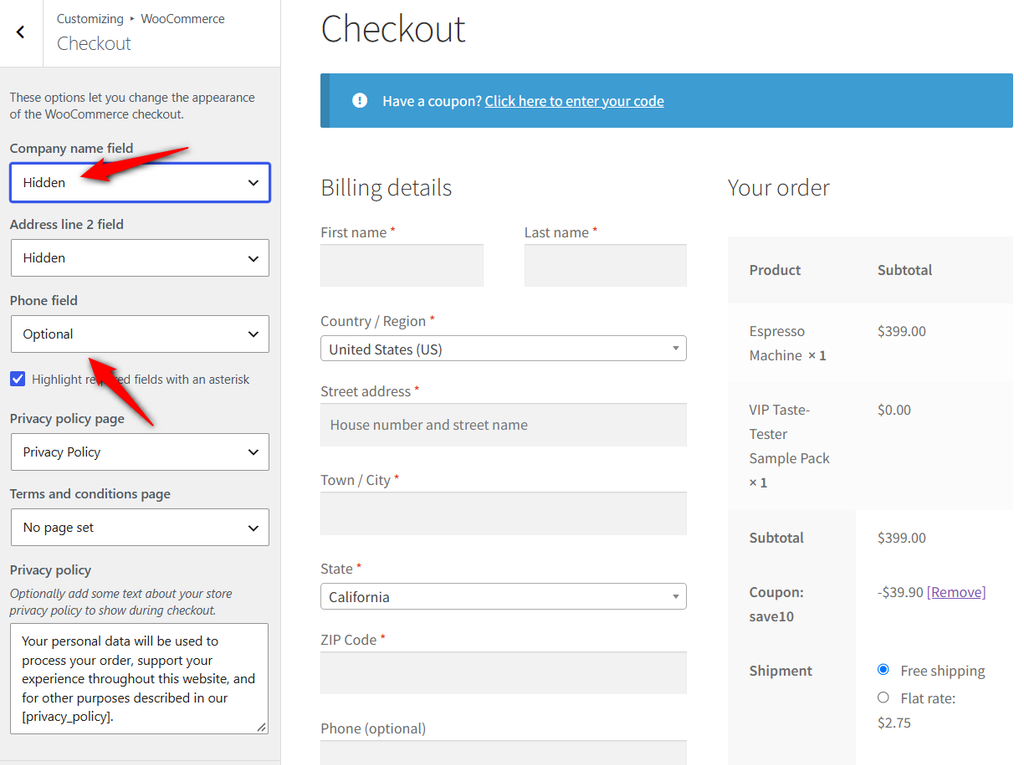
Go to Appearance ⇨ Customize ⇨ WooCommerce ⇨ Checkout.
Set the Company name, Address line 2, and Phone field dropdowns to Hidden or Optional, then click 'Publish'.
These built-in controls only cover those three fields.
For anything else, such as Postcode, State, or Order notes, you’ll need the PHP method that matches your checkout or a checkout field editor plugin.
Method 3: Remove Fields With PHP (Classic or Shortcode Checkout)
On the classic shortcode checkout, the woocommerce_checkout_fields filter lets you remove any checkout field.
WooCommerce passes the full list of fields through this filter, and unset() removes the fields you specify before the checkout form loads.
These snippets only work with the classic checkout.
If you add one and nothing changes, you’re likely using the Checkout Block. Use the checkout check at the top of this guide to confirm which one you have.
The safest way is not to edit your parent theme's functions.php because those edits are wiped on the next theme update and a syntax error can lock you out of your site.
Instead, you can install a free code-snippets plugin (such as WPCode or Code Snippets) and add the snippet there, or use a child theme.
A snippets plugin survives theme updates and lets you toggle code off instantly if something breaks.
Remove one or more fields
The snippet below removes the billing company, billing address line 2, and shipping company fields.
To remove something else, swap in any key from the table above.
add_filter( 'woocommerce_checkout_fields', 'mystore_remove_checkout_fields', 9999 );

function mystore_remove_checkout_fields( $fields ) {
	unset( $fields['billing']['billing_company'] );
	unset( $fields['billing']['billing_address_2'] );
	unset( $fields['shipping']['shipping_company'] );
	return $fields;
}
The 9999 on the first line sets the priority. A higher number makes the function run later, so your code gets the final say if your theme or another plugin tries to add the field back.
Remove all billing fields except email (and why country stays)
Stores that sell digital products often want a checkout that asks for an email and not much else.
The snippet below keeps the name, country, and email fields and removes the rest of the billing form.
add_filter( 'woocommerce_checkout_fields', 'mystore_minimal_billing_fields', 9999 );

function mystore_minimal_billing_fields( $fields ) {
	$keep = array( 'billing_first_name', 'billing_last_name', 'billing_country', 'billing_email' );

	foreach ( array_keys( $fields['billing'] ) as $key ) {
		if ( ! in_array( $key, $keep, true ) ) {
			unset( $fields['billing'][ $key ] );
		}
	}
	return $fields;
}
The Country field needs to stay because WooCommerce requires it to complete the order.
You can also remove the two name fields from the $keep list, but some payment gateways use the customer’s name and address to verify the card.
Test a real order through your live payment gateway before removing them.
Remove the order notes field and the "Additional Information” heading
The Order notes field and the Additional information heading above it are controlled separately.
To remove the entire section, you need both parts of this snippet.
add_filter( 'woocommerce_enable_order_notes_field', '__return_false', 9999 );

// Removes the order notes field.
add_filter( 'woocommerce_checkout_fields', 'mystore_remove_order_notes', 9999 );

function mystore_remove_order_notes( $fields ) {
	unset( $fields['order']['order_comments'] );
	return $fields;
}
This single change (the 9999) fixes the most common "I removed billing_address_2 / billing_first_name and it’s still there" complaint.
If a field is still required after you make it optional, see the troubleshooting section.
Make a field optional instead of removing it
Some fields are better left on the form but made optional. The snippet below keeps the Phone field visible while letting shoppers skip it.
For Phone, though, the Method 2 toggle does the same thing without code.
add_filter( 'woocommerce_checkout_fields', 'mystore_optional_phone', 9999 );

function mystore_optional_phone( $fields ) {
	$fields['billing']['billing_phone']['required'] = false;
	return $fields;
}
Address fields such as Postcode, City, and State follow each country’s address rules.
Change them through the default address field settings instead. Otherwise, the country-specific rules can quietly make a field required again.
add_filter( 'woocommerce_default_address_fields', 'mystore_optional_postcode', 9999 );

function mystore_optional_postcode( $fields ) {
	$fields['postcode']['required'] = false;
	return $fields;
}
Hide fields for virtual carts, specific products, or categories
For example, when the cart contains only PDF patterns, the Address and Phone fields disappear.
As soon as a printed kit is added, the full checkout form comes back.
add_filter( 'woocommerce_checkout_fields', 'mystore_fields_for_virtual_carts', 9999 );

function mystore_fields_for_virtual_carts( $fields ) {
	if ( ! WC()->cart || WC()->cart->needs_shipping() ) {
		return $fields;
	}

	$remove = array( 'billing_company', 'billing_address_1', 'billing_address_2', 'billing_city', 'billing_state', 'billing_postcode', 'billing_phone' );

	foreach ( $remove as $key ) {
		unset( $fields['billing'][ $key ] );
	}
	return $fields;
}
The next snippet removes the Company field whenever a product from a specific category is in the cart.
Replace downloads with your own category slug.
add_filter( 'woocommerce_checkout_fields', 'mystore_fields_for_category', 9999 );

function mystore_fields_for_category( $fields ) {
	if ( ! WC()->cart ) {
		return $fields;
	}

	foreach ( WC()->cart->get_cart() as $item ) {
		if ( has_term( 'downloads', 'product_cat', $item['product_id'] ) ) {
			unset( $fields['billing']['billing_company'] );
			break;
		}
	}
	return $fields;
}
It works the same way for a single product. Swap the has_term() check for 123 === $item['product_id'], using your product’s ID.
Hiding a field based on the payment method is a little more complicated because shoppers choose their payment gateway after the address form has already loaded.
On the classic checkout, use JavaScript to show or hide the field when the payment_method_selected event fires.
Keep the field optional as well, so it doesn’t prevent orders placed through your other gateways.
For more ways to customize the classic checkout with code, see our WooCommerce checkout hooks reference.
Method 4: Hide Fields on the WooCommerce Checkout Block
The Checkout Block doesn’t use woocommerce_checkout_fields by design because it uses a more curated approach for extending the block.
Instead, you can hide fields in the block by changing the country address rules with woocommerce_get_country_locale.
Everything in this section applies to both the billing and shipping address fields at the same time.
The Country field also needs to stay because WooCommerce uses it to determine which address fields to display.
Hide address fields for one country
WooCommerce calls single-country changes the safe option, since every other country keeps its normal fields.
The snippet below hides the street address, city, state, and postcode for shoppers in the United States. Replace US with your own two-letter country code.
add_filter( 'woocommerce_get_country_locale', 'mystore_hide_address_fields_us' );

function mystore_hide_address_fields_us( $locale ) {
	foreach ( array( 'address_1', 'city', 'state', 'postcode' ) as $field ) {
		$locale['US'][ $field ]['required'] = false;
		$locale['US'][ $field ]['hidden']   = true;
	}
	return $locale;
}
You don’t need to hide Address line 2 separately. WooCommerce skips it automatically once Address line 1 is hidden.
Hide address fields for every country
WooCommerce doesn’t recommend this approach unless you sell to a small, controlled list of countries and have tested each one.
Some payment gateways only run fraud checks in live mode, so a checkout that works in test mode can still fail when you process a real payment.
The filter also has a gap. It only includes countries with their own address rules. Every other country falls back to the default rules, so those fields stay if you only loop through the filter.
This snippet handles both sets of countries.
add_filter( 'woocommerce_get_country_locale', 'mystore_hide_address_fields_all' );
add_filter( 'woocommerce_get_country_locale_default', 'mystore_hide_address_fields_default' );

function mystore_hidden_address_keys() {
	return array( 'address_1', 'city', 'state', 'postcode' );
}

// Countries with their own address rules.
function mystore_hide_address_fields_all( $locale ) {
	foreach ( $locale as $country => $settings ) {
		foreach ( mystore_hidden_address_keys() as $field ) {
			$locale[ $country ][ $field ]['required'] = false;
			$locale[ $country ][ $field ]['hidden']   = true;
		}
	}
	return $locale;
}

// Every other country uses the default rules.
function mystore_hide_address_fields_default( $fields ) {
	foreach ( mystore_hidden_address_keys() as $field ) {
		$fields[ $field ]['required'] = false;
		$fields[ $field ]['hidden']   = true;
	}
	return $fields;
}
We’d still skip this version on most stores. It hides fields in countries nobody has tested.
Hide address fields only for virtual carts
On the Checkout Block, this is the pattern shop’s setup. Add this check to the top of both functions in the previous snippet.
In the second function, return $fields instead of $locale.
// Skip the changes when the cart needs shipping.
if ( ! WC()->cart || WC()->cart->needs_shipping() ) {
	return $locale;
}
needs_shipping() returns false when all items in the cart are virtual, so physical orders retain their full address form.
Set company, phone, and address line 2 with code
WooCommerce stores these three field settings as options: woocommerce_checkout_company_field, woocommerce_checkout_phone_field, and woocommerce_checkout_address_2_field.
You can set each to required, optional, or hidden. The snippet below sets Phone and Company to hidden by default.
add_filter( 'default_option_woocommerce_checkout_phone_field', function () {
	return 'hidden';
} );

add_filter( 'default_option_woocommerce_checkout_company_field', function () {
	return 'hidden';
} );
This only changes the default setting. If you want to change one of these fields for a specific country, use the country-specific snippet above and set company or phone as the field key.
Turn off order notes on the Checkout Block
On the block, order notes are an editor setting, so the Method 3 snippet has no effect here.
Open the Checkout page in the editor, select the Checkout block, turn off order notes in the settings sidebar, and save.
The classic checkout reads the same country address rules, so if you ever switch back, test it as well.
5 Best Practices to Keep a Shorter Checkout Converting
Let's look at best practices for striking the right balance by showing only the necessary checkout fields.
1. Only ask for information you will actually use
Before removing or keeping any field, ask yourself whether you need that data to process the order, fulfill shipping, or communicate with the customer.
If a checkout field does not serve a clear purpose, remove it. For example, most B2C stores do not need a company name field.
2. Use optional fields clearly
When optional fields are unlabeled, customers often assume they are required, which ultimately slows the checkout process.
If a field is truly optional, either label it clearly or remove it altogether to reduce perceived effort.
3. Place the email field at the top of the form
Collecting the email address enables cart recovery workflows. So your number 1 priority should be to place the email field at the top of your checkout form.
If a customer abandons the checkout after entering their email, you can send a follow-up email to bring them back and directly recover lost sales.
4. Use address autocomplete to reduce the number of visible fields
Instead of removing address fields entirely, consider enabling Google address autocomplete on your checkout page.
This allows shoppers to type a few characters and select their full address from a dropdown, which automatically fills in the city, state, postcode, and country.
Auto-fill address certainly reduces effort by capturing accurate shipping data.
5. Use custom fields only if they genuinely add value
Add custom fields only when they enhance the checkout experience or are essential for order fulfillment.
For example, special delivery instructions can help, but unnecessary questions can slow the process.
Stick to the checkout fields that serve a clear purpose and avoid adding extra steps.
For other checkout improvements, including layout, trust, and payment options, see our guide to WooCommerce checkout page optimization.
Checkout Field Still Showing or Still Required? 7 Fixes
These are the most common complaints on Reddit, the WooCommerce.com forums, and WordPress.org, and they almost always trace back to these issues.
Let's work through them in order.
1. Your snippet does nothing at all
Your store is using the Checkout Block, which doesn’t use woocommerce_checkout_fields. This comes up regularly in WooCommerce-related threads on Reddit.
Someone adds a snippet or tries a field editor, but nothing changes. The issue turns out to be the block checkout.
In one thread, even a CSS workaround failed because the Checkout Block doesn’t use the classic woocommerce-billing-fields class.
Run the checkout check at the top of this guide, then use Method 4 or switch back to the classic checkout.
2. The field still appears on the classic checkout
Your theme or another plugin may be adding it back after your code runs.
Add a priority of 9999 to your add_filter() line so your snippet runs last, as shown in the Method 3 examples.
3. The field is hidden, but checkout still says it’s required
CSS such as display: none only hides the field from shoppers. WooCommerce still validates it on the server, so the order can fail.
On the classic checkout, remove the field properly. On the Checkout Block, set it to hidden and required => false in the country rules, or make it optional.
4. Checkout shows “Please enter an address to continue”
You may have removed or hidden the Country field.
WooCommerce needs it in most cases, so restore it and limit your selling locations instead.
5. Postcode or State is still required after you made it optional
The country’s address rules may be setting the field back to required.
Change it with woocommerce_default_address_fields on the classic checkout, or use the country rules snippet in Method 4.
6. The fields came back after an update
If your code was in the parent theme’s functions.php, a theme update may have overwritten it. Move the code to a snippets plugin or child theme.
If the WooCommerce pages were recreated, the checkout may also have switched back to the Checkout Block, so run the checkout check again.
7. A plugin or payment gateway keeps adding the fields back
Some gateways require certain billing fields and add them at checkout.
Switch temporarily to a default theme such as Storefront or Twenty Twenty-Five, disable everything except WooCommerce, and test again.
Then enable your plugins one at a time until the field comes back.
Clear your page and CDN cache during the process so you’re not testing a cached version.
Frequently Asked Questions
Remove unnecessary checkout fields from your WooCommerce store to simplify the checkout process, which can lead to higher conversion rates and a better shopping experience. Here's how:
- A clutter-free checkout reduces distractions and makes it easier for customers to complete their purchase.
- Fewer fields mean a faster checkout process, which helps reduce drop-offs.
- If you're selling digital products, fields like shipping address or company name are often unnecessary.
- A complex checkout is one of the top reasons users abandon carts. A simplified form helps prevent this.
- A clean, intuitive checkout flow keeps customers happy and encourages repeat purchases.
Yes. The built-in toggles in Method 1 hide Company, Address line 2, and Phone, and a short PHP snippet in a code snippets plugin handles the rest.
On the classic checkout, unset billing_address_1, billing_address_2, billing_city, billing_state, and billing_postcode with one of the Method 3 snippets, and leave the country field alone.
On the Checkout Block, hide the same fields with the country rules snippet in Method 4. Our guide to removing the billing address from checkout covers more edge cases.
It can. Card processors often check the name, street address, and postcode for address verification and 3D Secure, so removing them can lead to more declines or fraud flags.
Some gateways only run those checks in live mode. Place a real order through each live gateway after every change.
On the classic checkout, add a new entry to the $fields array in woocommerce_checkout_fields with a type, a label, and a required setting.
On the Checkout Block, use woocommerce_register_additional_checkout_field(), which needs WooCommerce 8.9 or later and should run after the woocommerce_init action.
Our guide to adding a custom checkout field walks through both.
Yes, but the builder’s checkout widget decides which method works. If the widget loads the classic form, the PHP filter and classic field editors apply.
If a checkout builder plugin replaces the form, you manage fields in its own editor.
WooCommerce’s developer docs, which replaced the old WooCommerce Codex, have official pages on customizing checkout fields for the classic checkout and removing checkout fields on the block.
We also keep every snippet from this guide in a public GitHub repository.
Turn off the snippet in your snippets plugin, or delete it from your child theme’s functions.php. WooCommerce brings the default fields back on the next page load.
For the built-in toggles, set the fields back to Optional or Required.
For field editor plugins, use the plugin’s reset option if it has one.
Stop Losing Sales to Unnecessary WooCommerce Checkout Fields!
Removing checkout fields in WooCommerce comes down to one question: block or classic?
Your setup may be different, but the process is the same.
First, check which checkout you’re using and remove the fields you don’t need.
Make any fields you’re unsure about optional, then place a real test order before you consider the checkout finished.
If you’re rebuilding the checkout anyway, FunnelKit Funnel Builder gives you a drag-and-drop field editor and replaces the default WooCommerce checkout form, so you don’t have to worry about whether you’re using the block or classic checkout.
So why wait? Start streamlining your WooCommerce checkout today for a smoother, more profitable customer journey.

Editorial Team
September 14, 2026Changing currency at WooCommerce checkout is easier to explain with a simple example: a shopper in Munich sees €169 instead of $184 for the same jacket. Nothing about the product...

Editorial Team
September 11, 2026WooCommerce gift wrap might be the easiest extra money your store can make, yet most stores never offer it. Think about a department store in December. You buy a candle,...

Editorial Team
September 7, 2026Running a WooCommerce store means juggling a lot of moving parts. Security has to stay near the top of that list. WooCommerce's popularity cuts both ways though, since the same...






