


The WooCommerce checkout coupon field is where shoppers enter a discount code before they pay.
Once coupons are turned on, WooCommerce adds it to both the cart and the checkout page.
Its default spot doesn't suit every store, and it also differs between classic and block checkout. Some owners want it closer to the order total. Others want it off the checkout page while keeping it on the cart.
In this blog, we'll share how to add the field, move it, hide it, and apply coupons automatically, either at checkout or through a shareable link.
Quick Answers: WooCommerce Checkout Coupon:
Before we dive into the step-by-step guide, here’s a quick overview of the main actions you can take with WooCommerce checkout coupons
- How to Add a Coupon Field: Go to WooCommerce → Settings → General → Enable Coupons.
- How to Customize and Move the Coupon Field: Use a checkout plugin to customize and move the coupon field to your desired location.
- How to Hide the Coupon Field: Turn off coupons in WooCommerce settings, or hide the field on checkout only with a snippet, CSS, or a checkout plugin.
- How to Create a Checkout Coupon URL: Use a checkout coupon URL generator.
Table of Contents
- 1 Why Add a Coupon Field to WooCommerce Checkout?
- 2 How to Add a Coupon Field to WooCommerce Checkout (Default Option)
- 3 How to Customize & Move the WooCommerce Checkout Coupon Field for Free
- 4 How to Hide the Coupon Field on WooCommerce Checkout
- 5 How to Auto-Apply a Coupon At WooCommerce Checkout
- 6 How to Create a WooCommerce Checkout Coupon URL
- 7 Frequently Asked Questions About WooCommerce Checkout Coupon
- 8 Ready to Boost Checkouts with Smart Coupon Placement in WooCommerce?
Why Add a Coupon Field to WooCommerce Checkout?
A coupon field lets you offer discounts to specific shoppers, orders, or products instead of lowering prices for everyone. WooCommerce supports percentage, fixed cart, and fixed product discounts out of the box, and a coupon can also unlock free shipping.
Here's what that lets you do:
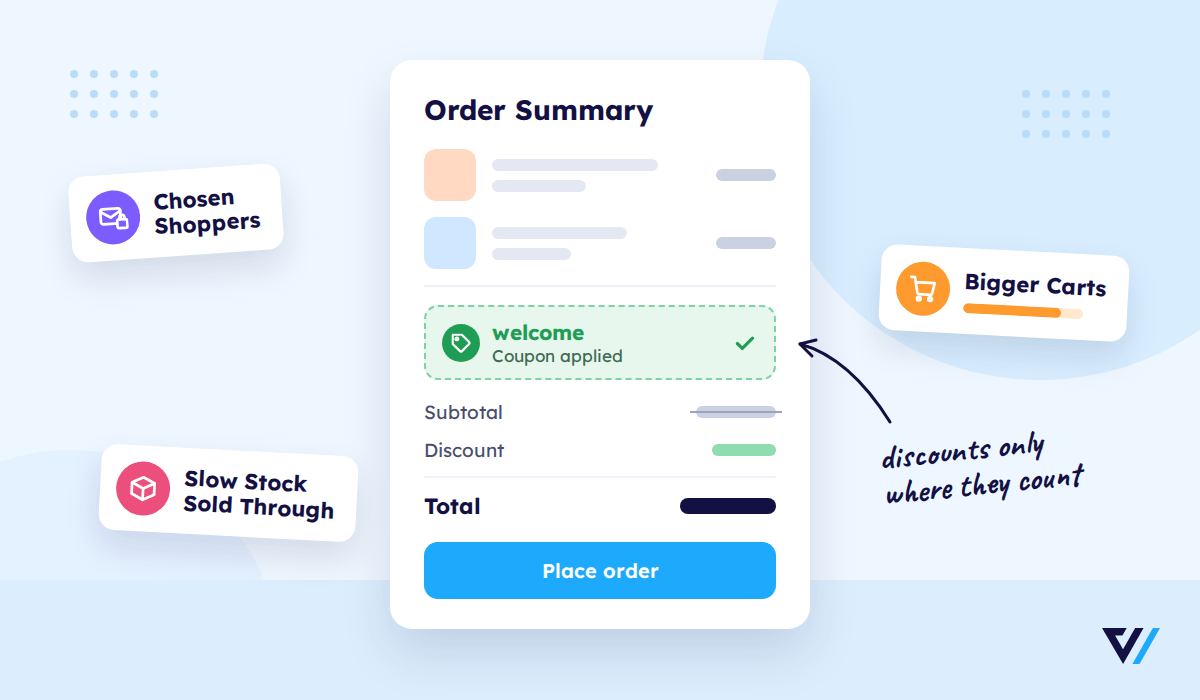
- Target specific shoppers. Limit a code to certain email addresses, cap how many times it can be used, and set an expiry date.
- Raise order value. Set a minimum spend so the discount only applies once the cart reaches it.
- Move slow stock. Restrict a code to the products or categories you want to sell through.
How to Add a Coupon Field to WooCommerce Checkout (Default Option)
To add a checkout coupon to the WooCommerce checkout, follow these steps:
Step 1: Navigate to WooCommerce settings
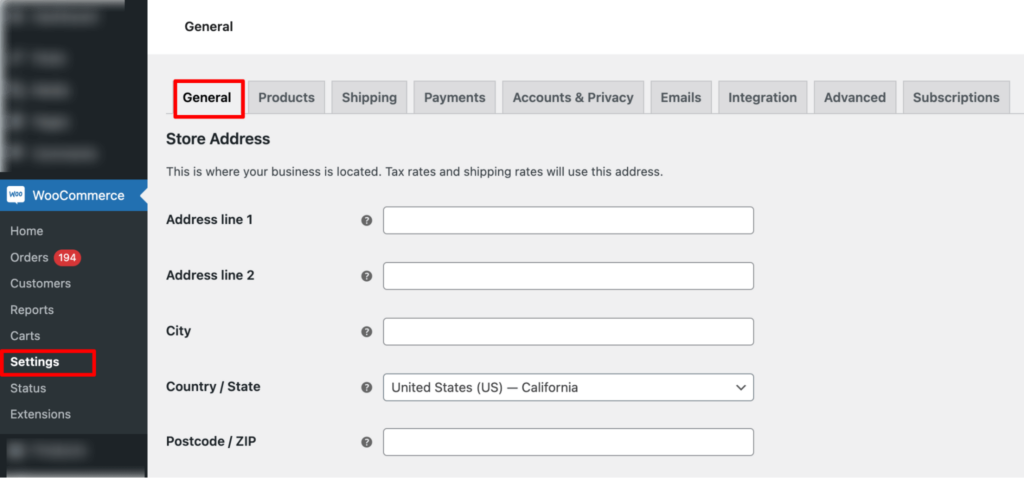
From the WordPress dashboard, navigate to WooCommerce ⇒ Settings and make sure you are on the General settings tab.
Step 2: Enable the use of coupon codes on the checkout
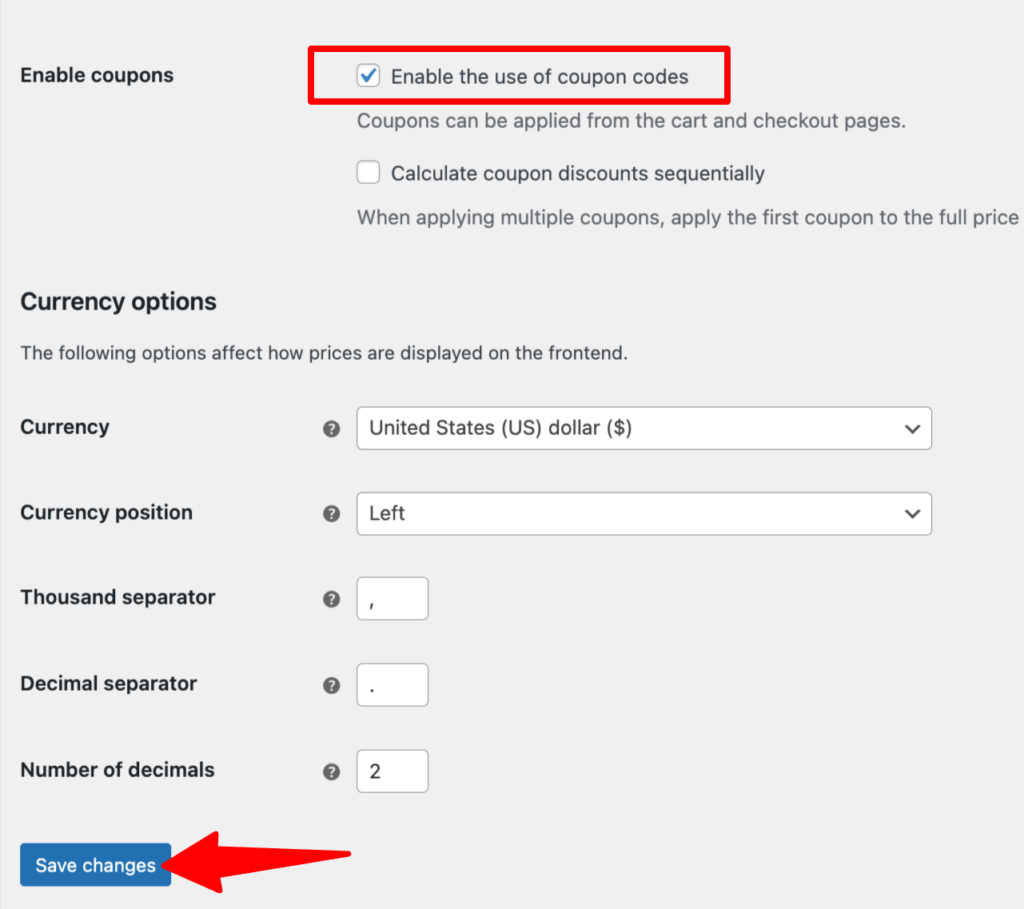
Now, scroll down and check the option “Enable the use of coupon codes.”

Click on “Save Changes” to update the settings.
Step 3: Check where the coupon field appears
Add a product to your cart and go to the checkout page. Where the coupon field shows up depends on which checkout your store uses.
Not sure which one you have? Open the Checkout page in the editor. A Checkout block means you're on block checkout. A [woocommerce_checkout] shortcode means you're on classic checkout.
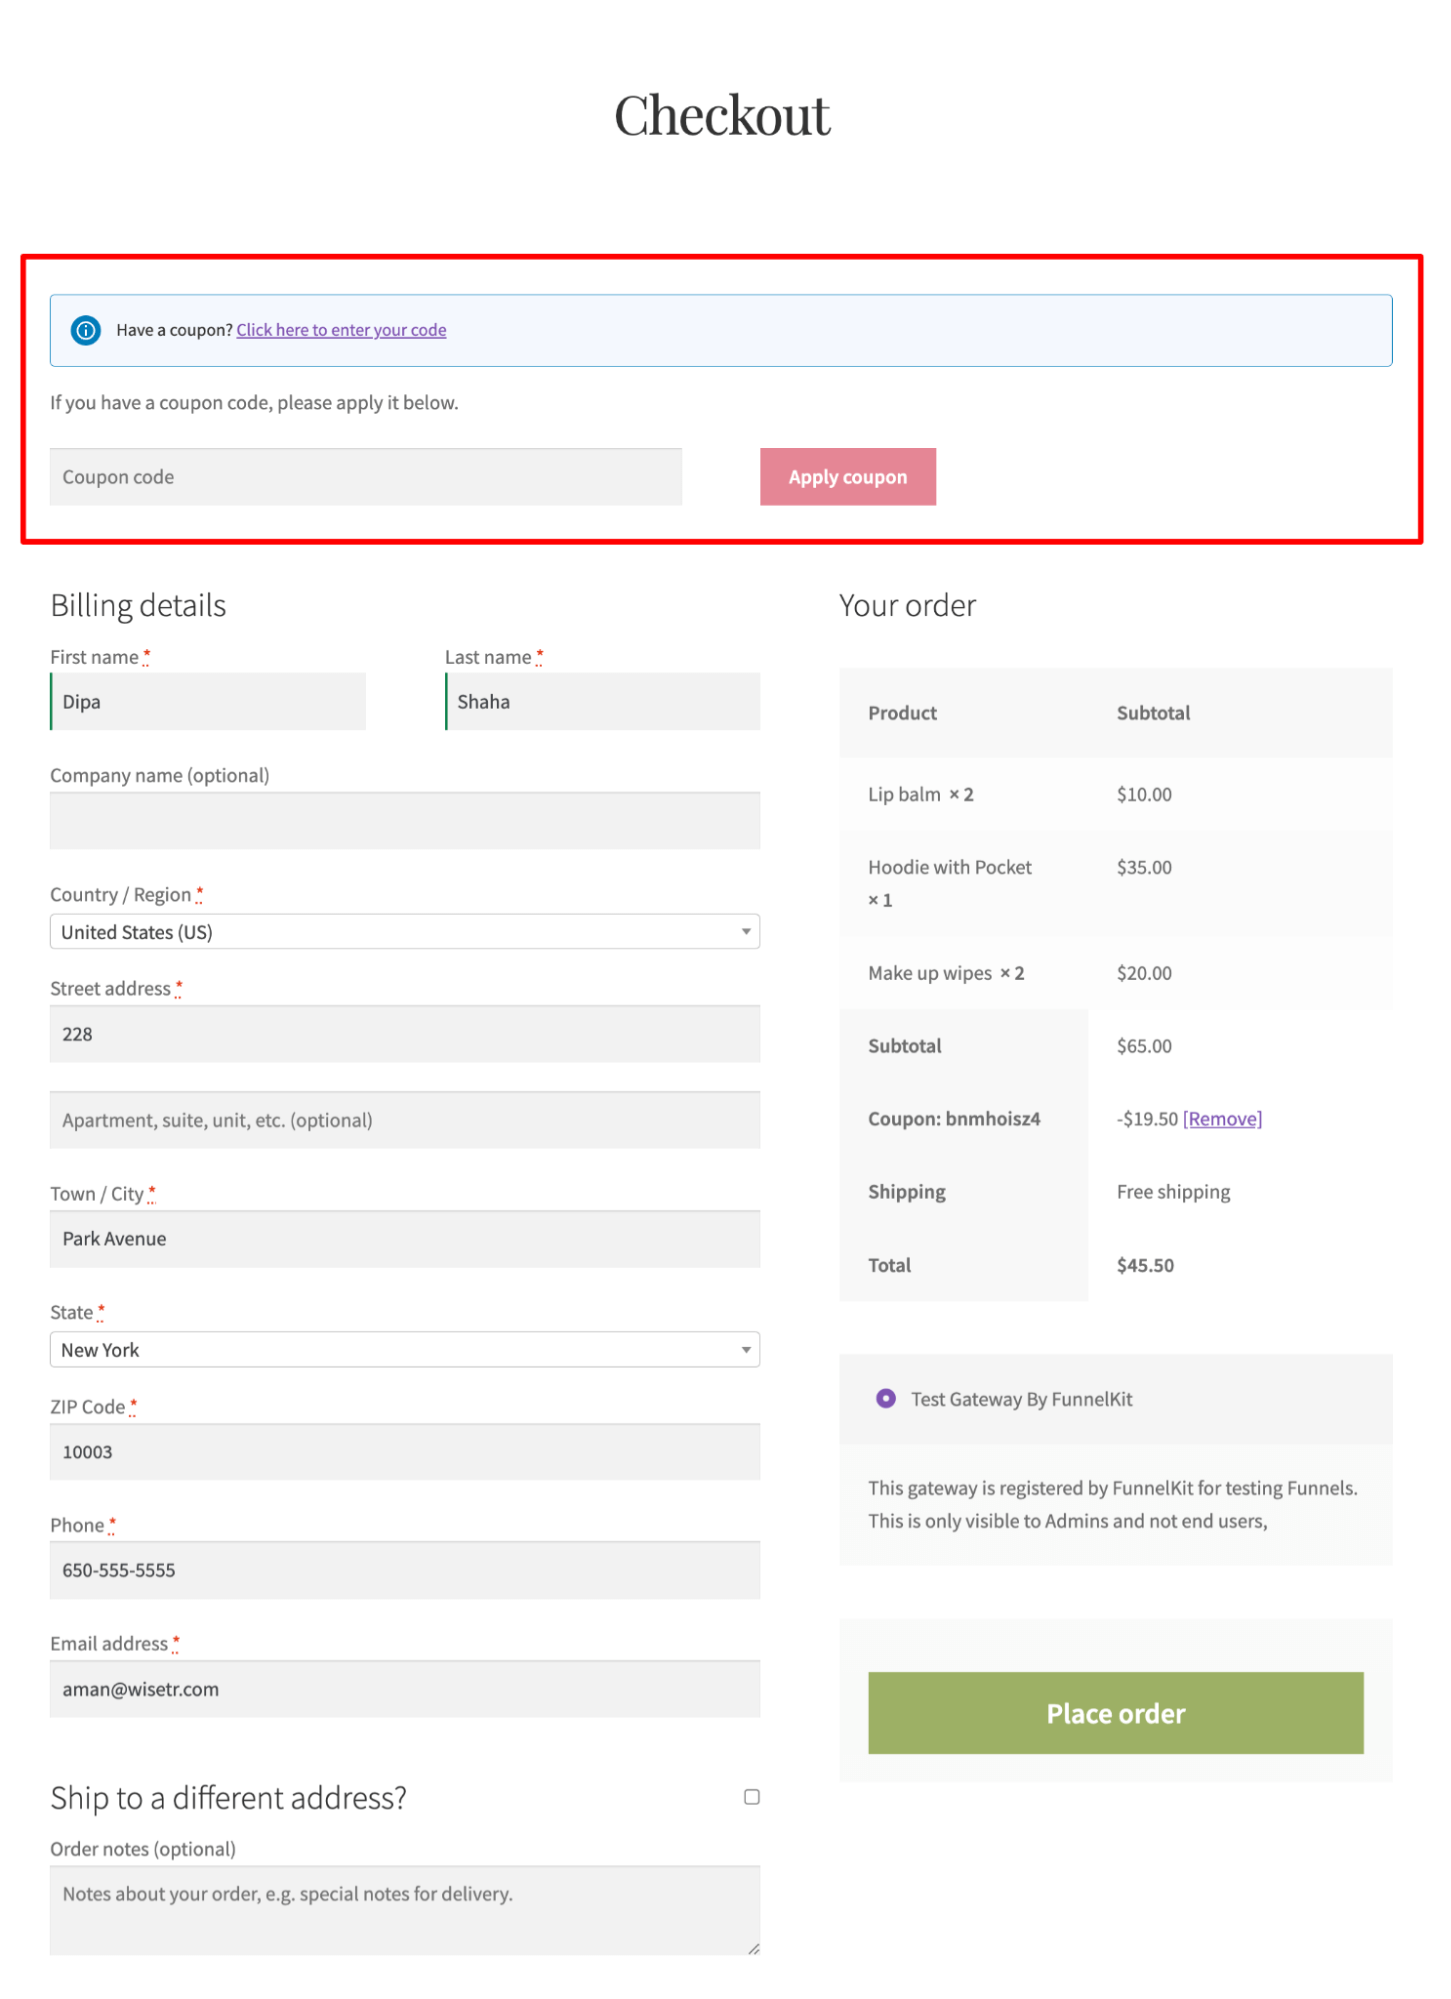
Classic checkout
The field sits above the billing form in a "Have a coupon? Click here to enter your code" bar. Shoppers click the link to open the coupon box, enter their code, and click Apply coupon.
Block checkout
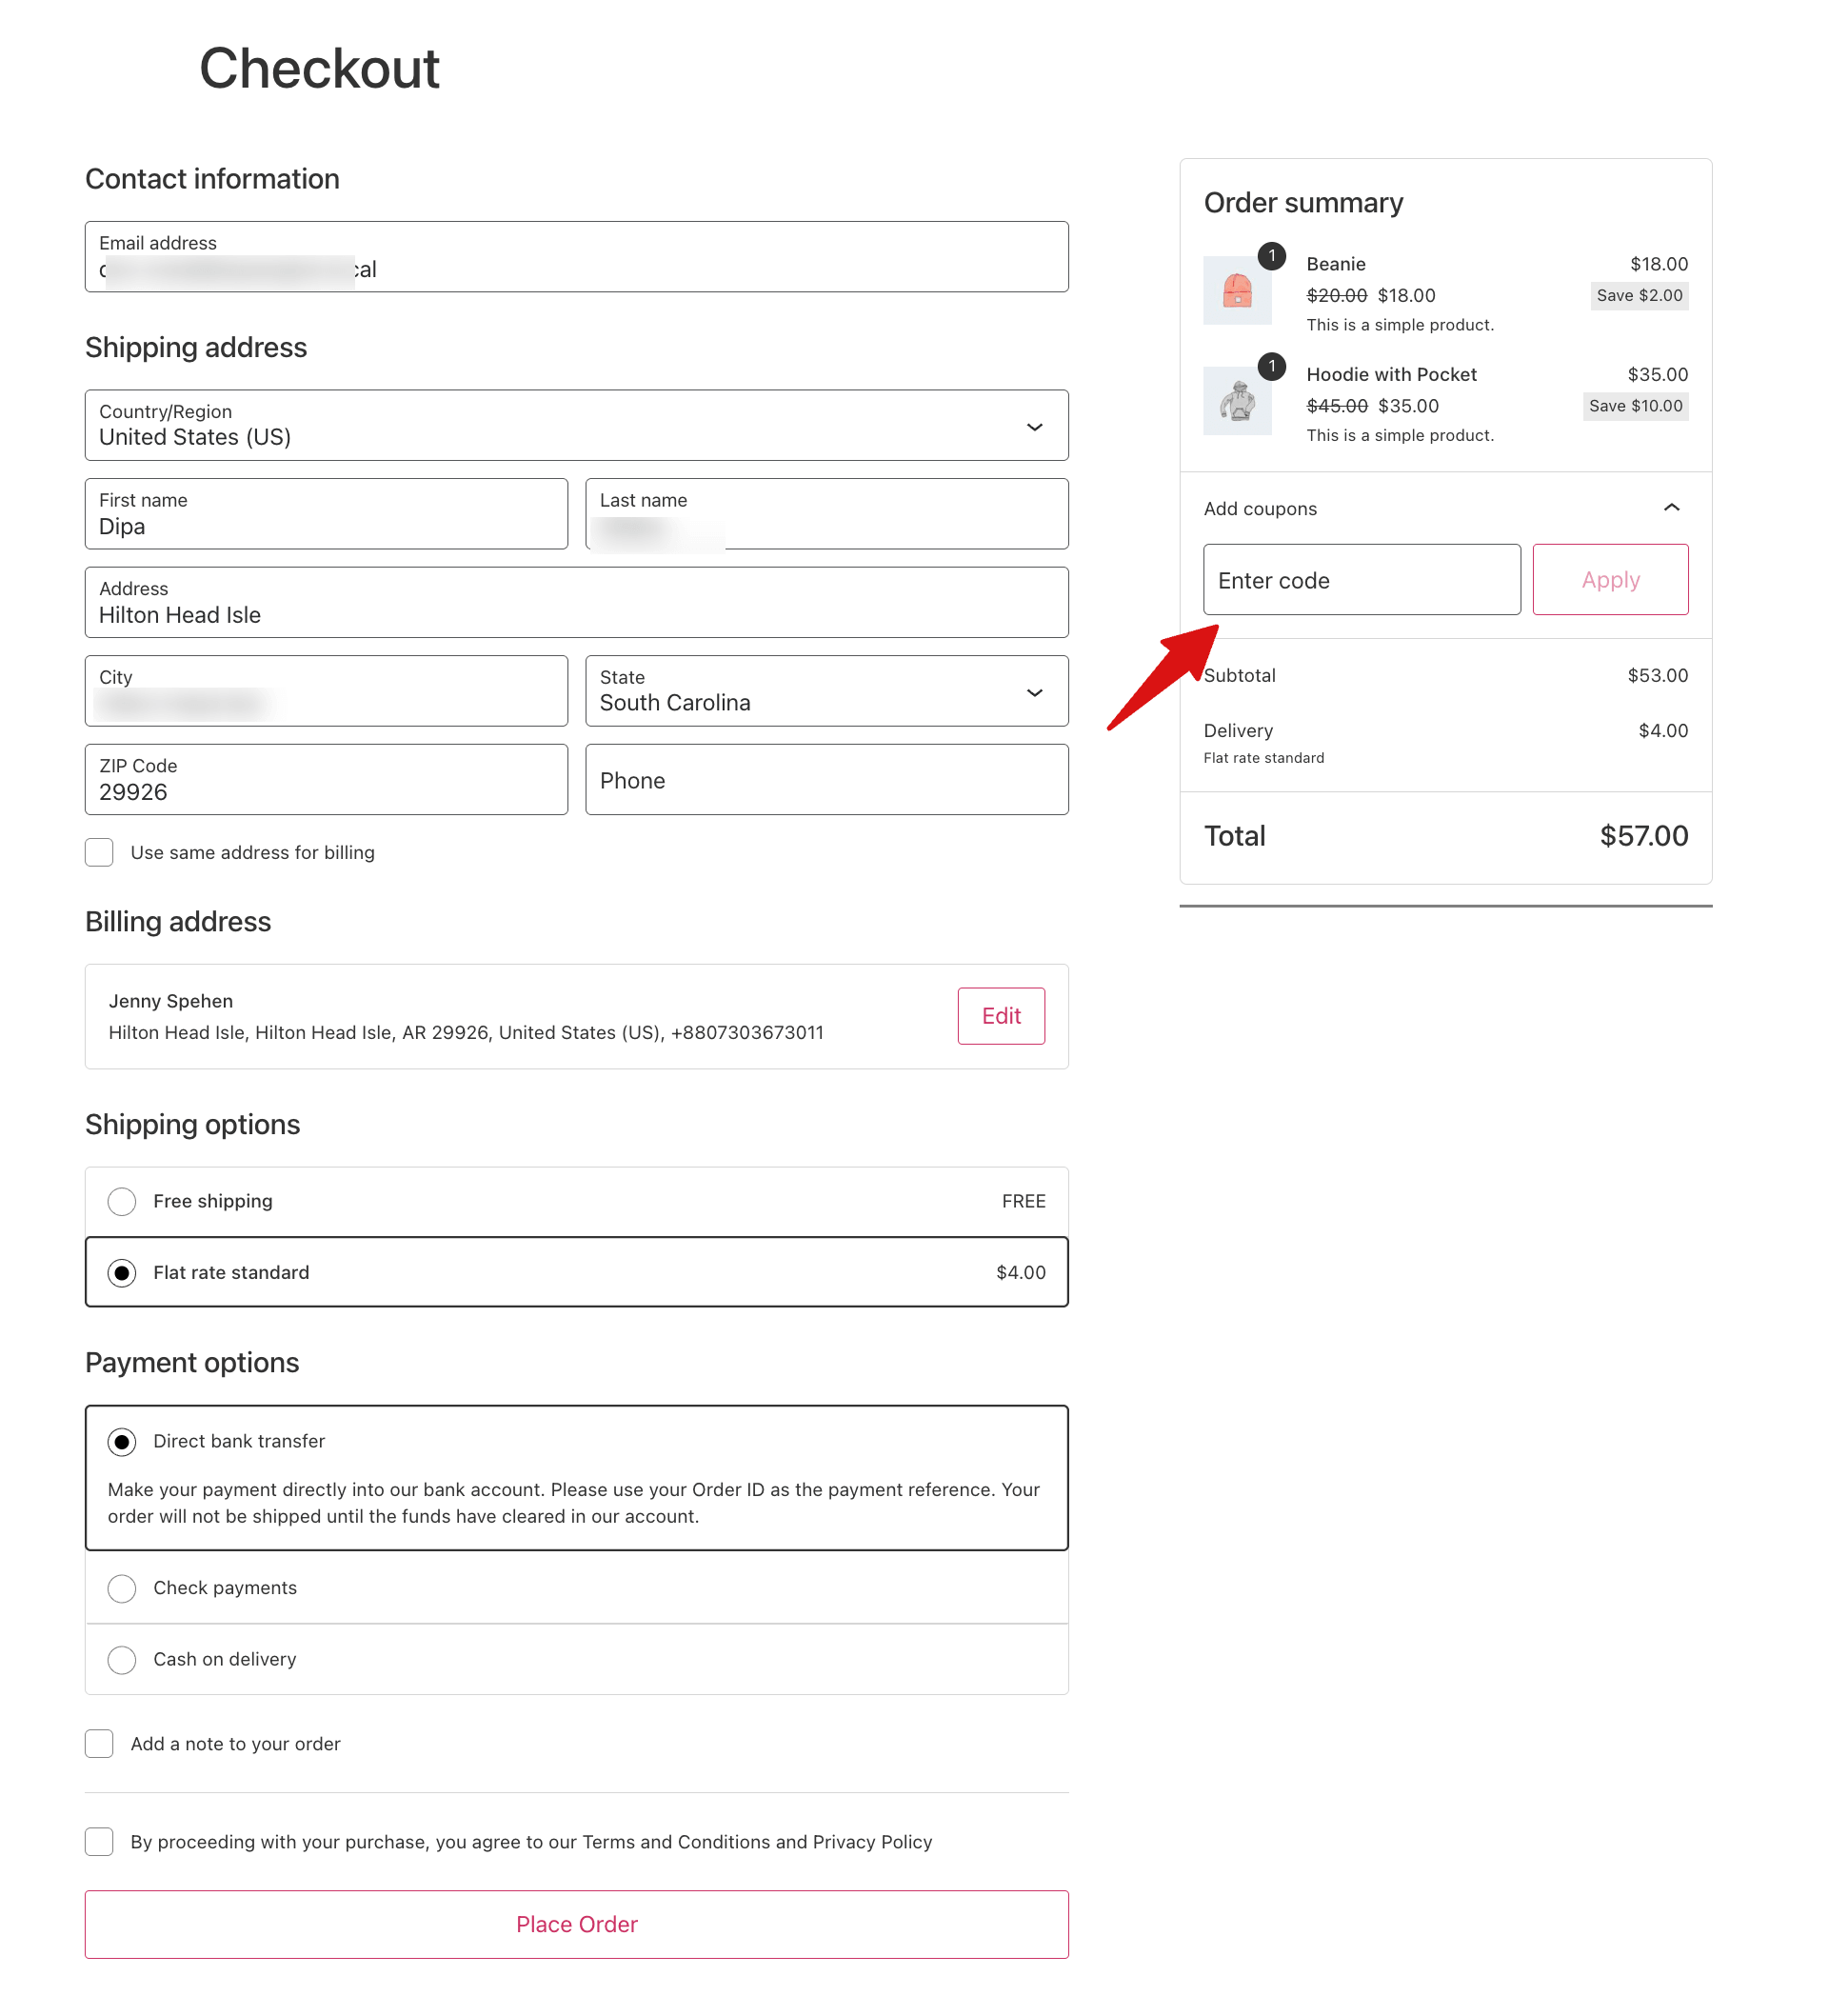
The field sits inside the order summary, collapsed behind an "Add a coupon" link. Shoppers click it to open the coupon box, enter their code, and click Apply.
Here is how to add a coupon field to your checkout page with the default option.
While the default WooCommerce coupon field works, you can make it more effective by customizing its appearance and placement.
Move to the next section to learn how to customize and reposition the coupon field at checkout.
How to Customize & Move the WooCommerce Checkout Coupon Field for Free
In this section, I’ll show you how to replace the default WooCommerce checkout page with a more attractive and optimized layout.
You’ll also learn how to control the placement of the coupon field to make it more convenient for customers.
For this process, I will use FunnelKit Funnel Builder. The free version is sufficient to get this done.
Step 1: Set up your store checkout
First, create a custom checkout for your WooCommerce store. For that, navigate to FunnelKit ⇒ Store Checkout.
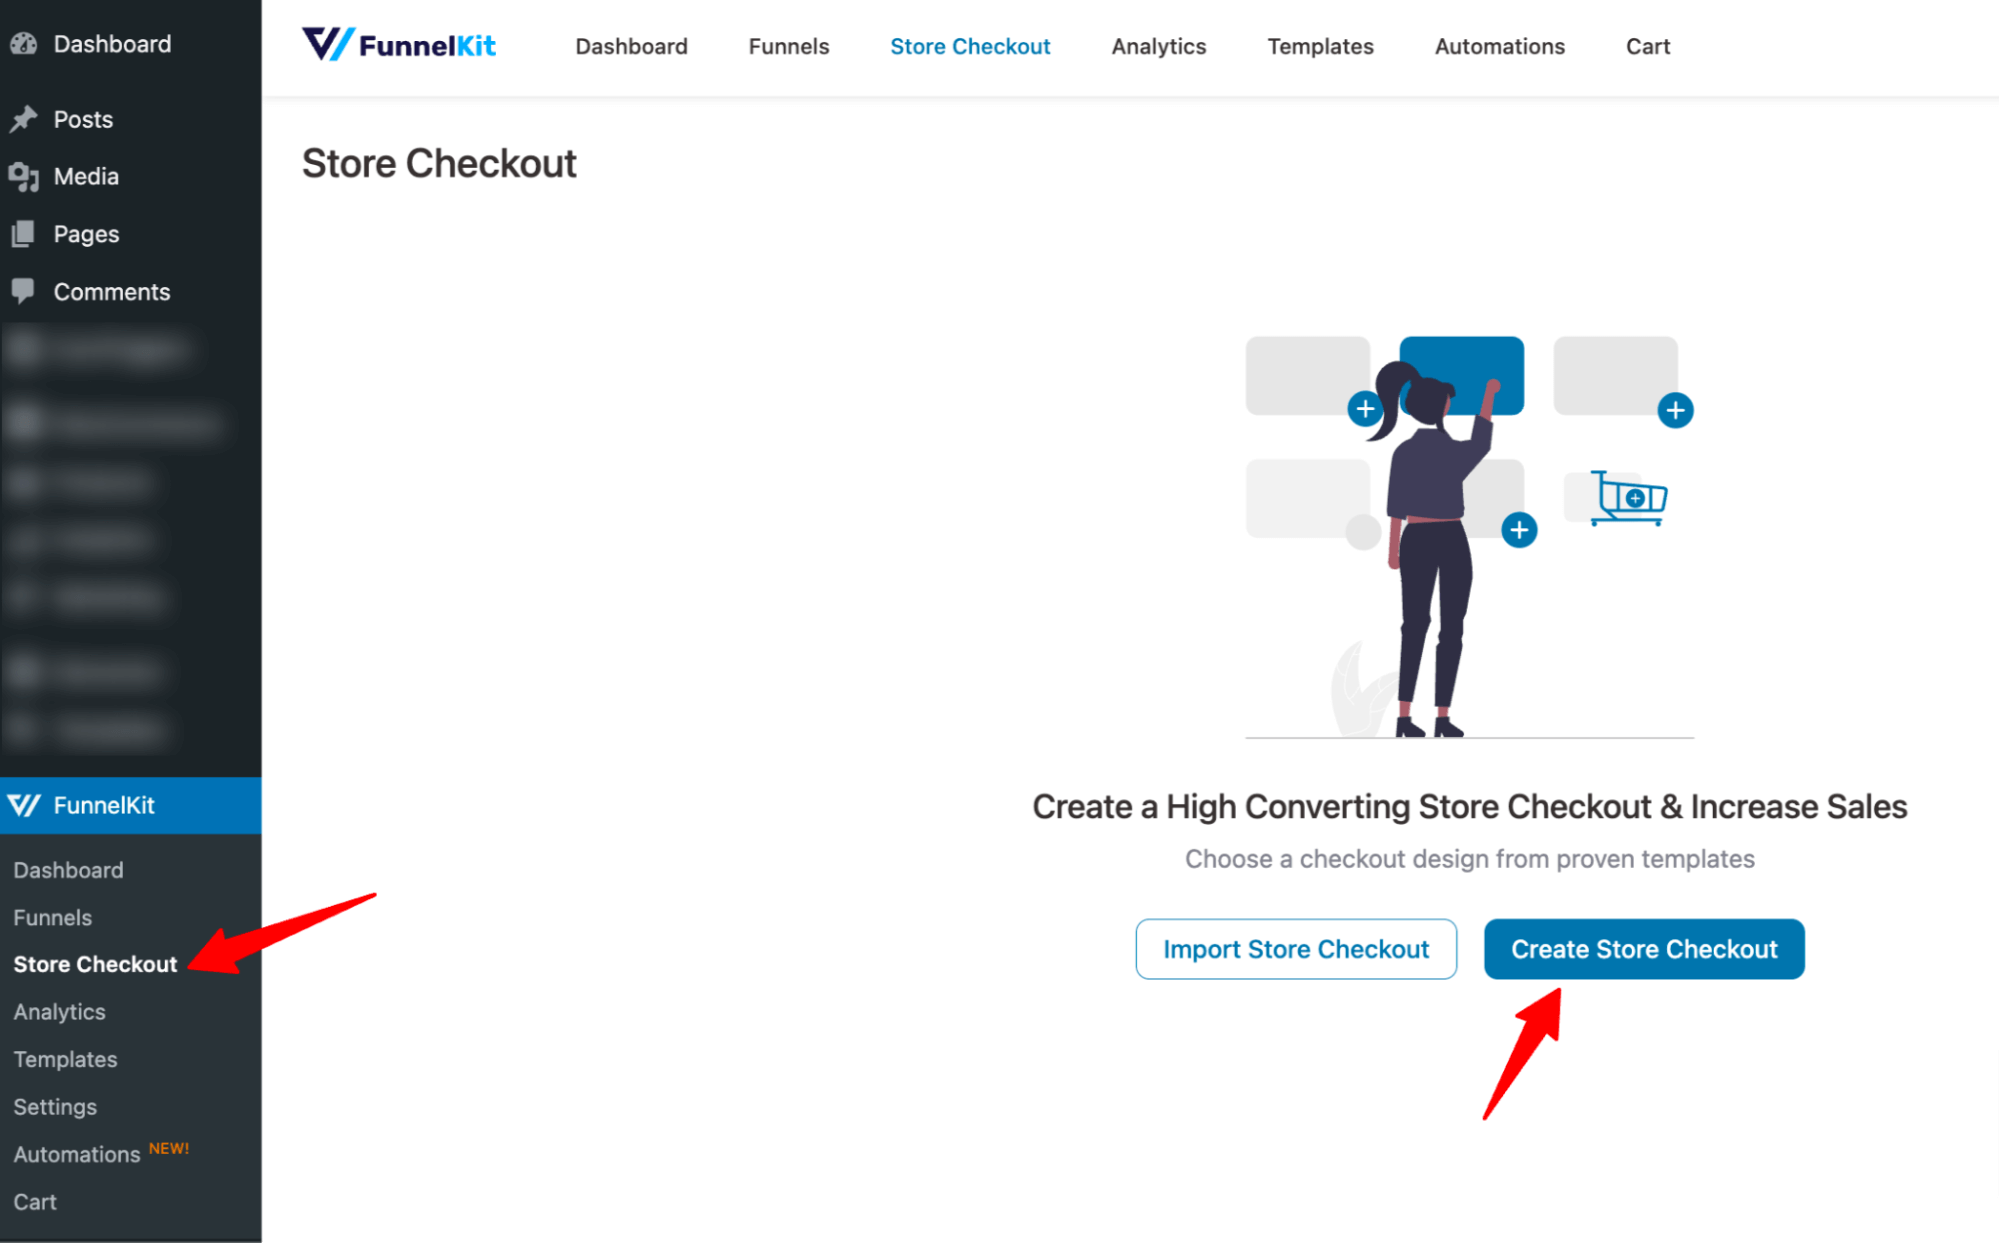
Now, choose your preferred page builder and the template you like. I am choosing Hific.
After that, choose a page builder to filter the sales templates. To check any template, hover over it and click on the preview button.
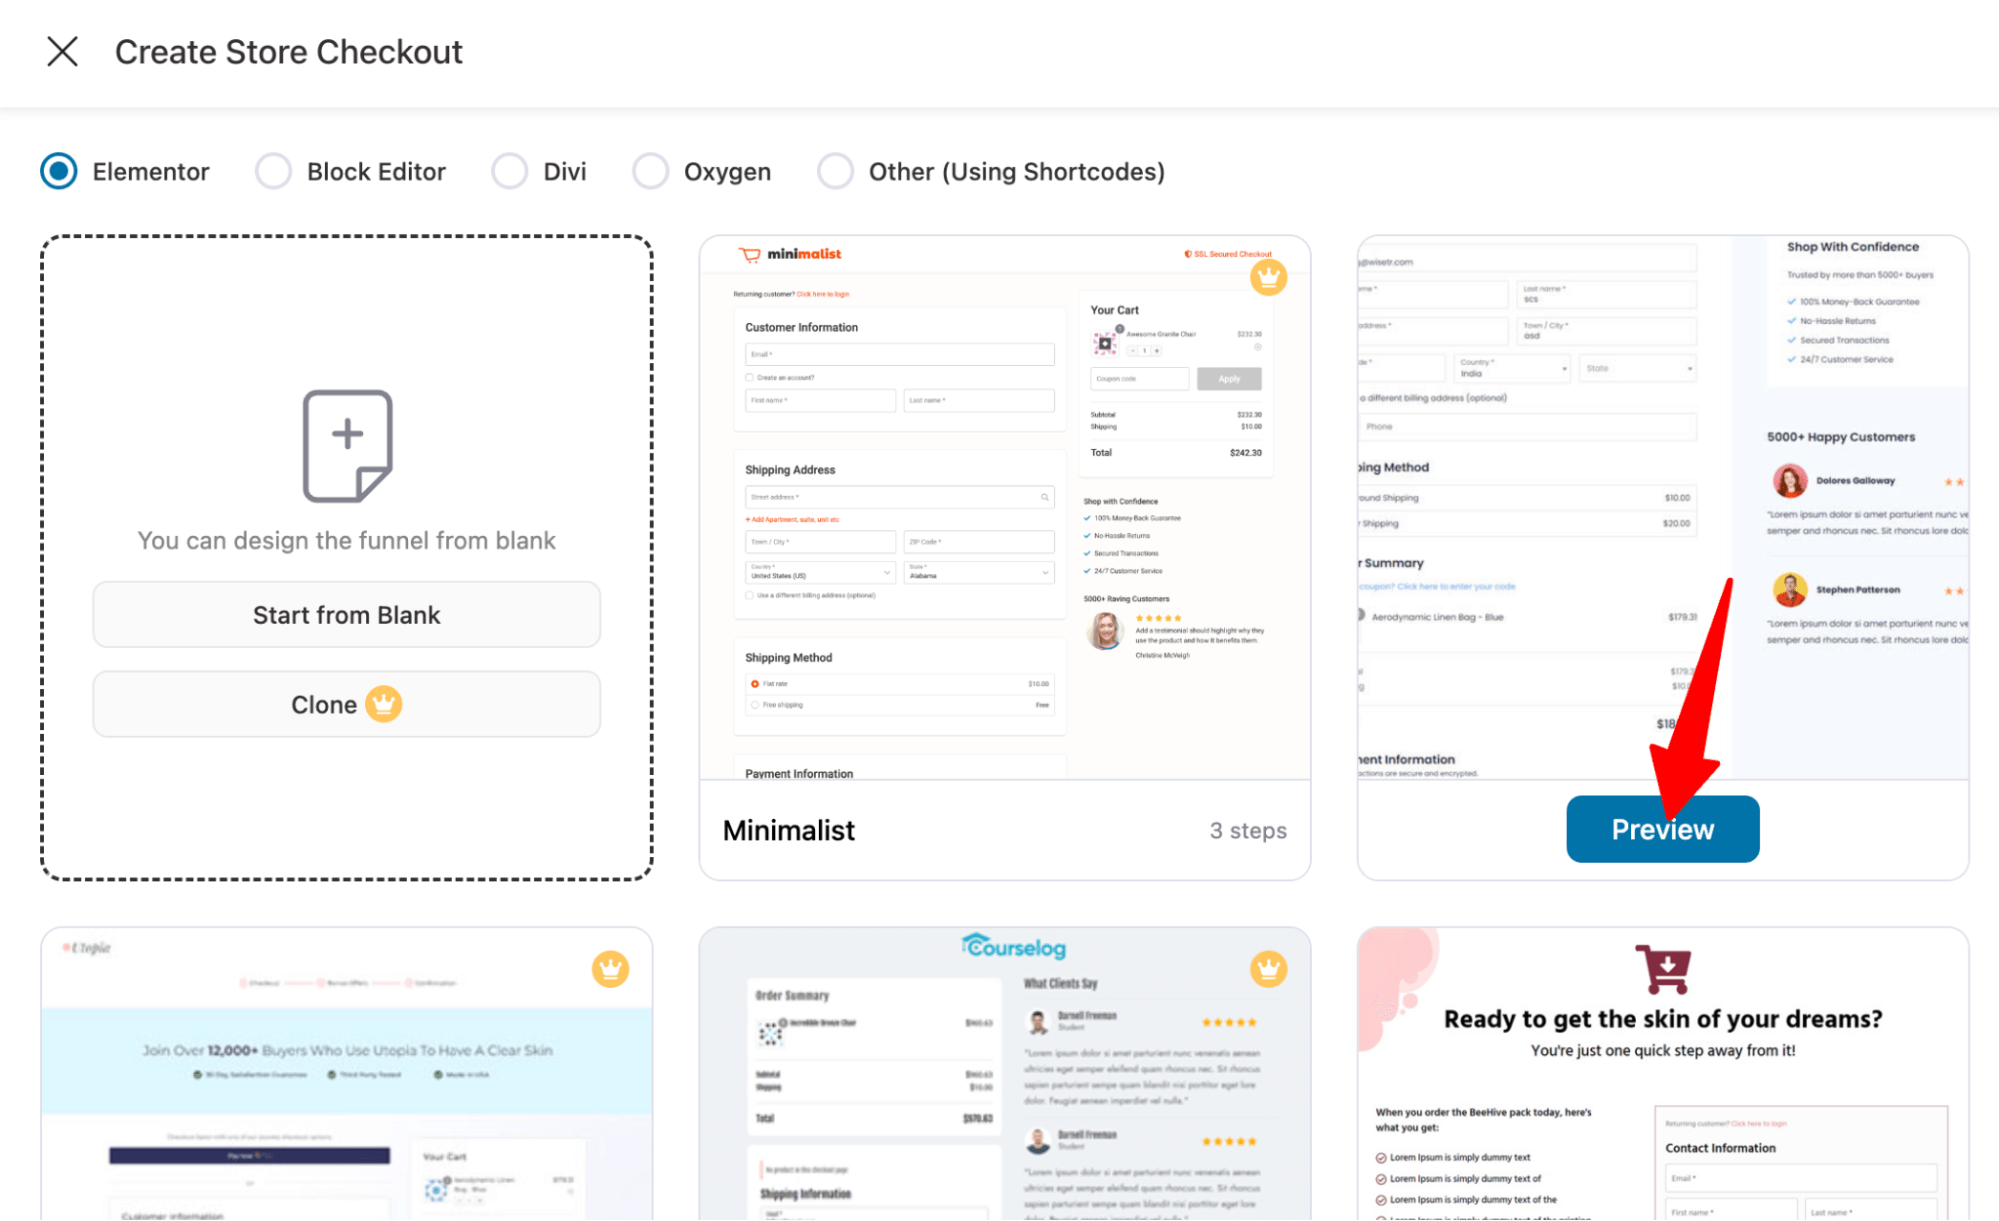
With the free version of FunnelKit Funnel Builder, you can only create a single-page checkout.
However, if you opt for the pro version, you can create a multi-page checkout that’s more conversion-optimized.
Now, to import, click on the “Import this Template” button. After that, provide a store checkout name.
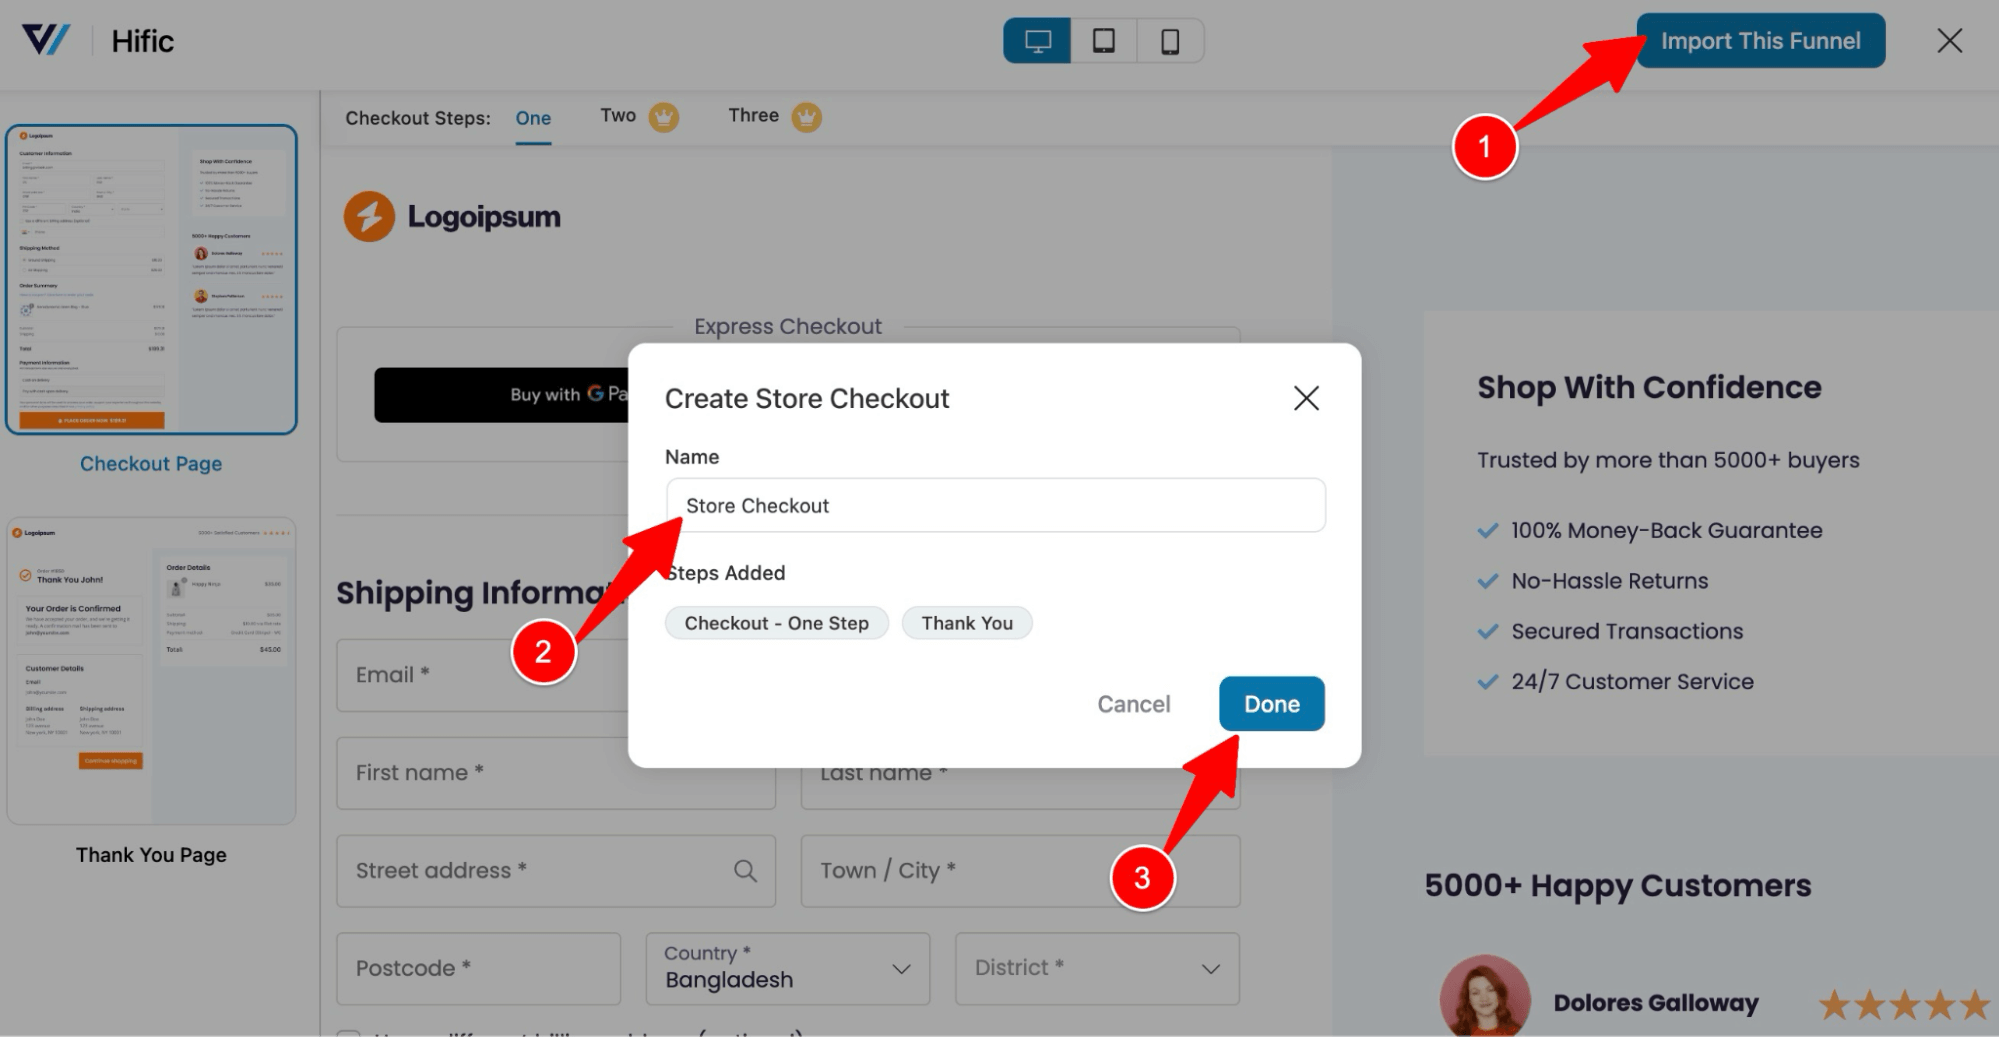
This will import two templates: checkout and thank you page.
Step 2: Customize the coupon field content and style on the checkout page
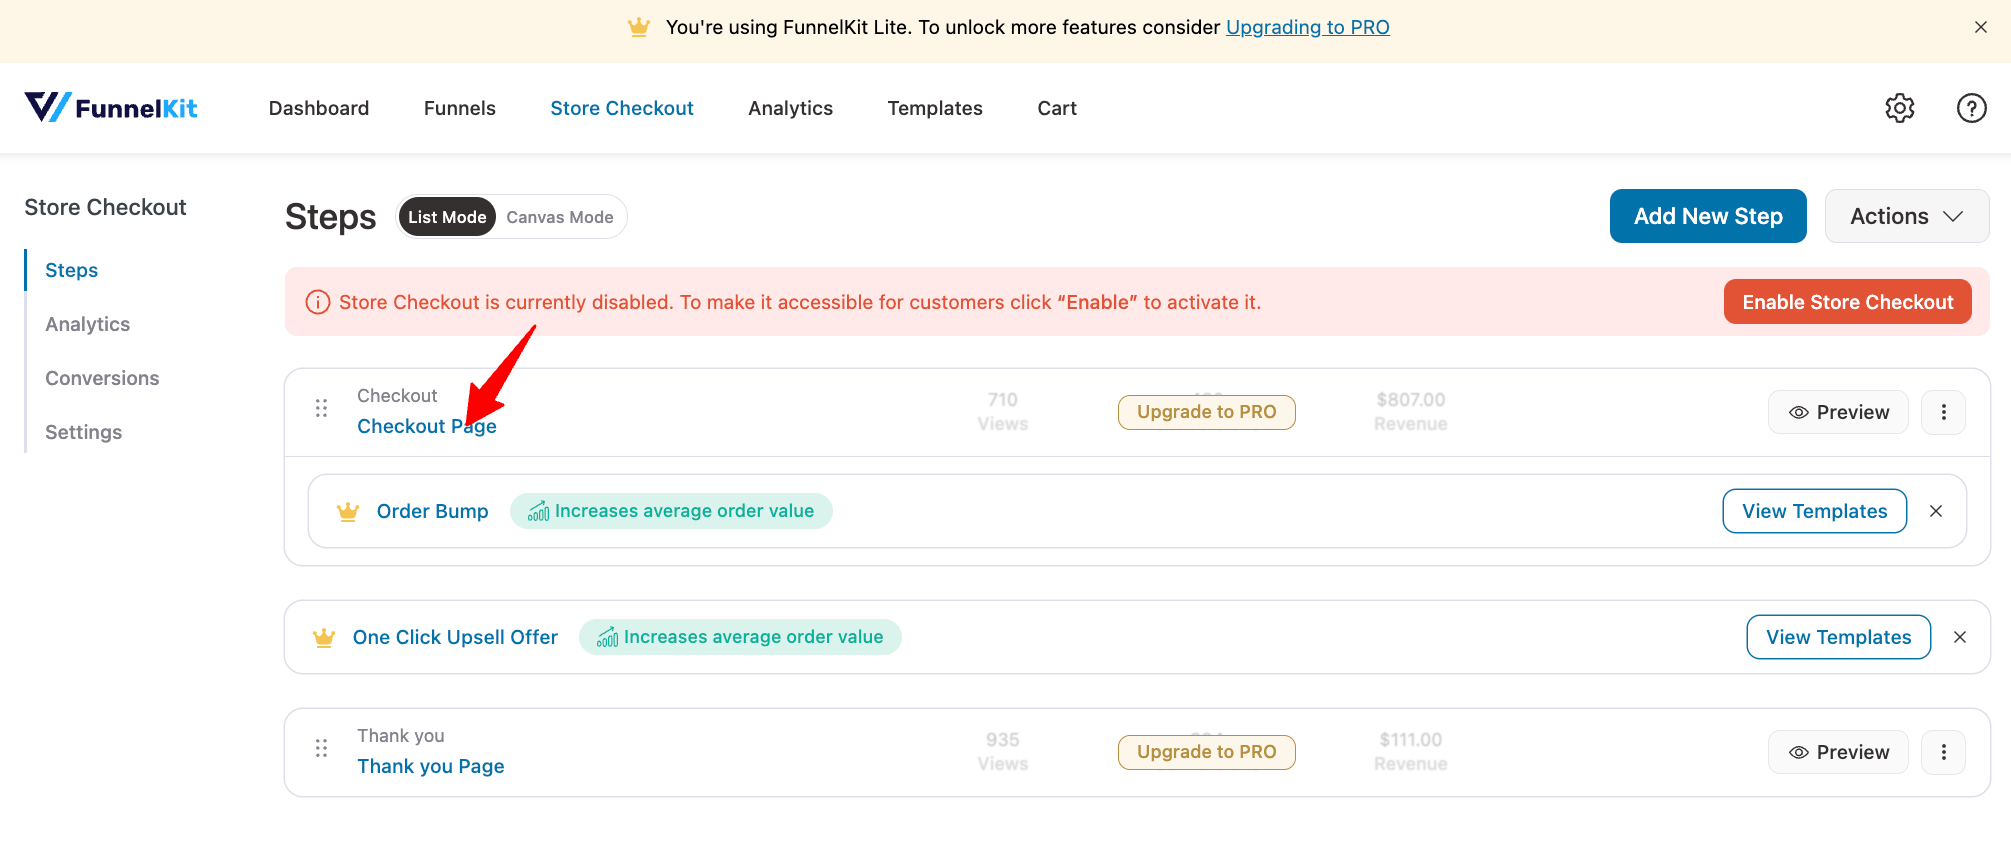
Next, you need to edit the checkout page. To do so, click on the checkout page option.
You will land on the Design tab. Now, scroll down to the "Checkout Form Fields" section. Here, you should see the Coupon code placed right before the order summary section.
This is a great placement because users can see how the coupon code affects the order details directly below the coupon field. (In the next section, you can find out how to move/reposition the coupon field.
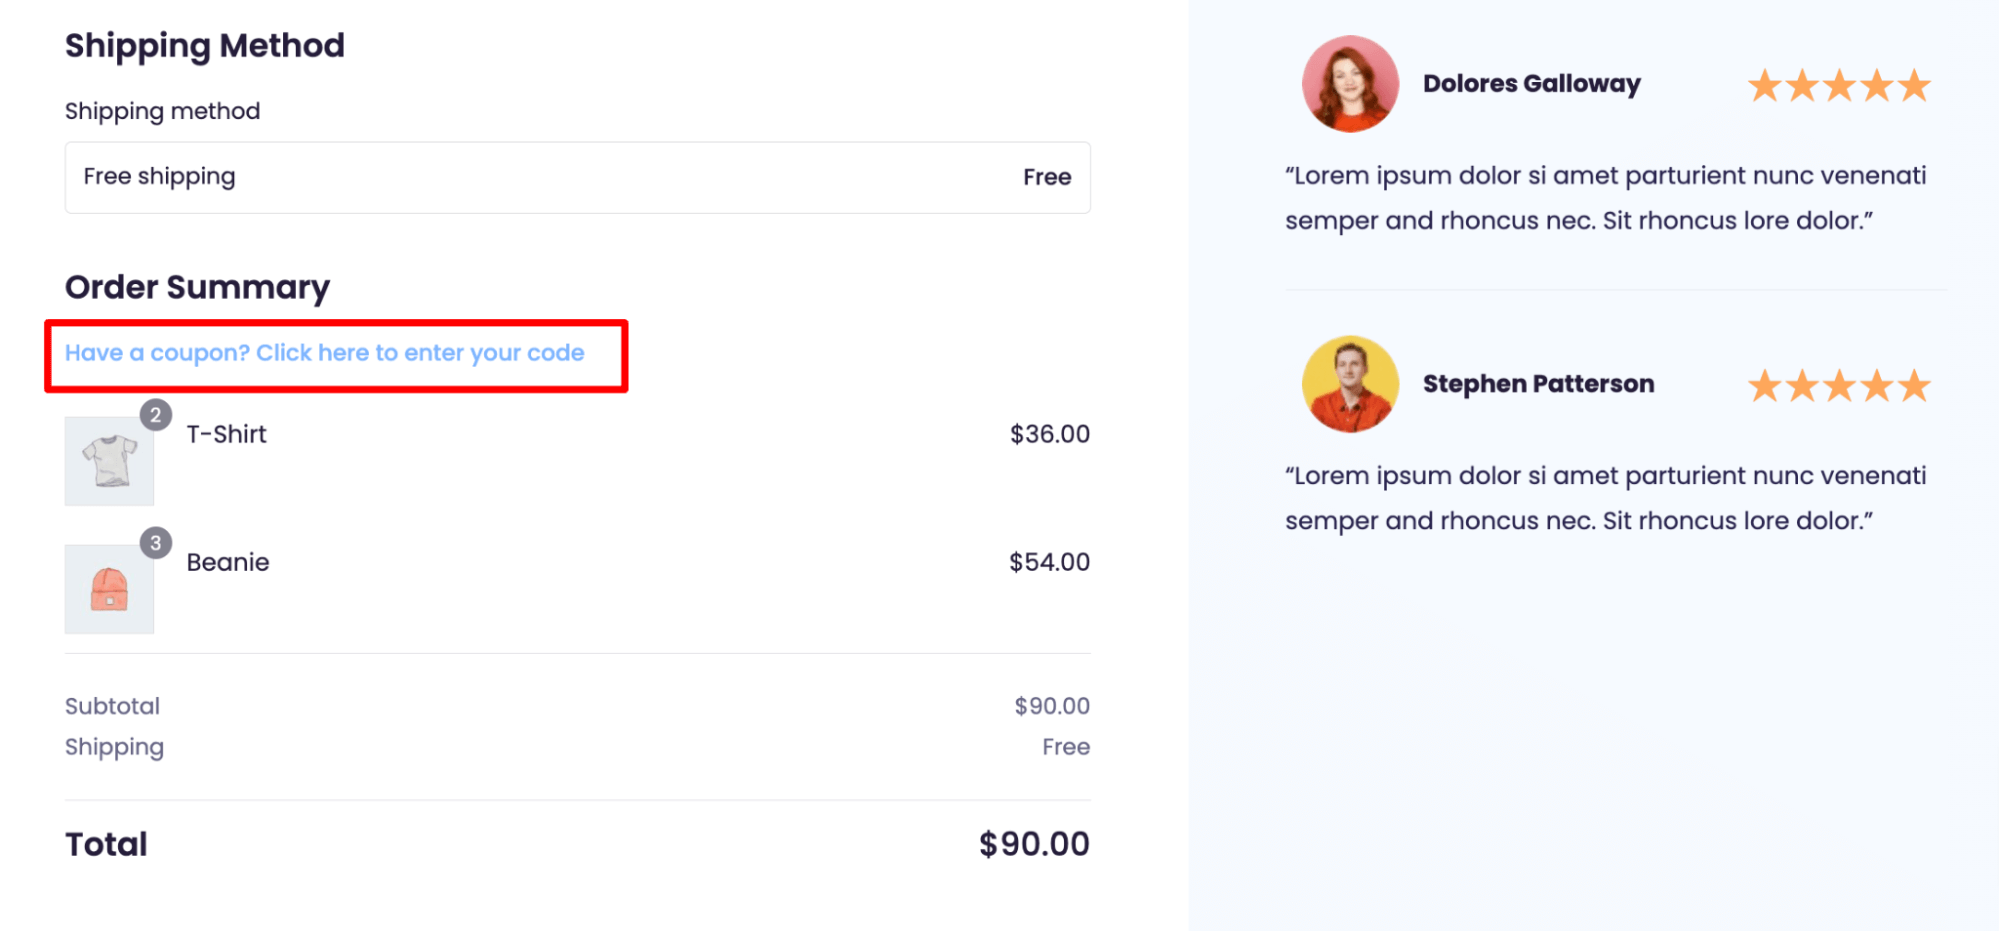
To make the field a clickable link, toggle on the "Make coupon field a clickable link" option.
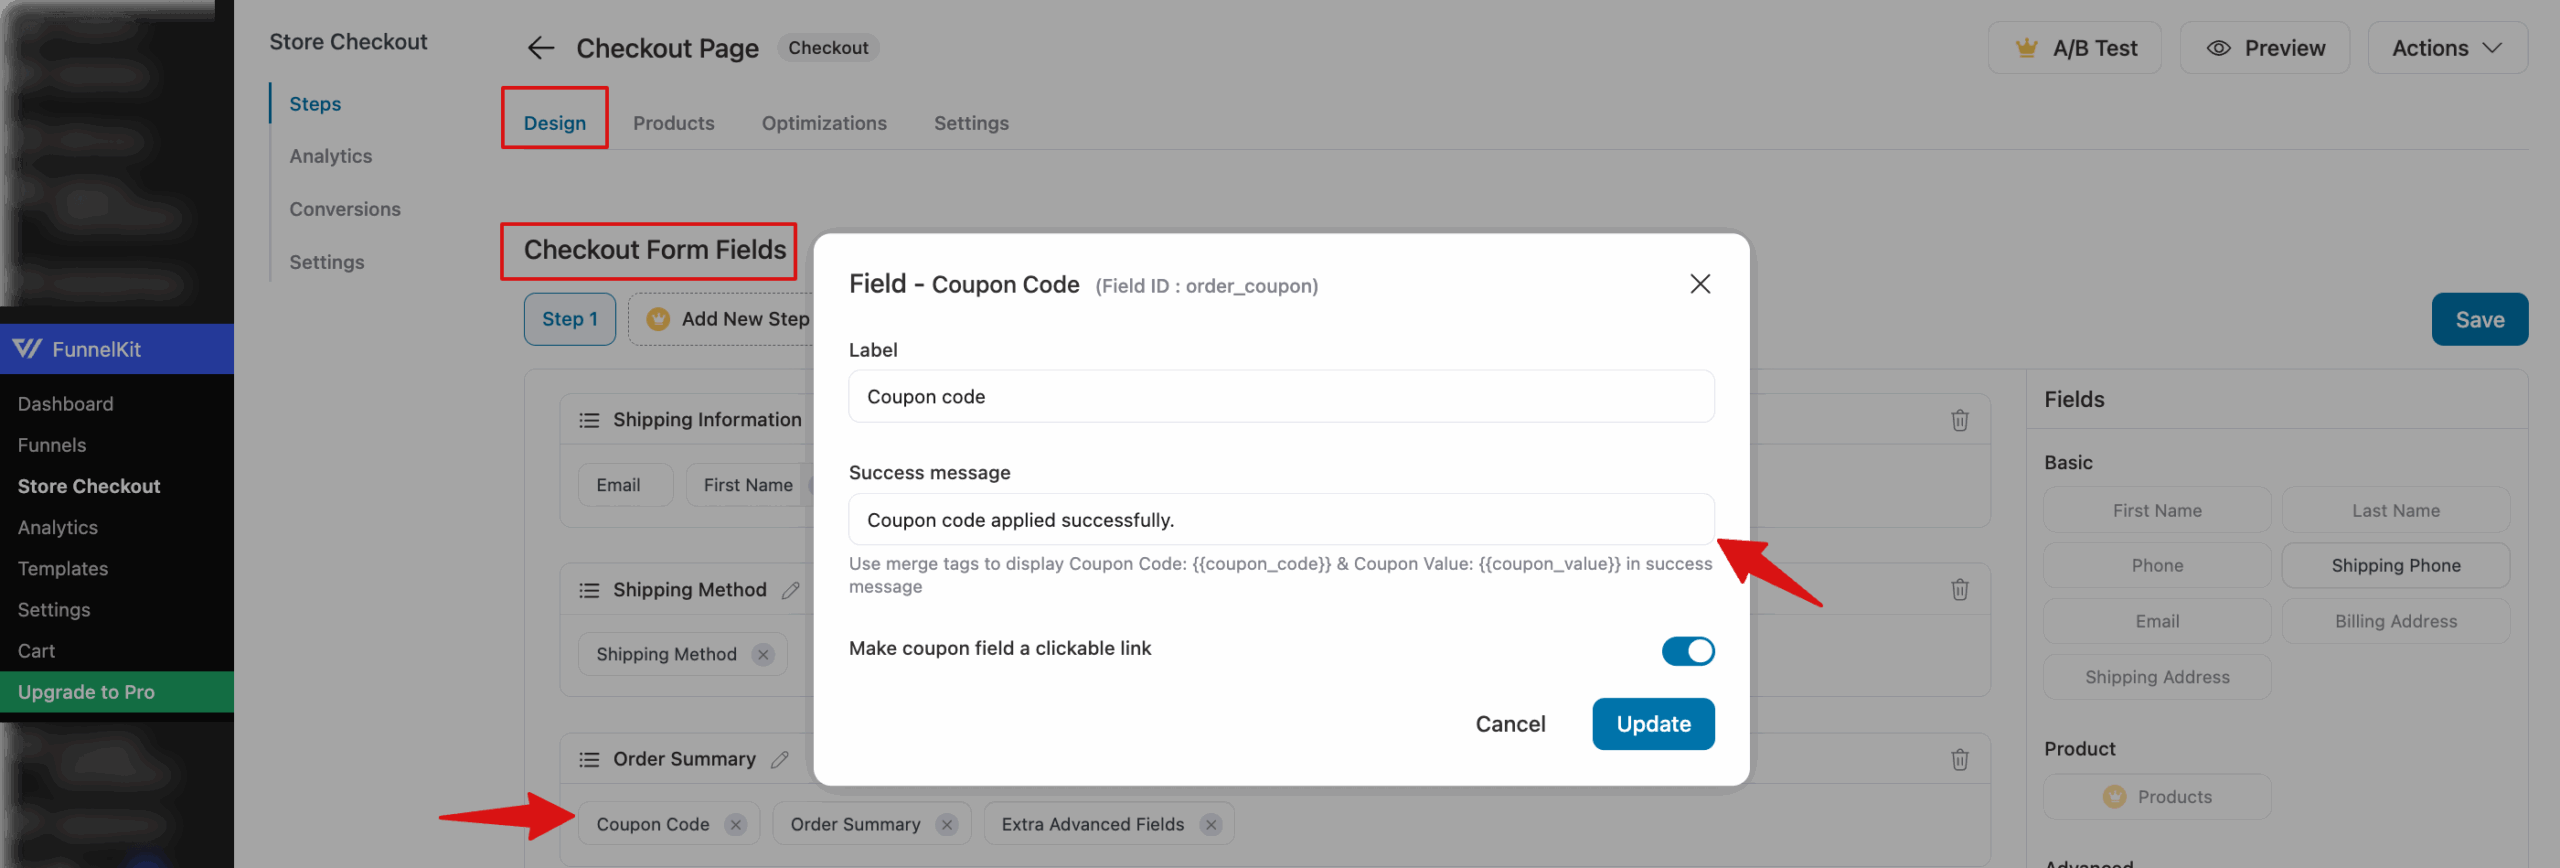
Make sure to click on ‘Update’ to save the changes.
Now, to customize the style, scroll up and hit the "Edit Template" option.
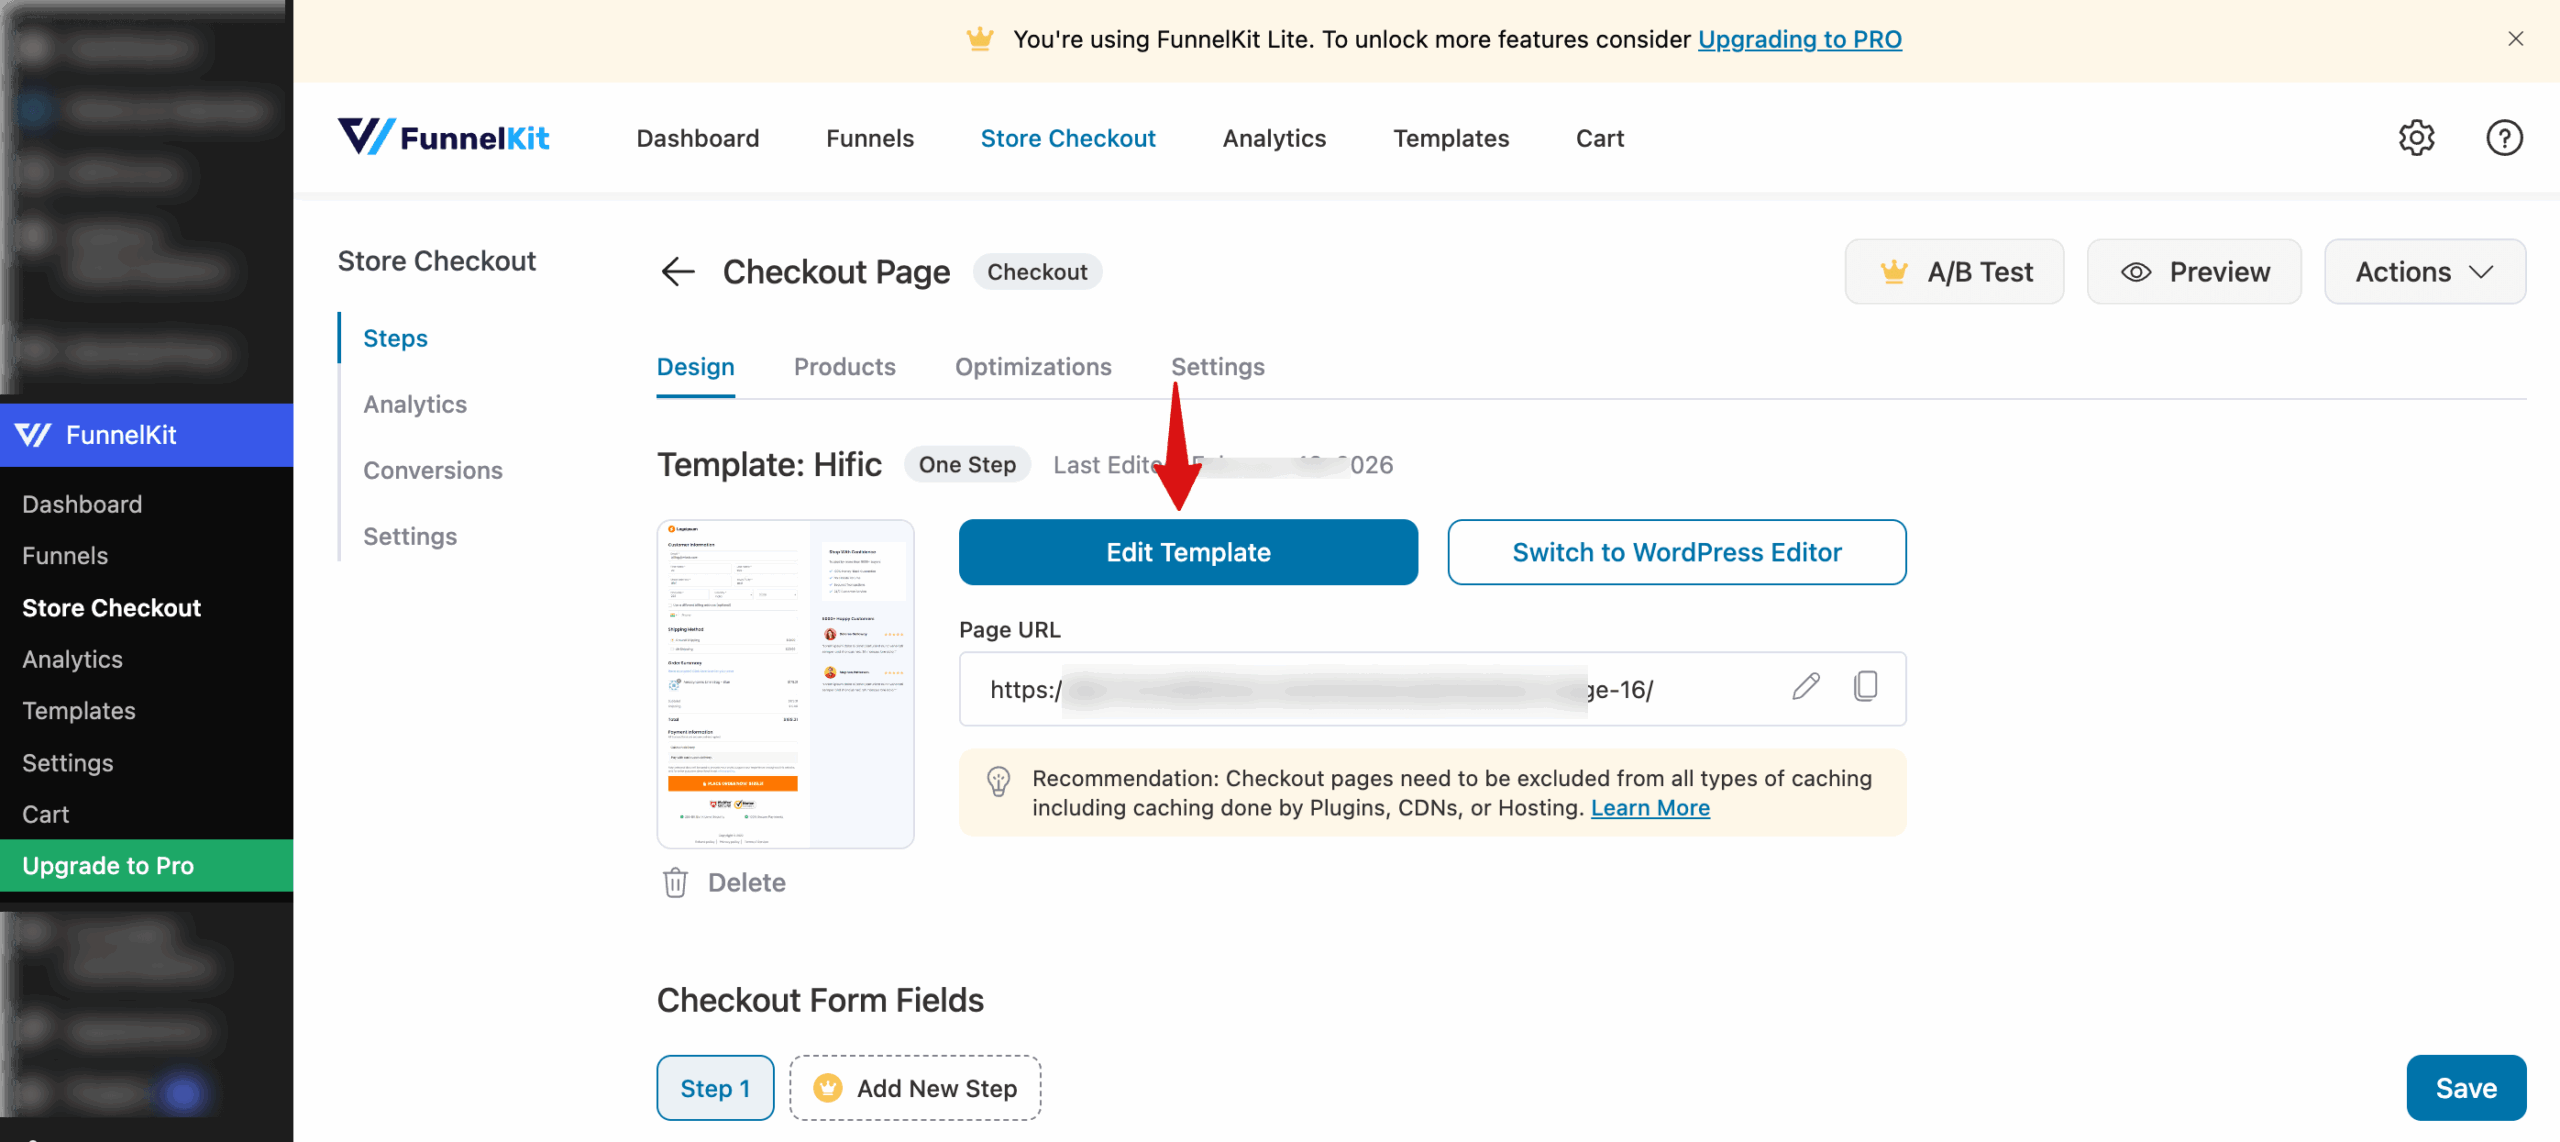
You can fully match the coupon field to your store branding by customizing links, fields, and buttons.
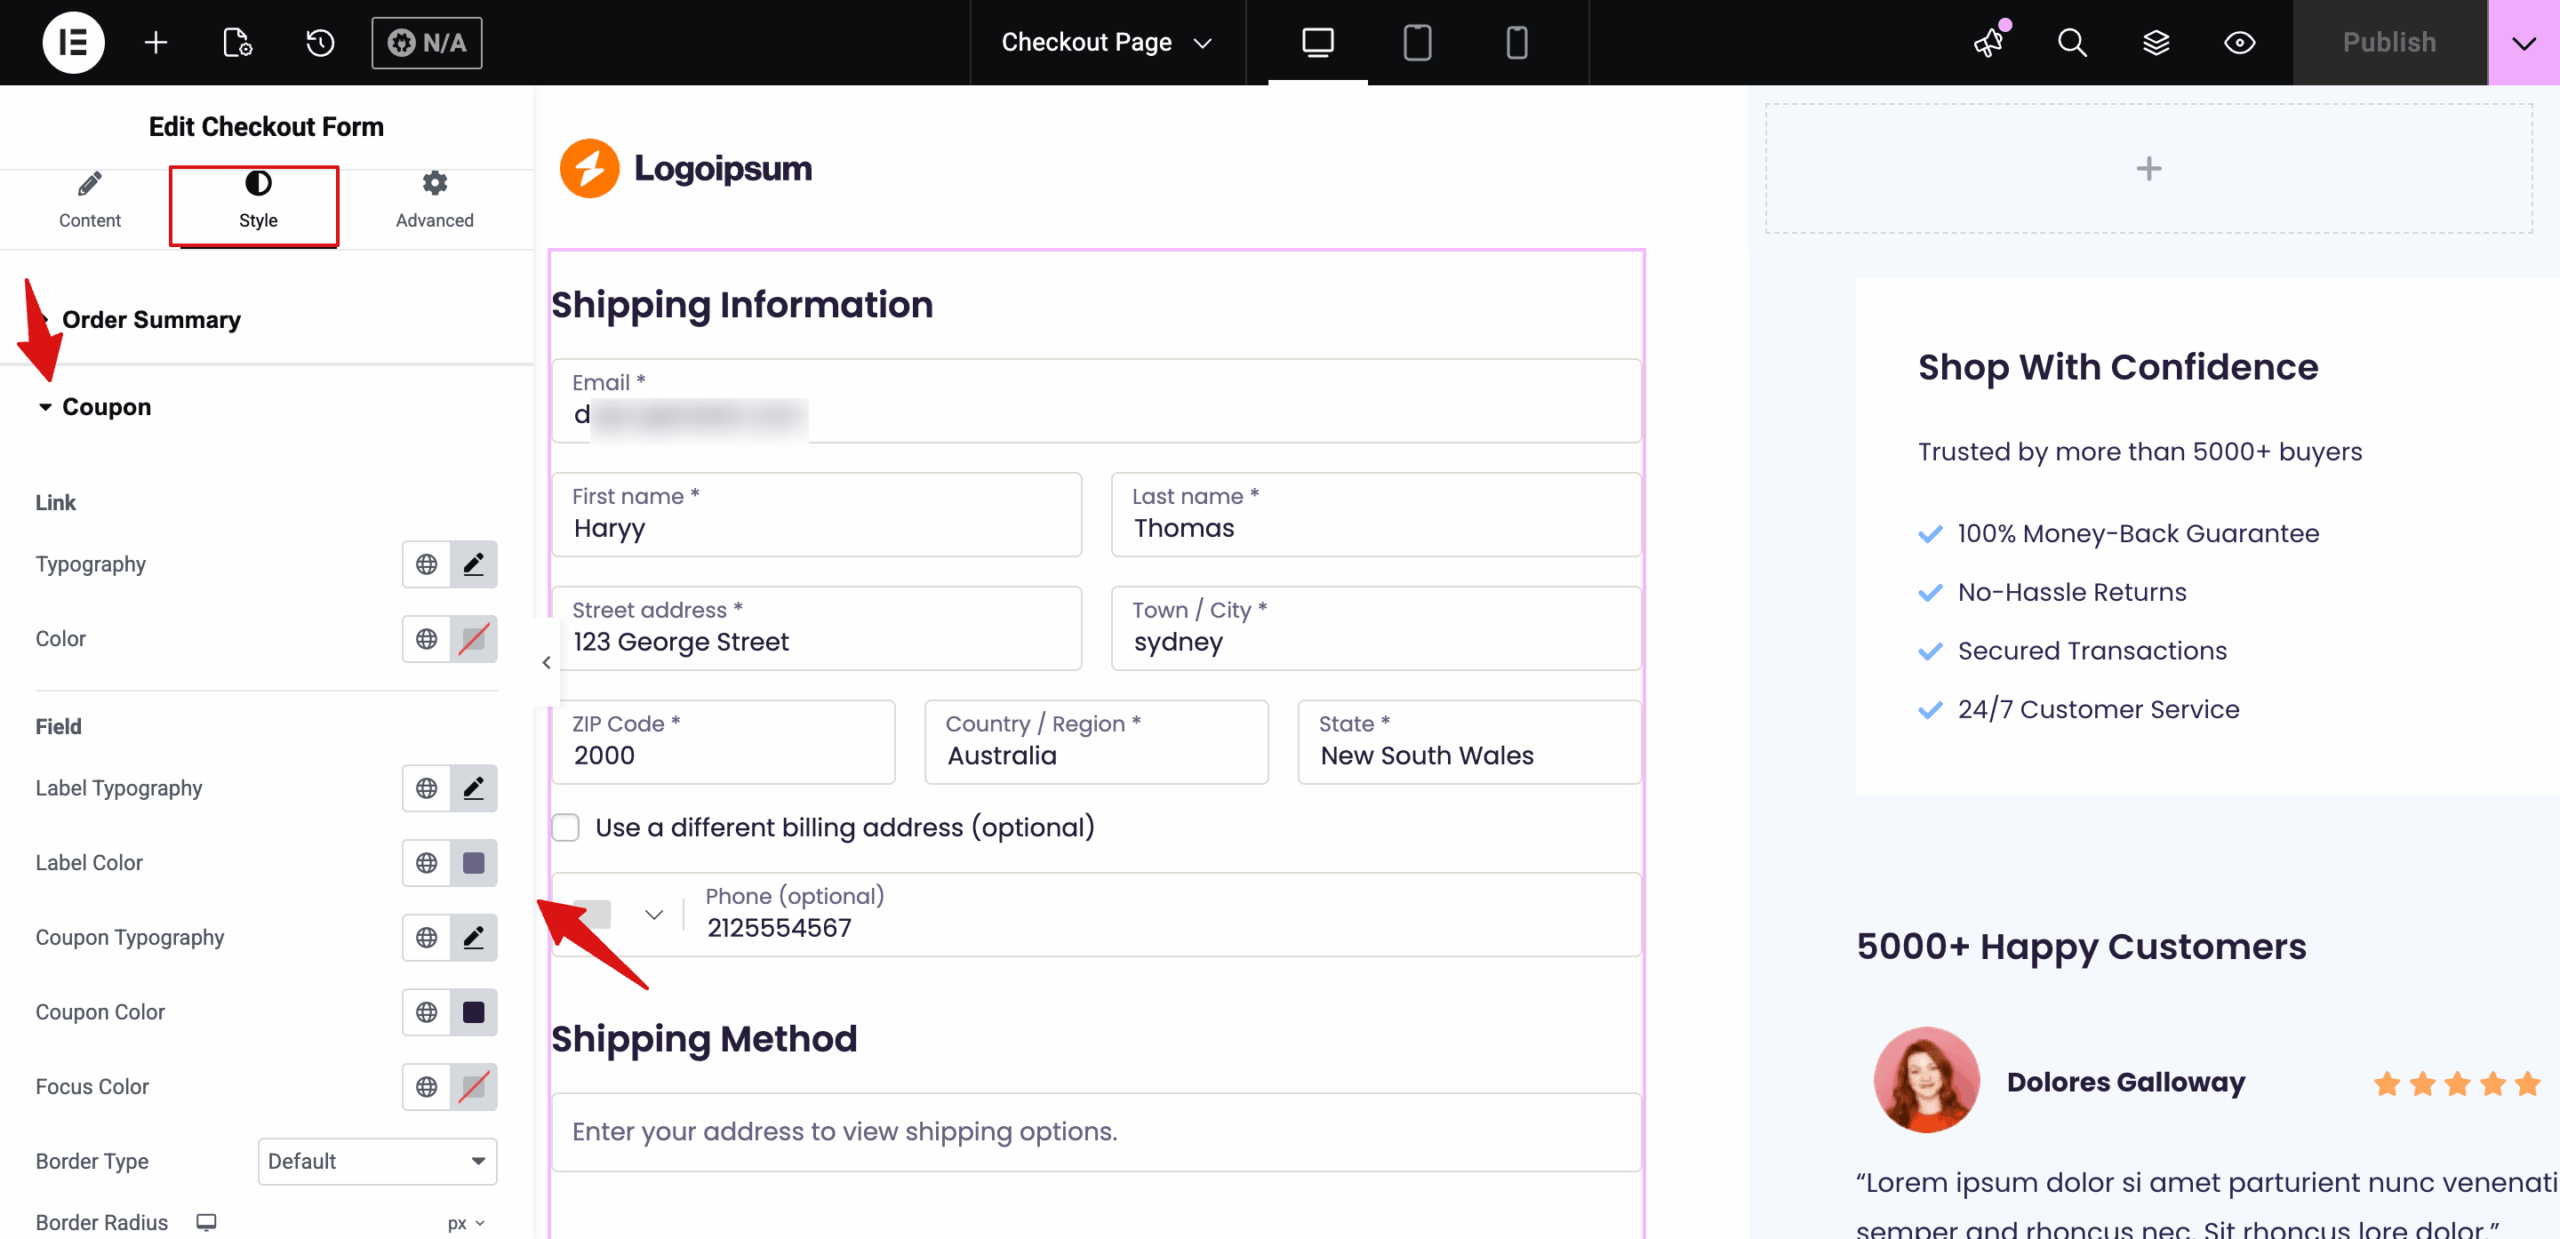
To change the appearance, go to the Style tab, expand the Coupon field to customize the following:
- Link: You can change the Typography and Color of any links in the coupon field.
- Field: You can customize Label Typography, Label Color, Coupon Typography, Coupon Color, Focus Color, Border Type (Default), and Border Radius (Top, Right, Bottom, Left).
- Button: For both Normal and Hover states, you can set the Background, Label color, and Button Typography.
Adjust these settings to match your store’s branding and design.
Here is what the clickable coupon field looks like:
Step 3: Reposition the coupon field on a checkout page
To change the order of the coupon form field, come back to the "Checkout Form Fields" section, simply drag and drop it to the desired location.
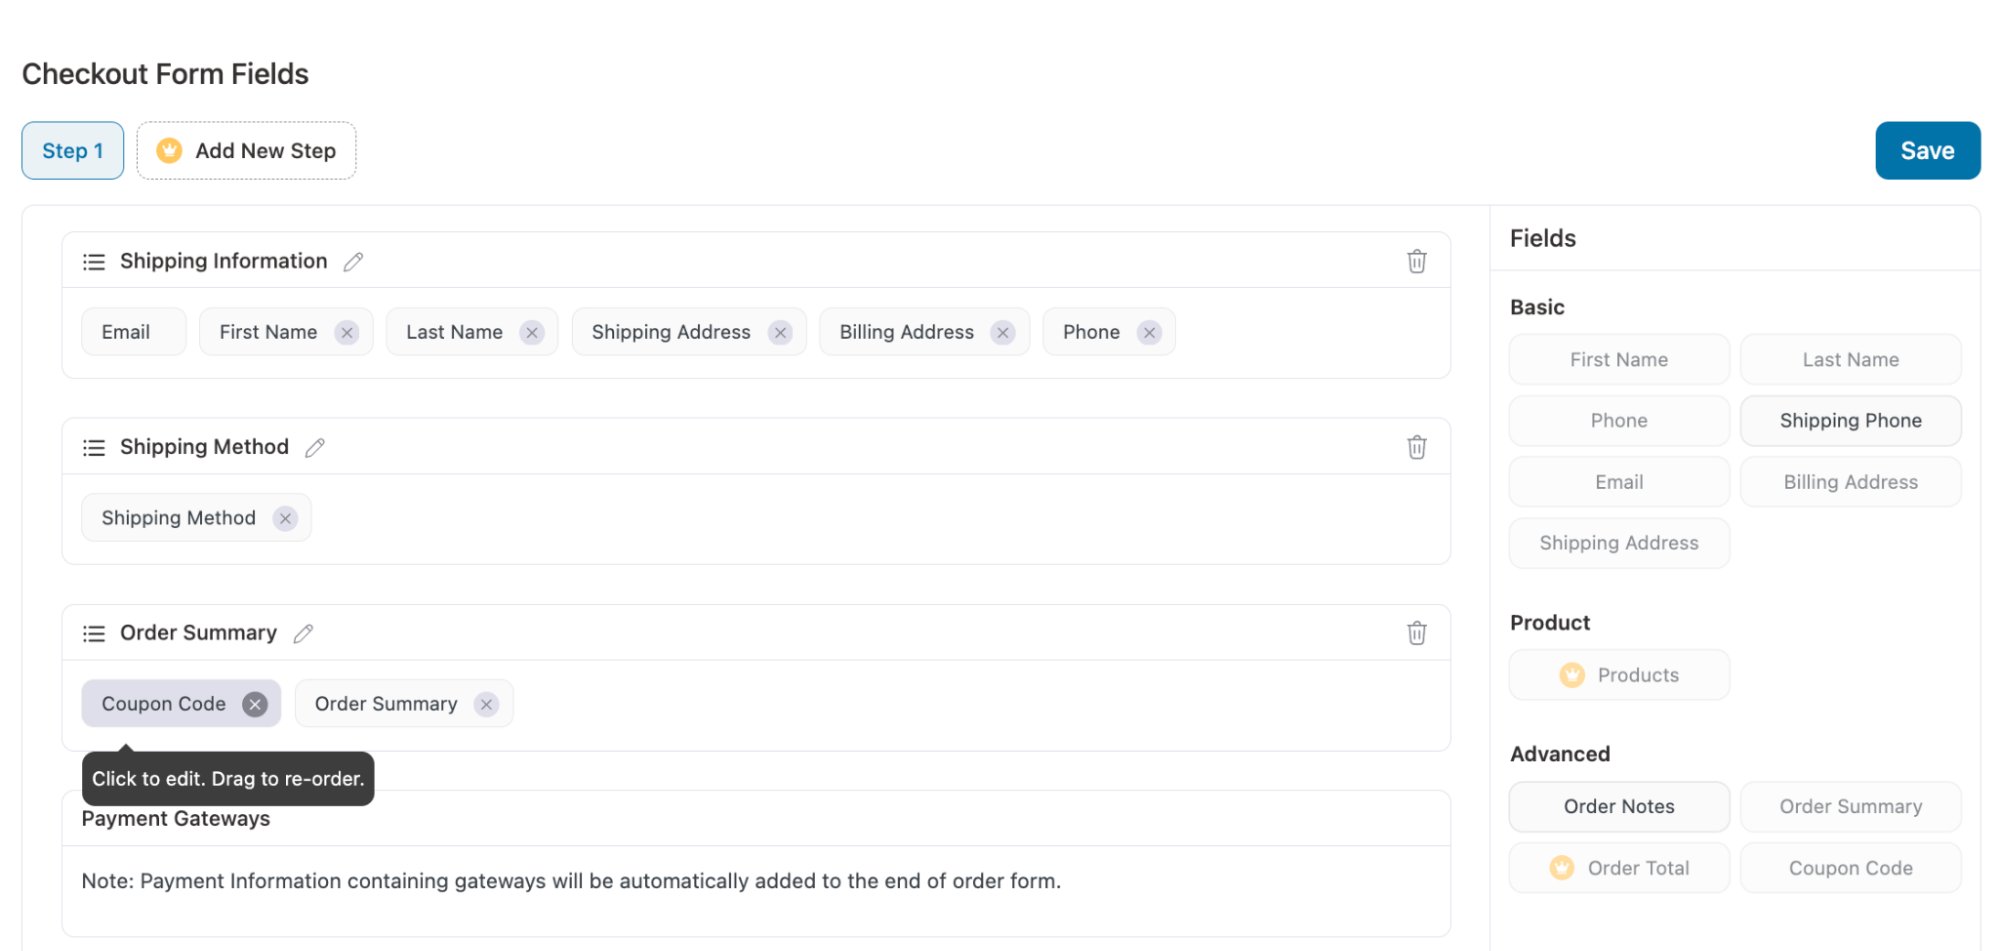
For instance, move the coupon code field to after the order summary.
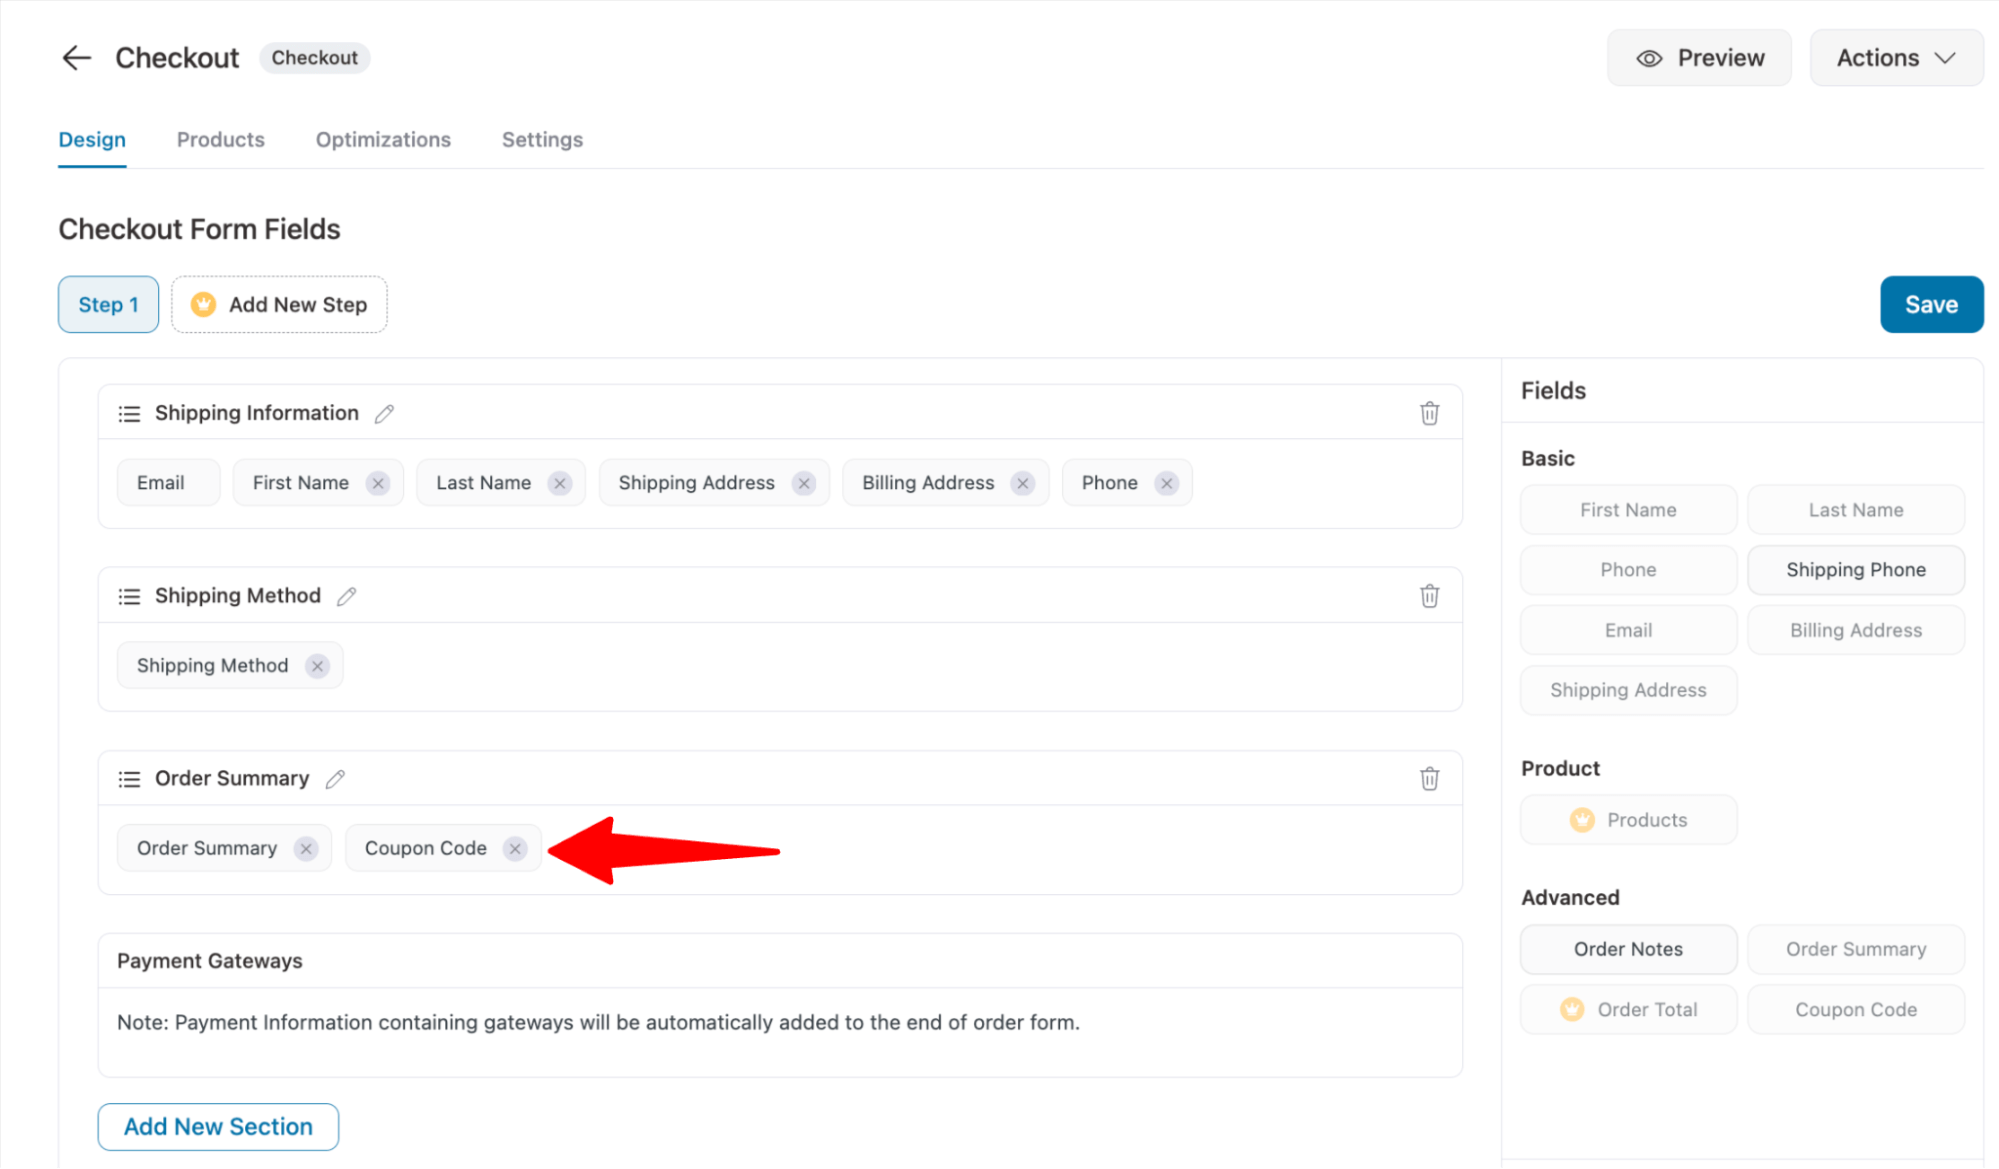
Make sure to click on ‘Save’ to update the changes.
Here is the preview of the coupon field in a new location:
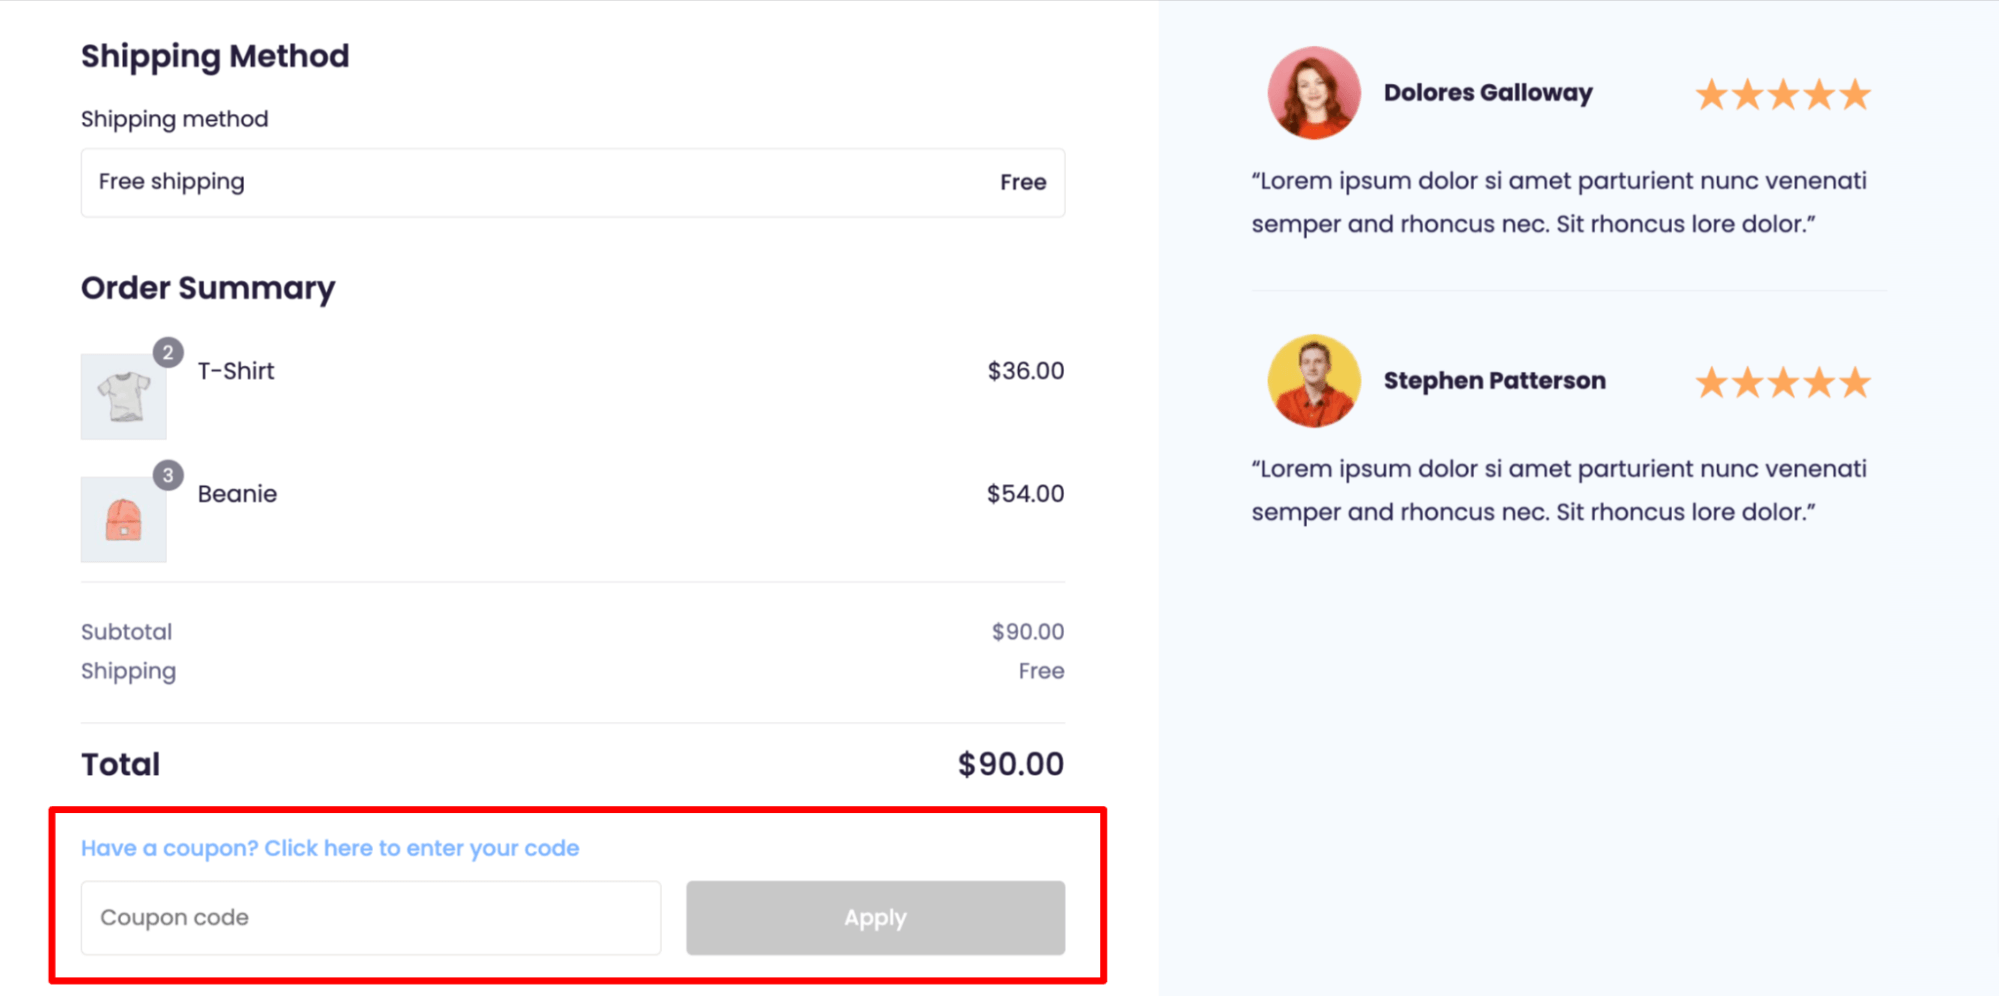

Step 4: Enable the store checkout
Lastly, click on the "Enable Store Checkout" button to activate the store checkout.
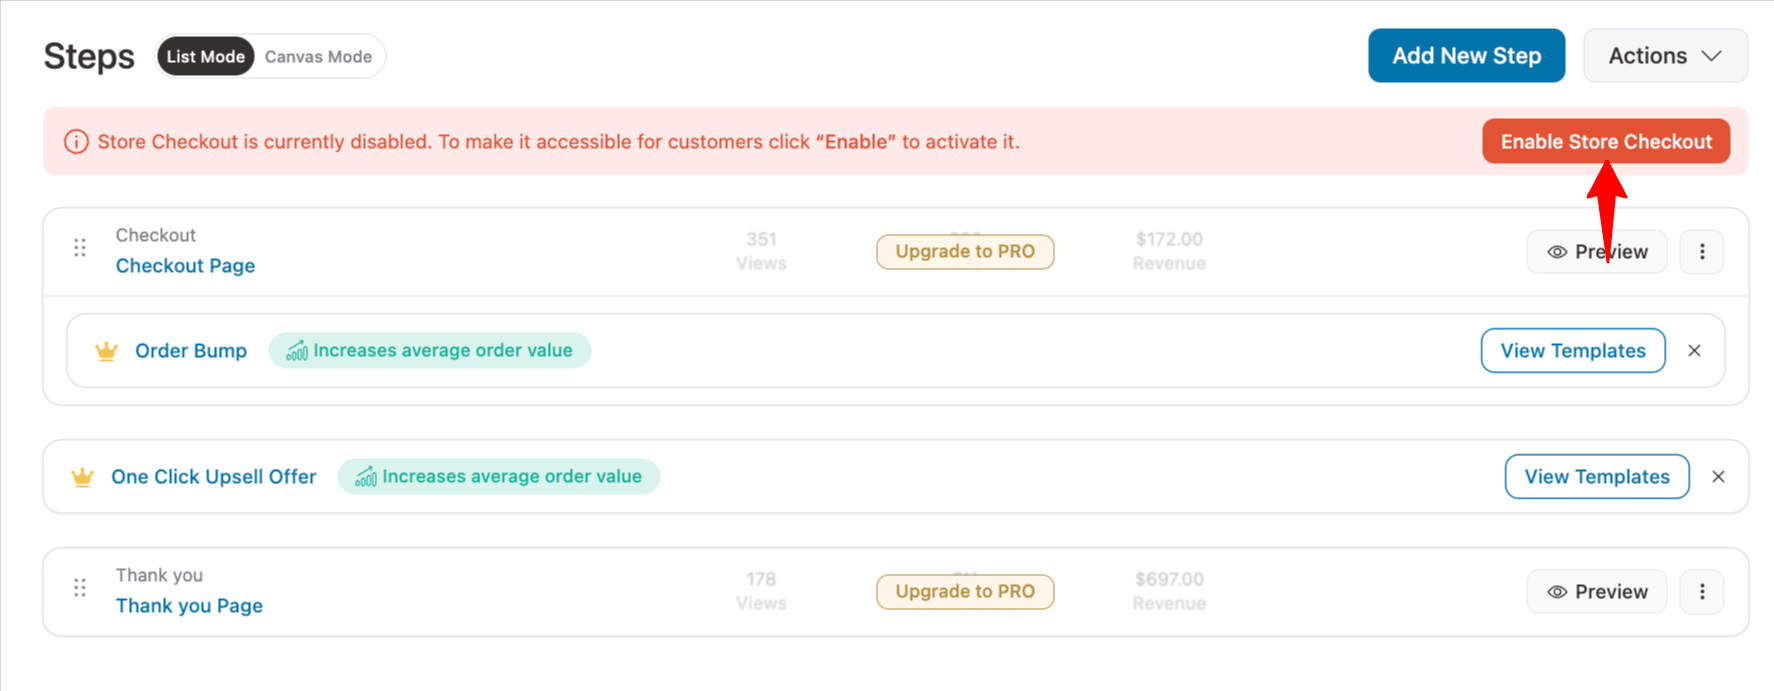
This is how you can add a checkout coupon field to the WooCommerce checkout and place it wherever you want.
How to Hide the Coupon Field on WooCommerce Checkout
If your question is "How to remove 'Have a coupon' from checkout form?", then this section provides 3 ways to remove or hide the coupon field from the WooCommerce checkout page.
Which method fits depends on whether coupons should keep working elsewhere in your store.
Method 1 turns coupons off everywhere. Method 2 removes the field from checkout only, so shoppers can still apply codes on the cart. Method 3 is for stores using a FunnelKit checkout.
Method 1: Turn off coupons store-wide using default settings
Go to WooCommerce ⇒ Settings ⇒ General, uncheck "Enable the use of coupon codes," and click Save Changes. This removes the coupon field from both the cart and checkout, on classic and block checkout alike. No coupon can be applied anywhere in your store until you turn the setting back on.
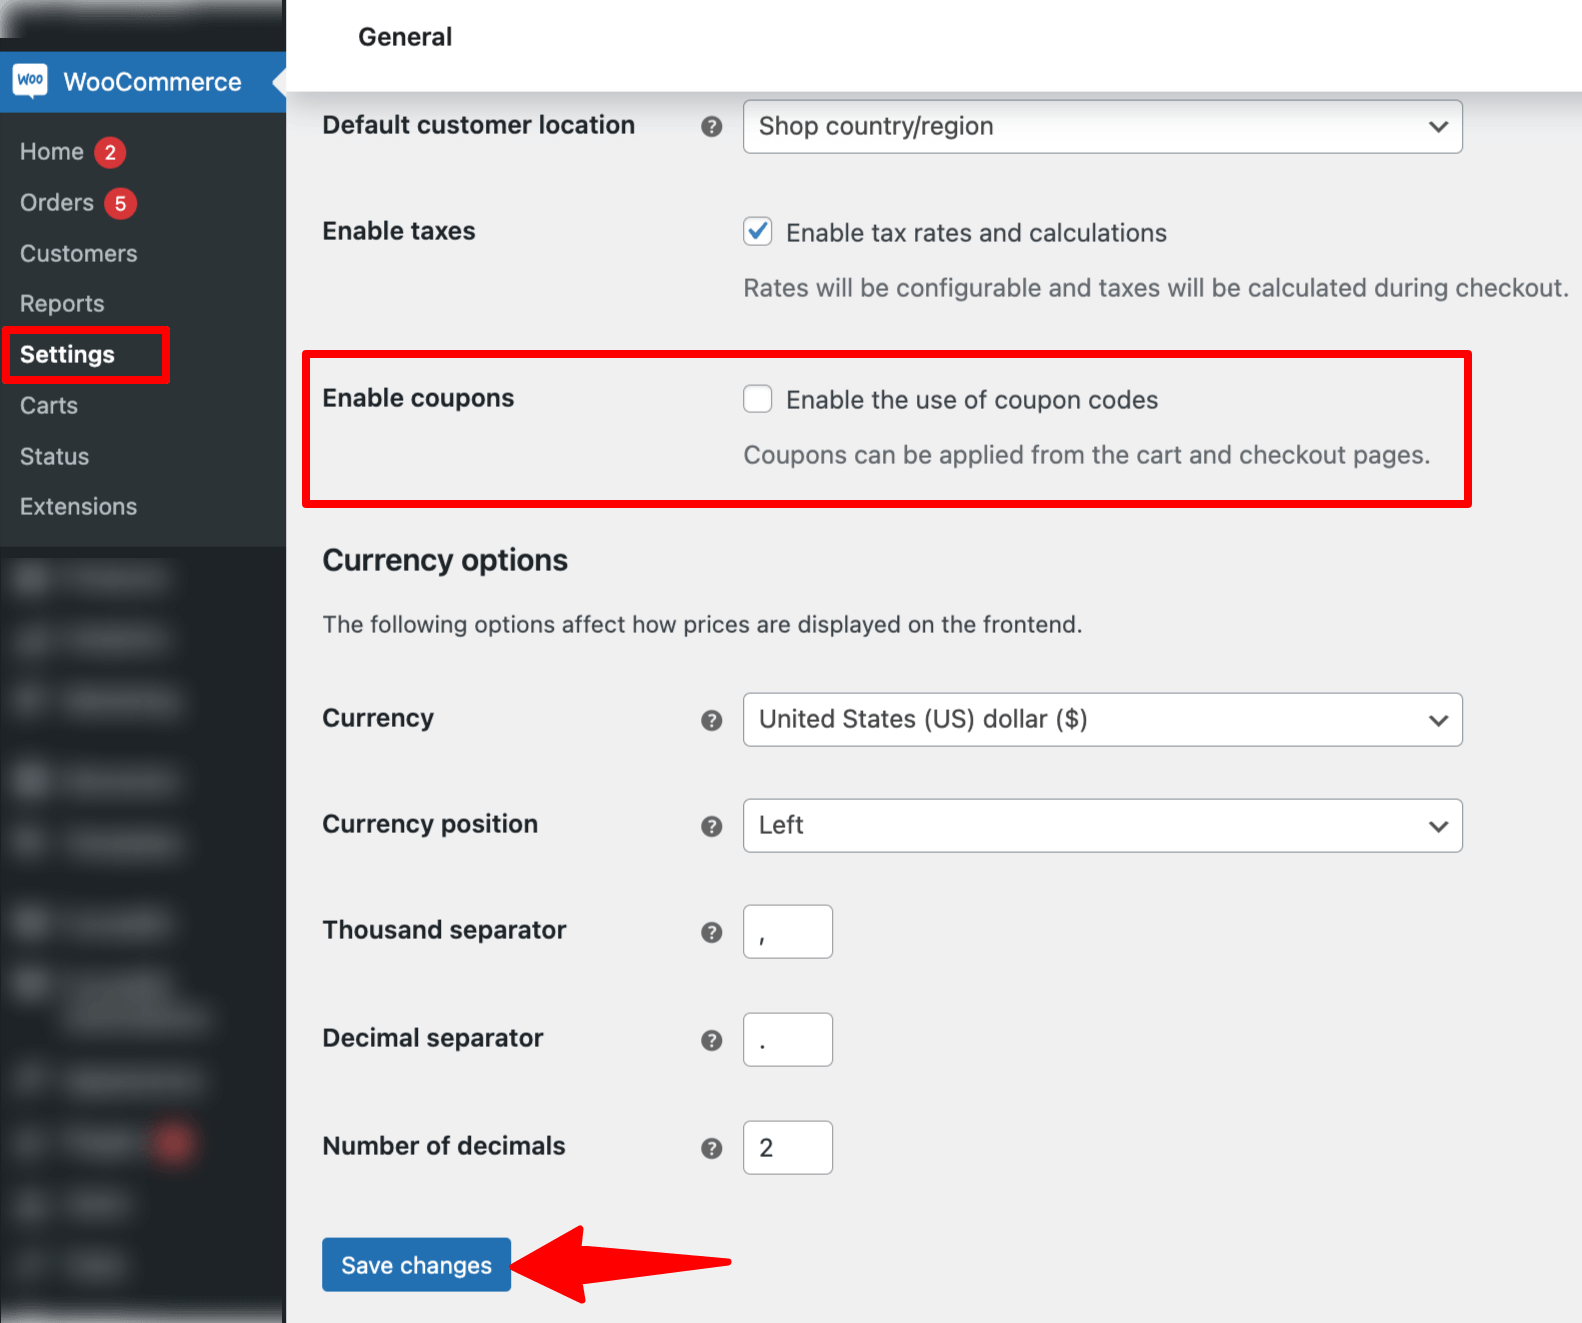
Method 2: Hide it on checkout only and keep it on the cart
This method takes the field off the checkout page while shoppers can still enter codes on the cart. Any coupon applied on the cart carries over to checkout and stays in the order total.
The steps differ by checkout type. If your checkout page uses the Checkout block, follow the block checkout steps. If it uses the [woocommerce_checkout] shortcode, follow the classic checkout steps.
Classic checkout
Add this snippet to your child theme's functions.php file or a code snippets plugin:
add_action( 'wp', function() {
    remove_action( 'woocommerce_before_checkout_form', 'woocommerce_checkout_coupon_form', 10 );
} );
It removes the "Have a coupon?" bar above the checkout form. The coupon field on the cart page isn't affected.
Block checkout
Add this CSS to your theme's Additional CSS panel. Classic themes have it in the Customizer, and block themes have it under Styles in the Site Editor.
.wp-block-woocommerce-checkout-order-summary-coupon-form-block {
    display: none;
}
This hides the coupon link inside the checkout order summary. The Cart block keeps its own coupon field.
Coupons already applied on the cart still show in the order summary with a remove (X) button. If a shopper removes one at checkout, they'll need to go back to the cart to add it again.
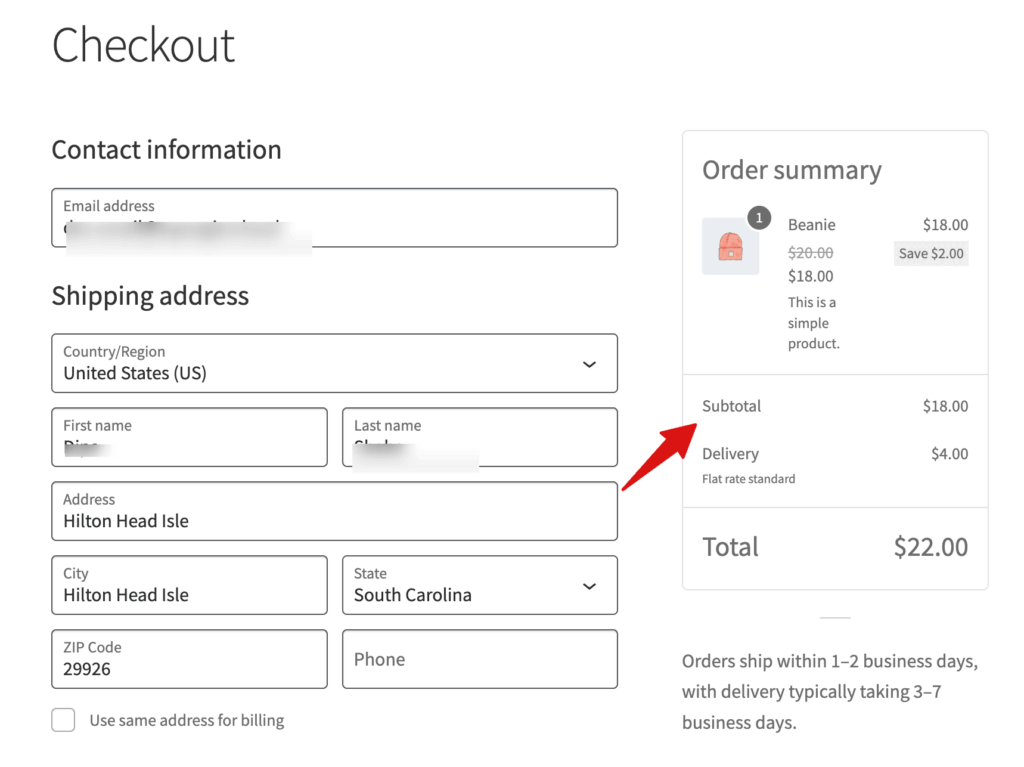
Test either version with a real code. Apply it on the cart, go to checkout, and confirm the discount still shows in the order total.
Method 3: Using a custom checkout with FunnelKit Funnel Builder
If you are using FunnelKit Funnel Builder to create your checkout page and add a coupon field, then removing the coupon field is way easier than you think.
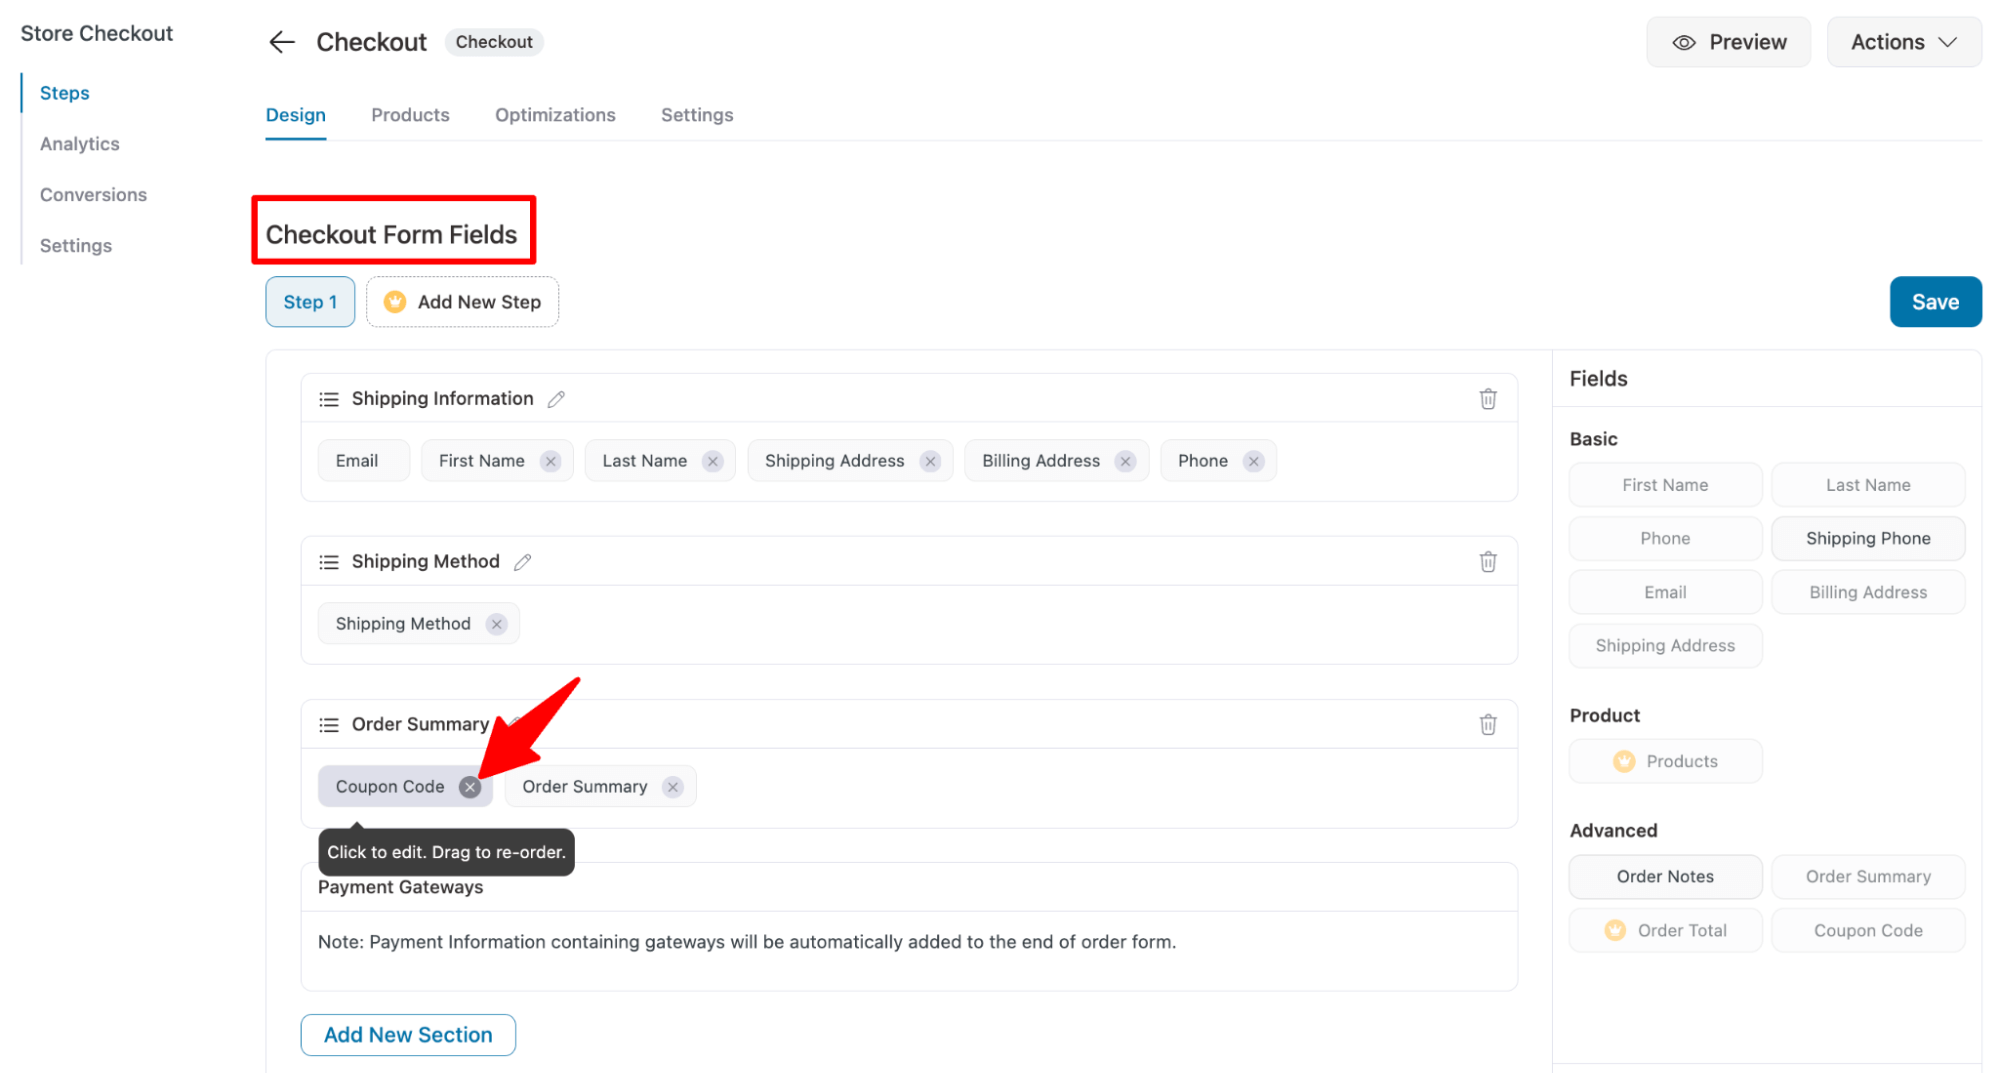
To remove the coupon field from your WooCommerce checkout page, edit the checkout page, scroll down to the Checkout Form Fields section, hover over the Coupon field, and click on the ‘X’ icon.
Make sure to click on Save to update the changes.
How to Auto-Apply a Coupon At WooCommerce Checkout
To configure an auto-applied coupon at checkout, make sure to install and activate FunnelKit Funnel Builder Pro.
Now, move to the Optimizations tab and click on the “Auto Apply Coupons” section to expand it. Choose “yes” and add the coupon code you want to auto-apply at checkout. Since the coupon is auto-applied, you can disable the field if you want.
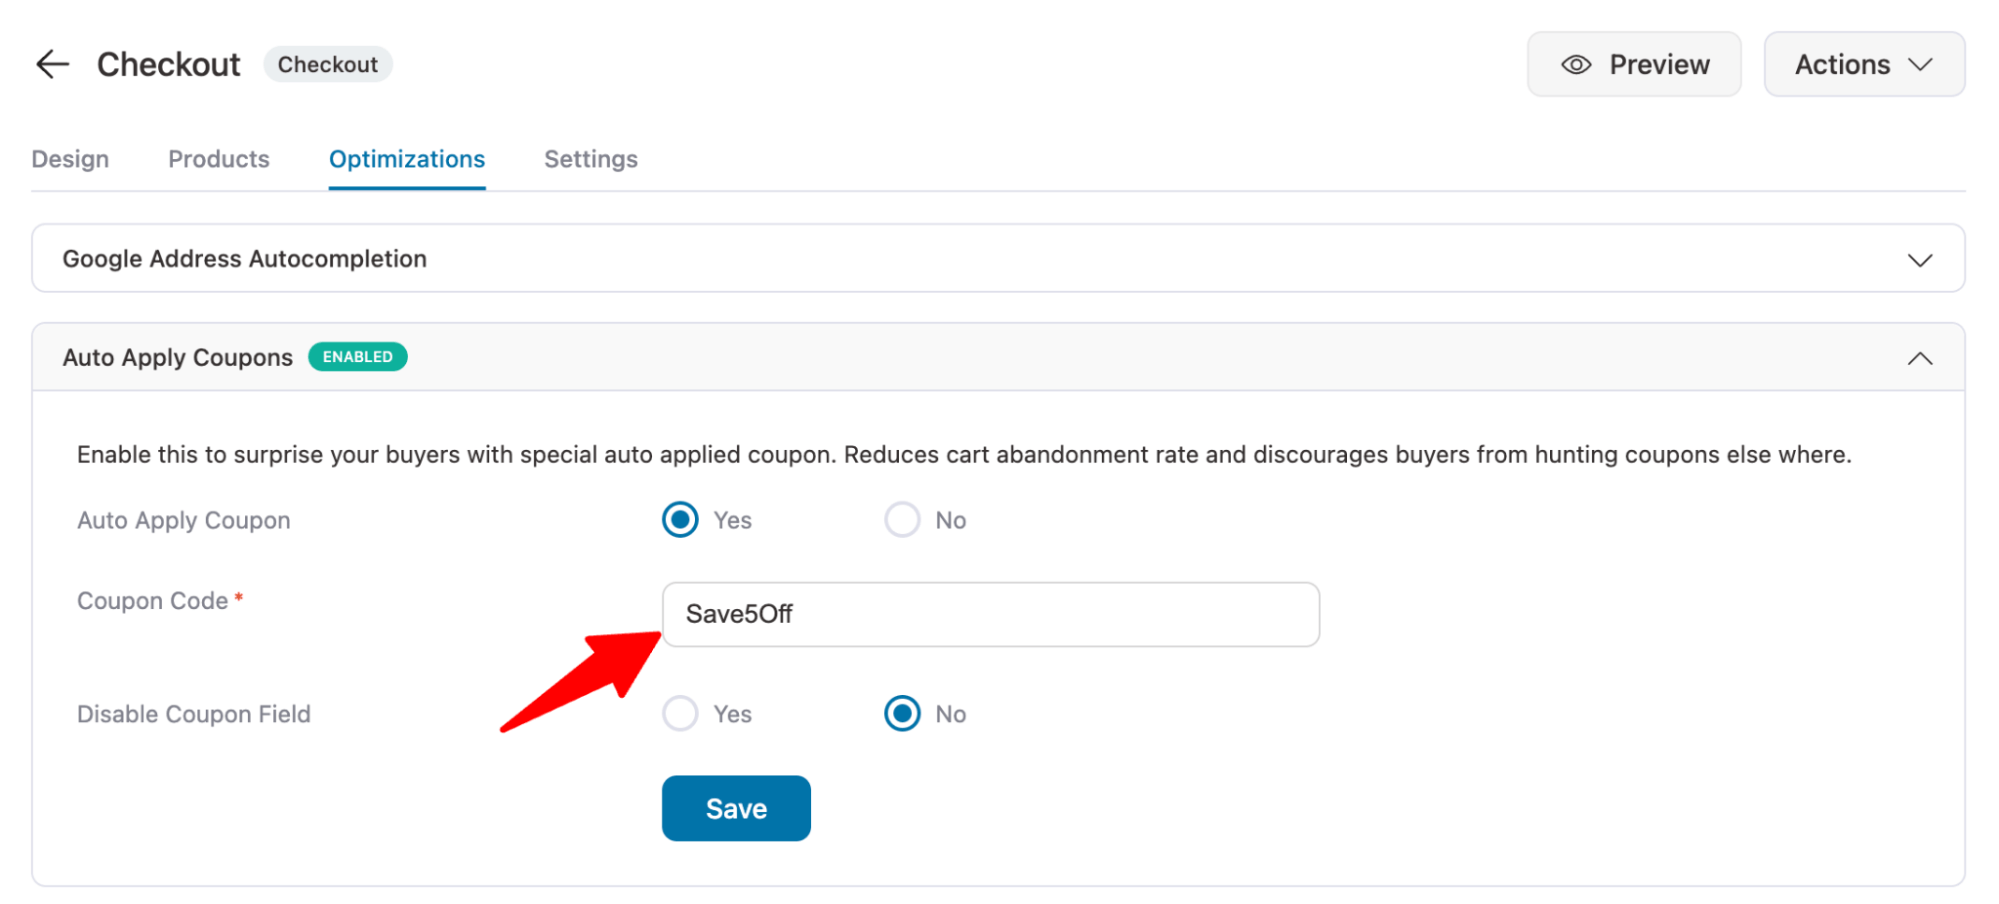
After that, click on “Save” to update the settings. This is how you can auto apply coupon at WooCommerce checkout.
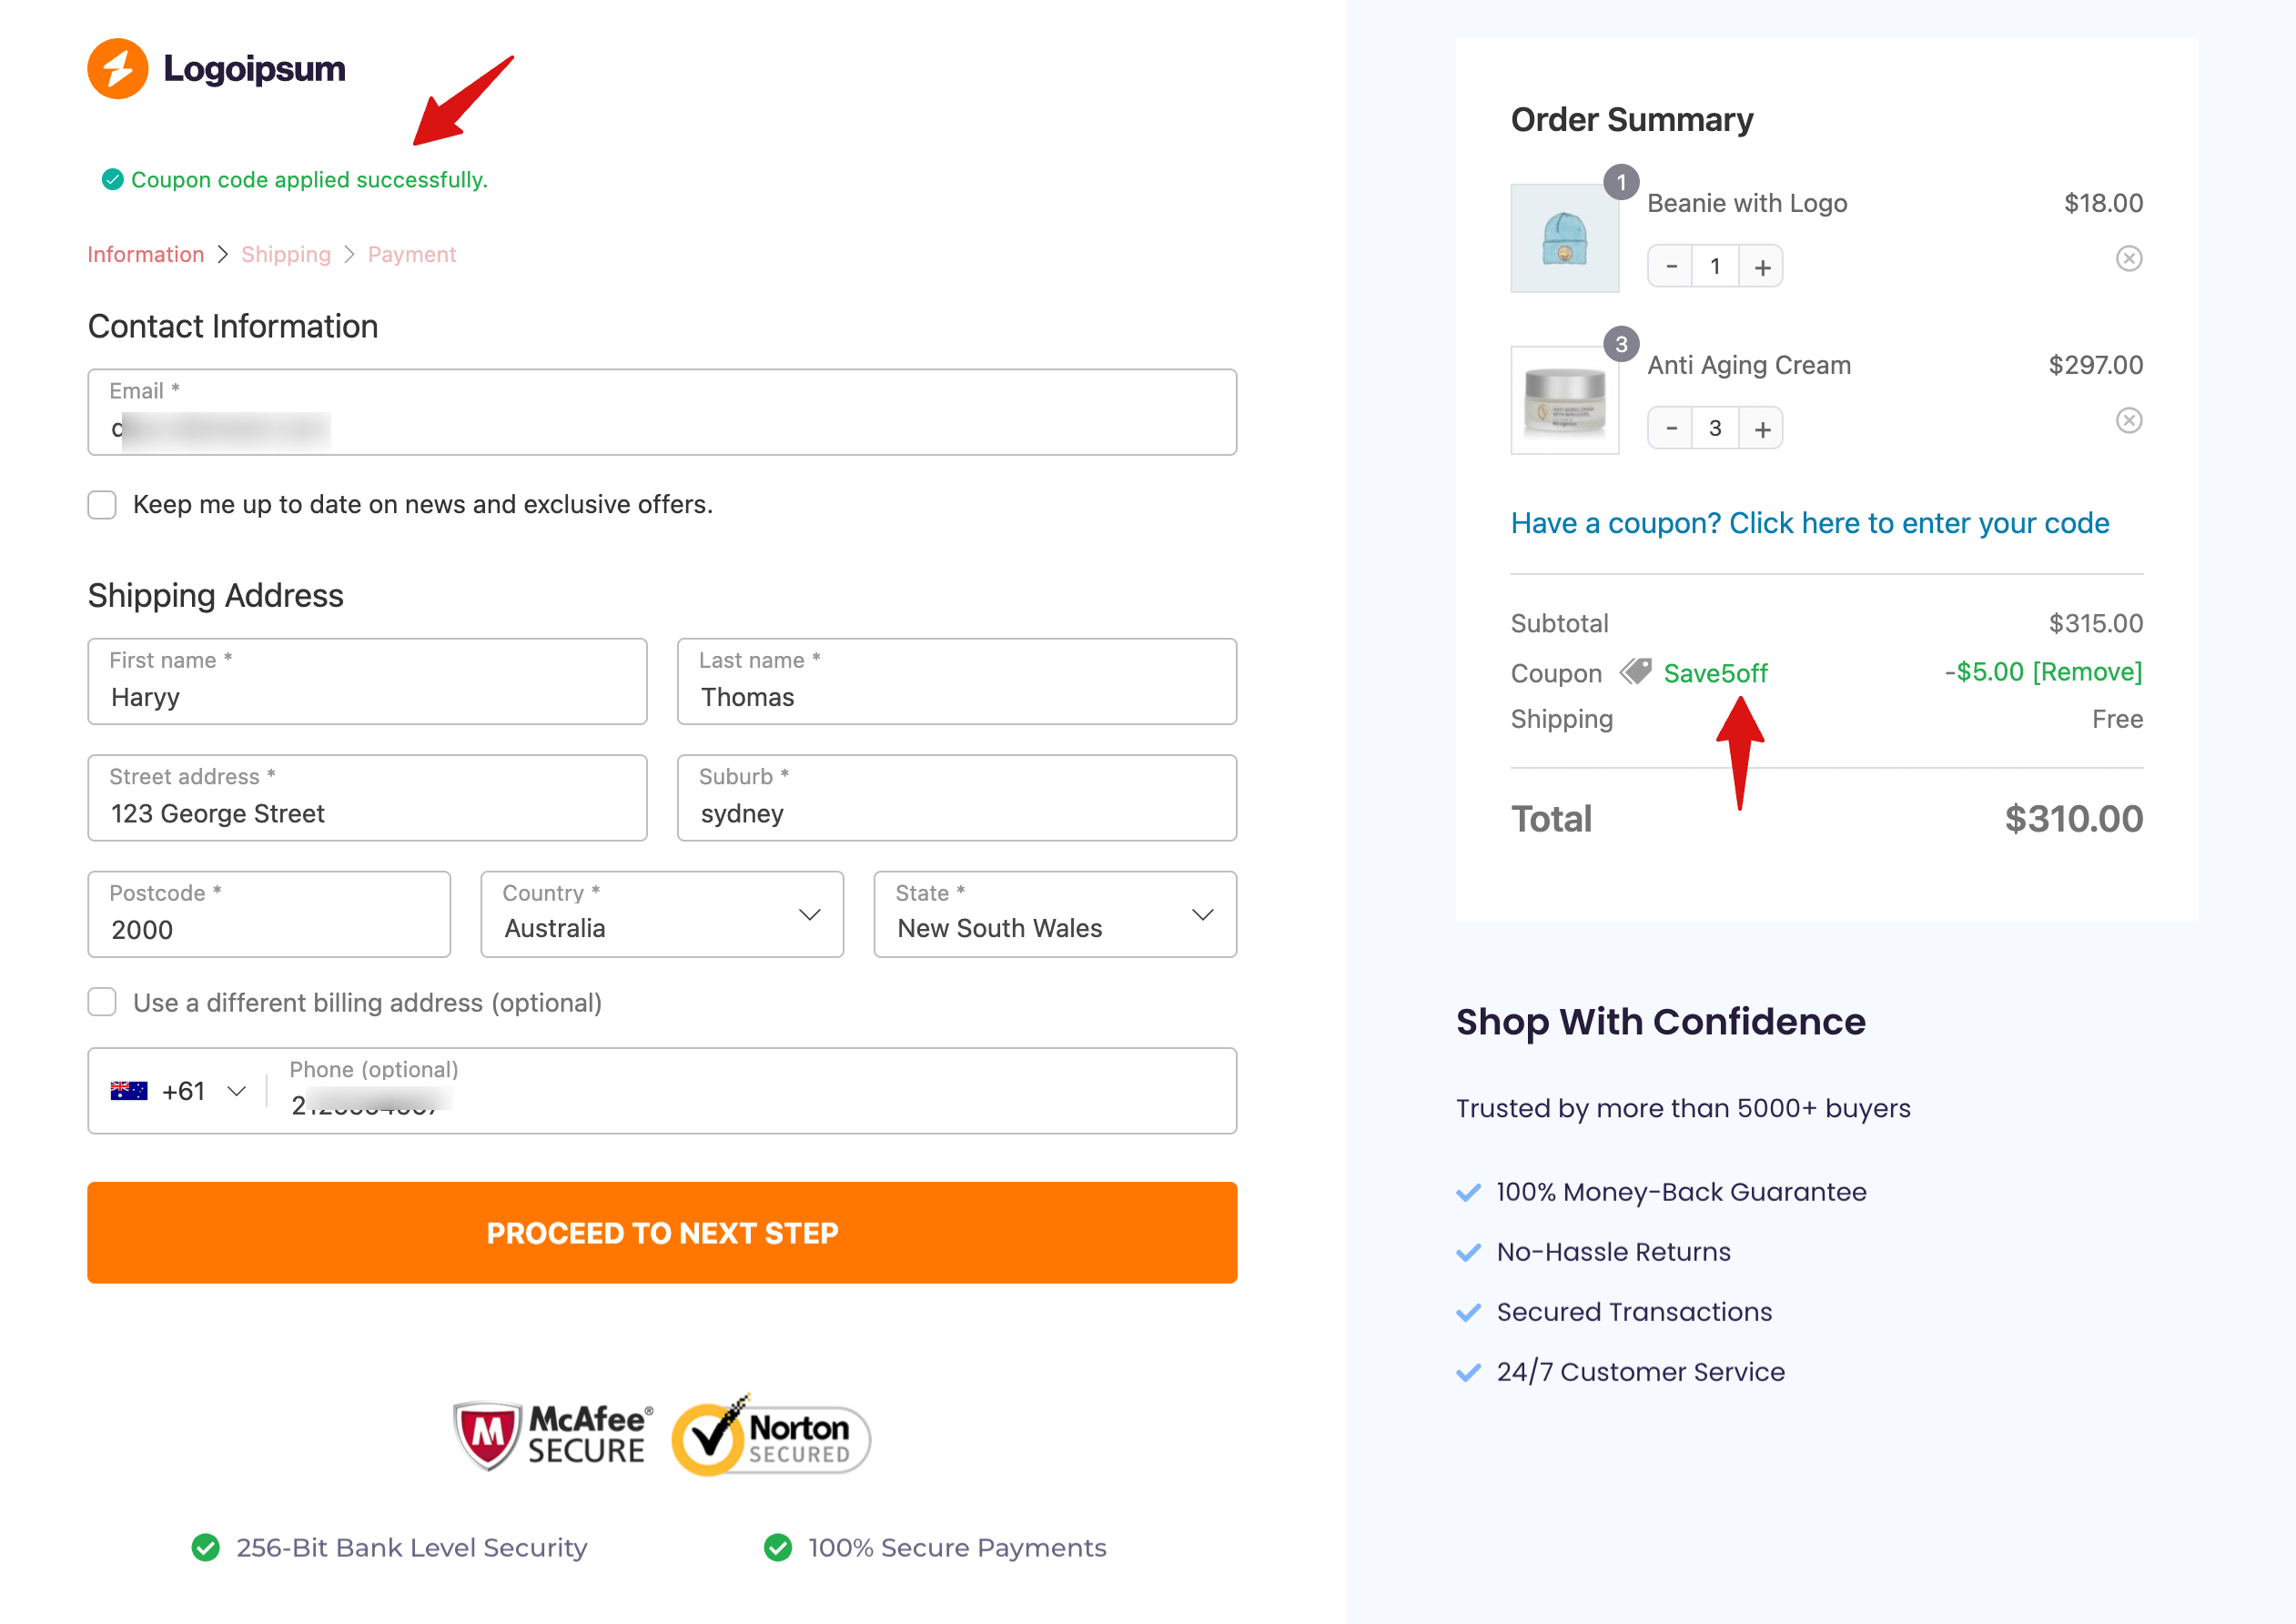
To test, place an order that meets all coupon conditions (e.g., minimum requirements), and the coupon will be applied automatically.
How to Create a WooCommerce Checkout Coupon URL
A WooCommerce checkout coupon URL directs users to checkout with the selected products and an automatically applied coupon. It’s ideal for exclusive discount offers.
With the FunnelKit Funnel Builder Pro, creating such URLs is simple.
After that, edit the checkout and move to the Optimization tab. Here, scroll down to the “Generate URL to populate checkout” section and expand the section. Then, set the following values:
- Product: Add the Product IDs separated by commas that will be added to the cart when users hit the URL.
- Quantity: Provide the product quantities, separated by commas. Make sure to follow the same sequence you used in the product IDs.
- Coupons: Add the coupon you want to apply to the cart when customers use this URL.
After providing the URL, you will find the WooCommerce Checkout Coupon URL in the field “Coupon URL”.
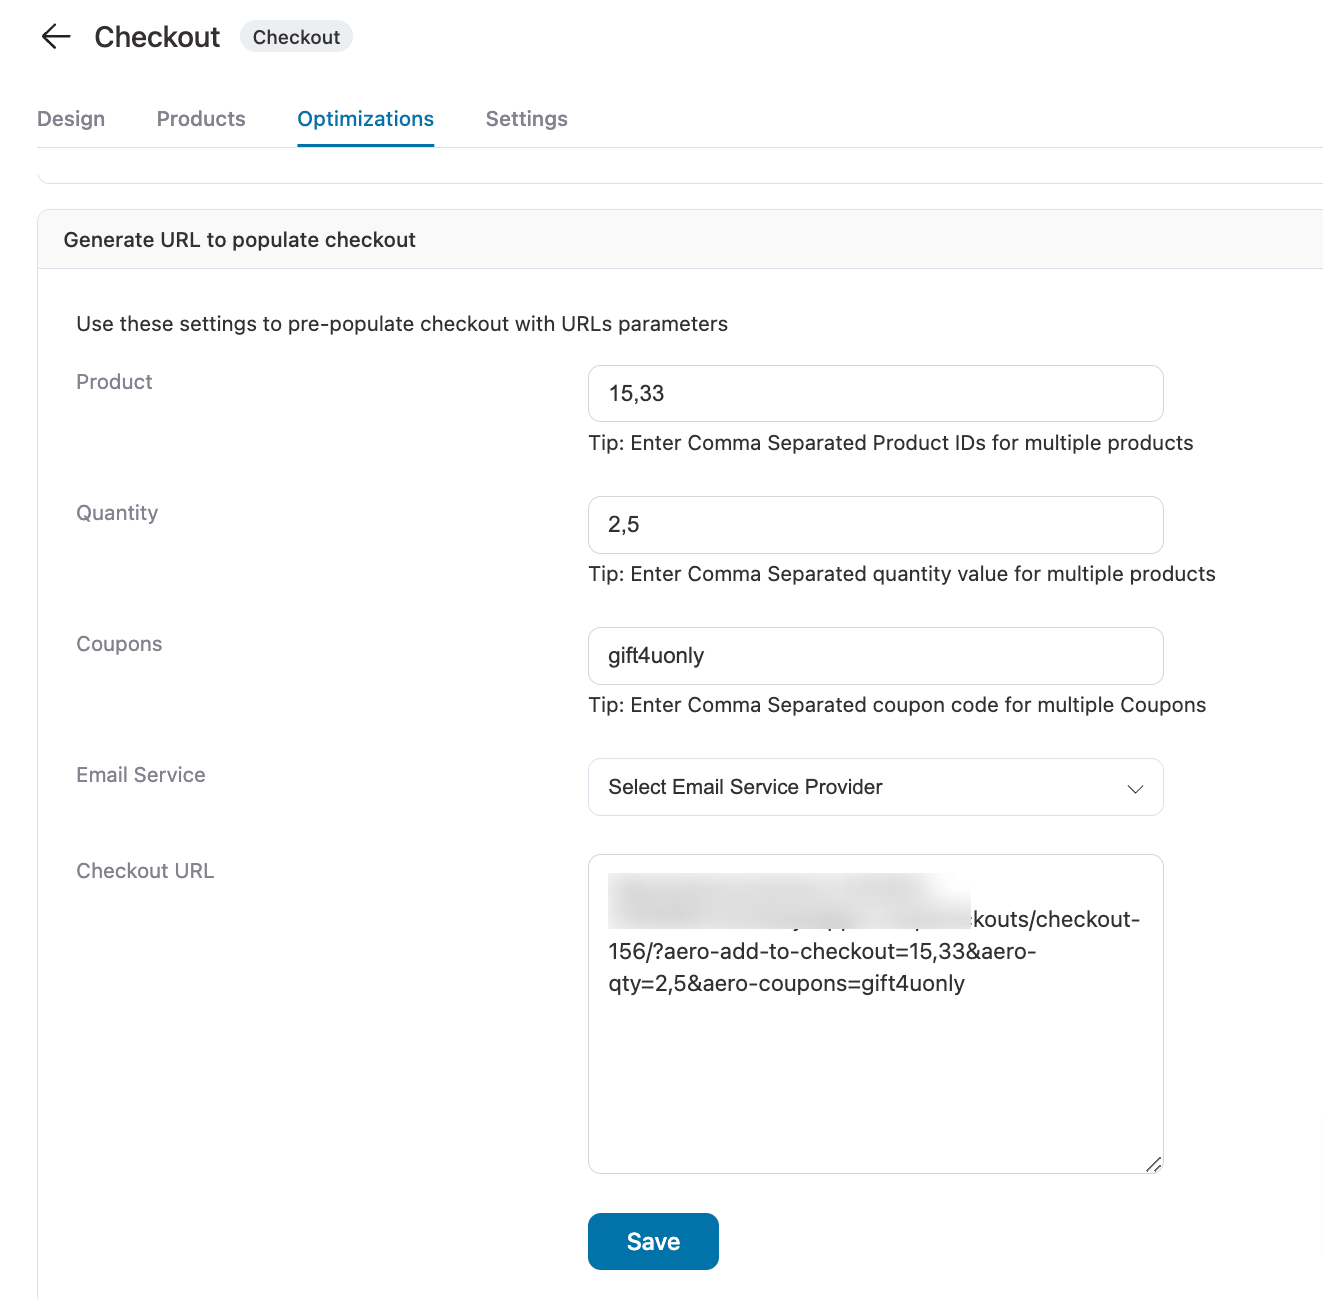
Make sure to hit Save.
Now, you can share this WooCommerce Checkout Coupon URL with the target audience via social or broadcast SMS and email campaigns.
Here is a preview of the WooCommerce checkout coupon URL:
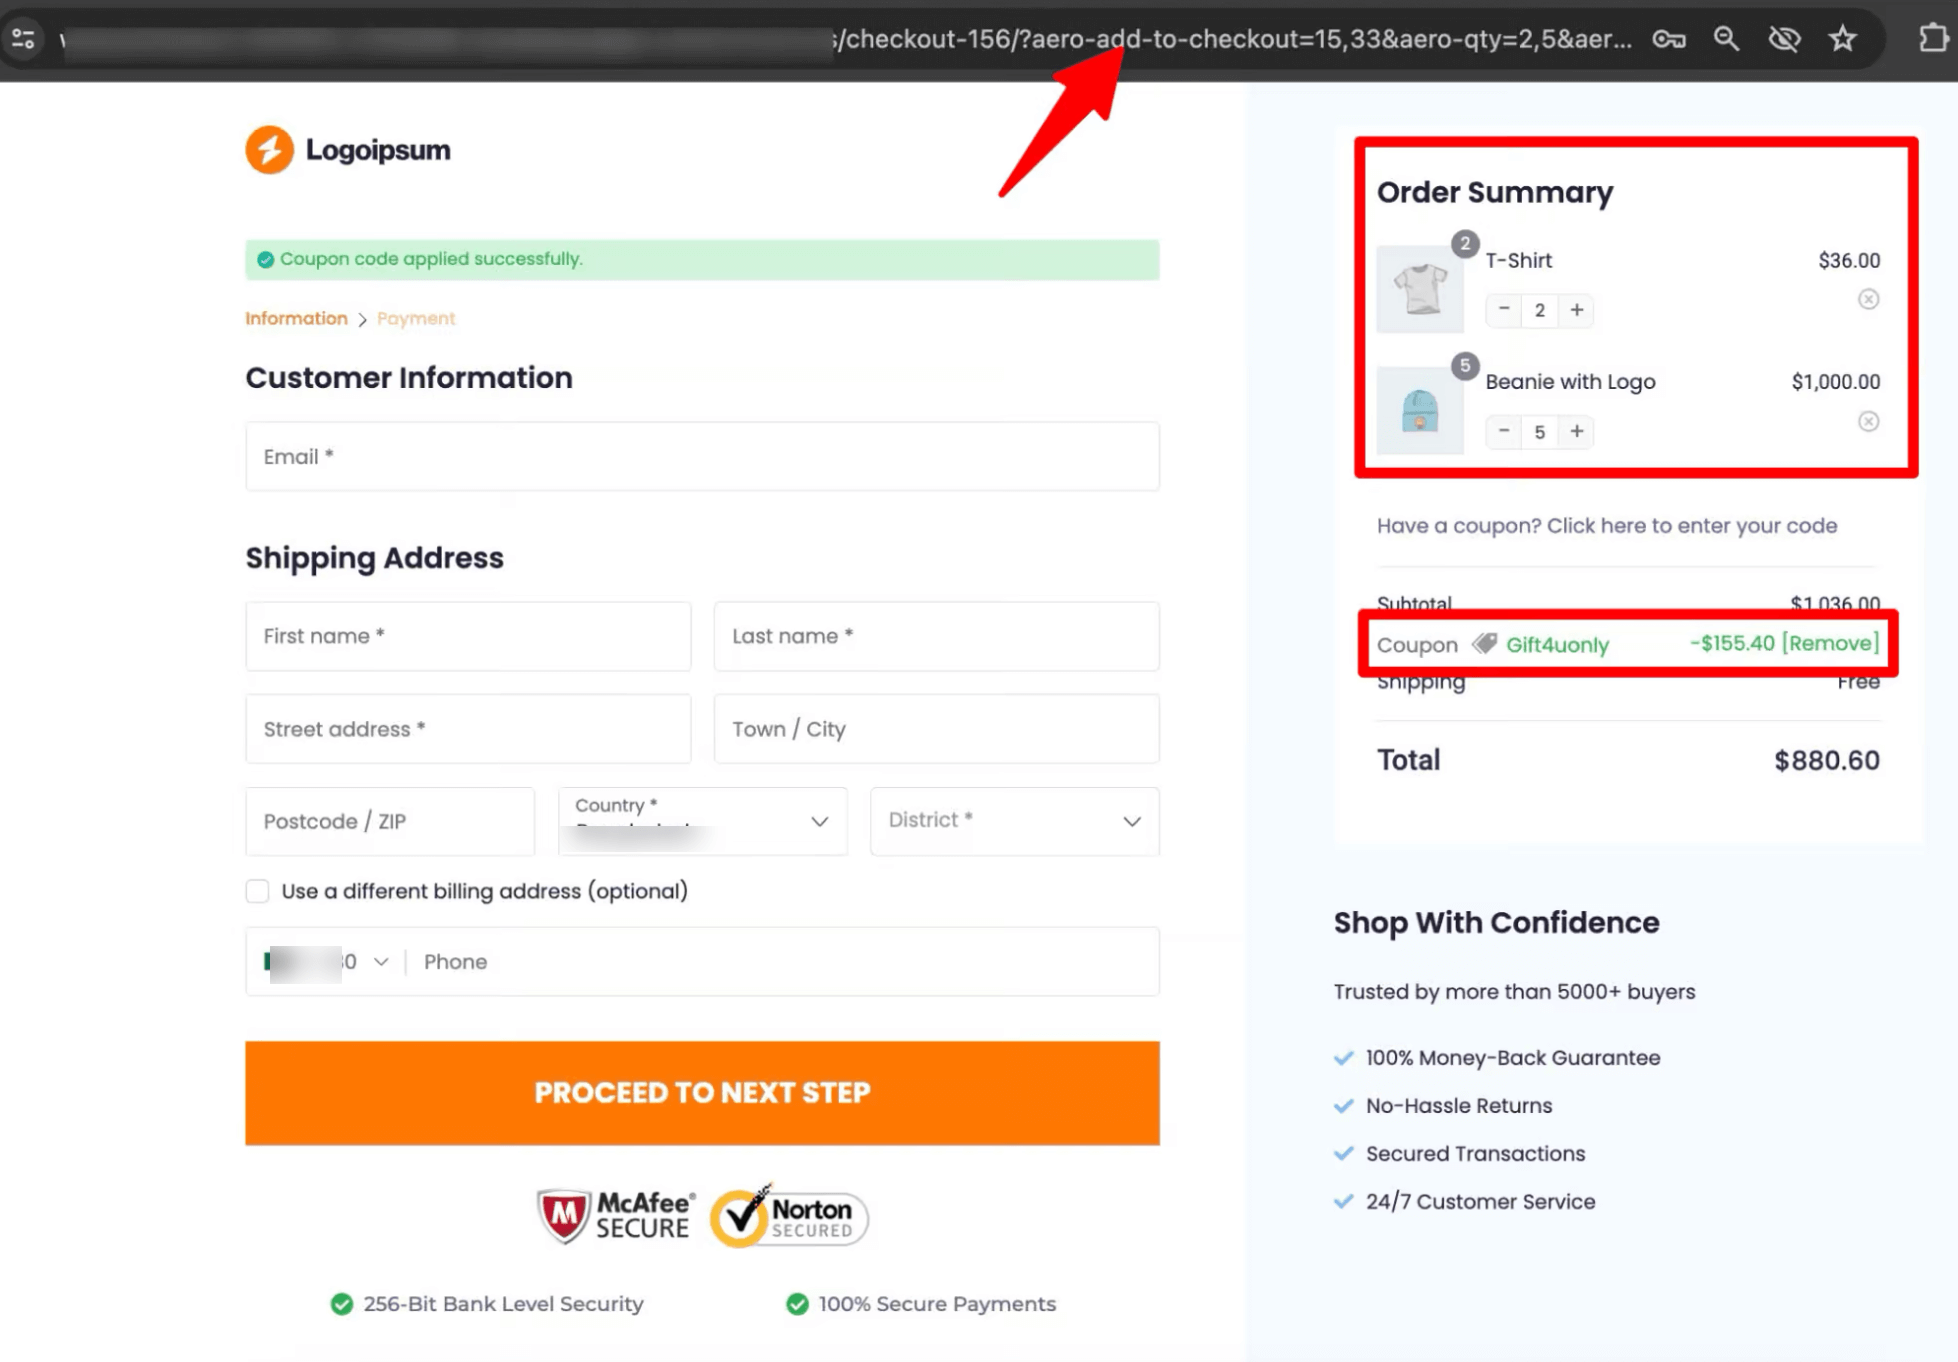
The multi-step checkout above uses FunnelKit Funnel Builder’s premium Hific template. It features a sleek mini cart with the coupon field conveniently placed just below for easy use.
Frequently Asked Questions About WooCommerce Checkout Coupon
Here are some common issues, questions, and tools for managing WooCommerce coupons.
By default, WooCommerce does not let you restrict coupons for guest users. To set limits based on user type, you can use a plugin like Advanced Coupons, which allows restrictions by user roles, including guests and registered customers.
Top WooCommerce coupon plugins include:
- FunnelKit Cart – Let's customers apply tiered, auto-applied coupons directly in a modern side cart, boosting order value.
- Advanced Coupons – Supports BOGO deals and loyalty programs, making promotions more engaging.
- Coupon Generator for WooCommerce – Quickly creates large numbers of coupons, saving time for busy stores.
- Bulk Edit Coupons for WooCommerce – Makes managing and updating multiple coupons fast and easy.
- FunnelKit Funnel Builder – Automatically applies coupons at checkout for a smoother buying experience.
- FunnelKit Automations – Sends dynamic, personalized coupons to customers, increasing repeat purchases.
- Tiered Pricing for WooCommerce – Offers wholesale or quantity-based discounts, encouraging larger orders.
- AffiliateWP – Let's affiliates generate coupon codes, boosting referral-driven sales.
- Flexible PDF Coupons – Creates and shares coupons in PDF format for offline or email marketing.
- Coupons Pro for WooCommerce – Enables sharing coupons directly on product pages, improving visibility and usage.
Each plugin is popular because it addresses a different part of the coupon strategy, from boosting AOV and loyalty to streamlining management and increasing conversions.
For a side-by-side look at the main options and what each one adds, see our guide to the best WooCommerce coupon plugins.
You can share a WooCommerce coupon with customers via email, SMS, WhatsApp, or other messaging platforms.
Cart pages can slow people down and make checkout longer, which may lead to abandoned carts. Offering coupons on the checkout page makes it easier to complete the order. You can also use a side mini cart so customers can see their cart and apply coupons anytime without extra steps.
Check these first, in order:
- Expired or maxed out. Every coupon has an expiry date and a usage limit buried in its settings. Both fail silently, no error message, the code just stops applying.
- Coupons disabled store-wide. WooCommerce → Settings → General → Enable the use of coupon codes. If this got unchecked, no coupon works anywhere.
- A restriction is excluding the cart. Minimum spend not met, product or category exclusions, shipping zone limits, or an email restriction tied to a specific customer.
- A plugin conflict. Cart or checkout plugins (page builders, custom checkout tools, other coupon plugins) sometimes override WooCommerce's native coupon logic. Deactivate non-essential plugins one at a time and retest after each.
Nine times out of ten it's the expiry date, the usage limit, or a restriction the store owner forgot they set months ago. Plugin conflicts show up less often, but they're the hardest to catch since nothing in the coupon settings looks wrong.
Yes, but only in a limited way.
On classic checkout, the coupon box is a separate form, so it can't sit inside the checkout form. A snippet can move it below the entire checkout. Add this to your child theme's functions.php file or a code snippets plugin:
add_action( 'wp', function() {
    remove_action( 'woocommerce_before_checkout_form', 'woocommerce_checkout_coupon_form', 10 );
    add_action( 'woocommerce_after_checkout_form', 'woocommerce_checkout_coupon_form' );
} );
The "Have a coupon?" bar then shows below the Place order button. Placing it next to the order total takes a custom coupon form and JavaScript, which is a job for a developer.
On block checkout, there's no snippet to move the field. It stays inside the order summary.
Not for the basics. Creating codes, setting limits, and adding the field at checkout all work with WooCommerce alone.
A plugin helps when you need something core doesn't do, like auto-applying coupons, sharing coupon links, showing available coupons on the page, BOGO deals, or creating codes in bulk.
Ready to Boost Checkouts with Smart Coupon Placement in WooCommerce?
Offering discounts gives users the push they need to complete a purchase. If you plan to use a discount coupon, the checkout page is the best place to apply it.
By strategically placing and customizing coupons, every checkout can become an opportunity to drive sales and improve customer satisfaction.
With the right tools, you can control how and when coupons are applied, running promotions that attract buyers while protecting your profit margins.
FunnelKit Funnel Builder allows you to manage, customize, and automate your WooCommerce checkout coupons with a single plugin.
You can add and reposition fields, create auto-applied coupons, and generate coupon URLs, making the checkout experience smoother and more motivating.
Every checkout becomes an opportunity to drive sales, improve satisfaction, and grow your store.
More WooCommerce Guides to Explore:
- How To Create Coupons in WooCommerce
- How to Create and Share WooCommerce Birthday Coupons
- WooCommerce Discounts: The Complete Guide
- How to Increase Repeat Sales With WooCommerce Dynamic Coupons
- How to Use WooCommerce Free Gift Coupon
- Best WooCommerce Coupon Plugins
- How to Set Up WooCommerce BOGO Offers
Editorial Team
September 25, 2026Removing checkout fields in WooCommerce is one of the fastest ways to simplify your store’s checkout and reduce cart abandonment. Every extra field you ask customers to fill in adds...
Editorial Team
September 14, 2026Changing currency at WooCommerce checkout is easier to explain with a simple example: a shopper in Munich sees €169 instead of $184 for the same jacket. Nothing about the product...
Editorial Team
September 11, 2026WooCommerce gift wrap might be the easiest extra money your store can make, yet most stores never offer it. Think about a department store in December. You buy a candle,...






