
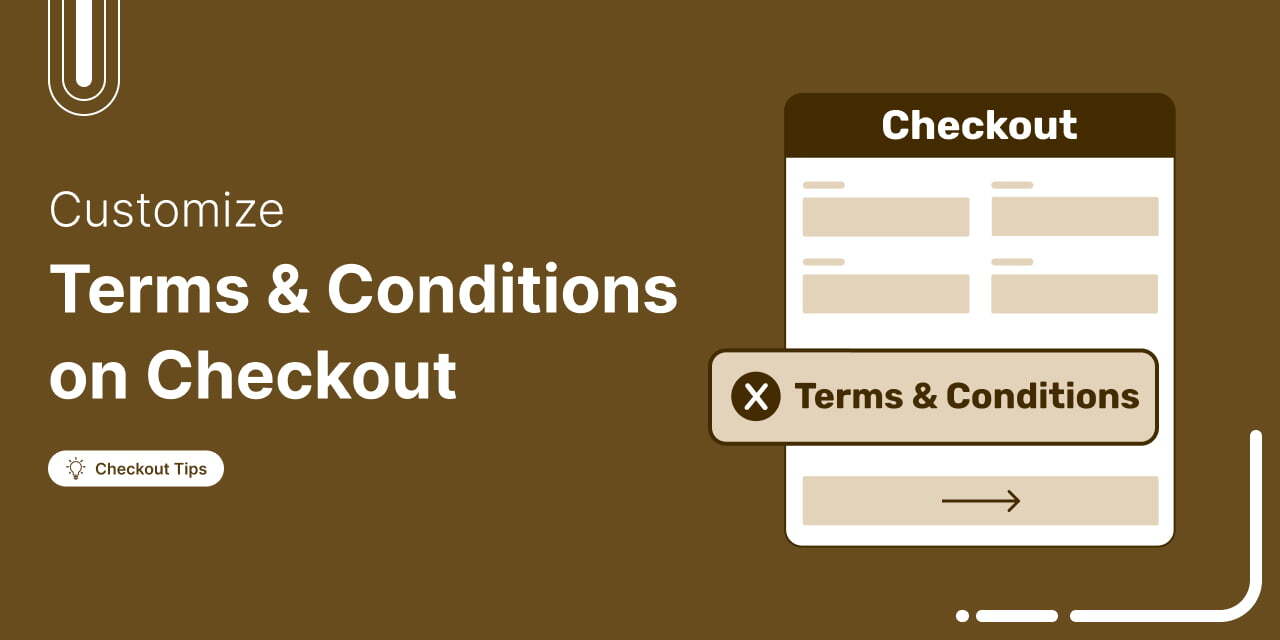
WooCommerce checkout page terms and conditions protect your store from disputes, chargebacks, and legal liability.
They set the rules that customers agree to before completing a purchase, covering everything from refund policies to shipping expectations.
The default WooCommerce terms and conditions setup is limited. Sure, you get a basic checkbox linked to a page. But that is it.
Want to tweak the label? Need a second checkbox? Looking for a database log proving the customer actually clicked 'agree'? The built-in settings will not do that.
For stores forced to comply with strict privacy laws like GDPR or PIPEDA, those native limitations become a real compliance headache.
In this guide, we will show you how to add terms and conditions to your WooCommerce checkout page, customize and extend them using a WordPress plugin without code.
We'll also explore alternative ways to display or even remove terms and conditions and share best practices for keeping your store legally compliant without hurting conversions.
Short on time? Watch the complete tutorial here 👇
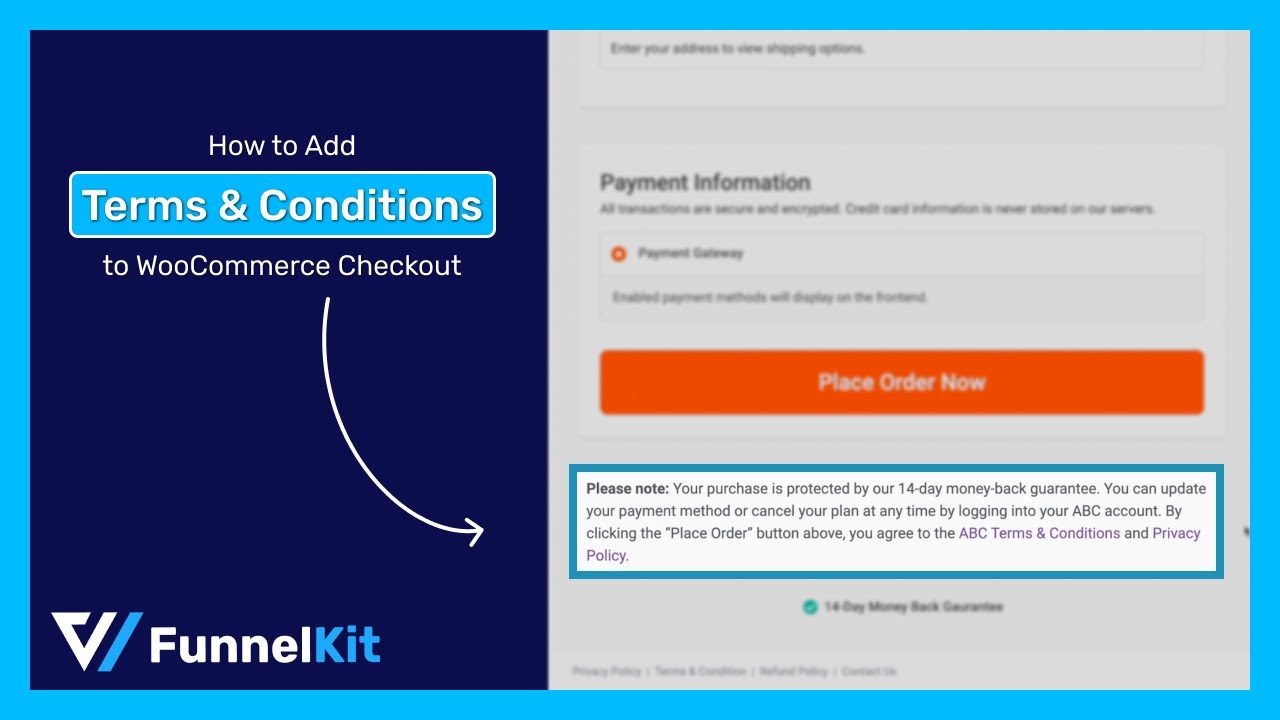
Table of Contents
- 1 How to Add the Terms and Conditions Checkbox to WooCommerce Checkout?
- 2 How to Add the Terms and Conditions to WooCommerce Checkout Without a Checkbox?
- 3 Method 3: How to Add a Terms and Conditions PDF to the WooCommerce Checkout Page?
- 4 Don't Want the WooCommerce Terms and Conditions? Here's How to Remove It from Checkout
- 5 WooCommerce Checkout Page Terms and Conditions: Frequently Asked Questions (FAQs)
- 6 Protect Your Store With WooCommerce Checkout Terms and Conditions
How to Add the Terms and Conditions Checkbox to WooCommerce Checkout?
Follow these steps to add the terms and conditions checkbox to the WooCommerce checkout page:
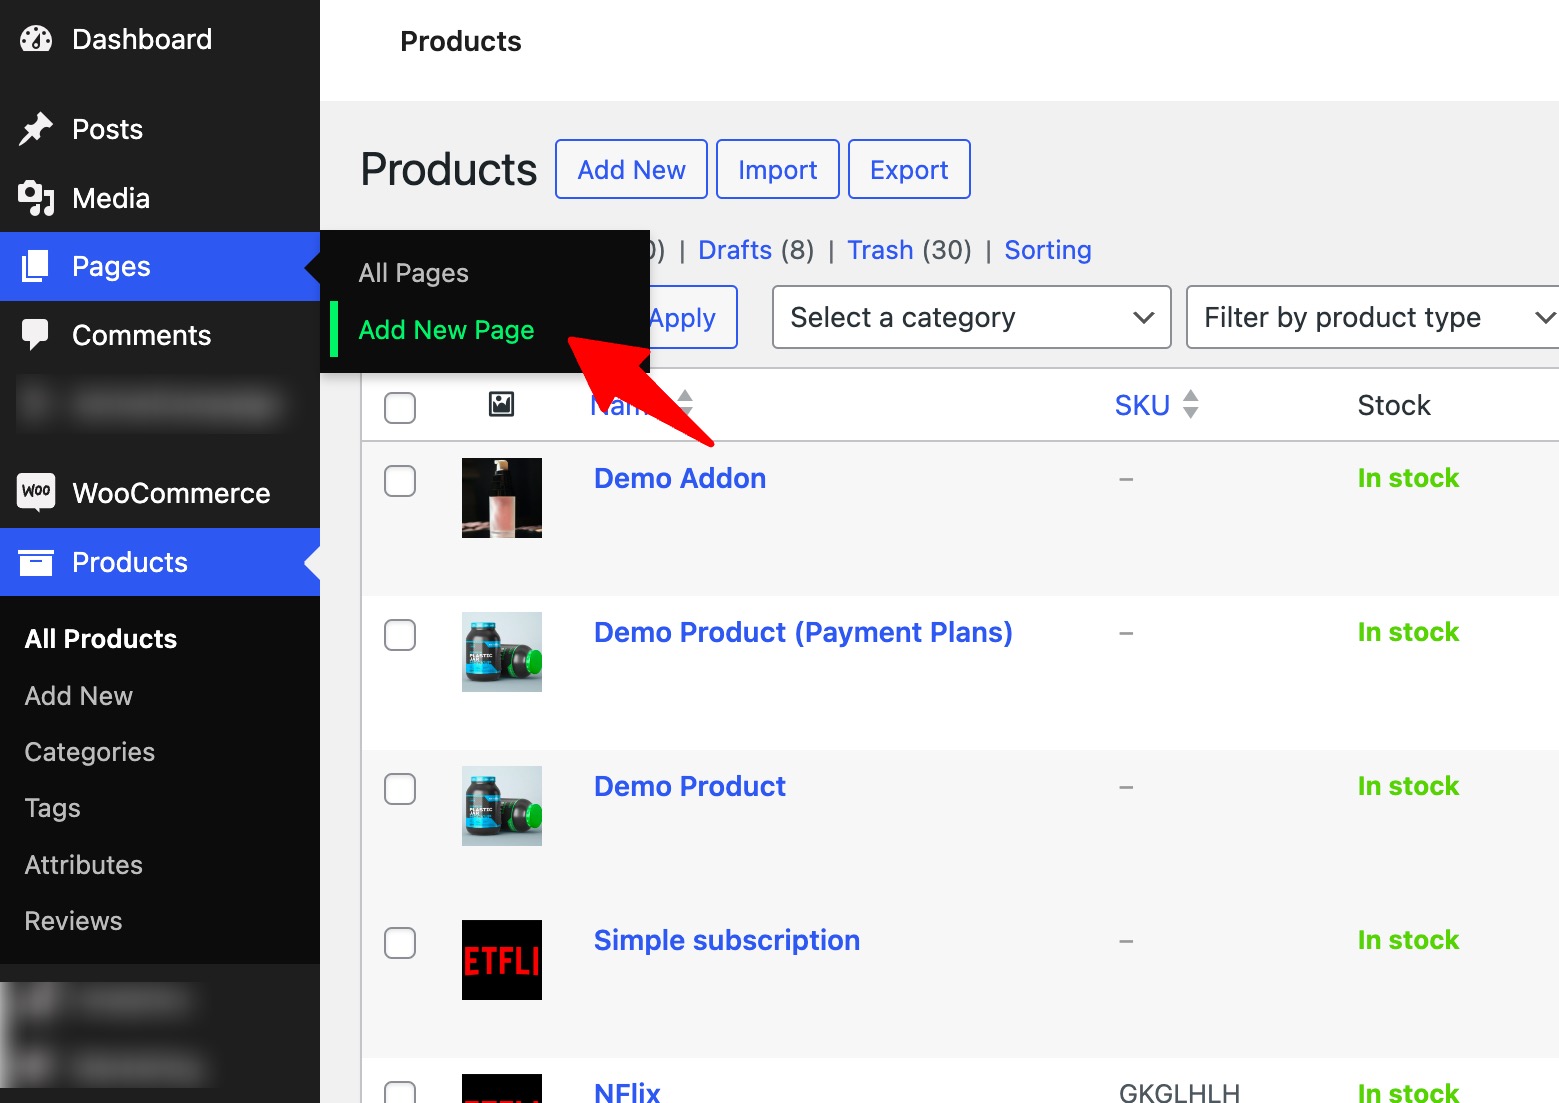
Step 1: Create a terms and conditions page
First, you need to create a terms and conditions page. From the WordPress dashboard, go to Pages ⇒ Add New Page.
Now, provide a page title, then add the terms and conditions of your WooCommerce business.
You can include the following things in your terms and conditions page:
- Your payment terms and accepted methods for different products and subscriptions
- Your refund and return policy
- Your shipping, delivery terms and international sales (customs duties, import taxes, etc.)
- How you gather and protect customer data
- Specific rules for your inventory format, such as warranty details for physical goods, download limits for digital files, or cancellation windows for recurring subscriptions
- Where legal disputes get filed
Need a baseline? Instead of writing everything from scratch, generators like Termageddon, Termly, or TermsFeed will build a solid foundational document by walking you through a detailed questionnaire about your exact business model and inventory setup.
Take whatever draft they give you. Tweak the text until those clauses match how you run your store, then paste it into the editor.
After that, click on the 'Publish' button.
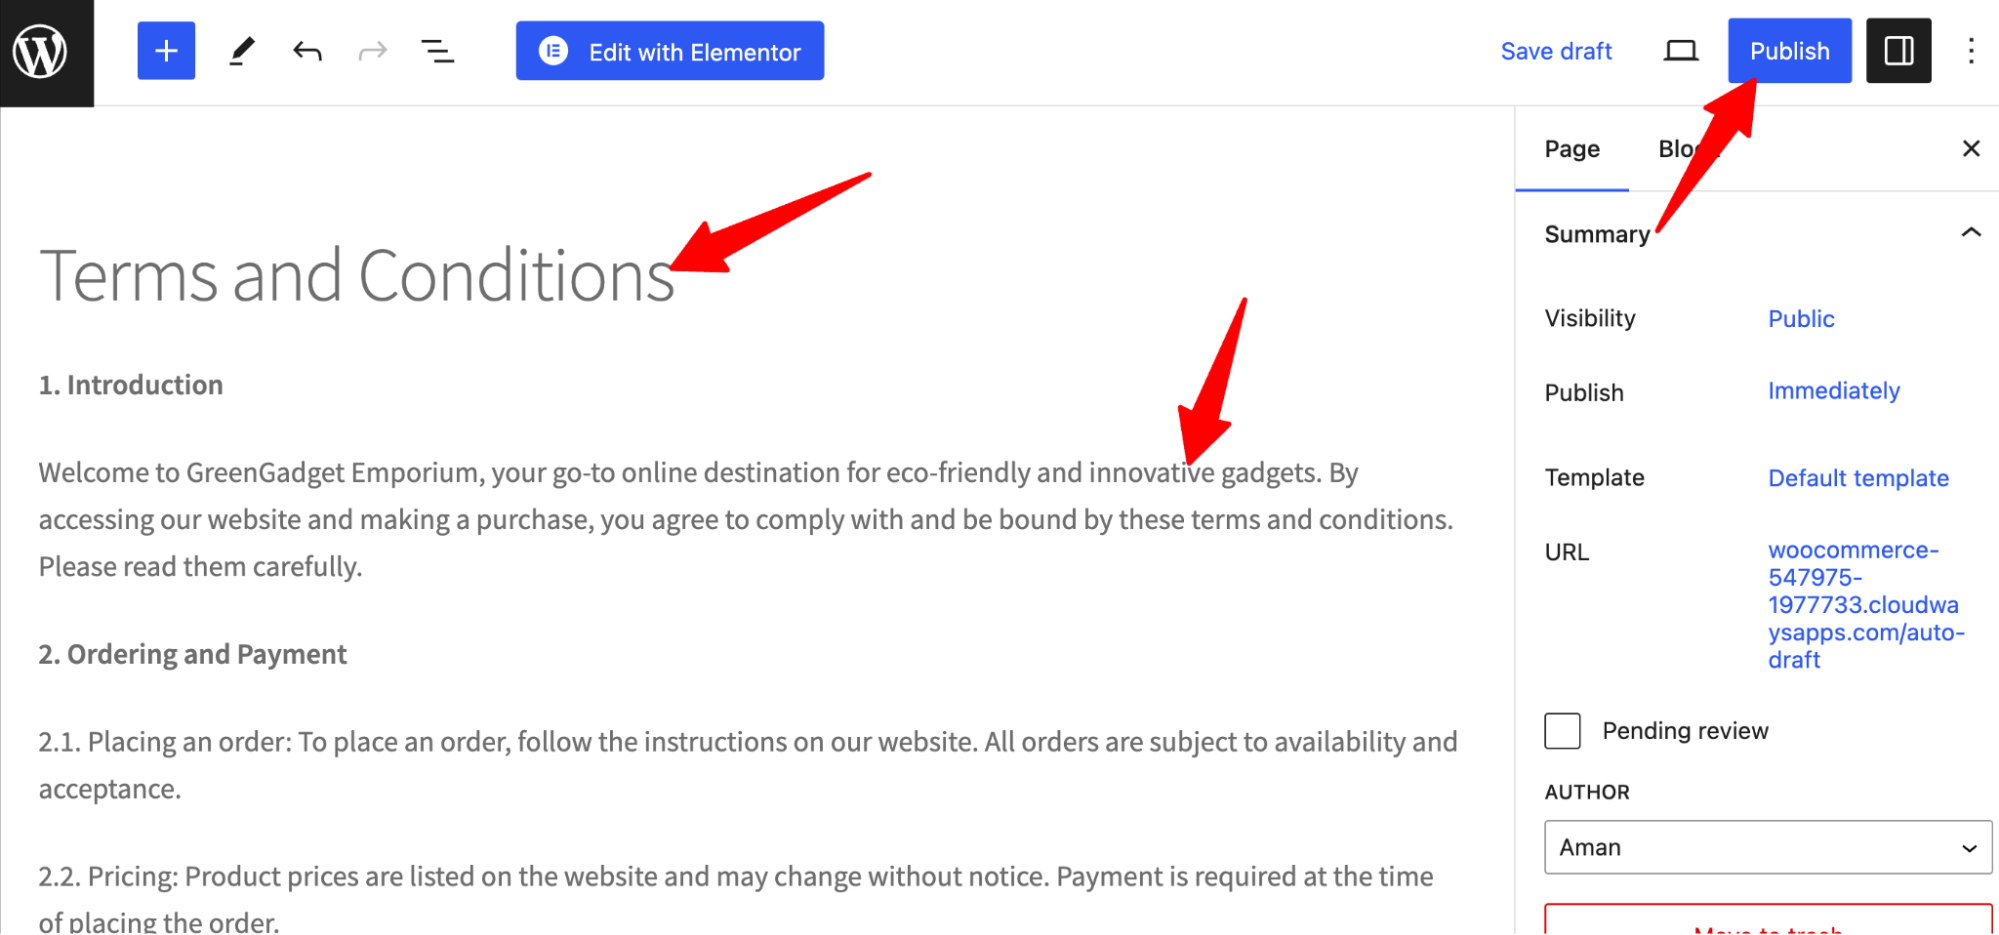
This will publish the terms and conditions page on your website.
Step 2: Add the WooCommerce terms and conditions checkbox to the checkout page
You can add terms and conditions to the checkout in two ways:
Option 1: Using WooCommerce advanced settings
Navigate to WooCommerce ⇒ Settings, then move to the Advanced tab.
Here, for the Terms and Conditions option under Page setup, choose the page you just created.
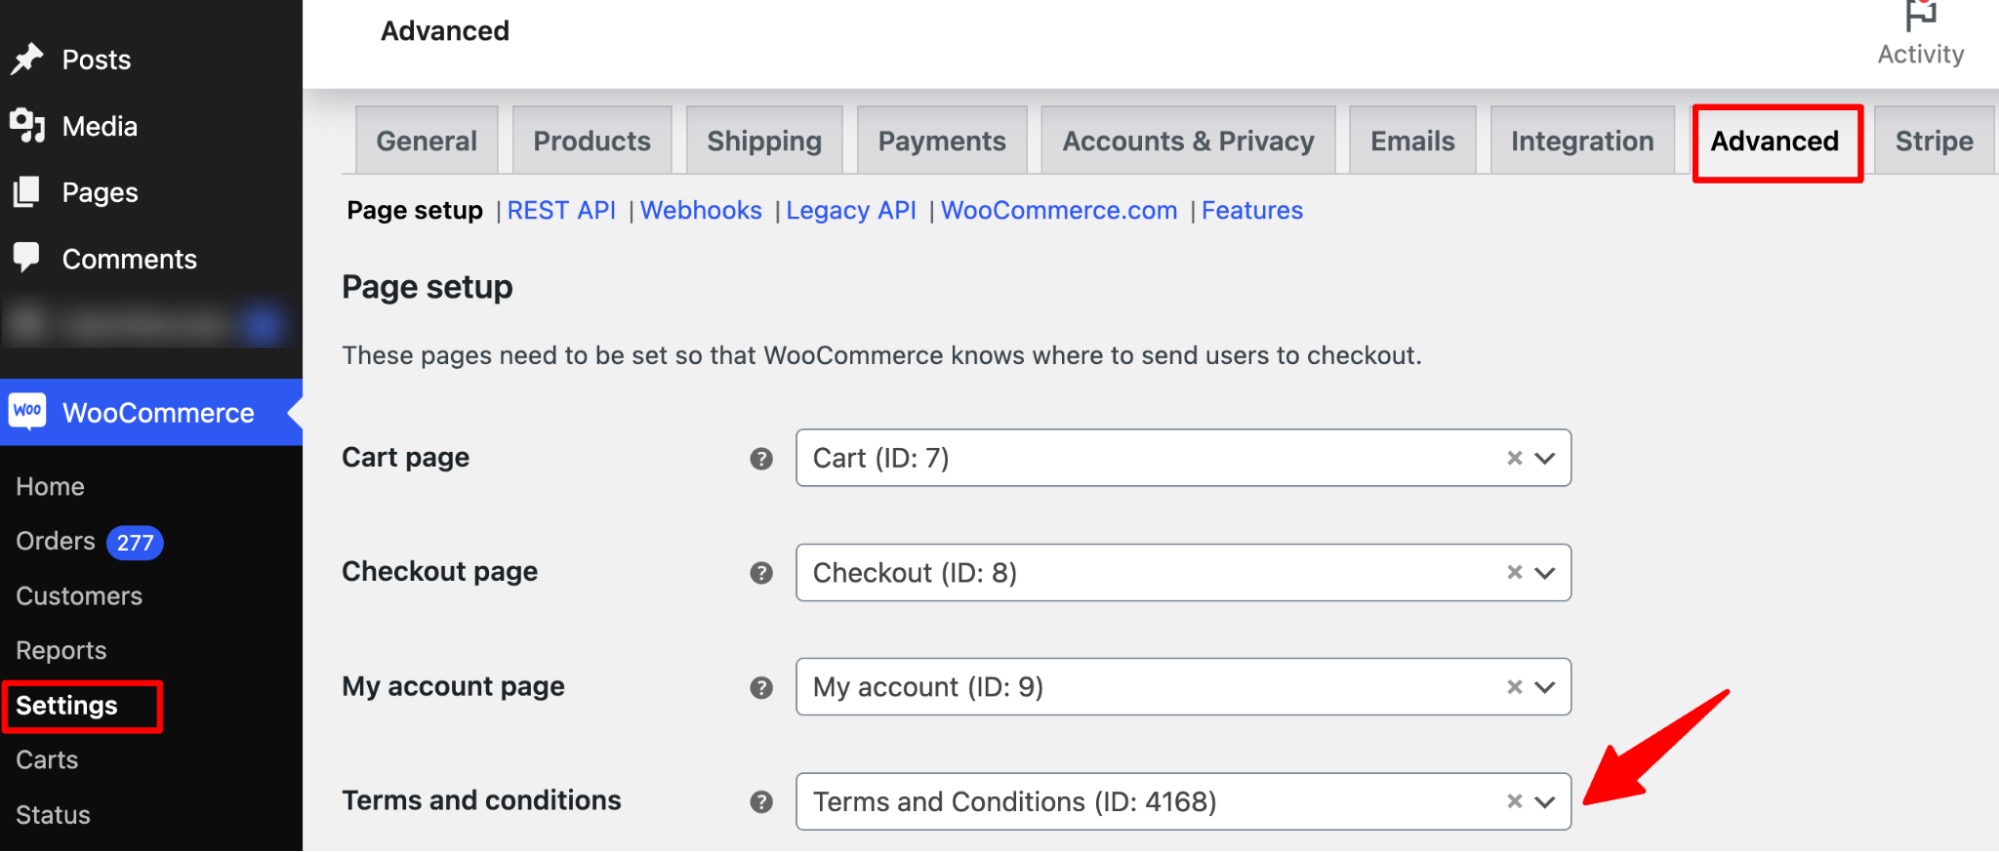
After that, click on 'Save Changes' to update.
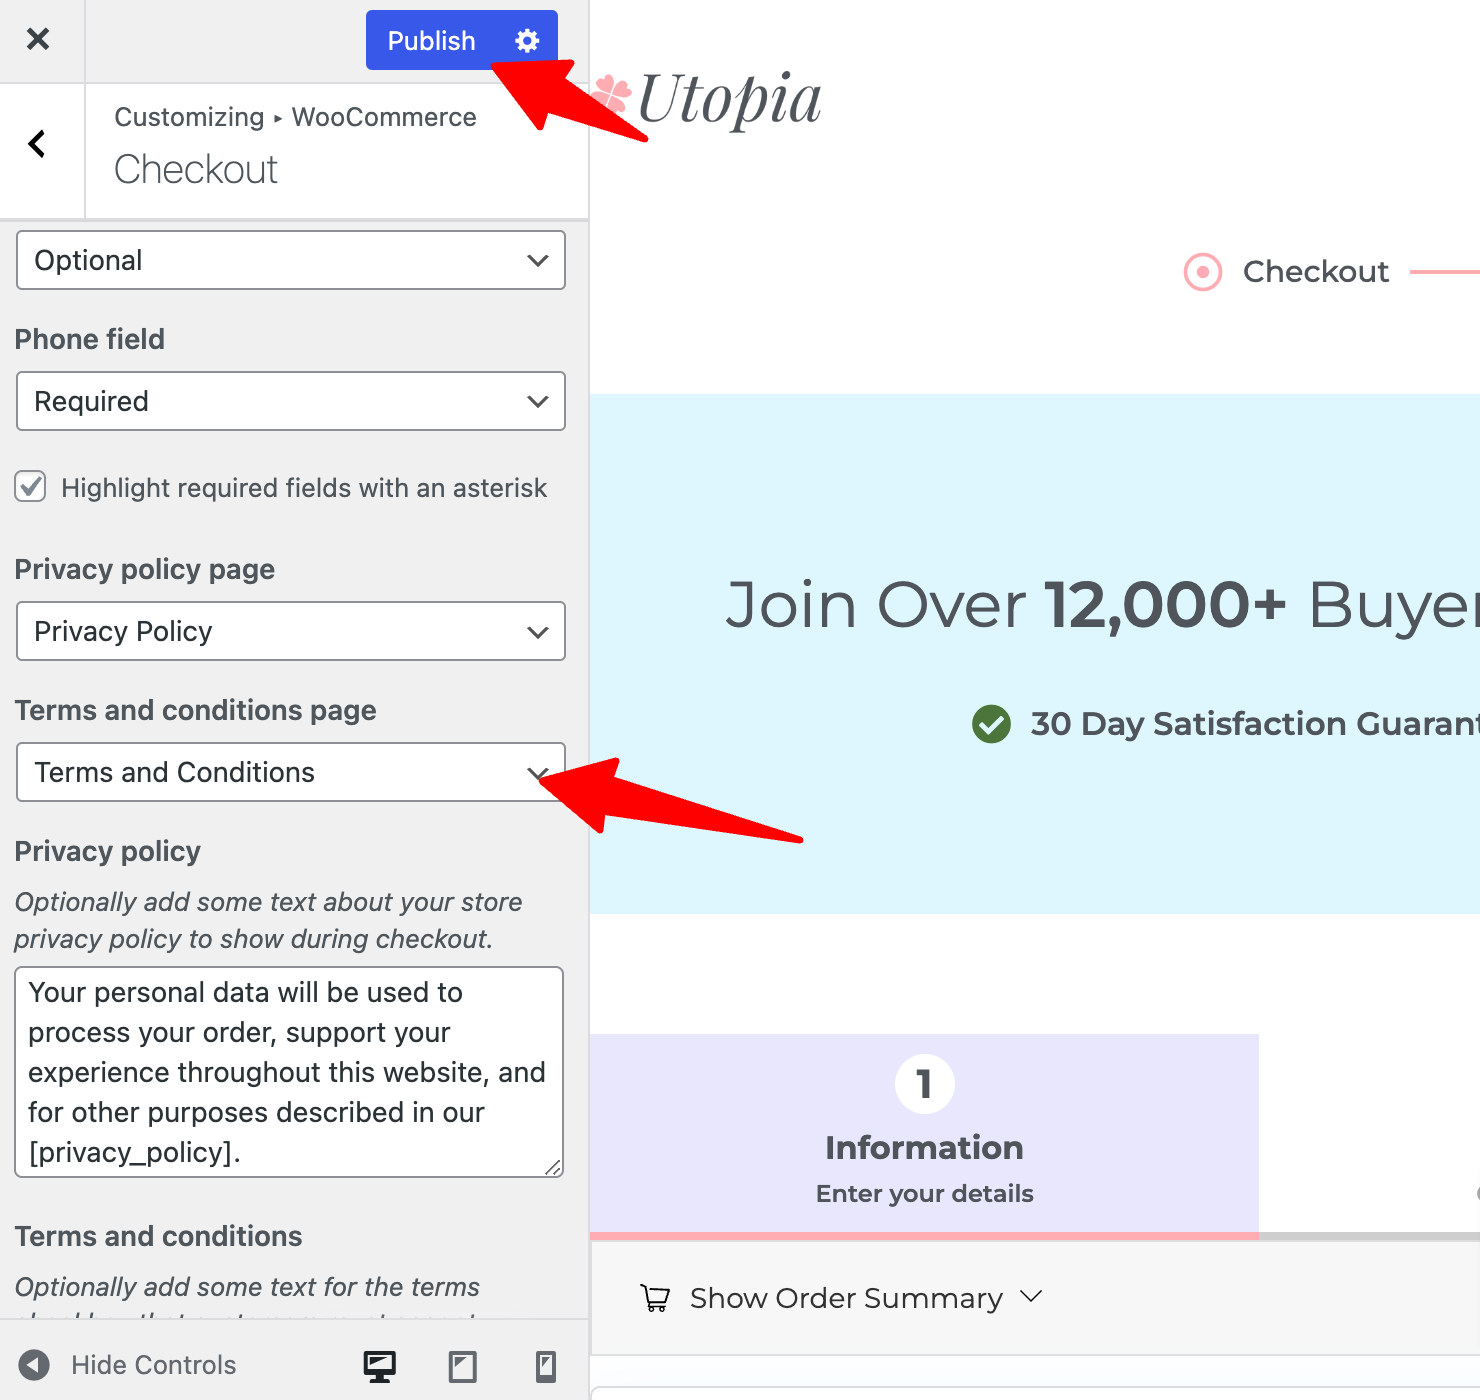
Option 2: From WordPress customization options
To use this option, go to Appearance ⇒ Customize from the WordPress menu.
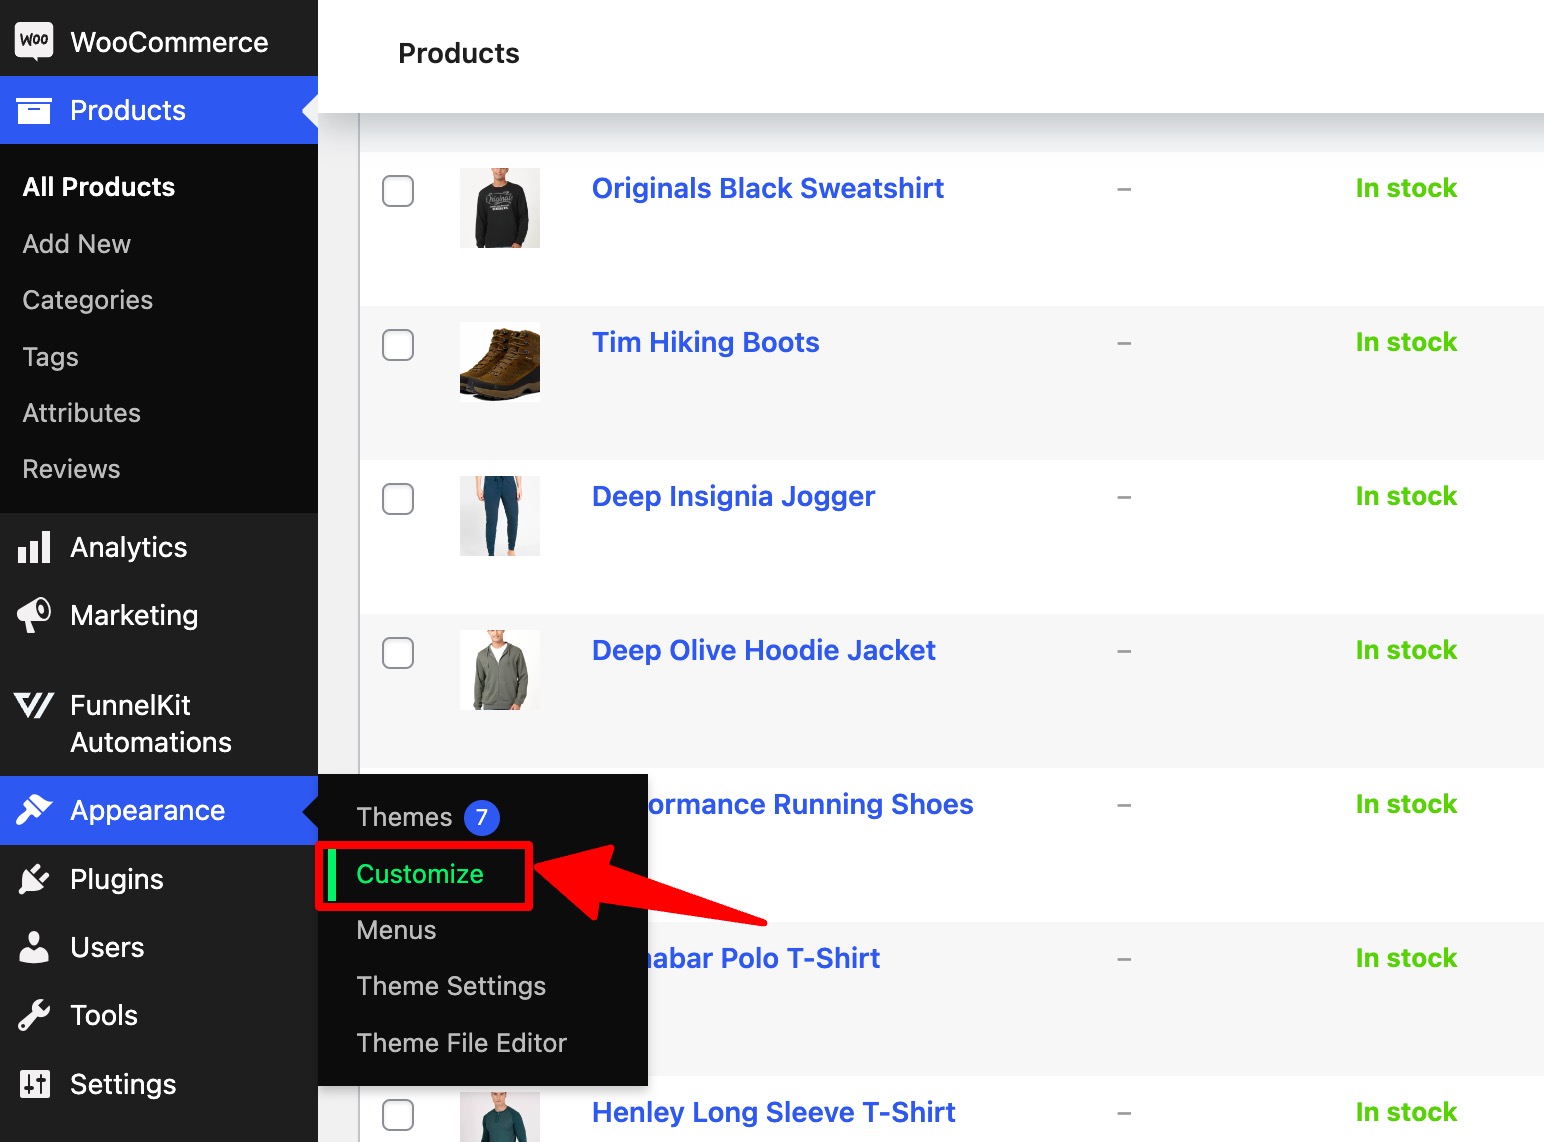
Then click WooCommerce to expand and view all options.
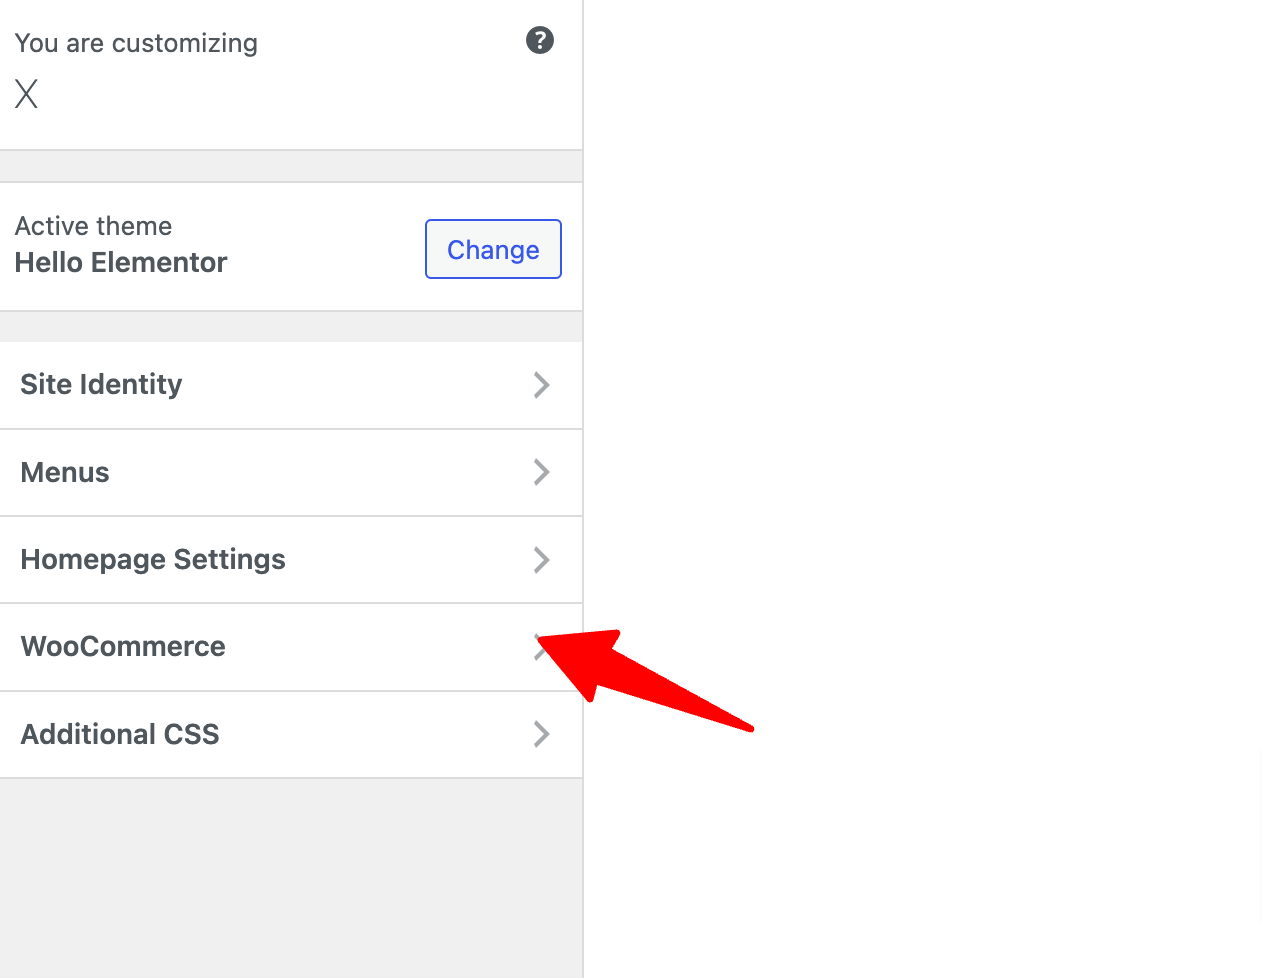
Now, click on the “Checkout” option to access the related settings.
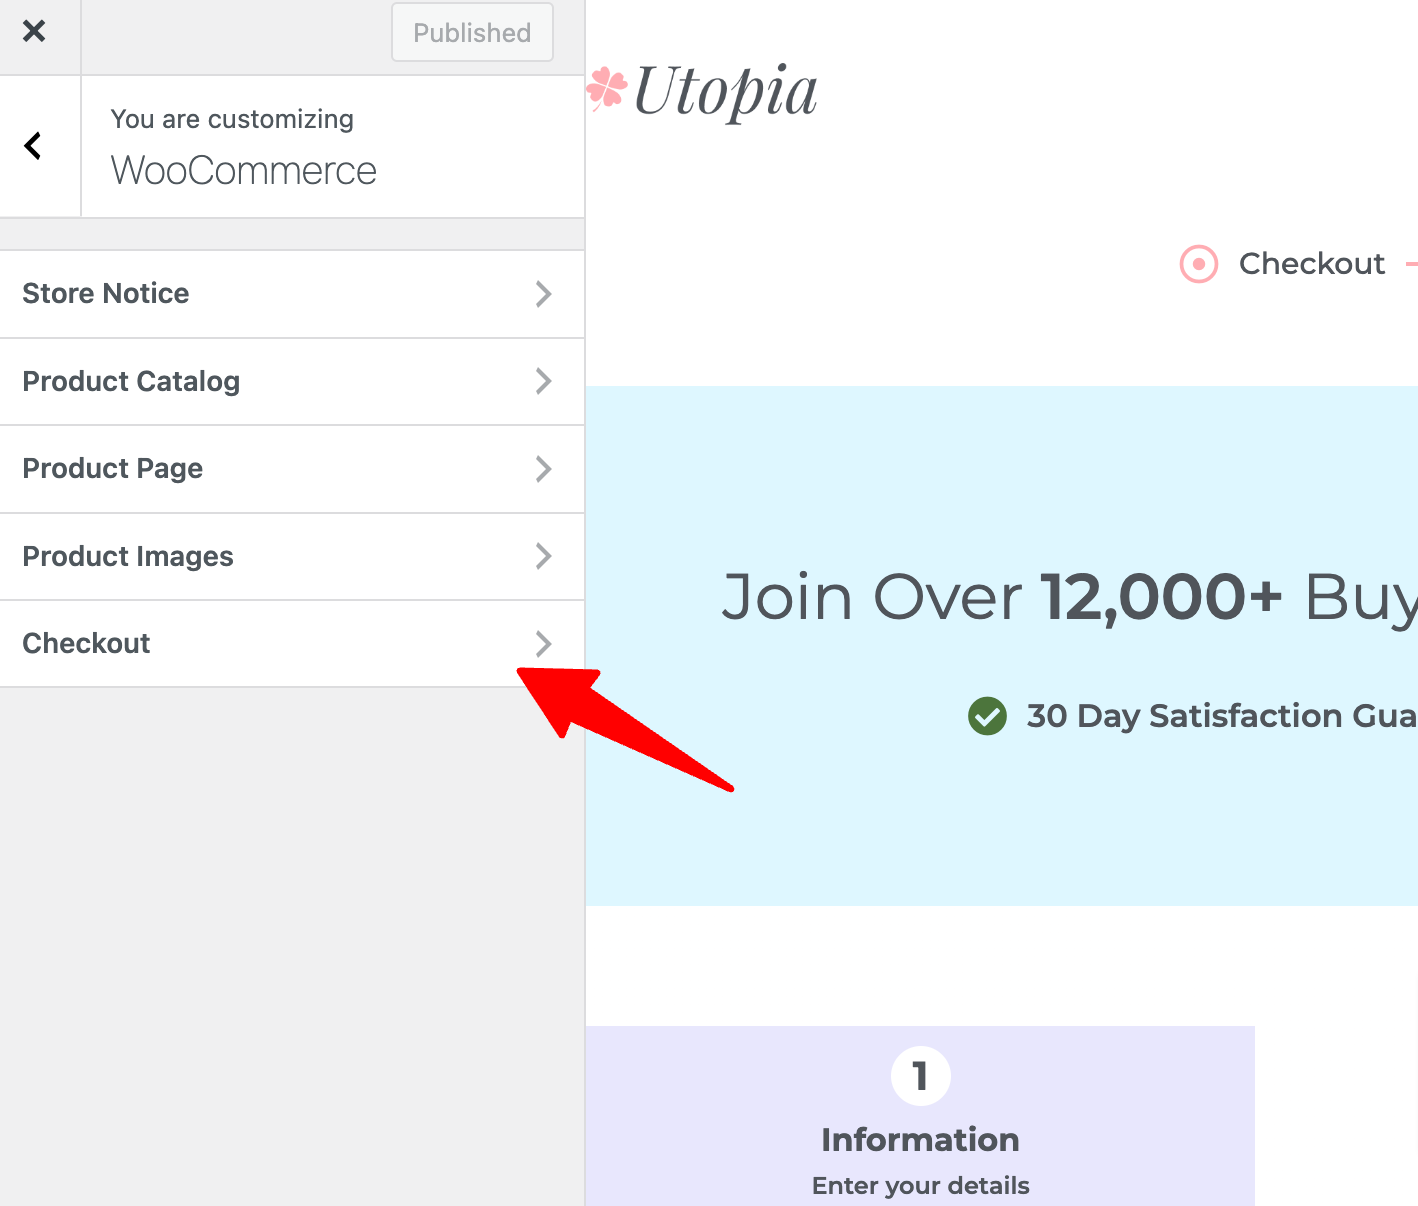
For the Terms and Conditions page option, choose the page you created and click on Publish to update the changes.
Step 3: Test terms and conditions on WooCommerce checkout
Now, if you go to the checkout page, you should see a checkbox asking users to confirm that they have read the terms and conditions of the WooCommerce store.
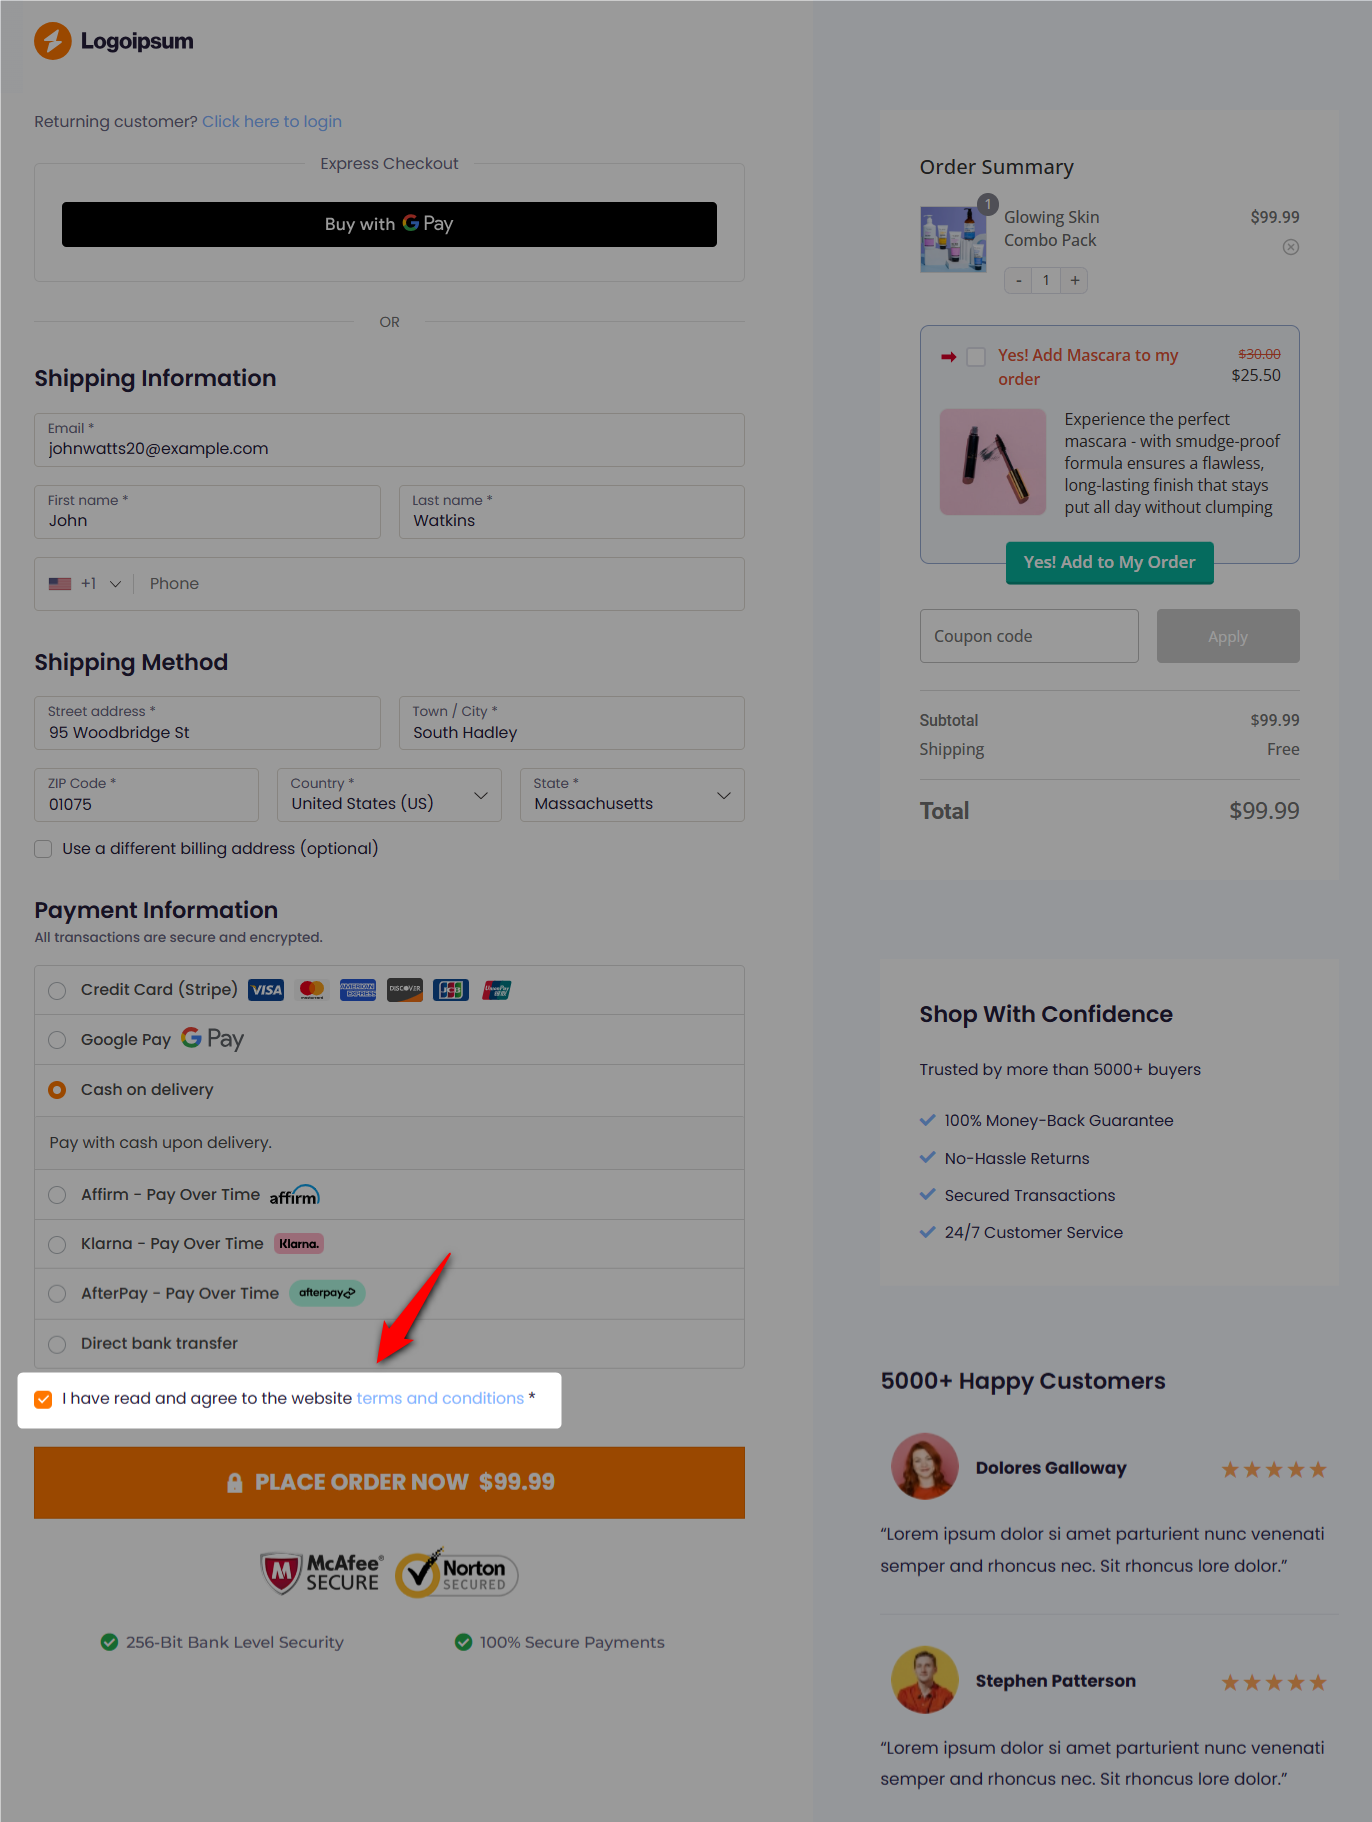
Well done! This is how you can add the terms and conditions checkbox to the WooCommerce checkout page.
How to Add the Terms and Conditions to WooCommerce Checkout Without a Checkbox?
Adding a checkbox on the checkout page requires users to check it before proceeding, increasing the number of fields they need to fill out to place an order.
What if we told you that you can include terms and conditions on the checkout page without requiring customers to check an additional field?
That’s exactly what we will share here in this section. You can get started with the free version of FunnelKit Funnel Builder for this.
Step 1: Remove the default terms and conditions and privacy policy content from the checkout
First, we will remove the terms and conditions default page from settings. We will also remove the privacy policy page because, by default, the checkout page will show the privacy policy text if the terms and conditions page is removed.
We’ll add a custom text field that will link to both the terms and conditions page and the privacy policy page.
To do so, go to Appearance ⇒ Customize. Then, click on WooCommerce and Checkout to expand the relevant options.
On the option Terms and Conditions page, select the option “No page set” from the drop-down menu. Do the same for the Privacy Policy page.
After that, hit Publish and save the changes.
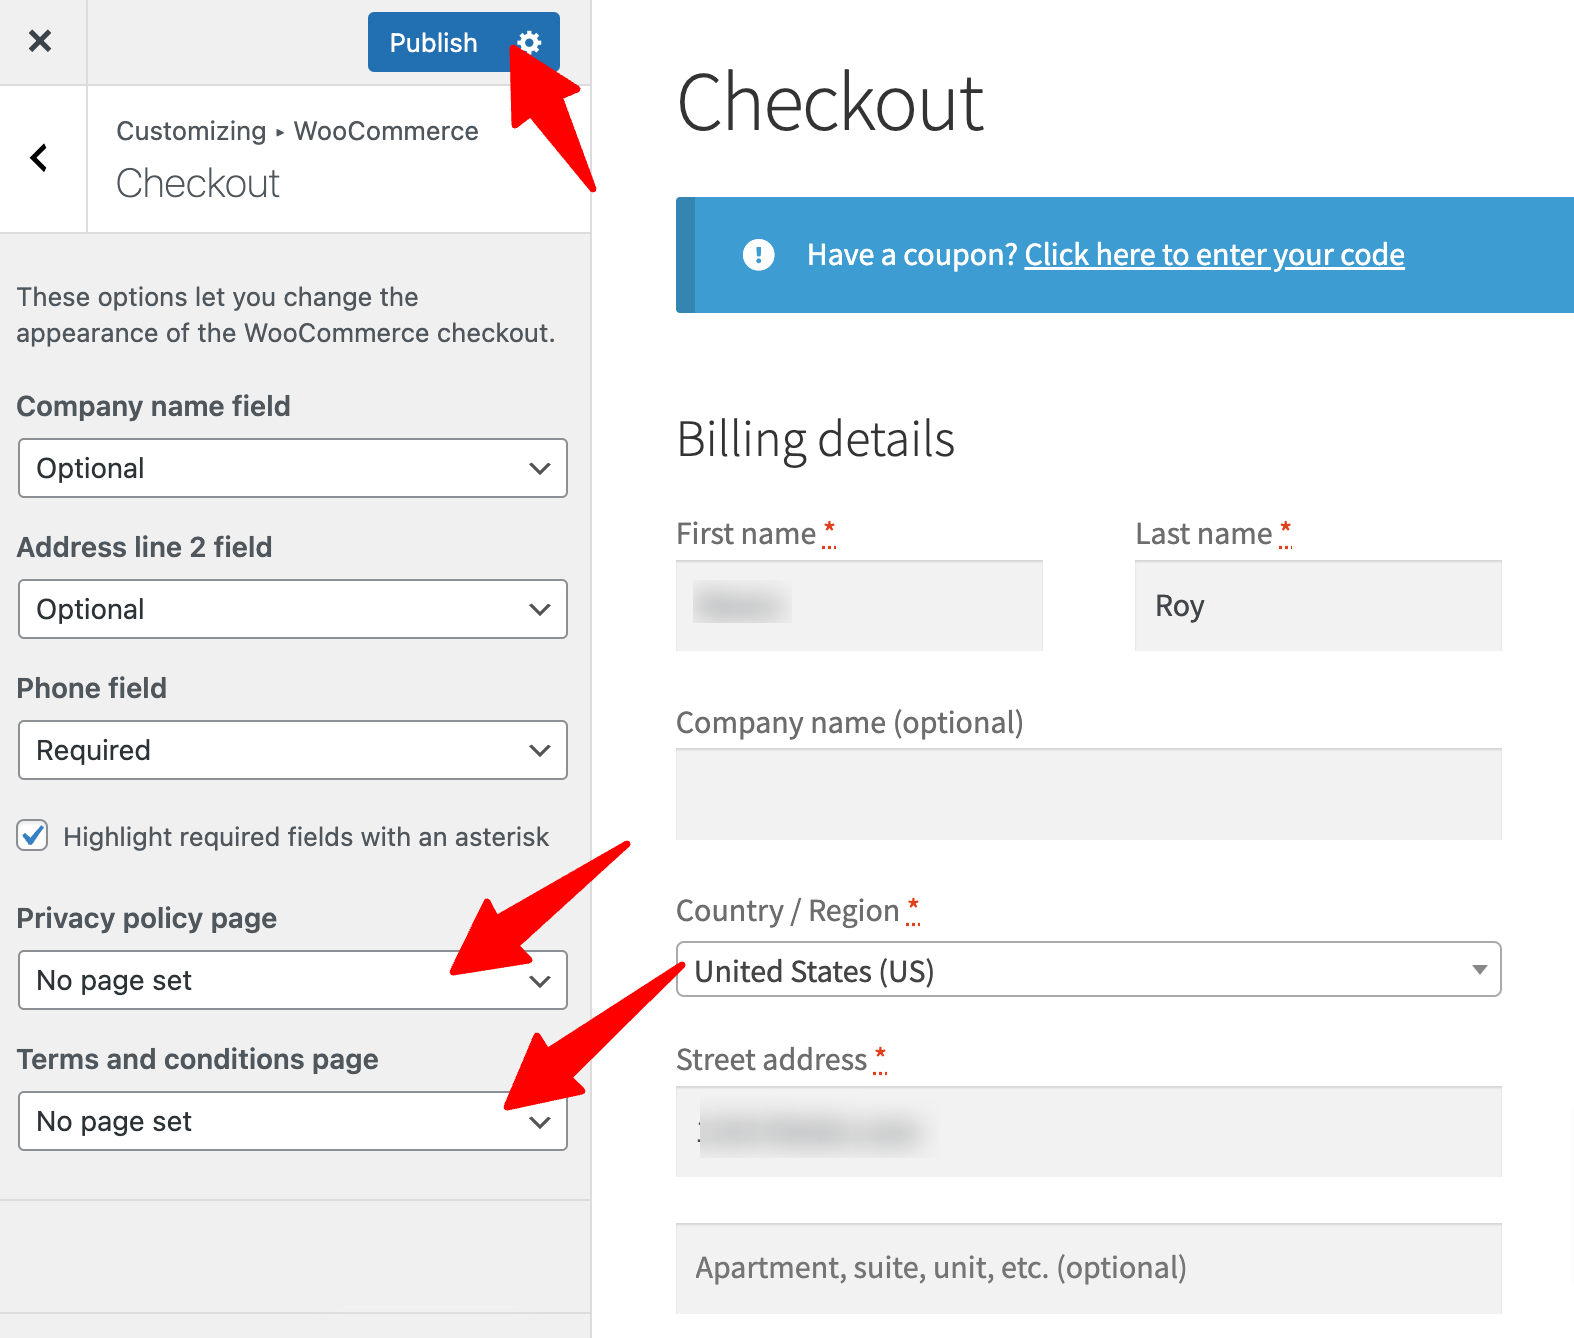
This will remove the default privacy policy statement from the checkout page.
Step 2: Create a store checkout
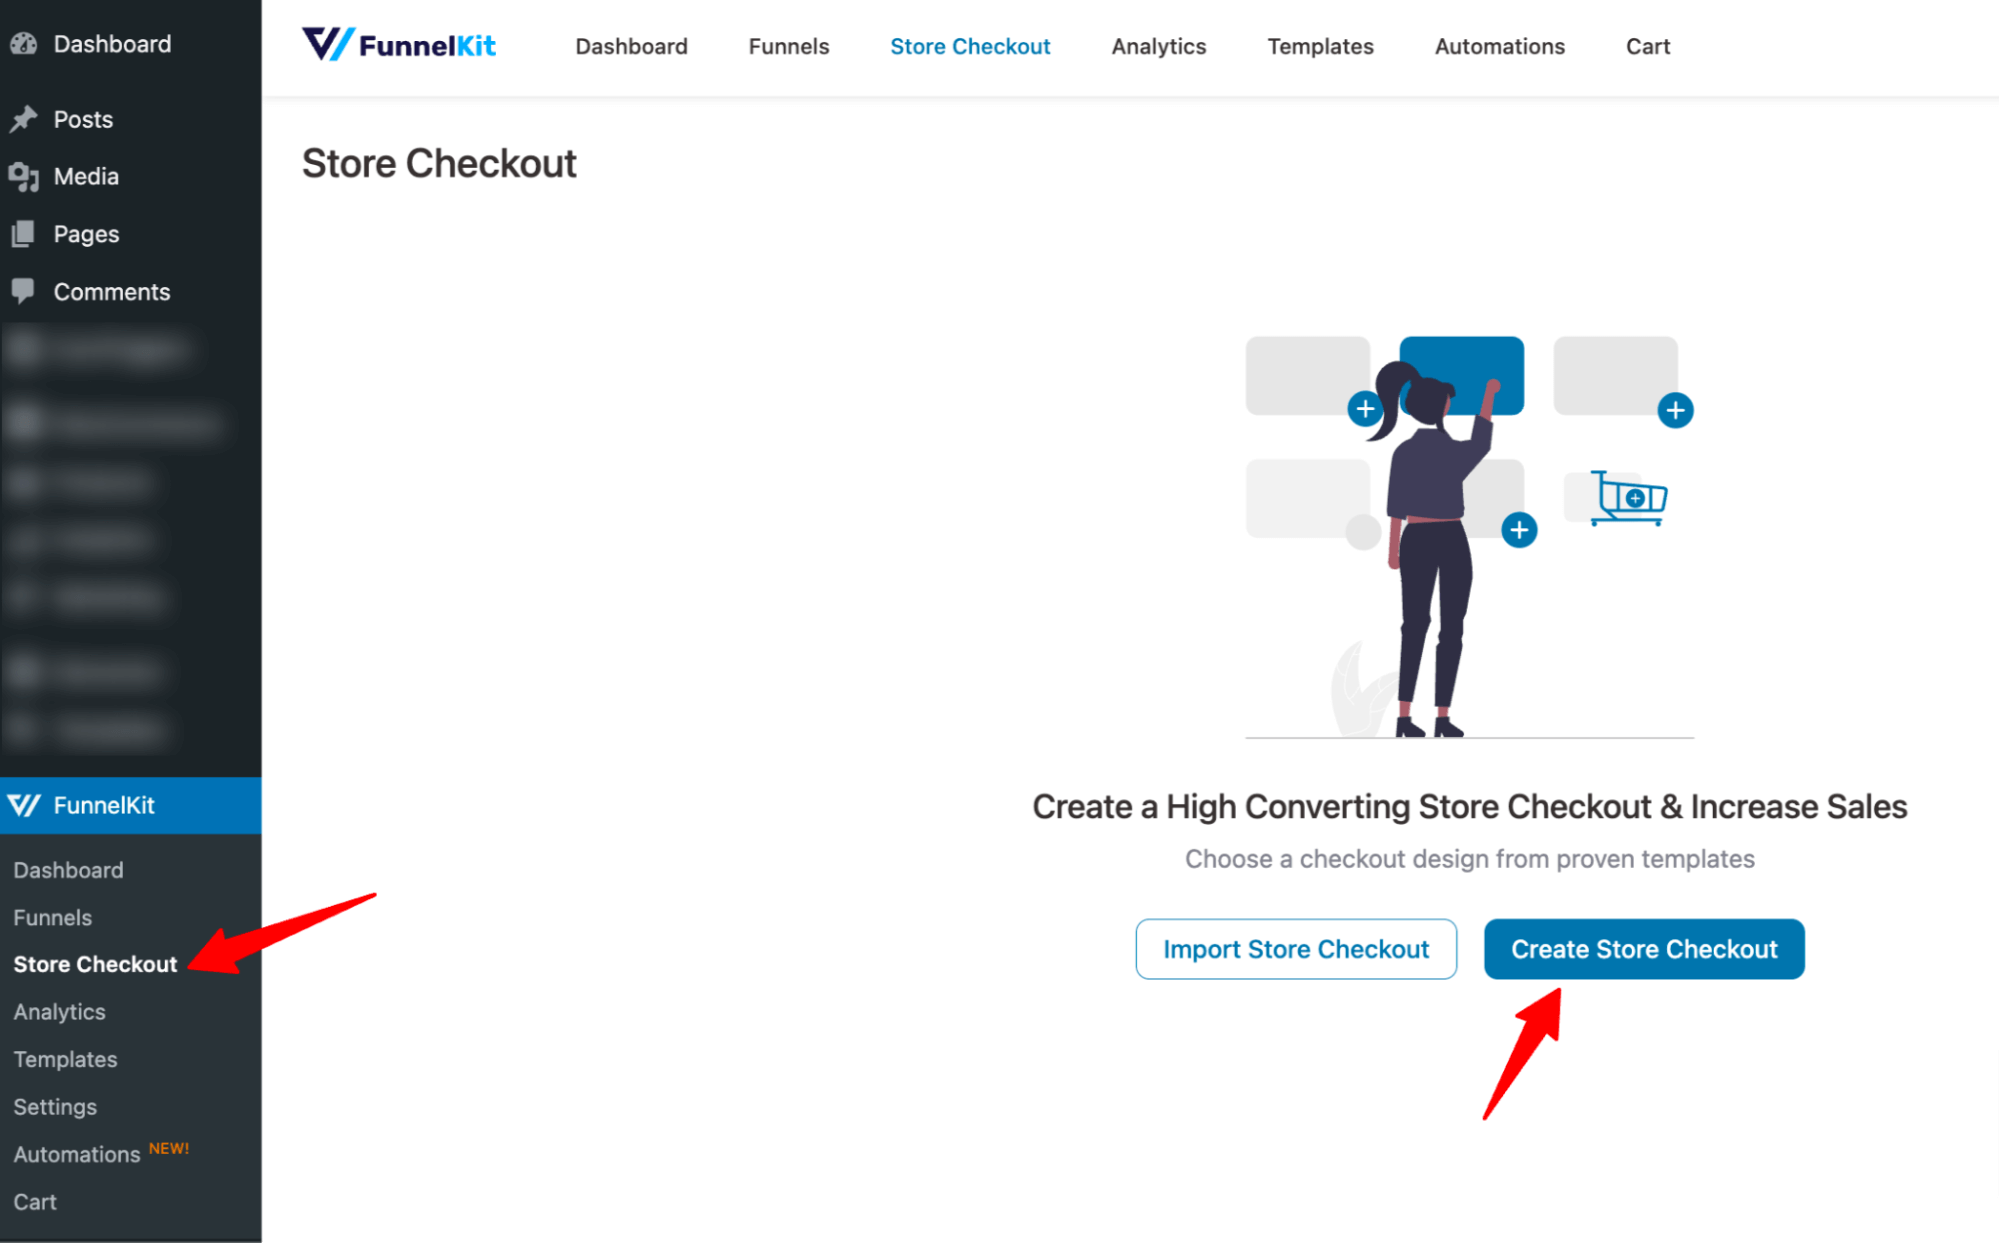
Now, we need to create a store checkout that will replace the default WooCommerce checkout page.
For that, navigate to FunnelKit ⇒ Store Checkout and click on the ‘Create Store Checkout’ button.
After that, select your favourite page builder and choose a template from the list of prebuilt checkout templates provided by FunnelKit.
Feel free to choose your favorite page builder, such as Elementor, Bricks, Divi, Gutenberg, or Oxygen, or use shortcodes with any other page builder you prefer.
To select one, hover on the template you like and click on Preview. Here, we are choosing the Elementor page builder and going with the Hific template.
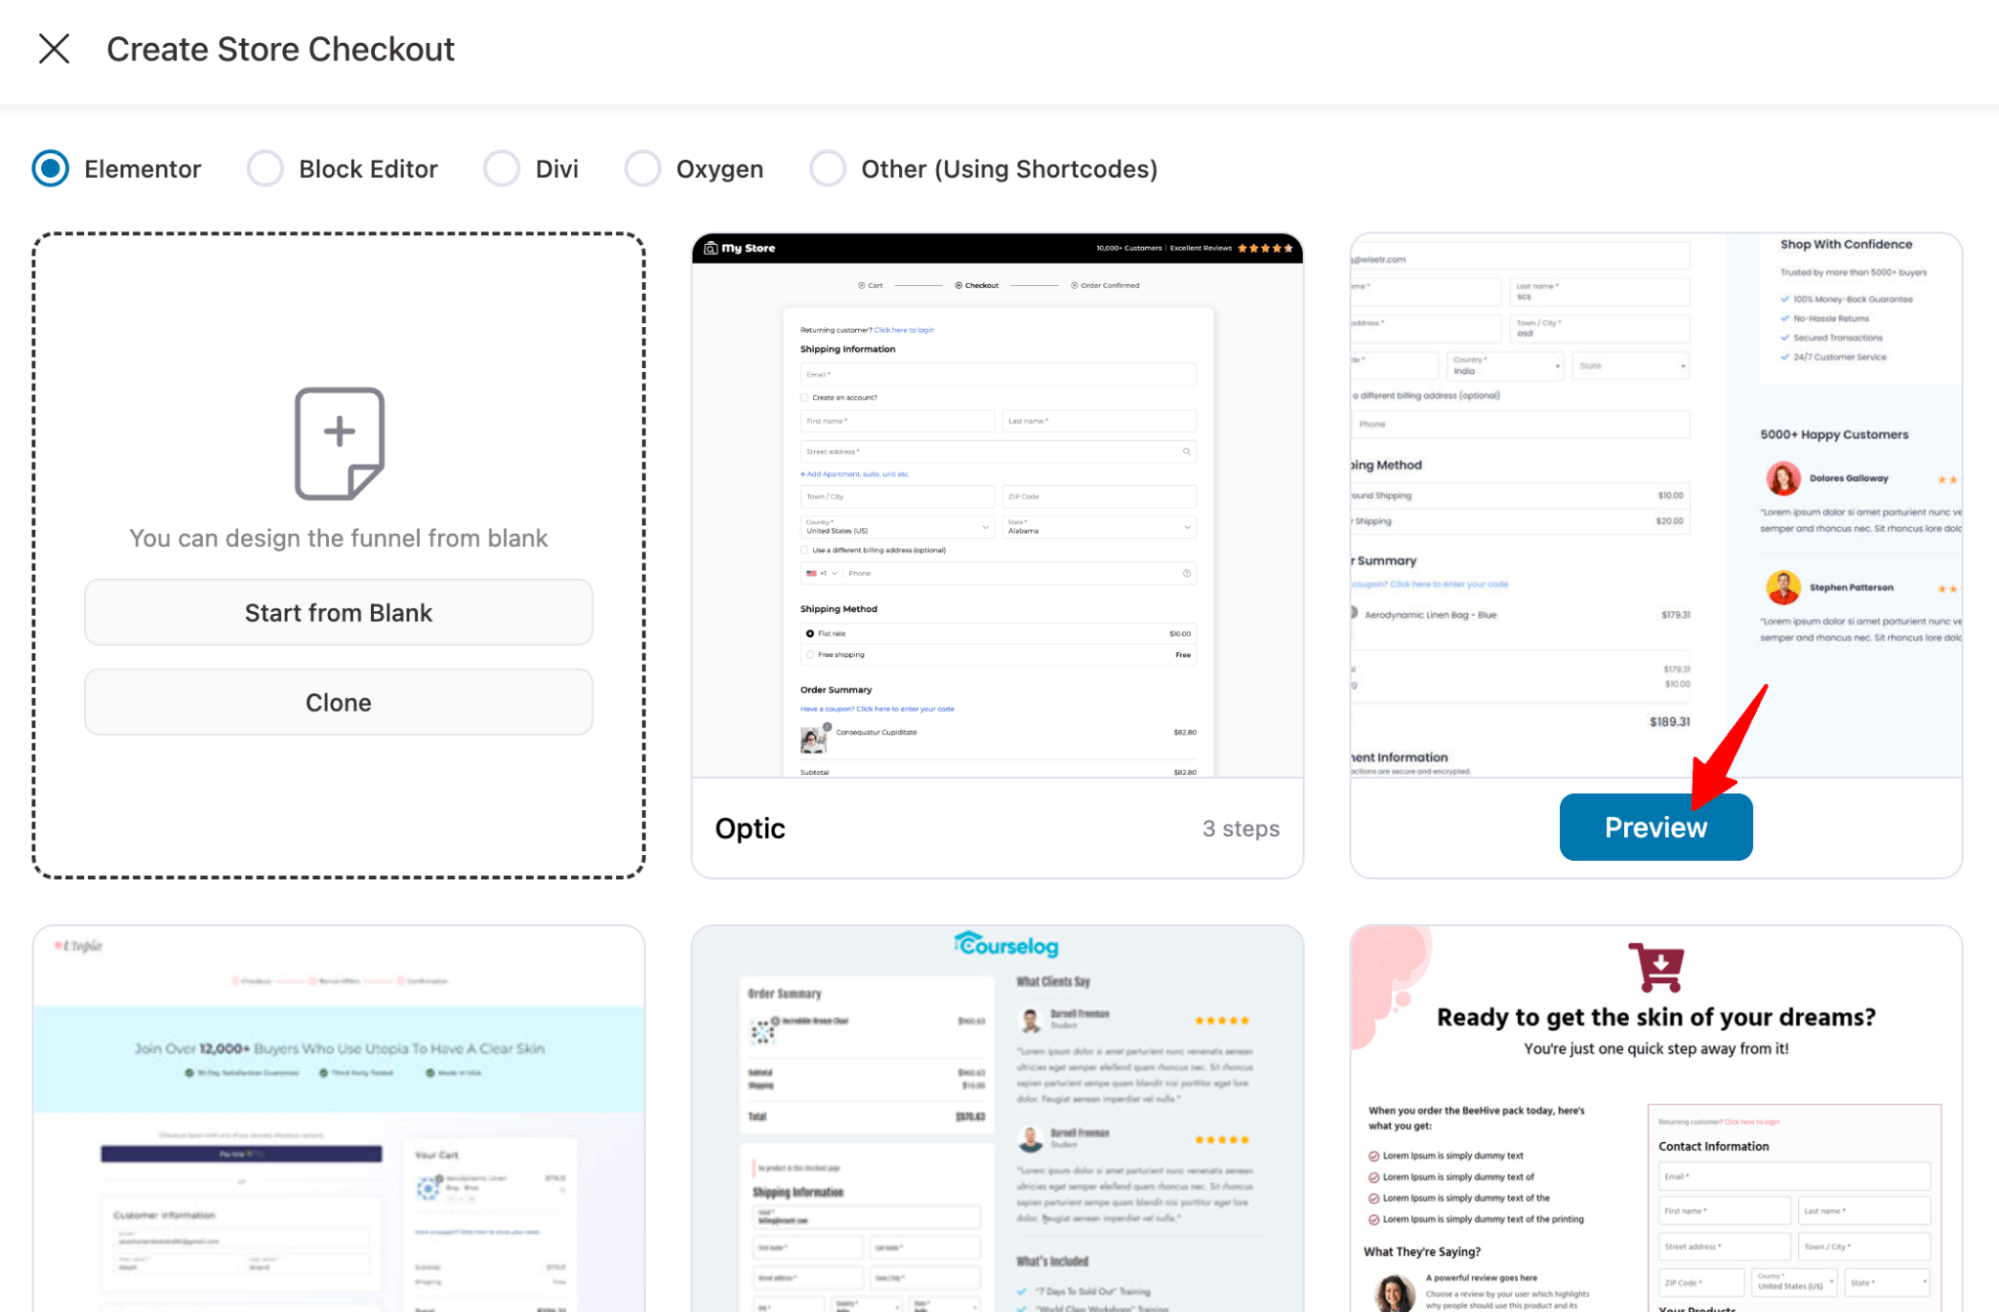
We are going with a one-page checkout. Please note that the multi-page checkout option is only available in the Pro version.
After that, click on 'Import This Funnel', provide a name, and hit the Add button to import your store checkout funnel.

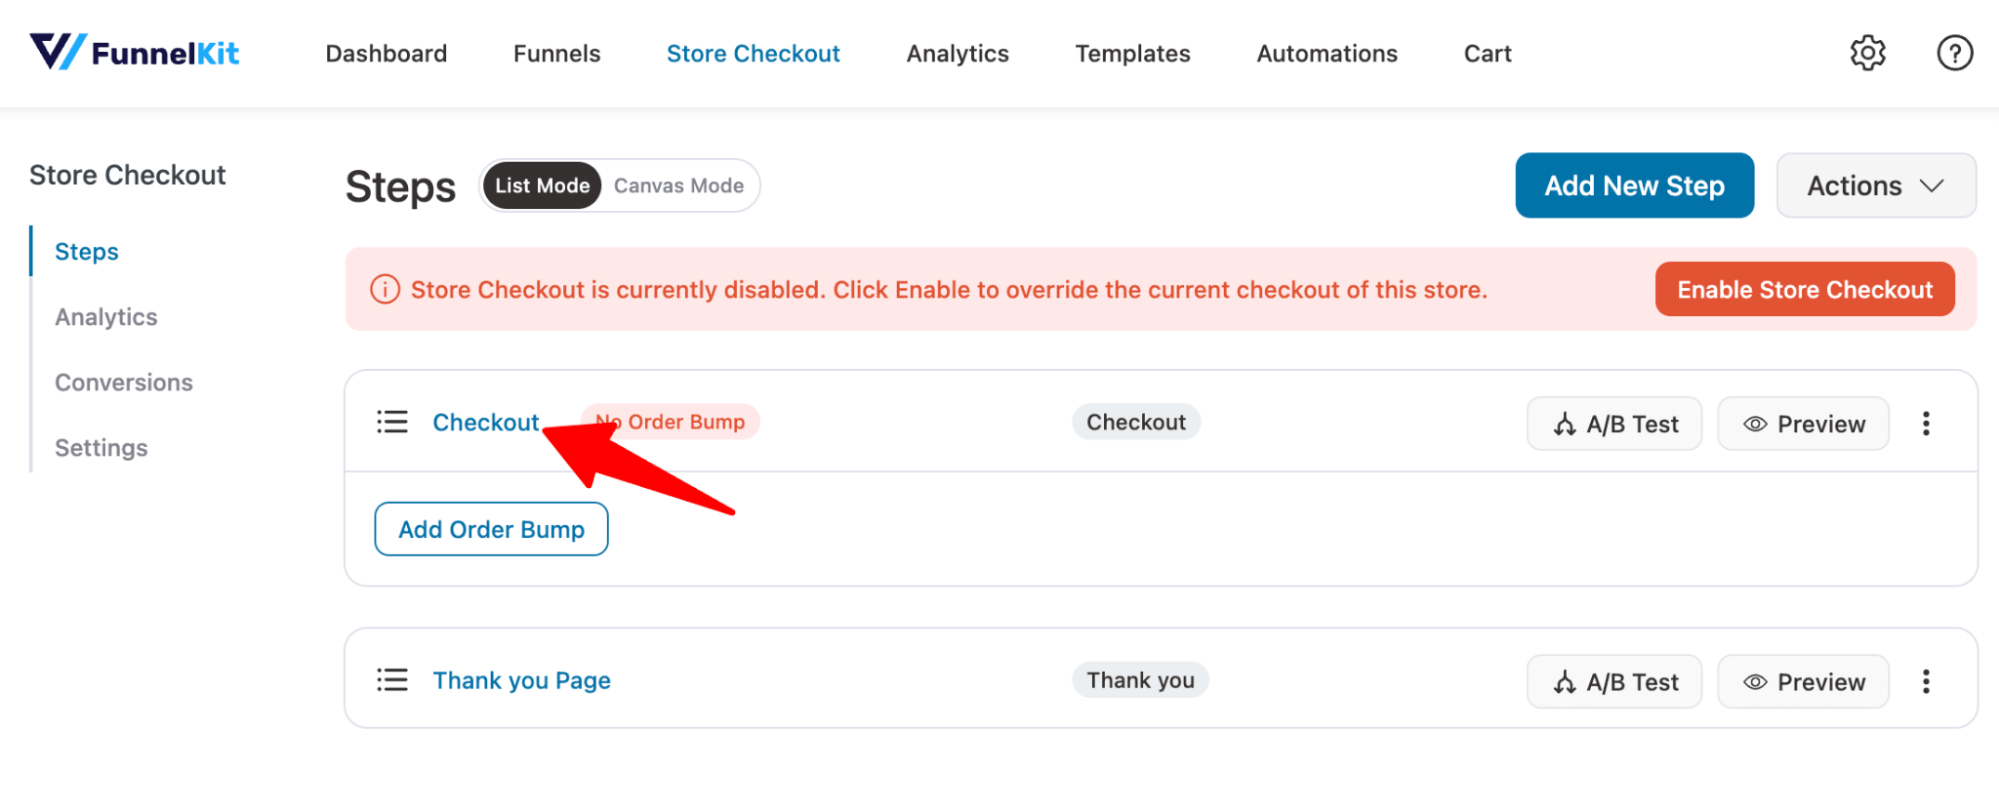
Step 3: Add the terms and conditions section
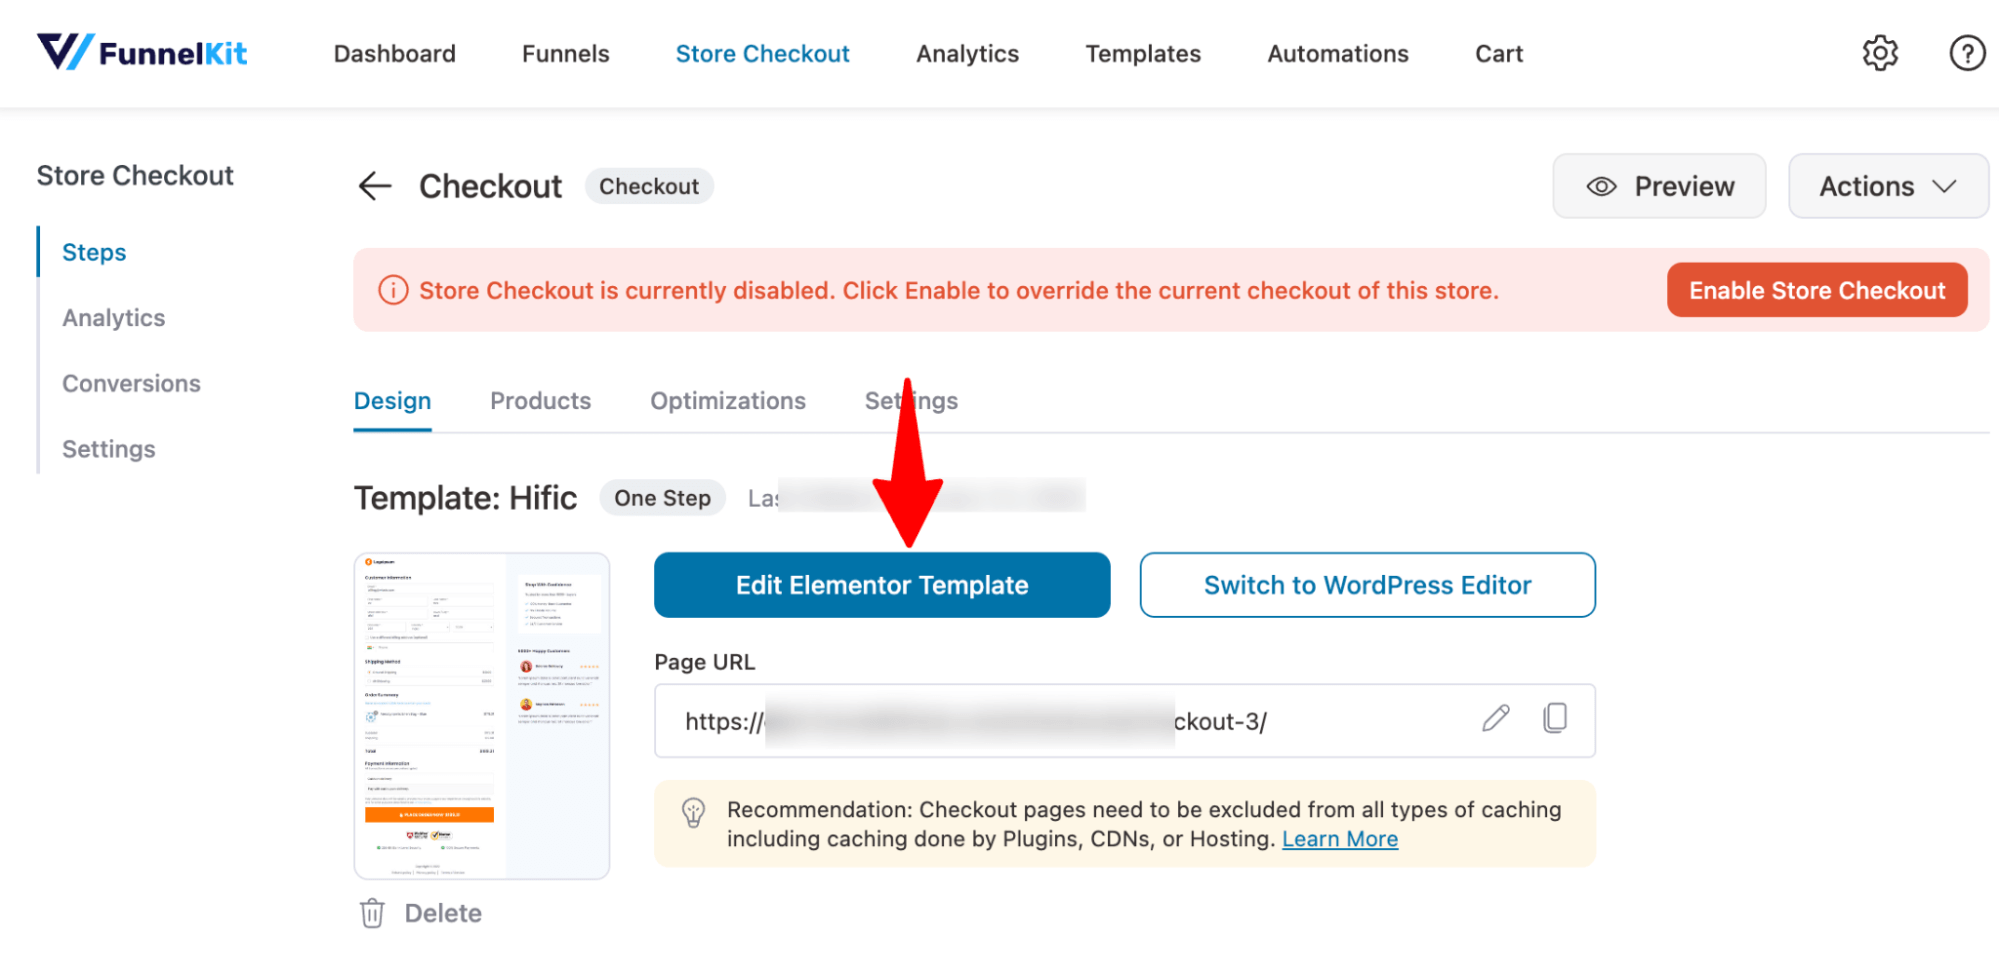
To customize the checkout page template, click on the checkout step.
Here, you can customize the design and content of the checkout page with the selected page builder and add a new section.
For that, click on the 'Edit Template' option.
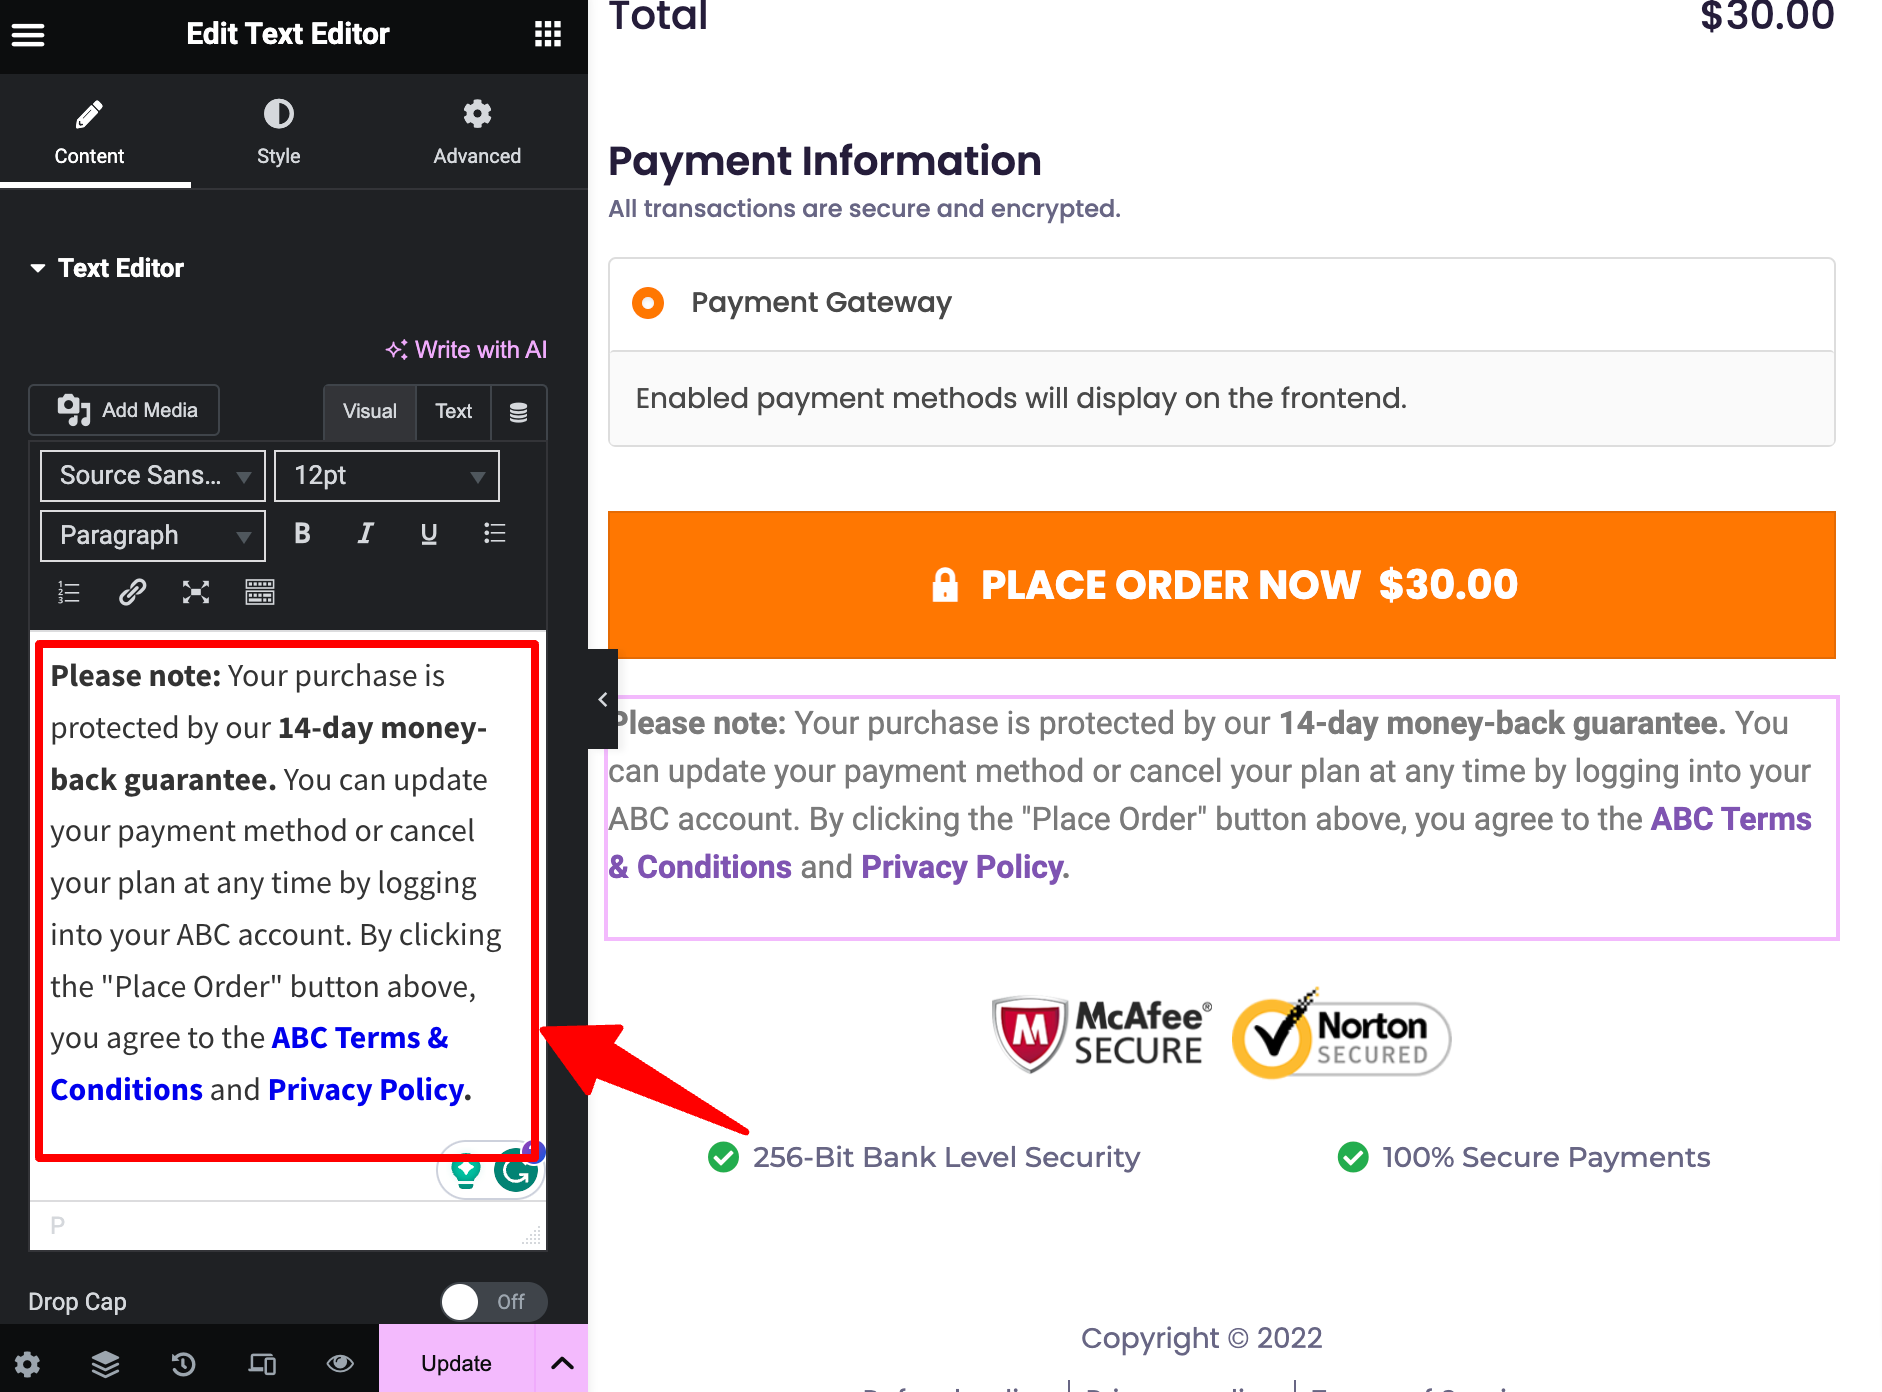
You can drag and drop the Text Editor widget from the left panel to the checkout page, right below the 'Place Order' button.
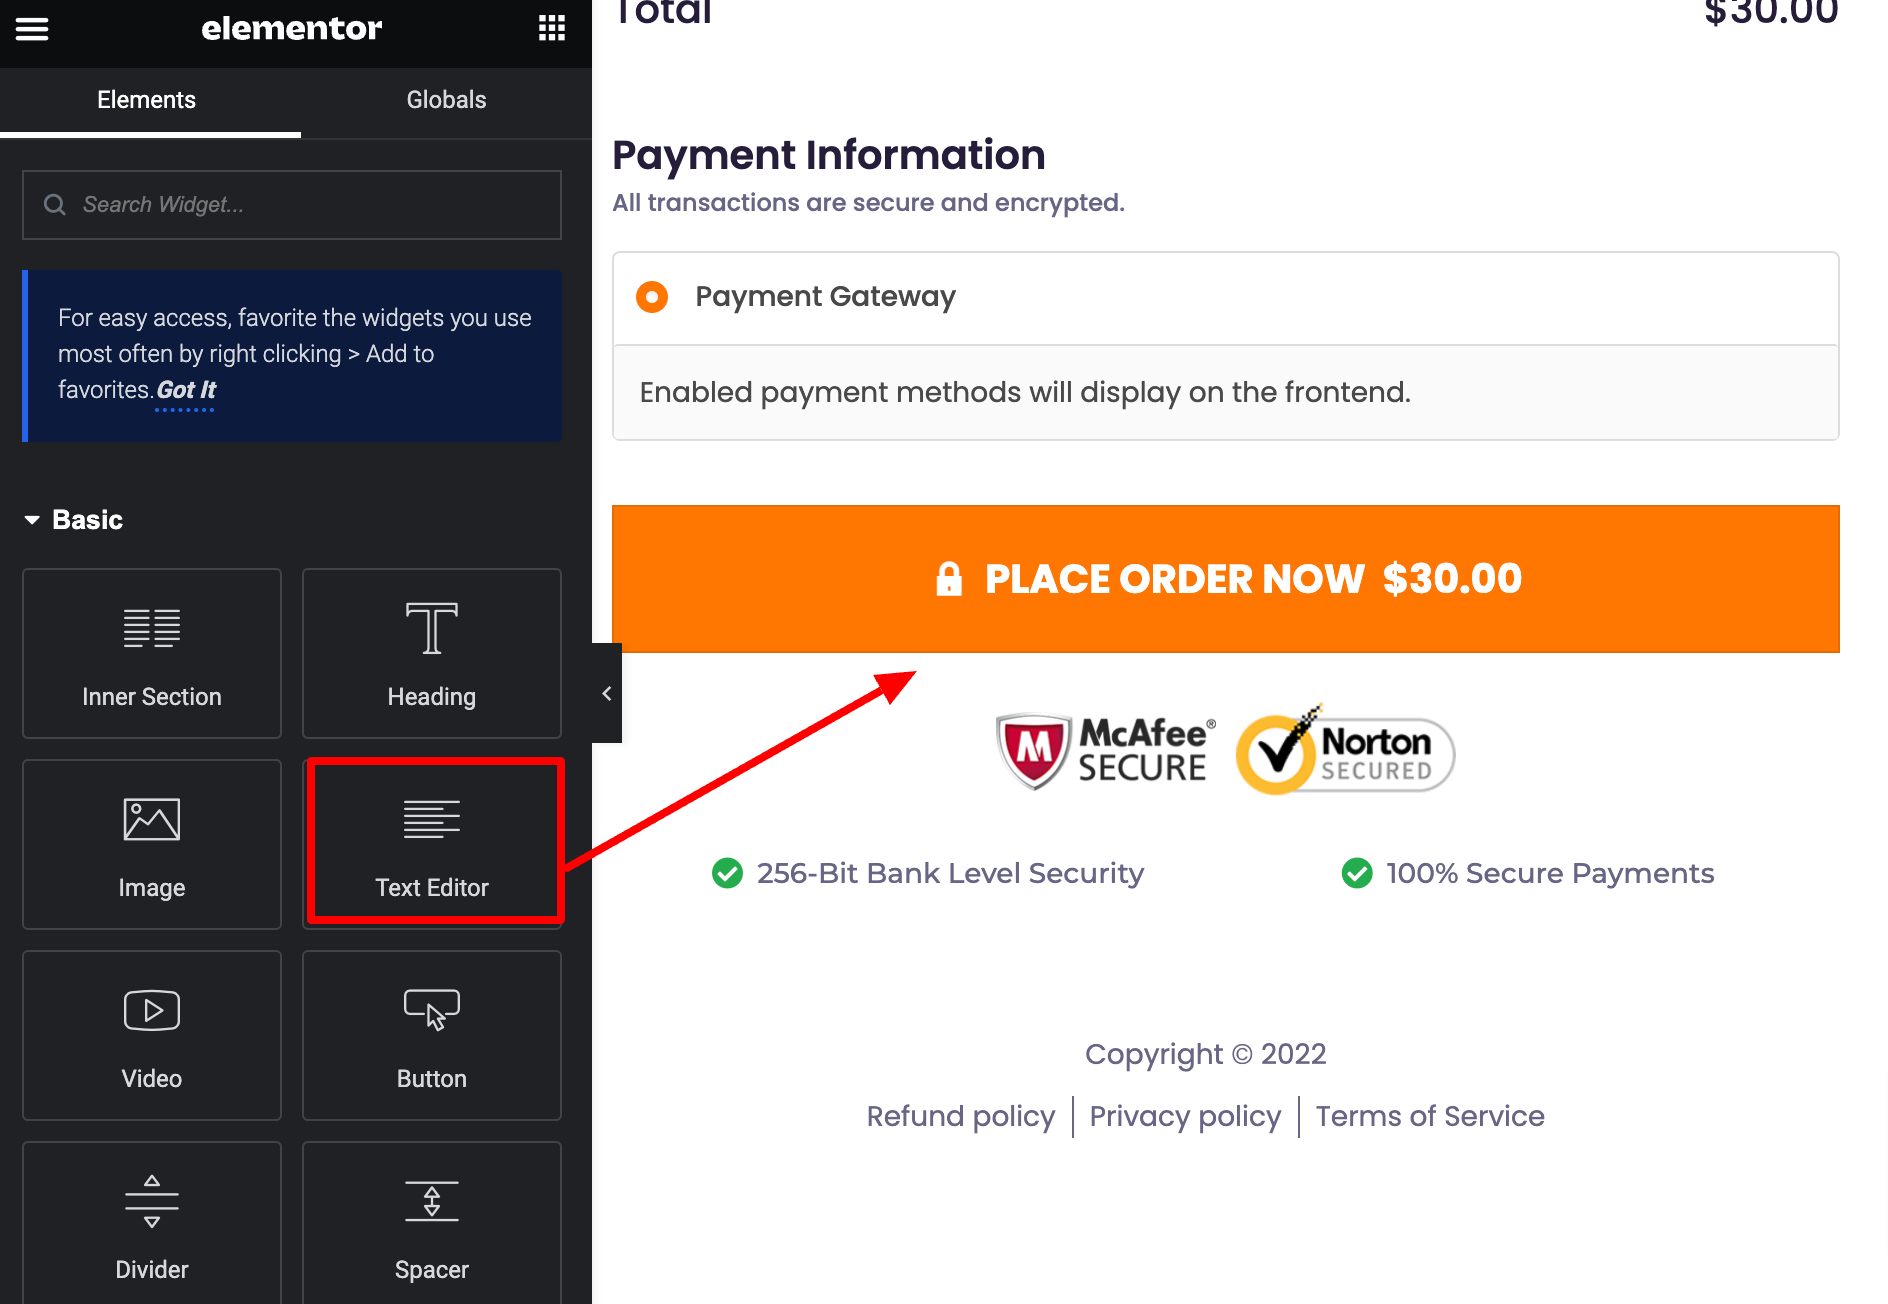
Now, add the content you want to show your customers. Make sure to link the terms and conditions page here.
After adding the custom text, click on Update.
This way, customers can check the terms and conditions page without being required to check the terms and conditions checkbox.
Not only that, you can customize the thank you page further as well.
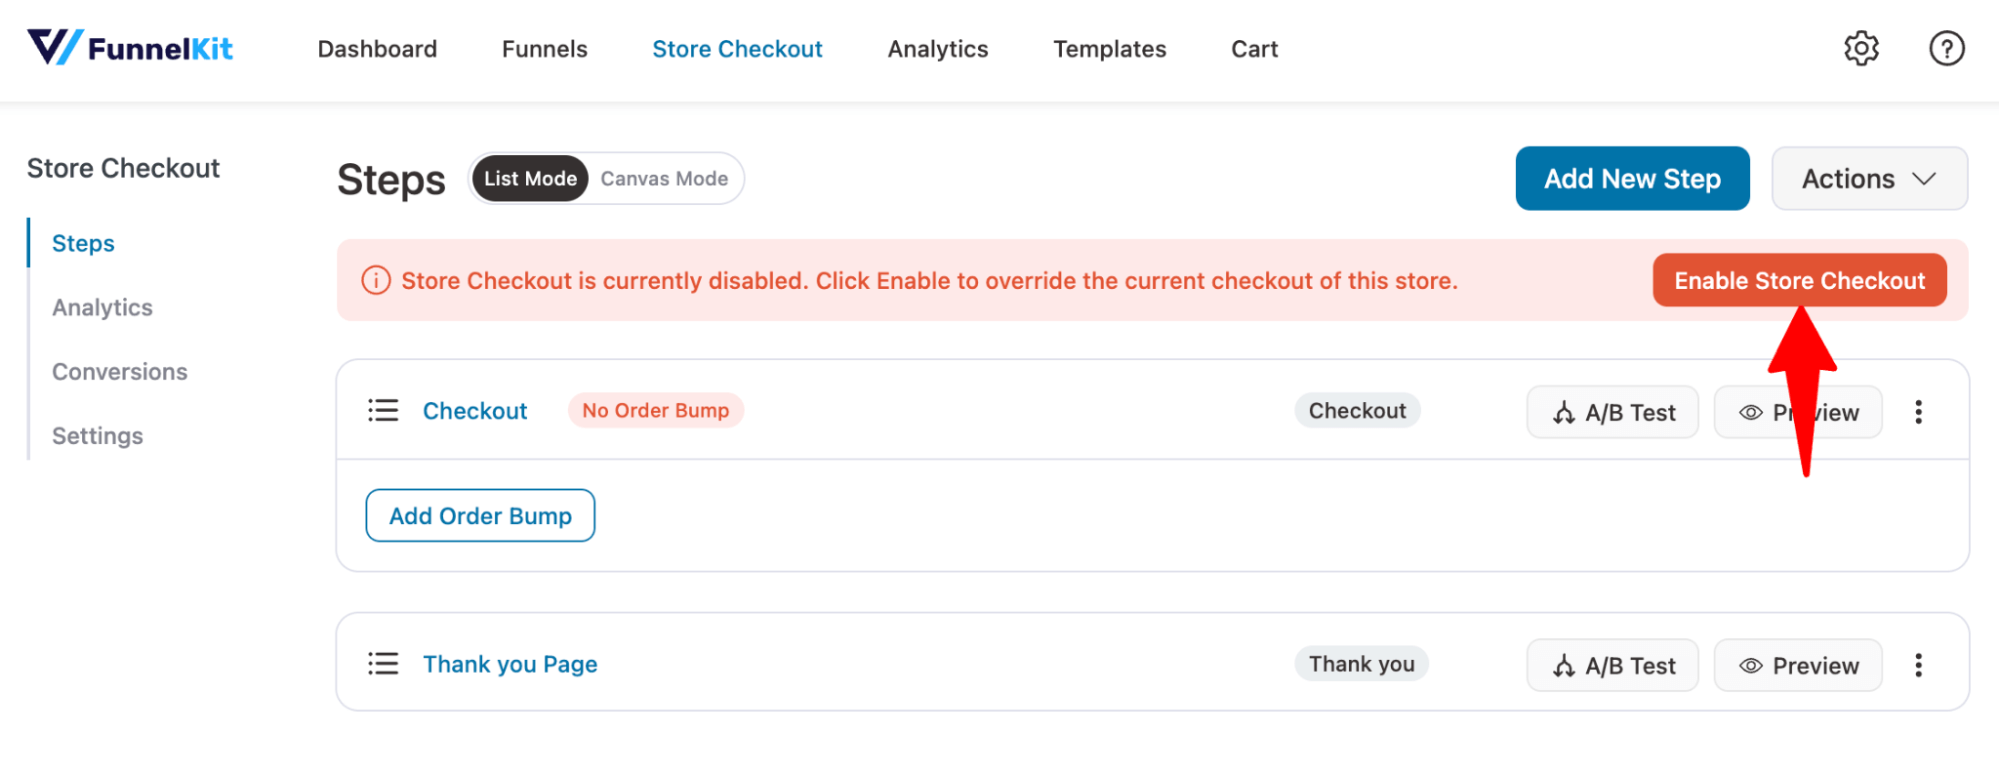
Step 4: Activate the store checkout
The final step is to activate the store checkout. For that, enable the “Enable Store Checkout” option.
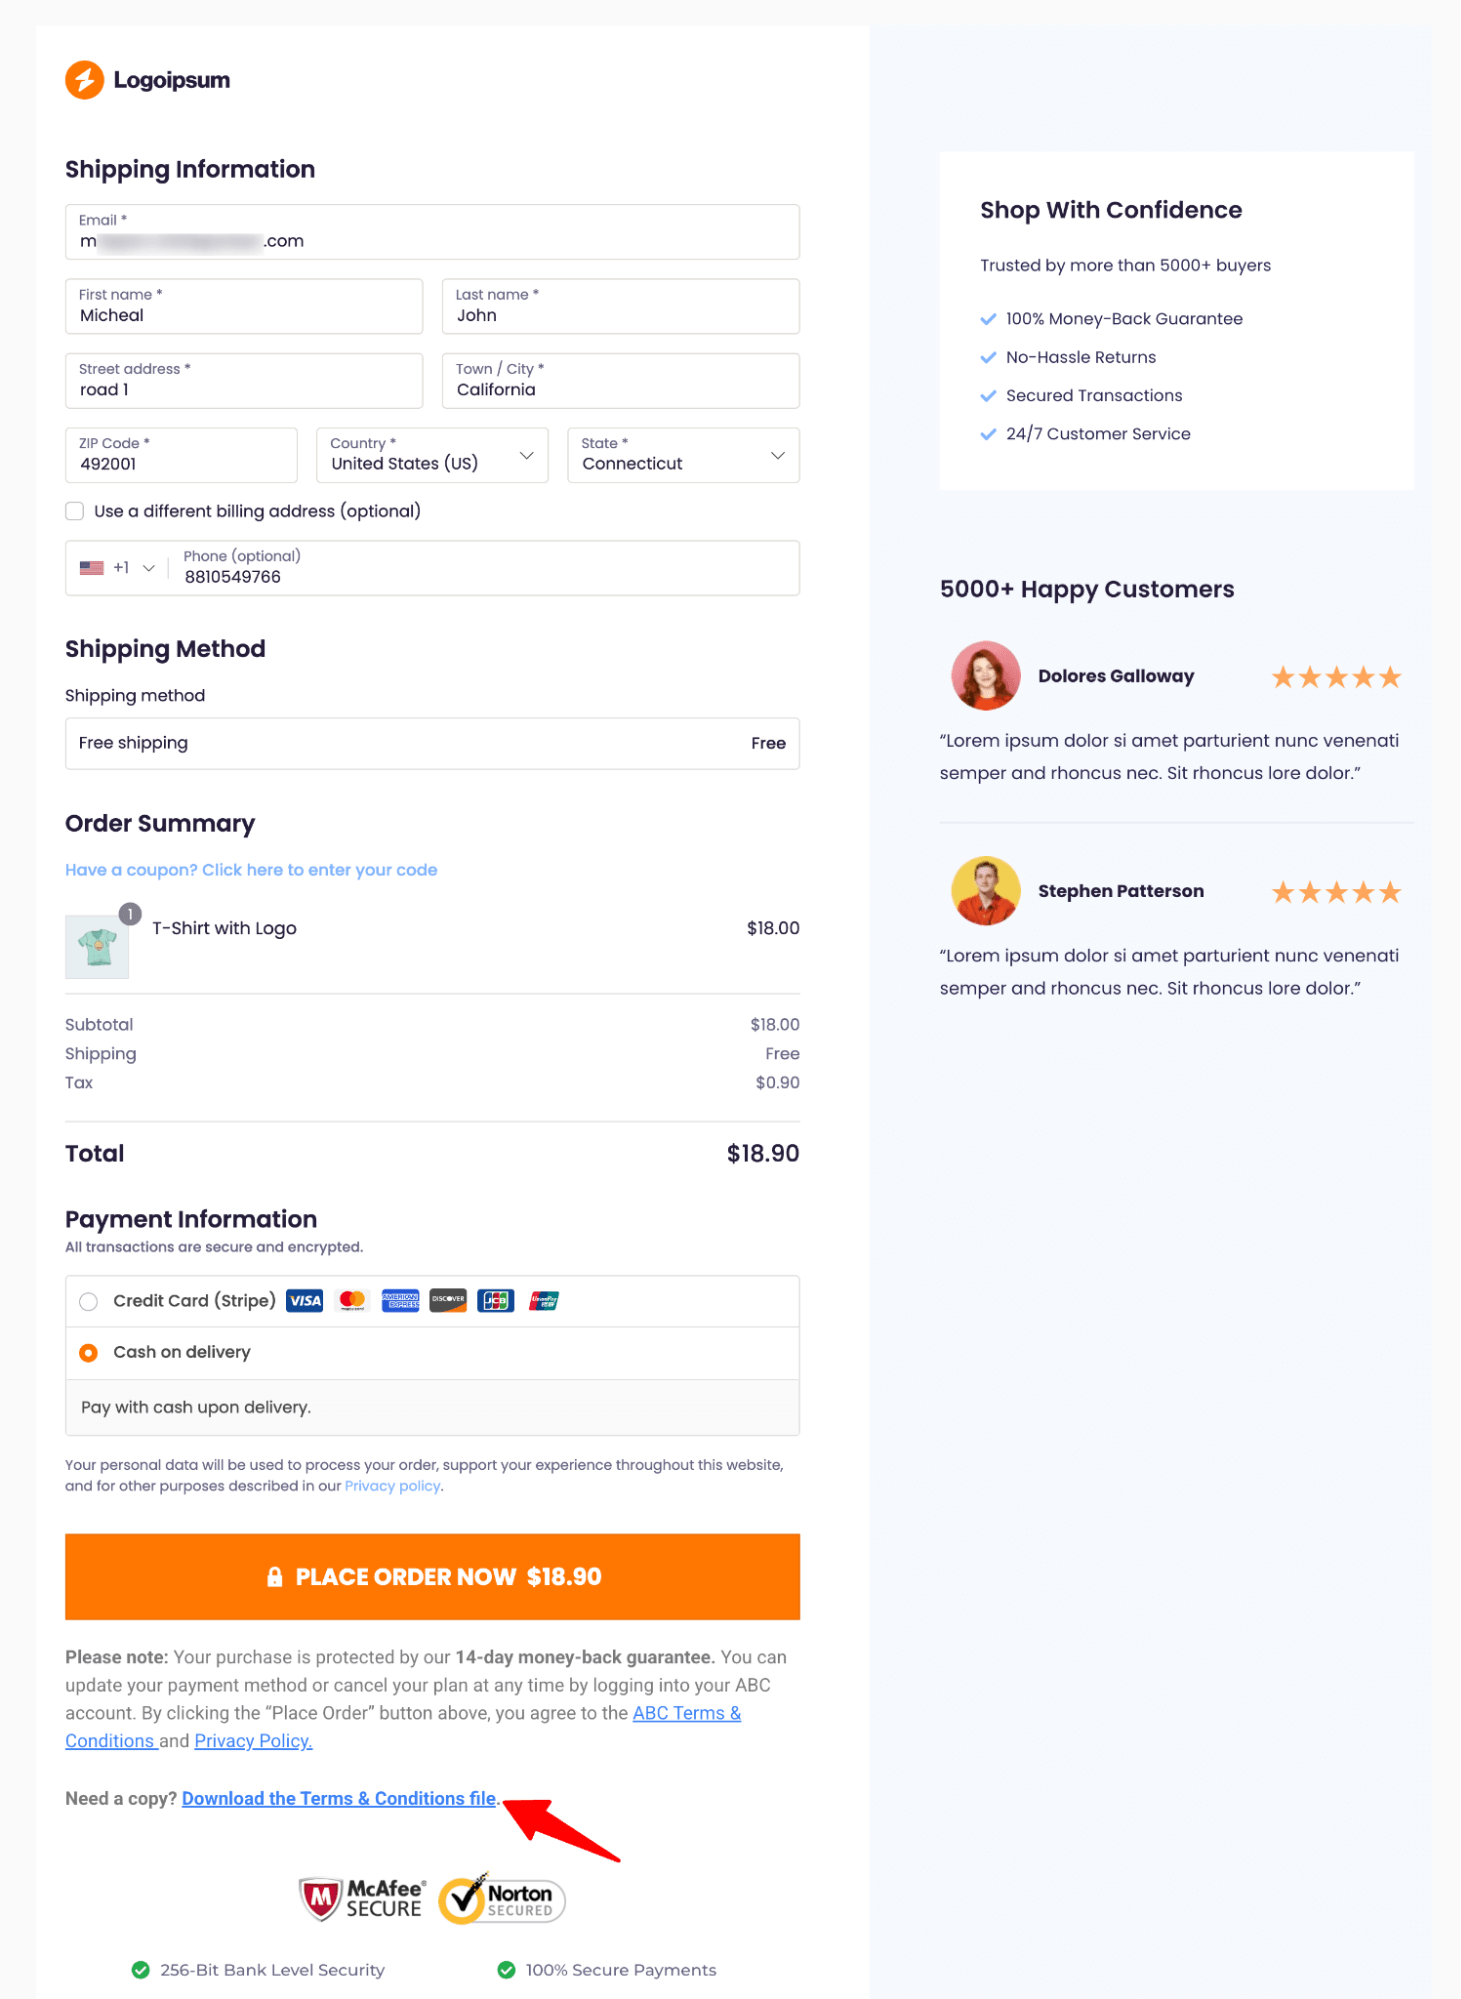
Here is what the WooCommerce checkout page with new terms and conditions text looks like:
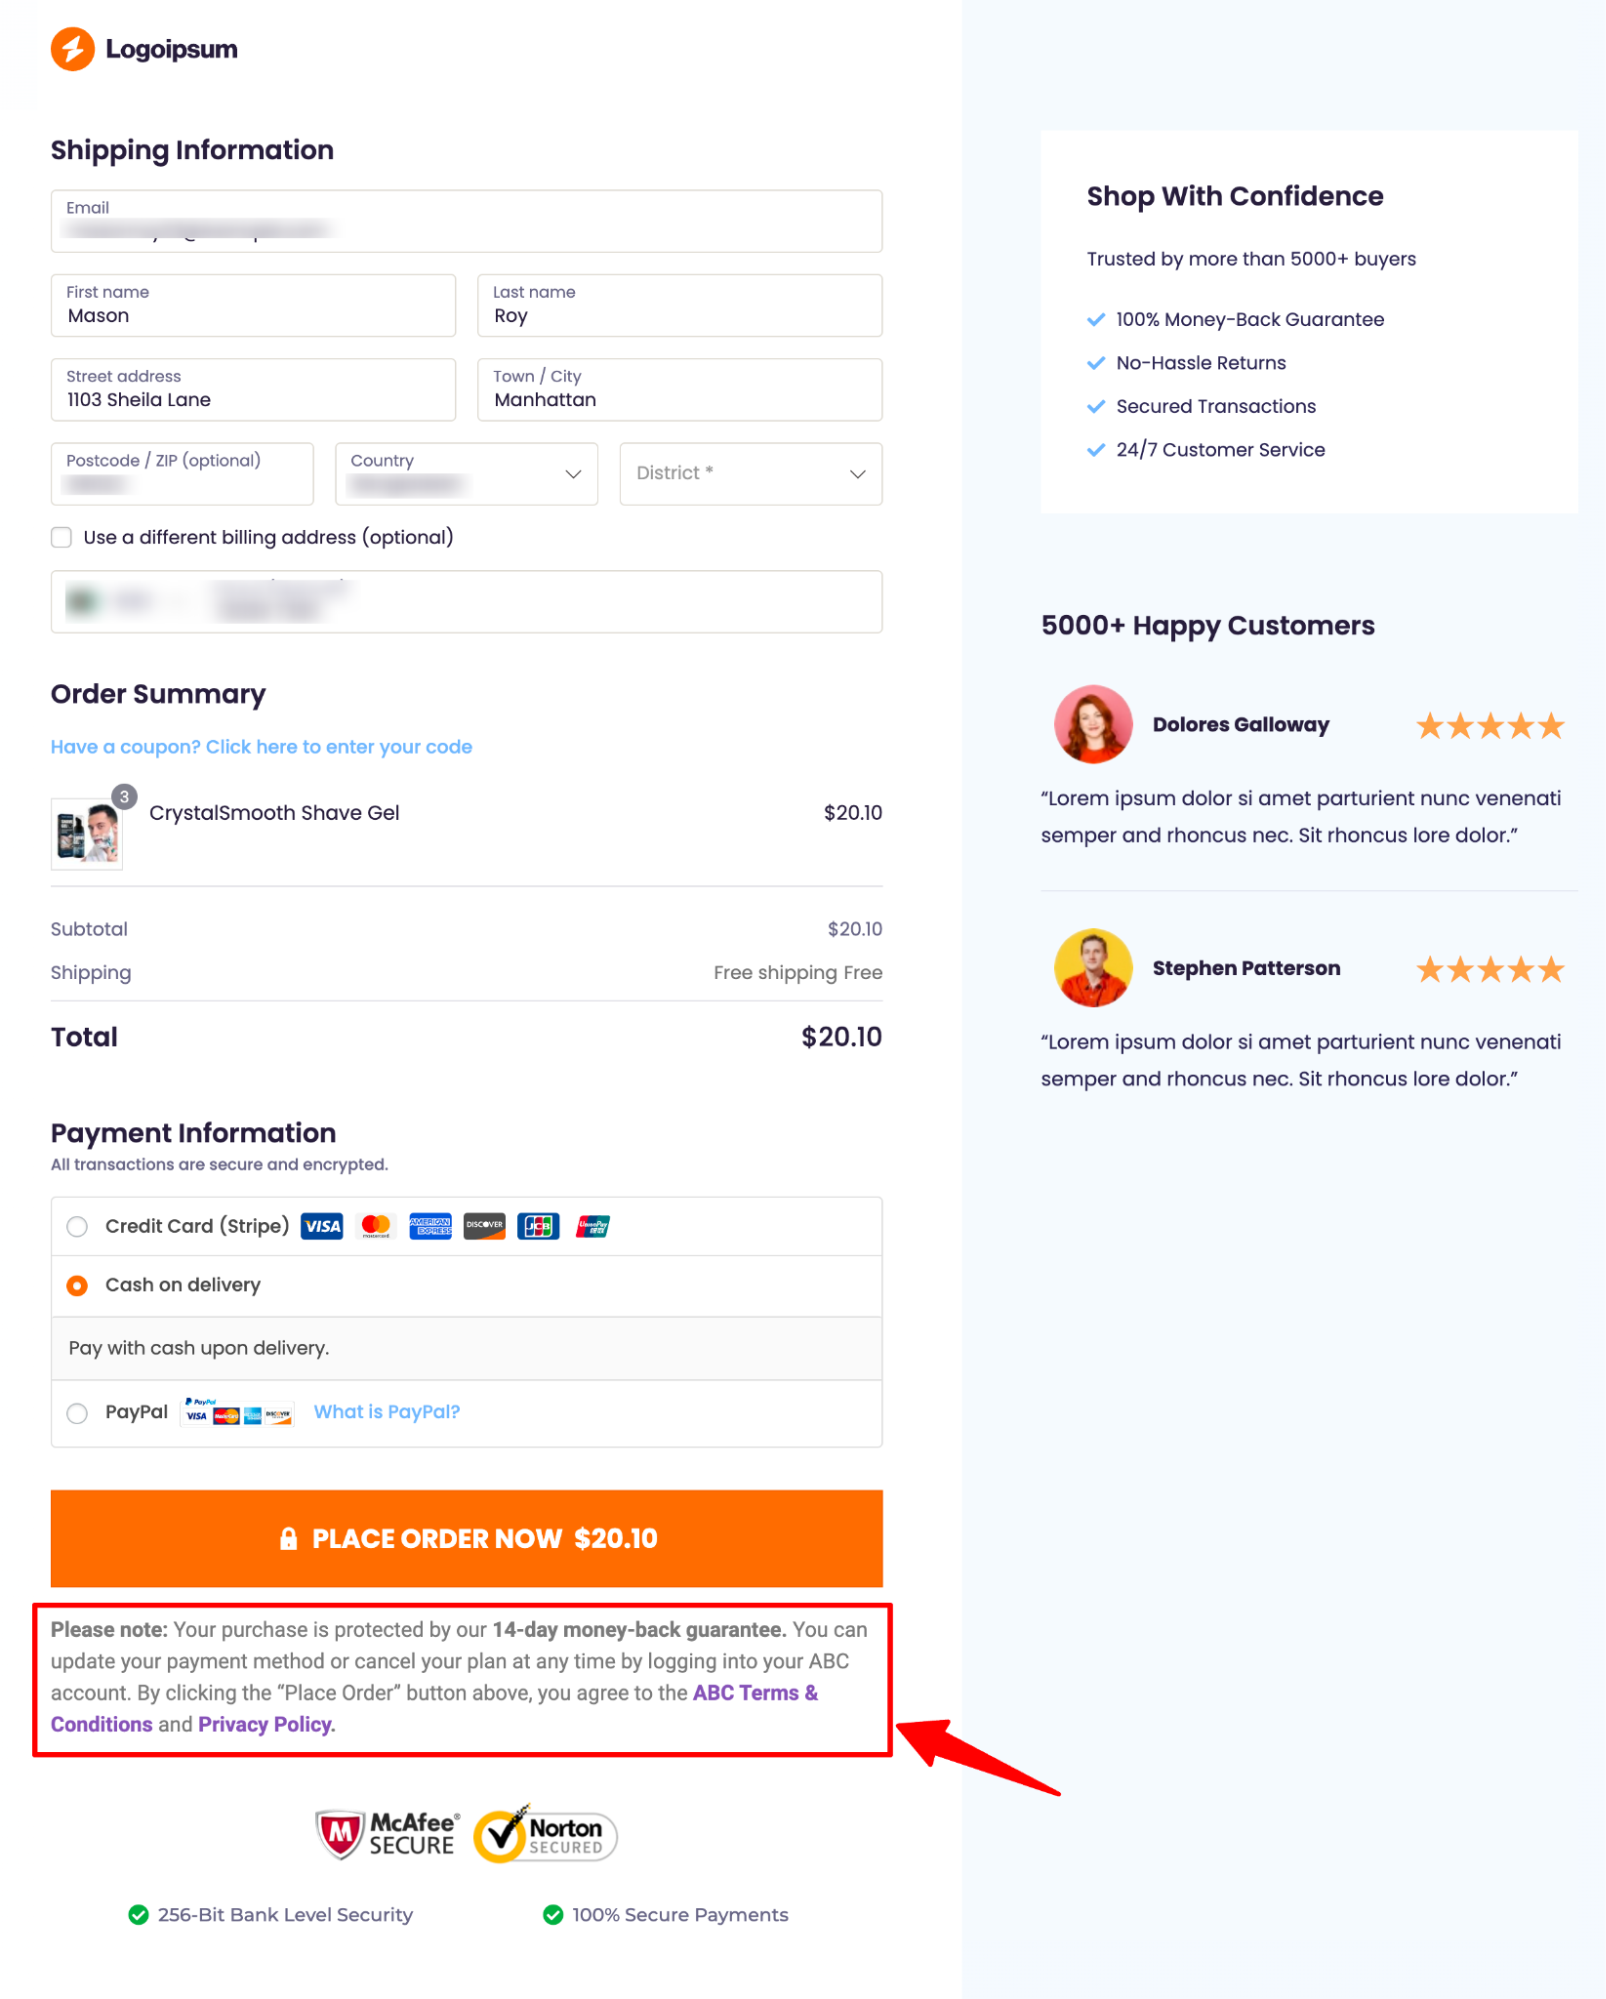
These terms and conditions don’t have a checkbox at the WooCommerce checkout. It allows users to go to the checkout page and purchase without having to click an extra checkbox.
This is how you can add the terms and conditions to WooCommerce checkout pages.
Method 3: How to Add a Terms and Conditions PDF to the WooCommerce Checkout Page?
In addition to linking to the Terms and Conditions page, you can add a PDF that customers can download and save. This makes it easy for them to refer back to it later and ensures they have a fixed version, even if your policies change.
To do this, first, add a Terms and Conditions section using FunnelKit Funnel Builder, as explained in the section above.
Next, follow these steps:
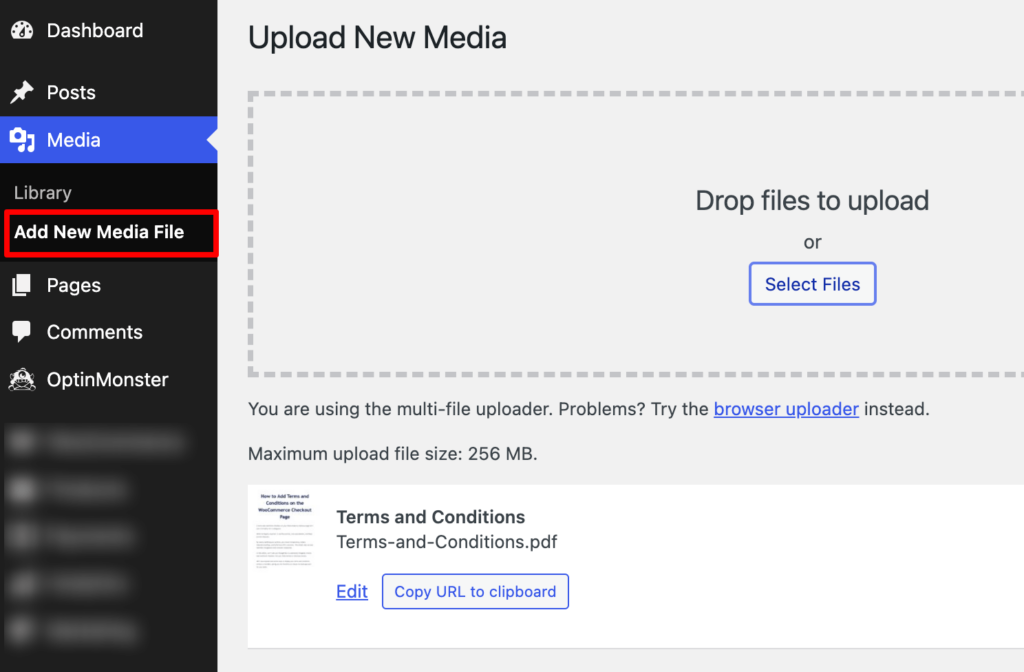
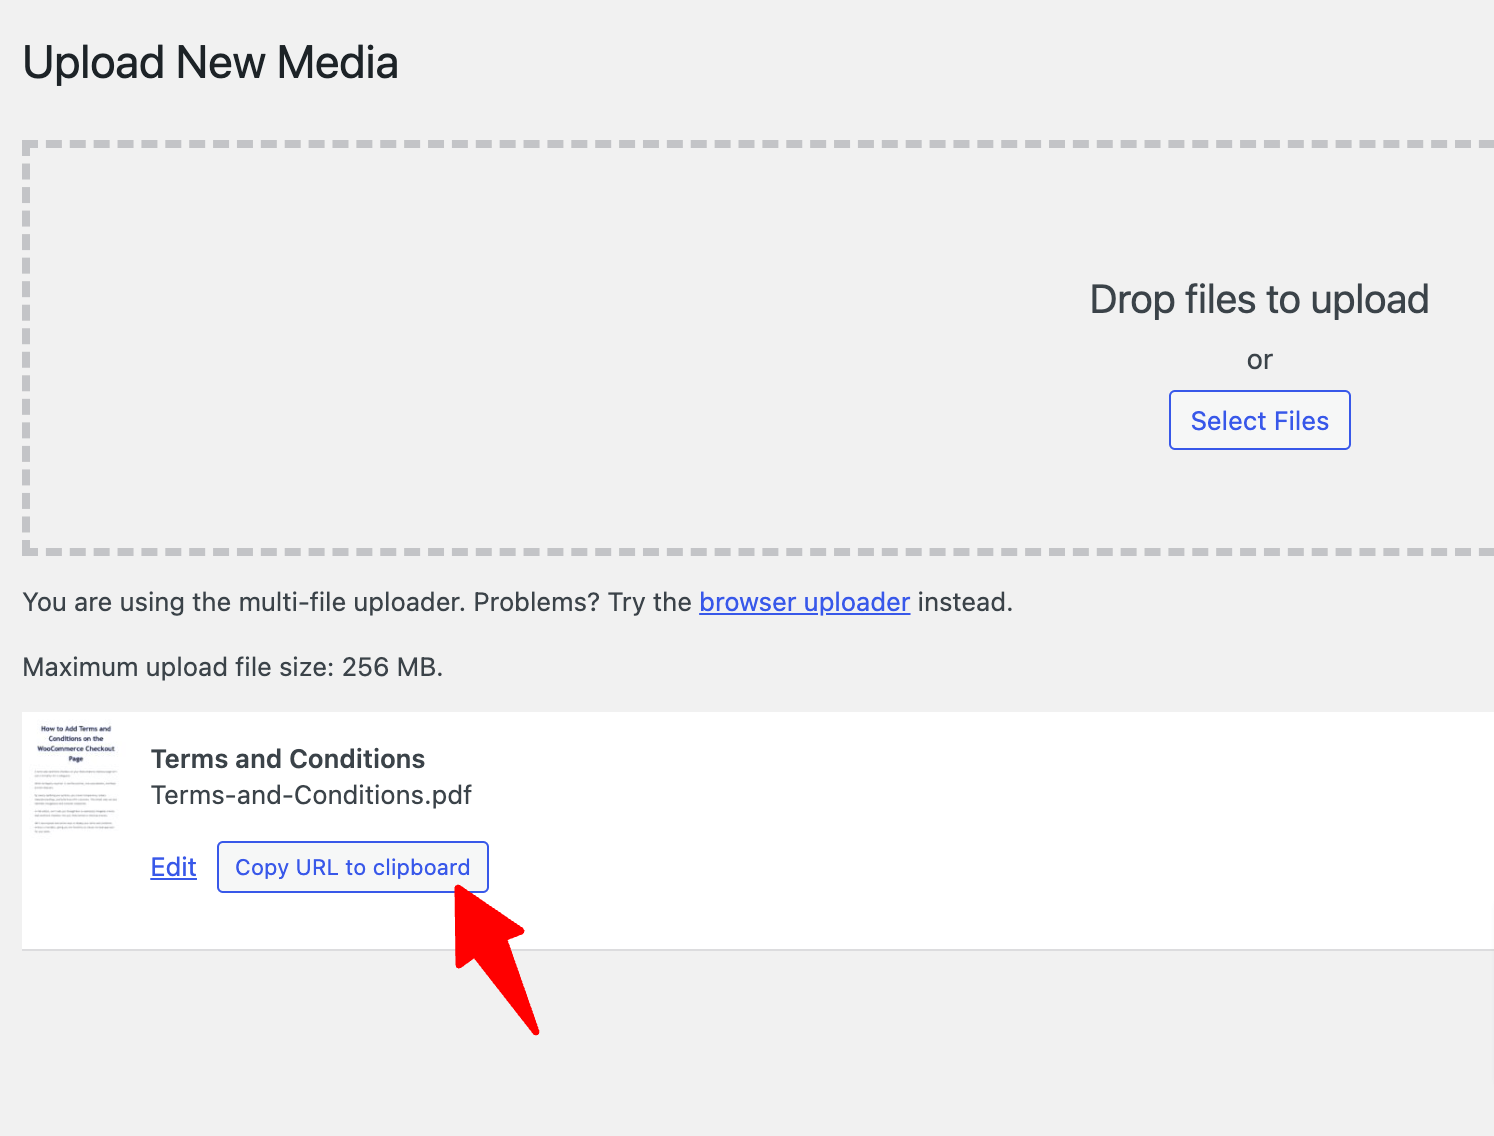
Step 1: Upload the Terms and Conditions PDF to your WooCommerce store.
Go to Media ⇒ Add New, then either select or drag and drop the file.
Step 2: Copy the terms and conditions PDF URL
Now, hit the “Copy URL to clipboard” button to copy the path.
Step 3: Link the PDF on the checkout page
Add the PDF download link to the Terms and Conditions section. Make sure the link opens in a new tab so customers can easily access it without leaving the checkout page.
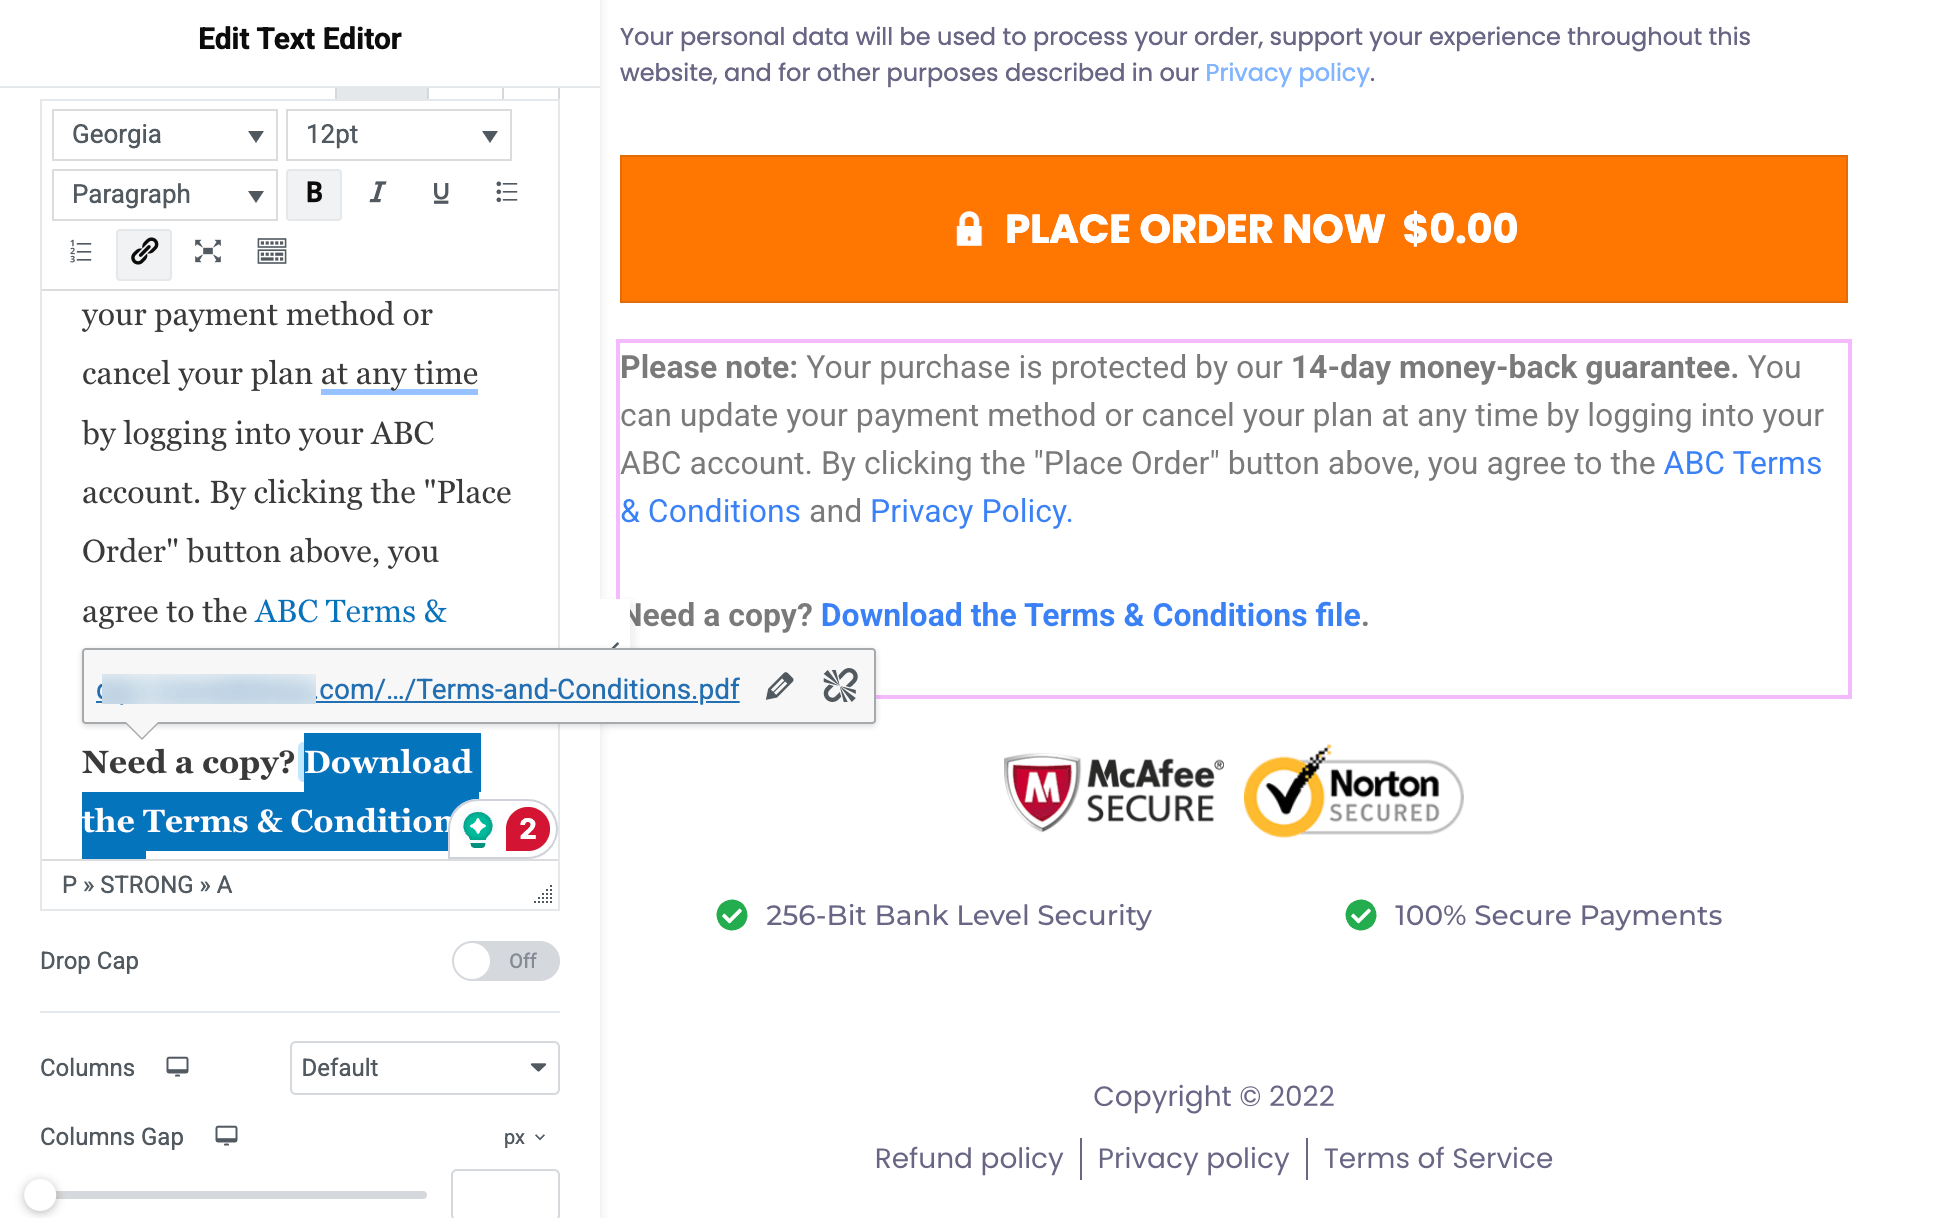
On the checkout page, users can click the link to download the terms and conditions file.
How can you add a terms and conditions PDF to the WooCommerce Checkout Page?
Don't Want the WooCommerce Terms and Conditions? Here's How to Remove It from Checkout
The terms and conditions checkbox on the WooCommerce checkout page is great for compliance, but sometimes, you don't need it at all.
Perhaps you run a straightforward store that doesn’t handle returns. Maybe your policies are already included elsewhere. Or maybe you’re looking for a cleaner, faster checkout experience to boost conversions.
Here's how you can remove the terms and conditions from your WooCommerce checkout page.
Navigate to WooCommerce ⇒ Settings ⇒ Advanced ⇒ Page Setup.
Find the setting labeled “Terms and conditions page”.
Deselect or remove the terms and conditions page from there.
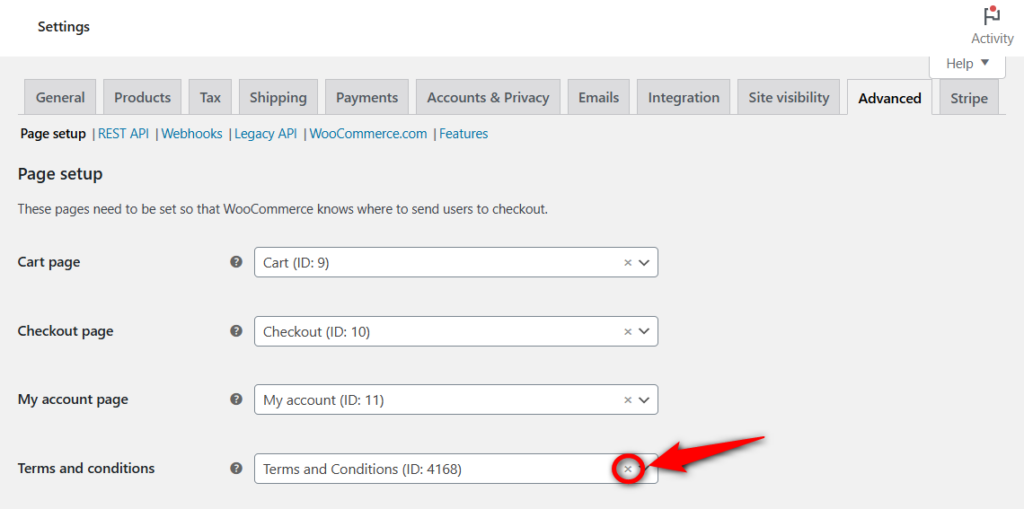
Click on 'Save changes' when done.
This is how you can remove the WooCommerce terms and conditions from the checkout page.
WooCommerce Checkout Page Terms and Conditions: Frequently Asked Questions (FAQs)
In this section, our experts have answered some of the most frequently asked questions regarding the WooCommerce checkout page terms and conditions checkbox:
You can add terms and conditions to the WooCommerce checkout using two methods.
First, create a new terms and conditions page and specify it in the advanced WooCommerce page setup settings. Customize the WordPress checkout template and assign the terms and conditions page there.
Second, create a store checkout with FunnelKit Funnel Builder and customize your checkout page with any page builder. Add the text editor widget and enter your terms and conditions under the place order button.
While terms and conditions are not universally required by law, they are strongly recommended for legal protection. In the EU, GDPR requires explicit consent for data processing, which means a checkbox is effectively mandatory for stores serving European customers.
Let’s look at the perks of having terms and conditions on your WooCommerce store:
- Legal protection: Adding terms and conditions provides legal protection for the WooCommerce store owner. It does so by serving as a legally binding agreement between the store owner and the customers about the rules, responsibilities, and expectations of both parties.
- Limiting liability: A well-drafted agreement limits legal liability, offering protection from breaches and product failures.
- Guidelines for users: Terms and conditions offer clear guidelines for acceptable behavior, helping to prevent website misuse. You can inform users that failure to comply with terms may result in account closure, manage expectations, and prevent disputes.
- Intellectual property protection: Clearly define and protect intellectual property (brands, trademarks, patents) owned by the WooCommerce store. You can also outline potential consequences if a user misuses intellectual property, fostering awareness and deterrence.
- Payment and shipping terms: Specify crucial details such as accepted payment methods, payment processing procedures, shipping terms, delivery duration, and protocols for lost or damaged orders.
- Dispute prevention: Setting clear rules and guidelines helps manage user expectations and prevents disputes, making both parties' rights and responsibilities evident.
WooCommerce handles privacy policies entirely separately from that main terms checkbox. Setting it up is fast. Head into WooCommerce Settings, click the Accounts and Privacy tab, and map your dedicated privacy page.
Right below that dropdown, you will spot a text area controlling the exact message buyers see right before handing over their credit card, and it comes pre-filled with a [privacy_policy] shortcode that automatically brings a clickable hyperlink. You can edit this text or replace it with custom HTML to match your store's checkout policies and tone.
If your WooCommerce terms and conditions checkbox is not showing, the most likely culprit is if you've assigned the page. Head to WooCommerce Settings, click the Advanced tab, and confirm you actually mapped a specific page inside the 'Terms and conditions' dropdown, because leaving that field blank guarantees the consent box will never load.
If the page is mapped but the box remains hidden, your active theme is probably stripping out the core checkout hooks. Block themes like Twenty Twenty-Four do this constantly since their built-in editor overwrites standard template behaviors.
The fix is straightforward. Either drop the classic checkout shortcode back onto the page, or bypass the conflict entirely by using a dedicated checkout plugin like FunnelKit to take complete control of the layout templates independent of your theme.
The default WooCommerce setup supports only one terms and conditions checkbox. To add multiple checkboxes for different consent types, such as a privacy policy agreement, marketing opt-in, or age verification, you will need a plugin.
You can change the WooCommerce terms and conditions text by navigating to Appearance > Customize > WooCommerce > Checkout. Edit the terms and conditions text there. You can also hyperlink your terms and conditions page there. Click the Save Changes button when you are done.
Protect Your Store With WooCommerce Checkout Terms and Conditions
In an online store, WooCommerce checkout terms and conditions are crucial to establishing a secure and transparent online shopping experience for you and your customers.
By clearly outlining the terms of service, privacy policies, and other important information, you can build trust with your audience.
Now that you've gone through this post, you can easily add terms and conditions to the WooCommerce checkout without requiring customers to fill in extra fields.
With FunnelKit Funnel Builder, you can completely replace the default WooCommerce checkout with built-in field management, mobile optimization, and the flexibility to add custom consent checkboxes, without code.
So, why wait? Add terms and conditions to your WooCommerce checkout page today!

Editorial Team
July 7, 2026Are shoppers adding products to their cart and leaving before they buy? According to Baymard Institute research on checkout usability, 18% of shoppers who abandon their cart do so because...
Editorial Team
July 3, 2026Sometimes, the difference between a visitor leaving and placing an order comes down to something surprisingly small, like a better headline, a cleaner checkout, or a more compelling offer. That's...
Editorial Team
July 1, 2026Are you leaving money on the table by not fully leveraging your customers’ shopping behavior? Many store owners don’t realize that every time a customer adds a product to the...


