
Do you know what’s worse than an abandoned cart? Not knowing why it happened!
Your WooCommerce store could be losing sales right now, but you wouldn’t even know it if you’re not tracking conversions properly.
With WooCommerce conversion tracking, you can monitor every customer action on your store, which campaigns generate revenue, and optimize your ad spend based on actual return on investment.
According to Baymard Institute, the average cart abandonment rate is 70.22%. Conversion tracking helps you identify where drop-offs occur in your funnel and which traffic sources drive customers who complete purchases.
In this guide, you will learn how to set up conversion tracking for seven major platforms: Google Analytics 4, Google Ads, Meta Pixel with Conversions API, UTM parameters, TikTok Pixel, Pinterest Tag, and Snapchat Pixel.
You will also learn how to verify each implementation, troubleshoot common tracking failures, and ensure compliance with privacy regulations like GDPR and CCPA.
Table of Contents
- 1 What is WooCommerce Conversion Tracking (And Why You Need It in Your Store)?
- 2 What Events Can WooCommerce Conversion Tracking Capture?
- 3 WooCommerce Conversion Tracking Methods Compared
- 4 Before You Start: Install FunnelKit Funnel Builder
- 5 Method 1: Set Up WooCommerce Conversion Tracking With Google Analytics 4
- 6 Method 2: Set Up Google Ads Conversion Tracking in WooCommerce
- 7 Method 3: Track WooCommerce Conversions With Facebook (Meta) Pixel
- 8 Method 4: Set Up UTM Parameter Tracking in WooCommerce
- 9 Method 5: Set Up WooCommerce Conversion Tracking for TikTok Pixel
- 10 Method 6: WooCommerce conversion tracking with Pinterest
- 11 Method 7: Set Up WooCommerce Conversion Tracking for Snapchat
- 12 5 Best Practices to Ensure Accurate Conversion Tracking in WooCommerce
- 13 Why Is My WooCommerce Conversion Tracking Not Working (Troubleshooting)
- 14
- 15 Frequently Asked Questions About WooCommerce Conversion Tracking
- 16 Start Tracking Every WooCommerce Conversion Today!
What is WooCommerce Conversion Tracking (And Why You Need It in Your Store)?
WooCommerce conversion tracking is the process of monitoring and tracking customer actions (events) on your WooCommerce site, including everything from viewing pages to making purchases.
This tracking helps you understand how effective your marketing and sales strategies are.
It provides insights into customer behavior and identifies which actions drive conversions (such as purchases, sign-ups, or other predefined goals).
Why You Need Conversion Tracking in Your WooCommerce Store (Benefits)
Running a WooCommerce store without conversion tracking is like managing a business without looking at your bank statements. You see traffic numbers, but you cannot connect those visitors to actual revenue.
Research shows that eCommerce brands using integrated analytics achieve conversion rates 25-30% higher than industry averages. The difference comes from data-driven decisions about where to allocate marketing budget.
Here is why conversion tracking matters for your store:
- Accurate marketing attribution: When a user clicks your Facebook ad, browses three product pages, leaves, returns via Google search, and finally purchases, conversion tracking shows you which touchpoint deserves credit. Without this data, you allocate your budget blindly.
- Retargeting audience building: Tracking pixels capture behavior data that lets you create precise remarketing audiences. You can target users who added products to their carts but did not purchase them. These audiences typically convert at 3-5x higher than cold traffic.
- Algorithm optimization for paid ads: When you send purchase events with accurate revenue values to Google Ads or Meta, their machine learning finds more users likely to convert. Without conversion data, algorithms optimize for clicks instead of sales.
- Identifying funnel drop-offs: Conversion tracking reveals exactly where users abandon your checkout process. You can see if users leave at the shipping calculation, payment entry, or final confirmation. This insight lets you fix specific friction points.
Even a 1-second delay in page load time leads to a 7% loss in conversions. (Source: We Make Websites)
Therefore, conversion tracking helps you identify these performance issues and measure improvement after fixes.
What Events Can WooCommerce Conversion Tracking Capture?
WooCommerce conversion tracking monitors specific actions that users take on your store. Each action is called an "event" and represents a step in the customer journey, from the first visit to the completed purchase.
Here are the events you can track:
- Page View: When a user visits a specific page on your WooCommerce store.
- View Item: When a user views a specific product page.
- Add to Cart: When a user clicks the add to cart button, the product is added to their shopping cart.
- Initiate Checkout: When a user navigates to your checkout page, start the conversion funnel.
- Add Payment Info: When a user enters payment details during checkout.
- Purchase: When a user places an order and includes the transaction value, the purchase is complete.
- Lead or Optin: Tracks when a user submits a form, signs up for your newsletter, or completes a lead generation action.
- Optin Confirmation: When a user confirms an optin sign-up.
- Sales Page: A user visits a landing or sales page of a funnel.
- Oder Bump Conversion: When a user purchases an order bump along with the main offer. It includes both add-to-cart and conversion events.
- Upsell or Downsell: When a customer buys additional items in the form of an upsell/downsell after checkout.
- Thank you: When a customer views the thank you page.
- Site-wide event tracking: Enable the View event site-wide without using any extra plugin.
The Purchase event is critical because advertising platforms use this data to find more users likely to buy. Without accurate purchase tracking, campaign optimization suffers.
WooCommerce Conversion Tracking Methods Compared
Different tools help you gather conversion data from various sources. Depending on your WooCommerce conversion tool, you can analyze and utilize the data.
Here are some WooCommerce conversion tracking methods you can use to track customer actions on your store:
| Method | Best For | Setup Time | Server-Side Support | Cost |
|---|---|---|---|---|
| Google Analytics 4 | Overall site analytics and reporting | 5 minutes | No | Free |
| Google Ads | Paid search campaign optimization | 10 minutes | Enhanced Conversions | Free |
| Facebook (Meta) Pixel with CAPI | Facebook and Instagram advertising | 10 minutes | Yes, required | Free |
| UTM Tracking | Multi-channel attribution in WooCommerce | 5 minutes | Yes, first-party | Free |
| TikTok Pixel | TikTok advertising campaigns | 5 minutes | Events API available | Free |
| Pinterest Tag | Pinterest ads and organic pins | 5 minutes | API available | Free |
| Snapchat Pixel | Snapchat advertising campaigns | 5 minutes | CAPI available | Free |
Start with Google Analytics 4 for baseline analytics. Add platform-specific pixels only for channels where you actively run paid advertising.
Before You Start: Install FunnelKit Funnel Builder
Before configuring any tracking method, install FunnelKit Funnel Builder on your WordPress site.
FunnelKit Funnel Builder lets you create high-converting WooCommerce checkout pages and profitable sales funnels in WordPress.
Additionally, this plugin handles pixel integration for all seven platforms covered in this guide without requiring manual code insertion.
FunnelKit provides native tracking support for Google Analytics 4, Google Ads, Meta Pixel, TikTok, Pinterest, and Snapchat. It also includes server-side Conversions API support for Meta, which is essential for accurate iOS tracking in 2026.
The plugin tracks standard WooCommerce events and advanced funnel events, such as order bump conversions and upsell purchases, that other tracking plugins miss.
The free version includes all pixel tracking features. The Pro version starts at $99.50 per year and includes built-in analytics, unlimited checkout optimizations, and dynamic upsells.
Method 1: Set Up WooCommerce Conversion Tracking With Google Analytics 4
Google Analytics has two types of properties: Universal Analytics (UA) and Google Analytics 4 (GA4).
However, Google discontinued its UA version and replaced it with Google Analytics 4 on July 1, 2023.
In this section, we will show you how to track WooCommerce conversions in GA4 with step-by-step instructions below:
Step 1: Find Google Analytics 4 measurement ID
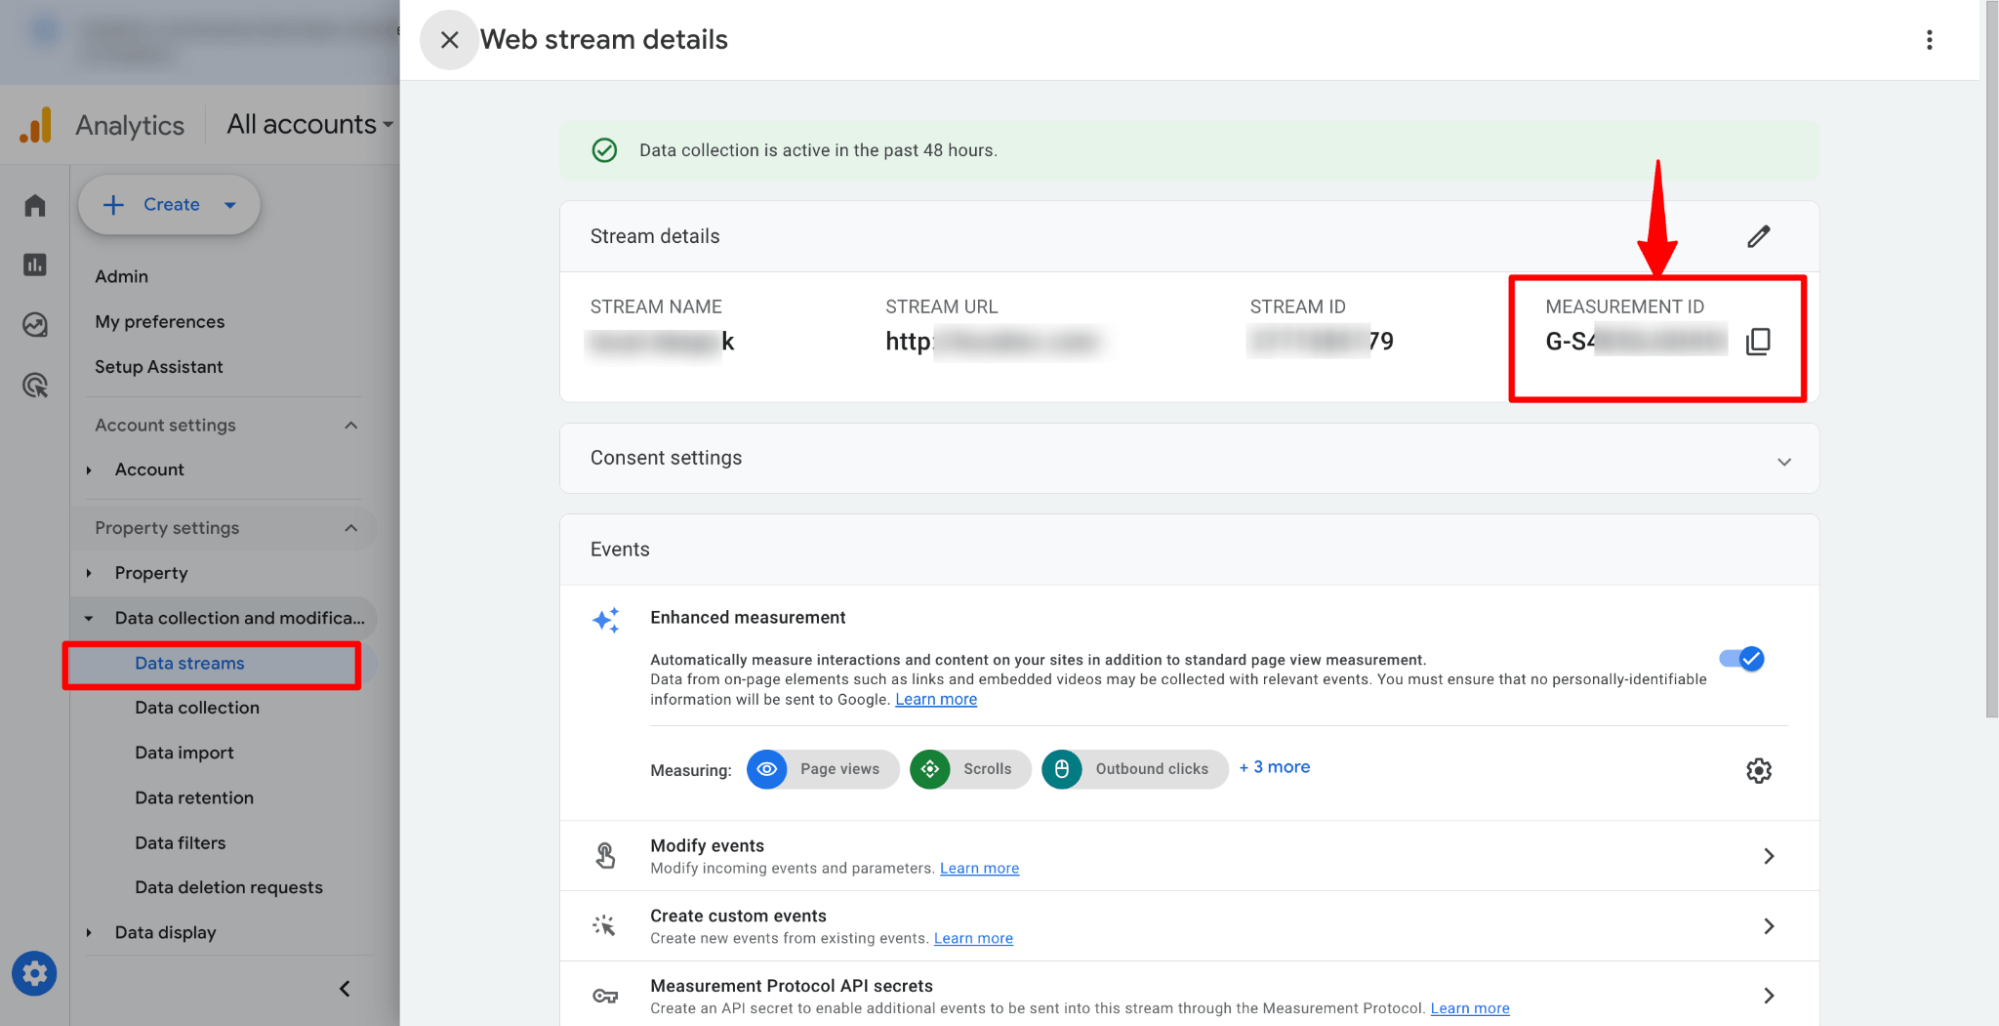
If you have already set the Google Analytics 4 property, navigate to Data Collections and Modifications ⇒ Data Streams.
Then click on the web stream and copy the “Measurement ID”.
Step 2: Add the Google Analytics 4 ID to WooCommerce
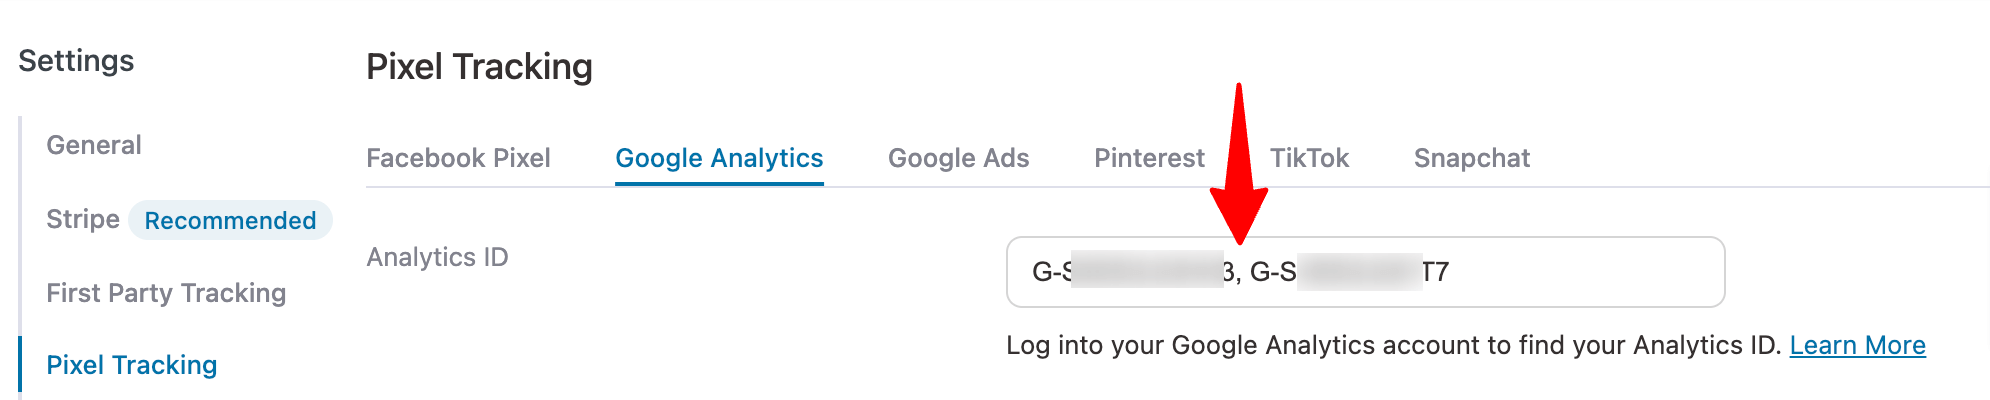
To connect to WooCommerce and the Analytics property, navigate to FunnelKit ⇒ Settings ⇒ Pixel Tracking.
Then, switch to the Google Analytics tab and paste the copied measurement ID into the field “Analytics ID.”
You can add multiple Google Analytics 4 IDs by separating them with a comma.
Step 3: Enable the WooCommerce conversion events you want to track
Here, you can enable the events you want to track on your WooCommerce store.
Here are the events you can track:
- Site-wide events: Here, you can enable Page View, Add to Cart, and View Item
- Sales Page events: Enable page view events
- Optin page events: Enable Page View and Lead events.
- Order Bump events: Enable Add to Cart and conversion event for add to cart.
- Checkout events: Enable page view, add to cart, begin checkout, and add payment info event.
- Purchase events: Enable page View and purchase event.
- Track Steps: Here, you can track different steps of any custom funnel you create with FunnelKit Funnel Builder.
You can also enable the advanced fields if you want.
After checking the events you want to track, hit Save to update the settings.
Now, you can track different customer activity and conversions on your WooCommerce store and send the data to Google Analytics.
Step 4: Test WooCommerce conversion tracking with Google Analytics
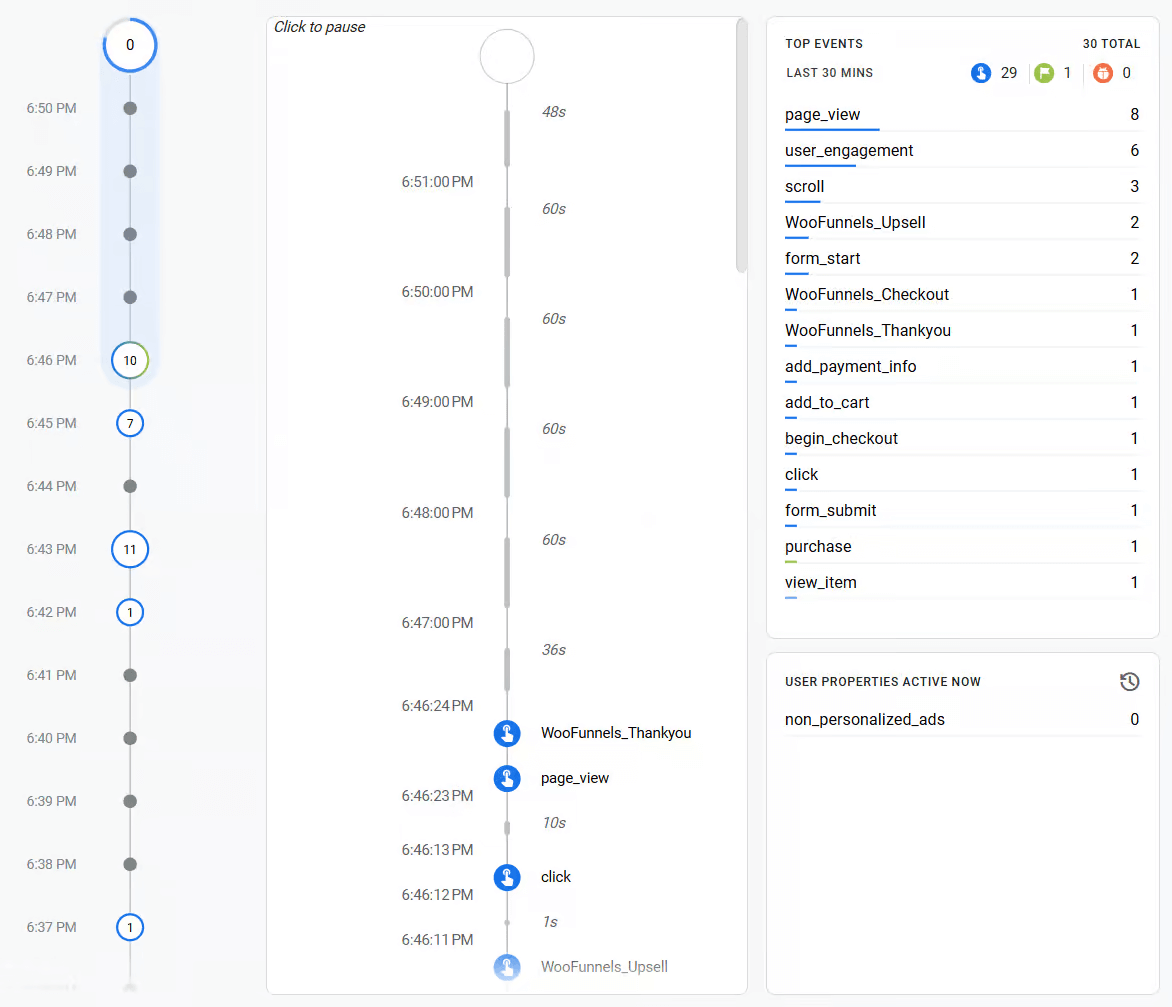
You can use two methods to test whether the conversion tracking is working correctly: Google Tag Assistant and Google Analytics debug mode.
- Using Google Tag Assistant
To do this, go to Google Tag Assistant, add the domain for which you added the Google Analytics ID, and hit connect.
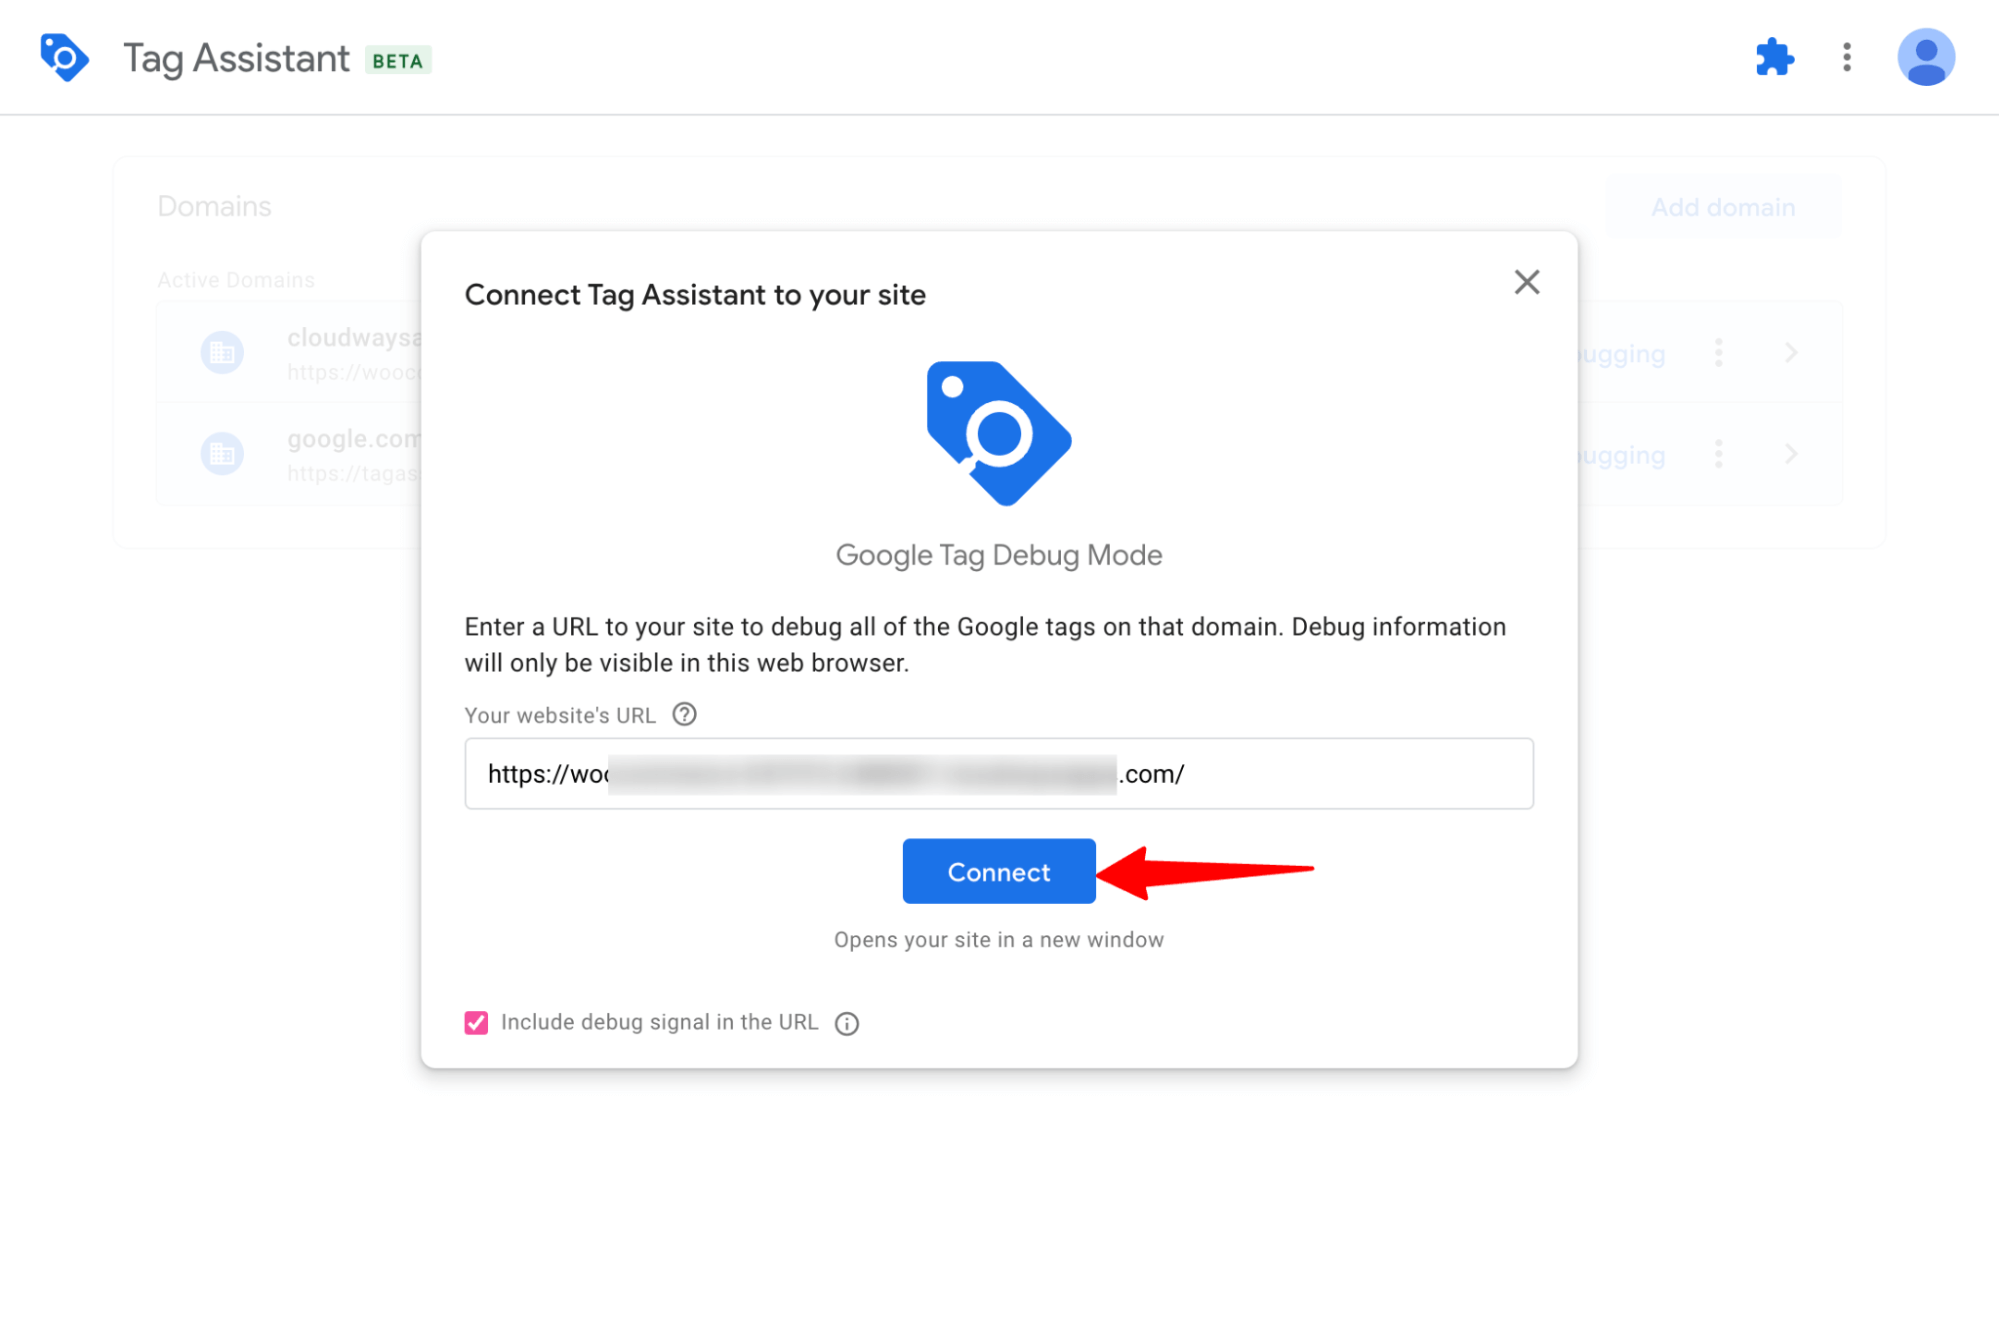
Once connected, any action you take on the connected store will appear here on the tag assistant dashboard.

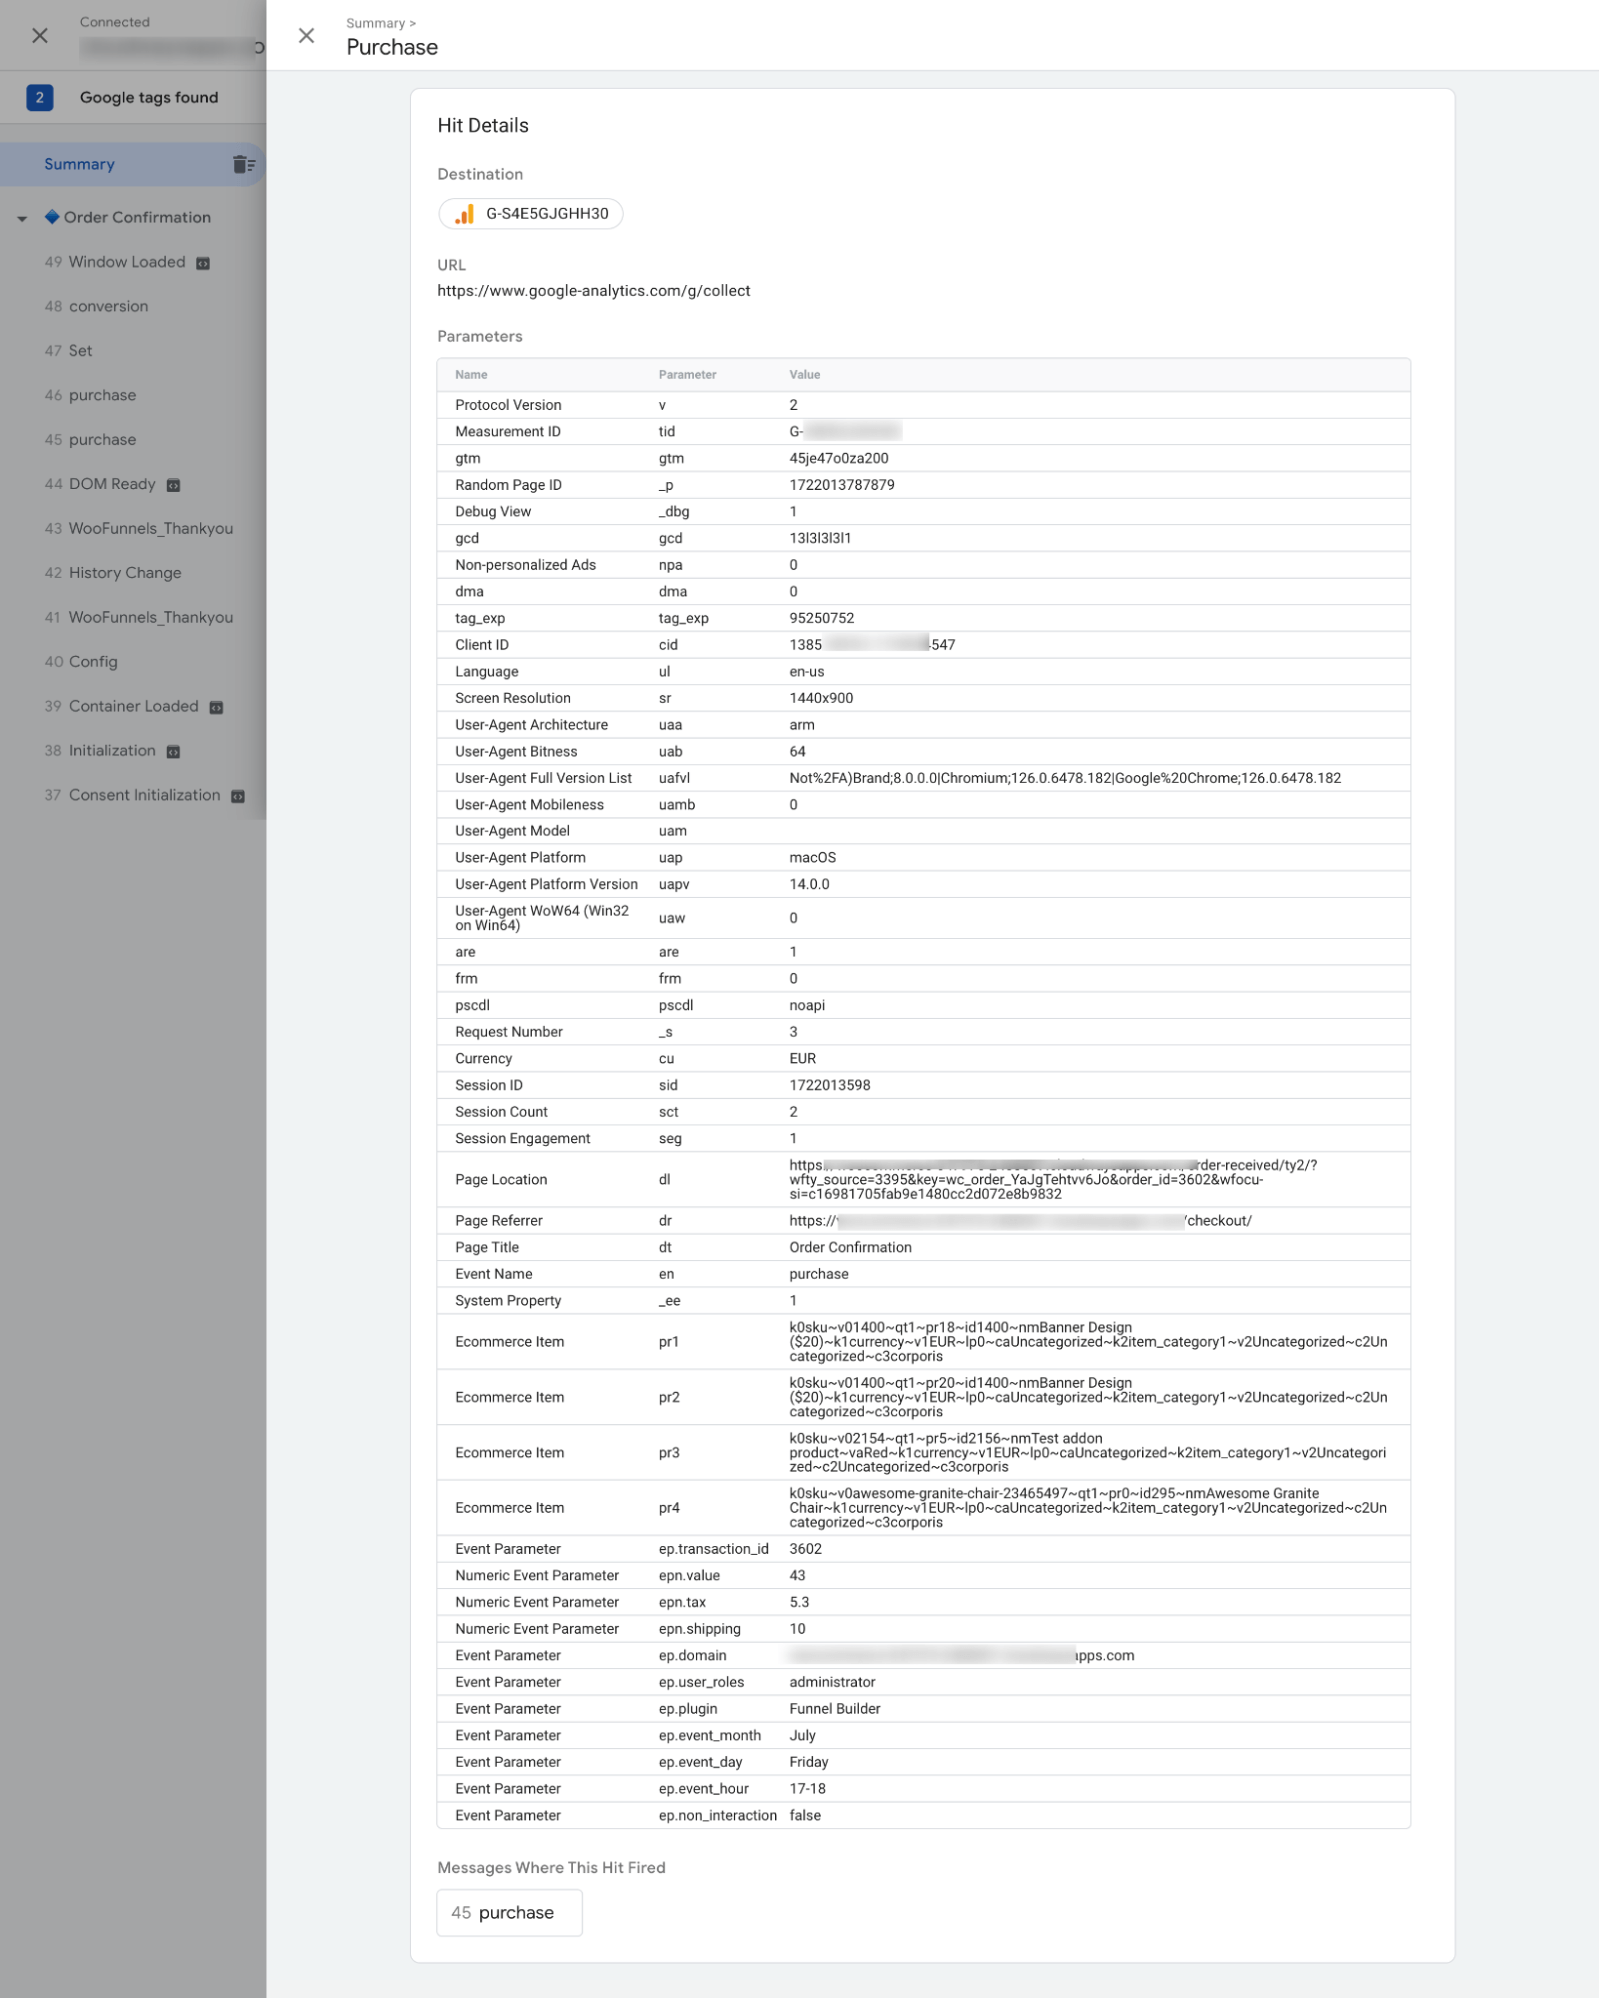
You can click any event to see more details.
Here are the details of the purchase event:
- Using the “Debug view” of Google Analytics
To see what actions are triggering in real time, go to the DebugView inside Google Analytics.
It'll show all events triggered on your website by your users' activities in a timeline.
If all the actions you are taking are being captured, then you can be assured that WooCommerce conversion tracking is working and data is being sent to Google Analytics successfully.
Method 2: Set Up Google Ads Conversion Tracking in WooCommerce
Google Ads is one of the most popular marketing tools for promoting your brand and driving traffic to your WooCommerce store, ultimately leading to conversions.
It enables smart bidding strategies such as Target CPA and Maximize Conversions, providing accurate return-on-ad-spend measurement for your campaigns.
Here are the steps you need to follow to track WooCommerce conversions with Google Ads.
Step 1: Create a conversion action
First, you need to set up the conversion actions. You can set different conversion goals, like page view, lead form submission, subscribe, request quote, add to cart, begin checkout, purchase, etc.
To do this, sign in to Google Ads, then go to Goals ⇒ Conversions ⇒ Summary.
Now, hit 'Add a conversion action manually' and set up the event. For example, here we are setting up the purchase event.
Set up all the events you want to track.
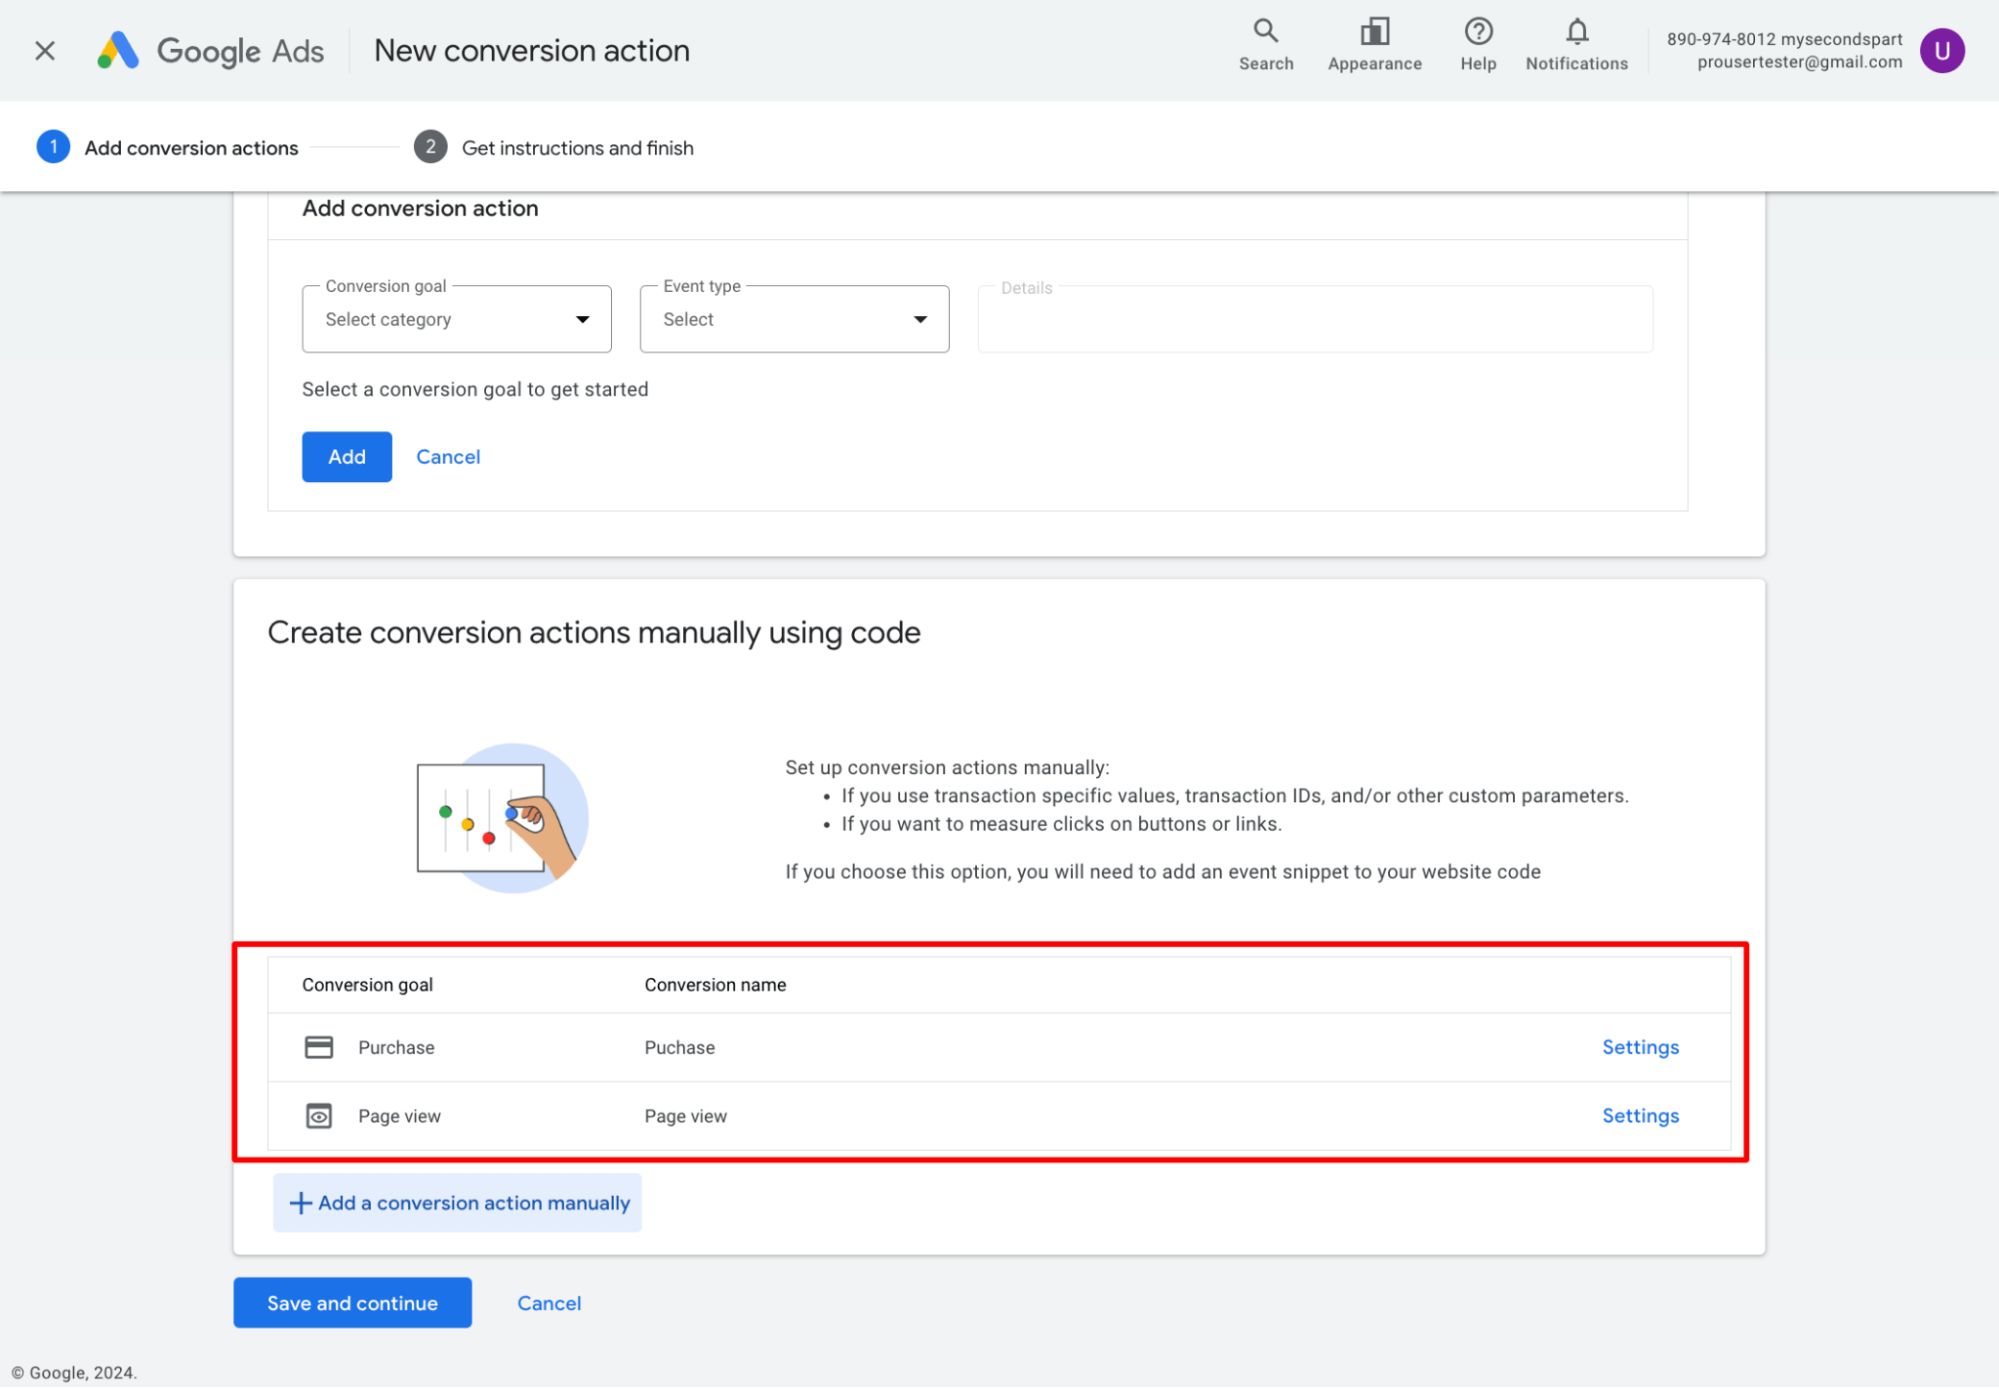
Hit “Save and continue” to add the actions.
Step 2: Copy the conversion ID and label
For each action, we need to add a tag on the WooCommerce site. To automatically add the tags, we will need FunnelKit Funnel Builder.
To do this, we need to add the conversion ID and label in FunnelKit.
But first, you need to copy these values. For this, hit “See Event Snippet”.
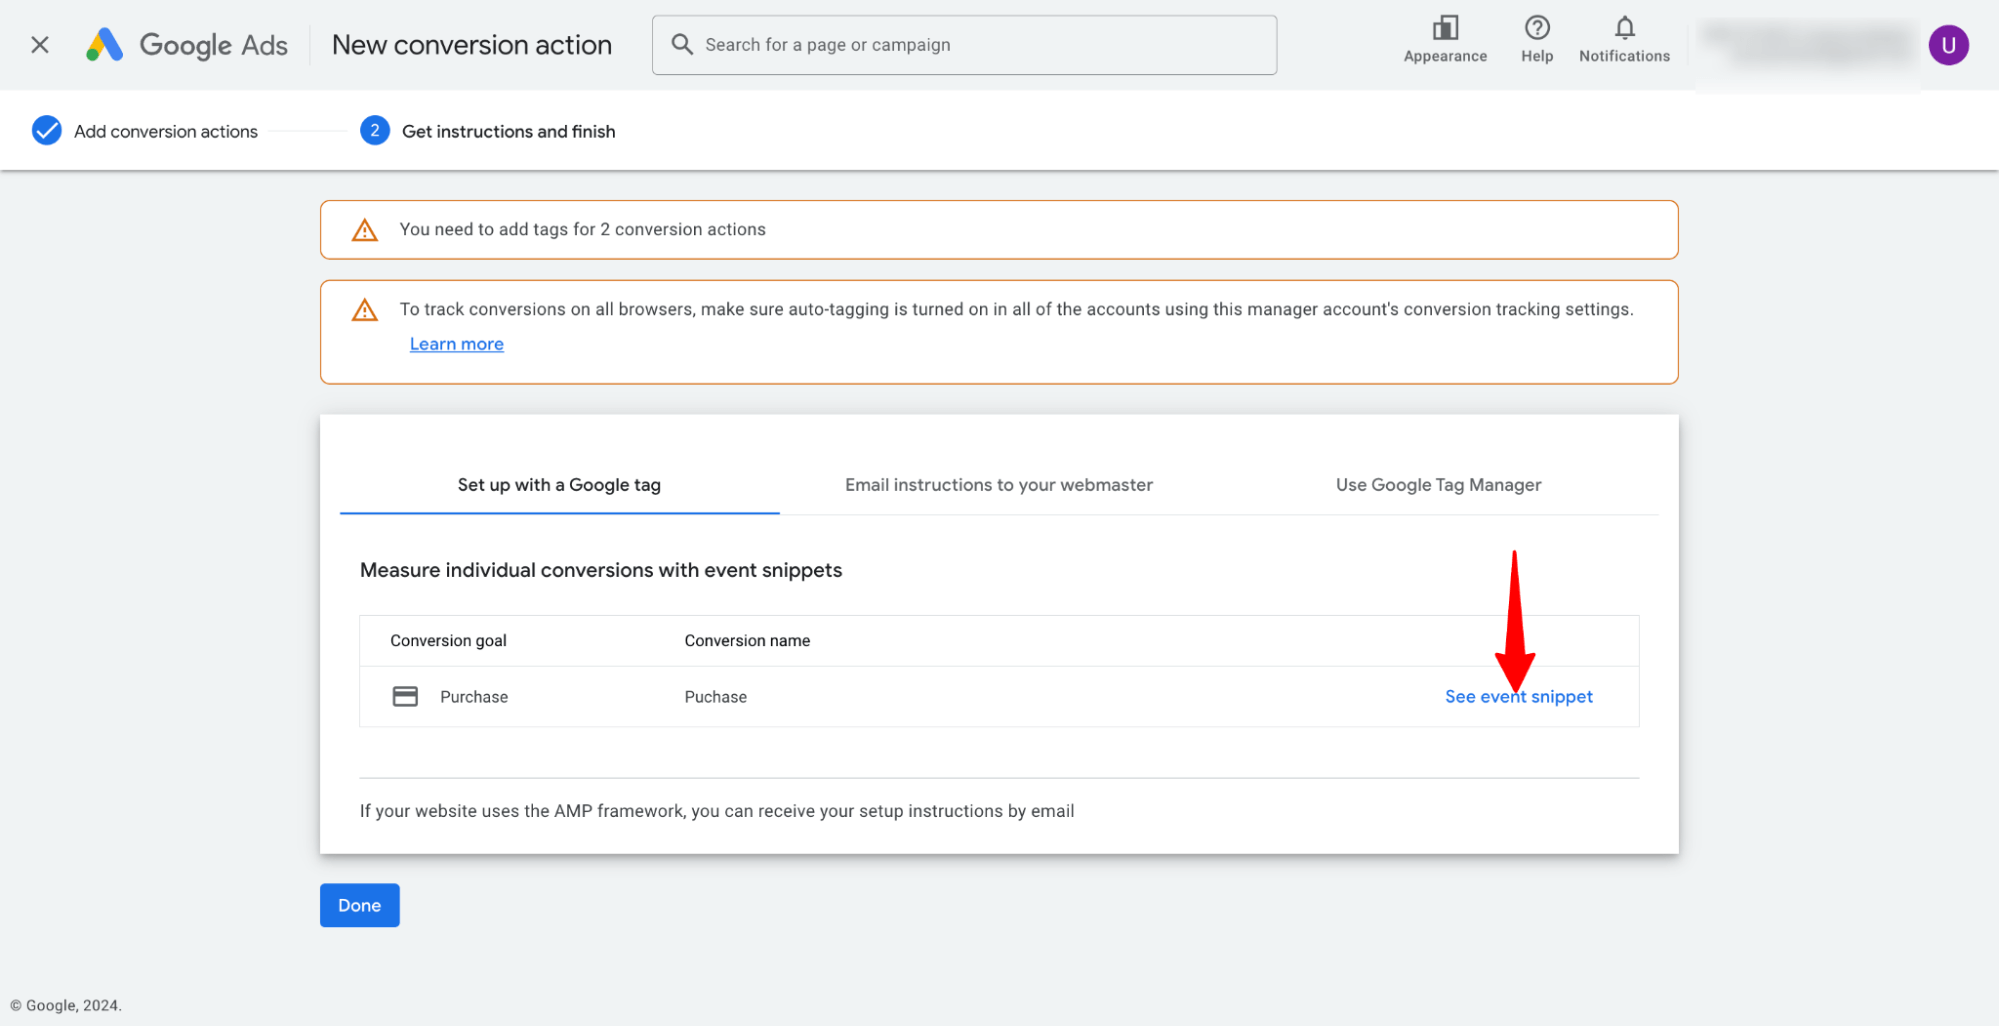
You can find the conversion ID and label in the ‘send to’ option, divided by ‘/’.
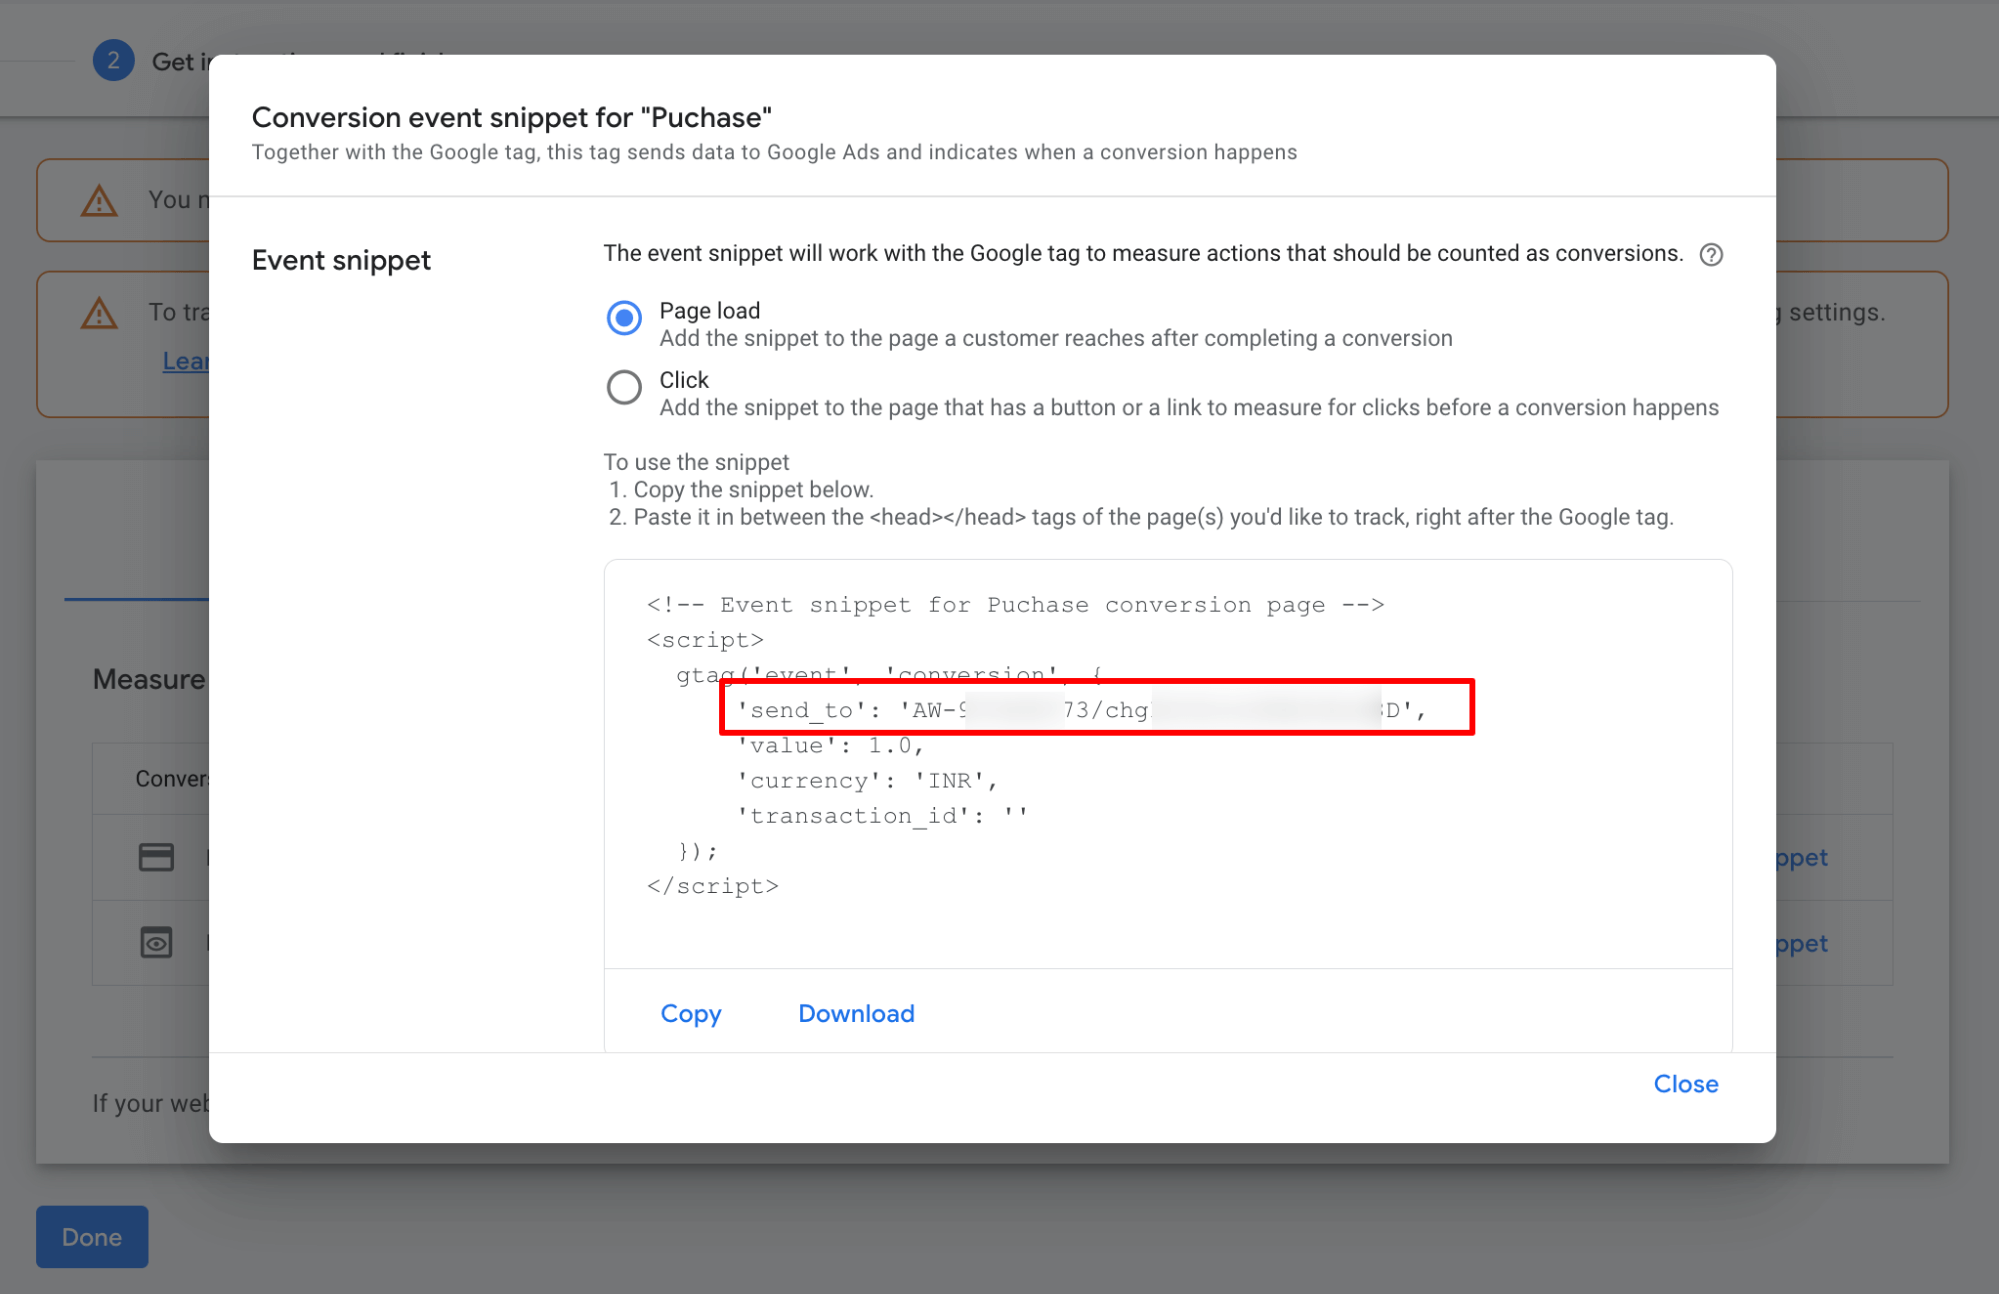
Copy these values.
Step 3: Add the Google Ads conversion ID and label to WooCommerce
Navigate to FunnelKit ⇒ Settings ⇒ Pixel Tracking.
Under the Google Ads tab, paste the copied Conversion ID and Conversion Label.
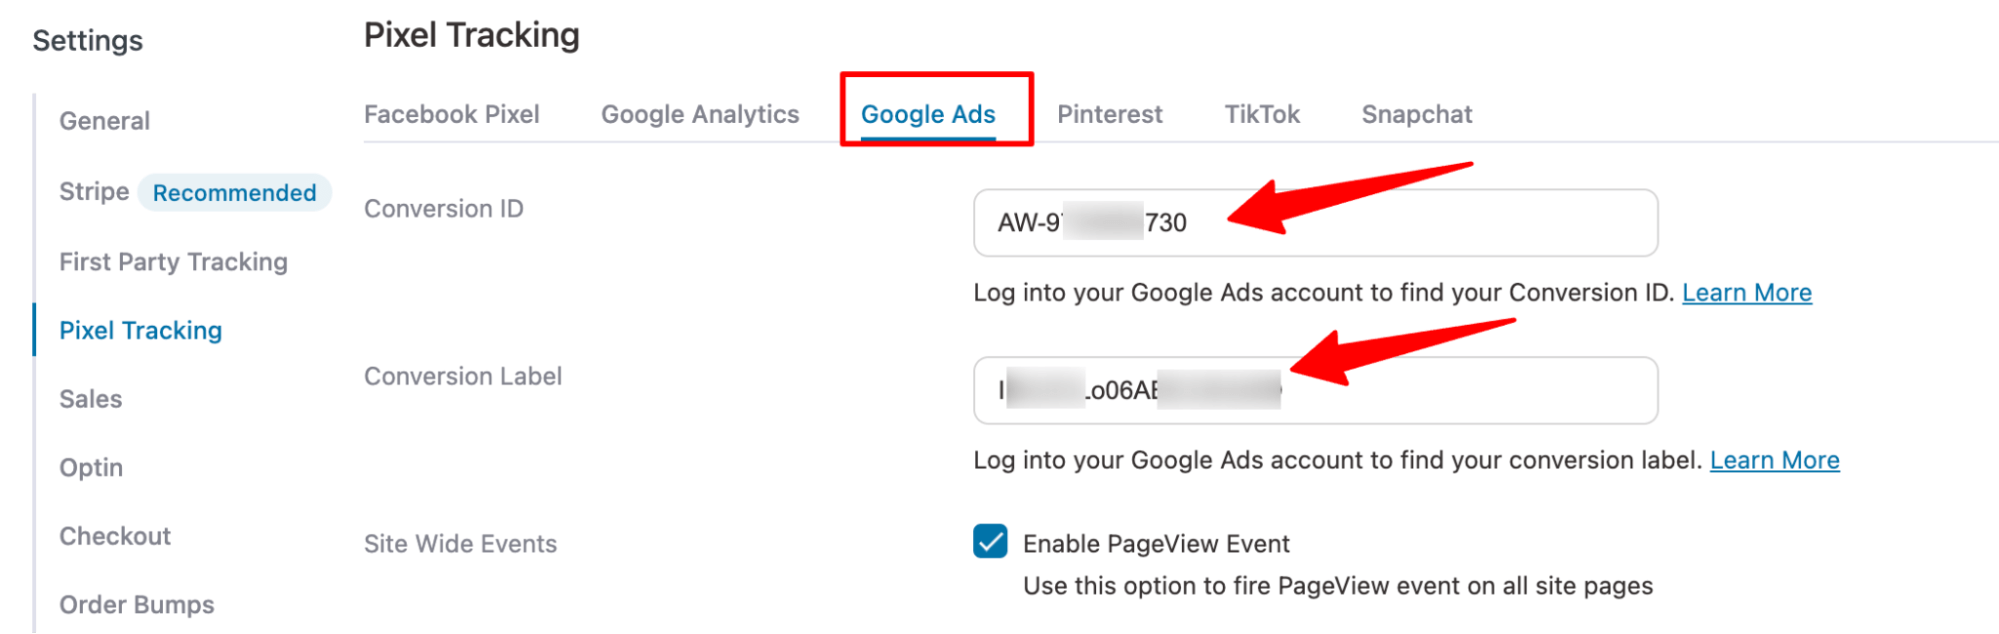
Step 4: Enable the WooCommerce events you want to track
Here are the events you can track
- Site-wide events: Here, you can enable Page View, Add to Cart, and View Item
- Sales Page events: Enable page view events
- Optin page events: Enable Page View and Lead events.
- Order Bump events: Enable Add to Cart and conversion event for add to cart.
- Checkout events: Enable page view, add to cart, begin checkout, and add payment info event.
- Purchase events: Enable page View and purchase event.
- Track Steps: Here, you can track different steps of any custom funnel you create with FunnelKit Funnel Builder.
Click on ‘Save’ once done.
Step 5: Test WooCommerce conversion tracking with Google Ads
Test if the conversion tracking is working with Google Ads.
Navigate to Google Tag Assistant, add the domain for which you added the Google Analytics ID and hit connect.
After connecting, interact with your store; for example, add a product and place an order.
As you take the actions, you can see them under the summary in the Google Ads tab of Tag Assistant.
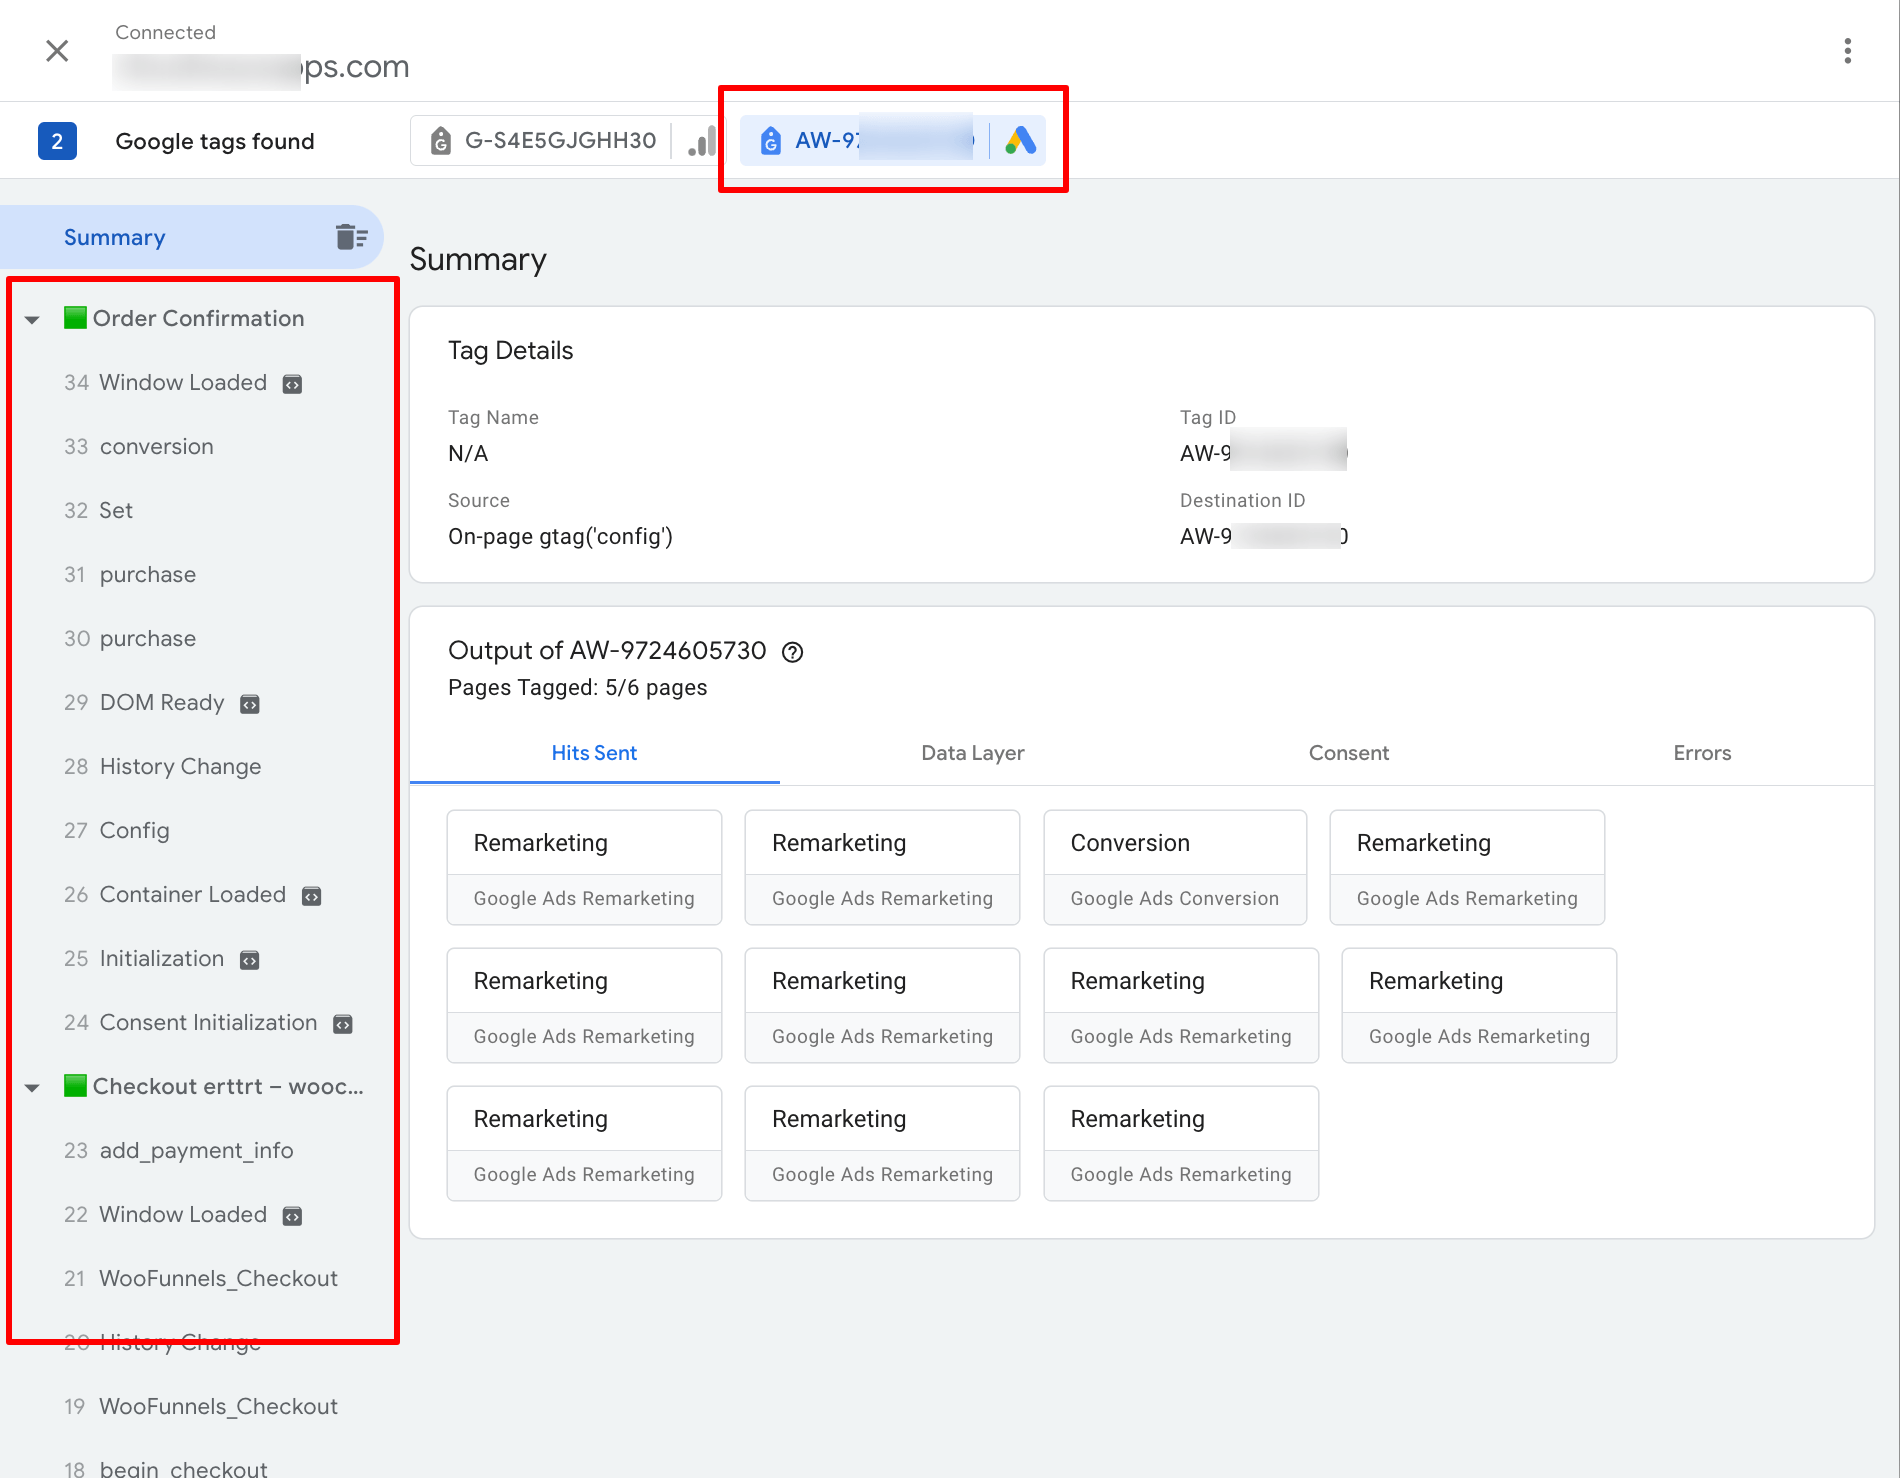
You can click on any of the fired events to learn more details. Here is an example of the purchase event.
Notice in the data how this information comes from the FunnelKit Funnel Builder.
Note: The event is triggered after you land on the thank you page, so you will find it under the order confirmation section in Summary.
Method 3: Track WooCommerce Conversions With Facebook (Meta) Pixel
Meta Pixel tracks user behavior for Facebook and Instagram advertising. In 2026, you must implement both browser-side pixel and server-side Conversions API for accurate tracking.
iOS 14.5 introduced App Tracking Transparency, and approximately 85% of users opt out of tracking. Browser-only pixel tracking misses these conversions. Conversions API sends data server-side, bypassing browser restrictions.
Here are the steps to enable WooCommerce conversion tracking with the Meta Pixel.
Step 1: Create your Meta Pixel
Log in to Facebook Business Suite and create the Meta pixel. You can connect your website to Facebook Pixel in two ways:
- Conversions API and Meta Pixel
- Meta Pixel
Our experts recommend using “Conversions API and Meta Pixel”.
Once done, your Facebook (Meta) Pixel ID will be created.
To learn about the whole process, watch this video 👇
After completing the process of creating a Facebook Pixel, go to the 'Settings' tab on your Pixel dashboard and copy the ‘Facebook Pixel ID’.
Step 2: Add the Facebook Pixel ID to WooCommerce
Now go to the Pixel Settings option of FunnelKit Funnel Builder, and on the Facebook Pixel tab, add the copied ID to the “Pixel ID” field.
Step 3: Enable Conversions API
Next, check the box next to ‘Enable Conversion API’.
You’ll need to paste the Conversions API access token.
To do so, go to the “Settings” tab on your Facebook Pixel Dashboard.
Then, scroll down below and click on the “Generate access token” link.
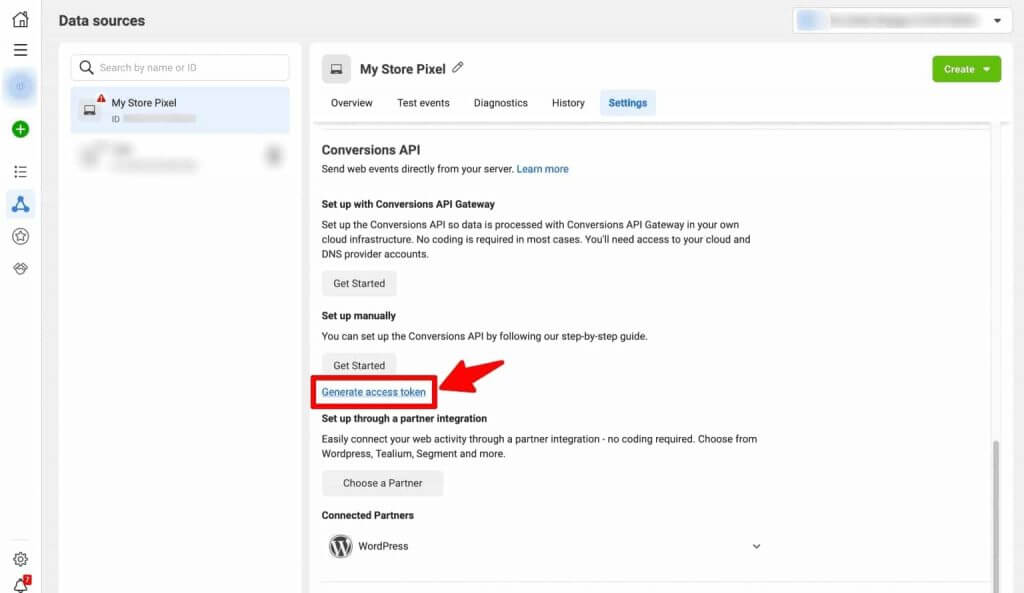
Copy the access token here.
Paste the access token into the FunnelKit Funnel Builder settings.
Now that the Facebook Pixel integration with WooCommerce is complete, it is time to decide which information you want to track.
Step 4: Enable the WooCommerce events you want to track
Now, enable the events you want to track. Here are the options you get:
- Site Wide Events: Enable Page View, Add to Cart, and View Item
- Sales Page Event: Check the Page View event.
- Optin Page Events: Enable Page View and Lead event
- Checkout Events: Check the options Page View and Add to Cart
- Order Bump Events: Check the options, Add to Cart, and Order bump conversion.
- Purchase Events: Make sure to check the purchase events Page View and Conversion.
You can also enable options to track custom funnel step events.
Make sure to hit the ‘Save Changes’ button when you’re done.
Step 5: Test WooCommerce conversion tracking with Facebook Pixel
To test if Facebook Pixel is receiving conversion data from your WooCommerce store, you can use two methods: testing browser events and testing server events.
- Testing browser events
To test browser events, install the Google Chrome extension Meta Pixel Helper.
After that, interact with your WooCommerce store and check that events fire accurately.
For instace, if you add the product to the cart and go to the checkout page, you will see events such as AddToCart, InitiateCheckout, Pageview, etc., being fired.
If you can see relevant events firing, you can be assured that the Facebook pixel WooCommerce conversion is working properly.
- Testing the server events
To test server events, enable "Test server events via test_event_code" under Facebook Pixel.
Then, go to the 'Test Events' tab, copy the test code, and paste it into the FunnelKit Funnel Builder settings.
Enable the purchase event logs to test whether the server-side events are working properly.
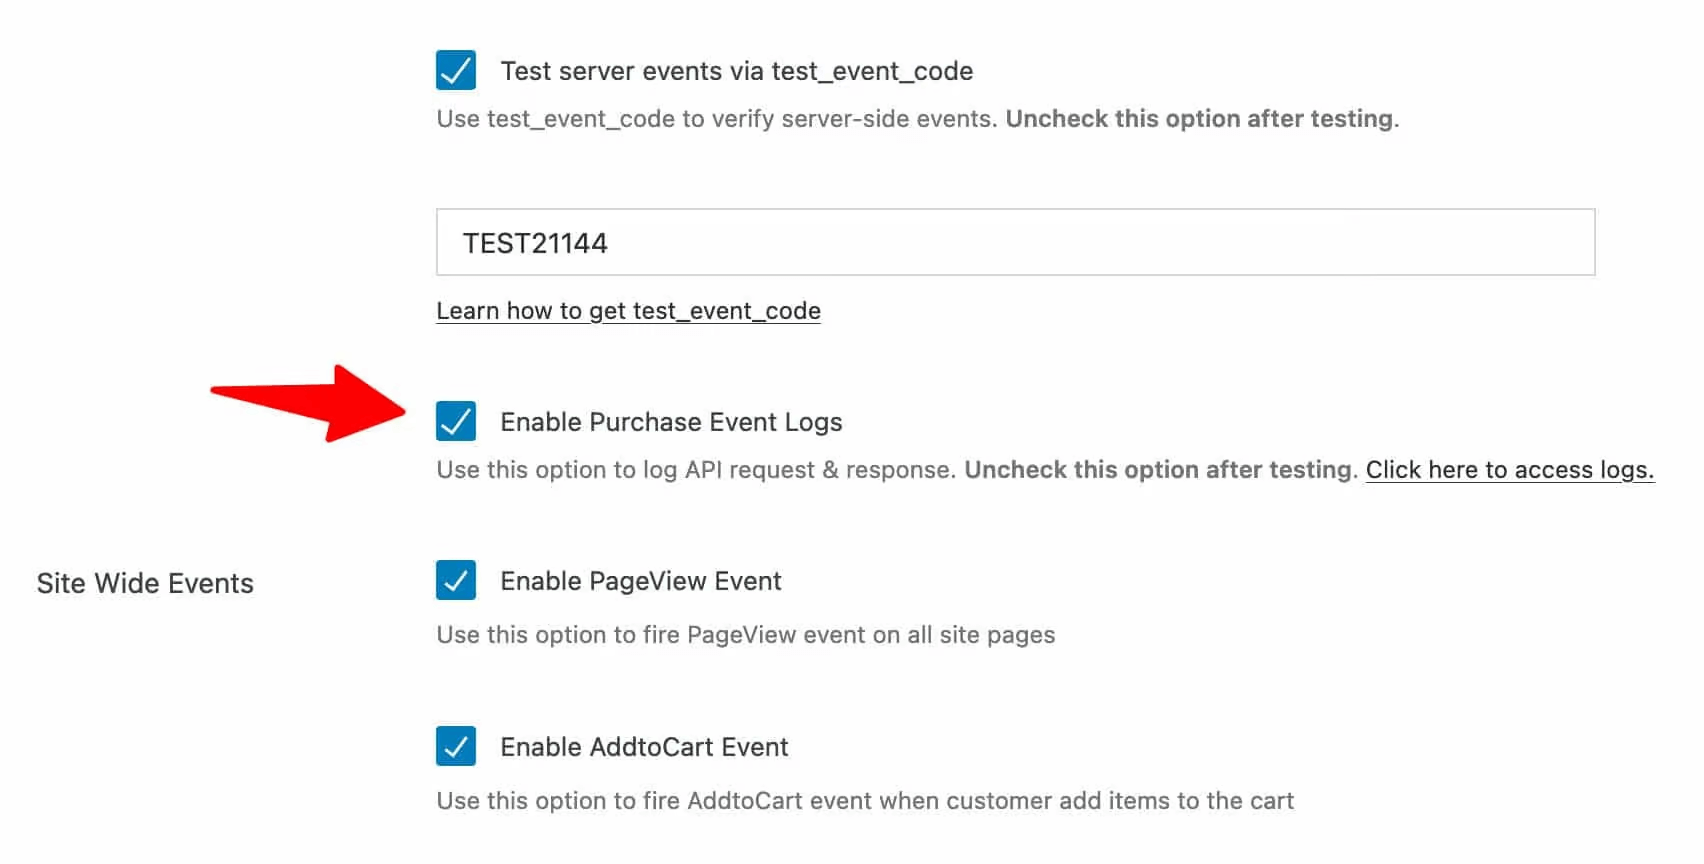
Now, go to your website to add products to the cart or start the checkout process.
You can view these events under the ‘Test events’ tab on your Pixel dashboard.
If you can see the actions in the events received, you can be assured that data tracking with Facebook pixel is working properly.
Method 4: Set Up UTM Parameter Tracking in WooCommerce
UTM (Urchin Tracking Module) parameters are tags added to the end of a URL to track the performance of online marketing campaigns across different traffic sources and publishing media.
You can track which campaigns/sources are driving traffic to your website.
There are five main UTM parameters:
- utm_source: Used to add the source of the traffic (e.g., Google, Facebook, newsletter).
- utm_medium: Indicate the medium (e.g., organic, CPC, email).
- Utm_campaign: Name of the campaign (e.g., summer_sale, product_launch).
- utm_term: Identifies paid search keywords (used mainly for PPC campaigns).
- utm_content: Differentiates similar links within the same content (e.g., multiple CTAs inside a blog or email).
To create a URL with UTM parameters, append them to your base URL. Start with a “?” for the first parameter and use “&” to separate subsequent parameters.
To track the performance of a Facebook ad campaign promoting a discount or sale, your URL might look like this:
The good news is that with FunnelKit Funnel Builder, you can track campaigns using UTM parameters right from your WooCommerce dashboard.
Follow the steps below.
Note: For UTM tracking to work, create a store checkout using FunnelKit Funnel Builder and ensure it’s activated.
Step 1: Enable first-party tracking
Navigate to FunnelKit ⇒ Settings ⇒ First Party Tracking and check the option “Conversion tracking”.
Step 2: Test the WooCommerce conversion with UTM parameters
Here are some of the ways you can test if WooCommerce UTM tracking is working:
- Placing an order
Now try placing an order with a UTM parameter. Now, if you go to WooCommerce ⇒ Orders, you can find the Source under “Origin”.
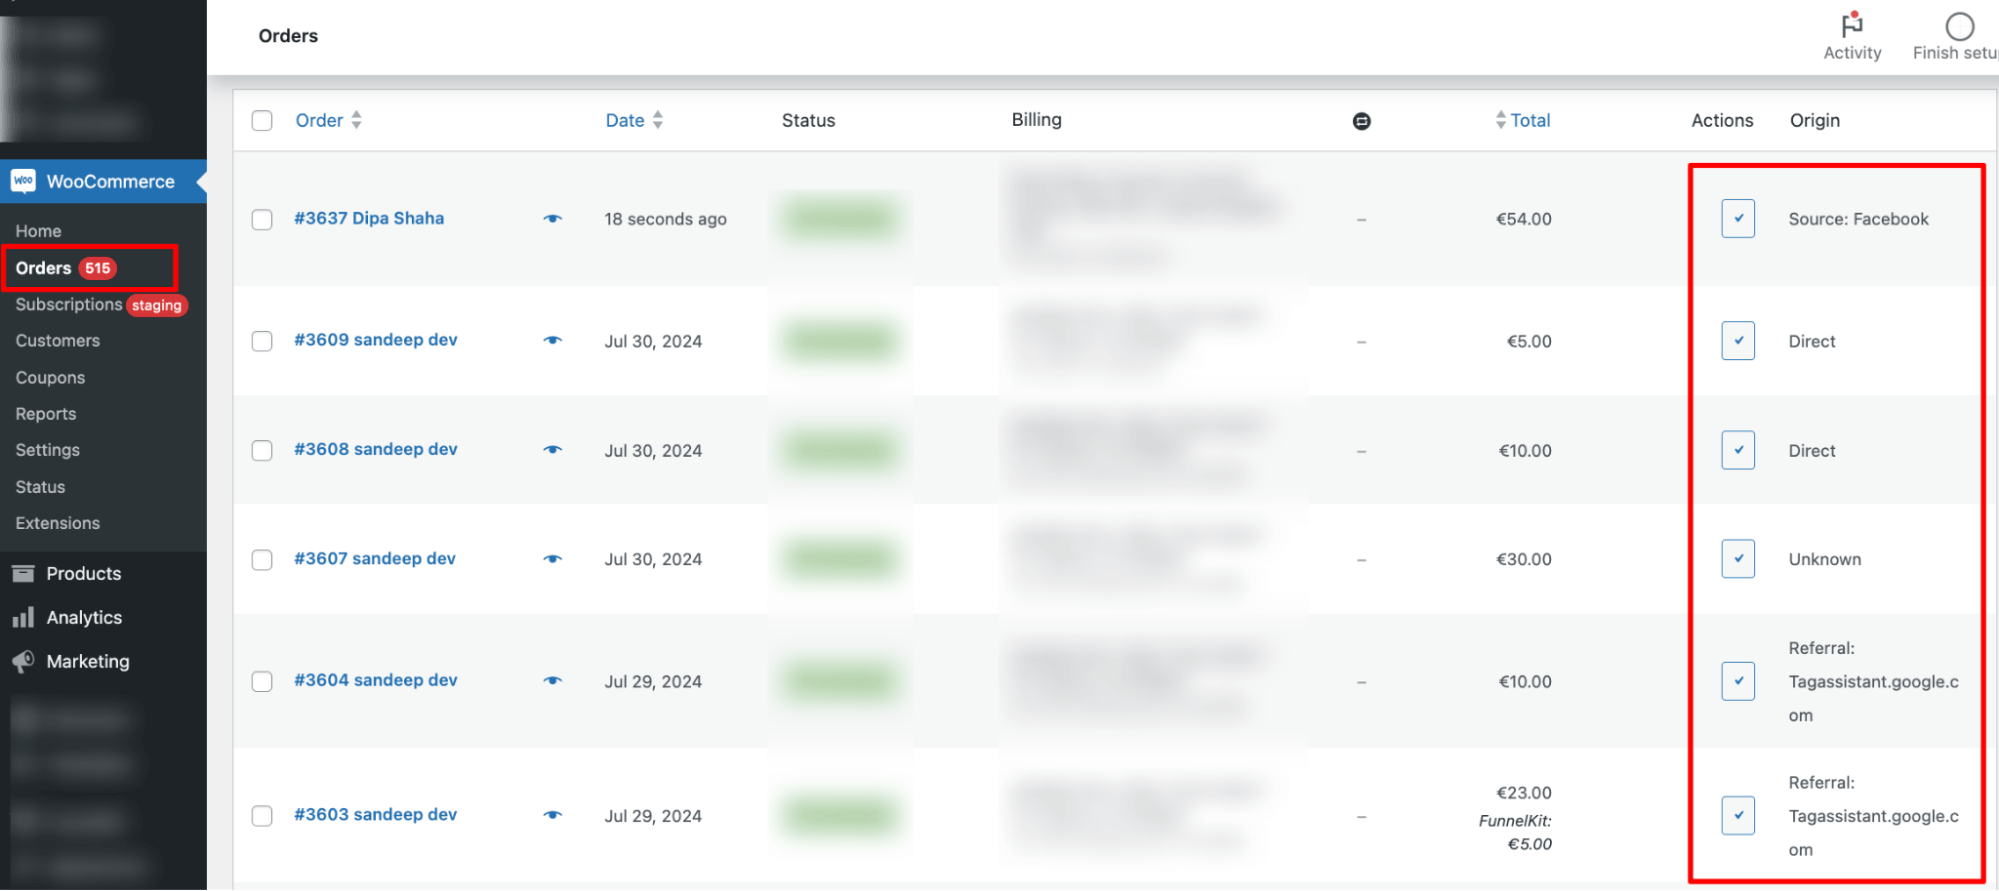
If you view the order details under order status, you will find a new section called “Conversion Tracking”.
Here, you can find all the UTM data related to that specific order, like source, medium, campaign, content, etc.
This was about conversion tracking with UTM for a simple product. But you need data for all the orders to get meaningful insights.
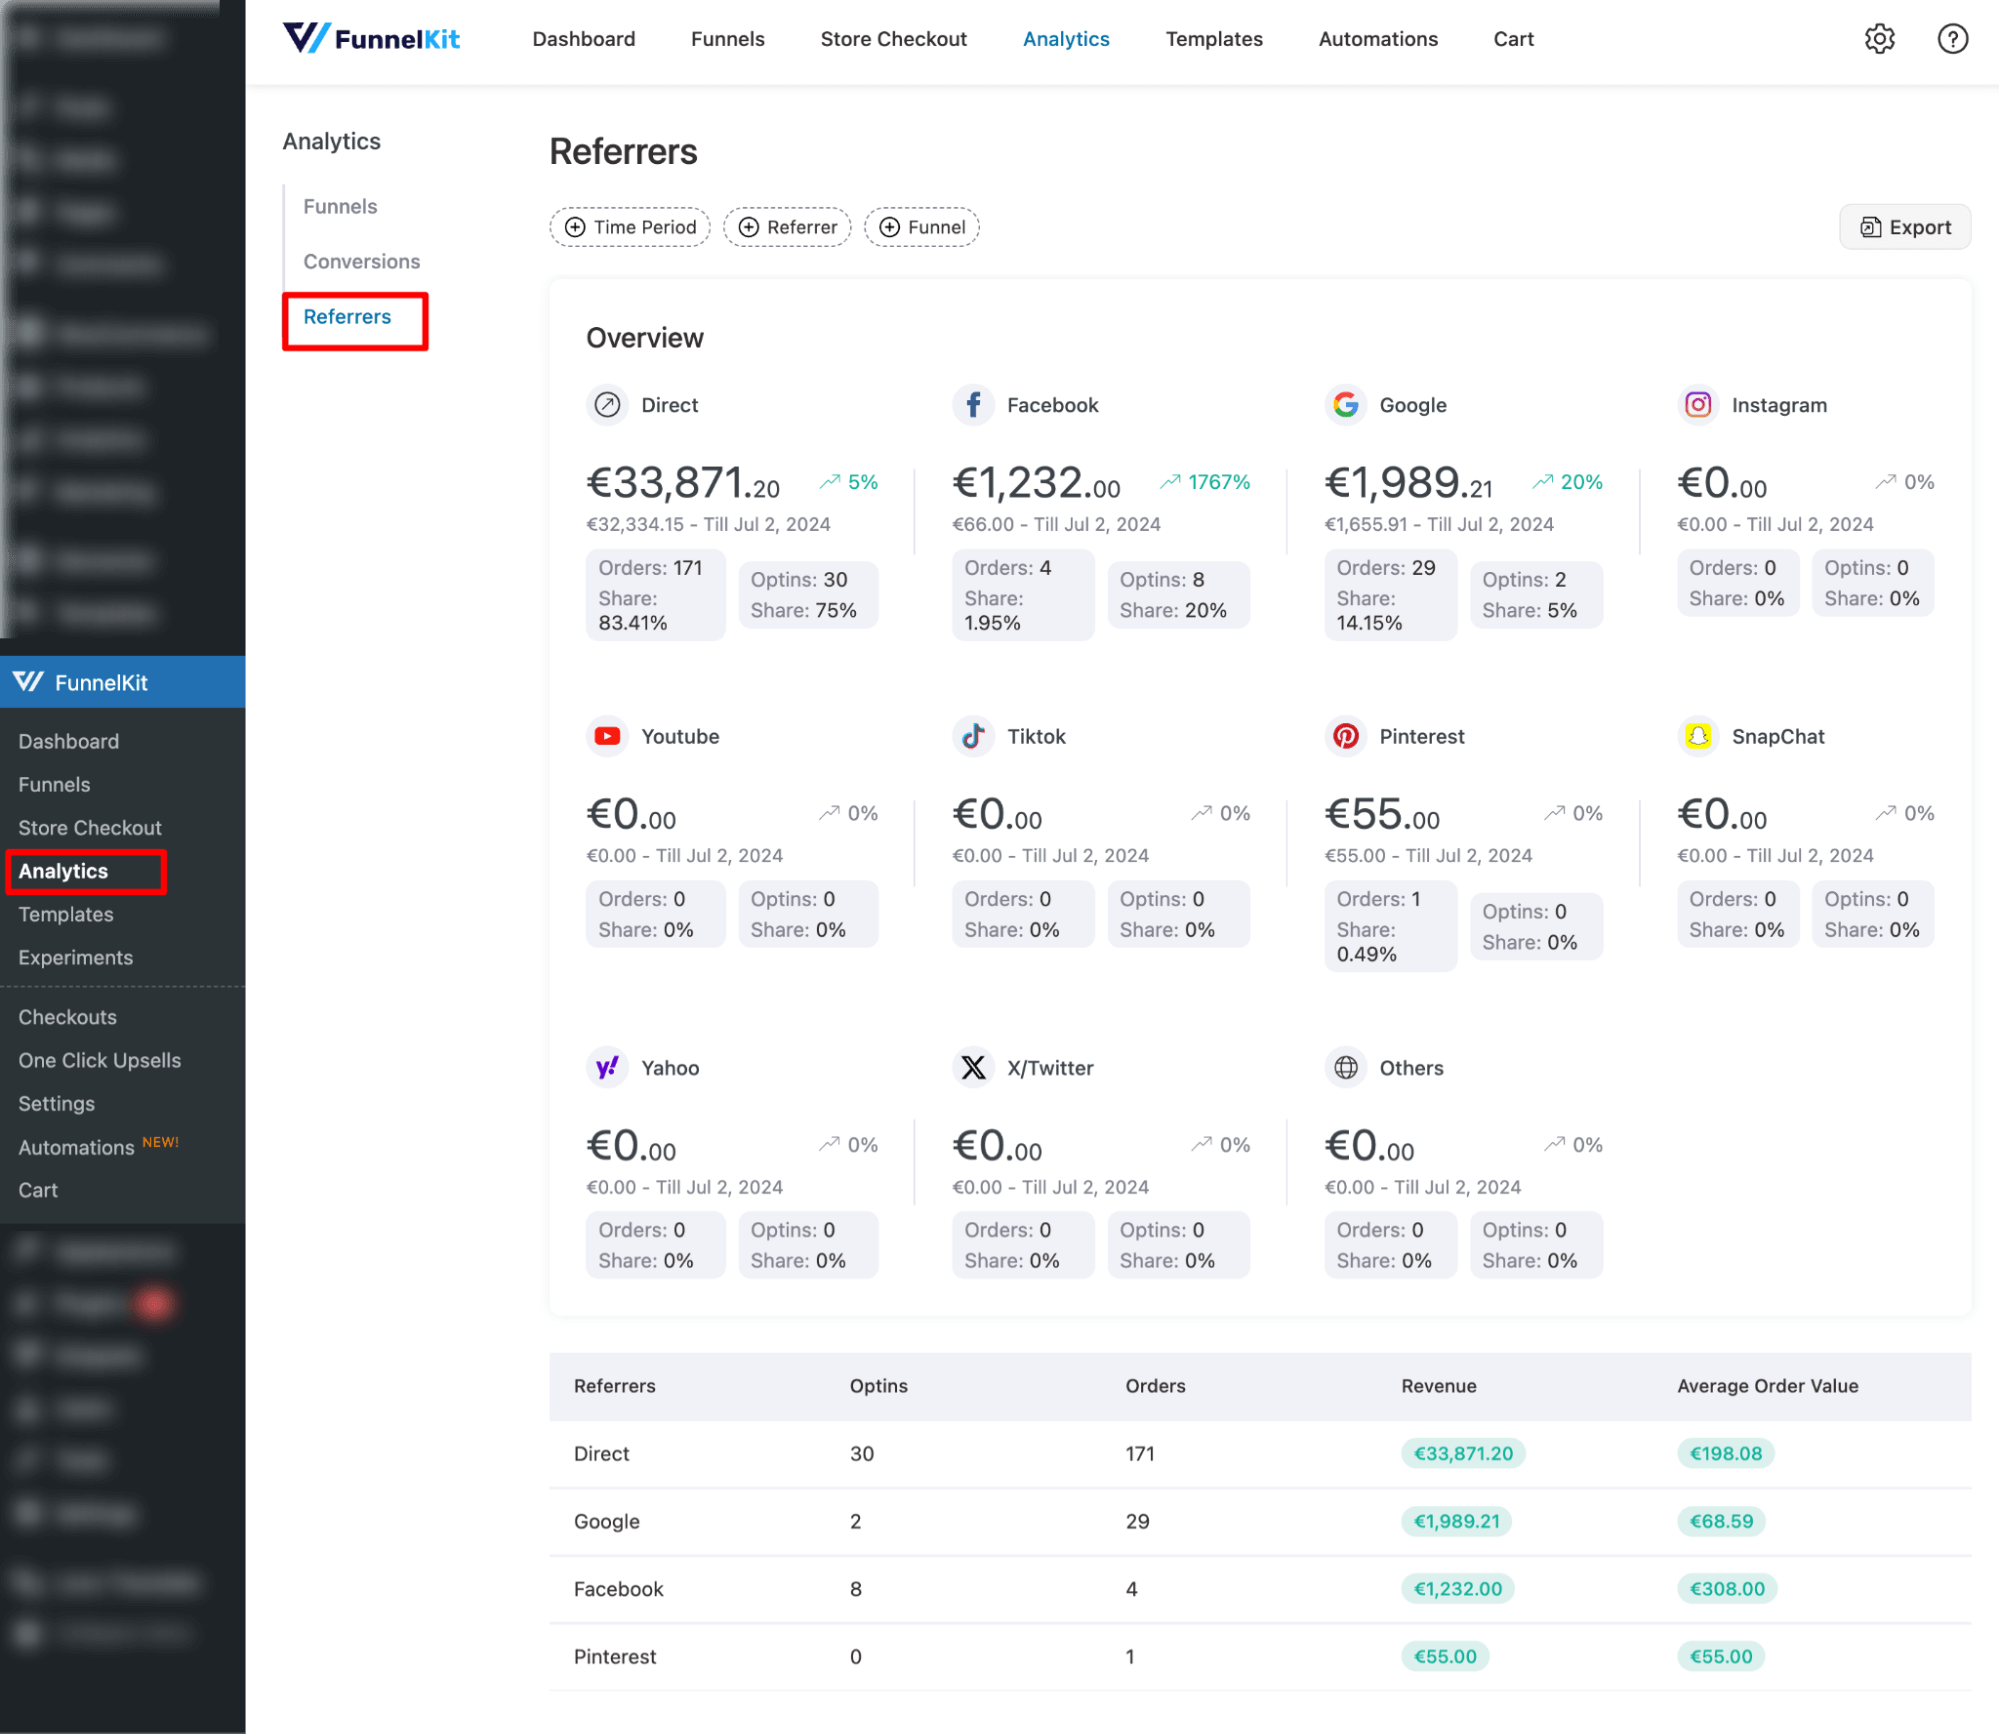
Well, you can do that with FunnelKit's Referrers option.
- Check if the referrer's data is working
Go to Analytics and click on the 'Referrers' tab. Find the number of orders and optin sign-ups from different traffic sources. You will also find the revenue and average order value.
- Check conversion with UTM filters
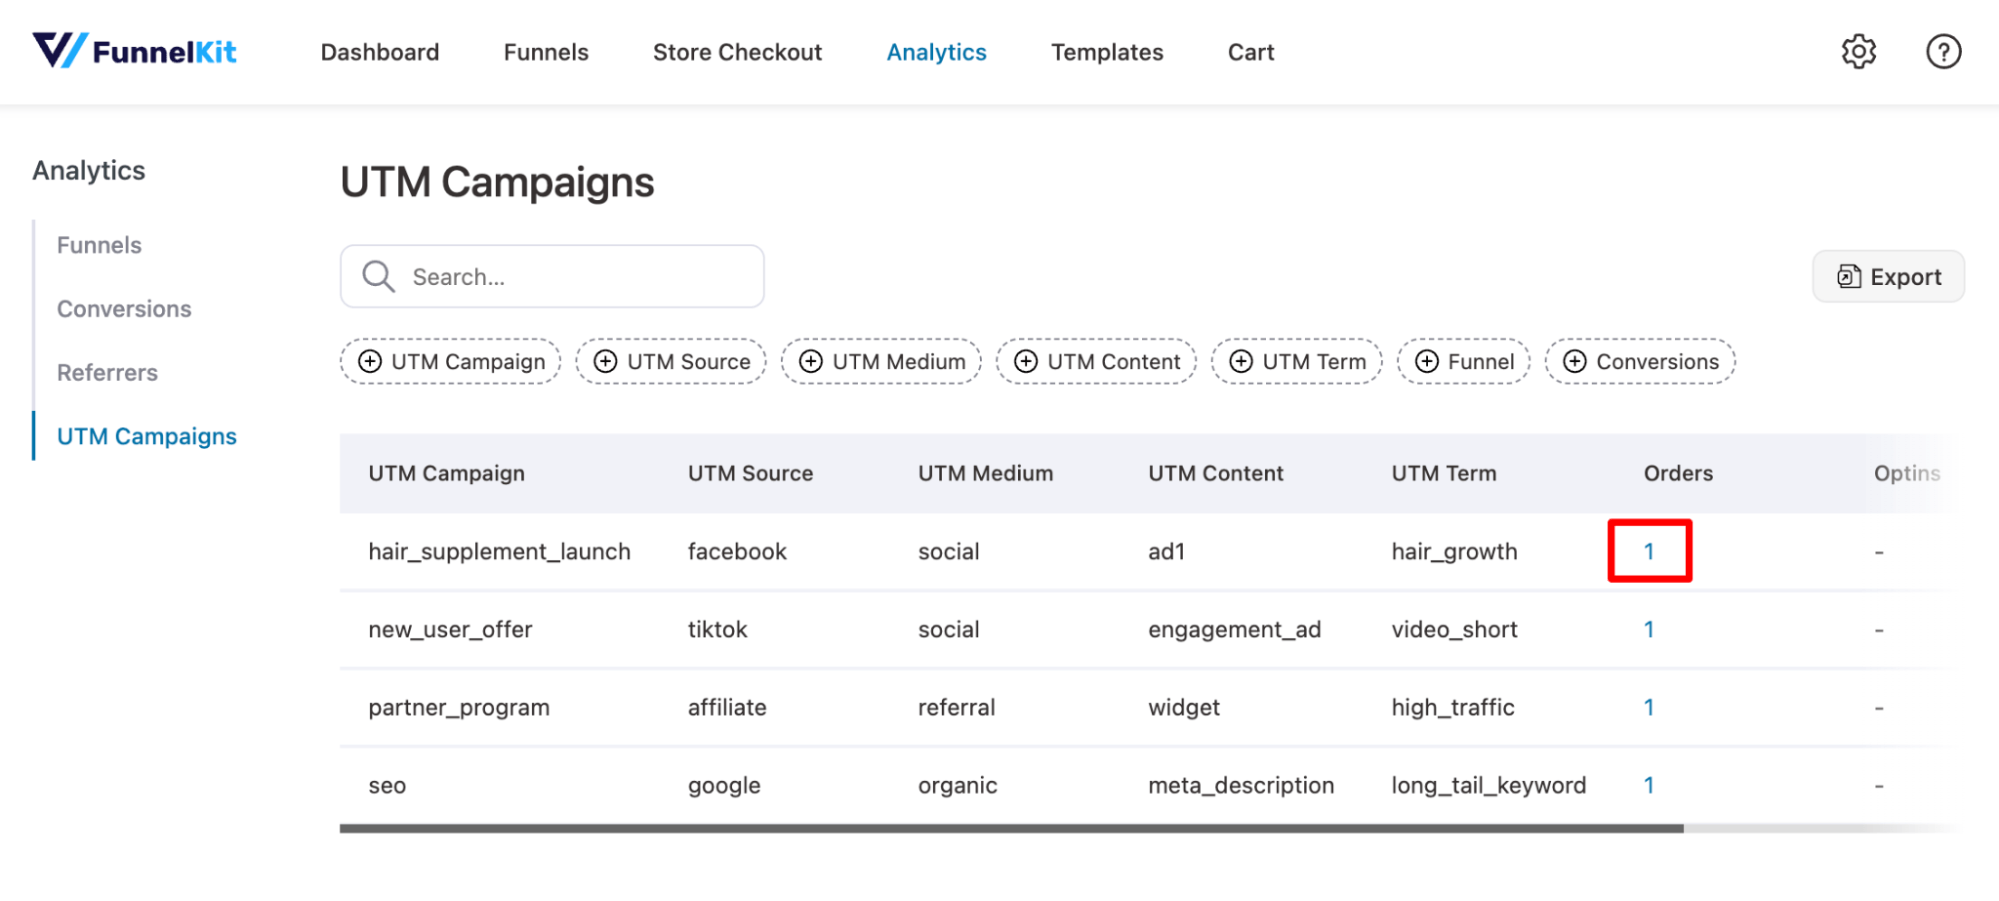
To track all your store's orders using the UTM parameter, navigate to Analytics and on to the UTM Campaigns tab.
Here, you will find a list of the UTM campaigns, along with the source, medium, content, term, orders, opt-ins, and revenue.
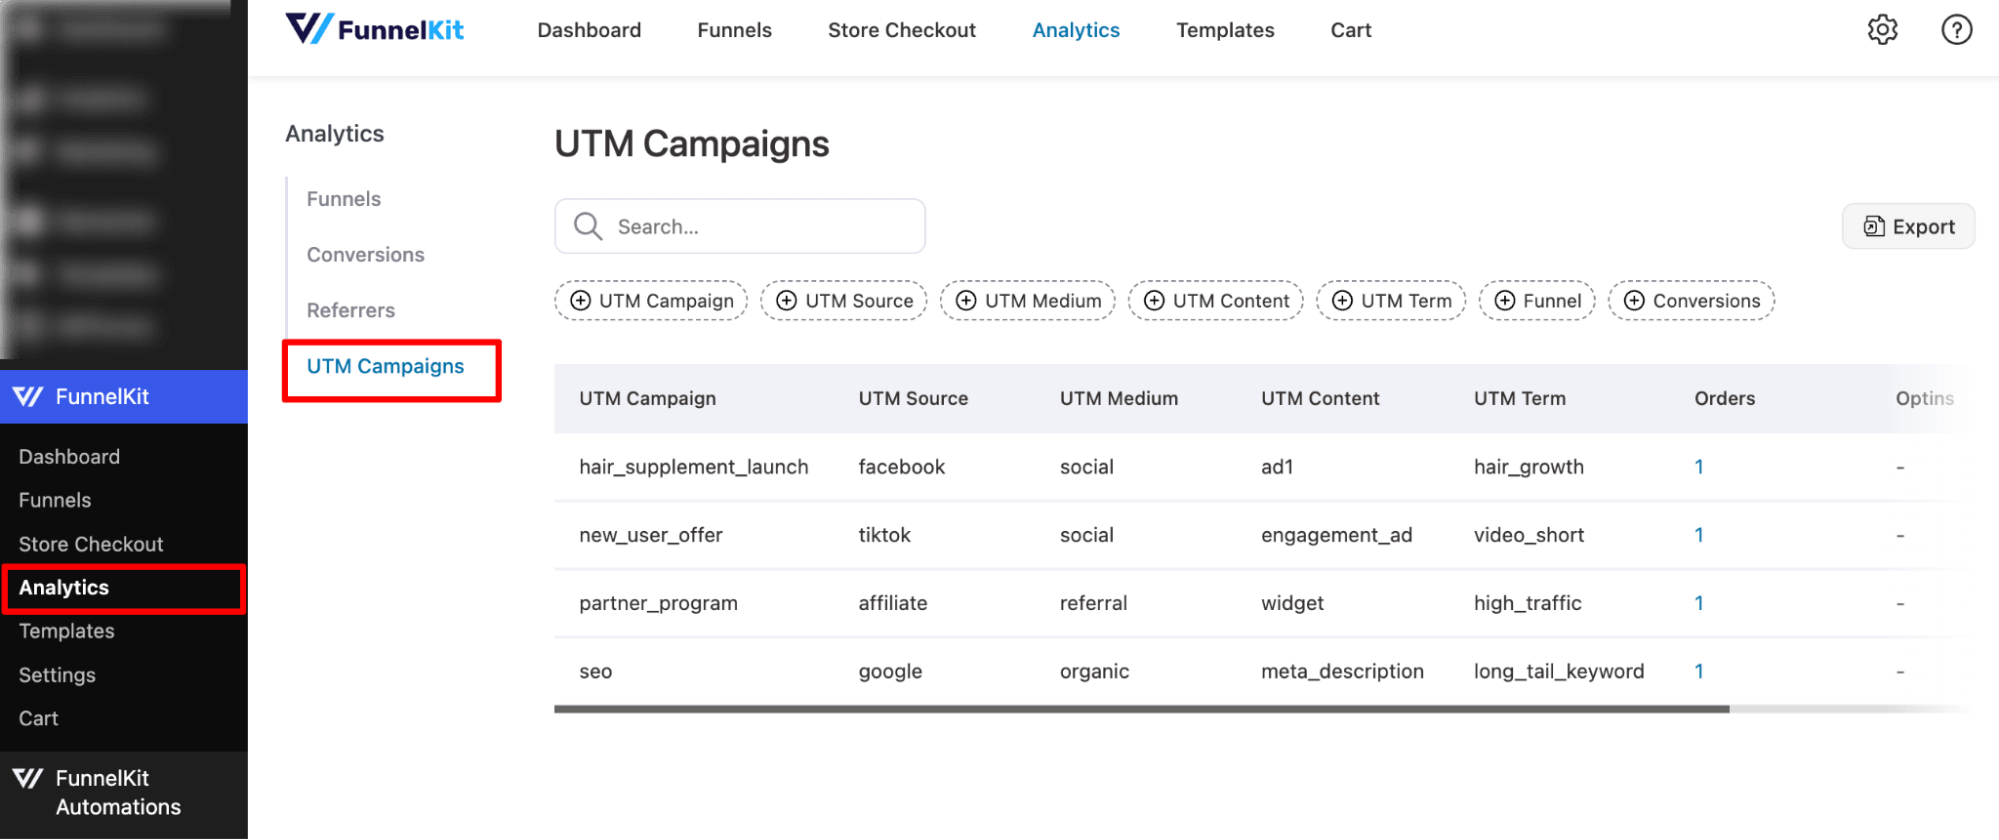
On the search tab, you can search for any related term to find results.
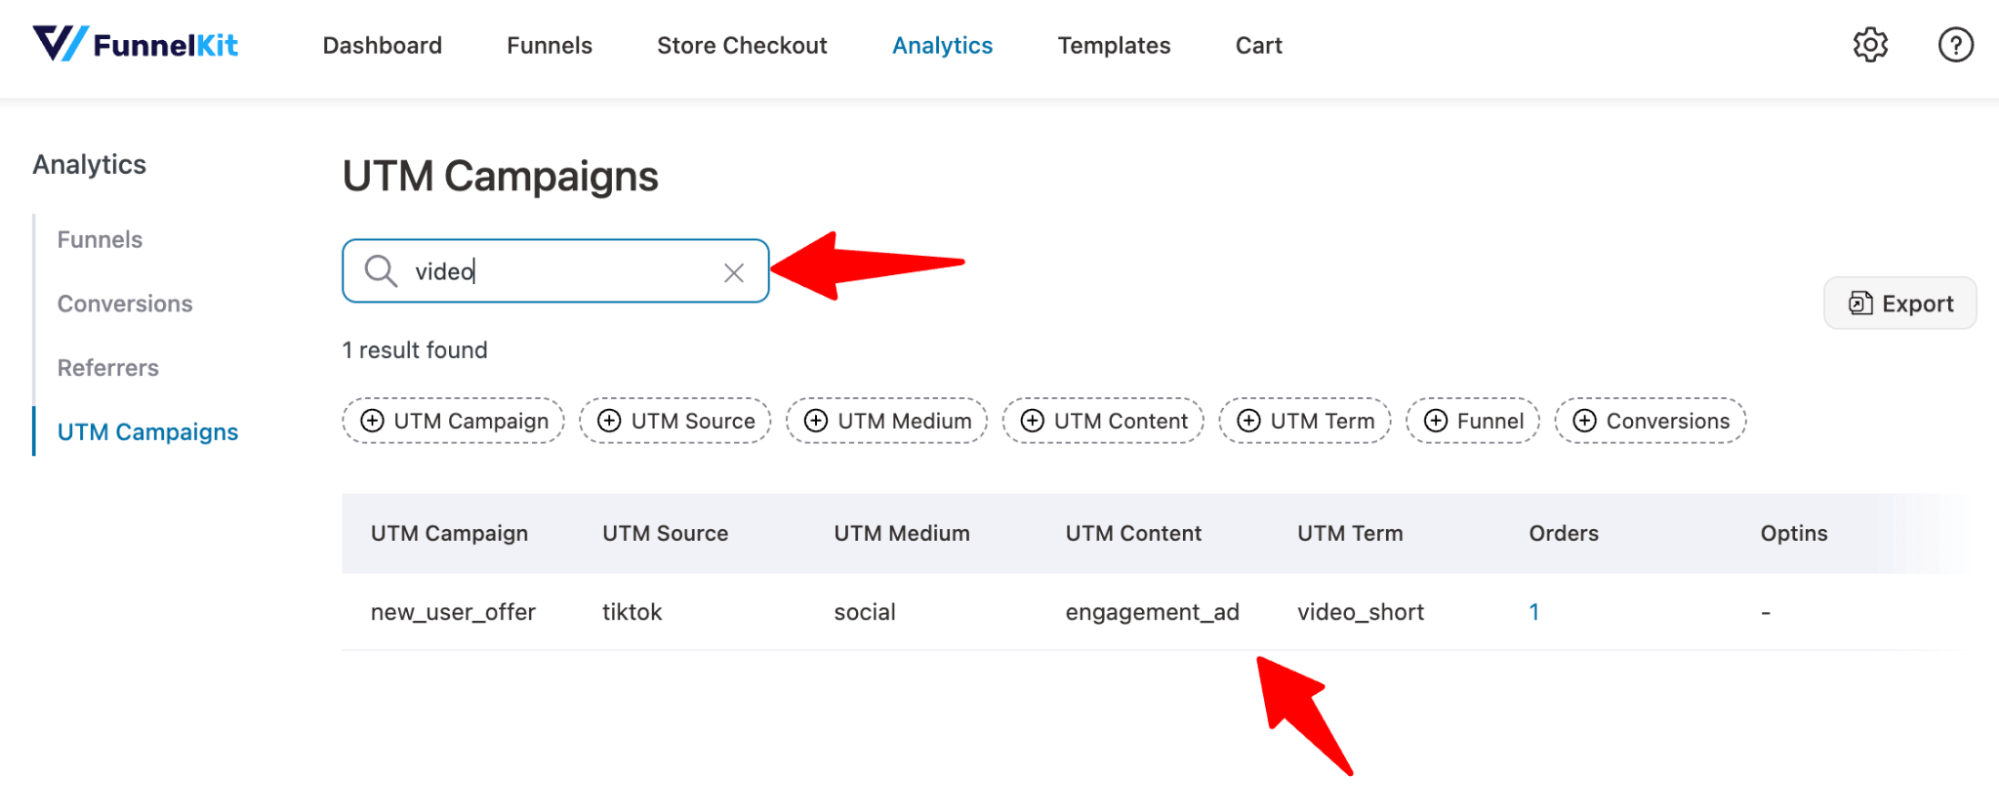
You can also use filters for campaigns, source, medium, content, term, funnel, and conversions to analyze the data you need.
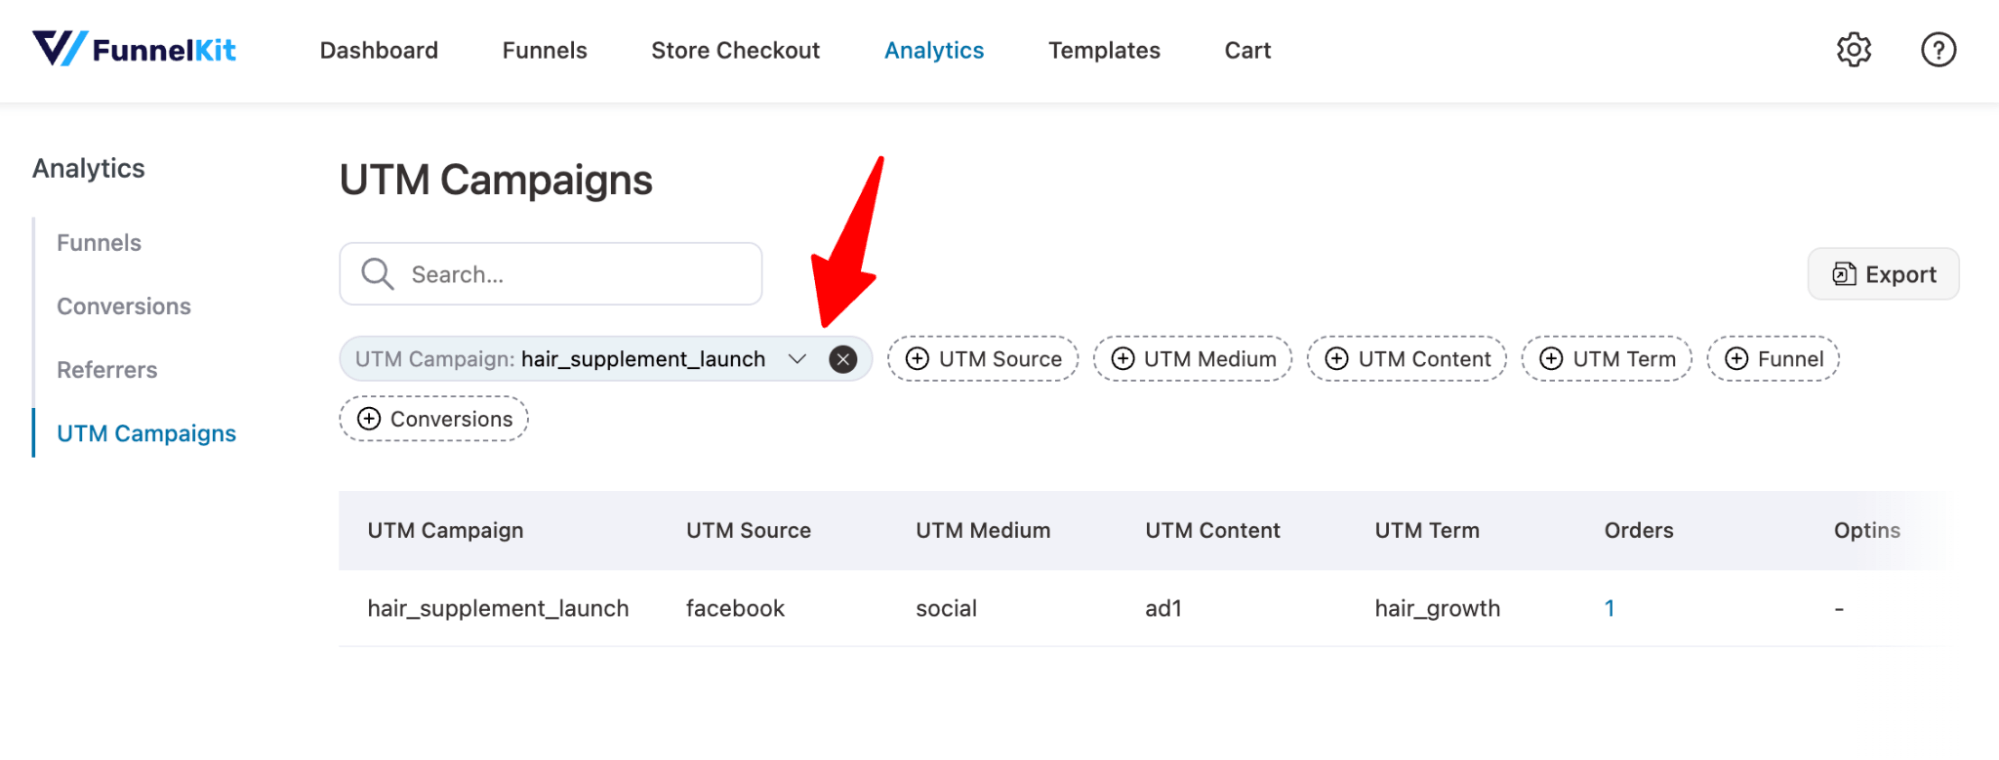
If you click the orders link, it will redirect you to the conversion page.
It lists all orders with their UTM data, including Order ID, Name, Email, Phone, Funnel, Date, Total Spent, Referrers, and Device.
That’s how easily you can track conversions using UTM parameters.
Method 5: Set Up WooCommerce Conversion Tracking for TikTok Pixel
With the integration of TikTok Pixel with WooCommerce, you can track how traffic coming from TikTok interacts with your WooCommerce store.
You can track events like View content, Add to cart, Order bump, Initiate checkout and Purchase.
To set up WooCommerce conversion tracking with TikTok Pixel, follow these steps:
Step 1: Create TikTok Pixel
Log in to your account on TikTok Ads Manager and create a TikTok Pixel.
After successfully creating the TikTok Pixel, copy the TikTok Pixel ID.
Step 2: Add the TikTok Pixel ID to WooCommerce
Now go to the Pixel Tracking section of FunnelKit Settings and paste the copied TikTok ID in the TikTok tab.
Step 3: Enable the WooCommerce conversion events you want to track
Now, check the WooCommerce events you want to track. Here are the options you get
- Site Wide Events: Enable Page View, Add to Cart, and View Item
- Sales Page Event: Check the Page View event.
- Optin Page Events: Enable Page View and Lead event
- Order Bump Events: Check the Add to Cart and Order bump conversion option.
- Checkout Events: Check the Page View, Add to Cart, and InitiateCheckout events.
- Purchase Events: Make sure to check the purchase events Page View and Conversion.
Make sure to hit 'Save' to update the settings.
Step 4: Test WooCommerce conversion tracking with TikTok Pixel
To track conversions with TikTok Pixel, you need to install the Google Chrome extension TikTok Pixel Helper.
After setting up this extension, you will receive real-time notifications about events that fire when you interact with your site.
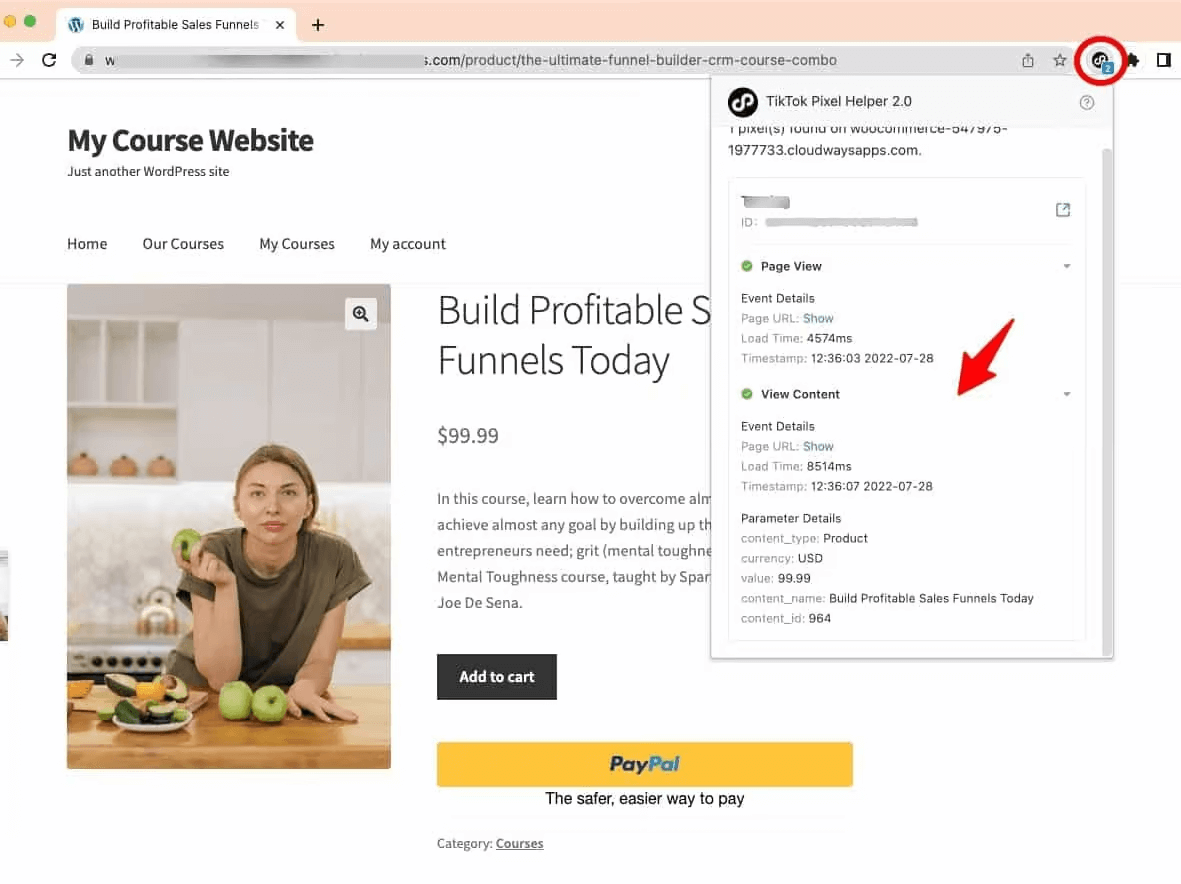
If the relevant events are firing, that means data tracking with TikTok Pixel is working.
Method 6: WooCommerce conversion tracking with Pinterest
Pinterest conversion tracking allows you to track the actions customers take when they land on your WooCommerce store after interacting with Pinterest ads.
You can track page visits, add items to the cart, initiate checkout, and complete the purchase.
Here are the steps you need to follow to track WooCommerce conversions with Pinterest ads:
Step 1: Copy your Pinterest tag ID
Go to the Pinterest Business platform and set up your account if you don’t already have one. After that, navigate to Ads ⇒ Conversions and create a Pinterest tag.
After creating the Pinterest tag, make sure to copy it.
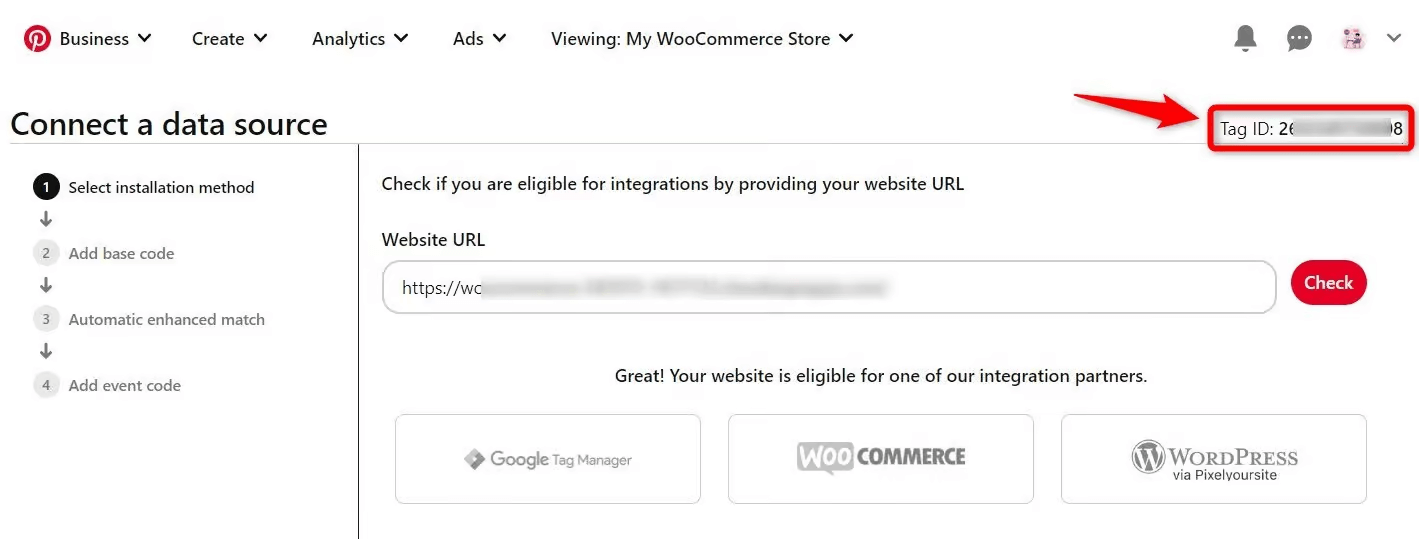
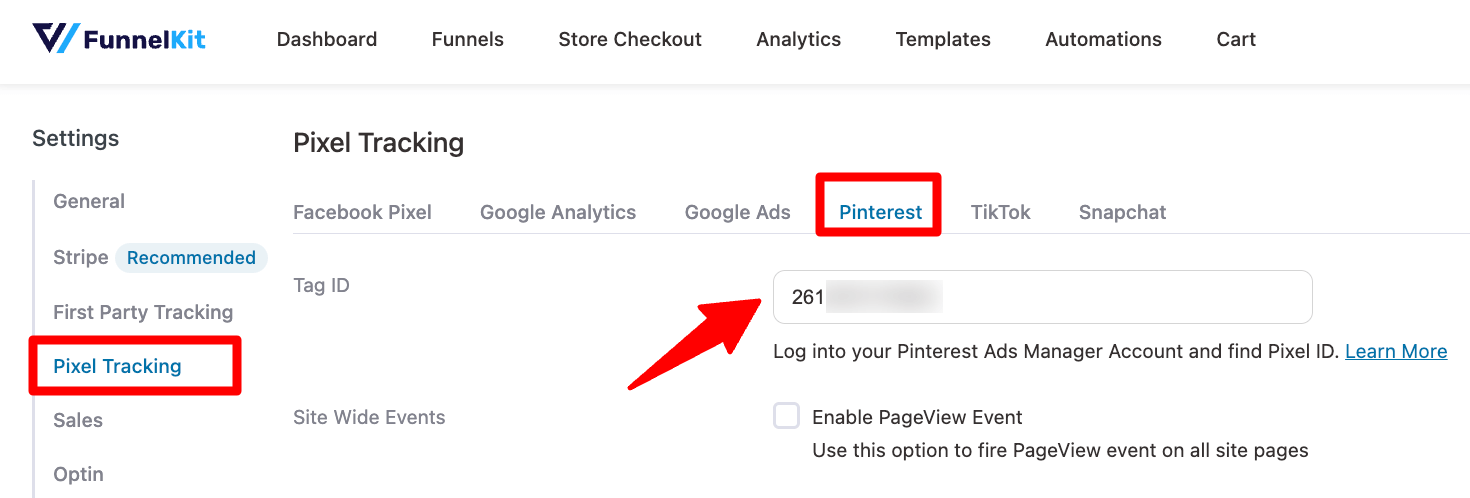
Step 2: Add the Pinterest tag ID to WooCommerce
Now, navigate to the Pixel Tracking section of FunnelKit Settings.
Under the Pinterest tab, paste the copied Pinterest tag ID.
Step 3: Enable the Pinterest conversion events you want to track in WooCommerce
Now enable the WooCommerce conversion tracking events for Pinterest:
- Site Wide Events: Enable Page View, Add to Cart, and View Item
- Sales Page Event: Check the Page View event.
- Optin Page Events: Enable Page View and Lead event
- Checkout Events: Check the Page View, Add to Cart, and IntitateCheckout event.
- Order Bump Events: Enable Add to Cart and Order bump conversion events
- Purchase Events: Make sure to check the purchase events Page View and Purchase.
Make sure to save changes to activate the conversion tracking with the Pinterest tag.
Step 4: Test and verify WooCommerce conversions from Pinterest
Install the Pinterest Tag Helper extension in Google Chrome to test if the conversion tracking is working correctly.
Now, whenever you take an action in your store, such as adding products to your cart, you will see the events firing in the notification.
If you receive the events firing notification promptly, the conversion tracking will work properly.
Method 7: Set Up WooCommerce Conversion Tracking for Snapchat
Snapchat has become popular in recent years for promoting and advertising products. Now, you can track how Snapchat users interact with your WooCommerce store.
Like other platforms, Snapchat allows you to track actions such as Page View, Add to Cart, Initiate Checkout, and Purchase. In addition to these actions, you can also track order bumps and opt-in events.
Here are the steps you need to follow to activate WooCommerce conversion tracking with Snapchat.
Step 1: Copy your Snapchat Pixel ID
Navigate to Snapchat Ads Manager and log in to your account, or register if you don't have one. Now navigate to Create Ads ⇒ Events Manager and follow the necessary steps to create a Snap Pixel.
After completing the process, copy the Snapchat Pixel ID.
Step 2: Add the Snapchat Pixel ID to WooCommerce
Navigate to Pixel Tracking ⇒ Snapchat, and in the Pixel ID field, paste the copied Snapchat Pixel ID.
Step 3: Enable the WooCommerce conversion events you want to track
Now check the WooCommerce conversion tracking events:
- Site-Wide Events: Enable Page View, Add to Cart, and View Item
- Sales Page Event: Check the Page View event.
- Optin Page Events: Enable Page View and Lead event
- Order Bump Events: Enable the Add to Cart and Order bump conversion.
- Checkout Events: Check the options Page View, Add to Cart, and Intitate Checkout event.
- Purchase Events: Make sure to check the purchase events Page View and Conversion.
Make sure to save the settings.
Step 4: Test WooCommerce conversion tracking with Snapchat
Install the Snap Pixel Helper extension to test the WooCommerce conversion tracking. It notifies you of the real-time events when someone interacts with your website.
After installing this extension on your browser, you can take action on your WooCommerce store, such as adding a product to your cart or checking out.
After each action, you should see a notification of the events that were triggered by your action.
By the way, the multi-step checkout page shown in this image is built with FunnelKit Funnel Builder.
Proper event firing confirms that your WooCommerce conversion tracking is effective.
That’s it. These were seven different ways of conversion tracking for your WooCommerce store.
5 Best Practices to Ensure Accurate Conversion Tracking in WooCommerce
Follow these practices to ensure accurate WooCommerce conversion tracking:
1. Use only one tracking solution per platform
Running multiple plugins that fire the same events almost always leads to duplicate conversions. Therefore, you should audit your WordPress plugins and remove any redundant ones.
2. Exclude checkout pages from caching
Exclude your WooCommerce checkout, one-click upsells and thank-you pages from caching. Cached confirmation pages are the most common reason purchase events fail or duplicate.
Therefore, always add checkout, upsell and order-received URLs to your cache exclusions.
3. Test tracking in incognito mode
Your browser extensions, cookies, and cached scripts can interfere with pixel event tracking. Therefore, always validate tracking in a clean private browsing session.
4. Enable Conversions API for Meta
Server-side tracking typically recovers 15-30% of conversions lost to privacy laws, ad blockers, and browser restrictions.
In 2026, accurate reporting on Facebook and Instagram isn’t possible without server-side tracking.
5. Compare your platform data with WooCommerce weekly
Compare WooCommerce orders with Meta and Google Ads conversions. If the gap is consistently over 15%, something is broken. You should need to reconfigure your setup step by step.
Why Is My WooCommerce Conversion Tracking Not Working (Troubleshooting)
Here are the most common WooCommerce conversion-tracking problems and how to fix them.
Problem 1: Purchase events not firing
You see no conversions in your analytics or ad platform, even though you have completed orders in WooCommerce.
Causes:
- Your payment gateway redirects users to an external site before returning to your thank-you page
- Your caching plugin is serving a cached version of the order confirmation page
- JavaScript errors on the thank you page prevent pixel code from executing
- Your checkout does not redirect to the WooCommerce order-received page
How to Fix:
- Open your browser developer tools by pressing F12 and check the Console tab for JavaScript errors on the thank you page
- Add your WooCommerce checkout and thank you page URLs to your caching plugin exclusion list
- For payment gateways like PayPal that redirect externally, implement server-side tracking through Conversions API
- Verify your checkout redirects to the standard WooCommerce order-received URL after purchase.
Problem 2: Revenue values are showing as zero
Purchase events fire correctly, but the revenue or value field is empty or shows a value of 0 in your reports.
Causes:
- Dynamic value tracking is not enabled in your pixel settings
- Currency mismatch between WooCommerce and your analytics account
- The order total variable is not passing correctly to the tracking code
How to Fix:
- Check that your WooCommerce store currency matches your GA4 or Google Ads account currency
- Use Google Tag Assistant to inspect the purchase event payload and verify that the value and currency parameters contain correct data
Problem 3: Duplicate conversions are being counted
The same order appears multiple times in your conversion reports, inflating your numbers.
Causes:
- You have multiple tracking plugins installed that both fire conversion events
- Users refreshing the thank you page triggers the conversion event again
- Both the browser pixel and the server-side API are counting without proper deduplication
How to Fix:
- Audit your installed plugins and remove any duplicate tracking solutions. Use only one plugin for conversion tracking.
- Implement transaction ID deduplication. FunnelKit handles this automatically by passing order IDs with each event.
- For the Meta Conversions API, verify that event_id is passed with both browser and server events. FunnelKit configures this automatically.
Problem 4: Low Meta event match quality score
Your event match quality score in Meta Events Manager is below 5.0. You see limited data warnings and fewer attributed conversions than expected.
Causes:
- iOS users are opting out of App Tracking Transparency
- You are not sending customer information, such as email and phone, with events
- Conversions API is not configured
How to Fix:
- Implement Conversions API alongside your browser pixel. This is required for accurate Meta tracking.
- Enable Advanced Matching in your pixel settings to send hashed customer data
- Ensure you are sending the hashed email and phone number with purchase events
- In Meta Events Manager, prioritize your 8 most important conversion events
Frequently Asked Questions About WooCommerce Conversion Tracking
Browser-side tracking uses JavaScript that runs in the visitor’s browser. When someone views a page, adds a product to the cart, or starts checkout, the pixel fires and sends data directly to platforms like Google Analytics or Meta.
Server-side tracking sends events directly from your server to advertising and analytics platforms using their APIs. The browser doesn’t need to execute any tracking code for these events to be sent.
We recommend using both methods to track conversions. Browser-side tracking is ideal for early-funnel events such as page views, product views, and add-to-cart actions because it captures user intent in real time. Server-side tracking is best for high-value events, such as purchases, where accuracy matters more than speed.
Use platform-specific debugging tools to verify implementation. Google Tag Assistant works for GA4 and Google Ads. Meta Pixel Helper works for Facebook. TikTok Pixel Helper, Pinterest Tag Helper, and Snap Pixel Helper work for their respective platforms.
Complete a test purchase in incognito mode and verify that the purchase events appear with the correct revenue values. Compare the conversions reported on each platform with your WooCommerce orders to identify discrepancies.
Yes, you can set up WooCommerce conversion tracking without using a plugin, but it requires custom development. You would need to implement data layer variables, add platform-specific JavaScript to appropriate pages, and configure event triggers through Google Tag Manager.
This approach requires ongoing maintenance when platforms update their tracking specifications. Most store owners find plugins more practical because they handle updates automatically.
Yes, you need conversion tracking if your WooCommerce store gets only organic traffic. Even without paid advertising, implement Google Analytics 4 to track eCommerce performance, identify top-converting landing pages, and understand the quality of traffic sources.
Use UTM tracking for email campaigns, social media posts, and any links you control. Understanding where conversions originate helps you prioritize content creation and SEO efforts.
Start Tracking Every WooCommerce Conversion Today!
Accurate conversion tracking transforms your store from a transaction processor into a data-driven business.
You can identify which marketing campaigns generate actual revenue, eliminate wasted ad spend, and scale what works.
Start by installing FunnelKit Funnel Builder and configuring Google Analytics 4 for baseline analytics. Later, add platform-specific pixels for any channels where you run paid advertising.
Enable Conversions API for Meta to recover iOS conversions. Verify every platform using the testing procedures in this guide.
Stores with accurate tracking make faster decisions and achieve better return on ad spend. The difference is not spending more but knowing exactly where each dollar produces results.
So, why wait? Start tracking WooCommerce conversions with FunnelKit Funnel Builder today!
Editorial Team
April 1, 2026The WooCommerce place order button on your checkout page is literally where the money changes hands. However, most store owners leave it completely untouched. You aren't stuck with the default...
Editorial Team
March 25, 2026Running a WooCommerce store without the Facebook Pixel is like pouring money into ads while blindfolded. You're spending, but you have no idea what's actually working. Every abandoned cart, every...
Editorial Team
March 24, 2026Every WooCommerce store needs a reliable way to generate PDF invoices and packing slips. Hand-typing order details into a Word template results in misspelled addresses, missing tax IDs, and a...


