Have you ever wondered why some online stores convert like crazy while others struggle to close a sale? A simple reason is checkout optimization.
If your WooCommerce checkout page still looks like every other default setup, you will lose potential buyers.
Shoppers expect a fast, intuitive checkout tailored to their needs. Yet WooCommerce’s default fields often slow things down, ask for irrelevant details, or miss crucial details that could improve fulfillment and the customer experience.
The solution? A WooCommerce checkout field editor lets you take full control, adding, editing, or removing fields that make sense for your business.
In this post, we’ll show you how you can customize the form fields on your WooCommerce checkout page without code.
What is a WooCommerce checkout field editor?
A WooCommerce checkout field editor is a tool or WordPress plugin that allows you to customize the form fields on your checkout page. You can add, remove, rearrange, or modify fields as needed to enhance the user experience and improve conversions.
Table of Contents
- 1 Why Do You Need a WooCommerce Checkout Field Editor?
- 2 Top 3 Best Checkout Field Editor Plugins for WooCommerce
- 3 How to Customize the WooCommerce Checkout Form Fields
- 4 WooCommerce Checkout Field Editor: Frequently Asked Questions (FAQs)
- 5 What is the best WooCommerce checkout field editor?
- 6 Why should I customize WooCommerce checkout fields?
- 7 How do I add custom fields to WooCommerce checkout?
- 8 How do I change the checkout field text in WooCommerce?
- 9 How do I create an advanced custom field?
- 10 Can I customize my WooCommerce checkout page?
- 11 Is a checkout field editor compatible with all themes?
- 12 Can I add conditional or dynamic fields?
- 13 Ready to Use the Best WooCommerce Checkout Field Editor to Encourage Quick Purchases?
Why Do You Need a WooCommerce Checkout Field Editor?
Let’s look at the default WooCommerce checkout page that you may be using right now:
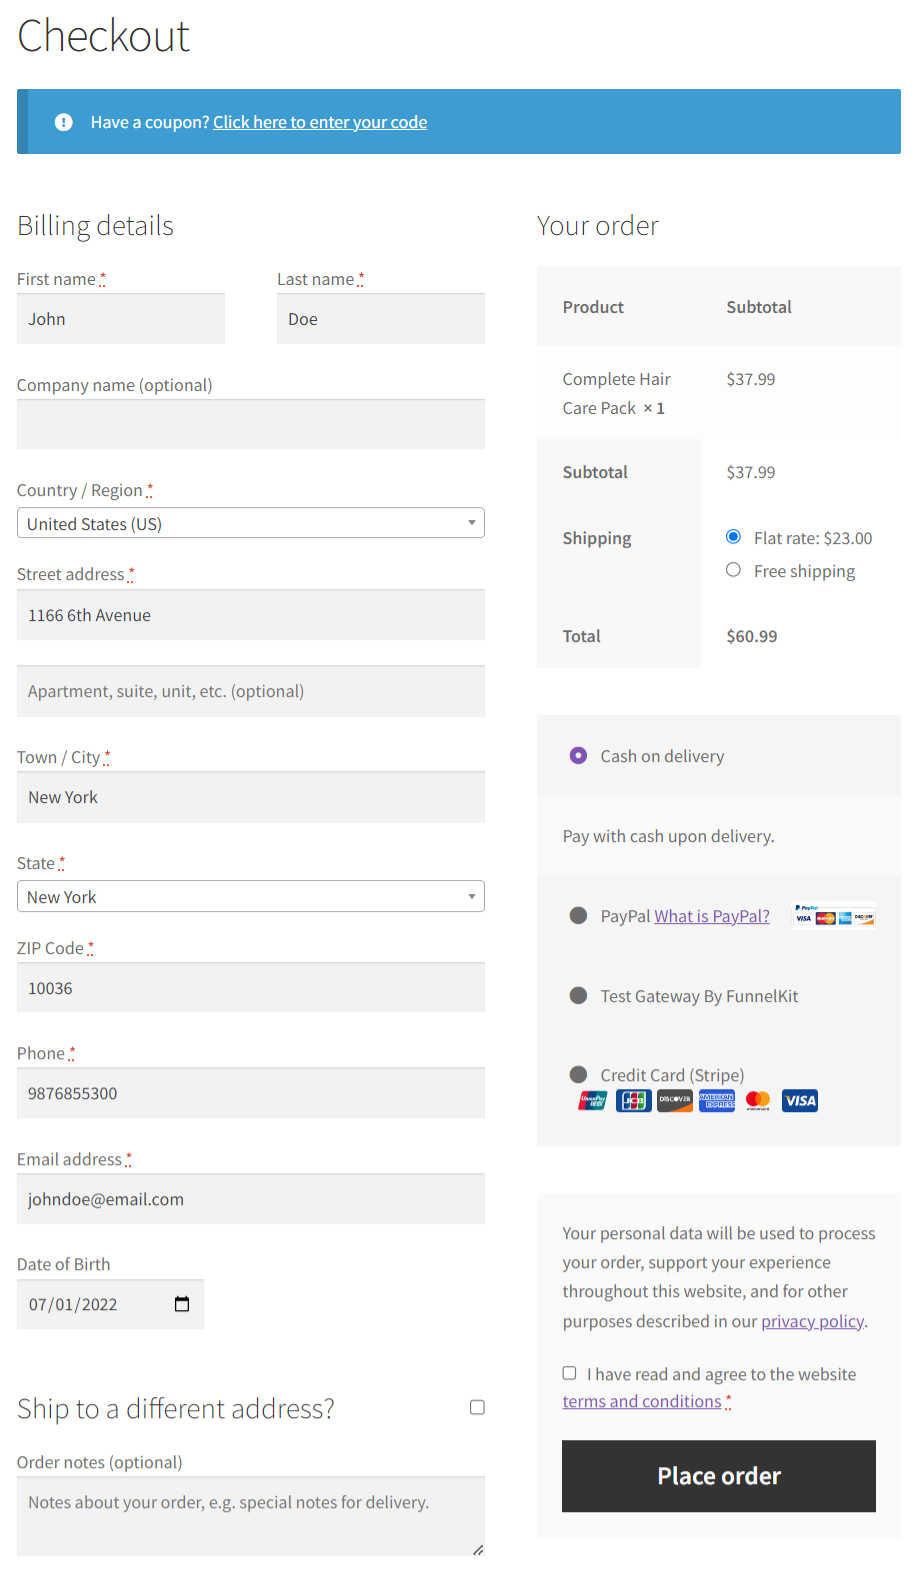
But as you can see, this page is not optimized for conversions. Here's why:
- The email is not the first field
- The form looks long and asks for all the details in one step only
- You cannot modify the item quantity or delete specific items
- The cart item images aren't displayed
- You can't add any custom fields to collect information that your business may require
On the other hand, take a look at this high-converting custom checkout page:
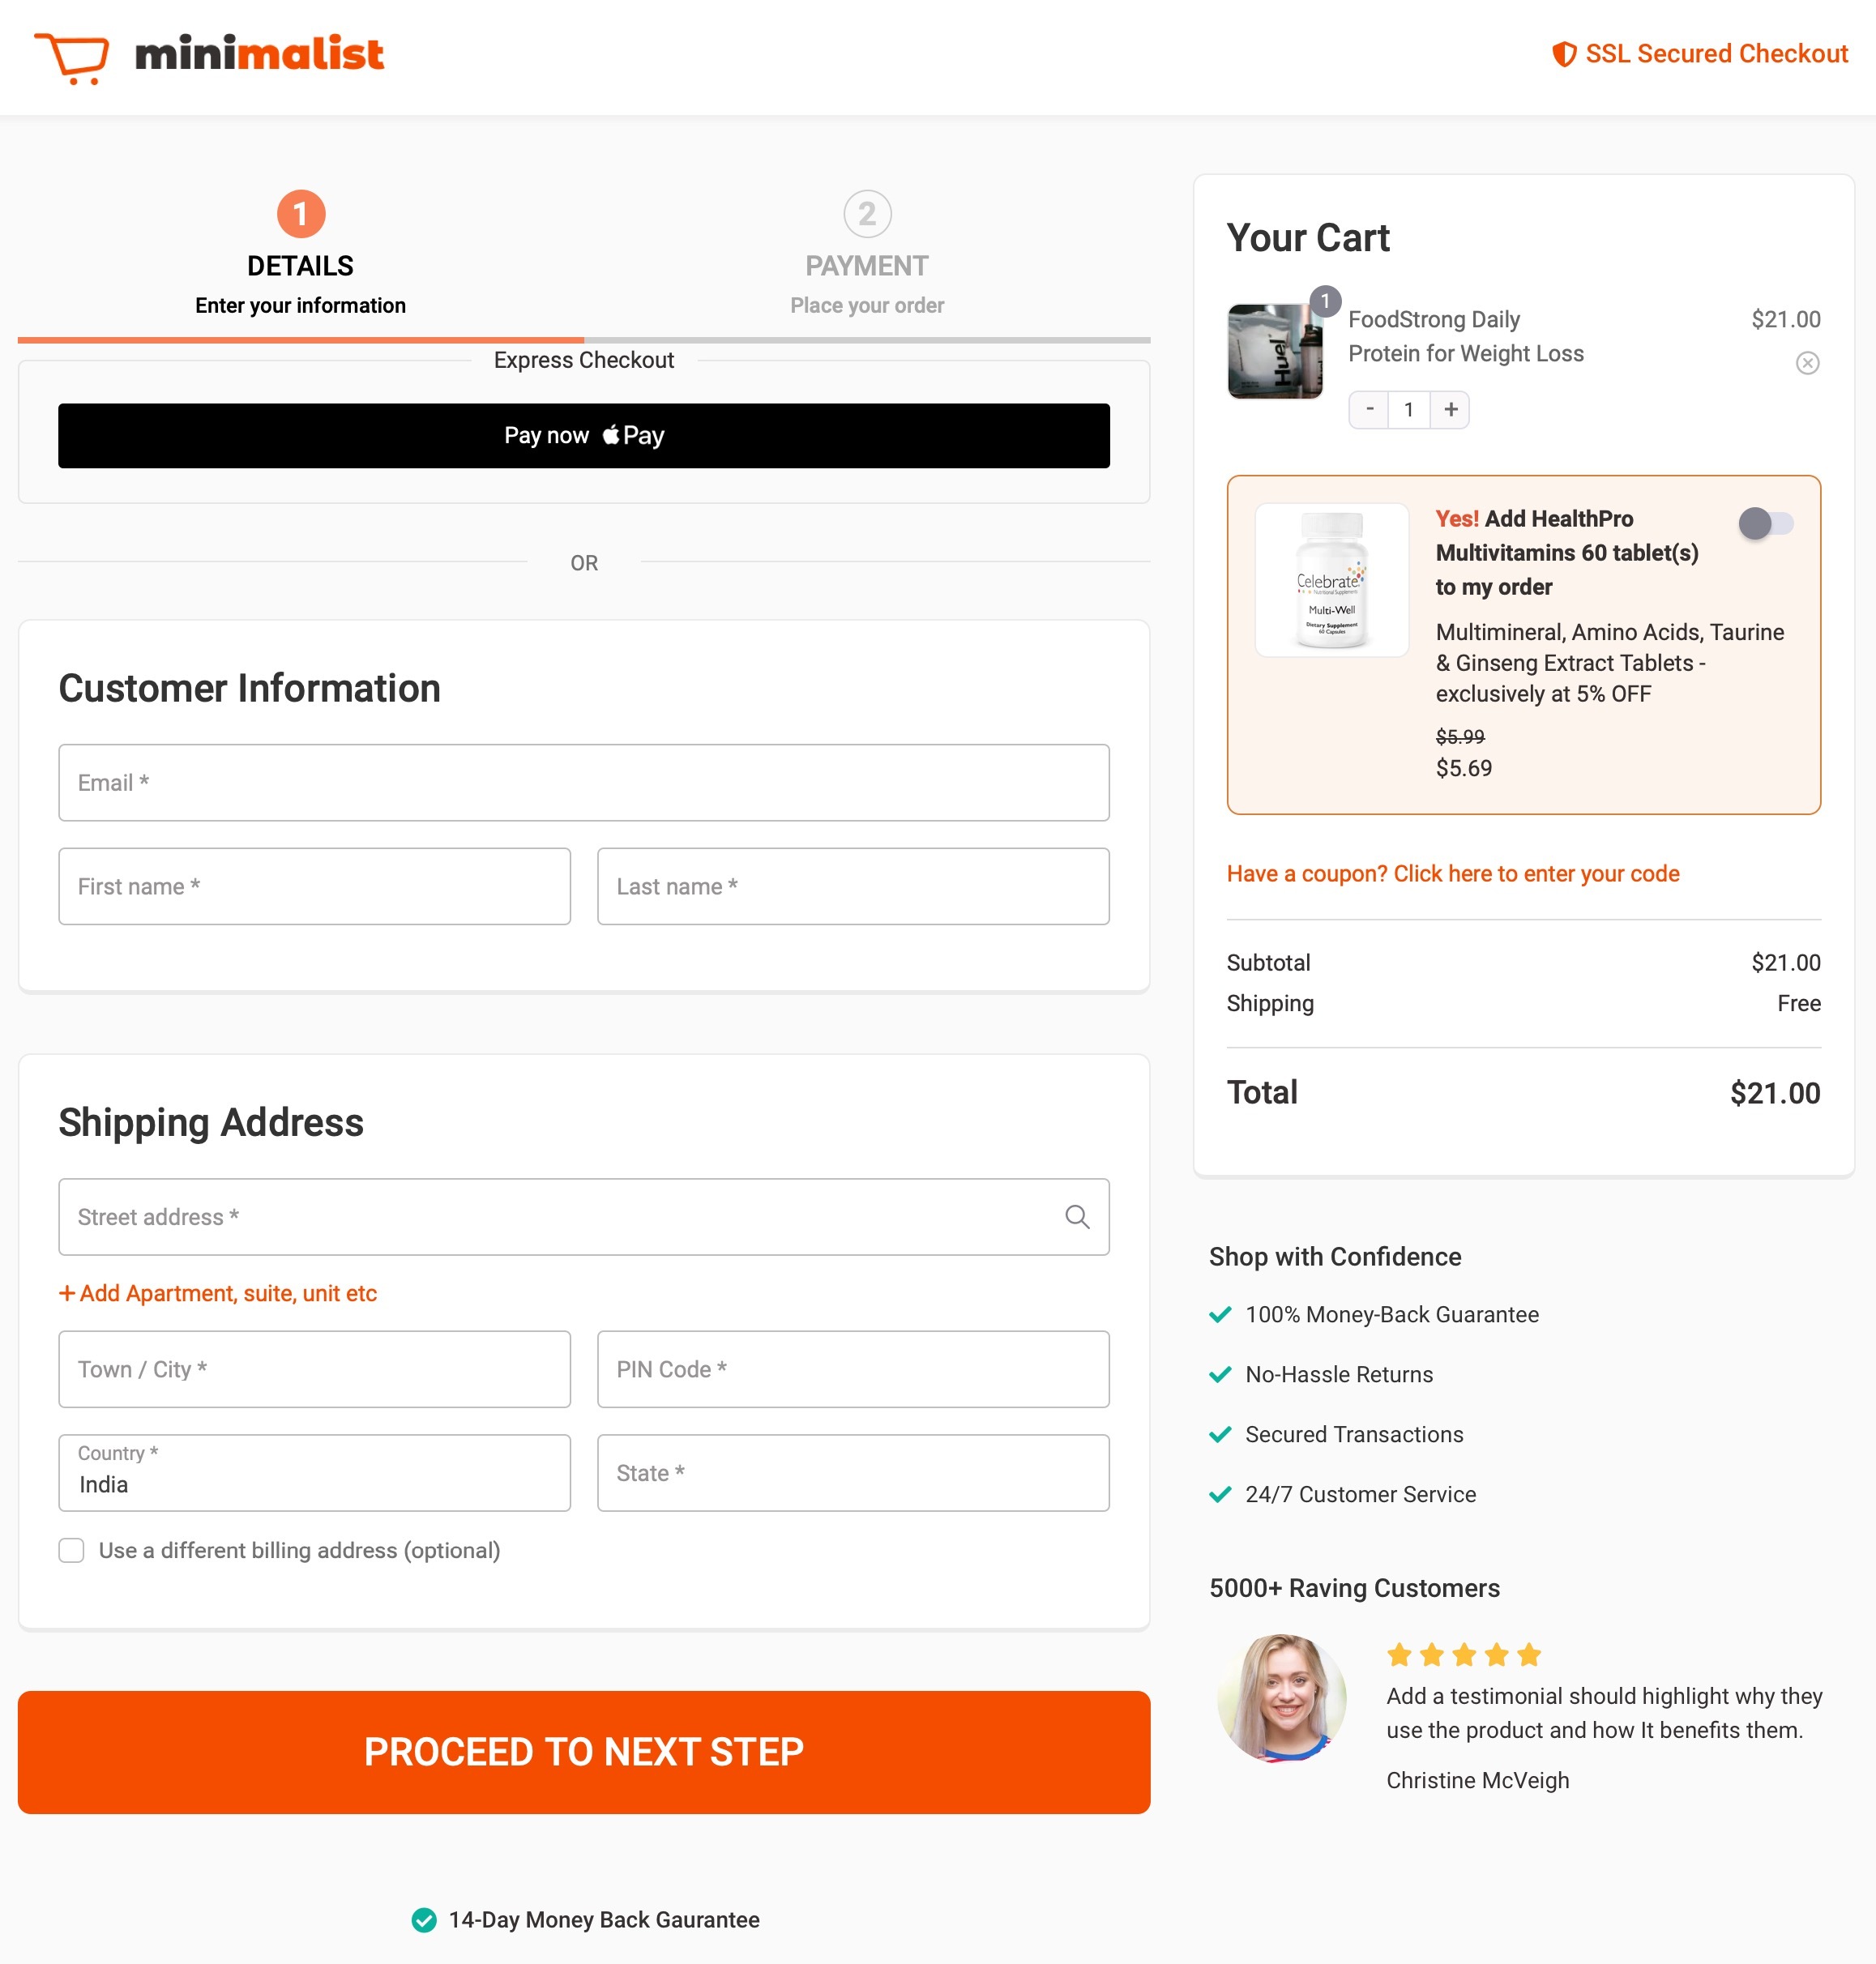
As you can see, it is perfectly optimized for conversions. The following checkout page has:
- Logically arranged form fields: As you can see, important form fields such as email and personal information are placed at the top. This helps you collect emails in real-time.
- Multi-step checkout: The checkout process is split into multiple steps with a progress indicator bar at the top.
- Clear depictions: Item image, name, and quantity with the total listed properly in a clear manner.
- Separate sections: The shipping address is on the first step, followed by other details on the next step.
- Coupon section: The coupon code field is visible and placed under order details.
- Express checkout: Express one-click pay buttons are right at the top, allowing users to check out faster.
Customizing checkout fields lets you create a flexible, smooth checkout process. This leads to higher conversions.
Top 3 Best Checkout Field Editor Plugins for WooCommerce
Out of all the WooCommerce checkout field editors and managers available, we have shortlisted the 3 plugins.
The reason we’ve chosen these plugins is that we evaluated them on these parameters:
- Ease of use
- Customization without code
- Advanced functionalities for a seamless checkout experience
- Value for money
Let’s explore these plugins.
1. FunnelKit Funnel Builder
FunnelKit Funnel Builder helps you set up optimized sales funnels for your WooCommerce store. You can create high-converting opt-in pages, sales pages, checkout, order bumps, one-click upsells, and even thank-you pages.
Plus, you can use any page builder to set up your sales funnels.
Diving deeper into this WooCommerce checkout manager plugin, you get the ability to modify your checkout fields.
FunnelKit’s checkout field editor for WooCommerce allows you to drag and drop to rearrange sections and fields within sections on the WooCommerce checkout page.
Using FunnelKit, you can offer many options to your prospects through the products field.
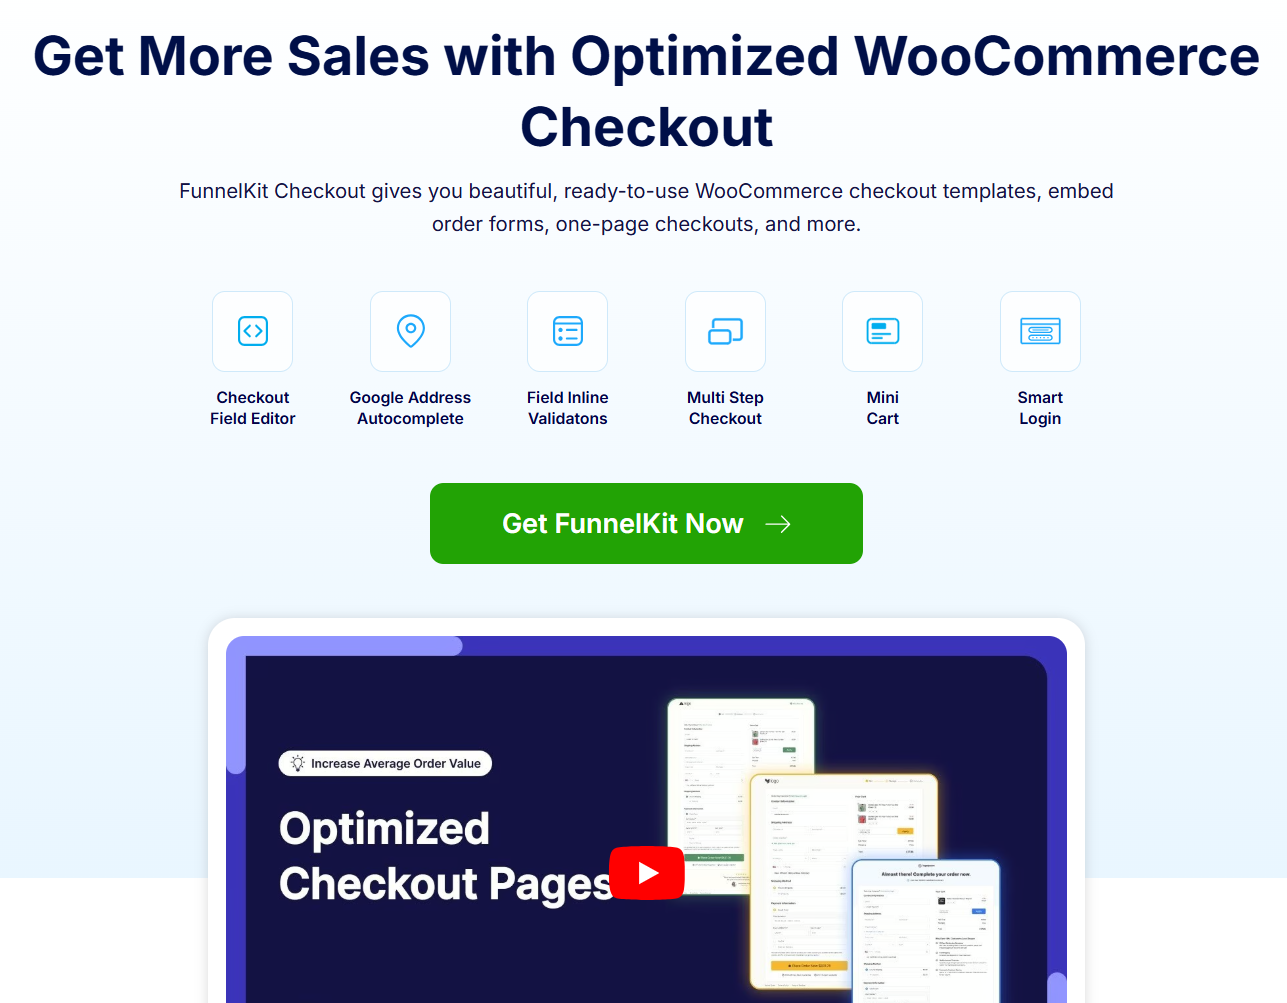
Here are some of the excellent features of its checkout field editor:
- Split the checkout fields: Split them into multiple sections using pre-designed multi-step checkout page templates.
- Adding custom fields: Easily add custom fields to your WooCommerce checkout form along with validations. This will help you better understand your customers.
- Rearrange fields and sections: It lets you rearrange the fields and sections on your checkout form using the drag-and-drop feature.
- Edit the checkout form fields: Get complete flexibility to edit checkout fields. You can edit any of your checkout form fields, such as billing and shipping address, product field, etc.
- Advanced checkout fields: Use advanced custom fields in your checkout form. These include text areas, radio buttons, checkboxes, HTML, password fields, etc.
You can’t get a more powerful checkout page builder than FunnelKit.
Pricing: FunnelKit Funnel Builder is available in the Lite (free) and Premium versions, starting at $99.50 annually. Its pricing is quite nominal, considering the conversion-worthy features it offers.
2. Checkout Field Editor for WooCommerce
This checkout plugin lets you optimize your checkout page by adding, editing, or removing fields as needed.
The Checkout Field Editor for WooCommerce lets you add custom fields such as text, select, checkboxes, and date pickers.
The plugin lets you rearrange fields and control your checkout page.
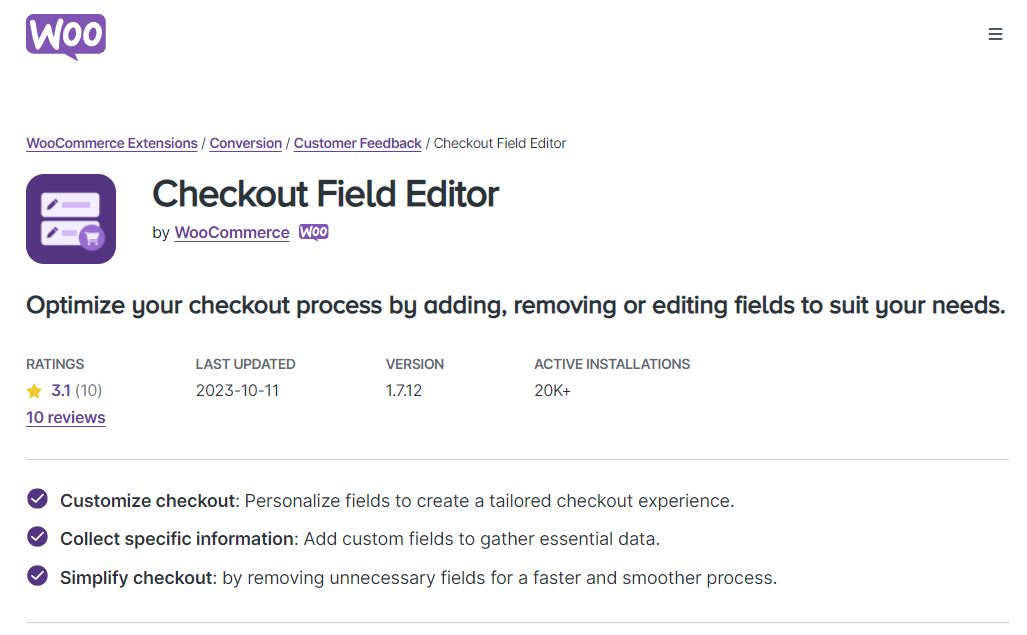
Here are some of its top features:
- Add custom fields: Add custom fields to your checkout form. The Checkout Field Editor by WooCommerce provides a range of fields, including text, radio buttons, checkboxes, date pickers, and more.
- Send custom field data: Send your custom field data to another website/app via Webhooks API. However, it requires you to do custom coding.
- Modify checkout form fields: Edit, reset, and remove them on your checkout page. You can easily modify the text and preferences based on your needs.
It’s a WooCommerce extension plugin that lets you modify the fields on your default WooCommerce checkout page. However, it lacks a modern interface.
Pricing plan: The Checkout Field Editor for WooCommerce doesn’t have any free or trial versions. Its premium version costs $49 a year, which is quite high for the features it offers.
3. Checkout Field Editor (Checkout Manager) for WooCommerce
You can easily customize the checkout form fields with this checkout plugin.
This checkout editor plugin includes various custom fields and allows editing, rearranging, and deleting existing fields.
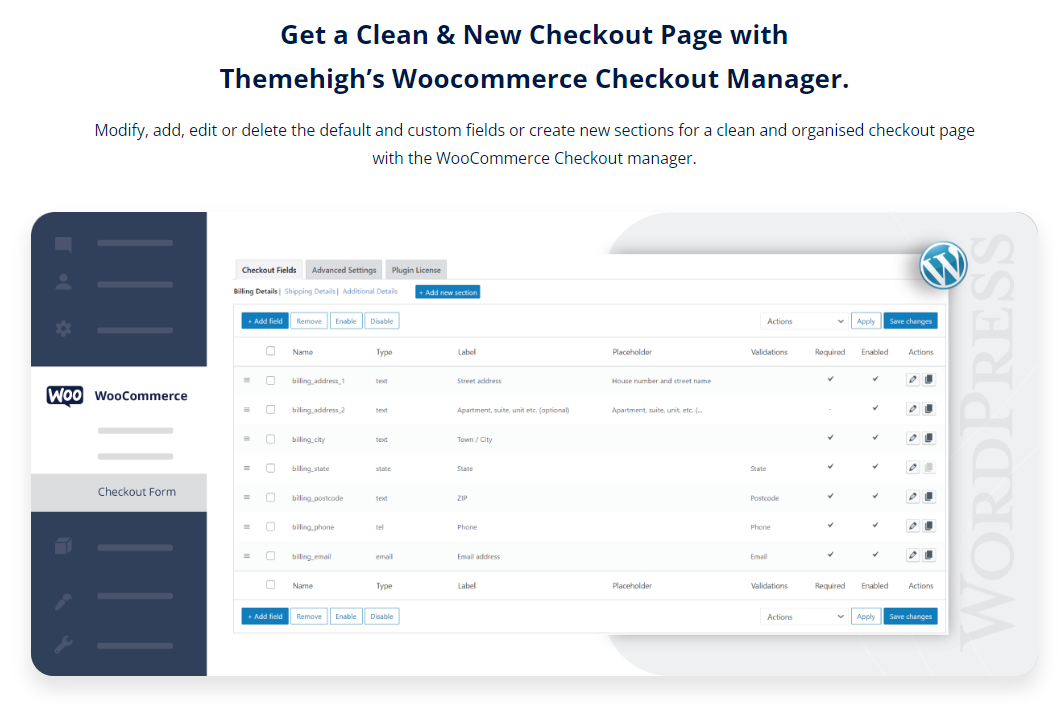
Here are some additional features that you get:
- Add custom fields to checkout: Add custom form fields to your checkout, such as password, phone number, radio, text area, etc.
- Set display rules: Configure the condition to display your custom fields on the checkout form.
- Set validations: Set custom validations on your checkout form fields.
It works in modifying the fields of your default checkout page in WooCommerce. However, it lacks an intuitive interface and the ability to set up custom checkout pages.
Now that you’ve seen the strengths and limitations of each plugin, here’s our expert recommendation
Expert Recommendation: The Best WooCommerce Checkout Field Editor Plugin
Out of all the checkout field editors for WooCommerce, our experts recommend you to use the FunnelKit Checkout.
Being a complete funnel builder and checkout manager plugin, FunnelKit Funnel Builder easily gets one step ahead to bring you high conversions to your business.
Creating beautiful checkouts, incorporating checkout optimization, and setting up targeted offers. Everything is possible with FunnelKit, and that is why over 40,000 WooCommerce businesses use it.
FunnelKit empowers you to customize the WooCommerce checkout experience for your shoppers. And that, too, without writing any custom code!
Let’s understand how you can use its checkout field editor to set up an effective checkout page in WooCommerce.
How to Customize the WooCommerce Checkout Form Fields
You can create an entire custom checkout page with FunnelKit Funnel Builder. But in this section, we’ll look at how to customize and modify the checkout form fields.
This will help you understand the ability of our WooCommerce checkout field editor perfectly.
First, make sure to install and activate the Funnel Builder plugin.
Next, follow these steps to customize the WooCommerce checkout form fields:
Step 1: Create a sales funnel with a custom checkout page
To start with, you’ll need to add a checkout page.
Go to FunnelKit ⇨ Funnels and hit ‘Create New Funnel’.
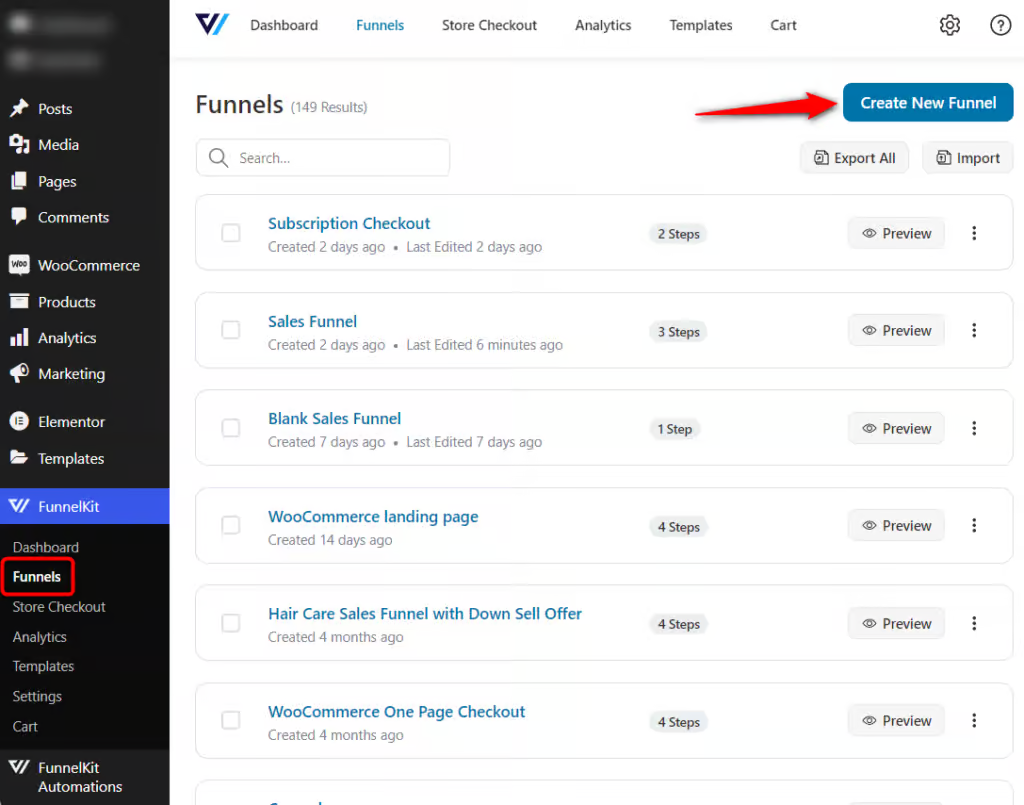
You’ll be directed to the templates page. Here you can see templates for sales and lead funnels.
Let’s click on the Livewire checkout template here.
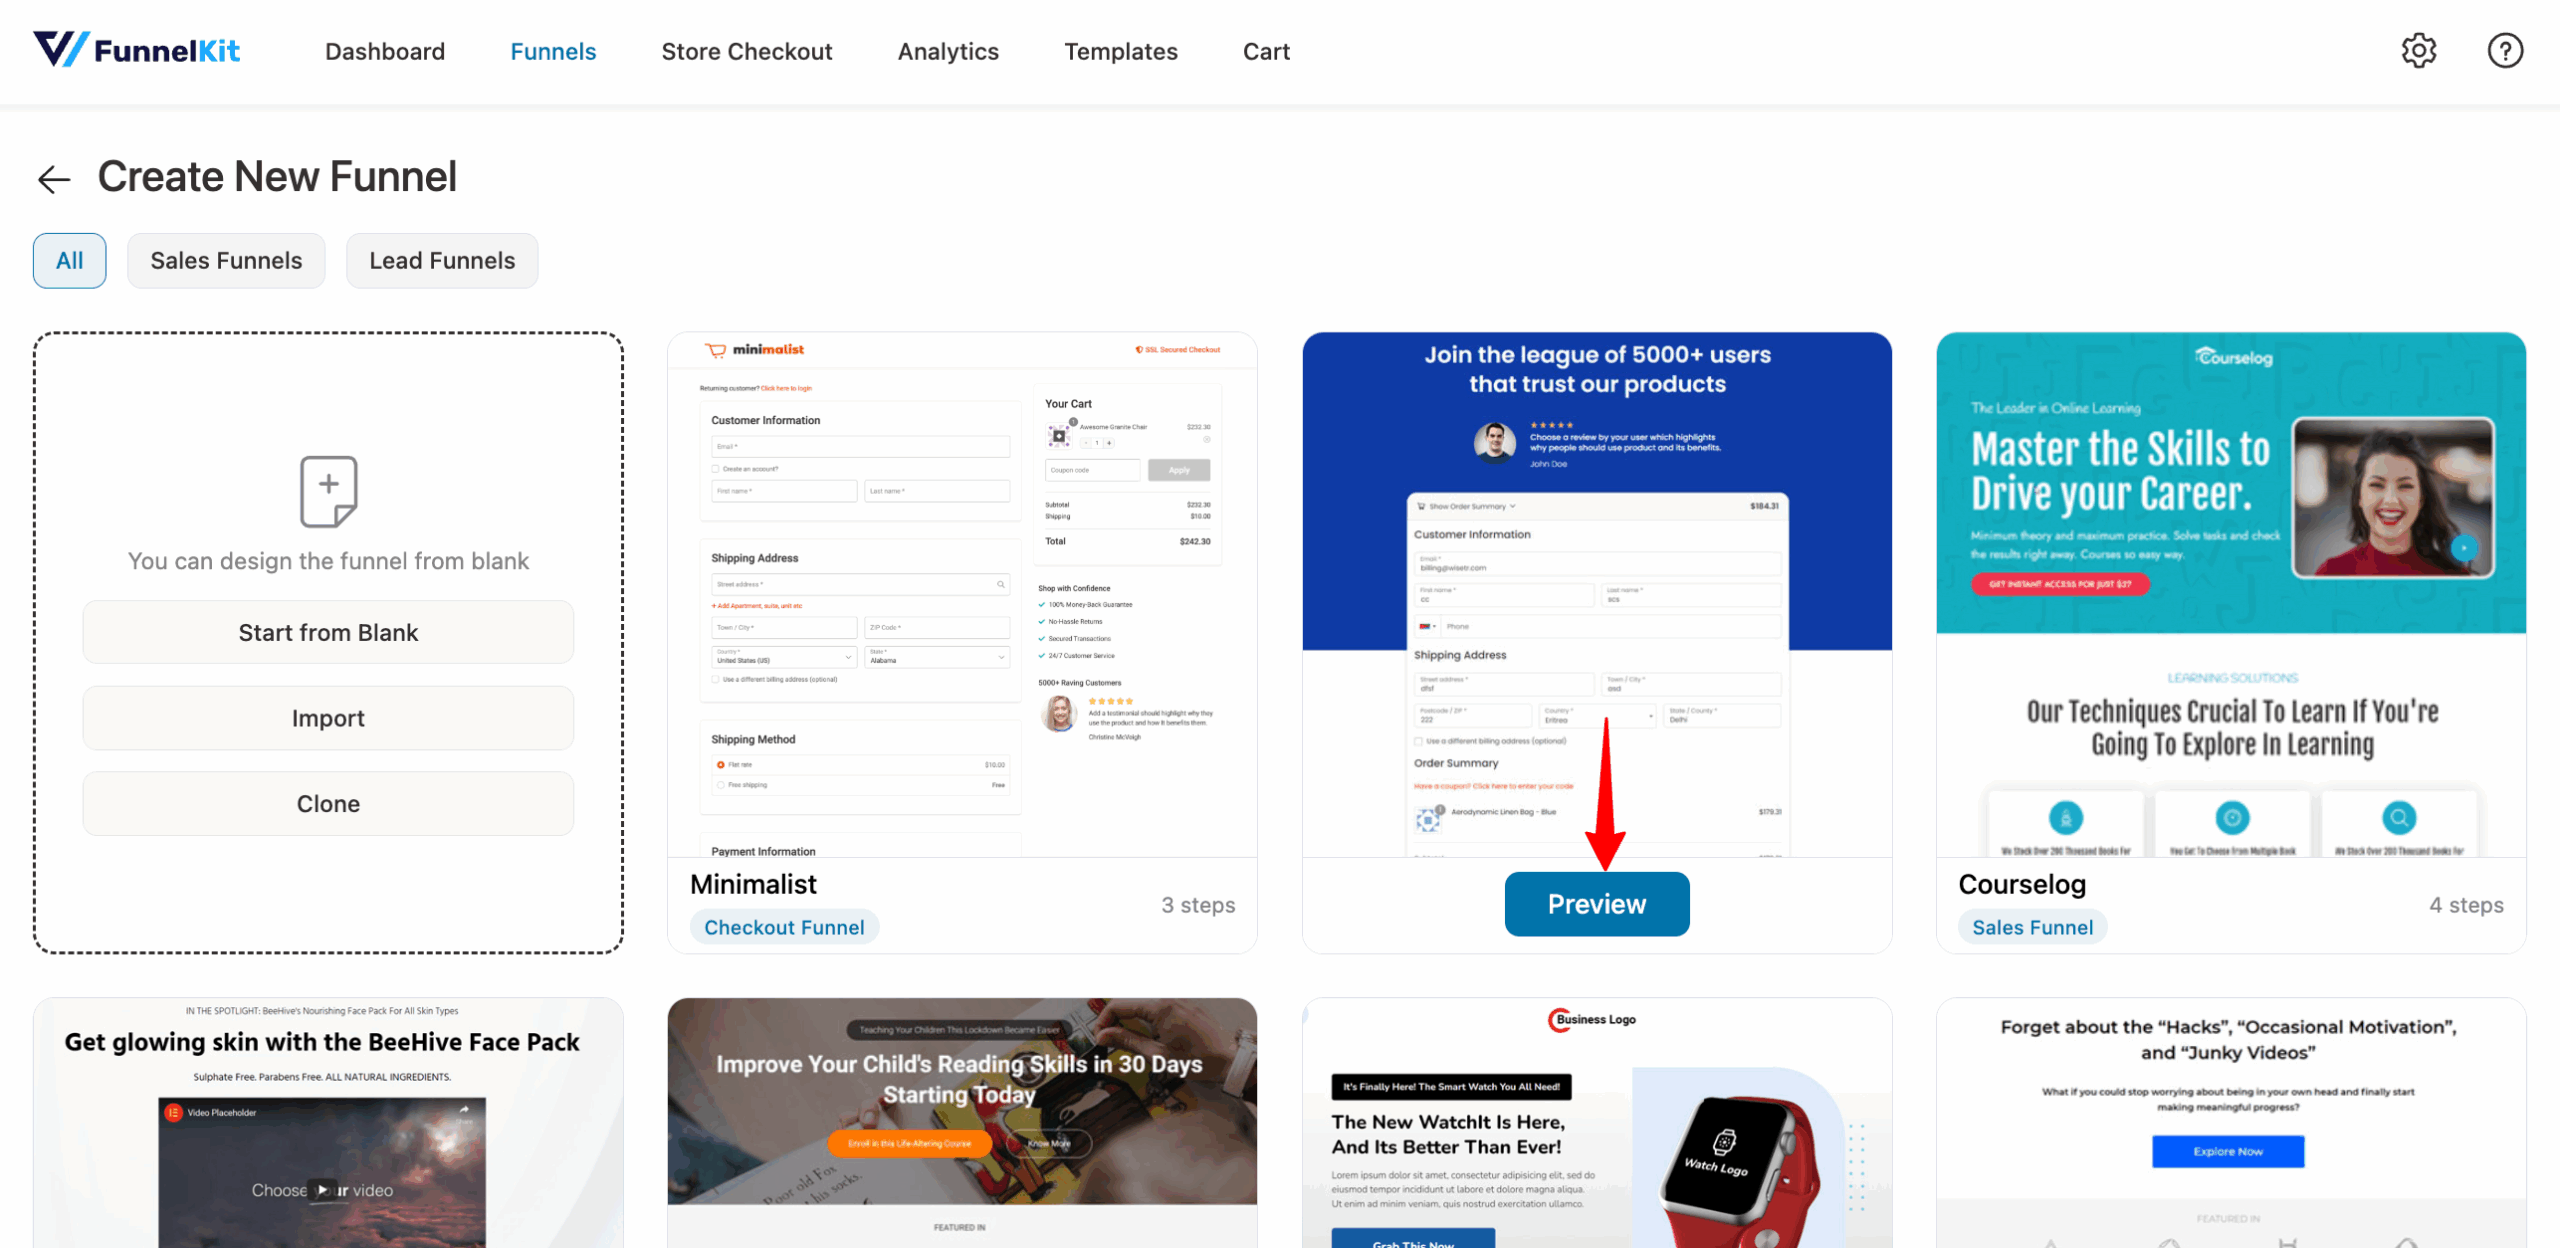
Here, you’ll be able to see a full preview of your checkout funnel. Select your checkout steps, click Import This Funnel, and then name your funnel.
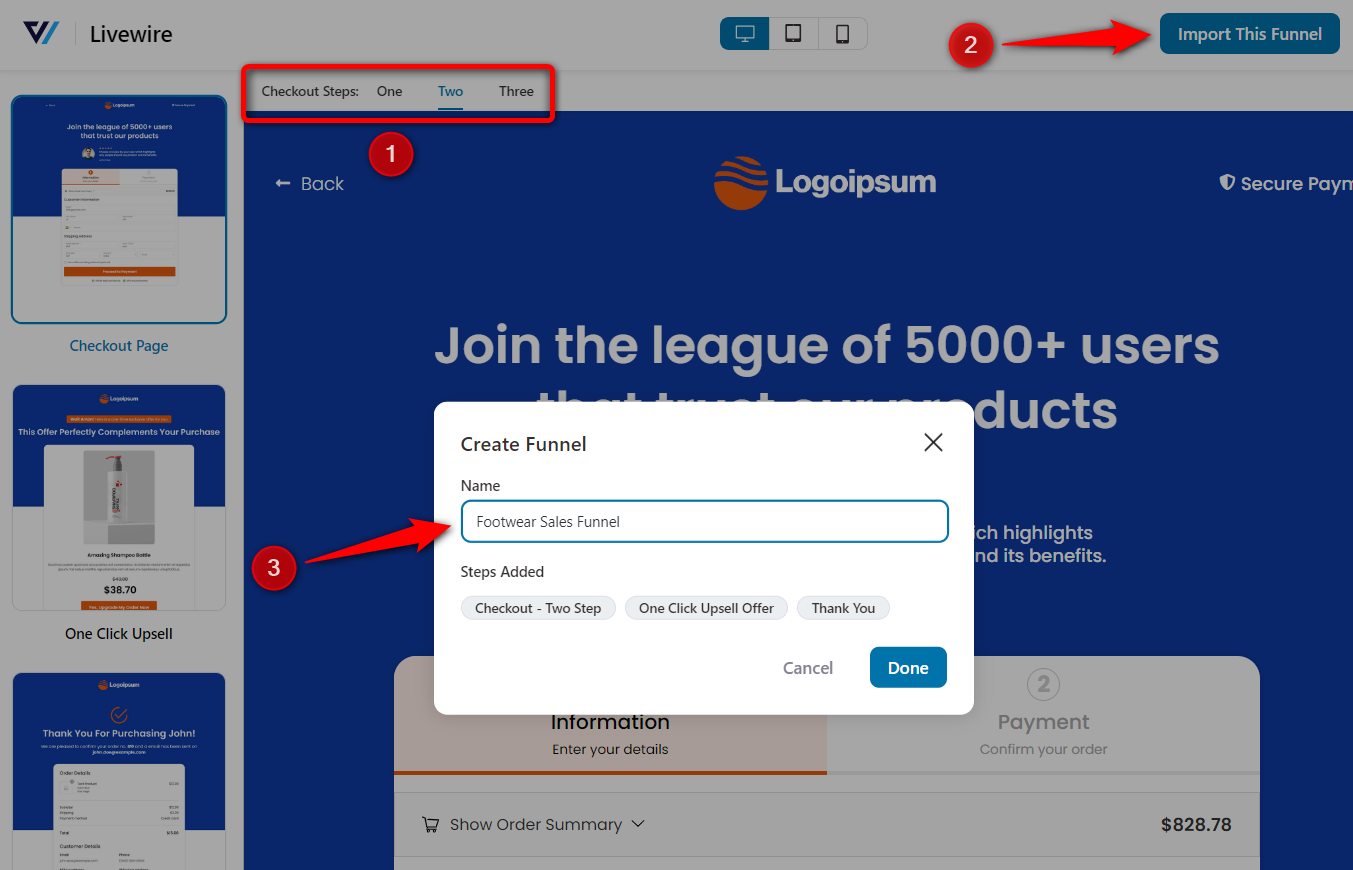
Clicking 'Done' will create this funnel, along with the checkout and thank-you pages.
Step 2: Add new fields to WooCommerce checkout forms
Click on the name of your checkout page to start editing it.
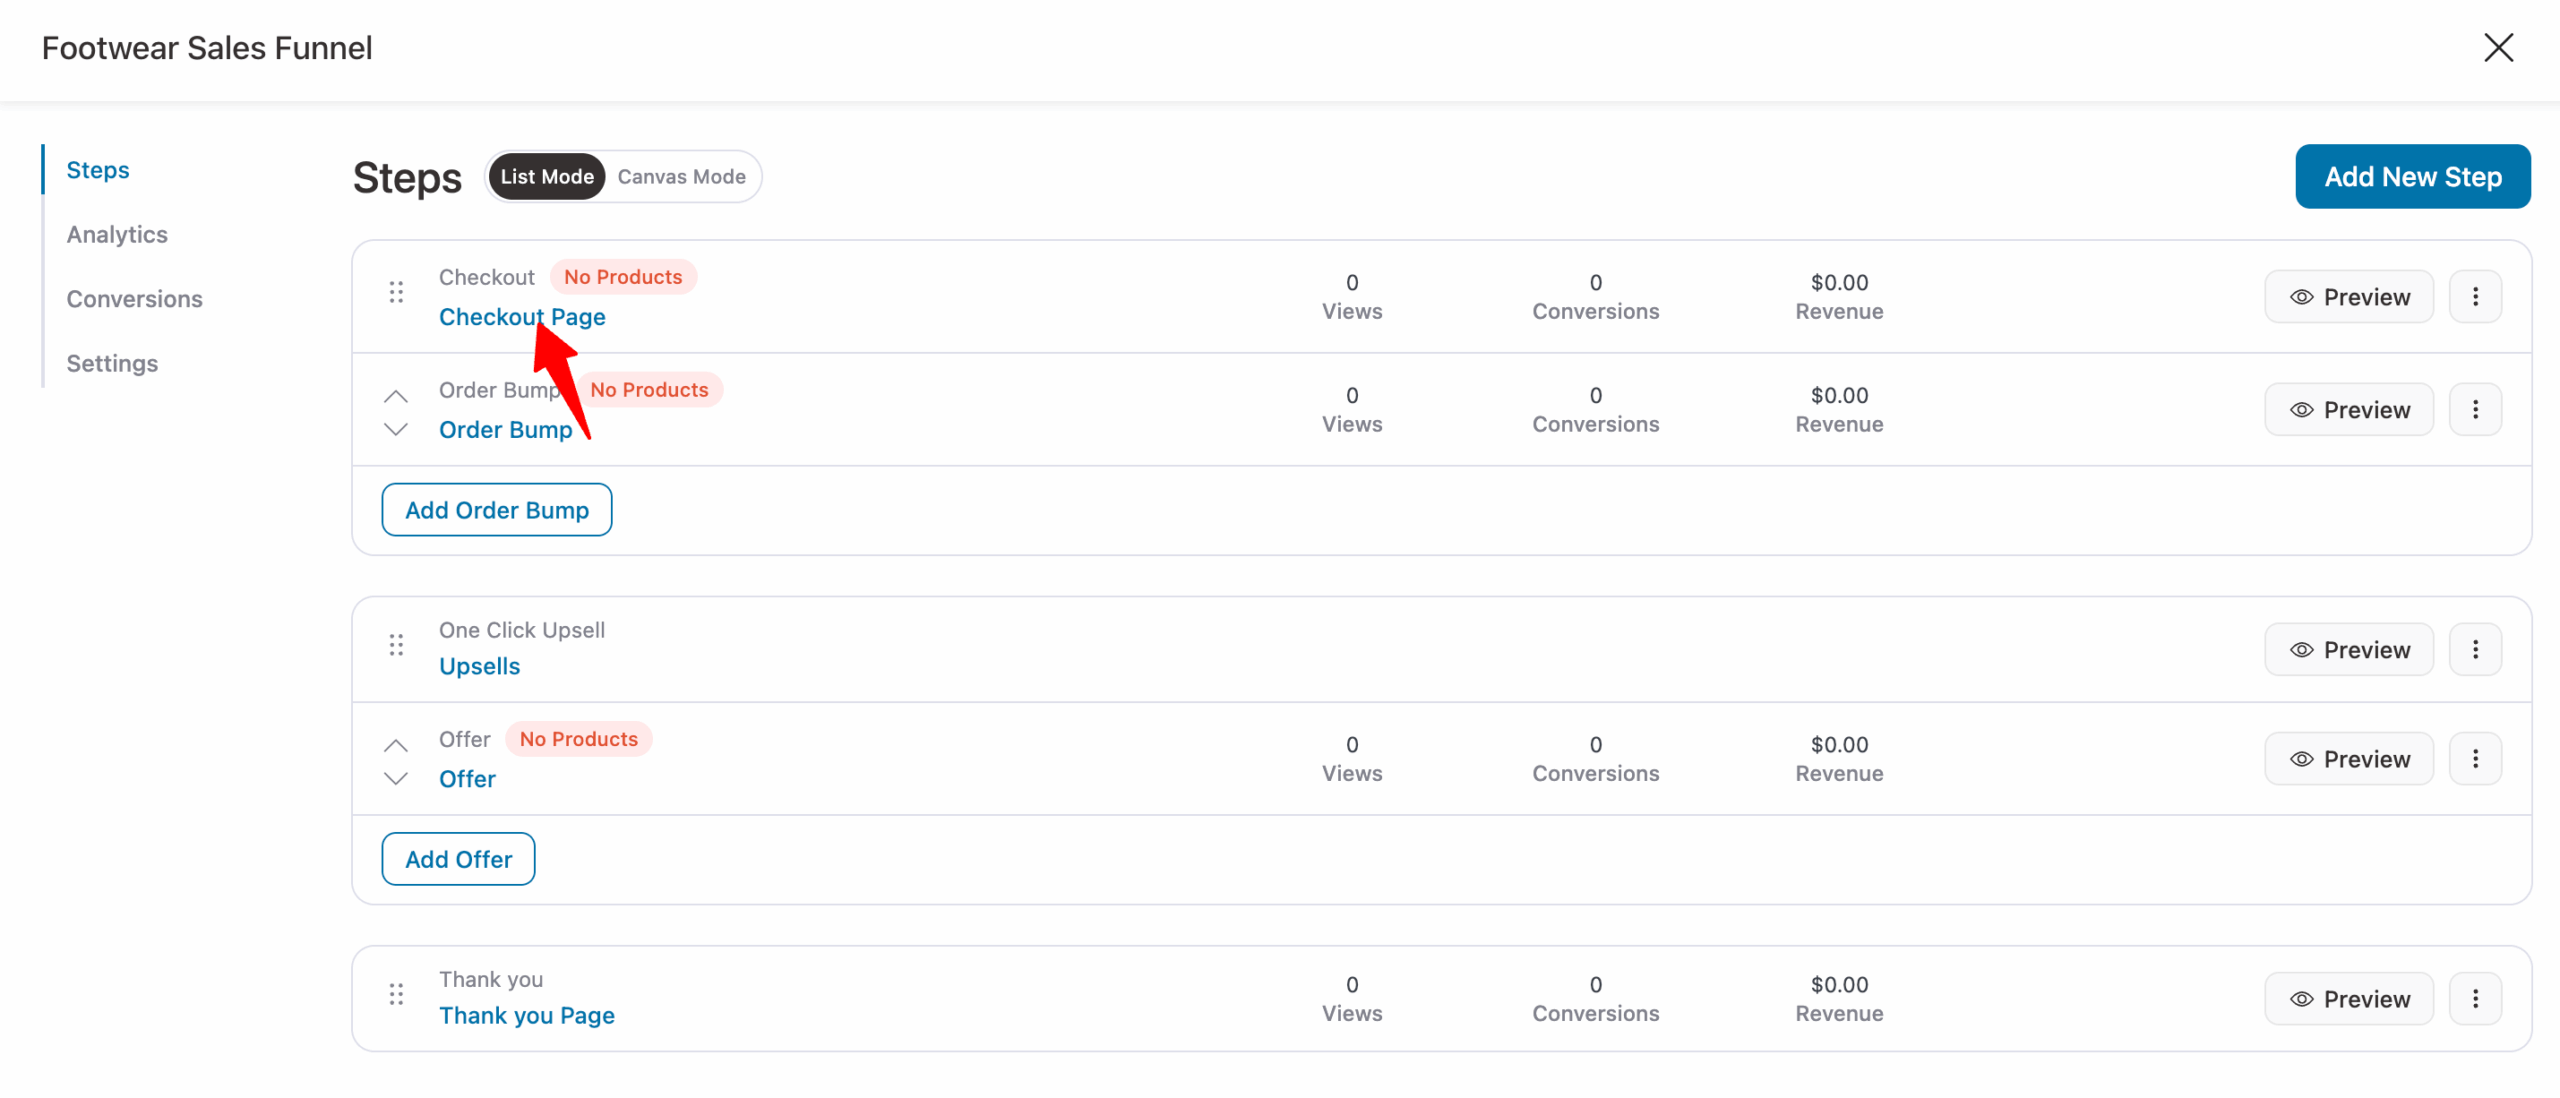
It’ll direct you to the Design tab, where you can customize the checkout page. You can change its design, content, style, and more such settings.
There are many widgets available, such as the Checkout Form and Mini Cart, to set up your checkout page the way you want.
On the Design tab, scroll down to the ‘Checkout Form Fields’ section to witness the real power of FunnelKit’s checkout field editor in WooCommerce.
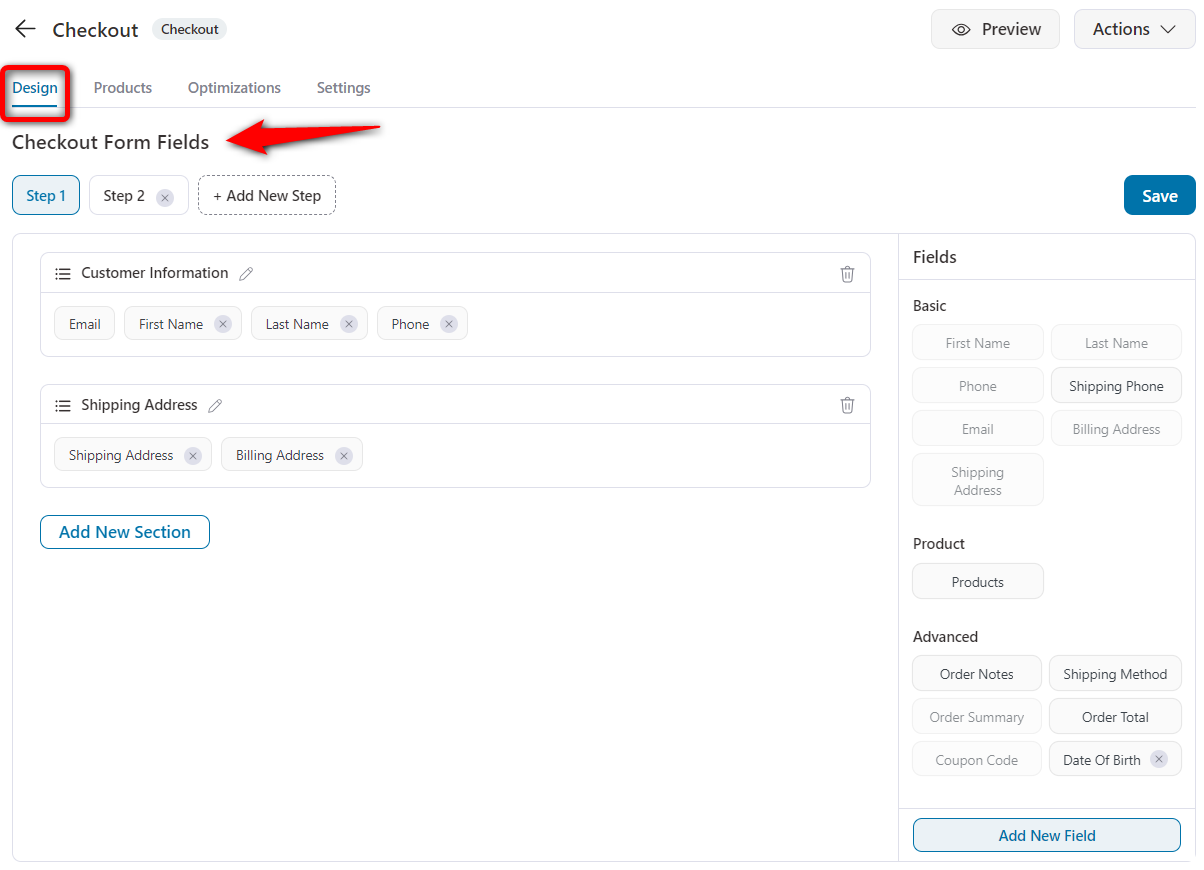
You'll see the steps you’ve selected when importing your checkout funnel, along with default fields.
FunnelKit's WooCommerce checkout field editor gives you complete flexibility to add new steps and rearrange sections, fields, and more.
Add a section to the WooCommerce checkout form
To add a section, click on the Add Section button.
Enter the section name, subheading, and classes for this section.
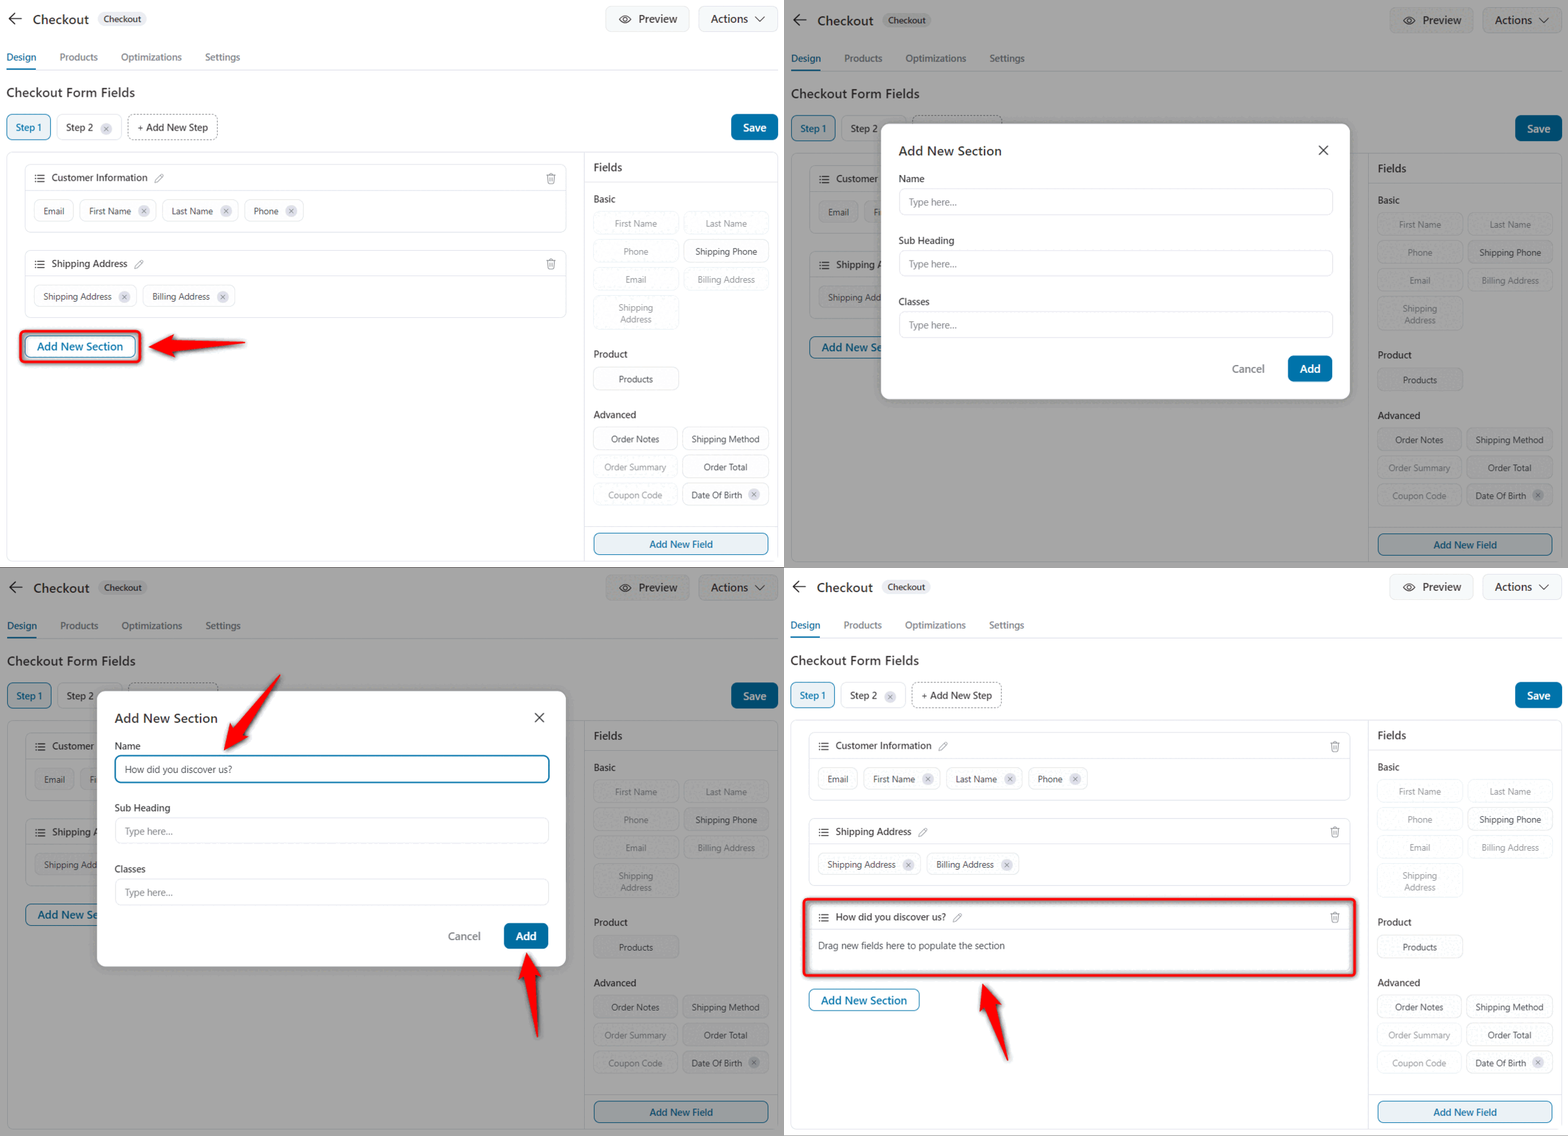
Clicking on ‘Add Section’ will add the new section to your checkout form.
Add a custom WooCommerce checkout field
FunnelKit’s checkout field editor for WooCommerce lets you add custom fields to your checkout.
Click on the ‘Add New Field’ button to create a new checkout form field.
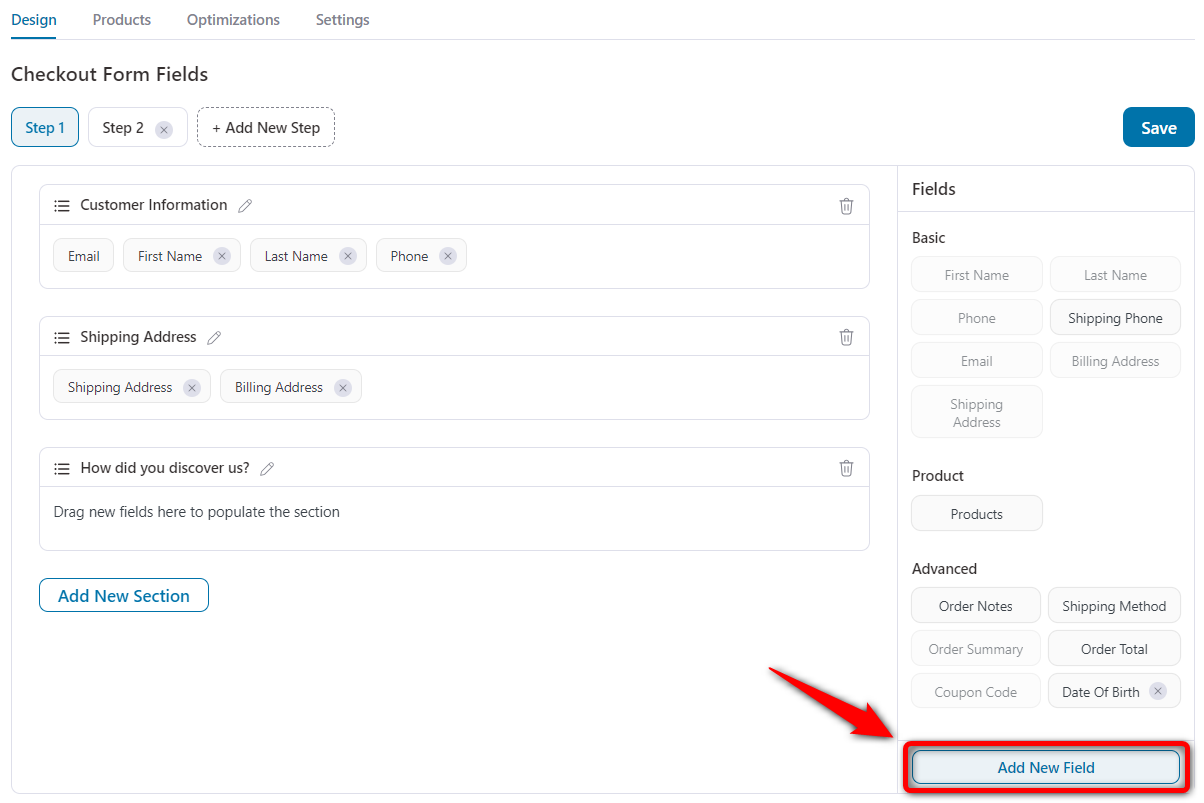
Our WooCommerce checkout field editor from FunnelKit lets you choose your field type from the drop-down menu.
It can be a single-line text field, a checkbox, a radio button, HTML, a multi-select, a paragraph, a dropdown, a password field, etc.
For example, we have created a radio field with a label, field ID, and radio options to store your customers’ responses.
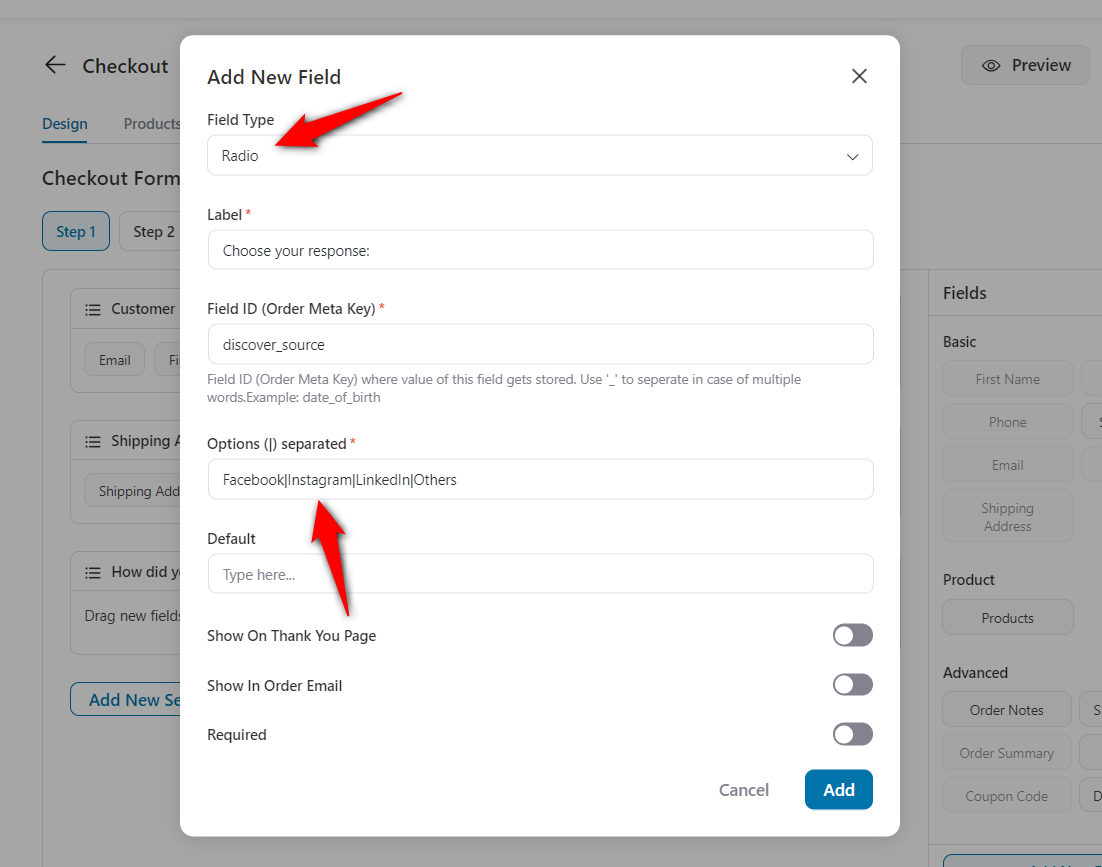
Once done, click on ‘Add’ to create this custom field.
Not only these fields, FunnelKit Funnel Builder integrates with various WordPress plugins to help you set up additional fields on the checkout page:
- EU VAT number
- Donation options
- File uploads
- CAPTCHA
- Terms and conditions
- Additional fees
- Checkout add-ons
Next, drag and drop the custom field you’ve created under the section you want.
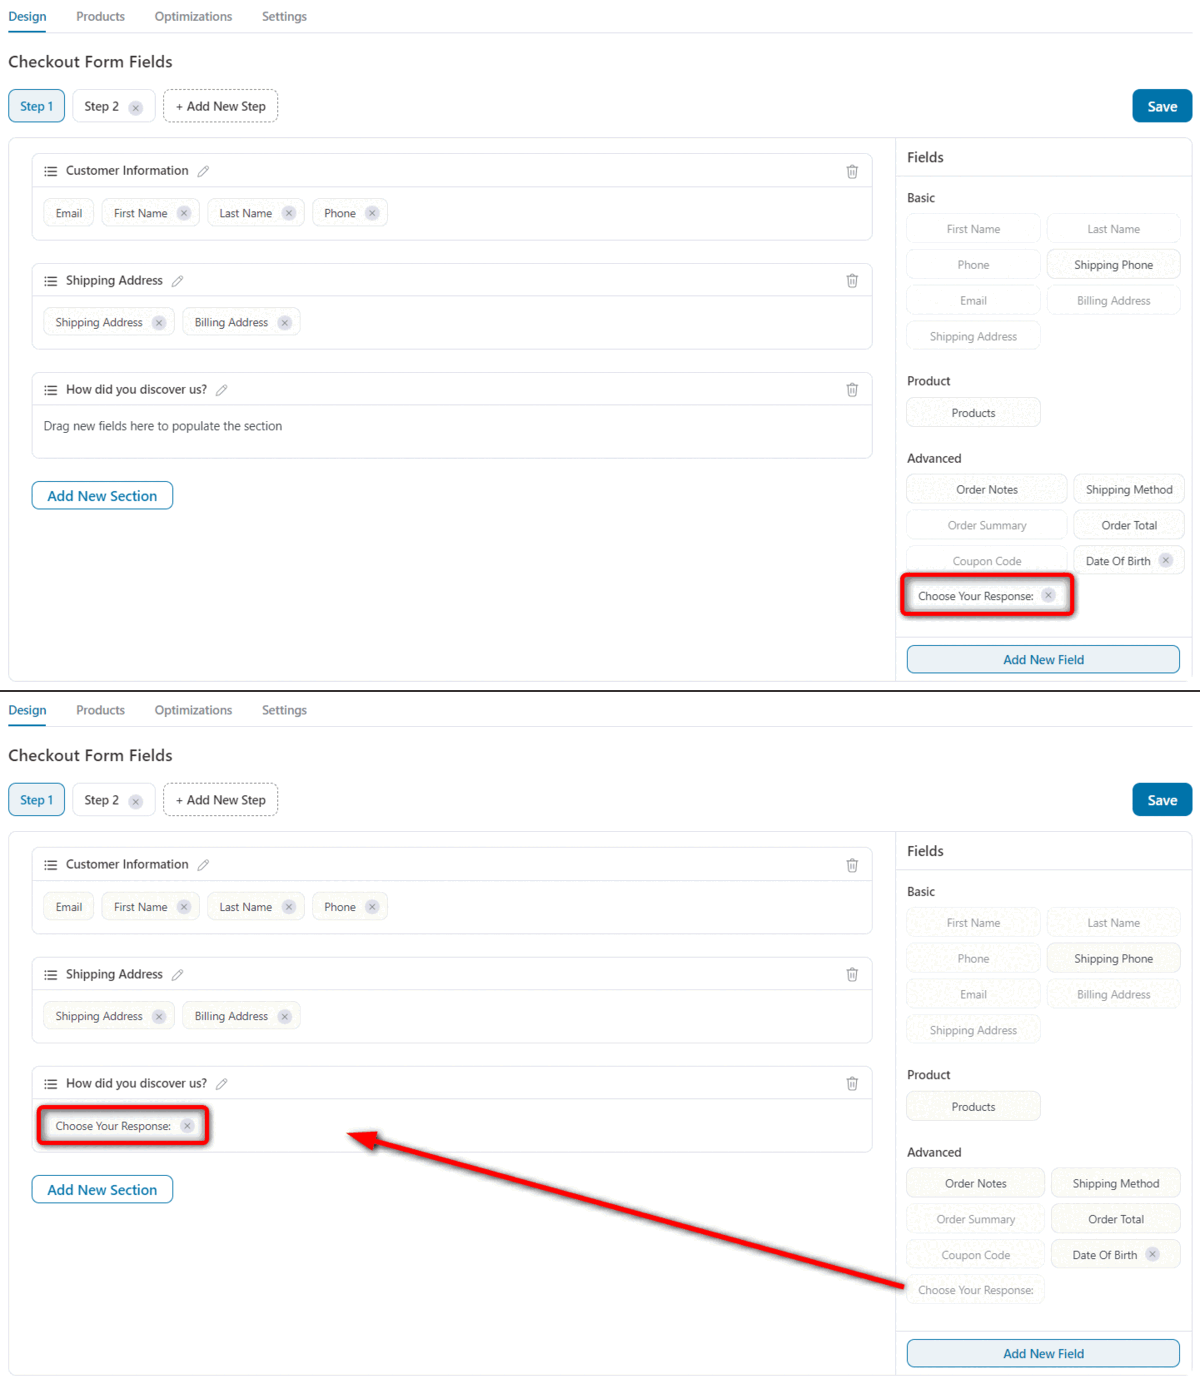
Hit ‘Save Changes’ to lock in the changes you made. Click on the ‘View’ button to preview your checkout.
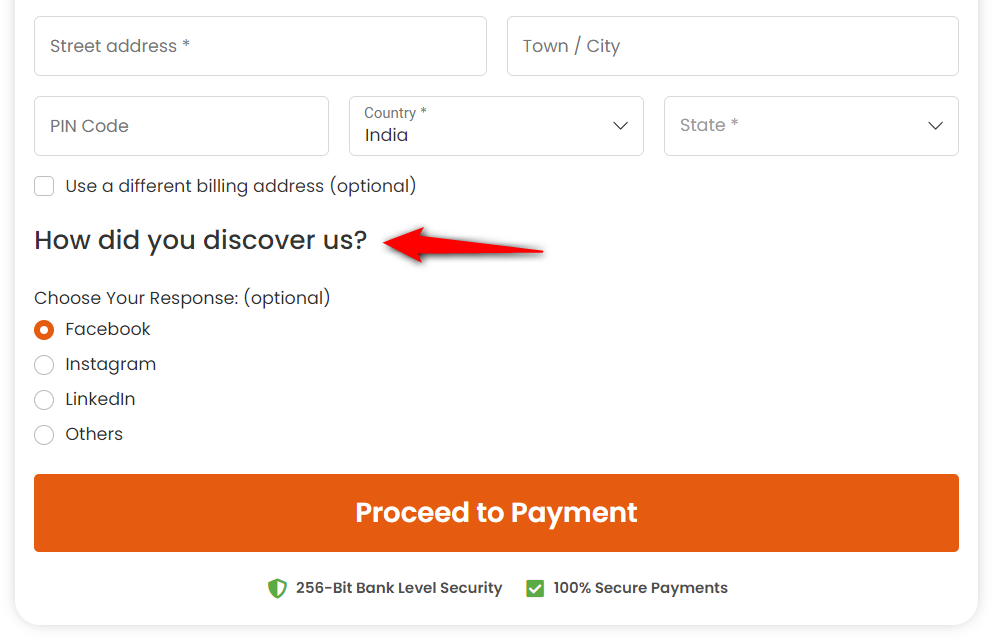
It’ll allow you to see the changes made at the front end.
Step 3: Customize the WooCommerce checkout fields
FunnelKit Funnel Builder lets you edit and rearrange the fields and sections on your checkout page.
Rearrange the WooCommerce checkout field
All it takes is a simple drag-and-drop. Drag the field or section you want to move and drop it to place it there.
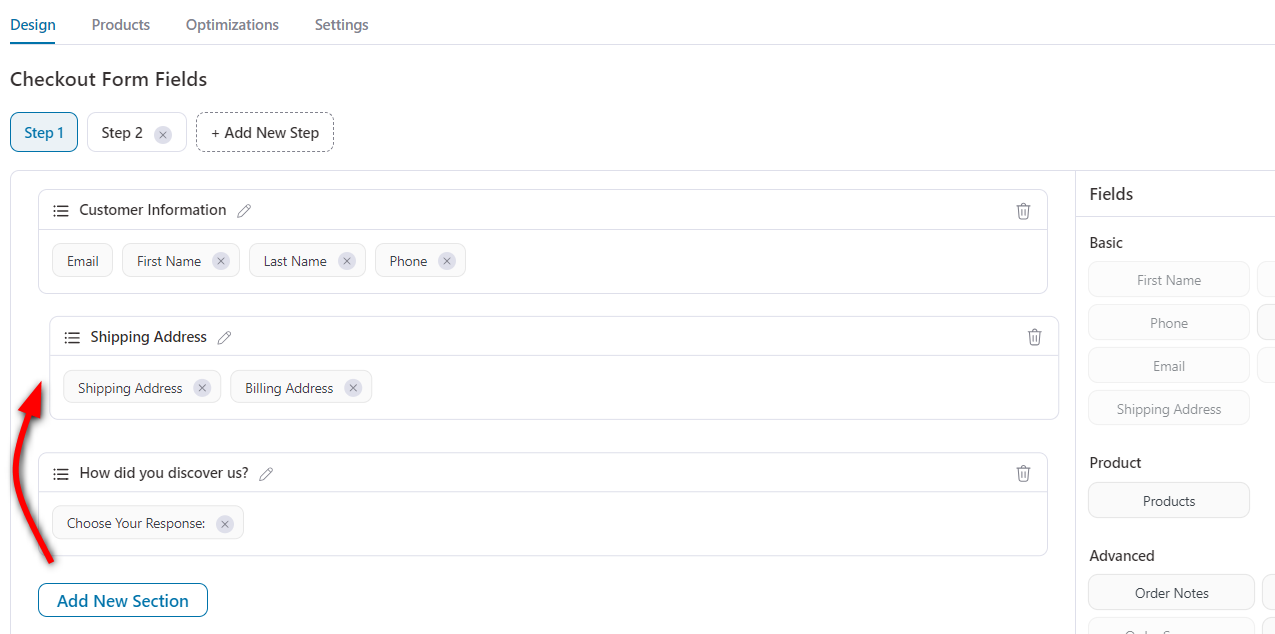
You can effortlessly rearrange your WooCommerce checkout form fields and sections with FunnelKit Checkout.
Here, we have kept the customer's and shipping address information on the first step and the WooCommerce payments field on the last step.
Edit the WooCommerce checkout field
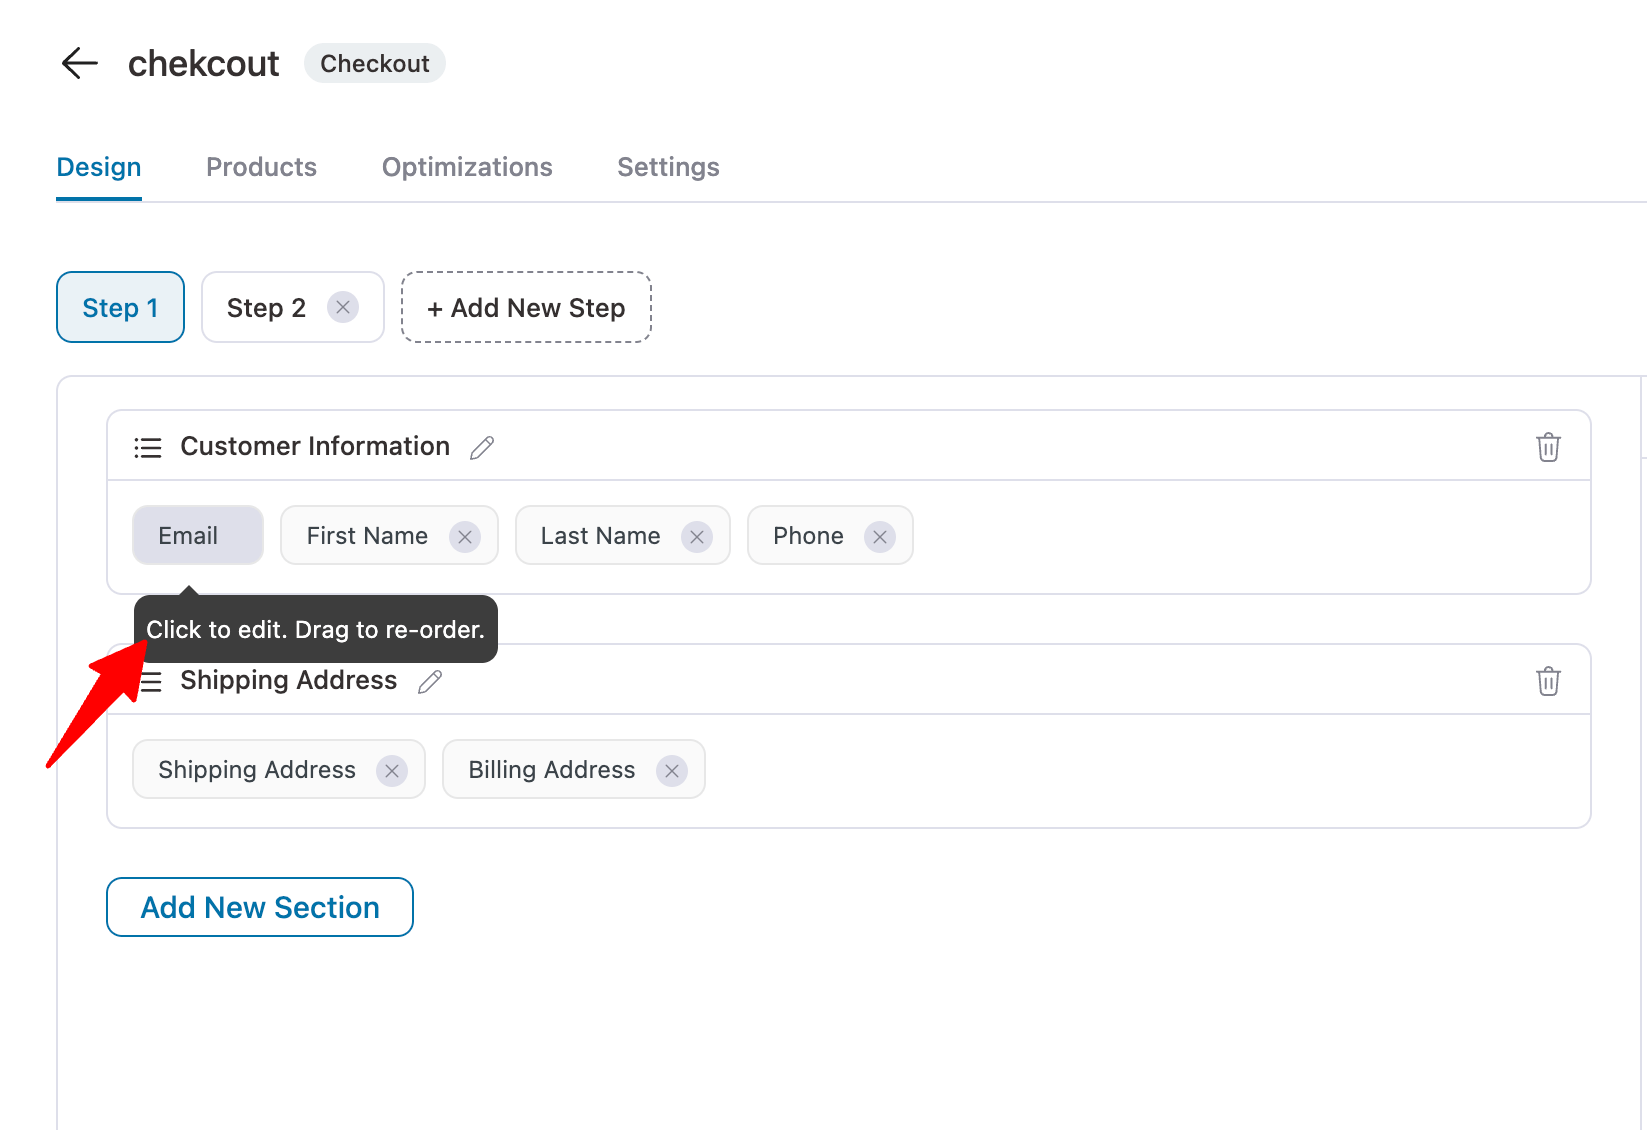
Clicking any field lets you edit that field in your checkout form.
Let’s say you want to edit the email field.
To do so, hover on the field and click to edit.
Then you can update the label and placeholder, and choose whether it should be required or optional.
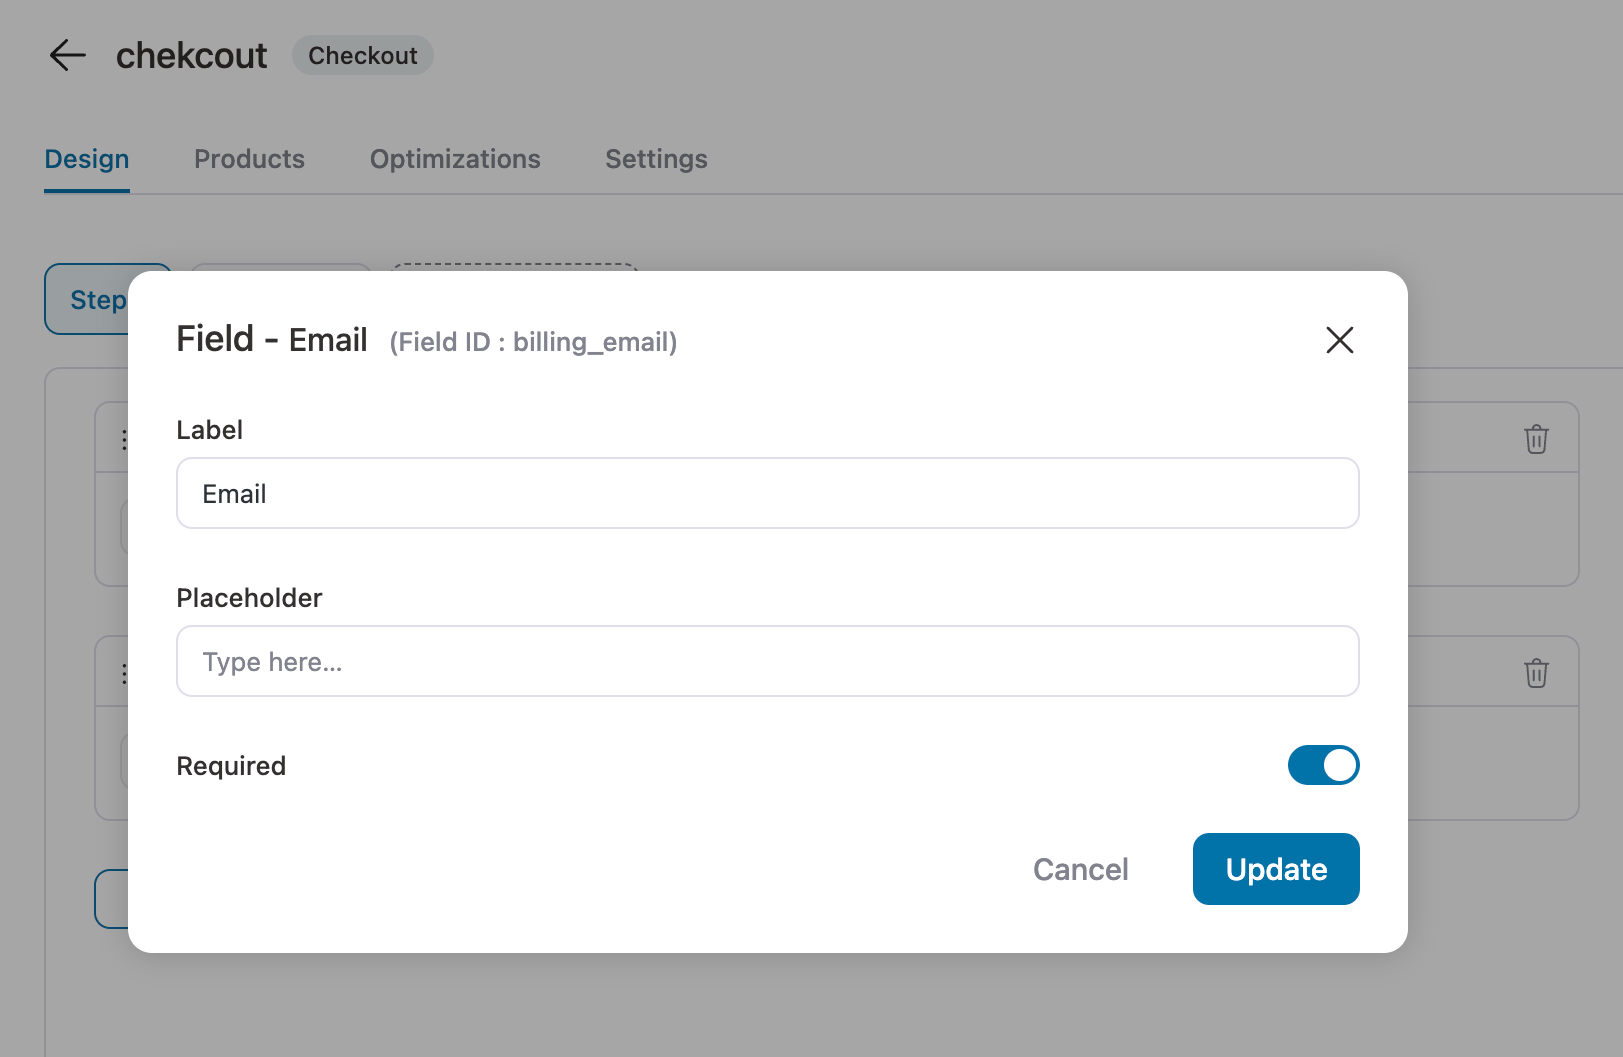
This way, you can edit all the checkout fields.
Step 4: Manage, hide, or delete checkout fields
You have the option to hide, disable, or delete any field as needed.
Hide or disable any checkout field
For instance, if you'd like to remove the company option from the shipping or billing address, simply click the field to edit it, then click the eye button to disable it.
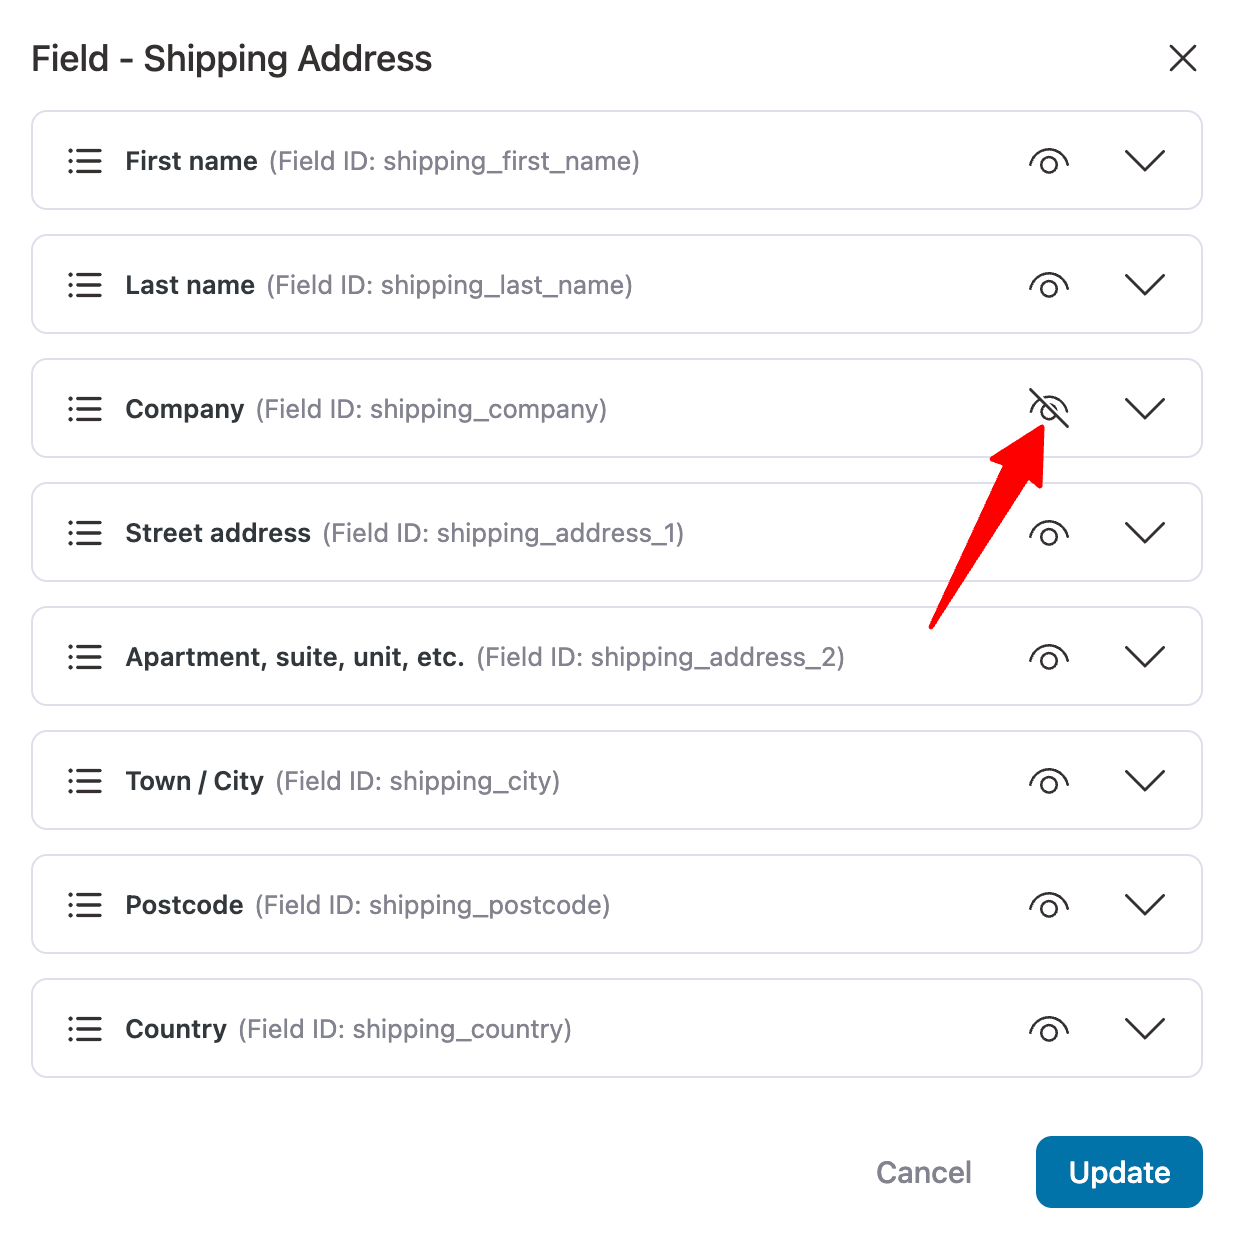
Further, you can enable or disable the “Use a different shipping address” section. It gives users an option to enter a billing address different from the shipping one.
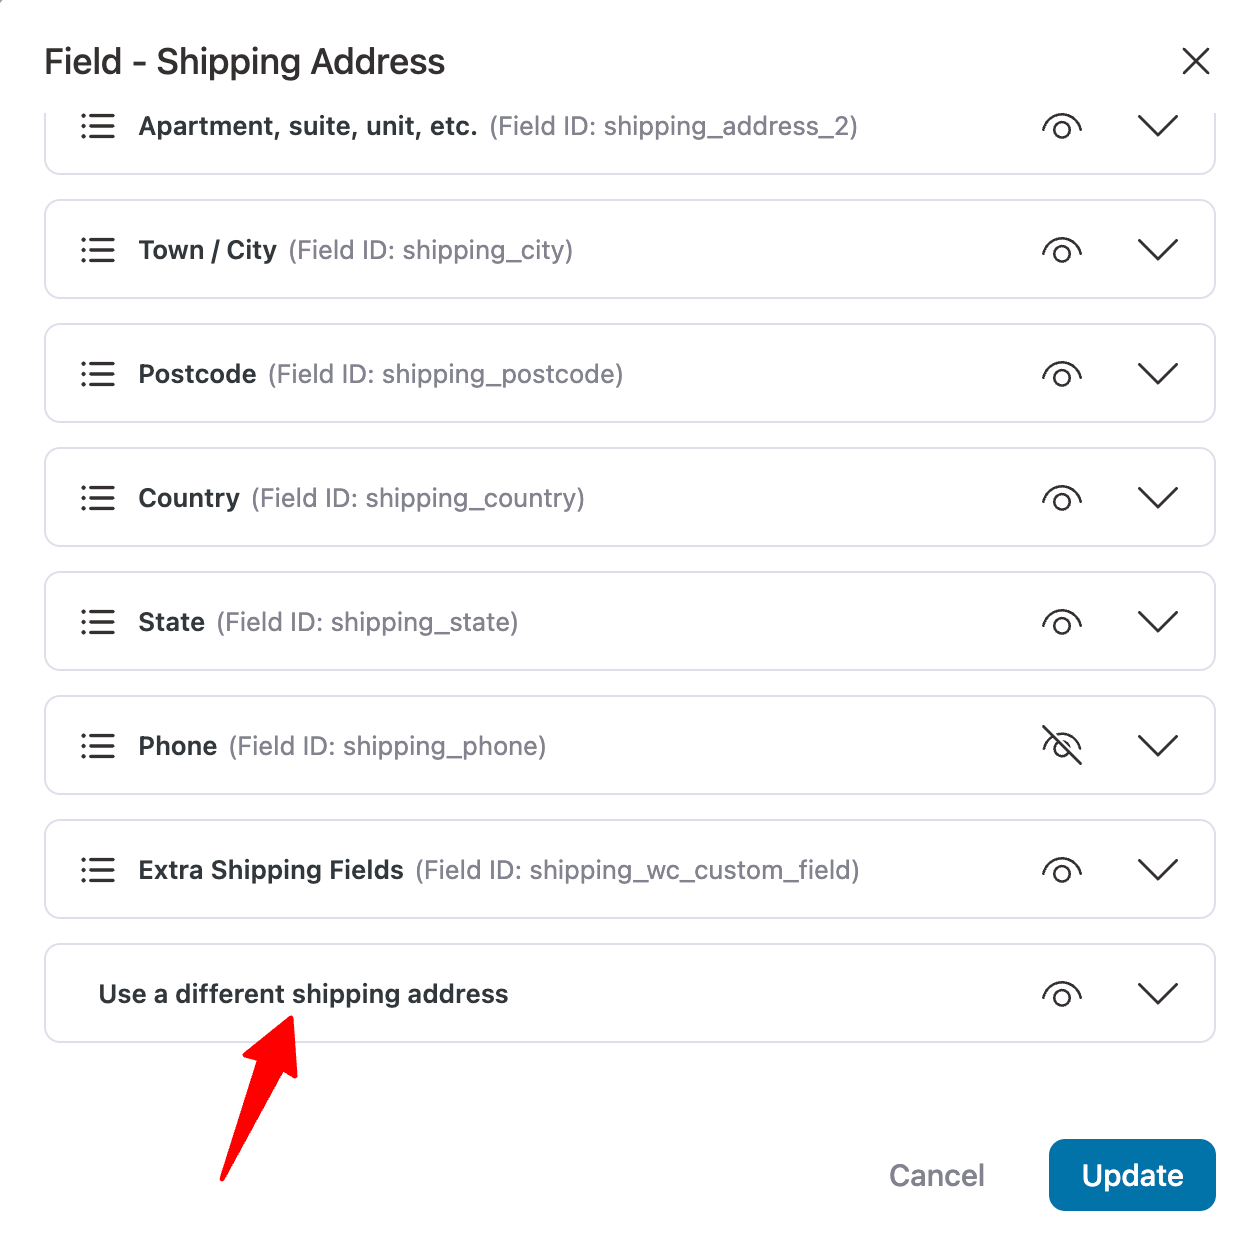
Make sure to hit the 'Update' button when done.
Delete a WooCommerce checkout field
FunnelKit Funnel Builder lets you remove any fields and sections that you don’t want on your checkout page.
To delete a specific section, click on the bin icon:
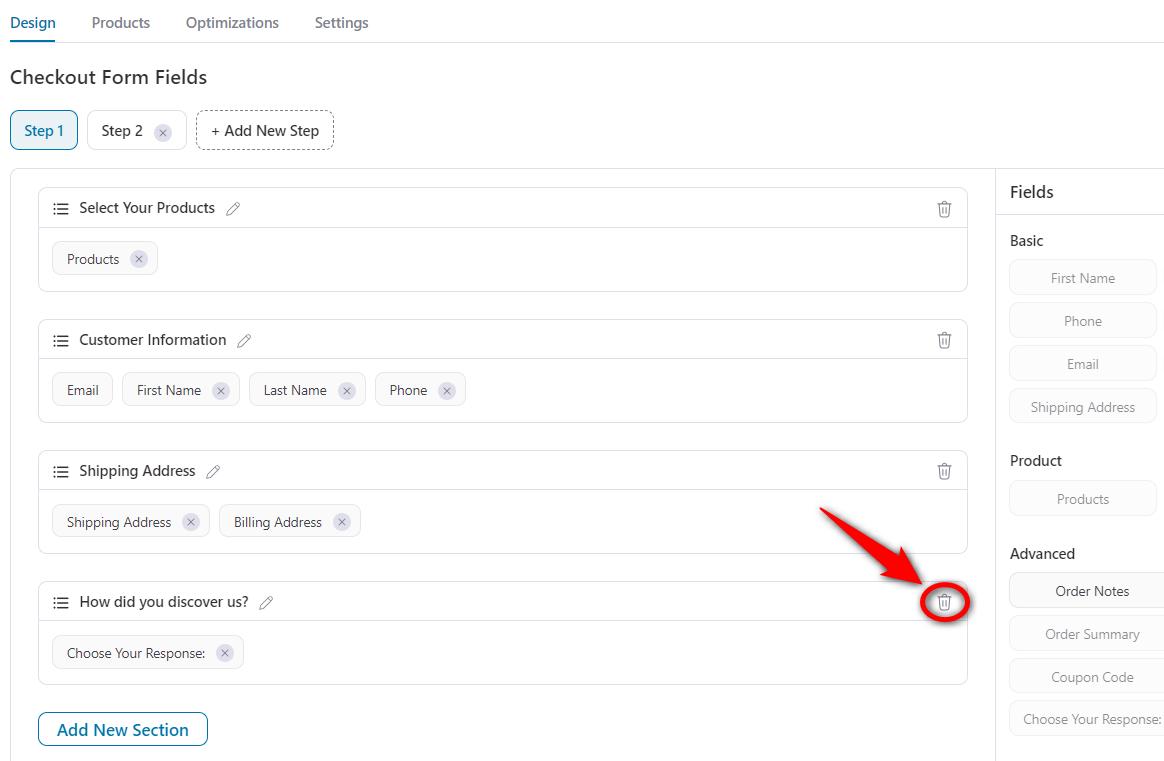
Furthermore, if you want to remove a specific checkout field, click on the cross button next to that field.
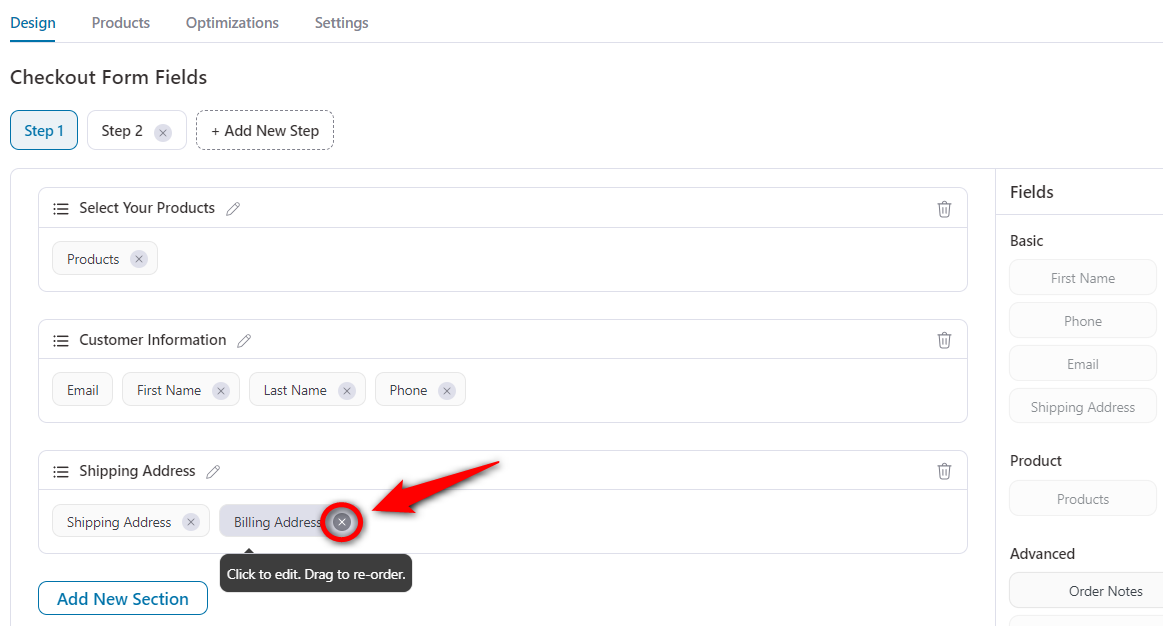
Click on ‘Save’ once you’re done.
Step 5: Customize product section using the checkout fields editor
Click on the ‘Products’ field to start editing.
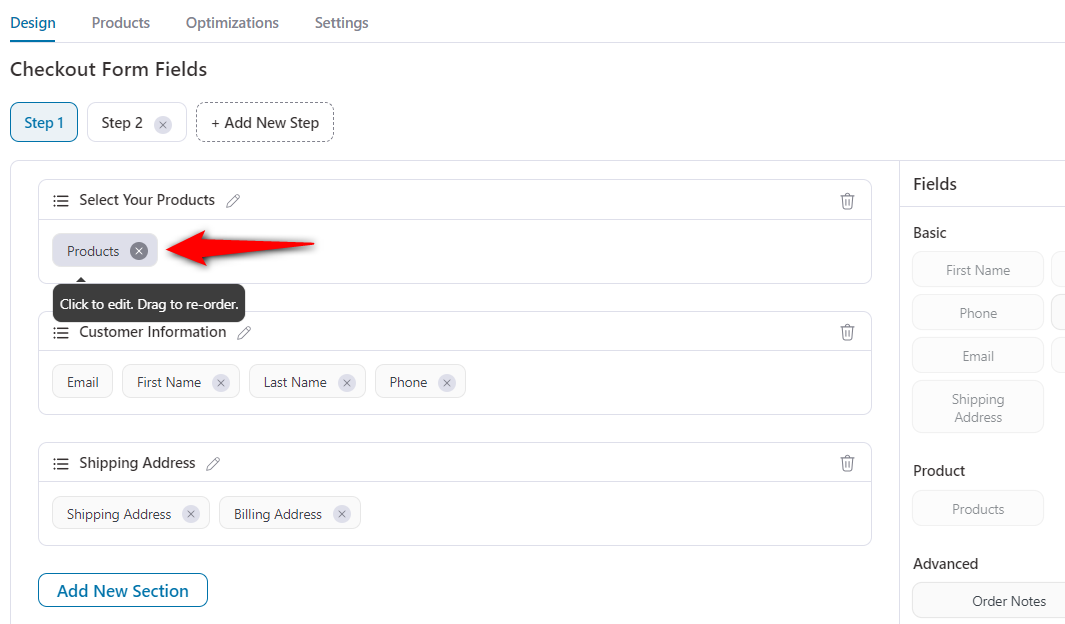
We have added variable products to the checkout. It includes one single product and a combo offer.
When customizing this field, you can write a brief about your offer below the product.
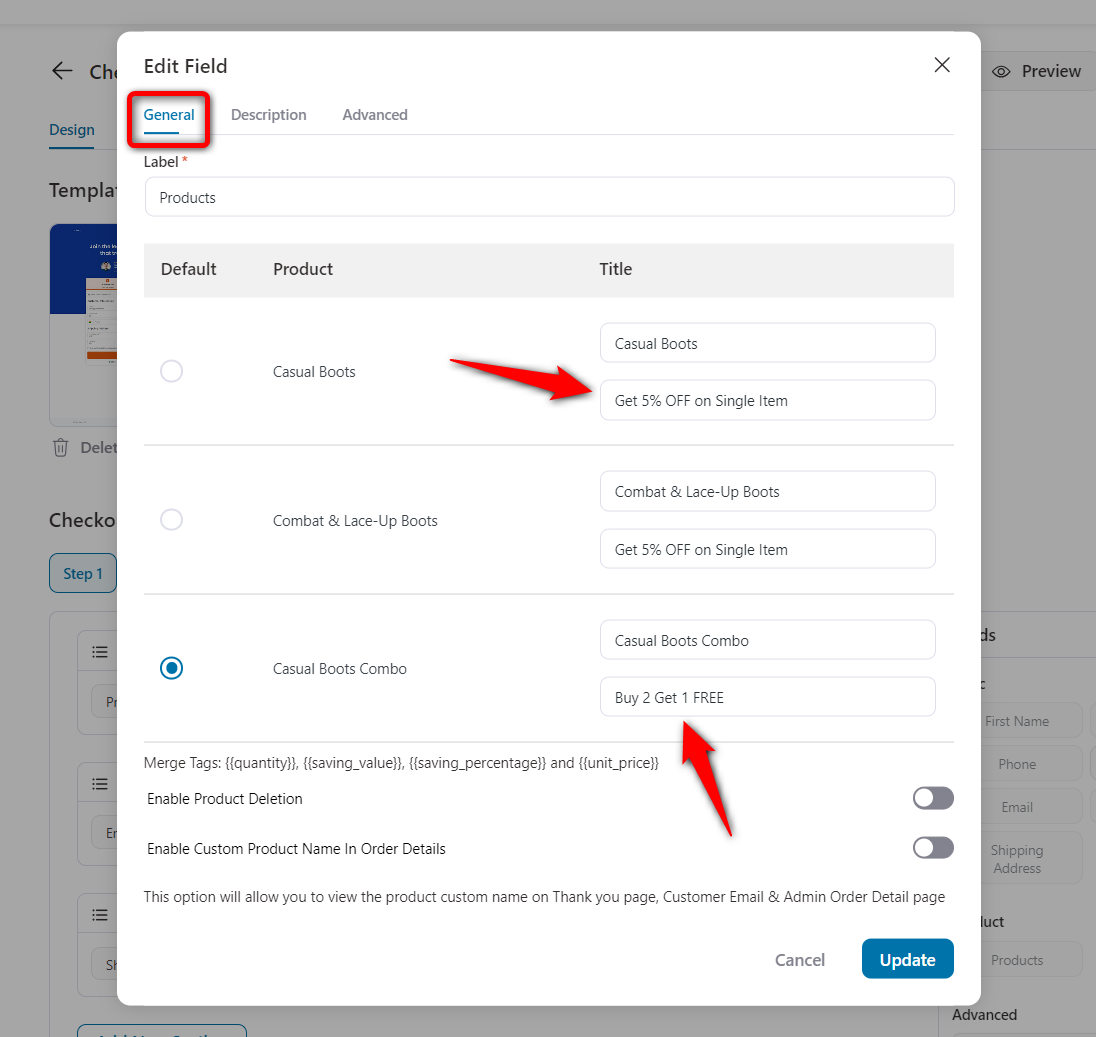
FunnelKit’s WooCommerce checkout field editor lets you write descriptions for your product.
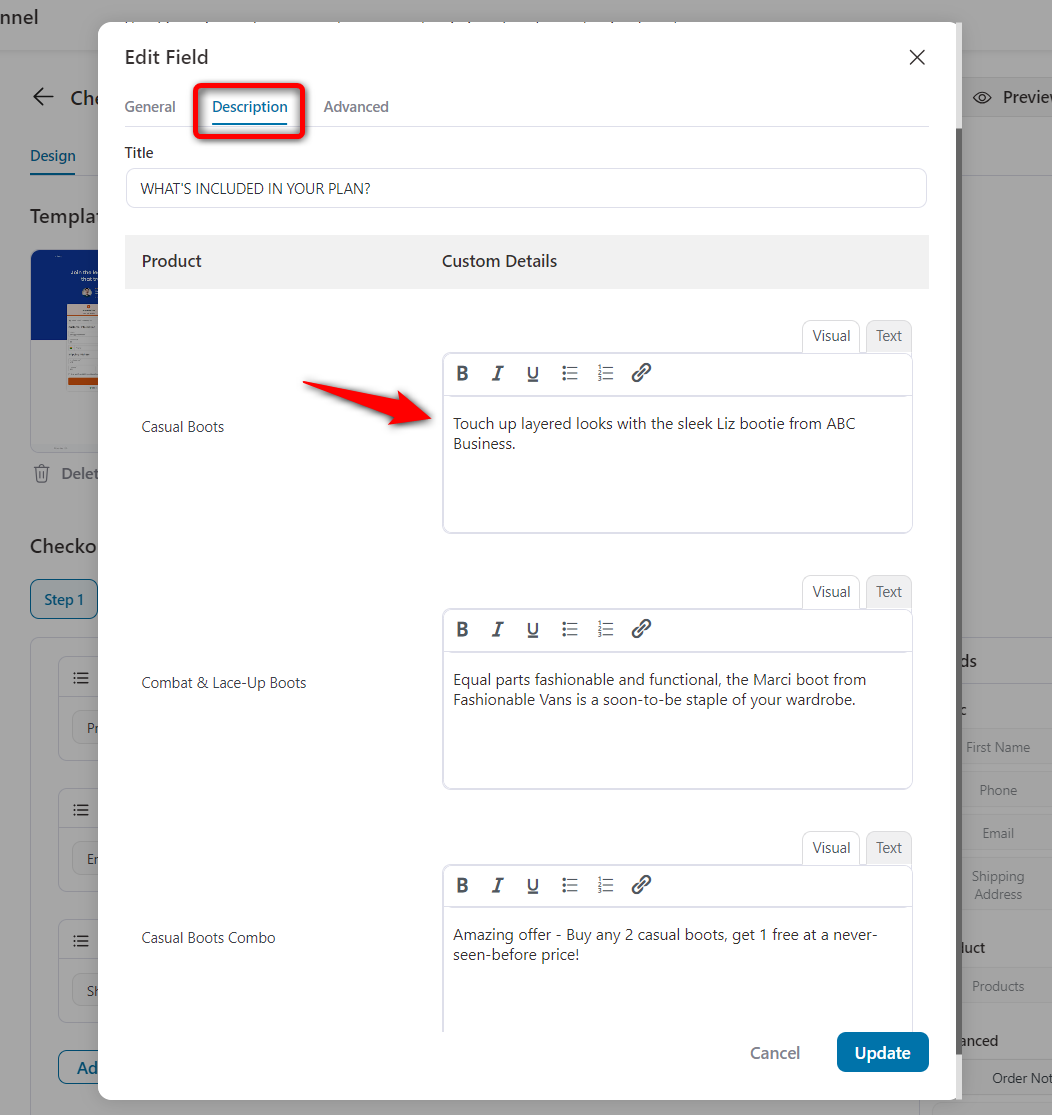
Go to the 'Description' tab and find the product you want.
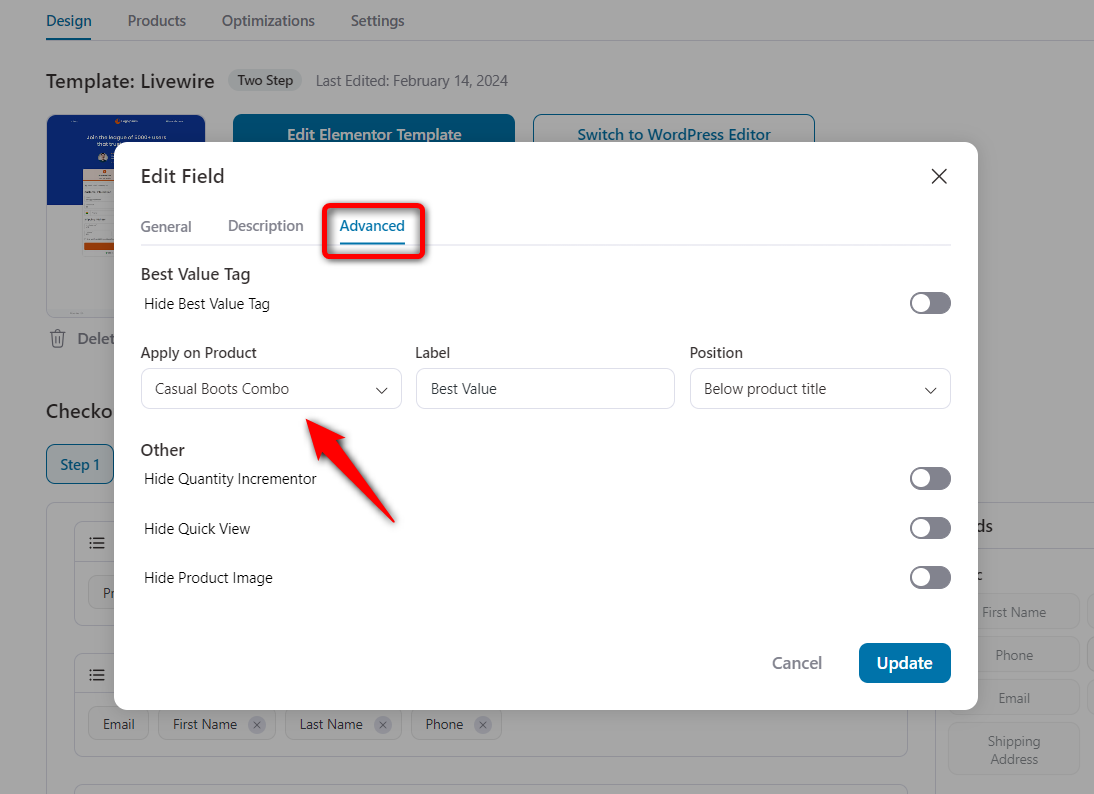
You can even add the 'Best Value' tag to your product on the Advanced tab.
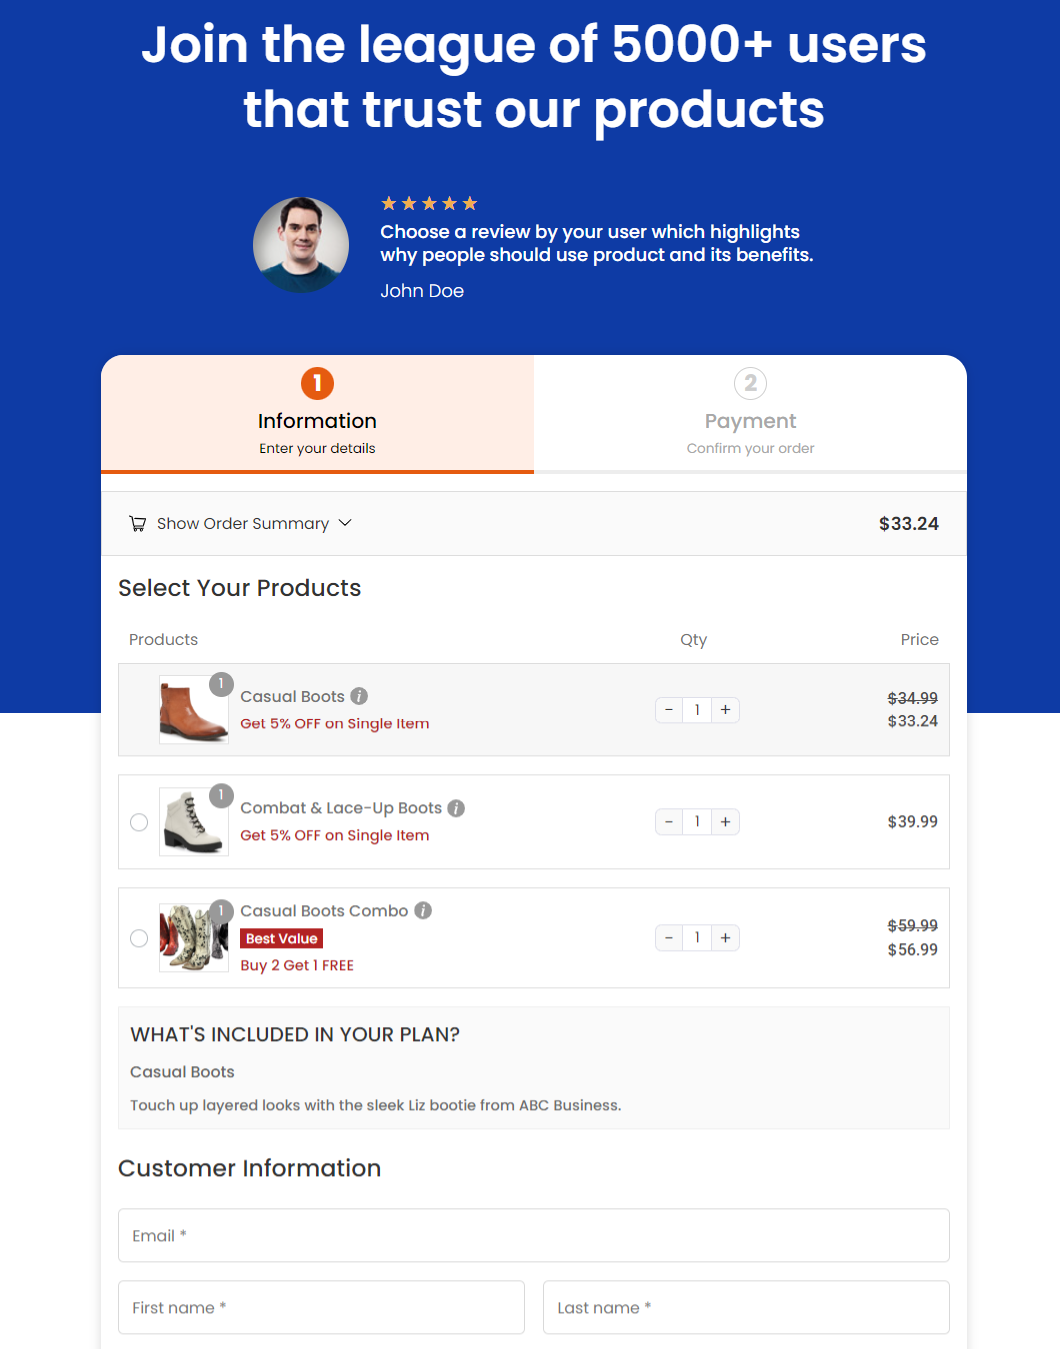
Here’s a quick view of how this looks on your checkout page:
Make sure to save the changes.
This is how you can use FunnelKit’s checkout field editor to customize different sections and fields for a faster checkout process. More importantly, the job is done without coding.
Like the checkout page, you can customize order bumps and one-click upsells to boost the order value in your store. And also, customize your thank-you page and keep the conversation going.
Well done! You’ve successfully optimized your checkout page by effectively modifying your WooCommerce checkout fields.
WooCommerce Checkout Field Editor: Frequently Asked Questions (FAQs)
Find answers to the most common questions related to WooCommerce checkout fields.
What is the best WooCommerce checkout field editor?
The best woocommerce checkout field editor is FunnelKit’s Checkout Field Editor because it lets you add, edit, remove, and reorder checkout fields with a simple drag-and-drop interface. It also supports conditional fields, multi-step checkout layouts, and advanced field types all without writing code.
Why should I customize WooCommerce checkout fields?
Customizing checkout fields in WooCommerce helps streamline the buying process, reduce cart abandonment, collect essential customer data, and improve order fulfillment. It also ensures compliance with legal or business-specific requirements.
How do I add custom fields to WooCommerce checkout?
You can add custom fields to your WooCommerce checkout by clicking on the ‘Add Field’ button in FunnelKit.
Select the type of field, label, field ID, required value, etc. Once done, click on ‘Add Field’ to create the new field.
How do I change the checkout field text in WooCommerce?
You can change the checkout field text in WooCommerce with the help of FunnelKit Funnel Builder. Go to the Fields tab under your checkout page and click on the specific field.
Change the label text of your checkout field and save the changes. This will modify the checkout field text.
How do I create an advanced custom field?
You can create advanced custom fields by going to the Fields tab in FunnelKit. All you have to do is hit the ‘Add Field’ button.
Choose the advanced custom fields under the field type. You can select radio, password, checkbox, multi-select, dropdown, HTML, and more.
Enter the label and related data, and your advanced custom field is ready to be used
Can I customize my WooCommerce checkout page?
Yes, you can easily customize your WooCommerce checkout page with FunnelKit. It has various checkout page templates that can be easily customized with any page builder.
Plus, you can also create custom checkouts such as one-page checkout, multi-step checkout, Shopify-style checkout, embedded order forms, etc., as per your requirements.
Is a checkout field editor compatible with all themes?
Most woocommerce checkout field editor plugins, especially FunnelKit FunnelKit Builder, are compatible with any WooCommerce-ready theme. They override the checkout form independently, so your theme does not limit the customization.
Can I add conditional or dynamic fields?
Yes. With FunnelKit Funnel Builder, you can easily add conditional fields for select type and radio button fields.
Ready to Use the Best WooCommerce Checkout Field Editor to Encourage Quick Purchases?
Using FunnelKit Funnel Builder, you can set up a faster buying process for your users in no time.
The plugin makes it easy for store owners to modify fields and sections within the checkout process.
Thus, you can use FunnelKit Funnel Builder's WooCommerce checkout field editor to quicken the checkout process.
Plus, with the FunnelKit Funnel Builder, you can also create high-converting sales funnels such as opt-ins, checkouts, one-click upsells, and thank you pages.
It’s a must-have tool to bring more sales than ever before!
Are you ready to customize your WooCommerce checkout fields and save your shoppers valuable time?
Editorial Team
February 3, 2026Do you know what’s worse than an abandoned cart? Not knowing why it happened! Your WooCommerce store could be losing sales right now, but you wouldn’t even know it if...
Editorial Team
February 2, 2026Adding a dropdown list to WooCommerce checkout lets you collect structured information from customers instead of relying on messy order notes. Whether you need delivery preferences, gift options, or marketing...

Editorial Team
January 22, 2026Are you looking for WooCommerce checkout optimization hacks to streamline your users’ shopping experience? Your WooCommerce store may have an attractive layout with a user-friendly interface. You may even have...


