
Imagine having a simple link that takes your customers directly to the checkout page, with their products already in the cart.
This is exactly what a WooCommerce checkout URL allows you to do.
By creating a direct checkout URL, you can streamline the buying process, eliminating the need for customers to navigate through multiple pages.
Whether you're running a promotion, recovering abandoned carts, or sharing a product link on social media, a direct WooCommerce checkout URL can simplify the user experience and drive more conversions.
In this guide, we will show you how to create checkout URLs for simple, variable, and grouped products, along with tips on setting quantities and applying coupons directly via the URL.
Table of Contents
- 1 What is a Direct WooCommerce Checkout URL?
- 2 6 Use Cases When You Need to Use a Direct Checkout URL
- 3 How to Create a Direct Checkout URL In WooCommerce and Change Quantity?
- 4 Method 1: How to Create a Direct Checkout URL in WooCommerce And Change Quantity Manually
- 5 Limitations of Creating WooCommerce Checkout URLs Manually
- 6 Method 2: How to Create a Checkout URL in WooCommerce Using a WordPress Plugin
- 7 How To Auto-Apply a Coupon in the Direct Checkout URL in WooCommerce
- 8 How to Add Different Types of Products Using One Checkout URL?
- 9 More Questions About WooCommerce Checkout URL
- 10 Ready to Use a WooCommerce Checkout URL?
What is a Direct WooCommerce Checkout URL?
A direct WooCommerce checkout URL is a custom link that takes customers straight to the checkout page, preloading their cart with selected products for a faster, more streamlined purchasing experience.
This URL bypasses the shopping cart page entirely, speeding up and improving the purchasing process for your customers.
For example, a WooCommerce checkout URL for a single product might look like this:
https://www.yourwoostore.com/checkout/?add-to-cart=ID
This URL takes the customer directly to the checkout page, where products with specific IDs are automatically added to their cart. From there, they can complete their purchase seamlessly, without any distractions.
6 Use Cases When You Need to Use a Direct Checkout URL
A WooCommerce direct checkout URL can transform the customer experience and drive conversions. Here’s how and when to use it effectively:
1. Promotional events
During promotions, such as seasonal sales or flash sales, a direct checkout link can make it easier for customers to purchase products.
Sharing a WooCommerce checkout URL with pre-populated products and discounts removes distractions, increasing the chances of a successful sale.
2. Abandoned cart recovery email
Abandoned cart emails are one of the most effective ways to recover lost sales. However, sending customers back to their cart page might cause them to abandon their purchase again.
Instead, sending a direct checkout URL to your abandoned cart email makes the process much easier by taking customers directly to the checkout page. With products already in their cart, they only need to complete the purchase, thereby increasing recovery rates.
3. Sharing links on social media
Social media is a powerful tool for driving traffic and boosting sales. If you have a significant following, especially on platforms like Instagram, you can use the direct checkout URL in your stories or posts.
For instance, a "Swipe Up" link in an Instagram story can take followers directly to the checkout with the product already in their cart. This seamless experience encourages impulse buys and reduces the risk of customer churn due to distractions.
4. Bulk orders
Creating a customized direct checkout URL is ideal for customers purchasing in bulk, such as wholesale buyers or those ordering multiple items at once. You can pre-configure the checkout with discounts, quantity selections, or special shipping options.
By offering a tailored checkout URL, you save your customers time and prevent them from having to manually adjust their cart for bulk purchases.
5. Incorporating links in content
Incorporating direct checkout URLs can significantly boost conversions if you run a blog or content marketing alongside your store.
For example, if you have an article about the best products in a particular category, such as wireless headphones, you can add a direct checkout URL within the content. This allows customers to make a purchase immediately after reading the article without having to navigate through multiple pages.
6. Service based products
If your WooCommerce store also offers services, such as network setup, consultancy, or other services, a direct checkout URL can help customers purchase them.
Instead of listing these services on your shop page, you can create a dedicated landing page for them with a direct checkout URL. This makes it easier for customers to book your services without any unnecessary steps.
How to Create a Direct Checkout URL In WooCommerce and Change Quantity?
You can create a direct checkout URL in WooCommerce in two ways:
- Manually
- Using a plugin
In the following sections, we will share both processes.
Method 1: How to Create a Direct Checkout URL in WooCommerce And Change Quantity Manually
Here, we will show how to create a custom add-to-cart link for different types of WooCommerce products and redirect it to the cart or checkout page. This is quite easy and does not require any plugins.
First, let’s understand the WooCommerce checkout URL parameters we will use to create a custom direct checkout URL.
- Add-to-cart: WooCommerce uses this parameter to add a product to the cart using the product ID or the Variation ID (for variable products).
- Quantity: This parameter specifies the quantity of the product to add to the cart.
Now, let’s check how you can use these parameters to create custom add-to-cart links.
Create direct checkout URLs for simple products
First, you need to find the product ID. Go to your WordPress admin panel, and go to Products ⇒ All Products.
Hover over any of your products, and you will see the product ID, along with other options.
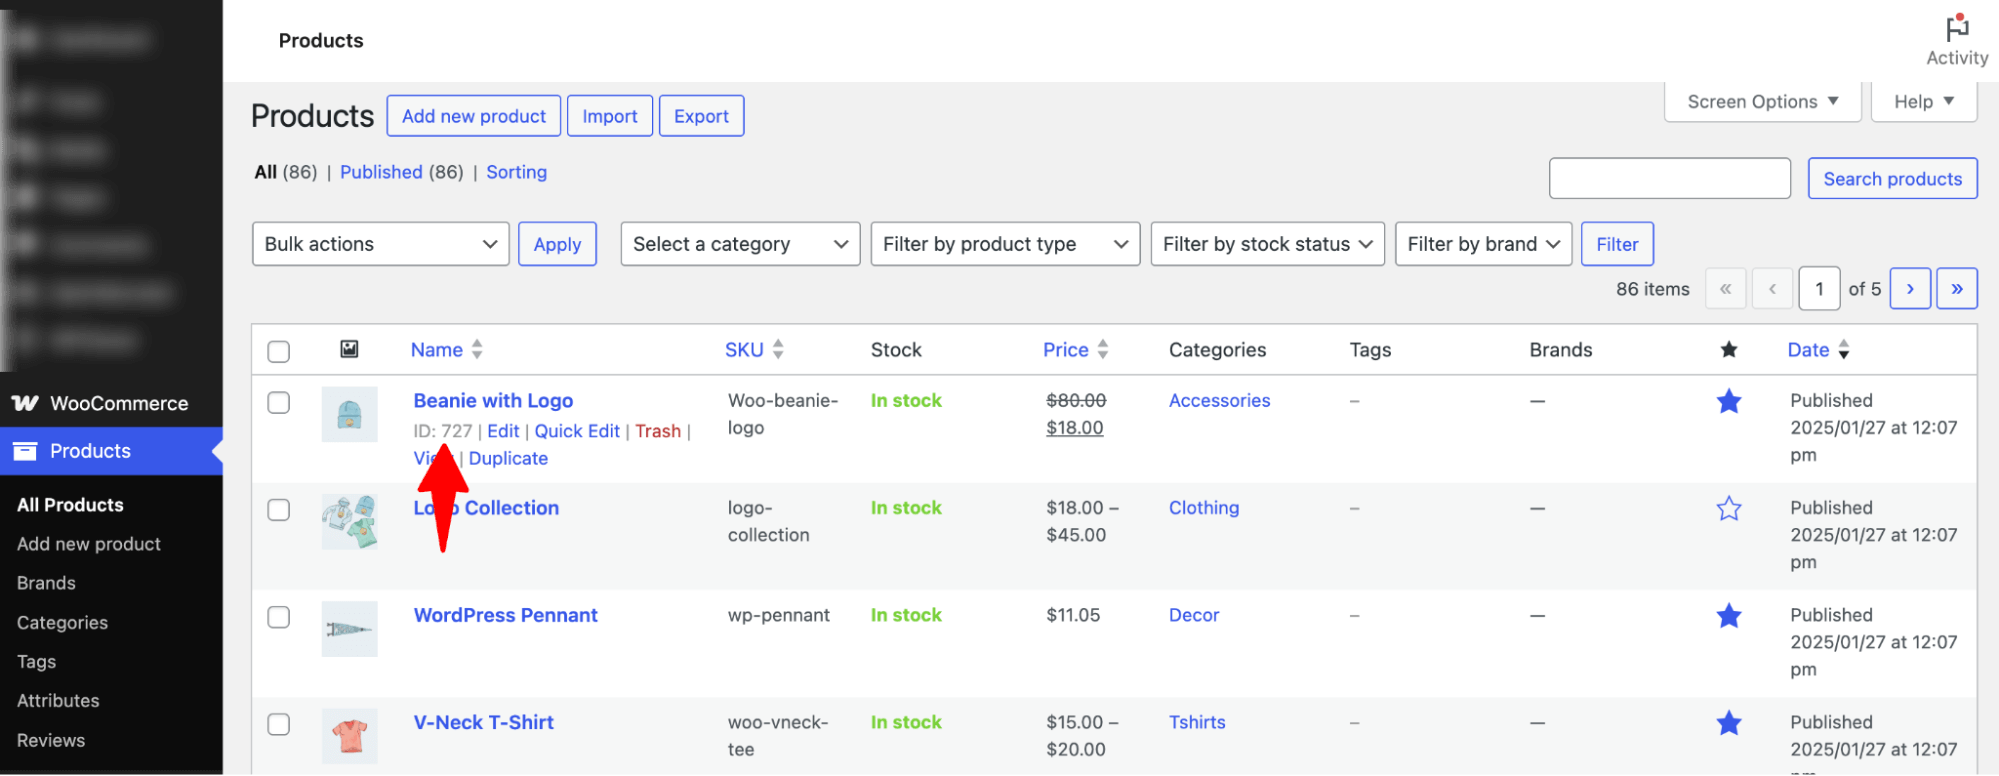
Copy the product ID and paste it at the end of the format link we showed.
For example, we have product ID 727 in the image above and want to create a WooCommerce direct checkout URL for this product.
It will look something like this at the end:
https://www.yourwoostore.com/checkout/?add-to-cart=727How to change the quantity for the WooCommerce direct checkout URL in simple products
All you have to do is add this &quantity=X at the end of the direct checkout URL. Here, X is the quantity.
Here is the default simple product checkout URL with quantity:
https://www.yourwoostore.com/checkout/?add-to-cart=727&quantity=5Create a direct checkout URL for variable products
Variable products have different IDs for different variations. To create a WooCommerce direct checkout URL, you need to find those IDs first.
Go to Products ⇒ All Products. Now, select the variable product from the Filter by product type drop-down and hit the Filter button.
Now, you will see only the variable products in your store. Enter the one you need and scroll down to the Product data section.
Enter the one you need and scroll down to the Product data section.
Click on the Variations tab, and you will see the different IDs for every variation.
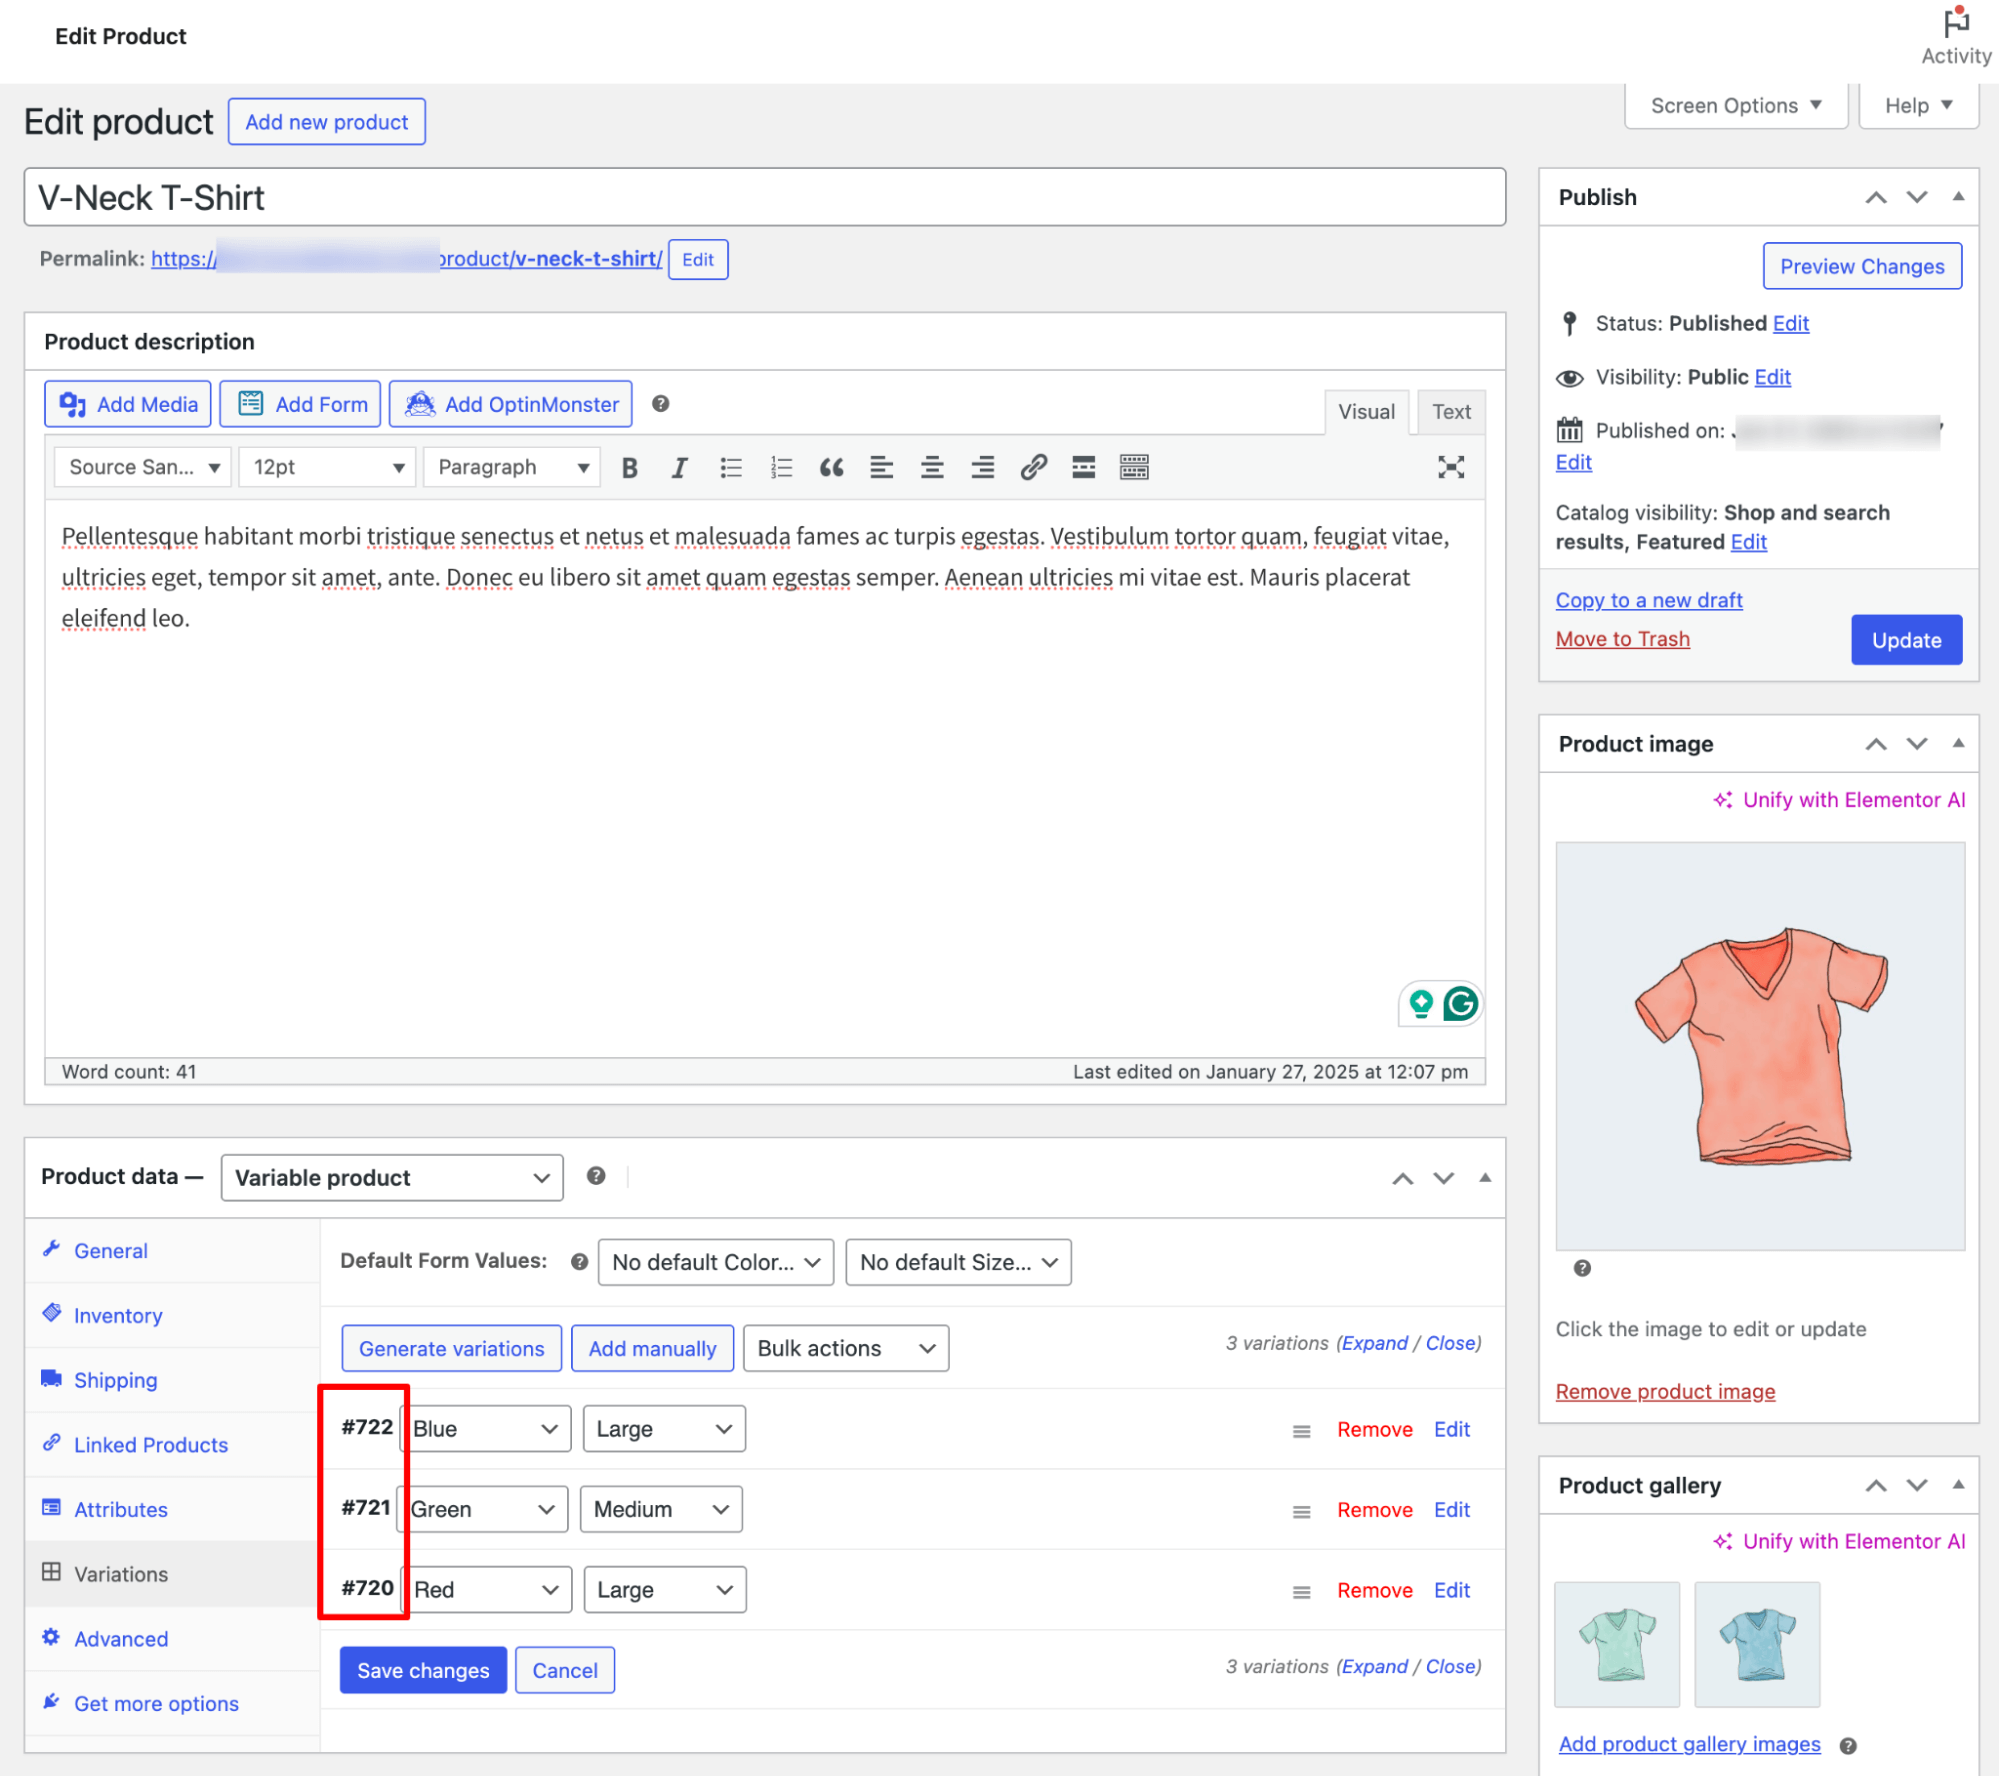
You can create a WooCommerce direct checkout URL with any of those IDs. For example, you want to create a direct link for a large blue t-shirt. The ID is #722, and the link will look like this:
https://www.yourwoostore.com/checkout/?add-to-cart=722
As you can see, the URL format is the same as the one we used for simple products. The main difference is that you can’t use the product ID to make a direct link. Instead, you must use the ID for the specific variation you want to link to.
How to change the quantity for the WooCommerce direct checkout URL in variable products
For variable products, you do the same. Following the example of our variable product (product ID=722), we simply add the quantity to the direct checkout URL as follows:
https://www.yourwoostore.com/checkout/?add-to-cart=722&quantity=3
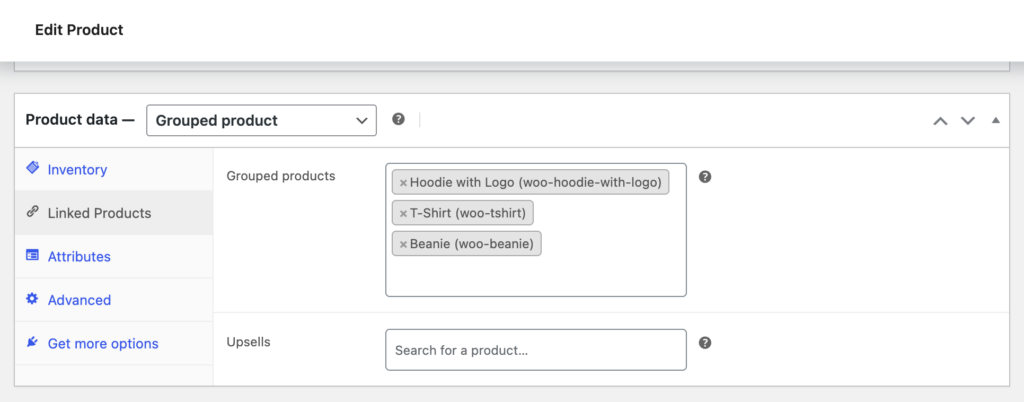
Create a direct checkout URL for grouped products
Similarly, you can create a direct checkout URL for grouped products. The process is identical to creating a WooCommerce checkout URL for individual products.
Grab the ID of your grouped product from the products page, then add it to the direct checkout URL. It's as simple as that.
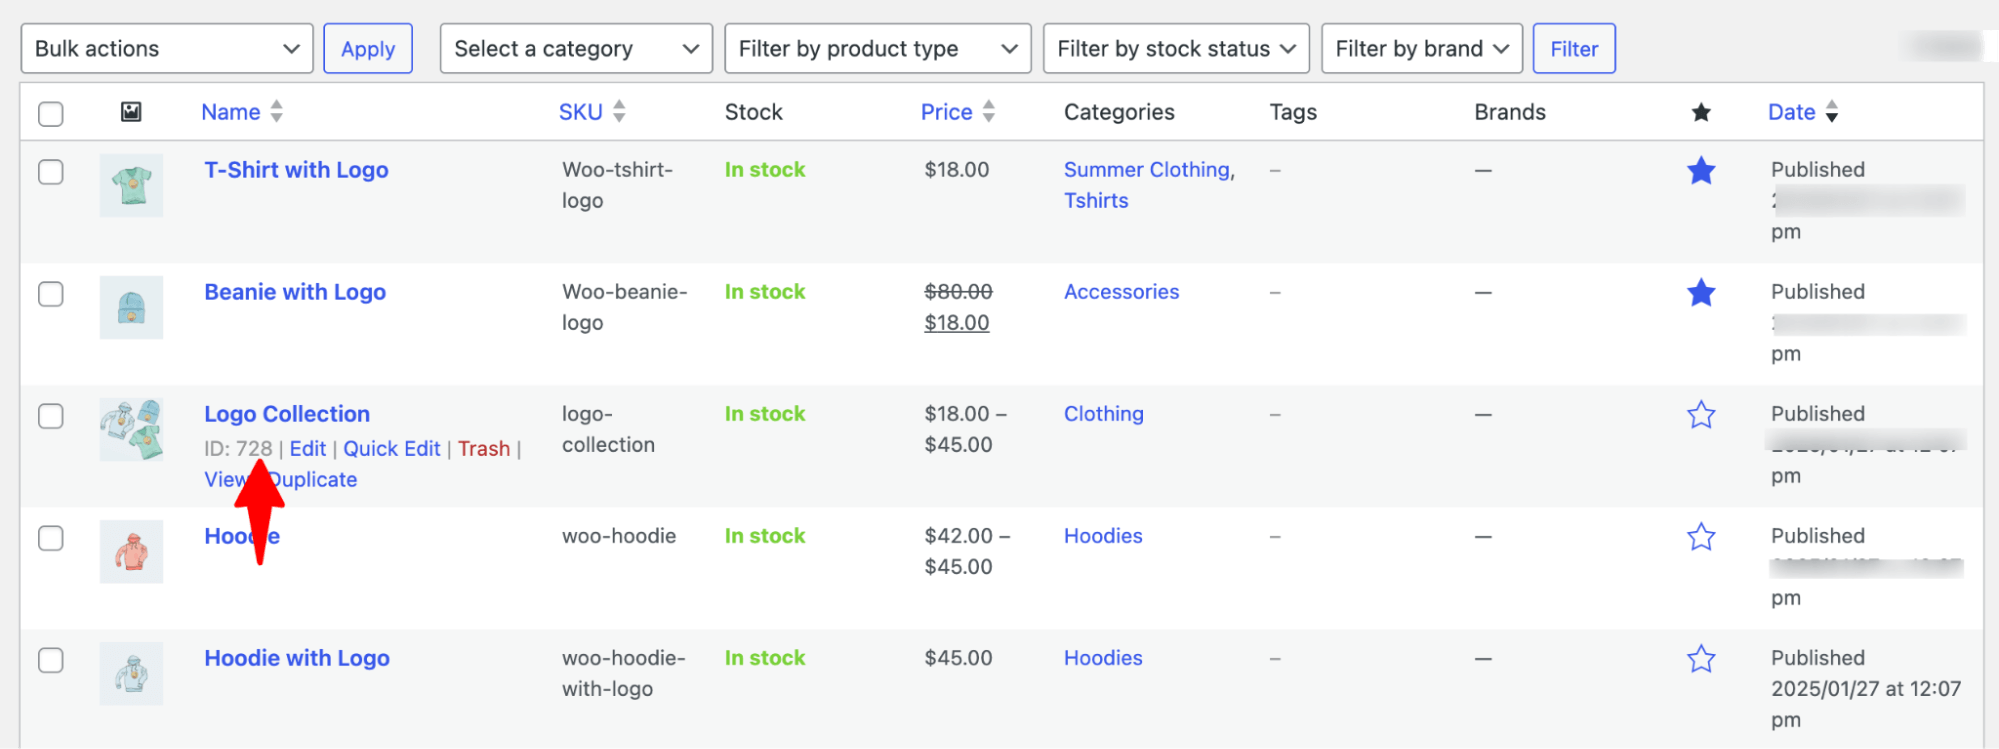
For example, a grouped product’s ID is 728. If you want to create a direct checkout URL, then it will look something like this:
https://www.yourwoostore.com/checkout/?add-to-cart=728When you use a direct checkout URL for a grouped product in WooCommerce, the products in the group are automatically added to the cart. For simple products, it adds 1 by default unless you change the quantity in the link.
For variable products, it selects the default option (e.g., size, color) and adds 1 unless you pick a different option or set the quantity. If any product is out of stock, it won’t be added to the cart.
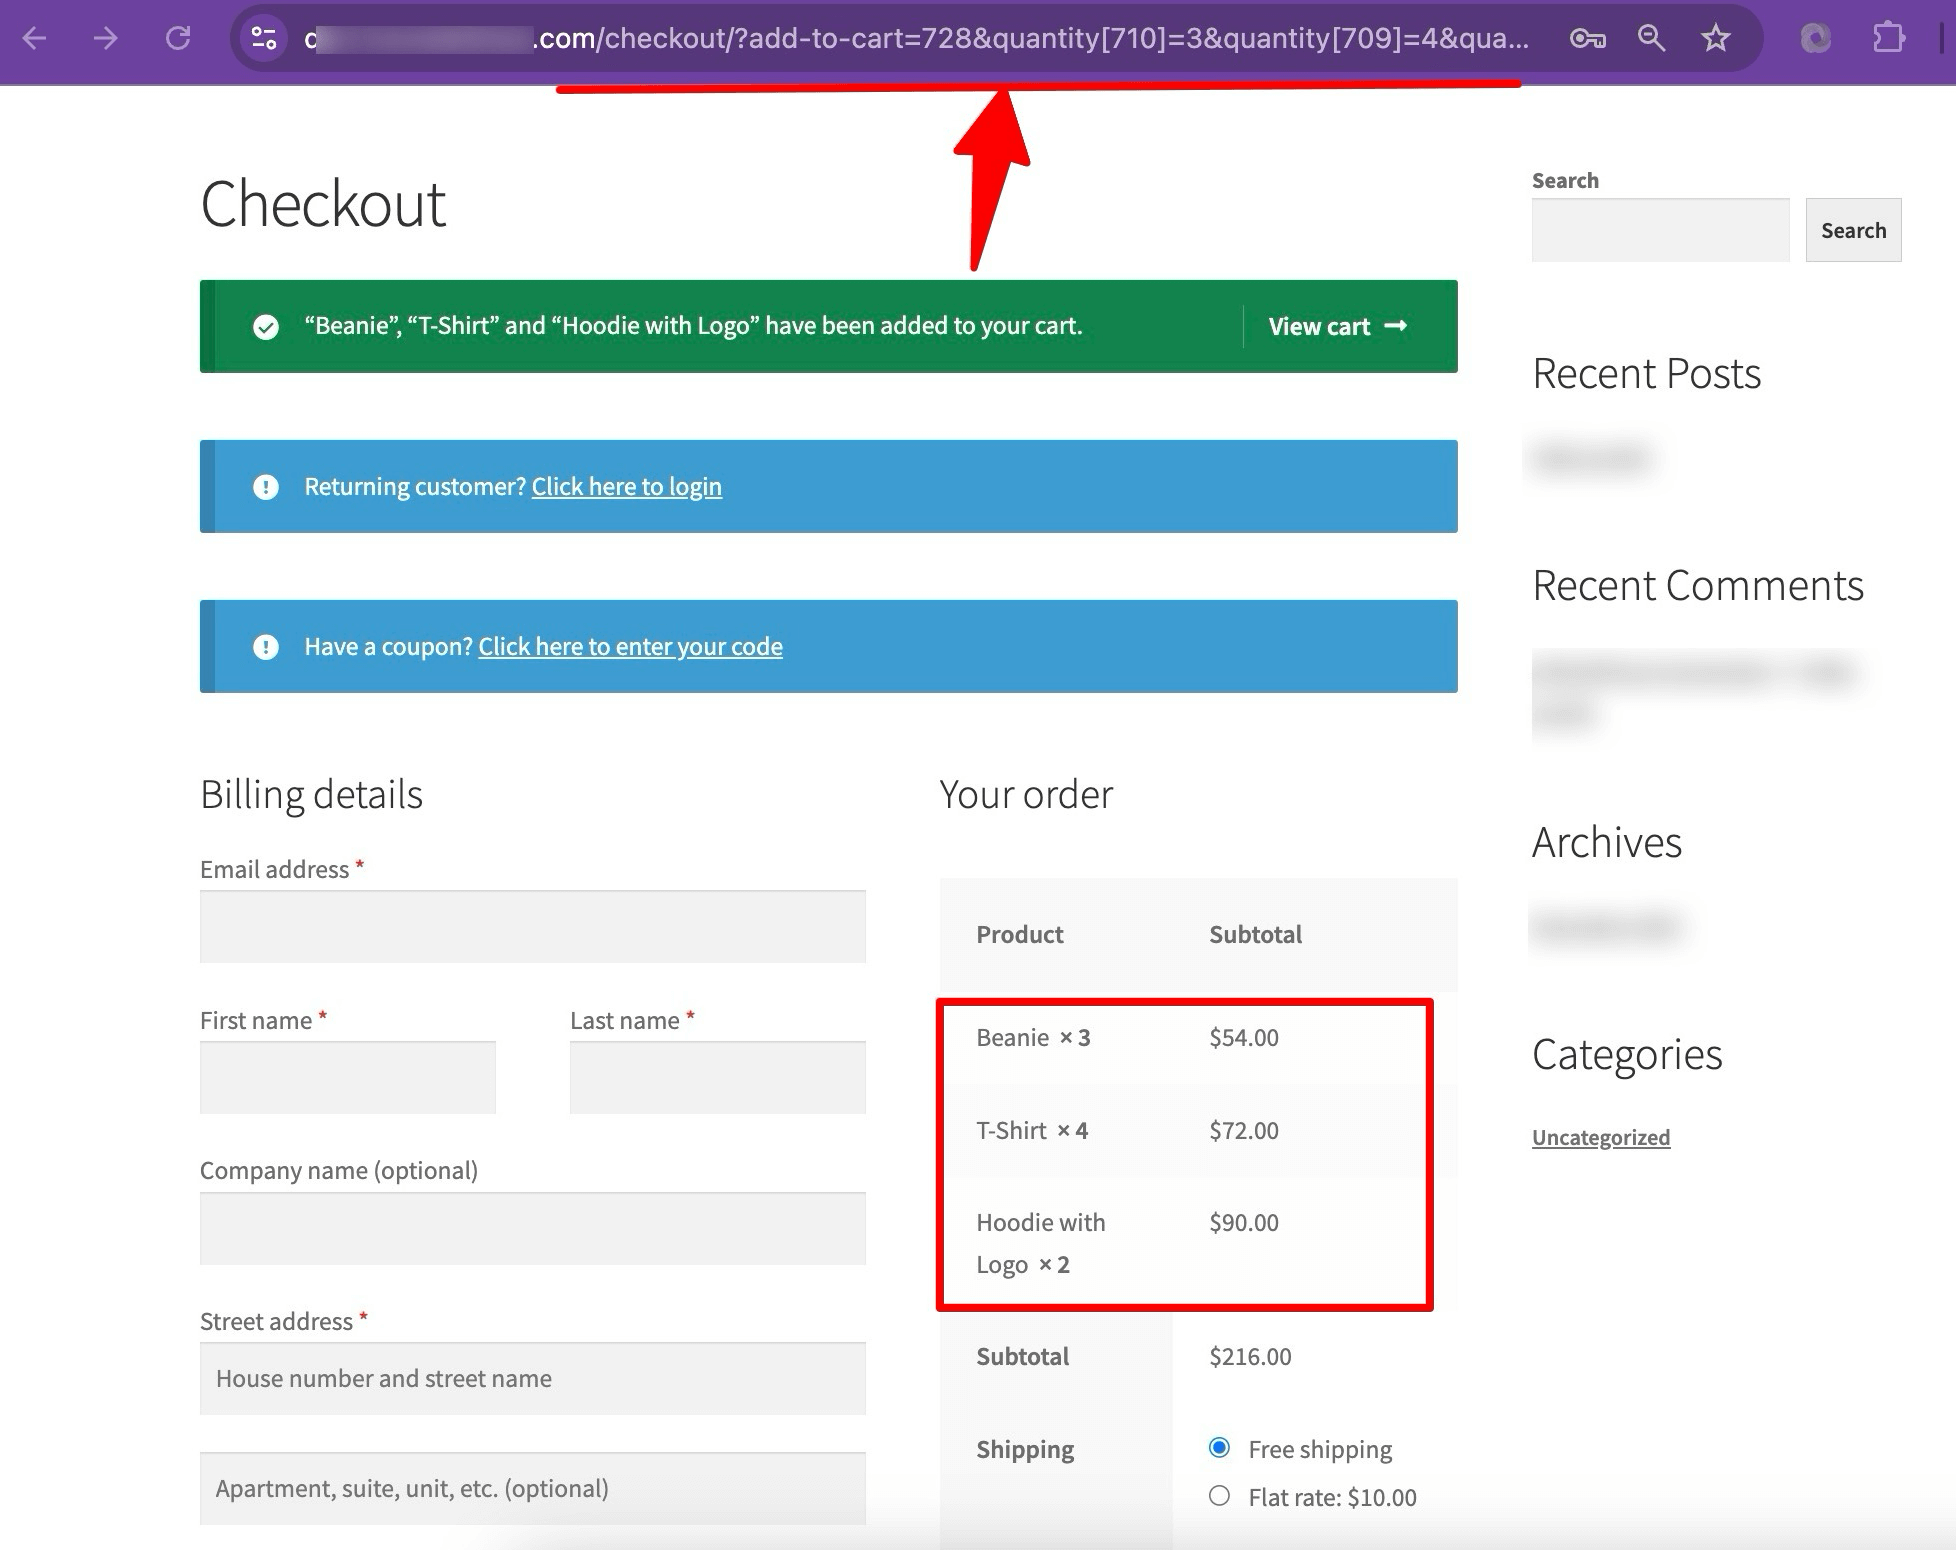
How to change the quantity for the WooCommerce direct checkout URL in variable products
For grouped products, you need to set quantities for each item in the group. Use &quantity[productID]=number in the checkout URL.
So, you need to check the products included in the group product.
Next, locate the product IDs by visiting each product in your WooCommerce dashboard.
Once you have the IDs, you can build your checkout URL with specific quantities.
For example, to add 3 Beanies [ID: 710], 4 T-Shirts [ID: 709], and 2 Hoodies with Logo [ID: 708] to the cart, your checkout URL would look like this:
https://www.yourwoostore.com/checkout/?add-to-cart=728&quantity[710]=3&quantity[709]=4&quantity[708]=2
How to test the WooCommerce direct checkout URL manually
To test any product, just copy the URL and paste it into the browser. You will be redirected to the checkout page, where you can view the products in your cart.
Limitations of Creating WooCommerce Checkout URLs Manually
Manually generating checkout URLs in WooCommerce may seem like a quick win, but they come with several drawbacks that can hurt your conversions and limit flexibility. Here’s what you miss out on:
- Customers can’t adjust the quantity
Customers can’t adjust product quantities during checkout. What you set is what they get.
- Users can’t remove items
Products added via the URL can’t be removed from the cart unless the user starts over.
- No auto-apply coupon support
Manual URLs don’t support automatic coupon application without extra plugins.
- Not optimized for conversions
The default checkout page lacks layout flexibility and features proven to improve conversion rates.
- No AOV-boosting features
You can’t show last-minute offers, order bumps, or one-click upsells to increase the average order value.
Method 2: How to Create a Checkout URL in WooCommerce Using a WordPress Plugin
We’ll use FunnelKit Funnel Builder to create a WooCommerce checkout URL.
FunnelKit Funnel Builder is the most powerful funnel builder for WordPress. It lets you create stunning sales funnel pages, including landing pages, opt-ins, checkouts, thank you pages, and one-click upsells.
With its library of ready-made templates, you can set up and launch high-converting funnels in just a few clicks.
You can also generate custom links for single or multiple products.
In this tutorial, we’ll walk you through creating a WooCommerce direct checkout URL using a sales funnel that adds multiple products with different quantities and discounts.
Before we begin building the funnel, install and activate the FunnelKit Funnel Builder. Both free and pro versions.
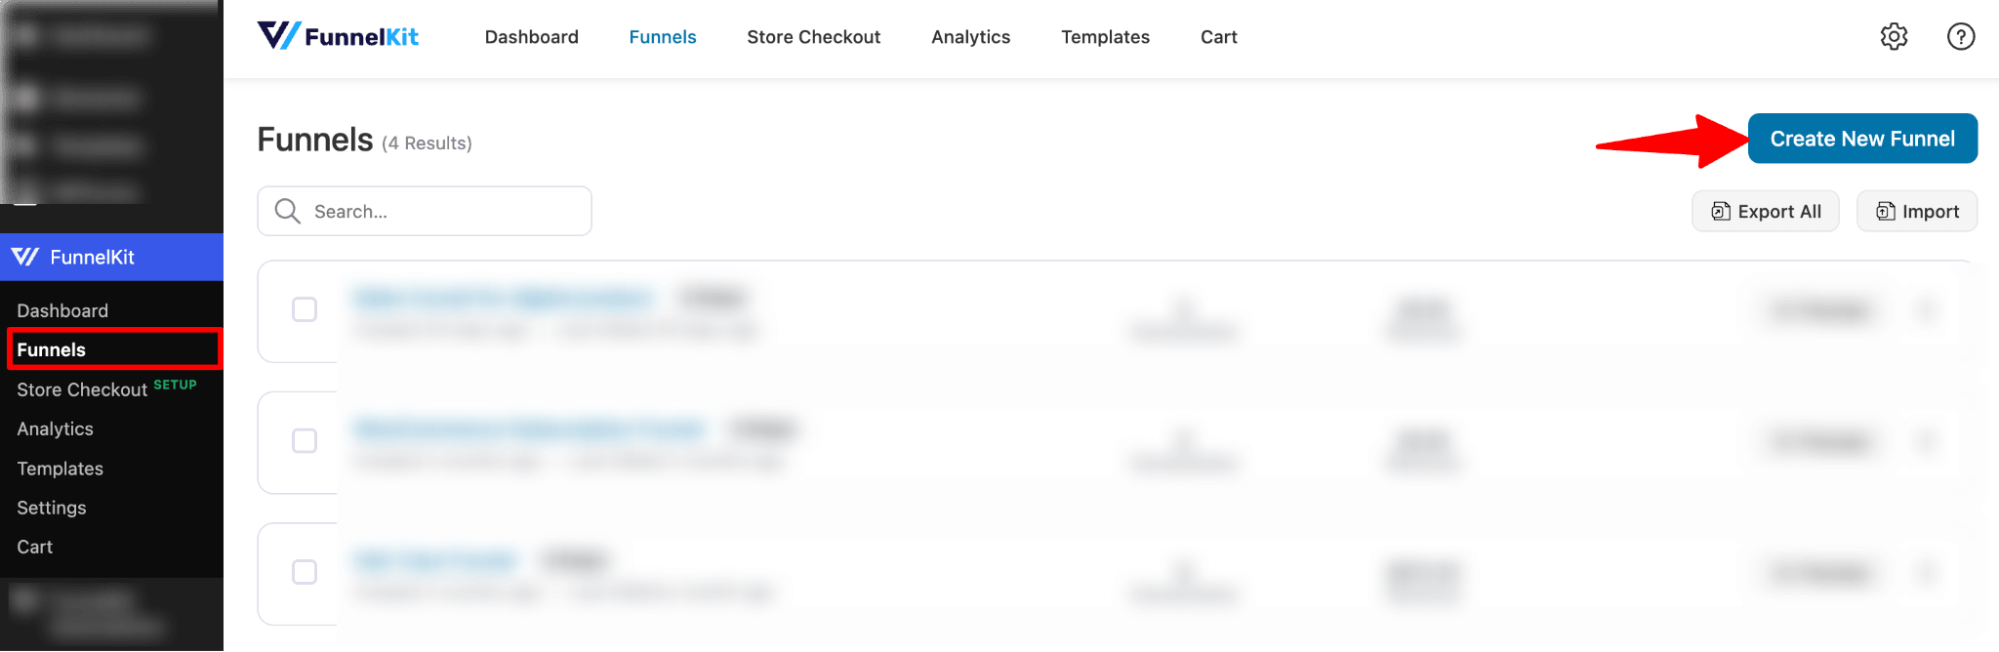
Step 1: Create a sales funnel
First, navigate to FunnelKit ⇒ Funnels from the WordPress admin panel and click the ‘Create New Funnel’ button.
Select “Sales Funnels” as the type.
After that, hover over the template you like, then click Preview. Here, we are choosing the Minimalist template.
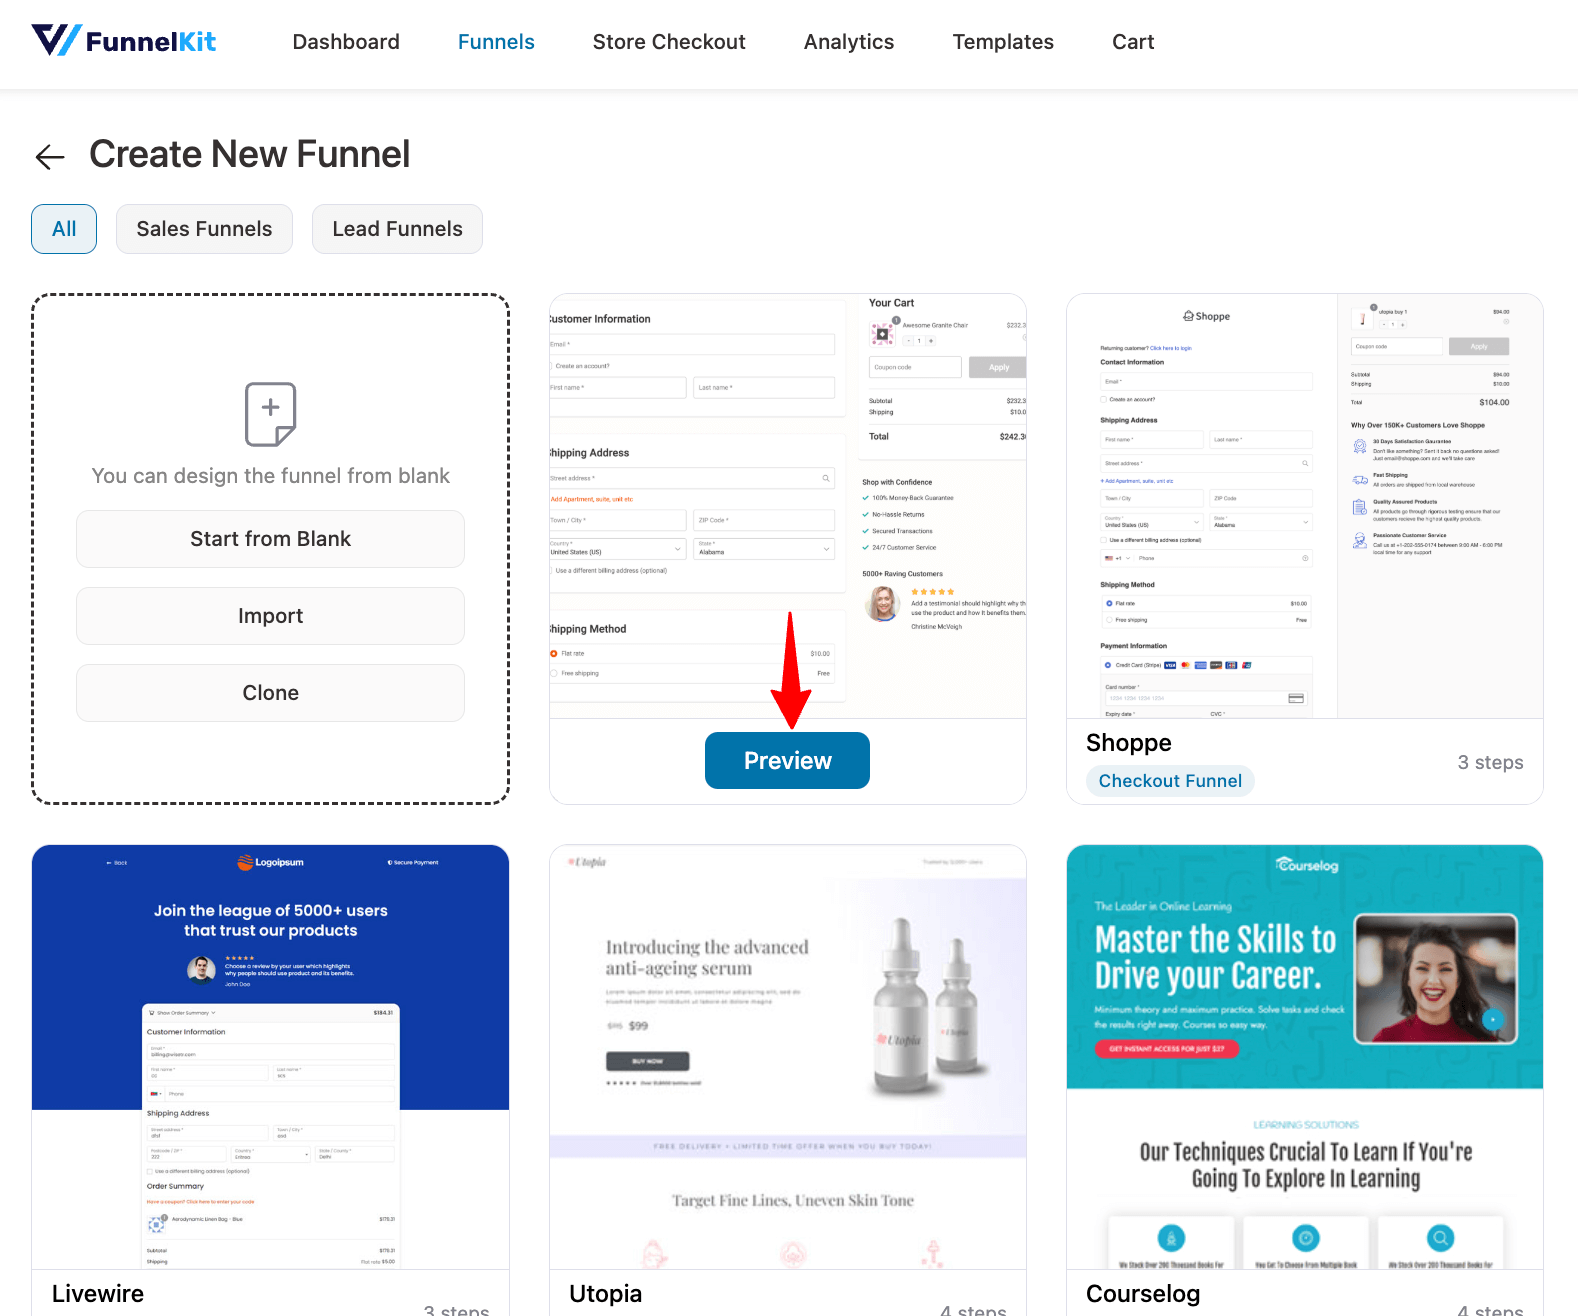
Now choose whether you want a single-page or multi-page checkout. We are going with the simple single-page layout.
To import the template you choose, click “Import This Funnel”, then provide a name and click on ‘Add'.
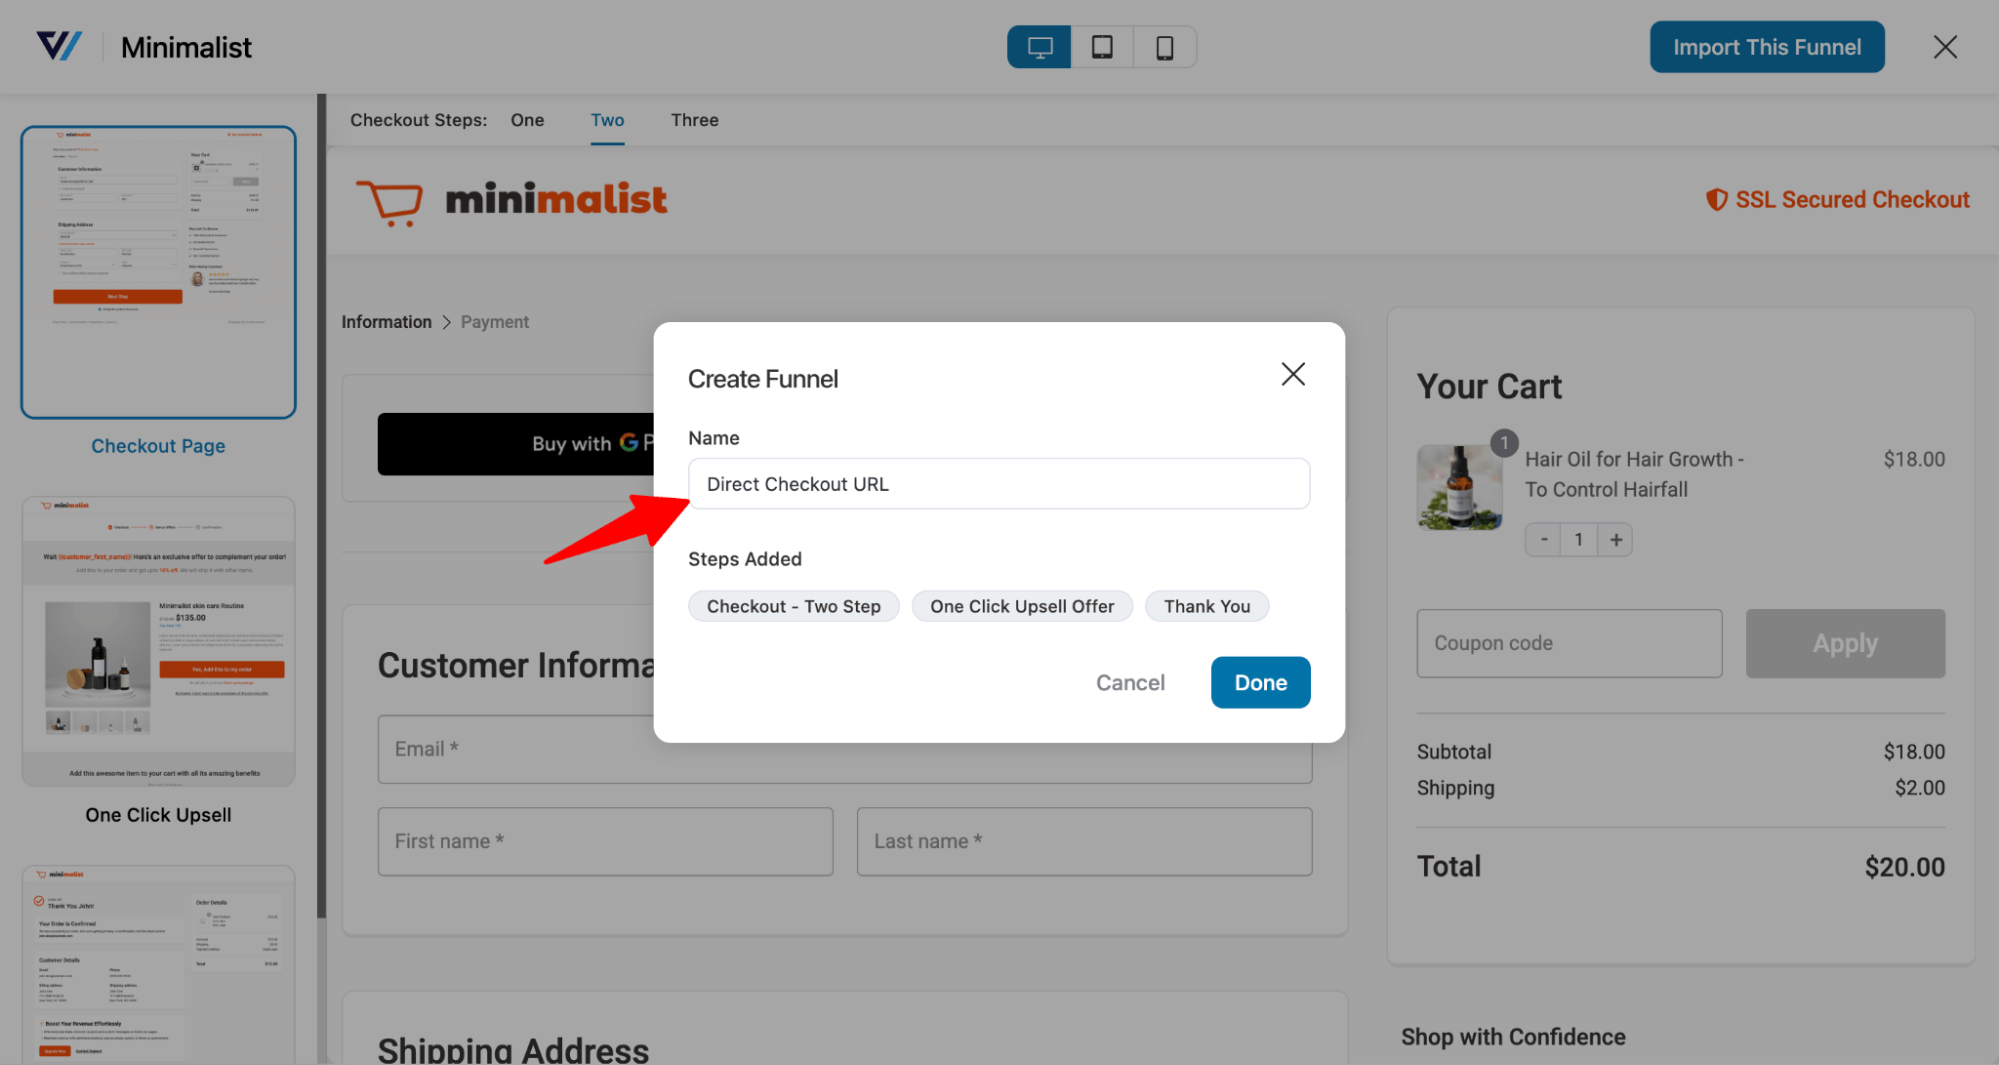
Your sales funnel should include three steps: checkout, one-click upsell, and thank-you page.
Step 2: Customize the checkout page
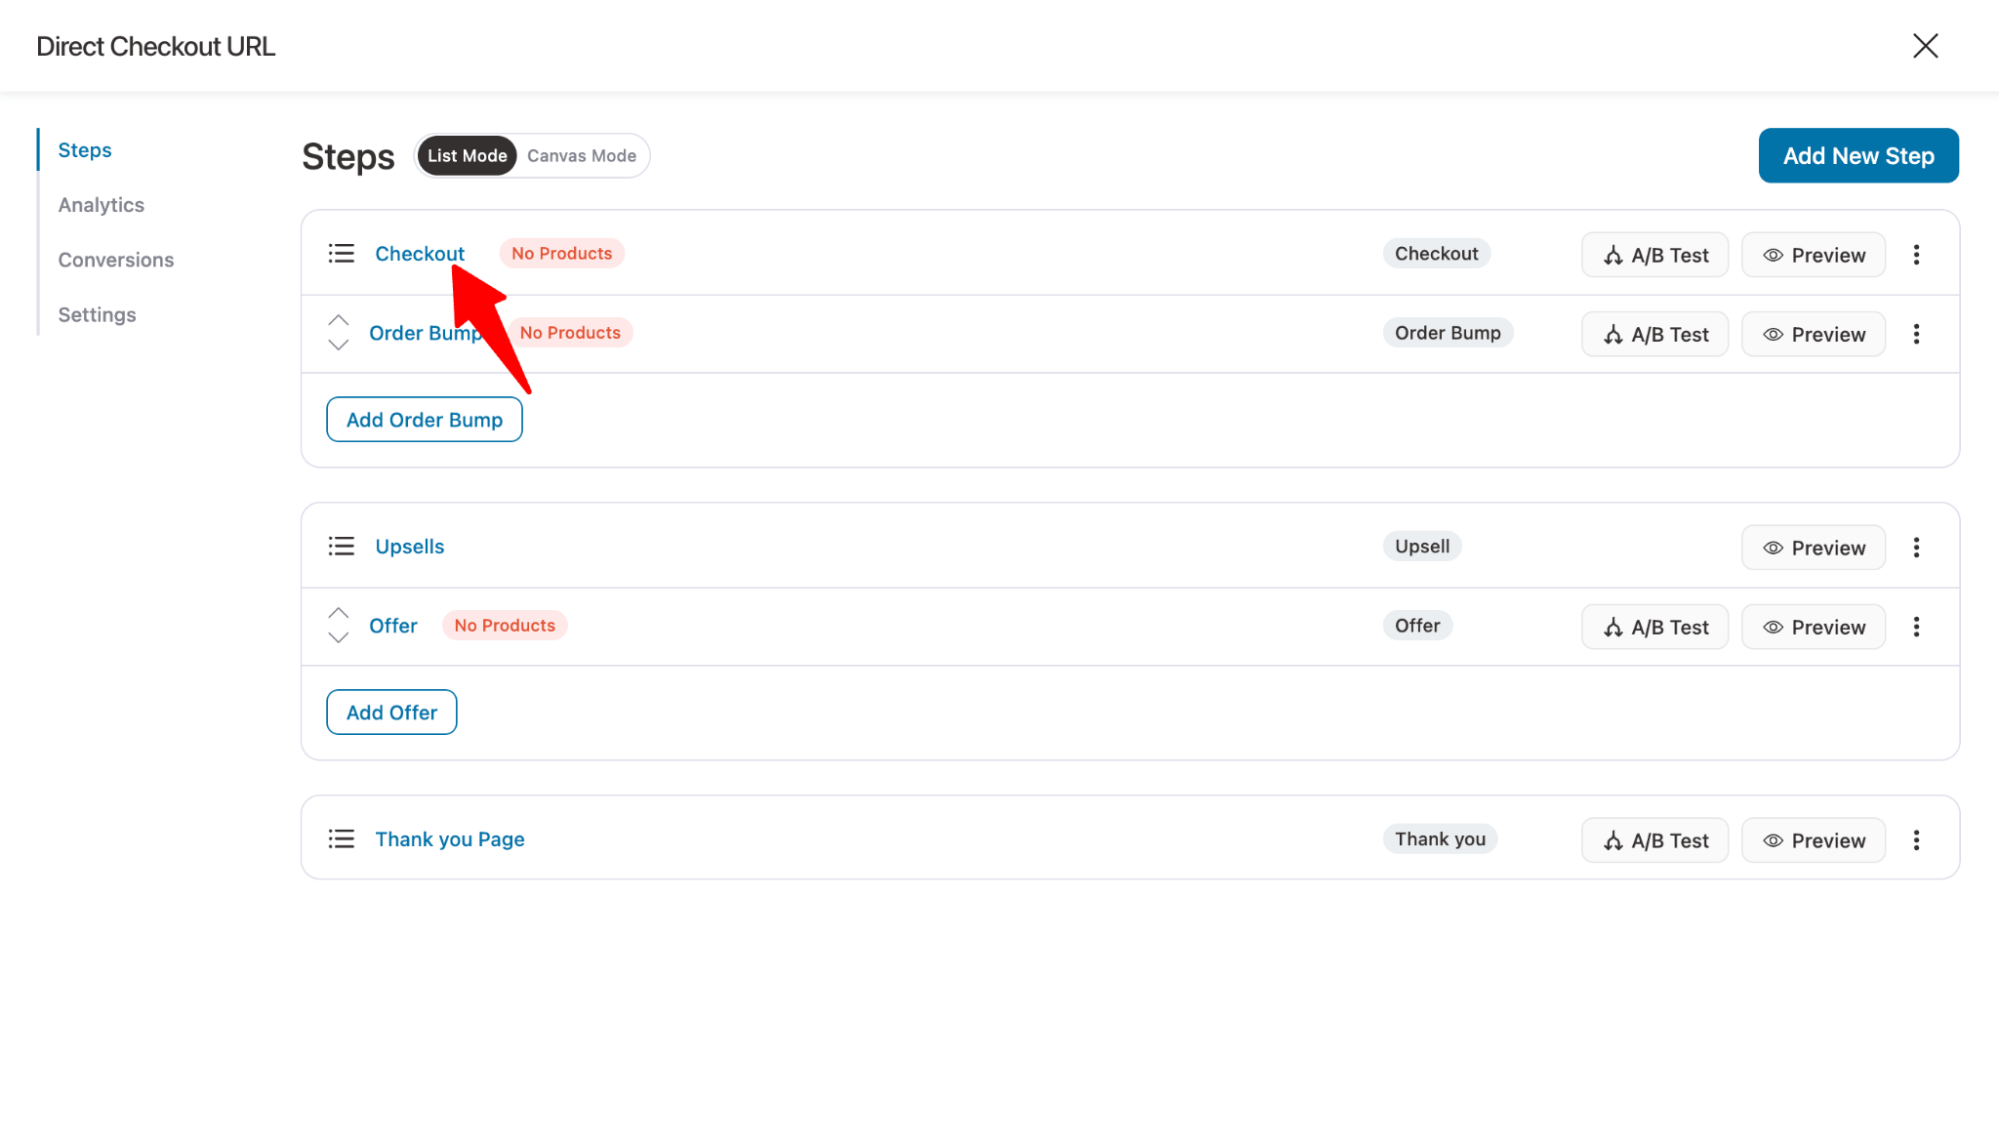
To customize the checkout page, click on the Checkout step.
You can customize the content and style of the checkout template using Elementor by clicking on the "Edit Elementor Template" button.

Here, you can customize all the sections of the checkout page.

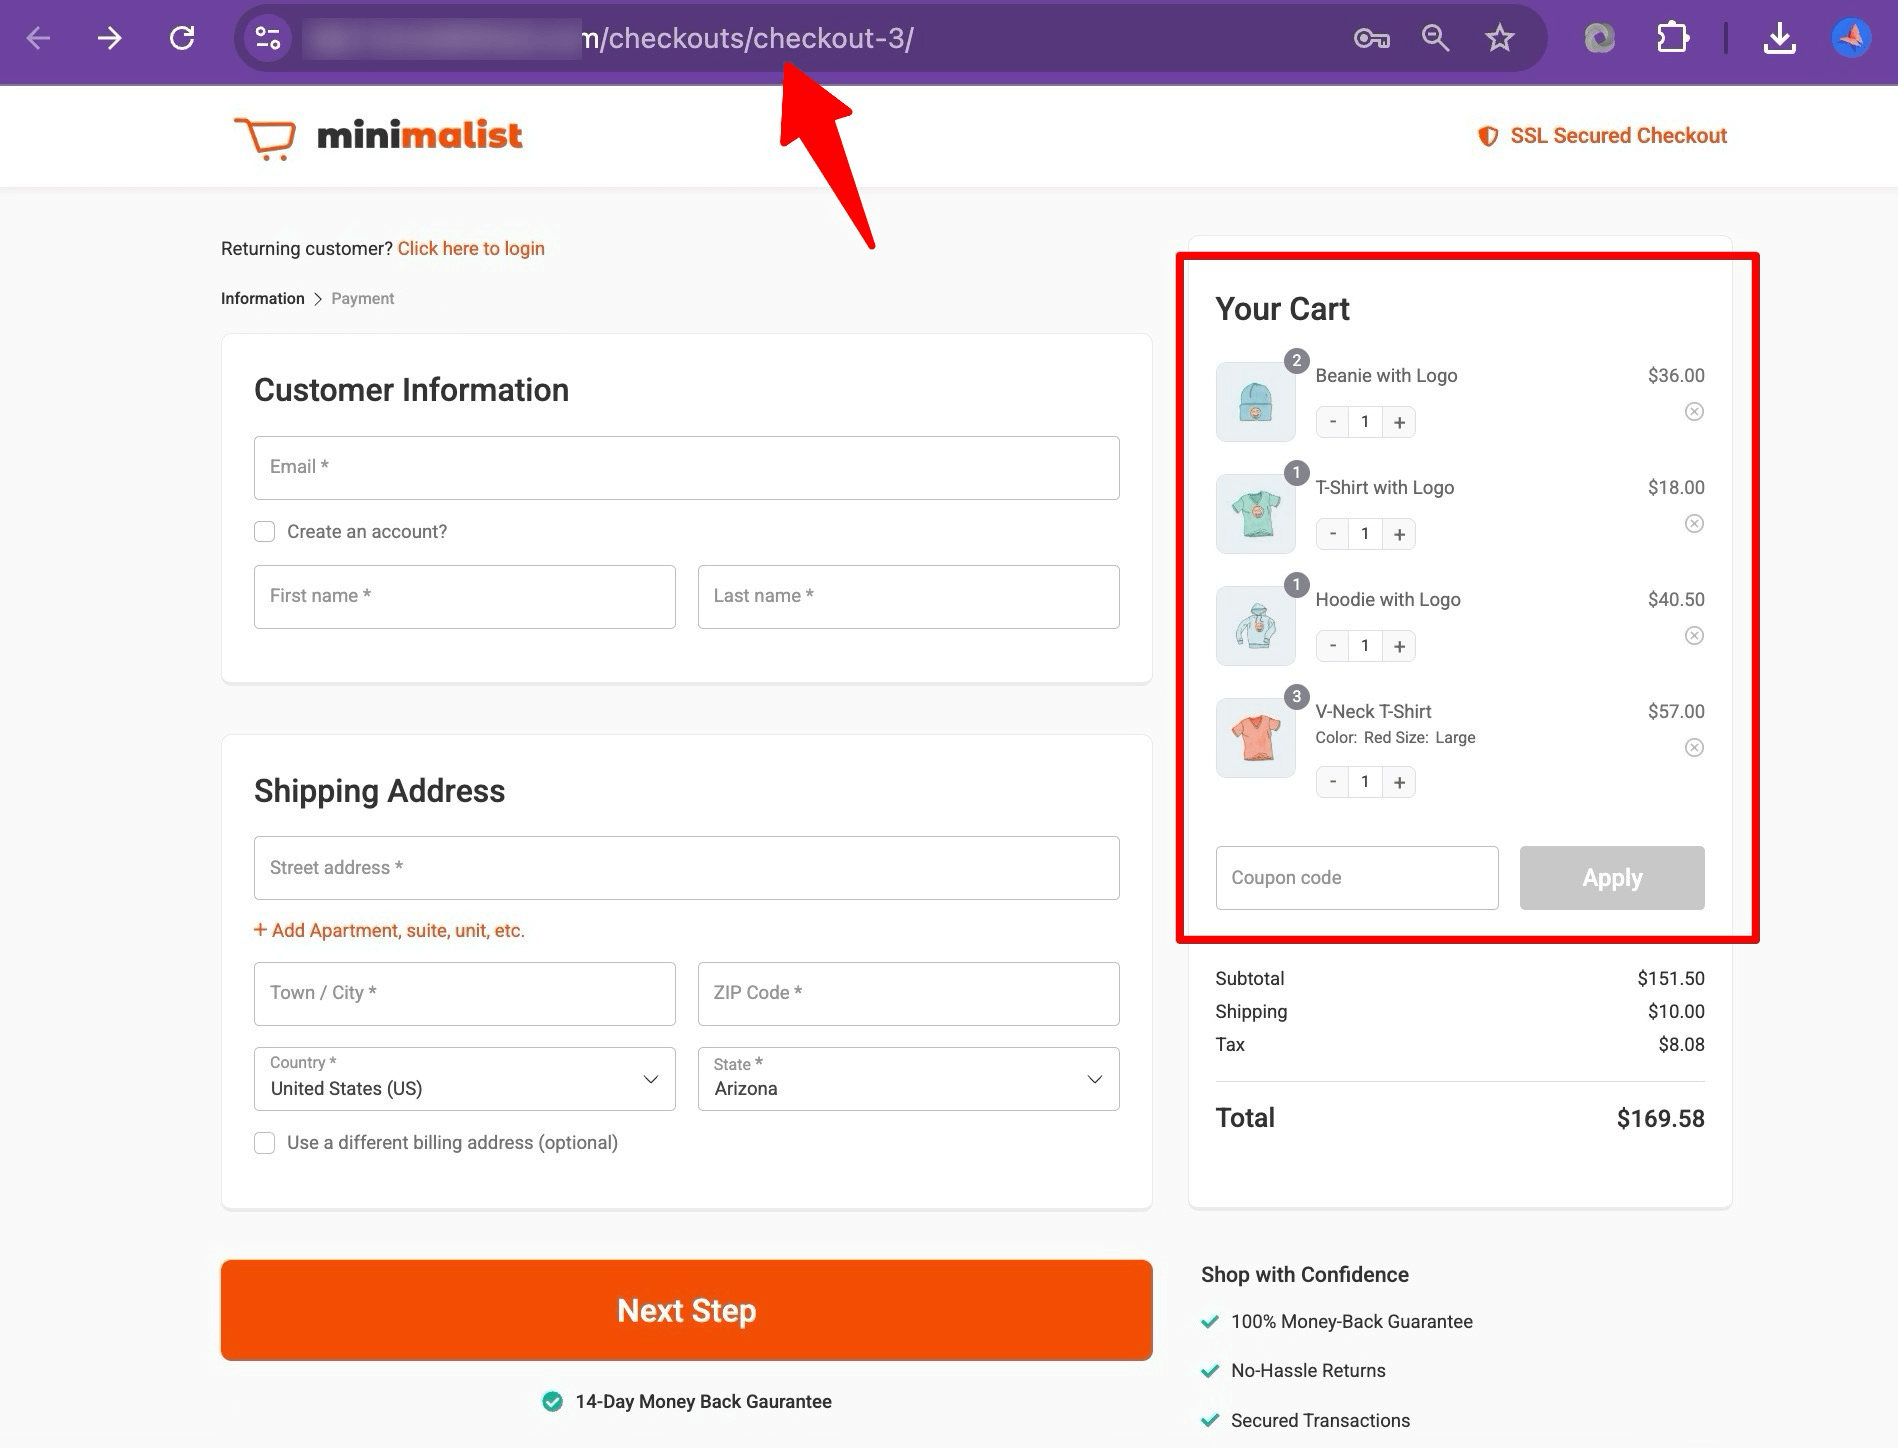
One of the best features FunnelKit adds to your WooCommerce checkout is the mini cart. It lets customers change product quantities right on the checkout page, which is not available with the default checkout.
So, even when users use direct checkout, they can still update order items smoothly on the checkout page.
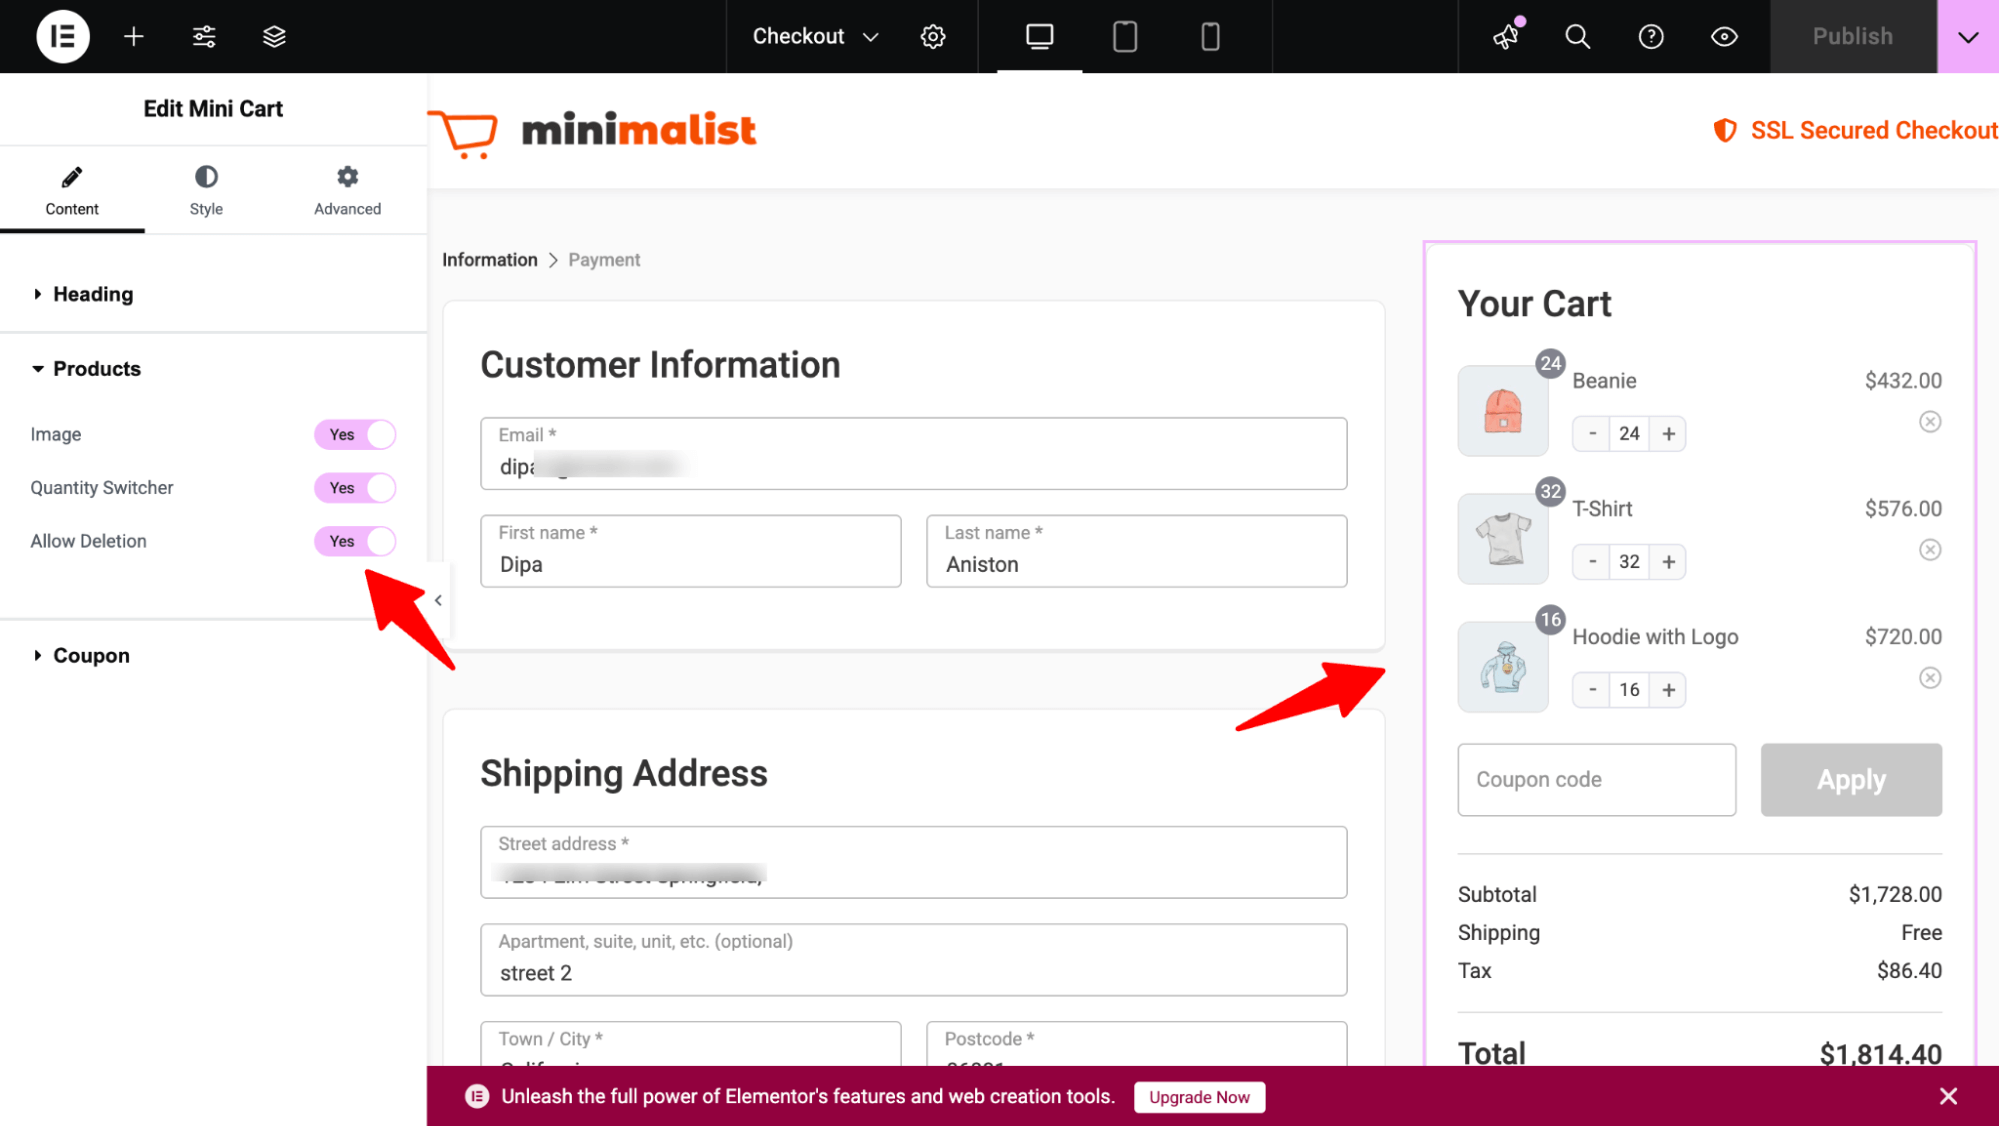
After making the design changes, hit ‘Update’ to save all the changes.
Step 3: Add products
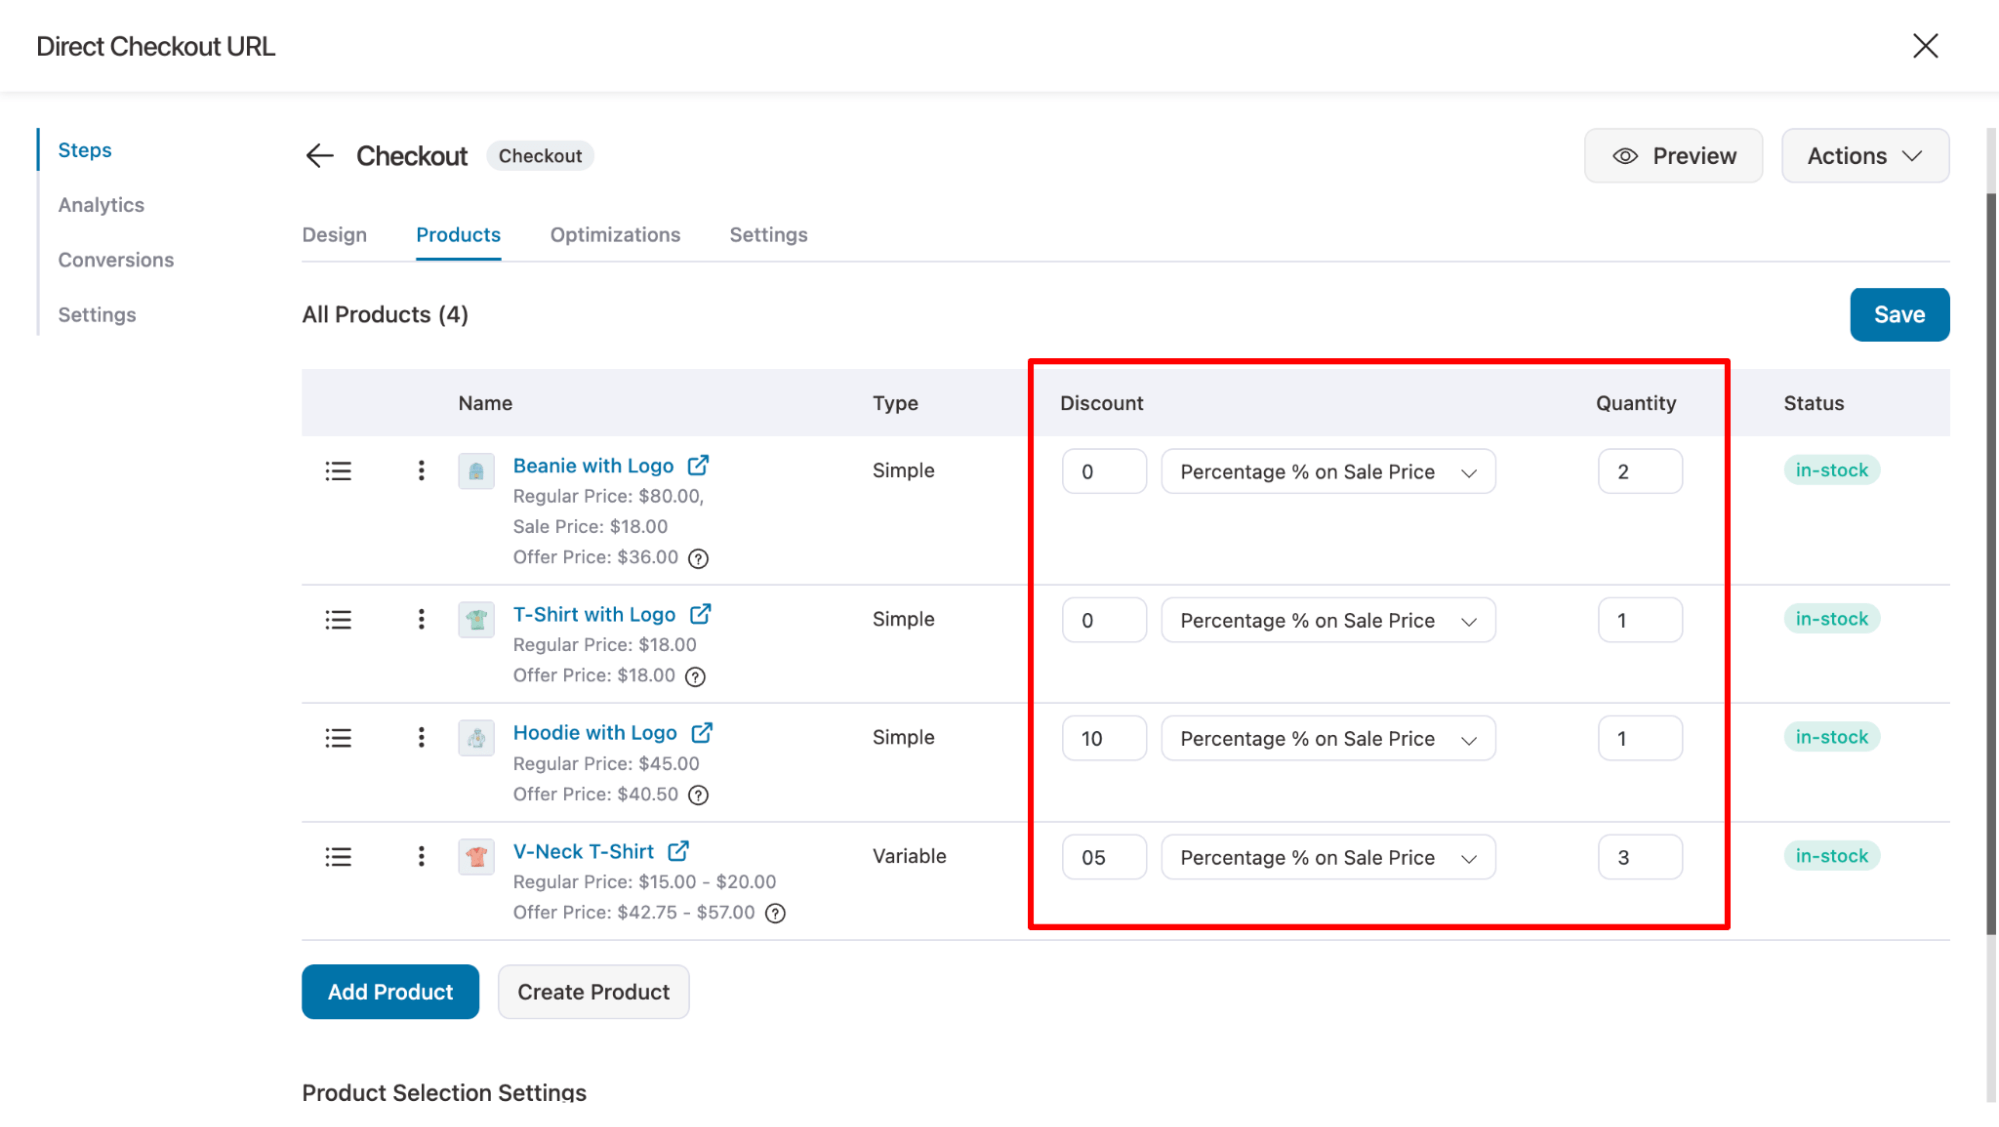
Move to the Products tab and click the ‘Add Product’ button. Then, search for and select the product you want to add to the cart upon clicking the WooCommerce add-to-cart link.
You can add as many products as you need using the same process. Finally, click “Add New” to add the product to the checkout.
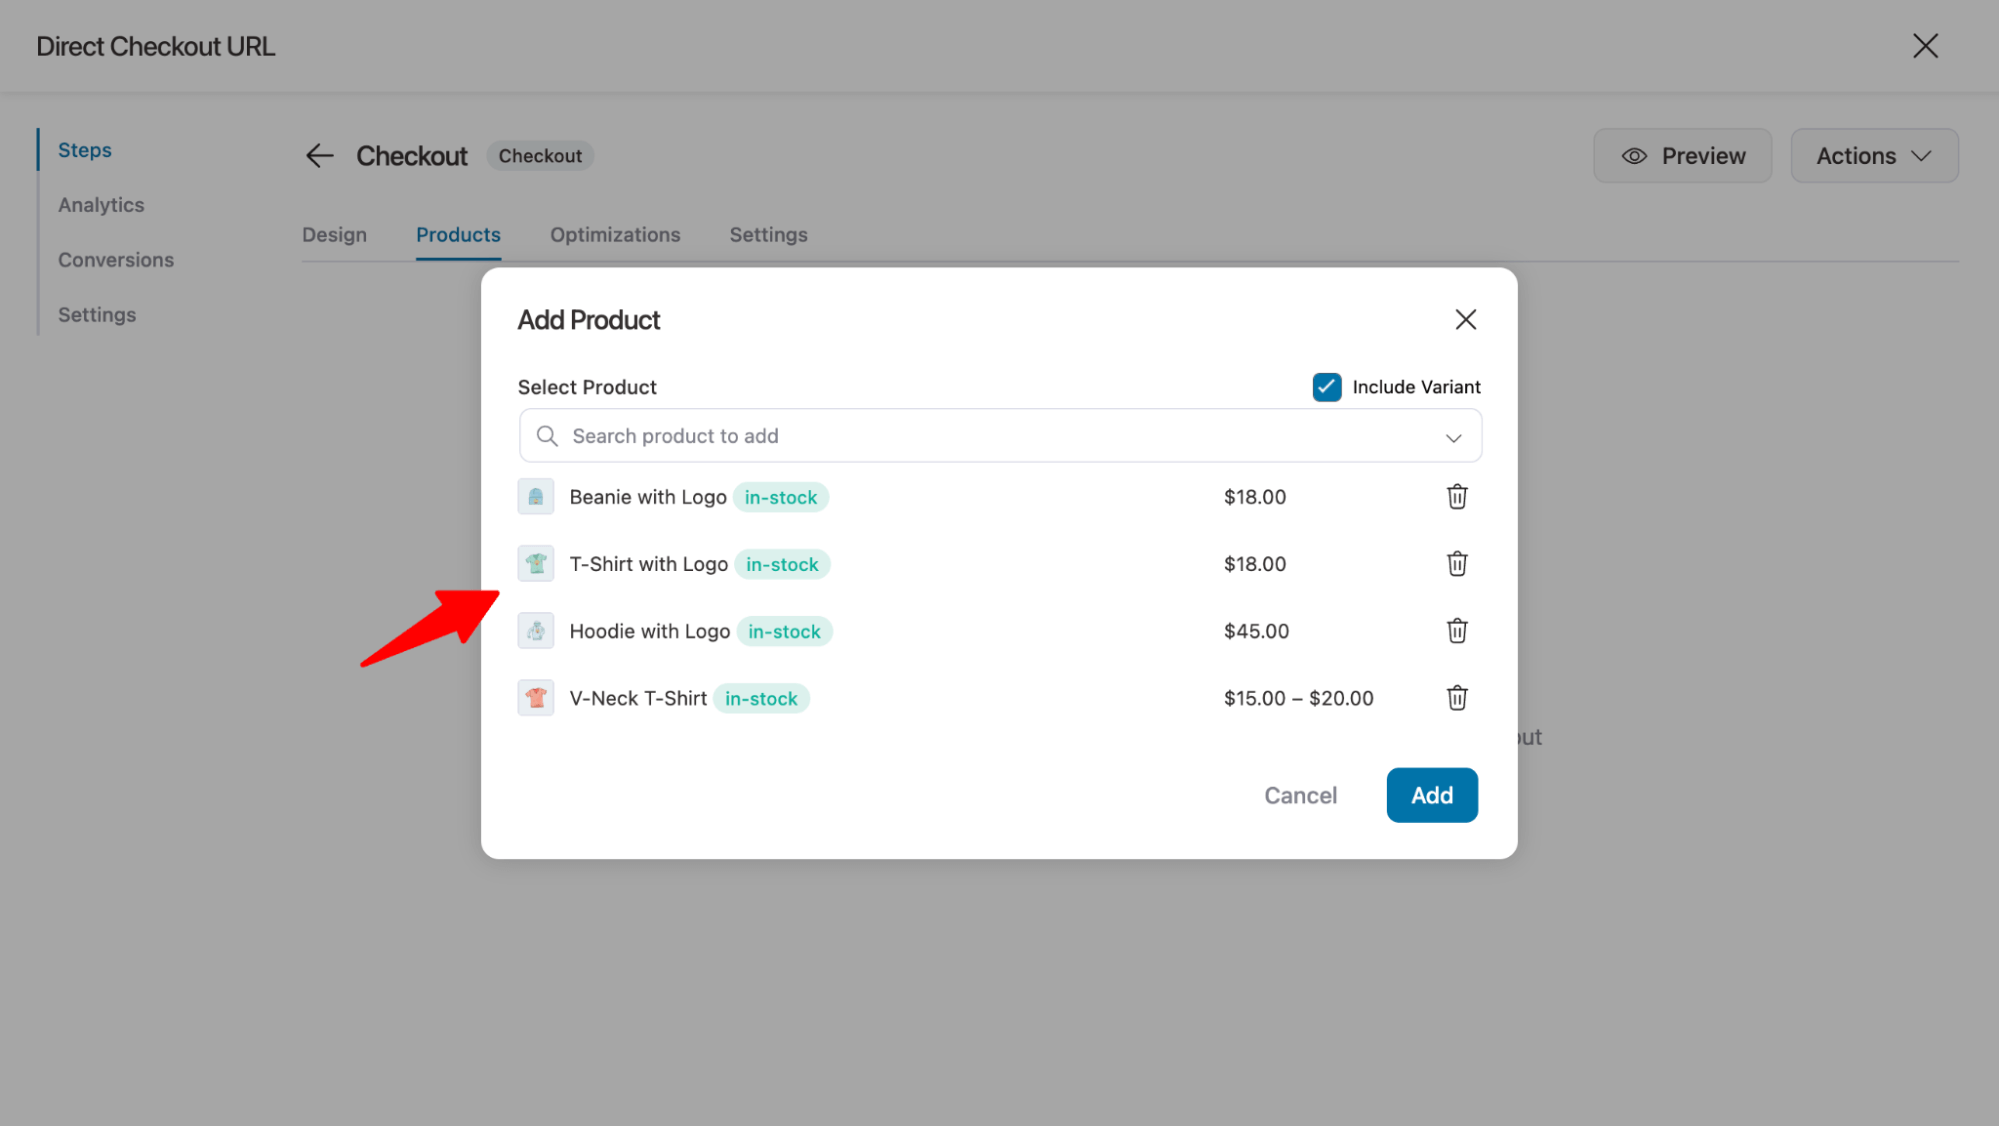
You can offer discounts and set the quantity of the products.
Scroll to the settings section and choose “Force sell all of the above product(s).”

Click on ‘Save Changes’ when done.
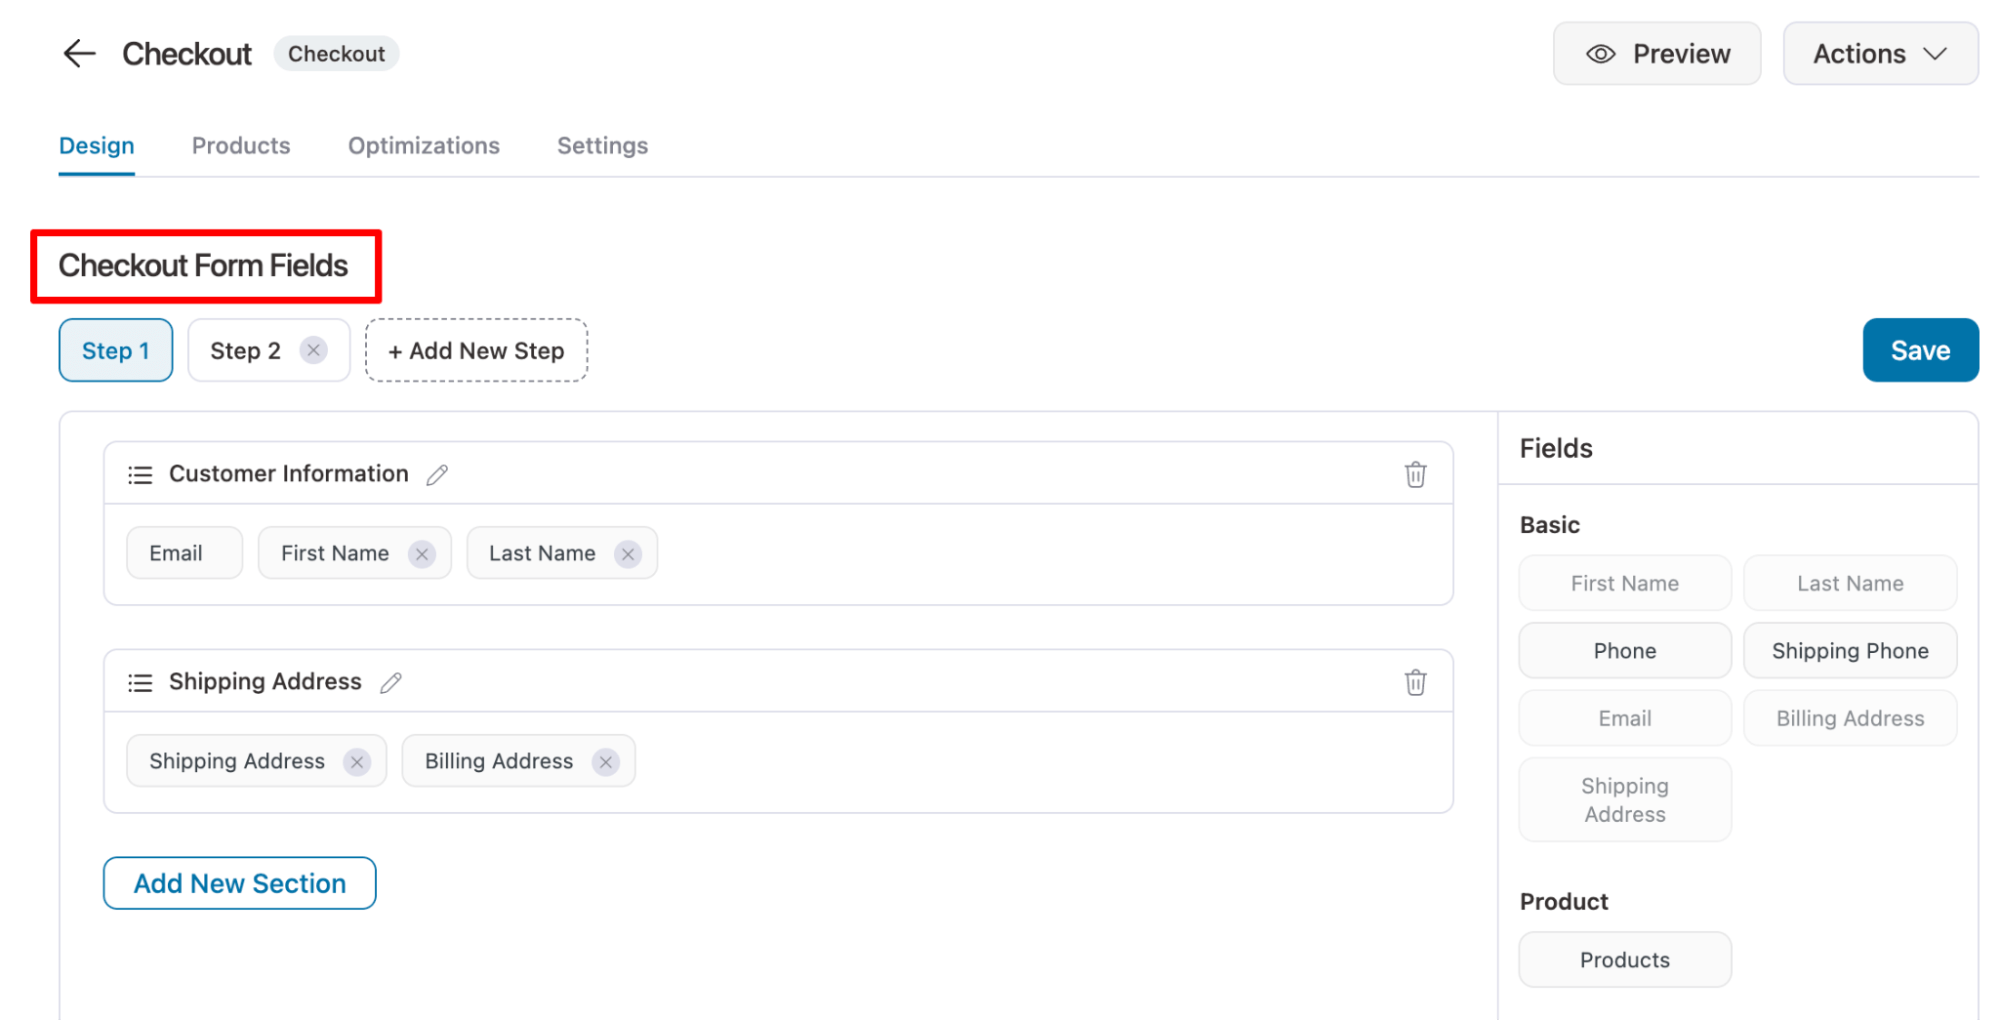
Step 4: Optimize the WooCommerce checkout page
Return to the Design tab and scroll to the "Checkout Form Fields" section. Here, you can rearrange or customize the form fields.
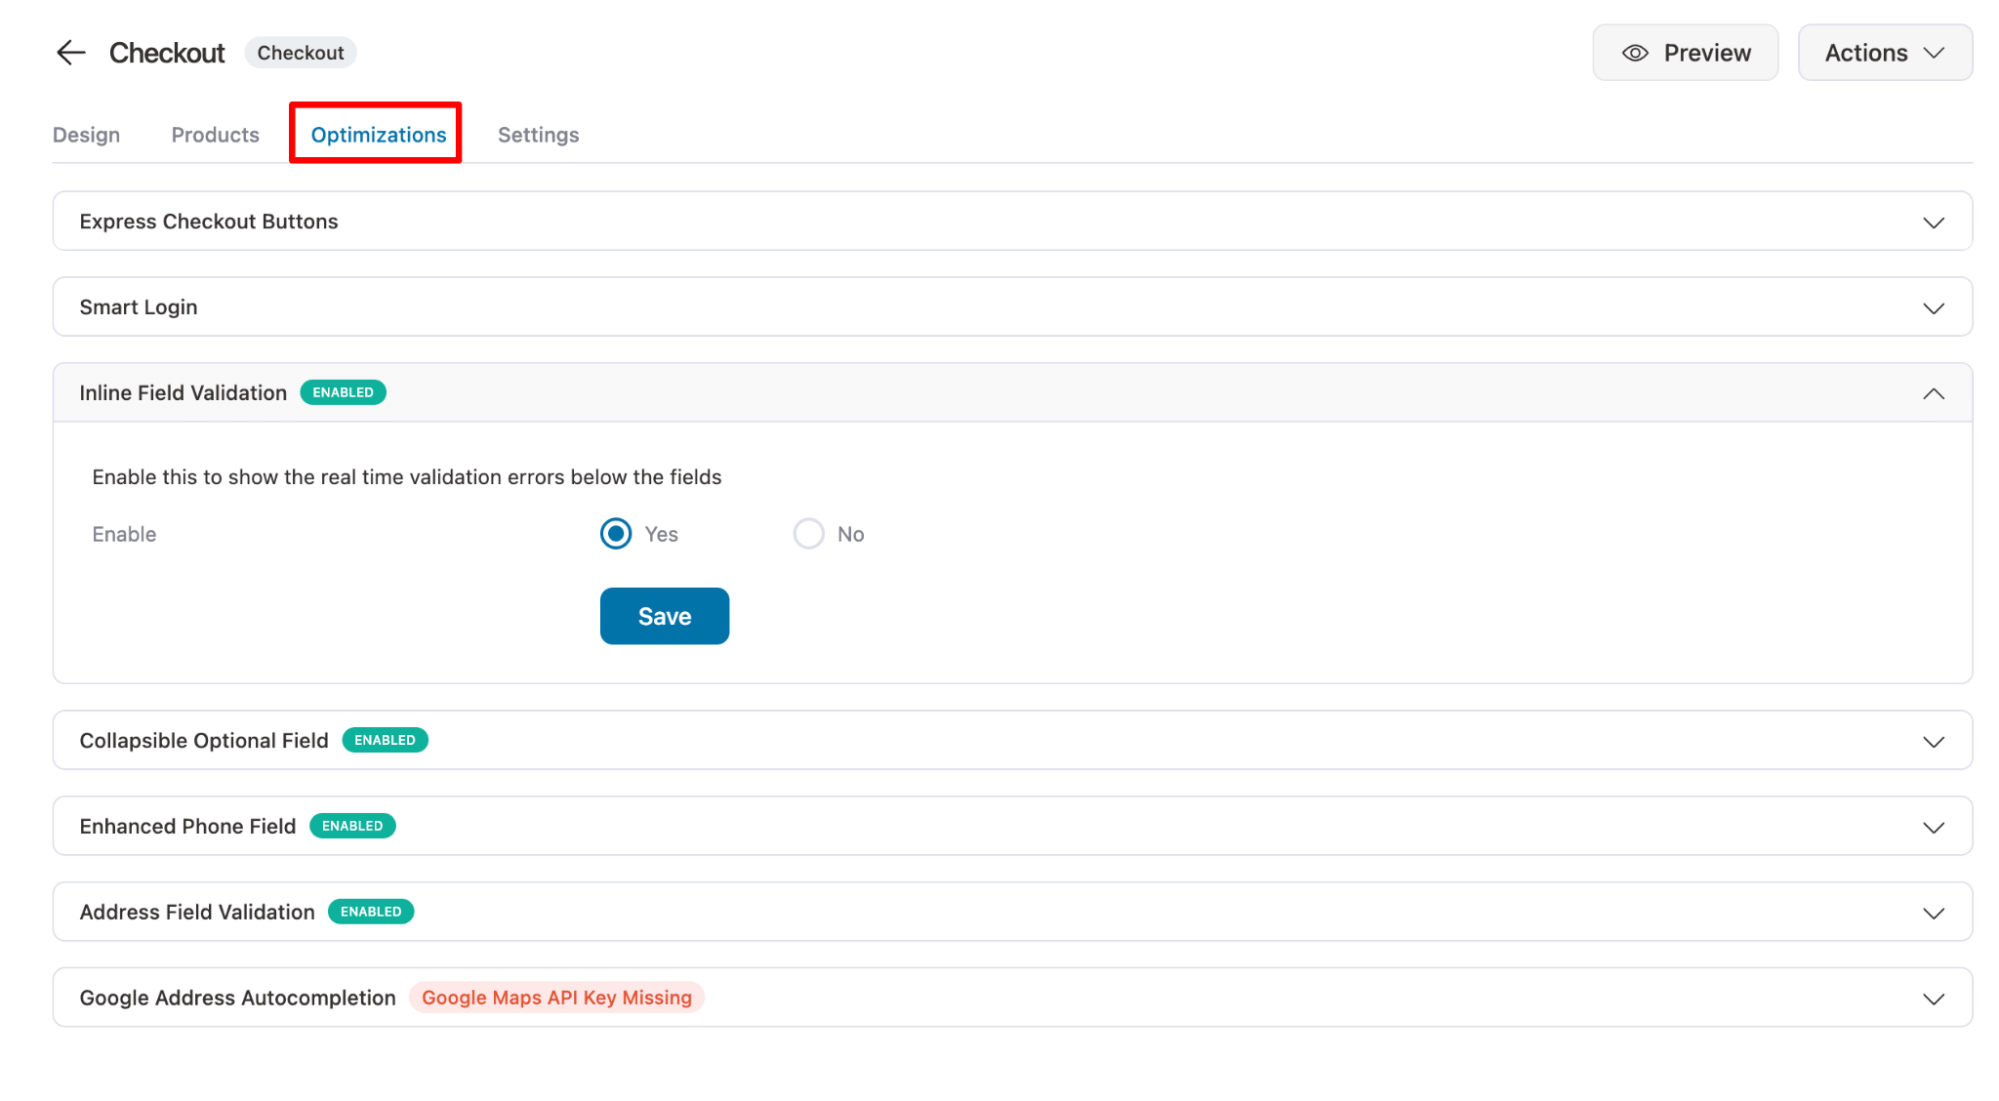
On the Optimizations tab, you can add express checkouts, such as Apple Pay and Google Pay, enable Google Address autocomplete, and auto-apply coupons. These will ensure your user experiences a frictionless checkout process.
Step 5: Test the direct checkout URL
Click on the ‘Preview’ option on the checkout page to access the direct checkout URL for the products you added.
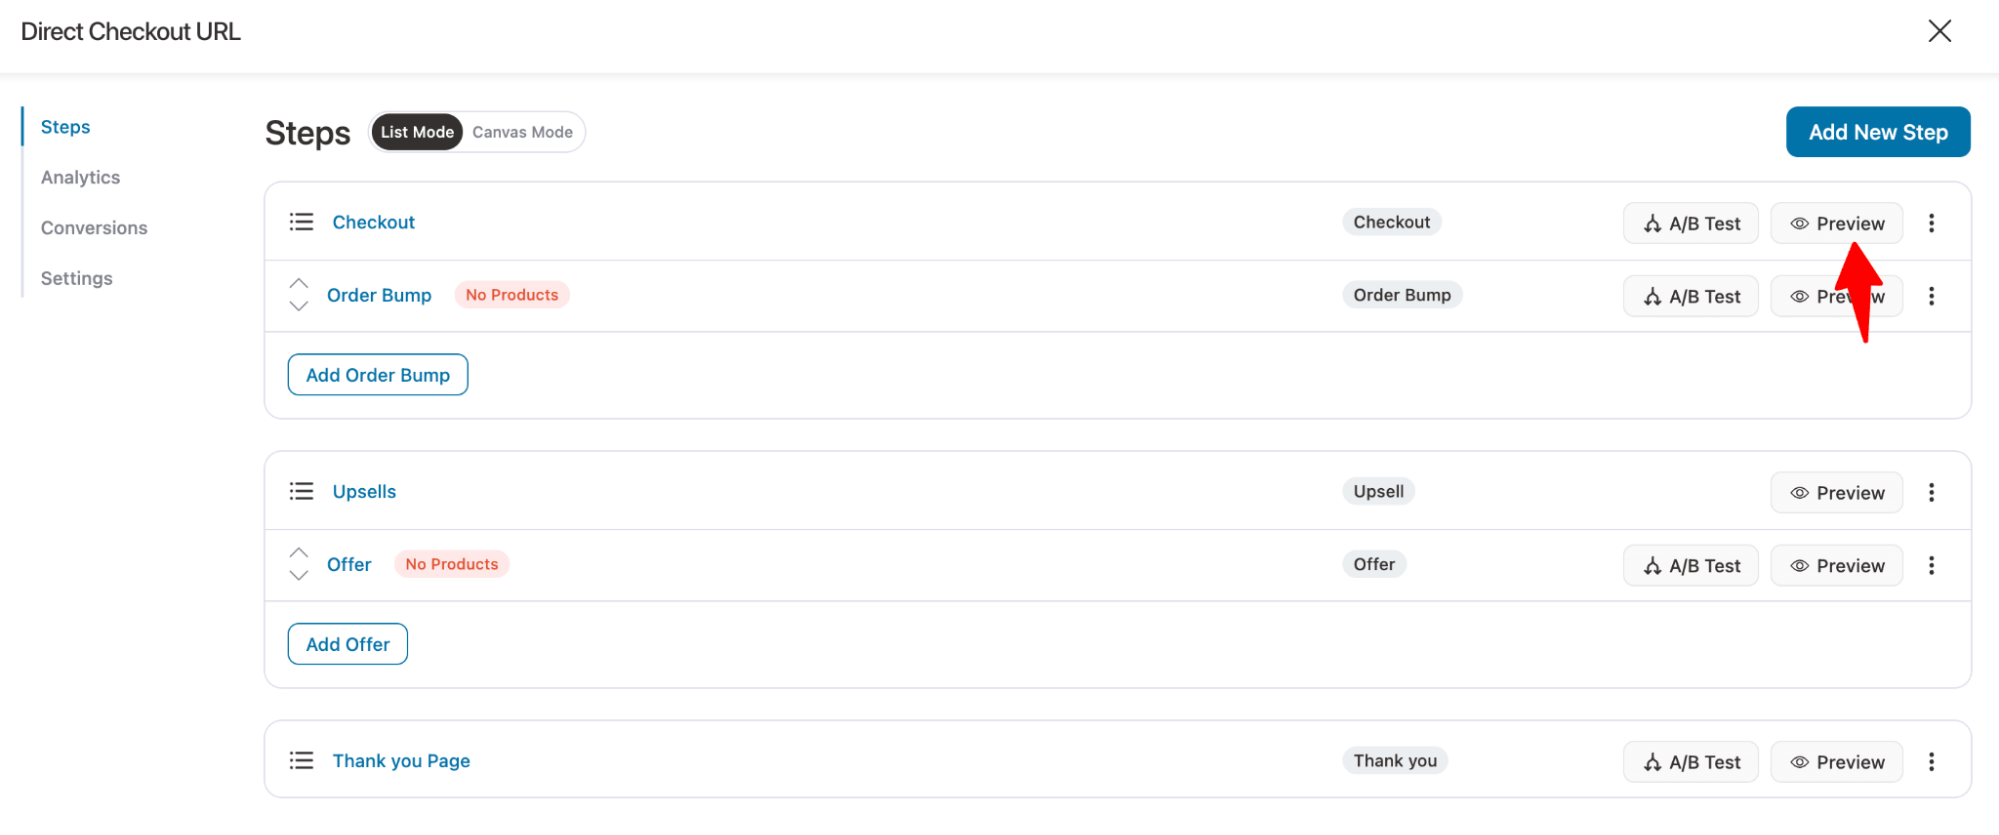
This will open the link in a new tab.
Now you can copy this WooCommerce add to cart link and use it for any promotional campaign.
Whenever the user clicks the link, the products you added to the cart will be automatically added and the user will be redirected to the checkout page.
How To Auto-Apply a Coupon in the Direct Checkout URL in WooCommerce
You can easily do that with FunnelKit Funnel Builder. For this, go to the Optimizations tab and expand the Auto Apply Coupon option.
Then select Yes for the Auto Apply Coupon option and enter the coupon code.
You can disable the coupon field if you want.
Make sure to save your changes.
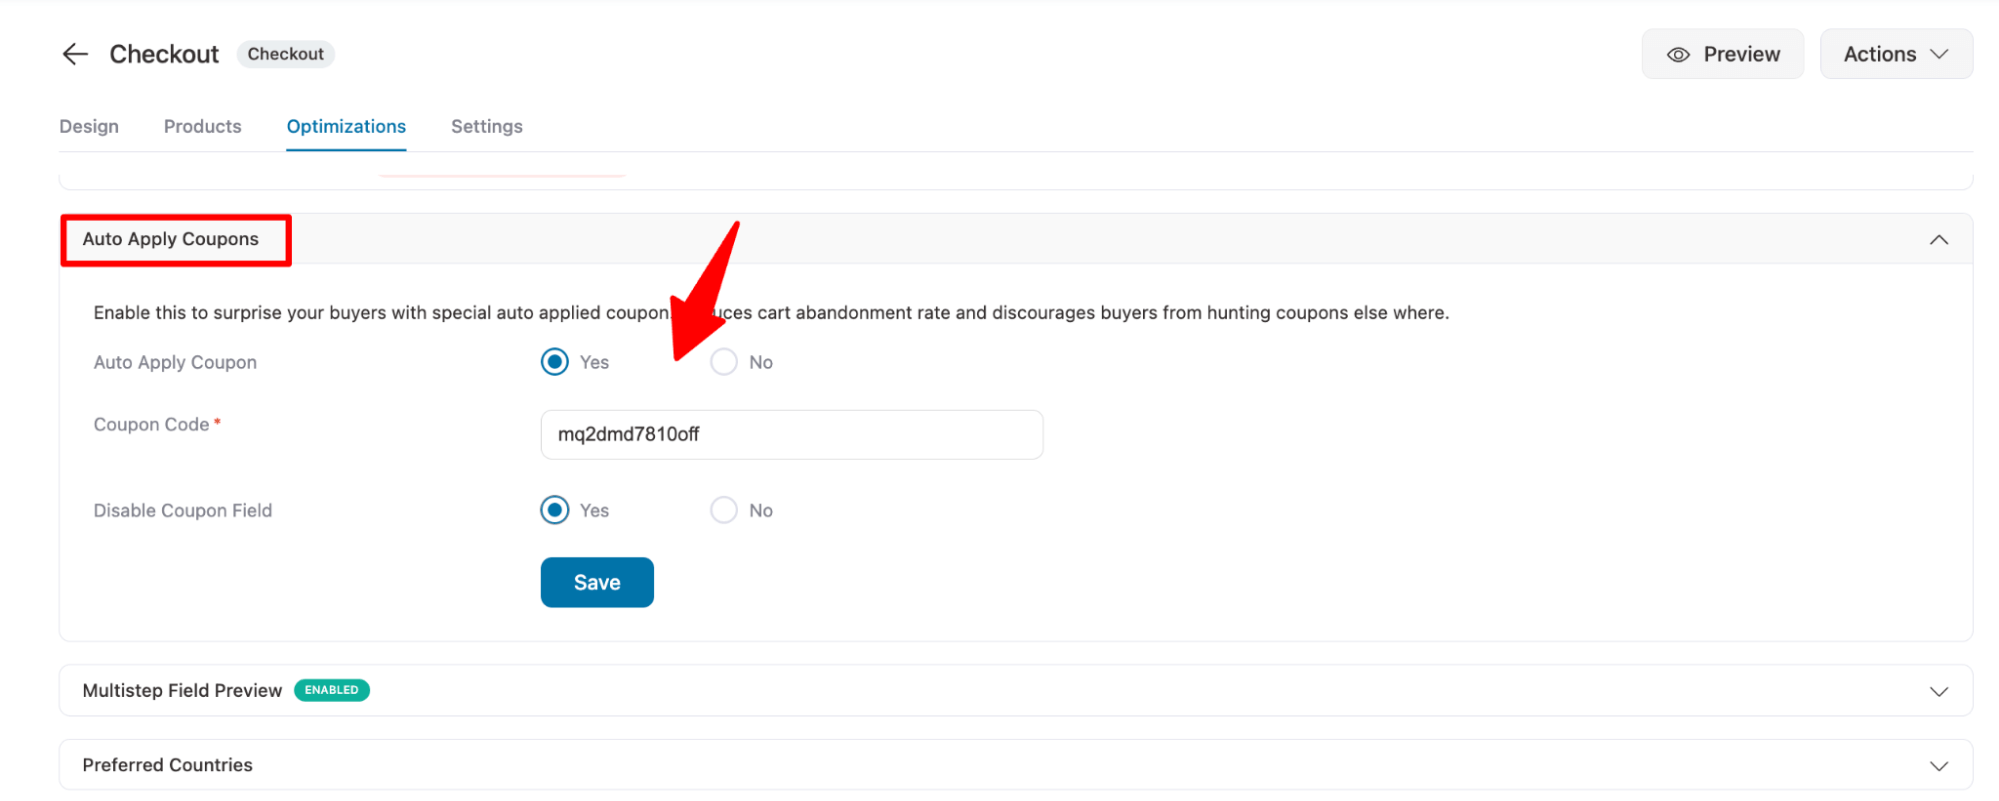
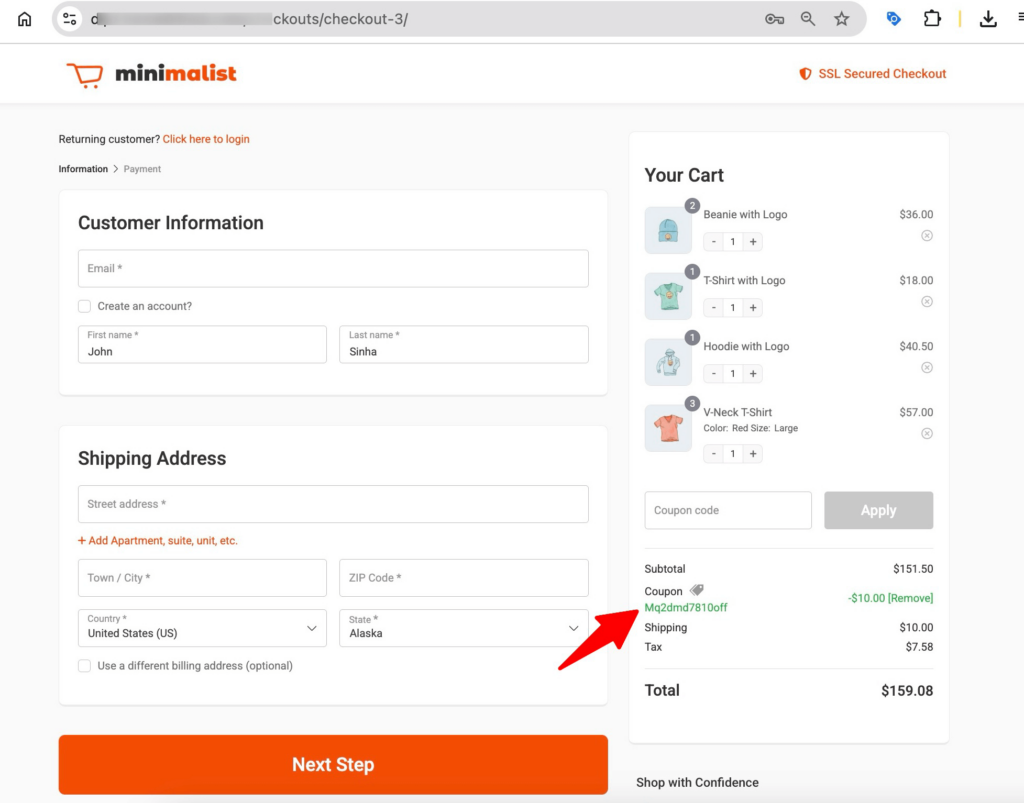
And that’s it. Now, if you hit the WooCommerce checkout URL, the coupon will be automatically applied.
How to Add Different Types of Products Using One Checkout URL?
You can add different types of products, including simple, variable, and even subscription, in a single checkout URL using both the default WooCommerce checkout URL and the FunnelKit Funnel Builder.
Manually add different types of products to a checkout URL
To create a checkout URL with different product types, simply append their IDs to the add-to-cart multiple times. For variable products, include the variation_id and the specific attribute(s) (e.g., size or color) in the URL.
For example, to add one simple product (ID 135) and two variable products (variation IDs 566 and 567), your checkout URL will look like this:
https://yourstore.com/checkout/?add-to-cart=135&add-to-cart=123&variation_id=566&attribute_pa_size=medium&add-to-cart=123&variation_id=567&attribute_pa_size=large
Here, 123 is the parent product ID for both variations, and the attributes define the selected variation.
Create a direct checkout URL with multiple products using a plugin
With FunnelKit Funnel Builder, you can easily do that. After creating the sales funnel, go to the Products tab in the checkout step, search for, and add the products. Here, you can add multiple products.

Feel free to adjust product quantities or offer separate discounts from here.
More Questions About WooCommerce Checkout URL
Have a look at some of the frequently asked questions about checkout URL in WooCommerce:
Using a direct checkout URL in WooCommerce streamlines the shopping experience by bypassing the cart page. This reduces friction in the buying process, decreases cart abandonment, and improves conversions, especially during promotional events or abandoned cart recovery.
Yes, direct checkout URLs are perfect for bulk orders. You can create a custom URL that adds multiple products, each with its own quantity, to the cart. This makes it easier for wholesale buyers or customers ordering in large quantities to complete their purchase quickly.
If a product is out of stock when using a direct checkout URL, it will not be added to the cart. Customers will be directed to the checkout page with only the available items in their cart.
Yes, you can share WooCommerce checkout URLs on social media platforms like Instagram, Facebook, and Twitter. This is especially effective during promotional campaigns, as it encourages impulse purchases by providing a seamless shopping experience.
Ready to Use a WooCommerce Checkout URL?
WooCommerce direct checkout URLs let you send users straight to the checkout with selected products, saving clicks and speeding up the purchase journey.
While the default option is enough to create a direct URL, it's not enough to seal the sales.
That’s where FunnelKit Funnel Builder really shines, transforming a basic checkout into a high-converting funnel that’s tailored, flexible, and designed to boost your average order value.
Plus, it lets users adjust product quantities and remove items at checkout, giving them the freedom they want. As store owners, you can offer auto-applied coupons to please customers and show additional offers like order bumps or upsells to increase the order value.
So don’t just build a checkout URL! Instead, create a smart checkout URL with a conversion-optimized process to get maximum results.

Editorial Team
June 16, 2026Utilizing the power of the WooCommerce sales funnel can boost your online sales and revenue. That means a product page that builds desire, an in-cart upsell, a checkout with an...
Editorial Team
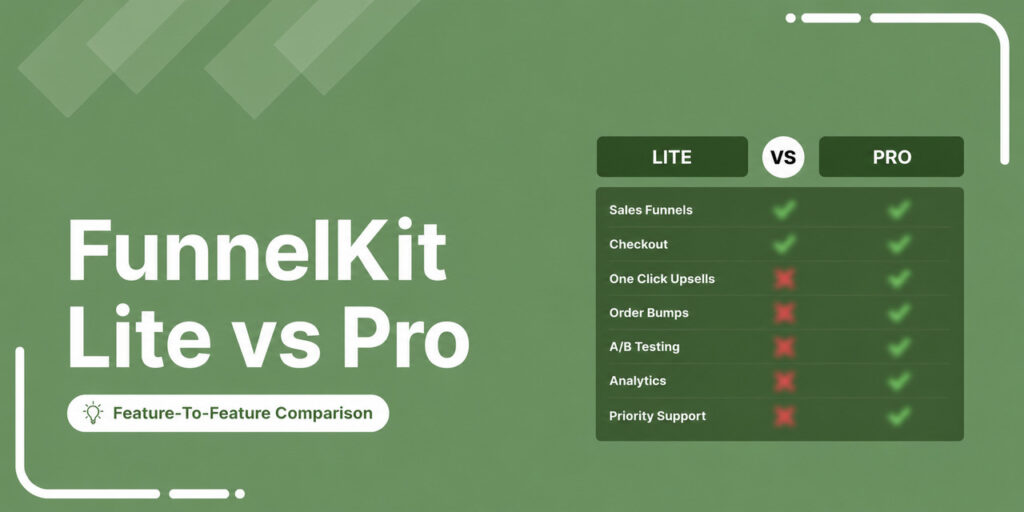
June 15, 2026If you run a WooCommerce store, you've almost certainly come across FunnelKit. FunnelKit is a suite of three separate products, each with its own Lite (free) and Pro versions: FunnelKit...
Damanjeet Singh
June 12, 2026Hi, I'm Damanjeet, co-founder and CEO of FunnelKit. For the last 15 years, I've helped WooCommerce stores solve one expensive problem, which is that the default checkout wasn't built to...


