Need help optimizing your WooCommerce checkout page?
Sometimes, a single field can slow down the process and distract customers from completing their purchases.
For stores selling primarily to individual buyers, the Company Name field is often unnecessary and can make the checkout page look busier than it needs to be.
In this blog, we’ll show you exactly how to remove the company name field from your WooCommerce checkout page, making the process faster and simpler for your customers.
Whether you prefer a quick code snippet or a plugin solution, we’ll walk you through every step to create a checkout experience that’s clean, efficient, and tailored to your audience.
Let’s dive in and simplify that checkout process.
Table of Contents
- 1 What is the Company Name Field in WooCommerce?
- 2 Default Company Name Field in the WooCommerce Checkout Page
- 3 Why Remove the Company Name Field from WooCommerce Checkout?
- 4 How to Remove the Company Name Field from the WooCommerce Checkout Page
- 5 Method 1: Remove the Company Name from WooCommerce Checkout Using the Custom Code
- 6 Method 2: Remove the Company Name from the WooCommerce Checkout Page Using a Plugin
- 6.1 Step 1: Create a store checkout page
- 6.2 Step 2: Import a pre-designed store checkout template
- 6.3 Step 3: Customize the checkout page
- 6.4 Step 4: Deactivate the company name field on the checkout page
- 6.5 Step 5: Enable the store checkout
- 6.6 Step 6: Final preview after removing the company name field from the WooCommerce checkout page
- 7 5 Tips for Removing Company Name from WooCommerce Checkout
- 8 Wrapping Up: Boosting Checkout Efficiency in WooCommerce
What is the Company Name Field in WooCommerce?
The company name field on the WooCommerce checkout page is an optional field where customers can enter the name of their business or organization.
It’s mainly there for stores that cater to B2B (business-to-business) customers who might need to include their company name for invoicing or shipping purposes.
However, if you’re running a B2C (business-to-consumer) store and mainly selling to individual buyers, this field might feel unnecessary and can even clutter the checkout form.
Therefore, removing it can simplify the checkout and create a smoother experience for customers who don’t need to fill out business details.
Default Company Name Field in the WooCommerce Checkout Page
Here’s the default WooCommerce checkout page that includes the “Company Name” field.

This default checkout page by WooCommerce needs customization. There are several reasons to focus on it, but we’re just sharing some points on it.
- Too many fields – This makes checkout feel long and tedious.
- Lacks branding – Misses an opportunity to reinforce brand trust.
- Poor mobile experience – Too cluttered for small screens.
- Order summary visibility – Not prominent enough for quick review.
- Unclear payment options – Text could be more user-friendly.
- Higher abandonment risk – Simplifying could improve order completion rates.
Apart from these, there are some other reasons that you might consider. We’ve discussed them in the next section.
Why Remove the Company Name Field from WooCommerce Checkout?
The Company Name field in WooCommerce was primarily designed for B2B (business-to-business) customers, but it’s often unnecessary for stores focused on B2C (business-to-consumer) sales.
Removing this field can make the checkout process smoother, helping customers complete their orders faster with less hassle.
Here’s a closer look at why it might be a good idea to remove it:
- Reduces confusion for B2C shoppers
The Company Name field can be confusing for customers making personal purchases. They may feel unsure whether they need to fill it in, which can cause hesitation and slow checkout.
- Avoids unnecessary validation errors
If the Company Name field is set as required, customers who skip it can receive frustrating error messages. Removing it can prevent these validation issues, allowing for a seamless checkout.
- Shortens the form for faster completion
Every extra field in a form adds more time to the process. Removing the Company Name field reduces form length, helping customers complete their orders more quickly and smoothly.
- Improves visual simplicity on small screens
For mobile users, fewer fields mean less scrolling and a more compact, visually simple checkout experience. Reducing the number of fields makes the checkout feel less cluttered and easier to navigate on smaller screens.
- Focuses checkout on essential information only
By eliminating unnecessary fields like the Company Name, you’re guiding customers to provide only the information needed to complete their order. This streamlined approach builds trust and reduces the likelihood of drop-offs during checkout.
Removing the Company Name field is a quick and easy way to make your checkout more user-friendly and improve the shopping experience for customers, especially those making personal purchases.
How to Remove the Company Name Field from the WooCommerce Checkout Page
We'll use two simple methods to remove the company name field from the checkout page:
- custom codes and
- a WooCommerce checkout plugin.
Let’s dive into an easy, step-by-step guide to make it happen!
Method 1: Remove the Company Name from WooCommerce Checkout Using the Custom Code
If you’re comfortable adding some code, this is a simple and effective way to remove the Company Name field from your WooCommerce checkout page.
Adding the code directly means you won’t need any extra plugins, and it keeps your checkout clean and streamlined.
Here’s how to do it:
- Access your theme’s functions.php File: First, go to your WordPress dashboard, navigate to Appearance > Theme Editor, and locate your child theme’s functions.php file. Using a child theme is best to avoid losing changes when the theme updates.

- Add the Custom Code: Copy the following code snippet and paste it into your functions.php file:
add_filter( 'woocommerce_billing_fields', 'remove_company_name_field' );
function remove_company_name_field( $fields ) {
    unset( $fields['billing_company'] );
    return $fields;
}
This code uses a WooCommerce filter to unset (remove) the billing_company field from the checkout page.
- Save your changes: After adding the code, click Update File to save it. This will instantly remove the Company Name field from your WooCommerce checkout.
- Test your checkout page: Finally, test your checkout page to ensure everything works as expected and the field is gone. Try going through the checkout on both desktop and mobile to ensure the field is successfully removed without any issues.

- Bonus Method
Another method to remove the company field from the WooCommerce checkout page is to navigate to the theme's customization page.
Then, move to WooCommerce > Checkout Page. Here, change the option to “Hidden”.
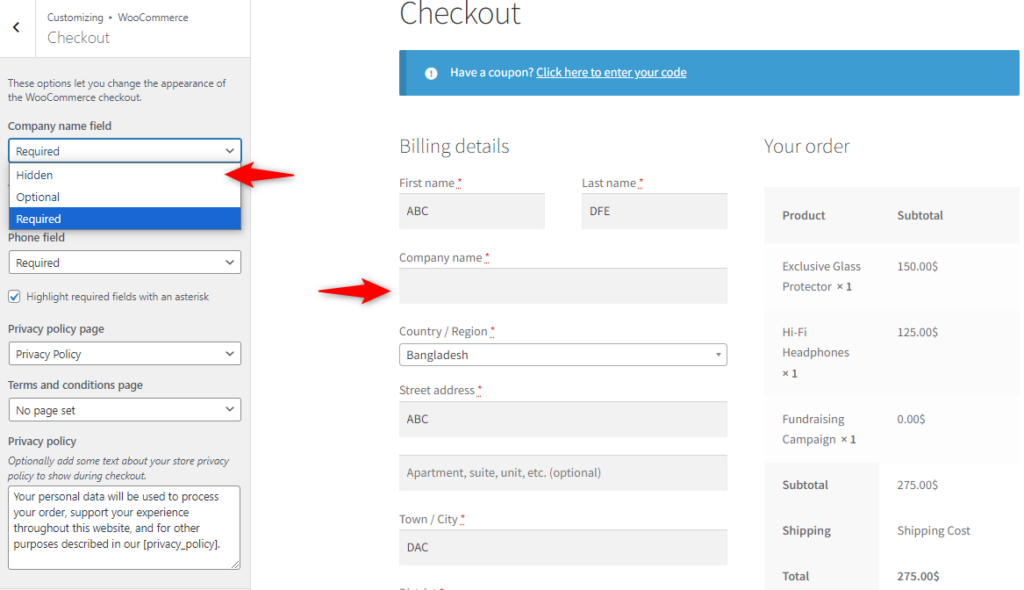
- The “Company” field does not appear here, which means it has been removed from the checkout page.

Method 2: Remove the Company Name from the WooCommerce Checkout Page Using a Plugin
FunnelKit Funnel Builder offers an easy, no-code solution if you prefer not to use code.
This WordPress plugin designed to optimize WooCommerce stores by enhancing the checkout and sales funnel experience.
It is a powerful tool for creating customized, high-converting checkout pages, sales funnels, and upsell offers.
It includes features like:
- Customizable checkout fields: Add, remove, or reorder fields (like the Company Name) with a simple drag-and-drop.
- Order bumps and upsells: Encourage additional purchases by offering add-ons directly during checkout.
- Conversion-optimized templates: Access a library of ready-made, high-converting templates for checkout pages and whole sales funnels.
- A/B testing: Test different checkout setups to see which performs best, helping you continuously improve conversions.
- Detailed analytics: Track visits, conversion rates, and revenue to optimize each stage of the checkout funnel.
With FunnelKit Funnel Builder, you can remove the Company Name field from the WooCommerce checkout with just a few clicks, making it ideal for store owners looking to enhance the checkout process without coding.
Step 1: Create a store checkout page
First, you must create a store or global checkout using FunnelKit Funnel Builder.
To do that, navigate to the FunnelKit > Store Checkout and click the Create Store checkout button.

Step 2: Import a pre-designed store checkout template
The next step is to choose a template. You can find available templates here.
You can choose the one that you like best.
In our case, we’re going with the “Hific” template.

Then, you can look at the available options in the template. Once it’s checked, click on the “Import This Template.”

Then, you’re required to provide a name for it. And then hit the done button.

Your store checkout will be created with pre-designed templates.
Step 3: Customize the checkout page
After that, you’ll see the checkout form pages. Now, click on “Checkout”.

Here, you will see the details of the checkout page. The page editing option includes the selected page builder and the available fields.
Also, on the right side, you can see some additional fields. You can just add them by drag-drop.

Before removing the company name field from the checkout page, see the page preview.
You can see the “Company” field is appearing here. We’ll show you how to remove it.

Also, if you edit the page with Elementor, you can make specific changes to the checkout field. For example, you can change the length of each field (for shipping and billing information).

Also, you can make changes to the entire checkout form from here.

Step 4: Deactivate the company name field on the checkout page
Let’s deactivate the company name field on the checkout page. Again, return to the customizing page and click “Shipping Address.”

The expanded window will contain some additional information. Now, use the built-in checkout field editor to disable the “Company” name field.

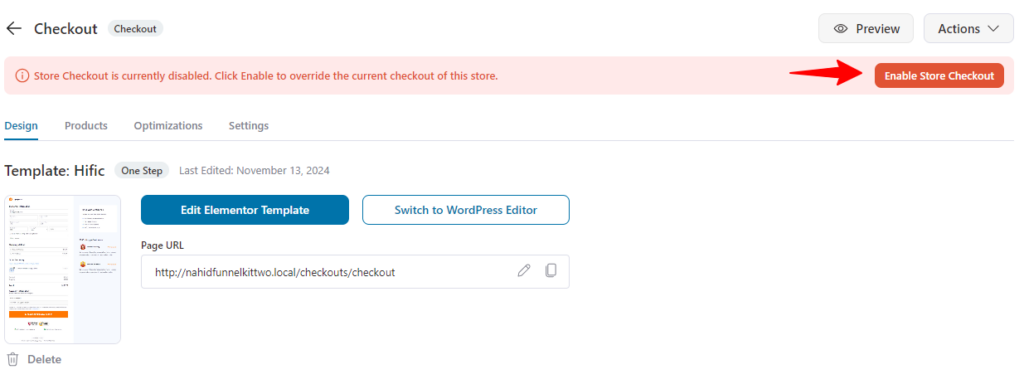
Step 5: Enable the store checkout
Once you’re done, it’s time to enable the checkout page. To do that, click on the button. That’s all. It’s enabled.
Step 6: Final preview after removing the company name field from the WooCommerce checkout page
Once your customers go to their checkout page, they will see this form without the “Company” name field.
The field is occupied only with necessary information, such as email, name, mobile number, shipping address, etc.
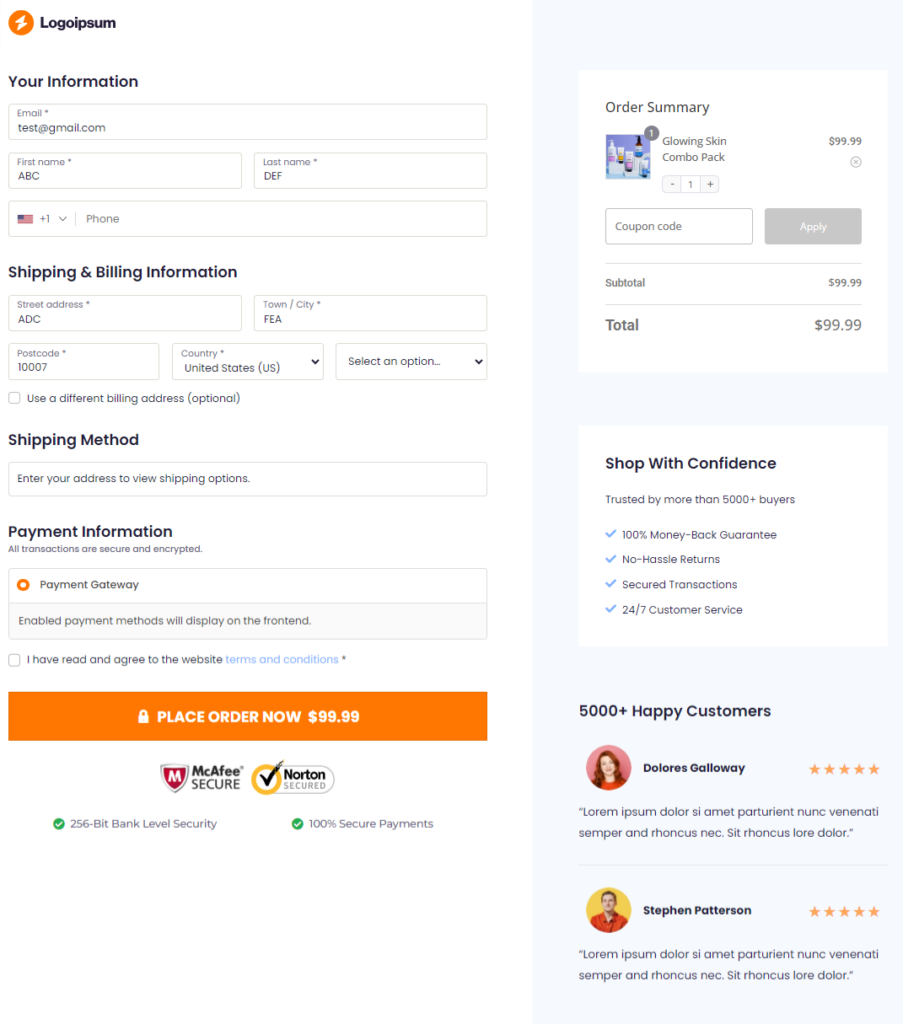
This is how you can easily remove the company name field from your WooCommerce checkout page.
5 Tips for Removing Company Name from WooCommerce Checkout
Removing the Company Name field in WooCommerce is a great way to streamline checkout, but it’s important to do it correctly to avoid any issues down the road.
Here are five tips to help you remove this field smoothly and effectively:
1. Add code in a child theme or use a custom plugin
When customizing WooCommerce, adding code to your child theme’s functions.php file rather than the main theme’s file is best.
This keeps your changes safe during theme updates. If you’re uncomfortable with code, consider using FunnelKit store checkout facilities to simplify your tasks.
2. Test for compatibility with other checkout plugins
WooCommerce stores often use multiple plugins, such as payment gateways or design customizations, to improve the checkout experience.
Before rolling out changes, test your checkout thoroughly —ideally on a staging site—to ensure that removing the Company Name field doesn’t conflict with other plugins.
3. Check checkout field validation rules
If the Company Name field was marked as "required" previously, its removal could impact the form’s validation requirements.
Ensure all required fields function correctly and that customers can complete checkout without encountering unexpected errors. If necessary, adjust any validation rules in the WooCommerce settings.
Like FunnelKit Funnel Builder, it can uncheck the company name field. You can easily enable or disable it from here.

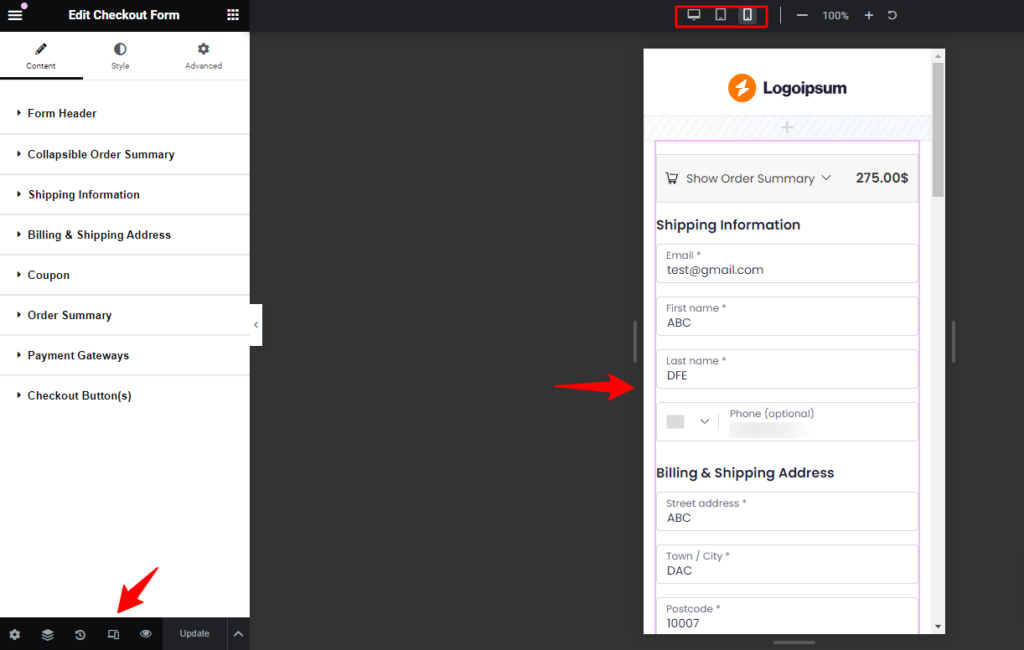
4. Adjust for mobile optimization
Mobile checkout is crucial for eCommerce, and removing unnecessary fields like Company Name can make checkout faster and easier for mobile users.
Once you’ve removed it, review the mobile checkout experience on various devices to ensure it’s smooth and visually appealing.
In the FunnelKit Funnel Builder, you can check the mobile responsiveness of your checkout page.
5. Consider customizing for different user types
If you have individual customers and businesses, consider using conditional logic to make the Company Name field visible only to business customers.
Plugins like WooCommerce Conditional Checkout Fields let you display the field only when certain conditions are met, simplifying the form for individual shoppers while allowing businesses to provide necessary details.
According to a study by Baymard, a simplified checkout page (with fewer fields) can reduce cart abandonment by 20-60%.
You can follow these basic steps to streamline and boost your checkout page experience. It will increase AOV and generate sales.
Wrapping Up: Boosting Checkout Efficiency in WooCommerce
Removing the Company Name field is a small but impactful way to streamline your WooCommerce checkout experience.
By eliminating unnecessary fields, you reduce friction, speed up the process, and create a smoother, more enjoyable experience for your customers.
Remember, every improvement counts when it comes to boosting conversions.
If you want an even easier way to make these changes without coding, the FunnelKit Funnel Builder is a fantastic tool.
With FunnelKit, you can quickly remove fields like the Company Name, customize the checkout, and create a seamless, high-converting experience for your customers.
Now that you know how to do it, optimize your checkout for a more efficient, customer-friendly WooCommerce store!
Editorial Team
February 16, 2026Using a checkout coupon can be a smarter way to boost sales than offering direct product discounts. Coupons give you full control over your discount strategy, letting you run targeted...
Editorial Team
February 12, 2026Removing checkout fields in WooCommerce is one of the fastest ways to simplify your store's checkout and reduce cart abandonment. Every unnecessary field you ask customers to fill out adds...
Editorial Team
February 4, 2026Adding a checkbox to the WooCommerce checkout is one of the easiest ways to collect information from customers, without asking them to do much extra. Think about it. The customer...


