
Tired of losing sales because of a clunky checkout process?
More than 70% of online shoppers abandon their carts, and one big reason is the hassle of typing in long, detailed addresses. [Source: Baymard Institute]
To make matters worse, address mistakes lead to 41% of delivery delays and 39% of failed shipments, creating headaches for both you and your customers.
In our analysis of various checkout sessions, we found that manual address entry is a leading cause of cart abandonment on mobile devices (and even on desktops).
The solution? Google Address Autocomplete for WooCommerce.
This feature allows customers to fill in their addresses instantly, streamlining the checkout process, reducing errors, and improving conversions.
In this blog, we will share how you can easily add Google address autocomplete for WooCommerce checkout.
We will share two methods: one for beginners and another for pro users or developers.
Table of Contents
- 1 What is Google Address Autocomplete and How It Works in WooCommerce?
- 2 Why Use Google Address Autocomplete for WooCommerce?
- 3 WooCommerce Google Address Autocomplete Integration Methods
- 4 How to Set Up Google Address Autocomplete in WooCommerce
- 4.1 Step 1: Install and activate FunnelKit Funnel Builder
- 4.2 Step 2: Purchase a Google API Key from the Maps Platform
- 4.3 Step 3: Set up your store checkout
- 4.4 Step 4: Enable the Google Address Autocomplete feature
- 4.5 Step 5: Restrict Google Address Autocomplete for some countries (optional)
- 4.6 Step 6: Enable store checkout
- 5 6 Best Practices to Follow When Setting Up Google Address Autocomplete for WooCommerce
- 6 Frequently Asked Questions (FAQs) on WooCommerce Autofill Checkout Address
- 7 Ready to Set Up WooCommerce Google Address Autocomplete?
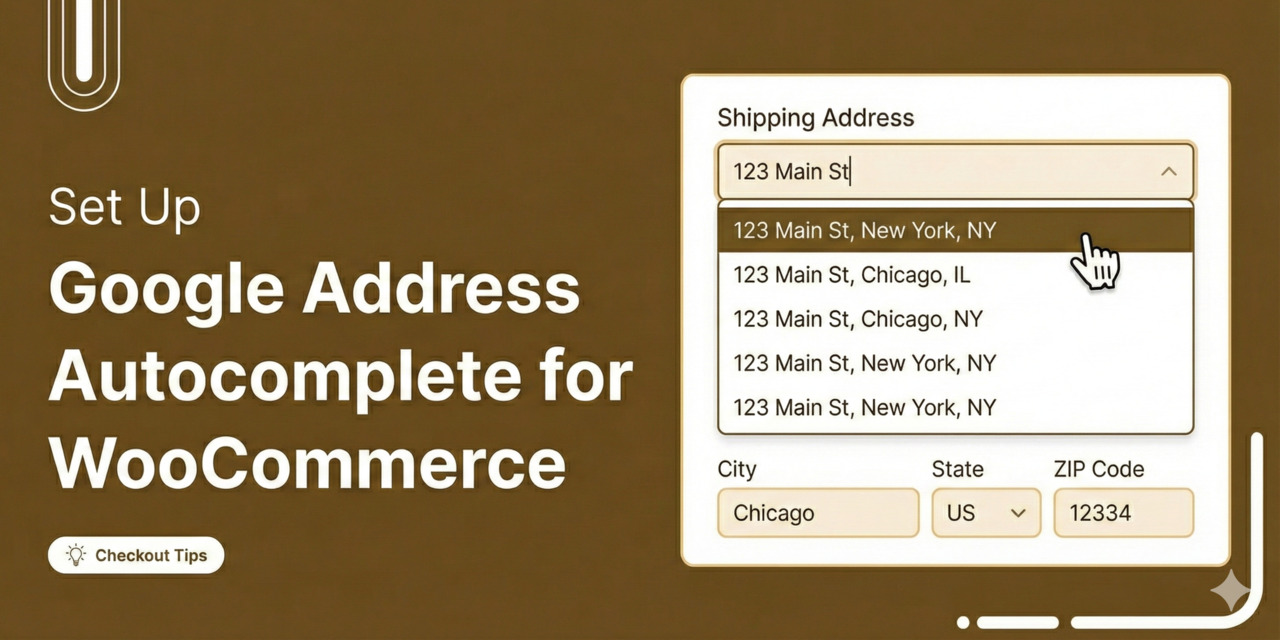
What is Google Address Autocomplete and How It Works in WooCommerce?
Google Address Autocomplete is a feature that automatically fills in users’ complete addresses as they type. It automatically fills out the street address, city, zip code, state, and country fields.
It’s a feature of the Places library in the Maps JavaScript API. It empowers forms to implement the type-ahead search behavior of the Google Maps search field.
As a result, it can autocomplete checkout form fields, such as addresses, and help customers select addresses more easily.
In layman’s terms, the Address Autocomplete API allows your shoppers to quickly input or select their addresses when they type the initial few letters in the address fields.
How Google Address Autocomplete Works on the WooCommerce Checkout Page
The WooCommerce checkout page includes billing and shipping address fields that customers must complete (either one or both) before placing an order. With Google Address Autocomplete, this process becomes faster and more user-friendly.
Here is how the Google address autocomplete works in the WooCommerce checkout page:
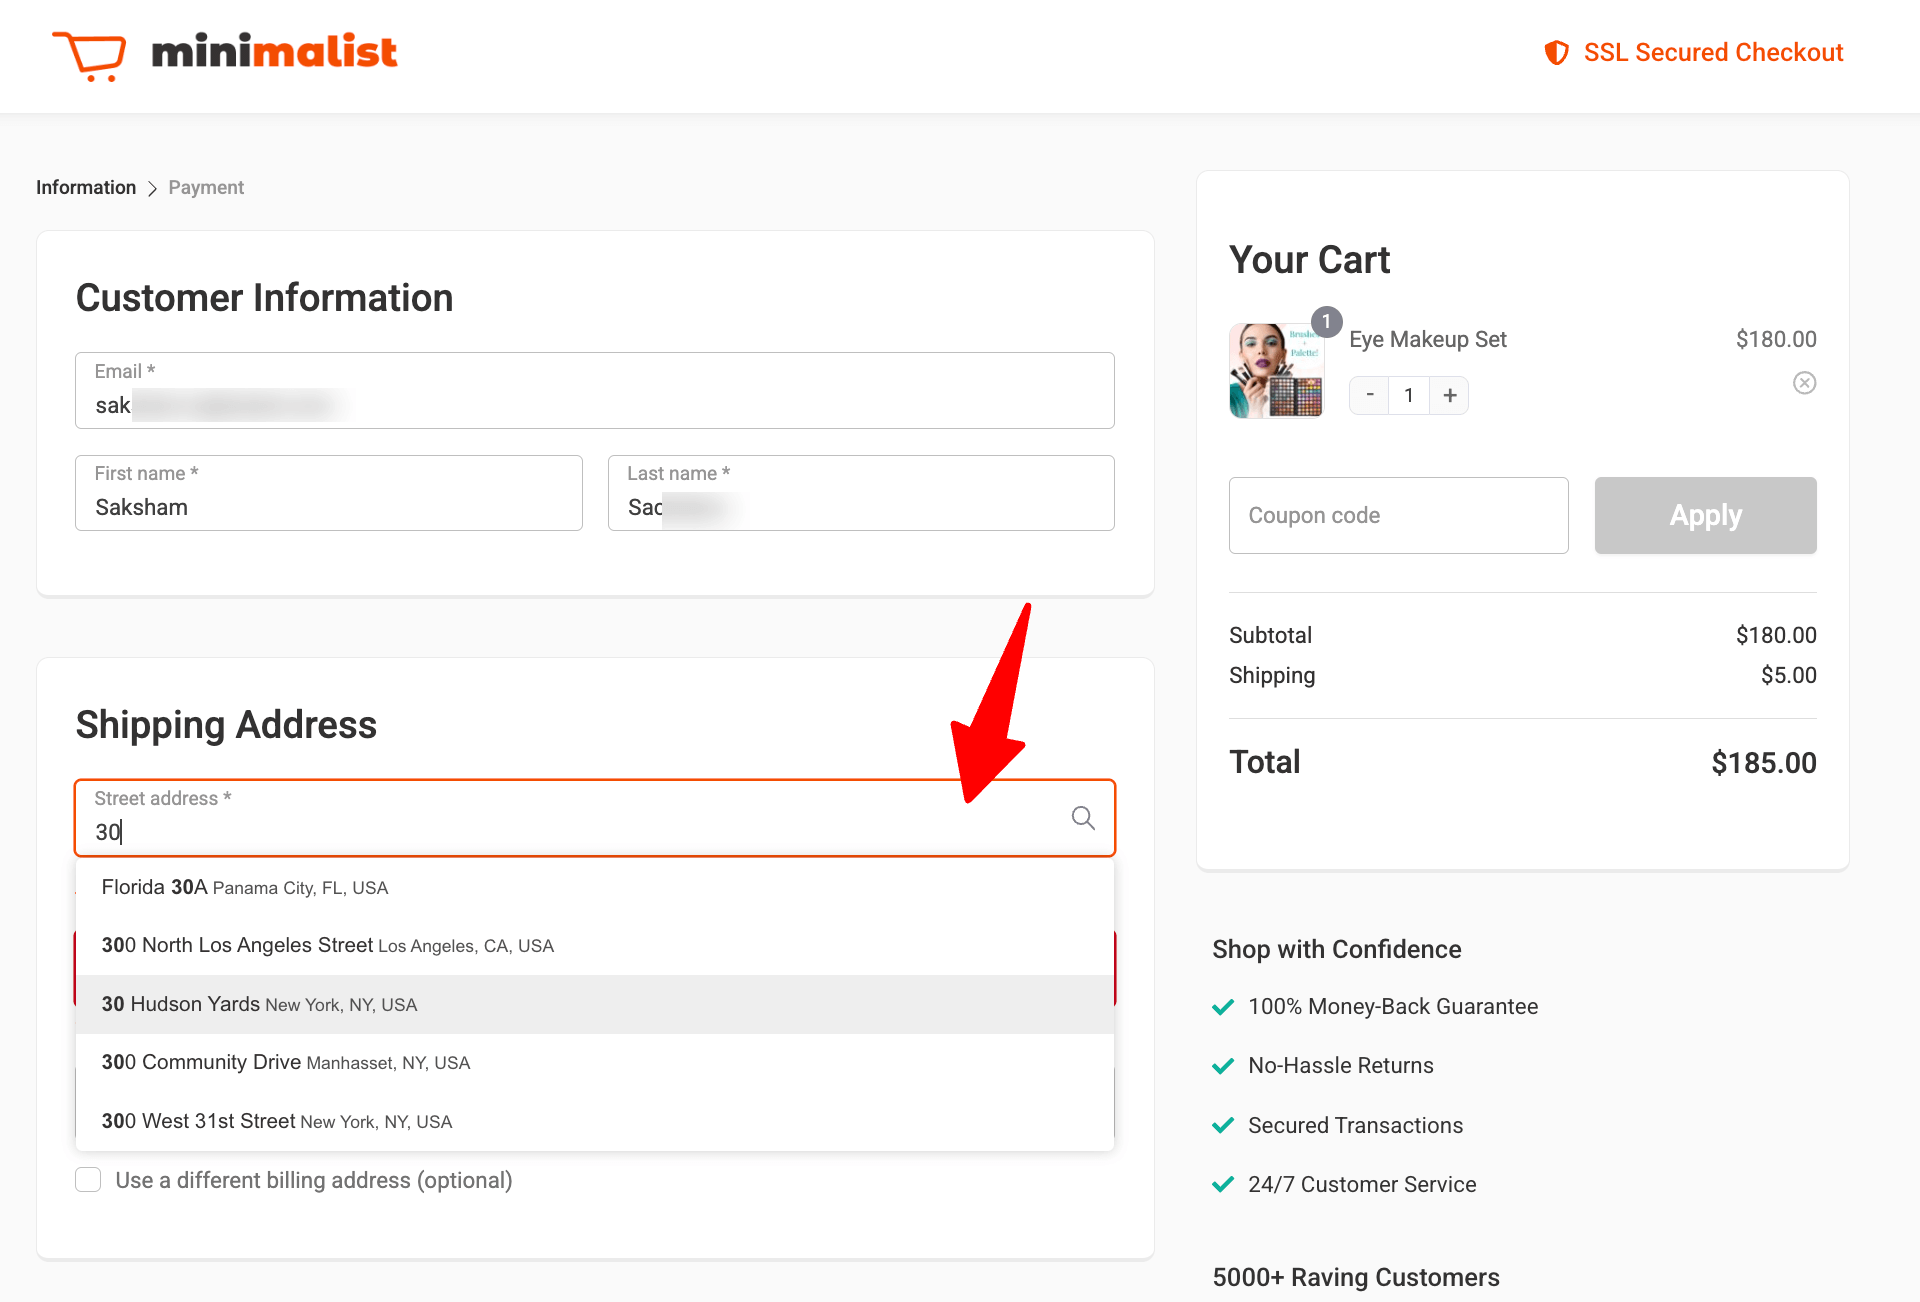
Step 1: Customer starts typing the address
When a user begins entering their address in the billing or shipping fields, Google Address Autocomplete provides real-time suggestions.
Step 2: A list of Suggested addresses appears
A dropdown list shows possible address matches based on the text entered, helping the user find their address quickly.
Step 3: Customer selects an address and auto-fills
Once the customer clicks on the address they want to select, the system automatically fills in all the address details, including street name, city, state, zip code, and country.
With the address fields auto-filled, customers can complete their checkout more quickly, reducing cart abandonment and minimizing errors in shipping information.
Why Use Google Address Autocomplete for WooCommerce?
Using the auto-fill address completion feature offers several compelling benefits for both store owners and customers.
Here’s why it’s a valuable addition to your checkout process:
1. Faster checkout experience
Take a look at the custom WooCommerce checkout page designed using FunnelKit without the address autocomplete option.
So the user lands on the checkout page and has to manually fill in every detail one by one:

A little bit of distraction can lead them to misspell or mistype the address. And this can lead to costly delivery-related failures.
Also, the entire process of typing out each detail is somewhat exhausting. Don't you agree?
Even more so on mobile, where the small screen size and countless notifications can distract people.
On the other hand, using Google address autocomplete on mobile is a breeze. Google Address Autocomplete simplifies the buying process by providing real-time address suggestions as users begin to type.
Google's own research indicates that autocomplete functionality reduces user typing time by approximately 25%.
Take a look below at how it saves so much time:
Notice how the user just had to type ‘2055’ and select one address for the remaining address details to be filled in automatically?
That's a huge improvement. So, incorporate Address autocomplete on your WooCommerce store to reduce friction, resulting in quicker checkouts and a more enjoyable customer experience.
2. Improves address accuracy
According to Shopify, Google Address Autocomplete reduces address-related errors during checkout by 20%. It also reduces the number of abandoned carts!
Auto-fill address ensures that customers choose valid, standard addresses, minimizing the chances of typos or missing information.
This helps reduce failed deliveries, delays, the associated costs of correcting address errors, and customer loss of trust in your brand.
It ensures a stress-free shopping experience and enhances your conversion rates.
3. Increases customer satisfaction
According to a National Retail Federation study, 31% of online shoppers agree that enhanced form-filling encourages them to complete the checkout process.
This is because Google Address Autocomplete provides a smooth user experience by minimizing the stress of typing too much information.
When the checkout process is quick, smooth, and error-free, customers will likely have a positive shopping experience.
A happy customer is more likely to return and recommend your business to others.
4. Reduces cart abandonment
Many cart abandonments occur during checkout because filling out form fields requires more time and effort.
Address Autocomplete shortens the process, making it easier and quicker for users to complete their orders.
This reduced friction can lead to higher conversion rates, helping you recover more sales that would otherwise be lost.
5. Global reach
If you run a WooCommerce store with international customers, the Google Address Autocomplete feature is a game-changer.
Google’s Places API has a vast database of addresses from nearly every country, enabling users to easily find and input their correct addresses worldwide.
This feature is especially useful for global eCommerce stores. It considers different address formats and local variations, ensuring smooth shipping to your customers’ locations.
Offering a seamless experience for international shoppers can also help build trust and encourage repeat business.
WooCommerce Google Address Autocomplete Integration Methods
There are two main ways to integrate Google Address Autocomplete into your WooCommerce store:
- Using plugins (recommended for most users)
- Code implementation (ideal for developers)
Let’s look at both these methods to help you choose the right approach for your store.
Method 1: Using plugins
For most WooCommerce store owners, using a plugin is the easiest and most efficient way to integrate Google Address Autocomplete.
These plugins require no coding language and can be set up within minutes.
| Plugin name | Features | Pricing |
|---|---|---|
| FunnelKit Funnel Builder | - Add Google Maps API key to enable auto-fill billing and shipping addresses - High-converting sales funnels - Custom one-page and multistep checkouts using various page builders - Advanced checkout field editor - Checkout page optimizations to enable quick purchases - Built-in A/B testing - Order bumps and One-click upsells - Dynamic side cart - Detailed analytics and pixel tracking | The free version is available. The premium version is billed annually at $99.50. |
| Google Address Autocomplete For WooCommerce | - Auto-fill both billing and shipping addresses - Auto-fill region, street location, town/city, state, country, and postcode/ZIP fields - Select countries to restrict auto-complete address results | No free version. The premium version is billed annually at $49. |
| Google AutoFill Customer Addresses for WooCommerce | - Google API for auto-filling the addresses - Autofill the address in the order details page in the admin panel - Autocomplete the address on the checkout page - Automatically fill the address inside the customer’s My Accounts dashboard - Option to restrict address autofill in specific countries - Displays location on Google Maps on the checkout page | The free version is available to use |
| ELEX WooCommerce Address Validation & Google Address Autocomplete Plugin | - Billing and shipping address autocomplete - Enable address autocomplete for all or specific user roles - Display a warning message when the selected region is a restricted country - Customize the billing and shipping search field labels - Real-time address validation via Google Places API - Select location via Google Map pointer for precision - Autofill address details for country, city, ZIP code, etc. - Restrict specific countries - Offers verified address suggestions to shoppers - Auto-fills address fields on checkout, admin side orders, etc. - Address finder for Australian addresses - WooCommerce address validation based on countries | The free version is available. Its premium version costs $79/year. |
Experts Recommendation
Among the different plugins mentioned, our experts recommend using FunnelKit Funnel Builder.
It’s an all-in-one plugin that lets you customize the default checkout page, build sales funnels, optimize the checkout page, A/B test, edit form fields, and more, all at a reasonable price.
Spending $49 for a Google Address Autocomplete plugin for WooCommerce isn’t justified when you can bring FunnelKit - the complete checkout manager for your store.
We’ll use the FunnelKit Funnel Builder to demonstrate the process of enabling address autocompletion in WooCommerce.
Method 2: Custom implementation
Developers or those looking for a customized approach can manually integrate Google Address Autocomplete into WooCommerce.
You need to generate a Google API key in the Google Cloud Console - Places API dashboard.
Next, add the API script to WooCommerce:
After that, bind the Places API to your WooCommerce address fields using JavaScript:
You need to modify how your checkout form captures the full address.
Please note that the Google Places API returns multiple address components (e.g., street, city, ZIP code, state).
Therefore, you must ensure the returned data is placed in the right WooCommerce fields.
This method is quite complicated because it involves several technical steps that require a good understanding of web development concepts, APIs, and WooCommerce’s structure.
How to Set Up Google Address Autocomplete in WooCommerce
To set up Google Address Autocomplete for WooCommerce, we will use FunnelKit.
FunnelKit Funnel builder comes with many prebuilt sales funnel templates and optimization options. This WordPress plugin helps WooCommerce store owners increase sales through custom checkout funnels.
On top of that, FunnelKit offers Google autofill customer addresses to ensure a frictionless checkout process. It offers address autocomplete on both shipping and billing address forms.
Let’s check how you can utilize this powerful sales funnel builder.
Step 1: Install and activate FunnelKit Funnel Builder
You need to install both FunnelKit Funnel Builder and FunnelKit Funnel Builder Pro.
After you install both plugins, activate the license. If you need help activating the FunnelKit Pro license, then check our installation guide.
Step 2: Purchase a Google API Key from the Maps Platform
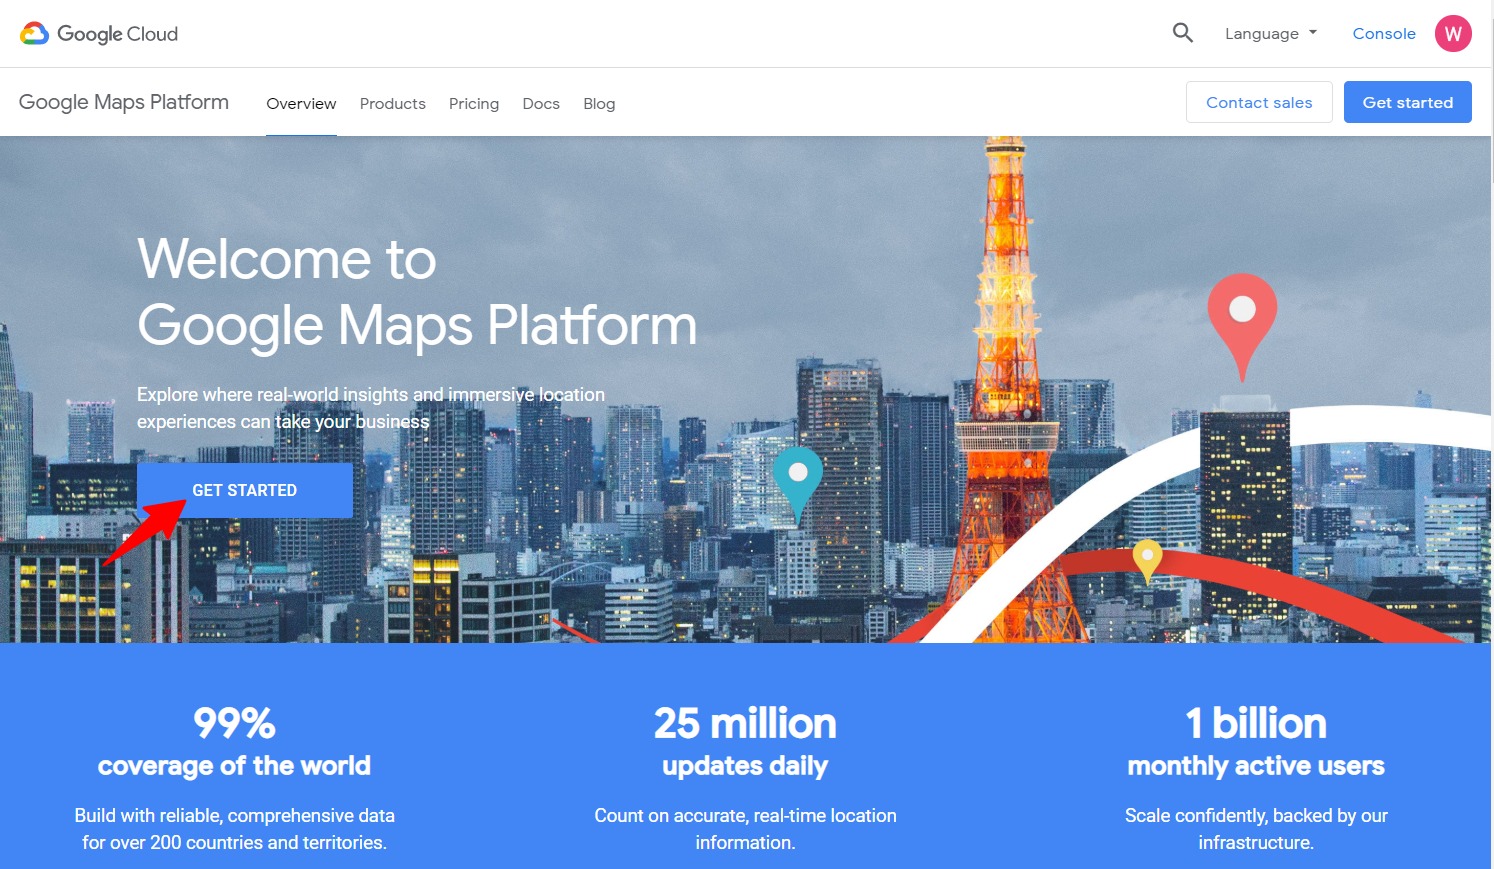
First, you need to purchase a Google Maps API Key.
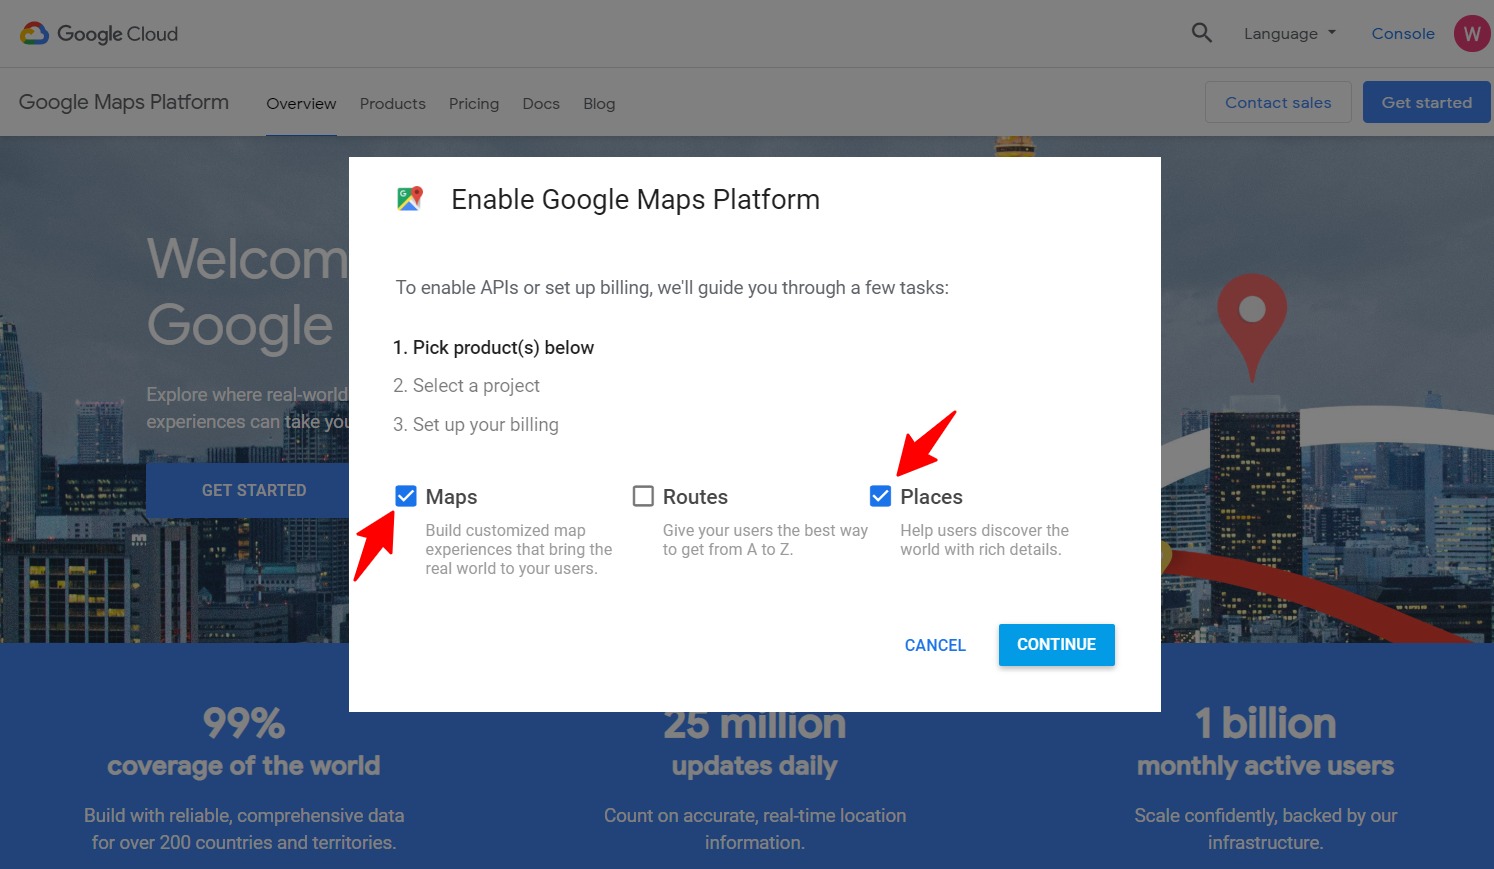
Go to Google Maps Platform and then click on 'Get Started' to select your plan and proceed with the payment
Enable Maps and Places.
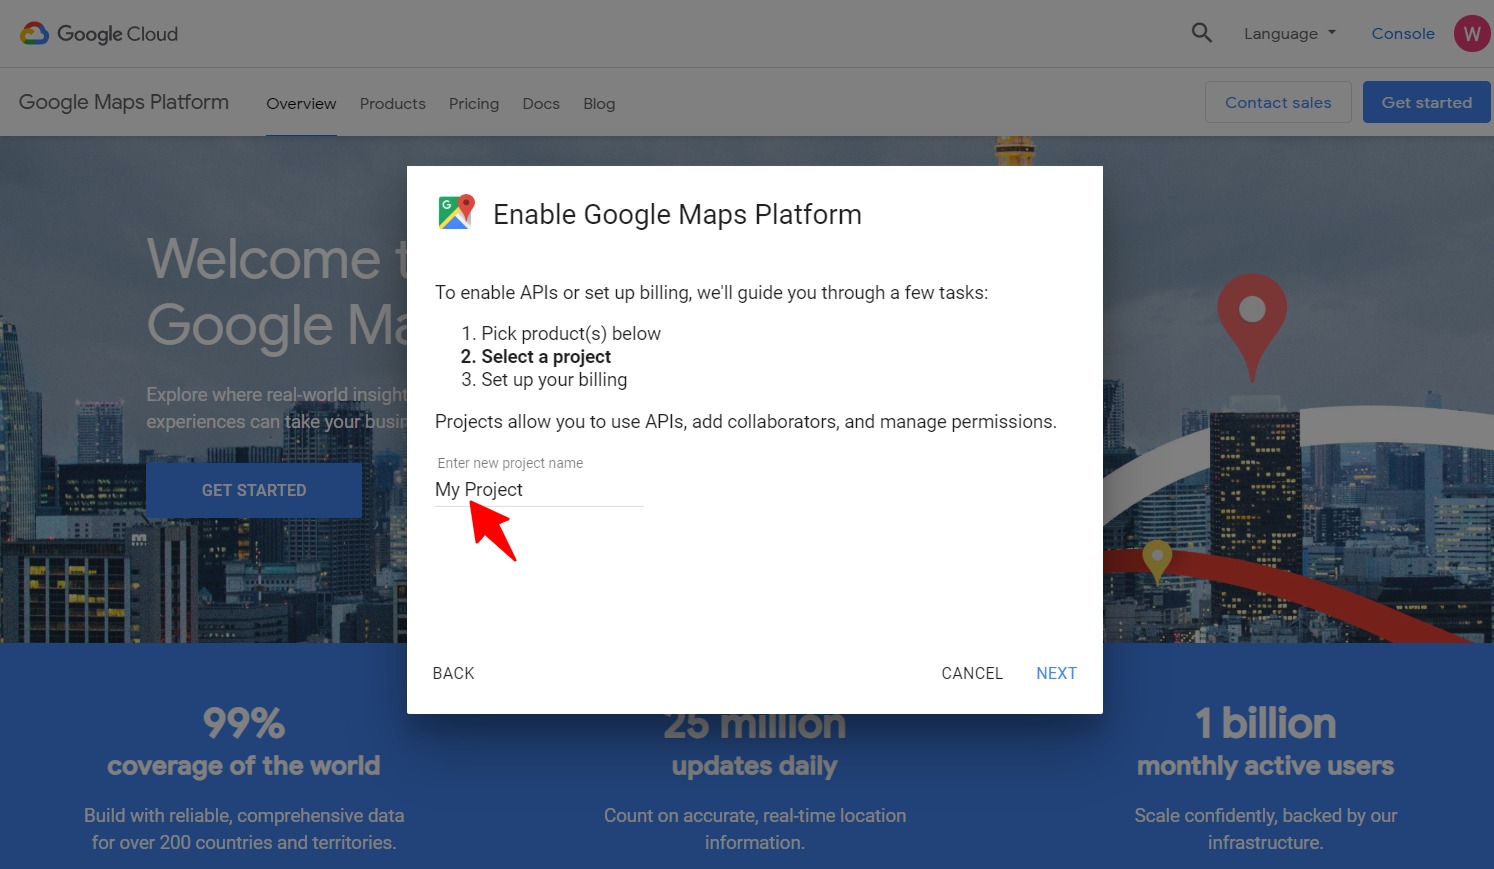
Next, enter a project name and click on Next:
Fill in the remaining details for your country and region.
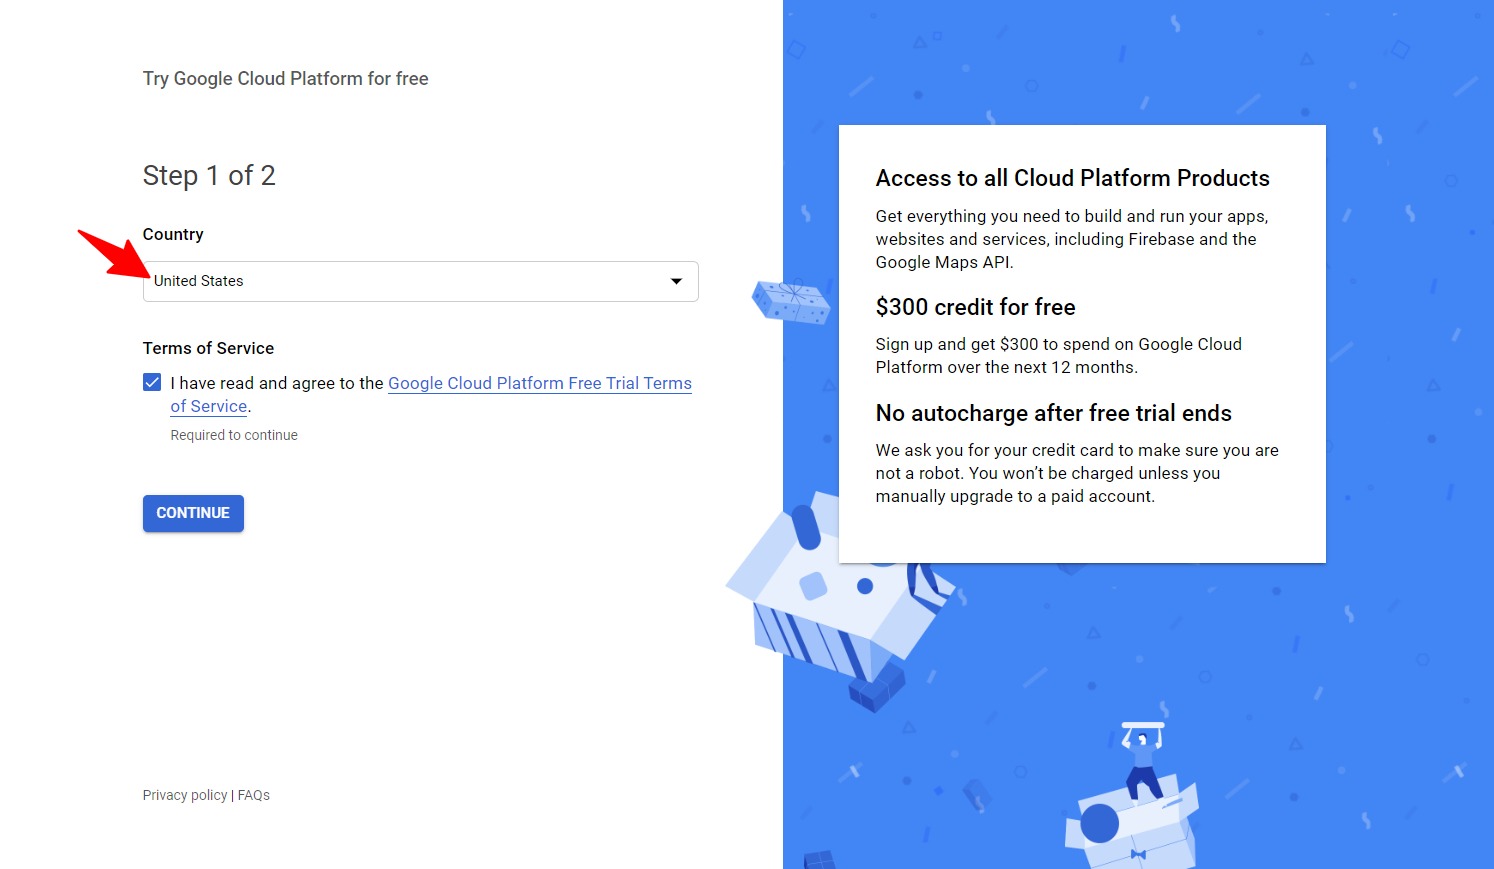
Once you're done filling out your billing details, select the plan that suits you.
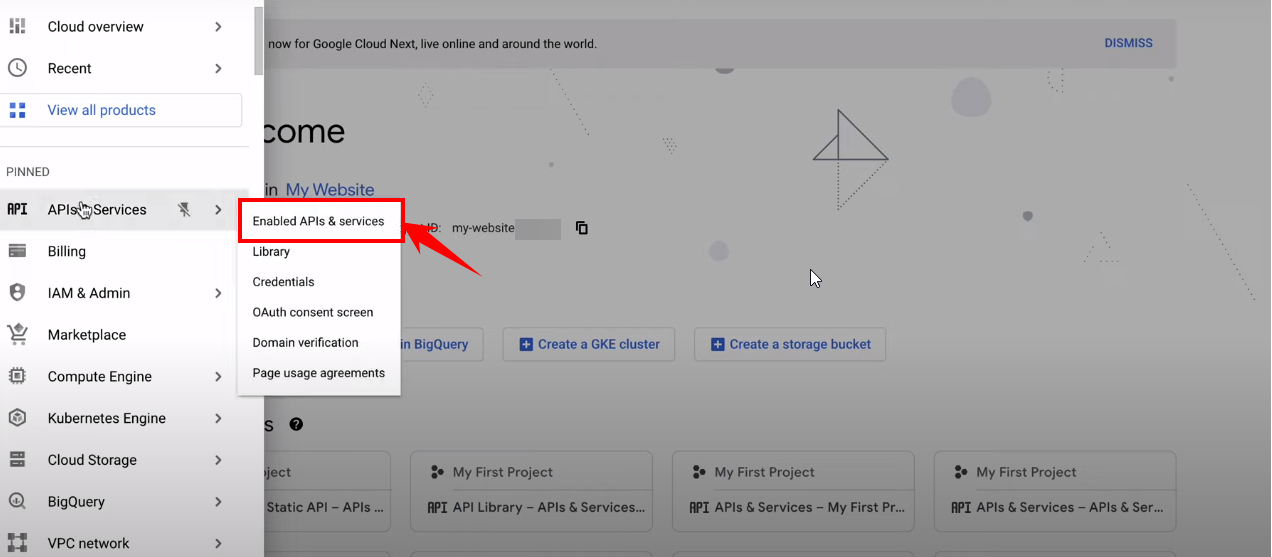
Now navigate to API services ⇒ Enable APIs & Services.
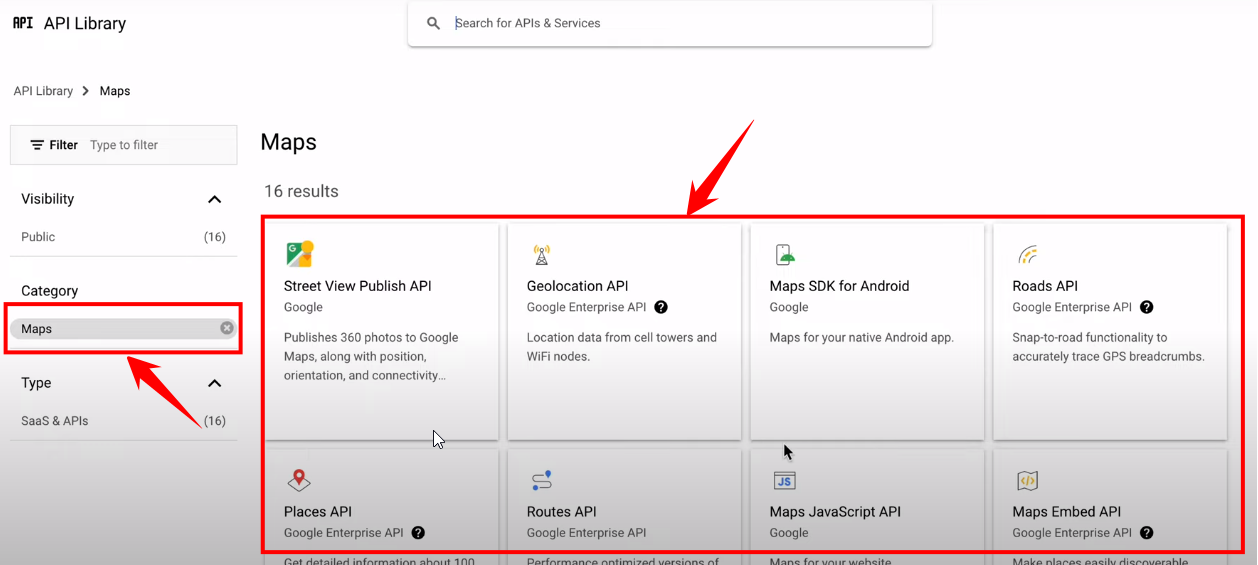
After that, open the Maps tab and enable the required APIs. You need to open each API in a new tab and enable it.
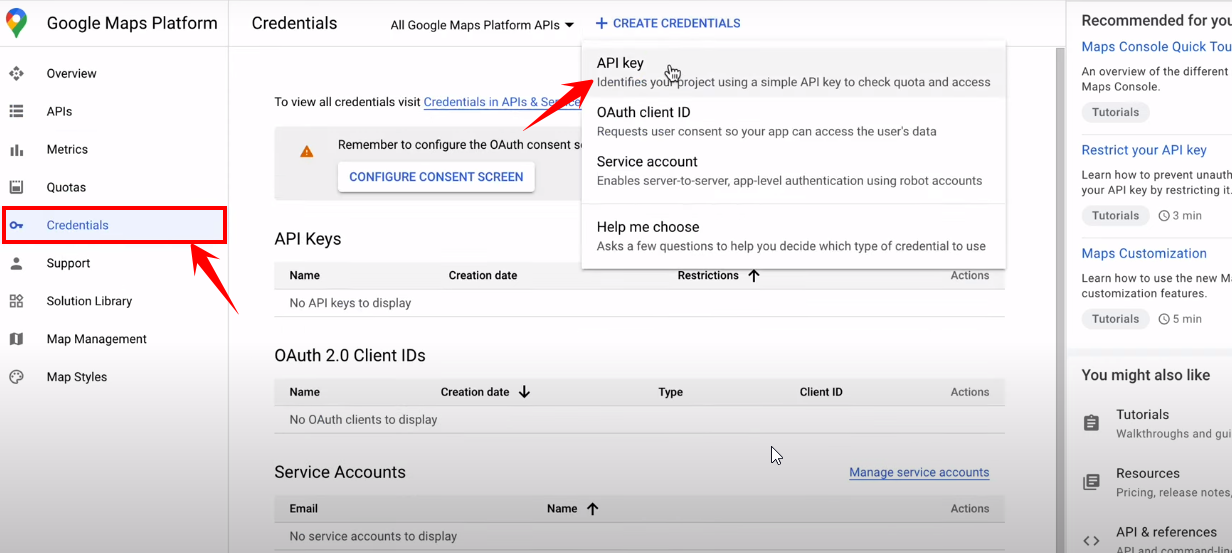
Now go to credentials and click on the API key to generate the API.
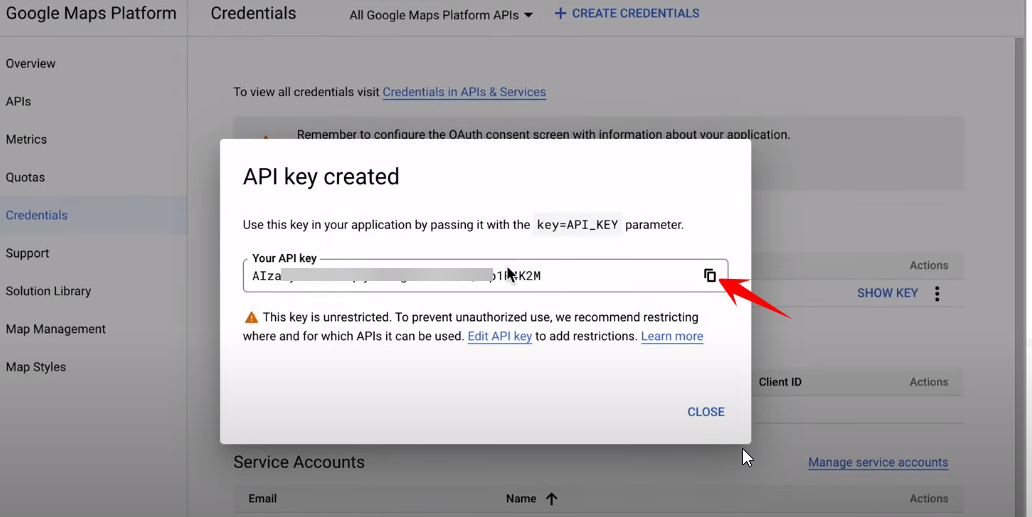
Once the API is generated, copy the key.
Next, go to FunnelKit ⇒ Settings. Under General settings, you will find a field for Google Map API Key.
Paste the API key here and click on Save.
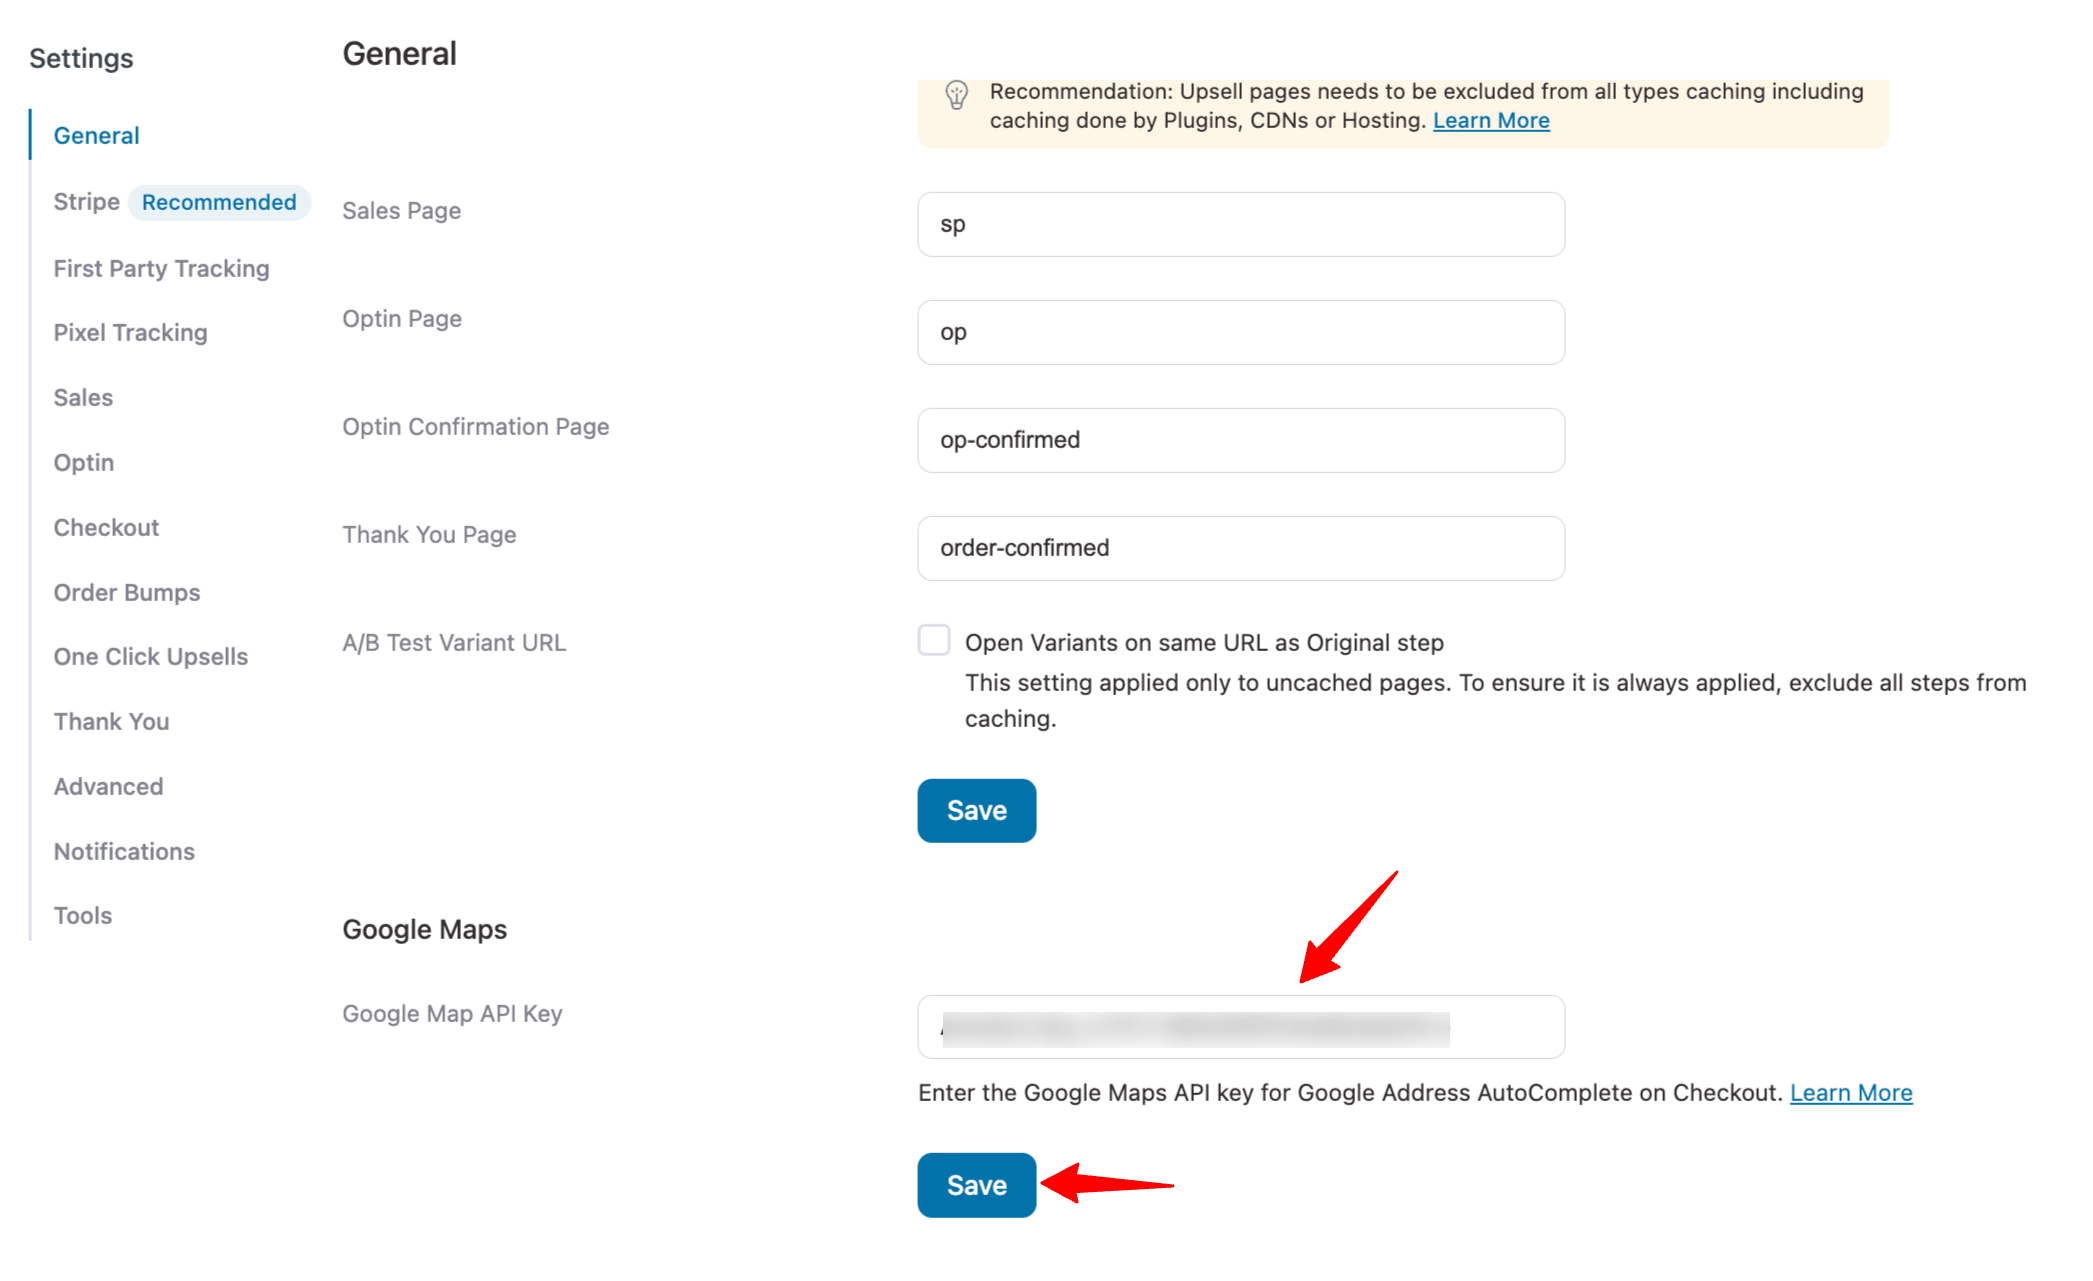
Once you've entered the API Key, hit the 'Save Changes' button.
Step 3: Set up your store checkout
Now let’s create a custom checkout for your WooCommerce store.
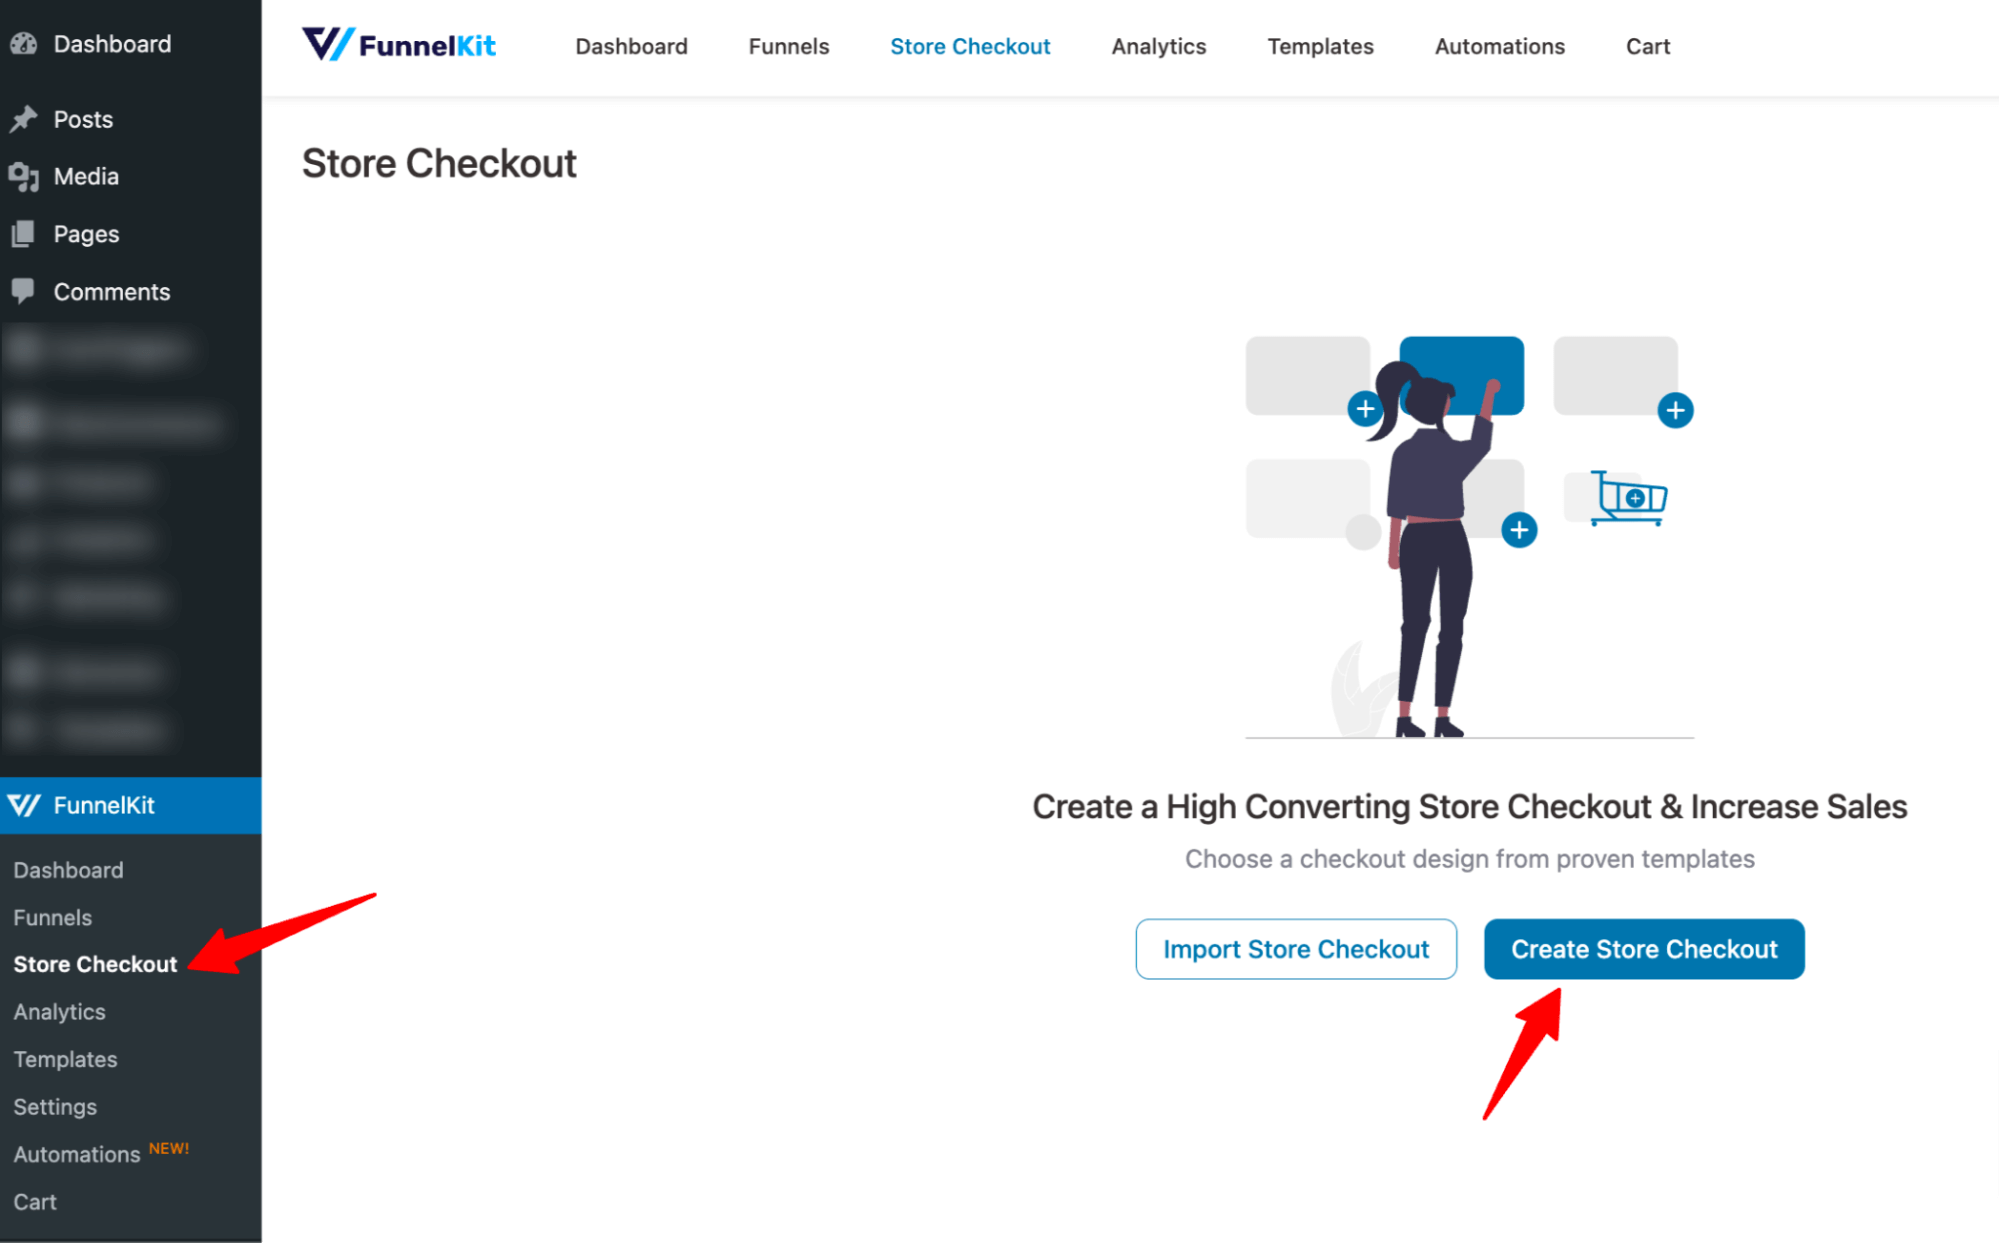
For that, navigate to FunnelKit ⇒ Store Checkout and click on the 'Create Store Checkout' button.
Now choose the template you like. We are choosing Minimalist here.
After that, choose a page builder to filter the sales templates. Now, to check any of the templates, hover over it and click on the preview button.
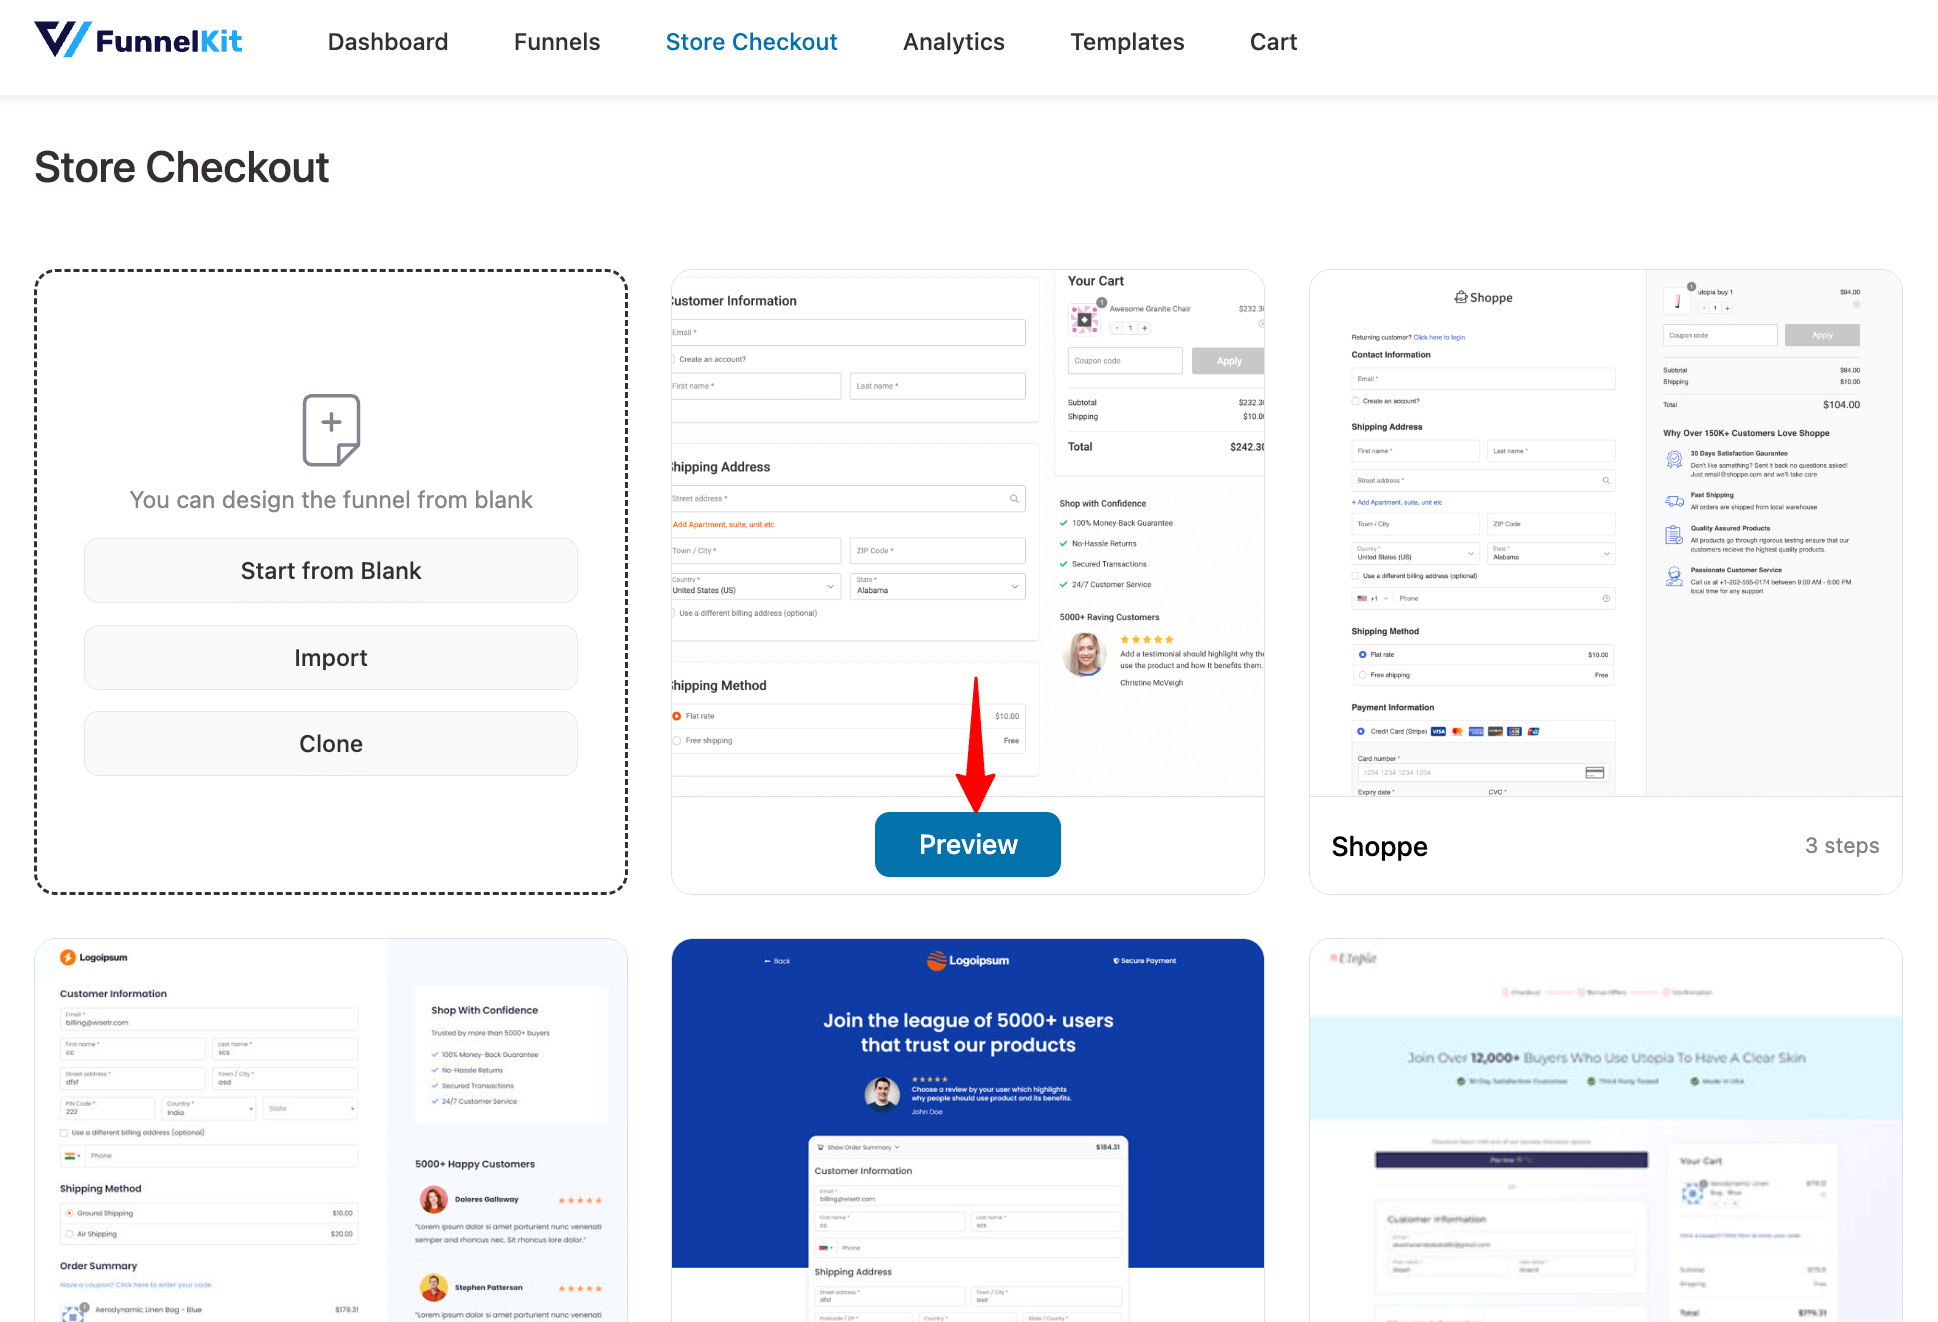
Choose whether you want a single-page checkout or a multi-page checkout. Then click on the “Import this Template” button to import the template. After that, provide a store checkout name and click on Add.

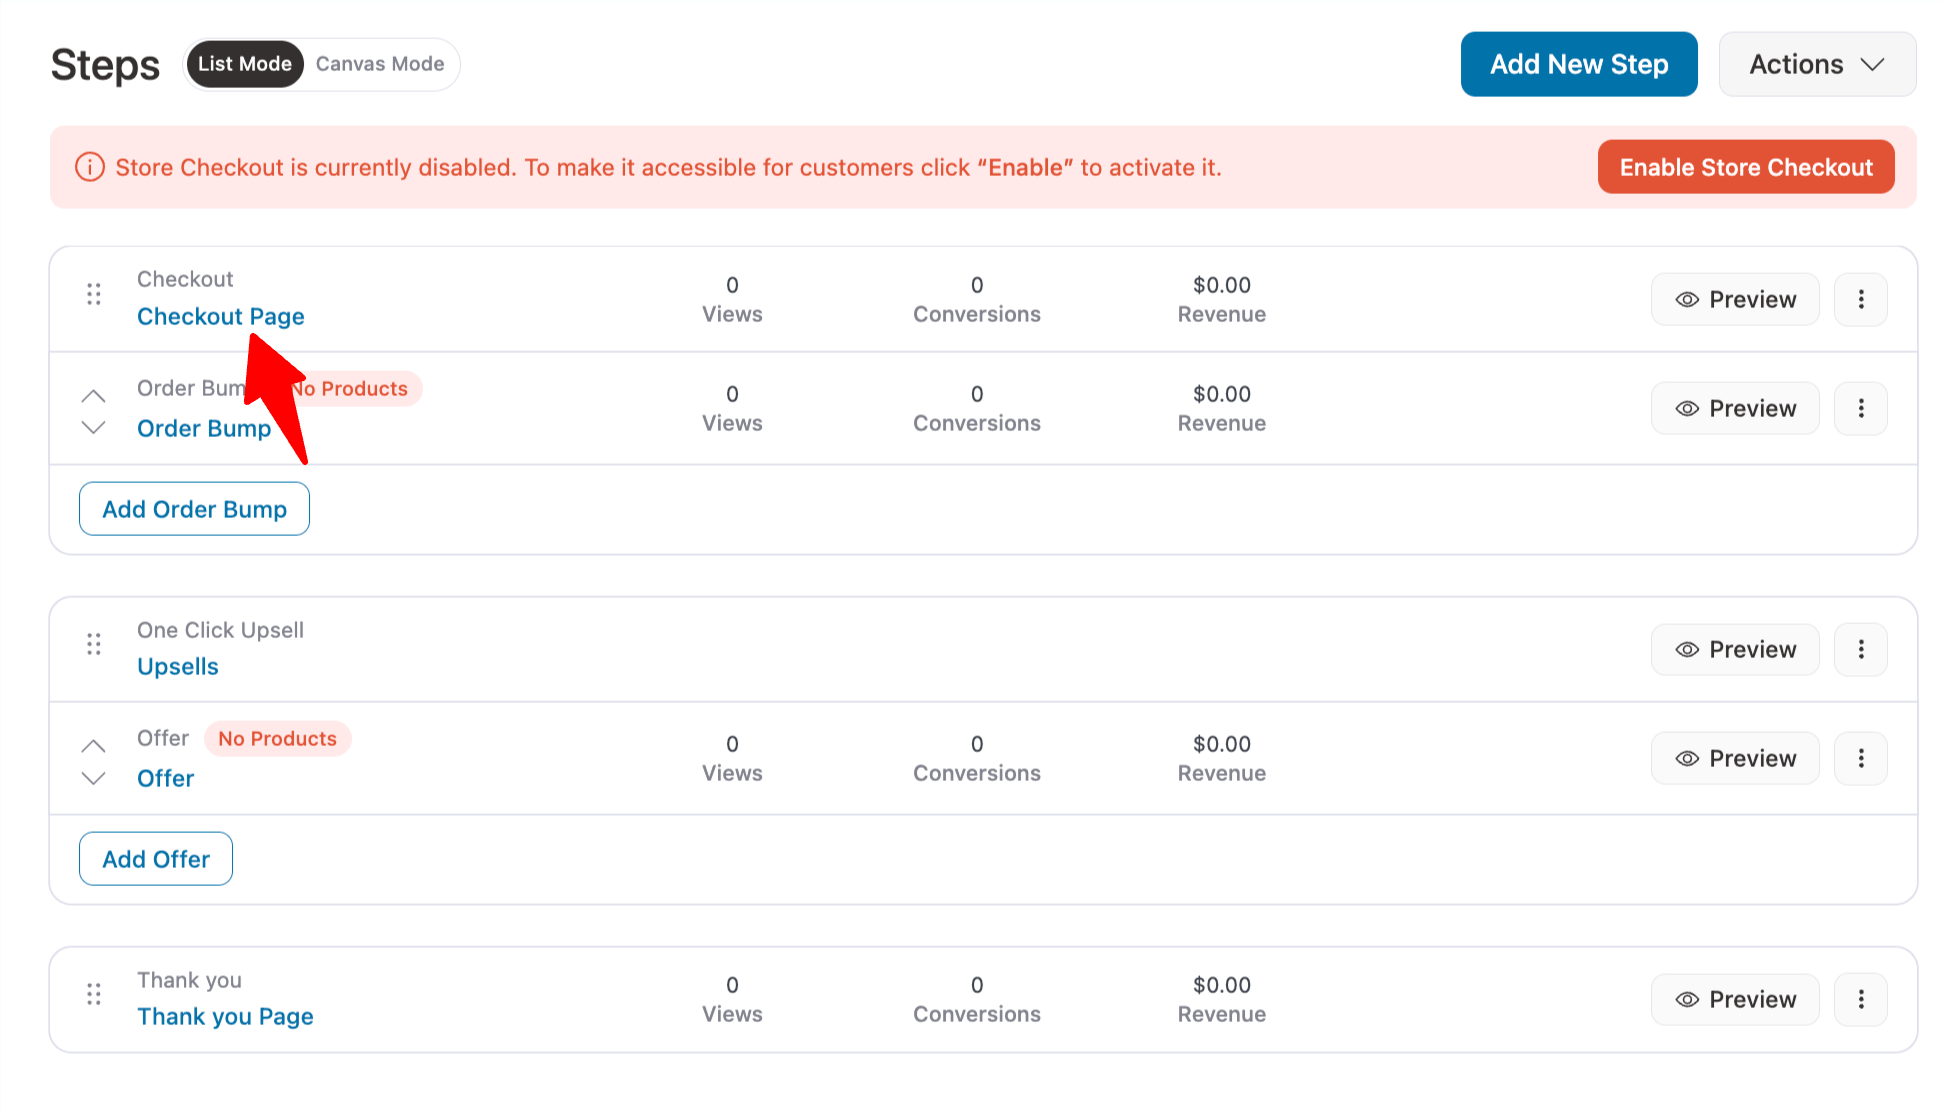
Click on the Checkout step to edit it.
Step 4: Enable the Google Address Autocomplete feature
Now, move to the Optimizations tab. Then, expand the Google Address Autocompletion option and select the "Yes" toggle.
This will enable Google address autocomplete on the WooCommerce checkout page.
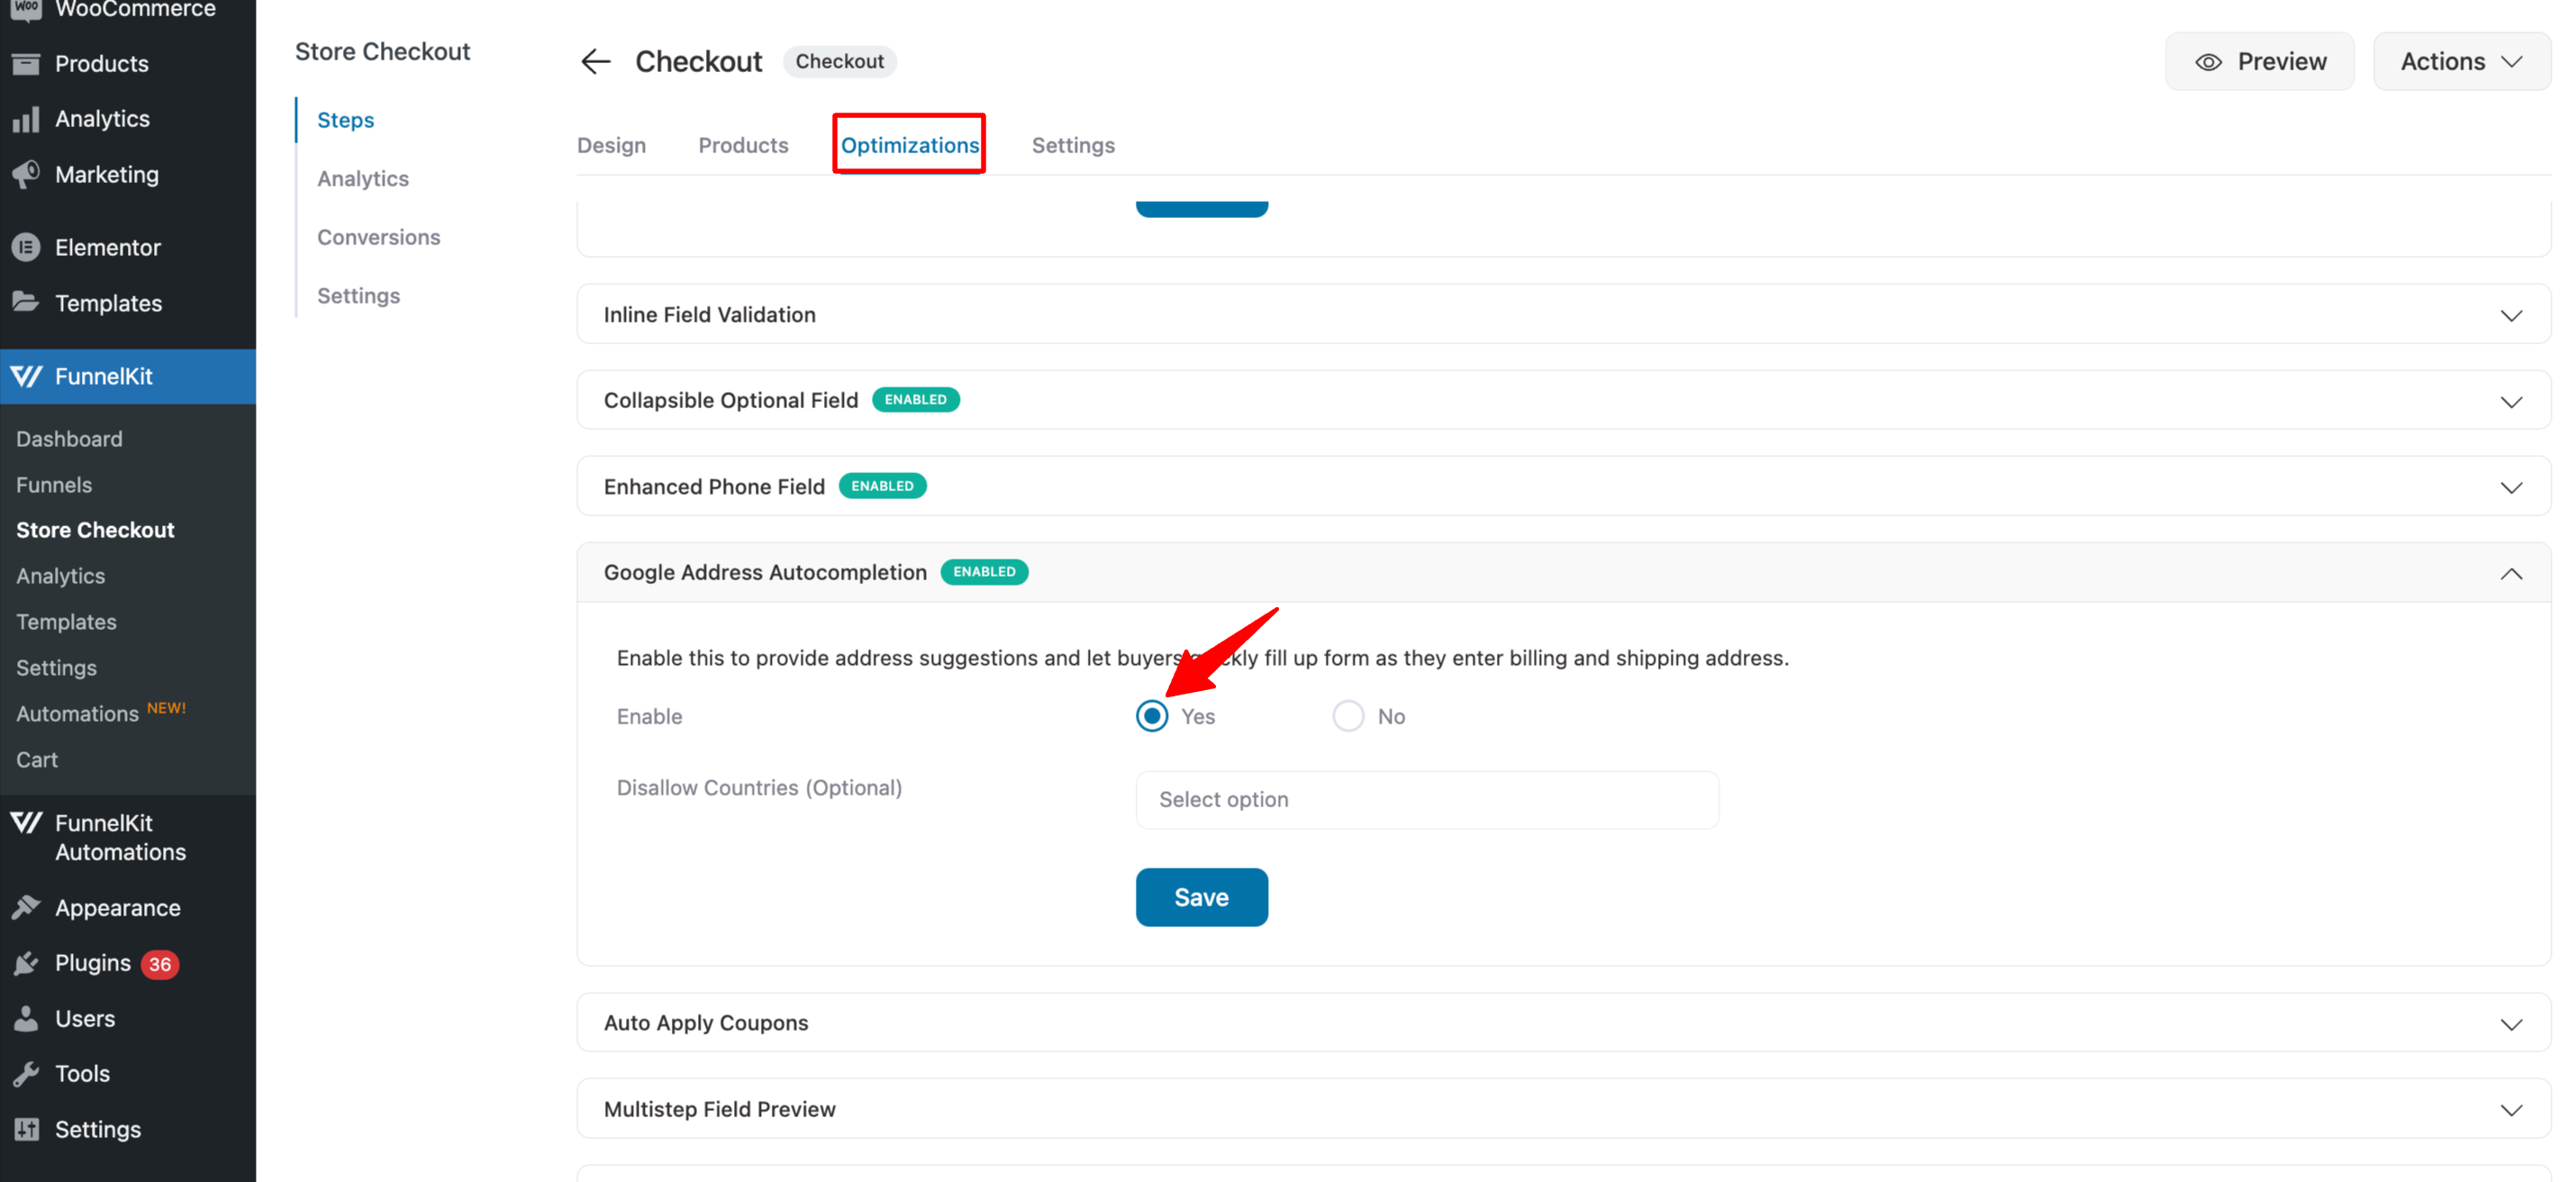
🔔 Note: If you want, you can also enable other options such as express payment buttons, auto-apply coupons, enhanced phone field, etc.
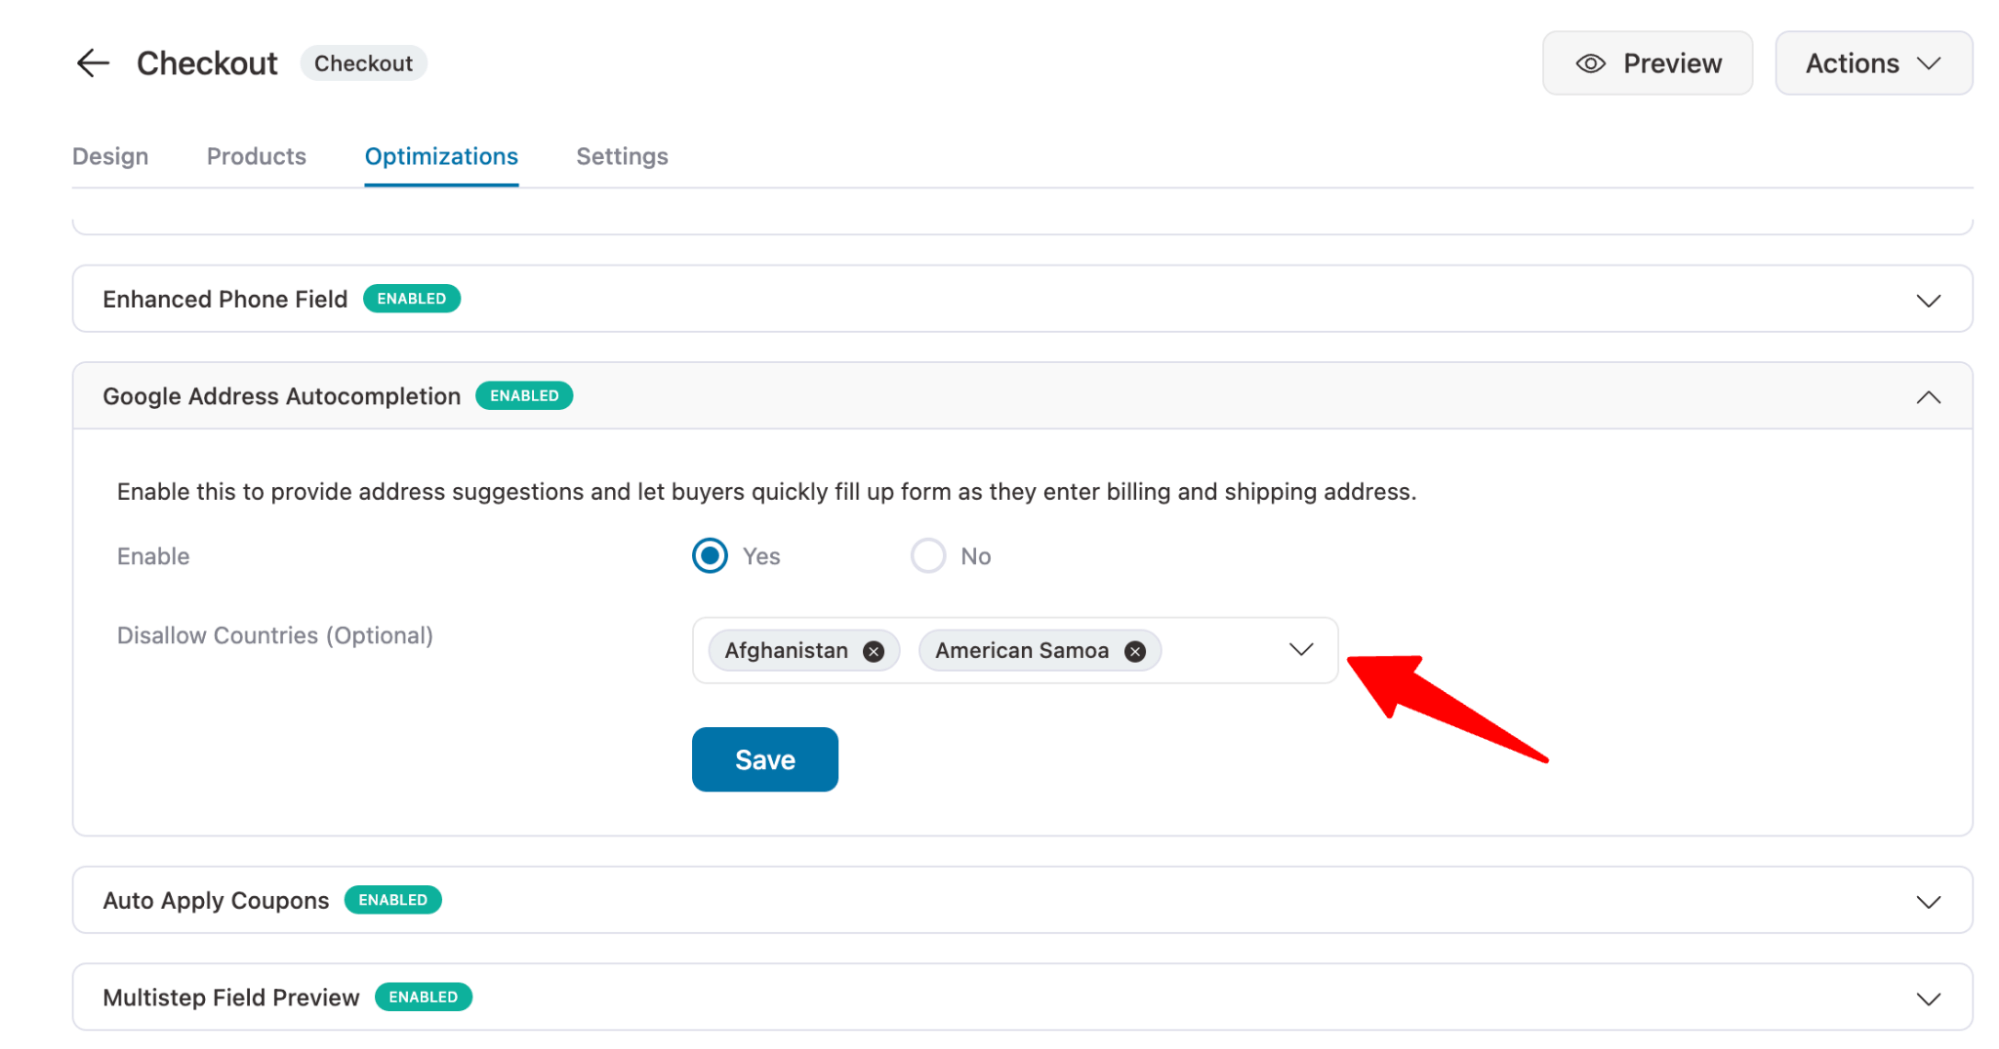
Step 5: Restrict Google Address Autocomplete for some countries (optional)
Google Address Autocomplete may not be accurate for some countries (like the UK). Hence, you can restrict it to those countries.
Select the countries from the 'Disallow Countries' drop-down. This ensures that users coming from these countries will not see the Google Address Autocomplete function.
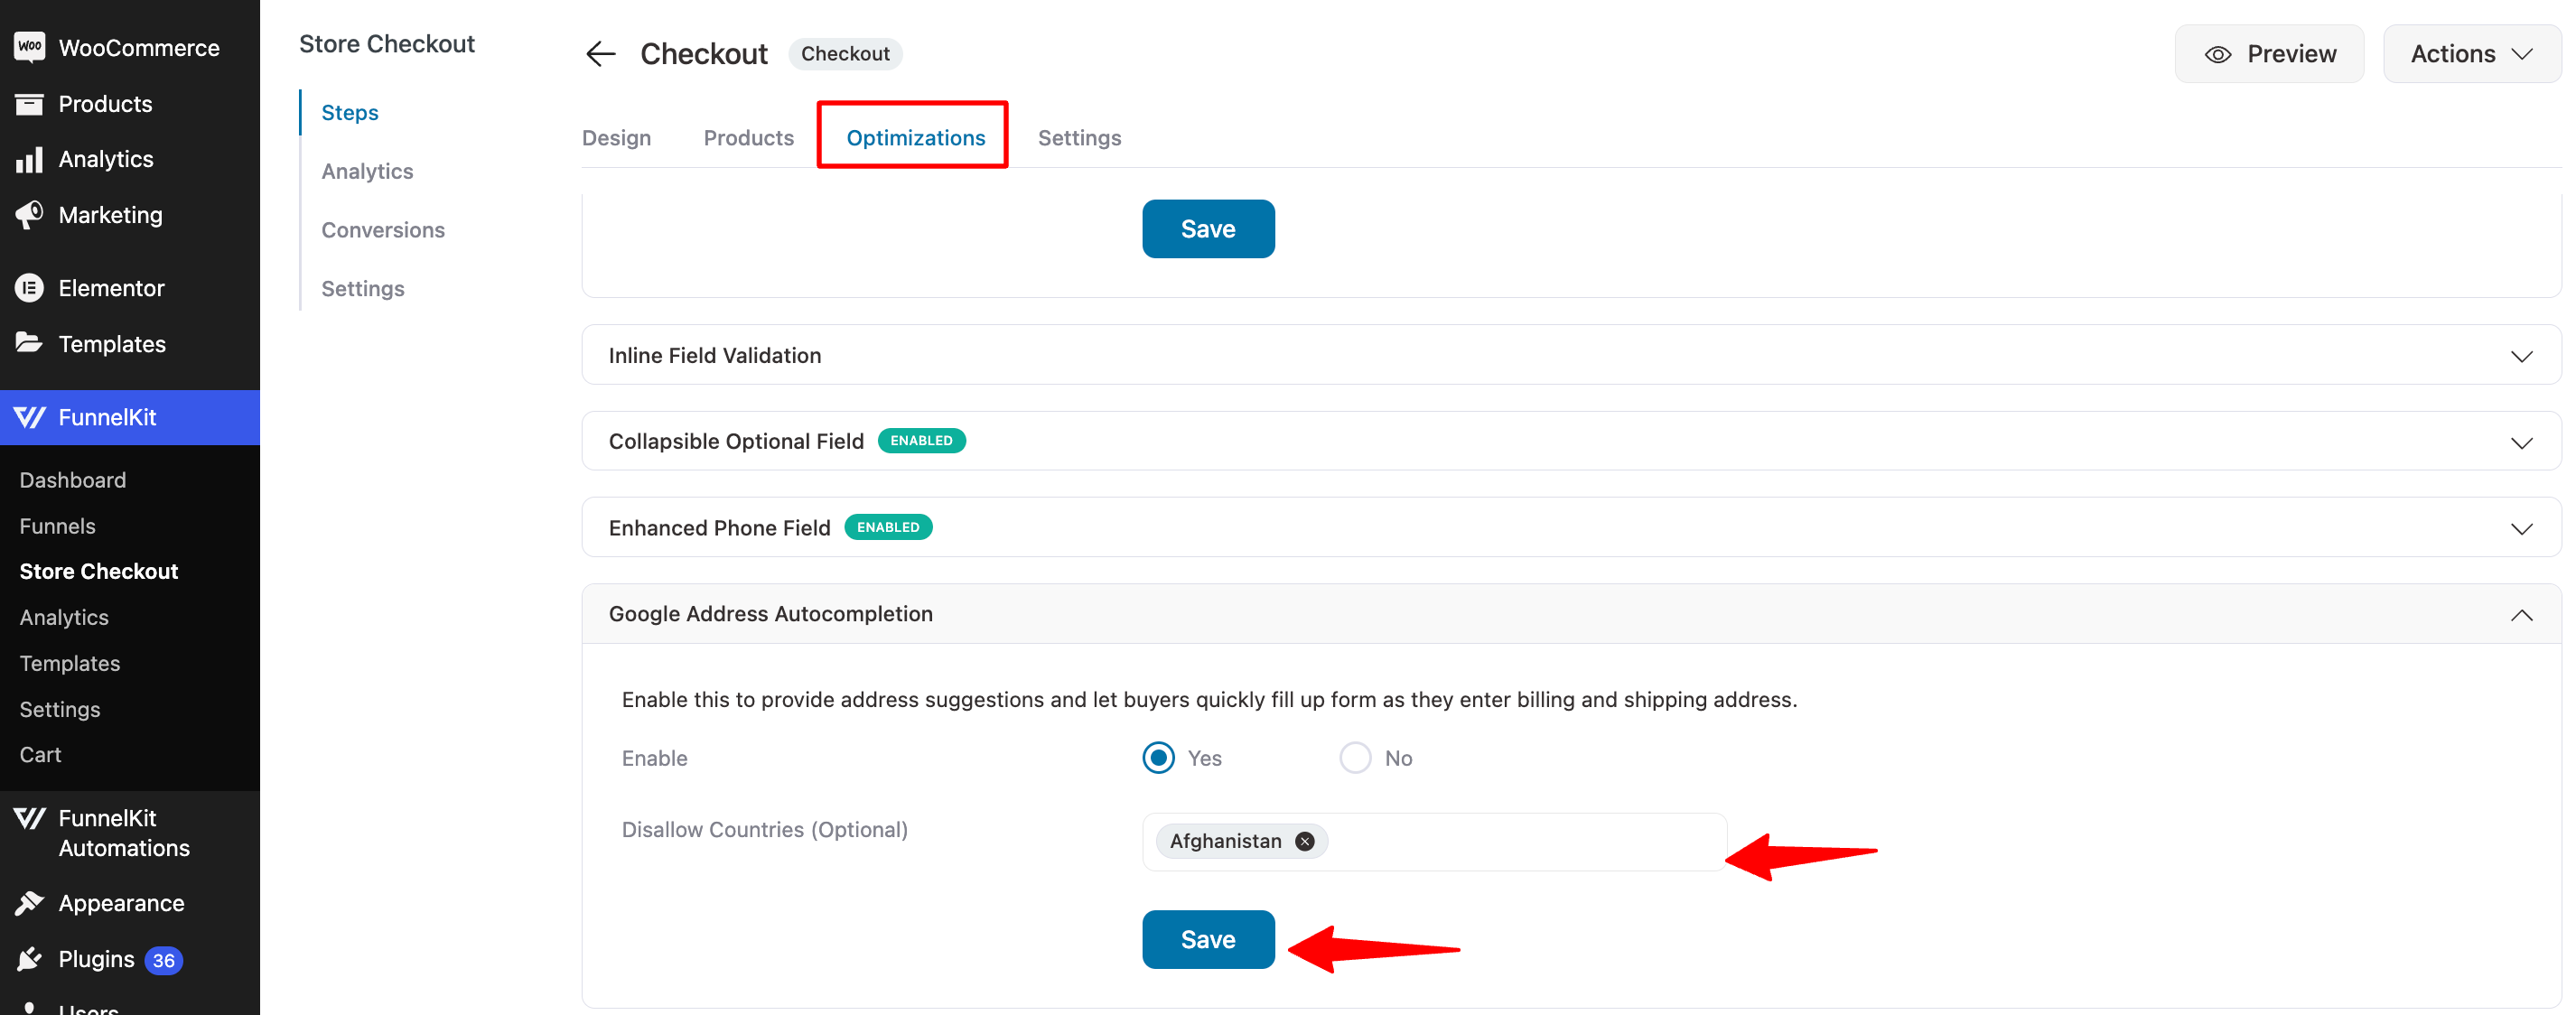
Once you are done, hit the 'Save Changes' button.
Step 6: Enable store checkout
Lastly, click on the "Enable Store Checkout" button to activate the new checkout with FunnelKit Google Address Autocomplete.
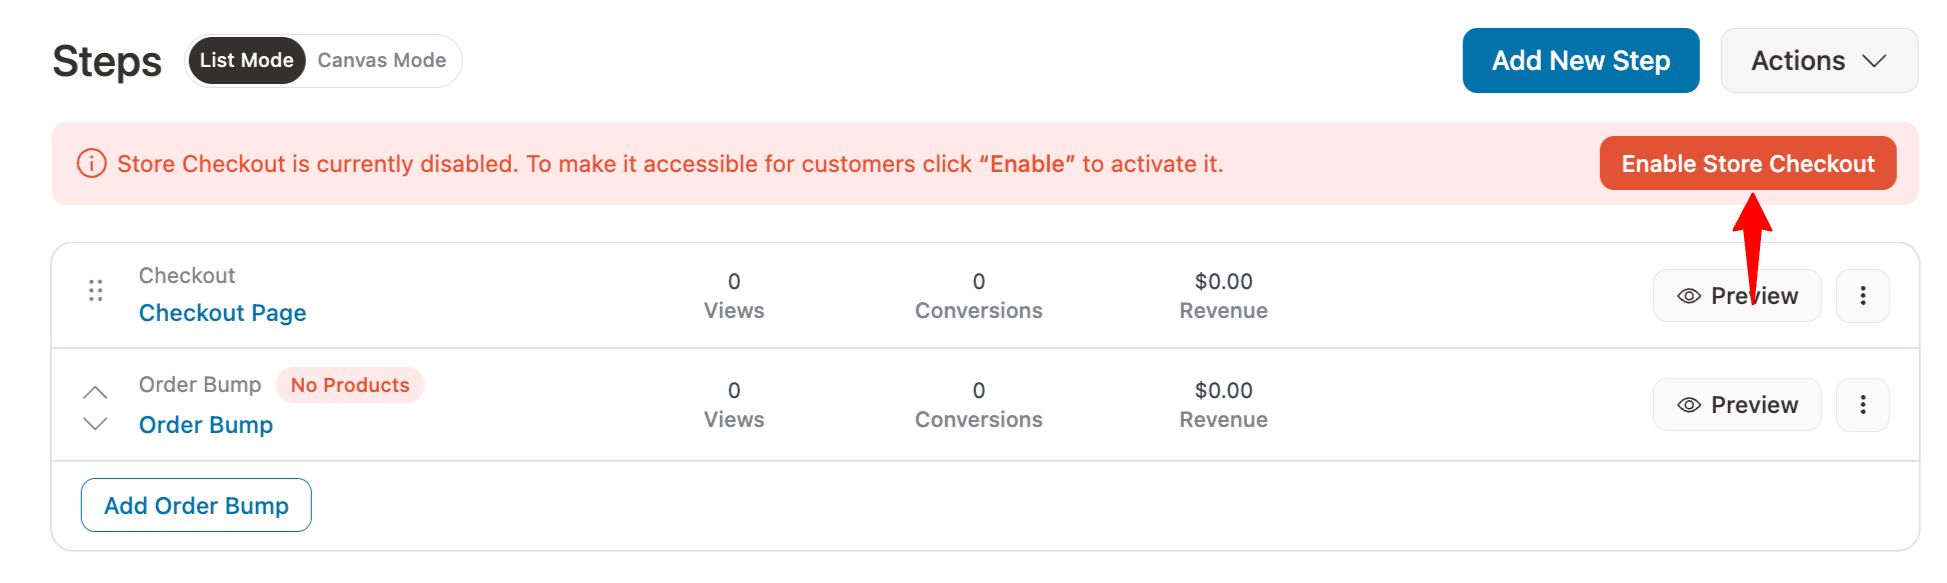
That's it. You've now set up Google Address Autocomplete for your WooCommerce.
Here is what Google Address Autocomplete by FunnelKit looks like:
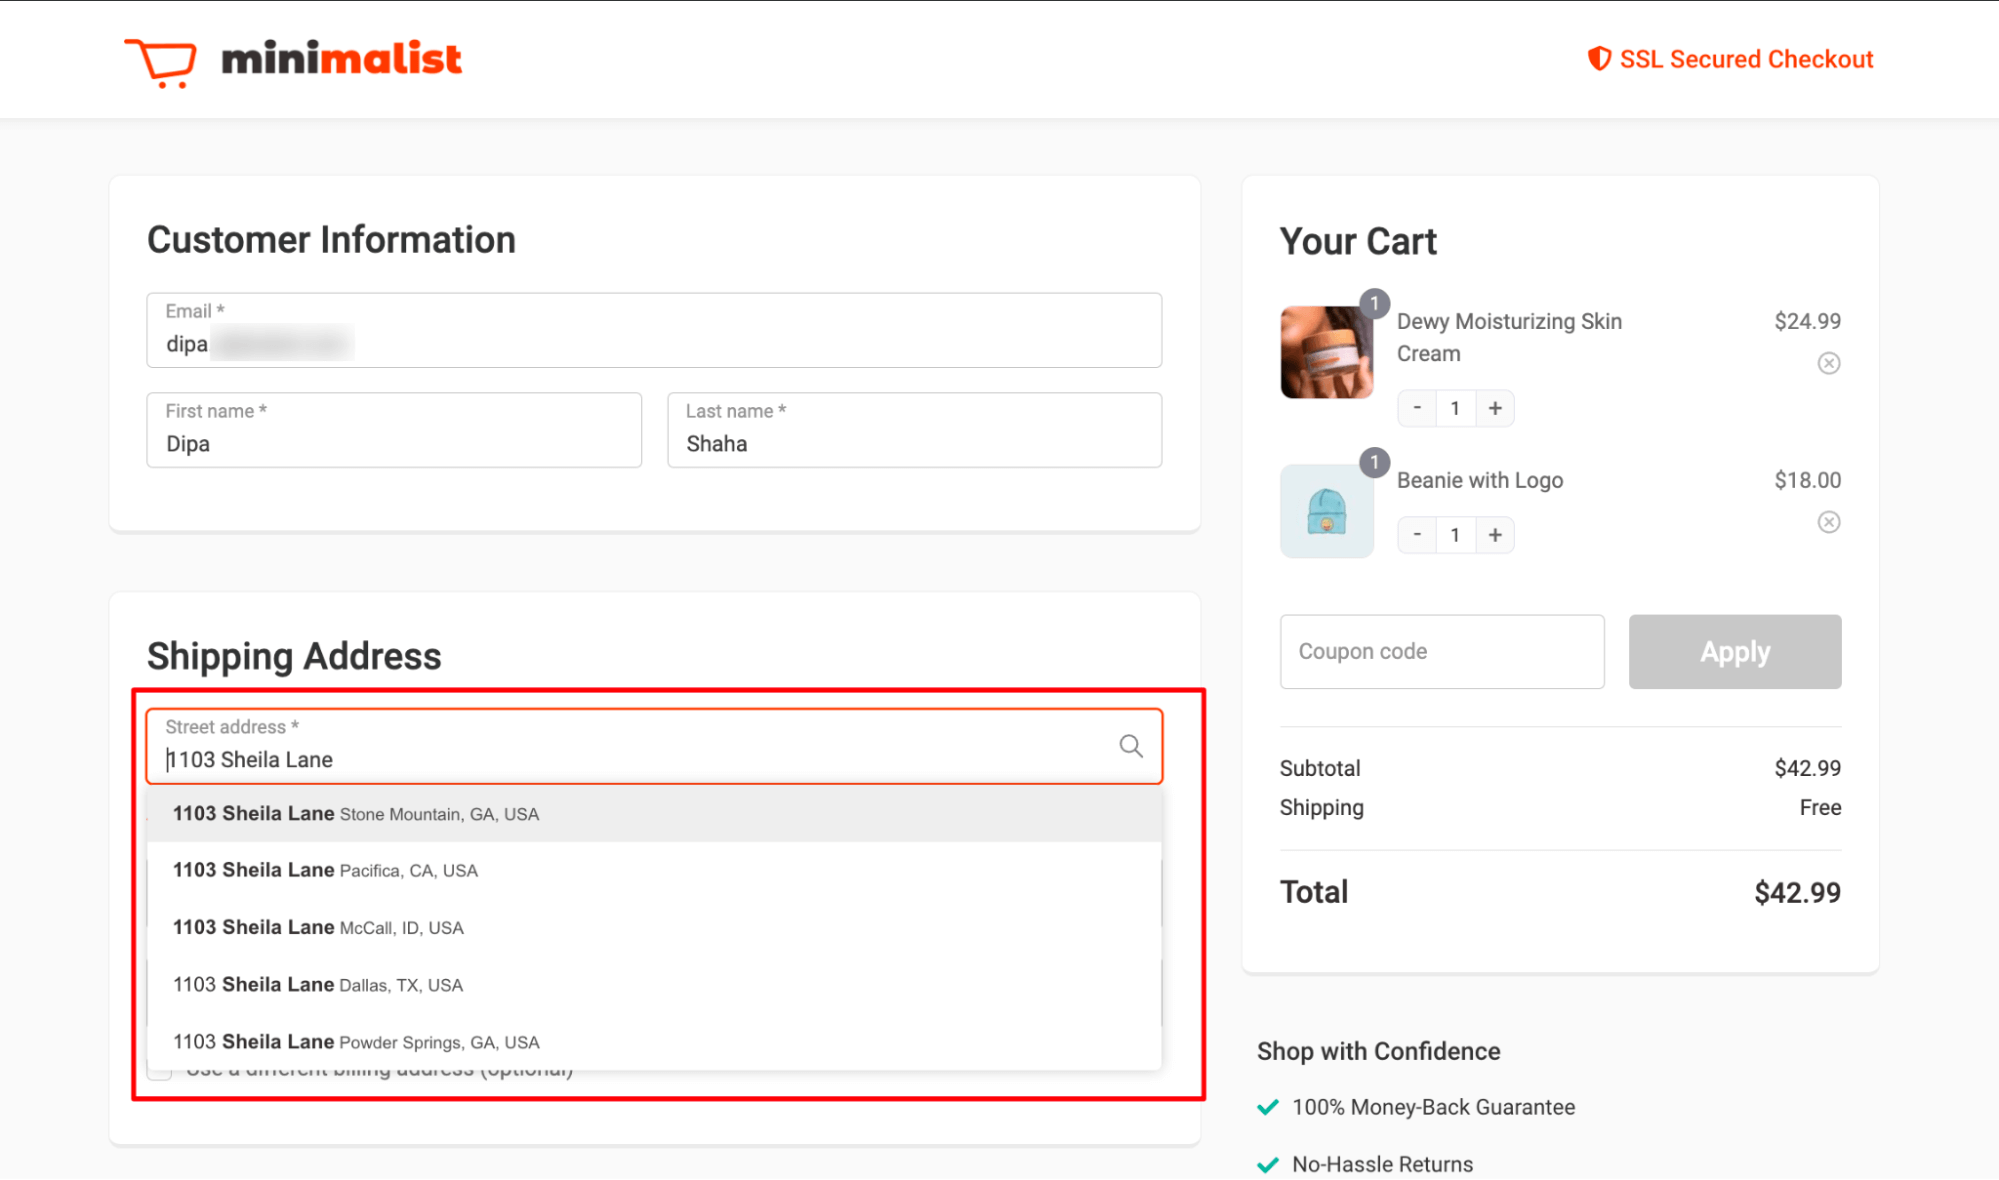
So, this was the process of adding Google Address Autocomplete for WooCommerce without any coding.
6 Best Practices to Follow When Setting Up Google Address Autocomplete for WooCommerce
When implementing WooCommerce Google Address Autocomplete, it’s crucial to prioritize both performance and user experience.
Here are some best practices and optimization tips:
1. Choose a lightweight plugin
Select a plugin that ensures your WooCommerce site remains fast and responsive, particularly on the checkout page. Heavy or multiple plugins can lead to slower load times and higher abandonment rates.
Work with plugins like FunnelKit Funnel Builder, which handles multiple tasks to enhance your WooCommerce store processes while implementing auto-fill address suggestions.
2. Optimize for mobile
Over 50% of online shopping happens on mobile devices. Ensure that the autocomplete fields are easy to interact with on smaller screens.
Make sure your checkout page is fully responsive on mobile devices. The dropdown menu for suggestions should be touch-friendly for easy selection.
Test your checkout and address implementation across various devices to ensure it functions seamlessly.
3. Limit address suggestions
Limit the number of auto-address suggestions to 3-5 results. This helps balance offering useful options and not overwhelming shoppers with too many address choices.
FunnelKit Funnel Builder is an efficient plugin that offers five address suggestions at a time to simplify the shopping experience.
4. Pre-fill other fields automatically
One of the biggest advantages of the address autocomplete feature is reducing manual input.
By automatically filling in fields like city, region, and ZIP code, you save users time and reduce the chance of typos or errors.
FunnelKit provides optimized autofill address suggestions, enhancing the user experience by speeding up and improving the efficiency of checkout.
5. Leverage Google’s geolocation API
Google’s geolocation API provides more accurate location-based suggestions, especially for mobile devices.
FunnelKit Funnel Builder enables location biasing to prioritize suggestions from the user’s selected country or region.
This prevents irrelevant global addresses from appearing in the suggestions list and helps users quickly select the right address.
6. Implement checkout field validation
Invalid or missing information can lead to order issues, payment failures, and shipping problems.
FunnelKit enables you to provide proper inline field validation that ensures every required and essential detail provided during checkout (such as name, email, phone number, etc.) is verified for accuracy and completeness.
This leads to smoother transactions and minimizes the need for manual order corrections or customer support interactions.
Frequently Asked Questions (FAQs) on WooCommerce Autofill Checkout Address
Yes, you can easily do that using a plugin like FunnelKit Funnel Builder. All you have to do is buy the API key and add it to your FunnelKit settings.
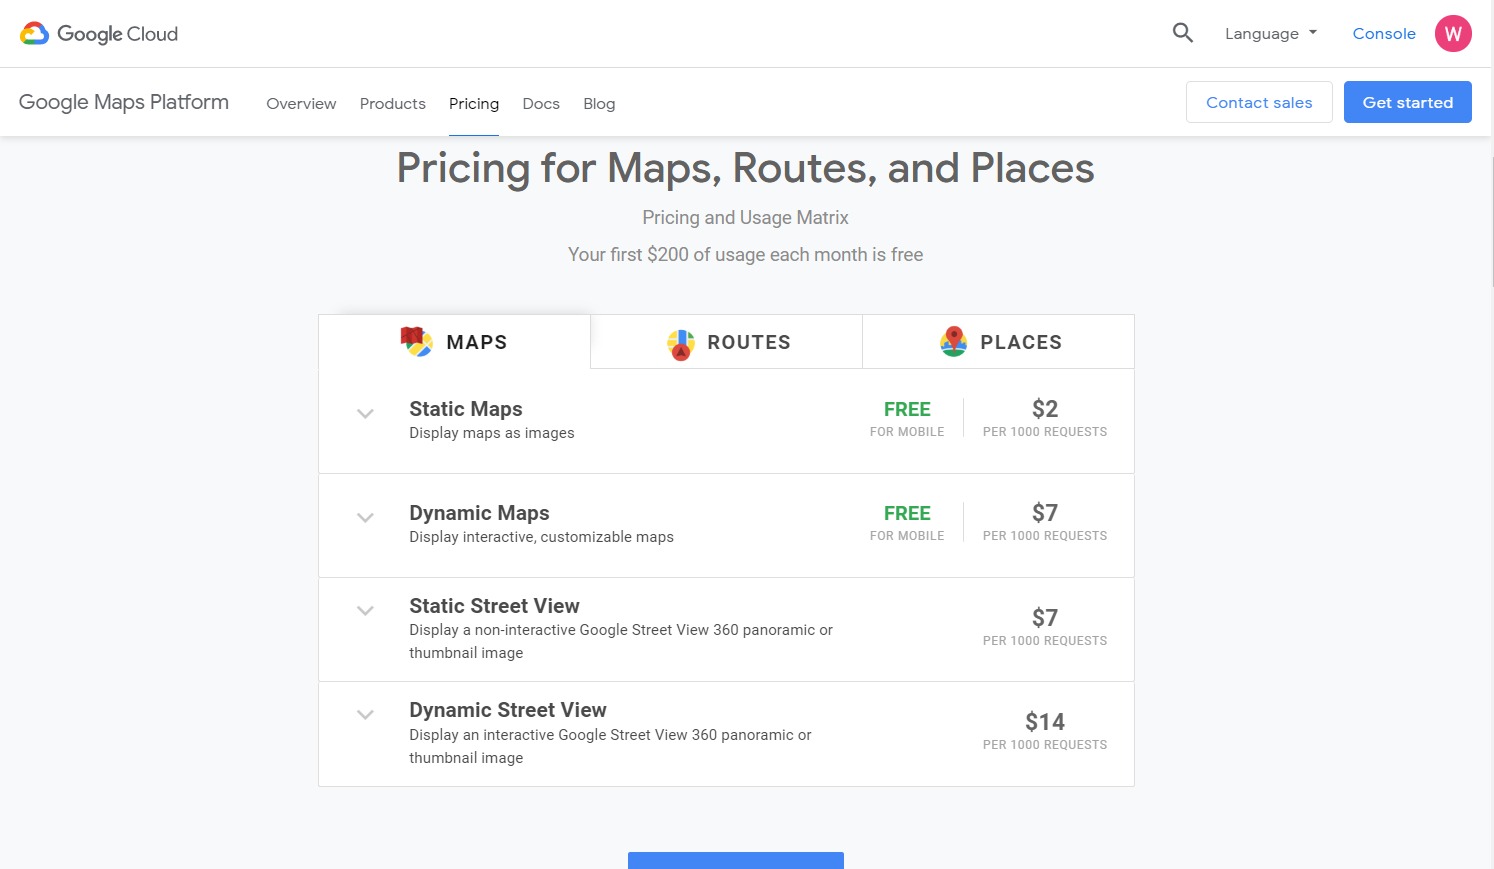
It totally depends on your usage. Usually, Google offers a $200 monthly credit for free, which is more than enough for stores with a decent volume. However, if you exceed this limit, you have to pay. For pricing, you can check the Google Maps site.
Well, you can autofill addresses in WooCommerce by using the Google Maps API. You can connect to the API using an API key. You can add the key to your WooCommerce site using a plugin.
With FunnelKit Funnel Builder, you can seamlessly add the Google Address Autocomplete feature for both billing and shipping addresses.
Here are some of the reasons why your Google address API isn't working:
- Required APIs aren’t enabled: Ensure Places API, Maps JavaScript API, and Geocoding API are activated in Google Cloud Console.
- API key restrictions: Check if your key is restricted to specific domains or IPs; try an unrestricted key for testing.
- Billing is not enabled: Google requires an active billing account for the API to function.
- API key not saved in plugin's settings: Check for any extra spaces or truncated characters.
If address suggestions are missing, check for:
- JavaScript errors on the checkout page might prevent the API from running.
- Missing API permissions in the Google Cloud Console.
- Conflicts with other plugins affect the checkout page.
With FunnelKit Funnel Builders, you can restrict Google address autocompletion using the disallow option.
Some caching or optimization plugins might interfere with Google Address Autocomplete. To fix this exclude the checkout page from caching.
Yes, with FunnelKit Funnel Builder, you can easily integrate Google address autocomplete in a multi-step checkout.
With FunnelKit Funnel Builder, users can always enter their address manually, overriding auto-suggestions if they wish.
If the Google Places API is temporarily unavailable, customers will need to manually enter their addresses. It's always good to have an alternative manual input method enabled to ensure a smooth checkout experience.
Use FunnelKit's built-in A/B testing to compare checkout completion rates before and after implementation. Plus, FunnelKit lets you integrate with Google Analytics 4 to track checkout abandonment by step. Focus on the percentage of users who reach your checkout page and successfully complete a purchase. Next, compare 30-day averages before and after implementation to see seasonal variation and changes in traffic sources.
Ready to Set Up WooCommerce Google Address Autocomplete?
Implementing Google Address Autocomplete is one of the highest-ROI actions you can take for your WooCommerce store.
It signals to your customer that you value their time, and it signals to your logistics team that you value accuracy.
This way, you can achieve the ultimate goal of increasing the site’s conversion rate. So, do add this user-friendly feature to your WooCommerce store.
If you use FunnelKit to add address autocomplete, you’ll also get a custom checkout page to enhance the customer’s shopping experience.
Besides, you can add order bumps and one-click product upsells to increase your eCommerce site’s average order value.
So, are you ready to set up Google address autocomplete in your WooCommerce store? Get the FunnelKit Funnel Builder today!

Editorial Team
June 22, 2026Are you searching for the best WooCommerce plugins to enhance the overall customer experience and boost conversions in your store? Honestly, there are a ton of free and paid WordPress...
Editorial Team
June 18, 2026Want to sell your LearnDash courses through WooCommerce and accept payments seamlessly through gateways like Stripe, PayPal, or Apple Pay? To sell LearnDash courses through WooCommerce, you install the WooCommerce...

Editorial Team
June 17, 2026Looking for the WooCommerce thank you page so you can edit it, but can’t find a page anywhere in your dashboard? You’re not alone. WooCommerce doesn't show this page like...


