
![How to Optimize WooCommerce Order Pay Page for Better Conversions [Free & No-Code Method]](https://funnelkit.com/wp-content/uploads/2025/03/How-to-Optimize-Your-WooCommerce-Order-Pay-Page-for-Better-ConversionsHow-to-Optimize-Your-WooCommerce-Order-Pay-Page-for-Better-Conversions.jpg)
Not every online order follows the standard checkout process.
Sometimes, a customer may request a custom order, need an invoice to finalize payment, or simply want to retry a failed transaction.
Forcing them to add items to the cart and go through checkout again creates unnecessary friction, leading to a poor customer experience and potential lost sales.
That’s where the WooCommerce order-pay page comes to the rescue.
It provides a direct payment link, allowing customers to complete their orders effortlessly.
In this blog, we’ll walk you through everything you need to know about the Order Pay Page in WooCommerce, including how to create and share the link with relevant customers.
Table of Contents
- 1 What is the Order Pay Page in WooCommerce?
- 2 How Does the Order Pay Page Work in WooCommerce?
- 3 How Is Order Pay Different from the Checkout Page in WooCommerce?
- 4 How to Create an Order Pay Page in WooCommerce?
- 5 Why Choose a Custom Order Pay Page Over the Default WooCommerce One?
- 6 How to Create a Custom Order Pay Page in WooCommerce?
- 7 How to Share the Order Pay Page Link to Increase Conversions?
- 8 More Questions About The Order Pay Page in WooCommerce
- 9 Start Using a Custom WooCommerce Order Pay Page to Boost Conversions!
What is the Order Pay Page in WooCommerce?
The WooCommerce Order Pay Page is a dedicated payment page that allows customers to pay for an existing unpaid order using a secure payment link.
It skips the cart and billing forms by using the order’s saved details and available payment gateways, letting customers complete their order without going through the full checkout process again.
Here is an order pay page URL structure:
https://yourstore.com/checkout/order-pay/{ORDER_ID}/?key=wc_order_{UNIQUE_KEY}Here’s what the order-pay page includes:
- Order details: Displays the order number, product list, quantity, and total amount.
- Billing and shipping information: Pre-filled from the original failed or manually admin-created order.
- Payment methods: Shows the available payment gateways configured in WooCommerce.
- Payment button: Allows customers to complete their payment securely.
- Privacy policy: A text link directing customers to the store's privacy policy for transparency on data usage.
How Does the Order Pay Page Work in WooCommerce?
If you are wondering how the order-pay page works in a WooCommerce store, then,
Here is a step-by-step breakdown of how the process works:
Step 1: Order creation
The store owner manually creates an order in WooCommerce (via the admin panel), or an order is generated but remains unpaid.
Step 2: Order pay page link generation
WooCommerce automatically generates a unique Order Pay Page URL for that specific order.
Step 3: Sharing the order pay page link
The store owner can send this link to the customer via email automation, SMS, WhatsApp, or any other communication channel.
Step 4: Payment completion using the link
When the customer clicks the link, they are taken directly to a secure payment page, where they can complete the order without having to re-enter details or go through checkout again.
How Is Order Pay Different from the Checkout Page in WooCommerce?
Both the WooCommerce Order Pay Page and the Checkout Page facilitate payments, but they serve different purposes.
While the Checkout Page is designed for new orders, the Order Pay Page allows customers to complete an existing unpaid order seamlessly.
Here is a more detailed comparison:
| Feature | Order pay page | Checkout page |
|---|---|---|
| Purpose | Used to complete an existing unpaid order | Used for placing a new order |
| User flow | Customers receive a direct payment link and go straight to the payment | Customers add products to their cart, enter details, and proceed to the payment |
| Requires adding products to cart? | No | Yes |
| Requires filling billing/shipping details? | No (Uses existing order details) | Yes |
| Use case | Manual orders, failed payments, and invoice-based payments | Regular purchases where customers browse and check out normally |
How to Create an Order Pay Page in WooCommerce?
You can follow the steps below to create a custom order pay page link in WooCommerce
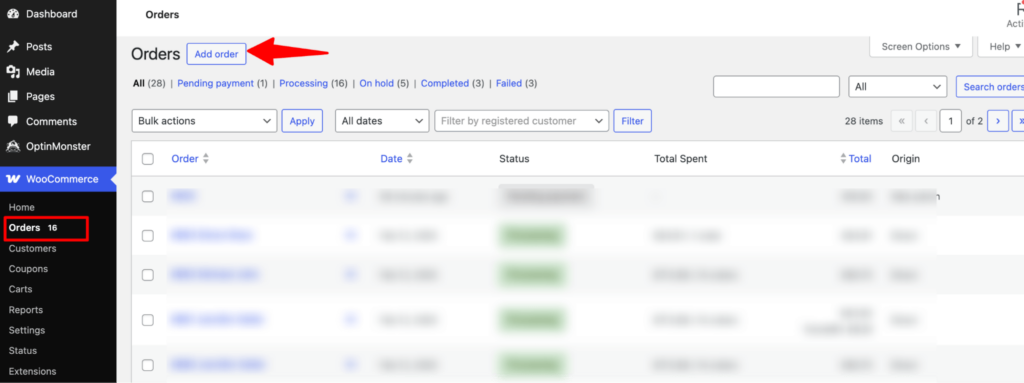
Step 1: Navigate to the add order option
First, navigate to WooCommerce ⇒ Orders and hit Add Order.
Step 2: Set up customer details
Next, choose the customer. If you choose a registered customer who already has their shipping and billing information set in their accounts, it will get populated automatically.
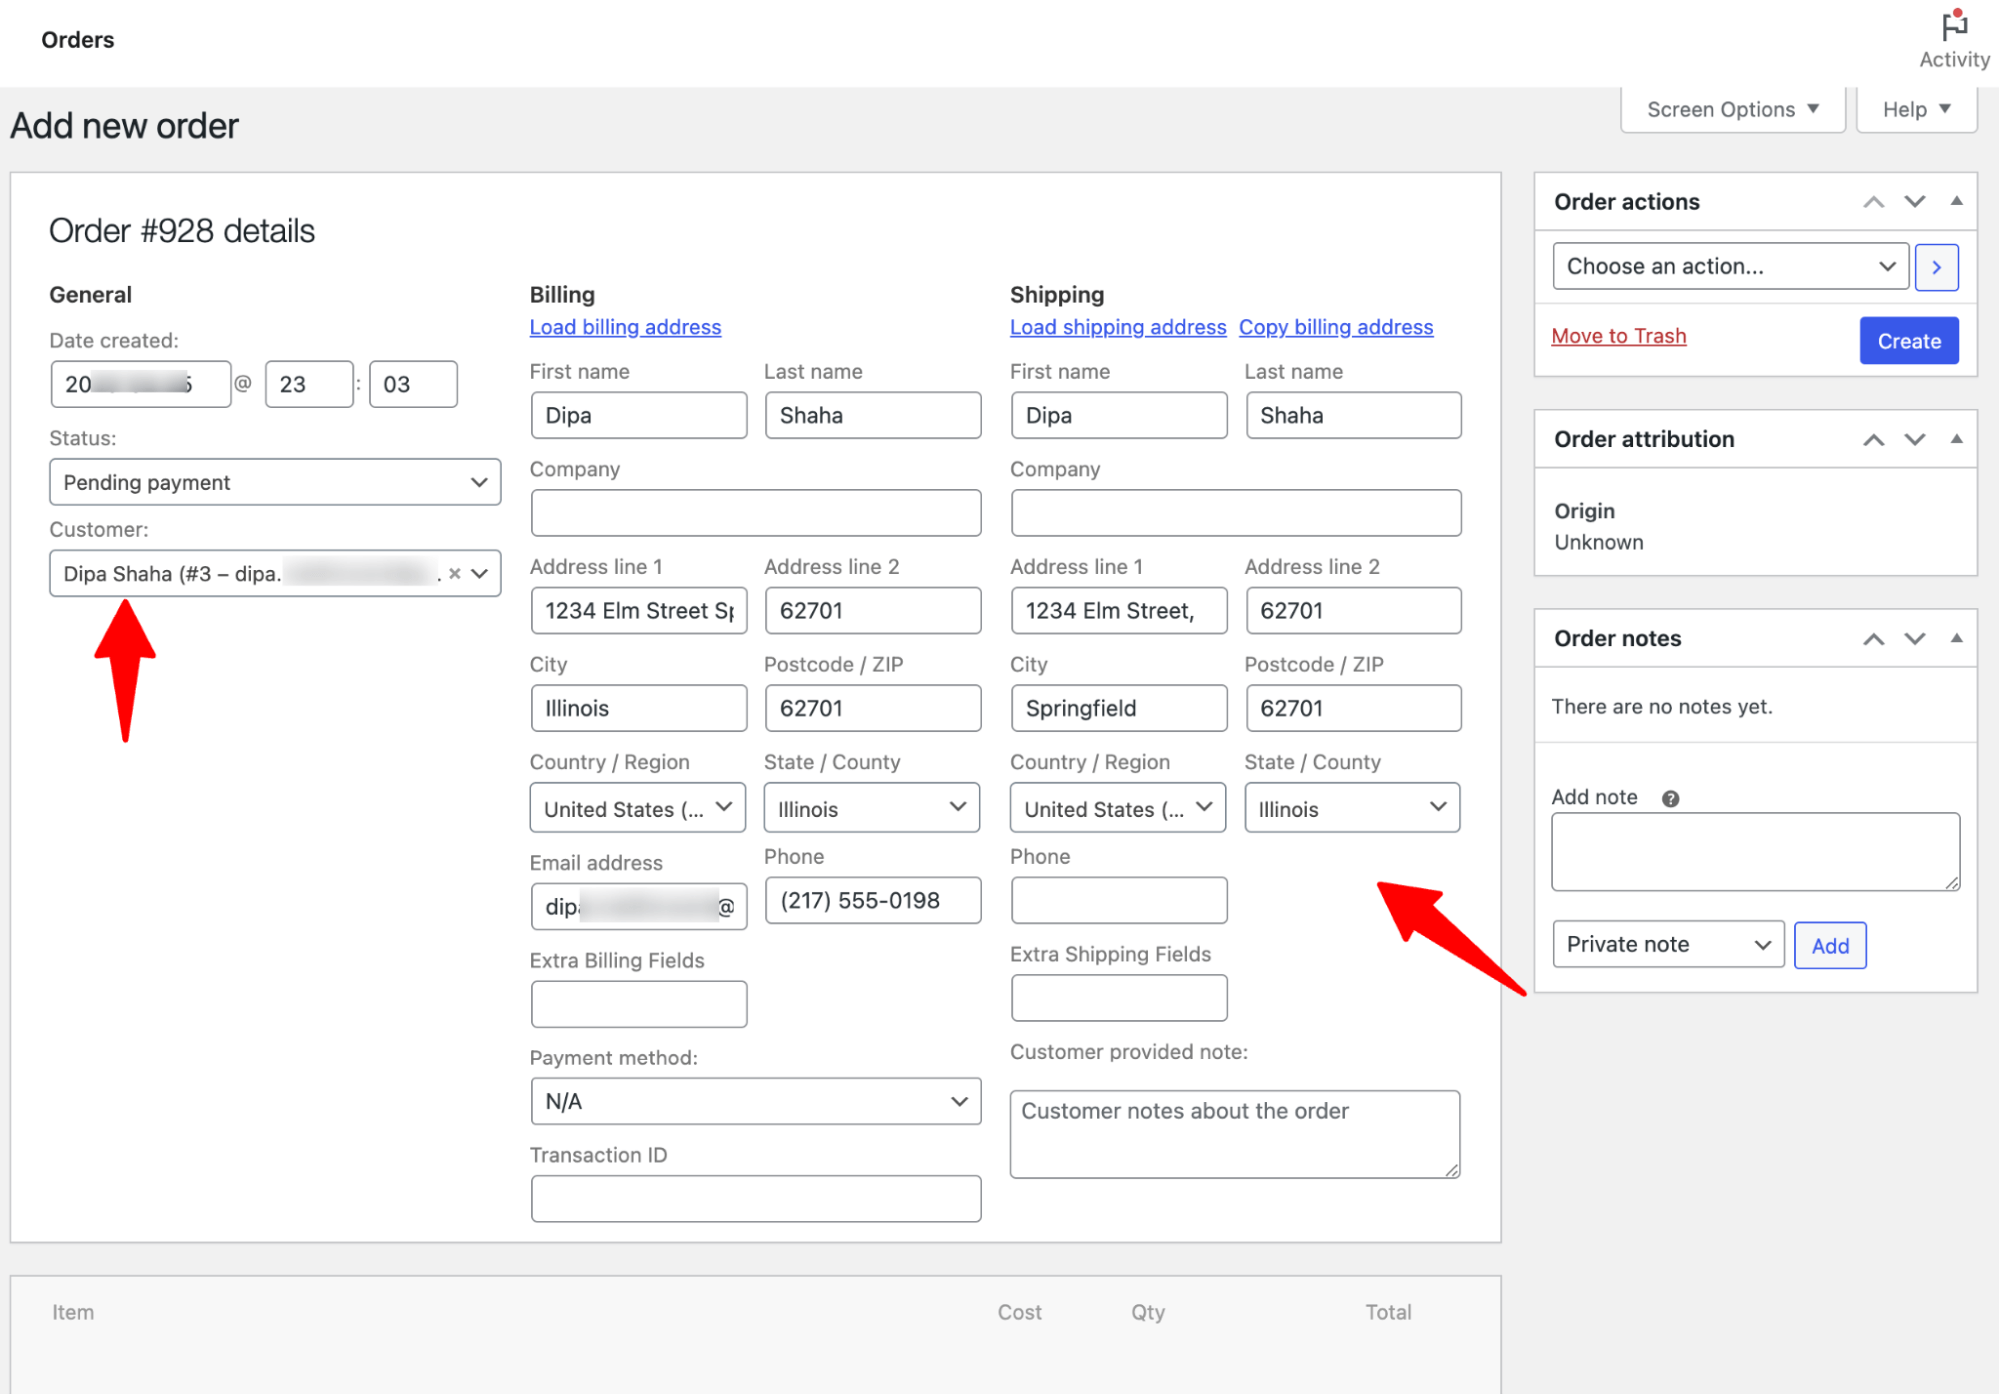
You can make changes to the prepopulated information if needed.
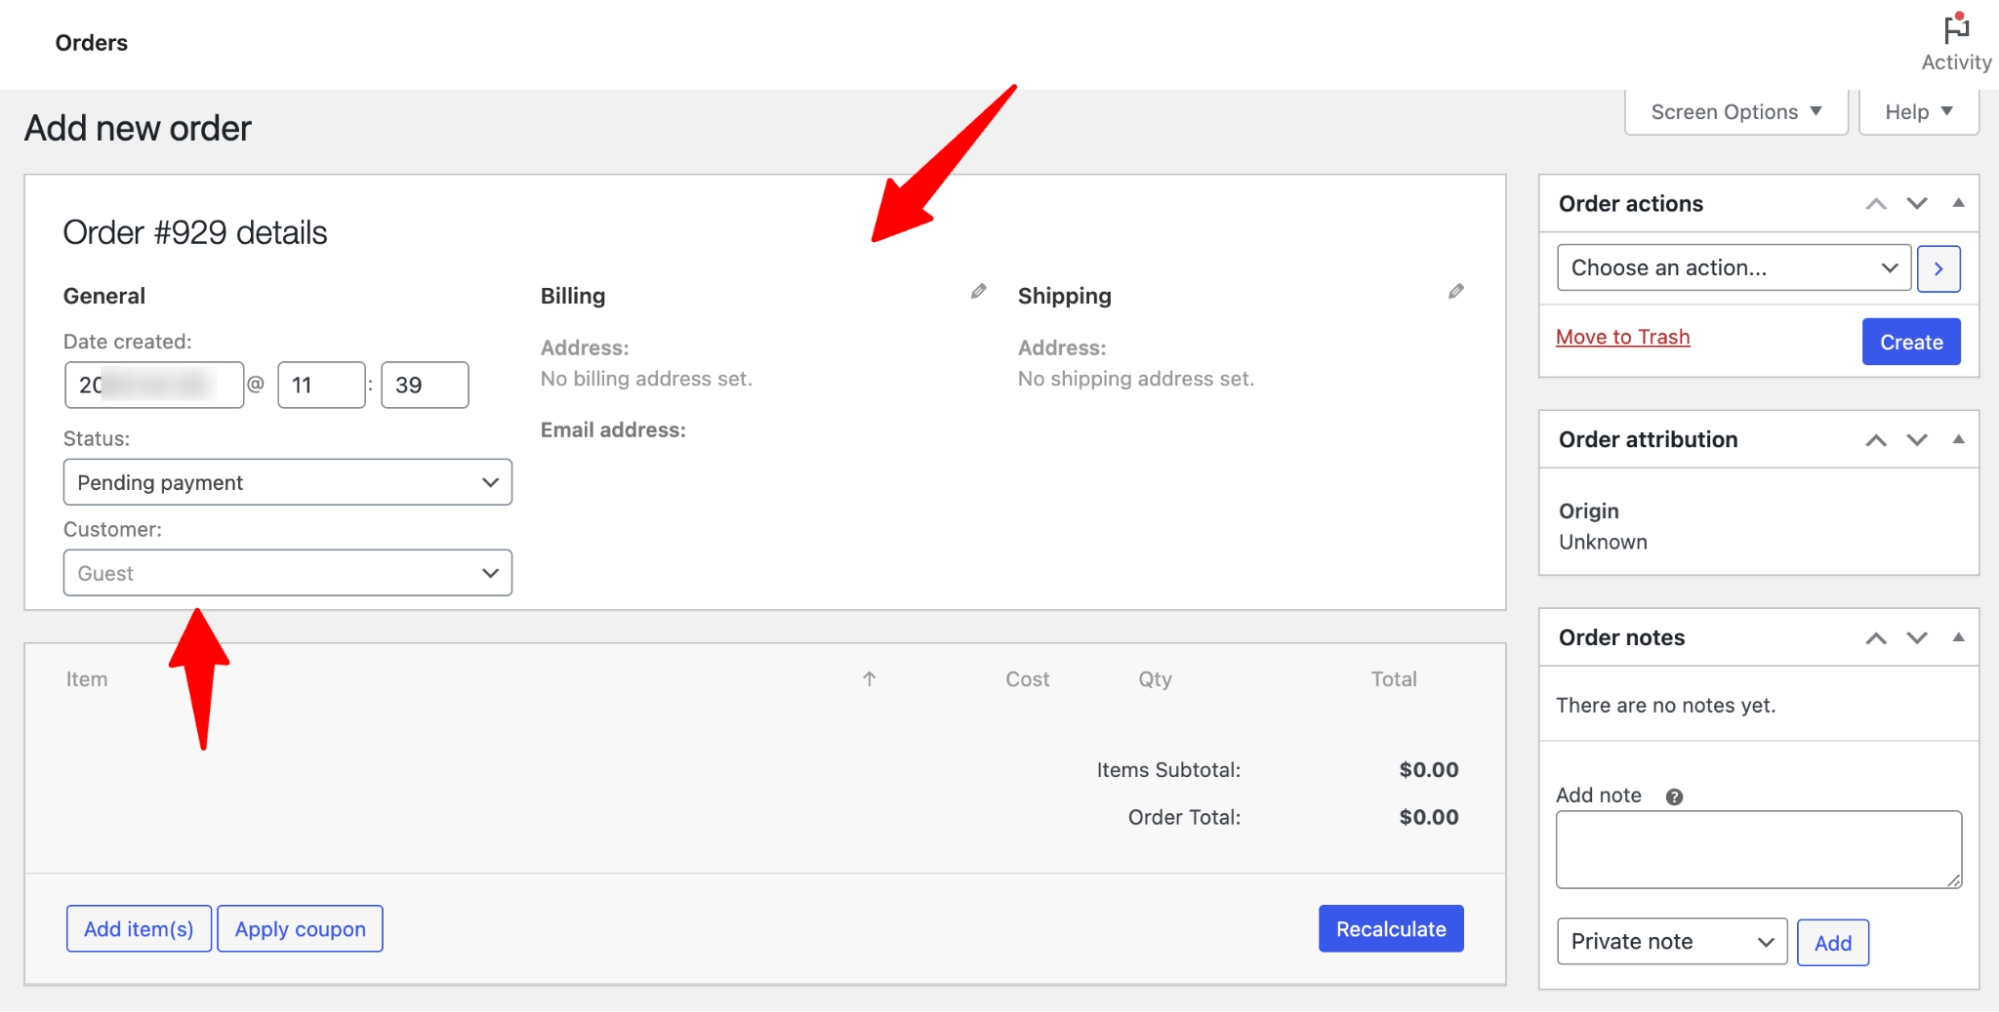
If you want to create the order-pay page link for a guest user, select guest, then enter the shipping and billing details.
Step 3: Add products to the order
Now is the time to add the items you want to include in your order.
For this, hit the ‘Add Item(s)’ button.
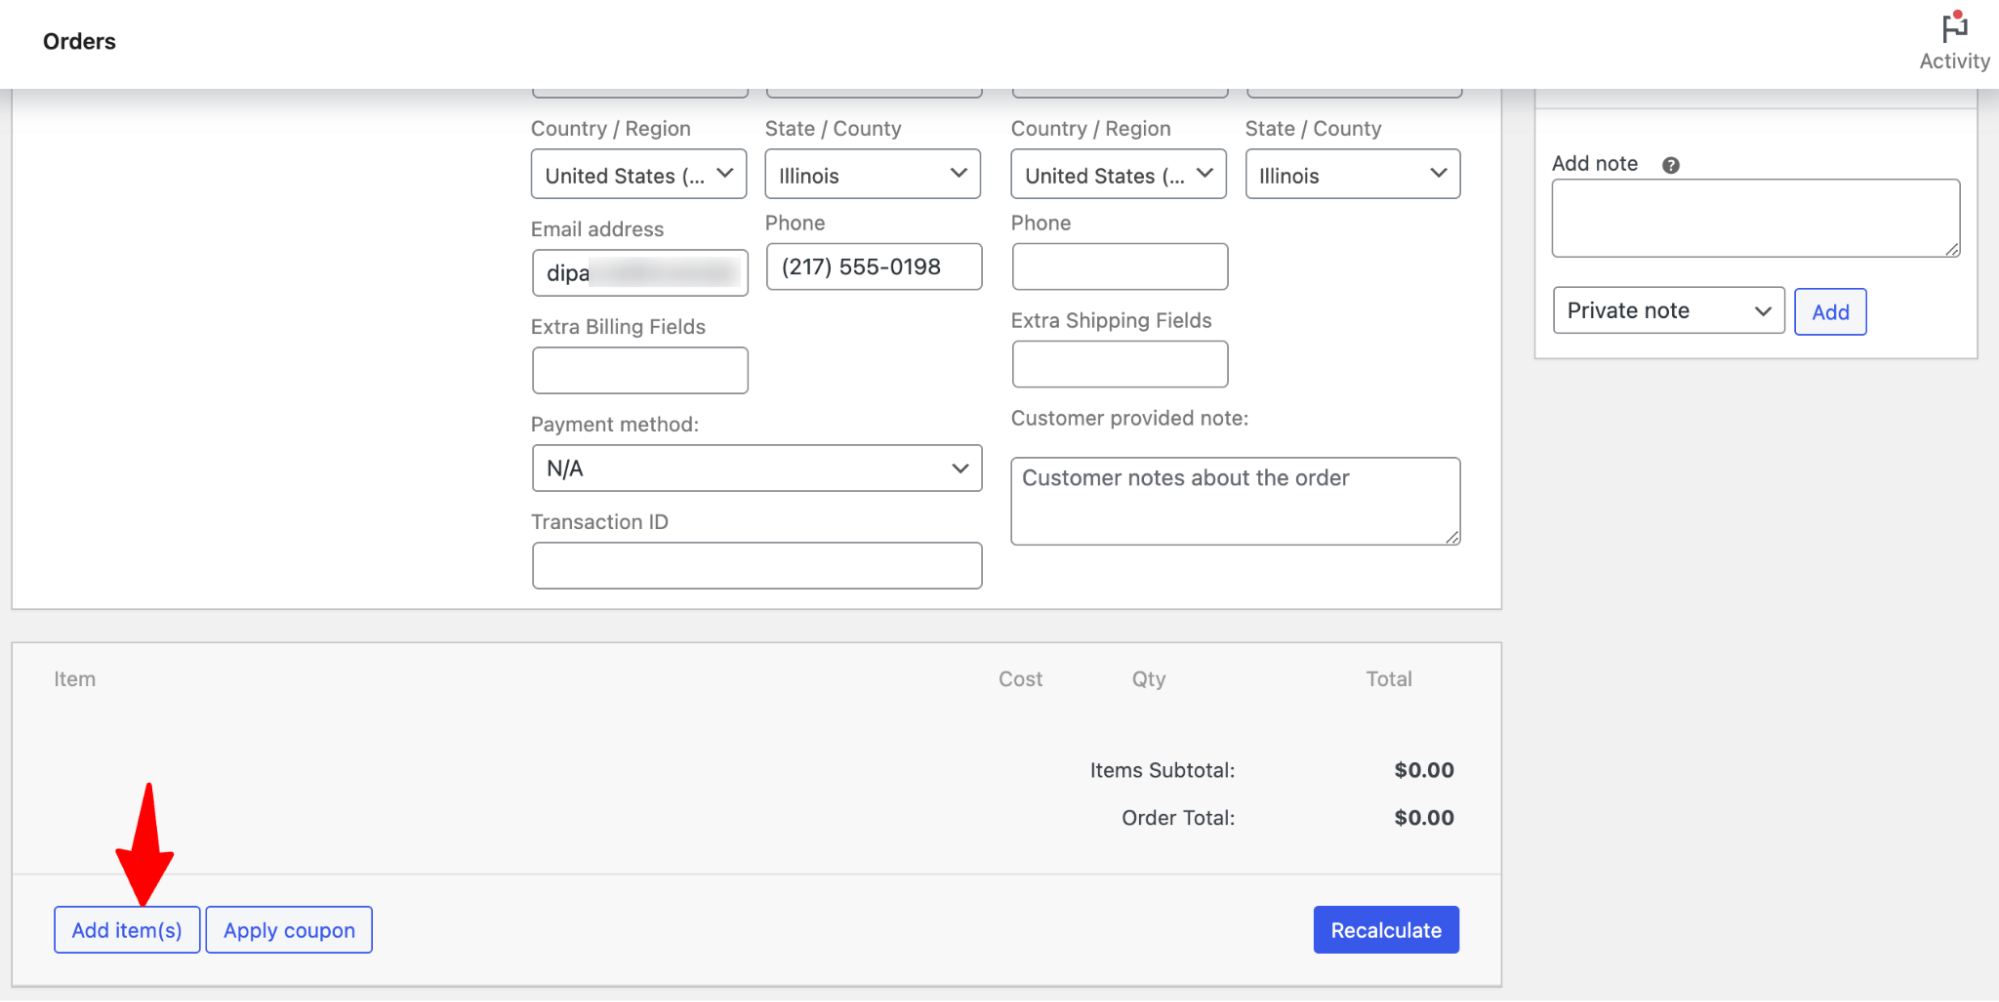
Then, hit Add Products.
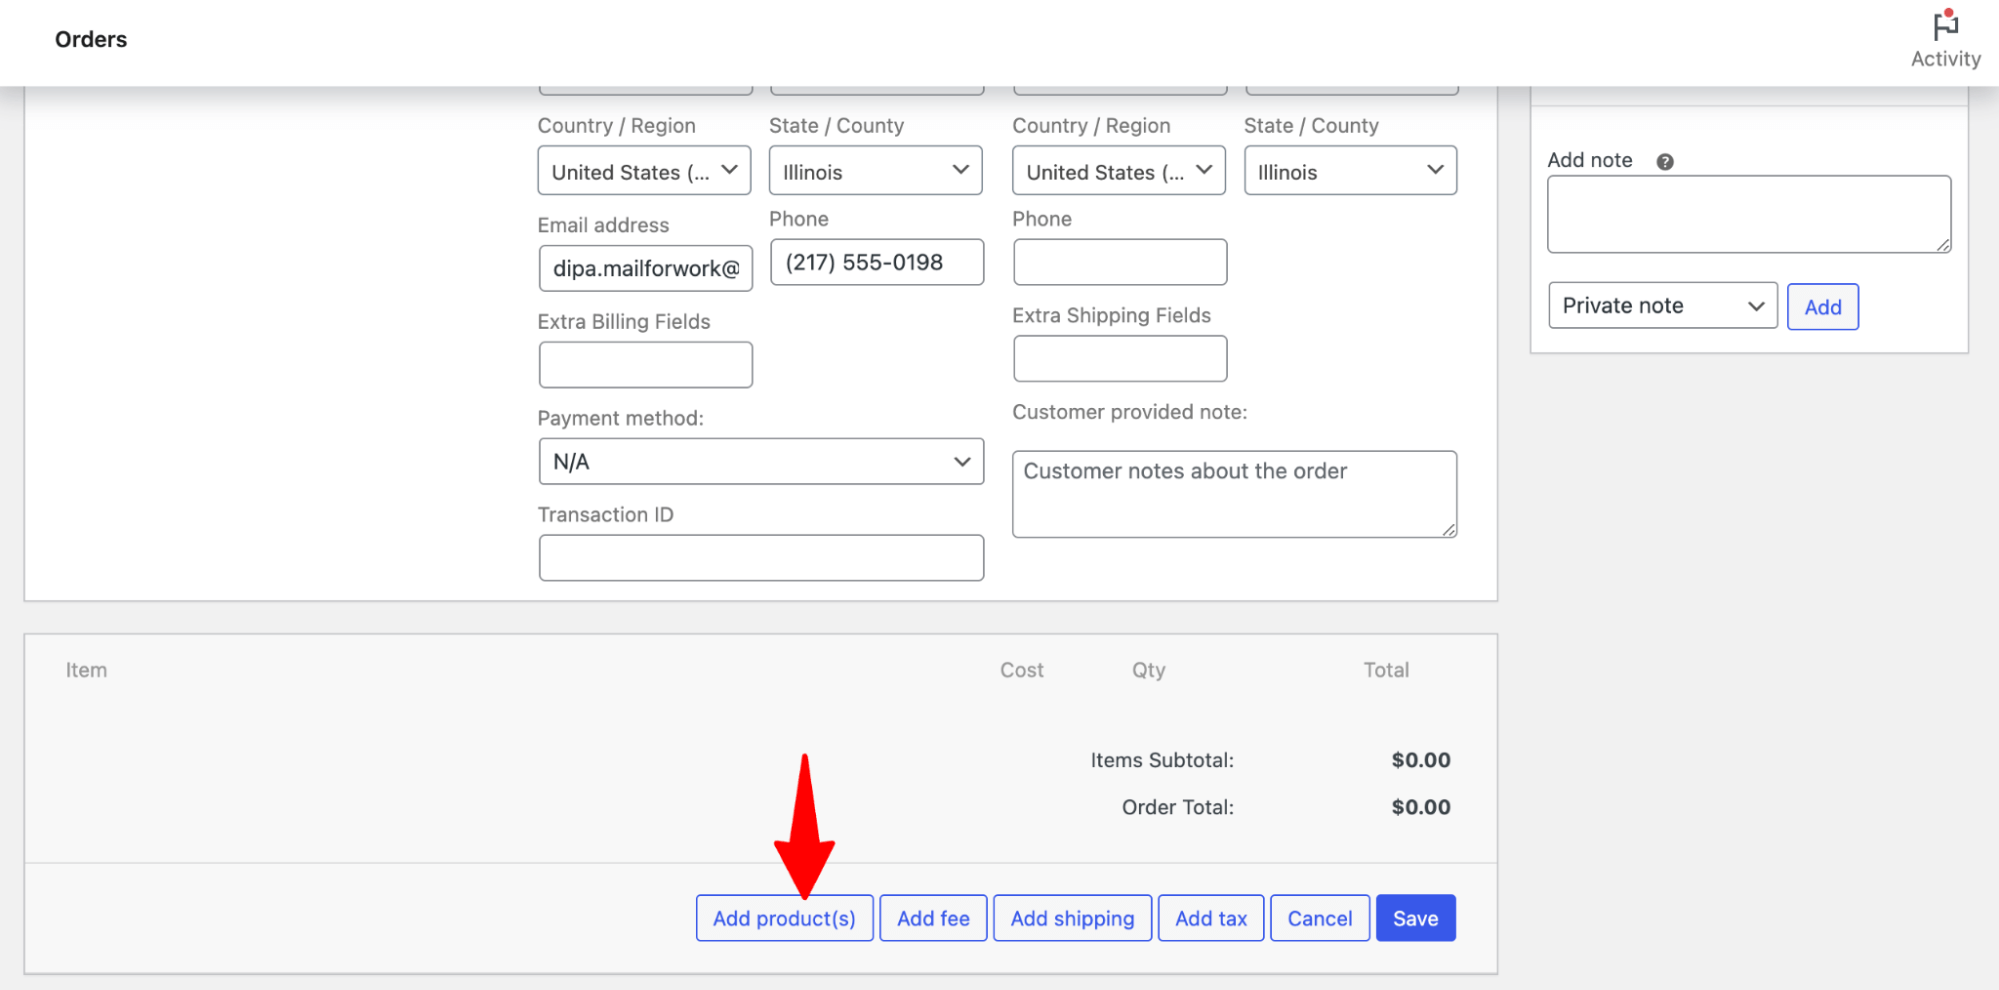
Now search for and add the products, and then set the quantity. You can add multiple products.
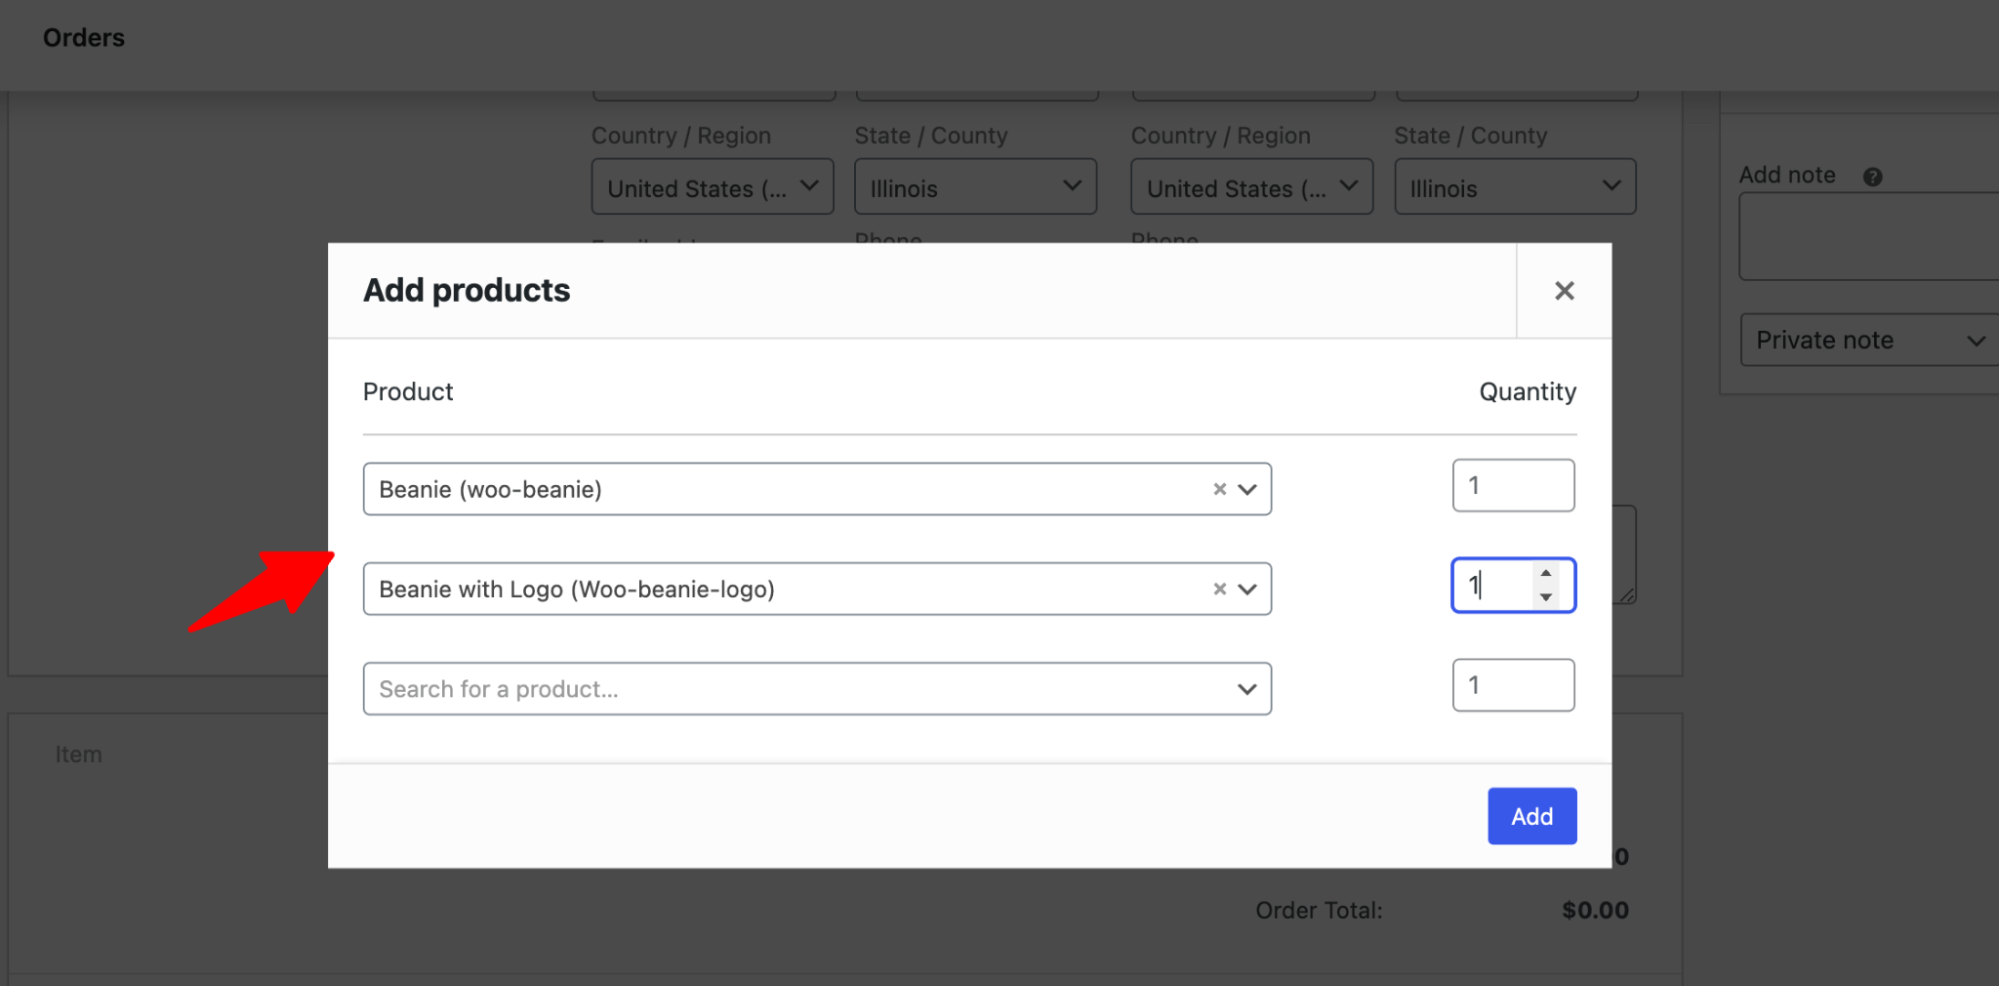
Hit ‘Add’ to complete adding the products.
In the same way, you can add extra fees, shipping, and taxes.
Step 4: Add the shipping method
For physical products, adding a shipping method is mandatory.
To do this, click the ‘Add Shipping’ button, then set the shipping type, fee, etc.
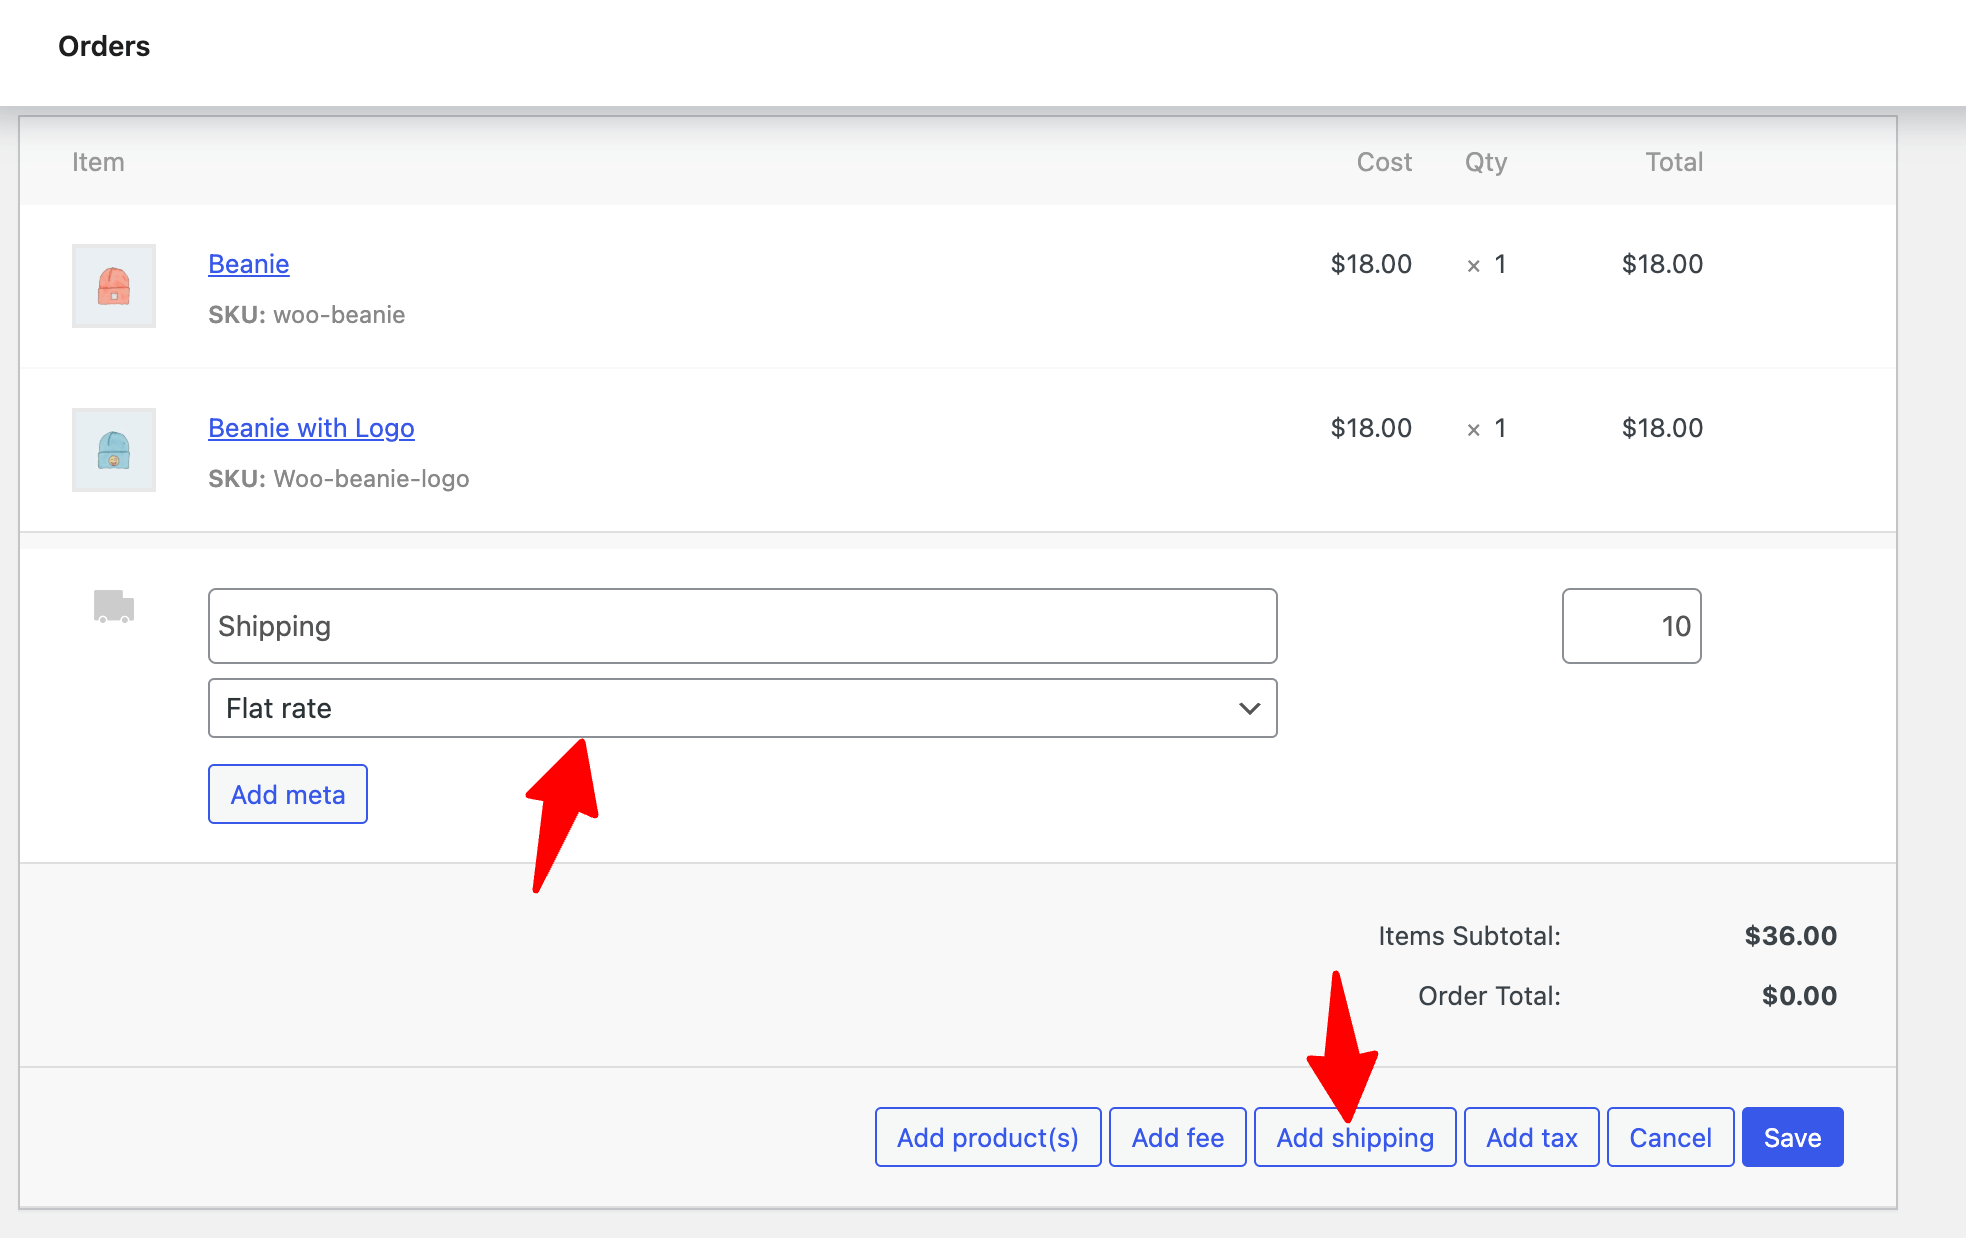
Step 5: Generate the order pay page link
Lastly, hit the ‘Create’ button to generate the order pay page link.
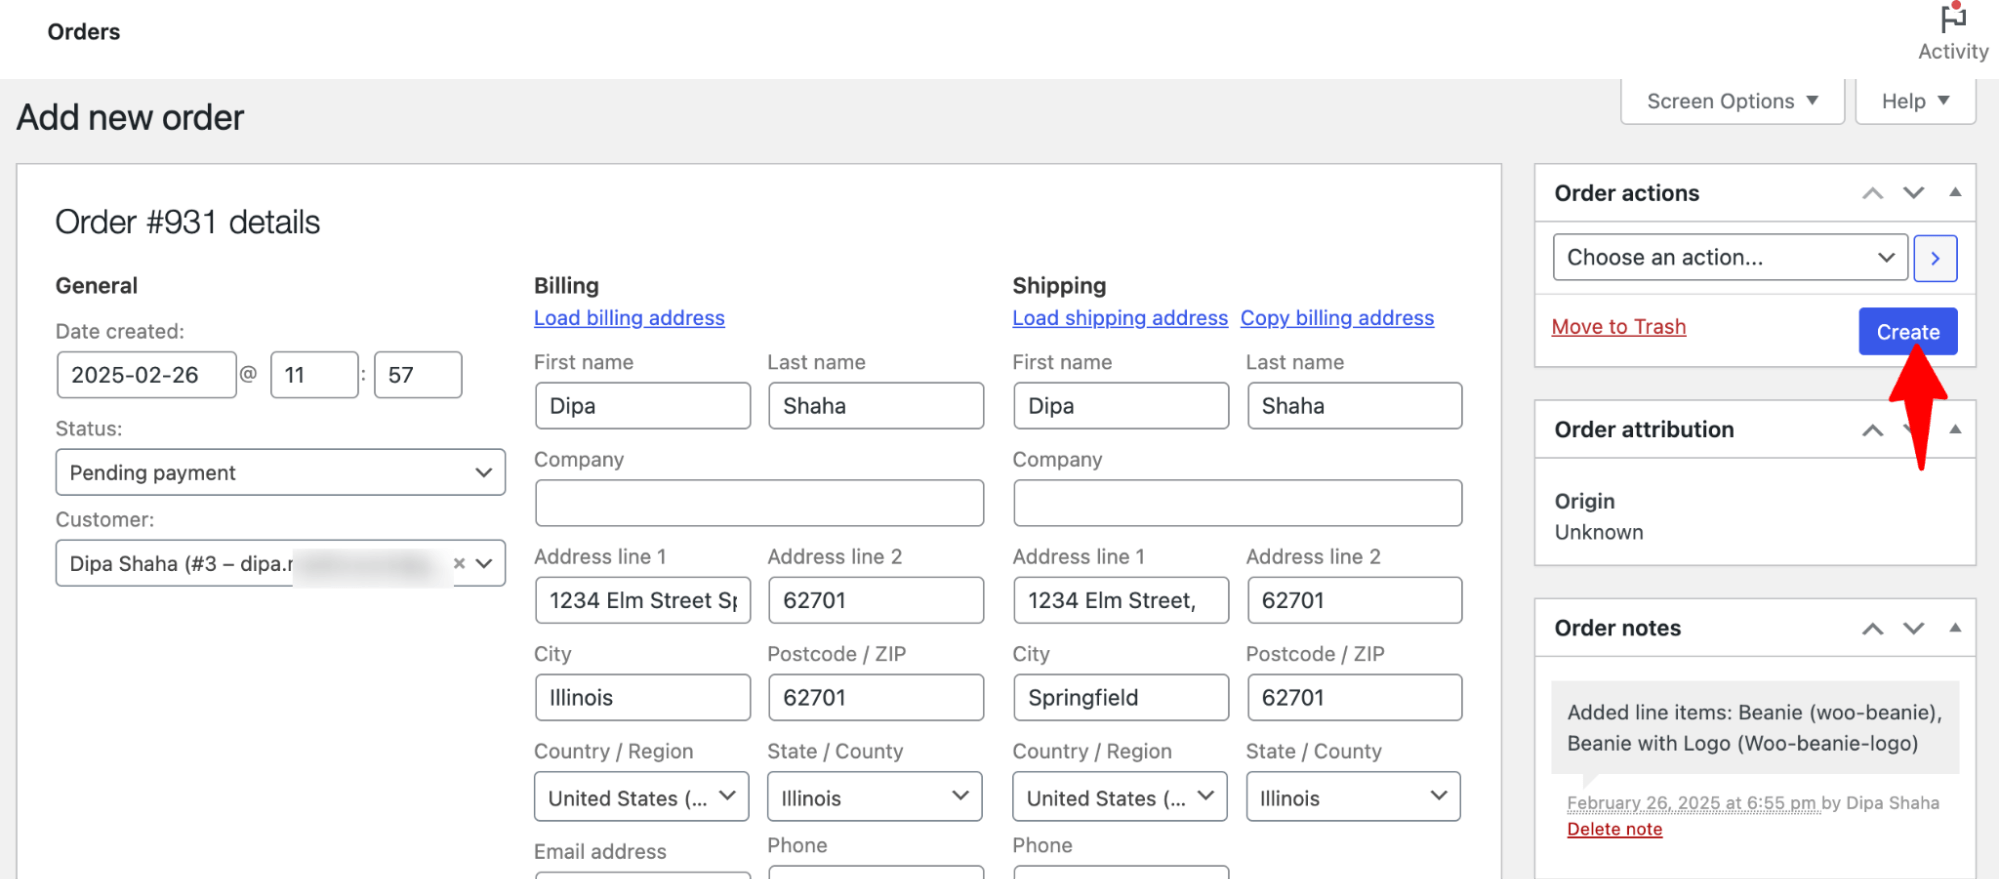
Once the order is updated, you will find a link named “Customer payment page”.
This link will redirect customers to the order pay page.
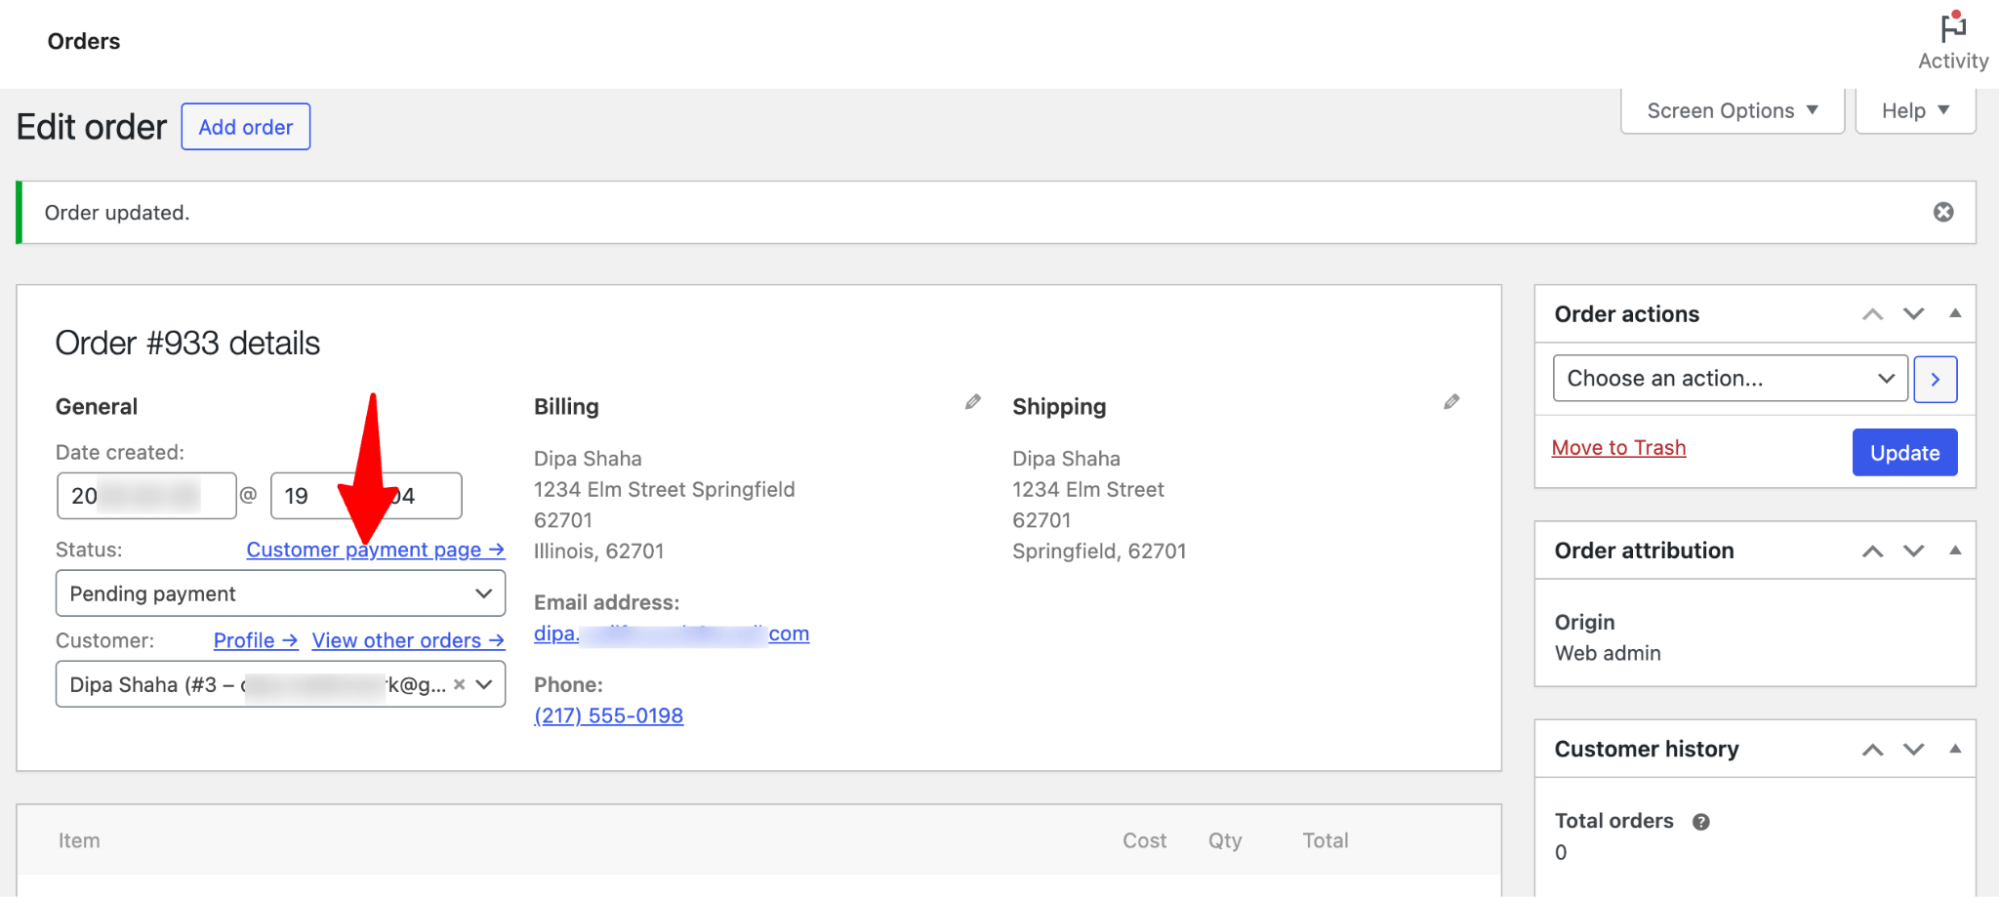
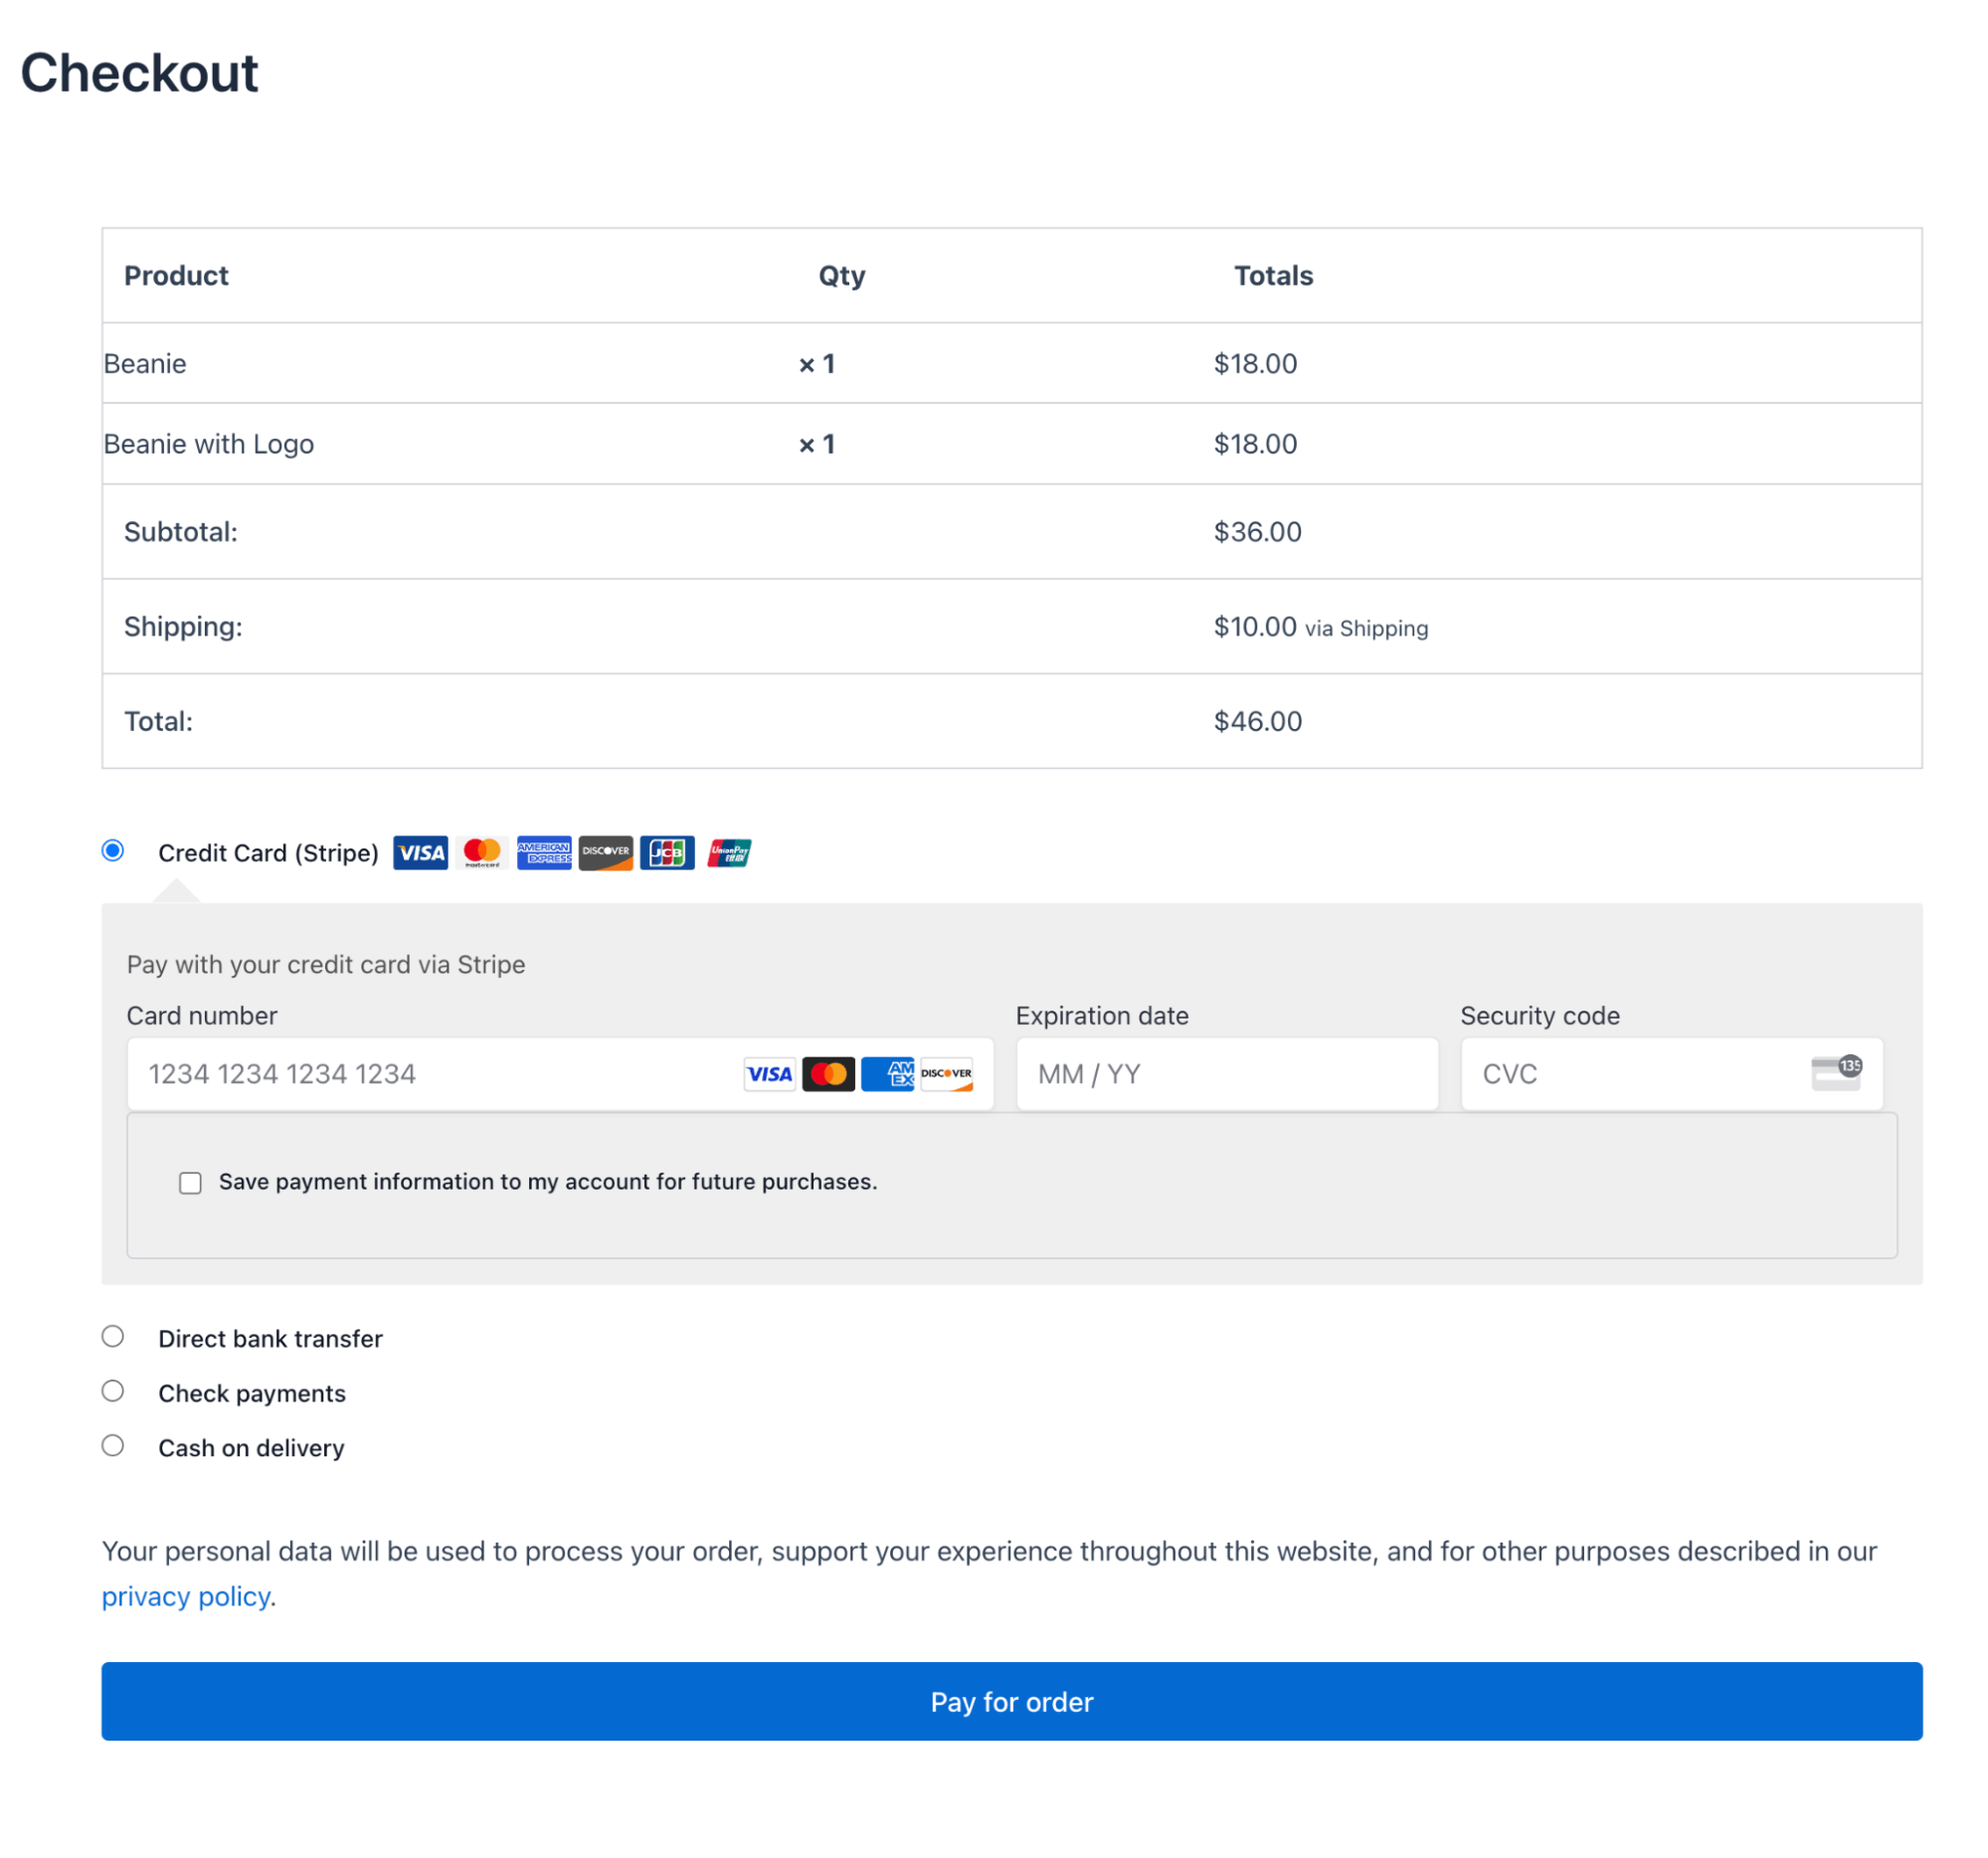
Here is how the default order-pay page looks:
Well done! This is how you can create the WooCommerce order pay page with ease.
Why Choose a Custom Order Pay Page Over the Default WooCommerce One?
The default WooCommerce Order Pay page is basic, lacks flexibility, and doesn’t align with most store designs.
Here’s why creating a custom order-pay page is a smarter choice:
- Brand consistency: The default page looks plain and doesn’t reflect your store’s identity. A custom page allows you to match your fonts, colors, and layout for a cohesive experience and a more aesthetic look.
- Better user experience: The default layout is rigid and not optimized for usability. A custom design ensures a cleaner, more intuitive payment process without unnecessary distractions.
- No option for additional content: The default page doesn’t allow modifications like adding trust signals like customer reviews, shipping policies, support information, etc. A custom page lets you control what customers see before completing their payment.
A custom order pay page gives you complete control over branding, usability, and clarity, ensuring a more professional and seamless payment experience for your customers.
How to Create a Custom Order Pay Page in WooCommerce?
We’ll use FunnelKit Funnel Builder to create a custom order-pay page that replaces the default one with a more professional and conversion-optimized layout.
FunnelKit Funnel Builder is the ultimate checkout manager and sales funnel builder that allows you to replace the default checkout, thank you, and order pay pages with custom ones.
Plus, you can optimize the checkout process to ensure a smooth shopping experience as well as boost AOV with pre- and post-checkout offers like order bumps and one-click upsells.
To follow along with the process, you need to install and activate FunnelKit Funnel Builder. The free version is enough to add a one-click checkout option.
After activating the plugin, follow these steps:
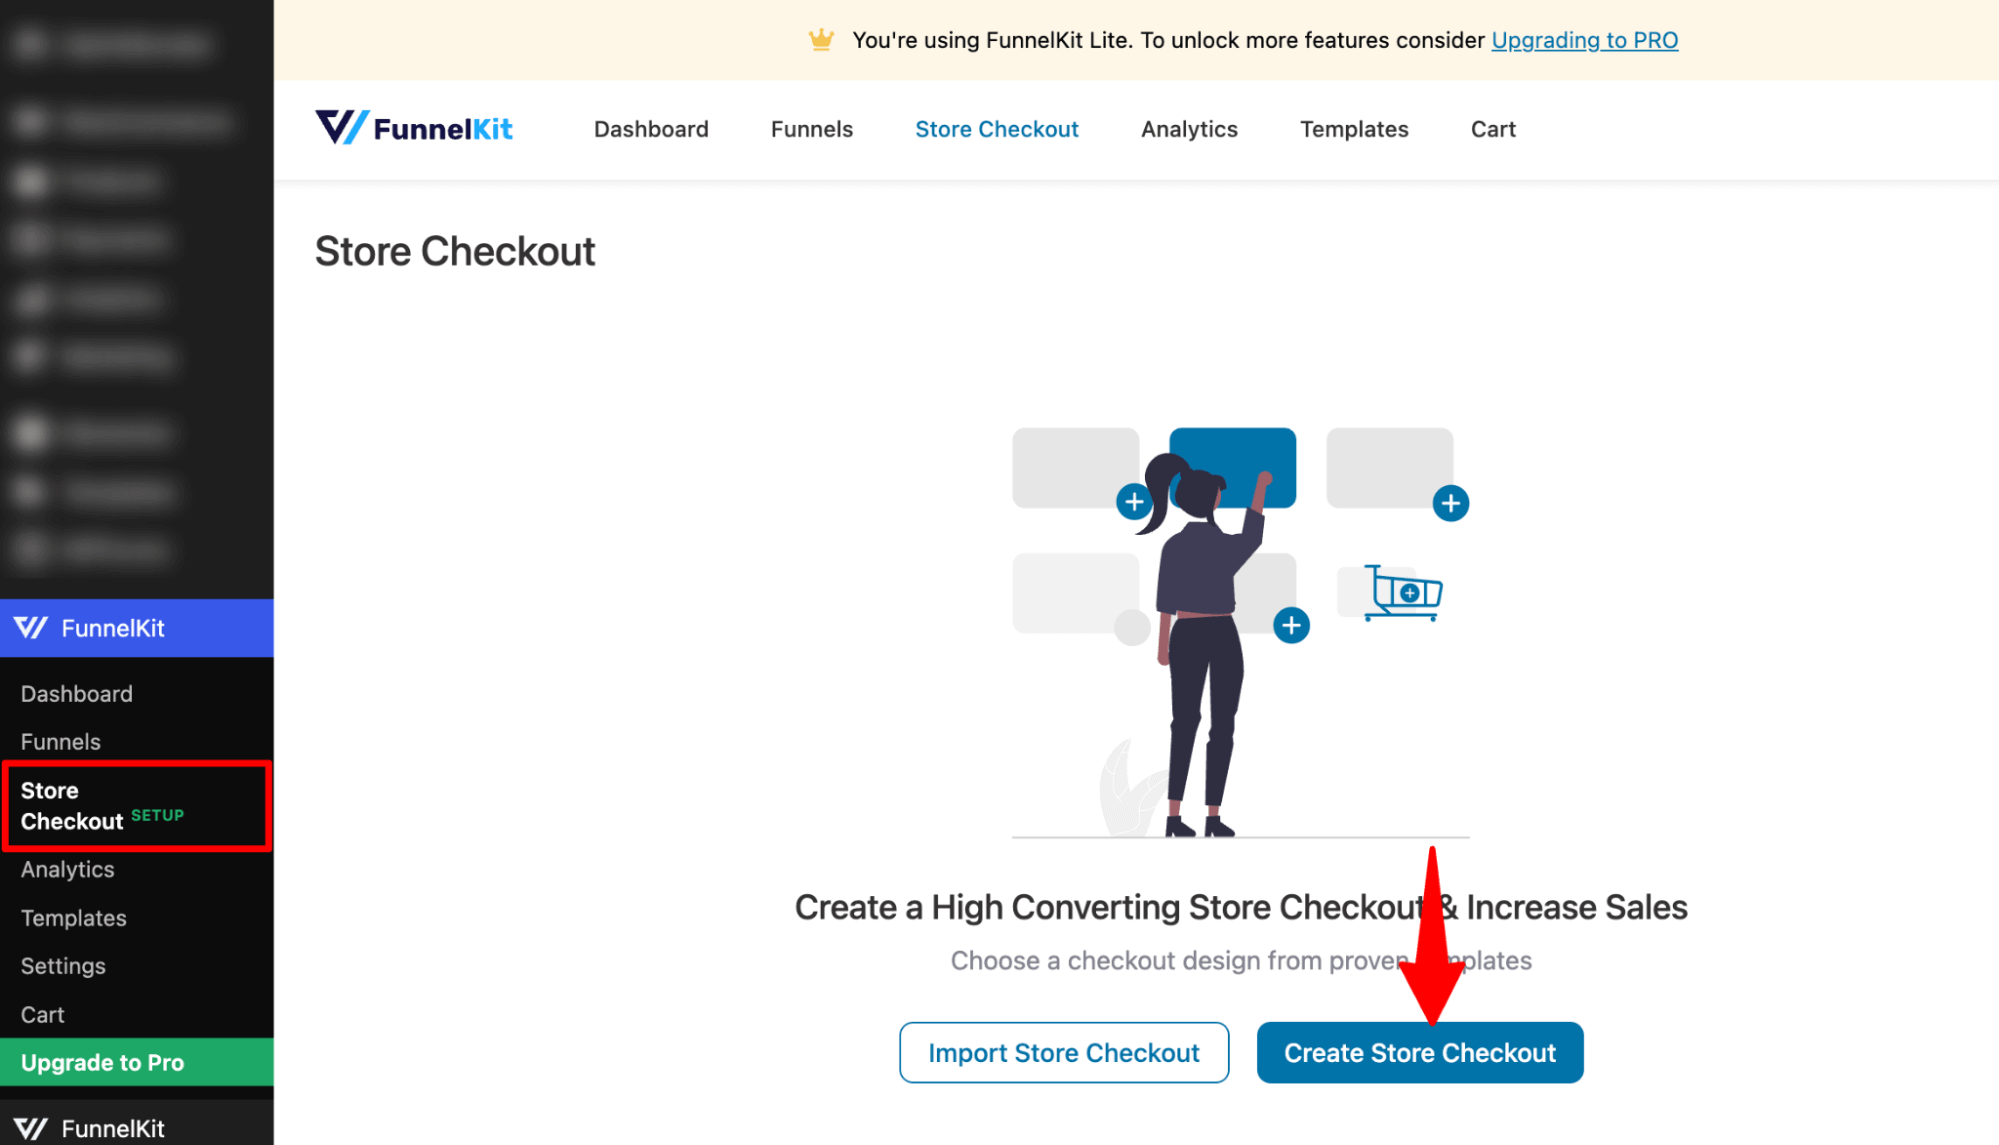
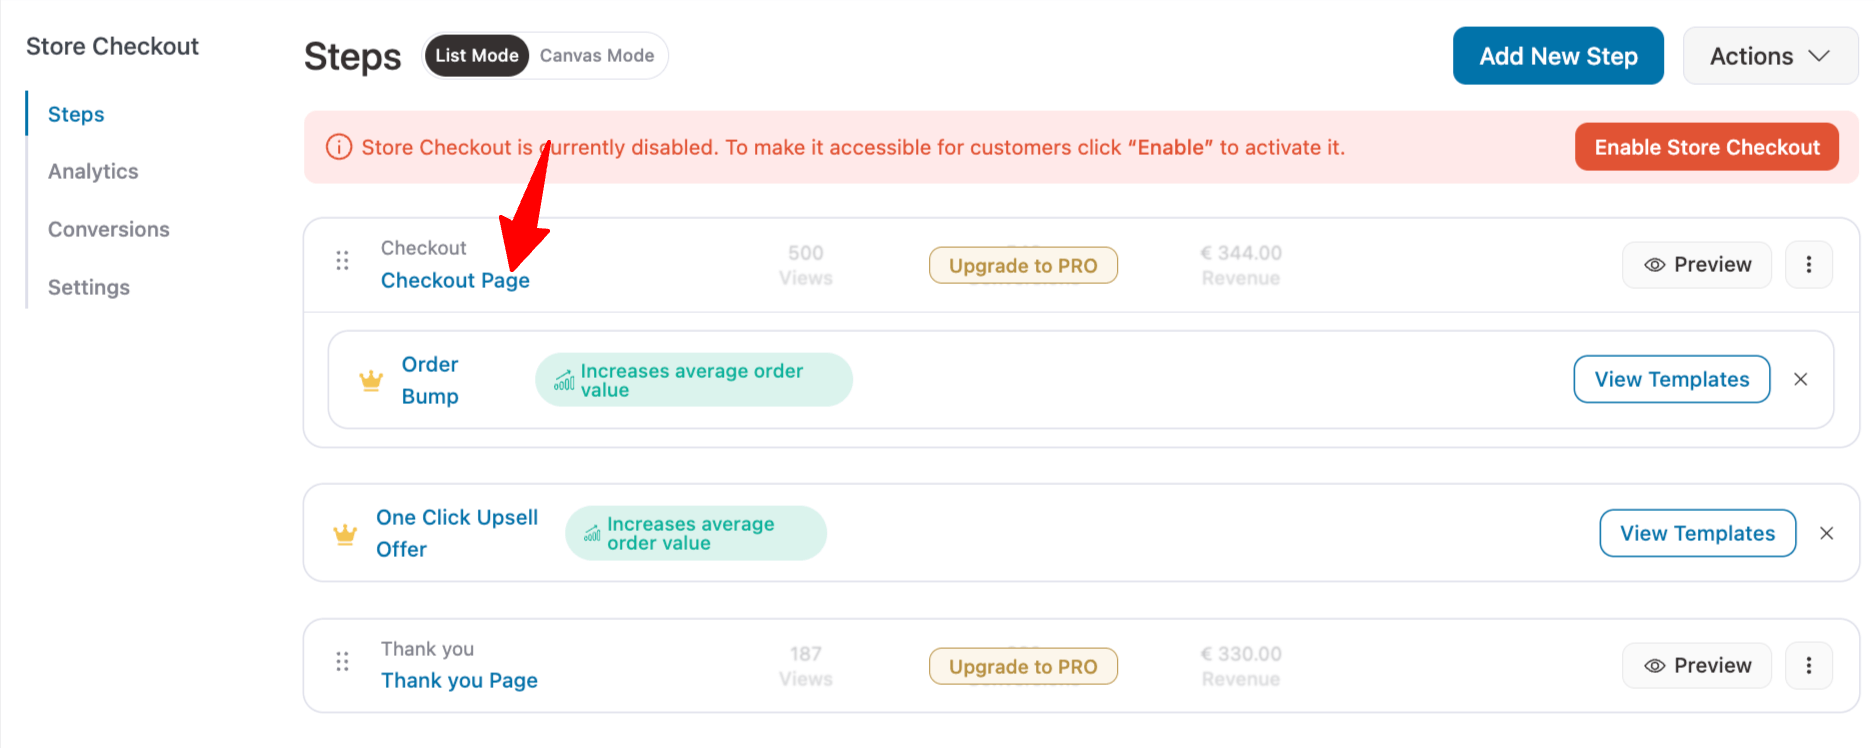
Step 1: Create a store checkout
First, create a store checkout to replace the default WooCommerce checkout page.
Go to FunnelKit ⇒ Store Checkout and click 'Create Store Checkout'.
You get a great collection of prebuilt templates that can be imported and customized with your favorite page builder.
First, you need to choose a template. To select one, hover on the template you like and click on Preview.
Here, we are going to import the Hific template.
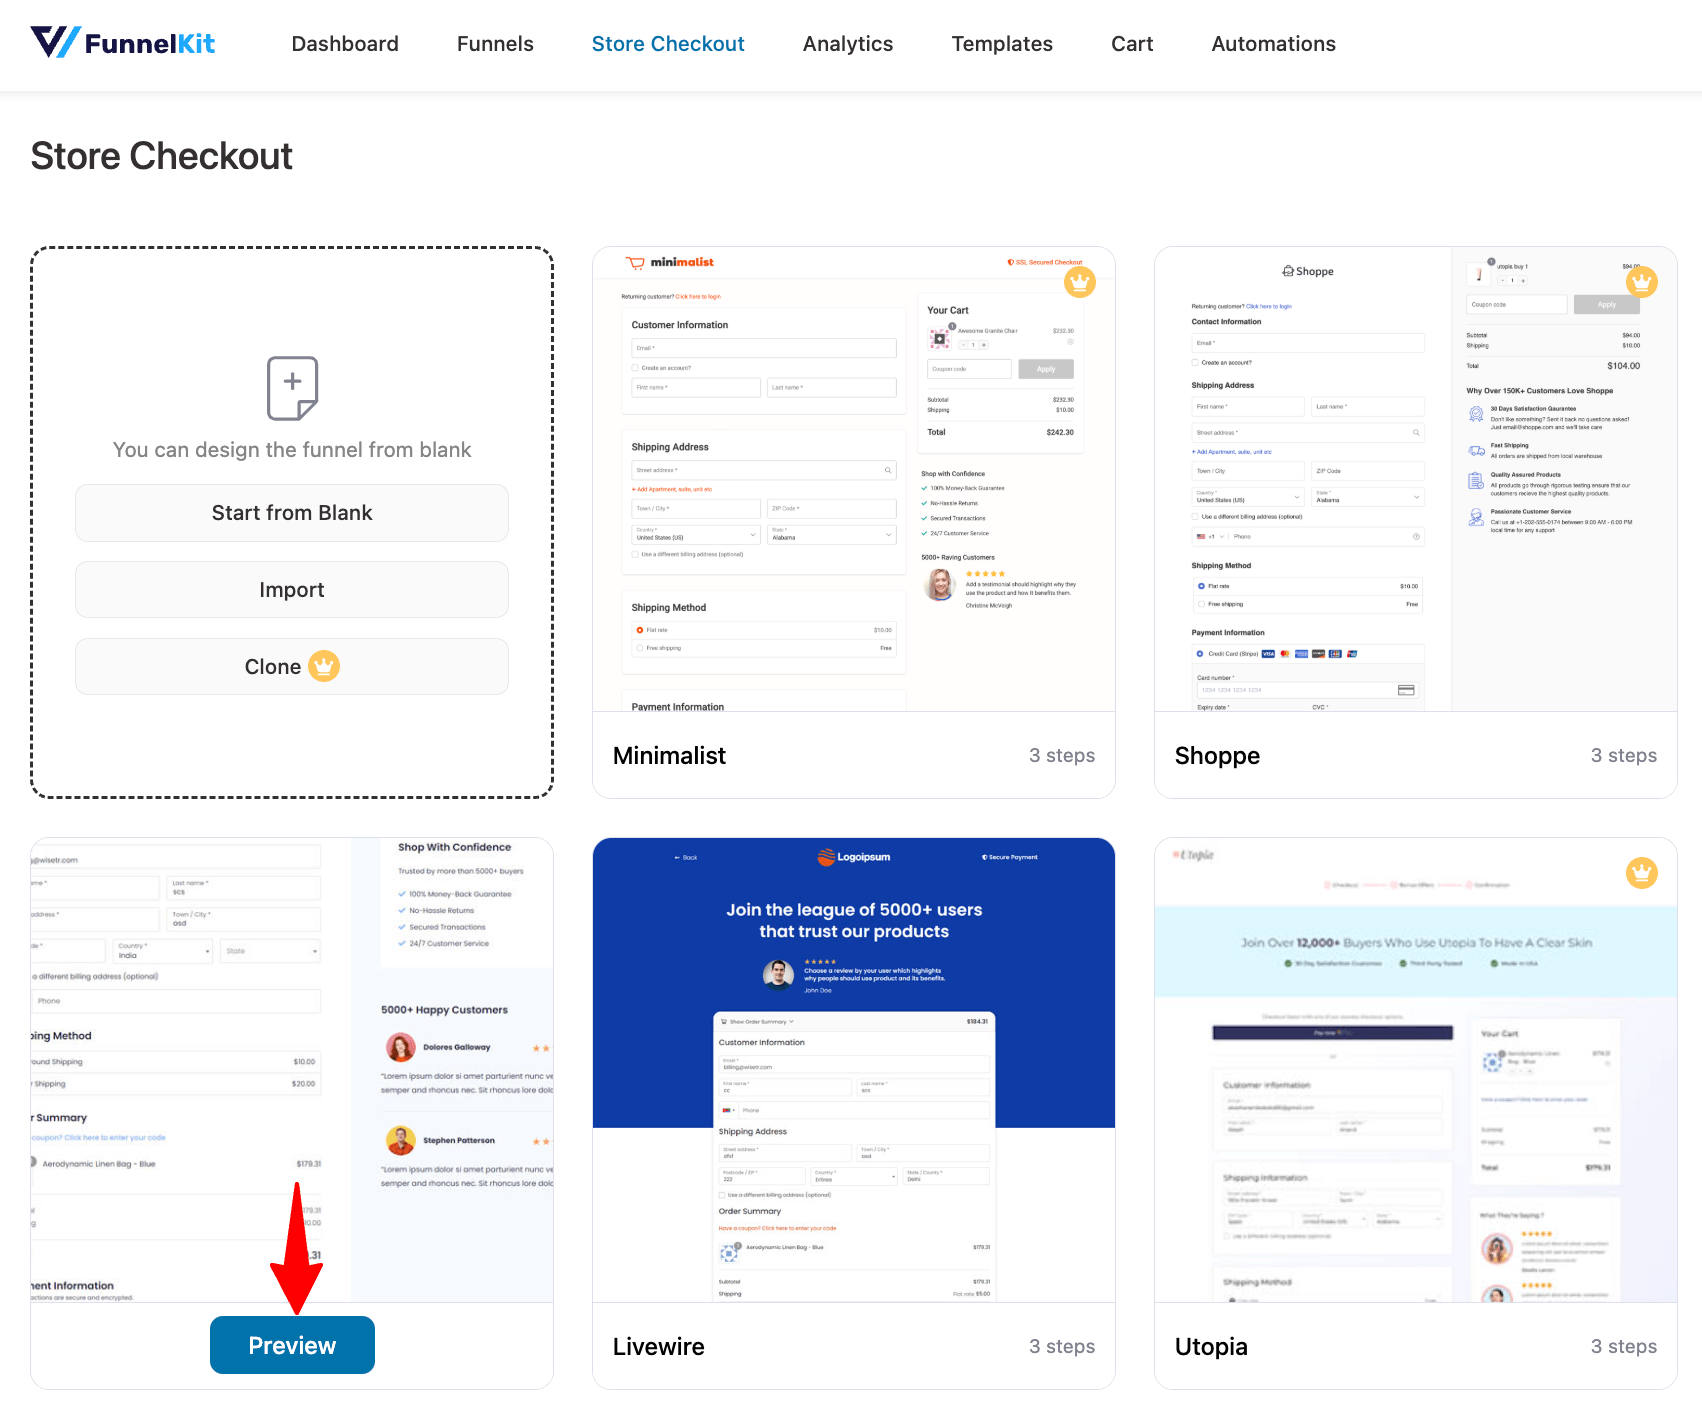
You can only create a single-page checkout with the free version. However, you can create a multi-page checkout page with the premium version.
Next, to import the template you like, click on “Import This Funnel”, provide a name, and click on "Done" to import this funnel as your default checkout.

This will import your store checkout funnel.
With the free version, you can use a custom checkout and thank you page. To create offers like order bumps and one-click upsells, you need the premium version.
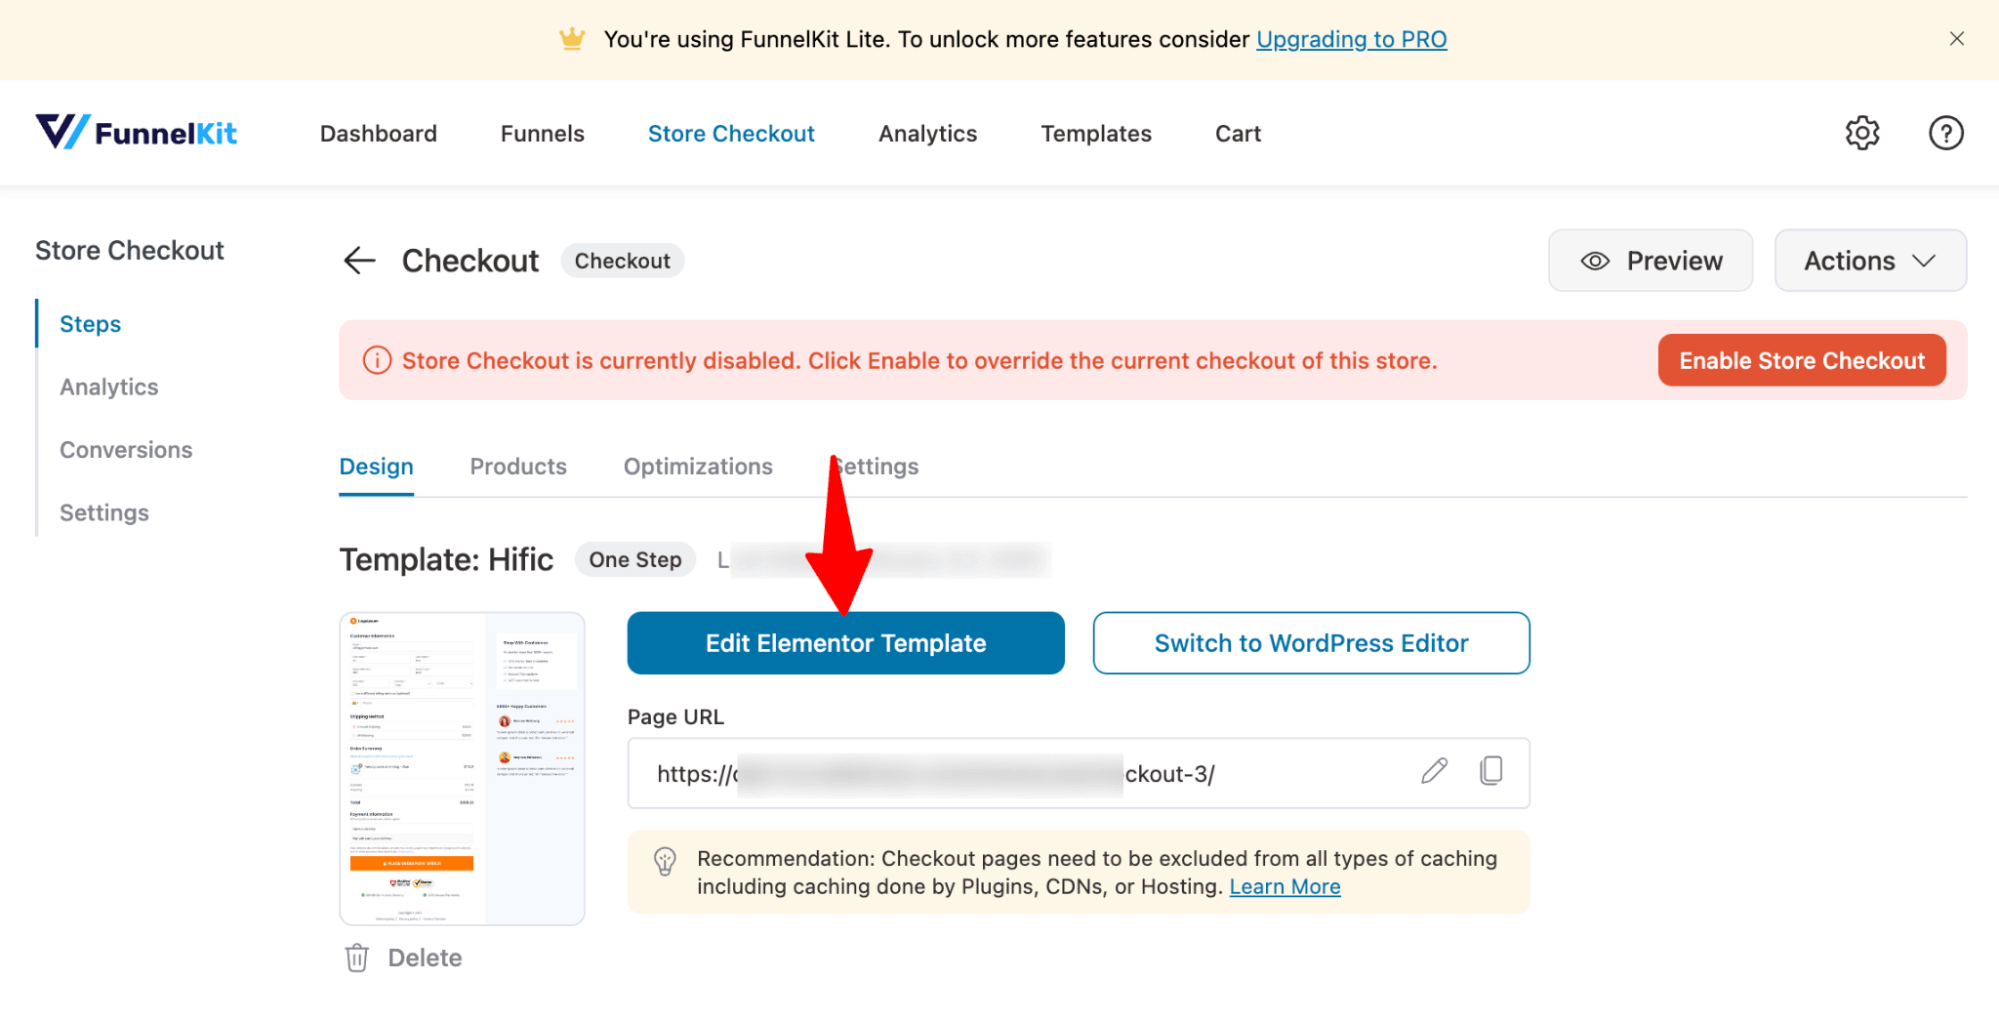
Step 2: Customize the order pay page
FunnelKit Funnel Builder doesn’t offer direct customization options for the order pay page.
However, the order pay page inherits the style and content of the checkout page. So, any customizations you make to the checkout page will automatically apply to the order pay page.
That’s why you need to customize the checkout page.
For this, click on the Edit option next to your checkout page to customize it.
Here, you can customize the design and content of the checkout page with the selected page builder. In our case, this is Elementor.
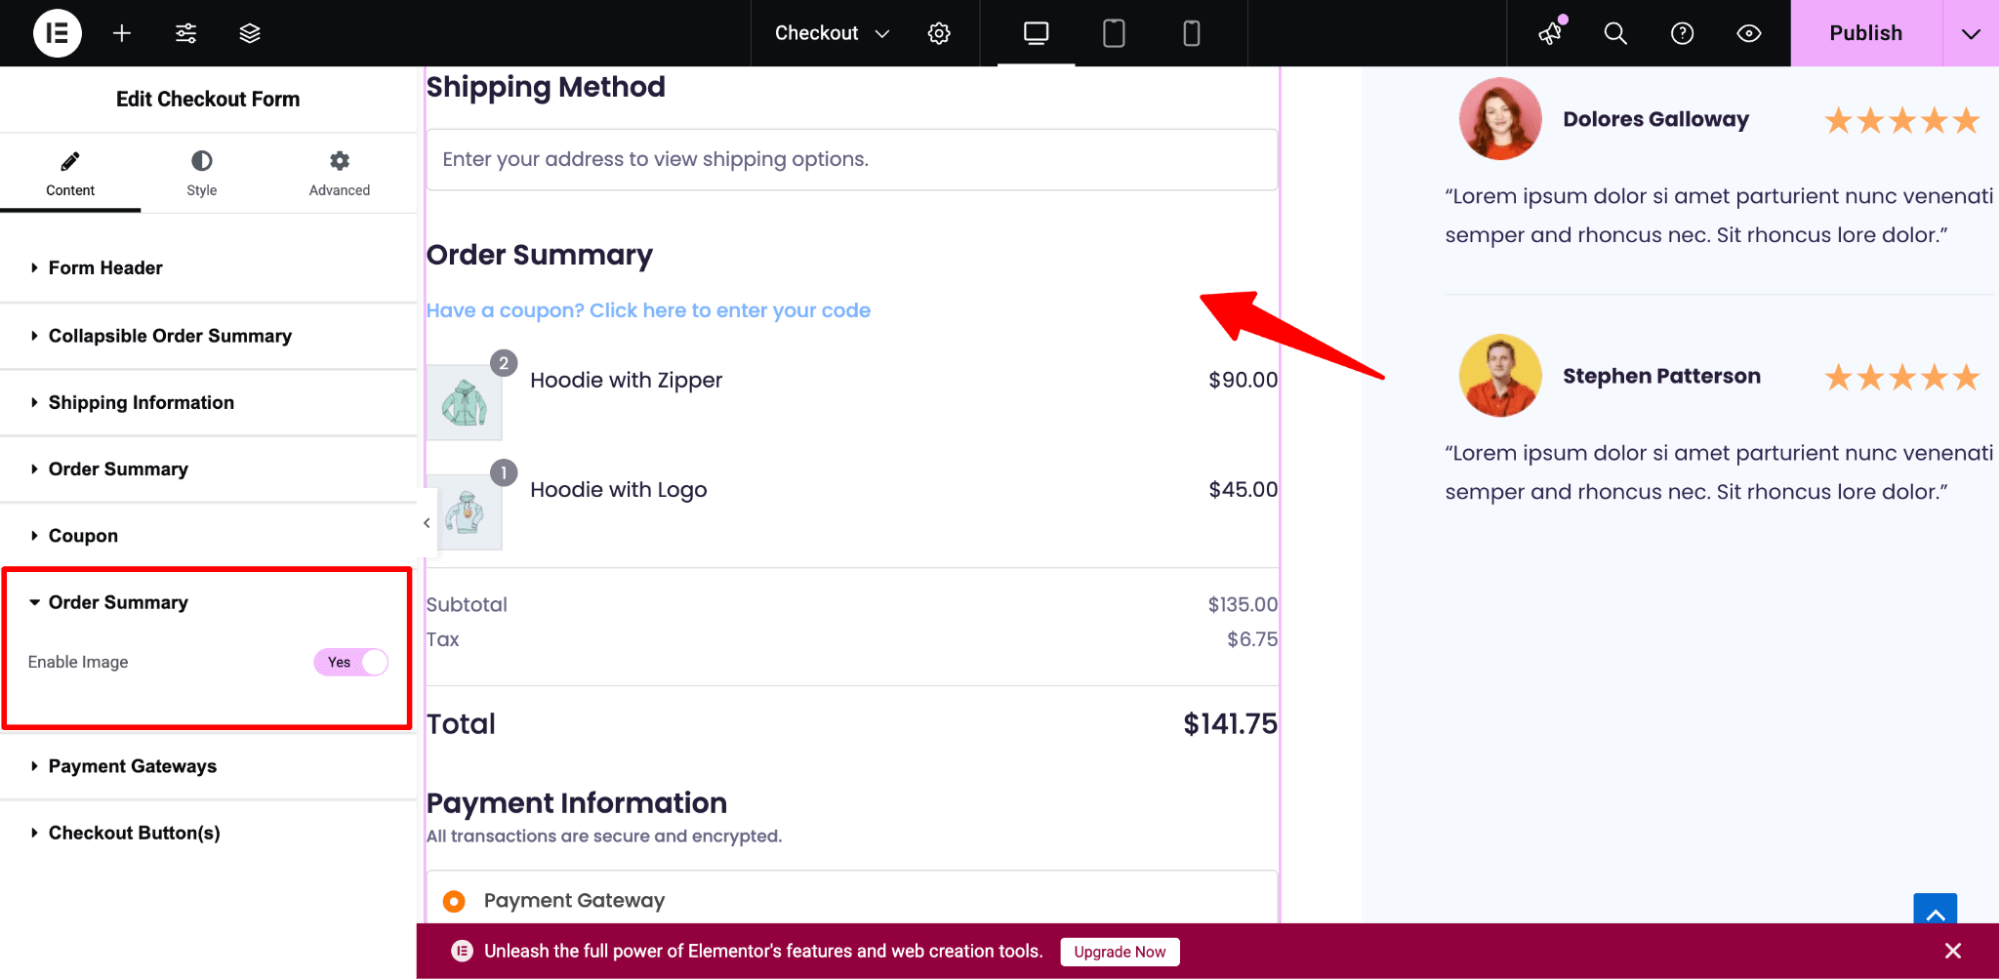
Since the order-pay page will have the order summary section, payment section, CTA, and other additional content, here we will show how to customize these sections.
For the order summary section, you can choose to enable or disable the product image.
For the payment section, you can set a custom heading and subheading.

Next, you can set your shipping policies.
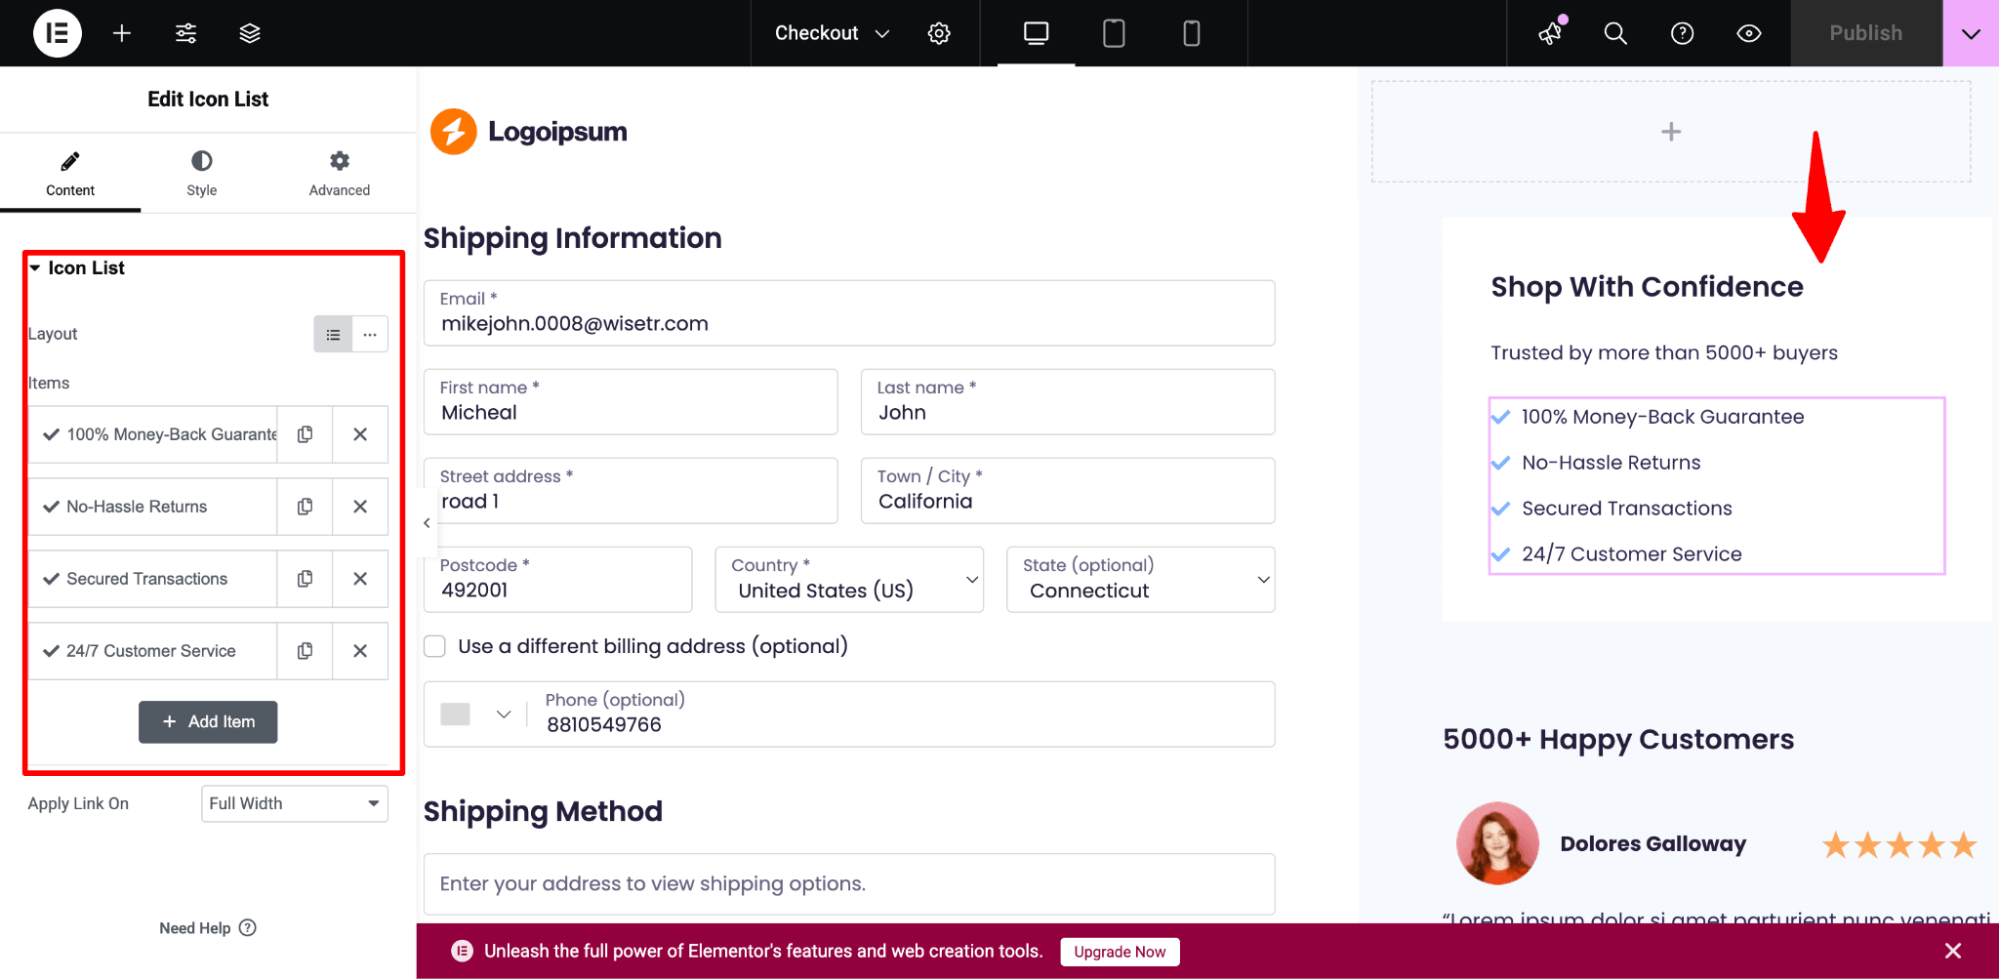
Customize it to add authentic reviews about your products.
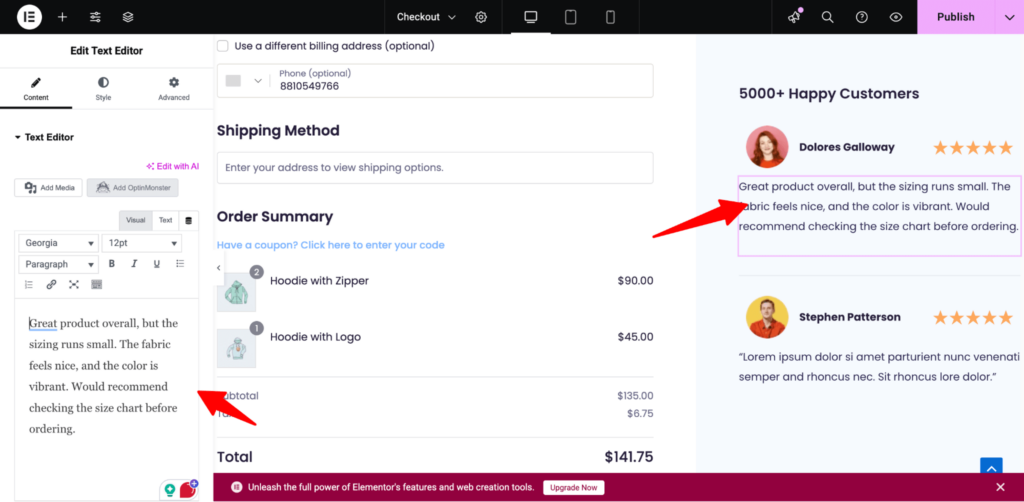
After making all the changes, hit ‘Publish’.
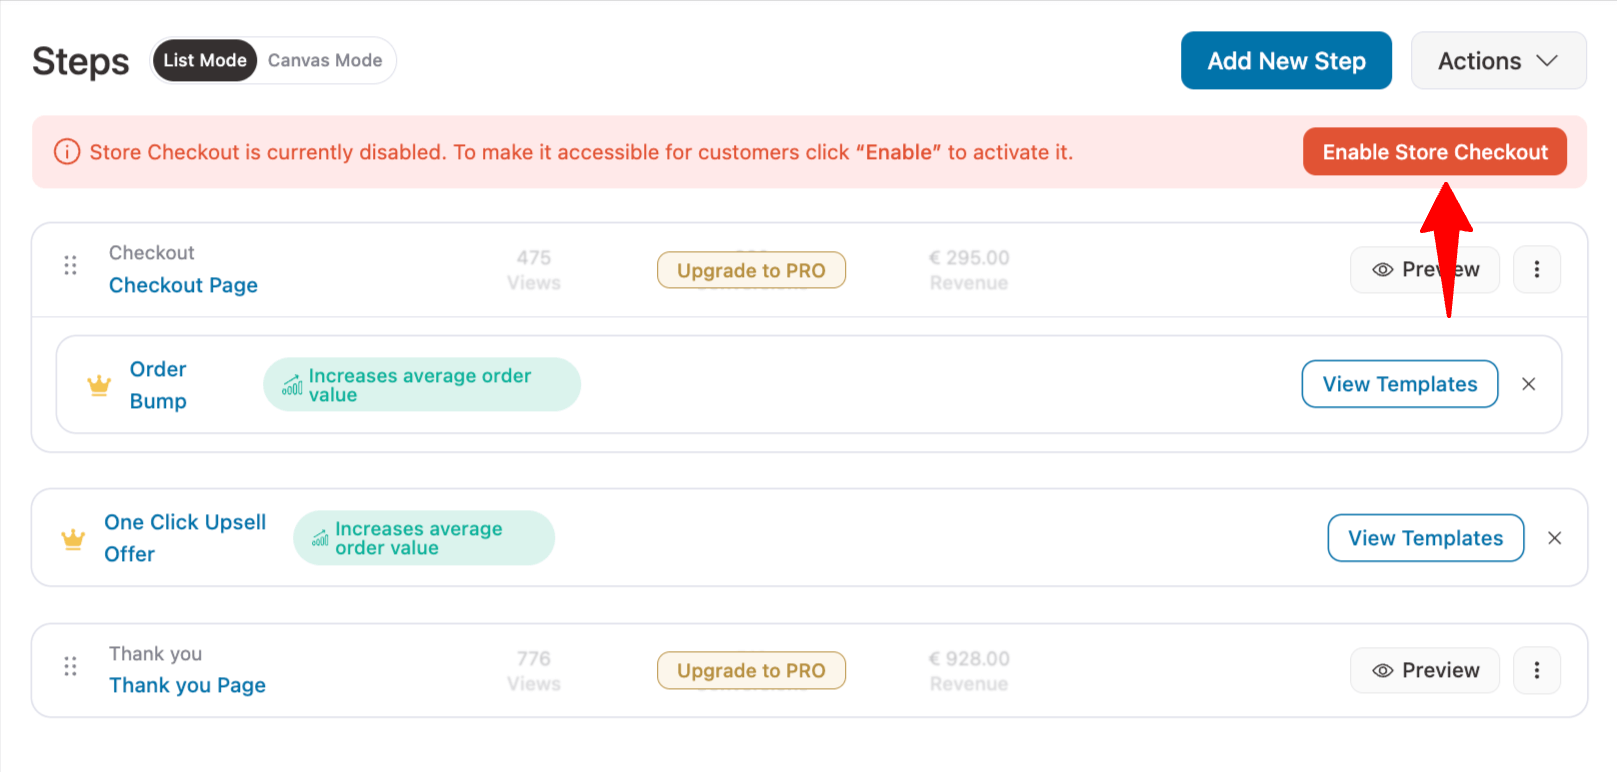
Step 3: Activate your store checkout
If you want, you can add order bumps on the checkout page. And, like the checkout page, you can also customize the upsell offer and thank-you page with FunnelKit’s Funnel Builder.
Finally, you need to activate the store checkout. For that, return to the sales funnel page and turn on the “Enable Store Checkout” button.
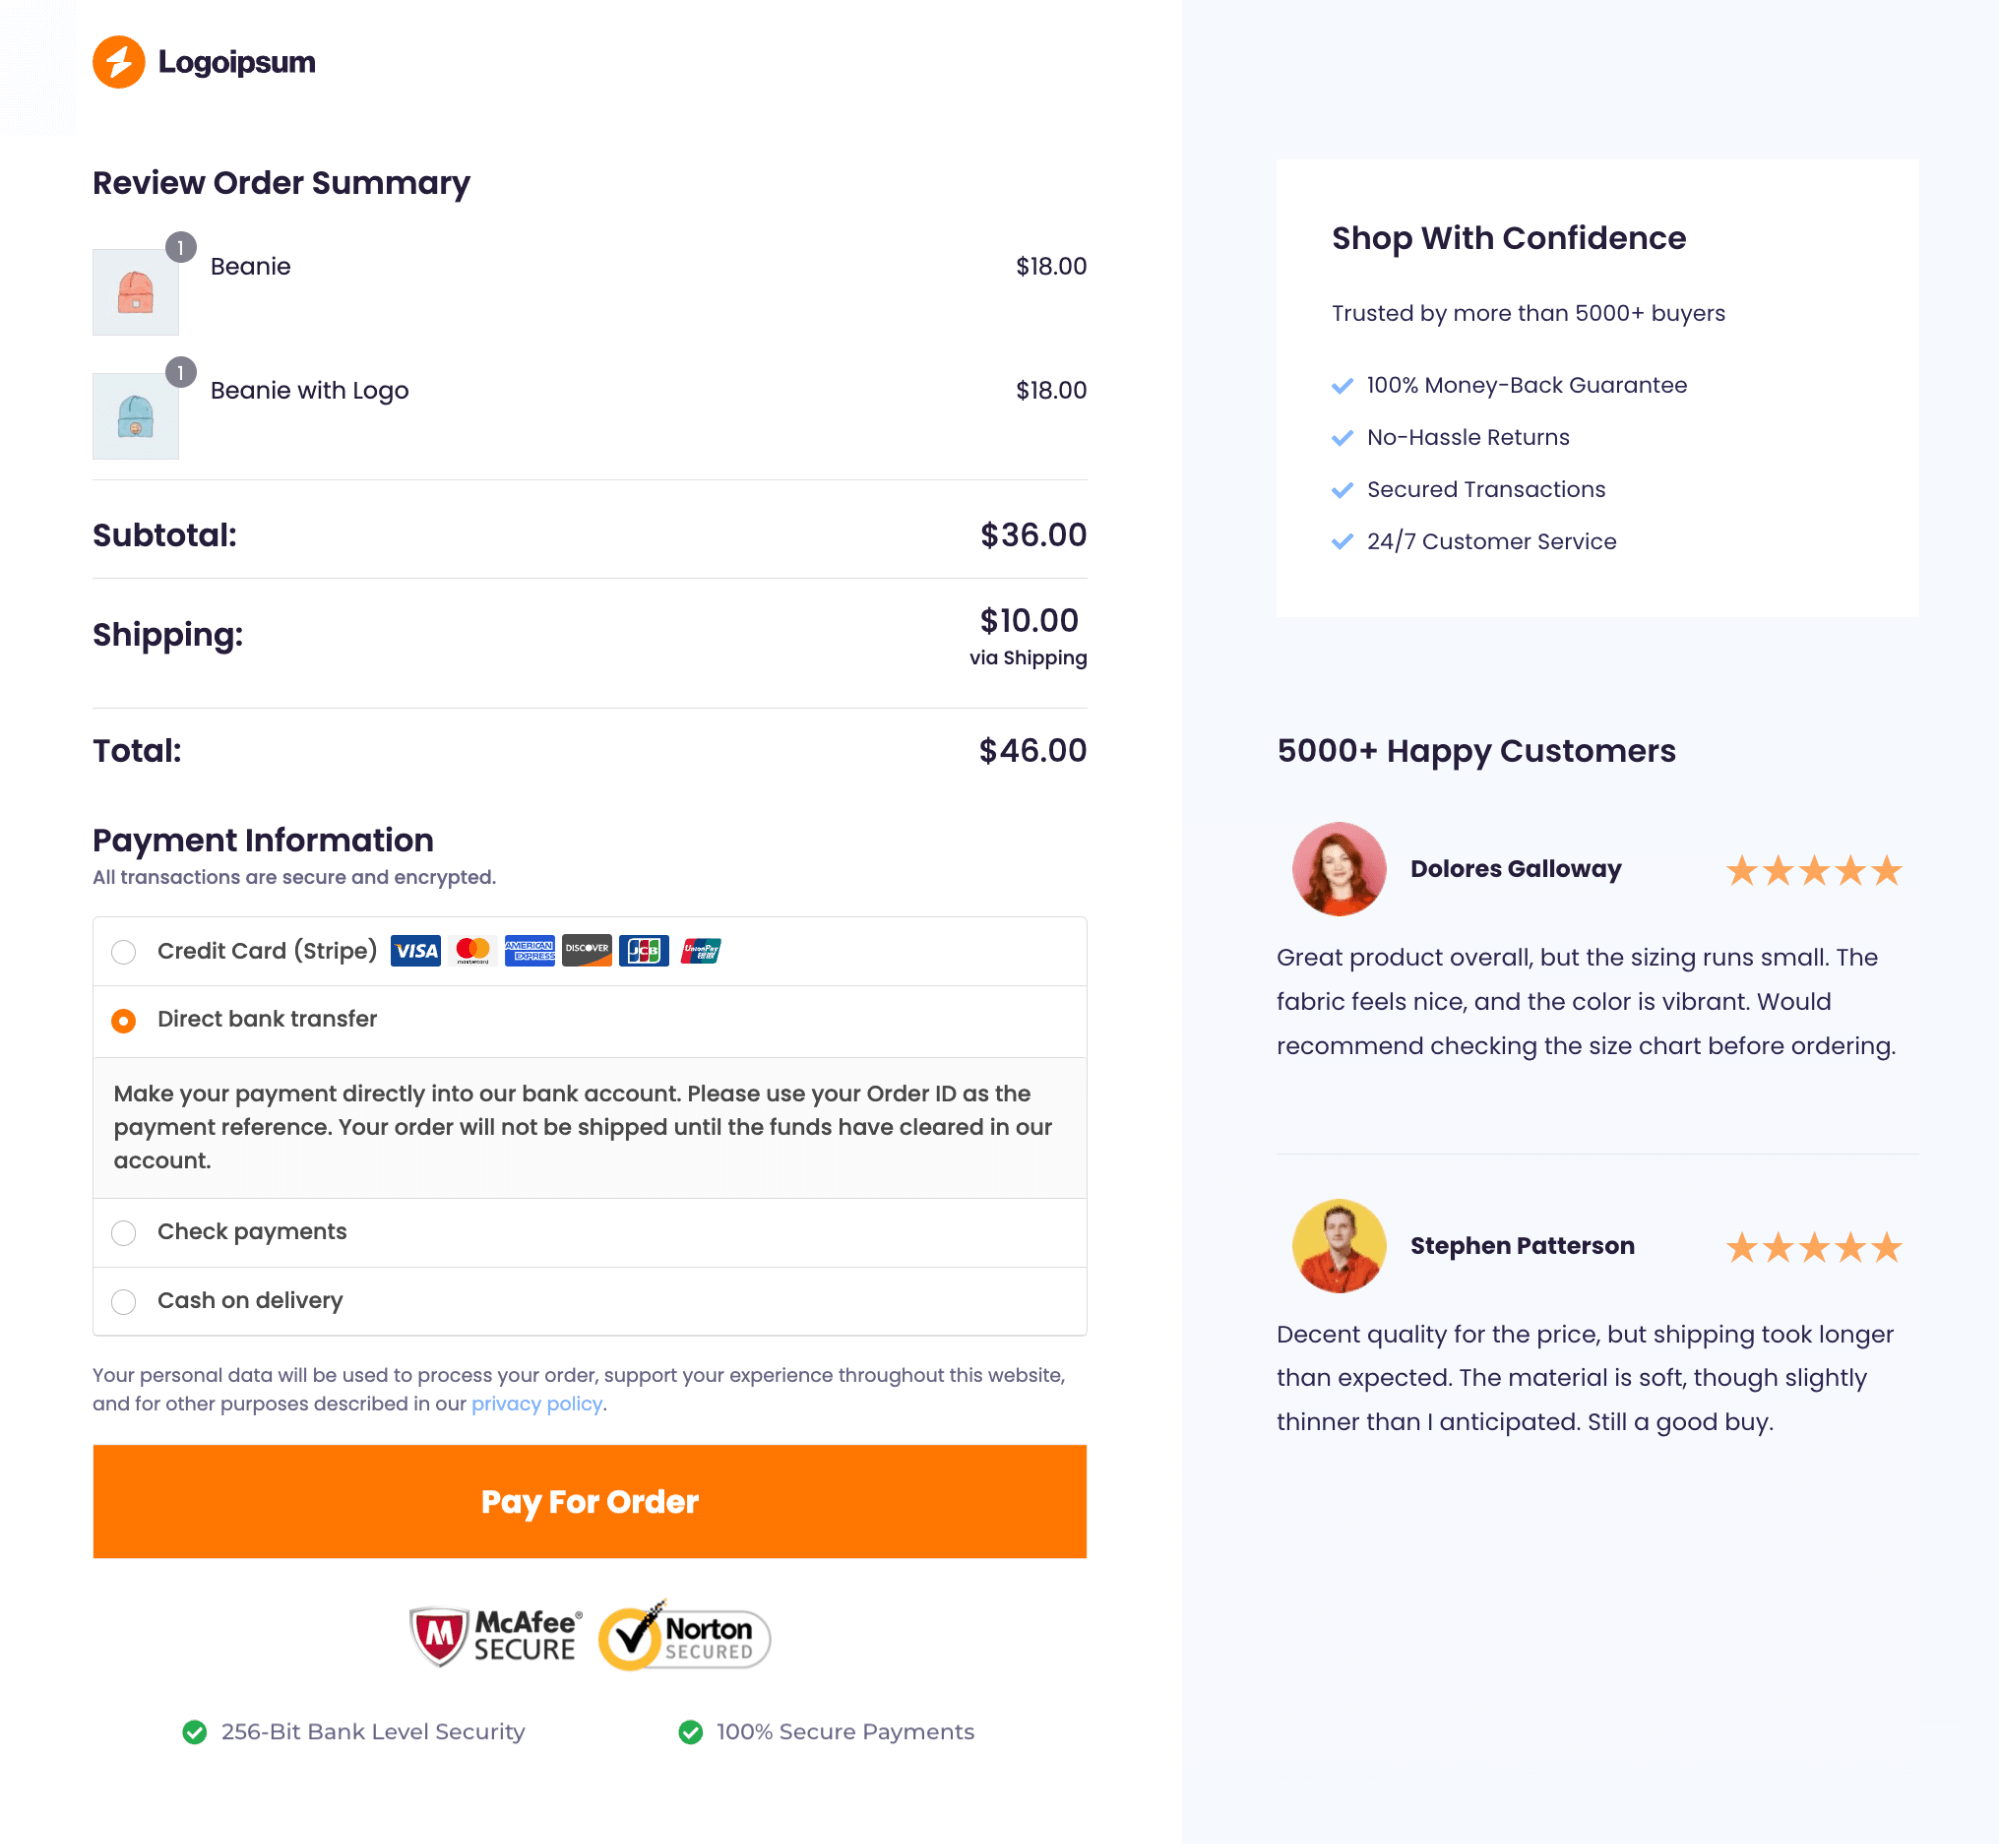
Here is what a custom order-pay page looks like:
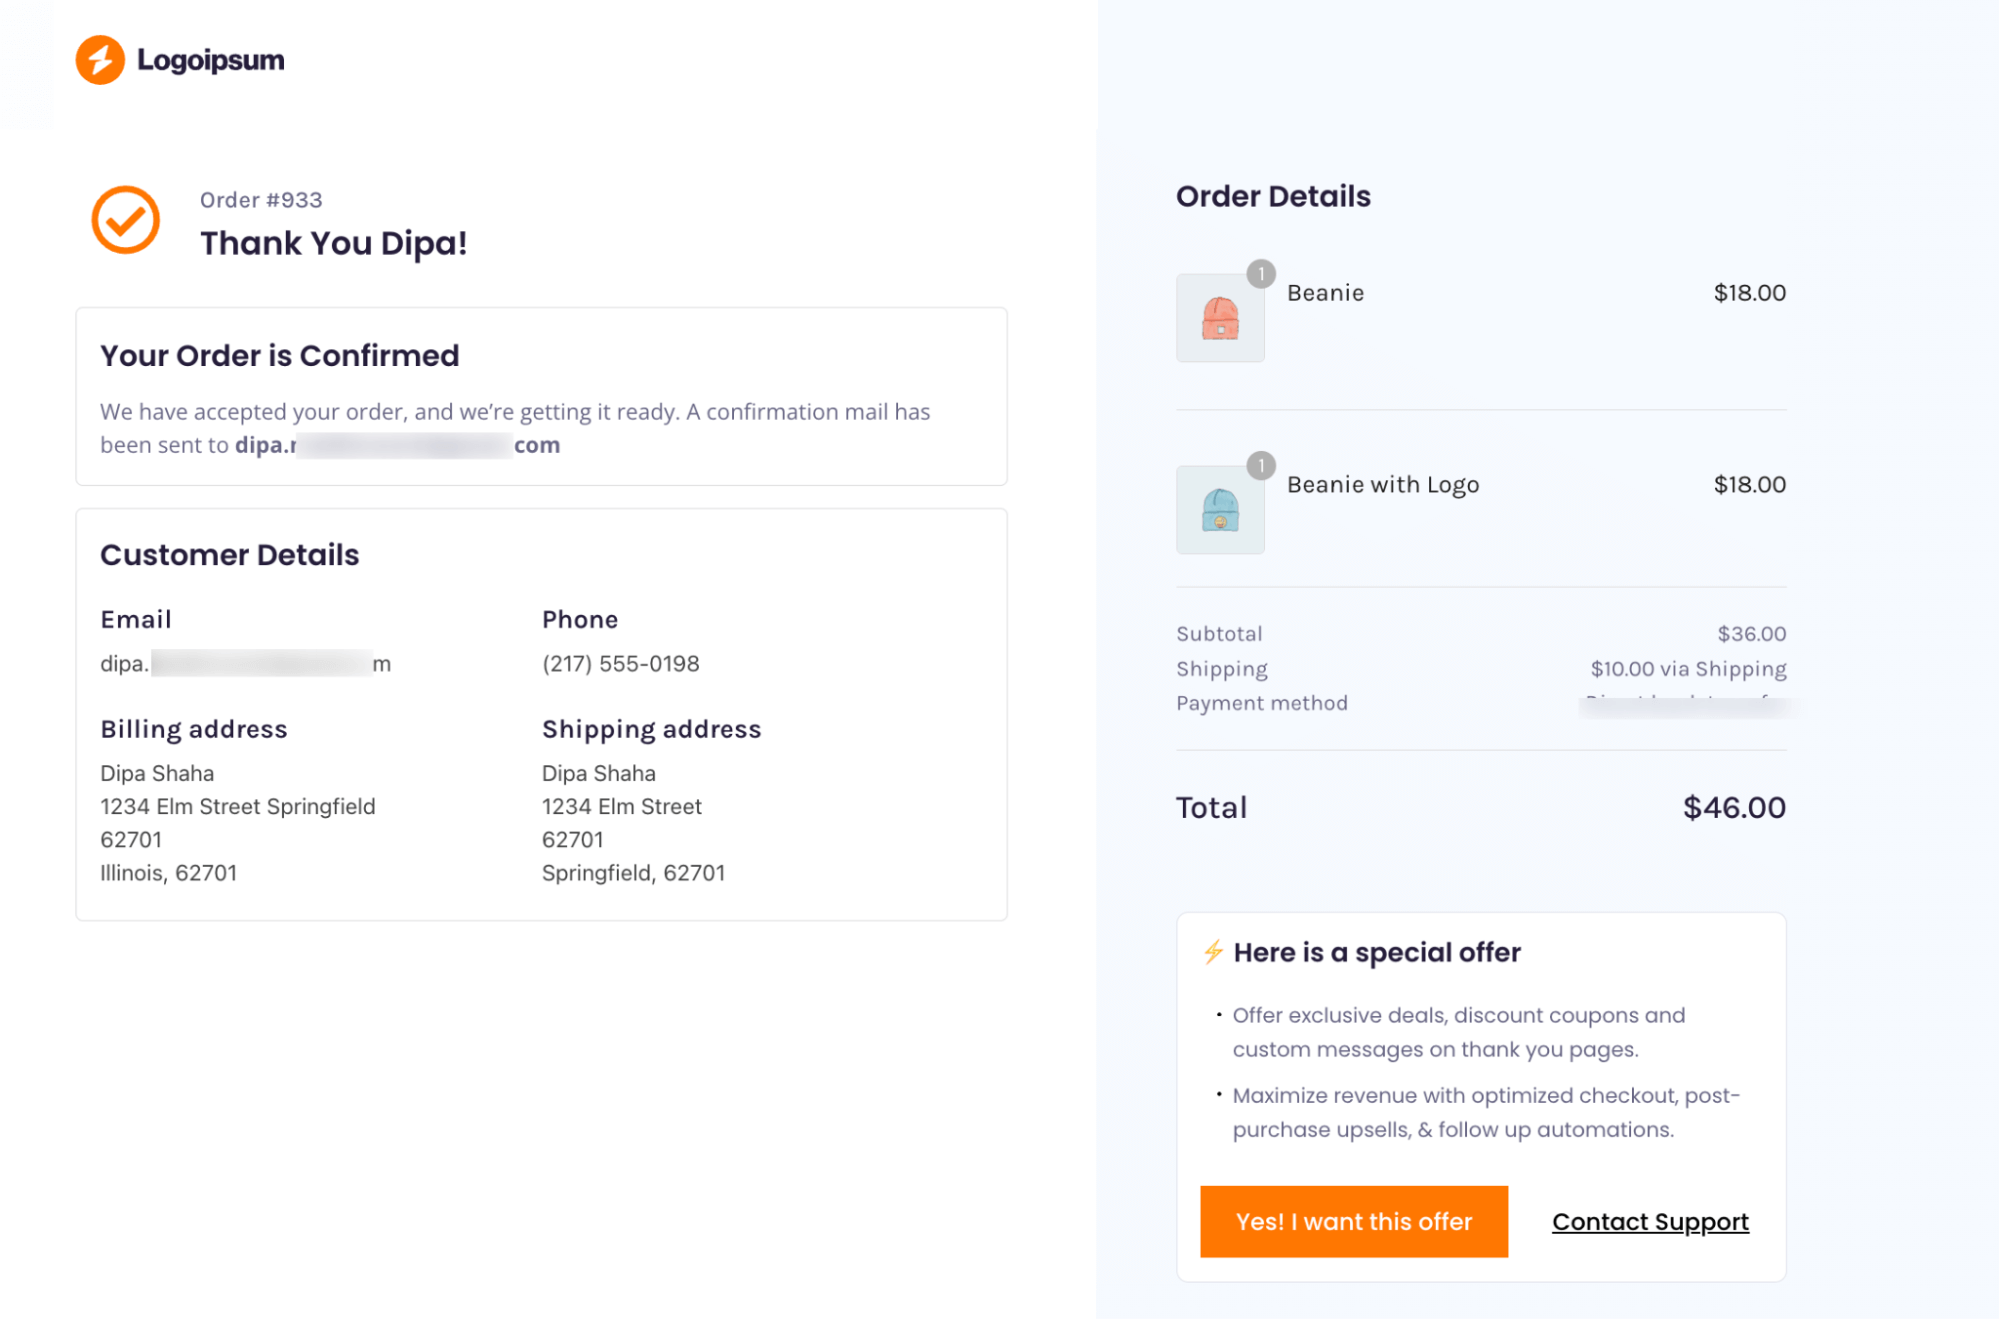
Once users complete the payment, they will be redirected to the custom thank you page.
How to Share the Order Pay Page Link to Increase Conversions?
As discussed earlier, there are two main scenarios where you need to share the order pay page link: Manual orders with a pending payment status and failed orders.
Now, let’s walk you through how to share the payable link with customers.
- For manual orders witha pending payment status
For this, under order details, choose the option “Send order details to customers” and hit Update.
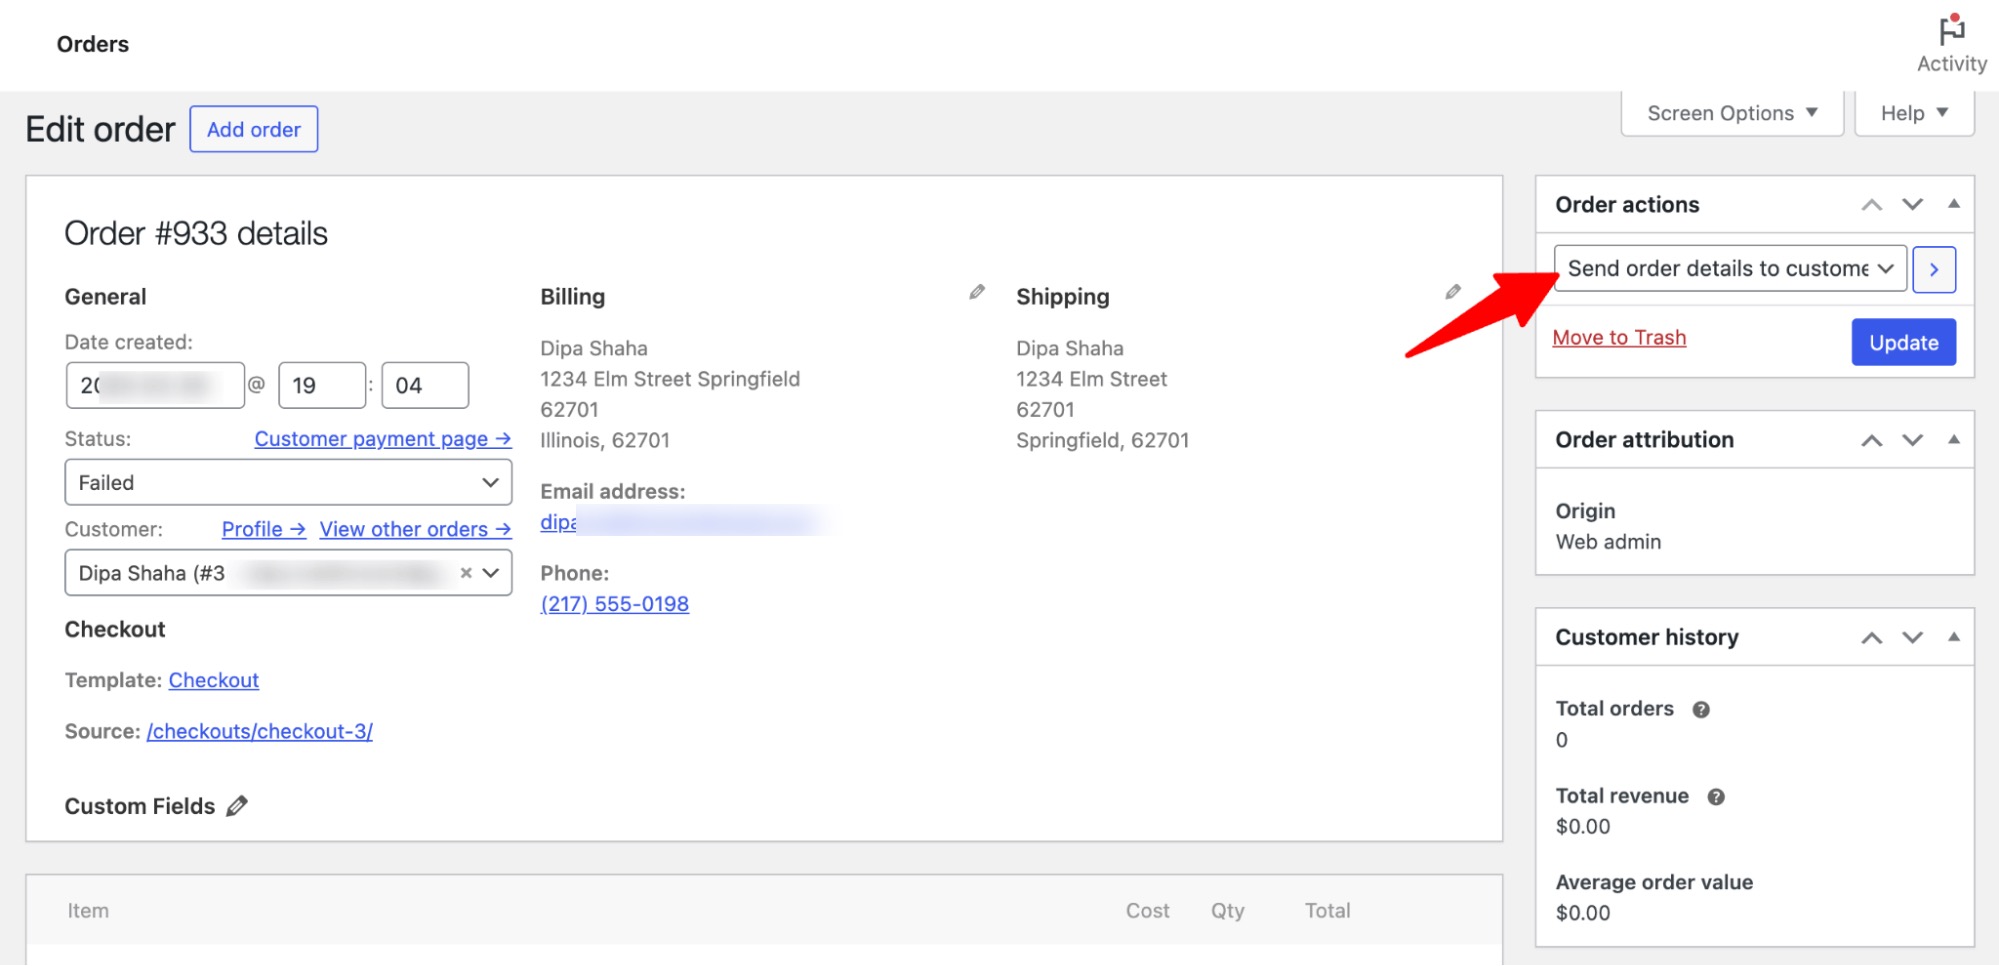
Now, your customer will receive a similar email to the one shared below:
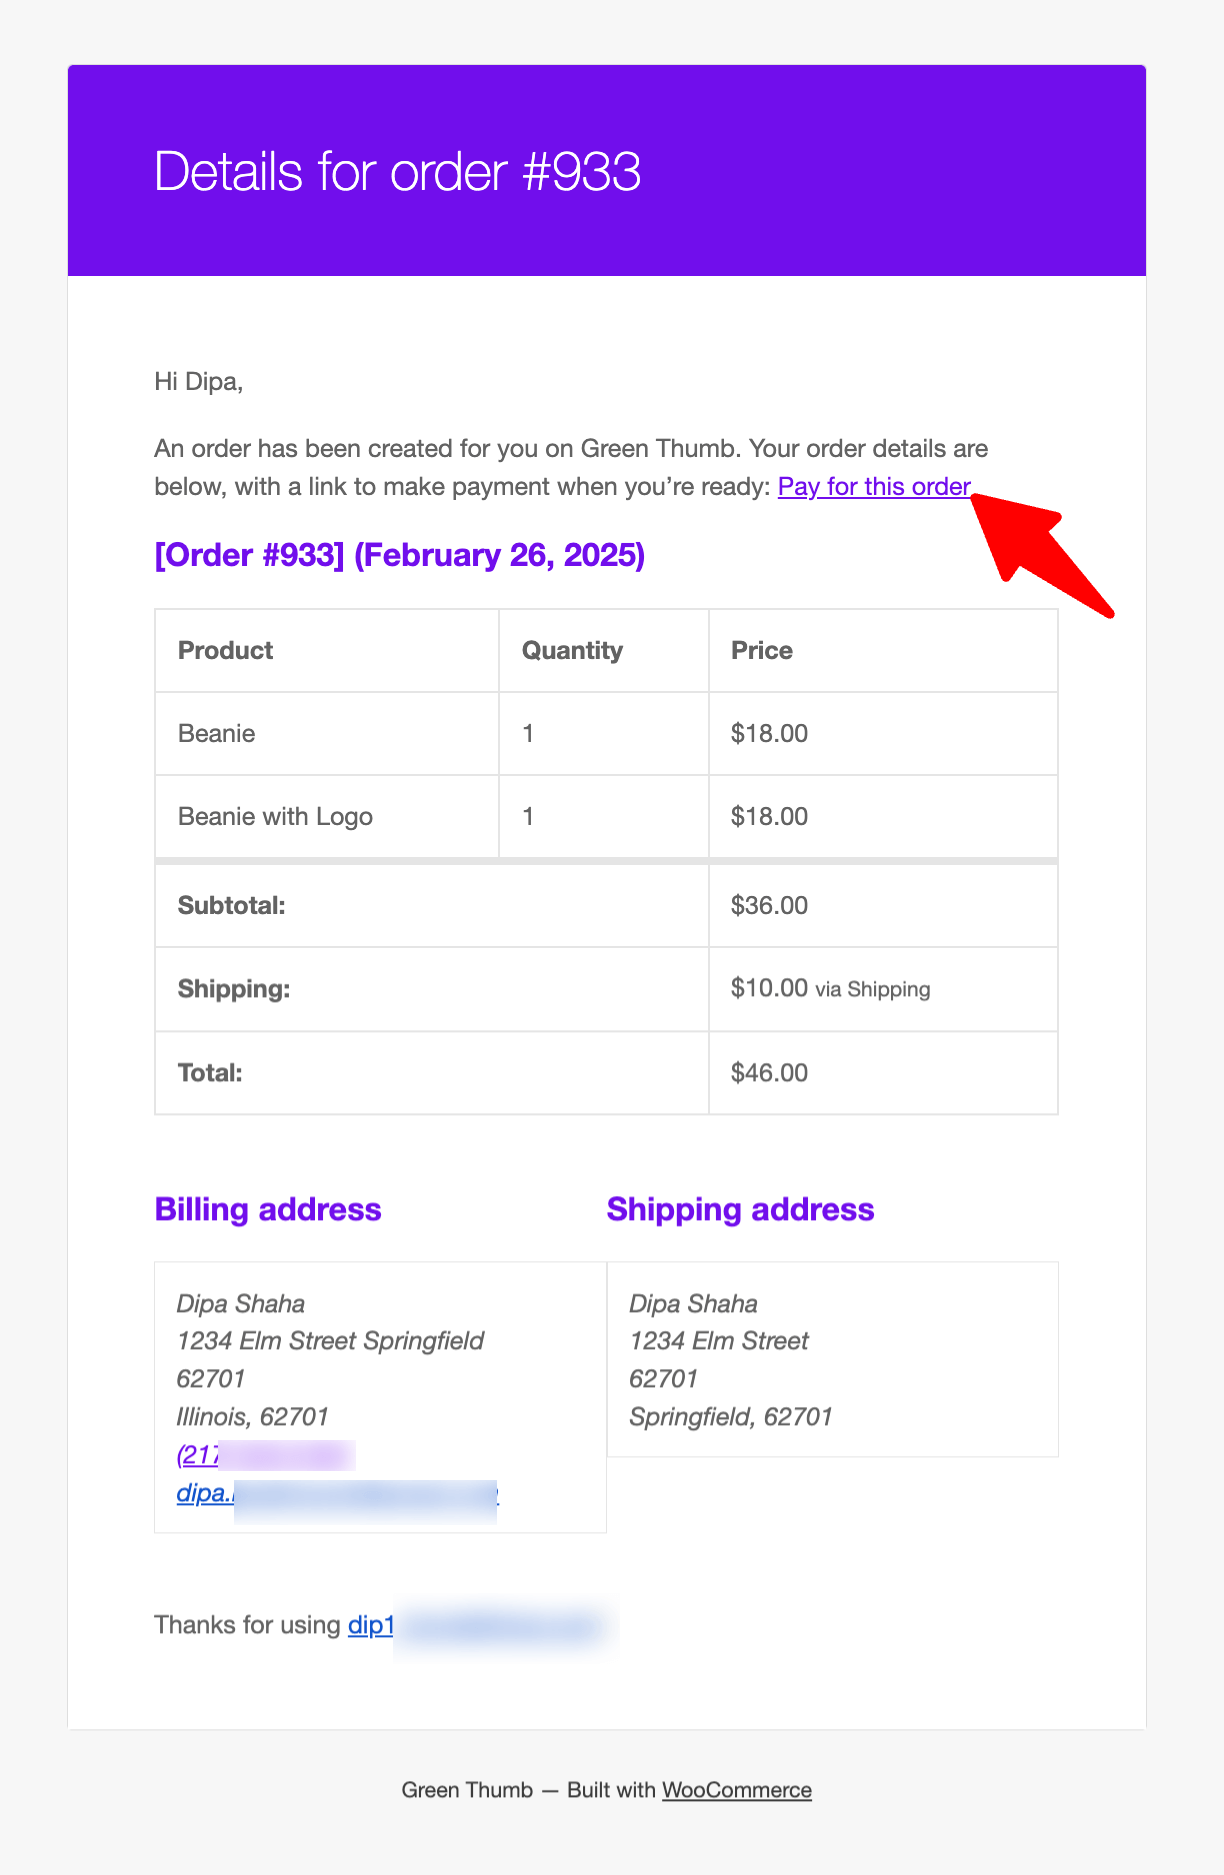
As you can see, the email isn't engaging, and the payment link is not appropriately presented to direct users, which can ruin the experience.
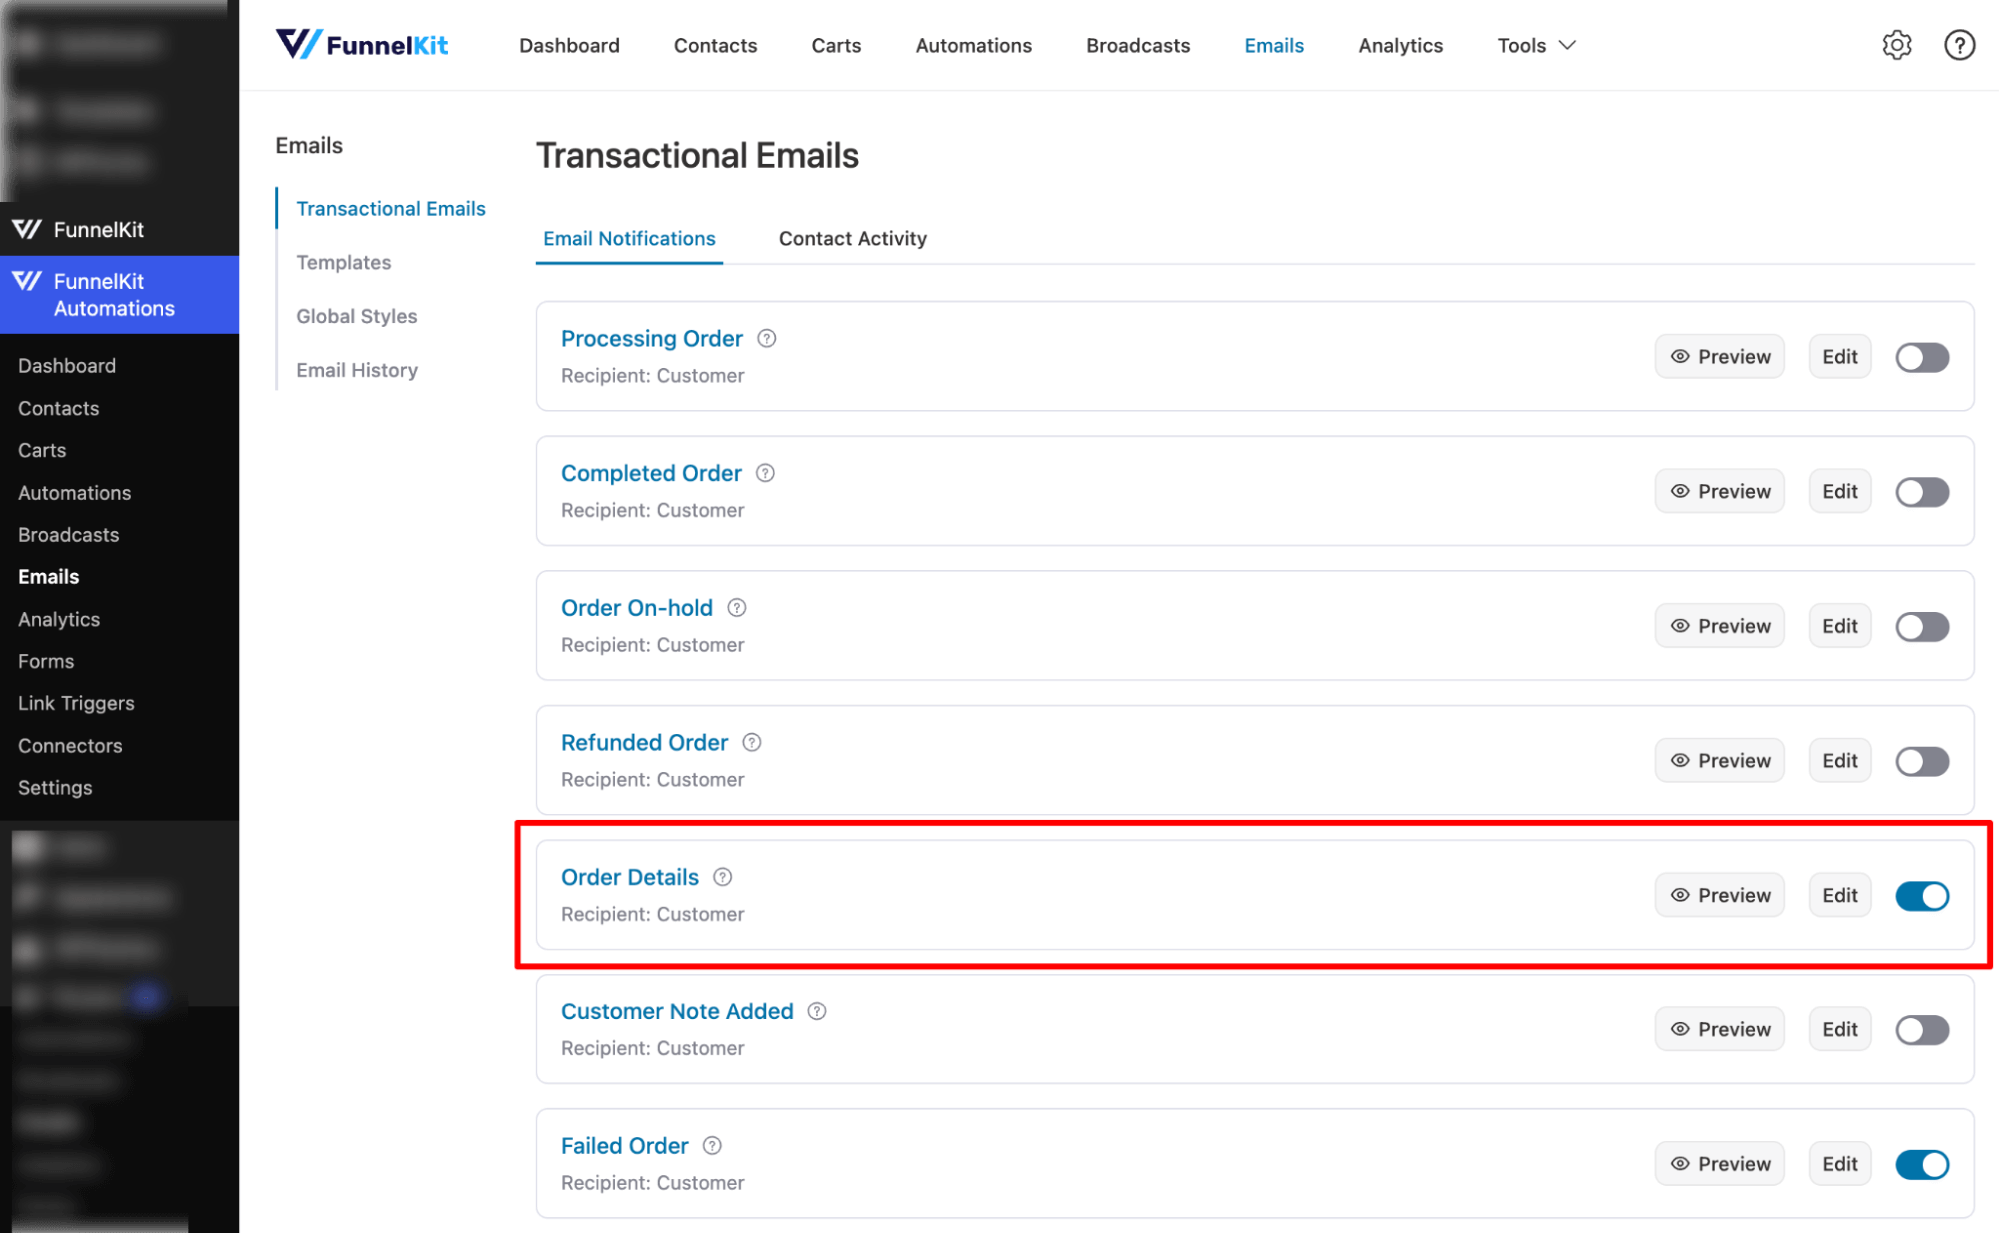
However, you can send users a custom email with a proper pay-now CTA using automation built with FunnelKit Automations.
You can use the Order Details email under transactional emails to send a custom email. When you turn this option on, hitting the “send order details to customers” option will send the custom email.
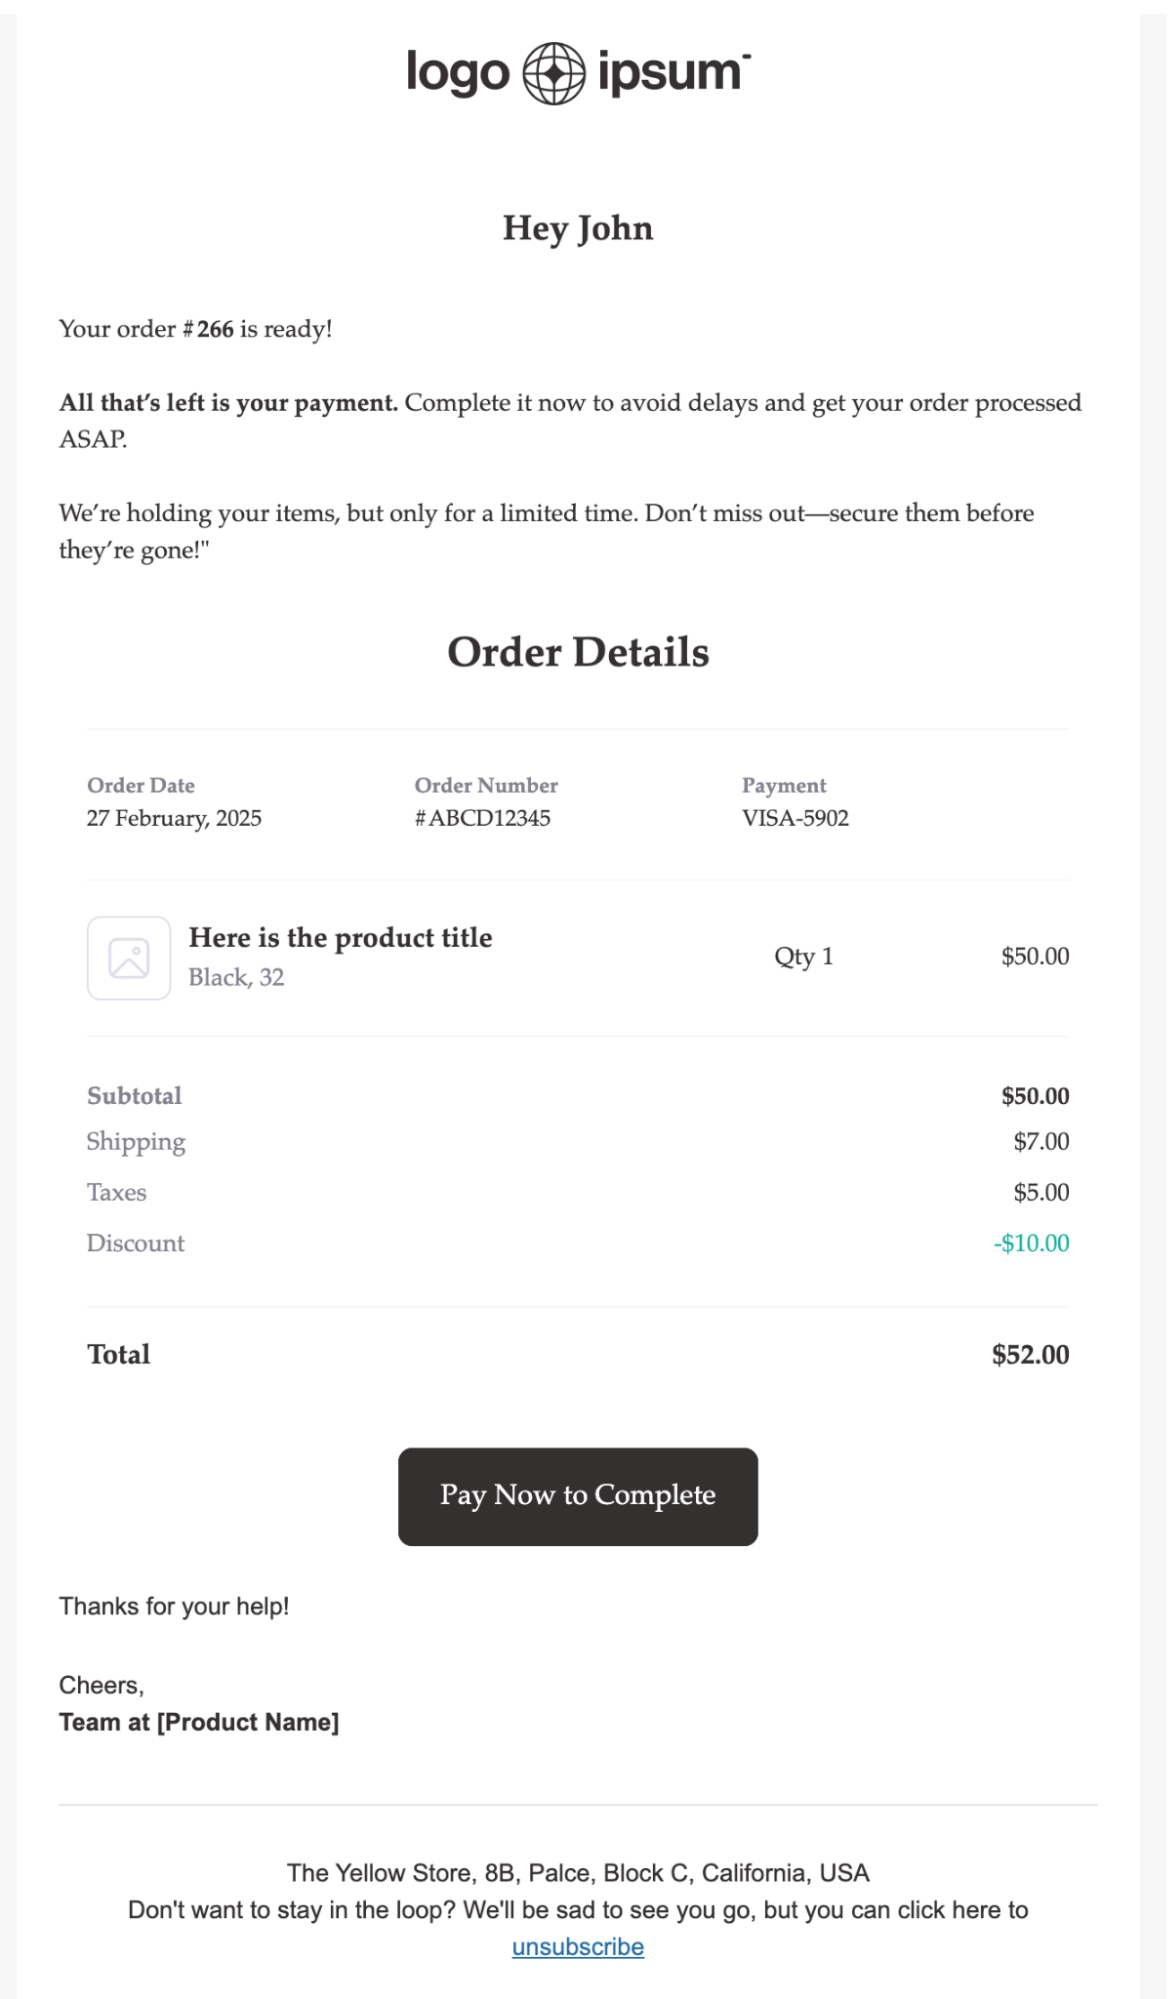
Let’s look at the email built using the advanced visual builder of FunnelKit Automations.
We’ve also used merge tags to add dynamic information like order id, customer information, order details, order number page link, etc.
- For failed orders
WooCommerce sends a notification email for a failed order, but it doesn't share the order-pay page link.
Here is the default failed order email:
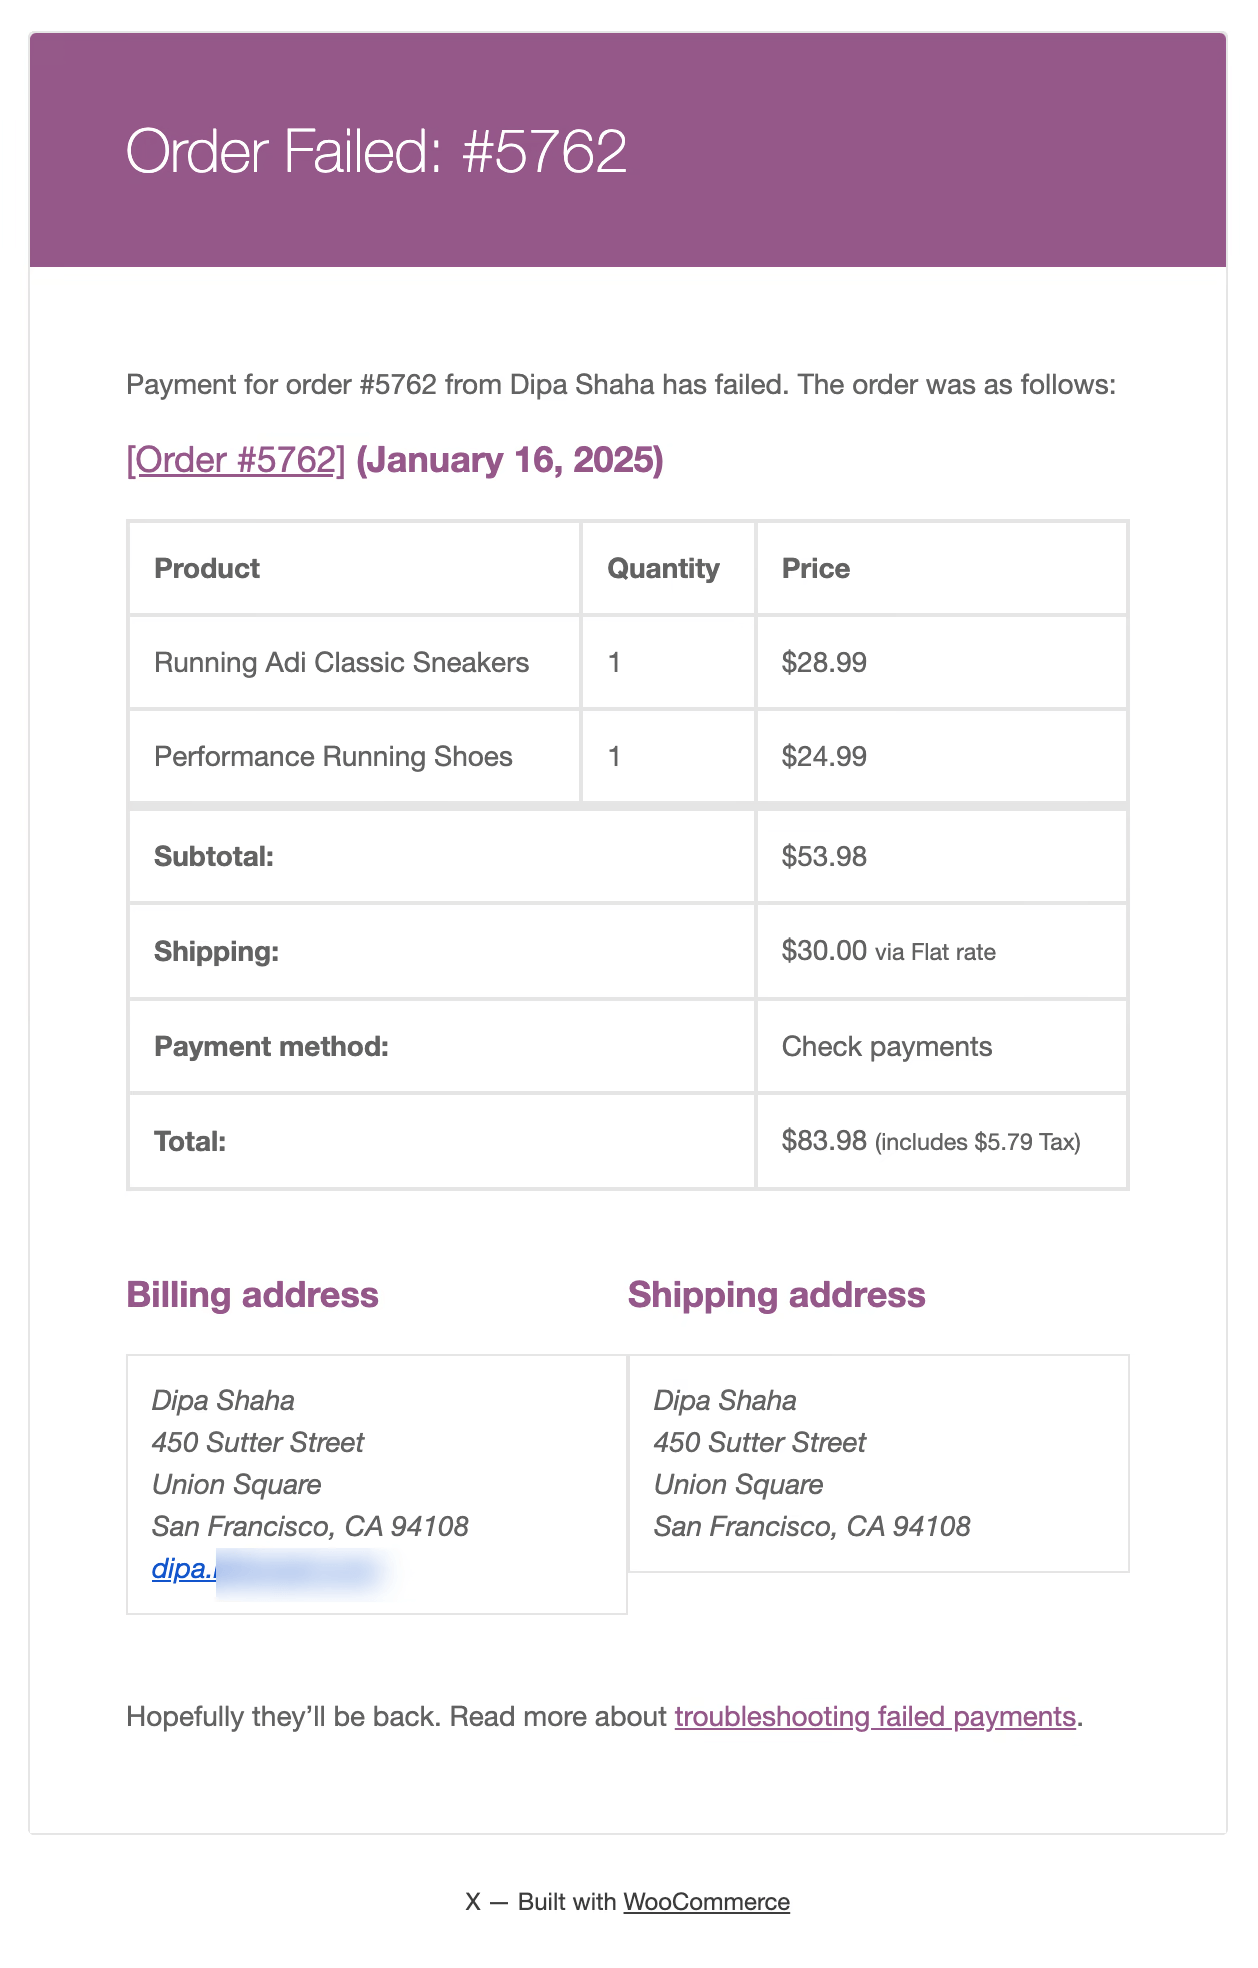
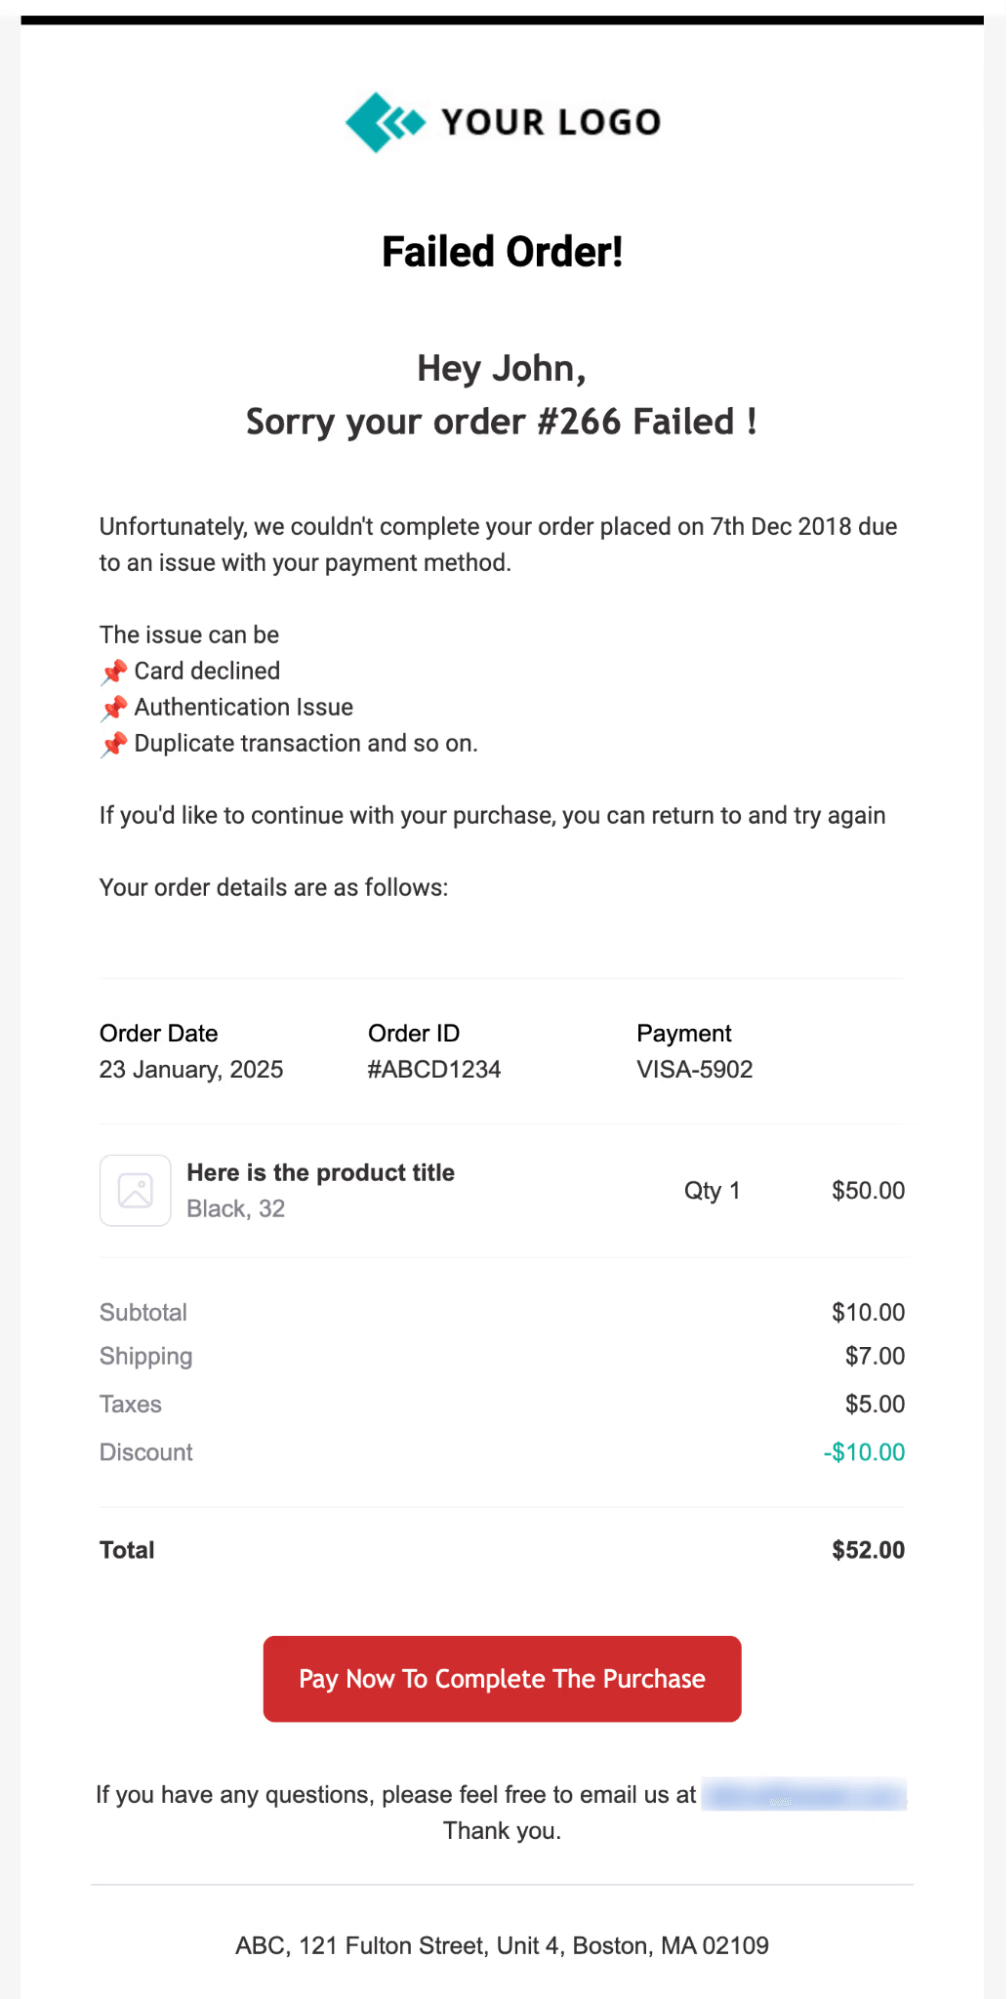
However, with a custom email, you can easily share the order pay page with customers so they can go to the page using a single click to complete payment.
Here is a custom failed order email with a CTA to the order-pay page using FunnelKit Automations.
You can set up and enable this email from the transactional emails section. For more details, check our blog on “failed order”.
More Questions About The Order Pay Page in WooCommerce
Have a look at some of the commonly asked questions with answers:
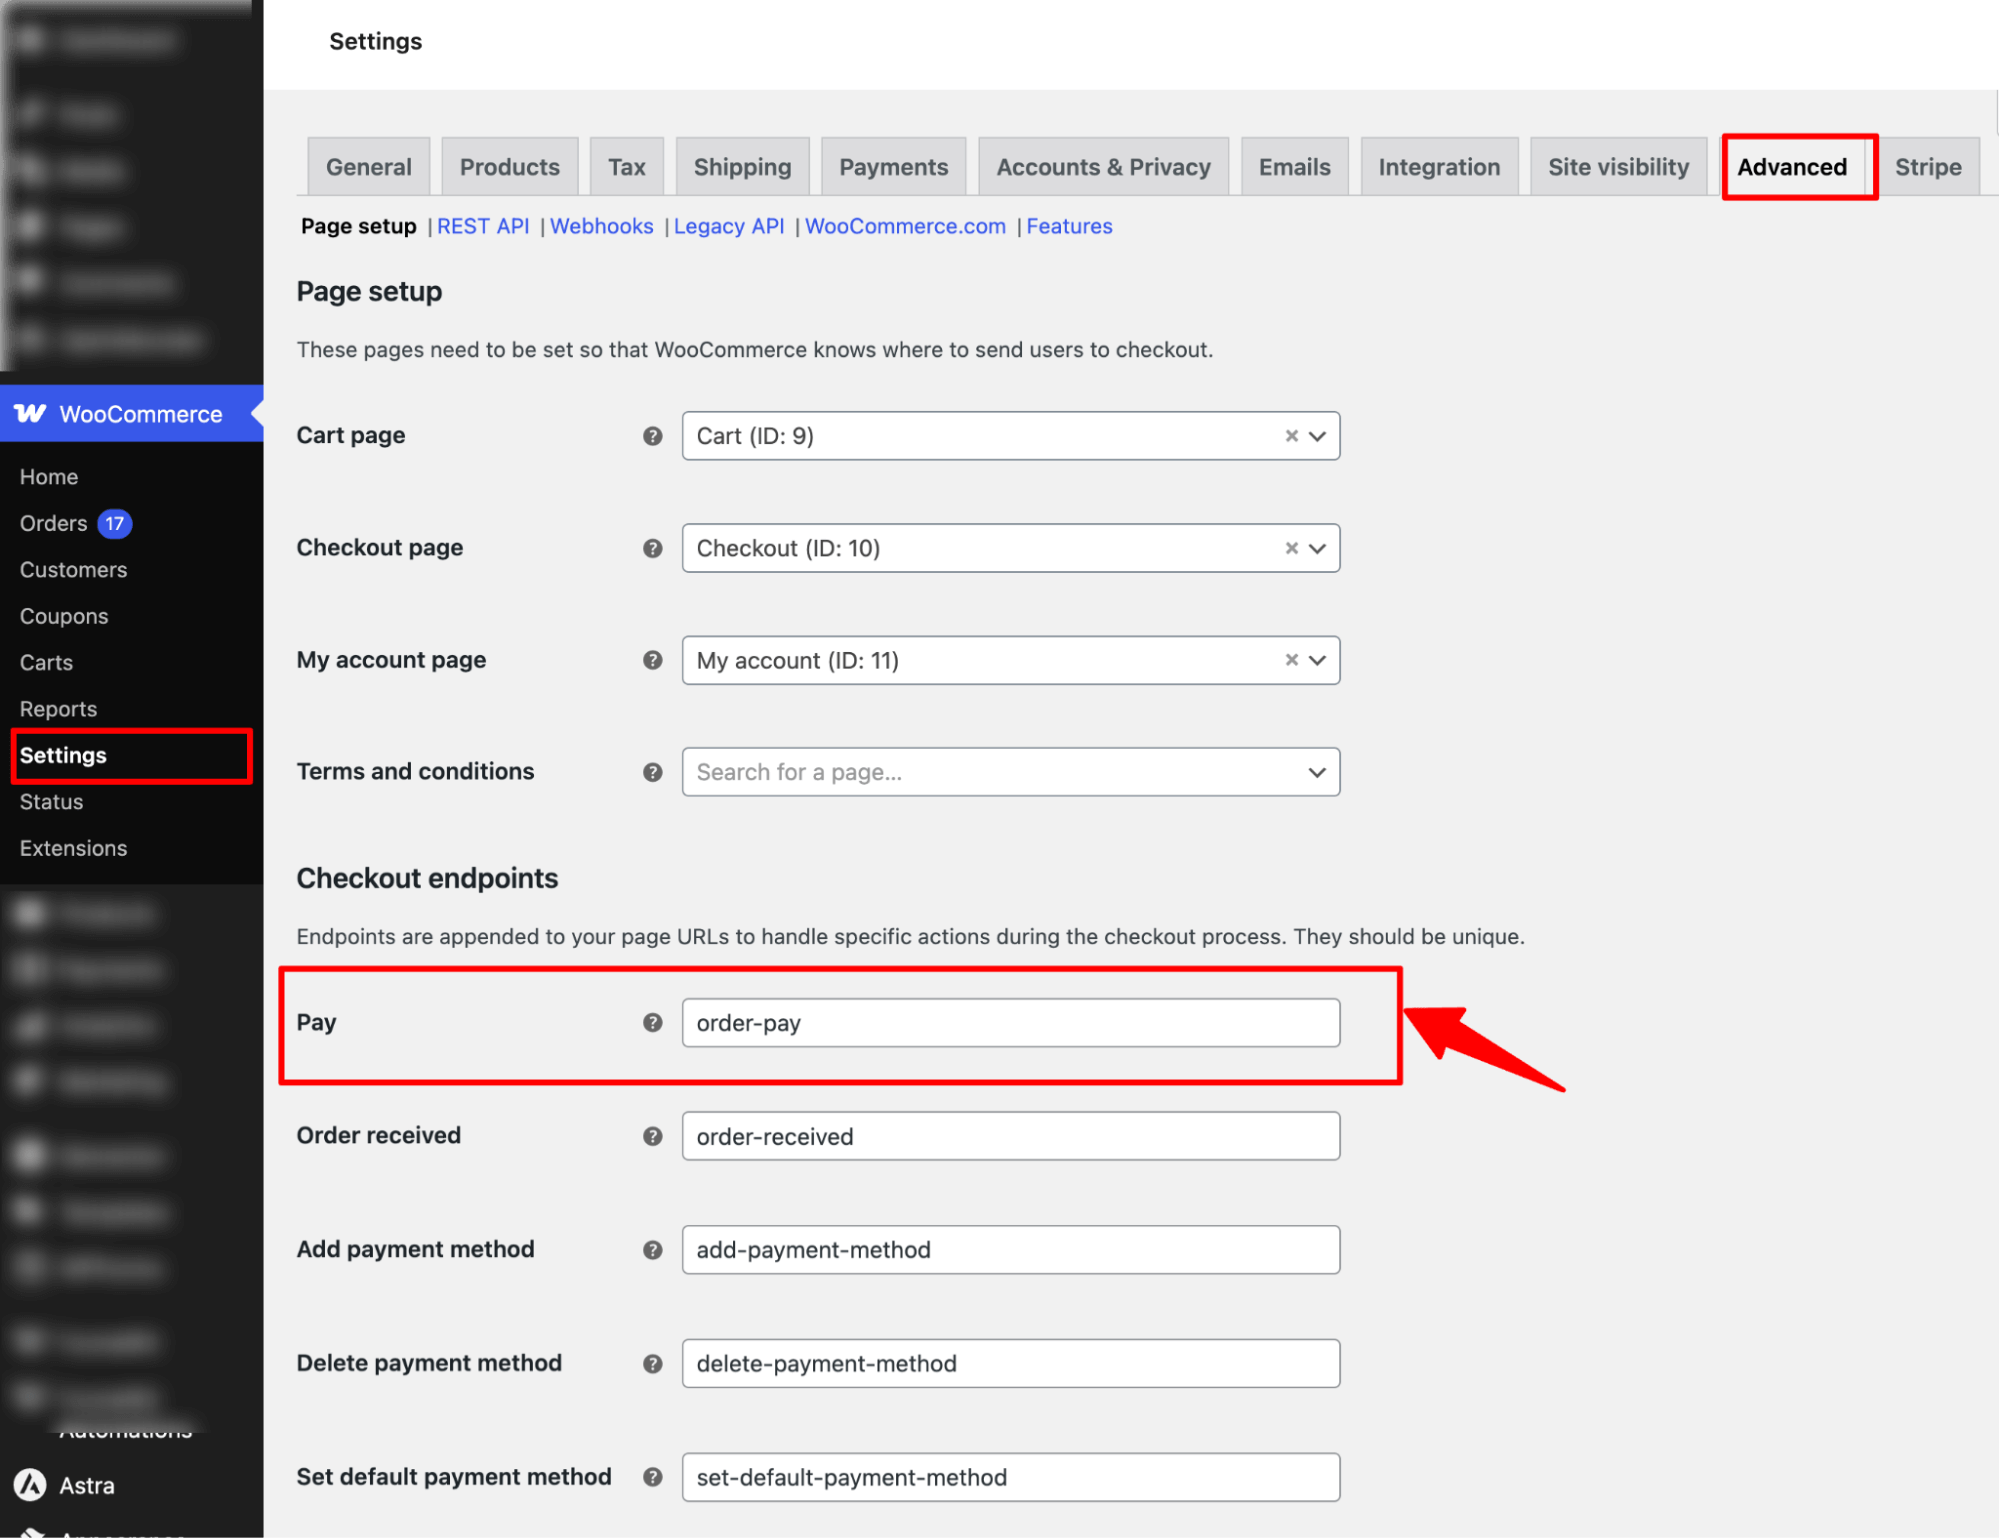
To find the endpoints, go to WooCommerce ⇒ Settings ⇒ Advanced and scroll down to checkout endpoints.
Usually, an order-pay page link in WooCommerce looks like this:
https://yourstore.com/checkout/order-pay/{ORDER_ID}/?key=wc_order_{UNIQUE_KEY}
Use the order-pay page when a customer's order is created, but payment is still pending. It's useful for:
- Manual orders created by admins
- Failed or abandoned payments that need completion
- Custom payment flows where customers pay later
Yes, you can customize the order pay page in WooCommerce. By using a plugin like FunnelKit Funnel Builder, you can match the page’s design with your store’s branding, including colors, fonts, and layout. This ensures a cohesive and professional payment experience for your customers.
If a customer doesn’t complete their payment via the order pay page link, the order status will remain as pending. You can send reminders or set up automated email notifications to encourage the customer to complete their payment.
Start Using a Custom WooCommerce Order Pay Page to Boost Conversions!
The default WooCommerce order pay page gets the job done, but a custom design can do so much more!
By adding trust signals, multiple payment methods, and customer reviews, you can eliminate hesitation and increase completed payments.
With FunnelKit Funnel Builder, you can create a well-optimized order pay page that gives customers the confidence they need to finish their purchase effortlessly.
But what if they don’t?
Many customers abandon payments simply because they lose the link or get distracted.
That’s where FunnelKit Automations comes in! With custom email reminders and a clear CTA, you can send the payment link at the perfect time, ensuring they take action without friction.
By combining a conversion-optimized order pay page with automated payment follow-ups, you recover lost sales and turn pending payments into completed ones.
So why wait? Get FunnelKit today and start maximizing your revenue!

Editorial Team
July 7, 2026Are shoppers adding products to their cart and leaving before they buy? According to Baymard Institute research on checkout usability, 18% of shoppers who abandon their cart do so because...
Editorial Team
July 7, 2026You’ve built your WooCommerce store, polished your product pages, and invested in marketing, but sales aren’t coming. Visitors browse, some add items to their cart, and most vanish before completing...
Editorial Team
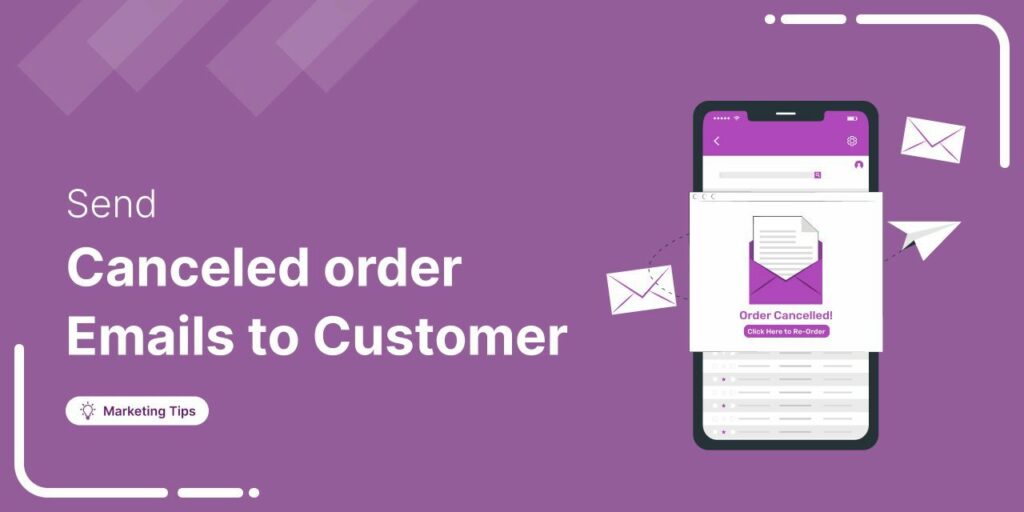
July 3, 2026Discover how a canceled order doesn't have to mean a lost customer, and how the right WooCommerce canceled order email can turn it into a second chance. WooCommerce canceled order...


