Among all the funnels a marketer can create, challenge funnels are fun and the fastest at converting visitors into buyers.
Unlike a standard lead magnet that users download and forget, a challenge demands active participation, turning a cold lead into a raving fan in a short time.
As a marketer, I’ve helped thousands of WordPress users build high-converting sales paths. I’ve seen firsthand that the "Challenge" model is a psychological ecosystem that primes your audience to buy.
It starts with enrolling people in a challenge that they’re collectively passionate about and ends with achieving their goals.
For a marketer or business owner looking to step up their store’s sales, there is nothing better than challenge funnels.
In this guide, I will move beyond the basics and show you exactly how to structure a challenge, the psychology behind why it works, and the specific technical setup you need to launch this on WordPress without writing a single line of code.
Table of Contents
- 1 What is a Challenge Funnel?
- 2 5 Key Elements to Building a Successful Challenge Funnel
- 3 How to Create a Challenge Funnel that Converts? (Step-by-Step Process)
- 4 Use Lead Nurturing and Cart Abandonment Marketing Automations to Increase Sales
- 5 Frequently Asked Questions (FAQs) Related to Challenge Funnels
- 6 Can you give me some challenge funnel examples?
- 7 How should I decide the challenge duration of my challenge funnel?
- 8 How can I enhance my revenue if the users reject my offers?
- 9 Do I need to do the challenge live every time?
- 10 Should my challenge be free or paid?
- 11 How do I deliver the daily challenge videos?
- 12 Are You Ready to Set Up a High-Converting Challenge Funnel?
What is a Challenge Funnel?
A challenge funnel is a time-bound learning journey that guarantees favorable results. For example, lose 5 kgs of weight in 14 days or write your first book draft in 7 days.
The challenge has a specific goal that encourages users to subscribe to your mailing list.
The funnel starts with a challenge: offering a freebie to visitors in exchange for their email address.
This challenge page briefly describes the challenge, the solution to your problem, and the free product that will help you overcome it.
For example, a PDF that daily guides users to improve their content writing skills for 21 days.
Once users sign up, they are automatically redirected to a sales or checkout page for your premium product.
Here’s an overview of the complete challenge funnel:
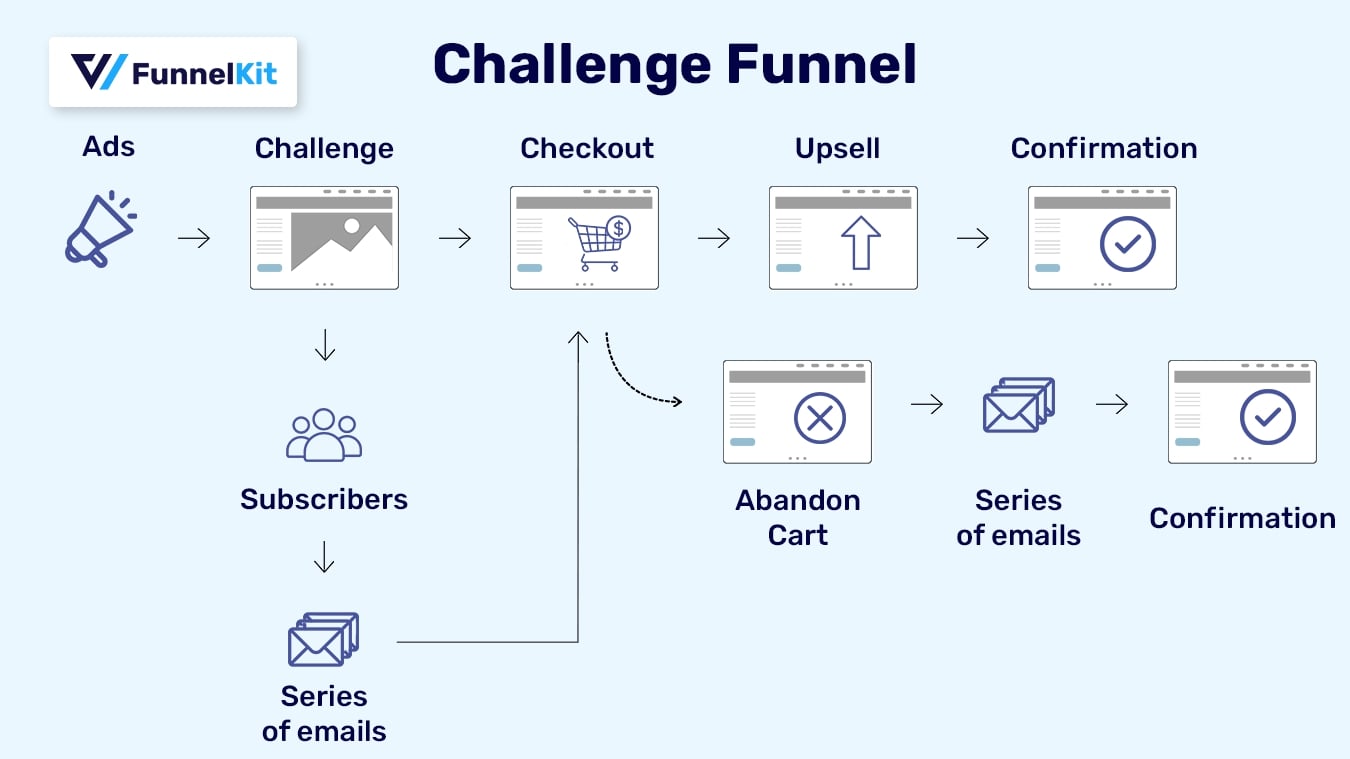
If a user doesn’t buy your paid offer, that’s okay! You can use emails to nurture them about your paid product and close the sale.
This way, your challenge funnel closes to generate leads and revenue simultaneously.
Benefits of Using a Challenge Funnel
Here are the benefits of incorporating challenge funnels into your business:
- Inspire your clients and transform their lives: If you run a health and wellness store or sell educational services, a challenge funnel can help your clients achieve their life-changing goals. It could be about losing weight, creating engaging videos for their YouTube channel, etc.
- Boost your sales conversions: Challenge funnels are a brilliant way to build credibility. You help users to achieve their goals, which in turn gets their trust. It further helps to build anticipation for your future challenges or products and converts them into paying customers.
- Create content to engage your users: Building challenges is an engaging way to interact with your audience. It helps your users learn about new, unique ways to achieve their goals every day. You can use quizzes, polls, videos, and more to engage your subscribers.
- Get qualified leads for your brand: If you’re focused on bringing in new, high-qualified leads and don’t know where to start, challenge funnels can be your lucky start.
- Jump on the new social media trend: These challenges are quite trending online. If you want to try a proven online trend to introduce your brand to the world, there is nothing better than this.
- Have a quick win: Running a business or building your brand's authority is a long game. But wouldn’t it be nice to have a quick win to keep you inspired throughout the journey? Seeing your users accomplish their goals to the challenges will quickly help you boost your credibility as a creator and trust in your brand.
Now that you know about the basics. It’s time to look at the key elements of an efficient challenge funnel.
5 Key Elements to Building a Successful Challenge Funnel
Before we dive into how to set up your challenge funnel, let’s explore the key elements behind it:
1. Choose the outcome of your challenge
Focus on the end goal before you start putting up your challenge funnels. Ask yourself, “What is the goal of your challenge?” or “What will my audience learn from it?”.
For example, a 30-day weight-loss challenge will help your subscribers lose weight with your guidance in 30 days.
Please keep in mind that the challenge goal should align with your area of expertise. It'll help establish authority and make your challenges credible to participate in.
Figuring out each point of your challenge and the resulting action beforehand is surely the way to make your challenge funnel successful.
2. Schedule your challenge
The next step is to decide how many days you'll run this challenge. Choose the duration of your challenge wisely, as it plays a big role in helping your audience reach their goals.
The stipulated time for your challenge should align with your goals. There is no such challenge that works for everyone, but we advise keeping it for at least 3 days and not more than 30 days.
Please note that the most important thing about your challenge schedule depends on the outcome. For example, if you’re aiming for consistency to achieve your challenge, then you should go for 30 days. However, if you’re trying to achieve a quick win, then allocating 3 to 7 days will be best.
Once you're done, it's equally important to decide the date and time when your challenge will go live. Your marketing strategy must be in place to make your challenge funnels a real success.
3. Create the content for your challenge
For a challenge funnel, it’s important to deliver the resources (free or paid) to users that will help them achieve their goals.
Think of your challenge as setting up a pathway for your users. Simply, you’ll be taking them from where they are now to the point where they want to be. Think of all the steps they need to take.
Focus on the content for each day to be offered as a freebie:
- Learnings for the day
- Define how each day's learnings brought them closer to their end goal
- Action step after this challenge day
You have to carefully lay out the resources of your challenge to make your funnel successful.
Once that’s done, you have to lay out the challenge on a lead-capture or opt-in page.
4. Plan your pitch for the paid offer
By this time, you’ve successfully provided your audience with a freebie to help them achieve their goals. But there are always supporting elements to consider to help your users get there faster and be more efficient.
That’s exactly the point where you transition to your main offer or paid program. This is the point where you can pitch your product and close the sales with a sales cum checkout page.
For example, if you’re putting up a weight-loss challenge, you could offer a diet plan or daily 5-minute healthy-cooking recipes as your paid product.
Be mindful that your main offer should always align with the challenge.
5. Create complementary offers to get more profits
The best thing about funnels is that you can make them work the way you want. If you want to put more offers in the middle, you can totally do that.
Once the users are in their buying state, show them some pre-checkout offers to earn extra. You can always add revenue-boosting offers to increase the average order value.
For example, if you’re offering the diet plan as your main order, some stress gummies or multivitamins are great pre-checkout offers.
You can also set up post-purchase upsells and downsells to boost your store’s AOV (discussed in the next section).
How to Create a Challenge Funnel that Converts? (Step-by-Step Process)
To create a winning challenge funnel, you need a powerful tool. That’s why we’ll use FunnelKit.
FunnelKit is the most robust sales funnel builder for WordPress. It allows you to set up high-converting sales funnels, including your opt-in pages, landing pages, checkouts, one-click upsells/downsells and thank you pages.
Here are some eye-dropping features of FunnelKit’s Funnel Builder that you simply cannot miss:
- Stunning, customizable templates: FunnelKit offers a variety of templates for your use cases. You can import and customize each of these templates the way you want.
- Compatibility with different page builders: FunnelKit works with all page builders and lets you customize your funnels however you want. It deeply integrates with Elementor, Divi, Oxygen, and Gutenberg. But if you want to use other builders, create them using shortcodes.
- High-converting store checkout: Create a beautiful, custom checkout that converts. Customize your checkout form with FunnelKit’s field editor. Optimize your checkout pages with express payment buttons, Google address autocomplete, auto-apply coupons, and more.
- AOV-boosting offers - Boost the average order value of your store with pre-checkout offers (order bumps) and post-purchase offers (upsells and downsells). Set up and start running within minutes: Import the template, add your offer, and that’s it!
- A/B testing - Improve your page conversions with FunnelKit’s built-in A/B testing feature. It lets you A/B test all the pages in your funnel and provides metrics to declare a winning variant and redirect 100% of future traffic to it.
Now that’s done, let’s dive into setting up our challenge funnel using FunnelKit’s Funnel Builder.
Step 1: Install and activate FunnelKit
Get a copy of the Pro version.
FunnelKit’s Funnel Builder comes with both free and paid versions. However, we will use the premium version for more brilliant functionalities.
Know more about installing and activating FunnelKit’s Funnel Builder here.
Step 2: Add the challenge funnel
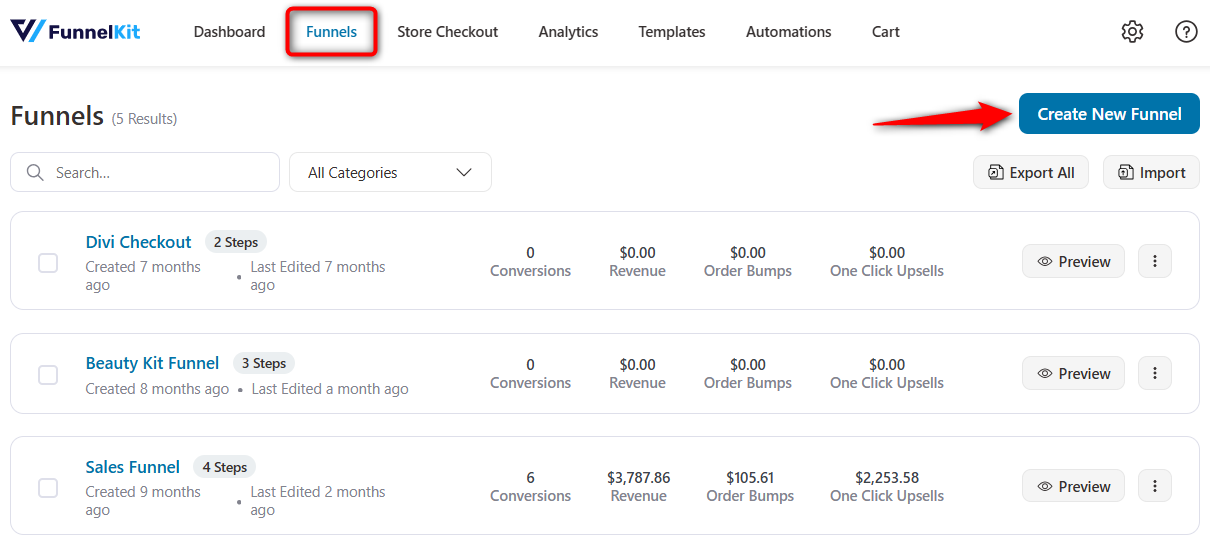
Go to Funnels under FunnelKit and hit the 'Create New Funnel' button.
You’ll be directed to the templates page. Select Lead Generation and you’ll then be shown all the lead gen templates.
Choose your favorite page builder and click on 'Preview' next to the Challenge funnel template you like.
Here, we’ll select Elementor and choose the 'Challenger' template.

Next, you’ll be able to preview the full template here.
Once you’re satisfied with your template, hit ‘Import This Funnel’ and name your funnel - 21 Day Weightloss Challenge Funnel.

Clicking on ‘Done’ will create your challenge funnel.
Step 3: Customize your challenge (opt-in) page
Click on the optin page to start customizing your challenge page.

On the Design tab, hit the ‘Edit Template’ button.

Your page will load in the page builder you selected. Since we chose Elementor, our page will load up in the same page builder.
Now, you’ll be able to customize the elements of the opt-in page in your challenge funnel.
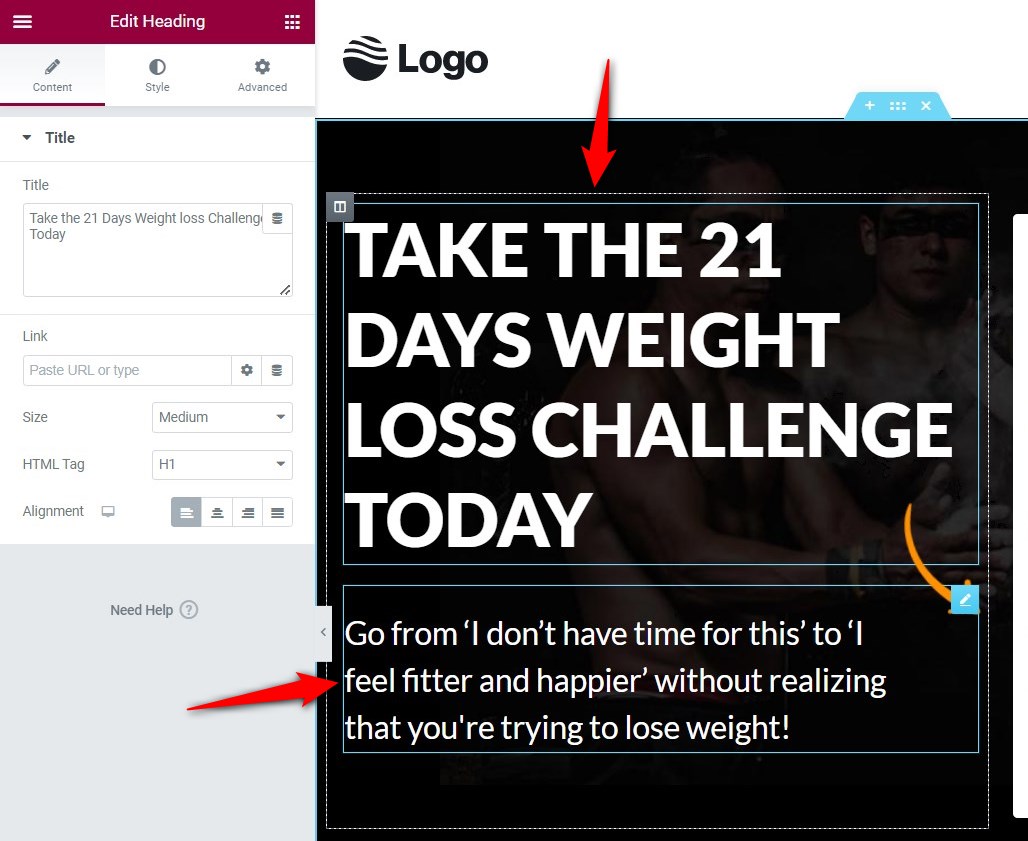
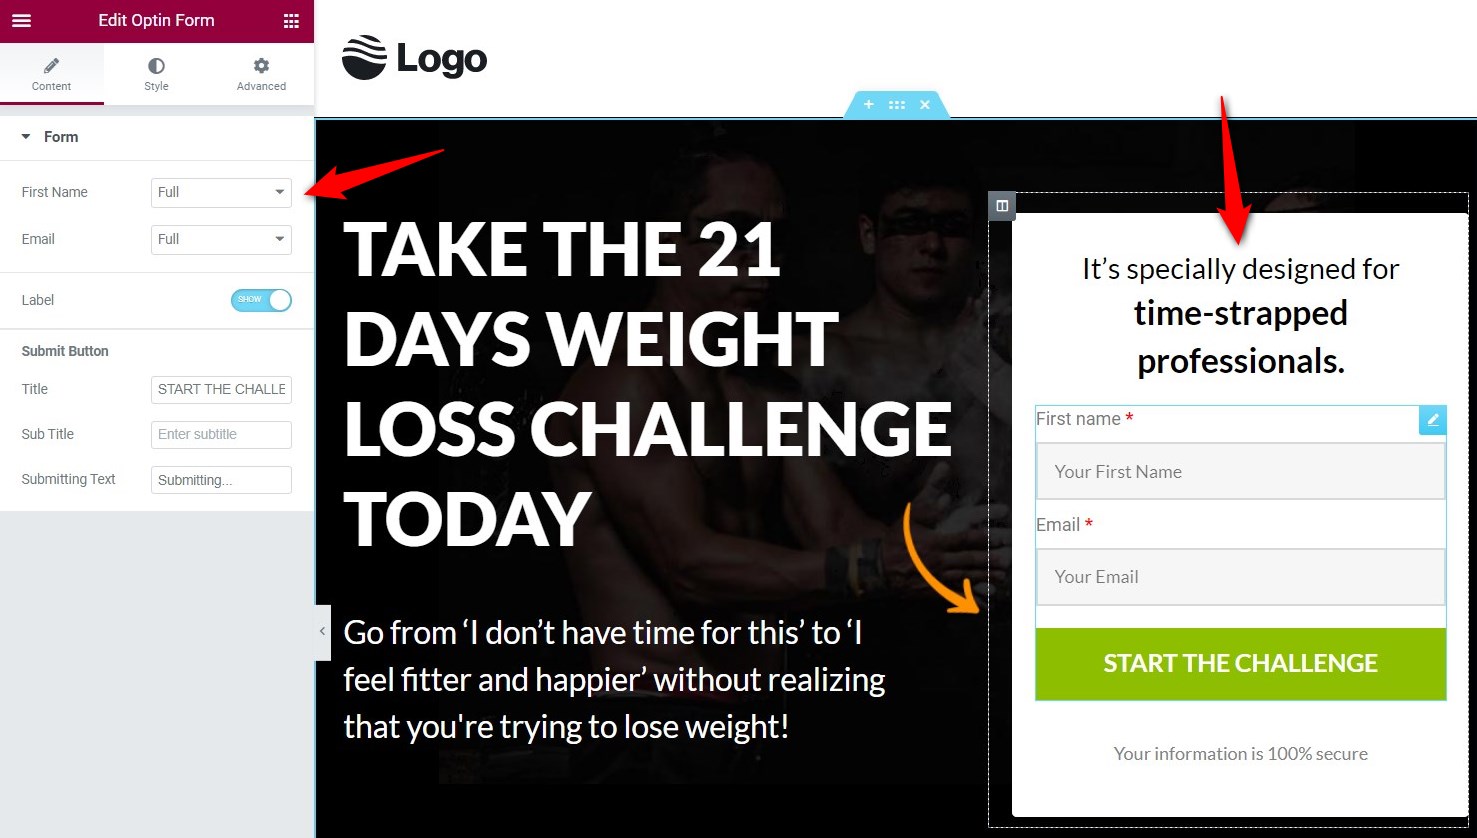
Attractive Headline
Click on the pencil icon to edit your headline.
Write an attractive title or the goal of your challenge that compels the visitors to subscribe.
Simple opt-in form
Make sure to lay out a simple opt-in form that takes less than 20 seconds to fill. You can have simple first name and email fields in your opt-in form.
Compelling copy
When it comes to writing compelling copy for your challenge funnel, you should clearly give out the goal of your challenge.
Back your copy with a scientific study and how you’ve planned it to get to your goal:

Pan out all the benefits of taking this challenge:

Finally, have an author section that demonstrates why you’re in this position to help your audience accomplish their goals:

Actionable CTA button
Add 2-3 actionable buttons where the users are able to start with your challenge.
Your CTA should be short, actionable and to the point.
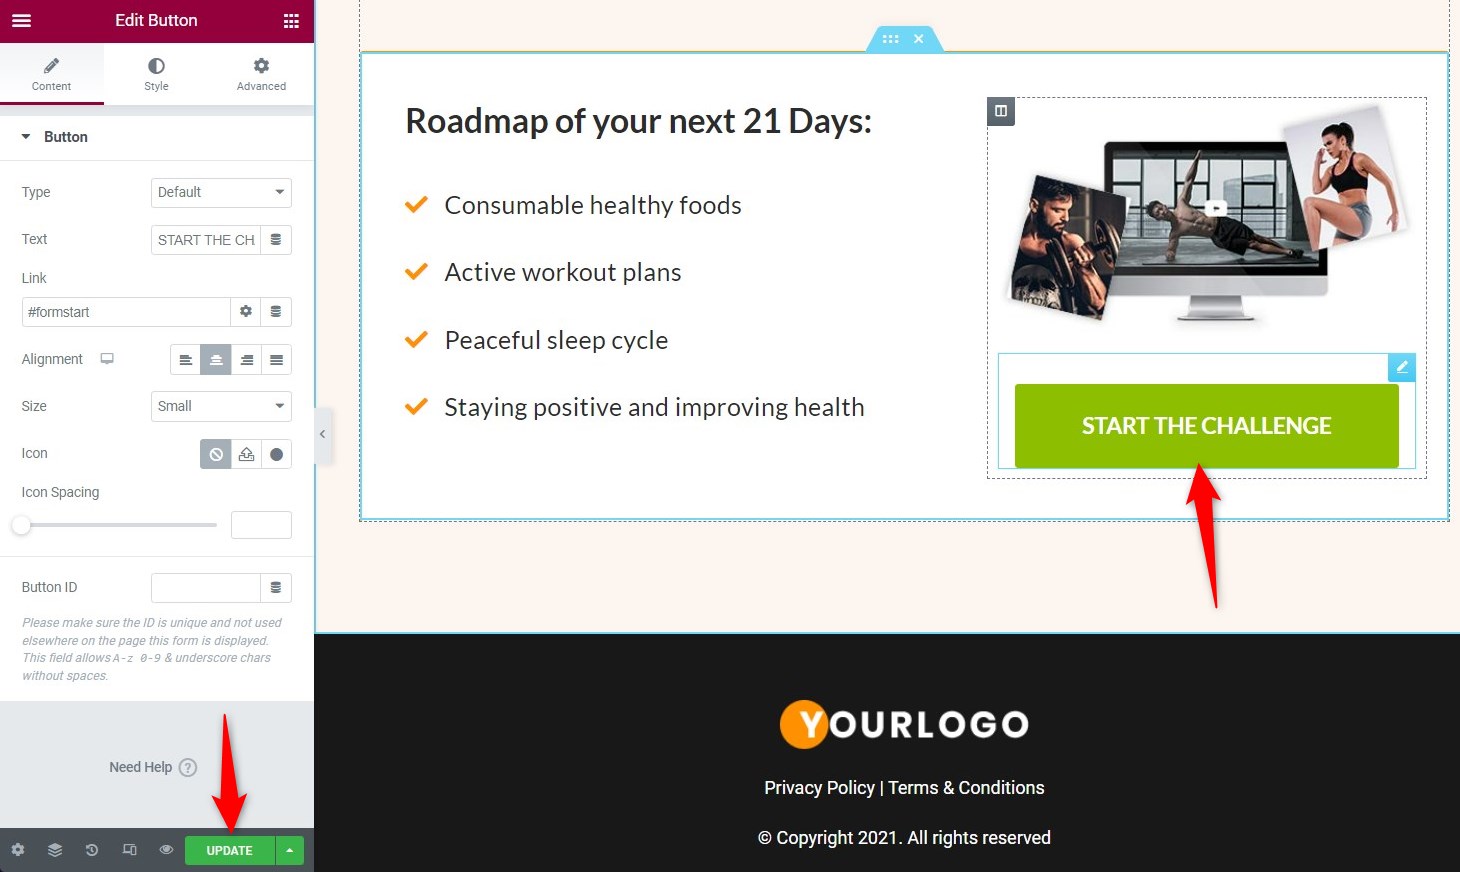
Click the Update button when done, then head back to your funnel.
Step 4: Add a sales cum checkout page
Next, we will direct users to our paid offer.
For that, we’ll add a sales cum checkout page. But before that, we’ll remove the Opt-in confirmation step first.

Now, click on 'Add New Step'.

Select the 'Checkout Pages' and you’ll be shown all the FunnelKit's checkout page templates.
Follow the same steps - choose page builder, preview the template, name your page and import it.
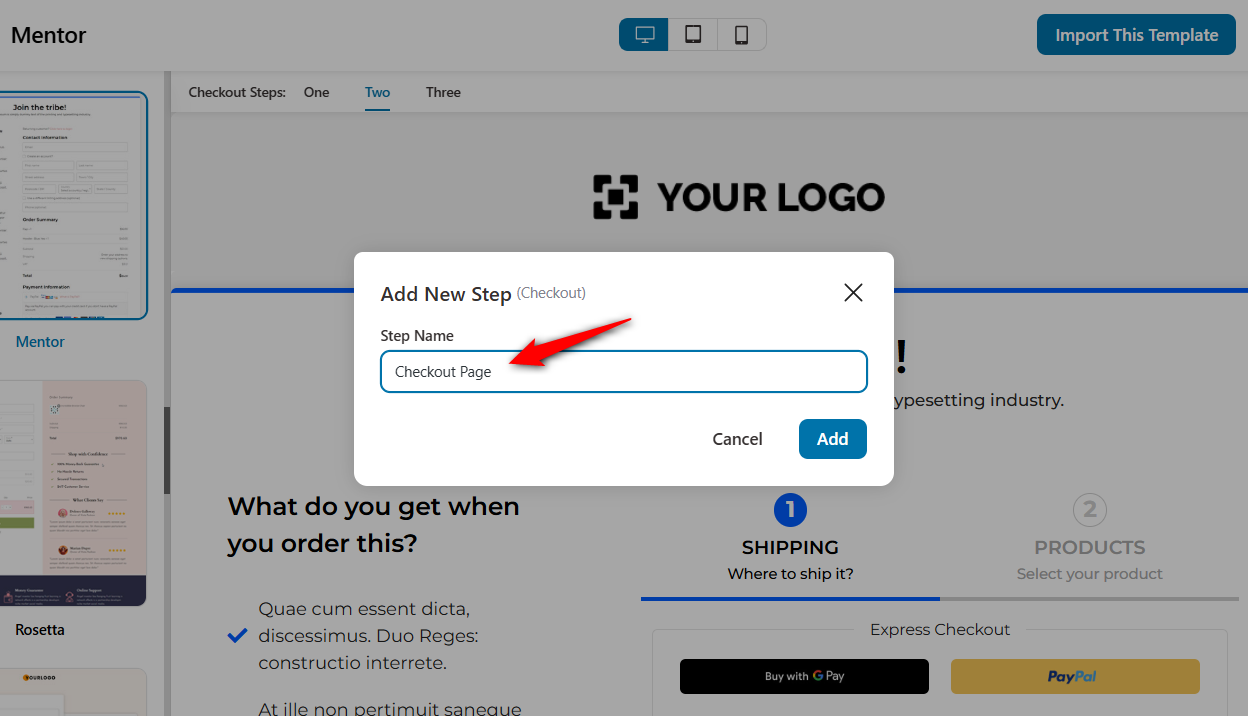
Click on 'Edit' to start customizing your checkout page.
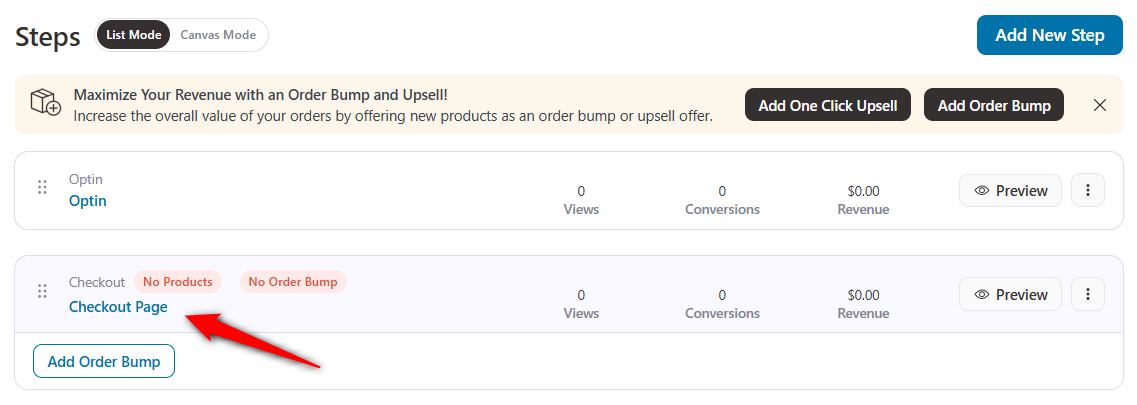
The checkout page is fully customizable. Edit the fields that you want to show, split the checkout process into different steps, add new fields, and more.
In the Products tab, make sure to add your paid product.
Choose the product from your catalog and add it here.

Save the changes before you move to the next step.
You can further optimize your checkout page with express payment buttons, address autocomplete, and more.
Step 5: Add order bump and one-click upsell offers
Order bumps and one-click upsell offers are AOV-boosting offers that increase the value of each order.
Let’s discuss how to add each of these offers.
Order Bump
Click on the ‘Add Order Bump’ button below the checkout page in your challenge funnel.

Enter the name of your order bump and import a skin you like.

Add the product you want to offer on your checkout page.
On the Products tab, you can further add a discount to make it appealing.

Next, write a copy of your offer and choose the order bump skin to make it compelling from the Design tab.

Save the changes and be done! Your order bump is now ready.
One-Click Upsells
One-click upsells are post-purchase offers that encourage users to buy once they have initially paid for the main offer.
Repeat the same process of adding a new step as did with your checkout page, but this time select ‘One-Click Upsell’.

FunnelKit has single and multi-product templates for one-click upsells. So you can add multiple products and offer them on a single page.
Make sure to hit edit and add your product as an upsell:

Further, you can also add a downsell offer and dynamically link both your upsells and downsells. This way, on acceptance of one offer you can show the other and on the rejection, you can show another.
This is the one-click upsell page we have created:
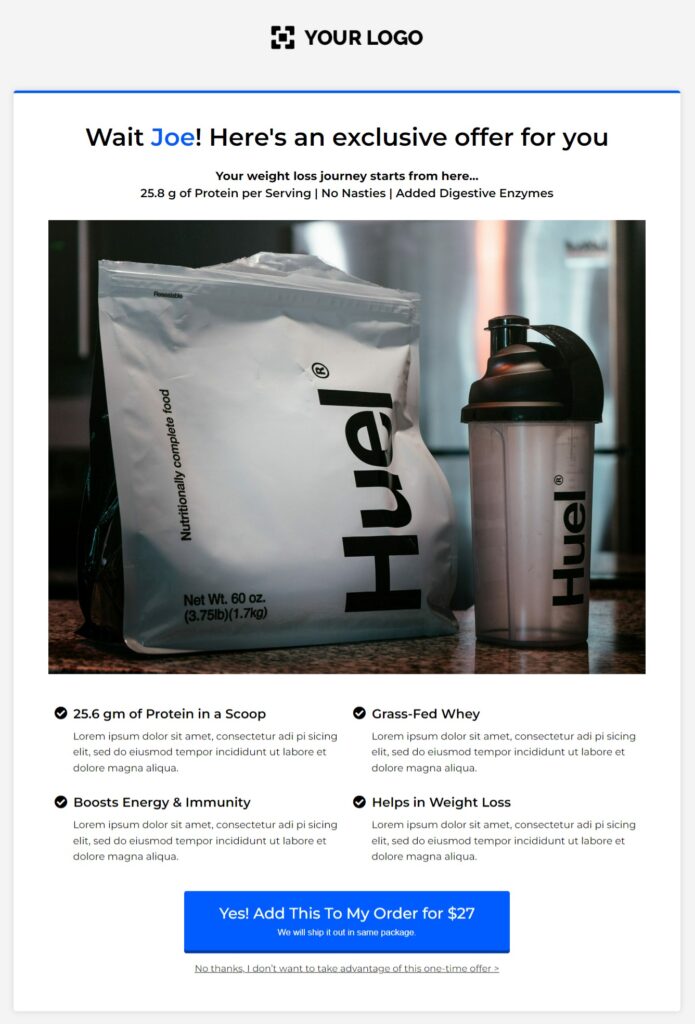
Step 6: Add the thank you page to complete your challenge funnel
Finally, add a modern-looking thank you page.
FunnelKit lets you create custom thank you pages that help you carry forward your conversation.
Select from a range of thank you page templates and customize them the way you want.
We have chosen the Mentor thank you page template to close our challenge funnel:
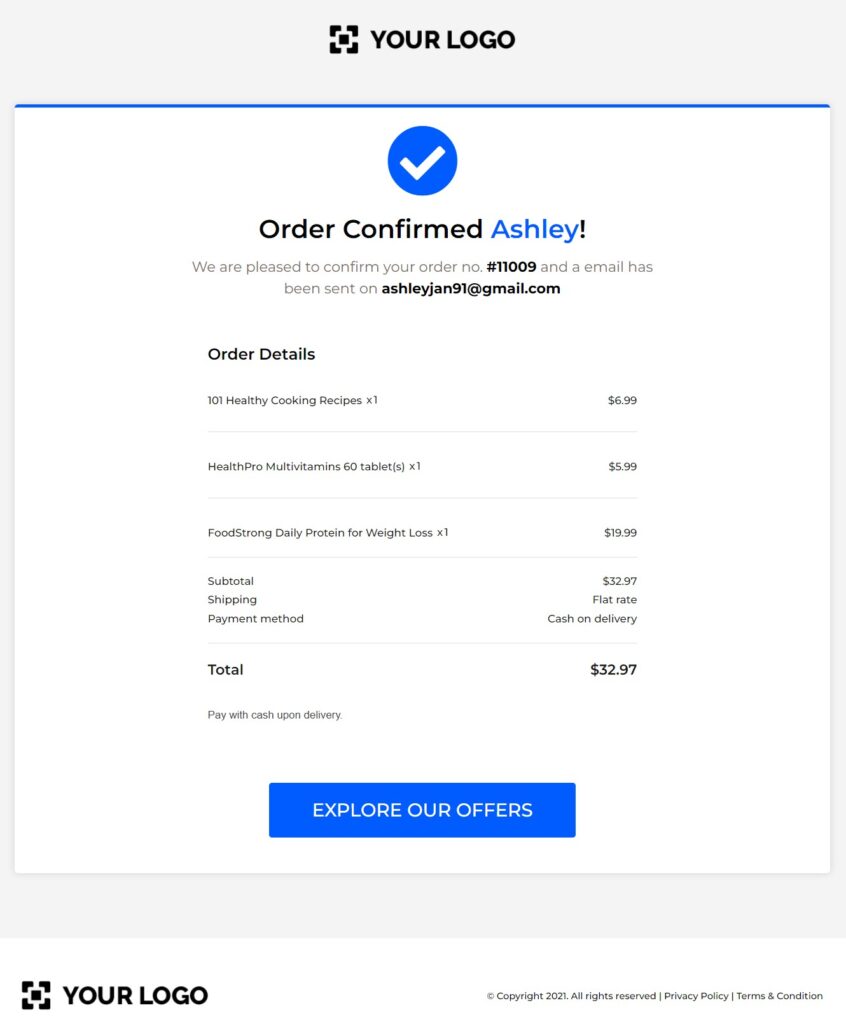
And there you go! This is how you can set up your challenge funnel in 6 easy steps.
Looking for more? Check out our guide on some more funnel-specific strategies:
Use Lead Nurturing and Cart Abandonment Marketing Automations to Increase Sales
The challenge funnel gives you two opportunities to set up your automated email sequences:
1. Lead welcoming and nurturing sequences after the opt-in
2. Cart abandonment recovery sequences in case the user leaves at checkout
FunnelKit Automations gives you the opportunity to set up these sequences with timed delays, well-thought-out actions and conditions, and more.
It has pre-built automation recipes that let you customize your workflows and automate your processes.
Go to the Automations section and you’ll see the FunnelKit Automations plugin.
Once done, there are various recipes, including opt-in lead nurturing sequences, abandoned cart reminder workflows, etc., to take advantage of.
Based on your strategy, you can make these automations convert your prospects and sell while you sleep.
You can start setting up your abandoned cart workflows with its free version.
Further, level it by welcoming your new leads and nurturing them into top-valued customers gradually.
Frequently Asked Questions (FAQs) Related to Challenge Funnels
Here, we have answered the common questions users ask on the challenge funnel.
Can you give me some challenge funnel examples?
Here are two good examples of challenge funnels:
The 5-Day Video Challenge
This video challenge is about learning the essential ingredients of making an engaging video that performs well online.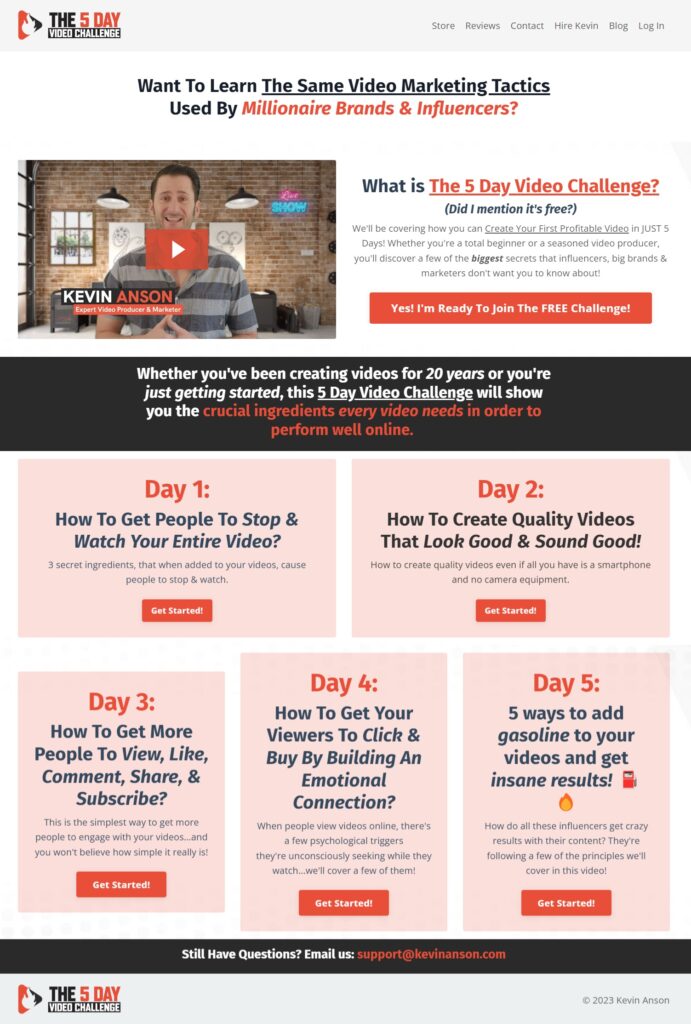
It uses a short description and well-placed CTAs to give all the information about this challenge. Plus, it gives a detailed day-wise breakdown of how users can achieve their goals with this free challenge.
10-Day Smoothie Challenge
The Green Smoothie challenge is about blending a smoothie each day to boost energy and improve your overall health.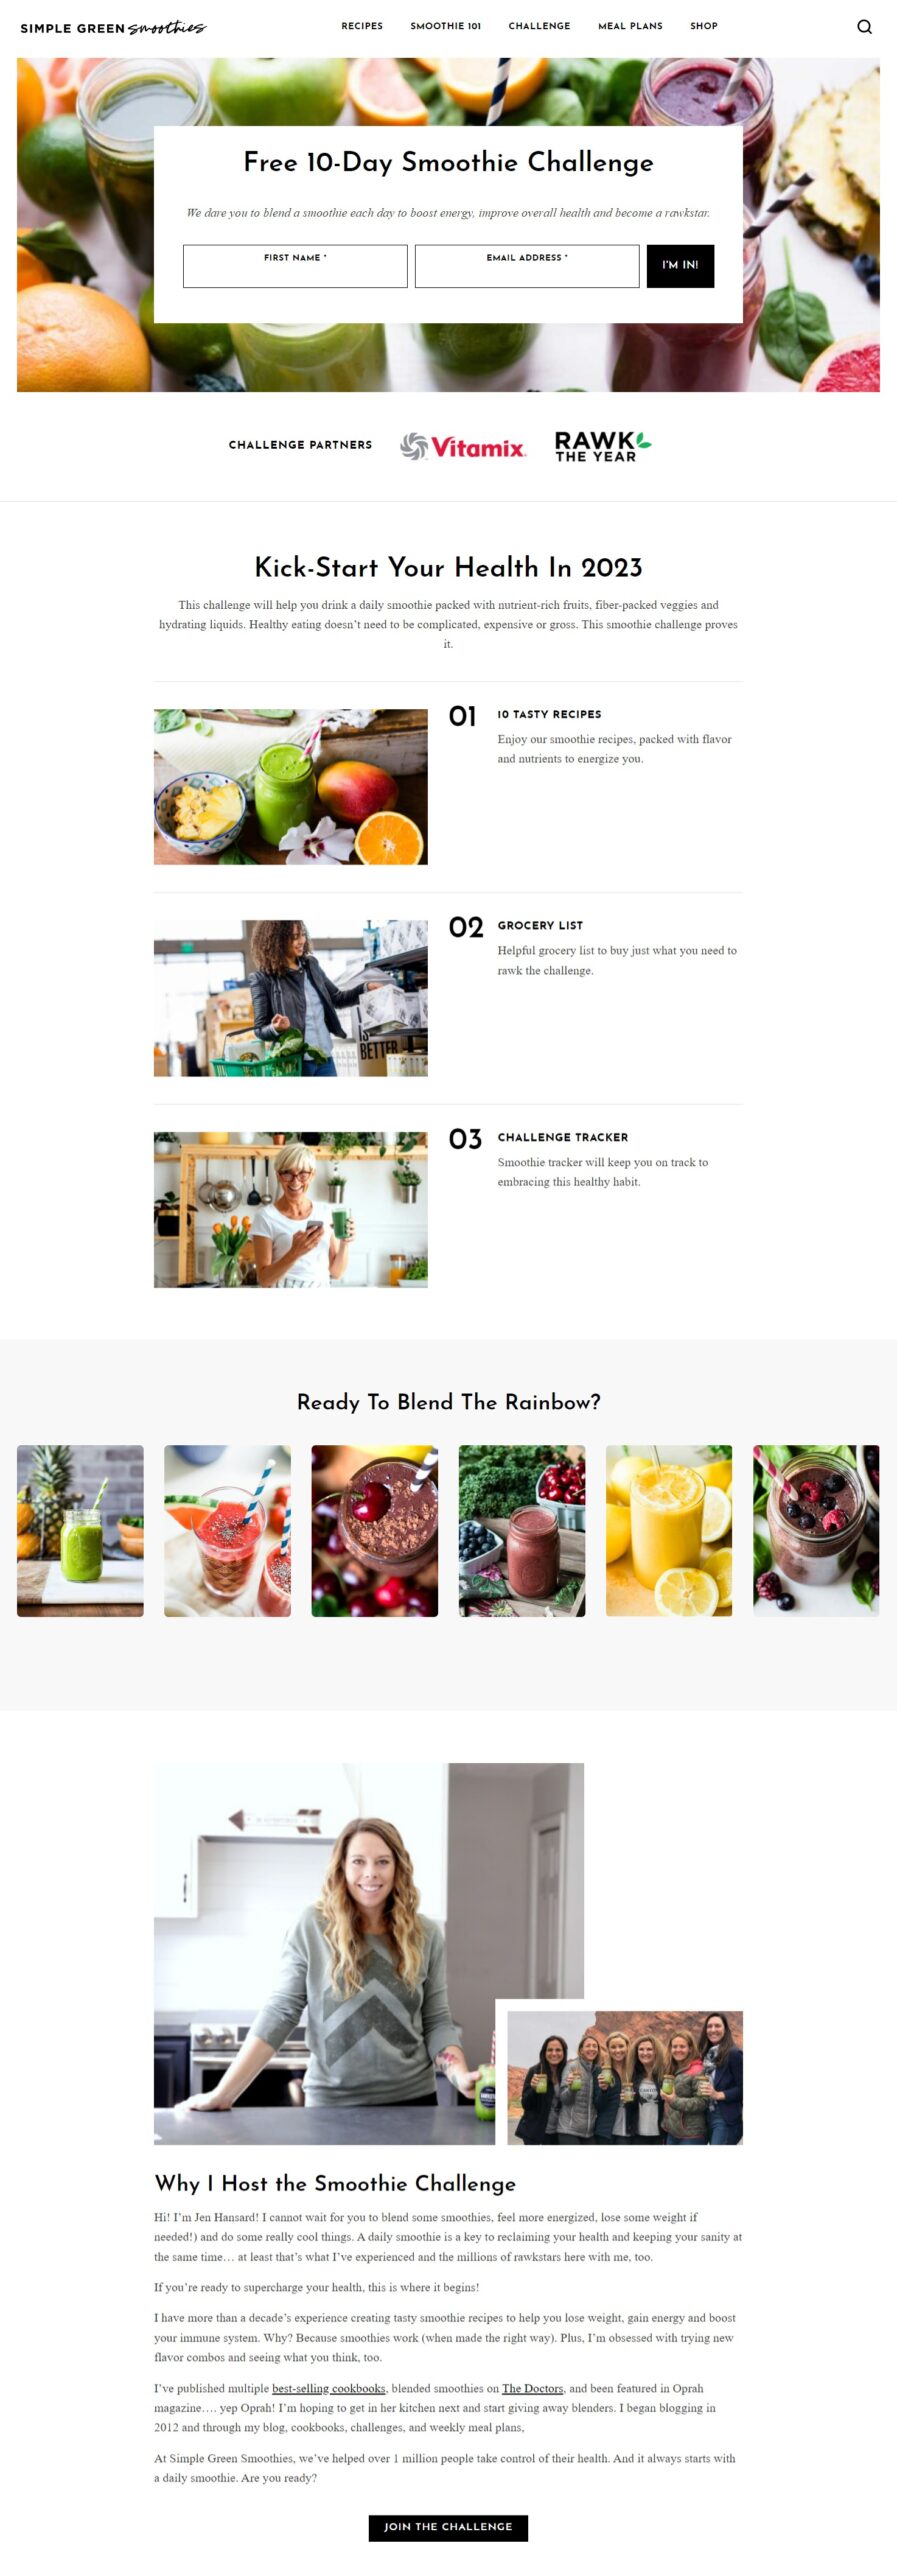
The page highlights all the key benefits of taking on this challenge. Signing up will deliver some of the healthiest green smoothie recipes straight to your inbox.
How should I decide the challenge duration of my challenge funnel?
The duration of your challenge should be at least 3 days to a maximum of 30 days. It depends on the goals you want your subscribers to achieve in a set time frame.
How can I enhance my revenue if the users reject my offers?
You can boost your revenue by sending lead-nurturing emails if any user rejects your offer. All you need is a powerful, easy-to-use CRM like FunnelKit Automations. It has all the events, actions, delays and conditions to set up brilliant automated sequences that drive sales.
Do I need to do the challenge live every time?
No. You can run a "Live" challenge once, record it, and then turn it into an "Evergreen" challenge using funnels to simulate the live experience for new entrants.
Should my challenge be free or paid?
Free challenges generate more leads (volume). Paid challenges (even just $7) generate higher quality leads (Intent). If you are just starting, I recommend starting with free to build your list and refine your content.
How do I deliver the daily challenge videos?
Host your videos on Vimeo or YouTube (Unlisted). Embed them on specific pages created within your FunnelKit funnel steps, ensuring they are mobile-responsive.
Are You Ready to Set Up a High-Converting Challenge Funnel?
A Challenge Funnel is more than just a marketing tactic, it is an accelerator for trust.
By delivering results before the sale, you prove your expertise rather than just claiming it.
All you have to do is think of a challenge that your products can help your audience achieve their goals. Once they’re in your funnel, sign them up by giving them a free offer.
Sequentially placing your irresistible offers right after the lead magnet is the way to earn big.
Ensure your offers align with your challenge funnel.
Whether you are selling a high-ticket coaching program or a digital course, the infrastructure you build today on WordPress using FunnelKit will serve as your automated sales team for years to come.
Start with the 5-day blueprint, focus on small wins for your users, and watch your conversion rates climb.
Editorial Team
February 3, 2026Do you know what’s worse than an abandoned cart? Not knowing why it happened! Your WooCommerce store could be losing sales right now, but you wouldn’t even know it if...
Editorial Team
February 2, 2026Adding a dropdown list to WooCommerce checkout lets you collect structured information from customers instead of relying on messy order notes. Whether you need delivery preferences, gift options, or marketing...
Editorial Team
January 22, 2026Are you looking for WooCommerce checkout optimization hacks to streamline your users’ shopping experience? Your WooCommerce store may have an attractive layout with a user-friendly interface. You may even have...


