
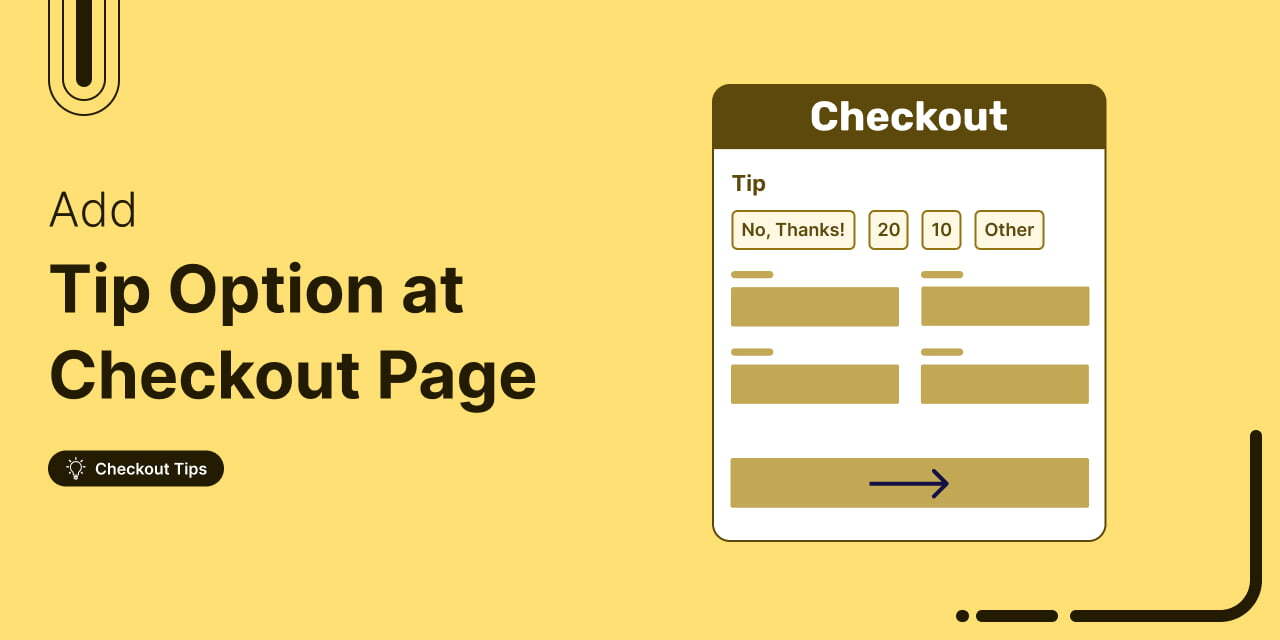
What if you could collect tips at WooCommerce checkout just like a physical shop? This can positively impact your staff’s lives with extra earnings.
Some happy customers are eager to show appreciation, and adding a tip feature gives them an easy way to do just that. And for your team, it means well-earned extra income they truly deserve.
A Forbes 2023 survey reveals that 65% of people tip at least 11% more when using digital payment methods compared to cash. This proves just how effective digital tipping can be.
In this blog, we will share how to add a tip collection option at WooCommerce checkout, along with best practices to ensure it doesn’t impact your store negatively.
Table of Contents
- 1 How Does Tipping Work in a WooCommerce Store And Why Should You Add It?
- 2 Different Use Cases of Asking For a Tip in WooCommerce
- 3 Does WooCommerce Come with Tipping Features?
- 4 Top 4 Best WooCommerce Tipping Plugins
- 5 Method 1: Add a Tip Option to Checkout With A Free Plugin
- 6 Method 2: Add Tip Option and Optimize Your WooCommerce Checkout For Higher Conversions
- 6.1 Step 1: Create a product to collect tips at checkout
- 6.2 Step 2: Create a store checkout with a pre-built template
- 6.3 Step 3: Create an order bump to add a tip option
- 6.4 Step 4: Add the tip product and customize the order bump
- 6.5 Step 5: Restrict tip to certain orders (optional)
- 6.6 Step 6: Optimize checkout page for higher conversion
- 6.7 Step 7: Enable store checkout
- 7 4 Best Practices of Tipping in WooCommerce To Avoid Cart Abandonment
- 8 Frequently Asked Questions About Tips on WooCommerce Checkout
- 9 Ready to Start Collecting Tips at WooCommerce Checkout?
How Does Tipping Work in a WooCommerce Store And Why Should You Add It?
In WooCommerce, you can easily let customers leave a tip during checkout, similar to physical stores. After adding their items to the cart and proceeding to checkout, customers can choose whether to add a tip and select the amount they’d like to contribute.
It's just like when people pay the bill in a physical store and choose to leave a tip for great service.
Tips can be of different types, like :
- Predefined fixed tip amounts: Let customers choose to offer fixed tip amounts like $2, $5, or $10, making it easy for them to select a tip without thinking about percentages.
- Predefined tip percentages: Offer predefined tipping options based on a percentage of the cart subtotal. For instance, customers can choose 5%, 10%, or 15% of their total order as a tip.
- Custom tip amount: Customers can enter their own tip amount on the checkout page. For example, they can add any amount, like $3, $11, or $23, based on how much they wish to contribute.
Here are some benefits of providing an option to leave a tip at checkout in WooCommerce:
- Let customers show appreciation
Customers who want to show their gratitude for great service or products can easily leave a tip, creating a sense of connection and appreciation.
- Financial support for your team
It allows customers to directly support your staff, helping them earn extra income and boosting morale.
- Increased revenue for your business
Offering a tip option can increase your overall revenue without additional work, as tips come from willing customers.
- Seamless experience like a physical store
Just like in physical stores, customers can easily add a tip during checkout, making it a natural and convenient part of the purchasing process.
Different Use Cases of Asking For a Tip in WooCommerce
Tips don't have to be just limited to physical stores. For different online stores, asking customers to leave a tip is also a practical thing to do.
Here are some of the cases of different businesses or situations in which you can ask for a tip:
1. Restaurant or food delivery services:
Tipping is a common practice in the food industry, and offering a tipping option on WooCommerce allows customers to reward delivery drivers or restaurant staff for exceptional service easily. It enhances the customer experience and provides employees with additional income, which can further motivate them to work harder.
2. Custom or handmade products
Customers who purchase custom or handmade products often appreciate the craftsmanship and time invested. By offering a tip option, you allow them to show their gratitude for the personal touch, further strengthening their connection with your brand.
3. Subscription-based services
For subscription services, customers might want to express their ongoing satisfaction with the quality of service. A tipping option enables them to show appreciation for consistently great service, providing additional income to support business growth without requiring extra products.
4. Donation or charity store
In charity-focused stores, offering a tip option can allow customers to donate additional funds while making a purchase. This helps increase the amount donated to causes they care about, creating a deeper sense of community involvement and purpose.
5. Personalized customer service
For businesses offering personalized services like consultations or custom design work, customers often want to acknowledge the extra effort. Tipping provides an easy way for them to show appreciation for the personalized attention and expertise they received.
Does WooCommerce Come with Tipping Features?
No, WooCommerce by default doesn’t offer any option to ask for a tip at checkout. For this, you need an additional plugin.
In the next section, we will share a list of the best tipping plugins for WooCommerce:
Top 4 Best WooCommerce Tipping Plugins
Here is the list of the best WooCommerce tipping plugins with key features and pricing:
1. WPC Order Tip for WooCommerce
WPC Order Tip for WooCommerce lets your customers leave a tip during checkout, whether it’s for your team or a charity. With predefined or custom options, this plugin helps you boost customer satisfaction and add extra income to your business.
Here are the main features:
- Multiple tip options: Create and display multiple tip sets on the cart page.
- Flexible values: Offer fixed amounts, percentages, or custom tips.
- Easy customization: Adjust the tip amounts and order priority to suit your business.
- Smooth checkout: Tips are automatically added to the order subtotal without hassle.
Price: A free version is available. The premium costs $29.00.
2. Order Tip for WooCommerce
With Order Tip for WooCommerce, you can easily enable customers to add a tip or donation to their order. Whether it's a fixed amount or a percentage of the order value, this plugin offers a flexible tipping option, including a custom amount field.
The plugin also allows you to control whether the tip is taxed based on your WooCommerce tax settings, providing a seamless experience for both store owners and customers.
Key Features:
- Various tip options: Fixed amount, percentage, or custom tips.
- Predefined rates: Includes six standard tip options, customizable via filters.
- Tax configuration: Choose whether tips are taxable or not.
- Support for multiple languages: Compatible with multiple language plugins.
Price: Free.
3. Donation for WooCommerce
Donation for WooCommerce makes it easy to create and manage donation campaigns on your WooCommerce store. Whether you want to collect one-time donations or set up recurring contributions, this plugin offers all the tools needed to inspire generosity.
With customizable donation amounts, progress bars, and flexible placement options, you can seamlessly raise funds for causes such as charities, nonprofits, and more.

Here are the main features:
- Easy tip or donation management: You can easily manage both one-time tip and also regular donation campaigns on your WooCommerce store.
- Automatic donations: Set up automatic donations that keep coming regularly to support your cause.
- Flexible placement options: Place donation options anywhere on your site to make it easy for people to donate.
- Track progress: Show how much has been donated and how close you are to your goal to encourage more donations.
Price: This is a paid plugin that costs $99/ year.
4. FunnelKit Funnel Builder
FunnelKit Funnel Builder is a sales funnel builder that allows you to offer a tipping option on the checkout page. Let customers select a tip (based on a base amount) and add it to their order in just one click.
Along with the tip option, you can also create a conversion-optimized one-page or multi-step checkout. Plus, you can offer additional offers on the checkout as order bump as well as after checkout as one click upsell to boost the average order value of your store.
Here are the main features:
- Add tip option on checkout: Allow customers to leave a tip at the checkout page. They can select any amount using the multiplication of the base amount set.
- Customization options: You can customize the style and content of the tipping section on the checkout page. You get 6+ different style options.
- Placement options: Eight placement options to place the tipping section on checkout.
- Conditional tip: You can ask for a tip based on different conditions, like the customer’s item in the cart, previous purchase history, etc.
- Restrict tipping: You can use different conditions to restrict the tipping option on checkout by products and shipping methods.
- Checkout page optimization: You can optimize your checkout in 25+ ways to streamline the process and boost conversion.
Price: A free version is available on WordPress.org. The premium version starts at $99.5/year. To get access to all the premium features, you need to get the Plus plan, which costs $179.5/per year.
Now that you know about the best somethings, how about you learn how to use them?
In the following sections, we will share two different methods of adding a tip option on the checkout page.
Method 1: Add a Tip Option to Checkout With A Free Plugin
For this, we will use the WPC Order Tip plugin. Make sure you have installed and activated the plugin.
Once done, follow these instructions:
Step 1: Add tip option on the checkout page
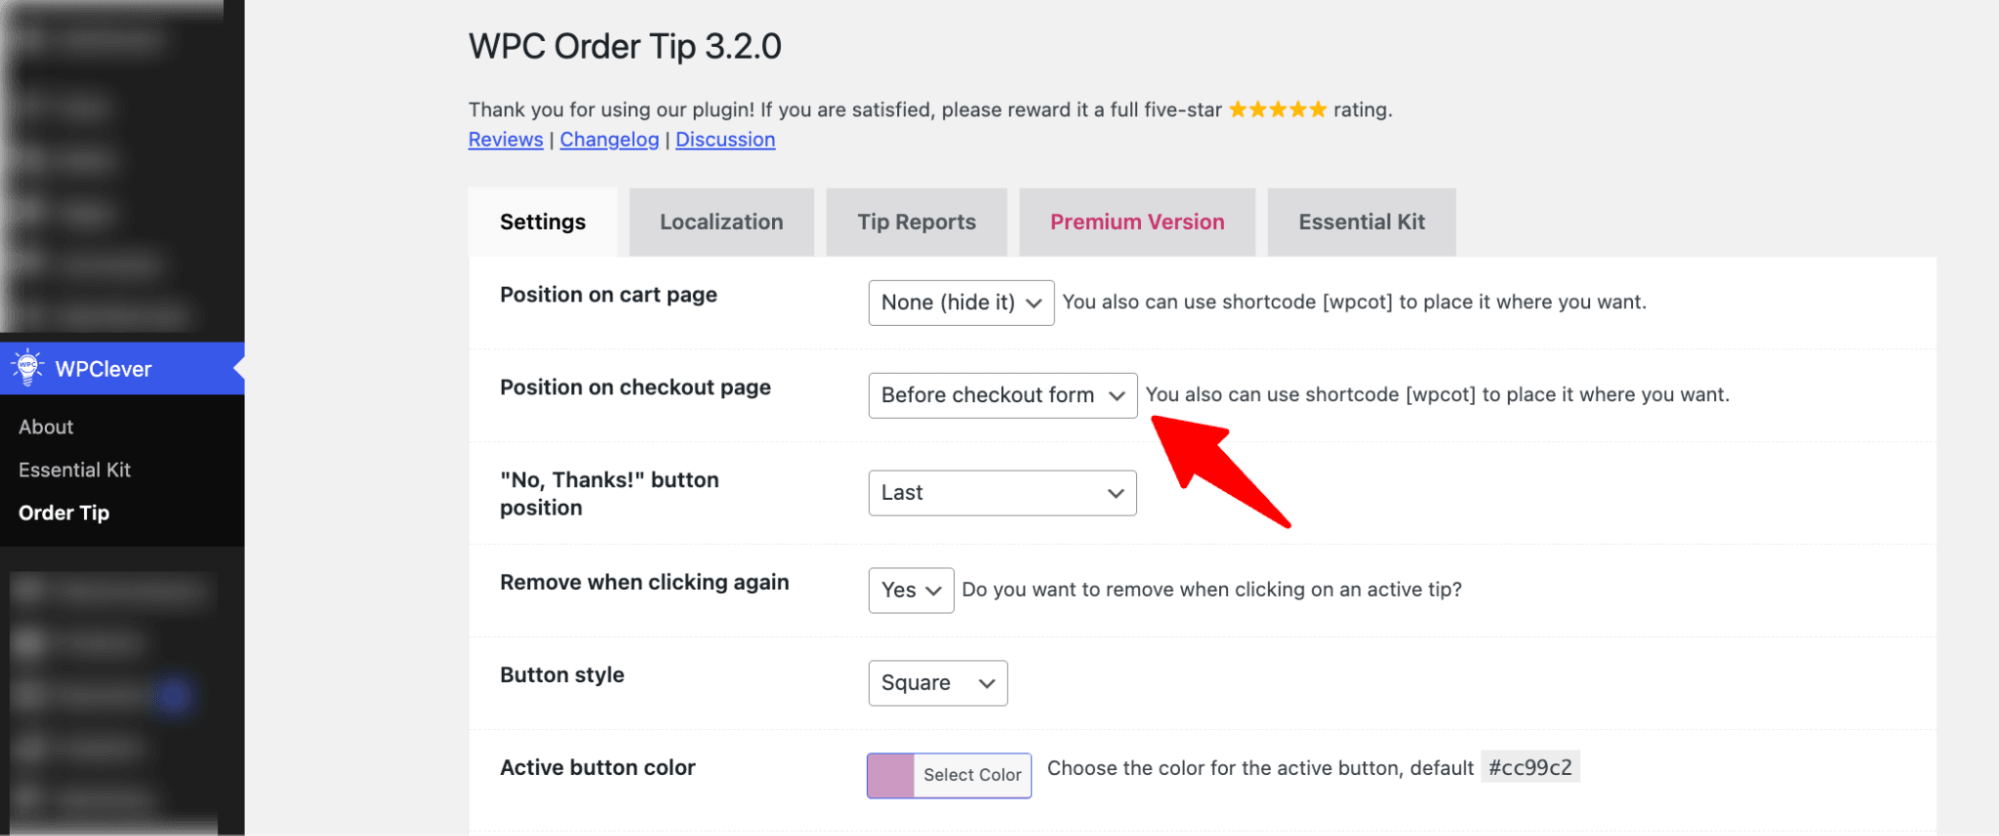
Navigate to WPClever ⇒ Order Tip and choose the position on the checkout page.
Next, choose the position of the "No, Thanks!" button.
For a cleaner experience, set the “Remove when clicking again” option to Yes. This will hide the button once it's clicked.
Then, customize the button style and set the active button color to match your branding.
Step 2: Set the preset tip options
Next, scroll down a little to set the Tip name; the description is optional.
Moving on, set the following:
- Values: Set values as a percentage. The default values are 5, 10, and 20. To add more values, hit the “+ New Value” button.
- Default value: Set the default value to be selected automatically. Has to be one of the existing values.
- Custom amount: Choose yes for custom value. You can set the range if you want.
🔔 Note: To make the tip taxable and add conditions, you'll need the premium version of the plugin.
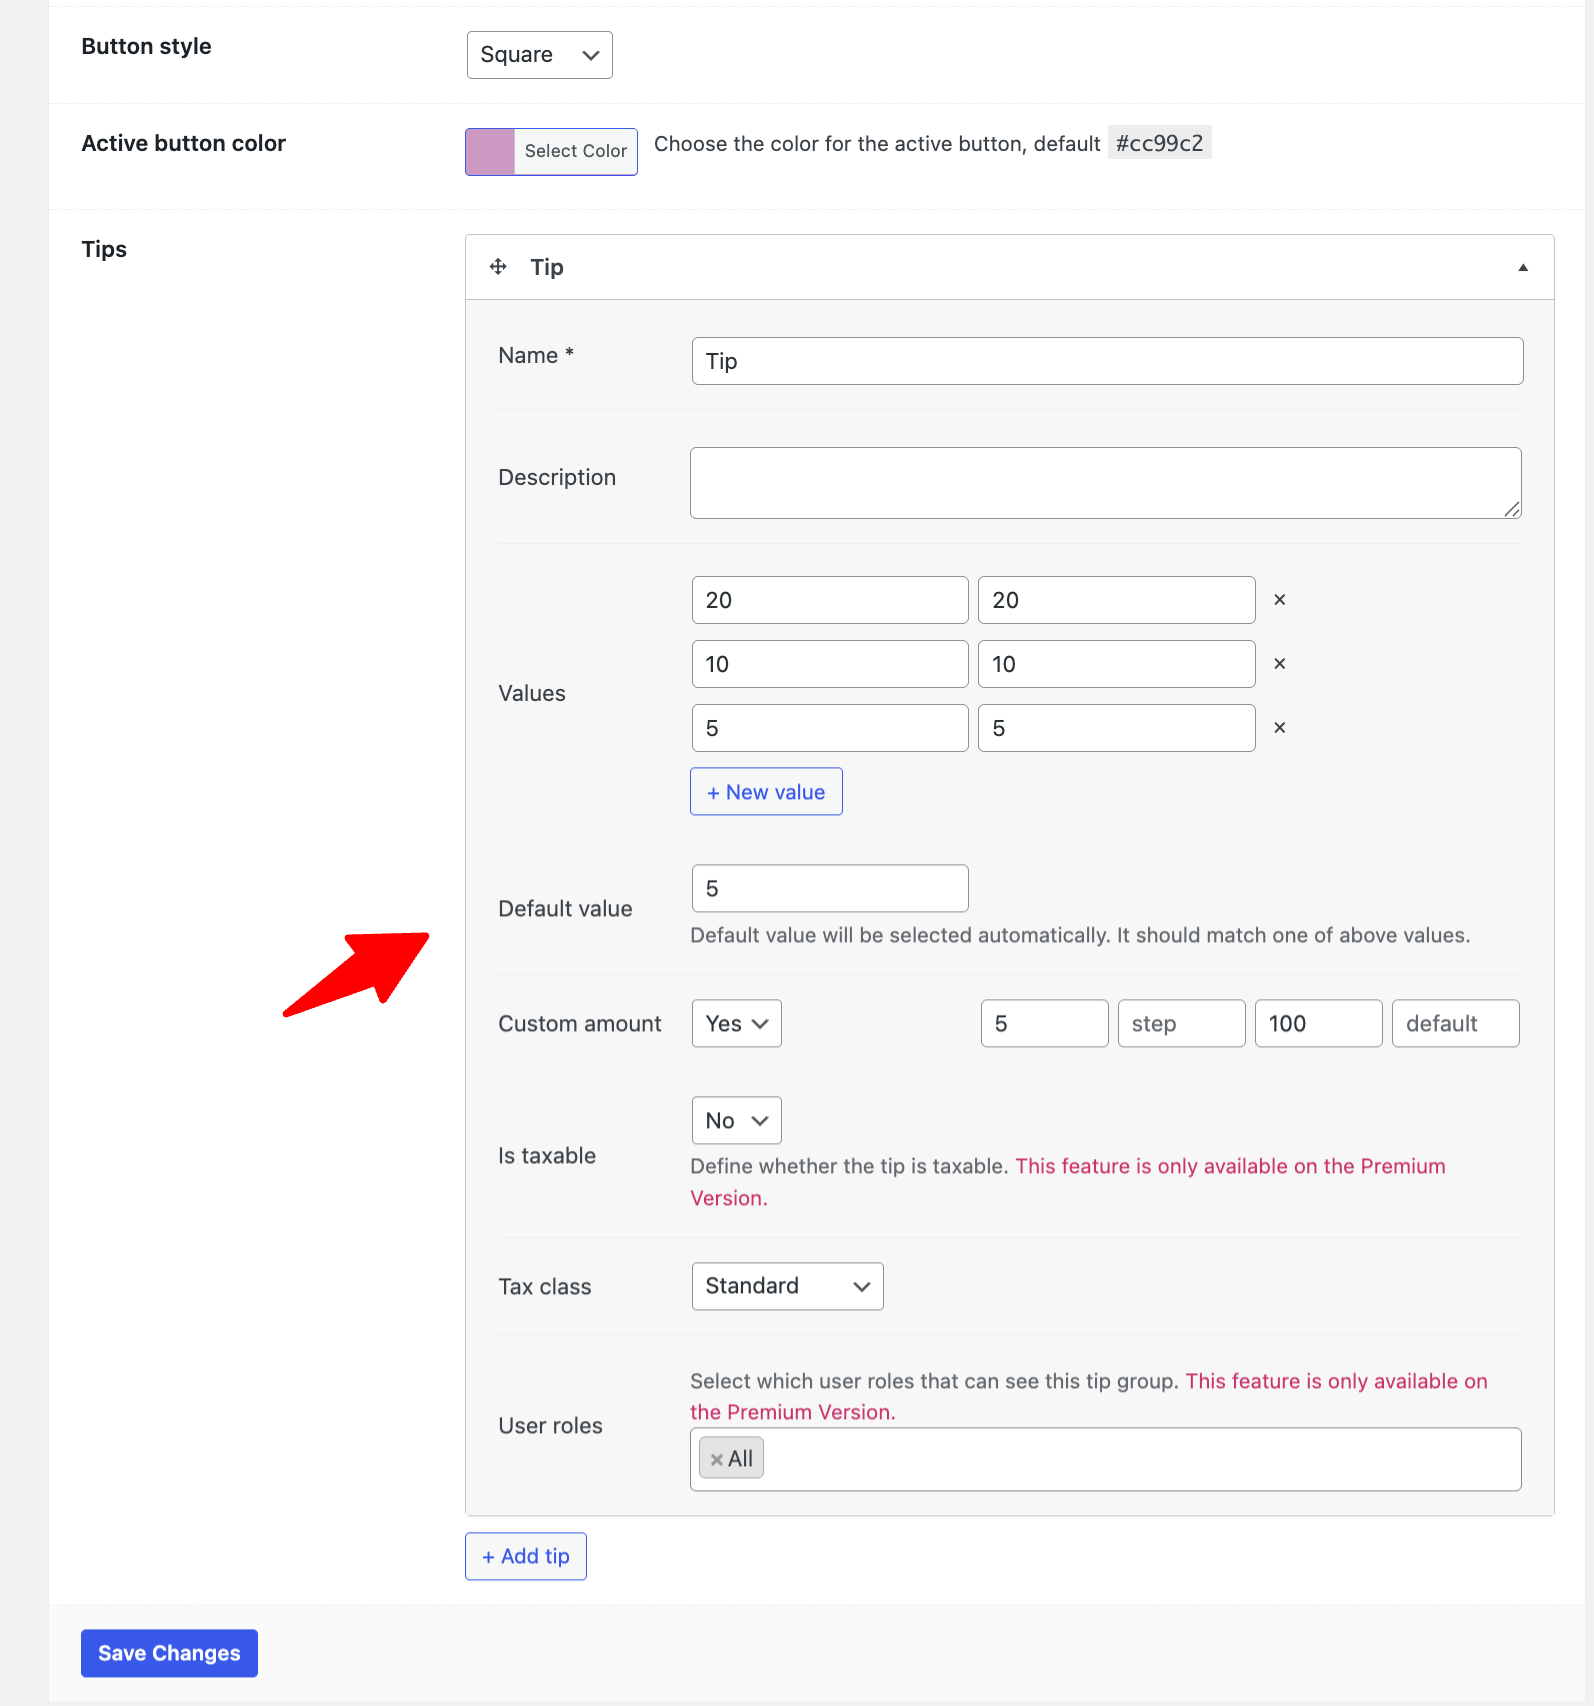
Make sure to hit ‘Save Changes’ to update the changes.
Step 3: Test the tip option on checkout
Now, if you try to place a test order, you will see the tip option on the checkout page.
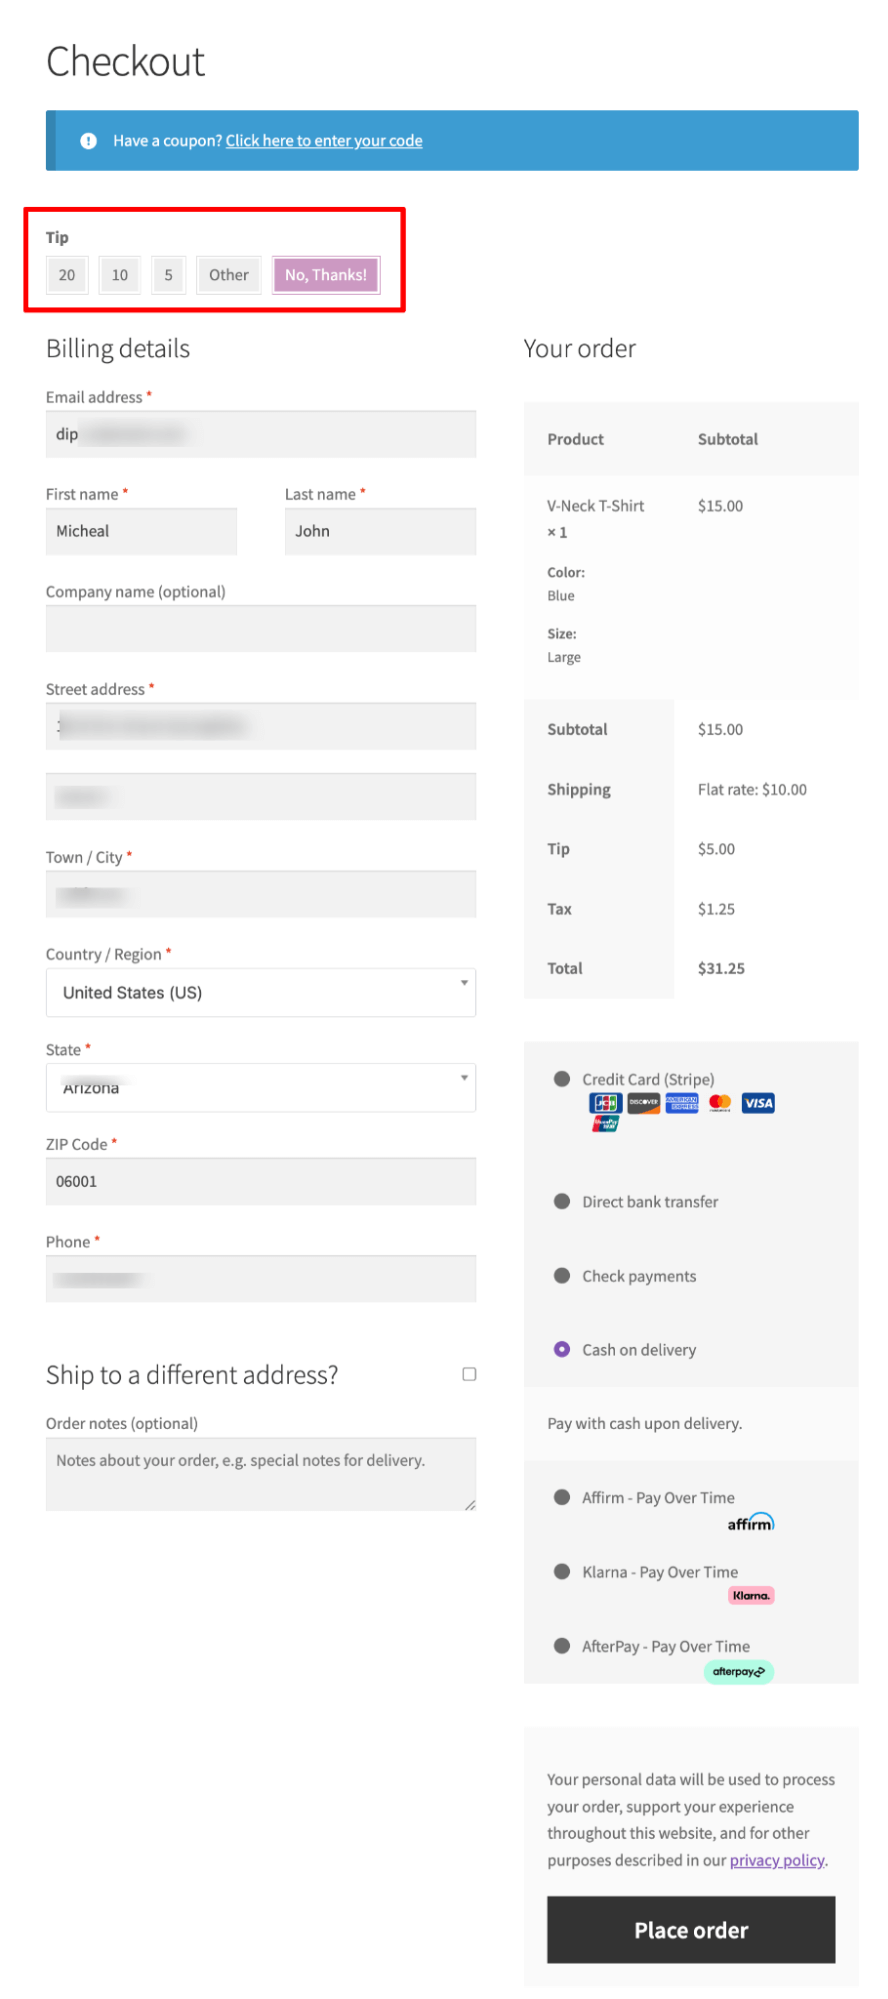
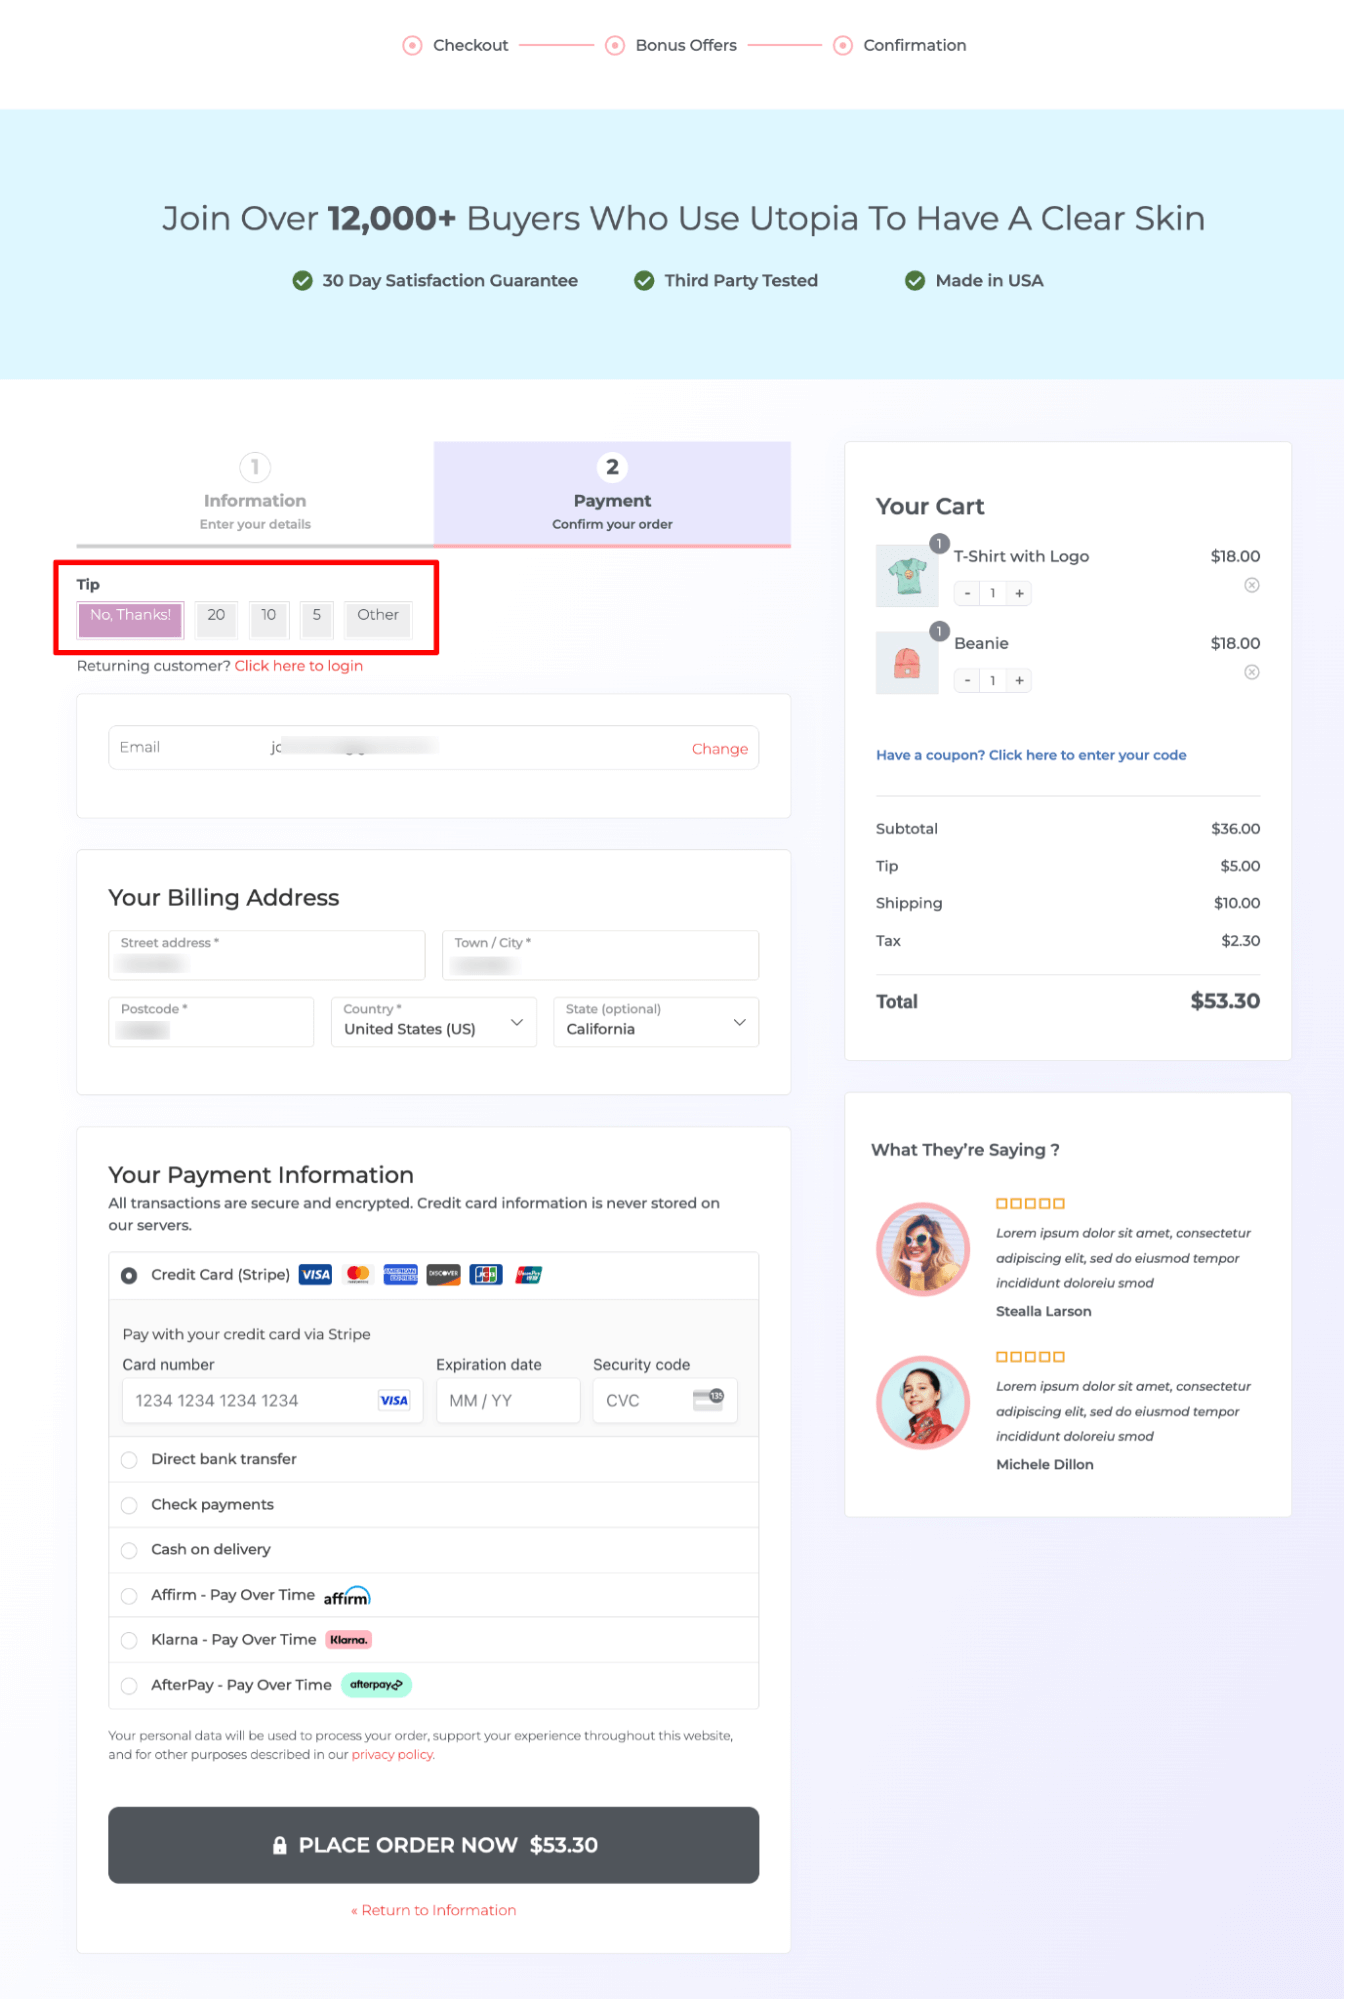
While the tip options work great on the default checkout page, it isn’t optimized for conversion.
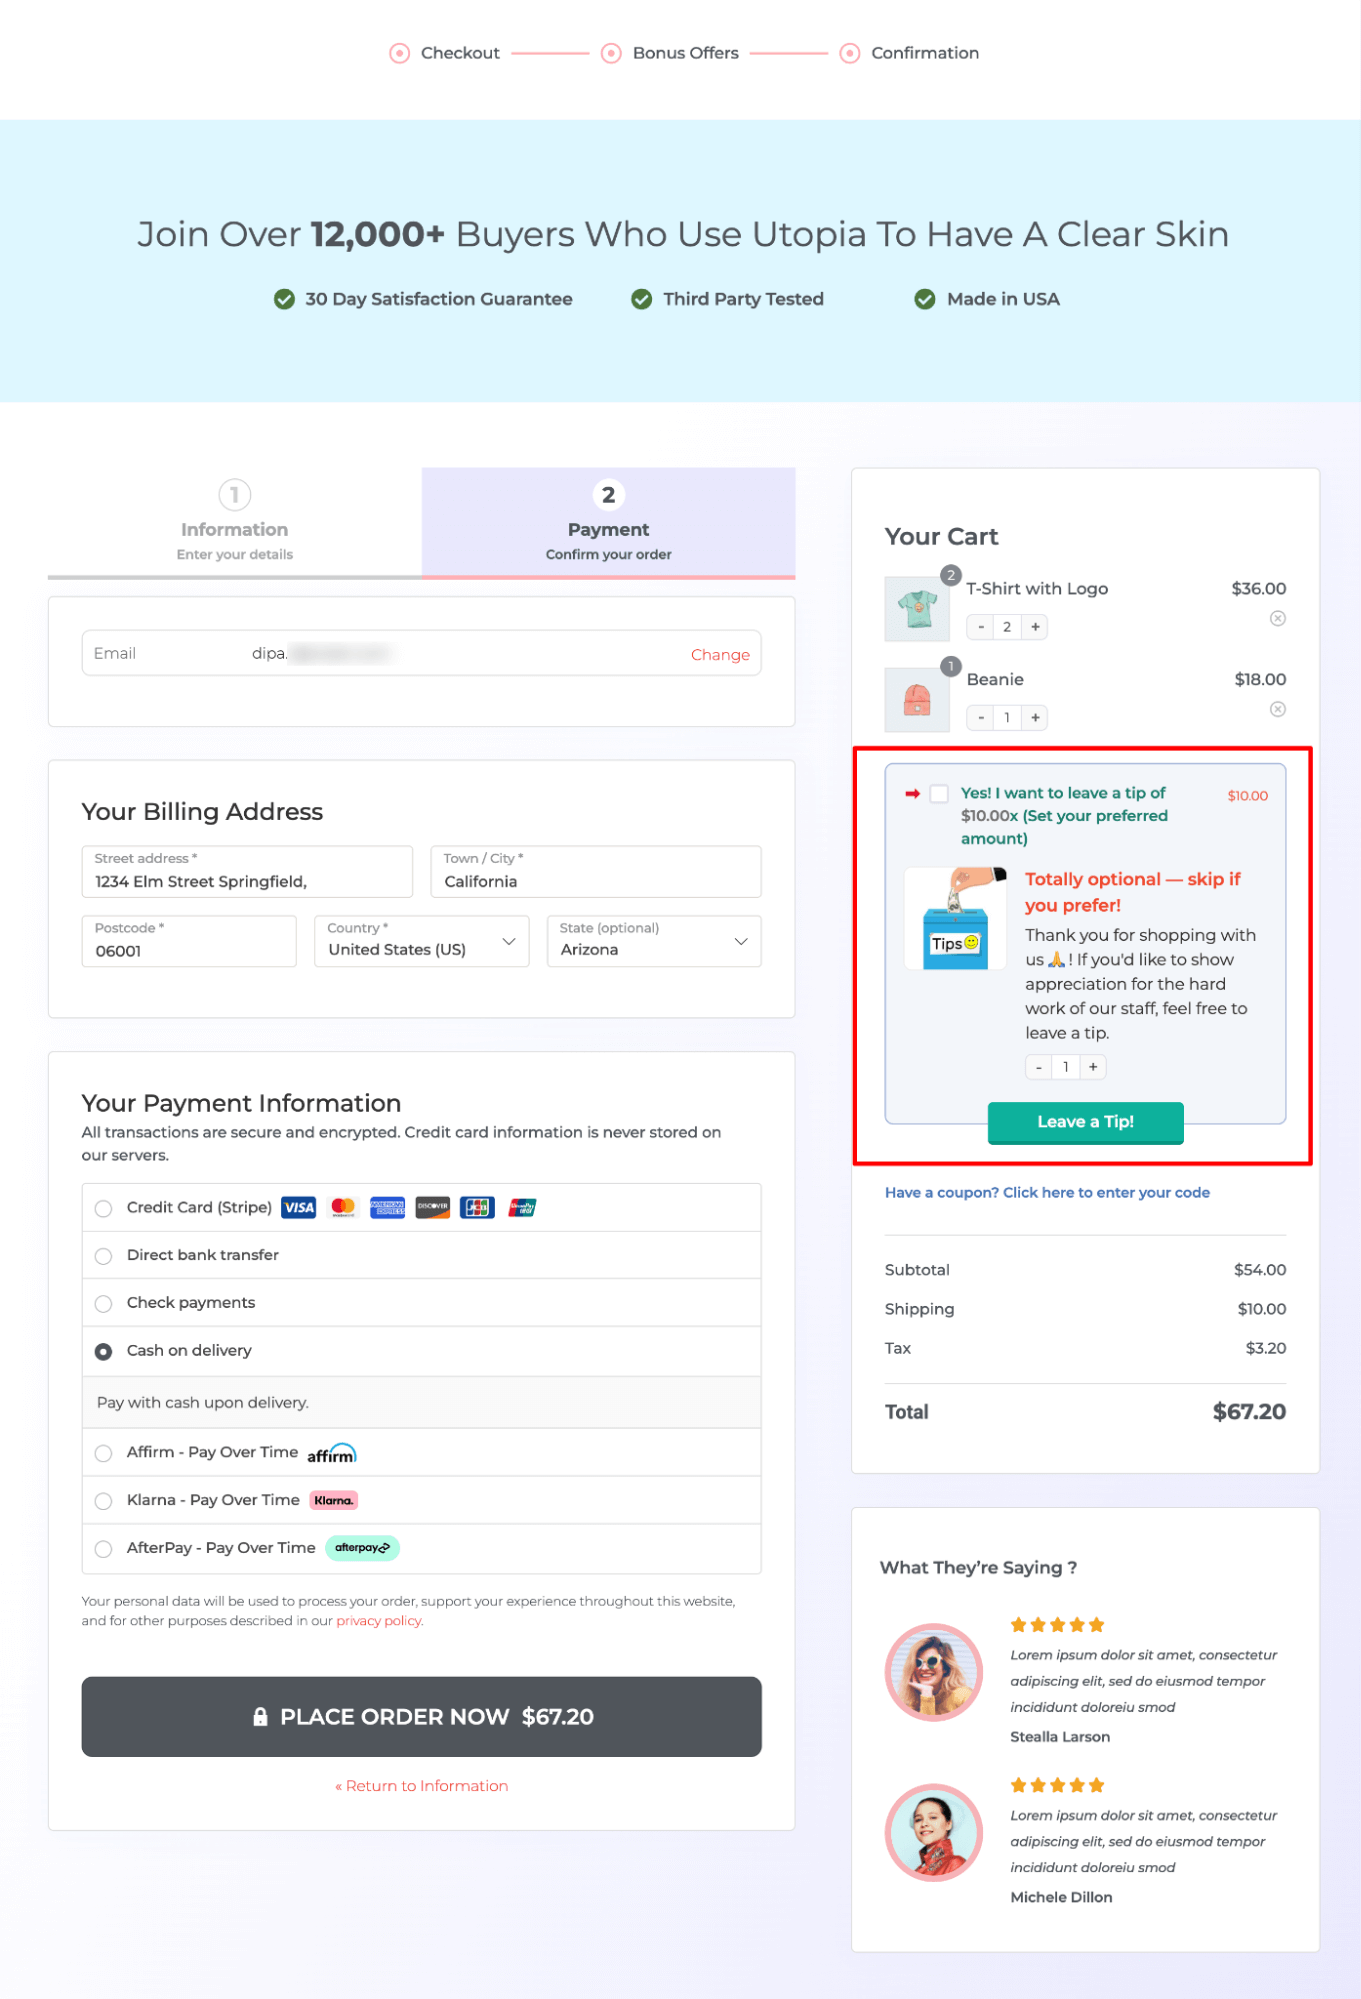
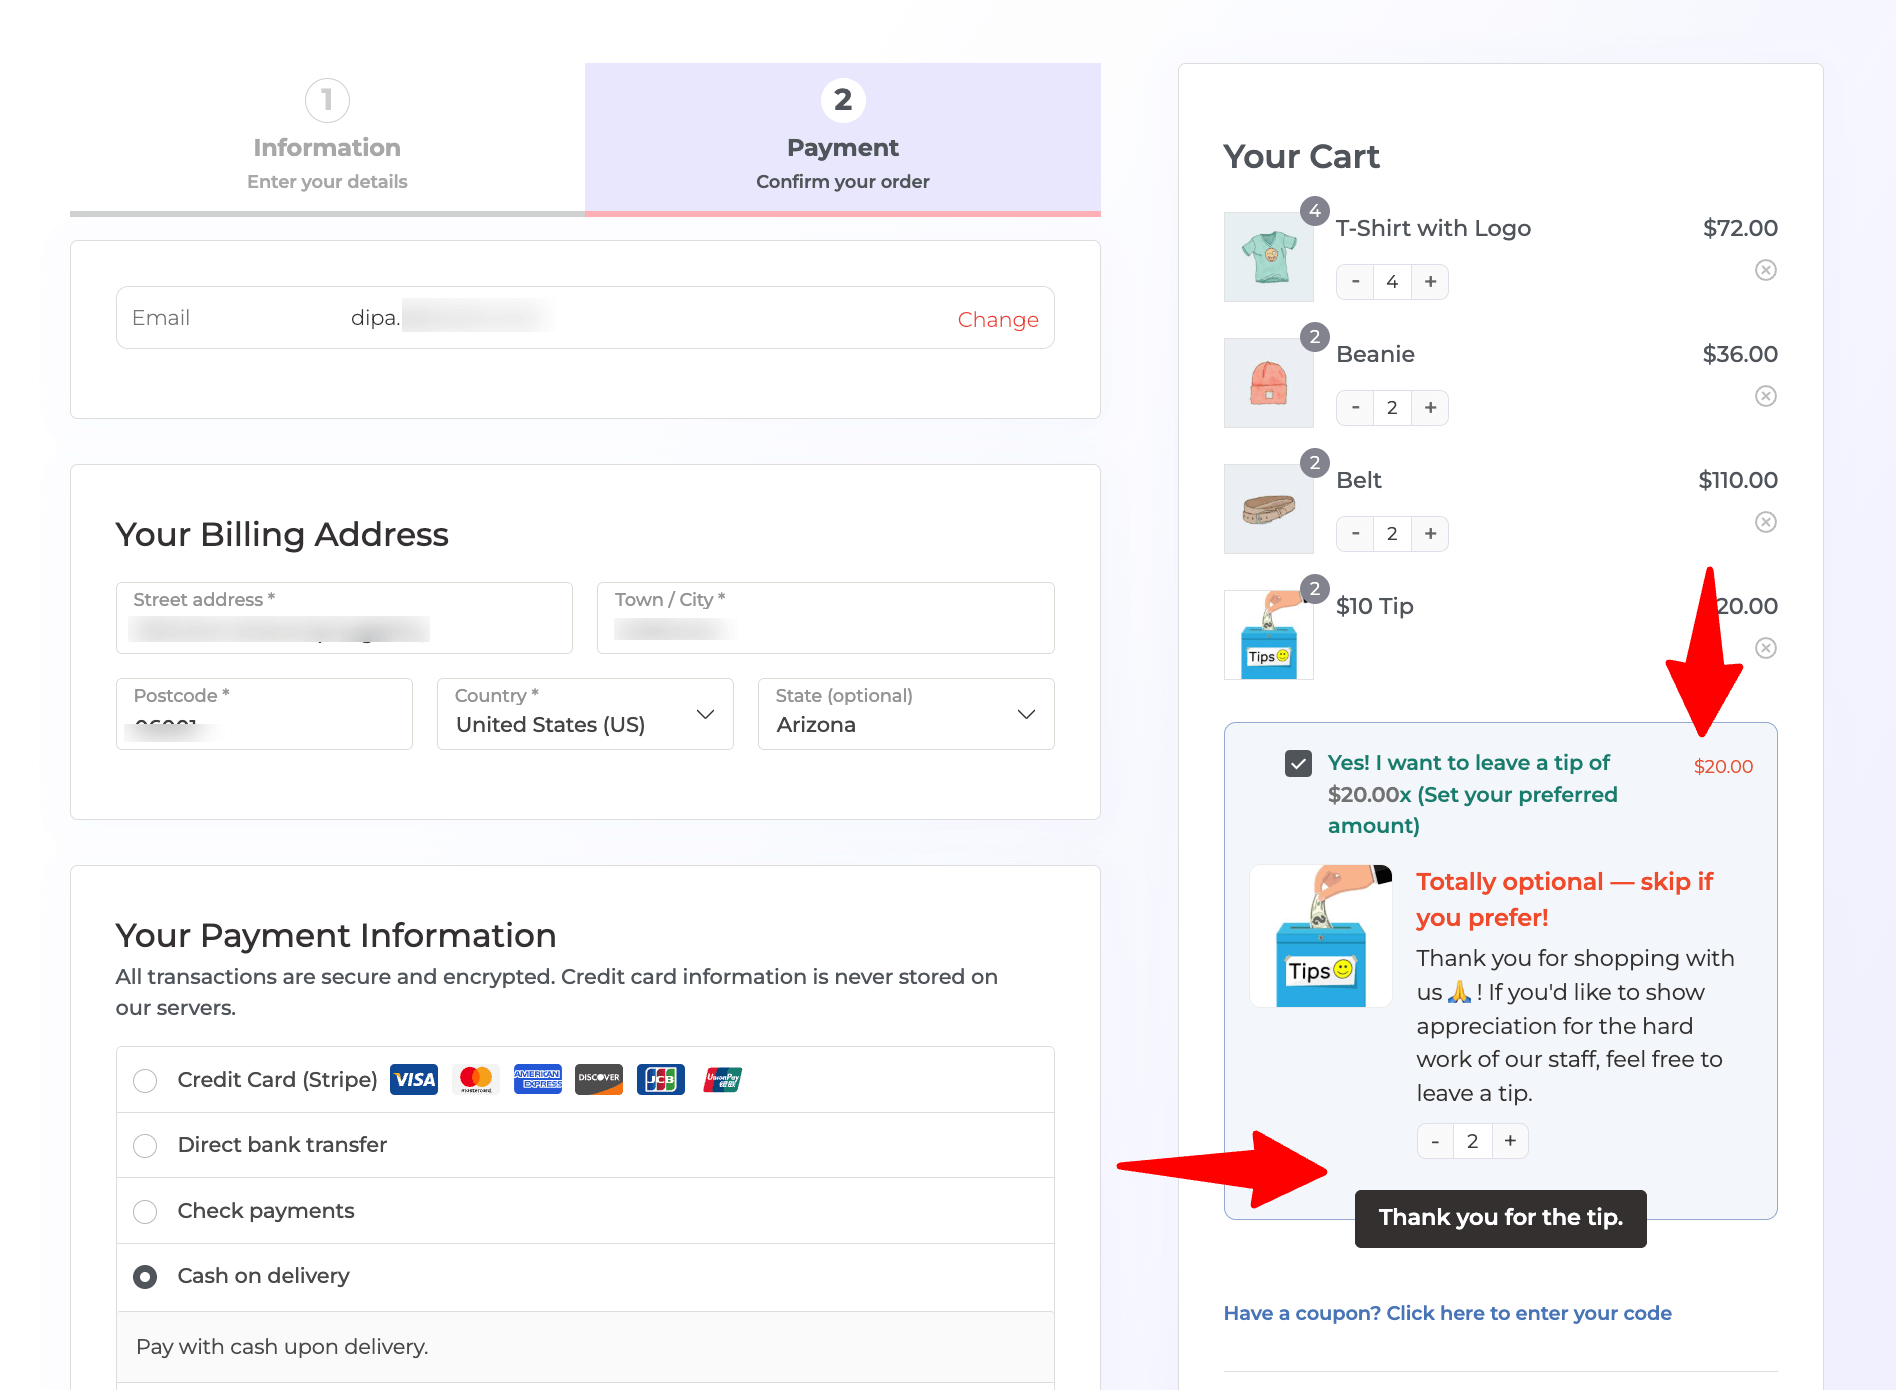
What if you could replace it with a beautiful conversion-optimized multi-step checkout page like the one shown below?
The beautiful multi-step plugin shown above in the image is built with FunnelKit Funnel Builder. To learn how to create a multi-step checkout like this, move to the next section.
Method 2: Add Tip Option and Optimize Your WooCommerce Checkout For Higher Conversions
In this method, you can provide users a base amount as a tip, and then they increase/decrease to adjust the amount they want to leave as a tip or skip it totally if they wish to.
For this option, you need to install and activate FunnelKit Funnel Builder, which is both free and pro.
Once done, follow these steps:
Step 1: Create a product to collect tips at checkout
First, you need to create a product with the price as the base value of the tip. For this, navigate to Products ⇒ All Products and then create a product. Make sure to add an appropriate image along with a name and description.
The most important thing is to set the price, which will be the basis of the tip. In addition, it's essential to hide the catalog visibility so the product doesn't show up on the shop page with other products.

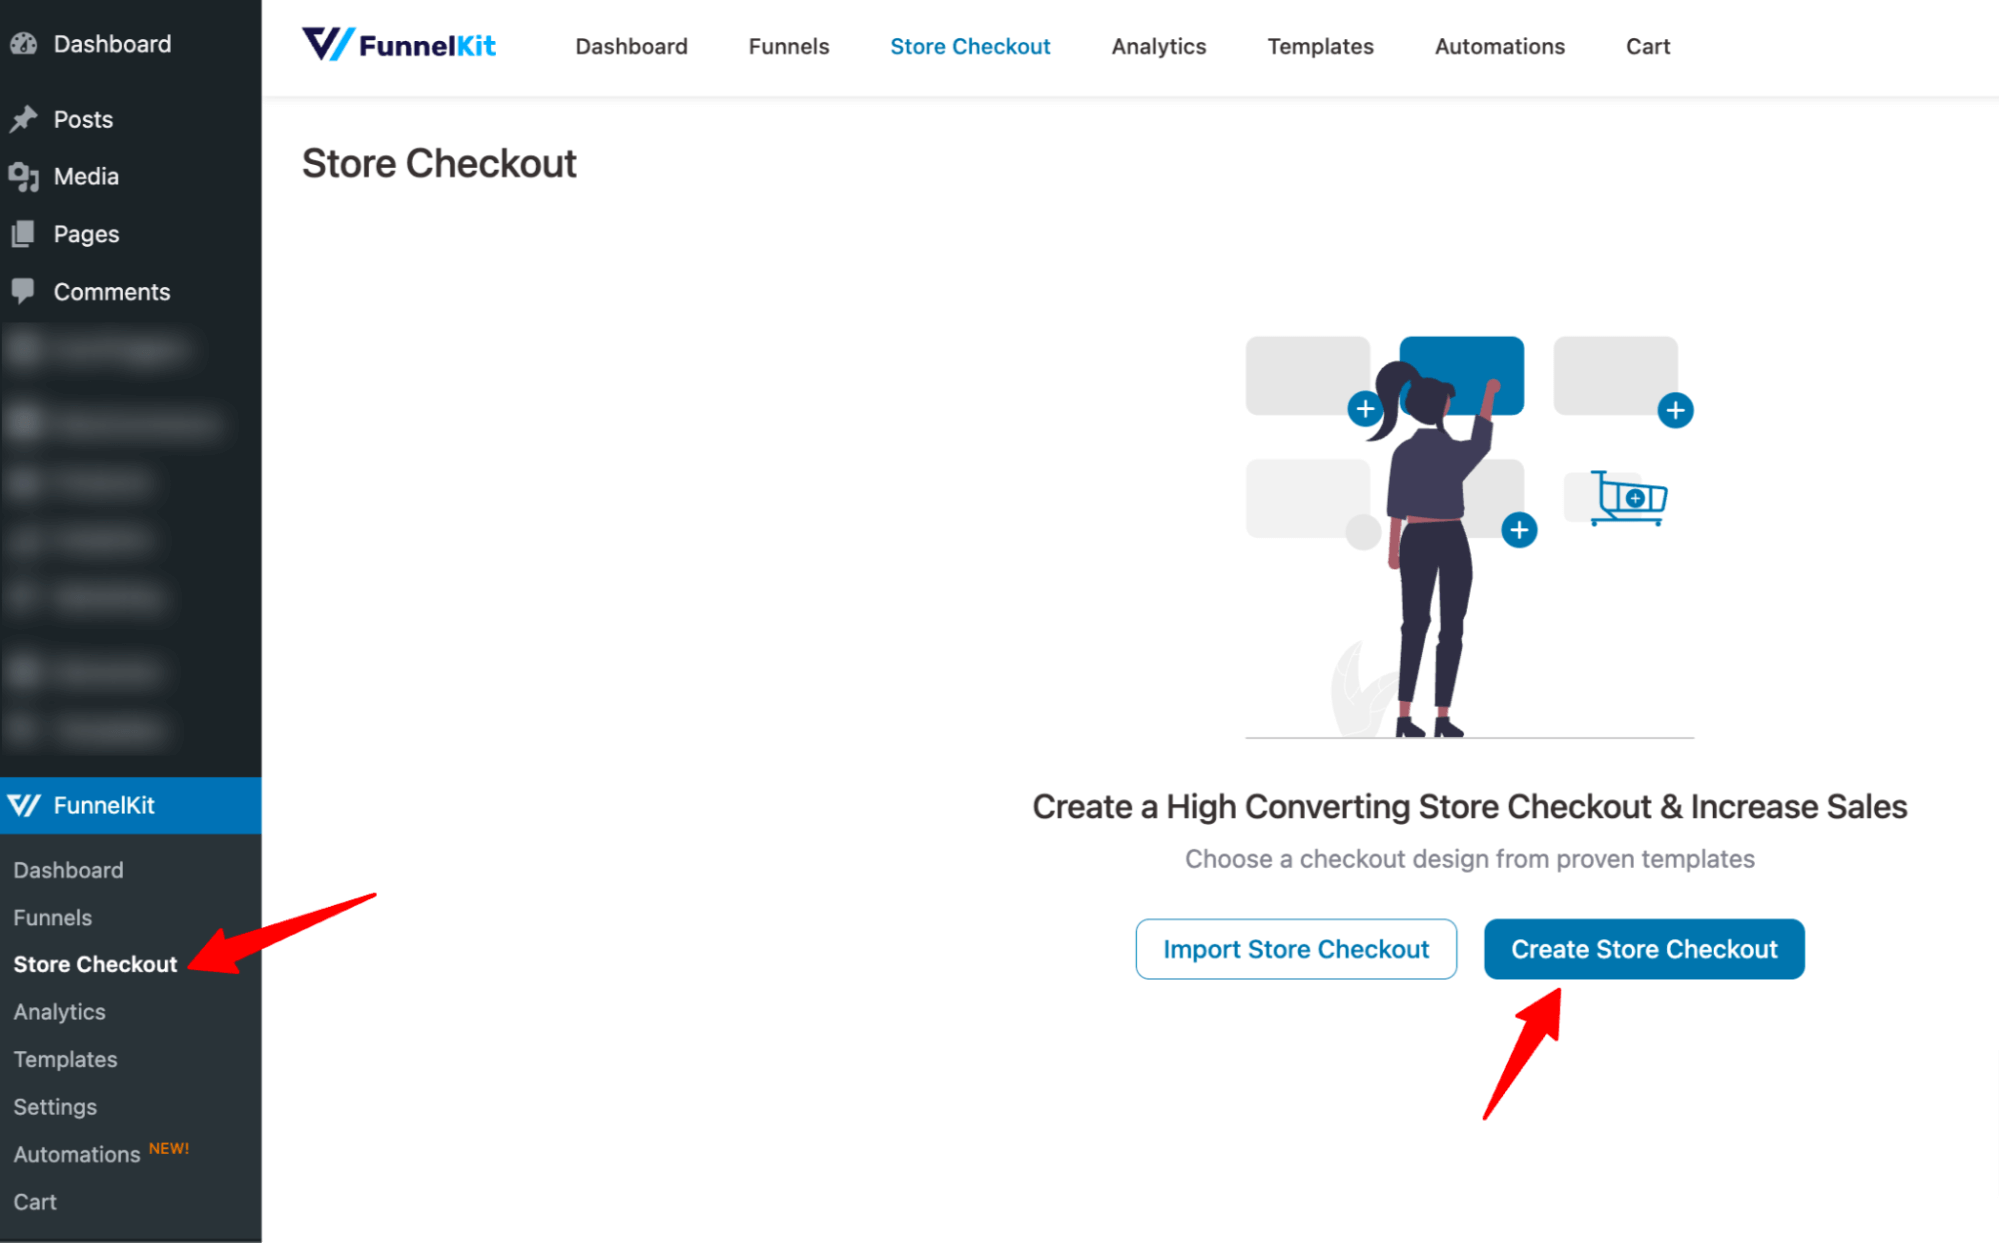
Step 2: Create a store checkout with a pre-built template
We need to create a store checkout that will replace the default WooCommerce checkout and thank you page.
To do so, navigate to FunnelKit ⇒ Store Checkout and click on the ‘Create Store Checkout’ button.
After that, select your page's favorite page builder and choose a template from the list of prebuilt checkout templates that FunnelKit provides.
To select one, hover on the template you like and click on ‘Preview’. We are going with Utopia here.
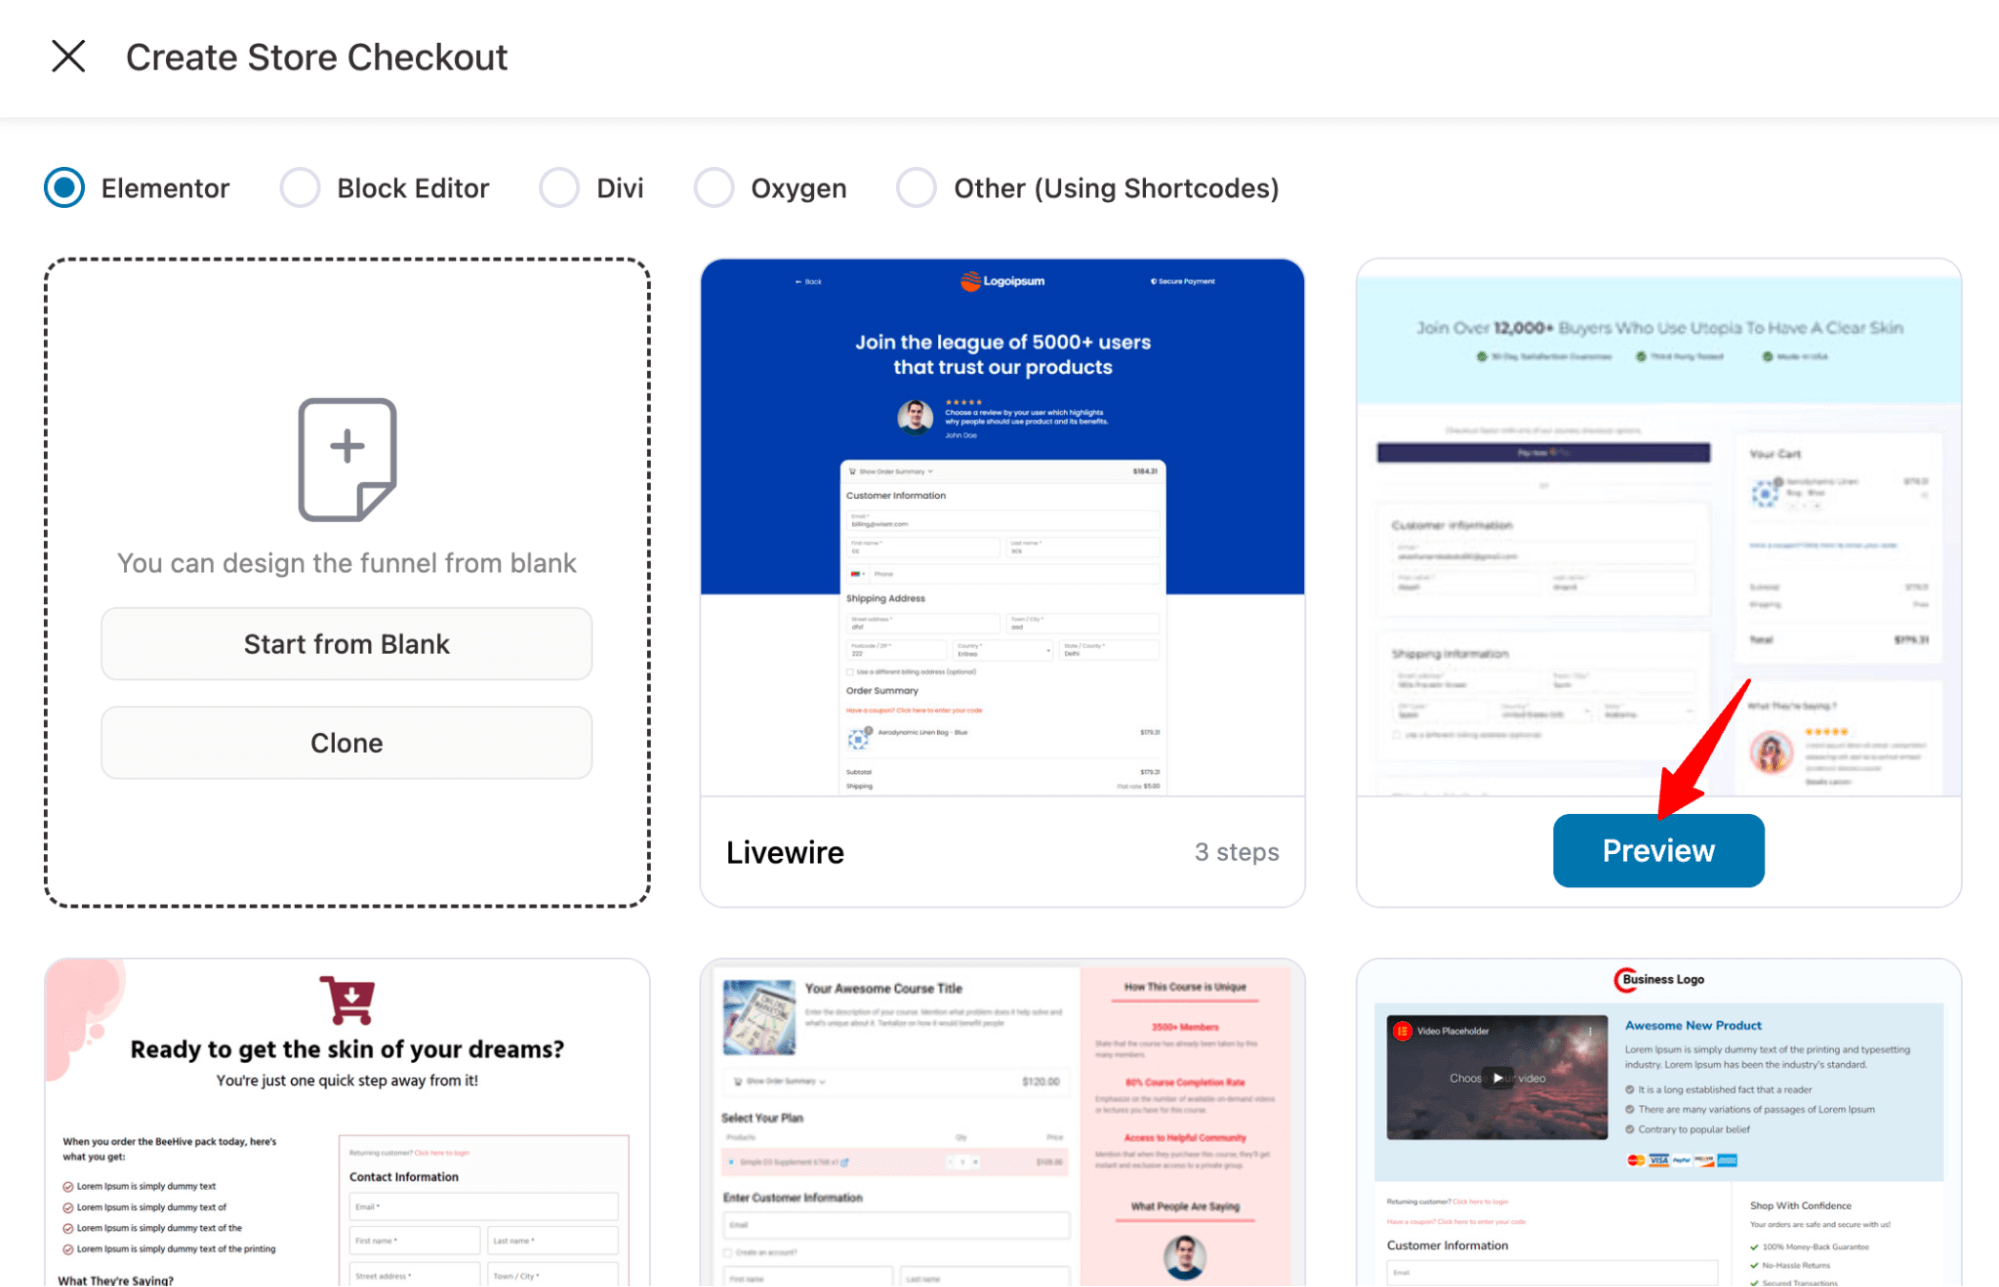
Now, choose whether you want a one-page or multi-step checkout page. We are going with a one-step checkout page here.
After that, click on “Import This Funnel” to import the template. Provide a name and click on “Add” to import the template.
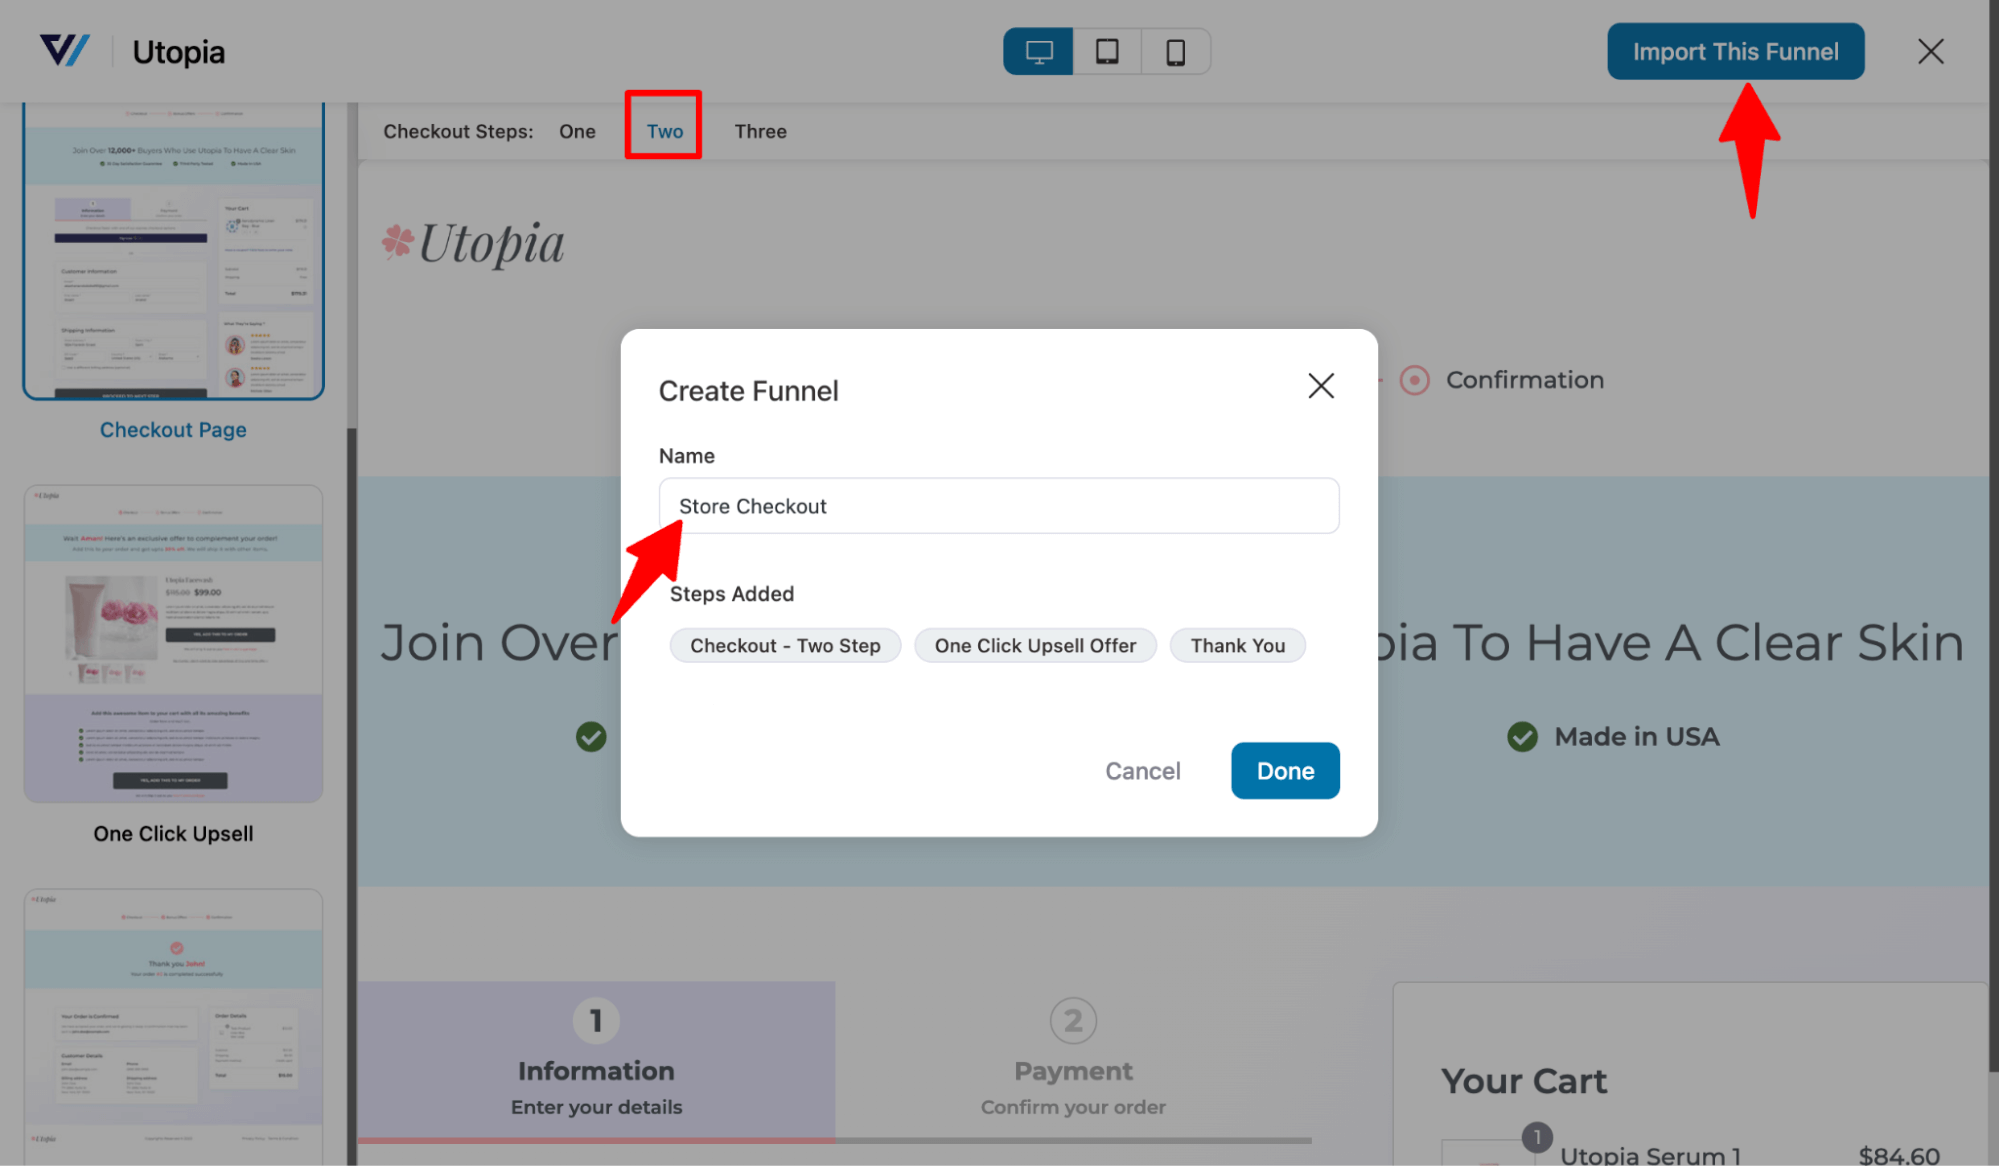
This will replace the default checkout page with a custom one.
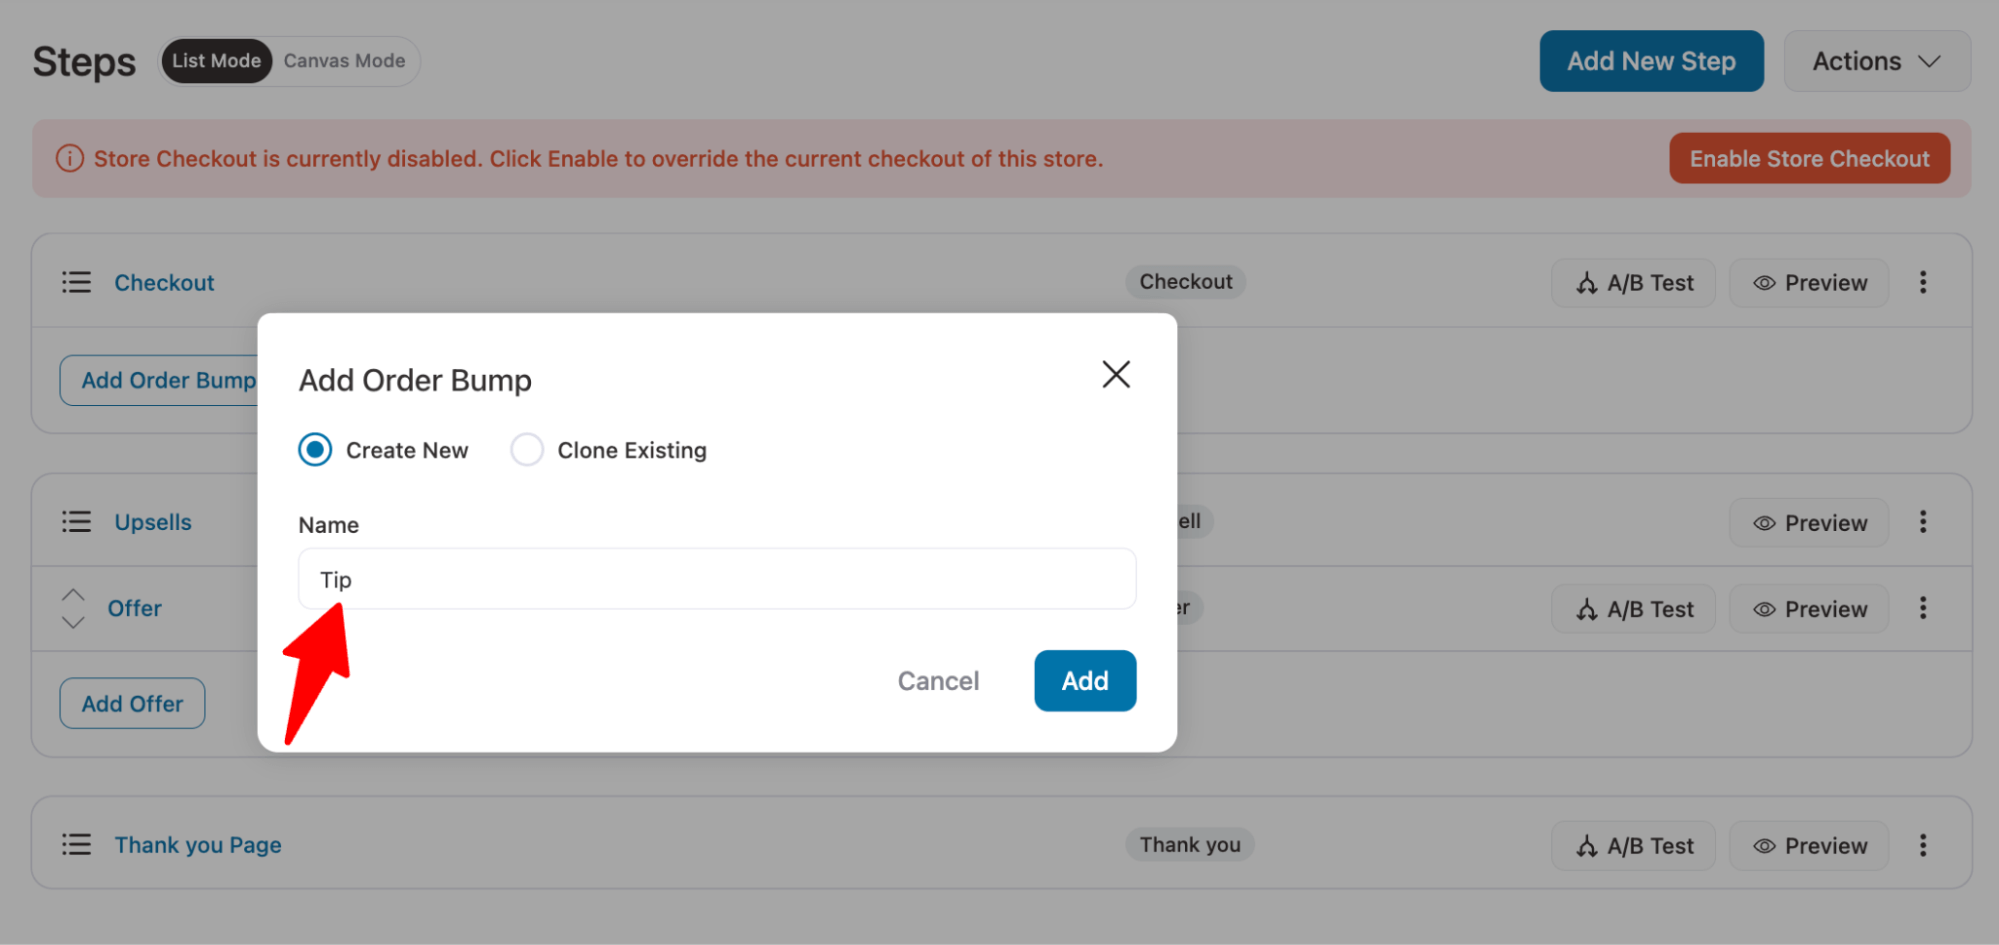
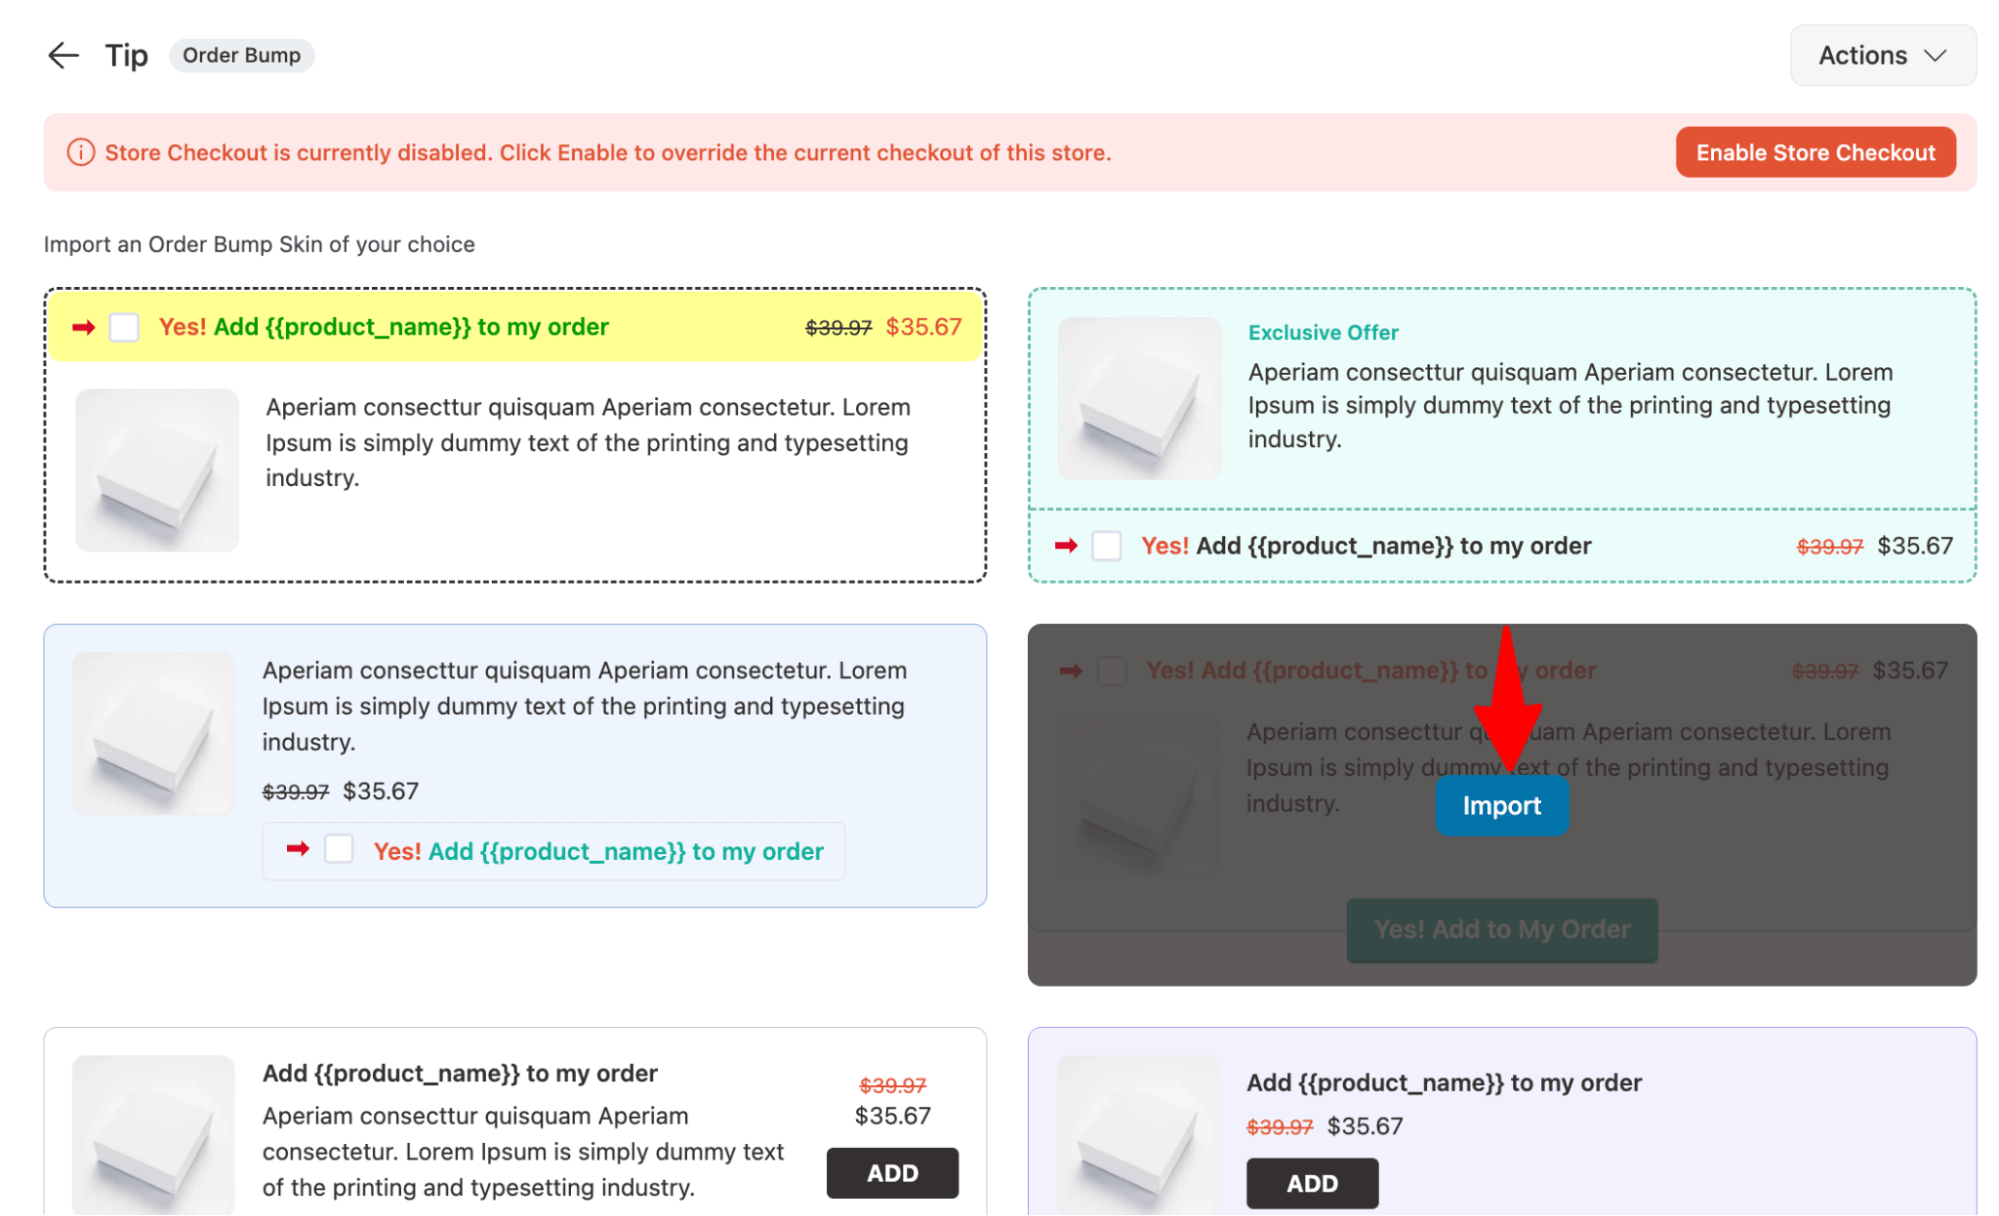
Step 3: Create an order bump to add a tip option
For this, click the ‘Add Order Bump’ button below your checkout page. Then hit order bump WooCommerce order bump ideas.
Next, enter the name and hit ‘Add’ to add the newly created order bump that we will use to collect the order tip on the checkout page.
Next, choose the order bump skin by clicking on the 'Import' button.
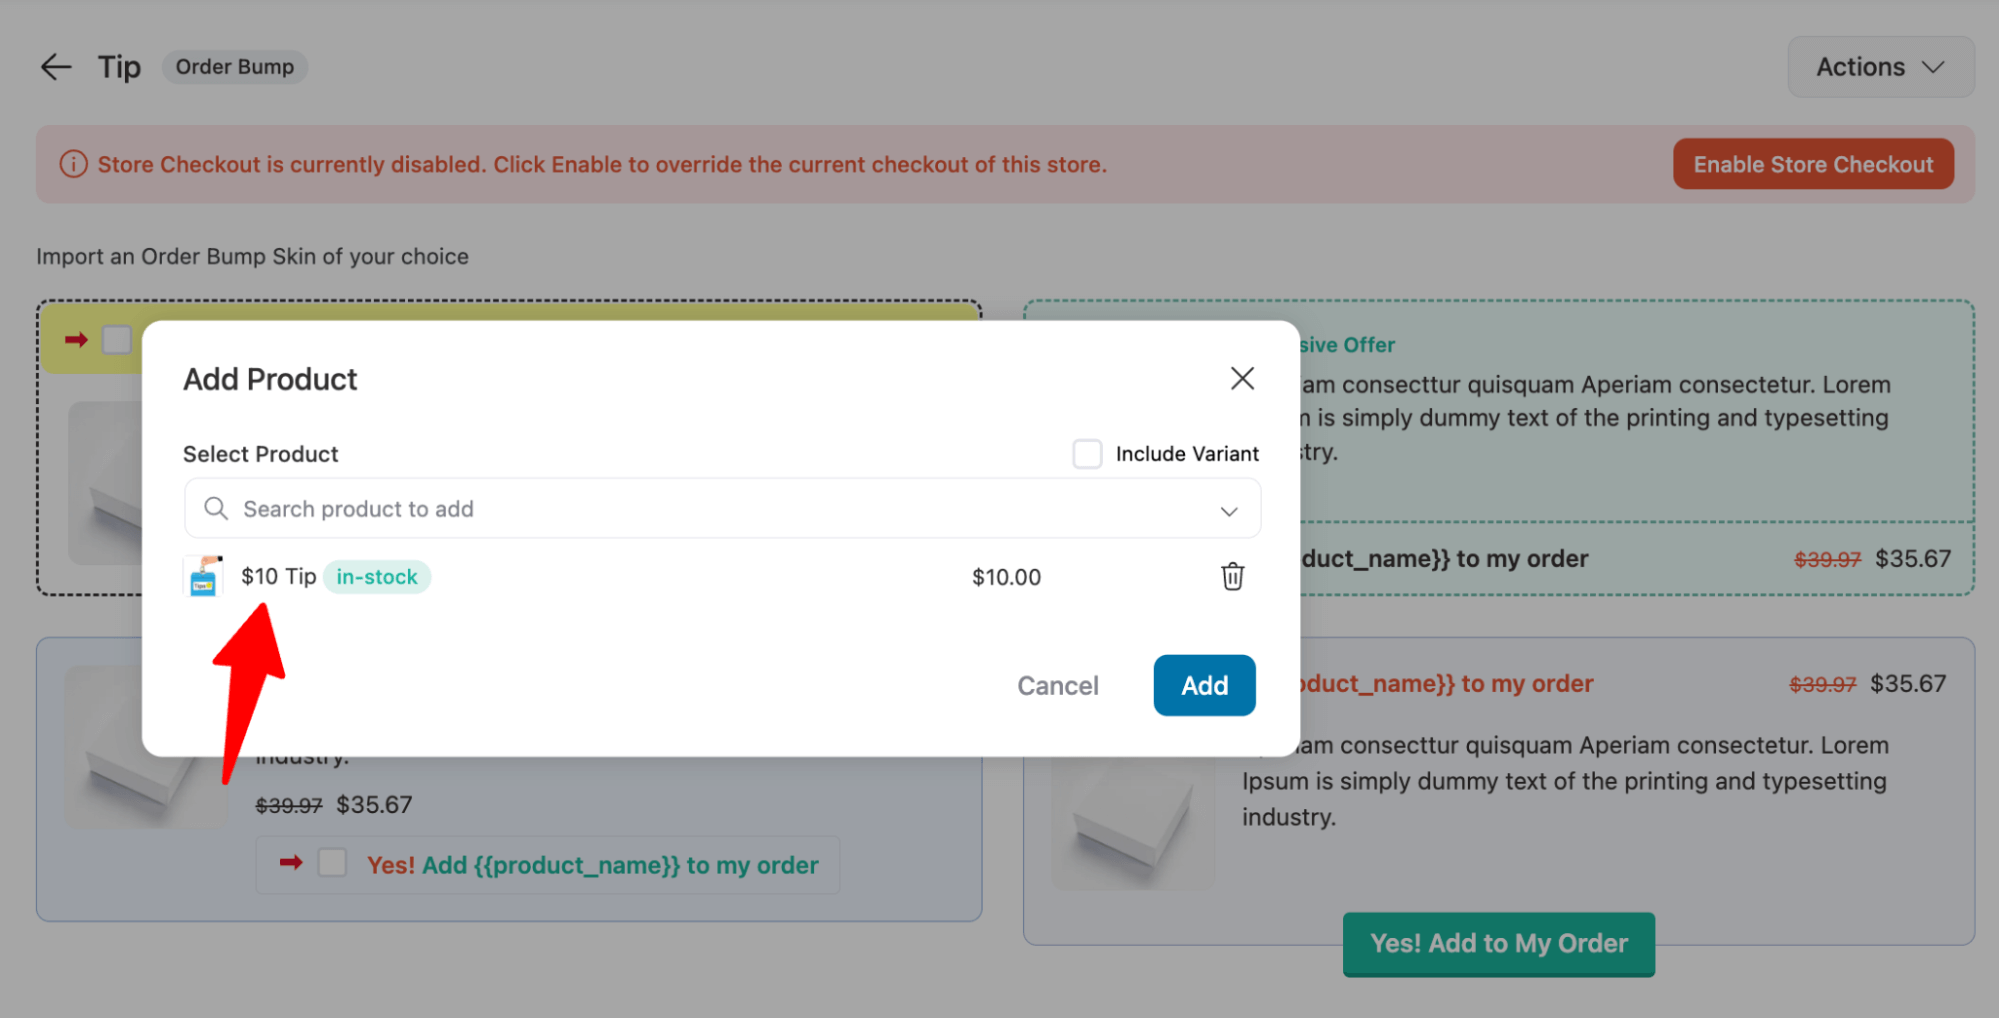
Step 4: Add the tip product and customize the order bump
Next, search for and add the product you created in the first step.
Moving on, customize the content, such as the title, description, button text, etc., to fit your ask for a tip.
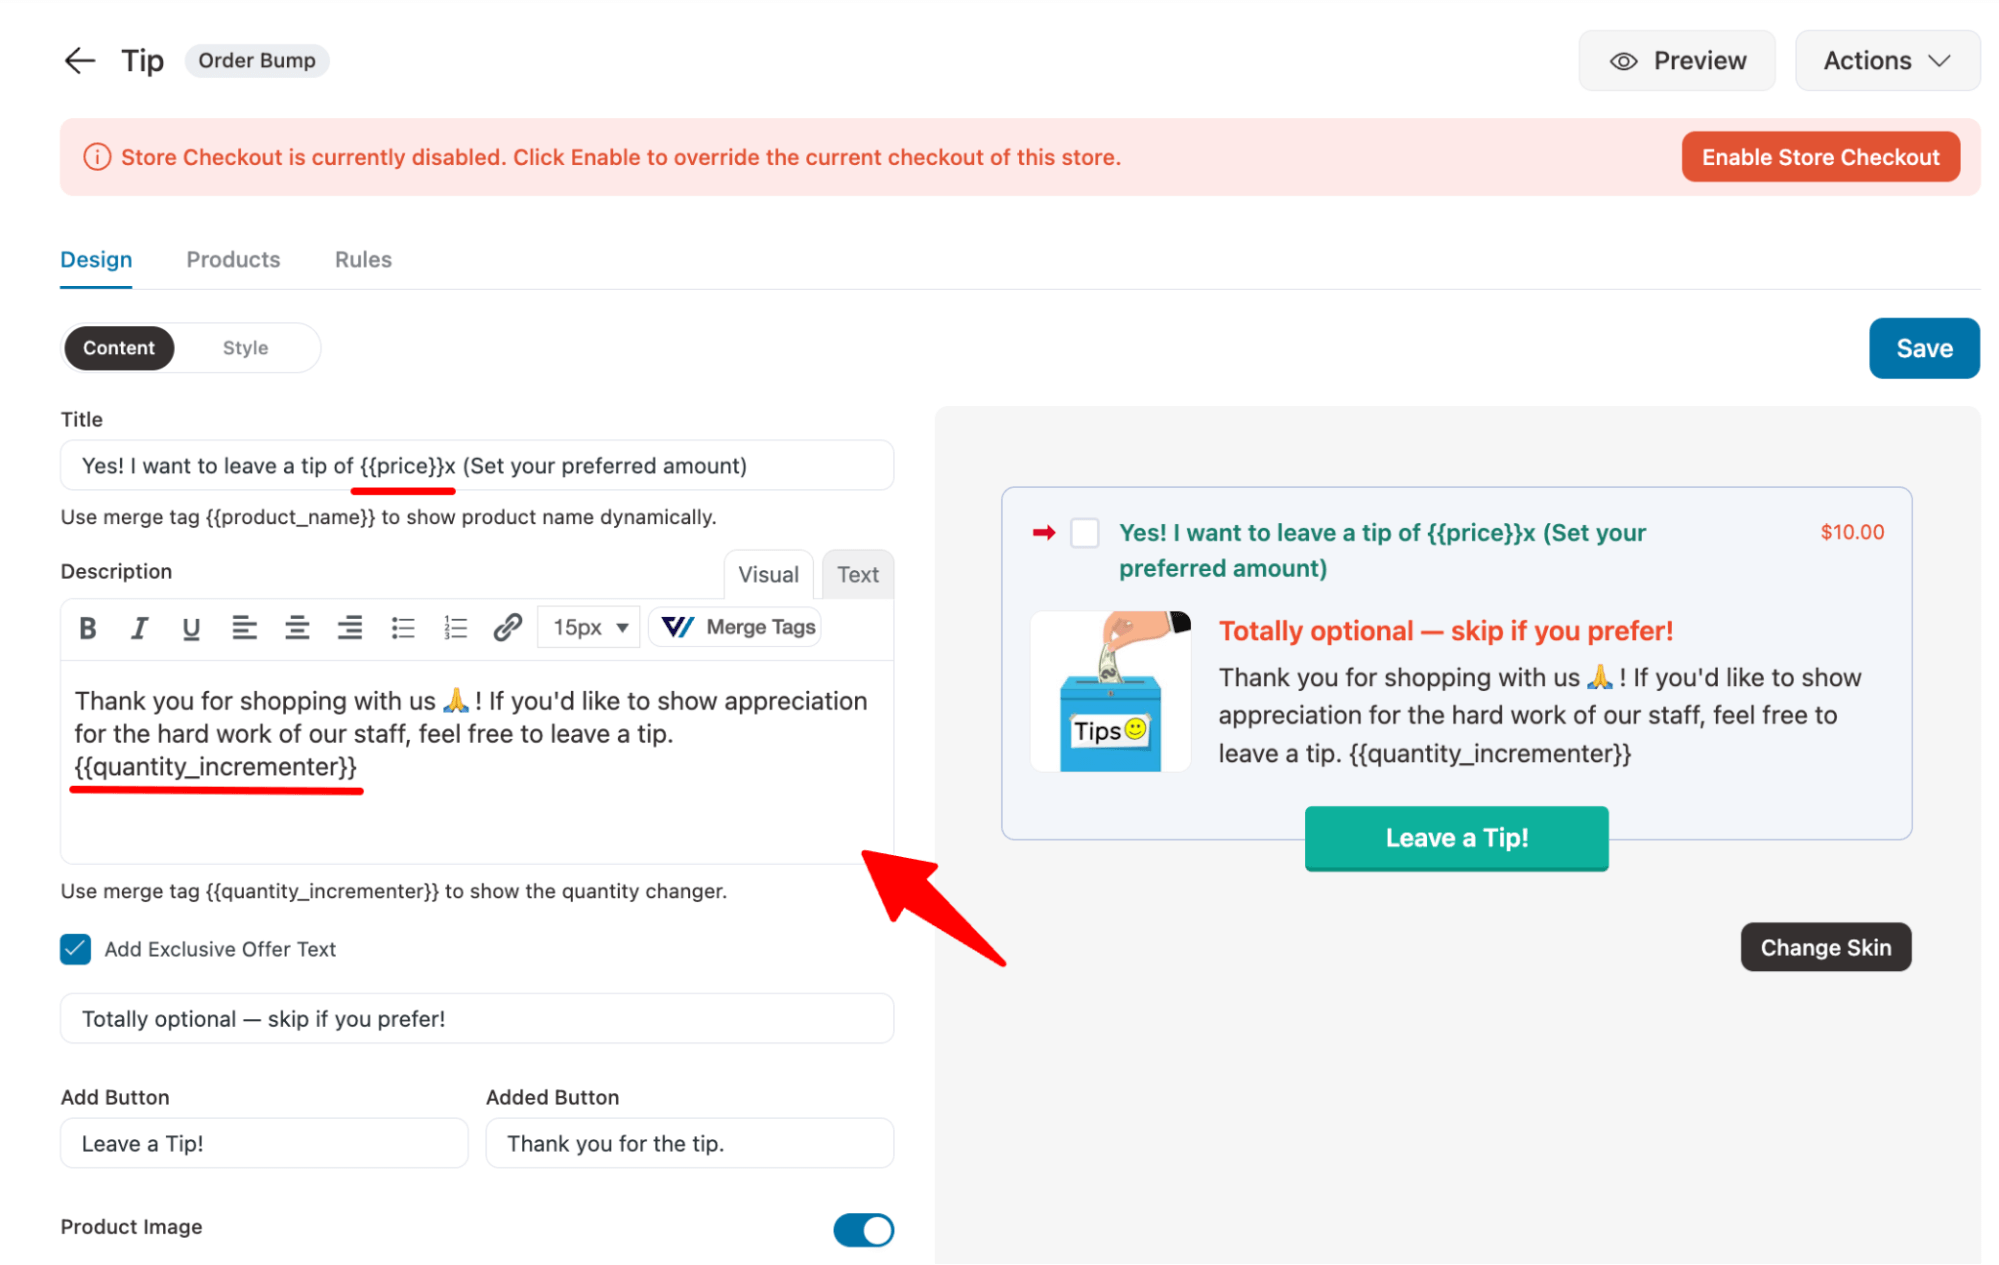
On the Style tab, you can set the position of the tip option on the checkout page. Plus, customize different style options for the Layout, Call To Action Text, Buttons, Image, Description, Price, and Exclusive Offer Text.
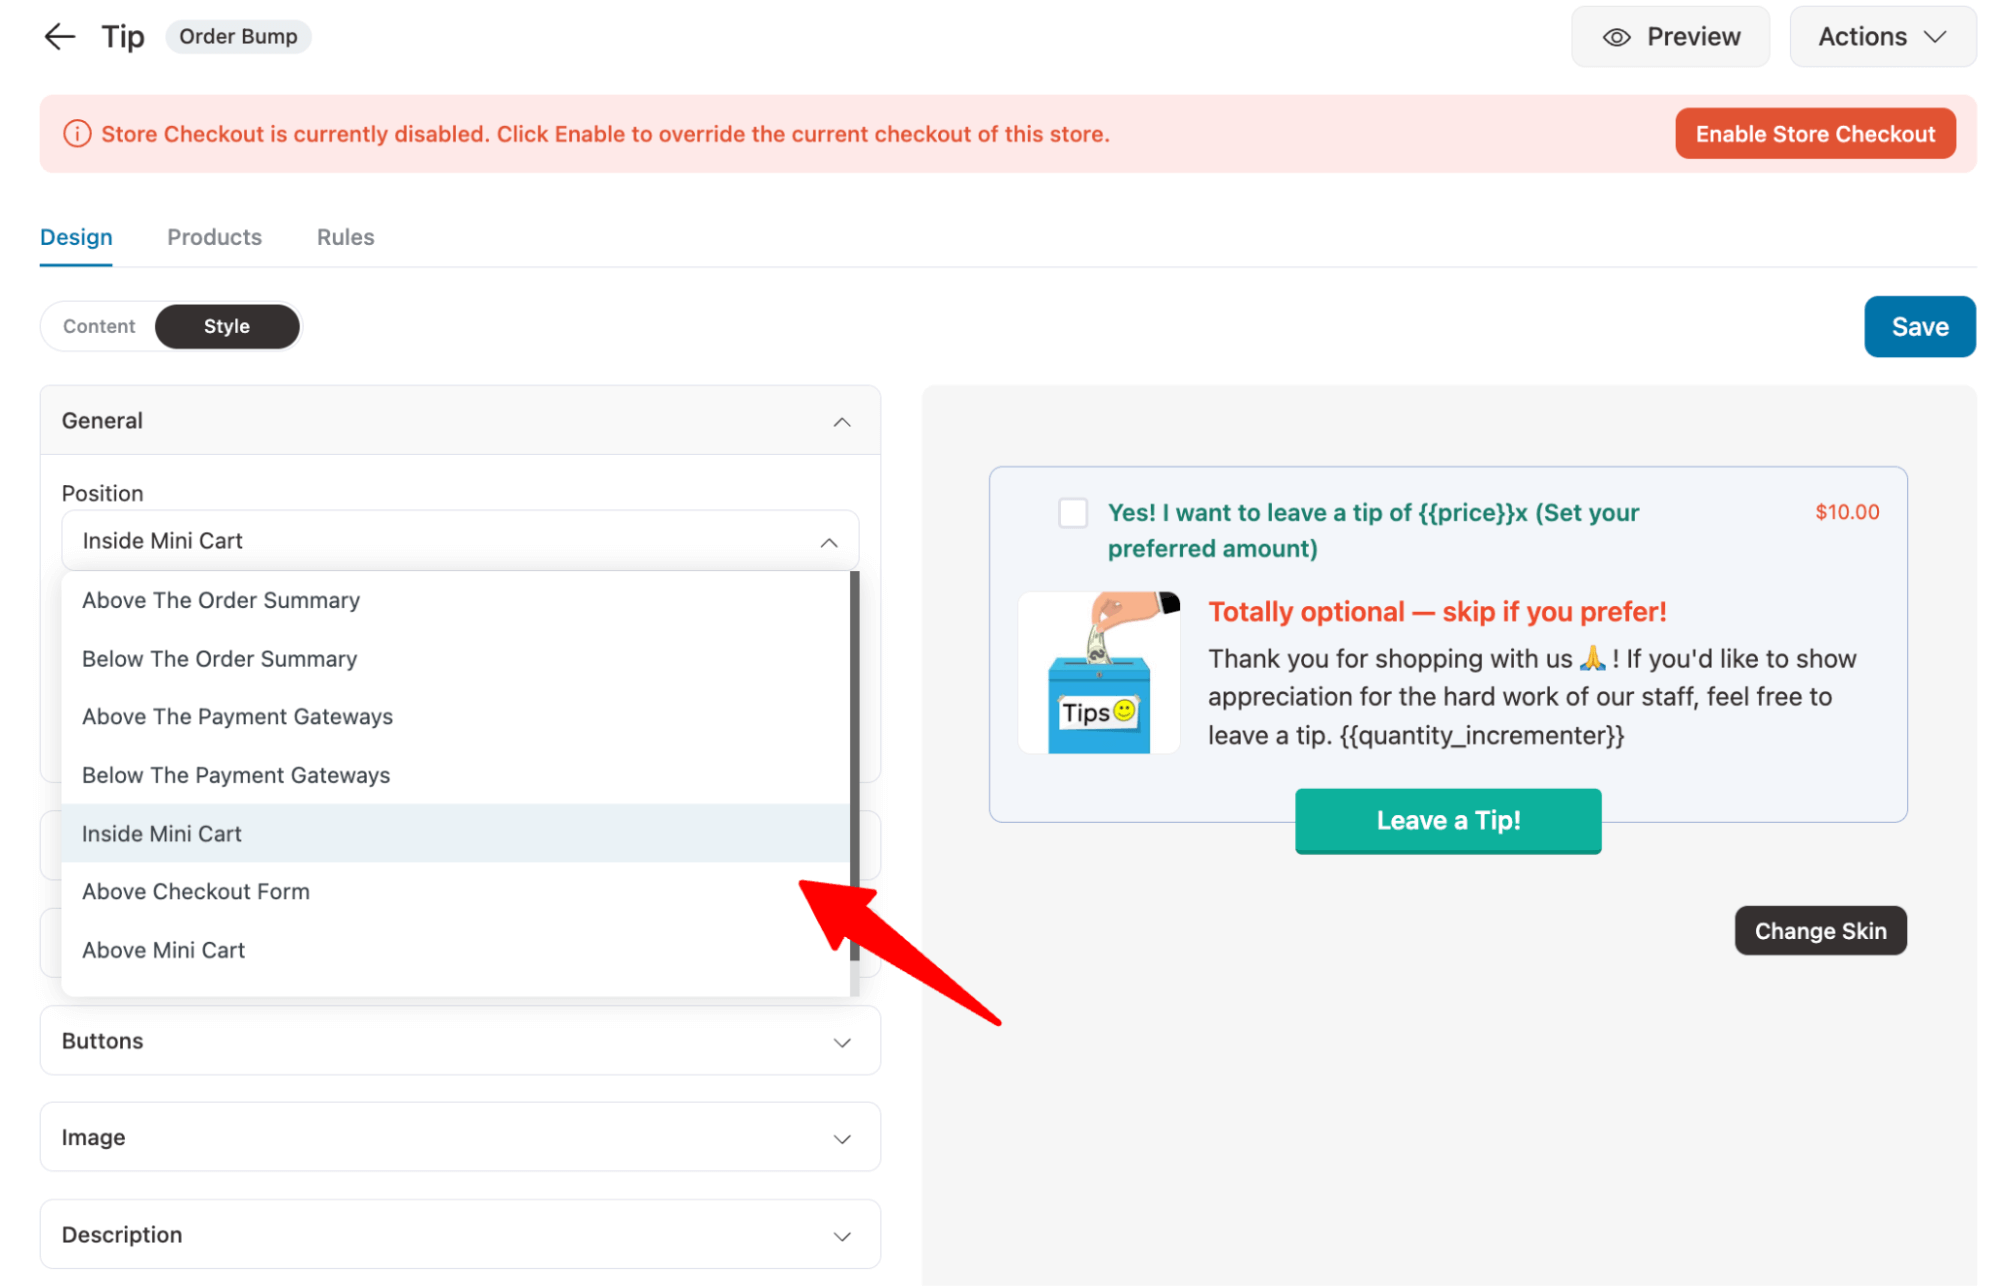
After making the changes, make sure to hit Save.
Step 5: Restrict tip to certain orders (optional)
This is optional, but if you want, you can restrict this tip option based on different conditions. For instance, maybe you only want to ask for a tip if the order is big, let’s say if the cart total is over 200 or is from a specific product category. You can easily do that with FunnelKit.
For this, move to the Rule tab and set the rule Cart Total is greater than 200.
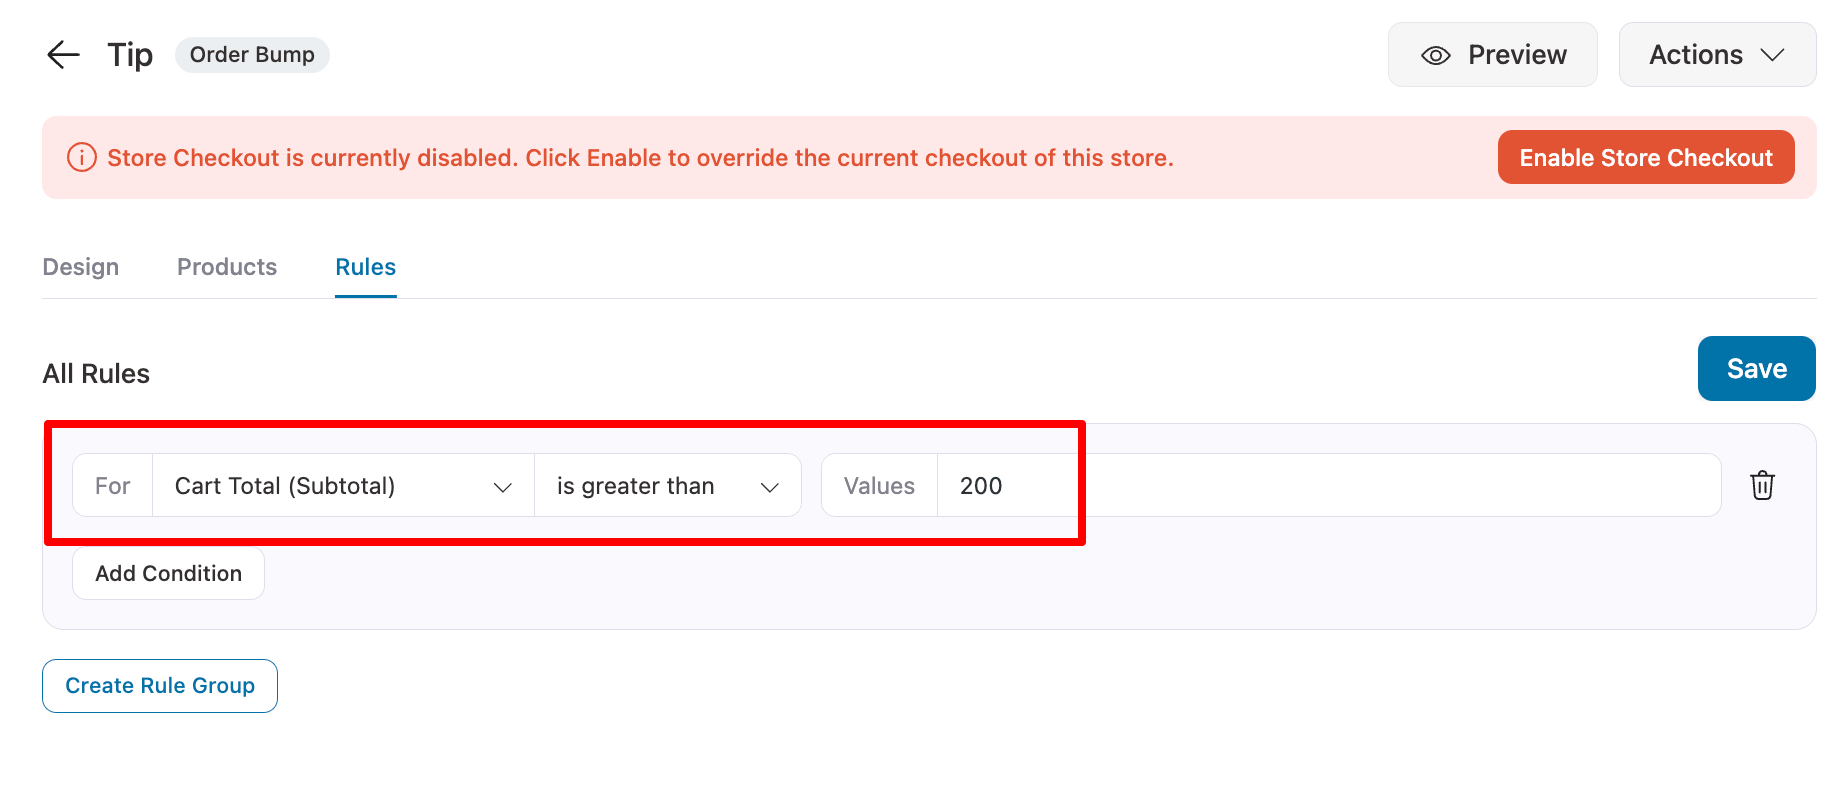
Don’t forget to hit the Save button to update the changes.
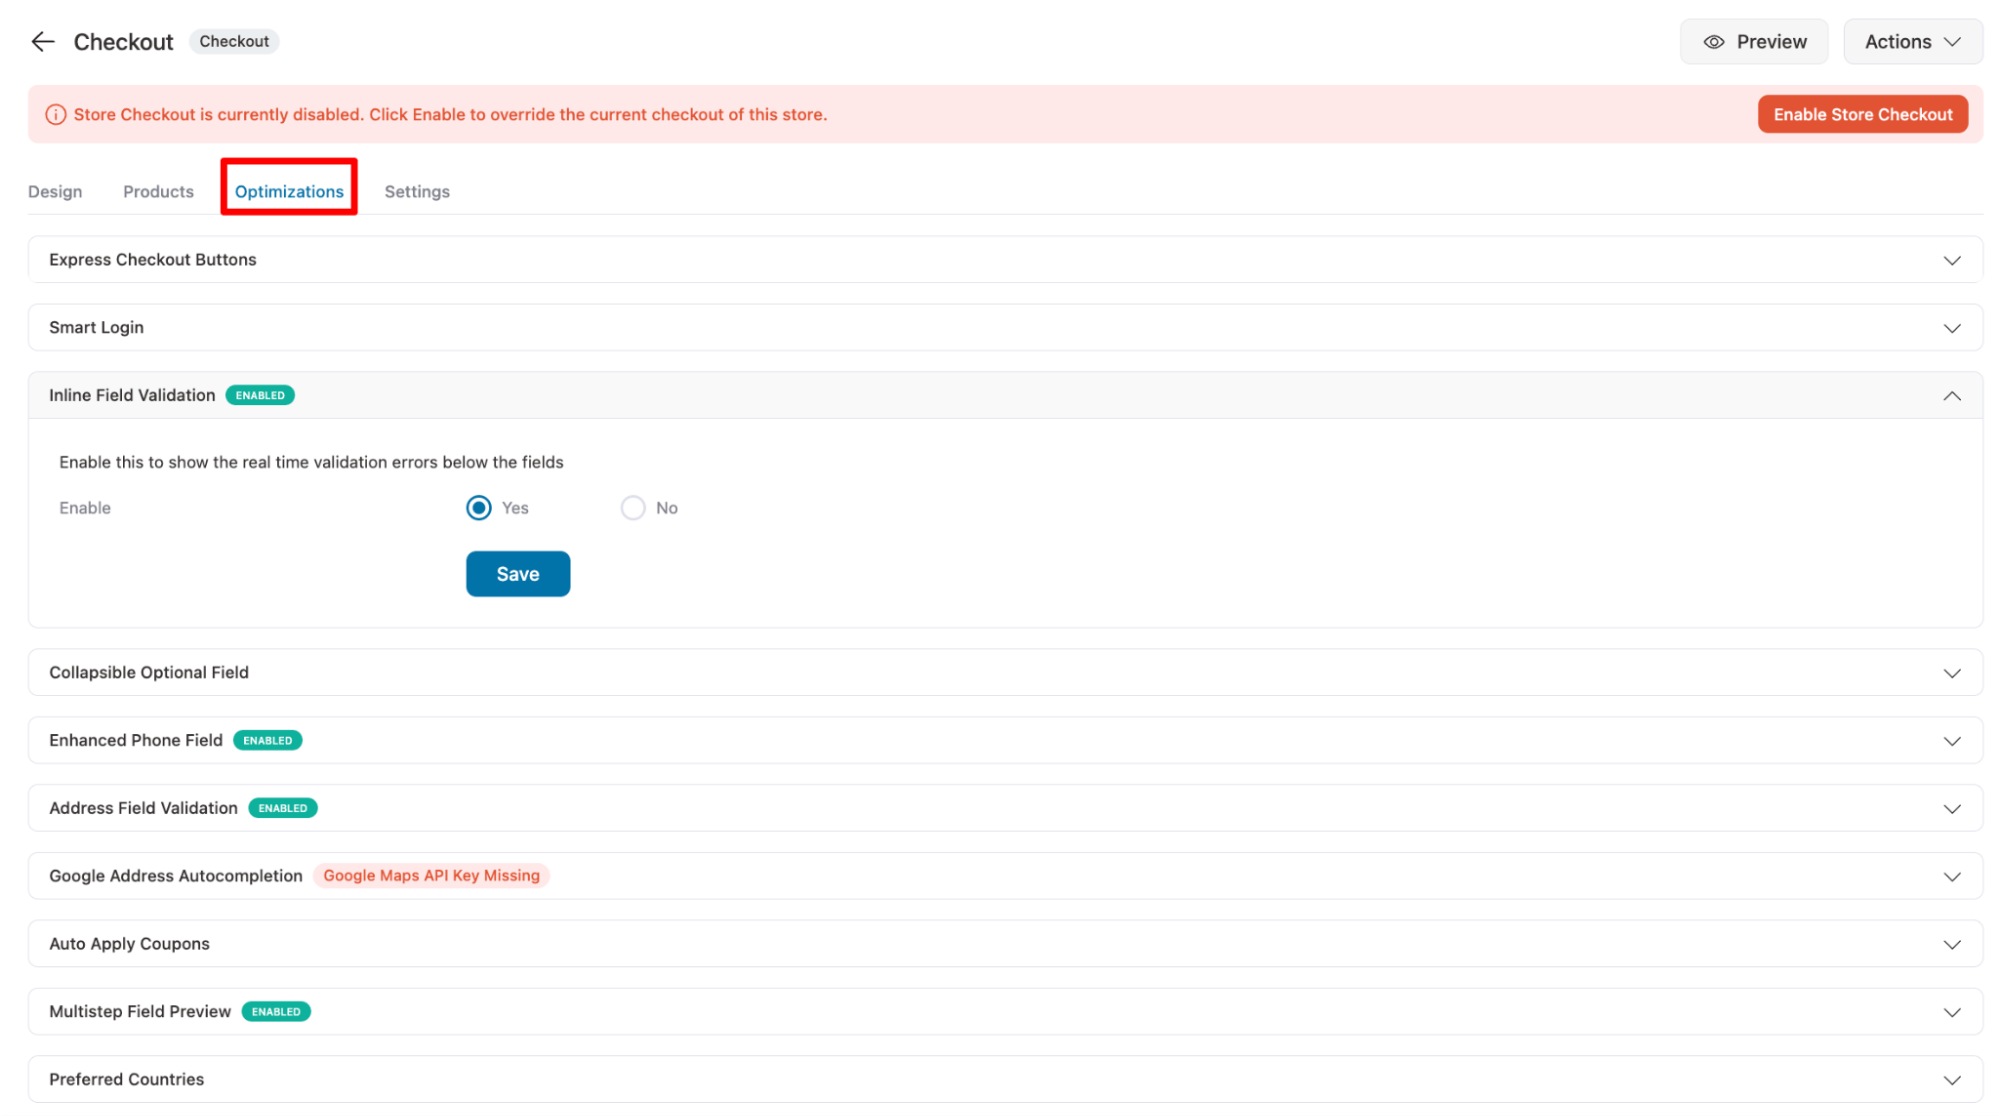
Step 6: Optimize checkout page for higher conversion
To optimize the checkout page for higher conversion, hit the checkout page and move to the optimization tab. Here, you can use different features to optimize your checkout page for conversion, including
- Add inline validation
- Smart login
- Make optional fields collapsible to shorten the checkout form length
- Add express checkouts like Apple Pay and Google Pay
- Enable Google Address auto-completion
- Auto-apply coupon codes
- Enhanced phone field, and so on.
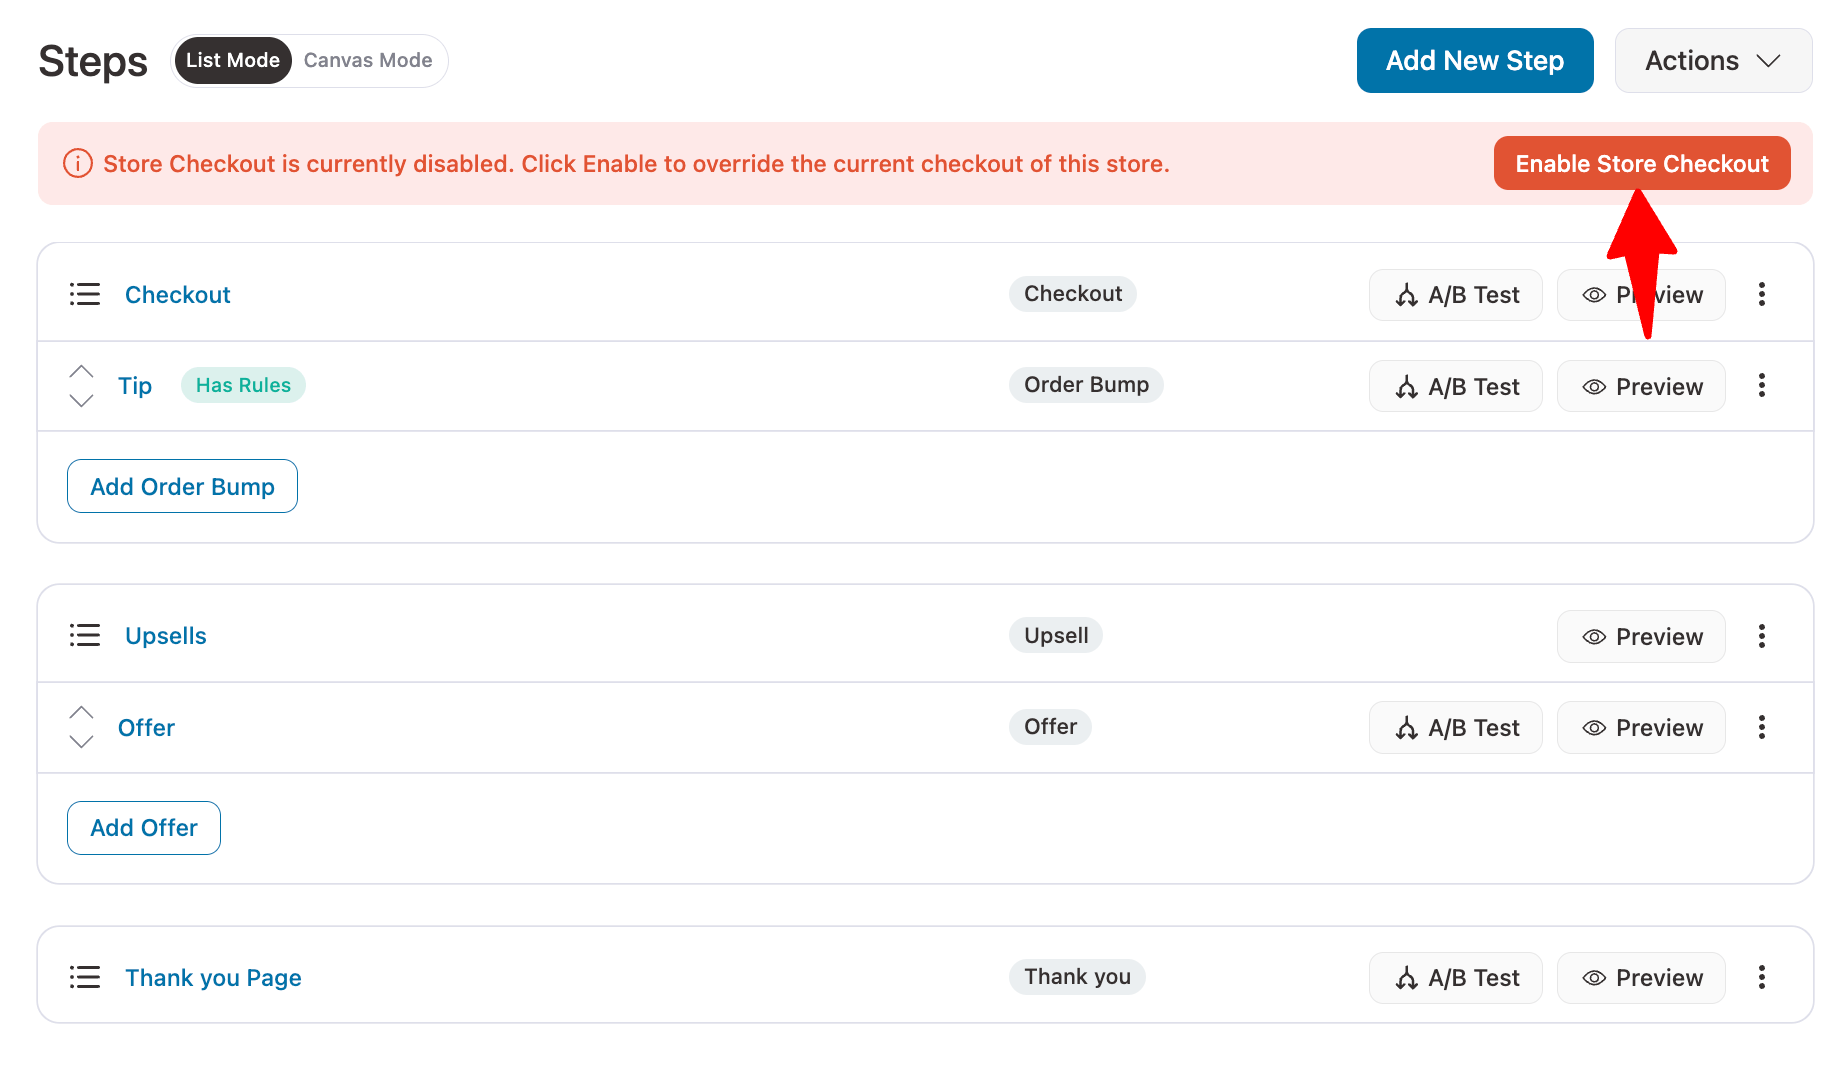
Step 7: Enable store checkout
After setting all the tips and additional offers, you can customize the order confirmation page as well.
The last and important step is to enable the store checkout. For this, hit the “Enable Store Checkout” button.
Now, if when someone shops in your store and fulfills the condition (if it has a rule), they will find the option to add a tip. Initially, they will see the value.
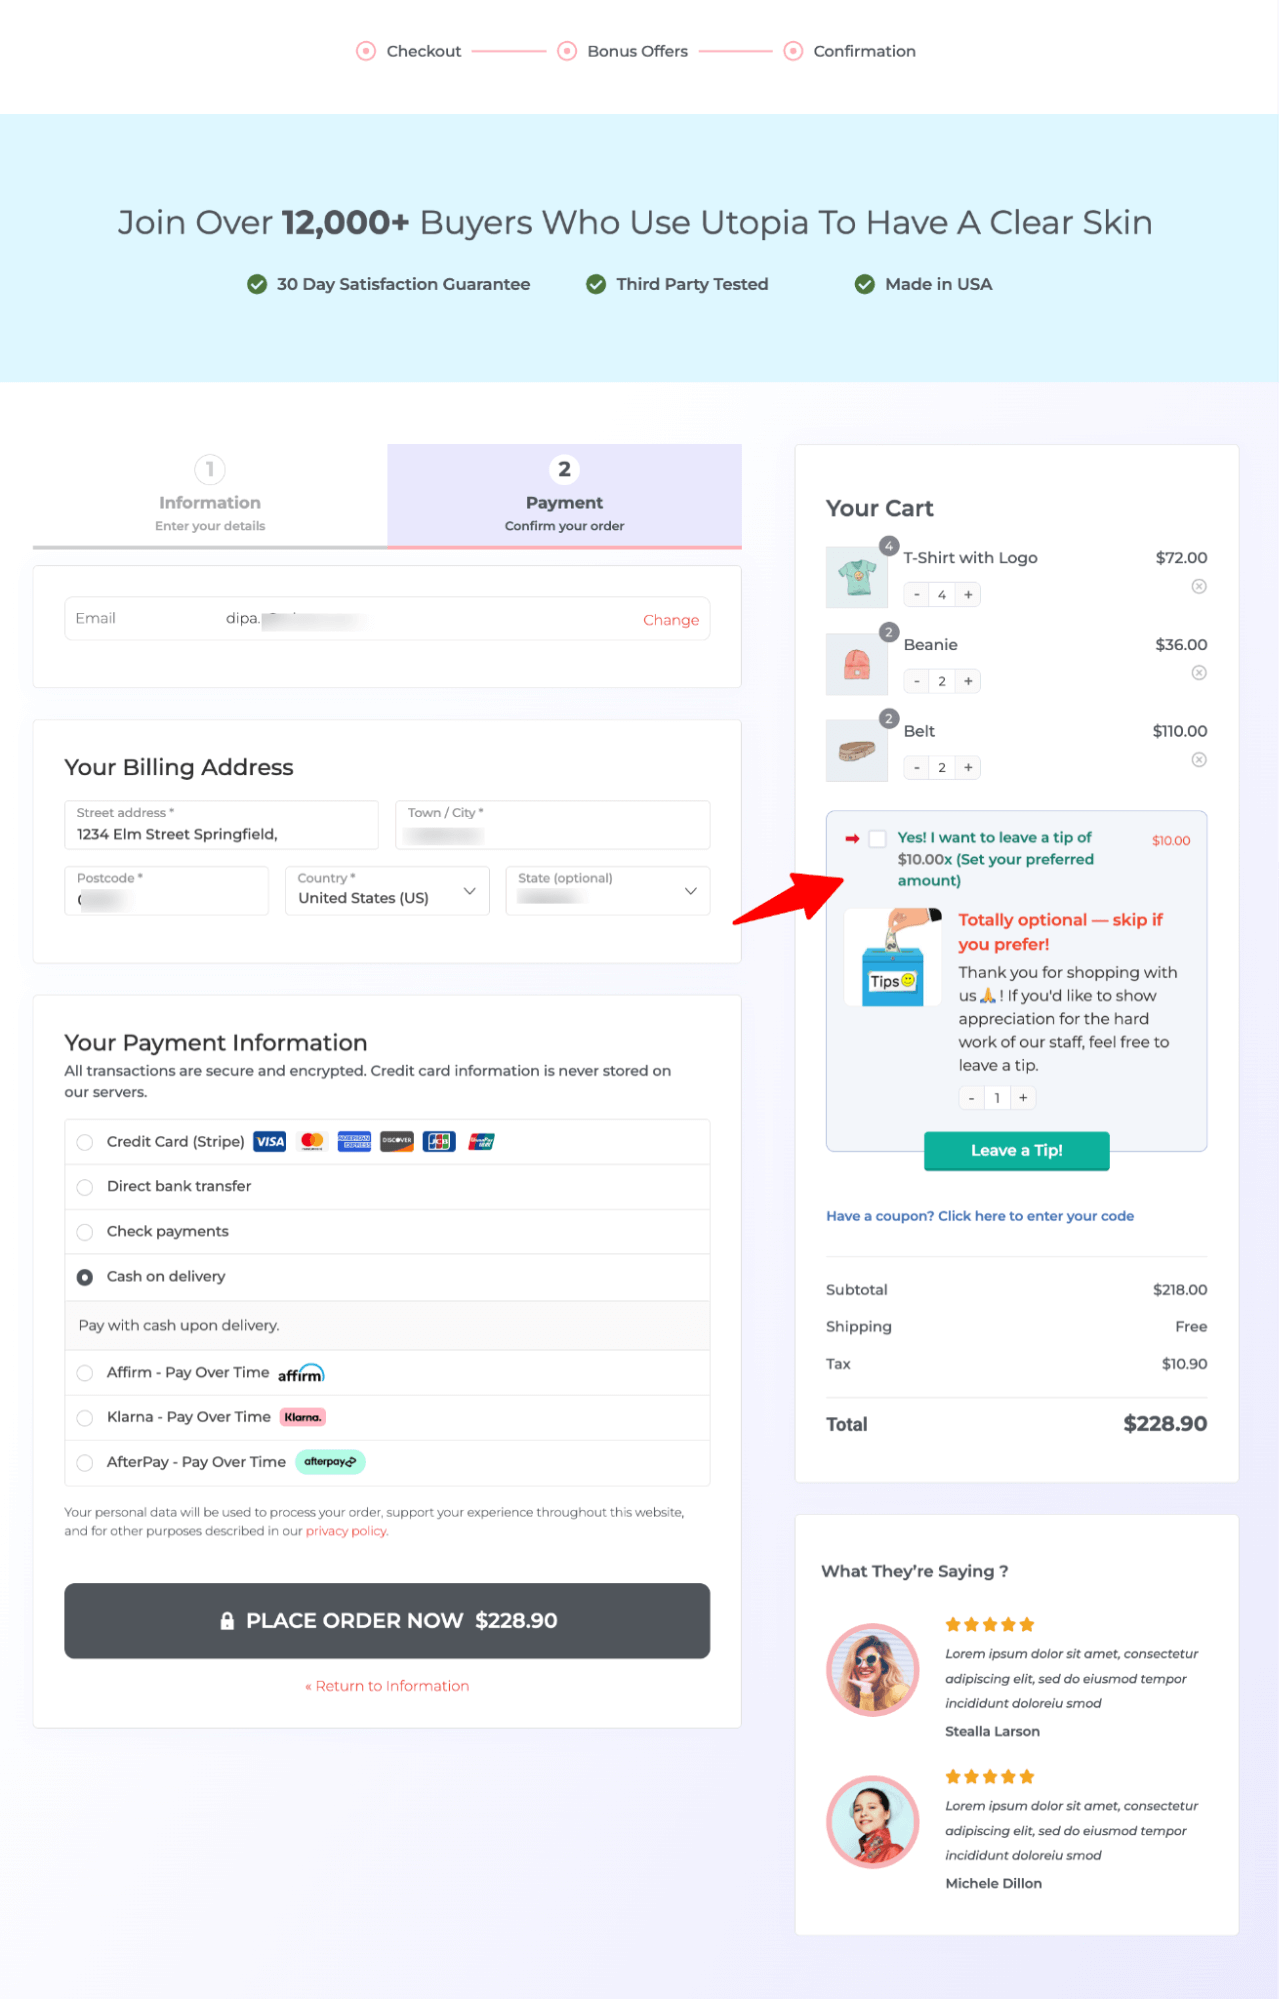
They can use the +/- button to increase or decrease the tip amount to their preference. The amount will be reflected in the tip section.
Once users choose to leave a tip, they will see a thank you text.
4 Best Practices of Tipping in WooCommerce To Avoid Cart Abandonment
Asking for a tip at checkout can backfire if it feels forced or unclear. A sudden, unexplained charge might make shoppers uneasy or, worse, lead them to think it's a scam and even result in cart abandonment.
Here’s how to do it right:
- Make it clearly optional
Always label the tip as optional and don’t auto-add it to the order. Let customers feel in control.
- Explain why you're asking for a tip
Add a short, friendly message like “Support our staff” or “Help us serve you better” to build trust.
- Let users enter a custom amount
Giving them the freedom to tip what they’re comfortable with makes them more likely to contribute.
- Thank the customer for the tip
A simple “Thank you for your support!” goes a long way in making them feel appreciated.
Frequently Asked Questions About Tips on WooCommerce Checkout
- Can customers leave a tip with any payment method in WooCommerce?
Yes, as long as the tip is added like a regular product or fee, it works with all major payment gateways.
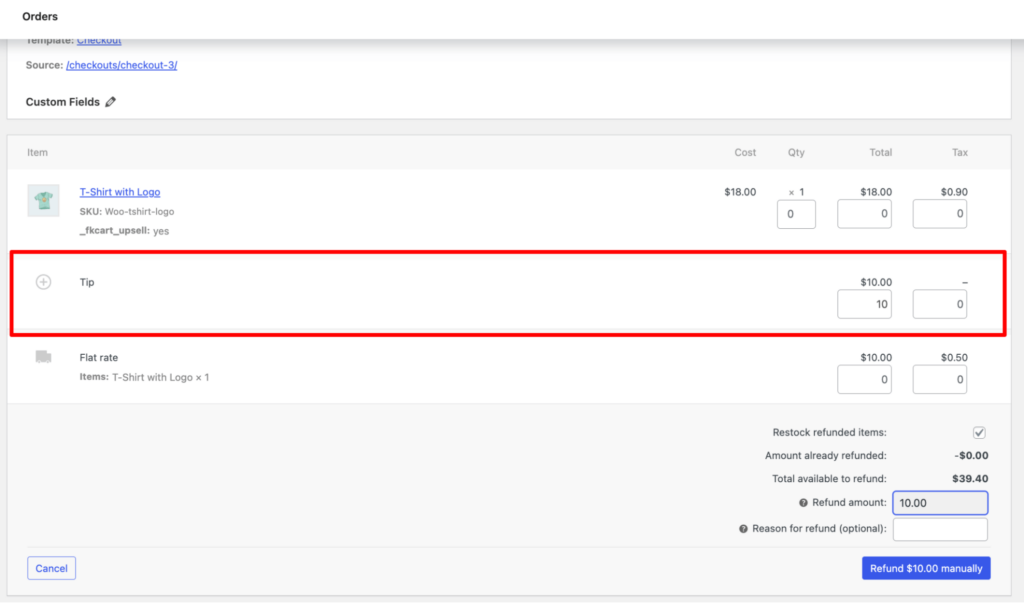
- Can we refund a tip in WooCommerce?
In WooCommerce, if the tip is added as a separate product or line item, you can refund just the tip without affecting the other three items.
- What should I do if asking for a tip turns customers off?
You can follow the best practices we shared above, like making it optional, providing a clear message, etc.
Ready to Start Collecting Tips at WooCommerce Checkout?
Introducing tipping in WooCommerce can be a valuable way to boost your revenue and reward your team, but it's essential to do it properly.
Make sure to keep it optional, explain its importance, and keep everything transparent. This approach will help avoid any confusion and build customer confidence.
While many different plugins can help you set this up, we recommend using FunnelKit Funnel Builder. It not only lets you customize your checkout page for a seamless experience but also encourages tipping with its clean, conversion-optimized design.
Plus, with its AOV boosting features like order bump and one-click upsells, boosting revenue has never been easier.
So, upgrade your checkout page to start collecting tips and boosting revenue simultaneously.

Editorial Team
July 7, 2026Are shoppers adding products to their cart and leaving before they buy? According to Baymard Institute research on checkout usability, 18% of shoppers who abandon their cart do so because...
Editorial Team
July 3, 2026Sometimes, the difference between a visitor leaving and placing an order comes down to something surprisingly small, like a better headline, a cleaner checkout, or a more compelling offer. That's...
Editorial Team
July 1, 2026Are you leaving money on the table by not fully leveraging your customers’ shopping behavior? Many store owners don’t realize that every time a customer adds a product to the...


