![How to Set Up WooCommerce Apple Pay & Accept Online Payments [2025 Guide]](https://funnelkit.com/wp-content/uploads/2025/02/How-to-Set-Up-WooCommerce-Apple-Pay-Accept-Online-Payments-2025-Guide.jpg)
Are you looking for a step-by-step guide on how to set up a WooCommerce Apple Pay payment gateway? You’re in the right place.
Digital wallets like Apple Pay, Google Pay, PayPal Express, and Amazon Pay are rapidly becoming the go-to payment methods for online shoppers.
Why? Because they make the checkout process faster, easier, and more secure.
Instead of manually entering card information, consumers can complete their purchases with a single tap or click.
In fact, digital wallet transactions accounted for 49% of the total eCommerce transactions in the US. (WorldPay from FIS: The Global Payments Report 2023)
By enabling Apple Pay on your WooCommerce store, you can provide a seamless payment experience that keeps customers coming back.
In this post, you’ll learn how to add both the Apple Pay express checkout and inline payment method to WooCommerce and start collecting payments easily in your store.
Don't want to read the content? Here's our quick tutorial video on how to set up Apple Pay express checkout in WooCommerce:
![How to Set Up WooCommerce Apple Pay & Accept Online Payments [2025 Guide]](https://img.youtube.com/vi/01pWZNaGGd4/maxresdefault.jpg)
Let's begin.
Table of Contents
- 1 How Does Apple Pay Work in a WooCommerce Store?
- 2 Why is Apple Pay a Must for Your WooCommerce Store?
- 3 Essentials to Set Up WooCommerce Apple Pay
- 4 Visibility Requirements for Apple Pay Express Checkout Button
- 5 How to Set Up WooCommerce Apple Pay in Your Online Store? (Step-by-Step)
- 6 Testing the Apple Pay Method in WooCommerce
- 7 Troubleshooting Apple Pay Button Visibility Issues in WooCommerce
- 8 Frequently Asked Questions (FAQs) for Integrating Apple Pay into WooCommerce
- 9 Bonus: Swap WooCommerce Checkout with Modern, Dynamic FunnelKit Checkout
- 10 Ready to Set Up Your WooCommerce Apple Pay Payment Gateway?
How Does Apple Pay Work in a WooCommerce Store?
WooCommerce Apple Pay is a payment option that enables customers to pay for their purchases on your WooCommerce store using Apple Pay, Apple’s digital wallet and payment solution.
This payment method enables seamless, one-tap checkout for users with Apple devices, such as iPhones, iPads, Macs, and Apple Watches.
With Apple Pay, customers can securely store their payment details and complete transactions quickly without manually entering card information with a simple biometric like Face ID or Touch ID.
It’s an ideal way to simplify the checkout process and reduce cart abandonment rates.
Apple Pay simplifies the checkout process by allowing customers to pay instantly without entering their payment card information or billing details.

Here’s how it works in a WooCommerce store:
1. Shopper selects Apple Pay
When a shopper visits your WooCommerce store and adds a product to their cart, they’ll see the Apple Pay button during checkout (based on the pages you’ve enabled in your store, it could be on the product page, cart page, or inside the shopping cart as well).
They’ll see the Apple Pay button only if they are using an Apple device with Apple Pay enabled.
Next, they tap on the Apple Pay button.
2. Shopper authorizes the payment
Once the Apple Pay button is clicked, the customer can authorize the payment using one of the following methods:
- Face ID (for iPhone or iPad with Face ID)
- Touch ID (for MacBooks or older iPhones with fingerprint recognition)
- Device passcode (if biometrics are unavailable)
This step ensures the payment is fast and secure.
3. Payment token is sent to the payment gateway
Apple Pay does not share the customer’s actual card details. Instead, it uses tokenization to create an encrypted, unique digital identifier called a payment token.
This token is sent to the payment gateway integrated with your WooCommerce store.
4. Payment gateway processes the transaction
The payment gateway decrypts the token and processes the payment with the customer’s bank.
Once approved, the funds are transferred to your merchant account, and the order gets successfully processed.
5. Payment confirmation
After a successful transaction, both the customer and store owner receive a confirmation.
The customer gets redirected to the thank you page, and you’re notified of the new order in WooCommerce.
This expedites checkout, minimizes abandonment, and boosts the user’s shopping experience.
Why is Apple Pay a Must for Your WooCommerce Store?
Apple Pay dominates the digital wallet market with an impressive 92% market share.
In 2022 alone, it processed a staggering $6 trillion in global payments, generating a remarkable $1.9 billion in revenue.
Here’s why Apple Pay is a game changer for your WooCommerce store:
1. Boosts conversions
Here’s a fact - 56% of shoppers expect to see multiple payment options on your store checkout.
And express payment options like Apple Pay, Google Pay, PayPal, Amazon Pay, and more give your shoppers a convenient way to pay and place their orders quickly.
According to ACI Worldwide, such convenient payment options can boost conversions by 30%!
2. Faster checkouts
If you have a WooCommerce one-page checkout, you are already giving your shoppers a quick checkout.
However, adding express pay options like Apple Pay to the mix can give your shoppers a frictionless checkout experience.
The WooCommerce Apple Pay integration can really add to your store’s enhanced experience.
With one-tap payments, Apple Pay eliminates the hassle of filling out forms, significantly reducing cart abandonment.
3. Unmatched popularity
With over 500 million active users worldwide, the likelihood that your customers already have Apple Pay set up on their devices is incredibly high.
By offering Apple Pay as a payment option, you tap into a massive base of loyal users who prefer using this fast, convenient, and secure method over traditional card payments.
This gives your WooCommerce store a competitive edge and ensures you don’t miss out on sales from Apple Pay users.
4. Enhanced security and fraud protection
When a customer makes a purchase using Apple Pay, their credit card details are never shared with your store.
Instead, Apple uses a tokenization process, which replaces sensitive data with a secure, one-time payment token. This ensures payment details can never be used fraudulently.
Additionally, Apple Pay uses Face ID, Touch ID, or a device passcode to authorize transactions, adding an extra layer of security for every payment.
5. User experience optimization
Repeat customers make up most of your sales. In fact, repeat customers have a 67% higher average order value than new customers.
Thus, giving these repeat customers a convenient express pay option like Apple Pay would optimize their shopping experience and encourage them to buy more often.
Essentials to Set Up WooCommerce Apple Pay
To set up WooCommerce Apple Pay, there are some essential plugins that you need to have in place.
1. WooCommerce Store
WooCommerce is the most popular eCommerce platform for building an online business.
Follow the WooCommerce guide to set up your new store if you already haven’t.
2. Stripe account
To start collecting payments, you need to set up a Stripe account.
You can set up Stripe for free. You won’t have to pay monthly or annual fees for their services. Instead, their fees are per transaction with transparent pricing.
Stripe fees vary according to country, so you can go to their pricing page and check the fees for your country.
3. Stripe Gateway for WooCommerce plugin
FunnelKit’s Stripe Gateway for WooCommerce is a powerful integrated solution to connect your Stripe account to your WooCommerce store.
With Stripe Gateway for WooCommerce, you can collect payments easily on the web and mobile. A simple, quick, and secure payment gateway for your online store.
Here’s what it offers:
- Quick setup - The easy onboarding allows you to integrate WooCommerce and Stripe in less than two minutes without manually copying and pasting keys or going through the complicated webhook setup process.
- Card payments - Our WordPress plugin lets you collect debit and credit card payments (Visa, MasterCard, American Express, Discover, JCB, etc.) via Stripe.
- Express checkout - Enable faster payments with express checkout options like Apple Pay and Google Pay. These can also be shown as inline payment methods on the checkout page.
- Buy Now Pay Later (BNPL) - Offer buy now pay later payment options with Affirm, Klarna, and Afterpay.
- Local payment methods - Supports local payment gateway options such as SEPA, Bancontact, P24, iDEAL, and more.
- Deep integration - Stripe Gateway for WooCommerce deeply integrates with FunnelKit’s Funnel Builder and One Click Upsells for seamless payment ordering and processing.
Additionally, Stripe Gateway for WooCommerce integrates with FunnelKit Automations to recover your upsell offers with enhanced automations.
4. A Valid SSL Certificate
Your website must have a valid and active SSL certificate installed. Apple Pay will not be visible in your store without an SSL certificate.
Visibility Requirements for Apple Pay Express Checkout Button
Before we proceed, it’s important to note that Apple Pay is not visible on every device. Once we have set it up, knowing when and where it shows up will be handy.
Here are the requirements to see Apple Pay Button:
1. Compatible device
- iPhone: Models with Face ID or Touch ID, excluding iPhone 5s.
- iPad: iPad Pro, iPad Air, iPad, and iPad mini models equipped with Touch ID or Face ID.
- Apple Watch: Series 1 and later.
- Mac: Models with Touch ID, those introduced in 2012 or later paired with an Apple Pay-enabled iPhone or Apple Watch, and Macs with Apple silicon paired with a Magic Keyboard with Touch ID.
- Apple Vision Pro: Supports Apple Pay for purchases and payments.
2. Web browsers
- Safari: Apple’s native browser supports Apple Pay on compatible devices.
- Third-party browsers: With iOS 18 and iPadOS 18, Apple Pay has extended its functionality to third-party browsers such as Google Chrome, Microsoft Edge, and Firefox.
Refer to the official Apple’s guide for compatible devices and browsers.
3. Supported countries
Customers with supported countries and regions will be able to see the Apple Pay express payment button on their compatible devices.
Check the complete list of countries and regions that support Apple Pay.
4. Domain verification
Ensure that you have verified your store’s domain.
FunnelKit’s Stripe Gateway for WooCommerce automatically verifies your domain with Apple Pay behind the scenes.
How to Set Up WooCommerce Apple Pay in Your Online Store? (Step-by-Step)
Now that we’ve discussed the requirements, let’s connect your WooCommerce store with Stripe using FunnelKit’s Stripe Gateway for WooCommerce plugin.
Step 1: Install FunnelKit Stripe Gateway for WooCommerce
You can install FunnelKit Stripe Gateway for WooCommerce just like you install any other WordPress plugin.
To find the plugin, search for the term “FunnelKit Stripe Gateway for WooCommerce”.
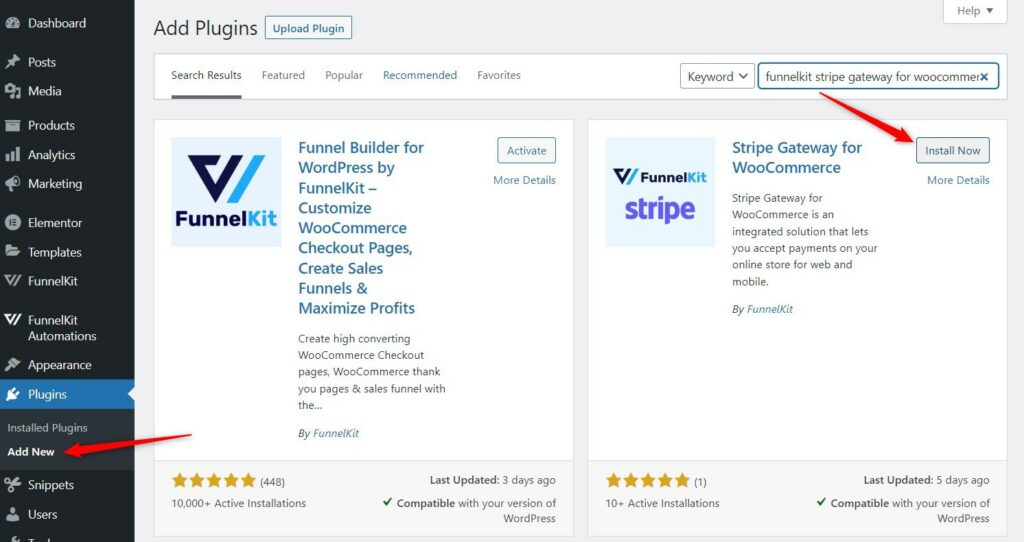
Once you have installed and activated the plugin, you can move to the next step in this WooCommerce Apple Pay integration.
Step 2: Connect Stripe with your WooCommerce store
When you go to your installed plugins dashboard, you will see a banner saying, “Start Onboarding Wizard”.
Click on the blue button, and you will be redirected to the Stripe account configuration page.
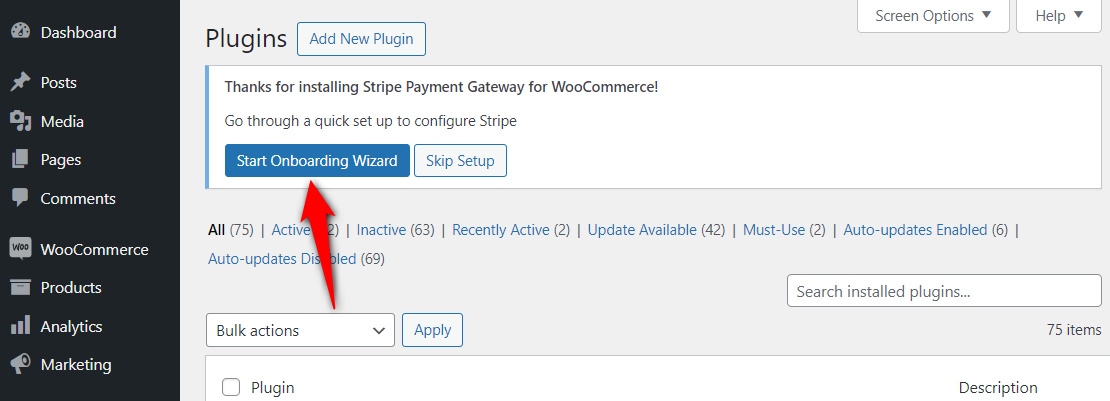
Click on Connect with Stripe.

You will be redirected to the Stripe account authorization page. Enter your email address and hit Continue.
Enter the password you set when opening your Stripe account. And then hit Log in.
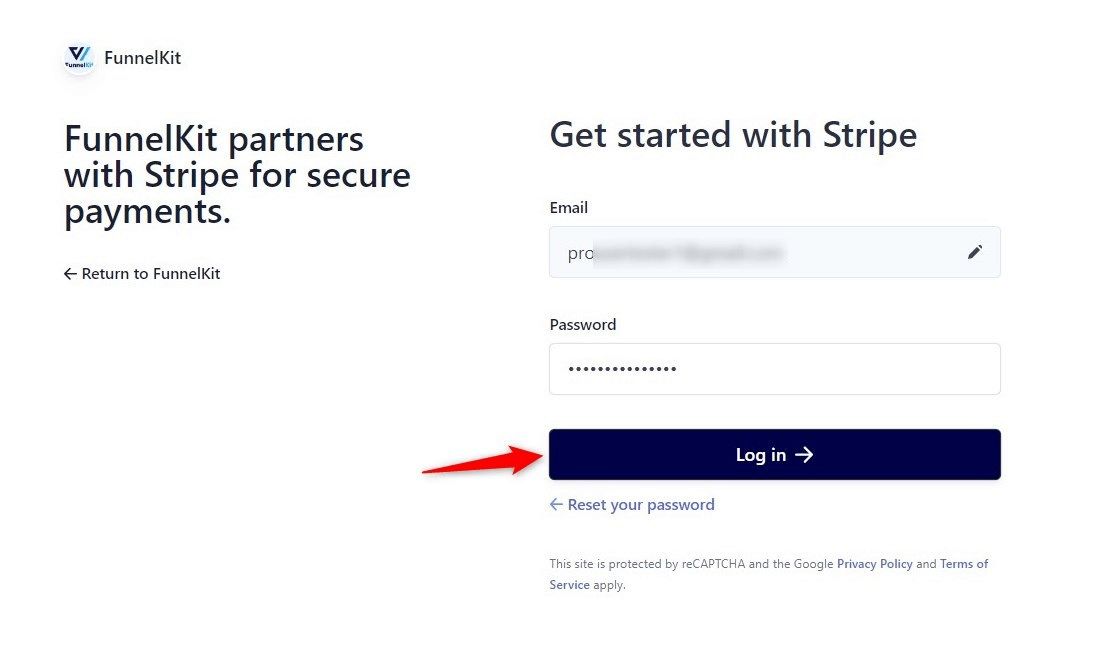
Note: You might be asked to verify your account with a 6-digit OTP sent to your registered email or mobile phone.
Now, select the Stripe account that you want to use for your WooCommerce Apple Pay integration.
Once selected, click Connect.
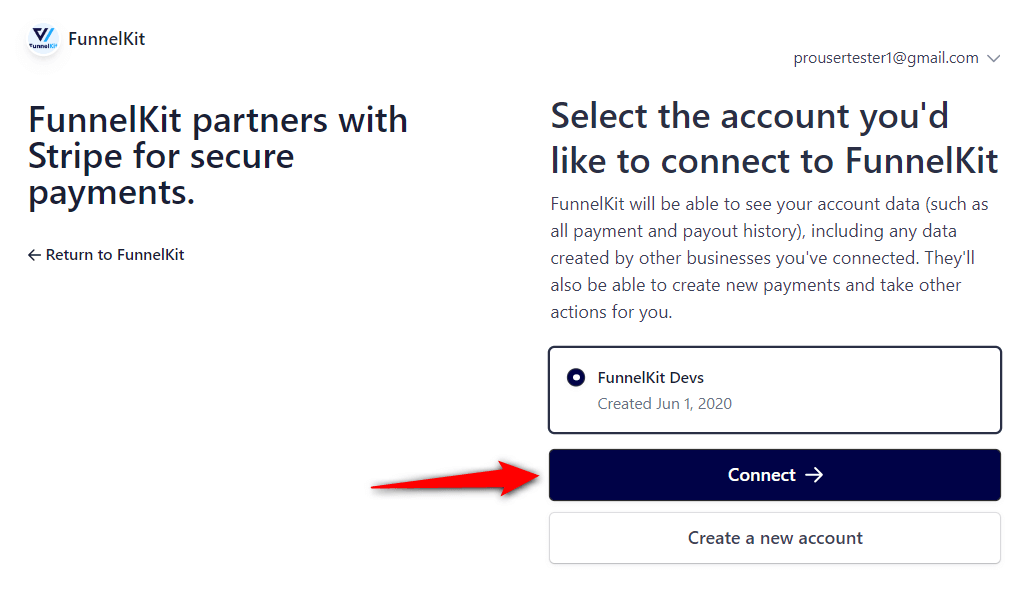
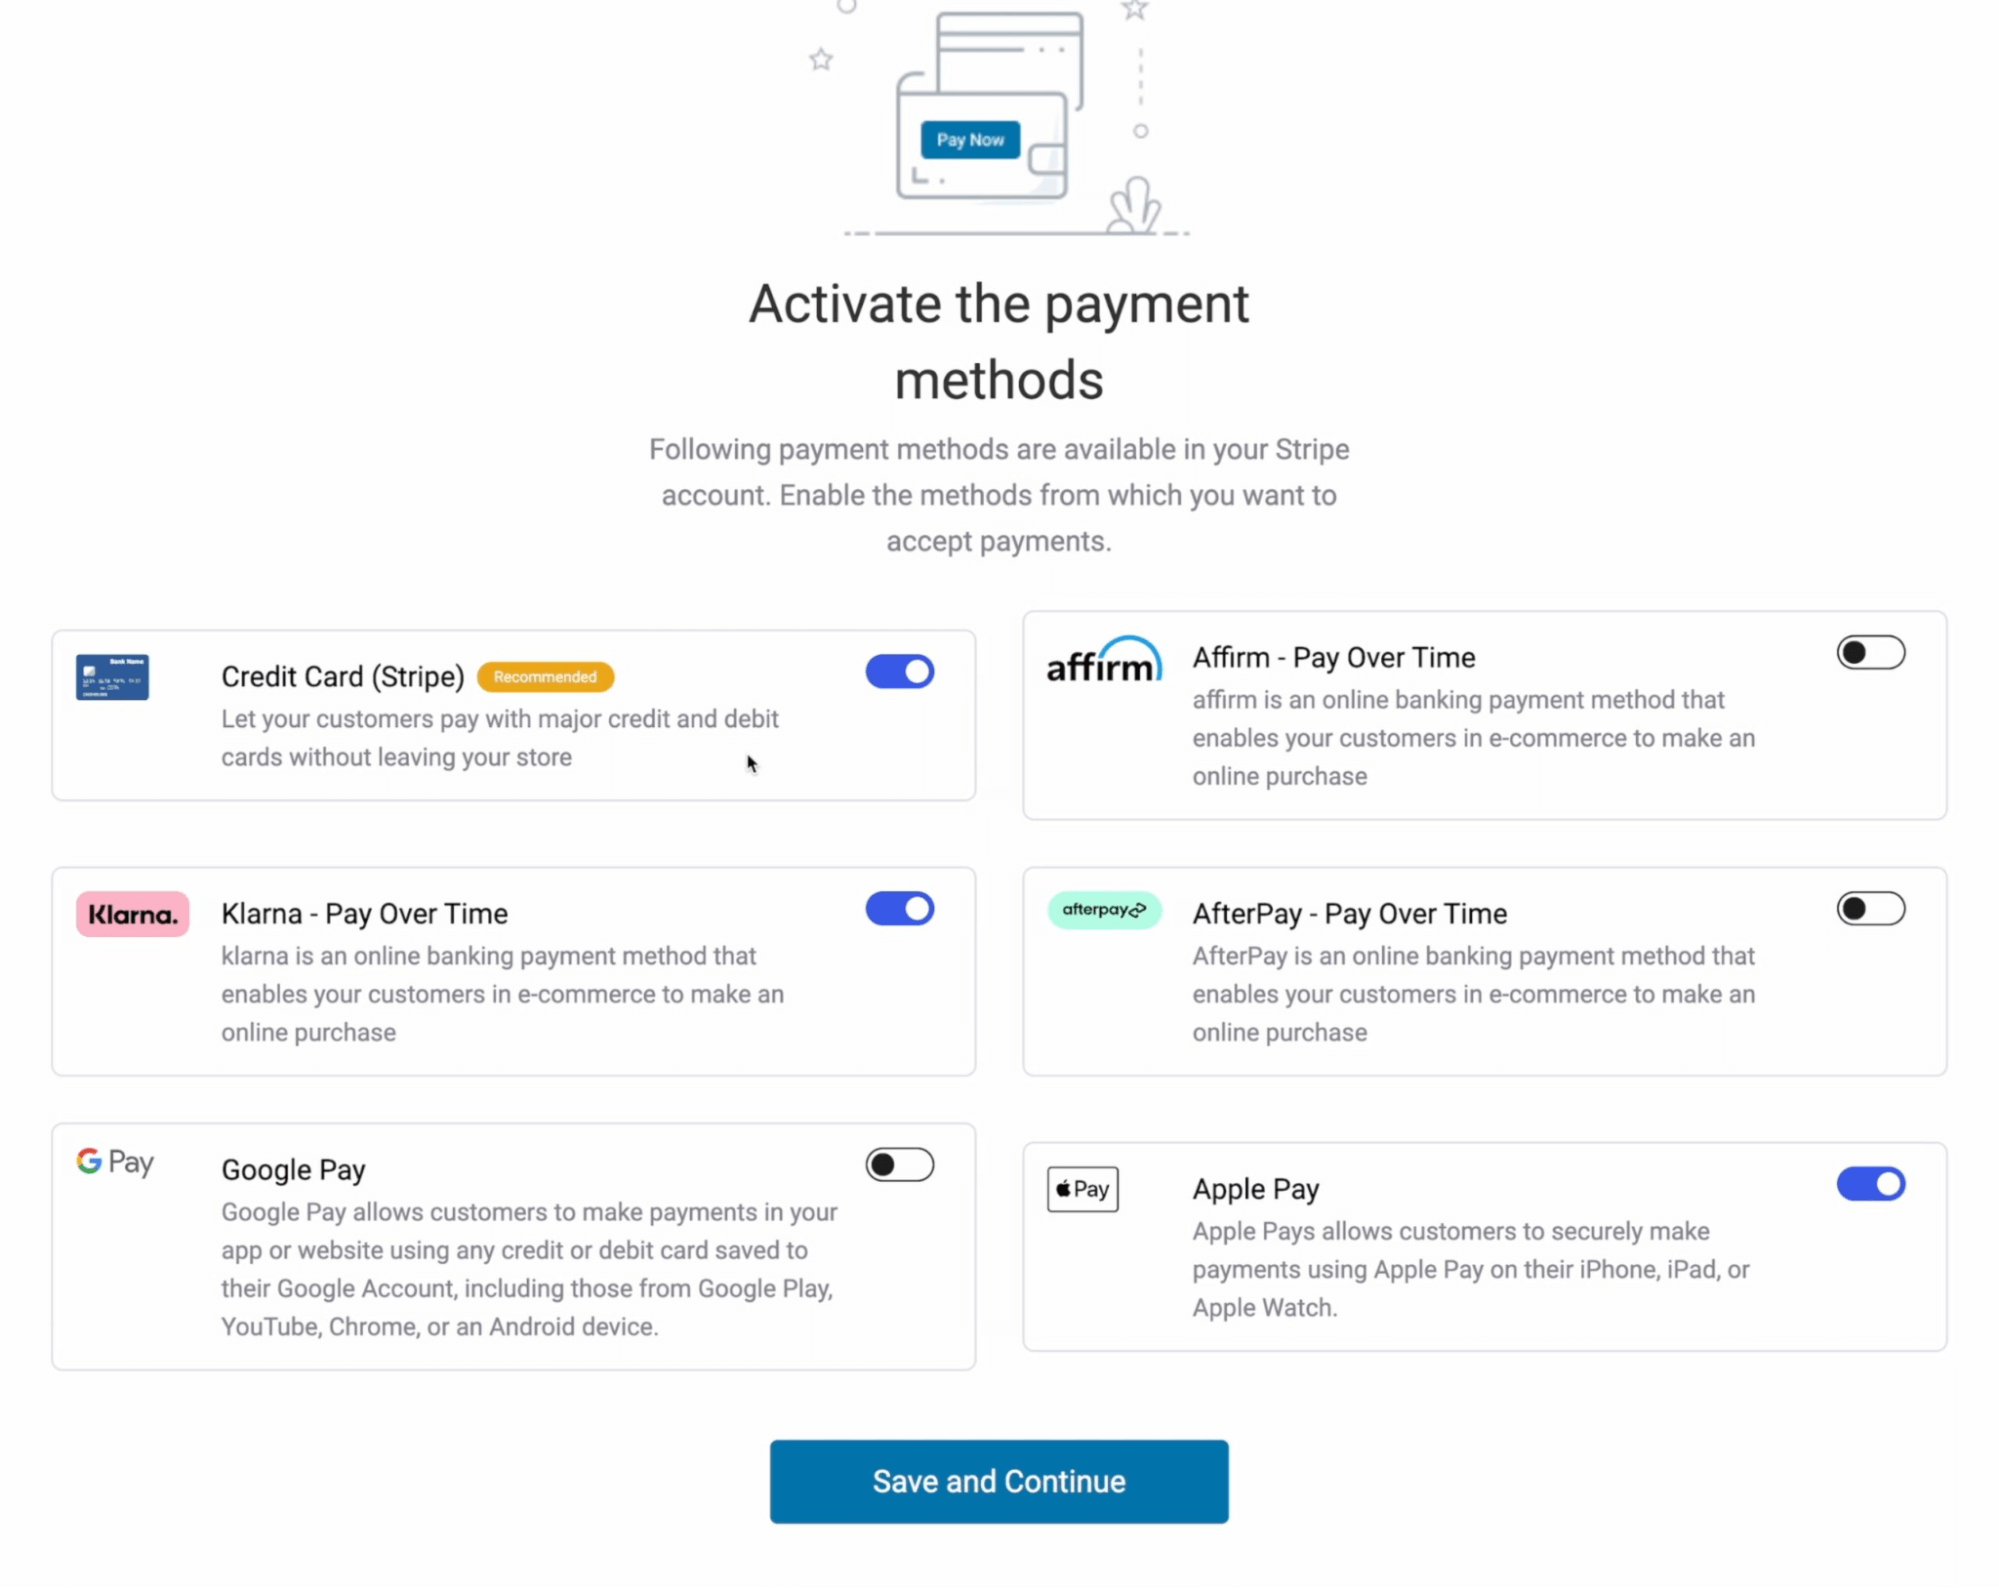
Enabling Payment Gateways
On the next screen, you will see all the available payment gateways. To keep things simple, we will only enable Credit Cards (Stripe).
However, if you wish to enable local payments or buy now pay later options, you can do that too.
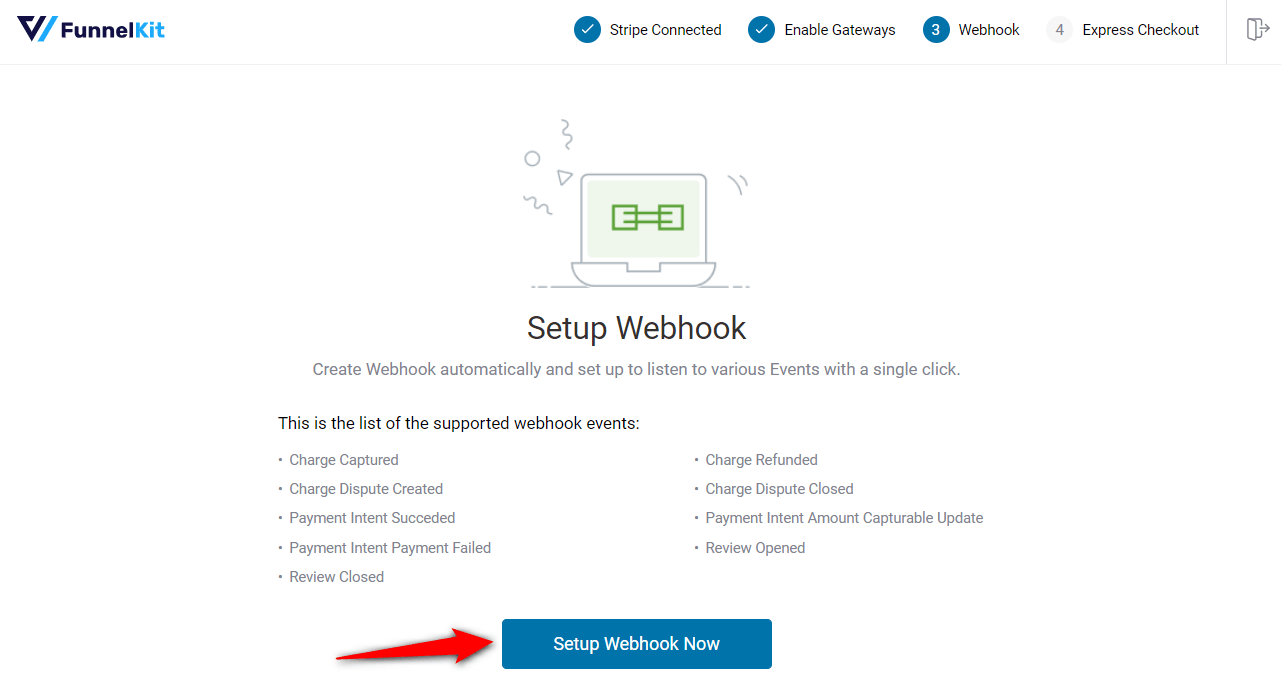
Setting Up Webhook
Stripe will now ask you to set up webhooks. Click on the button and move to the next screen.
Activating Express Checkouts
On the next screen, you will be asked to enable express checkout.
To set up your WooCommerce Apple Pay integration, you must first enable the express checkout options in Stripe.

You are all set. But first, you should test if Stripe successfully processes the payments on your WooCommerce store.
Thus, on the last screen, select the mode you want to test: Test, Admin Only Test, or Live.

Once you’ve selected your preferred mode, click Save and Review Settings.
Now that your Stripe account is configured, all the details will be fetched into your WooCommerce store, including:
- Webhook ID
- Webhook URL
- Live and test webhook secret
- Debug log URL
Now, let’s enable the WooCommerce Apple Pay integration.
Step 3: Customize the Apple Pay button and test the visibility
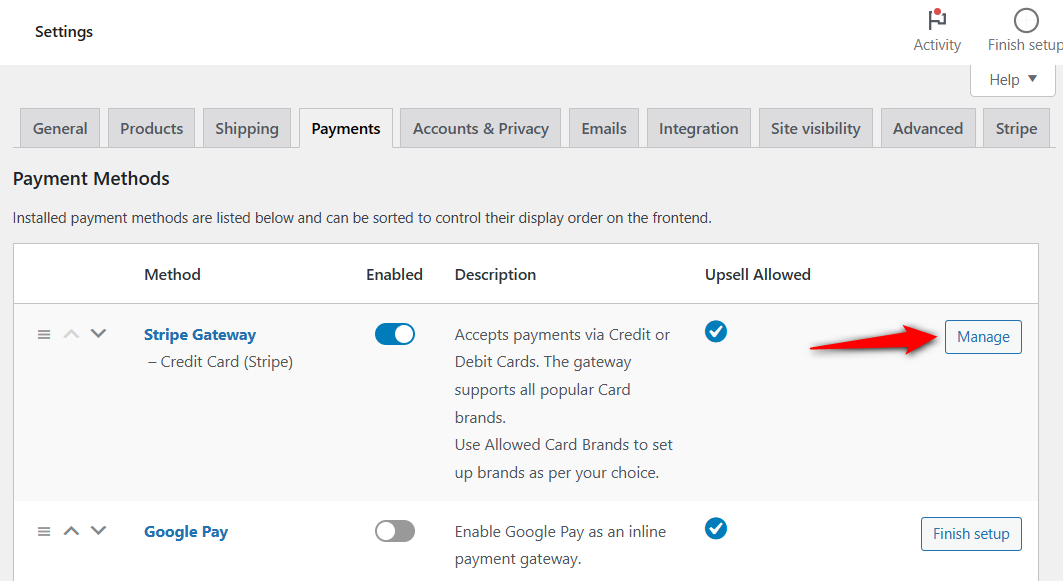
Navigate to WooCommerce ⇨ Settings ⇨ Payments.
Under the Payments tab, you will see various payment options. Click on Manage next to Stripe Gateway - Credit Card (Stripe).
Click on the Express Checkout tab. Check whether the “Enable Express Checkout” option is ticked or not.
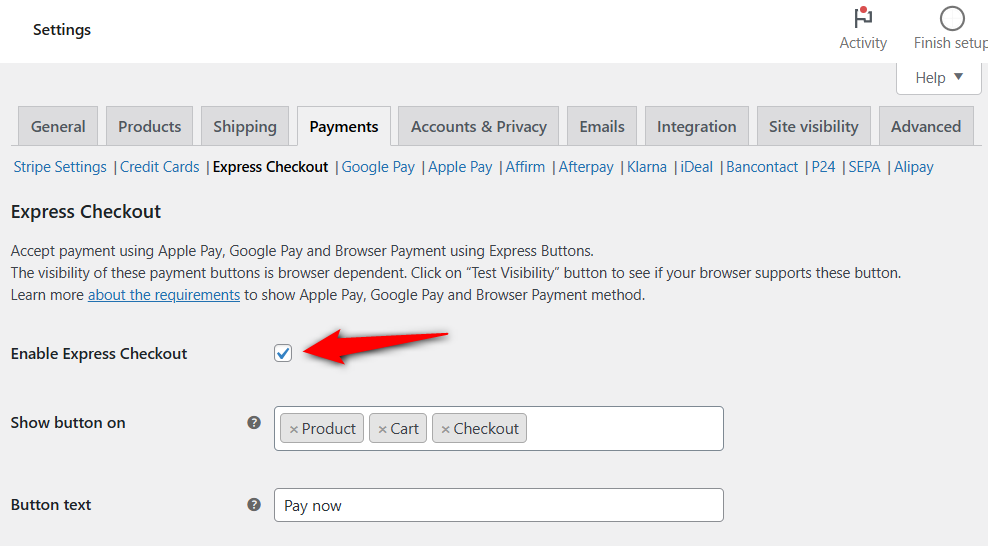
Now you need to show on which pages you want to display the Apple Pay button.
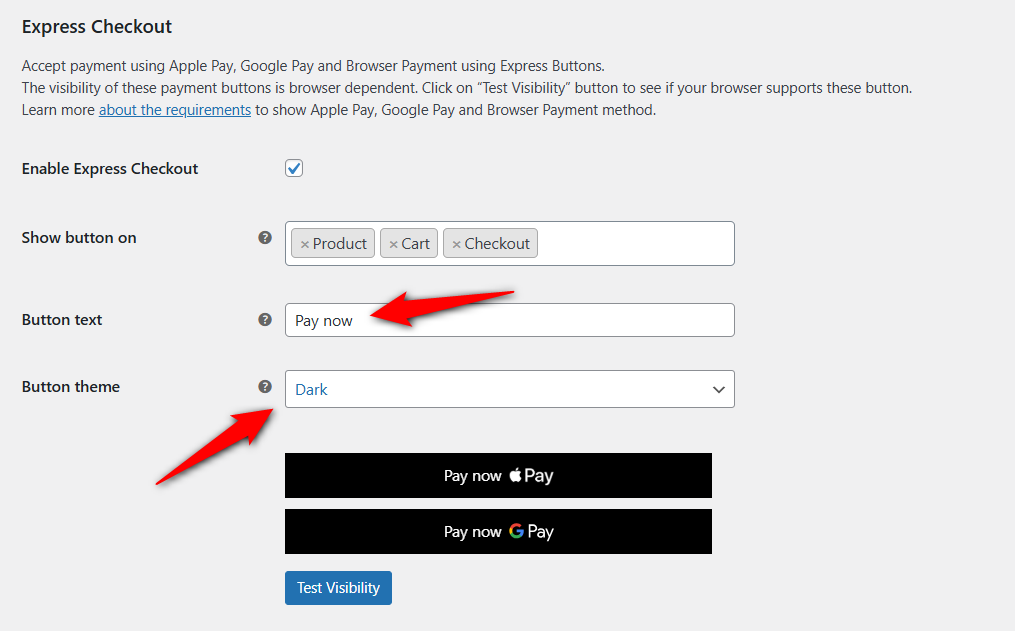
You should carefully assess the visibility of your Apple Pay button on different pages of your WooCommerce store.
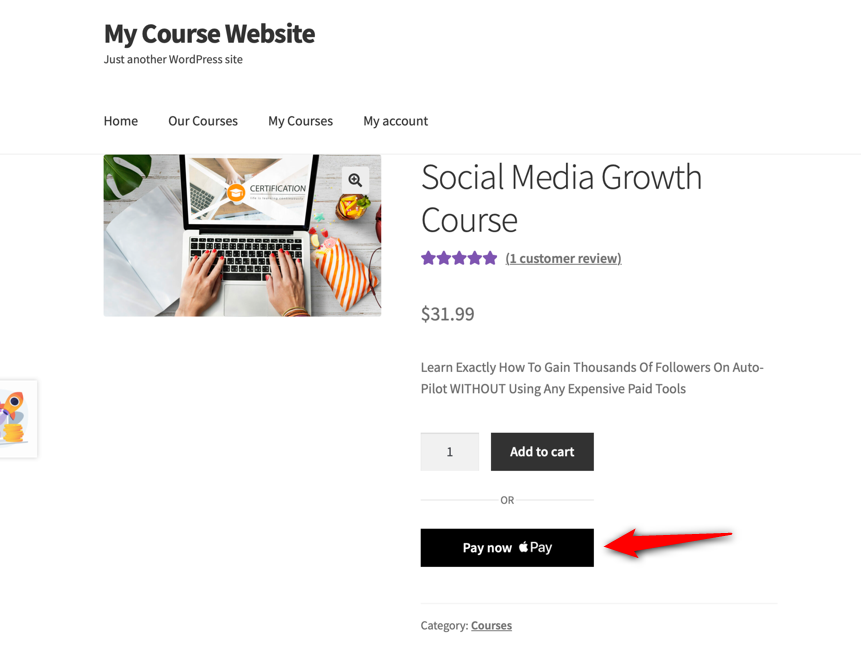
👉 Apple Pay Express Checkout on the Product Page
If a shopper purchases an item using Apple Pay from the product page, then only that item will get placed in an order, irrespective of the items they have in their shopping cart.
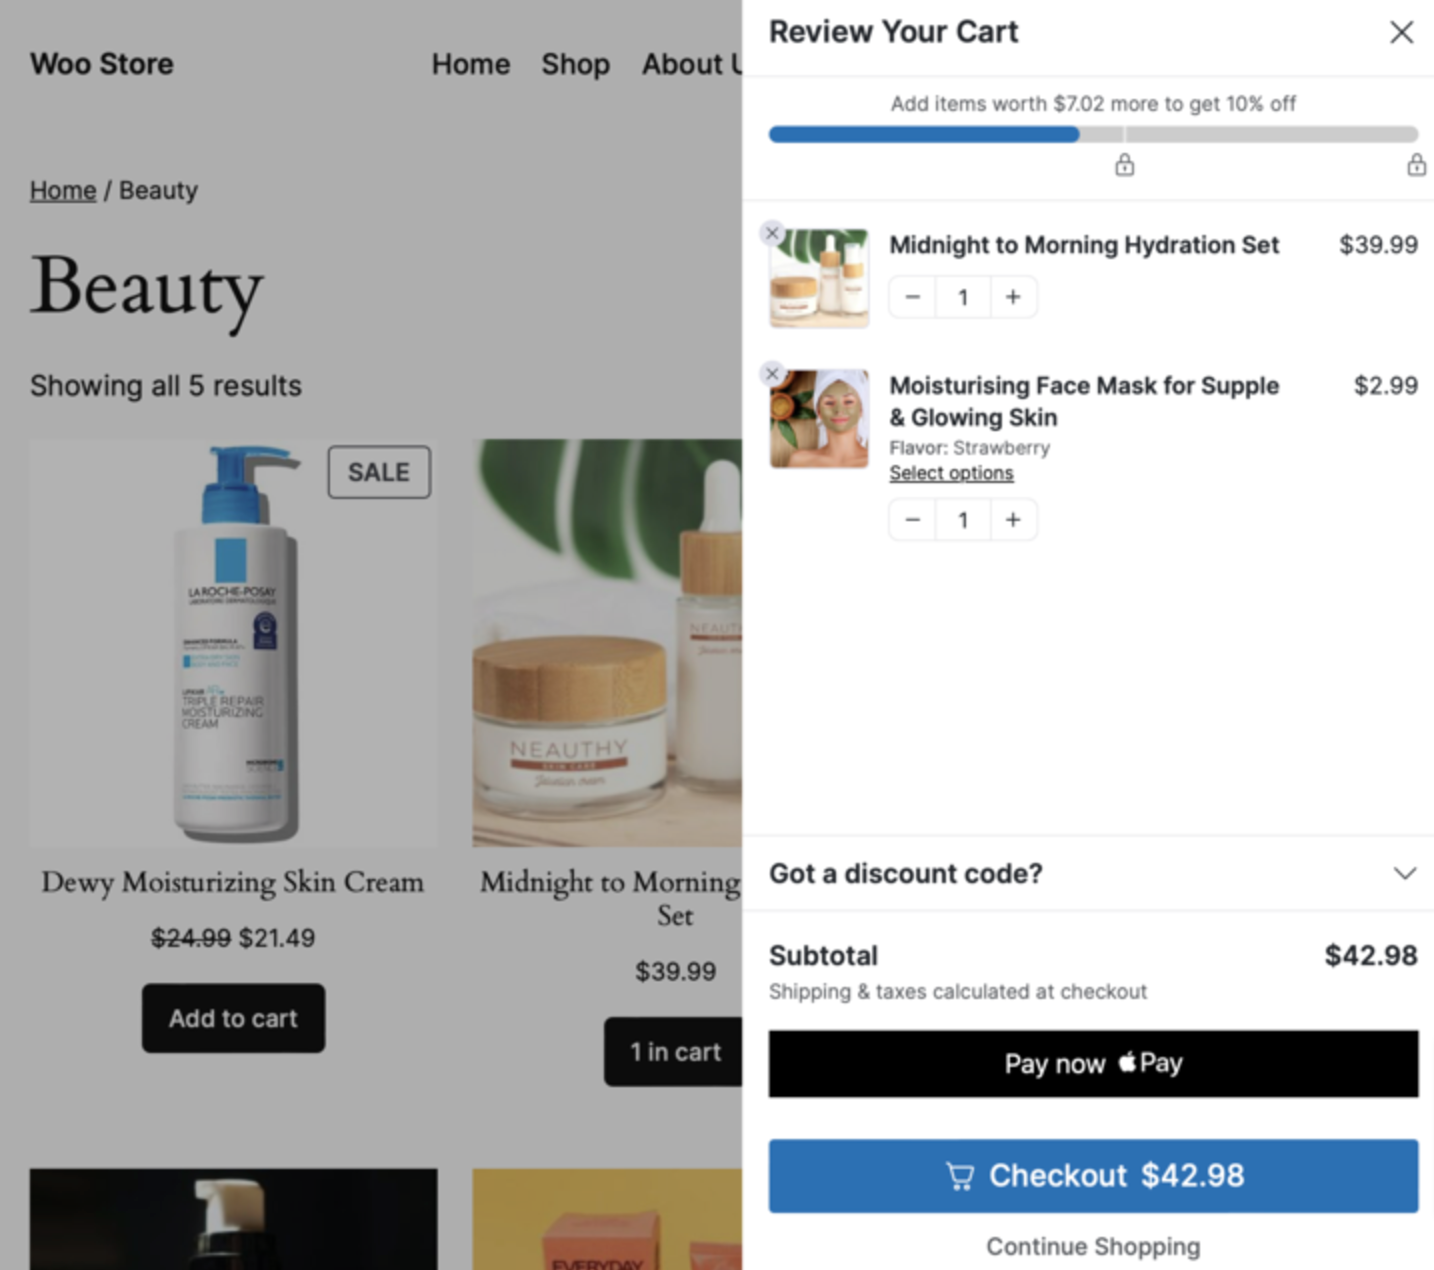
👉 WooCommerce Apple Pay Express Button inside the Shopping Cart
If you use FunnelKit Cart to bring a beautiful, dynamic shopping cart to your store, the Apple Pay button will show up there, too.
It completely replaces the default WooCommerce cart page, enabling users to checkout directly.
👉 Apple Pay Express Payment on the Checkout Page
Apple Pay express payment button on the checkout page enables shoppers to complete their transactions without filling out the checkout form.
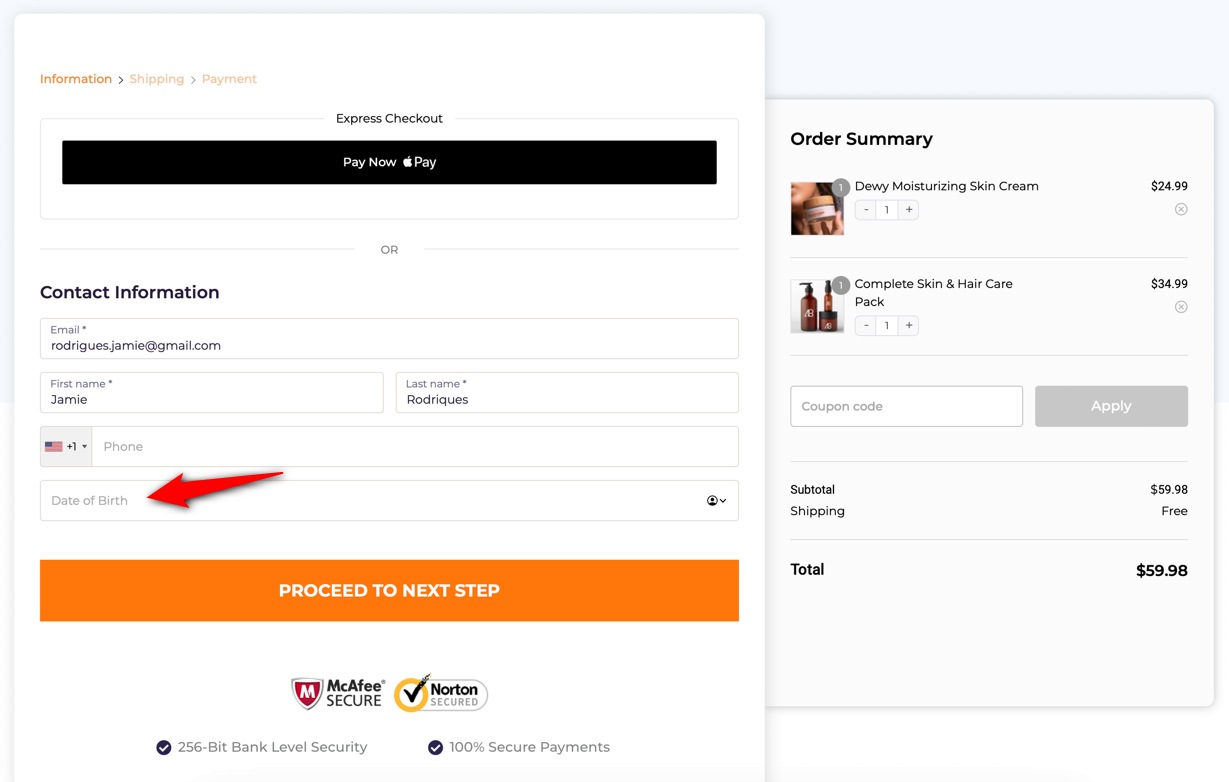
If your checkout page has custom fields to be filled, these fields will likely be skipped when paying through Apple Pay express payment.
Here, an effective solution can be to offer the inline payment method, which we will discuss in the next step.
Customizing the Express Pay buttons
Type the text that you want to show on the Apple Pay button.
Also, choose the theme for your button.
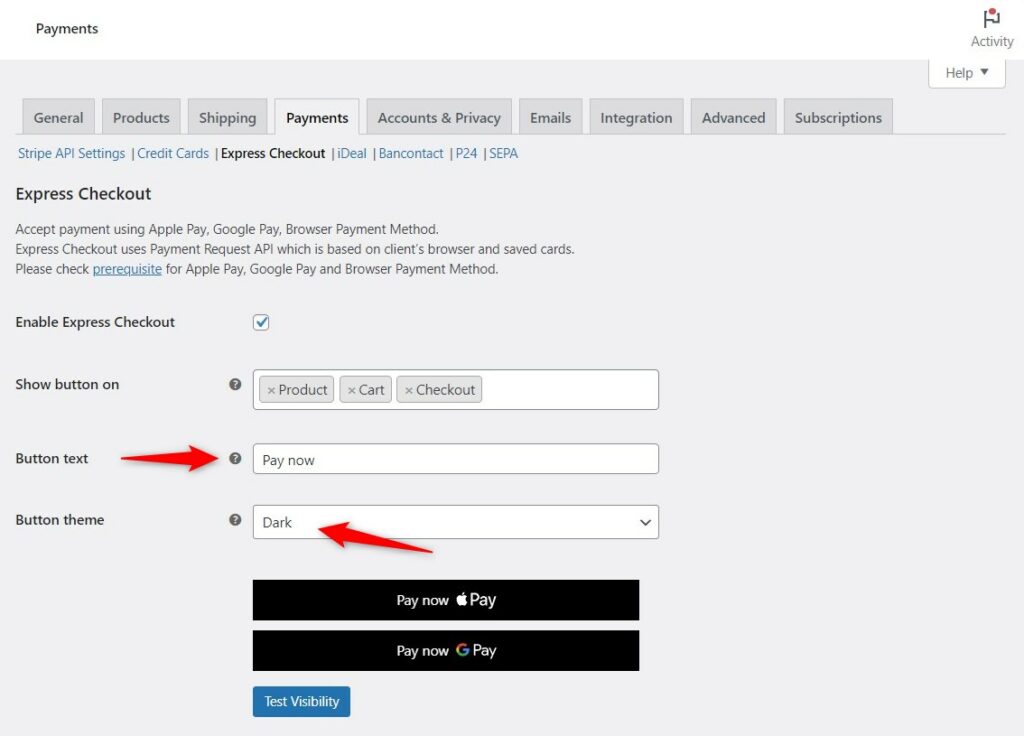
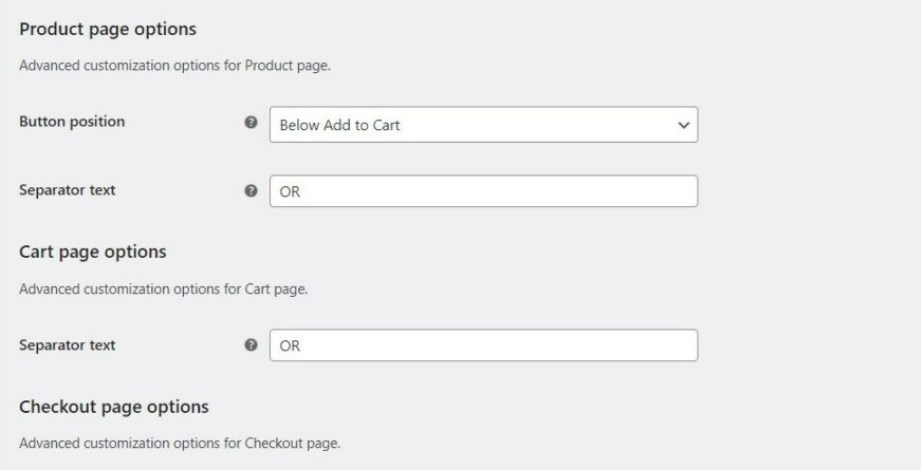
There are various customization options for the express Apple Pay button on each product page, cart page, and checkout page.
You can set the button position, add separator text, and customize the title, button width, and alignment.
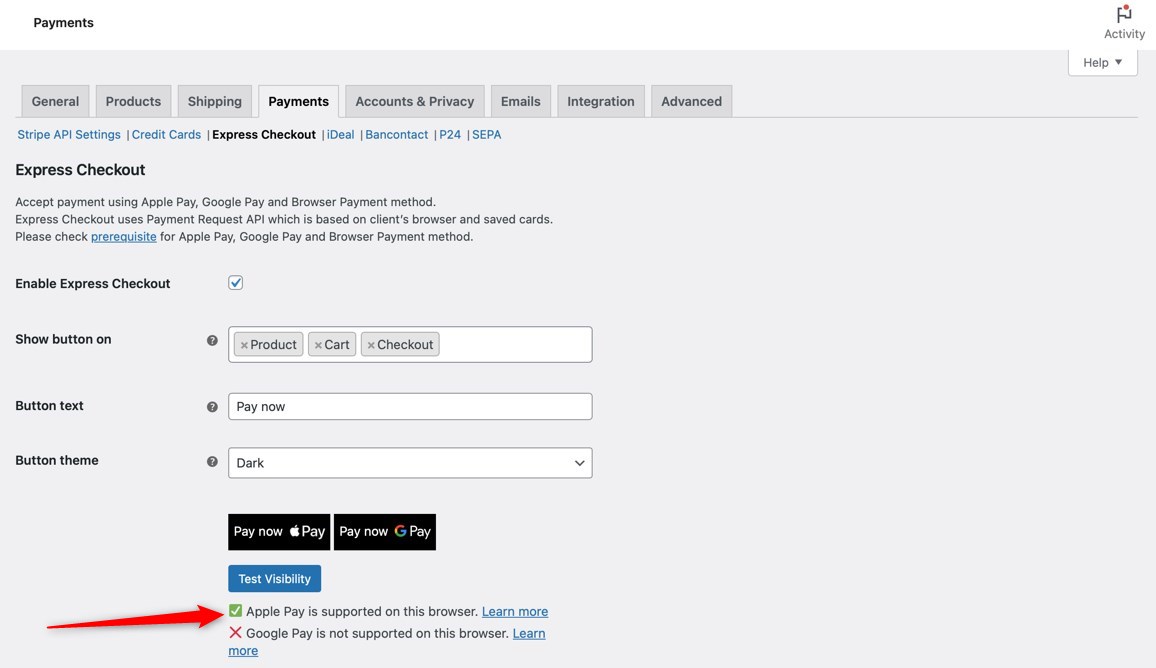
Click on Test Visibility to see if your current browser can show the Apple Pay button in WooCommerce.
Click on ‘Save’ when done.
Step 4: Enable WooCommerce Apple Pay as the inline method
By default, Apple Pay allows customers to complete their purchase in one click, which is great for speed but can cause issues if your checkout includes mandatory fields (like phone number, tax ID, or custom fields).
If these fields are left unfilled, customers may encounter errors—leading to frustration and potential cart abandonment.
With inline Apple Pay, the payment option is displayed within the payment gateway section.
To enable inline Apple Pay, move to the Apple Pay tab and check the option “Enable Apple Pay”.
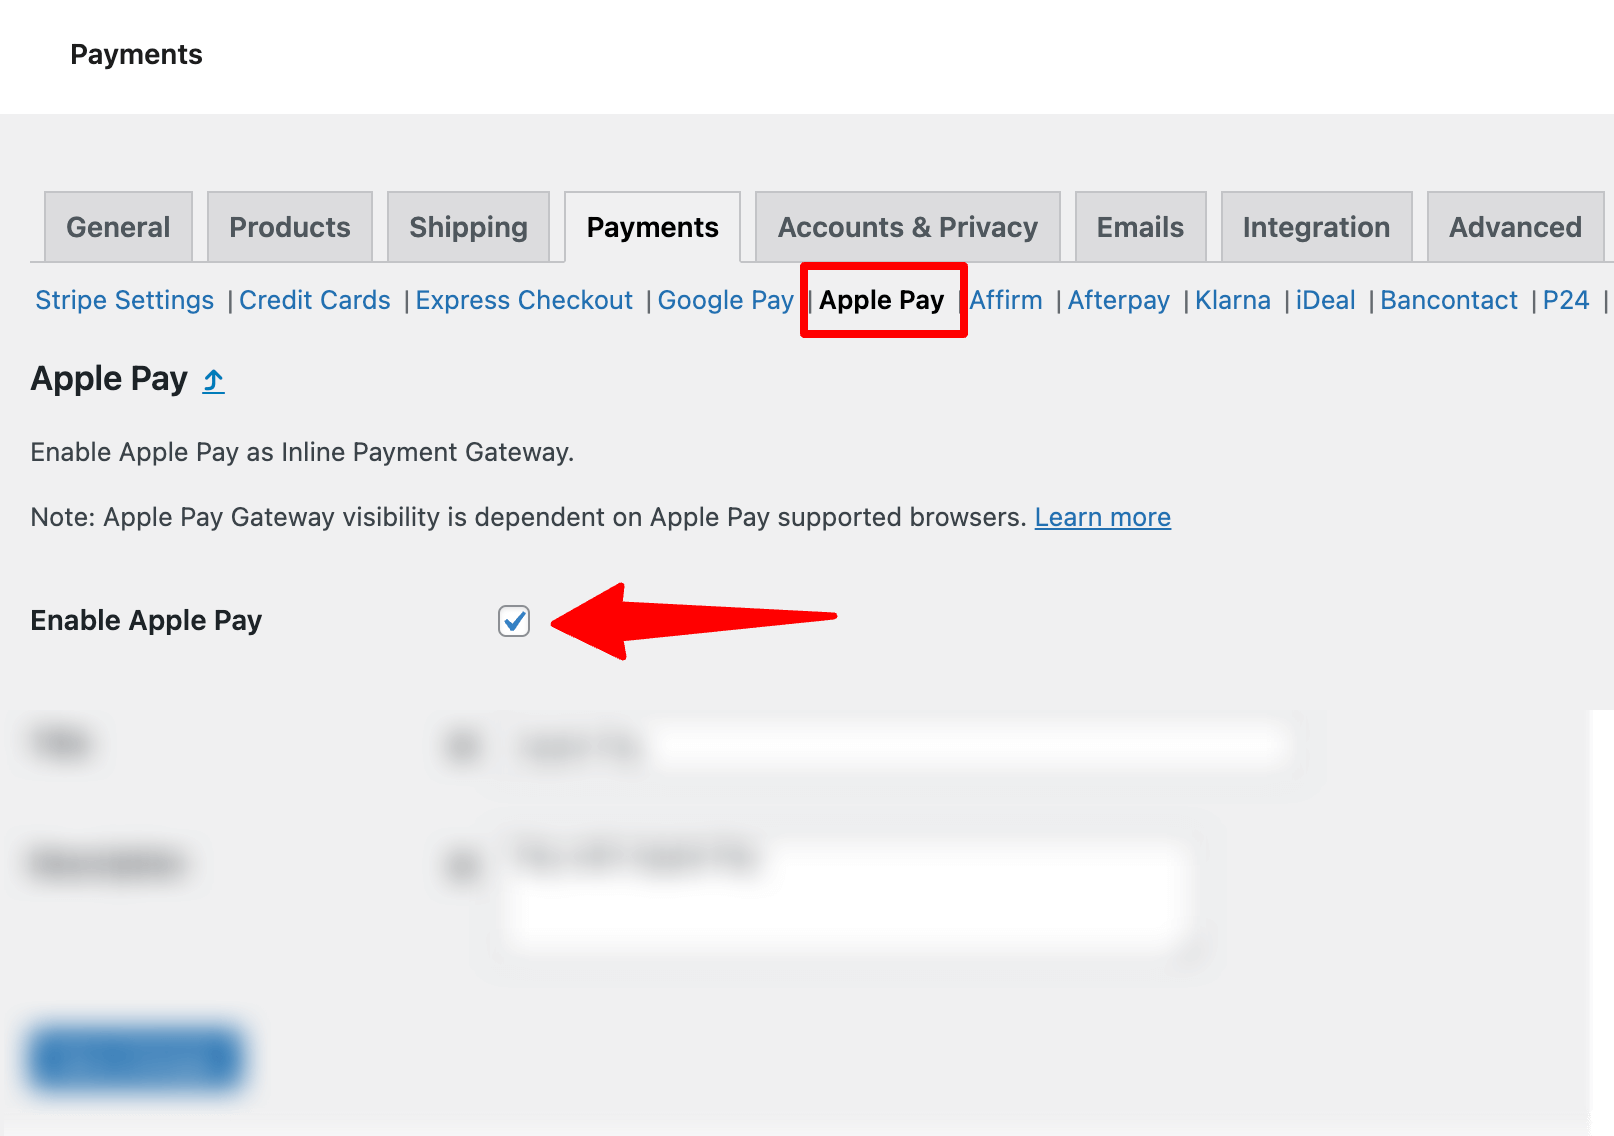
This will enable inline Apple Pay in your WooCommerce checkout page.
You can also set the title and description. Make sure to save the changes when done.
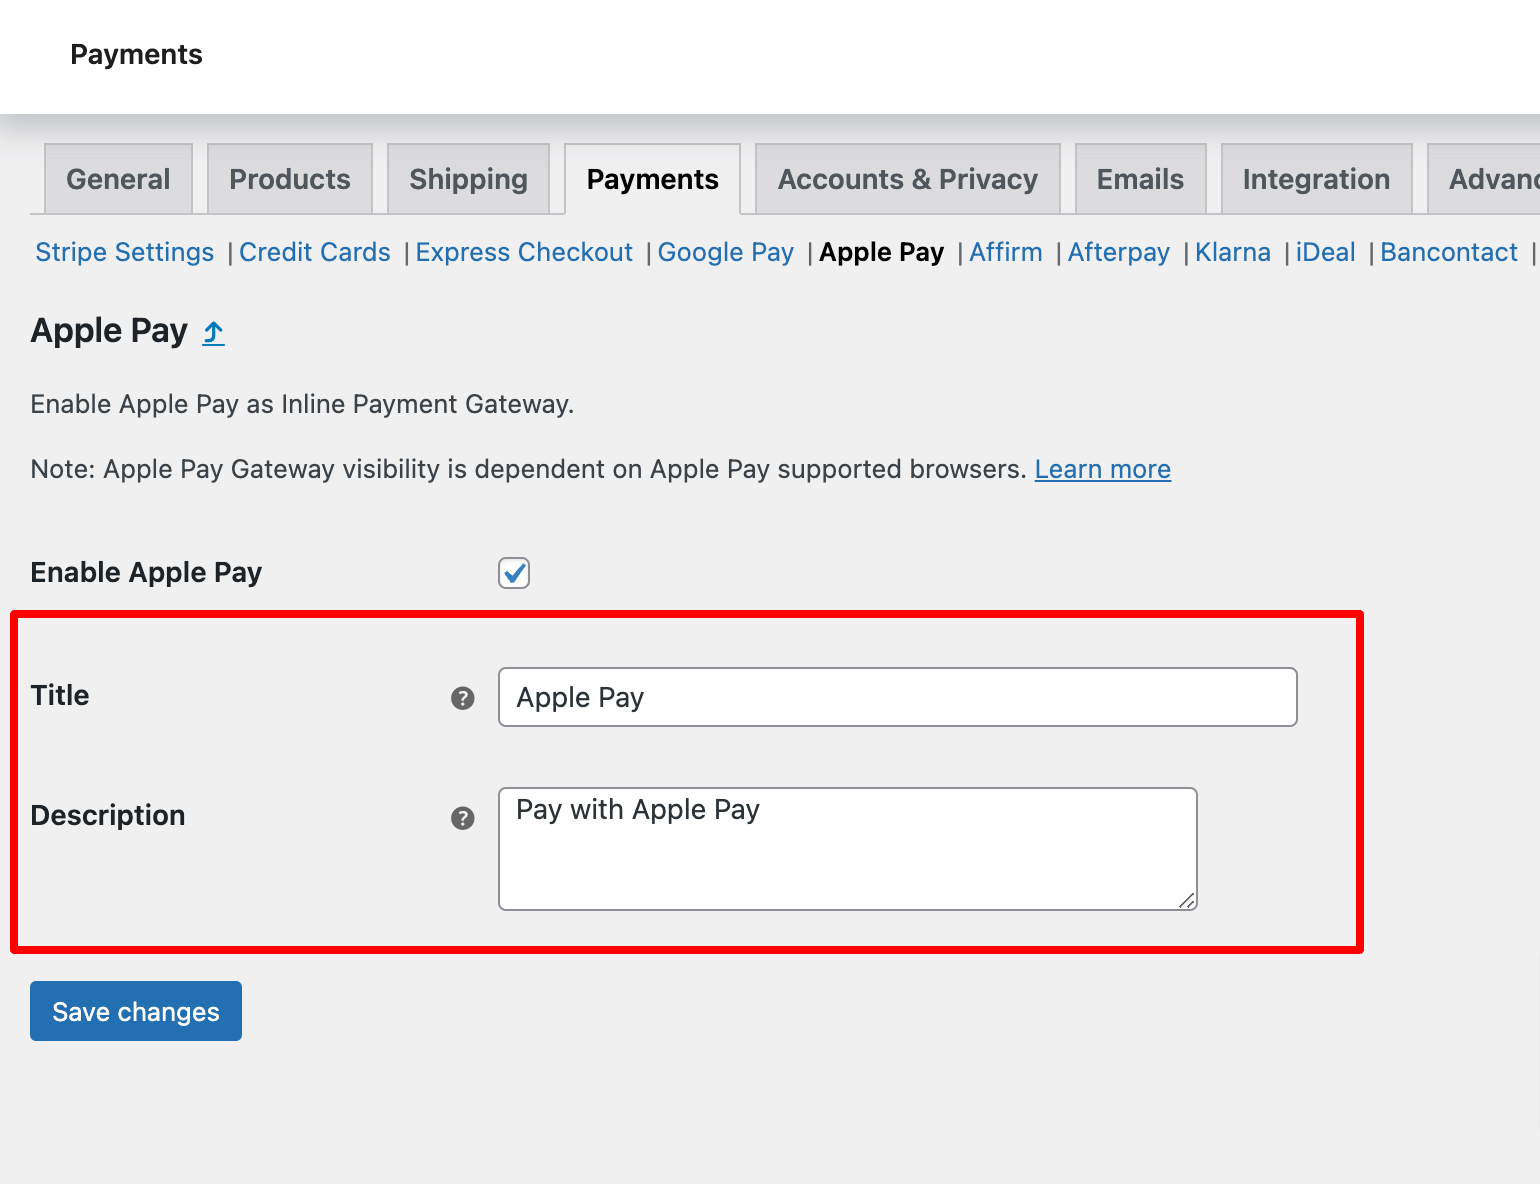
Now you have enabled both the one-click express and inline Apple Pay method, it’s time to test.
Testing the Apple Pay Method in WooCommerce
To test the payment button, put the website under the Test mode or Admin Only Test mode if not already.
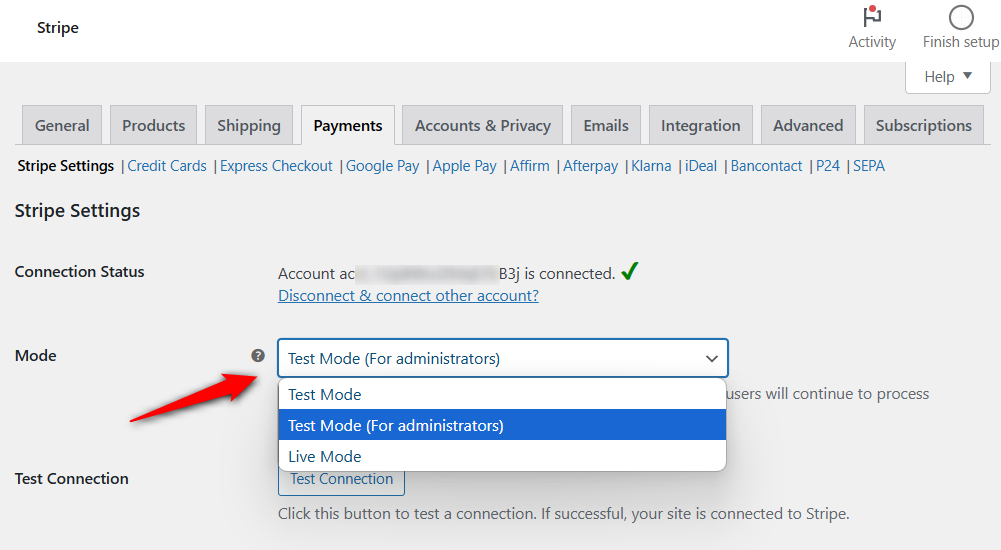
You can see the Apple Pay button on the pages you’ve set up.

If you’re making a payment on a mobile device, you will see this interface.
Confirm the payment with Touch ID/Face ID, and the payment will be deducted from the added credit/debit card.

Your WooCommerce Apple Pay setup is complete, and you’ll be directed to the thank you page.
Troubleshooting Apple Pay Button Visibility Issues in WooCommerce
Some users might face issues after setting up the WooCommerce Apple Pay gateway.
The Apple Pay button may not be visible, or the domain verification may fail. Such issues need troubleshooting before you start collecting payments on your website with Apple Pay.
Here is a 5-step fool-proof troubleshooting tactic for your WooCommerce Apple Pay button visibility:
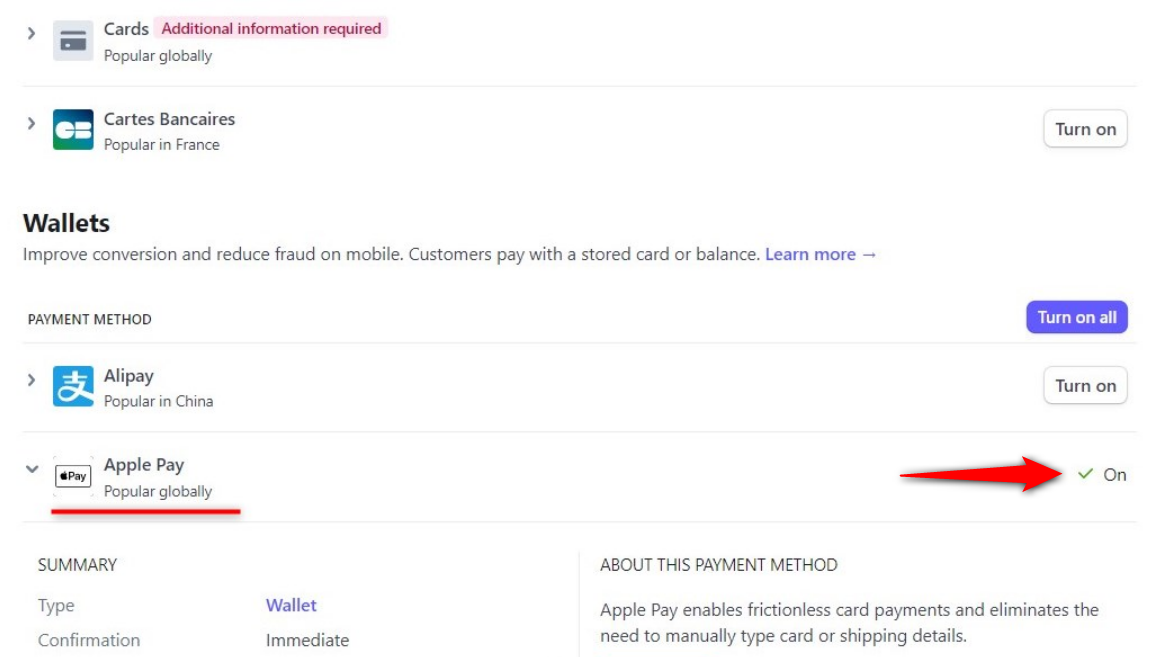
1. Ensure Apple Pay is enabled in your Stripe account
Login to your Stripe account and check whether Apple Pay is enabled in your Stripe account.
You can find it in the ‘Payment Methods’ section under Wallets.
2. Verify Your Website Domain for Apple Pay
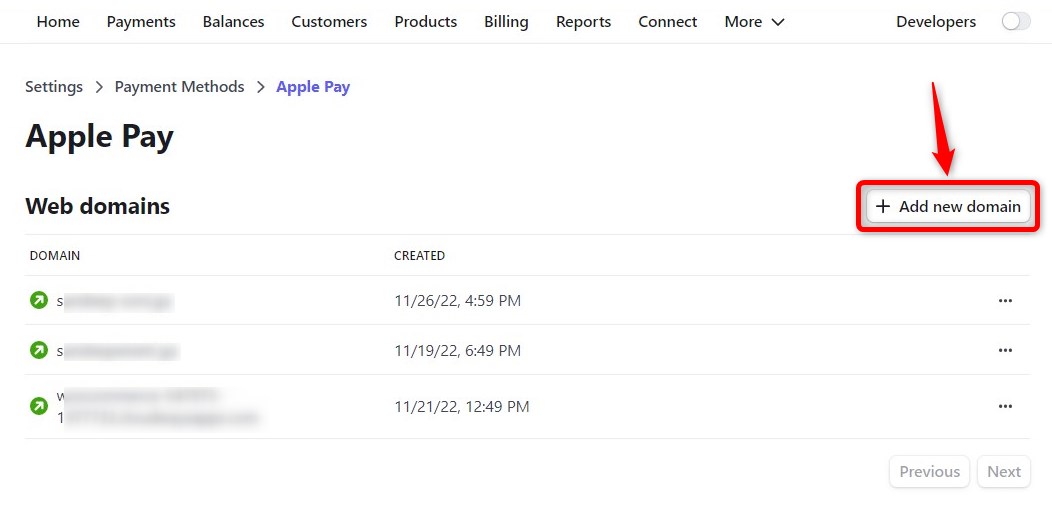
Under Apple Pay, you can check the web domains to enable the Apple Pay payment method.
You can request to re-verify your domain from the FunnelKit Stripe payment settings.
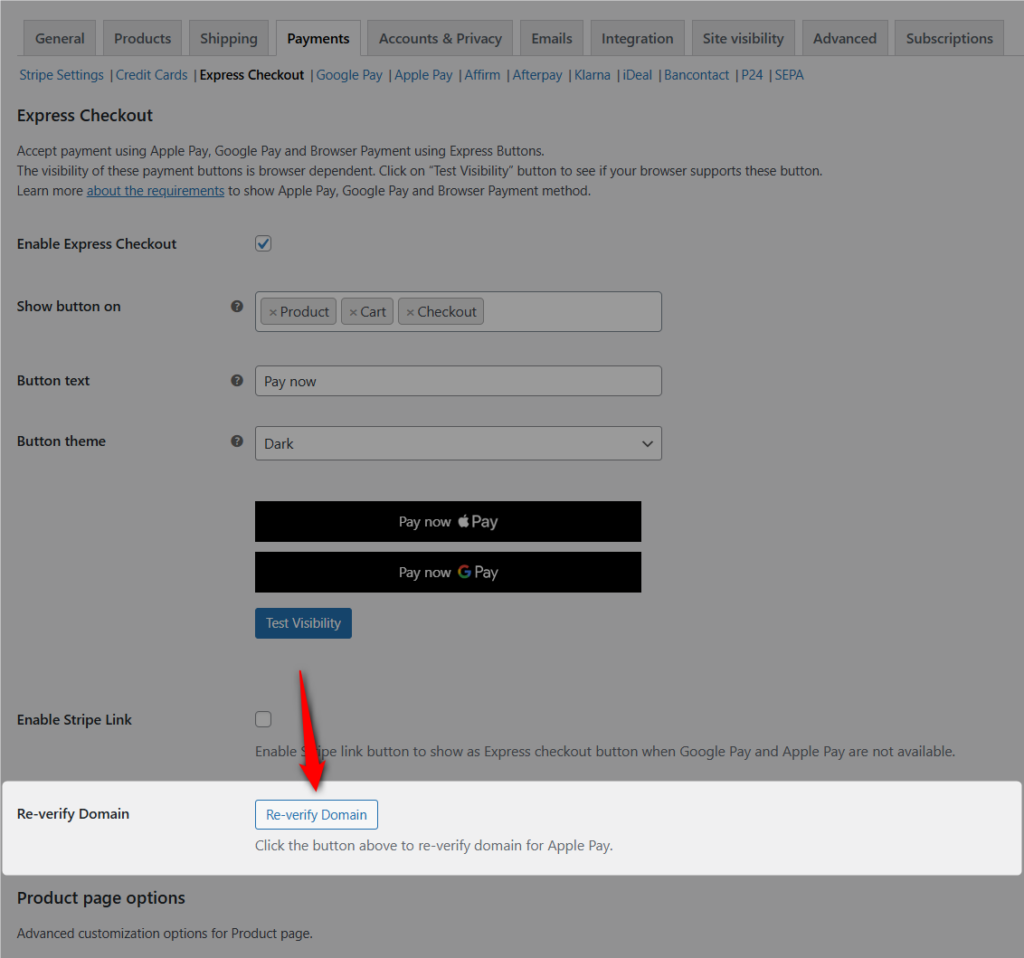
Furthermore, if your domain is not listed in the Stripe Apple Pay dashboard, you can verify your domain by clicking on the button as shown in the image below:
👉 Refer to our detailed documentation to verify your web domain manually.
3. Check for Browser Compatibility
Go to Safari browser and log in to the admin dashboard of your WordPress website.
Under the Stripe Checkout plugin settings, click on the Test Visibility button below the Express Checkout tab.
It’ll show up such a message if your browser is supported with Apple Pay, as shown in the image above.
👉 Check the complete list of Apple Pay supported devices here.
4. Verify Your Apple Pay Button Visibility from the Stripe Payment Demo
Go to the Stripe Payments Demo URL and cross-check if you’re able to see the Apple Pay button there.
If you don't see the Apple Pay express checkout button, this means it's not configured on your Apple device.
5. Verify you've added a card to Apple Pay to the Wallet app
You can add a credit, debit, or prepaid card to the Wallet app to the Wallet app on your iPhone, Macbook, and other compatible devices.
👉 Refer to the Apple official docs to set up Apple Pay on your supported device.
These five easy steps will help you troubleshoot and fix the Apple Pay visibility issue in WooCommerce.
Frequently Asked Questions (FAQs) for Integrating Apple Pay into WooCommerce
Here, we have answered some common questions related to Apple Pay integration with WooCommerce.
1. Can you use Apple Pay on WooCommerce?
FunnelKit Stripe Gateway for WooCommerce provides a medium to connect your store with Stripe.
This way, the plugin makes it easier to link Apple Pay to WooCommerce and lets shoppers checkout via Apple Pay with their Touch ID or Face ID from their Apple devices.
2. My WooCommerce Apple Pay domain verification failed; what to do?
In rare cases, the automatic domain verification might fail. You can always re-verify your domain or manually verify your domain with Apple Pay.
We have created a step-by-step document to verify your domain manually. You can refer to it anytime you want.
3. How do I turn off Apple Pay in WooCommerce?
To turn off the Apple Pay button in WooCommerce, follow these steps.
Go to Stripe plugin settings in the WordPress dashboard, and disable the express pay options under Payments > Express Checkout.
4. How do I host an Apple Pay verification file in WordPress?
Sometimes, while verifying your domain, you might get a message like this:
"The resource you are looking for has been removed, had its name changed, or is temporarily unavailable."
Apple’s step-by-step document will show you how to host an Apple Pay verification file in WordPress.
Bonus: Swap WooCommerce Checkout with Modern, Dynamic FunnelKit Checkout
The traditional WooCommerce checkout works well for beginners, as it does what it is supposed to do - enable the user to check out.
However, it is not optimized for conversions and is too rigid to customize.
So, what if we tell you that you can get beautiful pre-built checkout pages that you can import with just one click?
They come with conversion-proven elements like testimonials, trust seals, one-step or multi-step checkout forms, Google Address Autocomplete, embedded forms with customizable fields, and so much more!
Customize them with your favorite page builder - yes, drag and drop, no coding.
We are talking about the modern, dynamic FunnelKit Checkout.
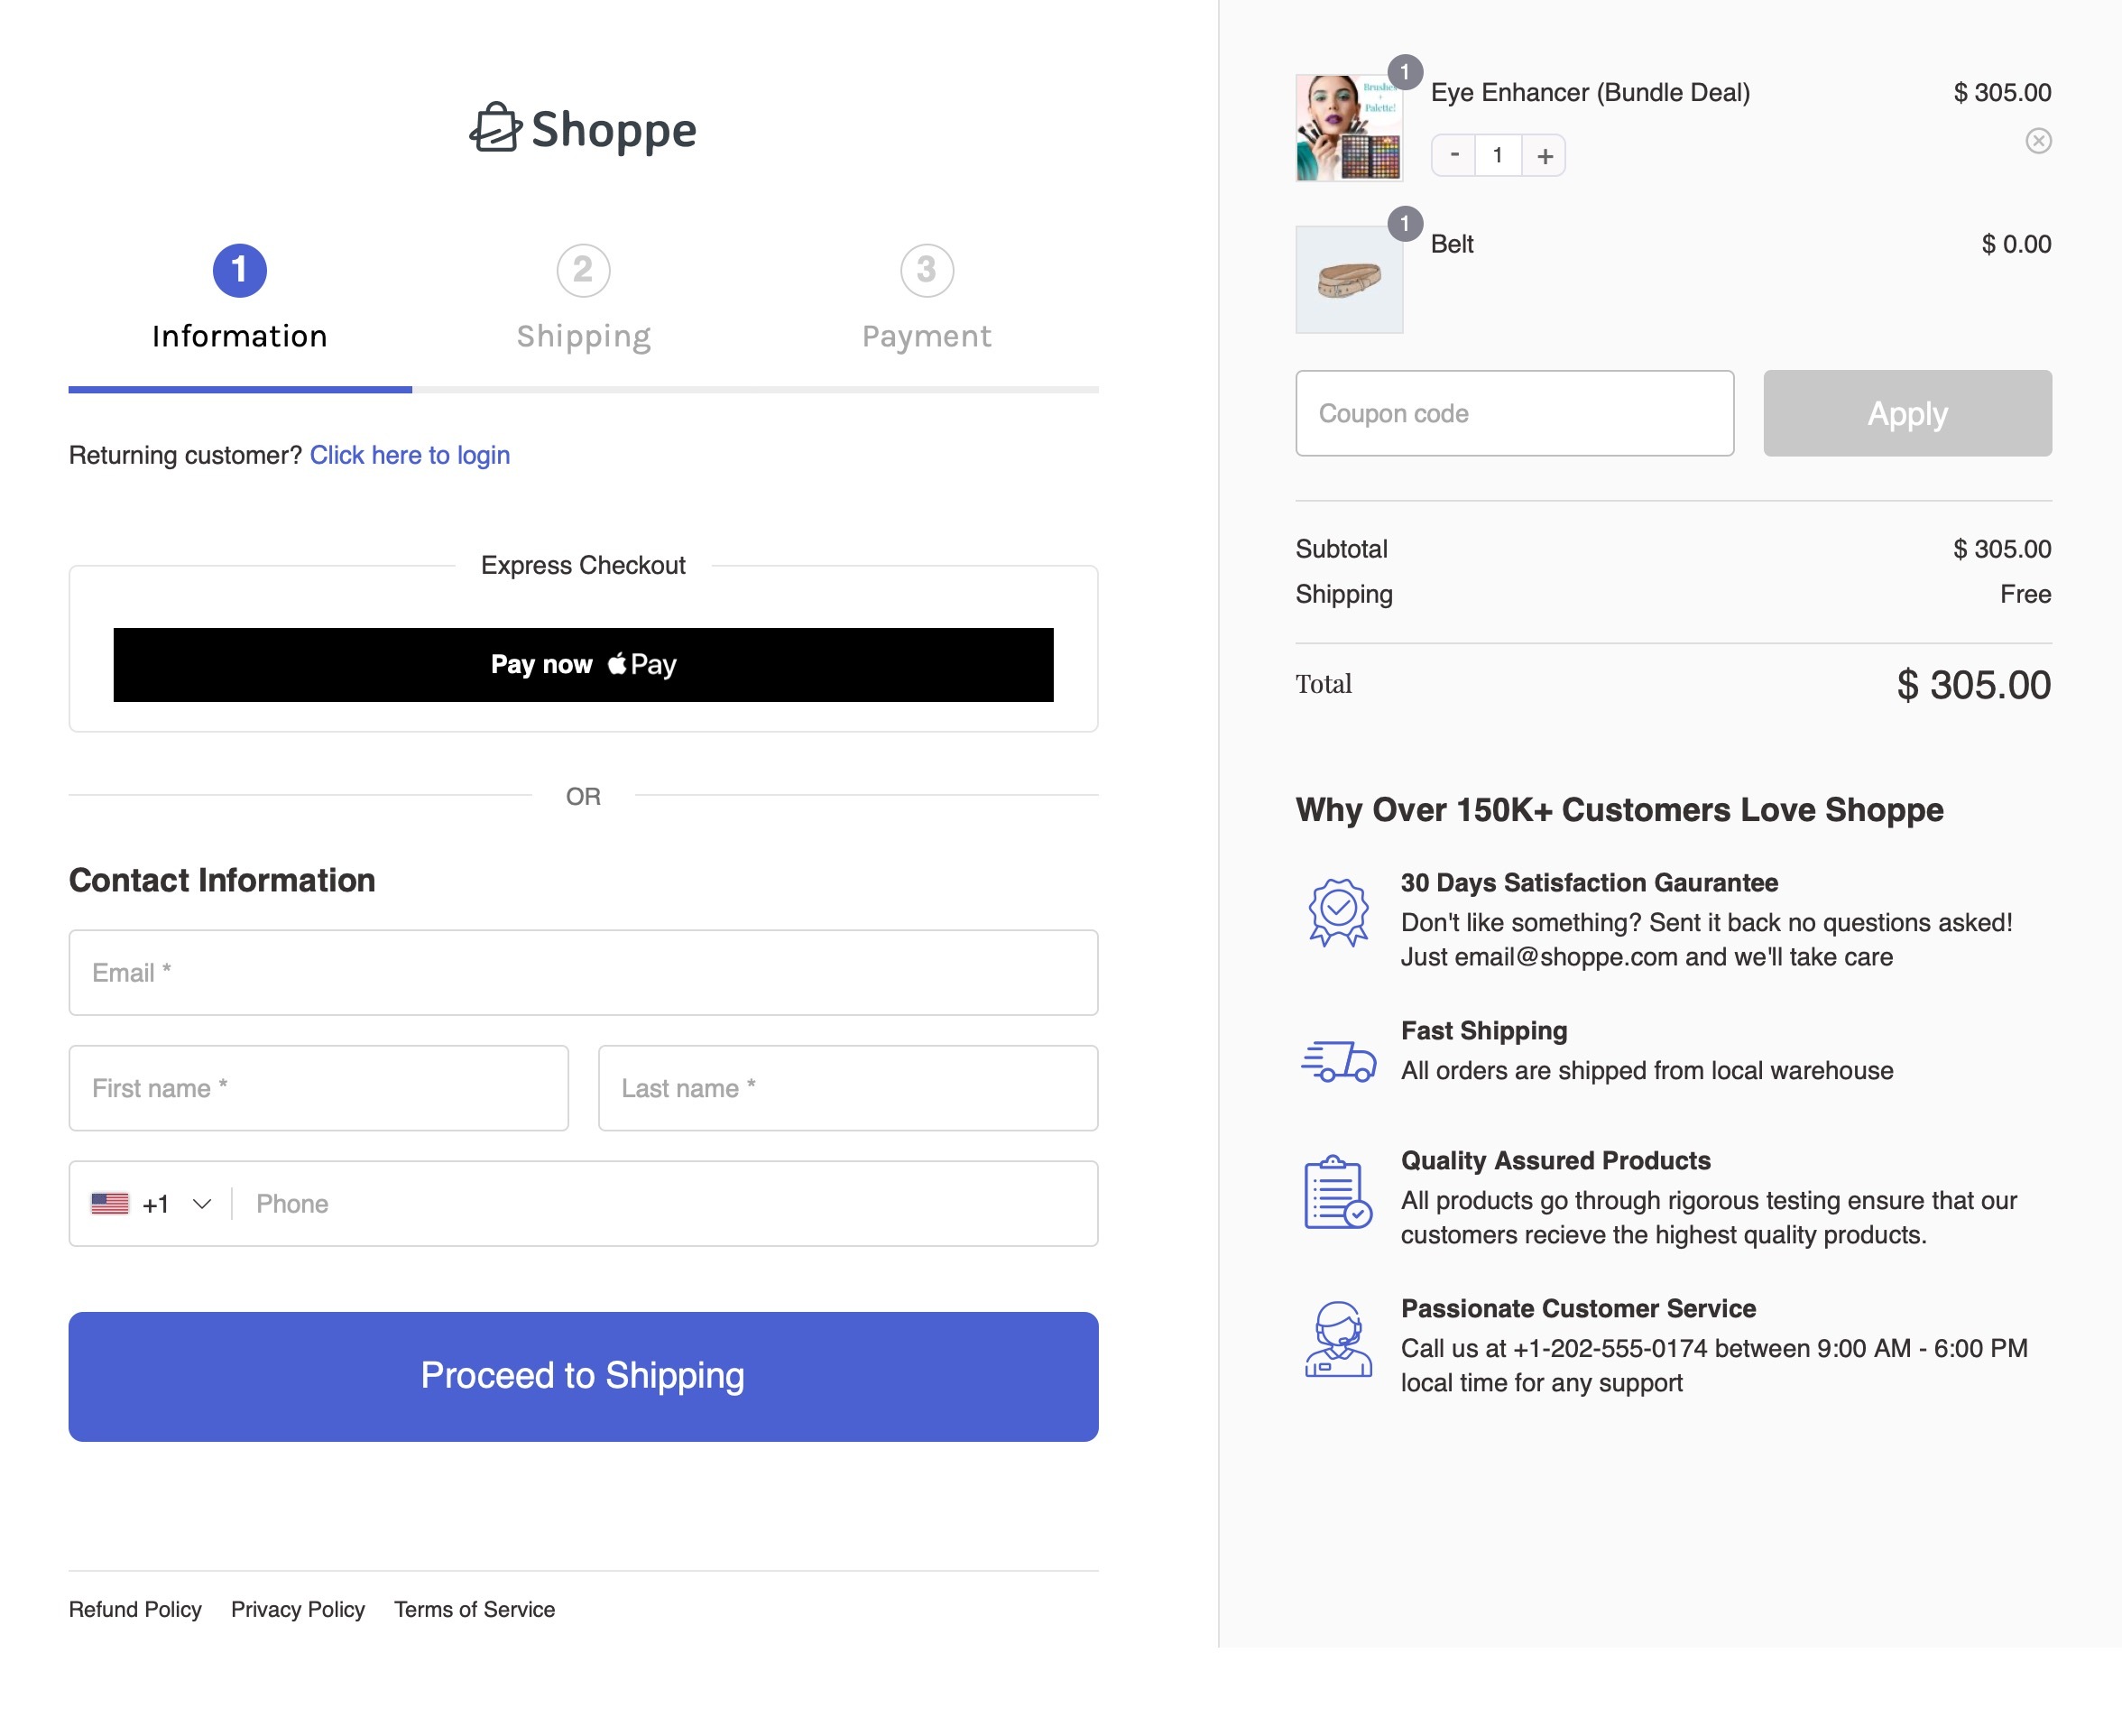
To reduce cart abandonments, you can enable a quicker checkout process with a one-page checkout or create a multi-step Shopify-style checkout.
With FunnelKit, you can do it the way you want!
But that’s not it. You get more.
🛒 Mini Cart Widget: FunnelKit’s checkout templates have a mini-cart widget. This allows your users to review, delete, adjust the quantity of their items, and more.
📍 Google Address Autocomplete: Wrong addresses can lead to failed deliveries. FunnelKit’s built-in checkout page optimizations like Google Address Autocomplete, allow your user to type in their address with just a few keystrokes.
🌟 Rule-based Checkouts: Create rule-based checkout pages for different products and add relevant upsell offers and one-click order bumps.
📄 Advanced Form Fields Editor: With the flexible checkout form builder, add sections and additional fields and re-arrange them all right within WordPress.
FunnelKit’s checkout page templates are optimized for mobile and ensure a frictionless checkout experience for your mobile users.
Ready to Set Up Your WooCommerce Apple Pay Payment Gateway?
The growth of the eCommerce industry and the rising use of express pay options like Apple Pay go hand in hand.
By enabling Apple Pay on your WooCommerce store, you’re giving customers a fast, secure, and hassle-free way to check out.
With just a tap, they can complete their purchase, reducing friction and boosting conversions.
The most significant benefit of Apple Pay is that it costs businesses nothing extra. Payment processors treat it as a regular credit card transaction, so you will only be charged a normal credit card processing fee.
Couple your WooCommerce Apple Pay with a conversion-boosting checkout page - and see sales rolling in!

Editorial Team
January 5, 2026Stripe is one of the most trusted payment gateways worldwide, powering over 3.5 million websites globally. With 90% of U.S. adults having made a purchase from businesses using Stripe (Source:...
Editorial Team
December 24, 2025Your customer finds the perfect product. Adds it to the cart. Reaches checkout and sees a wall of form fields. Name. Email. Address. City. State. Zip. Card number. Expiry. CVV....
Editorial Team
December 24, 2025Are you looking for a seamless way of adding Bancontact to your WooCommerce store? Bancontact is Belgium's most popular online payment method, having processed over 2.5 billion payments in 2024....


