


WooCommerce Google Pay can turn a 90-second checkout into a two-second tap.
Think about paying for coffee with your phone. You pull out your phone, tap to pay, and you’re done in a couple of seconds.
Now try buying that same bag of coffee from an online store. You enter your email, name, address, city, state, and ZIP code. Then you pull out your card and type in the number.
It’s the same customer buying the same product. But one payment takes seconds, while the other can take a minute or more.
That’s the problem Google Pay solves.
With Google Pay, shoppers can tap a button, choose a card they already have saved, and pay without typing their card details into your checkout.
If their shipping information is already saved, they can skip even more of the form.
And those extra checkout steps matter. Baymard Institute found that 17% of US shoppers have abandoned an order because the checkout was too long or complicated.
There’s just one catch: WooCommerce doesn’t include Google Pay by default.
Google Pay is provided through your payment gateway, so the setup looks different depending on whether you use Stripe, WooPayments, Square, or PayPal.
In this guide, we’ll walk you through enabling Google Pay with all four gateways, where to place the Google Pay button so customers actually notice it, and how to test the setup before accepting real payments.
And if the button still refuses to show up, don’t worry. We’ll also go through the 11 most common reasons Google Pay doesn’t appear and what you can do about each one.
Here's our quick video tutorial on setting up Google Pay in your WooCommerce store:
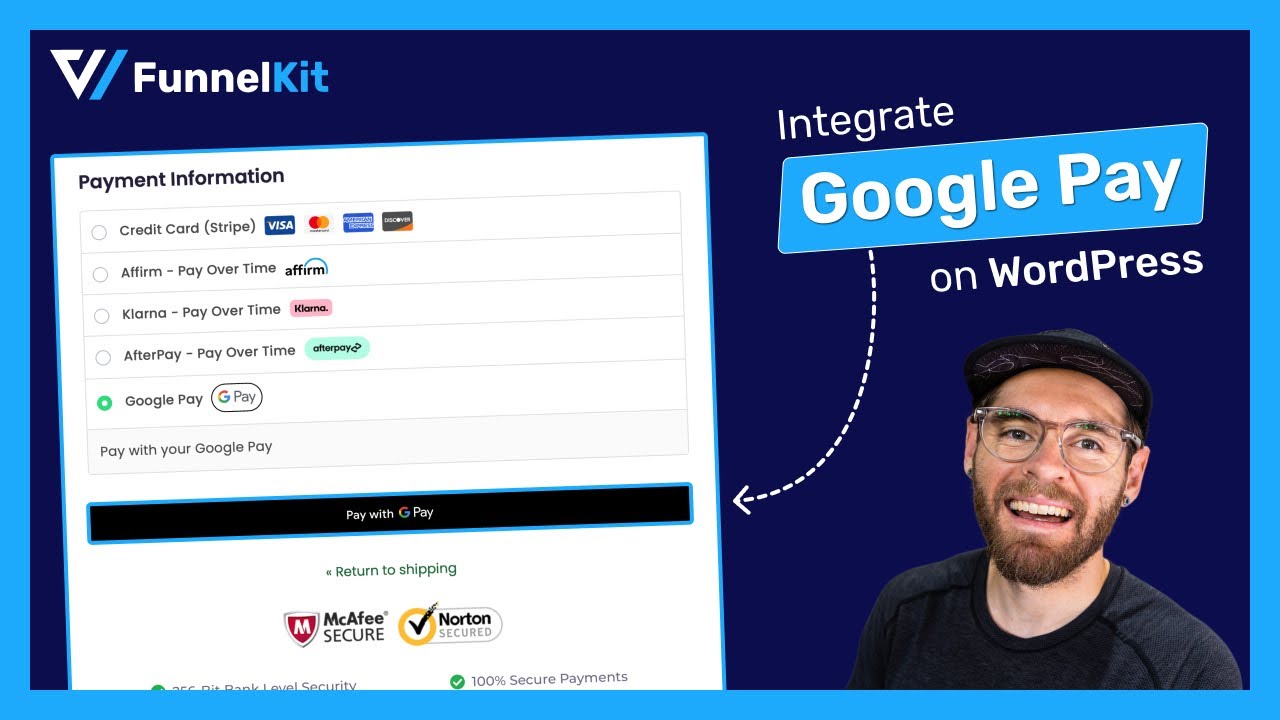
Table of Contents
- 1 What Is Google Pay in WooCommerce?
- 2 Four Ways to Accept Google Pay on Your Store
- 3 Essentials to Set Up WooCommerce Google Pay Using Stripe
- 4 Google Pay Setup and Button Visibility: Two Methods
- 5 How to Set Up Google Pay in WooCommerce With Stripe?
- 6 How to Perform Google Pay Test Transactions in Your WooCommerce Store?
- 7 How to Set Up WooCommerce Enhanced Google Pay Integration? (Google Merchant ID Creation and Integration Submission for Approval)
- 8 Testing Live Google Pay Transactions in Your WooCommerce Store
- 9 If You Are Not on Stripe
- 10 Google Pay Not Showing in WooCommerce? 11 Fixes
- 11 Frequently Asked Questions (FAQs)
- 12 Ready to Set Up Your WooCommerce Google Pay Payment Gateway?
What Is Google Pay in WooCommerce?
Google Pay is a digital wallet. Shoppers save cards to their Google account once, and any store with Google Pay enabled can charge those cards without ever seeing the numbers.
The payment flow is as follows:
- When the user taps Google Pay's payment button, a list of supported payment methods appears. The button also shows the previous payment method, and you can add a new card at checkout.
- The user does not need to fill out the checkout form again. It sends payment and billing information to the merchant.
- Google Pay securely returns a payment token to your WooCommerce store after a user selects a payment method.
- The payment token and purchase details are sent to your app's backend.
- Payment service providers receive the payment token from the backend and process the purchase to execute the payment.
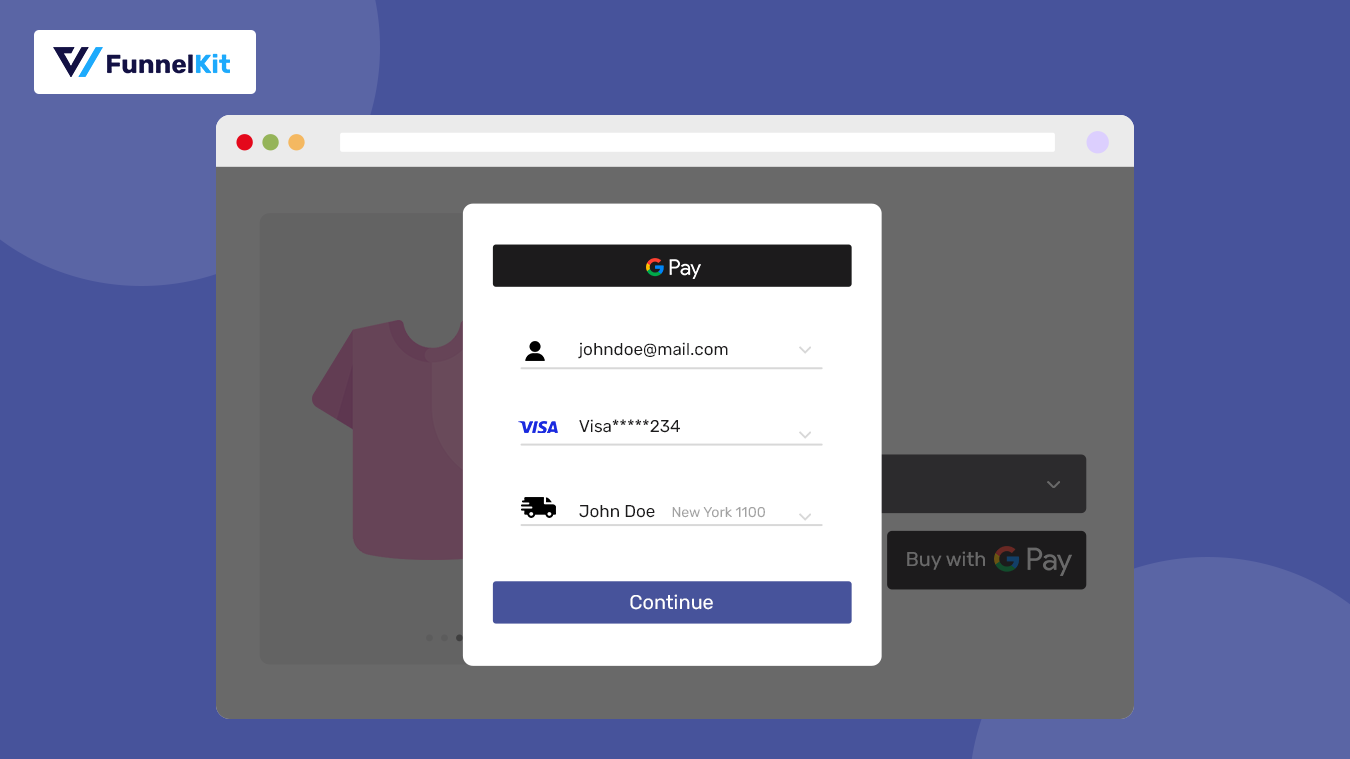
On your store, it shows up in two ways. As an express button, sitting above the checkout form on your product, cart, and checkout pages, letting shoppers skip the form entirely.
Or as an inline payment method, listed alongside credit card in the payment section, for shoppers who have already filled in your fields and just want a faster way to pay.
Here is what actually changes for the buyer:
| Parameters | Standard card checkout | One-tap wallet |
|---|---|---|
| Fields to fill | 12 to 24, depending on your setup | None |
| Card details | Typed from a physical card | Already saved to the Google account |
| Address | Typed manually | Pulled from the Google account |
| Account required | Often yes | No |
| Taps to buy | Dozens | Two |
Digital wallets now account for 56% of global ecommerce transaction value and 40% in the US, which makes this less of an upgrade and more of a baseline. (Source: Worldpay Global Payments Report 2026)
Over 150 million active users use Google Pay across 42 global markets.
Another thing to know up front: Google charges you nothing for this. Wallet payments settle as ordinary card transactions at your normal processing rate.
Four Ways to Accept Google Pay on Your Store
Most other guides on this topic focus on one gateway, but you can do it with more than one.
1. Stripe
The most flexible route, and the one this walkthrough uses. You get per-page control over where the button appears, the option to run it as its own gateway separately from Apple Pay, and express buttons inside a slide-in cart. Stripe also has the widest country coverage of the four.
2. WooPayments
The fastest to set up, because Stripe is already wired in behind it. The tradeoff is control: the two wallets share a single setting, so enabling one enables both, with no way to run them separately.
3. Square
The right call if you also sell in person and want online and offline inventory reconciled in one place. Square’s supported-country list is shorter than Stripe’s, so check yours before committing.
4. PayPal Payments
It works, with one real constraint. The button cannot be separated from your PayPal smart buttons. It sits below them, inside the PayPal gateway, and stays there.
Still choosing a processor? For the broader playbook, see our guide to the best WooCommerce payment gateways.
Already have one? Skip to your gateway below.
Essentials to Set Up WooCommerce Google Pay Using Stripe
You'll need the following essentials before setting up the WooCommerce Google Pay integration.
1. A WooCommerce store
WooCommerce is the most popular eCommerce platform in the world. It powers almost 36.68% of all eCommerce stores on the internet.
Follow the WooCommerce guide to set up your new store if you haven’t already done so.
2. A Stripe account
You need to set up a Stripe account before you start collecting payments.
Setting up Stripe is free, but they charge per transaction. Their pricing structure varies by country.
3. Stripe Gateway for WooCommerce plugin
FunnelKit’s Stripe Gateway for WooCommerce is a powerful integrated solution to collect payments on your store.
With FunnelKit's Stripe plugin, you can simplify the payment process on the web and mobile. It’s a quick and secure payment gateway for your WooCommerce store.
Here's what it offers:
- Credit and debit cards: Lets you collect debit and credit card payments via Stripe. Users can use any card, such as Visa, MasterCard, American Express, Discover, JCB, and more.
- Express checkout: Enables faster payment options like Apple Pay and Google Pay.
- Local payment options: Support bank redirect or local payment gateway options, such as SEPA, iDEAL, P24, Bancontact, etc.
- Buy now pay later (BNPL): Enable Buy Now Pay Later (BNPL) payment gateways such as Afterpay, Klarna, Affirm, etc.
- Deep integration: This Stripe gateway integrates deeply with FunnelKit's checkout pages, one-click upsells, and more. It provides your customers with seamless payment ordering and processing.
Google Pay Setup and Button Visibility: Two Methods
You can use two methods to set up Google Pay integration in your WooCommerce store.
1. Stripe Payment Request Button
This method allows developers to integrate Stripe-enabled payments into your WooCommerce store.
However, this payment setup is browser-dependent. You need to ensure your customers follow these criteria:
- Countries: Check the complete list of countries where Google Pay works.
- Device Compatibility: Your device must be compatible with Google Pay - see the complete list of devices. Google Pay for iPhone and iPad is only available in the US and India.
- Browser: Your shopper must use Chrome and have a Google account with their card details saved.
This method is unsuitable because it’s dependent on so many criteria. Many store owners have problems with the express button’s visibility using this method.
2. Enhanced Google Pay Integration via FunnelKit Stripe
FunnelKit’s Stripe Payment Gateway for WooCommerce has gone a step further by adding enhanced Google Pay integration via Stripe.
By setting up this integration, the GPay button appears everywhere in any browser, while payments still go through Stripe.
- Browser independence
- Improved user experience
- Global accessibility
- Stripe-powered payments
Now that we have discussed the two methods to set up Google Pay, let's get started with enhanced WooCommerce Google Pay integration.
How to Set Up Google Pay in WooCommerce With Stripe?
Now you know the requirements for this WooCommerce Google Pay integration.
Let’s connect the Stripe account to your WooCommerce store and set up Google Pay.
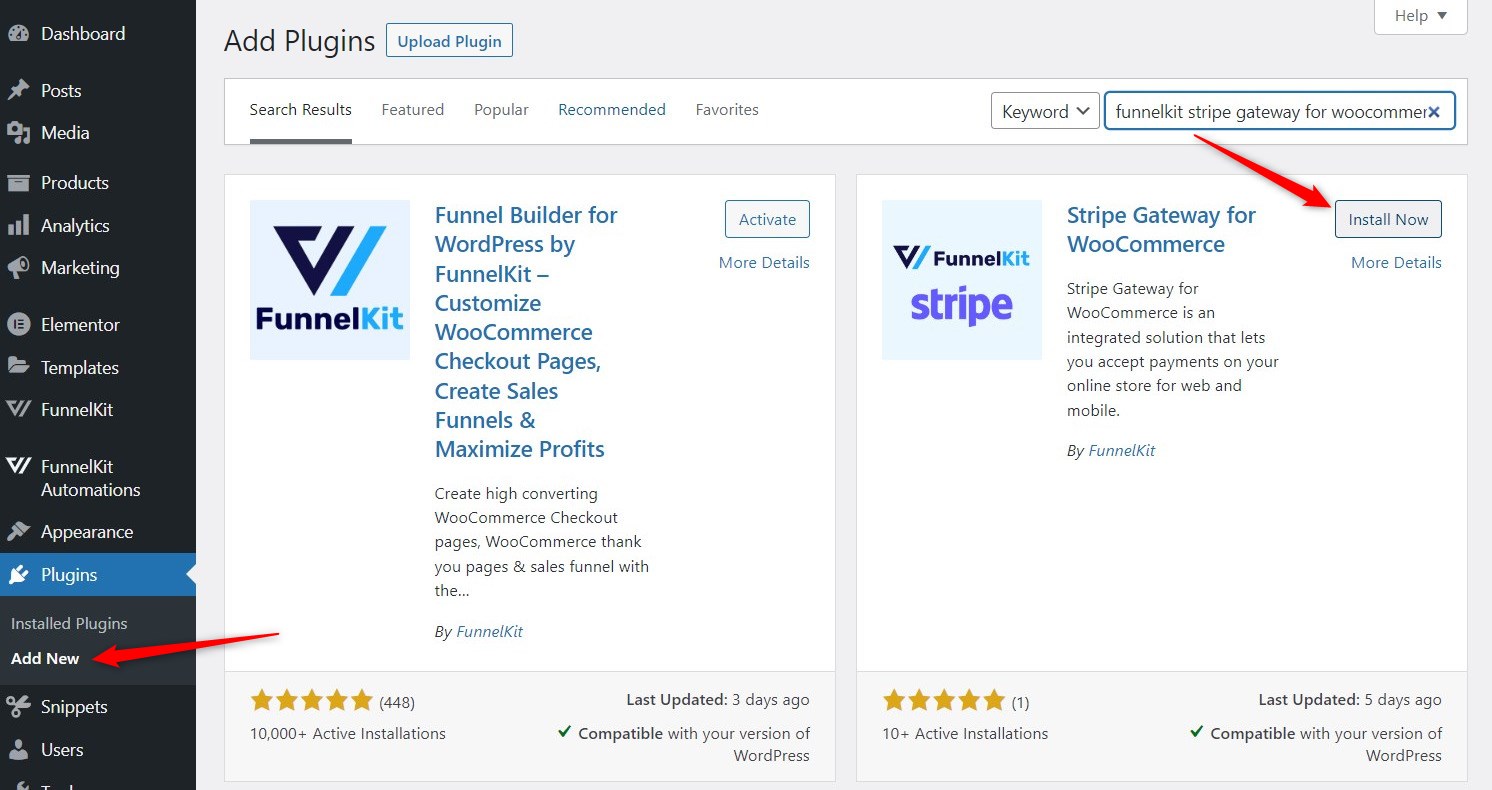
Step 1: Install the Stripe Payment Gateway for WooCommerce plugin
Go to your WordPress plugin dashboard and search for “FunnelKit Stripe Gateway for WooCommerce”.
When you locate the plugin, install and activate it.
Now, let’s move on to configuring your Stripe account to collect payments easily.
Step 2: Connect and configure your Stripe account
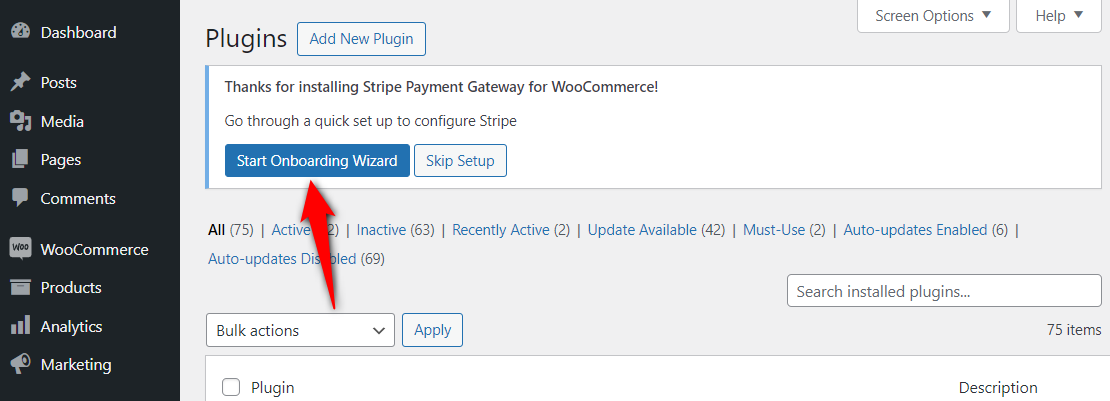
In the plugins dashboard, you’ll see a banner that prompts you to configure your Stripe account.
Click on the ‘Start Onboarding Wizard’ button and start configuring your account.
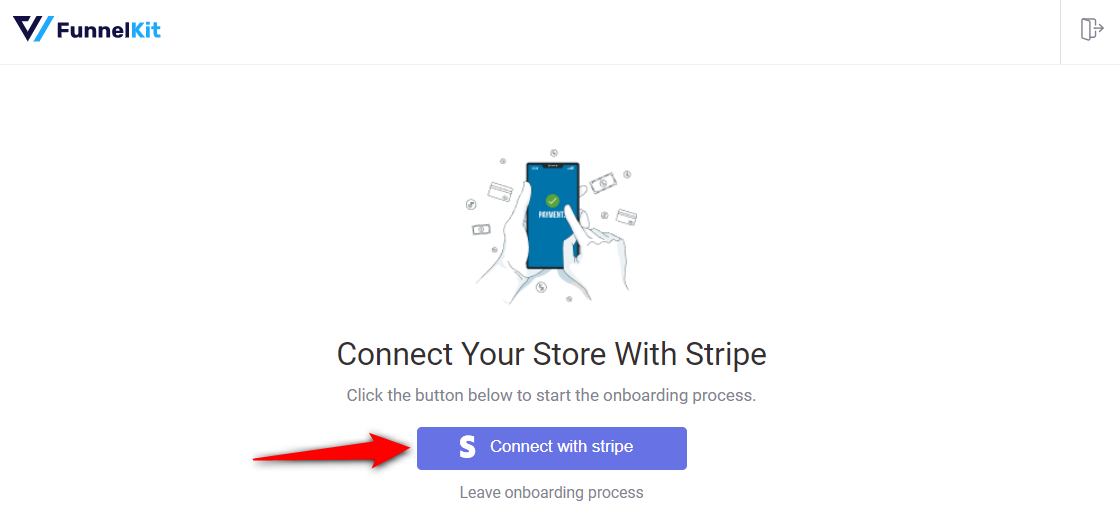
Next, hit the ‘Connect with Stripe’ button.
You’ll be redirected to the Stripe account authorization page.
Enter your registered email address and password to log in to your Stripe account.
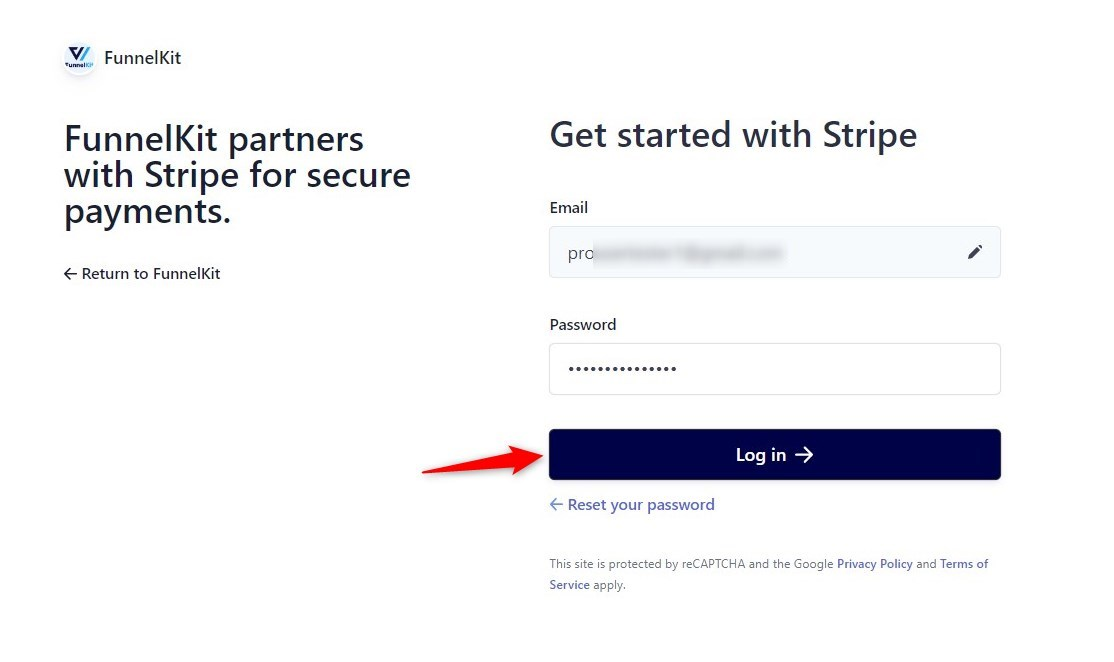
Note: You’ll be asked to verify your account with a 6-digit verification code sent to your registered email or mobile phone.
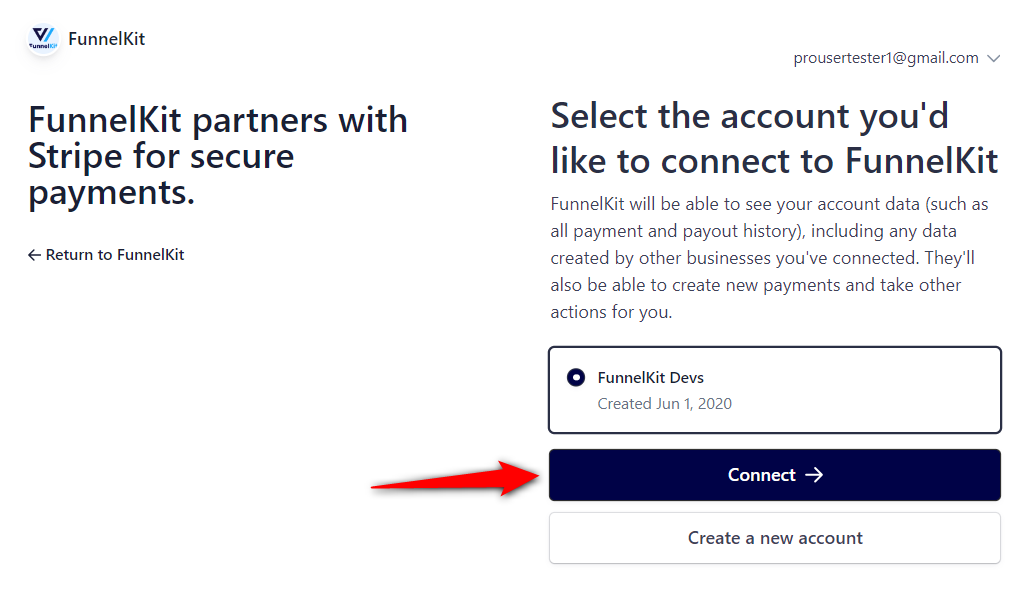
Now, select the Stripe account you want to use for your WooCommerce Google Pay integration.
Once selected, click Connect.
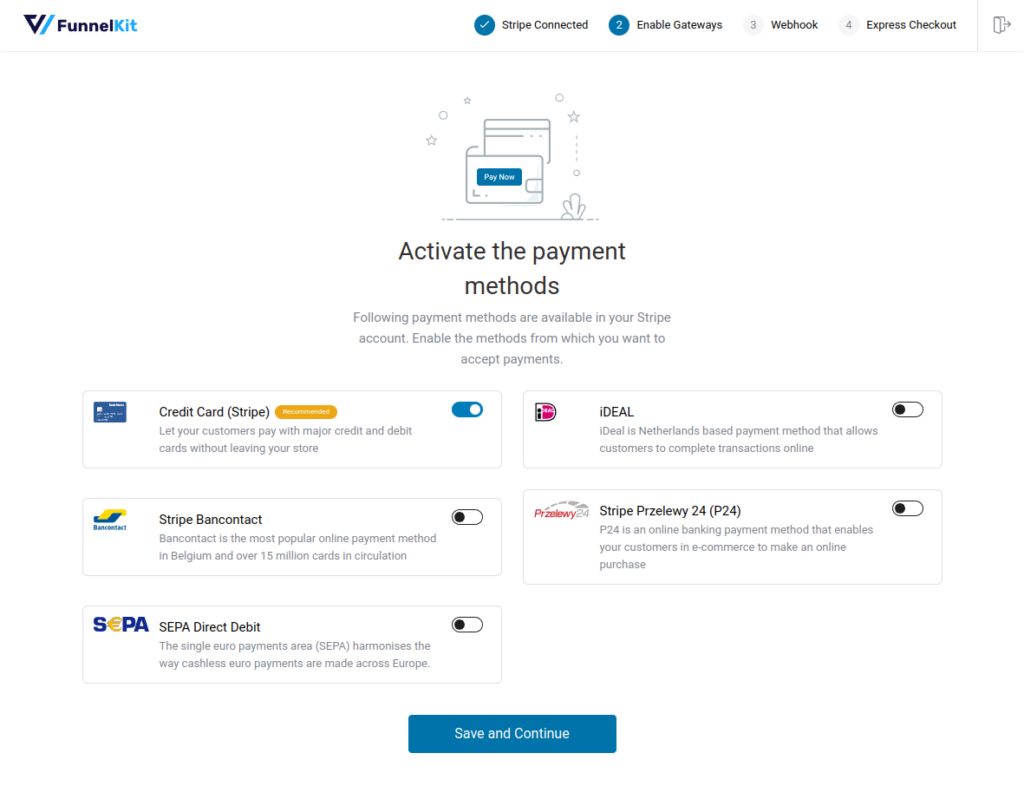
- Enabling Payment Gateways
On the next screen, you will see all the available payment gateways. To keep things simple, we will only enable Credit Cards (Stripe).
However, you can enable local payments or buy now, pay later options (need to be enabled from Stripe) from here.
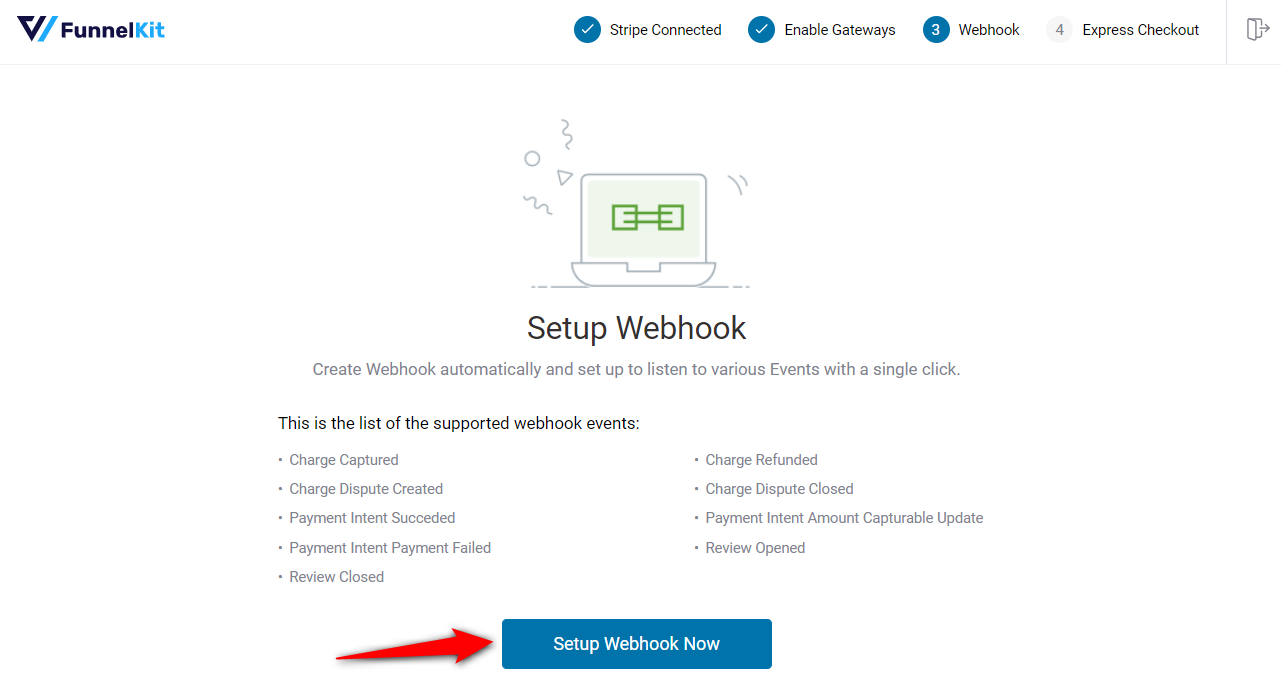
- Setting Up Webhook
Stripe will now ask you to set up webhooks. Click on the button and move to the next screen.
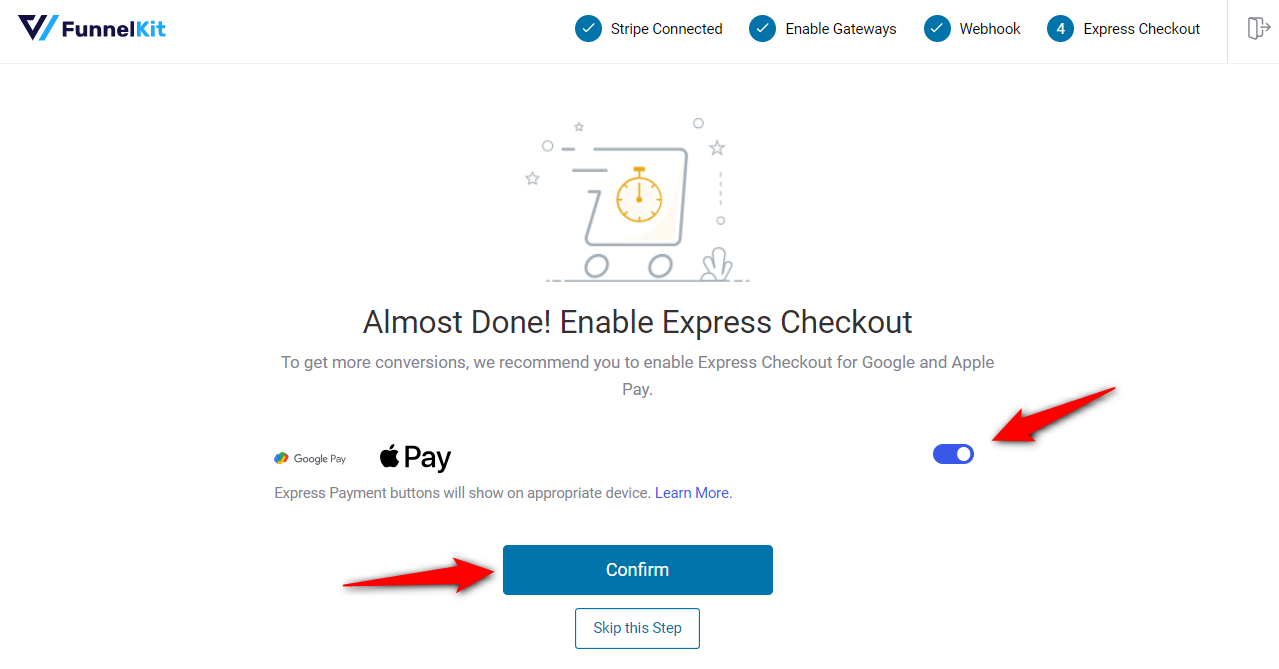
- Enabling Express Checkouts
You must now enable the express checkout buttons. To show the Google Pay button on your store, you must first enable the express checkout options in Stripe.
You are all set. Test if Stripe successfully processes the payments on your WooCommerce store.
Select the mode you want to test: Test or Live.
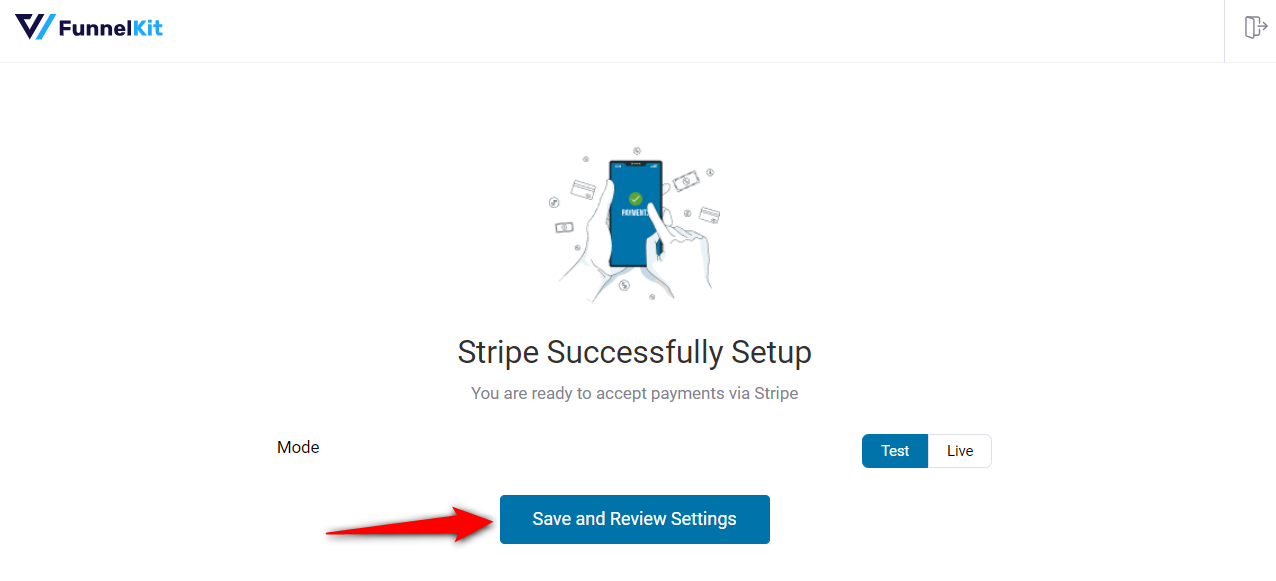
Once you’ve selected your preferred mode, click ‘Save and Review Settings’.
Now that your Stripe account is configured, all the details will be fetched into your WooCommerce store, including:
- Stripe connection ID and status
- Webhook ID
- Webhook URL
- Live and test webhook secret
- Debug log URL
Now, let’s customize the Google Pay button before we display it on our WooCommerce store.
Step 3: Enable and customize the Google Pay Button
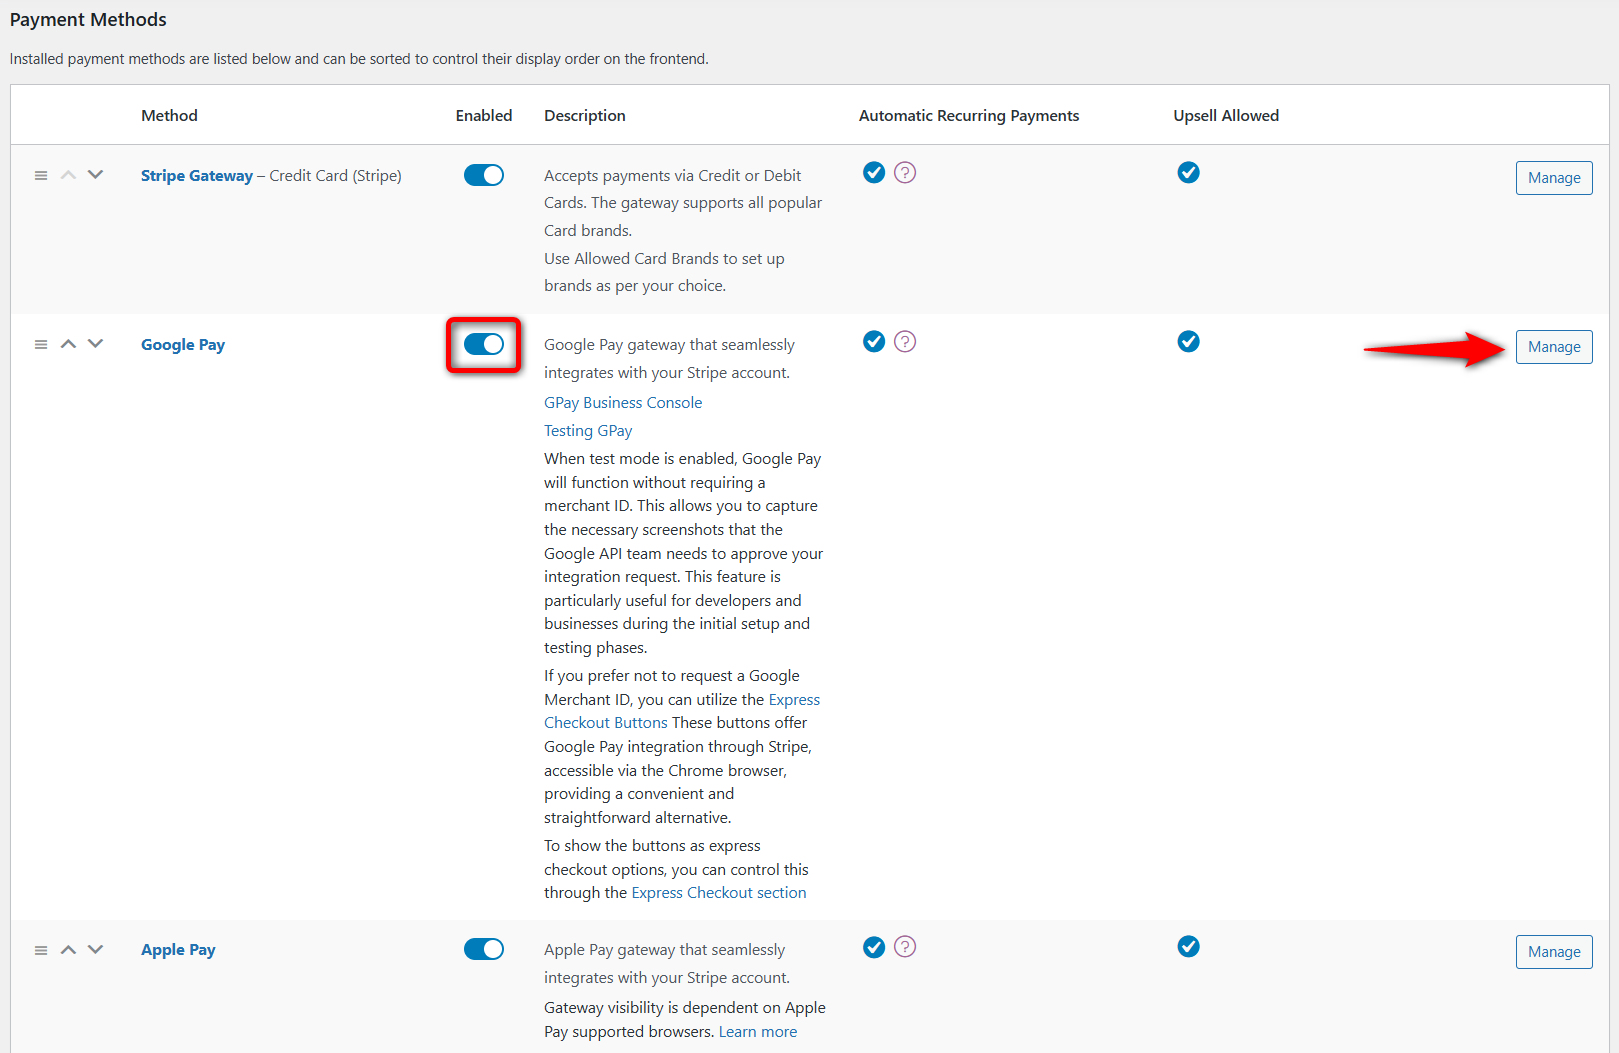
Under the Payments tab, scroll down to see Google Pay. Turn the toggle to enable it and click on ‘Manage’ next to it.
Configure the following settings for your WooCommerce Google Pay integration (which will appear as inline payment option):
- Enable Google Pay - Check this option to enable Google Pay in your store
- Title - Title of your Google Pay payment method
- Google merchant ID and name - Enter the Google Merchant ID and name provided while setting up your Google Business account. We’ll discuss how to get this ID later in this article.
- Display position - Enable the Google Pay payment method using express checkout buttons, in the payment gateway, or both.
- Description - The payment method description will appear below the title.
- Button color - Set the color of the Google Pay button: White or Black
- Button theme - Choose the theme of the Google Pay button: Book, Buy, Plain, Checkout, Donate, Order, Pay, and Subscribe.
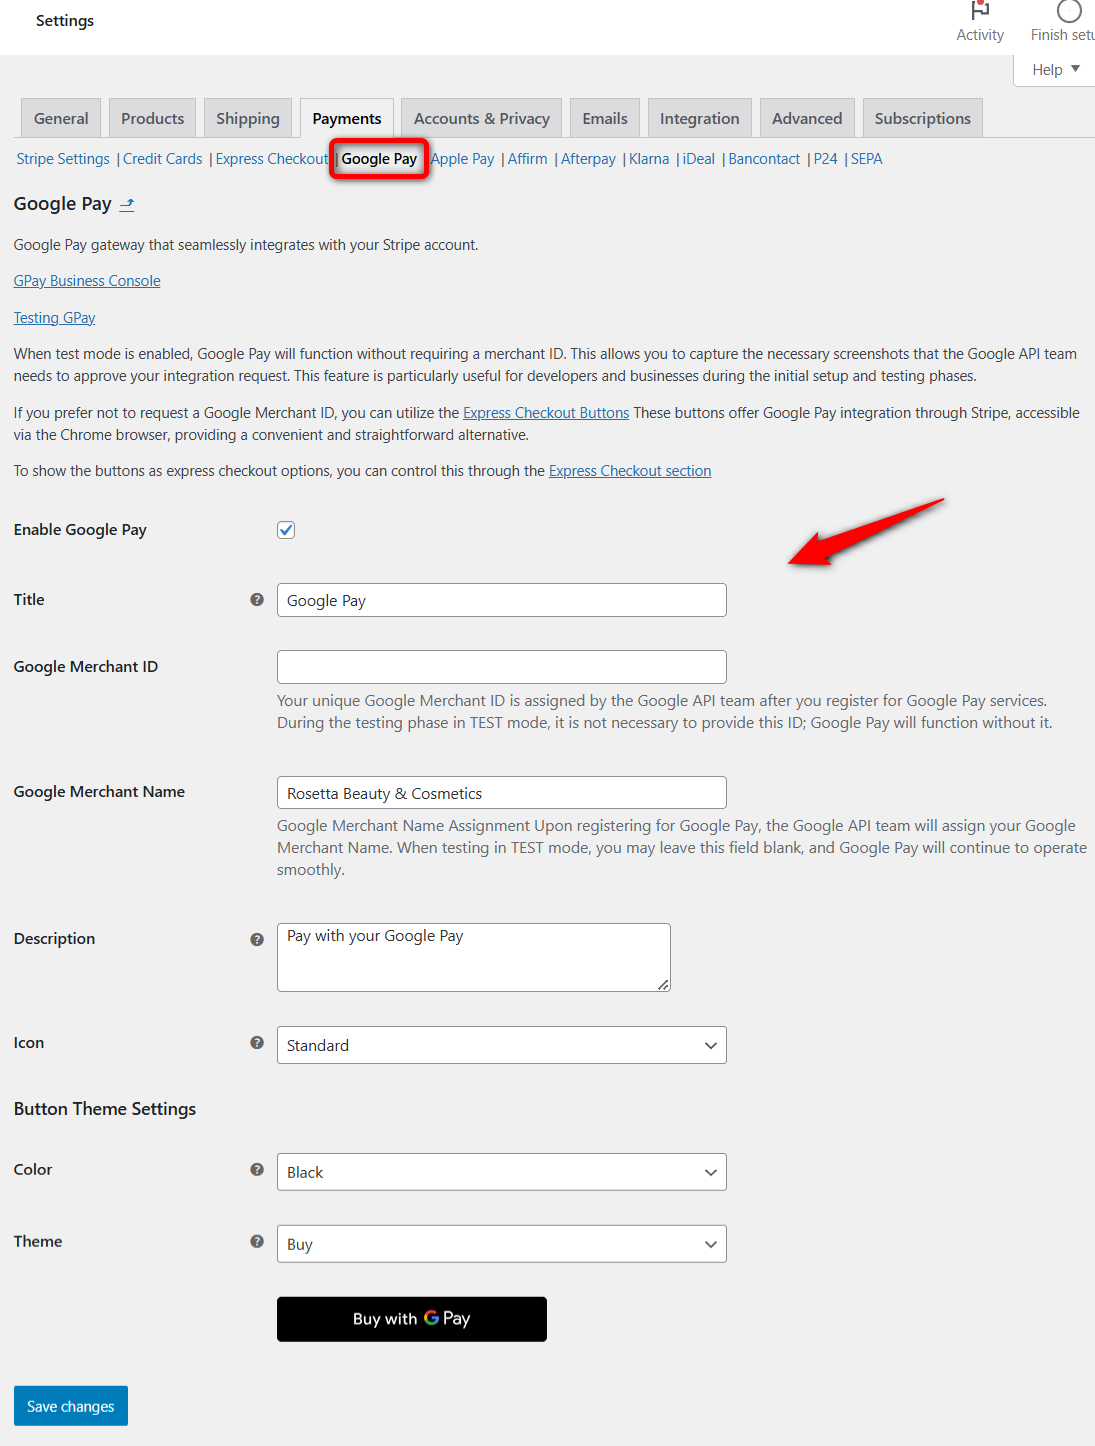
Hit the ‘Save changes’ button when done.
Make sure you have enabled express checkout buttons from the ‘Express Checkout’ tab:
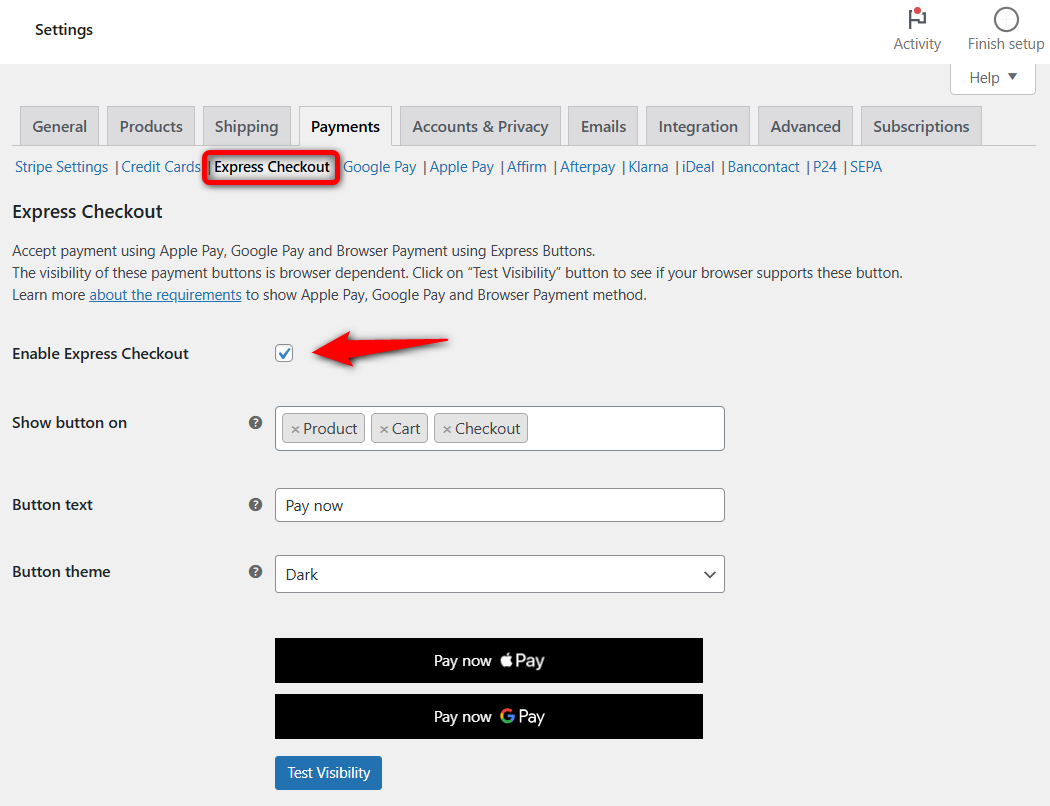
Be mindful of displaying Google Pay express payment buttons on different WooCommerce pages.
Customizing the Express Pay buttons
Type the text that you want to show using the Google Pay button.
Also, choose the theme for your button.
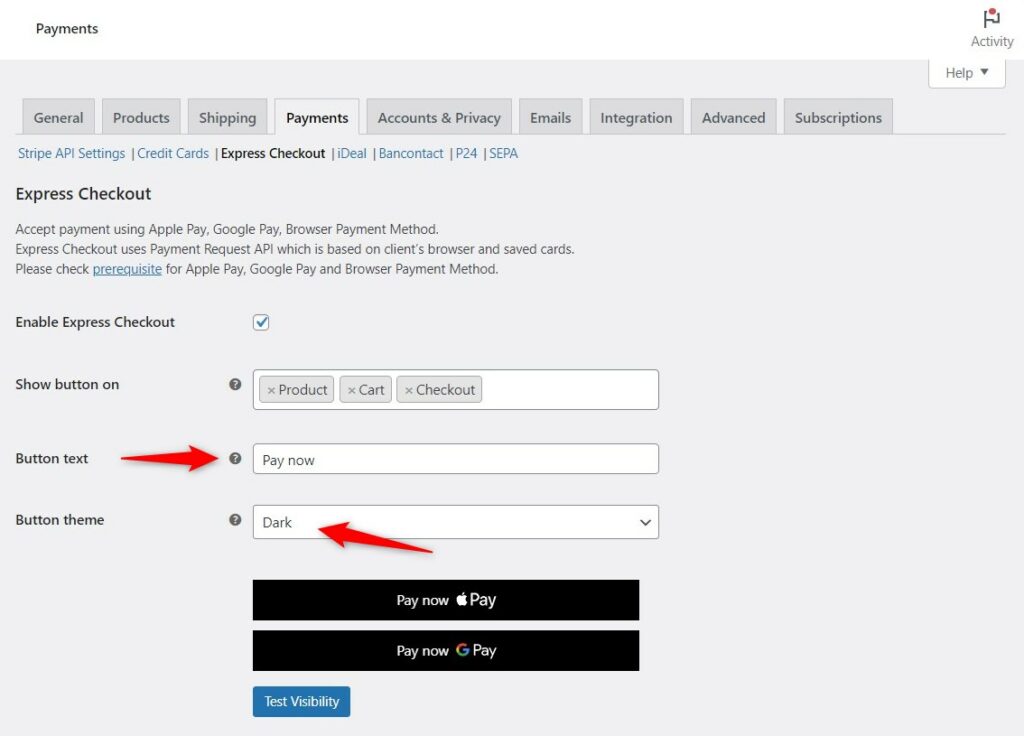
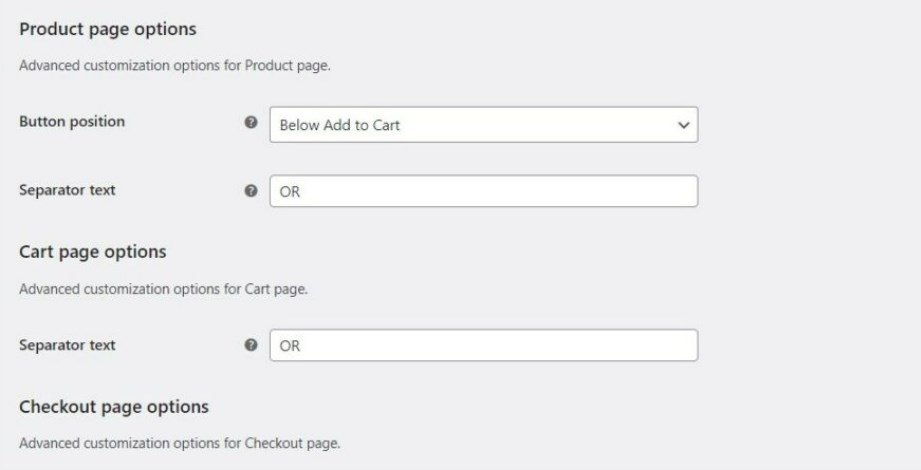
To add a separator between your buttons, customize the advanced settings.
Click on ‘Test Visibility’ to see if the Google Pay button can be shown on your store.
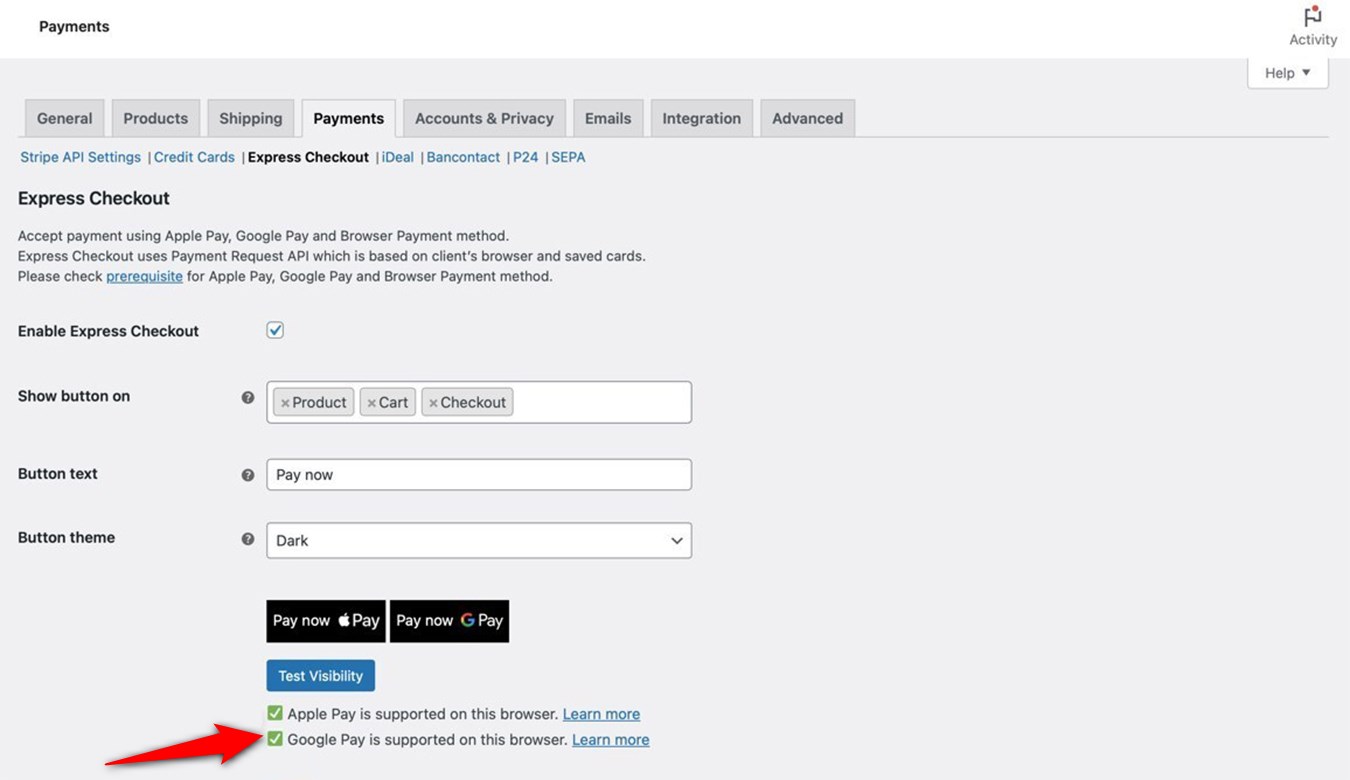
Below, you will see the confirmation that Google Pay is supported on your browser.
This is how you can enable Google Pay in your WooCommerce store.
How to Perform Google Pay Test Transactions in Your WooCommerce Store?
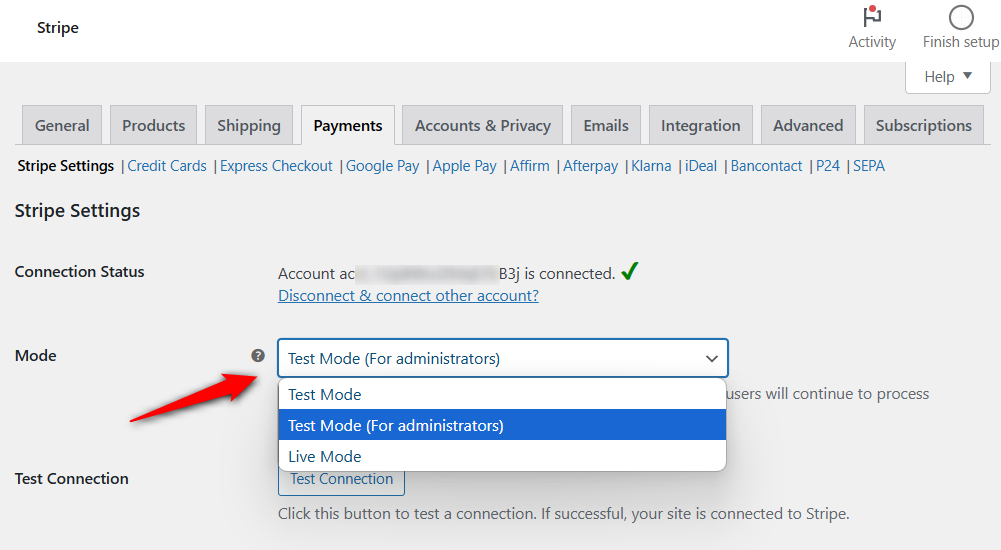
Make sure you have enabled the test or admin-only test mode from the Stripe Settings section:
Google Pay Express Checkout transaction on the WooCommerce product page
Next, go to the front end of your WooCommerce website and open the product page to see whether the Google Pay button is displayed.

You can one-click checkout directly from the Google Pay express button.
Please note that if a shopper makes a transaction from a product page using Google Pay, only that product will be placed, irrespective of the items in your cart.
Express checkout transaction button on the WooCommerce cart page
Add this item to your cart, and you’ll be able to see the Google Pay button on the cart page:
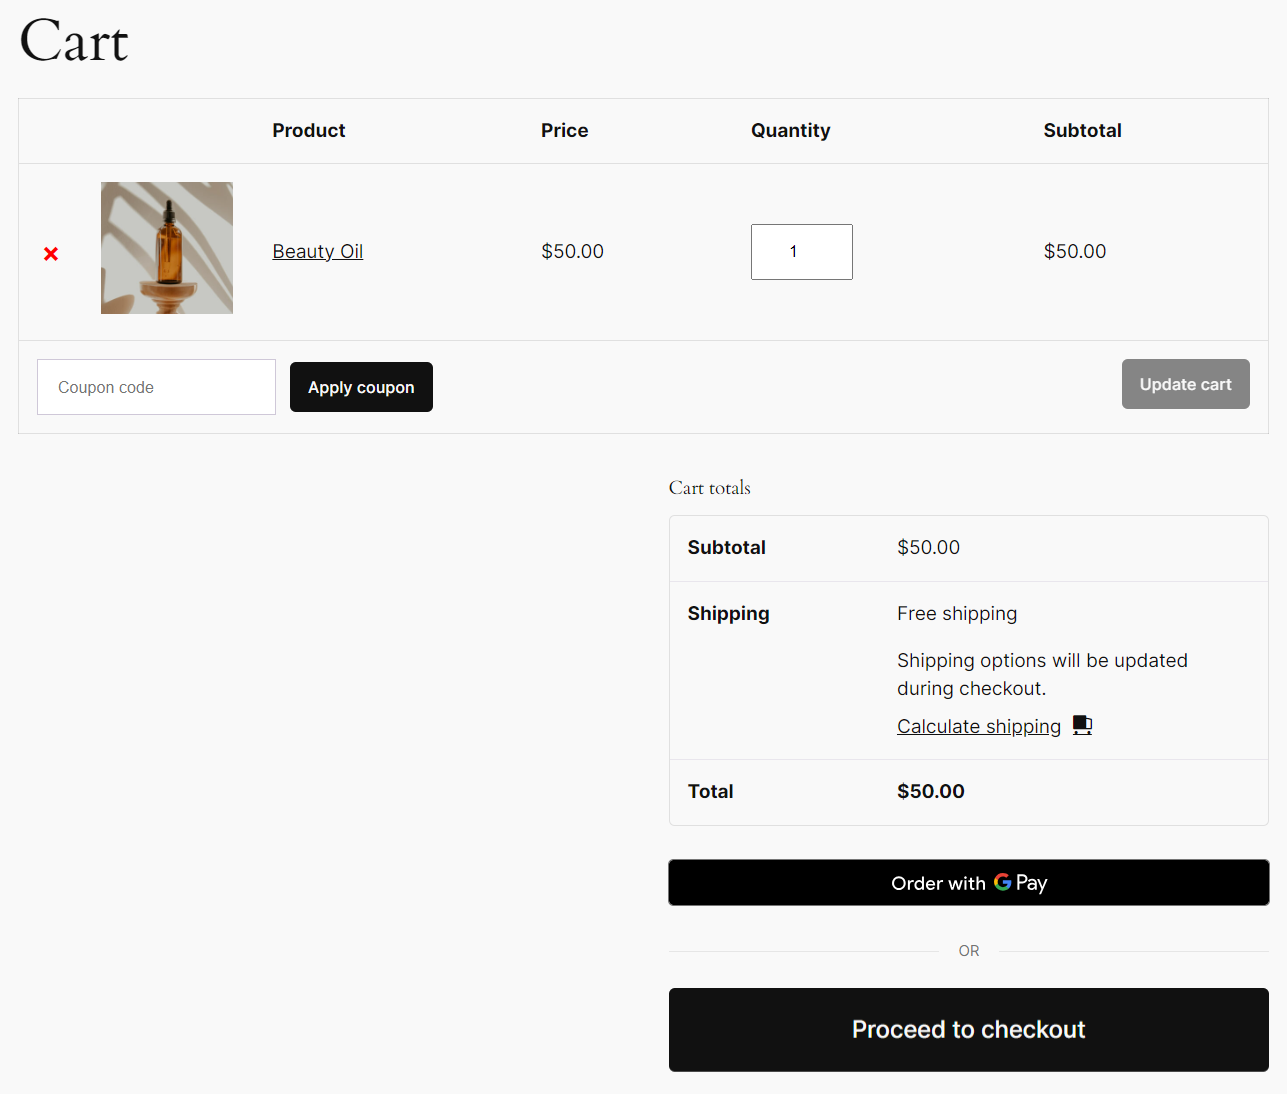
Google Pay express checkout transaction inside the WooCommerce shopping cart
If you use FunnelKit Cart, you can allow shoppers to check out directly from their shopping cart without visiting the checkout page.
FunnelKit Cart enables a modern, sliding cart for WooCommerce that replaces the default, redundant cart page.
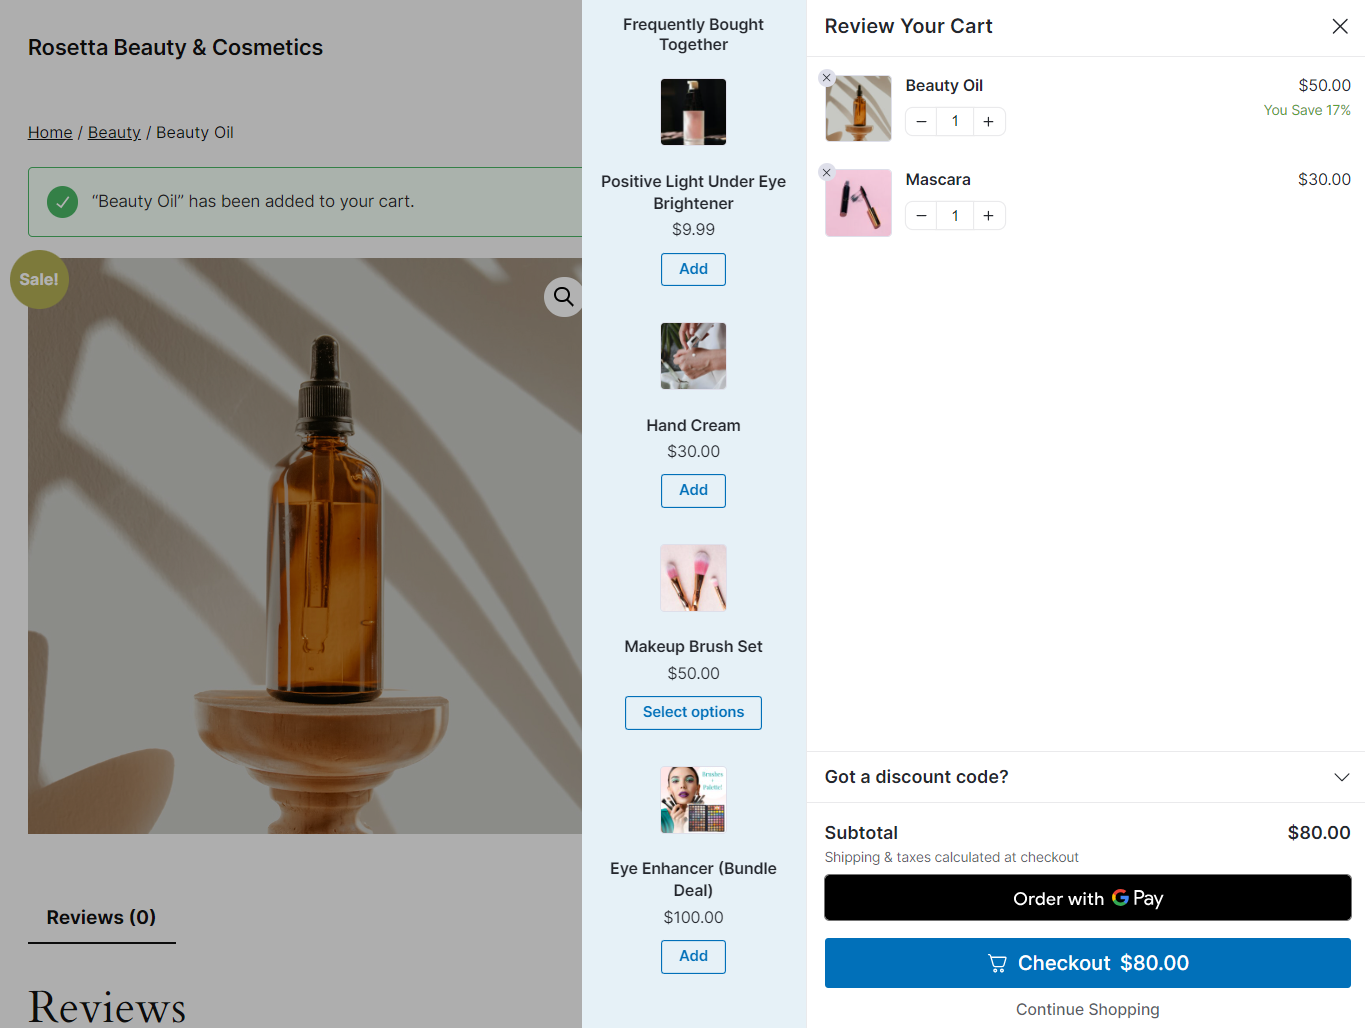
Google Pay express checkout button on the WooCommerce checkout page
Head over to the checkout page, and you’ll notice the Google Pay button.
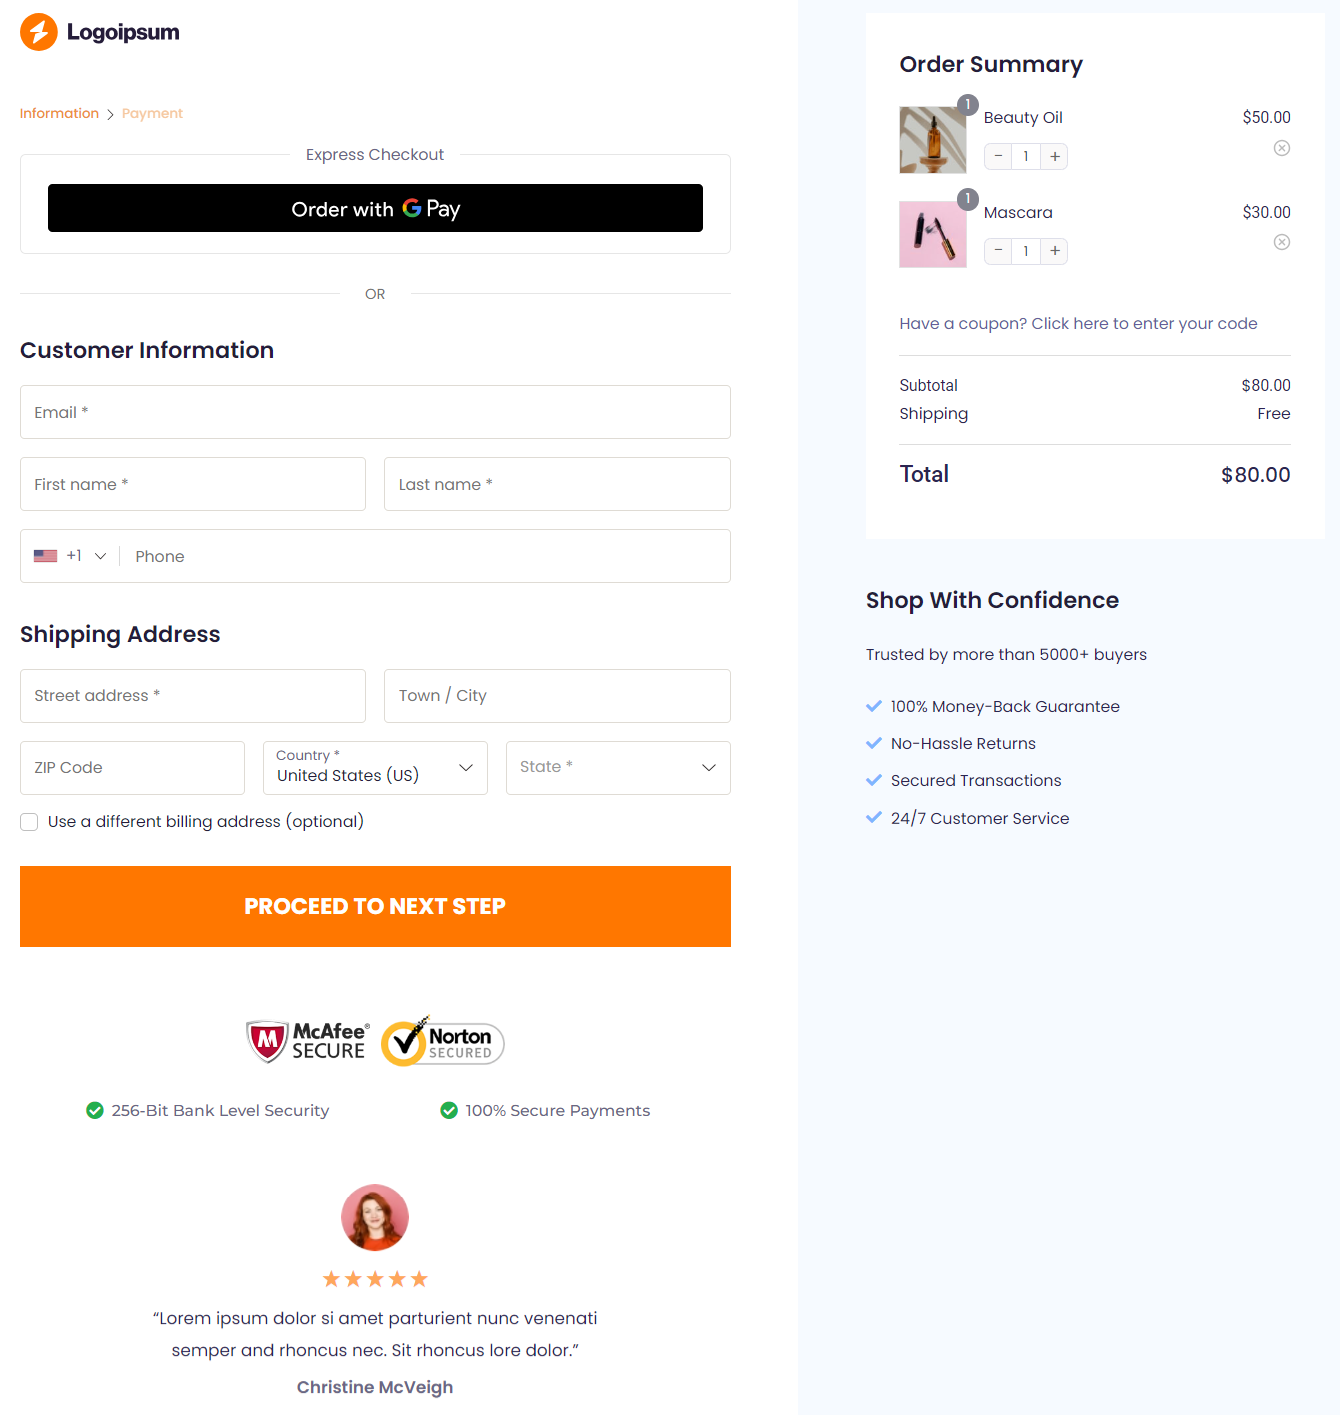
It also appears as an inline payment method, so you need not worry about shoppers not filling out any custom fields on your checkout pages.
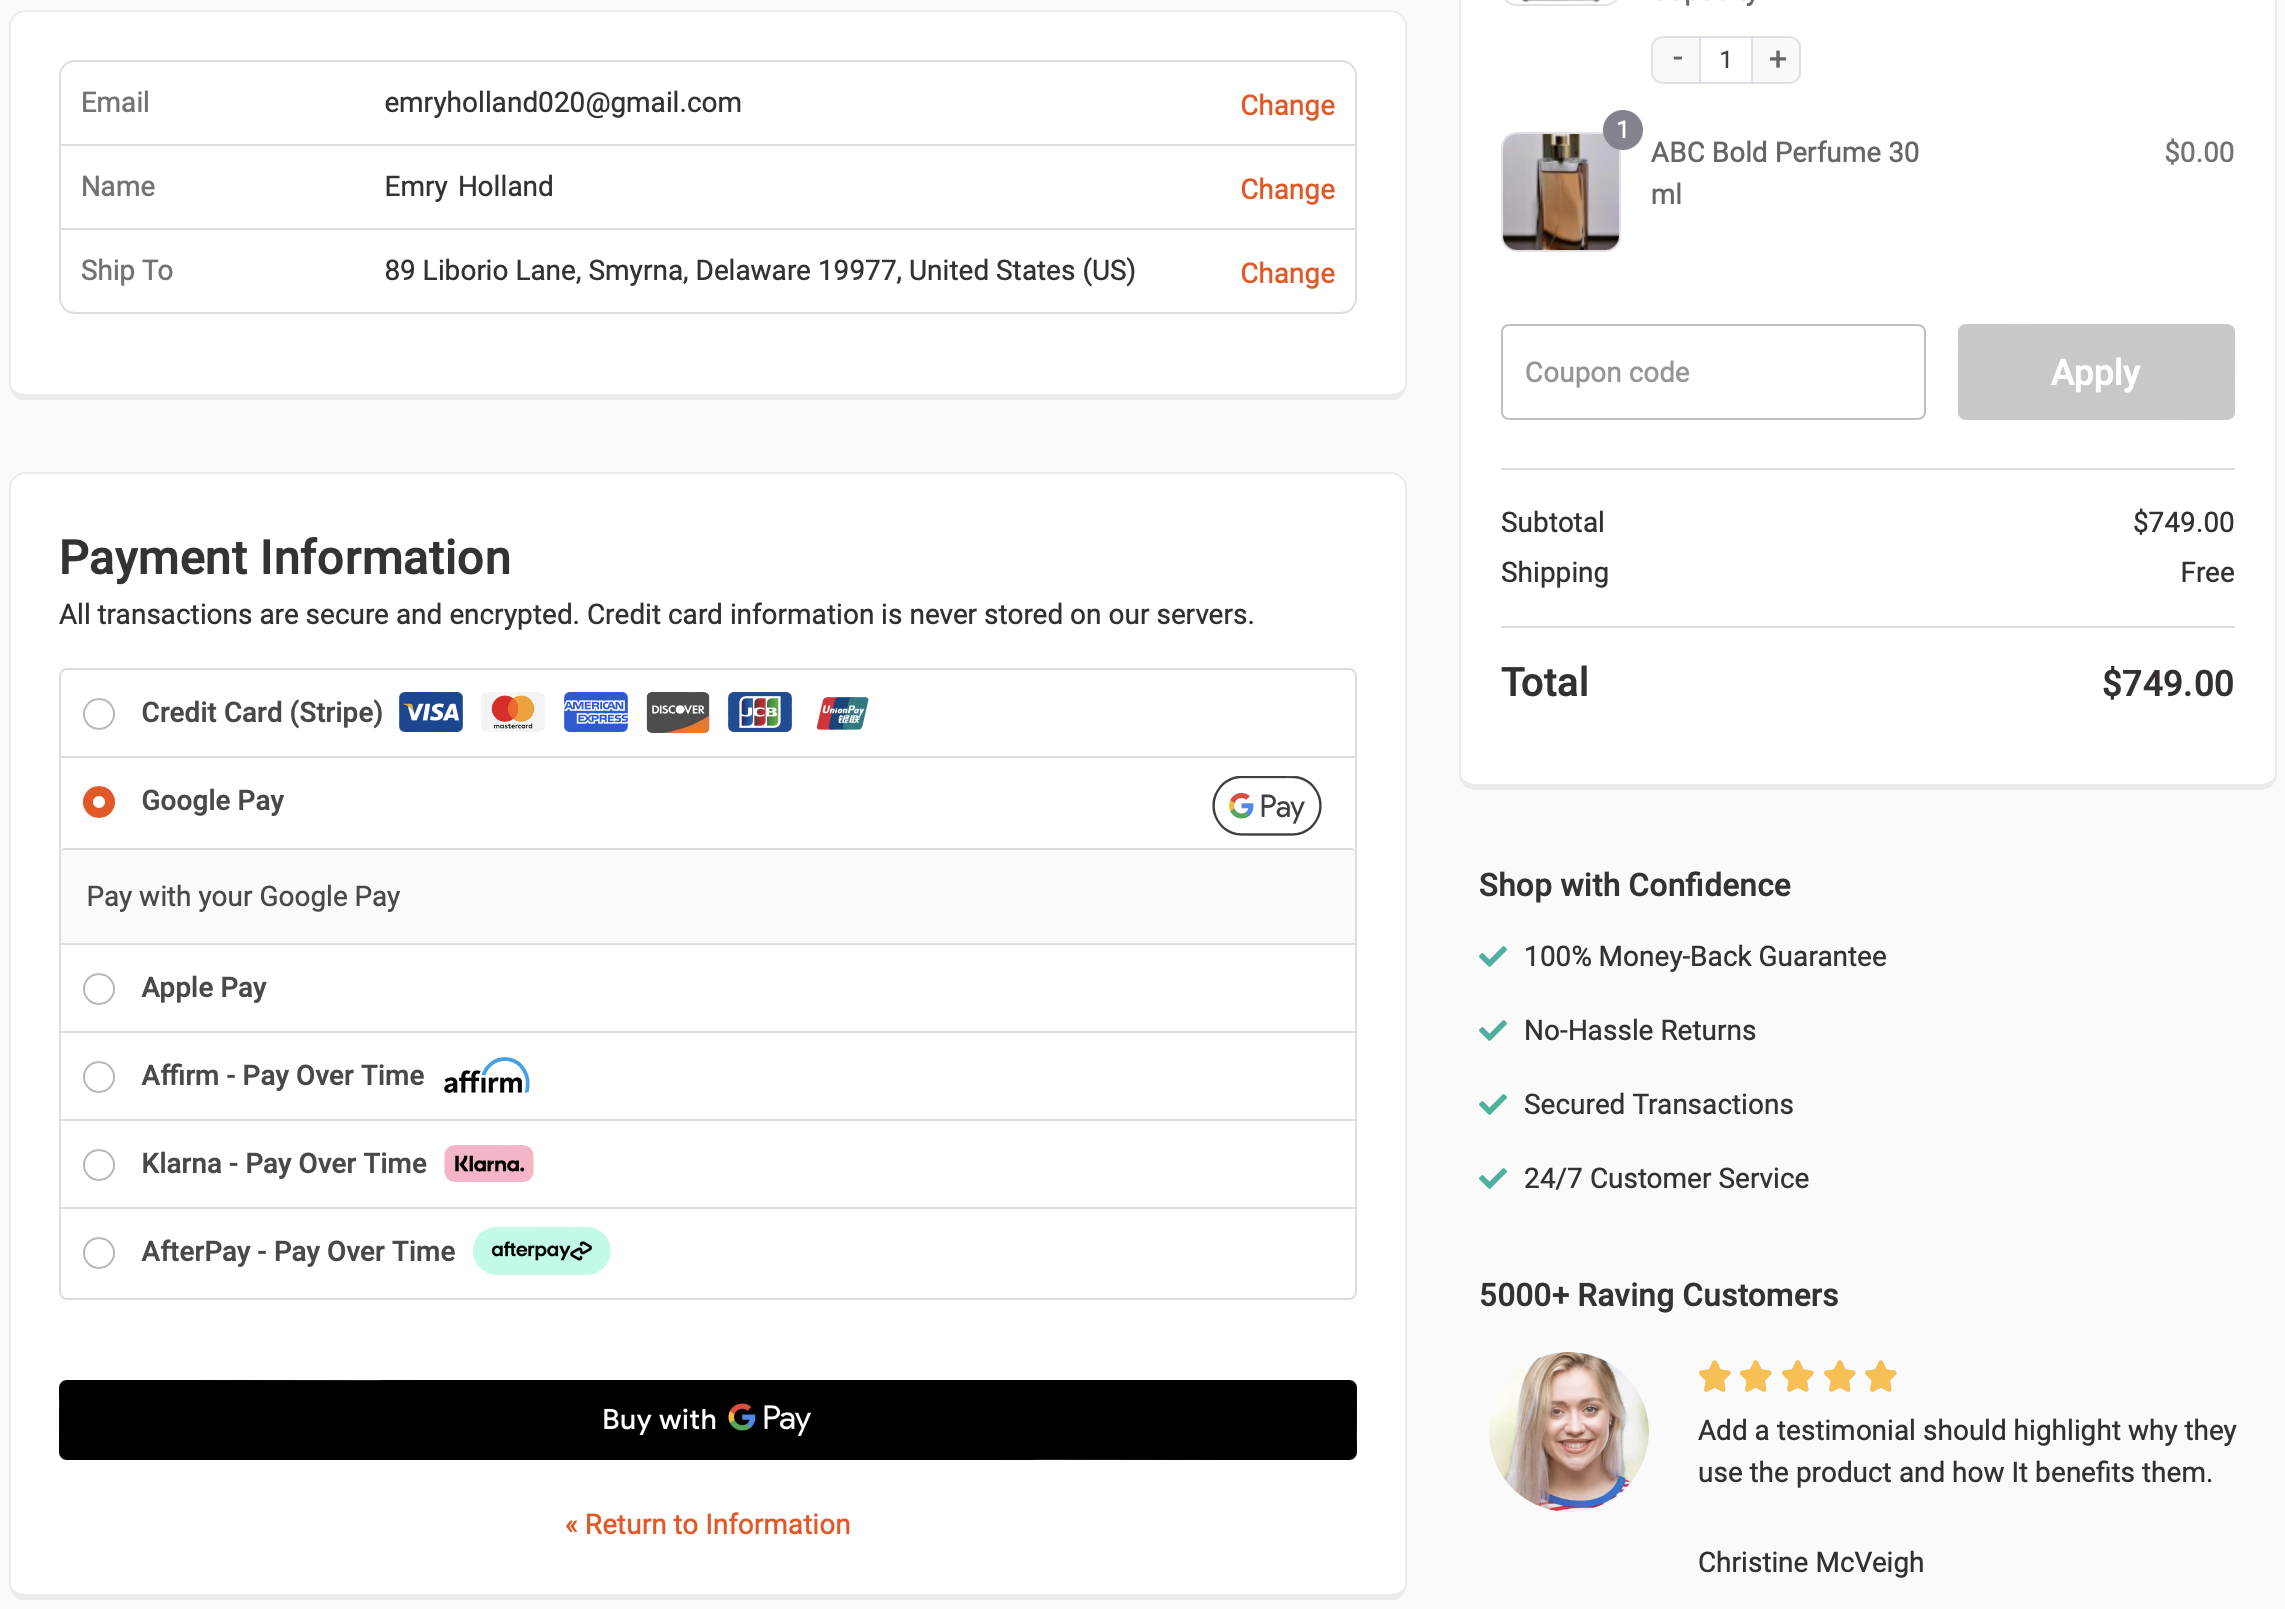
Click on the Google Pay button, choose the selected card, enter the address and pay for it.
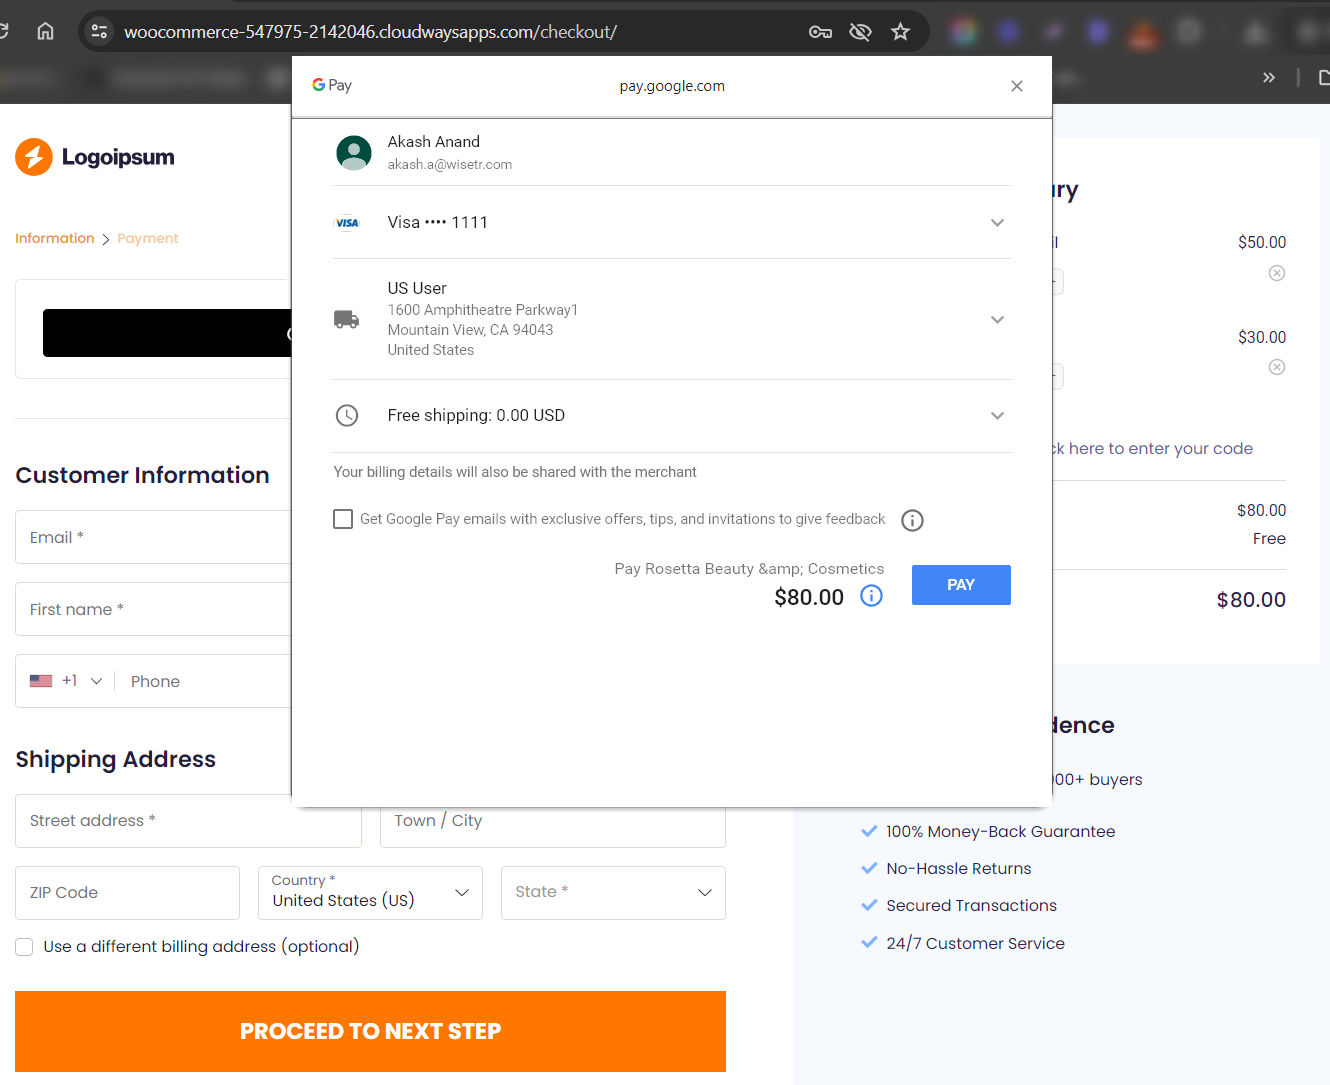
You’ll be redirected to the thank you page once the payment has been processed.
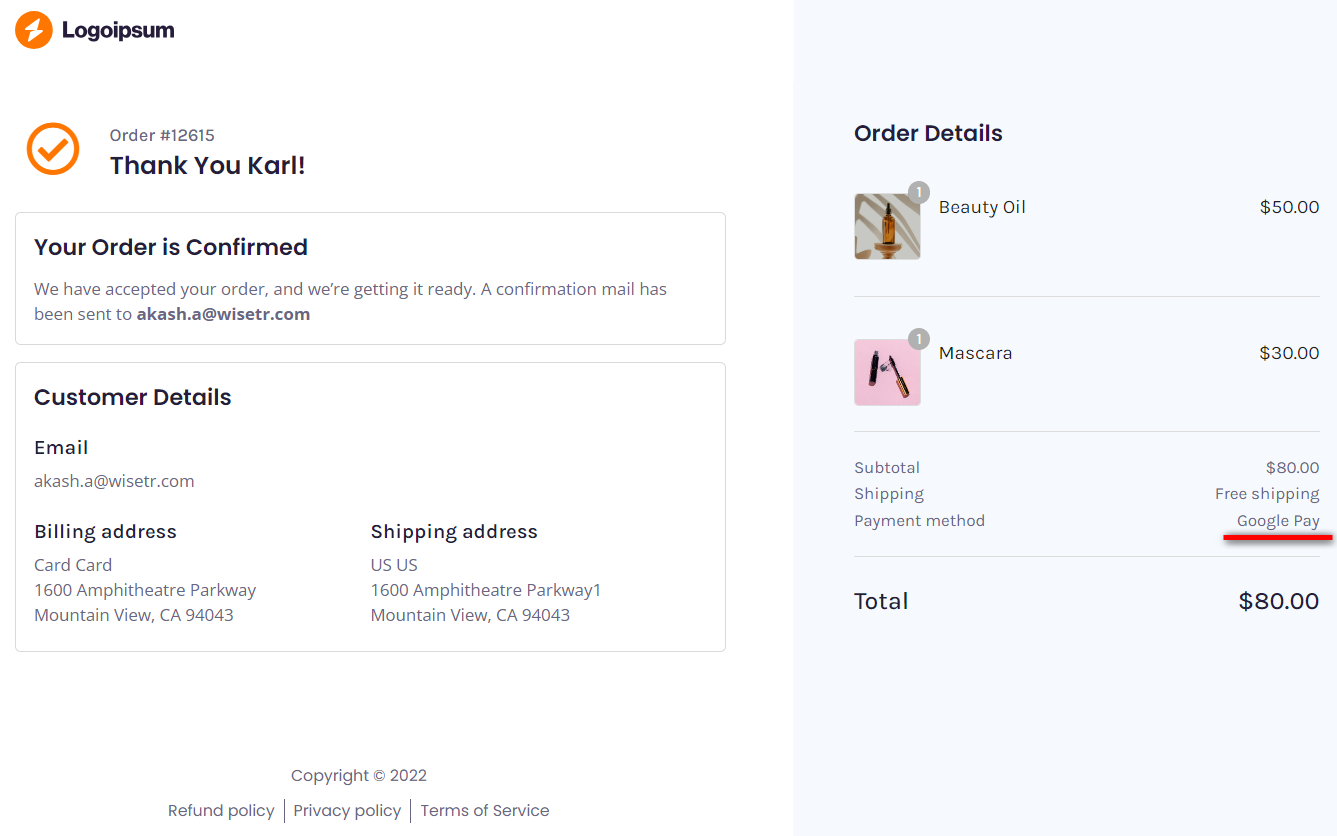
That’s it! This is how you can test Google Pay in your WooCommerce store.
How to Set Up WooCommerce Enhanced Google Pay Integration? (Google Merchant ID Creation and Integration Submission for Approval)
The Google Merchant ID is a unique identifier assigned to merchants. It is generated after entering information about your business.
Follow the steps below to get a Google Merchant ID to conduct live Google Pay transactions in your WooCommerce store.
Step 1: Log in to your Google Business account
Go to Google Business Console and log in to your account.
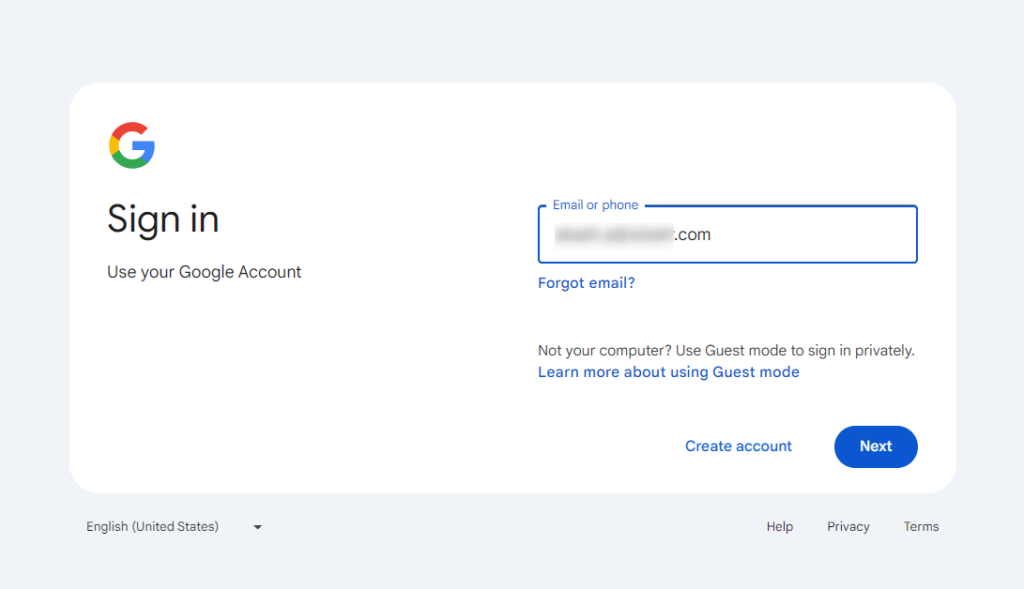
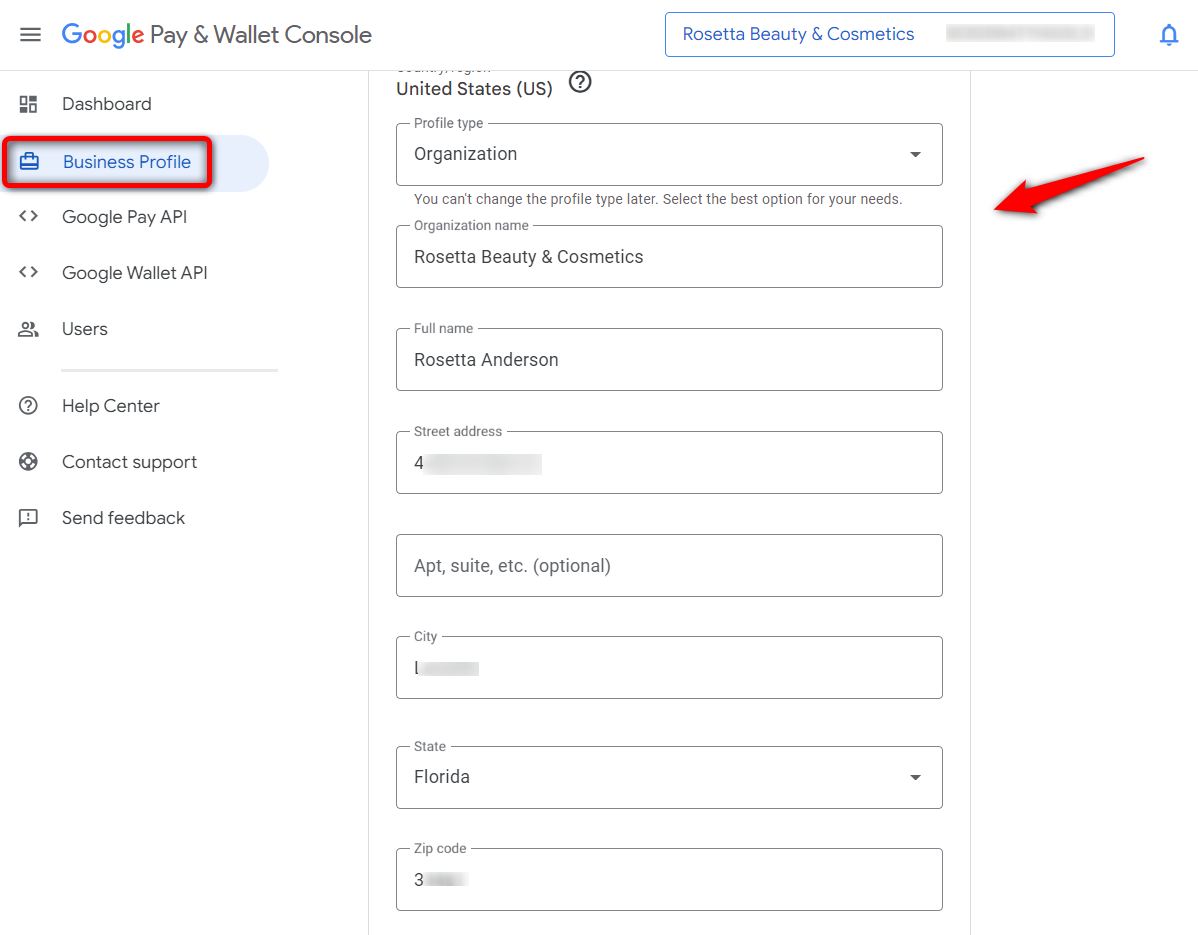
Step 2: Complete your business profile
In the Business Profile section, enter your business information, including the business name, street address, city, state, zip code, and country.
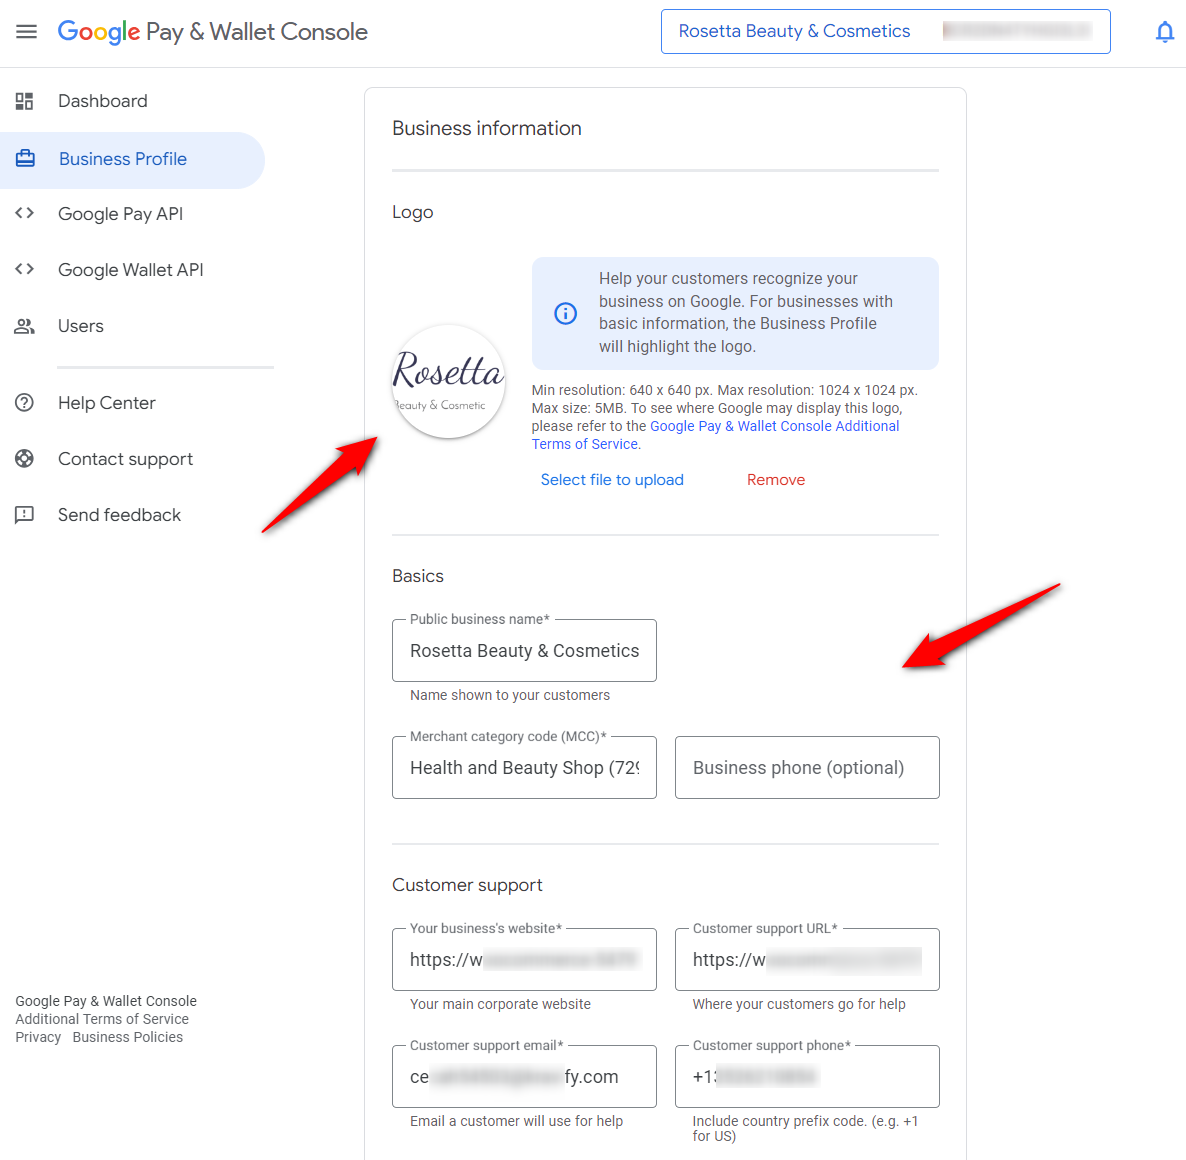
Scroll down and update your business's basic and customer support information.
Click on ‘Save’ when done.
After a few minutes, your Merchant ID will be generated.
You can find your Merchant ID here:
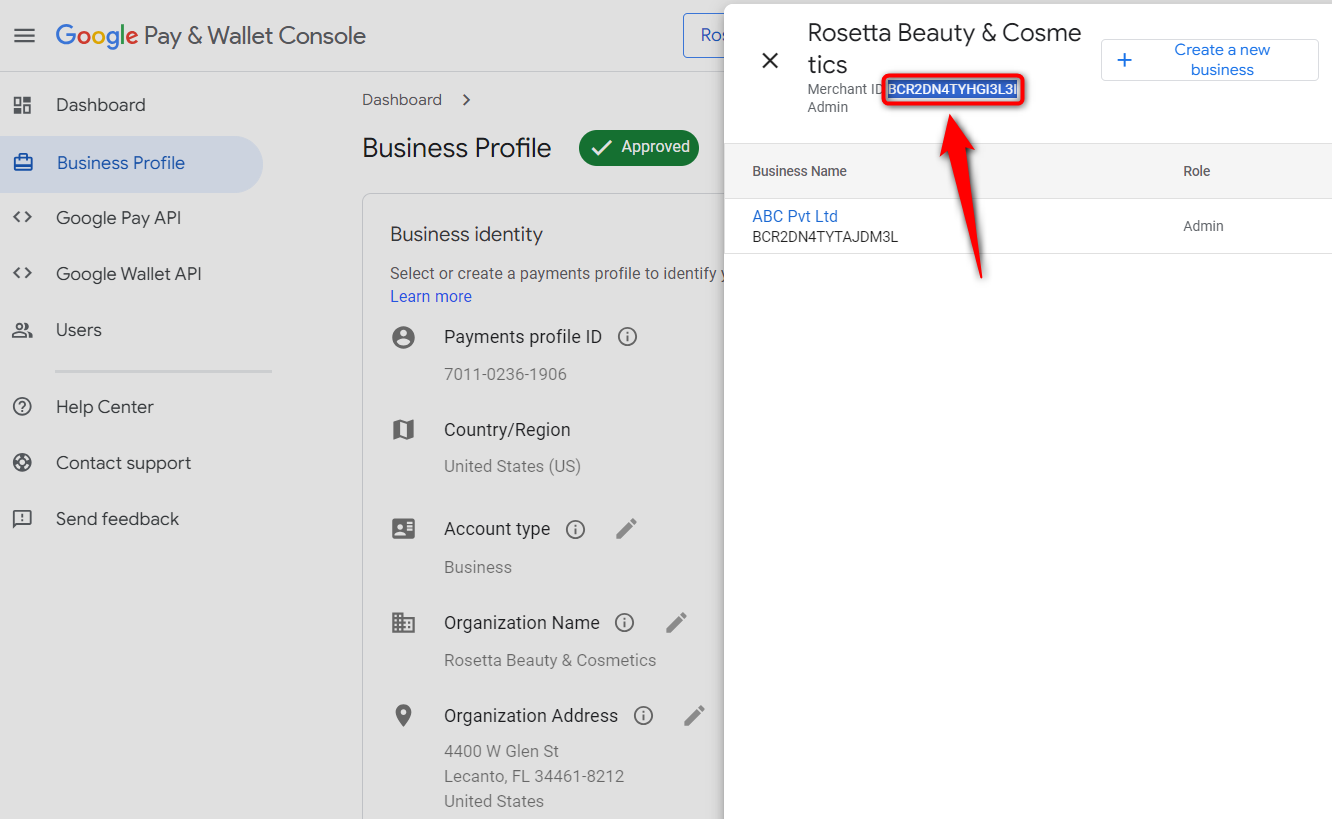
This is how you can get your Google Merchant ID.
Now that you have entered your Merchant ID let’s submit our website integration for review and approval.
Step 3: Add your website and upload the screenshots
Scroll down until you see the ‘Set up Google Pay UPI’ section. Click on the ‘Get Started’ button.
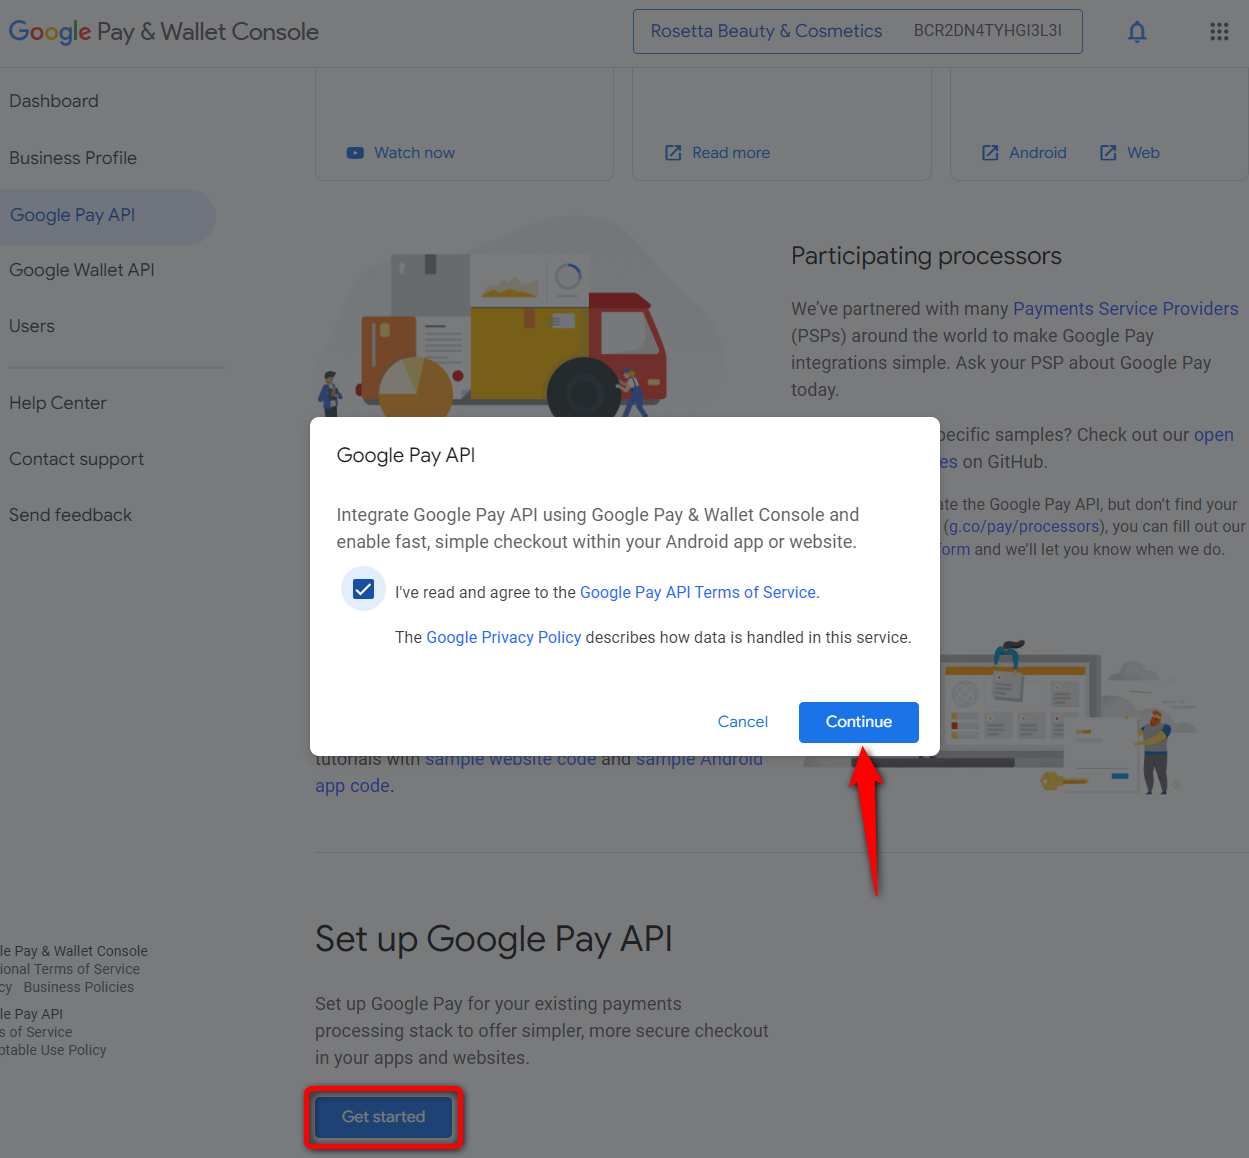
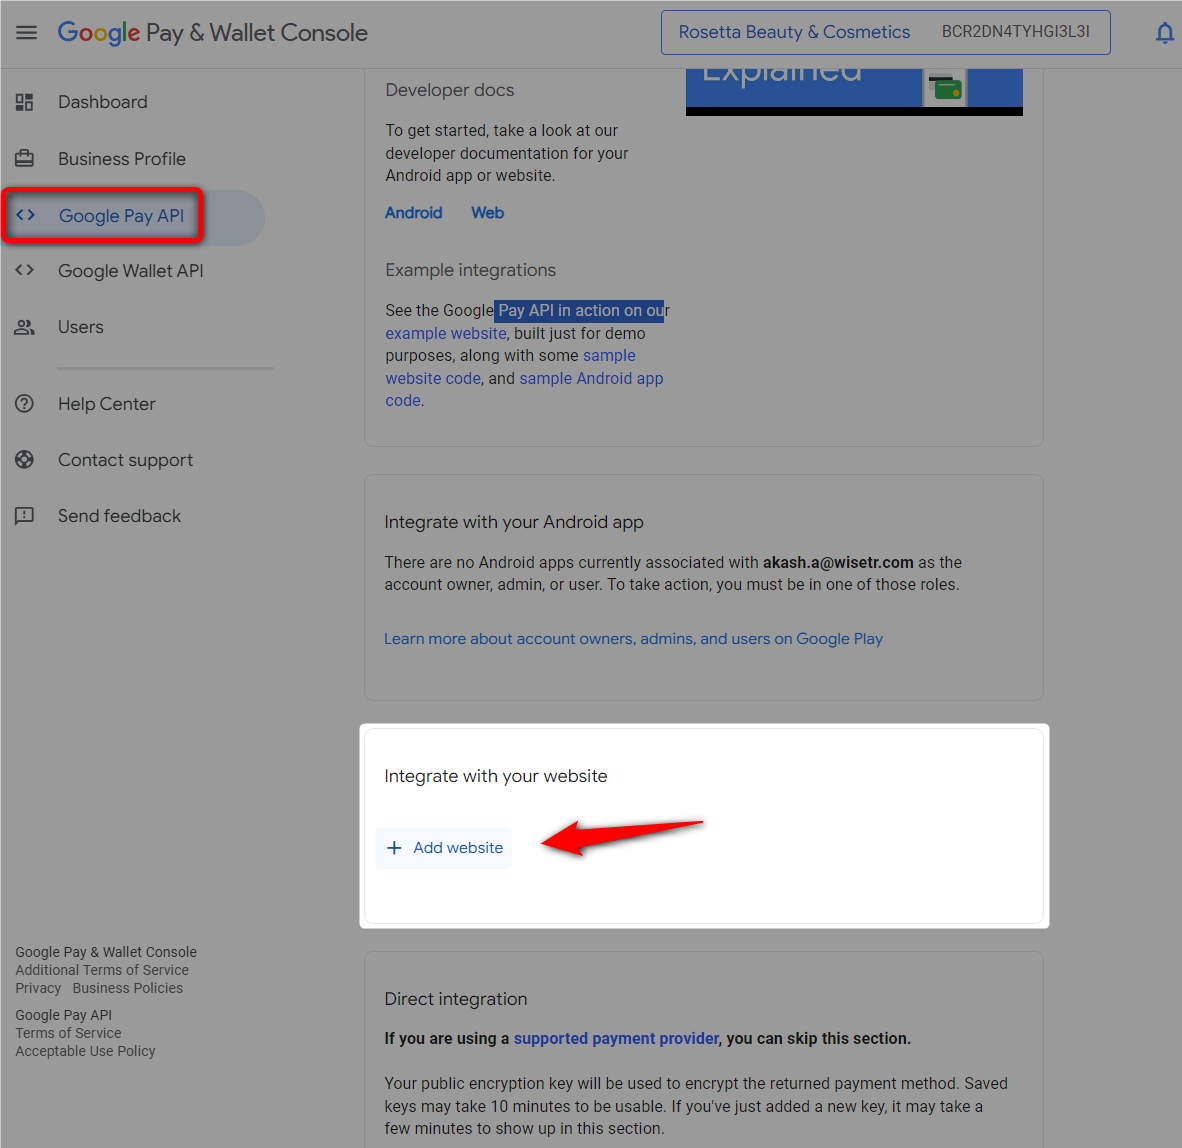
Next, click on the ‘+ Add Website’ to integrate your website with Google Pay API.
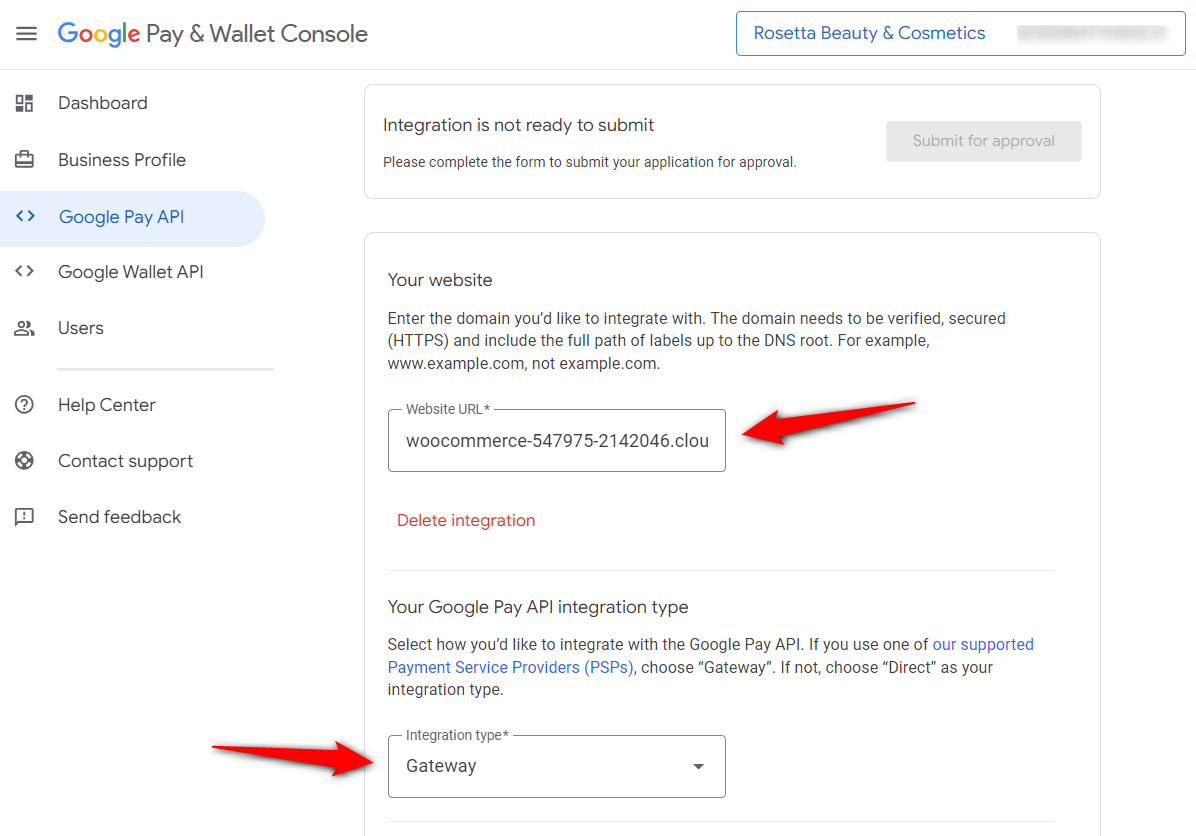
Choose the Google Pay integration type as Gateway.
Next, take some screenshots of the Google Pay button on different pages of your website, such as:
- Product page
- Cart page
- Checkout page
- Google API payment screen
- Thank you page
Upload all these screenshots one by one.
📝 Note: We recommend you to enable the test mode and take the screenshot of GPay button in your store. The test mode will activate the GPay button on your website.
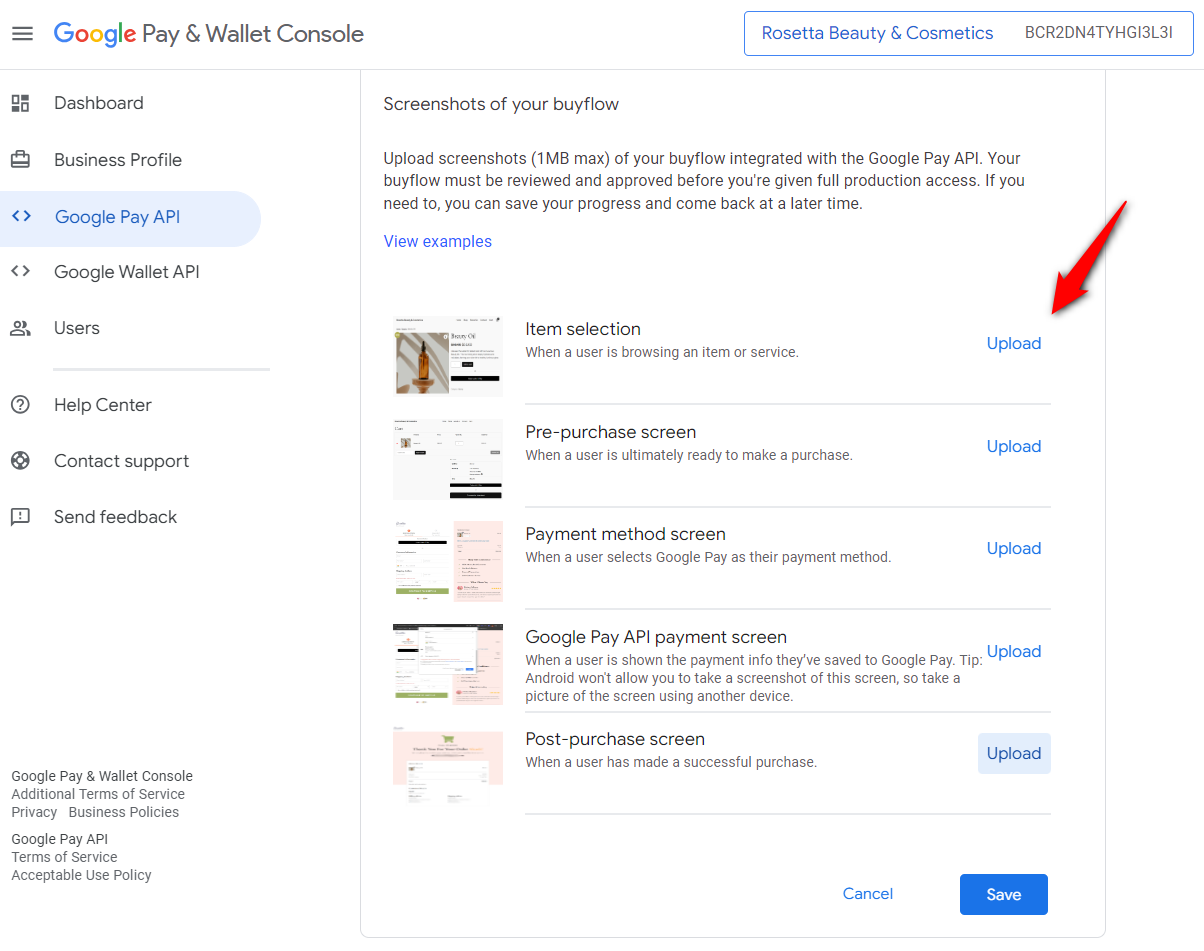
Once done, click on ‘Save’.
Step 4: Submit your integration to review
Scroll up, check all the boxes, and hit the ‘Submit for approval’ button.
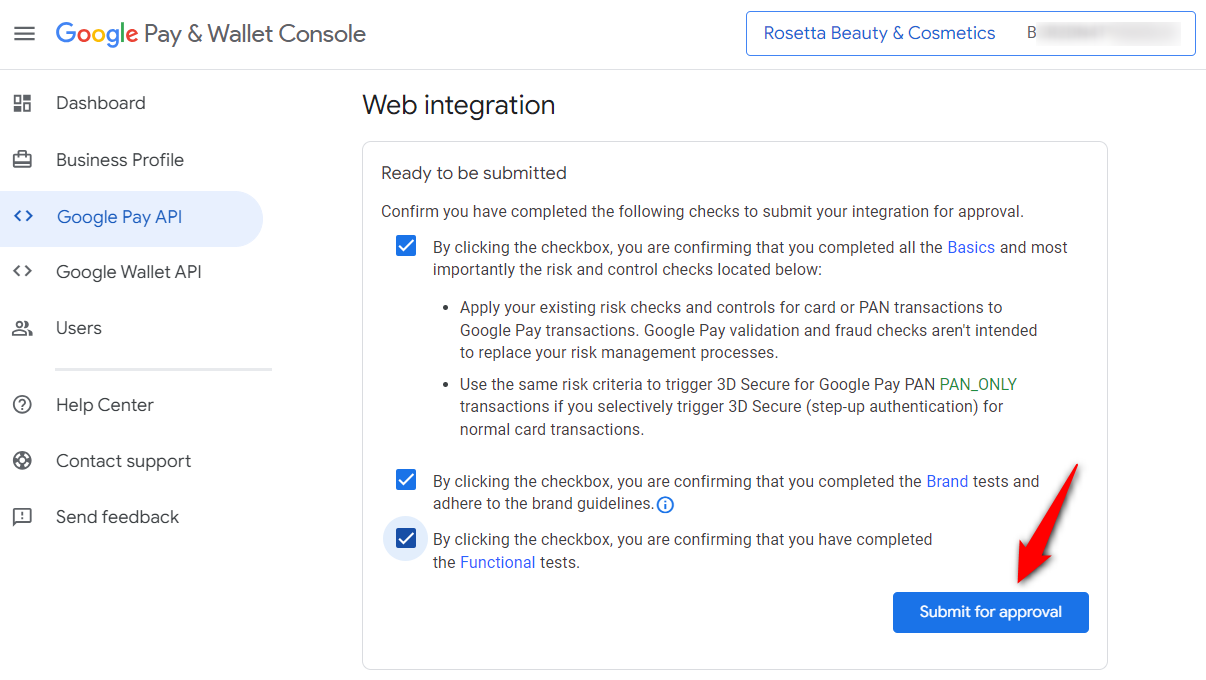
The Google API team will review your request. It takes 2-3 business days to get Google Pay integration approval; however, it may totally differ from store to store.
You’ll get a notification once your website is approved.
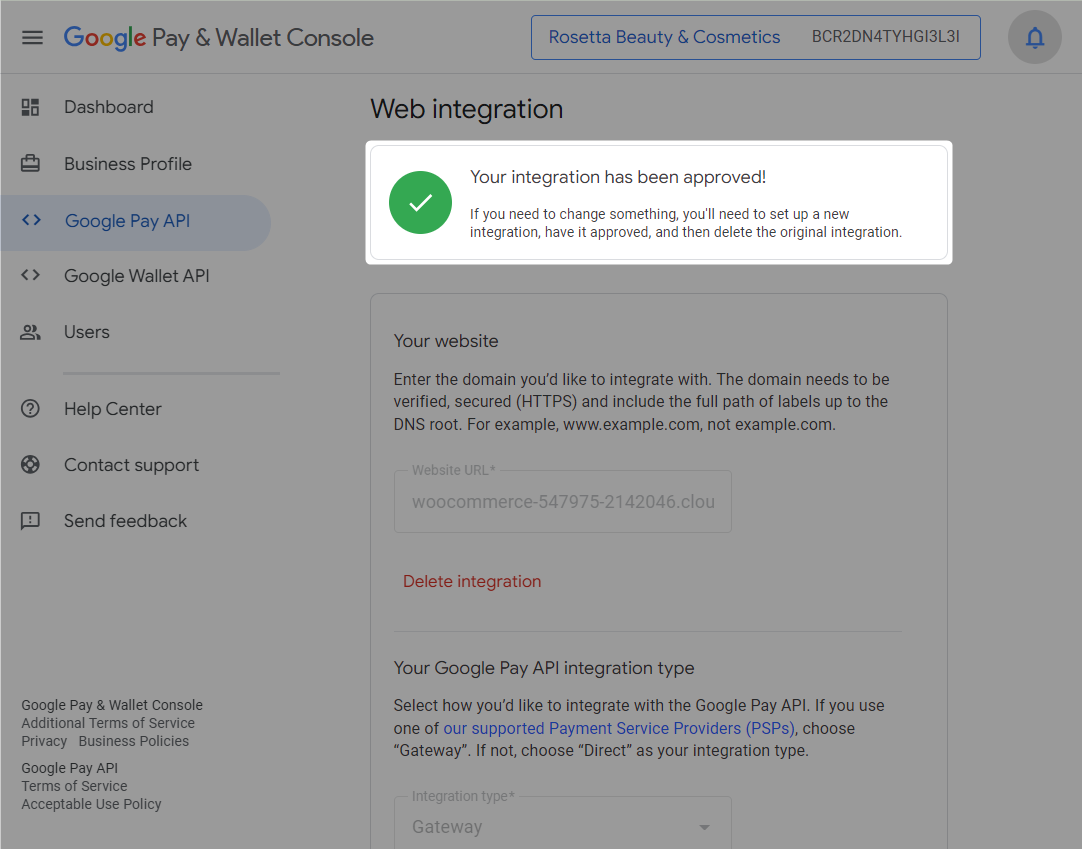
This is how you can request and get your WooCommerce Google Pay integration approved for your website.
Step 5: Copy your Merchant ID and paste it into the Google Pay gateway
To carry out live transactions in your store, copy your Merchant ID and paste it into your WooCommerce Google Pay settings.
You’ll have to go to WooCommerce Payment Settings and click on ‘Manage’ next to Google Pay payment gateway.
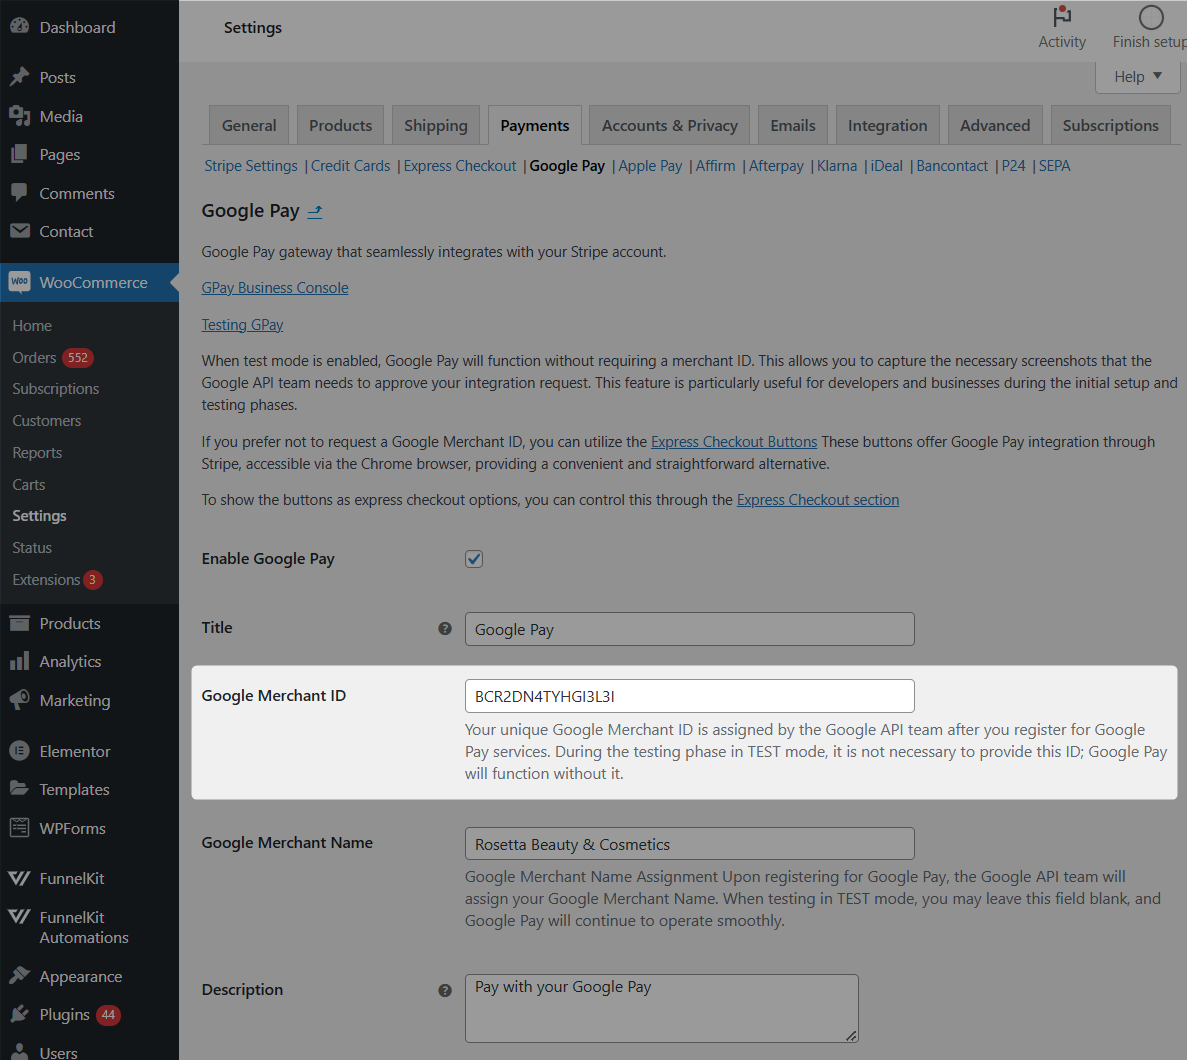
When you're done, save the changes. Your Google Pay button will now be visible to your shoppers, and they can complete transactions using this gateway.
Please only enter your Merchant ID if your integration is approved. Otherwise, you may experience failed transactions and user abandonment.
Testing Live Google Pay Transactions in Your WooCommerce Store
Now that everything is set, it’s time to do real transactions with Google Pay in your WooCommerce store.
Put your website in Stripe Live mode.
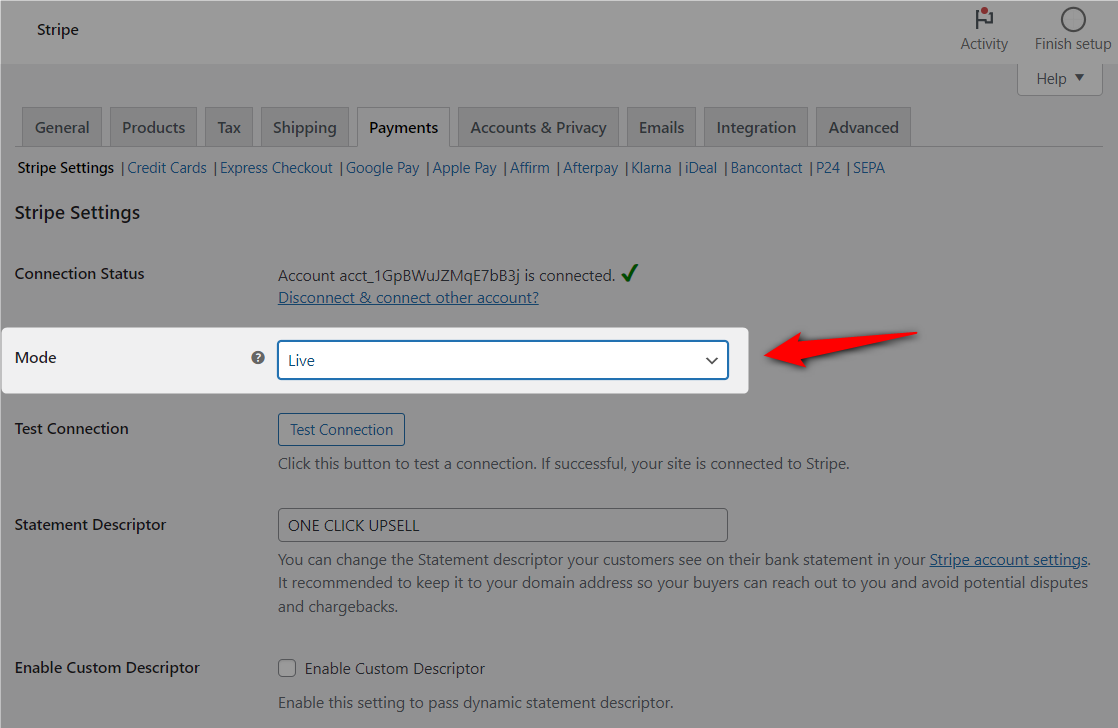
Next, go to your product and see if the Google Pay button is visible.
Add the item to the cart and verify that the button appears there, too. Then, proceed to the checkout page (just like you did in the test mode above).
👉 Check out our detailed post on how to test WooCommerce checkout to test and real transactions in your store.
If You Are Not on Stripe
- WooPayments
Go to Payments ⇨ Settings, find the Express Checkouts section, tick Apple Pay / Google Pay, and save.
Click Customize beside the same setting to choose which pages show the button and adjust its size, color, and corner radius.
Two things to know: the two wallets cannot be separated, and if you use the Express Checkout block, its “apply uniform styles” setting overrides some of your button styling.
That setting arrived in WooCommerce 9.4.0.
- Square
Install a Square gateway plugin, connect your seller account, then open the Google Pay section.
Enable it, set the title and description, and pick your pages.
Square’s sandbox uses a separate developer test account rather than a toggle, so create that before you start testing.
Full configuration is in our Square gateway documentation.
- PayPal Payments
Open the PayPal Payments settings, go to the Connection tab, and click Enable Google Pay.
PayPal sends you to a sign-up link to register for the feature, then you tick the enable box and save.
The button appears wherever your PayPal smart buttons already sit, and only there.
Google Pay Not Showing in WooCommerce? 11 Fixes
Before changing anything, find out whose problem it is. Open Google’s own payment demo page in the browser giving you trouble.
No button there either? The fault is the browser or the Google account, not your store.
Button there but not on your site? Work down this list.
1. The shopper is not signed into Google with a saved card
The button only renders for people logged into Google in that browser with at least one card saved.
This one cause explains more “broken” buttons than the other ten put together.
2. Your store is not fully HTTPS
Check the browser console for mixed content warnings.
One insecure asset on the page is enough to suppress the button.
3. Guest checkout is switched off
Go to WooCommerce ⇨ Settings ⇨ Accounts & Privacy.
Either enable guest checkout, or enable both account creation during checkout and the password setup link.
Express checkout will not render without one of those two configurations.
4. The shopper is not on a Chromium browser
By default, a payment request integration renders only in Chrome and other Chromium browsers.
Safari and Firefox visitors see nothing. The fix is a Google Merchant ID; we already covered it above.
If the button works on your machine and not on a customer’s, this is usually why.
5. The product is not compatible with express checkout
Subscriptions, deposits, pre-orders, and some variable products can block the button on the product page while leaving cart and checkout working normally.
6. Your theme is missing the hooks the button needs
The gateway injects the button at specific WooCommerce action hooks, and themes with heavily customized product or cart templates strip them.
Switch to Storefront for two minutes to confirm.
7. You are on the block checkout without the Express Checkout block
Add the block to the template. The gateway setting alone won't add it.
8. Apple Pay is taking the slot
Since iOS 16, iPhones can show Apple Pay in browsers other than Safari, so it can occupy the slot Google Pay used to fill.
There is no way to force the other button to show instead on those devices.
9. A caching or optimization plugin is stripping the script
Aggressive JavaScript minification, deferral, and combination constantly break payment scripts.
Exclude your gateway’s scripts from optimization and exclude cart and checkout from page caching.
10. Your country or currency is unsupported
Check against both your gateway’s list and Google’s.
A currency your gateway does not support for wallets will hide the button silently.
11. Your integration is not approved yet
A Google Merchant ID entered before Google approves the submission can fail transactions or hide the button in live mode.
Pull it out until approval lands.
Still nothing? Enable error logging, place one more test transaction, then read WooCommerce ⇨ Status ⇨ Logs.
Our express payment button troubleshooting doc covers the rarer cases.
Frequently Asked Questions (FAQs)
Some users might need further assistance in this WooCommerce Google Pay integration process.
That's why we have answered the most common questions about the payment buttons not showing up on the screen.
Yes, but not natively. It arrives through a payment gateway, and WooPayments, Stripe, Square, and PayPal all support it.
Configure one of those, enable the wallet in its settings, and the button appears for eligible shoppers.
The standalone GPay app shut down in the US in June 2024 and users moved to Google Wallet.
Online checkout is unaffected and still carries the Google Pay name, so stores accepting it don't need to change anything.
Depends on what else you need.
Stripe gives the most placements and browser-independent display via a Merchant ID.
WooPayments is simplest if you want one account.
Square suits stores already selling in person.
PayPal only works if PayPal is your primary wallet.
No. Google takes no merchant surcharge.
You pay your processor’s standard online card rate, typically 2.9% + $0.30 in the US, plus any international card or currency conversion surcharges your gateway applies.
Four variables decide it: the browser, whether the shopper is signed in to Google, whether a card is saved to that account, and Apple Pay precedence on iOS 16 and later.
A signed-out browser or fresh profile never shows it.
Yes, through the Express Checkout block. Add it to your checkout template above the form.
The block’s “Apply uniform styles” setting, added in WooCommerce 9.4.0, can override button styling you configured in your gateway.
Yes. The wallet returns a card token saved as a reusable payment method, and renewals charge it off-session.
The customer needs an account, and free trials with no signup fee hide the button because a $0 order can’t be processed.
Not to start. Your gateway’s default integration works without one.
You need it for browser-independent display and for production approval on a direct integration, which you request through the Google Pay & Wallet Console.
Put your gateway in test mode, join Google’s test cards allowlist group with your test Google account, and use admin-only test mode so shoppers never see it.
Test cards then appear in the payment sheet automatically.
Ready to Set Up Your WooCommerce Google Pay Payment Gateway?
Digital wallets now carry 56% of global ecommerce transaction value and 40% in the US.
None of that reaches you from a checkbox. It reaches you from a button that renders on every device your shoppers arrive with.
With Google Pay, you give customers a fast, secure, seamless way to complete purchases, reducing cart abandonment and boosting conversions effortlessly.
The best benefit of Google Pay is that it costs merchants nothing extra.
Payment processors treat it as a normal credit card transaction, so you will only be charged normal credit card processing fees.
Connect your gateway, enable the button on your product, cart, and checkout pages, place one test order, and go live.
Then come back and add the Merchant ID so Safari and Firefox shoppers see it too.
Small lifts like this one stack up, and checkout is where they compound fastest.
For faster conversions, add optimized checkout to your WooCommerce store and give your customers the smooth, one-tap checkout experience they expect!
Editorial Team
September 21, 2026WooCommerce Apple Pay lets shoppers skip most of the checkout form. They tap Apple Pay, double-click the side button, and confirm the payment with a glance at the screen. Think...
Editorial Team
September 7, 2026Testing Stripe payments in WooCommerce is quite simple. Turn on test mode in your Stripe plugin, add a product to your cart, and check out using the test card 4242...
Editorial Team
July 6, 2026Stripe is one of the most trusted payment gateways worldwide, powering over 3.5 million websites globally. With 90% of U.S. adults having made a purchase from businesses that use Stripe...






