
You can customize the WooCommerce checkout page in four ways: edit it natively in the block editor (free, no plugin), use a free checkout-field plugin, design it with a page builder, or control it with code.
The method you pick depends on whether your store uses the modern block checkout or the classic [woocommerce_checkout] shortcode.
In this method, we’ll walk you through these steps in simple terms, along with how to optimize the page to reduce cart abandonment and increase completed orders.
Watch this mini masterclass to get 20 proven tips on WooCommerce checkout page customization:
Table of Contents
- 1 Quick Answer: Which Method Should You Use?
- 2 Block Checkout vs Classic Shortcode: What's Your WooCommerce Store Has?
- 3 Method 1: Edit Natively in the Block Editor (Free, No Plugin)
- 4 Method 2: Build a High-Converting WooCommerce Checkout Page With the Customizer Plugin
- 4.1 Step 1: Create a store checkout
- 4.2 Step 2: Edit the checkout page design visually with Elementor
- 4.3 Step 3: Customize checkout fields without code
- 4.4 Step 4: Optimize your checkout for higher conversions
- 4.5 Step 5: Add a thank you page to delight shoppers
- 4.6 Step 6: Enable the new store checkout
- 5 Method 3: Edit Checkout Fields With a Free Plugin
- 6 Method 4: Customize the Checkout With Code (CSS + PHP Hooks)
- 7 Test and Track Your WooCommerce Checkout (So You Don’t Lose Sales)
- 8 9 Best Practices to Customize Your WooCommerce Checkout for Conversions
- 8.1 1. Simplify the checkout journey
- 8.2 2. Audit theme performance and optimize load time
- 8.3 3. Design for mobile-first shoppers
- 8.4 4. Use clear, action-oriented call-to-actions (CTAs)
- 8.5 5. Increase average order value with smart order bumps and upsells
- 8.6 6. Reinforce trust with security seals and compliance messaging
- 8.7 7. Support local and flexible payment options
- 8.8 8. Automate cart recovery and follow-up workflows
- 8.9 9. Run A/B tests to optimize for what actually converts
- 9 Frequently Asked Questions
- 10 Conclusion: Customize Your WooCommerce Checkout Without the Chaos
Quick Answer: Which Method Should You Use?
If you just want to edit fields, layout, or colors and your store is on a modern block theme, use the native block editor. It’s free and needs no plugin.
If you’re on the classic checkout and want to add or reorder fields without code, reach for a free field plugin. Developers who want precise control can use CSS and PHP hooks.
And if you want a fully branded, multi-step, conversion-optimized checkout, a no-code builder like FunnelKit is the upgrade path.
Here’s how they compare:
| Method | Best For | Cost | Coding | Control |
|---|---|---|---|---|
| Native block editor | Most stores on a block theme | Free | None | Limited customization for fields and checkout layout |
| Checkout customizer plugin | Branded, optimized checkout | Free and Paid (for additional options) | None | Full design with page builders (Elementor), checkout fields and optimization |
| Free field plugin | Editing fields on classic checkout | Free | None | Fields only |
| Code (CSS/PHP) | Developers, precise control | Free | Yes | All elements |
Block Checkout vs Classic Shortcode: What's Your WooCommerce Store Has?
Before you customize anything, find out which checkout your store runs. This will help you decide which method works for you.
Go to Pages ⇨ Checkout and open the page in the editor.
If you see a single Checkout block with its own settings panel, you're on the modern block checkout.
If instead you see the shortcode [woocommerce_checkout] sitting in a classic/shortcode block, you’re on the classic checkout.
This is where most users get confused. If you only see a shortcode, that’s not a bug. It just means your store uses the classic checkout.
The block checkout has been the default for new stores since WooCommerce 8.3 (November 2023), but only when the site uses a block theme.
Stores created before then or running a classic theme typically still use the shortcode, which is why so many merchants see it.
To switch to Block from Classic, go to WooCommerce ⇨ Status ⇨ Tools and click on the 'Create Pages' button to generate block-based versions, then set them as your checkout pages.
To switch to Classic from Block, create a new page, drop in the [woocommerce_checkout] shortcode, and assign it under WooCommerce ⇨ Settings ⇨ Advanced ⇨ Page setup.
Method 1: Edit Natively in the Block Editor (Free, No Plugin)
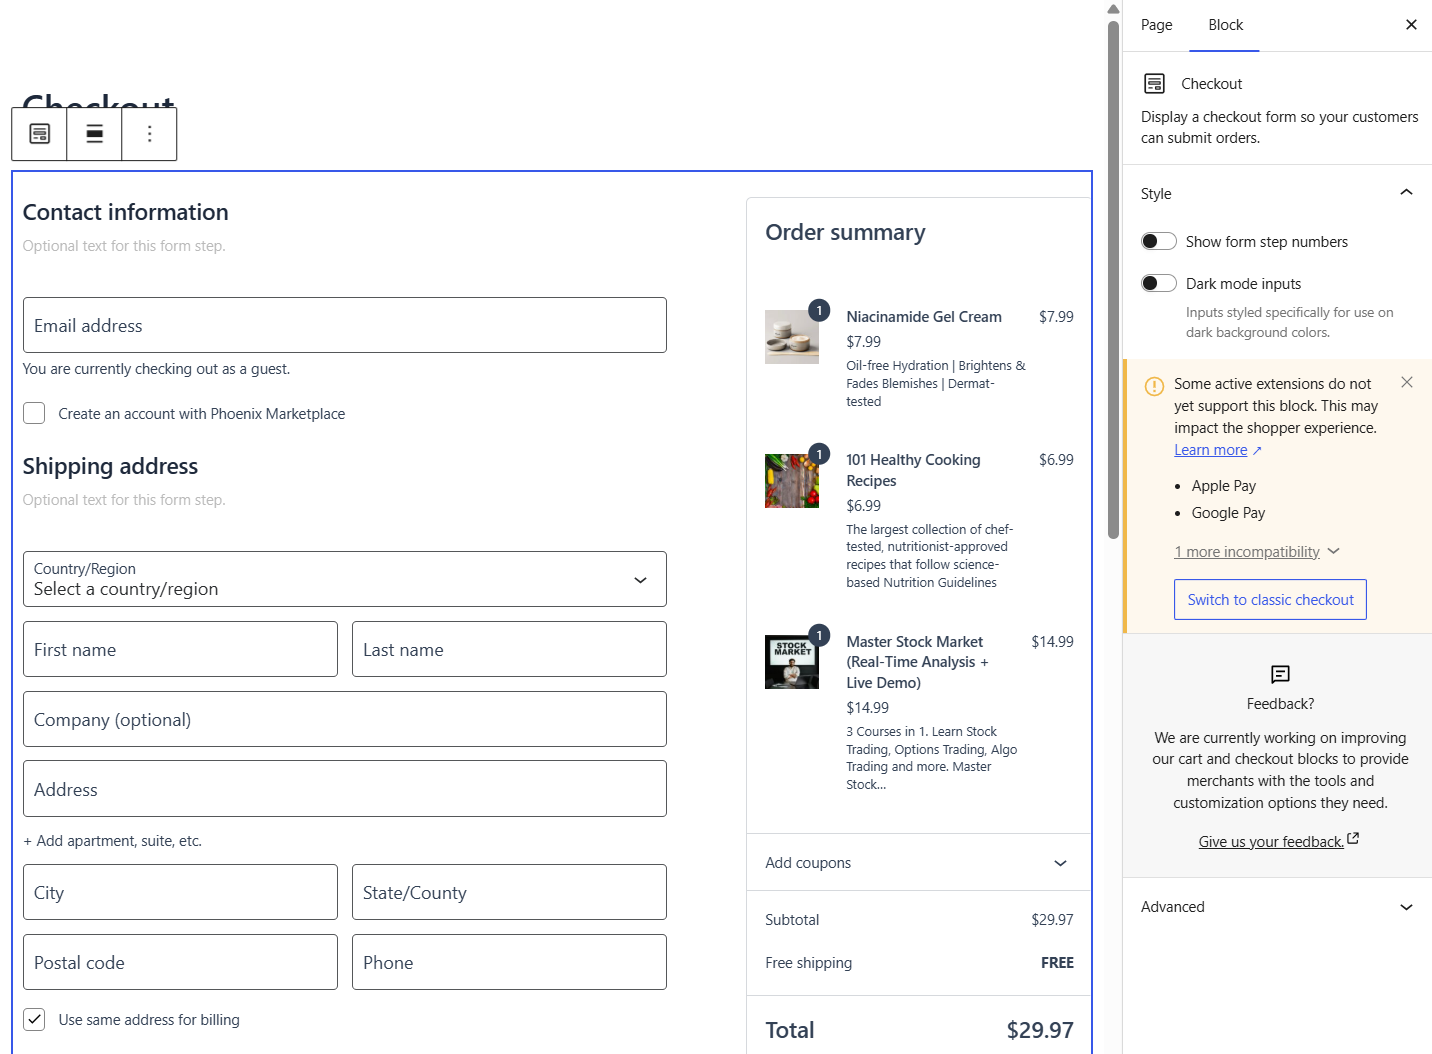
If your store is on a block theme, you can edit the checkout directly inside WordPress, no plugin, no cost. This is the fastest route for most stores, and it’s where you’ll do field toggling, layout changes, and color edits.
Block checkout
Go to Pages ⇨ Checkout to open the editor.
Click the Checkout block to open its settings in the right-hand panel. Toggle fields on or off. The block lets you control optional fields like Company, Address line 2, and Phone.
Set them to optional, required, or hidden.
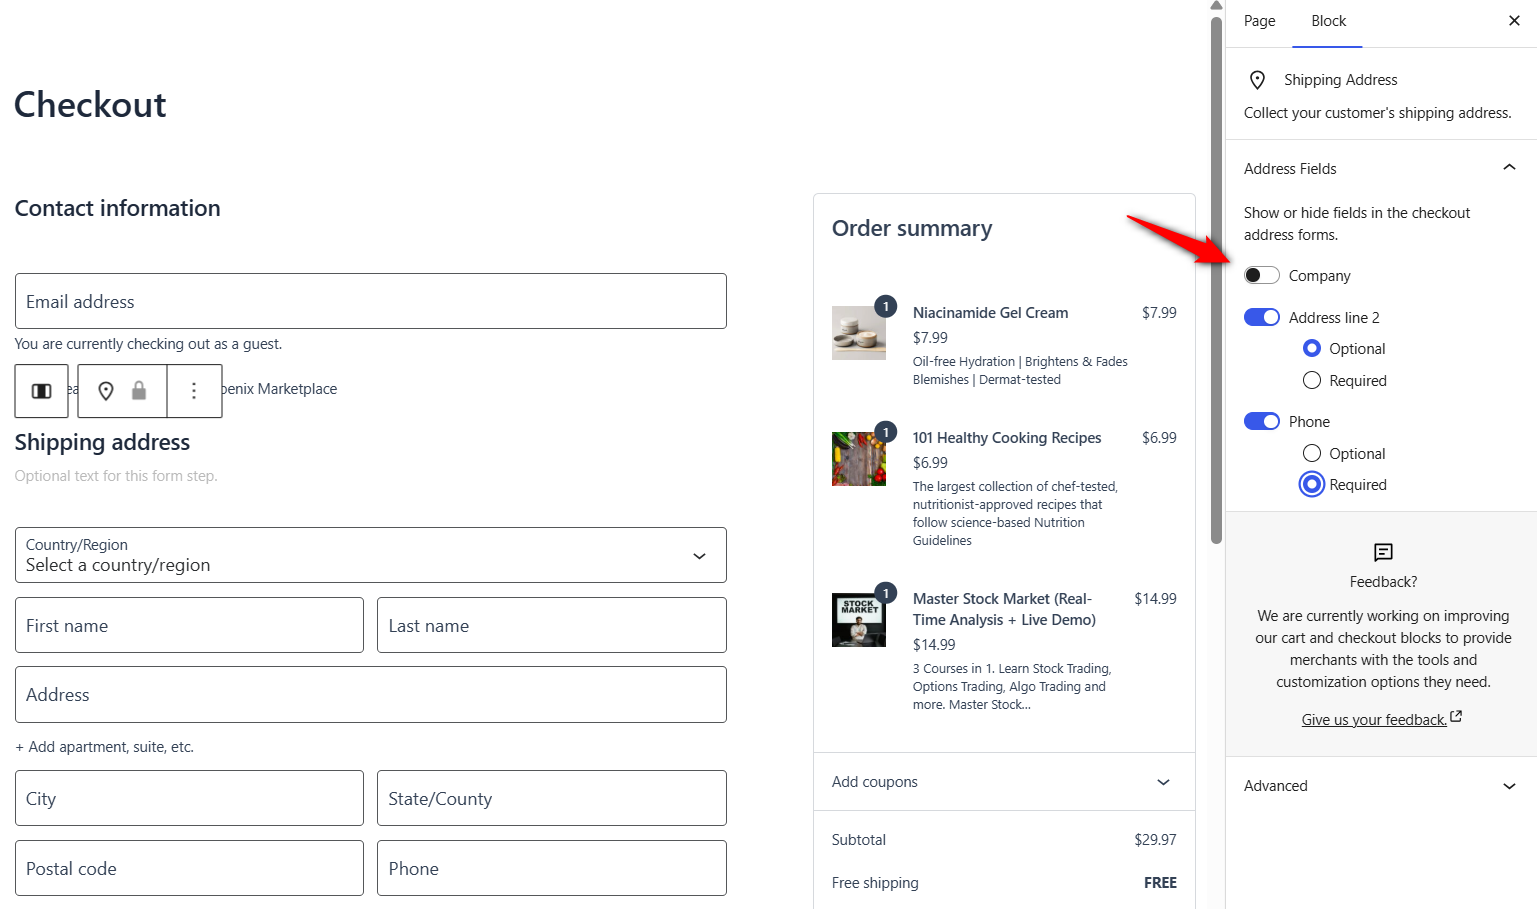
But you can do only a few customizations here. There are always blocks to add your custom CSS to make modifications in your checkout page.
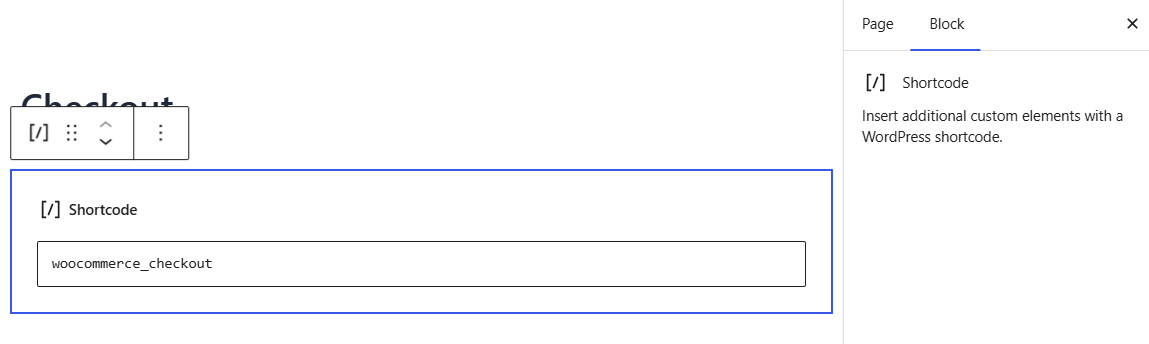
Classic checkout
If you’re on the classic checkout, go to Pages ⇨ Checkout ⇨ Edit. The shortcode itself isn’t visually editable, so field changes here are limited.
To add, remove, or reorder fields without code, use field plugin (Method 2), a powerful checkout customizer plugin (Method 3), or code (Method 4).
You can still adjust the surrounding page content, headings, and layout in the editor.
Method 2: Build a High-Converting WooCommerce Checkout Page With the Customizer Plugin
The methods above edit the existing checkout. If you want to go further, a branded, multi-step, conversion-optimized checkout with express payments, order bumps, and analytics.
A checkout builder plugin like FunnelKit Funnel Builder replaces the default checkout with a designed funnel. This is the advanced/conversion option, not the starting point for a simple edit.
Here are the simple steps to follow.
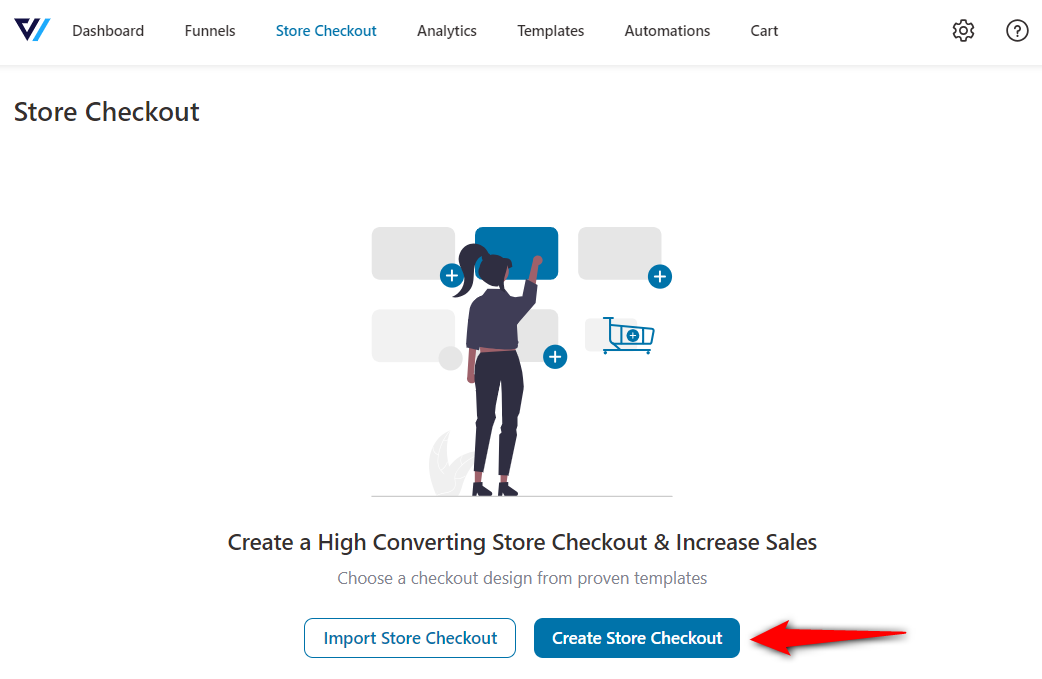
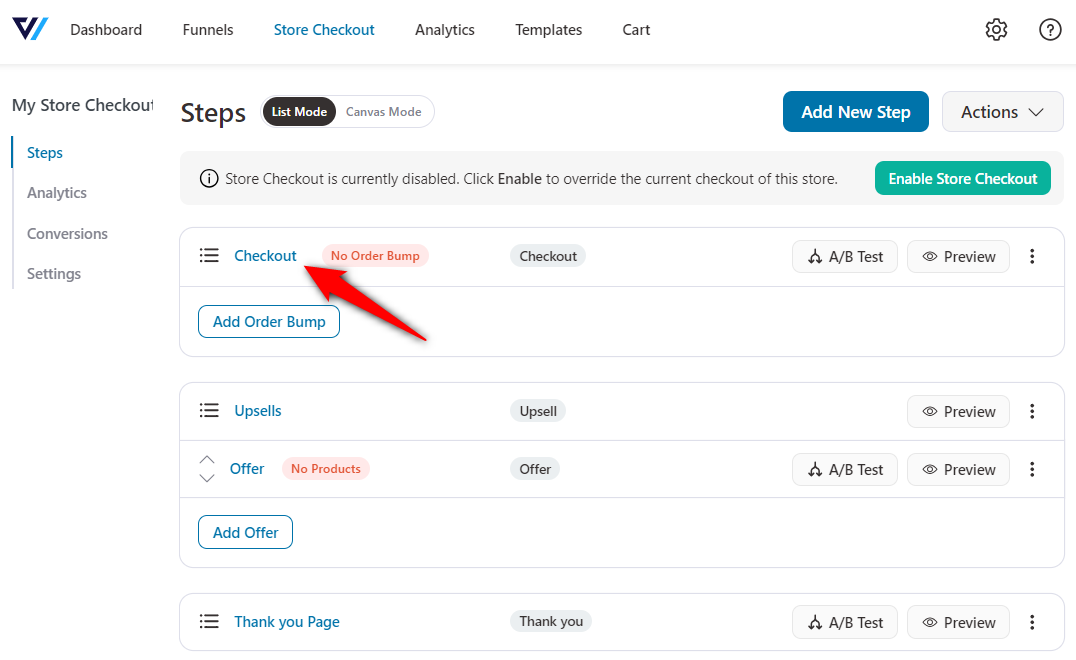
Step 1: Create a store checkout
Head to FunnelKit ⇨ Store Checkout and click on the ‘Create Store Checkout’ button.
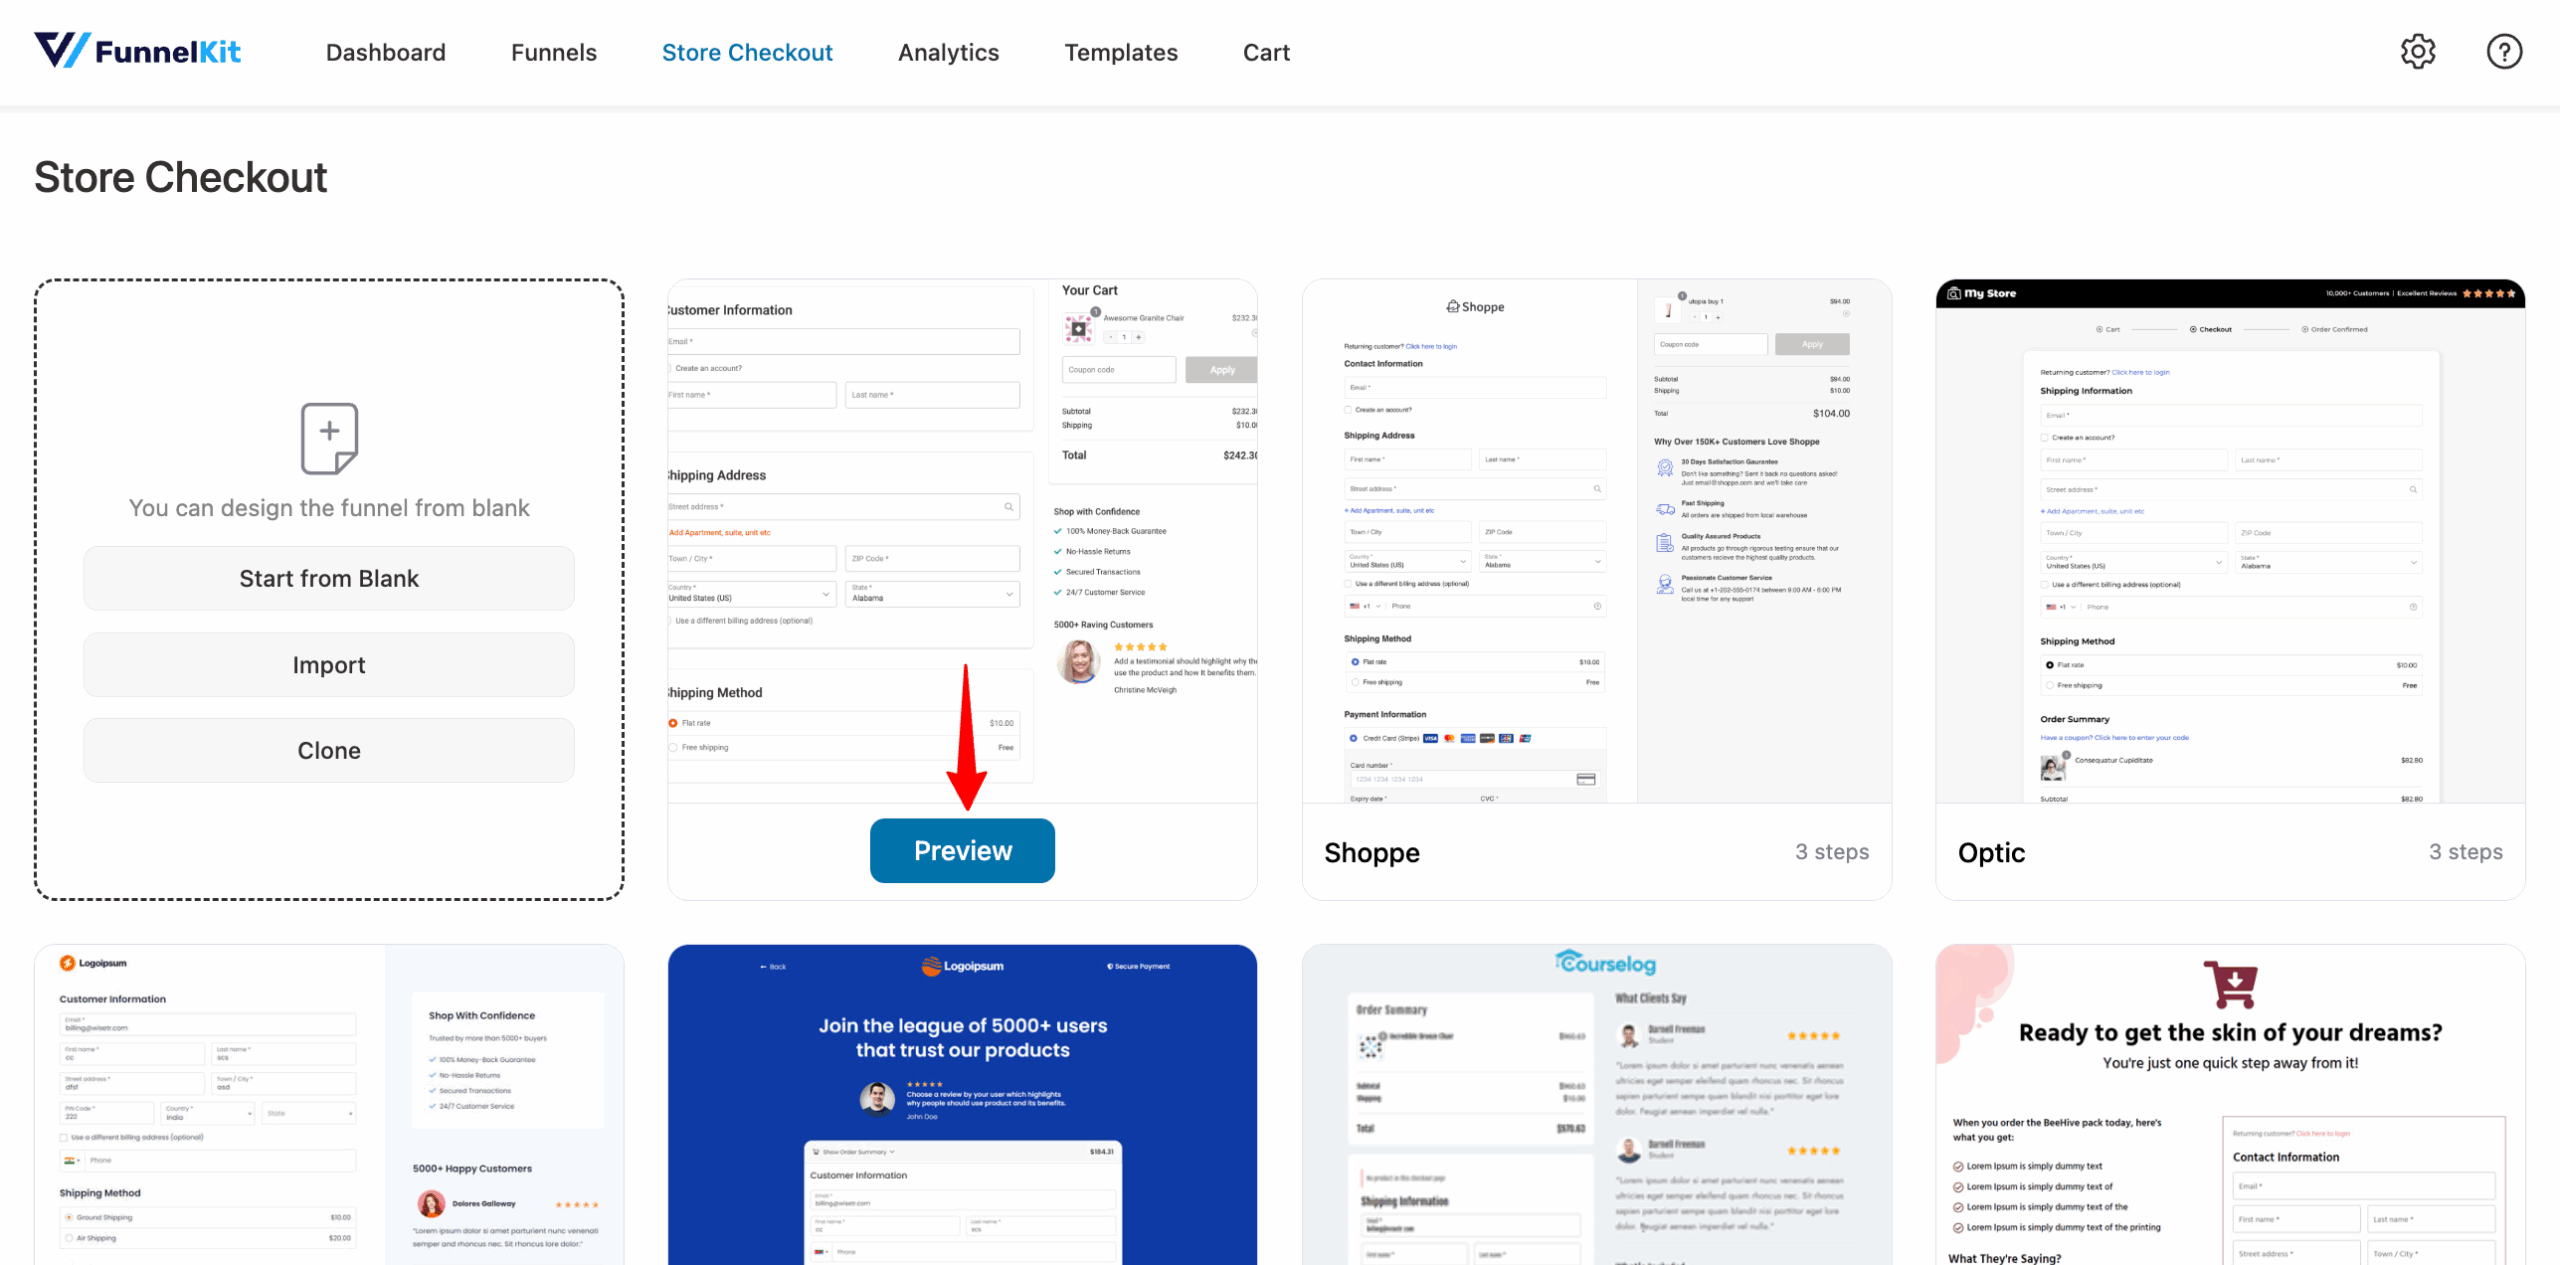
Pick a conversion-optimized template in one-step, two-step, or three-step format, then import it.
Use page builders such as Elementor, Divi, Oxygen, Bricks, or Gutenberg block to customize your checkout page.
A one-page layout suits low-ticket/impulse buys. A multi-step layout (Contact → Shipping → Payment) suits higher-ticket items by reducing cognitive load.
Hit ‘Import This Funnel’. Name your funnel (e.g., “Main Store Checkout”) and click ‘Done’ to import it into your workspace.
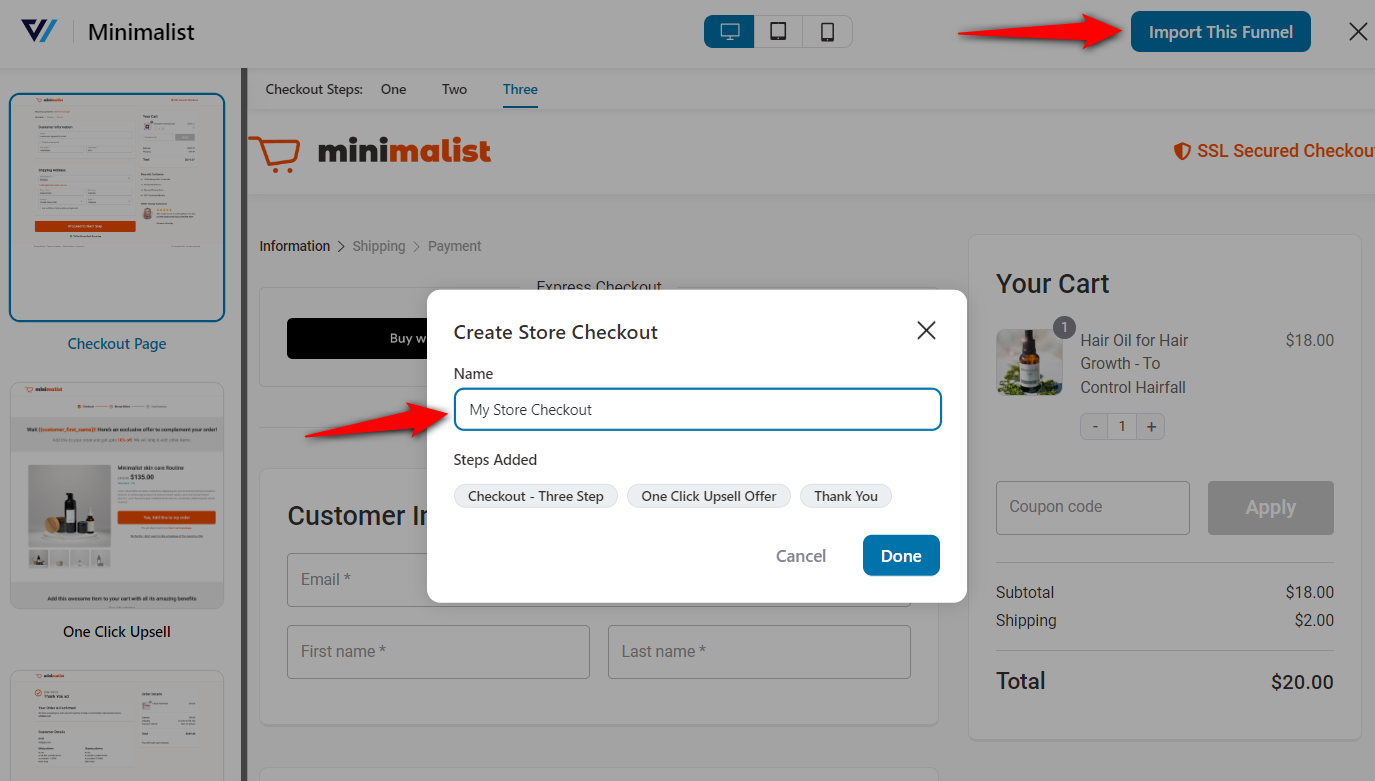
This will import your store checkout.
Step 2: Edit the checkout page design visually with Elementor
Start by clicking the name of your checkout.
Open the Design tab and hit ‘Edit Template’.
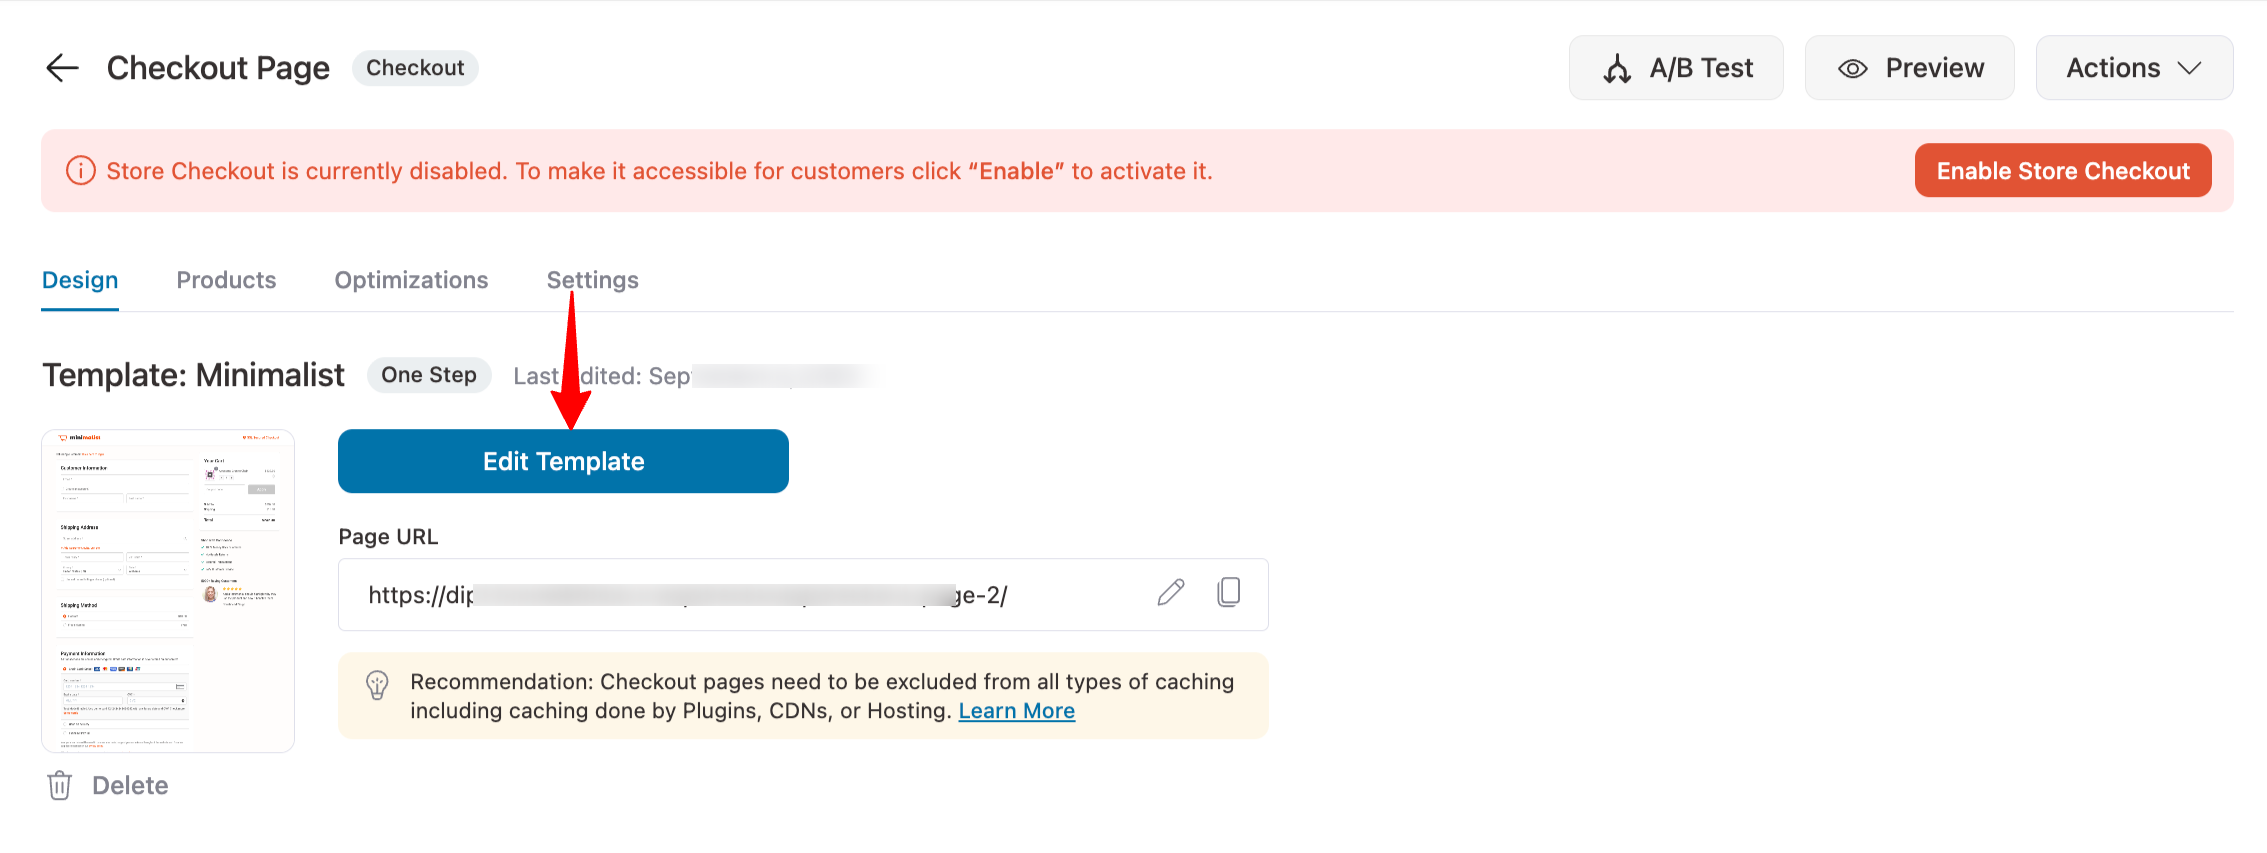
You’re now inside a live visual editor where you can drag, drop, and edit every element of your checkout page without touching a line of code.
Here’s what to customize to build trust, remove friction, and nudge the sale over the line:
- Add a custom logo to the checkout
Replace the placeholder with your brand logo. Adjust width, alignment, and opacity for greater credibility.
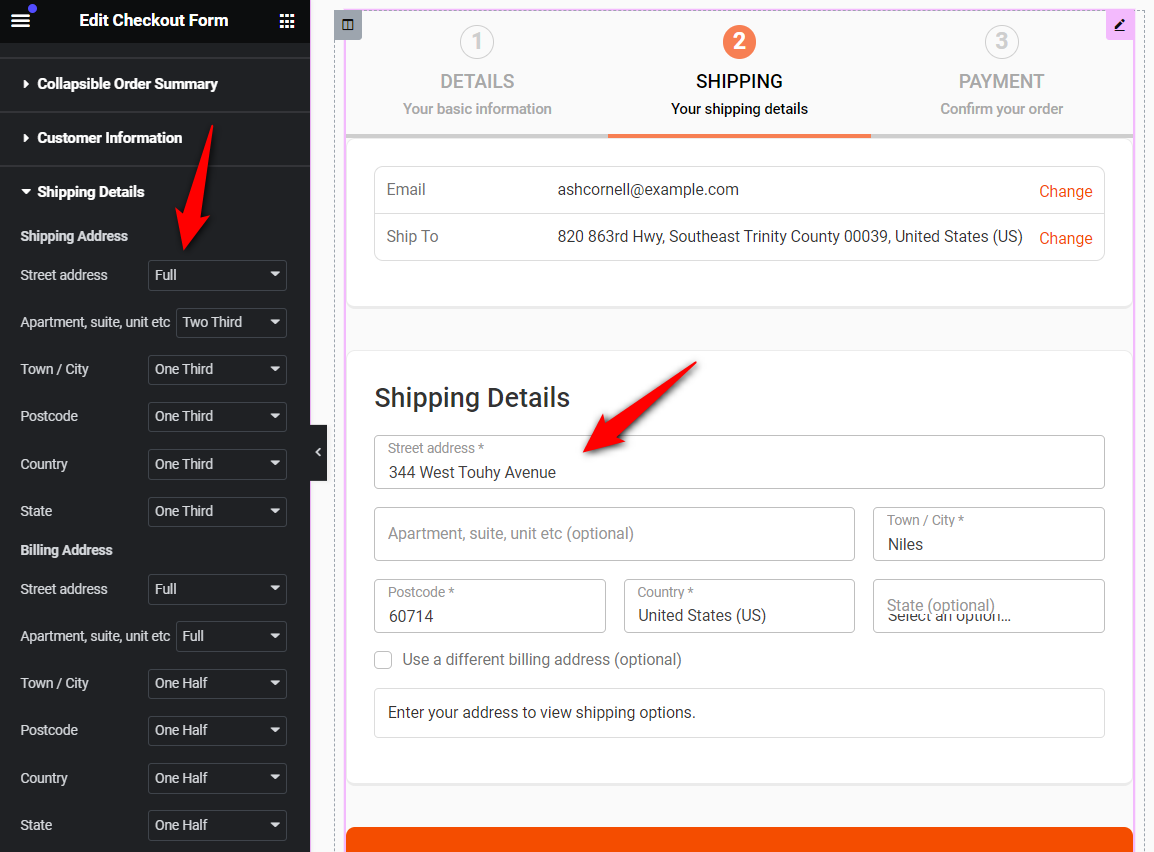
- Simplify the WooCommerce checkout form
Break it into steps (e.g., Customer Info → Shipping → Payment), rename the headings, and simplify the layout by adjusting field widths, enabling collapsible sections, and toggling coupon visibility.
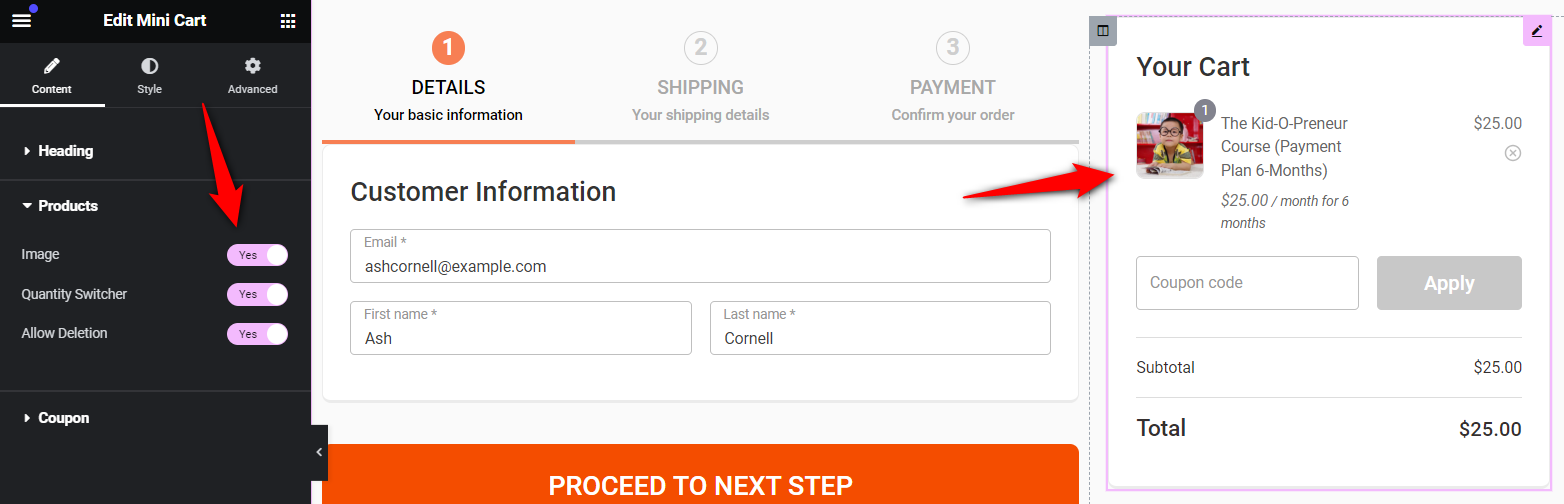
- Enable editing options on the mini cart
Let users view product images, adjust quantities, or remove items directly in the checkout mini cart. This gives them control, reducing decision fatigue and abandoned carts.
- Style the call-to-action (place order) button
Change the text to something active and benefit-focused (like Place My Order Now), and style the button to match your brand icon, color, hover state, and all.
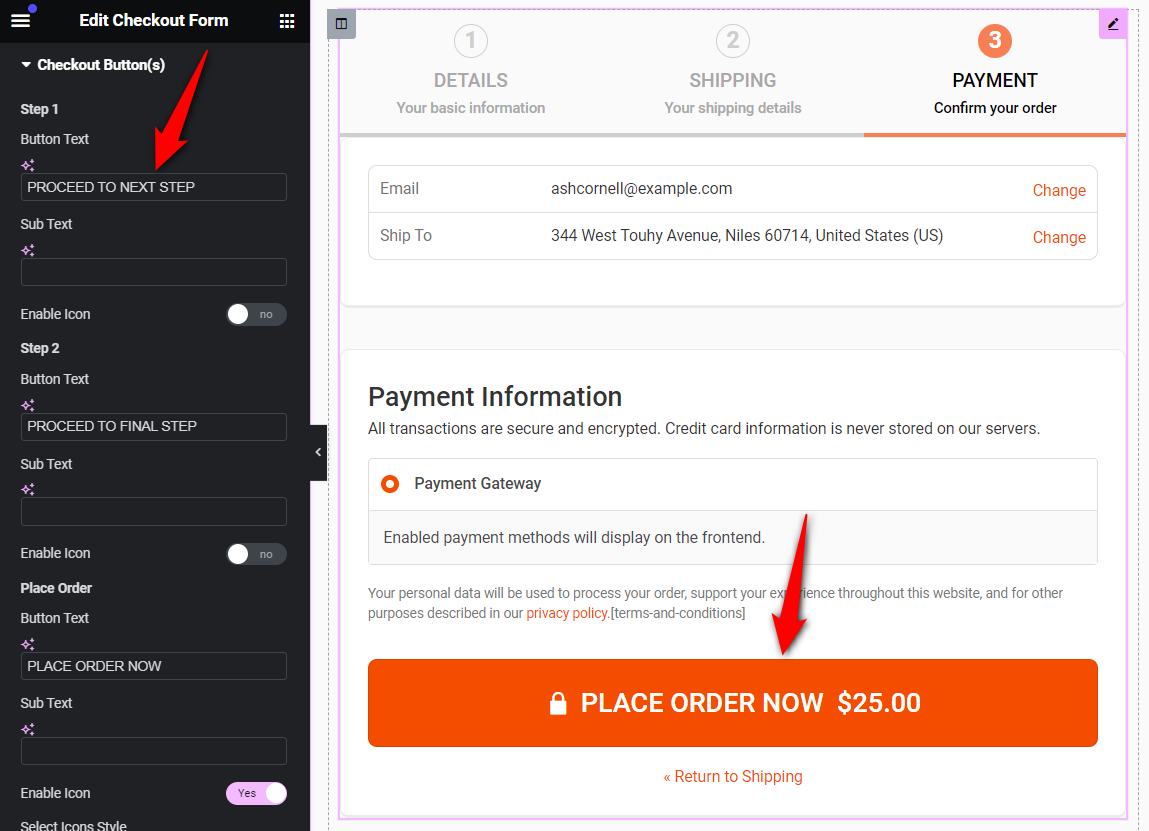
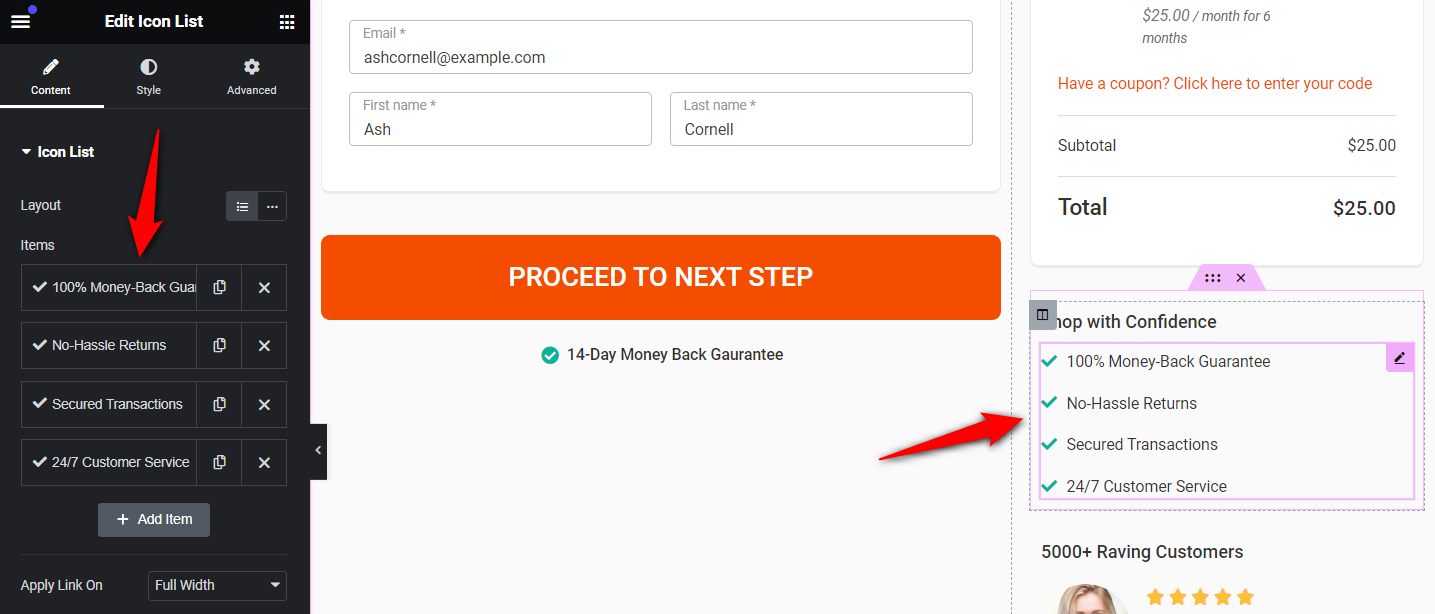
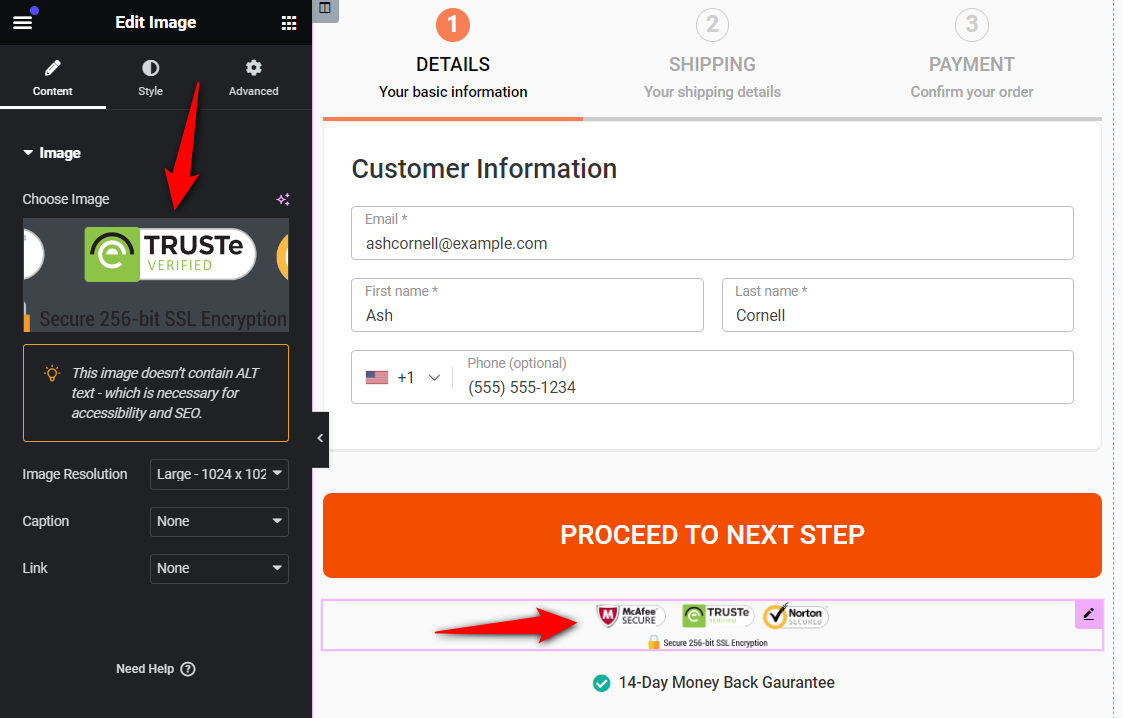
- Add the trust section (visual seals)
Add short, punchy reassurance copy like “100% Secure Checkout” or “Free Returns”, and tweak the styling to keep it consistent.
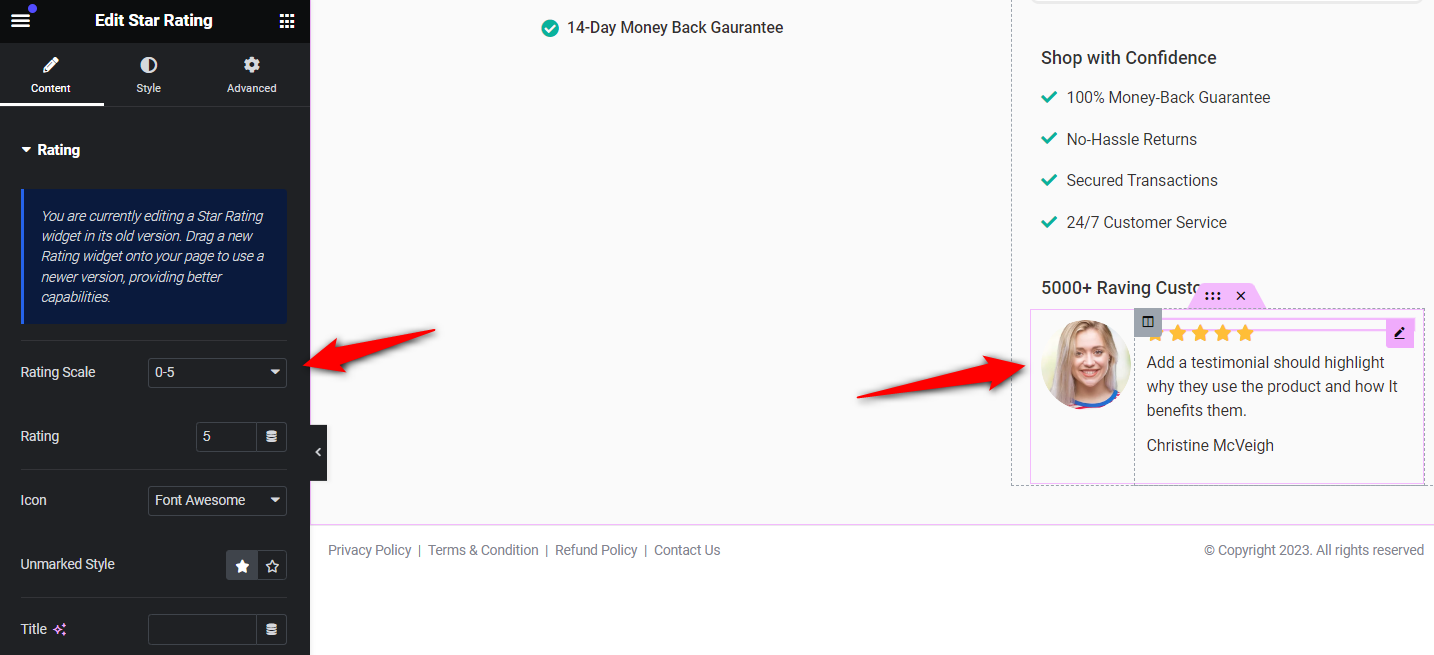
- Insert the social proof (customer reviews)
Add a single, powerful customer review with real names, photos, and star ratings in a sidebar or box next to the checkout form. These are subtle, high-converting nudges that reduce resistance at the moment of decision.
To change the checkout page background:
Under Styling options, find the “Page Background” setting in Elementor. Click the color picker and choose your brand color or enter a hex code directly.
Once you’re happy with the look and flow, click ‘Update’ and your high-converting, fully custom checkout is ready to go live.
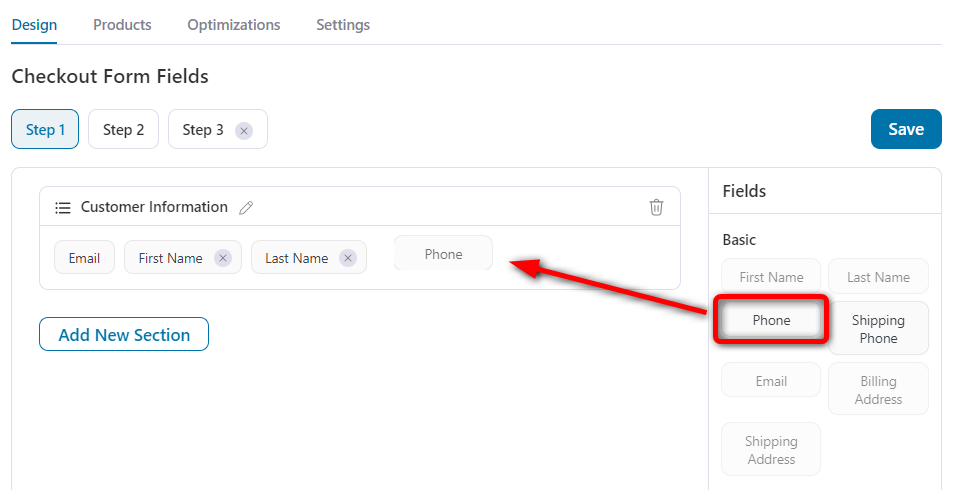
Step 3: Customize checkout fields without code
In the Design tab’s Checkout Form Fields section, add, edit, reorder, or remove fields with drag-and-drop.
- Add custom fields like phone number, delivery notes, or VAT info with one click. Choose from text, dropdowns, radio buttons, checkboxes, hidden fields, and more.
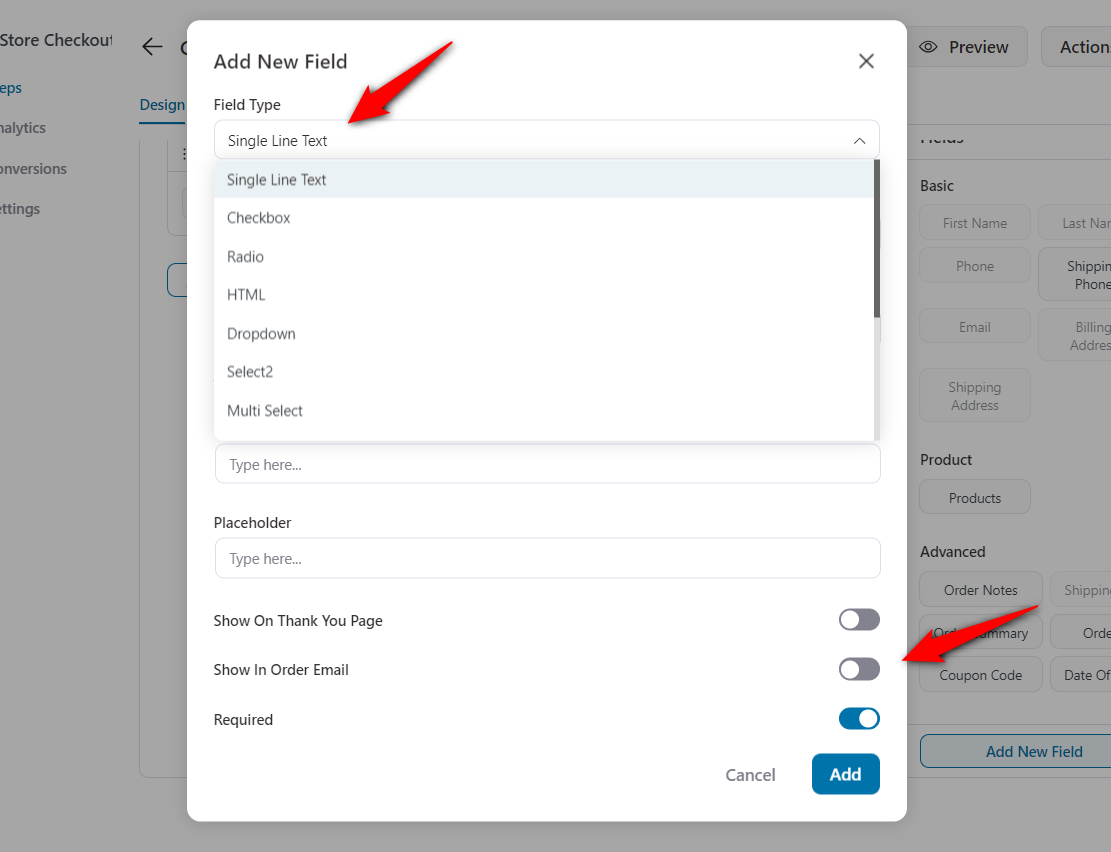
- Edit fields instantly change labels, placeholders, default values, required status, or visibility on emails and the Thank You page.
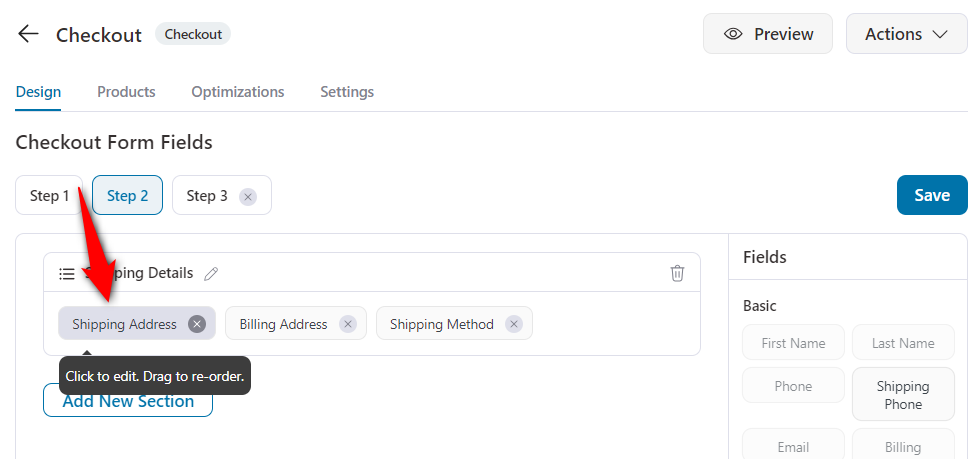
- Reorder fields or sections with simple drag-and-drop, no tech skills required.
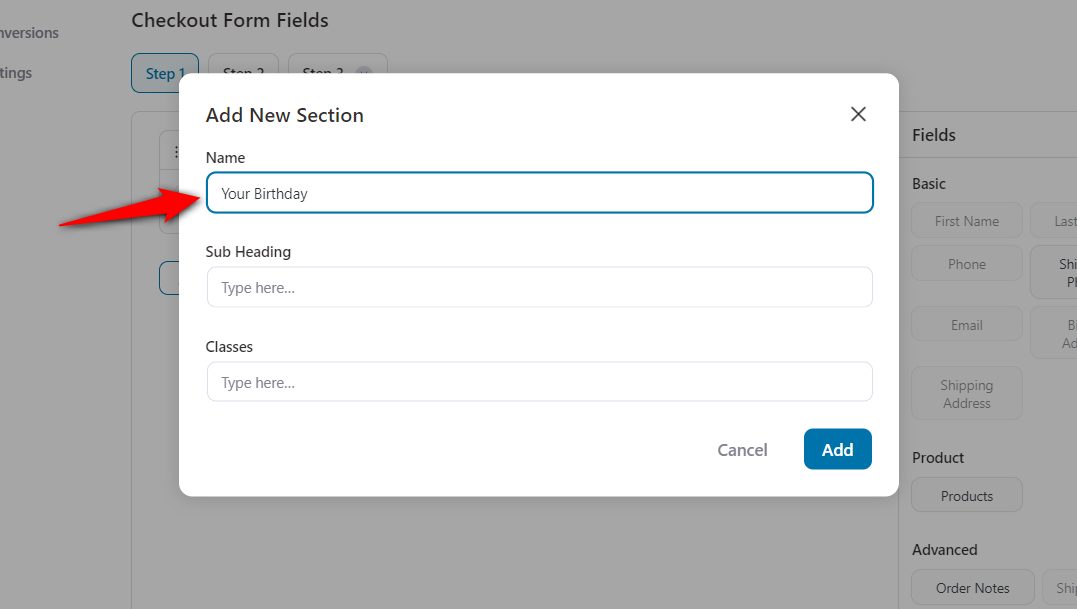
- Add new sections to group related info like shipping preferences, business details, or coupon codes.
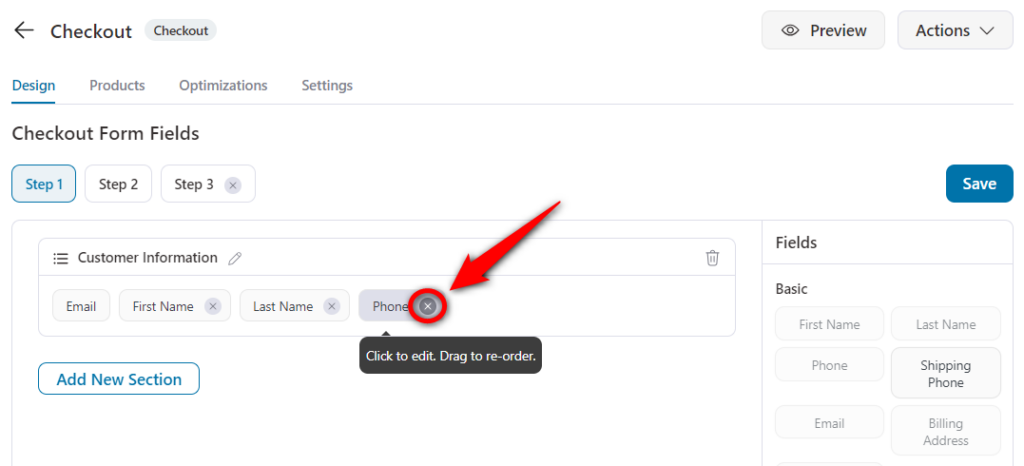
- Remove any field or section you don’t need. Just hover over the field, click delete, and confirm.
Example: Want to remove “Company Name,” make “Phone Number” required, and add a “Delivery Instructions” text box? You can do all three in under 60 seconds.
You can even add condition to your checkout fields. Once you're done, click 'Update' to publish your changes.
Step 4: Optimize your checkout for higher conversions
Your checkout is the last step. Make it the easiest.
Inside FunnelKit, head to the Optimizations tab. Here’s where you remove the blockers that slow buyers down.
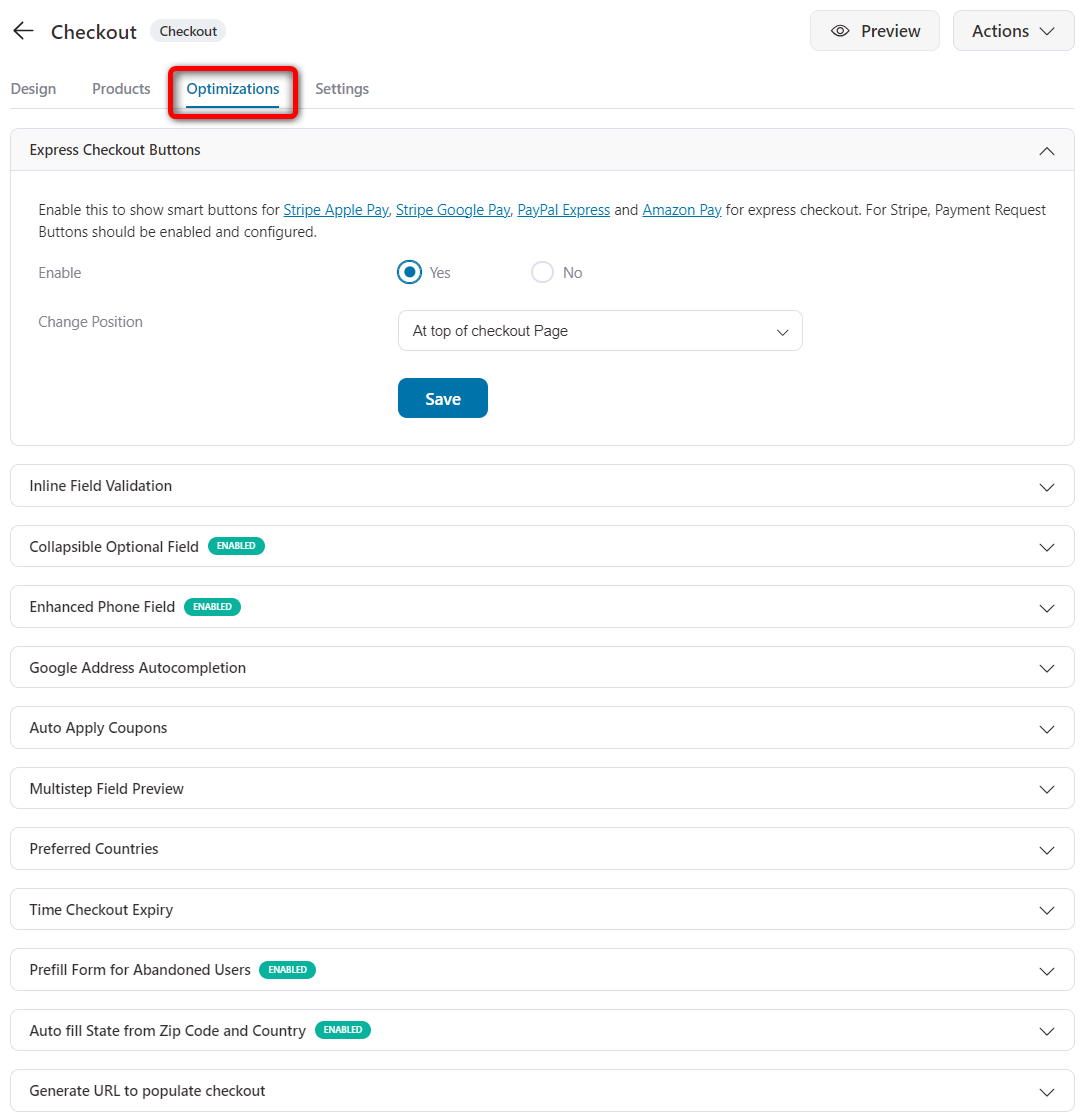
Turn on these high-impact optimizations:
- Express checkout: Offer Apple Pay, Google Pay, and other one-tap wallets. Fewer clicks = faster decisions.
- Address autocomplete: Pull verified Google addresses as users type. Fewer typos. Fewer delivery issues.
- Multi-step field previews: Show a quick summary of what buyers just filled. Builds confidence. Reduces errors.
- Auto-applied coupons: No more “Where do I find the code?” The discount just works.
- Smarter phone field: Auto-detect country codes. Format the number. Validate it. Done.
- Quick login: Let returning users log in without leaving the page. Keep them in the zone.
Click Save when done.
👉 Want more conversion wins? Steal our proven WooCommerce checkout upgrades.
Step 5: Add a thank you page to delight shoppers
They just bought and now’s your chance to keep them close.
Use FunnelKit to turn your WooCommerce thank you page into a smart post-purchase touchpoint.
Here’s what to add:
- A real thank-you message that is clear and written by a human
- A next-purchase discount that rewards action with action.
- Relevant products that show what pairs well.
- Social links that get the follow now, not later.
- Order summary + tracking. No confusion or follow-up emails.
The thank you page is your second conversion moment. Treat it like one.
Here’s the full playbook for high-converting thank you pages.
Step 6: Enable the new store checkout
Now that your custom checkout is built and optimized, it’s time to activate it on your store.
To do that, head back to your WooCommerce store checkout funnel in FunnelKit.
Toggle “Enable Store Checkout” to replace the default WooCommerce checkout with your new, fully customized version.
This action instantly makes your high-converting checkout live across your store.
Run a full test order using FunnelKit’s built-in test gateway, then track conversions, revenue, and step-by-step drop-off in the funnel analytics.
Method 3: Edit Checkout Fields With a Free Plugin
If you’re on the classic checkout, or you want more field control than the block checkout, a free field-editor plugin is the simplest no-code option.
Popular free choices include Checkout Field Editor for WooCommerce and Checkout Field Editor (Checkout Manager), both let you manage fields from a single admin screen.
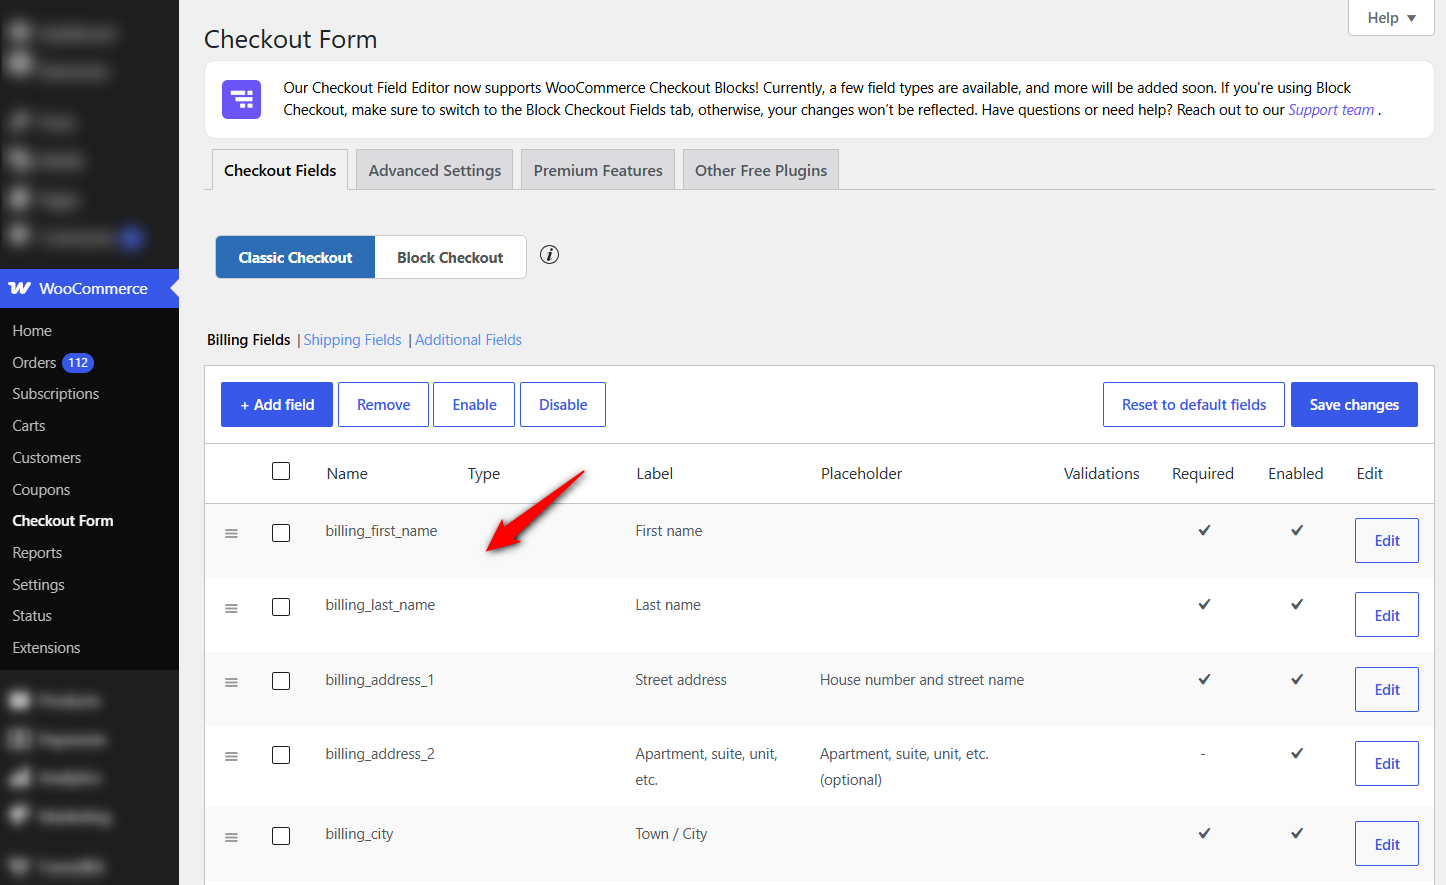
With this field-editor plugin, you can add new fields (text, dropdowns, radio buttons, checkboxes), edit labels and placeholders, reorder fields with drag-and-drop, set fields as required or optional, and remove fields you don't need.
This is especially useful for classic checkout, where the block’s built-in field controls aren’t available.
The only limitation is that you cannot manage fields in multiple checkout steps here. For that, you need method 3, which covers smart features for high-converting checkout.
For a complete walkthrough of field management, see our WooCommerce checkout field editor guide.
Method 4: Customize the Checkout With Code (CSS + PHP Hooks)
Customizing your WooCommerce checkout page isn’t just a cosmetic tweak but a strategic move to improve conversions. Here are the most effective methods to customize your WooCommerce checkout page using code, actions, and filters.
1. Customize checkout styling using CSS
Best for: Visual tweaks without altering layout or structure.
Skills needed: Basic knowledge of CSS.
Use custom CSS to style form fields, buttons, and hide unnecessary elements.
For example:
Similarly, there are separate CSS for button customization, responsiveness, and more.
Hide the header and footer on your checkout page using CSS:
2. Customize checkout logic with PHP hooks
Best for: Adding/removing fields, controlling field order, or injecting dynamic logic.
Skills needed: Intermediate PHP knowledge.
WooCommerce provides powerful checkout hooks. Example: to remove the phone field:
To remove placeholder text, use the following code snippet:
You can perform different functions using checkout hooks, such as adding custom fields, rearranging checkout form fields, displaying custom messages, etc.
Why it matters: Server-side customization provides precise control and keeps your checkout lightweight, which is essential for optimal performance and backend reliability.
Test and Track Your WooCommerce Checkout (So You Don’t Lose Sales)
Here's how you can test and track your checkout conversions.
Step 1: Run a real test
Before you go live, test the full checkout experience using FunnelKit’s Test Gateway.
Do this:
- Turn on Test Gateway
- FunnelKit → Settings → One-Click Upsells → Payment Gateways
- Toggle on Test Gateway by FunnelKit
- Walk Through the Flow
- Add a product → Go to checkout → Select Test Gateway → Complete order
- Every click should work. Every field should flow. If it doesn’t, fix it. Then retest.

Step 2: Let data reveal real numbers
Once live, track the metrics that matter inside your funnel:
- Conversions: Who entered, who ordered, and how much they spent
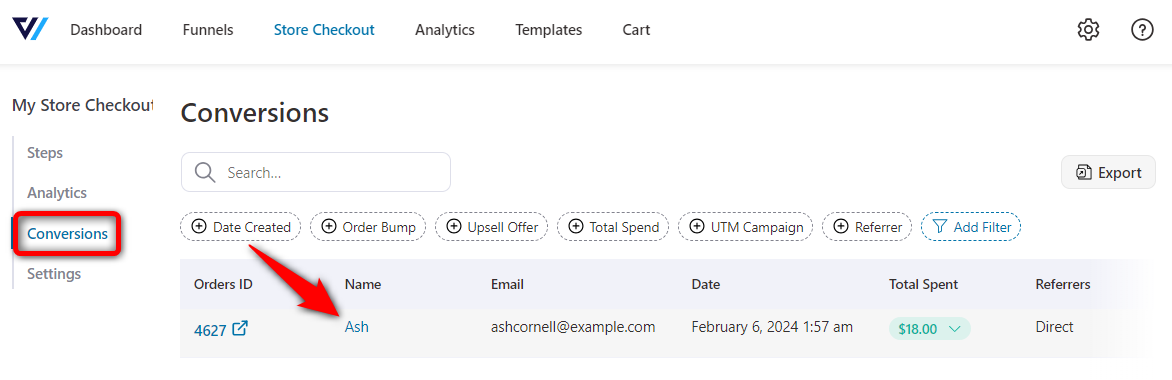
- Revenue: Total sales, AOV, RPV
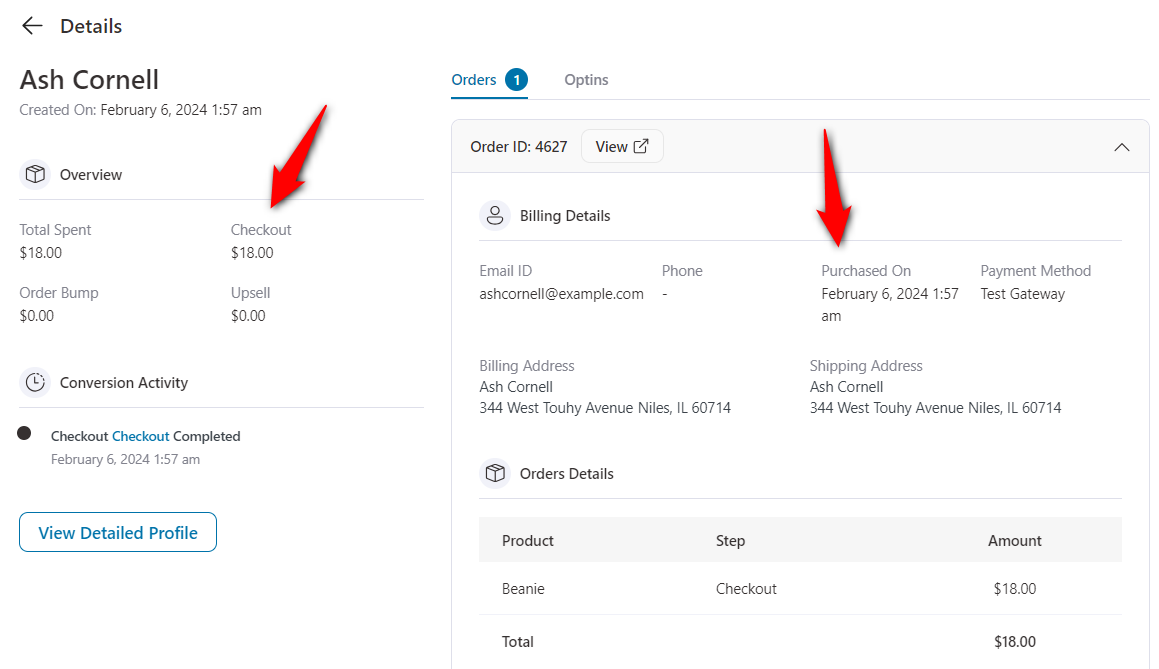
- Step-by-step drop-off: Views, clicks, exits, for each funnel step
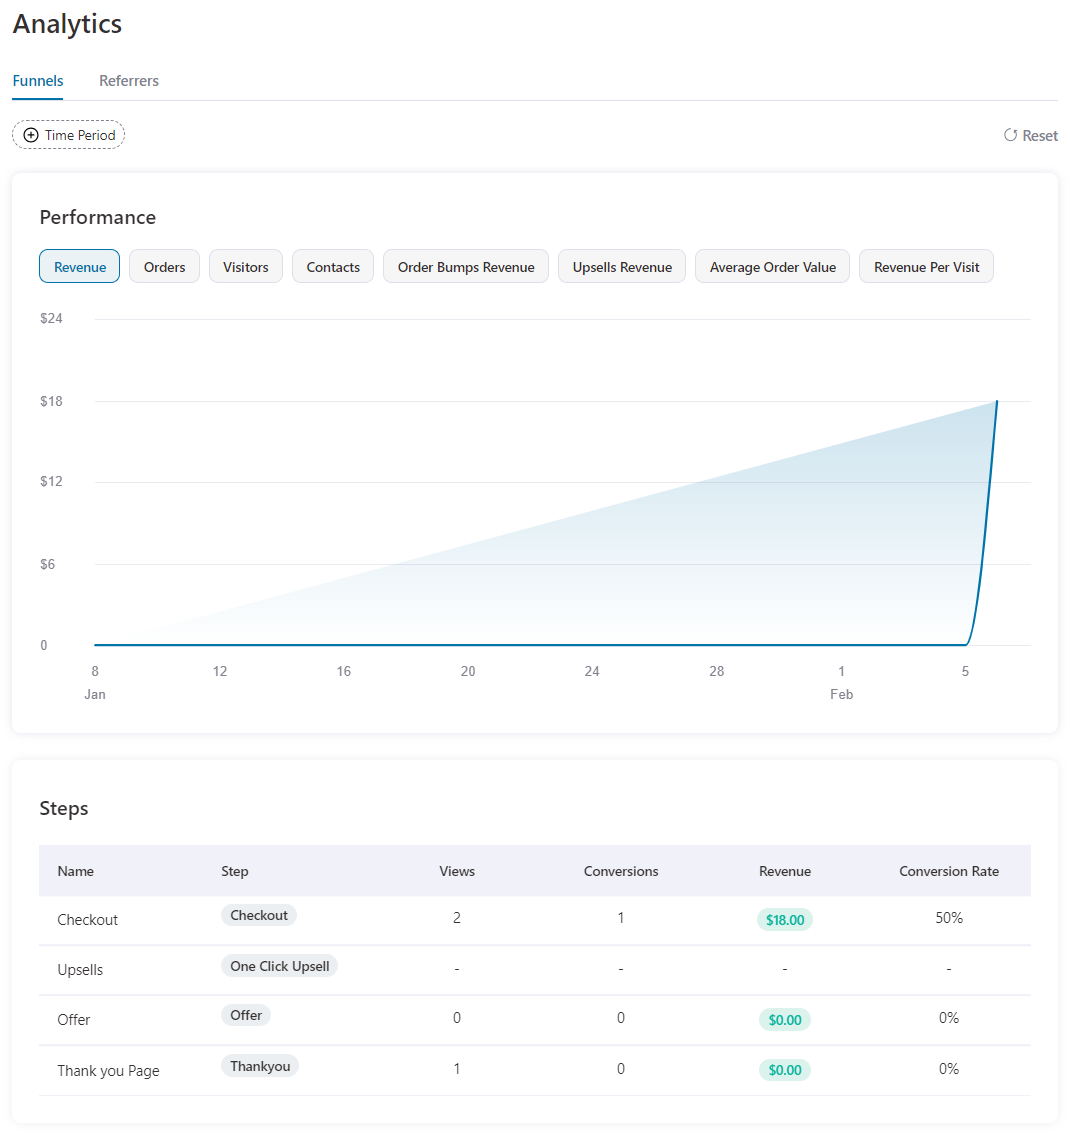
- Bumps & upsells: See which offers convert and what’s being ignored
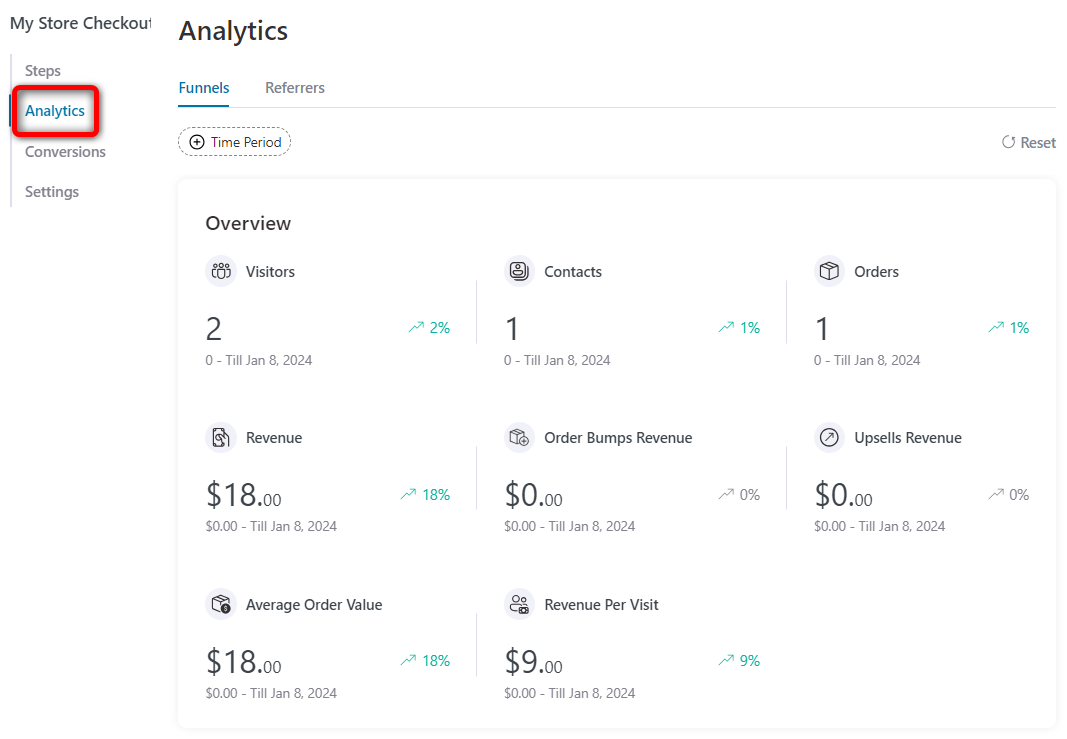
You can even filter by date to catch trends over time.
Let your checkout data do the selling.
9 Best Practices to Customize Your WooCommerce Checkout for Conversions
Customizing your WooCommerce checkout page isn’t just about aesthetics. It’s a strategic move to streamline user experience, boost conversion rates, and build trust across devices.
Below are nine evidence-backed optimization practices for a high-performing checkout experience that meets Google's latest expectations for page experience, trustworthiness, and mobile usability.
1. Simplify the checkout journey
A cluttered checkout is a conversion killer.
Minimize unnecessary fields, remove friction, and segment long forms into bite-sized steps. A multi-step layout not only feels lighter but also reduces cognitive overload.
Why it matters: A smoother experience improves completion rates, especially on mobile, where patience is low.
2. Audit theme performance and optimize load time
Page speed directly impacts conversions and Google's Core Web Vitals.
- Compress product images
- Enable browser caching
- Minify your CSS and JavaScript
Make sure your WordPress theme is optimized for performance, especially on checkout pages where delays can lead to drop-offs.
3. Design for mobile-first shoppers
Mobile commerce accounts for 74% of global retail traffic (Statista, Q1 2023). If your checkout isn’t fully responsive, you’re bleeding sales.
Head to the Design tab and preview your funnel in mobile view to ensure every element (like form fields, payment options, and CTA buttons) is touch-friendly, well-aligned, and fast-loading.
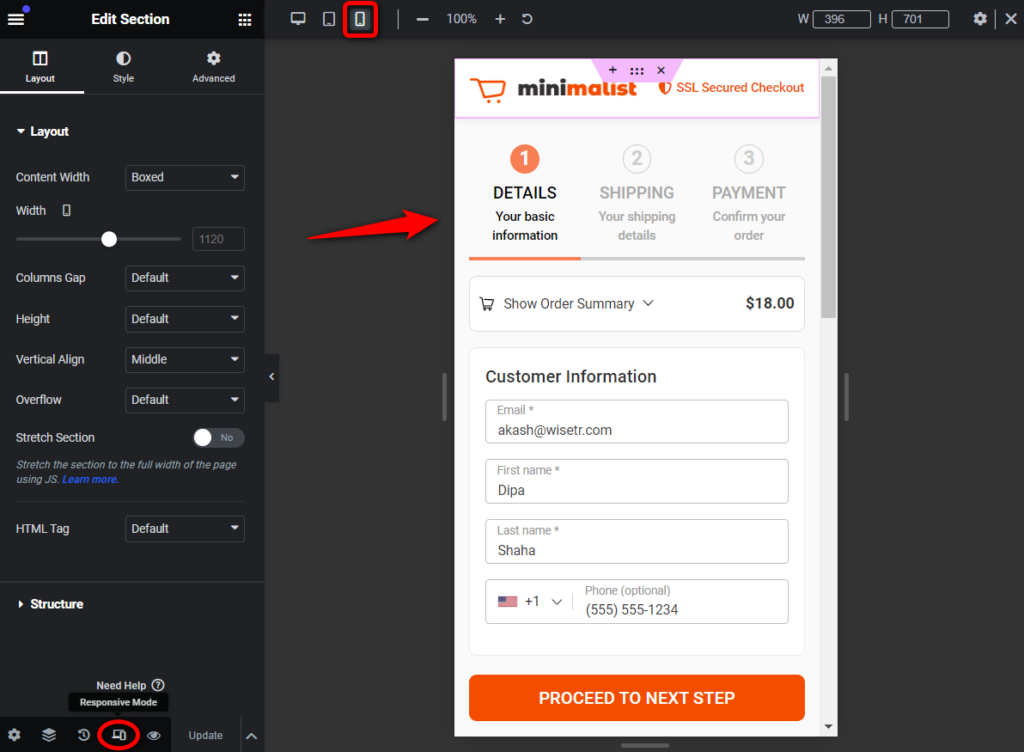
A responsive design not only improves user experience but also aligns with Google’s mobile-first indexing, helping your store rank better and convert more.
4. Use clear, action-oriented call-to-actions (CTAs)
Your checkout button is not just a formality; it’s the final nudge that seals the sale. Avoid vague labels like “Submit” or “Continue”. Instead, use high-converting CTAs that clearly state the outcome, such as:
- Complete My Purchase
- Place Secure Order
- Get Instant Access
Position your primary CTA above the fold on both desktop and mobile. Use color contrast and spacing to make it visually distinct, ensuring it's the first and most obvious action on the screen. A clear, confident CTA reduces hesitation and drives immediate clicks.
5. Increase average order value with smart order bumps and upsells
Boosting revenue per customer doesn’t require pushing harder. It requires presenting the right offer at the right time.
Strategically place order bumps directly on the checkout page to offer low-friction add-ons, such as warranty extensions or small complementary products.
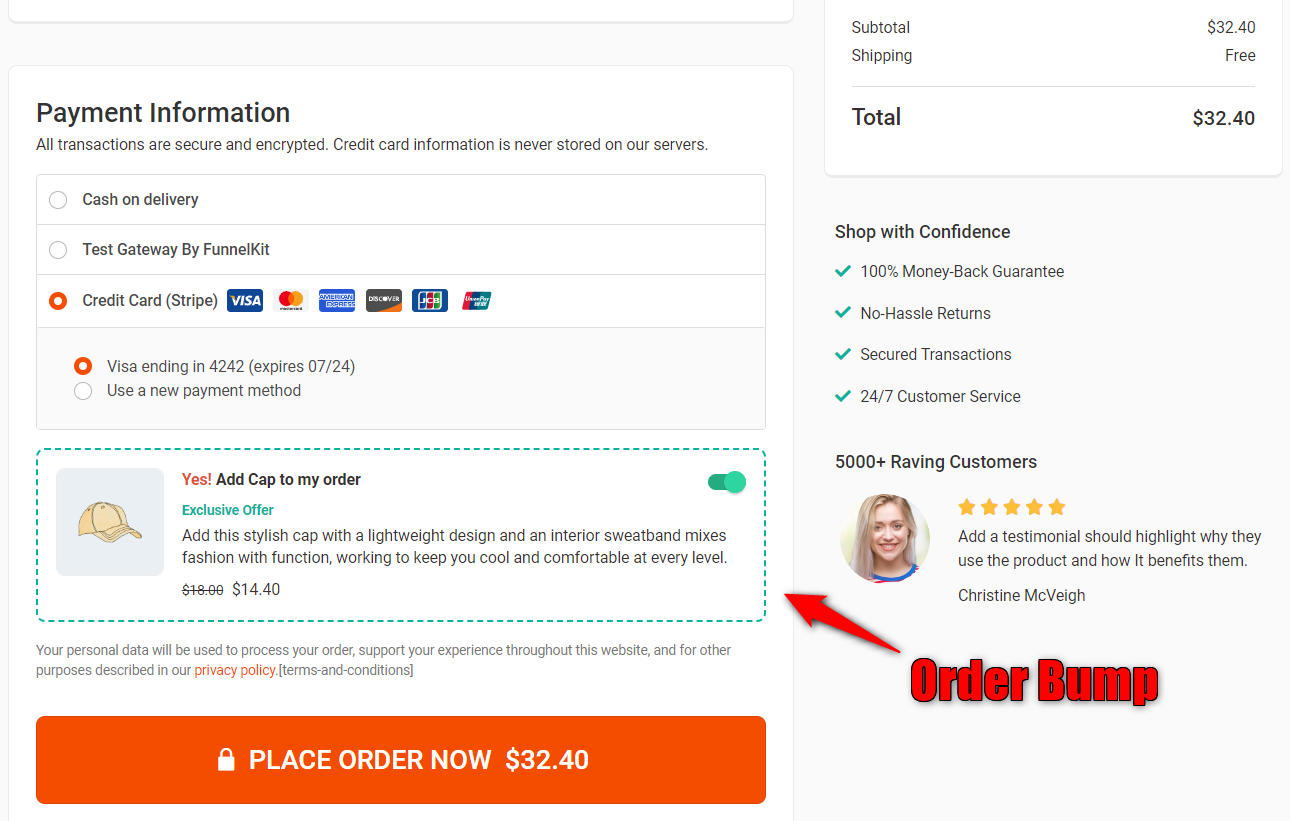
Post-purchase, use one-click upsells to present higher-ticket offers before the customer reaches the thank-you page. Since the buyer has already committed, these well-timed offers feel natural rather than intrusive.
6. Reinforce trust with security seals and compliance messaging
At checkout, trust is everything.
Visually reinforce your store’s credibility by displaying SSL certificates, secure payment logos, and clear privacy assurances near your purchase button. If your store complies with regulations like GDPR or CCPA, make that visible too.
These trust signals don’t just reassure customers, they reduce friction, lower abandonment rates, and align with Google’s emphasis on trustworthy, user-focused web experiences.
7. Support local and flexible payment options
Today’s shoppers expect options and if their preferred method isn’t available, they may not complete the purchase. Optimize your WooCommerce checkout to support:
- Credit and debit cards (Visa, MasterCard, American Express, etc.)
- Digital wallets (Google Pay, Apple Pay)
- PayPal
- Buy Now, Pay Later (BNPL) services like Klarna, Afterpay, and Affirm
- Localized methods such as iDEAL (Netherlands), Bancontact (Belgium), SEPA (EU), and more.
With the Stripe Payment Gateway for WooCommerce, you can enable many of these with minimal setup. Offering diverse payment methods builds trust and helps you cater to a global audience.
8. Automate cart recovery and follow-up workflows
The average cart abandonment rate hovers around 70%, with mobile shoppers abandoning at an even higher rate of 85% (Baymard Institute Research).
To win back these lost sales, set up automated cart recovery sequences that:
- Remind users of their incomplete orders
- Offer personalized incentives or limited-time discounts
- Nurture leads via email follow-ups and win-back campaigns
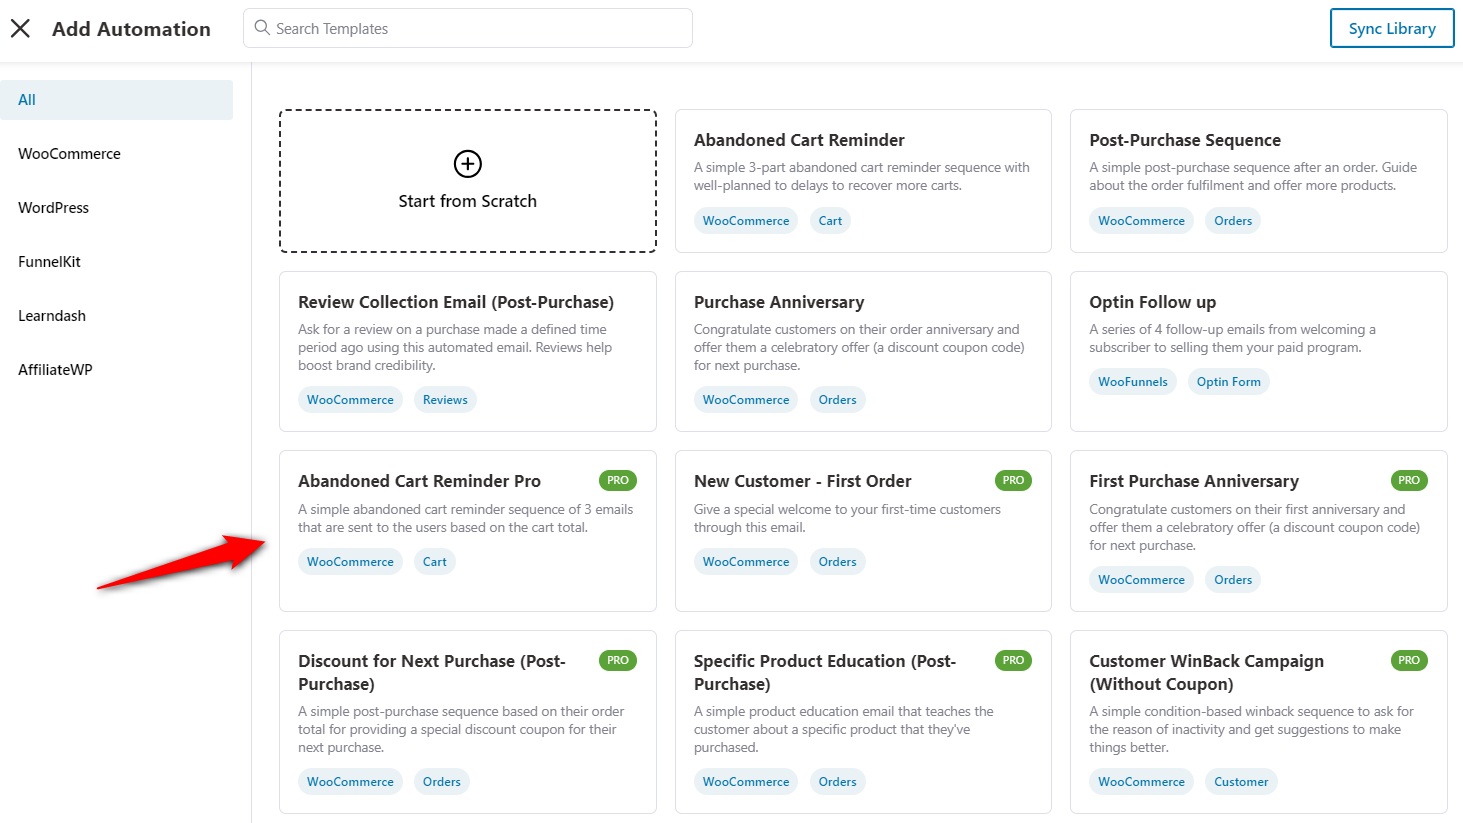
FunnelKit Automations lets you import pre-built, high-performing cart recovery workflows. Just tweak the copy, hit publish, and let automation do the rest.
9. Run A/B tests to optimize for what actually converts
Even the most intuitive ideas need to be tested. Use FunnelKit’s A/B testing tools to experiment with:
- Headline and subheading variations
- Different checkout layouts and field structures
- Button copy, size, and placement
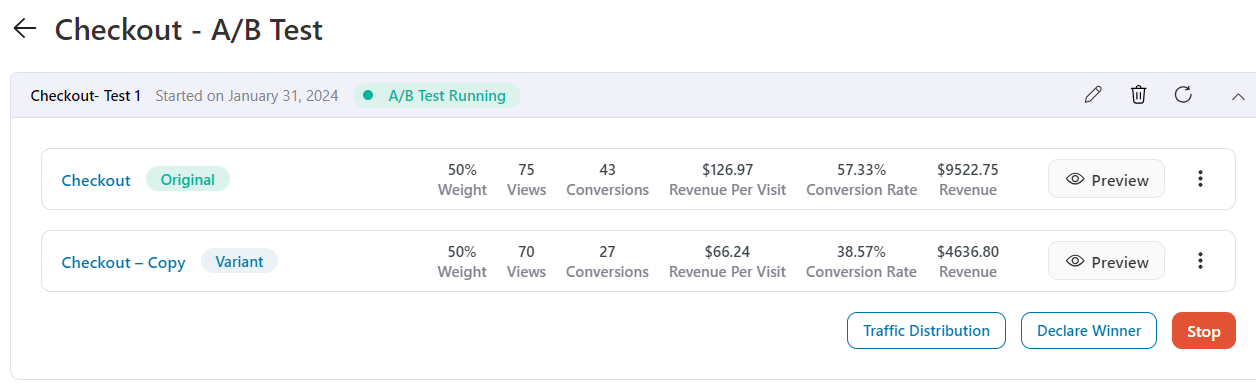
Track real-time performance based on views, clicks, conversions, and revenue impact. Then, double down on what works and replace what doesn’t. Continuous testing is key to a high-converting WooCommerce checkout.
Start with a simple A/B test on your headings. Changing the top headline from "Checkout" to "Securely Complete Your Order" can yield a surprisingly high lift in conversions.
Frequently Asked Questions
Use the native block editor via Appearance > Editor > Pages > Checkout, where you can toggle fields, change the layout, and edit colors for free. If you’re on the classic checkout, edit the shortcode page directly or use a PHP snippet in a child theme to modify fields.
The native block editor handles most layout, color, and field changes at zero cost. Pair it with a free field-editor plugin if you need to add, reorder, or remove fields, especially on the classic checkout. Code via CSS and PHP hooks is also free.
You’ve done the hard part: attracted traffic, earned trust, and convinced a potential buyer to add a product to their cart. But just when you should be celebrating a conversion, they hit your default WooCommerce checkout page and vanish.
The Baymard Institute reports that the average cart abandonment rate is nearly 70%, with a significant portion attributed to a checkout process that is “too long or complicated”.
While WooCommerce is an incredible platform, its default checkout setup is quietly sabotaging your sales. Here's why:
- It creates a trust gap (brand disconnect)
No logo. No colors. No warmth. The default checkout feels like it belongs to a completely different store, or worse, like a checkout template built in 2009.
- It overloads users with irrelevant checkout fields
Do your customers really need to type in “Company Name” when buying a scented candle or a notebook?
Every extra field is a friction point, and your default setup is riddled with them. Oh, and your email field? Tucked awkwardly at the bottom, it missed golden opportunities to capture abandoned carts.
- It offers zero guidance with a big wall of text
The standard layout is a solid wall of form fields. It lacks hierarchy.
There are no clear steps (like "Shipping" or "Payment") to guide the user psychologically toward the finish line. It feels like a chore rather than a purchase.
- The order summary is a mystery
The default WooCommerce summary often hides product images or renders them as tiny thumbnails.
It reads like a legal invoice rather than a shopping receipt, causing users to second-guess what is actually in their cart.
- It lacks “express” modernity
We live in an Amazon Prime world. Users expect speed.
No address autocomplete: The default setup requires manual typing, increasing the risk of typos, failed deliveries, and customer service headaches.
Limited gateways: If you aren’t prominently offering express options like Apple Pay or Google Pay, you add friction for mobile users who expect one-touch purchasing.
Absence of value: A customized layout allows for order bumps and upsells, which can increase average order value (AOV) by 30% overnight.
It’s the classic checkout. If your store predates WooCommerce 8.3 or uses a classic theme, you’ll see this shortcode instead of the Checkout block. To switch to the modern block checkout, go to WooCommerce → Status → Tools → Create Pages to regenerate block-based cart and checkout pages.
The block checkout has been the default for new stores since WooCommerce 8.3 (November 2023), provided the site uses a block theme. Older stores and those on classic themes commonly still run the classic shortcode checkout.
On the block checkout, use the Checkout block’s built-in styling controls for colors, typography, and one- vs two-column layout. On classic checkout, use CSS in a child theme, or a page builder to style the surrounding page.
Code changes can be overwritten by updates unless you put them in a child theme or a snippets plugin. Native block-editor edits and field-plugin changes are stored separately and are update-safe.
It depends on your product. For lower-priced items (roughly under $50), a one-page checkout tends to convert better with fewer clicks. For higher-ticket items, a multi-step flow (Contact → Shipping → Payment) reduces overwhelm and builds commitment gradually.
For simple field edits, a free field-editor plugin is enough. For a fully branded, multi-step, conversion-optimized checkout with express payments and upsells, FunnelKit Funnel Builder is a top-rated option. Match the tool to the depth of customization you actually need.
Yes. Hooks like woocommerce_checkout_fields let developers add, remove, and reorder fields. This method is code-heavy and can conflict with theme or plugin updates, so always use a child theme and test in staging.
Yes, it is safe to remove checkout fields in WooCommerce as long as the field isn’t required for payment, tax, or shipping logic. Test changes in staging first. Removing genuinely unnecessary fields reduces friction without harming order accuracy.
Add a clearly labeled opt-in checkbox for GDPR/TCPA compliance. FunnelKit integrates natively with tools like Klaviyo, Mailchimp, and ActiveCampaign to sync consented contacts to your email/SMS platform.
Conclusion: Customize Your WooCommerce Checkout Without the Chaos
A default WooCommerce checkout isn’t built for modern ecommerce. It’s rigid, generic, and often the biggest drop-off point in the buying journey.
Start with the free, native methods: edit the block checkout directly, or use a free field plugin and code for finer control.
When you outgrow simple edits and want a branded, multi-step, fully optimized checkout, a no-code builder like FunnelKit is the upgrade path.
Pick the method that matches the depth of change you need and test before you go live.
Editorial Team
July 7, 2026Are you looking for WooCommerce checkout optimization hacks to streamline your users' shopping experience? 7 out of 10 shoppers who reach a WooCommerce checkout leave without paying; according to Baymard...
Editorial Team
July 6, 2026A WooCommerce order form lets customers select multiple products, set quantities, and choose variations from a single page instead of visiting individual product pages. There are two ways to add...
Editorial Team
July 6, 2026The Bricks WooCommerce builder is built directly into the Bricks theme. Activate the free WooCommerce plugin, and Bricks unlocks more than 30 store-specific elements plus visual templates for every part...


