
Imagine a customer makes a purchase, but instead of the order smoothly processing through your system, it gets stuck in “Pending Payment” or “On Hold” indefinitely.
You’re checking your settings and refreshing your dashboard constantly, but nothing changes. Meanwhile, your customer is waiting and getting impatient.
WooCommerce order status provides crucial information about the progress of an order from the time it gets placed to when it’s delivered.
When configured correctly, they automate workflows, trigger customer notifications, and provide instant visibility into your business operations.
But when statuses don’t update correctly, it creates confusion, delays shipments, and even results in lost revenue. Payment processing status issues, misconfigured settings, and custom order status not working can all be to blame.
The good news is that you can take control of everything.
In this comprehensive guide, we'll share everything we've learned from processing millions of orders across thousands of stores.
You'll discover how each status works, when to use custom statuses, how payment methods affect status progression, and proven strategies to optimize your entire order management system.
Table of Contents
- 1 What is WooCommerce Order Status and Why It’s Important?
- 2 Understanding the Default WooCommerce Order Statuses
- 3 How Does Order Status in WooCommerce Work?
- 4 How Order Statuses Progress for Different Product Types
- 5 Custom Order Statuses: When and How to Create Them
- 6 How Payment Methods Affect Order Status Progression in WooCommerce?
- 7 How to Automatically Change the WooCommerce Order Status?
- 8 How to Set Up Automated WooCommerce Order Status Email Notifications?
- 9 5 Best Practices to Follow for WooCommerce Order Statuses in Improving the Customer Experience
- 10 Troubleshooting Common Order Status Issues in WooCommerce
- 11 WooCommerce Order Status: Frequently Asked Questions (FAQs)
- 12 Optimize Your WooCommerce Order Status Strategy for Seamless Growth
What is WooCommerce Order Status and Why It’s Important?
WooCommerce order status refers to the distinct stages in your fulfillment pipeline through which an order gets processed within WooCommerce.
It represents the current stage of an order and provides information about its processing and fulfillment.
These statuses convey the progress of an order from the moment it is placed to the moment it is delivered to the customer.
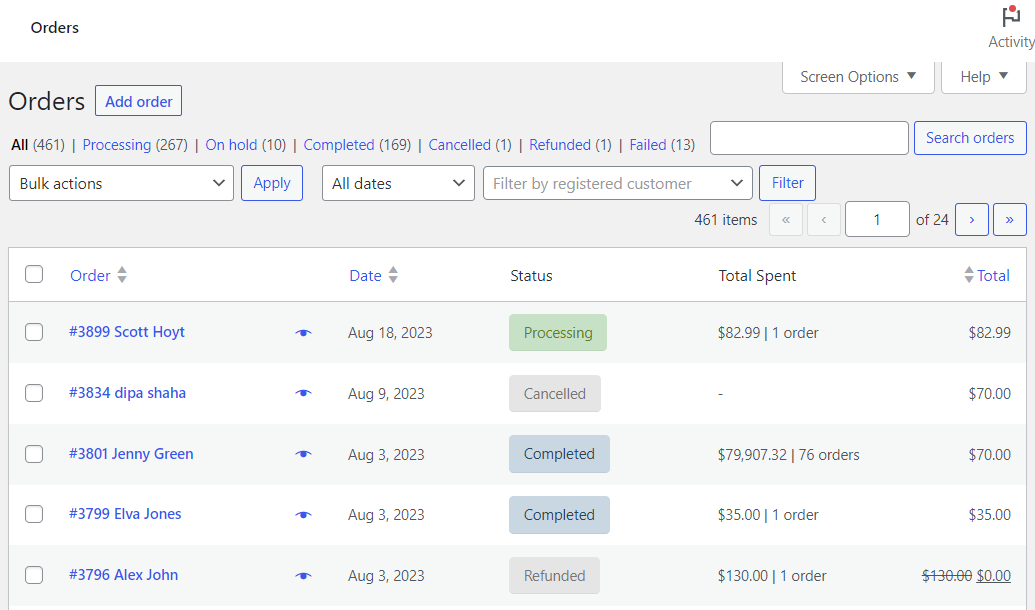
To check an order status, navigate to WooCommerce ⇨ Orders.
The orders placed in your store, along with their statuses, will show up like this:
Let’s look at their importance:
Importance of Order Statuses in WooCommerce
Order statuses in WooCommerce play an important role in managing the e-commerce workflow.
- Order tracking: It helps merchants track the progress of each order from placement to fulfillment, providing critical information to store owners and customers. These statuses enable you to identify potential issues and bottlenecks in the fulfillment process and resolve them promptly.
- Customer communication: These statuses help reduce support inquiries and improve customer satisfaction by keeping customers informed about their orders.
- Inventory management: WooCommerce order status helps track when products are sold and need restocking, facilitating accurate stock-level maintenance.
- Reporting and analytics: These order statuses allow businesses to analyze order flow and performance. This data helps identify trends and areas for improvement in business processes.
- Automations: These statuses enable automating various processes, such as sending emails when order status changes and streamlining the fulfillment process. You need a perfect WooCommerce CRM to set up automations in your store.
Overall, WooCommerce order status is a powerful tool that enhances communication, streamlines operations and provides valuable insights for your business.
Understanding the Default WooCommerce Order Statuses
WooCommerce provides eight default order statuses out of the box.
Let me walk you through each one based on what I've learned from managing different WooCommerce stores.
| Order Status | When It's Used | Impact on Product Stock | Your Action Required |
|---|---|---|---|
| Pending Payment | Order created, payment not confirmed | Stock reserved | Follow up if payment method requires it |
| Processing | Payment confirmed, order being prepared | Stock reduced | Fulfill the order |
| On Hold | Order paused for review | Stock reserved | Review and resolve the hold reason |
| Completed | Order fulfilled and delivered | Stock reduced | Request feedback, offer next purchase incentive |
| Cancelled | Customer or admin cancelled the order | Stock restored | Process refund if the payment was received |
| Refunded | Money returned to customer | Stock restored | Understand why and improve |
| Failed | Payment processing failed | Stock restored | Checkout started but was not completed |
| Draft | Checkout started but not completed | No impact | Contact the customer with the payment retry link |
Let’s look at them one by one.
1. Pending payment
An order marked “Pending payment” occurs when a customer has started the purchase process on the checkout page, but the payment is still awaiting confirmation.
This status is most common for orders using manual or offline payment methods, such as bank transfer or check, which take time to process.
Effective action:
You can contact your customers to confirm their payment method and provide clear instructions (if needed). We recommend setting up automated payment reminder emails with an effective CRM for WordPress.
Check the WooCommerce order status logs to track updates and manage the fulfillment process efficiently.
2. Processing
The WooCommerce processing status is marked with the order when it’s successfully placed, and the payment has been completed.
The order is now being prepared for shipping or fulfillment. This status comes right after pending, indicating the order's progress.
Effective action:
As orders move to the processing state, you can begin fulfilling them and preparing them for delivery.
Make sure to provide regular updates to customers on the shipment status of their orders.
If you're using shipping plugins like WooCommerce Shipping or Advanced Shipment Tracking, they typically monitor the Processing status and automatically generate shipping labels for you to print.
3. On hold
Orders may get the “On hold” status when they are temporarily paused for reasons like awaiting manual verification, stock availability confirmation, or unusual payment patterns.
Effective action:
Don't let orders stay on hold status. I've seen stores lose sales because customers got frustrated waiting for unclear reasons.
Immediately reach out to customers to request confirmation or offer alternative payment options.
This will help with smooth order flow and maintain customer satisfaction. You can also set up automated notifications with FunnelKit Automations or AutomateWoo to keep your customers informed automatically.
4. Completed
The “Completed” status indicates that the order has been successfully processed, shipped, and delivered to the customer.
This indicates that the entire transaction for the new order is complete, and you can review it in your store for any final checks.
Effective action:
Now that your sale is complete, you can focus on building a relationship with your customers.
You can send thank-you emails, request feedback, and offer next-order discounts in your post-purchase emails.
This helps you strengthen customer loyalty and boost your brand image, increasing the chances of customer retention in the future.
5. Cancelled
This status indicates that the customer or store admin has canceled the order for reasons such as the product being out of stock or the customer changing their mind.
The order stock increases to its previous quantity and will not be fulfilled.
Effective action:
If a customer cancels the order, make the refund process as smooth as possible.
If the cancellation was due to a product being unavailable, proactively reach out to the customer with an explanation and an alternative solution.
In our client stores, we've found that offering a similar product at a small discount can recover 30-40% of cancelled orders.
6. Refunded
The status changes to “Refunded” when a customer successfully processes a refund for an order.
This usually happens when they are unhappy with the product, the item doesn’t meet their expectations, or there is a shipping mistake.
Effective action:
When a refund gets processed, it’s essential to understand why it was requested.
Address the concern about a product defect, shipping reason, or anything else and ask for their feedback to improve.
Keep the communication channels open throughout the refund process to build trust and show you care about your customers.
Quarterly review of this data reveals patterns. For example, if 30% of refunds for a specific product cite not as described, you have an opportunity to optimize the product page.
7. Failed
The order is marked as failed when there is an issue with payment processing, such as a declined card, insufficient funds, or another reason.
Please note that this status may not appear immediately; it will show as ‘Pending’ until confirmation.
Effective action:
Review the issue on the WooCommerce order status page and ask the customer for an alternative payment method using a retry link.
Be transparent and tell them what went wrong so they feel supported and confident to place the order again.
8. Draft
The draft order gets created when shoppers start the checkout process in WooCommerce.
This ensures a shopper can easily pick up where they left off without losing track of their order.
Effective action:
Draft orders are your opportunity to recover abandoned carts. While the customer hasn't technically "abandoned" yet (they might still complete checkout), tracking drafts gives you earlier visibility into potential abandonment.
- Wait at least 1 hour before sending a cart abandonment email. Many customers are simply comparison shopping or got interrupted.
- Use the first email at 1 hour (a gentle reminder), the second at 24 hours (with social proof), and the third at 72 hours (with an incentive, if needed).
- Segment high-value carts because these warrant more attention and potentially outreach.
This will help stay proactive and ensure the order moves forward effectively.
How Does Order Status in WooCommerce Work?
WooCommerce order status is a system for tracking and managing the lifecycle of an order from the moment it’s placed until it’s completed.
Here’s how it works:
- Initial status assignment: When a customer hits the place order button, WooCommerce automatically assigns it an initial status, typically “Pending Payment” or “Processing”, depending on your payment method.
- Status progression: As the order progresses through the fulfillment journey, the store administrator can update the status automatically or manually.
- Automatic status updates: Certain actions trigger status changes in the order. For example, the status may change from “Pending payment” to “Processing” after a successful payment.
- Manual order status updates: Store owners need to manually change the status, such as setting it to “Completed” when an order is shipped and delivered to customers.
- Customer notifications: Many WooCommerce status changes trigger email notifications to inform customers about the progress of their orders.
- Filtering and sorting: In the WooCommerce admin panel, orders can be filtered and sorted by status, enabling efficient management.
- Custom order statuses: While WooCommerce has default order statuses, store owners can add custom statuses to fit their specific business needs.
- Reporting: You can generate reports by order status to track sales and other key metrics.
How Order Statuses Progress for Different Product Types
When I first started working with WooCommerce, I found that order statuses behave differently depending on your product type.
Let me explain the three scenarios based on what actually happens in the database.
Physical (simple) products
Physical products undergo the journey of order processing, shipping, and delivery. Therefore, it takes some time to process the order and update its status.
Once the payment is successful, the order status changes to ‘Processing’. After the order is delivered to the customer, it changes to ‘Completed’.
WooCommerce has no way to know when you've actually shipped the product or when it's been delivered unless you integrate a shipping plugin that reports delivery confirmation. We've discussed this later in the sections.
Virtual products
Virtual products are digital, non-tangible items such as memberships, services, warranties, subscriptions, etc.
You can access these virtual items with a username and password or a website URL hosted on a server.
Upon successful order placement, the order status goes to ‘Processing’.
Since the virtual products cannot be delivered to you, the order status will remain processing.
However, you can use a plugin called Autocomplete WooCommerce Orders to set the order status for virtual products.
We’ll discuss the autoprocessing of order status later in this post.
Both virtual and downloadable products
Virtual + Downloadable products are digital products that can be downloaded, such as ebooks, music files, PDFs, etc. These can be downloaded straight to your device.
Once you’ve made the successful purchase, the order status instantly changes to ‘Completed’.
This is the only scenario in which WooCommerce automatically sets the status to Completed. The customer has immediate access to the download and no fulfillment action is required from you.
Custom Order Statuses: When and How to Create Them
We already know a lot about the default order statuses in WooCommerce. These help track the progress of orders placed in your store.
However, the default options may not suit everyone’s needs. What if you want your customers to be updated on their orders more granularly?
That’s where the ability to add custom WooCommerce order statuses comes in.
When You Need Custom Order Statuses in WooCommerce
Adding custom order statuses in WooCommerce helps store owners manage their orders better and provide personalized experiences to their customers.
Consider custom statuses when:
- Complex fulfillment workflows: If your order fulfillment process has multiple distinct stages (picked, packed, quality checked, awaiting courier pickup, shipped, out for delivery), custom statuses provide visibility at each step.
- Multi-location operations: Stores with multiple warehouses or drop-ship partners use custom statuses such as "At Warehouse A", "At Warehouse B", or "Shipped from Supplier".
- Pre-order or made-to-order products: Custom statuses like "In Production", "Manufacturing", or "Awaiting Stock" keep customers informed about special-order items.
- Specialized business models: Rental businesses might need "Rented", "Awaiting Return", "Returned". Subscription boxes might use "Box Prepared", "Awaiting Shipment", and more.
- Requirements in customer communication: If you want to trigger specific emails at specific fulfillment stages (like "Your item is being custom-printed" or "Quality inspection complete"), custom statuses enable that.
With custom order statuses, WooCommerce store owners can create statuses tailored to their specific needs.
You can create WooCommerce custom order status in two ways:
- By adding a custom code snippet
- Using a WordPress plugin
Let’s look at both of these processes.
Method 1: Create a custom WooCommerce order status (using code)
Here, we’ll add a custom “Order Shipped” status in WooCommerce.
Instead of editing your theme's functions.php directly (which gets overwritten on theme updates), I recommend using WPCode (free, 2+ million active installations).
Next, go to ‘Snippets’ and click on the ‘Add New’ button.
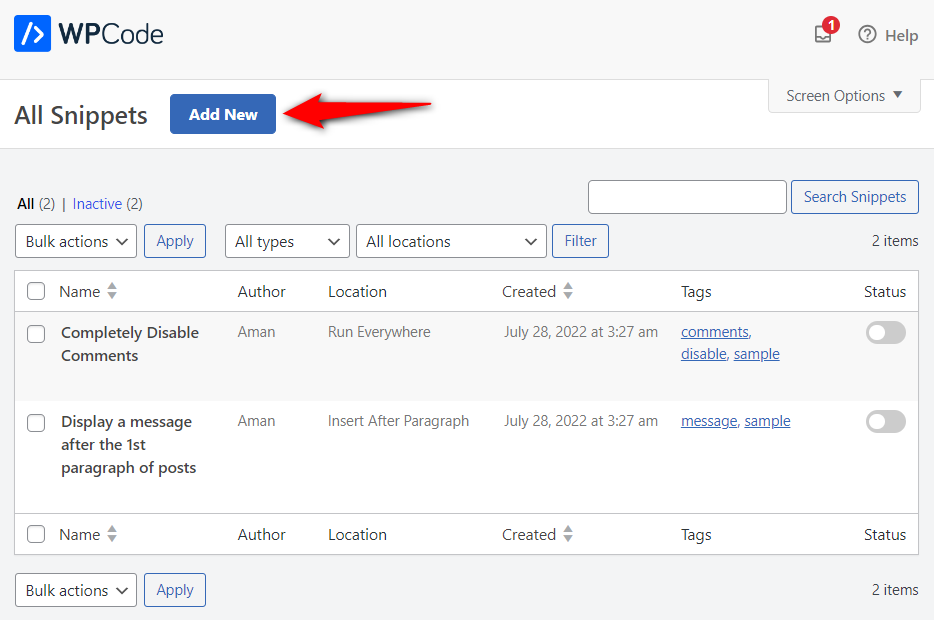
Add the following snippet code and select the option below to run it everywhere on the website.
Once done, hit ‘Update’ and activate the snippet.
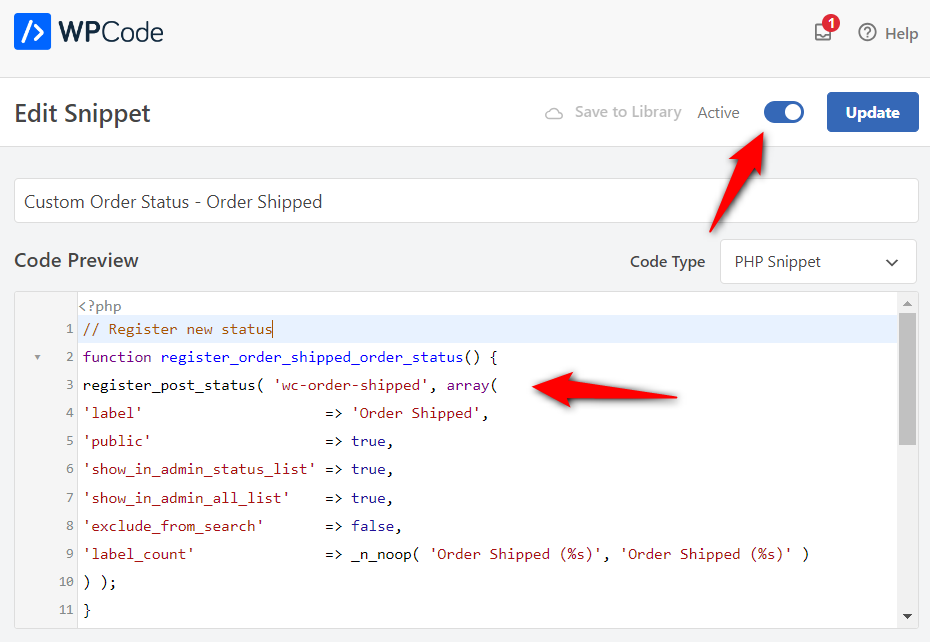
Orders in WooCommerce have a special ‘post_status’ value attached to them on the wp_posts table in the database, like any other posts.
Therefore, we’ll use the register_post_status() inbuilt function to include our custom order status.
This is the code you need to copy and paste on the code snippet:
Well done! This is how you can create a custom WooCommerce order status using a code snippet.
Method 2: Create a custom WooCommerce order status (using a WordPress plugin)
The easiest way to create a custom order status in WooCommerce is by installing a WordPress plugin like Custom Order Status Manager for WooCommerce.
This plugin lets you create, edit, and remove custom order statuses to manage your WooCommerce orders better.
Make sure to install and activate this plugin on your WordPress dashboard.
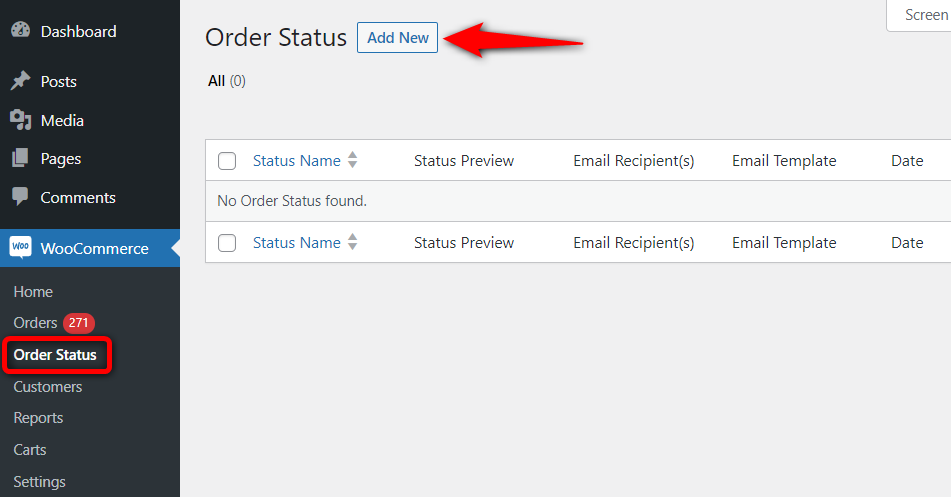
Once done, go to WooCommerce ⇨ Order Status and click on ‘Add New’.
Fill in the details related to your new custom order status:
- Order status name: Name of your custom WooCommerce order status
- Slug: Type in a unique slug for your order status
- Status icon: Add an icon of your custom order status
- Status view: Choose whether the status name or status icon will be displayed on the WooCommerce orders page
- Color: Set the color that gets applied to the text and icon of this order status
- Text background color: Set the background color of the order status text
- Paid status: Enable or disable whether the order on this status has been paid
- Download access: Turn on this option to allow download access when orders are on this status
- Add to actions on orders page: Turn on this option if you want to add this order status to the order actions page
- Add to bulk actions list: Enable or disable this option to add this order status to the bulk actions list
- Edit mode: Turn on this option to allow editing the WooCommerce order data for this status
- Email notification: Enable this option to get email notifications when the order status changes to this custom status
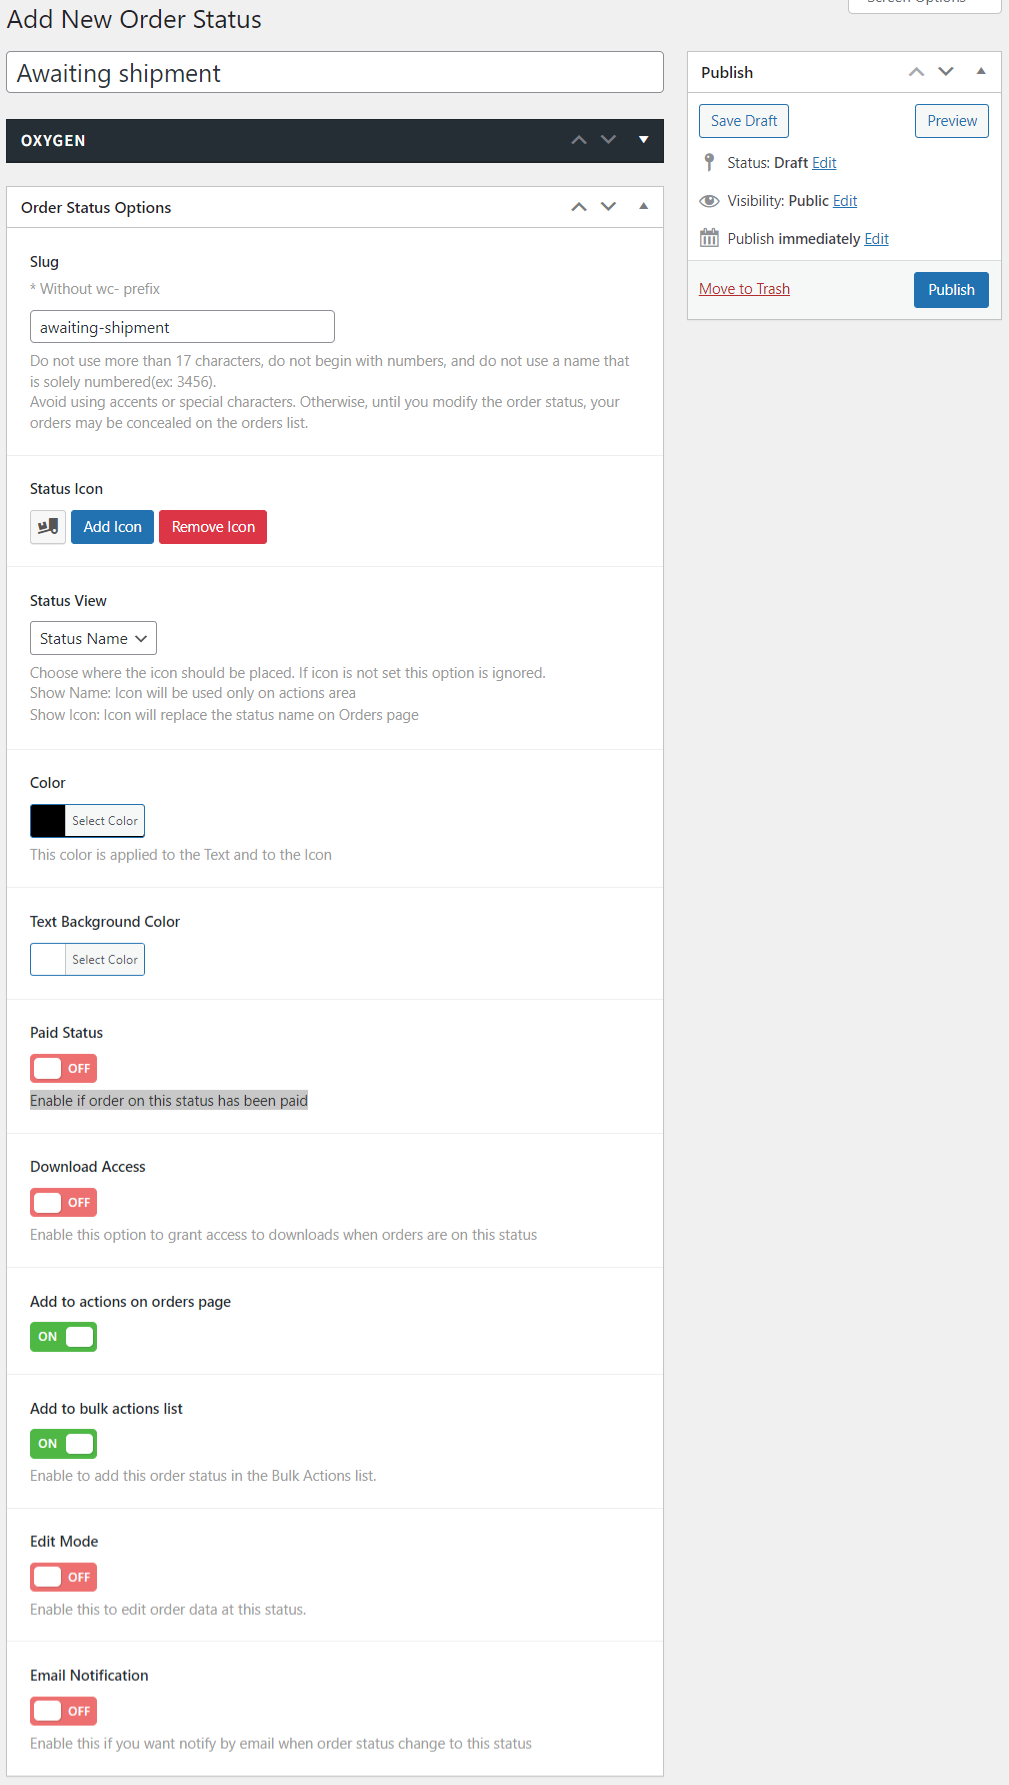
Once done, hit the ‘Publish’ button.
As you can see, the new custom order status has been successfully created in your WooCommerce store.
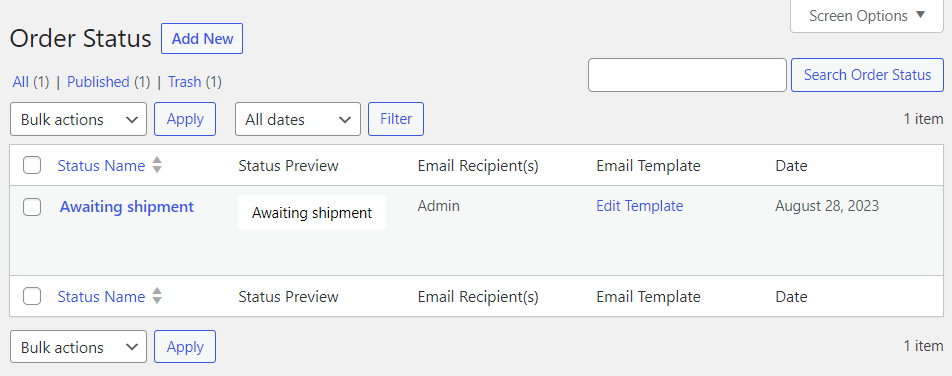
From this dashboard, you can edit the custom status, view or edit the email template, or even delete your custom order status.
You can even take bulk actions if you have set up multiple order statuses.
This plugin perfectly handles and helps you efficiently manage all your custom WooCommerce order statuses.
How Payment Methods Affect Order Status Progression in WooCommerce?
This is one of the most misunderstood concepts of WooCommerce order management.
Different payment methods cause orders to flow through statuses differently, and understanding this prevents confusion and optimizes your workflow.
Here are the order statuses for different payment methods used to make transactions in WooCommerce:
Credit cards / Debit cards / PayPal / Express checkout
Upon successful payment, the order status goes to ‘Processing’. The orders are automatically completed once they are processed and fulfilled.
If the payment fails, the status changes to ‘Pending’ and then to ‘Failed’ upon confirmation of the payment failure.
With real-time payment methods, order status updates happen automatically based on the payment gateway's response.
You can immediately begin fulfillment for orders in Processing status from these payment methods.
Check payments / Direct bank transfer
In the case of offline payments, such as check payments, direct bank transfers, and cash on deliveries, the order status will not auto-complete. But the stock of those products will reduce.
With manual payment methods, WooCommerce can't know when the payment actually arrives. The order sits in Pending Payment until you verify payment in your bank account or receive the check/cash, then manually move it to Processing.
Your order confirmation email must clearly explain the payment process and timeline. For example: "Please transfer funds to [account details]. Once we receive your payment (typically 2-3 business days), we'll ship your order".
Set up automated emails reminding customers to complete payment. I recommend reminders at 24 hours and 48 hours after order placement.
Products in Pending Payment orders are reserved but not removed from stock, so they still show as available to other customers. For limited-stock items, this can lead to overselling if multiple customers place pending orders.
Cash On Delivery (COD)
COD deserves special mention for its unique status flow.
- Order placed: the status goes to Processing (immediate - no Pending Payment stage)
- After delivery: Processing → Completed (manual, after your delivery person confirms cash collection)
COD orders go straight to 'Processing' because the payment method is inherently confirmed, as you'll collect payment upon delivery.
Therefore, it's essential to ship the order as soon as it enters Processing and have your delivery service report back when the cash is collected.
Then, manually mark the order as 'Completed' only after successful confirmation of the cash collection.
Also, track uncollected COD orders separately (these become a loss if customers refuse delivery).
How to Automatically Change the WooCommerce Order Status?
Manual status updates work for small stores, but once you're processing 40 or 50+ orders per day, automation becomes essential.
By default, WooCommerce automatically completes the paid orders for only virtual + downloadable products after a successful purchase.
However, for only virtual products, the order status goes to ‘Processing’, which shouldn’t be the case.
WooCommerce should also mark digital (virtual) products as ‘Completed’.
But you can alter this behavior in your store.
You can change the WooCommerce order status automatically (programmatically) to ensure it’s convenient for store owners and customers.
Configuration
To automatically change WooCommerce order status, you must install a WordPress plugin called Autocomplete WooCommerce Orders by QuadLayers.
Once you have the plugin, you can set the autocomplete configurations from the WooCommerce settings.
To do that, go to WooCommerce ⇨ Settings ⇨ Autocomplete Orders tab.
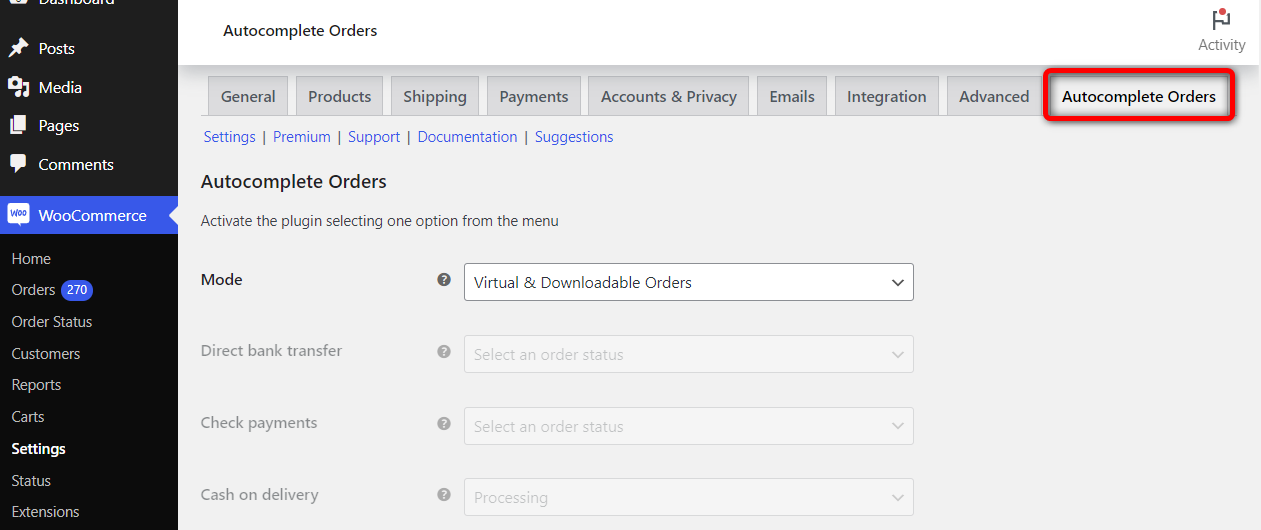
Click on the Mode options and select ‘Paid orders of virtual products only’.
You also get different options here to configure that let you autocomplete your WooCommerce orders.
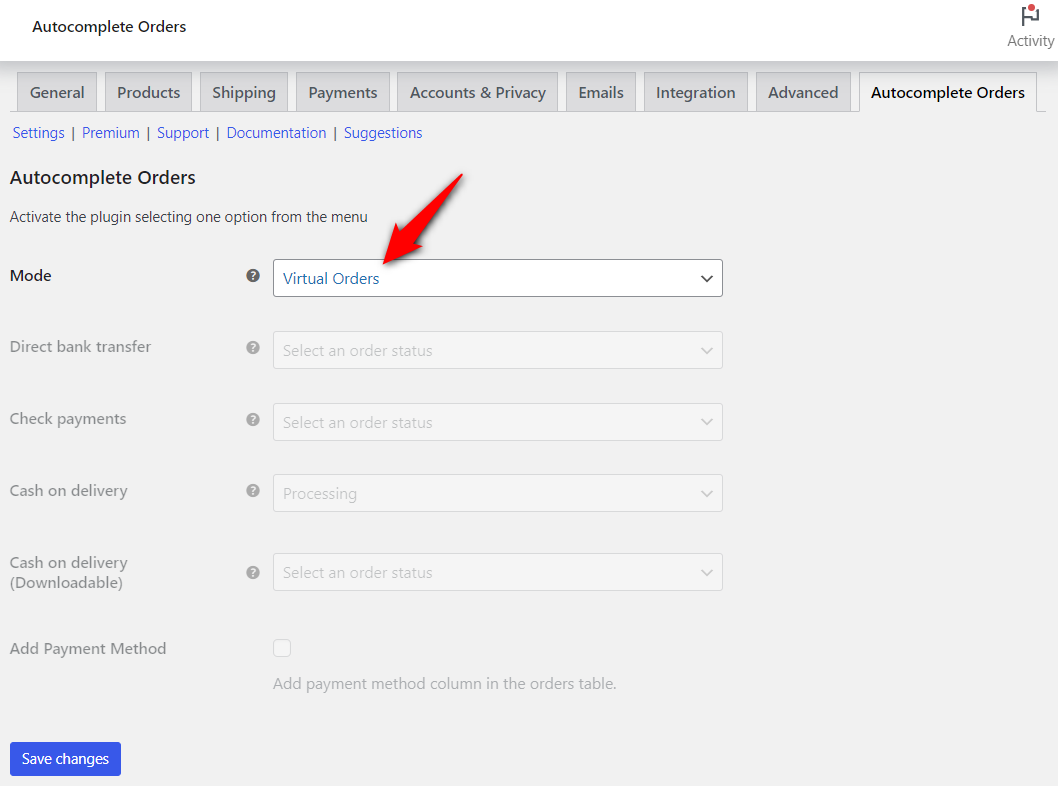
Once done, hit the ‘Save Changes’ button.
When a user successfully places a virtual order, the order status will automatically be moved to ‘Completed’.
Please note that you can configure autocomplete orders for all orders as well.
Testing
Now, if you try a test purchase of your virtual product in your store, go to the product page, then to the checkout order page, and complete the test purchase.
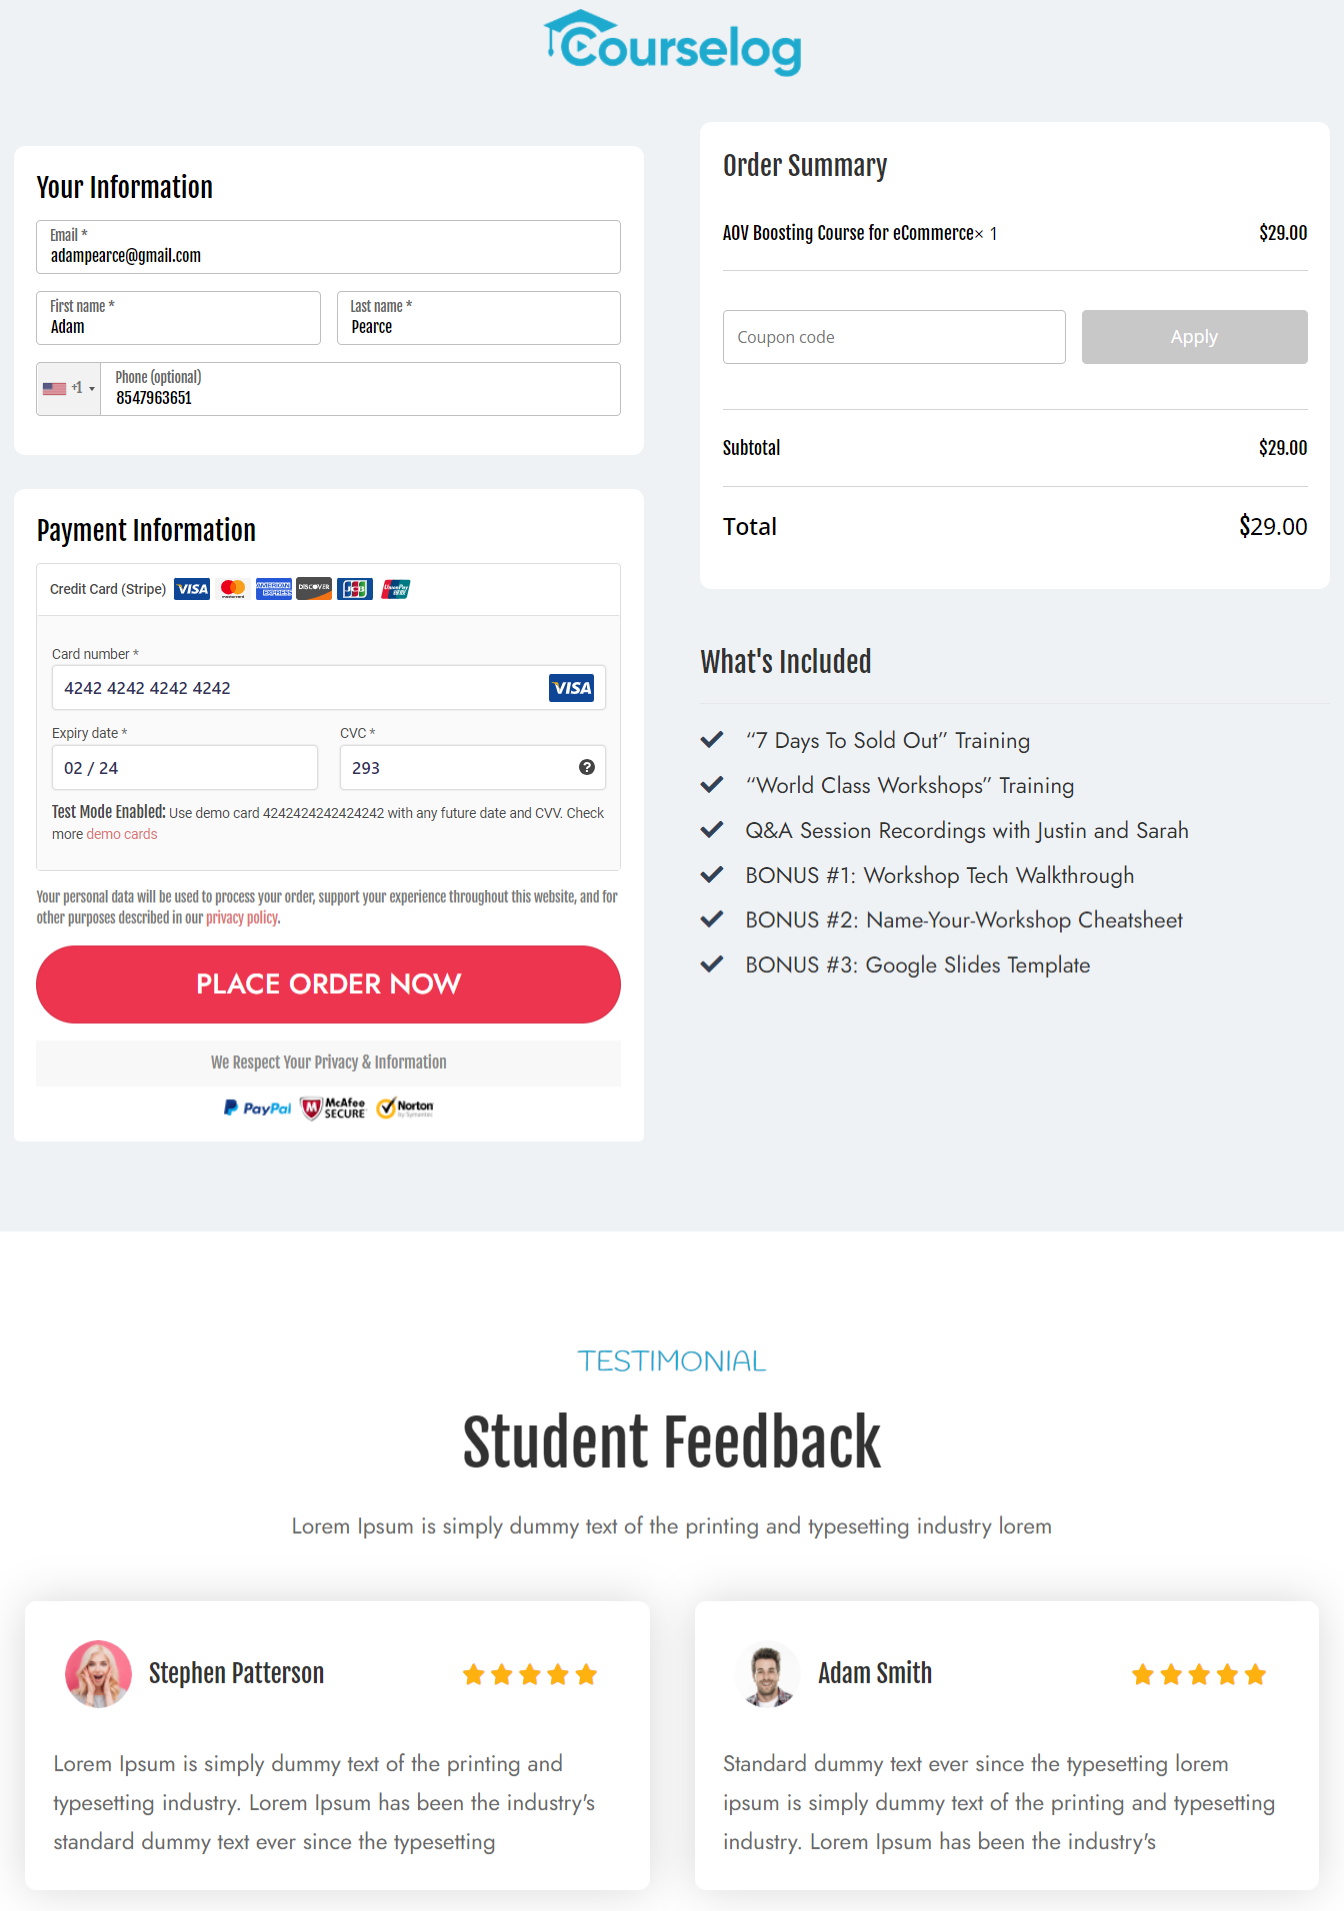
As you get directed to the WooCommerce thank you page, signifying our purchase is complete.
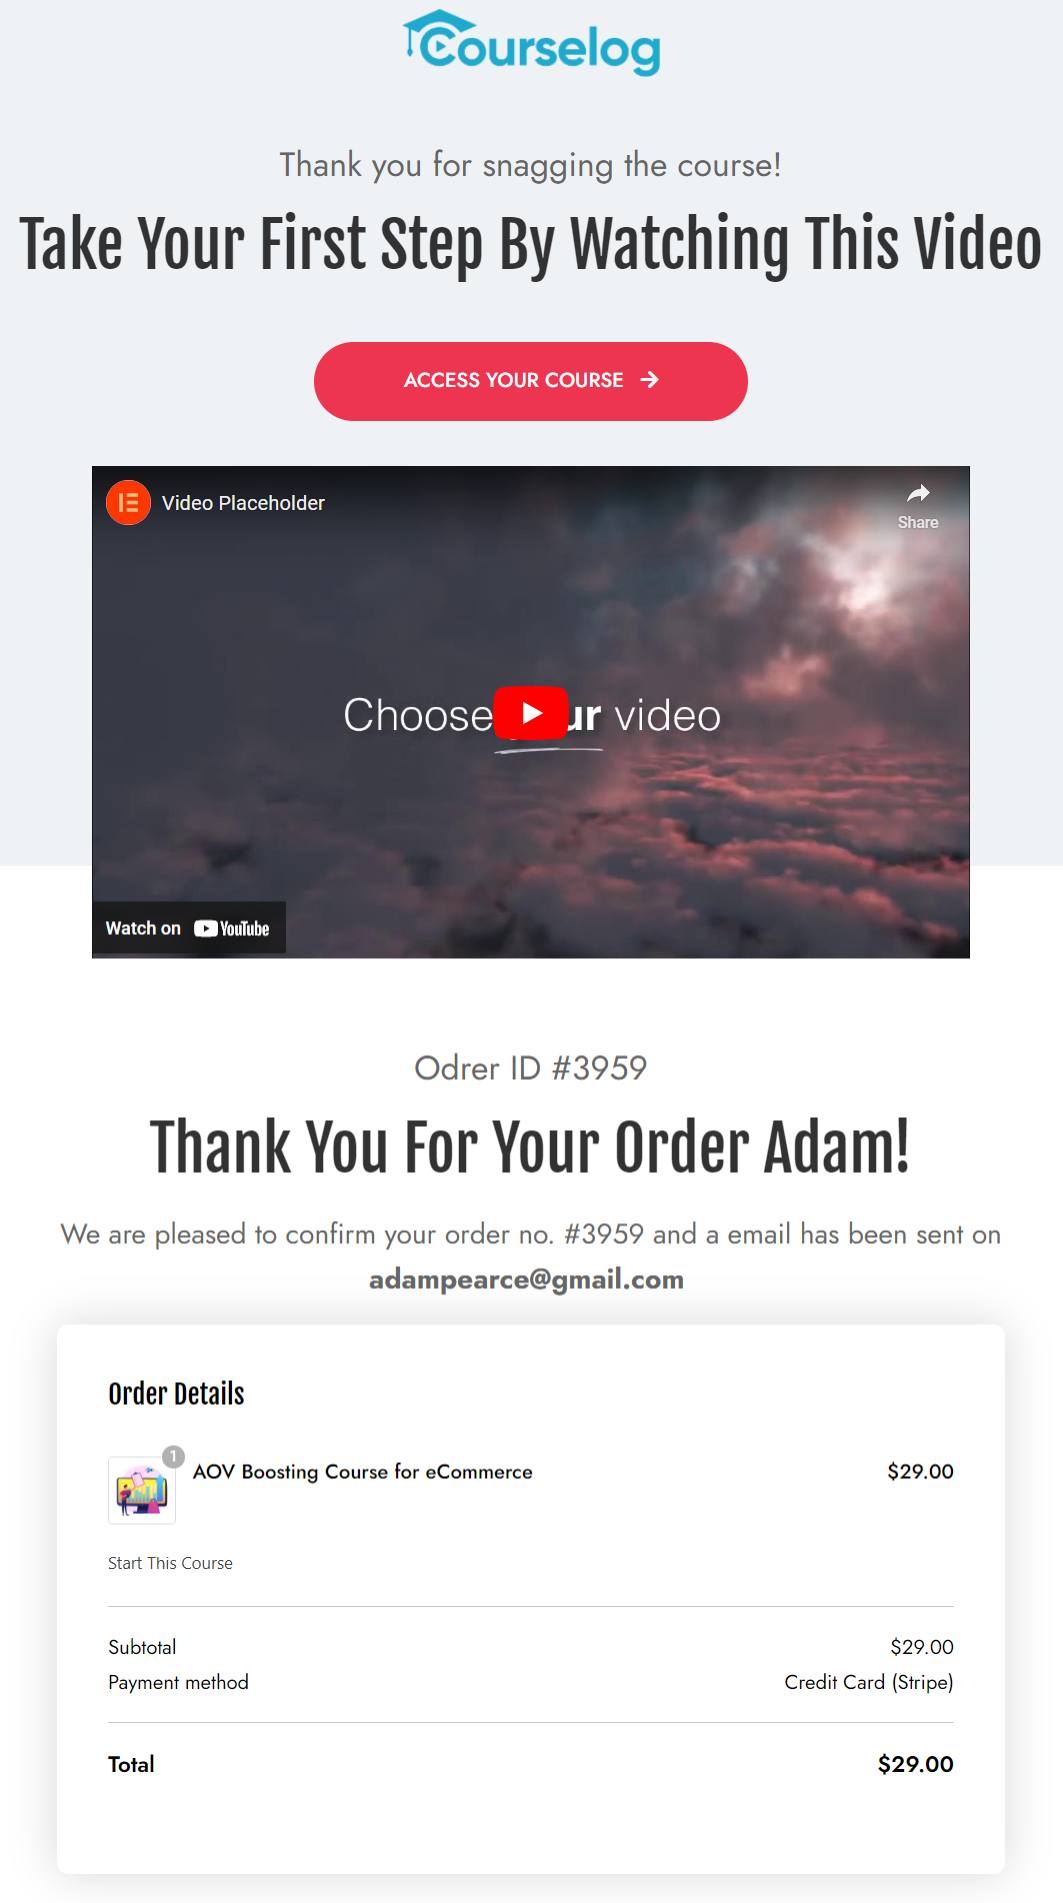
Now, if you go to WooCommerce orders, you’ll be able to see the order status - Completed.
That means this plugin works!
Alternatively, you can use other WordPress plugins to auto-complete orders as well. Here are some recommendations:
These WooCommerce order status manager plugins help you streamline order fulfillment in your business.
How to Set Up Automated WooCommerce Order Status Email Notifications?
Order status email notifications are crucial in the WooCommerce order management system, serving as an essential communication channel between merchants and customers.
Although WooCommerce uses default emails for some order statuses, you cannot customize them based on your brand.
The best way to customize your emails is with FunnelKit Automations, the most powerful marketing broadcast and automation CRM for WooCommerce ever made.
You can set up automated sequences, send email broadcasts or SMS texts, track orders and conversions for each campaign, and more.
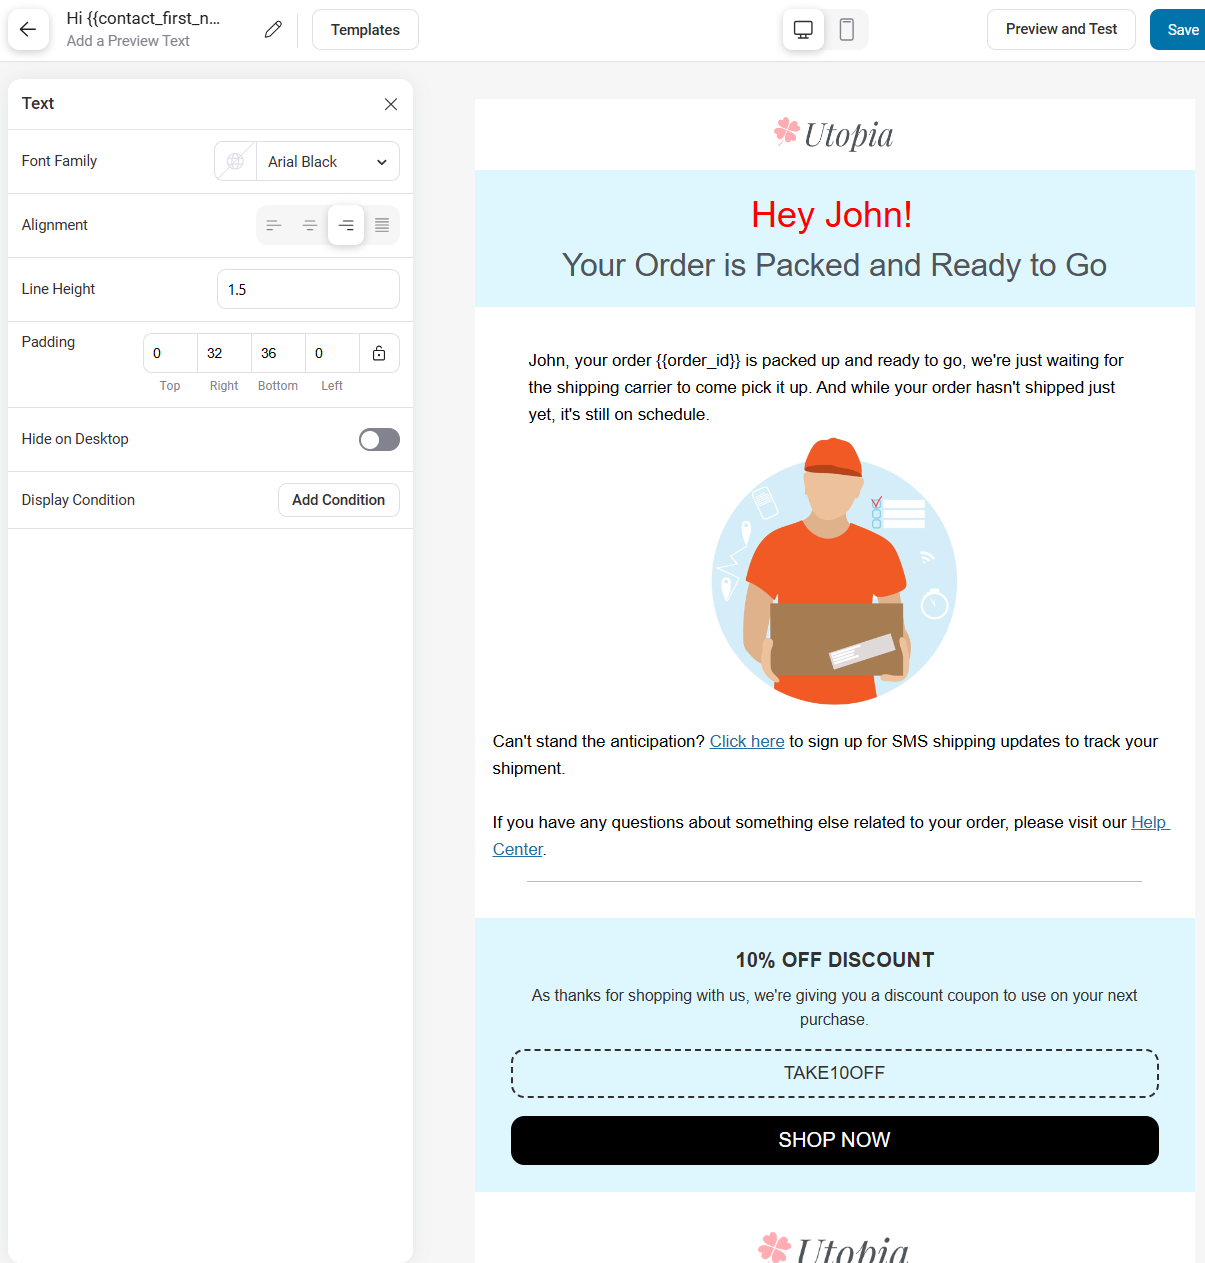
Suppose you have to send an email about the order being packed and awaiting shipment.
All you have to do is go to create a new automation in FunnelKit Automations. Select the ‘Order Status Changed’ event and configure them:
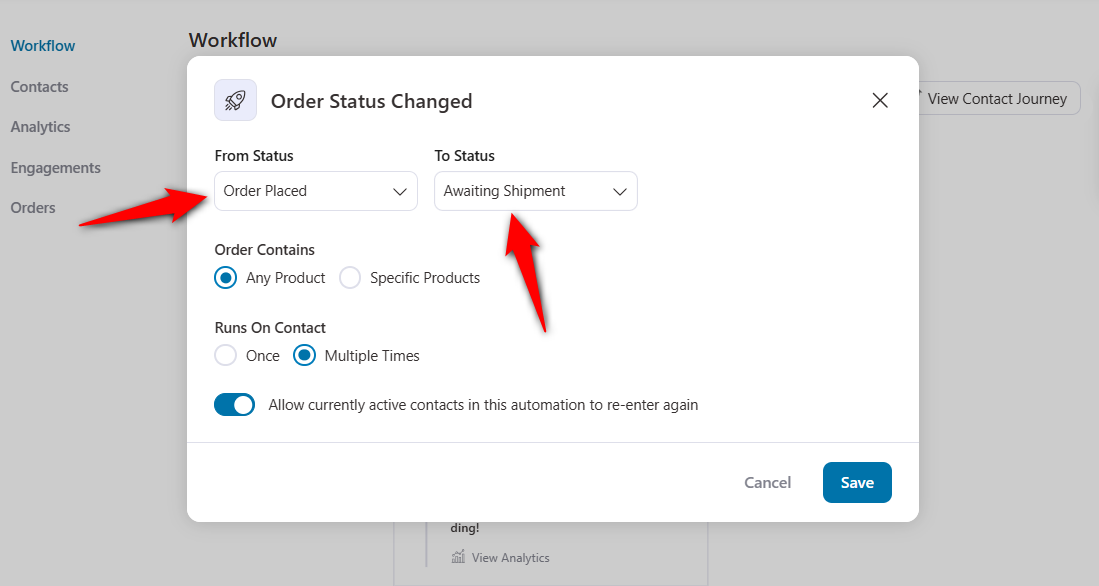
Now select the ‘Send Email’ action below the event.
One of the coolest things about FunnelKit Automations is that you get access to 20+ pre-designed email templates optimized for all devices.
You can import these templates and customize your emails the way you want.
👉 Read our detailed post on sending WooCommerce order notification emails here.
Not only that, FunnelKit Automations integrates with various plugins such as shipping plugins, subscription plugins, CRMs, and more.
This way, you’ll be able to send transactional and marketing emails, such as shipment tracking emails, cart abandonment emails, subscription emails, customer winback emails, and more.
5 Best Practices to Follow for WooCommerce Order Statuses in Improving the Customer Experience
Improving the customer experience in the order status process is crucial for WooCommerce stores.
Here are some effective best practices:
1. Clear and timely communication
Update order statuses promptly and ensure that every status change triggers a clear, informative notification to the customer.
This way, you keep them in the loop and reduce anxiety about their purchase.
FunnelKit Automations offers the convenience of sending automated order notification emails for each order status change.
2. Use descriptive order status labels
Take on status labels that are easy for customers to understand.
Instead of technical terms, use clear order status descriptions such as “Order Received”, “Preparing for Shipment”, “Out for Delivery”, etc.
These user-friendly labels help customers quickly understand the whereabouts of their orders without having to decipher complex terminology.
3. Offer tracking information
Integrate your WooCommerce store with shipping carriers to automatically update shipment orders with tracking numbers.
FunnelKit Automations integrates with various shipment-tracking plugins, including WooCommerce Shipment Tracking, WC Jetpack Shipment, Advanced Shipment Tracking for WooCommerce, and more.
Once a package is shipped and a tracking number is generated, update the order status to include the tracking number or email customers about it.
Consider embedding tracking information directly into your site so customers can track their packages without leaving your store.
4. Personalize status updates
Use merge tags in your WooCommerce email templates to automatically include the customer’s name, order number, and specific item details in your email notifications.
FunnelKit Automations provides dynamic merge tags that let you personalize your emails with relevant information.
The personal touch makes customers feel valued and provides relevant information without them having to look it up.
5. Optimize for mobile
With over 1.7 billion people using their mobile phones to open and read their emails, that’s why it’s crucial that your order status emails are mobile-responsive.
Use a single-column layout, large, readable fonts, and buttons that are easy to tap on small screens.
Ensure that your order tracking page is fully functional and easy to navigate on mobile devices.
Troubleshooting Common Order Status Issues in WooCommerce
Despite best practices, issues happen. Here are the most common problems I've encountered and their solutions.
Issue 1: Custom status not appearing in dropdown
You've created a custom status, but it doesn't show in the order status dropdown.
Some common causes include the order status slug doesn't start with the wc- prefix. Plugin conflict is preventing registration, or you haven't cleared the cache after adding custom code.
Solutions:
- Verify your order status slug starts with wc- (e.g., wc-awaiting-shipment).
- Deactivate other plugins one by one to identify the conflict.
- Clear all caches, including browser, WordPress, server, and CDNs.
- Check that your custom code uses the wc_order_statuses filter, not just register_post_status.
Issue 2: Emails not sending on status change
Order status changes correctly, but customers don't receive notification emails.
Common causes are email notification is not enabled for that status. There is an email delivery issue in WordPress, or emails are going to spam. Additionally, your email template has reported a fatal error that's preventing the send.
Solutions:
- Verify that email notifications are enabled for your custom status.
- Install WP Mail SMTP and configure it with a reliable SMTP provider (SendGrid, Mailgun, Amazon SES).
- Check spam folders and run a mail-tester.com test to identify deliverability issues.
- Enable WordPress debug mode to catch email template errors: add define('WP_DEBUG', true); to wp-config.php temporarily.
Check the SMTP logs to verify whether emails are being sent from WordPress (if they're not appearing in the log, they're not being sent).
Issue 3: Order status getting stuck in pending payment status
Orders remain in the 'Pending Payment' status even after successful payment.
Common causes include your payment gateways not being properly integrated with WooCommerce. IPN/webhook not configured or not reaching your site. SSL certificate issues are blocking payment callbacks. Firewall/security plugin blocking payment gateway notifications
Solutions:
- Check payment gateway logs by navigating to WooCommerce → Status → Logs and selecting your payment gateway.
- Verify IPN/webhook URLs are configured in your payment processor's dashboard (PayPal, Stripe, etc.).
- Ensure your site has a valid SSL certificate and all admin URLs use HTTPS.
- Temporarily disable the security plugins to test if they're blocking any gateway callbacks.
Issue 4: Stock not updating with status changes
Order status changes, but inventory doesn't adjust correctly.
Possible causes include stock management being disabled at the product level or the order status configuration not being set to reduce stock. Also, it could be that multiple inventory management plugins are causing conflicts, or that orders are manually created without triggering a stock reduction.
Solutions:
- Verify WooCommerce > Settings > Products > Inventory and enable the "Enable stock management" setting.
- For custom statuses, ensure "Paid Status" is enabled (this tells WooCommerce to reduce stock).
- Audit all inventory-related plugins for conflicts.
- When manually creating orders, ensure you check "Reduce stock" in the order panel.
WooCommerce Order Status: Frequently Asked Questions (FAQs)
Our experts have answered some common user questions about WooCommerce order status in this section.
You can add custom order statuses in WooCommerce using a plugin or a custom code with the ‘register_custom_order_status’ action to your theme’s functions.php file. We have talked about it in this post in detail.
You can change the default order status in WooCommerce using a plugin or custom code with the ‘change_default_order_status’ filter. In addition, you can change the default status according to the payment method. For example, you can change the default status for cash on delivery or bank transfer payments.
You can get all the order statuses in WooCommerce by navigating to WooCommerce ⇨ Orders section. You’ll see all the orders placed in your WooCommerce store and their respective status there.
You can manually update order statuses in WooCommerce by navigating to WooCommerce ⇨ Orders. Click on an order you want to update, and it’ll open a WooCommerce order details page.
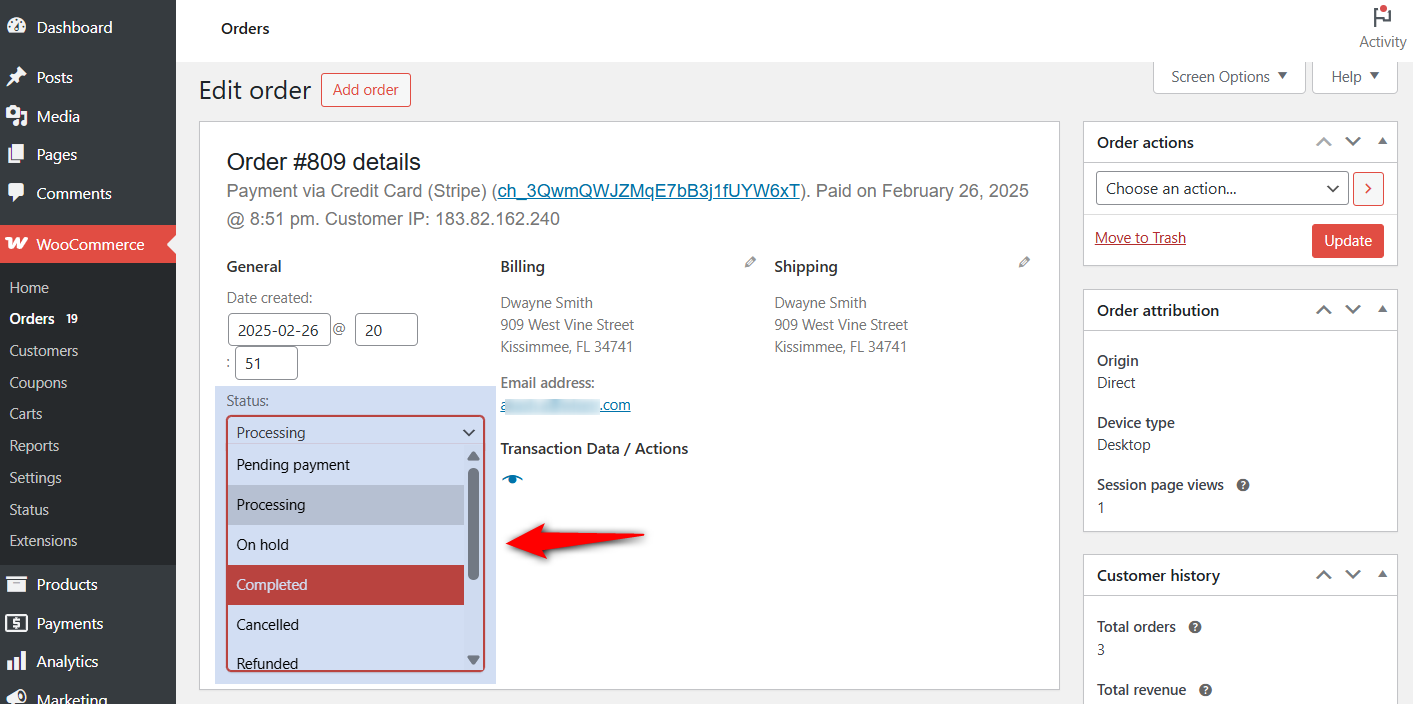
Click on the status and select the one you want from the dropdown. Once done, hit the ‘Update’ button to save the changes.
I recommend a maximum of 2-5 custom statuses. More than that creates complexity without proportional benefit. Ask yourself whether this status triggers a specific action or customer communication that differs from that of adjacent statuses. If not, you don't need it.
Optimize Your WooCommerce Order Status Strategy for Seamless Growth
Effective order management is crucial to any successful WooCommerce store.
You can streamline your order fulfillment, enhance customer communication, and optimize business operations by mastering default and custom order statuses in WooCommerce.
This not only improves efficiency but also builds trust with your customers, ultimately encouraging repeat sales.
For businesses looking to go beyond the basics, custom order statuses give the flexibility to align your workflow with unique operational needs.
Additionally, leveraging automation tools such as FunnelKit Automations will help save time and reduce manual effort.
WordPress order management plugins can take order management to the next level by automatically updating order statuses.
Add FunnelKit Automations to the mix to send automated email notifications for various order status changes.
This way, you can keep yourself and your customers informed, leading to a frictionless shopping experience.
So what are you waiting for? Start optimizing your WooCommerce order status management today, and watch your business grow with efficiency and confidence!
Editorial Team
March 23, 2026Does your WooCommerce store offer enough payment options? If not, you could be losing up to 13% of sales. [According to Baymard]. WooCommerce’s default payment options don’t always meet customer...

Editorial Team
October 14, 2025Are shoppers dropping off before completing their purchase? You’re not alone! According to a Baymard Institute study, nearly 18% of customers abandon their carts because the checkout process is too...
Editorial Team
June 25, 2025Discover everything you need to know about WooCommerce caching, how it works, which pages to exclude, and how to configure it for optimal performance. Caching helps speed up your website...


