
Are you looking to create a custom Divi WooCommerce checkout page for your online store?
The default WooCommerce checkout page looks plain and isn’t optimized enough to give users a smooth shopping experience. Though it provides essential features for customers to complete their purchases, it doesn’t offer the best experience.
You can change that by replacing the default checkout page with the Divi WooCommerce checkout.
Divi templates will give your checkout pages a clutter-free, chic look that allows your users to enjoy a frictionless shopping experience on your website.
The best part is that you can create your custom WooCommerce checkout template with Divi just by dragging and dropping different modules onto a page.
In this blog, we will show you a step-by-step process on how to create a custom Divi WooCommerce checkout page.
Let's begin to customize your Divi WooCommerce checkout pages with different templates and modules.
Table of Contents
- 1 Why Use Divi to Edit Your WooCommerce Checkout Page?
- 2 The Only Plugins You Need to Customize Your WooCommerce Checkout Page with Divi
- 3 The Spectacular WooCommerce Checkout Page Templates for Divi by FunnelKit
- 4 Meet the Divi WooCommerce Checkout Page Modules by FunnelKit
- 5 How to Create and Customize the WooCommerce Checkout Page in Divi?
- 6 5 Effective Tips to Optimize Your WooCommerce Checkout with Divi for Higher Sales & Conversions
- 7 Ready to Build Divi WooCommerce Checkout Pages?
Why Use Divi to Edit Your WooCommerce Checkout Page?
Divi is one of the most popular page builders for WordPress, being used on over 2 million websites worldwide.
Divi integrates smoothly with WooCommerce, making it easy to edit and customize your checkout page without conflicts or compatibility issues. It’s an excellent choice for customizing your WooCommerce checkout page, especially if you are not a coder.
What makes Divi a great choice for customizing your checkout page is its ease of use and flexibility.
- Drag-and-drop customization
- Completely custom design
- Built-in modules for WooCommerce
- Mobile-optimized and responsive
- Faster load times and performance optimization
With its visual builder, you can see what the page looks like while you are building it. Moreover, you can easily make your pages device-responsive.
Furthermore, the Divi page builder comes with a full range of design options, which is handy in ensuring your checkout page looks attractive.
The best part about Divi is it’s super fast, and therefore, it will give the checkout process a smooth start.
The Only Plugins You Need to Customize Your WooCommerce Checkout Page with Divi
Along with the Divi page builder, we will use FunnelKit Funnel Builder to create a custom WooCommerce checkout page.
The reason we are choosing FunnelKit Funnel Builder is that it comes with many prebuilt checkout templates that you can just import to create user-friendly global checkout for your WooCommerce store.
You can create one-page, multi-page, and Shopify-style checkouts, embedded order forms, and more, in addition to store checkouts.
In addition, you will also get access to the built-in checkout form field editor and a variety of checkout optimization options like Google Address Autocomplete.
This convenient feature automatically populates addresses, such as checkout billing and checkout shipping addresses, as users begin typing. Doing so effectively eliminates the possibility of incorrect address entry, thereby preventing misdeliveries and associated costs.
So, make sure you have installed and activated both the plugins to create a custom WooCommerce checkout page with Divi.
The Spectacular WooCommerce Checkout Page Templates for Divi by FunnelKit
Each WooCommerce user has a different requirement for their checkout page.
You may want to create a global checkout, i.e., the simple checkout page that replaces the default or native WooCommerce checkout. Or create a product-specific checkout page for their sales funnel.
You may want to create a sales page with an embedded checkout form for a dedicated funnel.
Whatever your use case may be, you now have a template created by our FunnelKit team for every goal at your disposal.
Let’s explore a few incredibly well-built templates:
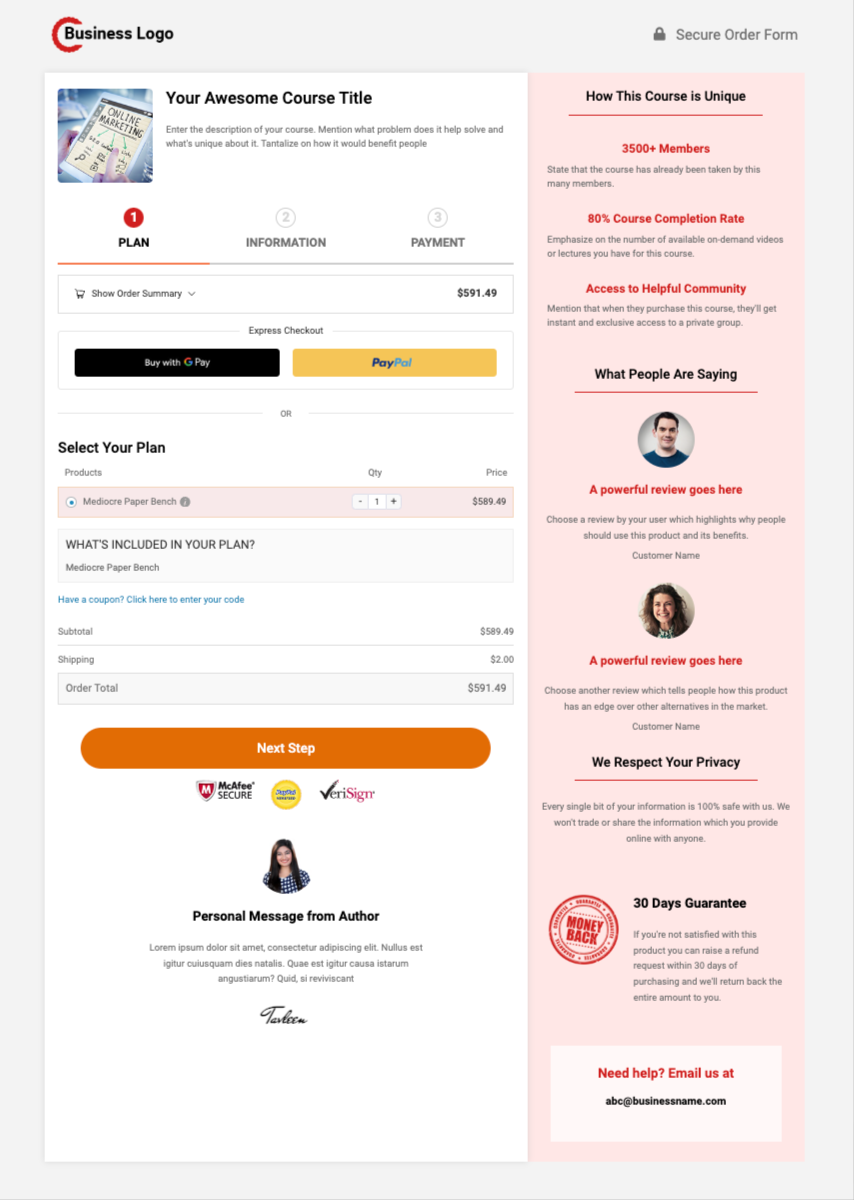
#1: The Minimalist Checkout Template Built-in Divi for WooCommerce
To help you replace the plain default checkout with something clean and optimized for sales, we built the Minimalist template on Divi for WooCommerce.
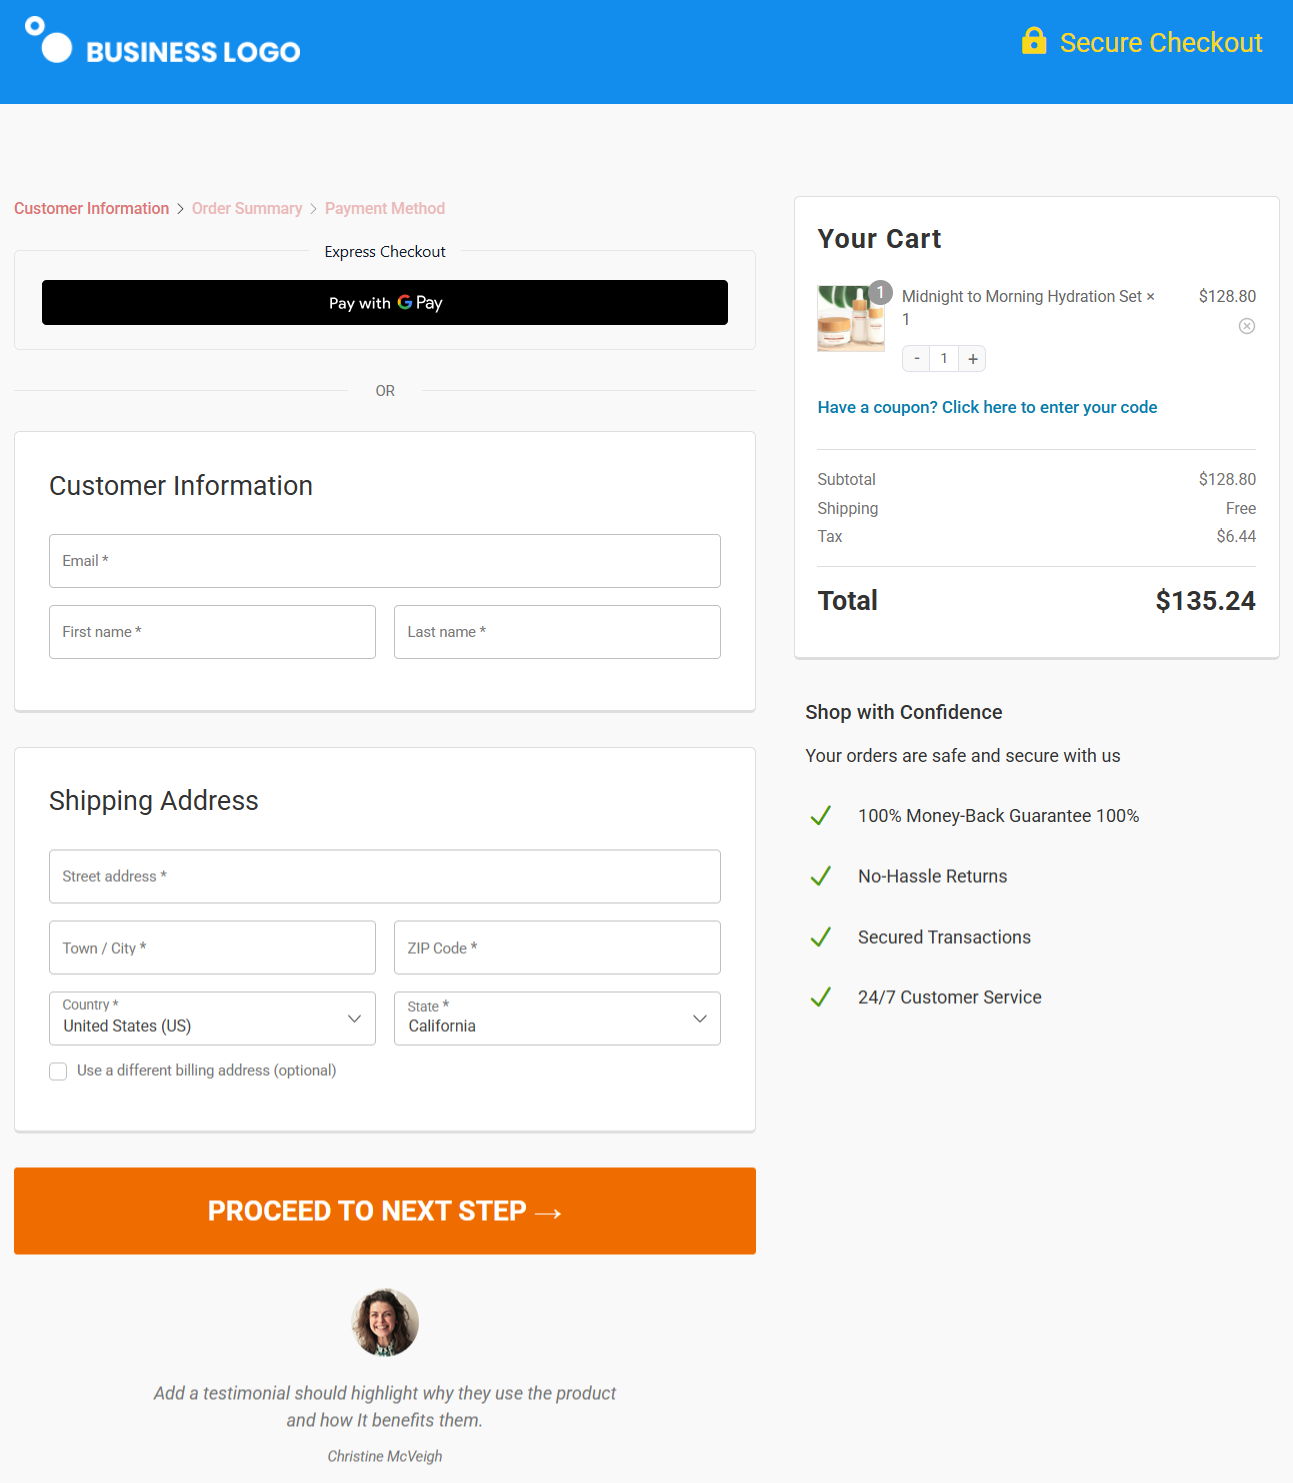
As you may notice, there are form fields that are grouped under different sections, and every section is distinguishable from the others.
This makes the page look clutter-free and very approachable to the viewer.
The mini cart on the right-hand side lets users see their order total, subtotal, and the list of cart items with images.
#2: The Allure Checkout Template
Want to sell specific products through dedicated checkouts? We've built the Divi Allure template for WooCommerce to serve that goal!

This template highlights the product’s unique value proposition using the image and brief explanation section at the top.
It's a clean and simple page with the product information, checkout form, and testimonials at the bottom being the only elements present.
It ensures that the focus remains on the product and is not diverted anywhere else.
This template is especially good if you’re selling a specific product through ads, and you want to lead them into a funnel with one-click upsells.
#3: The Persuader Checkout Layout
Most checkout pages on the Internet tend to look overwhelming and cluttered. On the other hand, the Divi Persuader checkout page layout for WooCommerce is minimalist because it leaves a lot of white space.
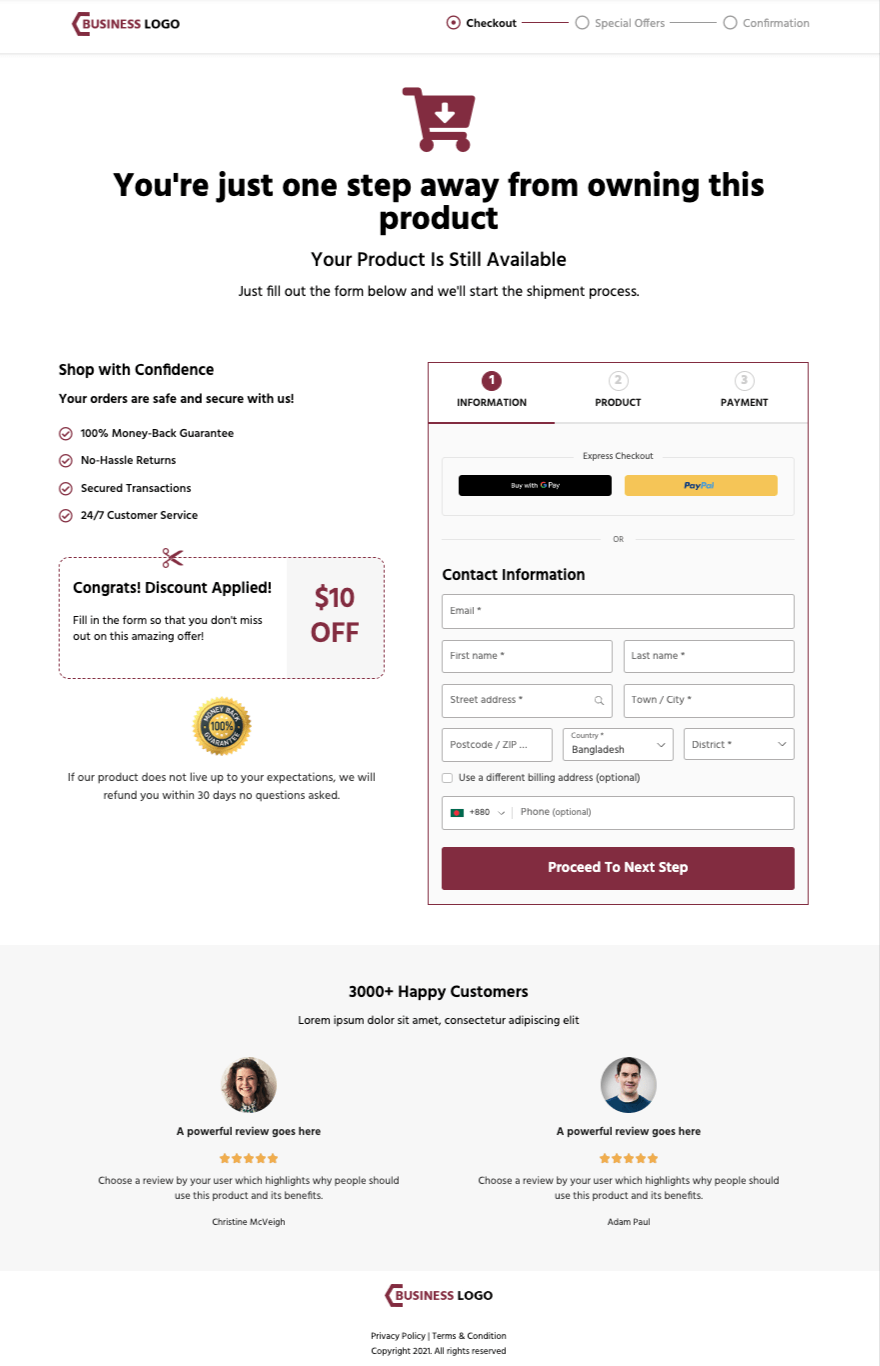
This checkout template shows why you should trust the business on the left, the product on the right, and the progress bar on the top.
It also clearly displays the customer testimonials.
So if you want your checkout page to have a good amount of breathing space but still be impactful, this one's for you!
#4: The Magnetic Checkout Template
Like a magnet, the Magnetic template pulls your attention towards the product and the benefits of the product listed. This template is great for Divi WooCommerce One Page Checkout.
The product's image with a small description is at the top of the checkout form.
A section next to the checkout form narrates why and how the chosen product is unique and special. Right below that it shows a message from the creator or seller; this will add a personal touch to the page and make it even more converting.
And like most of the FunnelKit templates, this one also has a section to offer order bumps in order to boost average order value.
Meet the Divi WooCommerce Checkout Page Modules by FunnelKit
Apart from giving you access to pre-built WooCommerce checkout templates, we’ve also given you the option to build your checkout pages from scratch.
You can do it using Divi modules made for FunnelKit Checkout.
Let's explore the WooCommerce modules for creating your Checkout page.
#1: The WooCommerce "Checkout Form" Divi Module
You can customize the checkout form using this module.

Everything from changing the way steps show up in breadcrumb or tabs format to the checkout form field widths through these settings.
Use the ‘Design’ section to beautify the said form and fields - from changing typography to the color of the margins and CTA buttons.
Under the Content bar, customize the fields on your WooCommerce Divi checkout page displayed to your customers.
Header: In this option, you can enable the header, choose the Type and provide the title.
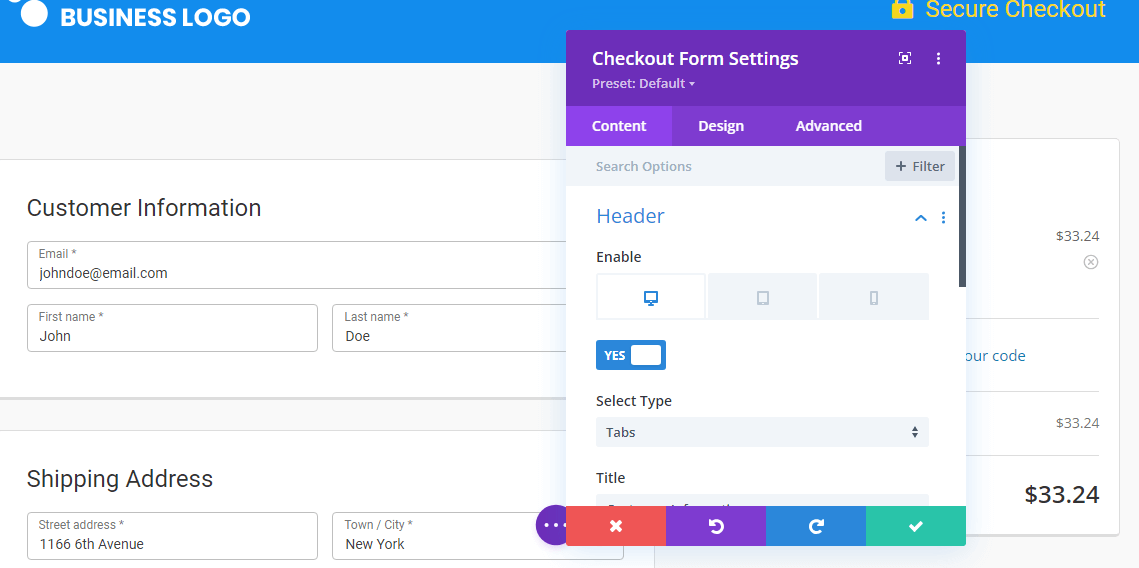
Collapsible Order Summary: Here, you can turn on the collapsible order summary for different devices. You can enable product images for this section. Also, provide the collapsed view text and expanded view text along with enabling the coupon section here.

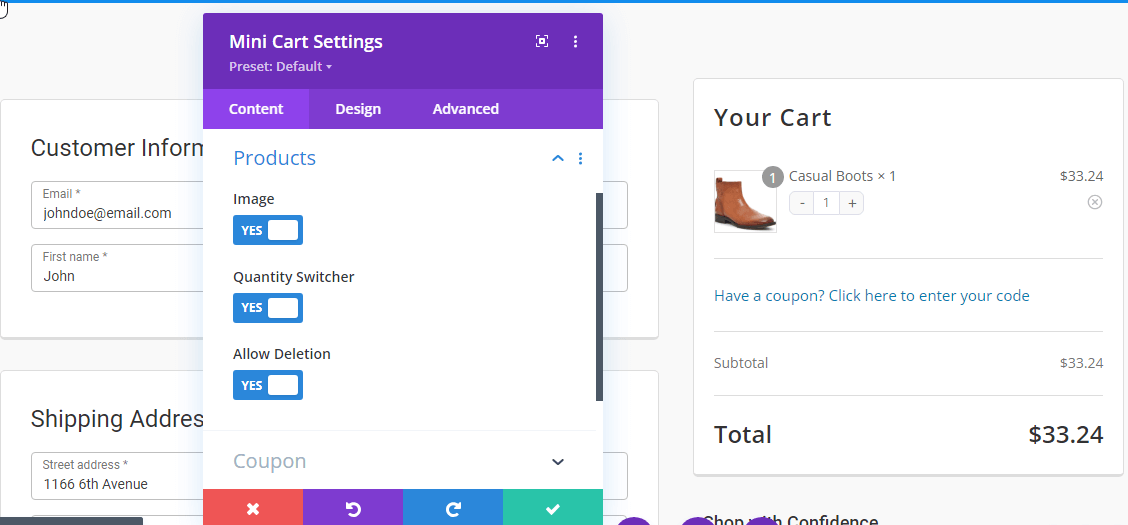
#2: The Mini Cart Divi Module
The mini cart lets your customers get a glimpse of the product they are about to pay for.
You can customize this module on your Divi WooCommerce checkout page the way you want.
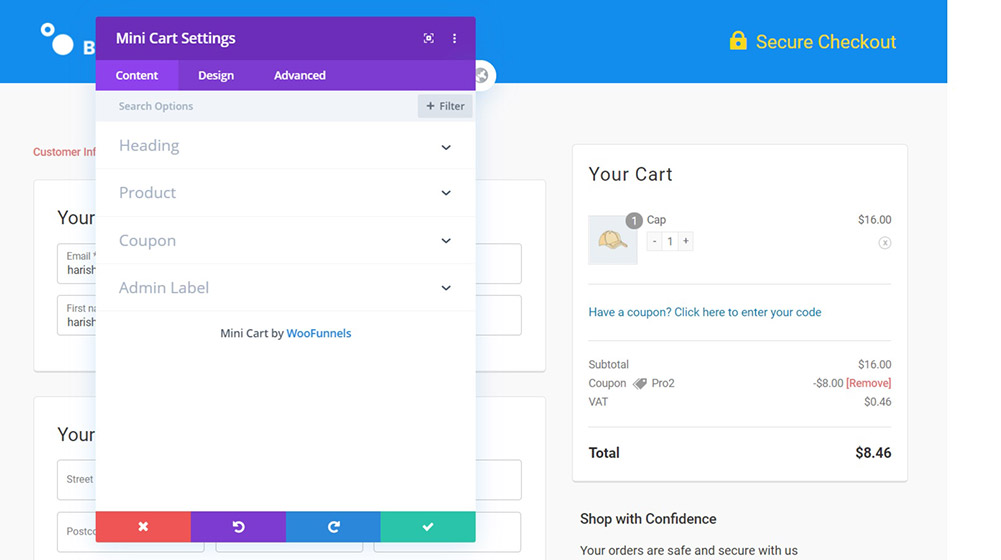
Change the way the cart is displayed on the page for the visitors to see. It is very similar to the Checkout form in a lot of ways.
Heading: You can edit the heading of your mini cart that you wish to be displayed on the page.
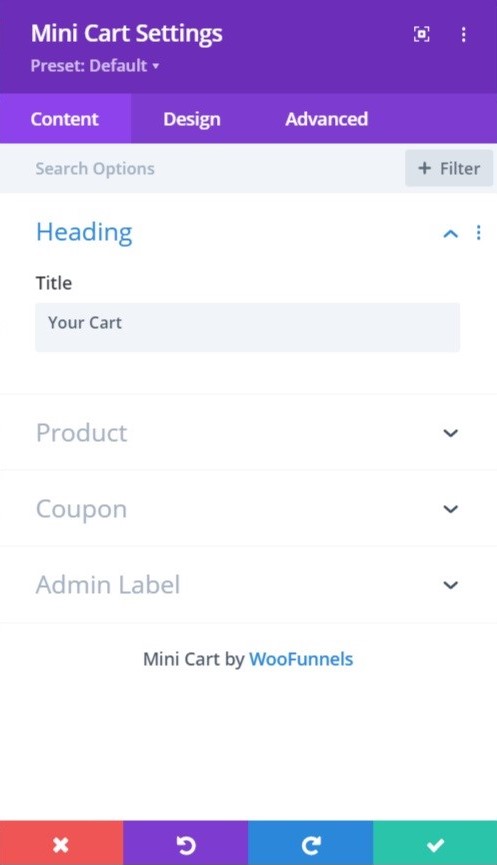
Product: Here you can make quite a few modifications to the carts section.
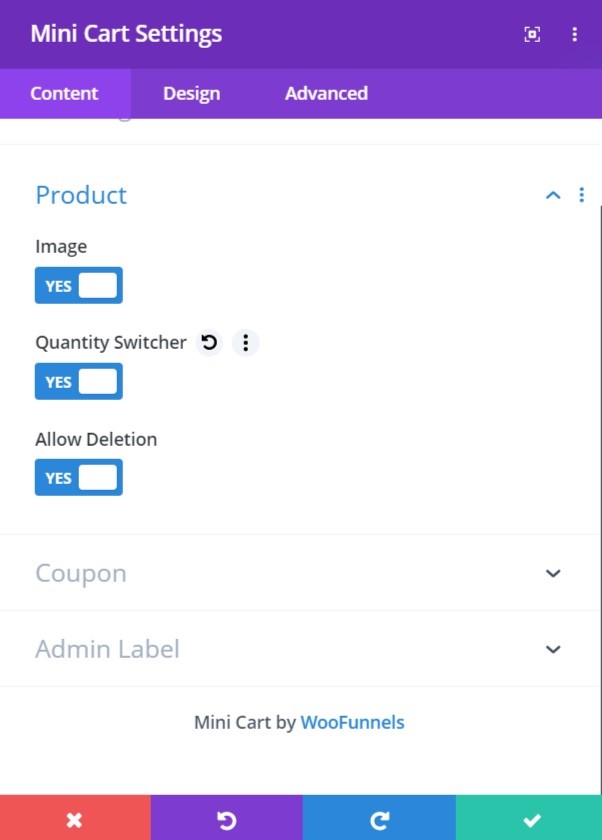
Enable product images: The product image reassures the customer of the product they’ve added to the cart. So we would suggest you have the images enabled for the mini cart.
Adjust the item(s) Quantity: The users adjust the product quantity on the checkout page itself to ensure that they don’t have to go back to their cart again and again, as that can lead to cart abandonment.
Delete an item: Having the delete option enabled in the mini cart gives full control to the user.
They can even undo an accidental deletion and won’t need to go back to the product page to add it back to the cart.
Such enablements can be accessed in the ‘Content’ tab of the settings menu.
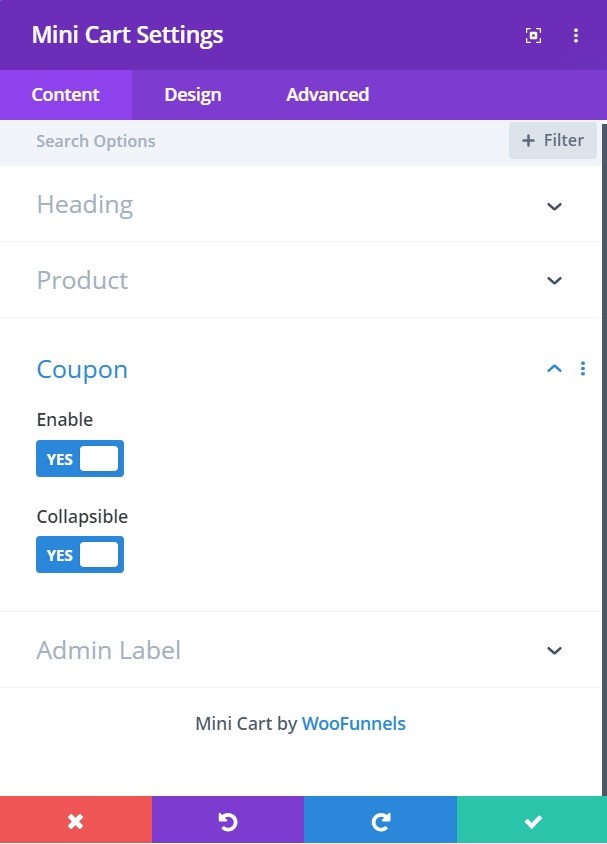
Coupon: You can also add the coupon section here and make it collapsible if you so desire.
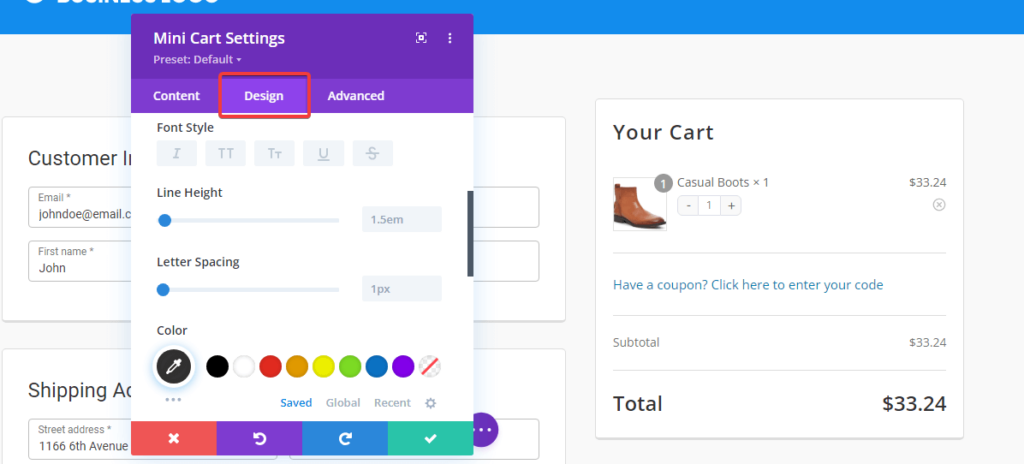
The ‘Design’ tab would give you all the same options as in the Checkout form to customize and style the cart to your liking.
Add padding, margins, border width, border radius, spacing, and everything else related to design here to create the Divi WooCommerce checkout page the way you want.
How to Create and Customize the WooCommerce Checkout Page in Divi?
Follow the step-by-step instructions here to create a Divi WooCommerce checkout page.
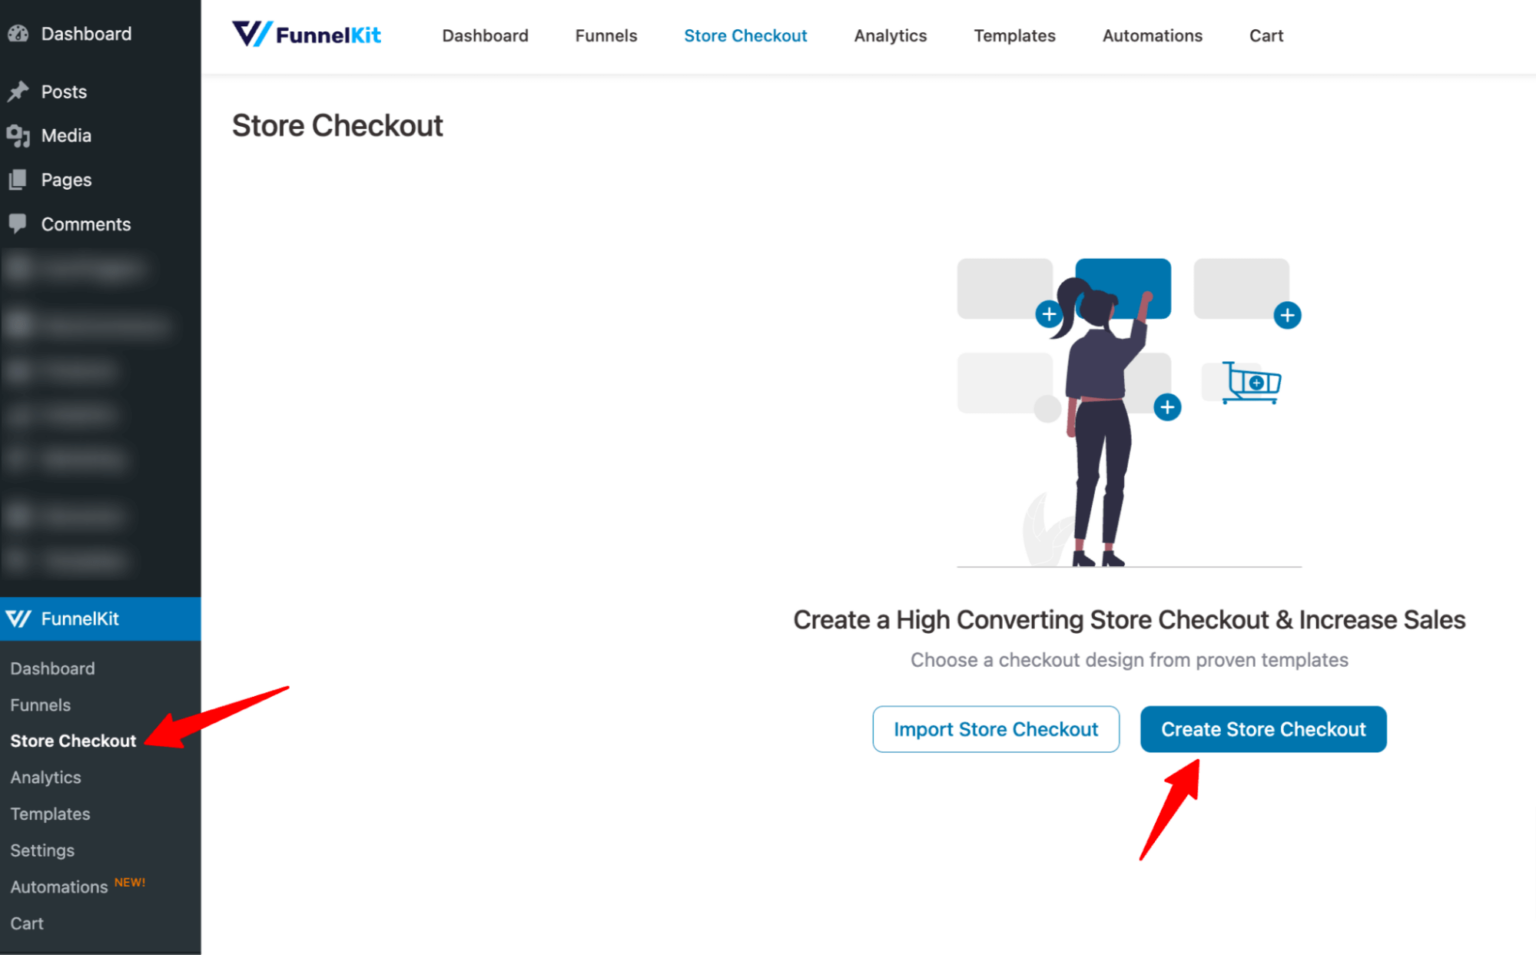
Step 1: Create a store checkout
Once you've installed and activated the Funnel Builder, go to “Store Checkout” and click on "Create Store Checkout".
Now choose “Divi” from the list of page builders. Hover over the template you want to use and click on “Preview”.
Then, choose whether you want a single-page checkout or a multi-page checkout.
After that, click on “Import This Funnel,” provide a name, and click on "Done" to import this funnel as your default checkout.

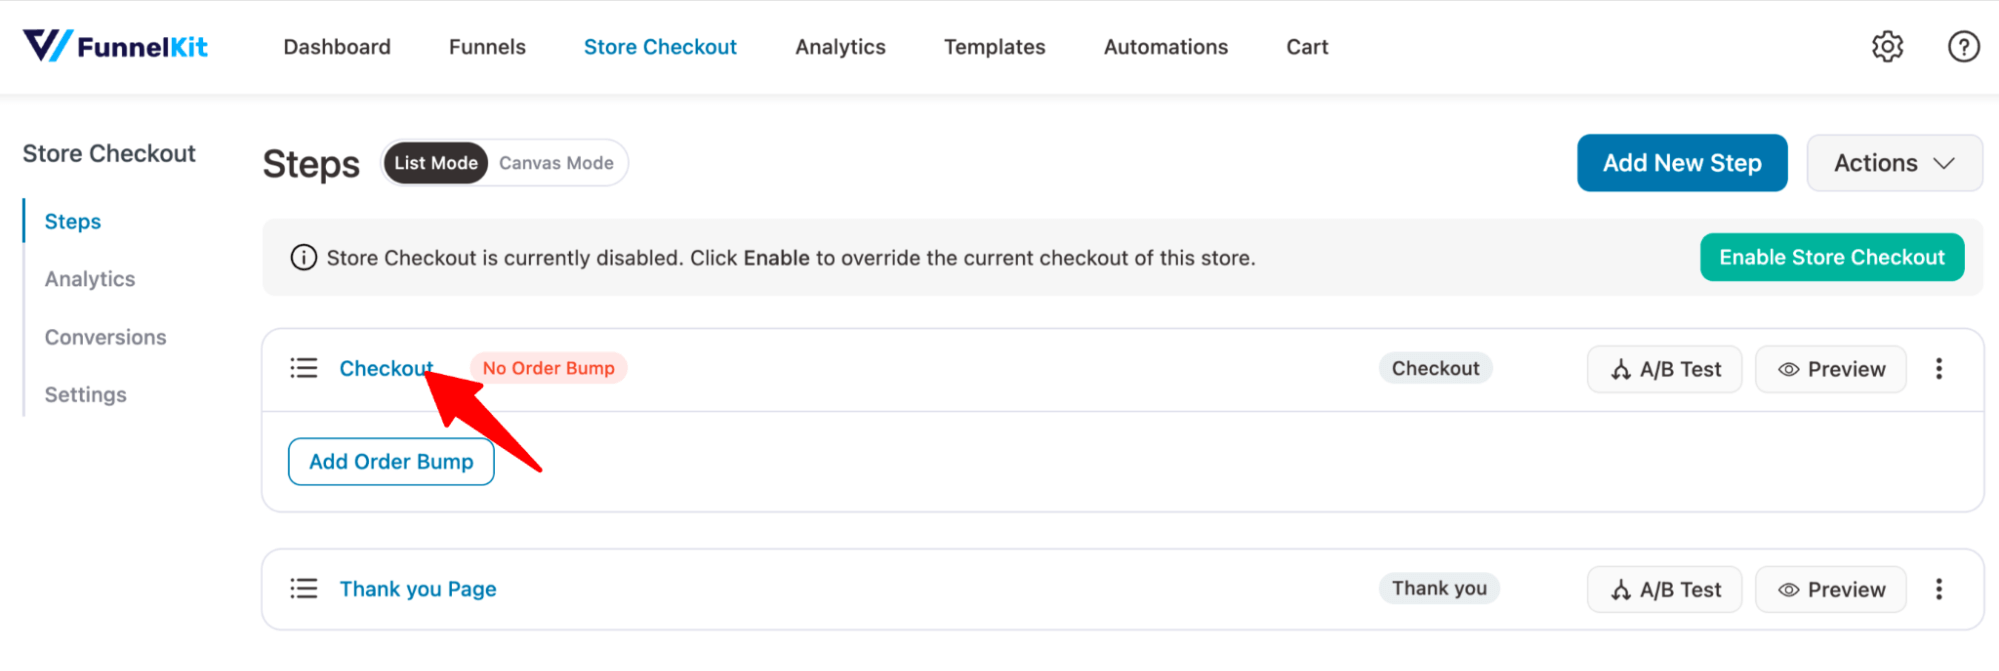
This will import a checkout funnel with two steps: checkout and thank you page.
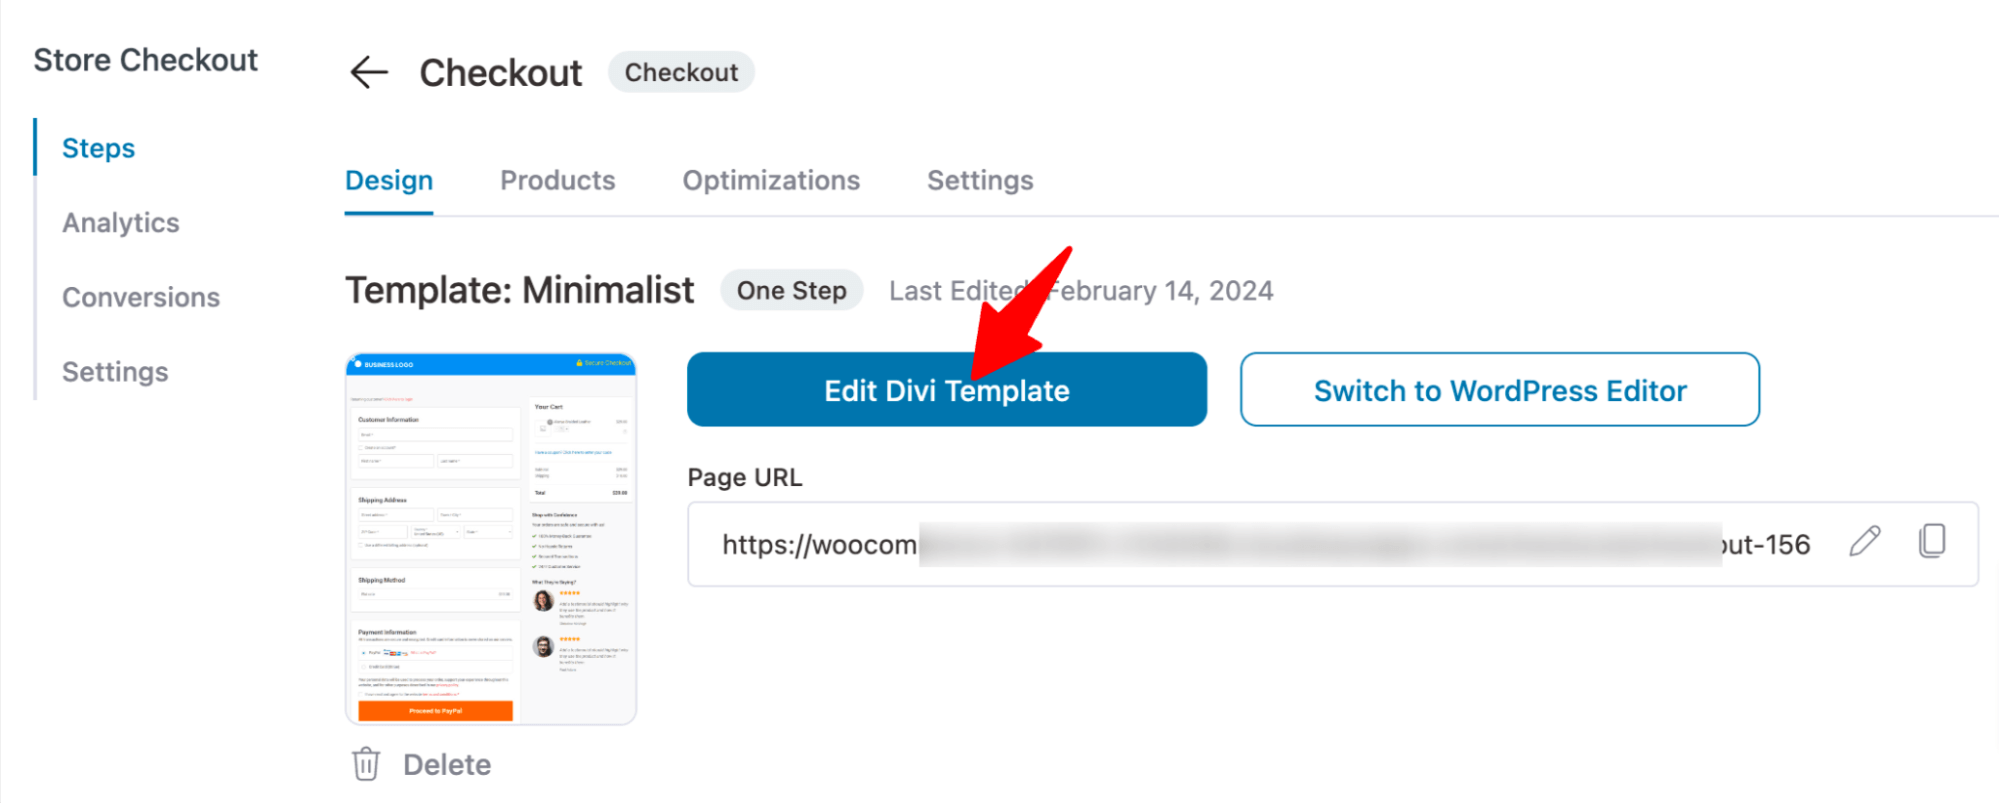
Step 2: Customize the Divi WooCommerce Checkout page
To customize the checkout page, click on the checkout step.
Now click on "Edit Divi Template" to customize the content and style of the checkout page.
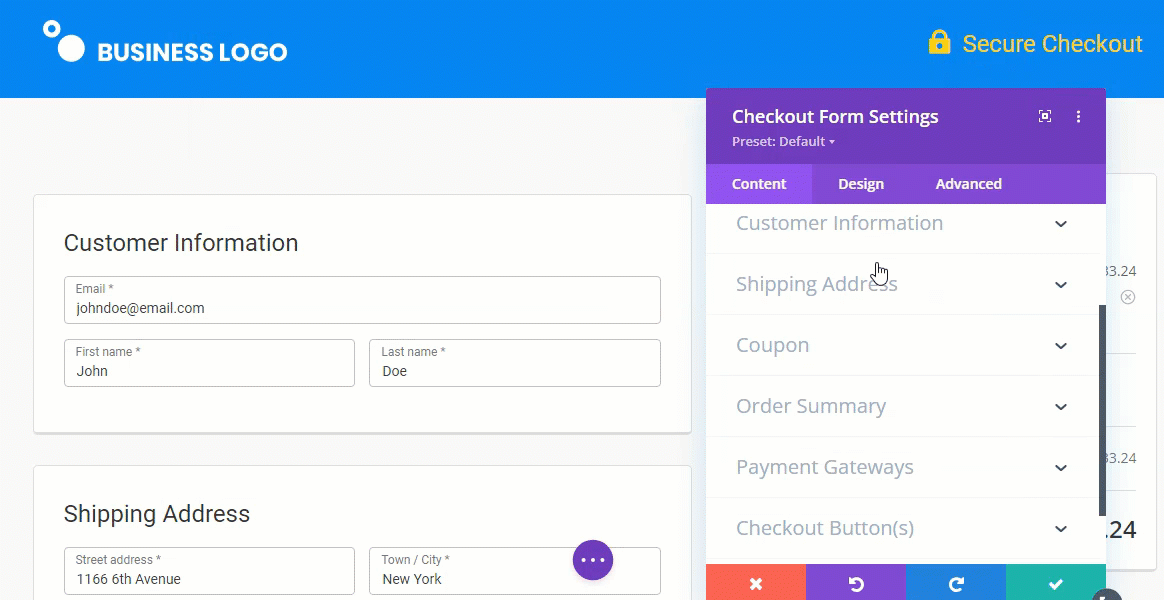
Now to edit any of the sections, click on the “Settings ⚙️” icon.
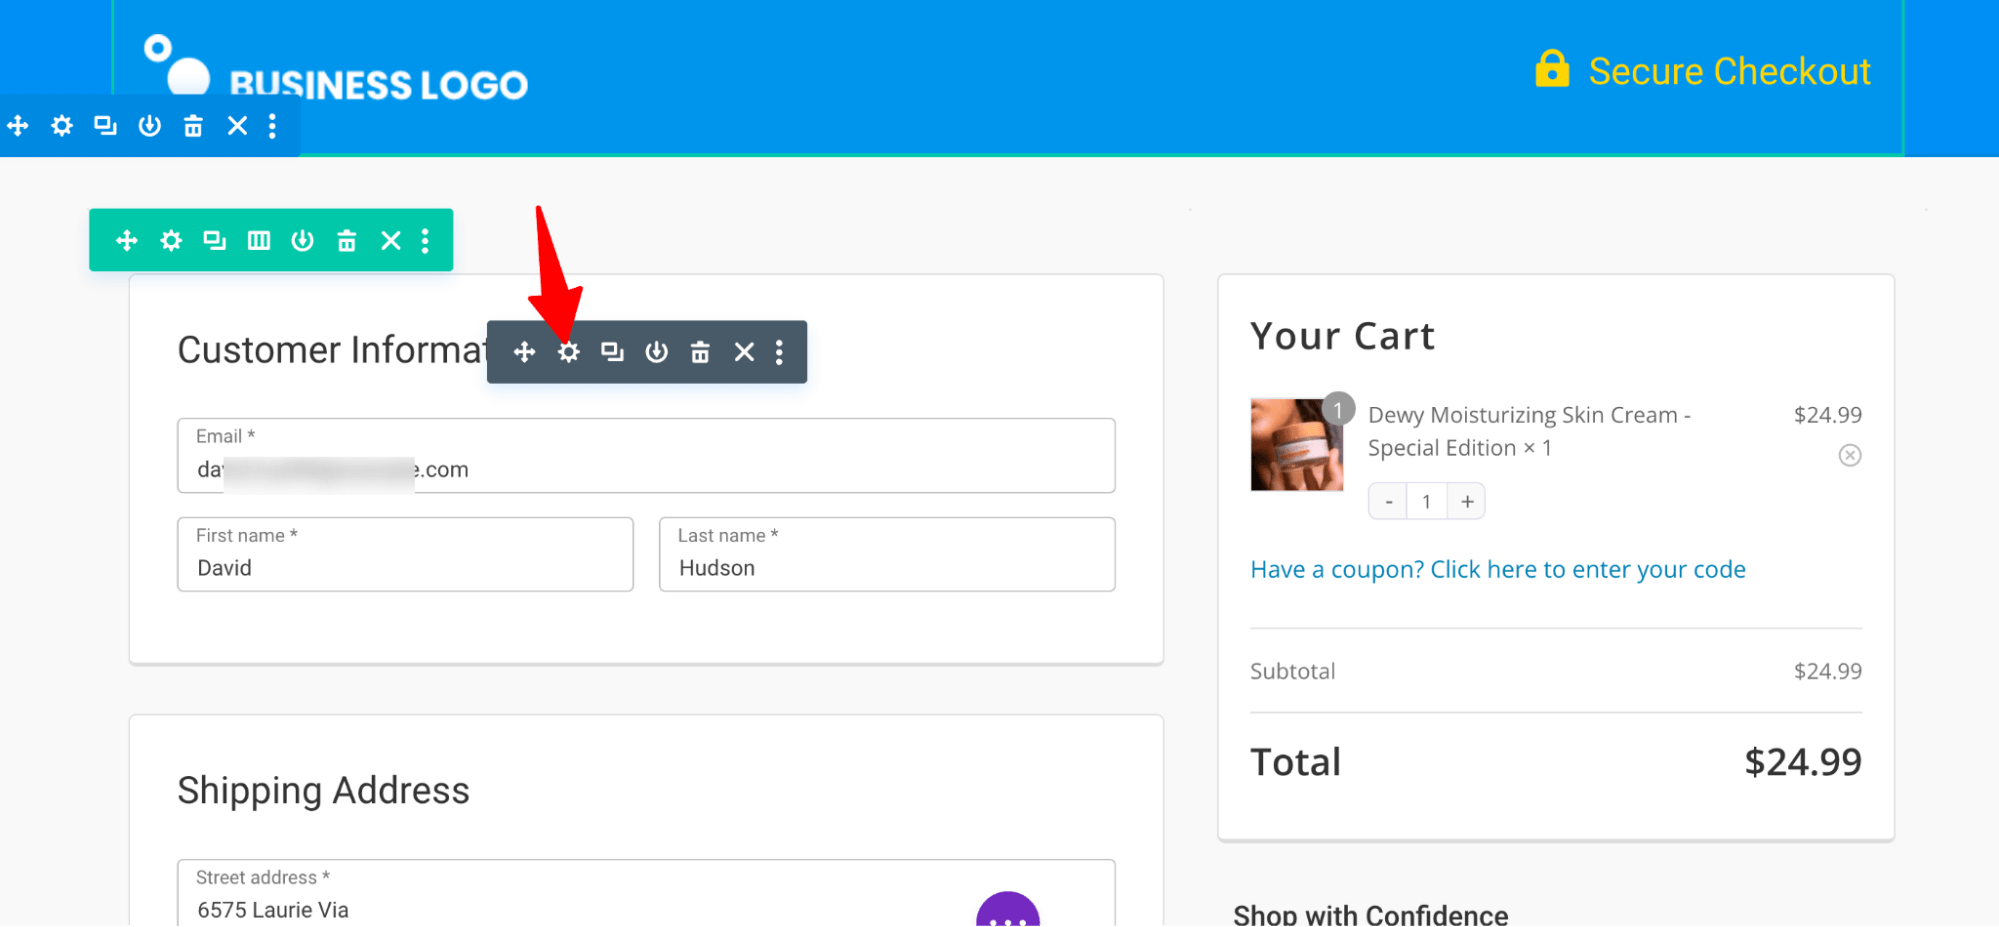
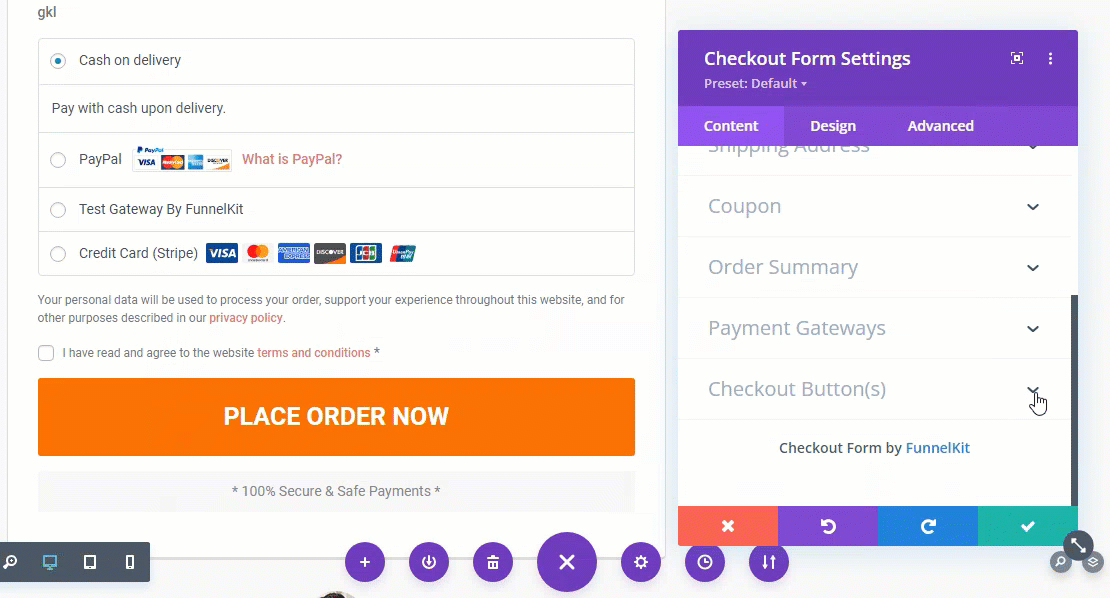
For the Checkout Form, you can edit each section, such as Header, Collapsible Order Summary, Customer Information, Shipping Address, Coupon, Order Summary, Payment Gateway, and Checkout Button.
The width is customizable. For each of the form fields, you can choose the width to be full, one-half, one-third, or two-thirds.
After that, for the Checkout Button, you can customize the button text, add an icon, add the order price, and also alter the text below the button.
For the mini cart settings, you can enable Product Image, Quantity Switcher, Allow Deletion, etc.
For each item, you can customize the style on the Design tab.
You’ll be able to customize Font size, Font Weight, Line height, Letter Spacing, Font color, etc. from the Design tab of the mini cart module.
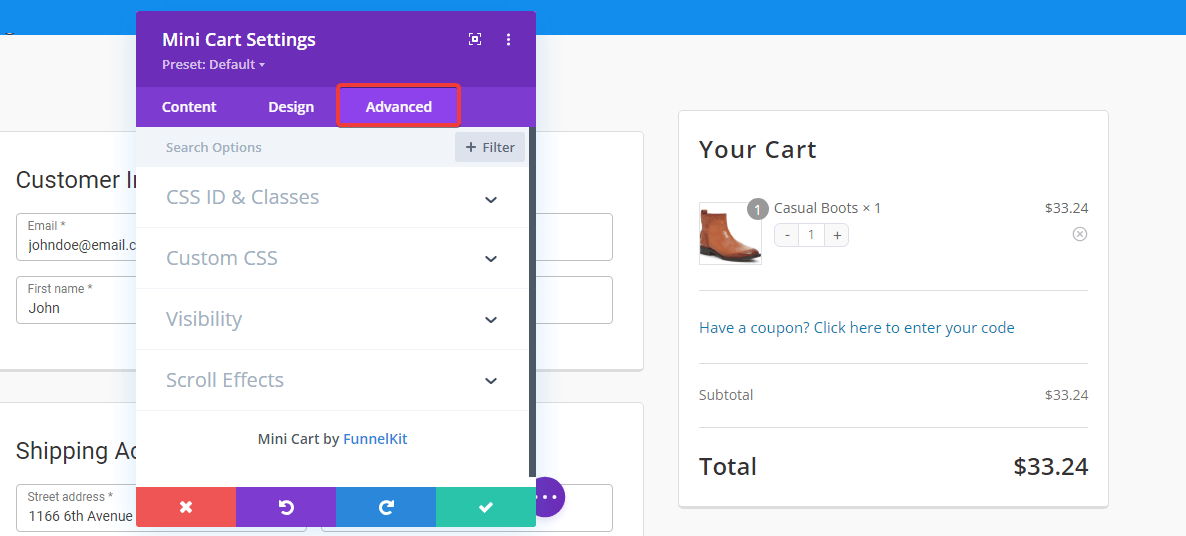
On the Advanced tab, you can specify custom CSS, visibility settings, scrolling effects, and more.
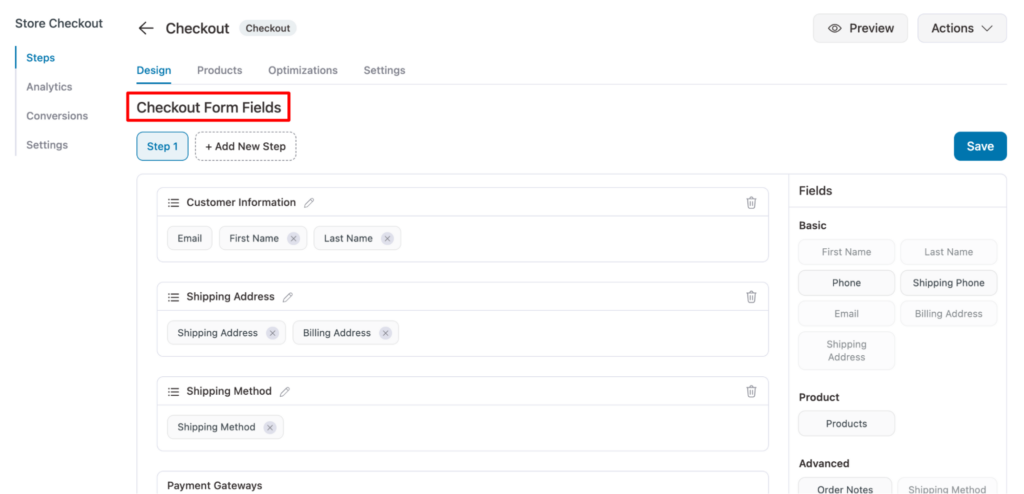
Step 3: Arrange the checkout form fields
You can design and structure the checkout form using Divi with the Funnel Builder.
Scroll down to the "Checkout Form Fields" section to add, delete, and even rearrange the checkout form fields.
To rearrange the fields and sections on the page, you only need to drag and drop them around the page.
For additional information, read our blog on WooCommerce Checkout Field Editor.
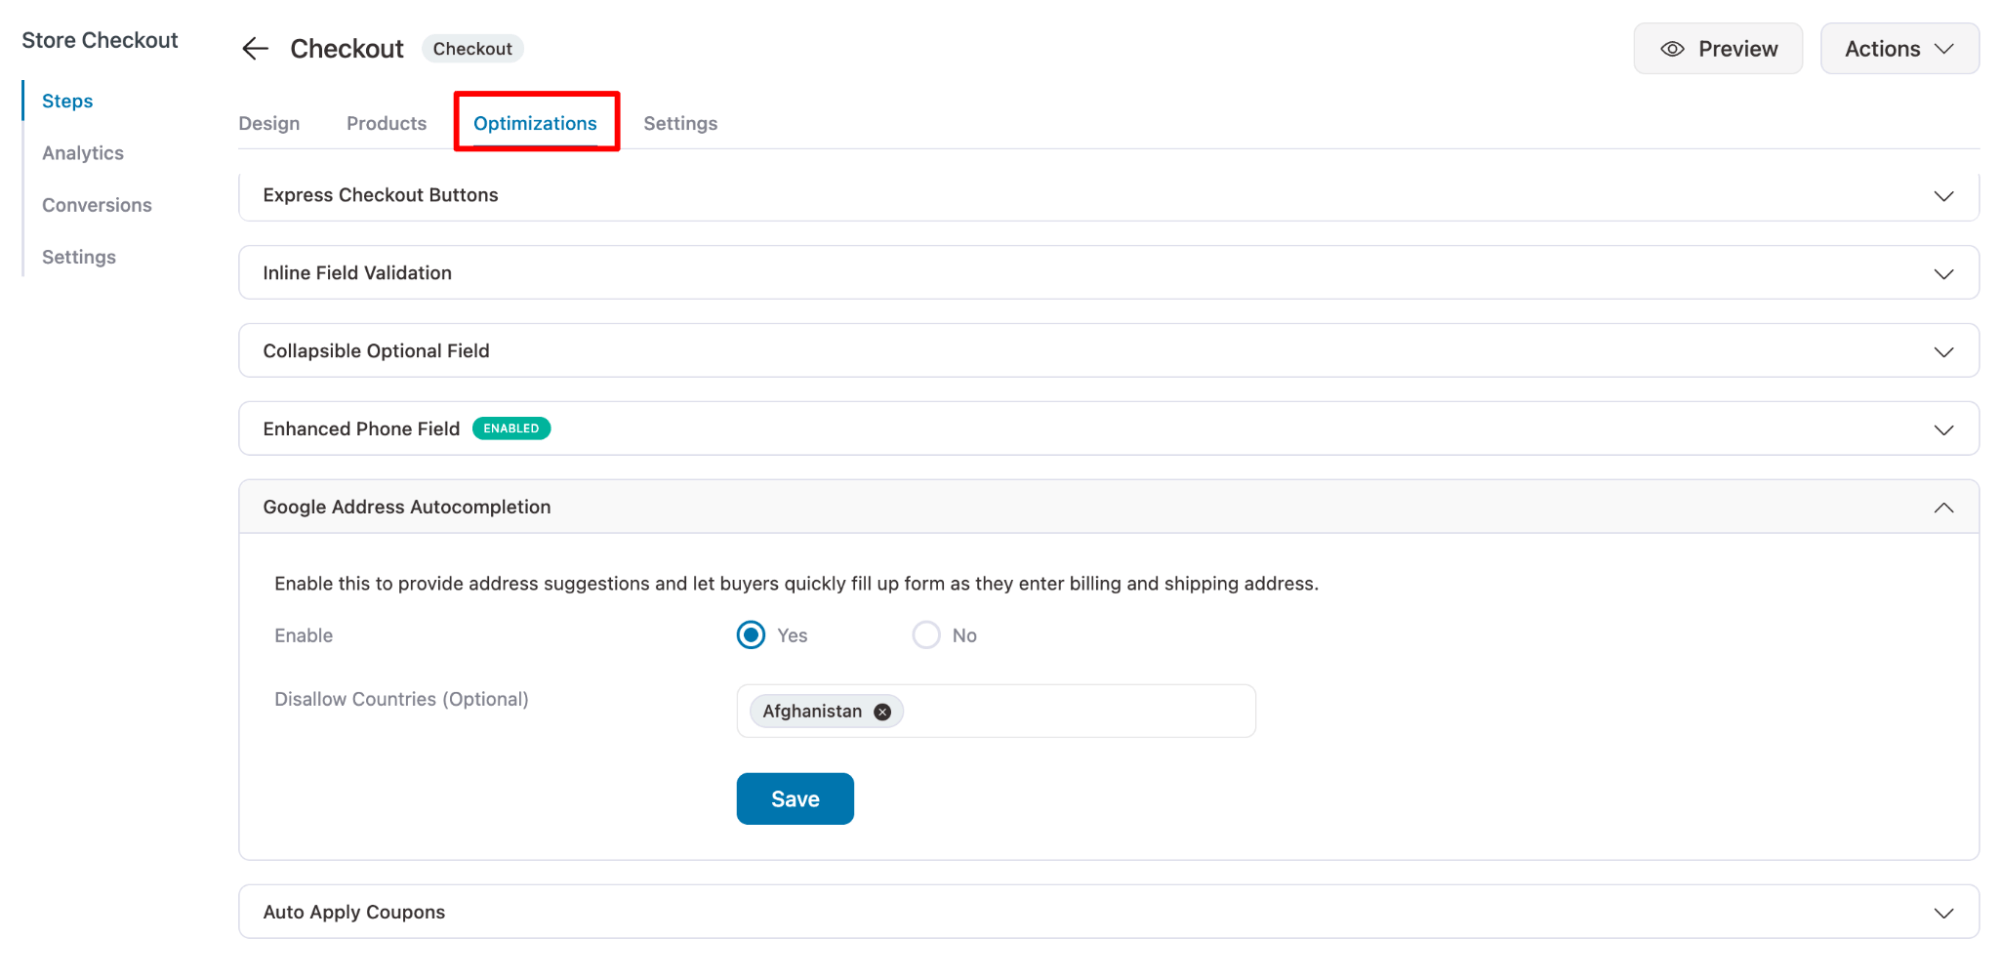
Step 4: Set up checkout page optimization settings
You can optimize your checkout page from the Optimizations tab for maximum conversion. You get options such as:
- Express Checkout such as Google Pay and Apple Pay
- Enhanced Phone Field
- Google Address Autocomplete
- Auto Apply Coupons
- Smart Login, and many more.
After making the changes, make sure to click on the 'Save' button.
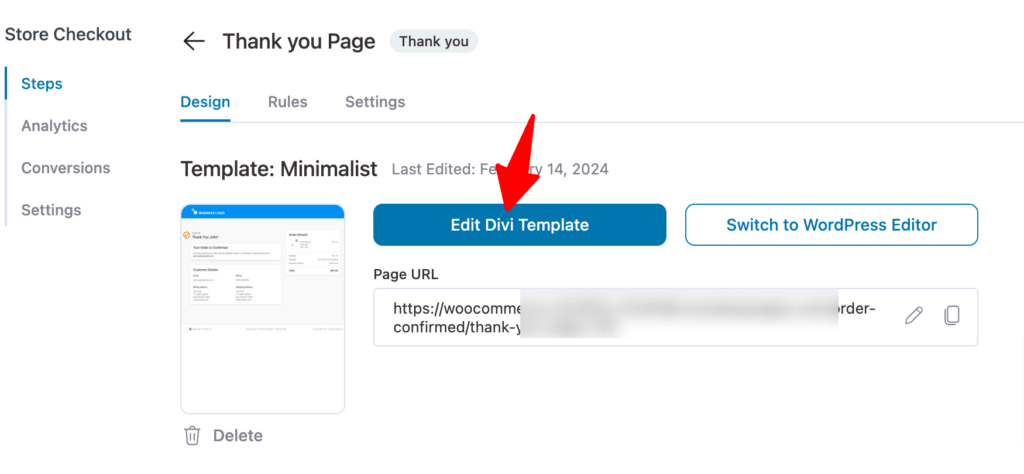
Once you are done customizing the checkout template, you can also use Divi to customize your thank you pages.
Step 5: Enable global store checkout
Now, turn on the “Enable Store Checkout” option to ensure the Divi checkout page you created becomes your active global checkout.
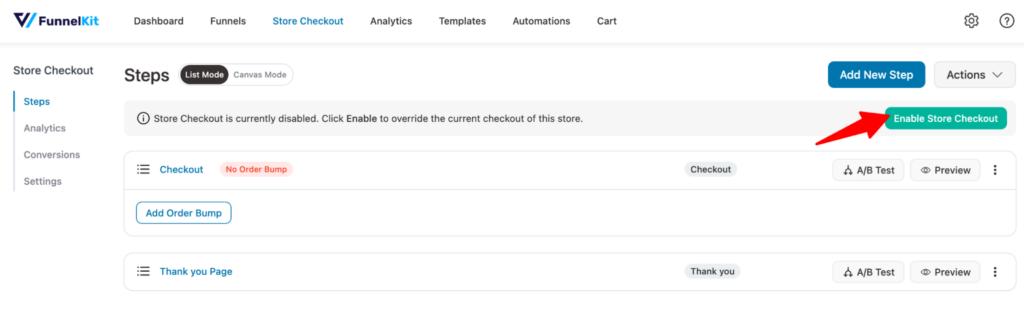
And that’s it! Your Divi WooCommerce checkout is ready.
Here is a preview:
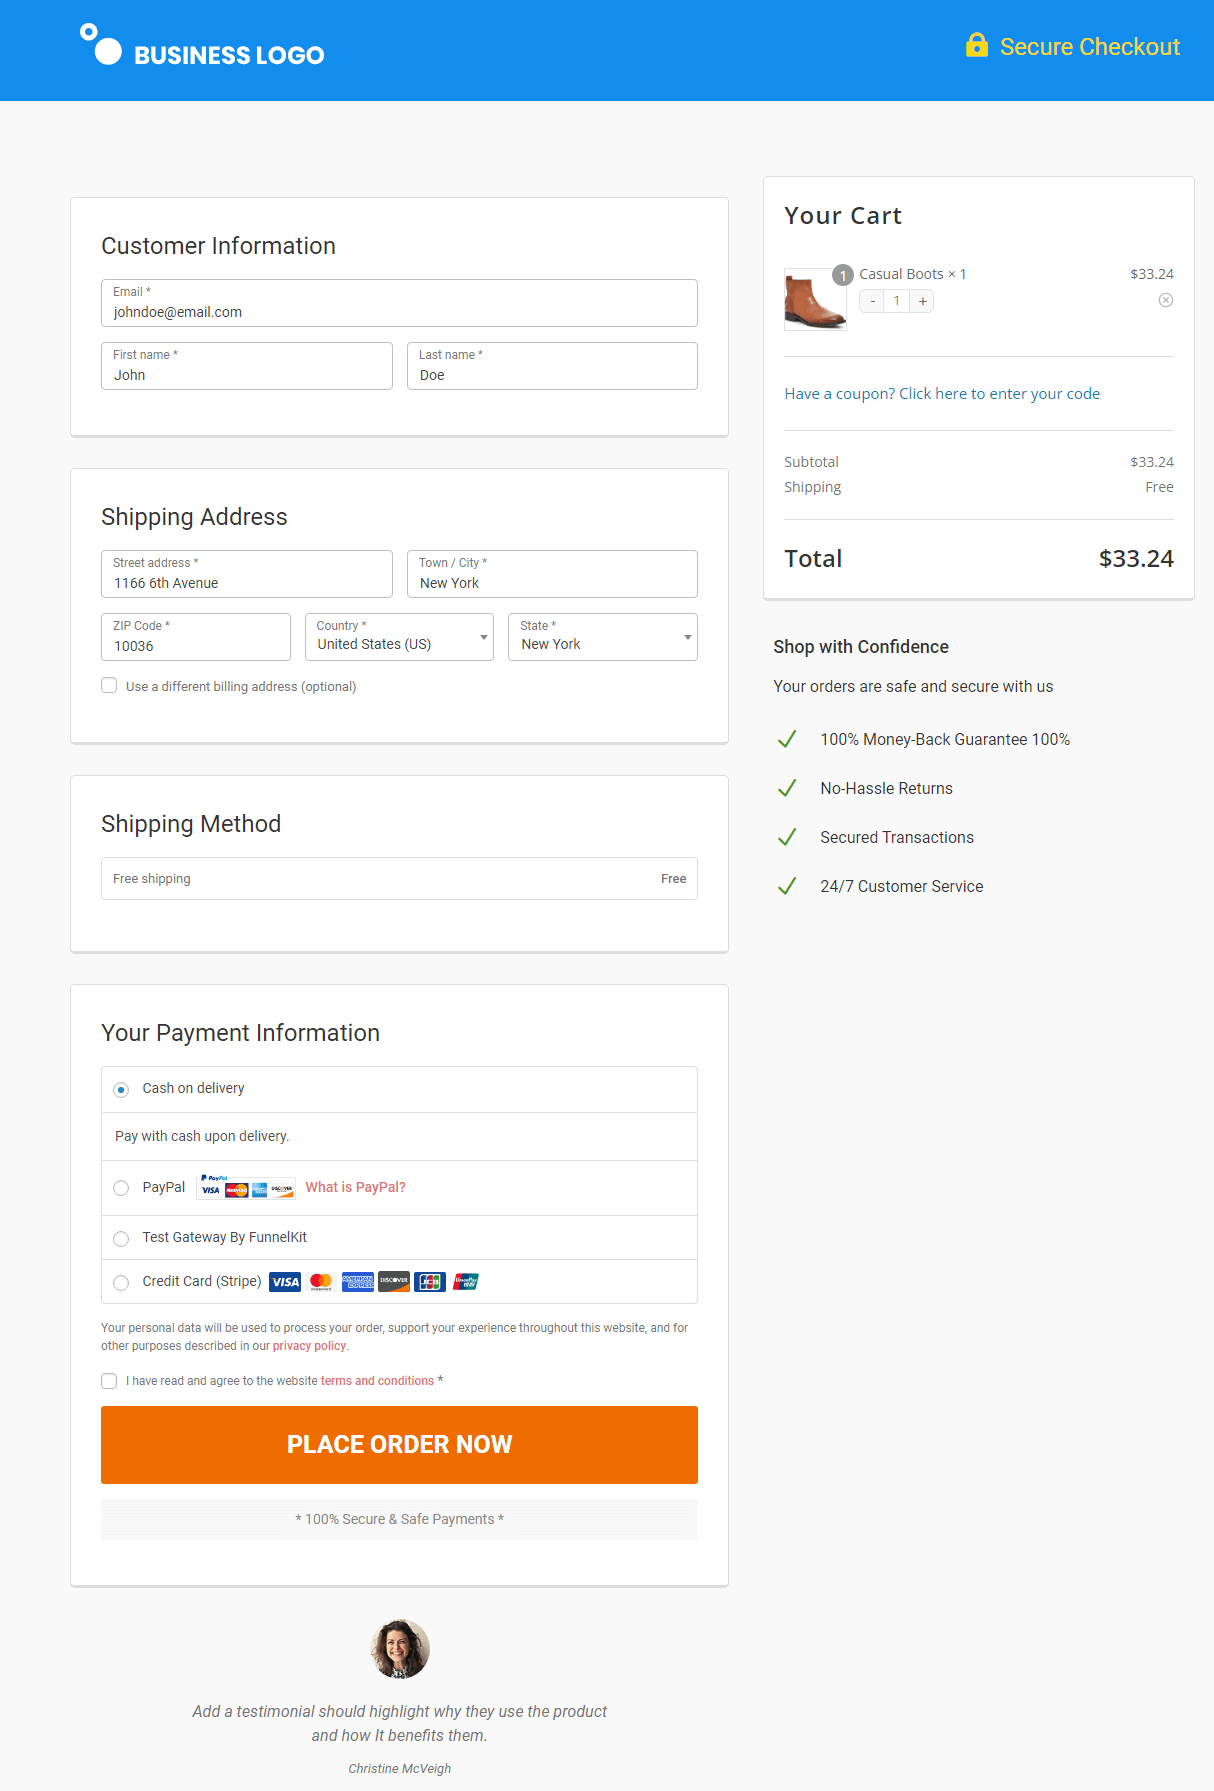
Well done! This is how you can create WooCommerce Divi checkout effortlessly with FunnelKit Funnel Builder.
5 Effective Tips to Optimize Your WooCommerce Checkout with Divi for Higher Sales & Conversions
If you're using Divi and FunnelKit Funnel Builder to customize your WooCommerce checkout page, you already have powerful tools in hand. But to truly boost conversions and sales, you need to optimize your checkout experience strategically.
1. Use a distraction-free checkout layout
Remove distractions and create a dedicated checkout page solely focused on completing the purchase. Keep the design clean, implement side cart, and allow users to direct checkout.
This way, you can reduce cart abandonment and keep customers from clicking away.
2. Implement a multi-step checkout process
Long checkout forms can overwhelm shoppers. Instead, break the process into multiple steps, such as:
- Step 1: Contact details
- Step 2: Shipping details
- Step 3: Payment and order summary
With Divi and FunnelKit, you can easily design a structured multi-step checkout page to reduce form fatigue and improve completion rates.
3. Optimize the mobile checkout experience
More than 60% of online purchases are done on mobile devices. Make sure your checkout has mobile-friendly larger buttons, quick loading image and scripts, collapsible order summary, keyboard-friendly input system, and more.
This way, you can tweak mobile layouts for an optimized, seamless experience.
4. Enable order bumps and one-click upsells
Boost average order value by offering related products right on and after the checkout page:
- Order bumps: Offer small add-ons like extended warranties, complementary items, or express shipping options.
- One-click upsells: Offer special deals after purchase without re-entering details.
Use FunnelKit + Divi to add high-converting order bumps and upsells seamlessly.
5. Highlight trust signals and security badges
Customers need reassurance before entering their payment details. That's why you should increase their trust by implementing an SSL secure security badge, a money-back guarantee, payment method icons, and customer support details.
Place these trust signals strategically near the checkout button to reinforce security and credibility.
Ready to Build Divi WooCommerce Checkout Pages?
Divi lets you style your WooCommerce checkout pages with great ease.
Even without any design or coding knowledge, you’d be able to put together a beautiful and cohesive WooCommerce checkout page using Divi that would get you splendid returns.
FunnelKit supports the integration amazingly by giving you easy-to-understand layout options for your page.
Also, it offers multiple options to choose your favorite checkout page design. On top of that, you can optimize your checkout page to ensure the best user experience and gain maximum sales.
So get yourself the FunnelKit Funnel Builder today, play around with Divi, and create beautiful WooCommerce checkout pages.
Editorial Team
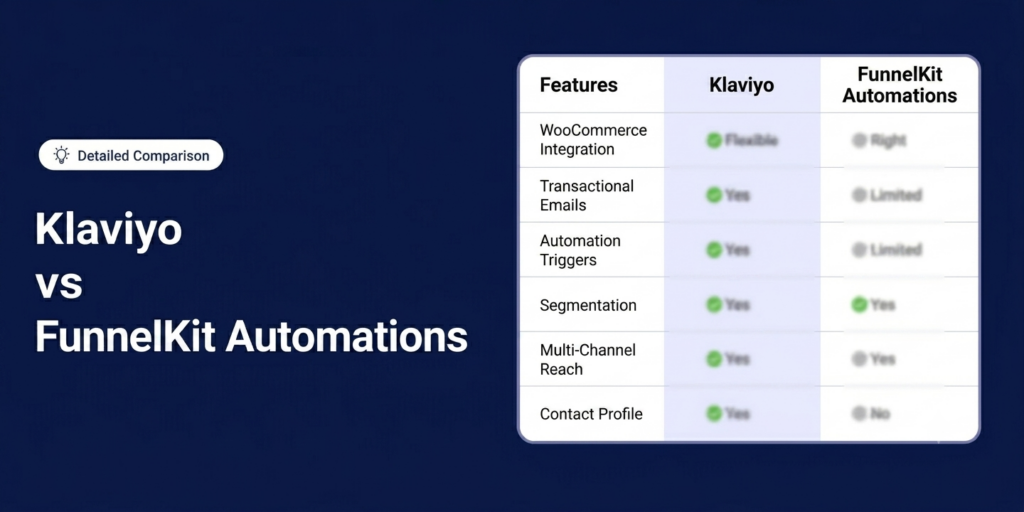
June 10, 2026If you run a WooCommerce store and you're serious about email marketing and automation, chances are FunnelKit Automations and Klaviyo are both on your short list. Klaviyo is a cloud-based...
Editorial Team
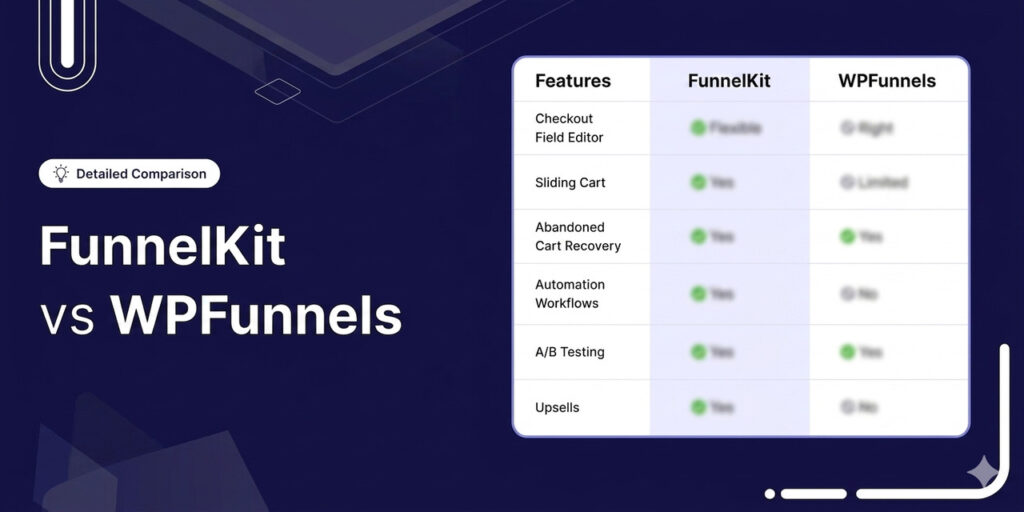
June 8, 2026If you run a WooCommerce store, the difference between a good funnel builder and a great one shows up directly in your average order value. Your checkout, your bumps, your...
Editorial Team
May 25, 2026WooCommerce variable products let you sell different versions of the same item from one product page. Sizes, colors, materials, styles, etc. Instead of a separate listing for each option, customers...


