
![How to Build a High-Converting WordPress Sales Funnel: The Ultimate Guide [2026]](https://funnelkit.com/wp-content/uploads/2025/05/How-to-Build-a-High-Converting-WordPress-Sales-Funnel.jpg)
If you're selling products, courses, services or memberships on WordPress and still relying on a single product page to all the heavy lifting, you're leaving money on the table.
Dropping visitors directly onto a shop page can leave them overwhelmed or unsure of what to do next.
That’s where a WordPress sales funnel comes in. It guides visitors step by step based on their needs and behavior.
A well-designed funnel does more than attract visitors. It leads them toward a purchase by delivering the right message at the right time.
It can lift average order value by 30-50%, recover abandoned carts and turn one-time buyers into repeat customers without touching a single line of code.
In this article, we will cover what a sales funnel is, the key elements that drive conversions, and the different types of funnels you can use. We will also show you how to build a WordPress sales funnel that turns visitors into paying customers.
This video tutorial shows exactly how you can set up WordPress sales funnels on your website:
![How to Build a High-Converting WordPress Sales Funnel: The Ultimate Guide [2026]](https://funnelkit.com/wp-content/uploads/2025/05/How-to-Build-a-High-Converting-WordPress-Sales-Funnel-Video.jpg)
Table of Contents
- 1 What is a Sales Funnel in WordPress?
- 2 Core Elements of a High-Converting WordPress Sales Funnel
- 3 How to Create a High-Converting Sales Funnel in WordPress (Step-by-Step)
- 3.1 Step 1: Create a new sales funnel
- 3.2 Step 2: Customize your landing page
- 3.3 Step 3: Add the product to your checkout page
- 3.4 Step 4: Optimize your checkout page
- 3.5 Step 5: Add AOV-boosting order bumps
- 3.6 Step 6: Add one-click upsells to boost your order value
- 3.7 Step 7: Customize your thank you page
- 4 How to Track and Analyze Your WordPress Sales Funnels
- 5 6 Proven Tips to Build and Optimize Your WordPress Sales Funnel
- 6 WordPress Sales Funnel Examples (By Business Type)
- 7 Frequently Asked Questions (FAQs)
- 8 Are You Ready to Leverage the Power of WordPress Sales Funnels?
What is a Sales Funnel in WordPress?
A sales funnel in WordPress is the journey a user takes from learning about your business to becoming a paying customer, either by purchasing an item or by filling out a form to generate a lead.
It’s a multi-step process that takes visitors on a distraction-free, well-planned journey from discovering your brand to making a purchase.
The funnel typically consists of various stages designed to attract, engage, nurture, and convert leads. The exact steps in a sales funnel may vary depending on the goal you’re aiming for.
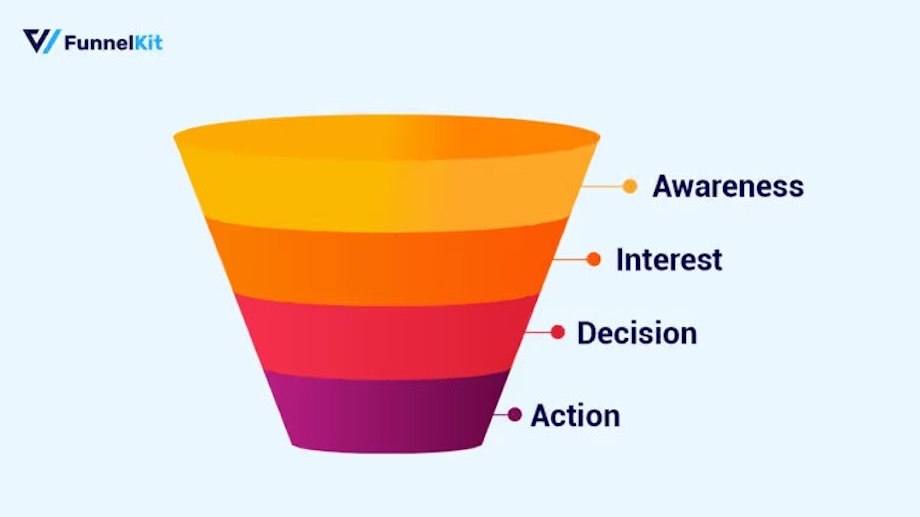
But here are four basic steps it boils down to:
- Step 1: Awareness
In this stage, a user learns about your product or business. This could be through organic search, social media ads, or other marketing efforts.
- Step 2: Interest
This stage provides the visitor with a good deal of information about your product or service, arousing their interest and sparking curiosity.
- Step 3: Desire
Users start connecting with a product or service that helps them solve their specific problems or fulfill their needs. This stage initiates a decision to convince potential customers.
- Step 4: Action
Users finally get convinced and complete the checkout process to place their orders. This successfully closes the sale and turns a visitor into a paying customer. If your goal is lead generation, then you’ll get highly qualified leads at the end of the process.
Sales funnels are like fixed roadmaps, with each turn predetermined. They are quite different from the global website flow, where traffic moves everywhere.
Sales funnel vs. regular WordPress site
| Regular WordPress site | WordPress sales funnel |
|---|---|
| Multiple distractions (menus, sidebars, footers, etc.) | Single focused goal per page |
| Generic checkout (often 2-3 pages in between) | Optimized 1-page checkout with bumps |
| No post-purchase offers | One-click upsells and downsells |
| Static (same offer for everyone) | Conditional logic and A/B testing |
| Hard to track conversion at each step | Built-in funnel analytics |
Sales funnel vs. sales pipeline
People often mix both of these up. A sales funnel is the customer’s journey from awareness to purchase. A sales pipeline is the seller's view of where each lead sits in the sales process.
In WordPress, when people talk about a sales funnel, they always mean the buyer journey: landing page, checkout, upsells, and thank-you.
Core Elements of a High-Converting WordPress Sales Funnel
There are various sales funnel elements.
For instance, your ad grabs their attention, the freebie builds interest, the paid product evokes desire, and upsells maximize the value of every sale.
Let’s check out the different sales funnel components and see how they move people from being interested in your offering to finally buying it.
1. An opt-in page
An opt-in page is key to lead generation. You offer free products (lead magnets) in exchange for the customer’s contact information, especially their email address.
These lead magnets could be free courses, ebooks, guides, templates, cheat sheets, or free slots in your webinar.
This would get them excited and, in turn, give you their email addresses.

Now that you’ve aroused their interest, you can develop a series of nurturing emails (like email courses) that deliver value and address their pain points.
You can segment your email list based on audience engagement with these emails.
2. Sales or landing page
A sales page is like the face of your brand, your money maker. It excites and convinces customers to buy your product.
This page contains all the required information about the offered product. It further helps the site visitors to make an informed decision.
Include the value proposition of your product, such as benefits, testimonials, product images, assurance, videos, etc., to convince prospects. Take a look at this sales page:
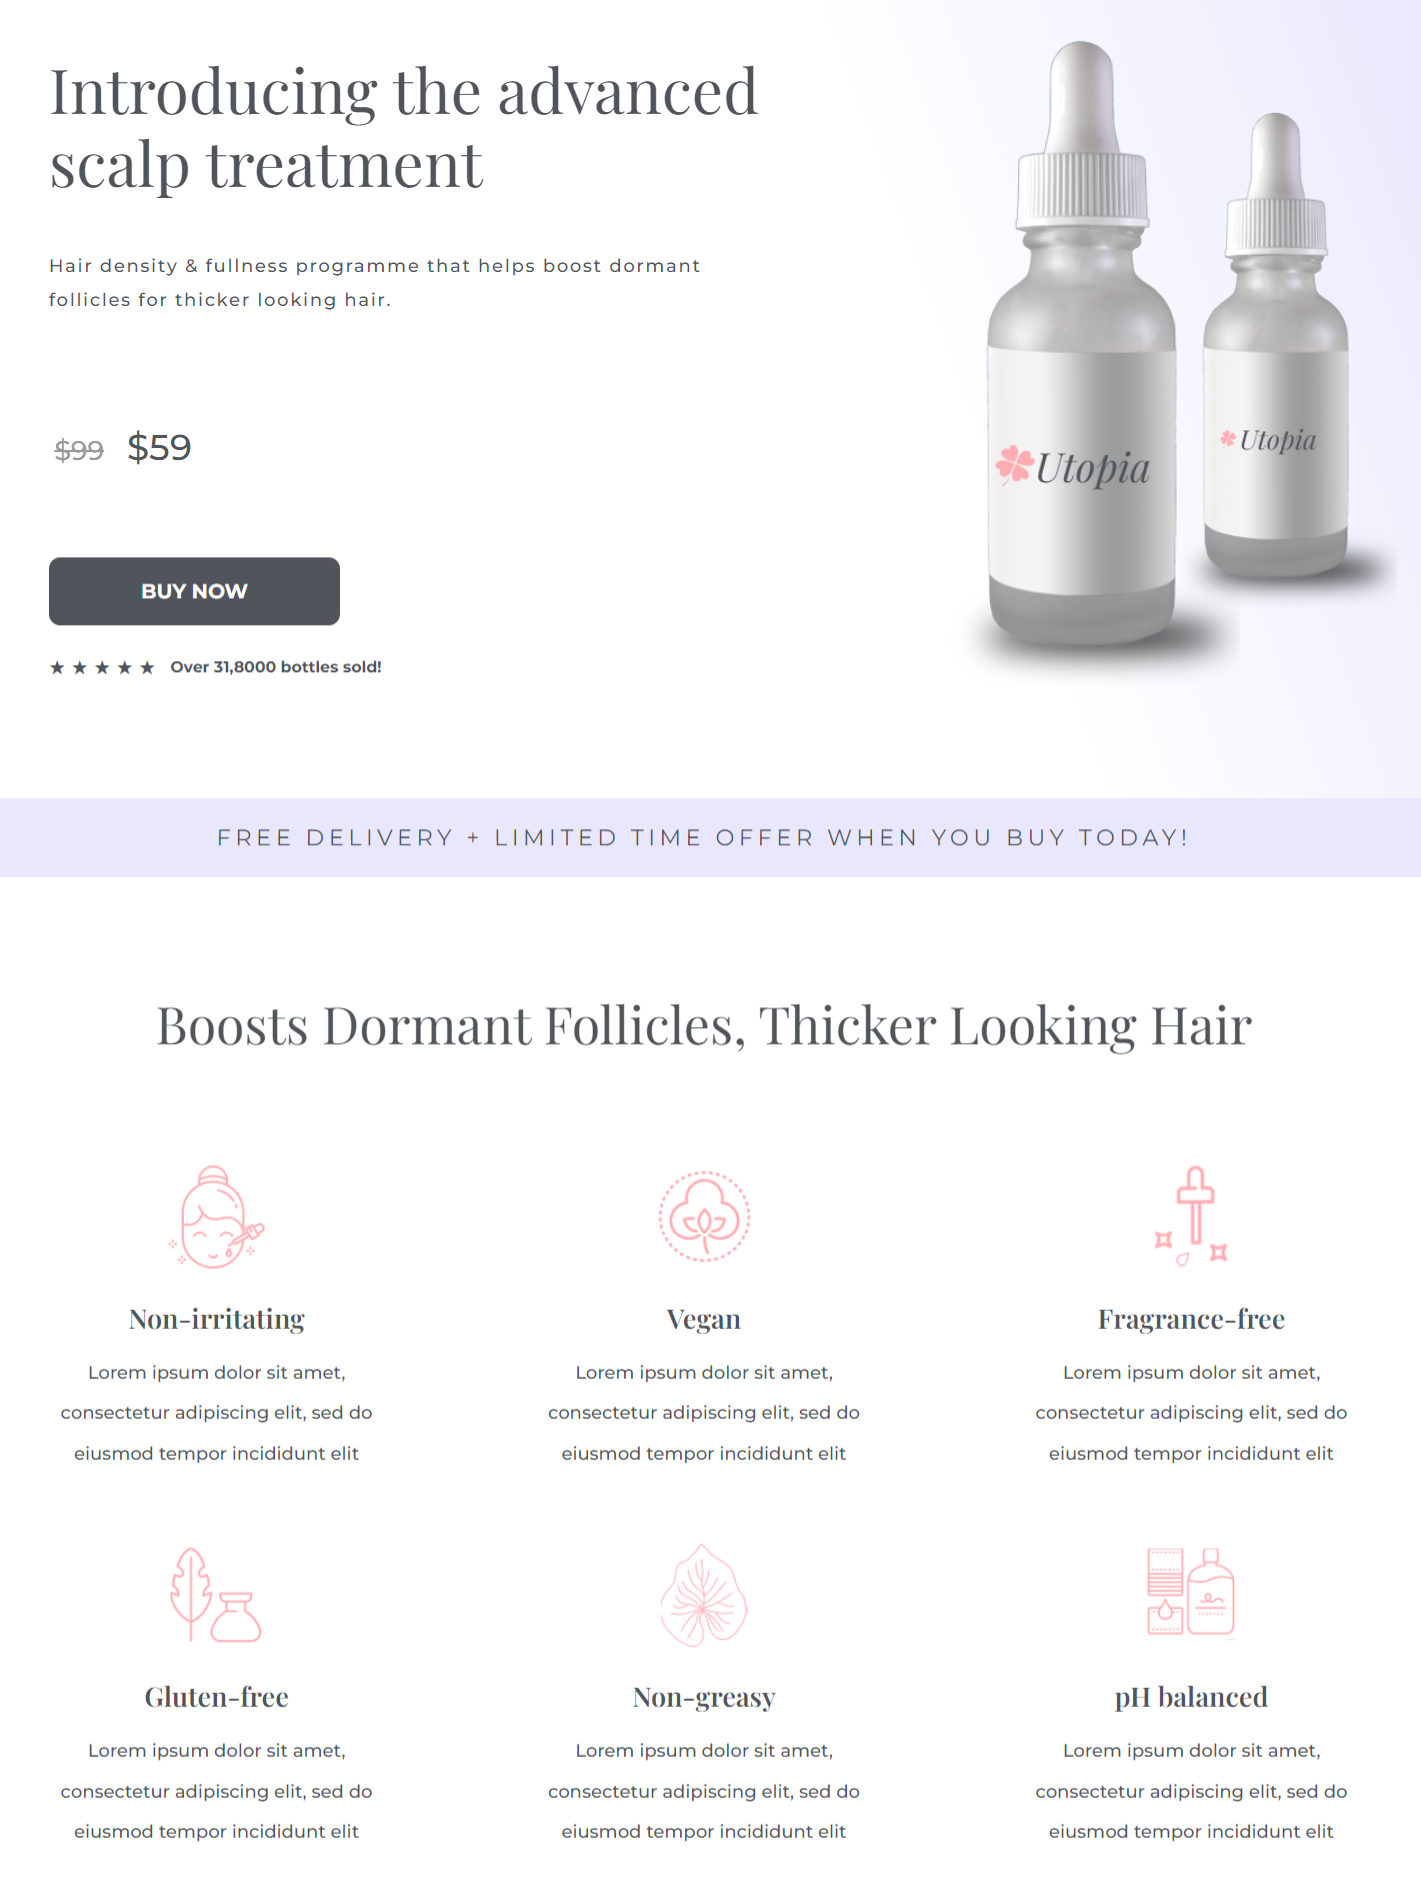
You must have a clean and easy-to-scan sales page. A busy landing page will distract customers and make them feel overwhelmed.
So, keeping it simple but attractive should be your mantra.
3. Checkout page
Some would say that after a sales page, it doesn’t matter how you design the checkout. But that’s not true, because a poorly designed checkout page can lead to cart abandonment.
The checkout page is your final bid to persuade visitors to pay for the products they’re considering.
Everyone gets anxious before paying. Calming your prospective customers at this point is very crucial.
Here's how the optimized checkout page looks:
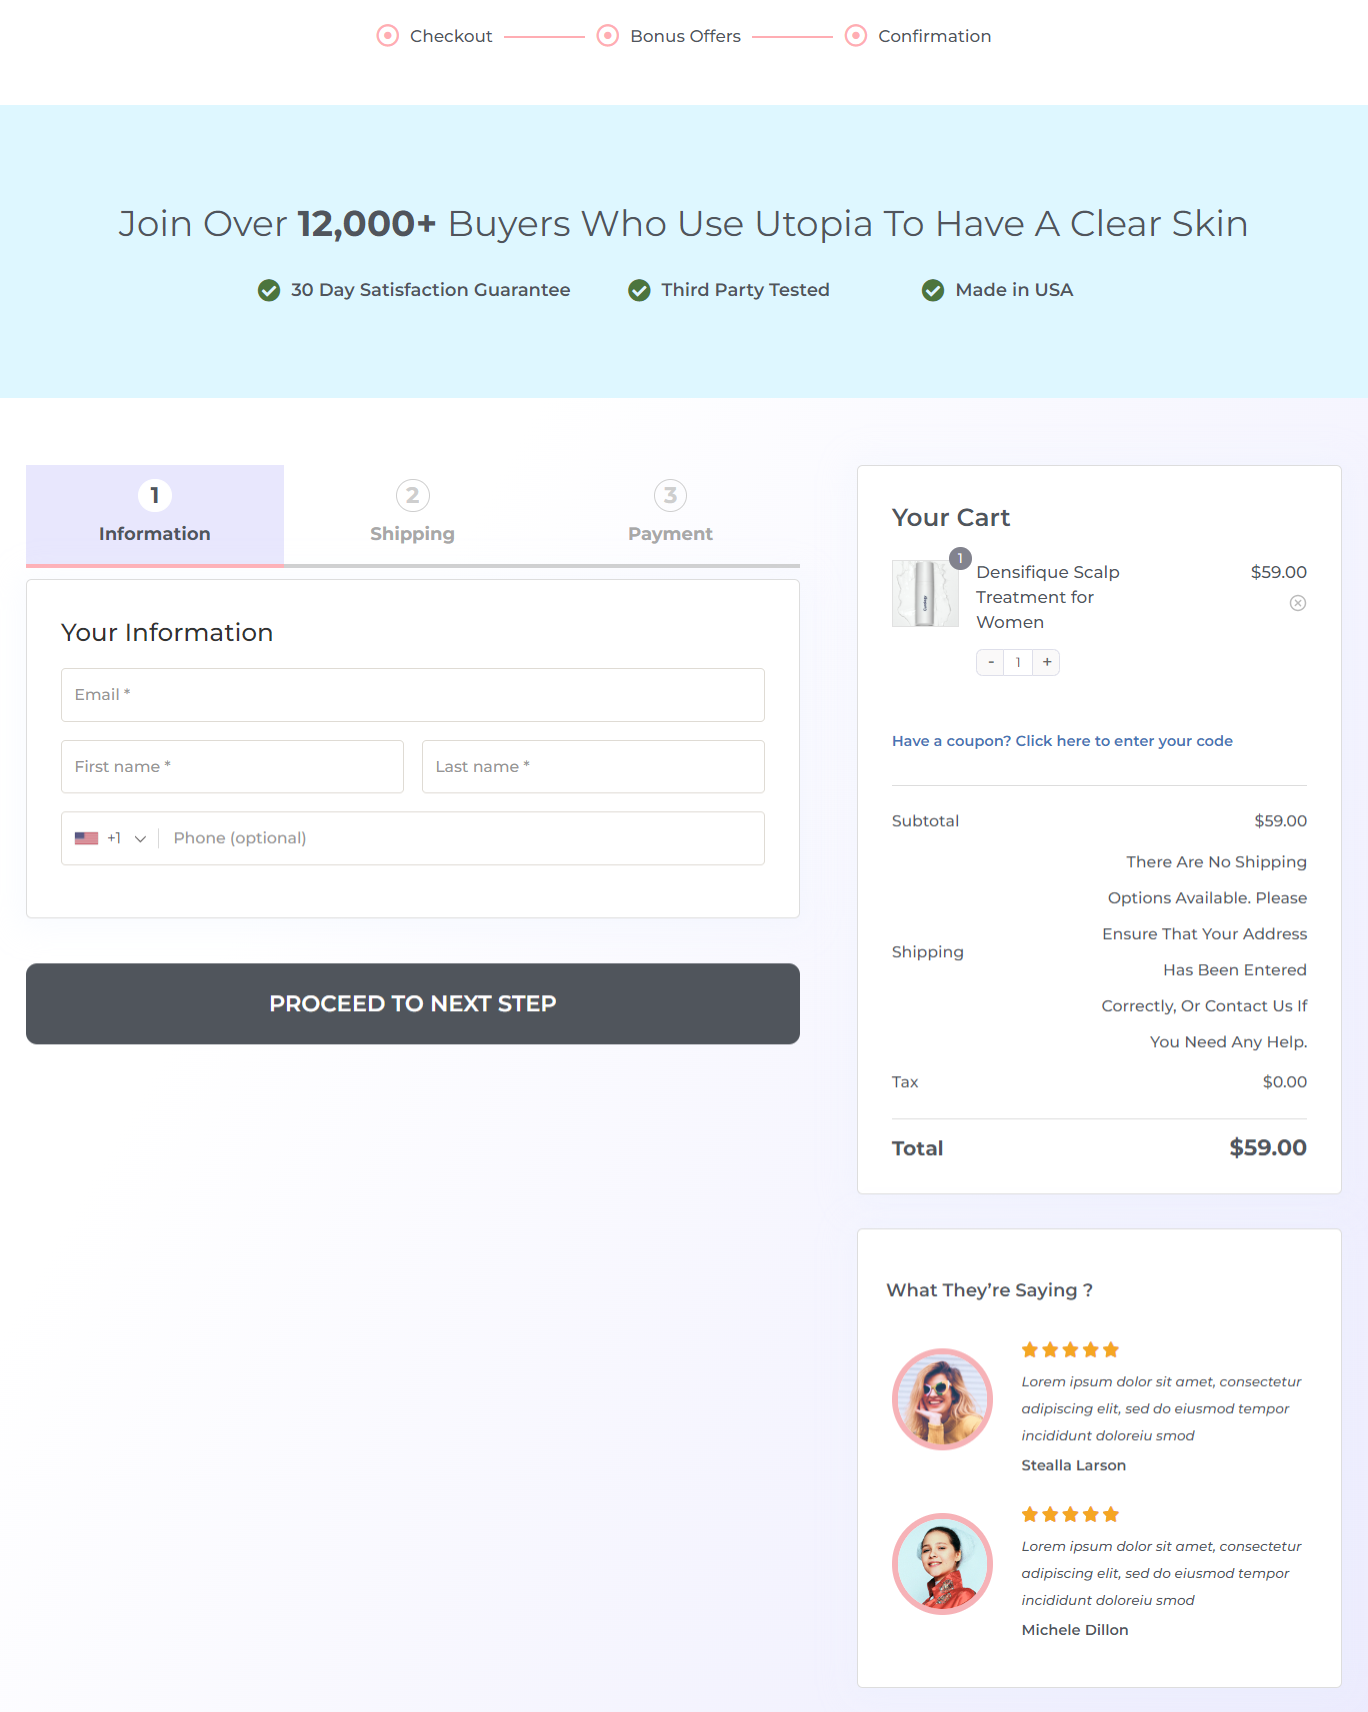
A clean, straightforward page with clear call-to-actions (CTAs) doesn’t cause any confusion and reduces the level of anxiety.
Add a few trust-building components, such as testimonials, value-added benefits, and what they get to the checkout page to win brownie points from your prospects before they pay.
You can customize the form fields and enhance the checkout experience with features such as Google address autocomplete and one-click express checkout to speed up purchases.
These elements will surely seal the deal on your checkout page.
4. Order bump
Order bumps are add-ons added before checkout and payment. They are a way to advertise another relevant product on the checkout page.
It adds value to your existing product and increases the checkout total.
You can create rule-based order bumps so shoppers see the right offer based on the items in their cart, the total, the product category, etc.
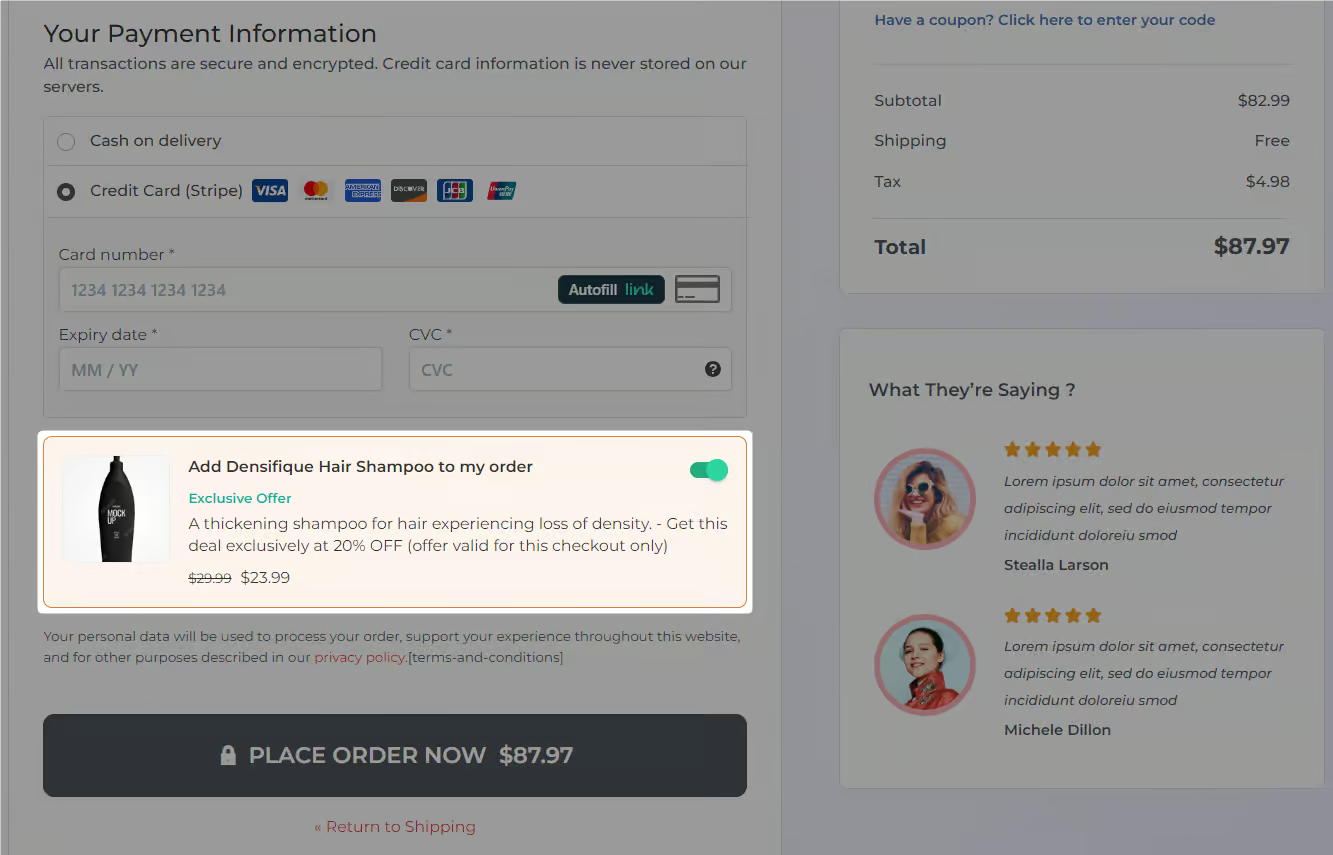
Let customers choose the product variant they want. Or even offer a discount on the order-bump offer to make it a more lucrative deal!
5. One-click upsell
After grabbing the initial sale, a one-click upsell is the post-purchase offer that boosts your order value.
It’s an offer page after the checkout page and before the order confirmation page. This page offers your users relevant products they can accept or reject with a single click, making the process quite convenient.

You can offer relevant product recommendations based on the user's order total, items purchased, purchase category, first-order status, and more.
What's more? You can also have a series of upsell and downsell offers. This way, customers are shown the next offer in the sequence, depending on whether they accepted or rejected the previous one.
Offering products related to the item bought is a clear-cut way to sell more and earn more on the same order.
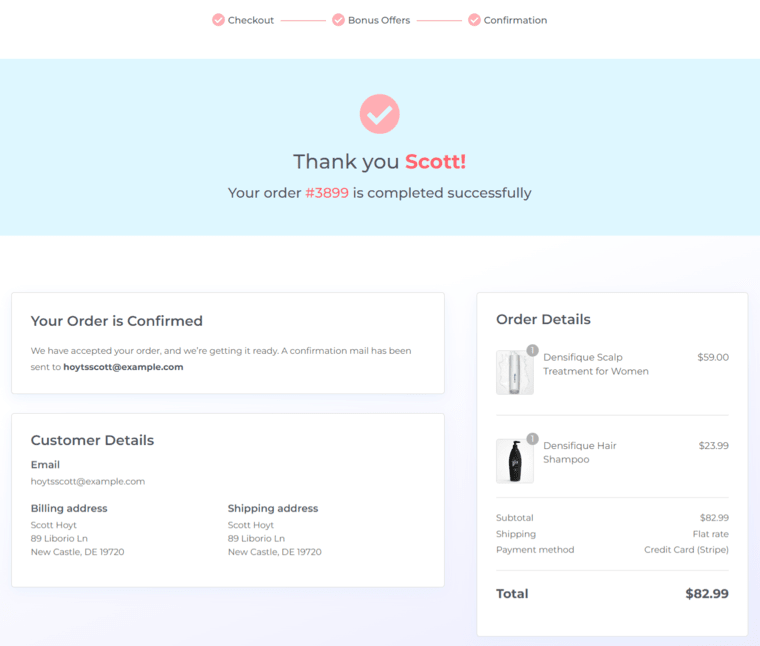
6. Thank you page
The thank you page is the final opportunity to interact with your customer about this transaction. Here, you confirm their purchase and thank them for shopping with you.
If it's a digital product, you either deliver it on this page or give them step-by-step instructions for accessing it.
But in the case of a physical product, tell the customer the expected delivery date and provide any other relevant information.
Investing time in designing professional and polished pages will be very rewarding in the long run.
7. Follow-up and retargeting
Emails can be included at every stage of a WordPress sales funnel and drive remarkable conversions.
Send emails at the awareness stage to introduce your brand to potential buyers and create awareness about your products and services.
At the interest stage, you can send targeted emails that address users' pain points and demonstrate how your products can solve their problems.
Once the user has evaluated their options and decided whether to make a purchase, you can send emails that list features, pricing, and special promotions.
Use WooCommerce email marketing automation to deliver relevant content that keeps them engaged with your brand even after the purchase. This is especially important to maintain long-term value.
If users abandon their carts, you can set up cart-recovery campaigns to bring them back and recoup lost costs.
How to Create a High-Converting Sales Funnel in WordPress (Step-by-Step)
Here’s the exact process to build your first WordPress sales funnel from scratch. Here, we'll use the FunnelKit Funnel Builder.
You can create opt-in pages, landing pages, custom checkouts, order bumps, upsells, downsells, and thank you pages.
Additionally, you get access to free premium templates that can easily be imported and customized to meet your needs.
Setting up a WordPress sales funnel with FunnelKit is easy and available in free (lite) and premium versions.
Once you've activated FunnelKit, follow the steps below to make your very own sales funnel in 6 simple steps.
Step 1: Create a new sales funnel
Go to FunnelKit ⇨ Funnels from the WordPress dashboard and click on the 'Create New Funnel' button.
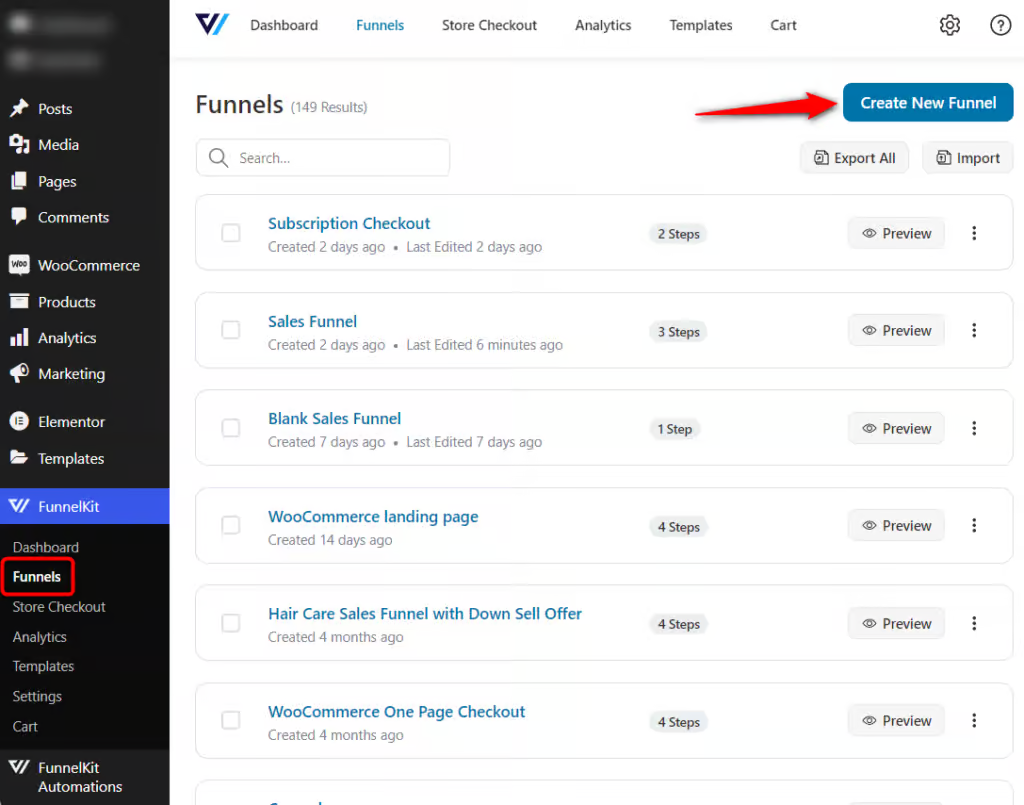
You'll be directed to the templates page.
Select the WordPress sales funnel templates and choose your favorite page builder. After that, you can either choose to start from scratch or customize a pre-built template:
- Start from blank - This is a blank template you can design to create a sales funnel for WordPress that matches your brand. There is no fixed template here; you can choose the steps to build the funnel.
- Pre-built templates - FunnelKit provides many utility-based templates that can be customized to fit your requirements.
But if your preferred builder is not on the list, click on ‘Other’ to design funnel pages with any page builder using shortcodes.
Click on the template you'd like to import.
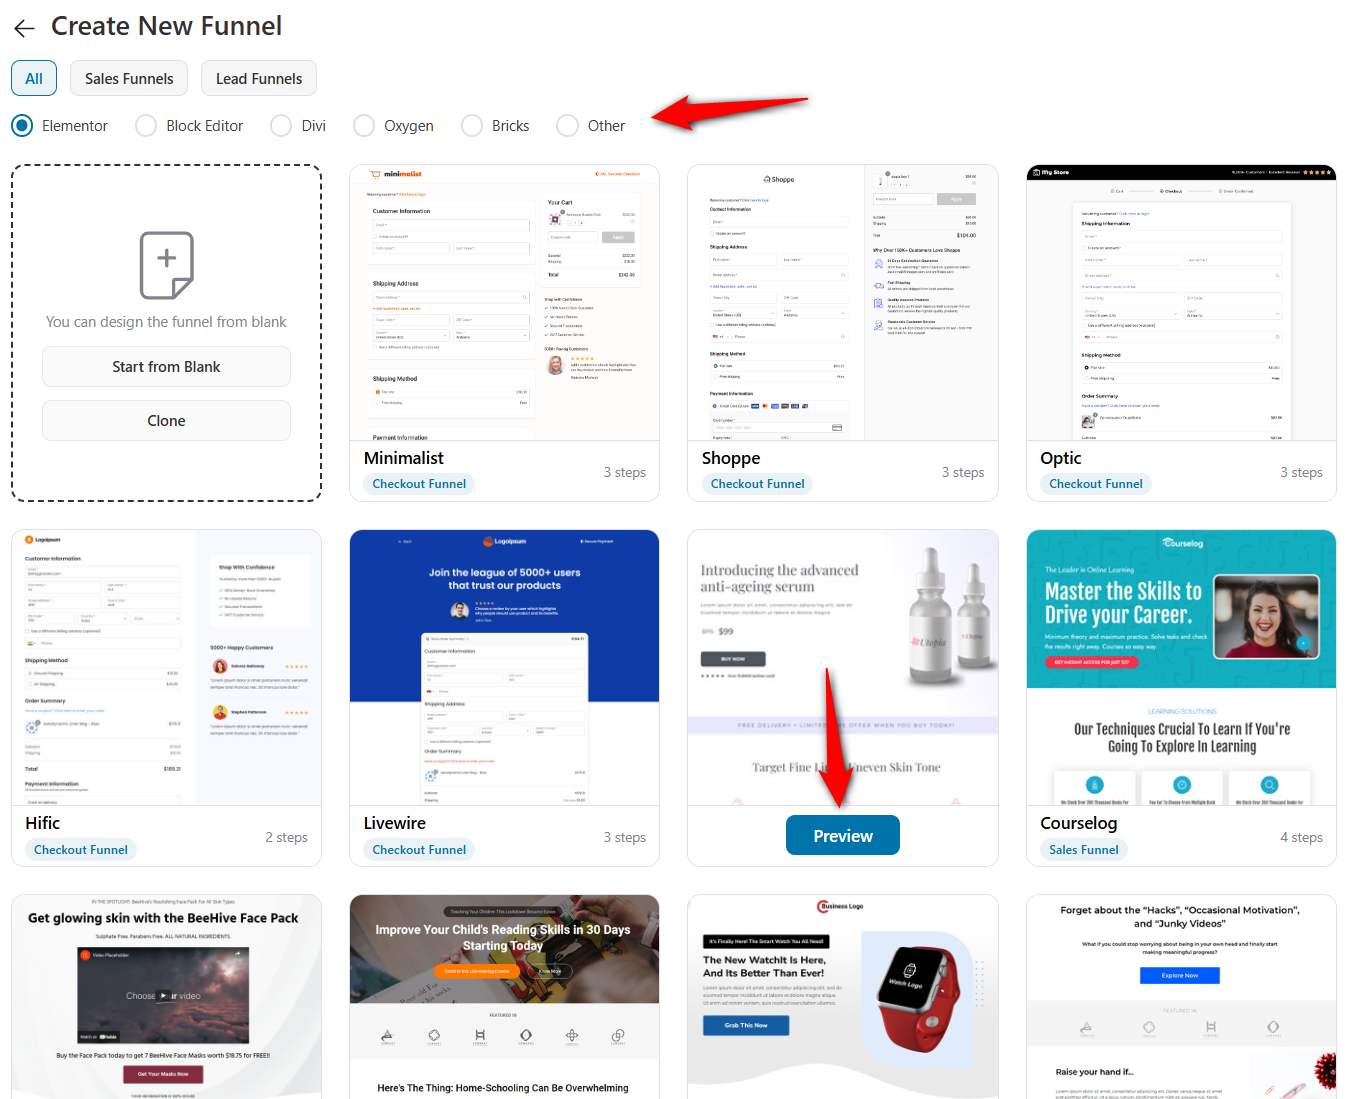
Next, you'll be able to preview the template. This template contains four pages:
- Landing/sales
- Checkout page
- One-click upsell offer
- Thank you
Click on 'Import This Funnel' and name your new funnel.
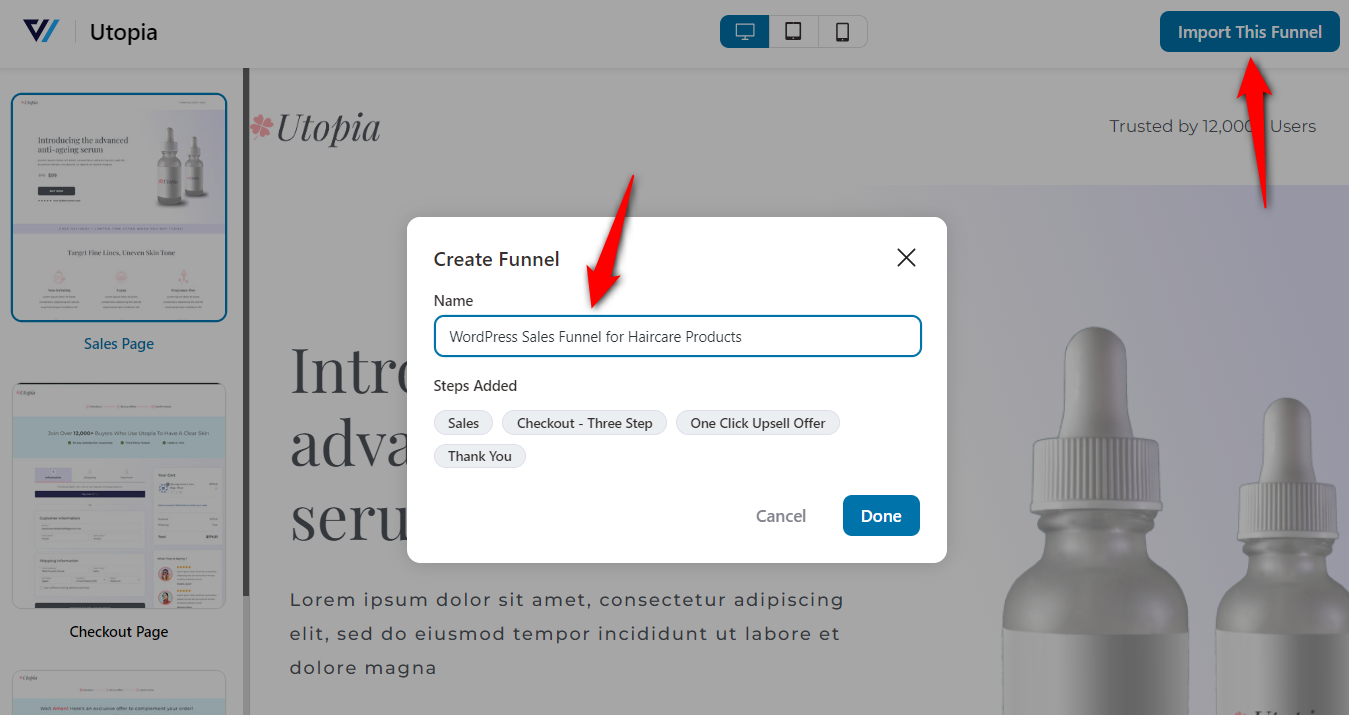
Click 'Done' to add your sales funnel to your WordPress workspace.
Step 2: Customize your landing page
Now that your funnel and selected template have been imported. You can even add more pages to your default funnel by clicking on ‘Add New Step’ at the bottom of the funnel builder page.
Next, customize the pages on your WordPress sales funnel.
Click on the name of your landing page to start customizing it.
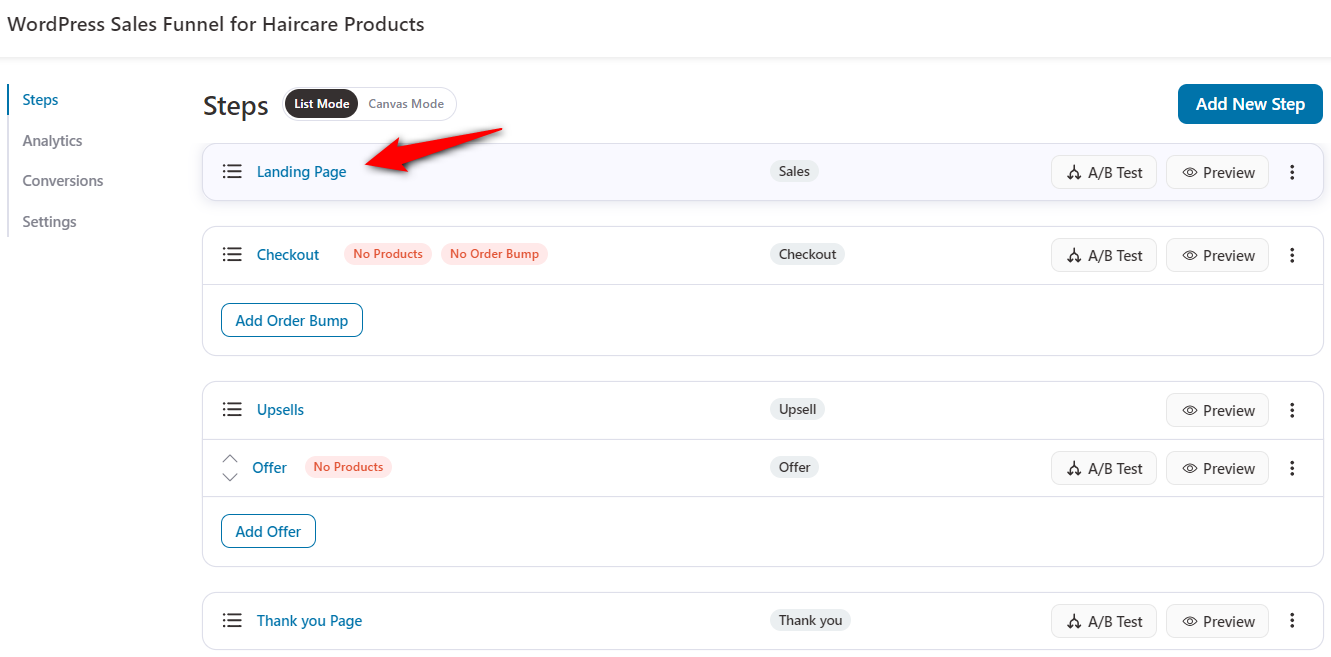
Next, hit the ‘Edit Elementor Template’ button to customize your landing page design template.
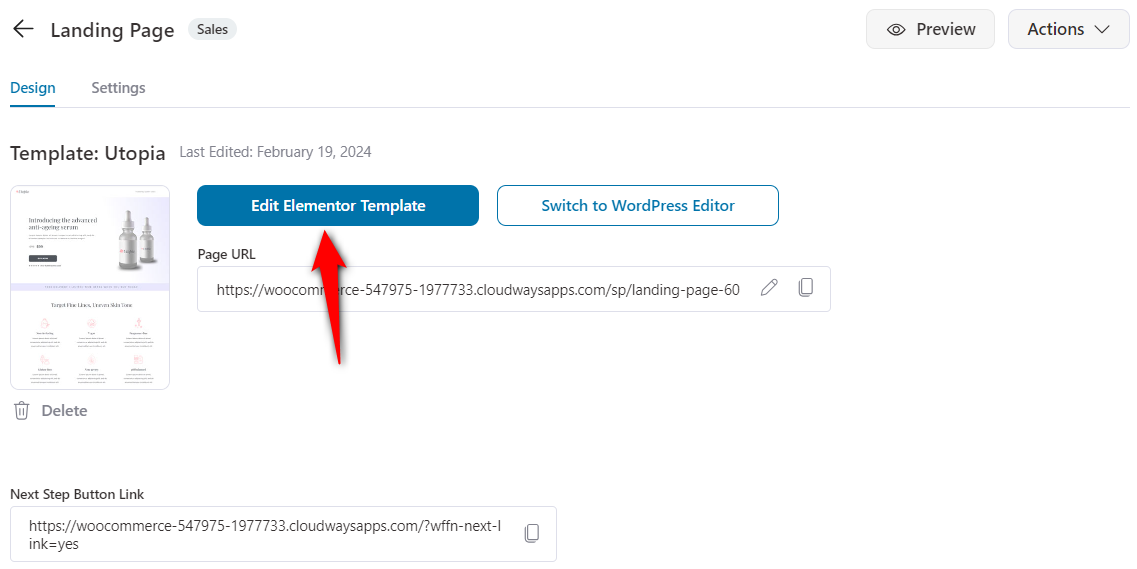
All you need to do is click each page of the funnel and customize its content.
You can change the design and layout of a funnel page in Elementor (that’s the page builder we selected at the start).
Start by putting your brand’s logo, content, background, images, CTA buttons, and more.
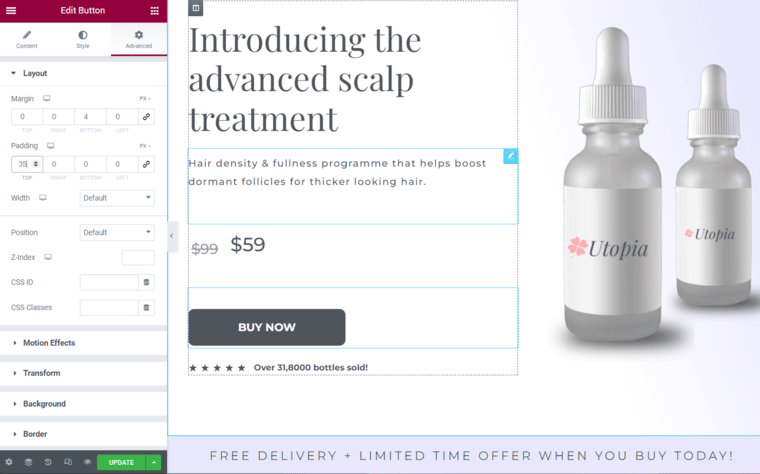
Once you’re happy with your design, hit 'Update' to save your changes.
Step 3: Add the product to your checkout page
Similarly, edit the checkout page design of your WordPress sales funnel.
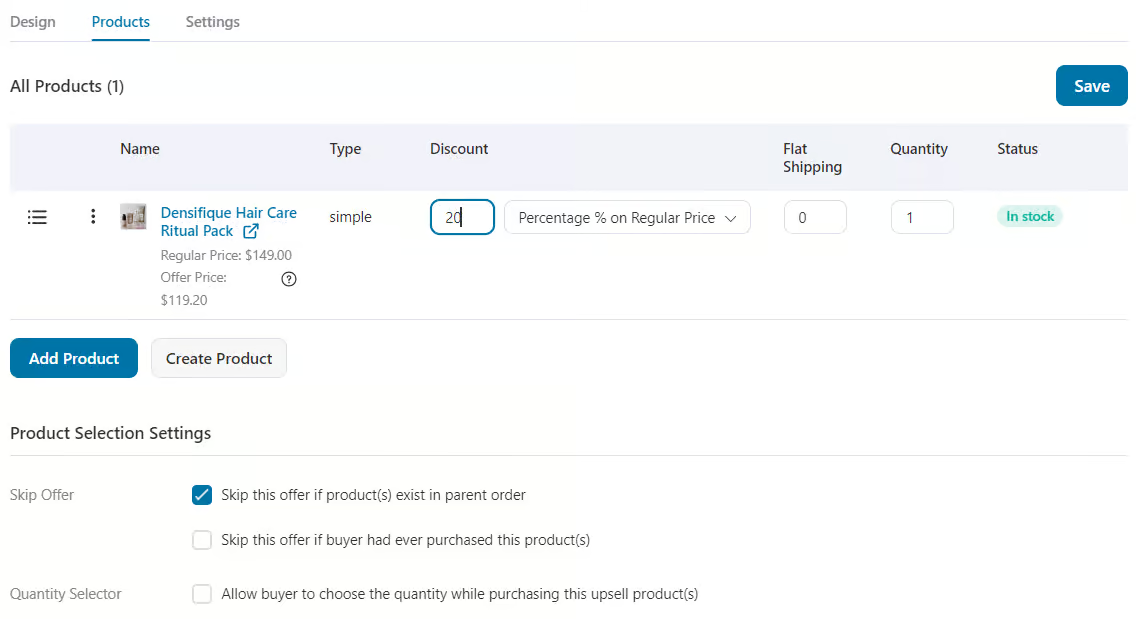
Next, go to the Products tab and click the ‘Add Product’ button.
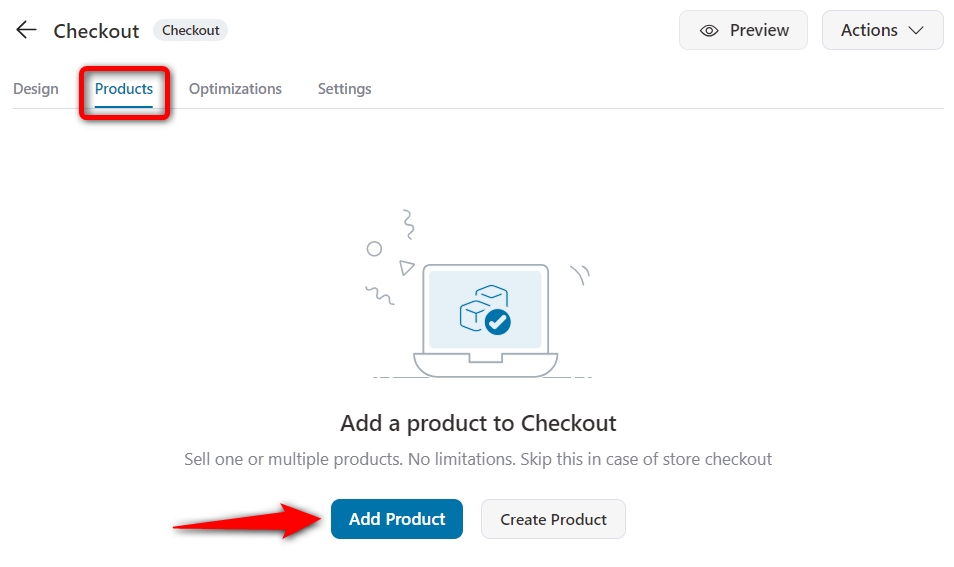
Search and add the product you wish to design the checkout page for.
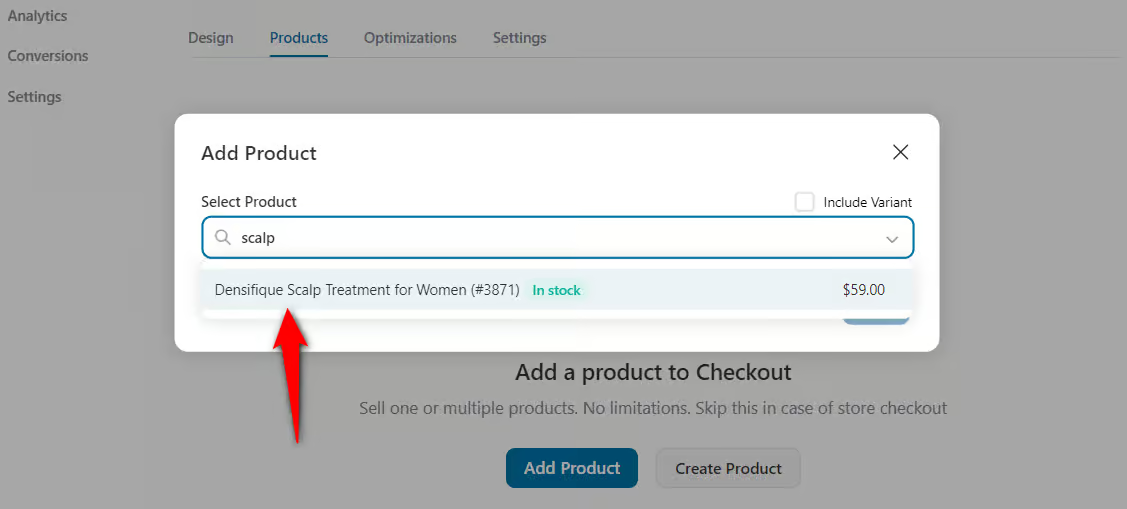
If you want to apply a discount to your primary product, adjust the quantity and set the discount percentage.
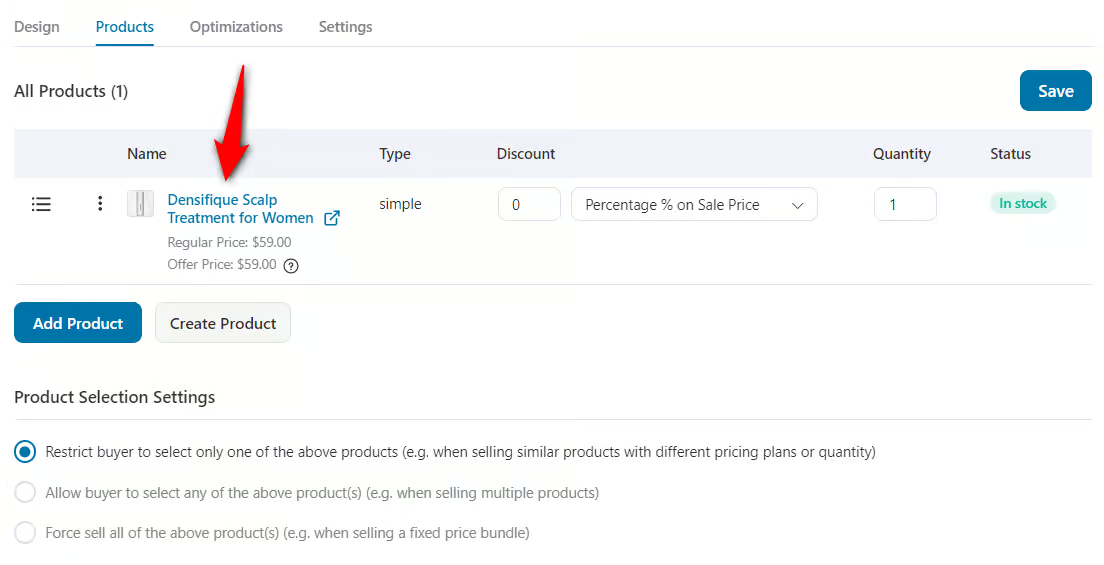
Click on 'Save' when you’re done.
You can even add more than one product to your checkout page. Just use the drag-and-drop feature to decide the order in which they are showcased.
Step 4: Optimize your checkout page
FunnelKit lets you optimize your checkout page for practical conversions.
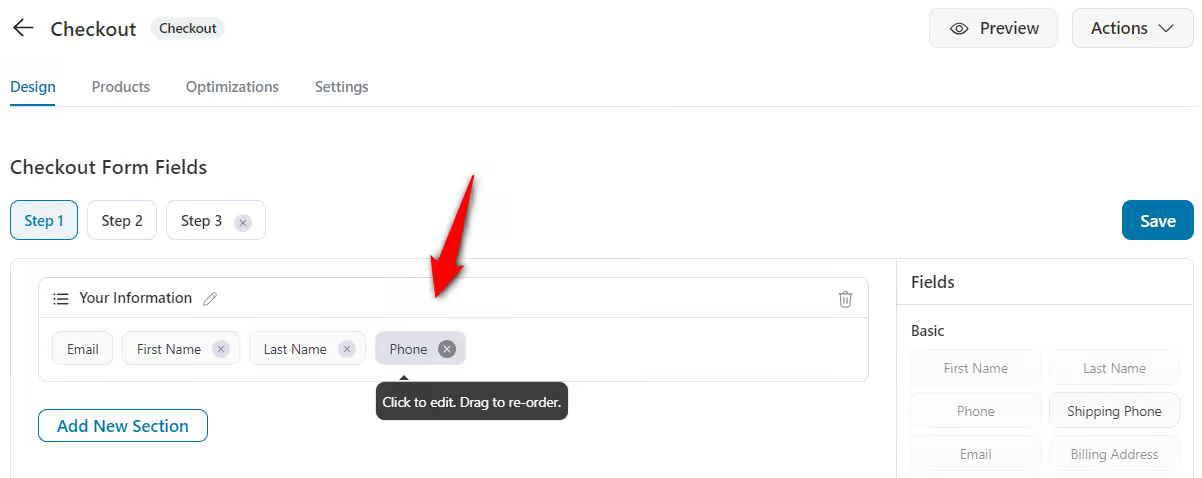
You can customize the fields on your checkout form per your needs by going to the Design tab and scrolling down to Checkout Form Fields.
It's a built-in checkout form field editor that lets you add, edit, rearrange, or delete any field. All this is possible with a simple drag-and-drop technology.
Furthermore, FunnelKit offers several optimizations you can incorporate into your checkout page. These strategies will enhance your overall sales funnel in WordPress.
You only need to go to the Optimizations tab and enable the available optimizations.
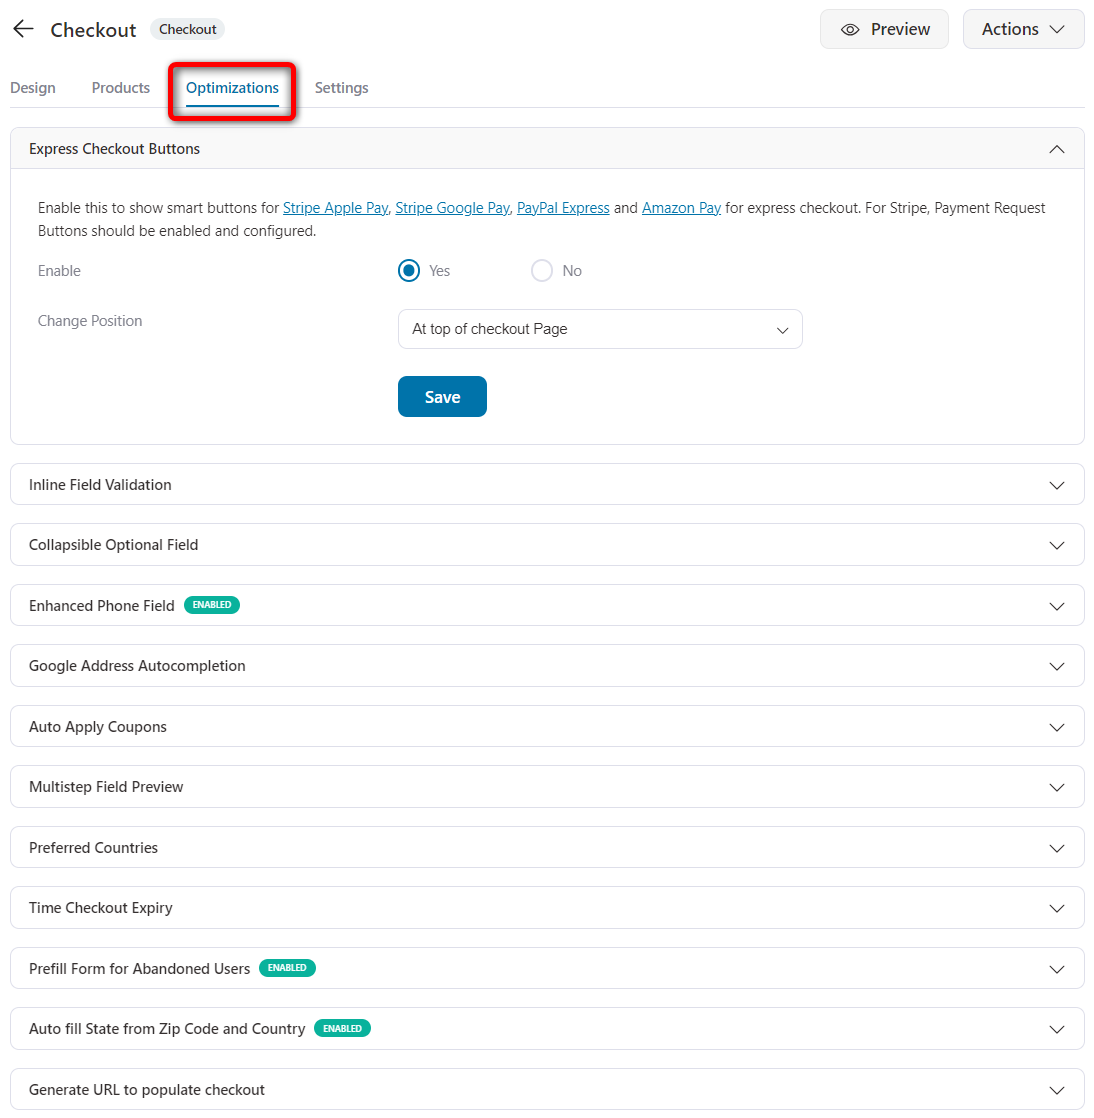
Save the changes when you’re done.
Step 5: Add AOV-boosting order bumps
A sales funnel allows you to offer relevant products to your users at different stages of the purchase process.
Adding AOV-boosting offers is easily possible with the FunnelKit Funnel Builder.
An order bump shows complementary product offers on the checkout page that can be added to the cart with just one click.
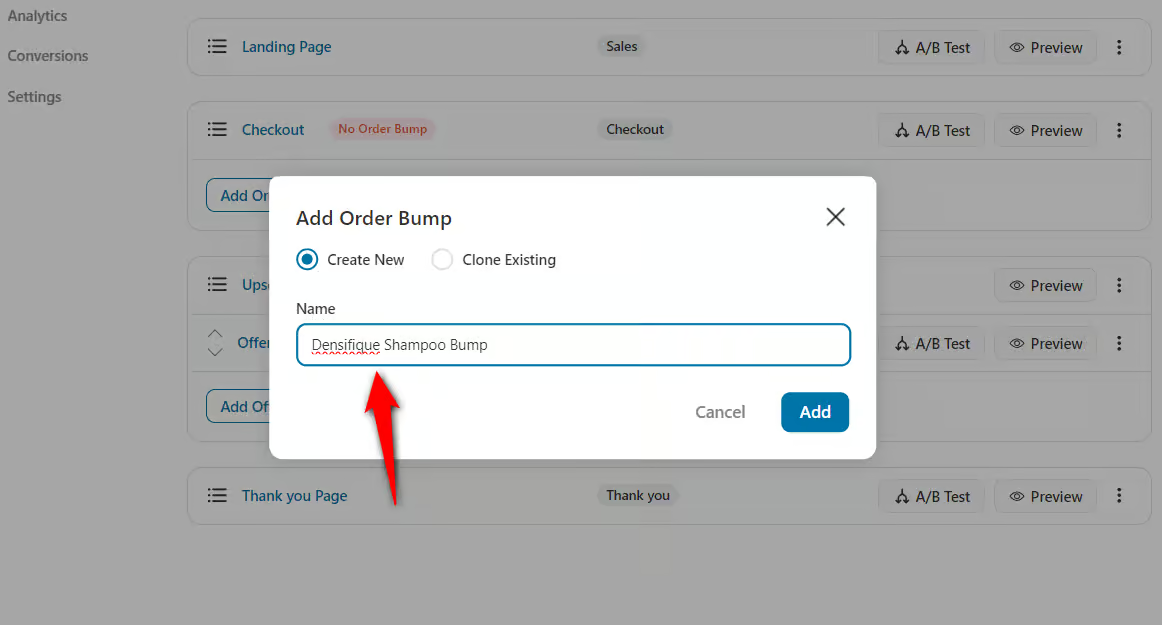
To add an order bump, click on the ‘Add Order Bump’ button.

Name your bump offer, and then click on it to begin editing.
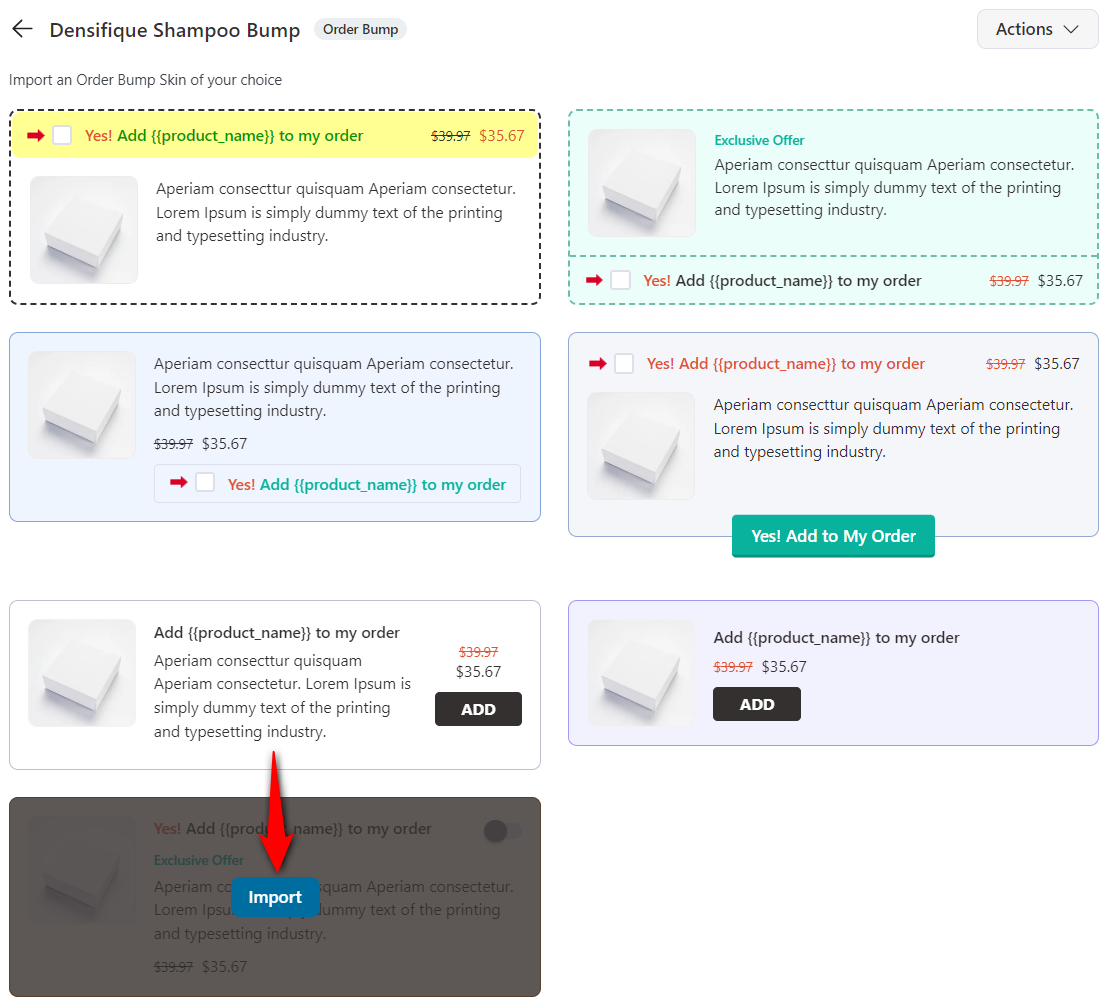
Next, import an order bump skin of your choice.
Now, you must search for and add a product to your bump. This product should complement your main product for better conversions.
You can even set its behavior and configure discounts from the Products tab.

Once you've decided on the product you wish to offer, click on the Design tab to style your Order Bump.
You can change the order bump’s skin, content, and style to make it on-brand.
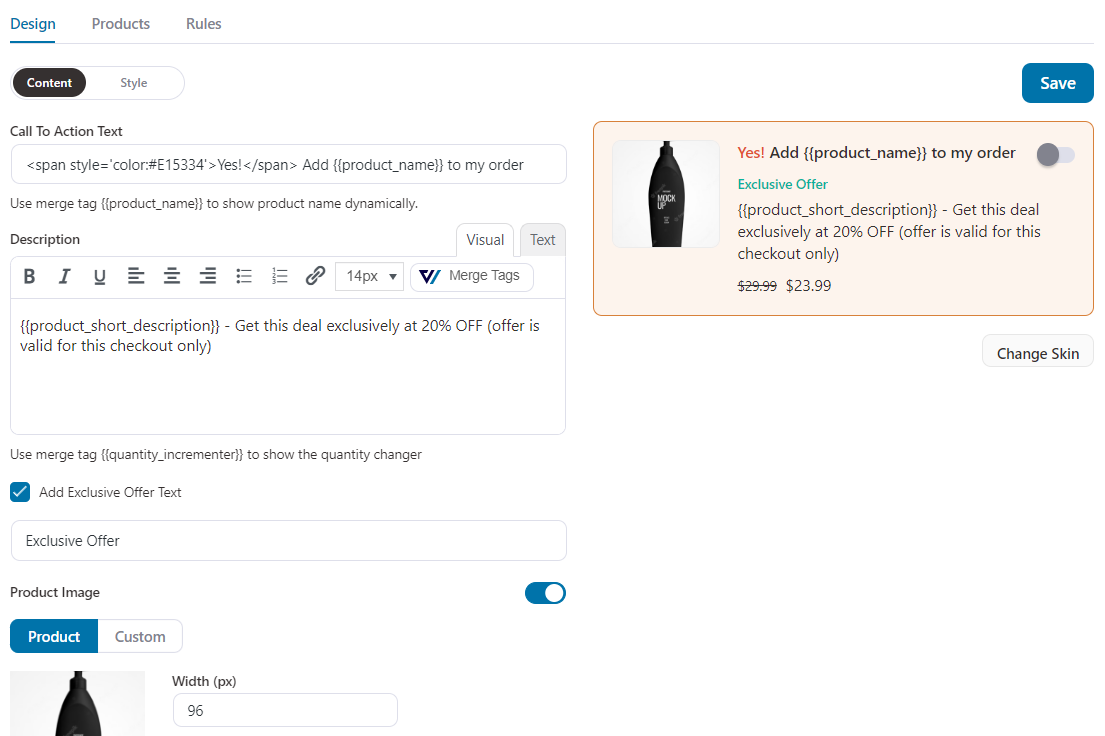
Save the design, and you're all set.
Step 6: Add one-click upsells to boost your order value
One-click upsells are the post-purchase offers presented to your customers after checkout and before the thank-you page.
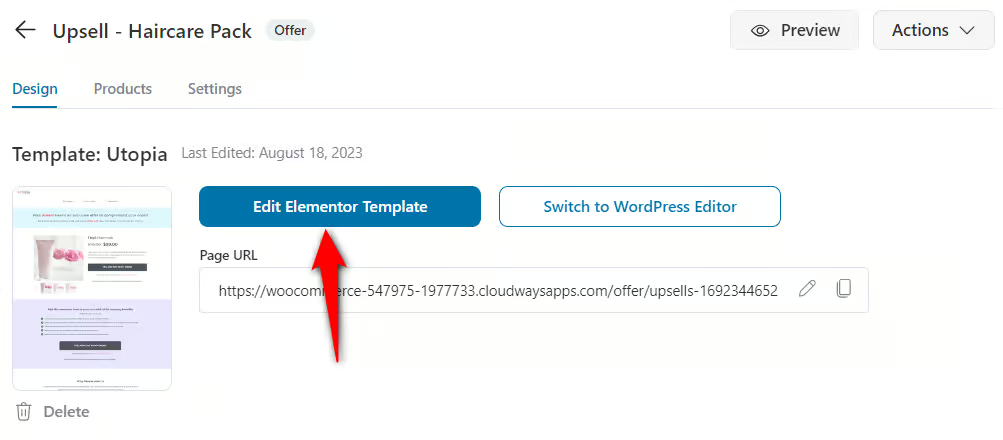
Like with other pages, click on the name of your one-click upsell page to start customizing it.
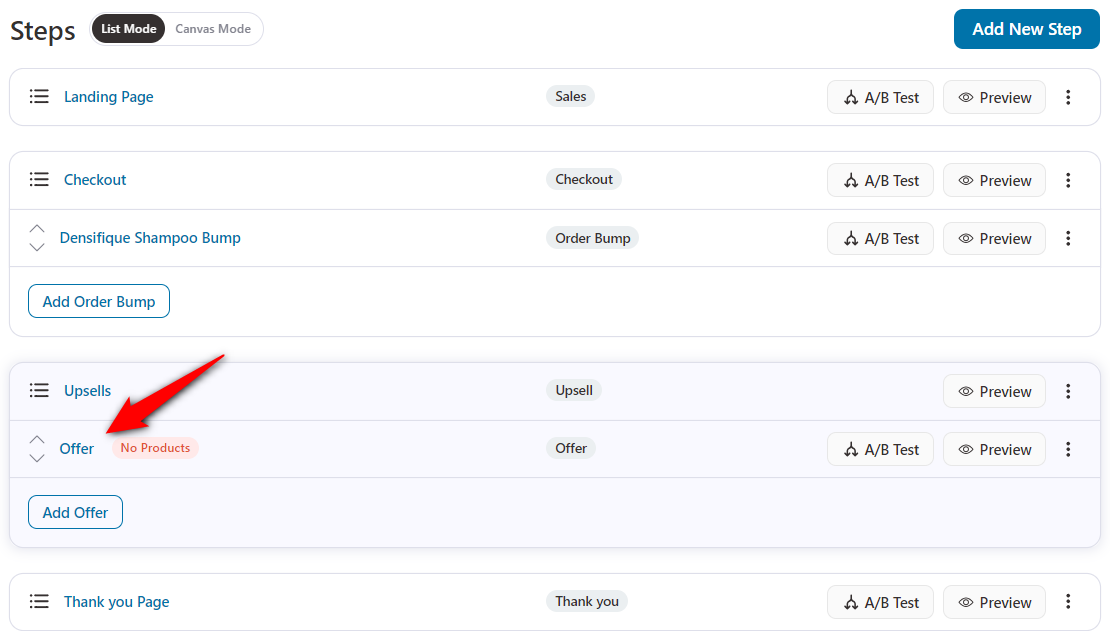
Next, add products to the upsell offer from the Products tab.
You can choose the product in the search bar. You can add variable products with variants, such as different colors and sizes.
Modify the quantity and discount details of the added product.
You can add more than one product to an offer and more than one offer to an upsell.
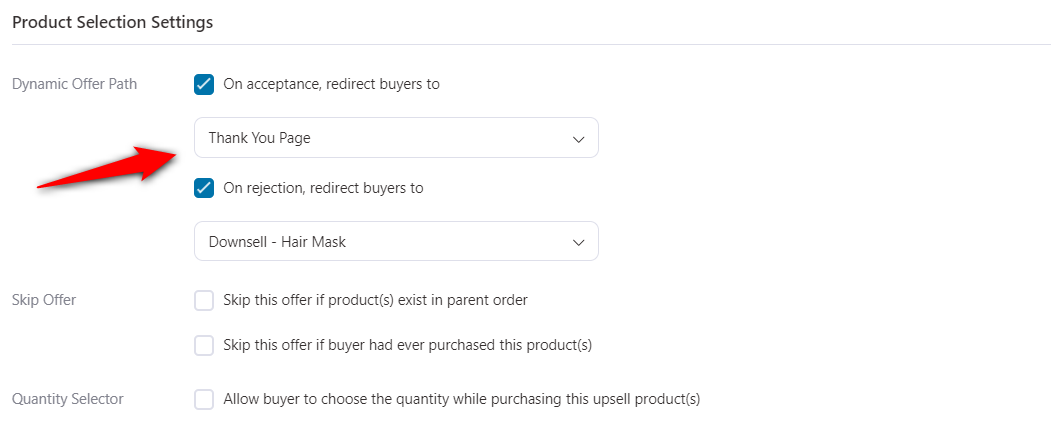
After adding multiple offers, interlink the offers using the Dynamic Offer Path.
This allows you to decide which page (a new offer or thank-you page) should be shown next, depending on whether your first upsell offer is accepted or rejected.
That's how you can offer a downsell to your shoppers with a WordPress sales funnel.
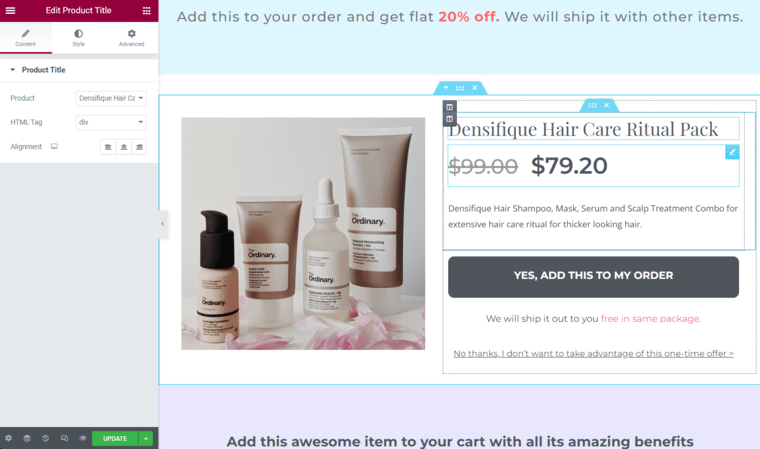
Under the Design tab, click on edit to customize the page in Elementor, just as you customized the sales and checkout pages.
There are 10 special widgets in total, which you can use to personalize the upsell offer page with your favorite page builder.
You can also apply rules to these offers to determine when a particular upsell offer is presented to a customer, and to change offer priority, order behavior, and more in settings.
Remember! You can add multiple bumps and upsell offers to your sales funnels.
Step 7: Customize your thank you page
A custom thank you page gives you an incredible opportunity to close the sale on a high note.
FunnelKit Funnel Builder lets you create beautiful order confirmation pages that you can customize as per your business needs.
Editing and customizing your thank you page is the same as you did with the other steps in your WordPress sales funnel.
Well done! You can create a high-converting sales funnel in WordPress with FunnelKit.
How to Track and Analyze Your WordPress Sales Funnels
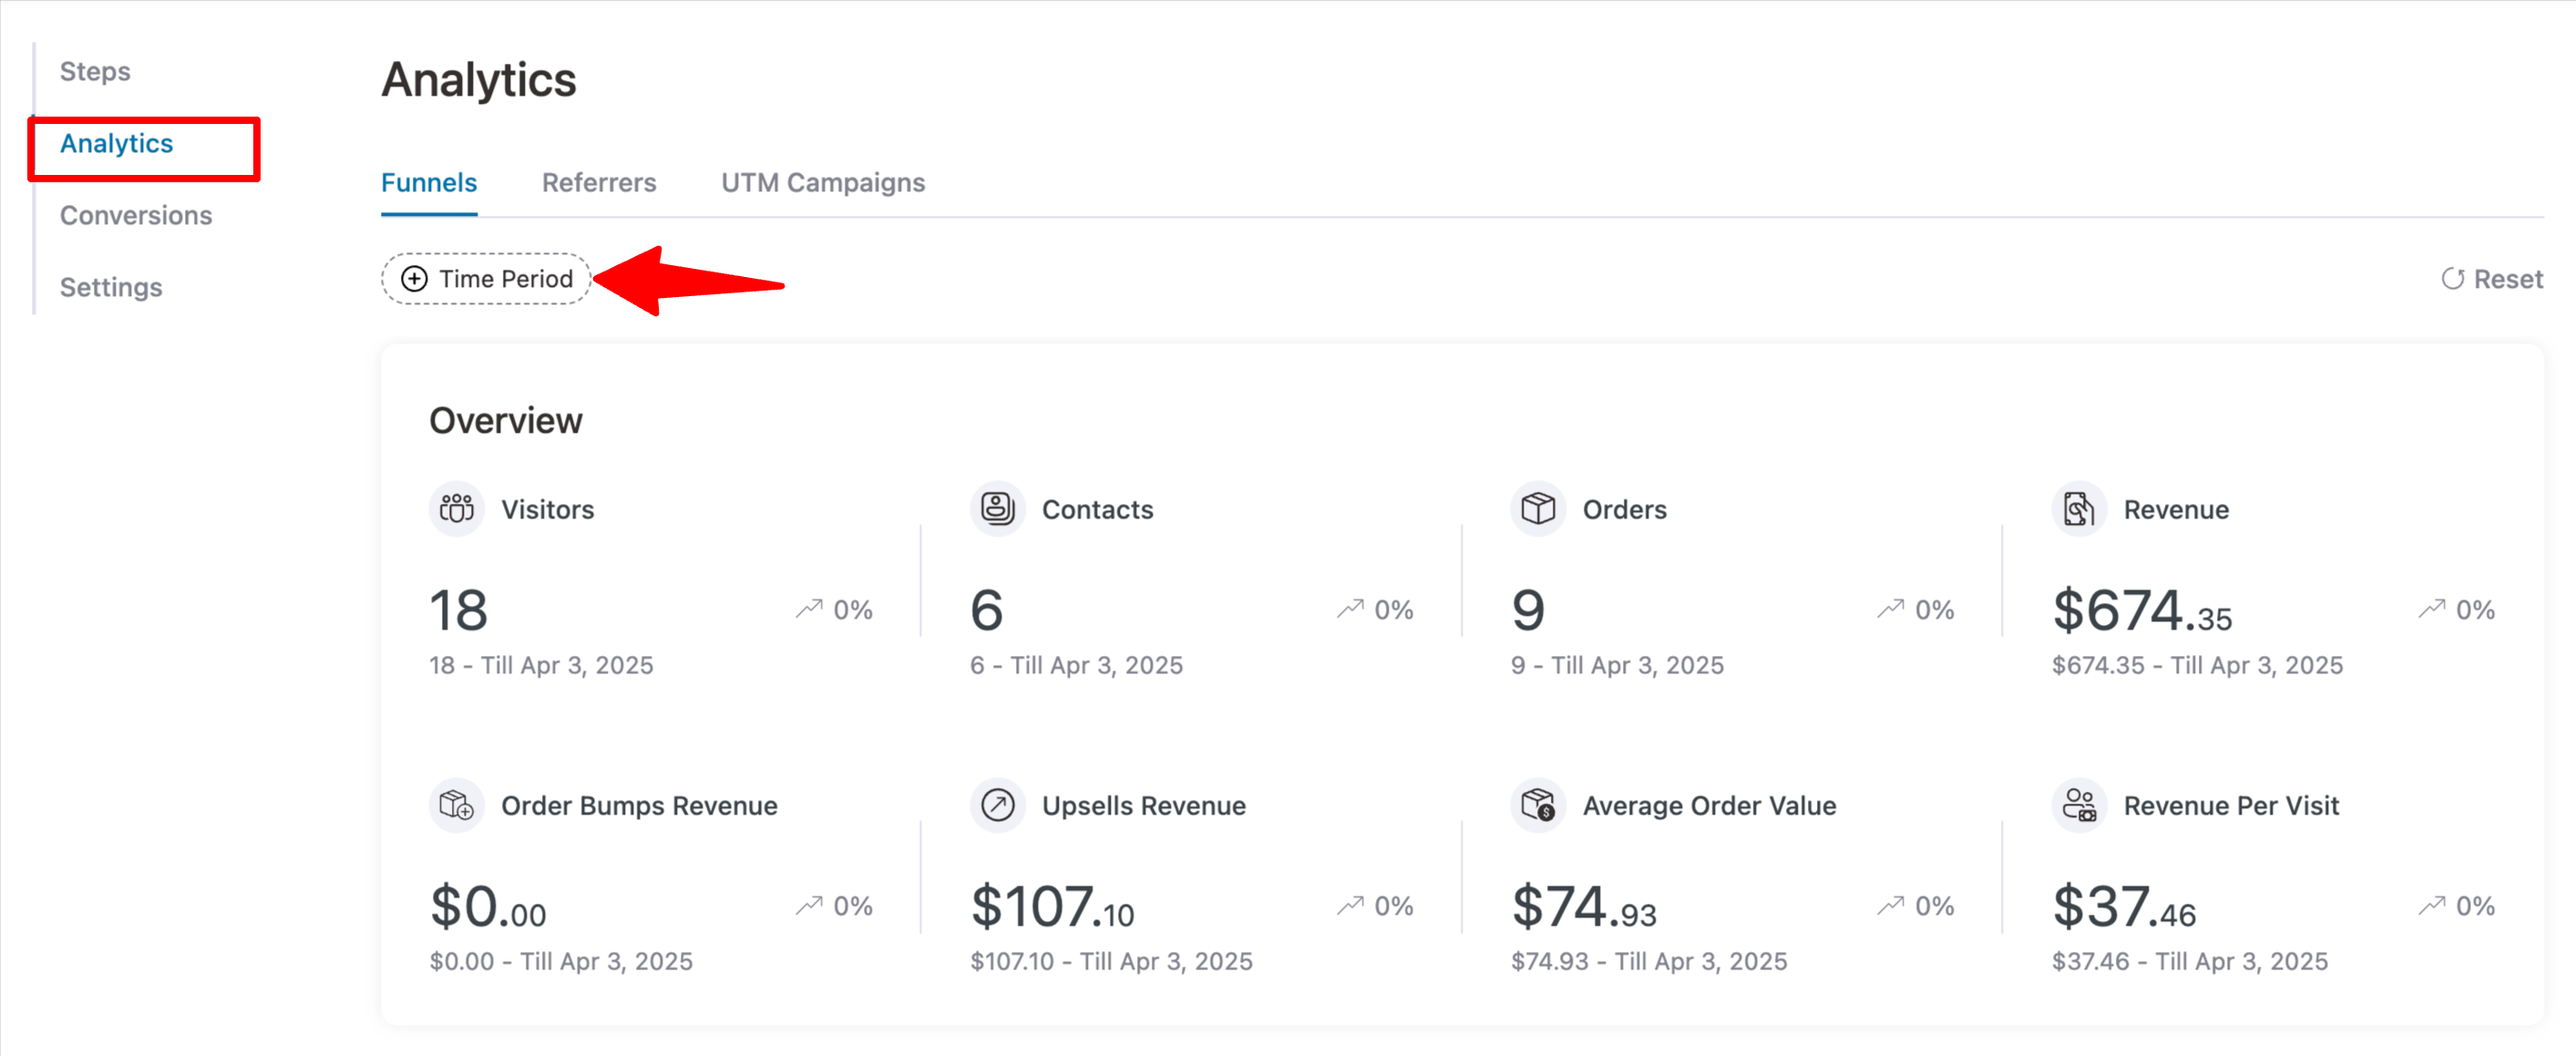
To track performance, go to your sales funnel and navigate to the Analytics tab.
Here, you can view detailed metrics, including Visitors, Contacts, Orders, Revenue, Order Bump Revenue, Upsell Revenue, Average Order Value, and Revenue Per Visit.
You can also set a custom time range to analyze performance for a specific period.
Next, you can move to the Referrers tab to find the source of your traffic and conversions.
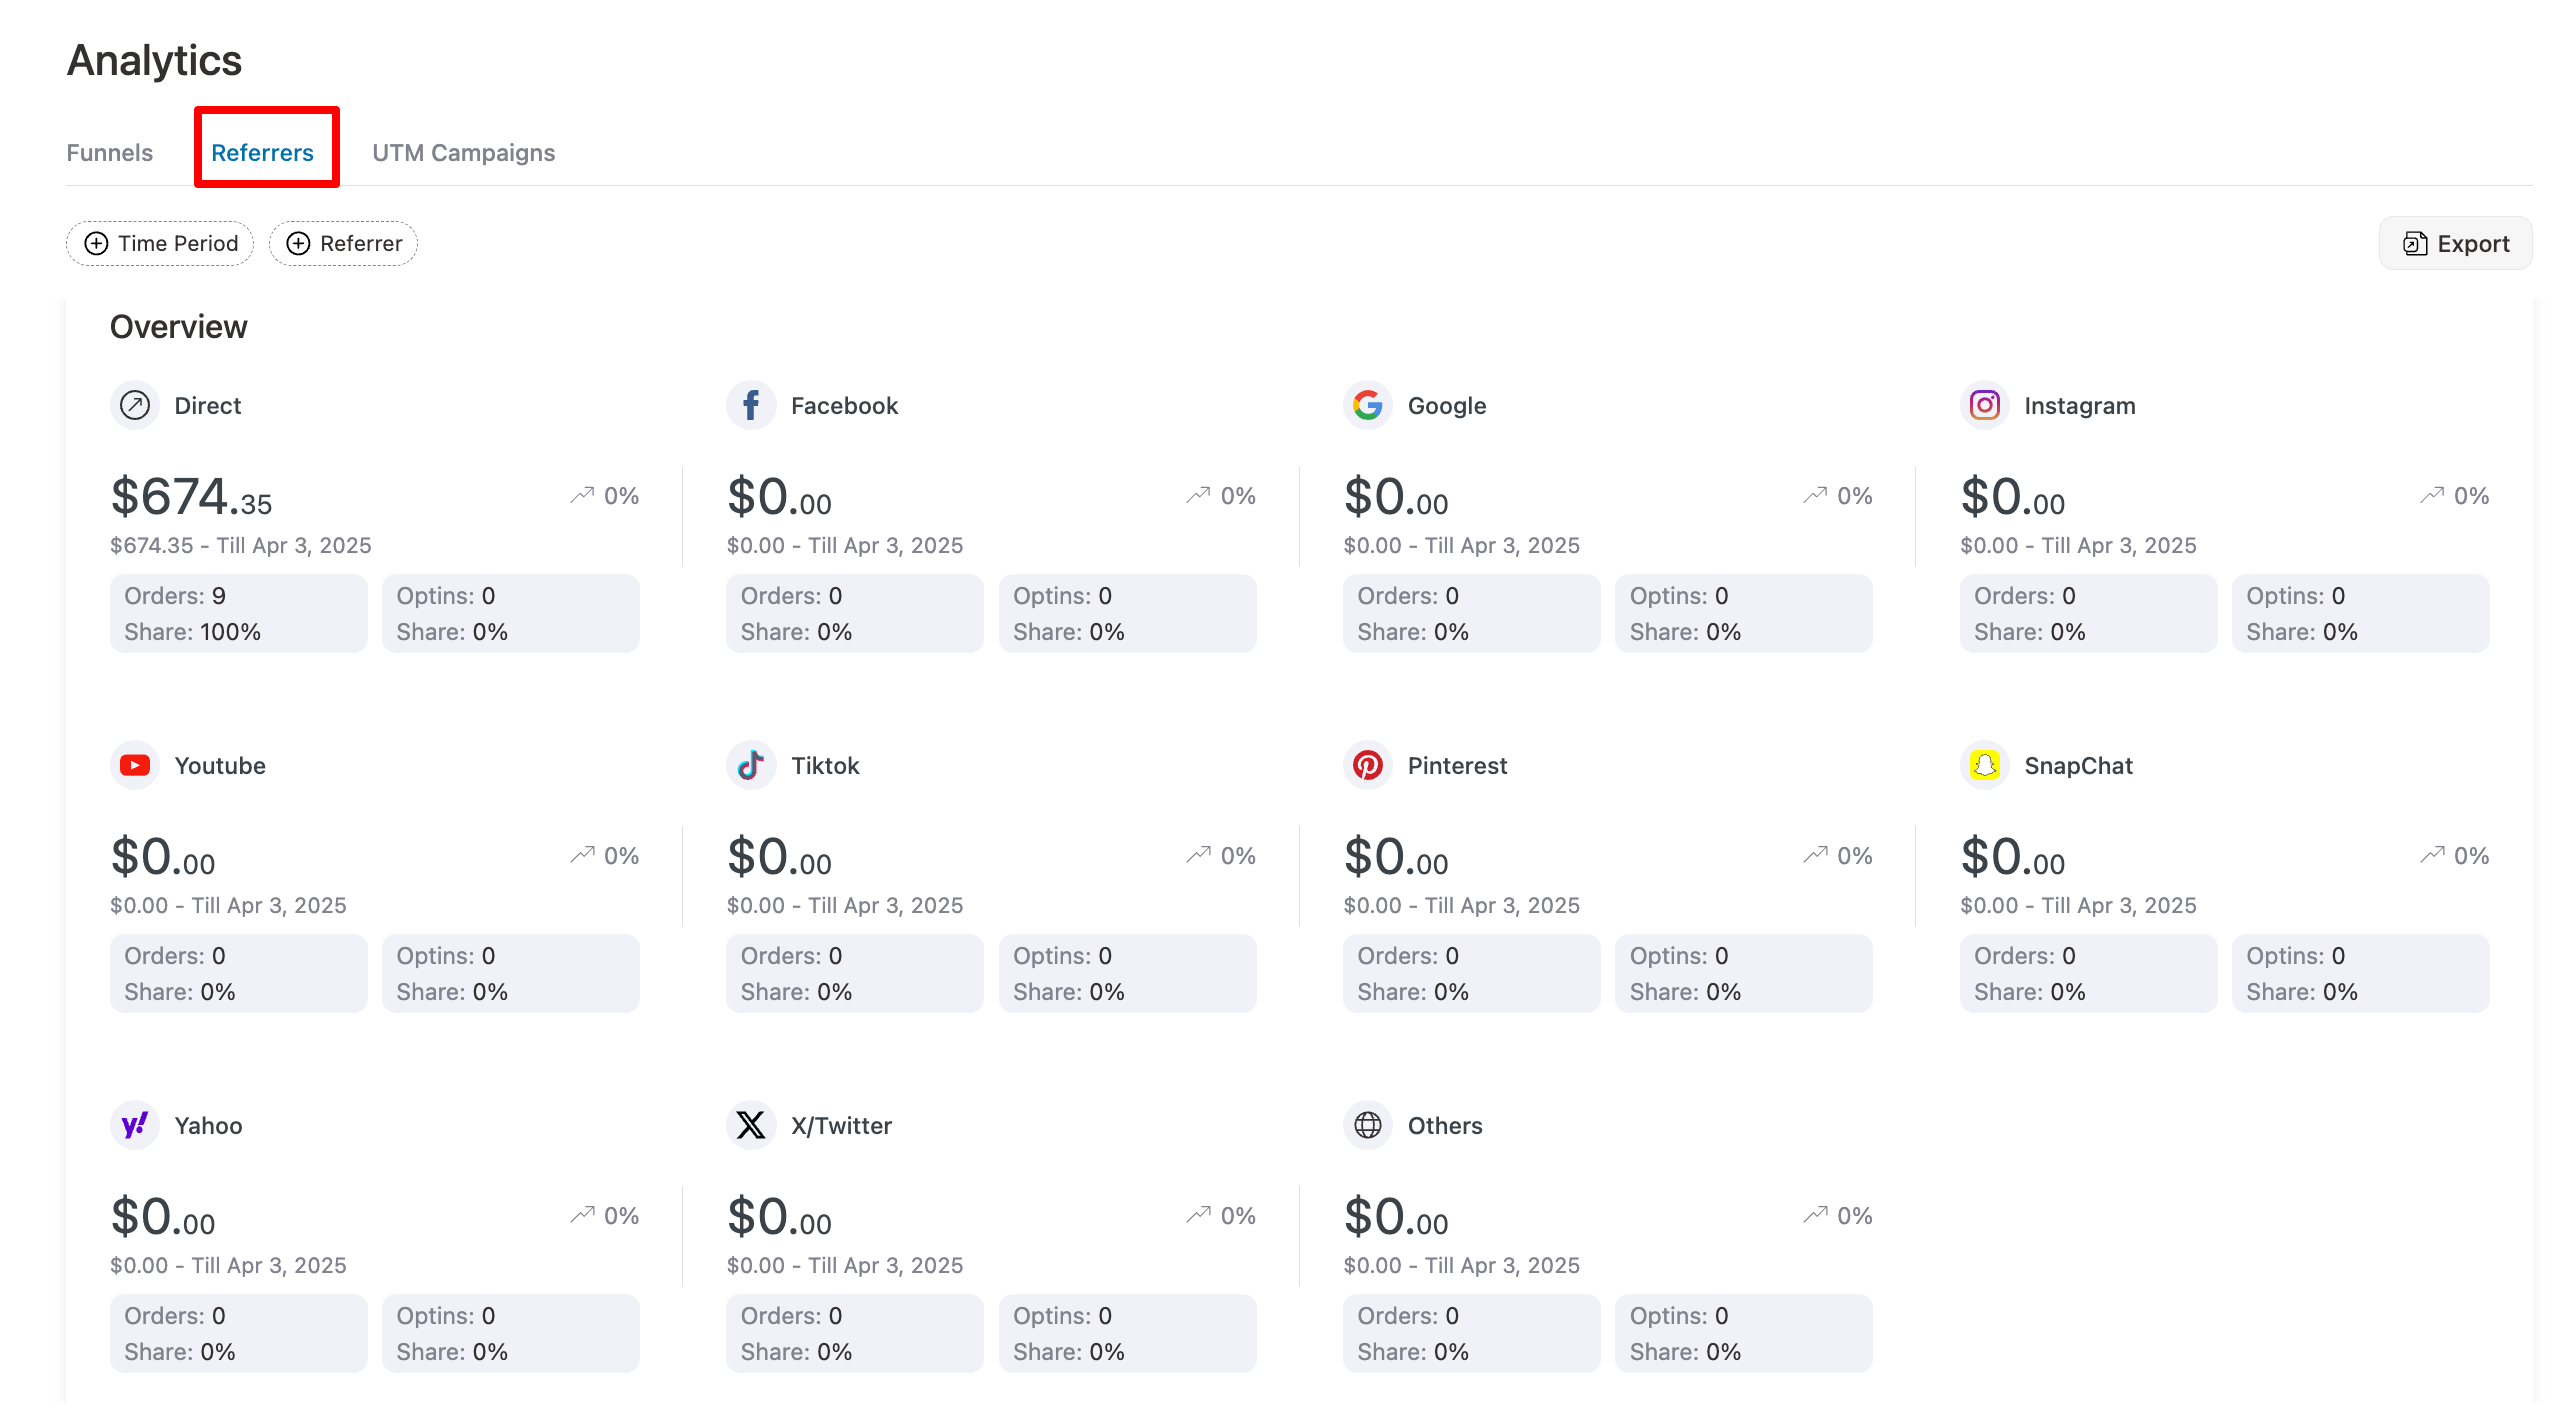
On the UTM Campaigns tab, you can find the UTM campaign, source, medium, term, etc.
Now to find all the conversions, move to the Conversion tab, where you can find detailed information such as Order ID, Name, Email, Phone, Date, Total Spent, Referrers, Device, UTM Campaign, UTM Source, UTM Medium, UTM Term, and Time to Convert.
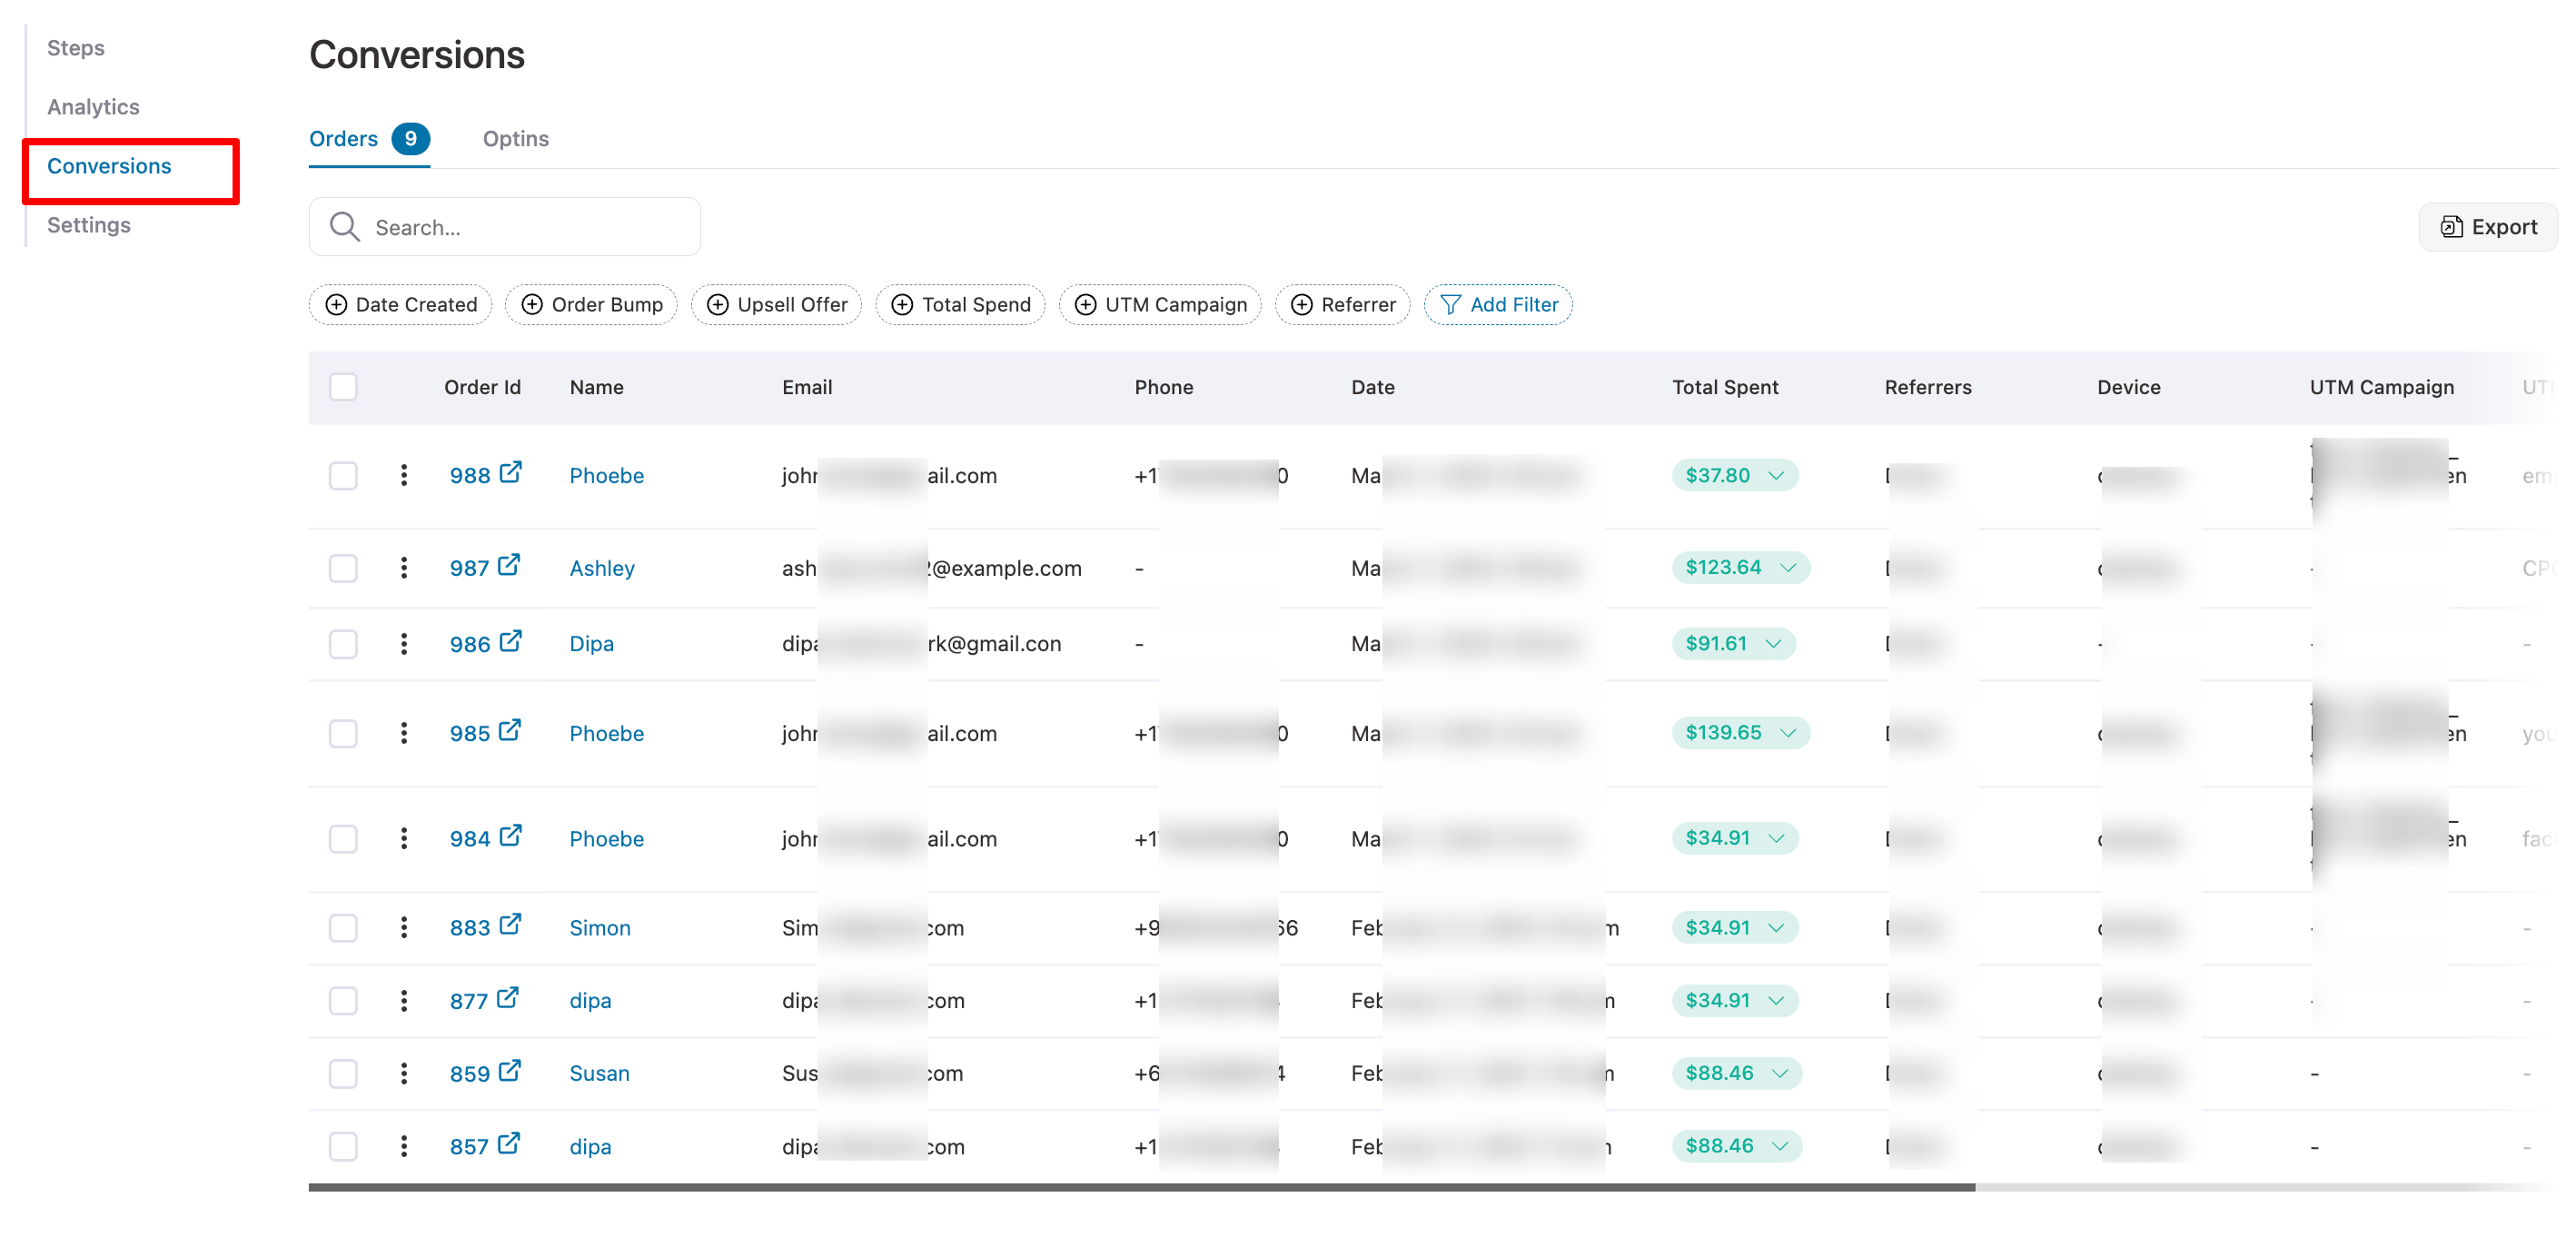
This is how you can track details of your WordPress sales funnels.
6 Proven Tips to Build and Optimize Your WordPress Sales Funnel
Creating a high-converting WordPress sales funnel requires effective design, optimization, and ongoing management.
Follow these best practices to ensure your sales funnels perform at their peak:
- Remove distractions from funnel pages
Remove the global header, footer menu, sidebar, and related-products sections from every funnel step. Each page should have exactly one job.
Use clear CTAs at each funnel stage to guide users to the next step.
- Use a one-page checkout
Multi-page checkouts kill conversions. A single-page checkout with smart defaults can lift completed orders by 20-30%.
- Add trust signals at the checkout
Money-back guarantee, security badges, real customer testimonials, and a visible phone number and email for support. Especially for first-time buyers.
Utilize social proof by adding reviews, testimonials, and real-time purchase notifications.
- A/B test sales funnel pages
The two highest-leverage tests on any sales page are the headline and how you frame the price (monthly vs. one-time, anchored to a higher regular price, payment plan options).
Perform A/B testing on landing pages, checkout pages, upsells, and email campaigns to improve results.
- Use conditional logic for upsells
Don’t show the same upsell to every buyer. Show different offers based on what they bought, cart value, or geography. Every major funnel plugin supports this in its Pro tiers.
- Leverage email marketing
Integrate email marketing with automated sequences to nurture leads, re-engage cart abandoners, and upsell customers.
Some essential email automations to set up are welcome sequences, abandoned cart recovery, post-purchase onboarding, and winback campaigns.
WordPress Sales Funnel Examples (By Business Type)
A funnel for an ebook looks nothing like a funnel for a high-ticket coaching offer. Here’s how the structure shifts by use case.
Ebook or digital product funnel
Lead magnet opt-in → tripwire offer ($5-20 ebook) → order bump (templates pack) → upsell (mini-course or membership) → thank-you with next-step offer.
Online course funnel
Free training opt-in → VSL sales page → checkout with payment plan options → order bump (workbook or templates) → upsell (1:1 coaching add-on) → thank-you with login.
eCommerce or physical product funnel
Sales page or category page → optimized one-page checkout with shipping calculator → order bump (related accessory) → one-click upsell (premium version or bundle) → thank-you with referral incentive.
Service or coaching funnel
Lead magnet → application page → calendar booking → confirmation email → discovery call → high-ticket offer presented live.
Membership funnel
Free trial opt-in → welcome sequence → conversion offer at trial end → annual upgrade upsell → retention automation.
Frequently Asked Questions (FAQs)
In this section, our experts have answered some of the most frequently asked questions about WordPress sales funnels.
WordPress is a content management system (CMS) primarily designed for building websites, blogs, and online stores. While WordPress doesn’t include built-in sales funnels, many plugins can help you create and manage sales funnels within your WordPress website.
FunnelKit is the best for both beginners and serious WooCommerce sellers wanting maximum revenue per visitor. OptimizePress is best if you want pages, funnels, and memberships in one tool. While SeedProd is best for designing pages.
A marketing funnel is a starting point for attracting potential customers by creating awareness and piquing interest in your product. Once prospects are aware and interested, they transition into the sales funnel. This stage is about converting interest into action.
Ranking organically on Google is tough due to competition and changing algorithms, while rising ad costs make it harder to turn a profit. A sales funnel helps WooCommerce businesses generate leads, drive conversions, and optimize to turn visitors into paying customers.
Here are some key reasons why you need a sales funnel strategy for your business:
- Guided consumer journey
A sales funnel directs potential customers through their buying journey, helping you tailor your marketing approach to their needs and preferences.
- Segmentation and personalization
By understanding the funnel stages, you can segment your audience and deliver personalized content to boost conversions.
- Increased conversions
Well-designed funnels engage visitors with the right content and offers, increasing the chances of a sale. Techniques like lead magnets, upsells, and order bumps help convert visitors.
- Qualified leads
Sales funnels help you identify high-quality leads, so you can focus your efforts on converting them.
- Long-term growth
Funnels not only drive immediate sales but also help nurture leads over time, fostering customer loyalty.
The best part about having your sales funnel run on WordPress is that you don't have to pay high monthly costs to be on a SaaS-based funnel builder.
Here are five powerful sales funnels you can build in WordPress using FunnelKit Funnel Builder to drive leads and sales:
- Opt-in funnel: Offer a free lead magnet in exchange for email addresses, then nurture leads with follow-up emails and pitch a paid product.
- Free plus shipping funnel: Give away a product for free while charging for shipping. It's an effective way to attract new customers.
- Webinar funnel: Use live or recorded webinars to deliver value, build trust, and promote your product during or after the session.
- Challenge funnel: Run multi-day challenges (e.g., 5-day fitness or cooking challenge) to engage users and build credibility.
- Self-liquidating funnel: Sell a low-cost offer to recover ad spend, then drive profit through upsells, bundles, or backend offers.
Are You Ready to Leverage the Power of WordPress Sales Funnels?
A WordPress sales funnel is for anyone selling online, which acts as the major difference between a website that earns and a website that just exists.
And don't worry, you don't need to build it perfectly on day one. Start with one funnel, one offer, one upsell. Get the flow live, drive traffic, and optimize the step with the biggest drop-off. Iterate from there.
If you're brand new to funnels, install FunnelKit Funnel Builder free, import a template and publish your sales funnel this week.
If you’re already on WooCommerce and want to extract maximum revenue per visitor, FunnelKit Pro has all the toolkit to build a profitable business. If you want any other tool, give SeedProd or WPFunnels a try.
Whichever you pick, the most important step is to lauch your funnel. The funnel that converts at 1% and exists beats the perfect funnel that lives in your head.
Editorial Team
June 25, 2026Are you looking to create an effective WordPress lead-generation system that produces highly qualified leads? Generating a consistent stream of qualified leads is the most effective way to drive sales...
Editorial Team
June 24, 2026There are three reliable ways to connect WooCommerce to Google Analytics 4: the official Google Analytics for WooCommerce plugin, Google Tag Manager via GTM4WP, or FunnelKit's built-in pixel tracking. The...
Editorial Team
June 24, 2026Finding a WordPress sales funnel builder that actually works is harder than it looks. Most plugins on the market do one or two things well and quietly skip the rest....


