
Your checkout template is the most important step in a customer’s buying journey. A slow, confusing, or generic template can cause abandonment and lost revenue.
WooCommerce’s default checkout template isn’t optimized for conversion—it adds friction, lacks flexibility, and doesn’t smoothly guide customers to the finish line.
A custom checkout template transforms this experience. With the right adjustments, it becomes a seamless, high-converting page that boosts sales and enhances user experience.
We will share how you can replace the default WooCommerce checkout template with a custom one. No coding is required.
Let’s get started.
Table of Contents
- 1 Why a Well-Designed WooCommerce Checkout Template Matters?
- 2 Key Elements of an Optimized WooCommerce Checkout Template
- 3 The Best Plugin to Customize Your WooCommerce Checkout Template and Boost Conversions
- 4 How to Customize Your WooCommerce Checkout Template Without Writing Any Code?
- 4.1 Step 1: Create a store checkout
- 4.2 Step 2: Customize the design of your WooCommerce checkout template
- 4.3 Step 3: Customize the fields of your WooCommerce checkout form
- 4.4 Step 4: Optimize your WooCommerce checkout page
- 4.5 Step 5: Customize your order confirmation page
- 4.6 Step 6: Activate your checkout page
- 5 Frequently Asked Questions (FAQs)
- 6 Choose the Best WooCommerce Checkout Template for Your Store!
Why a Well-Designed WooCommerce Checkout Template Matters?
Checkout is the final and most crucial stage in the customer’s buying journey. Yet, a slow, confusing, poorly designed checkout process can push buyers away—costing you revenue.
According to Baymard Institute, 70% of online shoppers abandon their carts before purchasing, resulting in an estimated $260 billion in lost sales annually.
This is where the well-optimized WooCommerce checkout template can help you reduce cart abandonment and drive more sales.
An optimized WooCommerce checkout template focuses on the following factors:
Key Elements of an Optimized WooCommerce Checkout Template
Let’s look at the key factors of an optimized WooCommerce checkout page:
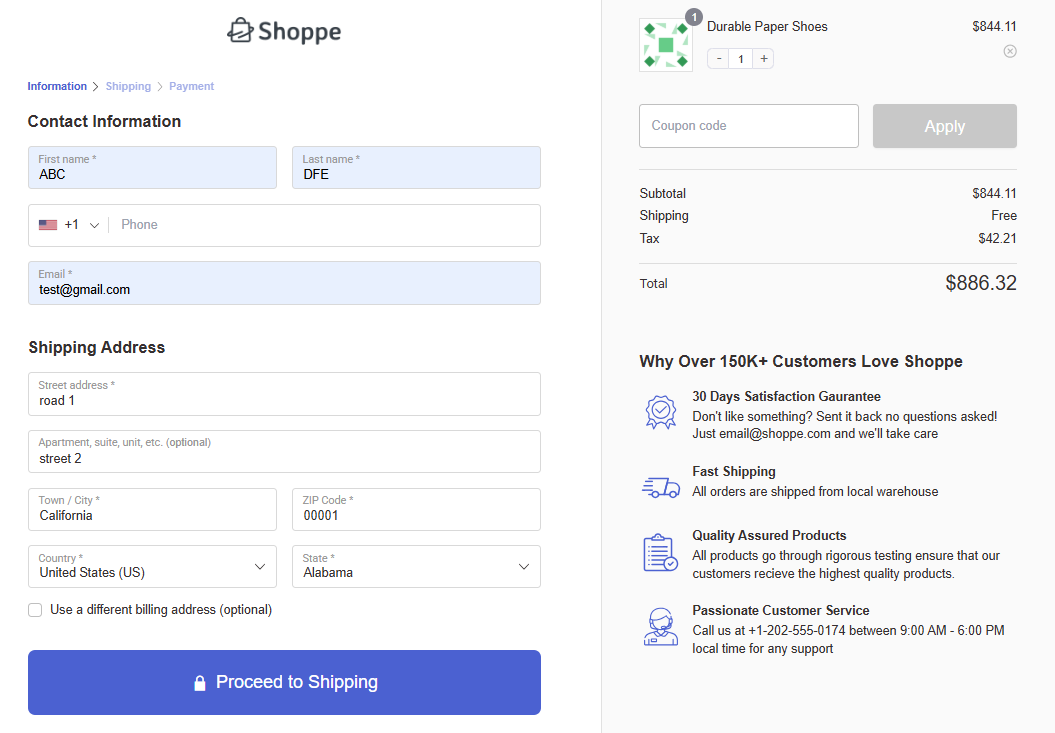
1. Simple and clutter-free design
Your checkout page should be easy to navigate so that users find it comfortable to make the purchase faster. Use ample white spaces, clear font style, and intuitive icons to create a seamless experience for your shoppers.
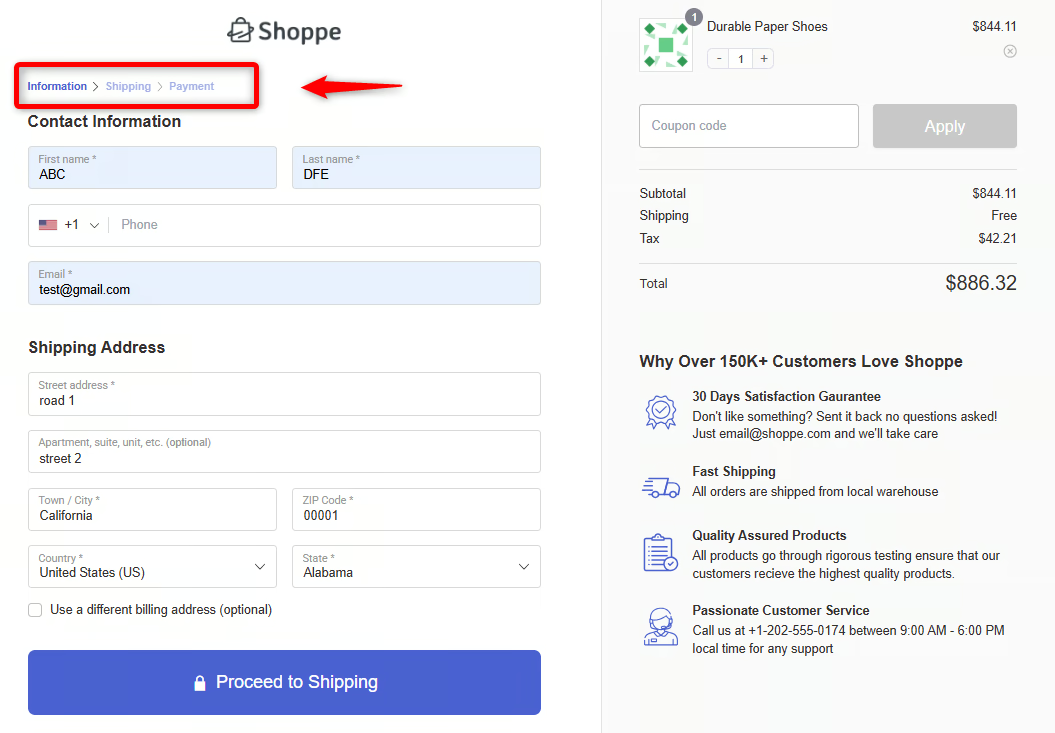
2. Progress indicators
Displaying progress indicators is crucial to keep shoppers informed about their shopping journey.
Thus, a step-by-step progress bar indicating the checkout page's different stages helps users understand where they are and how much more work is needed.
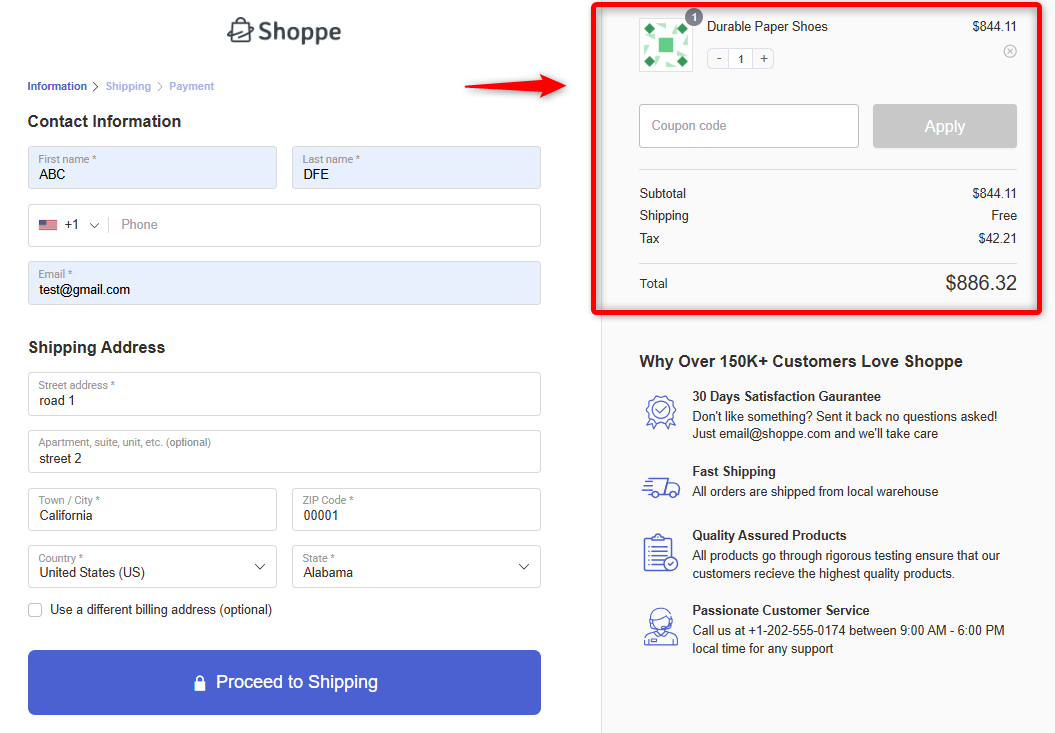
3. Order summary and item updation
The mini shopping cart section on your WooCommerce checkout template reminds users of what they are about to buy.
Your checkout page should allow users to view, edit the quantities, or even remove the items in their cart.
4. Multiple payment options
Offering different payment options to your shoppers is crucial to get users to place their orders.
Include popular payment gateways such as Paypal and Stripe, which give many credit and debit card methods, express checkout, and local payment options.

5. Mobile responsive design
With the increasing number of mobile users, it is important to ensure that your WooCommerce checkout template is optimized for mobile responsiveness.
Ensure your checkout page adapts to different sizes and resolutions and provides a seamless experience across all devices.
6. Minimal form fields
Keeping your checkout form fields minimal lets you streamline the process and reduce user friction.
Asking users to fill out minimal form fields on your WooCommerce checkout form helps you enhance the overall user experience and increase conversions.
Let’s say you sell digital products. You can remove shipping address-related fields for a seamless checkout process.
👉 There are 20+ other high-converting elements to create a custom checkout page. Read about those in our WooCommerce checkout optimization blog post.
The Best Plugin to Customize Your WooCommerce Checkout Template and Boost Conversions
FunnelKit’s Funnel Builder is WordPress's most powerful sales funnel builder plugin. It lets you design and customize your opt-in pages, sales landing pages, checkouts, order bumps, one-click upsells, thank-you pages, and more.
Here are a few reasons why FunnelKit will be your best bet in designing a custom checkout template:
- Pre-designed WooCommerce checkout templates
FunnelKit is a perfect WooCommerce checkout manager plugin that gives you a wide array of templates that can be imported and customized the way you want.
You get different kinds of templates to match your needs.
Let’s say you are a digital course seller; FunnelKit has some sleek templates to help you sell digital products.
Apart from that, there are:
- Physical product templates
- WooCommerce one-page checkout
- Multi-step checkouts
- Embedded order forms
- Shopify-style checkout templates and more.
You get irresistible WooCommerce checkout templates for all your needs.
- Works with all page builders
FunnelKit integrates with popular page builders such as Elementor, Divi Builder, Oxygen, Bricks, and Gutenberg.
Customizing your checkout page gives you access to two widgets: Checkout Form and Mini Cart.
These widgets/modules make it easy to customize your WooCommerce checkout template the way you want.
In addition, you can customize and design your checkout page using shortcodes with any of the other page builders.
- Checkout form customization
FunnelKit offers you the highest level of customization in its checkout form.
With FunnelKit’s checkout field editor, you can add, edit, and delete sections and fields in the checkout form.
It allows you to rearrange the fields on your checkout form using drag-and-drop functionality, simplifying it.
This way, you can edit your checkout form fields and give your customers the best buying experience.
- Modern checkout page optimization
With modern checkout page enhancements, you can optimize your store for a quick purchase process.
FunnelKit’s Funnel Builder has a wide array of optimization options available.
You can enable express checkout, address auto-complete, multi-step field preview, auto-apply coupon codes, and more.
- Built-in A/B testing
FunnelKit provides you with a built-in A/B testing feature that allows you to A/B test the components in your sales funnels.
You can create multiple variations of your checkout page templates and split-test all the elements to find which one works best.
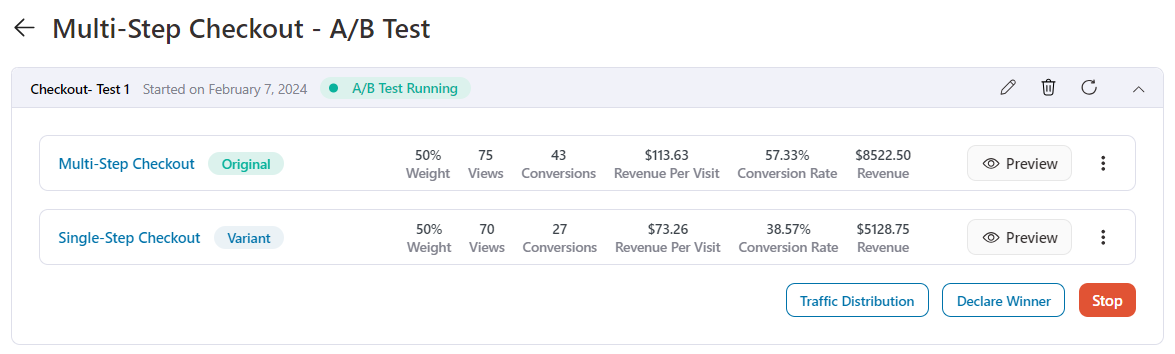
Track the real-time data to see how your A/B tests are performing. Once you have enough data, you can declare a winning variant and improve your conversion chances.
How to Customize Your WooCommerce Checkout Template Without Writing Any Code?
We will use the FunnelKit Funnel Builder to customize the WooCommerce checkout template.
First, install and activate the plugin (free and Pro). Get a copy of FunnelKit’s Funnel Builder by clicking on the button below:
👉 Refer to our documentation to install and activate FunnelKit on your WordPress website.
Follow the instructions given below to customize your WooCommerce checkout template without the code:
Step 1: Create a store checkout
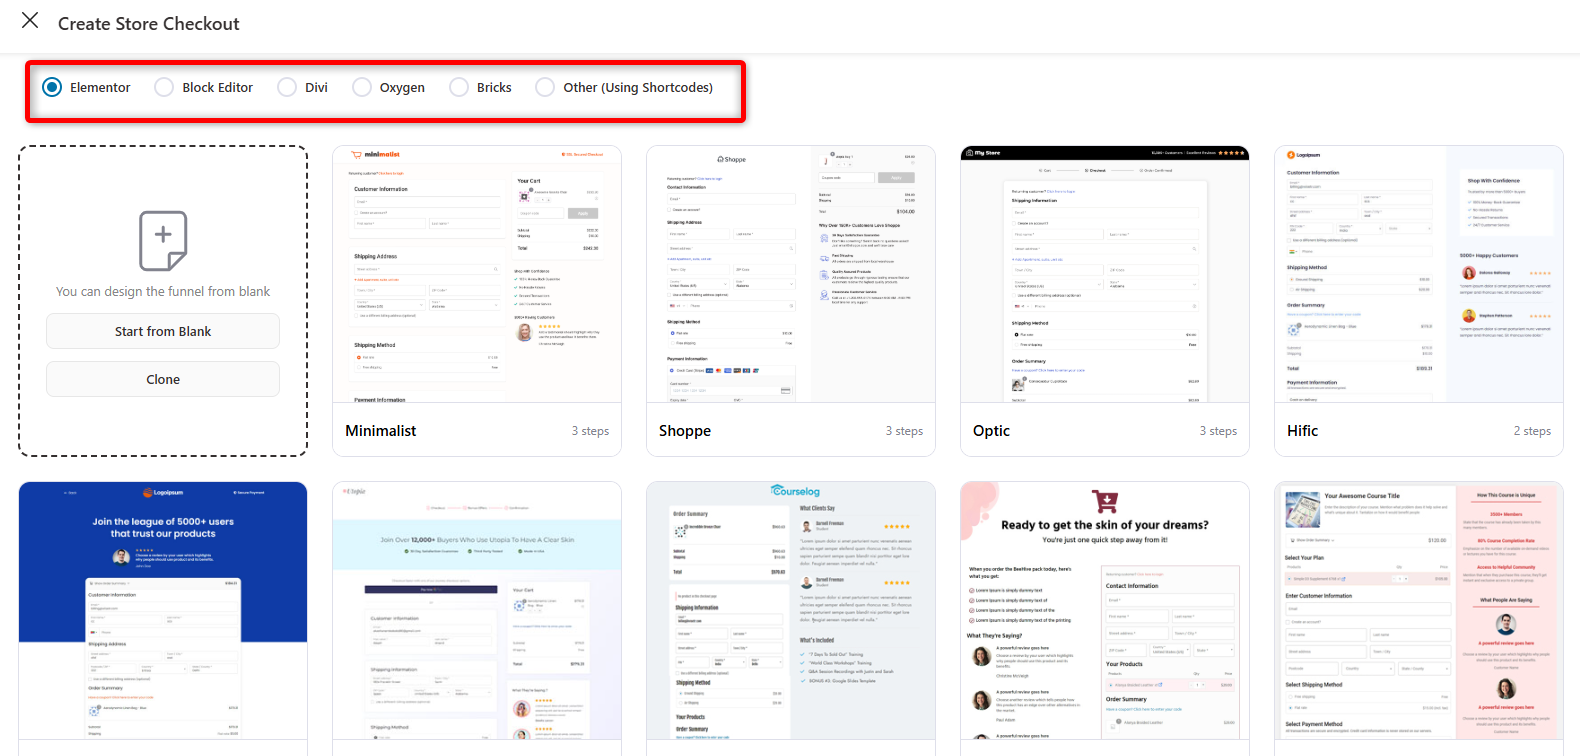
Go to FunnelKit ⇨ Store Checkout and hit the ‘Create Store Checkout’ button.
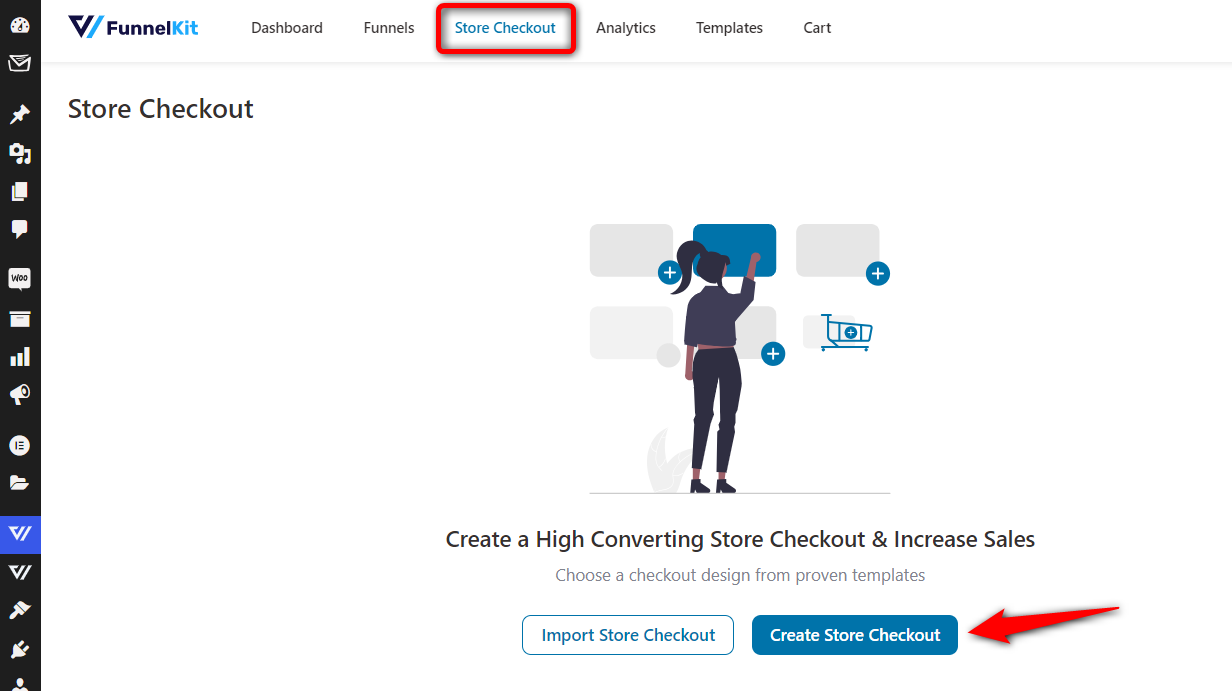
It’ll take you to the templates screen.
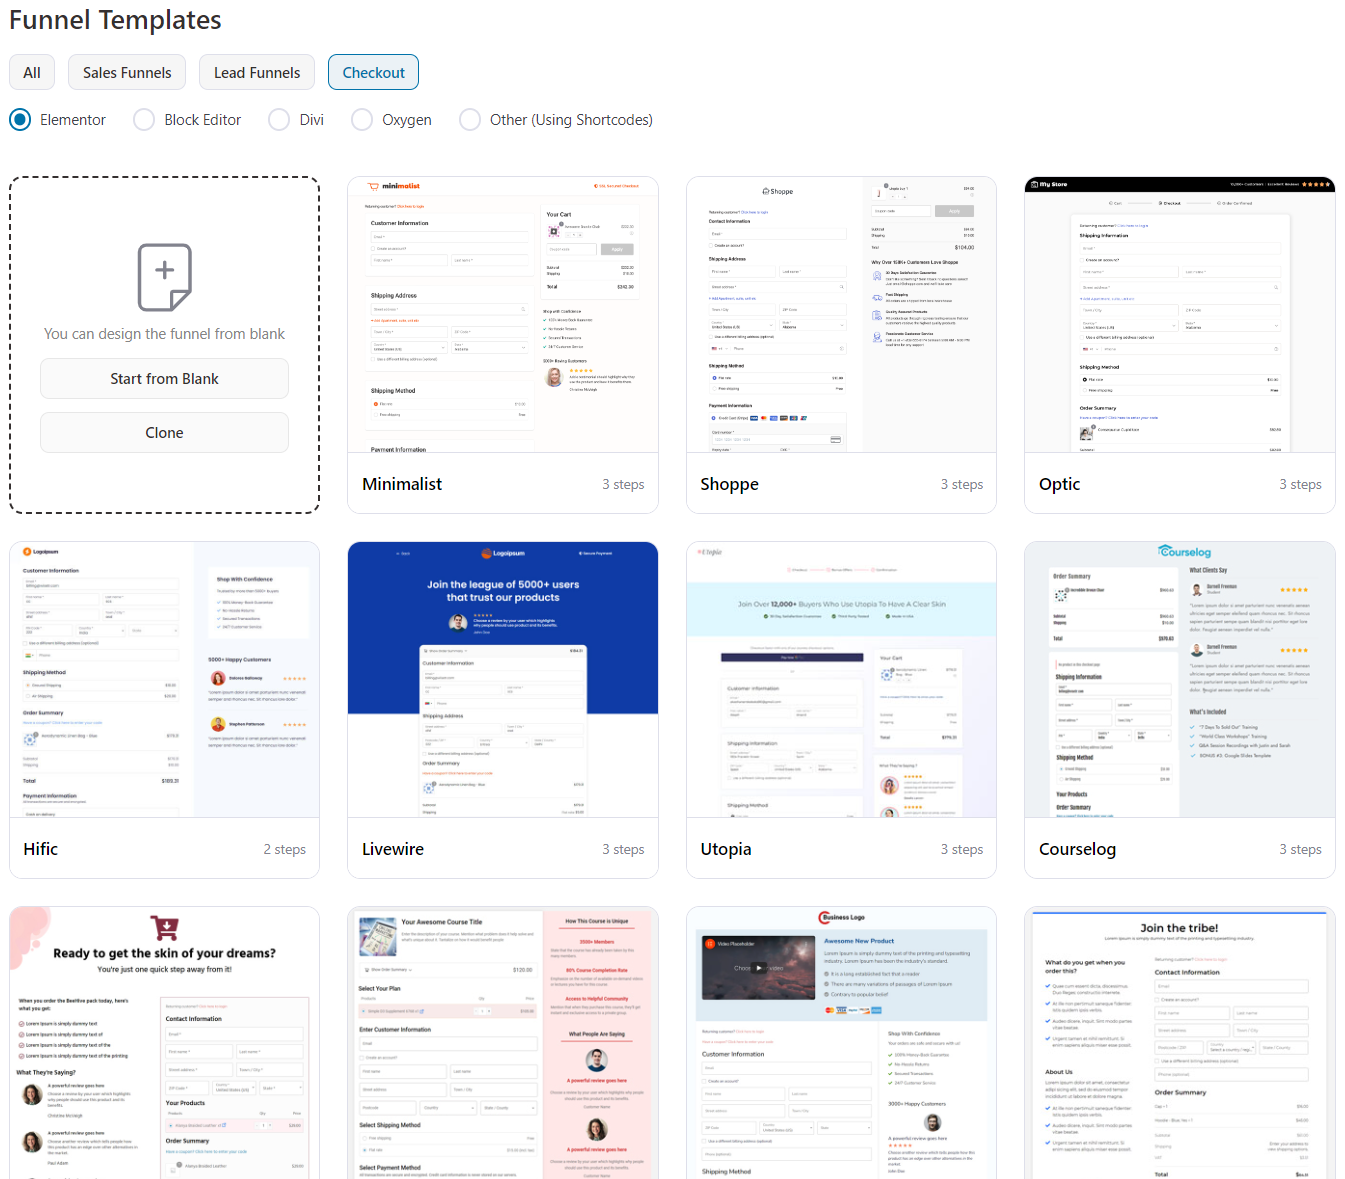
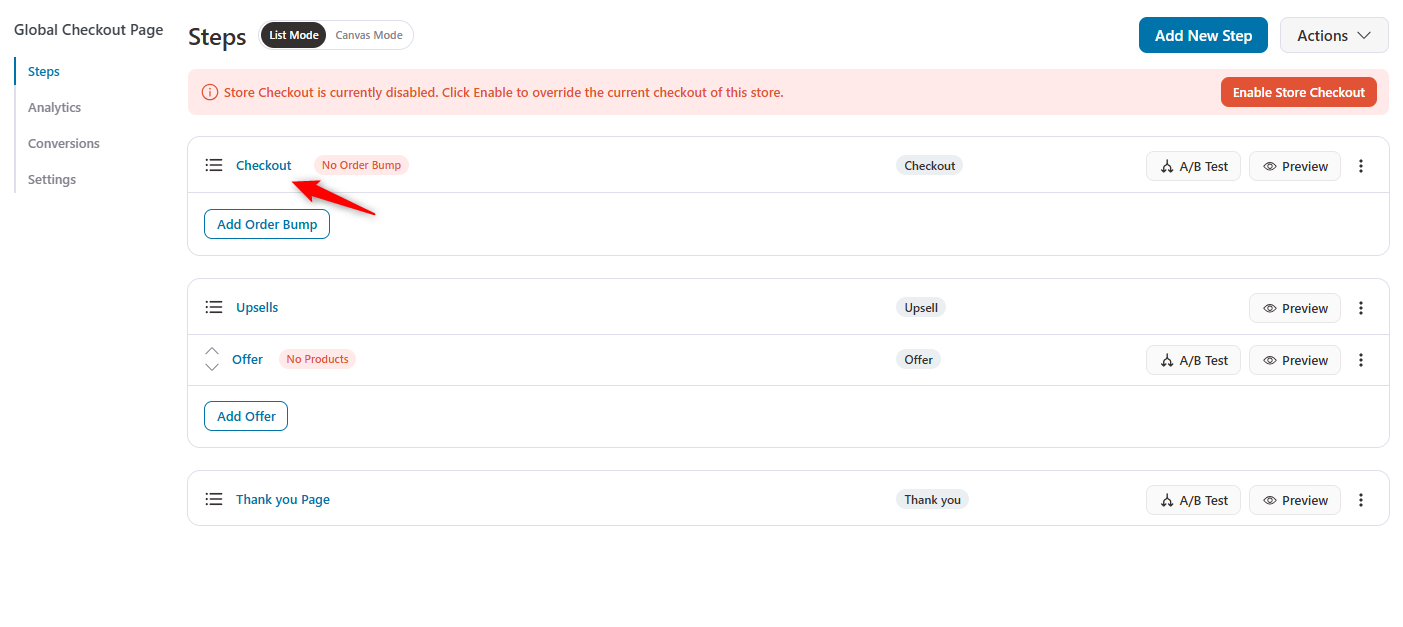
Click on the ‘Checkout’. Here, you’ll be shown the templates for your store checkout page. FunnelKit’s store checkout will replace the default WooCommerce checkout page.
When users move from the product page to the cart page to the checkout, they’ll be shown a custom WooCommerce checkout page template.
You can even make them skip the cart page and move directly to the checkout for a seamless buying experience.
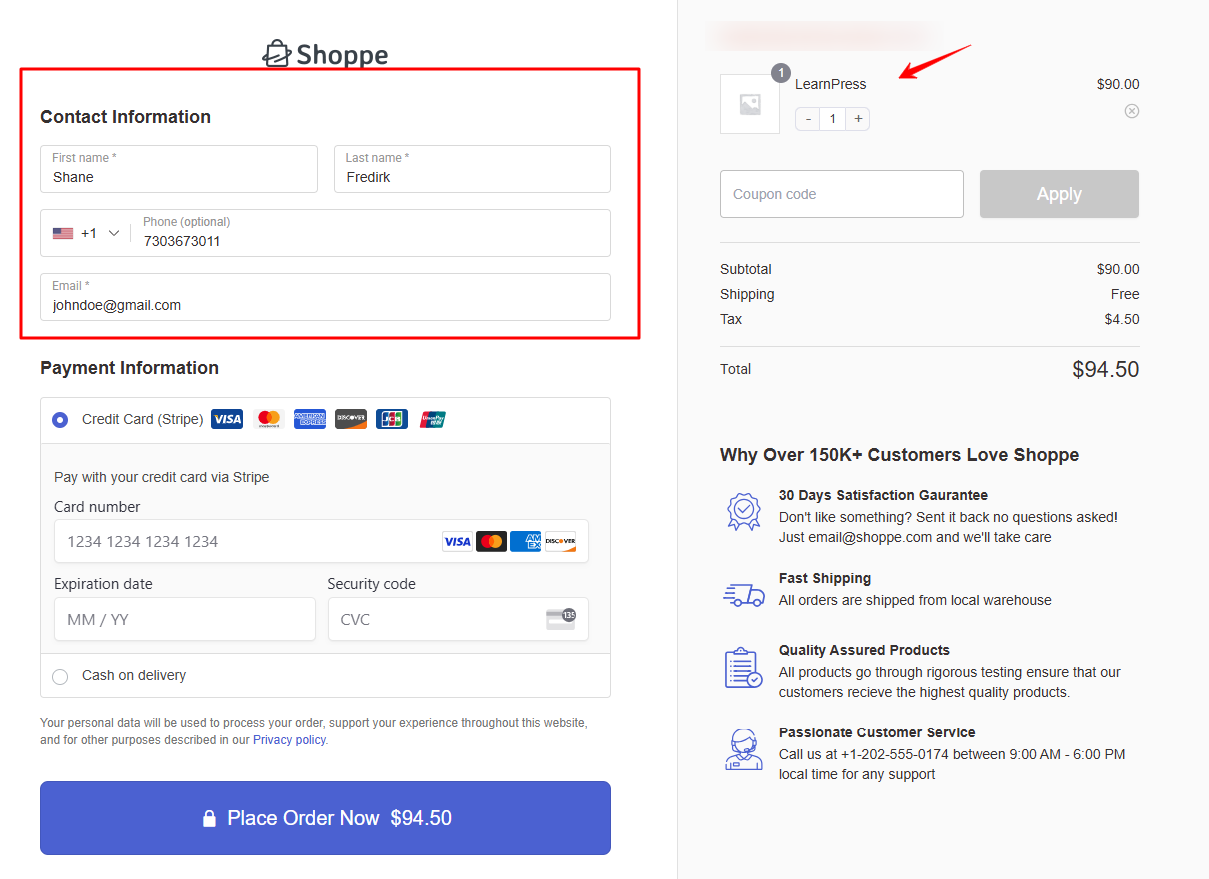
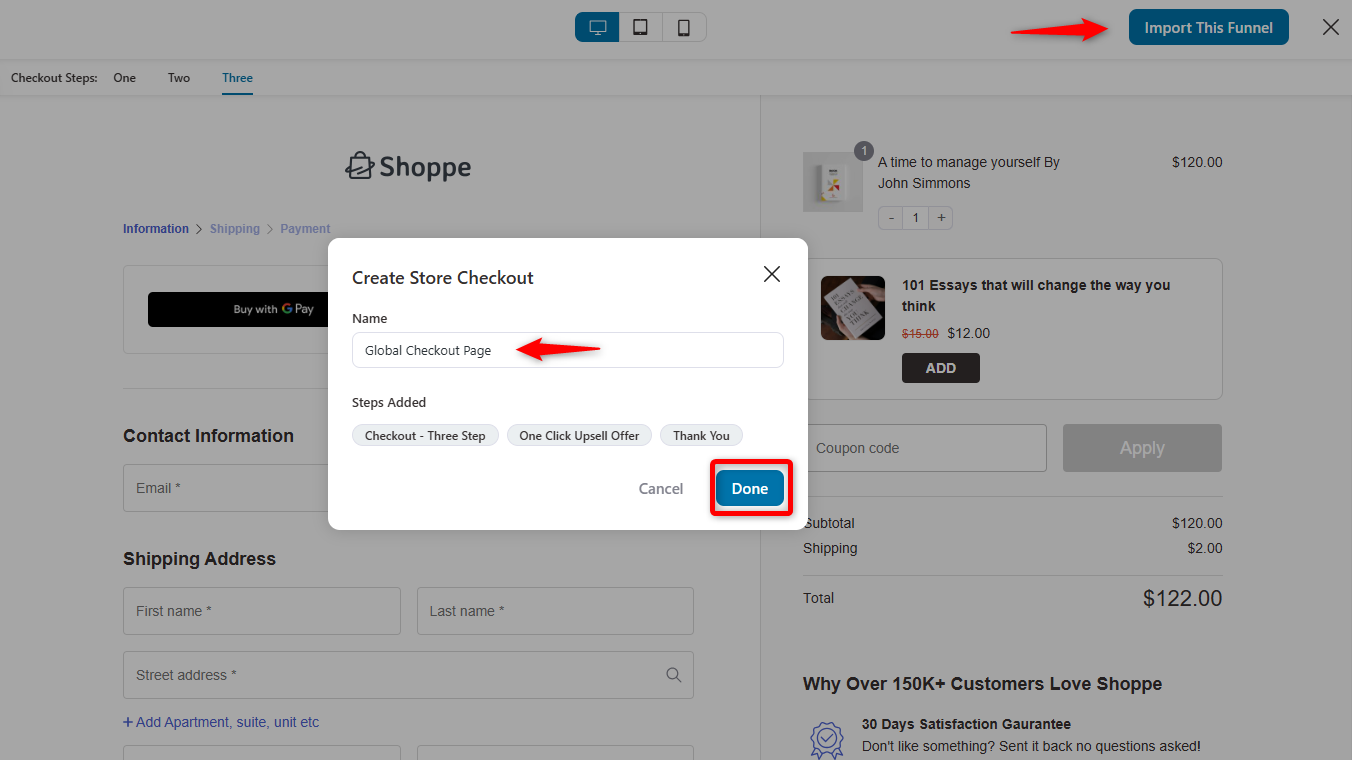
Choose your preferred page builder and hit the ‘Preview’ button next to the template you like. We are going with ‘Elementor’ and the ‘Shoppe’ template.
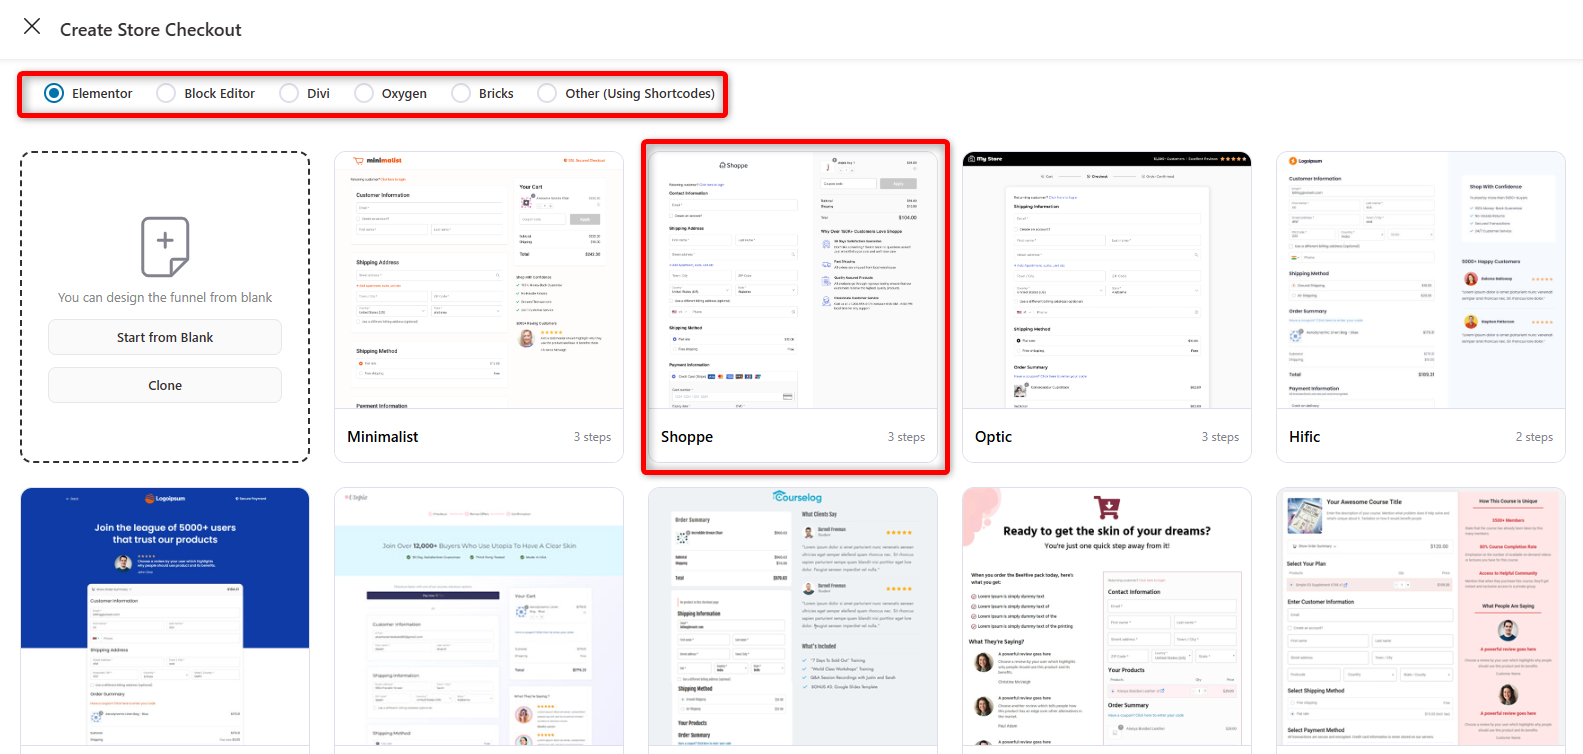
Here, you can specify if you want your checkout page to be one-step or multi-step.
We’ll set it to three-step and hit the ‘Import This Funnel’ button. Once done, enter the name of your store checkout funnel.
Clicking on ‘Done’ will create a new funnel.
Step 2: Customize the design of your WooCommerce checkout template
Click on the name of the checkout page to start customizing it.
You’ll reach the Design tab of your checkout page. To customize the design of your WooCommerce checkout template, click on ‘Edit Elementor Template.’
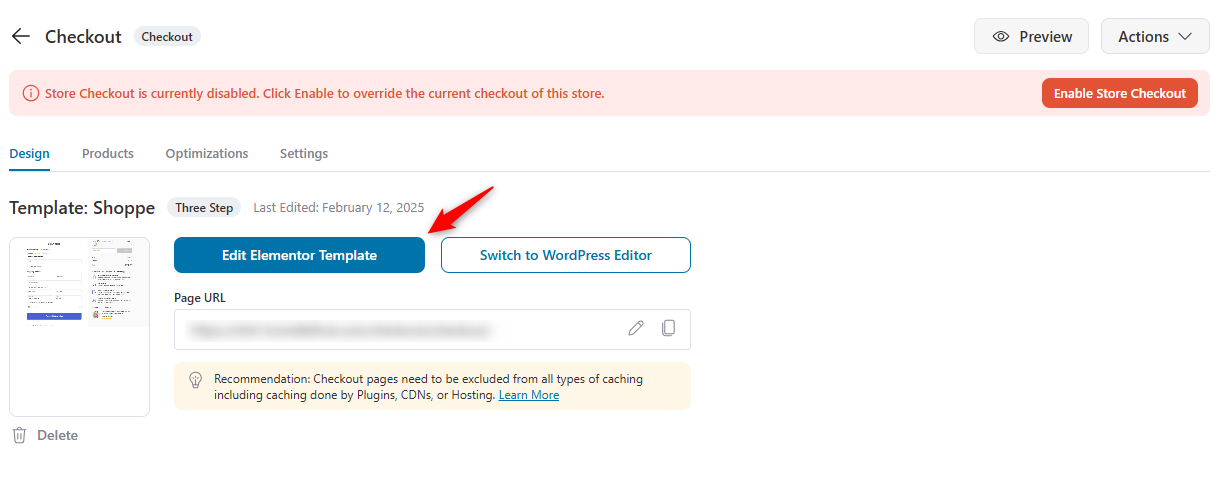
Your checkout page template will load in Elementor (our preferred page builder).
You can customize the logo on the checkout page by clicking on it and uploading it from the sidebar options.
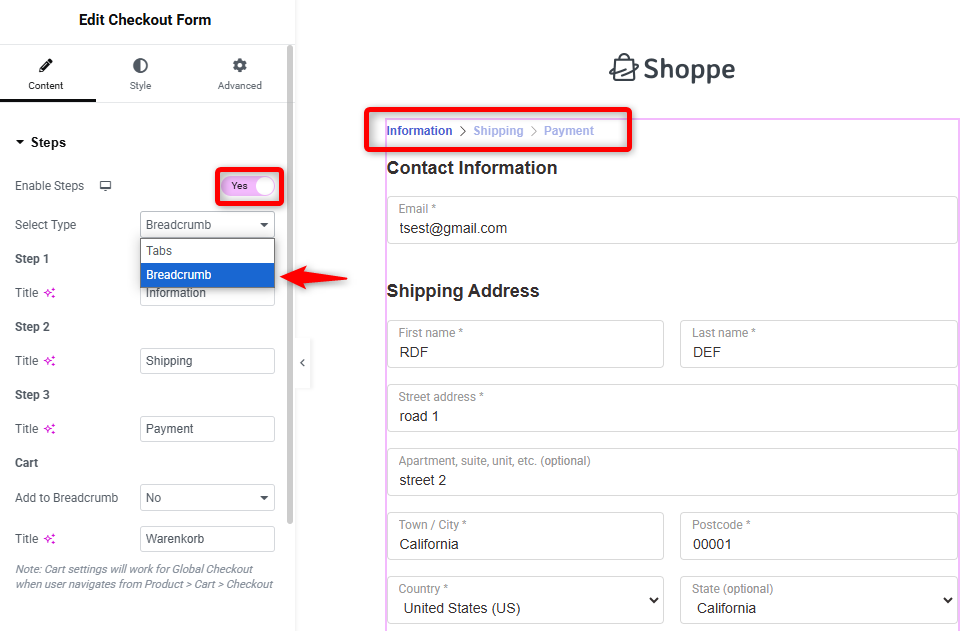
Add a progress indicator by clicking on the checkout form.
Then, under steps, select the type, specify it as ‘Breadcrumb,’ and edit the steps' headings.
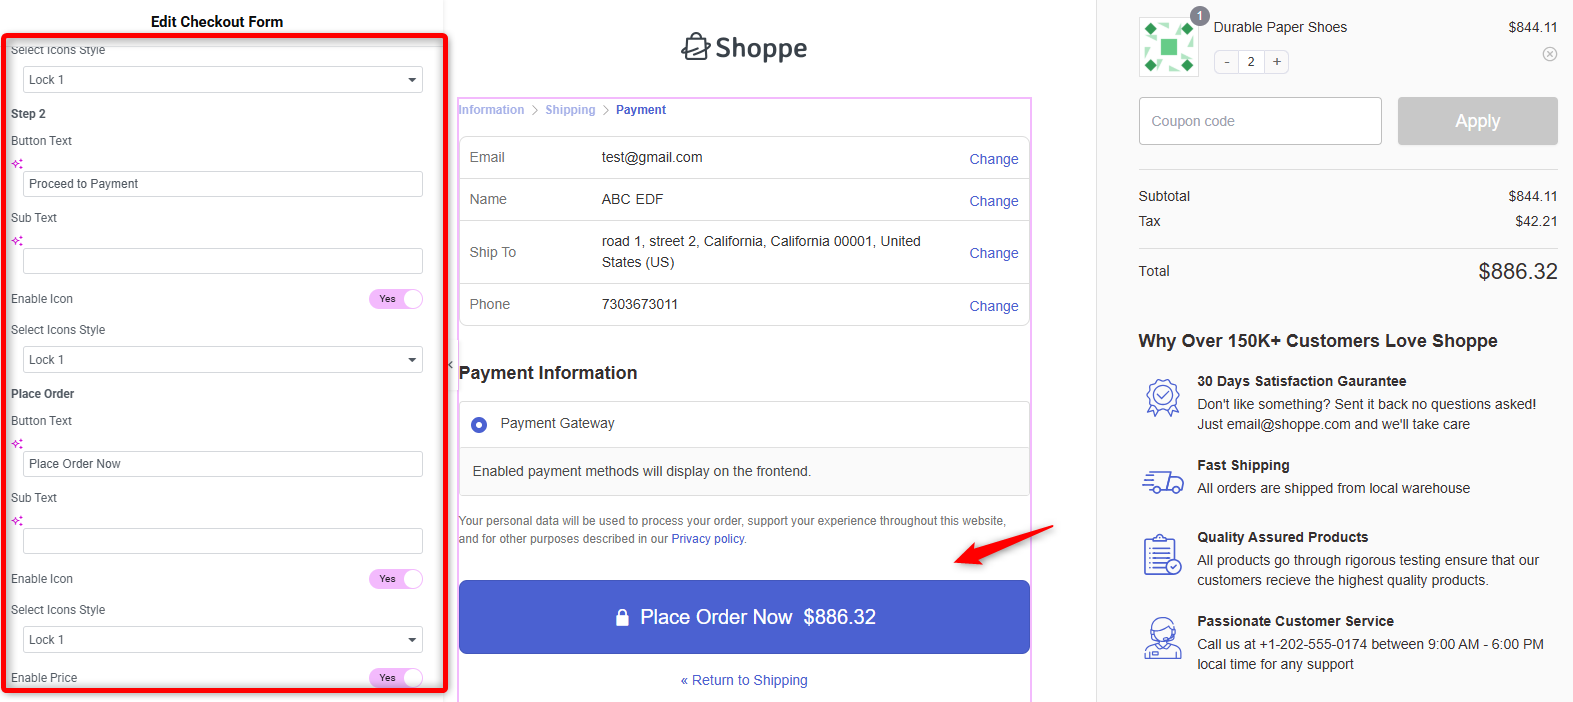
Go to the checkout button settings and customize the text.
Add a subtext and enable the icon and price to the place order button.
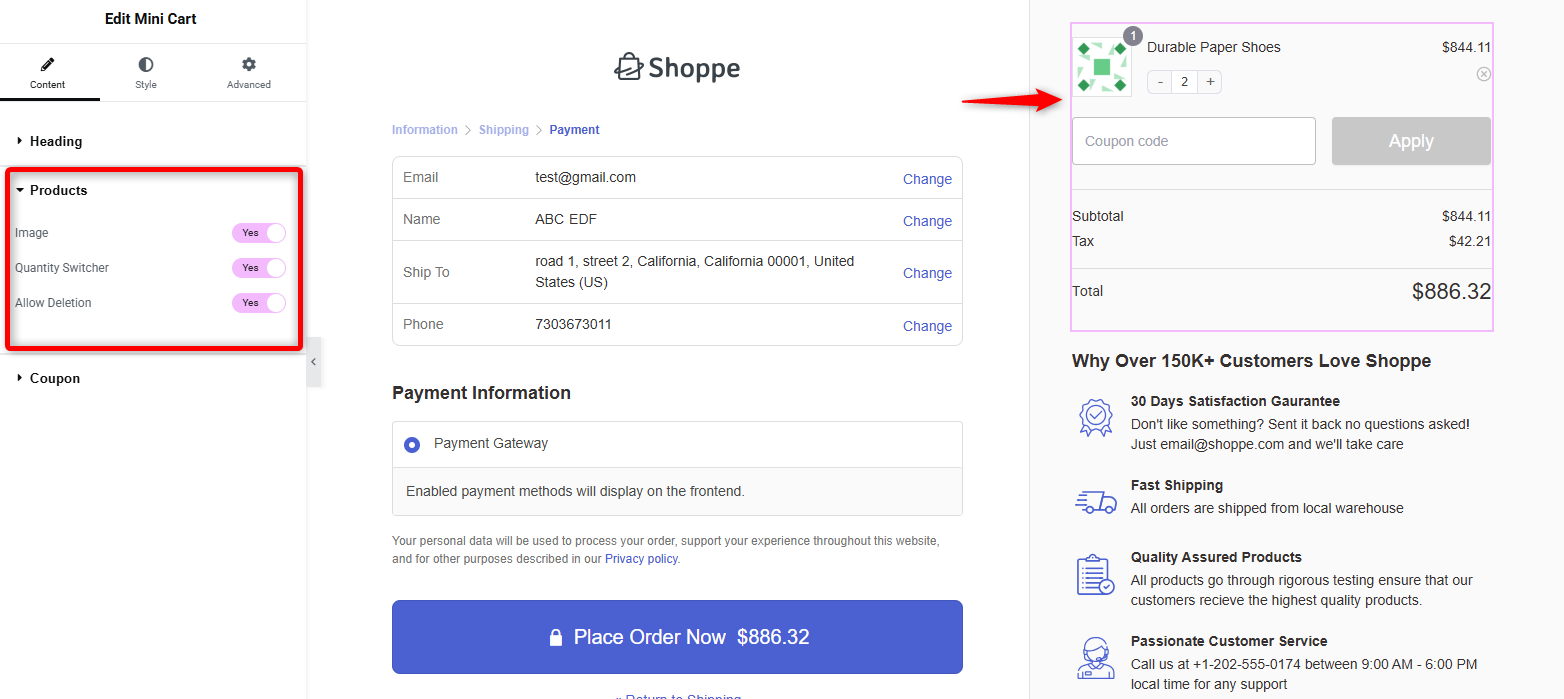
Go to the mini cart and enable the product’s images, quantity switcher, and deletion options.
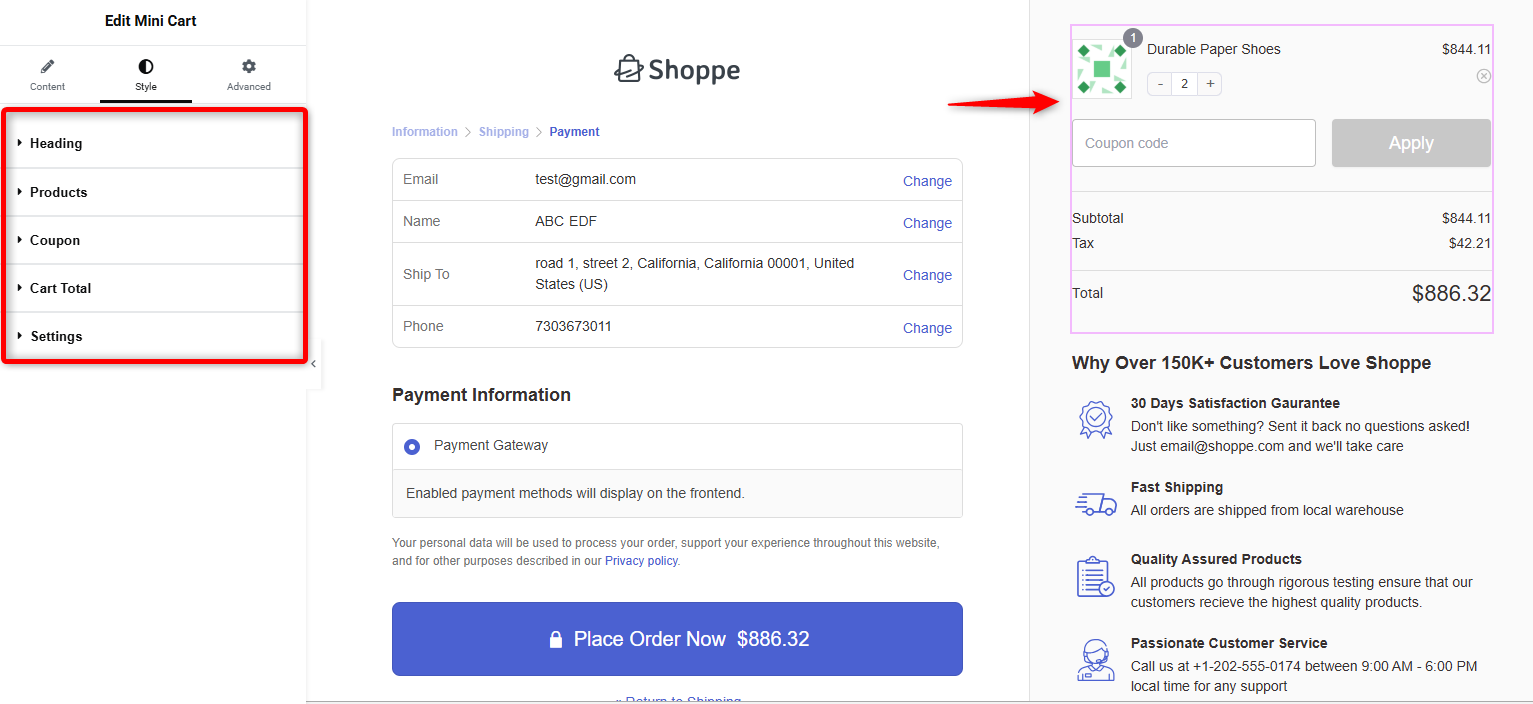
Plus, you can change the font, color and alignment of your headings, products, coupon section, etc., from the Style tab.
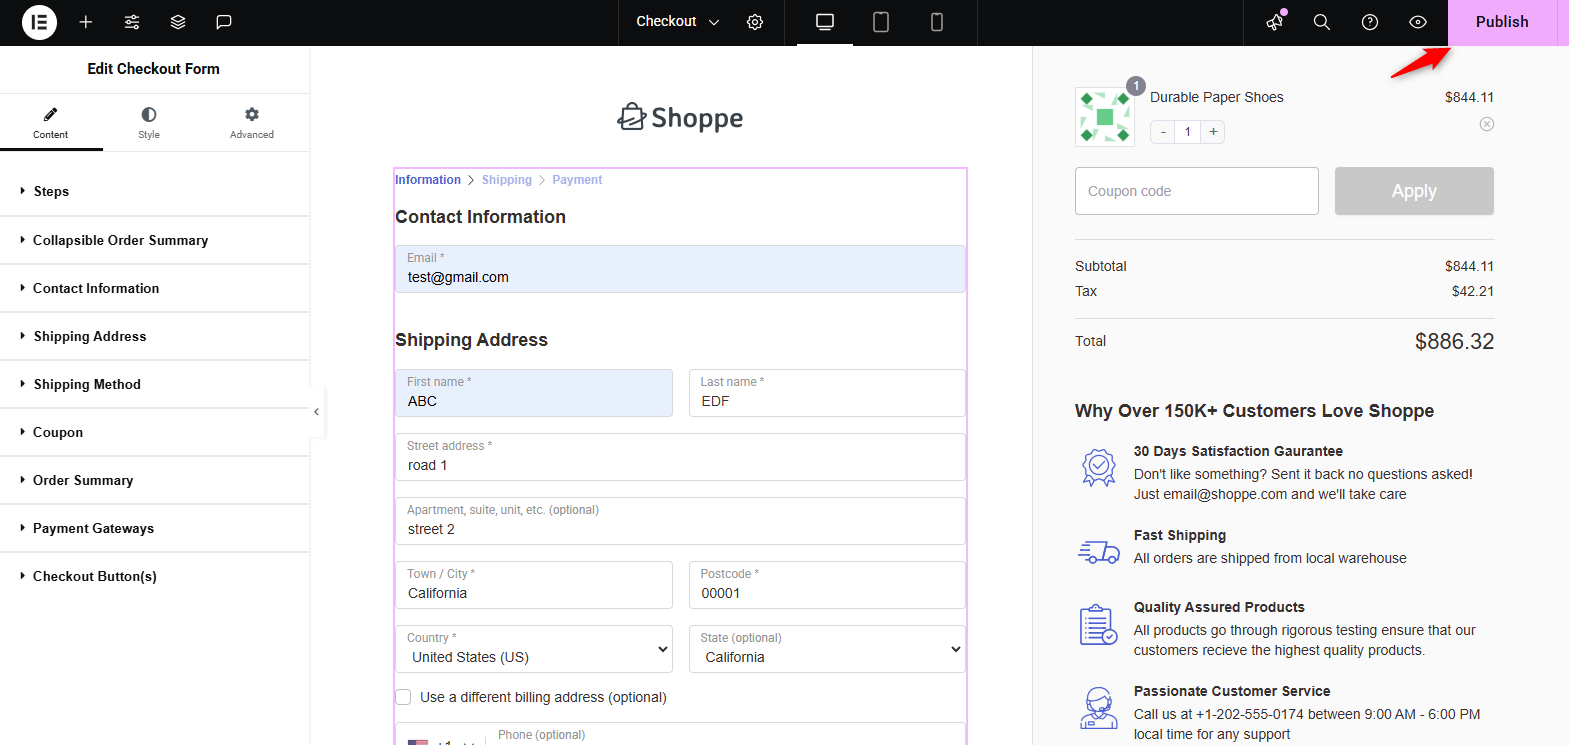
Once you’re satisfied with the design of your WooCommerce checkout page template, click on “Publish.”
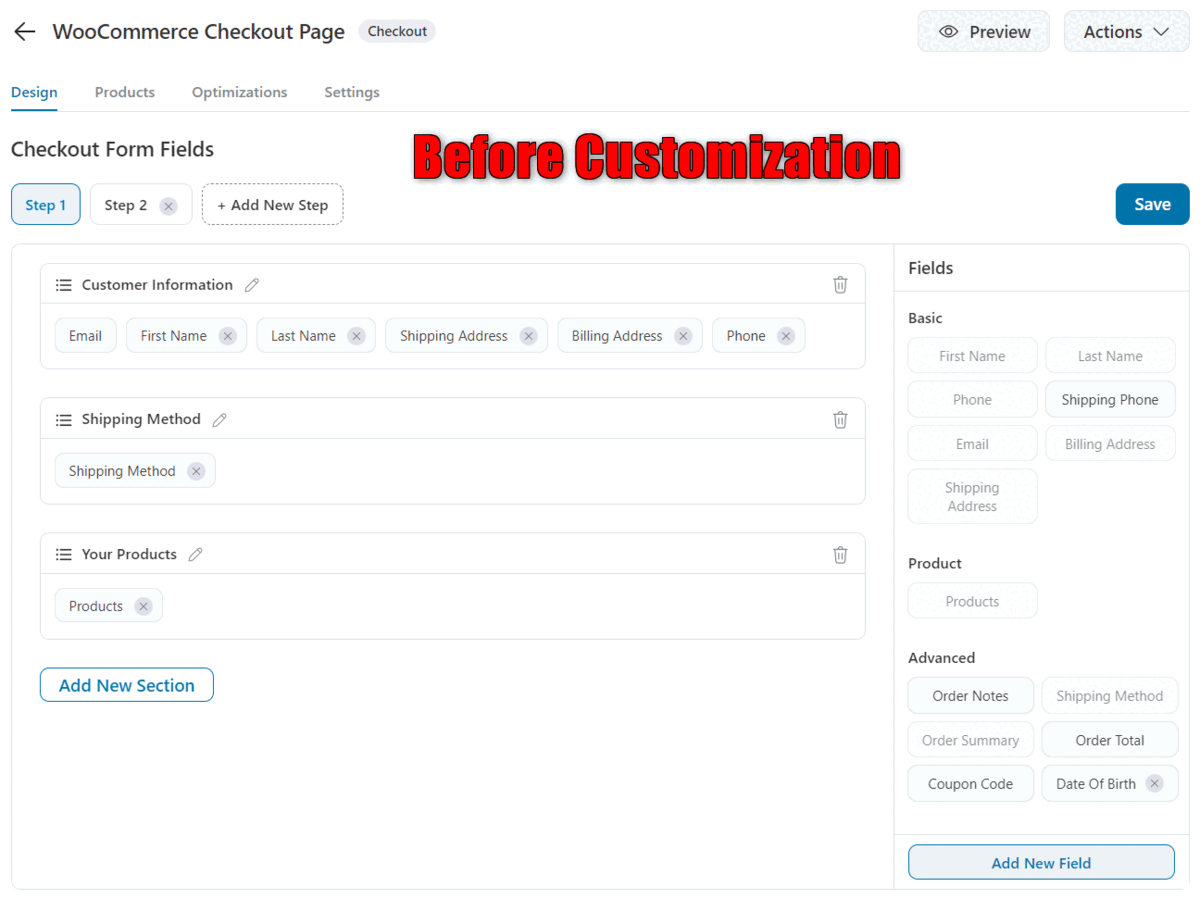
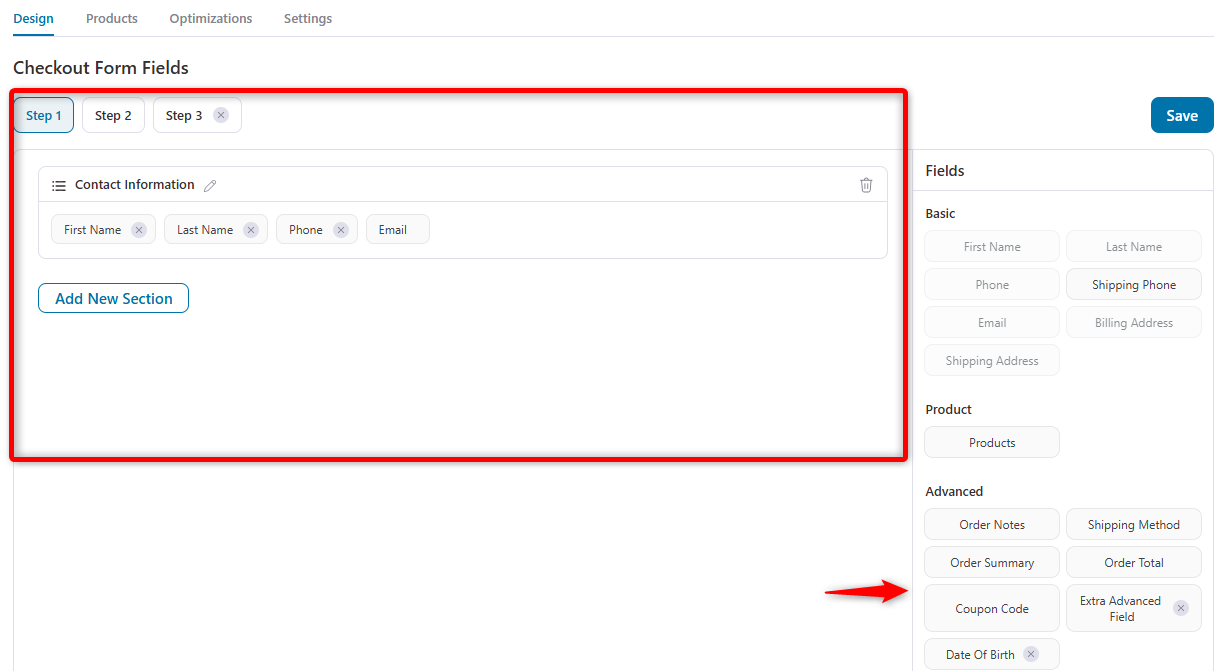
Step 3: Customize the fields of your WooCommerce checkout form
Next, head to the Design tab and scroll down to Checkout Form Fields.
You can add, edit, rearrange, or delete the sections and fields on your checkout form.
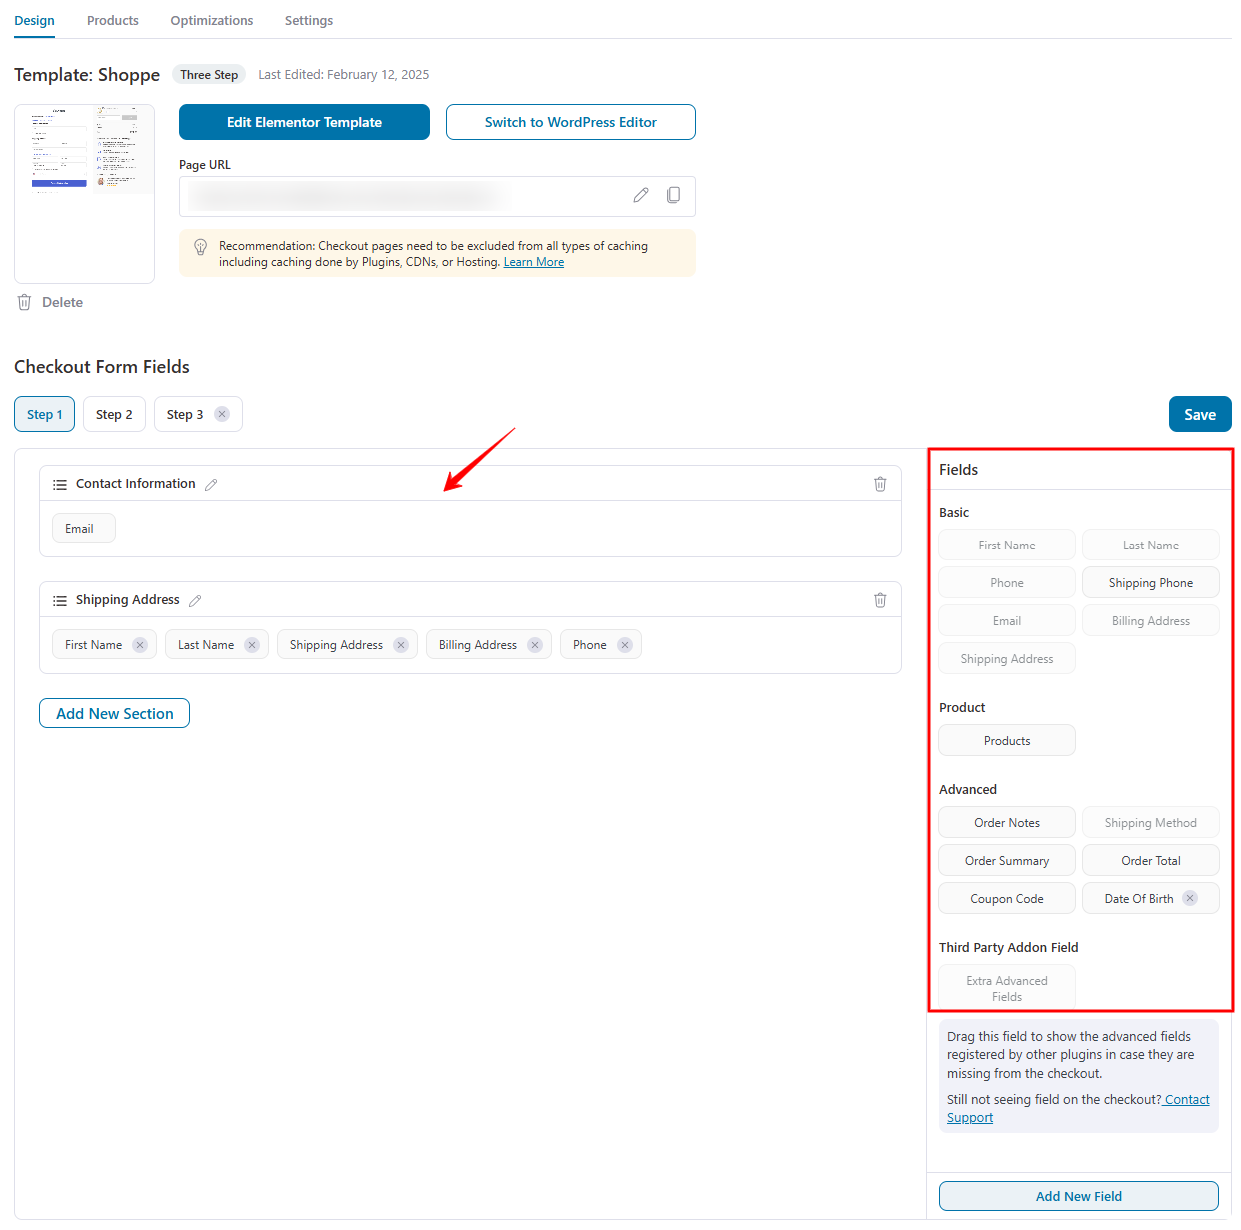
FunnelKit lets you add custom fields, such as text, checkboxes, passwords, email, dropdown, etc., on your checkout page.
You can even drag and drop the custom input field to the sections where you want without doing any custom coding.
👉 We have a detailed post on customizing the checkout fields using FunnelKit’s checkout field editor.
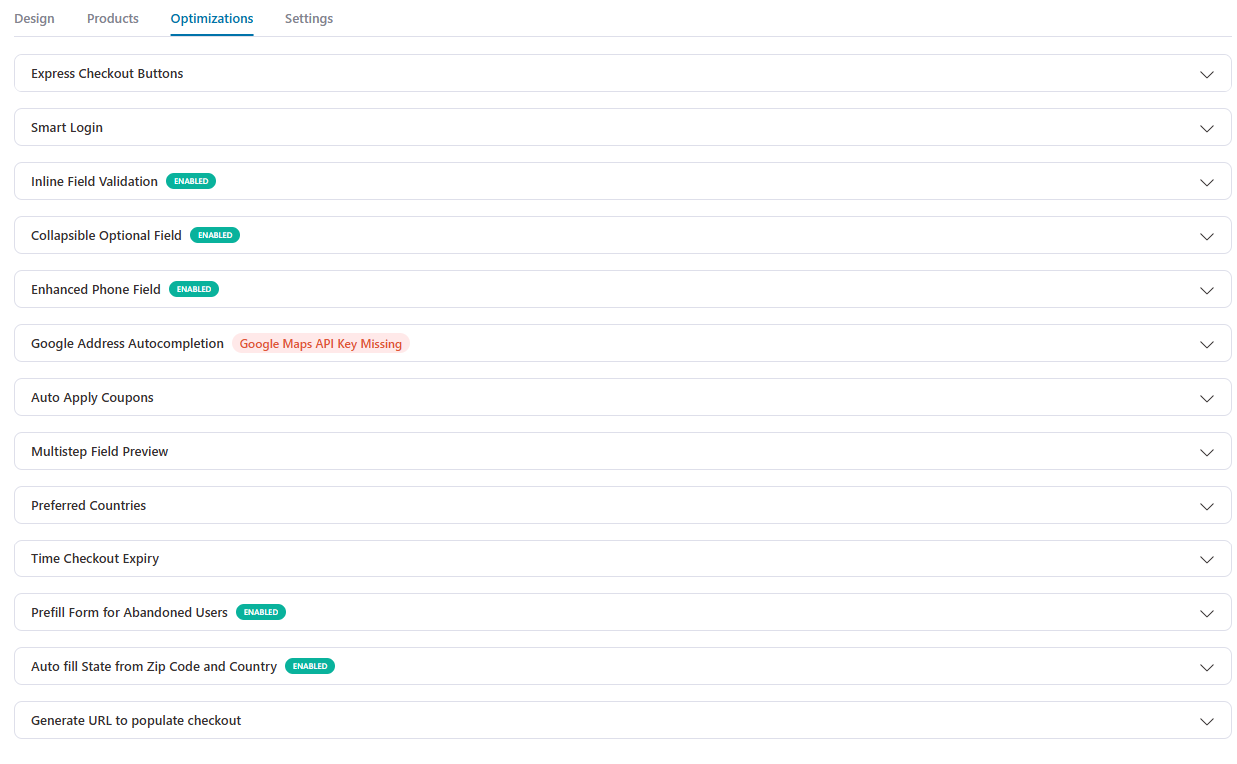
Step 4: Optimize your WooCommerce checkout page
You can even optimize your checkout page to give your customers a smooth buying experience. Go to the Optimizations tab.
Enable checkout page optimizing options, such as Google address autocomplete, auto-apply coupons, and express checkouts like Google Pay and Apple Pay, Multi-step field preview, Collapsible field, Multistep field preview and more.

Enable the optimizations you want to incorporate and hit ‘Save Changes’ when done.
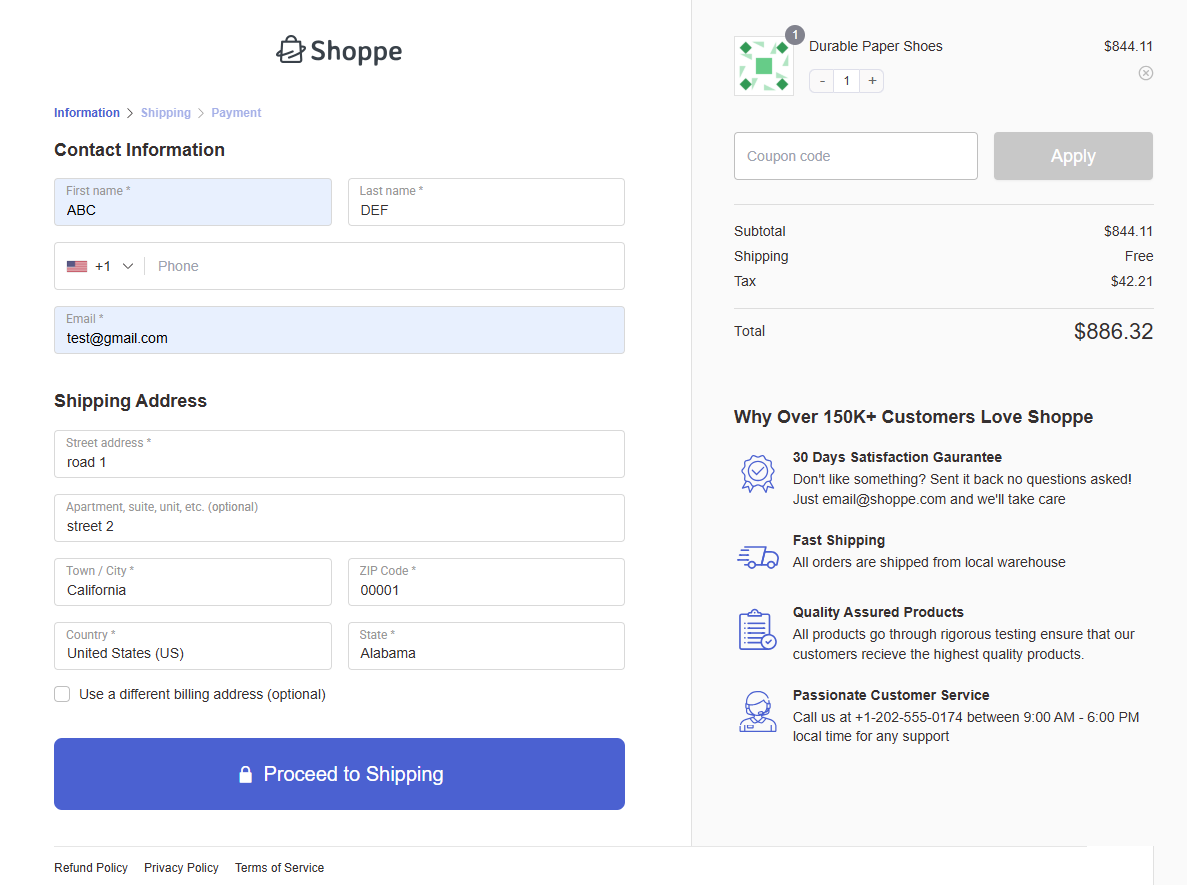
This is what our final, customized WooCommerce checkout template looks like:
👉 You can also add order bumps and one-click upsells to boost the average order value in your WooCommerce store.
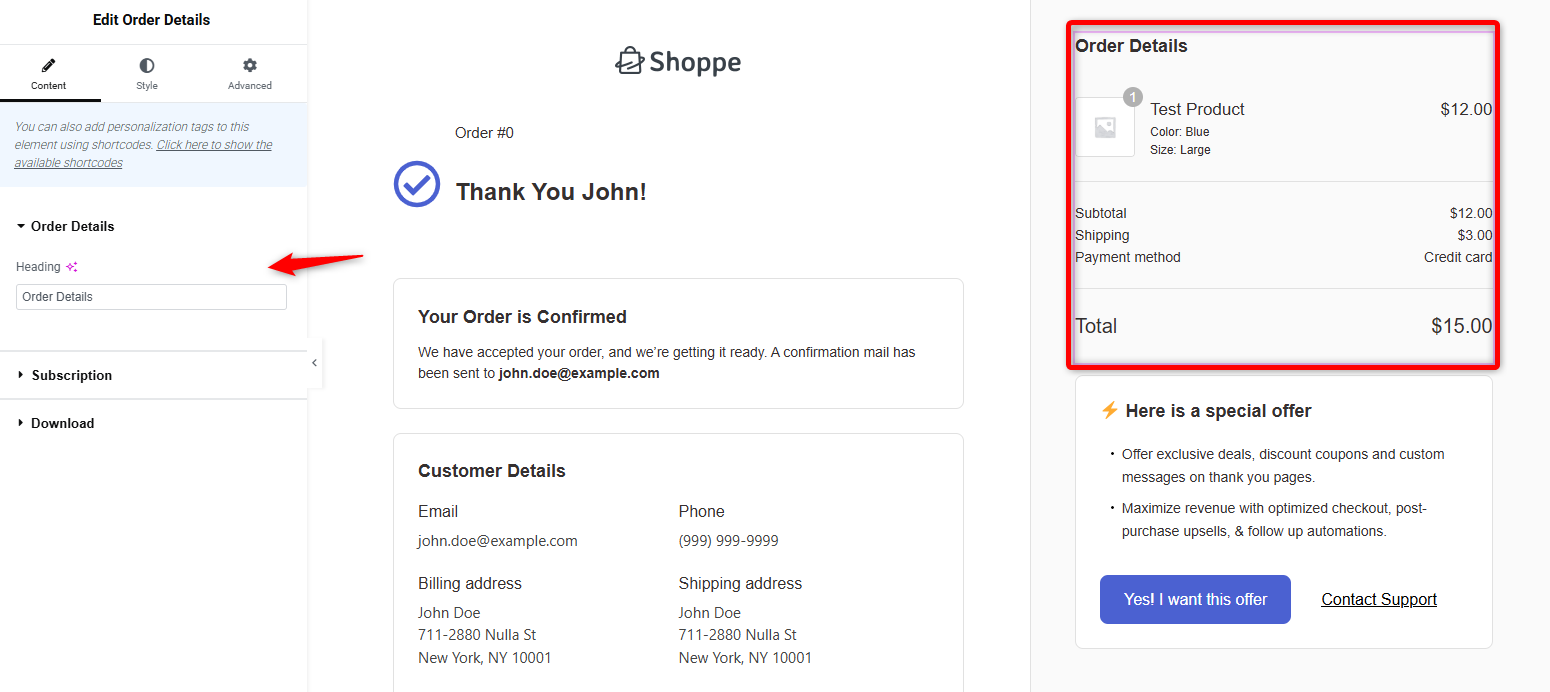
Step 5: Customize your order confirmation page
An order confirmation page is the last page of your funnel.
Setting up a custom thank you page allows you to go beyond displaying order confirmation details to keep the conversation growing.
FunnelKit lets you customize the design of your thank you page the way you want.
You can change the text, headings, logo, font, and background color, add social media buttons, and more.
Refer to our detailed post on setting up the WooCommerce custom thank you page.
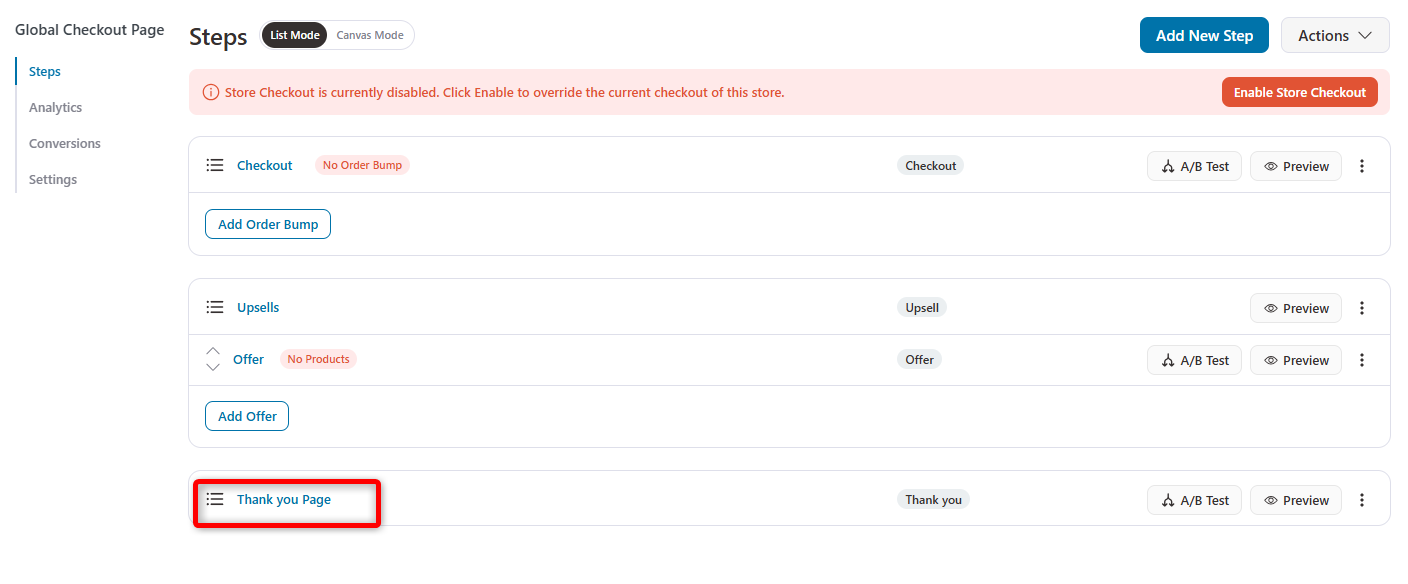
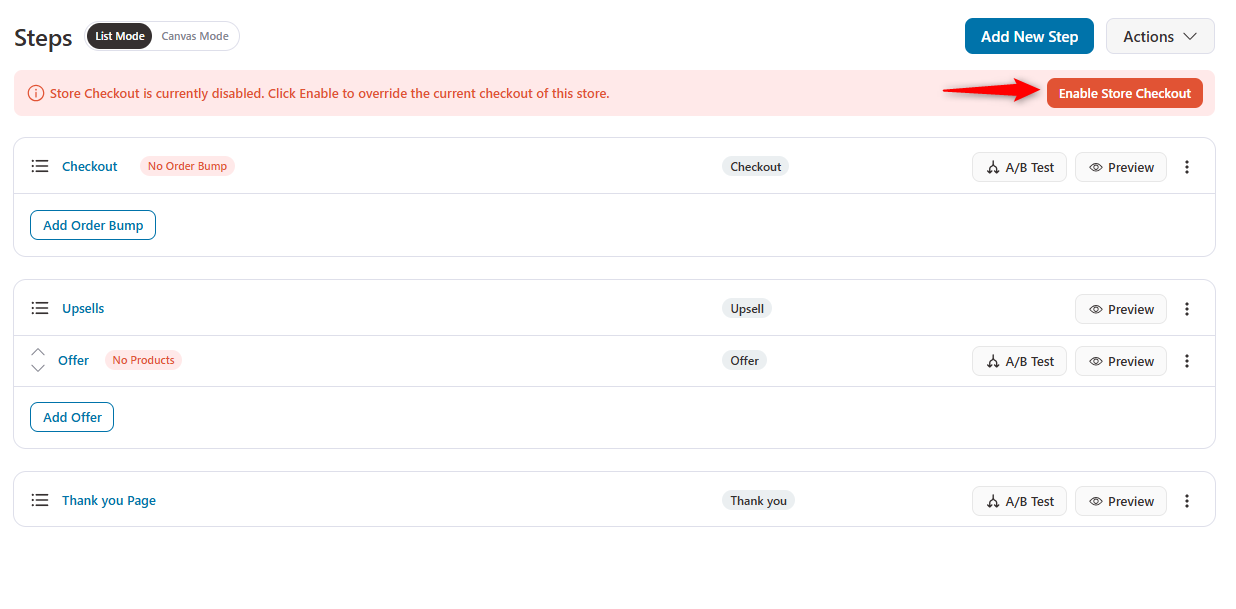
Step 6: Activate your checkout page
Go back to your funnel and activate your store checkout page.
Click the ‘Enable Store Checkout’ button next to your store checkout.
Well done! You can customize your WooCommerce checkout template without writing any custom code.
Frequently Asked Questions (FAQs)
In this section, we have answered the common questions asked by users regarding the template for WooCommerce checkout pages:
1. Does WooCommerce have built-in checkout templates?
No, WooCommerce does not have templates. You get the same default checkout page, which isn’t conversion-friendly. You need to install and activate multiple add-on plugins to get some templates for WooCommerce.
2. How do I customize WooCommerce checkout?
FunnelKit allows you to customize the WooCommerce checkout design. It gives you access to beautiful pre-built templates that can be customized with any page builder and are optimized for all devices.
3. How do I change the default checkout page in WooCommerce?
You can change the default checkout page in WooCommerce using FunnelKit. Create a custom store checkout page in FunnelKit, and you’ll be good to go. This blog post demonstrates this process in 6 simple steps.
Choose the Best WooCommerce Checkout Template for Your Store!
An optimized checkout template is undoubtedly the ultimate game changer for a WooCommerce store, where all the magic happens.
It can make or break the customers' buying decisions depending on how they are designed or customized.
And the fact is that it becomes effortless with the right tool.
Yes, FunnelKit’s Funnel Builder provides everything needed to build a high-converting checkout page—pre-designed templates, a powerful field editor, and built-in optimizations to generate more conversions.
A well-structured checkout isn’t just about completing transactions—it’s about creating a seamless experience that keeps customers coming back.
With FunnelKit, your WooCommerce store is equipped to perform at its best to take your business to new heights.
Editorial Team
July 7, 2026Are you looking for WooCommerce checkout optimization hacks to streamline your users' shopping experience? 7 out of 10 shoppers who reach a WooCommerce checkout leave without paying; according to Baymard...
Editorial Team
July 6, 2026A WooCommerce order form lets customers select multiple products, set quantities, and choose variations from a single page instead of visiting individual product pages. There are two ways to add...
Editorial Team
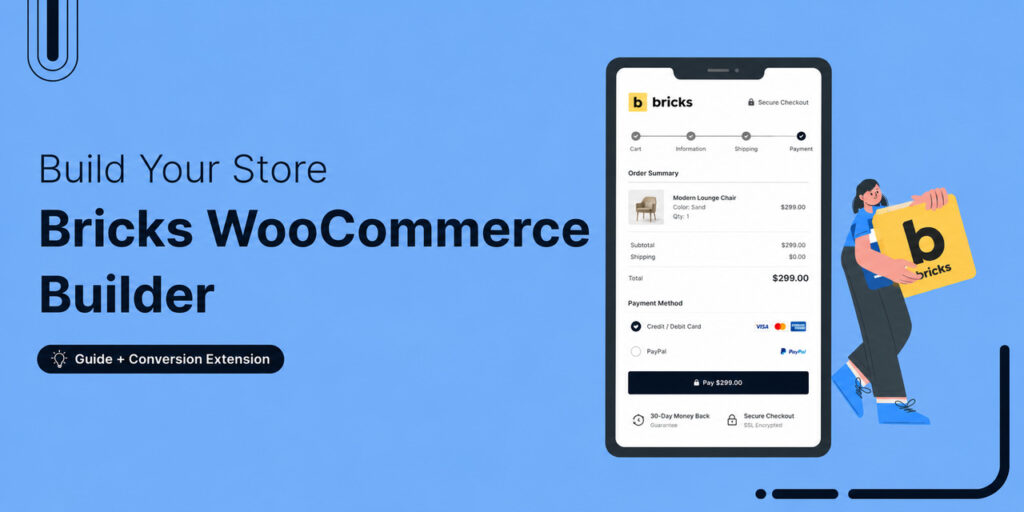
July 6, 2026The Bricks WooCommerce builder is built directly into the Bricks theme. Activate the free WooCommerce plugin, and Bricks unlocks more than 30 store-specific elements plus visual templates for every part...


