
The default WooCommerce checkout is a one-size-fits-all solution and is not optimized for your unique business needs.
But what if you want to add a custom field to your WooCommerce checkout page?
For example, you might need a “VAT Number” field for B2B sales, “Delivery Instructions” for your courier, or a “How did you hear about us?” field for your marketing.
Adding the right custom fields can make your checkout smarter, crucial for gathering data and improving fulfillment.
In this guide, we’ll walk you through the three best methods for adding custom fields to your WooCommerce checkout, from the easiest no-code solution to a full developer-level customization.
Table of Contents
- 1 Types of Custom WooCommerce Checkout Fields You Can Add
- 2 The 3 Best Methods for Adding Checkout Fields
- 3 Method 1: Add Custom Checkout Field in WooCommerce Using a Plugin (No Code Required)
- 4 Method 2: The Official Plugin Method (WooCommerce Checkout Field Editor)
- 5 Method 3: The Developer Method (Using Custom PHP Code)
- 6 Bonus: Developer Method for Block Checkout
- 7 6 Best Practices for Adding Custom Checkout Fields in WooCommerce
- 8 Use Cases: Examples of Extra Fields on WooCommerce Checkout
- 9 Frequently Asked Questions
- 10 Ready to Add Custom Fields to Your WooCommerce Checkout?
Types of Custom WooCommerce Checkout Fields You Can Add
When you’re looking to add a field to WooCommerce checkout, ask yourself this question: “What exactly do you want to collect and why?”
The good news? WooCommerce is flexible. You can add a wide variety of field types based on what your business needs, whether you’re gathering personalization info, preferences, legal data, or customer feedback.
Here are the most common WooCommerce custom checkout fields you can add:
- Single-line text input for short titles or names
- Number field to enter numerics
- Checkbox for multiple selections from given options
- Radio buttons to choose one option from a set
- Multi-line text area for longer responses, like comments or special instructions
- Select dropdowns for a collapsible menu
- Email address to collect users' email IDs with proper validation
- Multi-select to opt for multiple options
- Phone number with international contact numbers and validation
- Hidden field to store data for internal use (not visible to shoppers)
- Password entry that secures sensitive information
- Date to select a specific date from a calendar pop-up
- DateTime combination input
- Time in hours and minutes
- File uploads that let users upload files for custom orders
- Billing and shipping address details
- Conditional fields that appear or disappear based on input selections
- Custom validation fields that require input in a specific format (for example, VAT numbers or date of birth)
- Terms and conditions to add a user agreement checkbox on WooCommerce checkout for legal compliance
- Google reCAPTCHA to ensure the user is human
Let’s explore all the methods of adding a field to your WooCommerce checkout page.
The 3 Best Methods for Adding Checkout Fields
We’ve tested different ways to do this, and they all fall into three main categories.
- Method 1: The No-Code Method (Easiest & Most Powerful) using our FunnelKit Checkout plugin.
- Method 2: Using the WooCommerce Checkout Field Editor plugin, the Official Plugin Method.
- Method 3: Using a custom PHP code snippet. Ideal for developers.
Here is a quick comparison:
| Feature | Method 1 (No code) | Method 2 (Official plugin) | Method 3 (Developer) |
|---|---|---|---|
| Ease of use | Drag & drop | Settings UI | Requires PHP |
| Field types | 13+ types | 8 types | Any (manual) |
| Conditional logic | Built-in | Not available | Custom code only |
| Show in order email | Toggle in UI | Manual setup | Custom hook |
| Show on the thank you page | Toggle in UI | Not built-in | Custom hook |
Let’s explore these methods one by one.
Method 1: Add Custom Checkout Field in WooCommerce Using a Plugin (No Code Required)
To add fields to WooCommerce checkout, we'll use FunnelKit Funnel Builder.
FunnelKit Funnel Builder is a powerful checkout and sales funnel builder for WooCommerce, designed to boost conversions.
This is the best choice if you not only want to add a field but also want to create a high-converting one-page and multistep checkout, add order bumps and upsells, and reduce cart abandonment.
Follow these step-by-step instructions to add a custom field to your WooCommerce checkout page.
Make sure to install both the free and pro versions of FunnelKit Funnel Builder.
Step 1: Create a store checkout in WooCommerce
To add custom fields to your WooCommerce checkout, start by creating a global store checkout that replaces the default WooCommerce checkout page.
This optimized checkout flow helps boost conversions and streamlines the buying process.
You can navigate to FunnelKit ⇨ Store Checkout, click “Create Store Checkout”, choose a template, select your preferred page builder, pick single or multi-step checkout, and import the funnel by naming it and clicking “Add”.
For more details, check the store checkout guide.
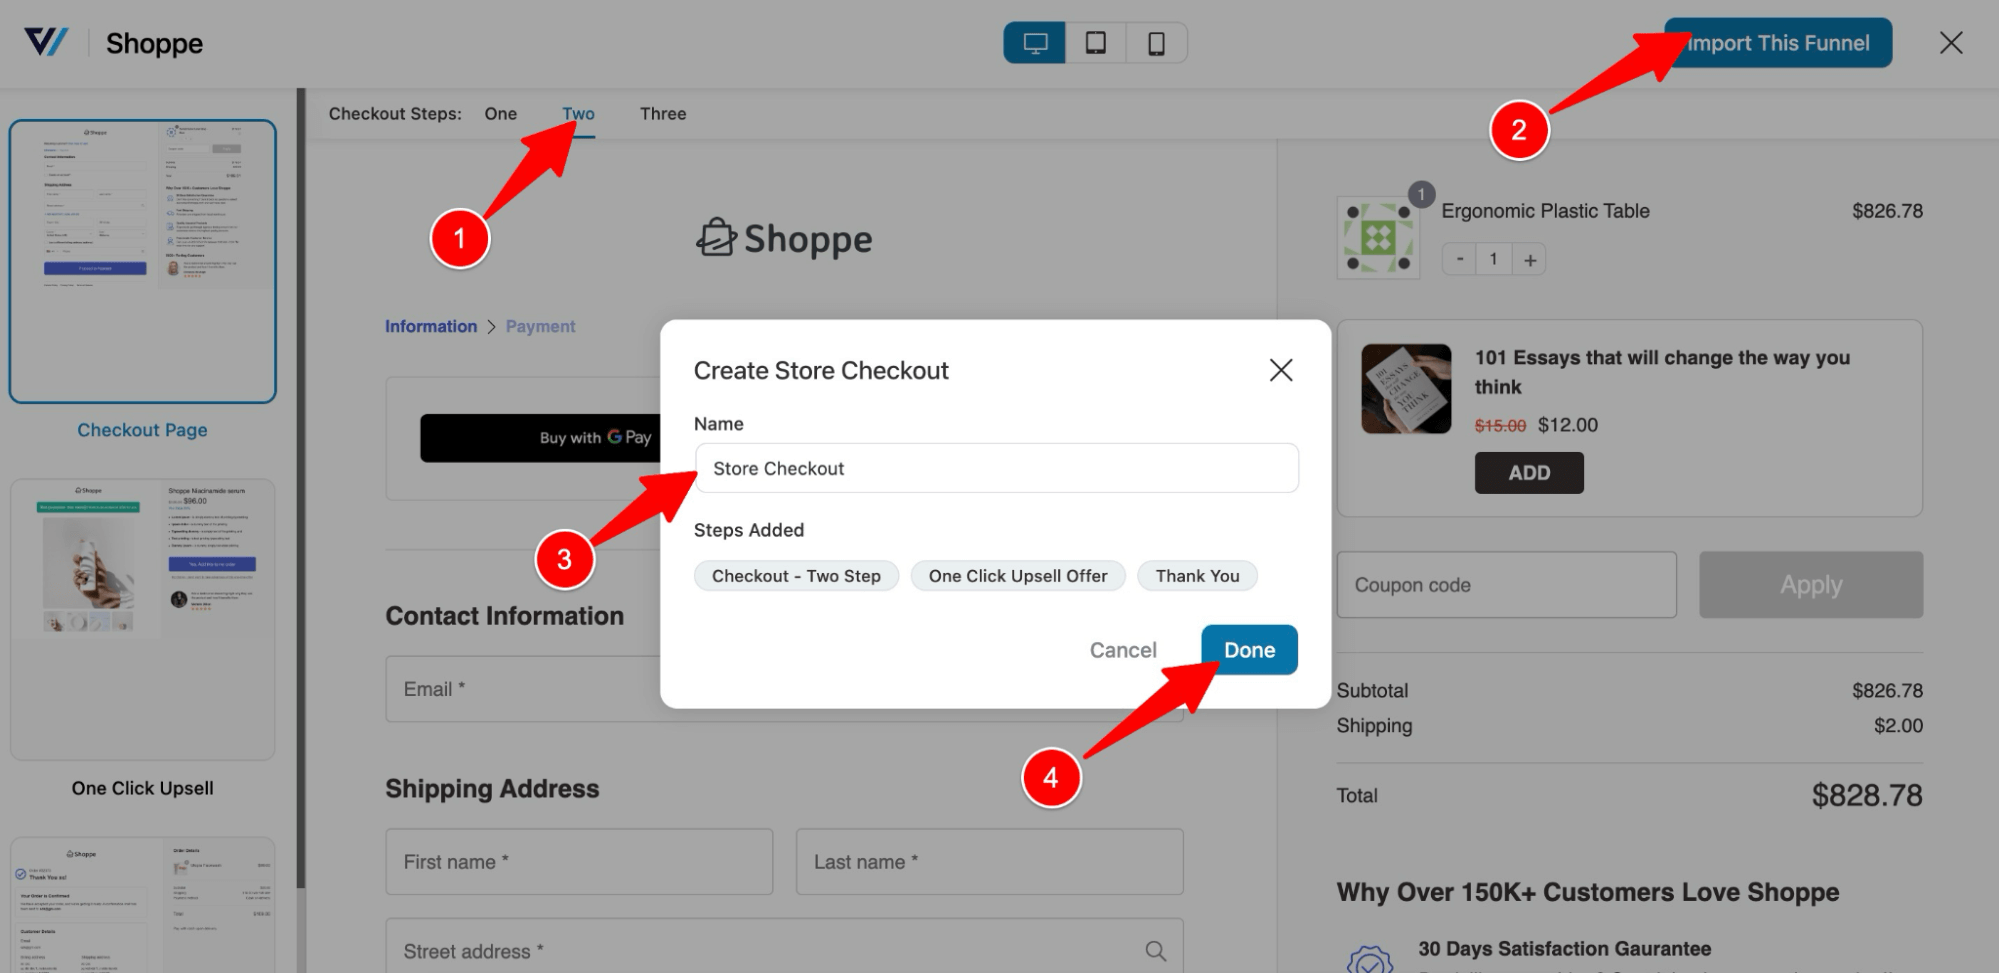
This will import a store checkout with three steps: Checkout, One Click Upsell, and Thank You page.
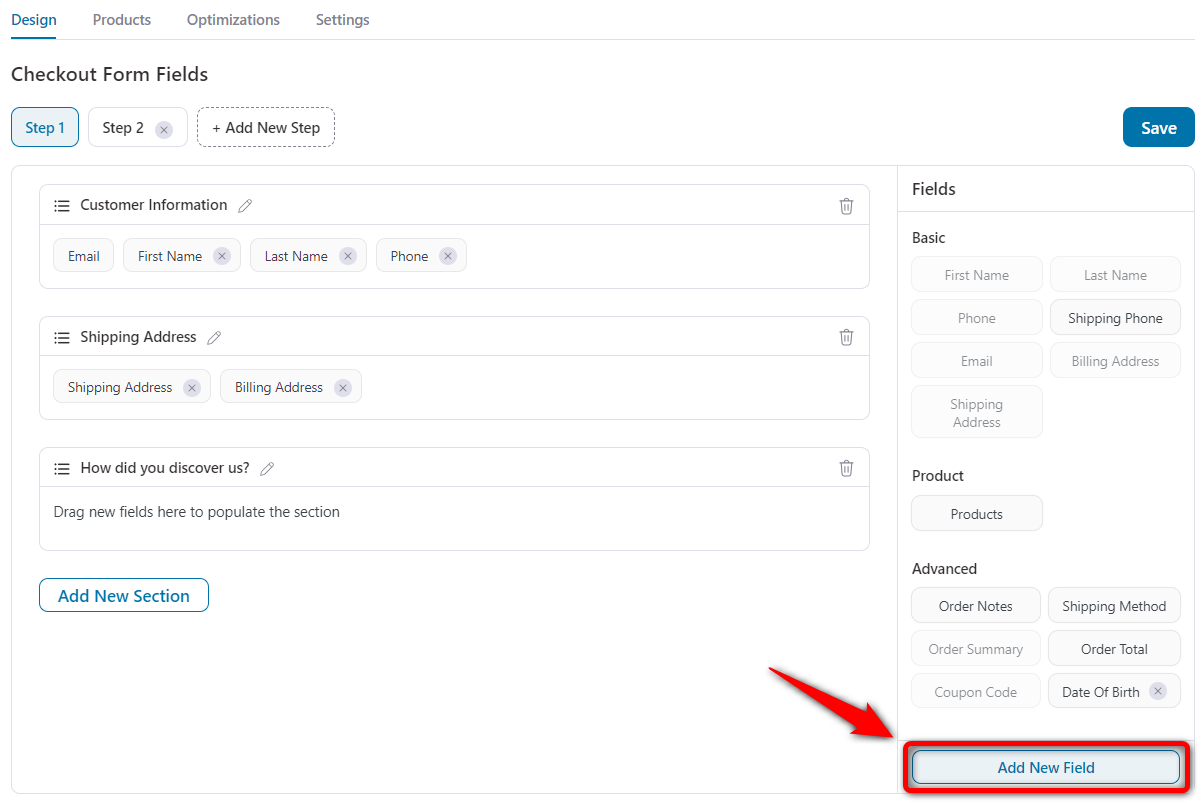
Step 2: Create a new custom WooCommerce checkout field
To edit the WooCommerce checkout page and add an extra field, click on the ‘Checkout’ step.
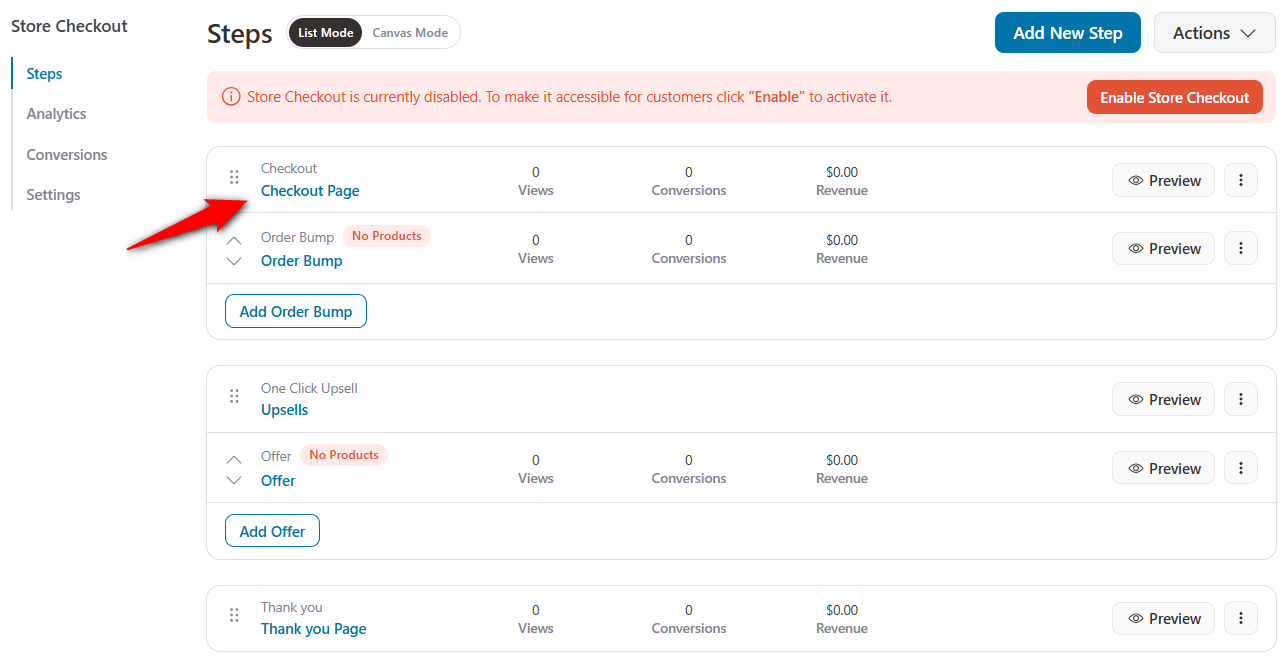
Under the Design tab, customize the layout and content of your checkout page using your chosen page builder (e.g., Elementor, Bricks, etc.).
To create a new field, go to the Advanced section and click ‘Add New Field’.
Note: FunnelKit also supports adding a Date of Birth field, which is perfect for sending birthday emails via automations.
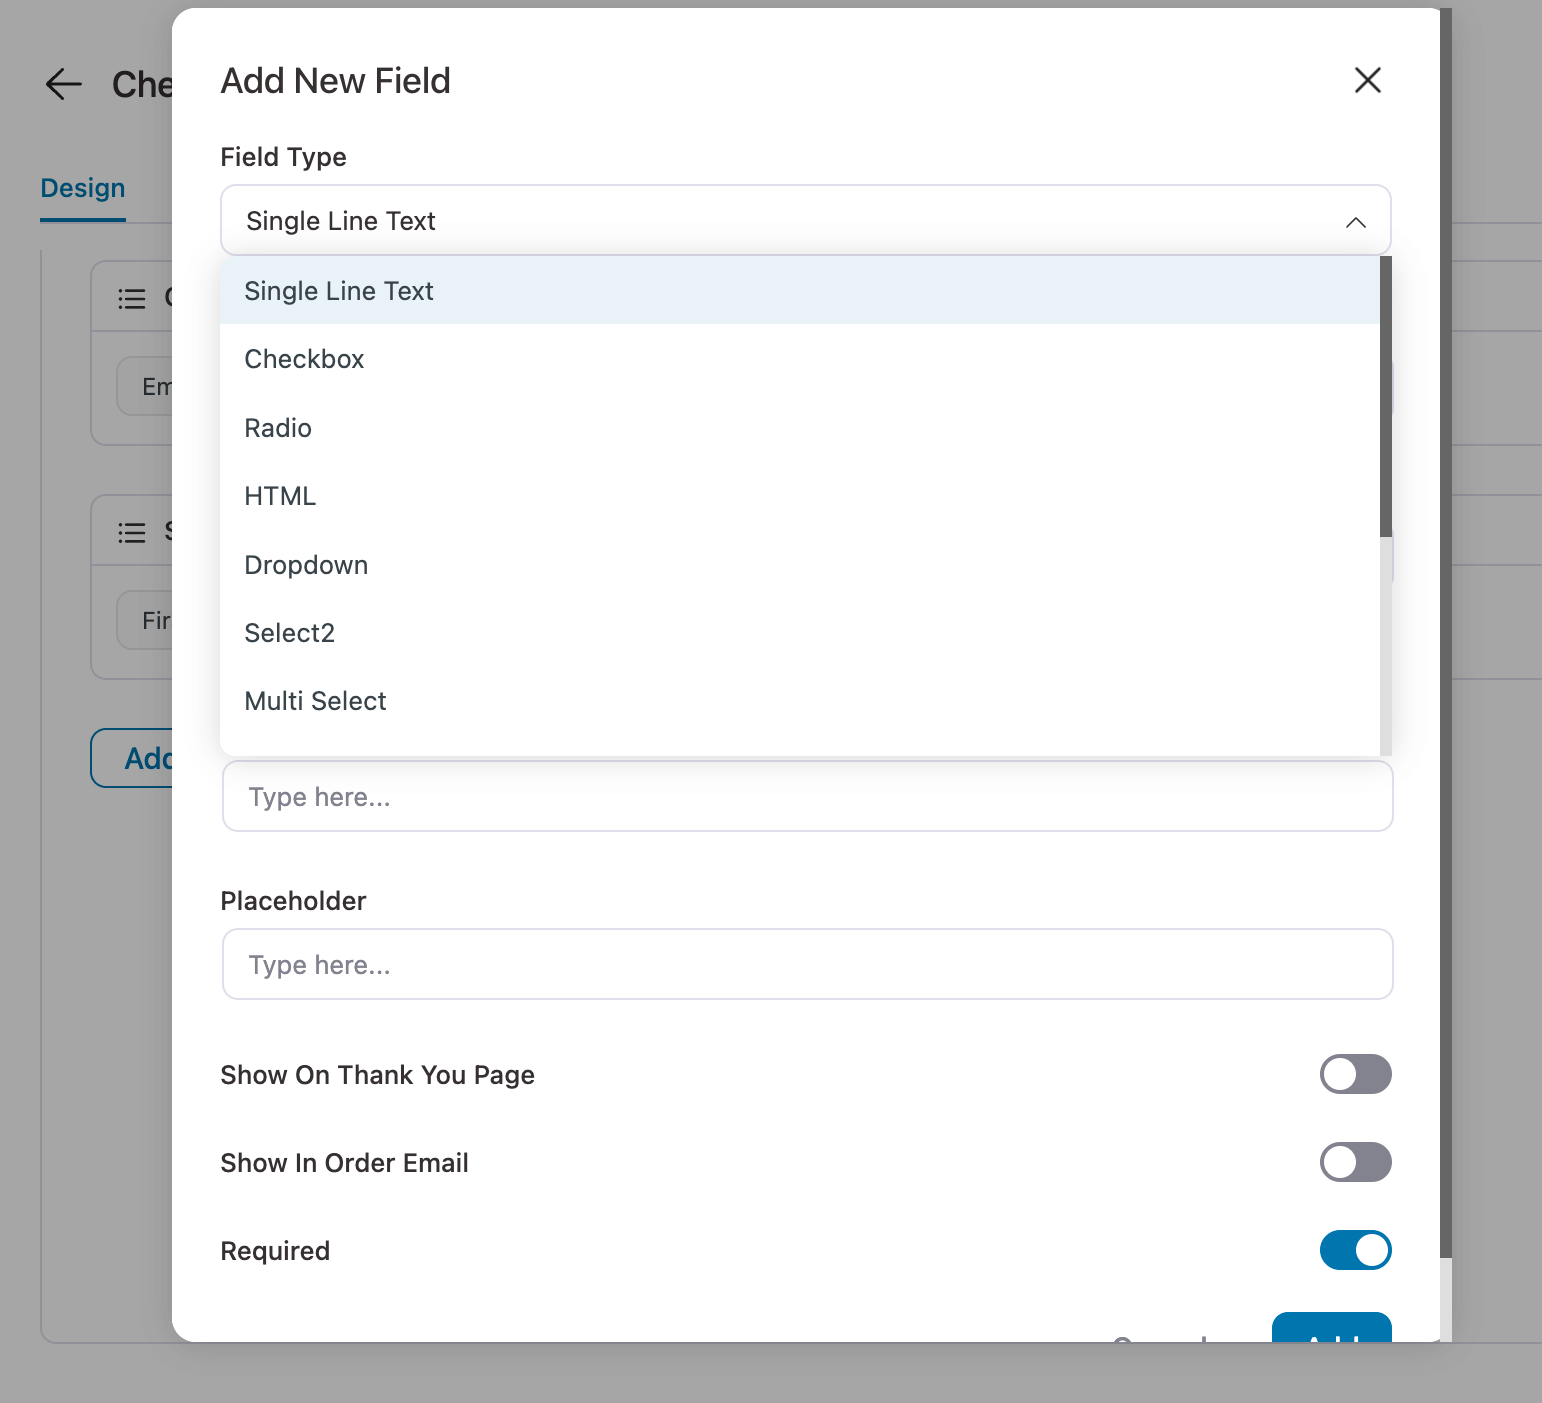
Here, you can create an extra custom checkout field. FunnelKit lets you create various types of custom WooCommerce checkout fields, such as:
- Single line text
- Checkbox
- Radio
- HTML
- Dropdown
- Select2
- Multi-select
- Paragraph text
- Number
- Telephone
- Hidden
- Password
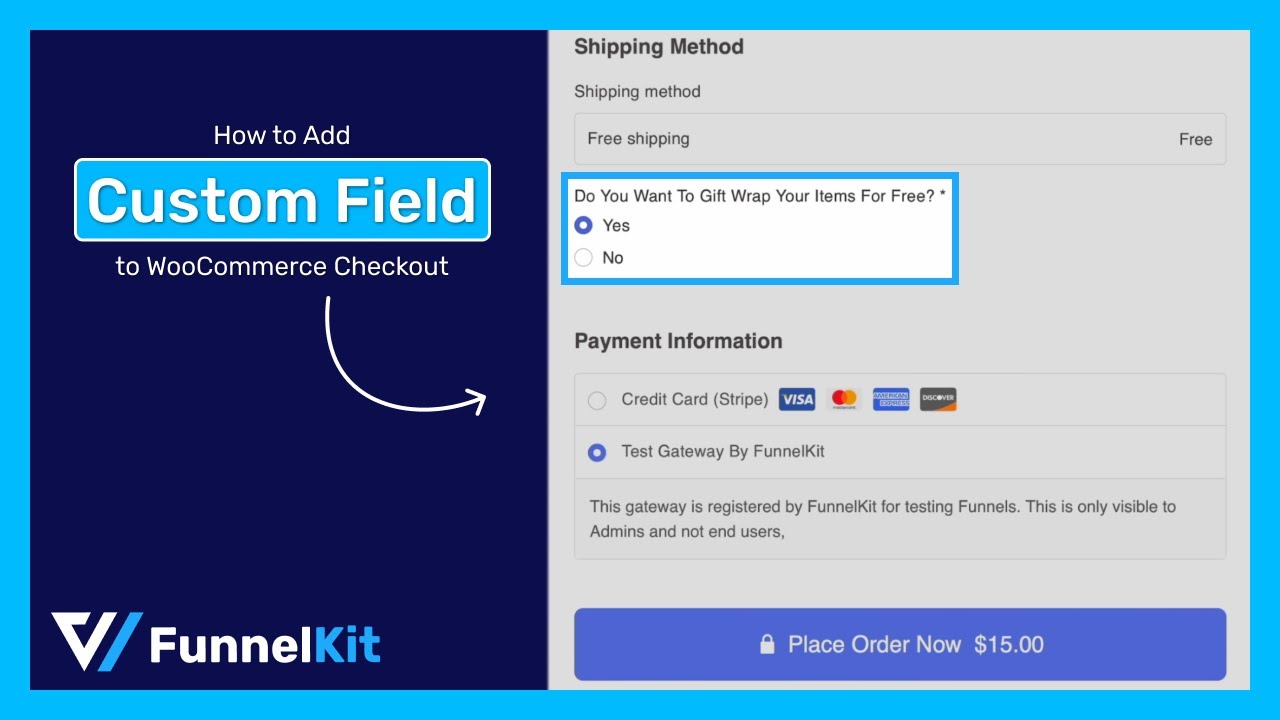
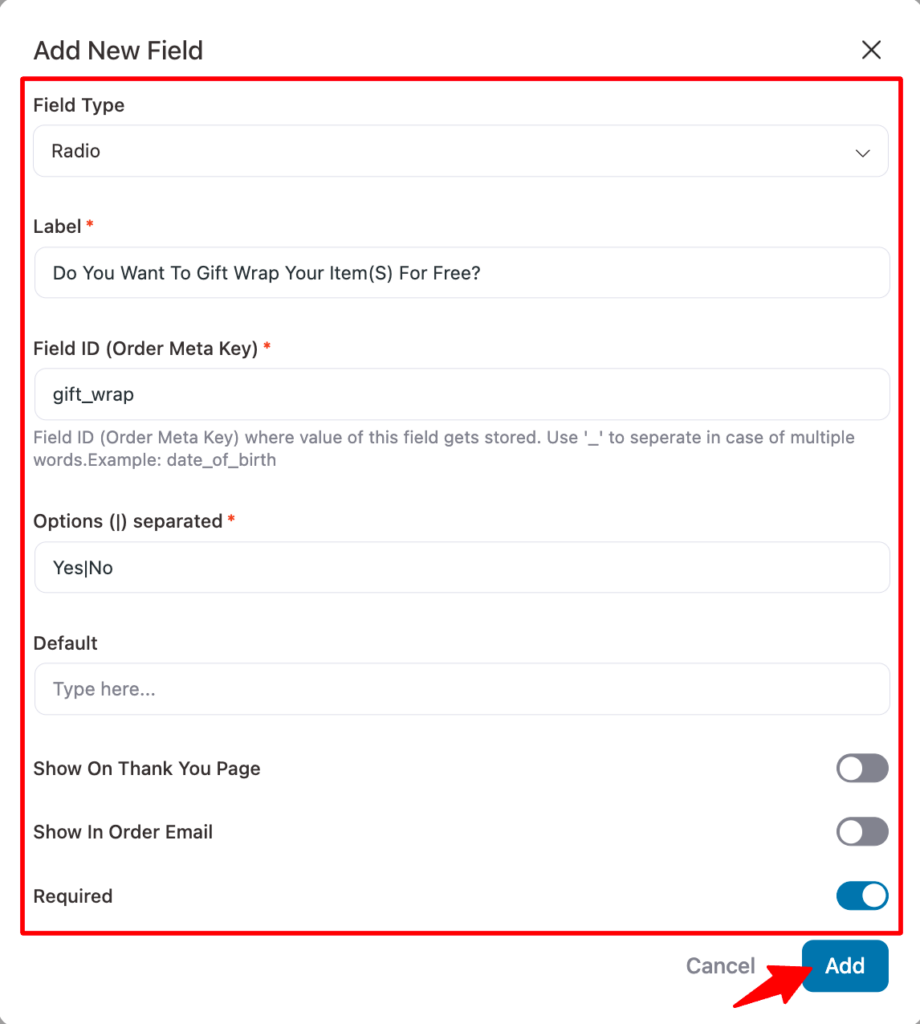
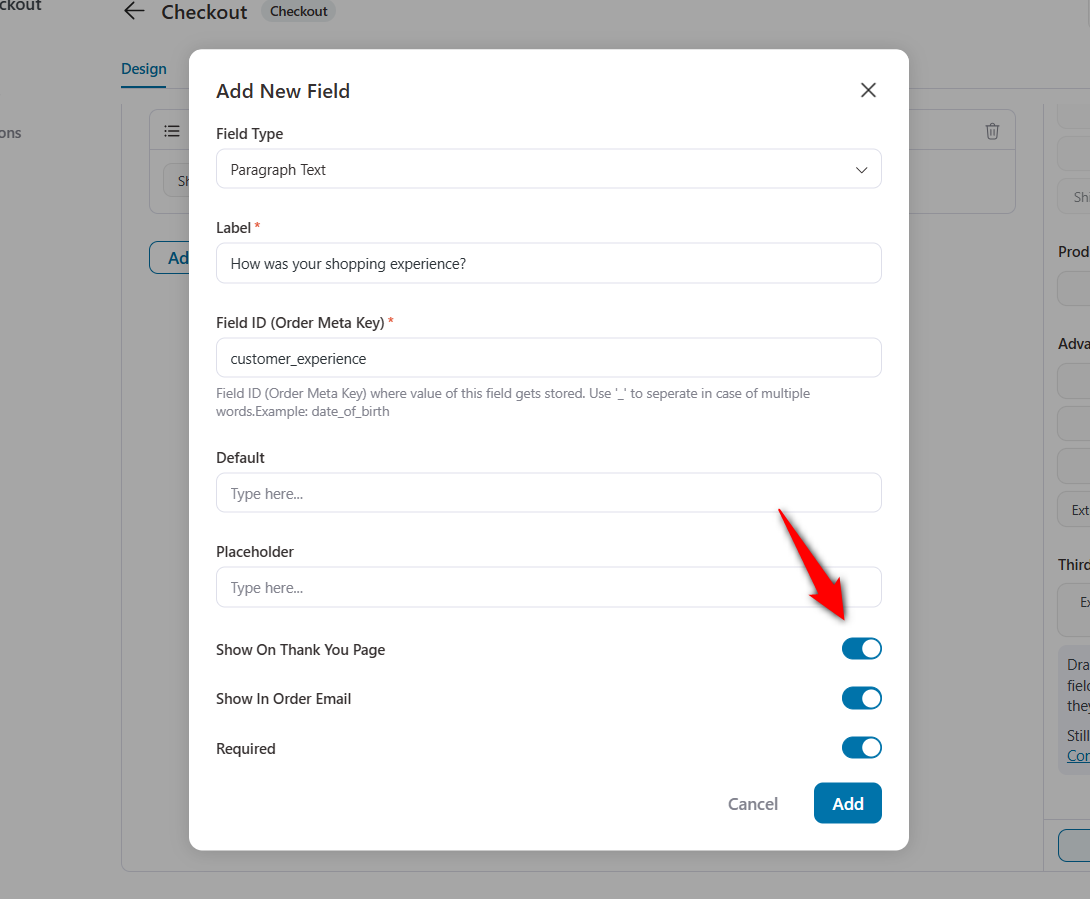
Here, we will show you how to create a custom Radio field, “Do You Want To Gift Wrap Your Item(s) For Free?”, for your checkout page.
For that, select the Radio as Field Type and provide the following options:
- Label: Provide a custom label for the checkout field.
- Field ID (Order Meta Key): Add a field ID; use multiple words by appending “_”.
- Options (|) separated: Add the options separated by “|”. We are adding two options: yes and no.
- Default: Provide the default value for this custom field. However, this is optional.
- Show On Thank You Page: Check this option if you want the value passed by this field to be shown on the thank you page.
- Show In Order Email: If you want to include this field in your order emails, check this option.
- Required: To make the custom WooCommerce checkout field required, check this option. To make it optional, leave it unchecked.
Finally, click on ‘Add’ to create the custom WooCommerce checkout field.
Your new checkout field will now appear in the Advanced section.
To place it within your checkout form, simply drag and drop it to your desired position.
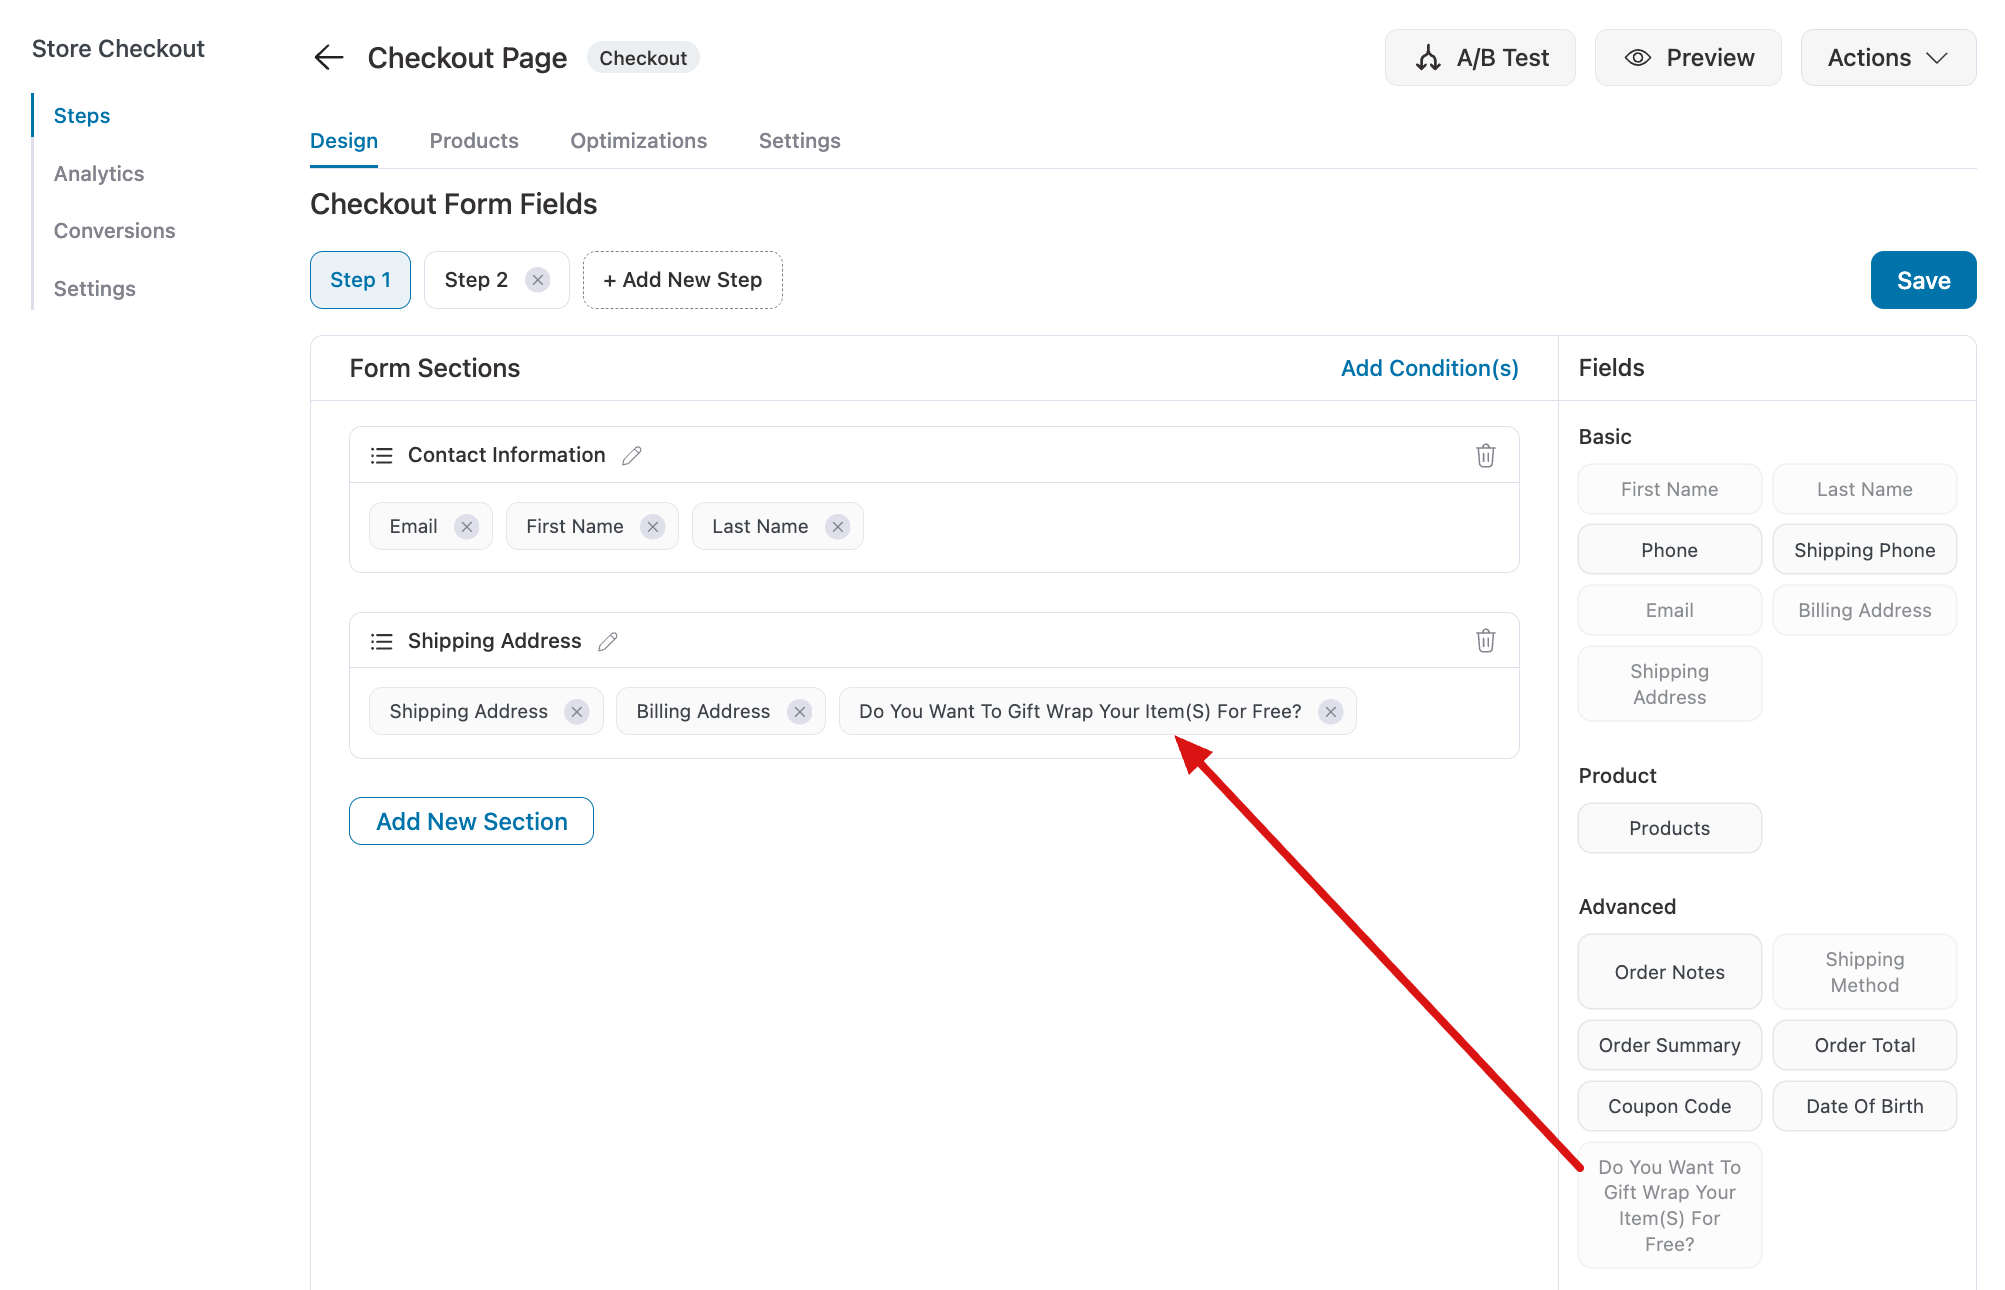
Step 3: Add a custom field to the WooCommerce checkout form
To add the custom field you just created to the checkout form, simply drag and drop it into the desired section of the form.
In this example, we’re adding it to the Shipping Address section.
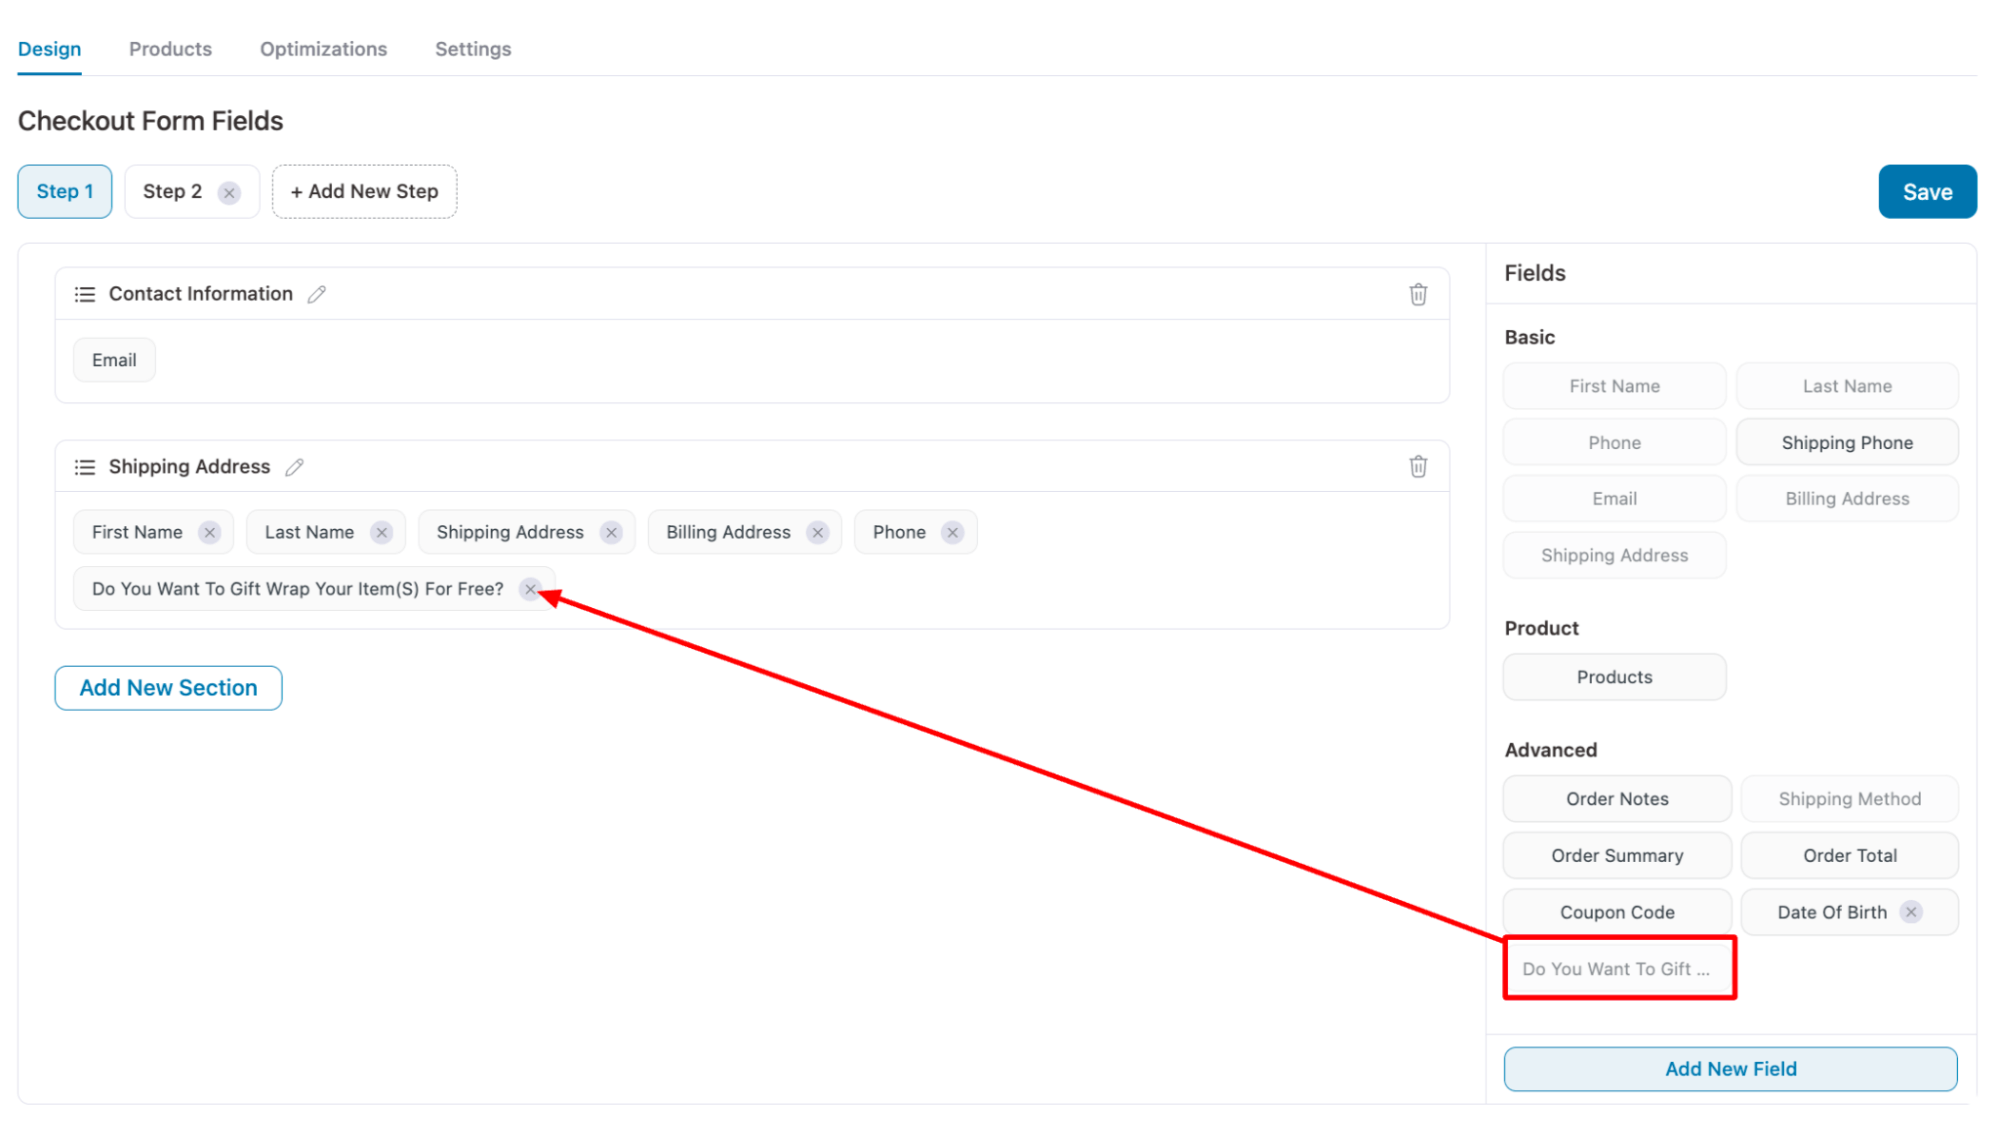
You can rearrange the order of fields by dragging them within any section.
Just hold the field and drag and drop in the order you want.
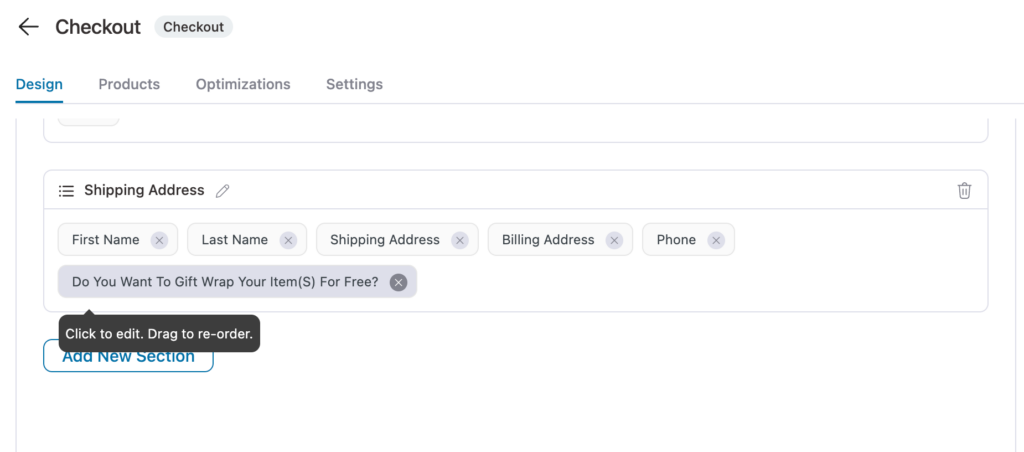
Want to make changes? You can edit, move, or delete any field right from the form builder interface.
Once you're happy with the placement, click ‘Save’ to lock all your changes.
Note: You can add as many WooCommerce custom fields as needed by repeating this process.
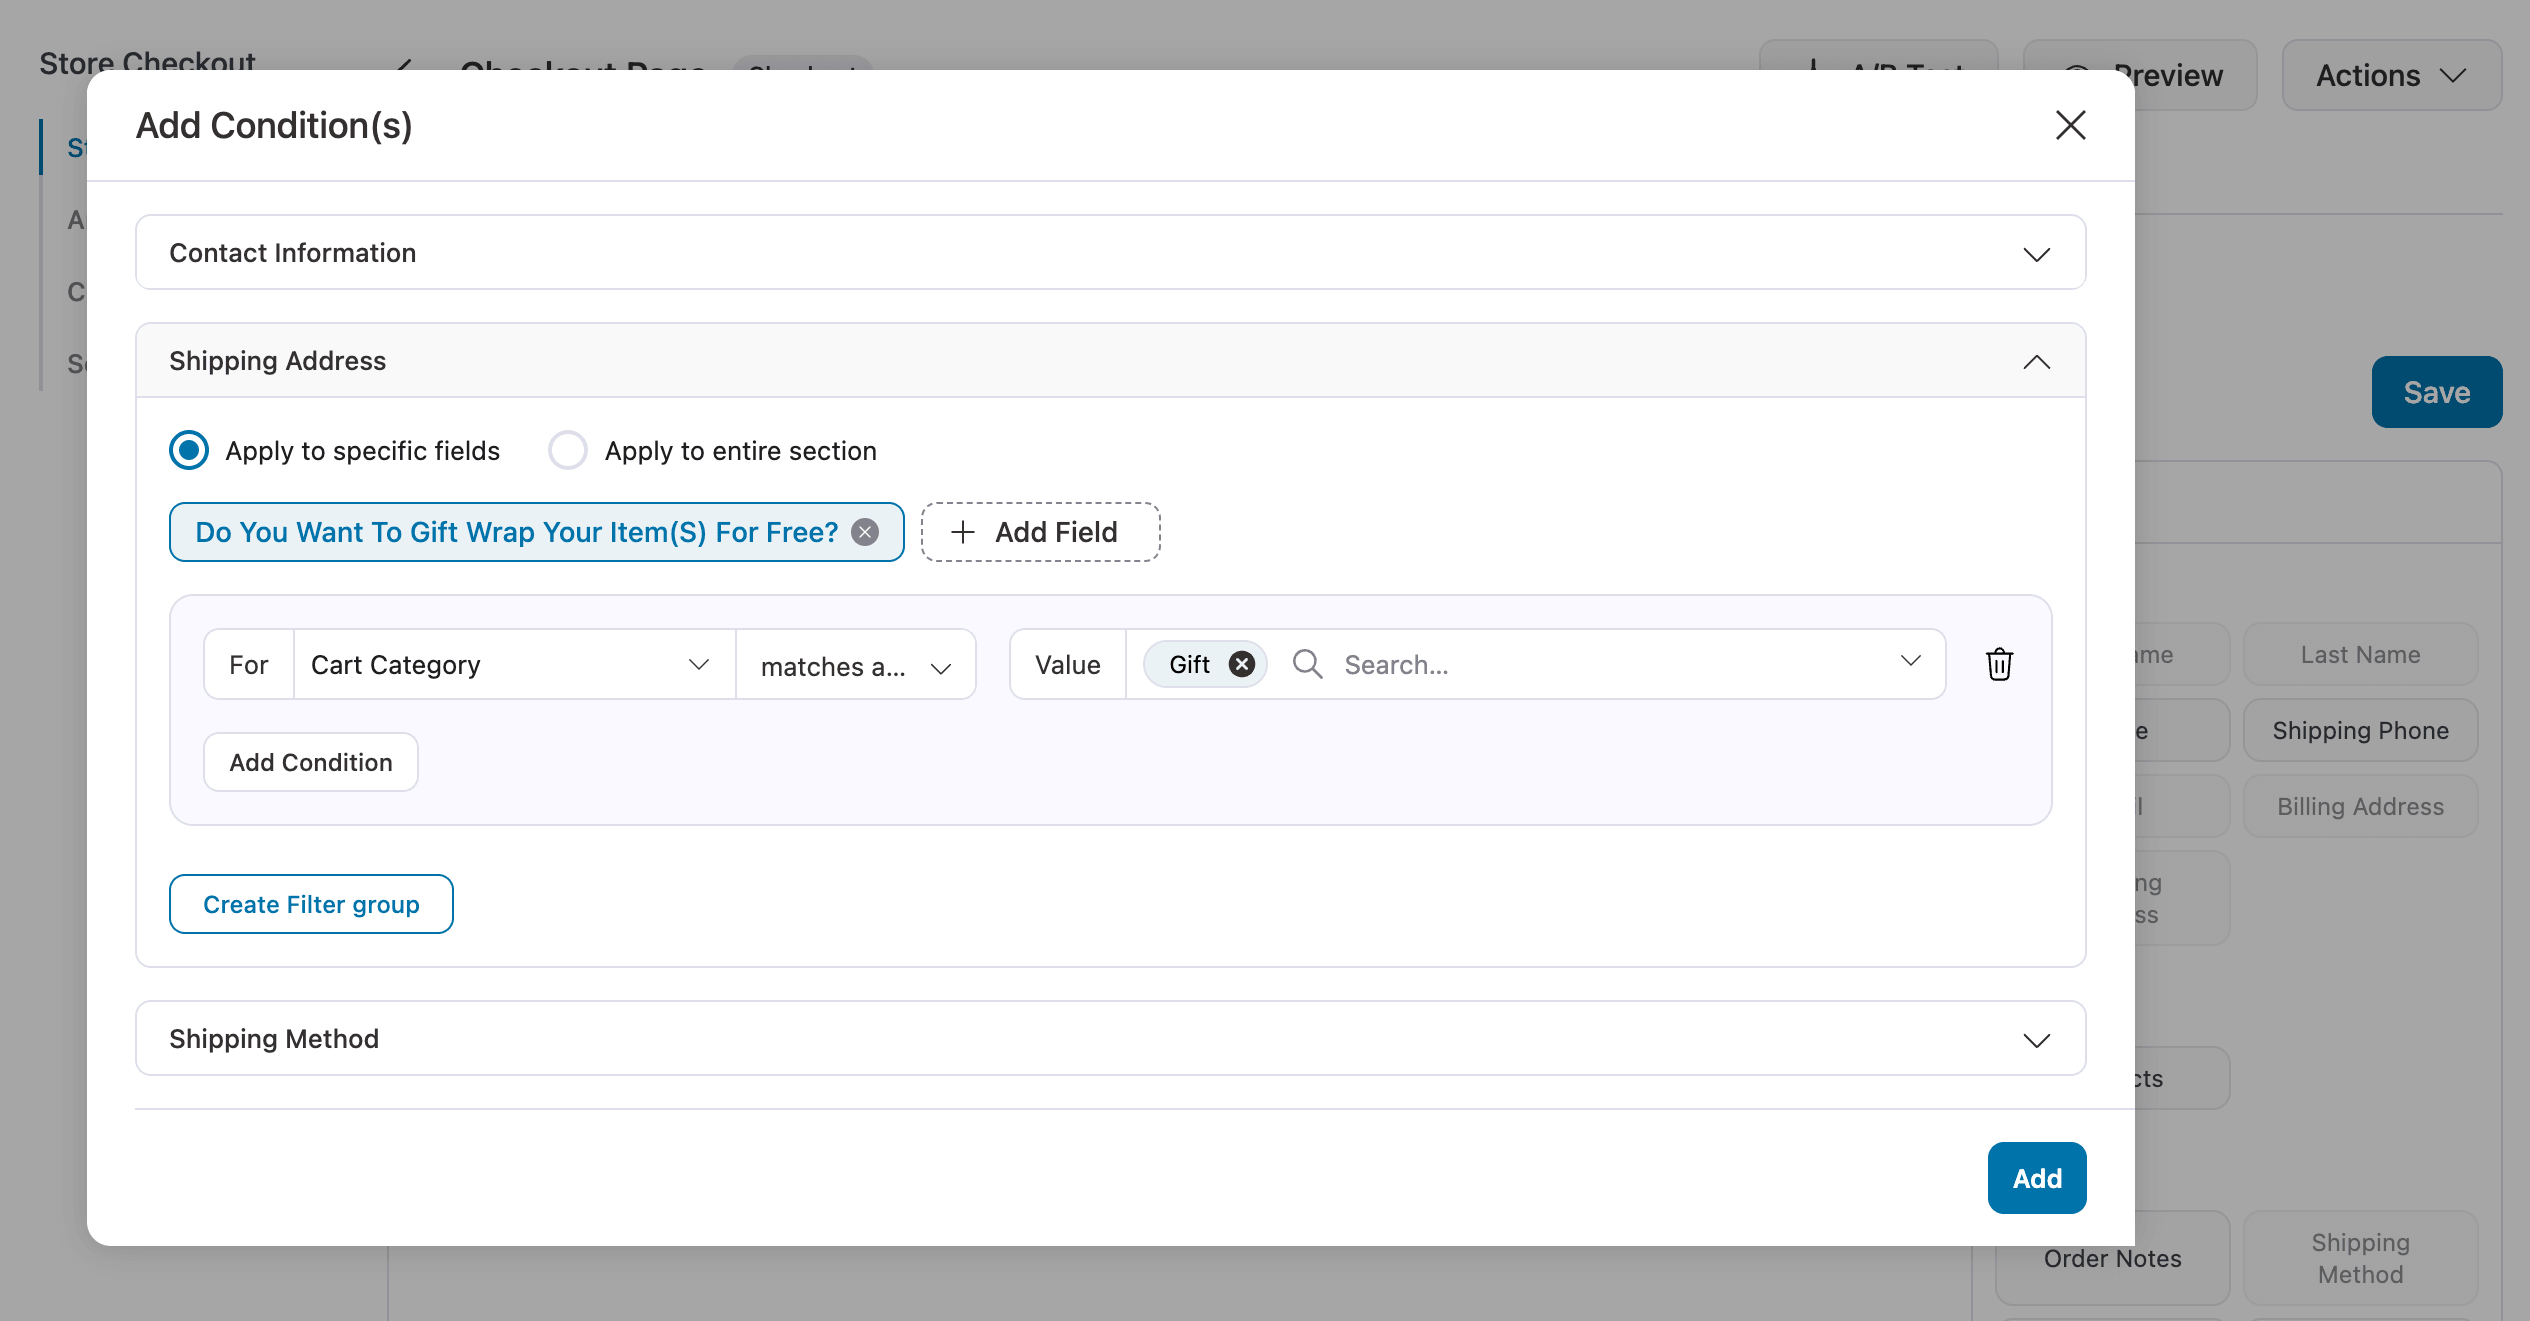
Step 4: Apply condition to custom fields (optional)
You can apply conditions to custom fields so they are only visible to the target audience. This helps reduce form clutter and ensures customers only see what is relevant to them.
To start, click “Add Conditions”, open the section.
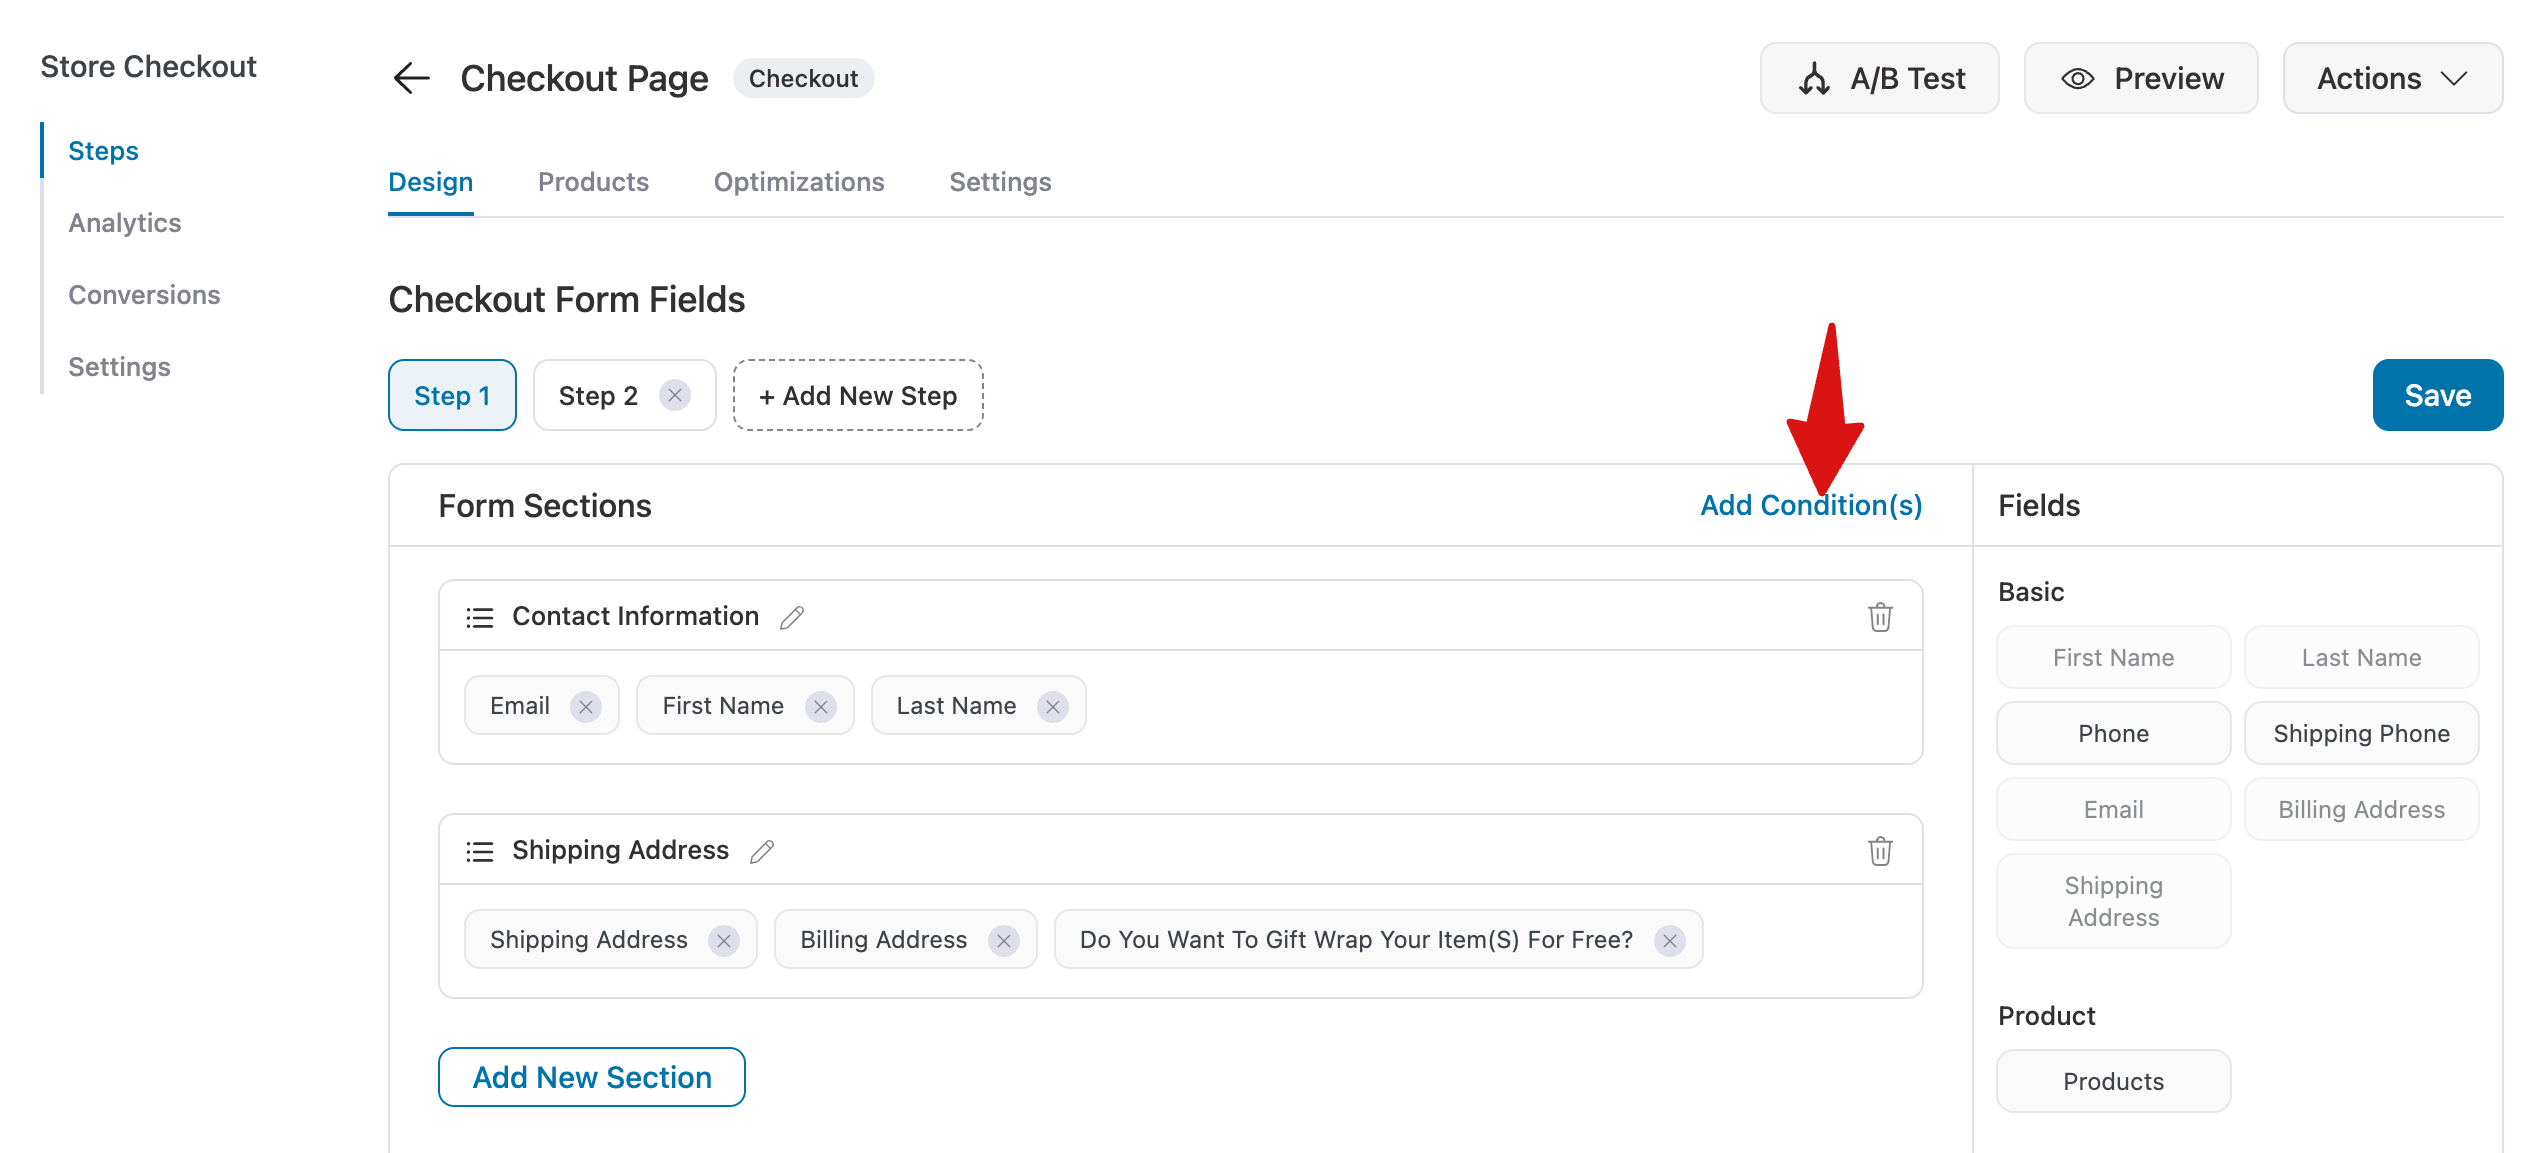
Select “Apply to specific fields”, then click “+ Add Field” and choose the target field.
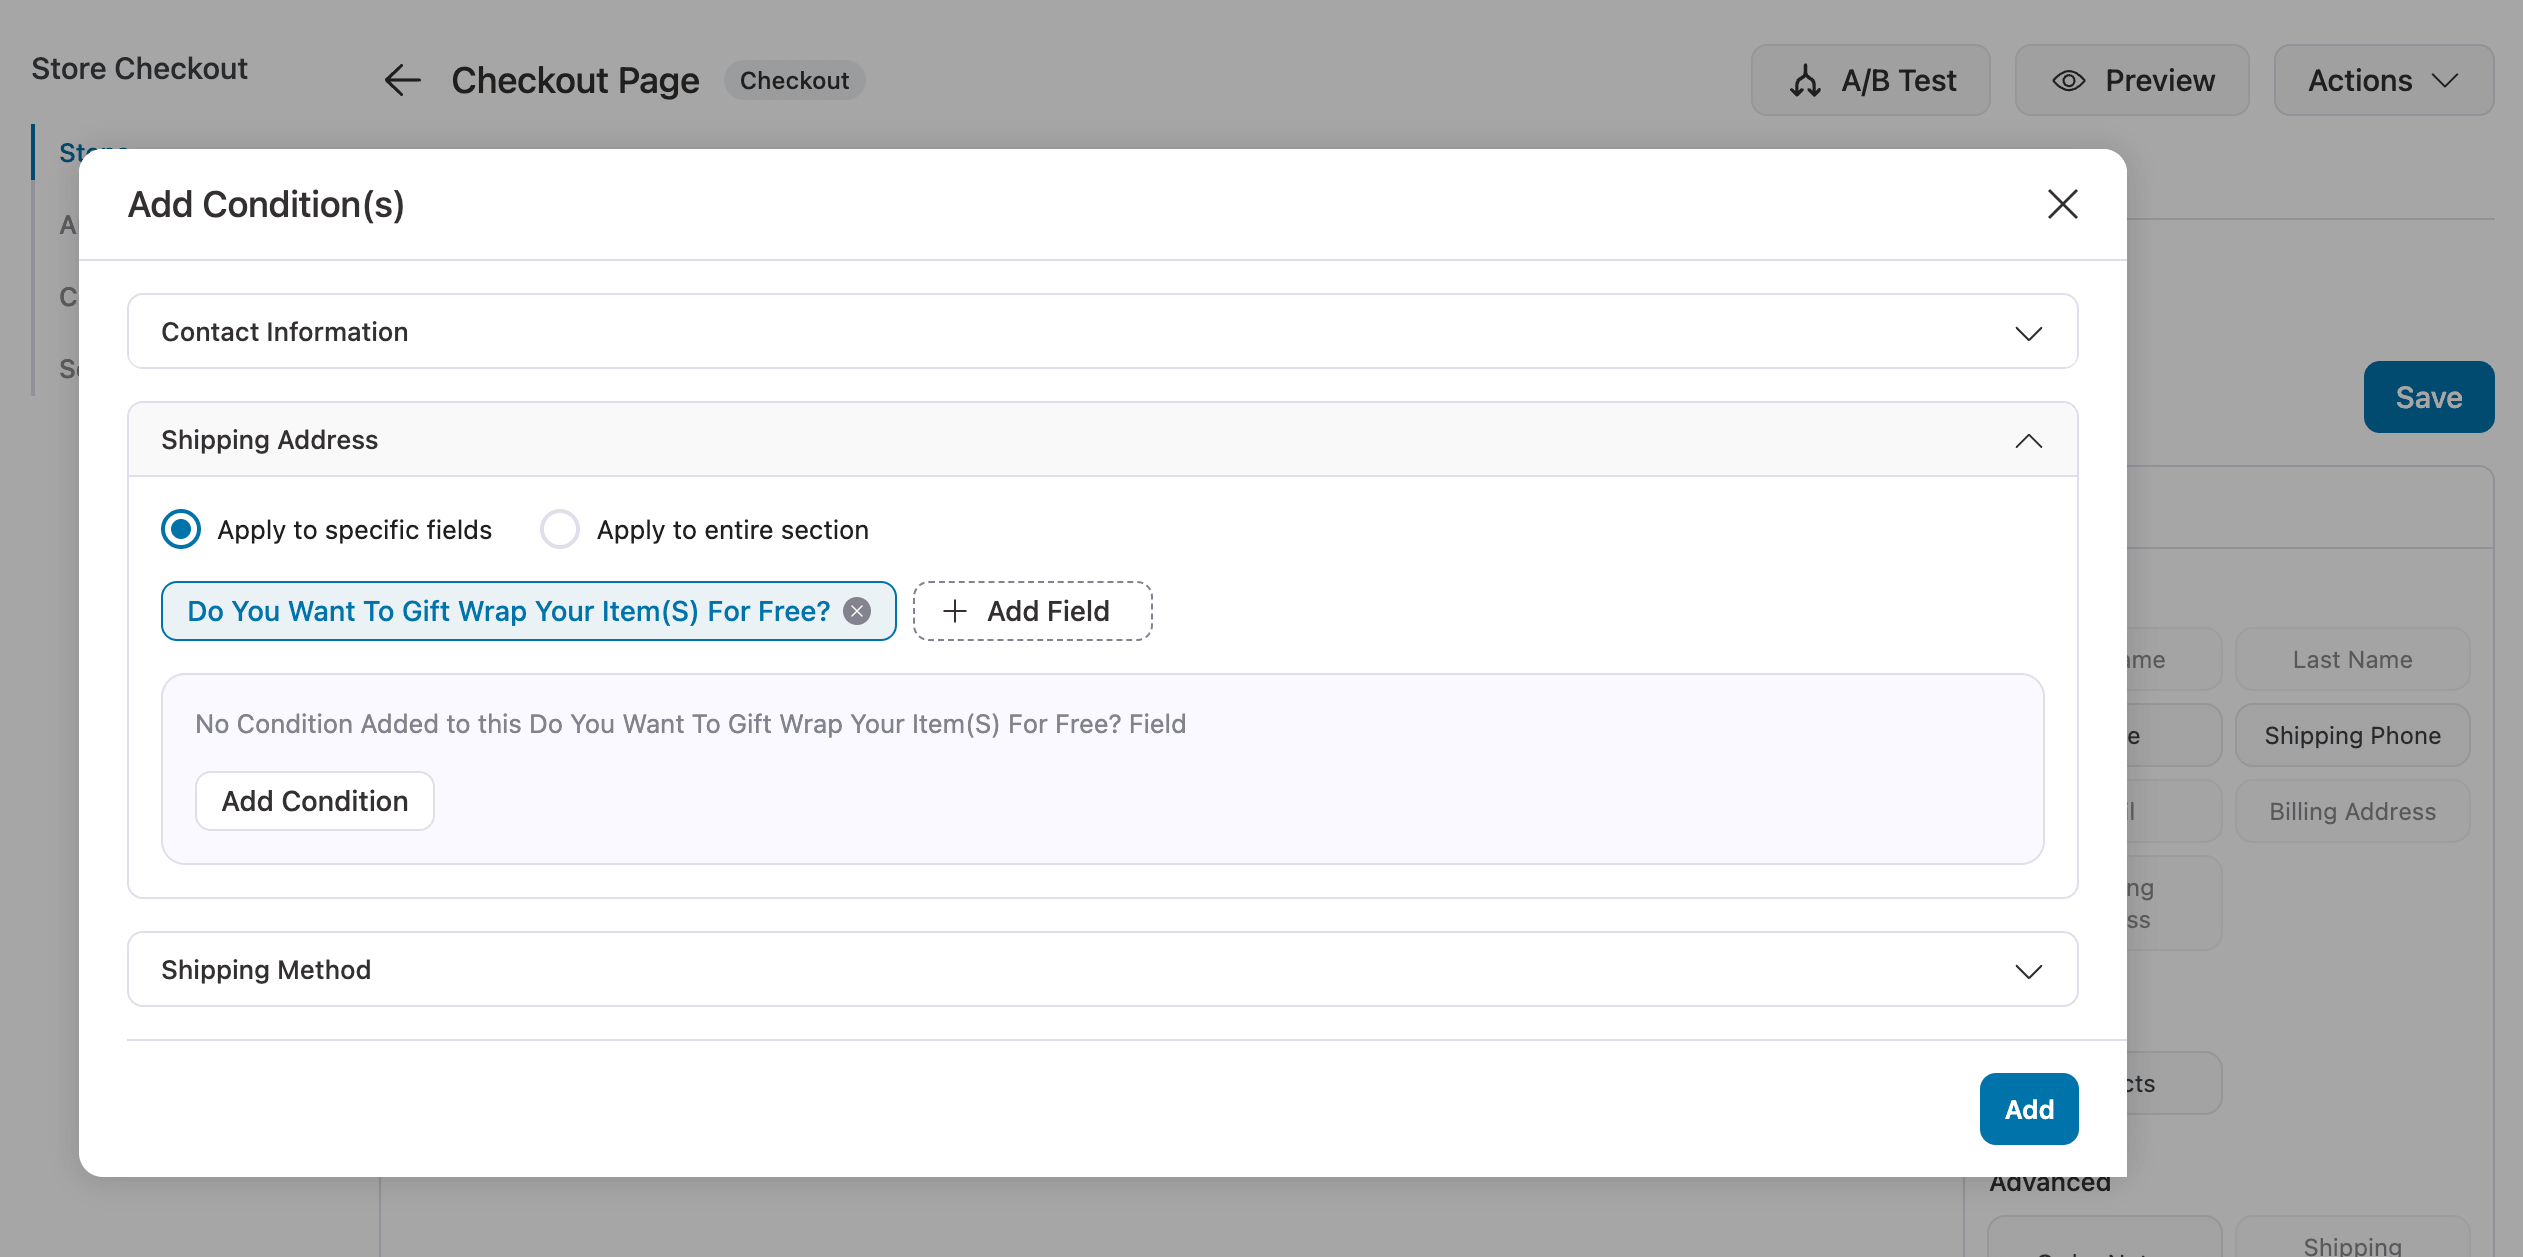
Next, click “Add Condition”, select the condition field, and set the rule, for example, if the cart item category is “gift”.
This helps you show only relevant fields to users, making the form cleaner and improving the overall user experience.
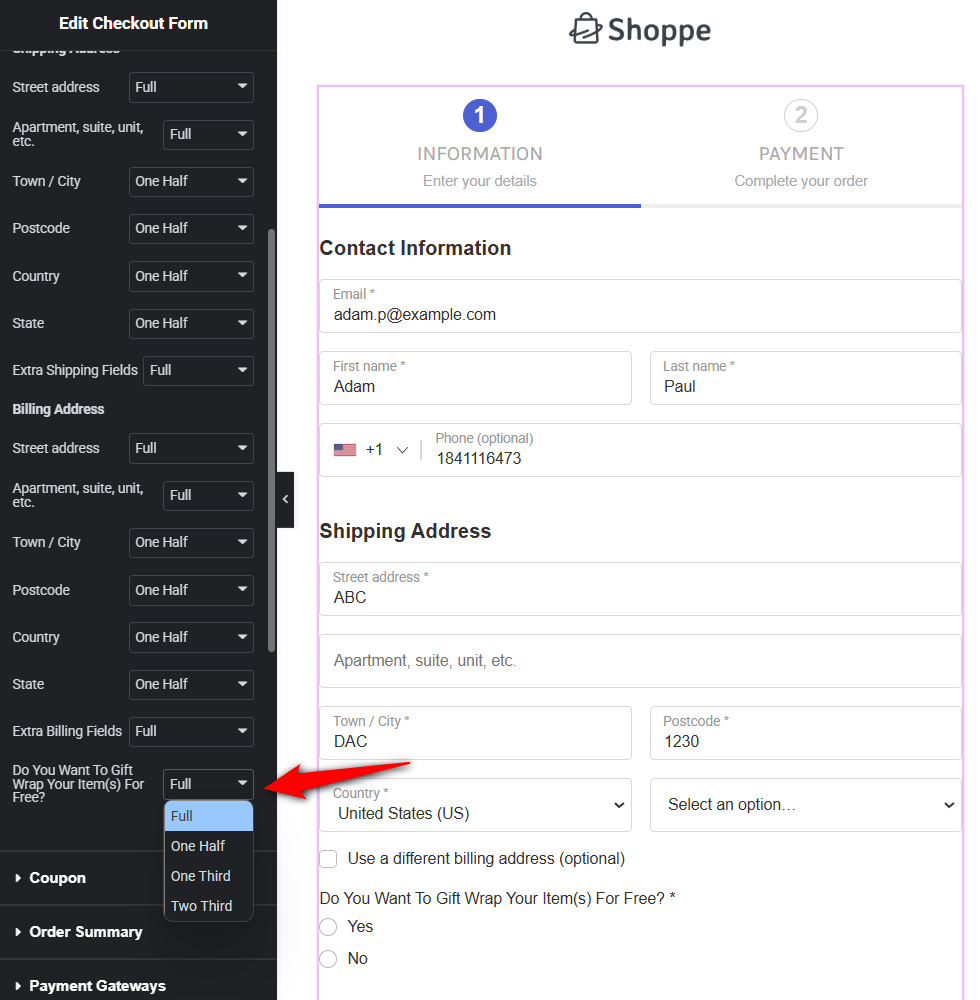
Step 5: Customize the custom WooCommerce checkout field
To further personalize your custom WooCommerce checkout page, you can style and adjust the custom field using your page builder.
Click on the ‘Edit Elementor Template’ to customize your custom WooCommerce checkout page.
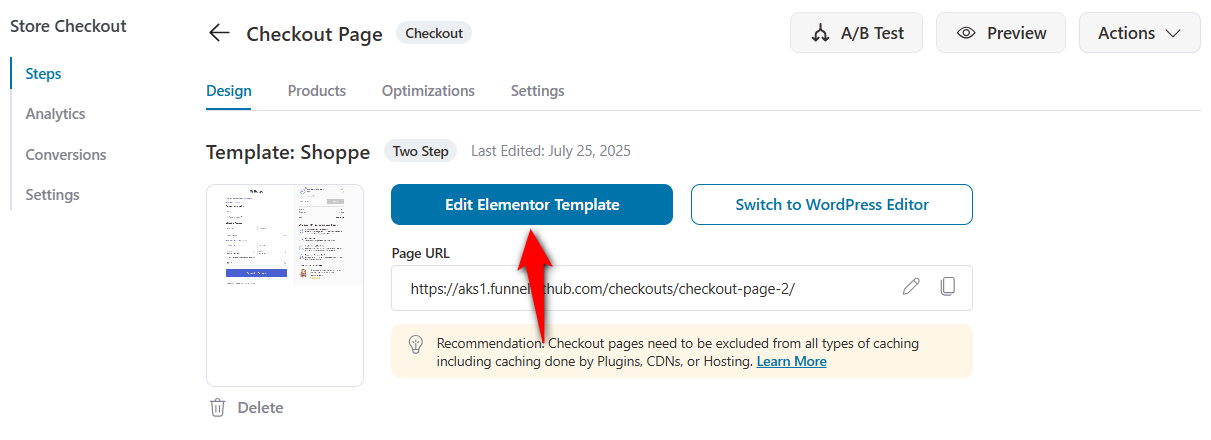
Customize the steps and name them for your multi-step checkout.
Adjust the width and layout of your custom checkout fields for better design and usability.
Once you're done customizing, click ‘Publish’ to save the changes.
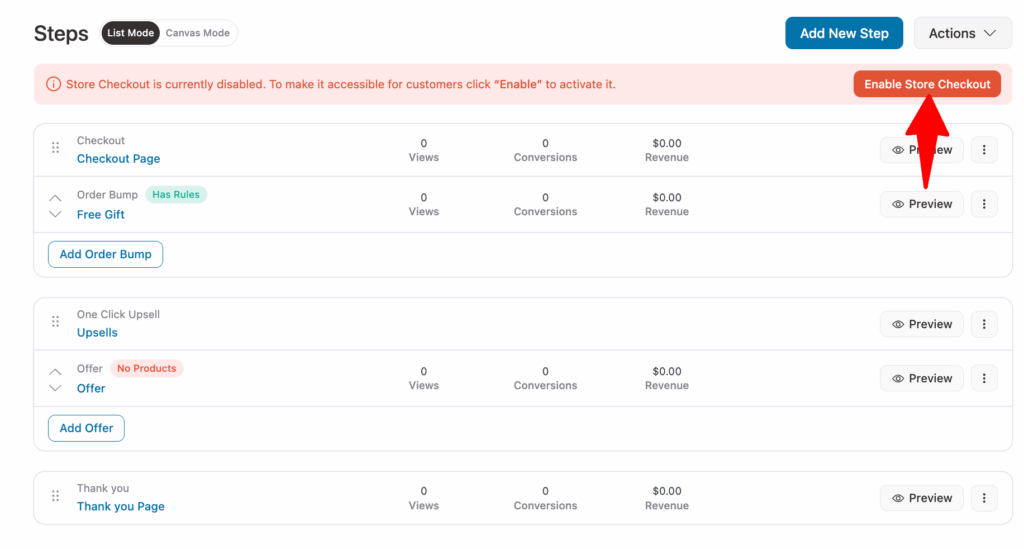
Finally, you need to activate the store checkout to replace the default one with a custom one with new fields.
To test your setup, go to your WooCommerce store’s front end, add items, and proceed to checkout.
Here’s what the WooCommerce checkout page created with FunnelKit with a custom extra field looks like:
Note: If you set any condition for the custom field, it will only show up when the conditions are met.
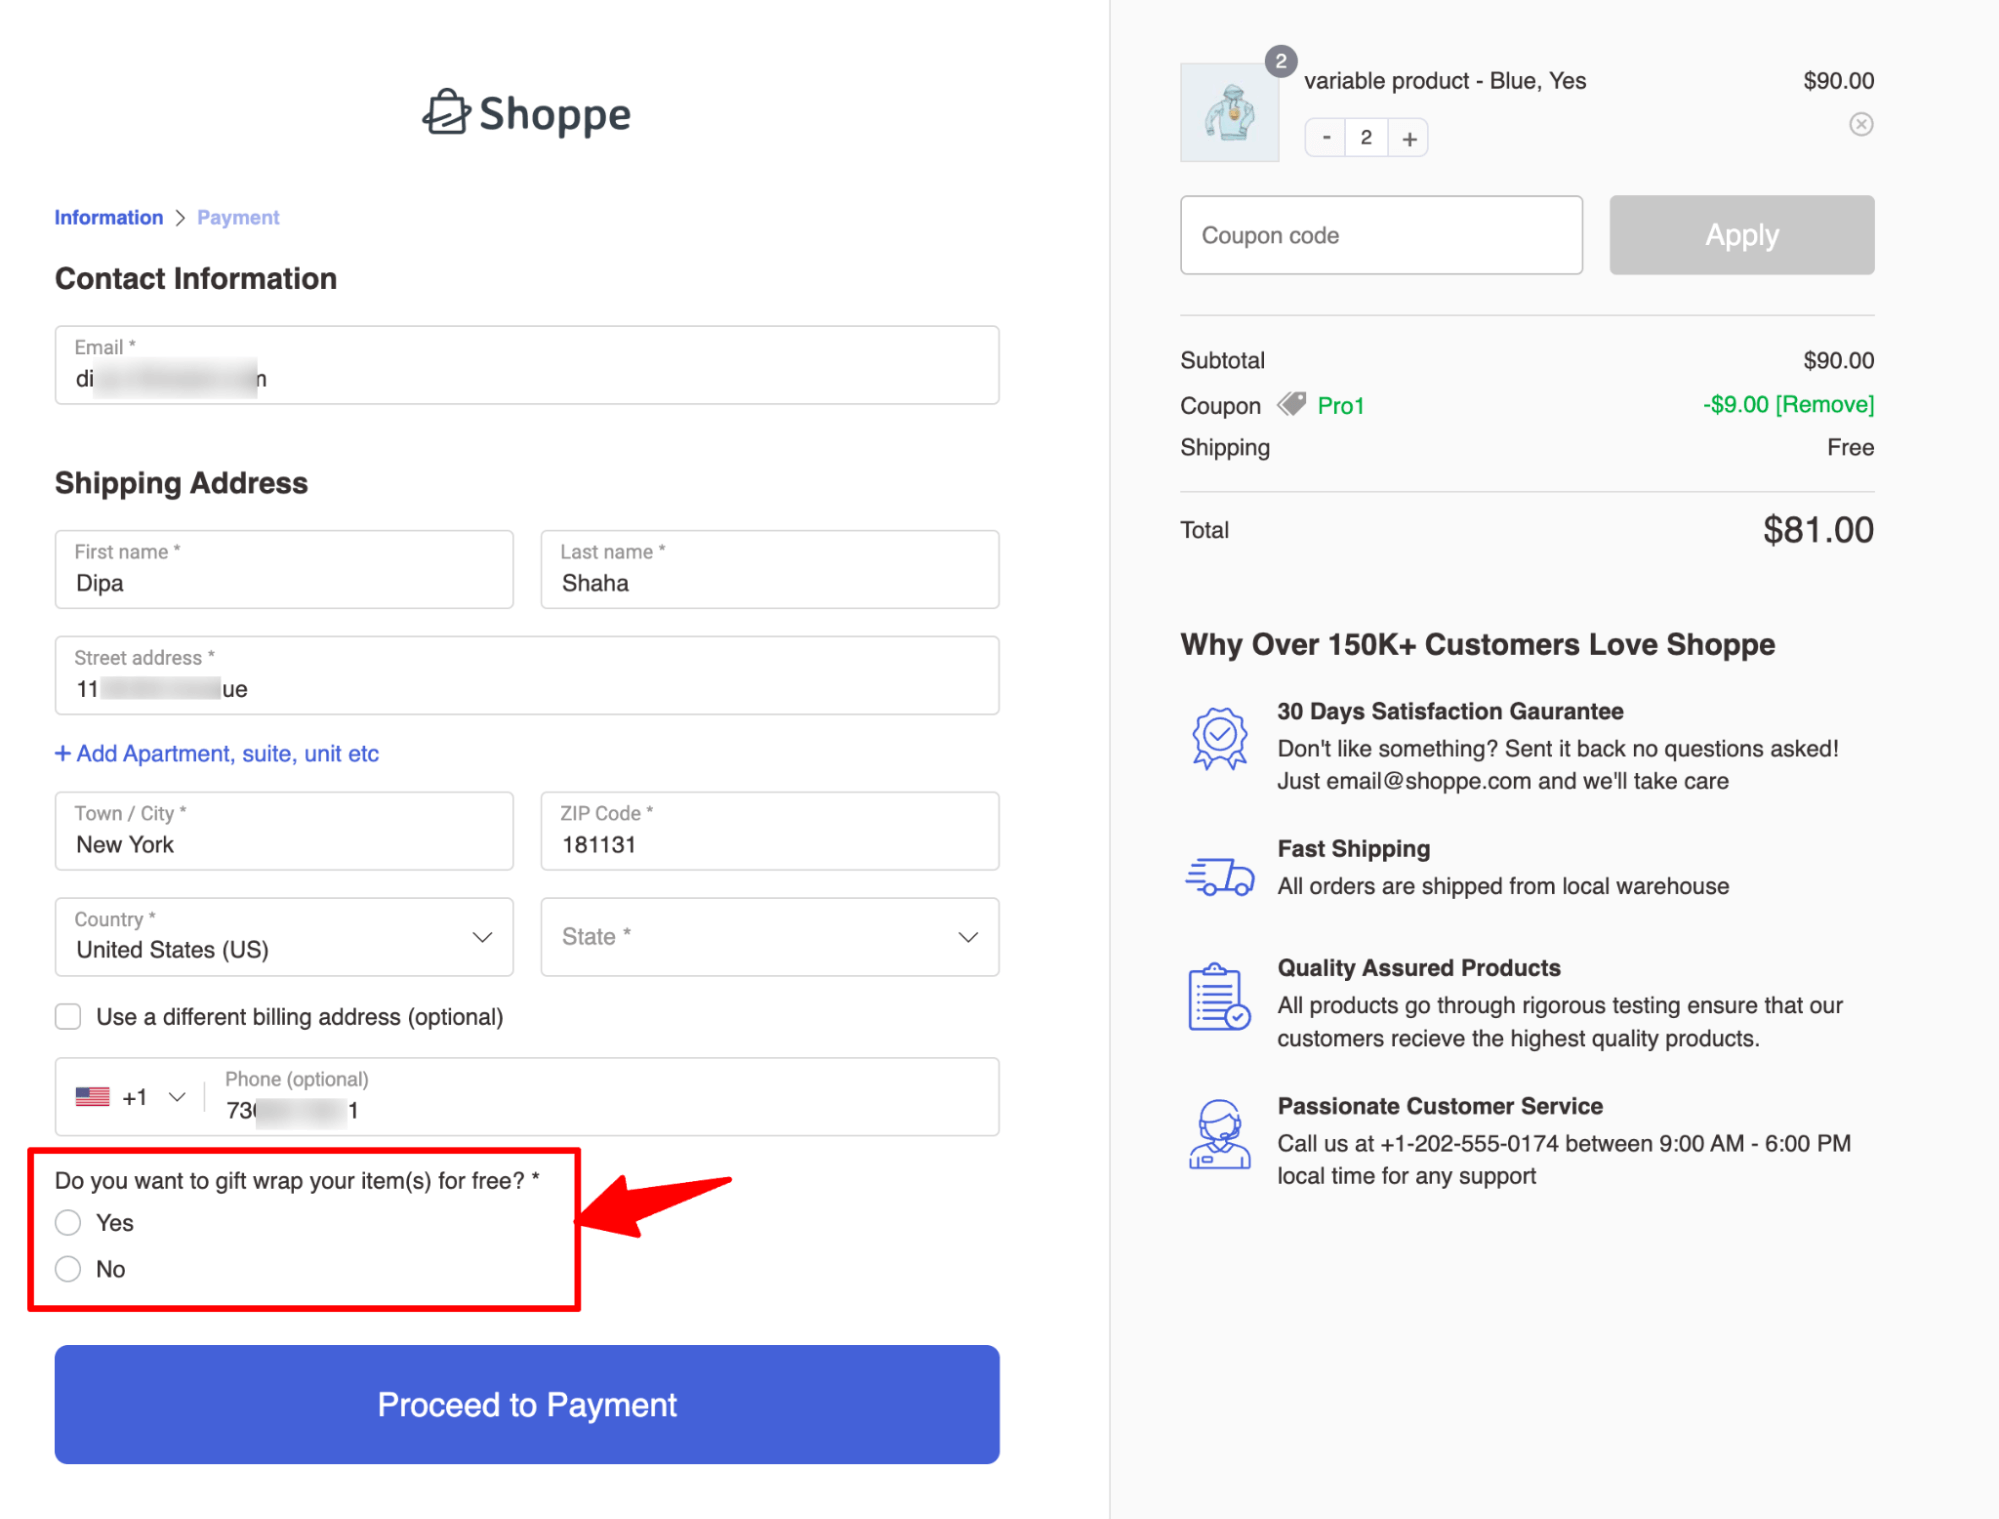
Select an option and proceed to make the test payment. This will place your order and redirect you to the order confirmation page.
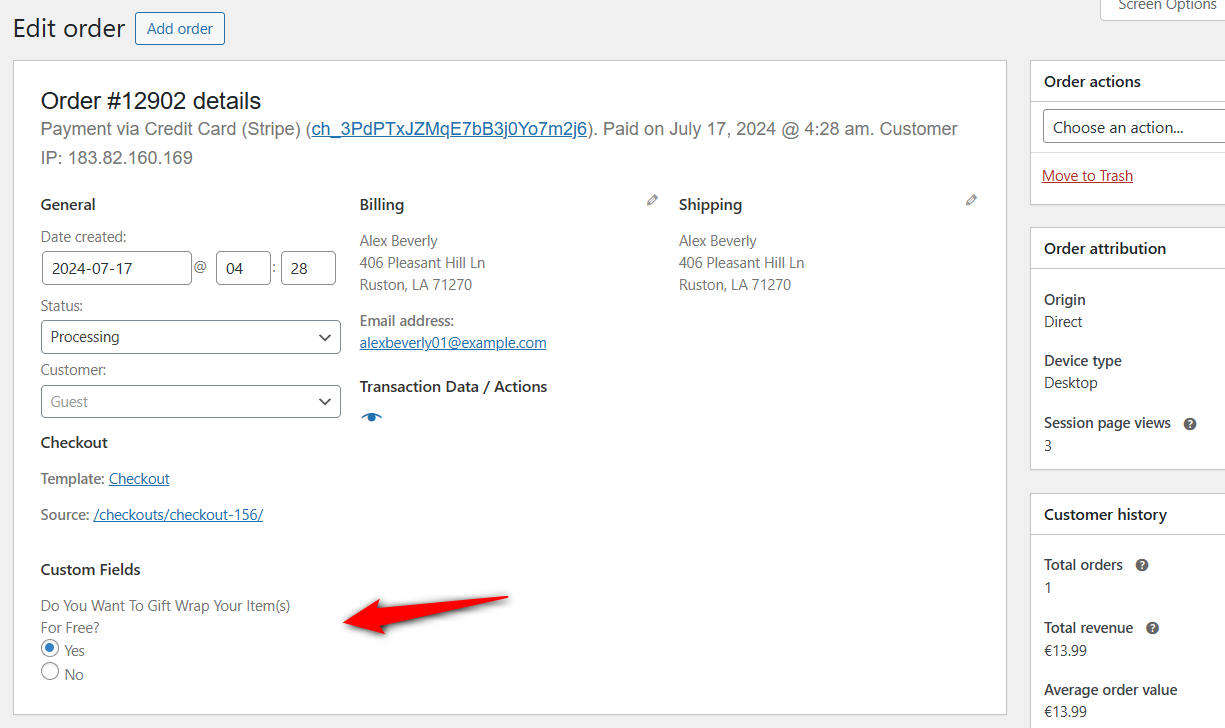
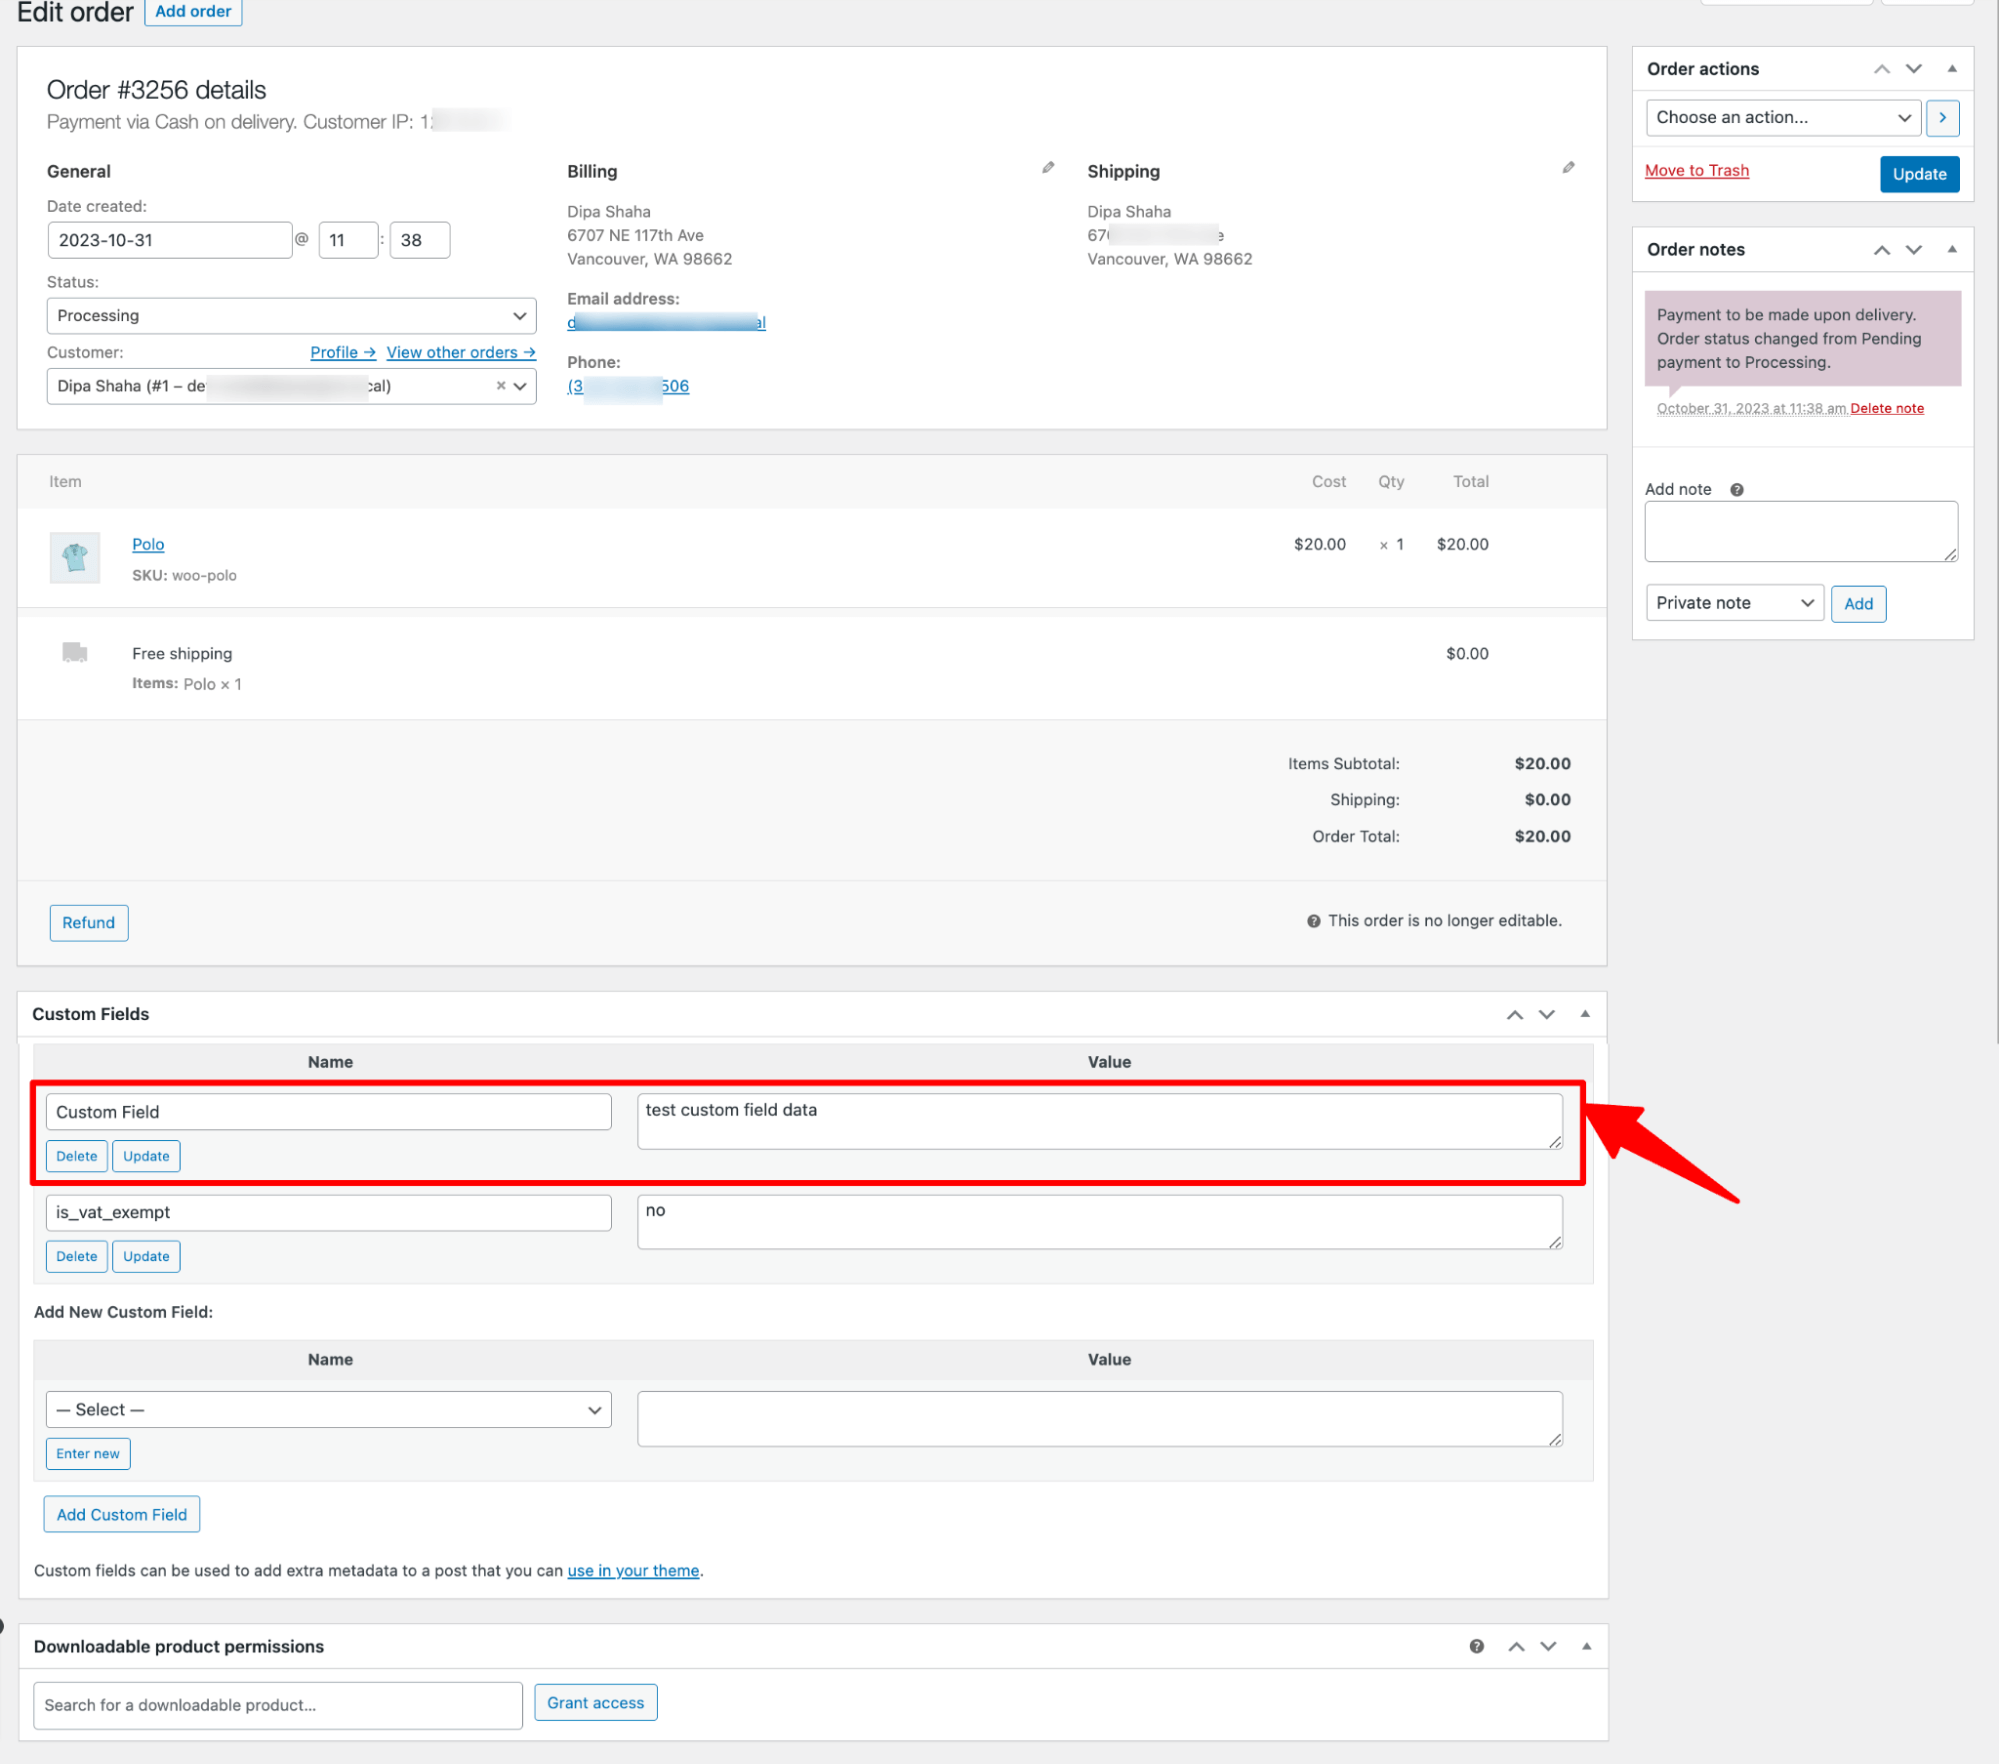
Next, navigate to WooCommerce ⇨ Orders to access the custom field.
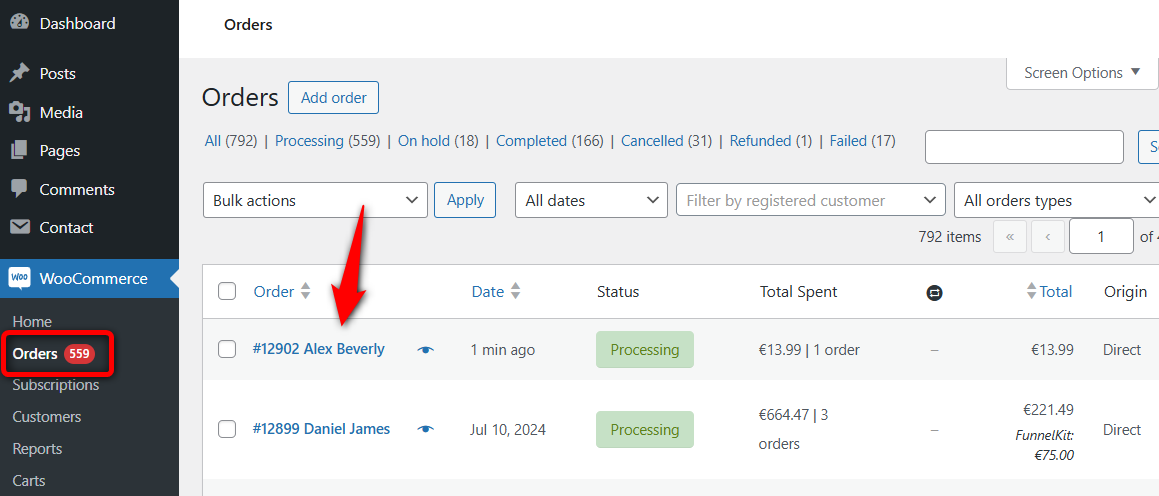
Here, you’ll be able to see the custom field:
You can use this custom field order during order processing by adding it to automated order emails and sending it to customers.
Or you can even include WooCommerce checkout custom fields in PDF invoices and packaging slips.
That’s how easily you can add an extra custom field to the WooCommerce checkout page using FunnelKit Funnel Builder.
Method 2: The Official Plugin Method (WooCommerce Checkout Field Editor)
If you’re not looking for a full funnel builder and only want to edit your checkout fields, this is a solid, reliable choice.
Checkout Field Editor is a paid plugin sold directly by WooCommerce.
It does one job, and it does it well. It gives you a simple settings page where you can add, edit, and reorder fields in all three sections: Billing, Shipping, and Additional.
Step 1: Install and activate the plugin from the WooCommerce marketplace
First, you need to install the Checkout Field Editor for WooCommerce on your WordPress website.
When done, activate it.
Step 2: Add a field to the WooCommerce checkout page
In your dashboard, go to WooCommerce ⇨ Checkout Fields.
You'll see tabs for Billing, Shipping, and Additional. From there, click on the ‘Add Field’ button at the bottom.

You can add fields such as text, password, textarea, select, radio, checkbox, date picker, and more.
Configure its type, label, placeholder, and validation rules. Once done, save the changes.
Our Take: This is a great tool if your only goal is to add a field. Its main limitation is that you’re still stuck with the default WooCommerce checkout page’s design and layout.
You still need to use CSS codes to further edit or rearrange checkout fields in this method.
Method 3: The Developer Method (Using Custom PHP Code)
If you're a developer or comfortable editing your theme’s files, this is the lightest and "pure" way to add a field. It's free and doesn't require any plugins.
However, if you’re a store owner or marketer, we strongly recommend the plugin route because it’s faster, safer, and easier to maintain.
Here, we'll show you how to add a custom field to the WooCommerce checkout page programmatically. Also, validate the form field and update the data so store owners can view the information from the backend.
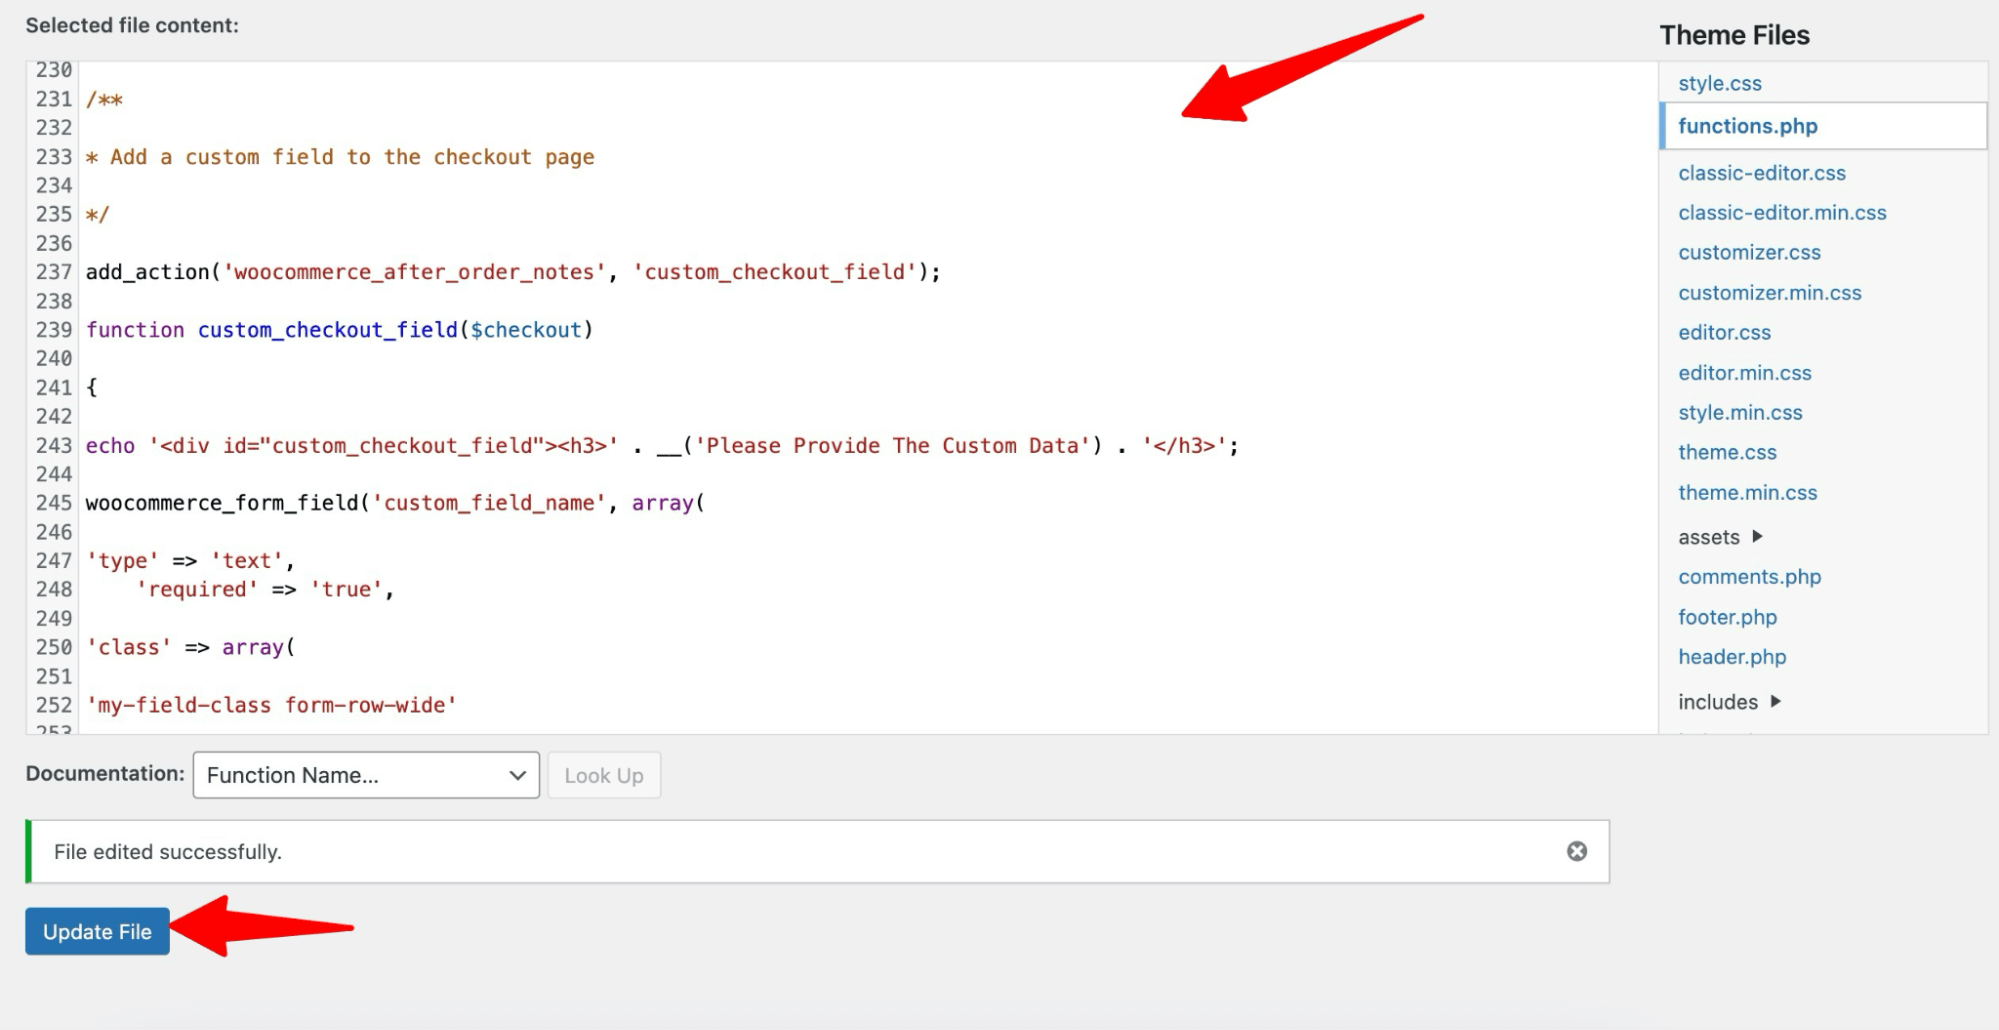
Note: You need to add custom code to your theme's function.php file.
Step 1: Navigate to the function.php file
First, navigate to Appearance ⇒ Theme File Editor and select the functions.php file.
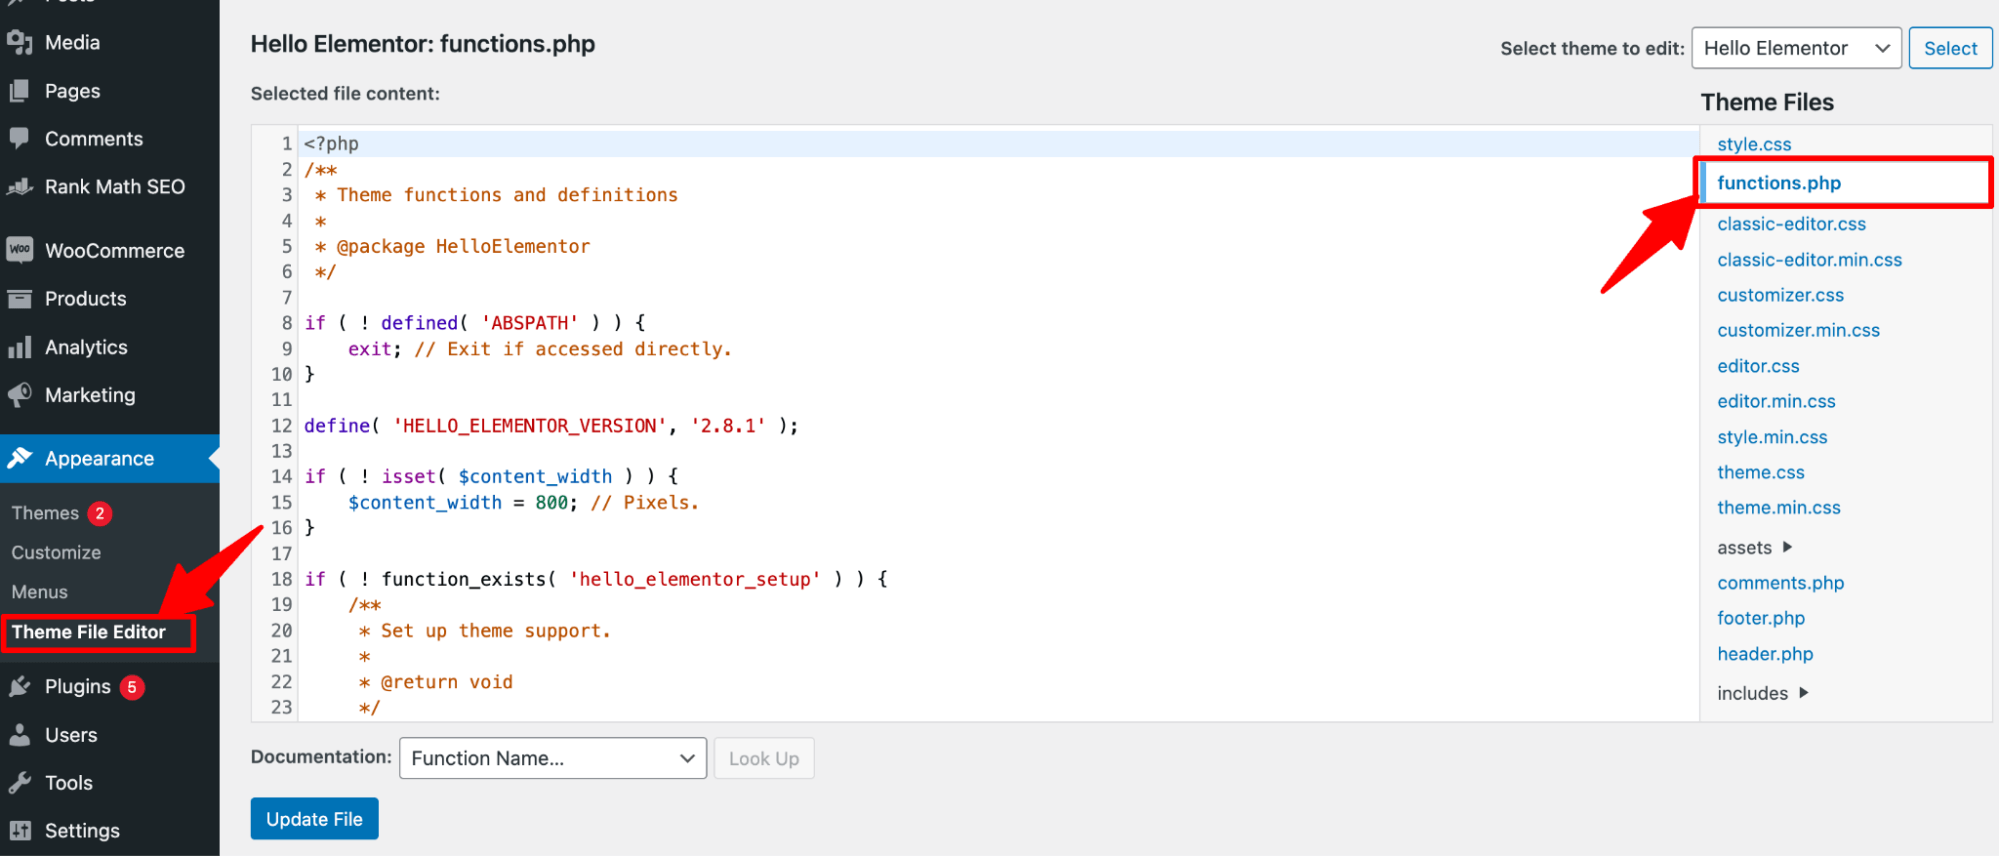
You’ll need to add your custom code here.
Step 2: Insert the code to add a custom field
To add a custom field, add the code below to the functions.php file. You can change the label, placeholder, and other details as needed.
If you want to make the field required, add the line ‘required' => ‘true’; otherwise, skip it.
/**
* Add a custom field to the checkout page
*/

add_action('woocommerce_after_order_notes', 'custom_checkout_field');

function custom_checkout_field($checkout)
{
    echo '<div id="custom_checkout_field"><h3>' . __('Please Provide The Custom Data') . '</h3>';

    woocommerce_form_field('custom_field_name', array(
        'type'      => 'text',
        'required'  => true,
        'class'     => array('my-field-class form-row-wide'),
        'label'     => __('Custom Field'),
        'placeholder' => __('Enter Custom Data'),
    ),
    $checkout->get_value('custom_field_name'));

    echo '</div>';
}
Add the above code at the end of the file and click on the 'Update File' button.
Here, we have added a required custom field.
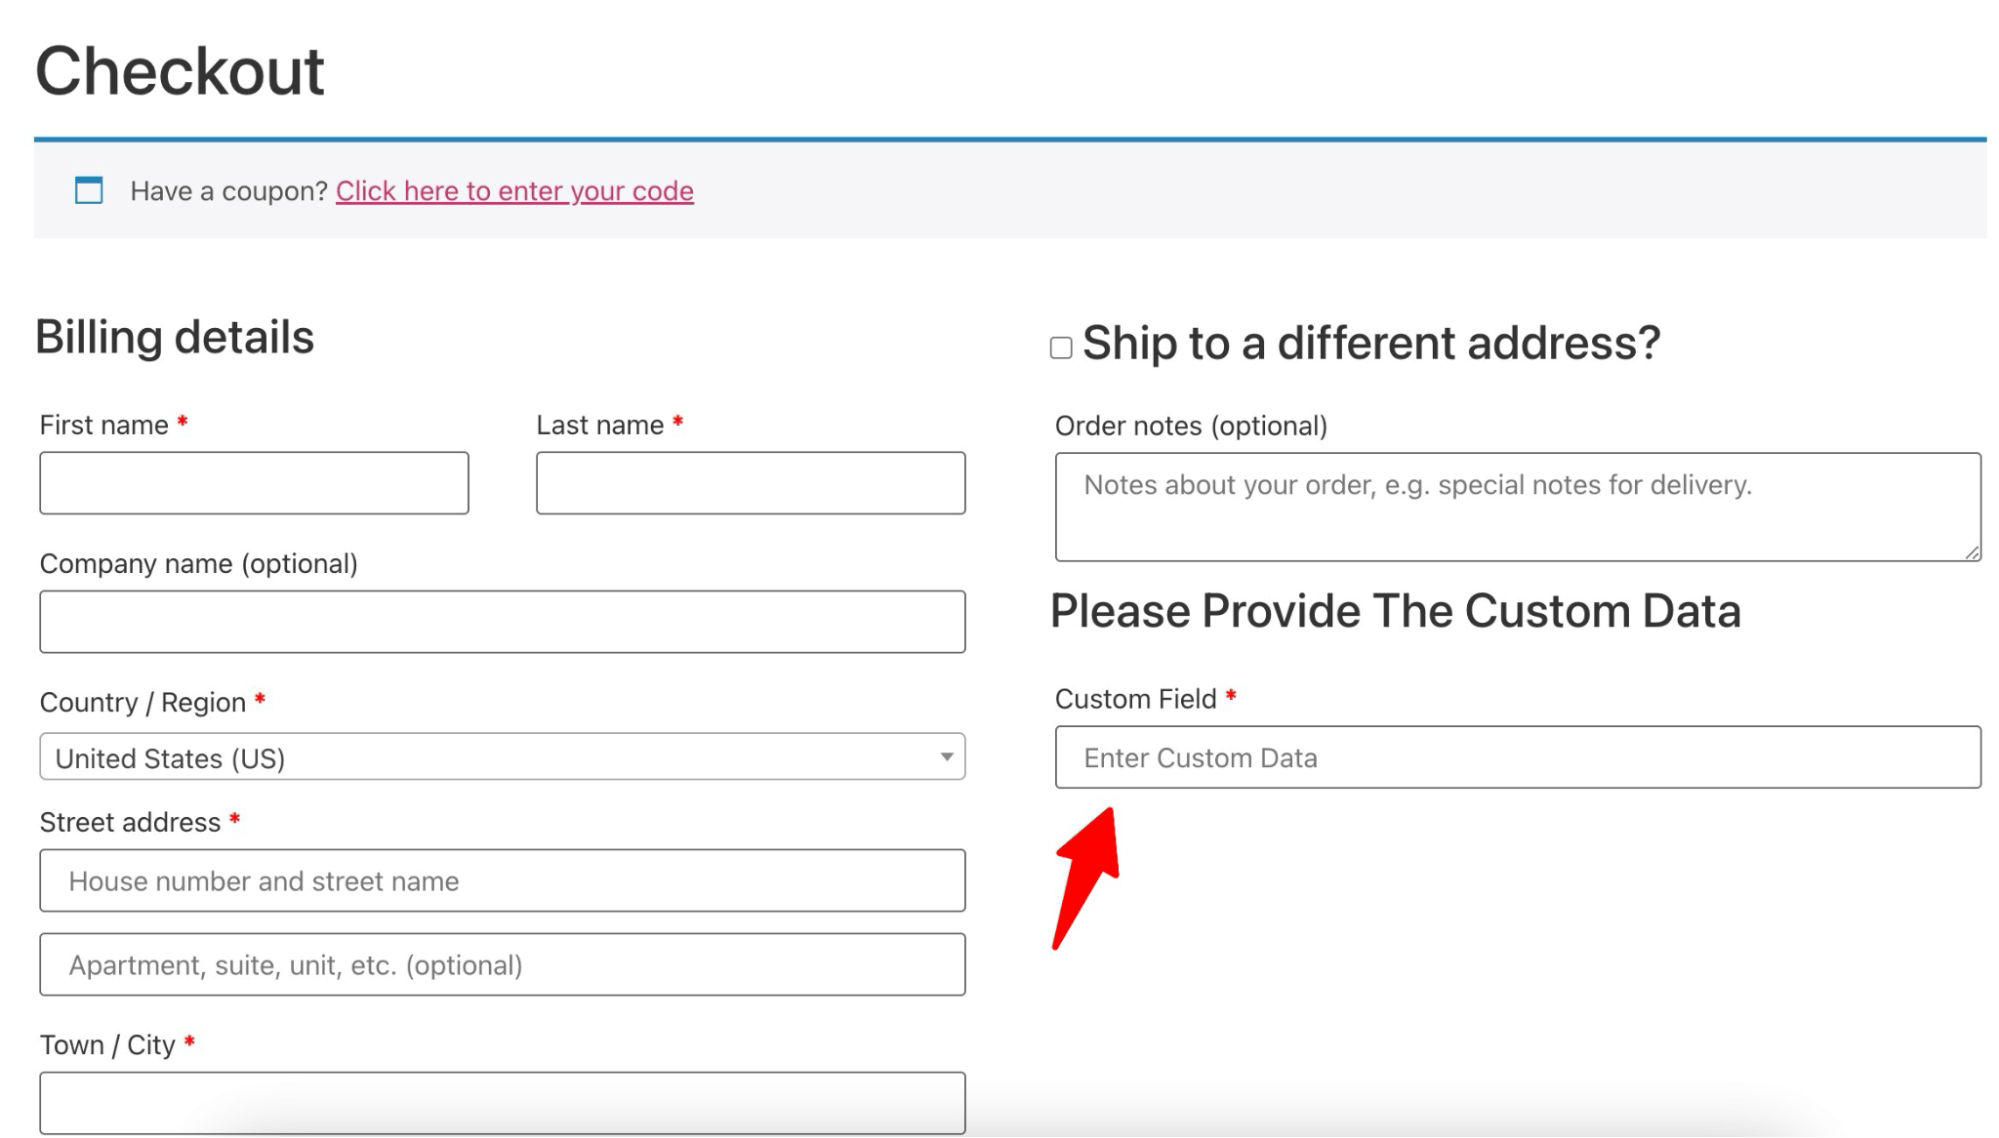
Step 3: Add the validation message
Making your custom WooCommerce checkout field required isn’t enough. To make the checkout process user-friendly, you should display a message indicating that the field is required.
To show an error message, add the following code to your function.php file.
/**
* Validate Checkout field
*/

add_action('woocommerce_checkout_process', 'customised_checkout_field_process');

function customised_checkout_field_process()
{
    // Show an error message if the field is not set.
    if (!$_POST['custom_field_name']) {
        wc_add_notice(__('Custom Field is a Required Field!'), 'error');
    }
}
Here is how the error message will be displayed:
Step 4: Save the custom data
Now, it’s time to ensure the client's details entered into the custom field are saved.
You can do this by adding the code below:
/**
* Update the value given in custom field
*/

add_action('woocommerce_checkout_update_order_meta', 'custom_checkout_field_update_order_meta');

function custom_checkout_field_update_order_meta($order_id)
{
    if (!empty($_POST['custom_field_name'])) {
        update_post_meta(
            $order_id,
            'Custom Field',
            sanitize_text_field($_POST['custom_field_name'])
        );
    }
}
Now, place a test order with some random value for the custom checkout field.
After placing the order successfully, check its details by navigating to WooCommerce ⇒ Orders.
You will find the custom field with the entered value here.
This is how you can add a custom checkout field to the WooCommerce checkout page with coding.
That’s why we suggest you use a renowned WooCommerce plugin to add a custom field to your WooCommerce checkout page.
Bonus: Developer Method for Block Checkout
If your store is on the new Block Checkout (default for every WooCommerce installation since version 8.3), use this method to add a custom field with code.
The Block Checkout API gives you three places to register a field:
- Contact information: Renders at the top of the form, next to the email field. Values are saved to the customer’s account, so they’re remembered for next time.
- Address: Renders inside both the shipping and billing address forms. Values are saved to both the customer and the order. It's best for things like a VAT number, government ID, or company tax ID.
- Order: Renders in a separate “Order information” inner block, by default. Values are saved only to the order, never to the customer.
Each field can only live in one location. You can register as many fields as you need across all three.
Use your child's theme functions.php file or a custom code snippet plugin.
Step 1: Register a simple text field
Let’s start with a common use case: a “How did you hear about us?” field in the order section.
Add the following code to your functions.php:
/**
 * Add a "How did you hear about us?" field to the Block Checkout.
 */
add_action( 'woocommerce_init', 'fk_register_block_checkout_fields' );

function fk_register_block_checkout_fields() {
    woocommerce_register_additional_checkout_field(
        array(
            'id'          => 'funnelkit/referral-source',
            'label'       => 'How did you hear about us?',
            'location'    => 'order',
            'required'    => false,
            'type'        => 'text',
        )
    );
}
Please note that the id must be in namespace/field-name format. WooCommerce uses the namespace prefix to avoid collisions with other plugins. Also, the location either accepts 'contact', 'address', or 'order'.
The function woocommerce_register_additional_checkout_field() must be called after woocommerce_init fires.
Step 2: Add custom validation
Built-in required validation is fine for "this field must have a value". But sometimes you need to check the value matches a specific format like a VAT number, a postal code, or a five-digit ID.
Use the woocommerce_validate_additional_field action:
/**
 * Validate the VAT number format.
 */
add_action(
    'woocommerce_validate_additional_field',
    'custom_validate_vat_number',
    10,
    3
);

function custom_validate_vat_number( WP_Error $errors, $field_key, $field_value ) {
    if ( 'vat-number' !== $field_key ) {
        return;
    }

    // EU VAT format: 2 country letters + 8-12 digits.
    if ( ! preg_match( '/^[A-Z]{2}[0-9]{8,12}$/', $field_value ) ) {
        $errors->add(
            'invalid_vat_number',
            'Please enter a valid VAT number (2 country letters followed by 8–12 digits).'
        );
    }
}
Step 3: Display the field data in the admin order page
Out of the box, the values customers enter into additional checkout fields get saved automatically to the order, the customer, or both, depending on the location. You don’t need to write any save logic.
But you do need to display them somewhere your team can see them. Here’s how to show your custom fields on the admin order details page:
/**
 * Display custom checkout fields on the admin order page.
 */
add_action(
    'woocommerce_admin_order_data_after_billing_address',
    'fk_display_custom_fields_admin'
);

function fk_display_custom_fields_admin( $order ) {
    // Make sure the CheckoutFields service is available.
    if ( ! class_exists( '\Automattic\WooCommerce\Blocks\Package' ) ) {
        return;
    }

    $checkout_fields = \Automattic\WooCommerce\Blocks\Package::container()->get(
        \Automattic\WooCommerce\Blocks\Domain\Services\CheckoutFields::class
    );

    // Order-location field
    $referral = $checkout_fields->get_field_from_object(
        'funnelkit/referral-source',
        $order,
        'other'
    );

    if ( ! empty( $referral ) ) {
        echo '<p><strong>Referral source:</strong> ' . esc_html( $referral ) . '</p>';
    }

    // Address-location field (billing)
    $vat = $checkout_fields->get_field_from_object(
        'funnelkit/vat-number',
        $order,
        'billing'
    );

    if ( ! empty( $vat ) ) {
        echo '<p><strong>VAT number:</strong> ' . esc_html( $vat ) . '</p>';
    }
}
The third argument to get_field_from_object() is the field group: 'billing' or 'shipping' for address-location fields, or 'other' for contact and order fields.
This code is fully HPOS-compatible. Because we’re passing the WooCommerce order object ($order) and using the Blocks helper method, the system handles the underlying storage, whether your store is on HPOS or legacy post storage, without any change to the code.
6 Best Practices for Adding Custom Checkout Fields in WooCommerce
Adding custom fields to your WooCommerce checkout page can enhance user experience and help you collect important customer information.
But if not implemented thoughtfully, they can slow down checkout and reduce conversions.
Follow these best practices to create effective and user-friendly checkout fields in WooCommerce:
- Define the purpose of each field
Before adding a field, be clear about why you need it. Is it for personalization, delivery preferences, or extra customer info?
Only add fields that serve a clear purpose, as unnecessary fields can increase friction and lead to cart abandonment.
- Place fields strategically
Place fields in sections where they make sense, such as billing-related fields in the Billing section, shipping-specific fields in the Shipping section, and additional notes or preferences under the Order Notes section.
Keep essential fields (like name, email, phone) at the top, and move optional ones toward the end.
- Minimize user effort
Enable pre-fill fields or address suggestions to minimize the user’s effort. Use dropdowns, radio buttons, or checkboxes to reduce typing errors.
FunnelKit Funnel Builder leverages tools such as Google Address Autocomplete to help users enter their addresses faster.
- Ensure mobile optimization
Test the added fields on mobile devices to ensure they are easy to fill out. Use larger input boxes, buttons, and dropdown menus for mobile touchscreens.
Keep the checkout process concise, requiring minimal scrolling on small devices.
- Test field placement and functionality
Field placement impacts conversions.
Try A/B testing one-page checkout with a multi-step checkout page and placing the custom field on different sections of the checkout form.
FunnelKit makes it easy to test different layouts and analyze performance.
- Use conditional logic for better relevance
Use conditional logic to show fields only when they are needed. This keeps the checkout form clean and avoids overwhelming users with unnecessary inputs.
Use Cases: Examples of Extra Fields on WooCommerce Checkout
Let’s look at some examples of custom fields on the WooCommerce checkout page:
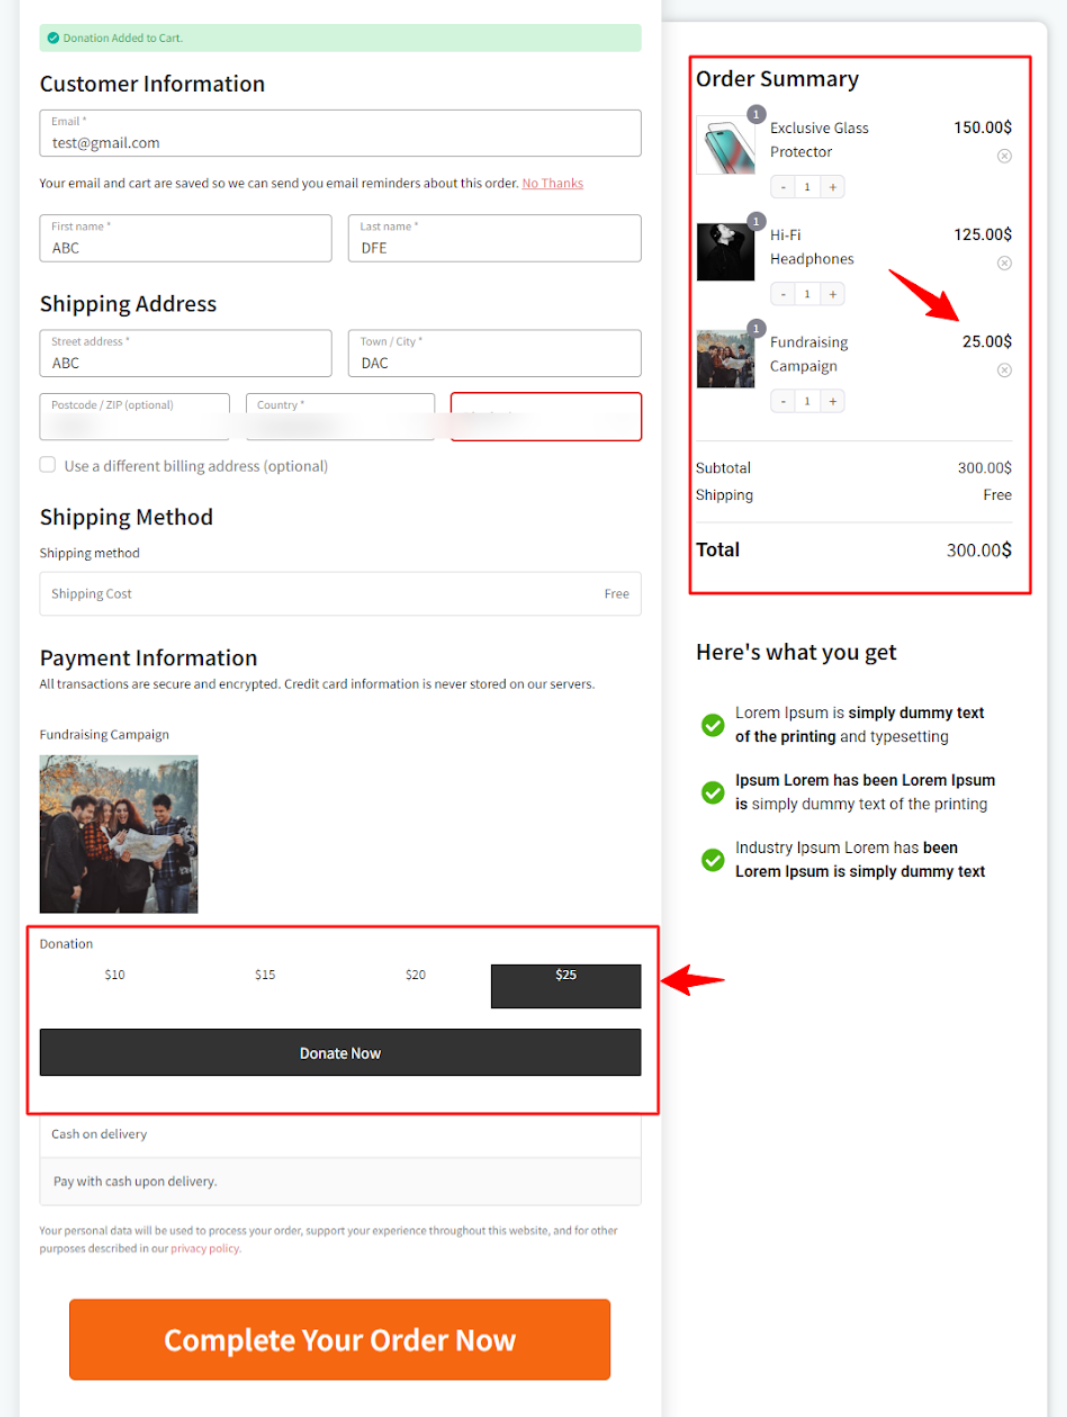
1. Donation campaigns
The donation field on the checkout page allows users to contribute to a cause or select donation preferences.
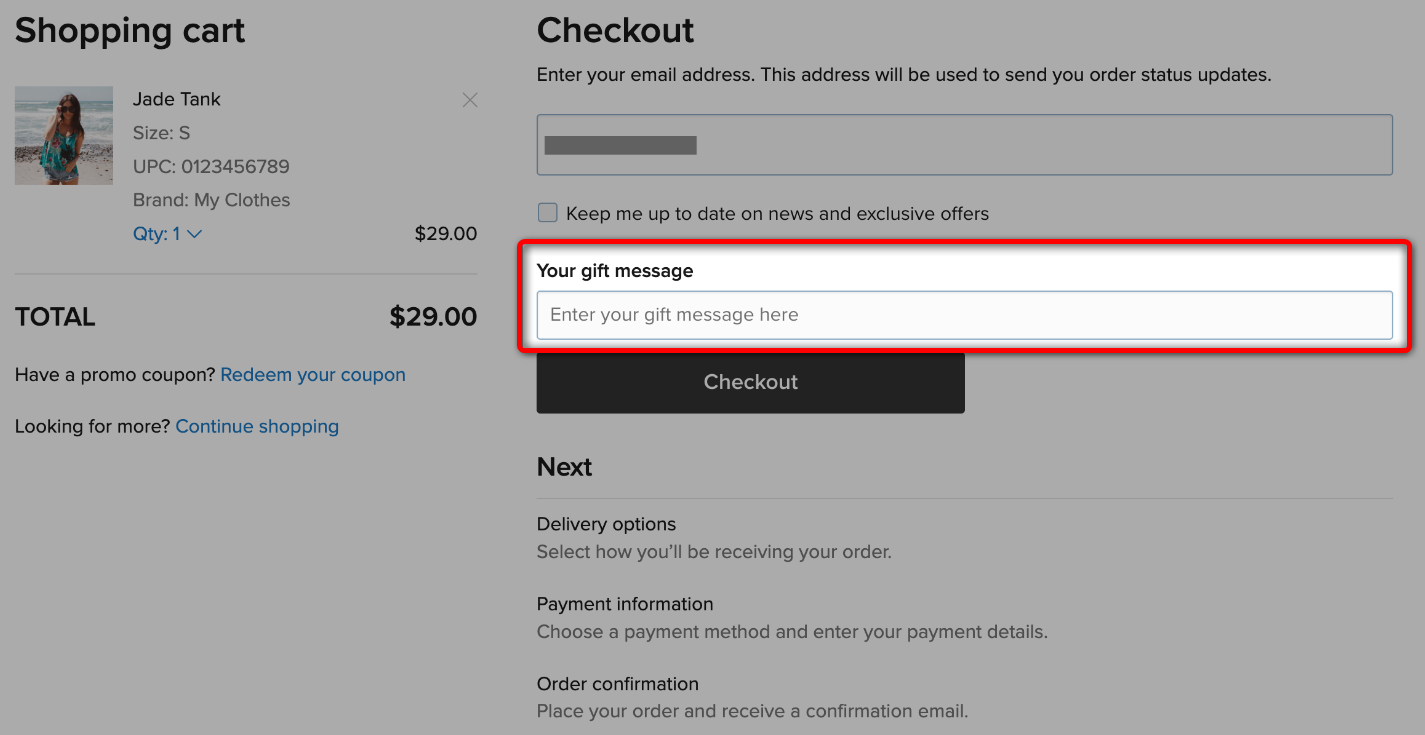
2. Personalized gifts
Additional fields allow customers to add personal touches to their purchases, making them ideal gifts for loved ones.
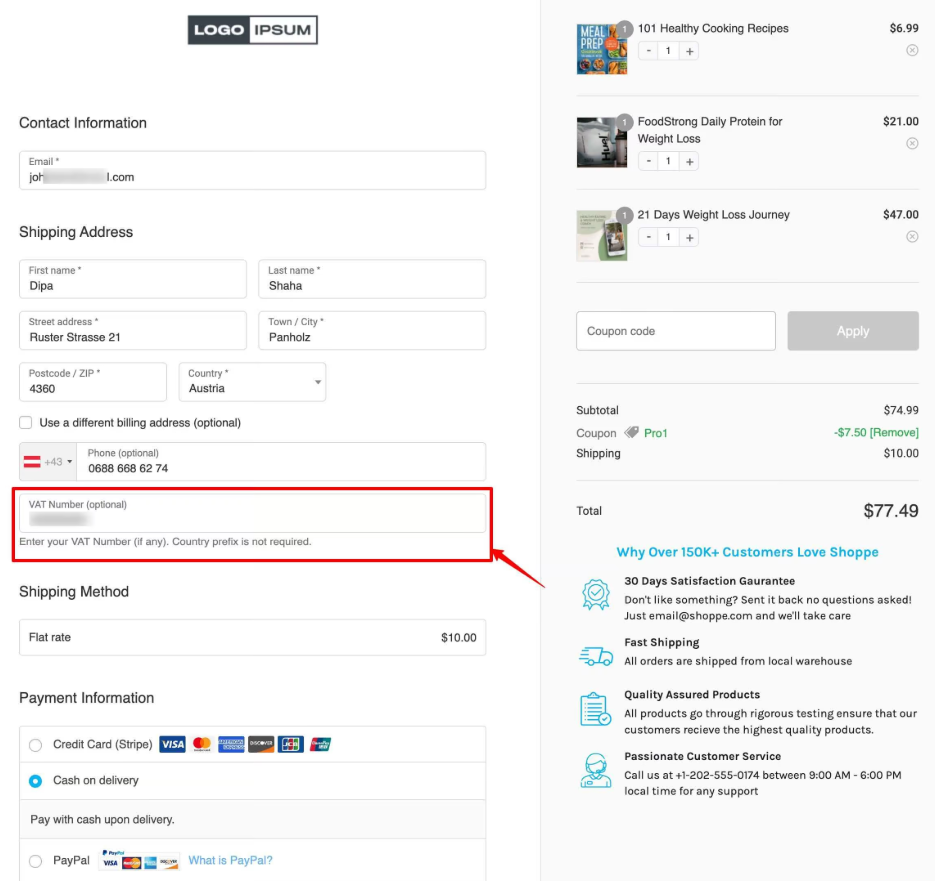
3. Business customers
Cater to B2B clients who require specific information for invoicing or tax purposes.
For example, EU VAT numbers or company registration fields can be added to checkout.
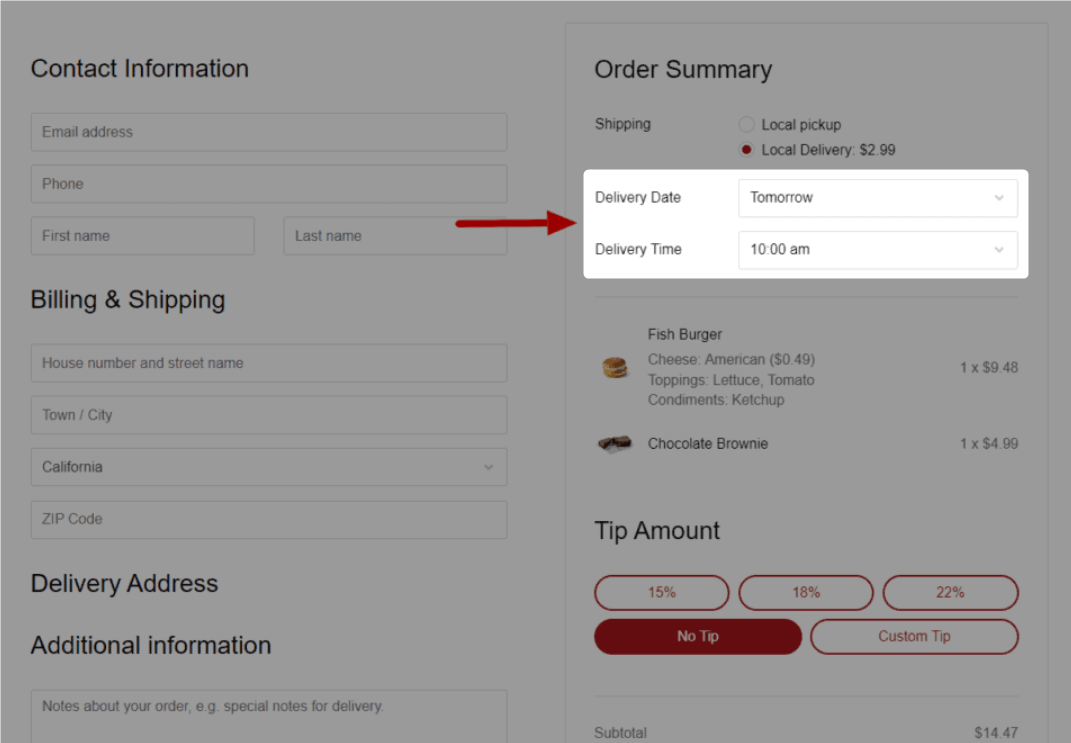
4. Delivery scheduling
Allows customers to select their preferred delivery date and time.
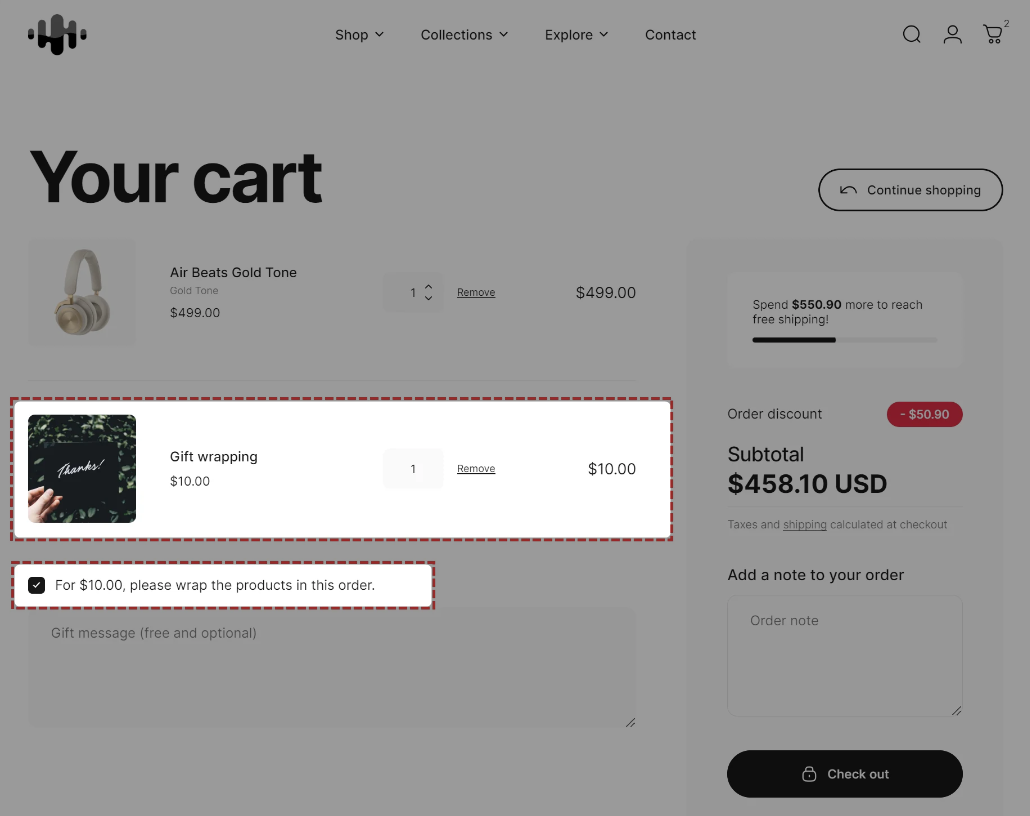
5. Gift wrapping
Provide additional services like gift wrapping or packaging.
There are many other custom field examples, such as a shopping experience rating and uploading a design to a T-shirt or mug.
👉 Read our blog on optimizing the WooCommerce order notes section.
Frequently Asked Questions
If you are using method 1 shared in this blog, you can display custom field data in the order details and order confirmation page as well, using the FunnelKit Funnel Builder. Make sure to add the field and drag it into the checkout form (as discussed in this article). On the WooCommerce thank you page, enable the toggle to display the custom field data on the order confirmation page.
The most common hooks for adding custom fields are:
- woocommerce_before_checkout_billing_form
- woocommerce_after_checkout_billing_form
- woocommerce_before_checkout_shipping_form
- woocommerce_after_checkout_shipping_form
- woocommerce_before_order_notes
- woocommerce_after_order_notes
Read our detailed guide on WooCommerce checkout hooks here.
Yes, you can use the “Conditional Fields” option with FunnelKit Funnel Builder and apply a condition “Cart item matches any specific product”. You can even implement it using the code-based method.
The data entered in custom fields is typically stored in:
1. WooCommerce order meta (viewable in the admin order details).
2. Customer profile (if you have a WooCommerce CRM).
3. Custom database tables, depending on your implementation.
To ensure compliance, follow these three steps:
1. Add a checkbox for user consent
2. Store only necessary data and provide clear descriptions for each field
3. Include a link to your privacy policy near the data collection fields
To ensure compliance, follow these three steps:
1. Add a checkbox for user consent
2. Store only necessary data and provide clear descriptions for each field
3. Include a link to your privacy policy near the data collection fields
Here's why you should adding fields to WooCommerce checkout is essential:
- Suggest related products: Use custom inputs (interests or preferences) to personalize product recommendations and increase upsell opportunities.
- Enhances order fulfilment: This is the most common reason. Think of fields like delivery instructions, gift message, or a preferred delivery date, allowing customers to specify their exact choices, reducing order errors and improving satisfaction.
- Collects vital marketing data: A simple "How did you hear about us?" (attribution) field can be priceless. You could also add a birthday field to send a coupon later, which we’ve found is a highly effective automation.
- Satisfies legal and tax requirements: Many businesses need to collect a “VAT Number” or have customers tick an “I am over 18” age verification checkbox.
- Improves customer service: Capture customer concerns to help your support team respond more efficiently and effectively.
You can customize the checkout in WooCommerce using any page builder with FunnelKit Funnel Builder. In the Design section, click on the ‘Edit Template’ button, and you can customize the page using your favorite builder.
Ready to Add Custom Fields to Your WooCommerce Checkout?
Adding custom fields to your WooCommerce checkout page helps you collect crucial information and deliver a personalized, frictionless shopping experience.
As demonstrated above, you can add custom fields in three ways:
- Visually, with FunnelKit Funnel Builder: the easiest and most powerful way, especially for non-tech users.
- Official checkout field editor plugin: the basic addition of fields; you still need to customize your fields with CSS and filter codes.
- Manually with code: ideal if you're a developer comfortable with coding.
In our expert opinion, FunnelKit Funnel Builder is the superior checkout field editor for WooCommerce. It offers a more efficient way to add a custom field to your checkout page.
You can easily include any checkout field without worrying about validation, since FunnelKit handles it in the background.
Furthermore, there's no need to be concerned about compatibility with WooCommerce. The dedicated plugin team consistently maintains and releases new versions, ensuring seamless compatibility with WooCommerce and essential plugins.
Moreover, this tool can do more than just add an extra field. You can create beautiful checkout pages using pre-designed templates and optimize the checkout process for a seamless shopping experience.
What’s more? You can even offer order bumps and one-click upsells to increase the average order value in your WooCommerce store.
So, start collecting custom data with an extra WooCommerce checkout field and enhance customers' shopping experience with a personalized touch today!

Editorial Team
July 7, 2026Are shoppers adding products to their cart and leaving before they buy? According to Baymard Institute research on checkout usability, 18% of shoppers who abandon their cart do so because...

Editorial Team
July 7, 2026You’ve built your WooCommerce store, polished your product pages, and invested in marketing, but sales aren’t coming. Visitors browse, some add items to their cart, and most vanish before completing...

Editorial Team
July 3, 2026Discover how a canceled order doesn't have to mean a lost customer, and how the right WooCommerce canceled order email can turn it into a second chance. WooCommerce canceled order...


