
Your checkout page might be silently killing your sales. No error messages, no warnings; just shoppers disappearing before they click the place order button.
One of the sneakiest causes? The WooCommerce checkout shortcode isn’t placed or configured correctly.
Maybe your page was set up a while ago, and suddenly, there is a conflict or a plugin that messed things up. Either way, a broken checkout can silently crush your conversions.
WooCommerce offers many shortcodes to display products, carts, customer accounts, etc. But the most critical of them all is the [woocommerce_checkout] shortcode.
This single line of code powers the entire checkout process. Even the slightest miscommunication with this shortcode can disrupt the entire flow.
We’ve helped clients recover their checkout and optimized its flow for conversions in under 10 minutes by fixing the checkout shortcode issue.
In this article, we’ll explain the WooCommerce checkout shortcode, its operation, and how to use it to create a smooth, reliable checkout experience.
Table of Contents
- 1 What is a WooCommerce Checkout Shortcode?
- 2 How to Use the WooCommerce Checkout Shortcode in Your WordPress Website?
- 3 Can You Edit the WooCommerce Checkout Shortcode?
- 4 Method 1: Customizing the WooCommerce Checkout Page Using Custom Codes
- 5 Method 2: Customizing the WooCommerce Checkout Shortcode Using a Page Builder
- 6 Method 3: Customizing the WooCommerce Checkout Page Without Any Page Builder [Using Shortcodes]
- 7 Block Checkout vs. Shortcode
- 8 Bonus Tip: Optimize Your Checkout Page for Mobile
- 9 Driving More Value from the Custom WooCommerce Checkout Page
- 10 Frequently Asked Questions (FAQs) Related to WooCommerce Checkout Shortcode
- 11 Ready to Optimize WooCommerce Checkout Shortcode for an Impeccable Experience?
What is a WooCommerce Checkout Shortcode?
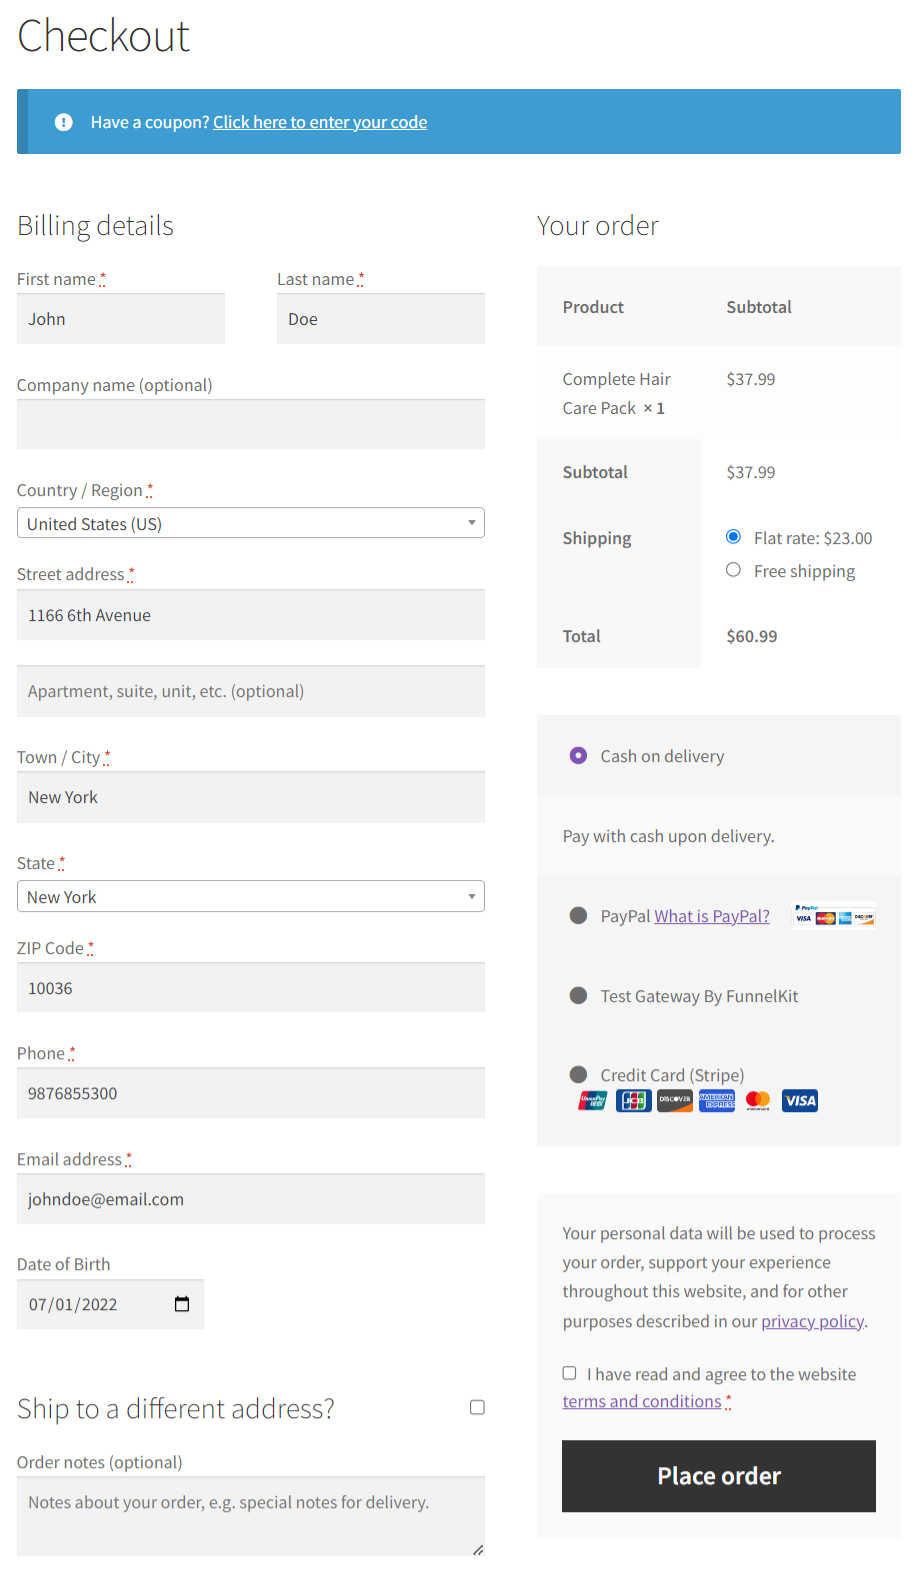
A WooCommerce checkout shortcode is a predefined code provided by WooCommerce that renders the checkout form on your website.
When inserted into a page, it displays a dynamic WooCommerce checkout form and related sections on your website.
Add this shortcode:
[woocommerce_checkout]In simple terms, shortcodes are shortcuts. Instead of writing complex PHP code or using a plugin, you can drop in the checkout shortcode to instantly add the complete checkout form, including:
- Customer’s personal details
- Billing and shipping fields
- Order summary
- Payment gateways
- Place order button
The checkout page is the most crucial step in your WooCommerce store, where shoppers complete their purchases.
The beauty of this shortcode is that it’s plug-and-play. The moment you insert the shortcode into a page, WooCommerce handles the heavy lifting of displaying all the necessary fields.
Not only checkouts, but WooCommerce also has various shortcodes to bring different content dynamically, such as:
- WooCommerce cart page: [woocommerce_cart]
- Specific product or item category page: [woocommerce_page id="xx"] or [woocommerce_page sku="xxx"]
- My account page: [woocommerce_my_account]
- Order tracking form: [woocommerce_order_tracking], and more.
However, we’ll look closely into the WooCommerce checkout shortcode in our post.
How to Use the WooCommerce Checkout Shortcode in Your WordPress Website?
When you first install WooCommerce, it automatically creates a set of default pages, including Shop, Cart, My Account, and Checkout (where the [woocommerce_checkout] shortcode is included by default).
In a perfect world, you’d never need to touch the shortcode again. But in reality, it can get a little messy.
We’ve seen it happen over time that merchants or developers unknowingly set the checkout page to draft, delete, or accidentally remove the shortcode during a redesign, a staging environment cleanup, or even while exploring some settings.
But don’t worry; getting it back up and running is pretty easy.
Here’s a simple, step-by-step guide on how to use the shortcode for WooCommerce checkout on your WordPress website.
Step 1: Create or edit a page
Navigate to Pages ⇨ Add New Page from your WordPress dashboard. You can even edit an existing page.
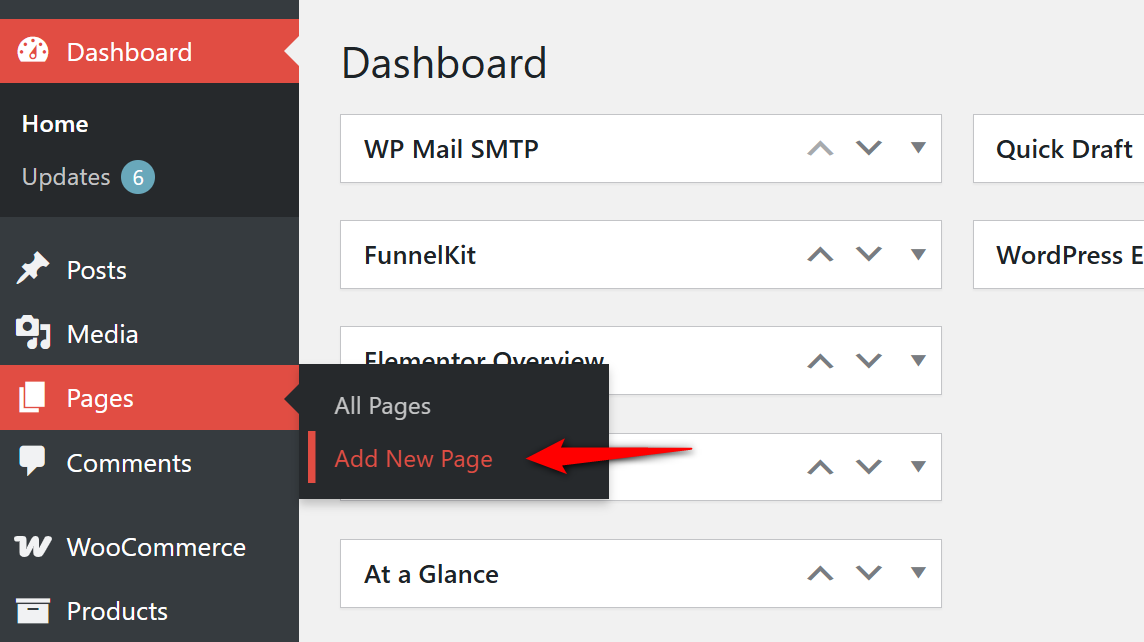
Enter the name of your page, like “Checkout” or any other name you want.
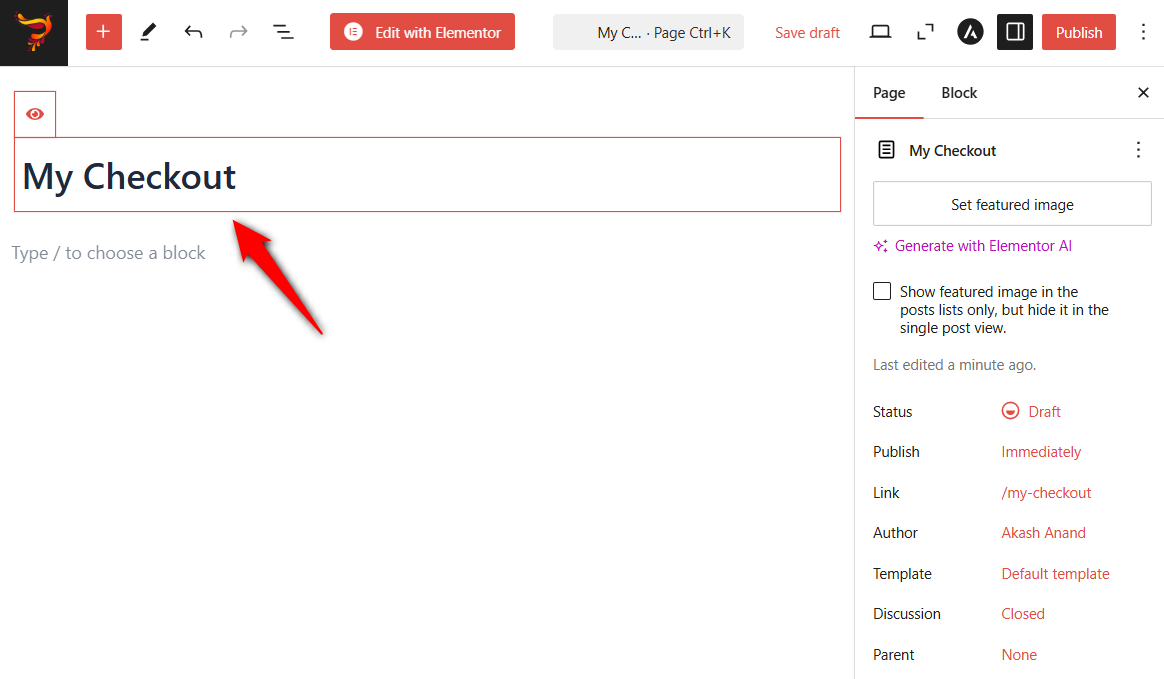
Your page title will be changed.
Step 2: Add the WooCommerce checkout shortcode
Use the shortcode block inside the Block Editor (Gutenberg) and paste the following shortcode:
[woocommerce_checkout]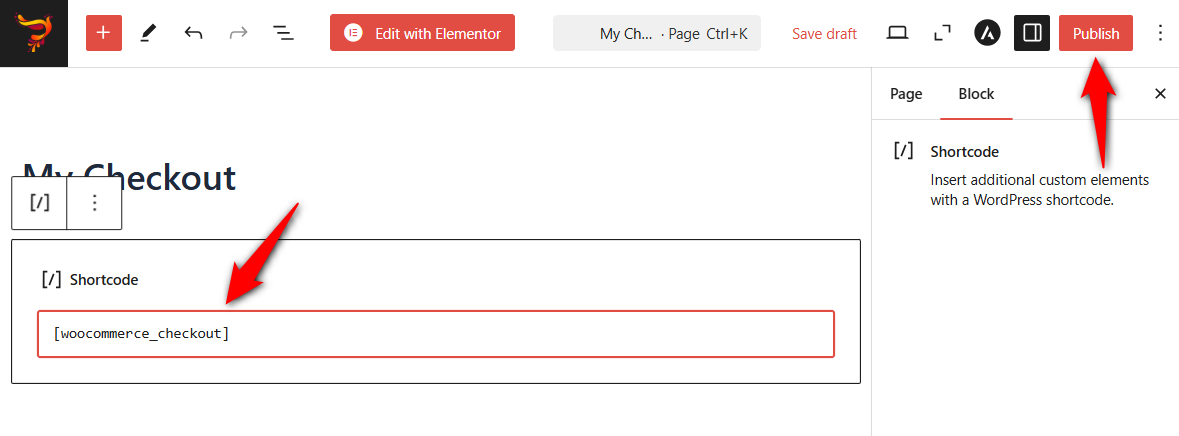
This shortcode will automatically display the complete WooCommerce checkout form, including billing fields, payment options, and the order review section.
Step 3: Set the page as checkout in WooCommerce [Important]
WooCommerce doesn’t scan your site looking for shortcodes. It needs to know exactly which page is designated for checkout based on its unique Page ID.
Without this assignment, WooCommerce cannot trigger the background processes associated with the checkout page, such as order processing, payment handling, and order notifications.
After creating the page, it’s essential to map it with the WooCommerce checkout.
For that, navigate to the WooCommerce ⇨ Settings ⇨ Advanced. Under the Page setup, select the checkout page you just created from the drop-down.
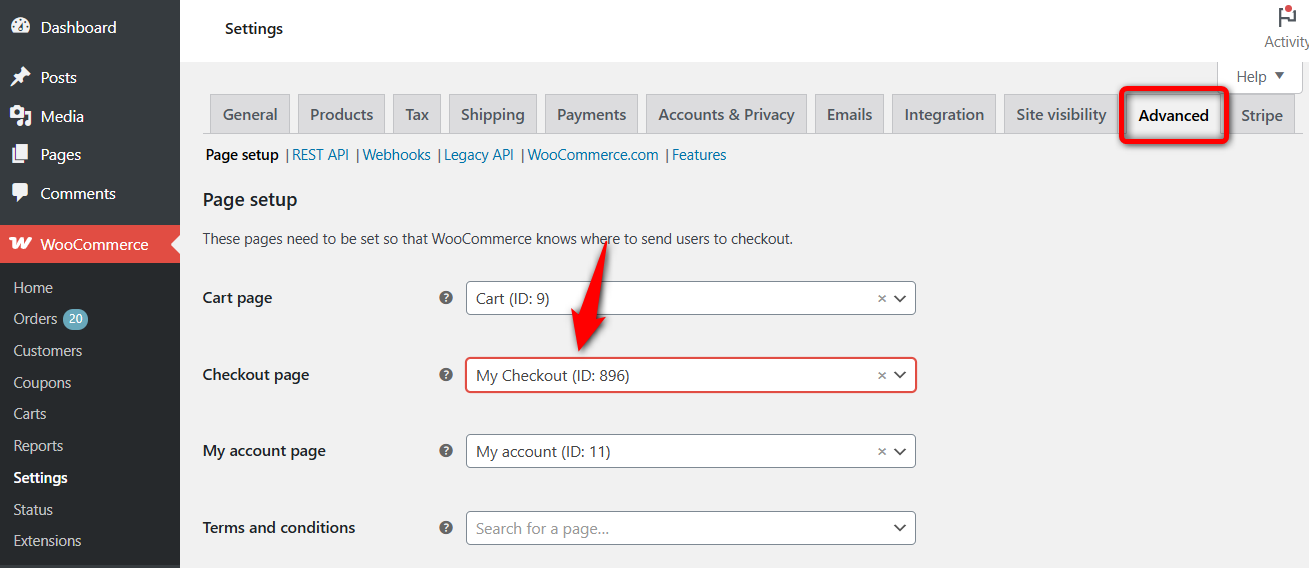
Once done, hit ‘Save changes’ and you’re done.
This is how you can use the shortcode for the WooCommerce checkout in WordPress.
Can You Edit the WooCommerce Checkout Shortcode?
There is some confusion when people or store admins talk about editing the WooCommerce checkout shortcode. Let’s clear that up below.
Can you edit the checkout shortcode?
No, the checkout or other WooCommerce shortcodes are fixed. The styling of the checkout page is usually controlled by the themes you’ve activated on your website (which are most likely the default options you get).
Direct shortcode editing isn’t possible if you want to streamline the process or add functionality to the checkout page.
Does the checkout shortcode accept parameters?
No, it doesn’t accept any parameters. When working with shortcodes, it’s natural to wonder about customization. Unfortunately, the WooCommerce checkout shortcode doesn’t offer many direct parameters.
While there are no parameters to control the display of checkout fields, the power lies in WooCommerce’s flexibility and your ability to customize its settings to fit your needs.
Why customize the default WooCommerce checkout page?
The default WooCommerce checkout has several limitations that can hinder the user experience, conversion rates, and overall store performance.
- Limited customization options: The default checkout page offers little flexibility for design or functionality. For example, you can’t easily add custom fields, reorder sections, change the layout, or make the checkout page on-brand.
- Cluttered user interface: The default checkout design is quite basic and hard to navigate. This may increase cart abandonment, as customers may feel frustrated or confused.
- Not optimized for mobile: The default checkout isn’t fully optimized for mobile users. This can result in a poor experience for mobile shoppers, with tiny buttons, difficult-to-read text, and smaller checkout forms.
- No multi-step checkout or progress indicators: The default checkout has a single-page layout with no visual progress indicator. Customers may not know how many steps remain in the process, adding to their frustration.
- No upsells or cross-sells during checkout: The default checkout doesn’t include options for upselling or cross-selling products at the checkout stage. You can add them to the product or cart pages, but not to the checkout page.
- Limited trust-building features: Trust elements such as security badges, return policies, and customer testimonials are not prominently displayed in the default checkout design. Trust signals are vital for reassuring shoppers that their payment is safe.
To streamline your checkout process, it’s crucial to customize your checkout page for conversions.
How can you customize the checkout page?
You can customize the checkout page by adding custom fields, editing, rearranging, or deleting existing fields, making the page on-brand, and adding trust seals, customer testimonials, etc.
For that, you can follow two methods:
- Method-1: Add WooCommerce hooks or add CSS codes
- Method-2: Use an effective page builder along with a checkout manager plugin
- Method-3: Use checkout shortcodes (if you’re not using any page builders)
Let’s go through them in detail.
Method 1: Customizing the WooCommerce Checkout Page Using Custom Codes
When customizing your WooCommerce checkout page, you need to edit different checkout hooks or custom code for each element.
For example, to rearrange checkout fields or hide specific sections, use the following code in your functions.php file or add it using a code snippet plugin:
Or, if you want to style your checkout fields, you need to modify the CSS. For other tasks, such as validating custom fields or modifying the checkout process by displaying a specific instruction, you’ll need separate code.
But there’s a better way to customize your checkout page if you’re a beginner or don’t want to use coding (see the next method).
Method 2: Customizing the WooCommerce Checkout Shortcode Using a Page Builder
If you don’t know how to write custom code or want to avoid the hassle of manual coding, using a WordPress page builder to style and customize the layout around the WooCommerce checkout shortcode is an excellent solution.
Many plugins are available in the WordPress repository that can help streamline the process, but experts recommend FunnelKit Funnel Builder as the top choice.
Here’s why:
- Pre-built checkout templates: FunnelKit Funnel Builder gives you access to 25+ pre-designed templates that you can customize and optimize for all devices. You can even design your checkout pages from scratch.
- Compatible page builders: Customize your checkout pages with your favorite page builders, such as Elementor, Bricks, Oxygen, Divi, Gutenberg, etc., using drag-and-drop content blocks and styling them according to your brand colors.
- Drag-and-drop checkout field editor: Customize the checkout form by editing, rearranging, or removing the fields and sections the way you want using the built-in drag-and-drop checkout field editor.
- Collect additional details: Add custom fields such as EU VAT number, extra fees, terms and conditions, tips and donations, file uploads, Google reCAPTCHA, product personalizations, etc., as per your business needs.
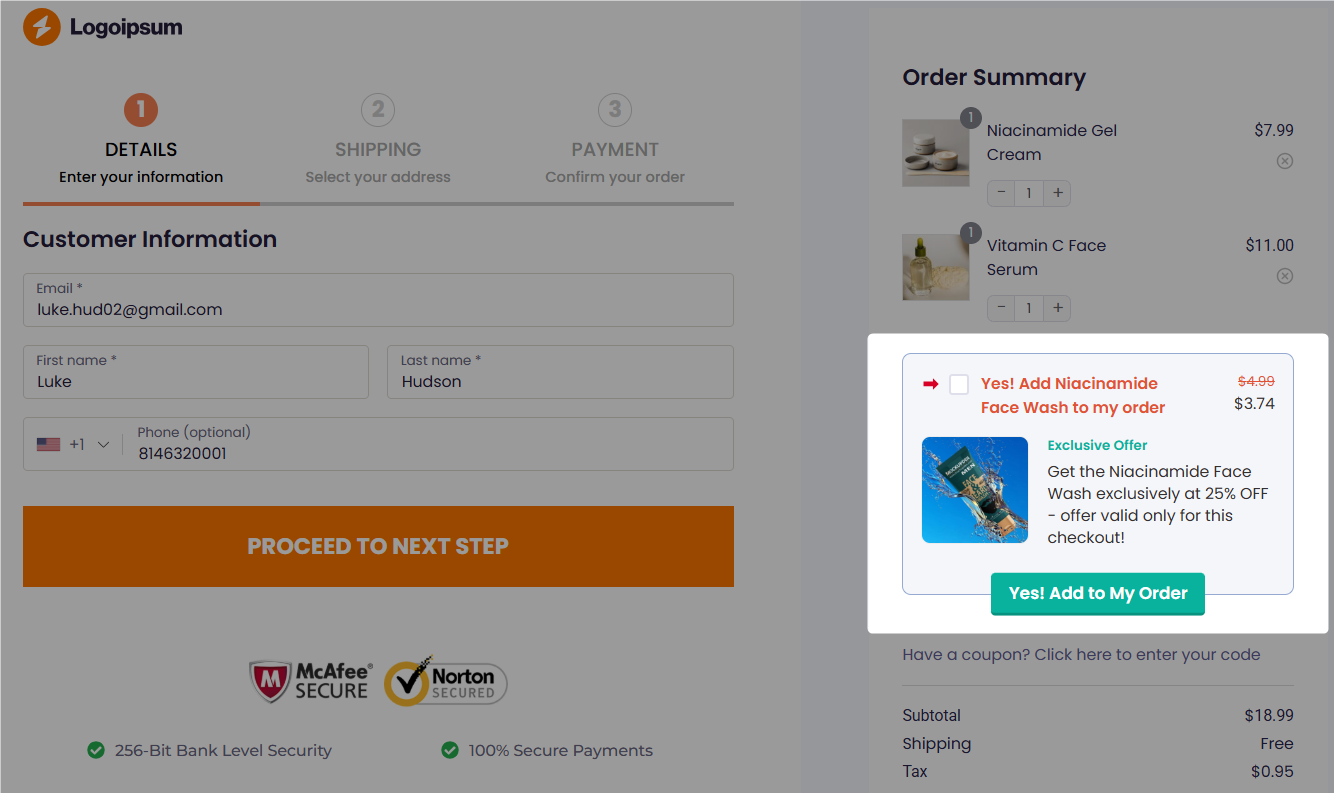
- AOV-boosting order bumps and one-click upsells: Set up pre- and post-checkout offers, such as order bumps and one-click upsells relevant to your customers’ purchases, to increase the value of each order.
- One-page and multi-step checkout pages: Choose between one-page, two-step, or three-step checkout formats to boost your sales. You have the flexibility to set up Shopify-style checkouts, order forms, and more.
- Checkout page optimizations: Optimize your WooCommerce checkout for higher conversions with express checkout, Google Address Autocomplete, auto-apply coupons, smart login, inline field validation, and many more.
- A/B testing: A/B test multiple variations of your checkout pages to see which one converts best. You can split-test different layouts, designs, colors, checkout buttons, trust signals, and more.
Get a copy of the FunnelKit Funnel Builder from below.
Make sure to install and activate the Funnel Builder on your website and follow the instructions to customize your checkout page:
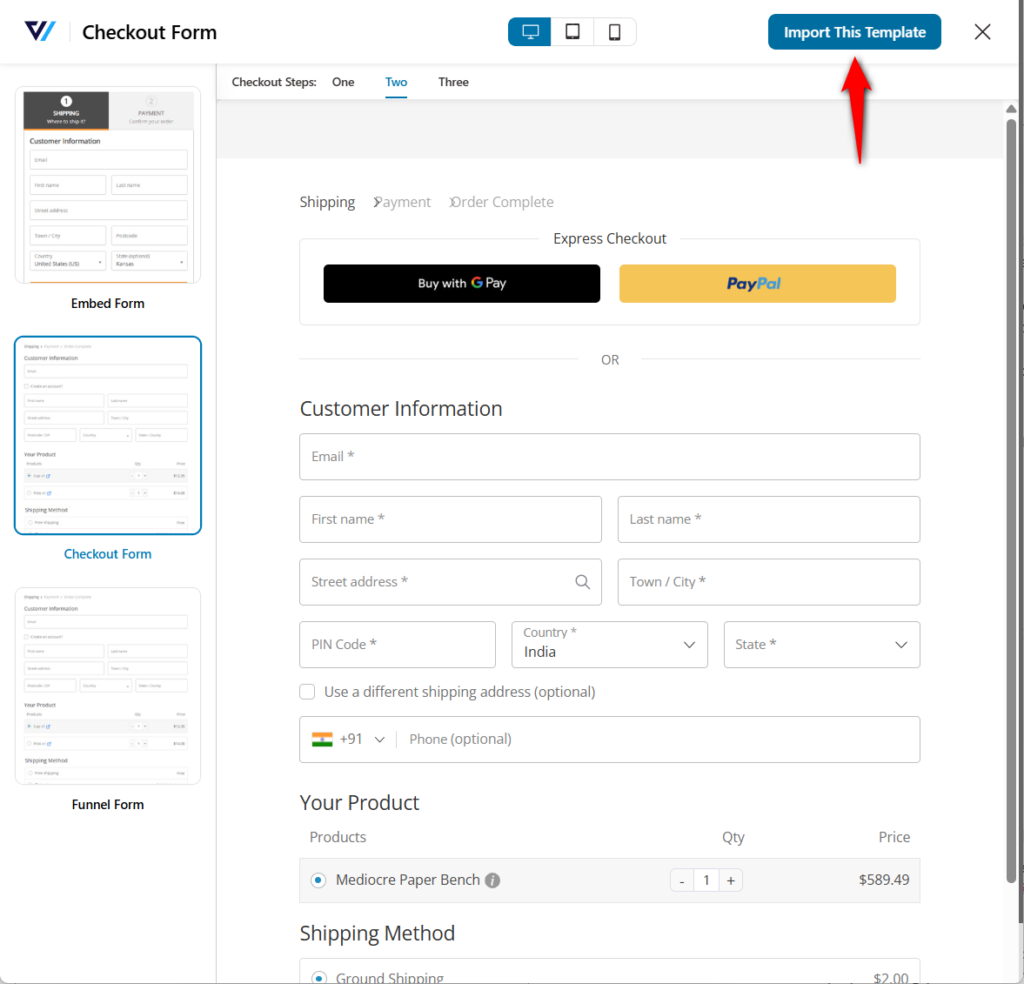
Step 1: Create a store checkout
Navigate to FunnelKit ⇨ Funnels and click on the ‘Create Store Checkout’ button.
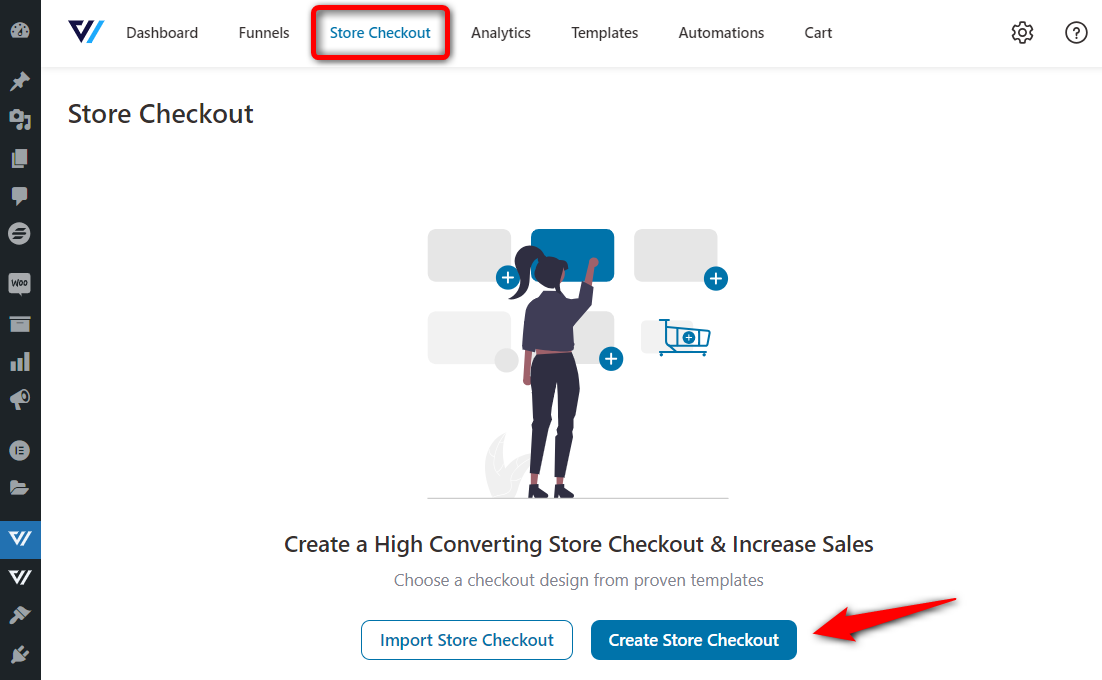
Next, it’ll take you to the FunnelKit templates page.
You get a wide array of templates to choose from based on your use cases. These templates work with all page builders, such as Elementor, Divi, Bricks, Oxygen, and Gutenberg. You can also create your checkouts using shortcodes if you use any other page builder.
Choose the page builder and click on ‘Preview’ on the template you like.
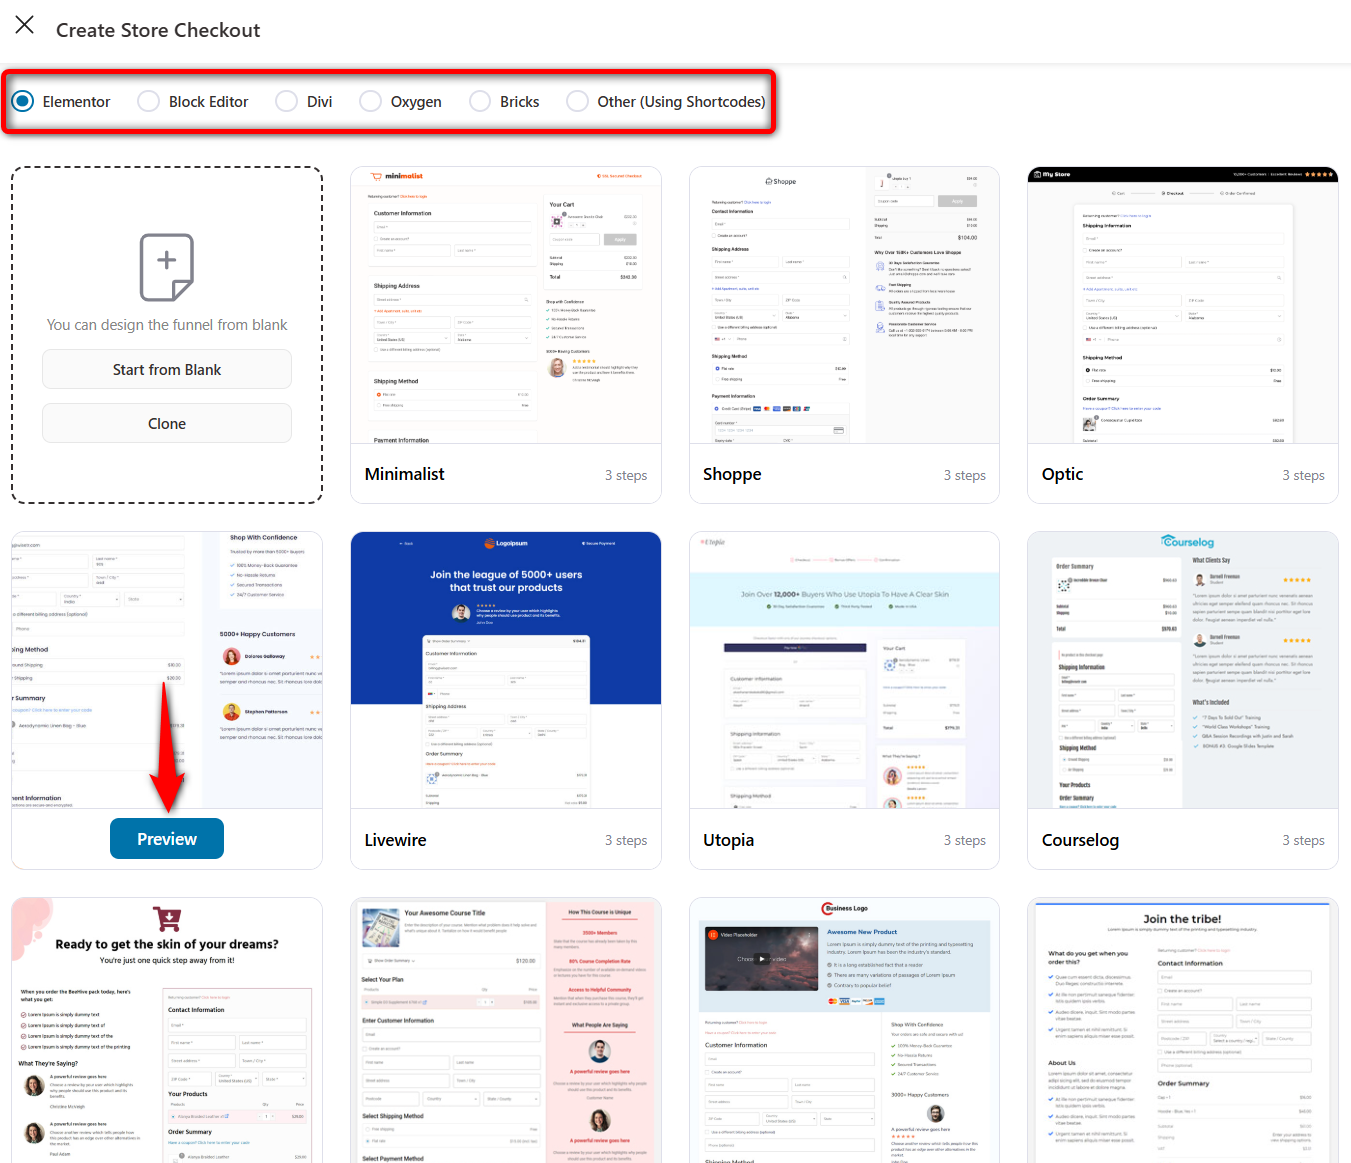
You’ll be able to view the complete checkout page template in one, two, or three-step formats. We’ve chosen the three-step format for our article here.
From the top, you can also view the mobile-optimized checkout page template.
Hit the ‘Import This Funnel’ button and enter the name of your store checkout.
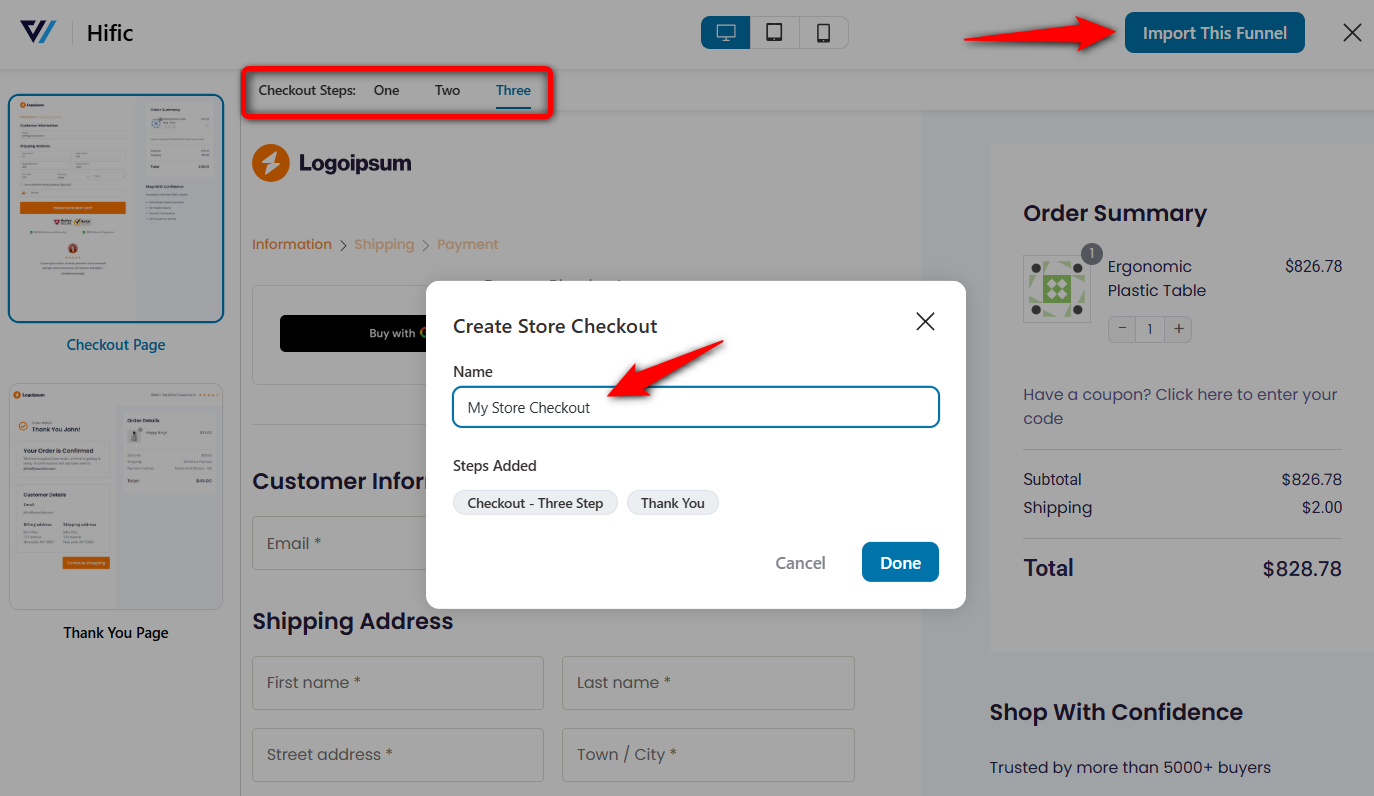
Clicking on ‘Done’ will import the store checkout into your workspace.
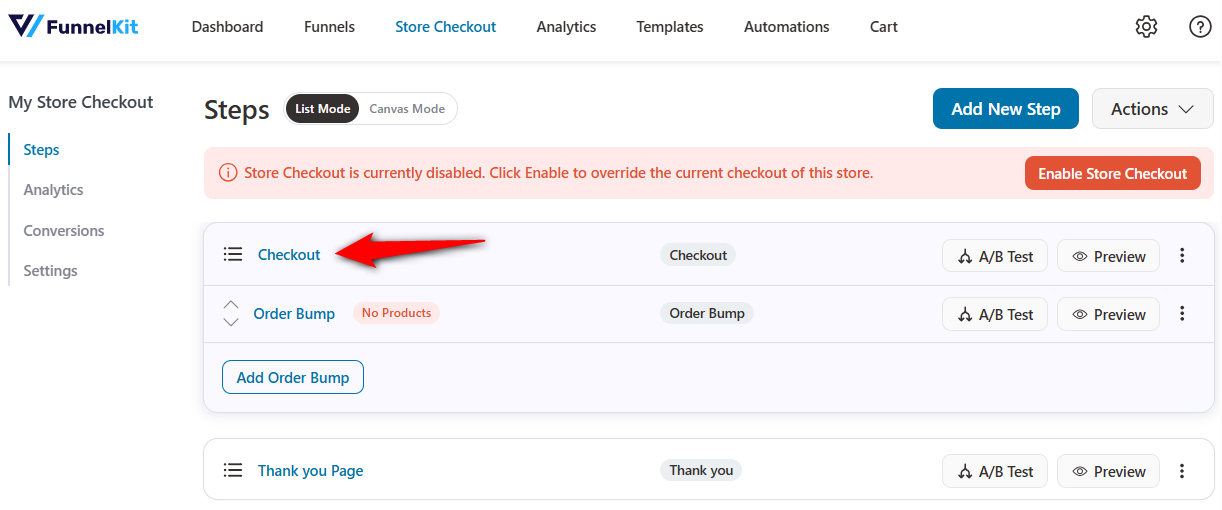
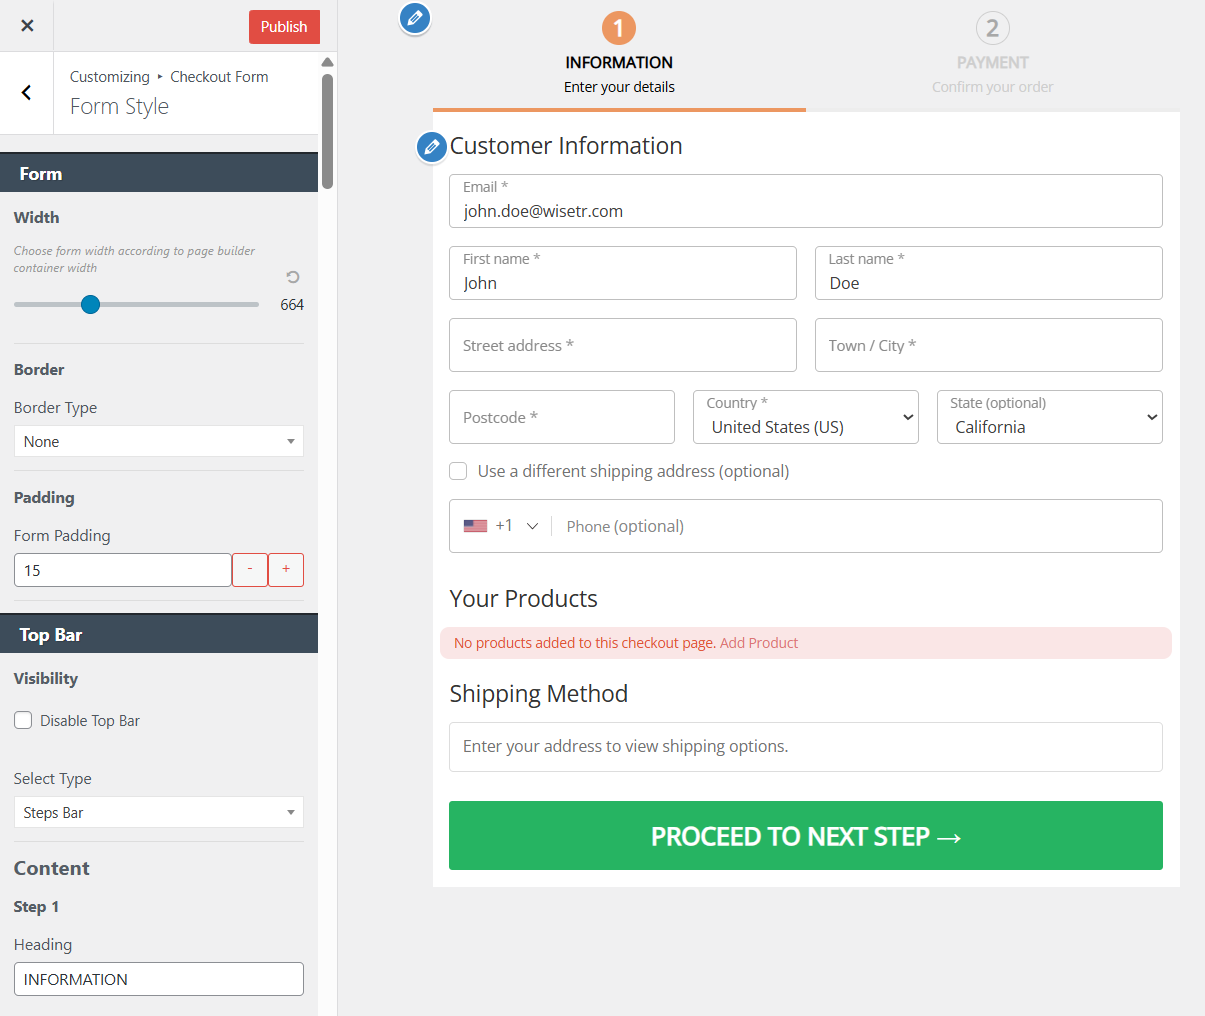
Step 2: Customize the WooCommerce checkout page
Click on the name of your checkout page to start customizing it.
To customize the checkout page using Elementor, click on the ‘Edit Elementor Template’ button.
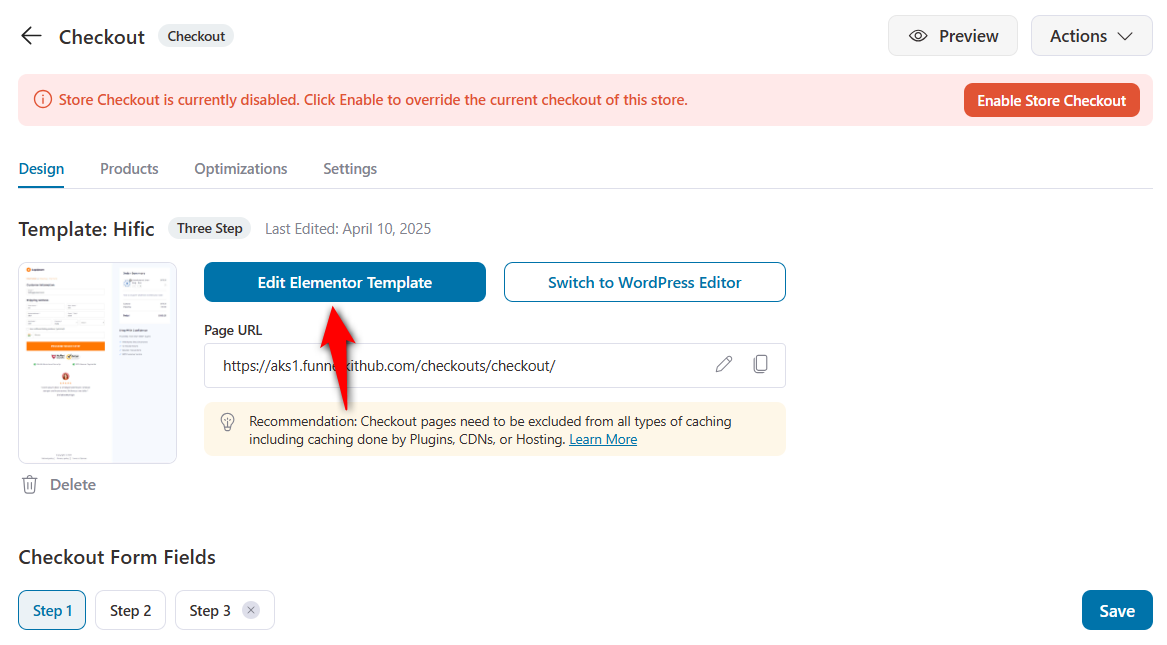
Use the drag-and-drop editor to design your checkout page using the different content widgets.
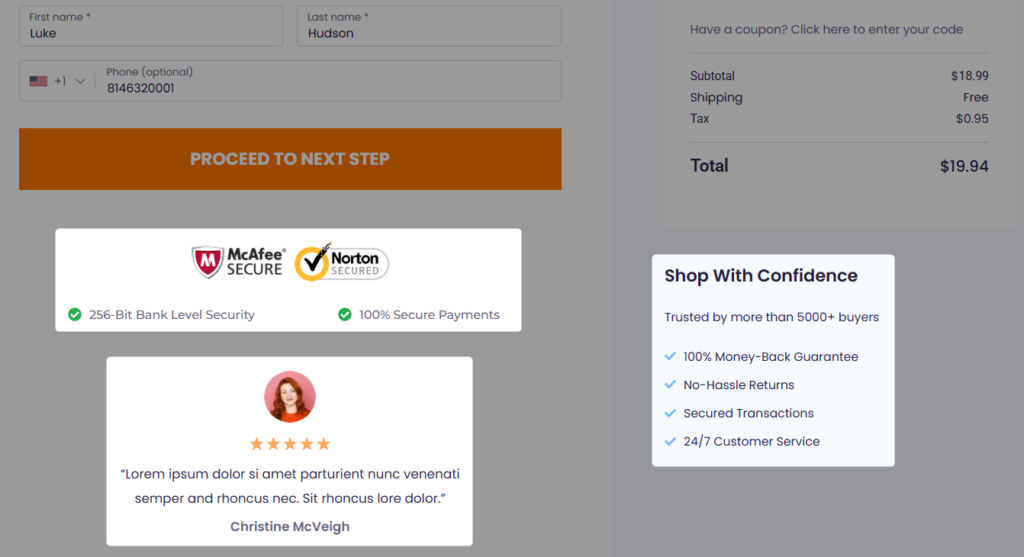
Edit the left menu to upload a logo and design your checkout form, including checkout step tabs, button styling, widths of checkout form fields, padding, and more.
You can even modify the order summary or mini cart section of your checkout page.
Once you’re satisfied with the design, hit the ‘Publish’ button to finalize your changes. We’ve efficiently enhanced the WooCommerce checkout shortcode for your store.
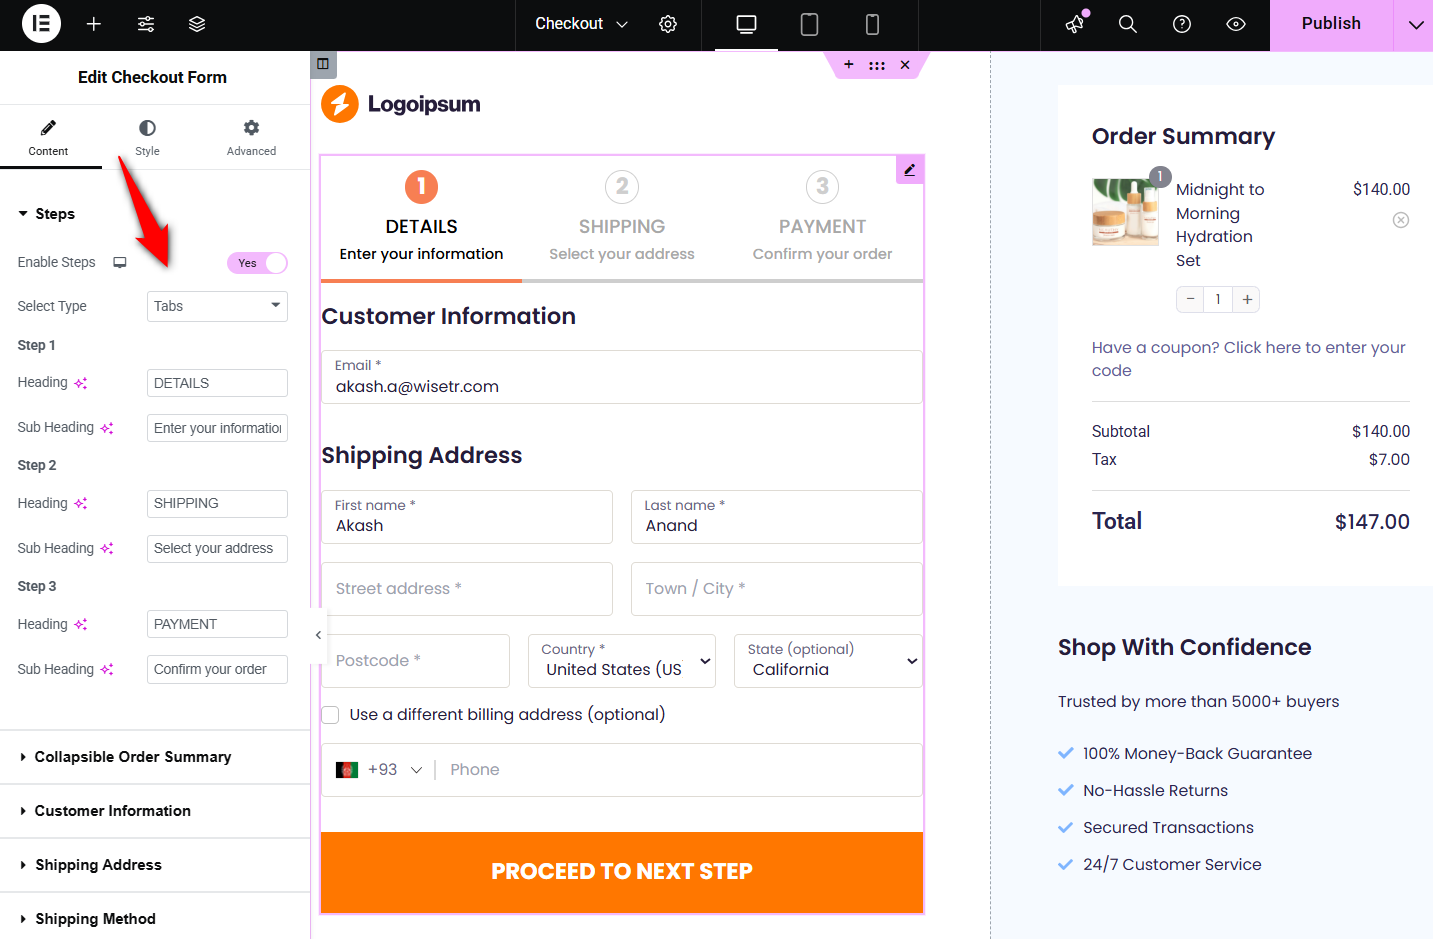
Step 3: Edit the WooCommerce checkout form fields
Go back to your store checkout and scroll down to find the ‘Checkout Form Fields’ under the Design section.
The built-in checkout field editor allows you to add custom fields, modify or delete the fields and sections on your checkout form.
Just drag and drop the fields or sections to rearrange them effortlessly.
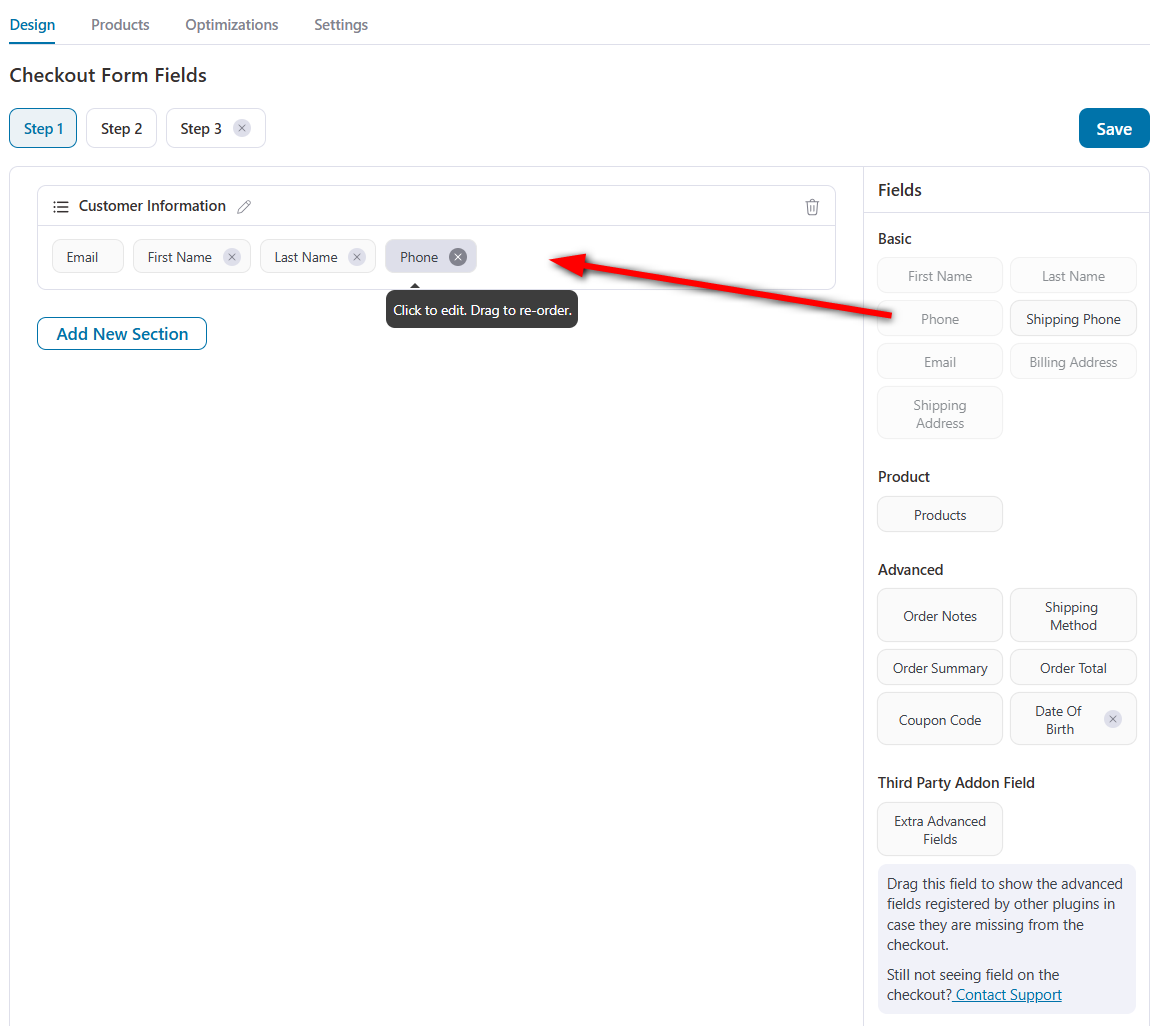
You can even add custom fields like text, checkbox, radio button, number, text area, multi-select, password, and more.
Once you’re fully satisfied with your WooCommerce checkout fields, click on ‘Save’.
This process is so much easier than custom coding when customizing your checkout page in WooCommerce.
Step 4: Optimize your checkout page for quick conversions
Navigate to the Optimizations tab and streamline your WooCommerce checkout page for better conversions.
Enable the following optimizations:
- Express checkout like Apple Pay and Google Pay
- Auto-fill address suggestions
- Smart customer login
- Auto-apply coupons
- Inline field validation
- Multi-step field preview, and many more.
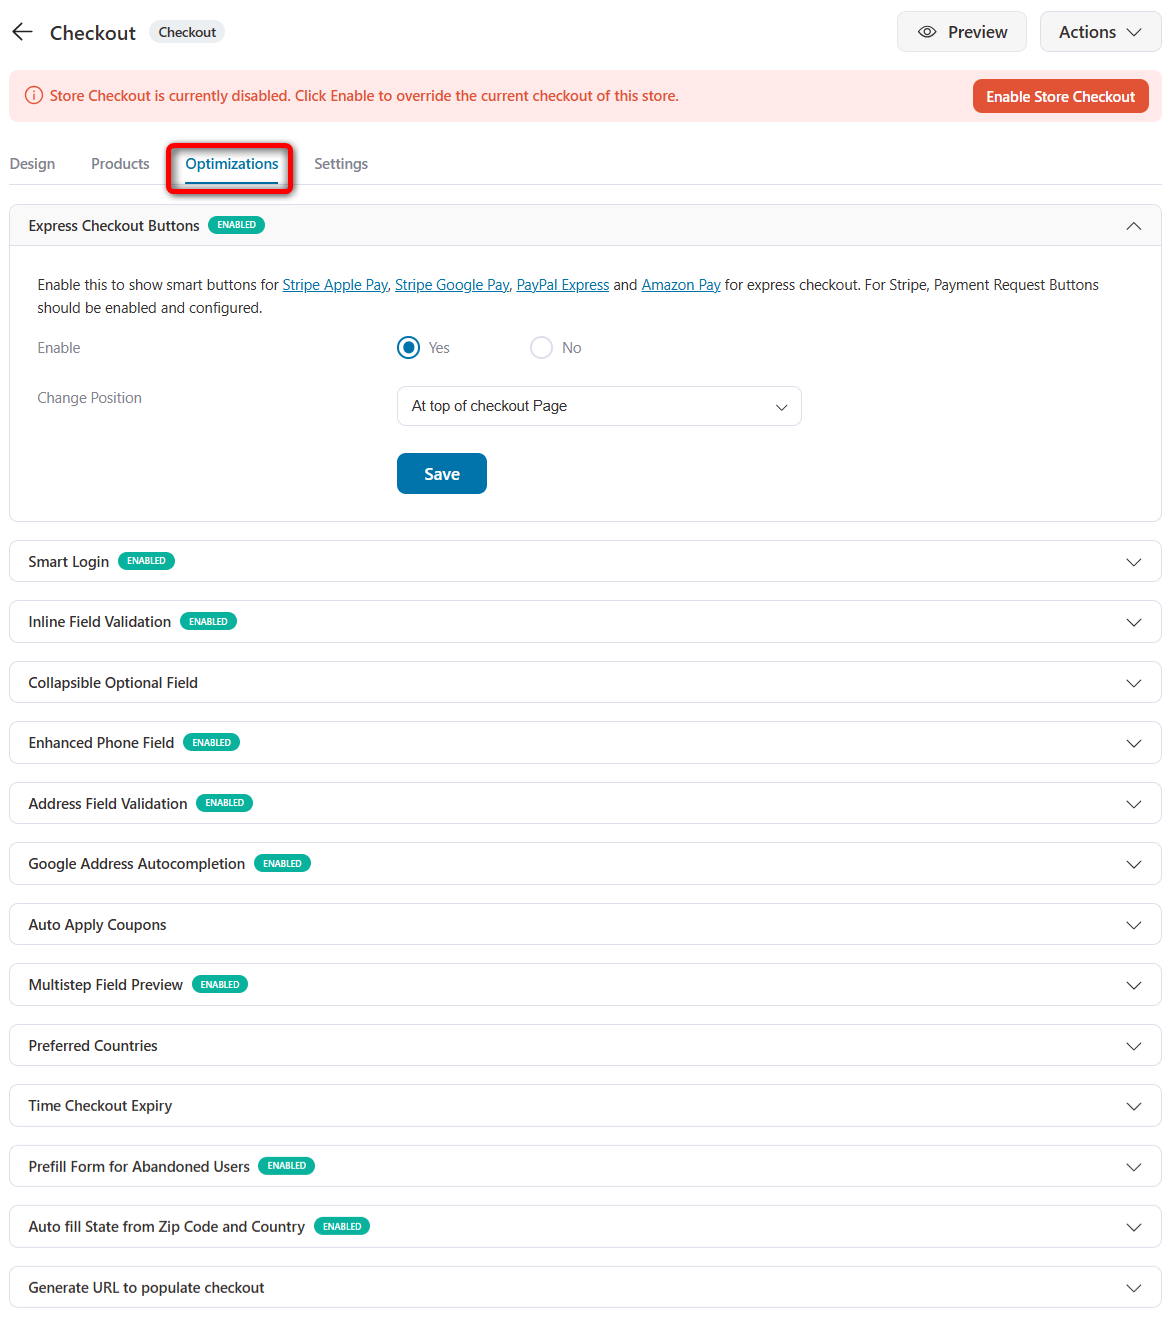
Similarly, you can customize your WooCommerce thank you page and engage with your customers effectively.
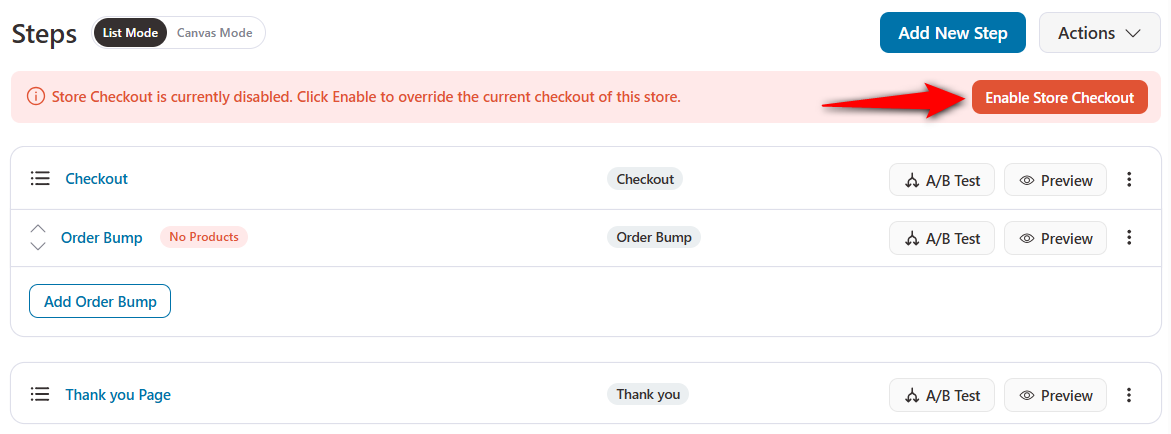
Step 5: Activate your store checkout
Once everything is done, make sure to click on the Enable Store Checkout button to activate it.
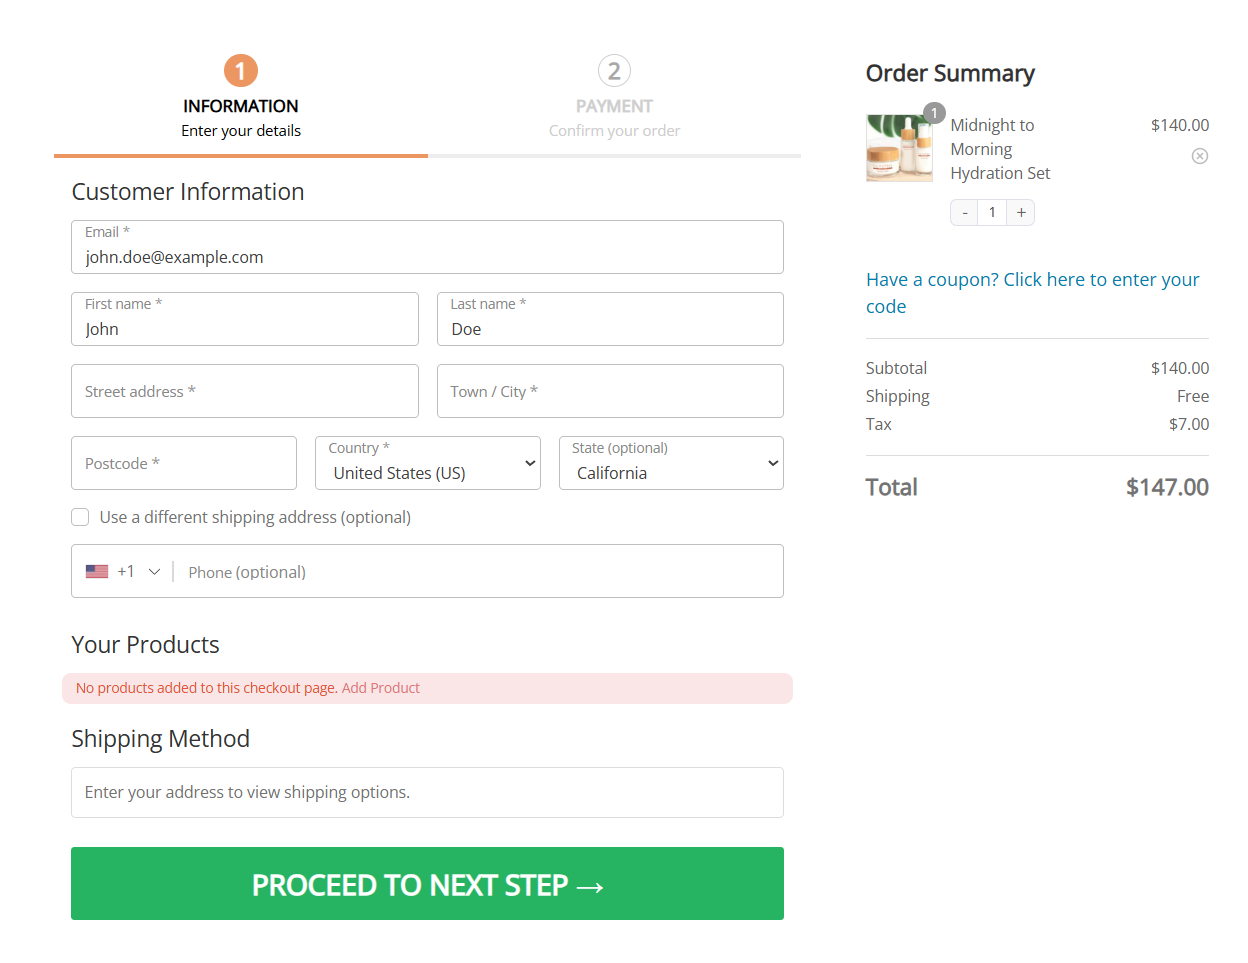
This is how your custom checkout page looks using FunnelKit Funnel Builder:
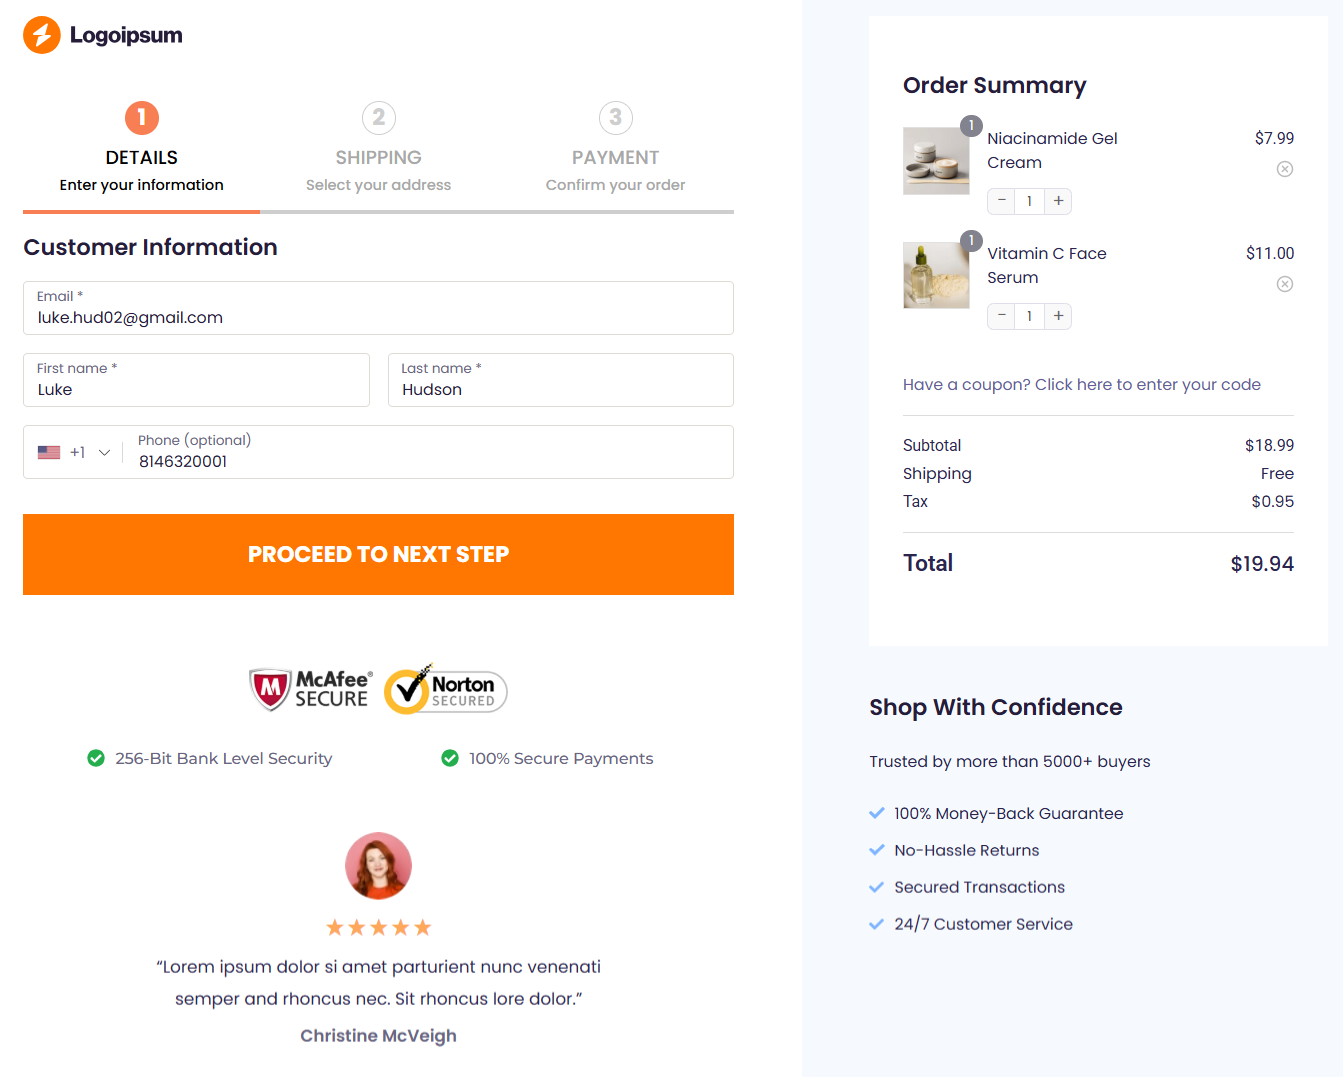
Nicely done! This is how you can set up a high-converting WooCommerce checkout page using the convenient and flexible FunnelKit Funnel Builder.
Don't forget to add upsells and cross-sells through order bumps and one-click upsells that helps boost AOV during the checkout process.
You can now use the WooCommerce checkout shortcode with custom, high-converting elements without any second thoughts.
Experts recommend you use this method to avoid any programmatic errors that may cause your checkout process to fail.
Method 3: Customizing the WooCommerce Checkout Page Without Any Page Builder [Using Shortcodes]
If you don’t want to use any page builders, there are two methods for checkout customization:
- Use the native Block Editor (just like we depicted above as Elementor)
WooCommerce now offers Checkout Blocks, a drag-and-drop experience inside the WordPress block editor. It’s beginner-friendly and looks clean out of the box.
Just select the Block Editor, import the template, and customize your page just like we did with Elementor above in Step 2.
However, keep in mind that customization options are limited, such as you can’t add customer testimonials, a confidence section, and more. If you're looking for flexibility, this method might feel restrictive.
- Use checkout shortcodes (as shown in this method below)
With shortcodes, FunnelKit Funnel Builder lets you customize the checkout form and mini cart. Once done, add both these shortcodes to WordPress.
Let’s show how to do it.
Step 1: Select the other option and import the checkout template
When importing the checkout page template, select Other (Using Shortcodes) and click on the Checkout Form template.

Next, select the checkout steps and import the template.
You can even go with the WooCommerce one page checkout shortcode or a multi-step one.
It’ll import this template.
Step 2: Customize the checkout form and mini cart templates
You’ll see the shortcodes for the WooCommerce checkout form and mini cart here.
You need to customize your checkout form and mini cart template. For that, click on the Edit Checkout Form Template button.

Customize the width and styling of your checkout form, such as checkout steps, buy now button, background, color, and more from here.
You can even configure the product list, mini cart, typography, order summary, and custom CSS.
Once done, hit ‘Publish’.
Step 3: Paste the WooCommerce checkout shortcode into the Block Editor
Go back to the WordPress Editor and paste the following shortcode into it.
- WooCommerce checkout form shortcode: [wfacp_forms]
- Mini cart shortcode: [wfacp_mini_cart]
Here, we’ve added two columns and pasted the shortcodes there.
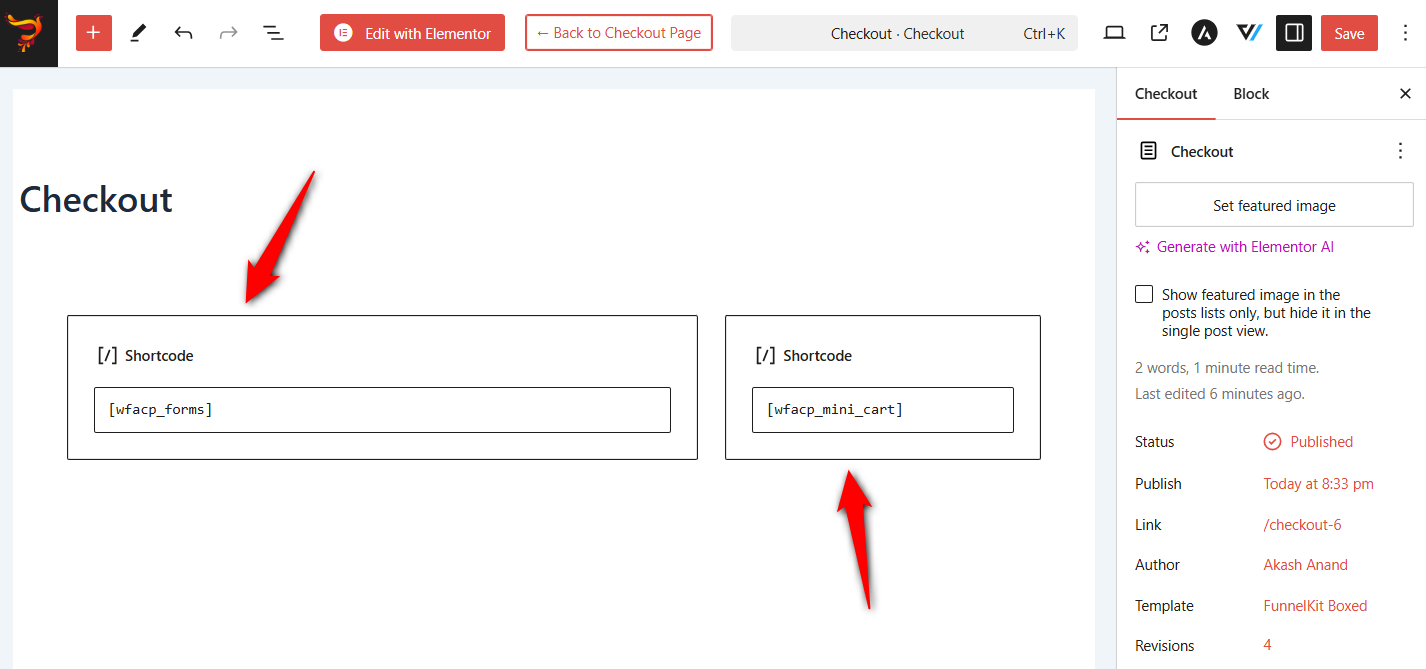
Save the page and see the preview there:
Block Editor has many limitations, which is why experts recommend using the FunnelKit Funnel Builder and page builders to customize the checkout experience in your store.
Block Checkout vs. Shortcode
If you’re wondering whether to go with WooCommerce’s Block Checkout or the traditional shortcode-based checkout, here’s the deal:
⚖️ Difference Between the Two
- Block Checkout is quick and modern but lacks deep customizations to the page.
- Shortcode-based Checkout is more versatile and works with more plugins and customizations.
When flexibility, advanced field control, and deep integrations matter, the shortcode method (especially when used with checkout page optimization tools like FunnelKit Funnel Builder) wins hands down.
🛠️ Troubleshooting: Checkout Page Not Displaying?
WooCommerce typically uses a page with the [woocommerce_checkout] shortcode to load its default checkout flow.
However, suppose that the checkout page has been trashed or moved to drafts, or the shortcode was accidentally removed. In that case, it can break the entire checkout experience, including any customizations or overrides added via FunnelKit Funnel Builder.
To restore it, you need to add the WooCommerce checkout shortcode to a page and assign it as the checkout page in the Advanced settings.
You need a checkout page with the correct [woocommerce_checkout] shortcode to display all the customizations correctly.
That’s how important the shortcode is!
Bonus Tip: Optimize Your Checkout Page for Mobile
As you know, over 70% of online shopping traffic comes from mobile devices. That means if your checkout page isn’t mobile-friendly, you could miss out on massive sales without even realizing it.
A clunky, hard-to-navigate mobile checkout experience leads to frustration and abandoned carts. That’s why optimizing your checkout page for smaller screens, such as mobile phones and tablets, is essential.
With FunnelKit Funnel Builder, you get device-optimized templates that ensure your checkout design looks sleek and functional on mobile devices.
Just choose the device responsive mode and preview, tweak, and test everything specifically for mobile users.
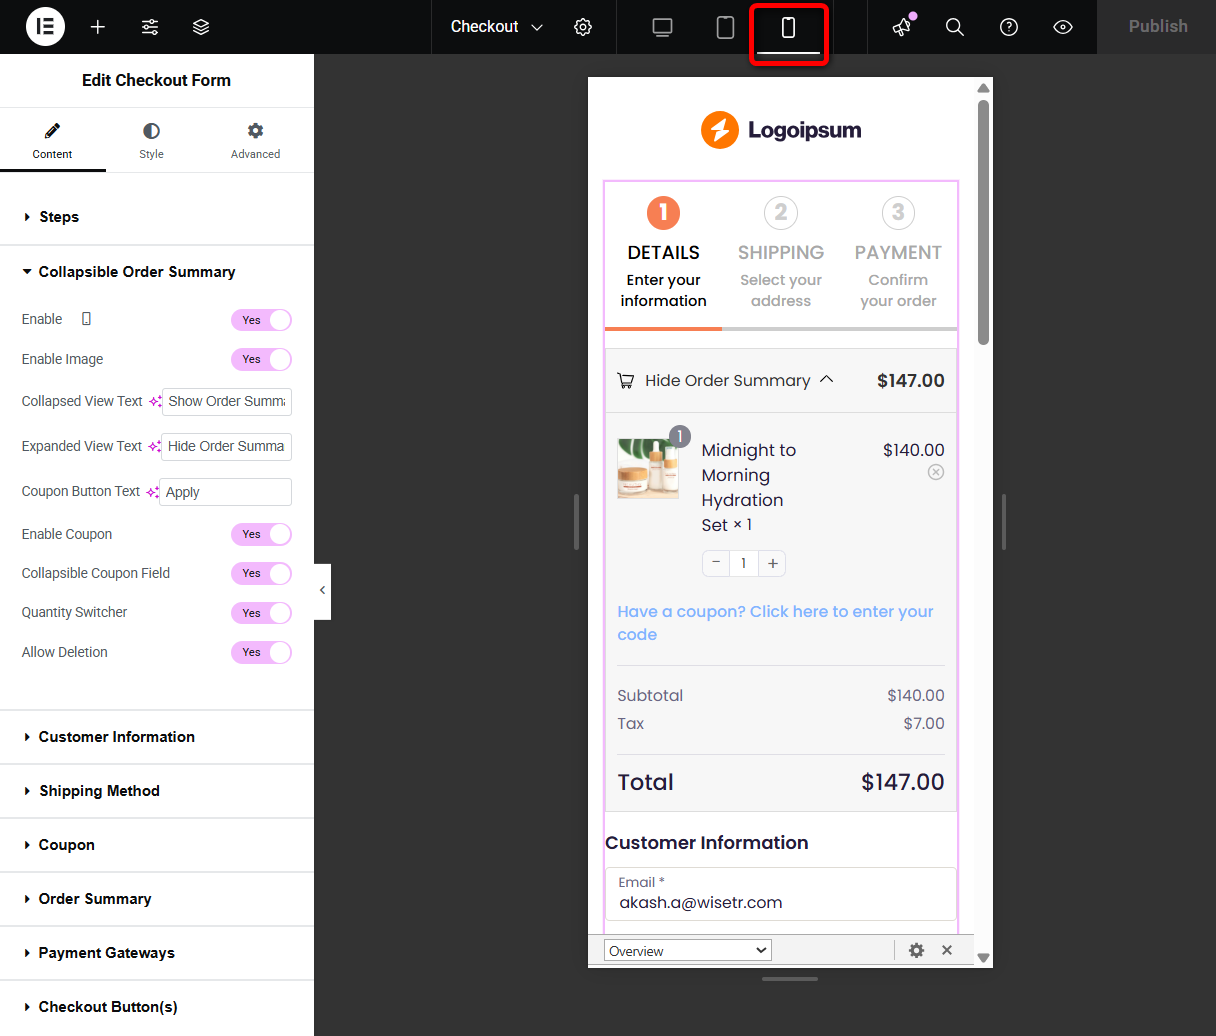
Adjust the spacing, hide certain fields, or enable collapsible sections to reduce scroll fatigue.
Make sure to:
- Keep the checkout form short and sweet
- Enable auto-fill wherever possible
- Keep the order summary collapsible
- Use mobile-friendly payment methods like Apple Pay or Google Pay
- Make checkout buttons big and thumb-friendly and enable the sticky option
A smooth mobile checkout = fewer abandoned carts + more conversions 🚀
Driving More Value from the Custom WooCommerce Checkout Page
Now that your checkout page is set up and optimized, you can drive more value and improve conversions by implementing these three tips:
- Add trust badges and testimonials
Adding trust elements near the checkout form (like security badges, confidence section, or positive reviews) can reassure customers and boost confidence.
- Offer checkout add-ons
Set up checkout add-ons like extra fees or suggest related products on the checkout page. This can significantly increase the average order value in your WooCommerce store.
- Measure your sales and conversions
Go through the analytics in FunnelKit Funnel Builder to ensure your checkout pages are working properly. Measure the conversion rates, orders, and revenue generated in real time.
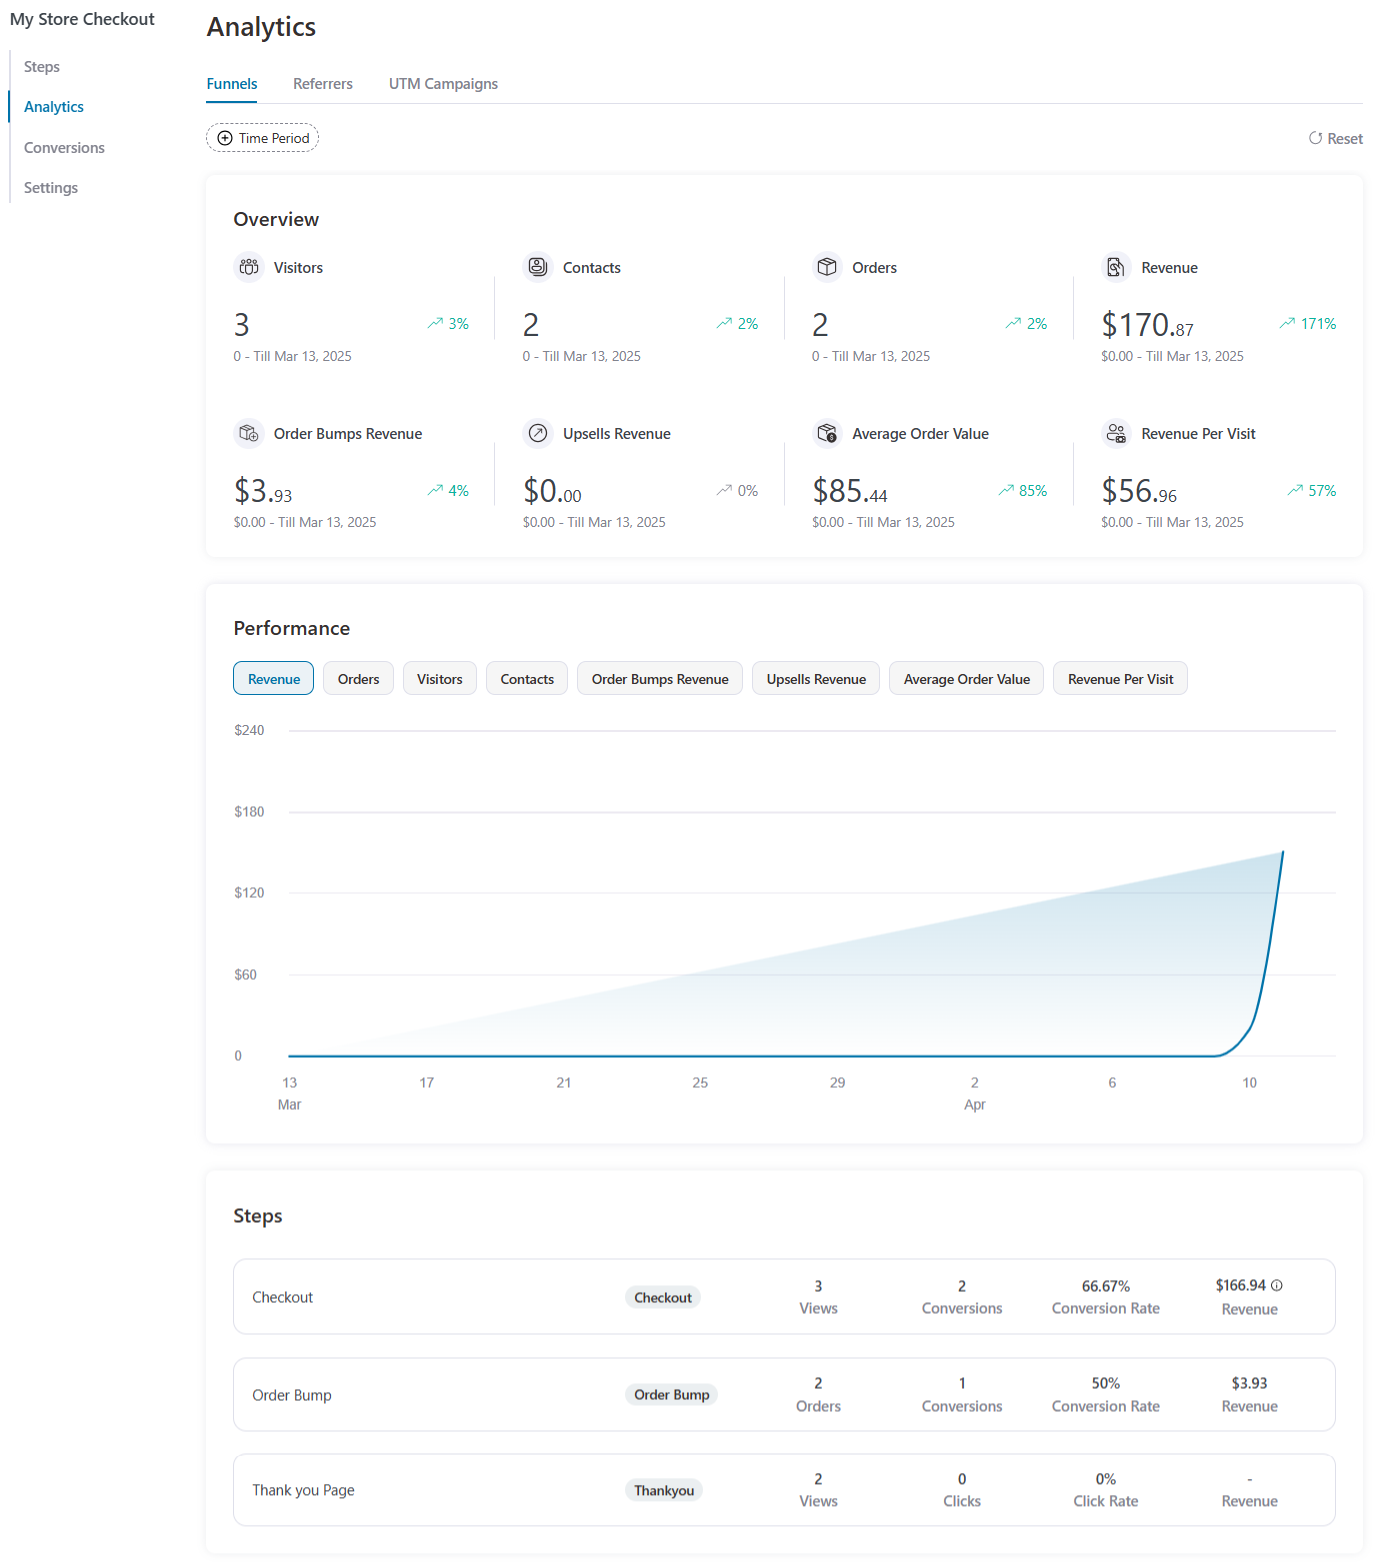
You can even view the conversion record of each order and the detailed UTM reports associated with your campaigns.
Frequently Asked Questions (FAQs) Related to WooCommerce Checkout Shortcode
The WooCommerce checkout shortcode is [woocommerce_checkout]. This single shortcode displays the complete checkout form, including billing fields, shipping fields, the order review section, and all active payment gateways.
There is no separate shortcode just for the payment section. The payment options are part of the full checkout form rendered by this shortcode.
The [woocommerce_checkout] shortcode displays the checkout form, where customers enter their billing and shipping details and complete payment.
The cart shortcode [woocommerce_cart] displays the shopping cart where customers review items, adjust quantities, and apply coupons before proceeding to checkout.
Each shortcode must be placed on a separate page assigned in WooCommerce settings.
Yes, you can place the [woocommerce_checkout] shortcode on any WordPress page, and it will render the checkout form. However, to function correctly with proper cart redirects, set the page as the official checkout page in WooCommerce > Settings > Advanced.
The checkout shortcode automatically adjusts based on product type. If your shopping cart contains only virtual or downloadable products and you have enabled the "Force shipping to the customer billing address" option or disabled shipping entirely from WooCommerce settings, the shortcode will hide the shipping fields.
This gives digital product customers a shorter, cleaner checkout form without any extra configuration.
WooCommerce only identifies one official checkout page at a time. Even though you can place the shortcode on multiple pages, only the page assigned in WooCommerce settings will function correctly with cart redirects and payment processing.
However, to use multiple checkout pages for different products or campaigns, a funnel builder plugin like FunnelKit lets you create separate checkout pages with unique designs, fields, and offers for each product or shopper.
Ready to Optimize WooCommerce Checkout Shortcode for an Impeccable Experience?
The WooCommerce checkout shortcode might look simple, but it’s one of the most powerful tools in your store arsenal.
With just one line of code, you can bring your entire checkout flow to any page you like, giving you complete control over your store’s buyer journey.
Whether you’re setting up a custom landing page, testing a new layout, or integrating with a sales funnel, this shortcode gives you the freedom and flexibility for a seamless shopping experience.
But don’t stop at just placing the shortcode. Customize, optimize, and test your WooCommerce checkout for maximum conversions.
And if you want total design freedom without touching a single line of code, FunnelKit Funnel Builder is the real deal to help you build a high-converting checkout page and sales funnels in minutes.
So what are you waiting for? Go ahead and take your WooCommerce checkout page from basic to brilliant. We’re sure your customers will thank you!

Editorial Team
July 29, 2026A WooCommerce one page checkout puts product selection, customer details, and payment on a single screen. It reduces redirects and page loads that drive abandonment and works either globally across...
Editorial Team
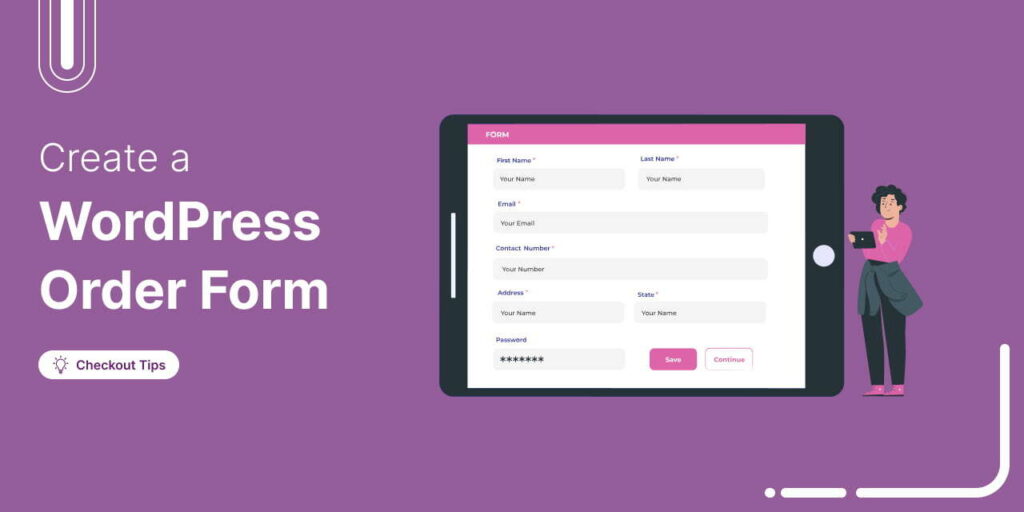
July 28, 2026Looking for the best WordPress order form plugin to take payments and customer details on a single page, without a full WooCommerce store? You’re in the right place. Across 93...
Editorial Team
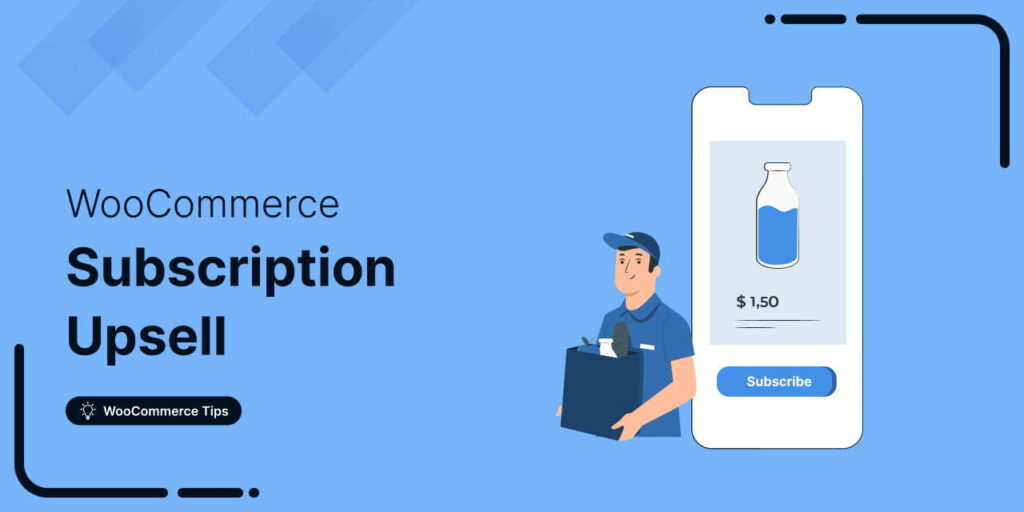
July 27, 2026WooCommerce subscription upsell can help boost your revenue through subscription-based sales. Moreover, subscription-based products allow you to add predictability to your revenue. You can sell physical and digital products and...


