
Are you looking for WooCommerce checkout optimization hacks to streamline your users' shopping experience?
Your WooCommerce store may have an attractive layout with a user-friendly interface. You may even have a wide array of products to bring traffic to your store.
But none of it matters if a high percentage of traffic can’t make it past the checkout page.
The average cart abandonment rate is 70% for eCommerce websites. That means 7 out of every 10 shoppers leave without making a purchase, which is quite shocking.
That's why you should focus on optimizing your WooCommerce checkout page to reduce cart abandonment and improve conversions.
An optimized checkout page ensures a seamless buying experience for your shoppers that helps them convert into customers.
In this post, we'll explore some effective strategies and hacks to optimize your WooCommerce checkout page and minimize cart abandonment.
Watch this video to learn about 20+ customization tips to create a high-converting checkout page:
Table of Contents
- 1 Why WooCommerce Checkout Optimization Matters?
- 2 Category 1: Checkout Form and Design Optimization
- 2.1 1. Remove unnecessary form fields
- 2.2 2. Allow guest checkout
- 2.3 3. Put email and phone fields first
- 2.4 4. Use smart input types and autofill
- 2.5 5. Enable address autocomplete
- 2.6 6. Set up inline field validation
- 2.7 7. Use optimized multi-step vs one-page checkout
- 2.8 8. Prioritize top-selling countries in the country dropdown
- 2.9 9. Pre-fill returning visitors
- 2.10 10. Let shoppers edit cart items on the checkout page
- 2.11 11. Auto-apply coupons (or hide the field)
- 2.12 12. Enable multi-step field preview
- 2.13 13. Use the same shipping for billing by default
- 3 Category 2: Performance Optimization
- 3.1 14. Defer transactional emails
- 3.2 15. Audit your payment gateway response time
- 3.3 16. Disable order attribution if you don't use it
- 3.4 17. Run query monitor on the checkout page
- 3.5 18. Disallow caching on the checkout page
- 3.6 19. Choose hosting built for WooCommerce
- 3.7 20. Use a lightweight theme
- 4 Category 3: Trust Booster
- 5 Category 4: Tactics That Live Across Layers
- 6 Category 5: Recovery Optimization
- 7 Frequently Asked Questions (FAQs) About WooCommerce Checkout Optimization
- 8 Get Ready and Start Incorporating These WooCommerce Checkout Page Optimization Hacks
Why WooCommerce Checkout Optimization Matters?
The checkout page is the final step in a customer’s journey, where they decide whether to complete their purchase or abandon their cart.
A poor checkout page often leads to frustration, confusion, and, ultimately, users abandoning the shopping process.
According to research done by Baymard Institute, here are the top 5 reasons why users abandon their carts:
- High extra cost (39%)
- Slow delivery (21%)
- Trust and security issues (19%)
- Stores wanting to create an account (19%)
- Long or complicated checkout process (18%)
To prevent this, you should provide a user-friendly and streamlined checkout flow that infuses trust, addresses potential concerns and removes unnecessary barriers.
WooCommerce checkout optimization is the process of removing friction between a shopper reaching your checkout page and successfully completing payment.
It operates on three layers, including form design, performance and trust.
Here's why optimizing checkout matters for your WooCommerce store:
- Reduces cart abandonment by keeping customers from dropping off before completing their purchase.
- Speeds up the buying process with features like auto-fill addresses, express checkout, auto-apply coupons, direct checkout, and more.
- Enhances the user experience with a clean, intuitive layout and minimal distractions, allowing shoppers to focus on their purchases.
- Boosts mobile conversions by ensuring seamless transactions across all devices.
- Increases trust and credibility with security badges, offers multiple payment options, and a transparent checkout flow to instill confidence in buyers.
This lets you significantly enhance the overall shopping experience and boost your conversions.
Category 1: Checkout Form and Design Optimization
The default WooCommerce checkout fields are the real enemy of conversions. This is where most stores leave the easiest money on the table.
1. Remove unnecessary form fields
The default WooCommerce checkout asks for things you almost certainly don't need. For most B2C stores, you can safely remove:
- Company name
- Address line 2 (combine into a single field, or hide and use the add another line link)
- The country dropdown is for when you only ship to one country
- Order notes if you don't operationally use them
By eliminating unnecessary form fields at checkout, you can reduce friction, enhance the customer experience, and increase conversions.
In FunnelKit Funnel Builder, the checkout field editor lets you add, remove, and reorder fields with drag-and-drop.
If you'd rather do it in code, the woocommerce_checkout_fields filter is the WordPress-native way:
add_filter( 'woocommerce_checkout_fields', function( $fields ) {
    unset( $fields['billing']['billing_company'] );
    unset( $fields['billing']['billing_address_2'] );
    return $fields;
});
Either method gets the job done. Make sure to justify every field you keep.
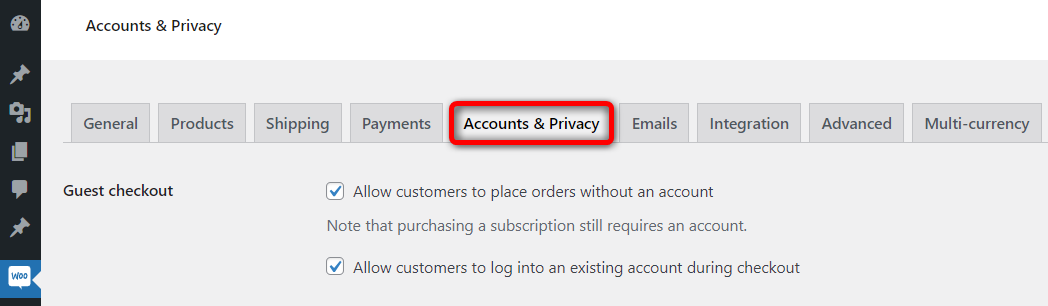
2. Allow guest checkout
Forced account creation is the single most-cited reason for cart abandonment after price. About 1 in 4 shoppers will abandon if they're forced to create an account.
Go to WooCommerce ⇨ Settings ⇨ Accounts & Privacy and:
- Enable the 'Allow customers to place orders without an account' option
- Check the 'Allow customers to create an account during checkout' option
- Disable any toggle that says require account
Allowing guest checkout is convenient for users, enabling them to place orders efficiently and leading to a positive buying experience and potentially higher conversion rates.
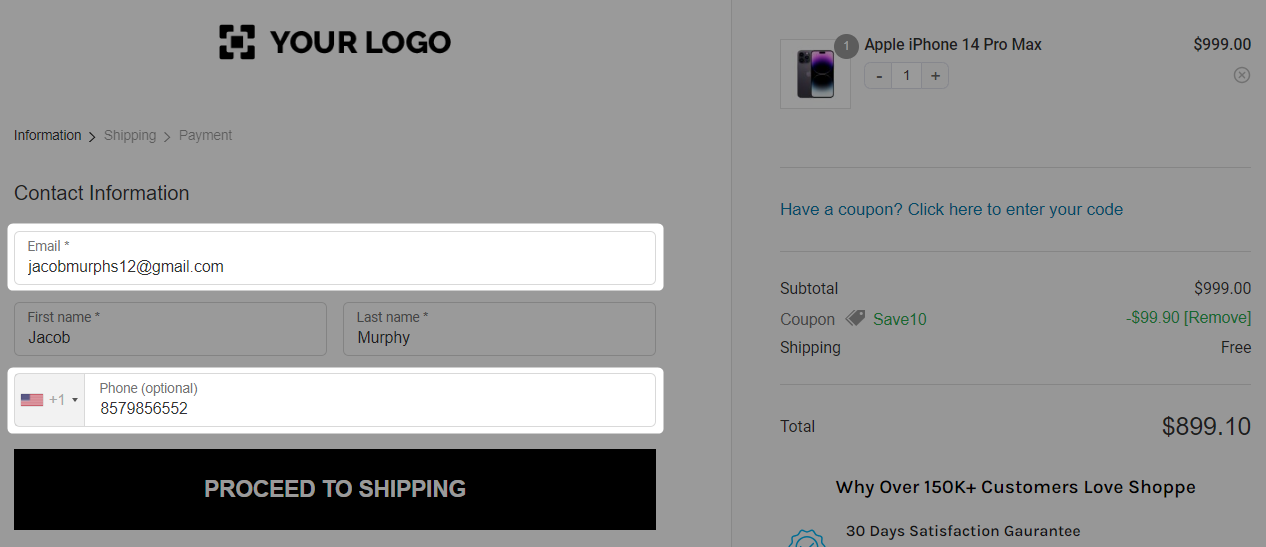
3. Put email and phone fields first
Make sure email and phone are your top fields on the checkout page. Let these be among the first few fields that a user fills out because:
- These are the lowest-friction fields. Users never hesitate to fill them out, so the form gets off to a strong start.
- If they abandon, you have the details you need to recover the cart. SMS open rates are around 98%, far higher than email, so capturing both gives you the two best recovery channels.
In FunnelKit, you can drag and drop the email field to the top of the checkout form.
If you're using code, adjust the priority value on the field array.
4. Use smart input types and autofill
The right type and autocomplete attributes do more to drive mobile conversions than most people realize.
They trigger the right keyboard, surface the right autofill suggestions, and reduce typos that cause failed deliveries:
- type="email", it brings the email keyboard with @ and .com shortcuts
- type="tel" and inputmode="numeric", the phone and card fields show the number pad
- autocomplete="given-name", family-name, street-address, postal-code, cc-number. It lets the browser autofill in one tap
Most modern checkout plugins handle this. The blocks-based WooCommerce checkout includes most of it by default. If you're on a custom or older shortcode checkout, audit your form HTML.
5. Enable address autocomplete
Filling out your complete address before buying is a frustrating process, and many customers may abandon it at the sight of the extra work.
Furthermore, incorrect addresses cause 41% of delivery delays and 39% of order failures. [Source: Chain Storage Age]
That’s why you should implement autocomplete address fields on your checkout.
Google Address Autocomplete is the most common implementation.
First, get a Google Maps API key. Paste it into FunnelKit's global settings and toggle on Address Autocompletion in the checkout's optimizations tab.
Shoppers start typing, select from a dropdown, and the city, state, and postcode auto-fill.

This is how you can improve your WooCommerce checkout and make an effortless shopping experience.
6. Set up inline field validation
Use real-time validation as users fill their checkout form, not after they hit the place order button. It immediately displays a red message when a required checkout field is left blank or fails validation.
Enable inline checkout field validation to reduce frustrating form rejections.
Enable it inside the Optimizations tab.
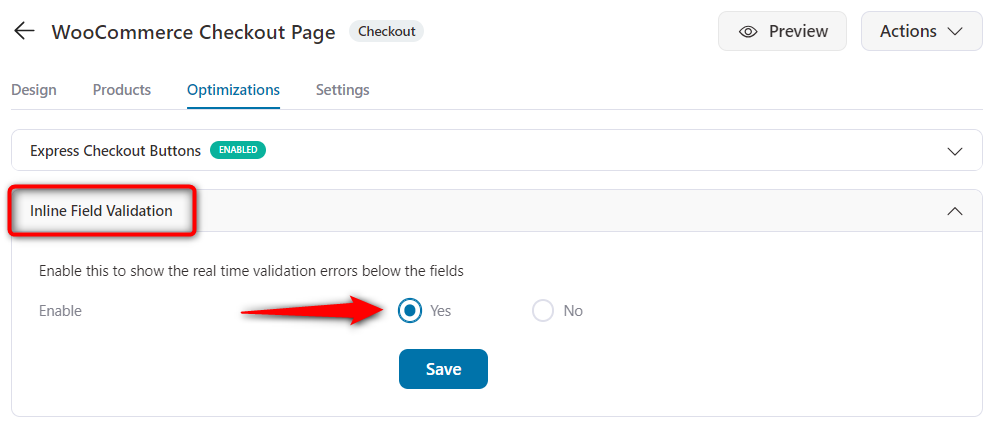
This real-time feedback speeds up the checkout, reduces errors/typos, and improves the shopping experience, leading to higher conversion rates.
7. Use optimized multi-step vs one-page checkout
This is a never-ending debate. But the answer depends on your requirements. It's always best to A/B test it on your actual traffic.
One-page checkout works better for digital products with minimal required fields, single-product checkouts, desktop-heavy traffic, and low-AOV stores where any extra step slows momentum.
Multi-step checkout tends to win for physical products that require shipping and billing, mobile-heavy traffic, higher AOV, and carts with multiple items.
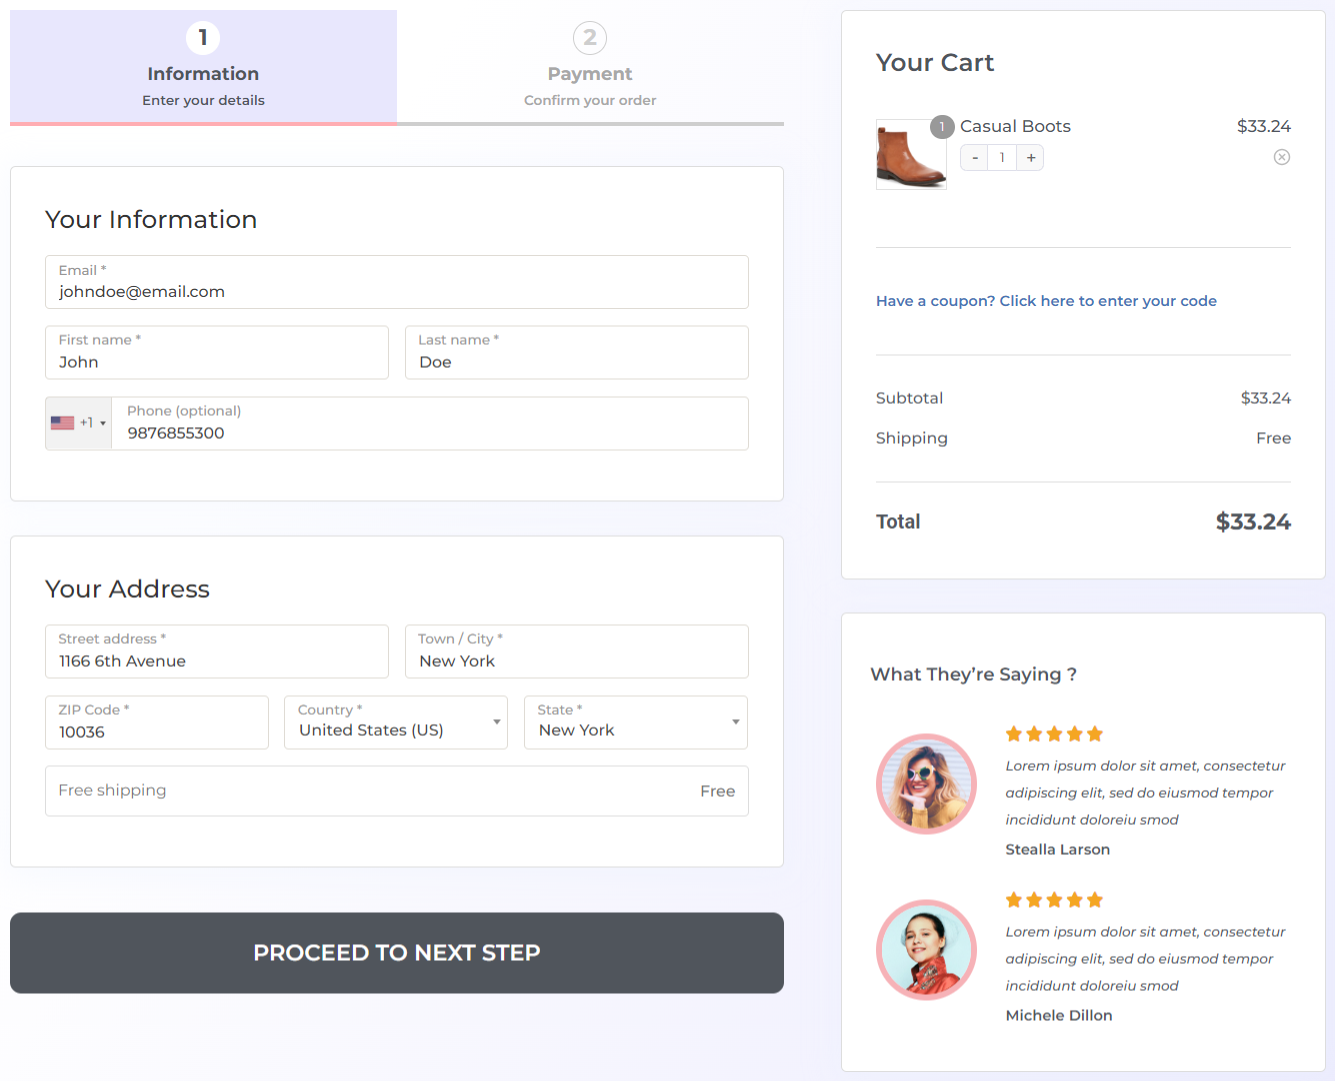
When you do go multi-step, two things matter:
- Display a progress indicator (breadcrumb or tabs), so users know how many steps remain. Progress bars consistently improve completion rates in our internal testing.
- Show a preview of previously entered fields on each step so users can verify their entries without going back.
This multistep checkout, created with FunnelKit, looks clean and distraction-free. Take a look:
Watch this step-by-step tutorial to set up one page checkout in WooCommerce here:
You can customize your checkout page with page builders such as Elementor, Bricks, Divi, Oxygen, the Gutenberg Block Editor, or others.
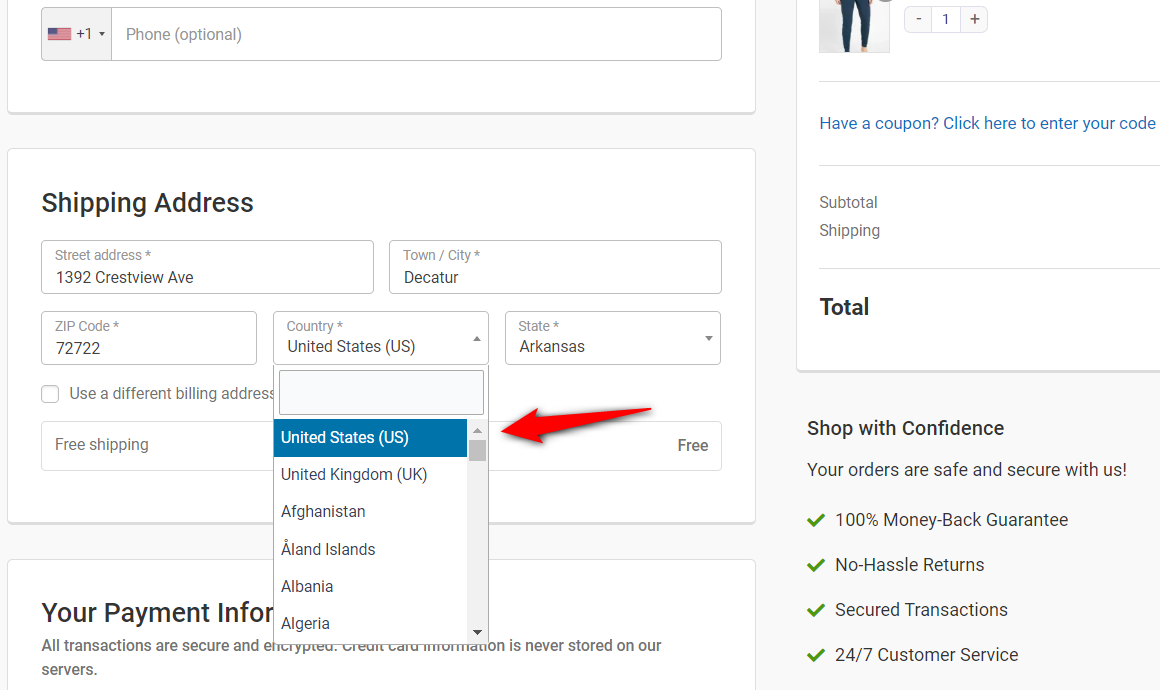
8. Prioritize top-selling countries in the country dropdown
If 75% of your sales come from five countries, those should appear at the top of the dropdown. This is a small hack that quietly removes friction for the majority of your buyers.
In FunnelKit, enable 'Preferred Countries' in the optimizations tab and pick your top markets.
The user sees a mini list of countries at the top and the remaining follow in alphabetical order.
In code, use the woocommerce_countries filter to reorder.
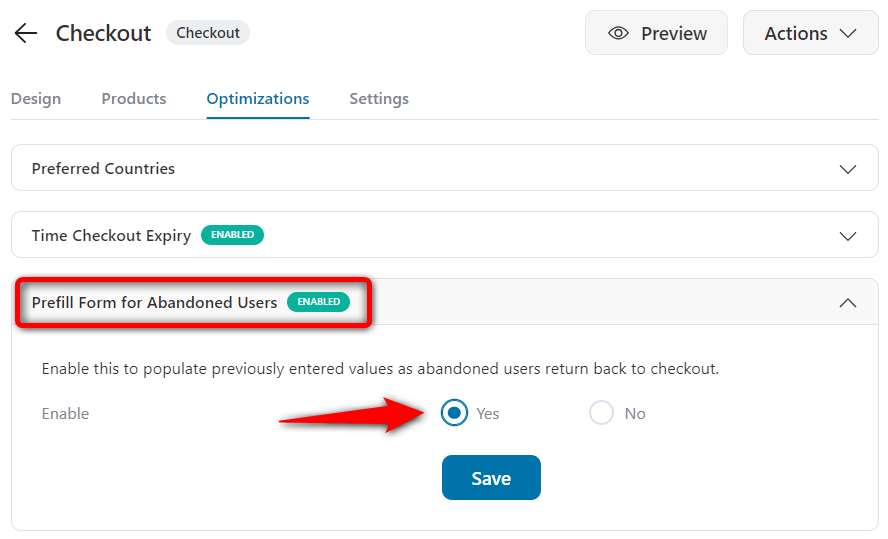
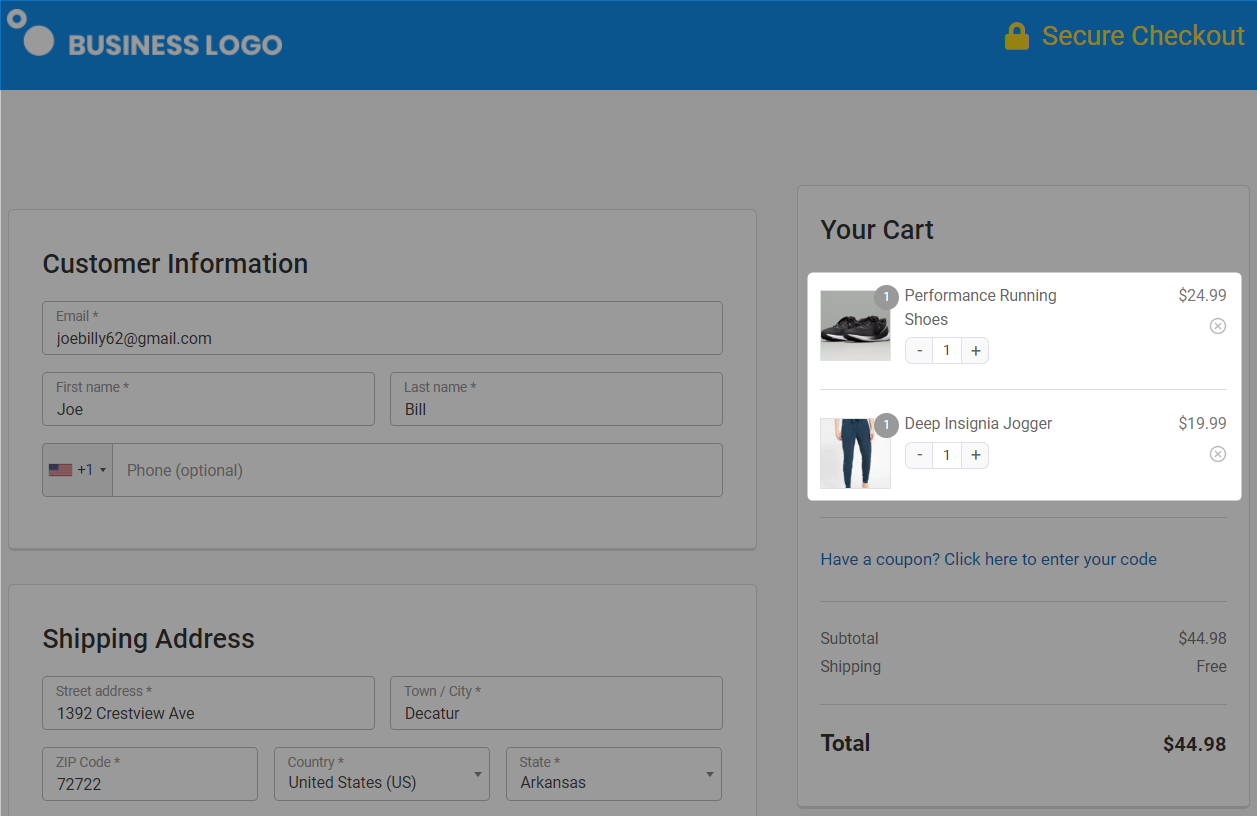
9. Pre-fill returning visitors
If a logged-out visitor abandoned earlier and returns from the same device, pre-fill the form with the information they previously entered. They see they're 80% of the way there and finish.
In FunnelKit's optimizations tab, enable the 'Prefill Form for Abandoned Users' option.
10. Let shoppers edit cart items on the checkout page
Bouncing back to the cart page to change a quantity is a source of friction.
Show an editable mini-cart in the checkout's order summary, including a quantity stepper, a remove button, and, ideally, a "you removed an item, undo?" recovery link.
FunnelKit handles this. It allows users to change the quantity of items in the cart and delete or even recover them.
Enable the quantity switcher option and allow deletion when customizing the checkout page with a page builder.
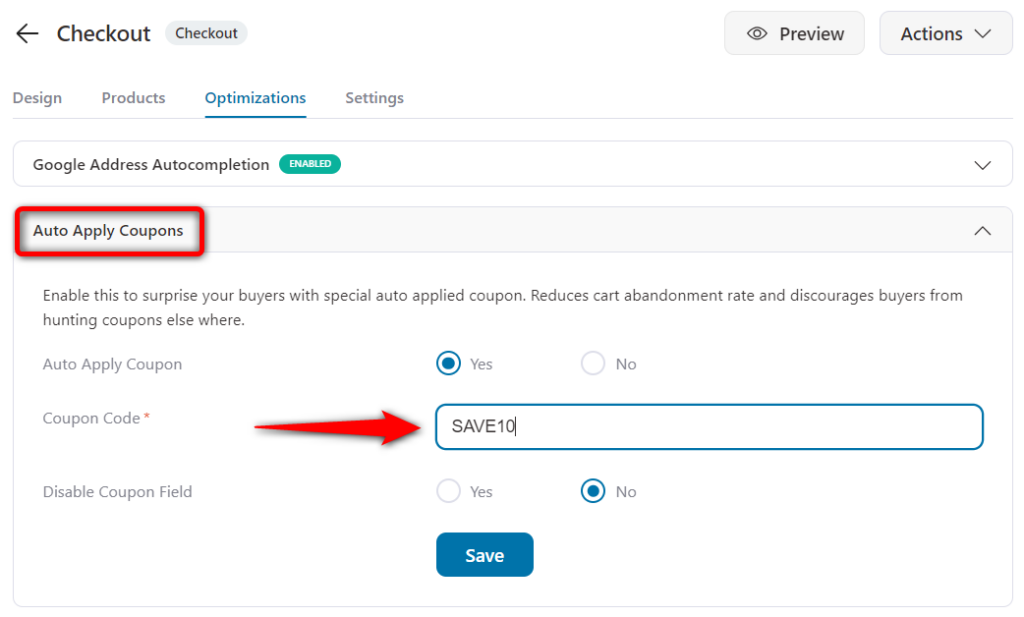
11. Auto-apply coupons (or hide the field)
When a user sees an empty coupon field on the checkout page, they search for it everywhere online. Many of them never come back to your store.
Here are two ways to defuse it:
- If you run regular promotions, auto-apply the relevant coupon so the discount appears without the user having to enter it. They see the savings, they don’t go searching.
- If you don’t run promotions, hide the coupon field entirely. If you must show it, hide it behind a small “Have a promo code?” link rather than a prominent empty box.
This is how the coupon is automatically applied on the checkout page, and the new order total is displayed:
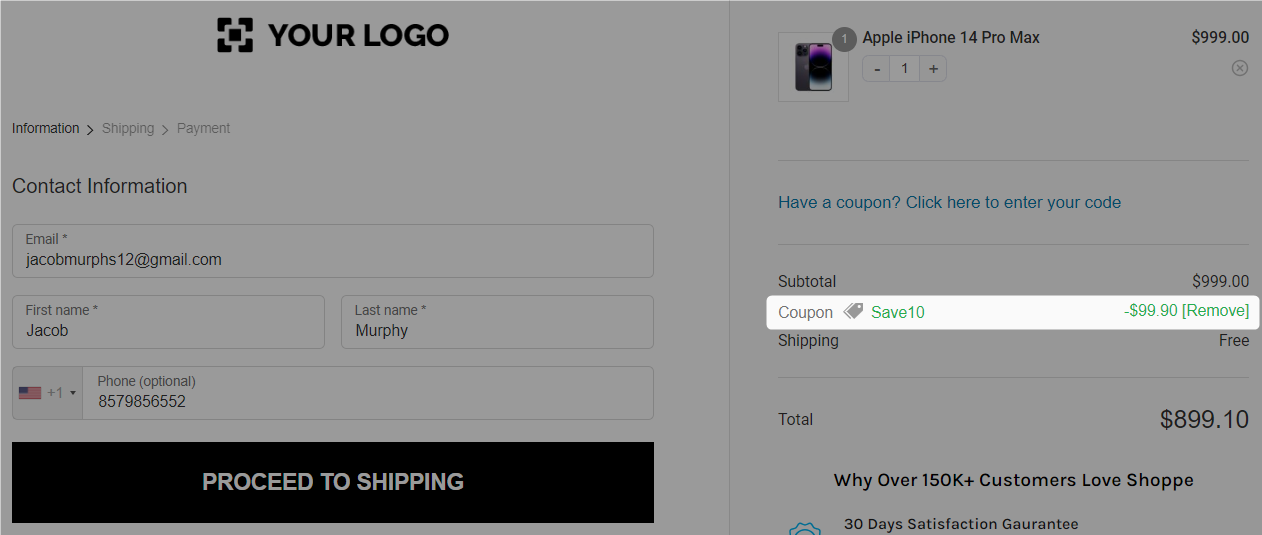
Just go to the ‘Optimizations’ tab when editing your checkout page. Next, specify the coupon code that you want to auto-apply at checkout.
12. Enable multi-step field preview
A multi-step field preview enables users to view the information they entered in the last step.
This way, they can cross-check the details they filled in on the previous step at the checkout form.
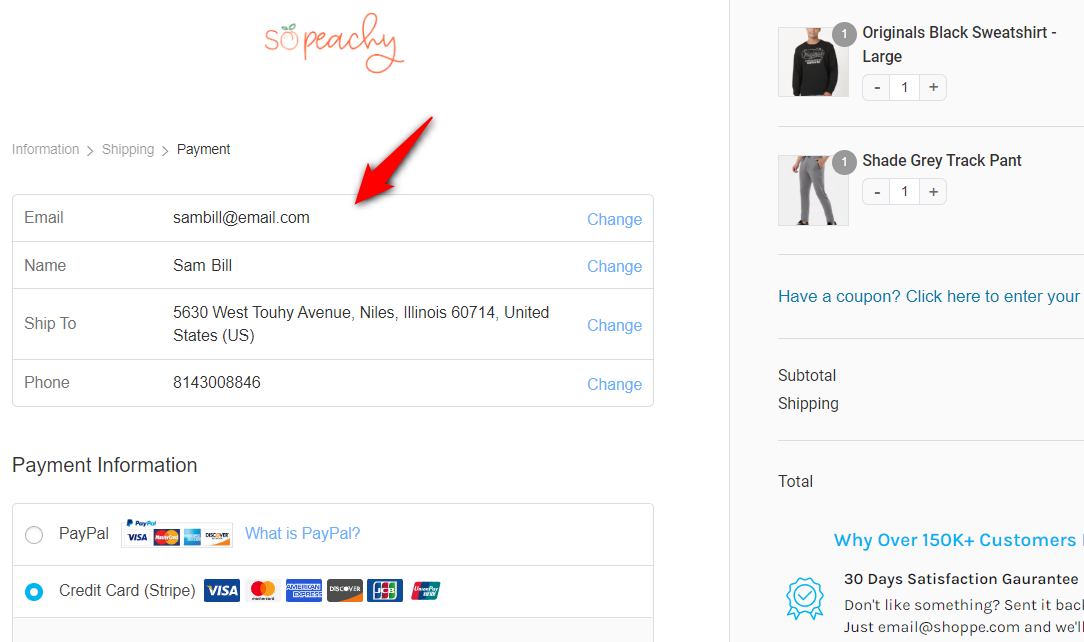
Go to the Optimizations tab and click on the ‘Multistep Field Preview’. Select the field(s) you want to show as a preview from there.
Simply check the boxes, and they'll be displayed when the user proceeds to the next step.
13. Use the same shipping for billing by default
Most shoppers have the same shipping and billing address.
Pre-check the “use shipping address as billing” option and only show the billing form if they uncheck it.
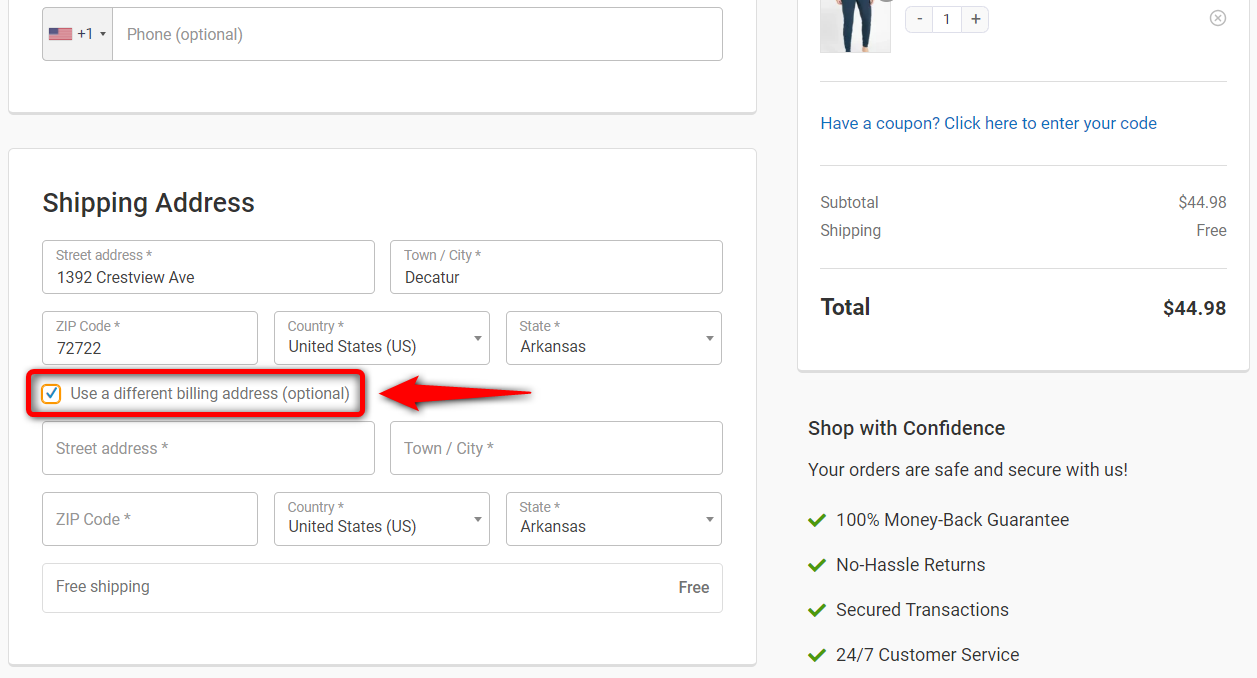
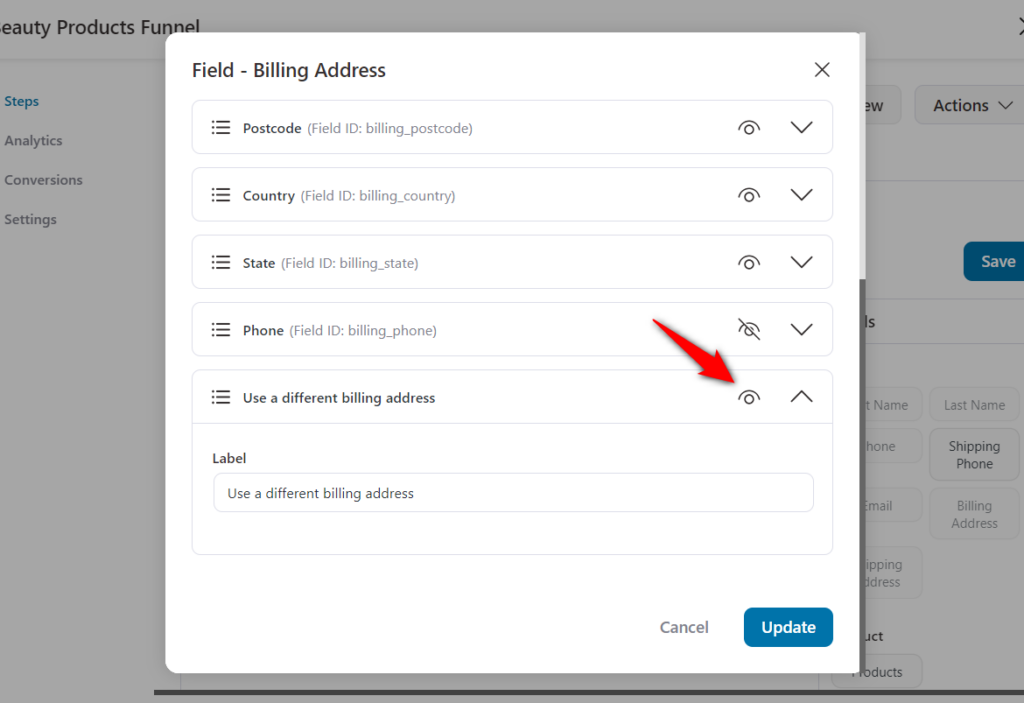
To set it up, go to the ‘Design’ tab in checkout and place the ‘Shipping Address’ field next to the ‘Billing Address’ field.
Next, click on the pencil icon to edit the billing address field. And turn the visibility ON for the ‘Use a different billing address’ option.
Category 2: Performance Optimization
Any delay in your checkout is a conversion killer. Shoppers think the site broke. They refresh (creating duplicate orders), they leave, or they panic and double-tap the button. None of those outcomes is good for you.
Here's how you can optimize your checkout for performance.
14. Defer transactional emails
By default, WooCommerce sends order confirmation emails synchronously before redirecting to the thank-you page.
If your SMTP server is slow, the customer will wait for emails to be sent. This is where stores operate well by deferring emails to a background queue using Action Scheduler.
The technique is well documented on Jesse Pearson's public gist. Copy and paste the PHP code into your child theme or a code snippets plugin.
If you're running email customizers like FunnelKit Automations, Omnisend, etc., transactional emails go through this queue automatically and don't block checkout.
15. Audit your payment gateway response time
Test your checkout with a non-API gateway, such as Cash on Delivery or Bank Transfer.
If those are fast and Stripe/PayPal are slow, the bottleneck is the gateway and not your site.
Some common causes are:
- The hosting region is far from the gateway's data center (a US store on EU hosting, talking to US Stripe will pay round-trip latency on every API call)
- Multiple webhook listeners doing synchronous work
- A gateway that doesn't support modern async confirmation flows
Use a good Stripe WooCommerce plugin that uses payment intents and async confirmation.
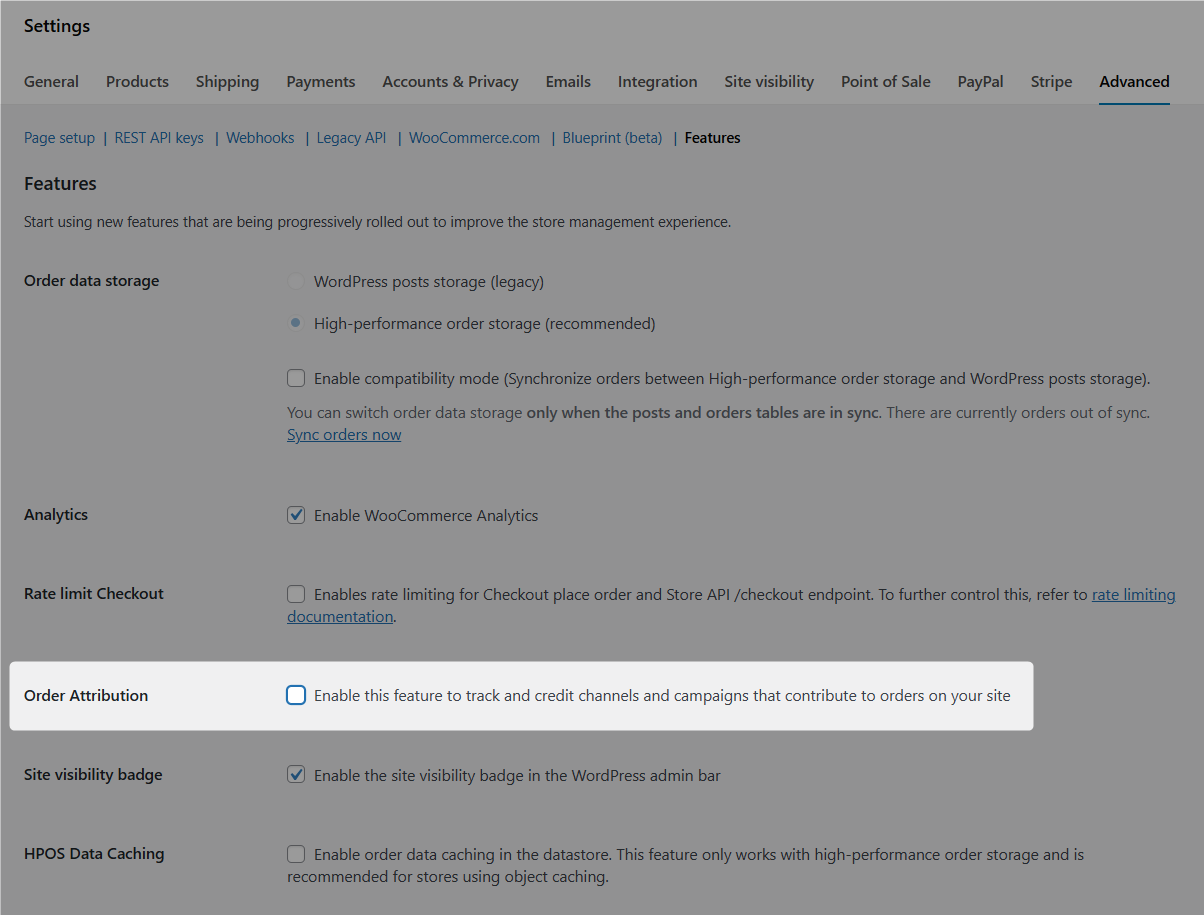
16. Disable order attribution if you don't use it
WooCommerce 8.5+ added an order attribution feature that tracks where each order originated.
It's useful if you actually use the data, such as origin, device type, session page views, etc., because it injects scripts and adds processing on every checkout submission.
To turn it off, navigate to WooCommerce ⇨ Settings ⇨ Advanced ⇨ Features and disable it.
17. Run query monitor on the checkout page
Use Query Monitor, a free developer tool that shows you every script, database query, and PHP function firing on a page.
Make sure to install it on a staging site, load the checkout, and look for:
- Plugins loading the scripts that aren't needed for checkout
- Database queries running into the hundreds (anything above ~50 queries on checkout is a red flag)
- Functions taking >100ms each
The usual culprits here are page builders, sliders, social-share plugins, and sitewide analytics scripts.
Use Perfmatters or Asset CleanUp to disable them specifically at checkout.
18. Disallow caching on the checkout page
Most caching plugins exclude /checkout/, /cart/, and /my-account/ by default.
And as a result, a cached checkout will serve stale prices, stale shipping, and broken nonces. The symptoms look like random bugs.
If you're using a plugin that aggressively caches everything, make sure the checkout pages are explicitly excluded.
Read our detailed post on WooCommerce caching here.
19. Choose hosting built for WooCommerce
WooCommerce performs many database writes during order placement. Shared hosting struggles with this under any meaningful traffic.
Stores handling serious volume should use managed WooCommerce hosting (Kinsta, WP Engine, Cloudways, Pressable, or SiteGround’s higher tiers).
A 200ms reduction in server response time at peak load is often a 5-8% conversion lift on its own.
20. Use a lightweight theme
Many WooCommerce-ready themes ship with thousands of lines of CSS and JavaScript that the checkout page doesn't need.
The checkout doesn’t need a slider. It doesn’t need a mega-menu. It doesn’t need parallax.
Lightweight themes such as Blocksy, Kadence, Astra, GeneratePress play well with optimized checkouts.
Or you can build a store checkout with FunnelKit that comes optimized for all devices.
Category 3: Trust Booster
Once the form is clean and the page is fast, the remaining gap is psychological.
People hesitate the most right before payment. The job of the trust layer is to absorb that hesitation.
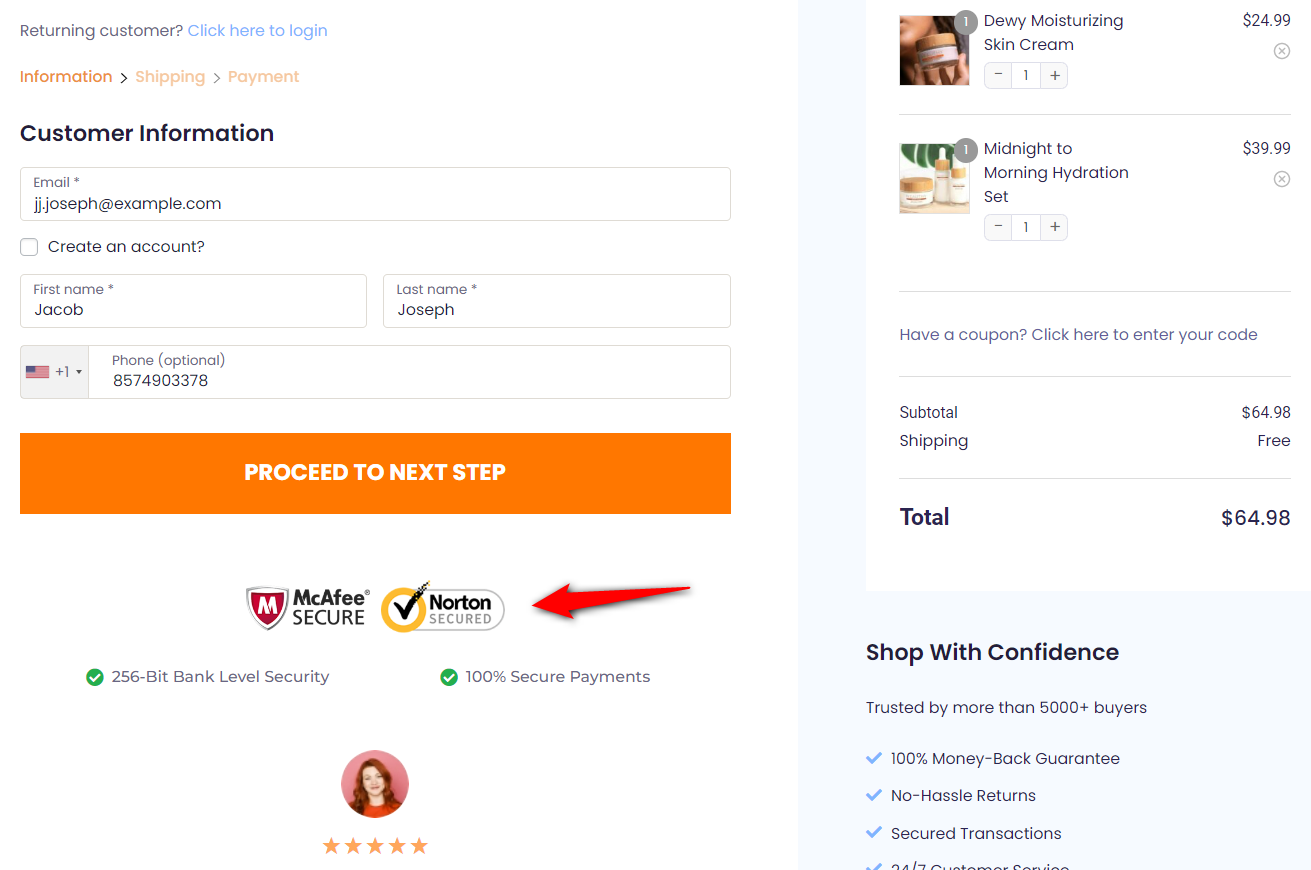
21. Place trust signals at friction points
Building trust is crucial for instilling confidence in your shoppers at checkout.
Therefore, displaying trust signals and security seals on the checkout page helps alleviate your customers' concerns regarding the security of their personal and financial information.
For that, you can make sure that your WooCommerce store has the following:
- SSL certificate
- Secured payment seals
- Money-back guarantee
- Shop with confidence section
Here’s an example of security seals that make your checkout page look authentic and secure:
Also, credibility markers such as 'Why Buy From Us' and 'Customer Reviews/Testimonials' make the page appear trustworthy.
22. Show all costs up front
Unexpected costs at checkout, such as shipping, taxes, and fees that are revealed late, are consistently among the top reasons for abandonment.
You can solve it before they reach the payment step:
- Use a shipping calculator on the cart page or inside the mini cart
- Default to the most likely shipping method for each region
- Show the all-in total prominently in the order summary, not just on the Place Order button
- If you offer free shipping over a threshold, display the threshold and how close the customer is on every cart and checkout view
If your margins allow it, free shipping over a threshold is the single highest-leverage offer in ecommerce. It’s both an AOV lever and an abandonment-reduction lever.
23. Strip distractions from the checkout page
The goal of the checkout page is to place the order. Remove every distraction that competes with it:
- Header navigation menus
- Sidebars
- Footer link forests
- Newsletter signup banners
- Live chat popups that auto-open on checkout
- Exit-intent popups firing on the checkout page itself
Most modern checkout plugins (FunnelKit, CheckoutWC, etc.) do this automatically by using a custom template.
But if you're using the default WooCommerce checkout, hide these elements via theme settings or a few lines of CSS.
24. Show recognized payment methods
This is part trust, part conversion. Visitors scan the payment area for logos they recognize.
If they see Visa, Mastercard, Apple Pay, Google Pay, and PayPal, they trust the page. If they see only generic “Credit Card” text, some percentage will hesitate.
Install a good Stripe plugin for WooCommerce. Next, navigate to payment settings.
Here, multiple payment methods are available, including credit/debit cards, buy now pay later, and local options such as iDEAL, P24, Bancontact, SEPA, and more.
Show your payment method logos in the checkout area. If you offer Apple Pay or Google Pay, make the express button visible above the form, not buried below.
Category 4: Tactics That Live Across Layers
A few high-impact tactics don't fit cleanly into one layer.
25. Enable express payment methods (Apple Pay, Google Pay, Link)
According to the FIS WorldPay Global Payments Report, digital wallets have surpassed credit card payments, accounting for 49% of global eCommerce transaction value.
Digital wallets like Apple Pay and Google Pay are in demand because they make the whole checkout experience seamless. Customers can place their orders with a single click.
With just a tap of the express checkout payment button, shoppers see all their saved cards to use for their purchases. They don’t even have to fill out the checkout form - it automatically sends the payment and address-related information to the merchant.
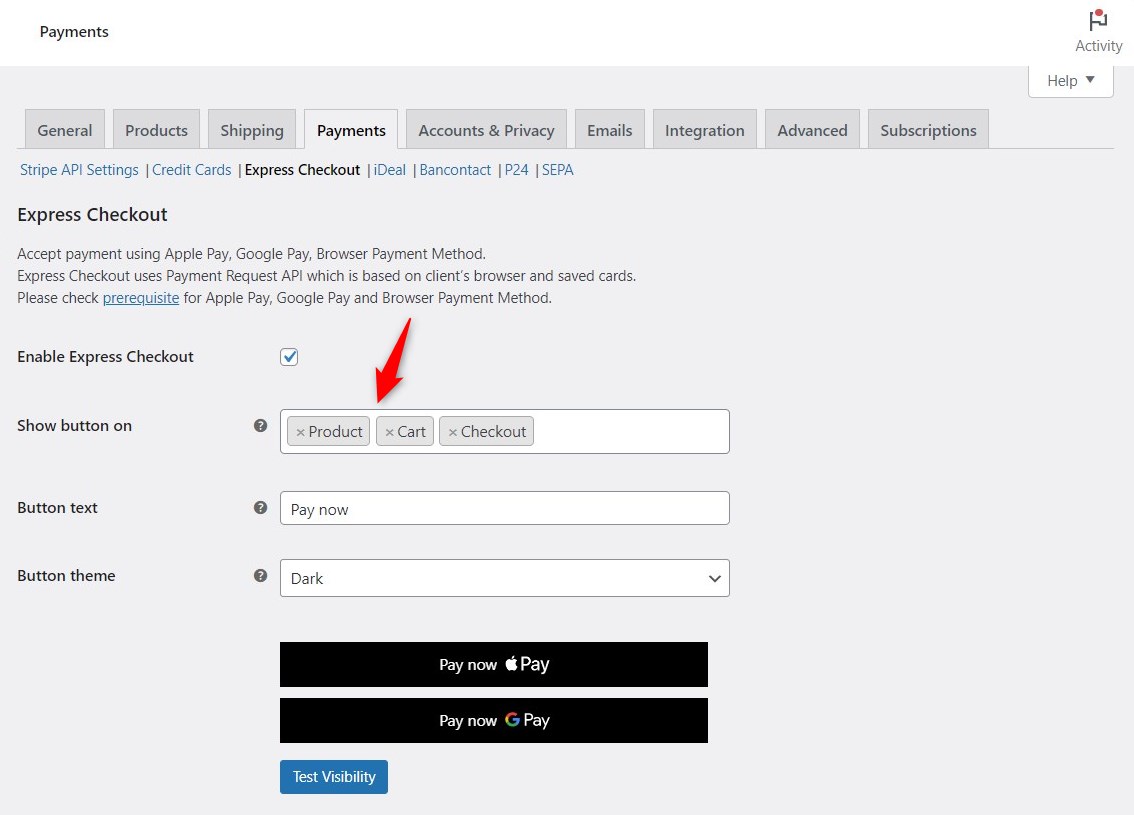
To enable express one-click checkout, install and activate the Stripe Gateway for WooCommerce from FunnelKit.
Once everything is set, go to the Express Checkout tab and enable it. You can even configure the visibility of the Google Pay and Apple Pay express checkout buttons here.
Read our detailed post on setting up Apple Pay and Google Pay in your WooCommerce store.
You can also check our video tutorial to set up express checkout below:
26. Add a modern sliding cart and skip the cart page
In the default WooCommerce shopping process, users have to go to the products page, then the cart page, and finally the checkout page.
This shopping process is long and tedious. Instead, you can add a sliding cart for WooCommerce and skip that one extra step in the journey.
It offers you a modern interface that provides a seamless add-to-cart experience.
Furthermore, you can set up a smart in-cart recommendation system to offer relevant product suggestions.
Go to FunnelKit ⇨ Cart and enable it to set it up.
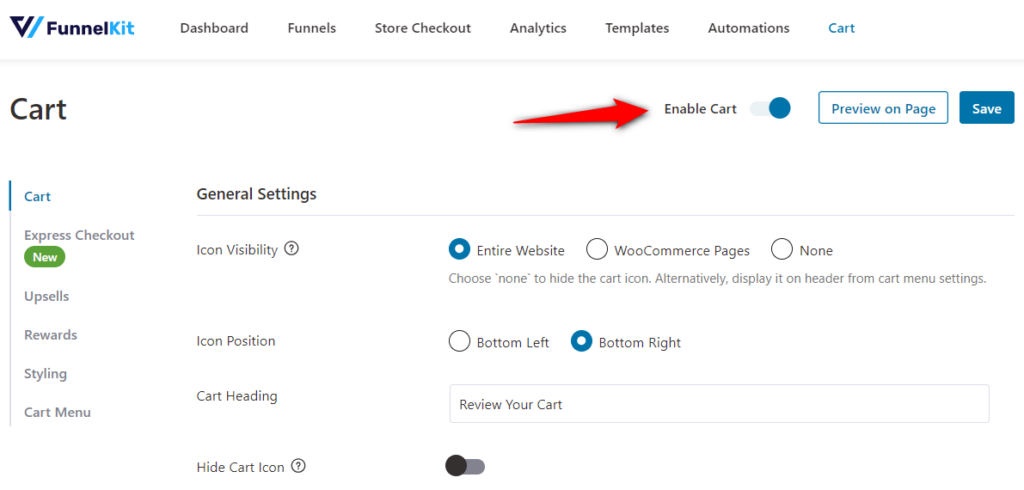
Configure different options for your sliding shopping cart and upsell recommendations.
Plus, you also get various styling options to customize your cart and its icon to your brand.
27. Display upsells and cross-sells on the checkout page
Offering complementary or related products based on the items in the cart can help boost your store’s average order value.
Upsells or cross-sells on the checkout page are called order bumps. These are usually low-priced items that prompt impulse purchases.
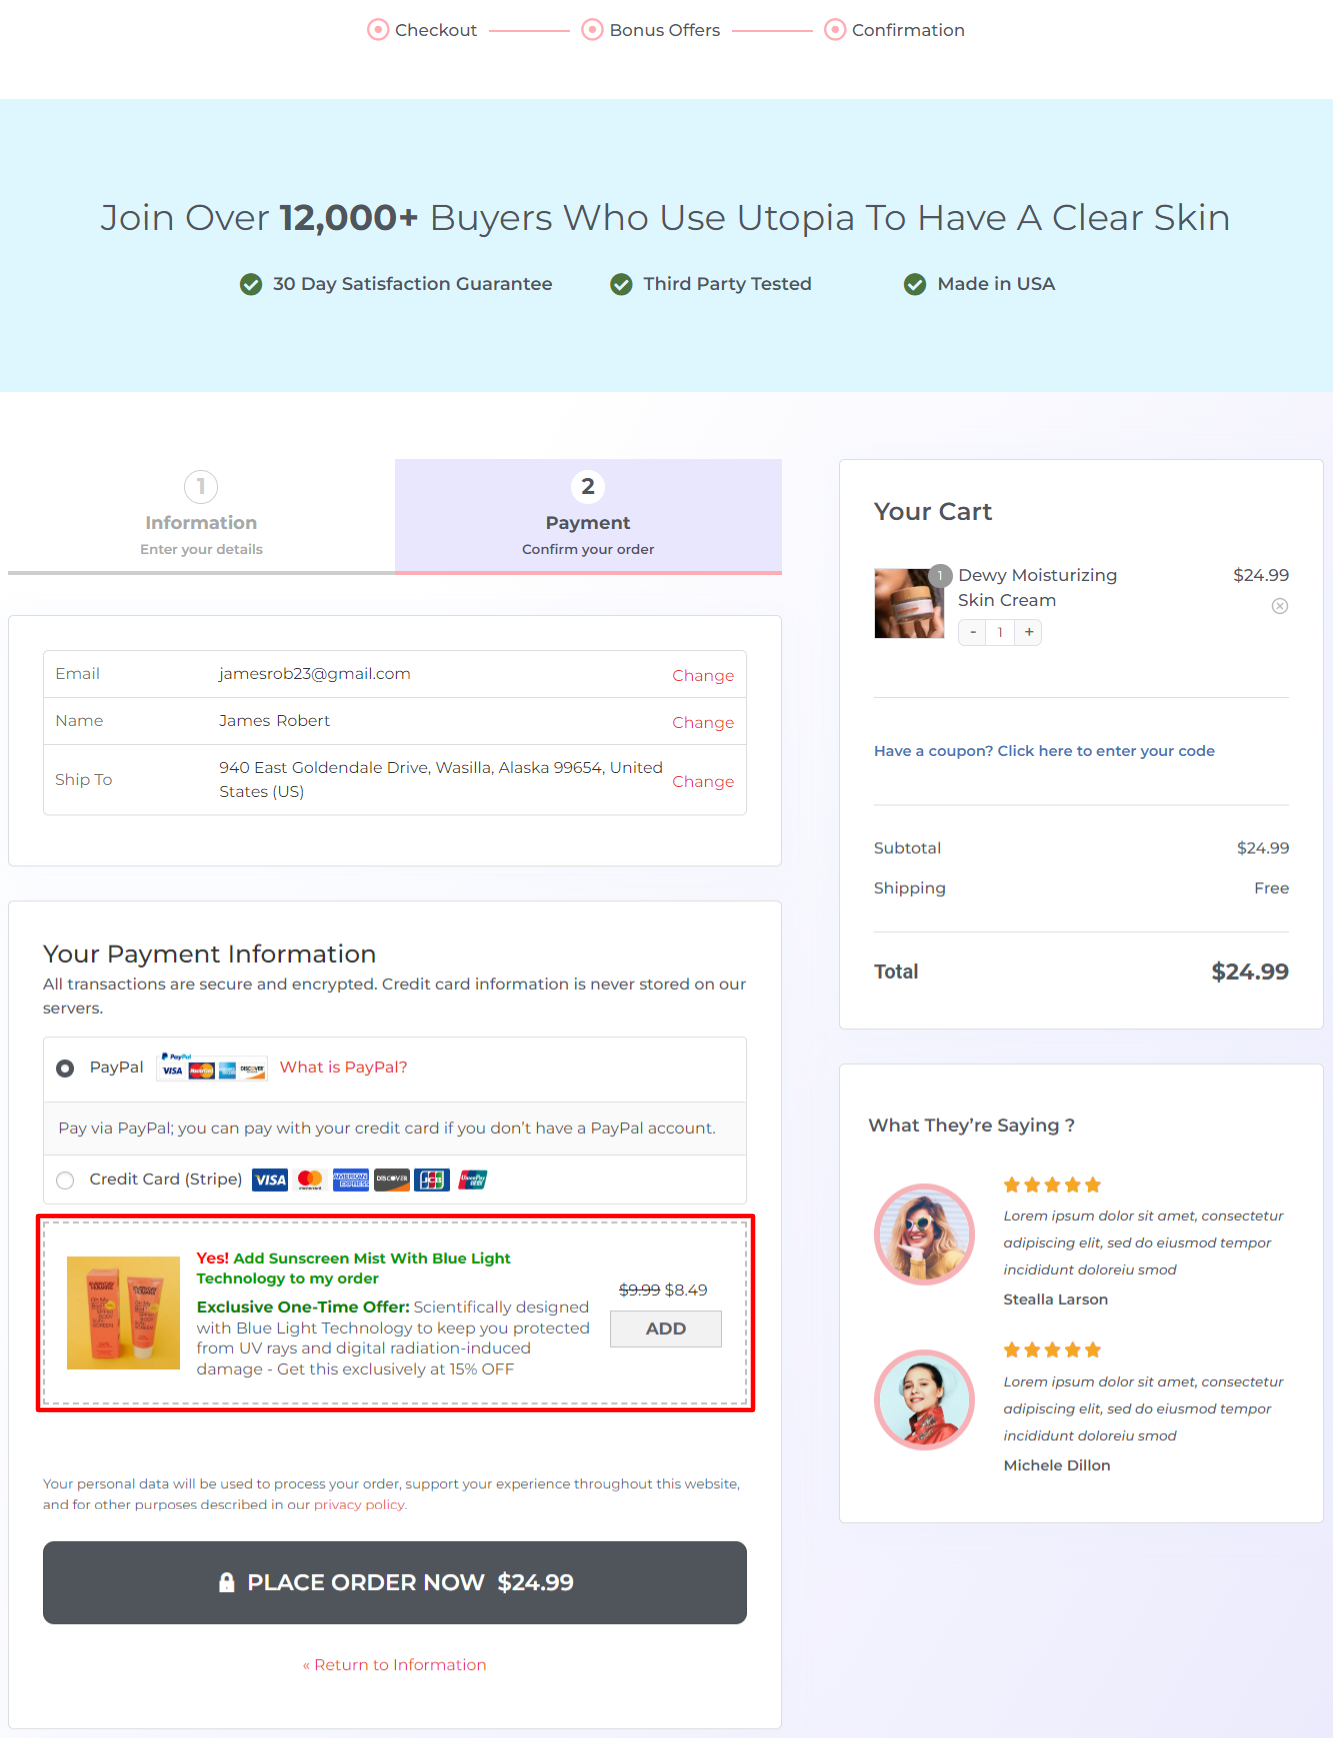
All you have to do is click on ‘Add Order Bump’ below the checkout on your funnel, import any skin and add the product you want to offer.
You can design your bump offer by crafting an attractive piece of copy.
28. Make mobile a first-class experience
Over 60% of WooCommerce traffic is now mobile, but mobile converts at roughly half the rate of desktop on most stores. The gap is almost entirely UX.
Mobile essentials:
- Tap targets at least 44×44 pixels
- Sticky Place Order button at the bottom of the screen
- Collapsible order summary so the form is the focus
- Disable iOS auto-zoom on form inputs (set input font-size ≥16px)
- Test on a real phone, on cellular data, with a card you don’t have saved
Category 5: Recovery Optimization
Even an optimized checkout will lose people. Catch them on the way out.
29. Send cart abandonment emails
Roughly 7 out of 10 carts are abandoned. A simple 3-email recovery sequence (1 hour, 24 hours, 72 hours after abandonment) typically reclaims 5-15% of those.
FunnelKit Automations handles this natively inside WooCommerce, no Zapier, no third-party tool.
Klaviyo and Omnisend are also nice alternatives if you’re already using them for email marketing.
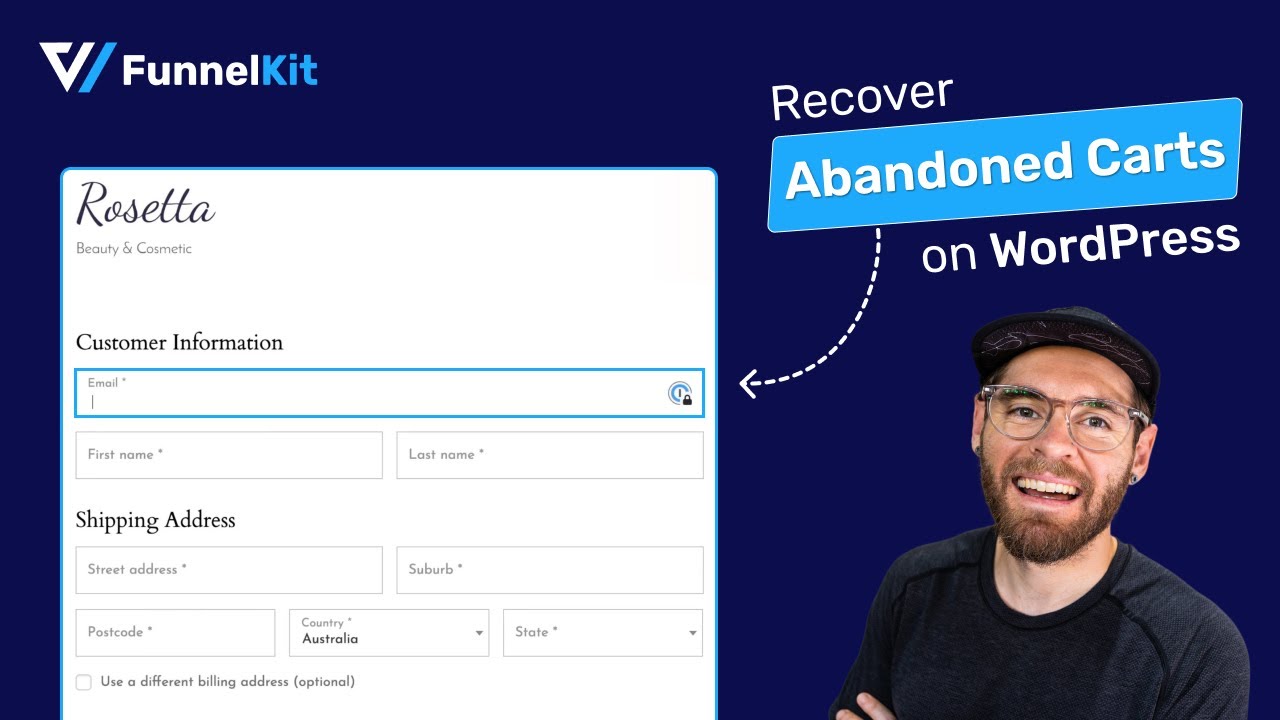
Watch this video tutorial to set up abandonment cart recovery automation in WooCommerce:
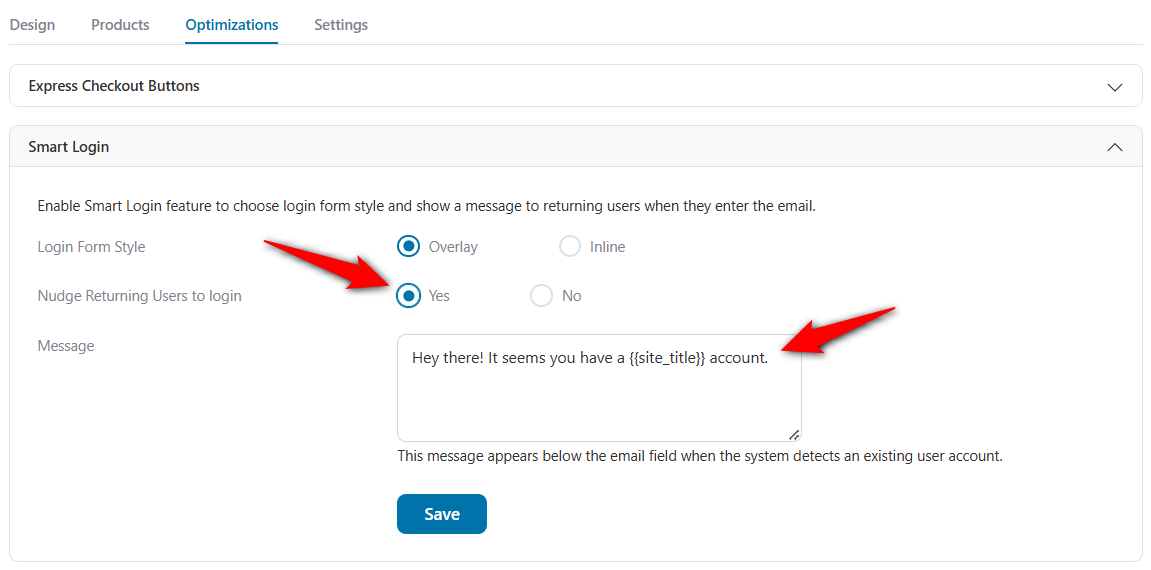
30. Enhance the customer login experience
The default WooCommerce checkout login experience is not optimal. However, with FunnelKit Funnel Builder, you can take it up a notch.
Here’s how:
- Check a user if they have an existing account when they enter their email address on the checkout page.
- Give an immersive experience that matches their brand color when they’re logging in with their credentials.
- If a user forgets their password and resets it, they are redirected to the same checkout page to complete their purchase.
Go to the Optimizations tab and choose the login form style under the Smart Login feature.
Enable the feature to nudge returning users to log in and message from there.
31. Use exit-intent on the cart page (and never on checkout)
Exit-intent popups on the cart page can save 2-5% of would-be abandoners by offering a discount or free shipping.
Do not run exit-intent on the checkout page itself. It interrupts buyers who are already in the middle of a payment, creating a net negative experience.
OptinMonster is the standard tool here. Pair it with FunnelKit Cart for the cart-side experience.
Frequently Asked Questions (FAQs) About WooCommerce Checkout Optimization
You should A/B test both. Our testing data shows that multi-step checkout outperforms single-page checkout for physical products (requiring shipping/billing), mobile users, carts with multiple items, and higher-value purchases.
Single-page checkout works better for digital products, simple offerings with minimal information requirements, desktop-heavy traffic, and low cart values, where any friction increases abandonment.
You can make basic customizations, such as CSS styling or using code snippets to hide fields, but deep optimizations like one-click upsells, order bumps, and express checkout integrations typically require a dedicated solution like FunnelKit to function reliably and securely.
You should display no more than two order bumps if they're distinctly different (e.g., warranty protection + gift wrapping). Our testing showed that conversion rates dropped by 23% when moving from one to three order bumps, due to decision paralysis. Quality and relevance matter more than quantity.
Page speed drastically affects checkout conversion. A 1-second delay in page load can result in a 7% reduction in conversions. Ensure your hosting is fast and that your checkout page doesn't load unnecessary scripts.
Yes, trust badges actually improve conversion, particularly for first-time customers. Our A/B testing across 40 stores showed that displaying a trust badge increased checkout completion by 8-12% for new customers but had a negligible effect on returning customers.
The most impactful seals are SSL certificate badges, payment processor logos (Visa, Mastercard), and money-back guarantee badges. Expensive third-party seals like Norton and McAfee were justified only for stores with an AOV above $200.
Our research across 500+ checkout implementations identified optimal ranges, such as 5-6 fields for digital products and 8-10 for physical products. Every field beyond this optimal range reduced conversion by approximately 2%.
The exact number depends on your products. B2B might justify the company name, international shipping requires a phone for customs, but start minimal and add only when truly necessary.
Checkout optimization prevents abandonment, but for those who leave, you need an automated recovery campaign.
We recommend capturing the email address early in the checkout process (as the first field) so you can send a smart recovery email even if they don't complete the payment.
If you run regular promotions, auto-apply codes and hide the manual coupon field to prevent external coupon hunting.
If you rarely run promotions, hide the field entirely because empty coupon fields trigger FOMO and drive abandonment. If you must show it, use microcopy like "Have a promo code?" with a collapsible field, not a prominent empty box.
Get Ready and Start Incorporating These WooCommerce Checkout Page Optimization Hacks
Your checkout page must inspire trust and confidence. It must not overwhelm users by asking for too much information.
That’s why splitting the form into multiple steps makes it look approachable and clean.
Express checkout reduces the time spent on the checkout page, leading to higher conversions.
Adding multiple payment options with an auto-fill address feature makes checkout seamless.
So go ahead and start implementing the checkout page optimization hacks you like.
We’re quite confident you'll start noticing an instant jump in conversions!

Editorial Team
June 24, 2026There are three reliable ways to connect WooCommerce to Google Analytics 4: the official Google Analytics for WooCommerce plugin, Google Tag Manager via GTM4WP, or FunnelKit's built-in pixel tracking. The...
Editorial Team
June 24, 2026Finding a WordPress sales funnel builder that actually works is harder than it looks. Most plugins on the market do one or two things well and quietly skip the rest....
Editorial Team
June 23, 2026Are you searching for the best WooCommerce plugins to enhance the overall customer experience and boost conversions in your store? Honestly, there are a ton of free and paid WordPress...


