Want to sell your LearnDash courses using WooCommerce and accept payments seamlessly through gateways like Stripe, PayPal, or Apple Pay?
As WooCommerce experts who’ve built and optimized hundreds of course websites, we’ll share real-world examples, best practices, and conversion tips that work.
Whether you’re selling multiple courses or launching a single flagship course, there are two proven approaches to selling LearnDash courses with WooCommerce.
One method is storefront checkout, ideal if you have multiple courses and want users to purchase them all at once, like a typical e-commerce store.
Another method is a more streamlined, dedicated sales funnel, perfect for a single-course launch or promotion, guiding users from the sales page directly to checkout without distractions.
Let’s dive in and set up a seamless LearnDash + WooCommerce system that turns your online learning platform into a powerful, automated sales engine
Table of Contents
- 1 What is LearnDash LMS and Why Use WooCommerce to Sell Your Online Courses?
- 2 Two Ways to Sell Your LearnDash Courses with WooCommerce
- 3 How to Create an Online Course in WordPress Using LearnDash?
- 4 How to Sell LearnDash Course in WooCommerce? (Method-1: Storefront Checkout)
- 5 Create a High-Converting Global Checkout with FunnelKit for Your Storefront
- 6 How to Sell Your LearnDash Course in WooCommerce? (Method-2: Dedicated Sales Funnel)
- 7 6 Best Practices to Implement With LearnDash WooCommerce Integration
- 7.1 1. Configure WooCommerce guest checkout or account creation settings
- 7.2 2. Add upsell recommendations to boost the order value
- 7.3 3. Enable multiple payment options
- 7.4 4. Use LearnDash retroactive course access
- 7.5 5. Send engaging follow-up emails
- 7.6 6. Track performance with real-time analytics
- 8 Frequently Asked Questions (FAQs)
- 9 Is LearnDash free with WordPress?
- 10 Are users automatically enrolled in the course after making the payment?
- 11 Do I need to manually remove a student from a course when the subscription expires?
- 12 Which payment gateway should I use when selling the LearnDash course in WooCommerce?
- 13 Can I create memberships and bundles with WooCommerce and LearnDash?
- 14 What can I use instead of LearnDash in WordPress?
- 15 Ready to Sell LearnDash Courses with WooCommerce?
What is LearnDash LMS and Why Use WooCommerce to Sell Your Online Courses?
LearnDash is a popular learning management system (LMS) WordPress plugin allowing you to create and manage your online courses easily.
This platform empowers all educators and entrepreneurs to deliver value to students through interactive e-learning experiences.
With LearnDash, you can easily set up courses, quizzes and assignments using a drag-and-drop course builder.
Not just that, it lets you track your students' progress with exhaustive analytics and reporting data. Also, you can award various badges and certificates to your students based on course completion and their performance.
It works with all WordPress themes and integrates with popular apps to successfully run your business.
However, while LearnDash is excellent for course management and content delivery, it’s not built for advanced selling or checkout functionality.
That’s where WooCommerce comes in.
WooCommerce is the world’s leading eCommerce plugin for WordPress, empowering over 5 million websites to sell physical and digital products.
When you combine LearnDash + WooCommerce, you create a complete system to sell, manage, and market your online courses from one platform.
Here’s Why You Should Use WooCommerce to Sell LearnDash Courses
- Access 100+ global payment gateways: Accept payments via Stripe, PayPal, Apple Pay, Google Pay, or any gateway your audience prefers without needing extra integrations.
- Free LearnDash WooCommerce Integration add-on: Download the free WooCommerce for Learndash plugin on your website and integrate the powerful functionalities into your LMS website.
- Sell courses like normal products in WooCommerce: Each LearnDash course can be listed as a WooCommerce product, allowing you to create bundles, offer discounts, or add related products and upsells.
- Automate course enrollments: Once a student completes checkout, LearnDash automatically grants access to the purchased course without any manual setup.
- Offer subscriptions and payment plans: Use WooCommerce Subscriptions to sell recurring memberships or split large payments into manageable installments via gateways like Affirm, Klarna and Afterpay, giving you a predictable monthly income.
- Run promotions and coupons: WooCommerce’s built-in coupon and discount features make it easy to run flash sales or special offers to attract new learners.
- Gain access to a complete marketing ecosystem: From abandoned cart recovery and email automations to order bumps and one-click upsells (you need highly effective marketing plugins to do all these), WooCommerce helps you maximize every sale.
Two Ways to Sell Your LearnDash Courses with WooCommerce
There are two primary ways to sell your LearnDash courses using WooCommerce:
- Storefront Checkout Method
- Sales Funnel Method
Both methods work well. The choice depends on how you want your customers to experience your courses and checkout process.
Method-1: Storefront checkout
Just like a physical store displays its products, you can showcase all your LearnDash courses on a WooCommerce storefront.
Visitors can browse, read descriptions, and purchase multiple courses at once from your main shop page.
Many popular eLearning websites like Udemy and Foundr Courses follow this method to display their course catalog.
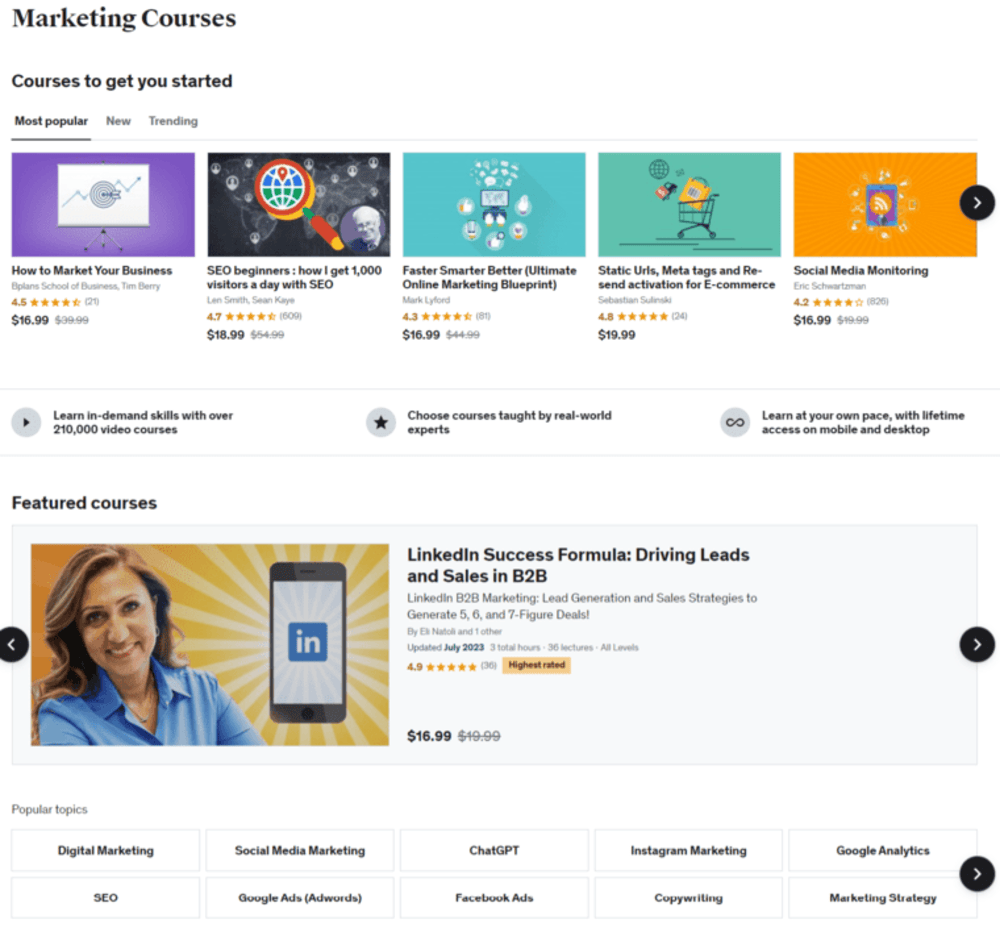
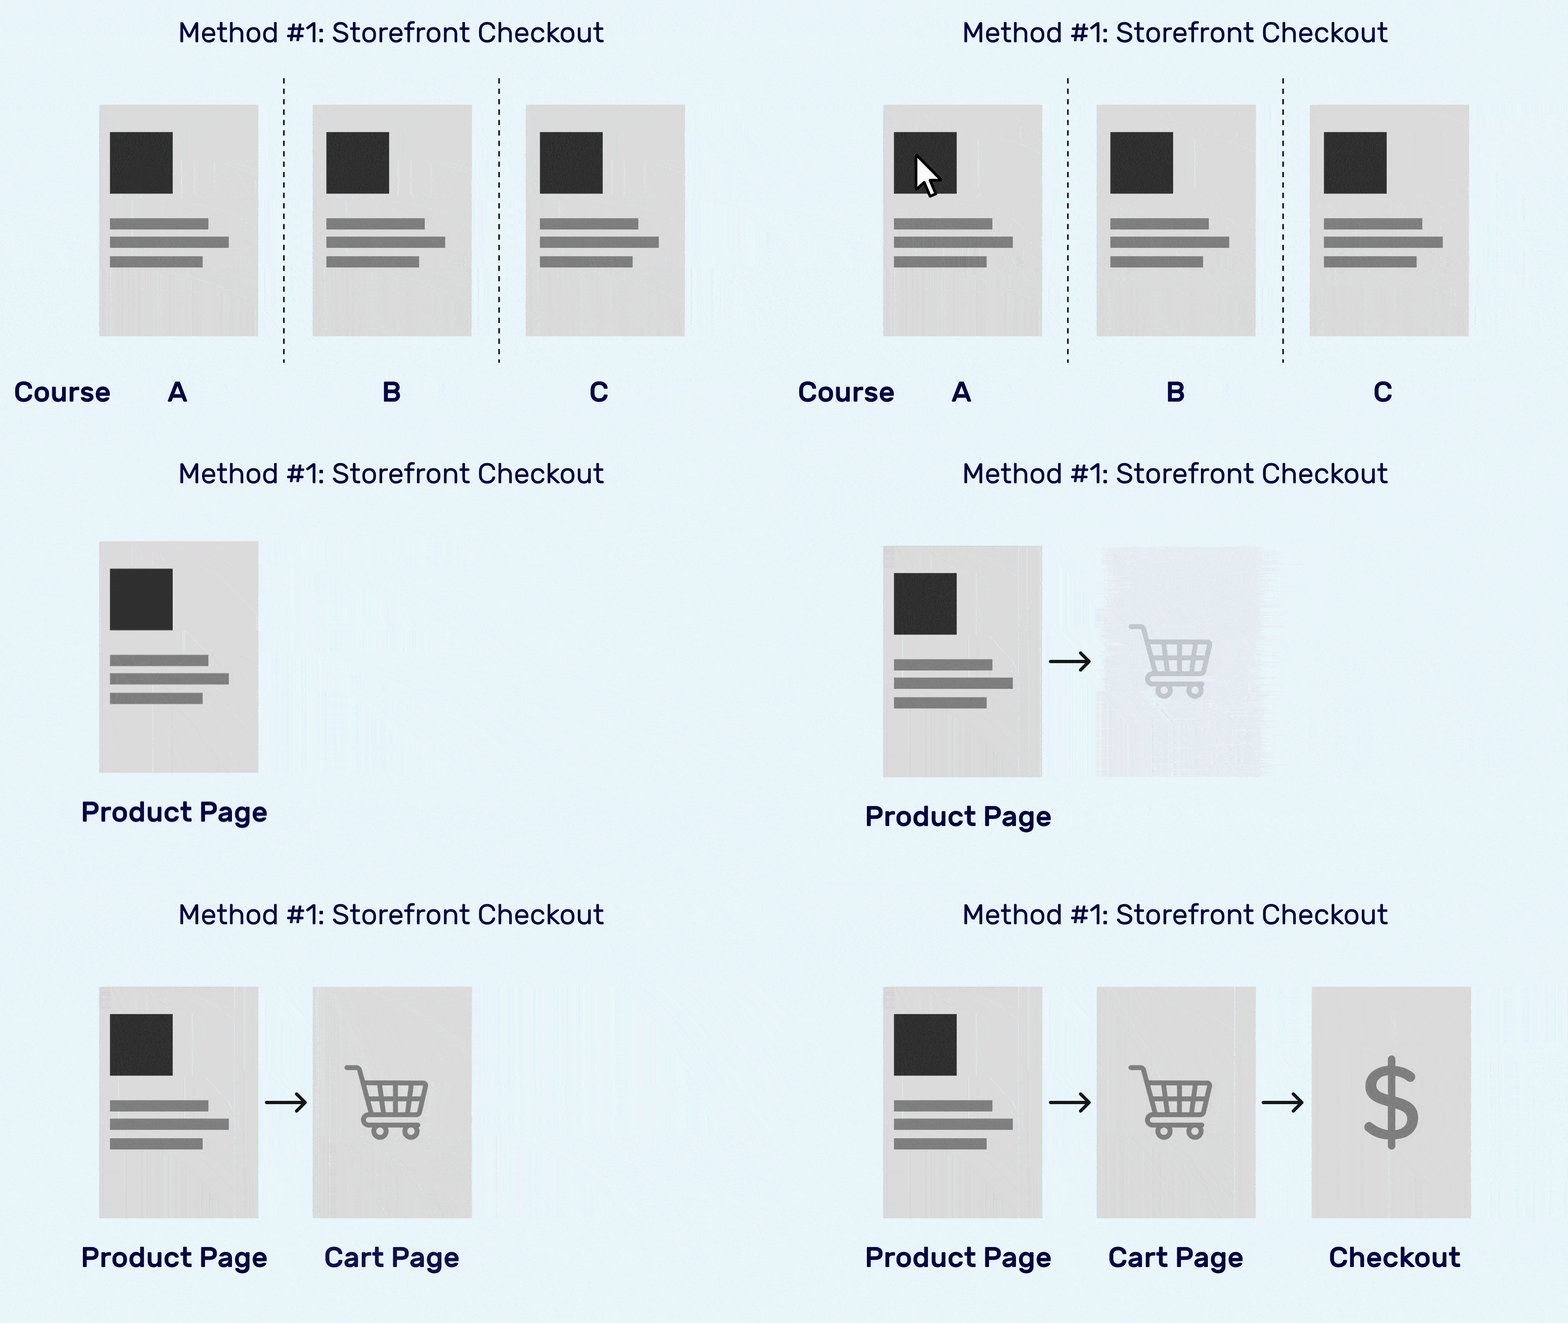
You can show the courses in a grid format, and the user would need to click on the desired course to open its product description page to view the lesson plans, course reviews, and more details.
Then they can add the product to the shopping cart and proceed to checkout. The customer can even add more than one course to the cart to purchase.
Let’s look at some pros and cons of this method:
Pros of the Storefront Checkout Method
- Perfect for multi-course websites: Users can purchase several courses at once.
- Familiar shopping experience: Mirrors how customers shop on eCommerce stores.
- Easy setup: Uses the standard WooCommerce product and checkout structure.
Cons of the Storefront Checkout Method
- More checkout steps = higher friction: Users navigate from course page → cart → checkout → payment.
- Higher chance of drop-offs: Each additional step can reduce conversions.
- Limited customization: The default WooCommerce checkout isn’t optimized for selling online courses.
Method-2: Dedicated sales funnel
In a course sales funnel, you’d have a dedicated sales page to explain the course in detail, along with testimonials from previous course takers and additional content to make the course more appealing to the user.
Such funnels provide a more frictionless experience for users, as prospects are directed to the checkout page from the sales page.
From there, they can make an informed decision about purchasing because they already know about your LearnDash course.
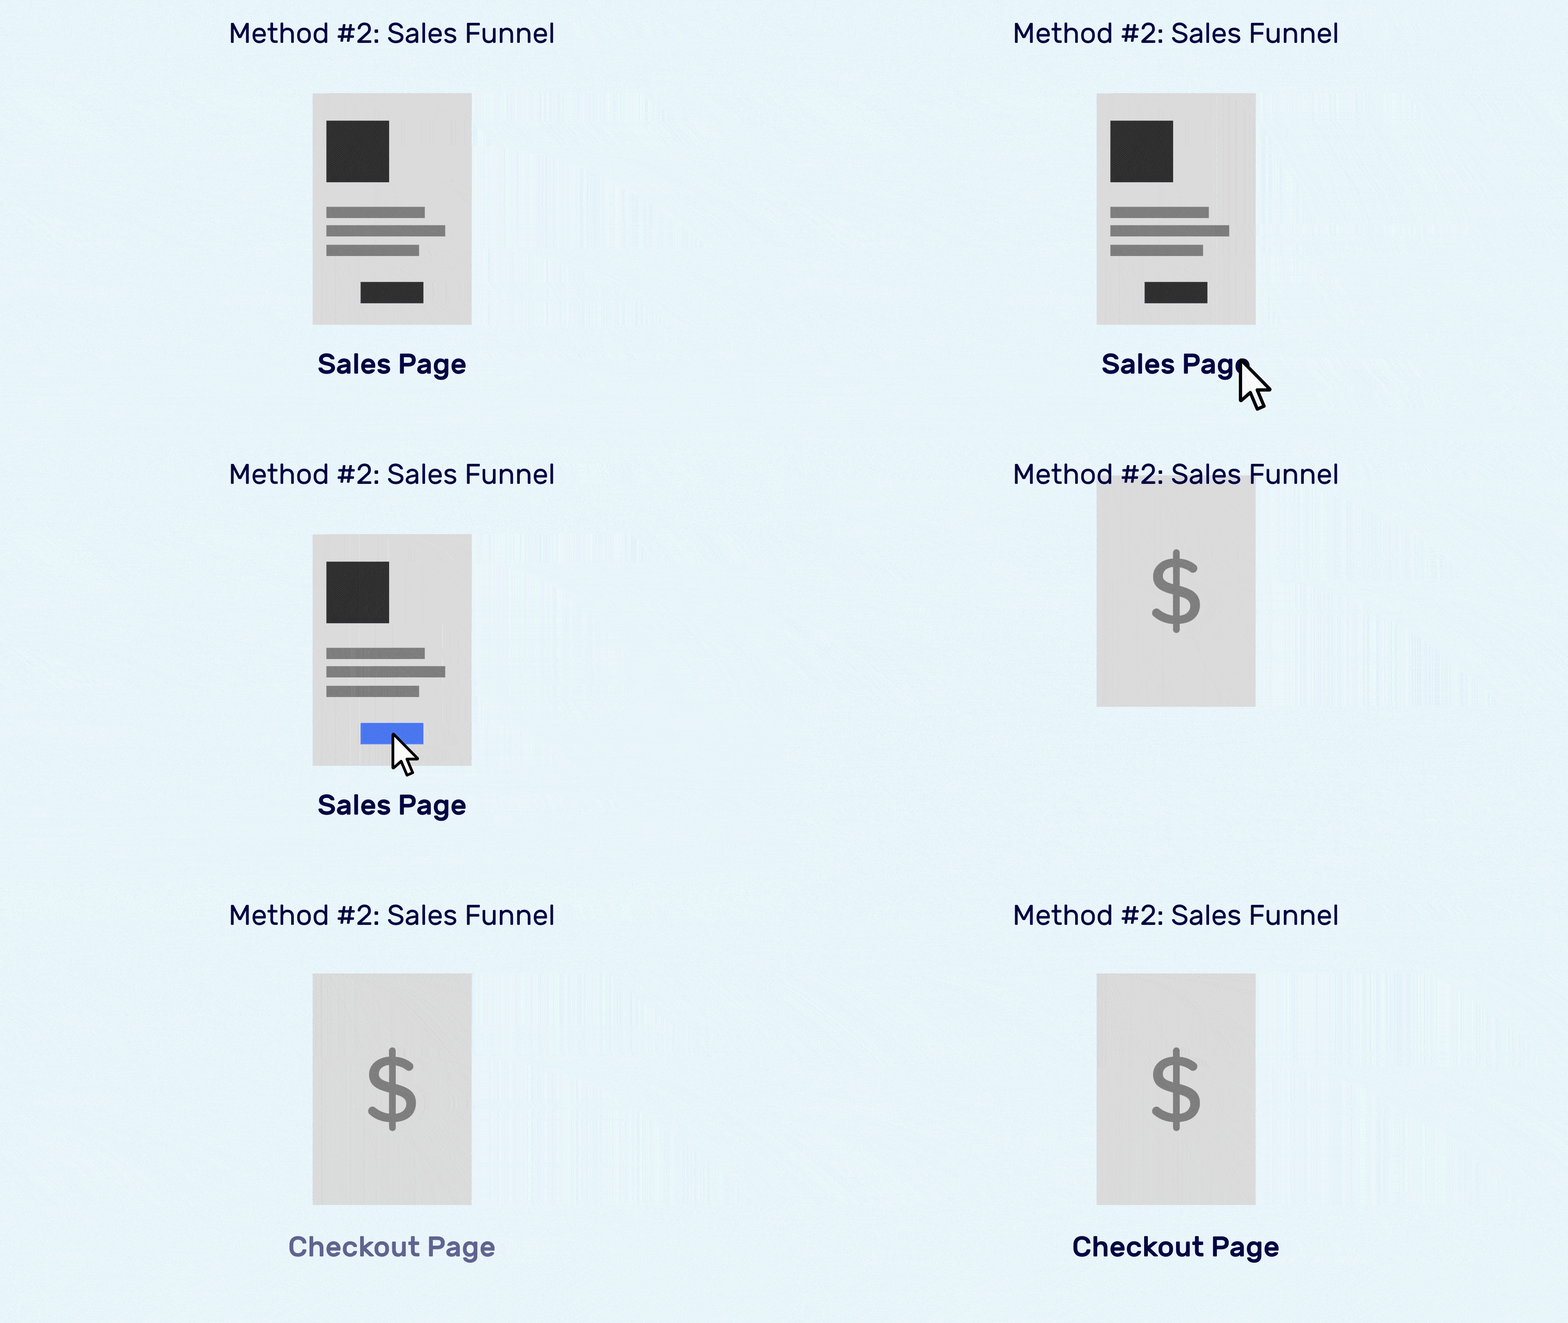
Alternatively, you can also have a one-page checkout designed for your courses.
One-page checkout is where the checkout form is embedded on the sales page itself, and the user doesn’t need to exit the page and move to a new one to make the purchase.
There aren’t many options provided to users to distract them from. So they either purchase the course or exit the funnel.
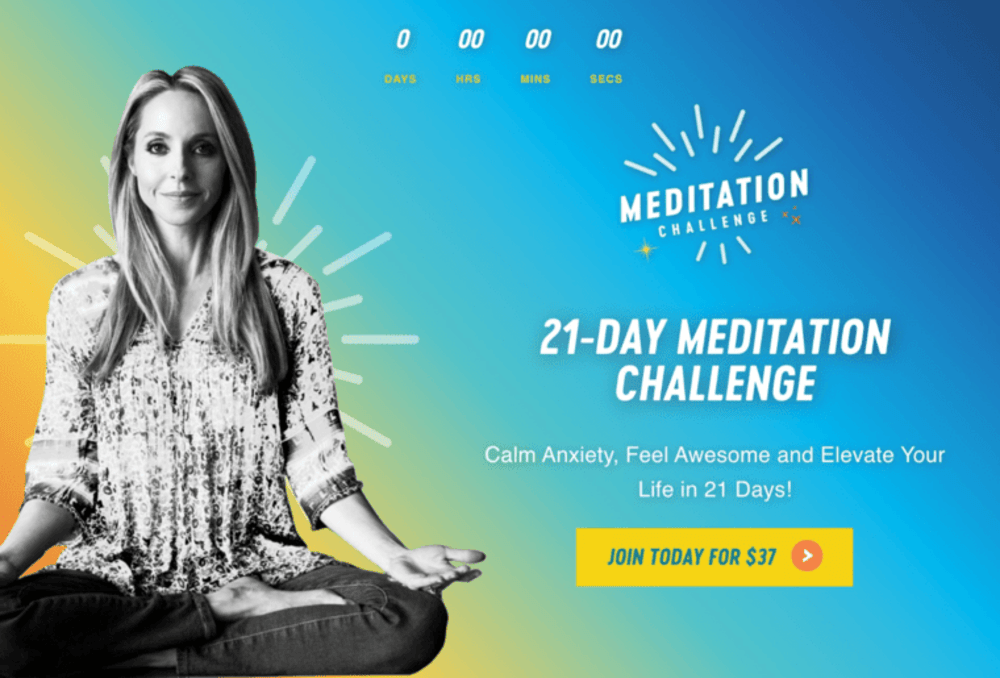
A great example of such a funnel is Gabby Bernstein's meditation challenge.
Pros of the Sales Funnel Method
- Frictionless experience: Fewer clicks from interest to purchase.
- High conversion potential: Focused messaging, testimonials, and visuals convince learners effectively.
- Fully customizable: You can design your funnel pages with tools like FunnelKit Funnel Builder to match your brand.
Cons of the Sales Funnel Method
- Best for single courses or limited offers: Not ideal for large multi-course catalogs.
- Requires design effort: Creating high-converting sales pages takes some setup time.
Before we dive further into any of the above methods, let’s first create a LearnDash course.
How to Create an Online Course in WordPress Using LearnDash?
Now that we have discussed all the components that go into creating and selling optimized and converting online courses, let’s get to building.
For this process, we only need two prerequisites:
- WooCommerce
- LearnDash LMS
Follow these steps to set up your LearnDash courses in WooCommerce:
Step 1: Add a new LearnDash course
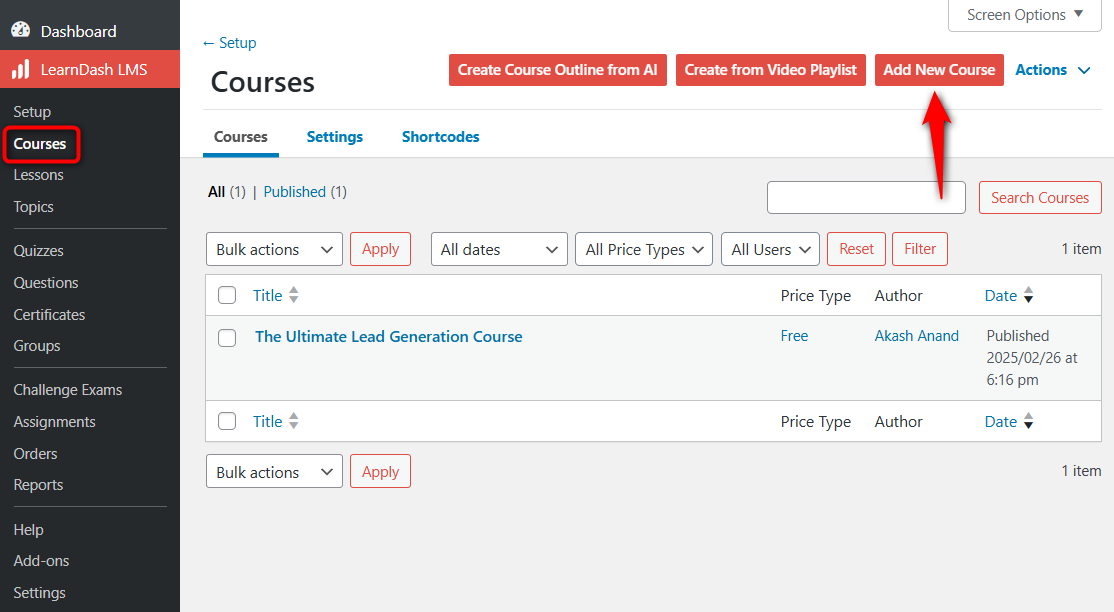
Go to LearnDash ⇨ Courses on your WordPress menu and hit the ‘Add New Course’ button.
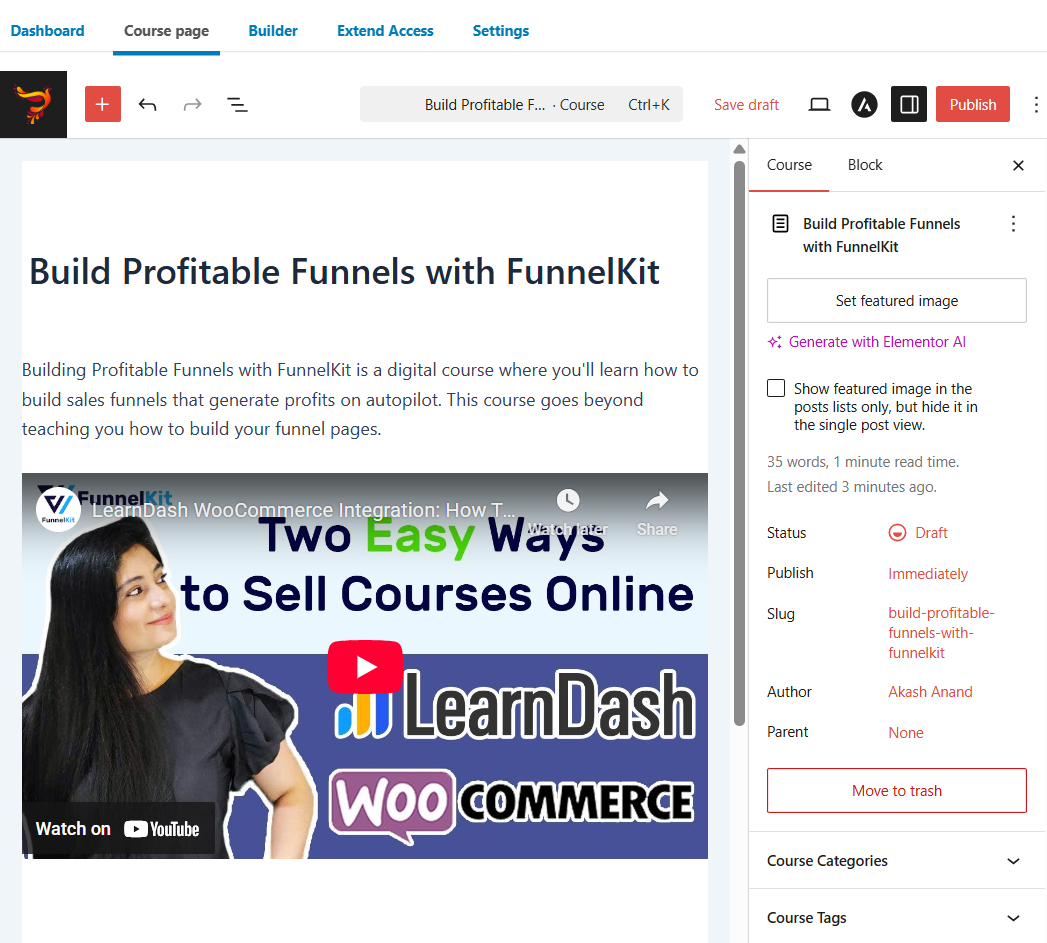
Add a course title and some brief information about your course.
Step 2: Design your LearnDash course page
Design the course page to attract the audience and urge them to buy the course.
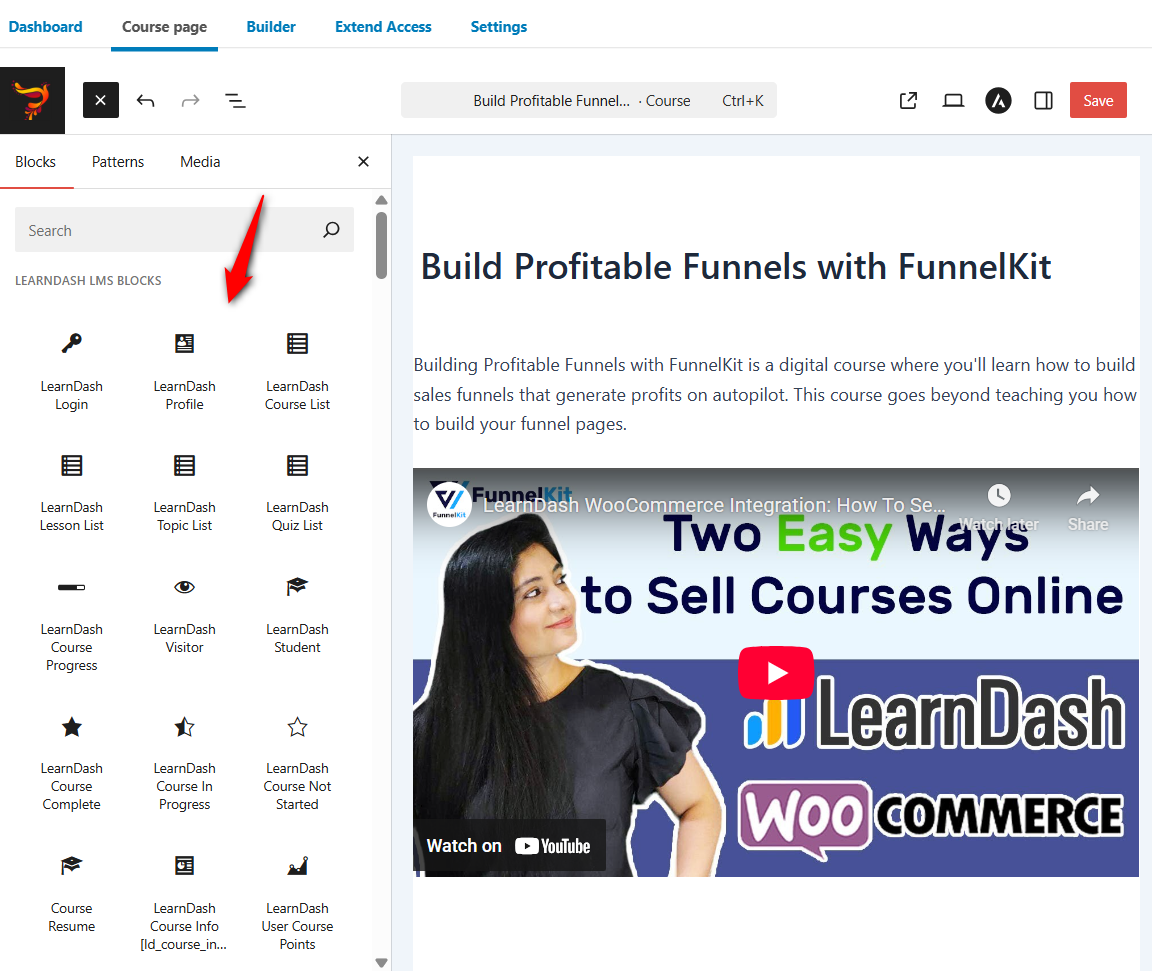
You can add Gutenberg blocks to the page's text, images, and videos.
LearnDash LMS has different blocks to help you create a perfect course the way you want. It includes LearnDash Login, LearnDash Course List, LearnDash Lesson List, LearnDash Course in Progress, Course Resume, LearnDash User Course Points, and more.
Make the copy informative yet easy to comprehend so the reader gets a good gist of your course.
When you are done, hit the ‘Update’ button to save the design of the course page.
Step 3: Create your LearnDash LMS course content
Next, go to the Builder section. Here, LearnDash LMS gives you complete flexibility to create content for your online courses.
You can add sections, lessons and quizzes within the courses to enrich the content provided to the students to enroll.
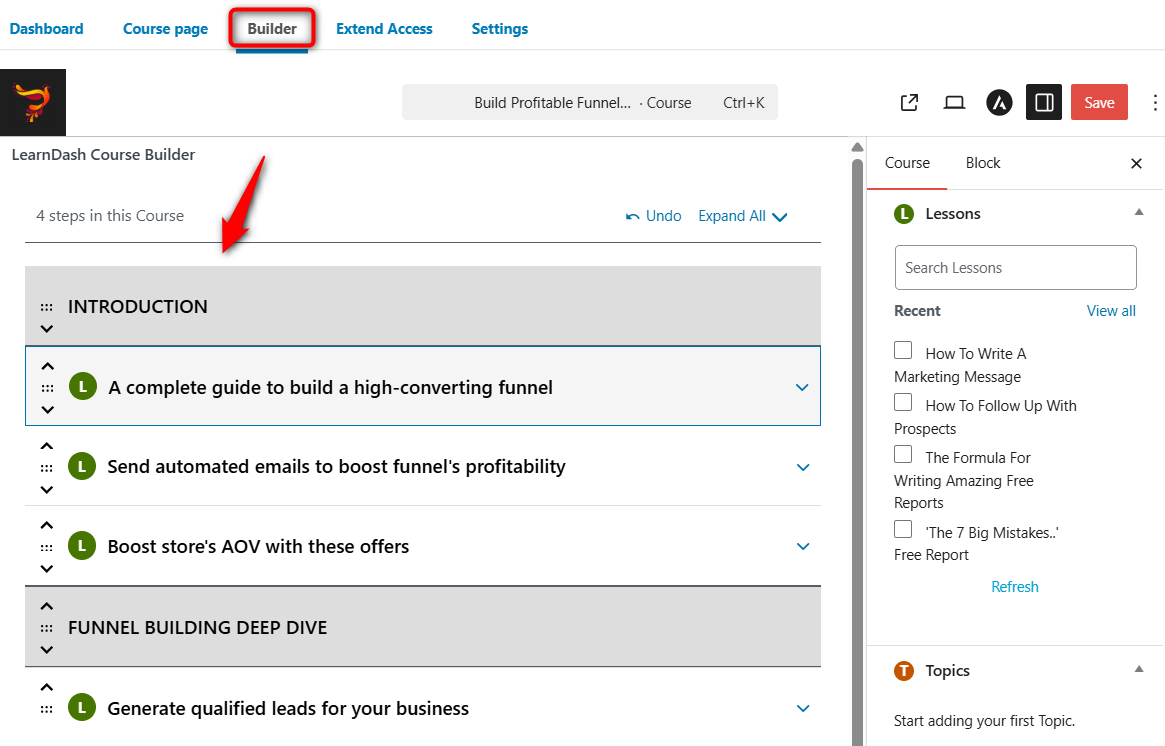
You can drag and drop each of these lessons within the section to rearrange the content order as per your needs.
👉 Learn how to create sections, lessons and quizzes within your LearnDash course here. This post also covers how you can generate leads with free course funnels.
You can take a full preview of your LearnDash LMS course page by clicking on ‘Preview’.
Now that you have successfully created your LearnDash course, it’s time to start selling it on WooCommerce.
How to Sell LearnDash Course in WooCommerce? (Method-1: Storefront Checkout)
In this section, we’ll guide you through selling the LearnDash course in WooCommerce using the store checkout flow.
Step 1: Install the LearnDash WooCommerce add-on
If you're looking for a LearnDash WooCommerce integration plugin, then the answer is right here.
All you need to do is install the WooCommerce add-on for LearnDash to set up the integration.
Just go to LearnDash LMS ⇨ Add-ons. From there, install and activate the WooCommerce for LearnDash add-on.
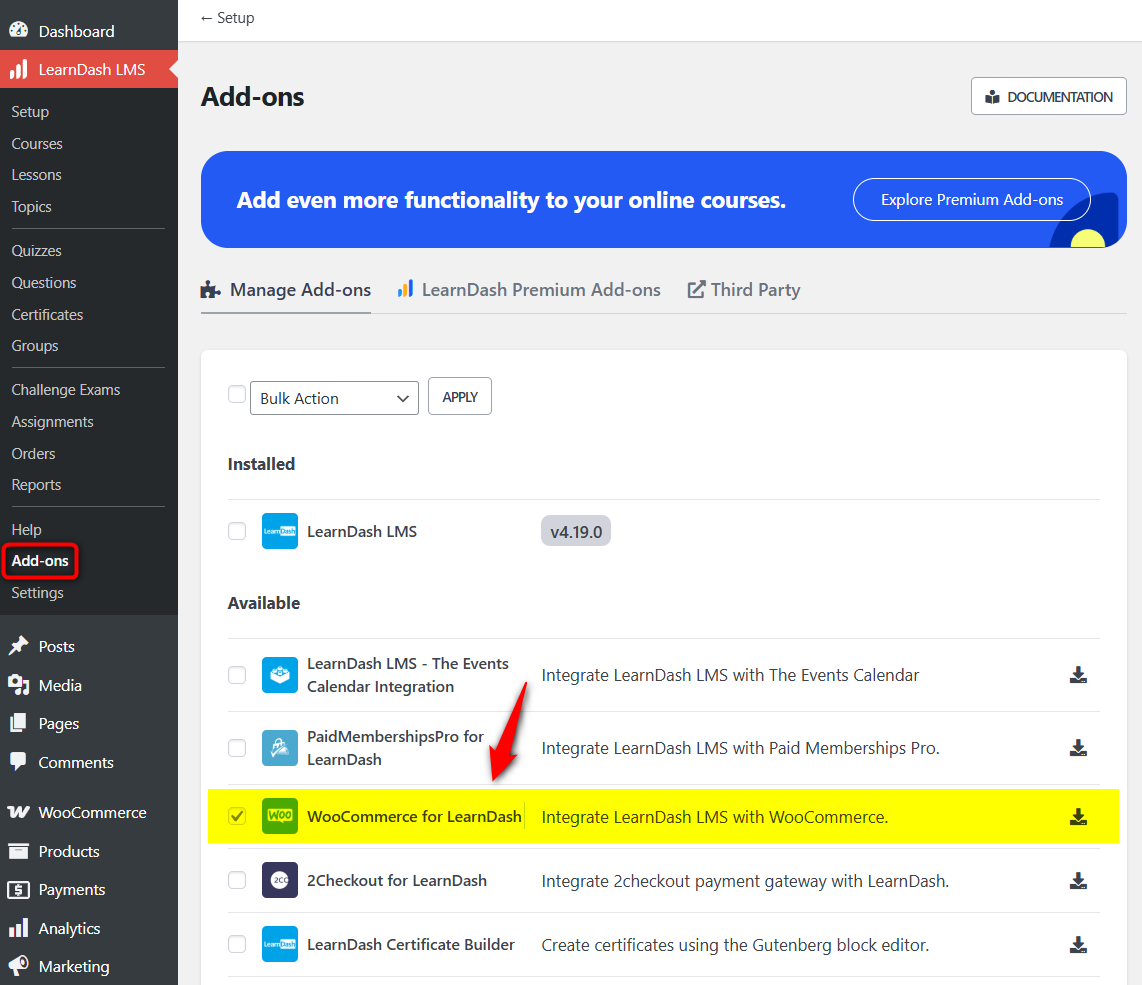
Once you’ve activated the add-on, you’ll be able to see LearnDash LMS - WooCommerce Integration on your Installed Plugins section in WordPress.
You can also get this WooCommerce add-on integration from the LearnDash website.
Step 2: Add your LearnDash course to WooCommerce as a product
To add the product, go to Products ⇨ Add New.
Fill in the details about the product - the course name (product title) and its description.
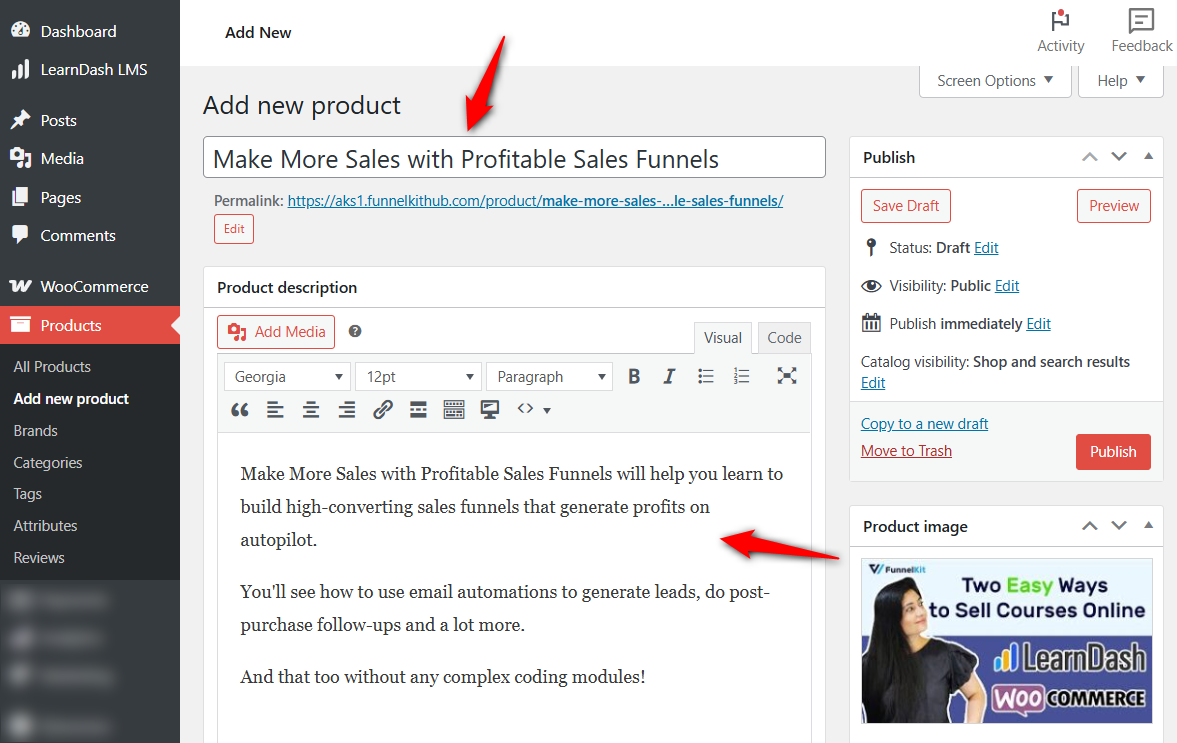
Next, select ‘Course’ from the Data - Product dropdown menu.
Specify the price and assign your created LMS course by its title in the LearnDash Courses field.
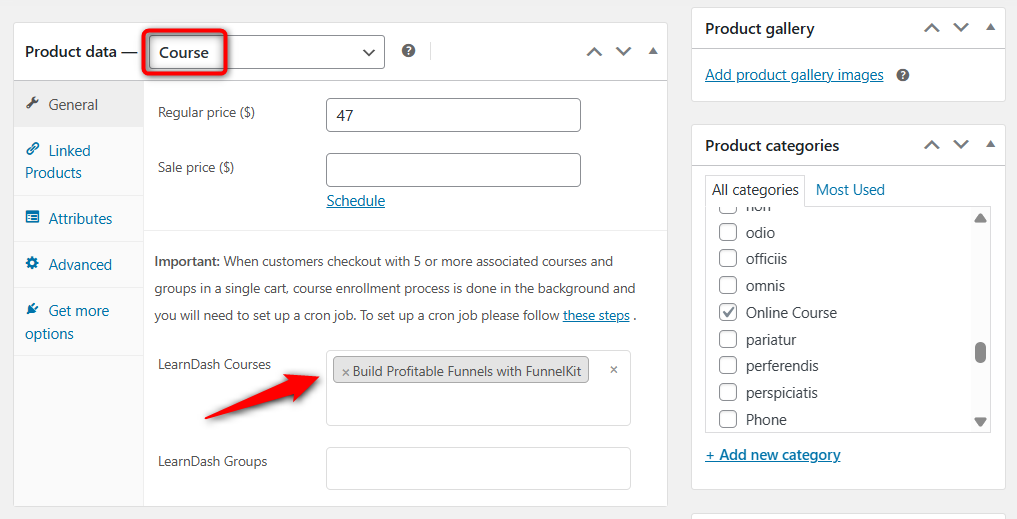
You can even associate more than one course with a particular product if you want.
Then, to complete the whole product creation process, add the product to a category, add tags to the product, set the product image, and more.
When you’re satisfied with your created WooCommerce product, hit the ‘Publish’ button to make it public.
Step 3: Configure your LearnDash LMS course access settings
Next, configure the way in which a student can gain access to your course in LearnDash.
To do that, go to the LearnDash LMS plugin from your WordPress admin area dashboard and edit your course. From there, navigate to the Settings section.
Scroll down and you’ll see Access Mode. Change the access settings to 'Closed'.
Here, enter the course price and button URL. This will be your WooCommerce product URL.
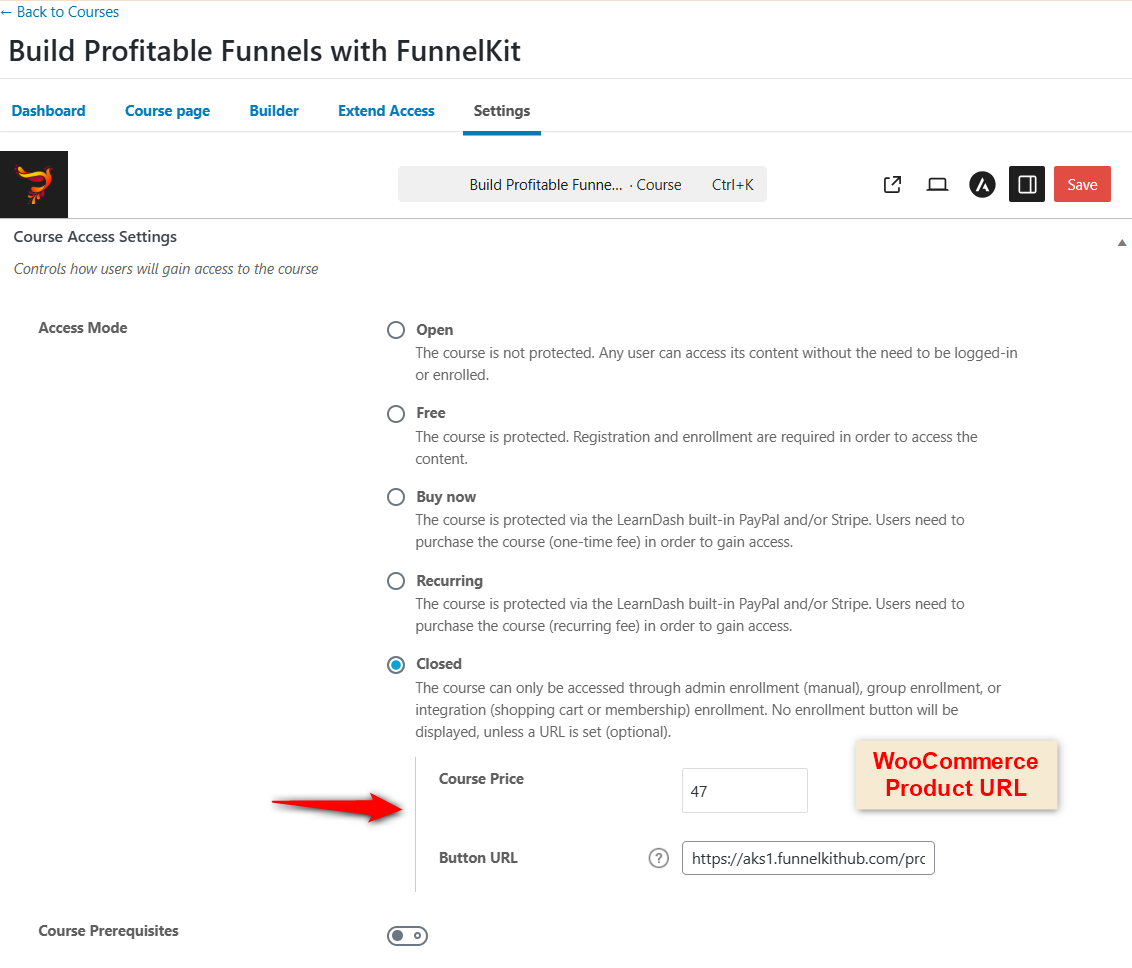
Once done, hit’ Update’ to save your changes.
Now that you have enabled these settings, you have restricted your course access.
You have allowed the LearnDash WooCommerce add-on to handle the course access, or you can even manually add users yourself.
Step 4: Test run your store checkout flow
Once you’ve published the product, click on ‘View the Product’ to get an idea of how the courses look on the website. The added lessons will automatically appear on the page.
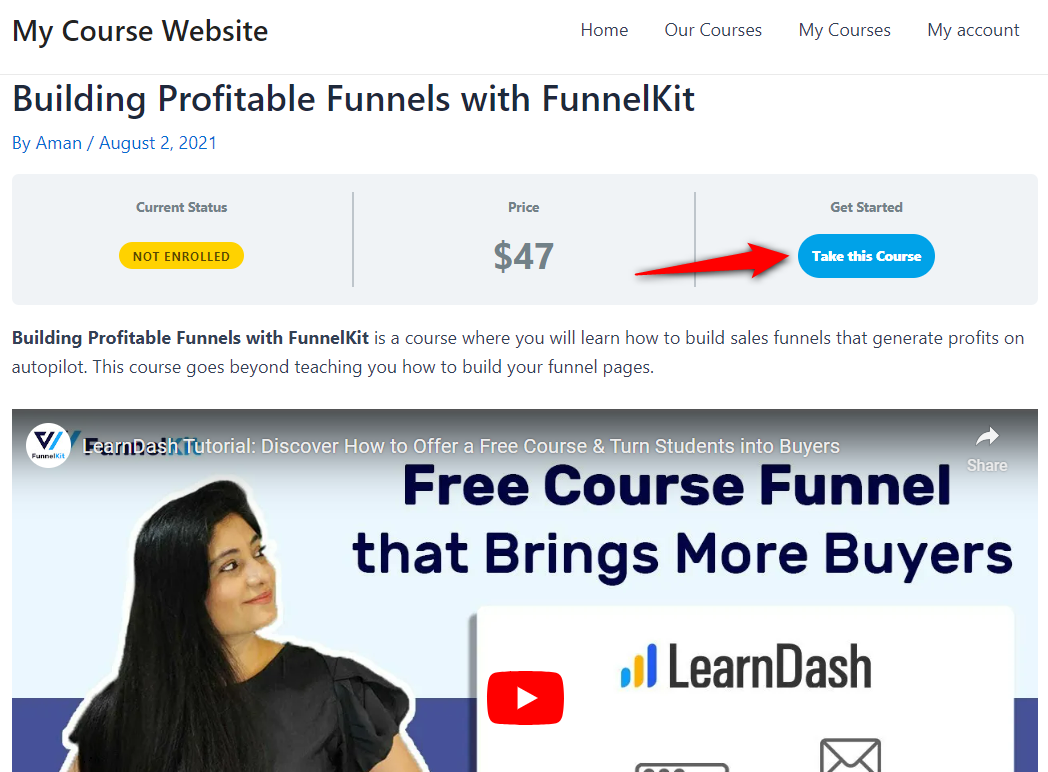
Clicking on ‘Take this Course’ will direct you to the WooCommerce product page, where you'll see this LearnDash course.
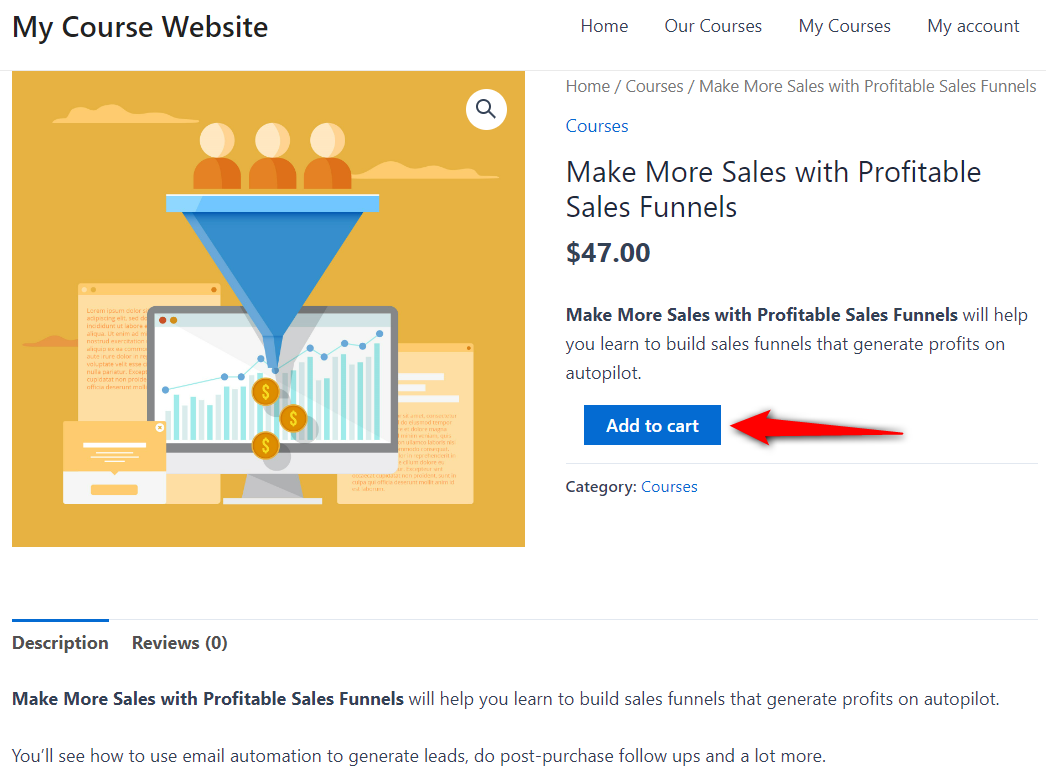
Take on the default WooCommerce flow path by adding the product to the cart, going to the cart page and then proceeding to the checkout page.
You’ll see the default WooCommerce checkout page, which looks bland and doesn’t match your brand colors.
Not just that, you don’t have a shipping address, which cannot be edited natively.
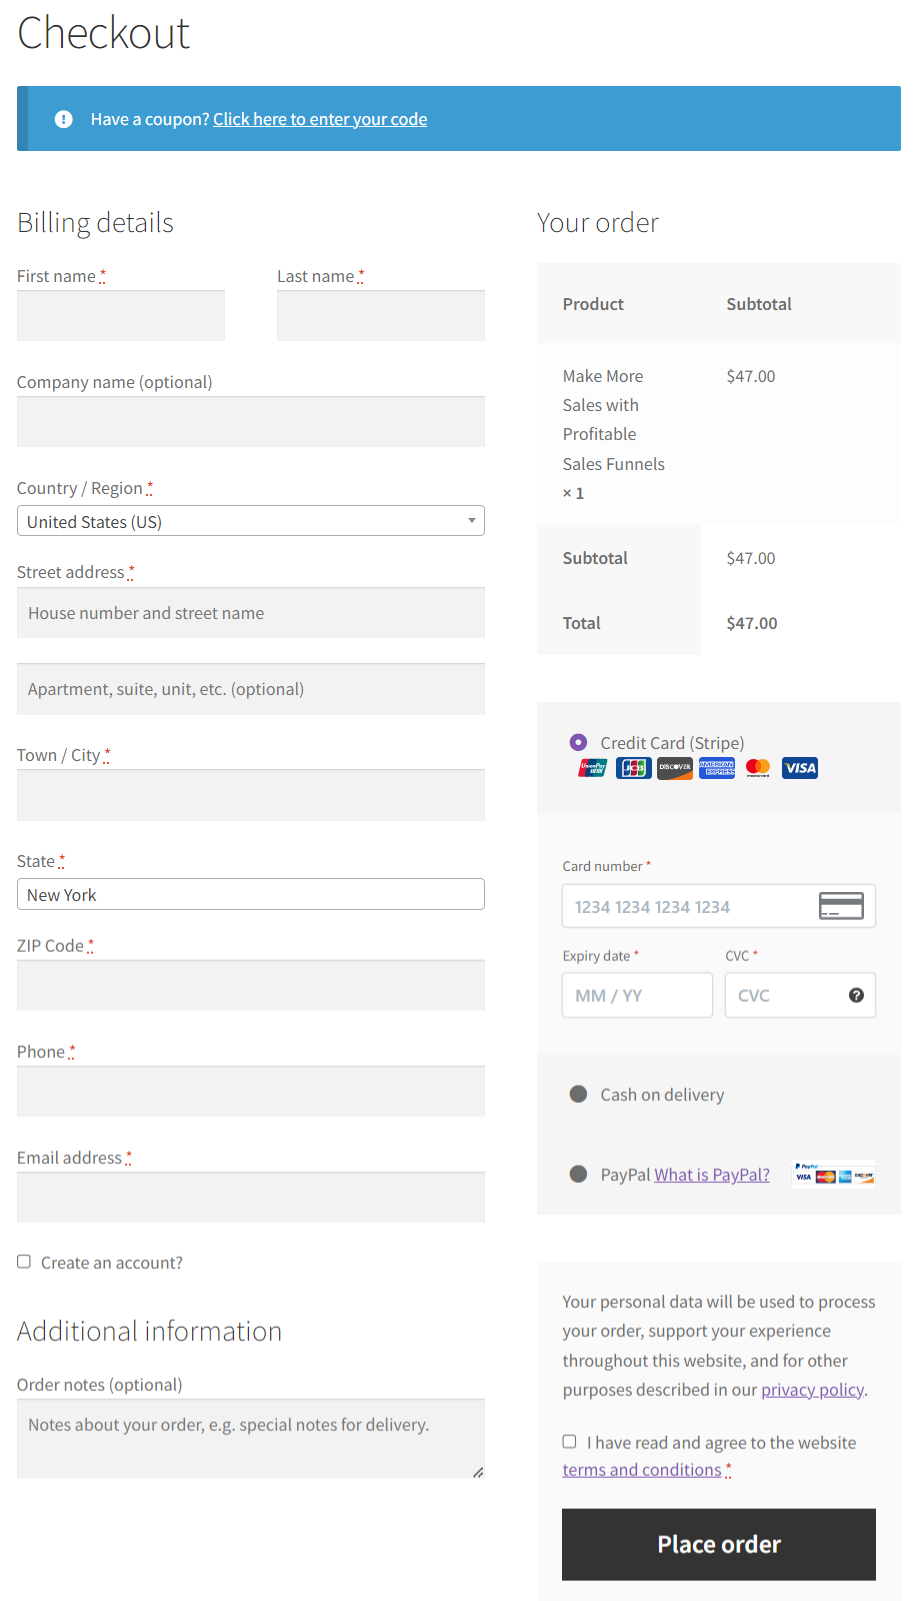
That’s where FunnelKit Funnel Builder comes into play.
FunnelKit helps you design a professional, on-brand custom checkout that gives the prospects the final push to make their purchases and not abandon with cold feet.
To design your pages, you get an ever-growing template library and compatibility with different page builders, like Elementor, Divi, Oxygen, Bricks, Block Editor, etc.
Let's look at how we can create a LearnDash WooCommerce sales funnel using FunnelKit.
Create a High-Converting Global Checkout with FunnelKit for Your Storefront
In case you’re not willing to invest too much time designing dedicated checkouts for each of your LearnDash courses, you can always create a compelling global checkout instead.
It’s a store checkout flow that stays consistent for all your WooCommerce products.
A good checkout page should look professional and on-brand, and our FunnelKit checkout page templates enable you to create just that.
- FunnelKit allows you to create custom checkouts with guarantee assurance, testimonials, etc., to make the product appear convincing.
- The users can adjust the quantity of the products in the cart, delete a product or even undo deleting a cart product - all on the checkout page with the mini cart.
- FunnelKit has a collapsible order summary option that saves space on mobile devices for other details and form fields to be shown.
- Users can add a dynamic side cart to their WooCommerce store and replace the redundant cart page with FunnelKit’s premium version.
And so much more.
Get the FunnelKit Funnel Builder from below.
👉 Refer to our guide to install and activate the FunnelKit Funnel Builder on your website.
Let's start creating a sales funnel for selling LearnDash courses on WooCommerce:
Step 1: Create store checkout
Navigate to FunnelKit ⇨ Store Checkout.
After directing to the templates page, select your favorite page builder and choose the template you’d like to import. Hover over the template and hit ‘Preview’.
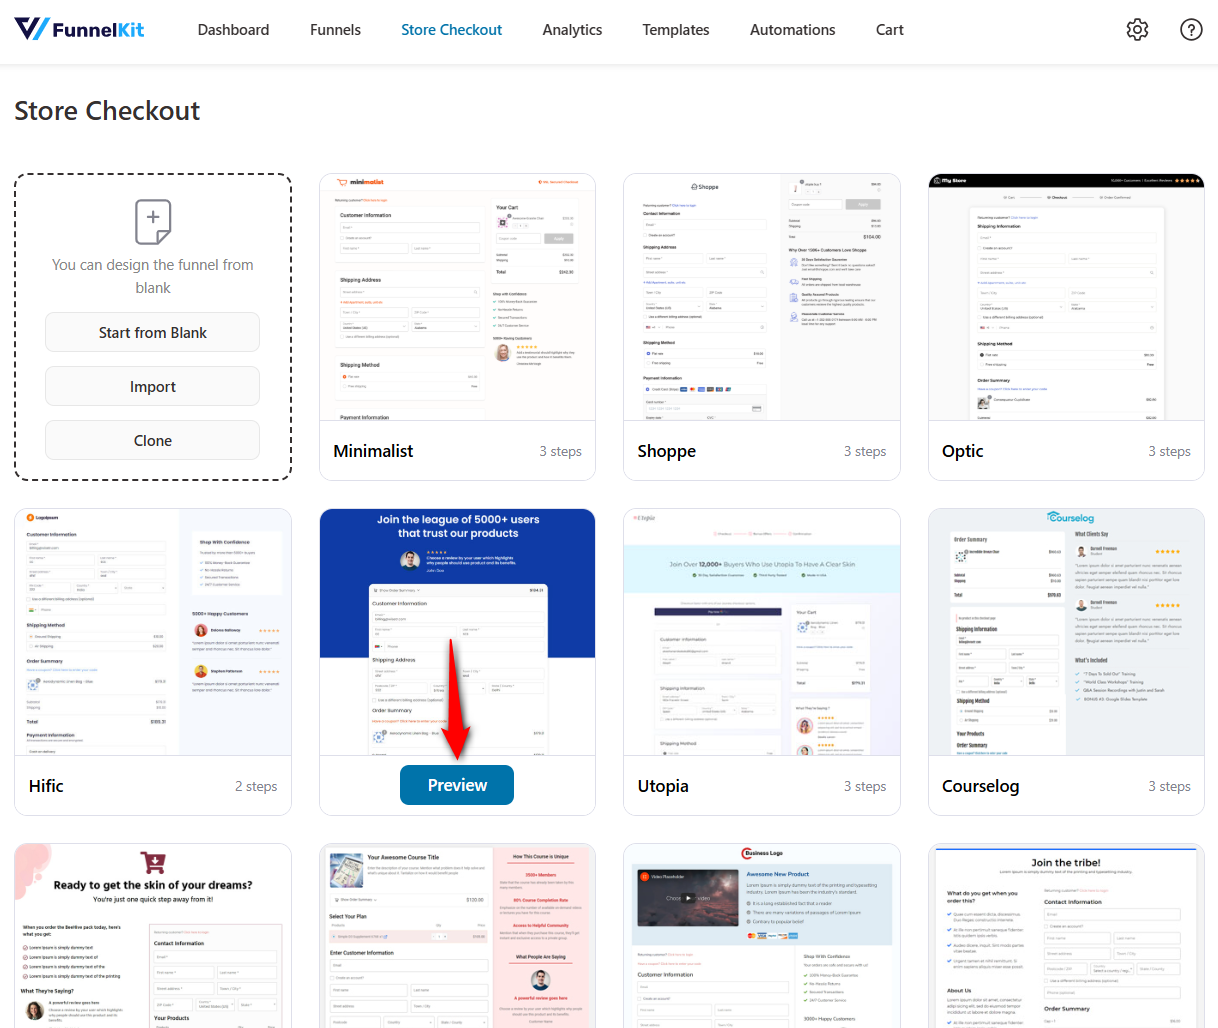
Choose the number of steps you want on your store checkout page and click on the ‘Import This Funnel’ button.
Name your store checkout and hit ‘Add’.
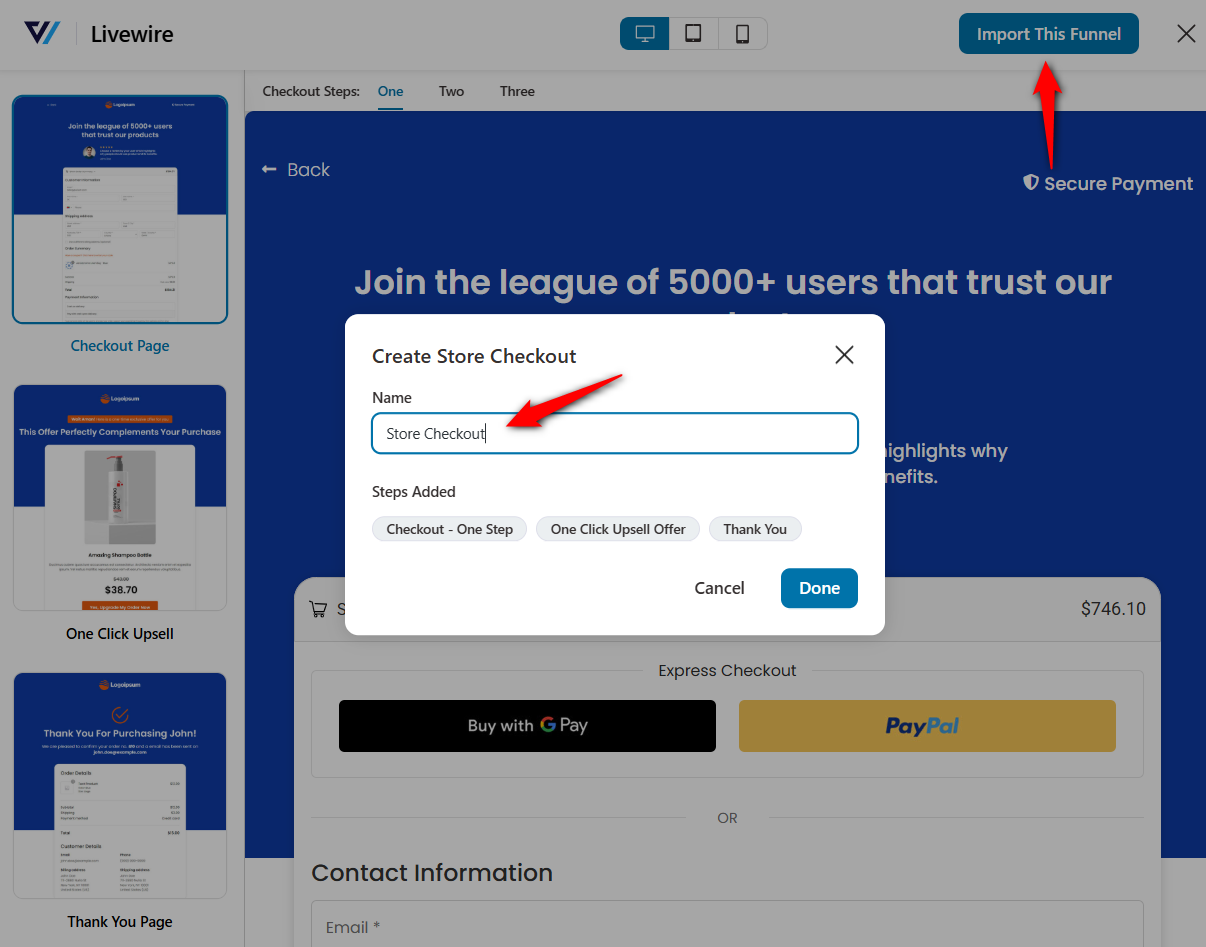
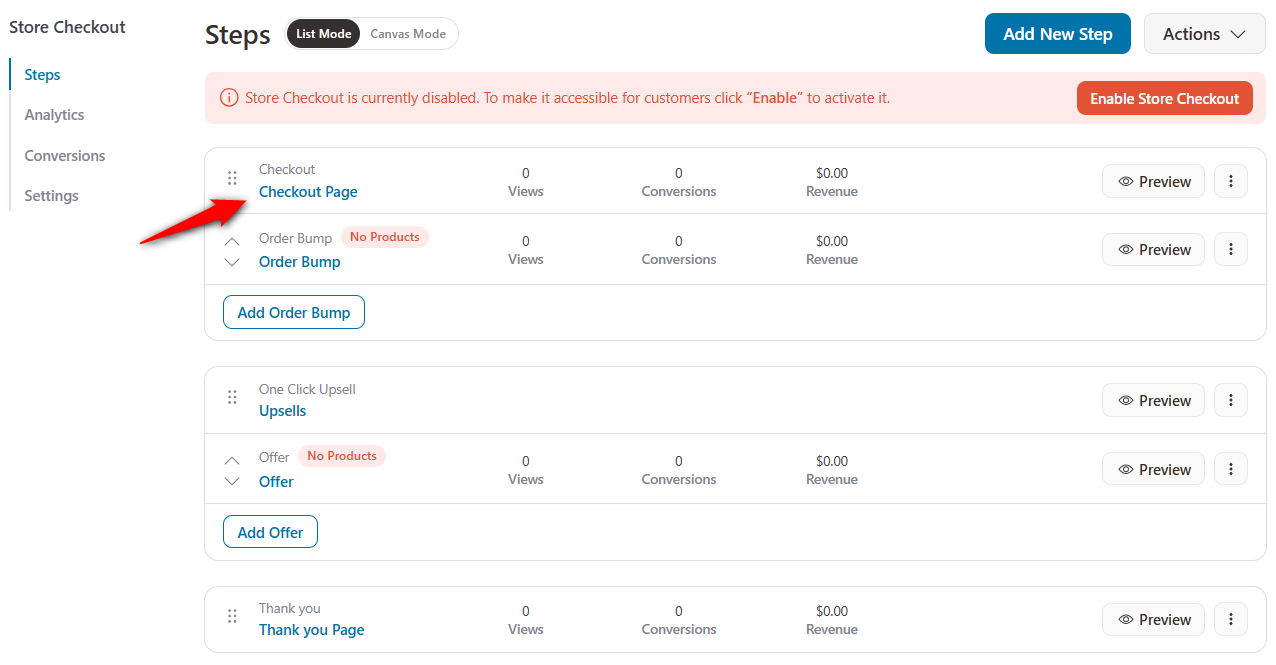
Your store or global checkout template will get imported to your workspace.
Step 2: Customize the design of your checkout page
Click on ‘Edit’ next to your checkout page and start customizing the design of your checkout page.
You'll land on the Design tab. From there, click on the 'Edit Template' button.
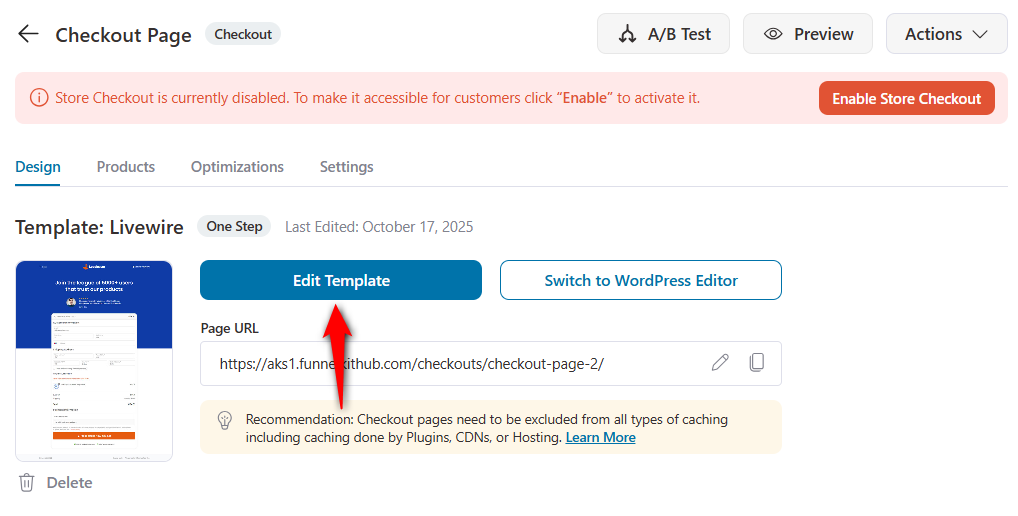
This page will load in the page builder you selected earlier.
Feel free to drag and drop elements and customize the text the way you want. Style it as per your brand colors.
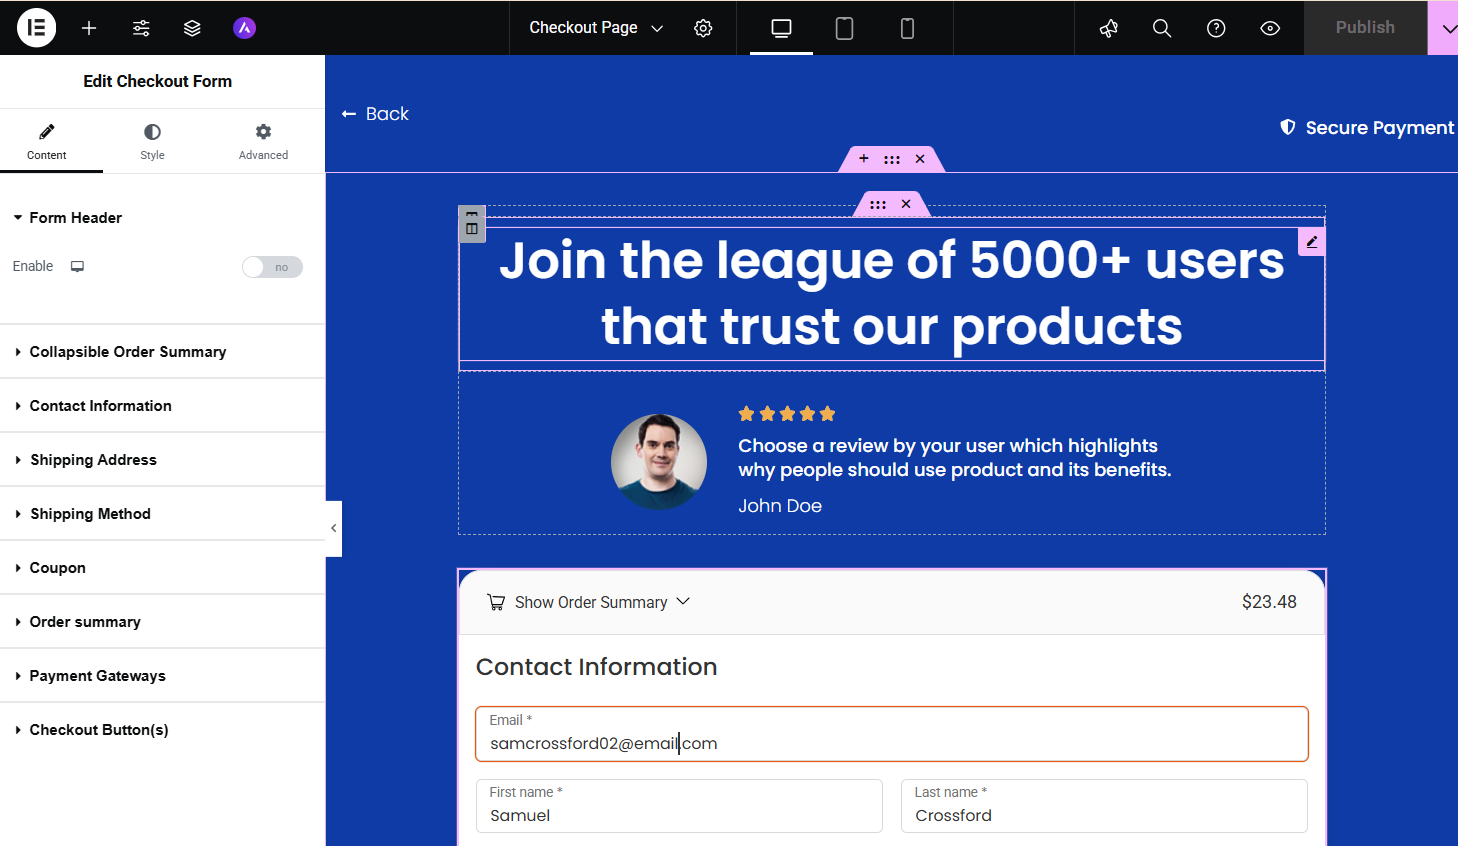
Check our detailed post to customize your WooCommerce checkout page here.
Step 3: Modify the WooCommerce checkout form fields
Under the Design tab, scroll down to the Checkout Form Fields section.
FunnelKit has a built-in checkout form field editor that allows you to add, edit, rearrange and delete any fields on your checkout form.
Here we’ll remove all the unnecessary fields to provide a quick checkout experience to our shoppers. You can also optimize your checkout page to streamline your checkout process and reduce abandoned carts.
Since we’re selling our LearnDash courses, we don’t need shipping addresses or shipping method-related fields.
Just remove the fields you don’t want. You can even rearrange your checkout fields by simply dragging and dropping them.
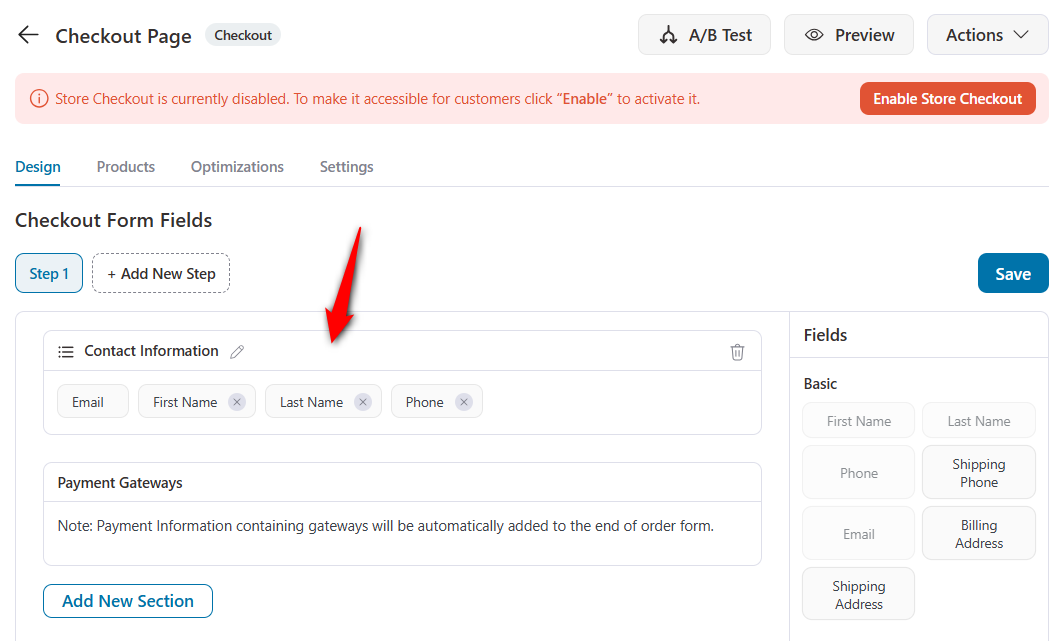
Make sure to save the changes when you’re done.
Read our complete guide to customize your WooCommerce checkout form fields here.
Step 4: Customize your WooCommerce thank you page
As important as it is to have convincing LearnDash course pages and checkouts, it is equally as important to have beautifully designed, converting WooCommerce thank you pages.
A custom thank you page helps you keep the conversation going. You can add relevant course recommendations or even take them to the course your customer has purchased from you.
You can customize your thank you page in the same way you have designed your checkout page.
Go to the ‘Design’ tab and start editing your order confirmation page template.
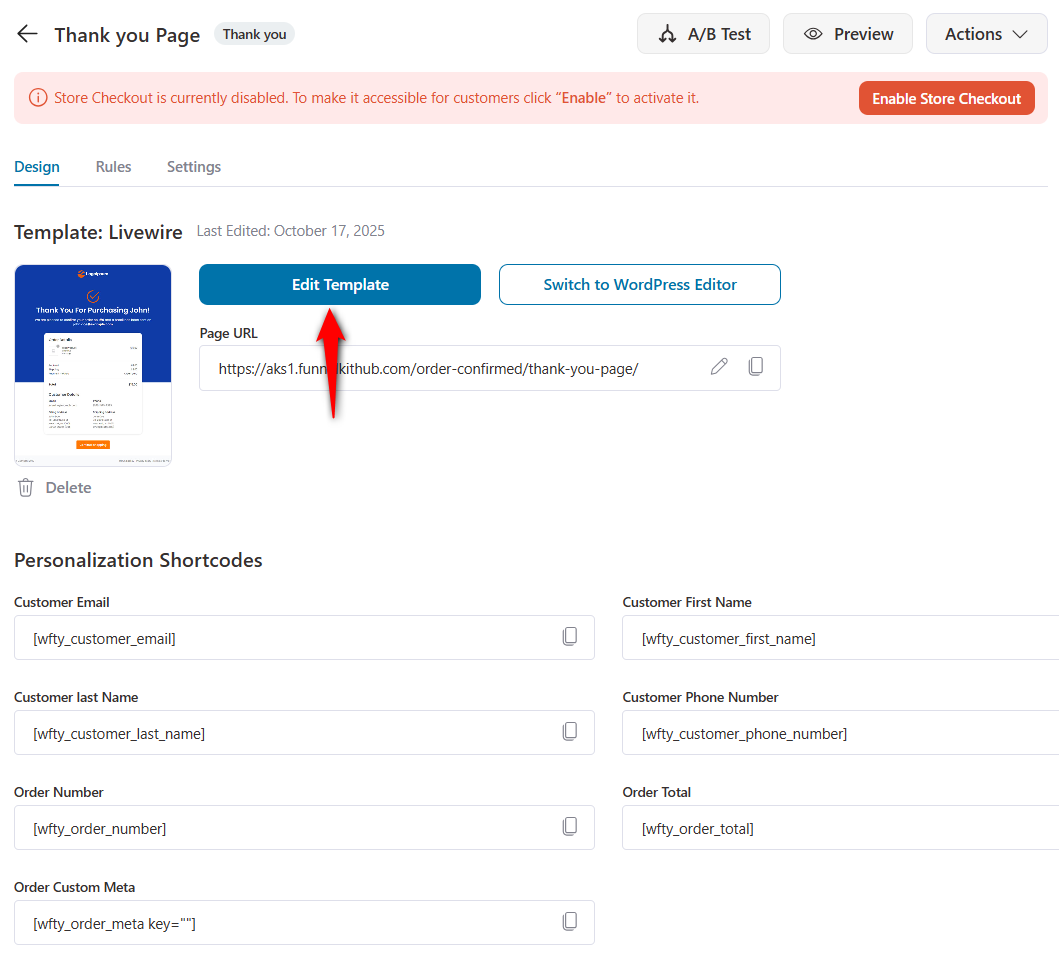
You can add a button on the thank you page to link to your social media or a learning group on Facebook, so customers can stay connected to you even after the purchase.
Or, you can link it to your website's ‘My Course’ page.
Copy and paste the link to the website page in the provided area; whenever a customer clicks on it, they will be auto-logged in and can access the course they just purchased.
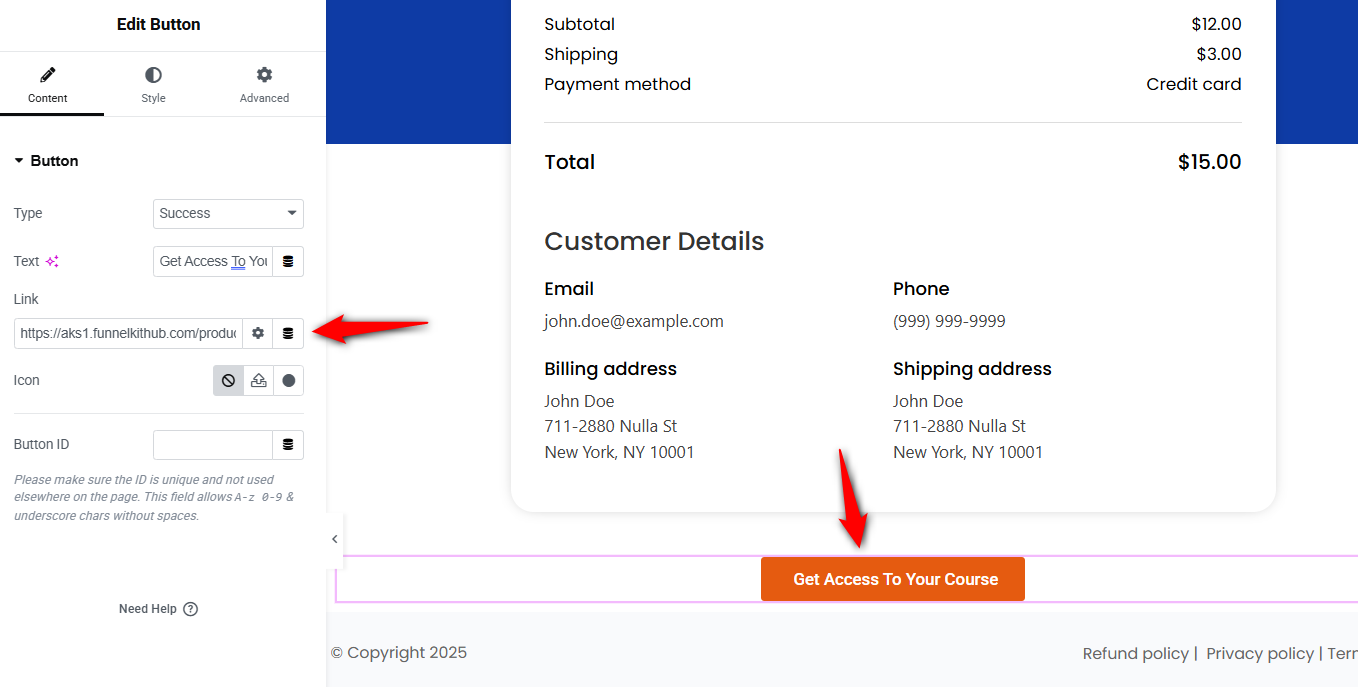
Hit ‘Update’ to save your changes.
This is what your customized thank you page will look like:
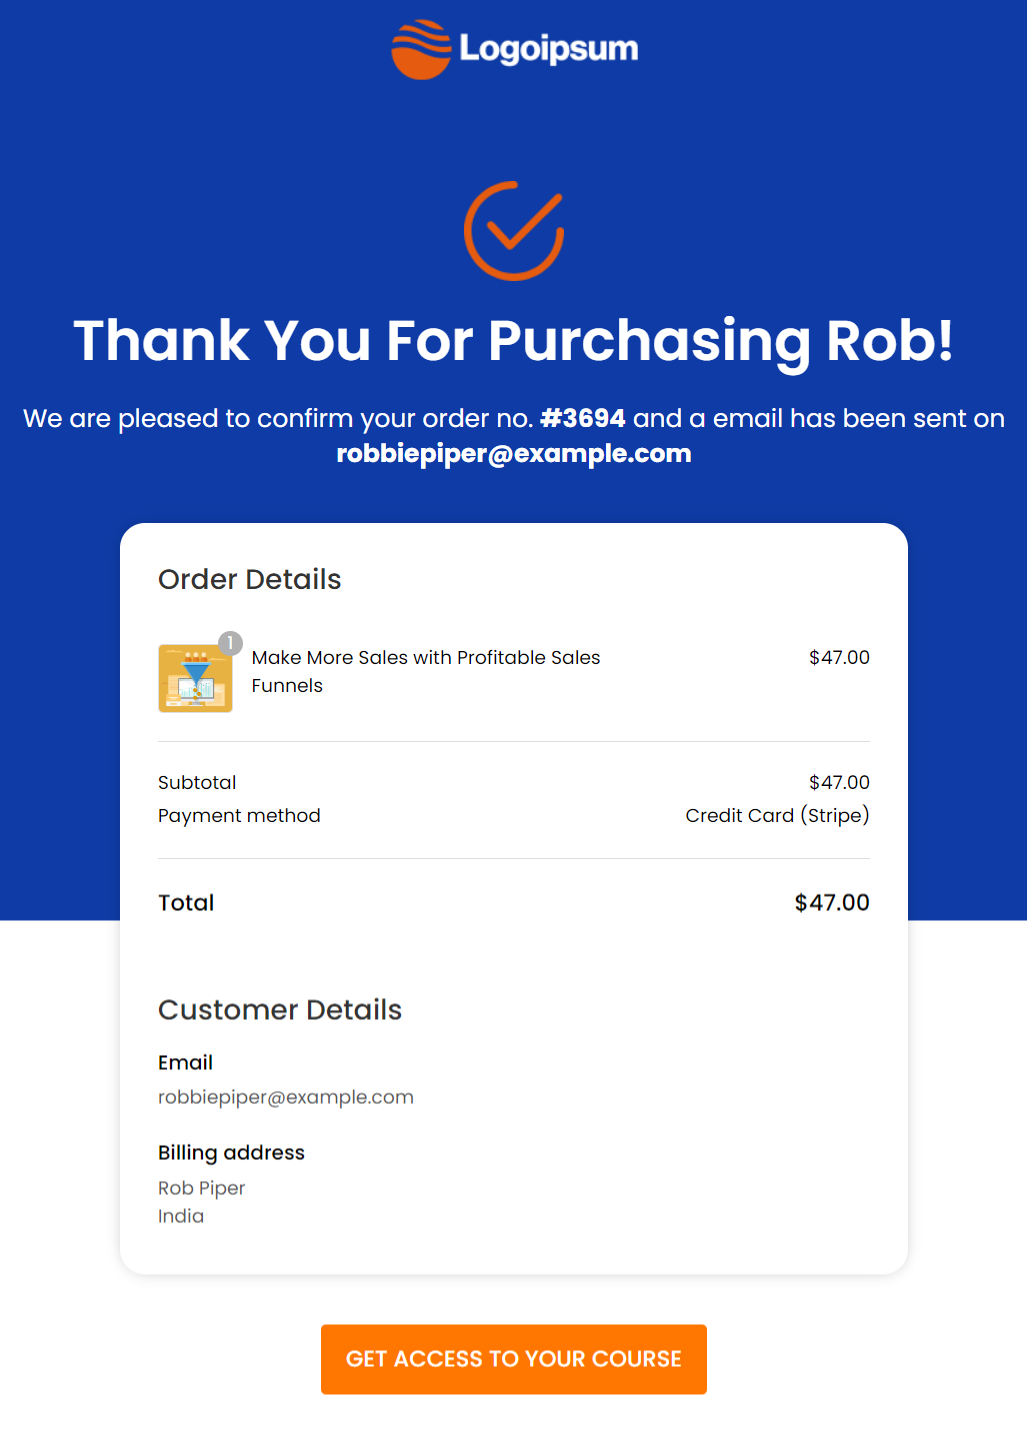
With the button on the thank you page, you can direct the customers to let them access their online course.
To let students access the dashboard area where they can view courses when logged in, you'd need to create a category and paste a shortcode.
Learn more about that and enable the course takers to access their course directly from the thank you page.
Step 5: Activate your store checkout
Go back to your funnel and click on the ‘Enable Store Checkout’ button.
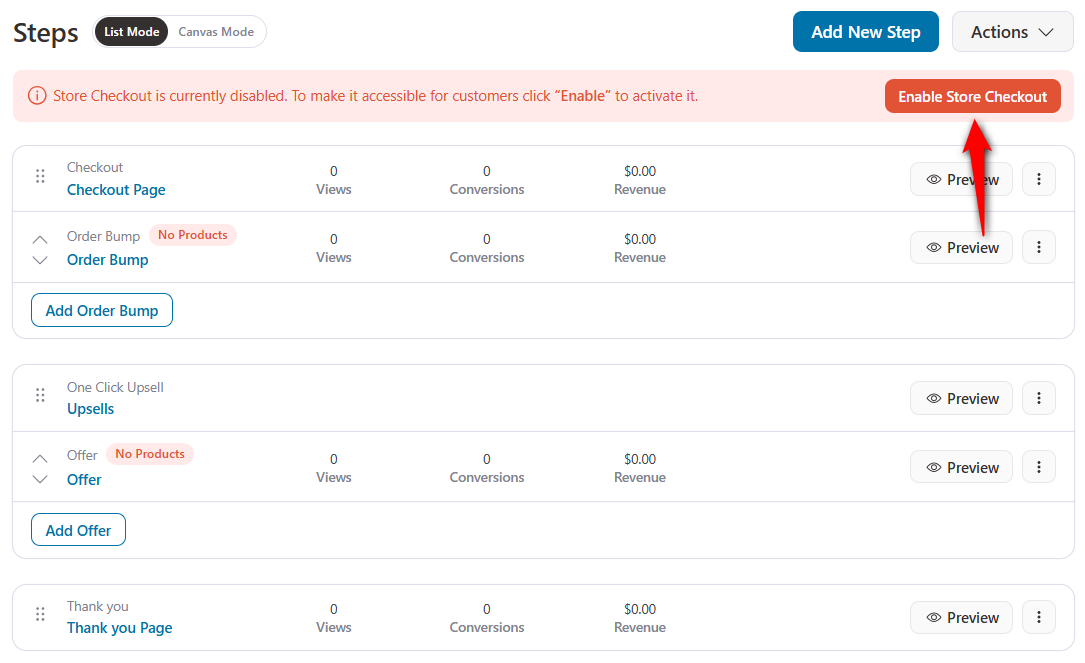
This will activate your store checkout that replaces your default WooCommerce checkout page.
Well done! This is how you can sell your LearnDash course in WooCommerce with a storefront checkout process with a custom-designed checkout page.
How to Sell Your LearnDash Course in WooCommerce? (Method-2: Dedicated Sales Funnel)
As we discussed earlier, another way of selling courses is through a sales funnel.
It involves guiding visitors through a path to your course and making a purchase.
To sell LearnDash courses using this WooCommerce method, you’d need to follow the following steps:
Step 1: Add a new sales funnel
Since a sales funnel will serve as the sales medium, we need to add a new funnel to our library.
For that, go to the Funnels section and click on the 'Create New Funnel' button.
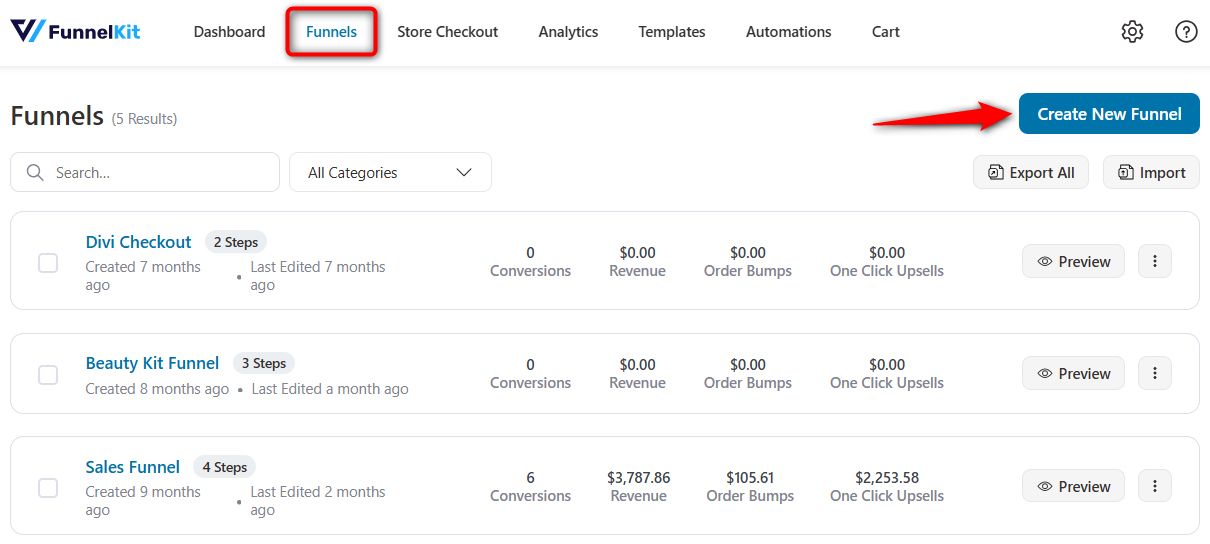
As you know, FunnelKit works with all page builders so that you can customize your sales funnels the way you want.
Here, we will import the Courselog Sales Funnel template from the available templates in Elementor.
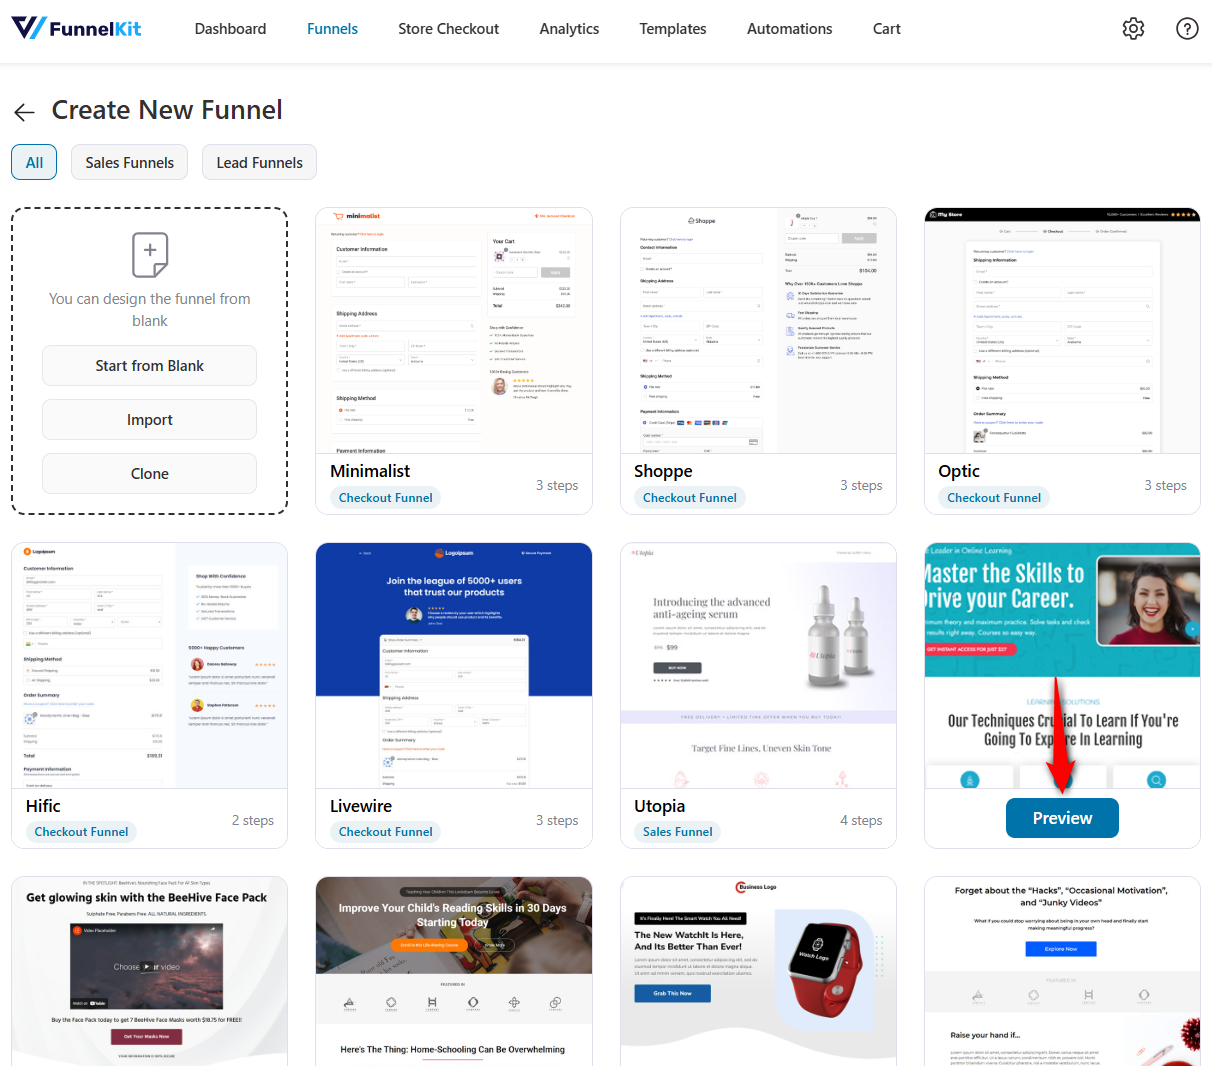
Choose the number of steps you want on your checkout page. Here you can select whether you want a one-page checkout or multi-step checkout.
Then, hit the ‘Import This Funnel’ button and name your funnel - LearnDash WooCommerce Funnel.
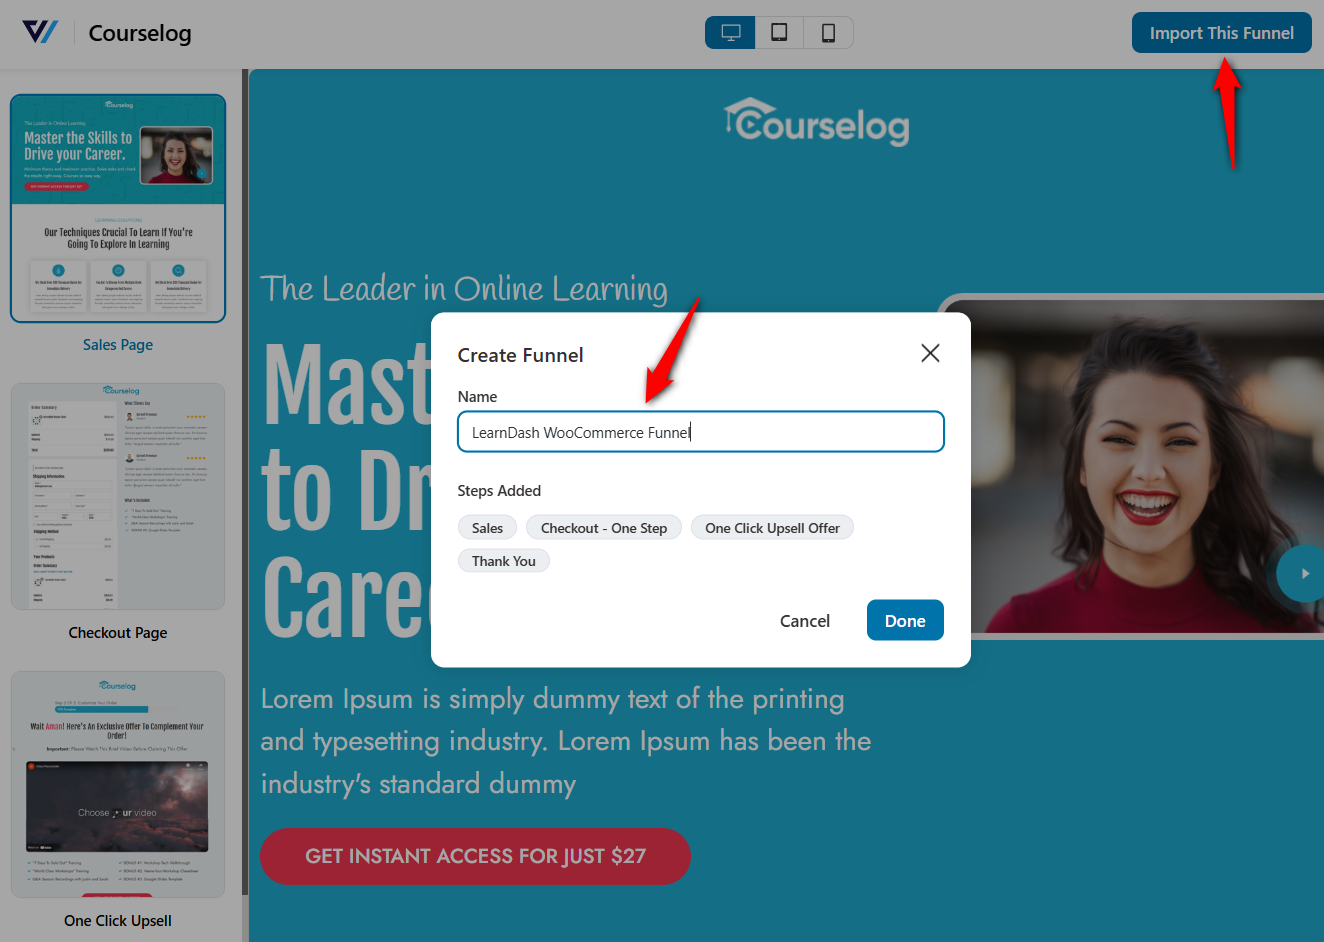
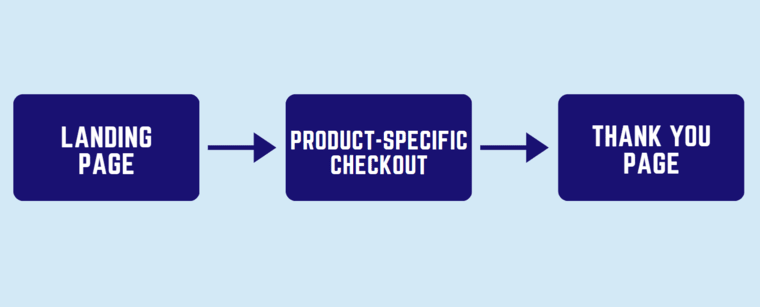
Clicking on ‘Add’ will add four steps to your funnel - Landing Page, Checkout Page, On Click Upsell Page, and Thank You Page - and the template design will be applied to each of these steps automatically.
Step 2: Add a product to your checkout page
As this would be a product-specific checkout page, we are going to add a product here.
Click on ‘Edit’ to start customizing your checkout page.
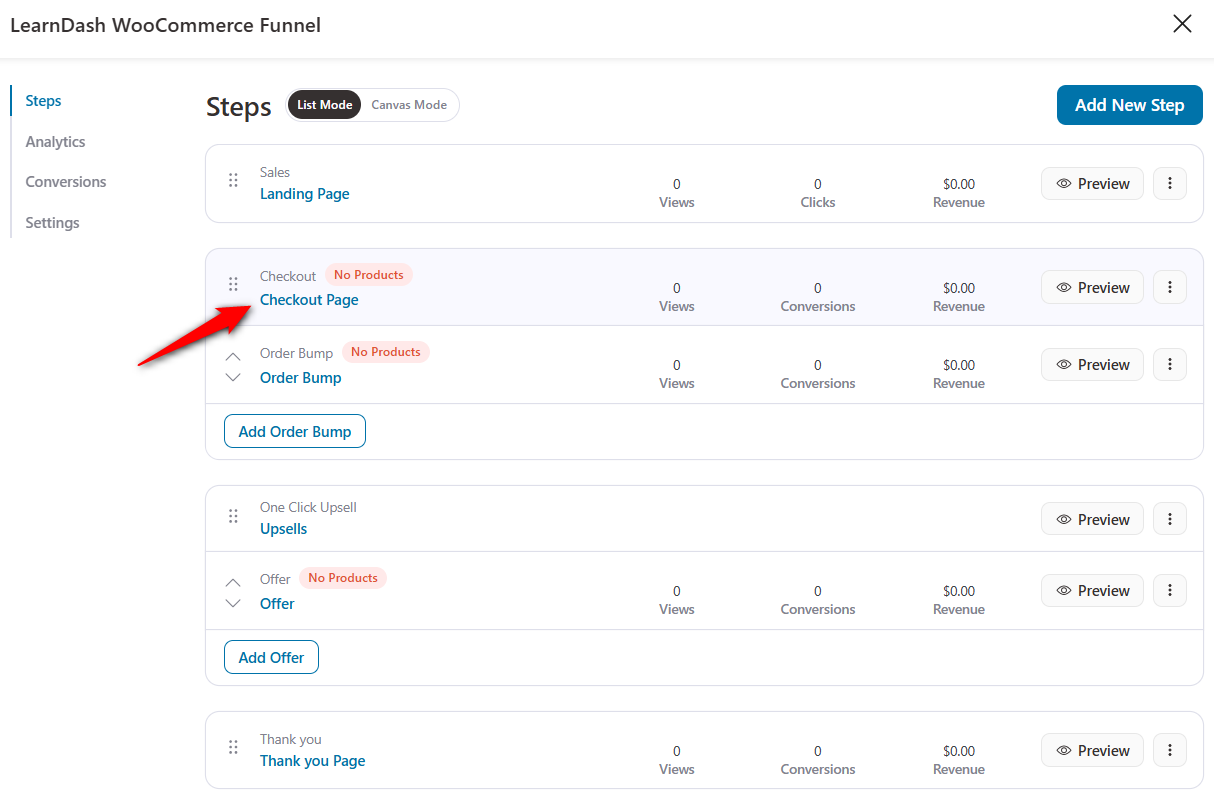
Go to the Products tab. Then, click on ‘Add Product’ to search and add your LearnDash course to the page.
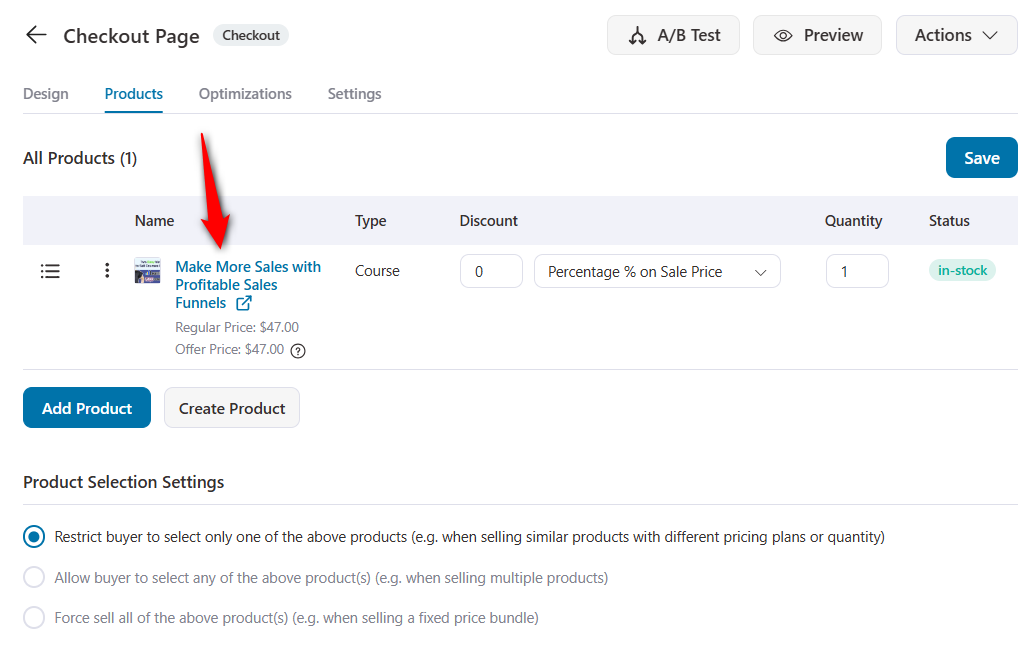
If you want, you can even offer a discount on the product(s) added.
You can customize the form fields and page design, as we discussed earlier in the post.
Once you're done, customize the rest of the steps in your sales funnel.
Step 3: Customize the steps in your funnel
You can customize each page of the funnel in Elementor, just like we customized the checkout page design in the previous section.
FunnelKit offers custom widgets for most of the pages that would assist you in creating beautifully designed sales funnels on WordPress.
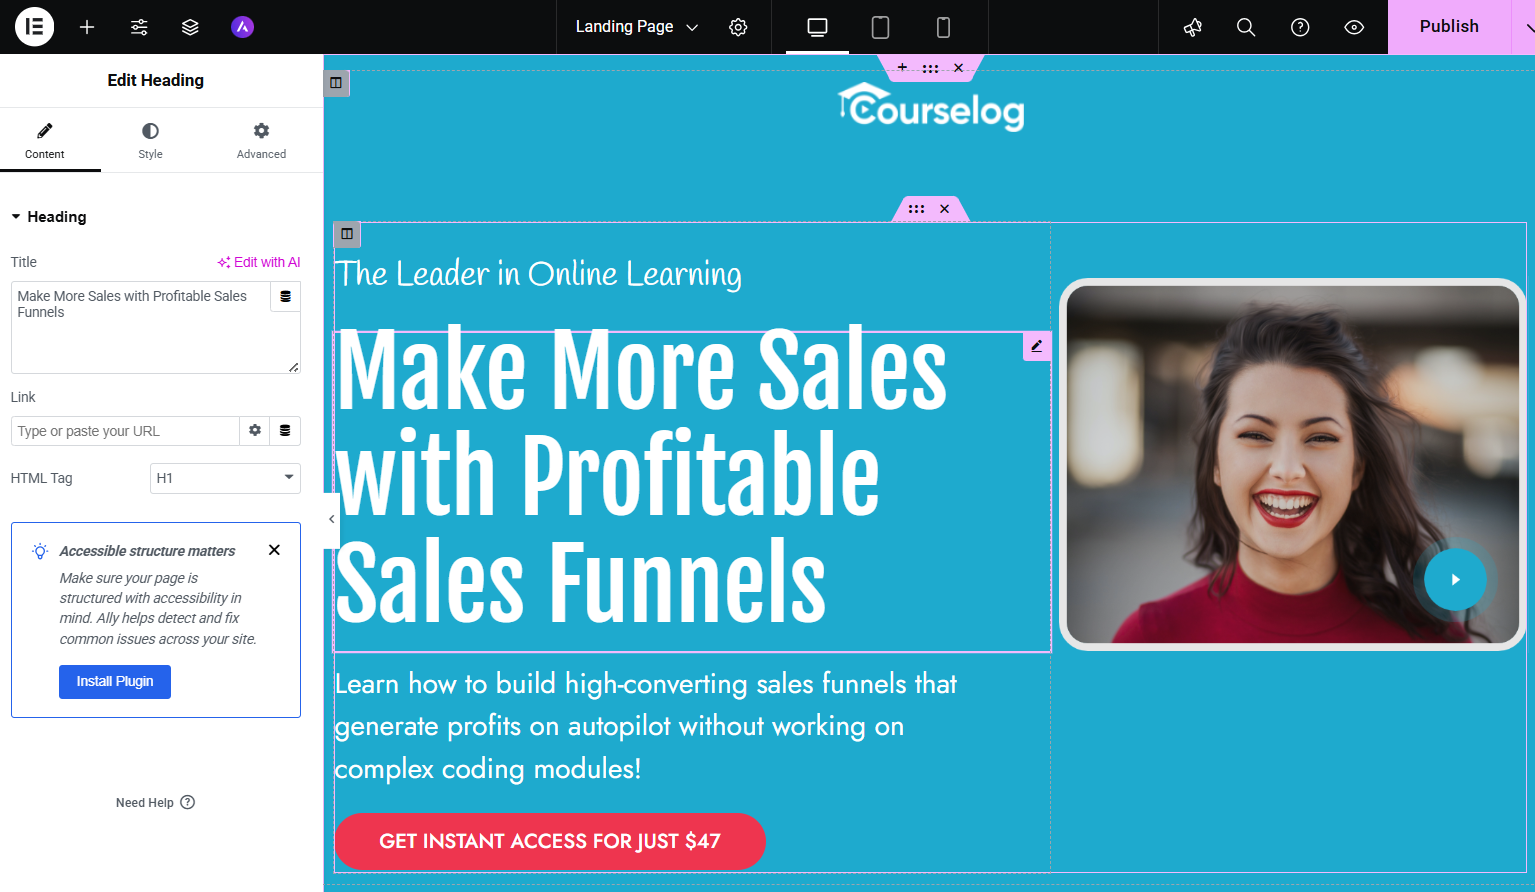
Edit and customize all the pages added to the funnel, such as the landing page, one-click upsell, and thank you page, to ensure a smooth and uniform flow through your funnel.
Step 4: Test your sales funnel
Finally, after designing and customizing the funnel pages, test the funnel to ensure it is working fluidly.
Start from the landing page and test run the complete flow to make sure it’s working.
And that’s it!
That’s how you create a sales funnel to sell LearnDash online courses in WooCommerce.
When a user stumbles on your advertisement, they will be directed to the sales page of this course funnel and follow a guided path to learn more about your course and make a purchase.
However, you can always optimize your WooCommerce store to provide a seamless buying experience to your users.
6 Best Practices to Implement With LearnDash WooCommerce Integration
To make the most of the WooCommerce LearnDash integration, keep the following best practices:
1. Configure WooCommerce guest checkout or account creation settings
If you wish to create an account for your course takers as they purchase products through the storefront, enable these WooCommerce settings to ensure the most frictionless flow.
Go to WooCommerce ⇨ Settings ⇨ Accounts & Privacy. Here are the options you can configure:
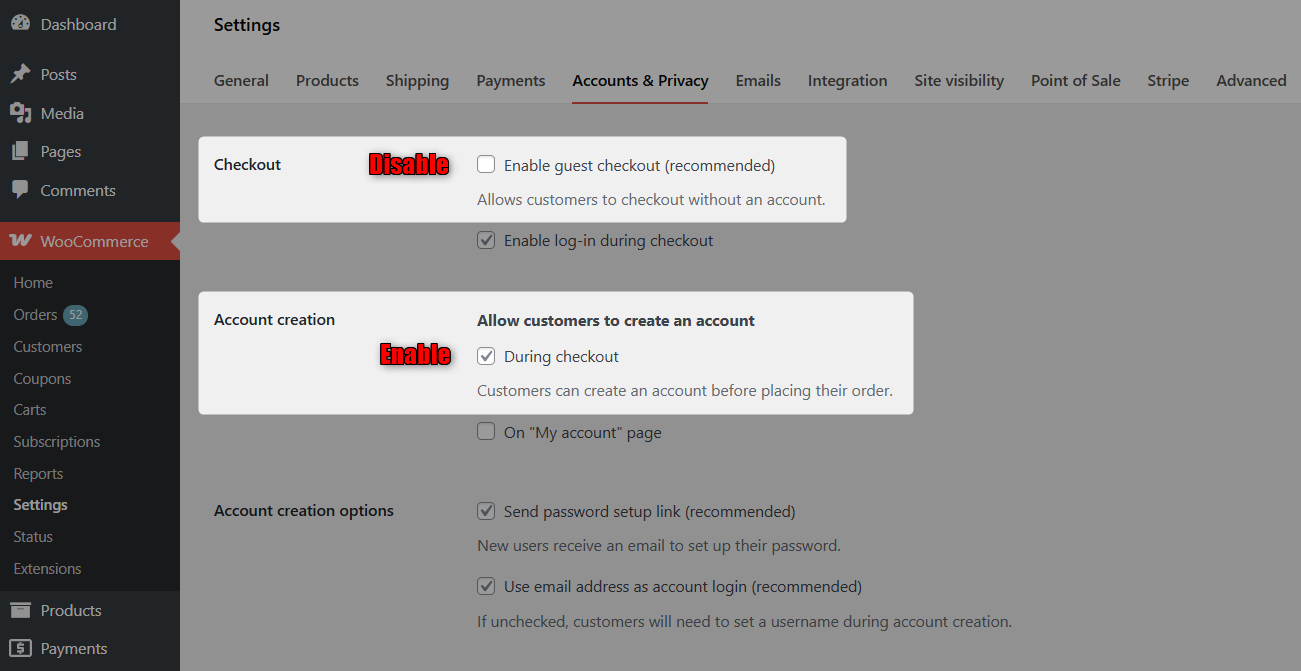
- Guest checkout settings - Under guest checkout, uncheck the first box so users cannot place an order without creating an account. When they create an account, you save their details for future reference. Also, you can have the "Log in with existing account" option checked or unchecked, as you prefer.
- Account creation settings - Here, enable the checkbox that allows users to create an account on the checkout page. Also, enable automatic account creation with a username and password on purchase.
2. Add upsell recommendations to boost the order value
Boost revenue on each purchase by placing WooCommerce checkout add-ons at key points in your shoppers' journeys.
The two most popular upsells include:
Order bumps (on the checkout page)
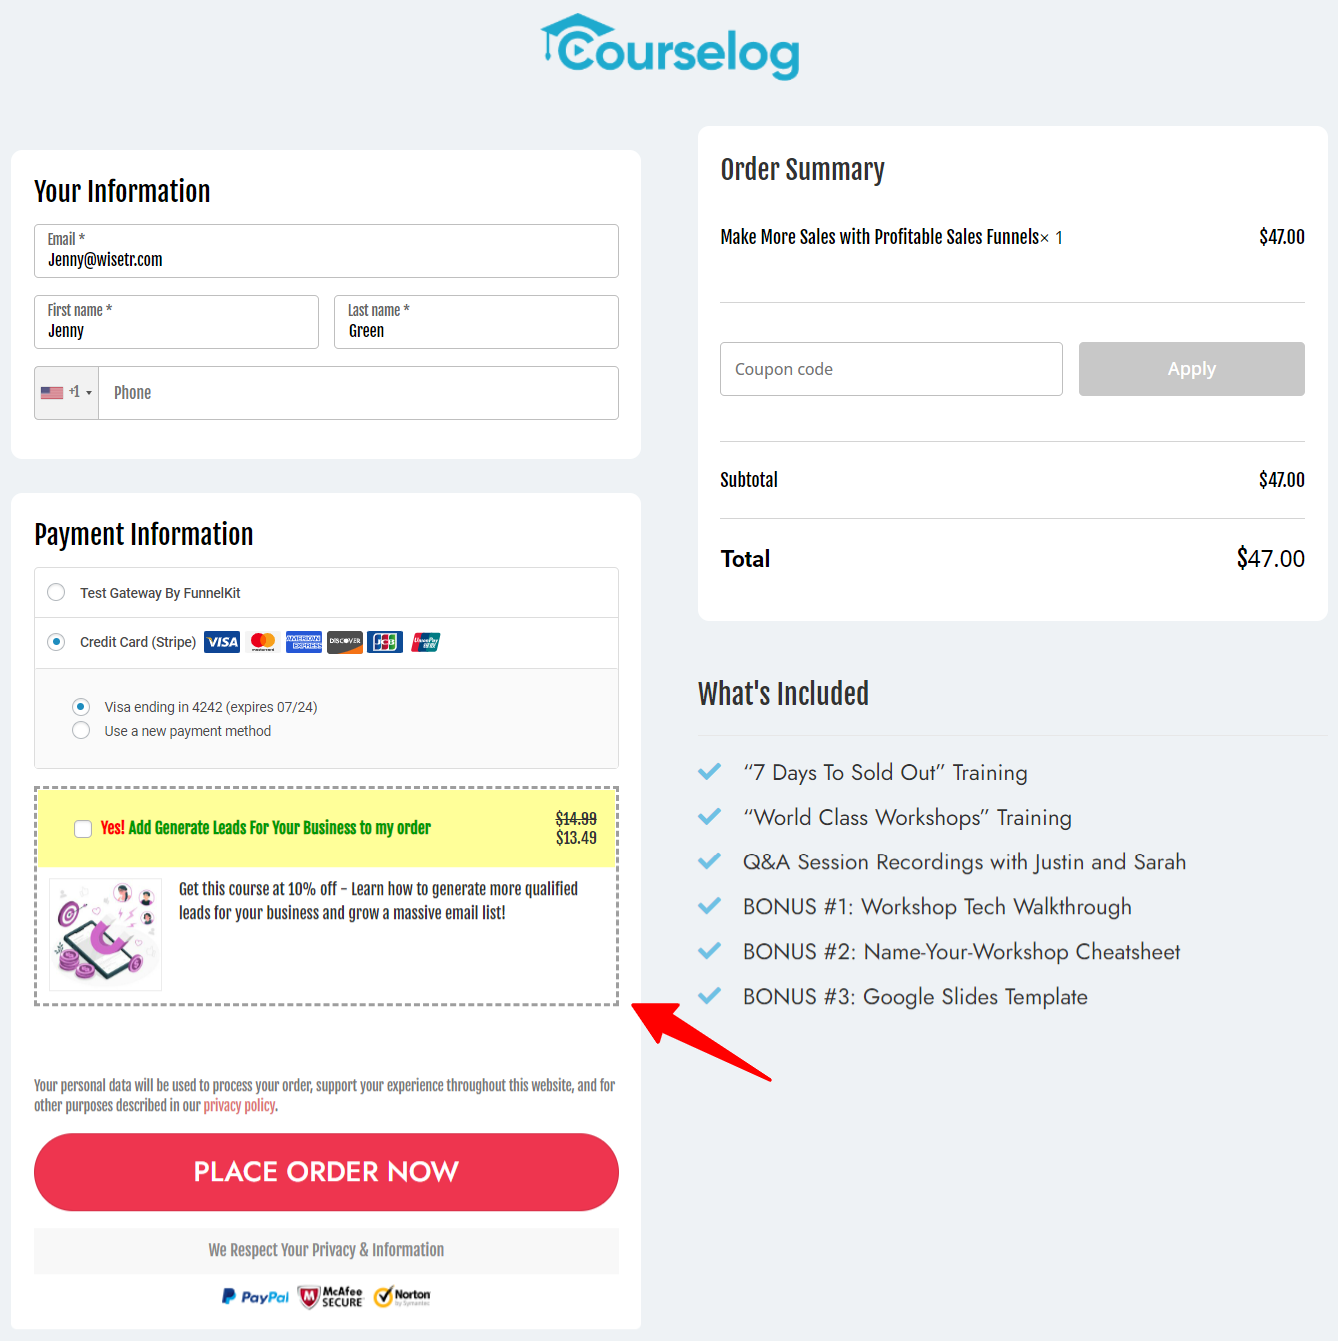
Your shoppers can add these bumps to their shopping cart before payment with just one click.
FunnelKit lets you add order bumps and customize them the way you want.
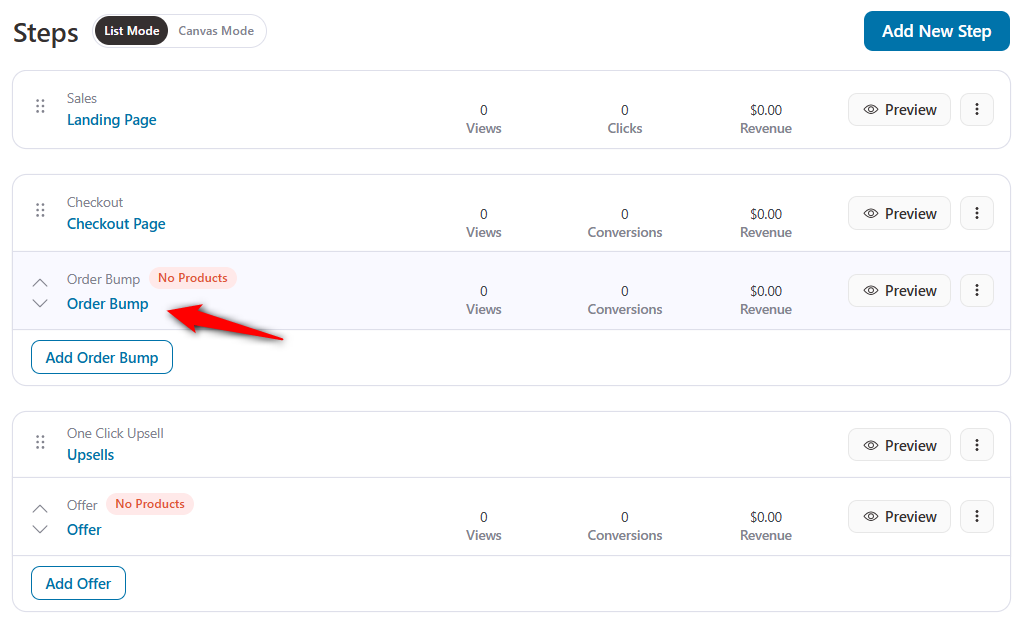
You can add a short LearnDash course to be offered as an order bump on the WooCommerce checkout.
Then, create a compelling offer by assigning some discounts there:
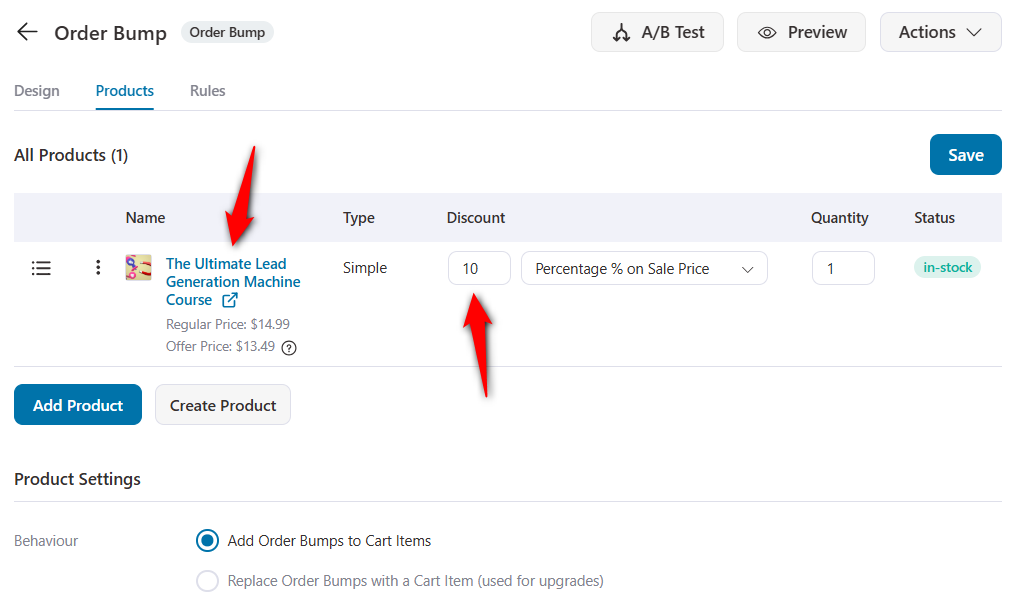
You can even select the bump skin, add content and style it from the Design tab.
Once everything is done, it’ll get added to your checkout page:
One-click upsells (after the checkout page)
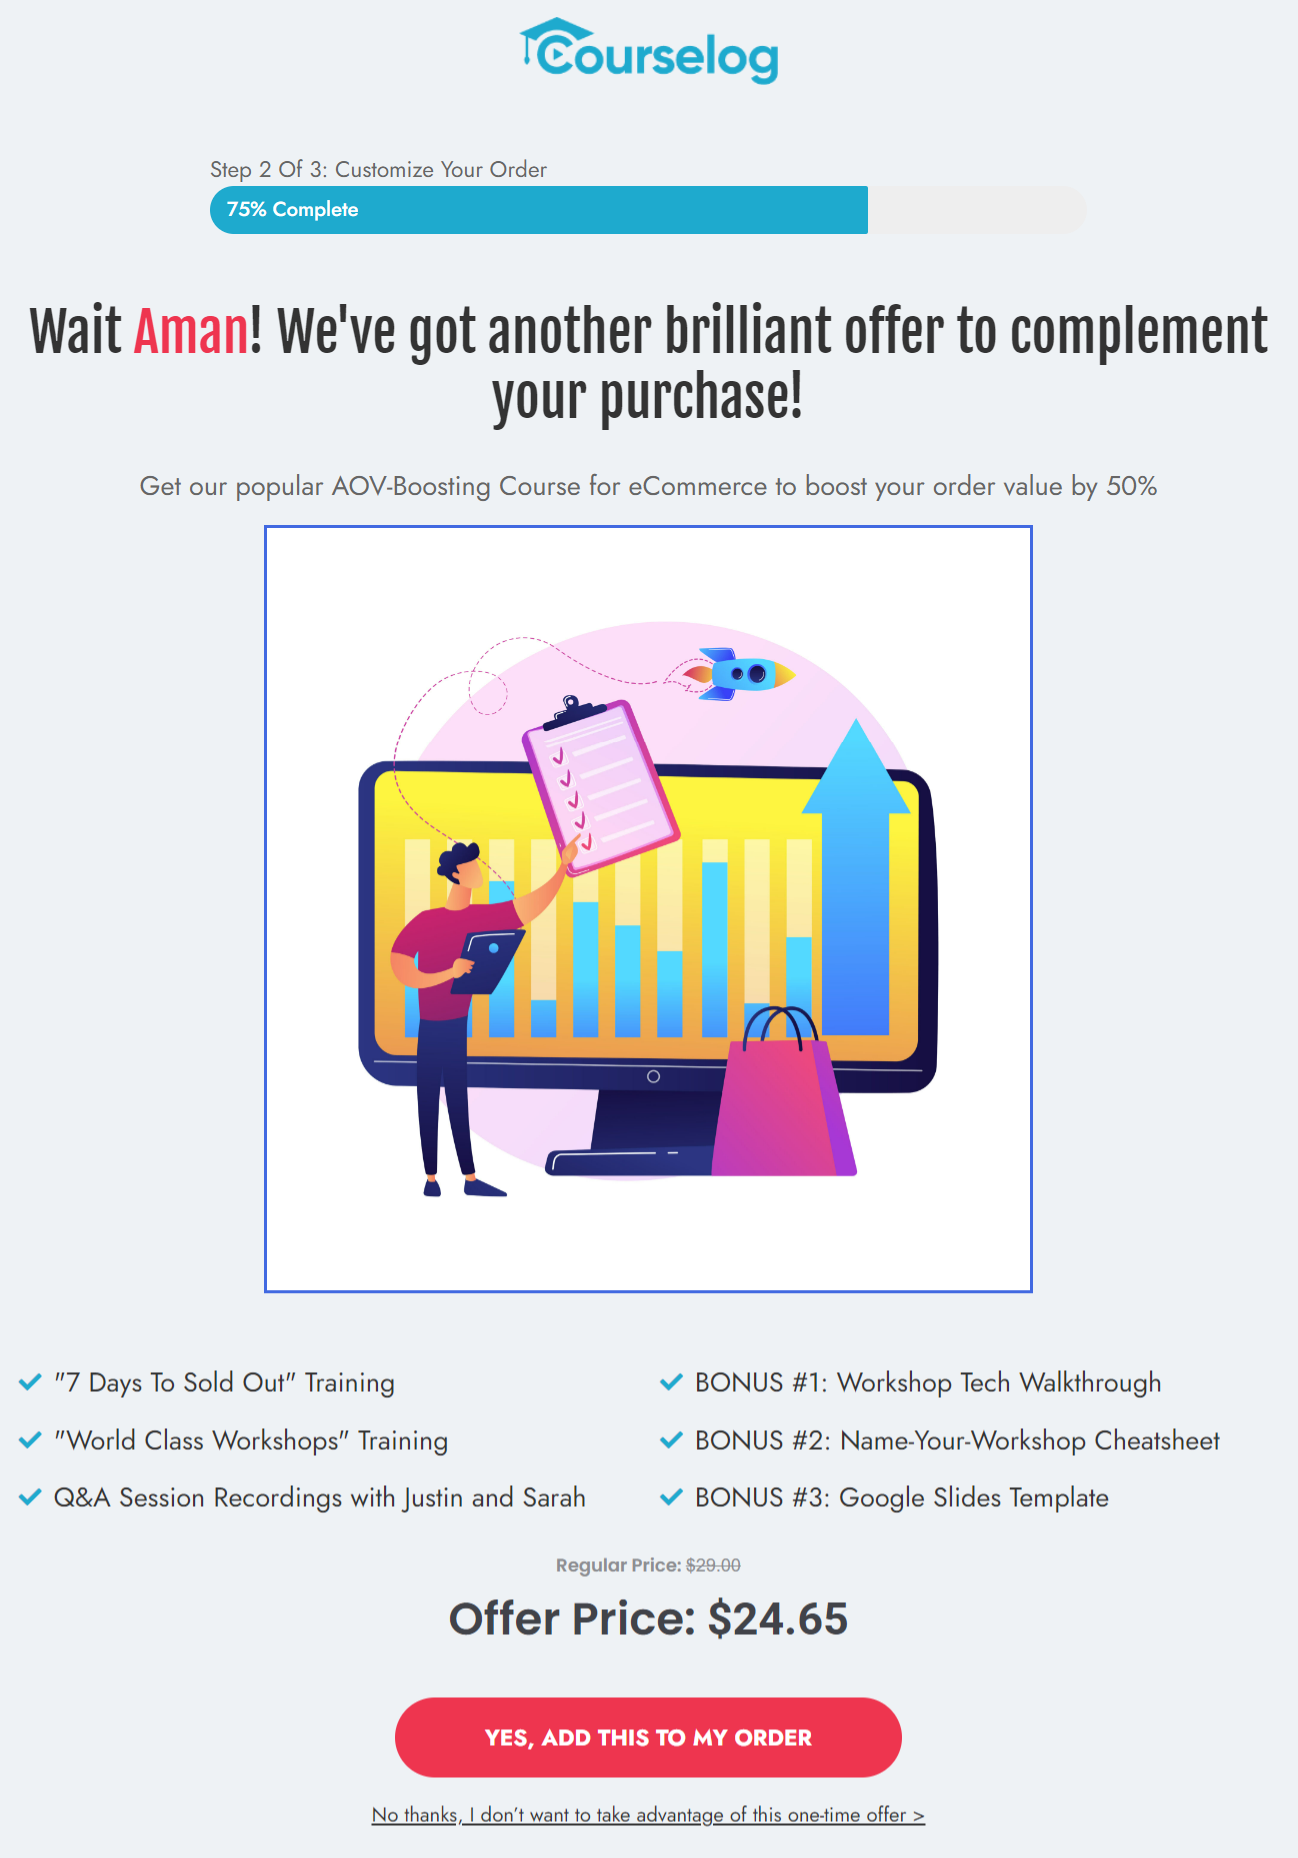
Another brilliant way to improve the store's revenue is through the post-purchase one-click upsells.
This page appears after the checkout and before the thank you page. It displays offers to complement the customer's primary purchase, making it difficult for the customer to reject.
You can even add more than one product to the offer and more than one offer to the upsell page.
Therefore, adding two or more of your LearnDash courses here on WooCommerce can help increase your revenue.
FunnelKit even allows you to interlink two or more offers, including a downsell based on the user's purchase behavior of accepting or rejecting the previous offer. This can be done with dynamic offer paths.
Here’s what it looks like:
3. Enable multiple payment options
Your WooCommerce store must have multiple payment options to serve different shoppers.
For that, you can bring in the Stripe payment gateway for WooCommerce plugin that helps you feature multiple payment methods in your store.
This plugin will help you enable the following payment methods in your WooCommerce store:
- Popular debit and credit cards such as Visa, MasterCard, American Express, Discover, etc.
- Express checkout options such as Google Pay and Apple Pay
- Local payment methods like SEPA, iDEAL, Bancontact, P24, and more.
Choosing the right payment options can help enhance your conversions significantly in your eCommerce store.
4. Use LearnDash retroactive course access
The retroactive course access tool in LearnDash allows you to grant access to your enrolled members.
In case some WooCommerce customers (having purchased the course) aren’t able to access their course. Then this tool helps you to scan all the orders placed in WooCommerce.
It looks for ‘Completed’ orders that are connected to the LearnDash course. Once they’re found, it automatically gives access to the course to those users.
You can find this setting in WooCommerce ⇨ Status under the Tools tab:

Once you click on the button, it’ll start scanning your WooCommerce orders. Wait a couple of minutes for the process to complete.
5. Send engaging follow-up emails
The average email opening rate in the education and training industry is around 28.5%. That’s why you should use it to drive user engagement and nurture your students, giving them a positive learning experience.
And what better way to do is by setting up automated email sequences for each use case?
Using a WordPress CRM tool like FunnelKit Automations lets you send automated email campaigns and keep track of their performance in real-time.
Here’s what you can do by setting up automated LearnDash email notifications for your users:
- Welcome your students when they enroll in your course
- Send congratulatory emails based on the scores your students got on their quiz
- Generate passwords to provide them with login access
- Create anticipation for their next lesson when completing a specific lesson
- Incentivize your students’ next purchase when they finish a course
These are just some of the use cases.
FunnelKit Automations offers you different triggers to set up your automation:
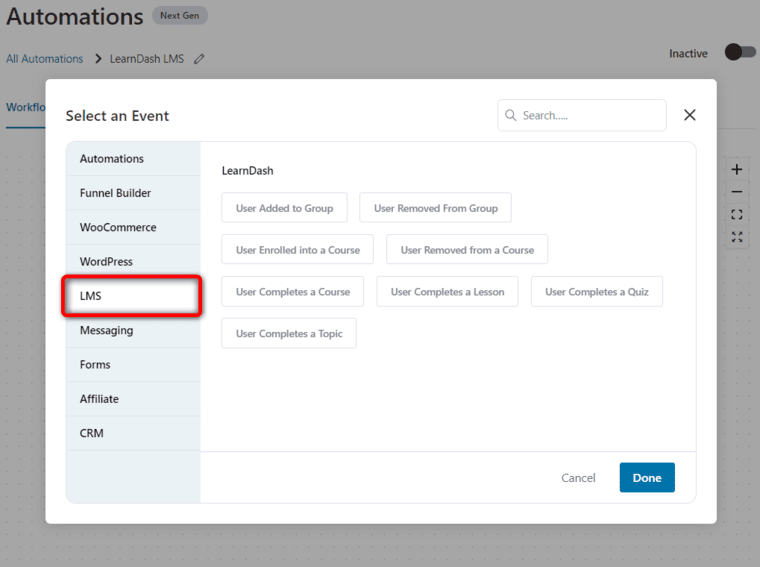
Setting up these automations is quite easy in FunnelKit Automations!
In fact, you get access to some pre-built LearnDash automated recipes that can be imported with a single click and customized as per your need.
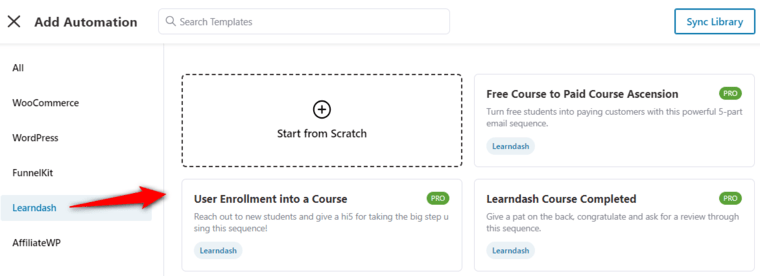
These all have pre-written emails and set-timed delays that you can customize as per your need.
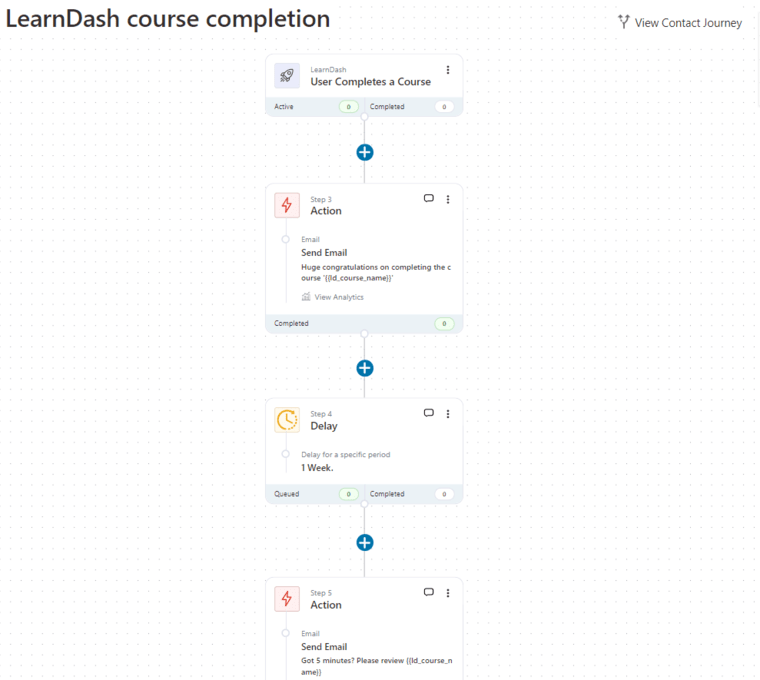
You can set up hundreds of custom workflows and automate your LearnDash WooCommerce business processes.
Not just that, you can set up a variety of automated workflows such as cart abandonment recovery, winback campaigns, post-purchase automation, and more.
6. Track performance with real-time analytics
Monitor your course sales, checkout conversions, and upsell performance using built-in FunnelKit analytics.
Track key insights like orders placed, revenue from order bumps and upsells, conversion rate per funnel, drop-off rate during checkout, and much more.
This helps you identify which courses and funnels perform best, so you can optimize continuously.
Frequently Asked Questions (FAQs)
In this section, you’ll find all the answers to some common questions related to selling LearnDash courses with WooCommerce:
Is LearnDash free with WordPress?
No, LearnDash is not free with WordPress. It’s a premium LMS plugin for WordPress that starts at $139.30 annually. However, LearnDash offers you the demo version so that users can experience it at their own pace.
Are users automatically enrolled in the course after making the payment?
Yes, users are automatically enrolled in the course if their WooCommerce order status is set to ‘Completed’ for transactions made with online payments. In case of offline payments, users won’t be enrolled because the order status will be set as ‘Pending’.
Do I need to manually remove a student from a course when the subscription expires?
No, you don’t need to manually remove a student from a course when the LearnDash subscription expires. If you have set up LearnDash WooCommerce subscriptions, access to that associated course will be removed as soon as the subscription expires.
Which payment gateway should I use when selling the LearnDash course in WooCommerce?
There are many payment gateways that are supported when selling your LearnDash course in WooCommerce. These are:
1. Online payments such as Stripe, PayPal, and all the WooCommerce-supported payment gateways
2. Offline payments such as check payments, direct bank transfers (BACS), and more.
Can I create memberships and bundles with WooCommerce and LearnDash?
Yes, you can create memberships and bundles with WooCommerce and LearnDash. All you need to do is integrate LearnDash with WooCommerce. With the LearnDash Groups add-on, you’ll be able to create membership levels for your memberships.
Furthermore, you can associate different courses into one and create LearnDash course bundles.
What can I use instead of LearnDash in WordPress?
There are many LearnDash alternatives that can help you build your course in WordPress. These include MemberPress, Wishlist Member, Lifter LMS, Thrive Apprentice, WP Courseware, Tutor LMS, and more.
Ready to Sell LearnDash Courses with WooCommerce?
Now you know that if you have a LearnDash course to sell, WooCommerce is the ultimate platform to make the sale.
Want to sell the courses through a storefront or sales funnels? WooCommerce gives you the liberty to choose the method of sale and its design as per your liking.
No other platform would offer you as much flexibility or as many options as WooCommerce does.
You must have also realized that setting up your LearnDash courses with WooCommerce is just one part of the equation. You still need to generate leads by offering free courses, follow up with customers using post-purchase upsells, and more.
All of this can be done with FunnelKit, as we have shown you in this post above.
So install your WooCommerce for LearnDash plugin now, and sell your courses online using the beautiful course pages and checkouts designed in FunnelKit.

Editorial Team
December 26, 2025The average affiliate marketing conversion rate sits at just 1.20% across all industries, according to FirstPageSage’s 2024-2025 analysis of thousands of campaigns. That means that for every 100 visitors who...
Editorial Team
December 22, 2025Do you want a reliable WooCommerce Google Analytics integration that tracks real customer behavior (not just page views)? Many WooCommerce stores install Google Analytics but never configure it correctly for...
Editorial Team
December 17, 2025Order Bump v/s One Click Upsell: Which one to choose? We got this question from a handful of our customers: "What's the difference between a one-click upsell and an order...


