
Ever wondered why so many customers abandon their carts without completing the purchase?
Studies show that 18% of online shoppers leave orders midway due to a complicated checkout process. [Source: Baymard Institute]
As WooCommerce experts with years of experience helping online stores optimize checkout flows, we’ve seen firsthand how a small but powerful change can dramatically reduce cart abandonment and boost conversions.
The solution? Adding an easy login popup or an inline login form to your WooCommerce checkout.
In this step-by-step guide, we’ll show you:
- Comparison of Default vs Easy Login in WooCommerce
- Step-by-step process to add an easy login to the WooCommerce checkout page
- 7 Effective tips to optimize the WooCommerce checkout experience
By the end, you’ll have a faster, smoother checkout that improves customer experience, reduces cart drop-offs, and increases repeat sales without any complex coding.
Table of Contents
- 1 WooCommerce Checkout Login: Default vs Easy Login Explained
- 2 How to Add Easy Login to WooCommerce Checkout Page? (Step-by-Step)
- 3 How to Customize the Style of the Easy Login Section?
- 4 7 Tips to Ensure a Smoother WooCommerce Checkout Experience
- 4.1 1. Remove unnecessary checkout fields
- 4.2 2. Enable guest checkout for new users
- 4.3 3. Use a multi-step checkout layout
- 4.4 4. Optimize the login popup for mobile devices
- 4.5 5. Offer multiple payment options, including express checkout
- 4.6 6. Offer complementary items on the checkout page
- 4.7 7. Enable one-click social login
- 5 Frequently Asked Questions About Easy Login in WooCommerce
- 6 Does easy login come with a remember me option?
- 7 Can I also allow guest checkout along with easy login in WooCommerce?
- 8 Why implement an easy login option at WooCommerce checkout?
- 9 Can I use an inline login form instead of a modal popup in easy login in WooCommerce?
- 10 Can I use a Google recaptcha while using the easy login option in WooCommerce?
- 11 Does adding a login popup slow down my checkout page?
- 12 Add Easy Login to Your WooCommerce Checkout and Make Shopping Journey Easier!
WooCommerce Checkout Login: Default vs Easy Login Explained
Here is a quick breakdown of the difference between a default login option and an easy smart login option in the WooCommerce checkout:
| Option | Default | Easy Login |
|---|---|---|
| Smart modal login popup | ❌ No | ✅ Yes |
| Inline login form | ✅ Yes | ✅ Yes |
| Redirect to after password reset | To My Account page | To the checkout page with pre-filled items, ready to complete the purchase |
| Detect existing customers and prompt them to log in | ❌ No | ✅ Yes (Prompt to log in to speed up checkout) |
| Remember me option | ✅ Yes | ✅ Yes |
Let’s go through them one by one.
Default Checkout Login Process
First, let's check how a default checkout login option works:
- Login for returning customers
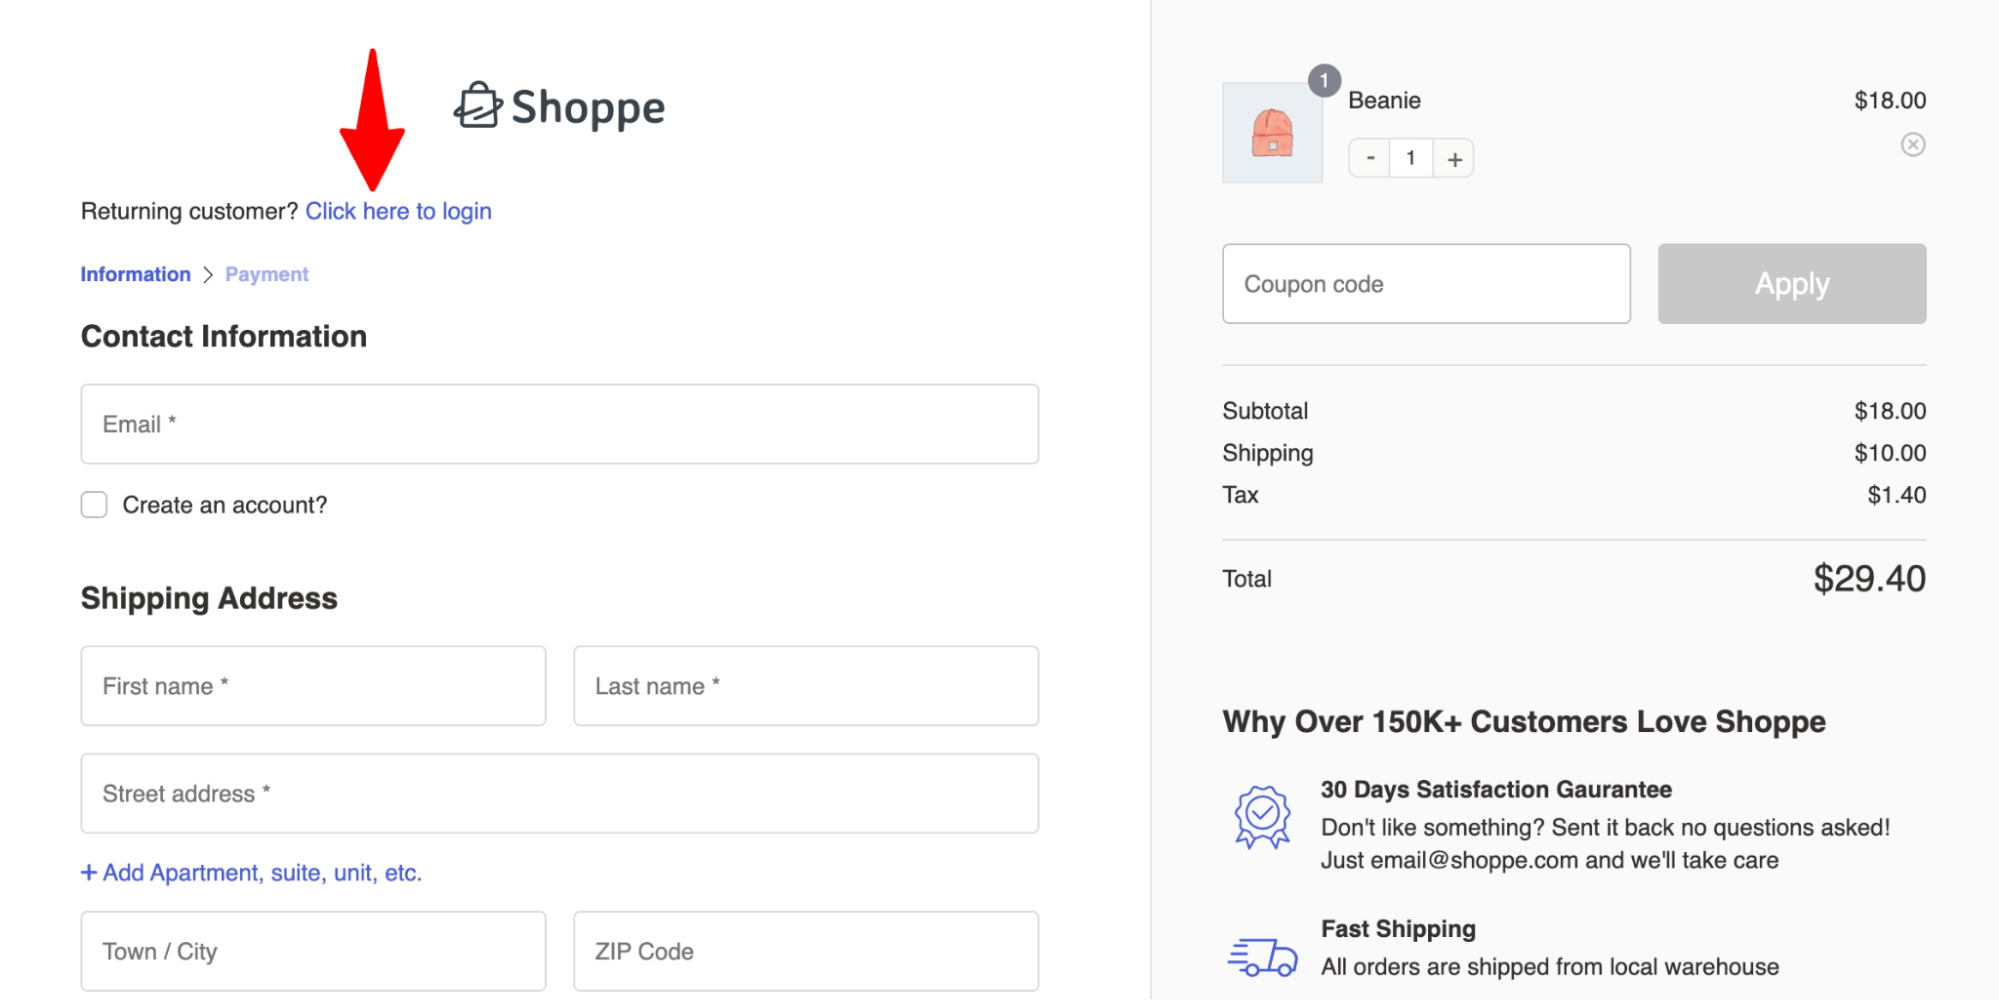
By default, WooCommerce shows a small "Click here to login" link above the checkout form.
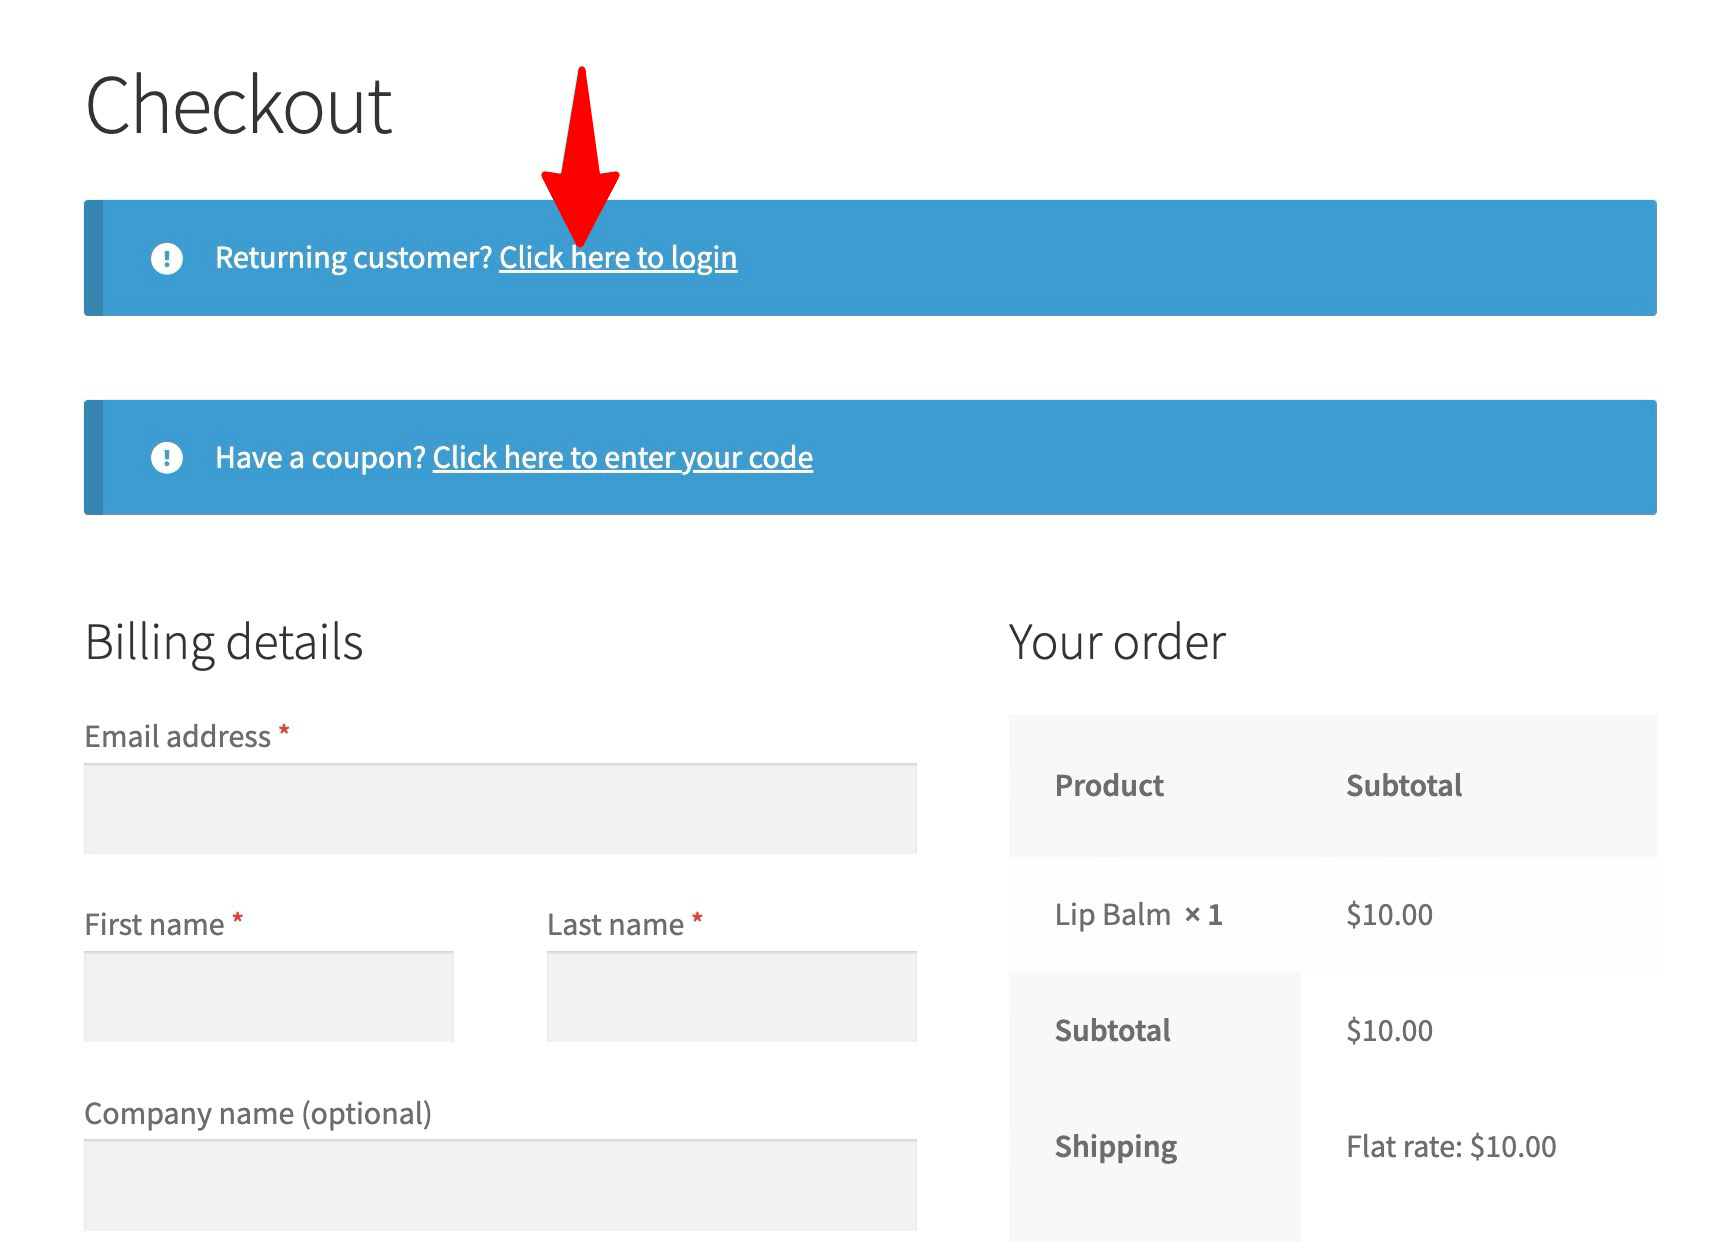
When customers click it, a login form appears on the same page, but it’s often easy to miss and not very user-friendly.
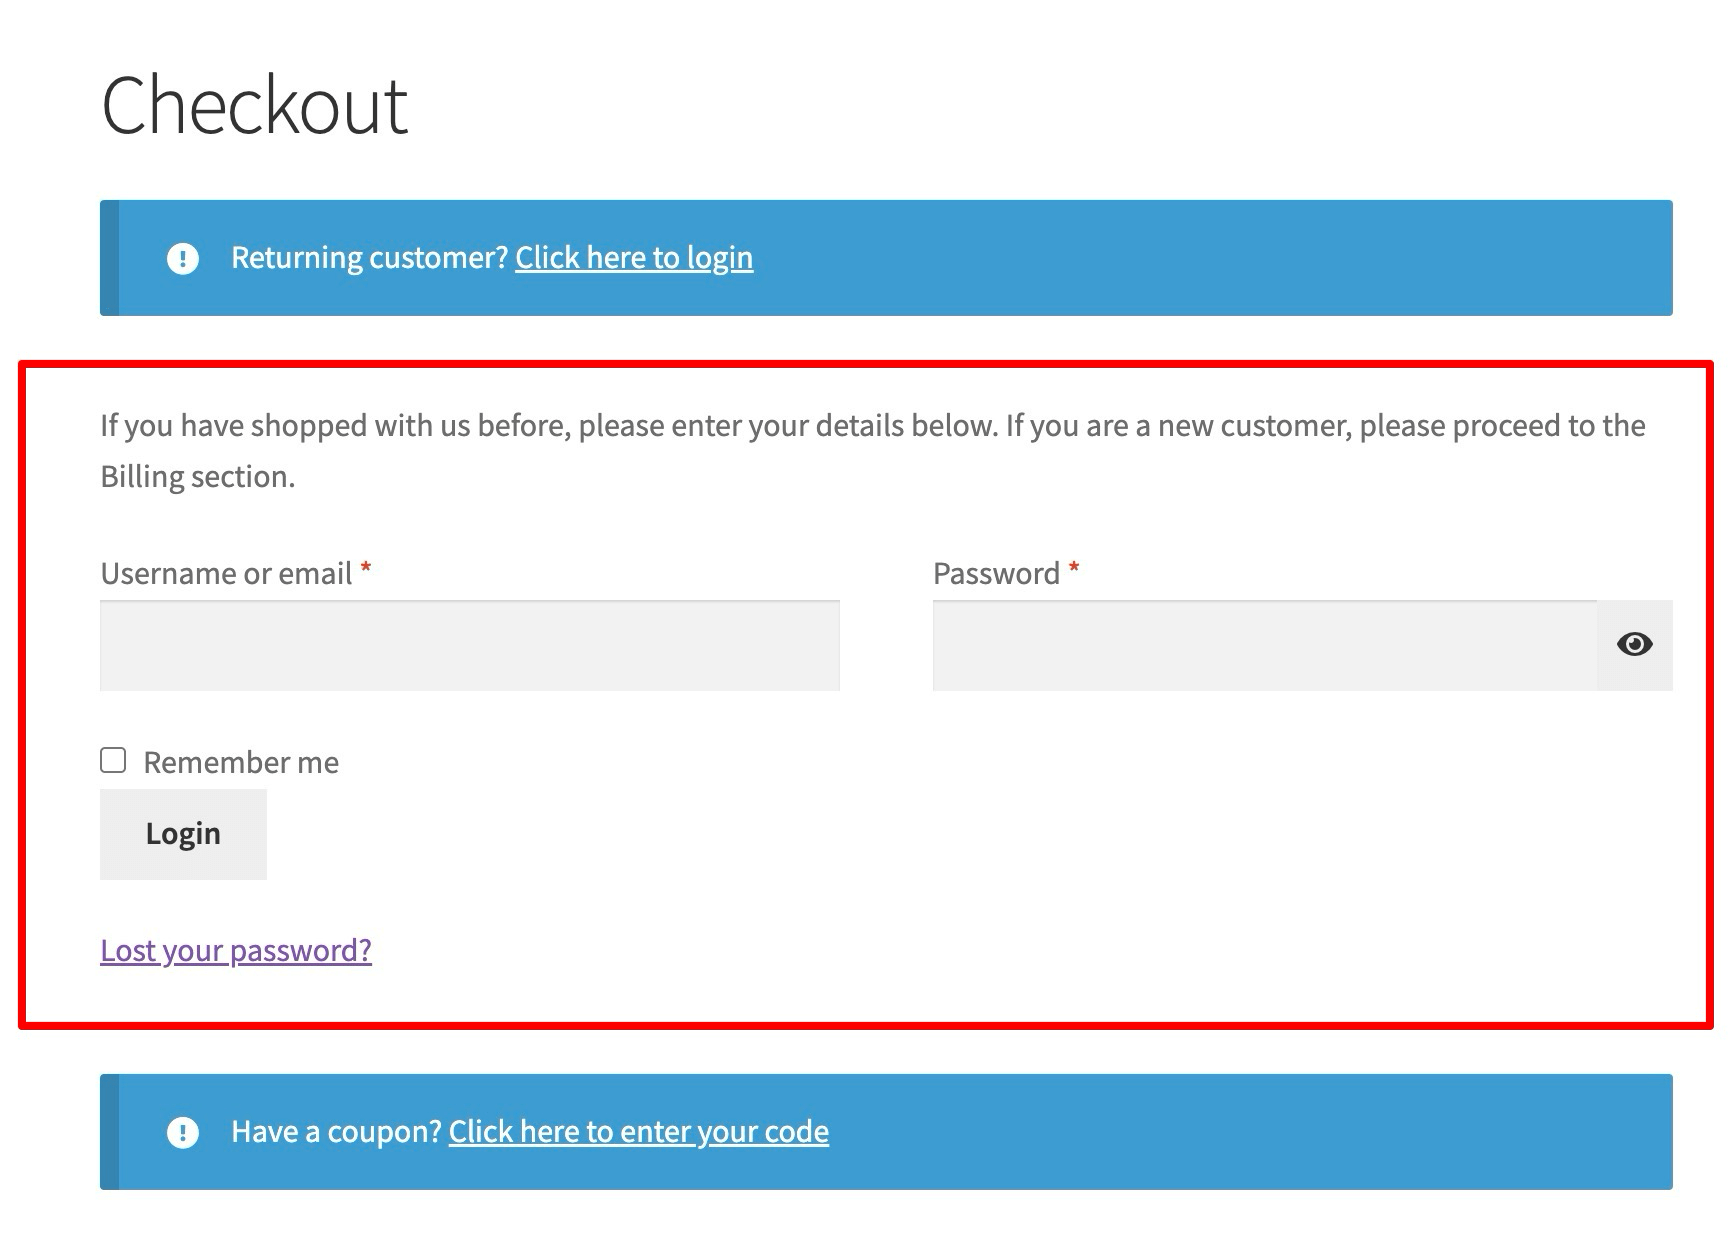
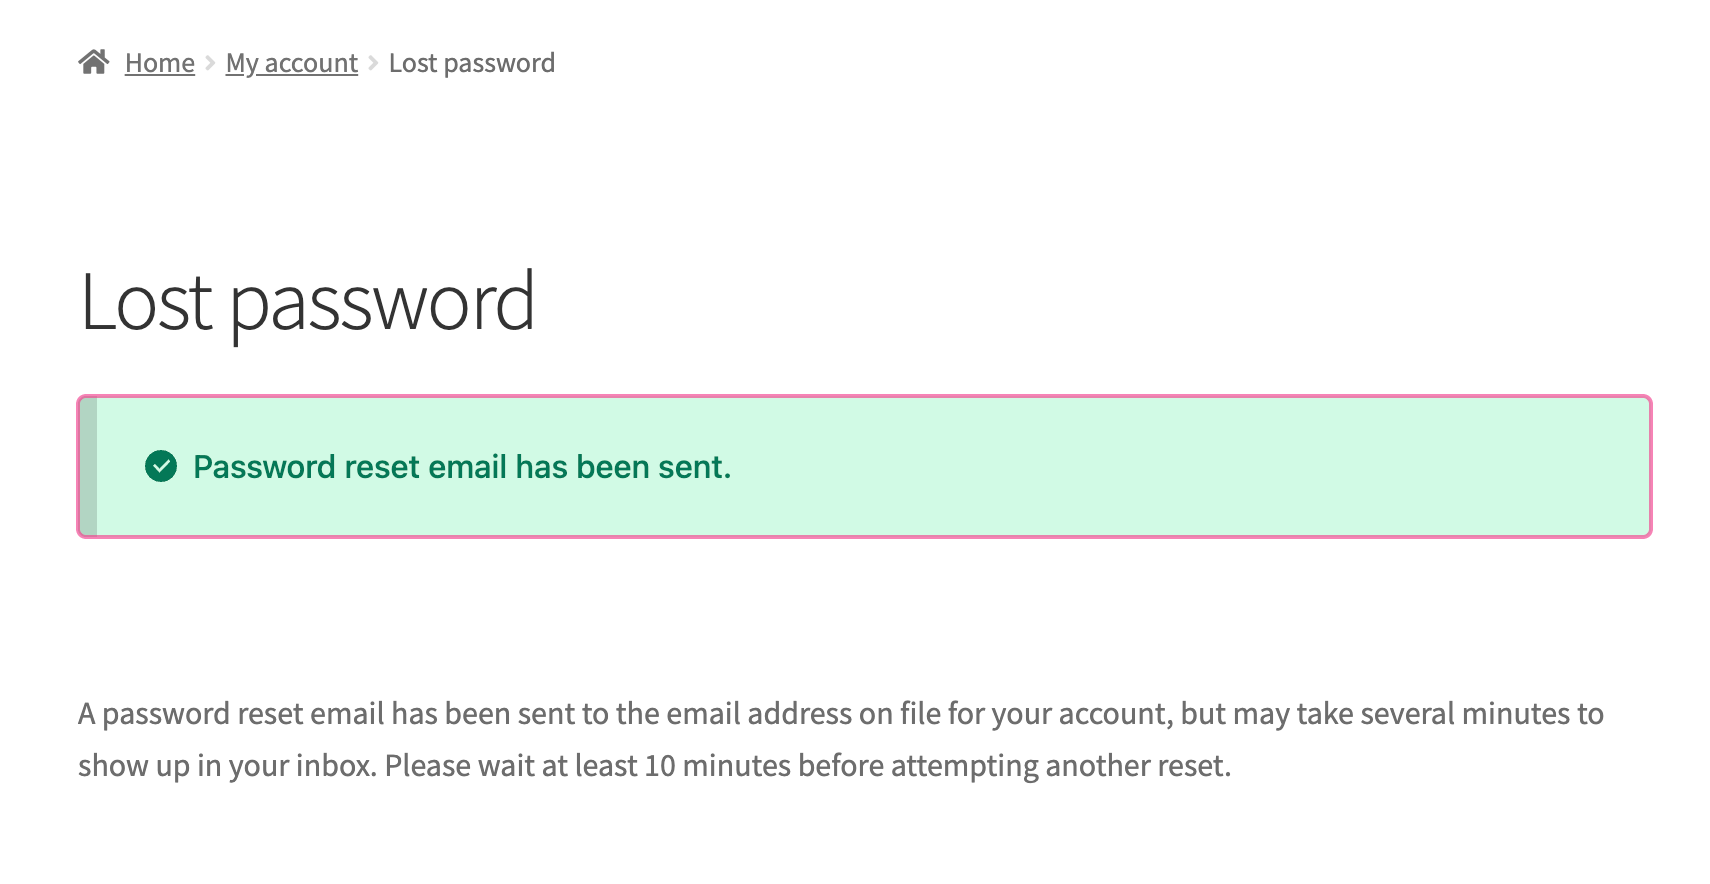
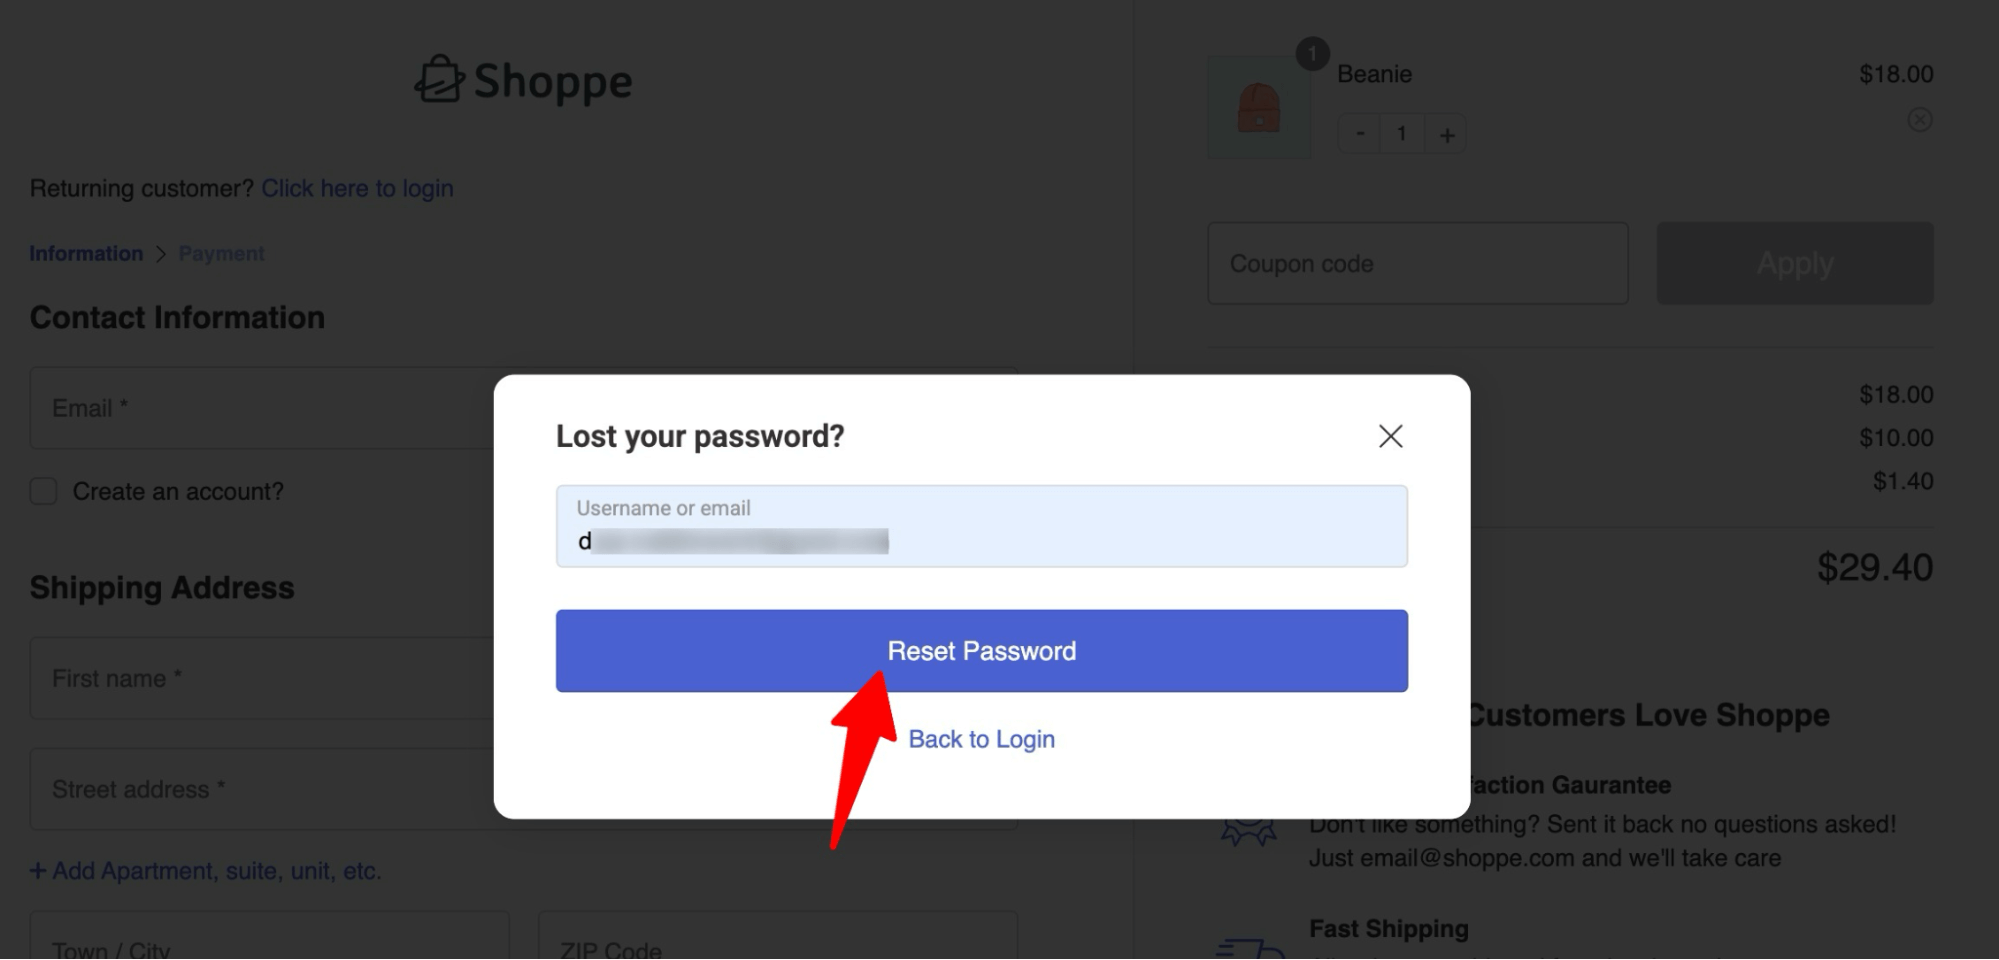
- Lost your password option
It also has a “lost your password” link. When clicked, it takes you to a new page and asks you to enter your username.
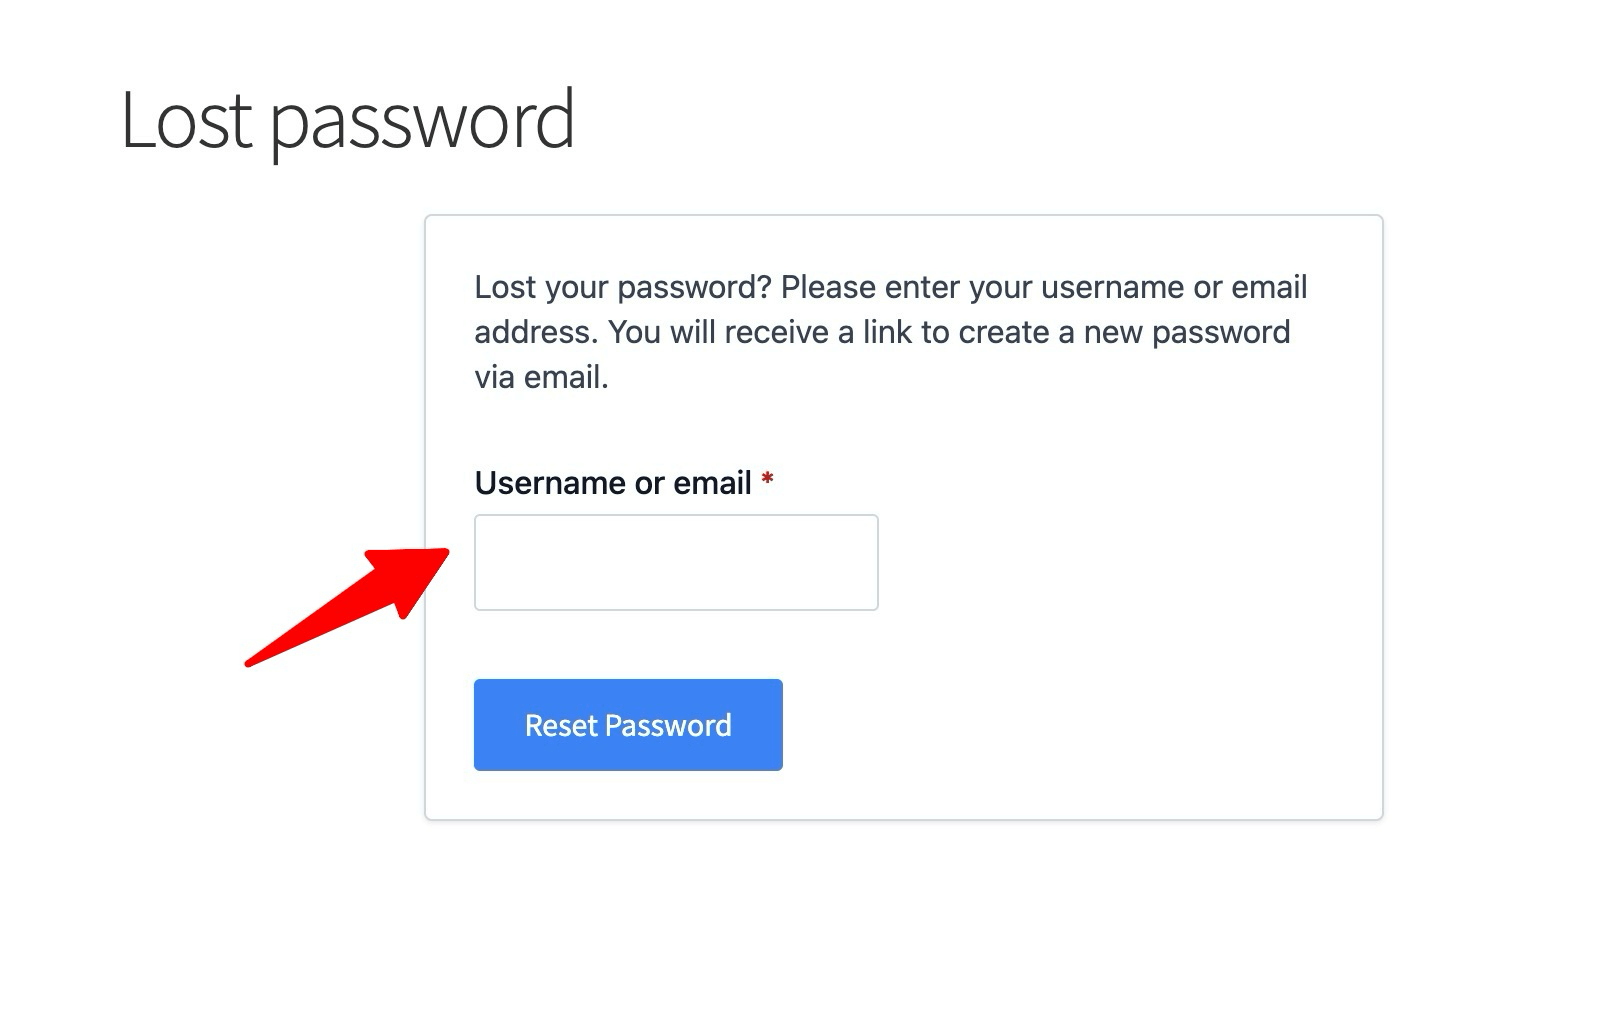
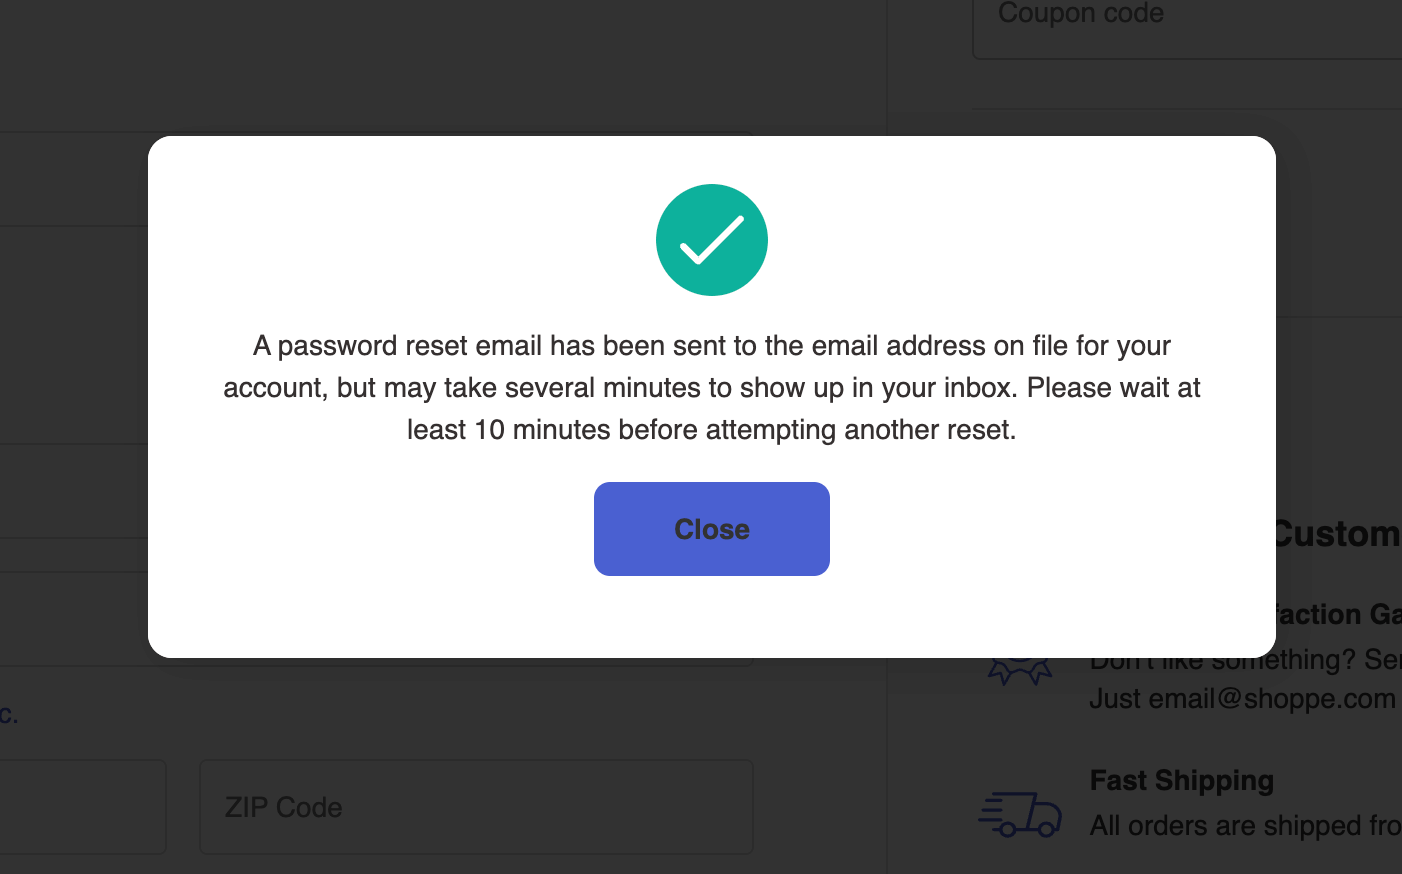
Once you provide the username or email and hit reset password, the system sends an email to your inbox.
Once you hit the reset link in your inbox, you will be redirected to another page where you can set the new password.

Once done, you will be redirected to your account.
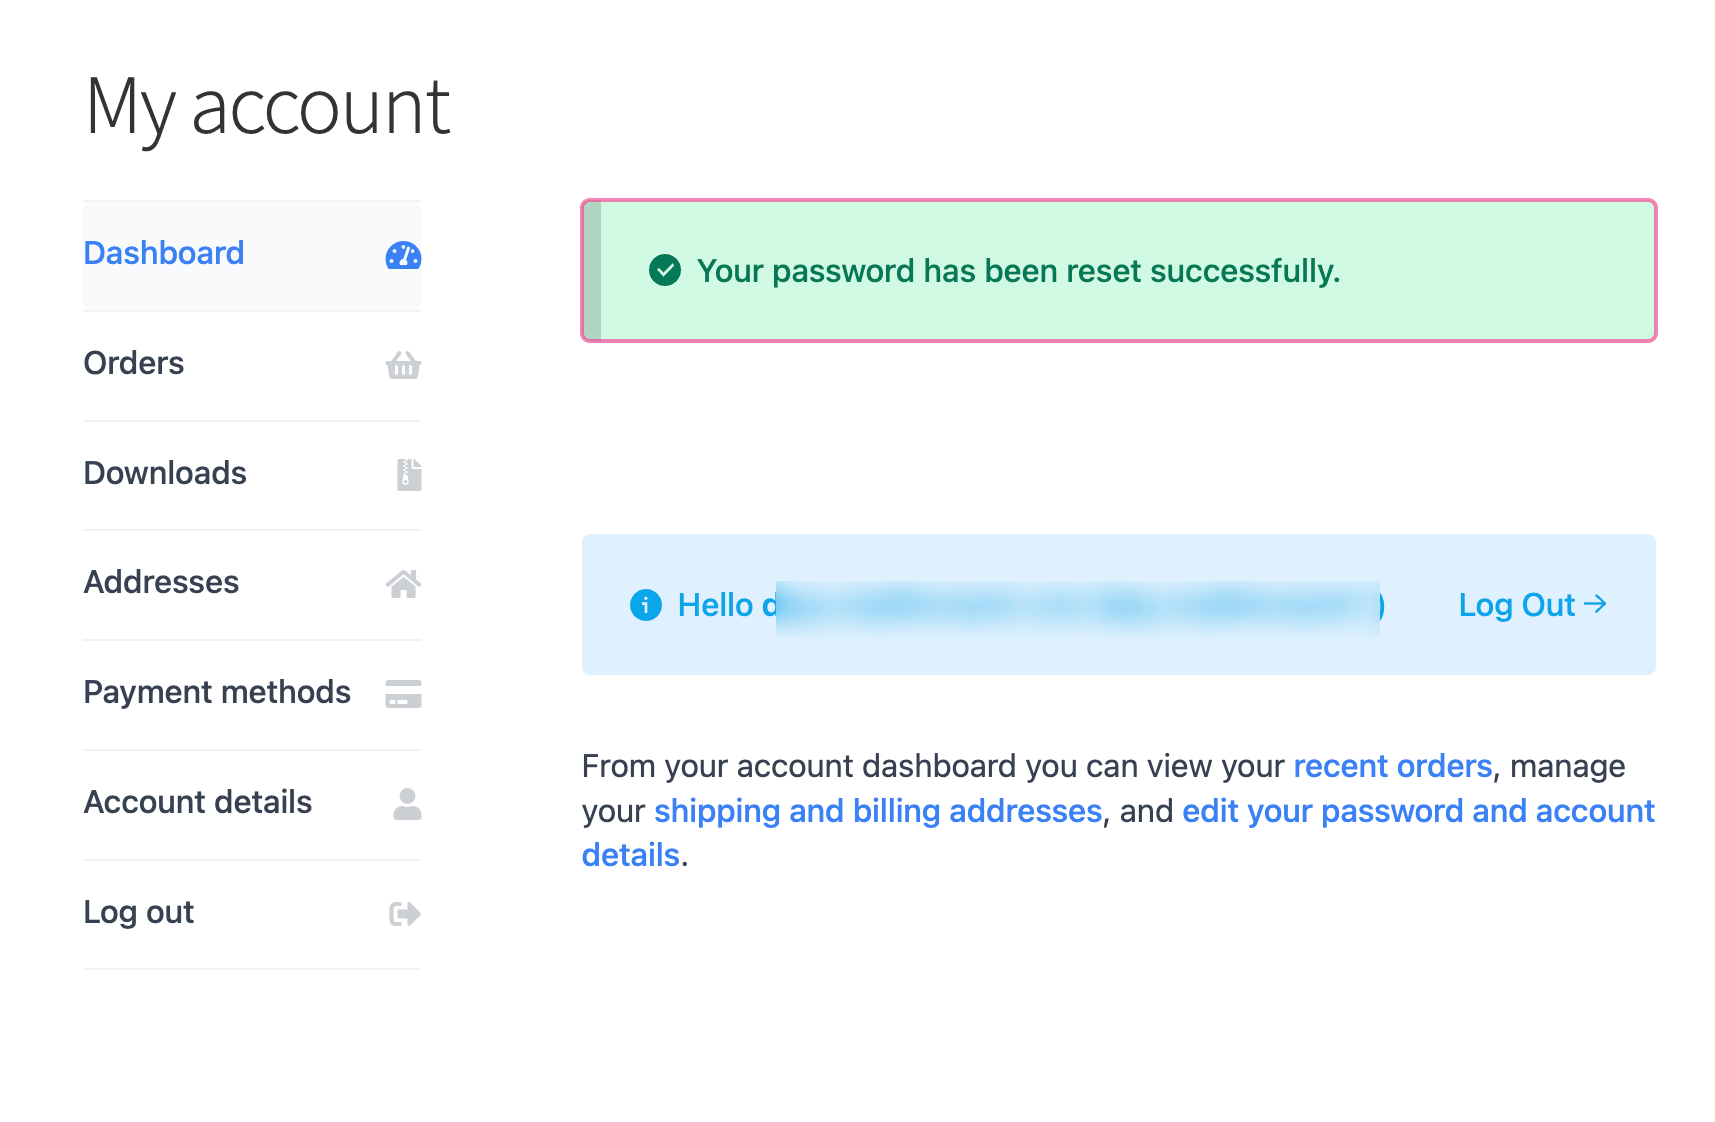
Now, there is no shortcut to go back to the checkout page to complete the purchase.
No wonder so many shoppers abandon their carts in the middle!
Now, let’s check. How does a smart, easy login in WooCommerce help you avoid such cases?
Easy Checkout Login Process
- Login for returning customers
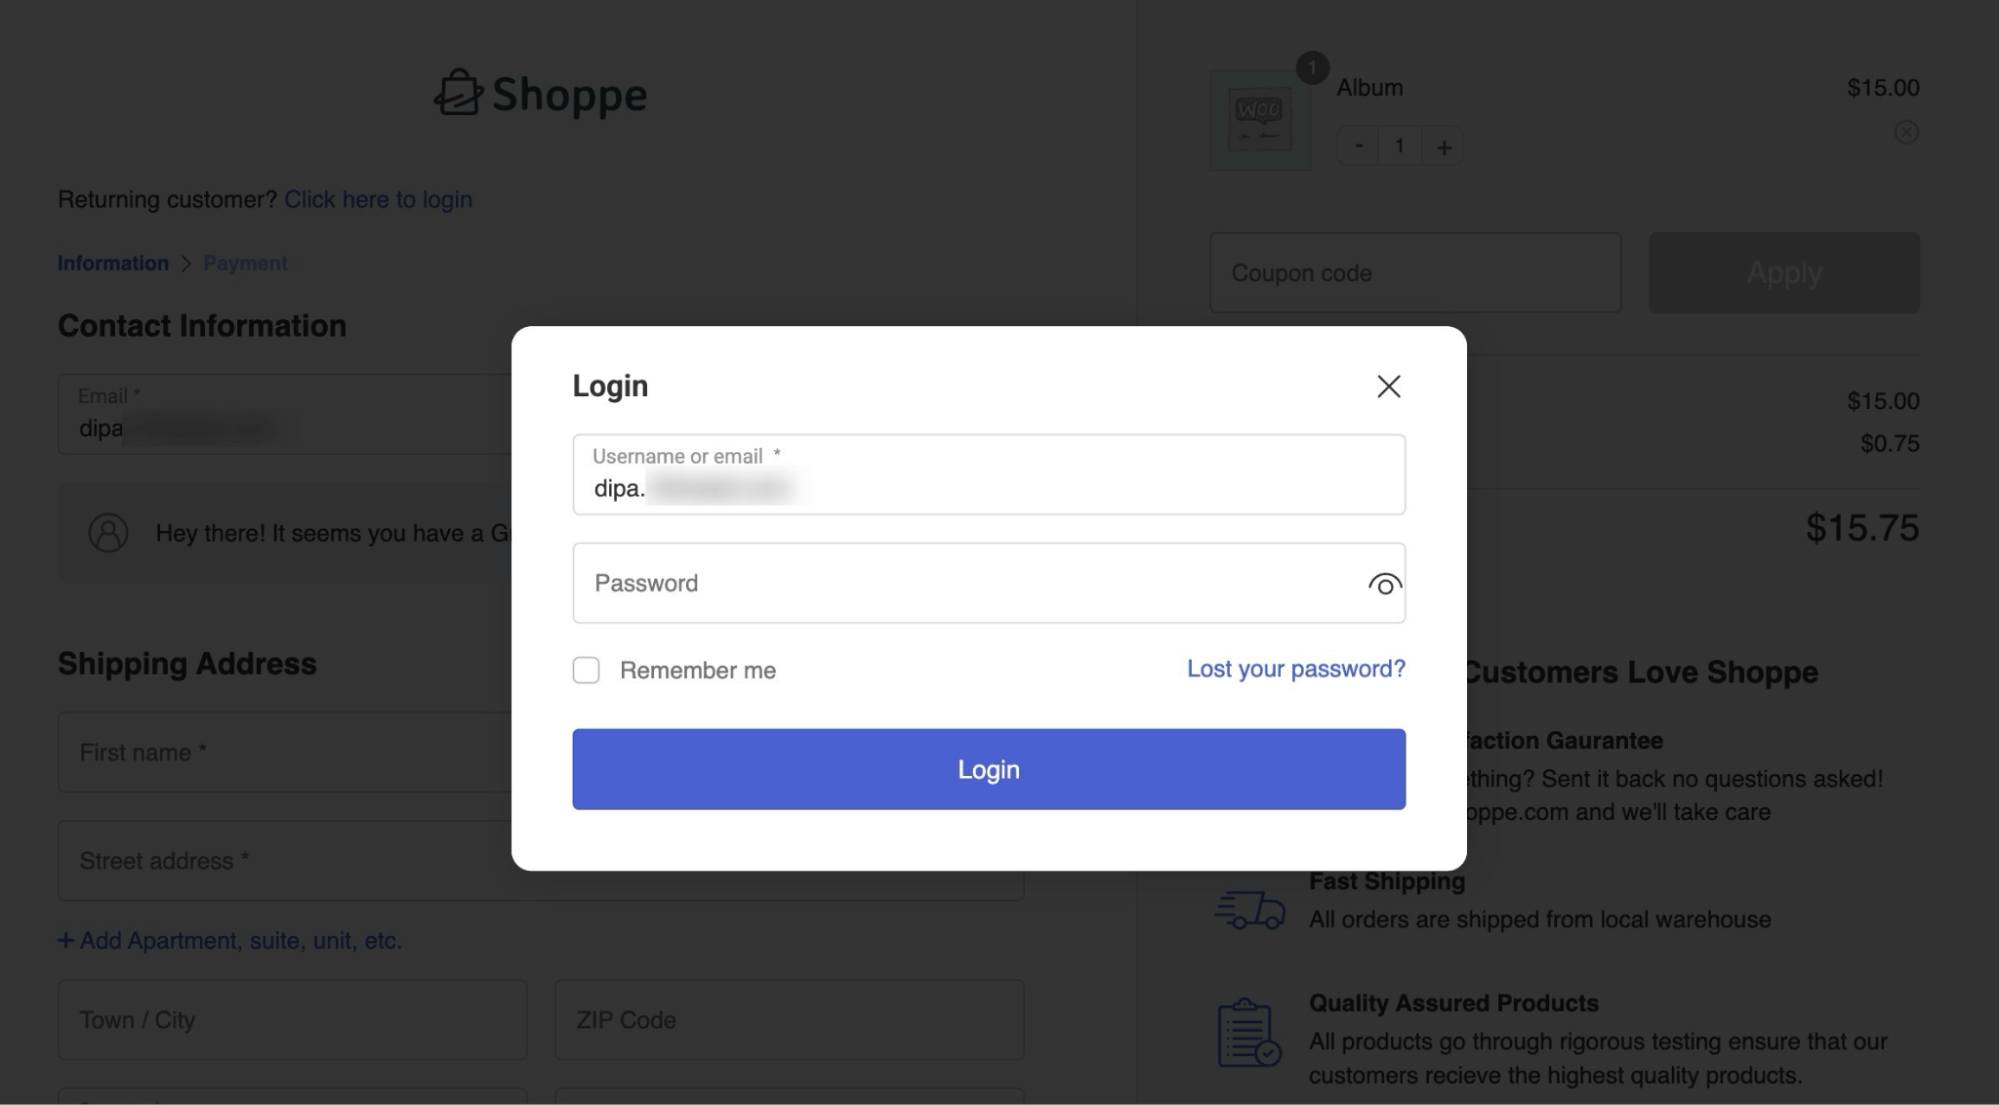
With an easy login system at checkout, existing customers see a "click here to login" option, but it's more attractive with a custom design, making it noticeable to users.
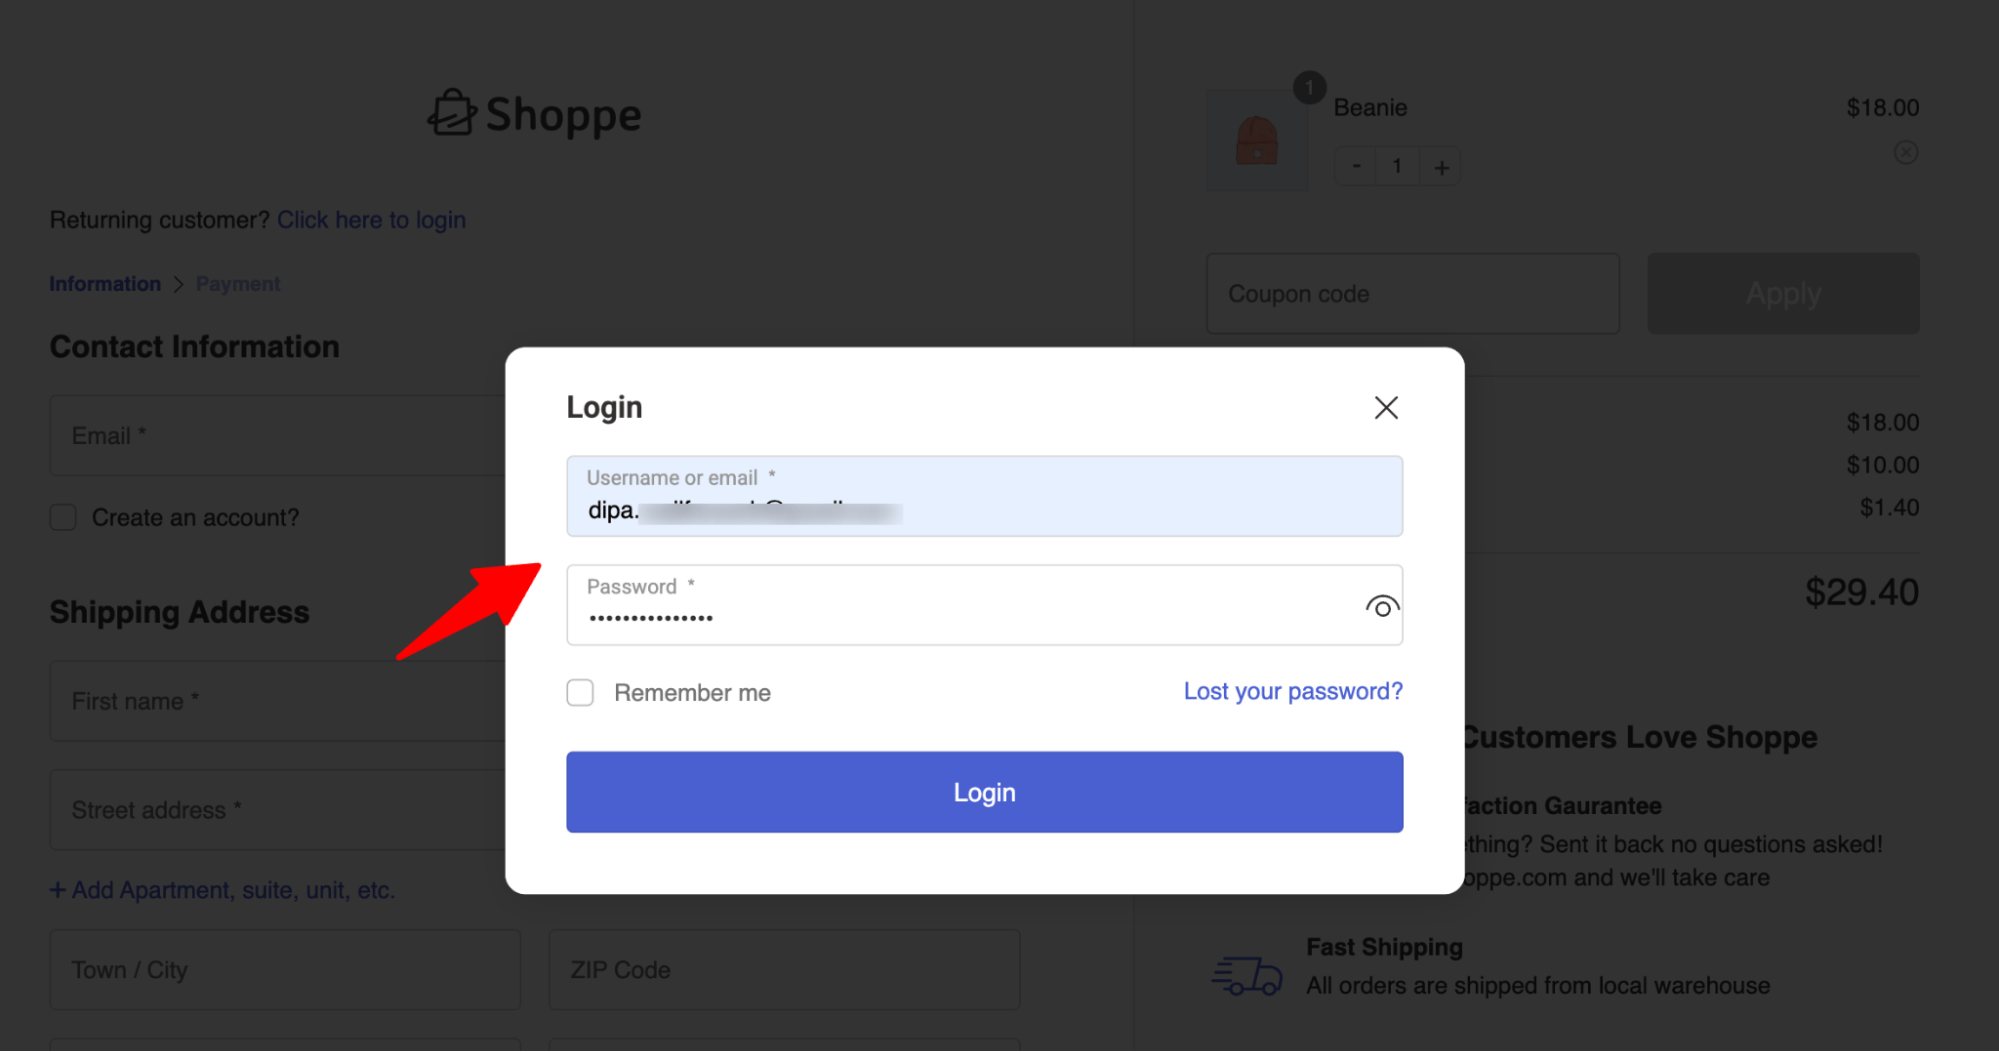
Once users hit the option, they can get an inline login option or a popup login modal, as shown below:
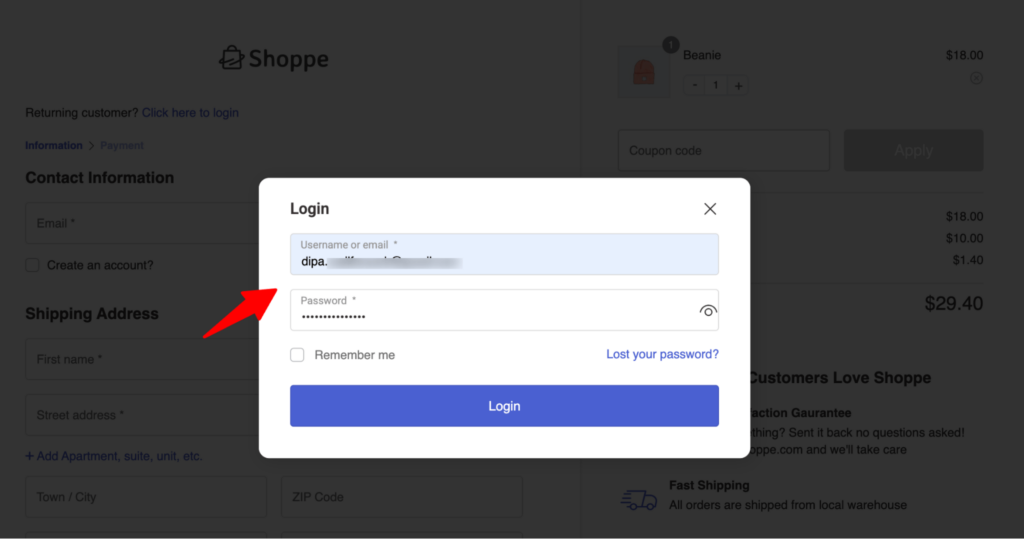
This way, users can easily log in to their accounts without leaving the page.
- Lost your password option
With the easy login Lost Your Password Link, users can provide their username to reset the password.
Then, they will receive an email with a reset link in their inbox.
Once you click the reset link in your inbox and update your password, the easy login system automatically logs you in and redirects you to the same checkout page, ready to complete your purchase.
- Nudge returning customers to log in (Not available in default)
Another impactful feature of easy login is that even if customers miss the login button and try to check out by providing their information, the smart login system checks if the email is linked to an existing account as soon as they enter their email and automatically asks users to log in.
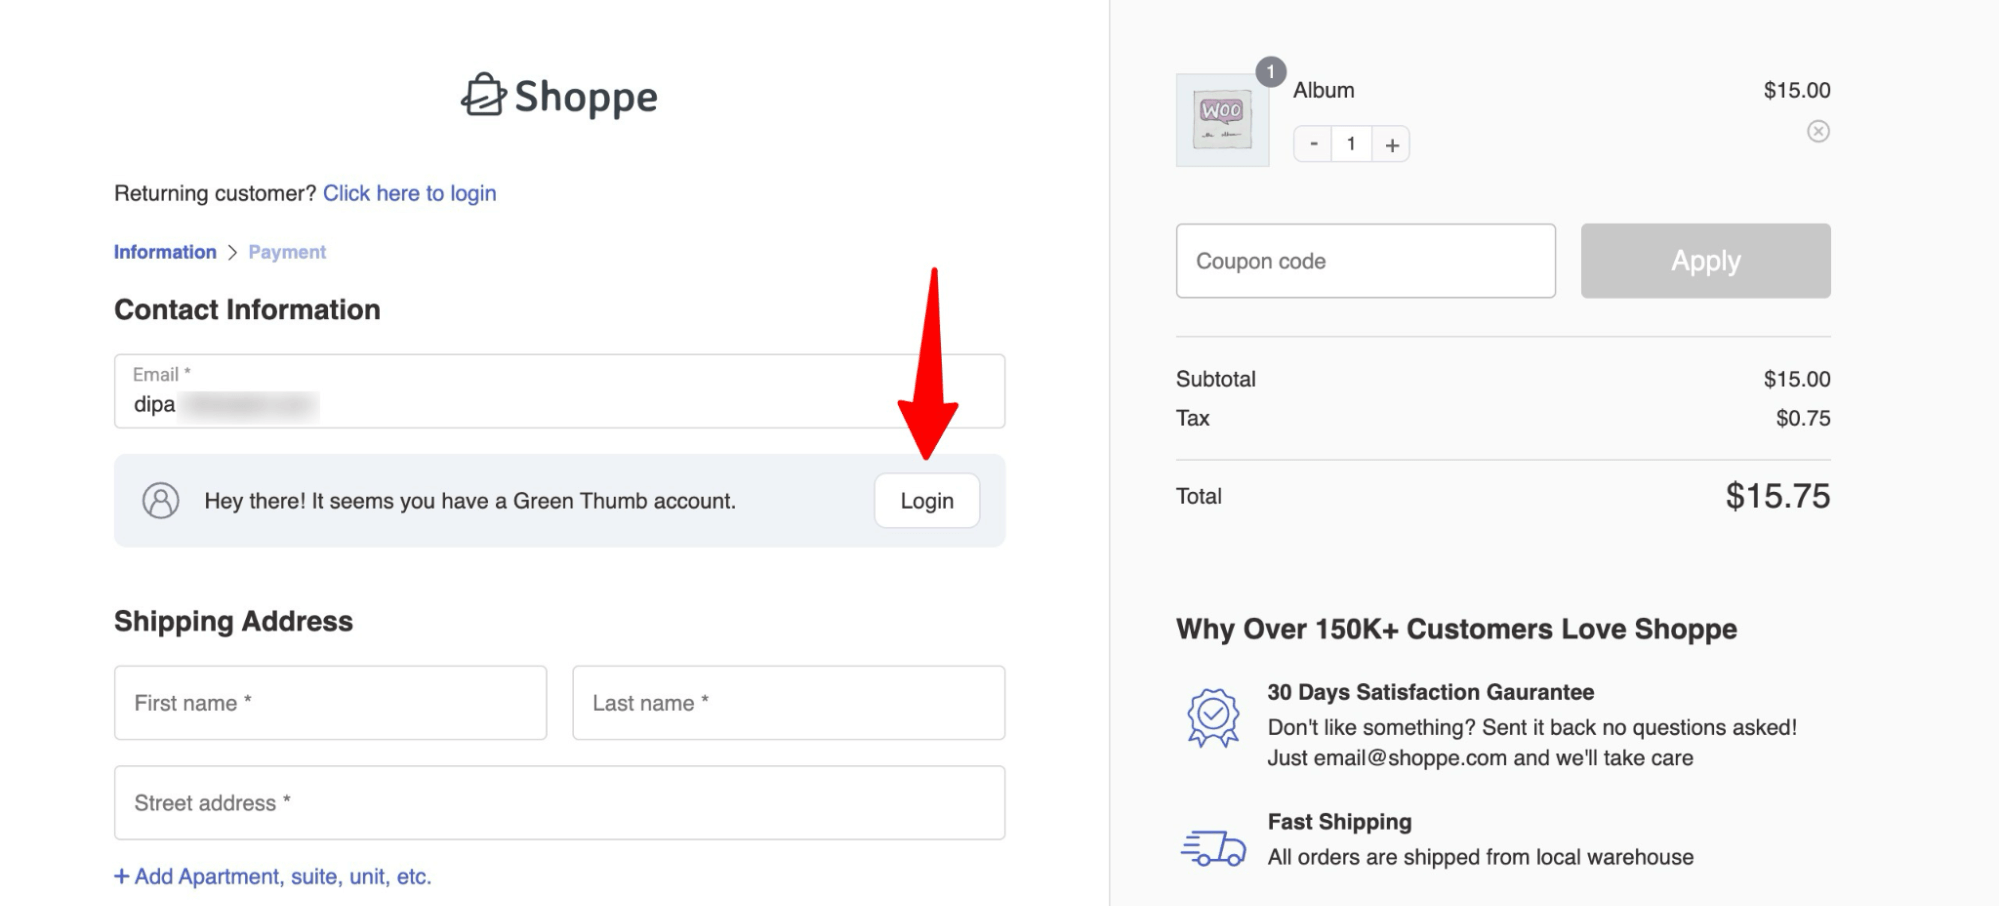
Users can simply hit the login button and easily log in and complete the checkout process.
This is how it simplifies the WooCommerce login process for customers.
By now, we’re sure you understand the difference easy login makes in terms of user experience and checkout login compared to the default option.
How to Add Easy Login to WooCommerce Checkout Page? (Step-by-Step)
You can easily add an easy login using FunnelKit Funnel Builder.
This is the ultimate checkout page customizer plugin for WooCommerce, giving you complete flexibility to design and optimize your checkout, ensuring you provide your customers with the best shopping experience.
Along with checkout page customization, you can also offer additional cross-sell and upsell recommendations on the checkout page and right after checkout, which is a proven way of boosting the AOV of your store.
"Getting compelling results for clients with FunnelKit (formerly WooFunnels). We made $5700 last month on a brand new store and $1000 with just one-click upsells. So that’s $1000 of profits added to our bottom line just because we use upsells.” - Marvin Coffman
To access the smart, easy log-in feature that aligns with the AOV features, you will need both the free and premium versions of FunnelKit Funnel Builder.
So, make sure to install and activate the plugins:
Short on time? Watch this video

Now, follow this step-by-step process.
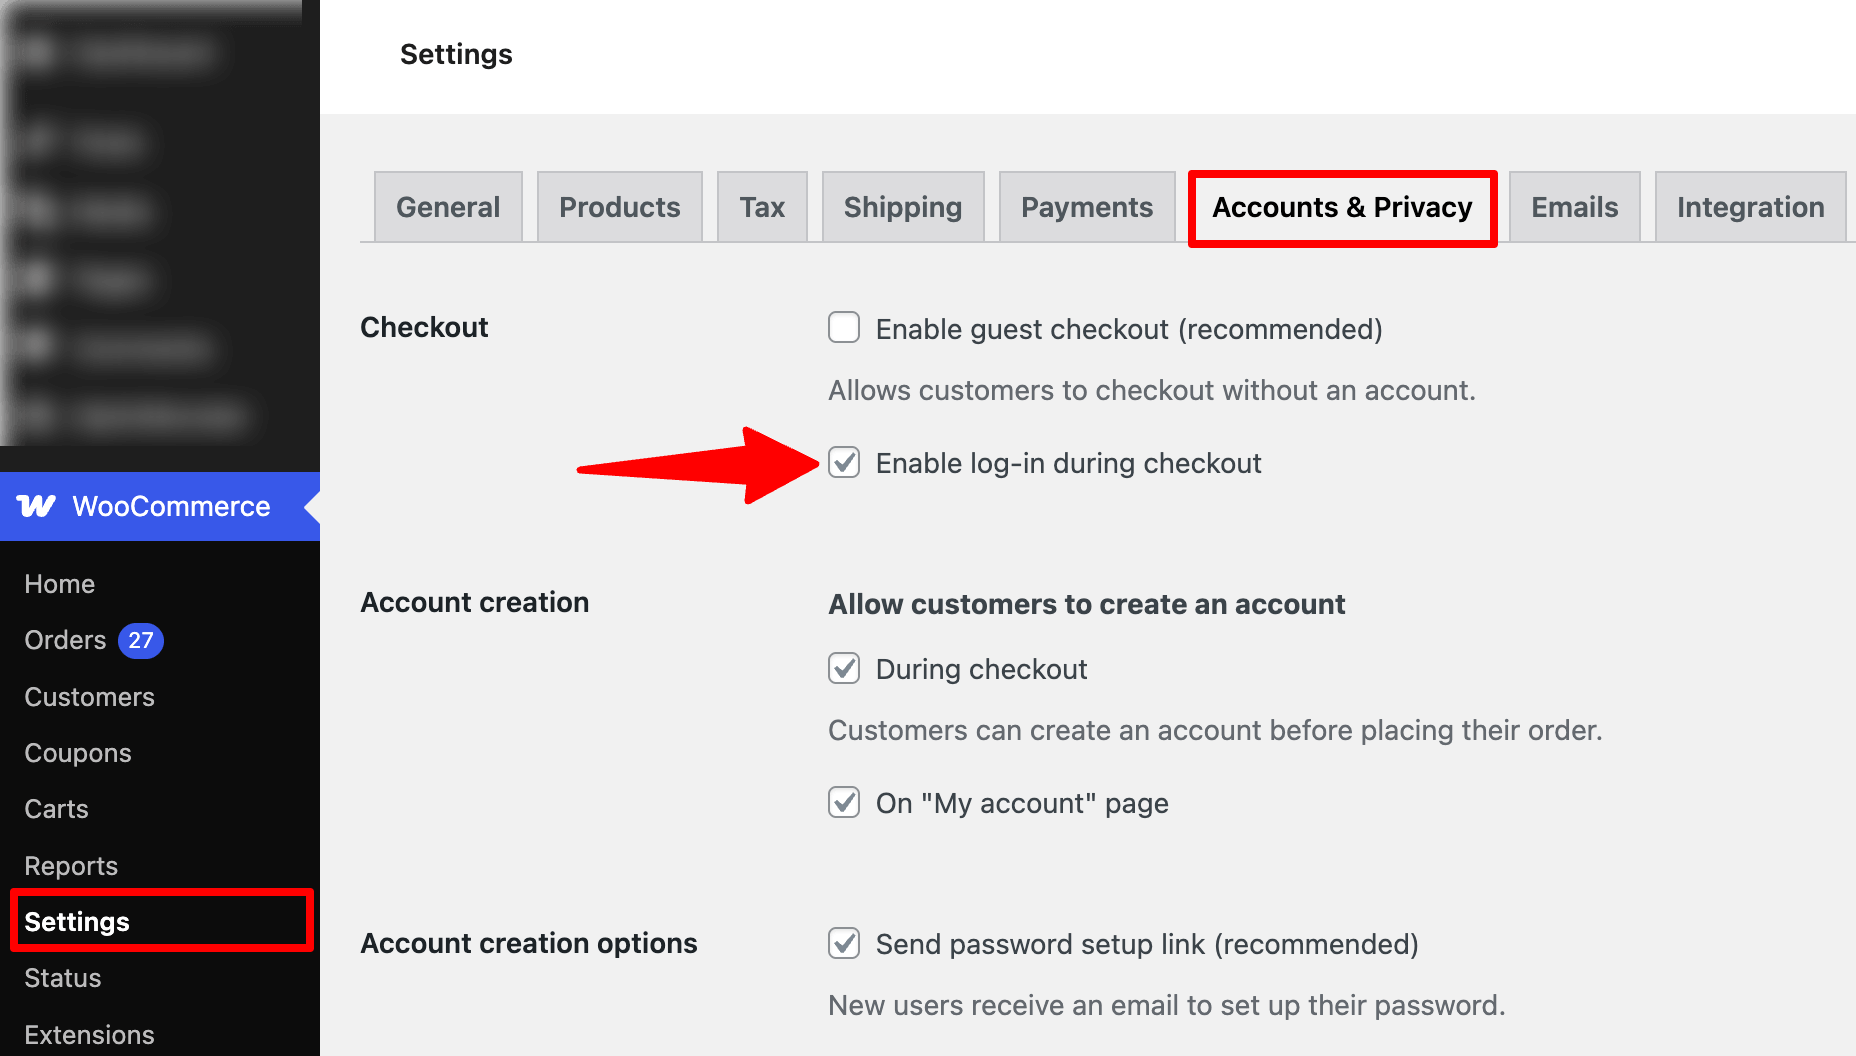
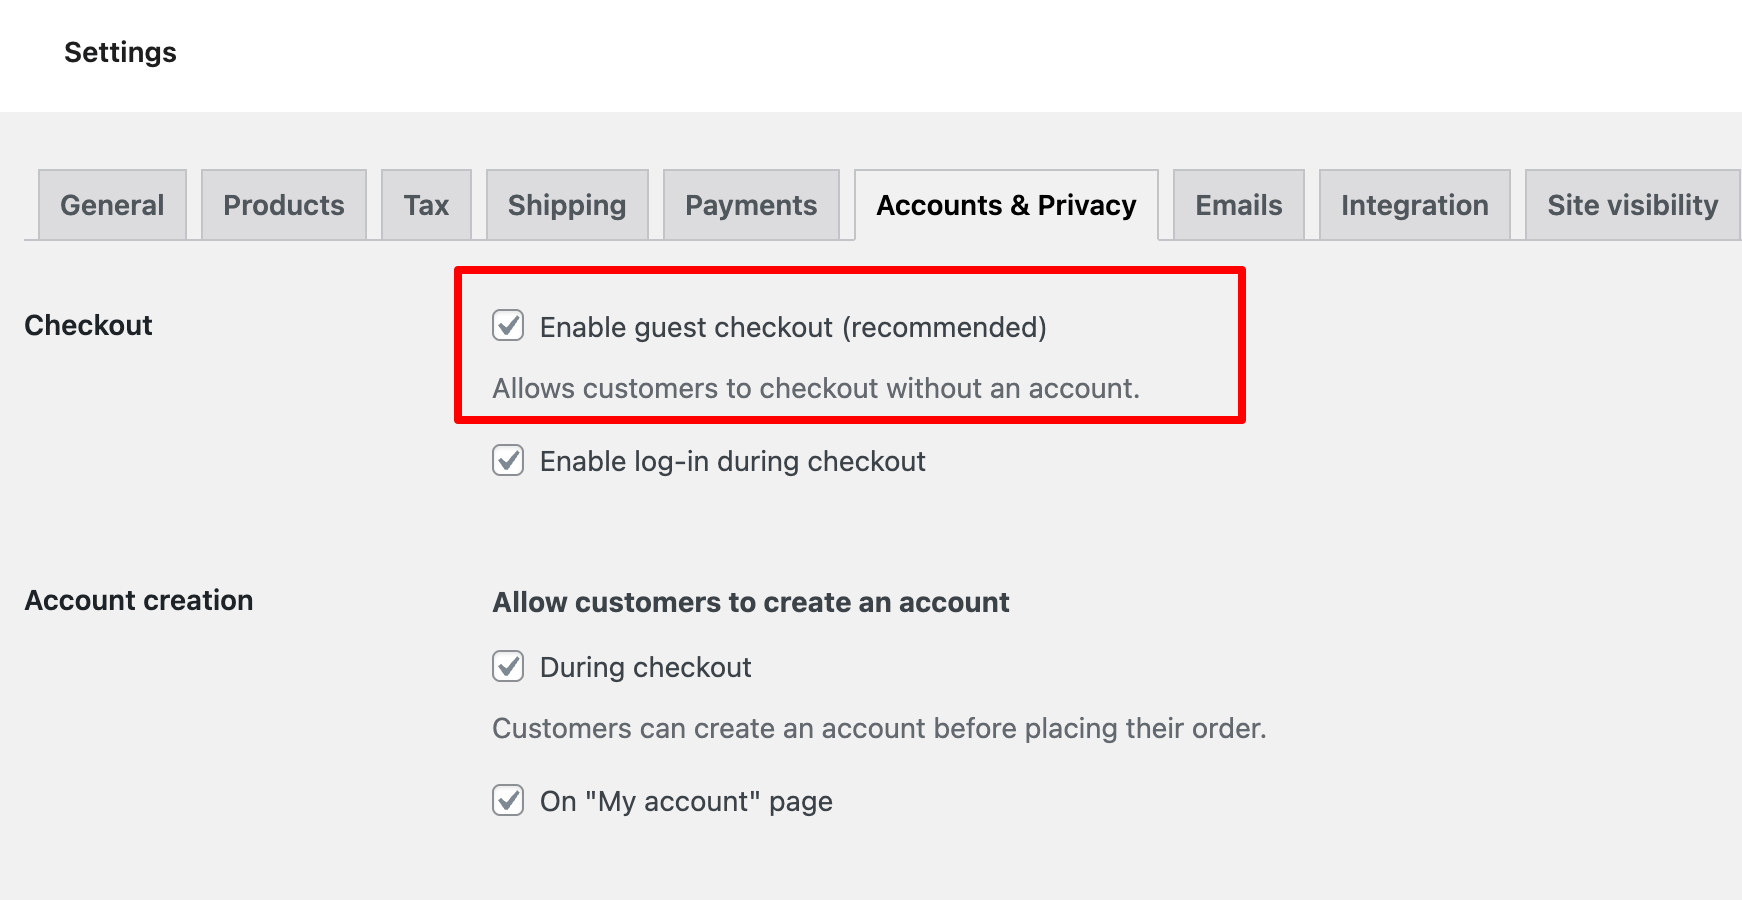
Step 1: Allow customers to log in to their existing accounts
First, Navigate to WooCommerce ⇒ Settings ⇒ Accounts and Privacy.
Check the option “Enable log-in during checkout” under checkout and hit Save changes to update.
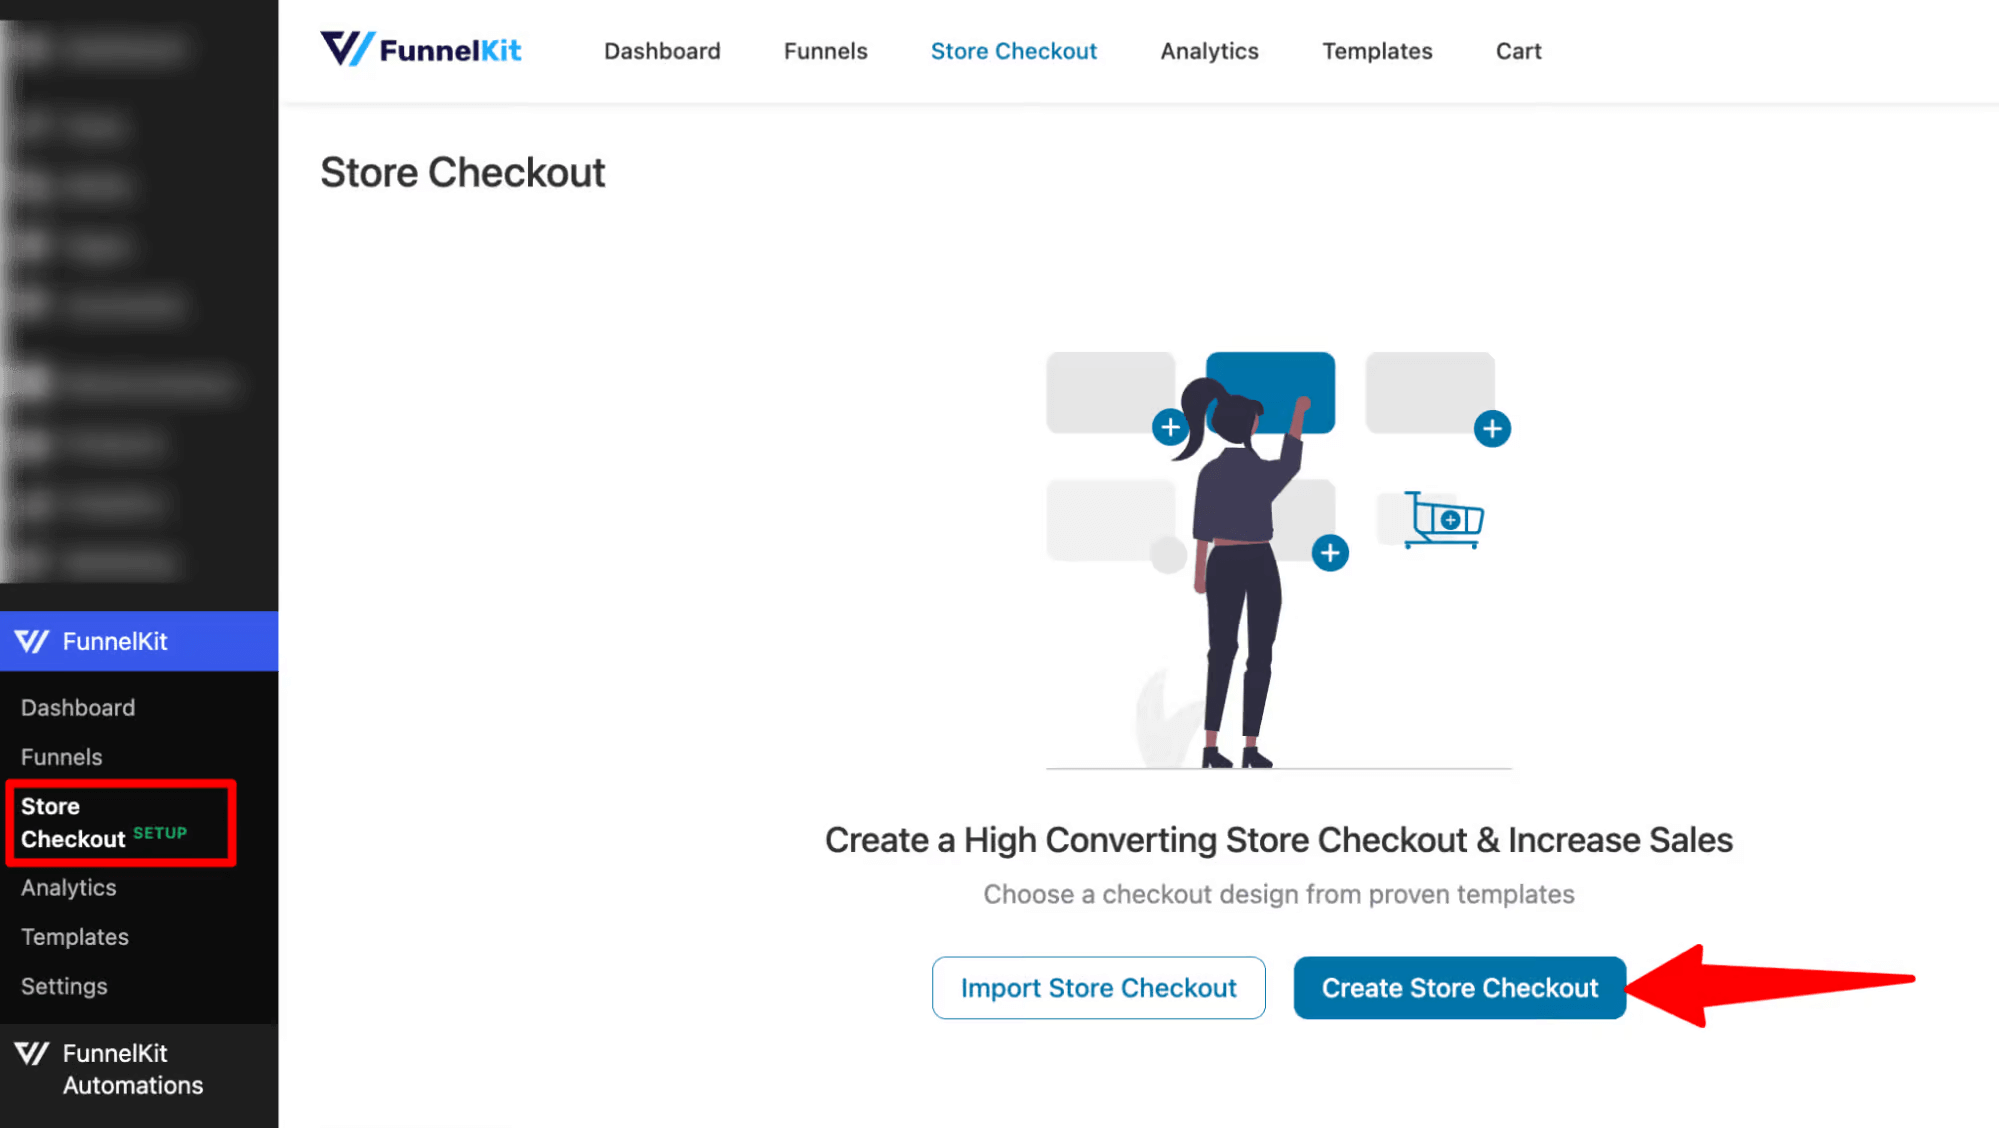
Step 2: Create a store checkout
The next step is to create a store checkout that will replace the default WooCommerce checkout page.
For that, navigate to FunnelKit ⇒ Store Checkout and click on the ‘Create Store Checkout’ button.
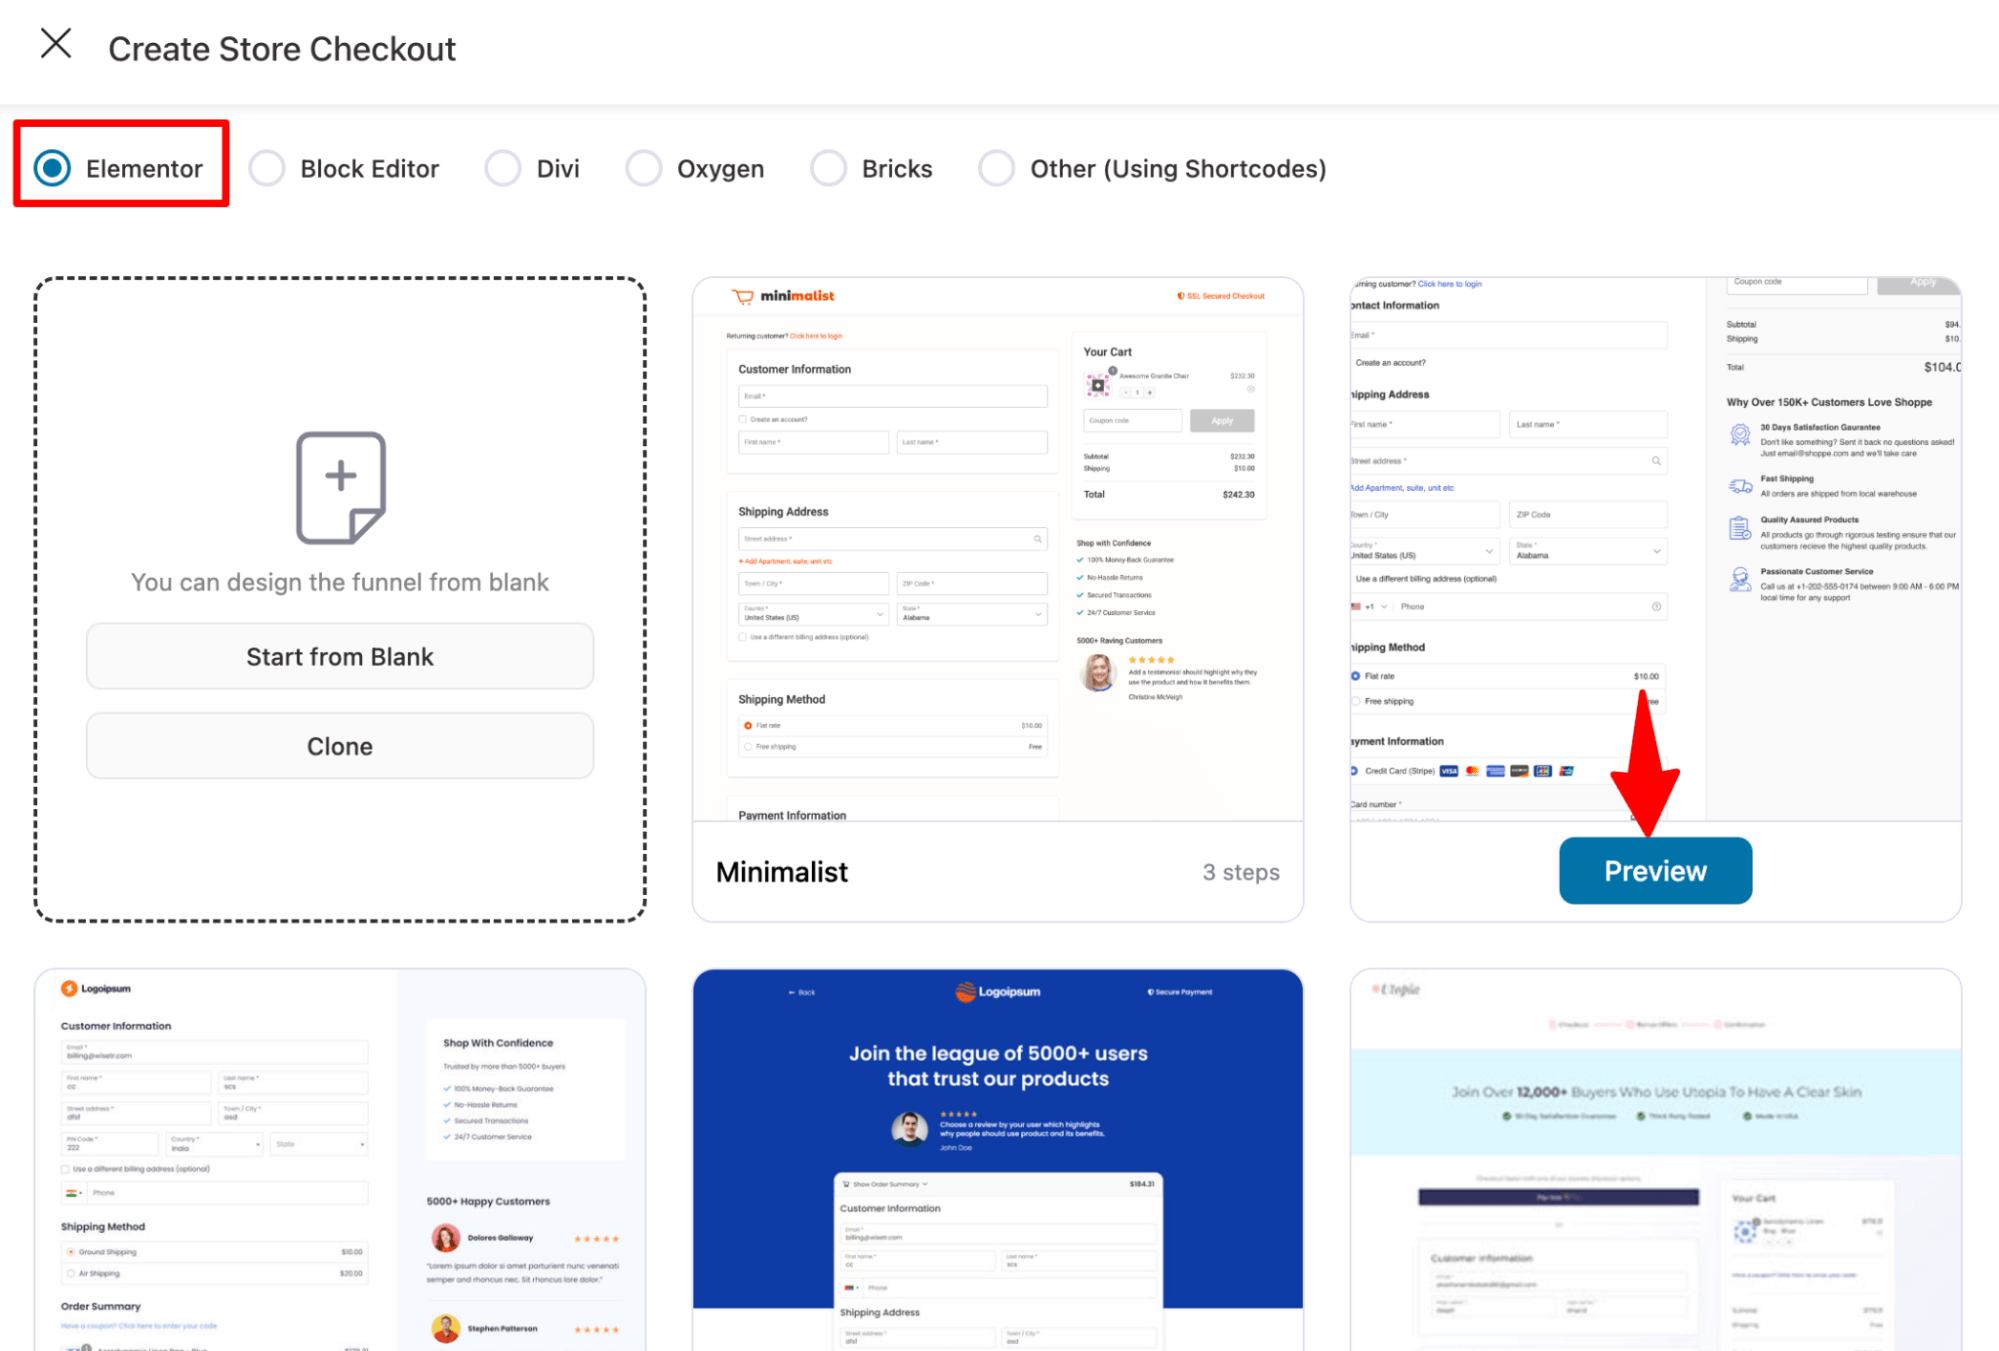
After that, select your favourite page builder and choose a template from the prebuilt checkout templates that FunnelKit provides.
You can select any page builder you prefer, like Elementor, Divi, Gutenberg, Bricks, Oxygen, etc., or use shortcodes with other builders you want.
To select one, hover on the template you like and click Preview. Here, we choose the Elementor page builder and the Shoppe template.
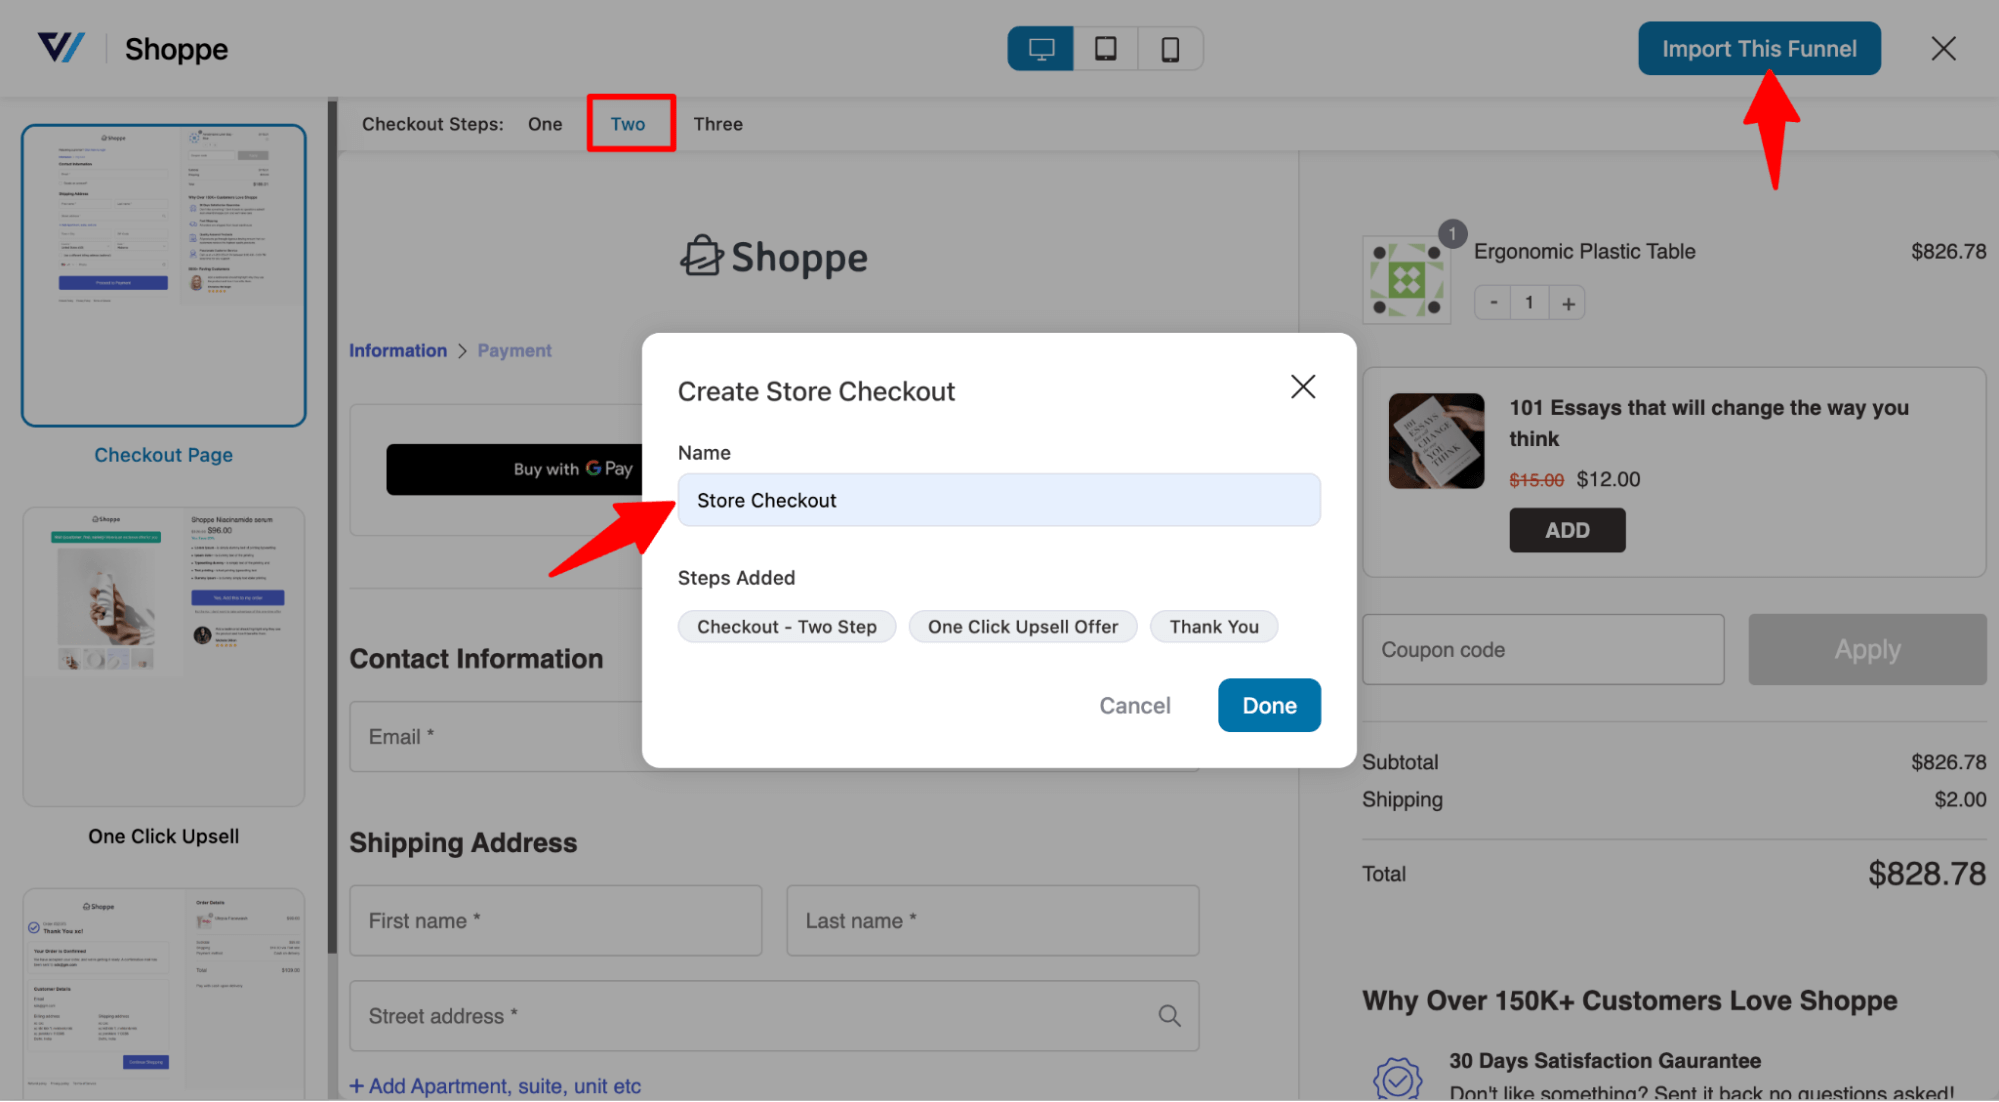
Next, select the number of pages you want on your checkout page. We are going with a multi-step checkout one with 2 steps.
After that, click on “Import This Funnel,” provide a name, and hit the Add button to import your store checkout funnel.
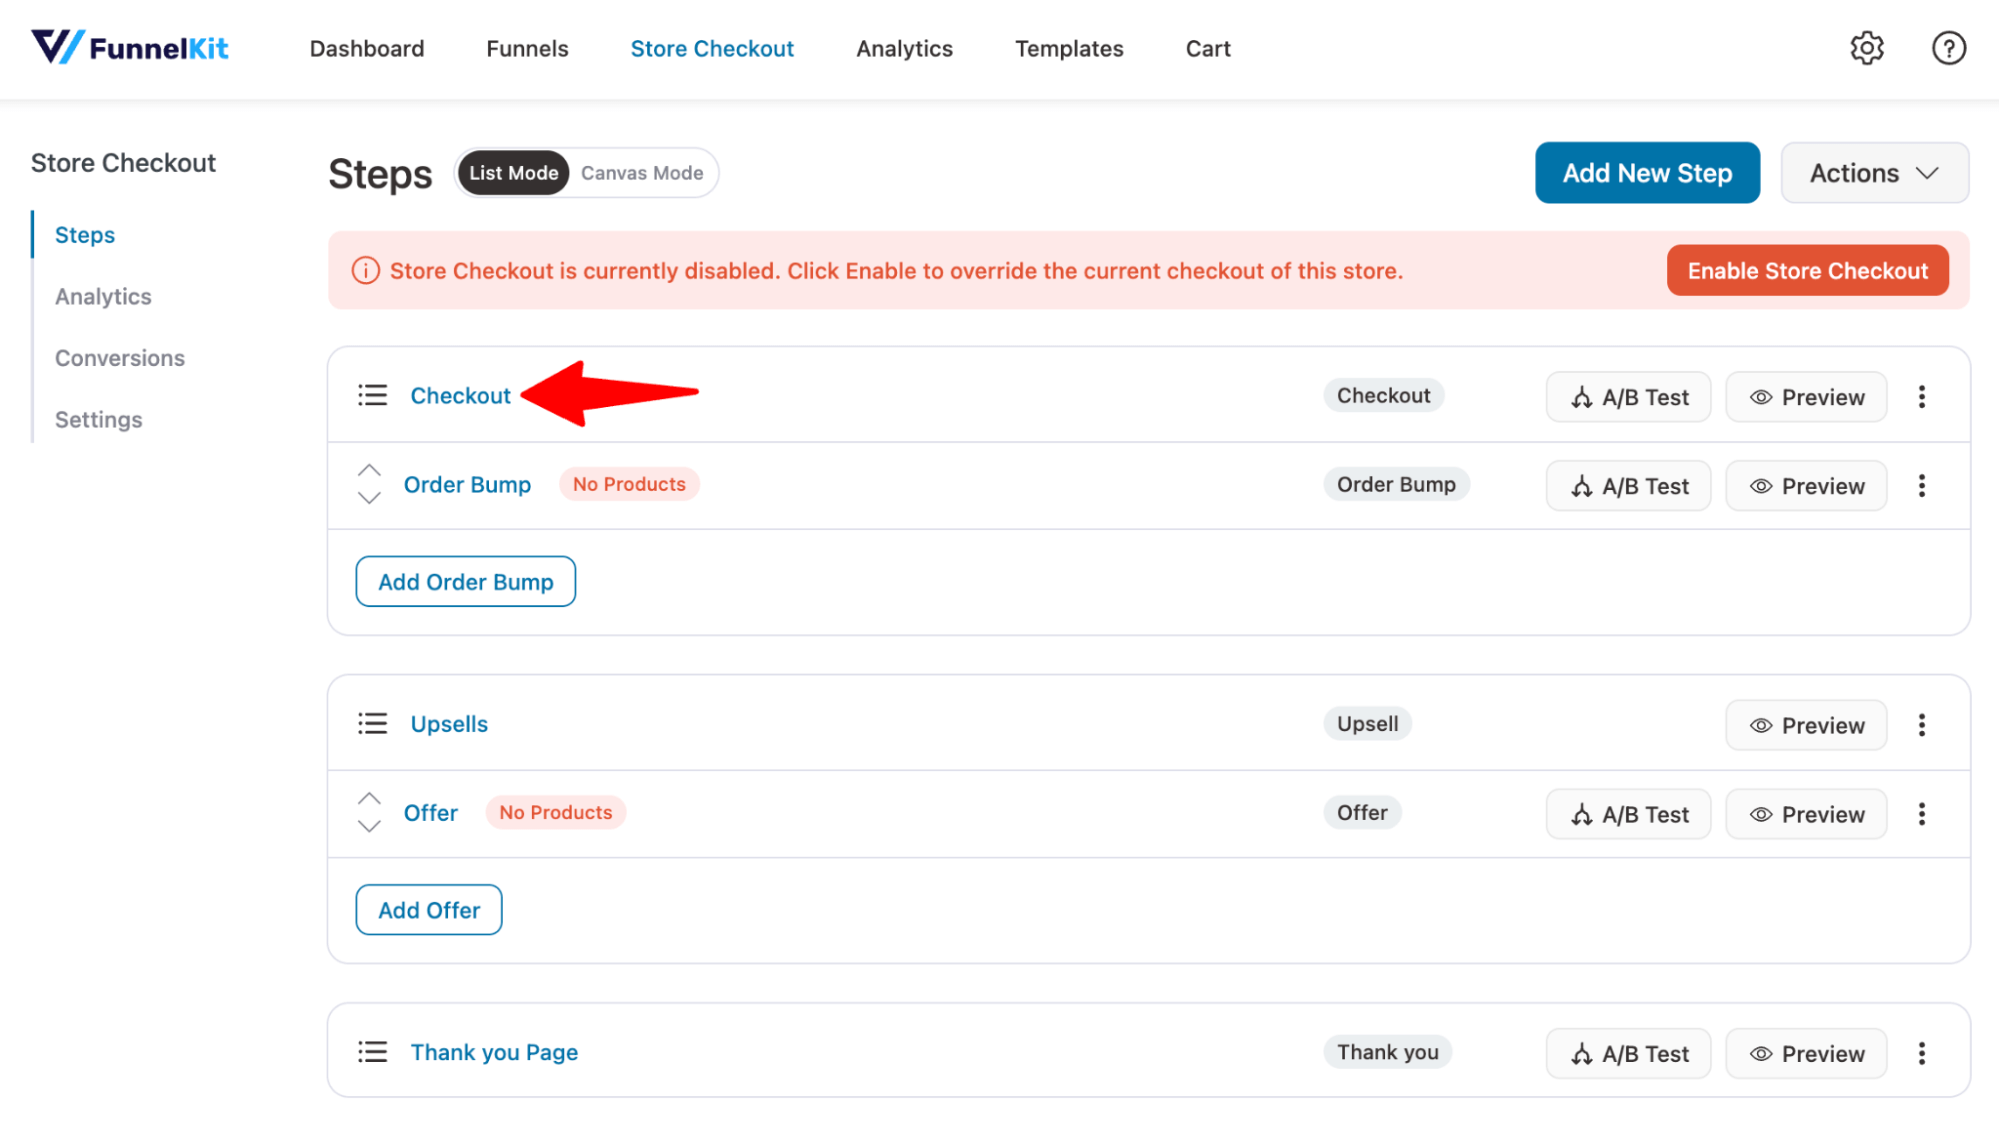
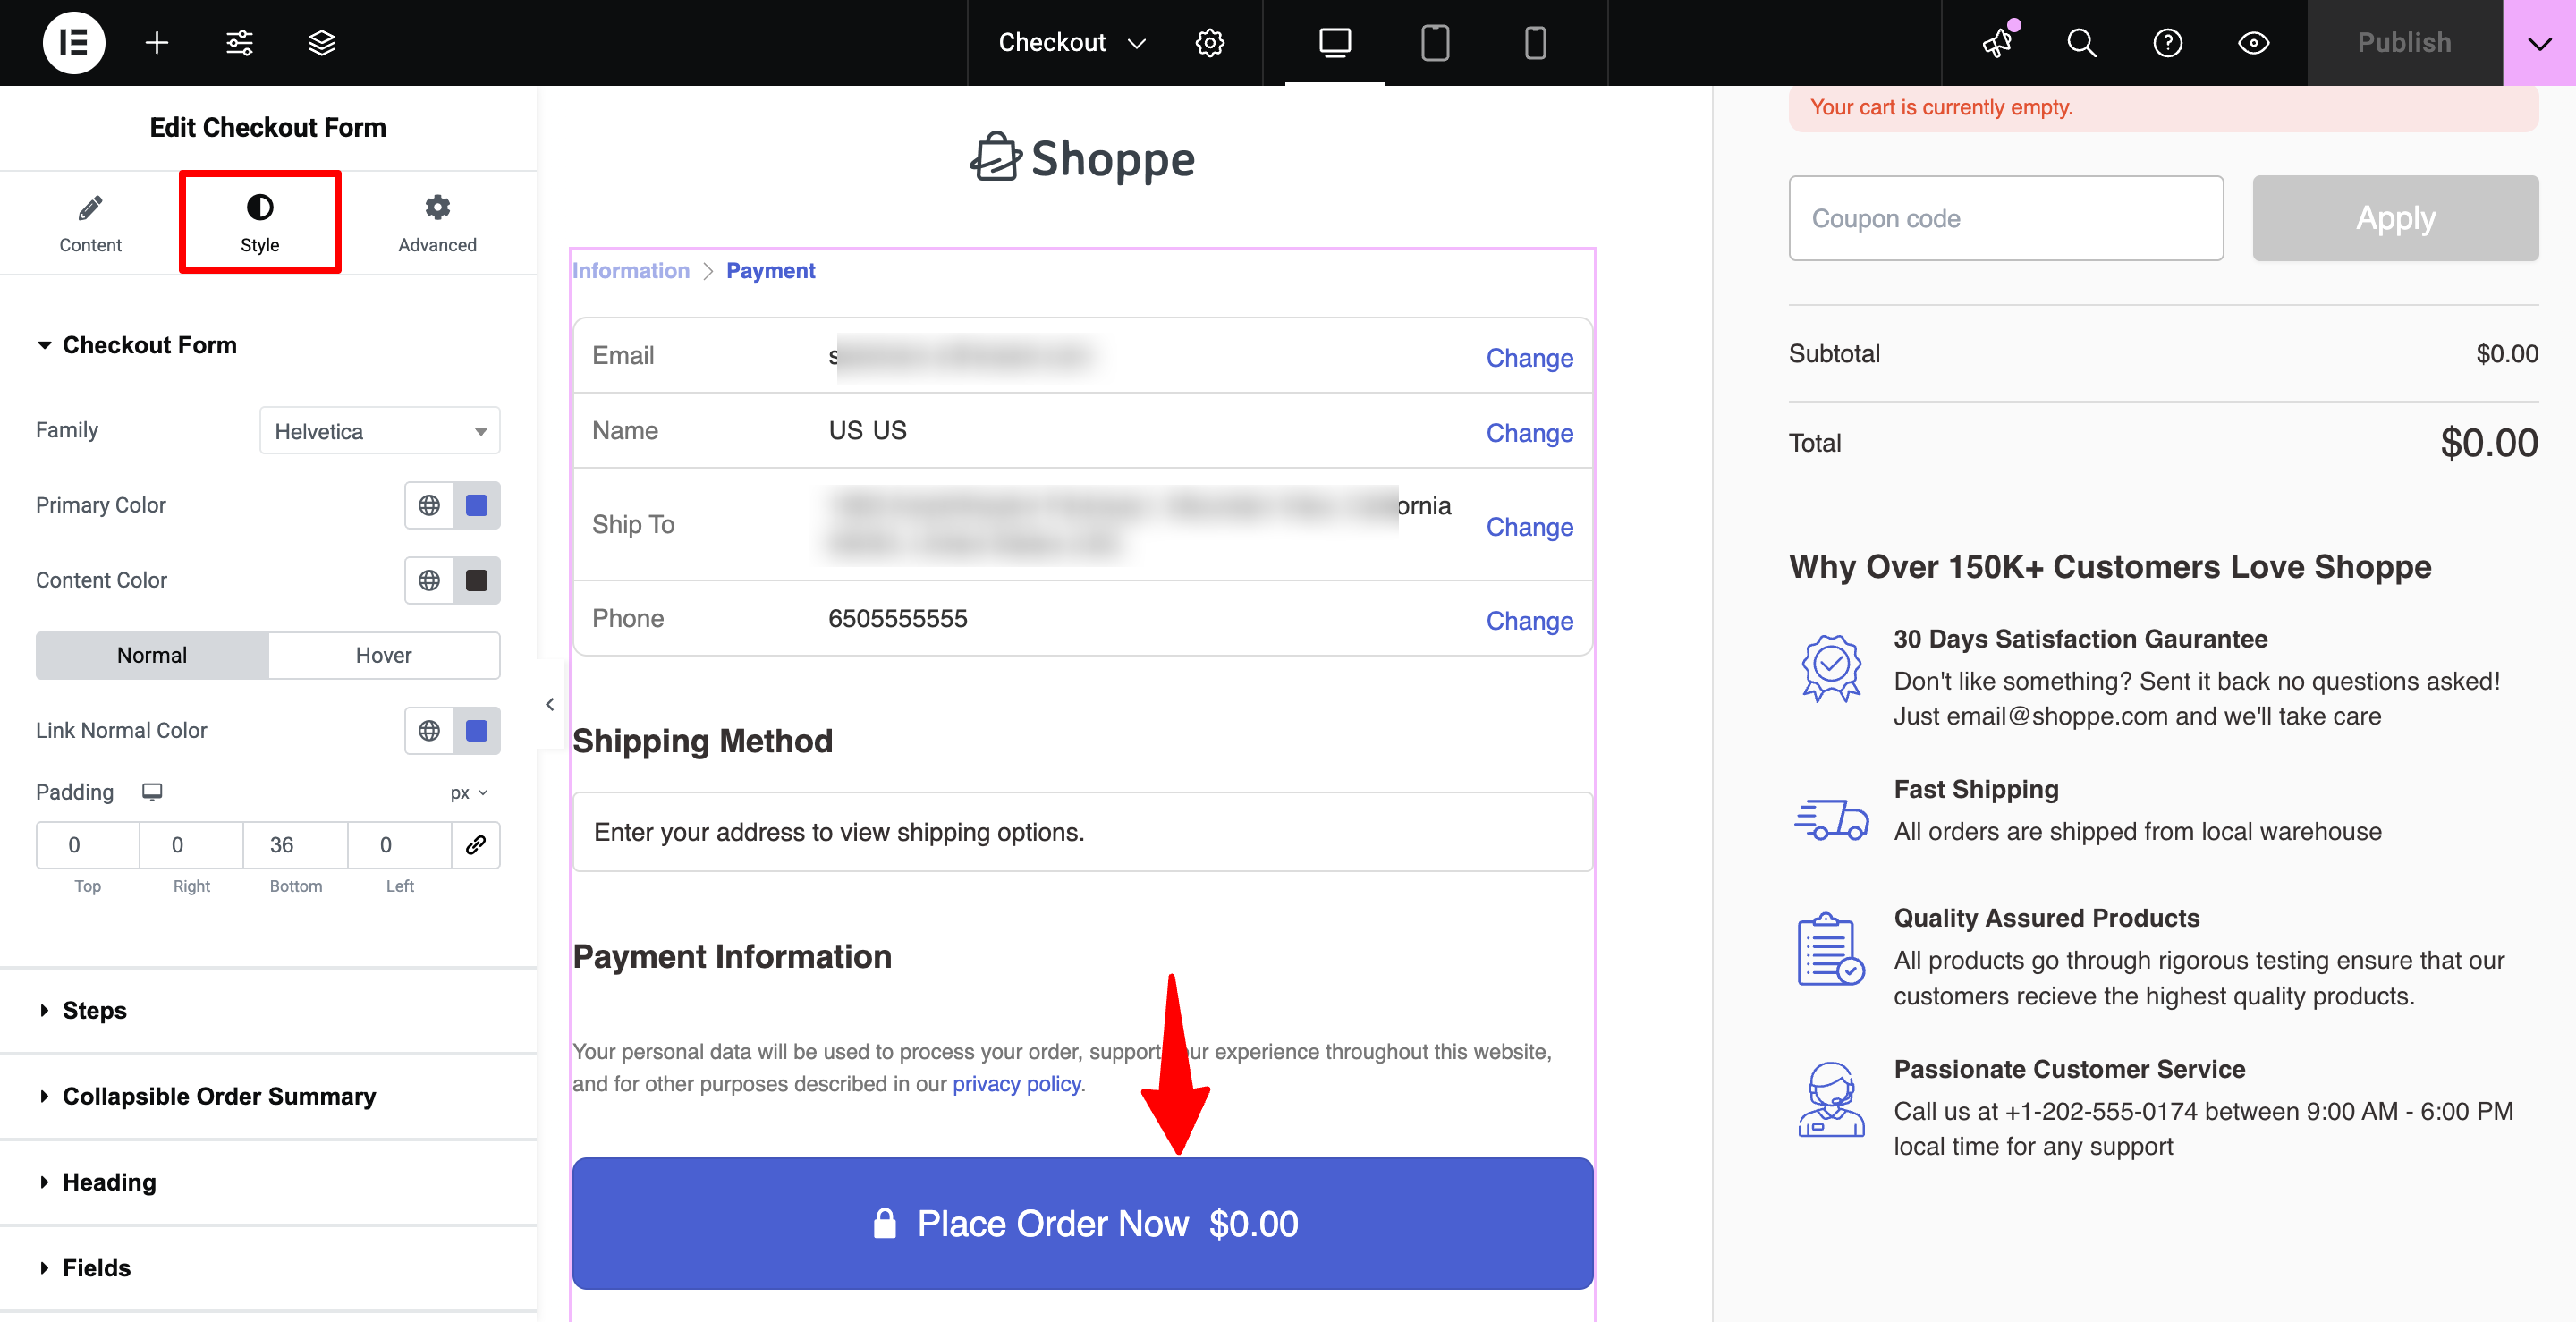
Step 3: Customize your WooCommerce checkout page
To customize the checkout page template, click on the checkout step.
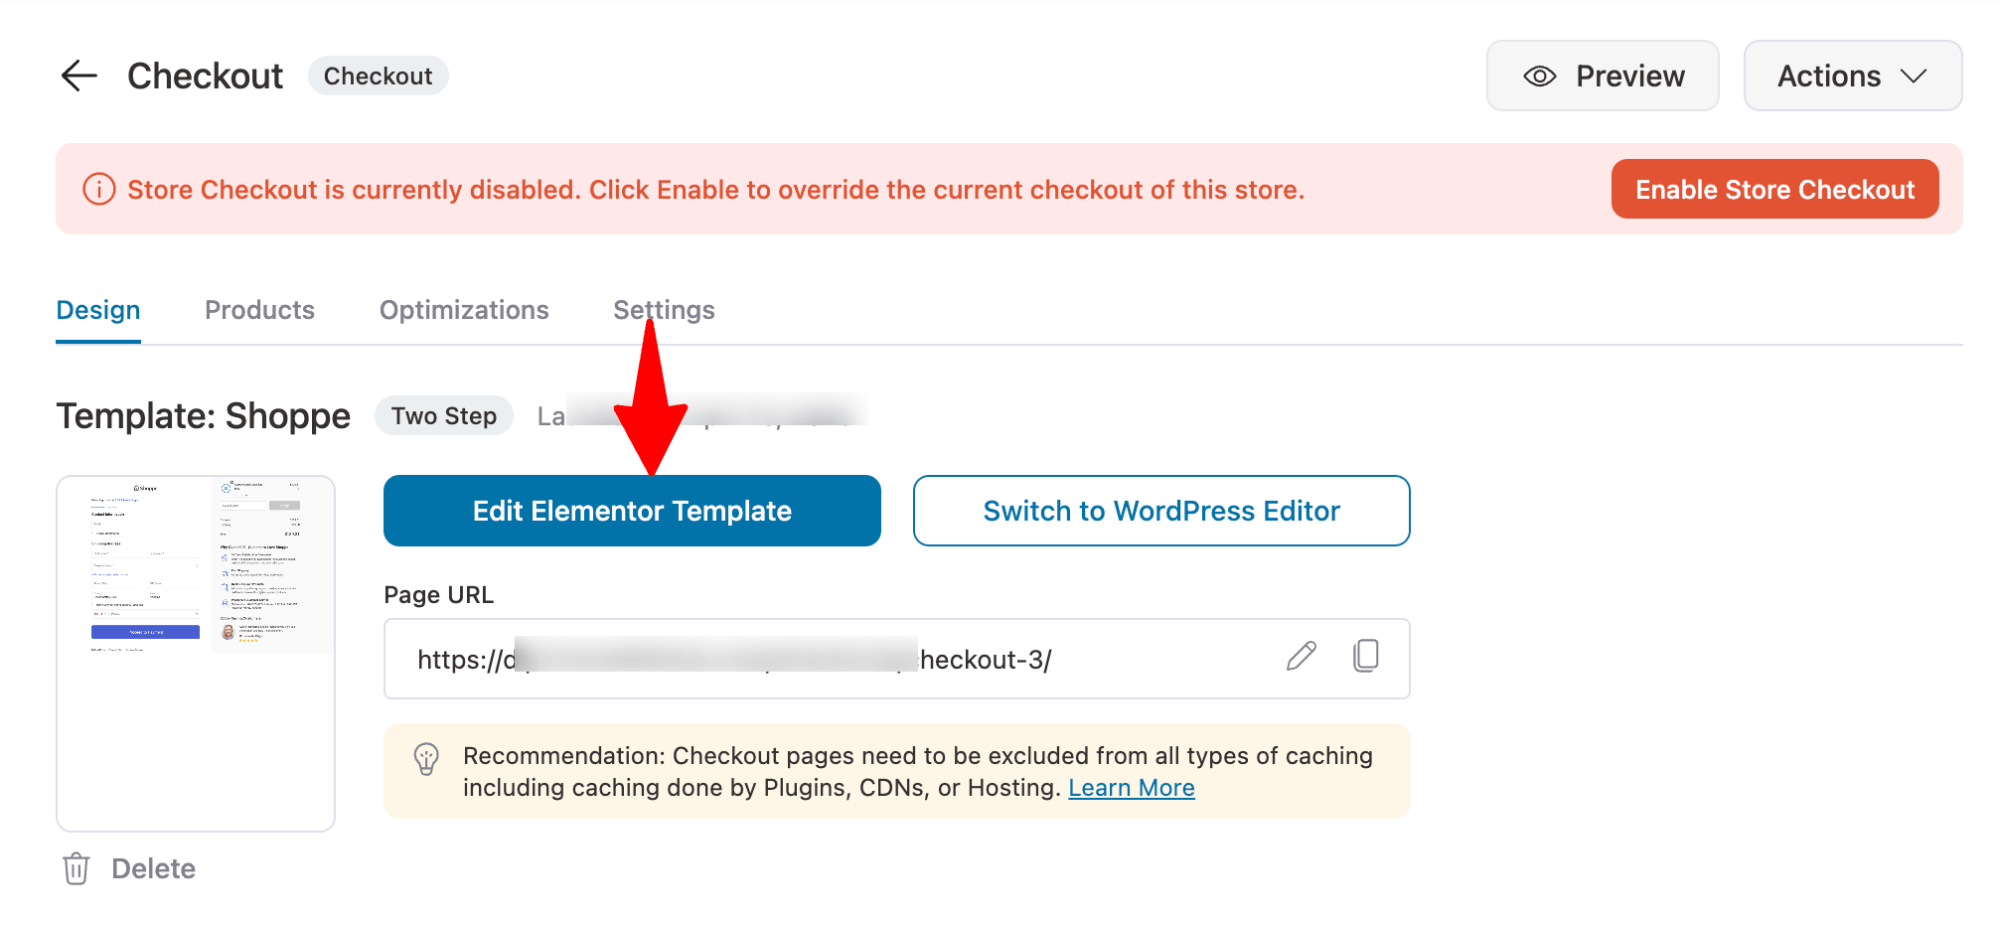
Next, hit Edit Elementor Template to customize the design of the checkout page.
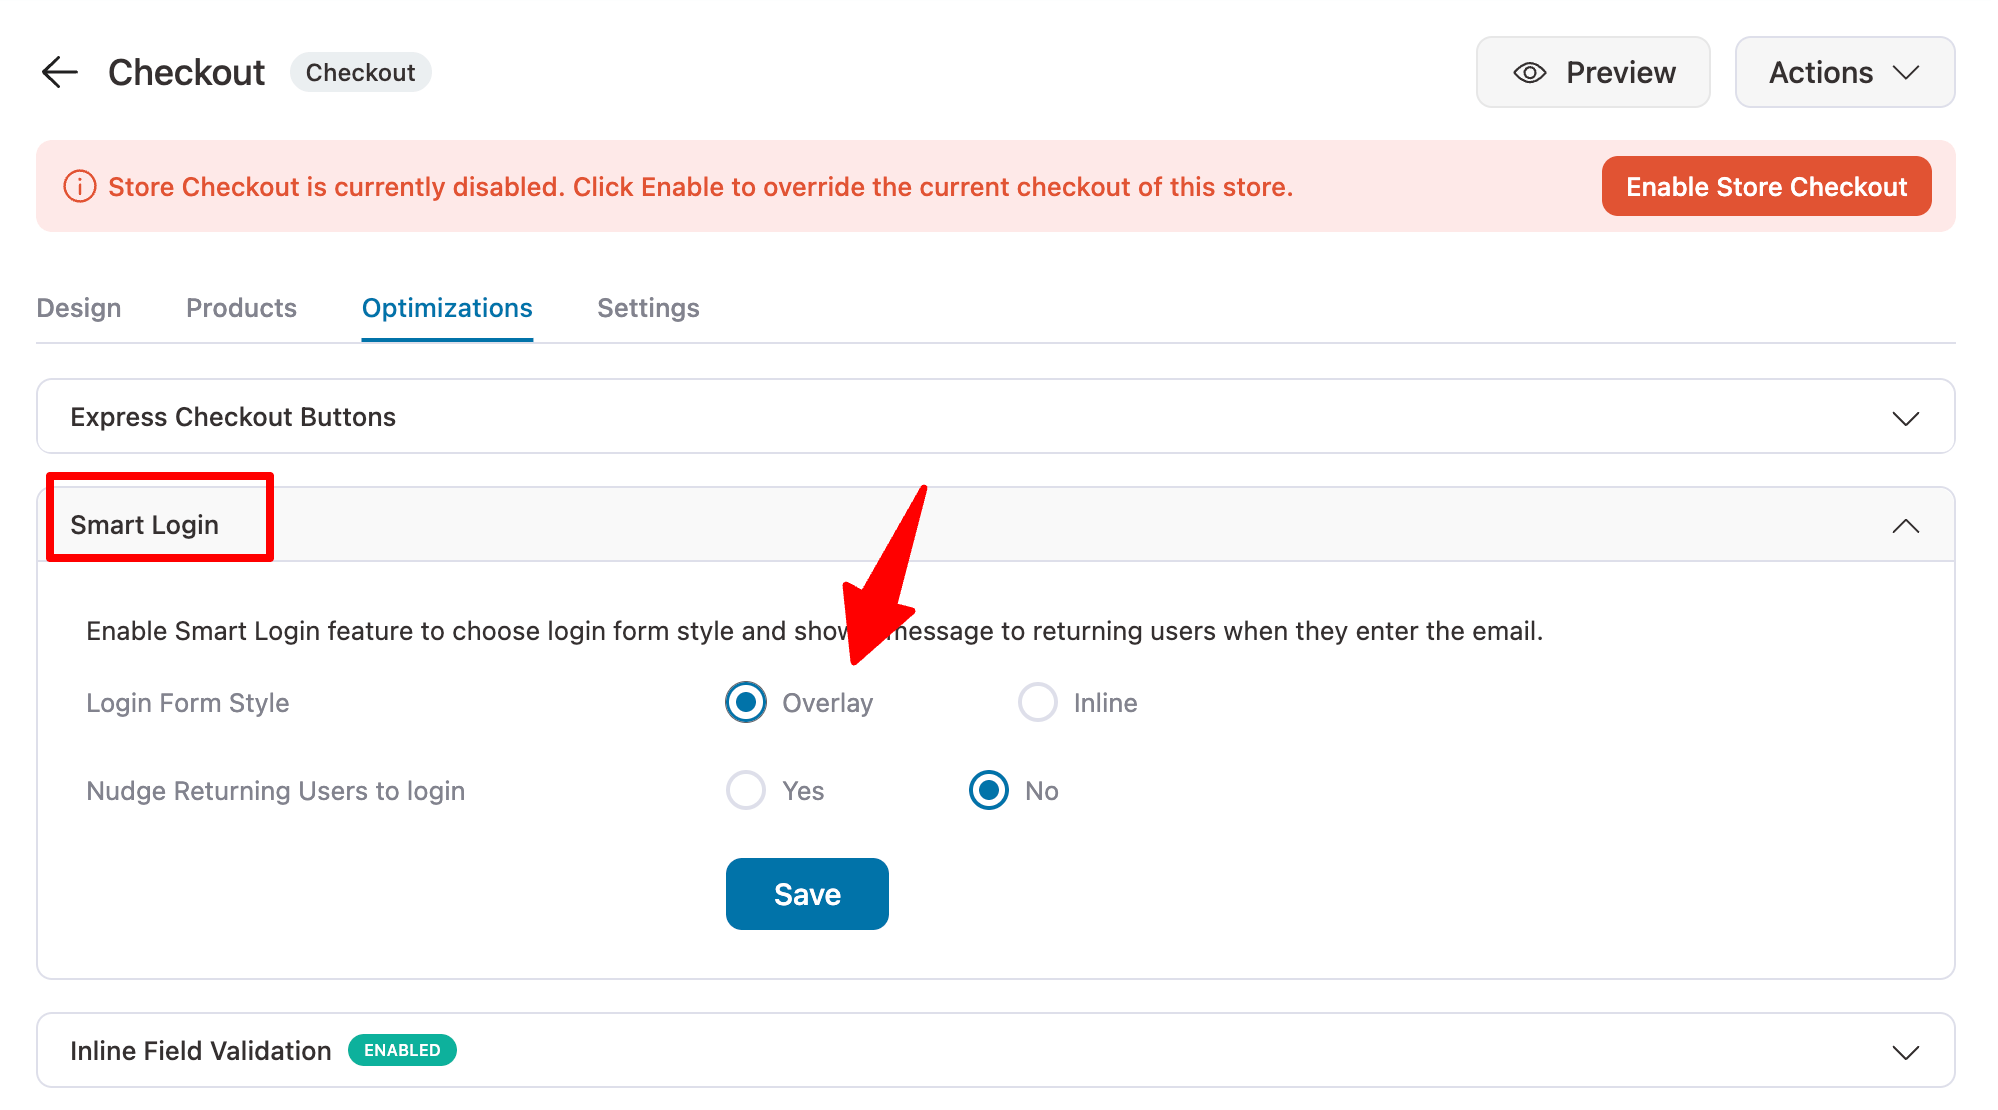
Step 4: Enable an easy login option
Next, move to the “Optimizations” tab and expand the Smart Login feature. Select the Login Form Style.
Here are two options: Overlay and Inline.
Here is the overlay easy login form.
And here is how the inline login form looks:
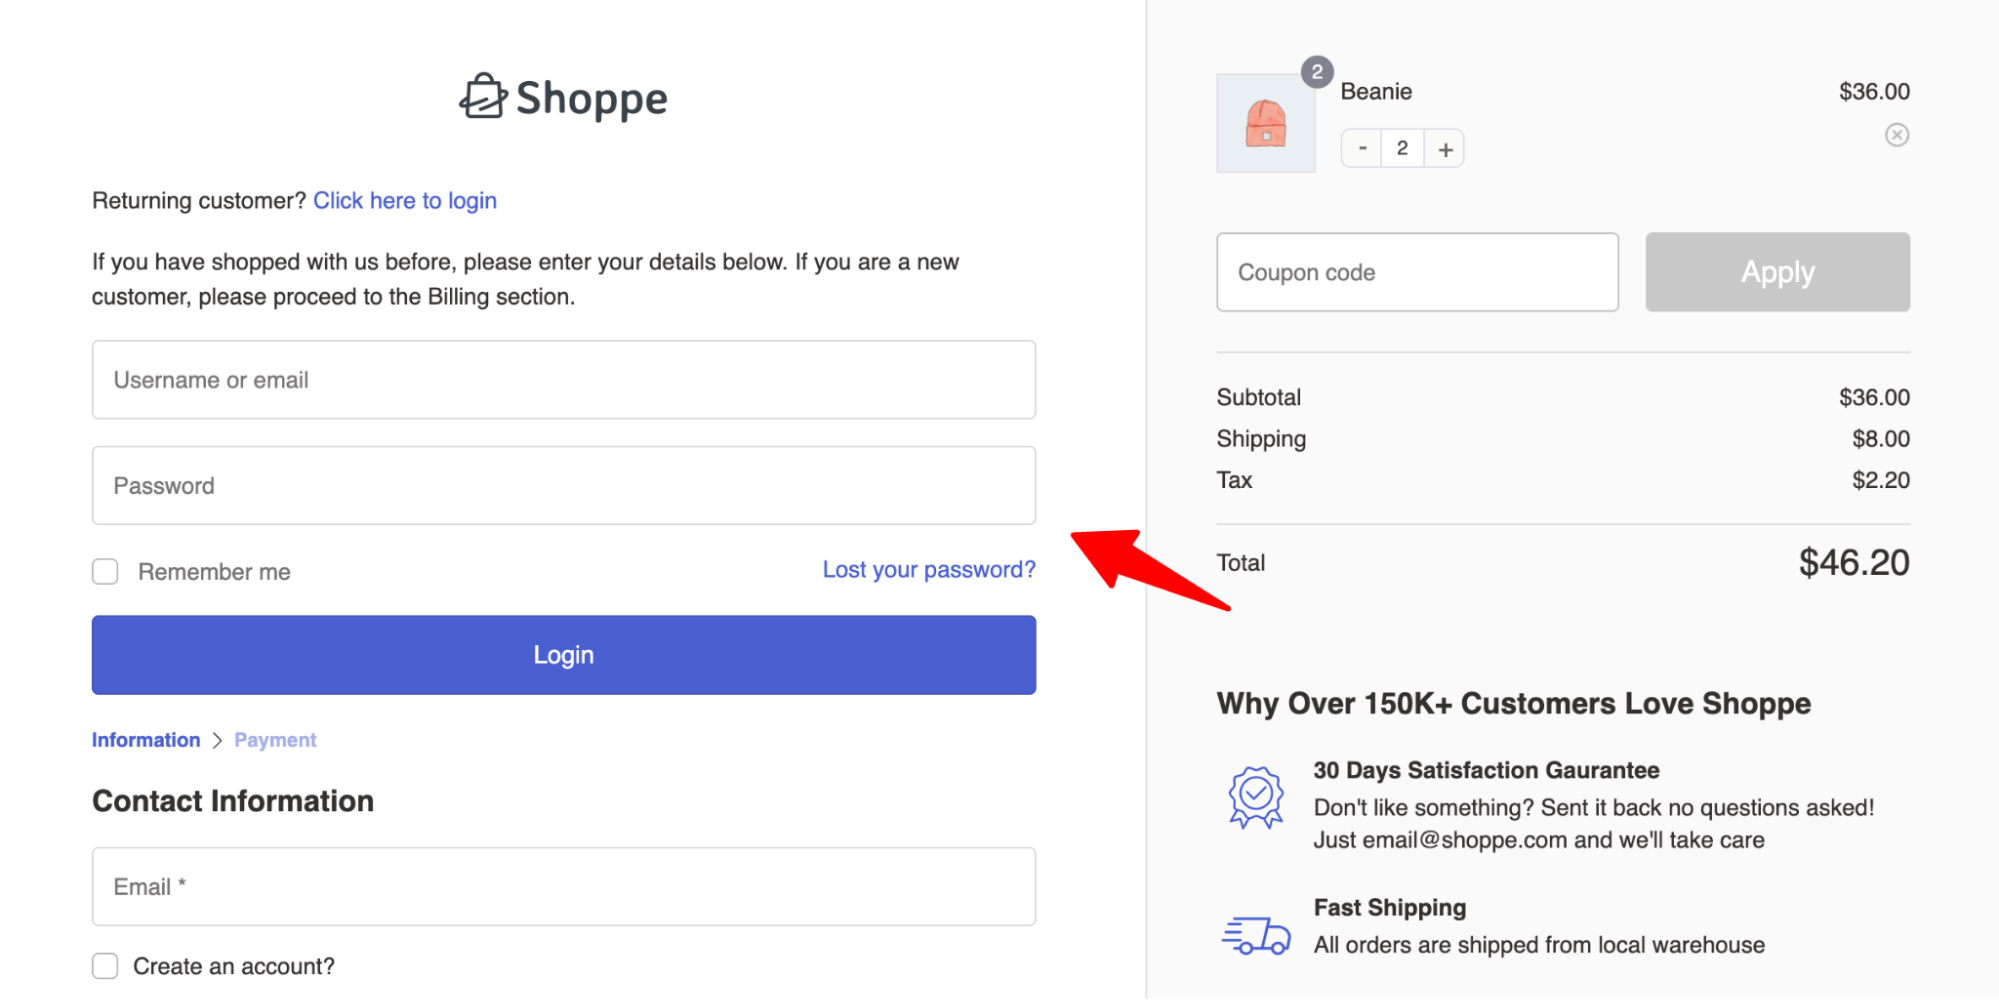
Choose the one that suits you best.
Step 5: Enable the option to prompt existing customers to log in
Next, check “Yes” for the option “Nudge Returning Users to login”. And also set the message.
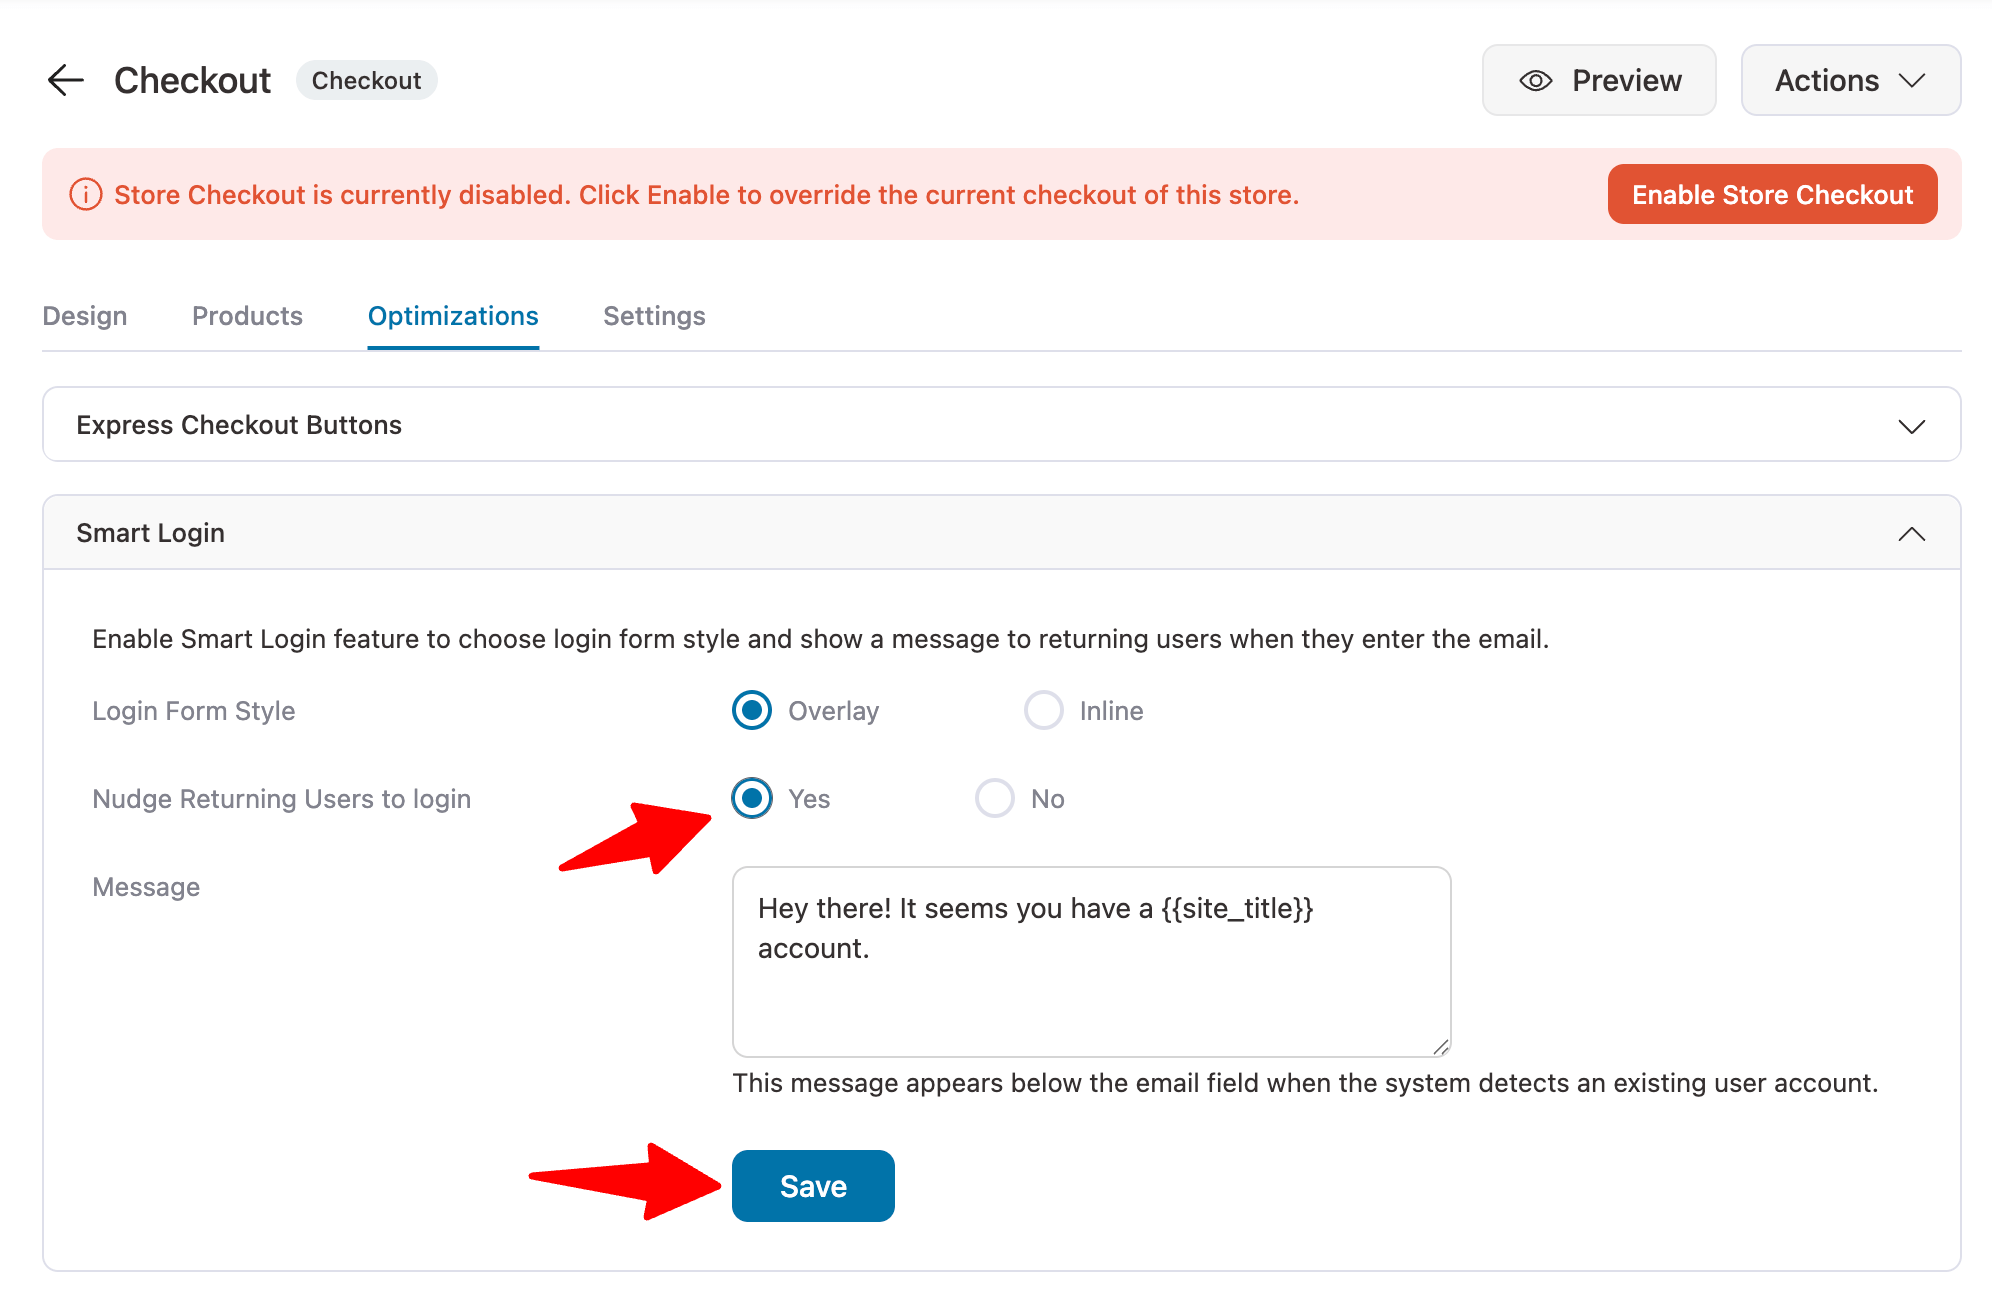
Now, when returning customers enter their email addresses, they will see a message with a button encouraging them to log in.

Step 6: Enable store checkout
The last step is to enable the store checkout by hitting the Enable Store Checkout button.
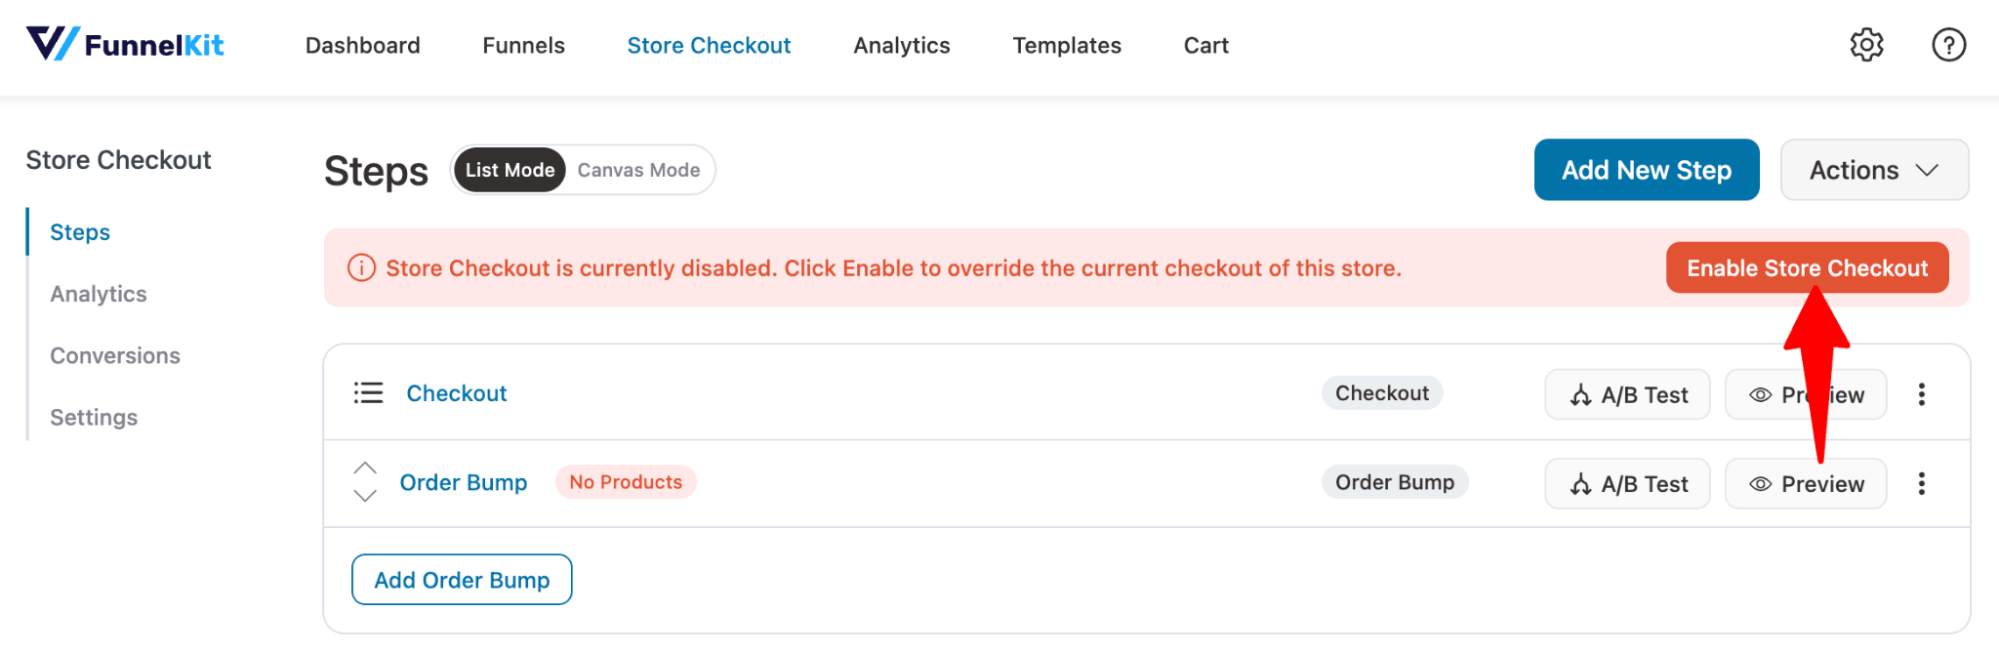
And that’s it! Your store checkout is now ready with an easy login option to provide customers a smoother and faster checkout process.
How to Customize the Style of the Easy Login Section?
The styling of the easy login section depends on the template and design settings used for the checkout page.
For example, the login button will automatically inherit the styling of the 'Place Order' button from the checkout page.
For more details, read everything about customizing the place order button in our post.
7 Tips to Ensure a Smoother WooCommerce Checkout Experience
Along with the easy log-in option, you can use another optimization hack to ensure your customers have a smoother checkout experience.
Here are a few:
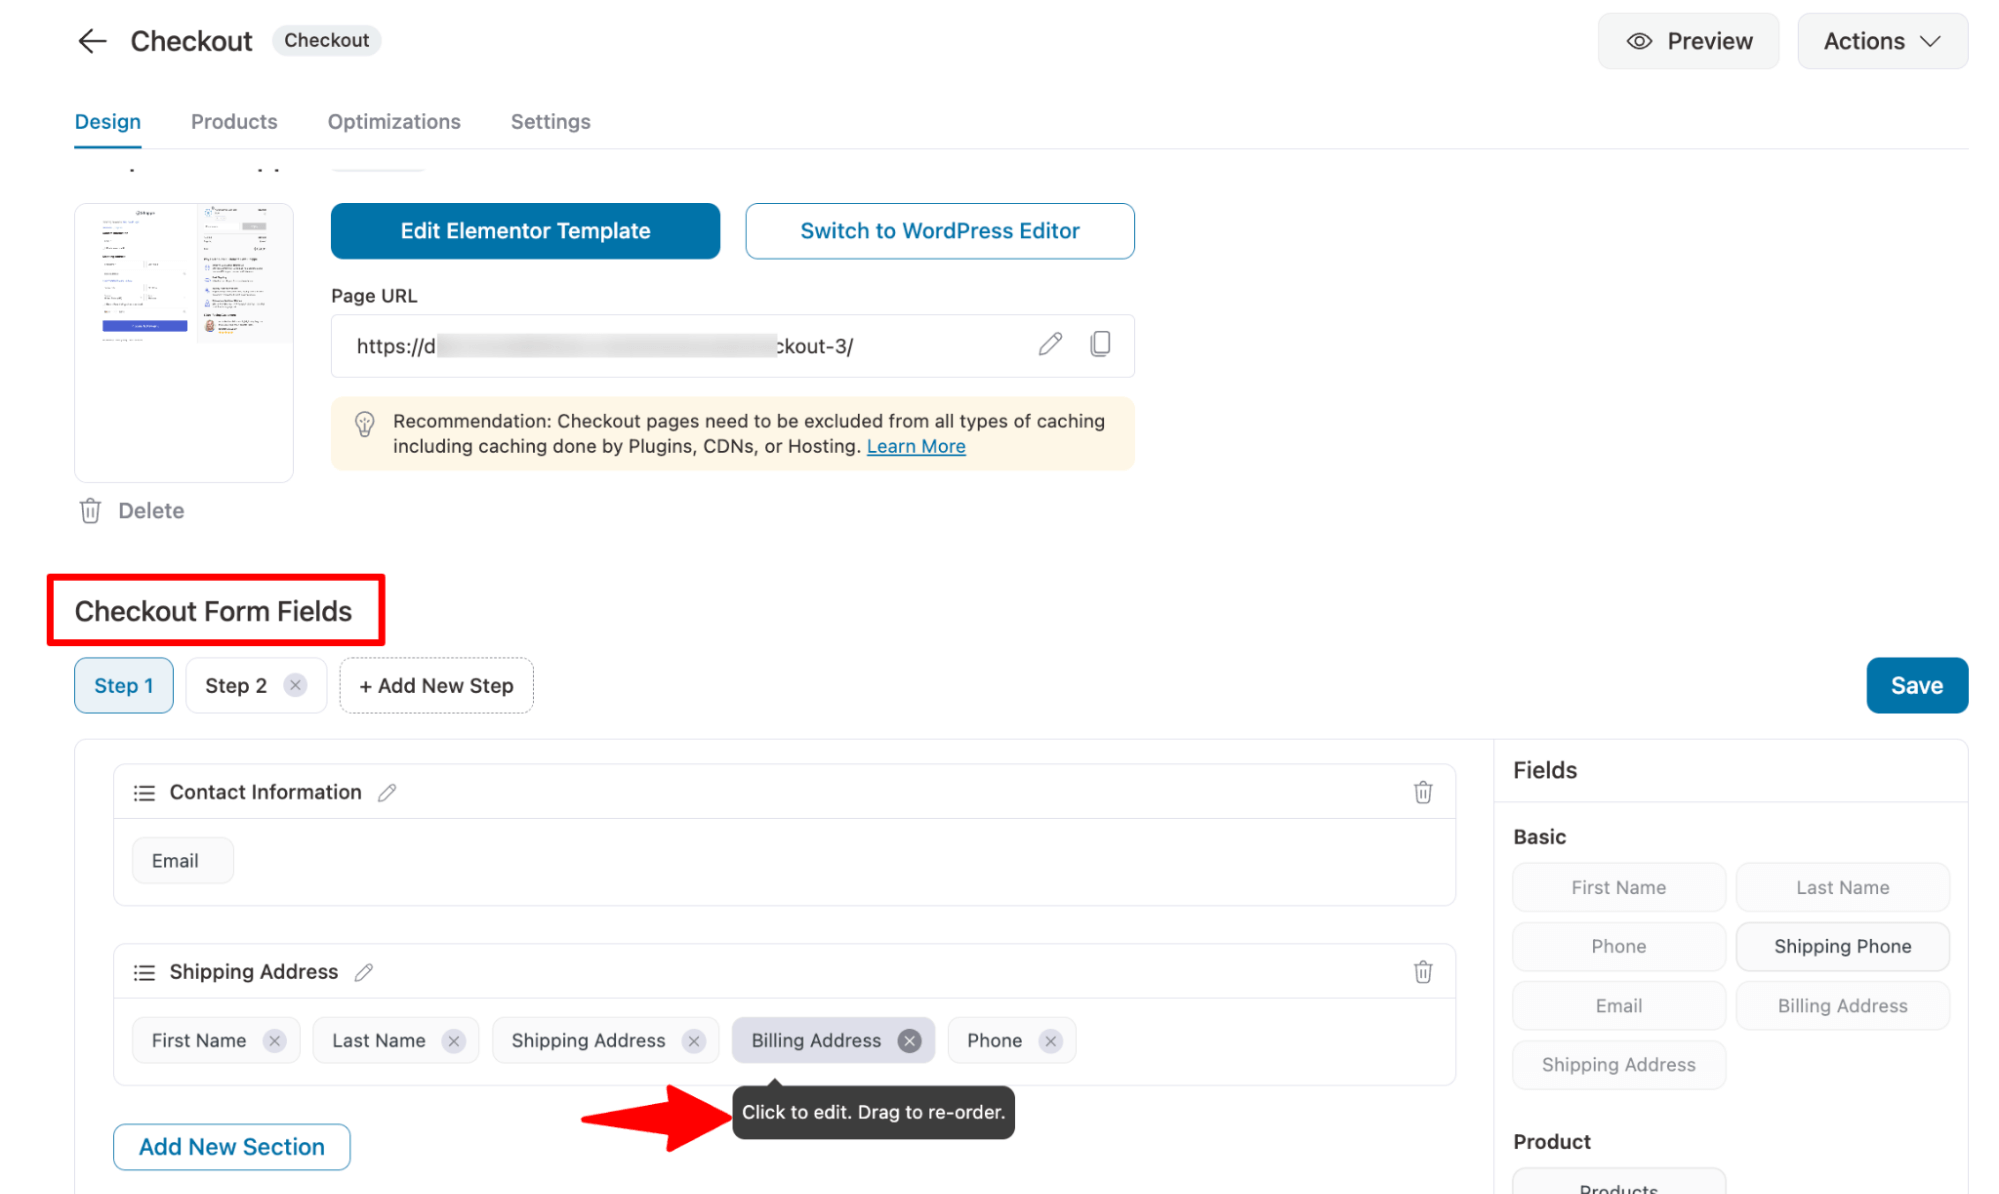
1. Remove unnecessary checkout fields
A cluttered checkout form can overwhelm customers and increase the chances of cart abandonment.
That’s why it’s important to keep things simple and only ask for essential details, like name, email, shipping address, and payment info.
With FunnelKit Funnel Builder, you can easily customize your checkout form by removing, reordering, or editing fields.
2. Enable guest checkout for new users
Let customers check out without creating an account.
This is especially helpful for new or one-time buyers who just want a quick purchase without the sign-up hassle. And for the returning, we have the easy login.
3. Use a multi-step checkout layout
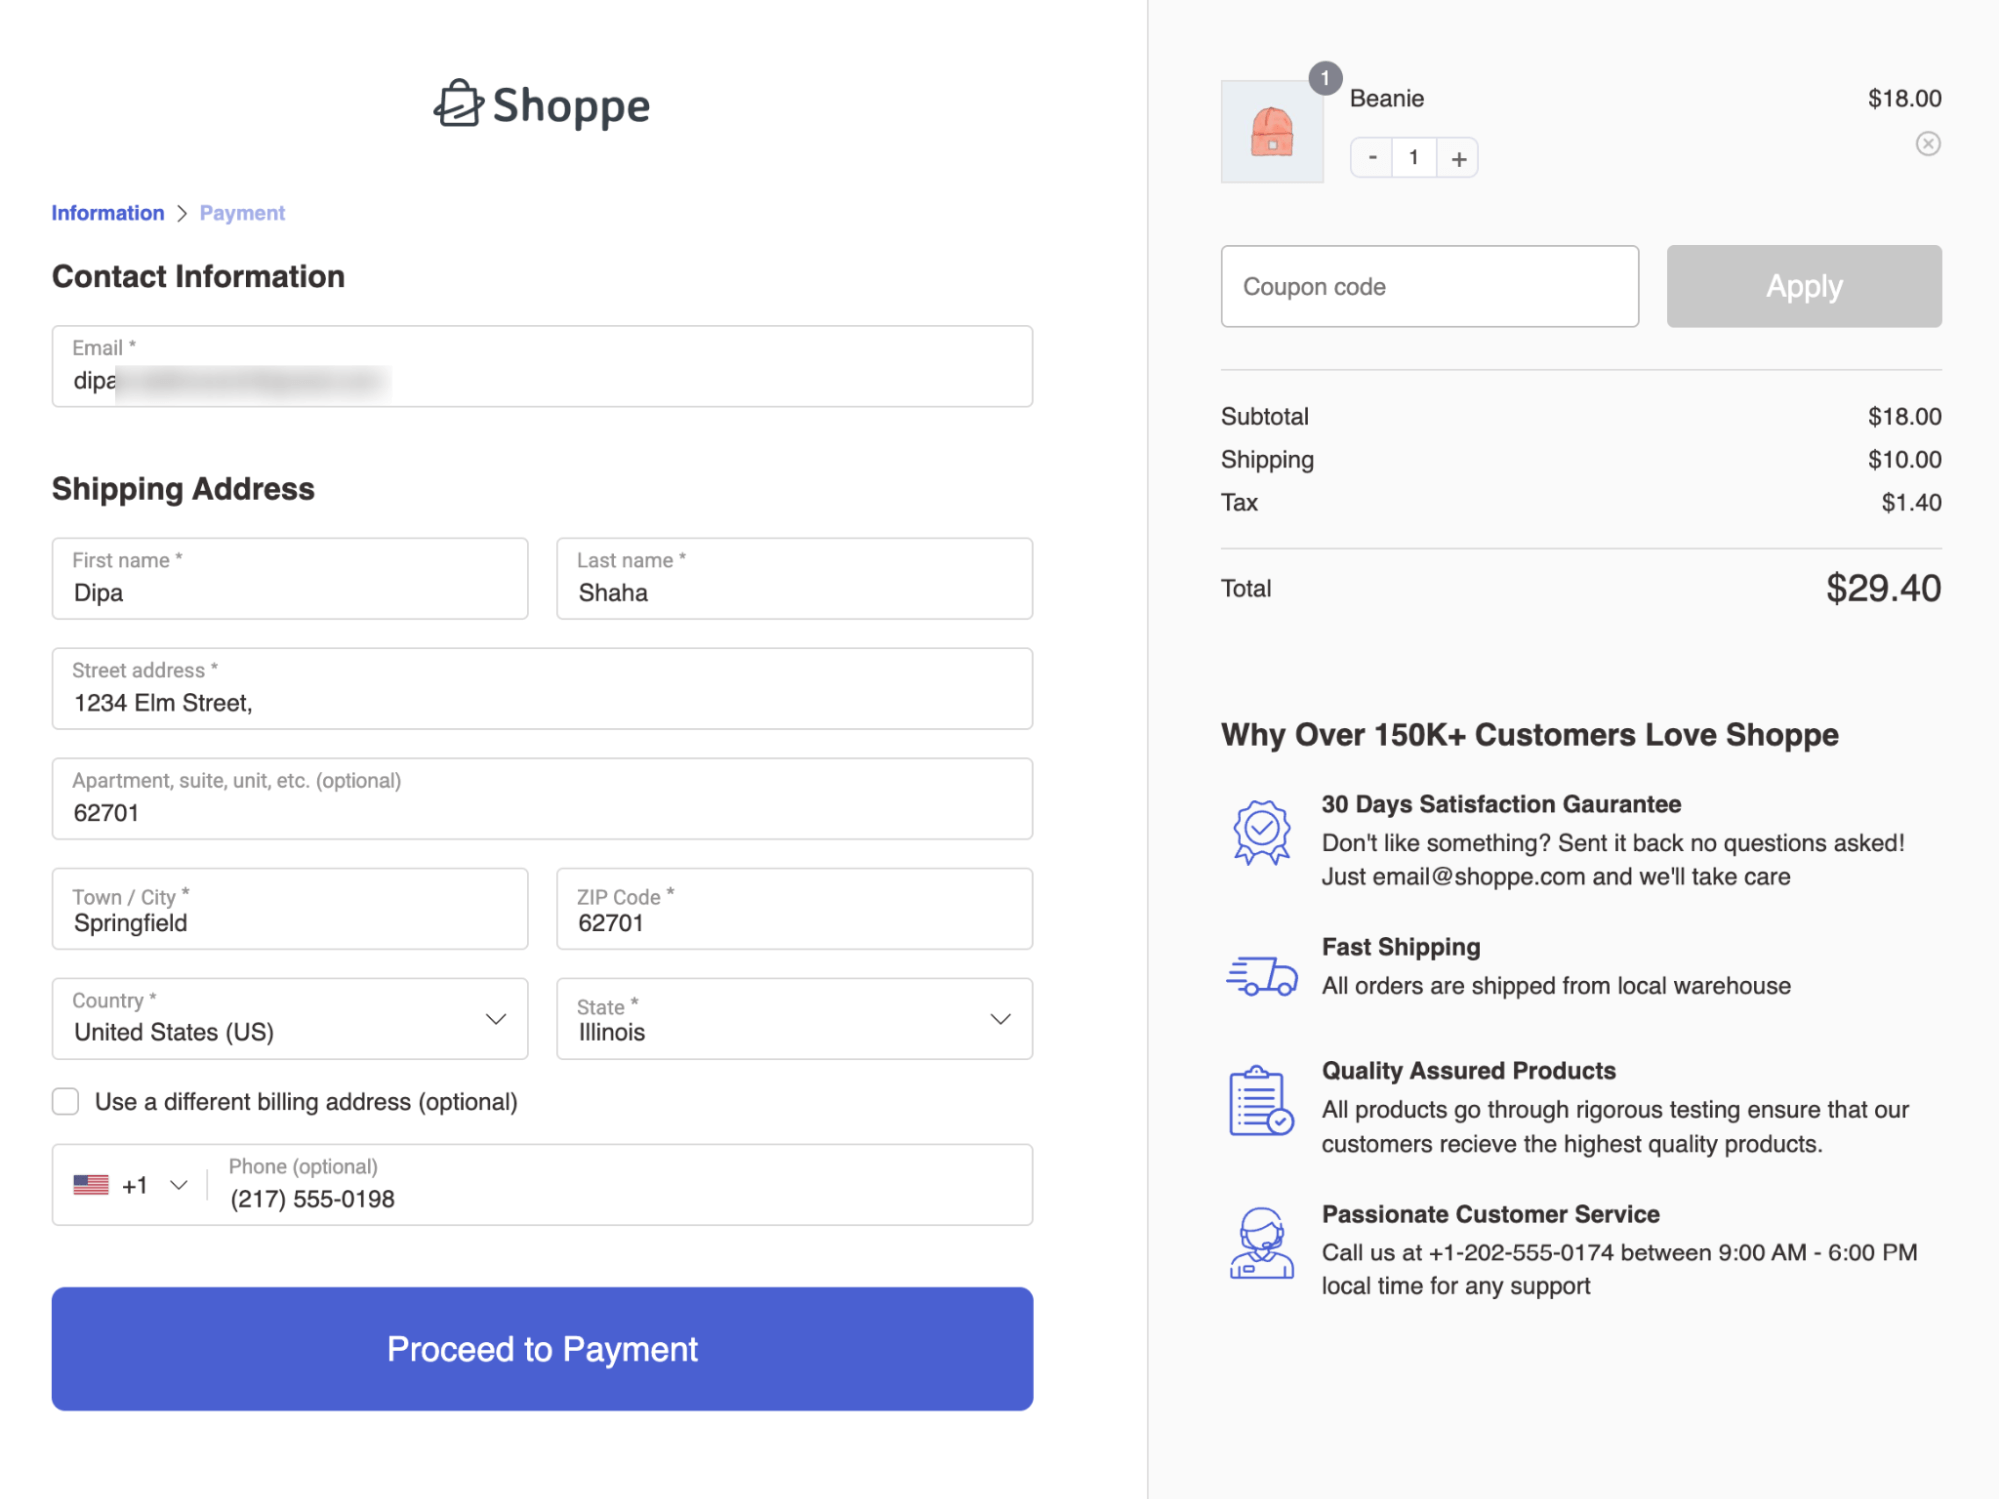
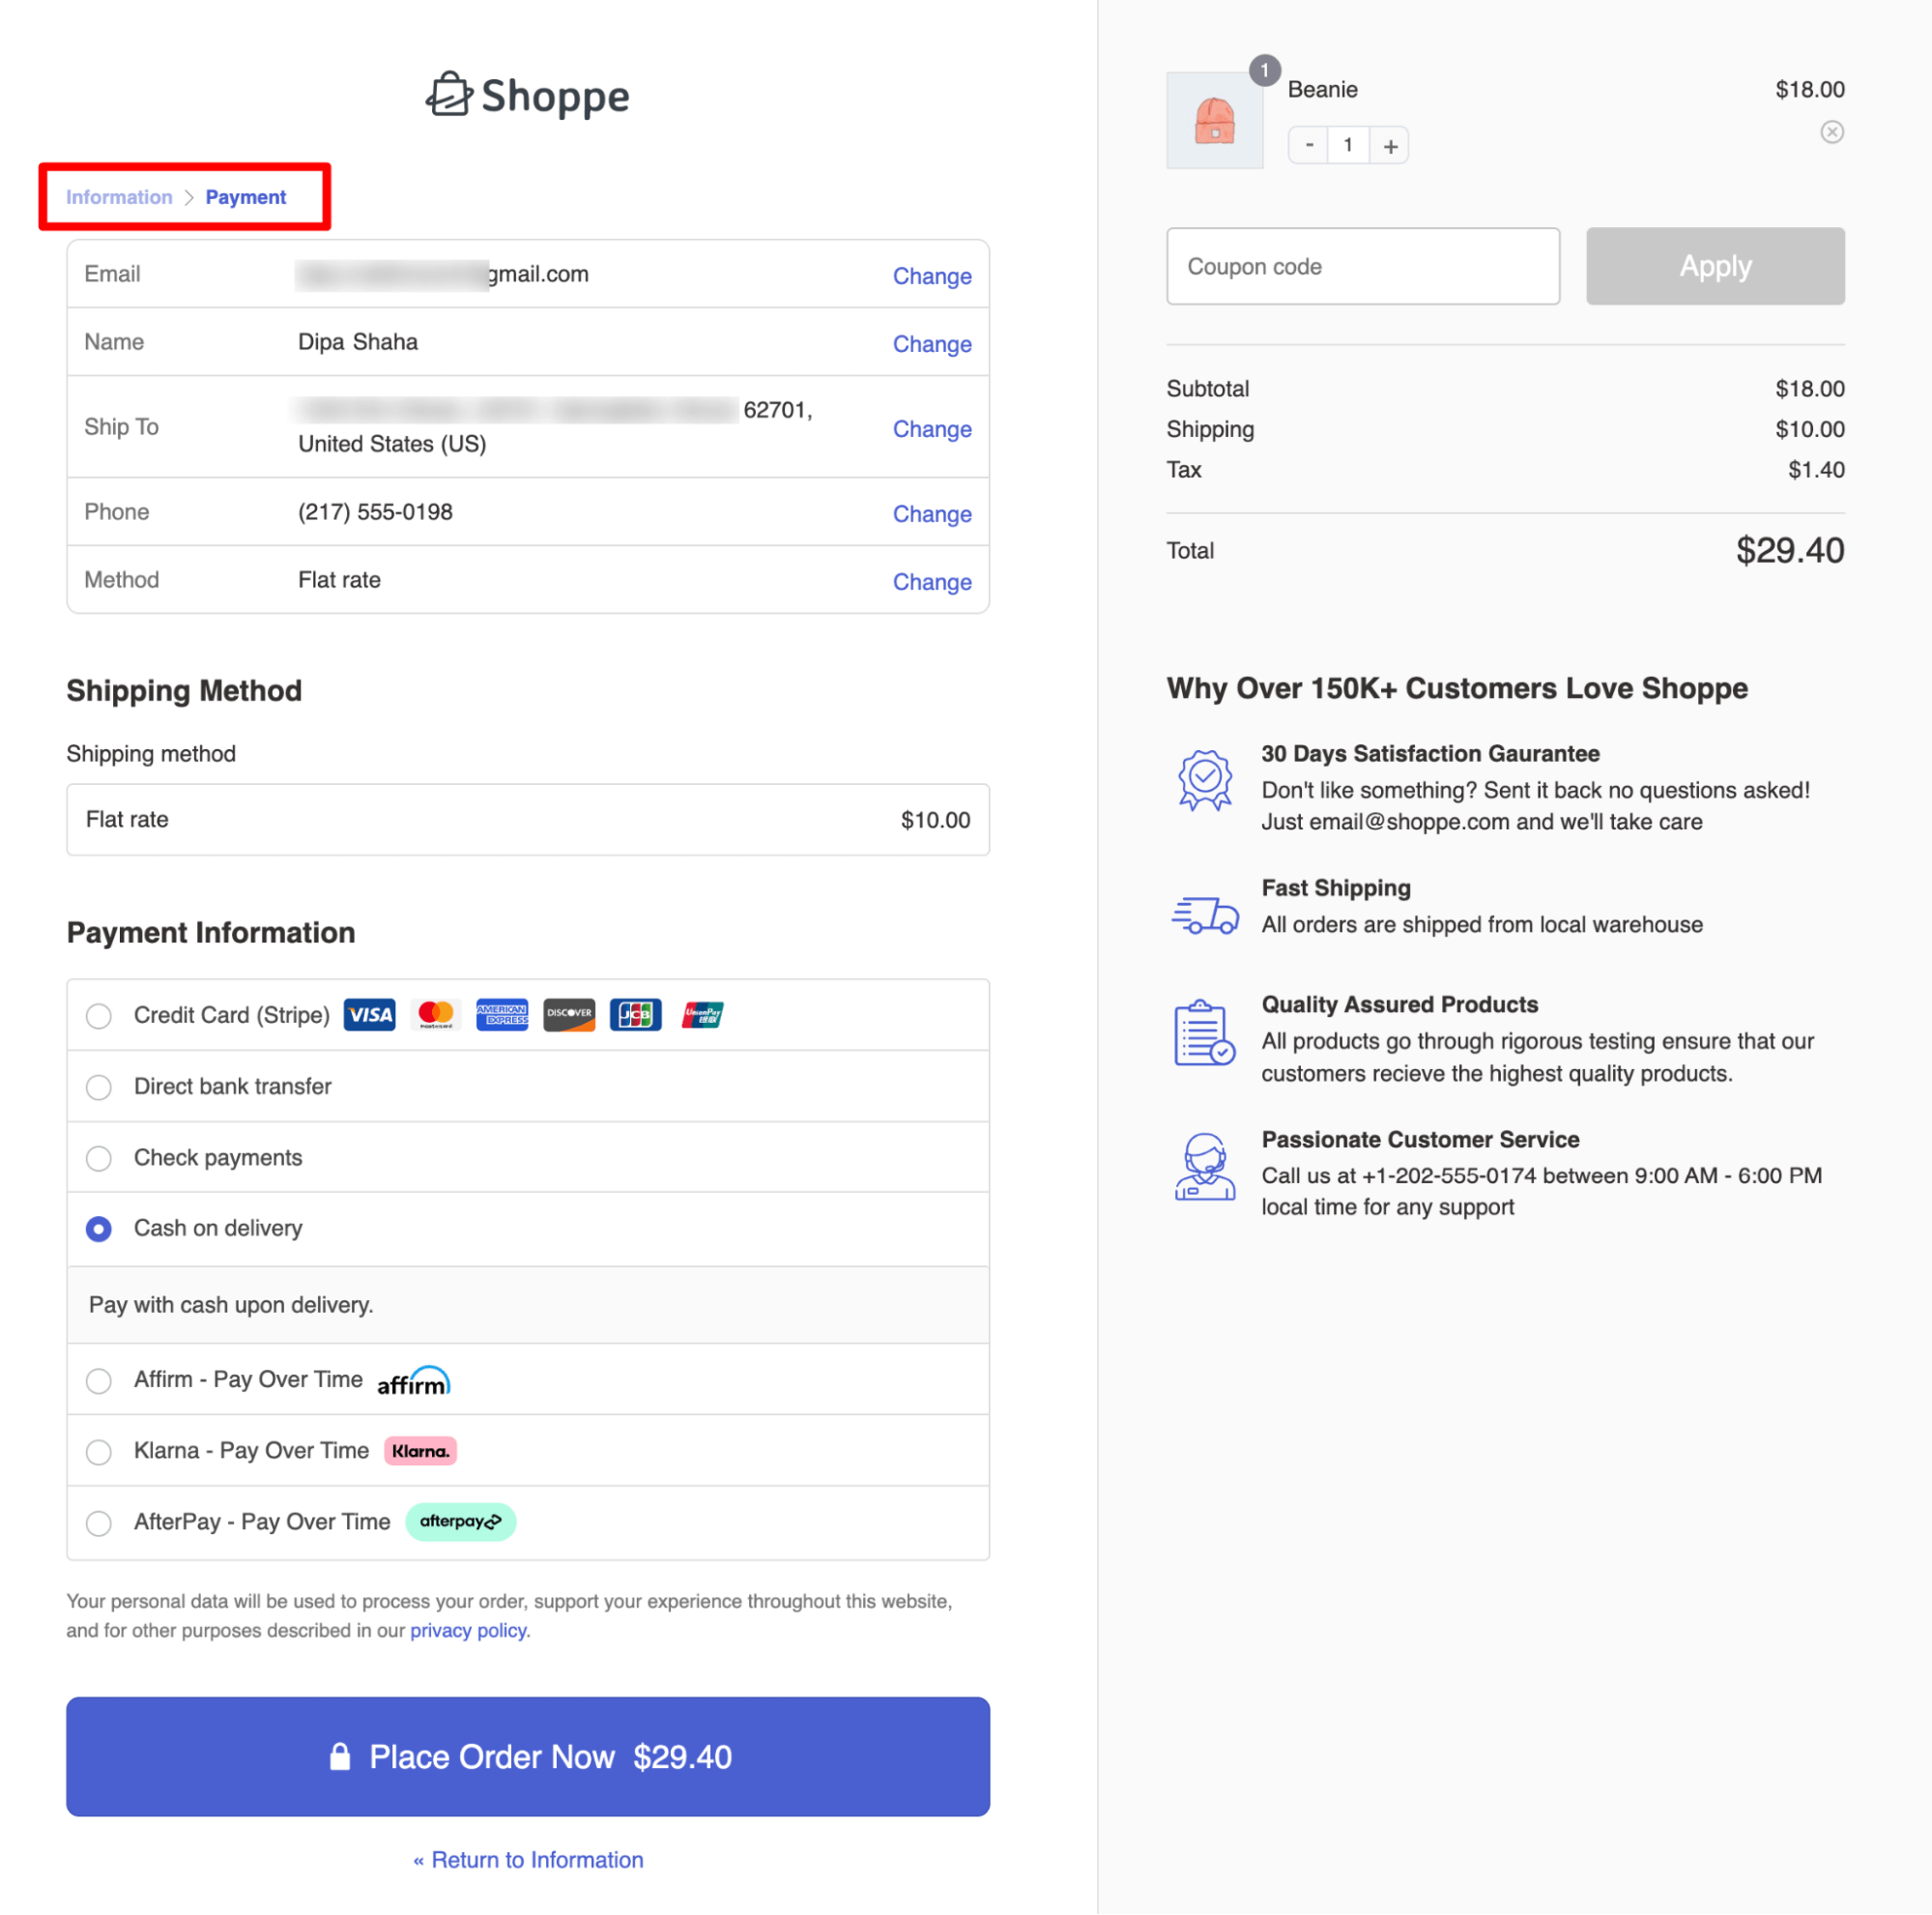
A multi-step checkout page breaks the checkout process into smaller, focused steps: Information ⇒ Payment. It makes the steps more manageable for customers.
This way, instead of overwhelming users with a long, single-page form, you can keep things clean, organized, and distraction-free, leading to higher conversions.
4. Optimize the login popup for mobile devices
Over 70% of online purchases now happen on mobile, so your login experience should be perfectly responsive.
Ensure that your login popup or inline form adjusts perfectly to smaller screens. Buttons should be large enough to tap easily, and text fields should auto-zoom properly.
Test your checkout flow on both iOS and Android devices before going live.
5. Offer multiple payment options, including express checkout
Give customers flexibility by offering debit cards, credit cards, and local payments. To target low-budget shoppers, you can also offer BNPL payment options.
Add express options like Apple Pay, Google Pay, and PayPal Express to speed up the process and boost conversions.
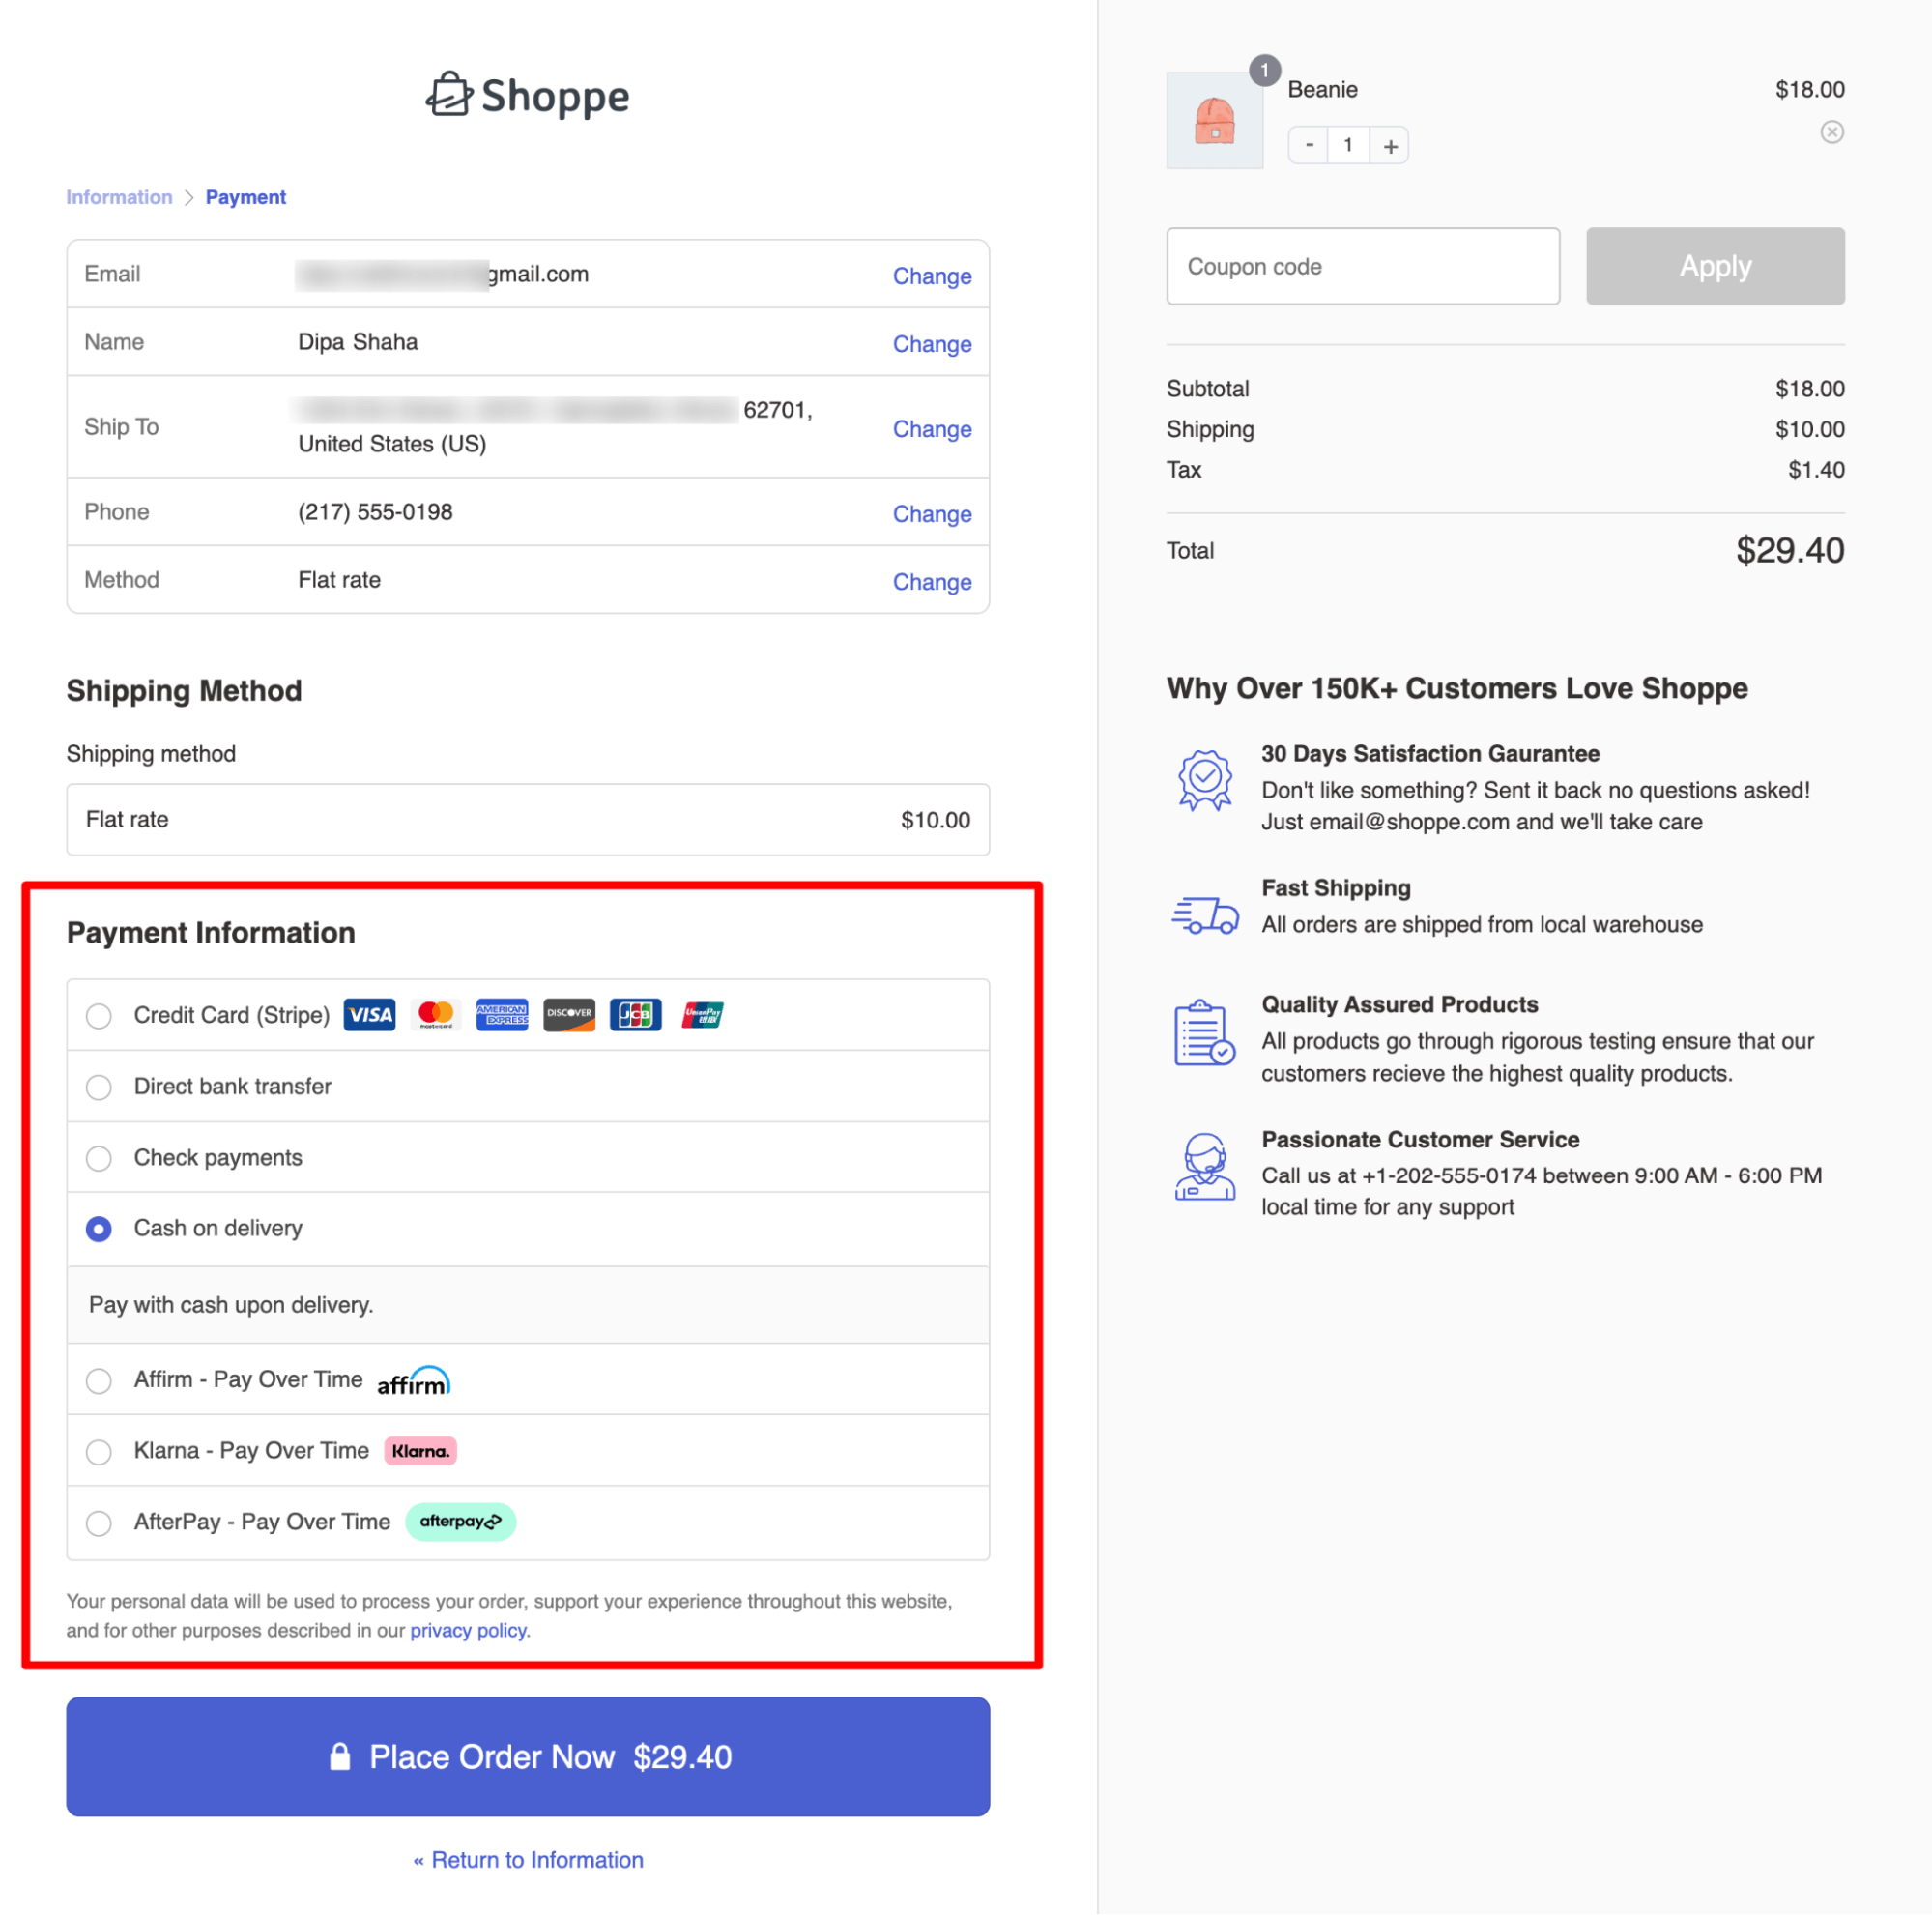
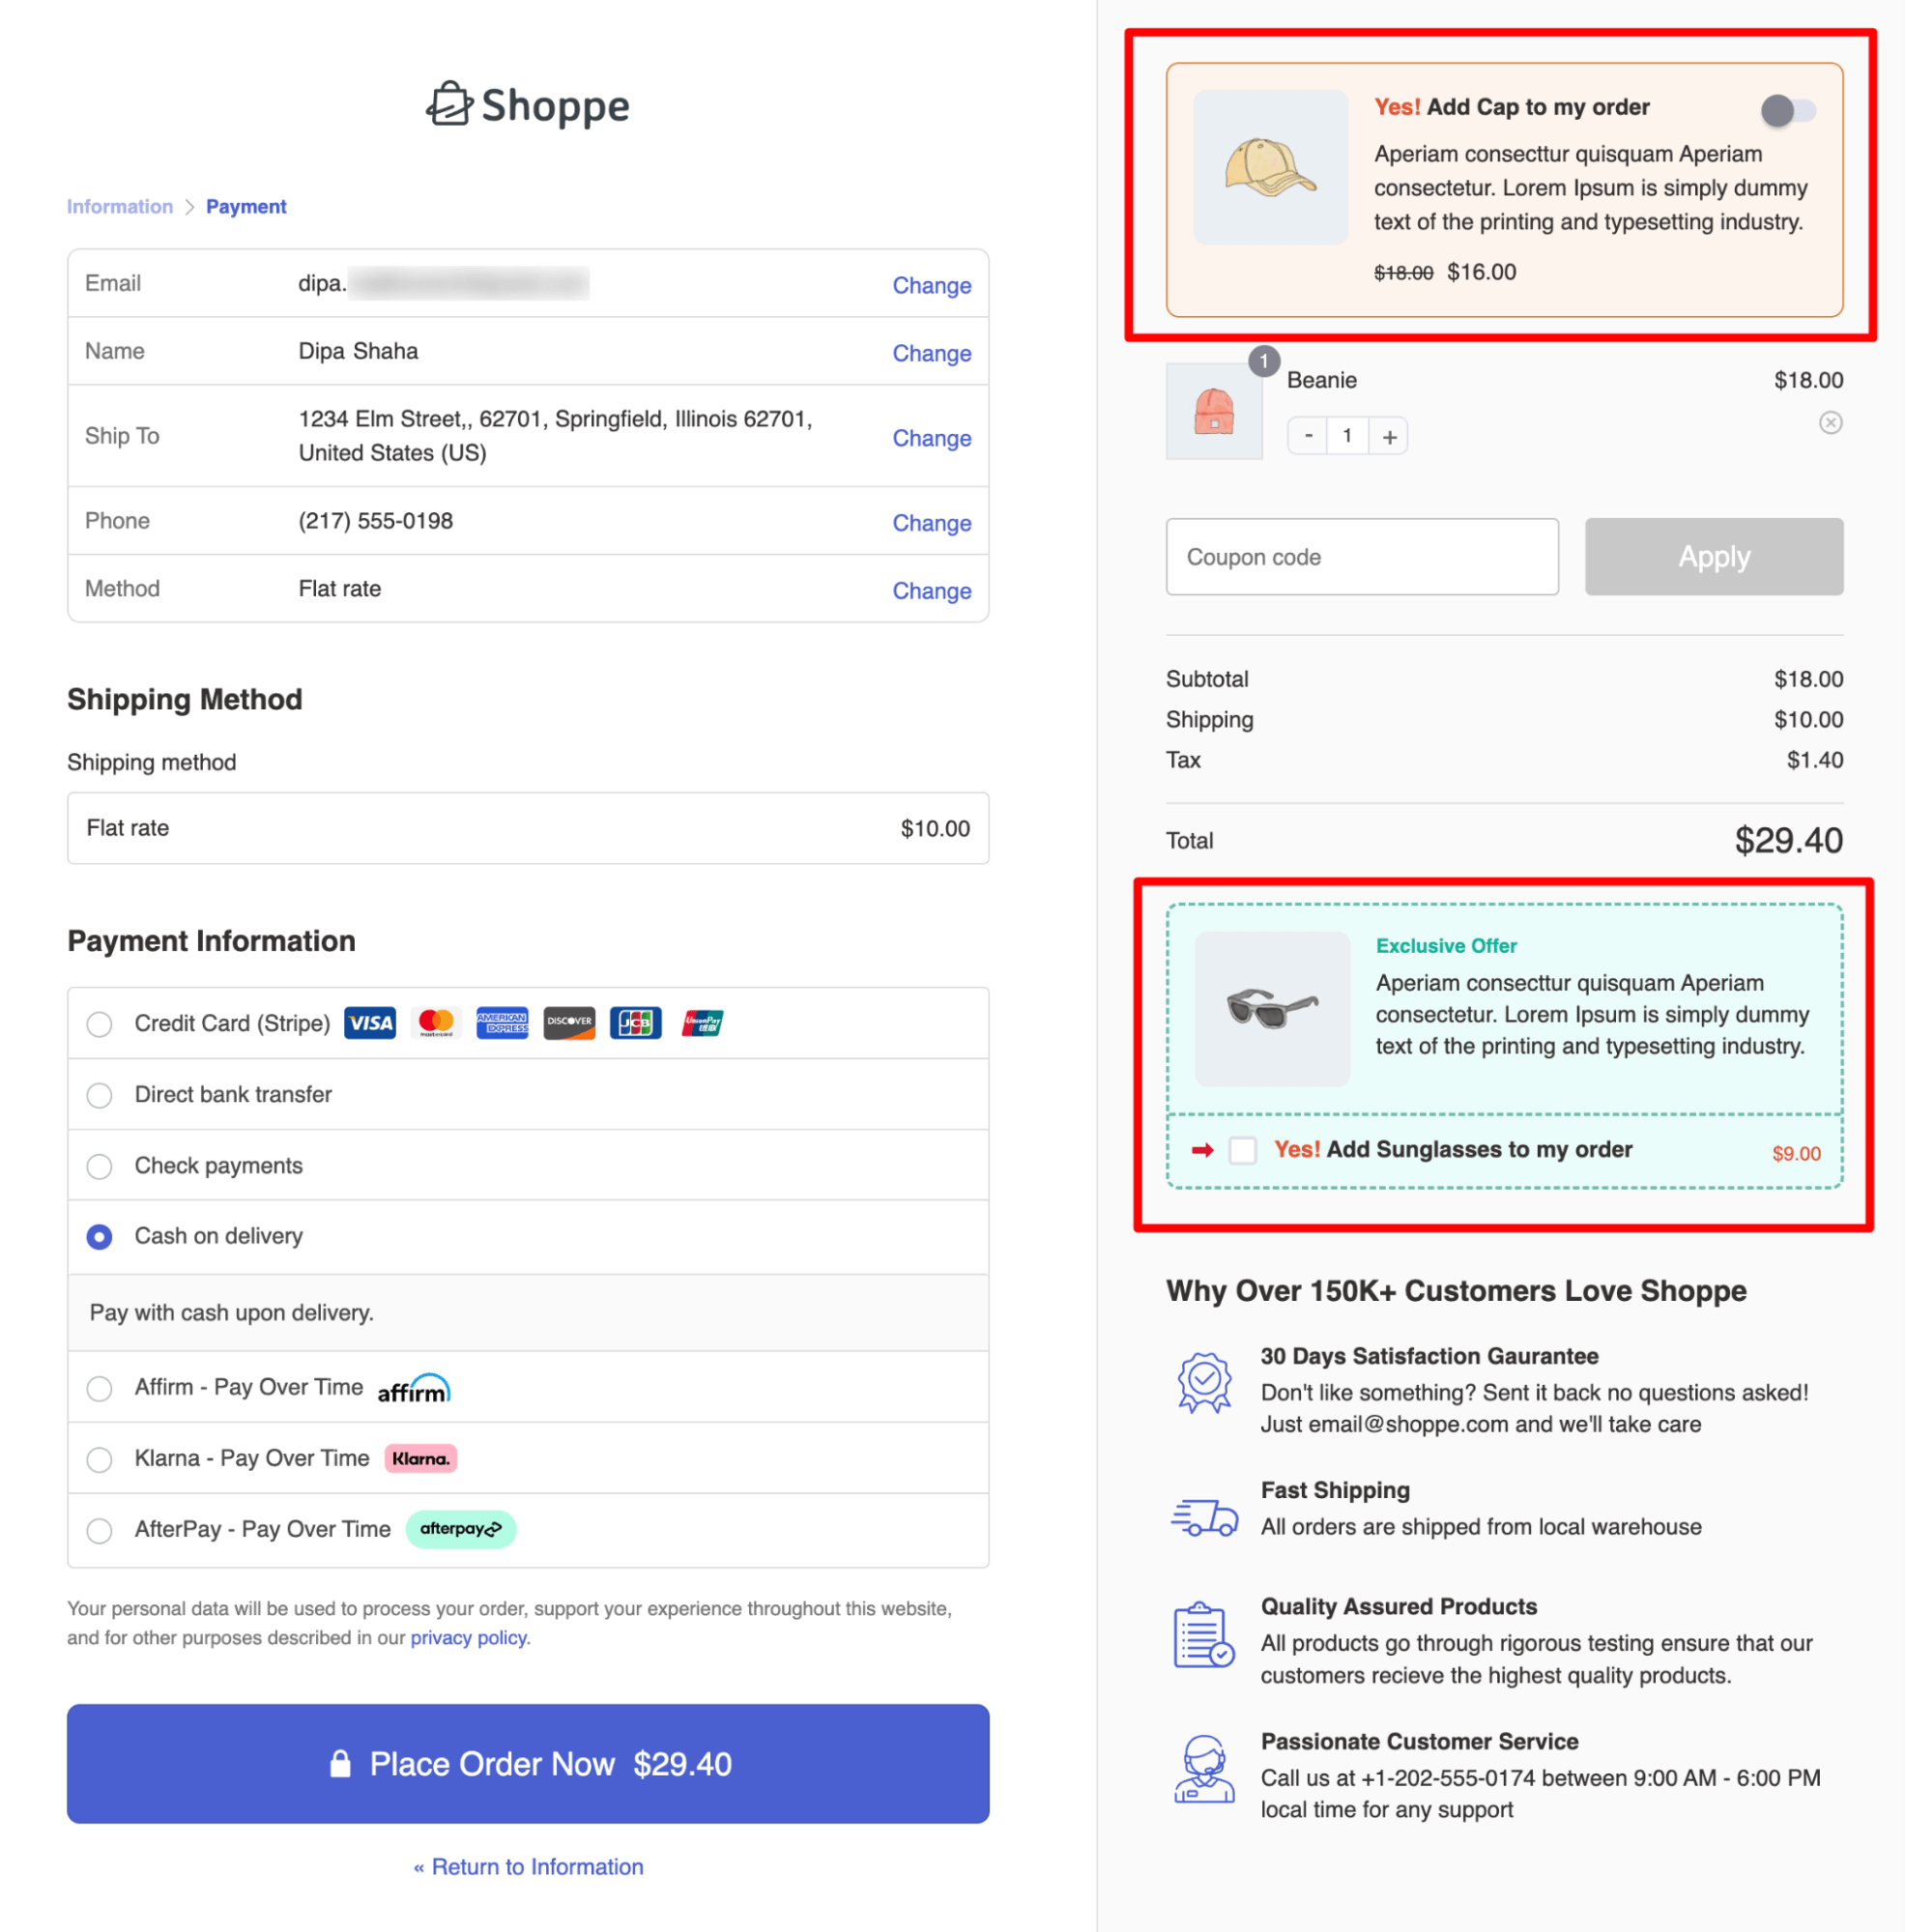
6. Offer complementary items on the checkout page
Displaying complementary products during checkout enhances the shopping experience by helping customers discover related items they may need.
This not only improves customer satisfaction but also boosts your average order value (AOV) by encouraging impulse buys. With FunnelKit’s order bumps, you can easily do that.
7. Enable one-click social login
Allow users to log in using their Google, Facebook, or Apple accounts. This eliminates the need to remember passwords and cuts down login time to just one click.
Social logins not only improve convenience but also build trust since users authenticate via familiar, secure platforms.
Use a plugin like Social Login for WooCommerce that supports multiple providers and displays minimal but recognizable social icons directly inside the popup.
Frequently Asked Questions About Easy Login in WooCommerce
Does easy login come with a remember me option?
Yes, the easy login feature includes a "Remember Me" option, allowing returning customers to stay logged in for future checkouts, making the process even quicker.
Can I also allow guest checkout along with easy login in WooCommerce?
Yes, you can enable both guest checkout and FunnelKit’s easy login in WooCommerce. Guest checkout helps first-time buyers complete their orders quickly, while the login popup makes repeat purchases effortless for returning customers. Combining both ensures the best conversion rates for all user types.
Why implement an easy login option at WooCommerce checkout?
Logging in while checking out auto-fills your saved details, sparing you the hassle of re-entering them manually. That’s why implementing an easy login option in your WooCommerce checkout can significantly enhance the customer experience and drive better results for your store. This is effective for existing customers when considering that it costs five to ten times more to acquire a new customer than to retain an existing one. You can understand the importance of an easy login on the checkout page.
1. Faster checkout for returning customers: An easy login option speeds up the checkout process for returning customers. They can log in quickly without leaving the page, and their information gets auto-filled, making the process more efficient.
2. Reduced cart abandonment: A smoother and faster login process means fewer customers will abandon their carts. With the easy login feature, customers don’t have to re-enter personal details, which often leads to frustration and cart drop-offs.
3. Improved customer experience: Customers enjoy a hassle-free experience because they don’t need to navigate multiple pages or re-enter information. This convenience enhances their overall shopping experience, leading to higher satisfaction and loyalty.
4. Increased conversion rates: The easy login option helps increase conversion rates by reducing friction during the checkout process. Customers are more likely to complete their purchase if the checkout is quick and straightforward.
5. Boosts repeat sales: A quicker login process encourages customers to return and shop again, knowing that they can complete their purchase easily. This convenience can lead to higher repeat sales and long-term customer retention.
Can I use an inline login form instead of a modal popup in easy login in WooCommerce?
Yes, you can use an inline login form instead of a modal popup in Easy Login with FunnelKit Funnel Builder. Just choose the option “Login Form Style” as Inline.
Can I use a Google recaptcha while using the easy login option in WooCommerce?
Yes, with the help of a reCaptcha plugin, you can add Google reCaptcha to the WooCommerce checkout.
Does adding a login popup slow down my checkout page?
No, FunnelKit loads the popup asynchronously, meaning it won’t delay your checkout page load. Just ensure your site uses caching, CDN, and image optimization to maintain fast performance across all pages.
Add Easy Login to Your WooCommerce Checkout and Make Shopping Journey Easier!
With easy login for WooCommerce, customers can quickly log in, autofill their details, and complete their purchases, making the shopping journey smoother and faster.
Whether you choose a modal popup or an inline form, integrating easy login into your WooCommerce checkout is simple and effective.
As we’ve shared, FunnelKit Funnel Builder makes it super easy to add an easy login to your checkout, streamlining the password reset process and improving the experience for existing customers by nudging them to log in.
But don’t stop there! Experts recommend combining this with other proven strategies, like post-purchase upsells, to maximize your revenue.
So why wait? Implement easy login today and give your customers the seamless, hassle-free checkout experience they deserve.

Editorial Team
July 7, 2026Are shoppers adding products to their cart and leaving before they buy? According to Baymard Institute research on checkout usability, 18% of shoppers who abandon their cart do so because...
Editorial Team
July 3, 2026Sometimes, the difference between a visitor leaving and placing an order comes down to something surprisingly small, like a better headline, a cleaner checkout, or a more compelling offer. That's...
Editorial Team
July 1, 2026Are you leaving money on the table by not fully leveraging your customers’ shopping behavior? Many store owners don’t realize that every time a customer adds a product to the...


