


![How to Enable WooCommerce Guest Checkout to Reduce Friction and Boost Sales [2026]](https://funnelkit.com/wp-content/uploads/2025/04/How-to-Enable-WooCommerce-Guest-Checkout-in-Your-Store-FunnelKit.jpg)
WooCommerce guest checkout lets shoppers buy from your store without creating an account.
They enter an email, their billing details, and payment, and the order goes through.
It's a built-in setting, so turning it on is quick. What comes after takes more thought. Guest orders aren't tied to a customer profile, some products still need an account, and an open checkout can attract fake orders.
In this blog, we'll share how to enable guest checkout, which account options to pair with it, when to keep accounts required, and how to fix it when it doesn't work.
⏱️ Short on time? Watch the video:
![How to Enable WooCommerce Guest Checkout to Reduce Friction and Boost Sales [2026]](https://funnelkit.com/wp-content/uploads/2025/04/Enable-WooCommerce-Guest-Checkout.jpg)
Table of Contents
- 1 What is WooCommerce Guest Checkout?
- 2 Why You Should Allow Guest Checkout in Your WooCommerce Store?
- 3 How to Enable Guest Checkout in WooCommerce
- 4 Bonus: Give Customers the Option to Register/Log In Without Forcing It
- 5 When Guest Checkout Makes Sense (and When It Doesn't)
- 6 How to Create an Optimized Guest Checkout Process that Converts?
- 7 9 Best Practices for WooCommerce Guest Checkout for High Conversion Rates
- 7.1 Tip #1: Simplify your checkout form design
- 7.2 Tip #2: Optimize for mobile
- 7.3 Tip #3: Recommend upsells and cross-sells
- 7.4 Tip #4: Collect customer data for marketing purposes
- 7.5 Tip #5: Clear Calls-to-Action (CTAs)
- 7.6 Tip #6: Run A/B tests regularly
- 7.7 Tip #7: Track checkout analytics
- 7.8 Tip #8: Set up abandoned cart recovery
- 7.9 Tip #9: Page loading speed
- 8 Frequently Asked Questions (FAQs) on WooCommerce Guest Checkout
- 9 Ready to Enable WooCommerce Guest Checkout and Skyrocket Your Sales?
What is WooCommerce Guest Checkout?
WooCommerce guest checkout allows customers to place orders without creating an account.
They add products to their shopping cart, go to the checkout page, fill in shipping and billing details, and complete the purchase, no login or registration required.

This feature is perfect for mobile users, ad-click traffic, or anyone who doesn’t want to go through the hassle of registration.
Why You Should Allow Guest Checkout in Your WooCommerce Store?
Here’s why enabling WooCommerce guest checkout can directly impact your revenue:
- User convenience: Let shoppers shop fast without registration hurdles.
- Reduced cart abandonment: Remove friction at the final step and recover lost sales.
- Increased sales: Simpler checkout = higher conversions, especially on mobile.
- Better user experience: Let users be in control by choosing between guest and account checkout. This flexibility enhances satisfaction and trust.
- Higher customer retention: Friction-free first experiences lead to repeat purchases and future loyalty.
How to Enable Guest Checkout in WooCommerce
To recover abandoned carts and boost sales, offering quick WooCommerce checkout options is a key step.
A faster, streamlined checkout process reduces friction and helps turn more visitors into paying customers.
Here’s the answer: Enabling guest checkout only takes 3 clicks.
From your WordPress dashboard, navigate to WooCommerce ⇨ Settings and click on the ‘Accounts & Privacy’ tab.
Under the Guest Checkout section, check the box: Allow customers to place orders without an account.
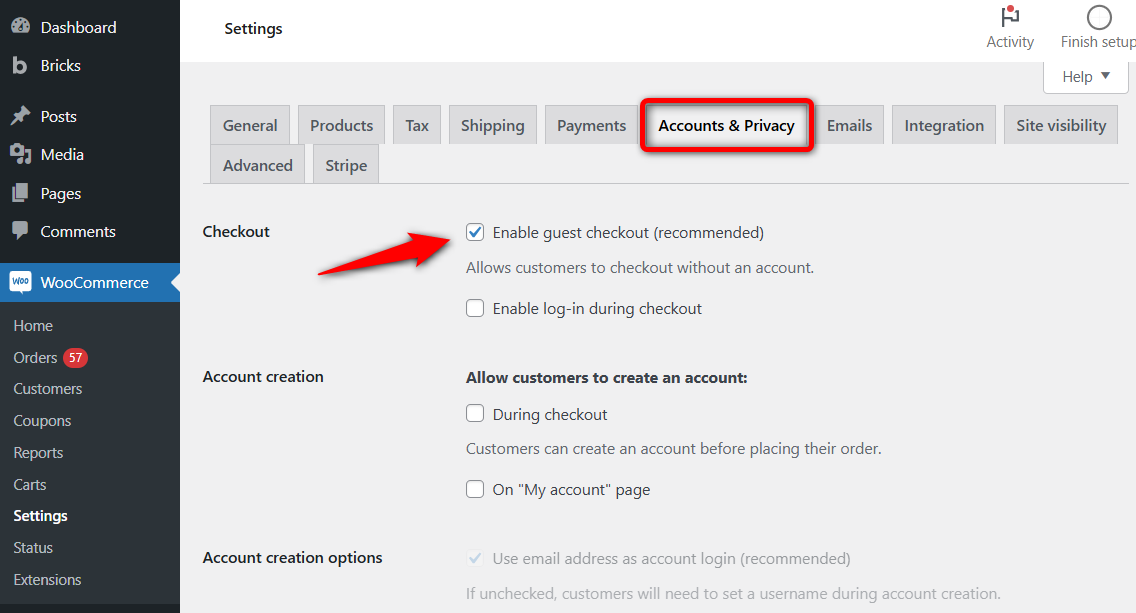
Scroll down and click ‘Save changes’.
That’s it! Guest checkout is now active on your WooCommerce store, enabling customers to complete their purchases without signing up.
After enabling guest checkout, test out the buying journey. Open your website in incognito mode and try placing a test order as a guest. For easy testing, temporarily enable cash on delivery as the payment method.
Selling subscriptions? Those products still need an account so customers can manage renewals. Most subscription plugins create one at checkout automatically, even with guest checkout turned on.
Bonus: Give Customers the Option to Register/Log In Without Forcing It
Now that you’ve learned how to enable WooCommerce guest checkout in your online store.
Here’s how you can go one step further in creating a streamlined buying experience for your shoppers.
1. Create an account during checkout
This feature enables shoppers using the guest checkout option to opt in to creating an account during checkout.
In other words, they don’t have to go through the full registration process up front.
Instead, they can complete their purchase as usual and have an account automatically created, making it easy to set up their login details later.
Enable account creation during checkout from Accounts & Privacy settings:
- Allow customers to create an account during checkout
- Use the email address as the account login (recommended)
- Send password setup link (recommended)
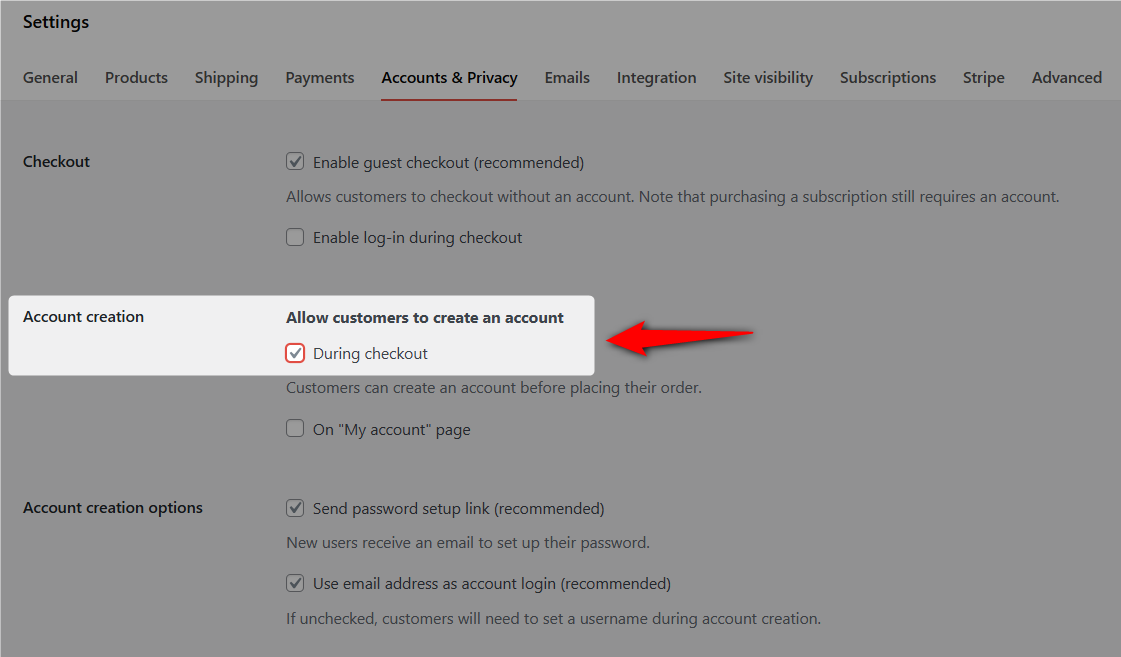
Without an account, users can’t access their order history, account dashboard, or manage their purchases.
When users check out using the guest checkout option, an account will be automatically created, and the user will receive an email with a link to set a password.
2. Allow existing customers to log in during checkout
For shoppers in a hurry, guest checkout is the ideal option. However, for returning customers, offering them the option to log in saves time and effort.
They simply enter their username and password when placing the order.
Enable log-in during checkout from the same Accounts & Privacy settings:
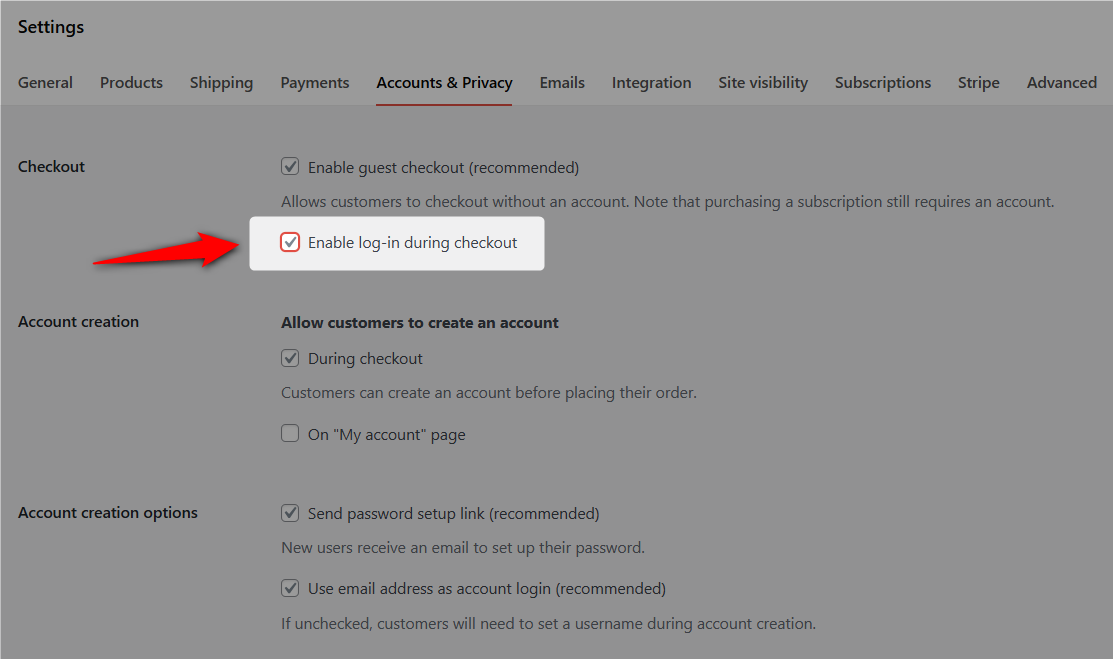
After that, click on ‘Save Changes’ to update these settings.
When Guest Checkout Makes Sense (and When It Doesn't)
Let’s look at some ideal scenarios for setting up guest checkout in your WooCommerce store.
1. Seasonal and high-demand products
Offering guest checkout for high-demand items, such as holiday gifts, enables customers to quickly purchase them and complete their transactions smoothly.
2. First-time buyers
For products that attract first-time buyers, offering guest checkout helps remove barriers and encourages faster purchases.
3. Promotional offers and inexpensive items
Guest checkout is perfect for promotions or low-cost products, attracting new customers who prefer a hassle-free shopping experience without creating an account.
4. Digital products
For digital products or downloads - ebooks or software- guest checkout allows customers to access their purchases instantly, improving satisfaction.
5. Wholesale and B2B orders
Wholesale stores often need accounts so each buyer sees the right pricing and tax settings. If your bulk pricing doesn't depend on who's logged in, one-off bulk buyers can still check out as guests.
5. Gift items
For gifts, guest checkout lets buyers avoid account creation, especially if they don’t want follow-up marketing for a one-time purchase.
How to Create an Optimized Guest Checkout Process that Converts?
Offering WooCommerce guest checkout is a great start. But to truly maximize conversions, you need to optimize your checkout process.
A clunky or overwhelming checkout process is one of the biggest reasons shoppers abandon their carts.
By streamlining the process, you make it easier for users, whether guests or not, to complete their purchase.
For that, we’ll use FunnelKit Funnel Builder. It’s a powerful sales funnel and checkout plugin built for WordPress and WooCommerce.
Make sure you’ve installed both the Lite (free) and Pro versions on your website.
After activating the plugins, follow these steps:
Step 1: Create a store checkout
To replace the default WooCommerce checkout with a high-converting one, first create a Store Checkout using FunnelKit.
For that, navigate to FunnelKit ⇒ Store Checkout and click on the ‘Create Store Checkout’ button.
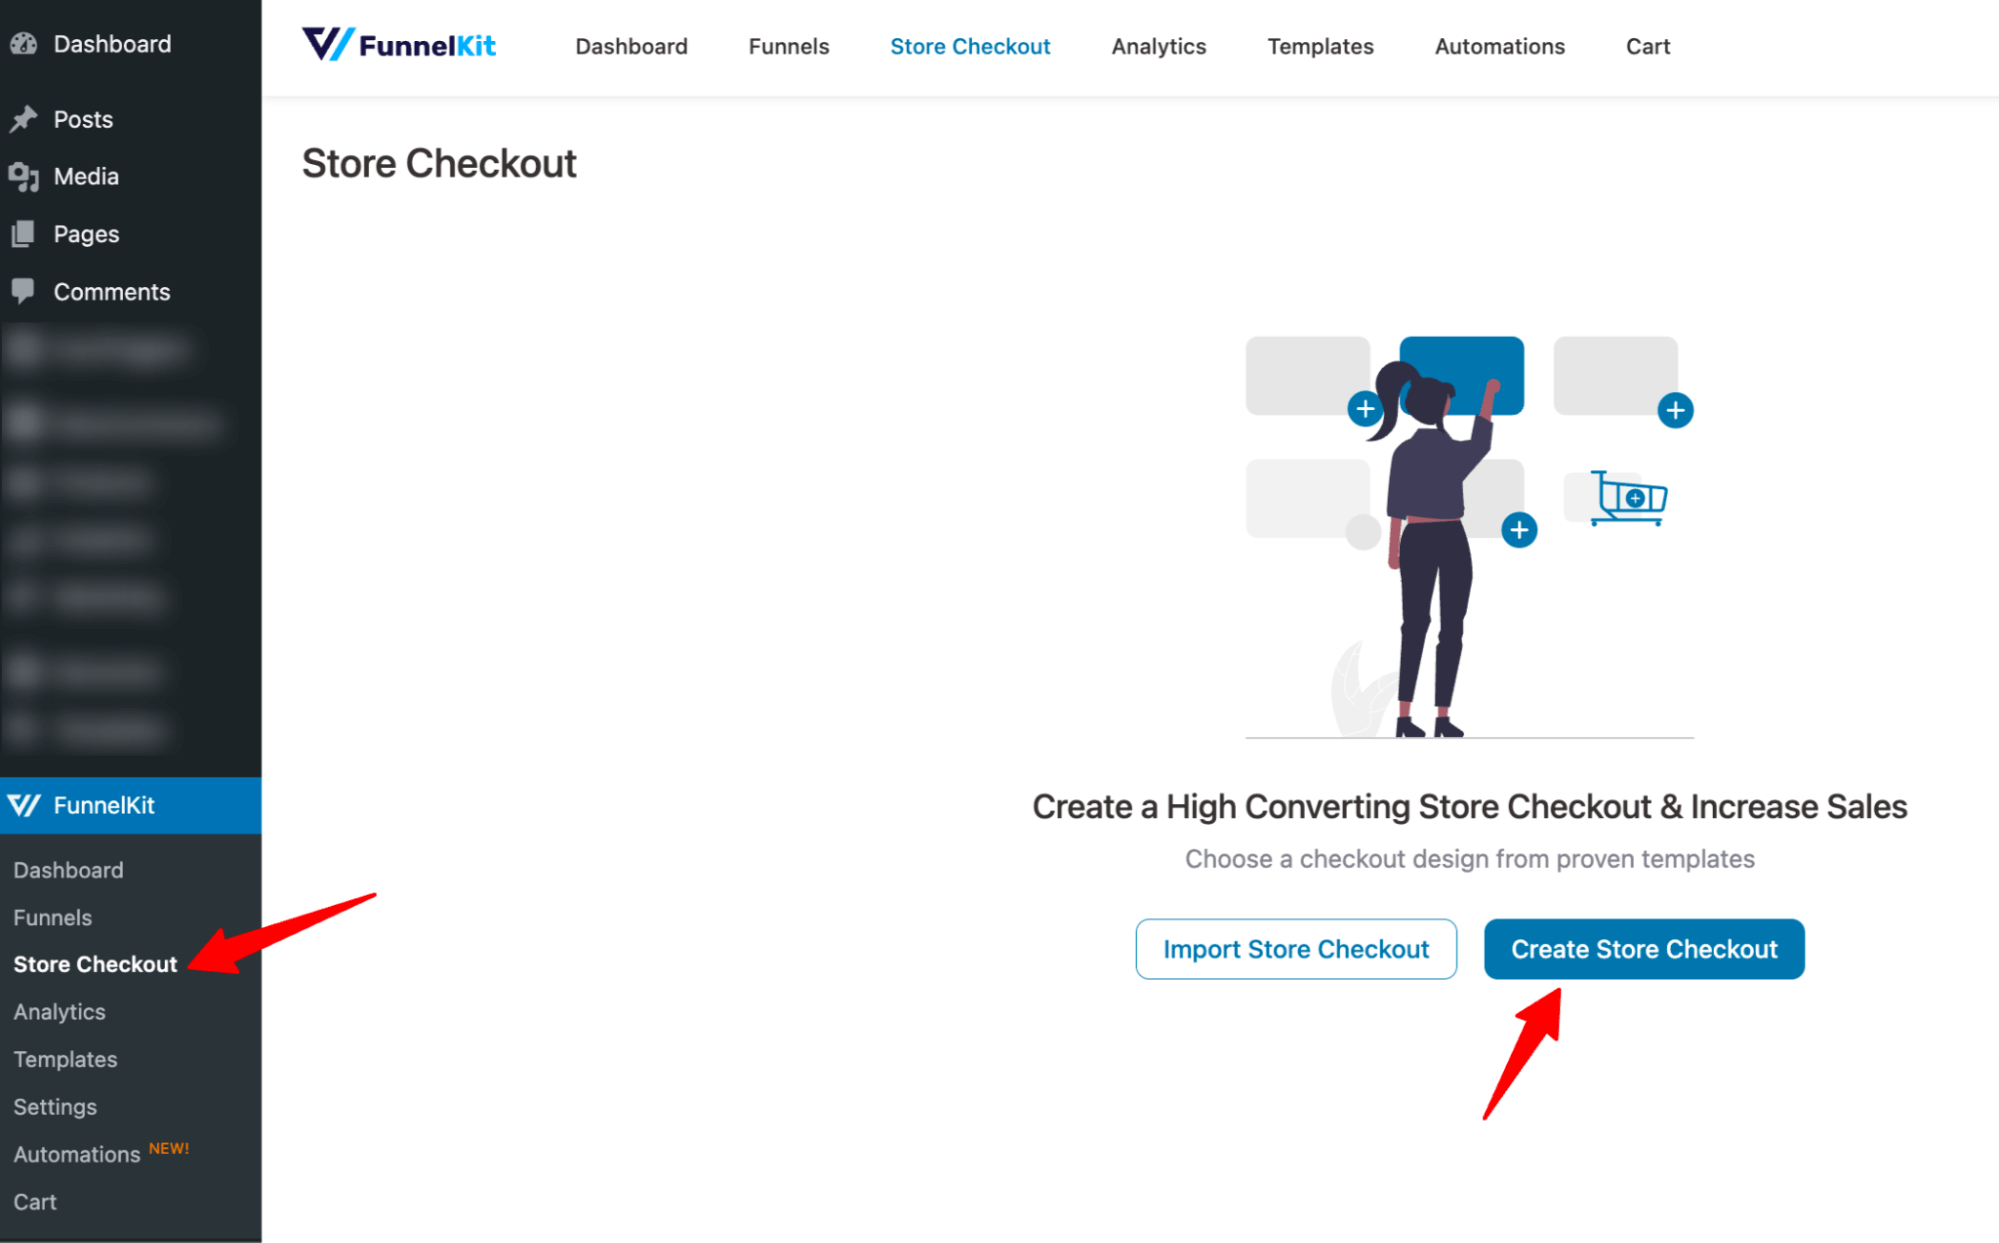
Next, browse the list of prebuilt checkout templates. Hover over the template you like and click ‘Preview’ to see how it looks.
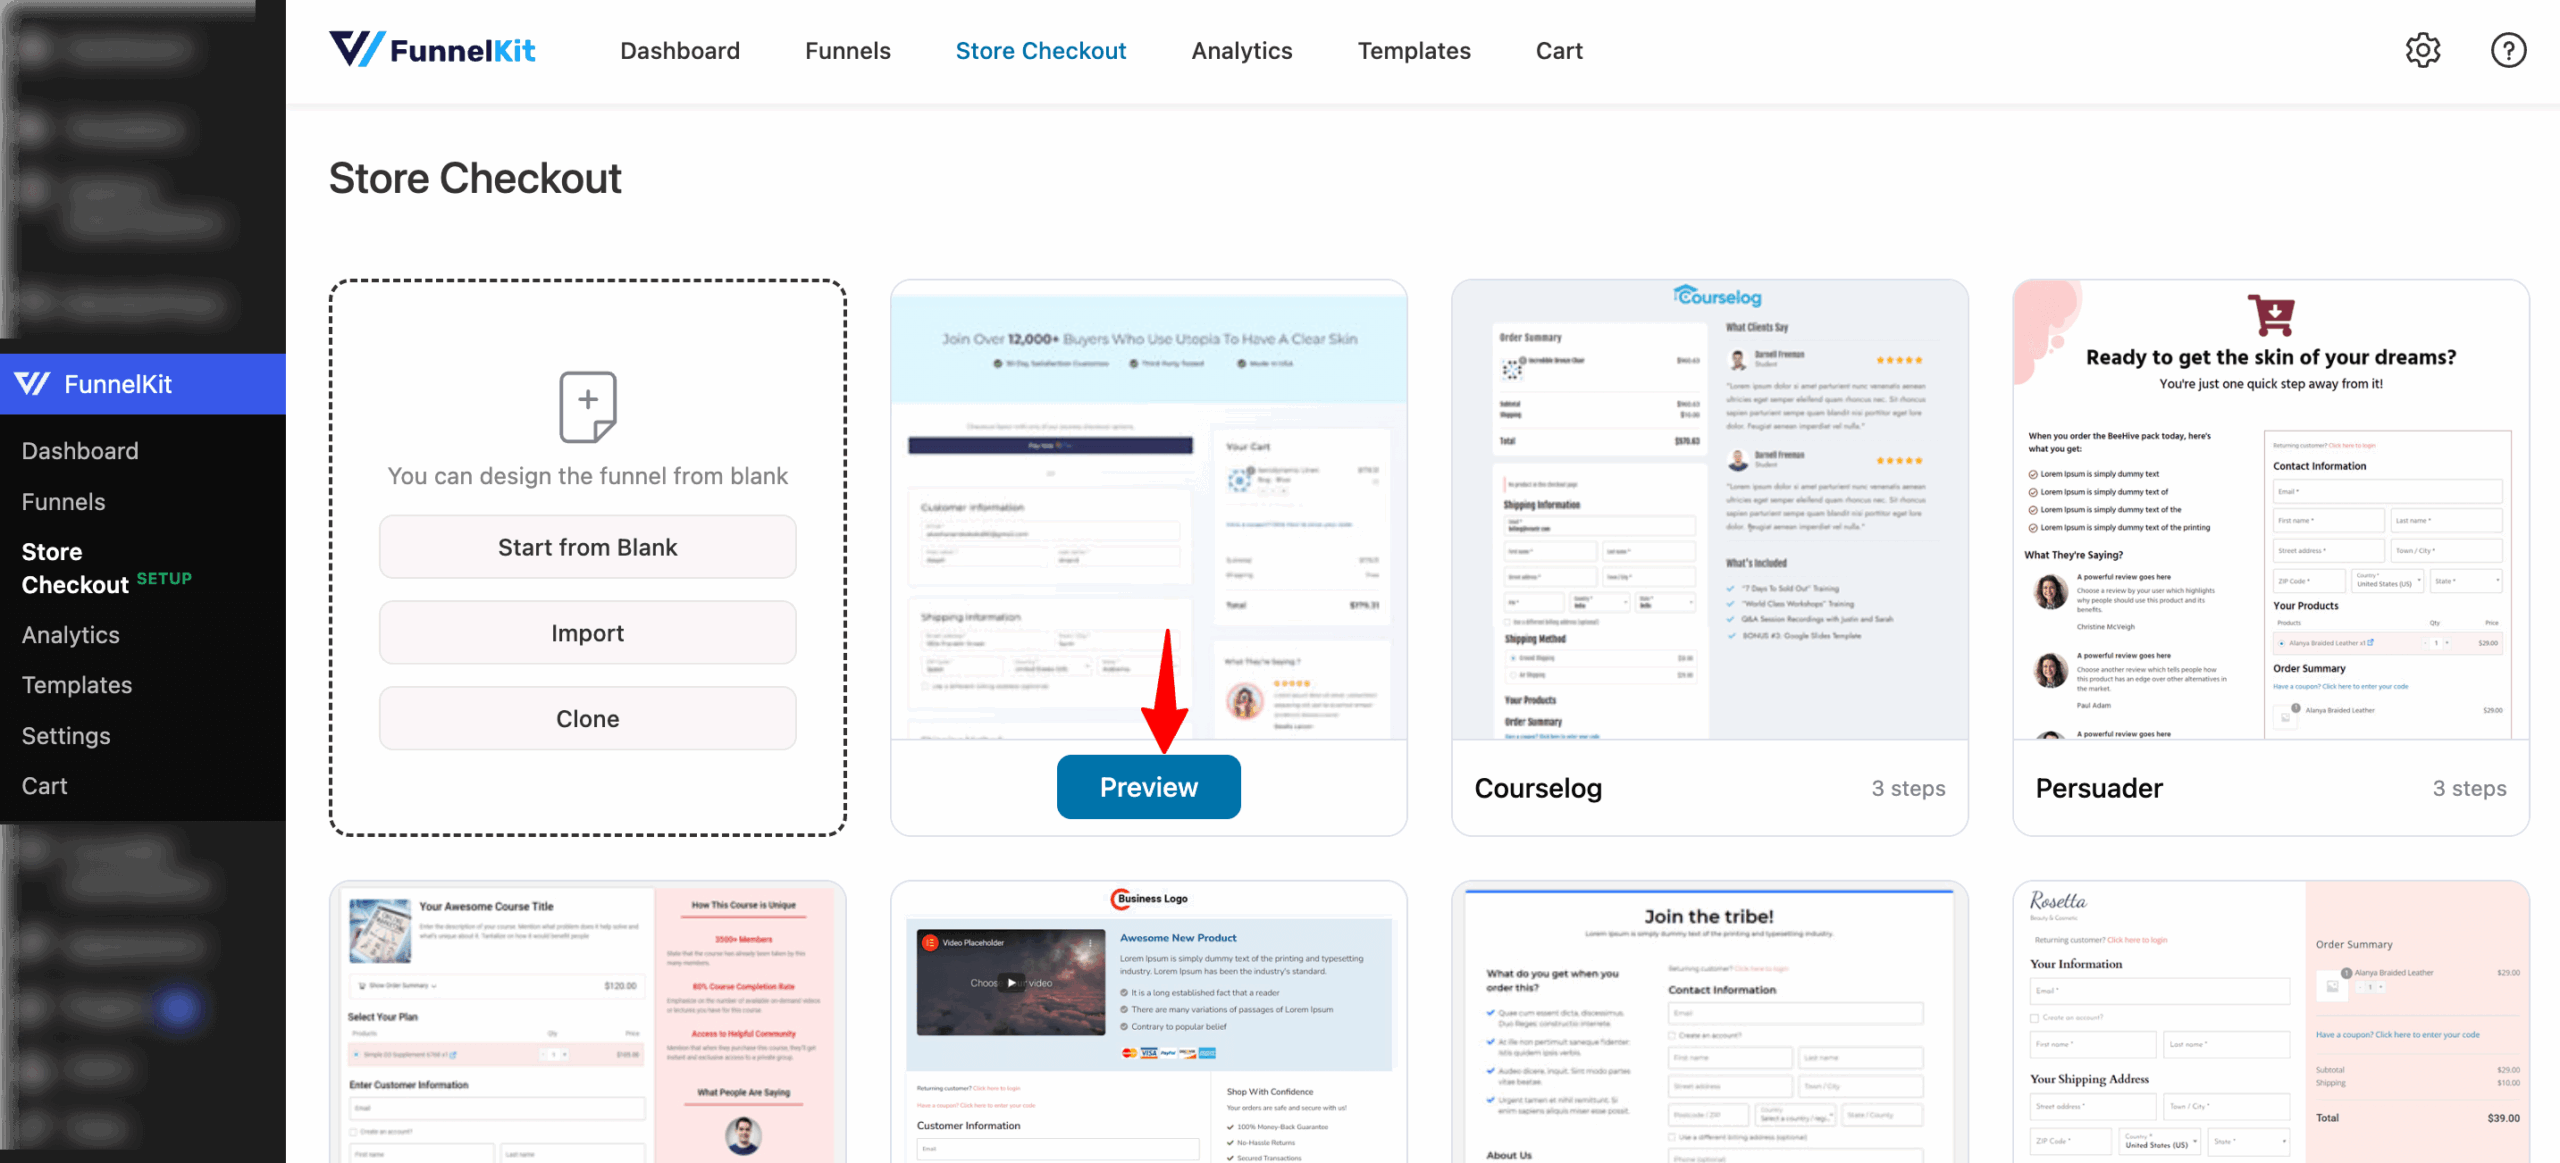
Now, choose a one-page checkout (one step) or a multi-step checkout (2-step or 3-step).
After that, click 'Import This Funnel', provide a name, and hit the 'Done' button to import your store checkout funnel.
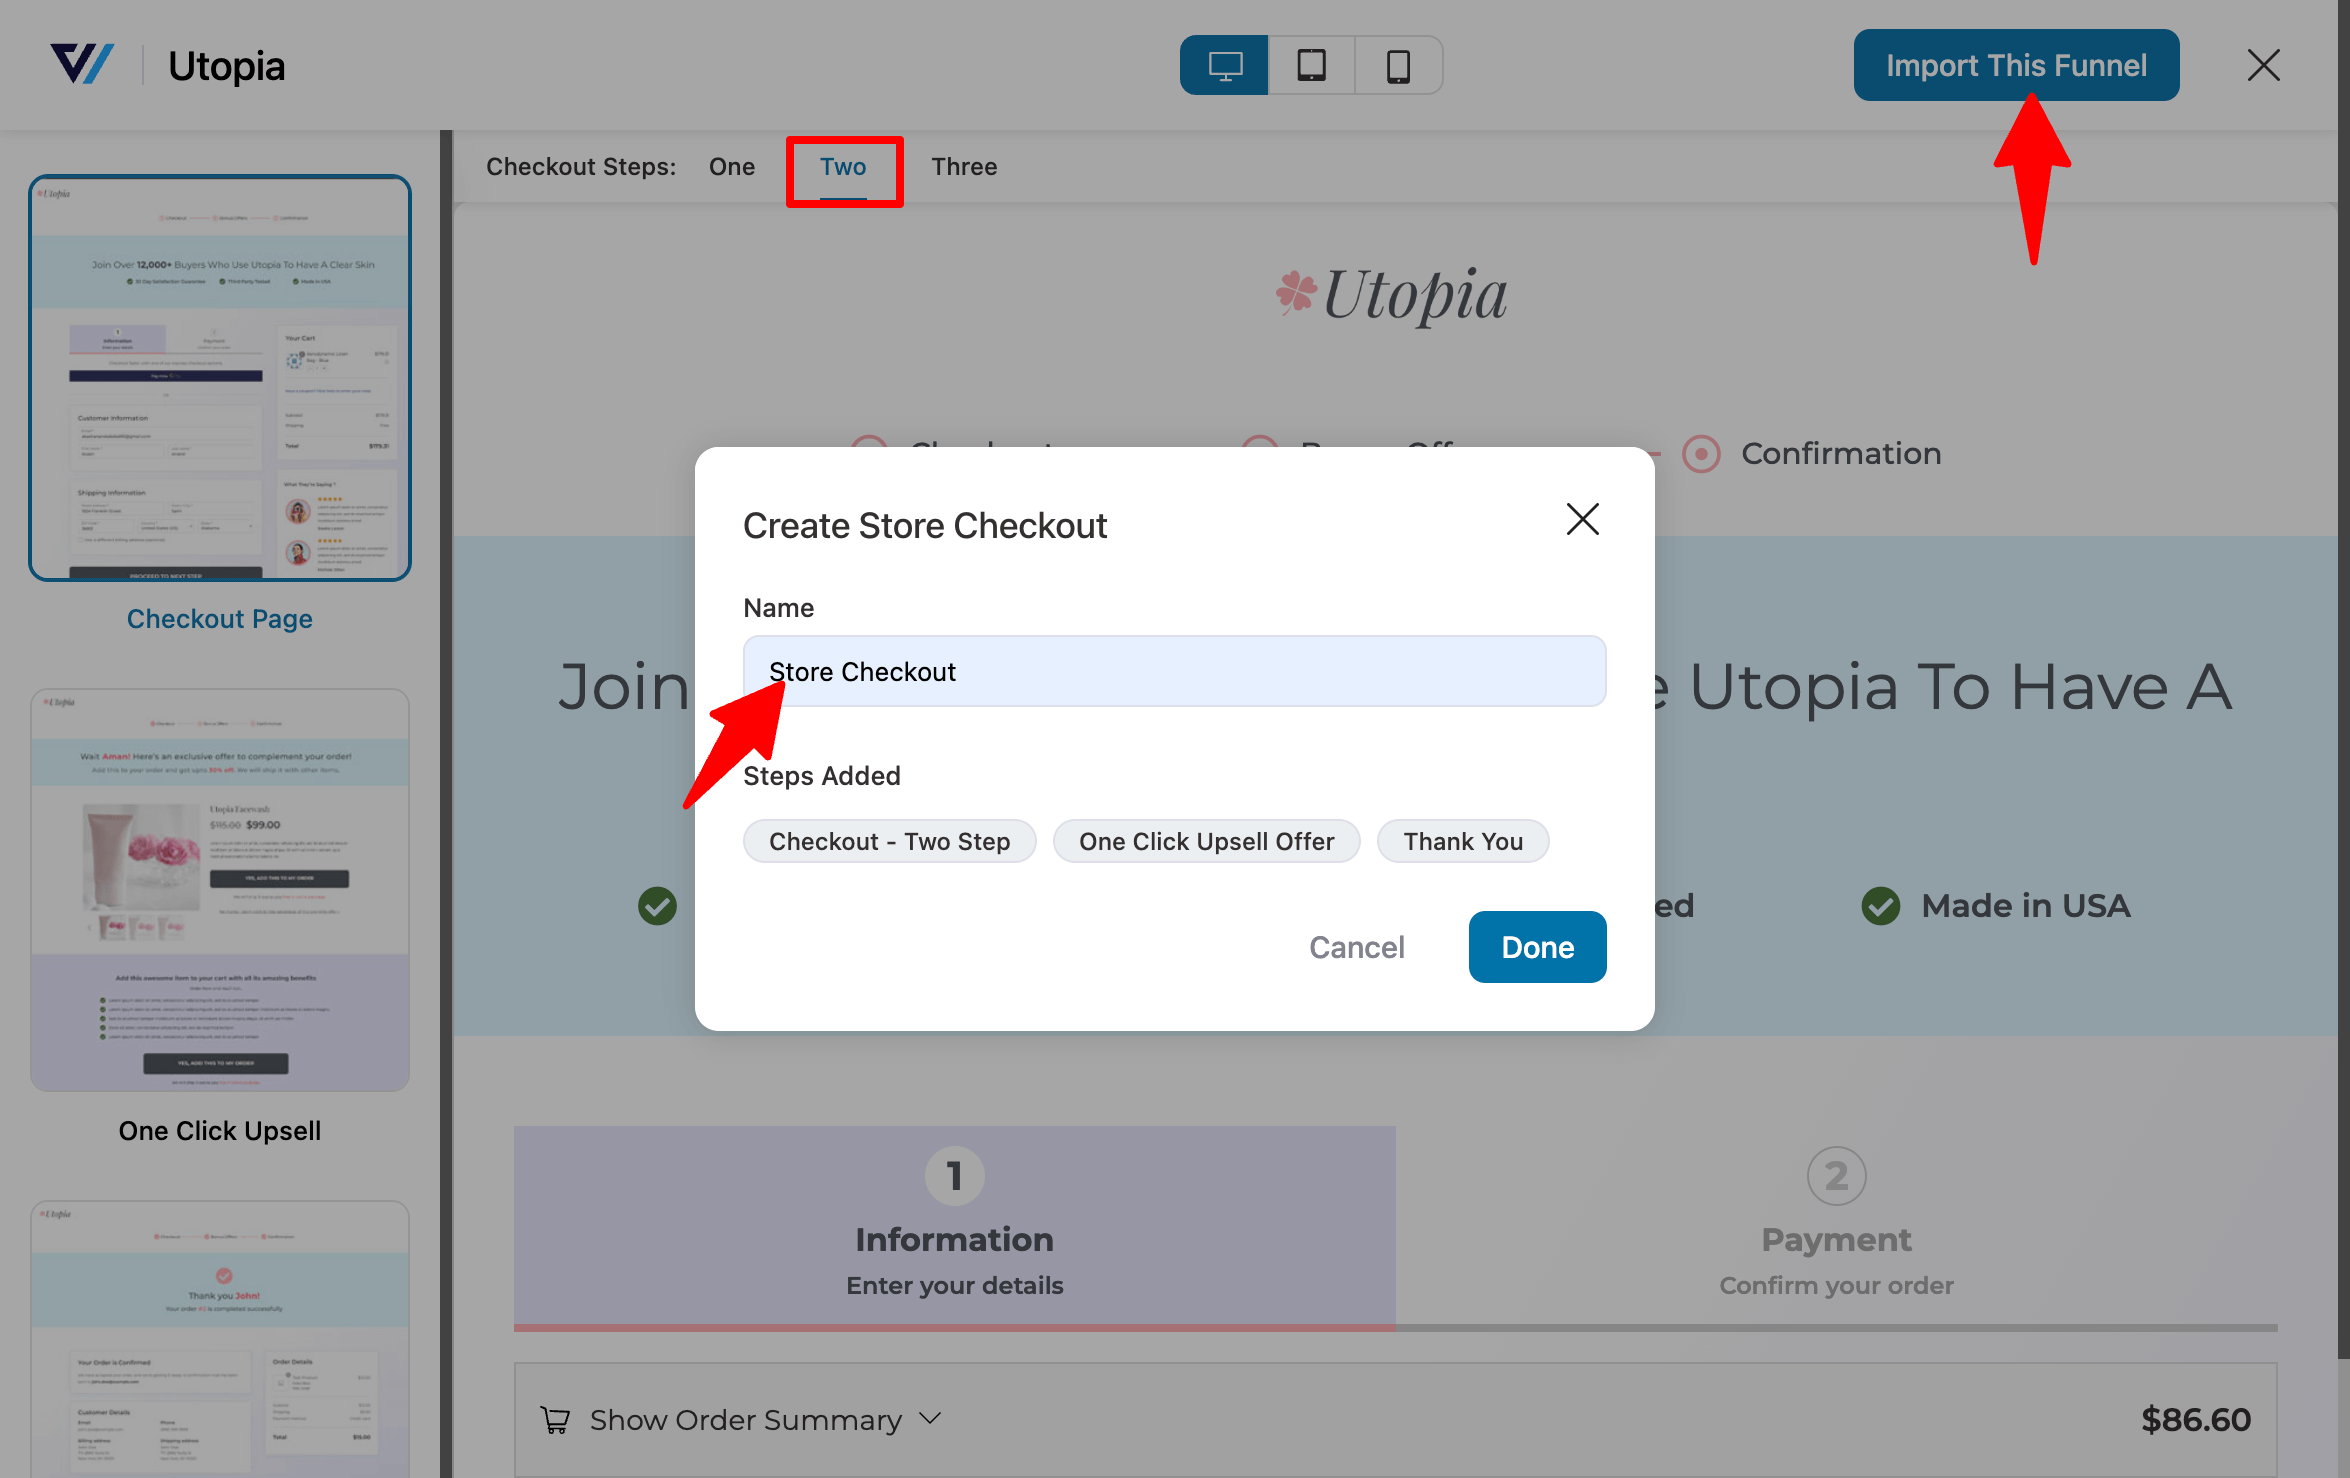
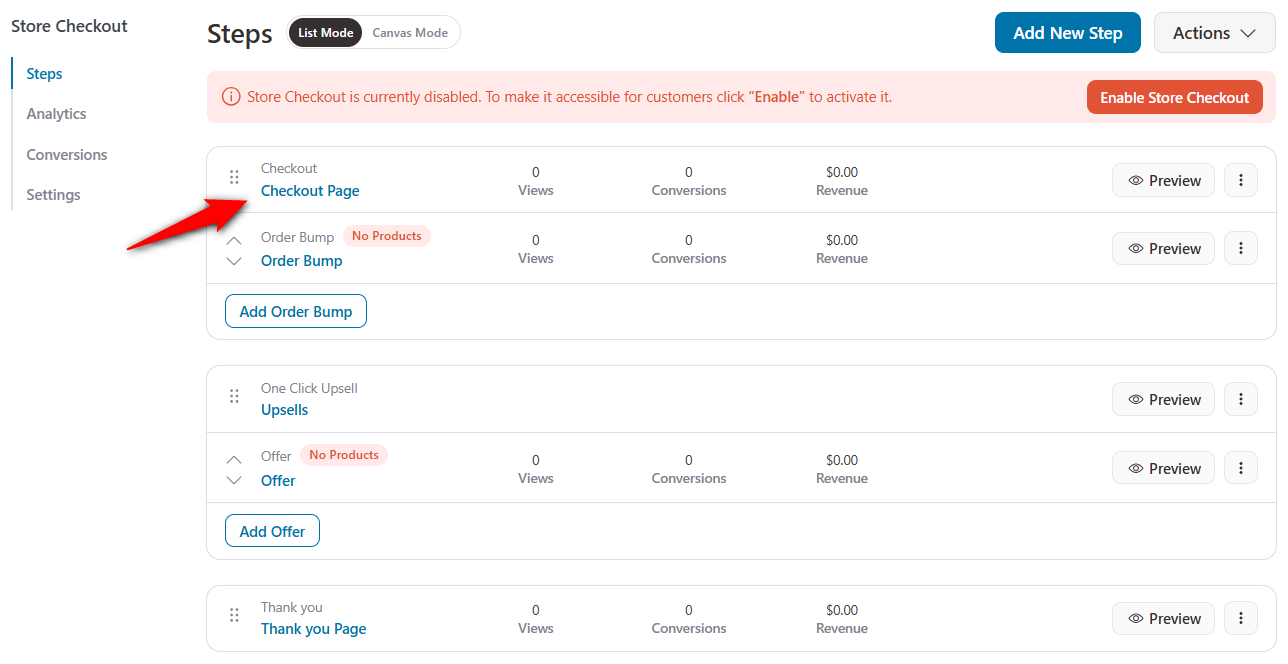
Your store checkout funnel will get imported with three steps: Checkout, One-Click Upsells, and Thank You.
Step 2: Customize your WooCommerce checkout page
Once your store checkout funnel is created, it’s time to customize the checkout page to match your brand and optimize the user experience.
Click on the checkout page to customize its template design.
Next, click “Edit Template” to open the page in your selected page builder (like Elementor, Divi, Bricks, etc.).
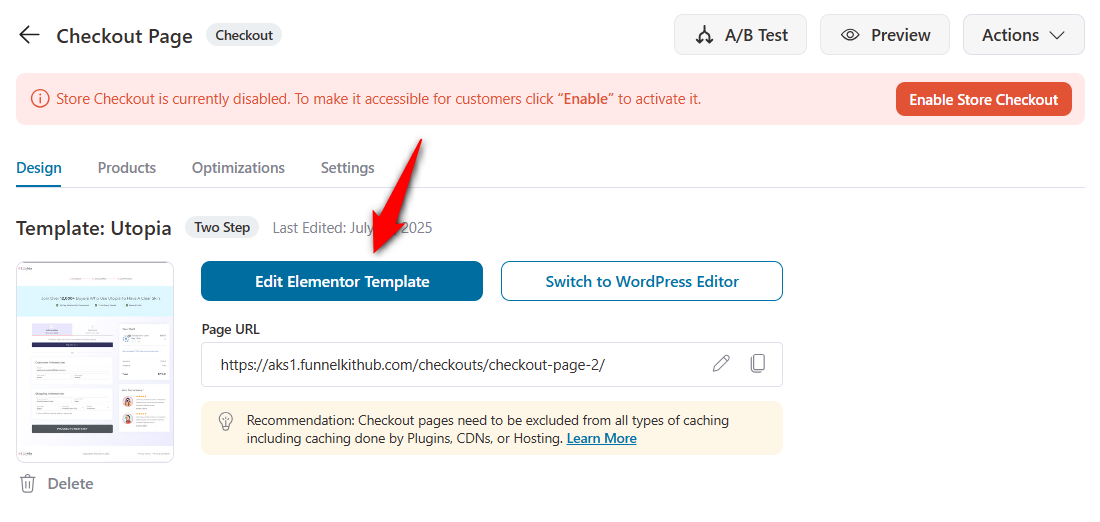
Here, you can customize various options, such as enabling a collapsible order summary, mini cart editing, and checkout button icons, which can be useful for a wider range of users.
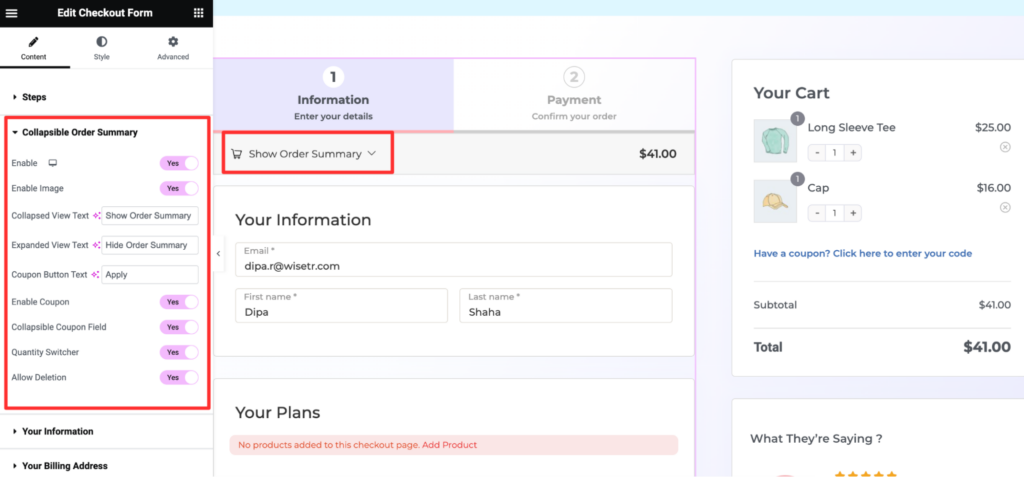
Furthermore, configure background, typography, colors, padding, etc., or even add trust signals like secure icons or customer testimonials to your checkout page.
Step 3: Customize the form fields for guest checkout
To tailor the checkout experience for your audience, you can easily customize the form fields using FunnelKit’s drag-and-drop builder.
Scroll down to the Checkout Form Fields section under the ‘Design’ tab.
Use the drag-and-drop checkout field editor to:
- Add new custom fields
- Edit checkout fields and sections
- Remove unnecessary fields
- Reorder fields based on your needs
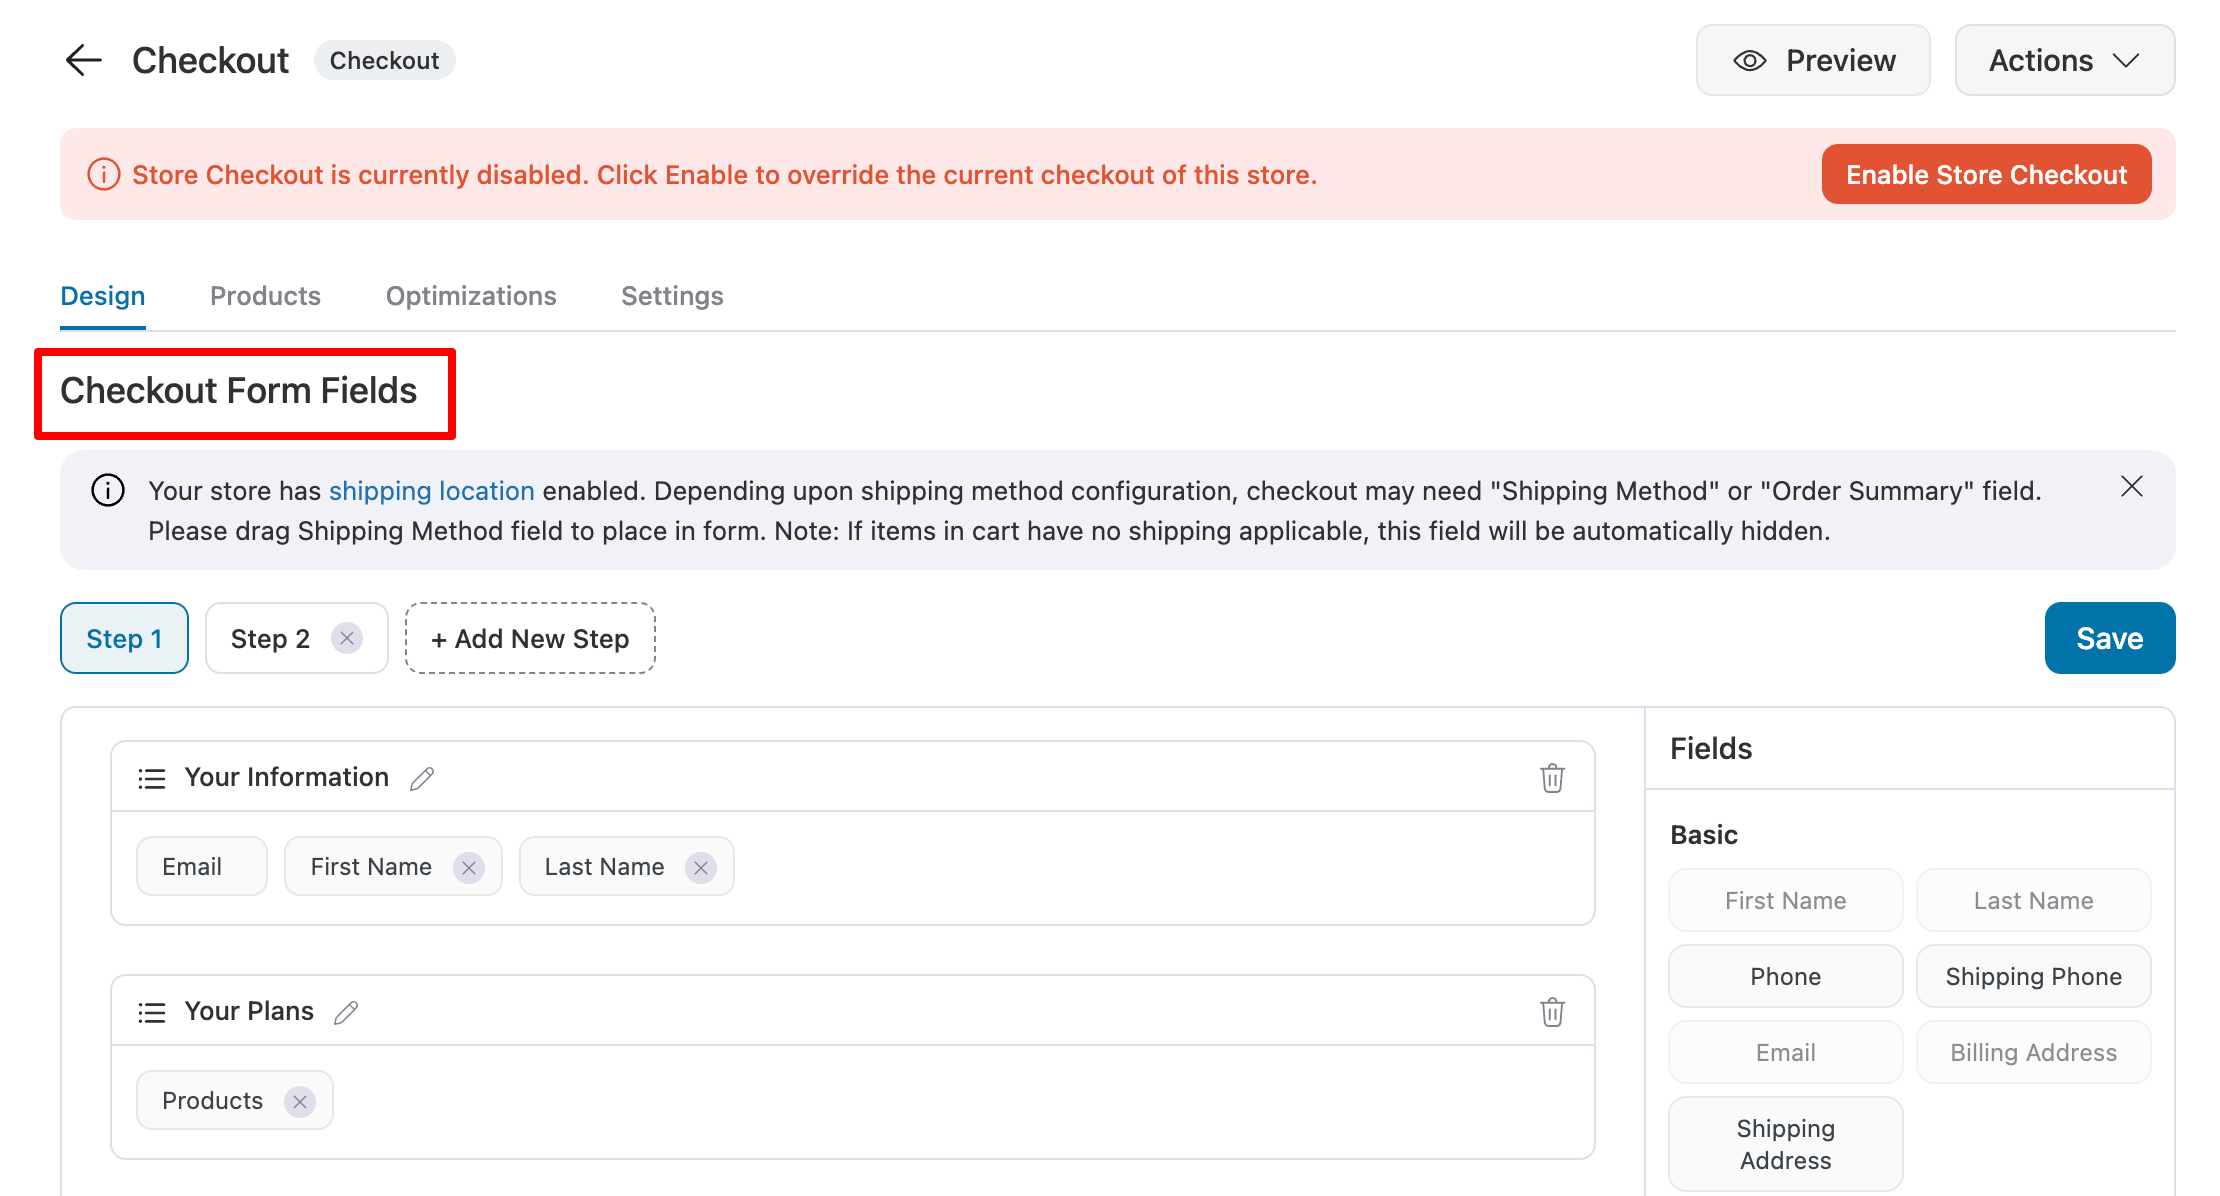
For example, if you're a B2C business, the default Company Name field might not be necessary.
You can simply remove it to make the form shorter and more relevant for your customers.
Additionally, you can also add custom fields such as gift notes, delivery instructions, or anything specific to your business.
Step 4: Optimize the checkout page for conversions
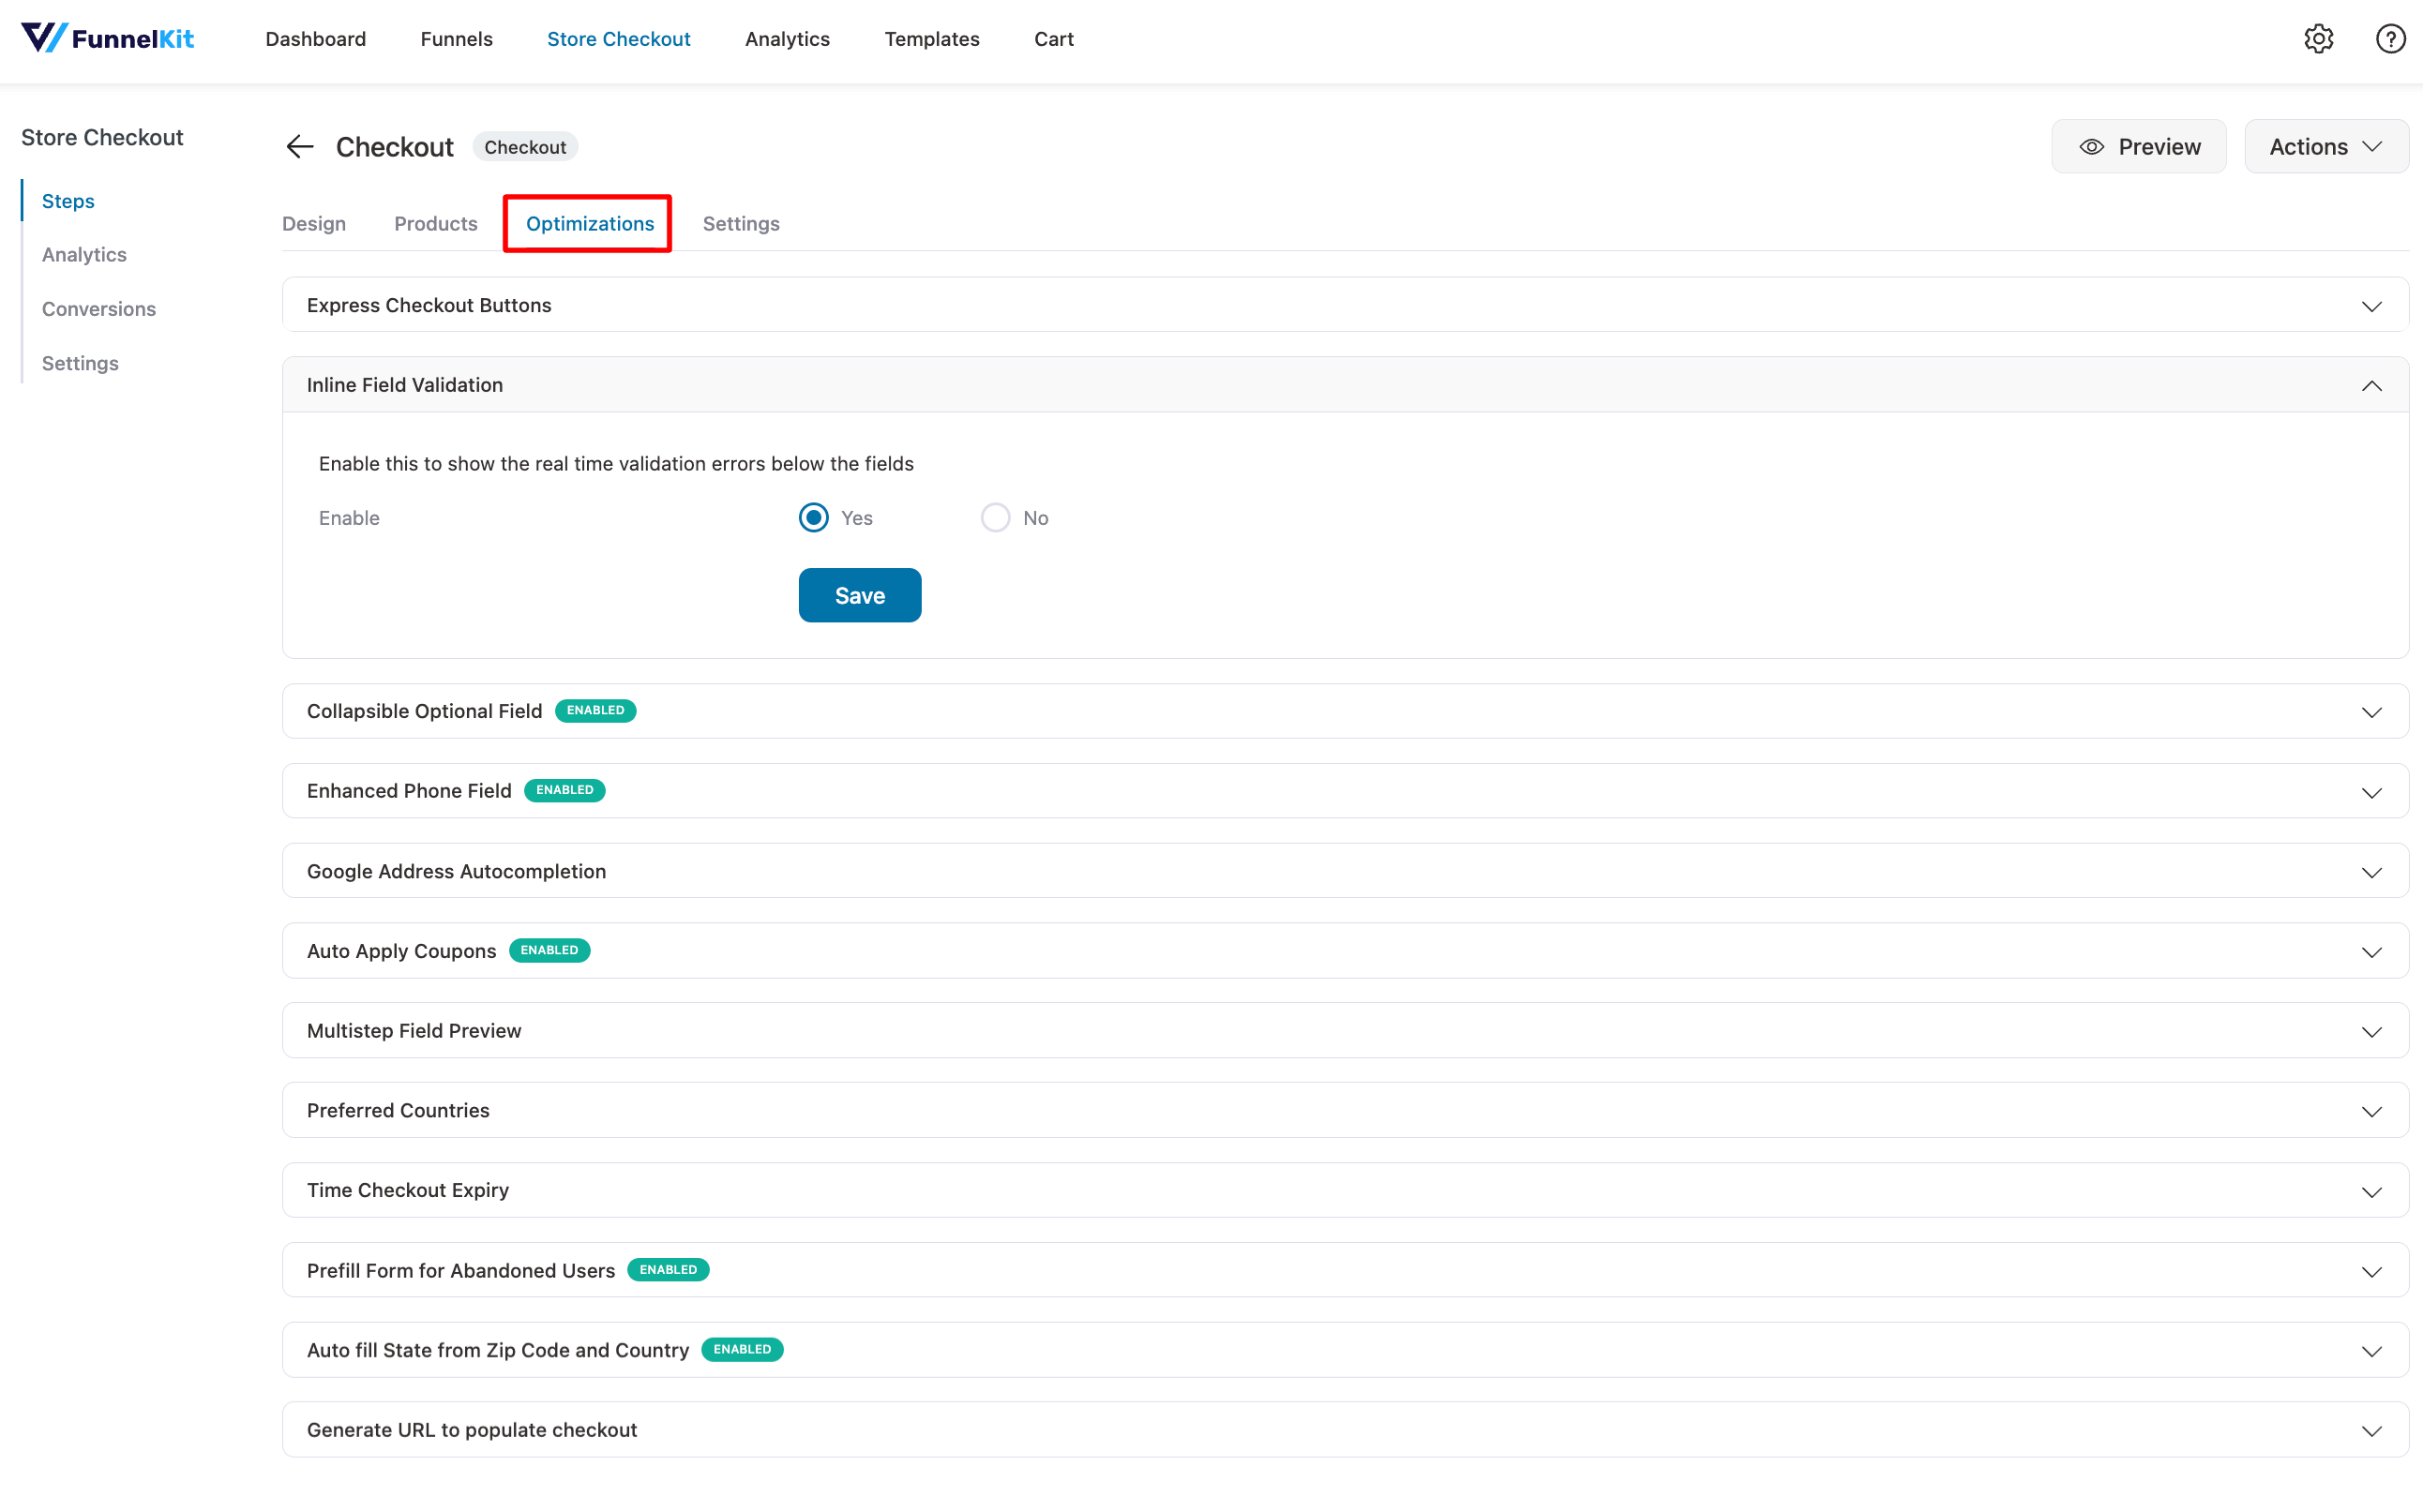
To optimize your checkout page for conversion, move to the Optimization tab. Here you can:
- Inline field validation: Display real-time input feedback to reduce errors
- Express checkout: Add Apple Pay, Google Pay, PayPal, and more for one-click payments
- Google address autocomplete: Speed up address entry and reduce shipping errors
- Auto-apply coupons: Instantly apply active coupons for a smoother checkout experience
- Enhanced phone field: Improve accuracy with smart phone number formatting
- Collapsible optional fields: Hide less important fields by default for a cleaner, shorter form
Step 5: Activate the store checkout
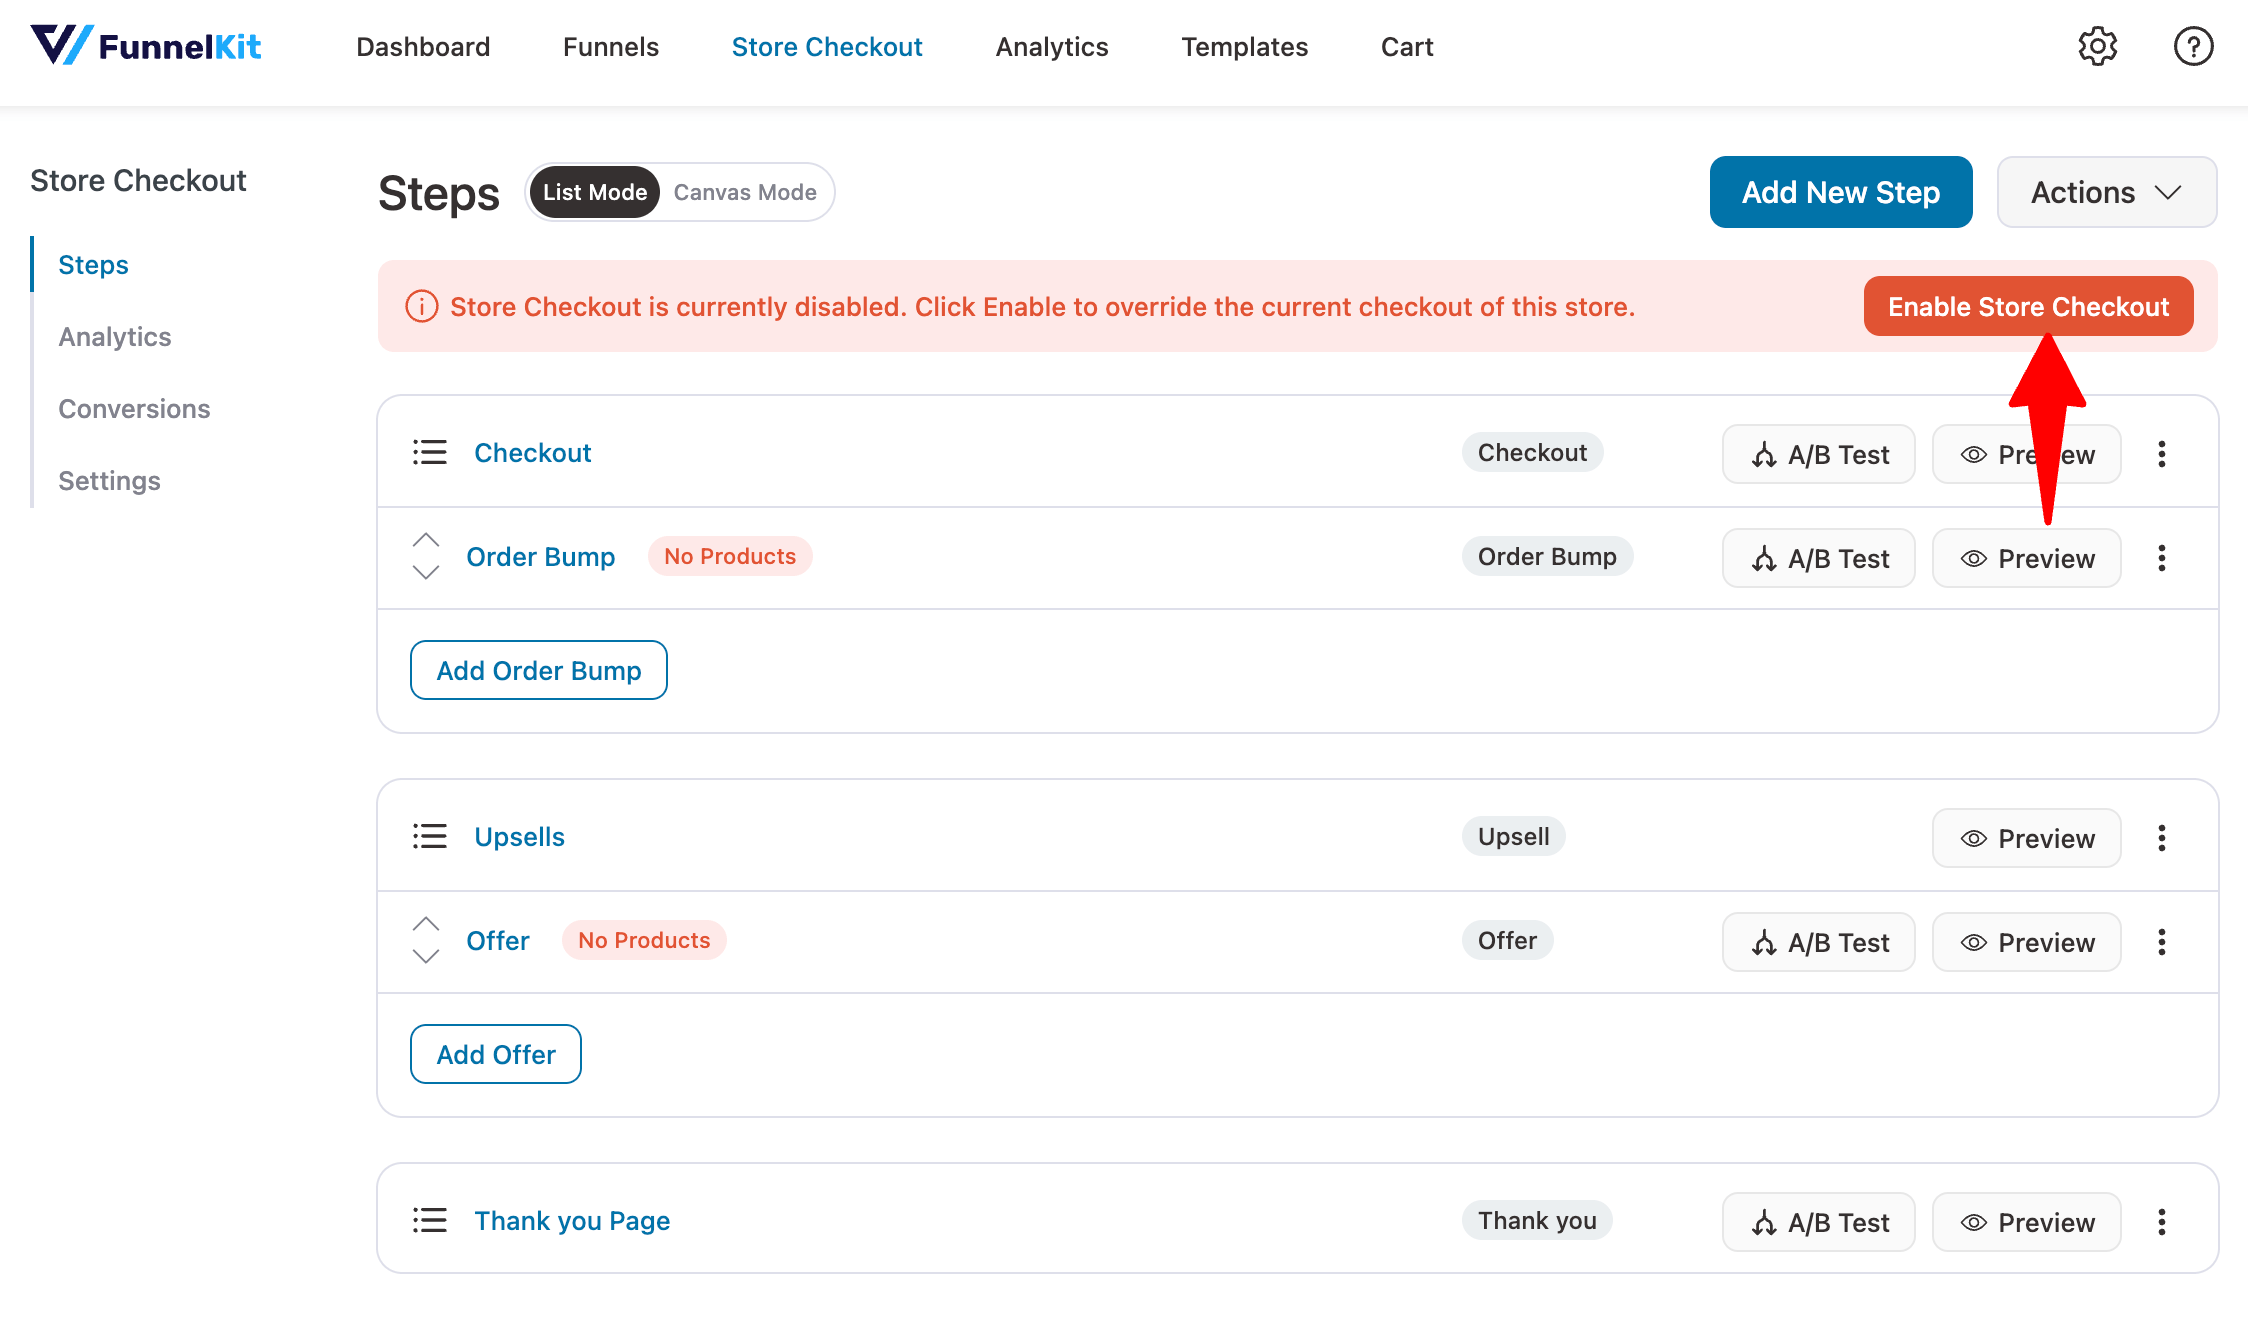
Once everything is set up and customized, it’s time to activate your new store checkout.
For that, click on the “Enable Store Checkout” button.
Your new WooCommerce guest checkout page is now live!
Here’s how it looks on the front end:
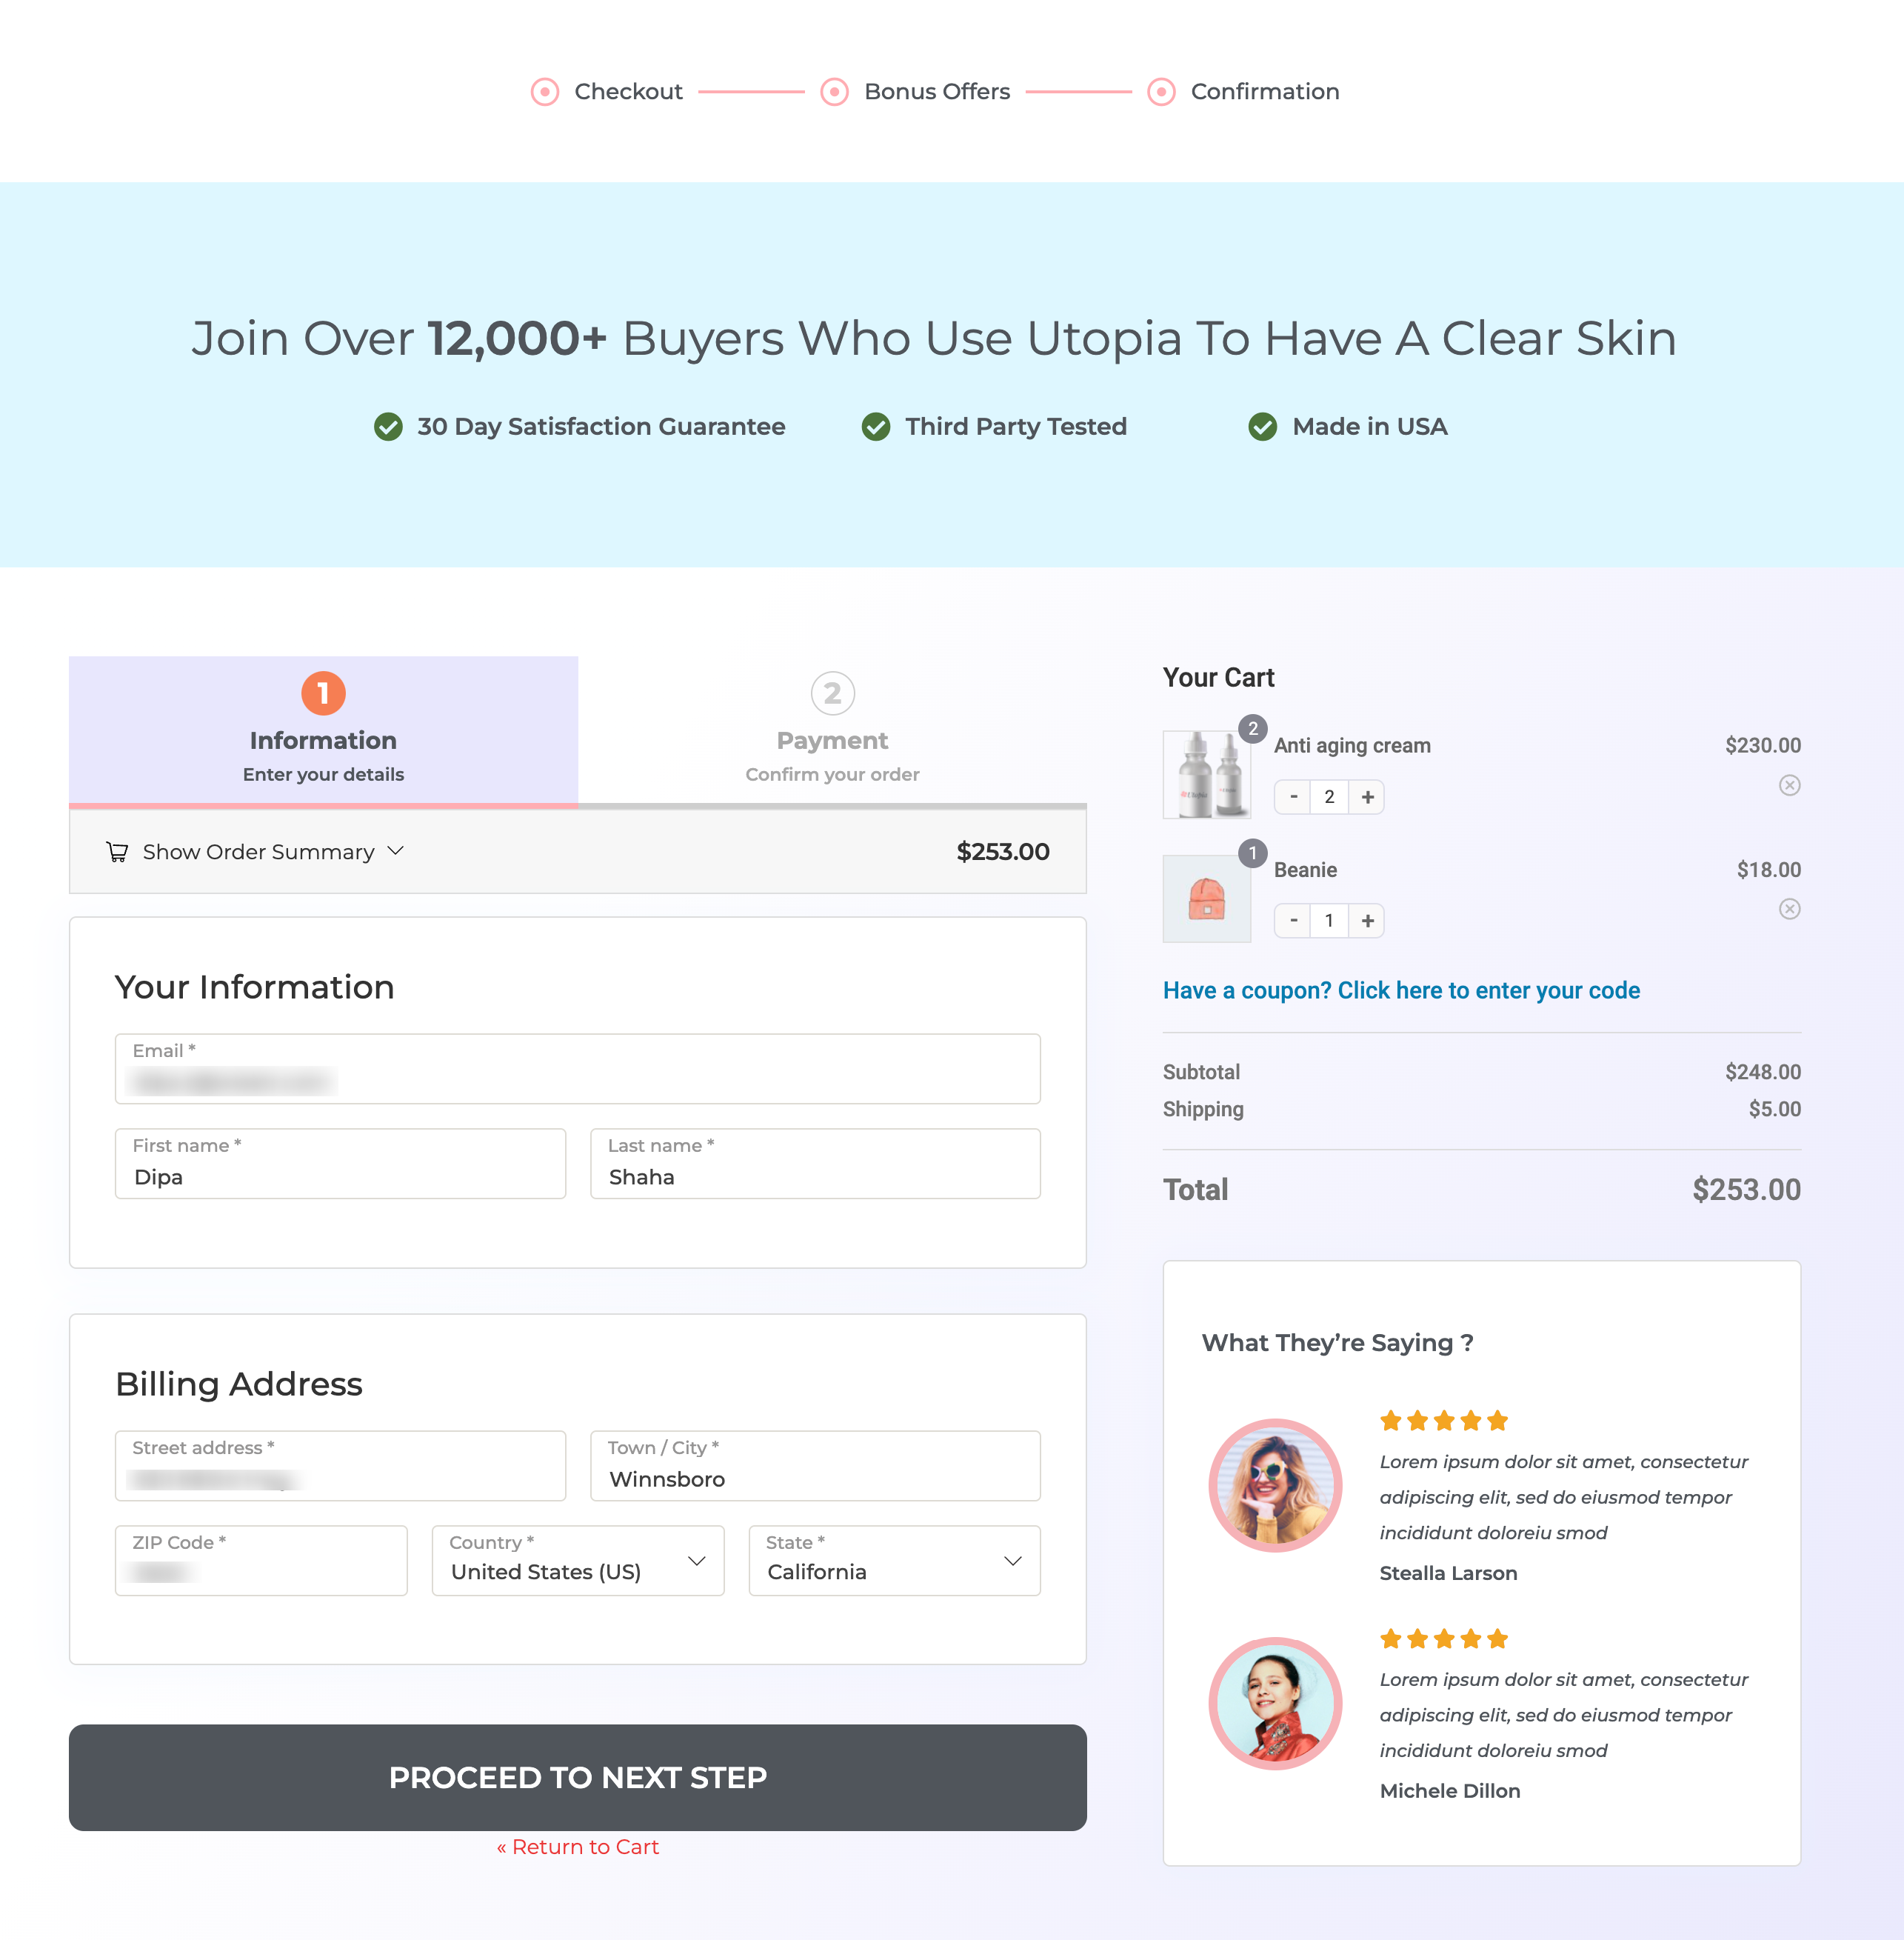
This is how you can create a conversion-optimized guest checkout experience in WooCommerce.
You can subscribe to our YouTube channel or join our Facebook group to catch the latest updates of FunnelKit.
9 Best Practices for WooCommerce Guest Checkout for High Conversion Rates
Enabling guest checkout in your WooCommerce store can significantly improve conversions by removing friction from the buying process.
But to make the most of it, you need to implement it the right way.
Here are nine best practices to ensure your WooCommerce guest checkout is fast, user-friendly, and optimized for conversions:
Tip #1: Simplify your checkout form design
A streamlined guest checkout begins with a clean and concise form, aiming to minimize friction and expedite the buying process as quickly as possible.
- Use FunnelKit’s checkout field editor to remove unnecessary fields.
- Enable inline validation so users can correct errors in real-time.
- Add Google Address Autocomplete to instantly auto-fill customer addresses.
This not only saves time but also improves data accuracy and user satisfaction.
Tip #2: Optimize for mobile
Many guest users shop on mobile devices, so your checkout form must be fully responsive.
- Use mobile-friendly input fields, large buttons, and touch-optimized elements.
- Simplify the layout with easy scrolling and eliminate the need for pinch-to-zoom.
- Keep navigation minimal to keep users focused on completing their purchase.
Tip #3: Recommend upsells and cross-sells
Yes, guest users can increase your average order value.
- Show product recommendations, bundles, or accessories right before checkout as order bumps
- Use one-click post-purchase upsells to present premium offers after the order is placed.
These subtle strategies work without disrupting the guest experience.
Tip #4: Collect customer data for marketing purposes
Guest checkout makes it harder to collect customer emails for future marketing campaigns.
One effective strategy is to add an opt-in checkbox during the checkout process that lets users willingly subscribe to your emails, even as guest users.
We recommend using FunnelKit Automations CRM, a powerful WordPress email marketing automation plugin that integrates seamlessly with WooCommerce.
Here’s how it works with guest checkout:
- Add a custom checkbox on your WooCommerce checkout form.
- When a guest user checks the box, their email address and name are added to your contacts.
- You can then automate welcome emails, send promotions, or segment them for future campaigns, without requiring them to create an account.
This method strikes the perfect balance between offering a frictionless guest experience and building a solid email marketing list.
Tip #5: Clear Calls-to-Action (CTAs)
A well-placed, compelling CTA can significantly impact conversions.
- Use action-oriented phrases like “Complete Purchase”, “Finish Order”, or “Buy Now”.
- Make your CTA button visually distinct with contrasting colors and consistent placement.
- Avoid distractions around your CTA to keep users focused on the action.
Tip #6: Run A/B tests regularly
Small changes can lead to big improvements. A/B testing helps you find what actually works for your audience.
Experiment with:
- Button colors, sizes, and placement.
- Single-page vs. multi-step checkout flows.
- CTA button text and form layout variations.
Use FunnelKit’s built-in A/B testing to compare versions and make data-driven decisions.
Tip #7: Track checkout analytics
Understanding user behavior is key to optimizing your guest checkout.
With FunnelKit, you can monitor:
- Page views and checkout starts
- Checkout completion rates
- Revenue generated and orders placed through guest checkouts
Additionally, FunnelKit integrates with Google Analytics to pinpoint drop-off points and refine your checkout flow accordingly.
Tip #8: Set up abandoned cart recovery
Even with a perfect checkout, some users will abandon their carts. That’s why a recovery strategy is essential.
Use FunnelKit Automations to:
- Send email or push reminders to guest users.
- Offer time-limited discounts, free shipping, or limited stock alerts to encourage return visits.
- Create urgency and recapture potentially lost revenue.
Tip #9: Page loading speed
Slow loading speeds can lead to cart abandonment, especially among first-time or guest users.
- Optimize images, scripts, and third-party resources.
- Implement lazy loading for non-essential elements.
- Set up WooCommerce caching to exclude checkout and upsell pages, reducing load time and improving performance.
A fast checkout page enhances the user experience and increases the number of completed purchases.
Frequently Asked Questions (FAQs) on WooCommerce Guest Checkout
In this section, our experts have answered your most frequently asked questions related to guest checkout.
Yes, WooCommerce allows customers to check out as guests.
This feature enables customers to make purchases without creating an account or logging in, enabling a faster checkout process.
Guest checkout allows customers to place their orders without logging in or creating an account.
Shoppers enter their email addresses and shipping/billing information during checkout and hit the buy now button.
Afterward, WooCommerce processes the order without storing login credentials or account details.
To disable guest checkout, navigate to WooCommerce ⇒ Settings ⇒ Accounts & Privacy and uncheck the ‘Enable guest checkout (recommended)’ option next to Checkout.
Once done, save the changes. Customers will now be required to create an account or log in before purchasing.
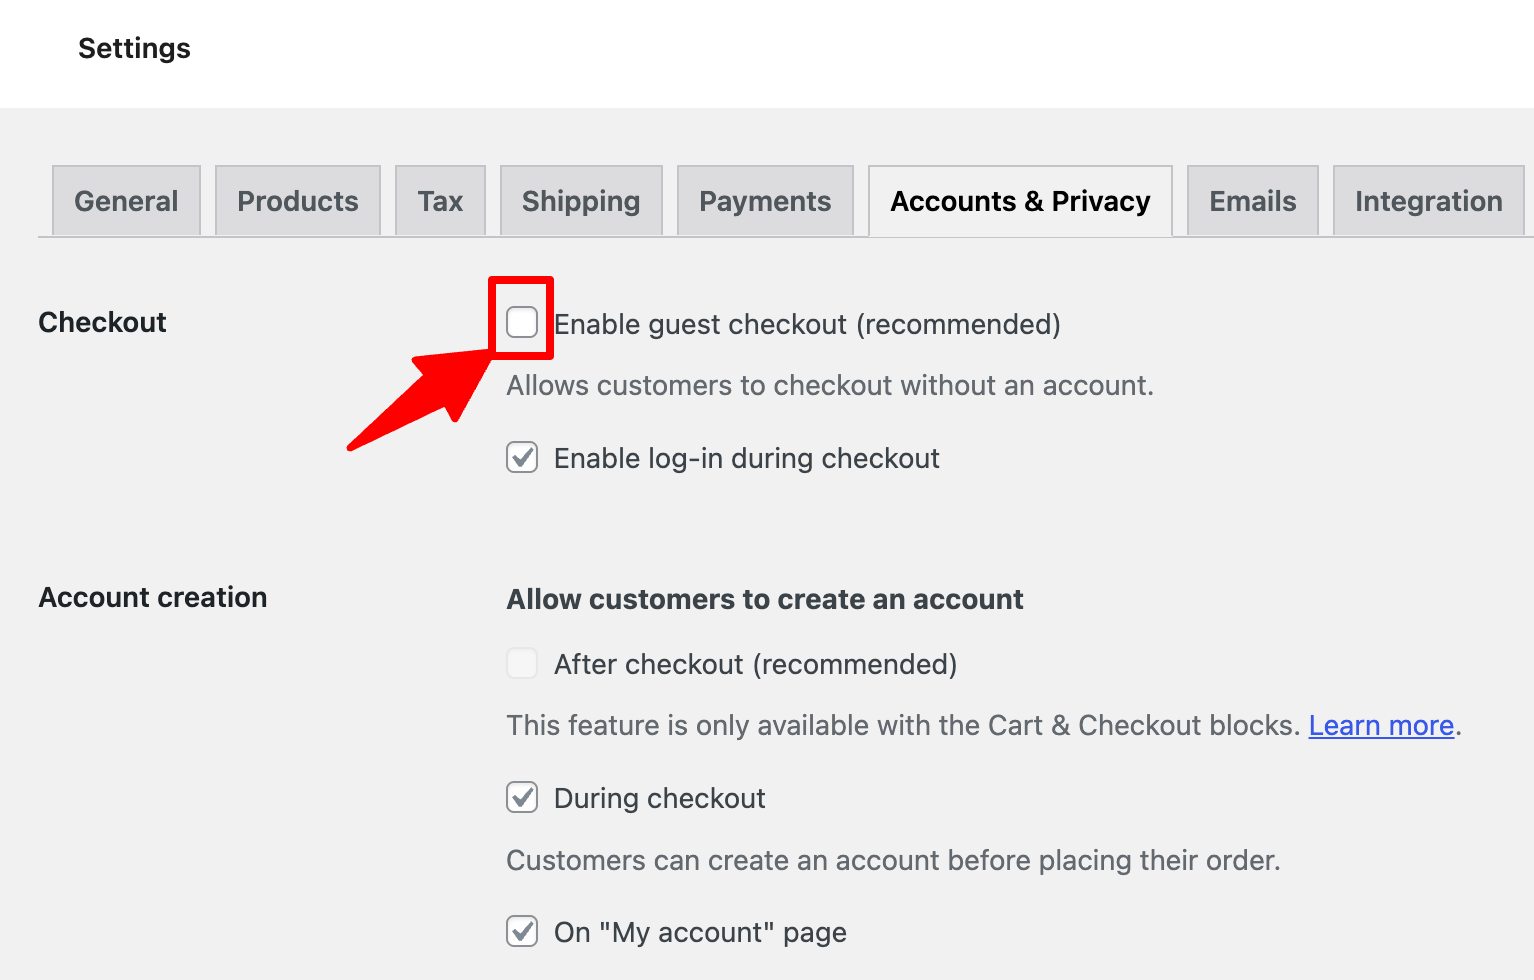
It usually happens when guest checkout is disabled in WooCommerce → Settings → Accounts & Privacy, or due to plugin conflicts, caching issues, or theme incompatibility. Enabling guest checkout and clearing the cache often fixes the problem.
Some shoppers abandon guest checkout because it may feel less personalized, and they miss out on features like:
- Saved addresses
- Faster future checkouts
- Access to order history
These features are only available for logged-in users.
Additionally, some guest checkouts still require a lot of information, leading to frustration and abandonment.
Yes, guest checkout is secure. It uses the same robust measures as registered accounts, including encryption protocols and secure payment gateways like Stripe and PayPal.
You can integrate your store with Stripe to add credit/debit card payments, express checkout, buy now pay later options, local payment methods, and more.
Key security features include:
- Data encryption: Every personal and payment information is encrypted, protecting sensitive data from unauthorized access.
- Secure payments: Platforms like Visa and Mastercard add extra security and reliability to each transaction made in your store.
- Compliance with industry standards: It follows industry standards like PCI DSS for secure payment processing.
- Fraud protection: Transactions are monitored for suspicious activities to prevent fraud, even without an account.
By default, WooCommerce does not create an account for customers using guest checkout. However, it still saves necessary order information associated with the guest’s email address.
This allows for order tracking and communication related to the specific purchase. While guest checkout doesn’t create a full customer account, it retains essential transactional data.
Opting for guest checkout means less data collection upfront, but you can still gather key information, such as the email address.
With customer consent, you can add these emails to your mailing list for sending future promotional campaigns.
Usually something sits on top of the setting and blocks it. Start with the setting itself, though: open WooCommerce > Settings > Accounts & Privacy and confirm the guest checkout box is still ticked, since a settings import or another admin can switch it off without anyone noticing.
Ticked? Check the cart. Subscription and membership products need an account.
Still stuck? Purge your cache after excluding the cart, checkout, and My account pages. If nothing changes, the Health Check & Troubleshooting plugin on WordPress.org lets you switch plugins off for your session only. Turn them back on one by one. Whichever brings the problem back is your conflict.
Last thing worth a look: press F12, open Console, and place a test order. Red errors there often point to the plugin at fault.
Even with guest checkout, you can capture emails by adding a consent checkbox at checkout using FunnelKit Automations. Go to Automations → Settings → Checkout Consent and check “Enable Marketing Consent. You can also set the consent field automation.
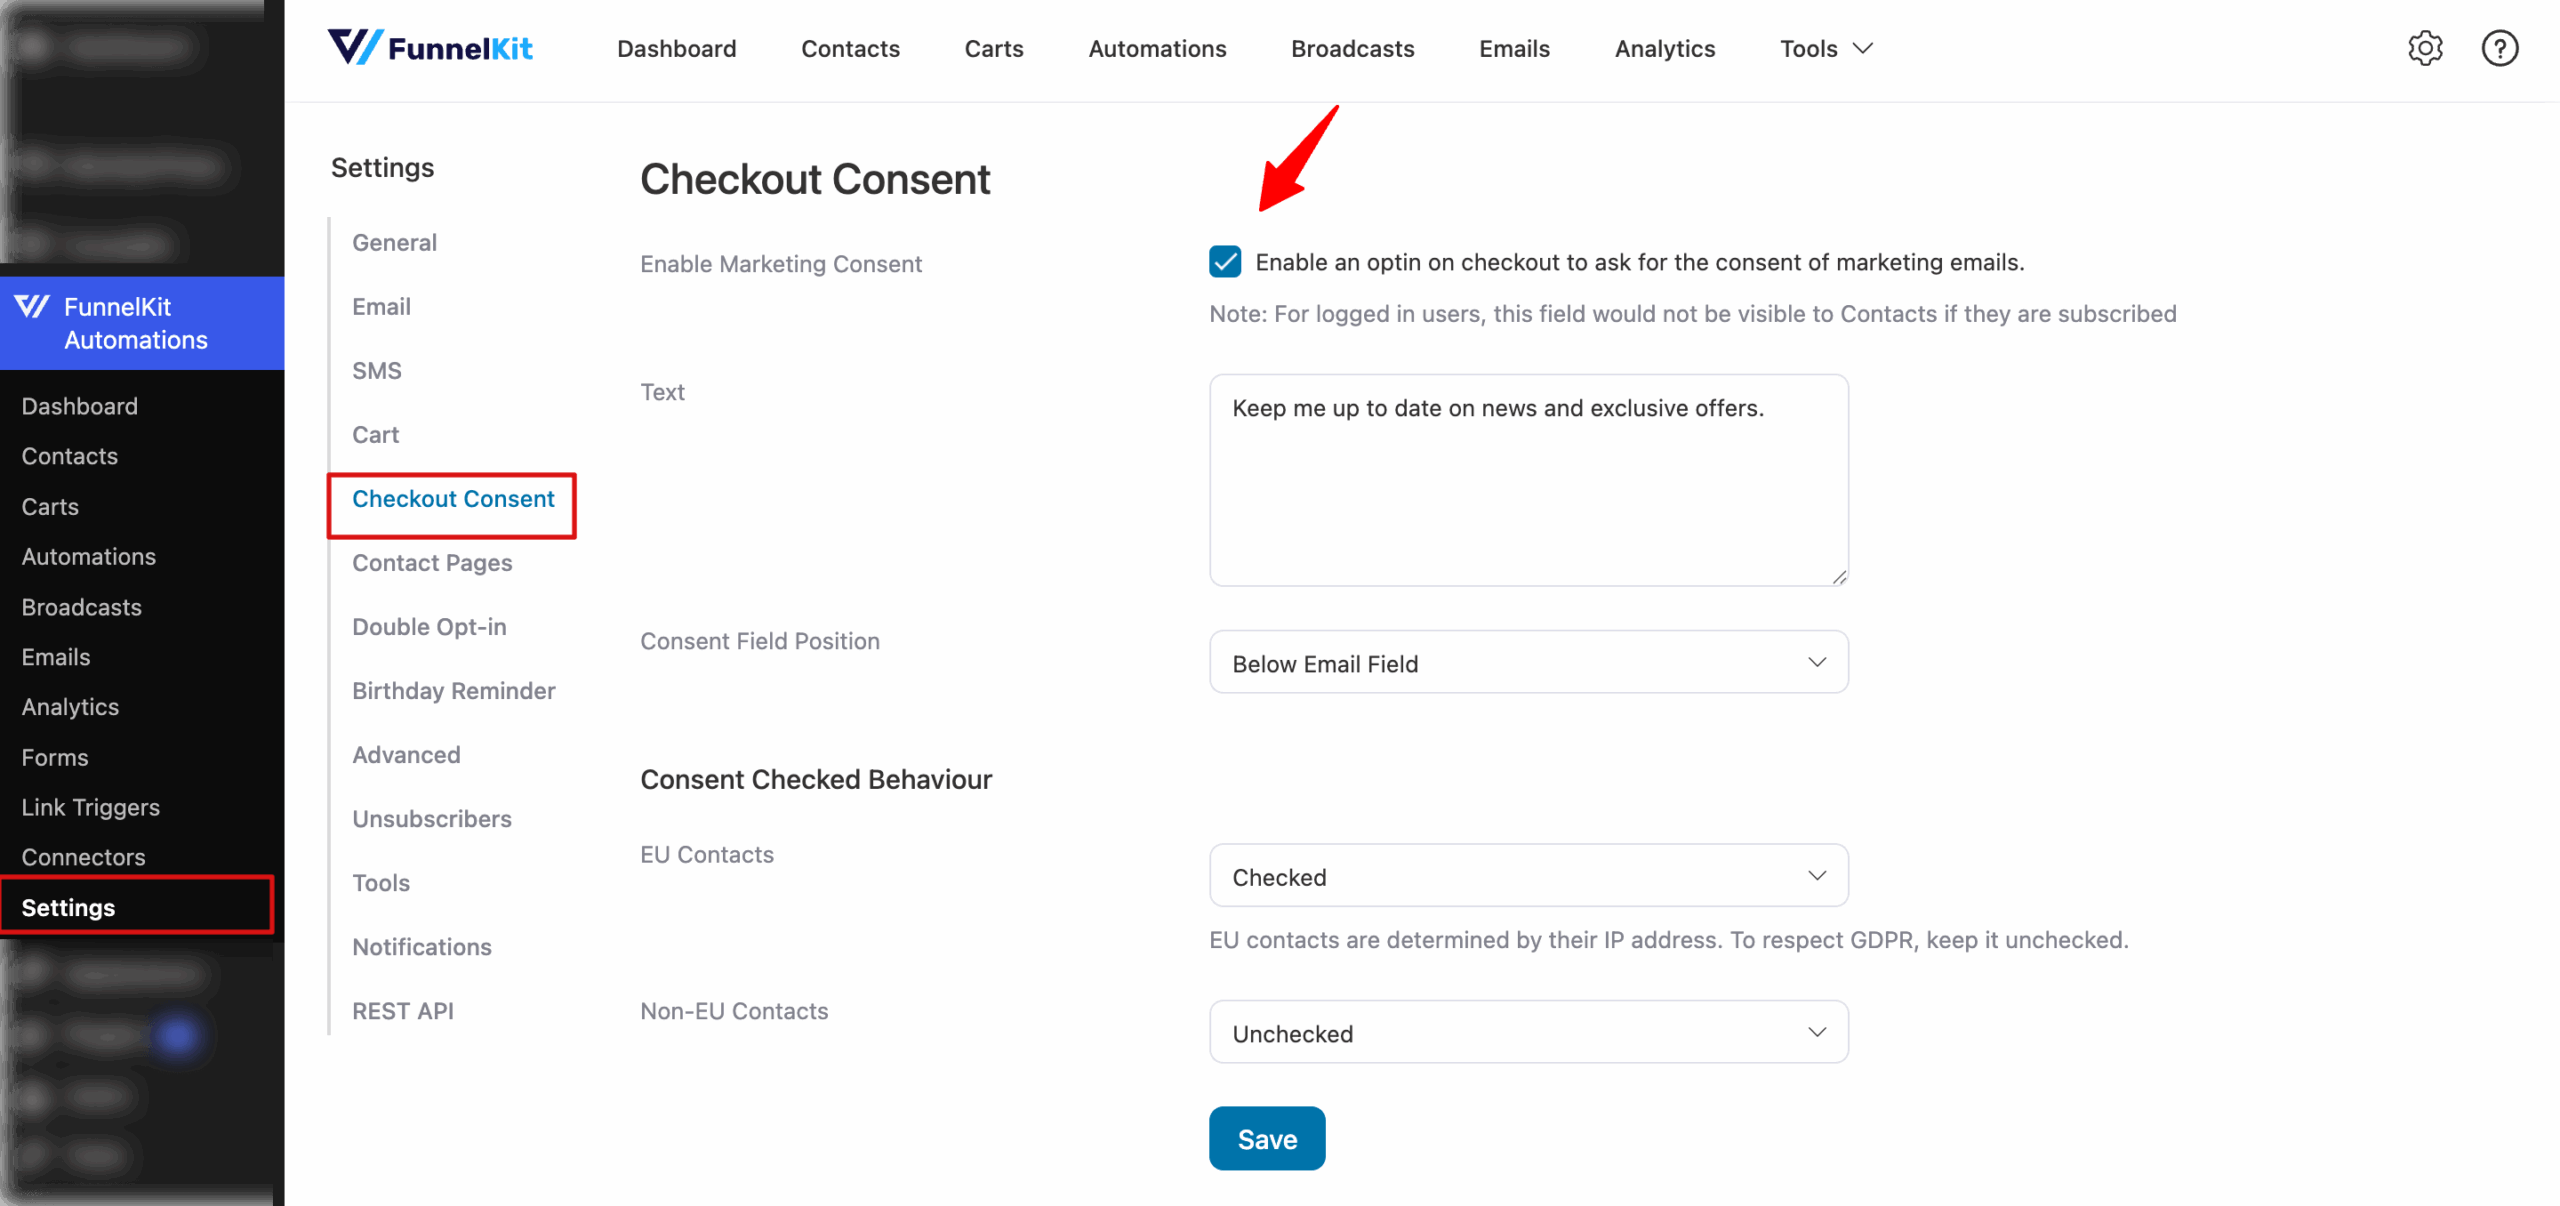
When shoppers opt in, their email is added to your list for campaigns and automations without slowing down checkout.
Most fake orders come from bots. They hit your checkout form again and again, usually testing stolen card numbers to see which ones still go through, and an open guest checkout makes that a little easier because there's no login in the way. Turning guest checkout off isn't the answer, though.
Add a [CAPTCHA to your checkout page](link to the FunnelKit WooCommerce captcha article) first. Cloudflare Turnstile and reCAPTCHA v3 both work in the background, so real shoppers rarely see a puzzle. For extra cover, use a honeypot field. People never see it, and any bot that fills it in gets blocked.
Keep an eye on your order list too. A cluster of orders a few minutes apart from the same IP? Billing and shipping details that don't line up? Cancel those before anything ships.
Through the billing email. WooCommerce can match guest orders to any account that uses the same address the shopper entered at checkout.
On WooCommerce 11.0 or later, customers can do it themselves. They log in, open My account > Orders, and request a confirmation link; once they click it, past guest orders placed with that billing email show up in their order history. Resetting their password later confirms the email as well.
Running an older version? A plugin like Guest Order Assigner from WordPress.org covers it. New guest orders get attached to an existing account with a matching email, and older ones are pulled in when the customer registers or logs in.
Ready to Enable WooCommerce Guest Checkout and Skyrocket Your Sales?
Offering WooCommerce guest checkout is one of the fastest ways to reduce buying friction, lower cart abandonment, and boost conversions.
By removing the barrier of account creation, you’re giving customers the freedom to purchase quickly, especially first-time buyers who may not want to register just yet.
But don’t stop there.
To truly maximize your checkout performance, use FunnelKit Funnel Builder to:
- Customize your checkout layout
- Enable express payment methods
- Add smart optimizations like address auto-complete and auto-apply coupons
And much more!
These enhancements, combined with guest checkout, create a seamless experience that encourages more people to complete their purchase.
Start optimizing your WooCommerce checkout today with FunnelKit and unlock higher conversions!
Editorial Team
October 9, 2026A downsell gives customers a cheaper option after they turn down your main offer. If you show it too soon, you might convince them to skip the original offer and...
Editorial Team
October 7, 2026WooCommerce upsells are products you recommend in place of the one a shopper is viewing, usually a better or higher-priced version of it. WooCommerce has a built-in upsell field for...
Editorial Team
October 7, 2026WooCommerce checkout optimization is about making it easier for shoppers to finish their purchase. A customer can reach your checkout on their phone, look at the form for a few...






