
WooCommerce ships with a built-in cross-sell field, but it only fires on the cart page, which covers only a fraction of where shoppers actually decide to add more to their order.
This guide closes that gap.
You’ll learn what a cross-sell is (and how it differs from an upsell, a related product, and co-selling), how to choose between the native method, a plugin, and custom code, and how to place complementary product offers across six stages of the funnel.
There’s a full developer section with hooks, the get_cross_sell_ids() function, a working shortcode, and a way to show recommendations by category, plus a troubleshooting section for when cross-sells won’t show.
Whether you run the store or build it, you’ll leave with a working setup and a strategy to back it.
Jump to the step-by-step process to add cross-sells to key stages of your customer’s journey:
Table of Contents
- 1 What is Cross-Selling in WooCommerce?
- 2 Cross-Sell vs Upsell vs Related Products vs Co-Selling
- 3 Native vs Plugin vs Code: Which Cross-Sell Method Should You Use?
- 4 Where to Place Cross-Sells: The 6 High-Converting Spots
- 5 1. Product Page (Frequently Bought Together)
- 6 2. Default Cart Page (native cross-sells)
- 7 3. Inside the Slide-in Shopping Cart (Cart Add-Ons)
- 8 4. Checkout Page (Order Bumps)
- 9 5. Post-Purchase (One-Click Offer)
- 10 6. Emails (Automated Recommendations)
- 11 How to Display WooCommerce Cross-Sells with Code (Developer Guide)
- 12 WooCommerce Cross-Sells Not Showing? 7 Fixes
- 13 5 Best WooCommerce Upsell and Cross Sell Plugins (2026)
- 14 9 Tips for Effective WooCommerce Cross-Selling to Your Customers
- 15 Frequently Asked Questions (FAQs)
- 16 Unlock Your Store's Potential with WooCommerce Cross-Sell Strategy!
What is Cross-Selling in WooCommerce?
Cross-selling in WooCommerce means recommending additional, complementary products at the moment a shopper is already committed to buying
This is the online equivalent of “Would you like fries with that?” The customer keeps their original item and adds something that goes with it.
The goal is to increase average order value (AOV) using the traffic you already have, rather than paying to acquire more.
Based on FunnelKit’s internal data across the stores we power, offers placed at checkout produce some of the strongest AOV gains of any placement.
We break that number down in the strategy section below.
Native cross-sells are configured per product in the Linked Products tab and, by default, appear on the cart page beneath the items table.
Everything else, such as product-page suggestions, checkout offers, post-purchase upsells, and email recommendations, sits outside what WooCommerce does on its own.
Cross-Sell vs Upsell vs Related Products vs Co-Selling
These four terms get used interchangeably and shouldn’t be. Getting them right matters for setup and for how Google reads your store, because each maps to a different WooCommerce field and a different placement.
| Type | What it does | Where it shows (native) | WooCommerce field |
|---|---|---|---|
| Cross-sell | Suggests a complementary item to add (case + phone) | Cart page, below the items table | Cross-sells (Linked Products) |
| Upsell | Suggests a better/pricier alternative to the product being viewed (16GB vs 8GB) | Product page, below the description | Upsells (Linked Products) |
| Related products | Auto-generated suggestions sharing tags/categories | Product page (theme-dependent) | None (automatic) |
| Co-selling | Two businesses selling jointly to one customer | Not a WooCommerce feature | N/A |
Here are a few distinctions to understand:
- Cross-sell vs upsell: An upsell nudges the shopper toward a higher-end version of the same product. A cross-sell suggests a different, complementary product alongside the one they’re buying. Upsells live on the product page; cross-sells live in the cart. The same item can play both roles, such as a wireless keyboard, which is an upsell for a basic keyboard, but a cross-sell for a monitor.
- Cross-sell vs related products: You curate cross-sells manually. Related products are generated automatically by WooCommerce from shared categories and tags, which are less targeted but require zero effort. If you set up upsells on a product, WooCommerce shows those instead of the auto-related block.
- Cross-selling vs co-selling: These are unrelated despite the similar name. Cross-selling adds complementary items to a single buyer’s order. Co-selling is when two businesses collaborate to sell to a shared customer, a partnership sales motion, not a product recommendation. If you came here for co-selling, it’s a B2B partner strategy, and not something you configure in WooCommerce.
Native vs Plugin vs Code: Which Cross-Sell Method Should You Use?
Before any setup, decide how you’ll implement cross-sells in your store. Most searchers are choosing an approach rather than a product.
The right answer depends on placement needs, budget, and whether you have a developer.
| Parameters | Native (Linked Products) | Plugin | Custom Code |
|---|---|---|---|
| Cost | Free | Free and paid | Free (dev time) |
| Placements | Cart page only | Product page, cart, checkout, post-purchase, email | Anywhere a hook exists |
| Targeting | None | Rules by cart, category, customer role, and more | Fully conditional |
| Discounts on offers | No | Yes | If you build it |
| Analytics | None | Built-in | Build your own |
| Maintenance | None | Plugin updates | You own it |
| Best for | One or two simple pairings | Most stores want more placements | Devs needing precise control |
Choose native if you only need a couple of cart-page suggestions and don’t want another plugin. It’s free and reliable, but capped at the cart and has no targeting, discounts, or reporting.
Choose a plugin if you want offers beyond the cart, such as frequently bought together on the product page, order bumps at checkout, one-click post-purchase offers, or rule-based recommendations.
Choose code if you have developer resources and need conditional logic that the UI can’t express, output by category, by cart contents, by customer role, or in a custom template location.
You can also mix them: native for simple pairings, a plugin for checkout and post-purchase, and a snippet to surface cross-sells in a spot where your theme doesn’t cover it.
Where to Place Cross-Sells: The 6 High-Converting Spots
Native WooCommerce only reaches the cart. These six placements span the full journey from first product view to the post-purchase email. Match the placement to the moment, not the other way around.
1. Product Page (Frequently Bought Together)
In WooCommerce, you can link different products as upsells and cross-sells.
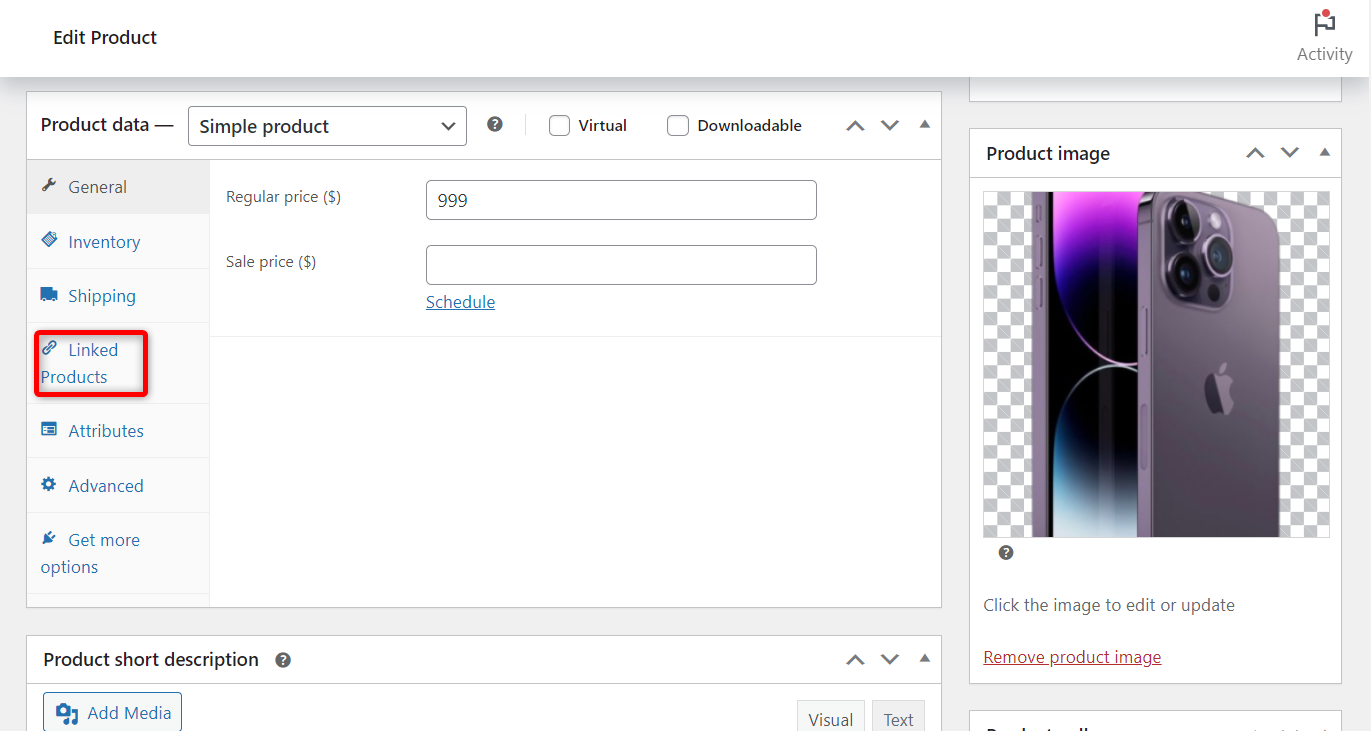
Step 1: Edit any product in your store
Click on any product under which you want to show cross-sell items.

Scroll down to the Product Data section and click on the ‘Linked Products’ tab.
Step 2: Add items to be displayed on the product page
Search and add a product from your WooCommerce store in the Upsells field.
You can add multiple items to be displayed as cross-sells on the product page.
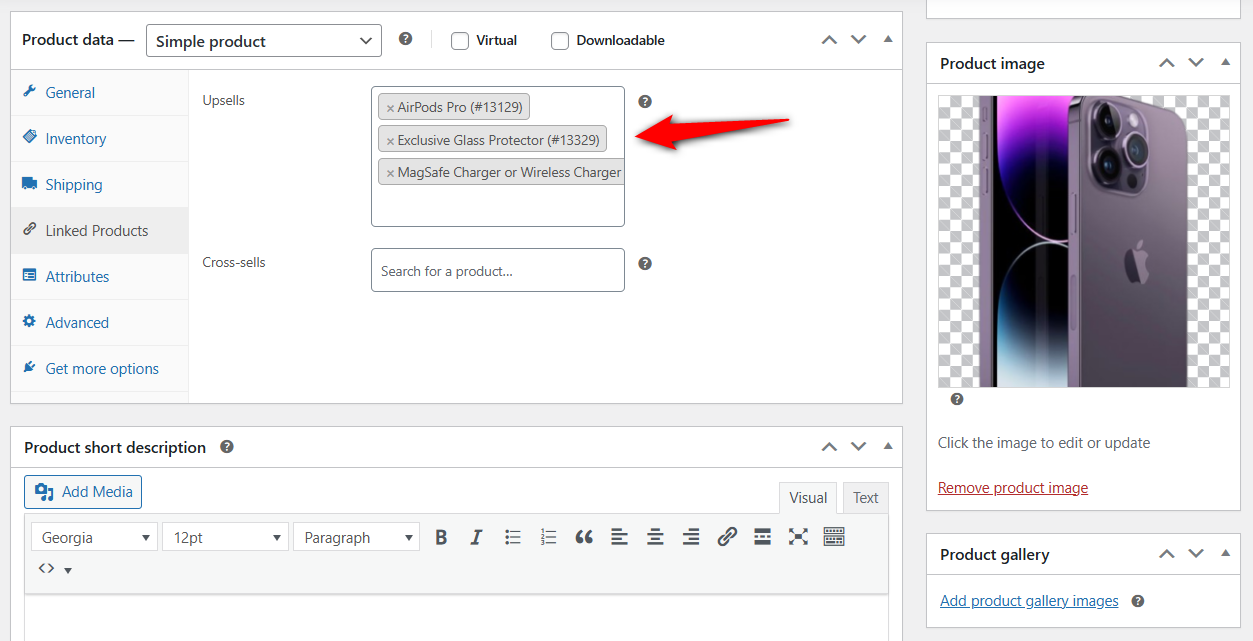
Once done, hit ‘Update’ to save the changes.
Step 3: Preview the cross-sells on the WooCommerce product page
Go to the product page, and you’ll be able to see cross-sells underneath the product description in the ‘You May Also Like’ section.
This section appears as the frequently bought together items:

Well done! This is how you can display cross-sells on the WooCommerce product page.
2. Default Cart Page (native cross-sells)
Follow the instructions to show cross-sells on the default WooCommerce cart page:
Step 1: Add a cross-sell product
When editing a product, scroll down to the ‘Linked Products’ tab and add items to the ‘Cross-sells’ field.
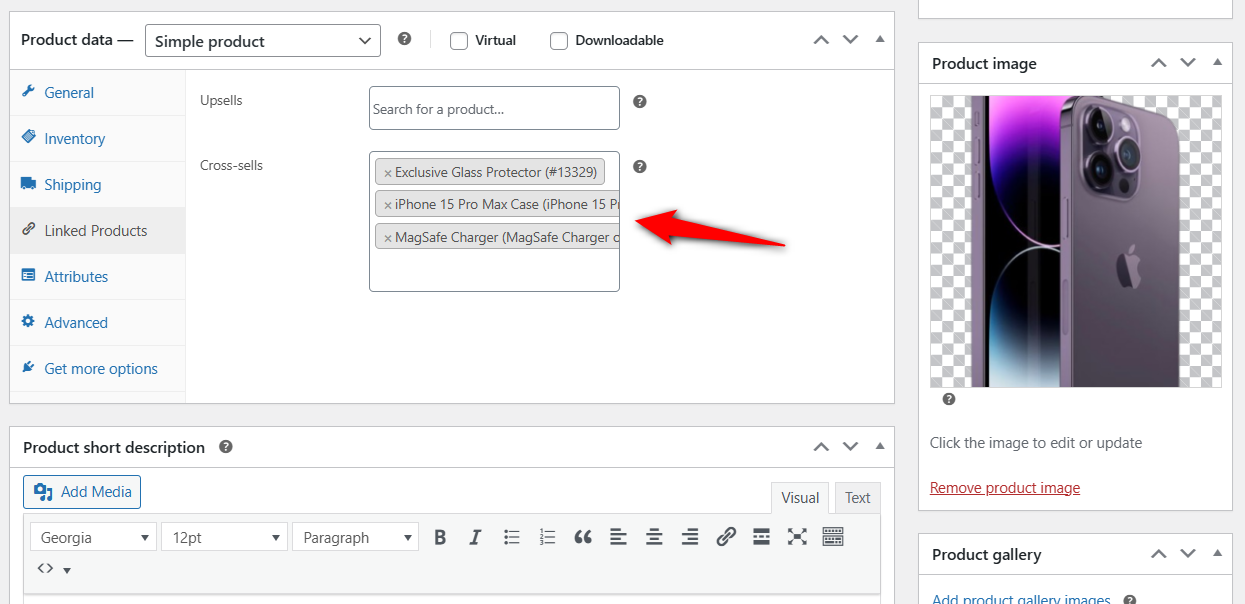
You can choose multiple cross-sell products here.
Click on the ‘Update’ button when done.
Step 2: Test and preview cross sells on the WooCommerce cart page
Go to the product page URL on the live site. Add an item to the cart and go to the cart page.
You’ll be able to find the cross sell products here:
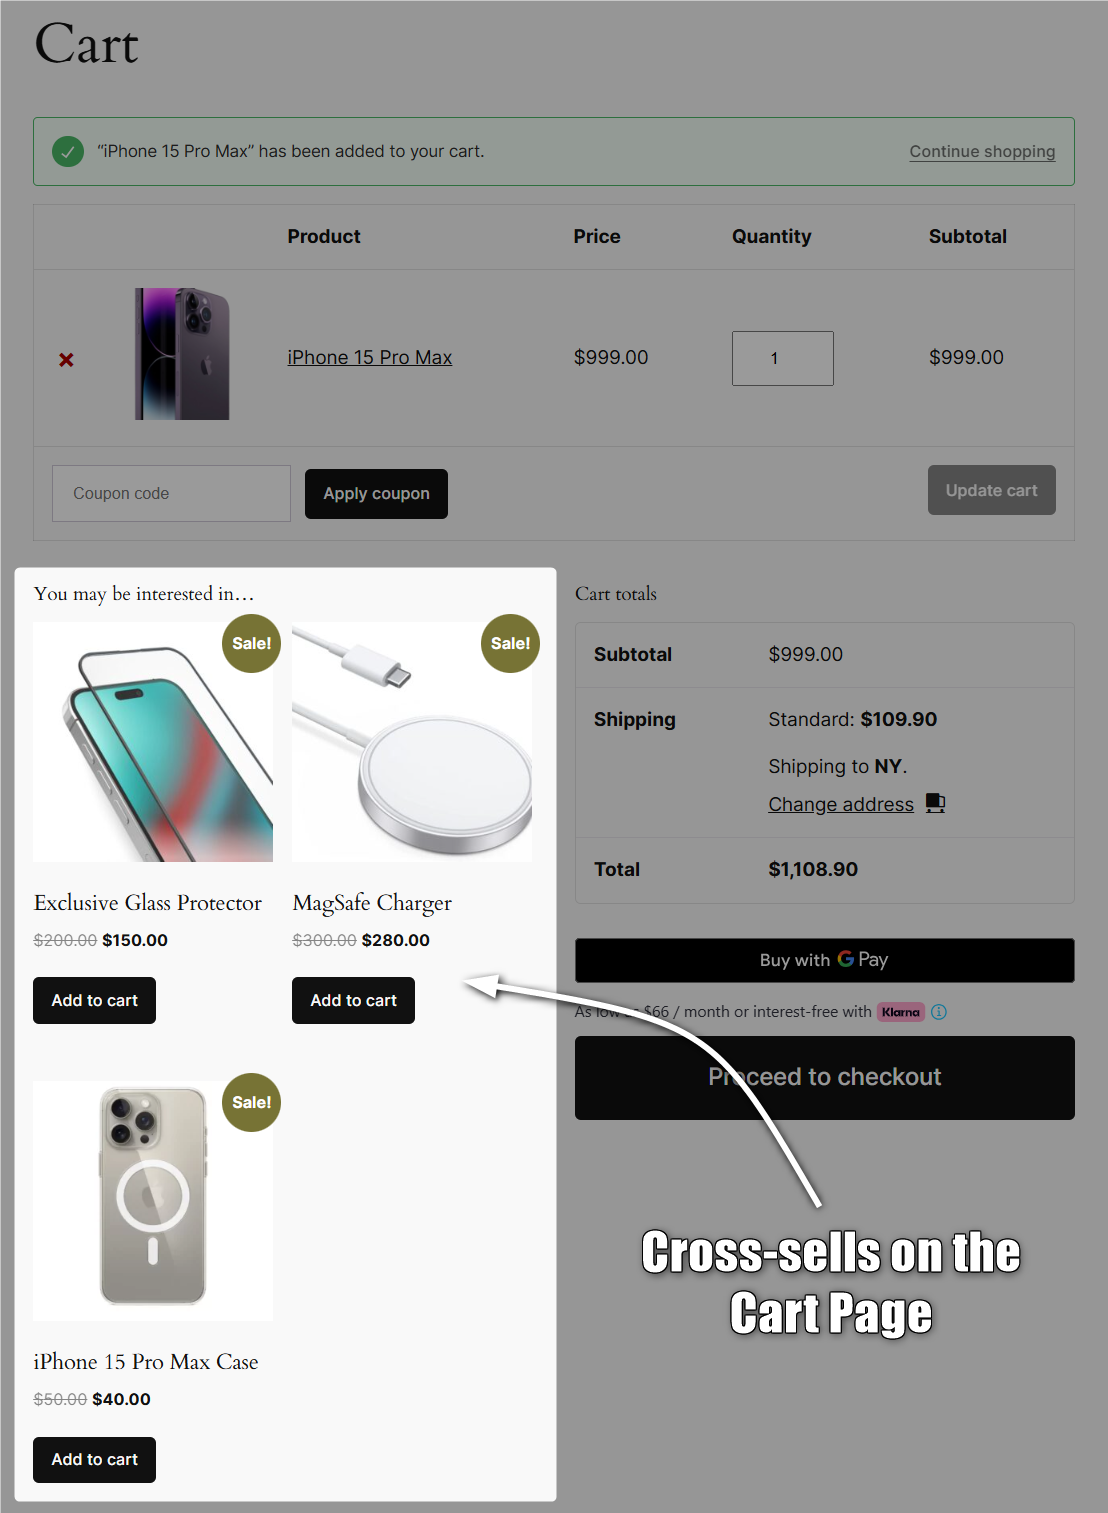
This is how you can show WooCommerce cross-sells on the default cart page.
3. Inside the Slide-in Shopping Cart (Cart Add-Ons)
The slide-in cart plugin, such as FunnelKit Cart, adds a dynamic slide-in shopping cart to your WooCommerce store.
It allows you to add a side cart that offers upsell and cross-sell products directly inside your shopping cart, and:
- Add relevant products to their cart with one click
- View, update, or remove quantities or items directly
- Skip the default cart page and proceed directly to checkout
- Get attractive rewards by reaching a certain cart value threshold
- Purchase directly from the cart with express checkout options
You can use the basic version of this WooCommerce cross sell plugin for free. However, to access premium features like upsells/cross-sells or milestone-based rewards, upgrade to the FunnelKit Professional plan or above.
Follow these steps to offer WooCommerce cross-sell and upsell products in a sliding mini shopping cart:
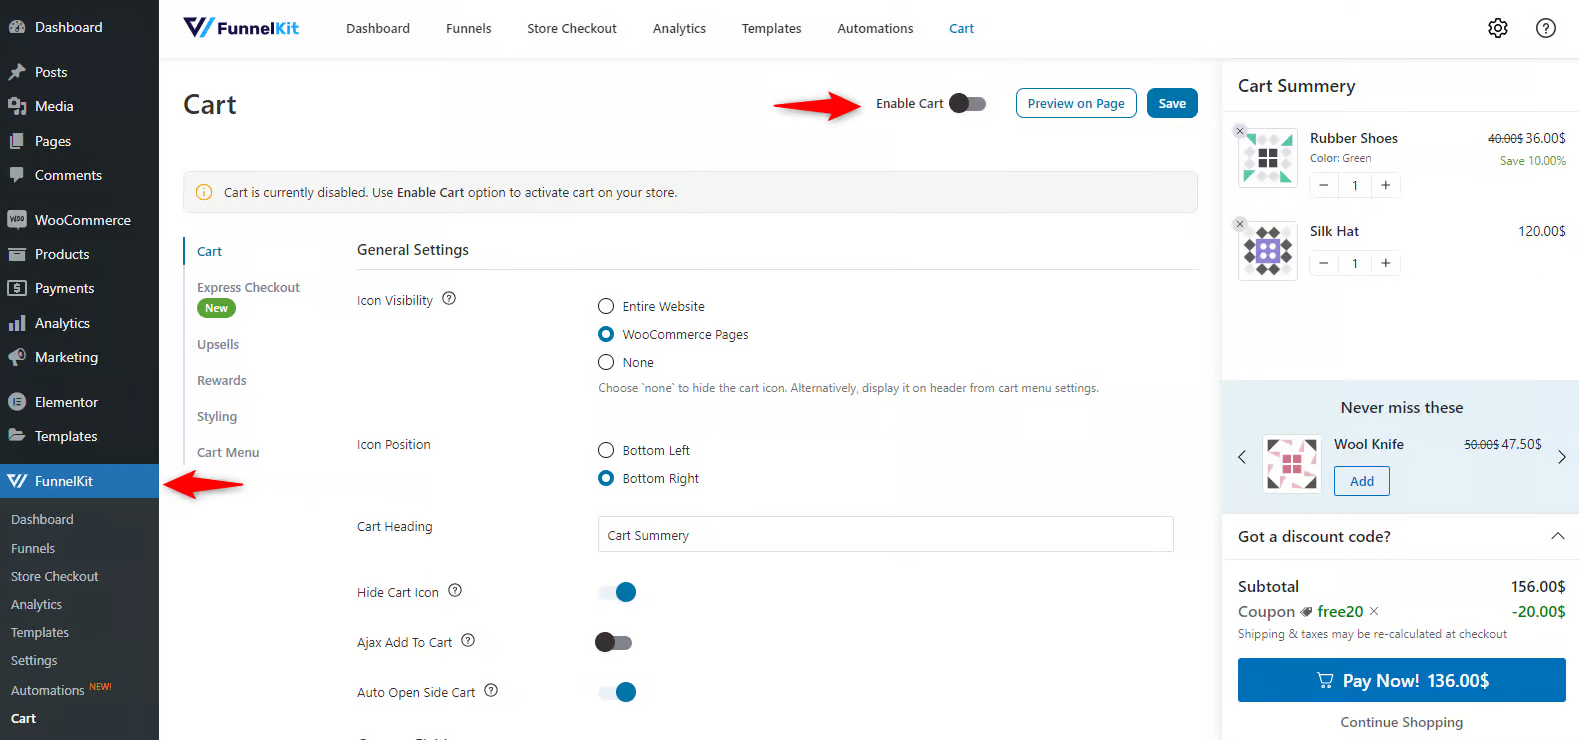
Step 1: Enable the WooCommerce cart plugin
After you install the plugin, navigate to FunnelKit > Cart.
Enable the side cart in your store from here:
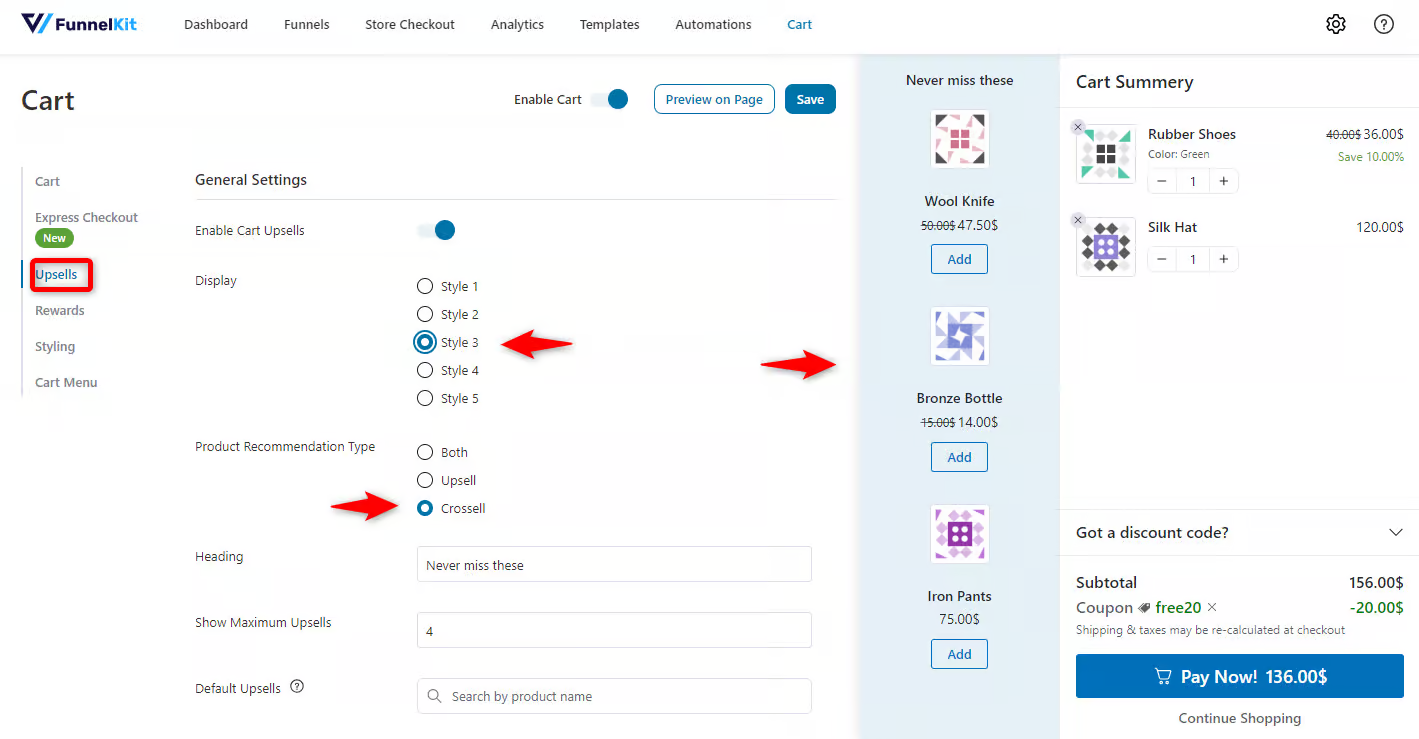
Step 2: Customize the cross-sell recommendation options
Next, click on the Upsells tab. Choose the display pattern and product recommendation type.
Step 3: Add cross-sell items to the main product
Click "View All Products" on the product page to add the cross-sell items to the primary product.
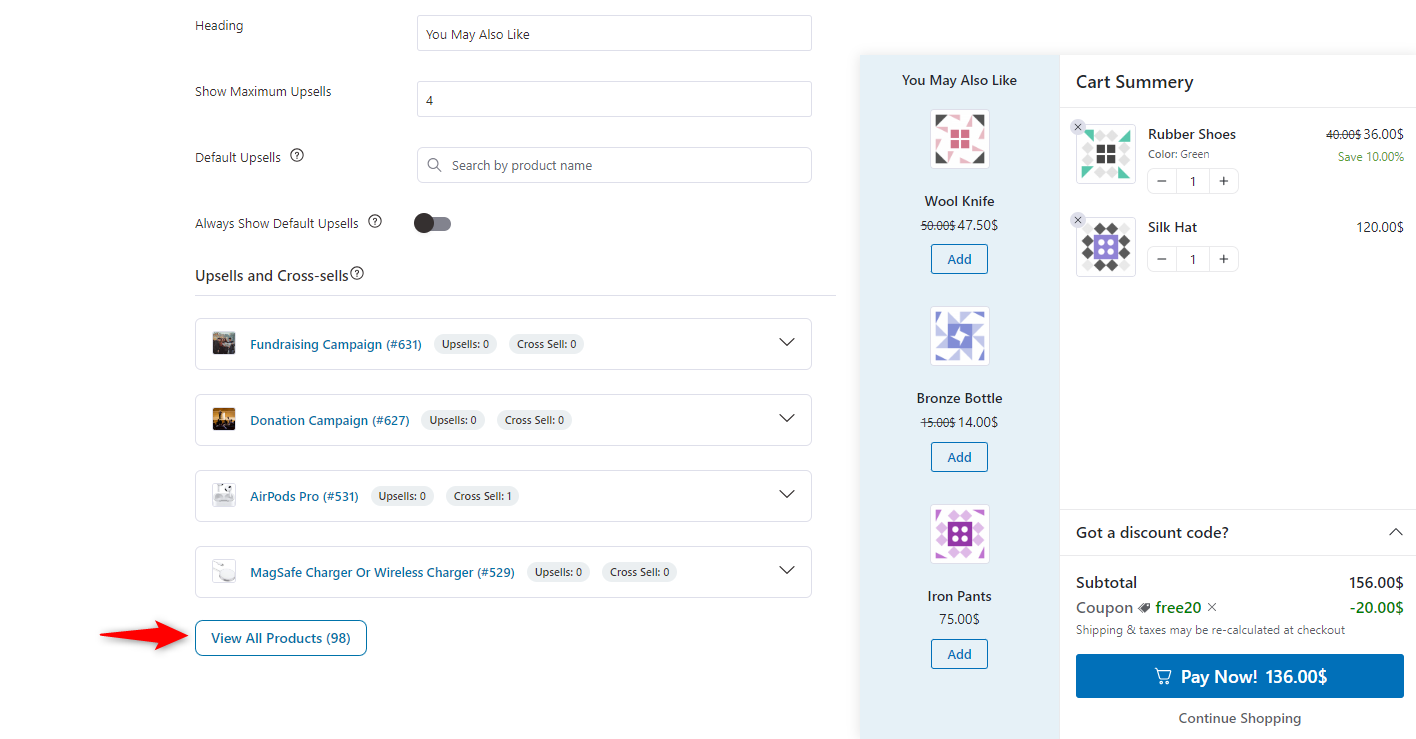
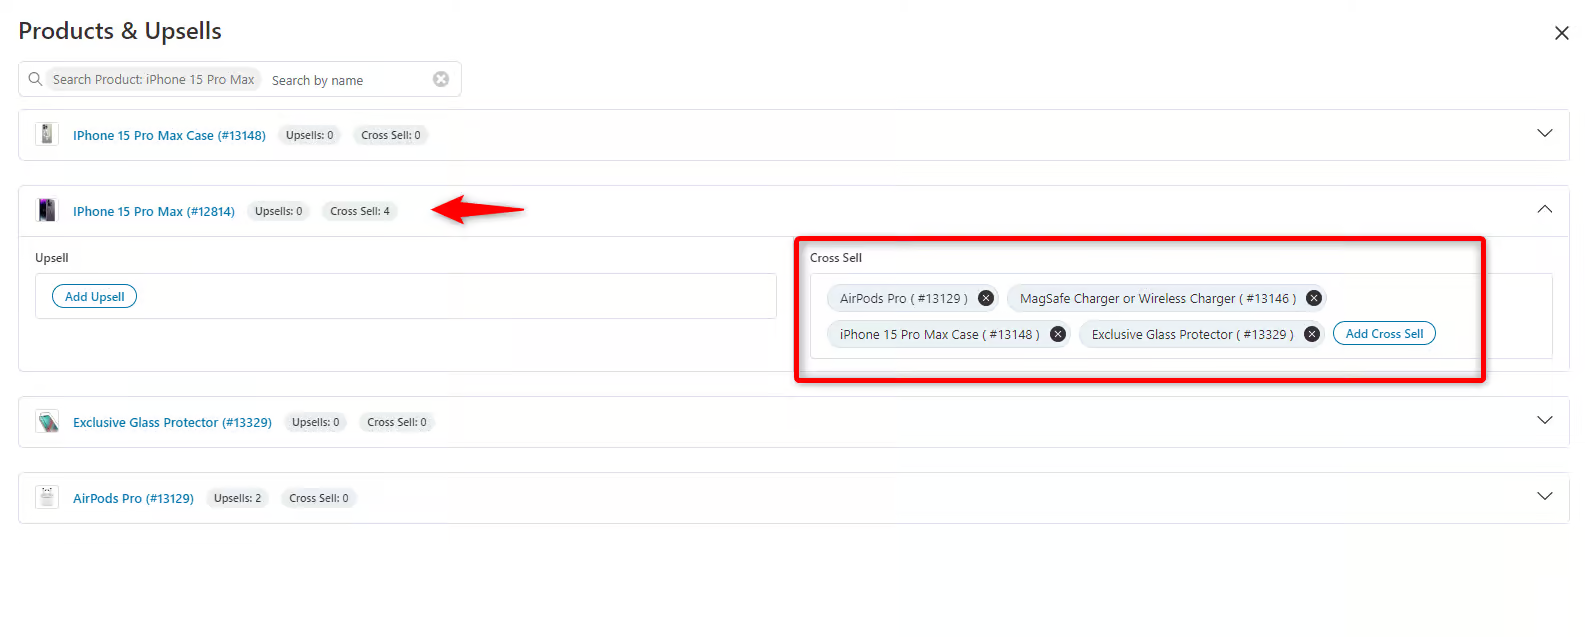
Then, search for the primary product you want to cross-sell, such as “iPhone 15 Pro Max”.
Under the product details, you’ll find the cross-sell option to add complementary products.
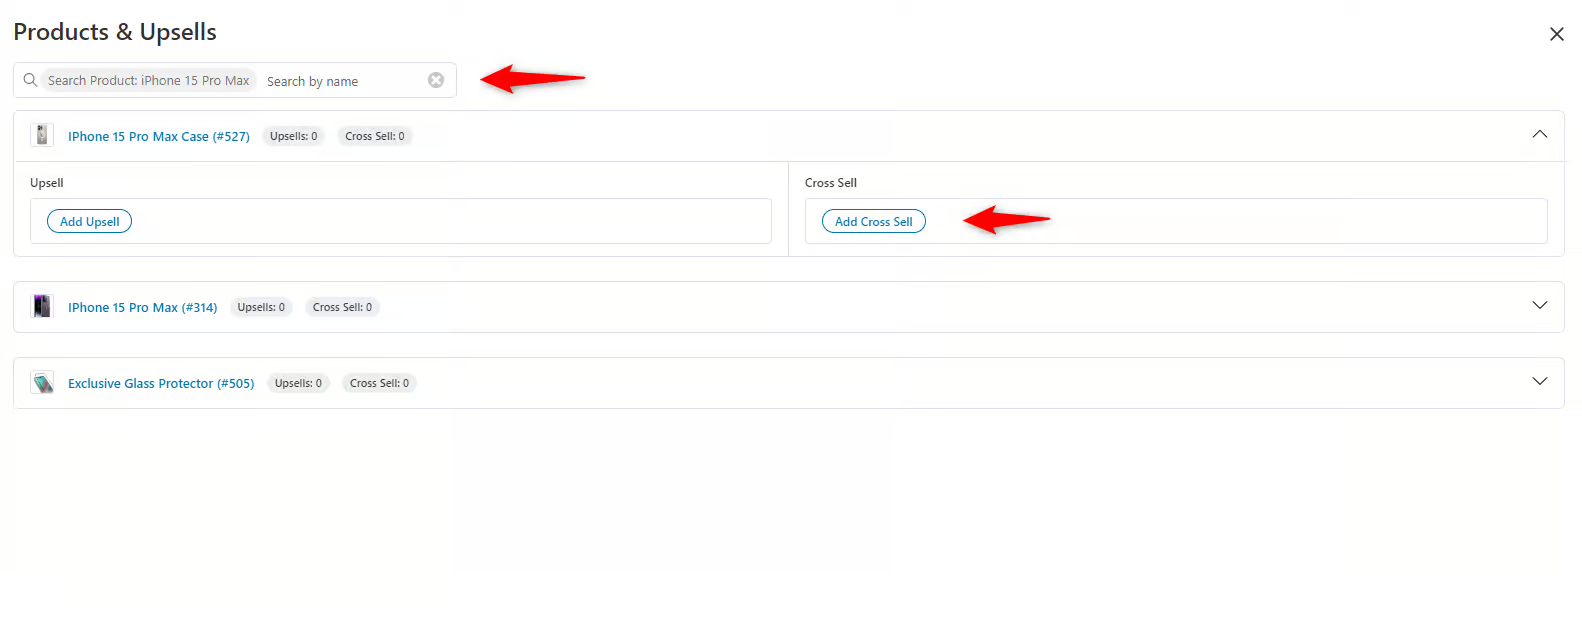
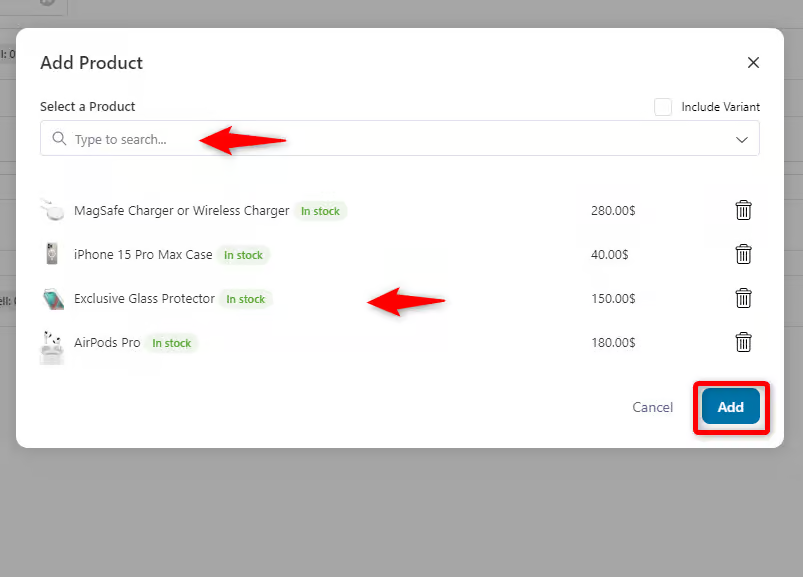
Add the recommended products to the main item as cross-sells and hit the “Add” button.
The products are added as cross-selling items.
Step 4: Preview of the cross-sell inside the shopping cart
So, when a user adds “iPhone 15 Pro Max” to the cart, it displays cross-sells there.
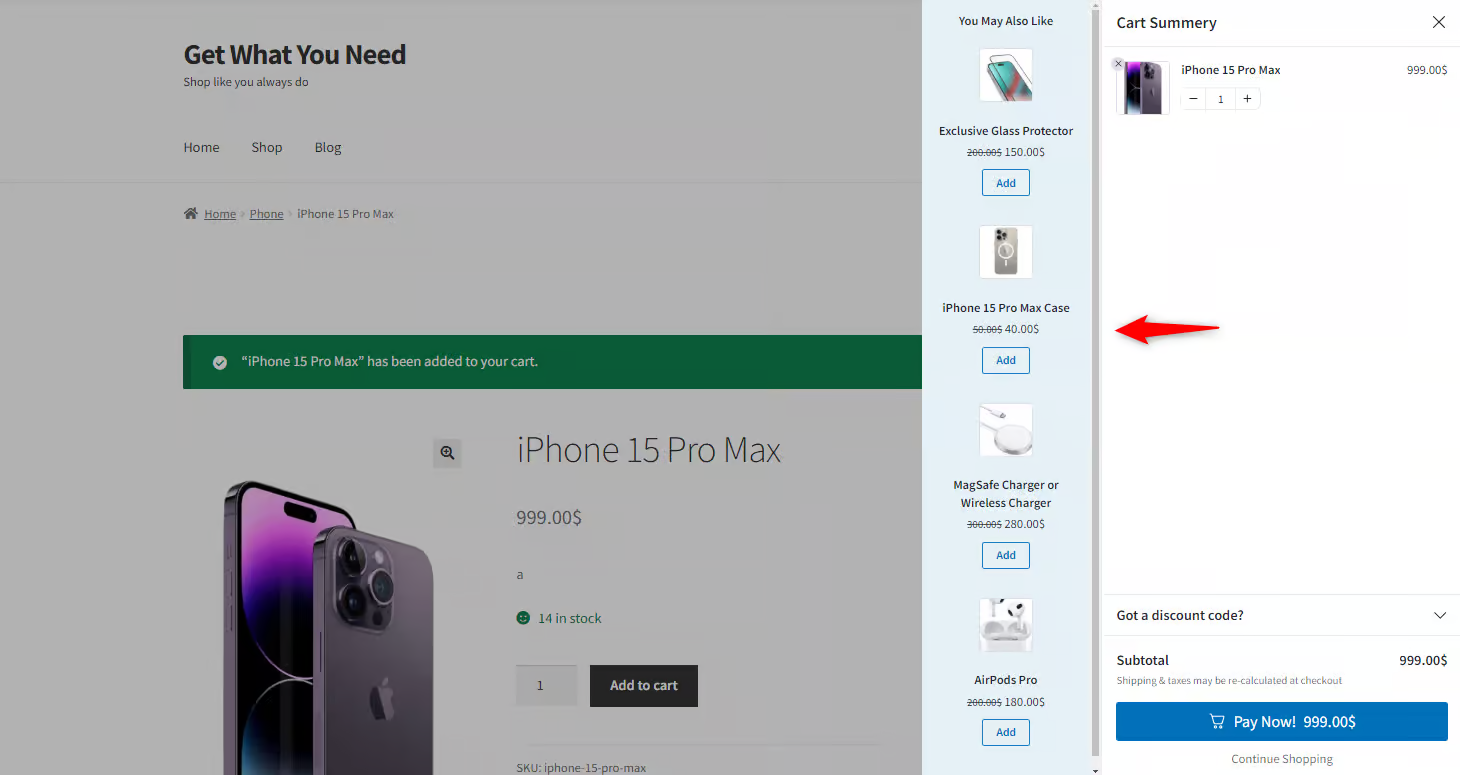
That’s it! Your cross-sells are now showing up in the dynamic shopping cart.
👉 Refer to our detailed guide on setting up cart upsells and cross-sells.
4. Checkout Page (Order Bumps)
Product recommendations on the checkout page are known as order bumps.
You can use checkout plugins like FunnelKit Funnel Builder to replace the default checkout page with a custom, high-converting one.
You can also offer exciting, low-dollar order bumps that encourage impulse purchases that can be added to the cart with a single click before checkout.
Make sure you’ve installed the FunnelKit Funnel Builder plugin by getting the copy from the button below:
Follow these steps below:
Step 1: Create a store checkout using a pre-built template
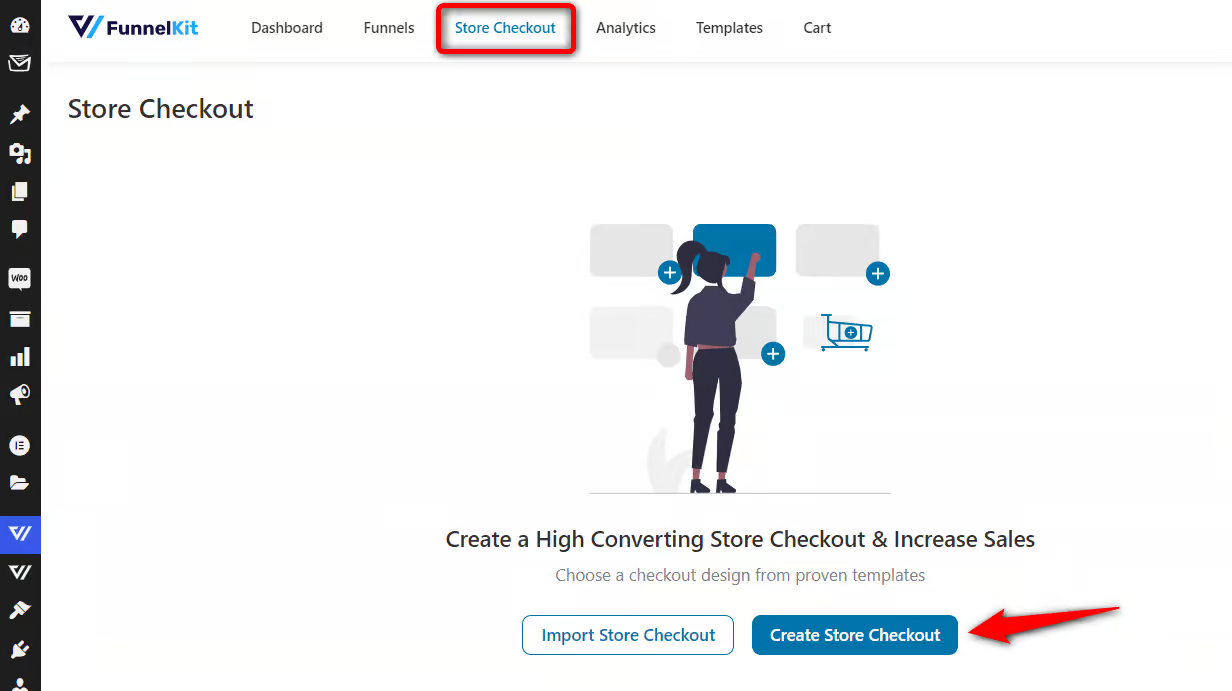
Navigate to FunnelKit ⇨ Store Checkout and click on ‘Create Store Checkout’.
Choose the page builder of your choice among Elementor, Bricks, Divi, Oxygen, Block Editor, and Other (using shortcodes).
Next, hover over the template you like and click on ‘Preview’.
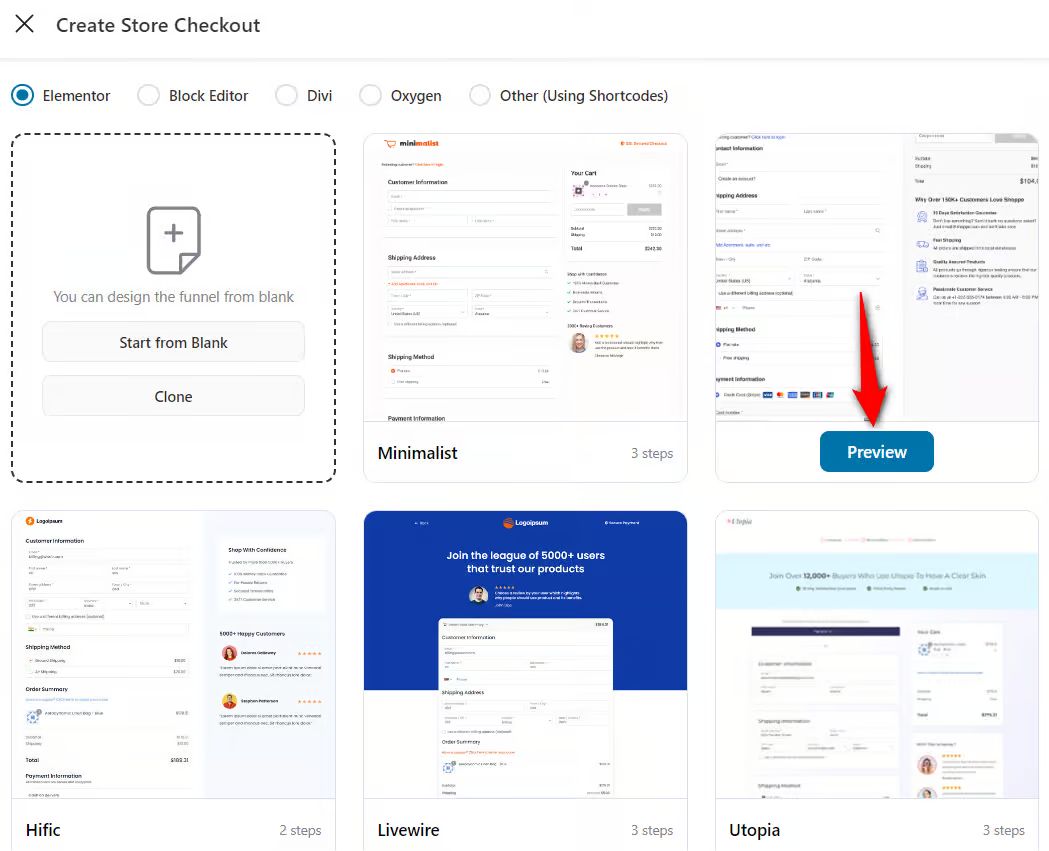
Let’s go with the Shoppe template and choose the number of steps you want on your checkout page.
Next, hit the ‘Import This Funnel’ button and name your store checkout.
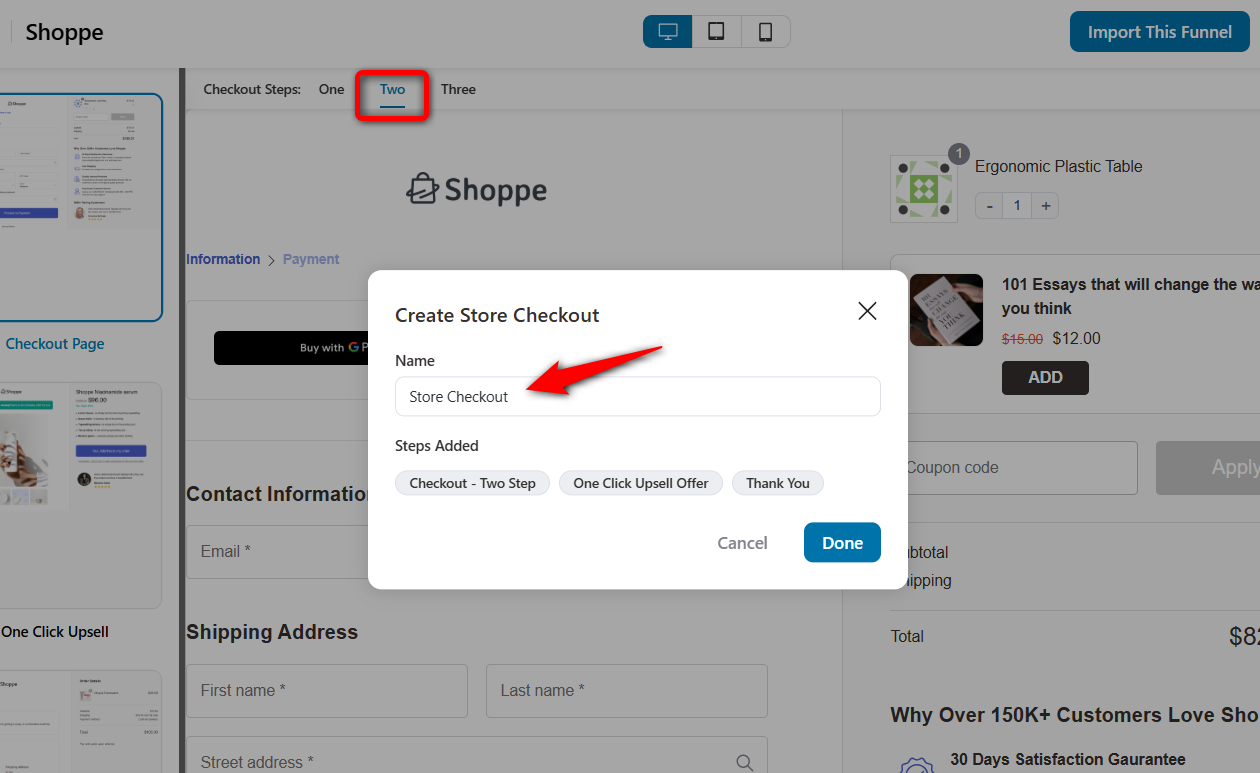
Finally, click ‘Done’ to import your store checkout with a checkout page, one-click upsell, and thank you page steps.
Step 2: Customize your WooCommerce checkout page
You can customize your checkout page however you like, using your favorite page builder.
Just hit the ‘Edit Elementor Template’ button.
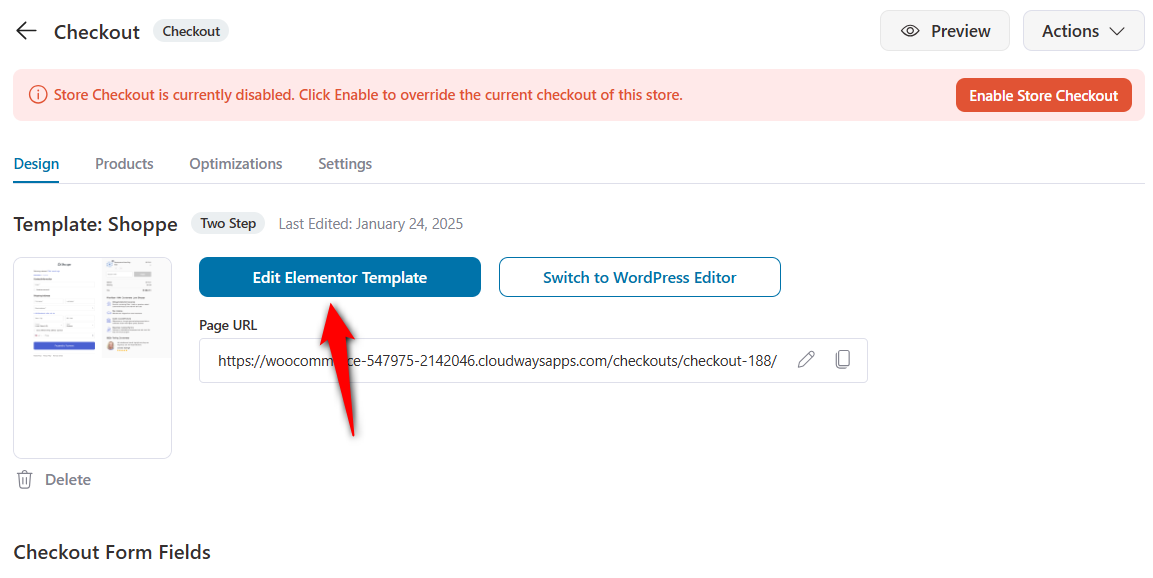
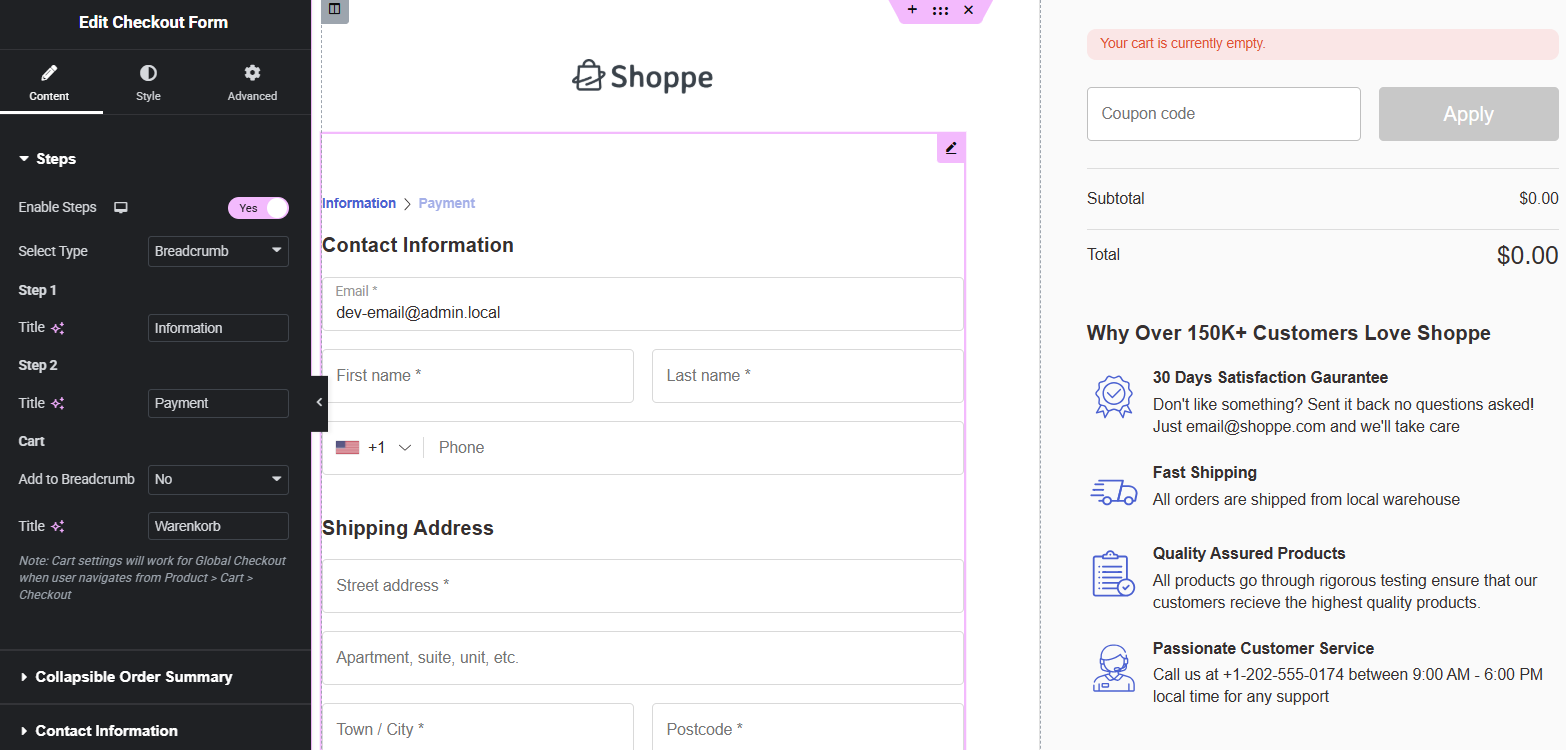
The page will load in Elementor. Here, you can customize your checkout page using Elementor widgets and a range of customization options.
Once done, hit ‘Publish’ to lock all your changes.
Next, you can customize the checkout form fields from the ‘Design’ tab.
Add a custom field, edit any field or section, rearrange them for the perfect order, or even delete unnecessary fields or sections.
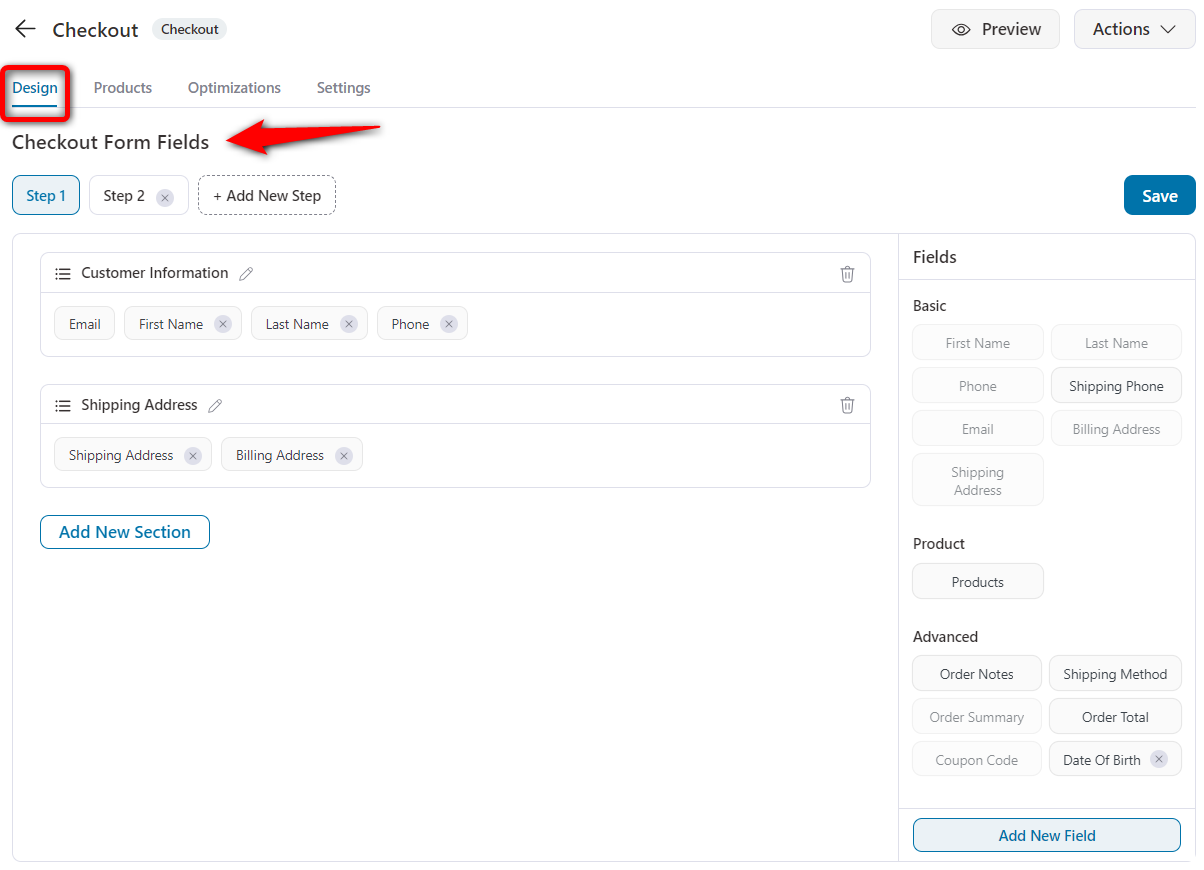
Save the changes when done.
👉 Check out our detailed post on optimizing your WooCommerce checkout page.
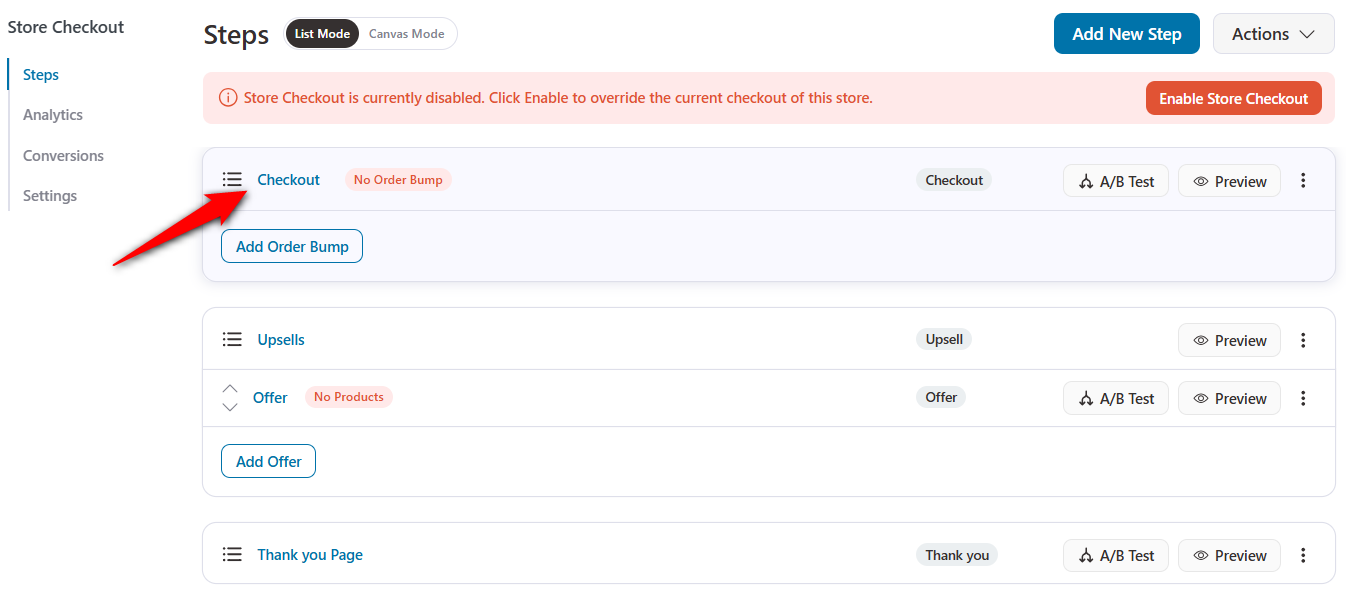
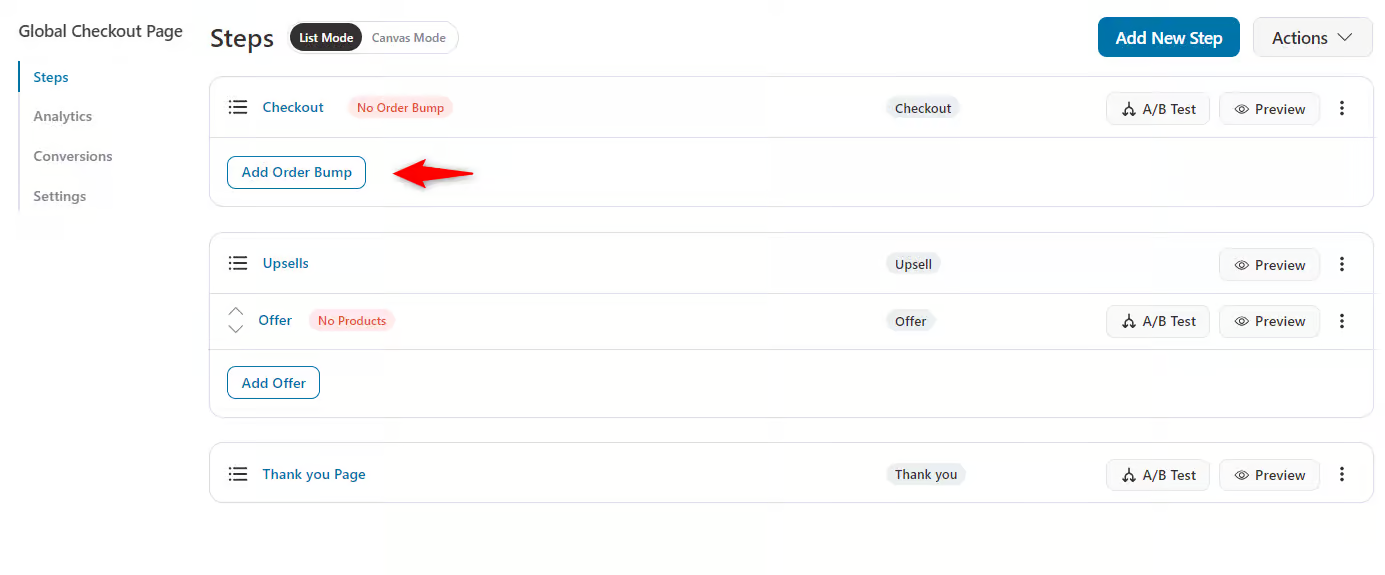
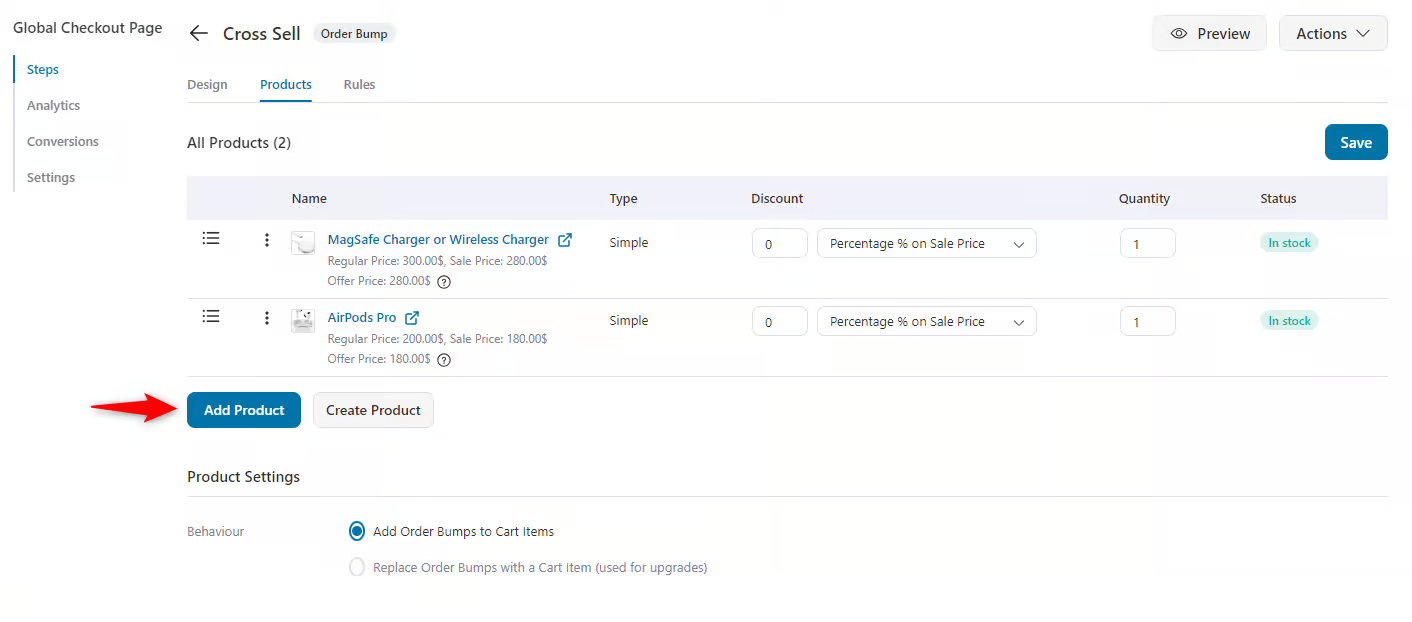
Step 3: Add cross sell products as an order bump
Click the “Add Order Bump” button.
Next, provide the name of the order bump.
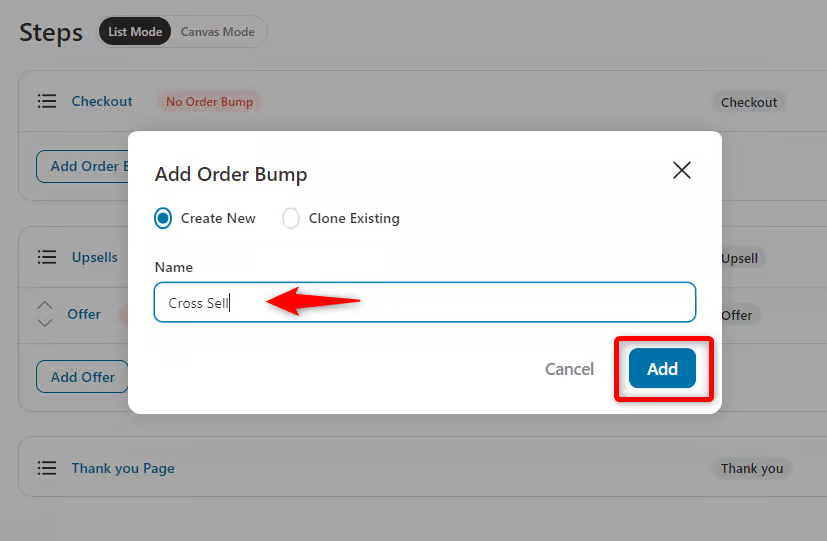
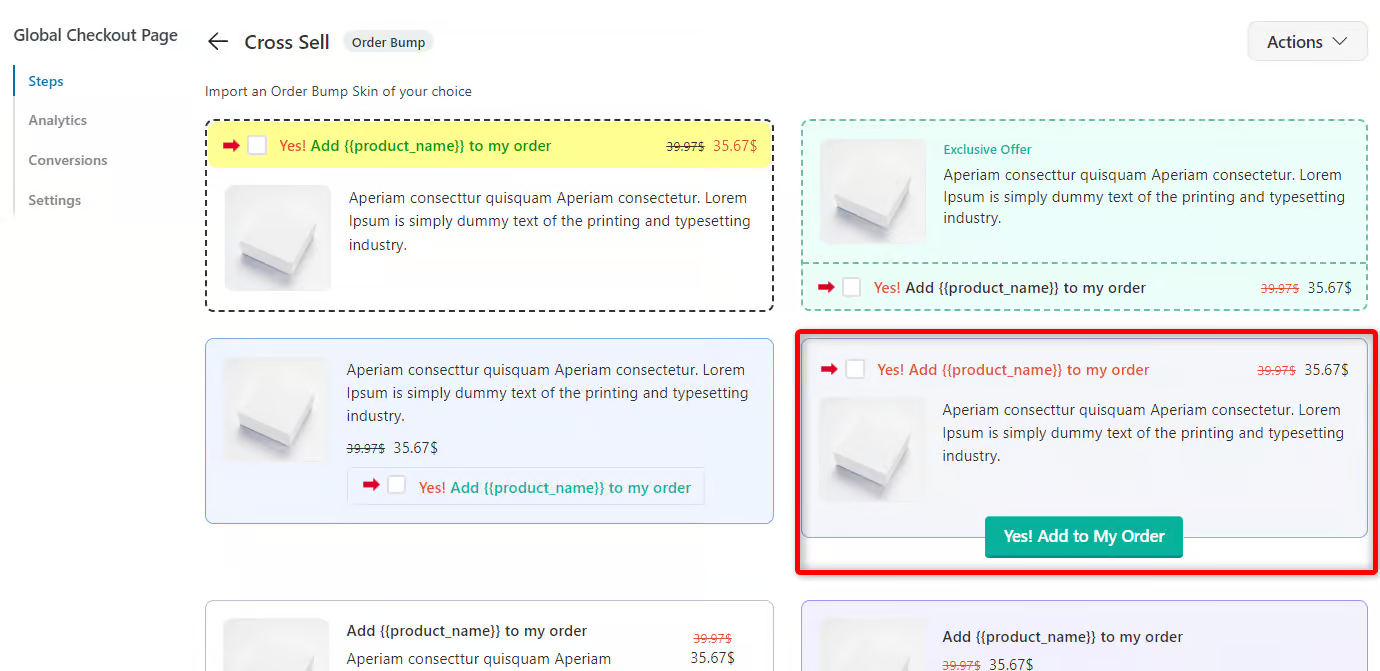
Choose the template to display the order bump on your checkout page.
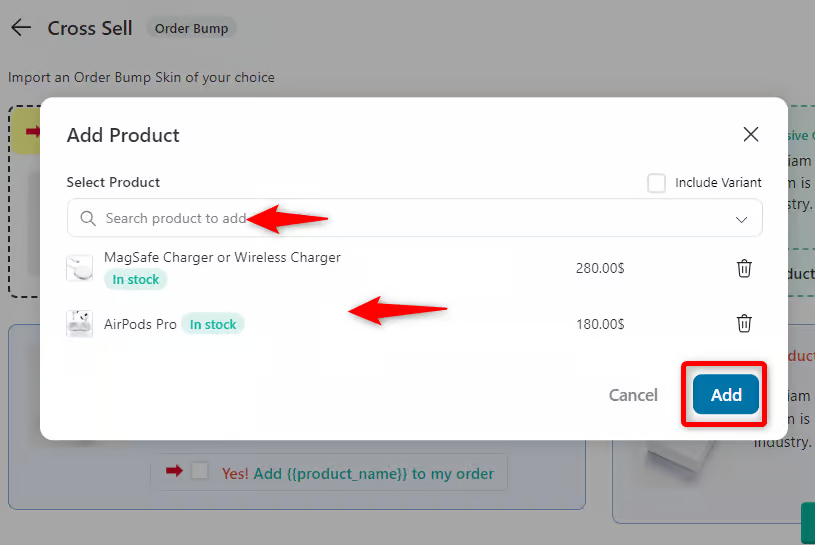
Next, search for the products here to add them as WooCommerce cross-sell recommendations.
Then, hit the “Add” button.
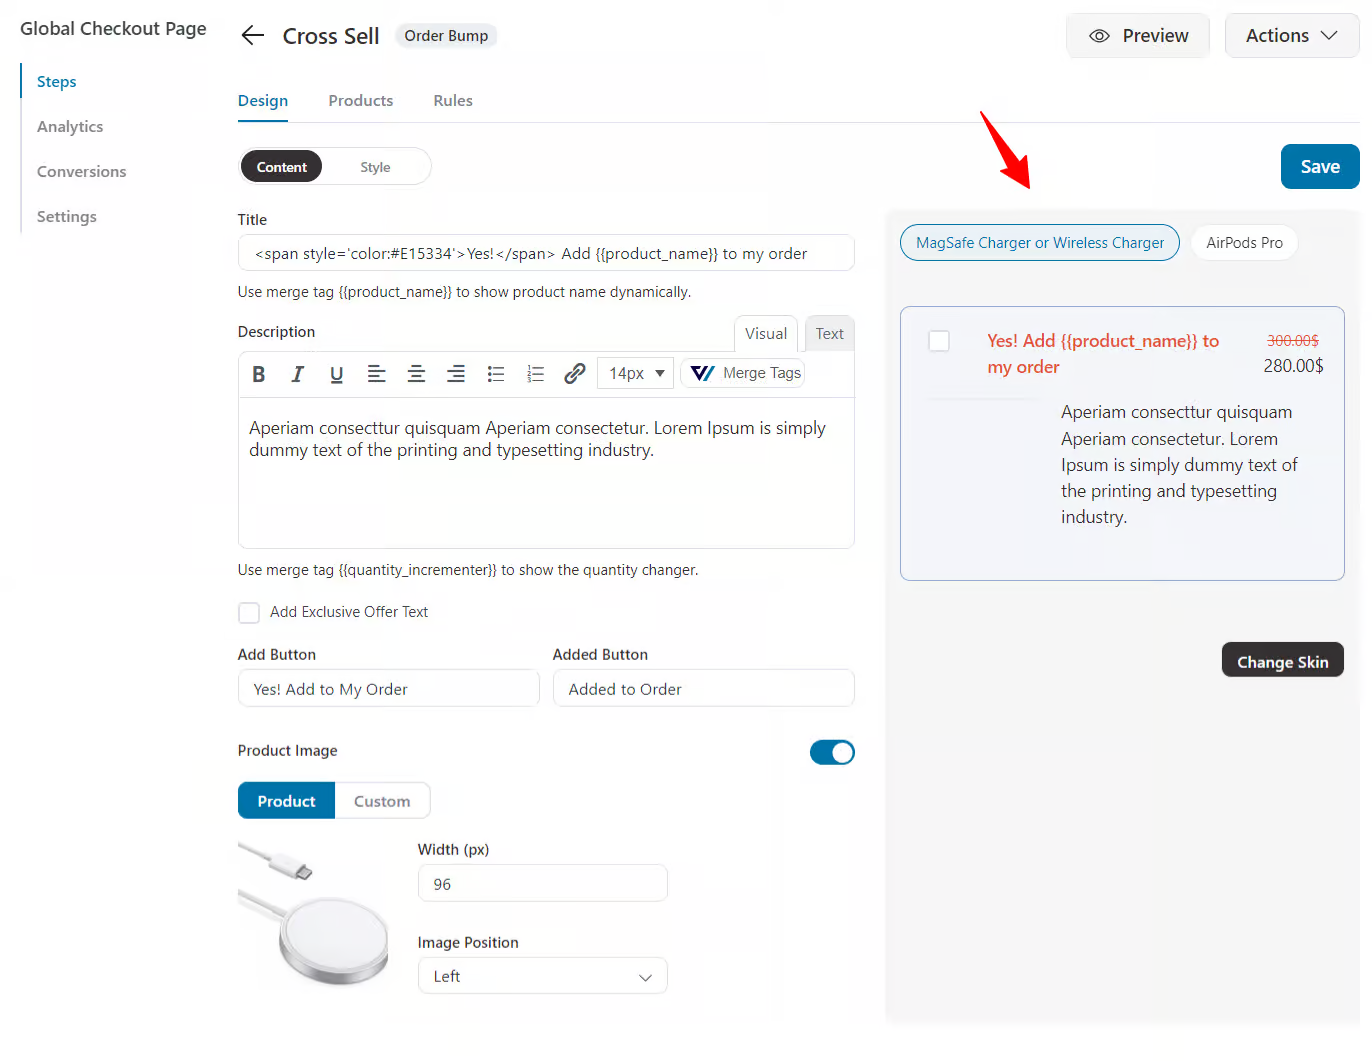
Step 4: Customize the order bump banner
To customize an order bump in WooCommerce:
- Navigate to the Content tab to customize the title, description, and buttons using dynamic tags like {{product_name}}.
- You can use the Style tab to adjust the appearance, such as button colors, fonts, and product image layout.
- Preview the order bump on the right panel to see real-time changes.
Step 5: Add the display condition for the order bump
Next, add a rule to show the order bump on the checkout page.
Here, the order bump will appear depending on the rules you set. We have selected the cart items, exact matches, quantity one, and the product name. Hit save when you’re done.
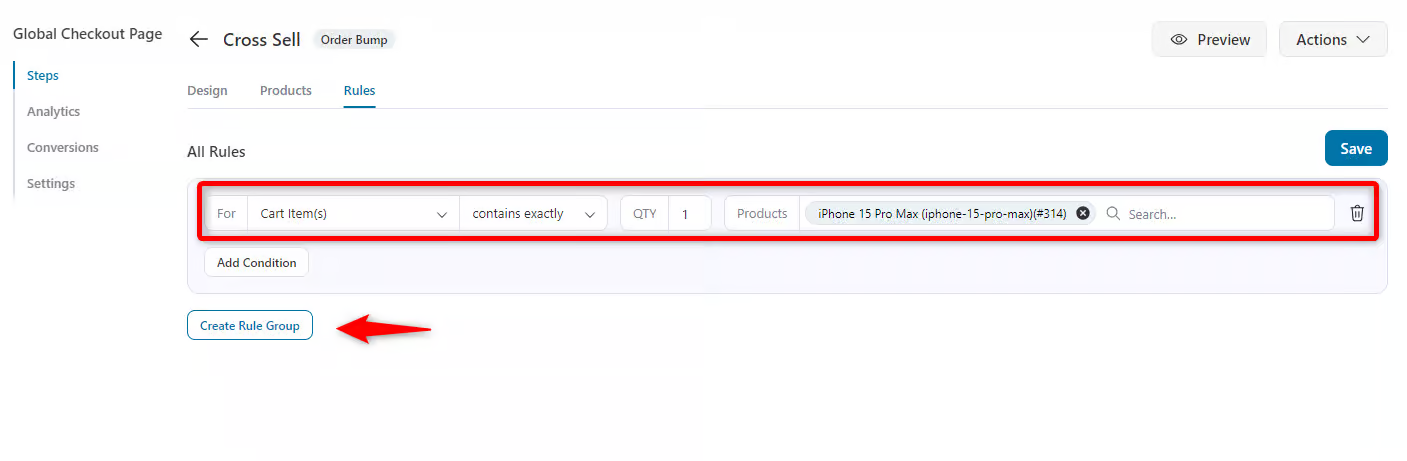
You can also add more products if you want.
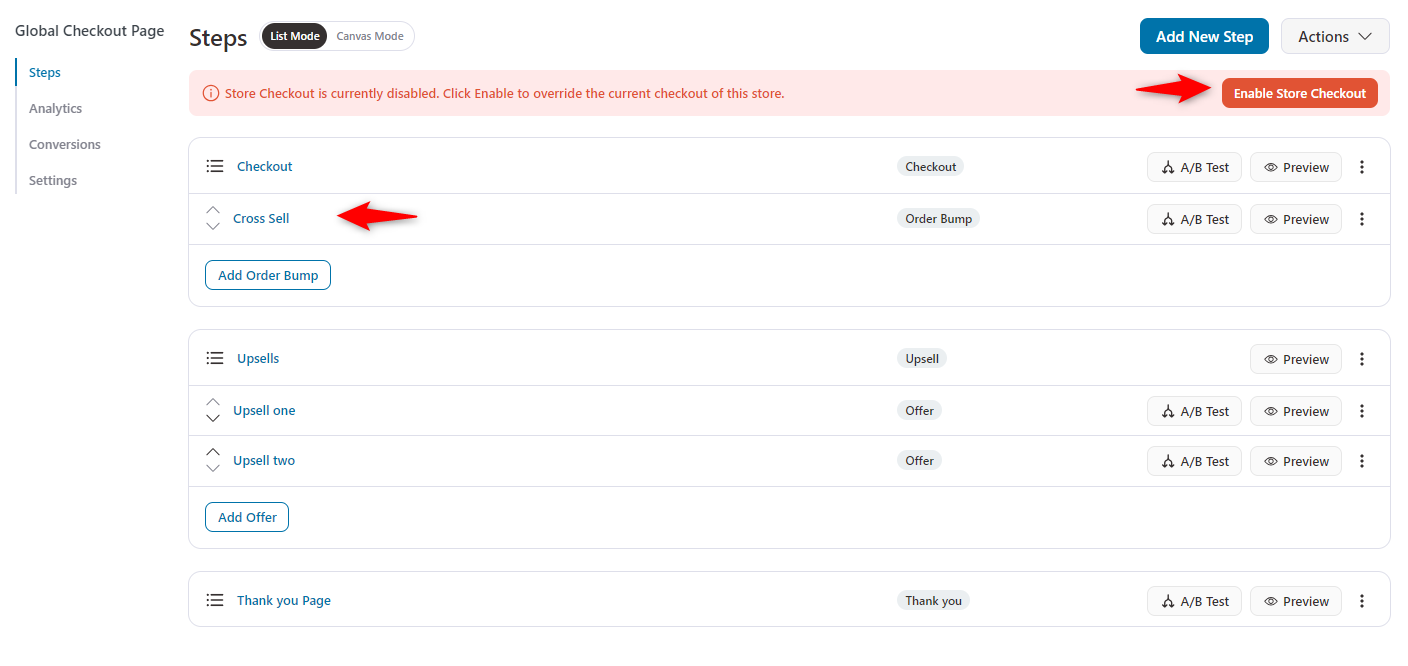
Before checking whether the order bump is working, you have to enable the checkout page.
To do so, click on the "Enable Store Checkout" button to activate the checkout page.
Now, it’s time to check if the order bump is working properly.
To do so, add “iPhone 15 pro-Max” to the cart, and the recommended products appear as cross-sells on the checkout page.
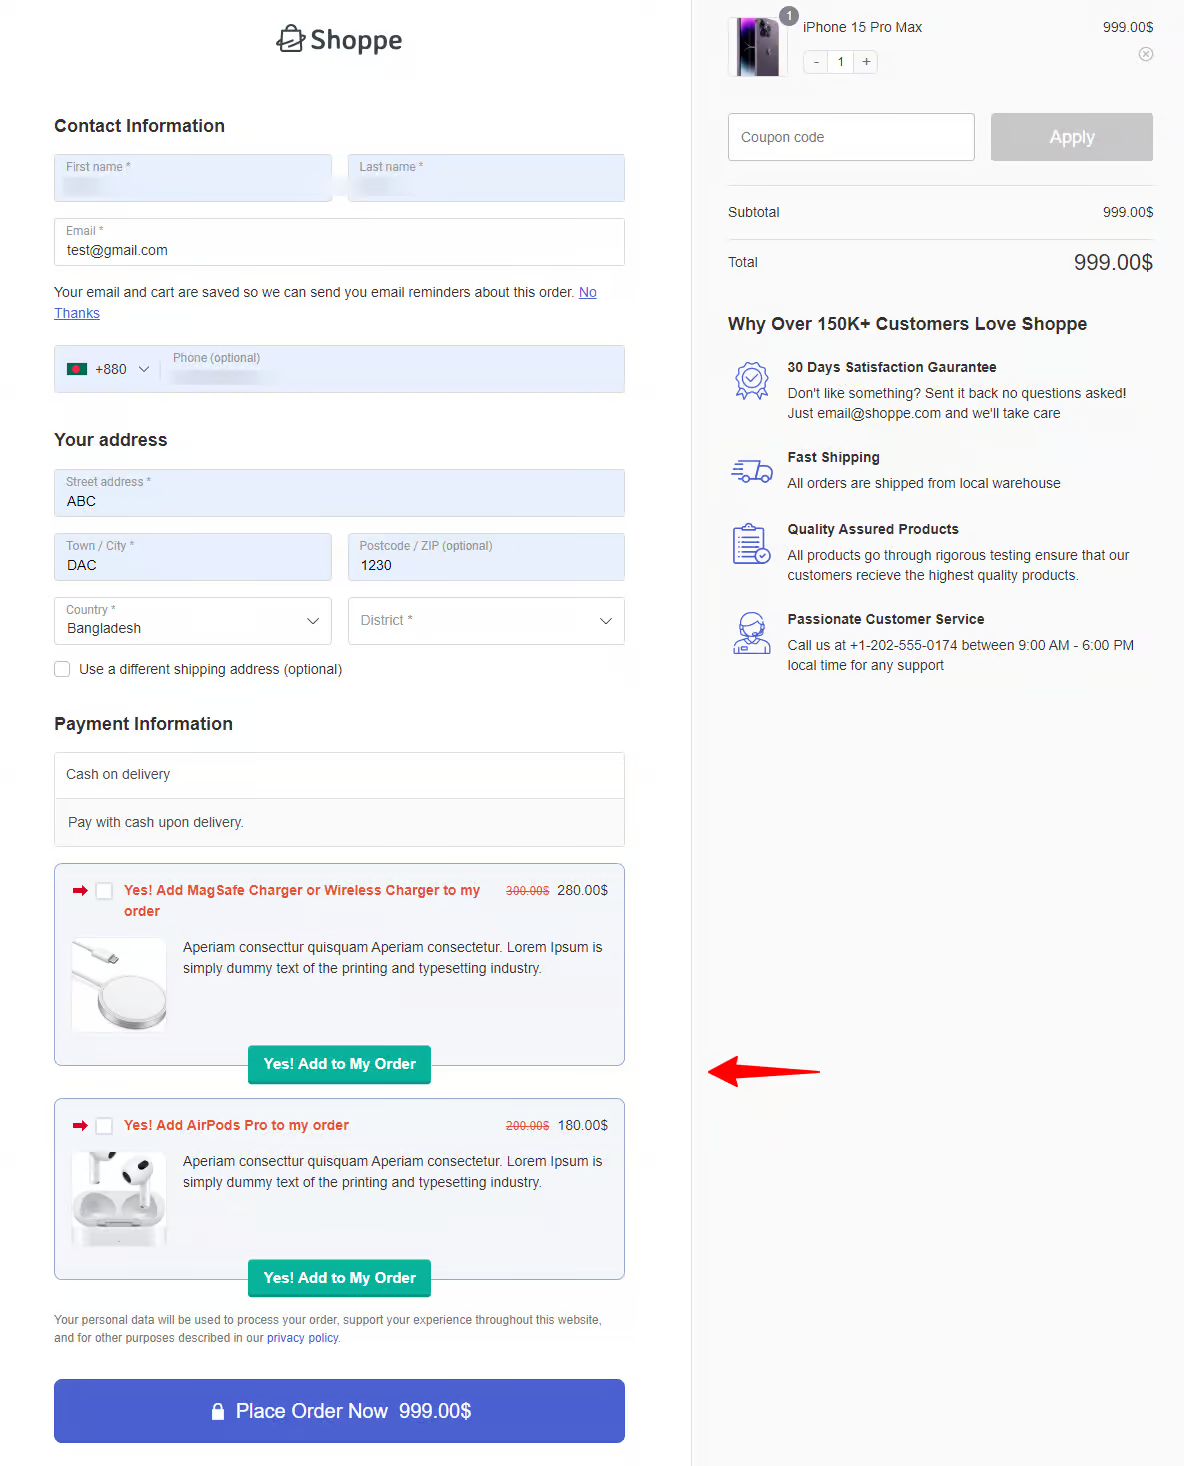
This is how you can showcase cross-selling products on the checkout page using the FunnelKit order bump feature.
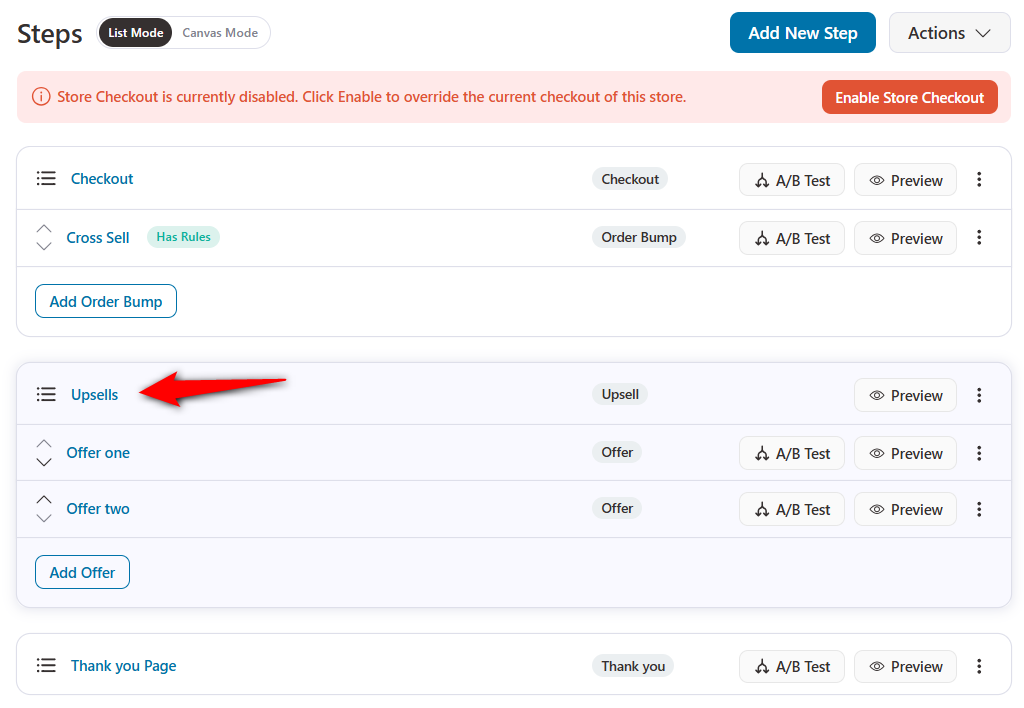
5. Post-Purchase (One-Click Offer)
You can create one-click upsells as part of your cross-selling offer. One-click upsells appear after the checkout page and before the order confirmation page.
These offers are accepted with a single click, requiring no additional input since the payment method is already tokenized.
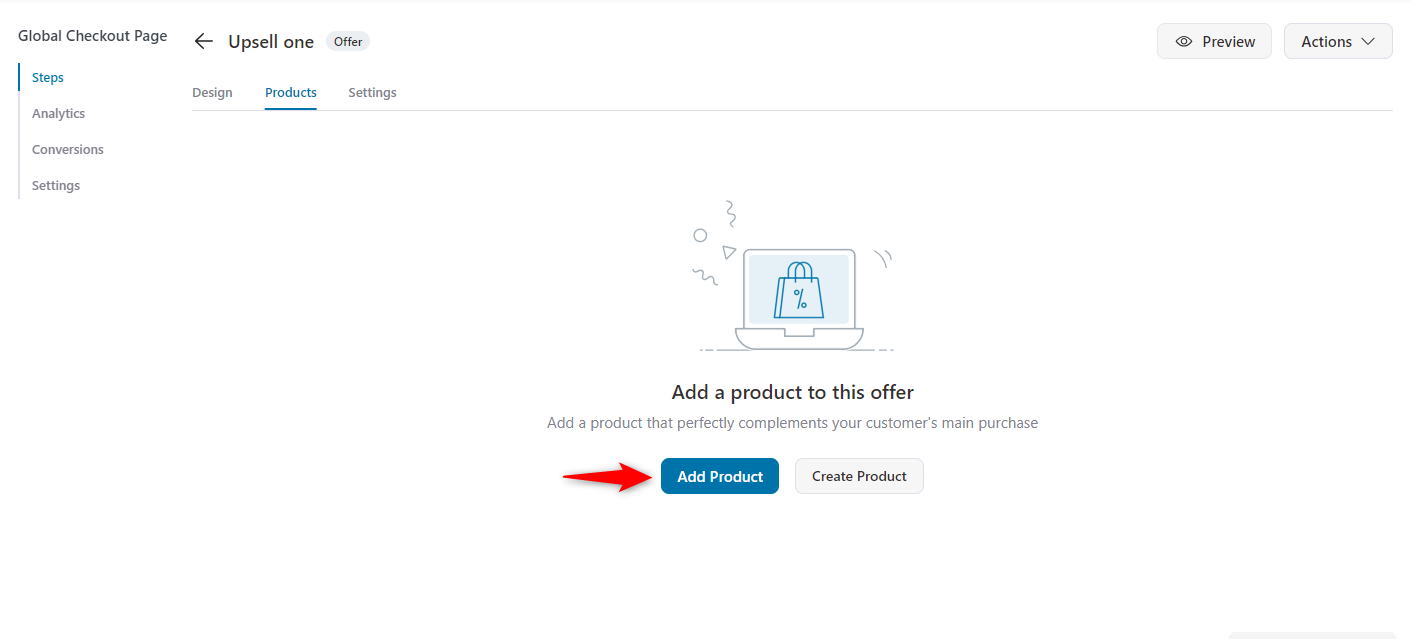
Step 1: Add the cross-sell product offer
The upsell section is on the store checkout page. To access it, click on the offer name.
Now, click the “Add Product” button to add a product to the upsell offer.
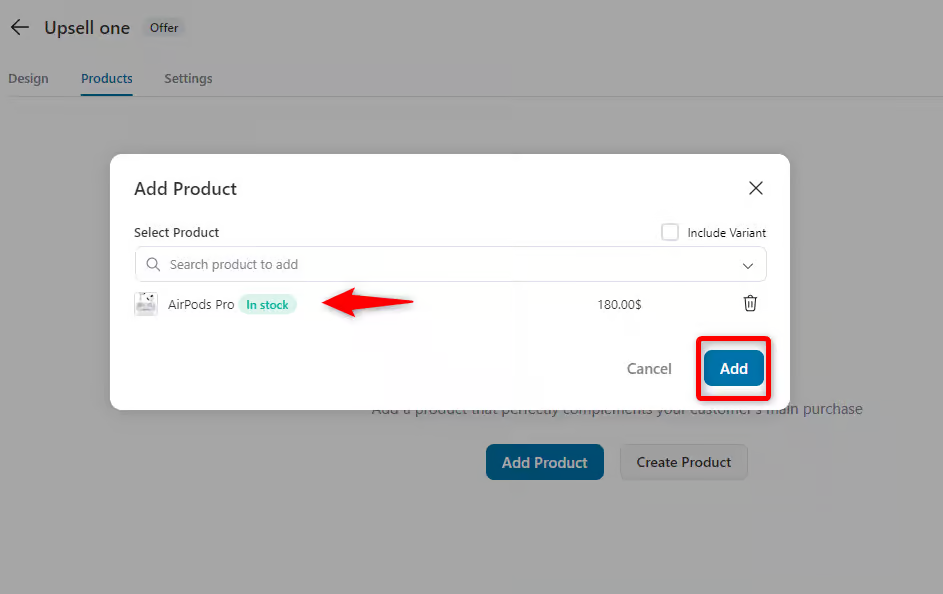
Search for the product and add it. And then click on the “Add” button.
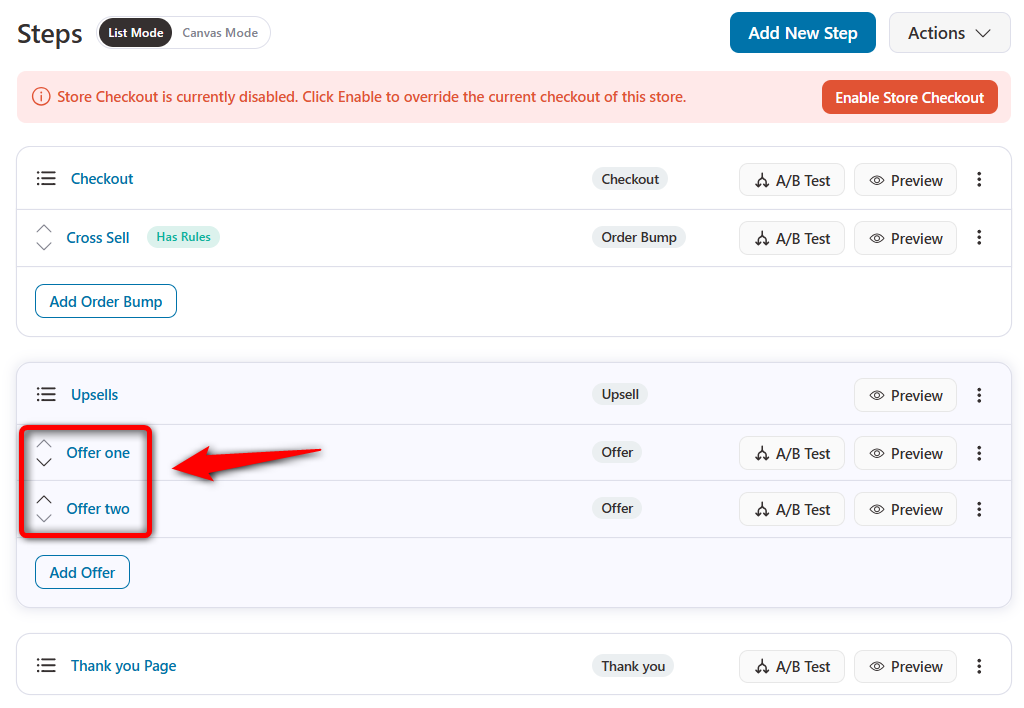
Following the same process, add another upsell offer. In our case, we created the "Upsell Two".
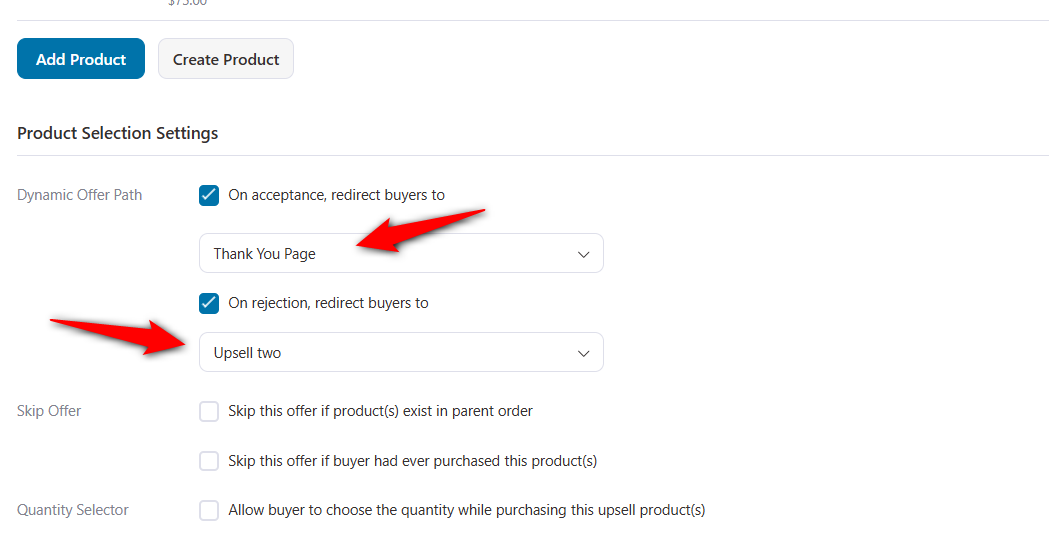
Step 2: Configure the upsell setting
Click the first upsell, then navigate to the product tab.
Here, you can configure some settings. You can set dynamic offer path conditions depending on your offers.
If anyone accepts the upsell offer, you can redirect your users to the thank you page.
Or if anyone rejects the upsell, you can redirect your users to the second upsell or downsell offer.
Step 3: Add rules to your one-click cross-sell offers
Click on the main upsell page.
Under the Rules tab, set up a display condition for your cross-sell offer.
Here, we’ll select the Product purchased rule.
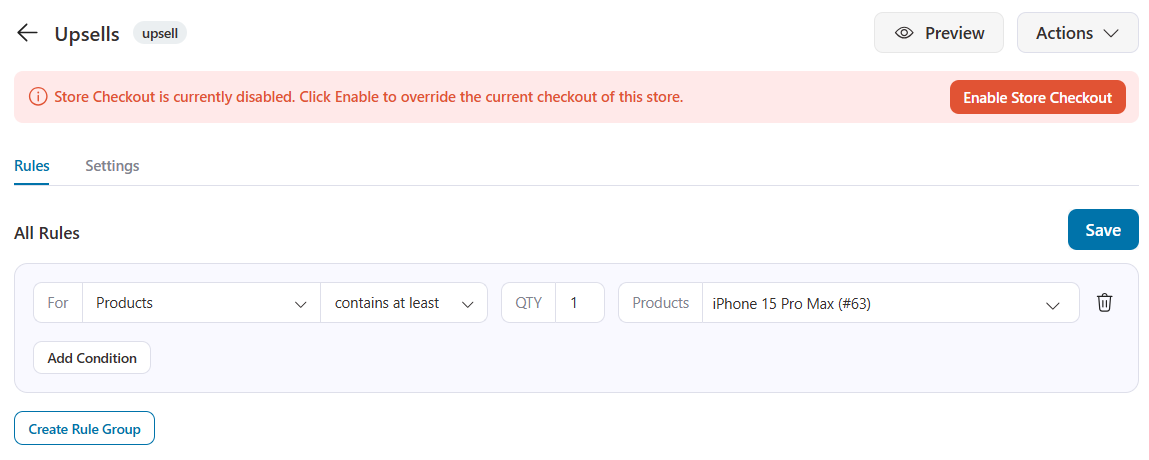
You can add more rules to show the right offers to the right customers.
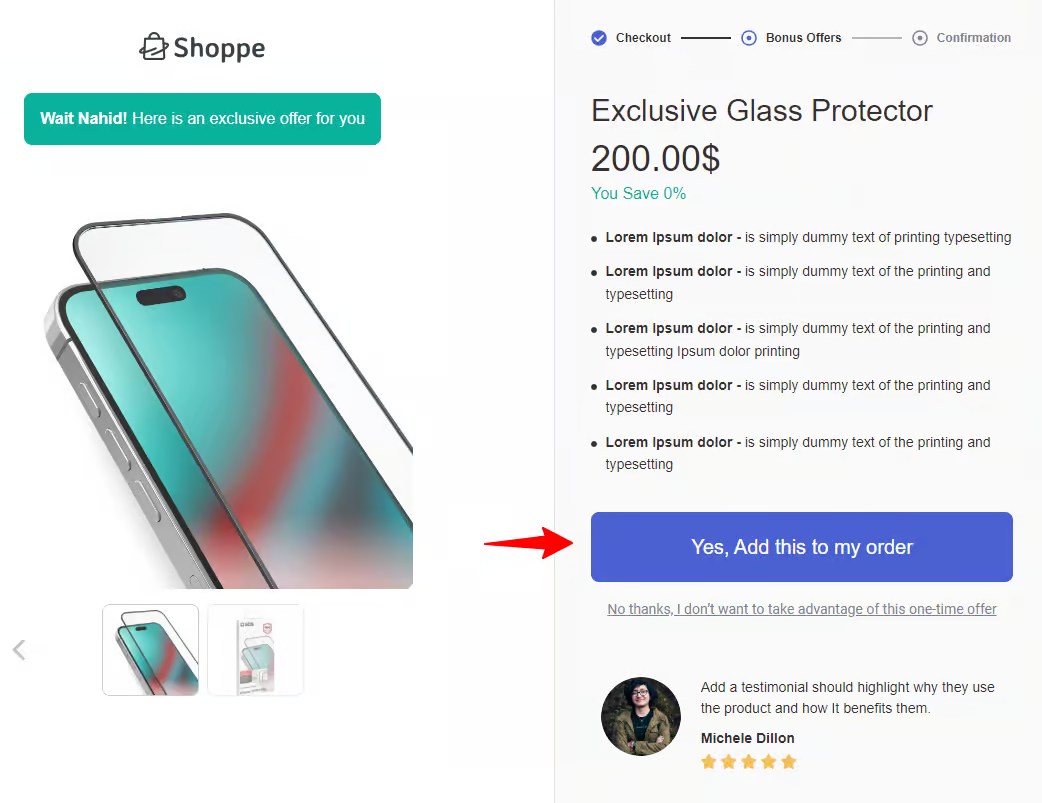
Step 4: Preview the WooCommerce cross-sell offer after checkout
Here is the preview of the first cross-sell offer appearing after the checkout page:
On rejection, the 2nd upsell offer appears.
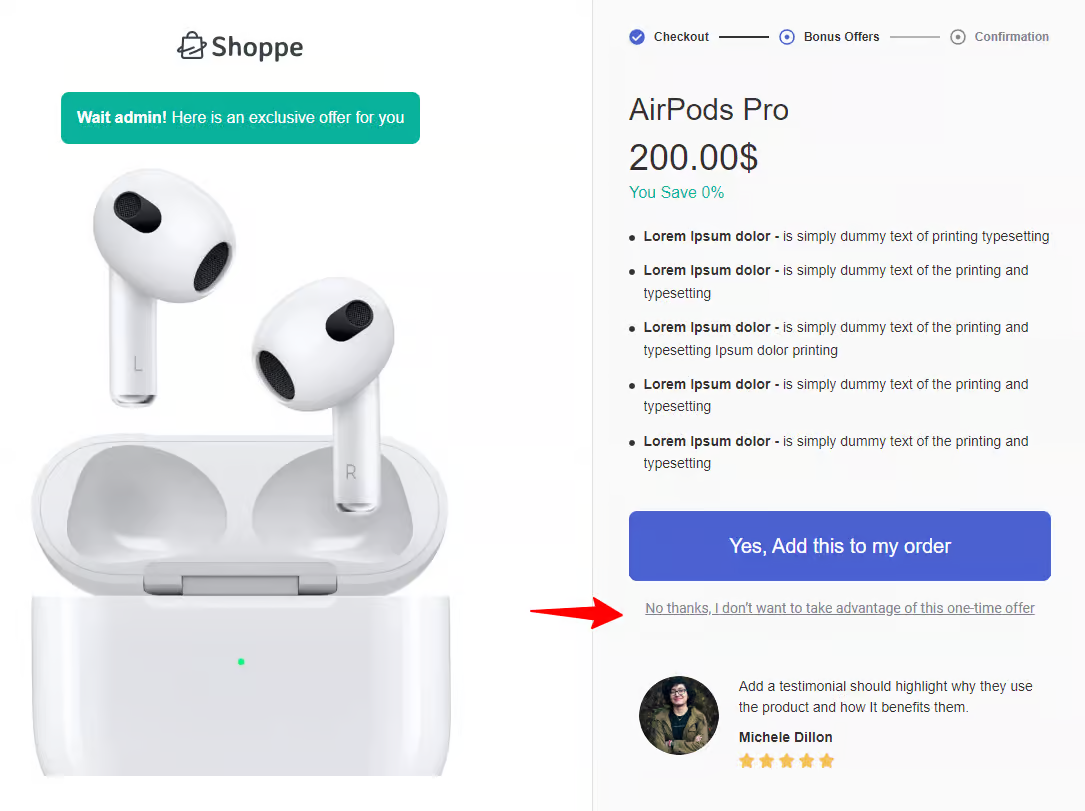
Your customers will land on the thank you page based on your acceptance or rejection of the offer.
This is how you can set cross-selling offers in your WooCommerce store using FunnelKit Funnel Builder's one-click upsell feature.
6. Emails (Automated Recommendations)
Cross-selling doesn’t end when customers leave your website. With automated workflows, you can continue suggesting related products via email to drive sales.
For example, after a customer buys a mobile phone, send a post-purchase email recommending a charger or phone case.
For that, we’ll use FunnelKit Automations, the best marketing automations and broadcast CRM for WordPress and WooCommerce.
Make sure to install and activate FunnelKit Automations on your website.
Step 1: Create an automation
First, you need to create an automation. Navigate to the Automations section and click the “Create Automation” button.

Next, you must choose a recipe to run the automation. In this case, we’re using Scratch.
After choosing, provide the name for it.
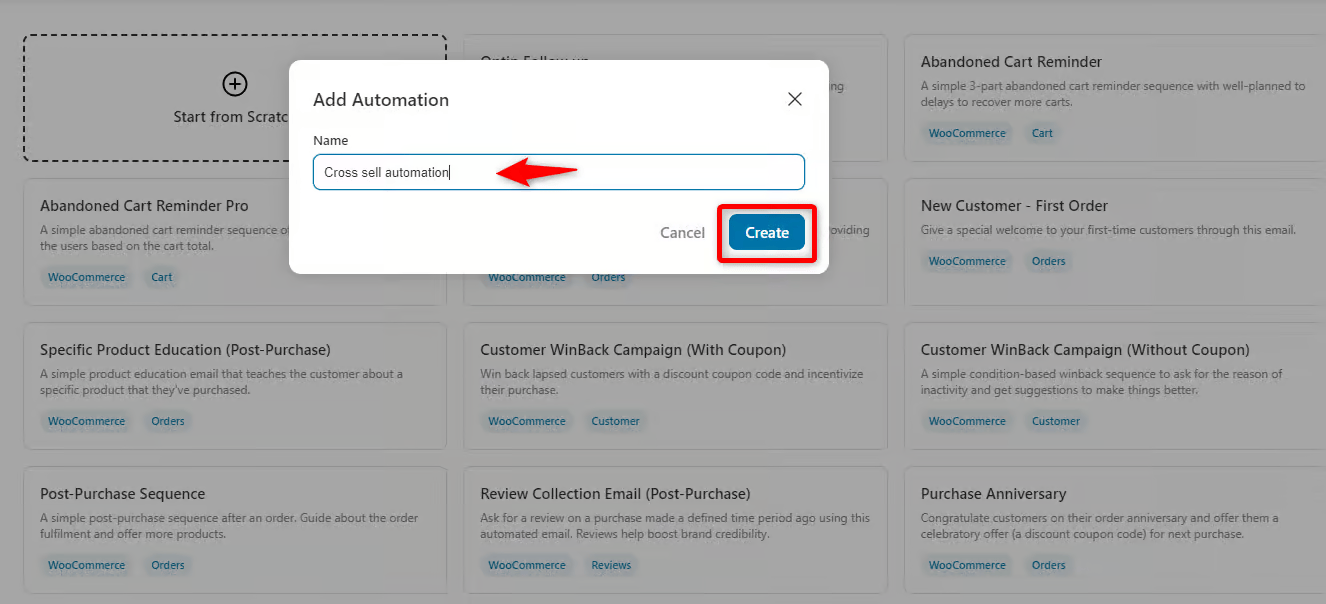
It’ll create a fresh workflow.
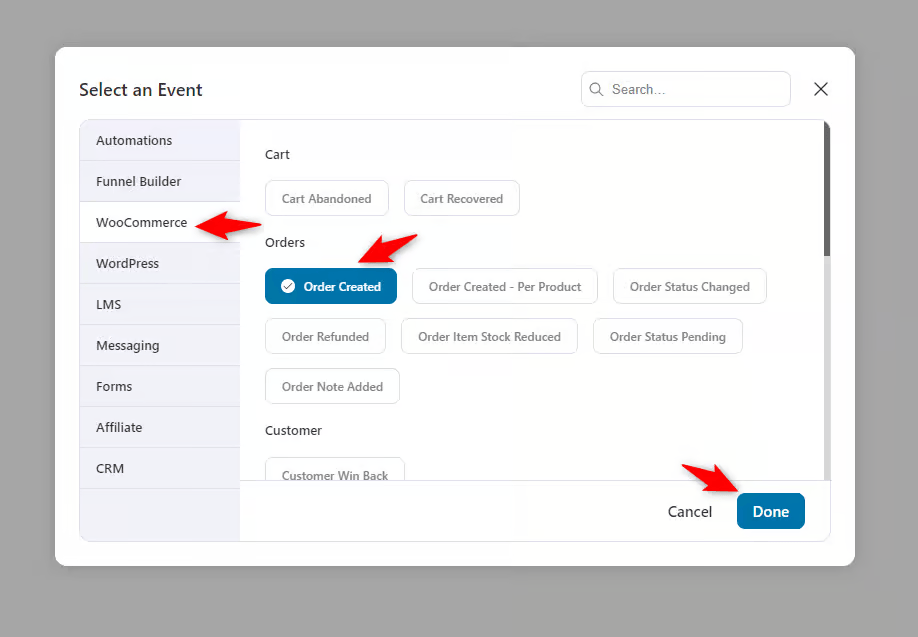
Step 2: Select the WooCommerce order created event
Next, select the event that triggers this automation.
Click on it and choose the ‘Order Created’ trigger under the WooCommerce section. Then hit ‘Done’.
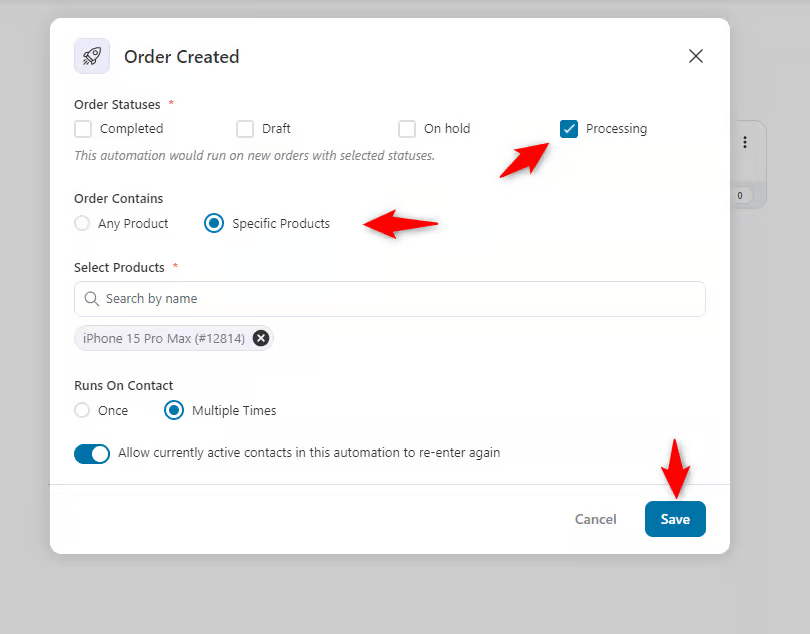
Next, check these options as they are. Just in the order contain section, choose specific products.
Suppose we send an email with a cross-selling offer. For that, we selected the “iPhone 15 Pro Max”.
So whenever the users purchase the iPhone 15 Pro Max, they will get the email, but not for all products they purchase. Hit save when you’re done.
Step 3: Create an automated email action
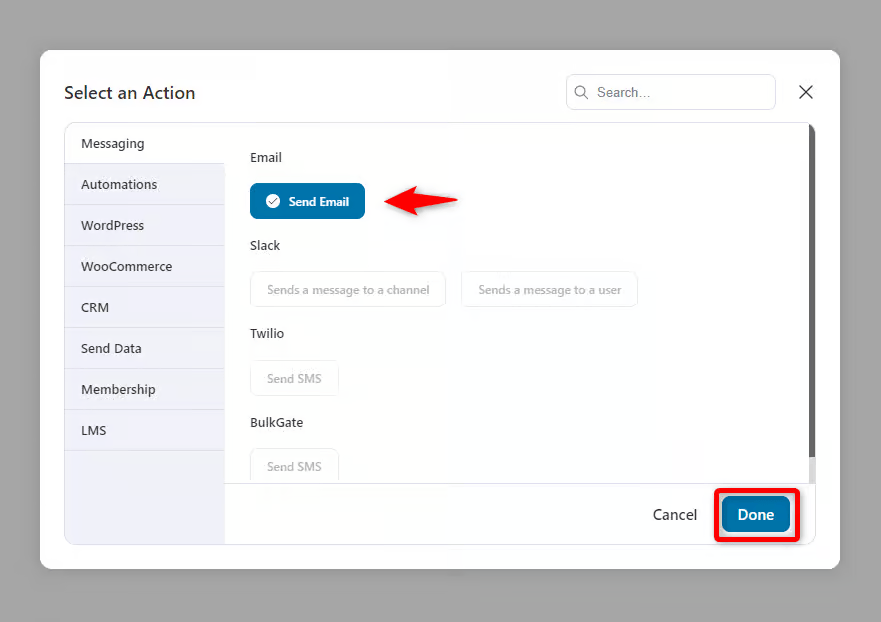
Next, create an event. Click the plus icon, then action.
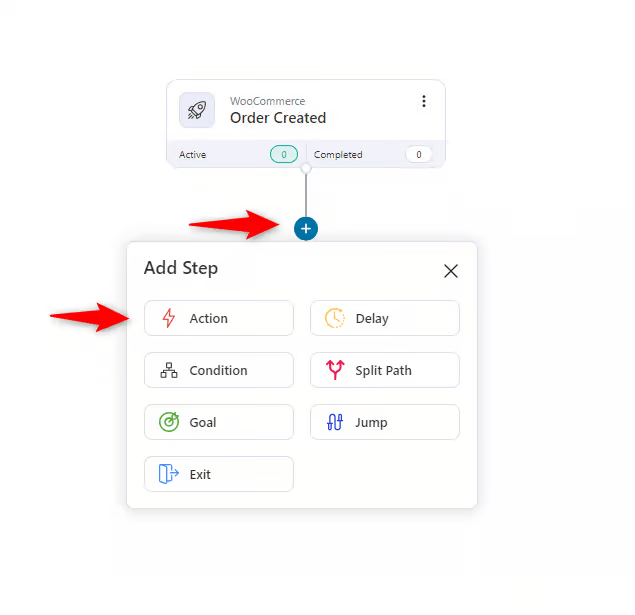
Select “Send Email” under the messaging section. And then hit done.
Step 4: Configure the email settings
Next, you need to configure the email settings. For example, provide a subject line and preview text.
Also, using the merge tag {{..}} icon, you can directly trigger your preferred thing in the email.
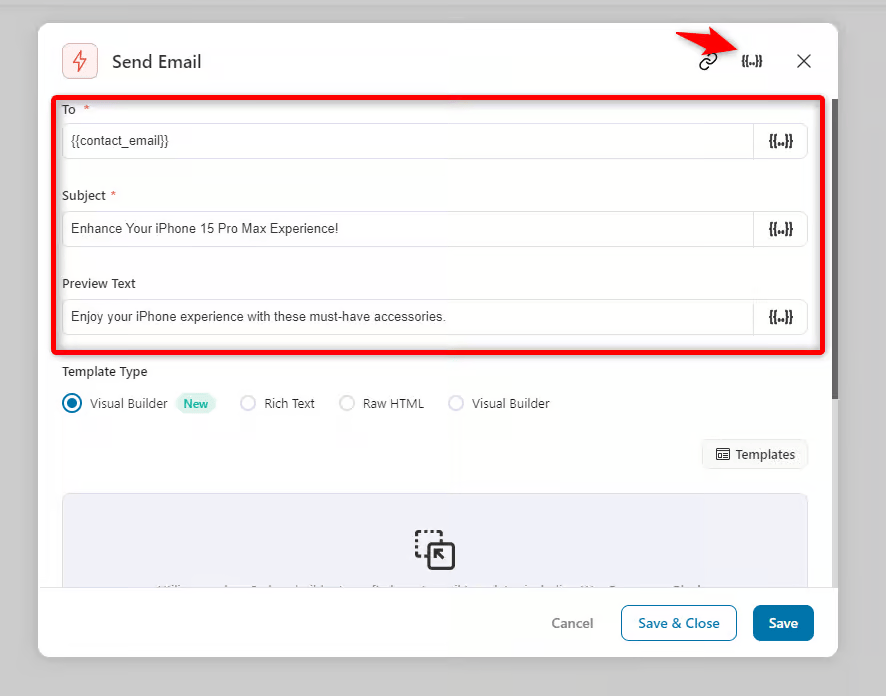
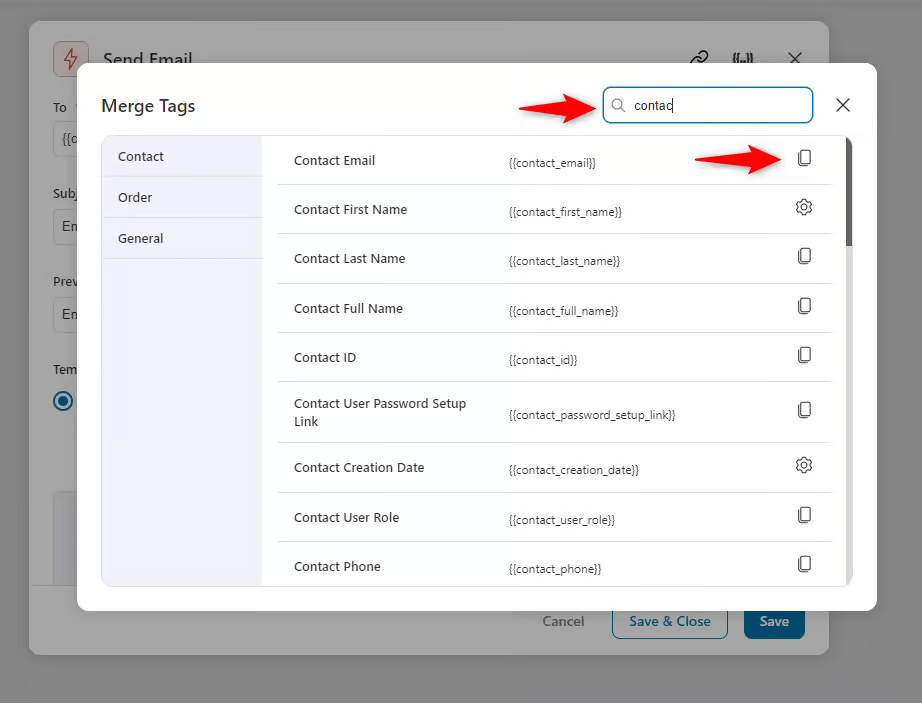
Suppose you want to trigger the contact email. To do so, click the merge tag icon to view the available tags.
Simply copy the code and paste it into the preferred place.
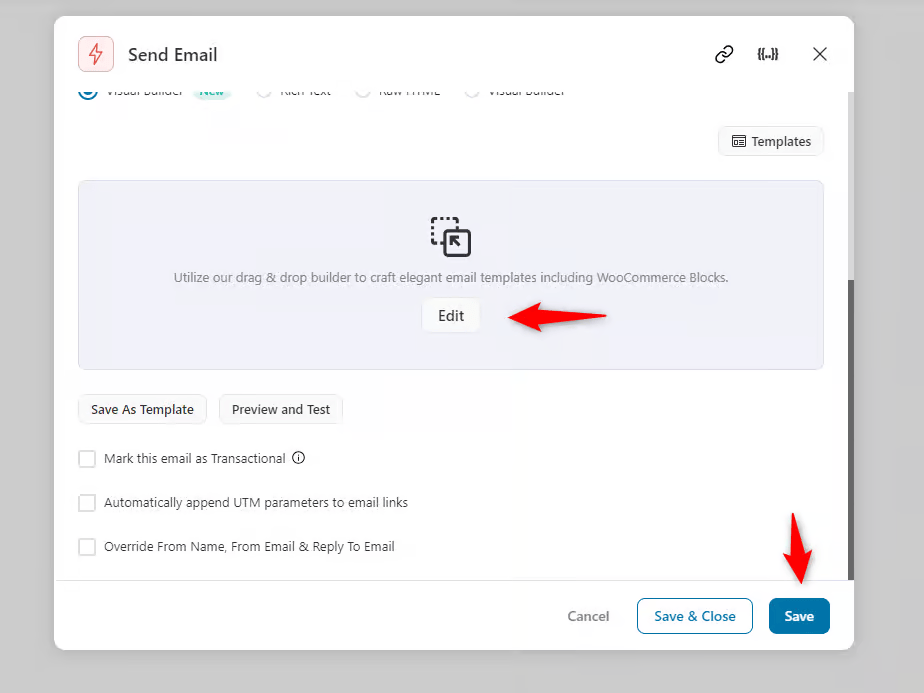
Step 5: Edit email with the visual builder
Once you’re done with the configuration, it’s time to customize the email template.
For instance, you need to use the visual builder of FunnelKit Automations. Click on the “Edit” button.
Under the eCommerce section, choose the “Cross-sells Products” template.
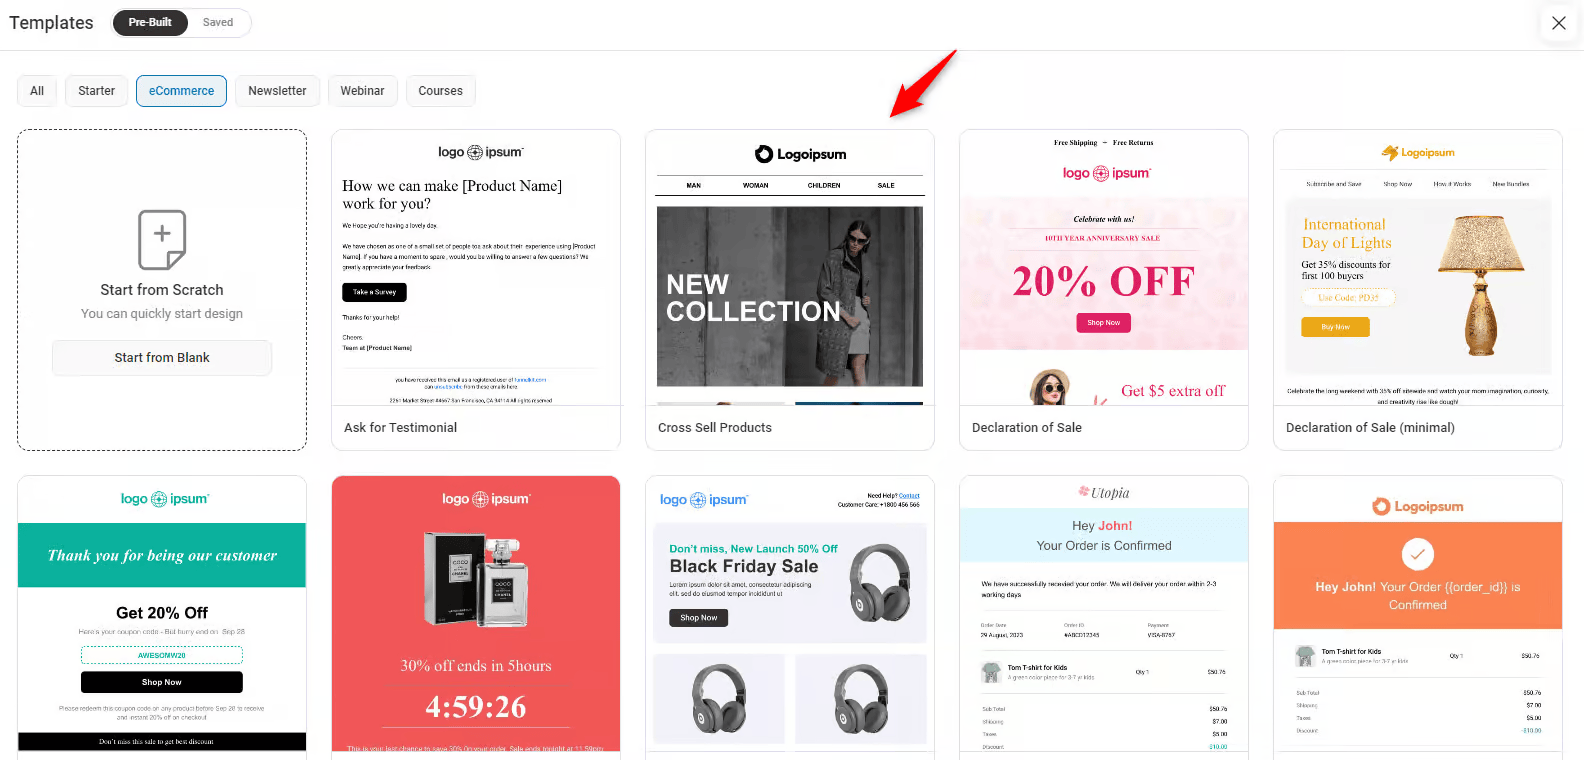
Preview the template and import it.
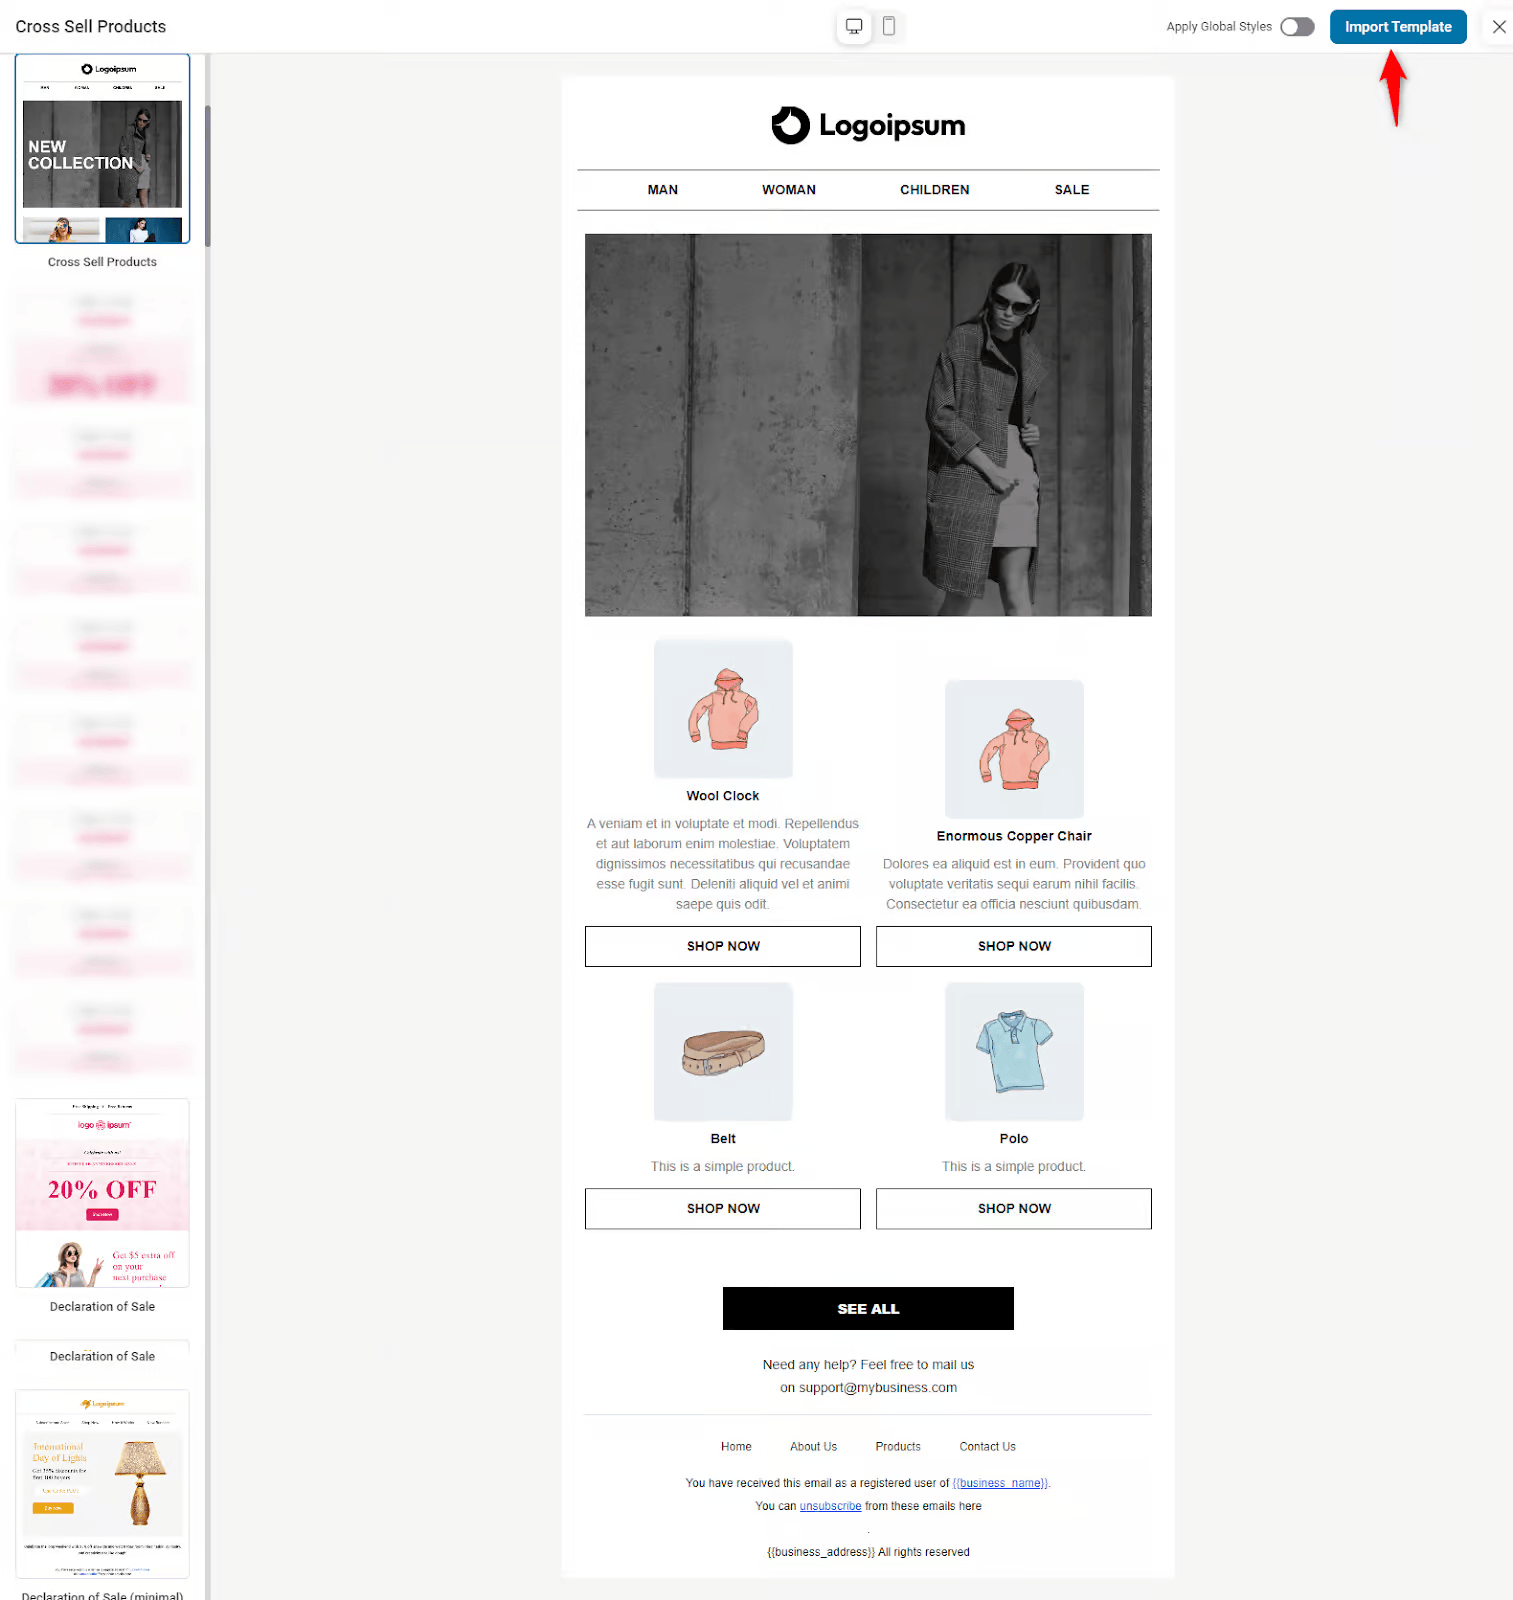
Customize the email content as per your business needs.
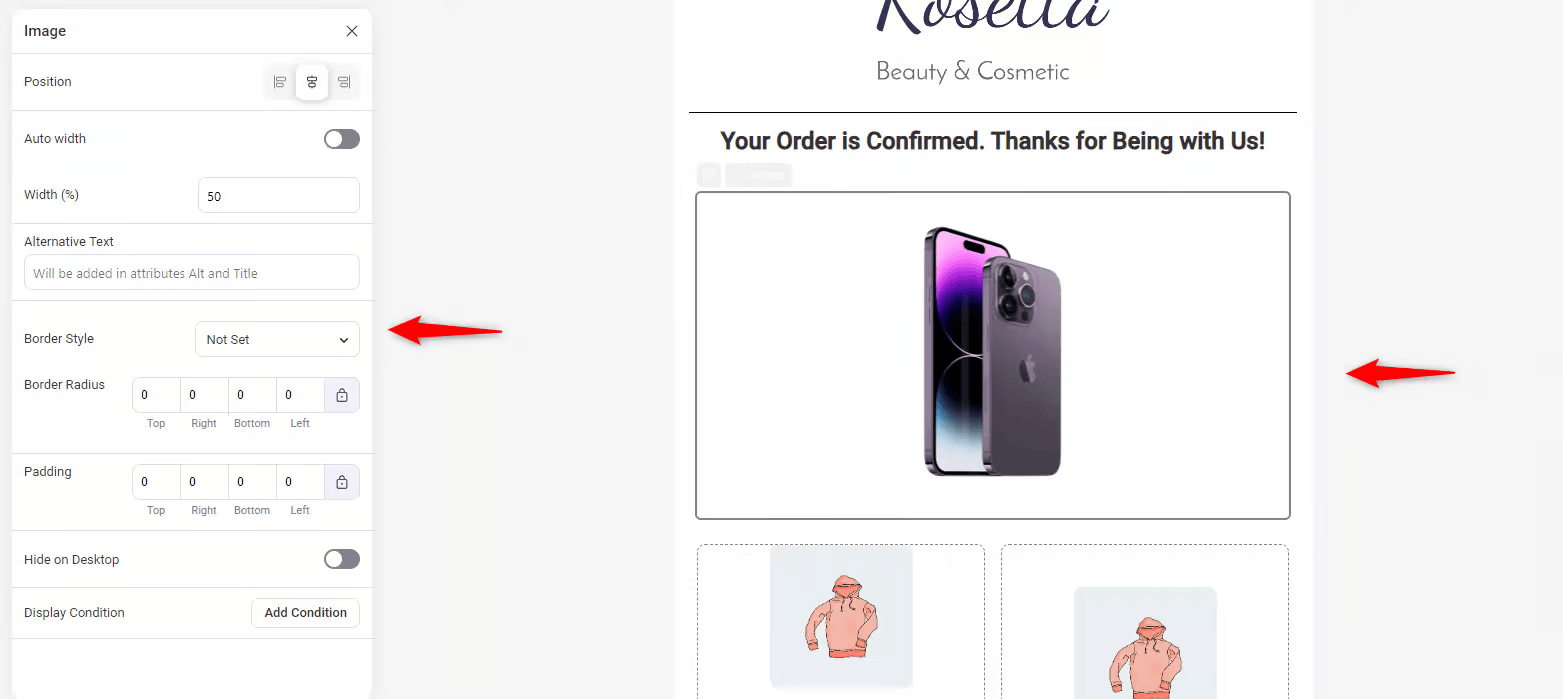
Customize the logo
Click the logo and upload your company or brand logo.
Once done, customize the logo image settings on the left side of the screen.
Adjust the position, auto-width, alt tags, border, padding, etc.
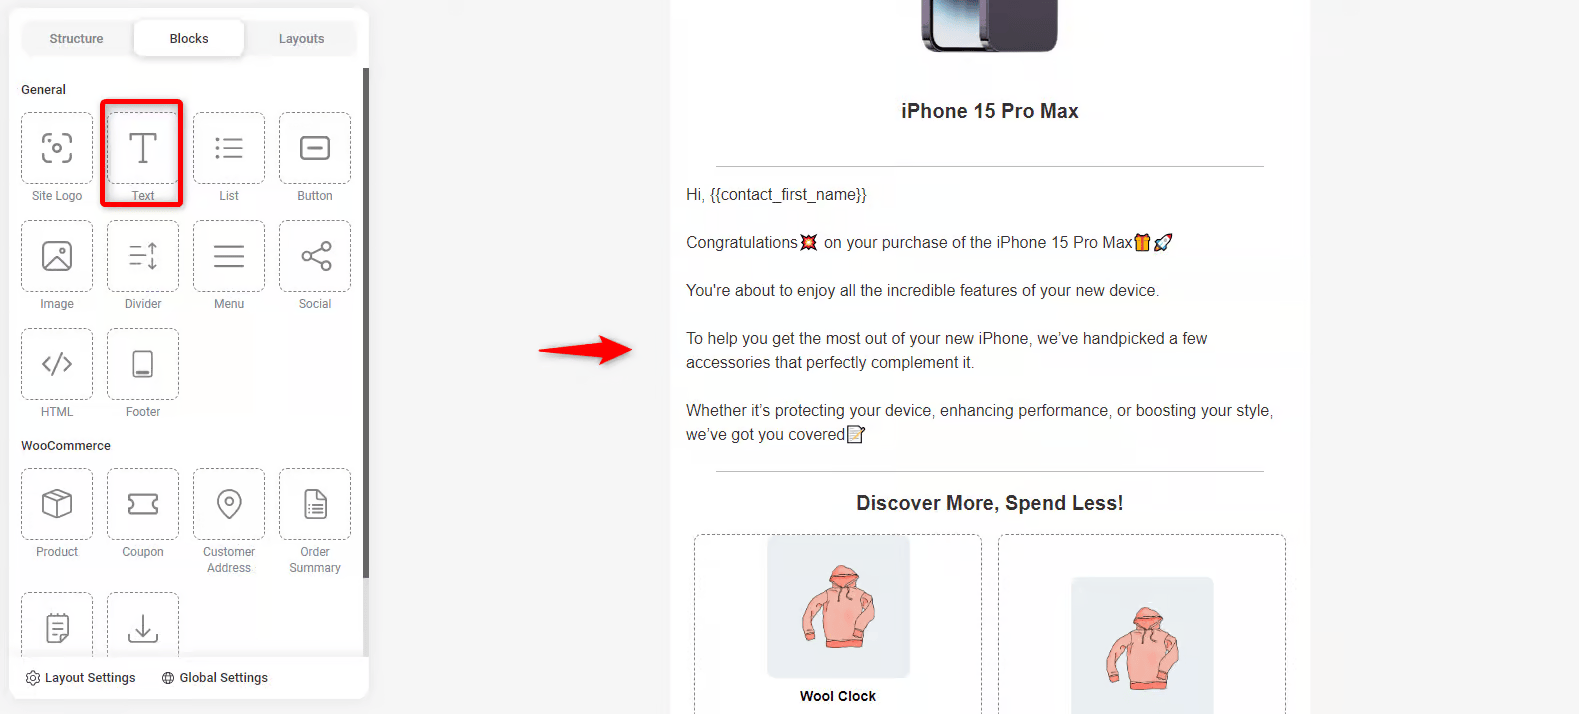
Customize the heading
The current heading may not be suitable for your brand. We’re changing it. Click on it and remove it.
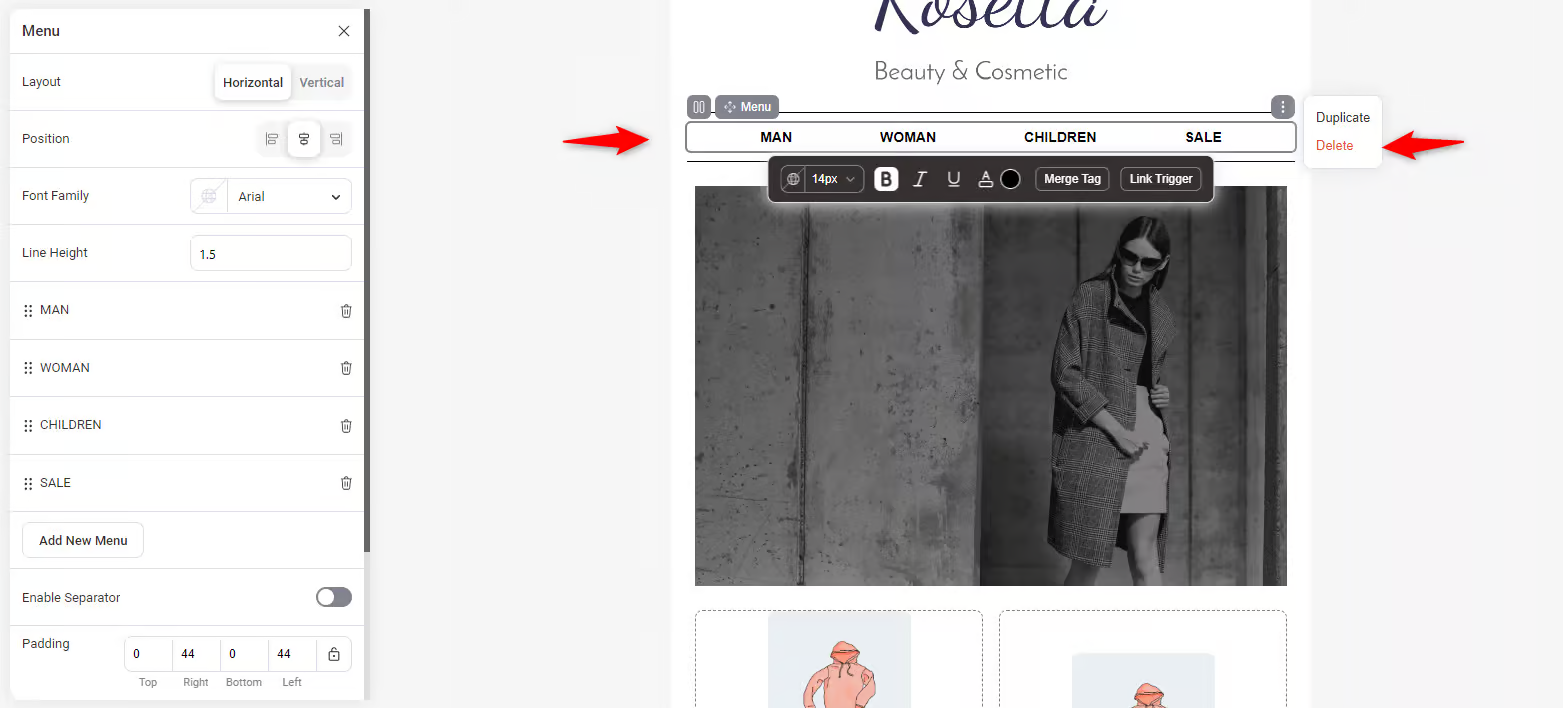
Then, add a text widget by dragging it from left to the right side.
Write your text here or any tagline that you want to use. Then, adjust the settings on the left side.
Customize the header image
We're removing the current image since we’re crafting the cross-selling email for the iPhone 15 Pro Max.
Upload your product’s image and adjust its settings from the left side.
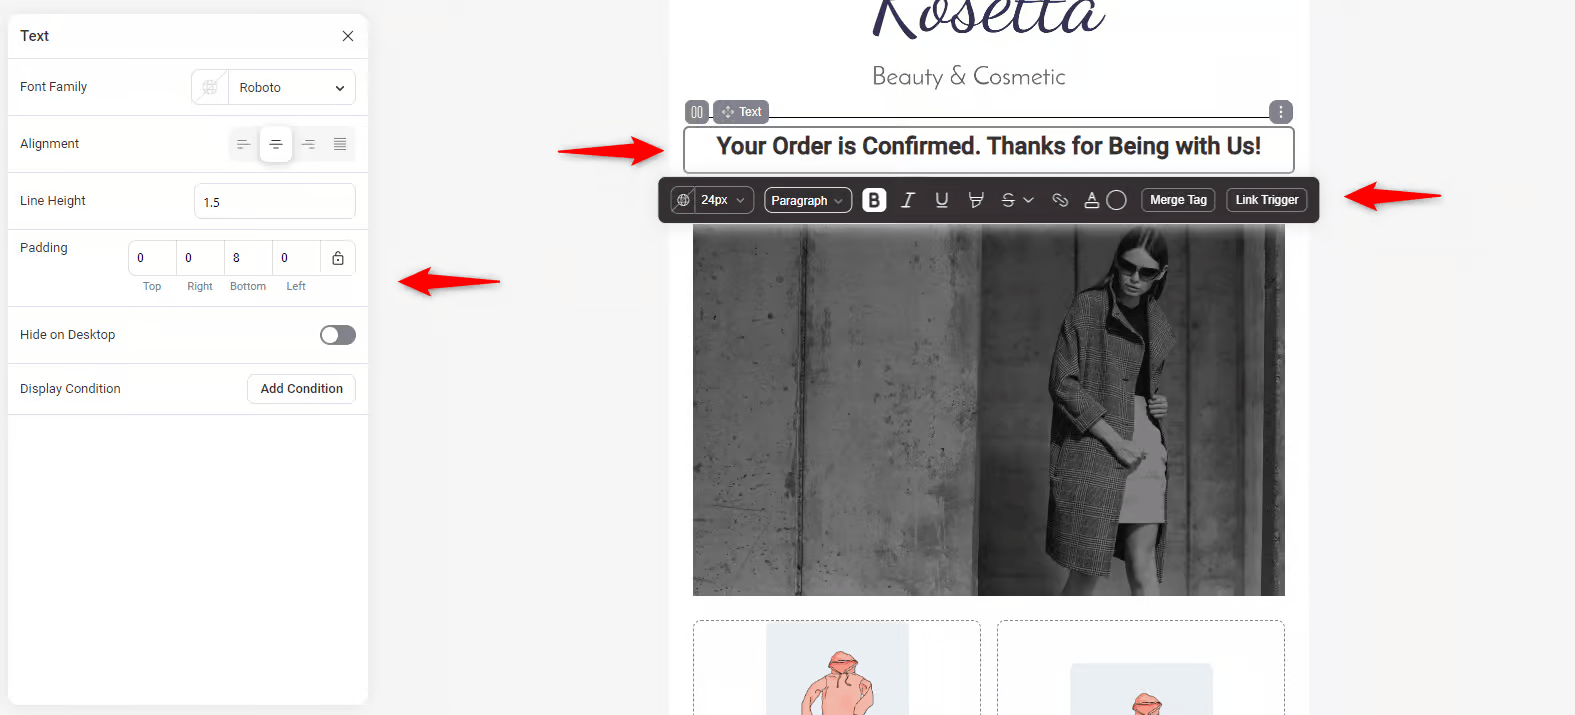
Customize the email body
In the same way, add another text widget and your email content.
Customize the product widget
Then, add the product widget to show cross-sell products.
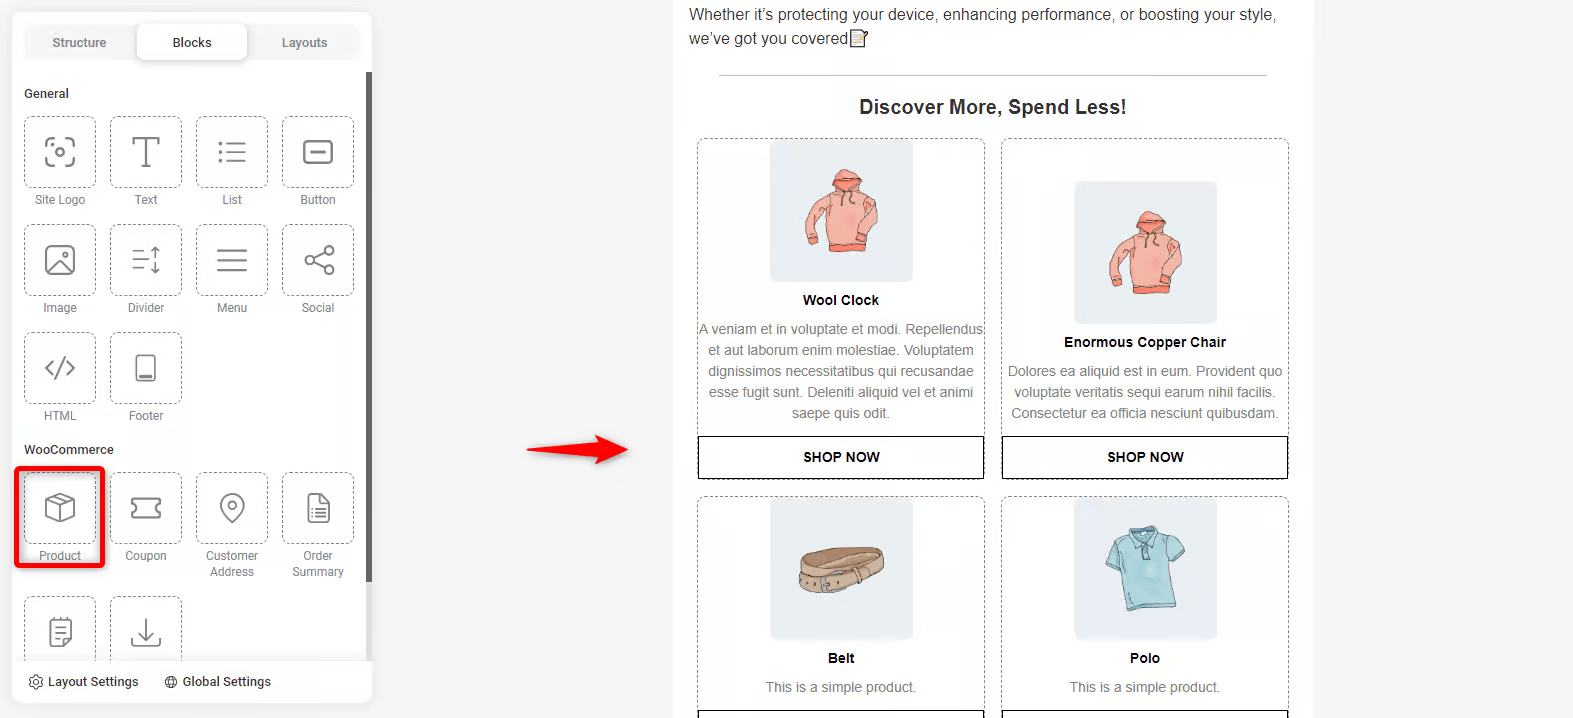
On the left side, choose the product feed. This will help you configure the product feed to display cross-sell recommendations dynamically.
You can even add the products individually.

Customize the CTA button
Next, customize the button and its text.
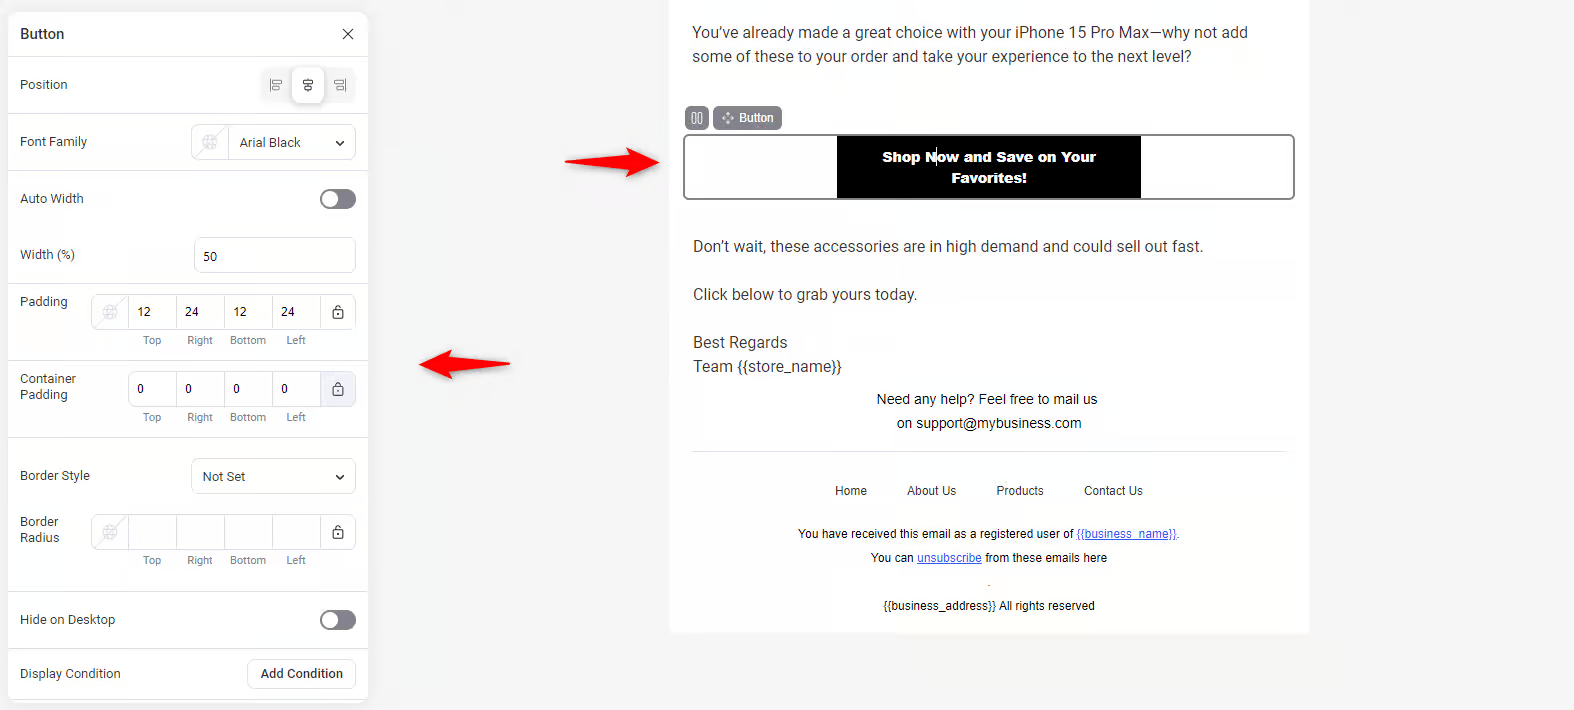
Save it when you’re done editing your WooCommerce cross-sell email.
Step 6: Activate the automation
Before running the campaign, be sure to activate the automation.
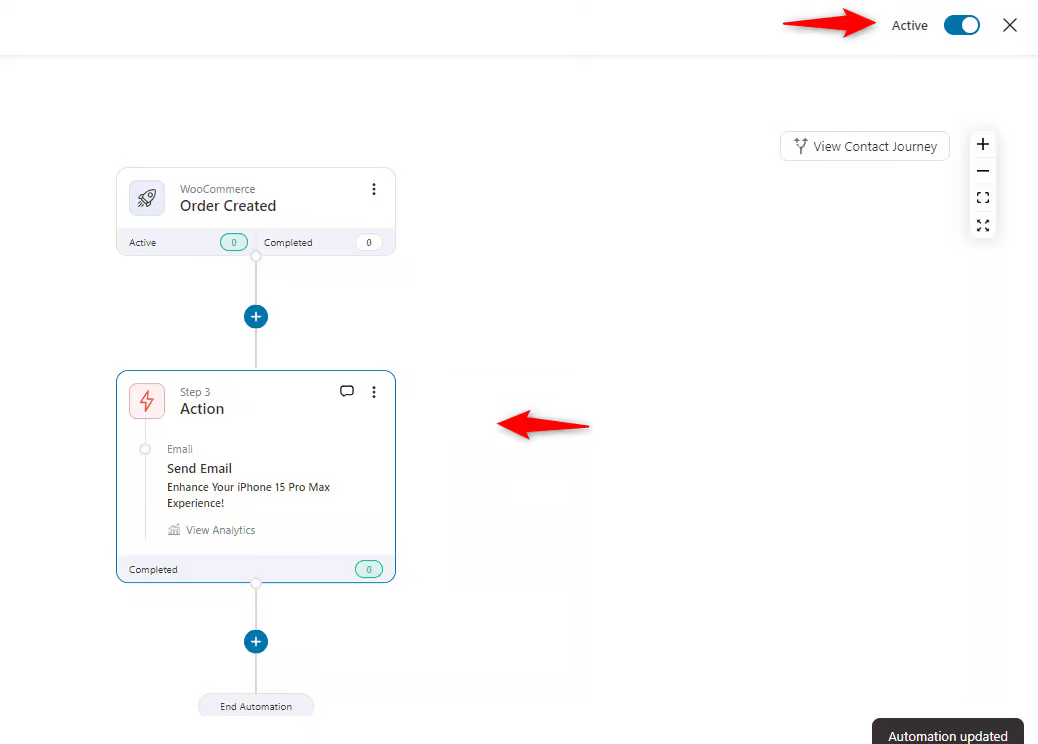
Users will receive this cross-sell email whenever they add the “iPhone 15 Pro Max” to their cart.
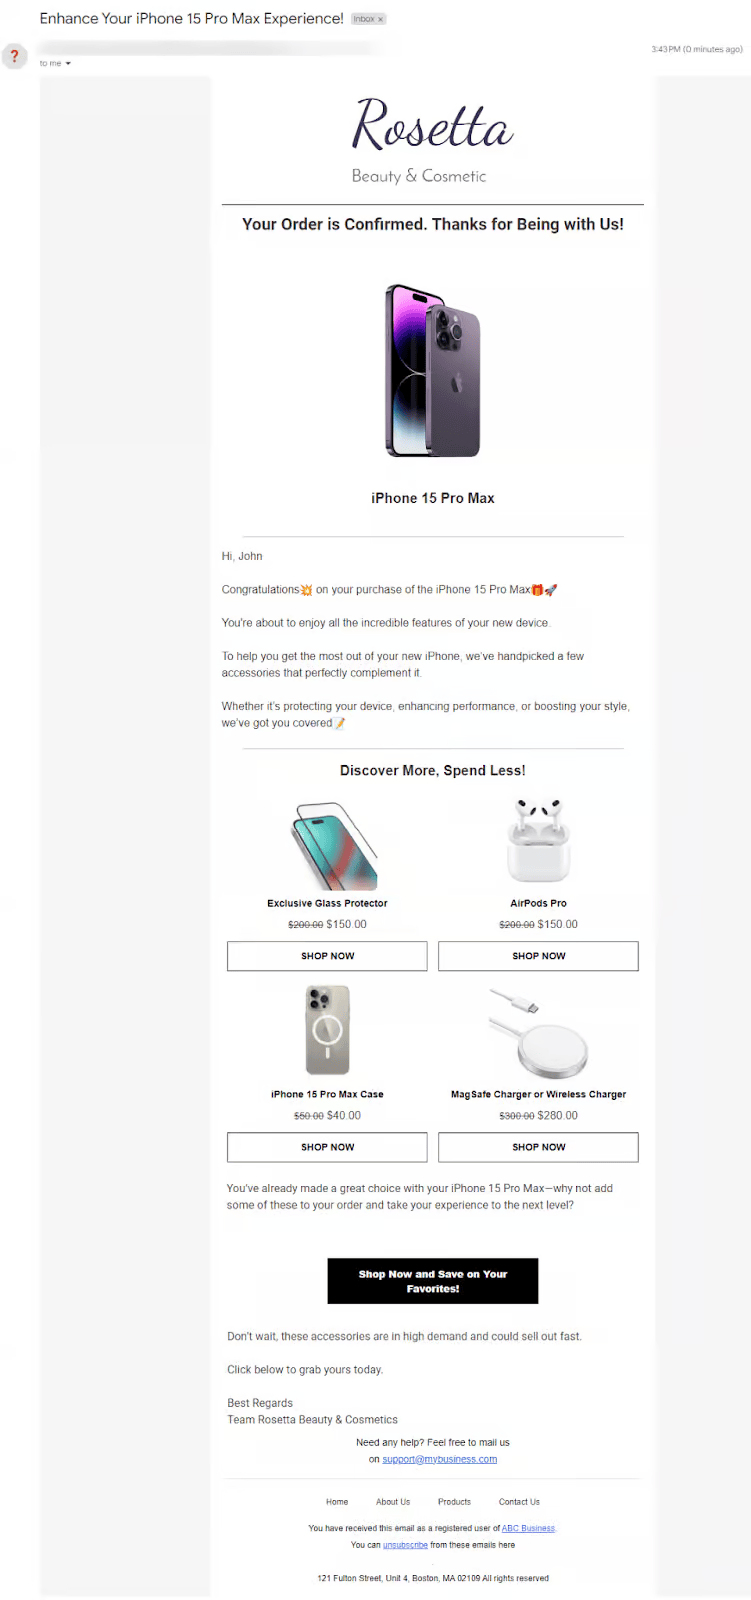
Well done! This is how you show cross-sells to your customers in an email.
How to Display WooCommerce Cross-Sells with Code (Developer Guide)
Native cross-sells are locked to the cart, and the UI gives you no targeting. Code removes both limits. Place PHP snippets in your child theme’s functions.php (or a custom plugin), and test on staging first.
Get cross-sell IDs programmatically
Every product object exposes its linked cross-sells in one line:
$cross_sell_ids = $product->get_cross_sell_ids();To compute the full set of cross-sells for an entire order (multiple products, de-duplicated), loop the order items and merge:
$cross_sells = array();
foreach ( $order->get_items() as $item ) {
    $product = $item->get_product();
    if ( $product ) {
        $cross_sells = array_merge( $cross_sells, $product->get_cross_sell_ids() );
    }
}
$cross_sells = array_unique( $cross_sells );
Display cross-sells on the product page
Cross-sells don’t show on the product page by default. Hook into woocommerce_after_single_product_summary and reuse WooCommerce’s own template so the markup matches your theme:
add_action( 'woocommerce_after_single_product_summary', function() {
    global $product;
    $limit   = 4;
    $columns = 4;

    $cross_sells = array_filter(
        array_map( 'wc_get_product', $product->get_cross_sell_ids() ),
        'wc_products_array_filter_visible'
    );
    if ( empty( $cross_sells ) ) {
        return;
    }

    wc_set_loop_prop( 'name', 'cross-sells' );
    wc_set_loop_prop( 'columns', apply_filters( 'woocommerce_cross_sells_columns', $columns ) );

    $cross_sells = wc_products_array_orderby( $cross_sells, 'rand', 'desc' );
    $limit       = apply_filters( 'woocommerce_cross_sells_total', $limit );
    $cross_sells = $limit > 0 ? array_slice( $cross_sells, 0, $limit ) : $cross_sells;

    wc_get_template( 'cart/cross-sells.php', array(
        'cross_sells'    => $cross_sells,
        'posts_per_page' => $limit,
        'columns'        => $columns,
    ) );
}, 15 );
Output cross-sells with a shortcode
WooCommerce has no dedicated cross-sell shortcode, but you can feed cross-sell IDs into the core [products] shortcode and render them anywhere shortcodes run on a page, a widget, or a block.
Register a small wrapper:
add_shortcode( 'wc_cross_sells', function() {
    global $product;
    if ( ! $product ) {
        return '';
    }
    $ids = $product->get_cross_sell_ids();
    if ( empty( $ids ) ) {
        return '';
    }
    return do_shortcode( '[products ids="' . implode( ',', $ids ) . '" columns="4"]' );
} );
Then drop [wc_cross_sells] where you want the block. (On a generic page with no global $product, pass explicit IDs to [products ids="12,34,56"] instead.)
Show cross-sells by category or cart contents
For conditional recommendations, for example, “if the cart contains anything in Cameras, suggest the accessories category”, query by term and inject. Here's a simplified pattern:
add_action( 'woocommerce_cart_collaterals', function() {
    $suggest = false;
    foreach ( WC()->cart->get_cart() as $item ) {
        if ( has_term( 'cameras', 'product_cat', $item['product_id'] ) ) {
            $suggest = true;
            break;
        }
    }
    if ( $suggest ) {
        echo do_shortcode( '[products category="camera-accessories" limit="4" columns="4"]' );
    }
} );
Swap in your slugs. The same has_term() check extends to tags, and you can branch on customer role with wc_current_user_has_role().
Change columns or override the template
Two filters control the native cross-sell layout without editing templates:
// Number of columns in the cross-sell grid
add_filter( 'woocommerce_cross_sells_columns', fn() => 3 );

// Total number of cross-sells displayed
add_filter( 'woocommerce_cross_sells_total', fn() => 6 );
For deeper changes, copy templates/cart/cross-sells.php from the WooCommerce plugin into your-child-theme/woocommerce/cart/cross-sells.php and edit the copy. Template overrides survive plugin updates; editing core files does not.
WooCommerce Cross-Sells Not Showing? 7 Fixes
A high-intent problem with a short list of usual suspects. Work through these in order:
- No products linked
The most common cause is that the cross-sells field on the product is empty. Add at least one and Update.
- Wrong field
Items in the Upsells field render on the product page, not the cart. Complementary cart items belong in Cross-sells.
- Out of stock
WooCommerce auto-hides linked products that are out of stock. Check inventory on the linked items.
- The theme doesn’t output them
Some themes (and block-based cart templates) omit the cross-sell hook. Test on Storefront to confirm, then add the hook back via code or use the block-editor cart’s cross-sells block.
- A plugin or builder removed the hook
Page builders and cart plugins sometimes strip woocommerce_cart_collaterals. Disable suspects one at a time to find the culprit.
- Caching
If you just edited Linked Products, clear your page cache and any object cache so the change renders.
- Classic vs block cart
The shortcode-based [woocommerce_cart] and the Cart block handle cross-sells differently. On the block cart, make sure the Cross-Sells block is present in the template.
If none of these apply, switch temporarily to a default theme with only WooCommerce active, which is the standard isolation test to rule out conflicts.
5 Best WooCommerce Upsell and Cross Sell Plugins (2026)
When it comes to implementing a winning cross-selling strategy in your WooCommerce store, the right plugin can make all the difference.
Choosing the best plugin for cross-sell products in WooCommerce means selecting one that boosts average order value (AOV), improves user experience, and works reliably across your customer journey.
Here are the key criteria to evaluate:
- Seamless integration with WooCommerce and your theme
- Multiple placement options (product page, cart, checkout, post-purchase)
- Smart recommendations or rule-based logic (e.g., “frequently bought together”)
- Fast performance and mobile-friendly design
- Analytics or tracking to measure uplift and conversions
- Trusted developer, maintenance updates, solid support
Below are the top plugin picks for 2026, each offering standout cross-sell features:
| Plugin | Best for | Key placements |
|---|---|---|
| FunnelKit Funnel Builder | Checkout order bumps + one-click post-purchase offers | Checkout, post-purchase |
| FunnelKit Cart | Slide-in cart with in-cart suggestions | Side cart |
| Product Recommendations | Rules-based, category/cart-condition cross-sells | Product and cart |
| WPC Frequently Bought Together for WooCommerce | Amazon-style FBT bundles on the product page | Product page |
| FunnelKit Automations | Automated cross-sell recommendations in email | Post-order email |
If you want a deeper comparison of these tools, including pricing, pros and cons, and use cases, check out our detailed guide on the best WooCommerce upsell and cross-sell plugins.
9 Tips for Effective WooCommerce Cross-Selling to Your Customers
Here are nine proven tips to make your WooCommerce cross-sell strategy more effective:
1. Offer relevant products and services
Recommend products and services that naturally complement each other.
For instance, if a customer buys a laptop, recommend accessories such as a mouse or an extended warranty.
2. Timing is key
Present cross-sells at the right moment: when items are added to the cart, at checkout, or after the purchase.
Suggest socks or shoe polish as customers are about to purchase a pair of shoes.
3. Use personalization
Tailor the cross-sell recommendations based on the customer’s purchase history or preferences.
For instance, suggest a water bottle, resistance bands, or a gym bag if a customer frequently buys workout gear.
4. Don’t overdo cross-sells
Don’t overwhelm customers with too many options. Focus on 2-3 products that naturally complement their purchase.
Too many choices can lead to decision fatigue and cart abandonment.
5. Pitch smart offers
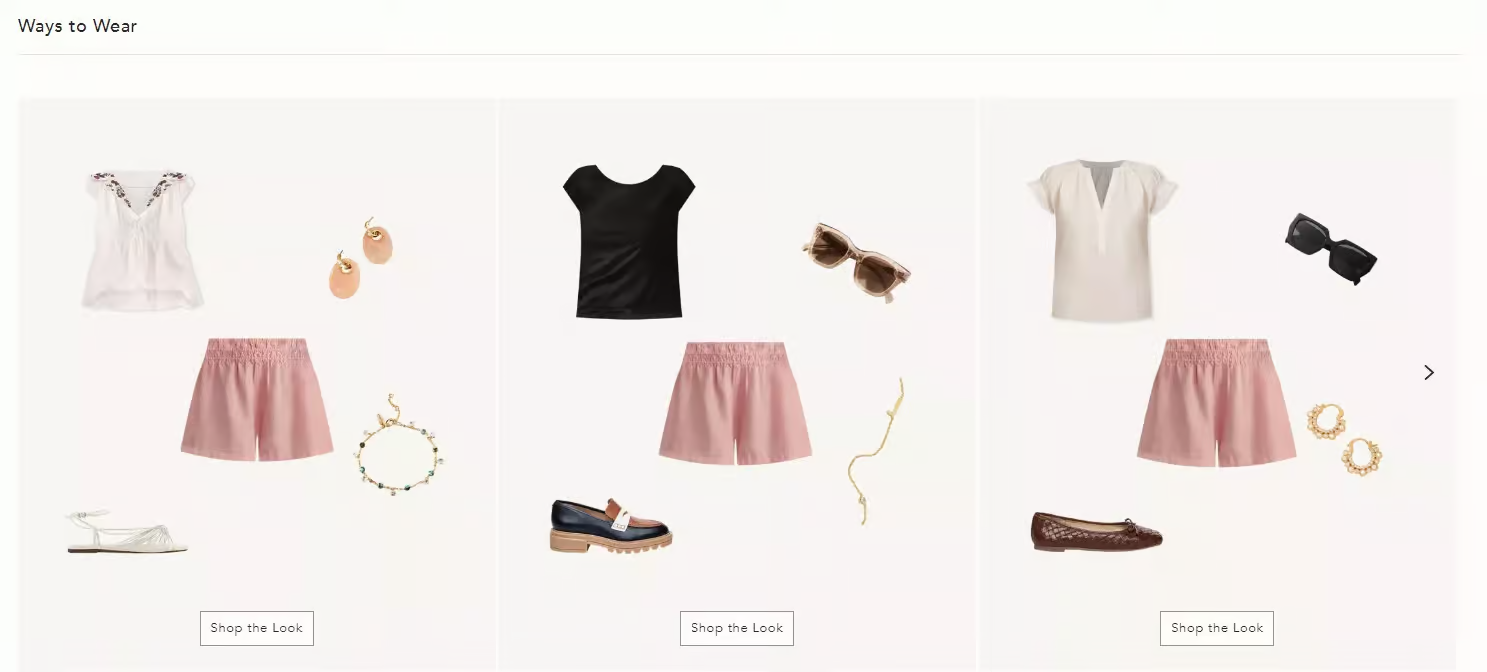
Make cross-sells more attractive by offering discounts or bundling items. Here’s a cross-sell example from brands like Adidas that use this strategy with the “Complete the Look” and “You May Also Like” sections.
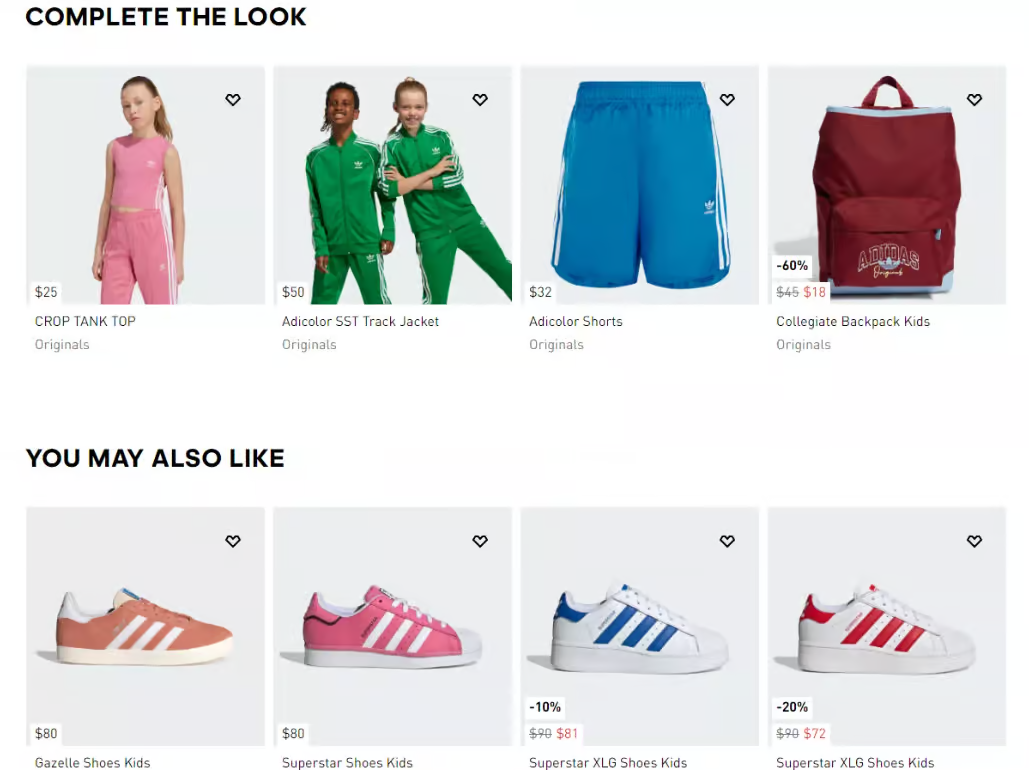
However, be sure to offer small incentives, such as 5% or 10%, on low-cost cross-sell items with high profit margins.
You can also entice customers to add complementary products to qualify for free shipping or to receive free samples and gifts, thereby increasing the overall order value.
6. Test and measure performance
A/B experiment with your cross-sells with products, discounts, and placements to find the most effective strategy.
You can run A/B tests and analyze performance to identify the best-performing variant.
We have found that free shipping often acts as a stronger psychological trigger than a small percentage discount, but you must test this for your specific audience.
7. Showcase product reviews
Highlight excellent reviews and 5-star ratings of related products to build trust and encourage additional purchases.
8. Limited-time offers
Add urgency with countdown timers to push shoppers to act quickly on your WooCommerce cross-sell offers.
9. Email marketing
Retarget existing customers with tailored emails by showcasing compelling cross-sell offers.
You can send dynamic, personalized coupon codes with your recommendations using FunnelKit Automations.
Frequently Asked Questions (FAQs)
While upselling and cross-selling are popular strategies to boost sales, they have distinct goals and approaches. Upselling encourages customers to spend more on an upgraded or premium version of the product they’re already buying. For example, suggesting a luxury leather sofa instead of a fabric one.
Cross-selling focuses on complementary items, like suggesting a pillow set when a customer buys a mattress.
The 25% thumb rule for cross-selling states that the price of the cross-sell product should not exceed 25% of the original product's cost.
Let’s suppose a customer buys a table lamp for $100, then the cross-sell products should ideally be priced at $25 or less.
When the price is low relative to the cart total, the customer’s brain categorizes the add-on as a "micro-transaction" that bypasses the usual resistance to spending.
Yes, cross-selling can be highly profitable if done effectively. It helps increase the average order value and revenue of all eCommerce businesses. McKinsey found that cross-selling has increased their revenue by 20% and profitability by 30%.
Some good examples of cross-selling include chargers, screen guards, phone covers, and headphones when buying a mobile phone.
When buying a yoga mat, cross-sell suggestions like resistance bands, gym bags, or water bottles.
Another can be a sleeping bag, portable stove, flashlight, or waterproof backpack when buying a camping tent.
Cross-selling works because it taps into a few core psychological triggers that guide buyer decisions:
1. The “Completion” effect: Shoppers naturally want a complete experience. When they see related products that make their purchase more useful, such as a camera tripod, they feel more satisfied.
2. Convenience and cognitive ease: Offering complementary items reduces the effort required to search for extras. People love convenience, and they buy more when you make shopping frictionless.
3. Trust and personalization: Relevant recommendations make customers feel understood. When your store suggests products that truly fit their needs, it builds trust and emotional connection.
4. Social proof and perceived value: “Frequently Bought Together” or “Customers Also Purchased” cues signal popularity and social validation. Buyers are more likely to follow these cues, assuming others made smart choices.
Together, these factors turn your WooCommerce store into a personalized experience that feels less like selling and more like helping.
No, cross-sells will not slow down your WooCommerce checkout page. Poorly built cross-sell plugins can slow down your site by running heavy database queries for every product in the cart. This is especially noticeable on the checkout page, where even a small delay can hurt conversions.
To avoid performance issues, use cross-sell solutions that are optimized for speed. Look for plugins that load recommendations via AJAX, rely on caching rather than repeated database queries, and are designed to scale with large product catalogs.
When cross-sells are handled efficiently, they won’t slow down your checkout and you can increase AOV without sacrificing page speed or user experience.
Yes, cross-sells work well on mobile devices but only when they’re designed with mobile users in mind. More than 85% of shoppers browse and buy on mobile, and poorly designed cross-sells can easily hurt conversions rather than help.
Common mistakes include intrusive pop-ups and layouts that push the “Place Order” button too far down the screen.
Follow these best practices for mobile-friendly cross-sells:
- Avoid pop-ups on mobile: They interrupt the flow, feel aggressive, and often get closed immediately.
- Keep cross-sells compact: Use clean, inline blocks instead of large product grids.
- Protect the “Place Order” button: Make sure cross-sells never push it below the fold on checkout.
- Optimize for thumbs: Buttons and images should be easy to tap without zooming.
When cross-sells respect mobile UX, they feel helpful instead of intrusive and they convert far better.
Here’s why cross-sells are worth implementing in your WooCommerce store:
- Increases average order value (AOV): Encourage shoppers to add complementary products, such as a laptop bag or mouse with a laptop.
- Improves the customer experience: Makes shopping easier by suggesting items that complete their purchase, such as mugs or stirrers for coffee.
- Builds customer loyalty: Personalized recommendations show you care, leading to repeat purchases, like socks with running shoes.
- Boosts product visibility: Surfaces products shoppers might otherwise miss, such as a coffee grinder paired with a coffee maker.
- Drives more conversions: Relevant suggestions nudge customers to buy more, such as headphones or chargers for a new phone.
Unlock Your Store's Potential with WooCommerce Cross-Sell Strategy!
WooCommerce gives you a free cross-sell field, but it stops at the cart and the cart is only one of six places where shoppers decide to add more.
The path to higher average order value is matching the right complementary offer to the right moment, native pairings where they’re enough, a plugin for checkout and post-purchase, and code where you need conditional control.
Start with the native setup, decide your method using the comparison table, and add the placements that fit your store.
If checkout and post-purchase offers are where you want the biggest lift, FunnelKit handles side cart, order bumps, one-click post-purchase, and email recommendations offers natively.
Start leveraging cross-selling today and turn your store into a revenue-boosting machine.
So, are you ready to unlock your store’s potential? Try FunnelKit now!
Editorial Team
July 1, 2026Are you leaving money on the table by not fully leveraging your customers’ shopping behavior? Many store owners don’t realize that every time a customer adds a product to the...
Editorial Team
July 1, 2026WooCommerce buy now pay later lets your customers split a purchase into smaller payments while you still get paid in full upfront. To offer buy now pay later, you connect...
Editorial Team
July 1, 2026Finding a WordPress sales funnel builder that actually works is harder than it looks. Most plugins on the market do one or two things well and quietly skip the rest....


