
Forcing buyers to retype their credit card numbers is killing your conversion rate. A WooCommerce one click checkout fixes this. It strips out the forms.
Baymard Institute's analysis of 50 studies puts the average cart abandonment rate at 70.22% in 2026, with 18% of those shoppers walking away because the checkout process is too long or complicated.
Out of the box, WooCommerce checkouts are clunky.
It forces customers through a cart page, a multi-field checkout form, and a separate payment confirmation, creating more friction than most buyers are willing to tolerate.
You need a bypass. One button. Tap, and the order processes.
A one click checkout solves this by collapsing the entire purchase flow into a single action. Customer clicks 'Buy Now', and the order is placed.
In this guide, you'll learn exactly what one click checkout is, which plugins make it possible in WooCommerce, how to set it up step by step, and how to make the most of it for physical products, digital goods, and subscriptions alike.
Short on time? Watch this video instead 👇
Table of Contents
- 1 What is WooCommerce One Click Checkout?
- 2 How to Add WooCommerce One-Click Checkout to Your Store?
- 3 How to Create a One-Click Purchase at WooCommerce Checkout Page for Free?
- 4 Best WooCommerce One-Click Checkout Plugins
- 5 6 Best Practices to Maximize Conversions With One Click Checkout
- 6 Frequently Asked Questions About WooCommerce One Click Checkout
- 7 Start Converting More Customers With WooCommerce One Click Checkout!
What is WooCommerce One Click Checkout?
The WooCommerce one-click checkout is a feature that allows customers to complete their orders with a single click, eliminating the need to visit the default cart page, fill out a checkout form, or manually enter payment details.
This streamlined process simplifies and expedites the purchasing experience for users.
You can offer one-click checkout in WooCommerce by offering express payment options such as:
- Apple Pay
- Google Pay
- PayPal Express
- Amazon Pay, and many more.
See the one-click checkout process in the GIF below.
All you need to do is click "Buy with Apple Pay", and you can pay with Face ID.
Why Use WooCommerce One Click Checkout Instead of a Traditional Checkout Page?
Traditional checkouts leak money. Here is why adding an express option changes the math:
- Improved user experience: WooCommerce's one-click checkout simplifies the purchasing process for your shoppers. This seamless and user-friendly experience can lead to higher customer satisfaction.
- Faster and more conversions: With one-click checkout, customers can skip the cart page and complete their orders quickly, increasing the likelihood of immediate conversions. In fact, one-click checkout can increase store conversions by up to 10.7%.
- Convenience for returning customers: It's especially convenient for those who have already provided their payment and shipping information. They can reorder with minimal effort, fostering customer loyalty.
- Mobile-friendly shopping: One-click checkout is well-suited for mobile users, where space is quite limited, and data entry can be cumbersome. This can lead to higher mobile conversion rates.
- Reduced cart abandonment: Complicated checkout processes can dissuade customers. On the other hand, one-click checkout simplifies the experience, leading to higher completion rates and reduced cart abandonment.
- Repeat customers: As customers know that buying from your online store is just a one-click job, they are more likely to come back and make repeat purchases.
In short, WooCommerce one-click checkout improves the shopping experience by making it faster and more convenient.
How to Add WooCommerce One-Click Checkout to Your Store?
This method provides a one-click checkout option within the shopping cart, right when shoppers are adding items.
For this, we will use FunnelKit Cart. This plugin allows you to add a one-click express checkout option to your mini cart through Google Pay and Apple Pay.
The express one-click checkout option is available in the free version of FunnelKit Cart.
Make sure to install and activate this plugin.
Now, follow these steps to add a one-click express checkout to your WooCommerce mini cart.
Step 1: Enable the Sliding Cart in your WooCommerce store
Now, it’s time to enable the mini cart option.
For that, go to FunnelKit ⇒ Cart and turn on the 'Enable Cart' toggle button, and click on the save button.
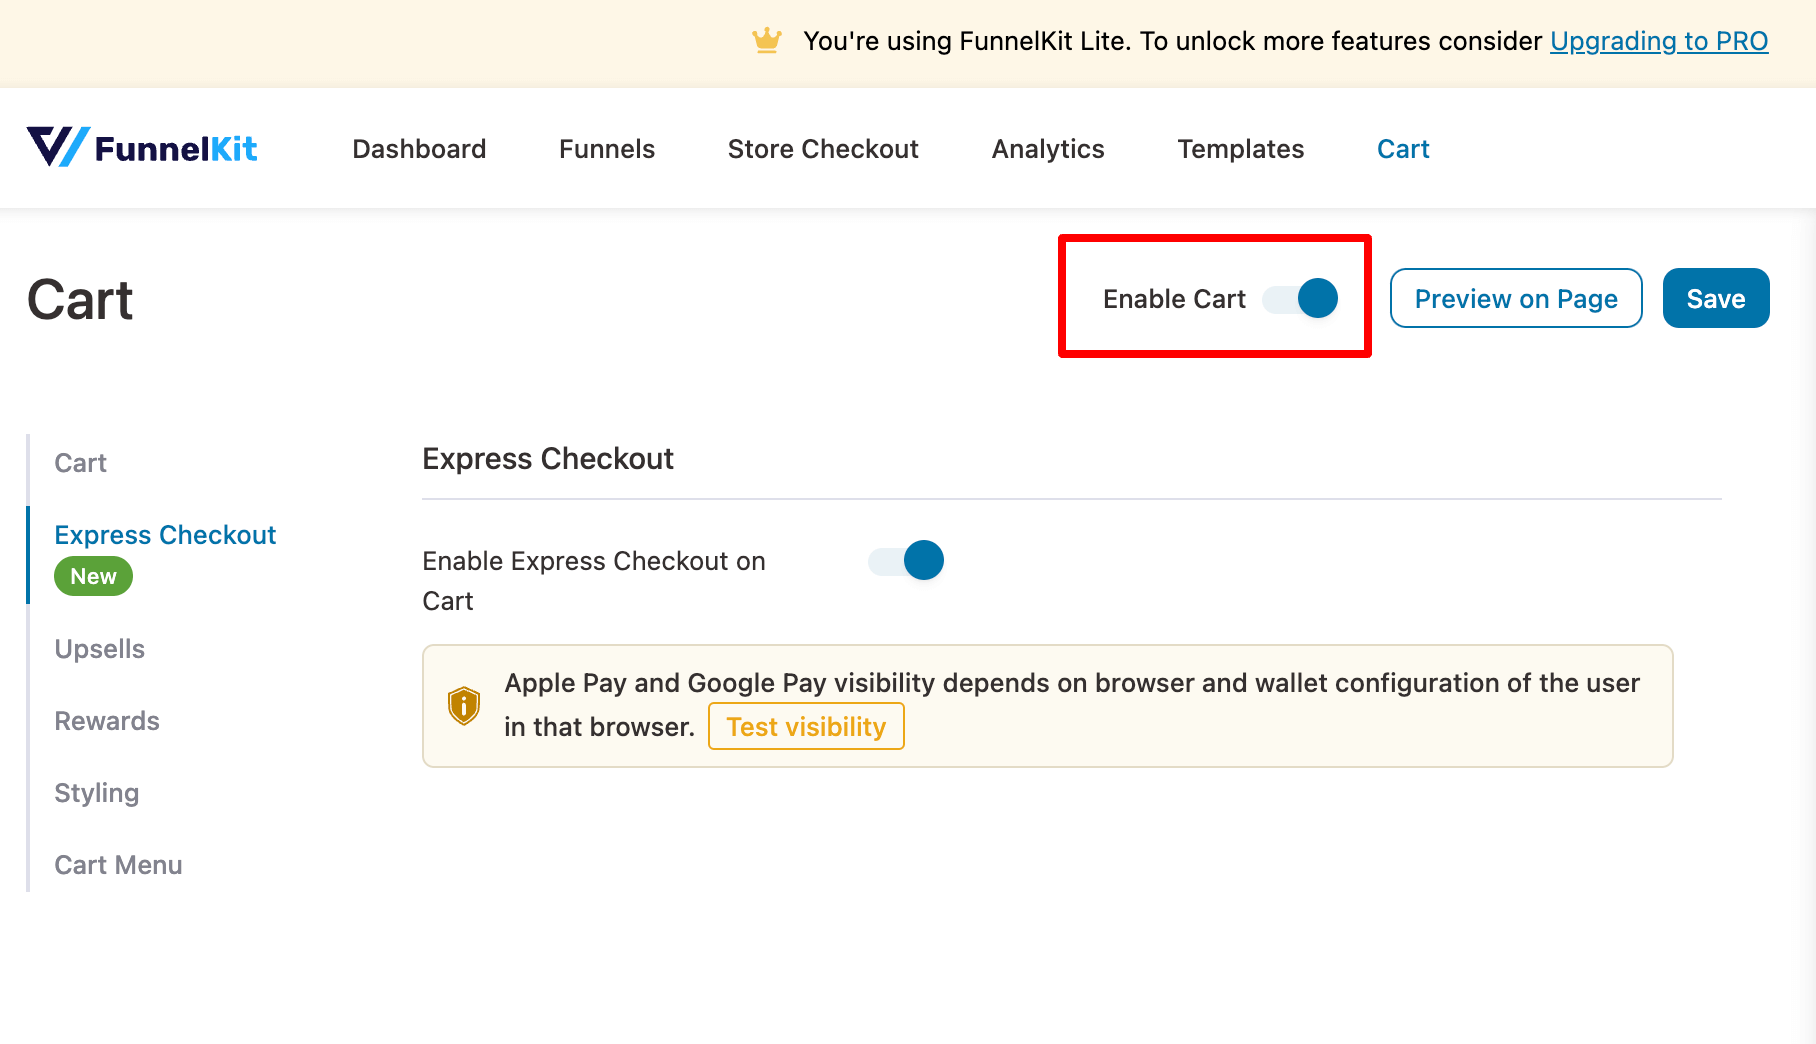
This will activate the WooCommerce side cart in your store.
Feel free to configure your WooCommerce sliding cart, add upsells and cross-sells, and set up smart rewards for your shoppers.
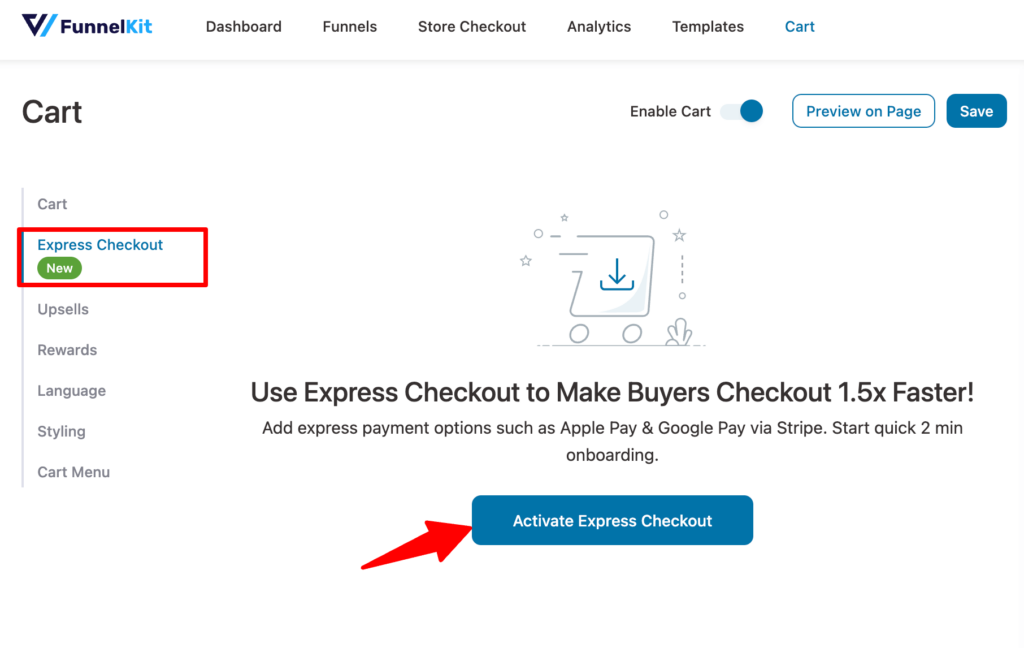
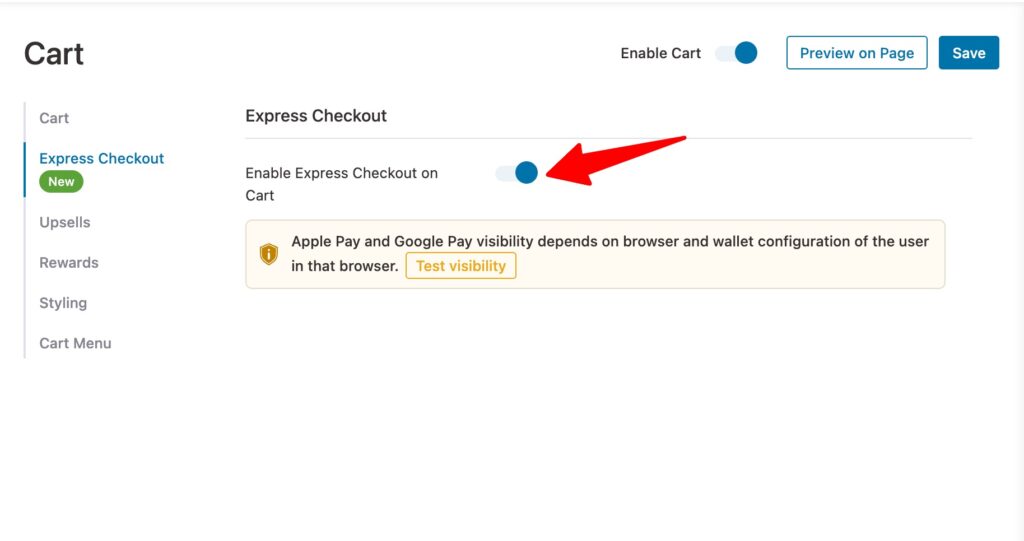
Step 2: Activate the express checkout option
Now, move to the Express Checkout tab and click on “Activate Express Checkout”.
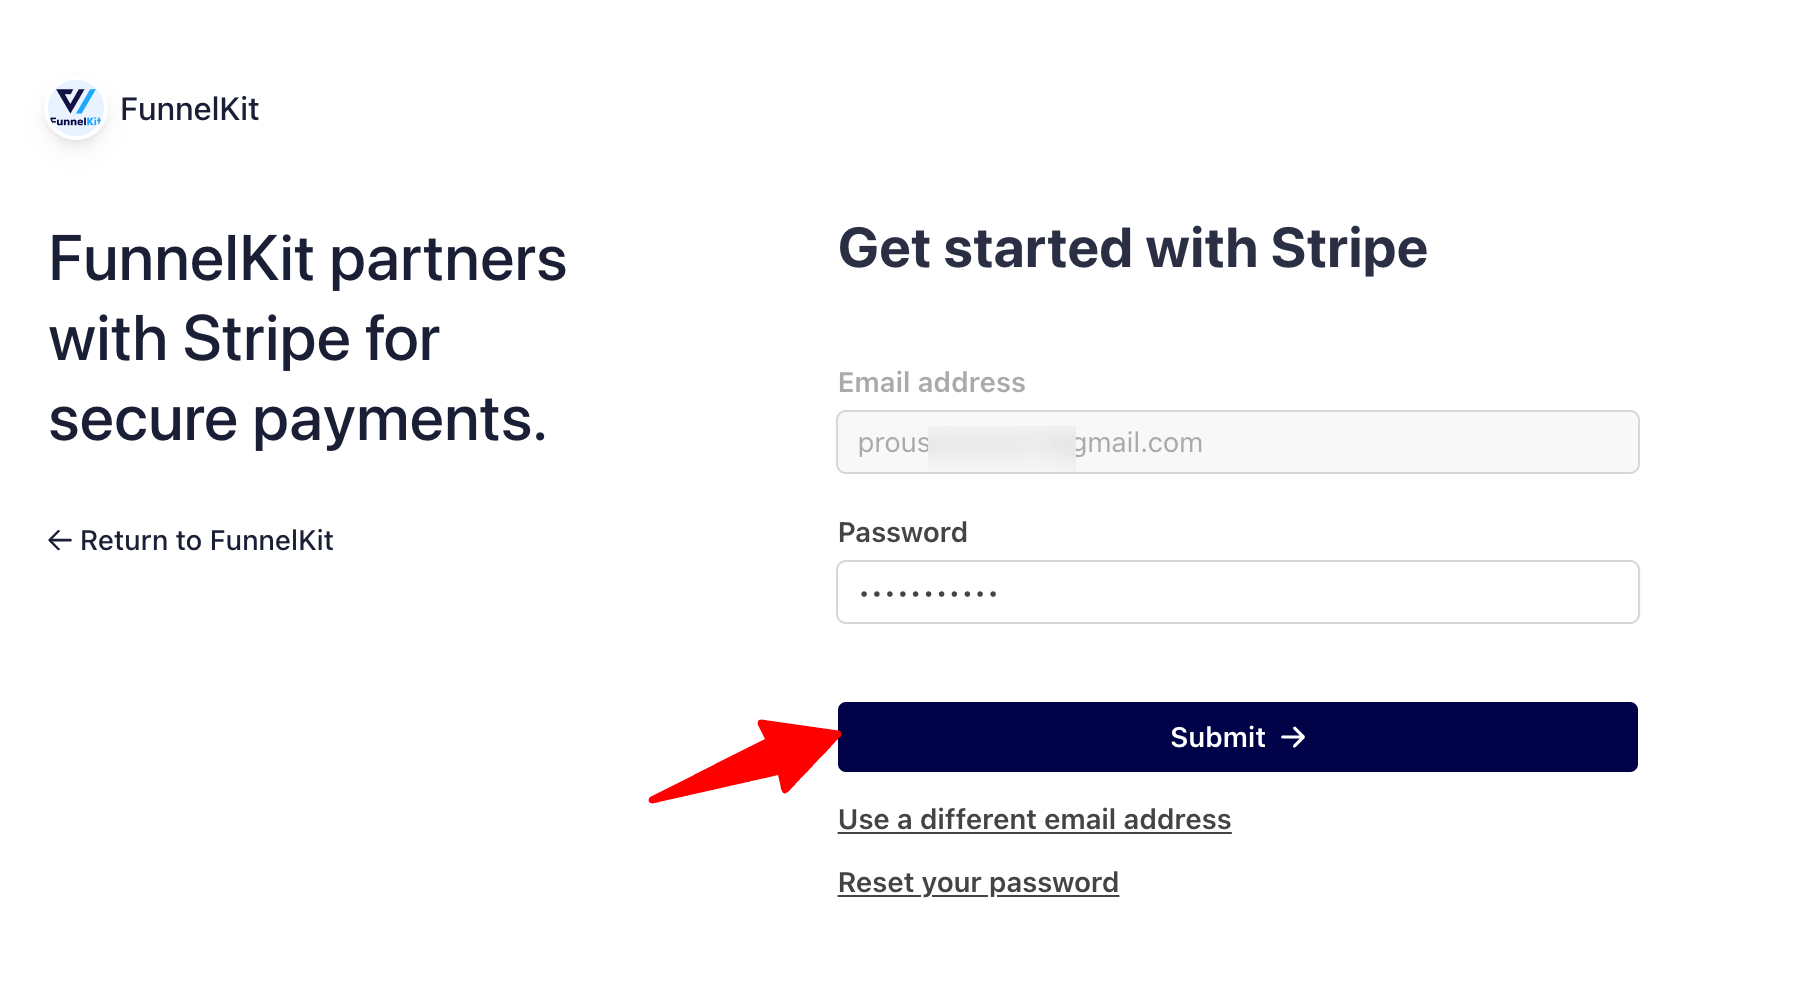
After that, you will be prompted to connect the FunnelKit Cart to your Stripe account. To do so, click on “Connect with Stripe”.

Provide your email address and password to log in.
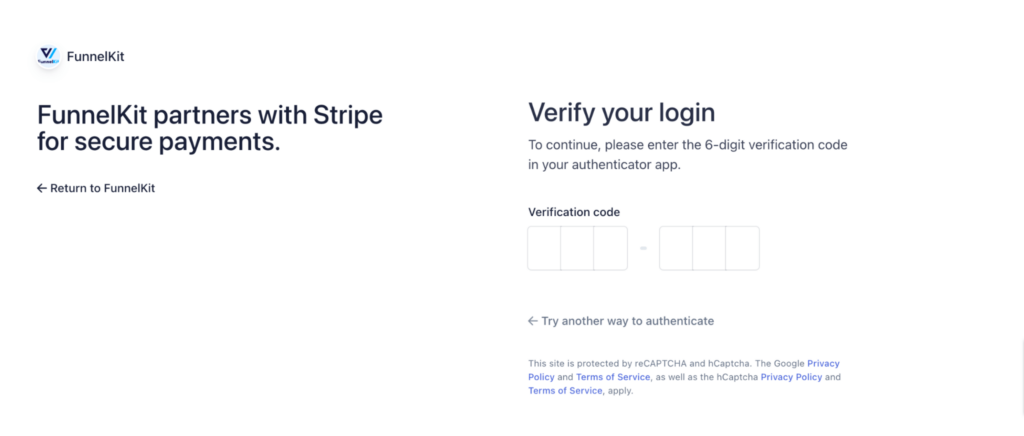
Then, provide the verification code.
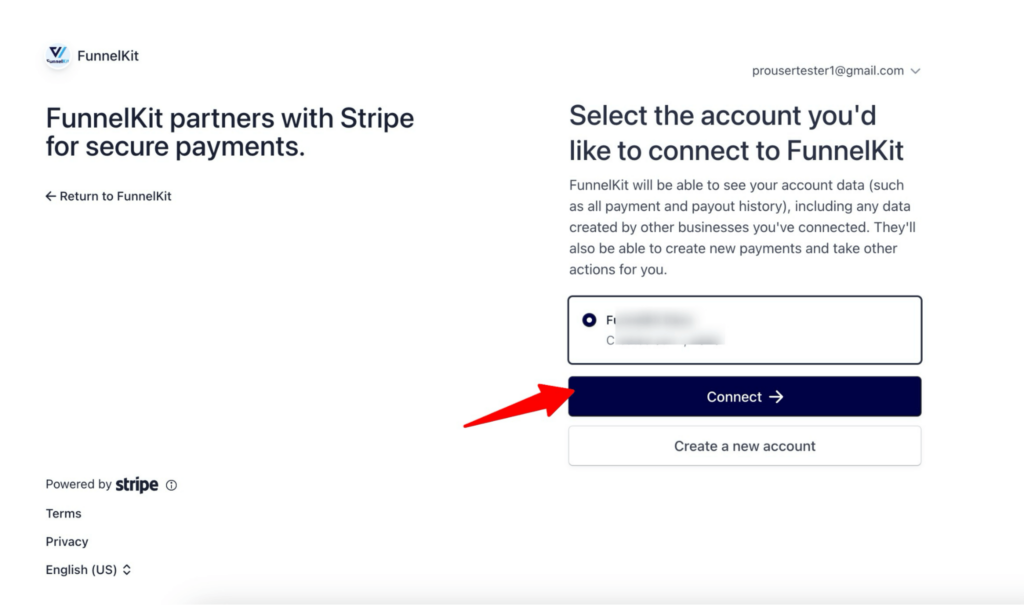
Now click on Connect to connect with the Stripe account.
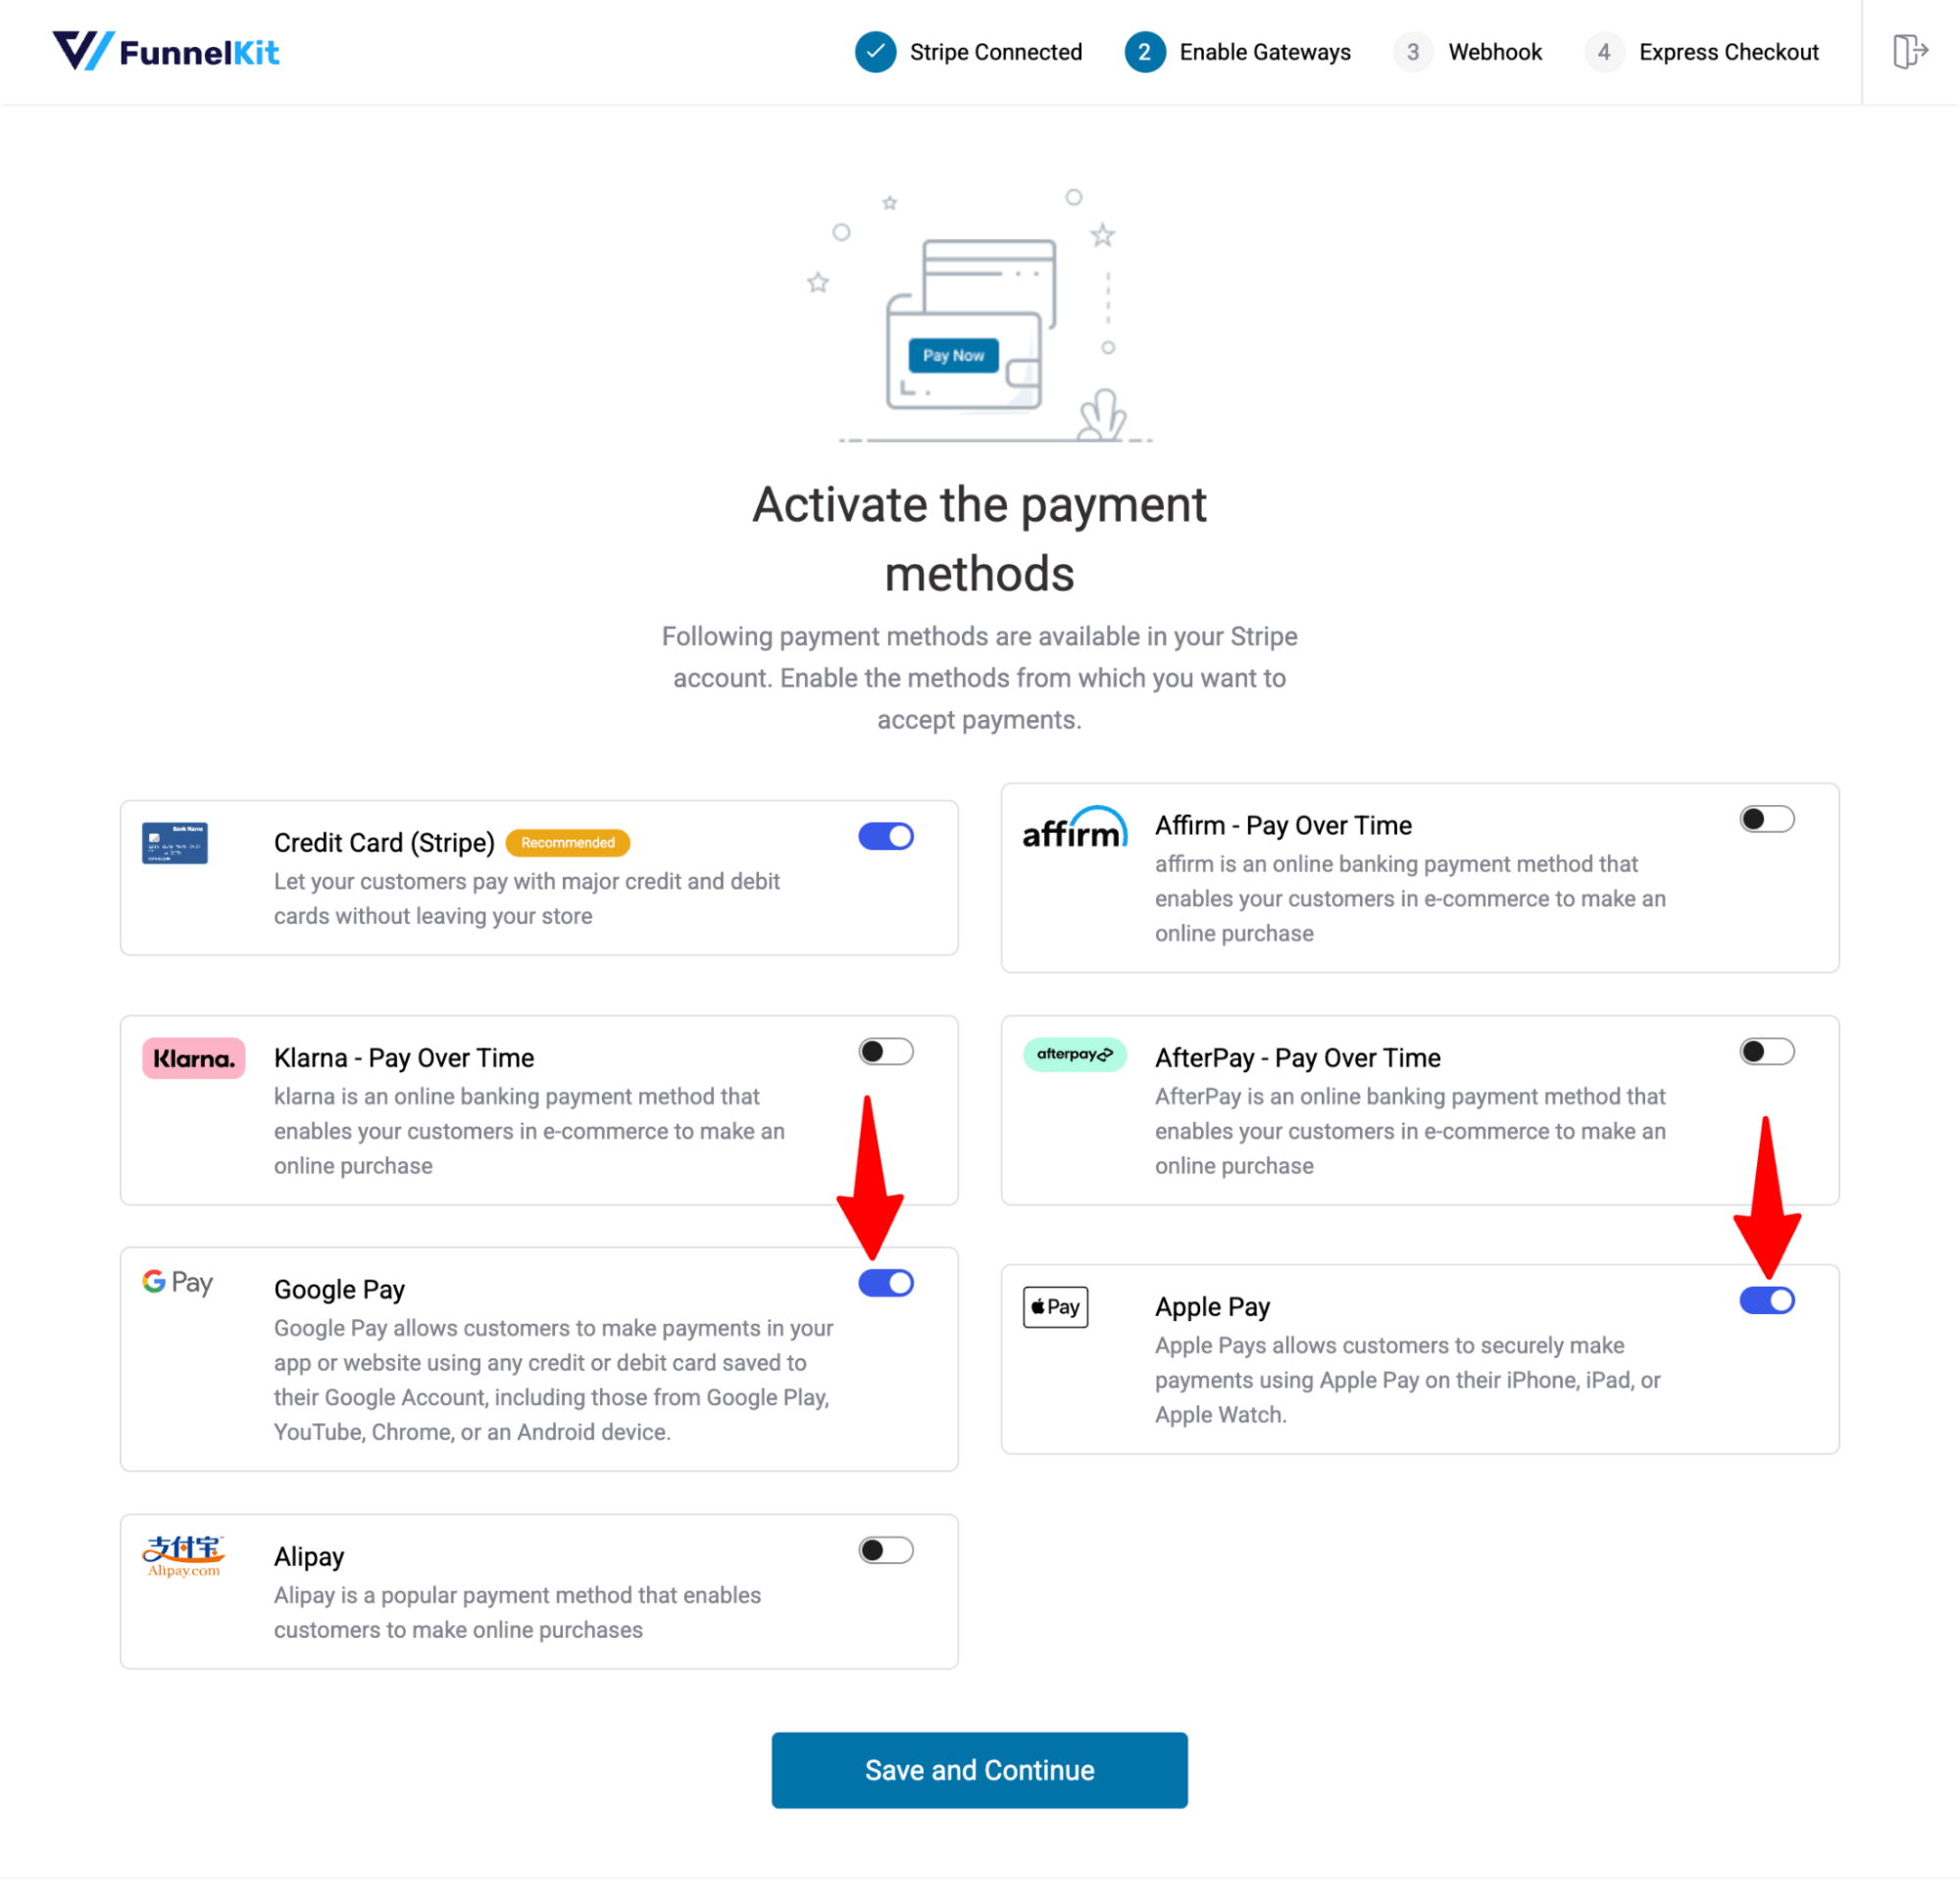
Then, enable Google Pay and Apple Pay along with other preferred options. Next, click on Save and Continue.
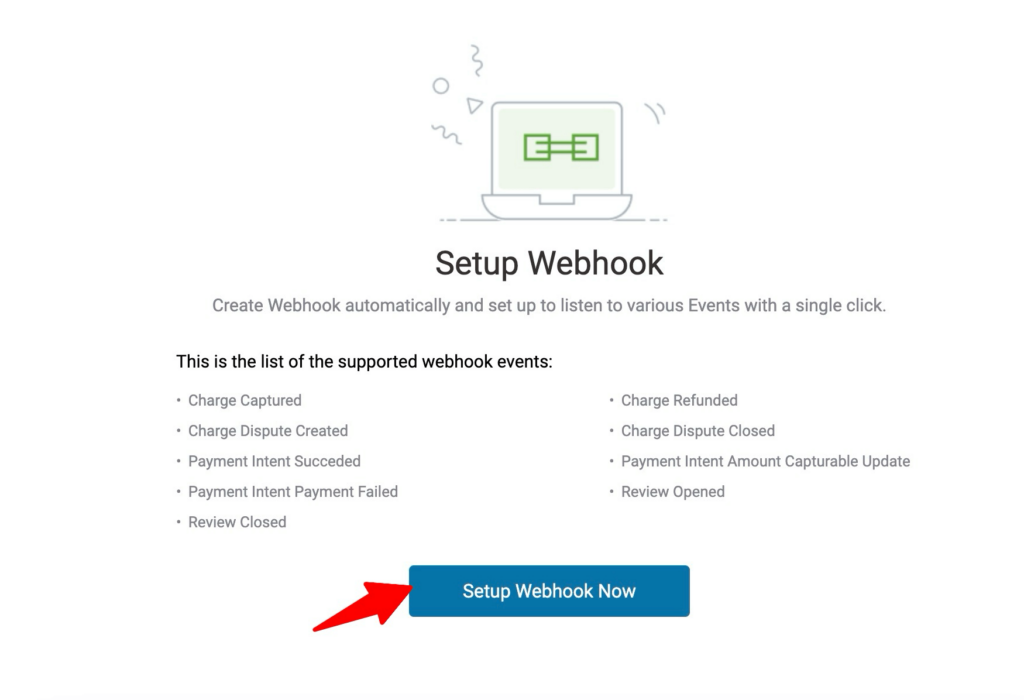
You need to set up the Webhook for that. Click on the 'Setup Webhook Now' button. It will automatically set up a webhook.
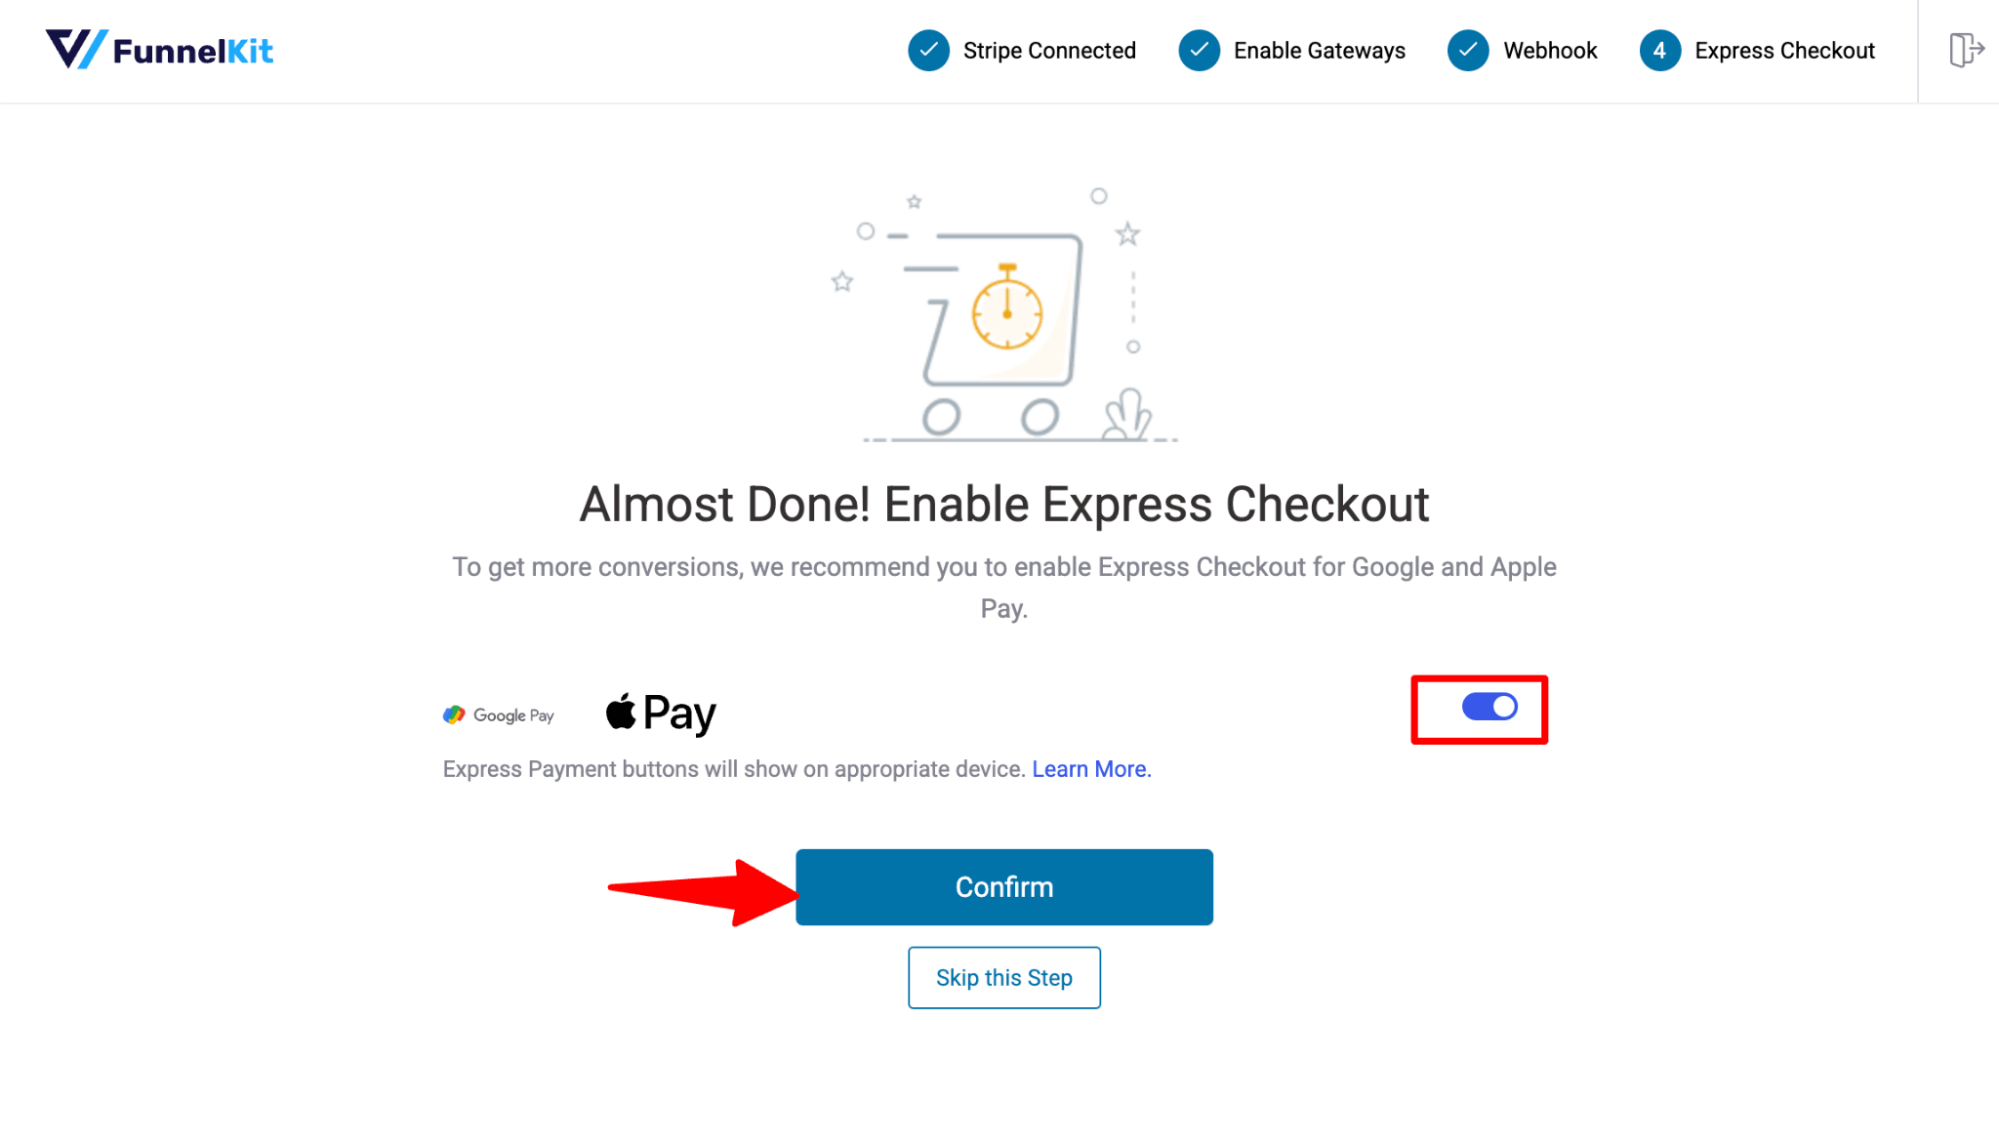
Now, turn on Google Pay and Apple Pay, and click on Confirm.
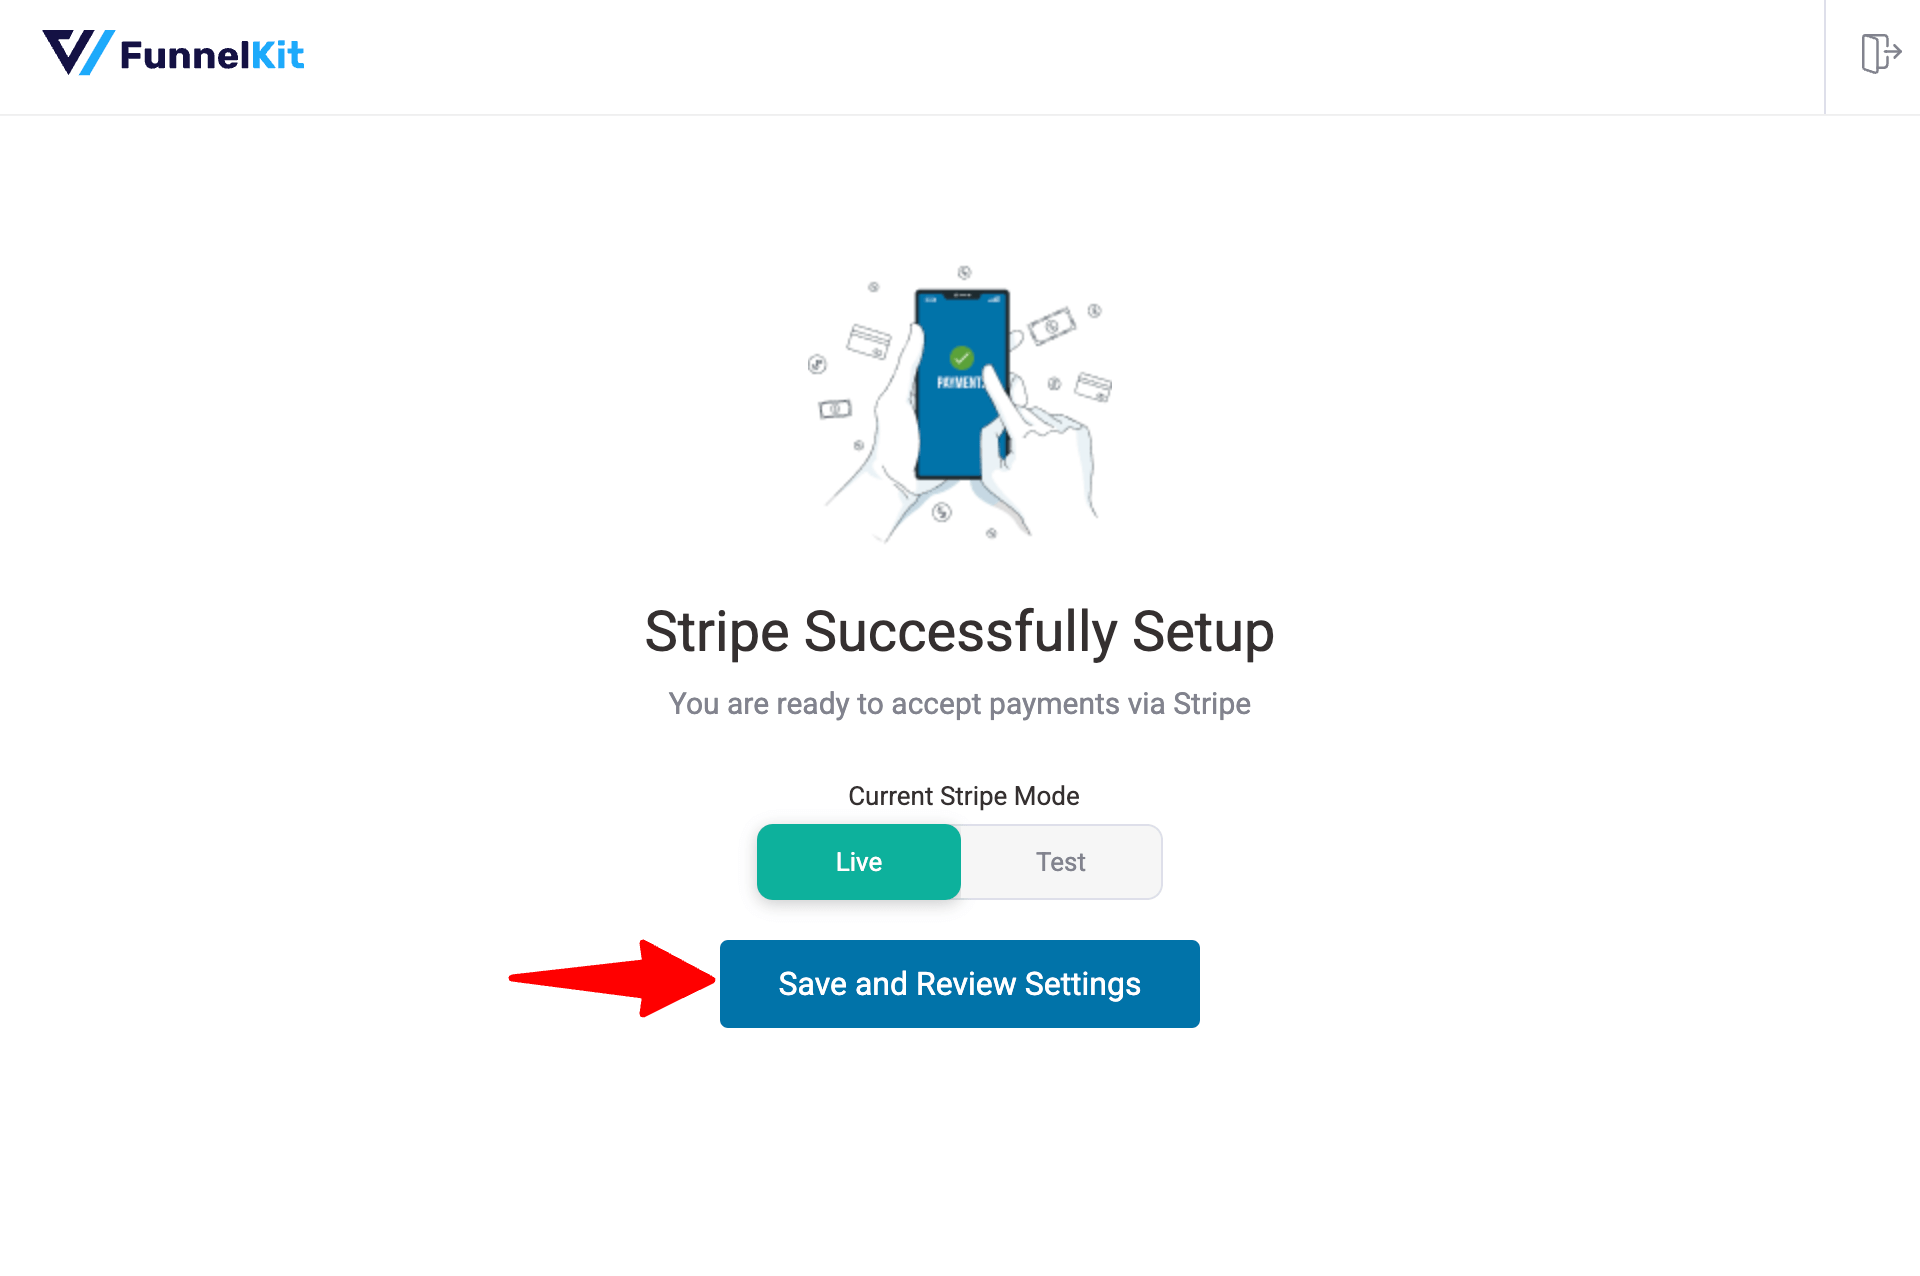
Finally, choose the mode, then click 'Save and Review Settings' to update the settings.
Again, return to the Express Checkout option in FunnelKit Cart and turn on 'Enable Express Checkout on Cart'.
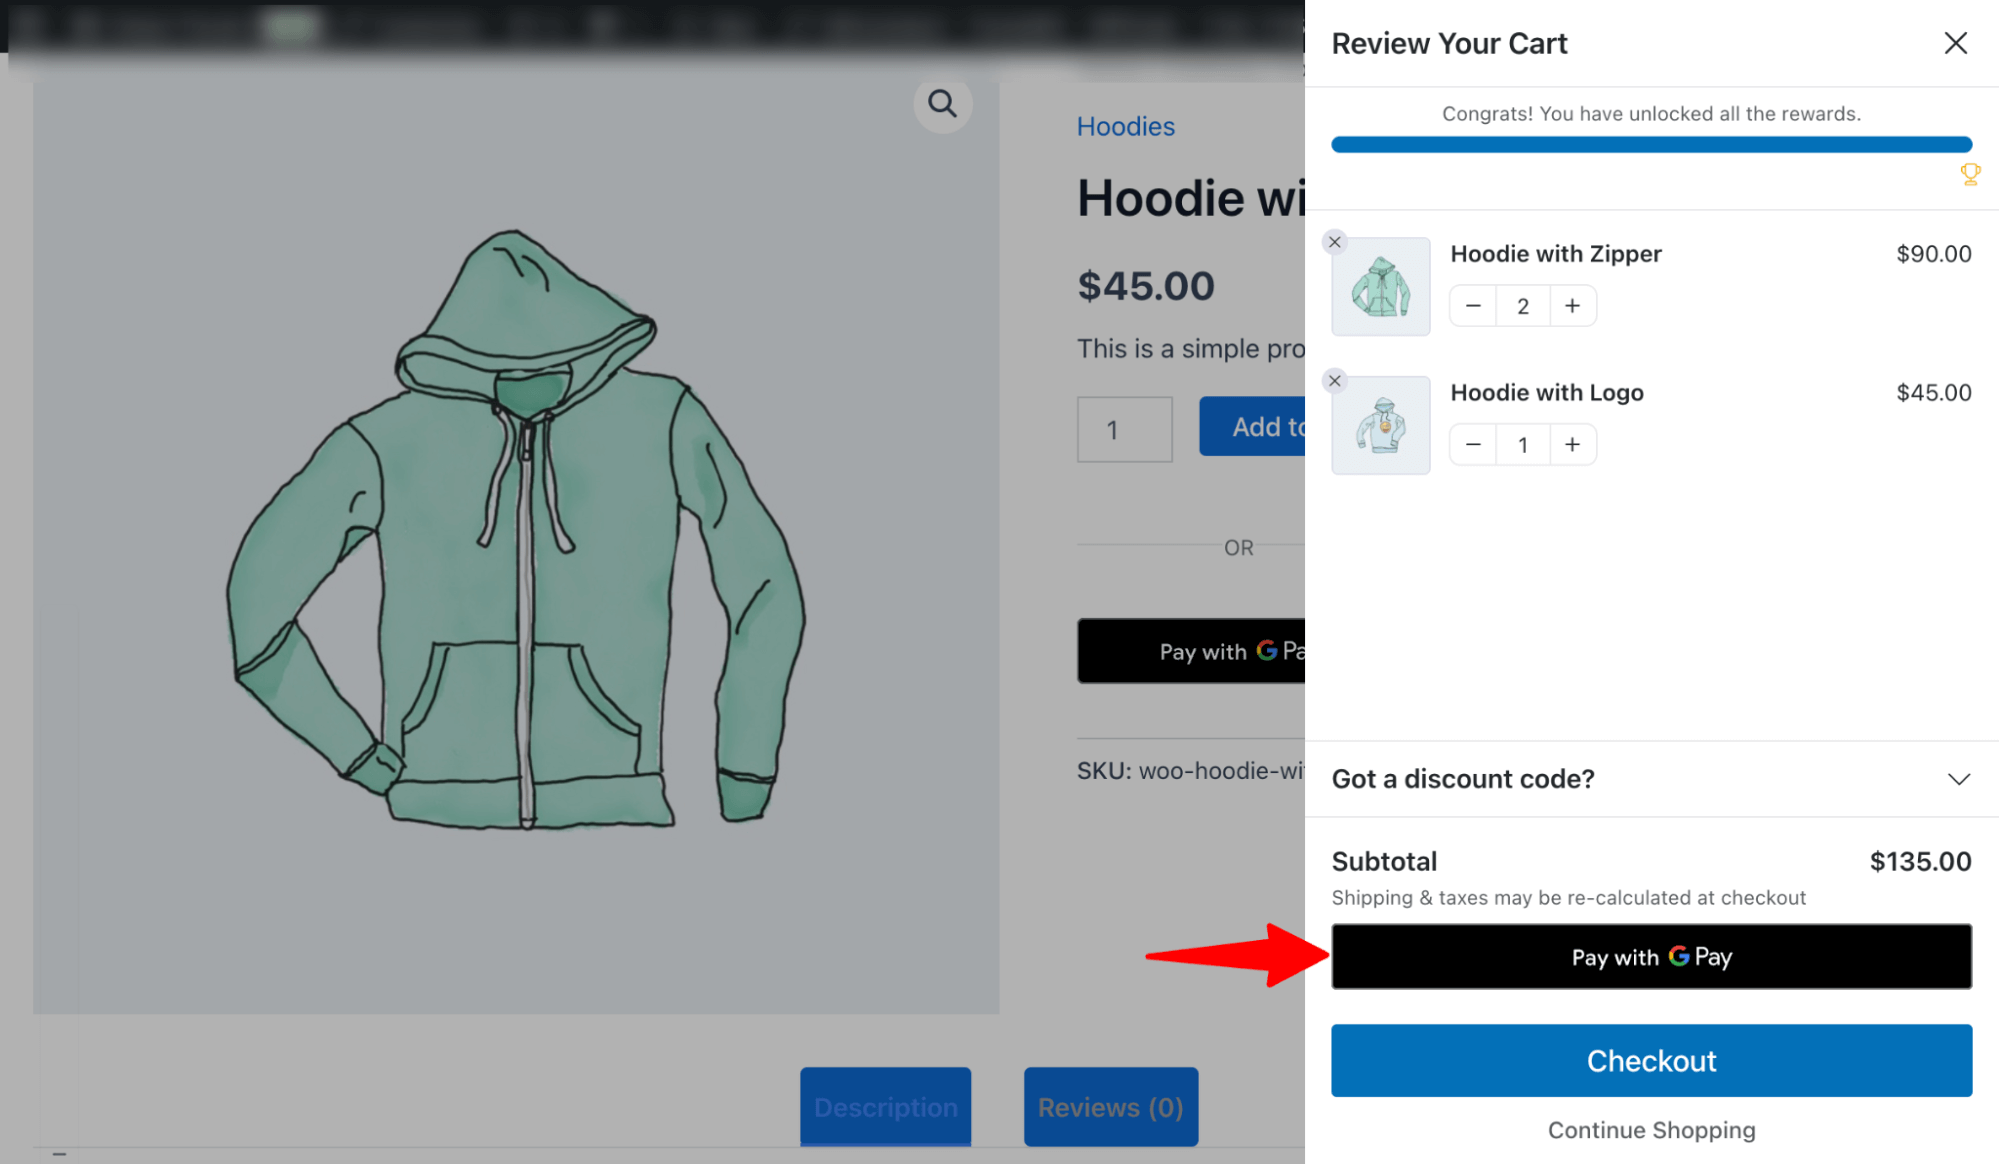
Step 3: Test one-click WooCommerce checkout on the mini cart
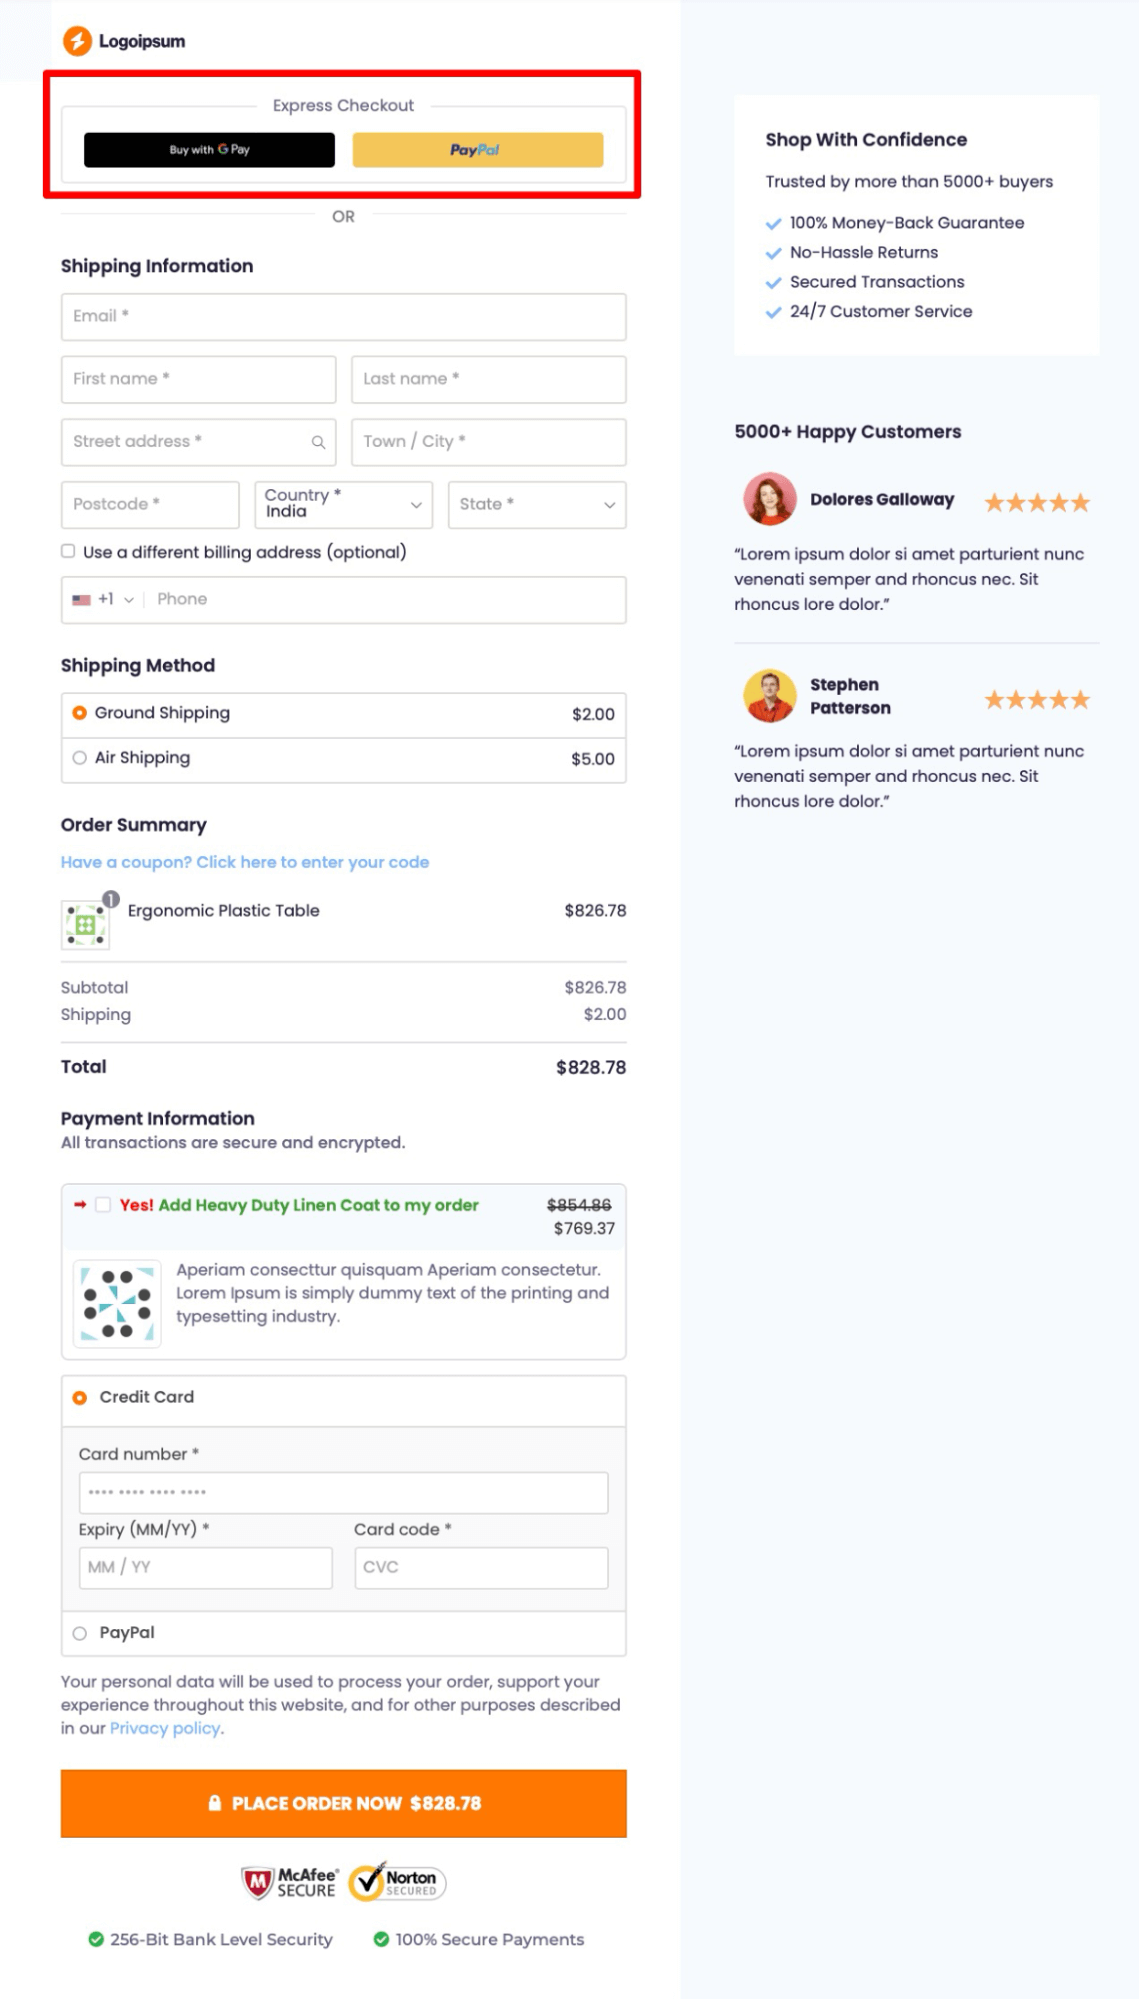
Now, on the front end, if you add products to the cart and try to checkout from the mini cart, you will find the express checkout option:
Please note that in-cart product recommendations and a milestone-based reward system are available with the premium version.
This was all about adding a WooCommerce one-click checkout to your cart.
How to Create a One-Click Purchase at WooCommerce Checkout Page for Free?
Adding a one-click checkout on the WooCommerce checkout page can enhance the user experience by allowing customers to complete transactions with a single click, eliminating the need for repetitive information entry.
Here, we will use FunnelKit Funnel Builder to add a one-click checkout on the WooCommerce checkout page. In addition to adding an express checkout, this plugin allows you to create beautiful sales funnels and store checkouts with prebuilt templates.
It also comes with AOV-boosting features such as order bumps and post-purchase one-click upsells.
To follow along with the process, you need to install and activate FunnelKit Funnel Builder. The free version is enough to add a one-click checkout option.
After activating the plugin, follow these steps:
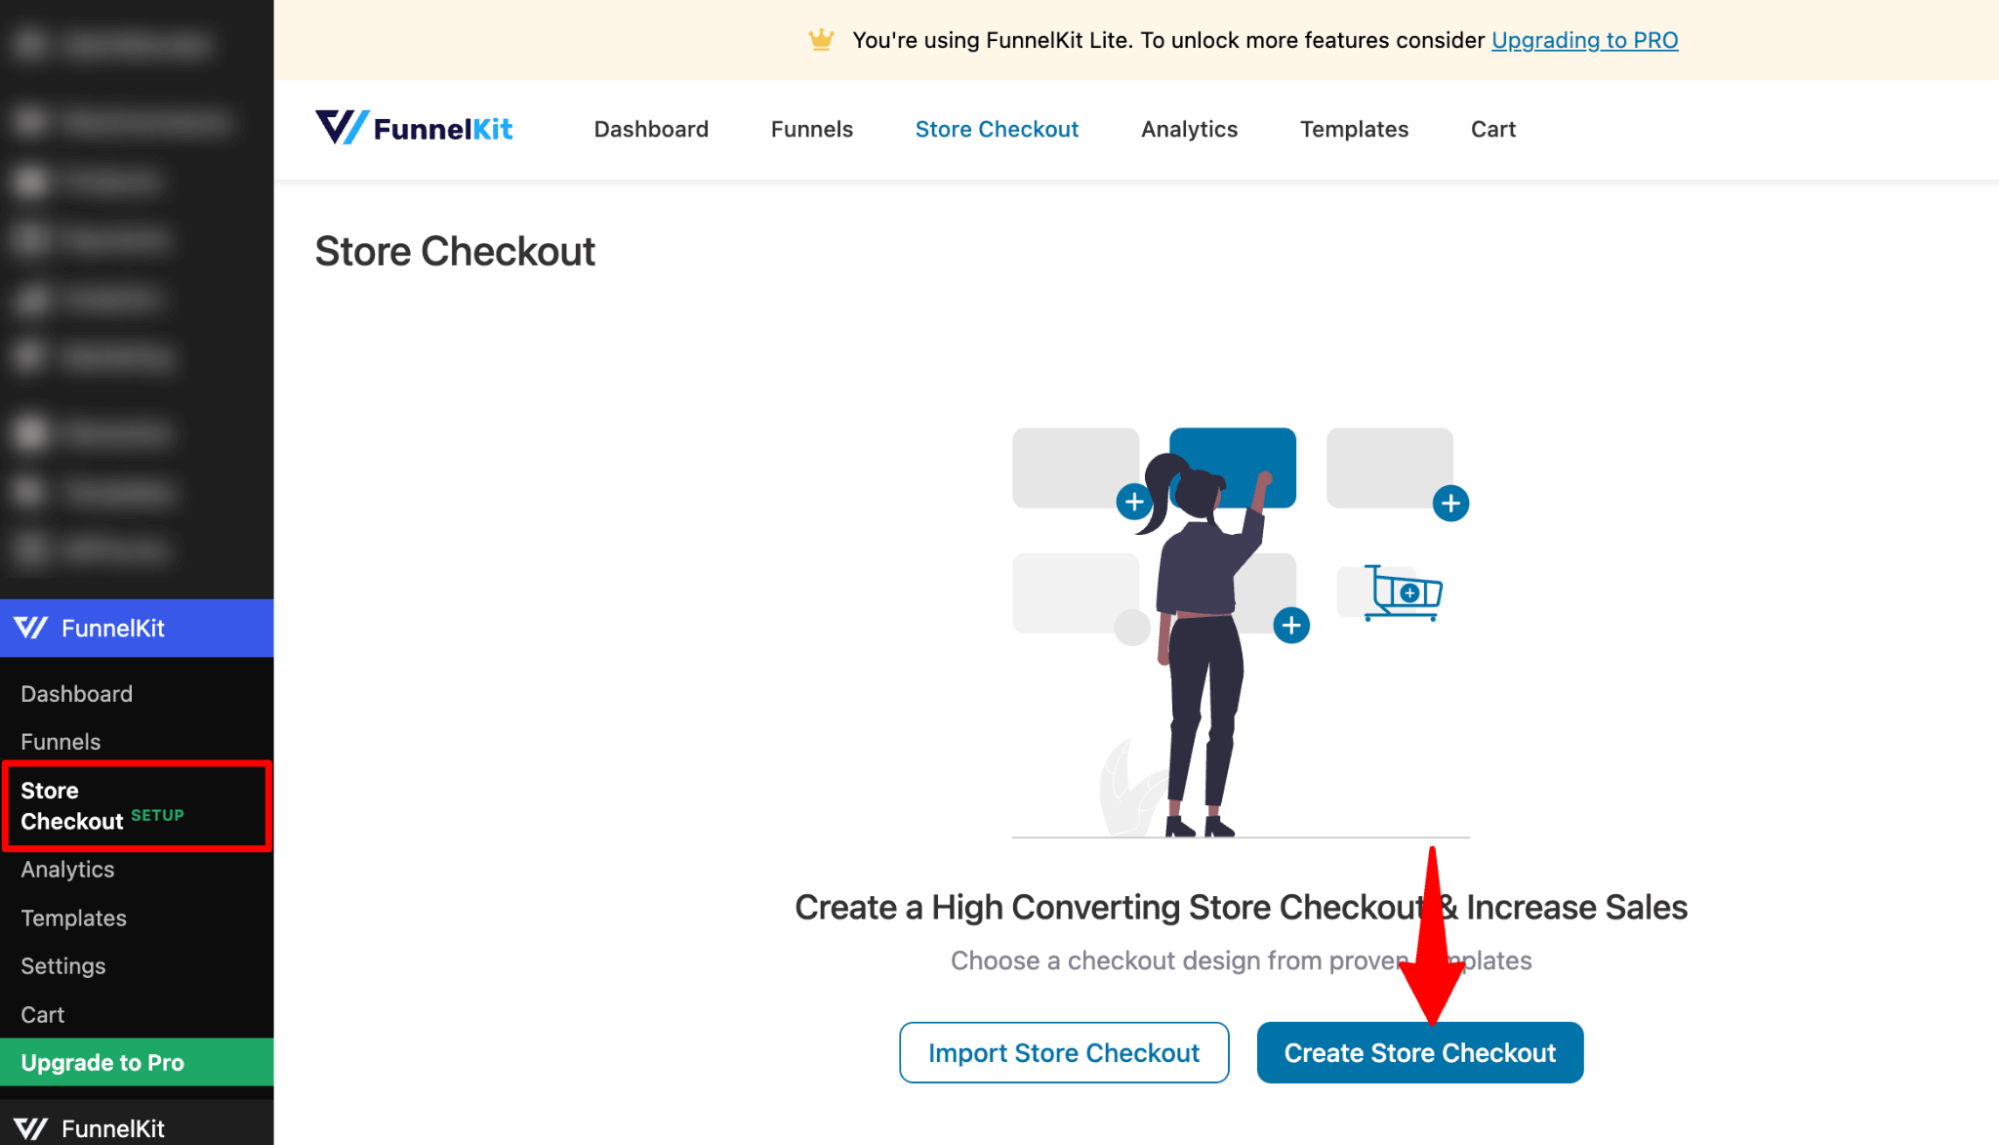
Step 1: Create a store checkout
First, we need to create a store checkout to replace the default WooCommerce checkout page.
For that, navigate to FunnelKit ⇒ Store Checkout and click on the ‘Create Store Checkout’ button.
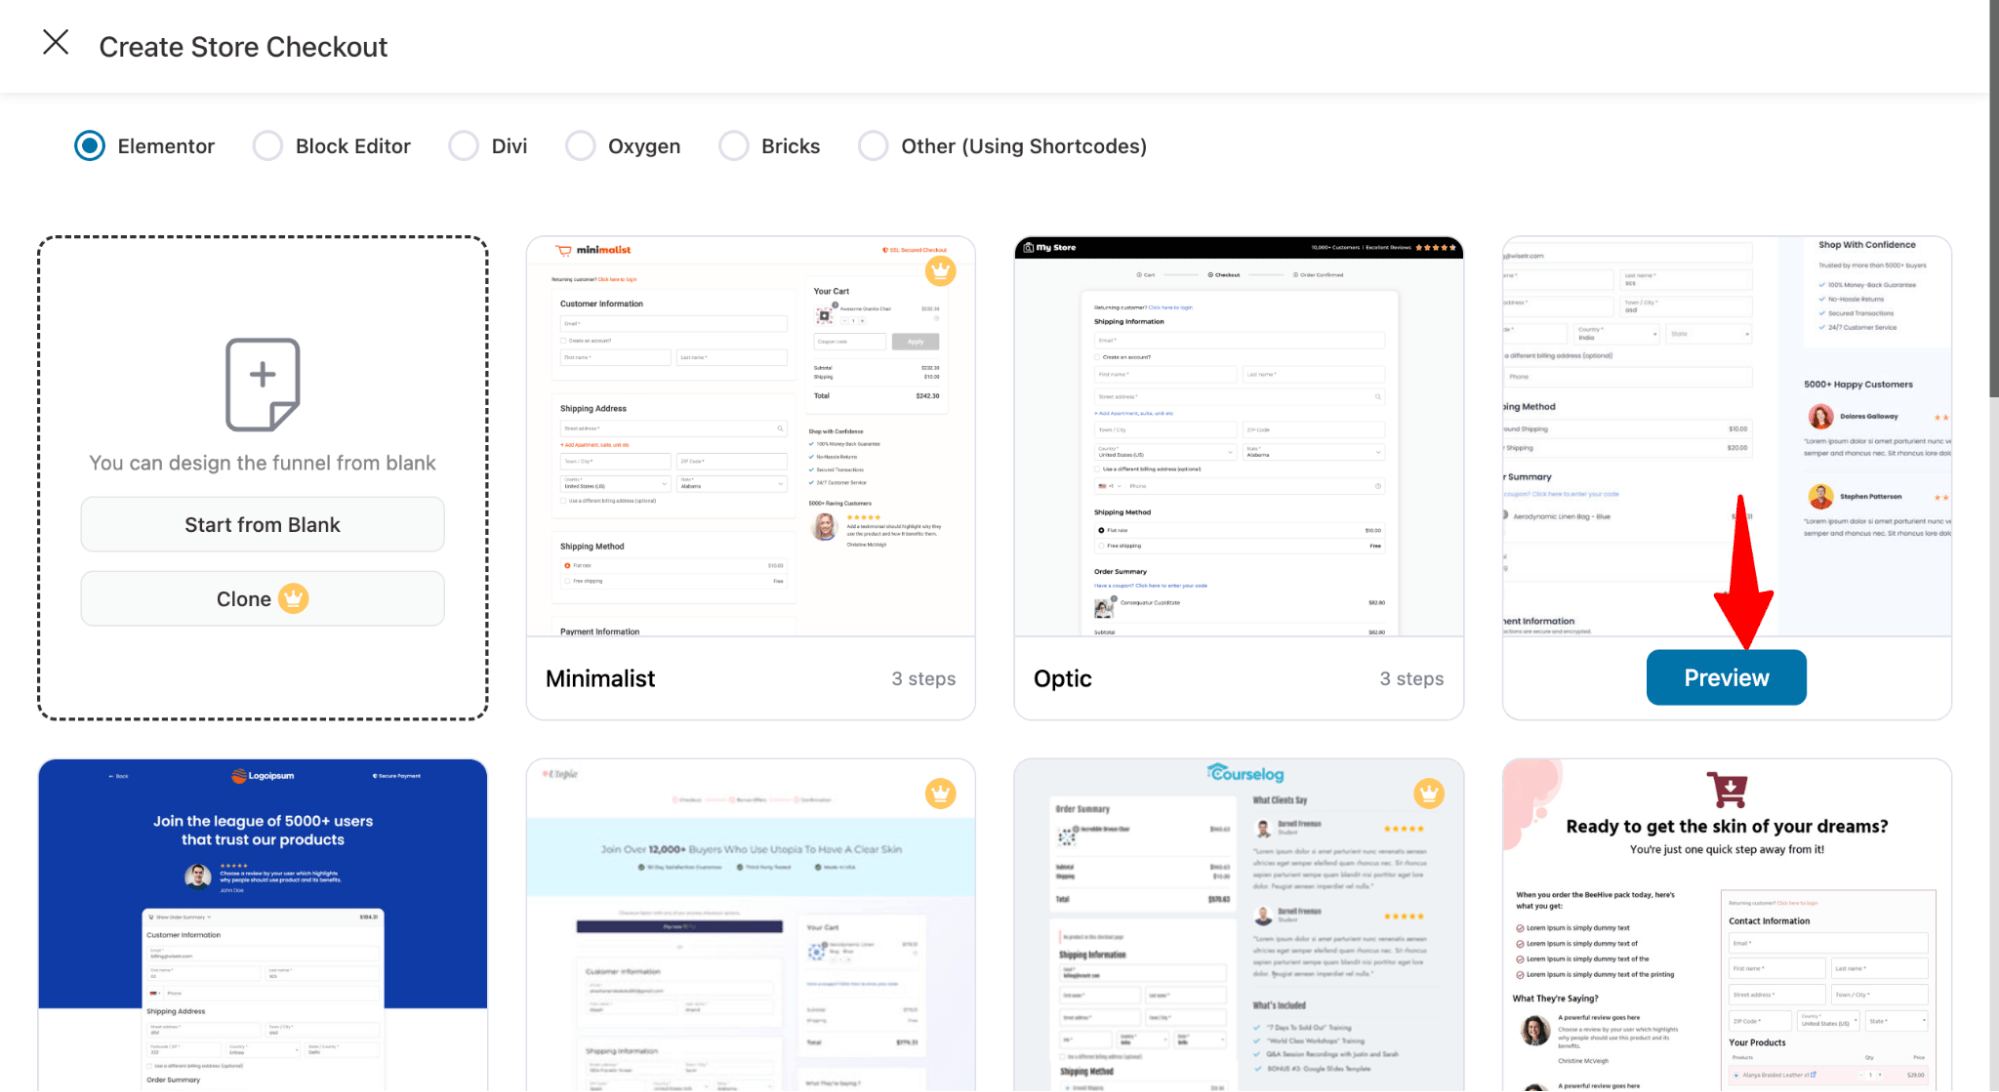
After that, select your favorite page builder and choose a template from the list of prebuilt checkout templates FunnelKit provides.
To select one, hover over the template you like and click 'Preview'.
The free version allows you to create a single-page checkout. However, with the premium version, you can create a multi-page checkout page.
Next, click on 'Import This Funnel', provide a name, and click on 'Done' to import this funnel as your default checkout.
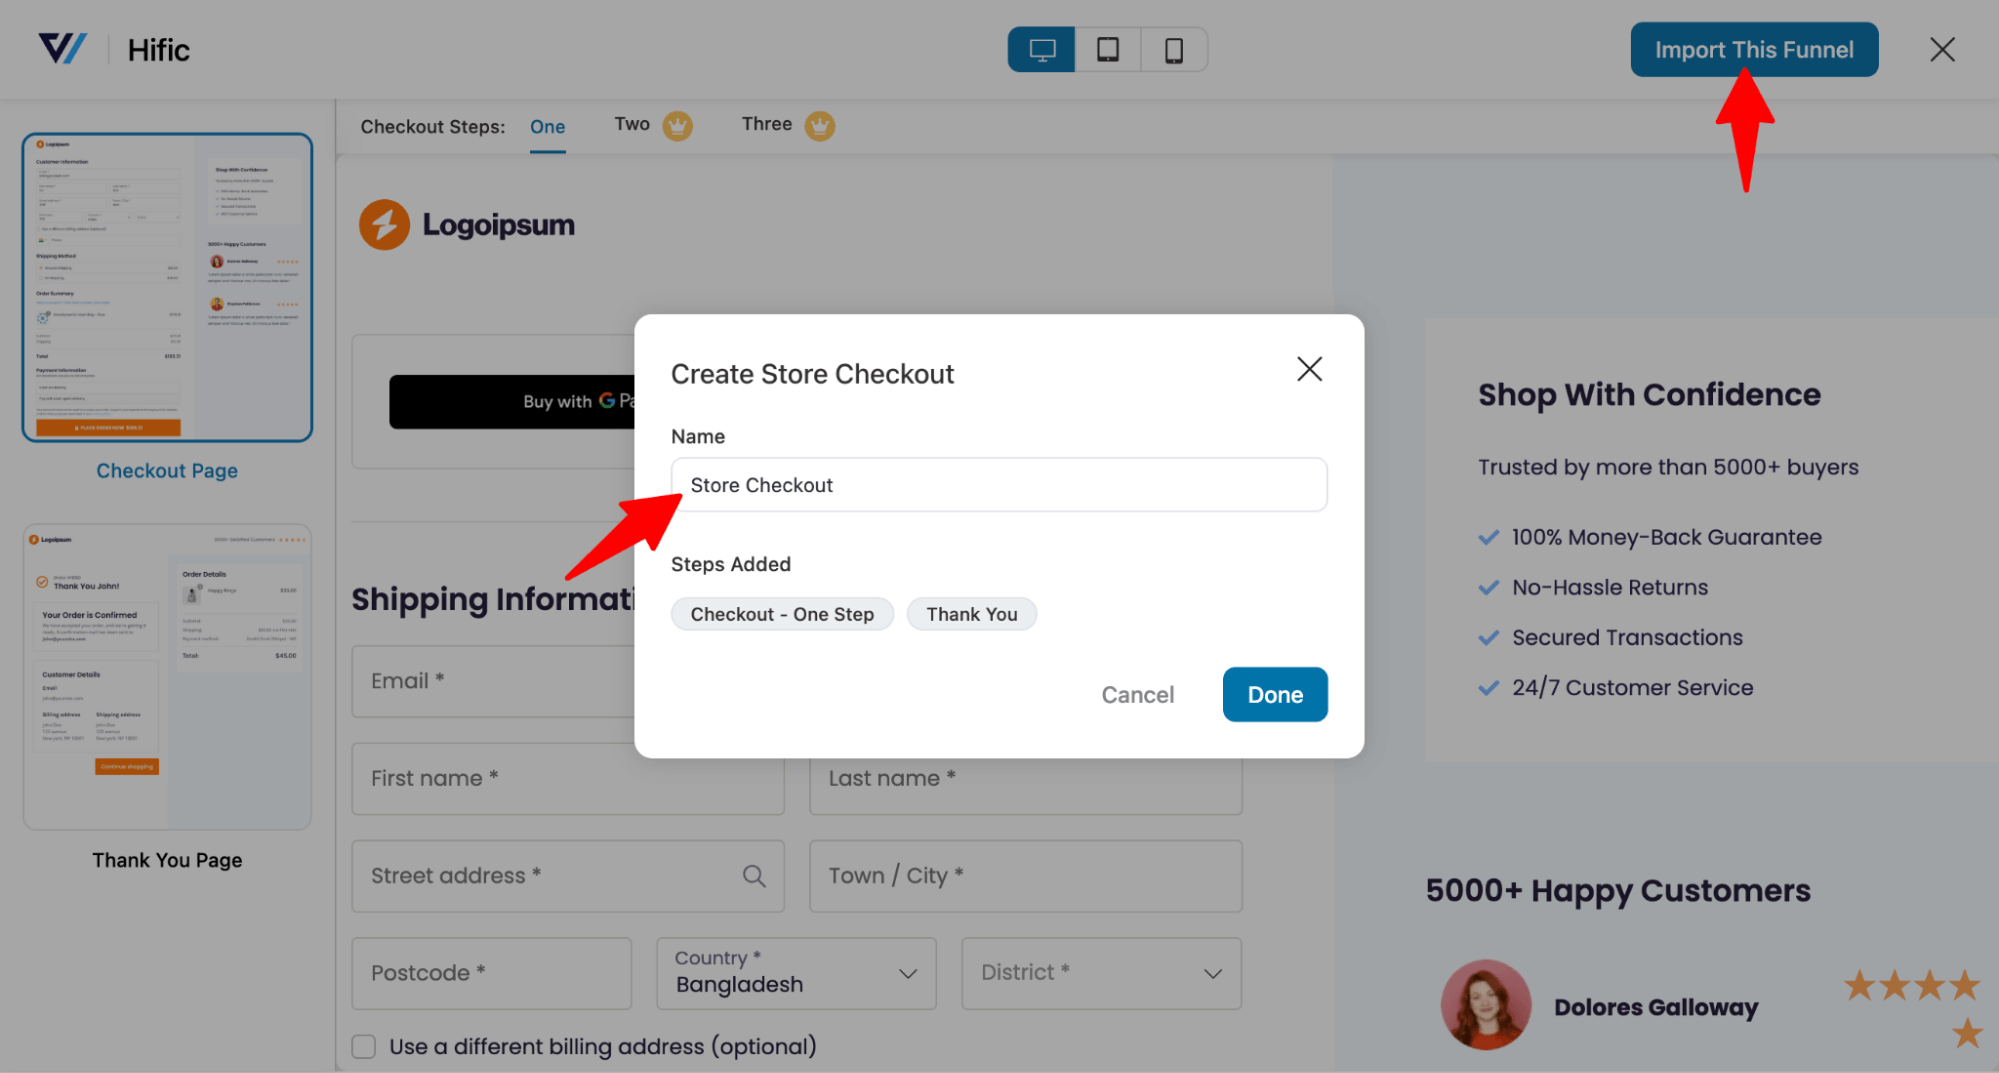
A checkout funnel should be imported now. With the free version, you can use a custom checkout and thank you page.
For other offers, like order bumps and upsells, you need a premium version.
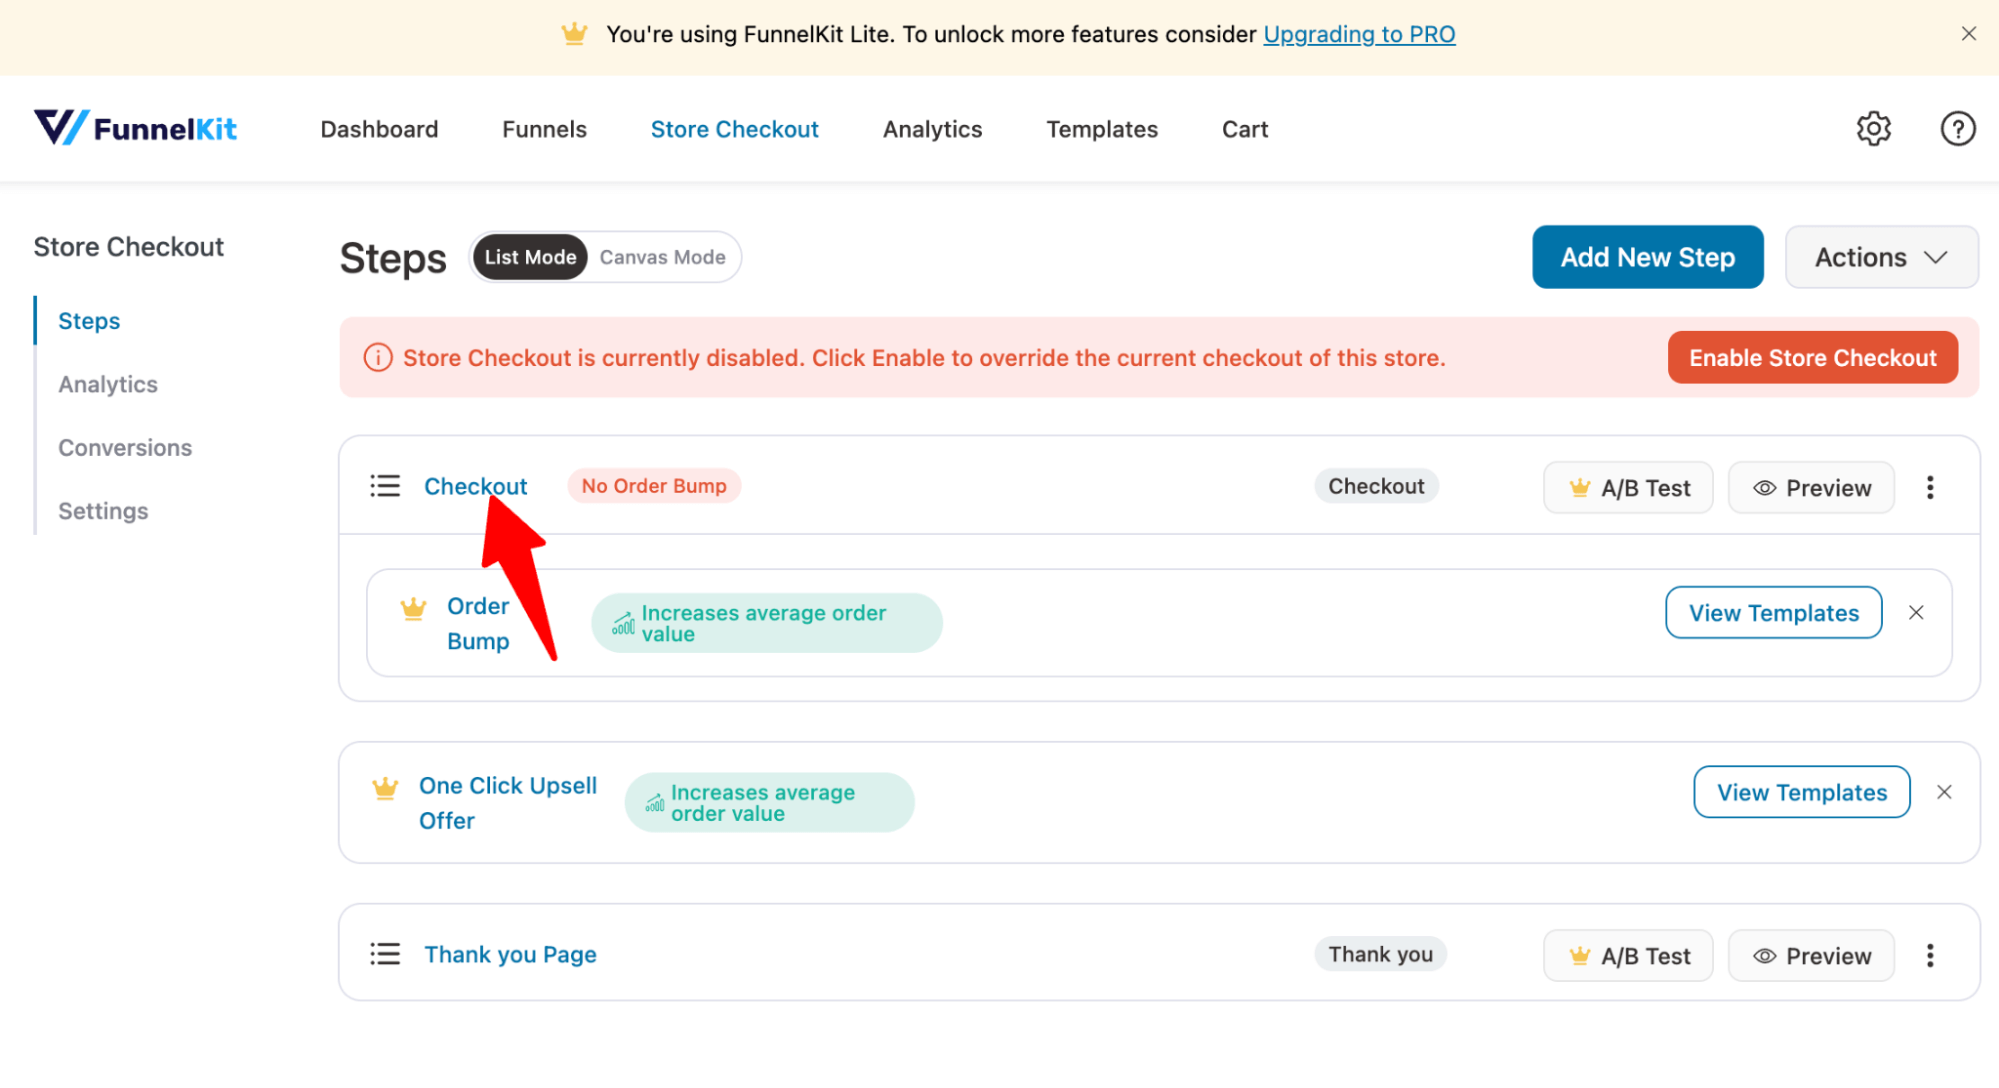
Step 2: Customize the checkout template
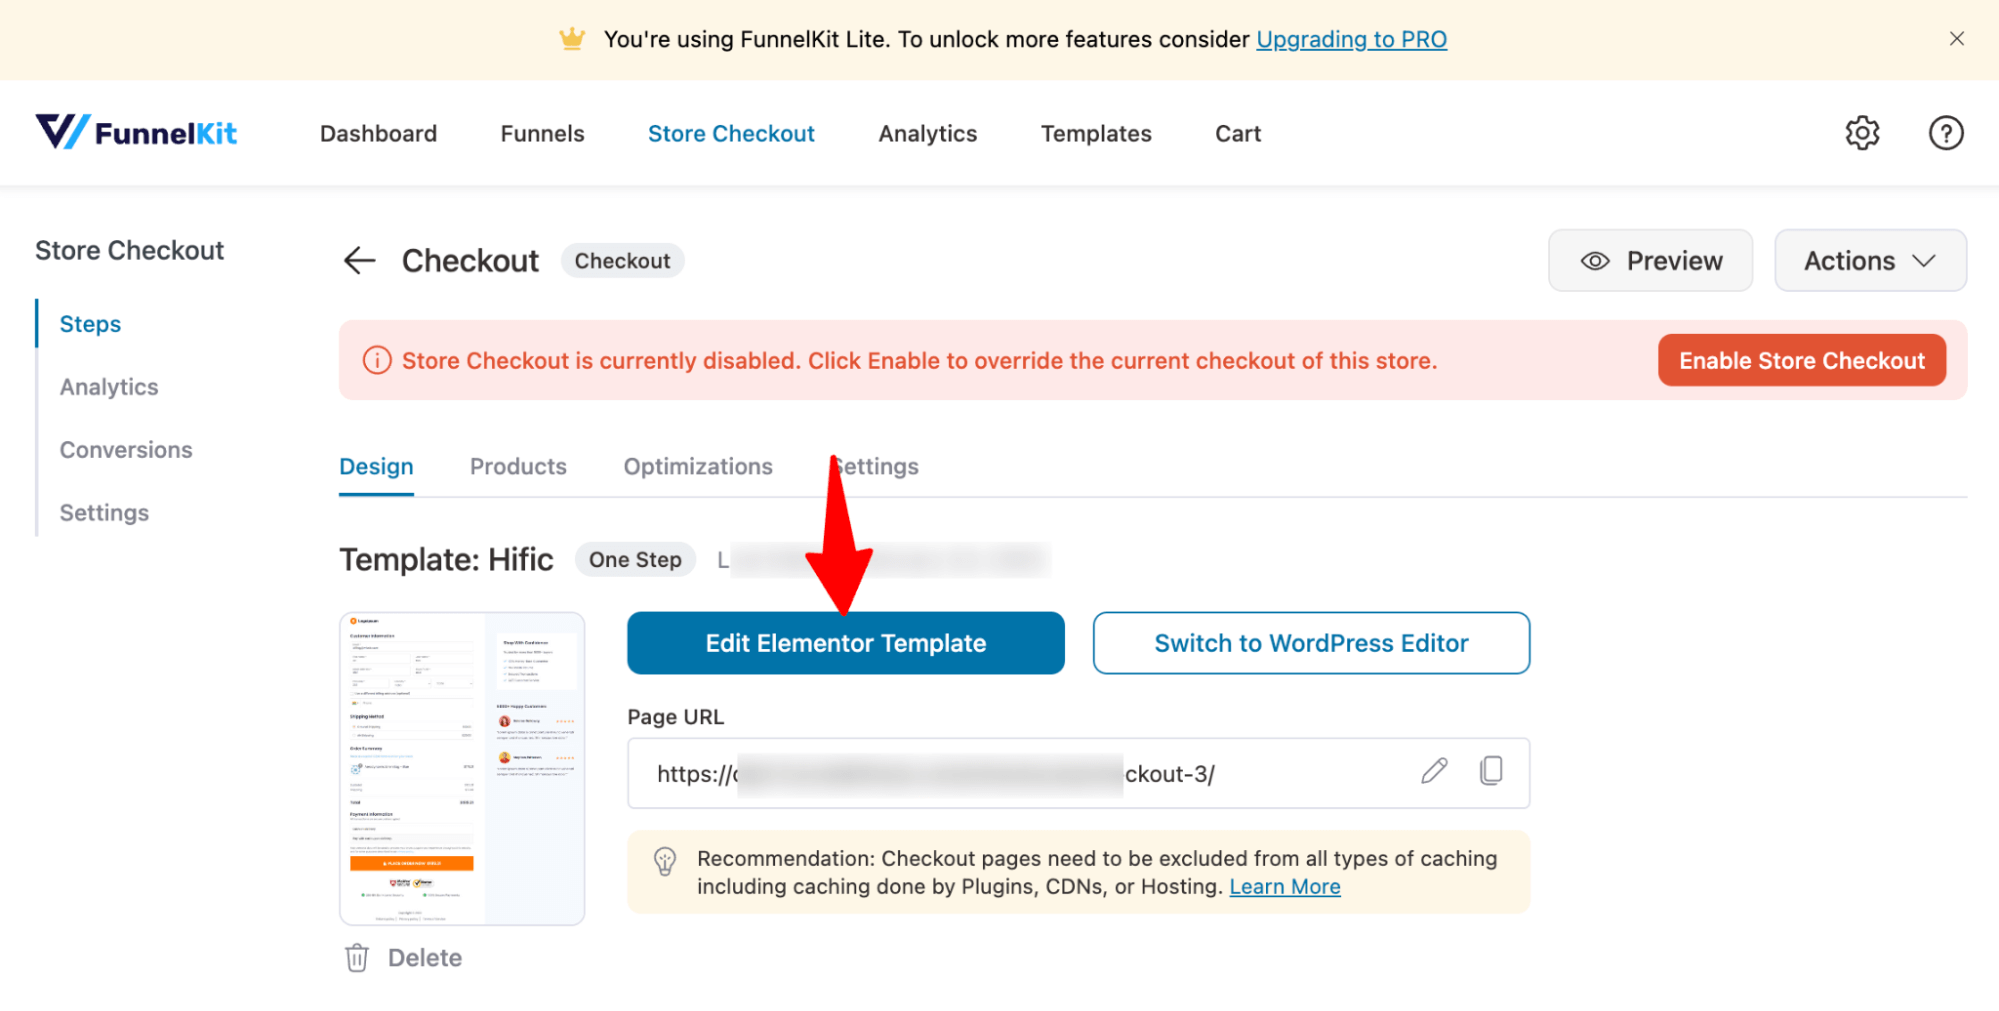
Click on your checkout page to start customizing it.
Here, you can customize the design and content of your checkout page using the selected page builder.
For more details on how to customize the checkout page, read our blog “How to Customize WooCommerce Checkout Page without Code”.
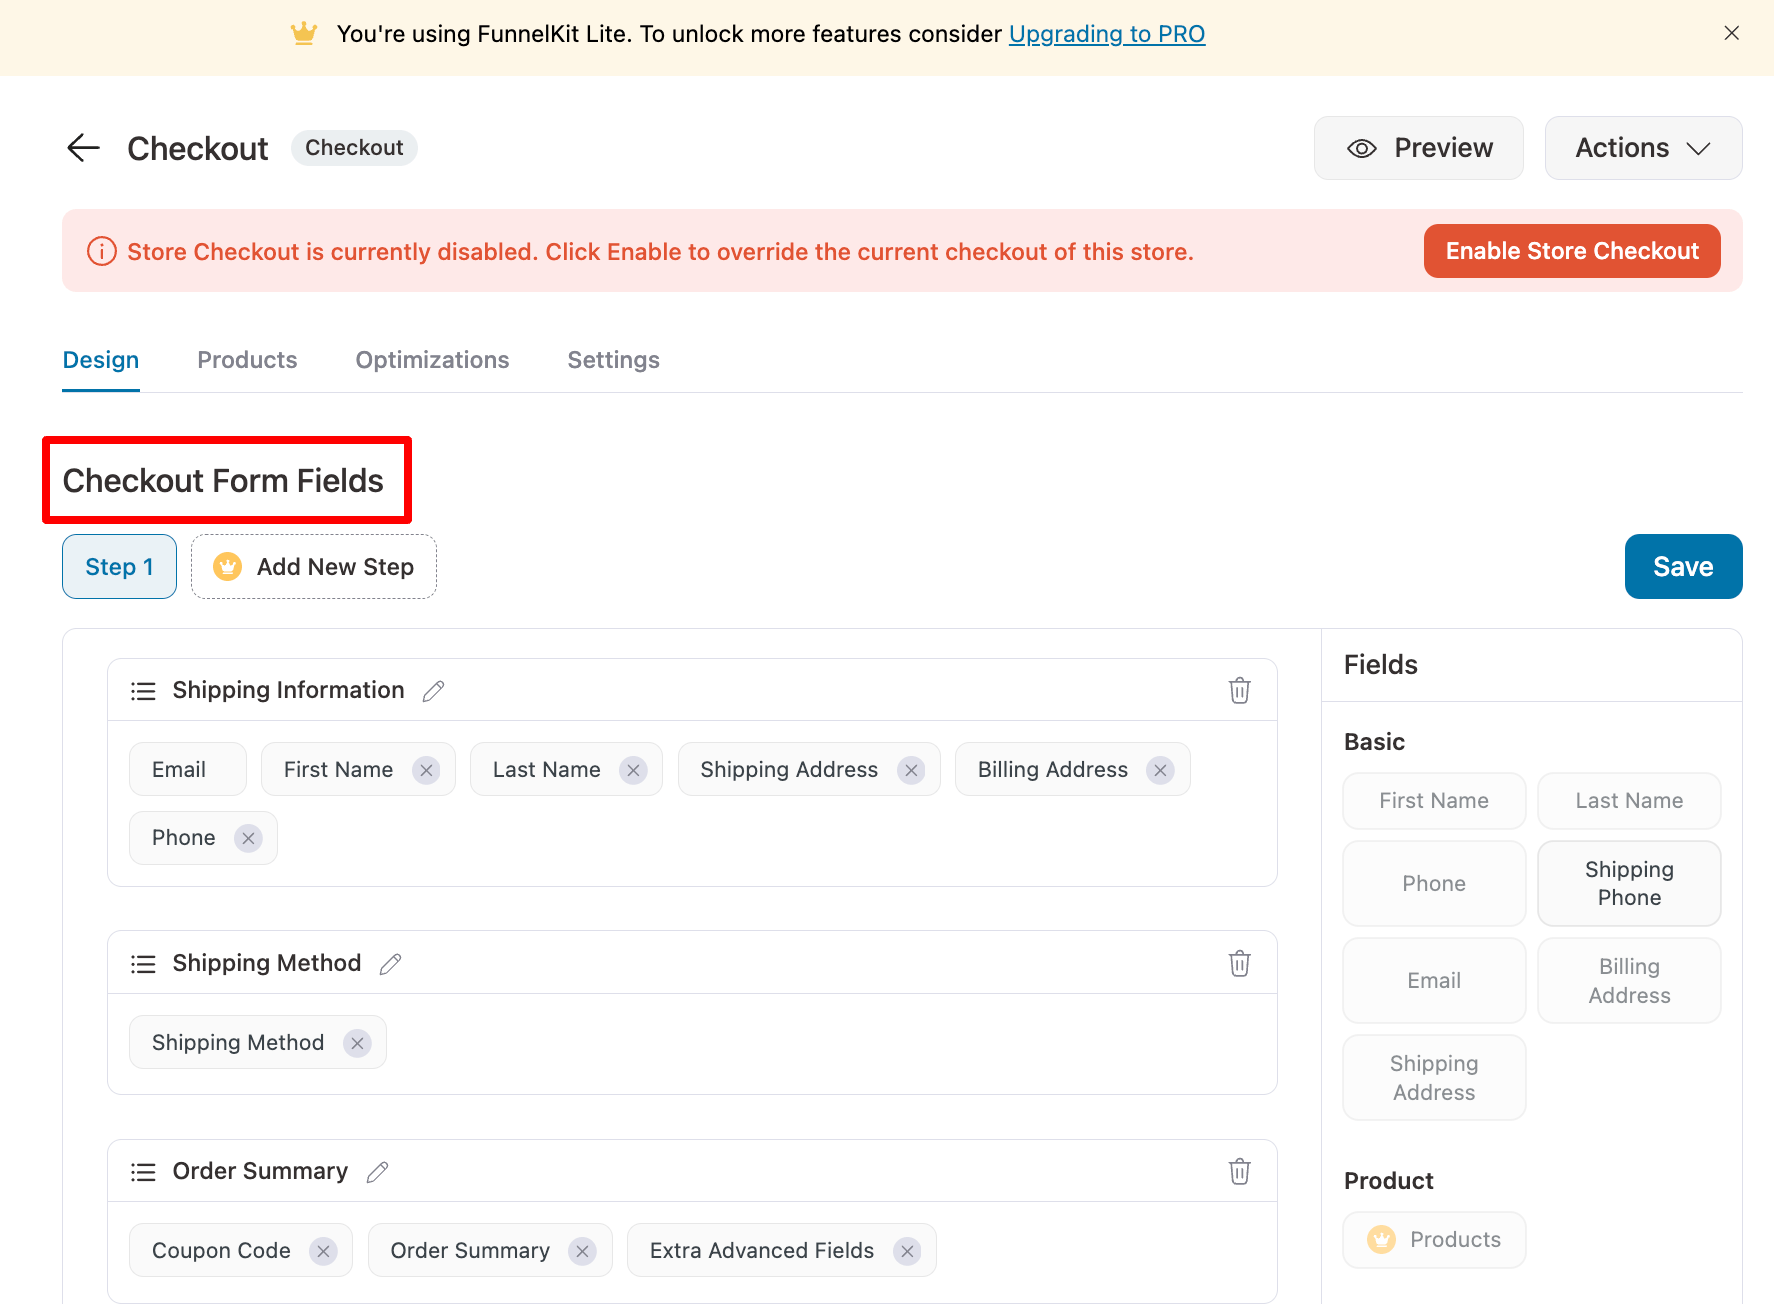
Scroll down to the "Checkout Form Fields" section to reorder the checkout fields by dragging and dropping. With the premium version, you can also add a new custom field.
For more details on checkout fields, check our blog on “WooCommerce Checkout Field Editor”.
Step 3: Enable the express checkout option
To activate the express checkout feature, navigate to the Optimization tab. Locate the "Express Checkout Buttons" option and click to expand.
Then, activate the Express Checkout Buttons by selecting 'Yes' and specifying the desired position for the Express Checkout button on the checkout page.
Finally, click "Save Changes" to apply the updates.
Note: This will add Stripe, Apple Pay, Google Pay, PayPal Express, and Amazon Pay to your checkout page. But for express checkouts like Apple Pay, Google Pay, etc., to work, you need to integrate Stripe with WooCommerce.
Check out our detailed post on integrating Stripe with WooCommerce.

On the optimization tab, you can also make the following optimizations:
- Inline field validation
- Optional fields collapsible to shorten the checkout form length
- Enable Google address auto-completion
- Auto-apply coupon codes
- Enhanced phone fields, and so on.
Step 4: Activate your store checkout funnel
If you want, you can add order bumps on the checkout page. As with the checkout page, you can also customize the upsell and thank-you pages with FunnelKit’s Funnel Builder.
Finally, you need to activate the store checkout. For that, come back to the sales funnel page and turn on the “Enable Store Checkout” button.
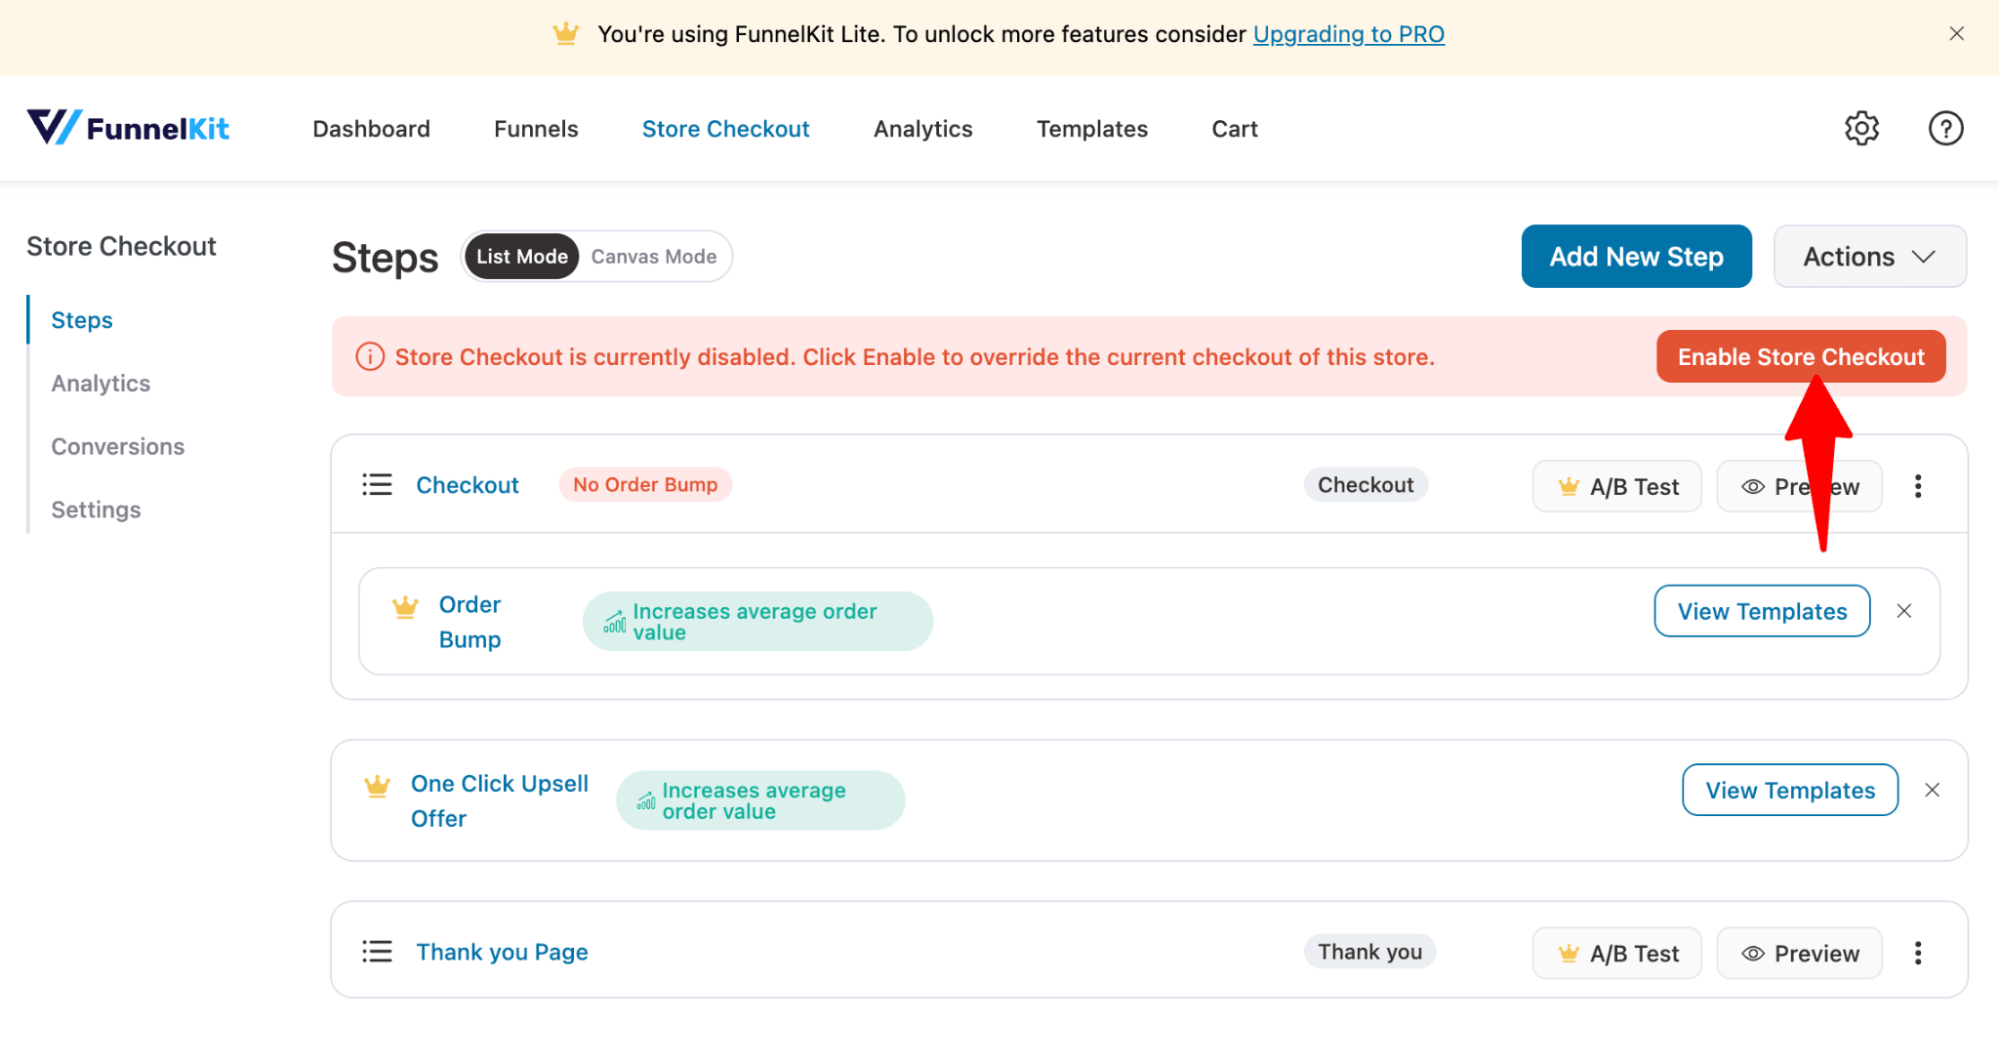
Now, if you place a test order, you can use the express checkout option to experience one-click checkout.
Best WooCommerce One-Click Checkout Plugins
Here are five top WooCommerce one-click checkout plugins based on their features, user-friendliness, and cost.
| Plugin | Key Feature | Express Pay | Free Version | Best For |
|---|---|---|---|---|
| FunnelKit Funnel Builder | Adds a “Buy Now” button for logged-in users with saved payment info after the first order | Apple Pay, Google Pay, PayPal, Amazon Pay | Yes (cart express checkout) | Stores wanting a complete checkout optimization suite |
| Stripe Gateway for WooCommerce by FunnelKit | Dedicated Stripe integration with express pay on product, cart, and checkout pages | Apple Pay, Google Pay | Yes | Stores that want express pay without a full funnel builder |
| YITH WooCommerce One-Click Checkout | Adds a 'Buy Now' button for logged-in users with saved payment info after the first order | No native express pay | No | Simple one-click reordering for returning customers only |
| Direct Checkout for WooCommerce | Skips the cart page and sends customers directly to checkout, Ajax add-to-cart | No native express pay | Yes | Stores selling single products or digital goods |
| WP Express Checkout | Adds a PayPal express “Buy Now” button to product pages | PayPal only | Yes | Small stores wanting quick PayPal checkout |
| WooCommerce One Page Checkout | Combines product selection and checkout on a single page | No native express pay | No (official WooCommerce extension) | Full funnel builder with custom checkout, order bumps, upsells, and A/B testing |
Understand the distinction between these plugins.
YITH WooCommerce One-Click Checkout and Direct Checkout for WooCommerce both simplify the checkout flow, but neither offers true express pay buttons.
YITH requires customers to be logged in with saved payment details before the one-click option becomes available. Direct Checkout skips the cart page but still requires customers to manually fill in all checkout fields.
FunnelKit stands apart by combining express checkout with a comprehensive conversion optimization toolkit.
You get custom checkout page templates, express pay integration through Stripe and PayPal, Google address autocomplete, post-purchase one-click upsells, order bumps, A/B testing, and detailed funnel analytics, all from a single plugin.
It also works with all major page builders, including Elementor, Divi, and Gutenberg, so you can customize the checkout design without touching code.
If you only need the express pay buttons and do not need the full funnel builder, the Stripe Gateway for WooCommerce by FunnelKit is a lightweight, free option that adds Apple Pay and Google Pay buttons to your product pages, cart, and checkout.
Some WordPress themes, including OceanWP, GeneratePress, Woostify, and Suki, also offer built-in settings to simplify the checkout layout.
These can be a quick starting point for cleaning up the default WooCommerce checkout appearance.
However, they do not offer express pay buttons, custom field management, multi-step checkout layouts, or the conversion features that a dedicated checkout plugin provides.
6 Best Practices to Maximize Conversions With One Click Checkout
Let's look at some highly effective tips to maximize profits by offering one-click checkout in WooCommerce.
- Offer guest checkout alongside express pay
Some people just want to use a credit card. Don't force account creation. Give them a stripped-down guest form instead.
According to research cited by PayPal, 74% of shoppers who prefer guest checkout do so because it is faster than creating a new account, and 82% have abandoned a purchase because the registration process took too long.
- Display estimated delivery information on the checkout page
Uncertainty kills conversions. Put the expected arrival date right next to the buy button.
This helps reduce uncertainty and prevents customers from abandoning the checkout process to search for shipping timelines elsewhere.
This is especially important for international orders where delivery expectations vary by country.
- Keep the number of payment options focused but sufficient
Offering too many payment methods can overwhelm customers and slow down decision-making.
Display two to three primary payment options prominently, such as Credit Card, Google Pay, and PayPal.
For WooCommerce stores serving international customers, add relevant local payment methods such as iDEAL (Netherlands), SEPA (EU), or Bancontact (Belgium) in a secondary section.
The Stripe Gateway for WooCommerce by FunnelKit supports all of these.
- Use auto-apply coupons instead of a coupon code field
When shoppers see a coupon box at checkout, many pause their purchase, leave the page, and search for a discount code. Some never come back.
If you are running a promotion, configure your checkout to auto-apply the discount and hide the coupon field. This keeps the one-click experience uninterrupted.
- A/B test your checkout layout and express pay placement
Test single-page checkout against multi-step checkout.
Test express pay button placement above the form versus below it. Test different order bump offers.
Small changes can produce meaningful conversion lifts when tested with real traffic. FunnelKit includes built-in A/B testing, making this straightforward.
- Add tracking pixels for conversion measurement
Install your Facebook Pixel, Google Ads conversion tag, or other tracking codes on the checkout and thank you pages.
Without conversion tracking, you cannot measure which traffic sources and campaigns are driving actual purchases through your one-click checkout, making it impossible to optimize your ad spend.
Frequently Asked Questions About WooCommerce One Click Checkout
No. Express checkout through Apple Pay, Google Pay, and PayPal works for both logged-in and guest users. The customer's payment and shipping details are pulled from their digital wallet, so they do not need an account on your store. This makes it useful for first-time buyers who do not want to register before purchasing.
YITH One-Click Checkout is the exception here. It requires customers to be logged in with saved payment information before the one-click button appears.
Yes. FunnelKit supports PayPal as an express checkout option on both the checkout page and the sliding cart. When customers click the PayPal button, they log into their PayPal account and their shipping and payment details are automatically applied to the order. You can offer PayPal alongside Stripe-powered Apple Pay and Google Pay so customers can choose their preferred method.
Yes! It uses encrypted transactions, tokenization, and fraud protection to protect customer data. Payment providers like Stripe, PayPal, and Amazon Pay ensure secure processing.
One-click checkout is ideal for repeat customers and low-cost items like accessories or home essentials. Buyers can check out instantly without re-entering details.
But for big-ticket items or complex B2B solutions, buyers often need more time and details before making a purchase.
Use one click checkout when you sell digital products, consumable or repeat-purchase products, subscription products, and physical products with standard shipping.
One-click checkout in WooCommerce works with express payment options such as Apple Pay, Google Pay, PayPal Express, Amazon Pay, and more. These gateways securely save customer details, enabling faster, hassle-free purchases.
You can add a URL parameter (?add-to-cart=PRODUCT_ID) to skip the cart and send customers straight to the checkout page. Add custom PHP code to redirect the “Add to Cart” button to the checkout page.
However, neither of these approaches offers true one-click checkout. Customers still have to fill in all form fields manually on the checkout page.
To offer express pay buttons with saved payment details and zero form fields, a plugin is required.
Start Converting More Customers With WooCommerce One Click Checkout!
WooCommerce one-click checkout can reduce cart abandonment rates, improve conversion rates, and enhance overall customer experience in your store.
You can choose to offer a one-click checkout in a mini cart, a checkout process, or both.
Adding a one click checkout option in the mini cart makes it more convenient for users as they can easily skip the cart page and checkout in the fastest way possible.
Many FunnelKit users have already shared their journeys of boosting their store conversions upon implementing one-click checkouts.
FunnelKit Funnel Builder makes adding one-click express checkout to your store super easy. Moreover, this WooCommerce one-click checkout plugin also lets you create beautiful checkouts and adds AOV-boosting features.
So, are you ready to use WooCommerce one-click checkout?

Editorial Team
July 7, 2026Are shoppers adding products to their cart and leaving before they buy? According to Baymard Institute research on checkout usability, 18% of shoppers who abandon their cart do so because...
Editorial Team
July 7, 2026You’ve built your WooCommerce store, polished your product pages, and invested in marketing, but sales aren’t coming. Visitors browse, some add items to their cart, and most vanish before completing...
Editorial Team
July 3, 2026Discover how a canceled order doesn't have to mean a lost customer, and how the right WooCommerce canceled order email can turn it into a second chance. WooCommerce canceled order...


