
A WooCommerce mini cart is a compact cart summary that displays product details, quantities, and totals without sending shoppers to a separate cart page.
You can set it up as a slide-out drawer, a simple dropdown panel, or a separate section on the checkout page.
Newer block themes often include a native widget for this in the site header, but if you run a classic theme, you are left with nothing out of the box.
The default WooCommerce setup forces a redirect to a dedicated page every single time a customer wants to review what they just added.
It completely breaks their browsing momentum and increases the chances of cart abandonment.
But with a few smart optimizations, you can turn your mini cart into an efficient sales-driving tool.
In this post, we'll show how you can add a mini cart to WooCommerce using a WordPress plugin without code.
We'll also walk you through a custom code method using the woocommerce_mini_cart() function and share best practices for getting the most out of your cart setup.
Here's a quick video on how to add the side cart in WooCommerce:
Table of Contents
- 1 What is a WooCommerce Mini Cart?
- 2 Method 1: Add a WooCommerce Mini Cart for FREE Using a Sliding Floating Side Cart? (Without Code)
- 3 Method 2: Add a Mini Cart to the WooCommerce Checkout Page
- 4 Method 3: Add a WooCommerce Mini Cart With Custom Code
- 5 7 Best Practices to Maximize Conversions With Your WooCommerce Mini Cart
- 6 WooCommerce Mini Cart: Frequently Asked Questions (FAQs)
- 7 Start Converting More Shoppers With a WooCommerce Mini Cart!
What is a WooCommerce Mini Cart?
A WooCommerce mini cart, also known as a WooCommerce shopping cart widget or cart preview, is a small cart interface that remains accessible as shoppers browse your store.
Instead of navigating to a full cart page, customers can view their order items, update quantities, and proceed to checkout from any page on your site.
It simplifies the shopping experience because the mini cart is usually located in the website's header or sidebar as a shopping cart icon.
In some instances, it also appears on the side of the checkout page to verify items in their cart at the last second.
Once users click the WooCommerce mini cart icon, the cart appears as a drop-down or slide-out panel, allowing customers to quickly view order details and update them if they wish.
Depending on the plugin/theme you use on your WooCommerce website, a mini cart typically includes:
- Your cart products list with their image thumbnail, quantity, and price
- Option to update the product quantity, or even remove them
- Order total
- Option to apply coupon codes
- A link/button that takes users directly to the checkout page, and so on.
Method 1: Add a WooCommerce Mini Cart for FREE Using a Sliding Floating Side Cart? (Without Code)
Here, we will use FunnelKit Cart. This easy-to-use WooCommerce plugin adds a custom floating sticky mini cart to your online store.
Users can access the mini cart by clicking the cart icon on any page on the website to view order details and cart items.
They can update the quantities of the order items or remove them from the cart. Offering a slide-out cart ensures a seamless add-to-cart experience for users.
This plugin has both free and paid versions, but for this blog, we will use the free version.
Follow these steps to add a floating sticky cart in WooCommerce for free.
Check out the whole process in this video:
Step 1: Install FunnelKit Cart and enable it
The free version of FunnelKit Cart is available on WordPress.org. Make sure you have downloaded and installed this plugin on your WordPress site.
To install the plugin from the WordPress dashboard, go to Plugins ⇨ Add New. After that, search for “FunnelKit Cart” and install the plugin.
Once installed, click 'Activate' to make this plugin live on your WordPress site.
After activation, go to FunnelKit ⇨ Cart and turn on the 'Enable Cart' toggle button and click on Save.
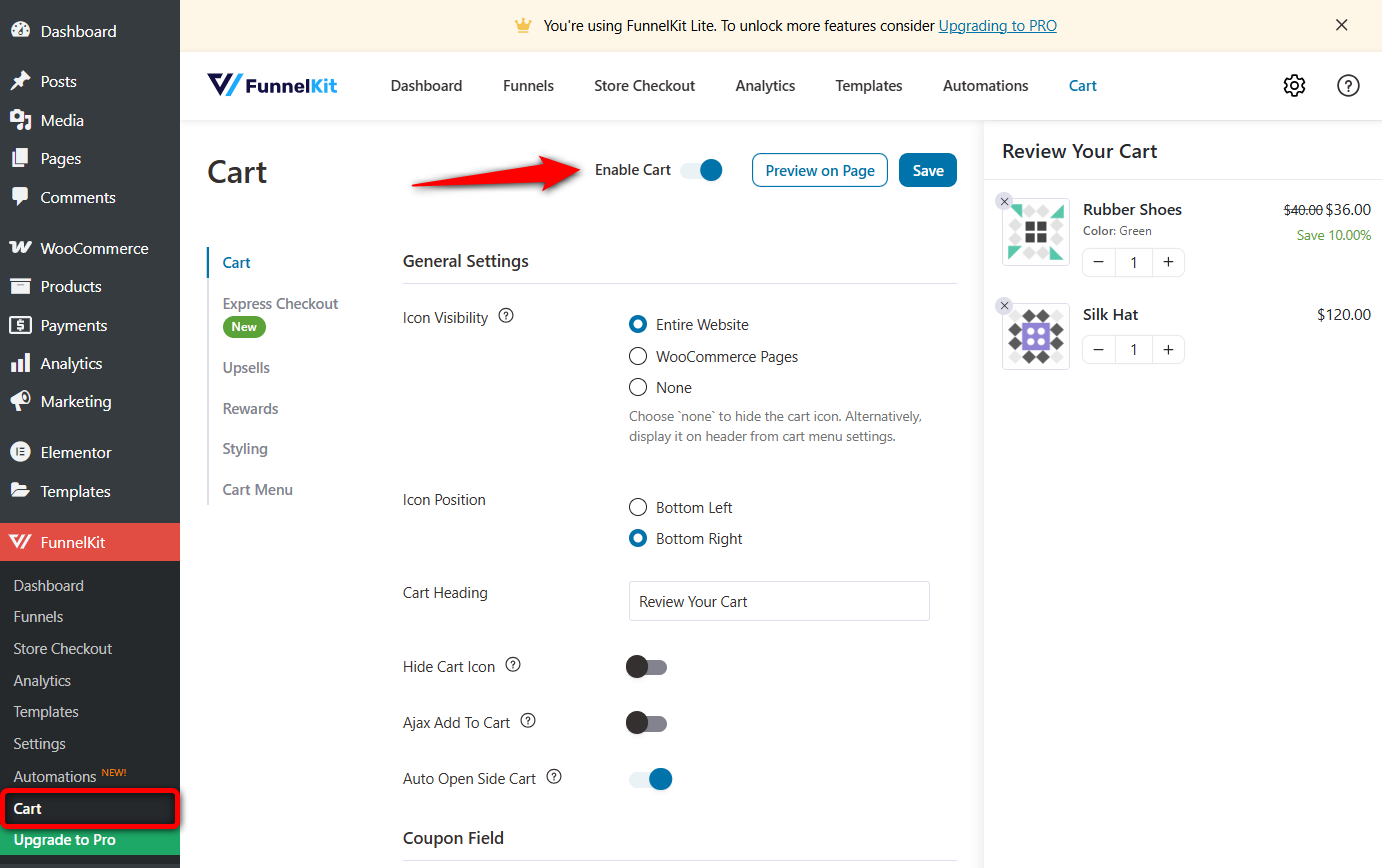
Now, if you go to the front end or click on 'Preview on Page', you should see a mini cart on your WooCommerce store.
It will, by default, appear in the bottom right corner. If you already have products in your cart, they will appear in the mini cart. If you don't, add some products.
You should find all the cart products, including images, quantities, order totals, etc., in a sliding, floating cart.

The cart will also include an option to update your cart items and a buy now button that takes you directly to the checkout page.
Step 2: Configure your cart icon and visibility settings
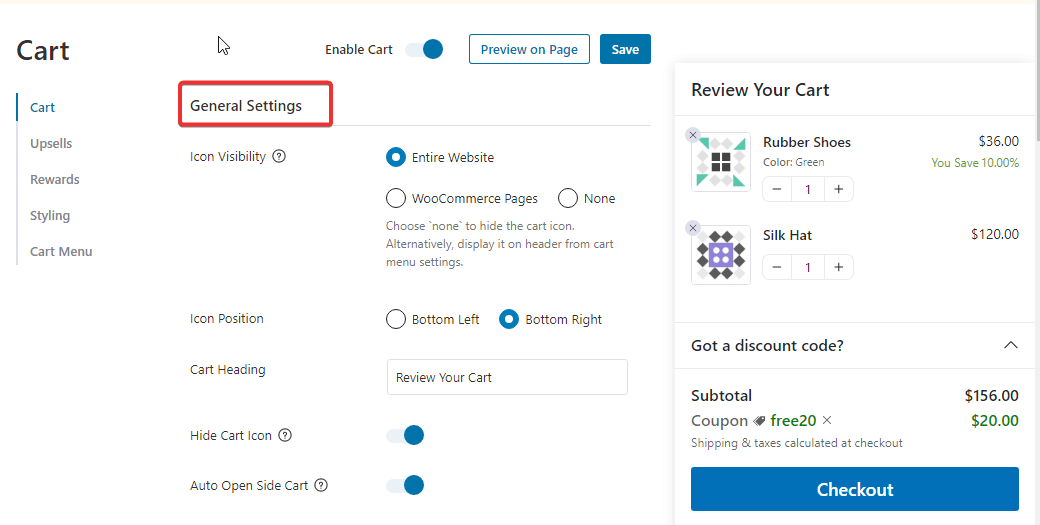
General settings
Under general settings options, you will get the following options:
- Icon Visibility: Here, you can see the pages on which the cart icon will be visible. You get three options: Entire website, WooCommerce pages and none.
- Icon Position: You can position the cart icon in the bottom-left or bottom-right corner.
- Cart Heading: Provide the text that will show up on the cart heading.
- Hide Cart Icon: Here, you can hide the cart icon until users add their first product.
- Auto Open Side Cart: Enabling this option will open the side cart when users add a product to their cart.
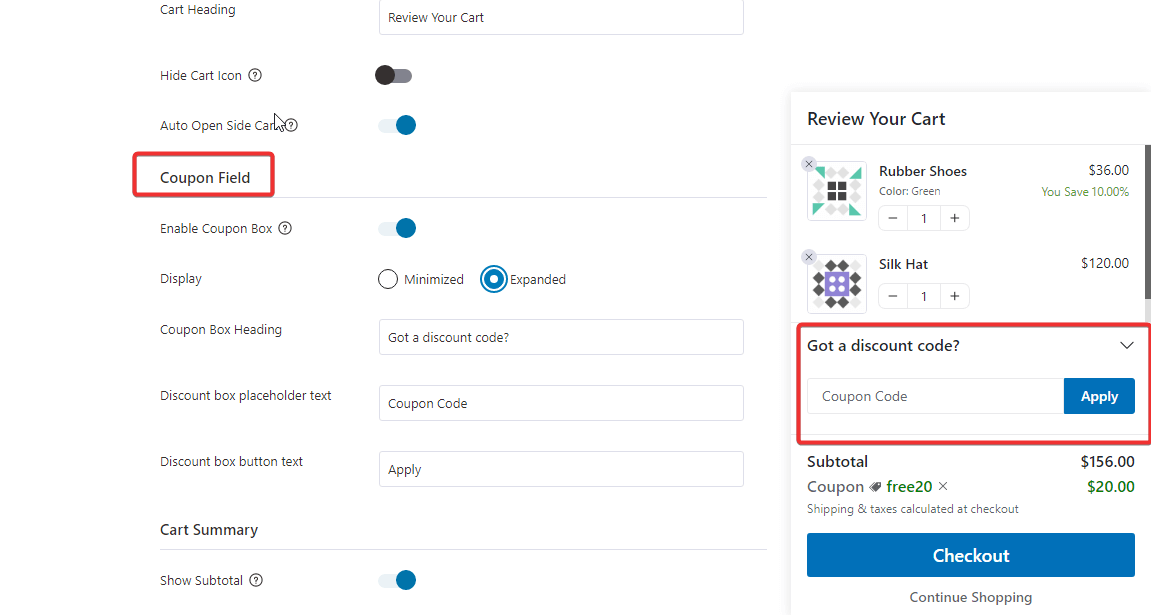
Coupon field settings
After General settings, you will find the different coupon box-related settings of this smart cart for WooCommerce:
- Enable Coupon Box: Select this option to display the coupon box in the floating cart, allowing users to apply coupons.
- Display: You can choose to display the minimum version of the coupon or an expanded version. If you select the 'Minimized' option, users will have to click on the down arrow to view the coupon code field.
- Coupon Box Heading: Provide the heading for this coupon section.
- Discount box placeholder text: Enter the placeholder coupon.
- Discount box button text: Provide the button text.
For more details, refer to the coupon field documentation.
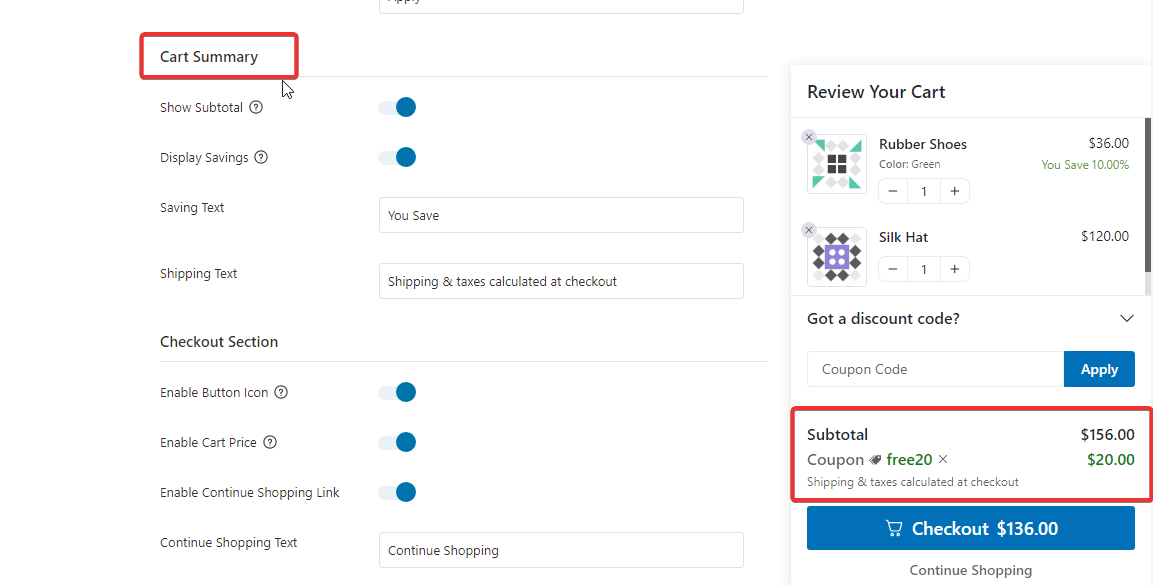
Cart summary
Under the Cart Summary section, you can customize the following options:
- Show Subtotal: Enable this option to show the subtotal.
- Display Savings: Enable this option to display savings applicable to any of the cart items in percentage.
- Saving Text: Provide the text that will show up as a saving test.
- Shipping Text: Provide any shipping-related text that you want to display on the cart summary.
For more details, refer to the cart summary documentation.
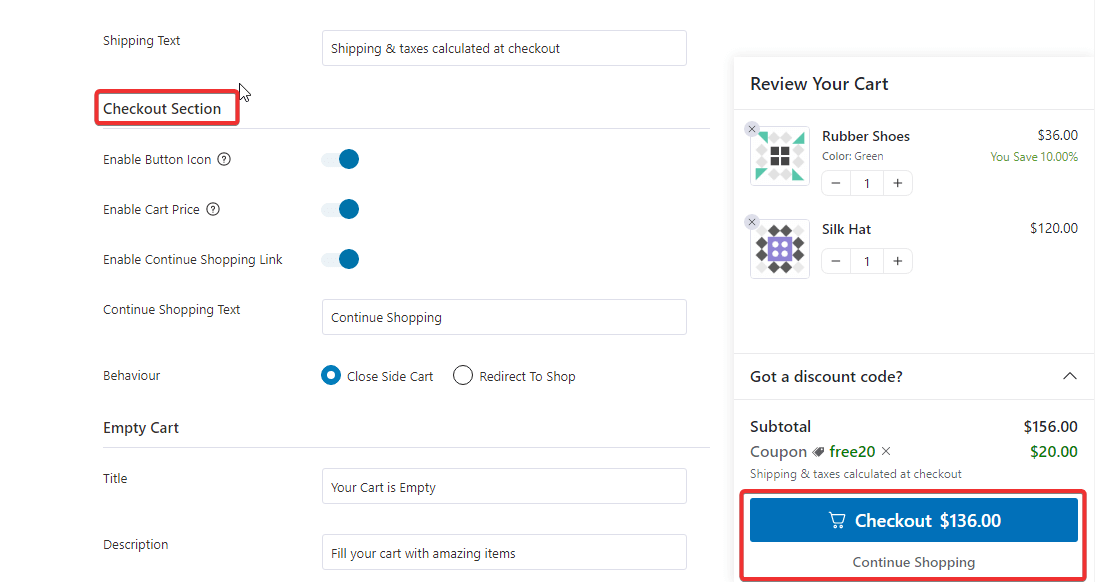
Checkout section
Under “Checkout Section”, you will find the following options:
- Enable Button Icon: Enable this option to add a checkout icon to the button
- Enable Cart Price: Enable this option to show the cart price on the button.
- Enable Continue Shopping Link: Adds a link that lets users continue shopping.
- Continue Shopping Text: Provide the text for the continuation shopping link.
- Behavior: Choose whether the continue shopping option closes the side cart or directs you to the shop page.
For more details, refer to the checkout section documentation.
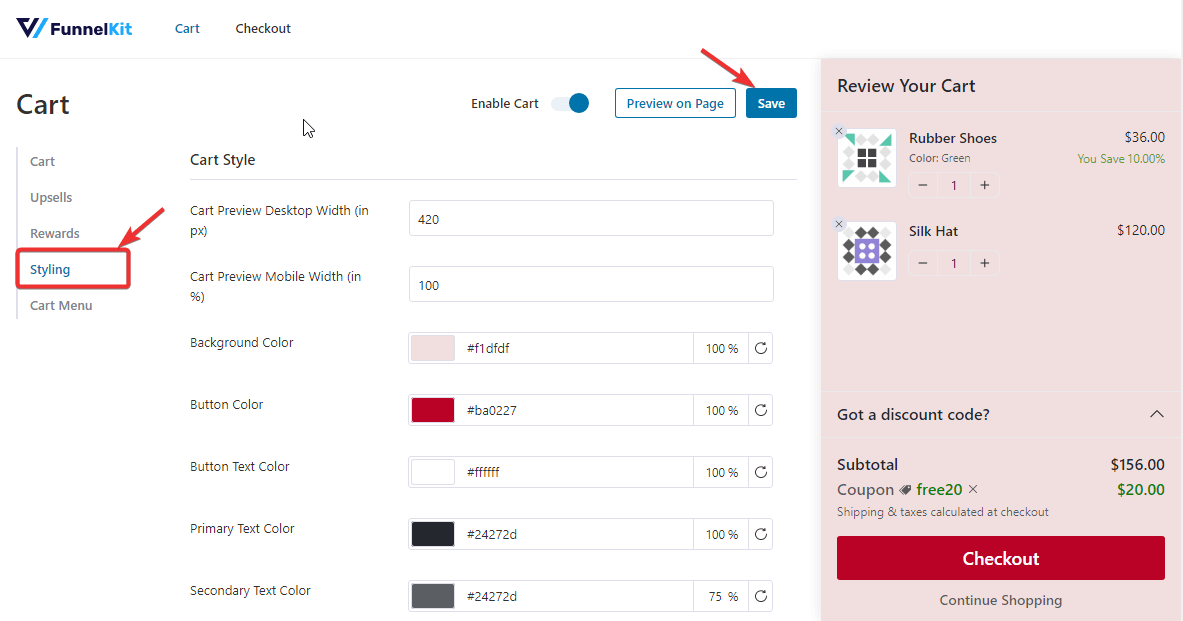
Step 3: Style your WooCommerce mini cart
To change the style of the floating sticky cart for WooCommerce, move to the “Styling” tab.
Here, you can configure your cart style and icon by customizing the background color, button color, button text color, icon style, and more. For more details on styling the WooCommerce mini cart by FunnelKit, see the Stylize documentation.
After making the changes, click 'Save' to apply all the changes.
Now you have your custom WooCommerce mini cart ready for free, thanks to FunnelKit Cart.
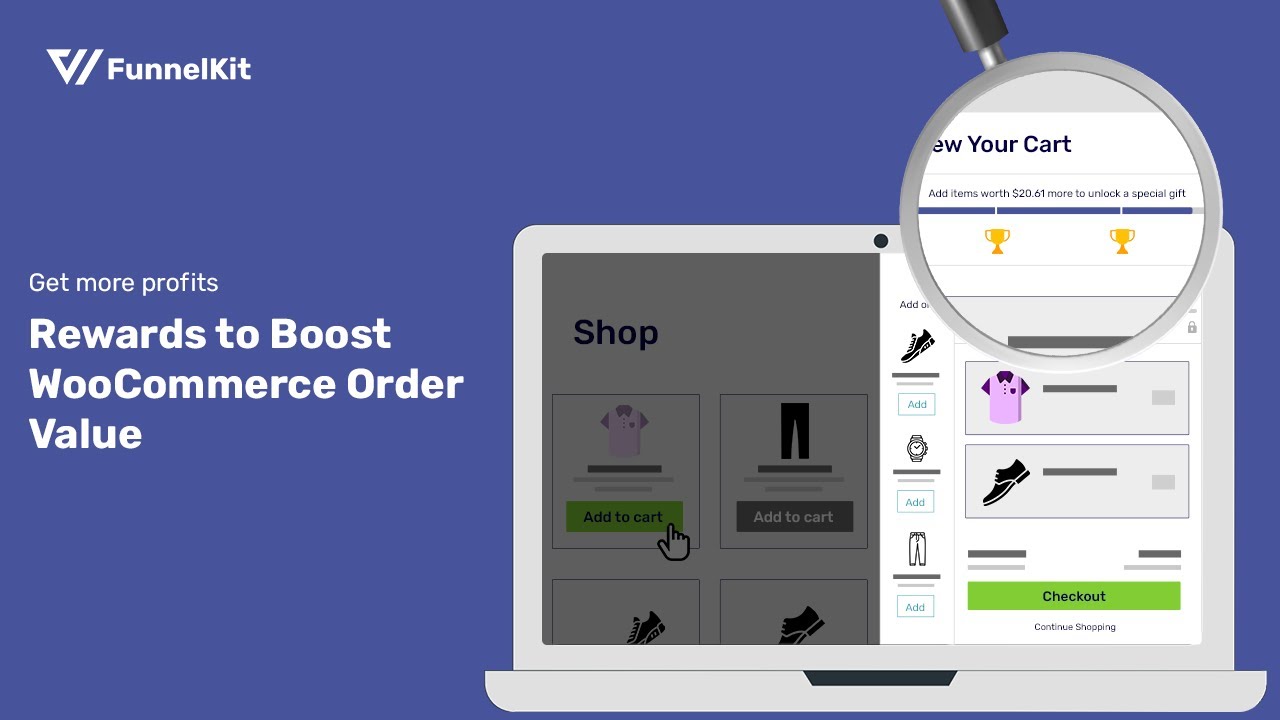
It also offers a feature to add a rewards system to the cart, which gamifies the shopping experience and makes it more enjoyable for users.
Learn more about the in-cart product recommendation that you offer inside the shopping cart.
Check out the in-cart reward system in the video below:
Method 2: Add a Mini Cart to the WooCommerce Checkout Page
FunnelKit Funnel Builder makes setting up a mini cart on the WooCommerce checkout page incredibly easy.
This is an effective sales funnel and checkout manager used by over 30,000 WooCommerce stores to enhance their shopping experience and increase average order value.
The best part is that customers don’t have to go to the cart page to view their orders. Neither will they miss the floating side cart because we will add a similar feature of a mini cart block on the checkout page itself.
Follow these steps to add a mini cart on the WooCommerce checkout page:
Step 1: Install and activate the FunnelKit Funnel Builder plugin
Get the FunnelKit Funnel Builder plugin. Please note that a Lite version of the Funnel Builder is also available for free, but we will use the Pro version for advanced features.
Download the zip files by going to the FunnelKit account:
1. Funnel Builder
2. Funnel Builder Pro
Install and activate both plugins. Once the plugins are activated, enter the license key you received at the time of purchase and click the Activate button to proceed.
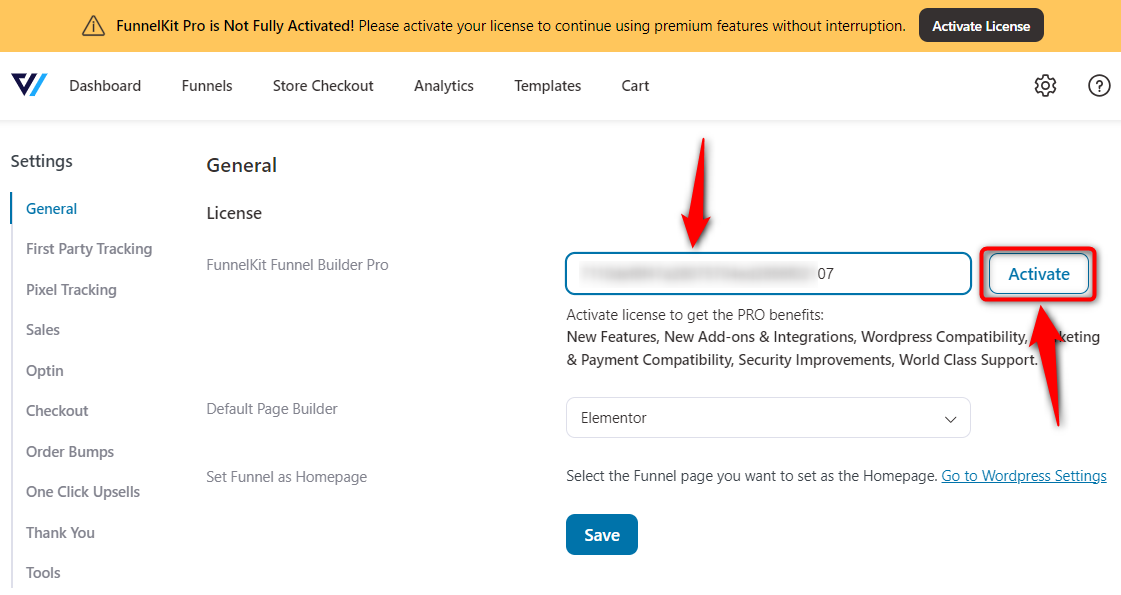
If you need help, you can check out the FunnelKit installation guide.
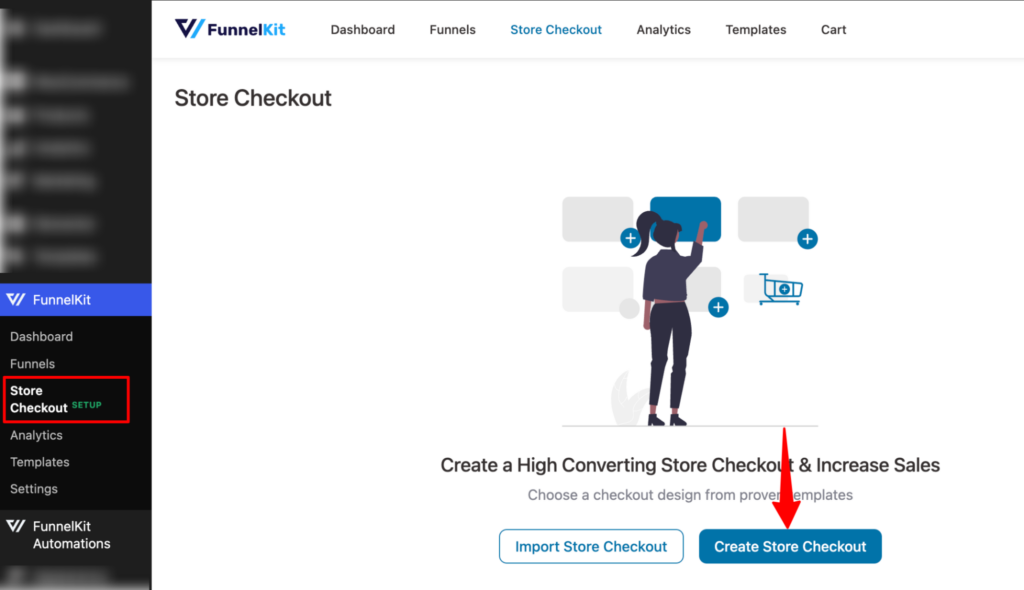
Step 2: Create a store checkout
Once you’ve installed the funnel builder on your WordPress site, the next step is to create an optimized checkout page.
Head over to FunnelKit ⇒ Store Checkout from the WordPress admin panel and click the Create Store Checkout.
We’ll import a prebuilt sales funnel template to build the store checkout.
Here, we are going to use Minimalist. Hover on the template and click on Preview.
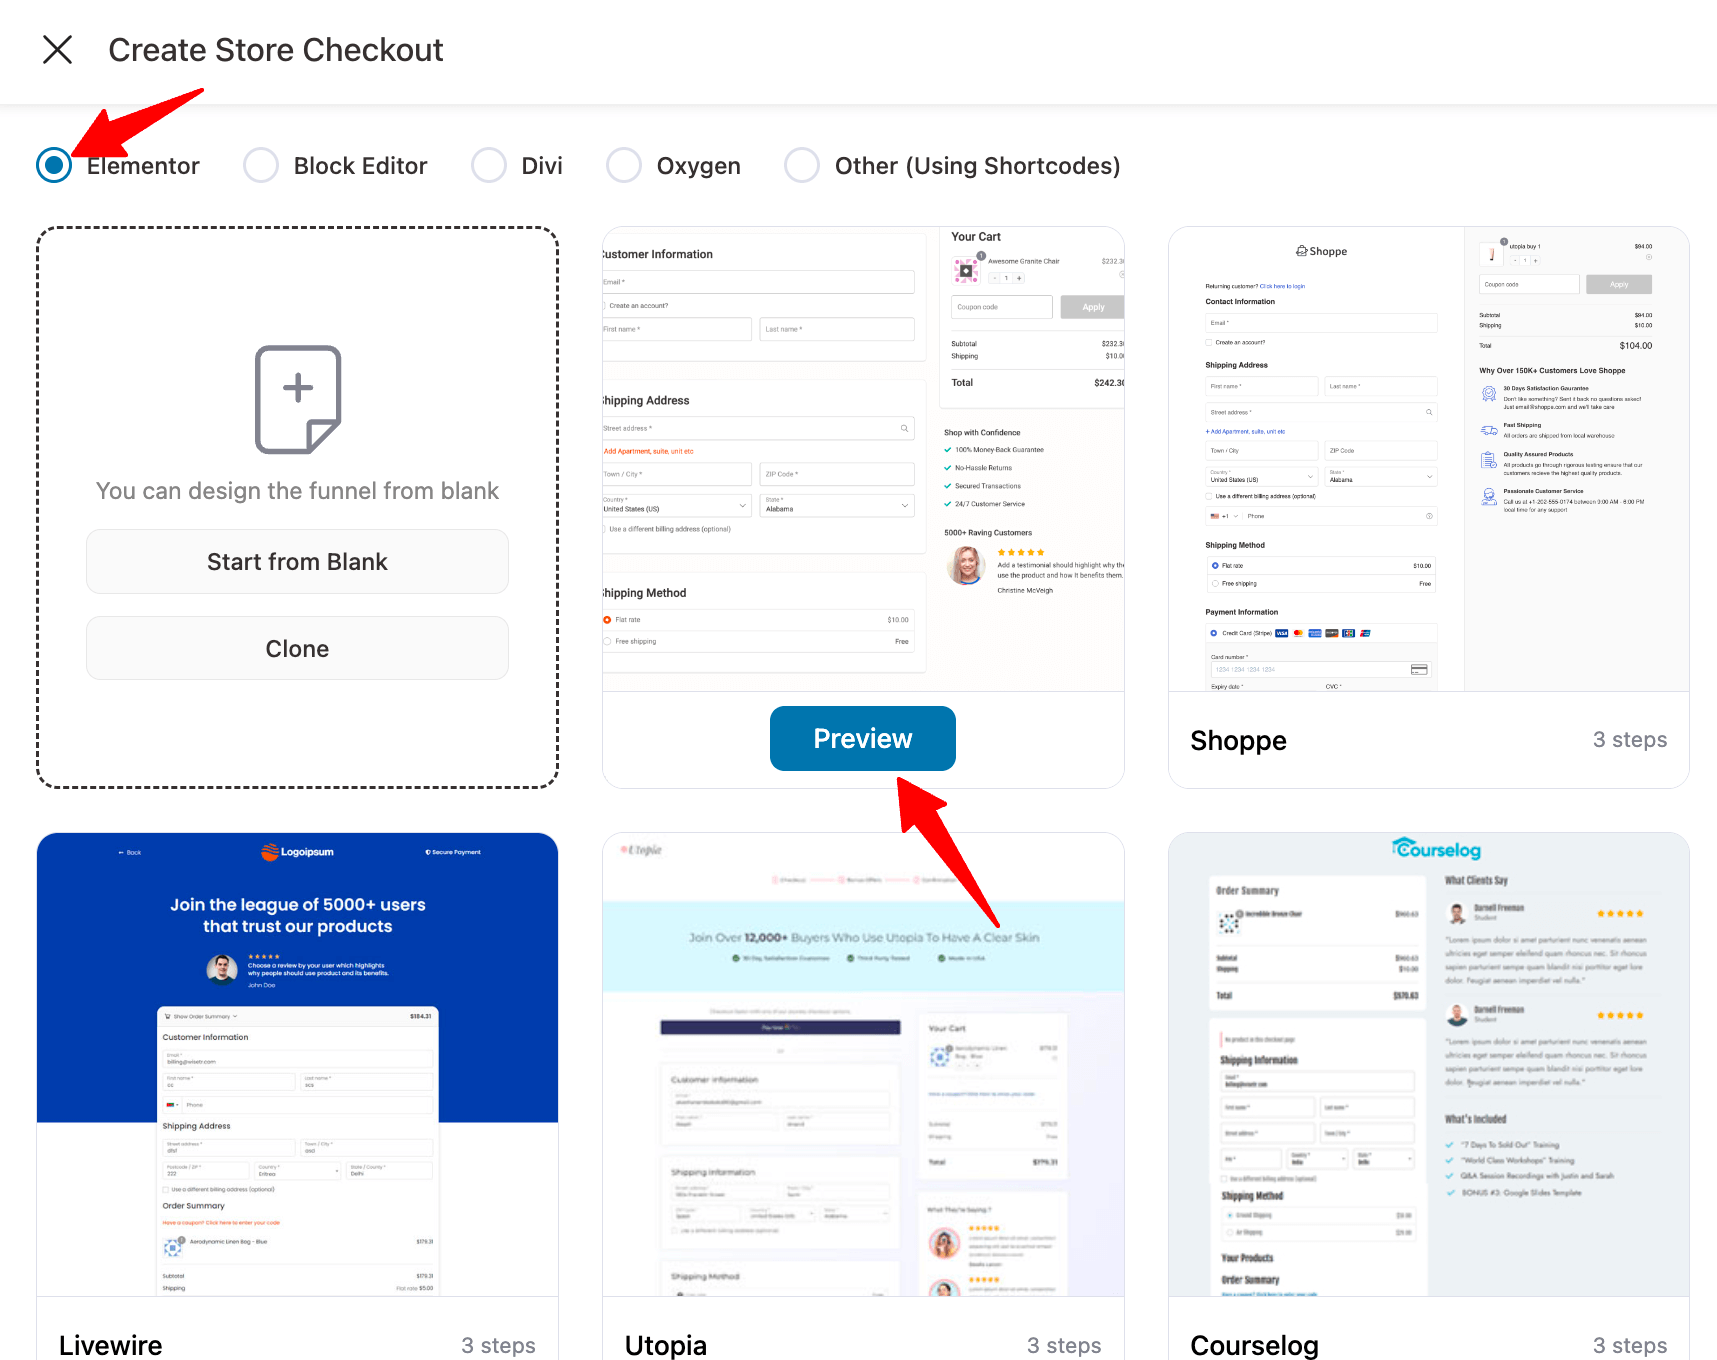
Choose whether you want a one-page checkout or a multi-page checkout. Then, click on the “Import this Template” button to import the template.
After that, provide a store checkout name and click on 'Add'.

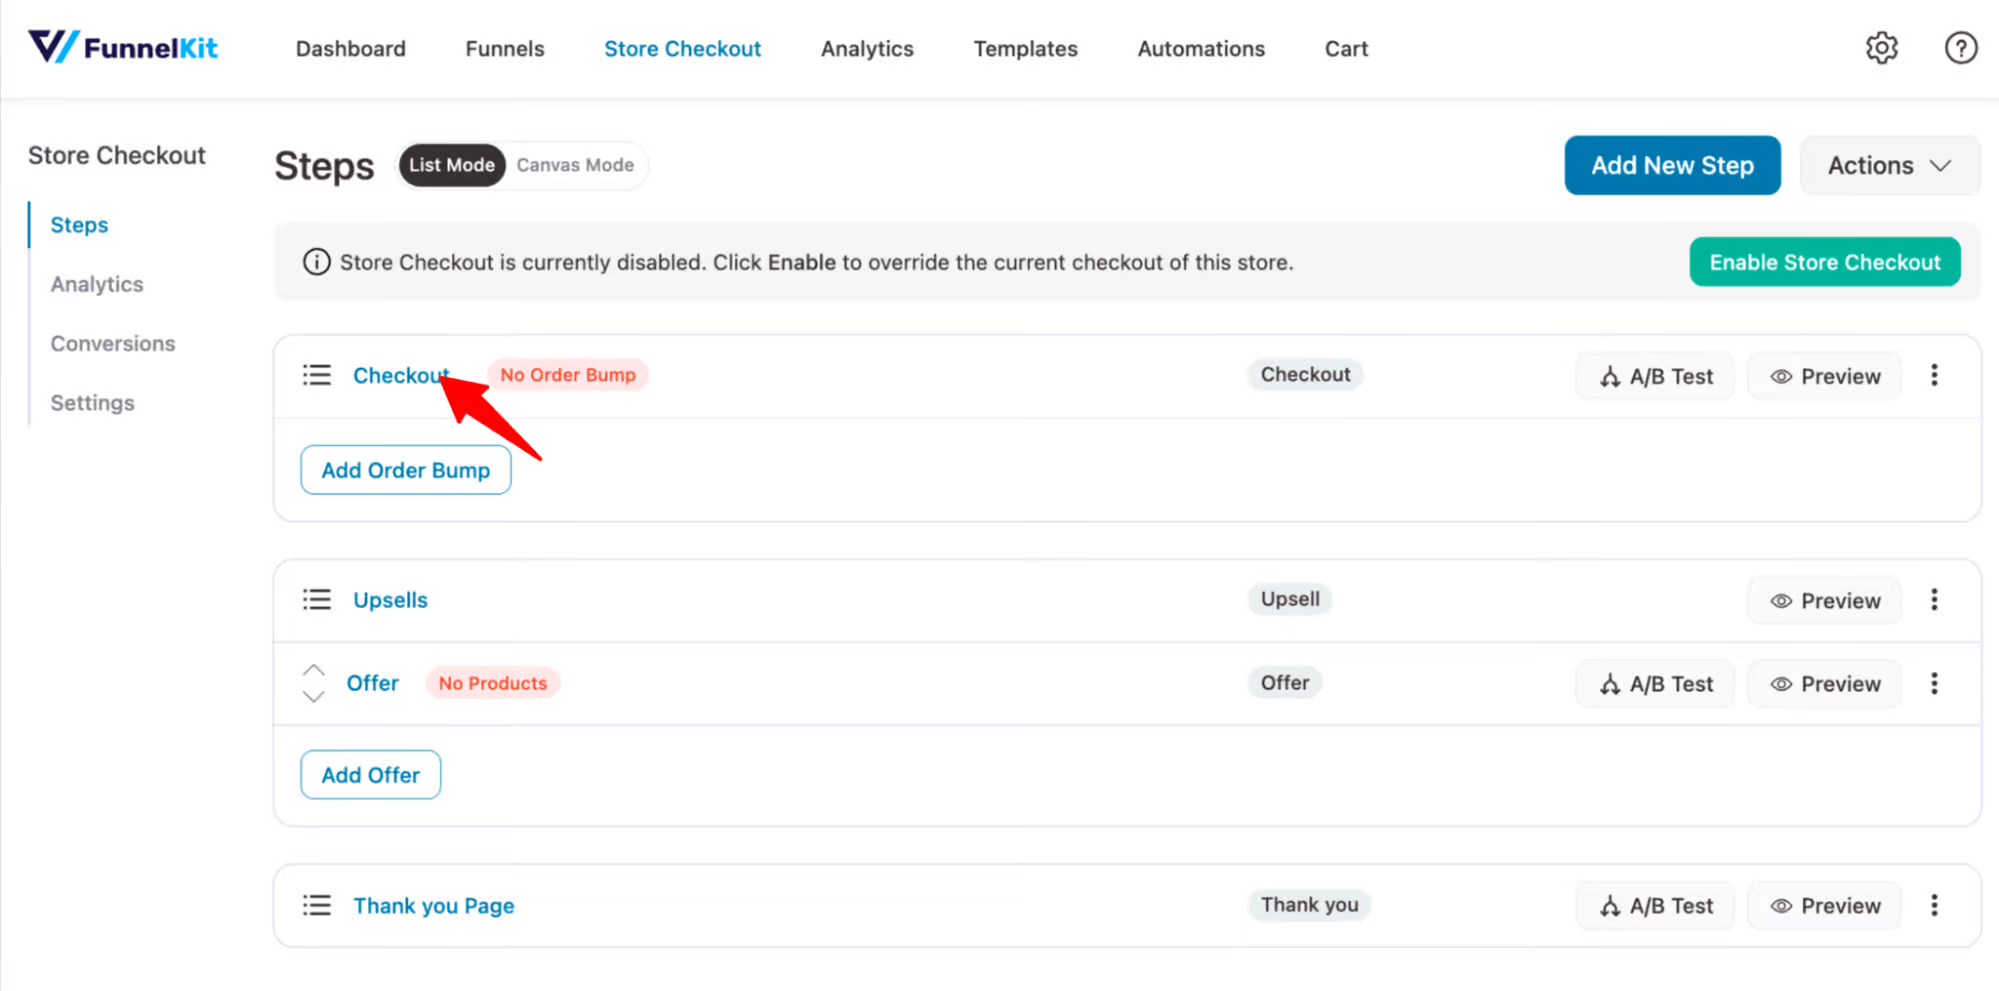
This will add a store checkout with three steps here: checkout, one-click upsell and thank you page.
Step 3: Customize the mini cart block on your store checkout
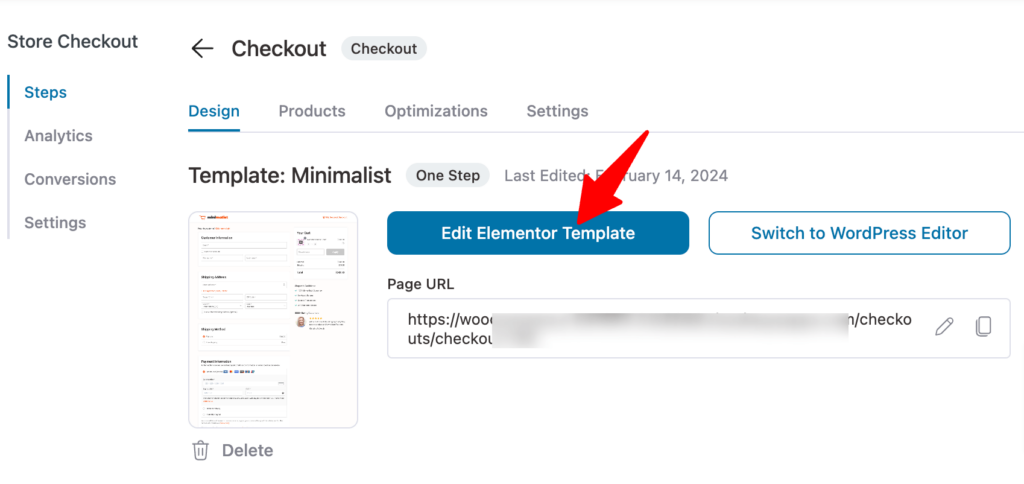
Once you’ve imported a template to create a global store checkout, click the checkout step to customize the mini cart.
After that, click on the “Edit Elementor Template” option to customize your checkout page with Elementor.
You can add and remove sections from the checkout page based on your preferences.
In addition, you can upload your logo, change labels, and more.
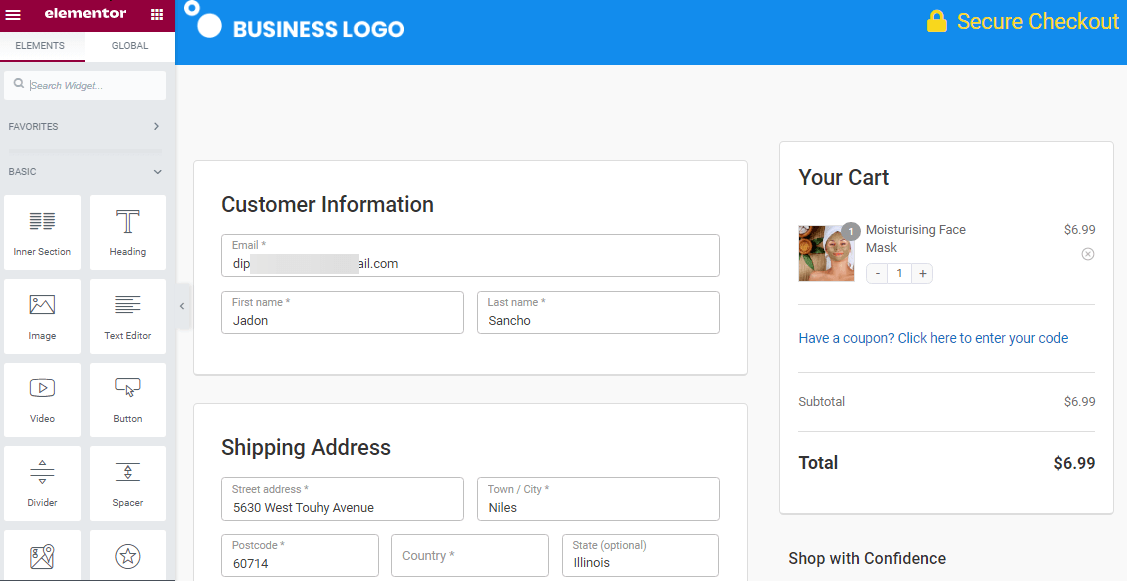
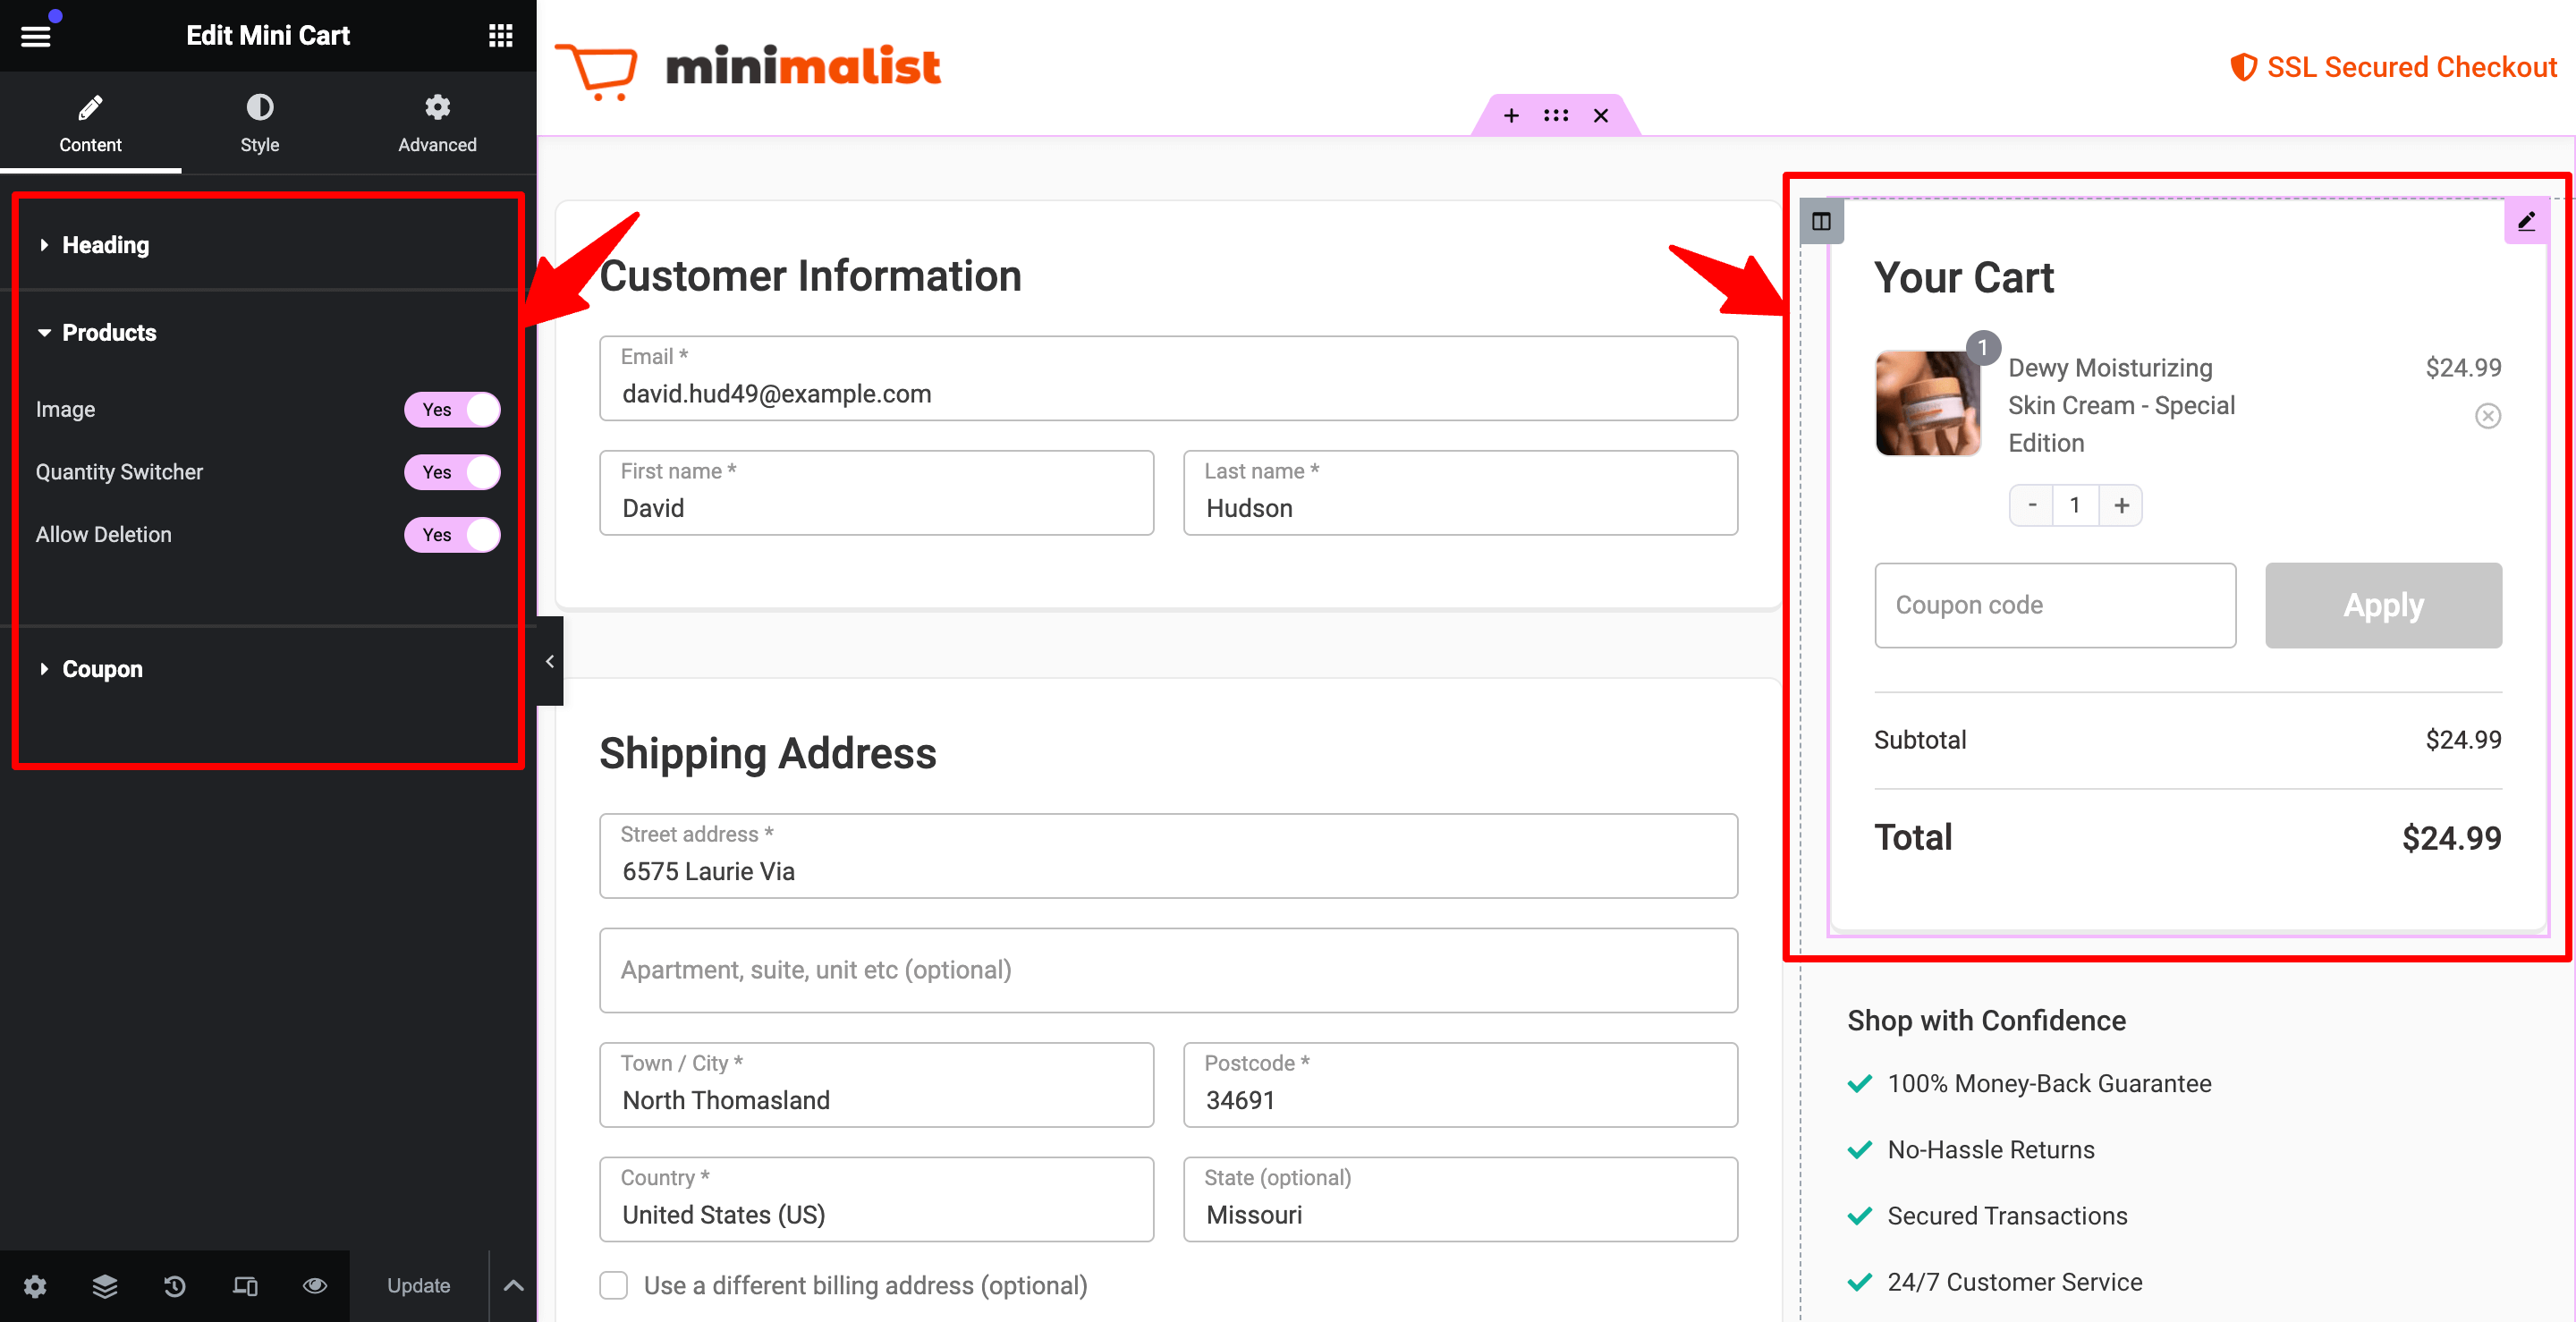
Notice that the checkout page already has a WooCommerce mini cart widget section added to it.
This section answers you 'how do you customize a mini cart?' queries like a charm.
You can customize the WooCommerce mini cart however you’d like. To customize the mini cart, click the cart, then on the left side you can change the heading text.
You can also choose to enable product Image, Quantity Switcher, and Allow Deletion options. You can also make the coupon section collapsible and edit the text of the coupon button.
Go to the Style tab to change the look of the mini cart.
Here, you can customize the color, typography, button color, text color, etc. of the mini cart.
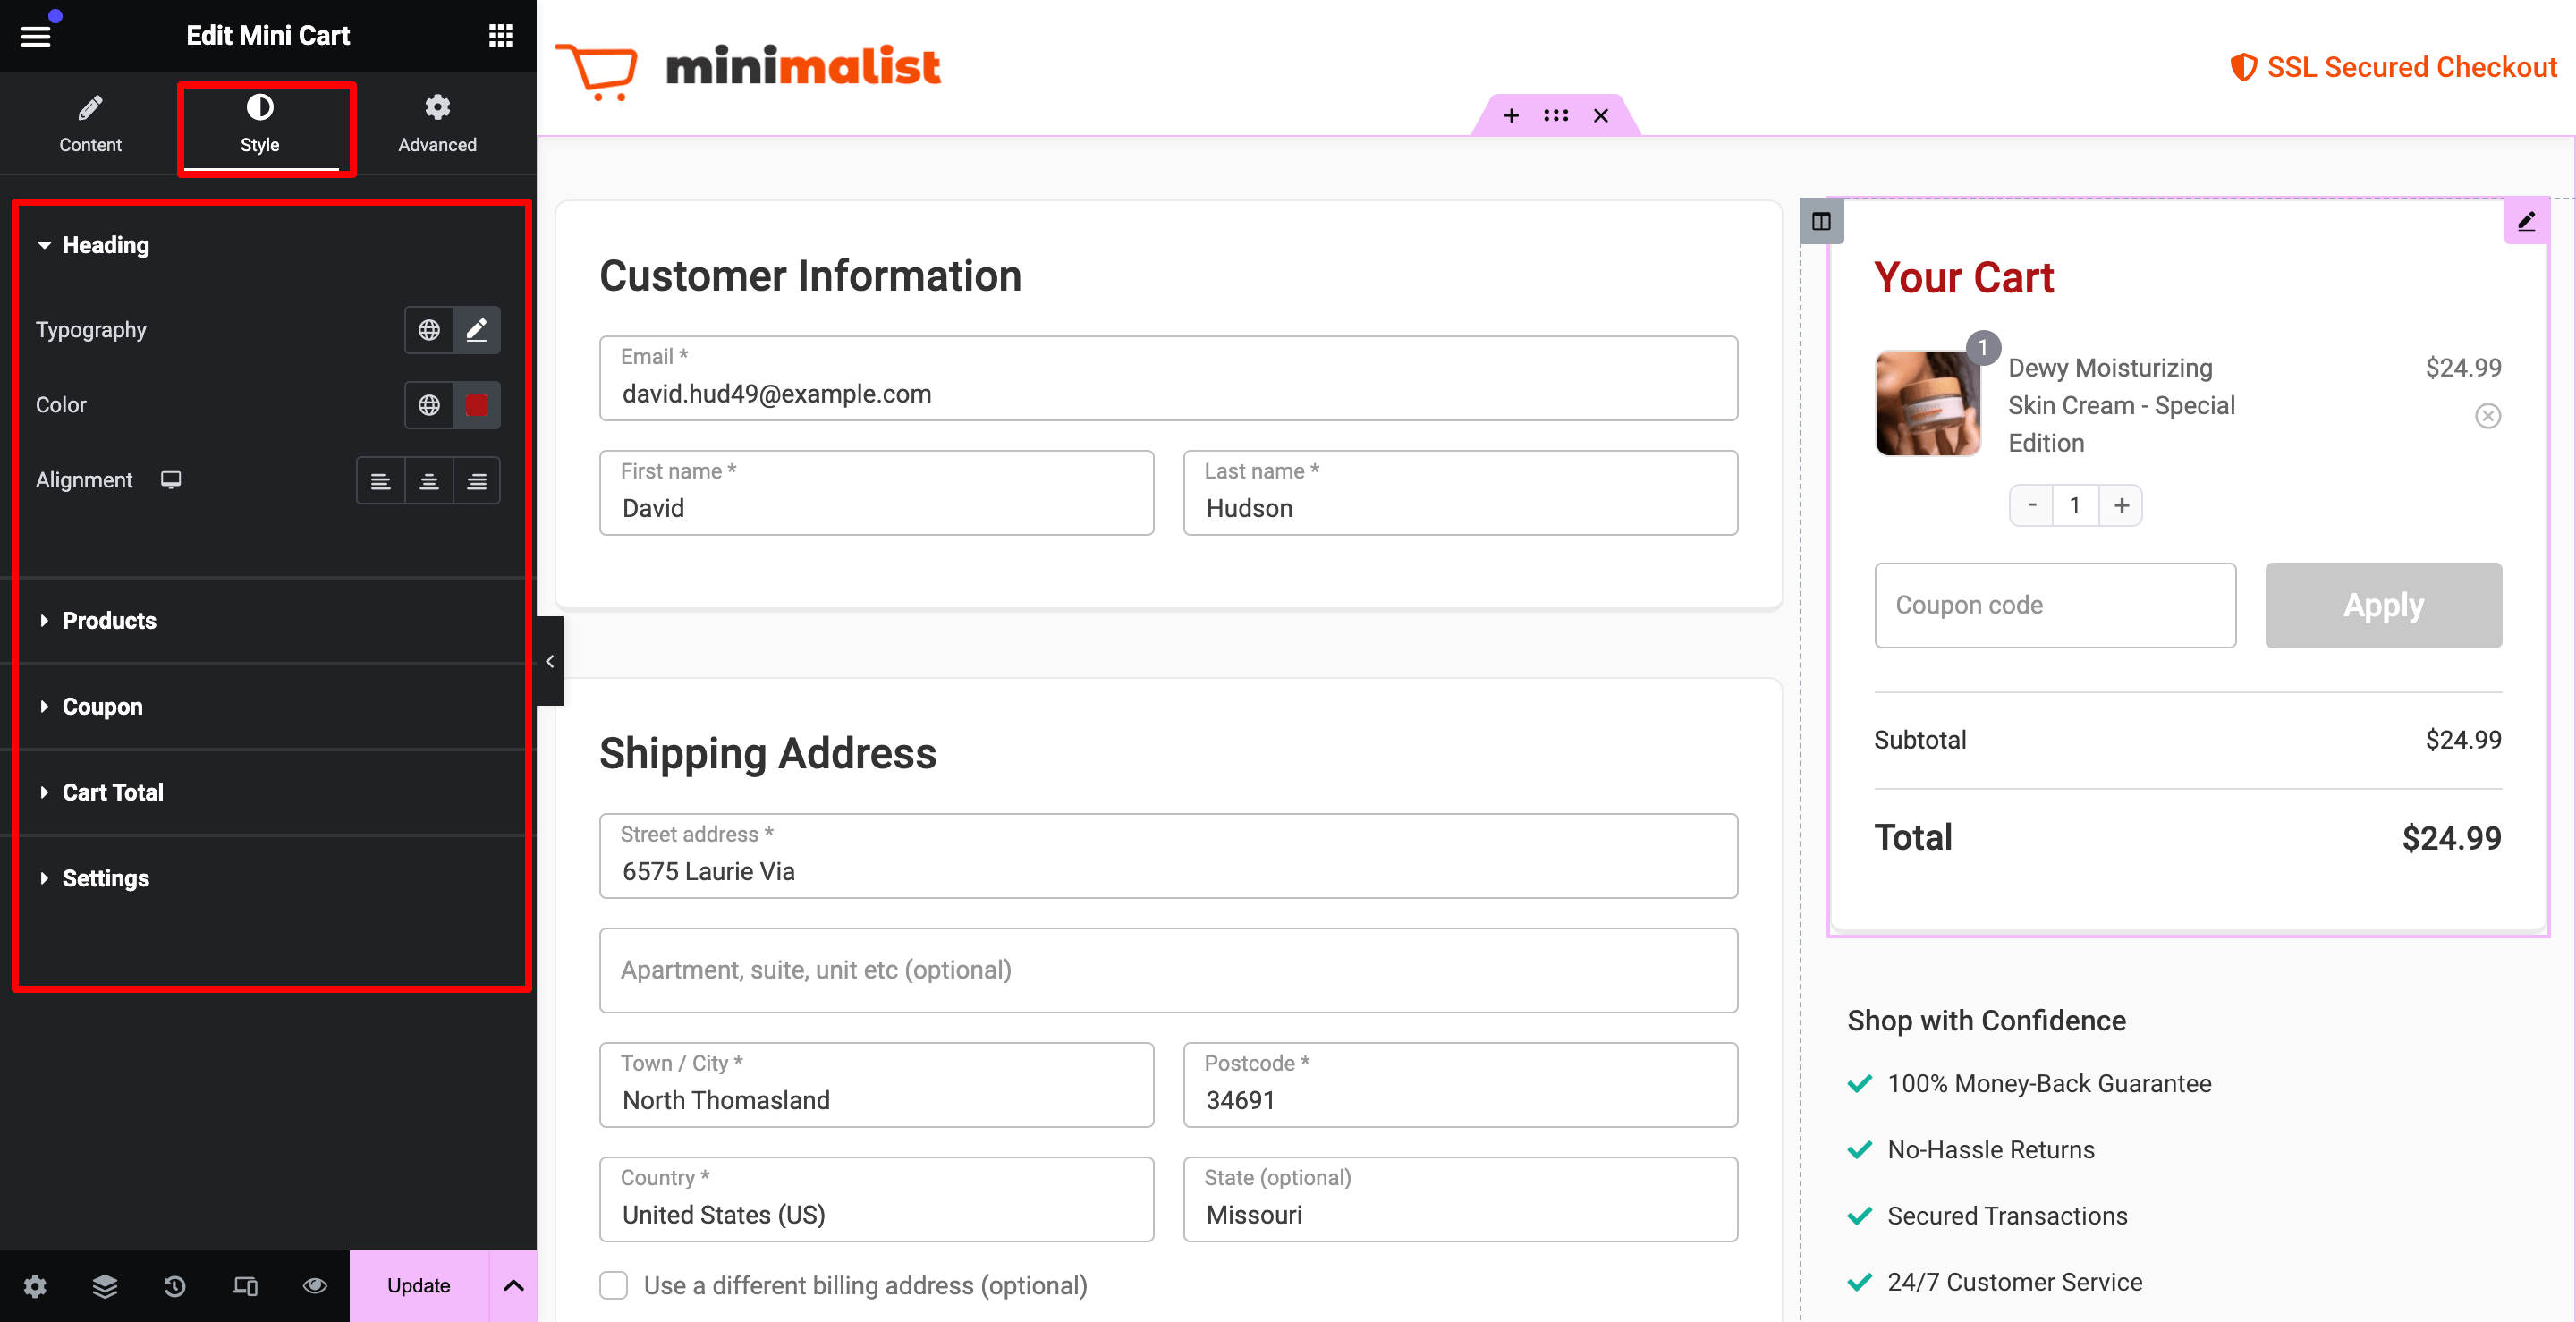
After customizing, click ‘Publish’ to save your changes.
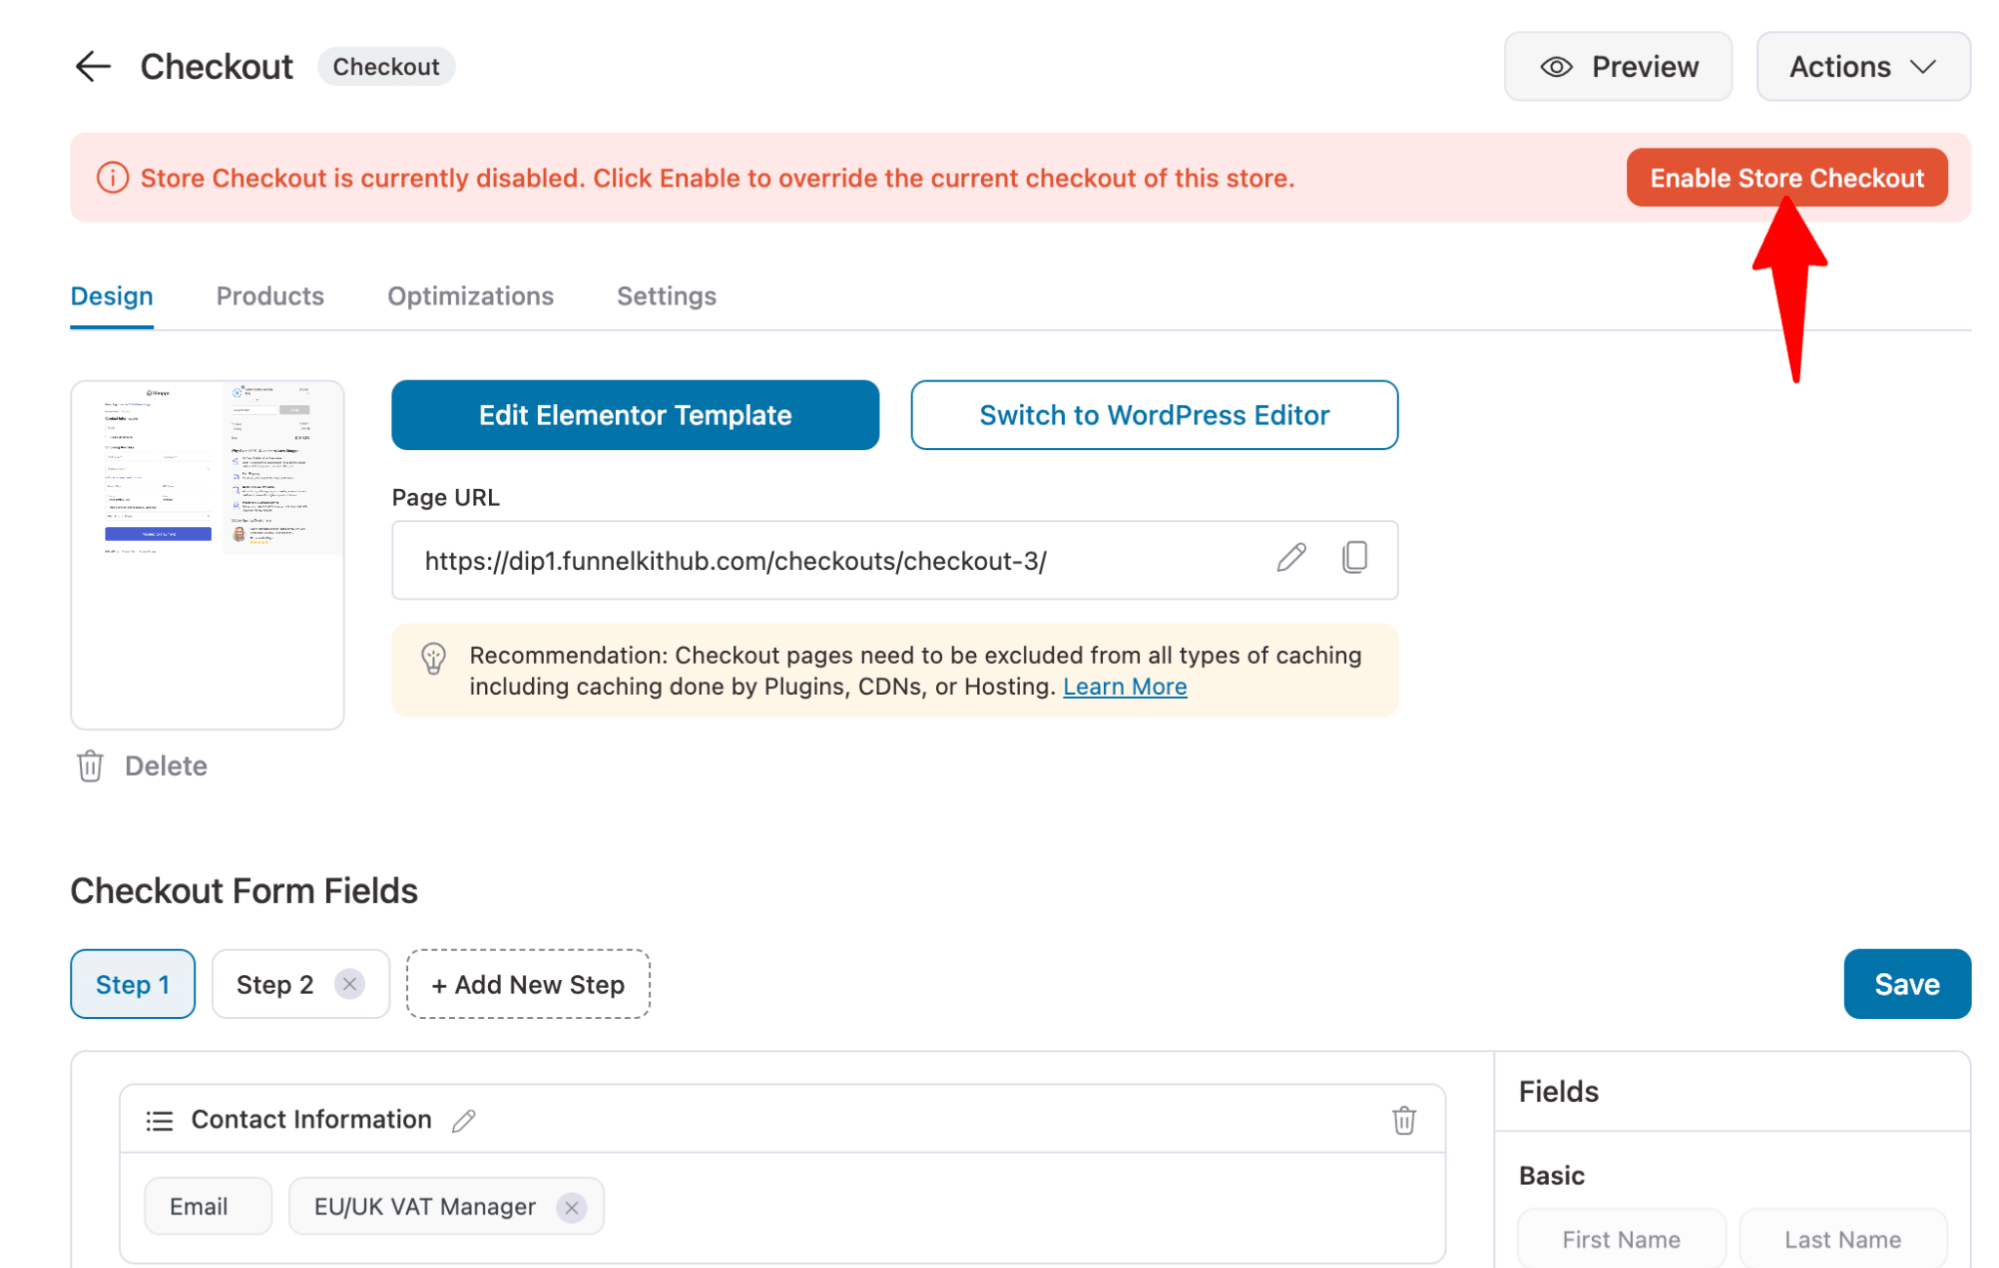
Step 4: Enable the store checkout
Now, turn on the “Enable Store Checkout” option to ensure that this custom checkout page you created becomes your active global checkout.
Step 5: Preview the checkout page with the WooCommerce mini cart
FunnelKit Funnel Builder will automatically add an AJAX-based custom mini cart to the checkout page.
You don’t have to use a shortcode to add it to your checkout page.
Test your checkout page by adding products to the cart and heading to checkout on your store’s front end:
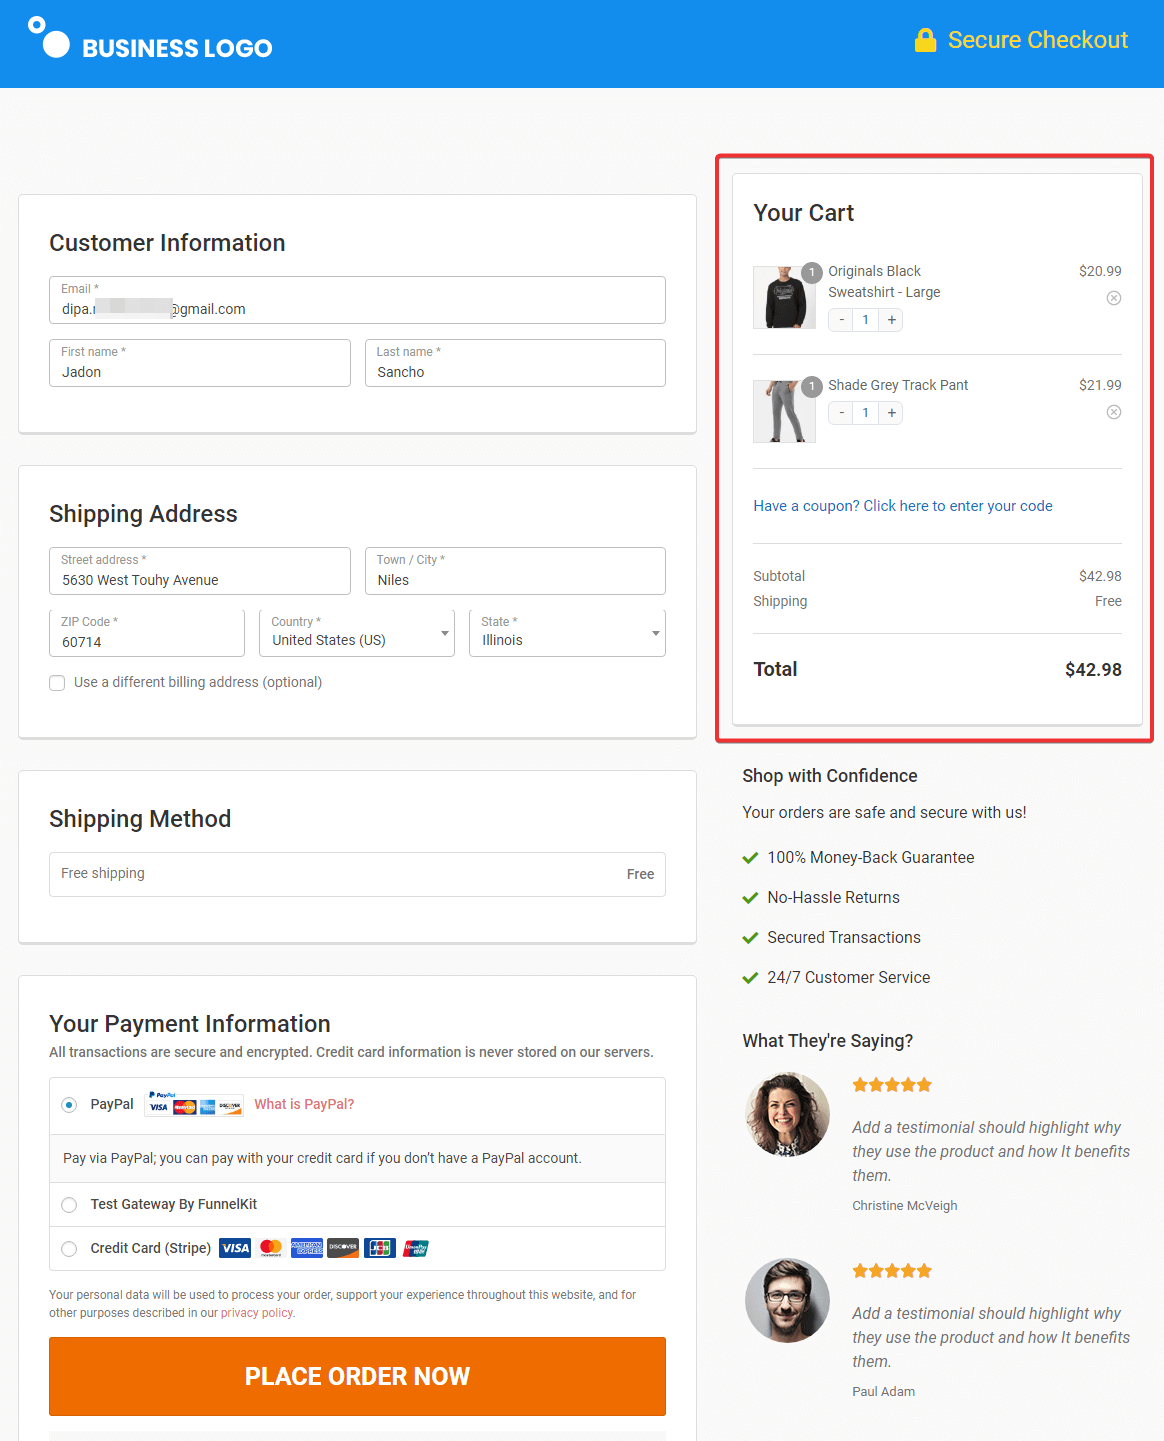
Your checkout page will now also have a mini cart widget.
And that’s it! Your store checkout with a mini cart is ready!
Method 3: Add a WooCommerce Mini Cart With Custom Code
If you prefer not to use a plugin, WooCommerce provides a built-in function, woocommerce_mini_cart(), that outputs a basic mini cart.
This method gives you more control over placement but requires working with PHP template files and custom code.
Before editing any theme files, create a child theme or use a code snippets plugin. Editing your theme’s files directly means your changes will be lost during a theme update.
Add this code to your child theme’s functions.php file or a code snippets plugin:
// Add mini cart to the navigation menu
function custom_woocommerce_mini_cart() {
    echo '<div class="mini-cart-wrapper">';
    echo '<a href="' . wc_get_cart_url() . '" class="cart-icon">';
    echo '<span class="cart-count">' . WC()->cart->get_cart_contents_count() . '</span>';
    echo '</a>';
    echo '<div class="mini-cart-dropdown">';
    woocommerce_mini_cart();
    echo '</div>';
    echo '</div>';
}
add_action( 'wp_footer', 'custom_woocommerce_mini_cart' );
This outputs the cart contents using WooCommerce’s default mini cart template located at woocommerce/templates/cart/mini-cart.php.
The template renders the product list, item totals, and links to the cart and checkout pages.
You can update the mini cart with Ajax using the theme's JavaScript file.
Styling the mini cart
The default WooCommerce mini cart template is quite limited.
You have to write custom CSS to position the dropdown correctly under your cart icon, build media queries so it doesn't break on mobile, and write the JavaScript needed to make the toggle open and close without glitching.
Limitations of the code method
Going the custom code method gets you basic cart functionality and nothing else.
You won't find upsell recommendations or free-shipping bars to push higher-order values.
If you want a coupon field directly inside the cart or a visual interface to change background colors without touching CSS stylesheets, you are entirely out of luck.
You also have to handle the AJAX updates yourself every time someone clicks 'Add to Cart' so the page doesn't violently reload.
A plugin solution is a more practical choice for stores that want a fully featured WooCommerce mini cart without development work.
7 Best Practices to Maximize Conversions With Your WooCommerce Mini Cart
Here are some best practices for using mini carts effectively in your store.
1. Keep the design simple and intuitive
A mini cart should have a minimalistic design that focuses on functionality. It’s important to avoid overwhelming customers with too many details.
Use clear typography, organized spacing and non-distracting colors to guide customers’ attention to their cart contents.
FunnelKit lets you customize the mini cart in your WooCommerce store however you want.
2. Provide clear call-to-actions (CTAs)
Clear call-to-action (CTA) buttons are critical for guiding users to the next steps, such as reviewing their cart items or hitting the place order button.
FunnelKit enables easy customizations of the button text and colors to make them highly visible and distinguishable from other elements in the mini cart.
Place these buttons strategically so users can effortlessly proceed without searching for where to click next.
3. Balance information display with simplicity
Striking the right balance between providing enough information and keeping the mini cart simple is crucial.
While it’s important to show key details - such as product names, quantities, images, prices, and totals - don’t clutter the space with unnecessary text or complex information.
A concise order summary lets customers see a snapshot of their cart without feeling overwhelmed.
4. Display promotional offers
The mini cart can be a strategic space to showcase product recommendations, featured products, or special offers.
FunnelKit lets you display related products, bundle offers, or thresholds for free shipping, discounts, or free gifts.
However, these promotions should be presented subtly to avoid distracting from the mini cart's main purpose.
5. Make the mini cart accessible across all devices
A good mini cart should work seamlessly across all devices, especially on mobile.
Use FunnelKit to customize the WooCommerce Ajax mini shopping cart icon. The icon should be easy to tap, and the text should be large enough to read without zooming in.
Test the cart thoroughly to ensure the interface is touch-friendly and buttons are not placed too close together.
6. Enable AJAX cart updates to avoid page reloads
A WooCommerce mini cart with AJAX updates the cart contents in real time when items are added, removed, or modified. This eliminates the jarring experience of full-page refreshes and keeps the interaction smooth.
If your cart does not update dynamically, shoppers may think their action did not register.
7. Customize the empty cart state to keep shoppers engaged
When the cart is empty, do not just show a blank panel. Use the empty state to display a “Start Shopping” button, feature popular products, or highlight a current promotion.
A well-designed empty mini cart turns a dead end into a browsing prompt that guides shoppers back to your catalog.
WooCommerce Mini Cart: Frequently Asked Questions (FAQs)
Here, we’ve answered some commonly asked questions about the WooCommerce mini cart.
Enable the mini cart in WooCommerce by navigating to the FunnelKit Cart and turning the toggle on to display a beautiful sliding cart in your store.
You can even enable the mini cart on your WooCommerce checkout page using the FunnelKit Funnel Builder.
Yes, you can customize the appearance of your mini cart using the Style section inside the FunnelKit Cart. Configure the customizations you need, such as animation, text, background, cart preview width, button, border radius, link color, etc.
Here are some reasons why incorporating a WooCommerce mini cart can be advantageous:
- Improved user experience
A mini cart eliminates the need for customers to visit a separate cart page to view their items, making the shopping process more convenient and efficient.
- Increased conversions
A WooCommerce mini cart keeps customers engaged by showing their items and encouraging them to continue shopping. As a result, it reduces the chance that customers will abandon their carts.
- Reduced friction
A complex checkout process demotivates users from shopping. A mini cart minimizes the process by adding a direct checkout option, motivating users to shop more.
- Quick access
A mini cart allows users to view the order total at any time from anywhere on the site, facilitating an anxiety-free shopping experience.
- Enhanced aesthetics
A well-designed mini cart can complement your WooCommerce store's overall design, offering a polished, professional look.
This is a common issue that typically comes down to AJAX not firing properly. That’s why we recommend enabling the Ajax add-to-cart feature inside the FunnelKit Cart to update the cart items in real time.
If you are using custom code, confirm that you have registered the correct AJAX hooks for the added_to_cart event.
Caching plugins can also interfere with cart updates, so exclude cart fragments from your page cache.
A well-implemented mini cart should have minimal impact on your website’s speed. However, poorly coded plugins or excessive customization can potentially slow things down. Plugins like FunnelKit let you enhance your WooCommerce store for faster speed and high performance.
Yes, FunnelKit offers icon visibility options to help you display the mini cart on all pages of your website. You can even put the mini cart on only WooCommerce pages or the header menu of your website.
In addition, you can also add a mini cart shortcode to the pages of your WooCommerce website.
Start Converting More Shoppers With a WooCommerce Mini Cart!
We covered three approaches for adding a mini cart to your WooCommerce store. One is the plugin method using FunnelKit Sliding Cart, the second is on the checkout page, and the third is the custom code method using woocommerce_mini_cart().
For stores that want a fully featured slide-out cart with product recommendations, reward milestones, coupon fields, and complete design customization, the FunnelKit Cart is the strongest option.
In addition, you can take things up a notch by gamifying the shopping experience.
With FunnelKit Pro Plus and above, you will get both FunnelKit Cart Pro and FunnelKit Funnel Builder Pro. This WordPress plugin can transform your online store into a customer-oriented powerhouse.
Elevate the shopping experience, increase sales, and foster customer loyalty like never before.
Ready to create a WooCommerce mini cart for your online store?
Editorial Team
March 31, 2026When it comes to lead funnel vs sales funnel, most marketers mix them up, which ends up costing them customers and revenue. Understanding the difference between the two is the...
Editorial Team
March 23, 2026Does your WooCommerce store offer enough payment options? If not, you could be losing up to 13% of sales. [According to Baymard]. WooCommerce’s default payment options don’t always meet customer...
Editorial Team
February 4, 2026Triggered emails are one of the highest-converting tools in digital marketing, yet most businesses still underuse them. These emails are sent automatically based on how users interact with your site,...


