
Ever clicked the checkout button and suddenly felt unsure? Did I add the right items? Am I being overcharged? The same uncertainty is costing you sales.
Shoppers expect full transparency at checkout. If they cannot see a detailed breakdown of their order products, pricing, discounts, and shipping, they hesitate. And hesitation leads to lost revenue.
A well-structured WooCommerce order summary can boost trust and increase conversions effortlessly.
By customizing the order summary section, you can enhance the user experience, provide additional information, and even match the design with your brand.
In this guide, we’ll share why it’s important to customize the WooCommerce order summary and how to customize it on both the checkout and thank you pages.
Short time? Watch the video:
Table of Contents
- 1 What is WooCommerce Order Summary?
- 2 Why Should You Customize WooCommerce Order Summary in Your Store?
- 3 How to Customize WooCommerce Order Summary Without Coding?
- 3.1 Step 1: Install and activate FunnelKit Funnel Builder
- 3.2 Step 2: Create a store checkout with a pre-built template
- 3.3 Step 3: Customize the WooCommerce order summary on the checkout page
- 3.4 Step 4: Customize the WooCommerce order summary on the thank you page
- 3.5 Step 5: Activate your store checkout
- 4 5 Best Practices for an Optimized WooCommerce Order Summary
- 5 Frequently Asked Questions About WooCommerce Order Summary
- 6 How can I customize the order summary to match my brand?
- 7 Is it essential to optimize my order summary for mobile devices?
- 8 Is it possible to track user interactions with the order summary?
- 9 Ready to Customize WooCommerce Order Summary?
What is WooCommerce Order Summary?
The WooCommerce order summary is a concise overview of a customer’s order details within the WooCommerce e-commerce platform, typically displayed on the checkout page and the order confirmation or thank-you page.
Typically, an order summary includes the following information:
- Product information: Product information includes the name of the product, quantity, price, image, and product attribute (in case of a variable product).
- Payment information: Payment information includes subtotal, shipping cost, any applicable taxes, additional fees, or discounts applied to the order subtotal, and total payable amount.
- Customer information: Customer information includes name, email, billing, and shipping address. The shipping address represents the place where the product will be delivered.
- Payment method: The order summary also includes the payment method the user chooses to pay for the order.
- Order ID: The order summary on the thank you page includes the order ID as well.
- Date of order placement: On the order summary page, the date of order placed is also included.
- Order notes: If the order has additional notes, they are also shown as part of the order summary.
Why Should You Customize WooCommerce Order Summary in Your Store?
Before discussing why you should customize the order summary section of WooCommerce, let’s look at the default WooCommerce pages.
Here is the default checkout page with the order summary:

Here is the default WooCommerce thank you page with order details:
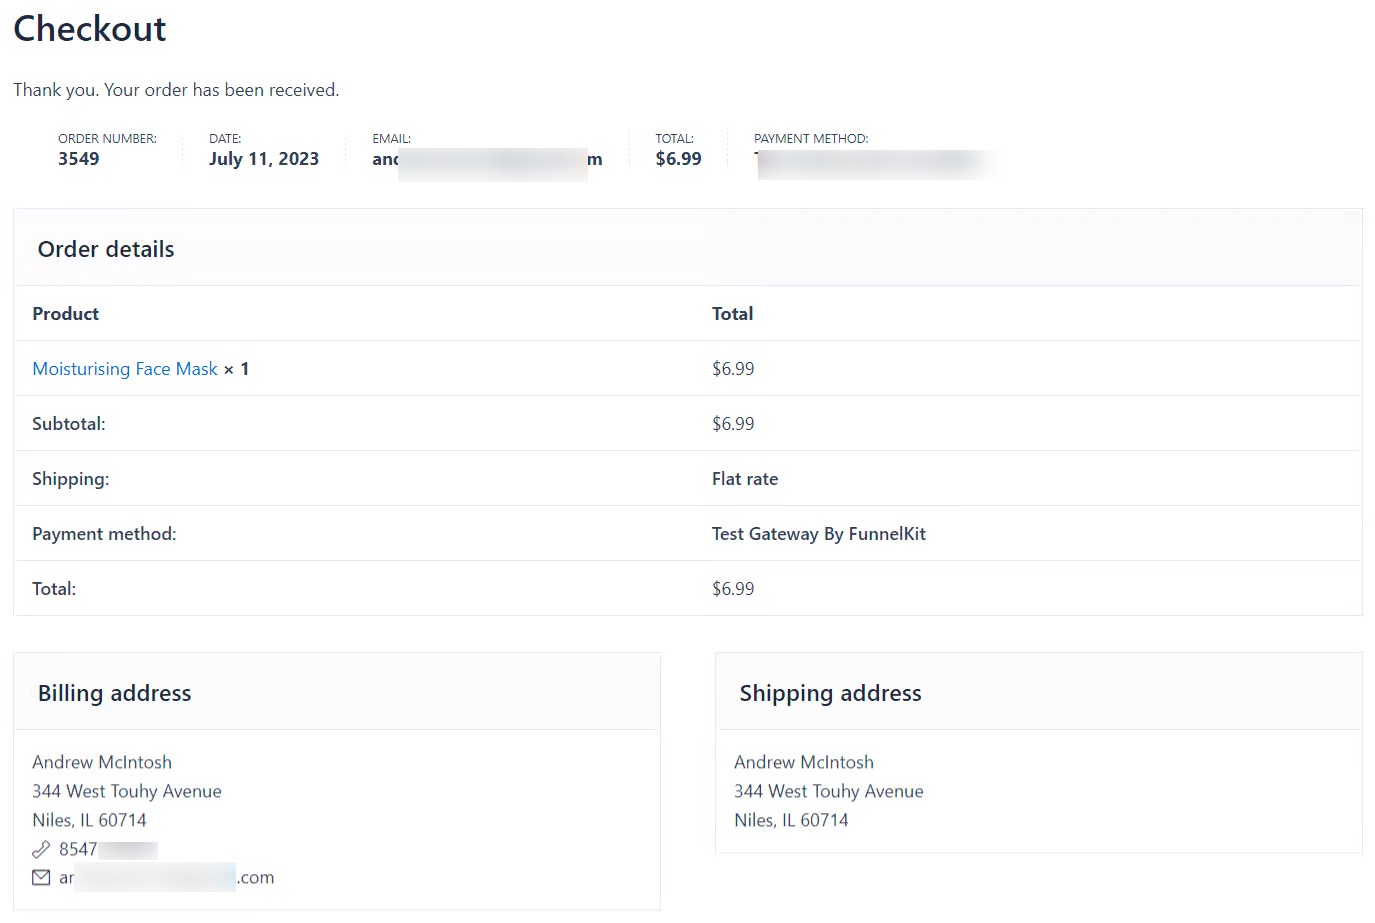
Both the default WooCommerce order summary section is basic and does not adequately reflect any brand identity.
The product section doesn’t show any product image, only the name, which can create ambiguity. Moreover, it’s not engaging enough.
If you customize the WooCommerce order summary section, you can achieve the following:
- Brand representation
Customization allows you to incorporate your brand colors, font, and overall visual identity into the order summary. This reinforces brand recognition and presents a cohesive image throughout the customer's shopping experience.
- Enhanced user experience
A customized order summary can be designed to be more user-friendly, presenting information clearly, organized, and aesthetically pleasing.
- Provide clarity and relevance
By customizing, you can prioritize and emphasize the most important information for your customers. This ensures that crucial details such as product information, pricing, and discounts are easily accessible and understood.
- Building trust
A well-designed and professional-looking order summary can instill trust in customers. They will likely make repeat purchases when they perceive your online store as trustworthy and reliable.
Now, let’s check how you can customize the WooCommerce order summary on both the checkout and thank you pages.
How to Customize WooCommerce Order Summary Without Coding?
In this section, we’ll not override the order summary block with a piece of code or any template file.
Instead, we’ll customize it without doing any custom programming.
We’ll use a sales funnel builder named FunnelKit Funnel Builder to customize the order summary in your WooCommerce store’s checkout page and thank you page.
FunnelKit Funnel Builder is the most powerful sales funnel builder and checkout manager plugin that comes with pre-built templates that you can use to import checkout and thank you pages and customize them easily.
Moreover, FunnelKit FunnelBuilder provides deep integration with page builders such as Elementor, Bricks, Divi, Oxygen, Gutenberg, etc.
Therefore, you can customize WooCommerce pages along with the order summary section simply by using drag-and-drop without any coding.
In addition, you can also add order bumps and one-click upsells, which help you increase your AOV. Furthermore, you can provide lucrative discounts on your offers with just a few clicks.
Step 1: Install and activate FunnelKit Funnel Builder
The first step is to install both FunnelKit Funnel Builder free and FunnelKit Pro on your website.
If you need help installing and activating FunnelKit Funnel Builder Pro, then check our installation guide.
Step 2: Create a store checkout with a pre-built template
Now, we need to create a store checkout that will replace the default WooCommerce checkout and thank you page.
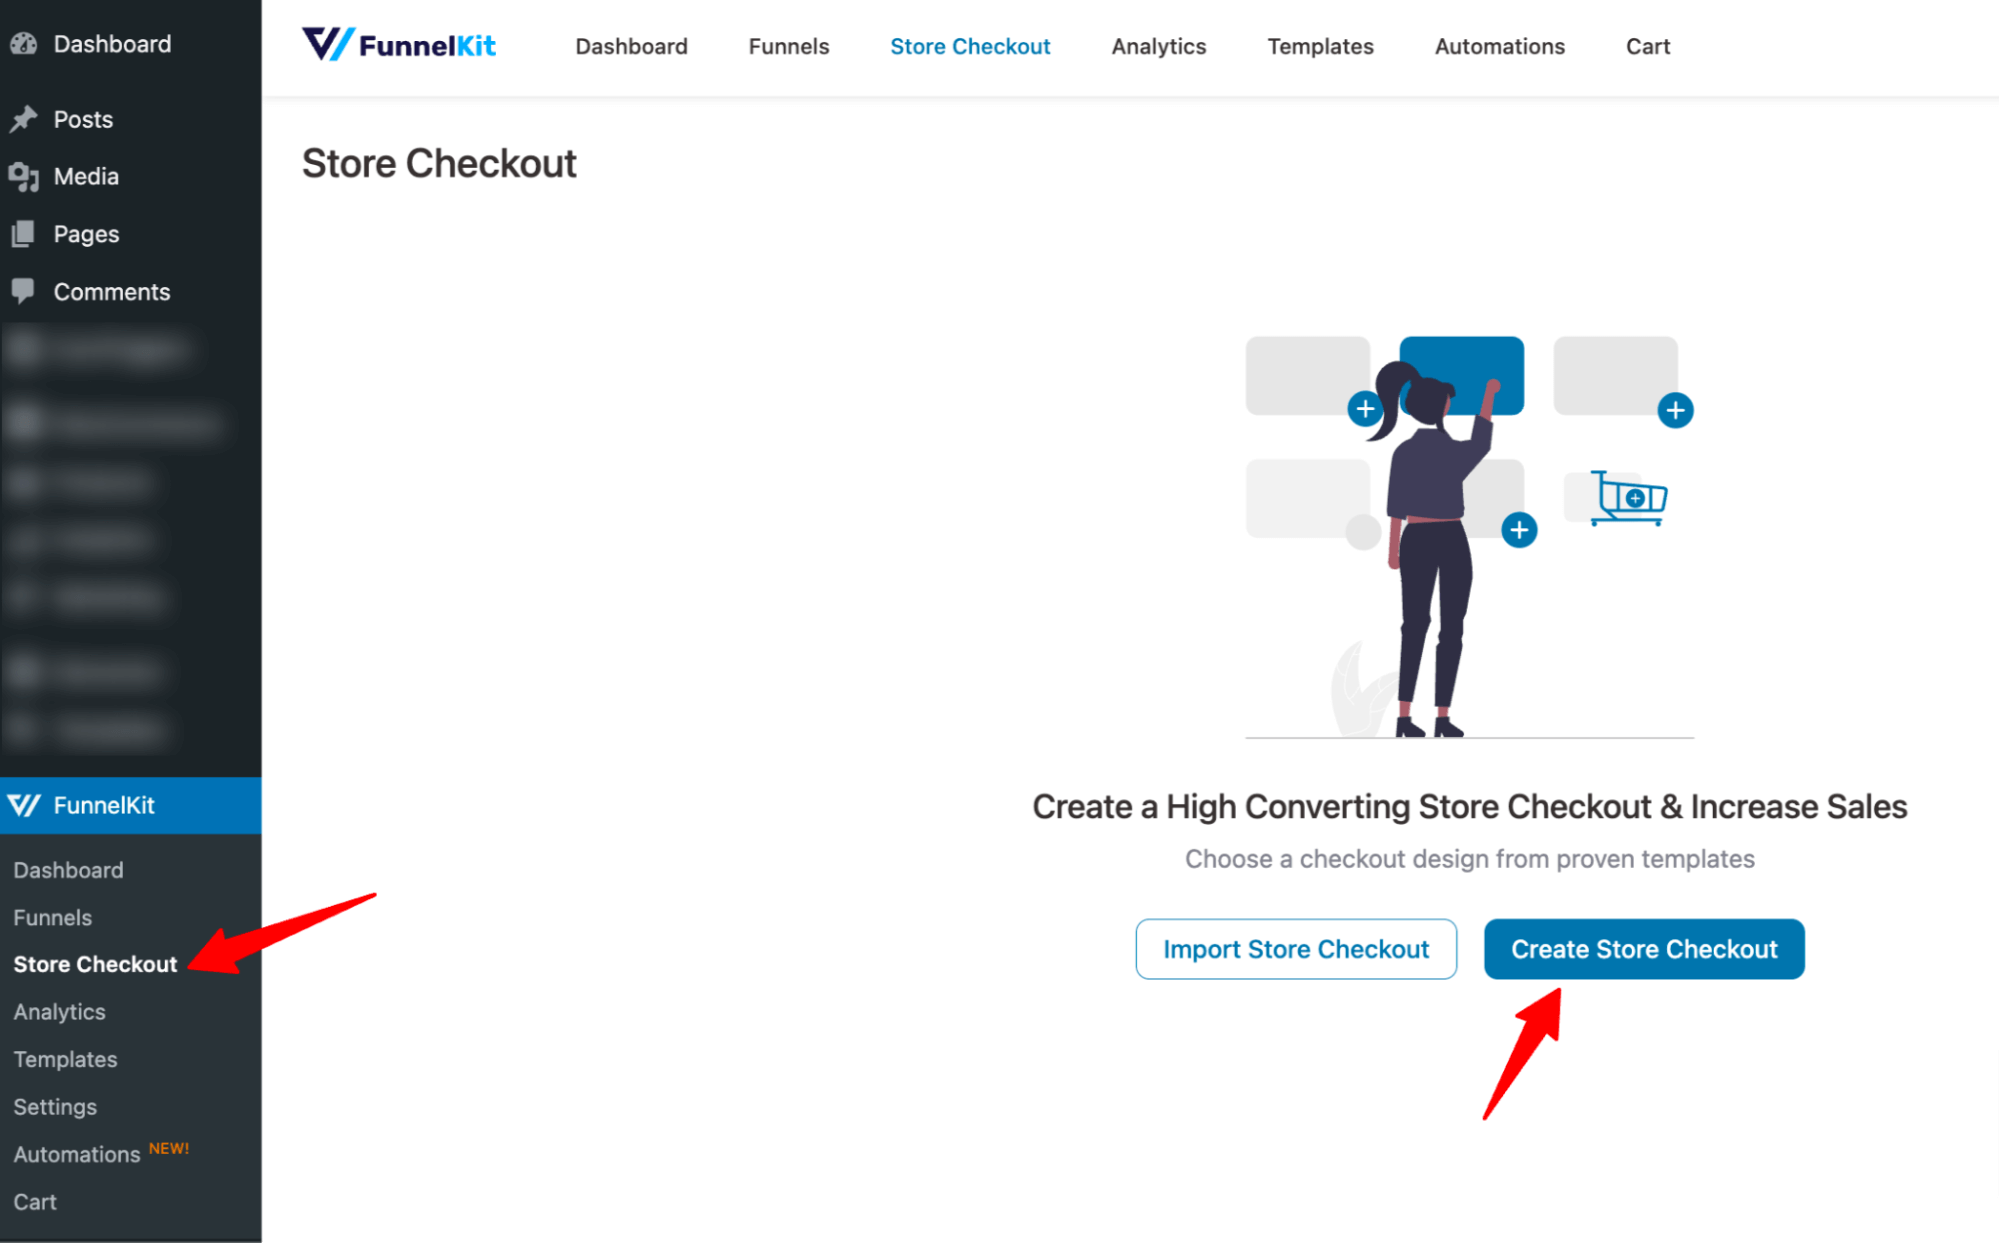
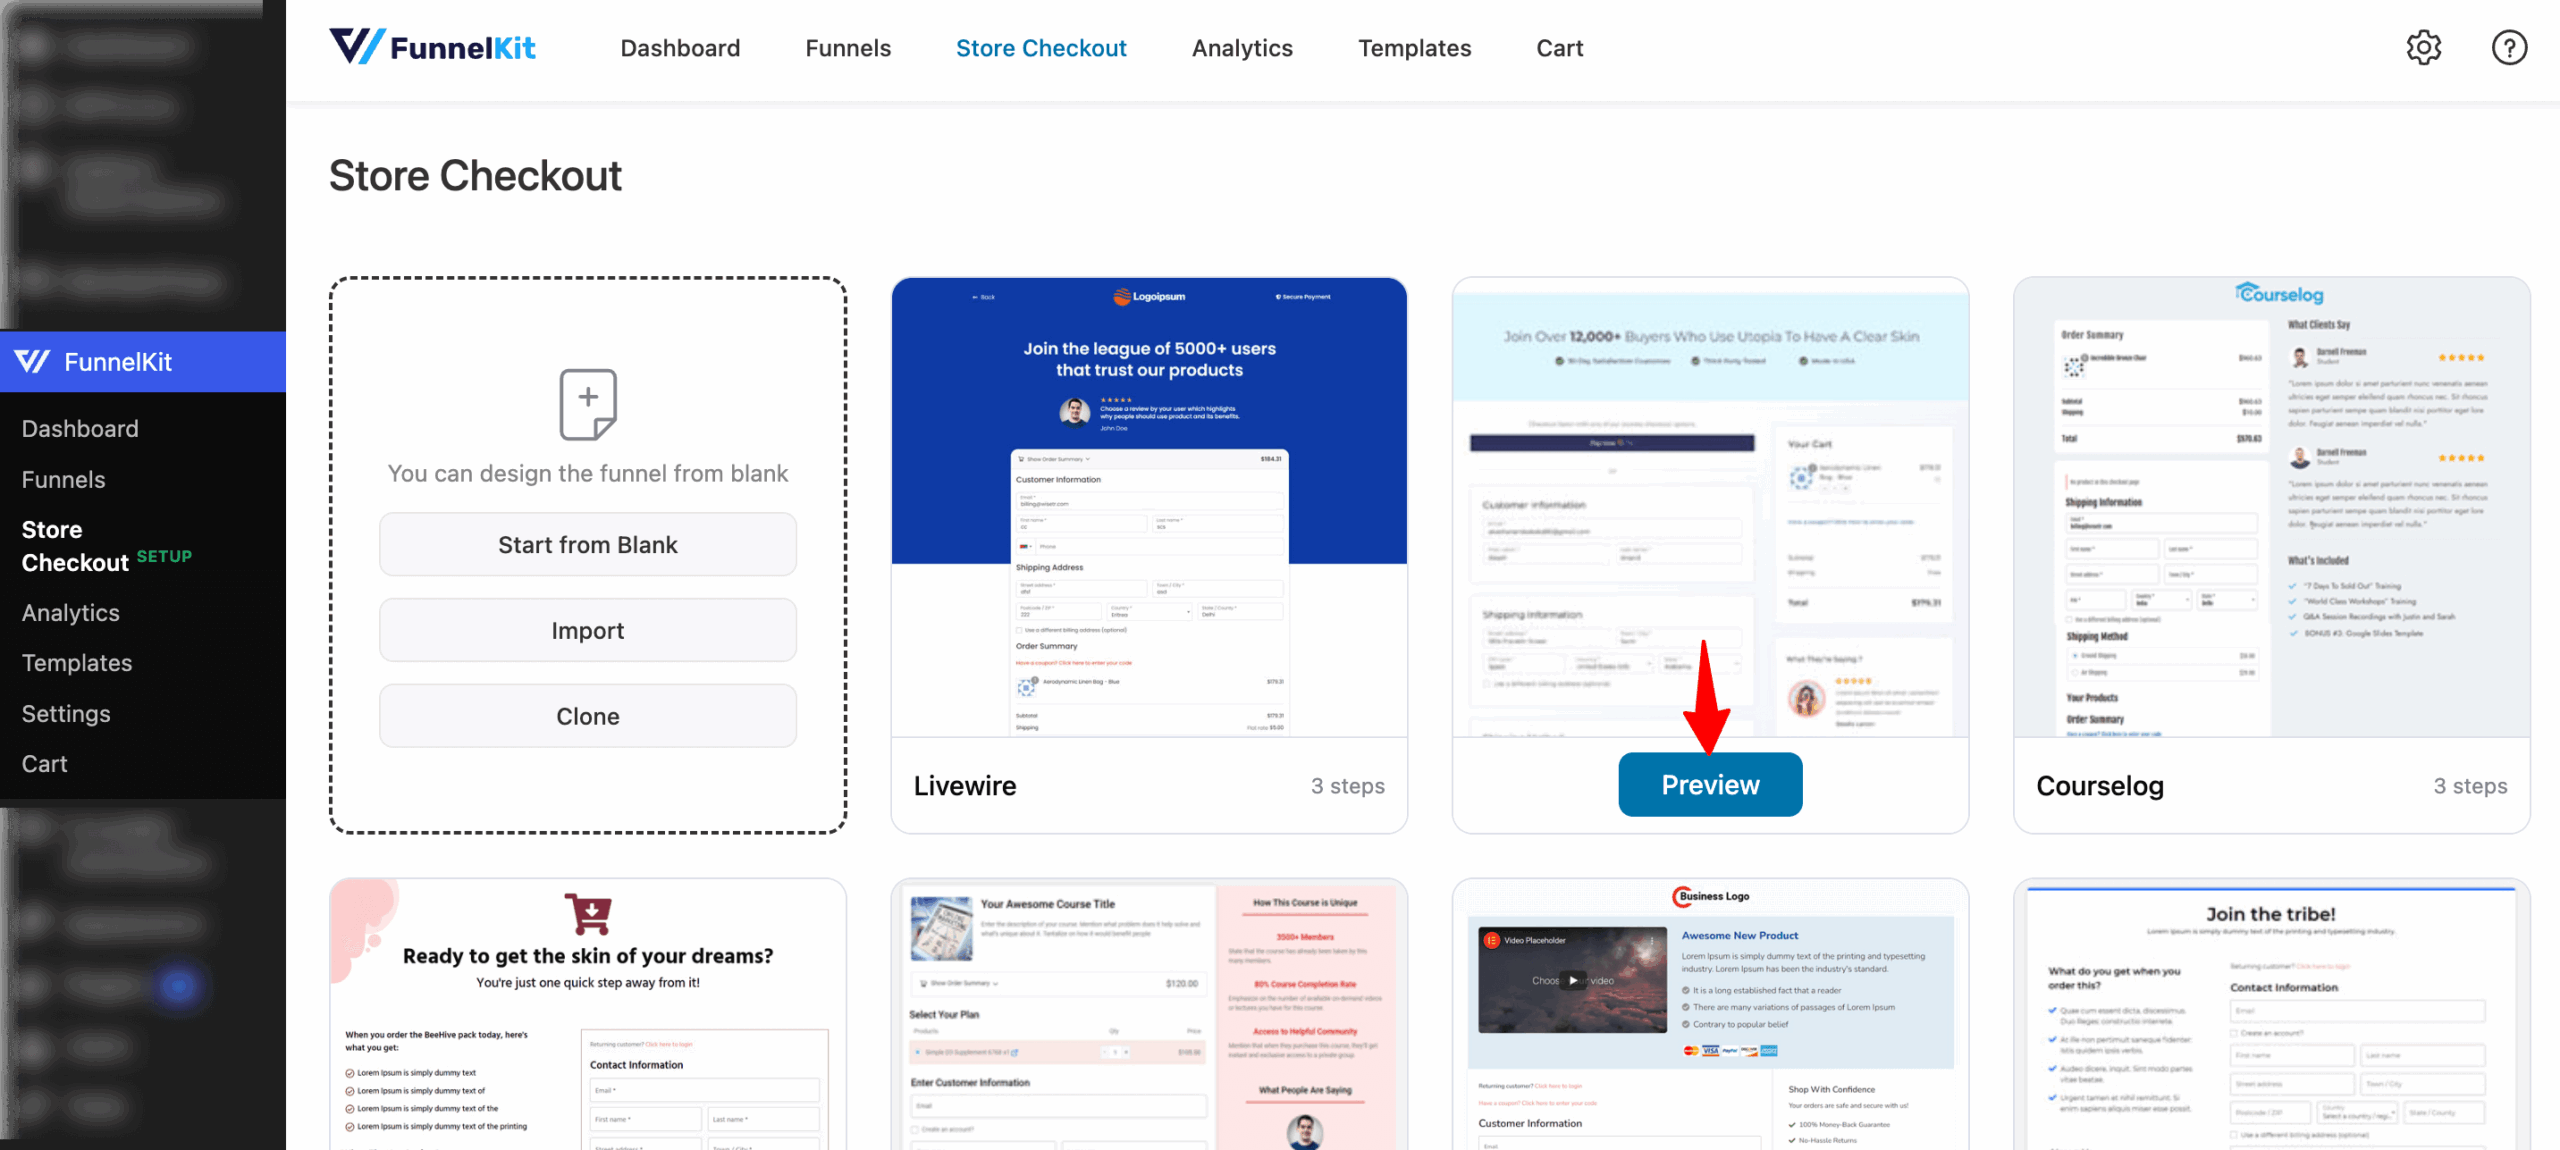
For that, navigate to FunnelKit ⇨ Store Checkout and click on the ‘Create Store Checkout’ button.
You need to choose a template from the list of prebuilt checkout templates FunnelKit provides.
To select one, hover on the template you like and click on ‘Preview’. We are going with Utopia here.
Now, choose whether you want a one-page checkout or a multi-step checkout page. We are going with a one-step checkout page here.
After that, click on “Import This Funnel” to import the template. Provide a name and click on “Add” to import the template.
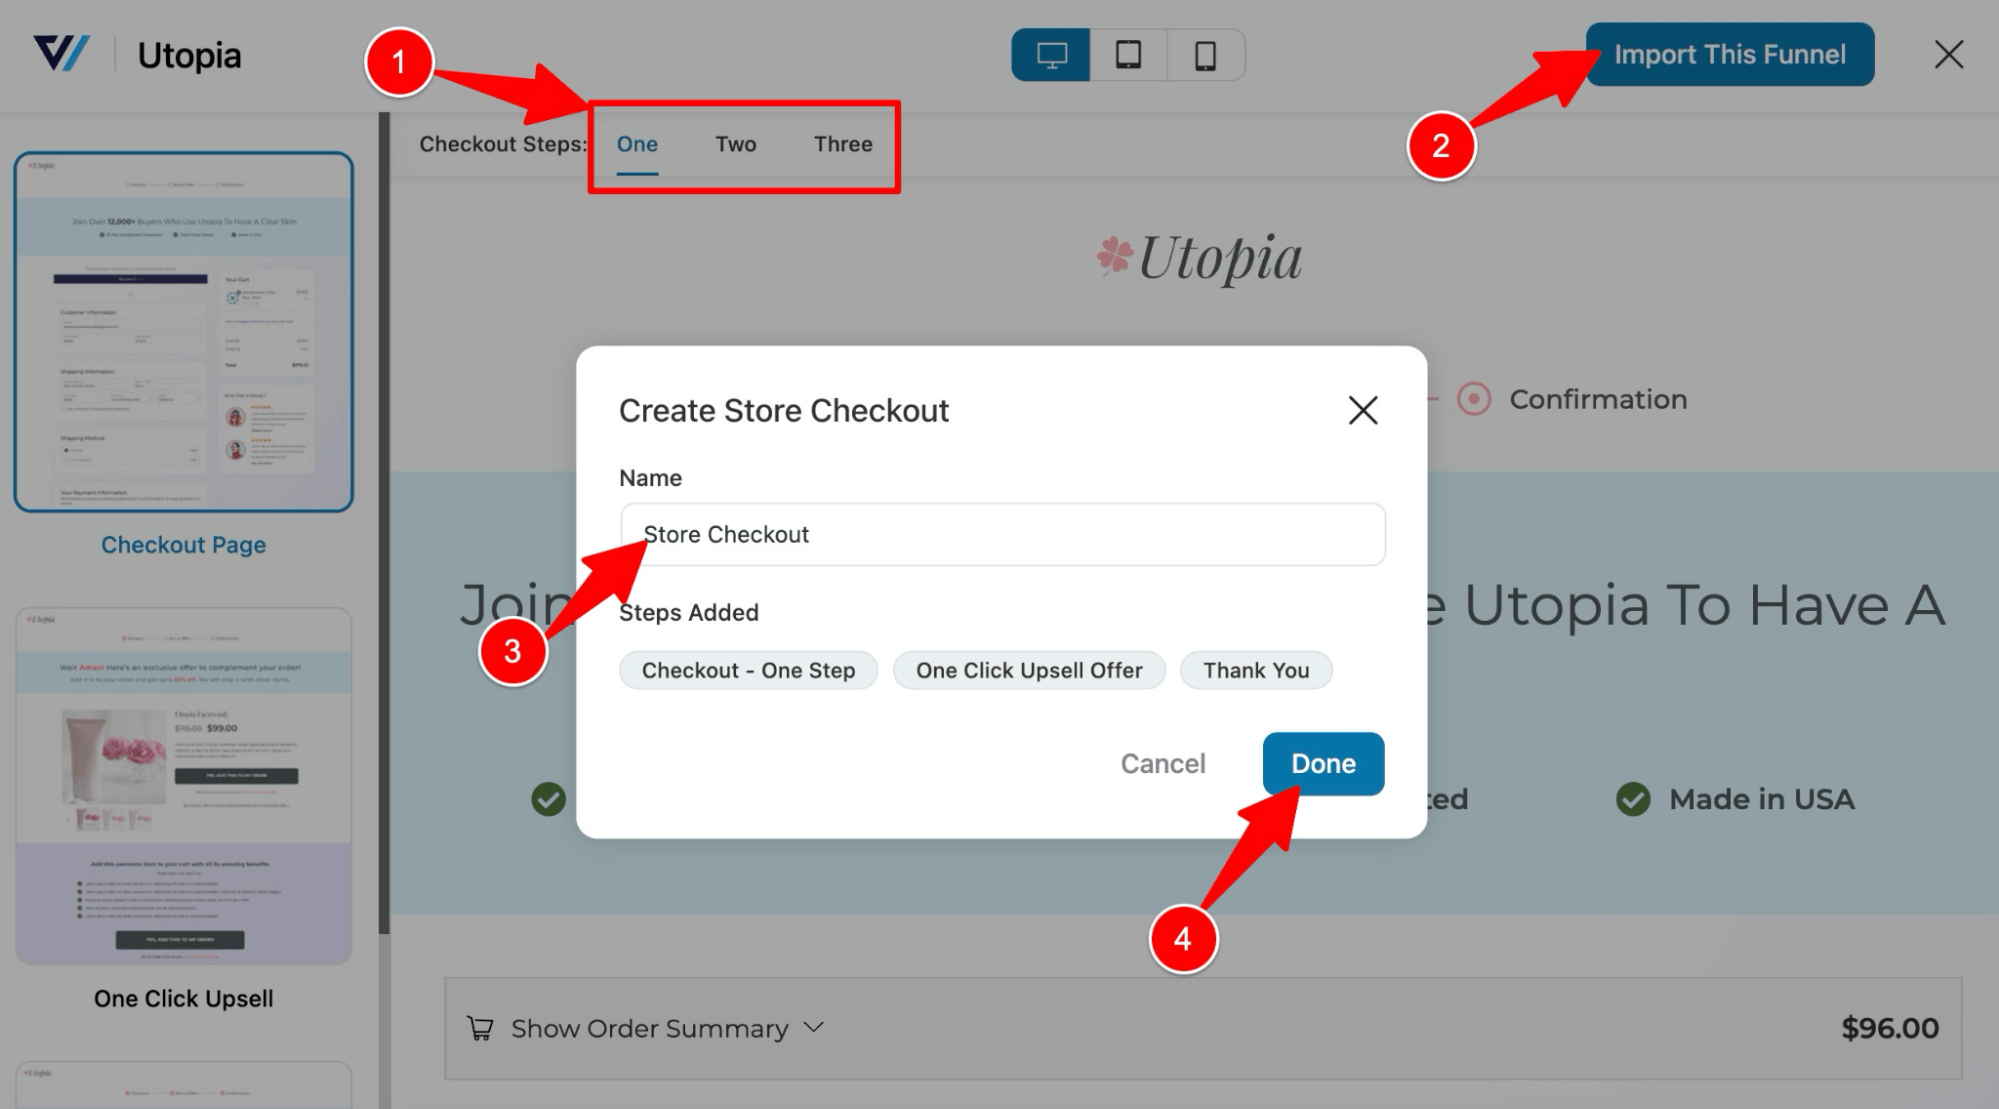
This will import a store checkout with three steps: checkout, upsell, and thank you page.
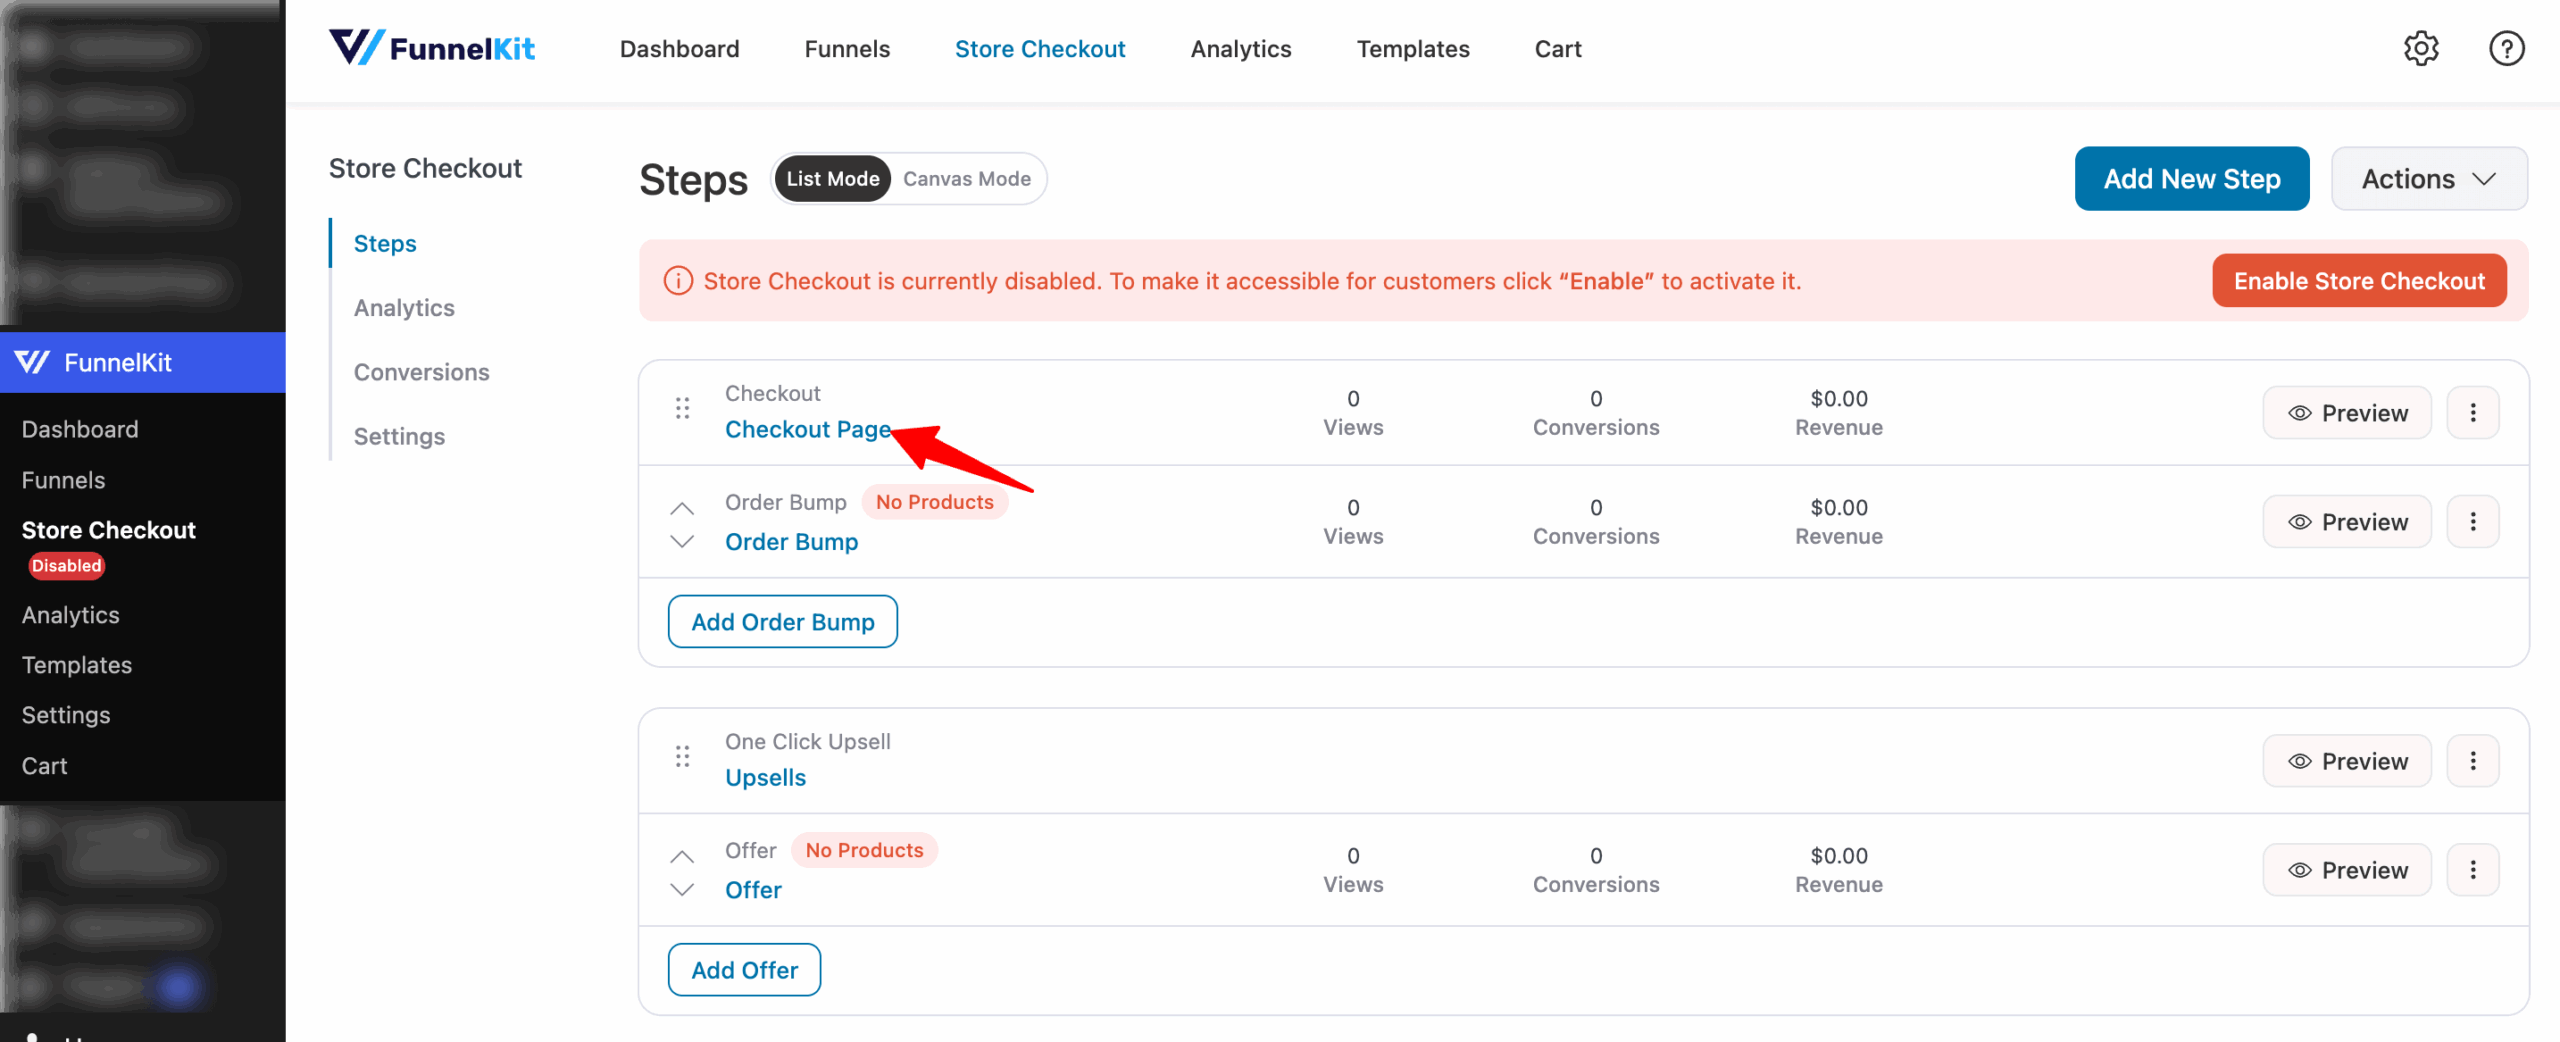
Step 3: Customize the WooCommerce order summary on the checkout page
To customize the checkout page template, click on the “Edit” option.
Here, you can customize the design and content of the checkout page with the selected page builder.
To do so, click on the “Edit Elementor Template” option.

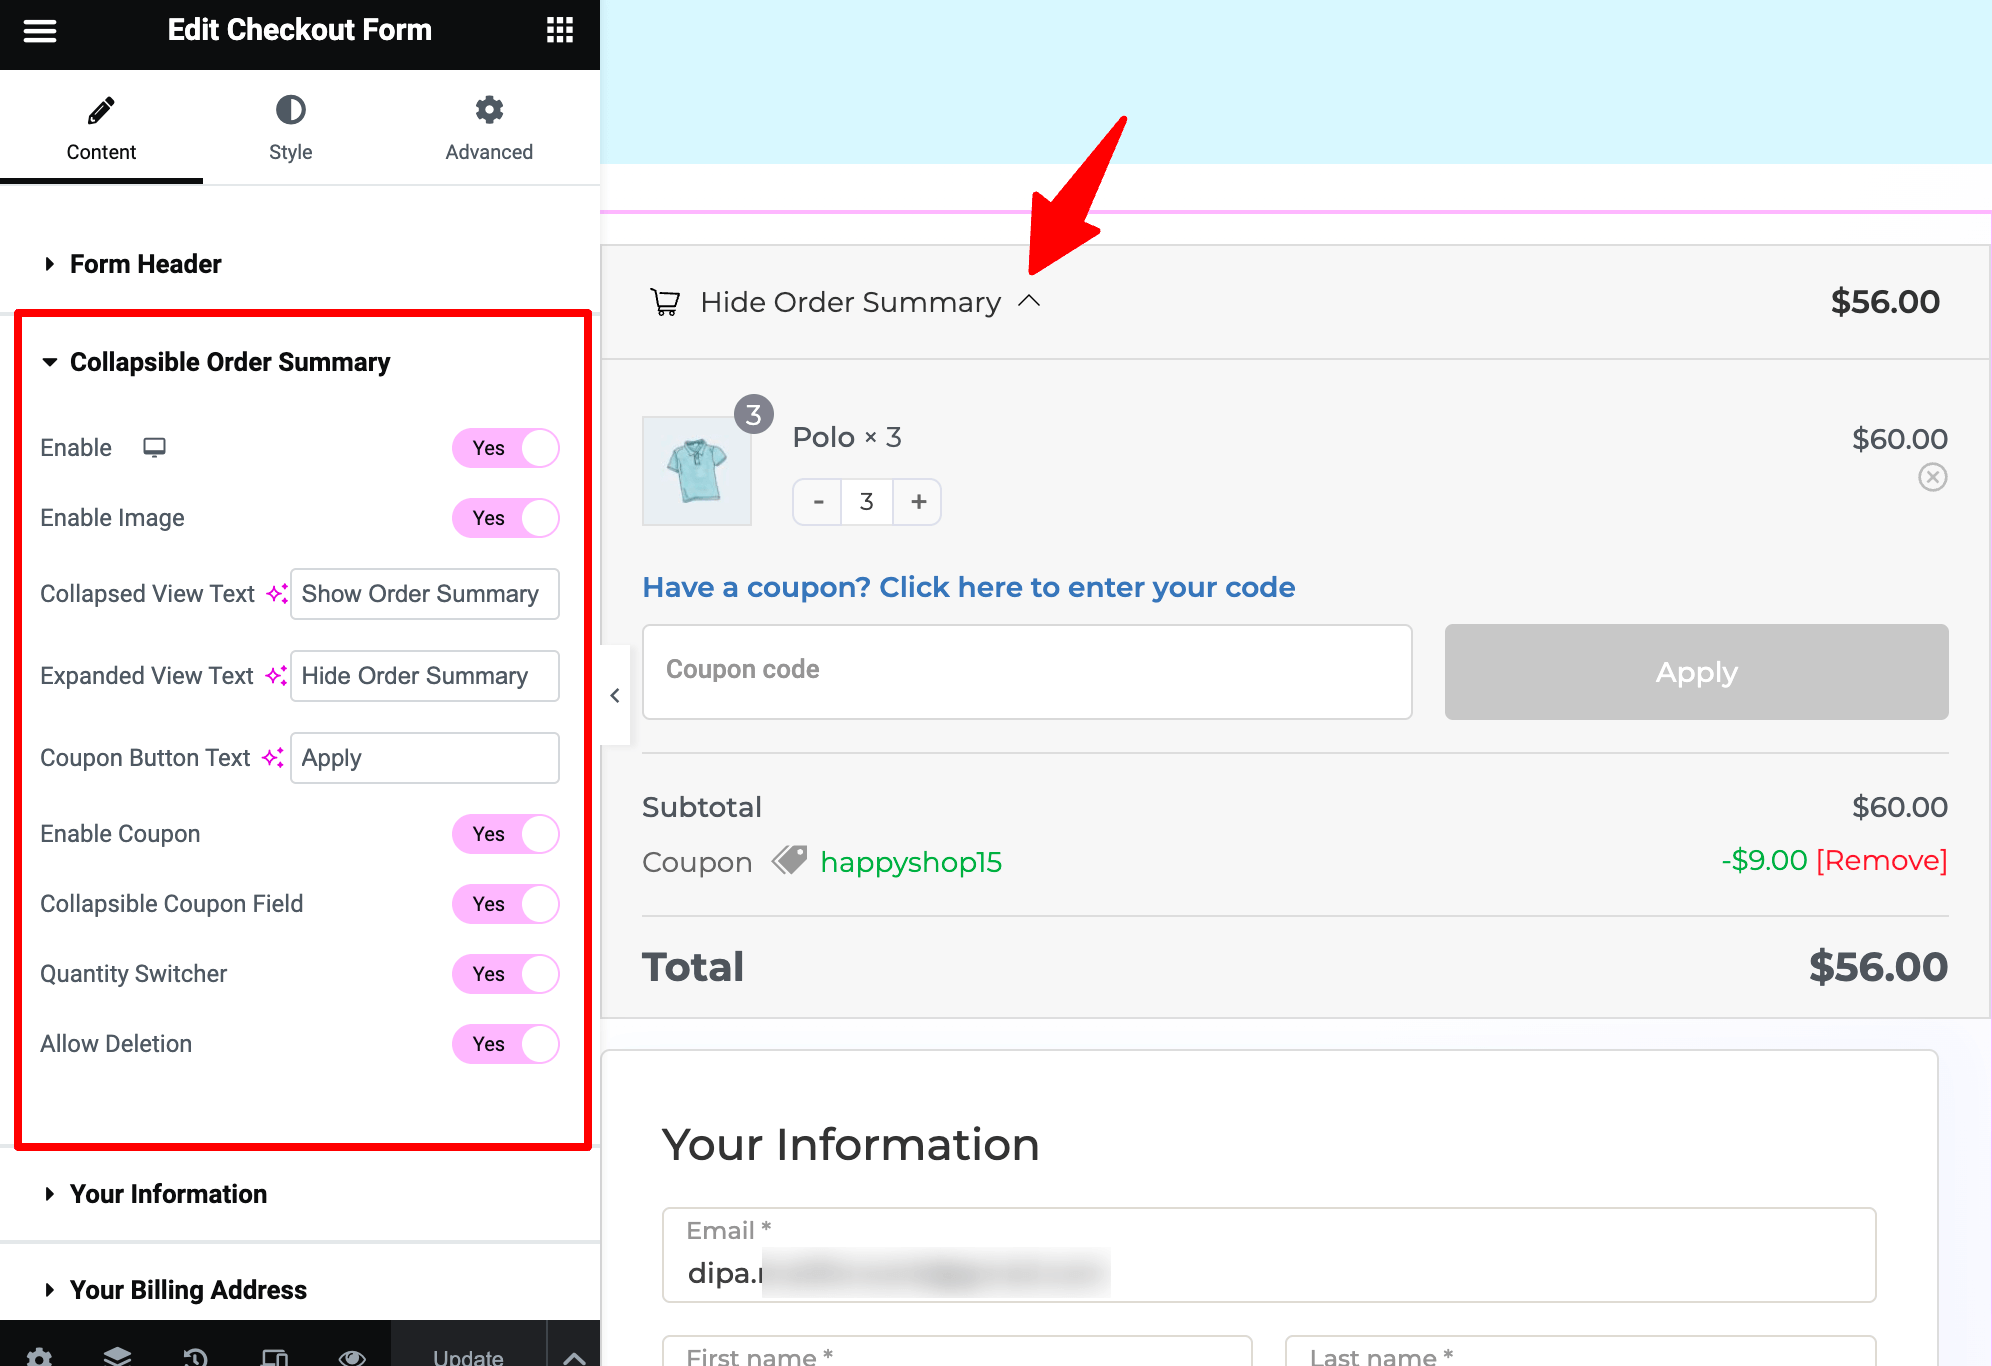
Here, you can customize the content and design of the checkout page. Regarding the order summary, FunnelKit Funnel Builder has a unique yet user-friendly feature named the collapsible order summary.
This feature adds a collapsible order summary at the top of the checkout page, which is really handy, especially for mobile users, as they don’t have to scroll down to see the order details.
Users can apply coupon codes and also update cart item quantities using this collapsible field.
To add this collapsible order summary, you need to turn on the “Enable” toggle button.
You can also customize different components of the order summary, such as:
- Enable Image: Enable this option to add the product images to the order summary.
- Collapsible Text View: Provide the text that will show up on top when the order summary is collapsed.
- Expanded Text View: Add the text that will show up when the order summary section is expanded.
- Coupon Button Text: Enter the coupon button text.
- Enable Coupon: Enabling this option will add a coupon field to the order summary section.
- Collapsible Coupon Field: Enable this option to make the coupon field collapsible.
- Quantity Switcher: This option will add the coupon quantity switcher to the order summary, where users can update the item quantity.
- Allow Deletion: If you enable this option, users will get the option to delete/remove any product from the cart.
Another amazing feature is that with FunnelKit Funnel Builder, you can also add a mini cart to the checkout page.
With this mini cart, customers can view, update cart items, and apply coupon codes in the coupon field.
It has an additional option to "Allow Deletion" where you can change the product quantities and remove items you don't want, making it superior to the redundant, default WooCommerce cart page.
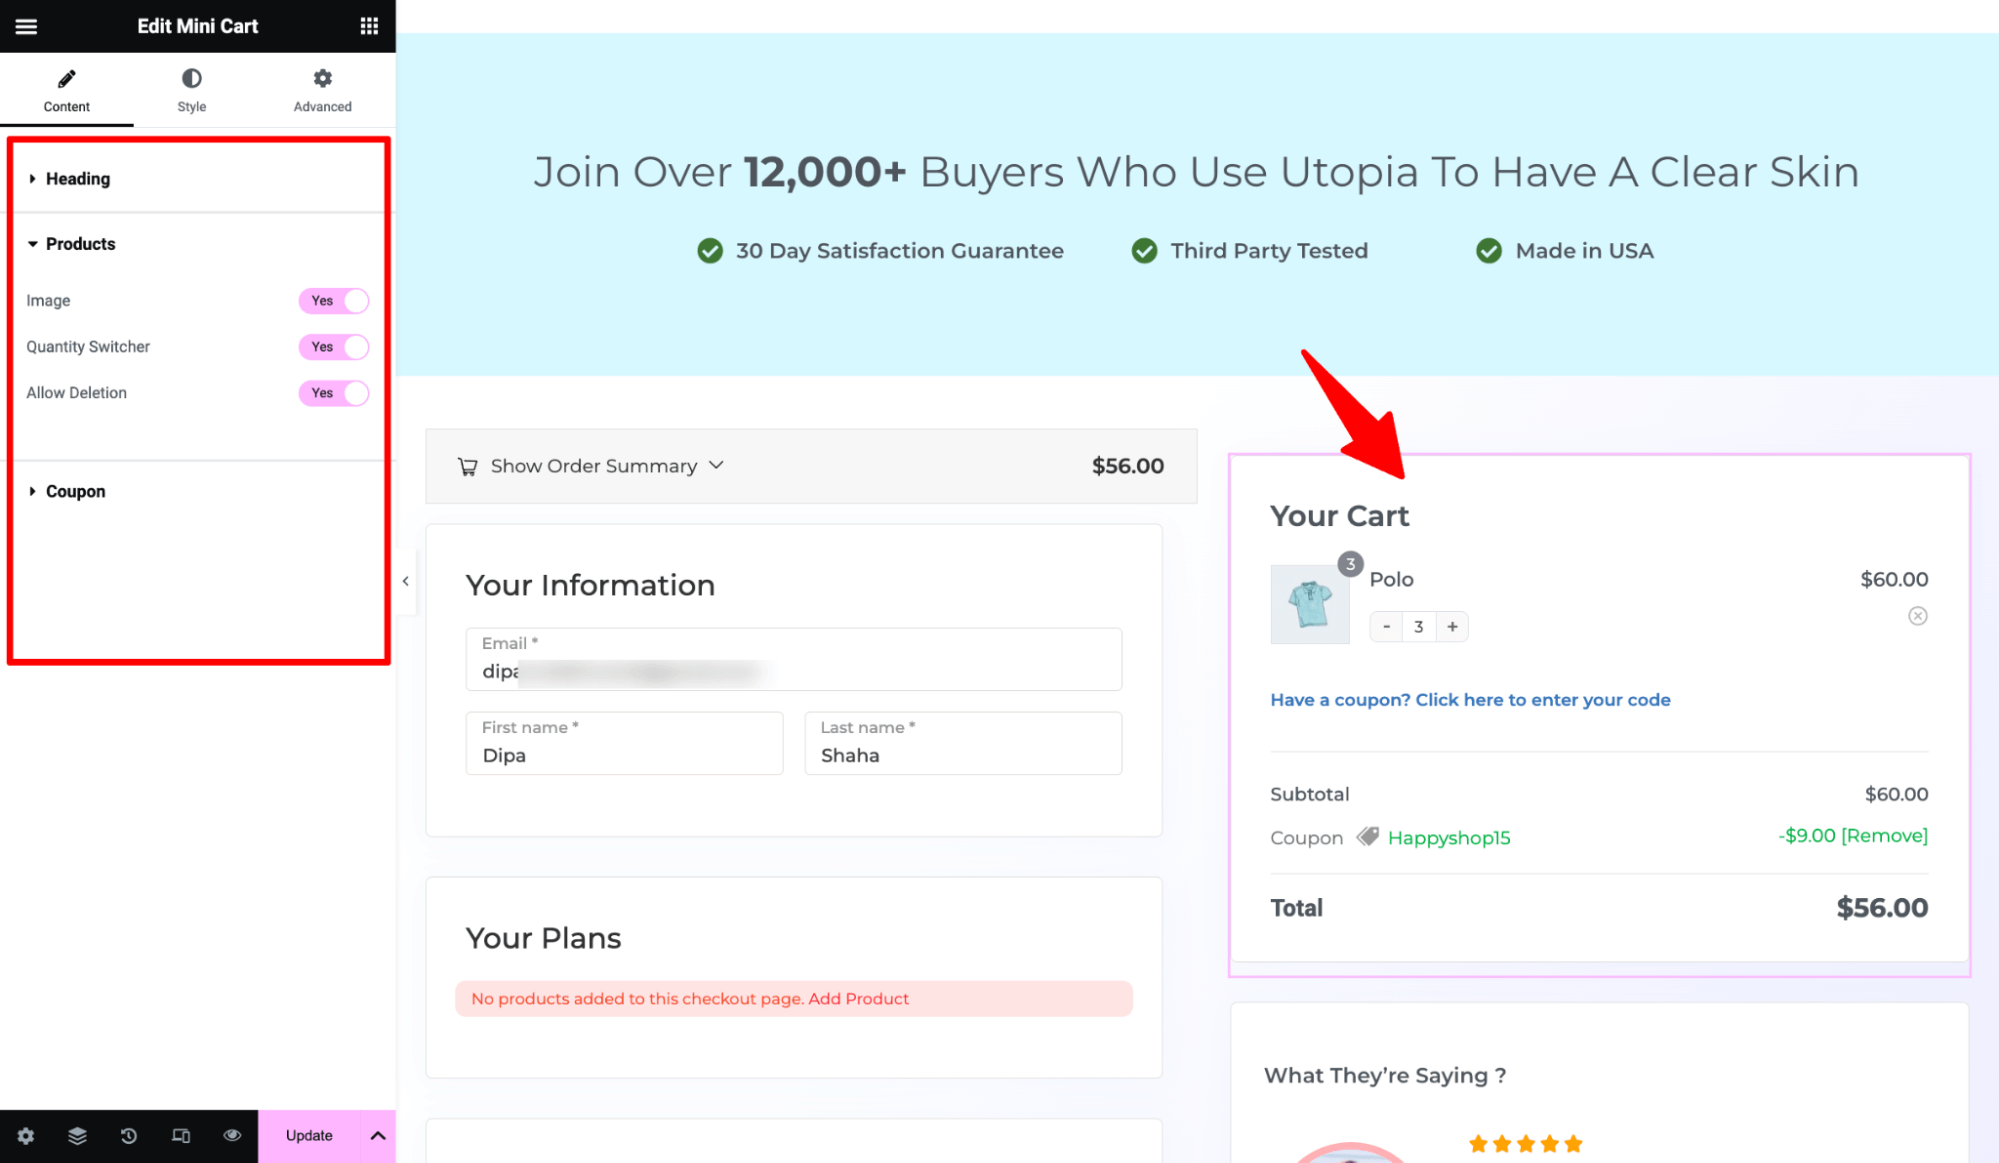
After making all the changes, click on the “Update” button to save.
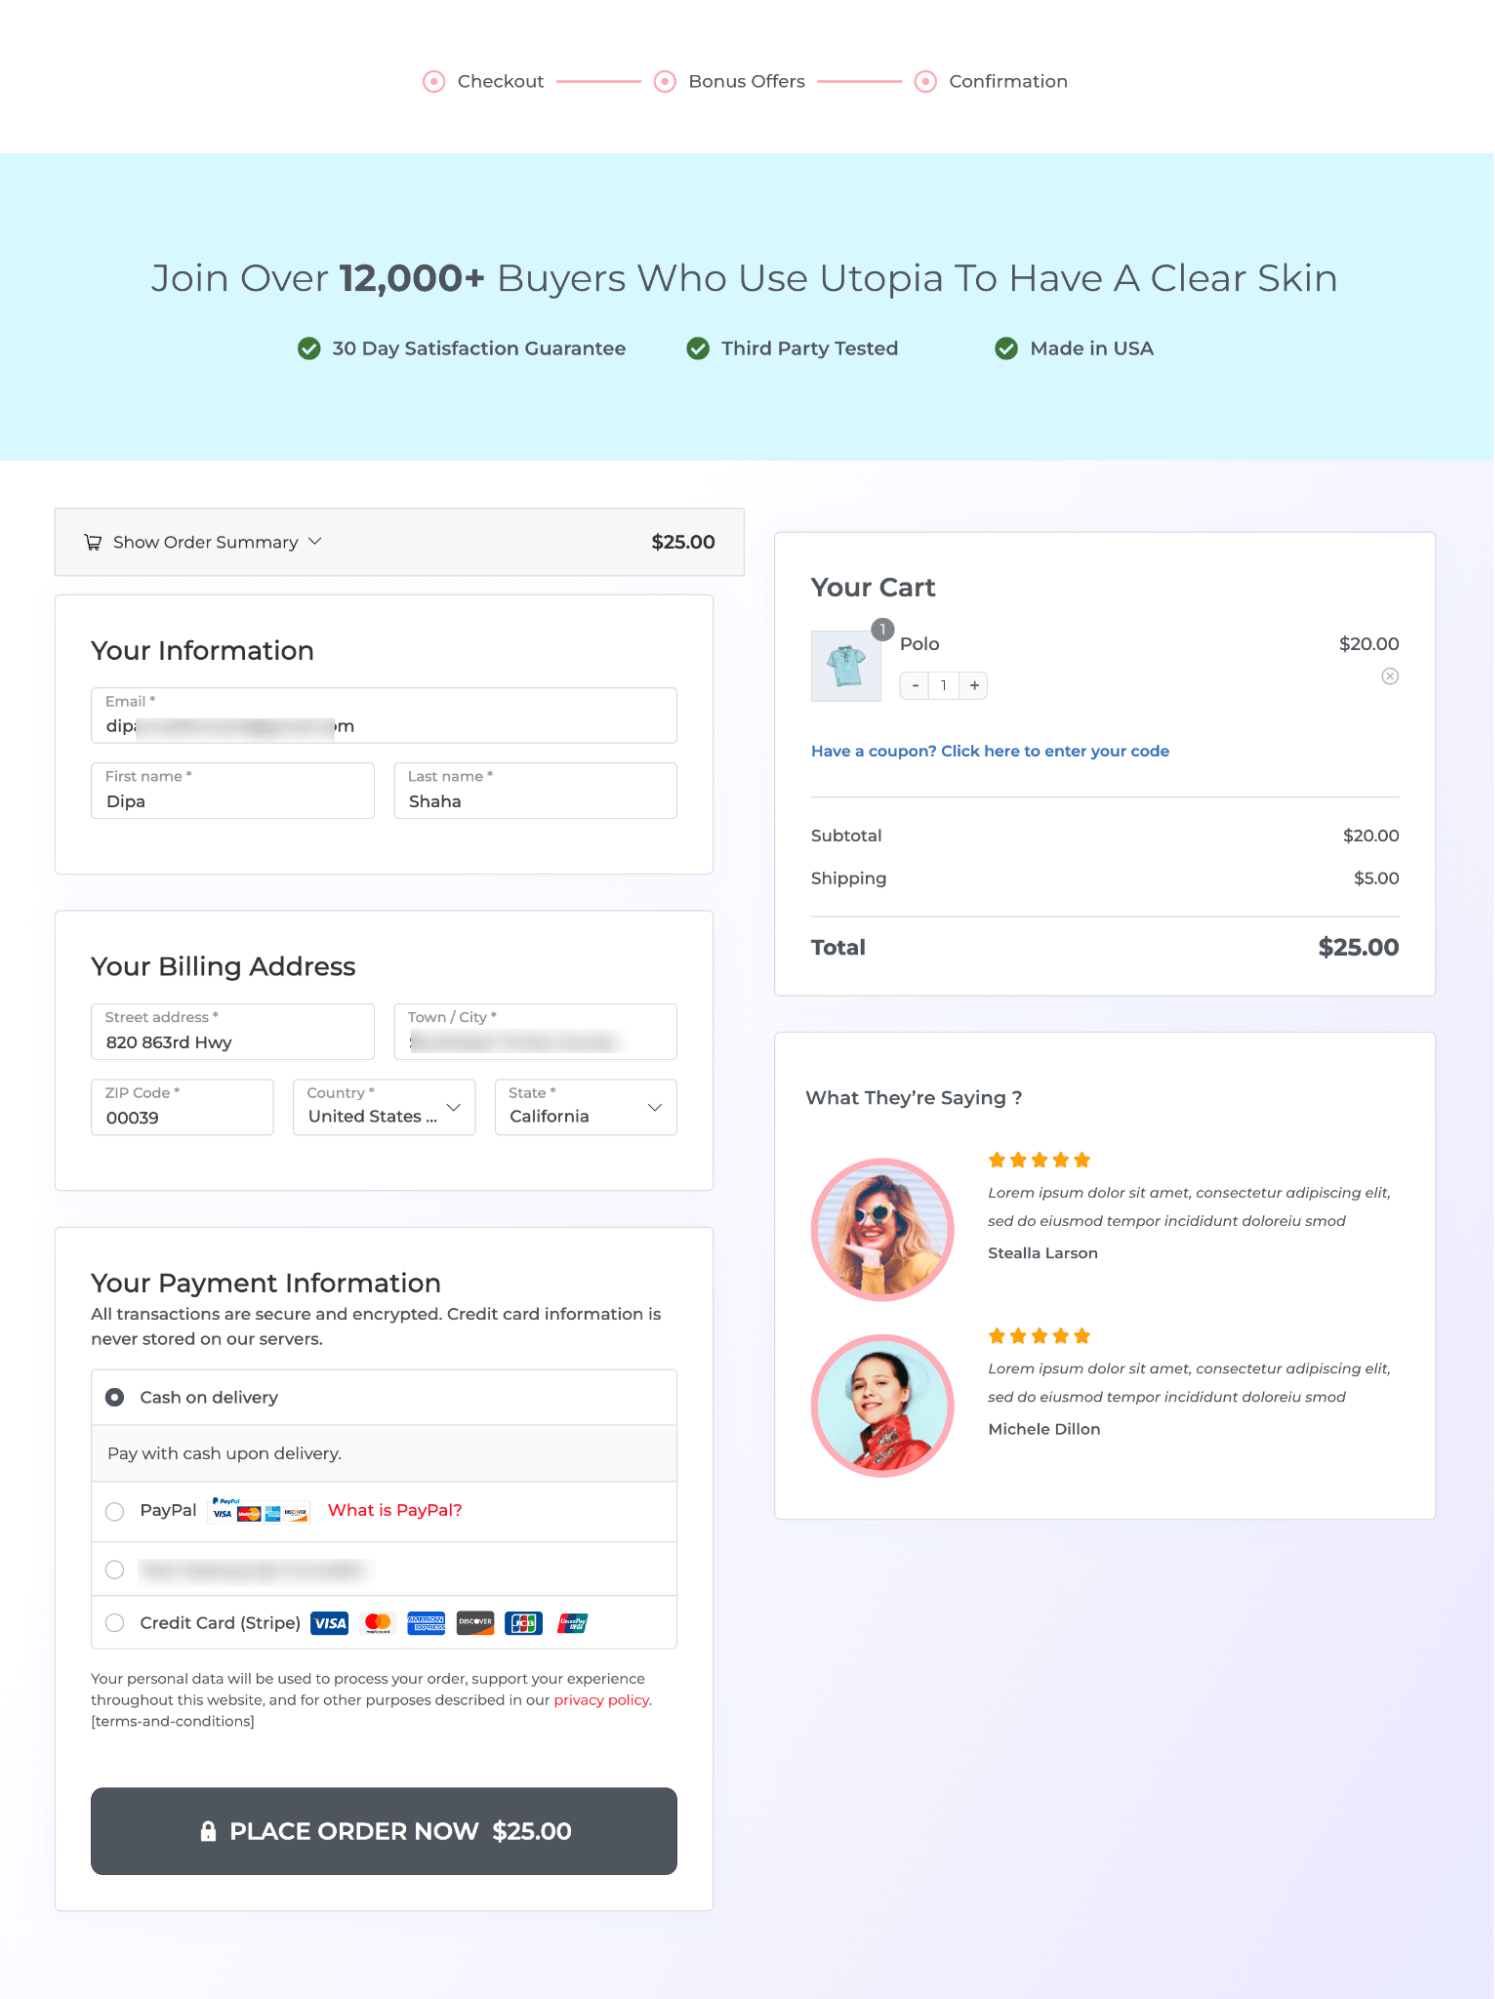
Here is what the checkout page with WooCommerce order summary looks like:
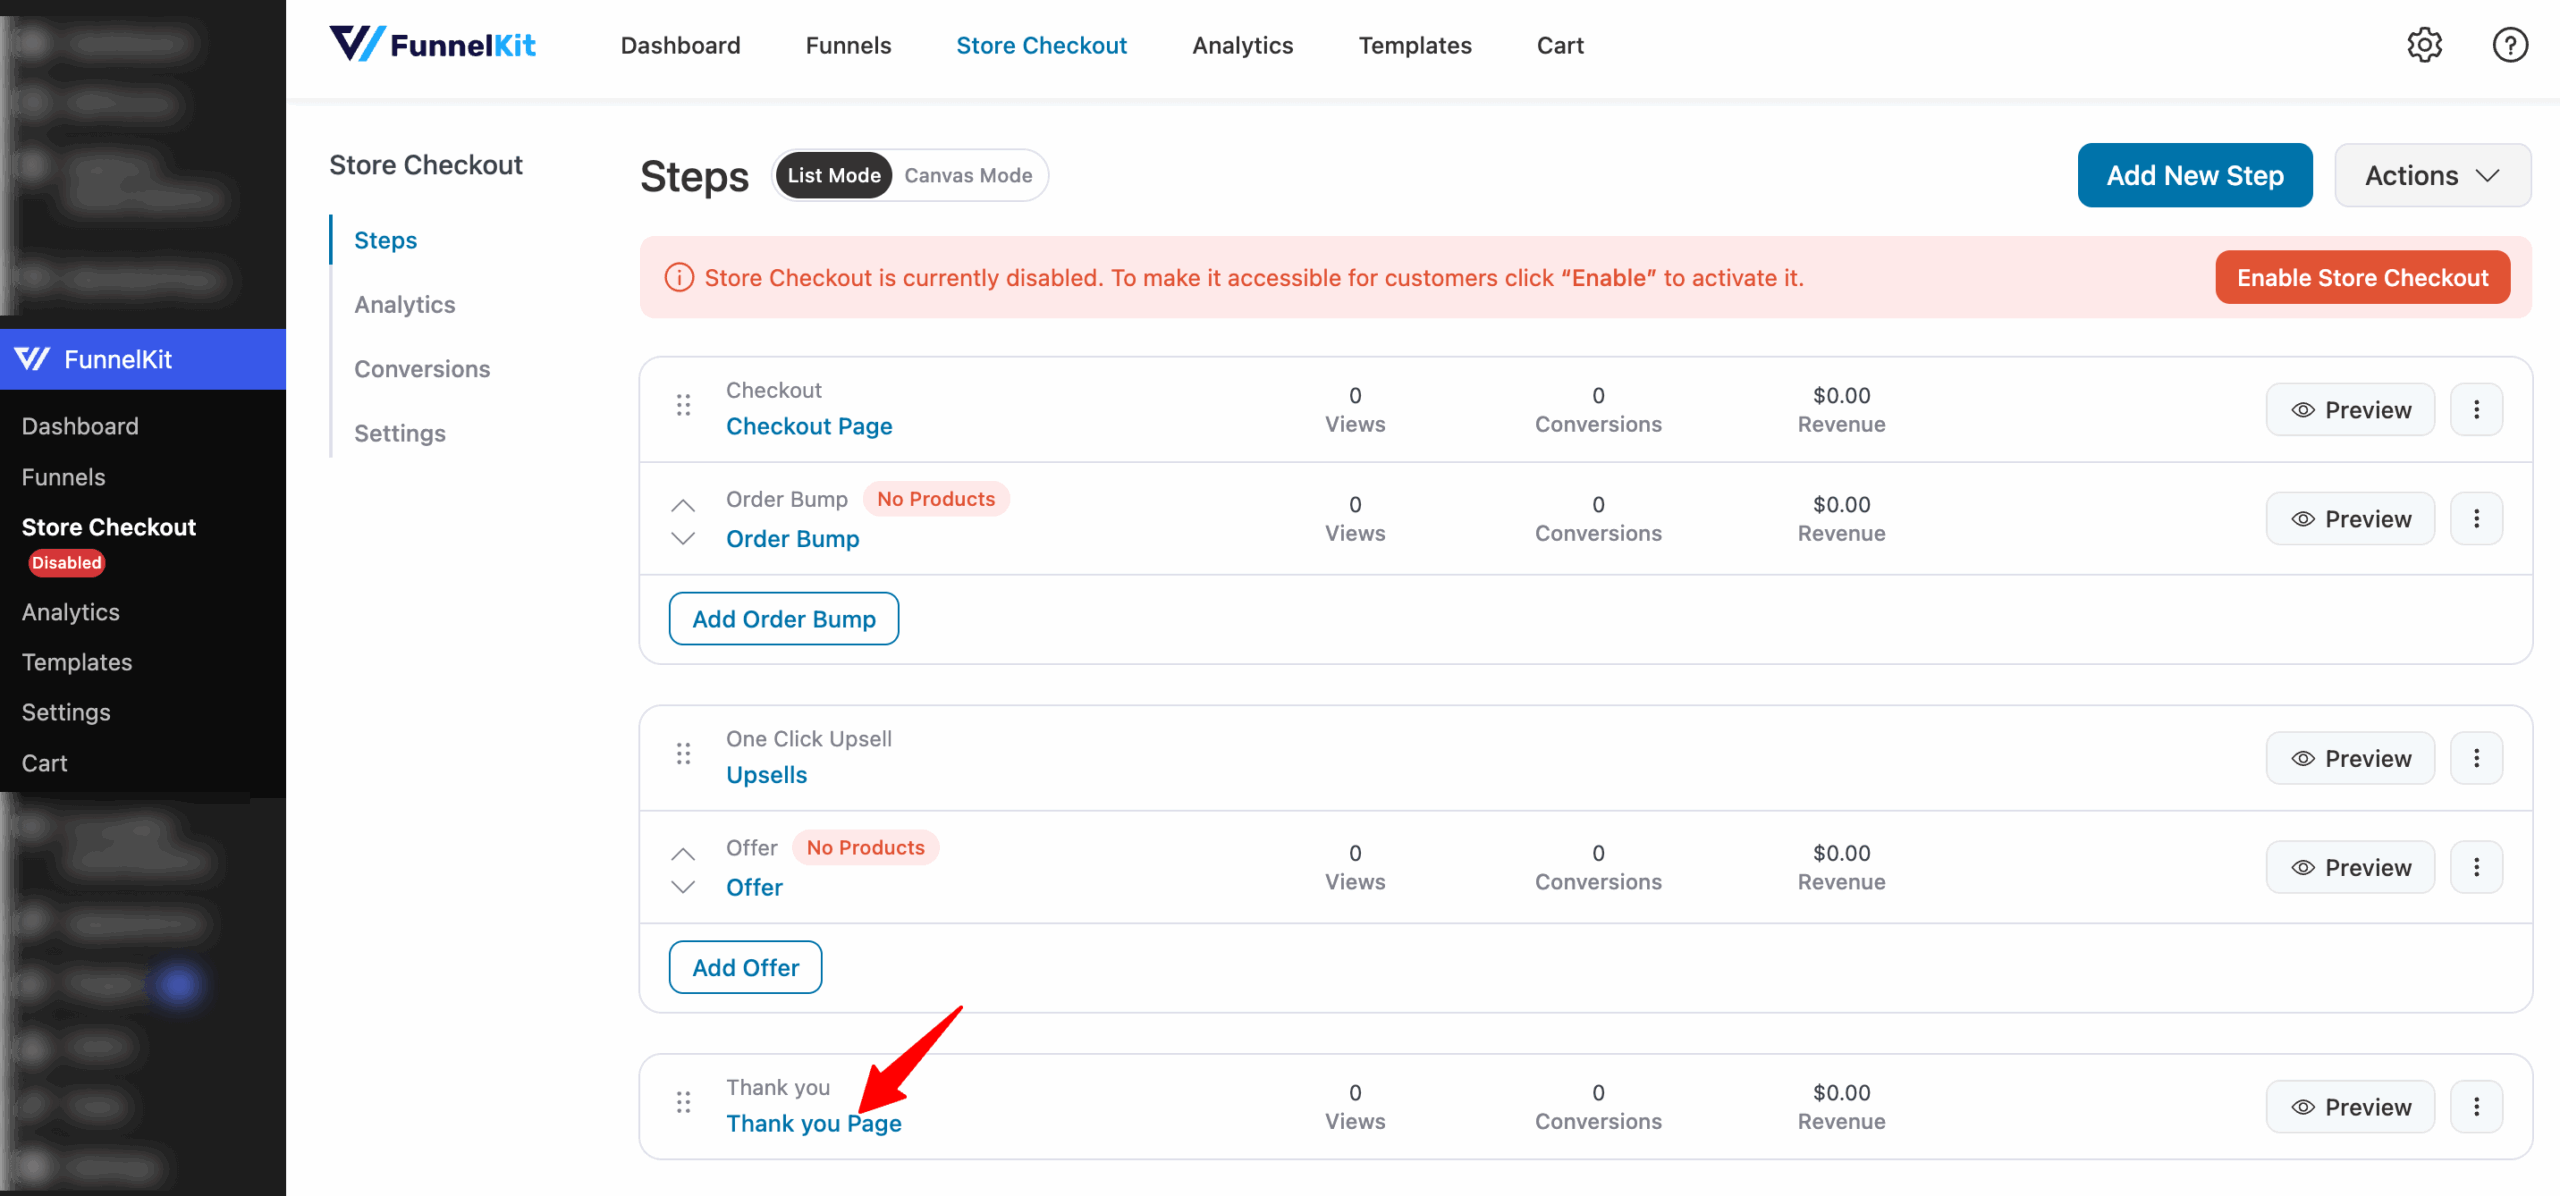
Step 4: Customize the WooCommerce order summary on the thank you page
To customize the thank you page template, click on the “Edit” option.
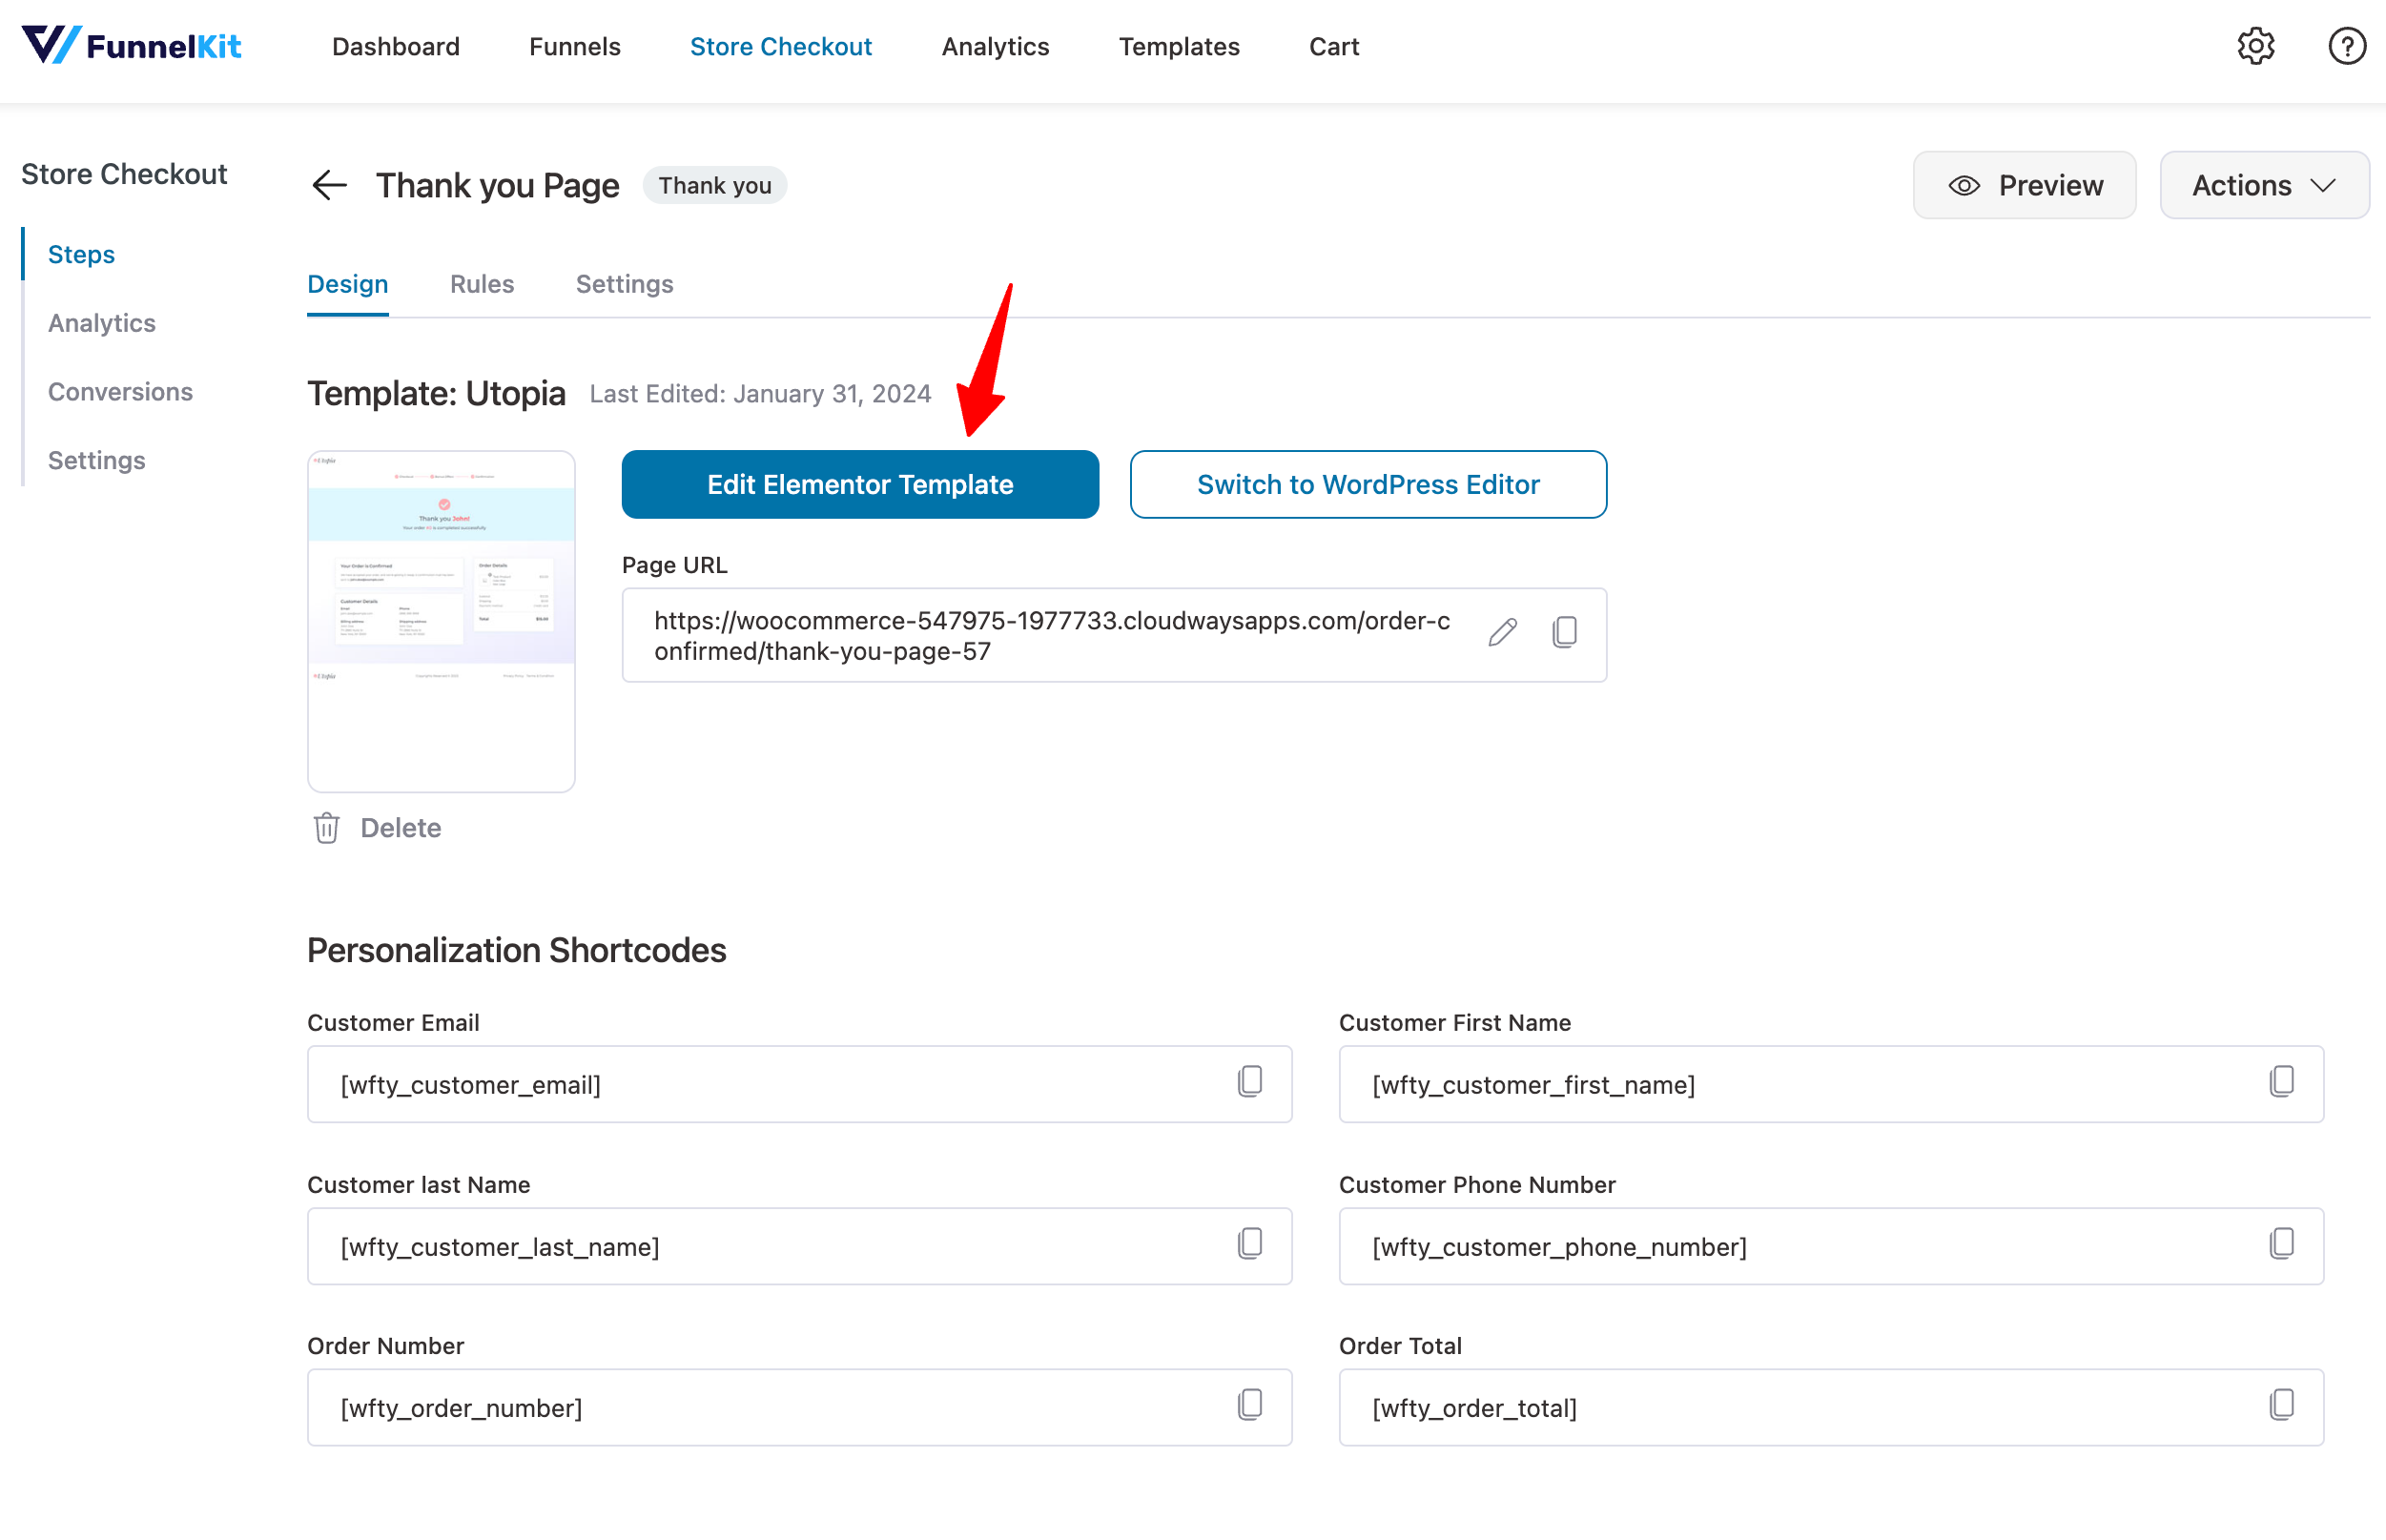
Here, you need to click the ‘Edit Template’ option to customize the order summary page.
On this page, if you scroll down a little, you will find WooCommerce order summary shortcodes you can copy and use.
Some of the WooCommerce order summary shortcodes are Customer first name, Customer number, order number, order total, etc.
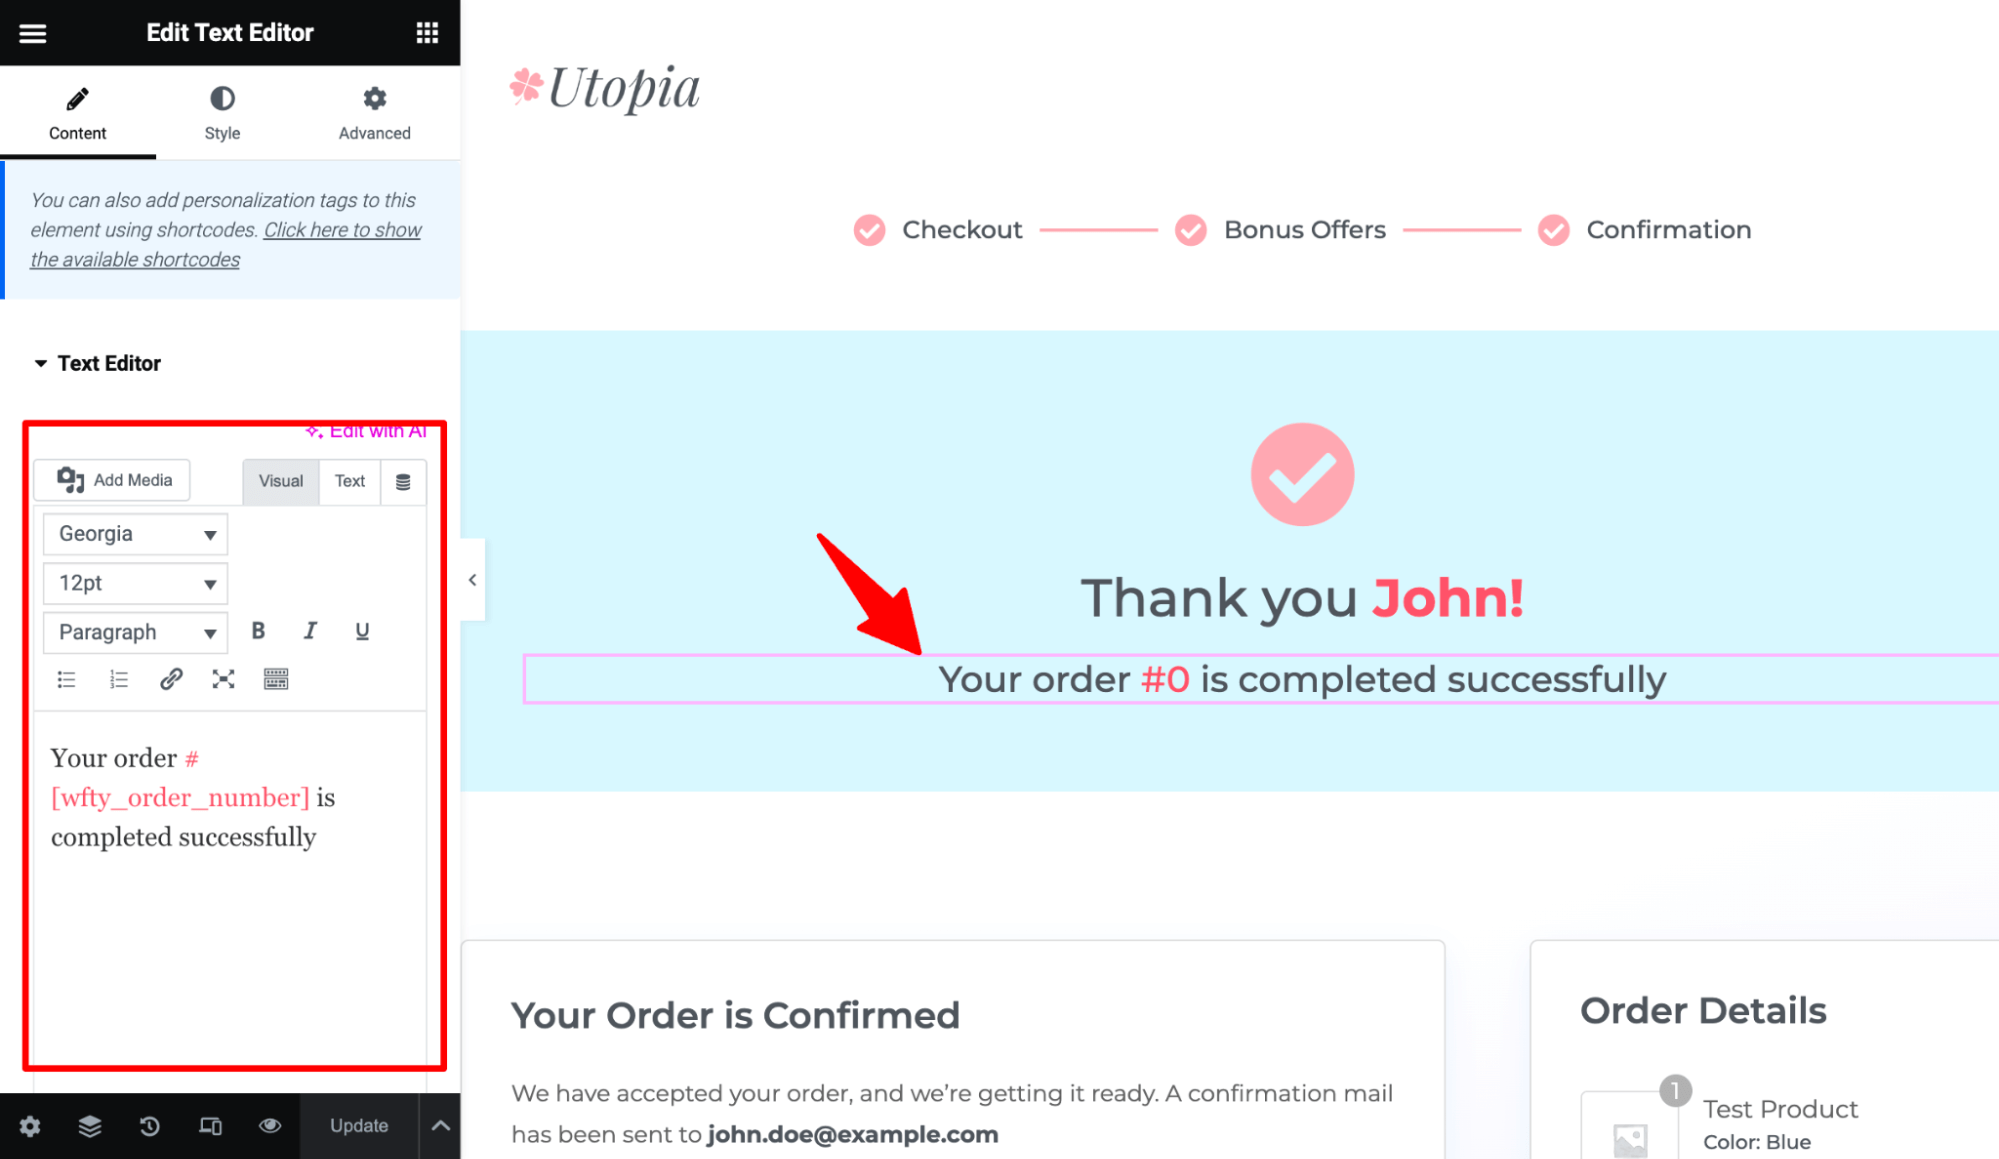
Now, to edit any section of this WooCommerce order confirmation page, just click on that section, and on the left panel, you can customize the content and styles.
For example, you can change the confirmation message heading, it’s font family, font size, etc.
Change the heading for the Customer Details section.
You can also change the layout to either a two-column or one-column full-width structure.

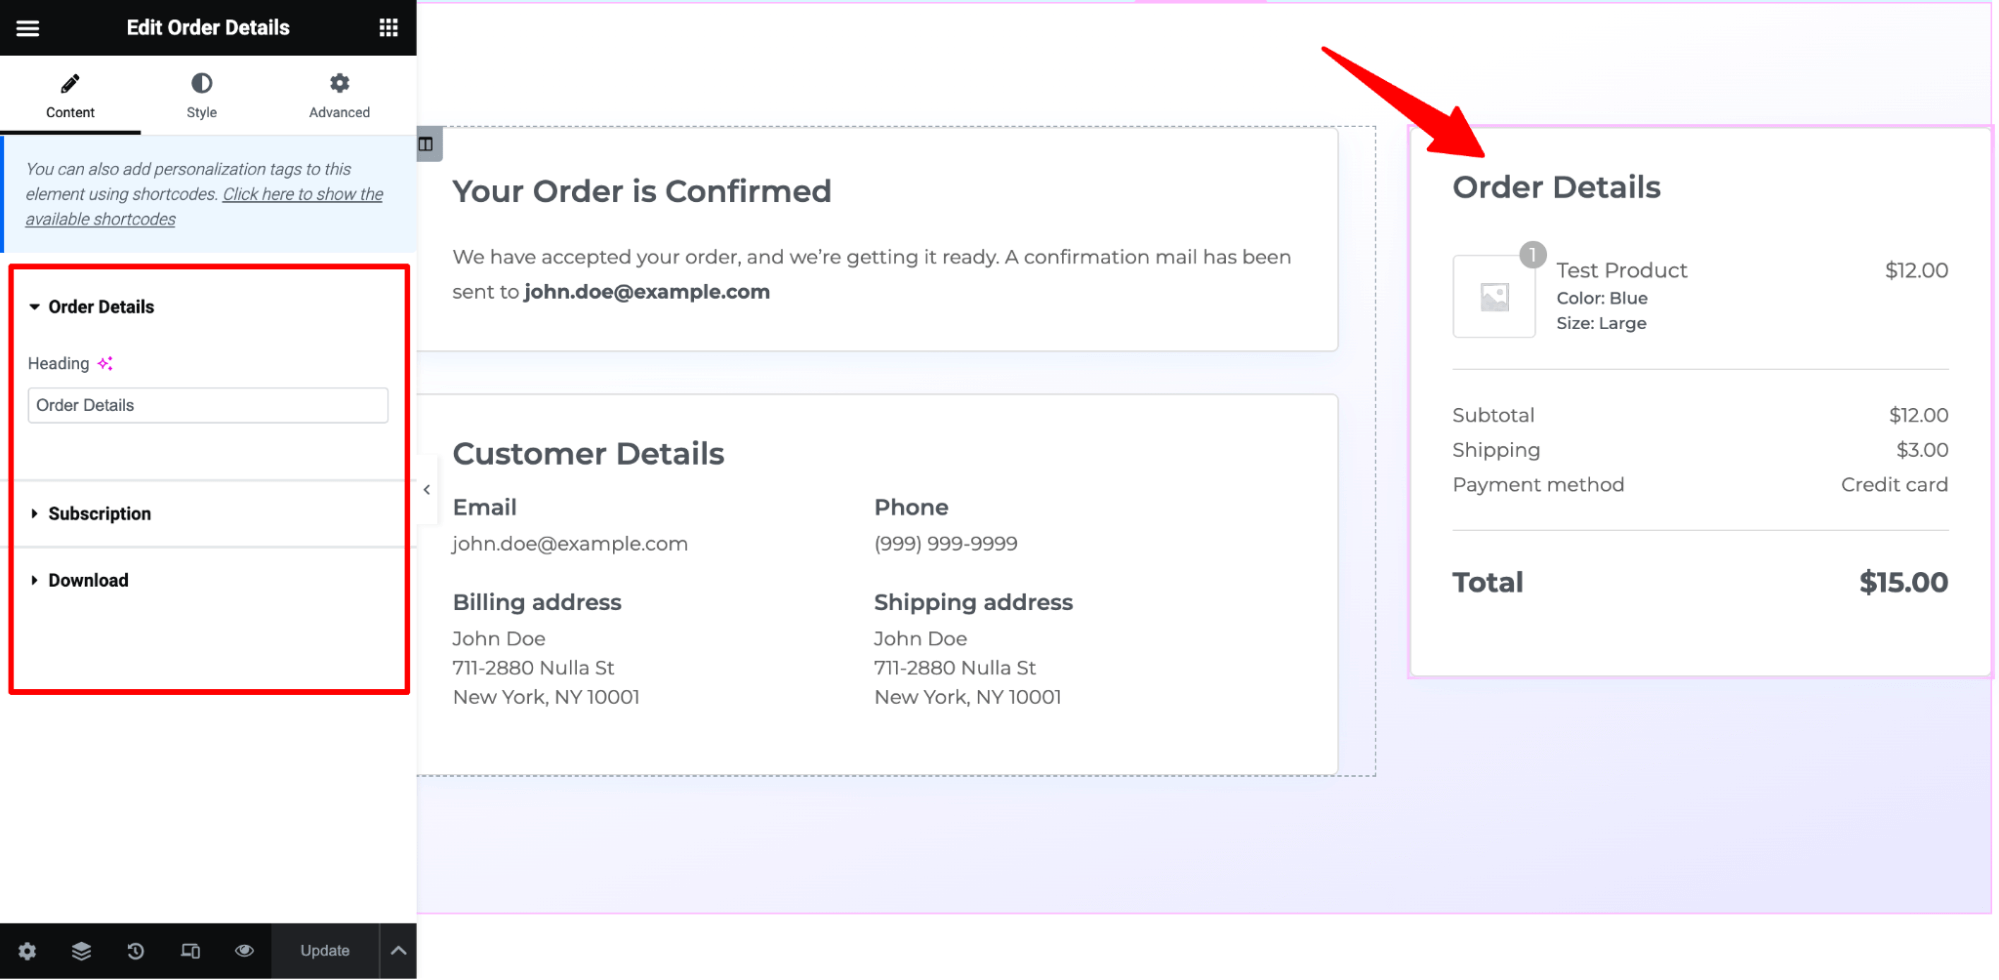
For the order details section, you can set different headings for physical products, subscriptions, and downloads.
If you move to the style tab of any section, you will find options to customize the style of the order summary section to fit your brand.
For instance, for the Order Details on the style tab, you can customize color and typography for the heading, product, subtotal, total, etc.

Make sure to click on ‘Update’ to save all your changes.
Here is the final look of the thank you page with WooCommerce order summary:

As you can see, the overall page looks more pleasing than the default WooCommerce pages.
Step 5: Activate your store checkout
Finally, you need to activate the store checkout. For that, come back to the sales funnel page and turn on the “Enable Store Checkout” button.
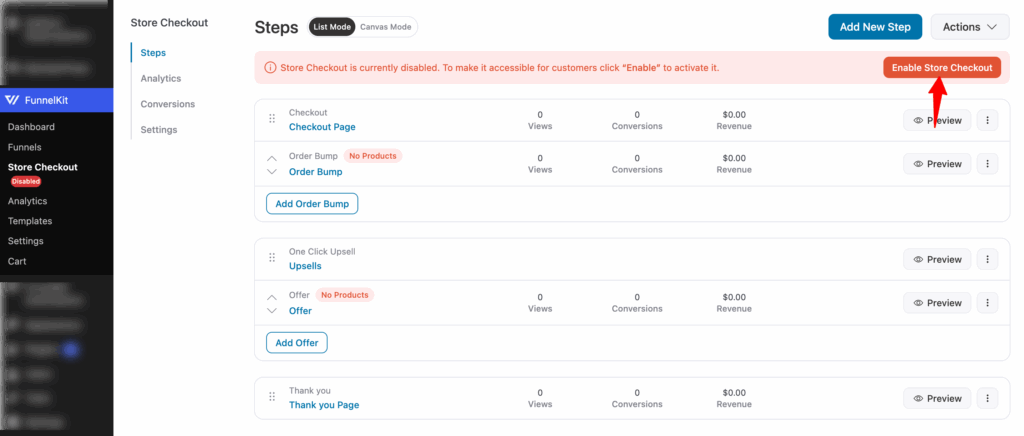
Now you have a checkout and thank you page with a customized WooCommerce order summary.
5 Best Practices for an Optimized WooCommerce Order Summary
Here are five best practices for optimizing the WooCommerce order summary:
1. Ensure clarity and transparency
Customers should get a clear understanding of what they’re paying for.
Display a detailed breakdown of products, quantities, subtotal, and total with taxes, shipping costs, and discounts to eliminate confusion and reduce cart abandonment.
2. Show the order summary inside the shopping cart
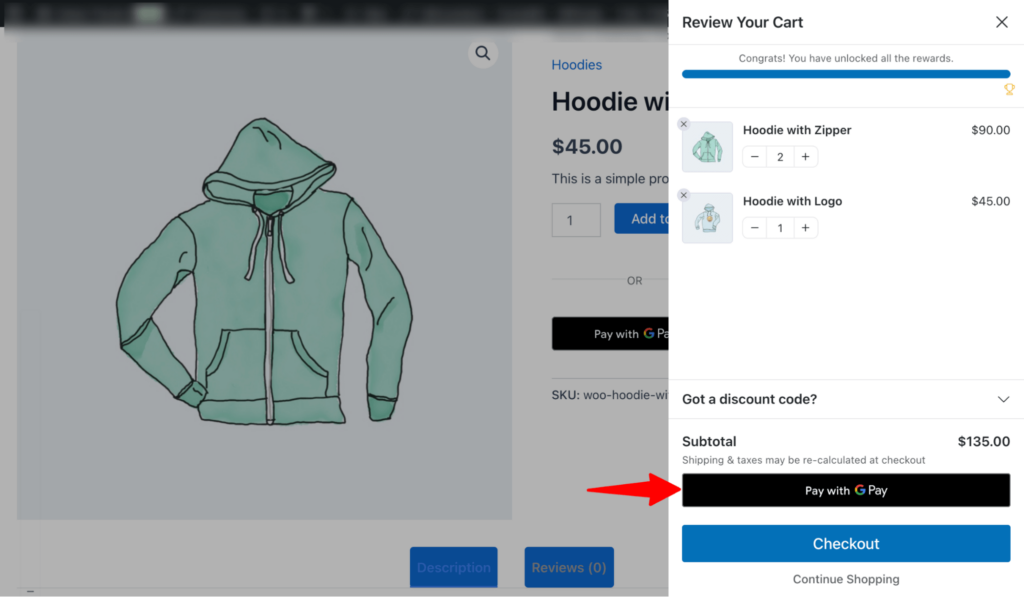
Displaying the order summary directly inside the WooCommerce side cart helps customers review their purchase details before checkout.
FunnelKit Cart lets you bring a dynamic sliding cart into WooCommerce, replacing the default, redundant cart page.
It lets shoppers purchase their items directly from the shopping cart or head straight to the checkout page, eliminating the extra steps in their journey.
This helps reduce cart abandonment and improve the overall shopping experience.
3. Make it mobile-friendly
With a majority of users shopping from their mobile devices, a responsive order summary is essential.
Optimize the order summary layout for mobile users, such as collapsible sections, clear fonts, and touch-friendly elements.
4. Highlight savings and offers
Customers love to see how much they’re saving while shopping.
For that, highlight applied discounts, coupon codes, or special pricing to reassure customers of their savings and encourage order completion.
5. Provide multiple payment and shipping details
Providing convenience to customers with a range of payment and shipping options is key to high conversions.
Integrate with the best payment gateway like Stripe to offer multiple payment methods like:
- Credit and debit cards
- Express checkout options like Apple Pay and Google Pay
- Buy now, pay later methods with Affirm, Klarna, and Afterpay
- Local or bank redirect methods like SEPA, P24, Bancontact, iDEAL, etc.
Frequently Asked Questions About WooCommerce Order Summary
Here are some commonly asked questions about the WooCommerce order summary with answers.
How can I customize the order summary to match my brand?
You can integrate your brand logo, use consistent colors, typography, and incorporate unique design elements to align the order summary with your brand identity.
Is it essential to optimize my order summary for mobile devices?
Yes. In the upcoming year, a significant 42% of smartphone users intend to increase their shopping activities through mobile devices. So, it’s important that you optimize the order summary section for mobile devices as well.
Is it possible to track user interactions with the order summary?
Yes, you need to enable conversion tracking settings in Funnel Builder. For more details, check the detailed post on WooCommerce conversion tracking here.
Ready to Customize WooCommerce Order Summary?
The checkout page and order confirmation represent the final stages of a purchasing journey, making it crucial to establish a personalized touch as users leave your site.
While customizing the order summary section may seem trivial, it plays an important role in ensuring you provide a seamless shopping experience for your customers.
With FunnelKit Funnel Builder, you can easily customize the order summary and also boost average order value with order bumps and one-click upsells.
This allows you to elevate your customer's journey and leave a lasting impression.
So, are you ready to change how the WooCommerce order summary looks in your store?
More WooCommerce Resources
- How to Optimize WooCommerce Order Pay Page for Better Conversions
- How to Create a WooCommerce Order Form
- WooCommerce Order Notes: Everything You Need to Know
Editorial Team
July 3, 2026Discover how a canceled order doesn't have to mean a lost customer, and how the right WooCommerce canceled order email can turn it into a second chance. WooCommerce canceled order...
Editorial Team
July 3, 2026Sometimes, the difference between a visitor leaving and placing an order comes down to something surprisingly small, like a better headline, a cleaner checkout, or a more compelling offer. That's...
Editorial Team
July 1, 2026Are you leaving money on the table by not fully leveraging your customers’ shopping behavior? Many store owners don’t realize that every time a customer adds a product to the...


