
Do you want to know how to create a sales funnel for free?
Getting people to visit your site is only half the battle; the real challenge begins once a visitor lands on your site. The real goal is to turn visitors into paying customers.
That’s where a sales funnel can help you seal the deal. By providing users with the right information at the right time, a sales funnel persuades users to buy the product and actually place an order.
If you are using WordPress, you can easily build a sales funnel for free without spending a penny.
In this blog, we will share how to create a sales funnel for free using WordPress and tips on how to use the right strategy to achieve the maximum result.
So, let’s start.
Table of Contents
- 1 What is a Sales funnel?
- 2 Why You Should Utilize the Power of Sales Funnels?
- 3 How to Build a Successful Sales Funnel Strategy?
- 3.1 Step 1: Define your goals
- 3.2 Step 2: Understand your audience
- 3.3 Step 3: Select a medium to create awareness
- 3.4 Step 4: Generate interest with a persuasive landing page
- 3.5 Step 5: Close the sale with a conversion-optimized checkout page
- 3.6 Step 6: Follow up to boost conversion and retain customers
- 3.7 Step 7: Monitor and optimize
- 4 How to Create a Sales Funnel for Free in WordPress?
- 5 Frequently Asked Questions About How to Create a Sales Funnel for Free
- 6 Ready to Create a Sales Funnel for Free?
What is a Sales funnel?
A sales funnel is a marketing concept that describes the journey customers take from first becoming aware of a product or service to purchasing it.
It's called a 'funnel' because it starts with a large group of people at the top. As they go through different stages of the buying process (awareness, interest, desire, and action), the funnel gradually narrows down to a smaller group who finally make the purchase.
Here are the steps of a sales funnel:
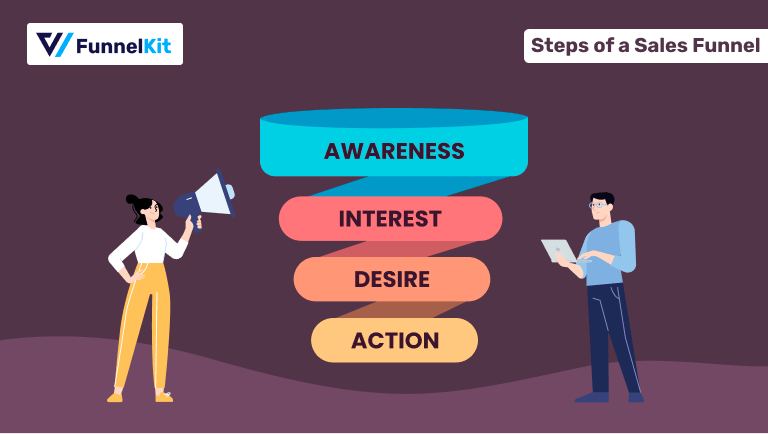
- Awareness
This is the top of the funnel (TOFU), where potential customers first become aware of your product or service. You can make your target audience aware of your product or service through various channels, such as advertising, social media, content marketing, and SEO.
With marketing campaigns, you can grab users' attention towards your product and service. This is an important step because once a potential customer knows about your product/service, they will enter the sales funnel.
- Interest
The interest stage is the second phase, where potential customers start showing interest in your product or service and begin to engage more actively.
Examples of showing interest include visiting your website, signing up for a newsletter, and following your social media accounts. You can use a landing page at this stage to educate the prospect about your product and spark their desire to purchase.
- Desire
At this stage, potential customers develop a desire for the product and actively consider your product or service. However, they may still be unsure or might be considering other options as well.
You can use the landing page to highlight product benefits and differentiators and give customers reasons why your product is better than others. You can also share previous customer reviews to prove the quality of your product.
- Action
The final stage, “Action”, is the decision-making stage. At the bottom of the funnel (BOFU), the potential customer is likely one step away from becoming a paying customer.
You can create FOMO (fear of missing out) among users by offering a time-sensitive discount coupon and urging them to make a quick purchase. Additionally, it's important to create an attractive CTA (call to action) to guide users through the purchase process.
While the traditional sales funnel ends with a purchase, post-purchase communication can extend the journey in online business. By engaging customers through follow-up communication (email and SMS), you can encourage them to make repeat purchases. This can turn one-time buyers into loyal customers and brand advocates.
Why You Should Utilize the Power of Sales Funnels?
Sales funnels guide potential customers through their purchasing journey, ultimately enhancing conversion rates and stimulating business growth.
Here are some of the reasons why you should make use of sales funnels:
- Streamline the customer journey: Sales funnels streamline a customer's buying journey by providing a clear and structured path from initial awareness to the final action of making a purchase. This ensures a seamless customer journey.
- Optimise marketing efforts: Analyzing each stage of the sales funnel lets you identify areas for improvement in your marketing strategy. You can pinpoint why people aren't engaging or making purchases and then refine your marketing strategies effectively.
- Target the right audience: Targeting the right audience is key to maximizing sales funnel benefits. By focusing on your ideal customers based on their demographics, interests, and behaviors, you can better tailor your marketing to meet their needs.
- More conversions with increased AOV: A well-structured sales funnel addresses specific customer pain points, which can lead to higher conversions. Depending on your expended sales funnel strategy, you can also boost average order values(AOV) by offering pre and post-purchase offers like order bumps and upsells in your sales funnel.
- Improve lead generation: With a sales funnel, you can capture leads at various stages and effectively nurture them to convert. For instance, if someone shows interest in your product, goes to the checkout, and abandons it for some reason, you can send them abandoned cart recovery emails to encourage them to complete the order.
How to Build a Successful Sales Funnel Strategy?
Building a sales funnel involves several key steps to guide potential customers from initial awareness to purchasing effectively. Here are the main components of a successful sales funnel strategy:
Step 1: Define your goals
Determine what you want to achieve with your sales funnel, such as generating leads, increasing sales, etc. Depending on your goal, your sales funnel strategy will change.
For instance, if you want to generate leads, you should create a landing page offering freebies. On the other hand, if you want to increase sales, you should create a landing page with detailed product features and benefits to convince users to make a purchase.
Step 2: Understand your audience
Once you have set your goals, the next step is identifying your target audience. Conduct thorough research and create a potential buyer persona to understand your target audience.
This includes understanding their needs, behaviors, and pain points. Additionally, ascertain their preferences, such as their activity on social media, their preference for content types (e.g., e-books, videos, webinars), and more.
Step 3: Select a medium to create awareness
Once you have established your goals and identified your audience, the next crucial step is to raise awareness among your target audience about your product or service.
You can effectively promote your offerings through various marketing channels, such as social media, content marketing, and SEO.
Choose the appropriate marketing platform and type of content to advertise your product or service.
Ensure your marketing campaign is engaging enough to achieve a higher click-through rate. Offering relevant freebies is important for generating leads.
👉 For more freebies or opt-in ideas, read our blog, Email Opt-In Ideas.
Step 4: Generate interest with a persuasive landing page
Once users click on the marketing campaign, ensure your prospects land on a targeted landing page instead of your website. A landing page allows you to convince customers to convert with specific messaging.
Provide targeted content and solutions that address specific customer needs and challenges. Build trust and credibility by sharing testimonials, case studies, etc.
🔔 Pro tip: If you can divide your audience into multiple groups, our experts recommend using different landing pages for each group. This allows for more targeted messaging and is likely to yield better results.
Experts suggest using compelling offers or promotions to persuade leads to take action. You can use limited-time discounts or free trials to encourage conversions.
👉 For more details, read our blog on the product landing page.
Step 5: Close the sale with a conversion-optimized checkout page
Creating a persuasive landing page is not enough to seal the deal. According to the Baymard Institute, 70% of people abandon their cart in the middle without completing it due to an unoptimized checkout page.
So, ensure the landing page is followed by a fully optimized checkout page. You can optimize your checkout page by removing unnecessary fields, implementing inline form validation, adding Google address auto-complete, etc.
In addition, consider replacing the traditional one-page checkout with a multi-step checkout process. It’s also essential to offer different payment methods, like Google Pay and Apple Pay, etc., for one-click payment options.
Plus, you can offer Buy Now, Pay Later (BNPL) options like Affirm, Klarna, Afterpay, Bancontact, etc., to encourage people with low budgets to make purchases and boost sales.
Step 6: Follow up to boost conversion and retain customers
Don’t just stop customer communication after someone makes a purchase. Implement strategies like post-purchase email product education, product recommendations, customer feedback surveys, customer product reviews, and exclusive offers to nurture long-term relationships.
Also, follow up with those who drop off at various stages of the buying journey and don’t complete their purchase. Communicate with them through persuasive email and SMS marketing campaigns to encourage conversions.
With an effective follow-up strategy, you can boost conversion rates by re-engaging those who abandon the sales funnel in the middle and improve retention rates through post-purchase follow-ups.
👉 For more details, read our blog on WooCommerce follow-up email marketing.
Step 7: Monitor and optimize
Marketing is an ongoing process, as is utilizing a sales funnel to keep getting sales. Getting some sales through a sales funnel isn’t the end; it is a new beginning because now you know your audience better.
For example, you can look at the number of people who buy compared to the number who visit your site, the number of customers who keep coming back, and the amount of money you make compared to the amount you spend.
Analyze this data to identify areas for improvement and test different strategies to enhance your sales funnel.
🔔You can A/B test your sales funnel pages to determine what works for your audience.
Monitoring and refining your sales funnel's performance is crucial for achieving sustained success in your sales strategy.
These are the steps to creating a solid sales funnel strategy.
Now, you know how to create an impactful sales funnel strategy. In the next section, we will share how to create a sales funnel for free using WordPress and WooCommerce.
How to Create a Sales Funnel for Free in WordPress?
Here, we will share how to create a sales funnel for free in WordPress. We are choosing WordPress because it’s the most popular CMS in the world, and it provides a beginner-friendly interface that makes it super easy for anyone to create a sales funnel.
For the online store functionality, we will use WooCommerce. The good news is that both WordPress and WooCommerce are free.
In addition, we will use FunnelKit Funnel Builder, the highest-rated sales funnel builder for WordPress and WooCommerce.
The basic version of FunnelKit Funnel Builder is available on WordPress.org. The free version allows you to create beautiful landing pages, checkout pages, thank you pages, etc.
FunnelKit Funnel Builder provides free sales funnel templates to import and use. This sales funnel plugin is compatible with all the popular page builders, such as Elementor, Divi, Oxygen, etc.
Learn more about FunnelKit Funnel Builder 👇
Make sure you have FunnelKit Funnel Builder installed and activated. Now go through the step-by-step process of how to make a sales funnel for free below:
Step 1: Create a sales funnel with a pre-built template
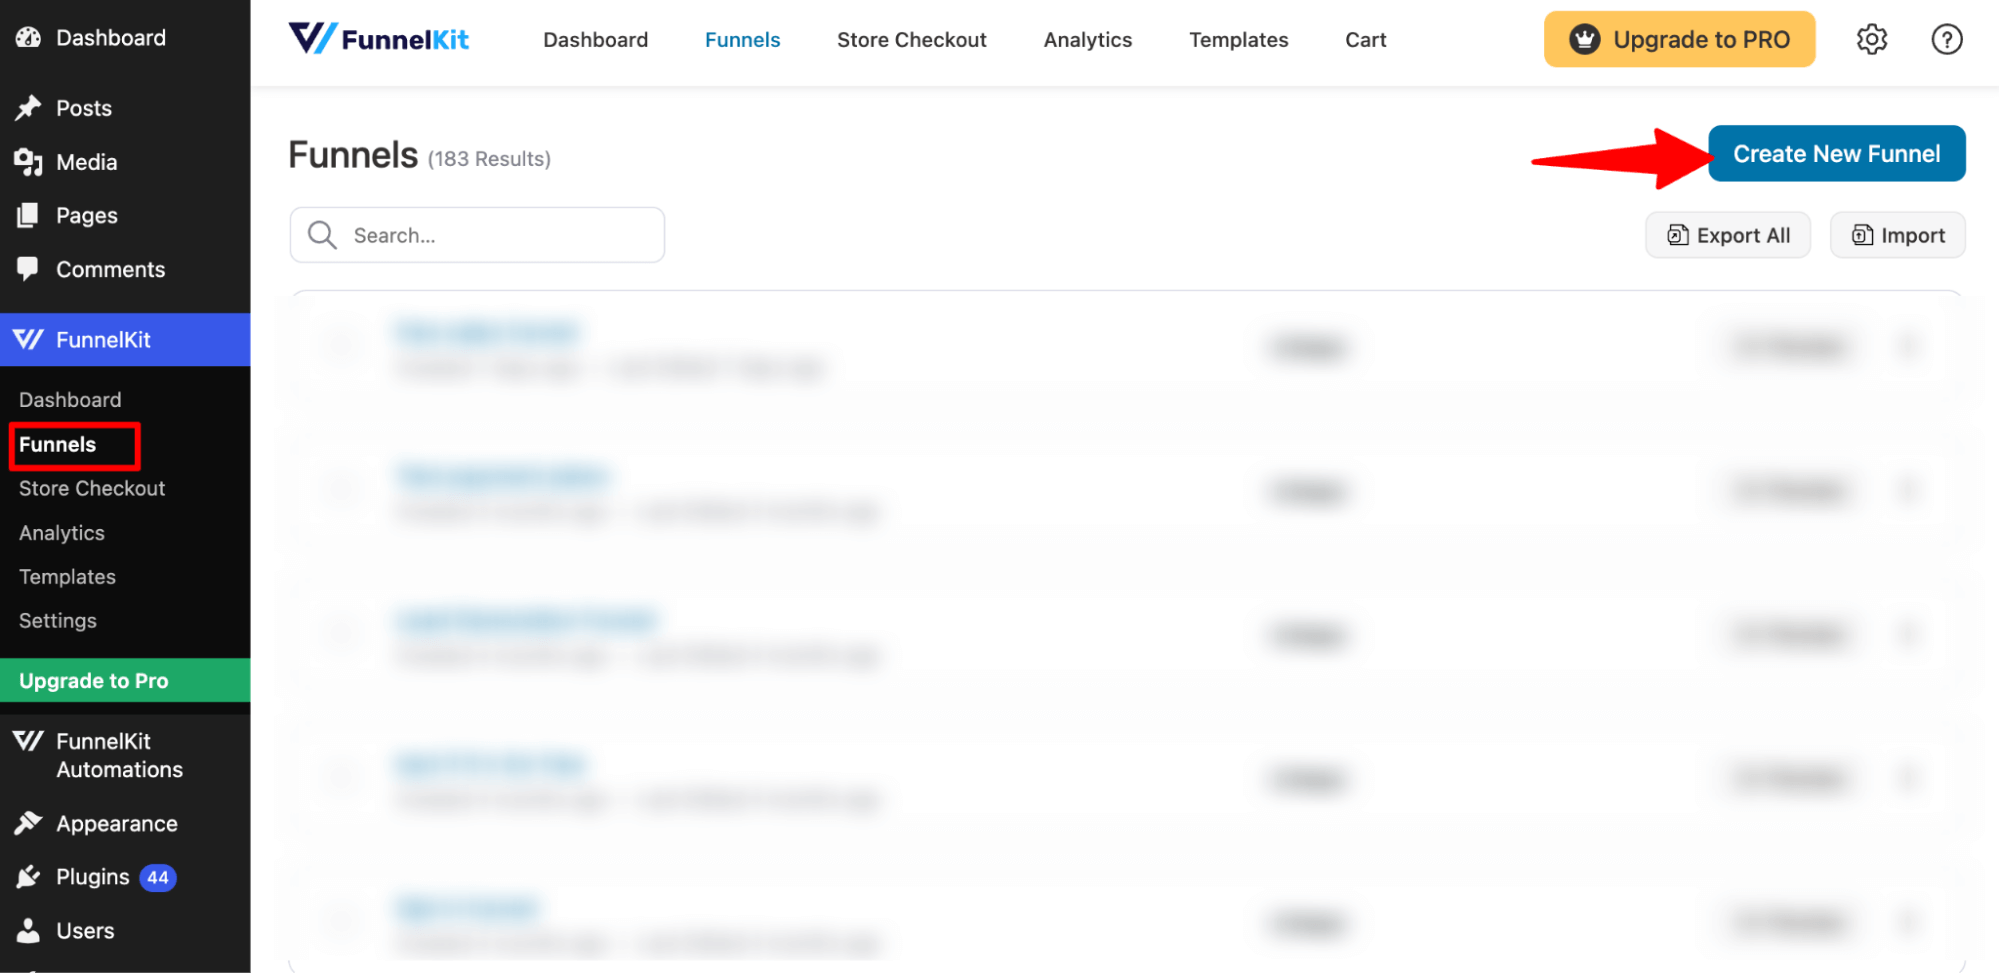
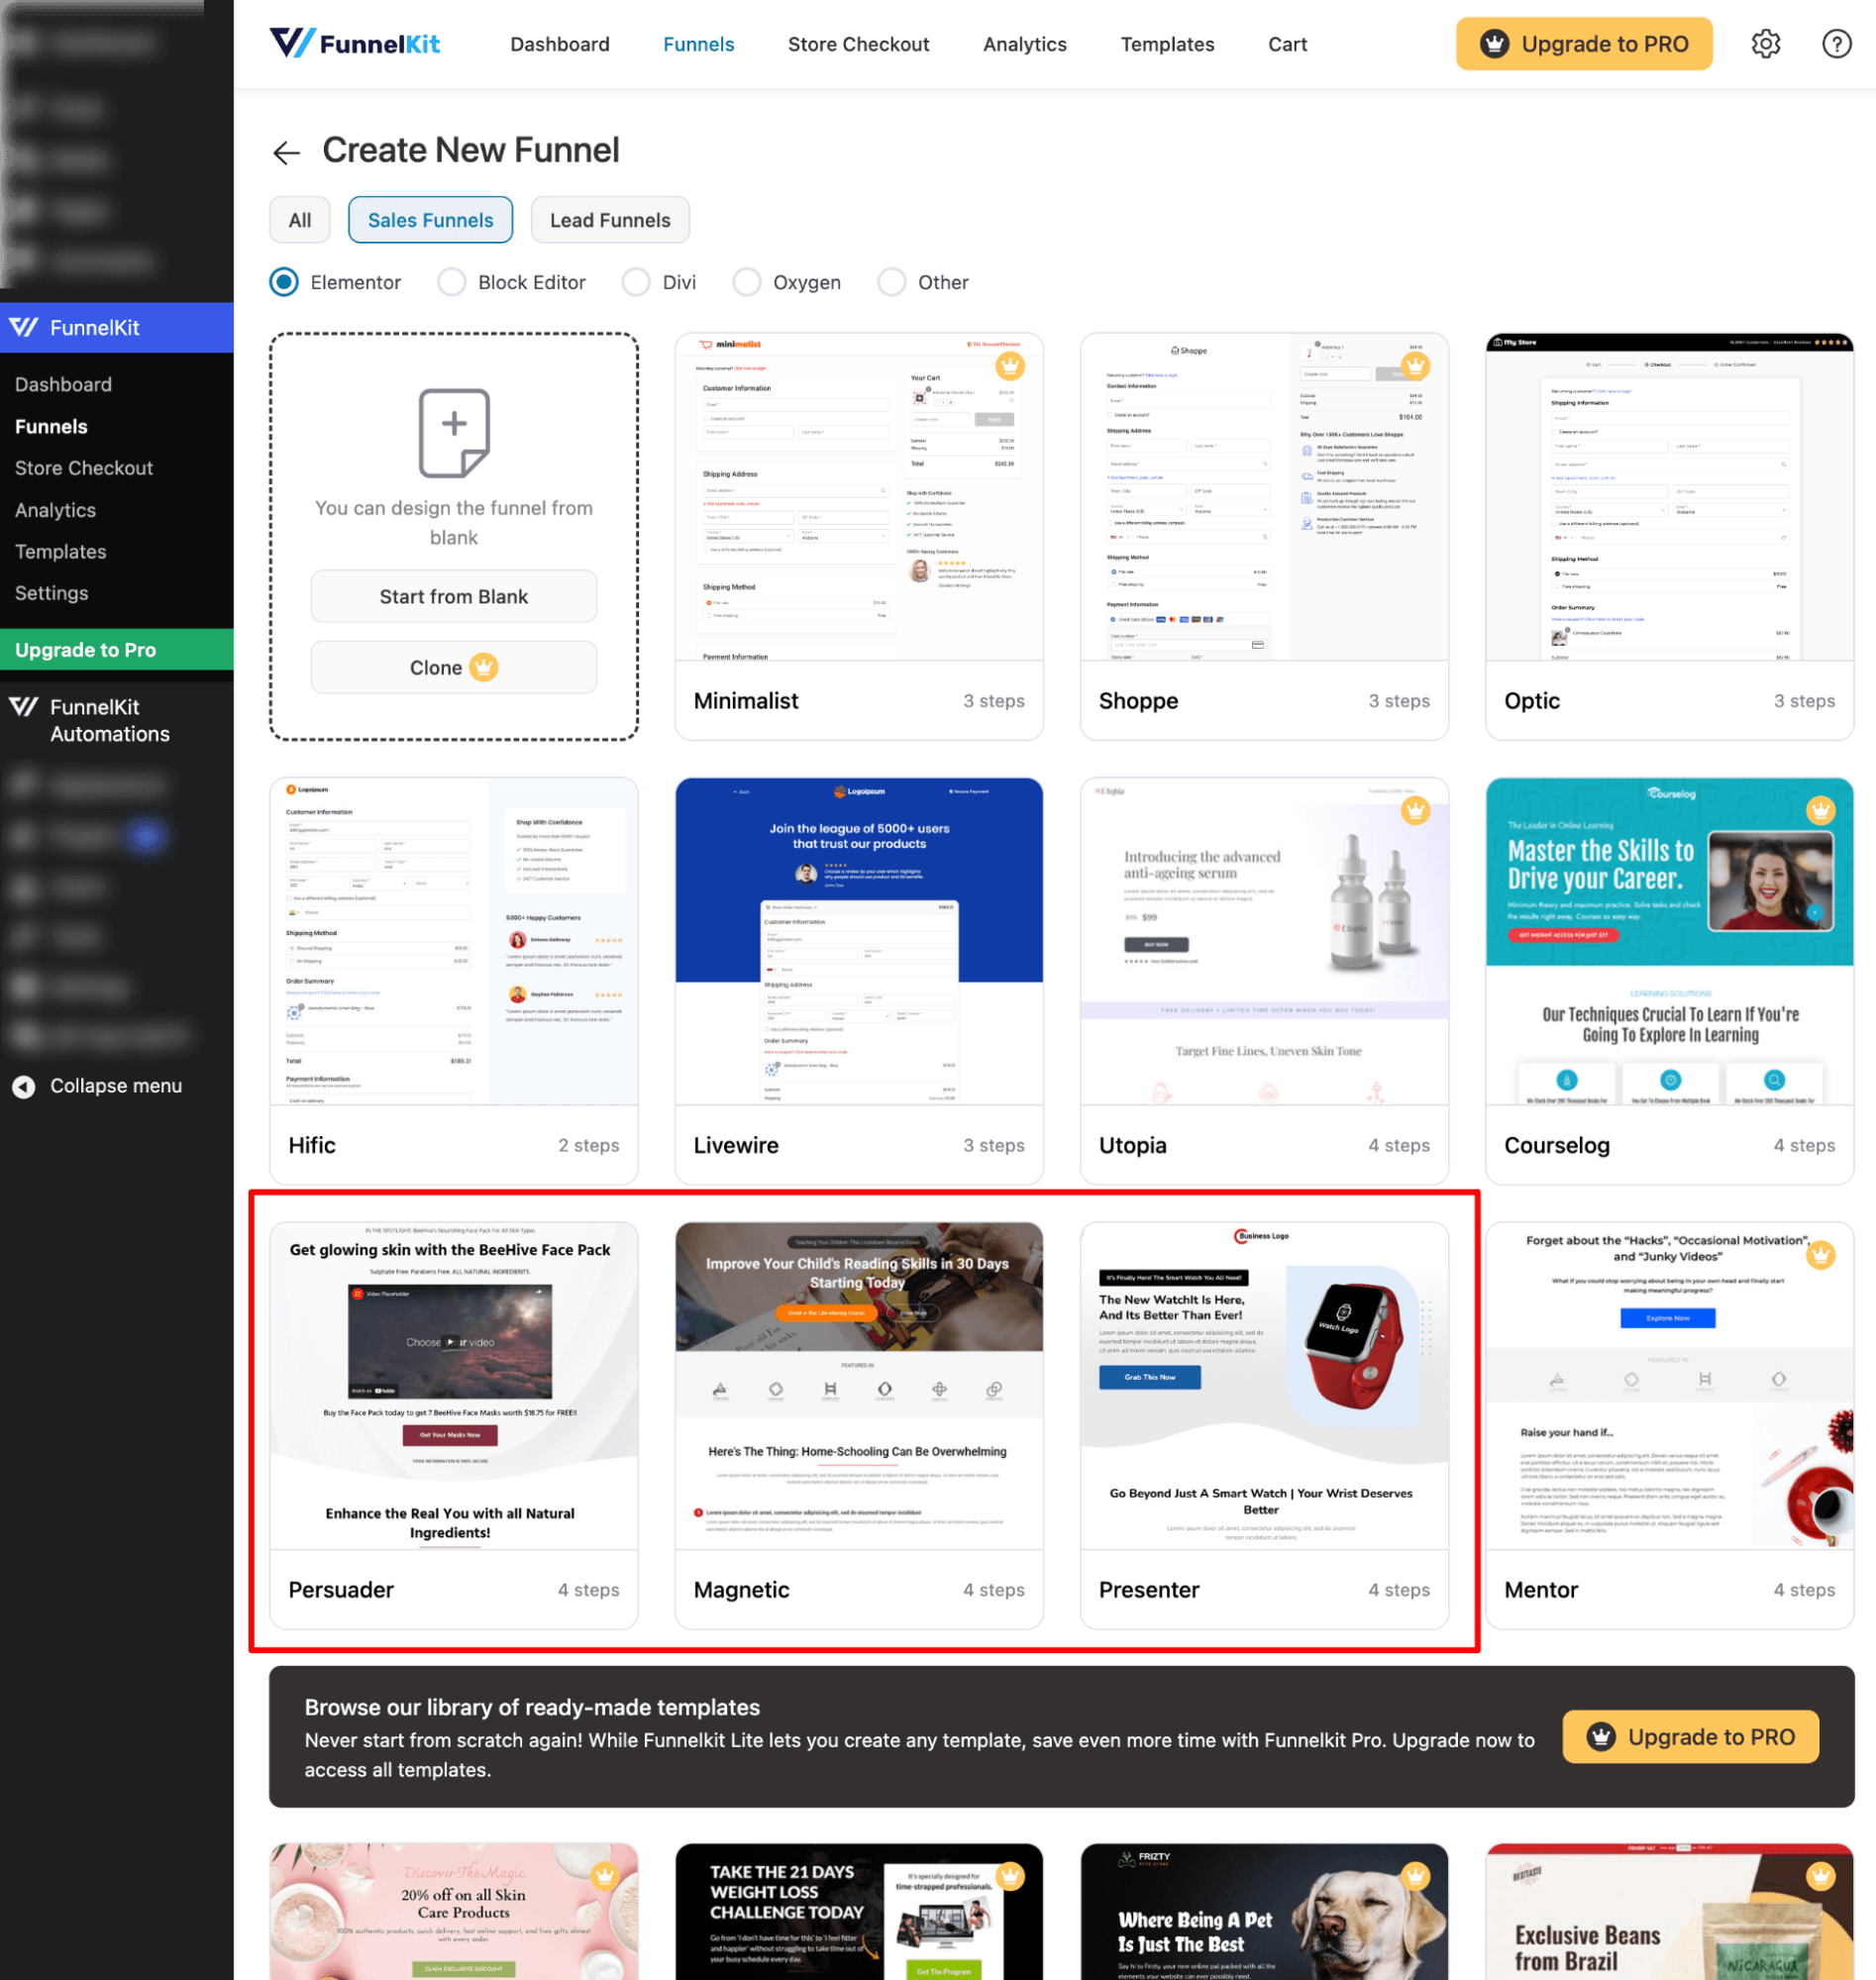
Navigate to FunnelKit ⇒ Funnels from the WordPress admin panel and click the “Create New Funnel” button.
After that, choose funnel and your favorite page builder to see the free sales funnel templates. Here, we are choosing Elementor.
With the free version of FunnelKit Funnel Builder, you get 3 free sales funnel templates: Persuader, Magnetic, and Presenter.
🔔 Note: Make sure your chosen page builder is installed and activated on your WordPress site.
To choose one template, hover over the template and click on "Preview". We are going with the Presenter.
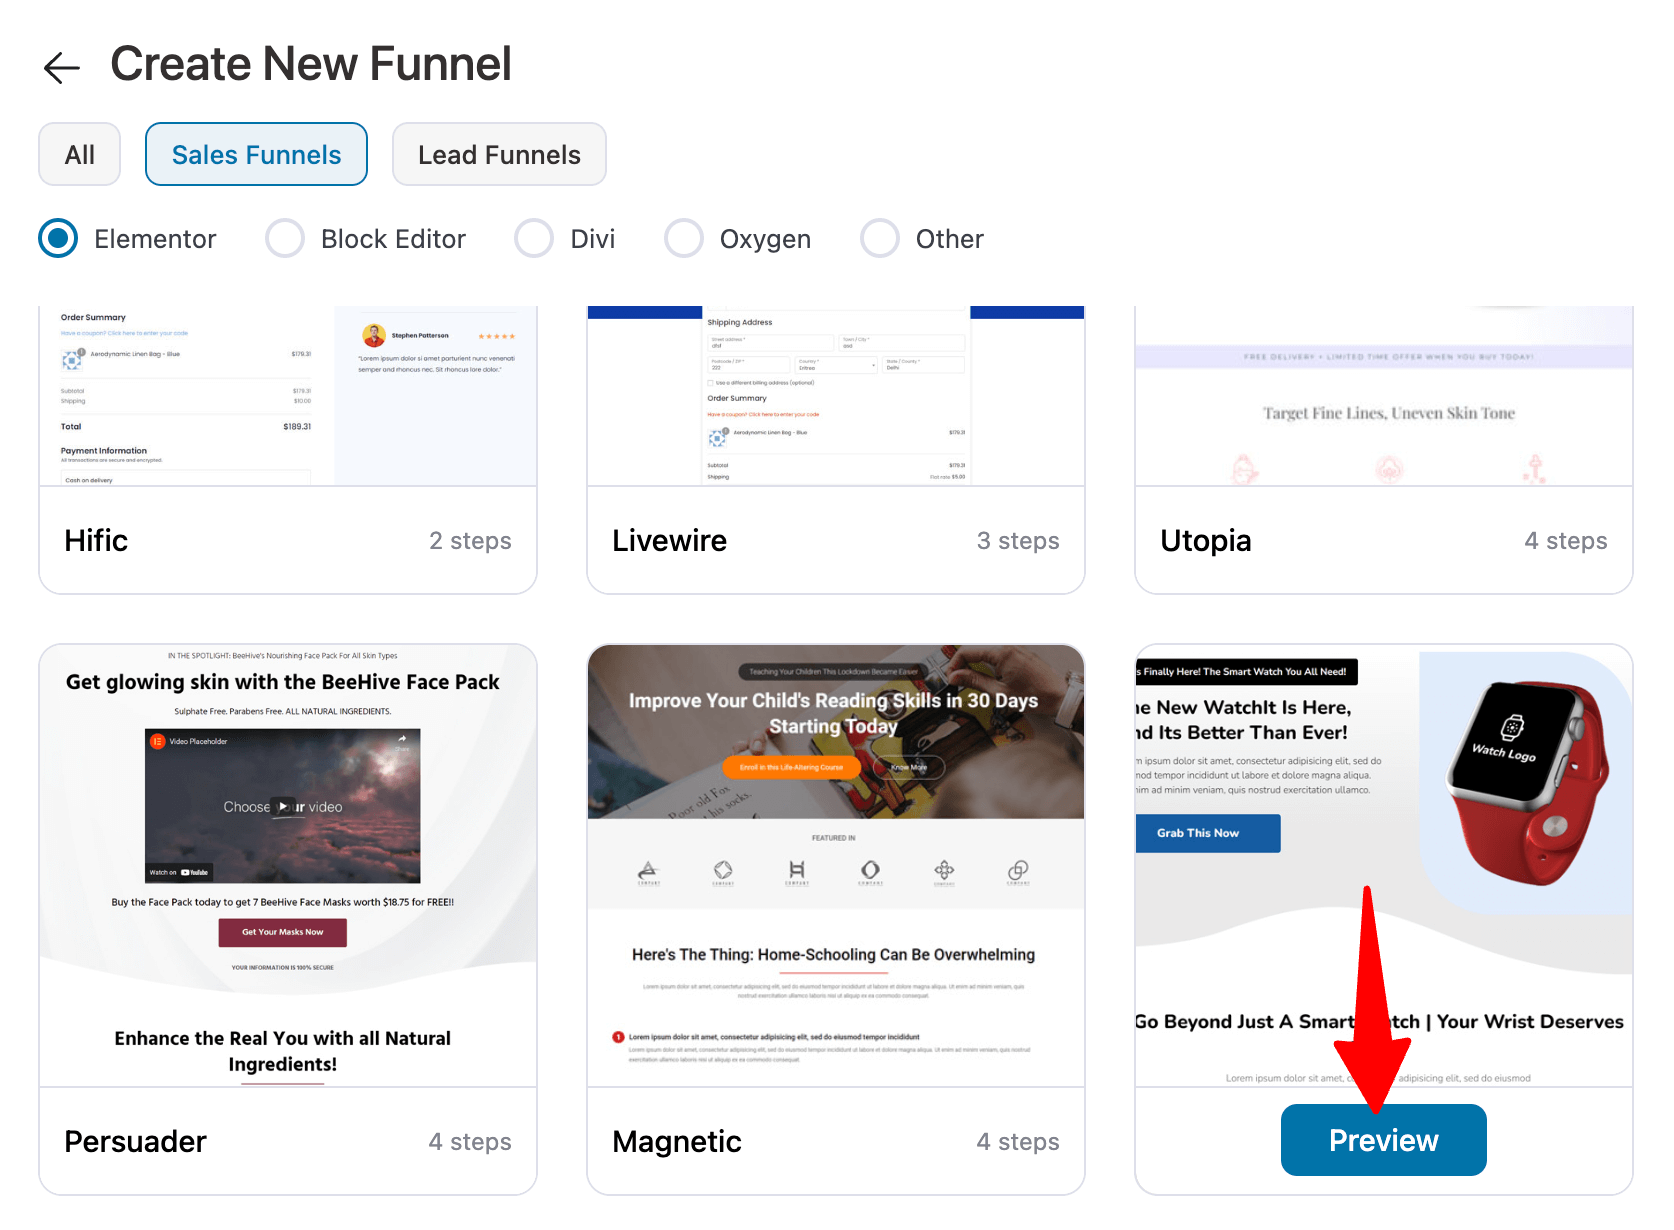
This is a four-page template: sales page, checkout (one page), one-click upsell, and thank you.
However, the upsell template is only available with FunnelKit Funnel Builder Pro.
To import the free template, click “Import This Funnel”, provide a name, and hit Done.
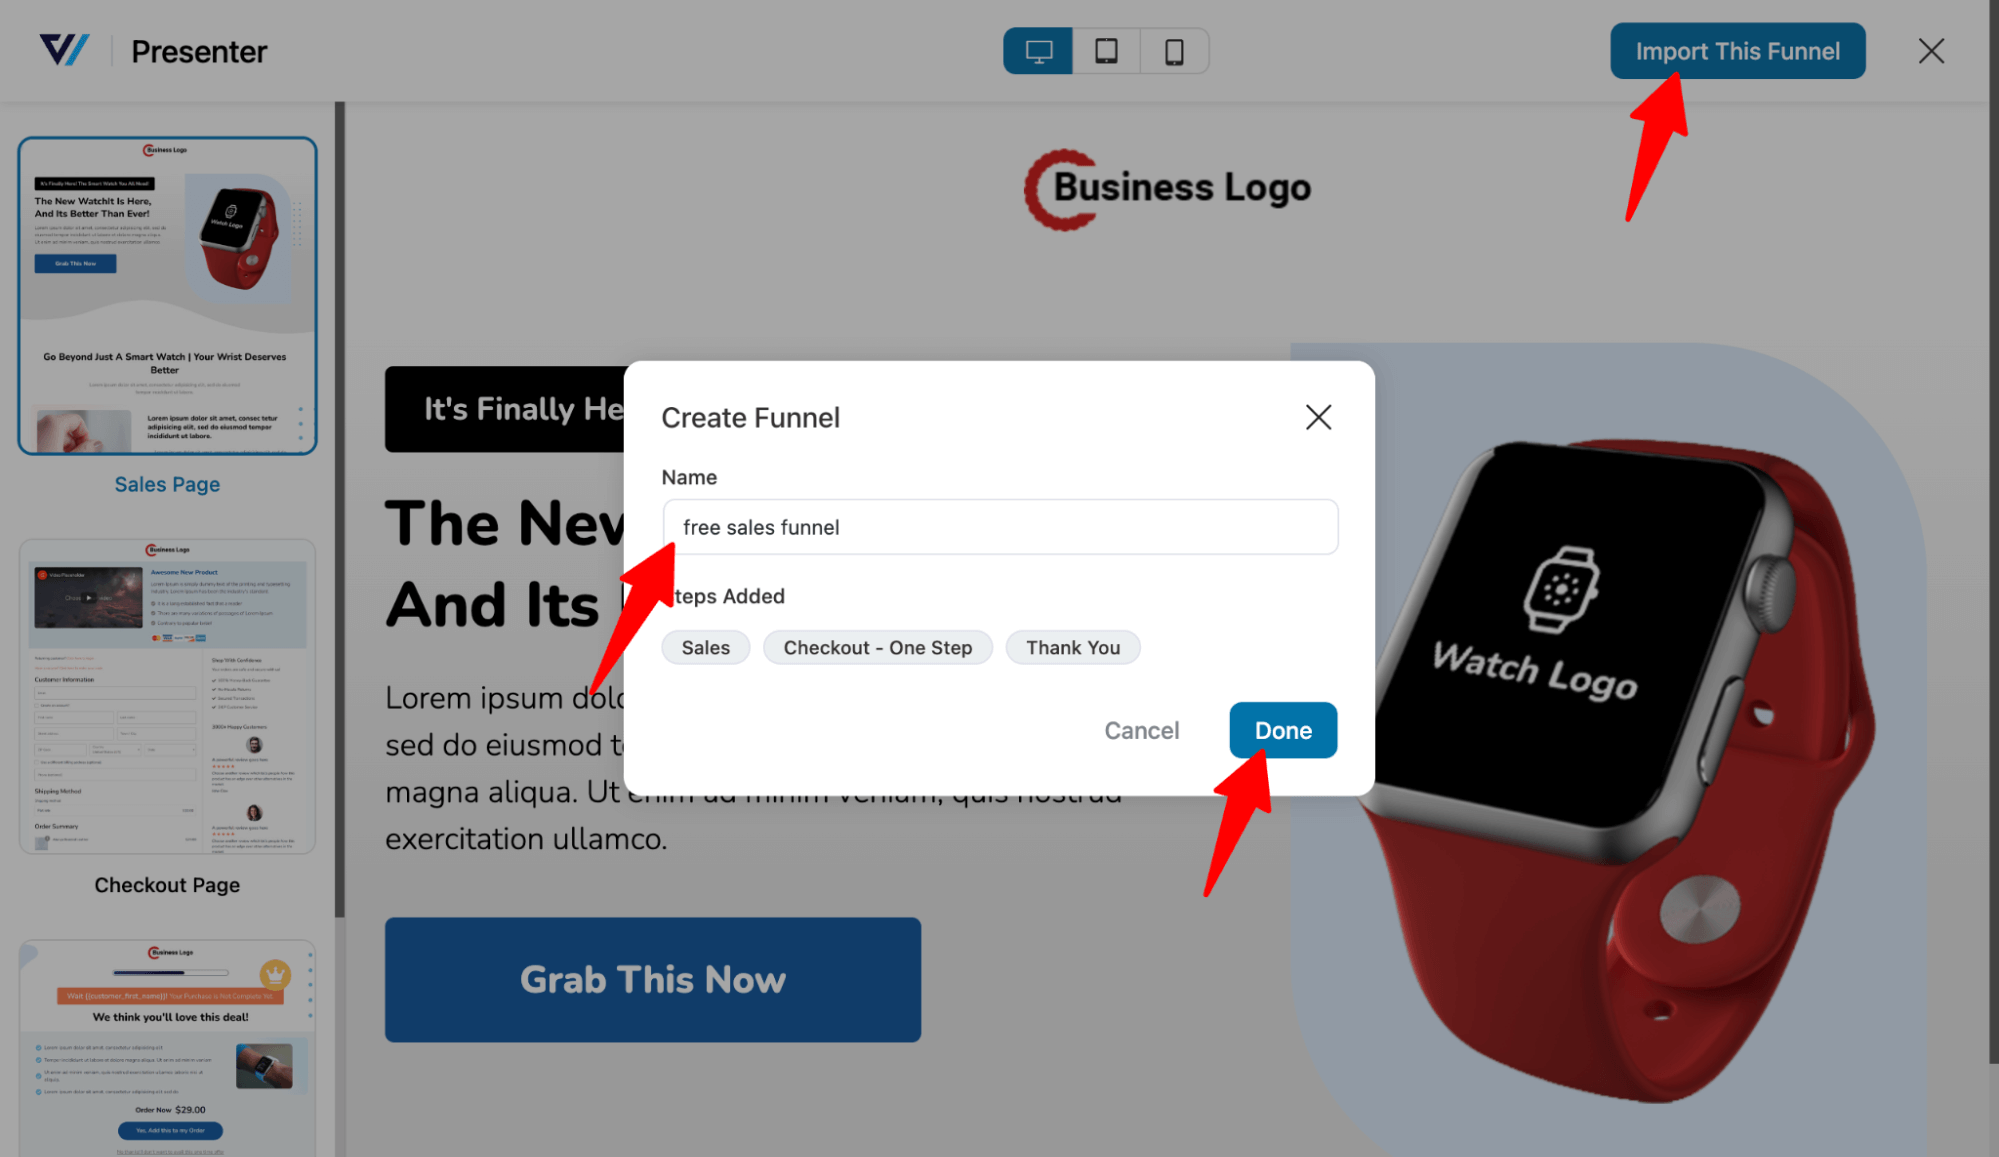
Now, you should have a sales funnel with three active templates: sales page, checkout, and thank you.
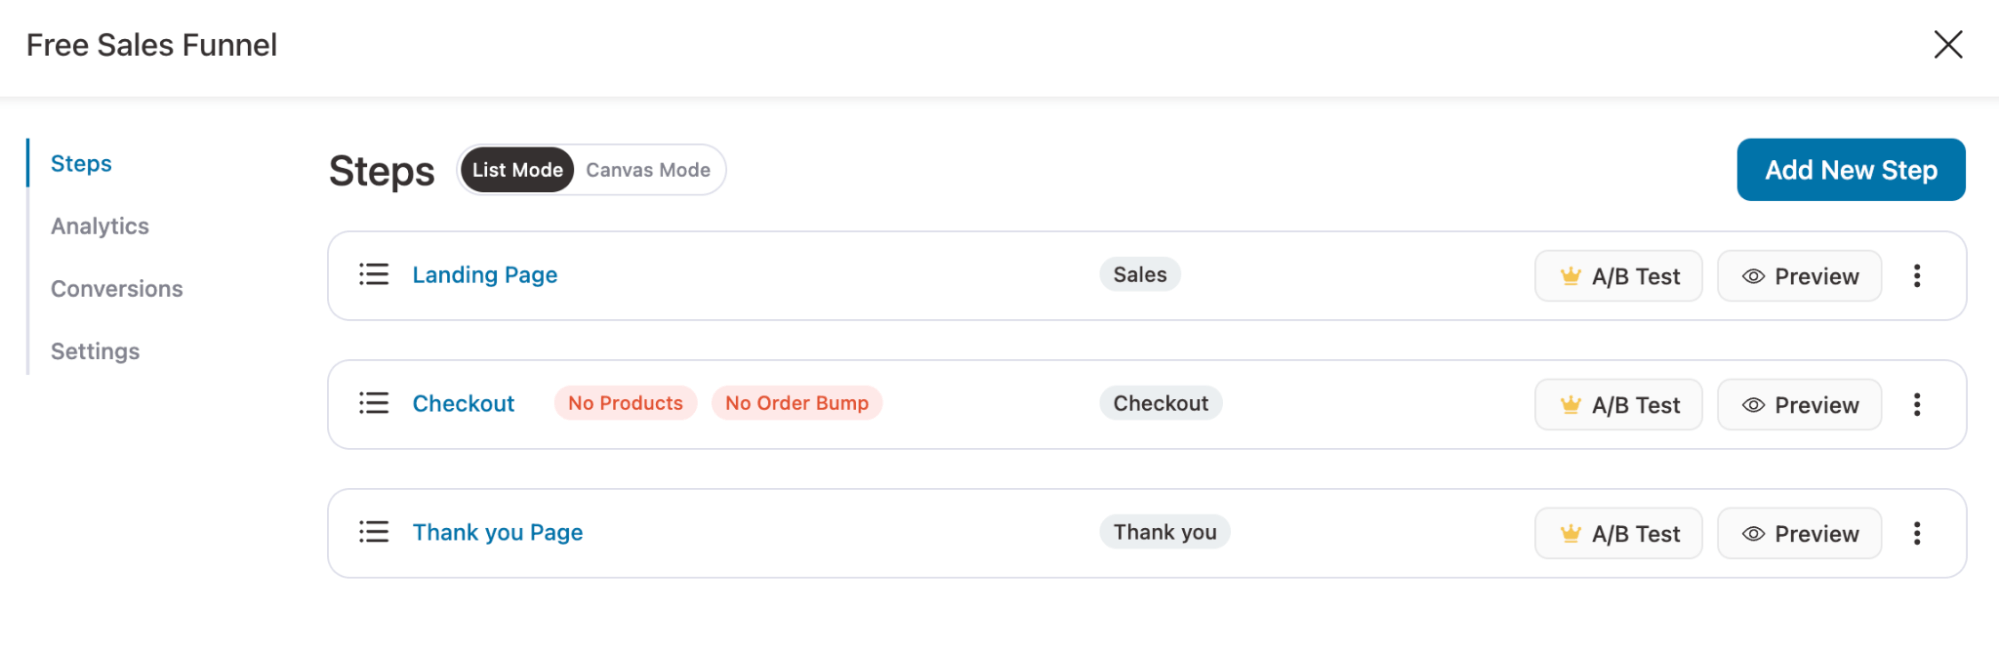
Step 2: Customize the content of the landing page
Now, it’s time to customize the landing page. To do this, click on the landing page step.
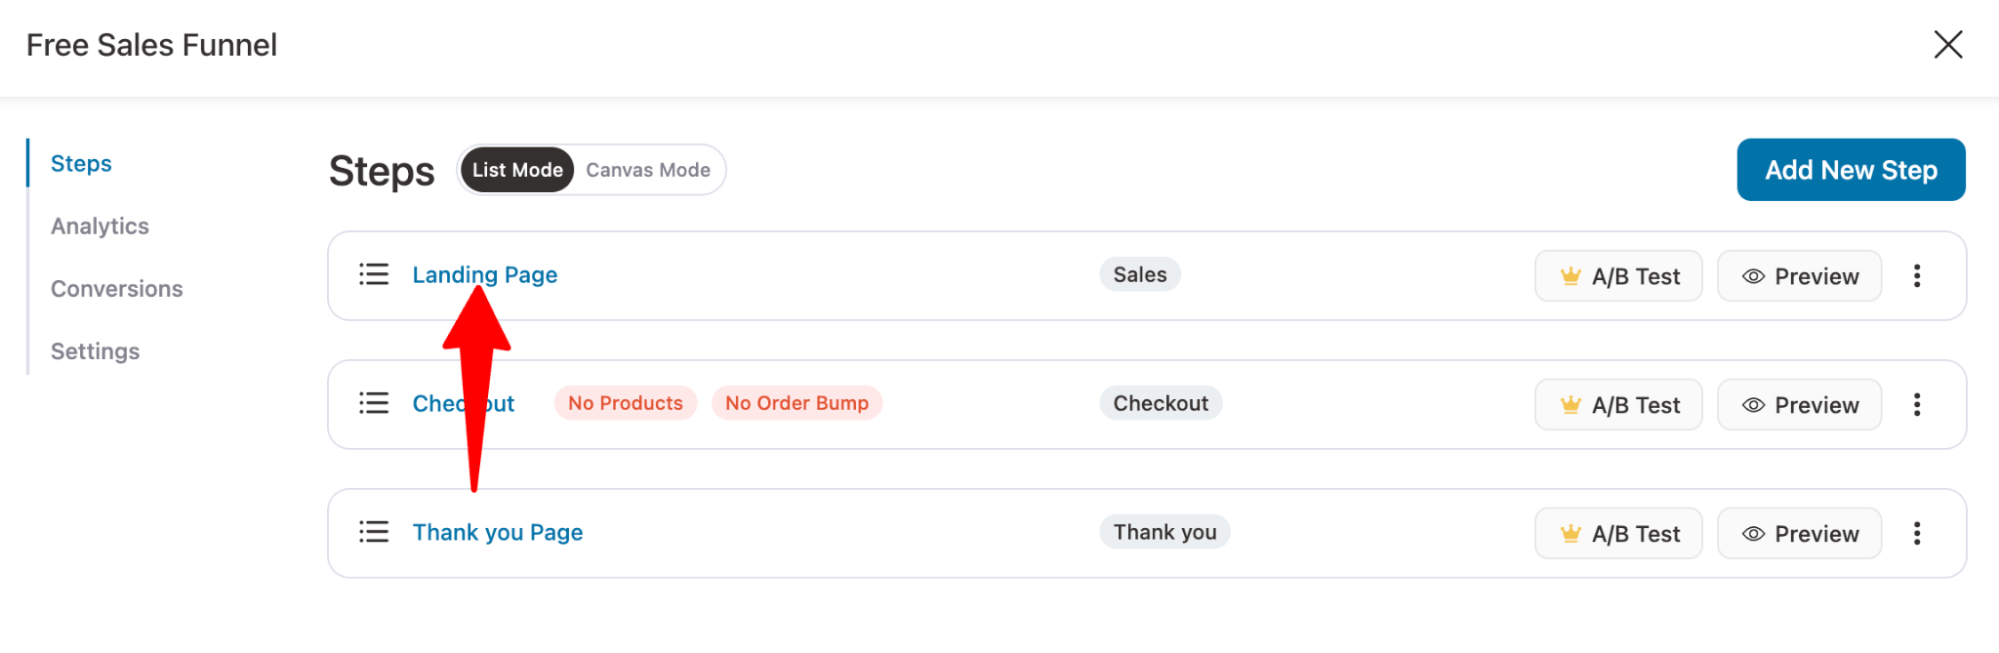
After that, click on “Edit Elementor Template”.
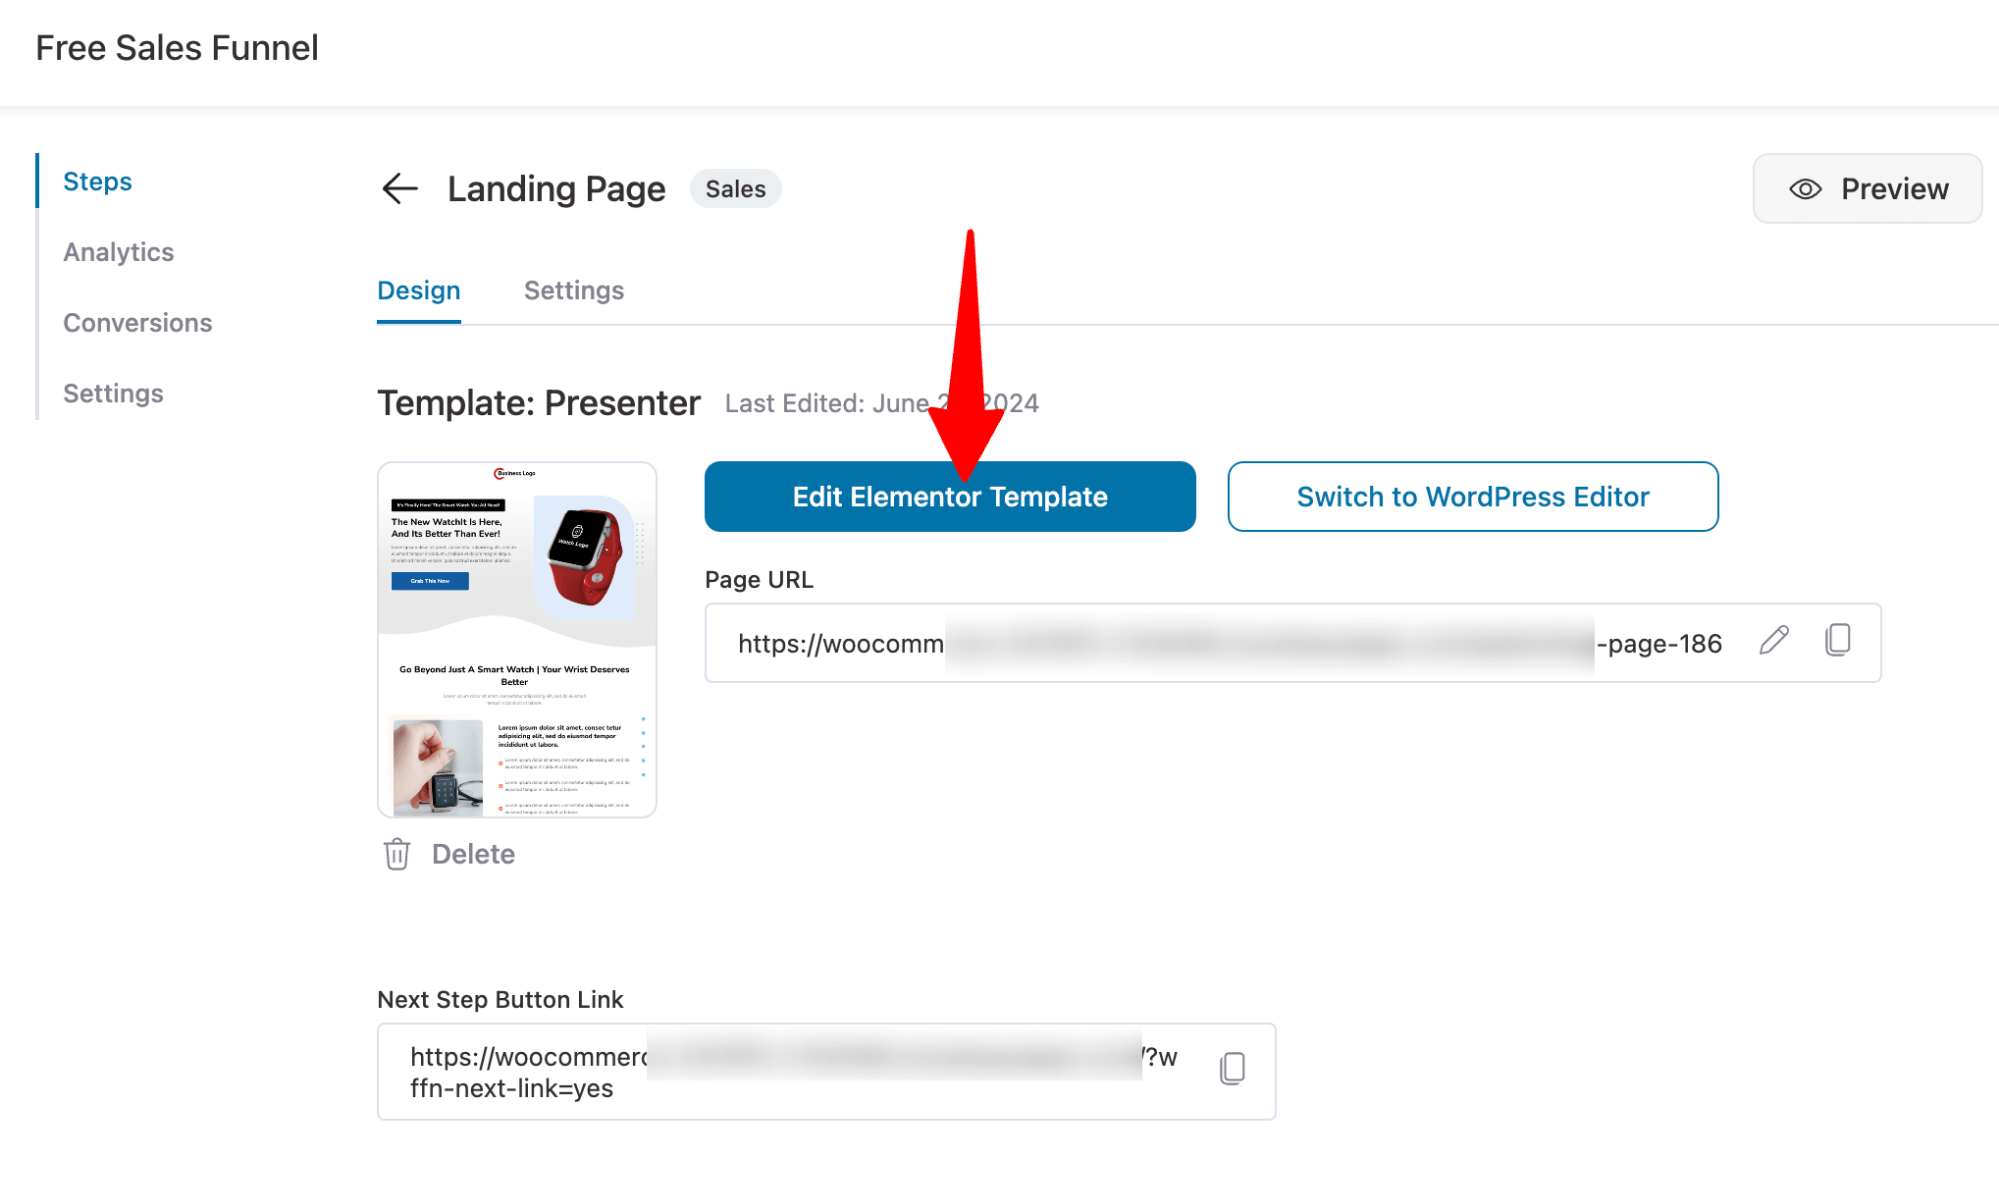
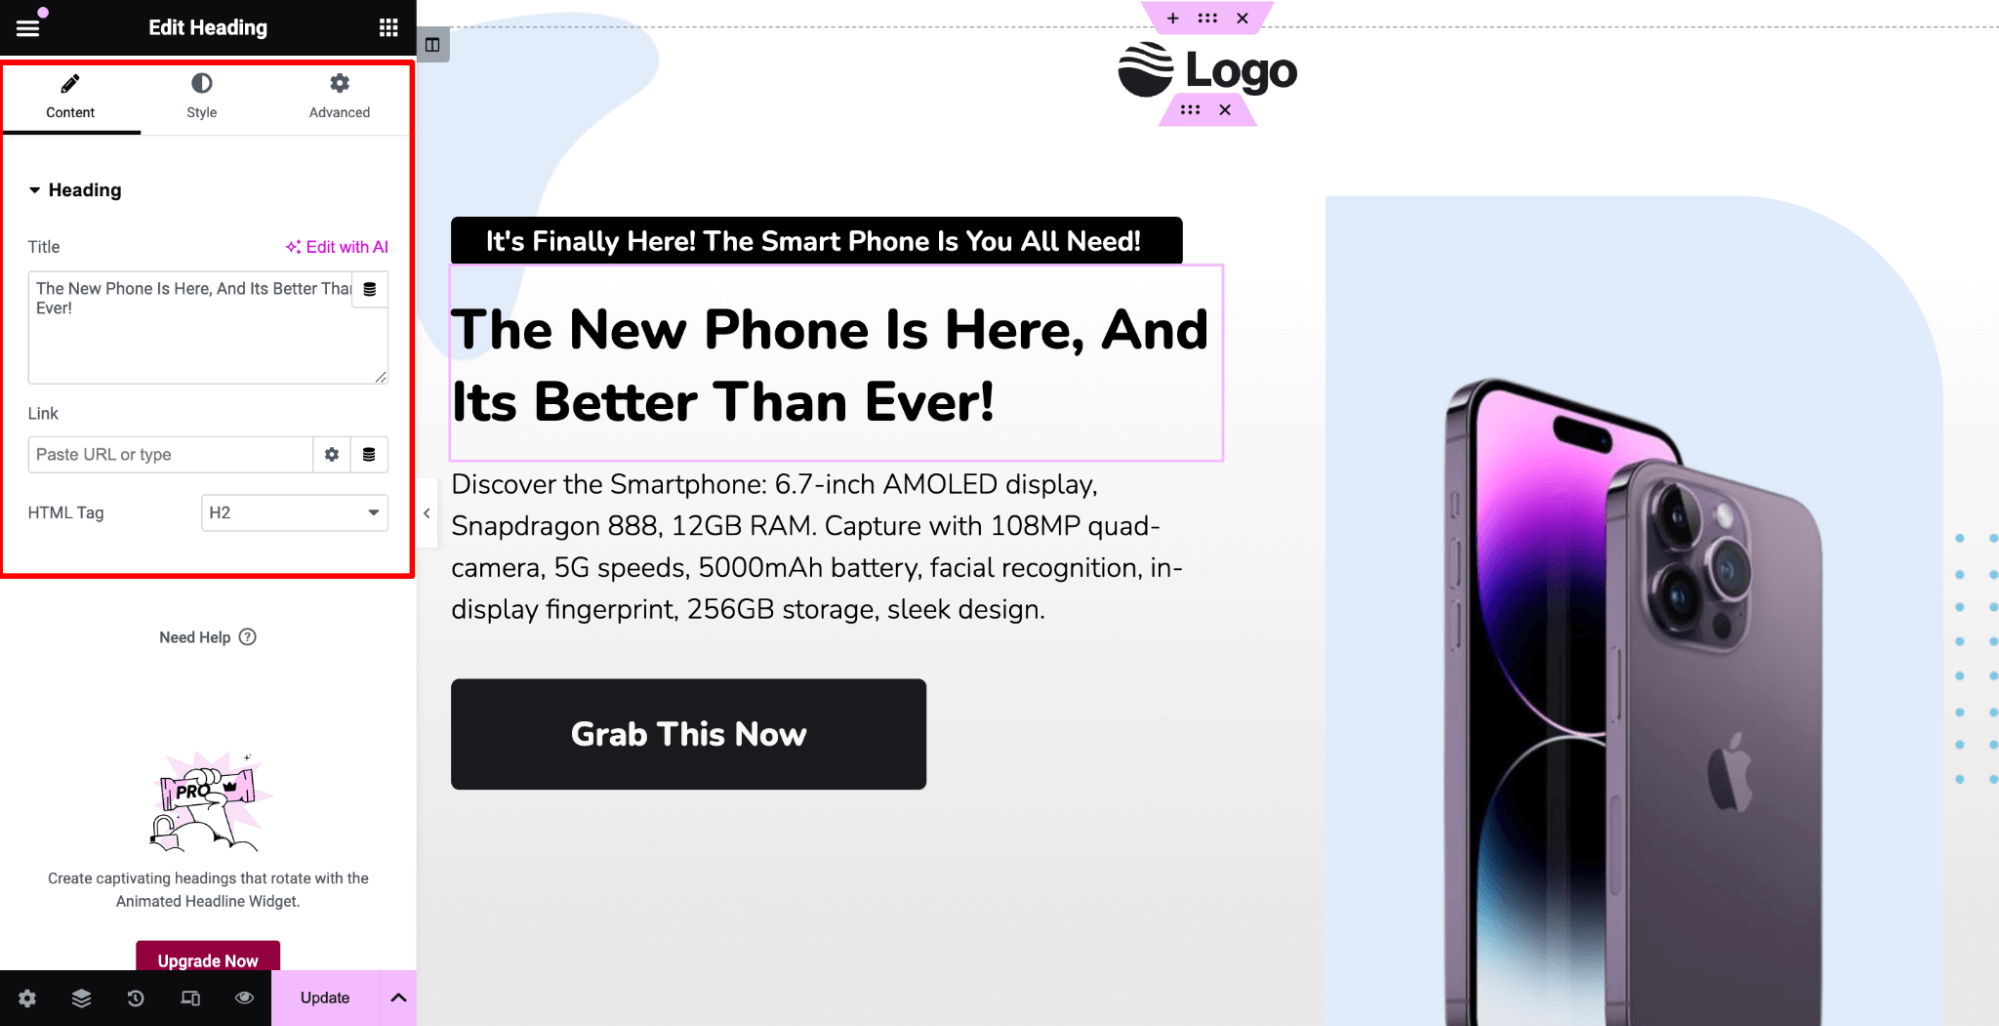
Now, customize the landing page with the chosen page builder. Here, we are going to edit the page with Elementor. Here, we have updated the logo, heading, product image, CTA and so on.
You can find customization options for each section on the left side panel.
For more details, check out our blog on the WooCommerce landing page.
After customizing all the sections, make sure to update the savings.
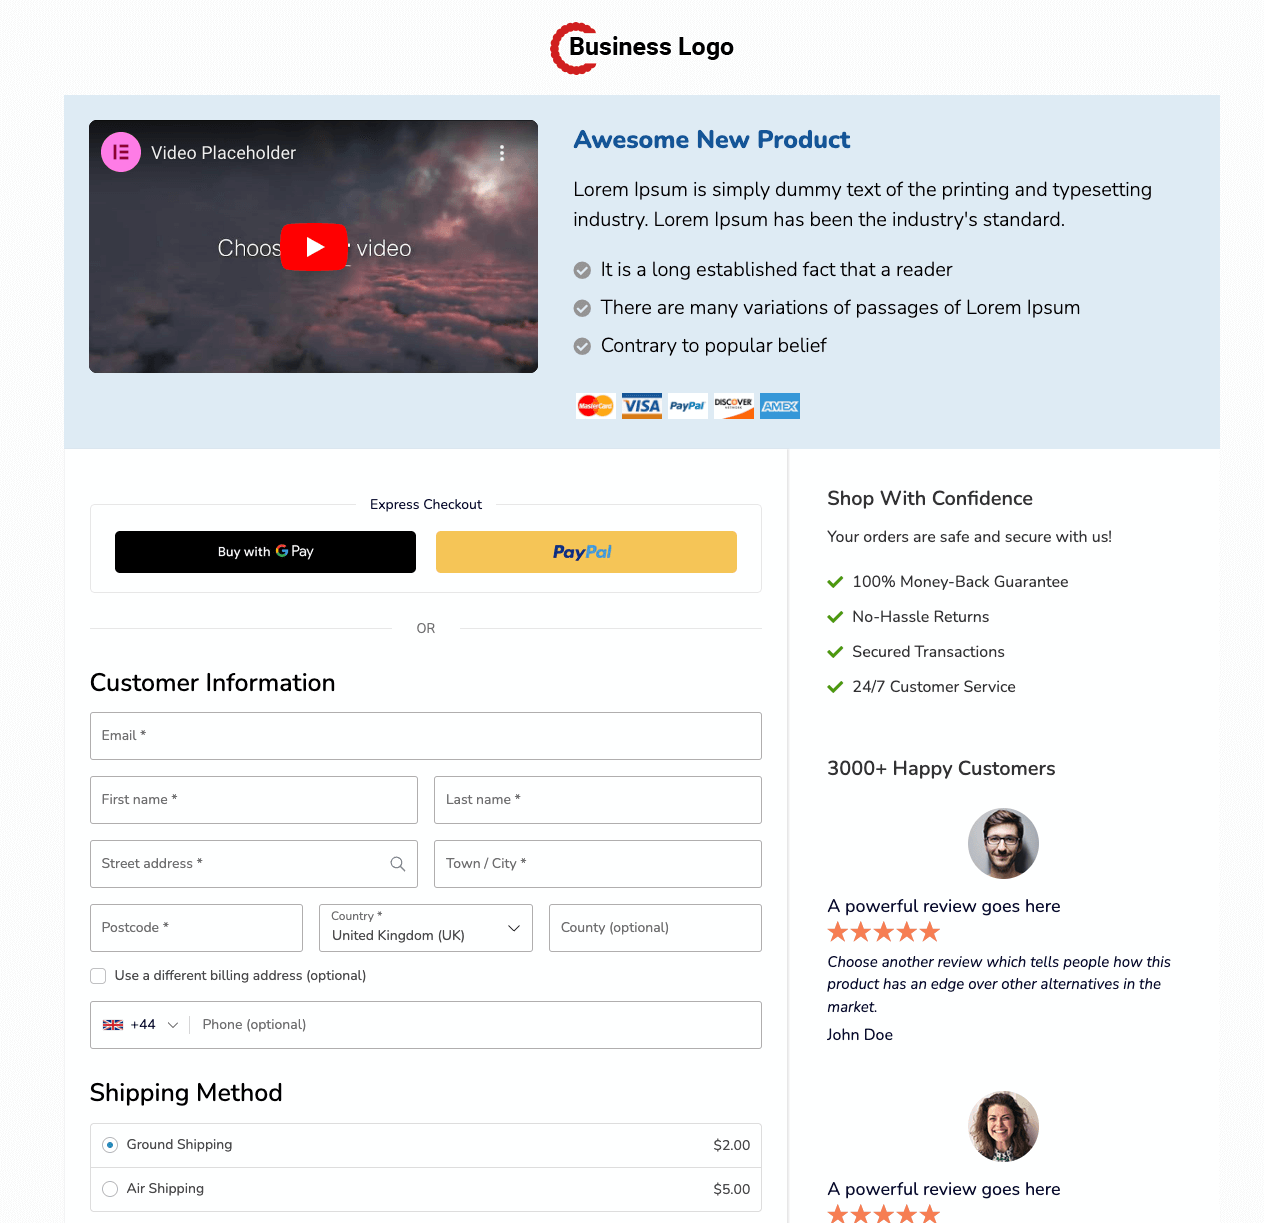
Here is a preview of the landing page:

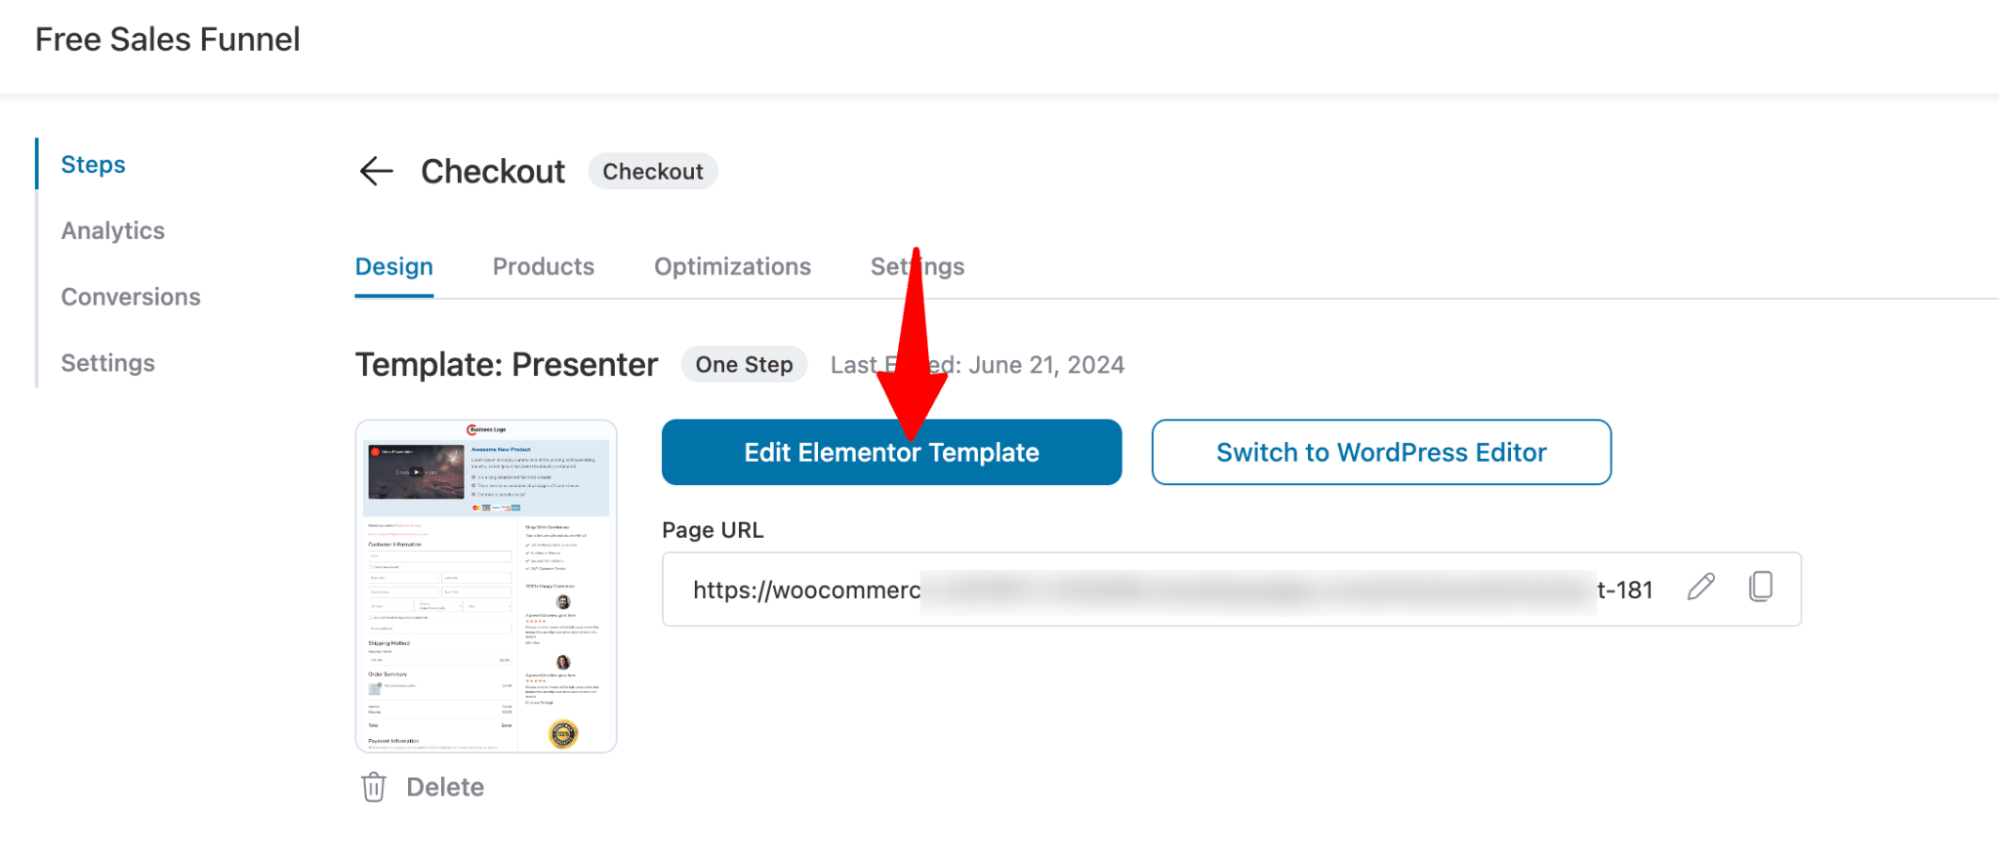
Step 3: Customize the checkout page template
To customize the checkout page template, click on the template and then hit “Edit Elementor Template”.
For more details, check the blog on how to customize a one-page checkout.
If you scroll down a little, you can reorder the checkout page form fields. You can delete any of the fields if you need as well.
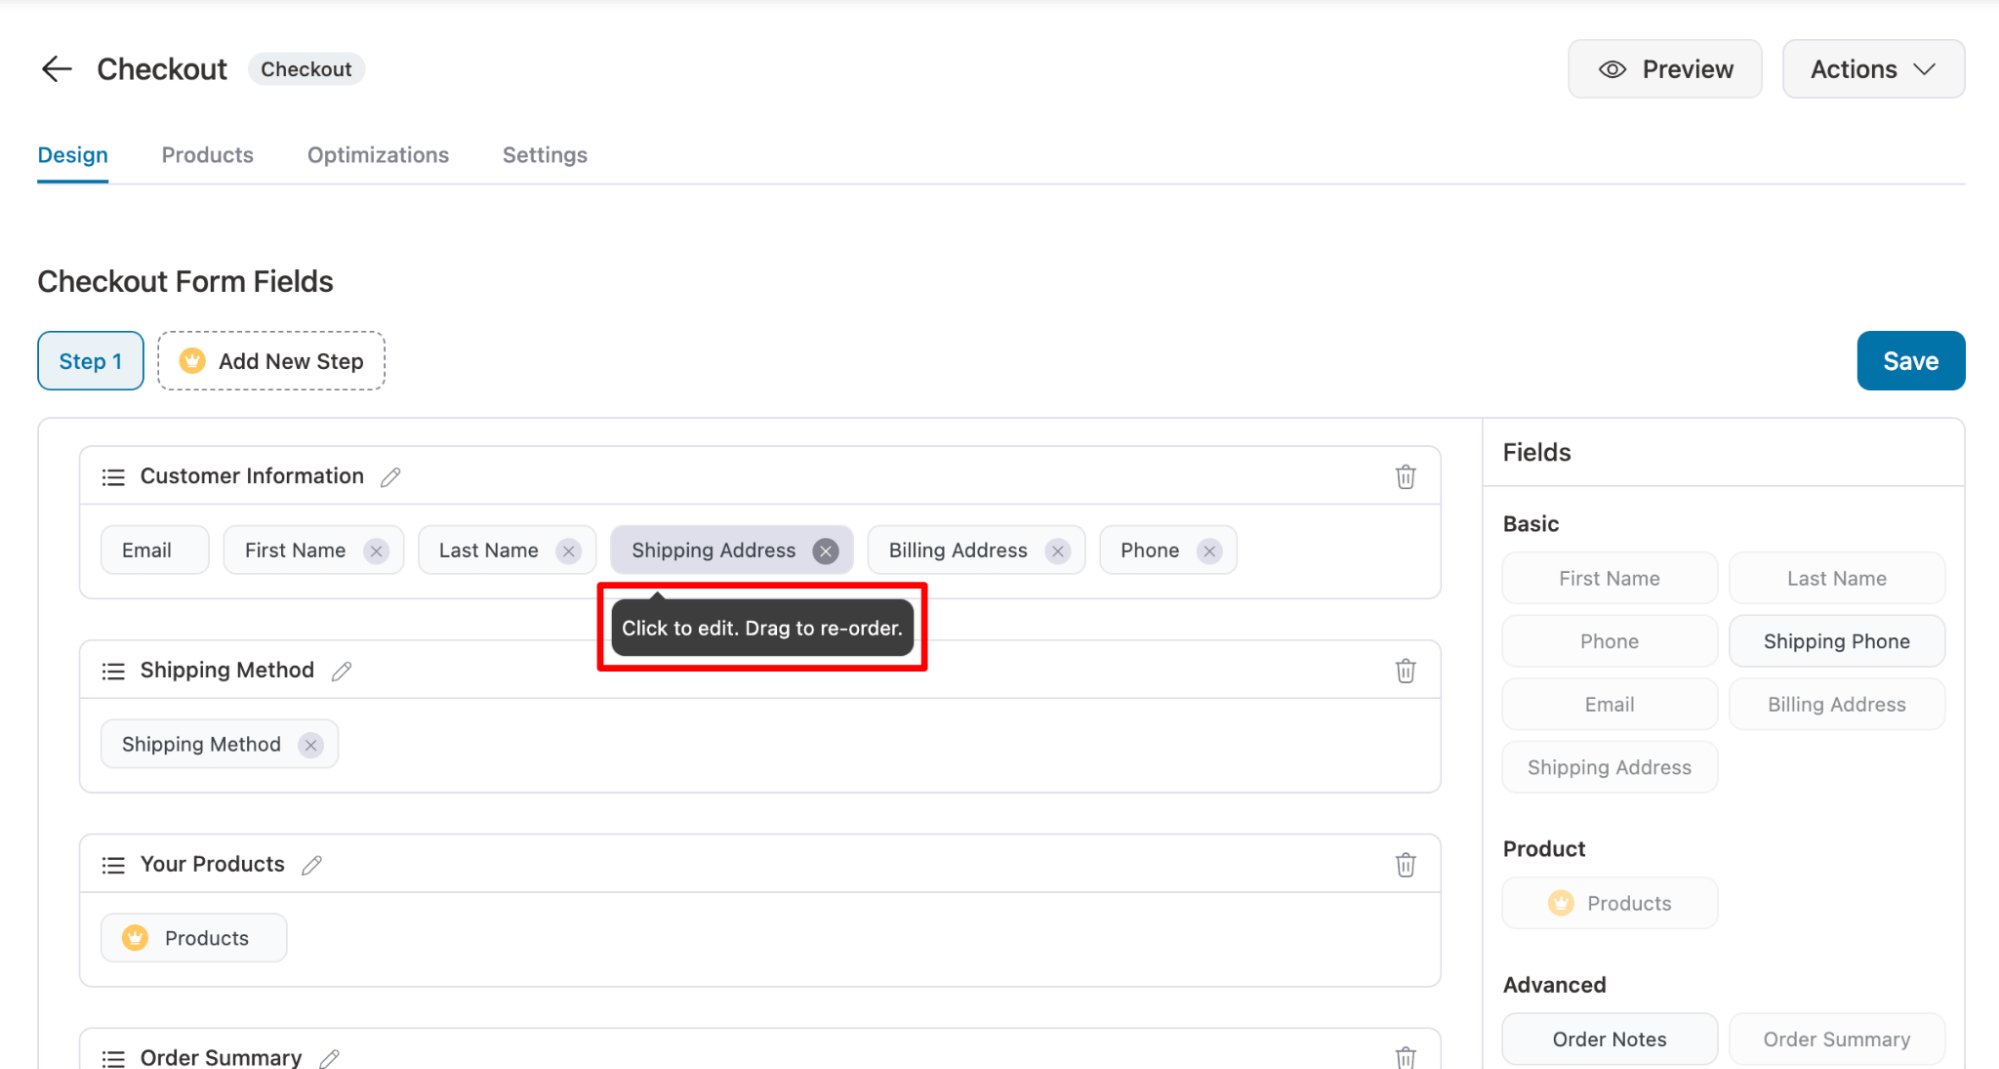
Some form fields, like Products, are only available on the premium version of FunnelKit Funnel Builder. Also, with the premium version, you can add new custom fields to the checkout page.
For more details, read our blog on the WooCommerce checkout field editor.
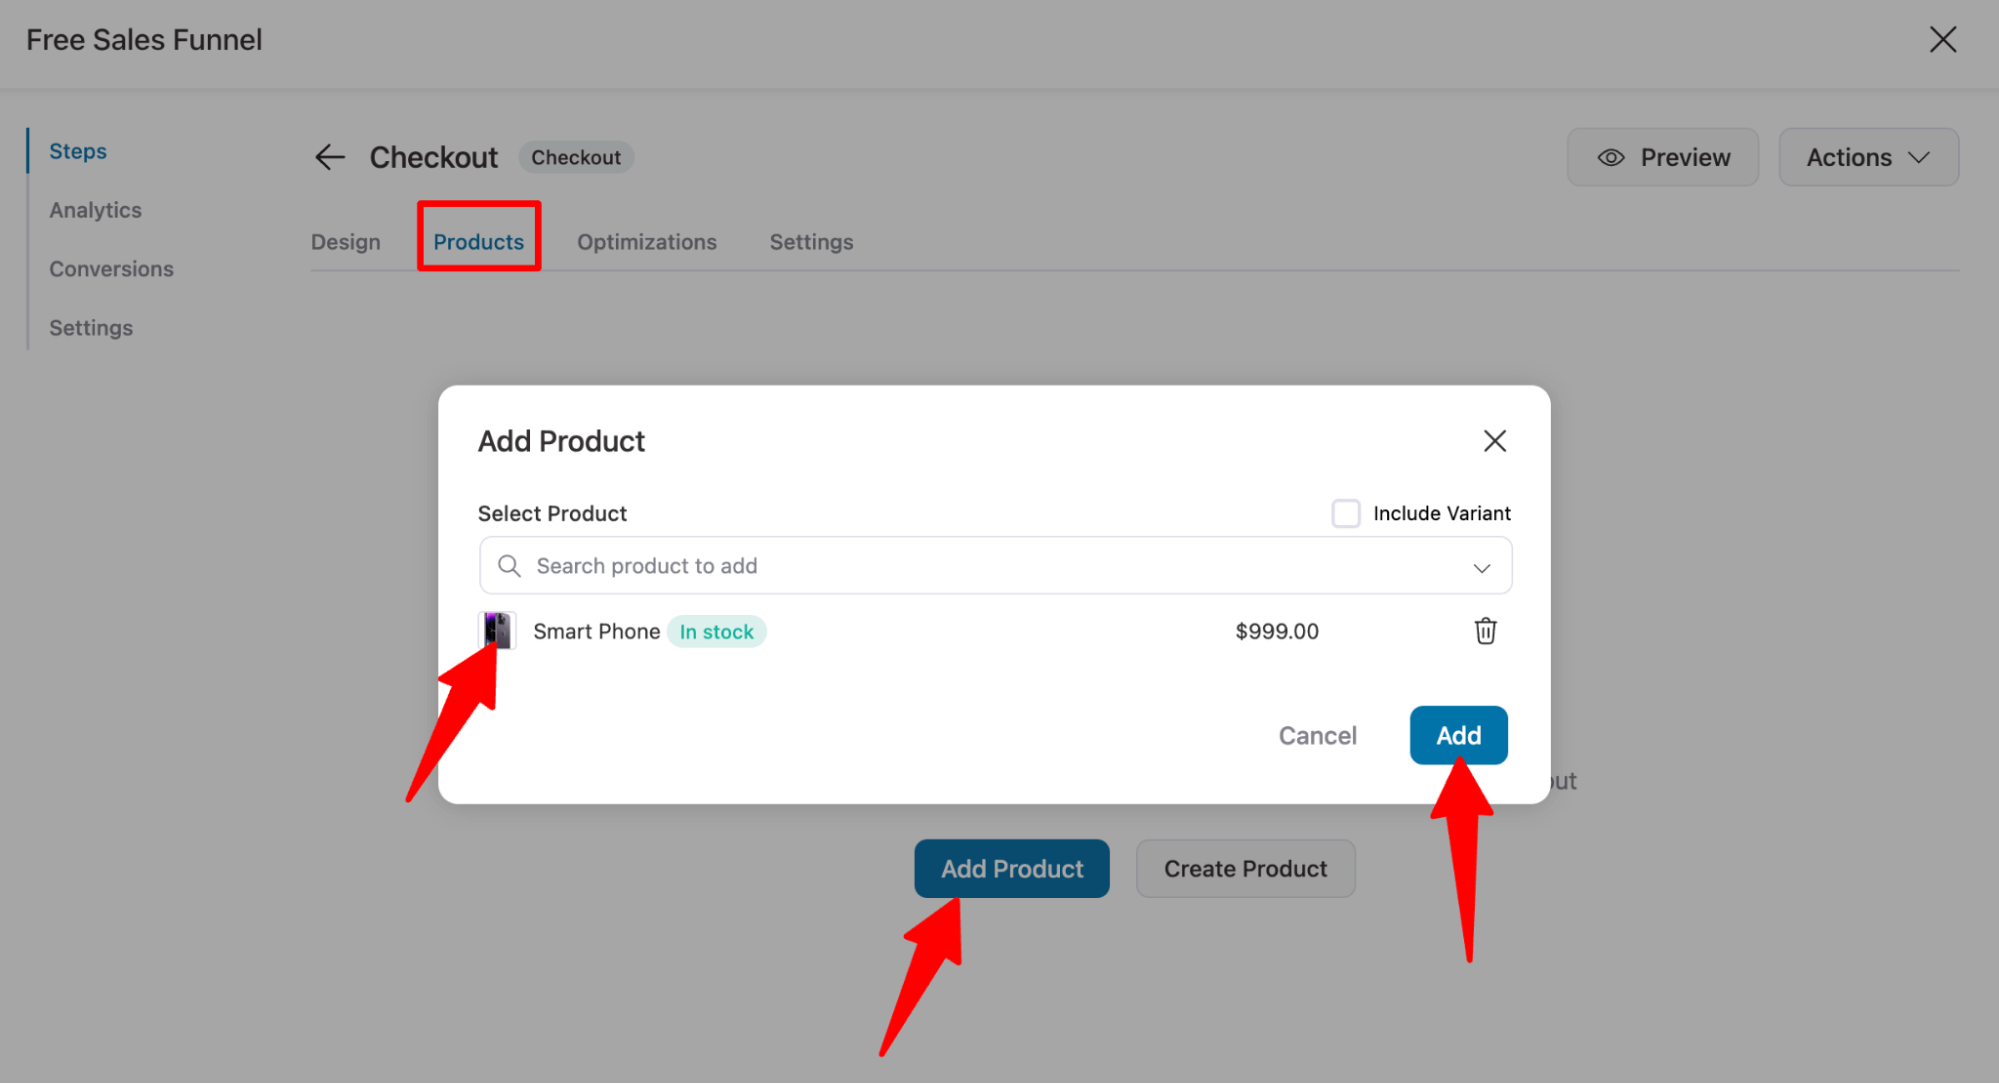
Step 4: Add product to the checkout page
Now, it’s time for an important step: adding the product to the checkout page. This will be added once users choose to purchase the product from the landing page. Using a sales funnel, you can sell both physical and digital products.
To do this, move to the “Product” tab. Then click “Add Product” and search for and add the product. Finally, hit Add to add the product.
After adding the product, you can set up any discounts on the main product here.
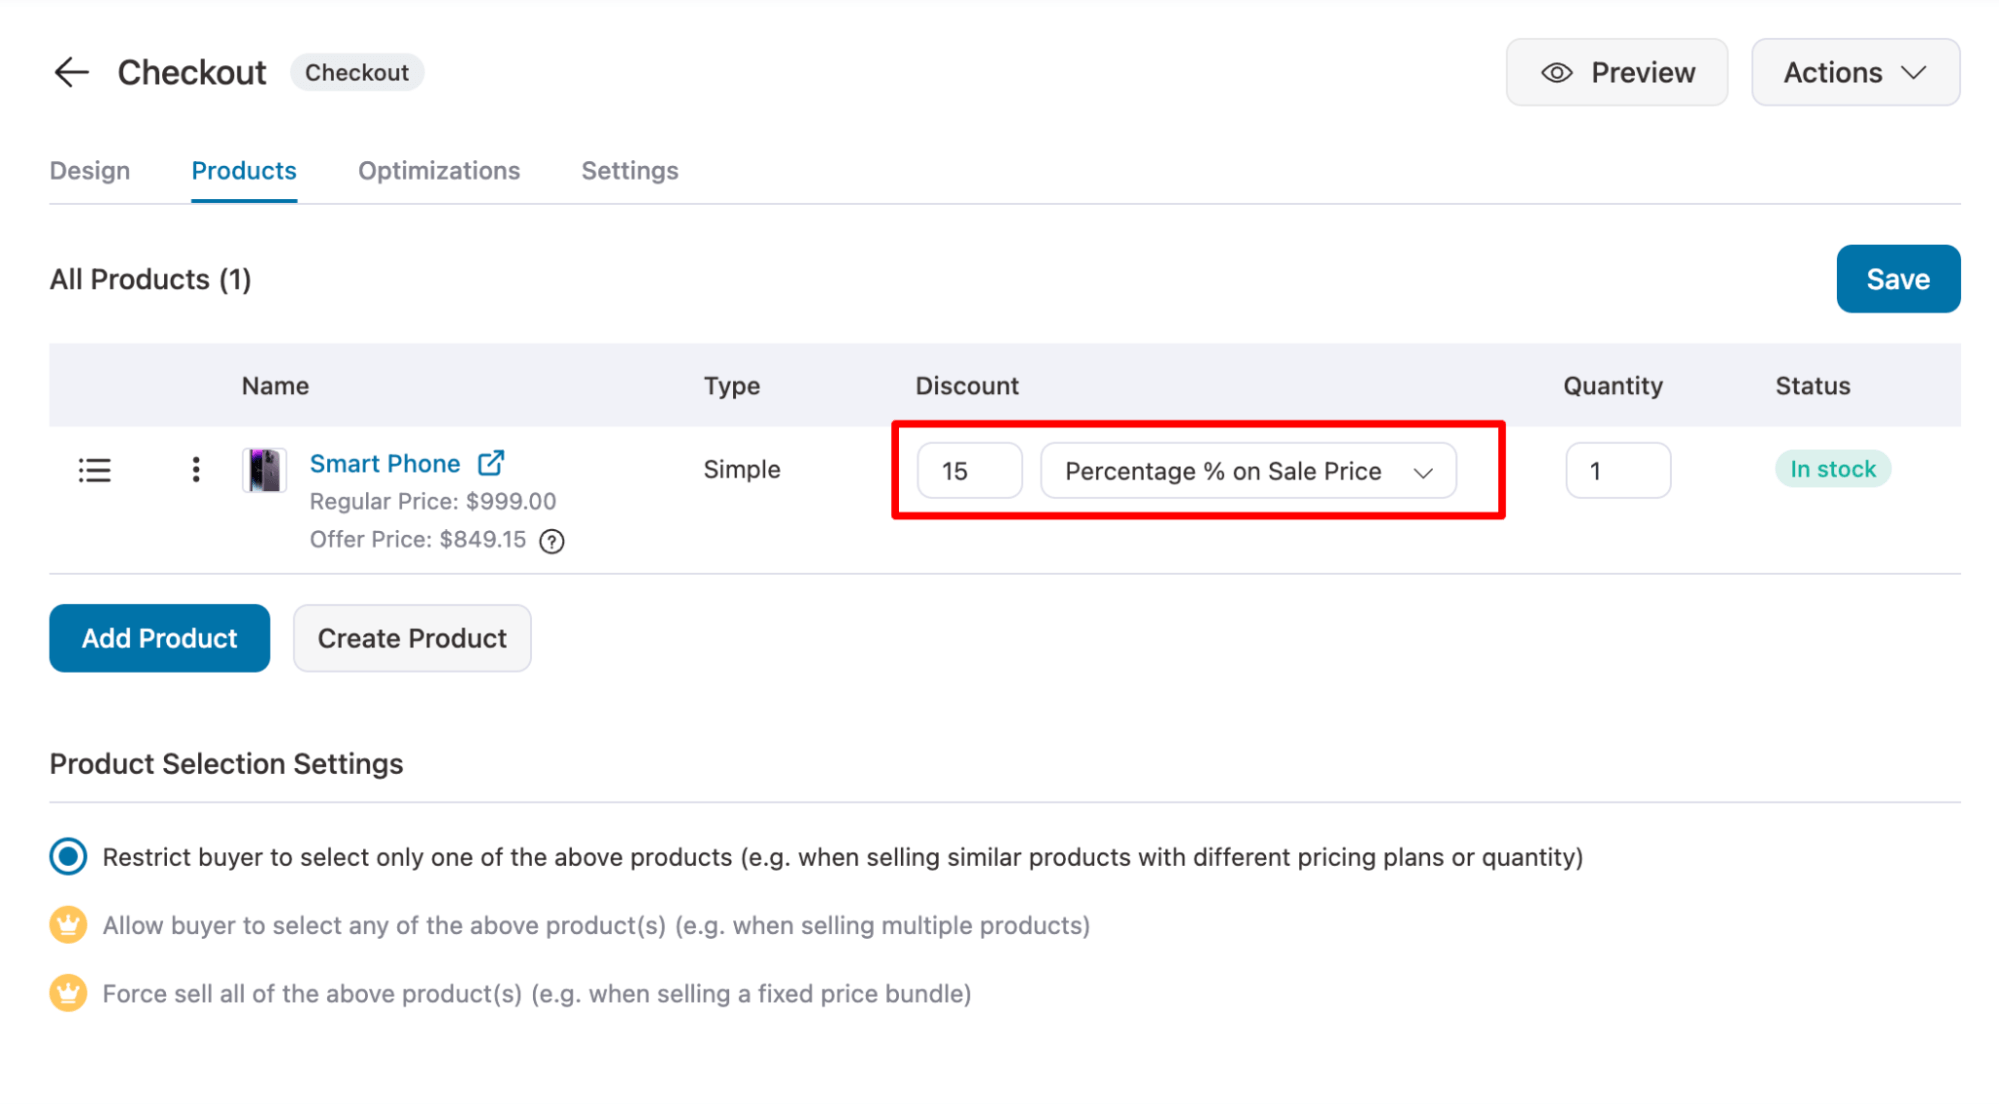
Make sure to hit “Save” to update the settings.
🔔Note: With the premium version of FunnelKit Funnel Builder, you can offer an order bump on the checkout page to increase the average order value.
Step 5: Optimize the checkout page template
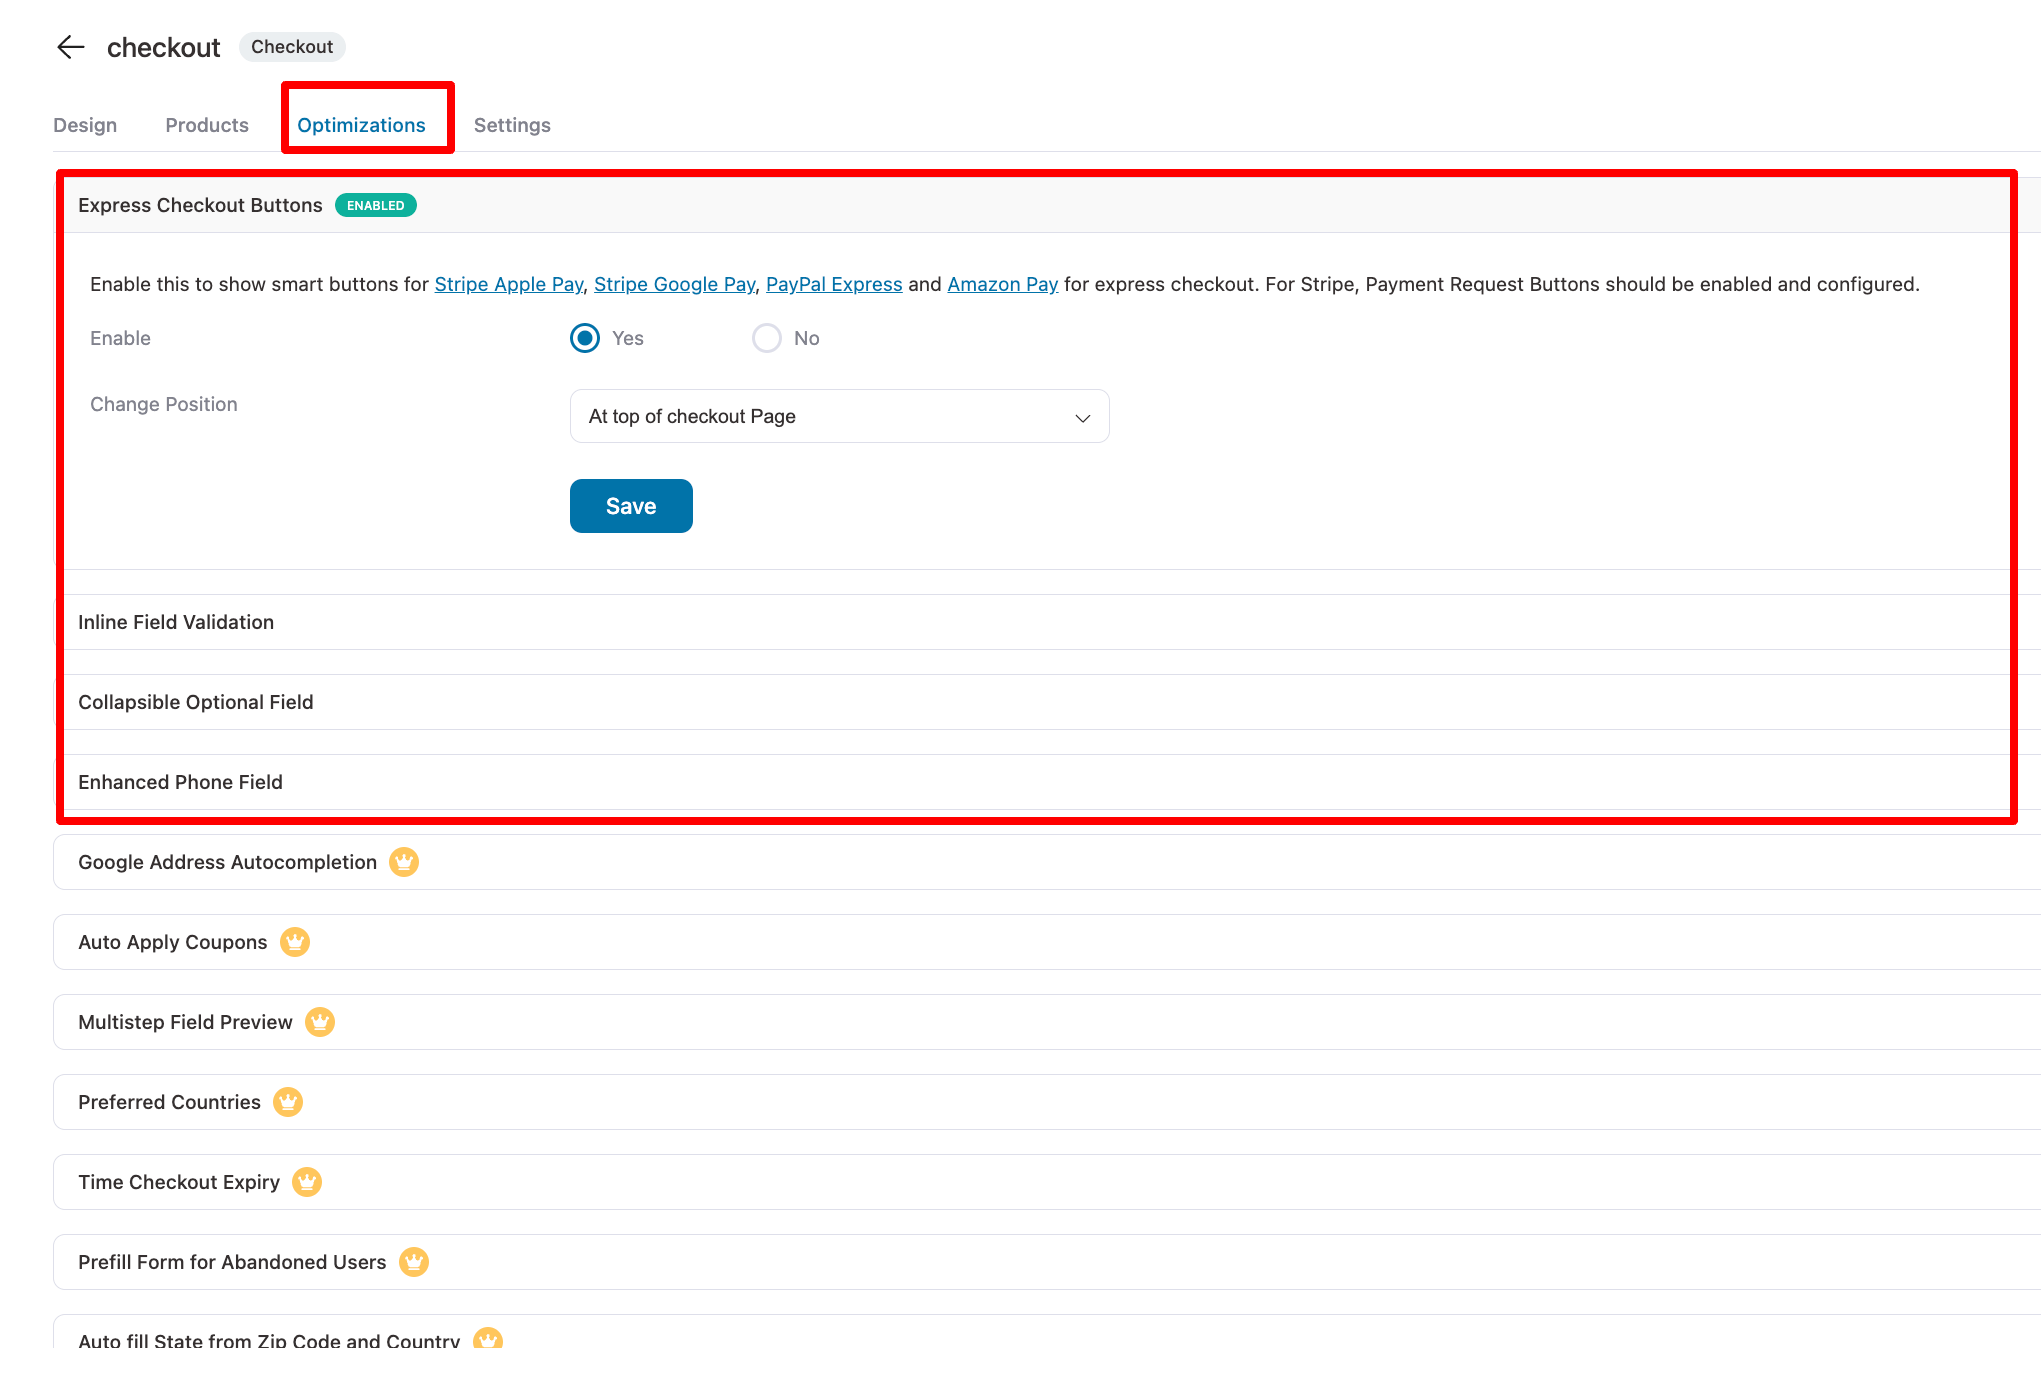
As mentioned earlier, it’s important to optimize your checkout page for a smooth shopping experience for the users. While you can’t go for a multi-step checkout with the free FunnelKit Funnel Builder version, you get some optimization options.
To utilize the free checkout page optimization options, move to the Optimizations tab. Here, you can add express checkout, enable inline validation, enhance phone number field, and add a collapsible form field for free.
👉 Check out our blog on “WooCommerce checkout page optimization tips” for all the other premium optimization options.
🔔 Note: You can add different payment methods to your checkout using Stripe integration with a free plugin called Stripe Payment Gateway for WooCommerce. For more details, read our blog on WooCommerce Stripe Integration.
Here is a preview of the checkout page:
🔔 Note: After the checkout, you can offer one-click upsell offers that users can add to their cart with a single click without entering the payment details again. This post-purchase upsell can significantly improve the average order value of your sales funnel.
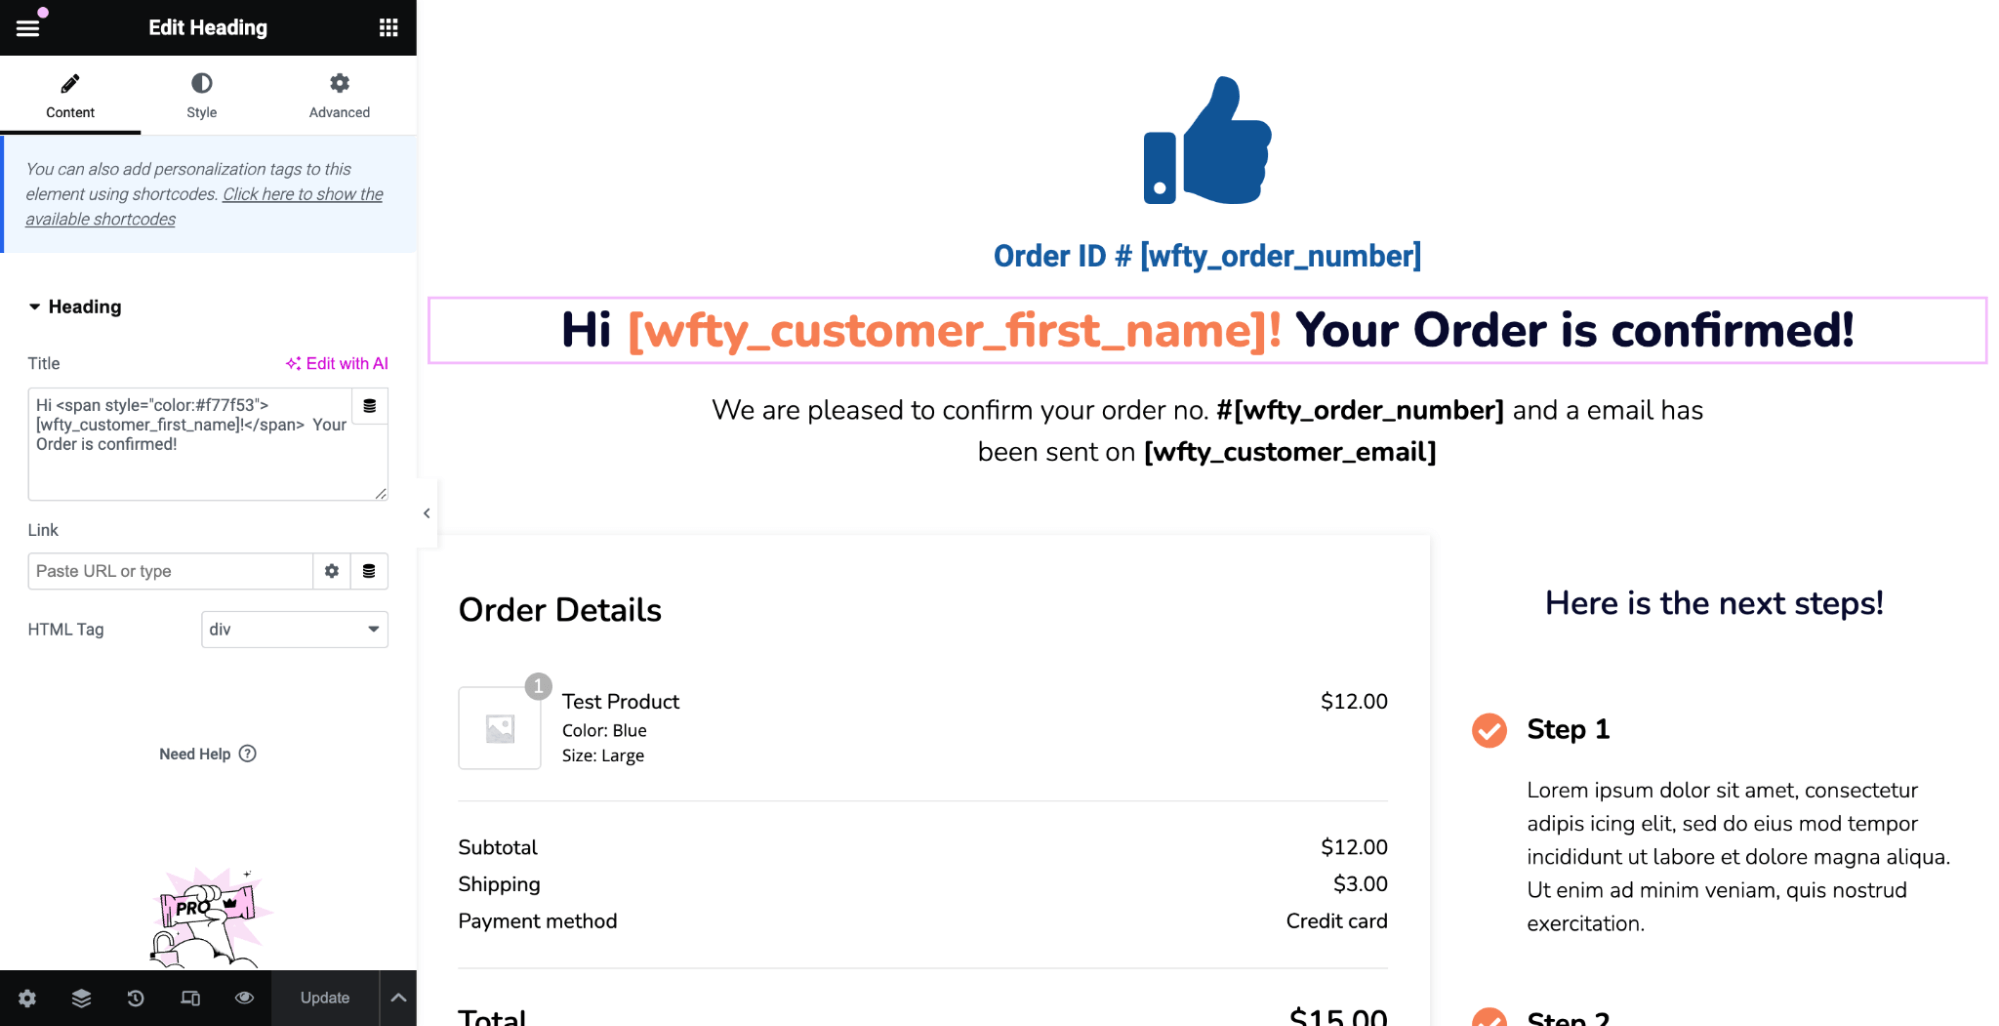
Step 6: Customize the thank you page
Like the landing page and checkout page, you can customize the thank you page template.
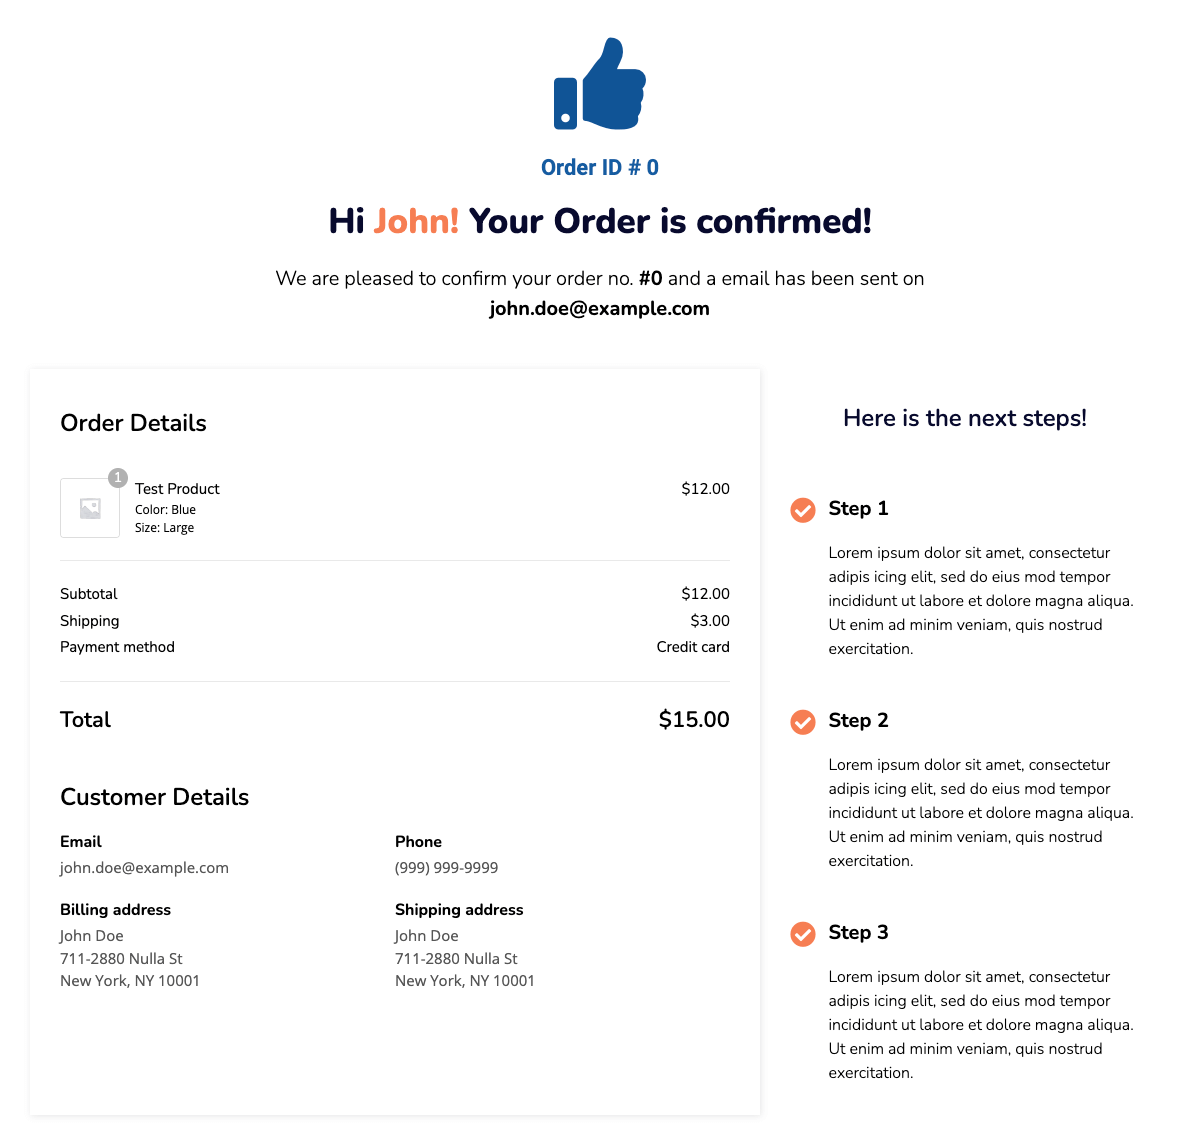
Here is a preview of the order confirmation page:
Once you create the free sales funnel, return to the landing page to copy the URL.
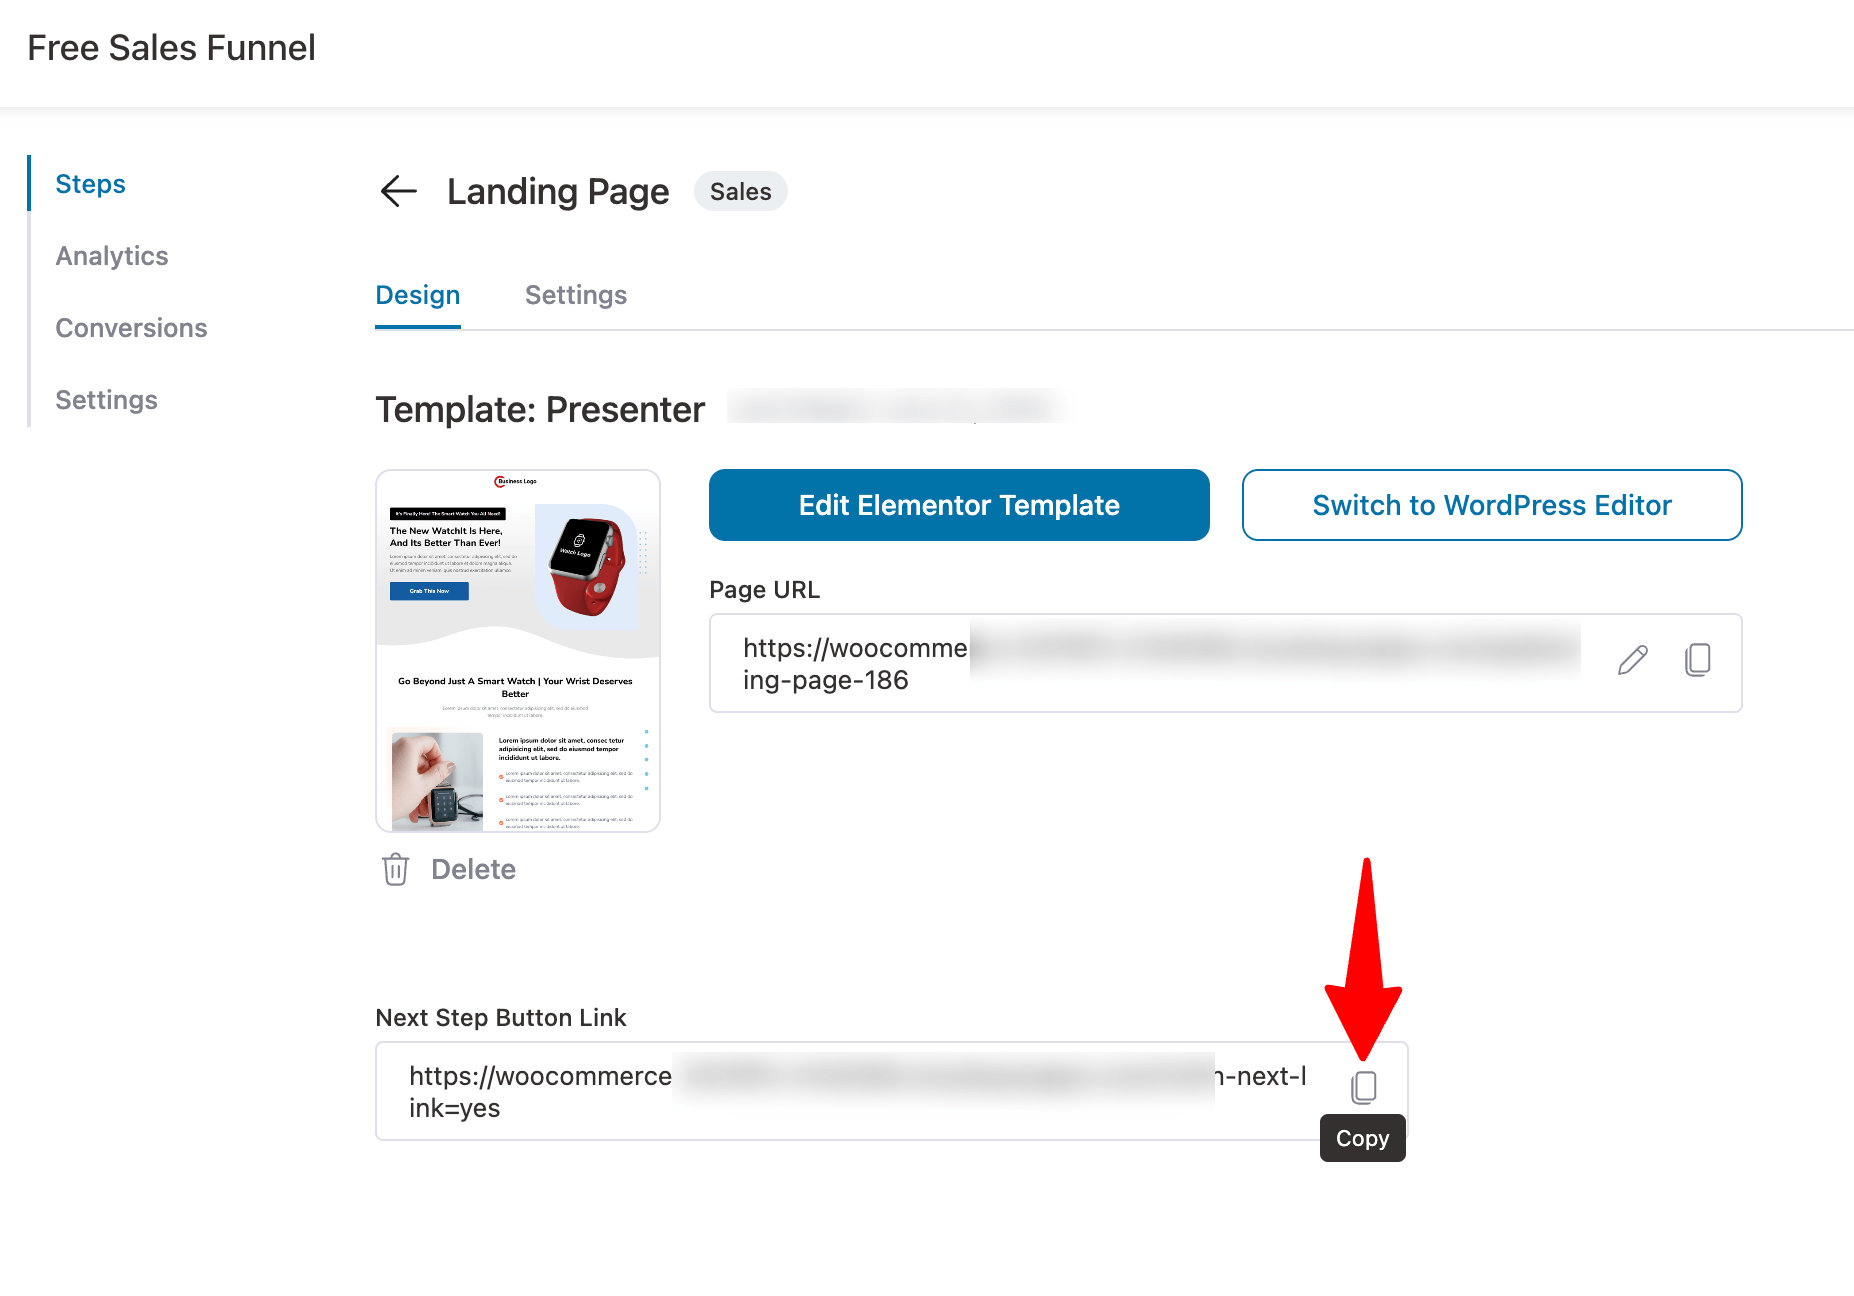
You can use this URL to link the free sales funnel with your marketing awareness campaigns.
That’s it. That was all about how to create a sales funnel for free.
Frequently Asked Questions About How to Create a Sales Funnel for Free
Here are the common questions about how to create a sales funnel for free with answers:
- What are the four stages of the sales funnel?
The four stages of the sales funnel are awareness, interest, decision, and action.
- Where can I build a sales funnel for free?
You can build a sales funnel for free using WordPress CMS and a free sales funnel builder like FunnelKit Funnel Builder.
- How do you create a simple sales funnel?
First, create your sales funnel strategy, including your goal, target audience, and how you plan to get users to enter the funnel. Then, you can easily create your own sales funnel for free using WordPress and FunnelKit Funnel Builder.
- What is the best free sales funnel builder?
The best free sales funnel builder is FunnelKit Funnel Builder. It comes with many free prebuilt sales funnel templates and is fully compatible with popular page builders, giving you the utmost flexibility in creating your sales funnel.
- Can you A/B test your sales funnel pages?
With FunnelKit Funnel Builder Pro, you can A/B test all your sales funnel pages, including sales page, checkout page, one-click upsell, and thank you page. You can distribute the traffic according to your strategy and then declare a winner based on the results.

- How do we monitor sales funnel performance?
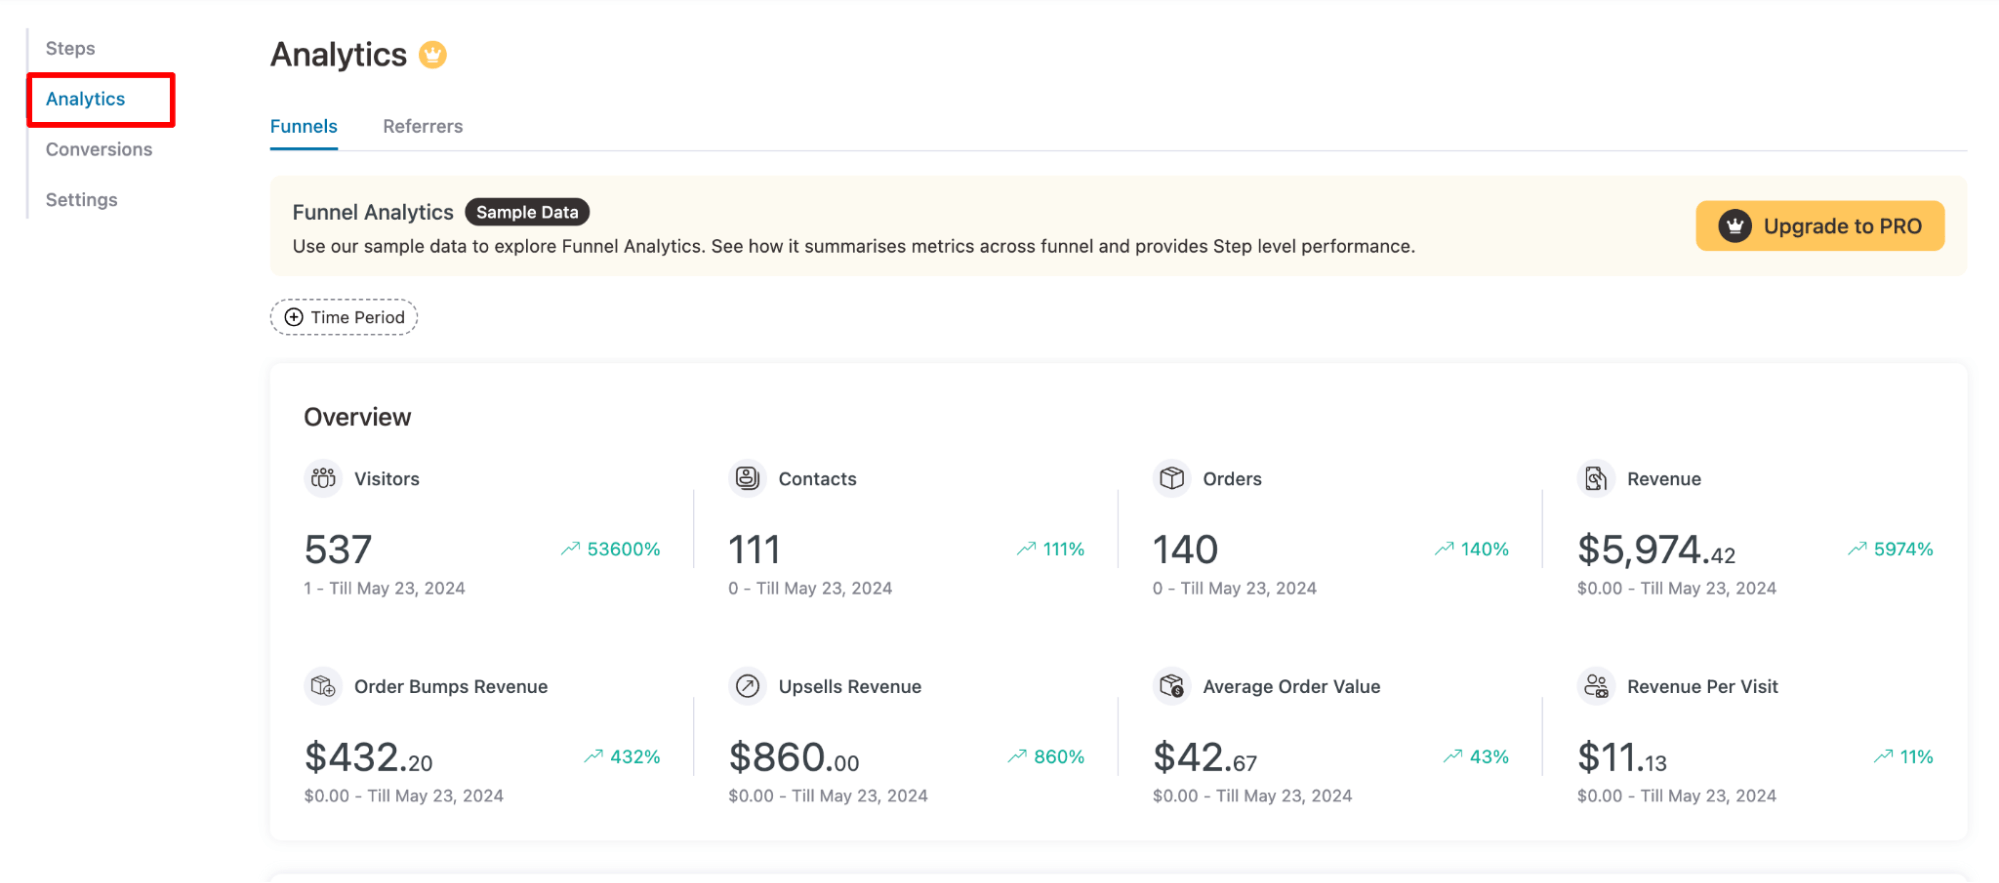
With FunnelKit Funnel Builder Pro, you can track the performance of your sales funnel. Under the Analytics section, you can find detailed metrics such as visitors, orders, revenue, order umps revenue, average order value, revenue per visit, etc.
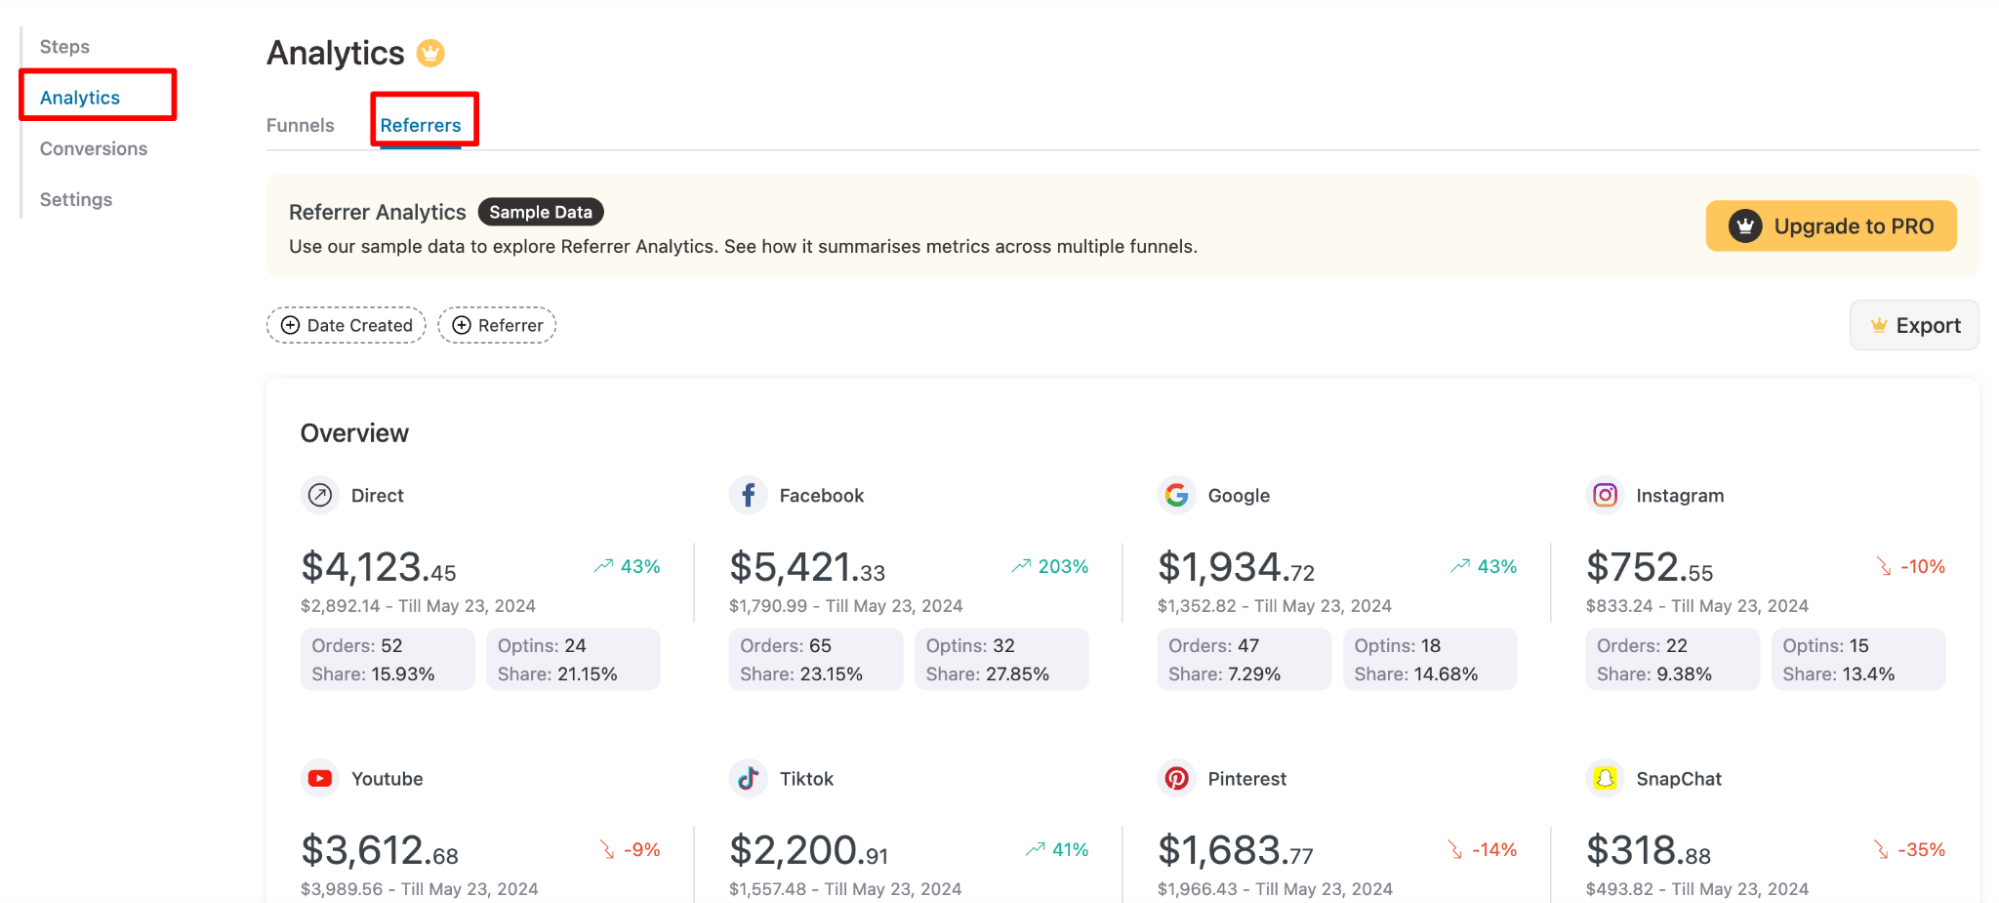
On the Referrers tab, you can find earnings from various referral sources, such as Facebook, Google, Instagram, YouTube, etc.
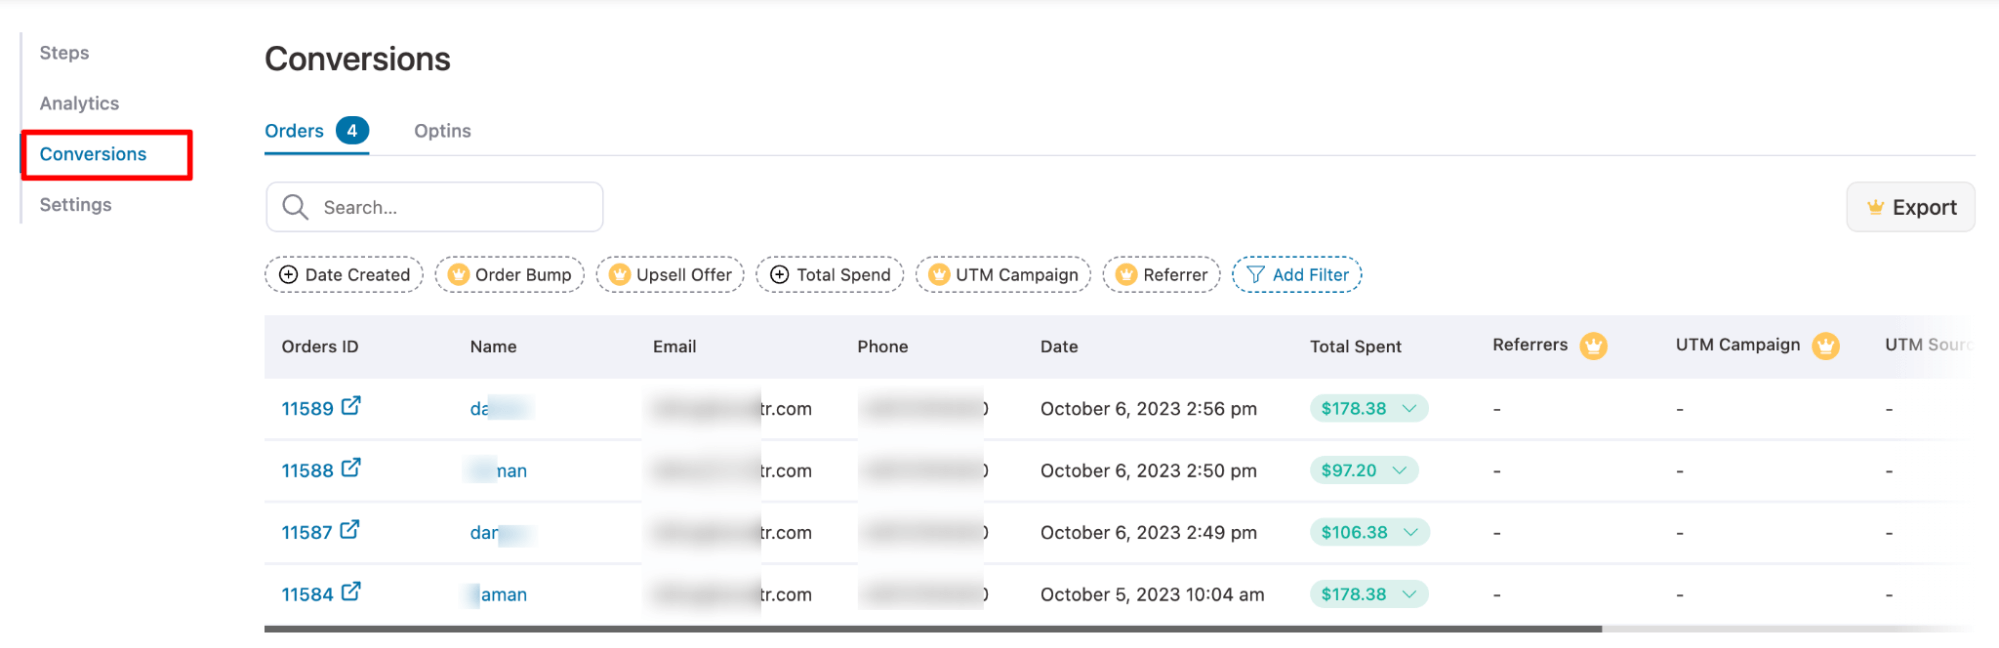
In the Conversions section, you can find the order you received from the sales funnel along with the Order ID, Customer Name, Email, Phone, Total Spend, etc.
Ready to Create a Sales Funnel for Free?
We hope that our guide on "How to Create a Sales Funnel for Free in WordPress" has provided you with a comprehensive and effective solution.
With FunnelKit Funnel Builder, creating a sales funnel is an absolute breeze. While the free version is good enough to create a fully functioning sales funnel, our experts recommend utilizing the premium features.
That’s because the premium features allow you to maximize the benefits of using a sales funnel, such as boosting average order value with features like order bumps and one-click upsells.
Additionally, you can track the performance of your sales funnel, conduct A/B tests on pages to optimize your strategy, and more.
However, you can start by creating a sales funnel for free with FunnelKit Funnel Builder Lite and then transition to the premium version at your own pace.
So, are you ready to create a sales funnel for free?
Editorial Team
July 27, 2026WooCommerce subscription upsell can help boost your revenue through subscription-based sales. Moreover, subscription-based products allow you to add predictability to your revenue. You can sell physical and digital products and...

Editorial Team
July 7, 2026Are shoppers adding products to their cart and leaving before they buy? According to Baymard Institute research on checkout usability, 18% of shoppers who abandon their cart do so because...
Editorial Team
June 29, 2026Broadcast emails are one-time campaigns sent to a specific audience, ideal for sharing sneak peeks, announcing offers, or revealing major updates. You can use them to announce a sale, introduce...


