


WooCommerce upsells are products you recommend in place of the one a shopper is viewing, usually a better or higher-priced version of it.
WooCommerce has a built-in upsell field for this, and anything you add there shows up on the single product page.
That covers one spot in the buying journey. To show offers in the cart, at checkout, right after payment, or in follow-up emails, you'll need a plugin.
Upselling can lift revenue by 10-30% on average, because you're selling to someone who already has buying intent.
The best part? You can automate the entire upselling process using the right funnel builder and checkout tools without any coding.
In this blog, we'll share how to set up native upsells and cross-sells, where the built-in feature falls short, and how to add each plugin-based placement step by step.
Table of Contents
- 1 What Are WooCommerce Upsells?
- 2 How to Set Up Upsells in WooCommerce (Native Method)
- 3 Limitations of the Native WooCommerce Upsells Feature
- 4 How to Extend WooCommerce Upsells (Plugin Methods)
- 5 How to Add Side Cart Upsells in WooCommerce
- 6 How to Add Checkout Order Bumps in WooCommerce
- 7 How to Set Up Exit-Intent Upsells in WooCommerce
- 8 How to Offer Post-Purchase One-Click WooCommerce Upsells
- 9 How to Send Post-Purchase Upsell Emails in WooCommerce
- 10 Plugin Options for Each Upsell Placement
- 11 10 Best Practices and Optimization Strategies for WooCommerce Upsells
- 12 Frequently Asked Questions (FAQs)
- 13 Start With Native Upsells, Then Add One Placement at a Time
What Are WooCommerce Upsells?
An upsell in WooCommerce is a product recommendation that encourages shoppers to purchase a more expensive or premium version of the item they're already viewing.
The purpose is to increase your average order value (AOV) while enhancing the customer’s shopping experience.
For example:
- Purchasing a smartphone? Offer a better model or a fast-charging adapter.
- Buying a pair of shoes? Suggest premium socks or a cleaning kit.
A good upsell feels helpful, not pushy. It points the shopper to a better version of what they already want.
Here's what a persuasive WooCommerce upsell page looks like:
This is the Persuader template available in FunnelKit. It features clean visuals, persuasive copy, and trust-building elements, such as testimonials, that make the offer feel irresistible.
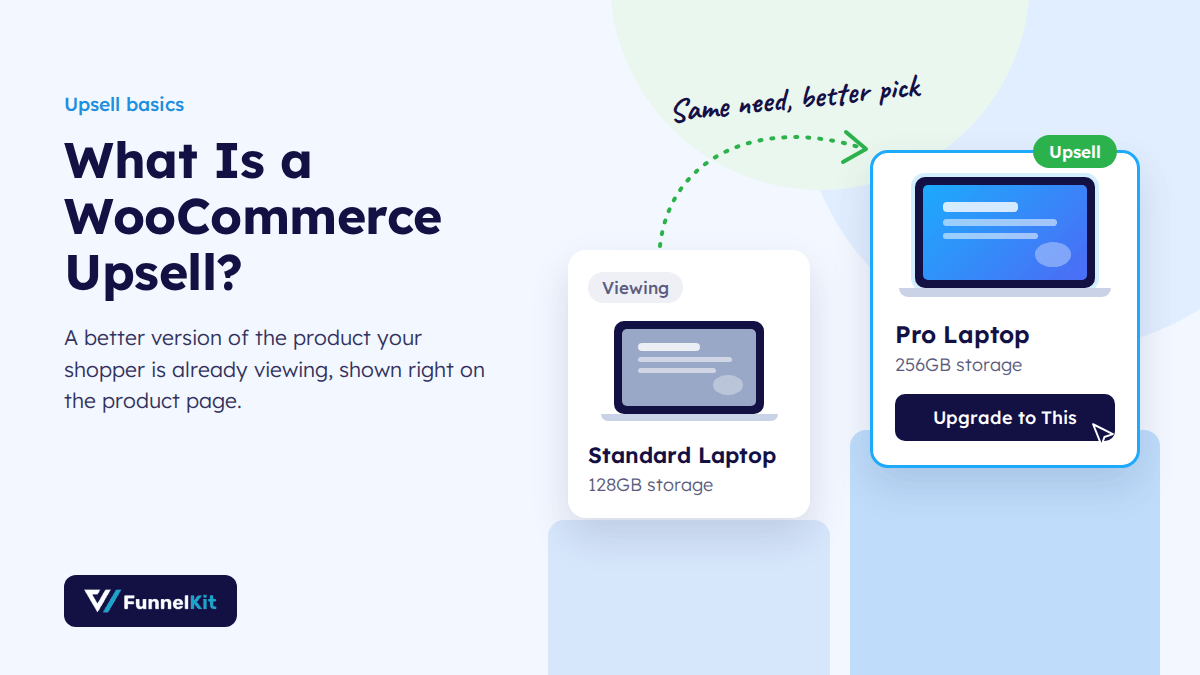
The core idea is that upsells imply a better version of the same product.
For example, if someone is looking at a 128GB laptop, the upsell is the 256GB model. If they're viewing a basic yoga mat, it's the premium non-slip version. Either way, the customer trades up to a better product.
How to Set Up Upsells in WooCommerce (Native Method)
Here, we'll talk about the default upselling method.
1. Offer upsells on the product page
WooCommerce lets you easily display upsell products directly on the product page, helping shoppers discover premium or complementary options before adding an item to their cart.
Here’s how you can set it up:
Open the product you want to add upsells to. Scroll down to the Product Data section.
Under the Upsells field, search for and select the products you want to link as upsells.
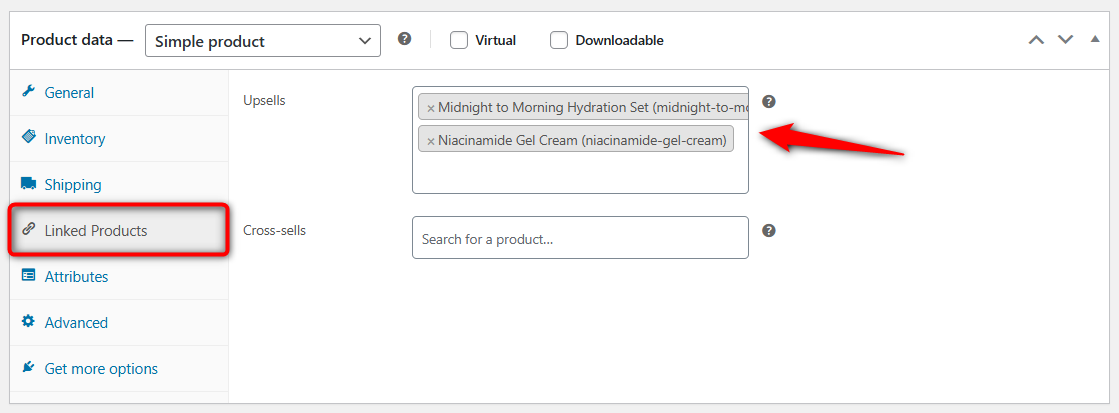
Once done, click Update to save your changes.
Now, the selected upsell products will appear on the product page, usually below the main product description, like this:
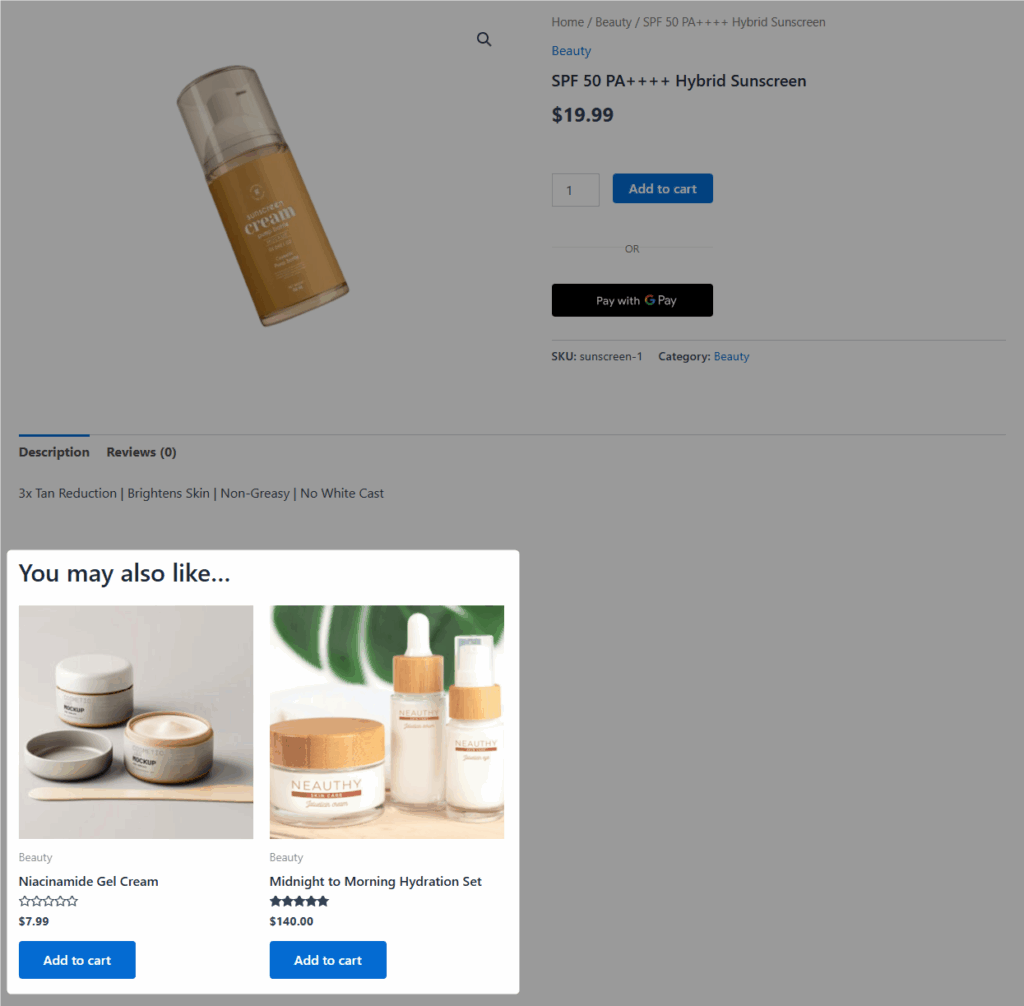
These product page upsells encourage visitors to explore better or related options before completing their purchase, boosting engagement and average order value.
2. Offer upsells on the cart page
The default WooCommerce cart page offers a simple yet effective way to display upsell products and encourage customers to explore premium or complementary items before heading to checkout.
Follow these steps to set up upsells on the WooCommerce cart page:
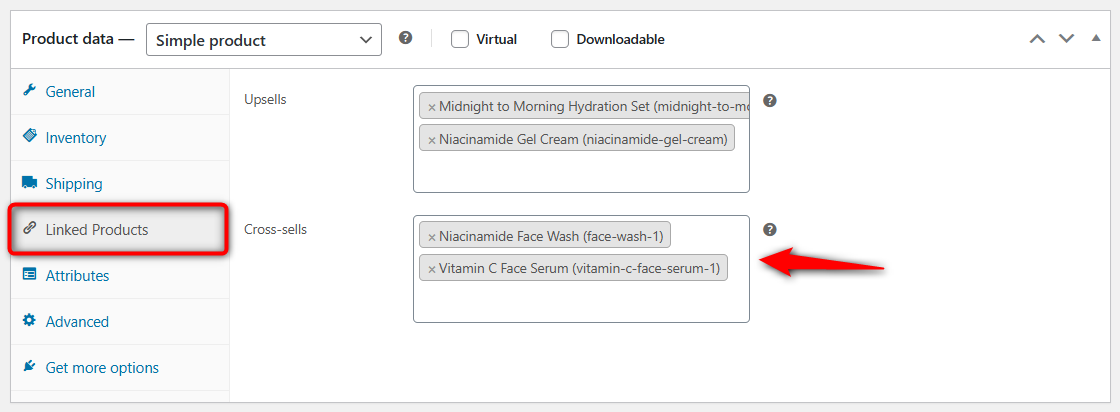
Go to Products > All Products and open the product that should trigger the cross-sells. In the Product data box, click the Linked Products tab. Next, in the Cross-sells field, search for and select the complementary products.
Now, when a customer adds this product to their cart and visits the cart page, they’ll see your upsell products displayed below the cart items under a section titled “You may be interested in…”
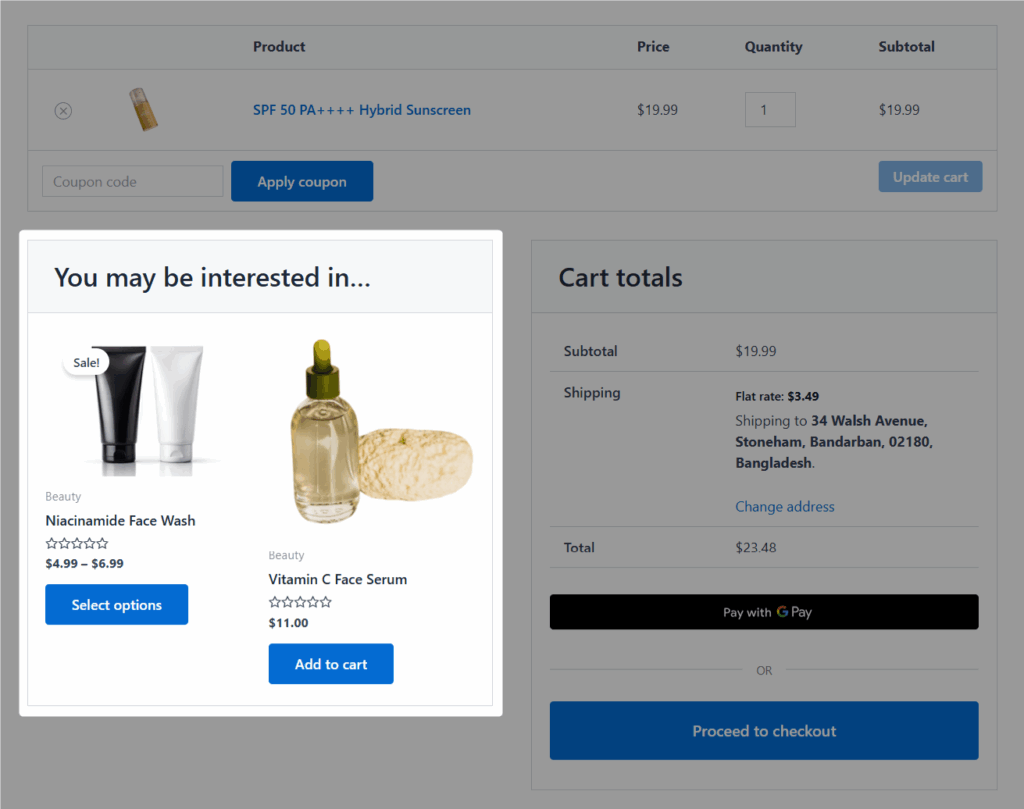
How this section looks depends on your theme. To change the heading text, use a translation plugin, a code snippet, or a theme override.
Limitations of the Native WooCommerce Upsells Feature
The native Linked Products > Upsells field covers the basics, but it's built for a single use case: suggesting a better or pricier version of a product on that product's own page.
For stores that want upsells to meaningfully grow average order value, the native feature has several hard limits. Here are the gaps that push most store owners toward plugin-based solutions.
- Upsells only appear on the single product page. You cannot natively show upsells in the cart, on the checkout page, after the purchase, or in follow-up emails.
- Displaying upsells is entirely theme-dependent, and you cannot change how your recommendations appear, what they look like, or even whether they appear at all, depending on how your theme handles the woocommerce_upsell_display hook.
- WooCommerce displays native upsells in a random order on every page load. The product you most want customers to see has the same chance of appearing as any other.
- Native upsells are a static list tied to one product. You cannot show different upsells based on the customer's cart total, past purchase history, user role, location, or more.
- You cannot offer a discount on the upsell. There is no way to say "Add this upgrade to your order for 20% off" within the native flow.
- To use native upsells, you have to open each product manually. If you have 500 products, you'll need 500 edits because there is no bulk editor or conditional rules.
- You cannot see how many customers clicked your upsells, what the click-through rate is, which upsells converted, or how much revenue your upsells generated. Also, you cannot A/B test different upsell strategies against each other.
How to Extend WooCommerce Upsells (Plugin Methods)
The limits of the native feature exist because it was built for a single moment in the customer journey.
Plugin-based upsells extend that feature into every moment that matters.
Instead of one placement below a product description, you can now offer upsells in the side cart as customers shop, at checkout as they pay, immediately after purchase with a single click, and in email follow-ups days or weeks later.
| Method | Where it appears | Best for | Conversion window |
|---|---|---|---|
| Side cart upsell | Sliding cart drawer | Low-price add-ons and accessories | While shopping |
| Checkout order bump | Checkout page | Complementary low-dollar items | Pre-purchase |
| Exit-intent offer | Popup offers on exit intent | Relevant products | Exit-intent |
| One-click post-purchase upsell | Between checkout and thank-you page | Premium upgrades and bundles | Peak buying intent |
| Post-purchase email upsell | Inbox, hours or days later | Replenishment and long-tail offers | Long-tail |
How to Add Side Cart Upsells in WooCommerce
A side cart appears inside a sliding cart drawer that opens when the customer adds a product. Shoppers can add upsell products to their cart and update or remove any item from it from anywhere on the website, without going to the default cart page.
Let's use FunnelKit Cart to set them up.
Note: The side cart itself is free in the basic version on WordPress.org. Cart upsells and milestone-based rewards need FunnelKit Plus or above.
Follow these steps to offer WooCommerce upsells and cross-sell products on a slide-in mini shopping cart:
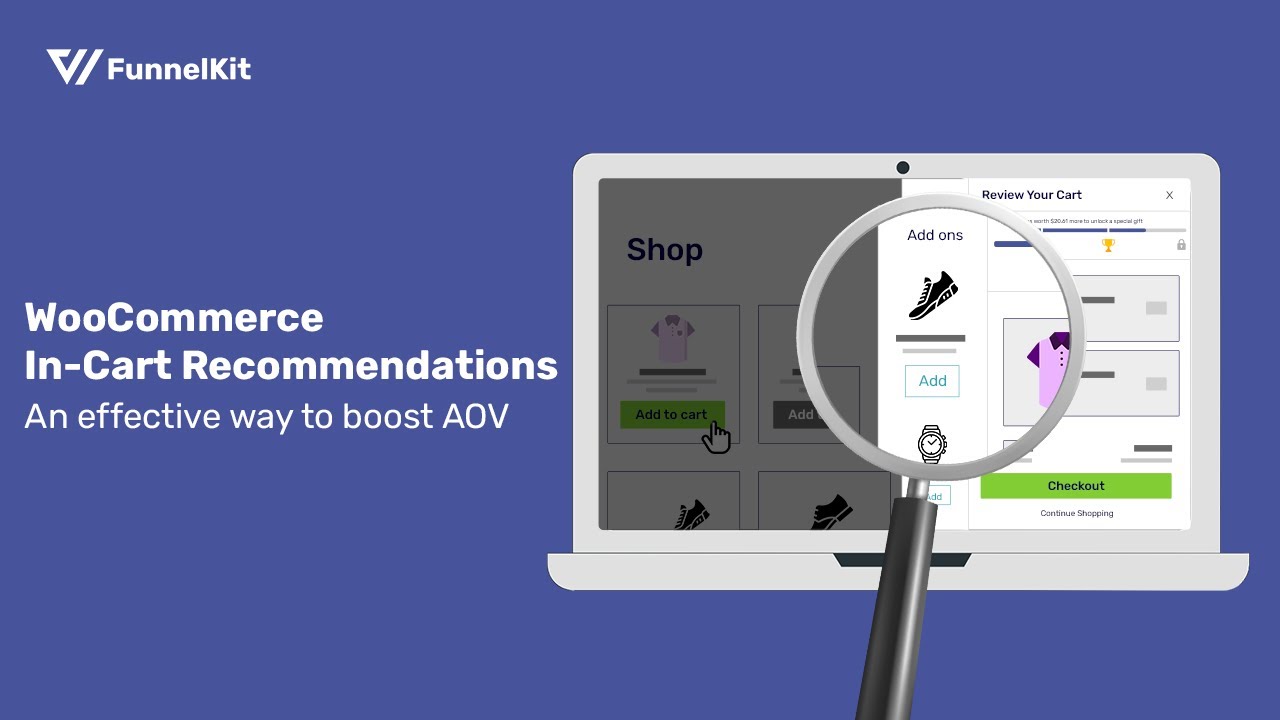
Step 1: Enable the side cart in WooCommerce
The first step is to enable the slide-in cart. Go to FunnelKit ⇒ Cart and turn on the 'Enable Cart' option to turn on the mini cart.
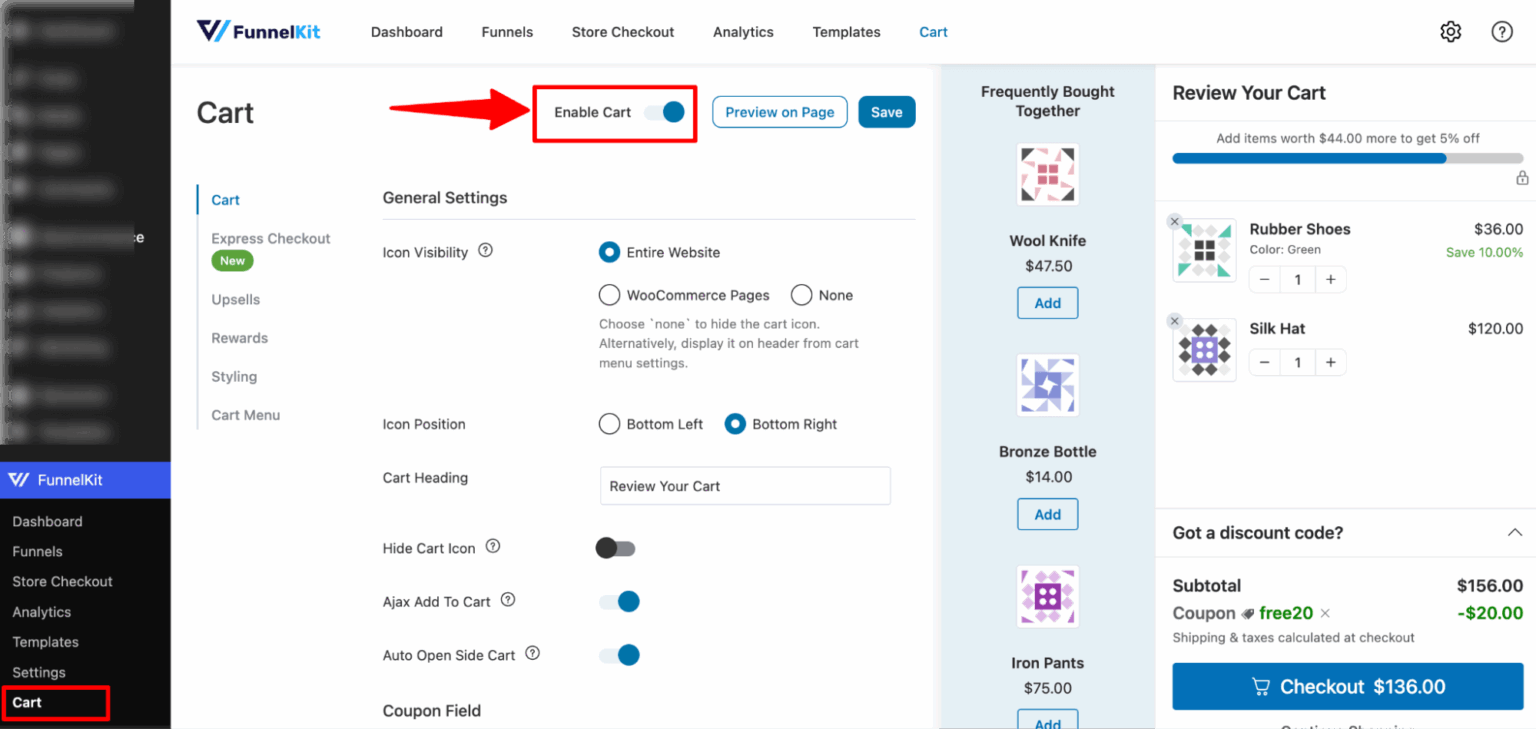
After that, you can configure different settings, such as cart visibility, icon position, cart heading, coupon field, etc.
Along with the general settings, you also get options for the coupon field, cart summary, and empty cart. Configure them as per your requirements.
Step 2: Turn on cart upsells
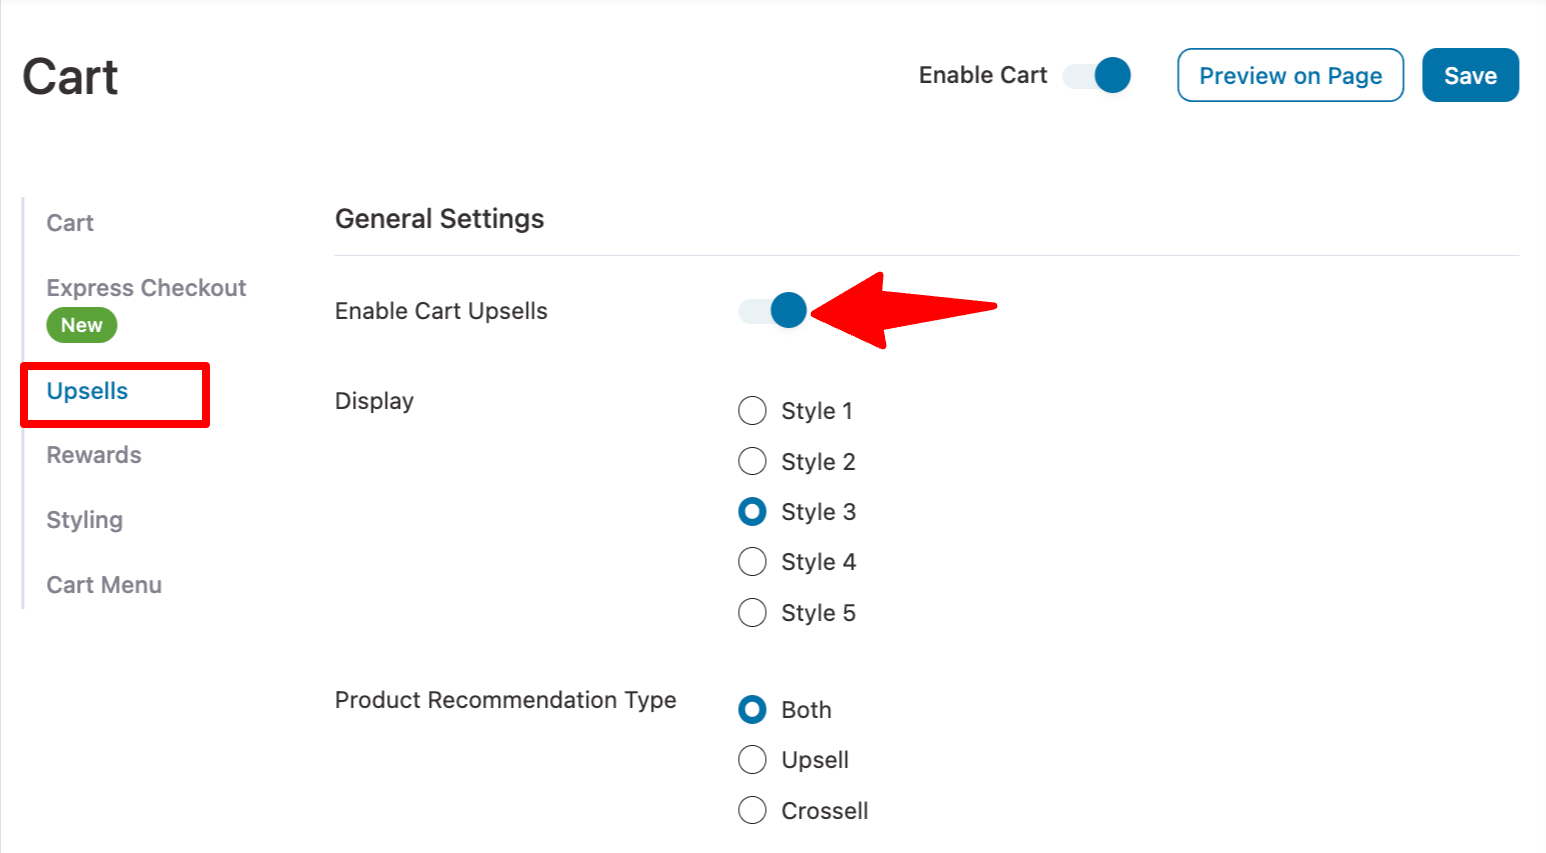
To enable the Upsells option, go to the Upsells tab and turn on the 'Enable Cart Upsells' option.
Step 3: Choose a display skin
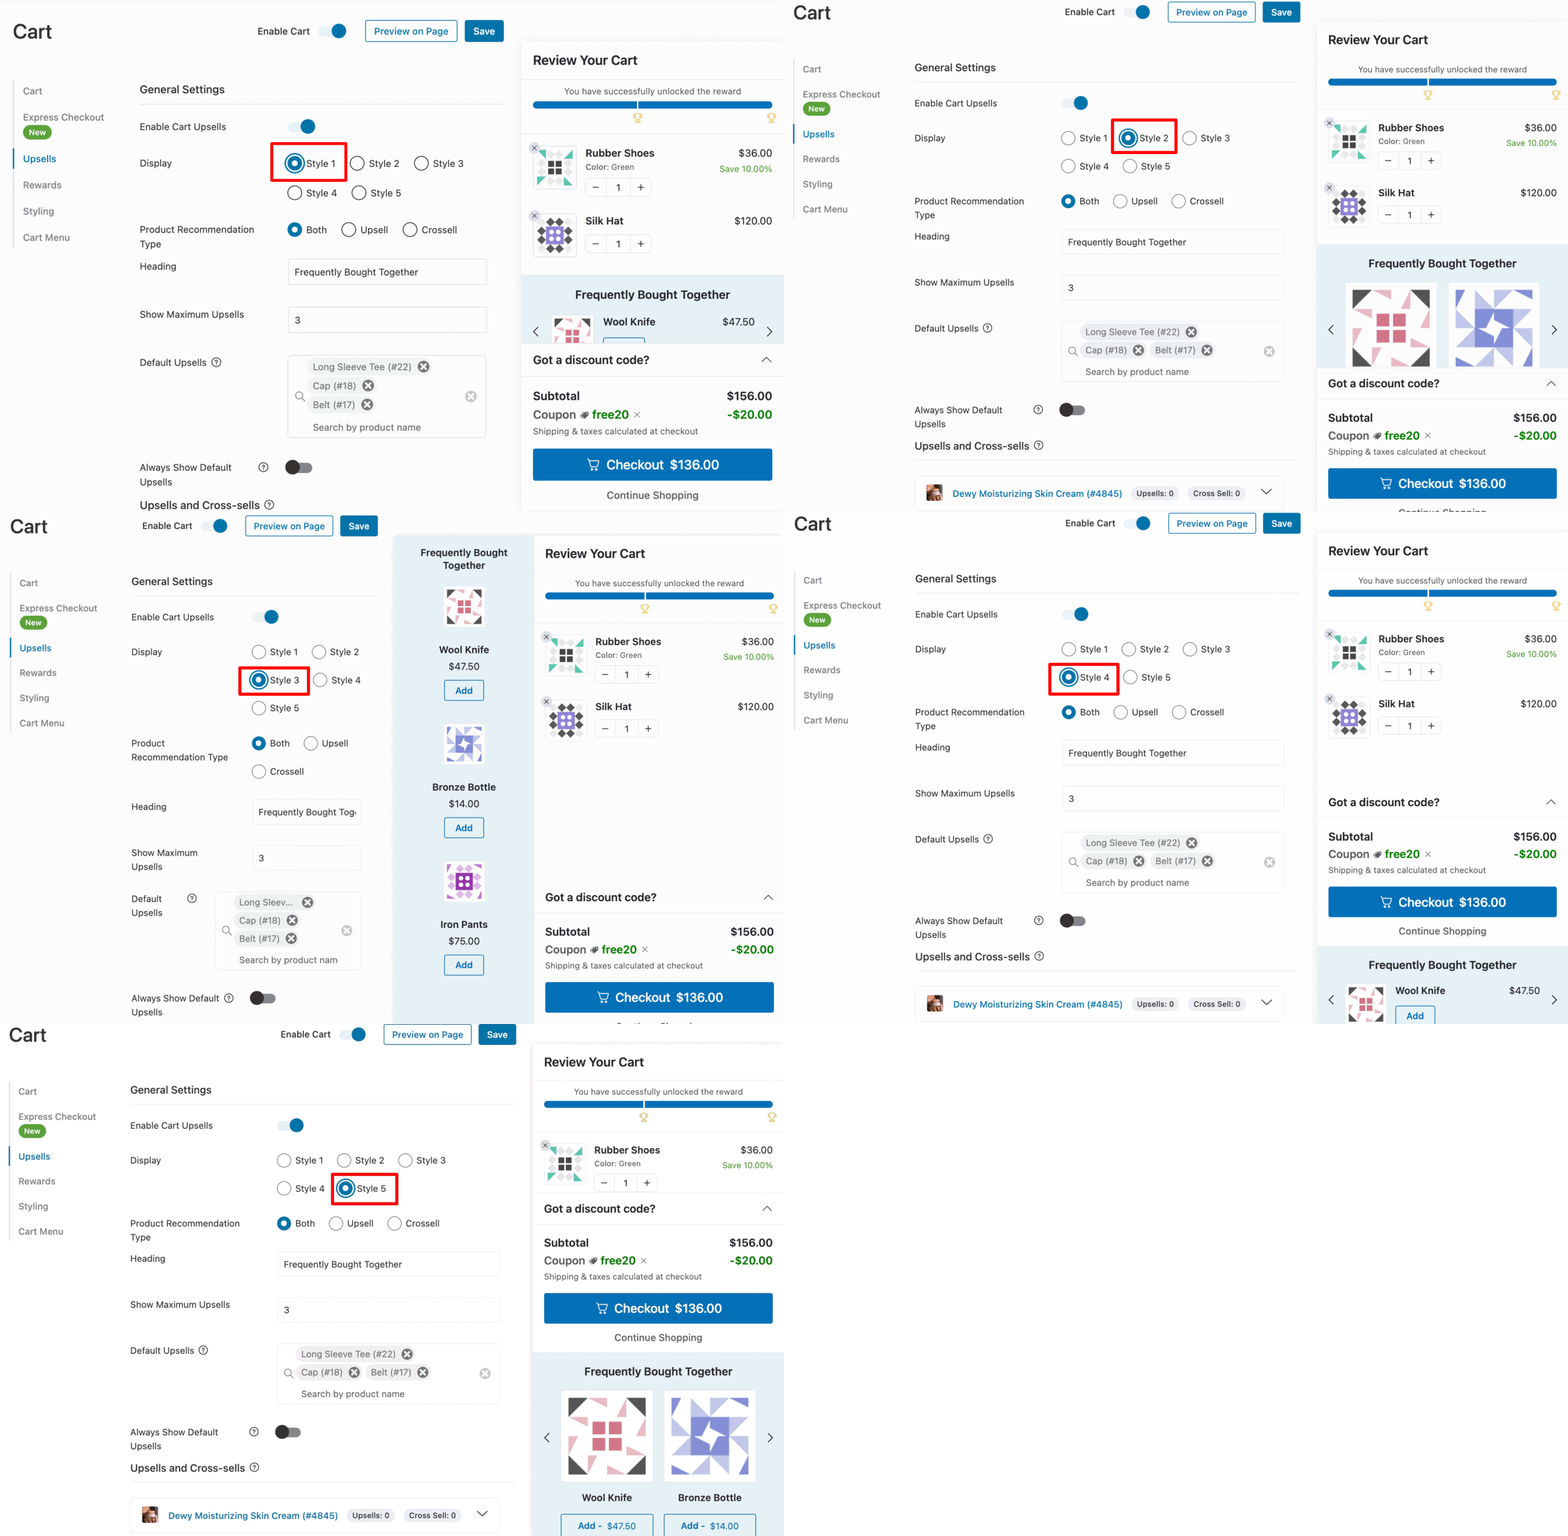
Now you can choose the display style for your cart upsells. You get five different styles to choose from.
Please note that in all styles, each related product appears with a product image, price, an add-to-cart button, and a small form for selecting or updating the quantity.
After choosing how you want to display your recommended products, customize the following:
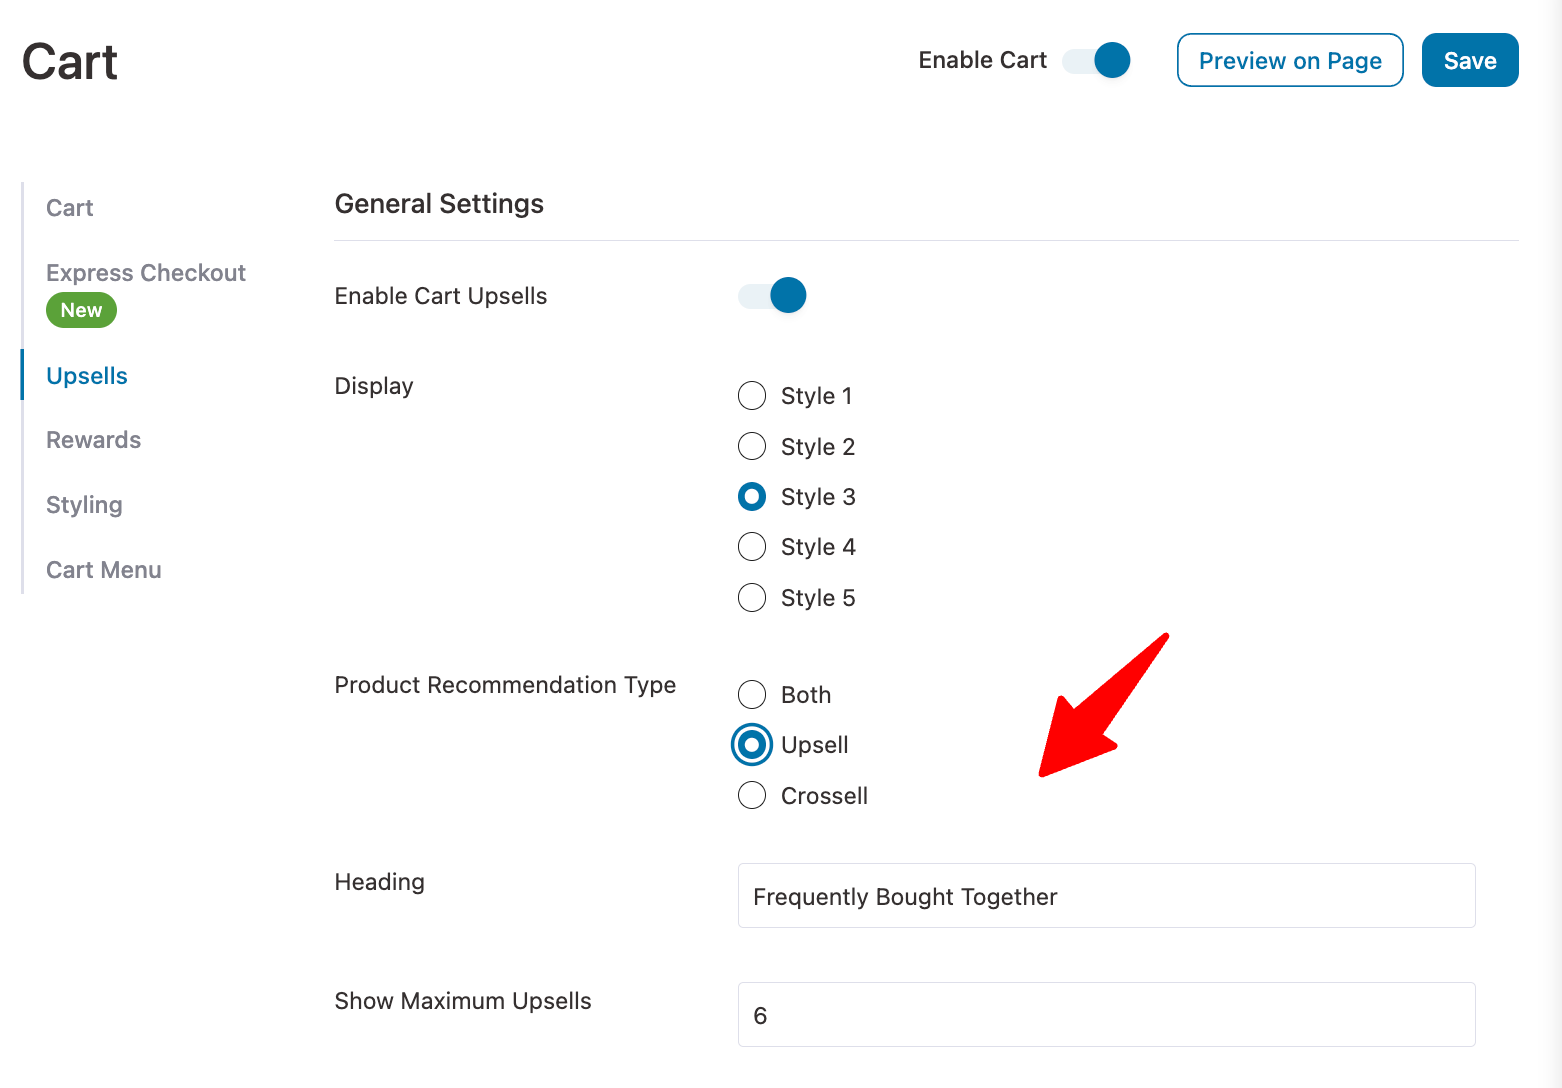
- Product Recommendation Type: Recommend different products as upsells, cross-sells, or both. Here, we will choose to upsell related products.
- Heading: The default heading option is "Frequently Bought Together". Here you can change it and provide the heading you want to display above the product recommendation section.
- Show Maximum Upsells: Specify the maximum number of items you want to display as WooCommerce upsell products.
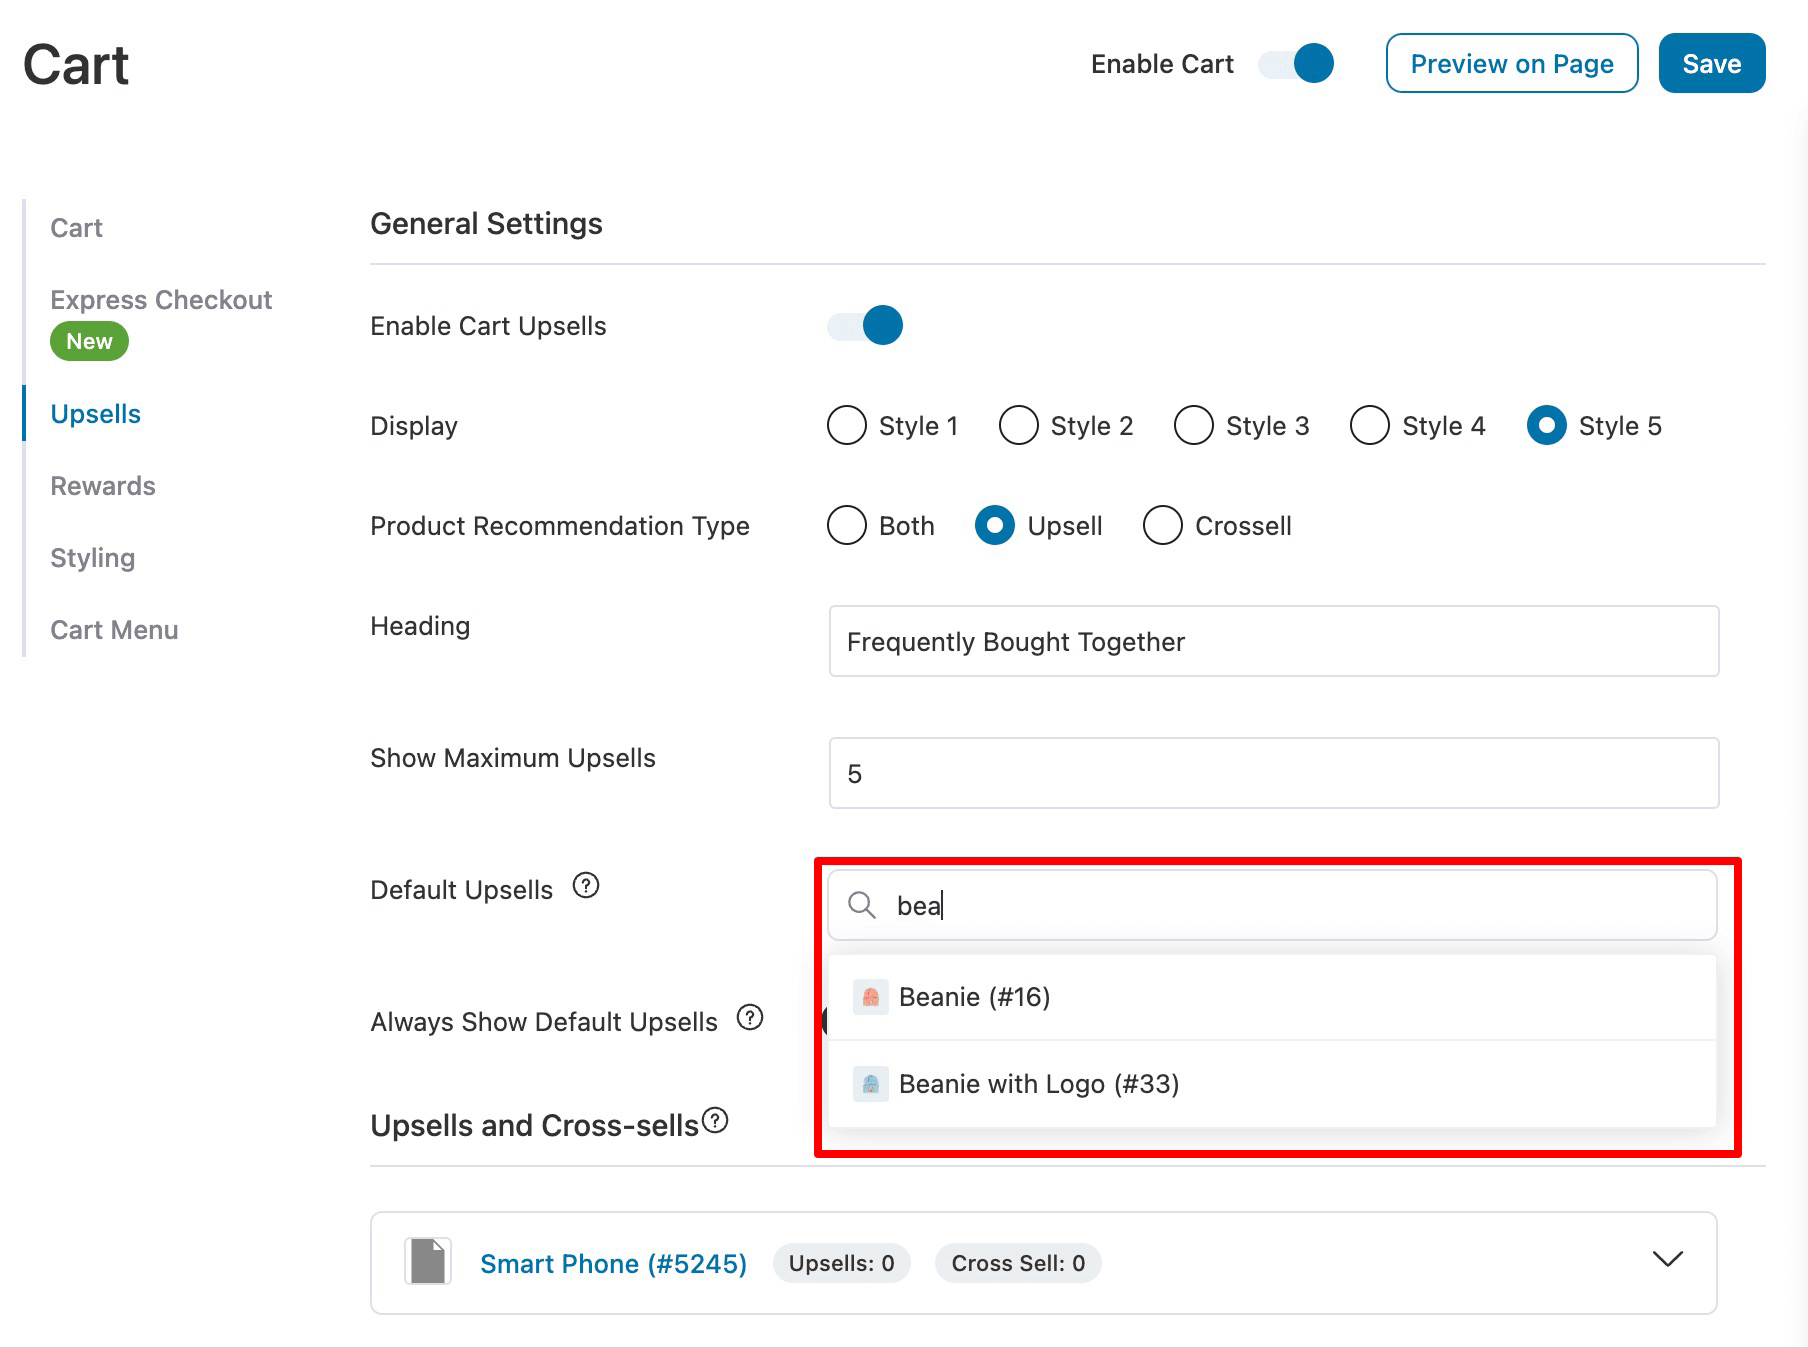
Step 4: Add default upsells
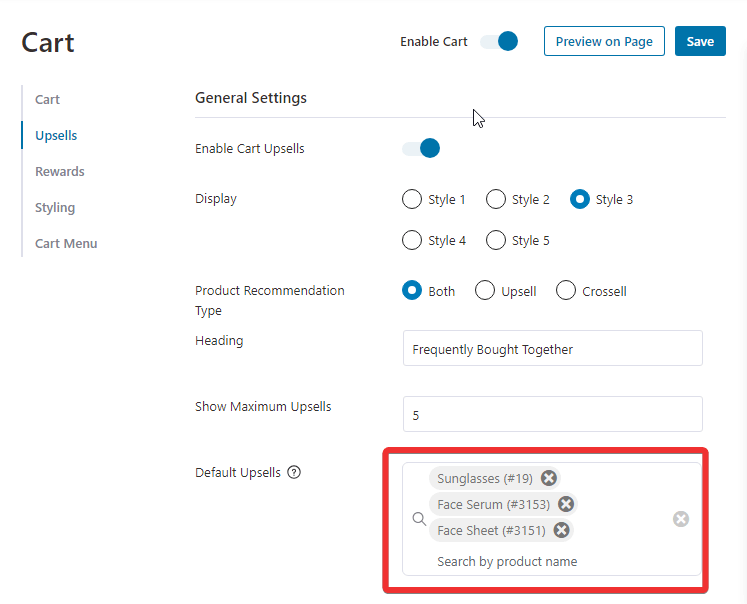
In the 'Default Upsells' option, you can add products that will show up as upsells if the individual products don’t have any upsells assigned to them.
You can search for products by name and add them to the default upsell. You can add as many products as the default upsell as you want.
Step 5: Add upsells and cross-sells to individual products
FunnelKit provides a sleek interface for adding upsell and cross-sell products in the Cart settings. You no longer have to go to the individual product page to add upsell products.
Under the “Upsells and Cross-sells” section, you will find your WooCommerce products. Now expand the section, and you will find the option to add both upsell and cross-sell.
To find any product, click on the “View All Products” option.
Now search for the product you want to add an upsell to. Then expand the product, click on “Add Upsell”, search for and add the product.
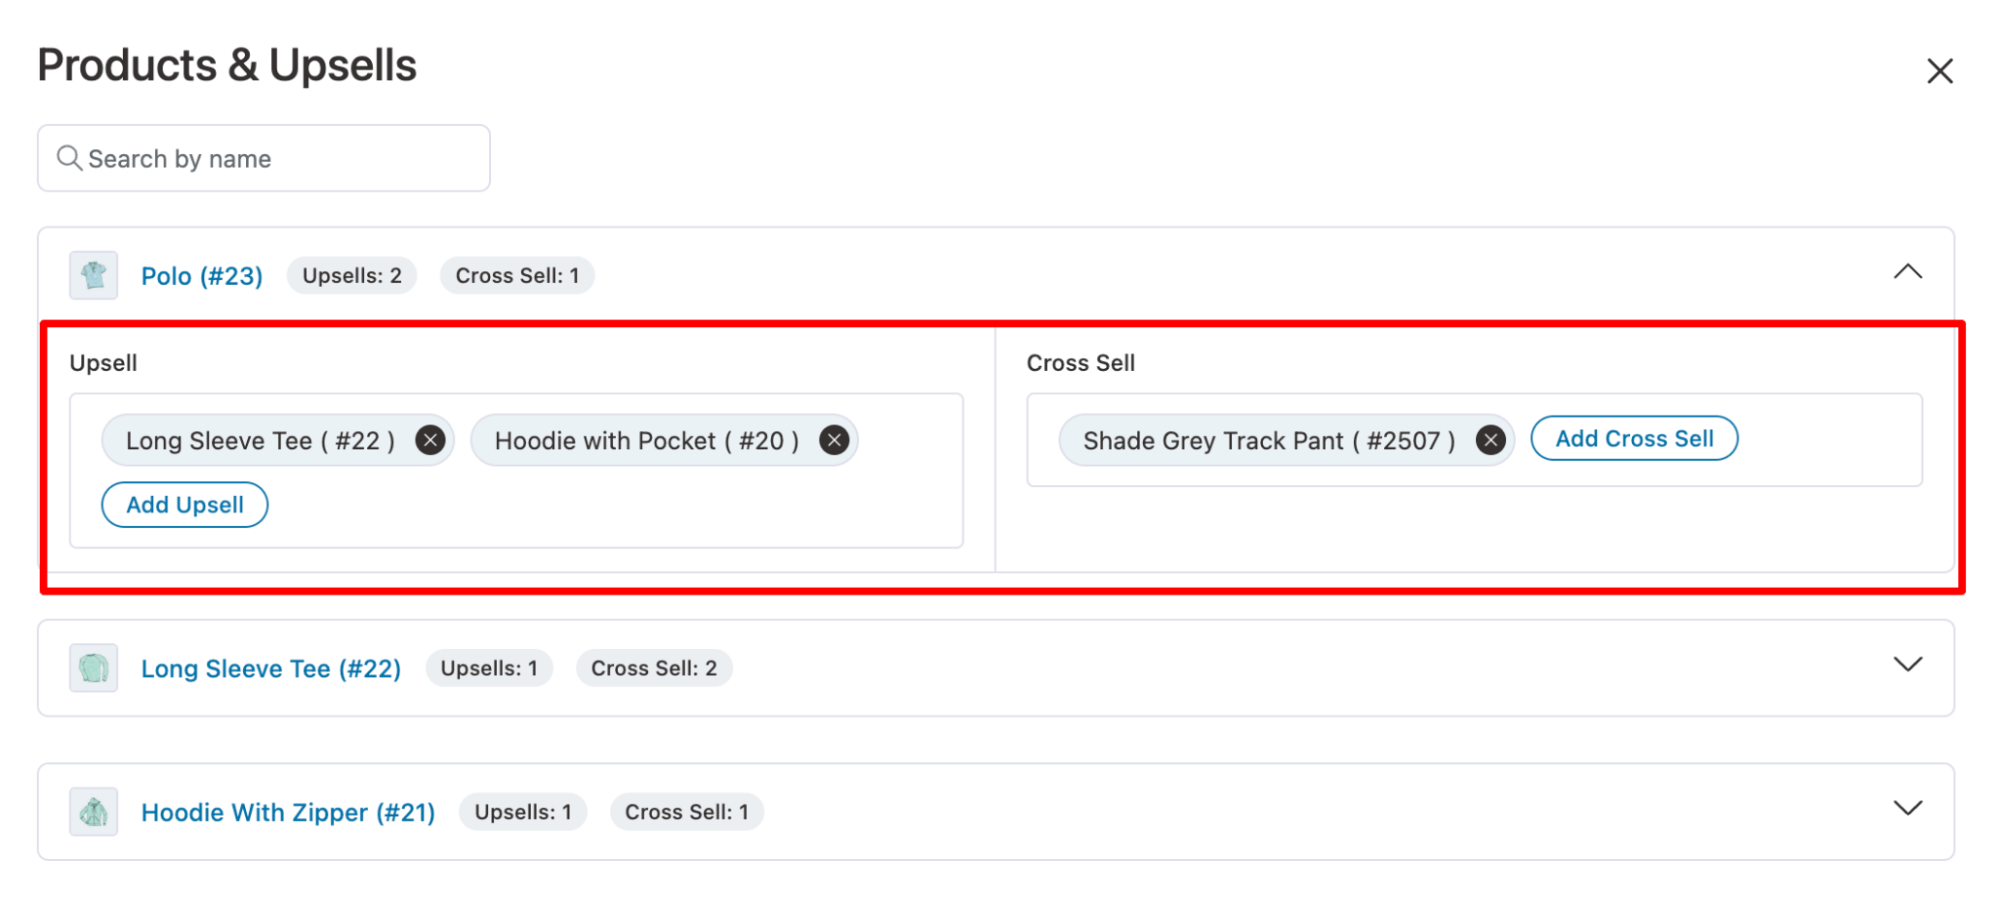
And that’s it! This is how you can add your upsells without visiting the product pages in WooCommerce.
Here is how the upsell will appear on the front end in the mini cart.
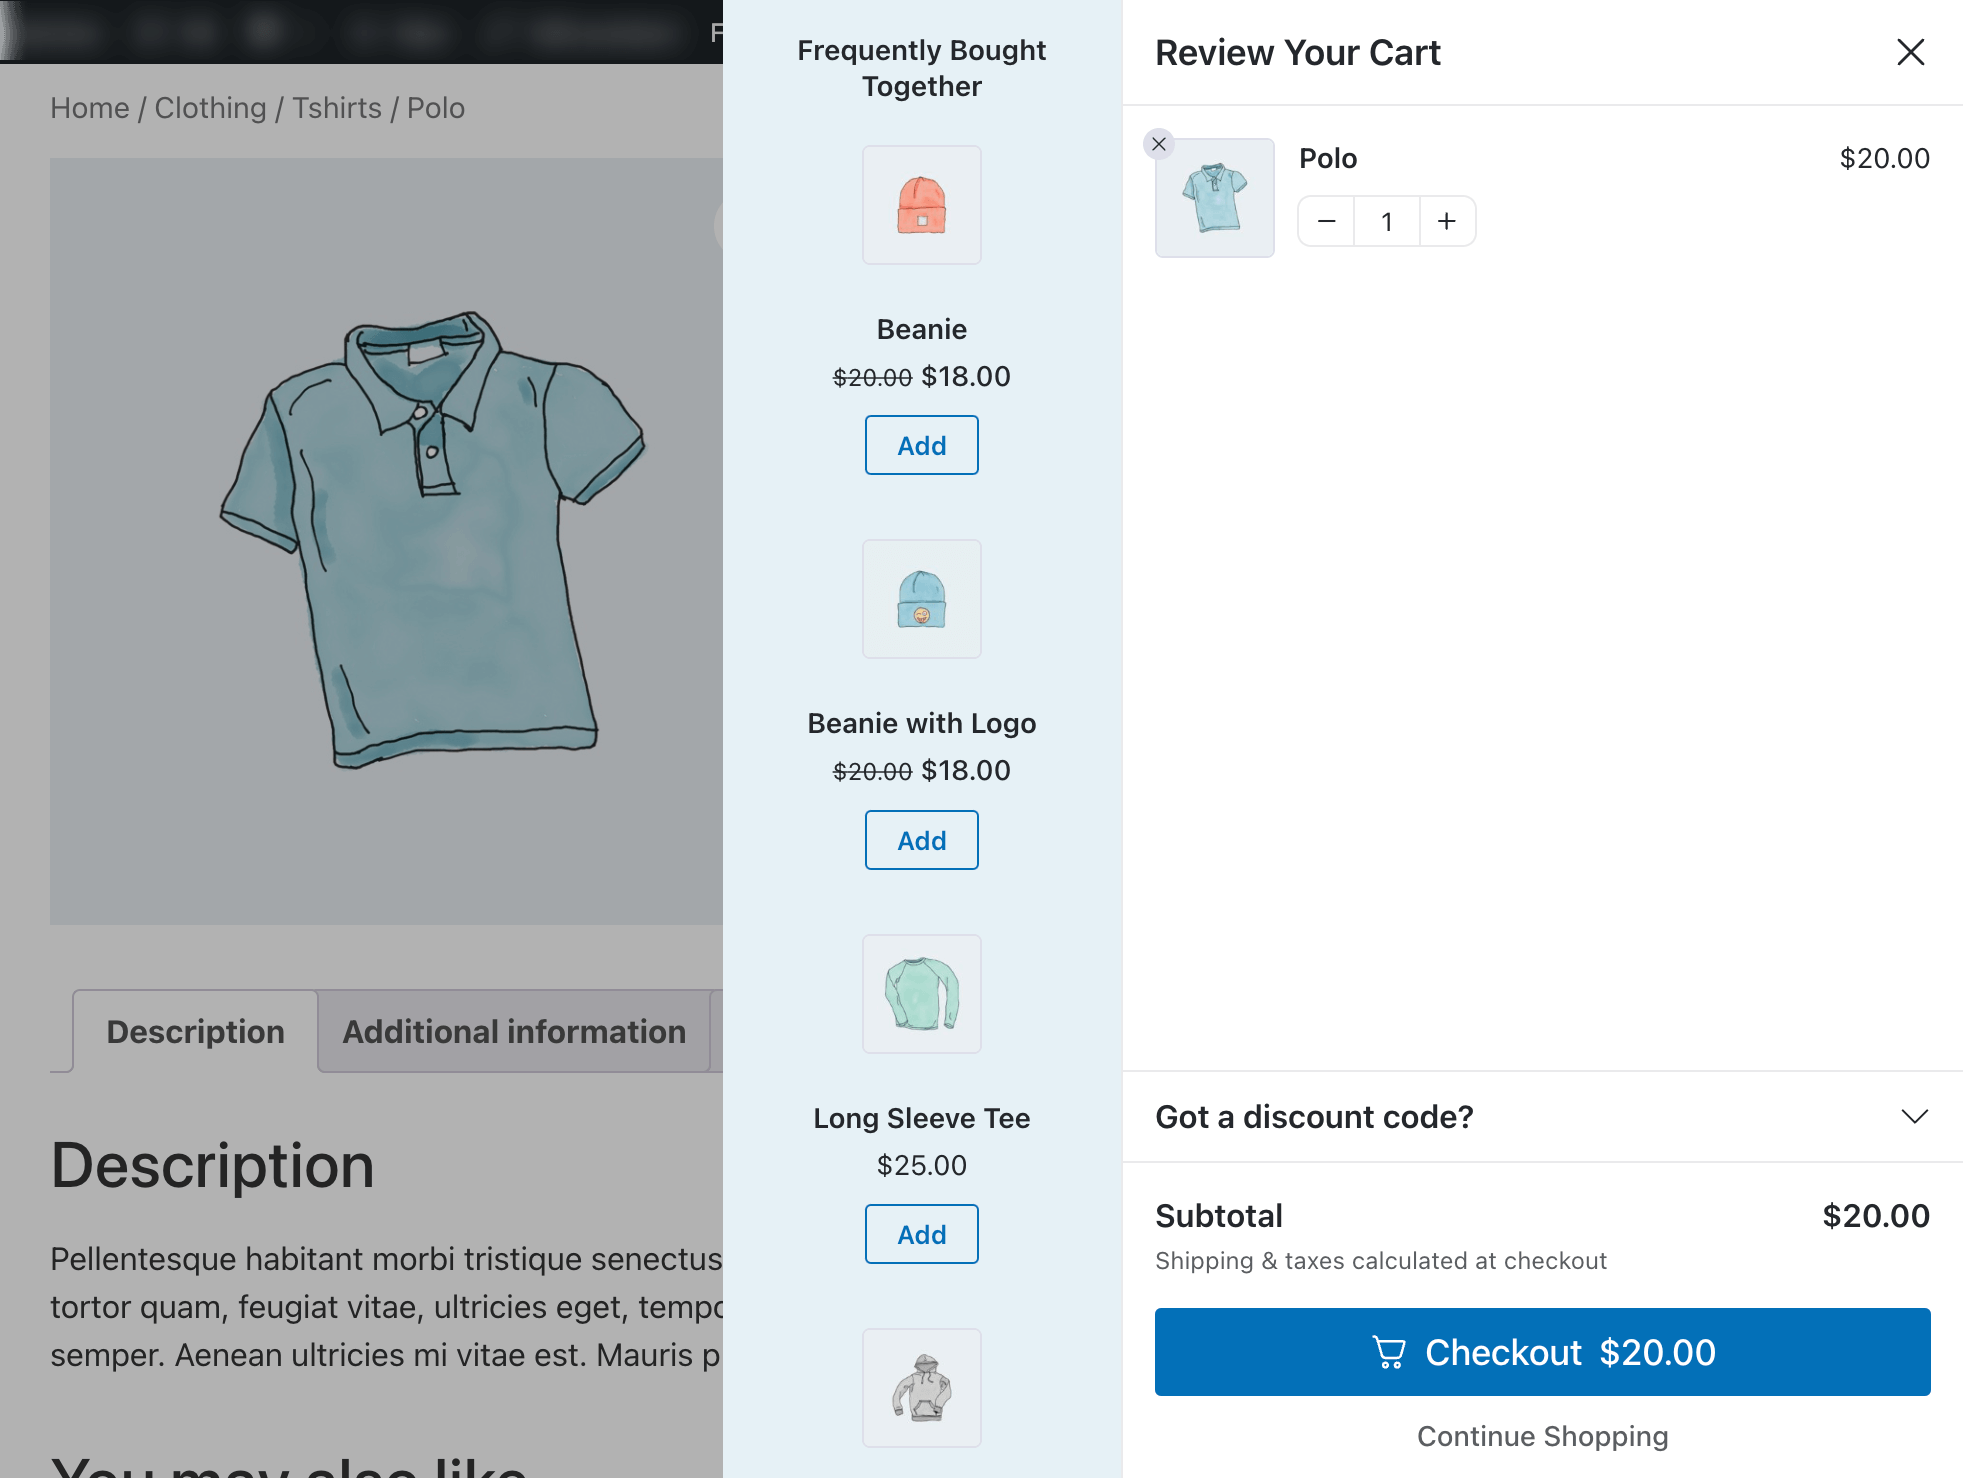
That's how easy it is to offer to upsell in WooCommerce mini shopping carts.
How to Add Checkout Order Bumps in WooCommerce
You can offer upsells on the checkout page as order bumps. Order bumps are low-dollar offers that users can add to their order with just one click, just before they make a purchase.
To offer an order bump, we will use a sales funnel that lets you set the original product and the order-bump product.
Step 1: Create a sales funnel using a pre-built template
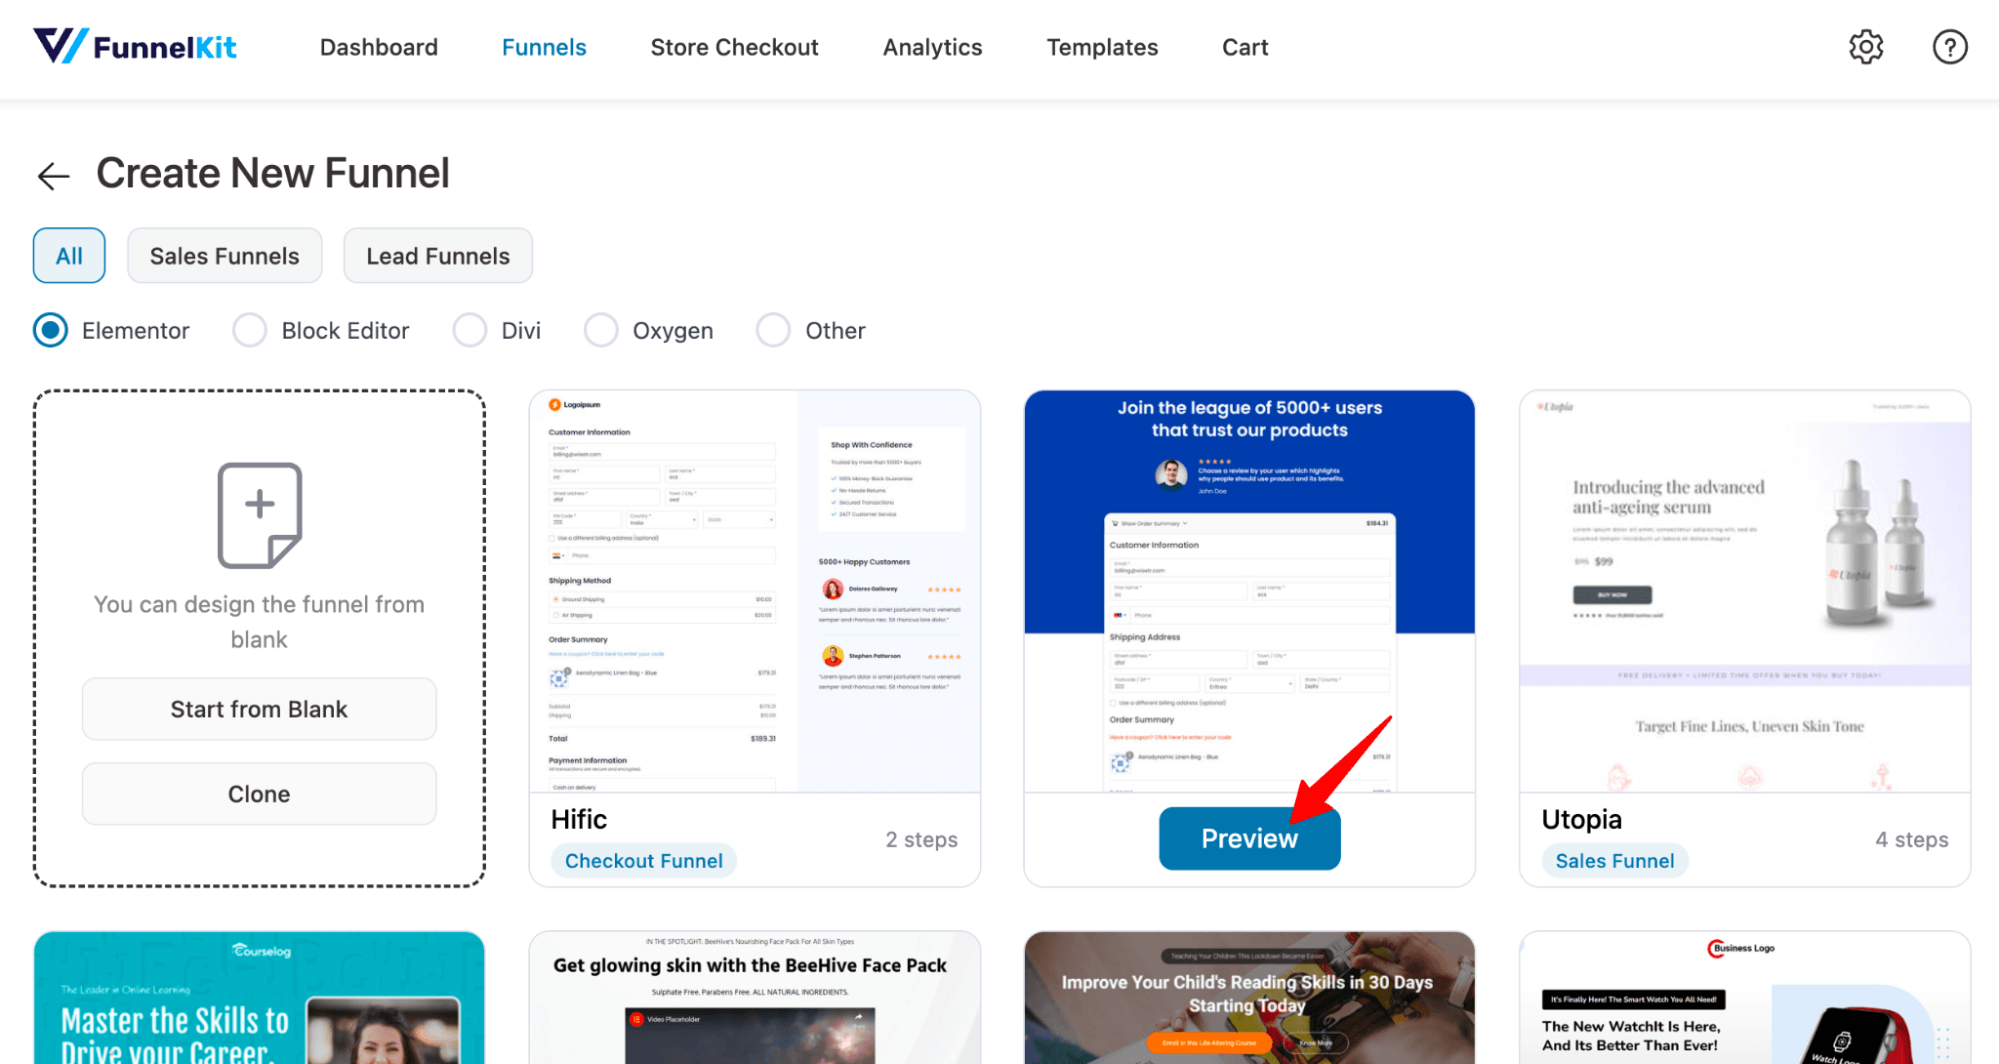
To create a sales funnel, go to FunnelKit Funnel Builder ⇒ Funnels and click on ‘Create New Funnel’.
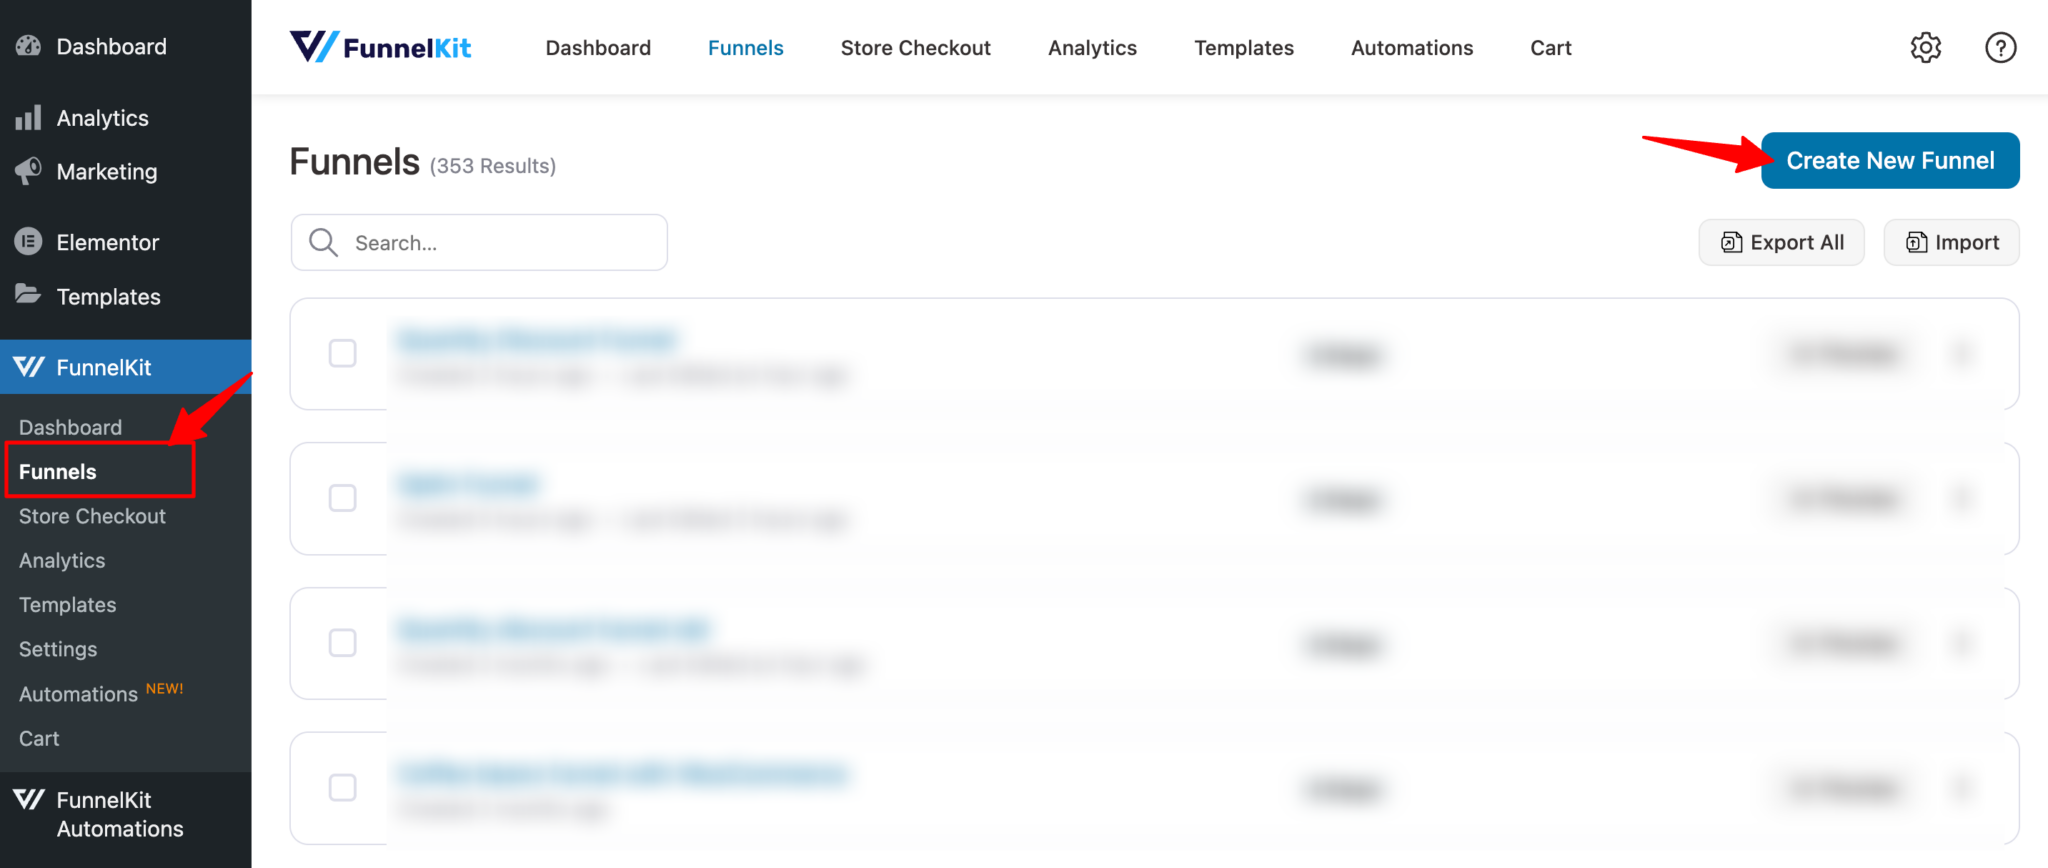
After that, choose the page builder of your preference. Now, to choose the template you like, just hover over it and click on Preview.
We are going to use the Livewire template here. This template has three steps:
To import this template, select the steps you want to appear on your checkout page.
After that, click on the 'Import This Funnel' button, provide a name, and click on Done.
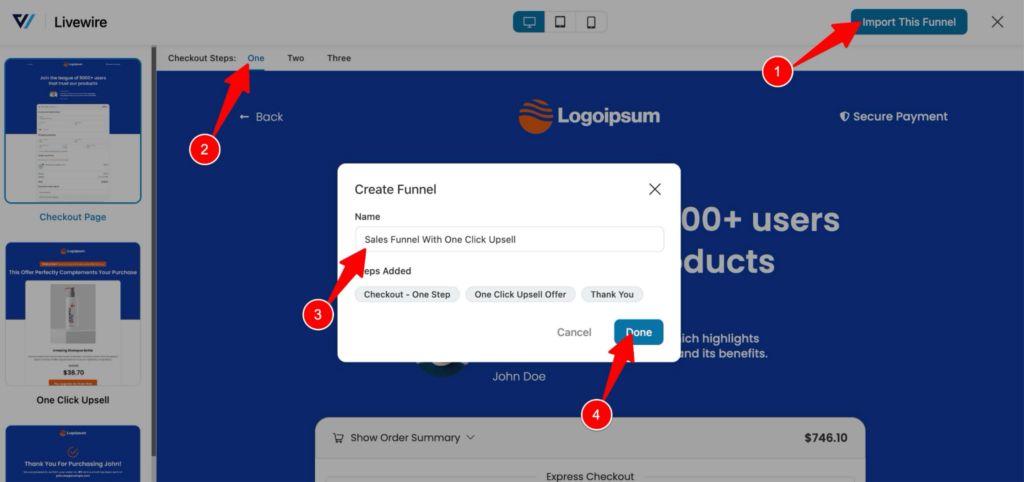
This will import your sales funnel with the three steps mentioned above.
Step 2: Add products to the checkout page
Now we are going to add products to the checkout page.
As we're setting up a product-specific checkout, we will demonstrate how to configure a 1-click upsell for WooCommerce, referencing our checkout product in the following steps.

To add the product to the checkout page, first, click on the checkout template.
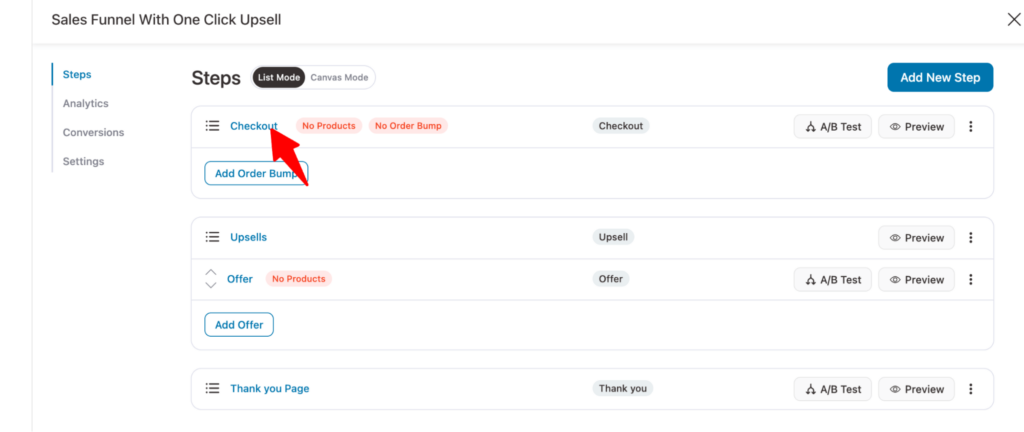
Now, click on the “Edit Elementor Template” option to customize your checkout page.
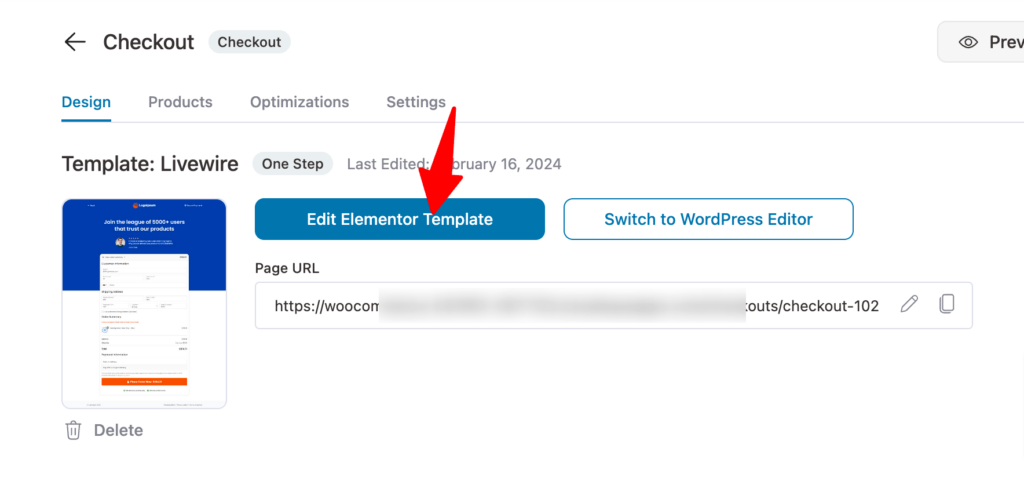
Now, to add products, move to the Product tab. From there, click Add Product, search for the product, select it, and click the 'Add' button.
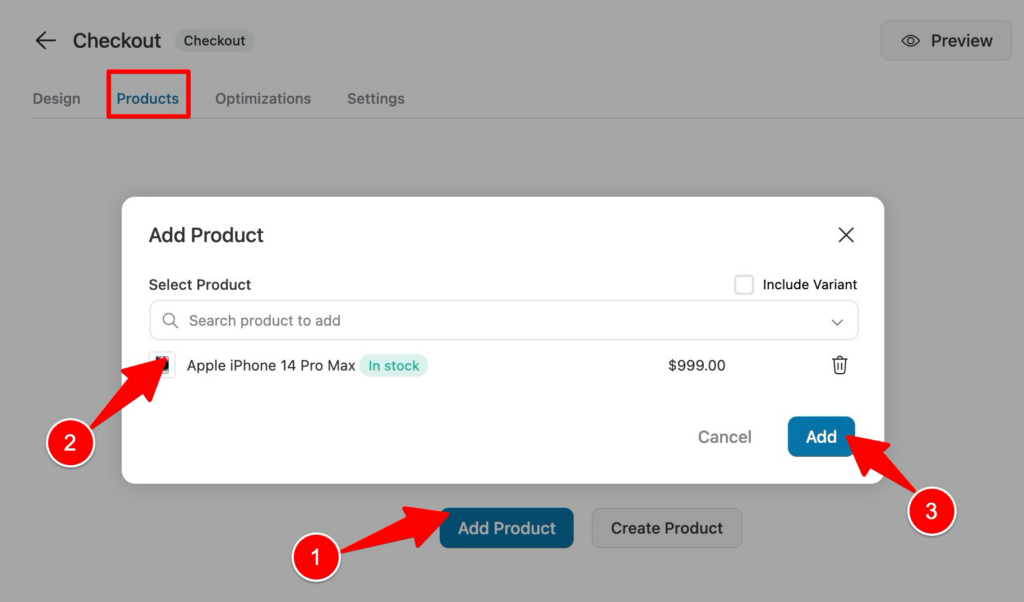
This will add the product to the checkout page. If you want, you can add discounts to the product.
Make sure to click on 'Save’ to update any changes you make.
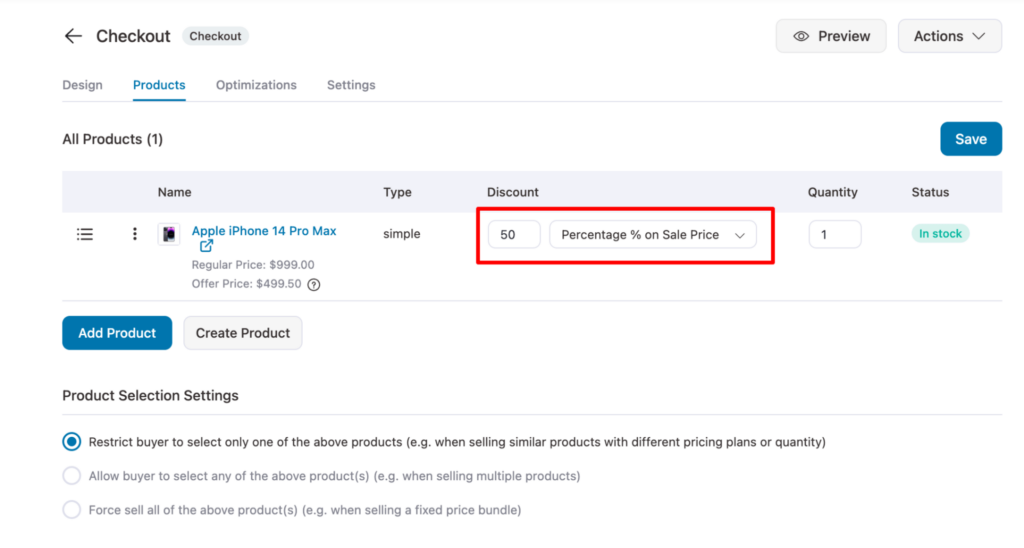
Step 3: Add order bump as the checkout upsell
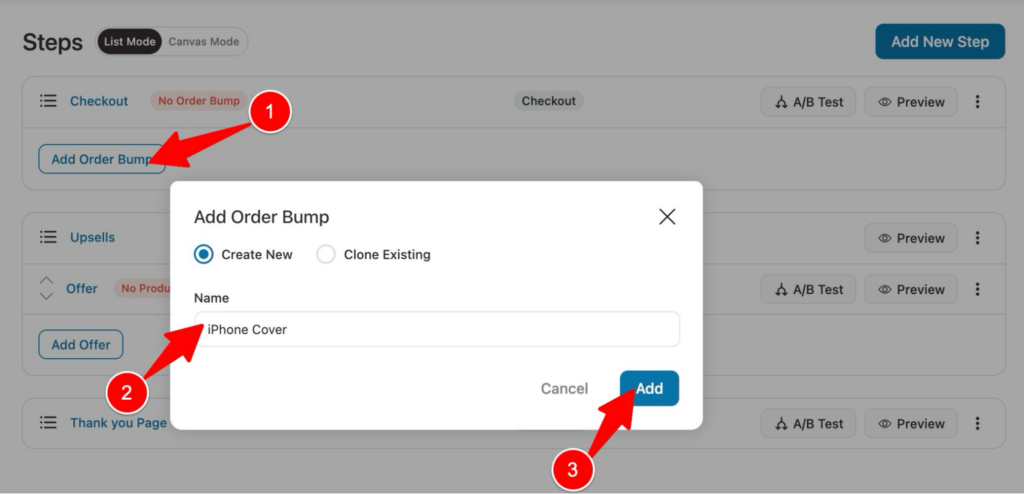
You can also offer complementary items as an order bump on the checkout page. First, you need to add an order bump step.
To do that, click 'Add Order Bump', enter its name, and hit the Add button.
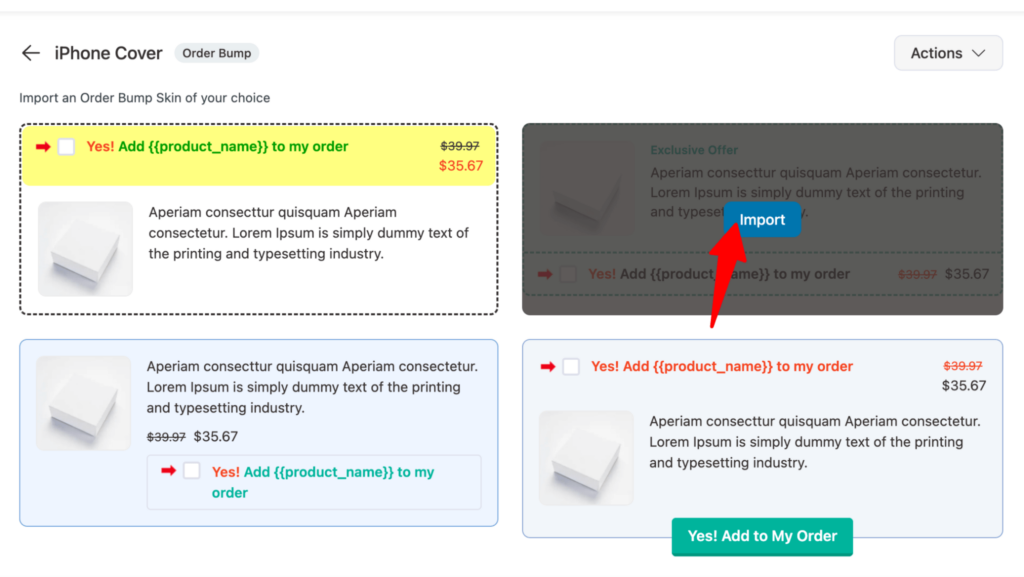
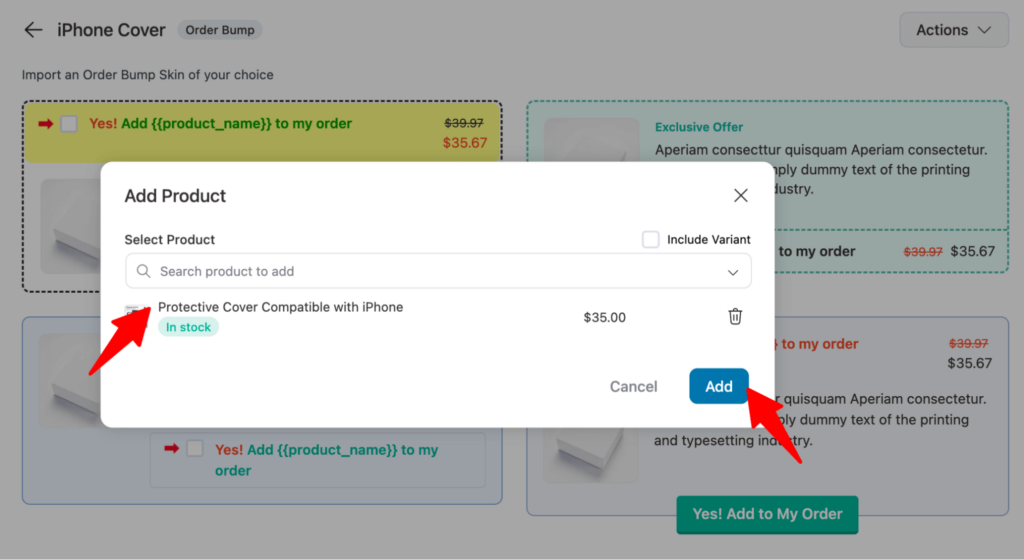
Now choose an order bump skin, then click Import.
Search for and add the product you want to offer as an order bump. Finally, click on 'Add'.
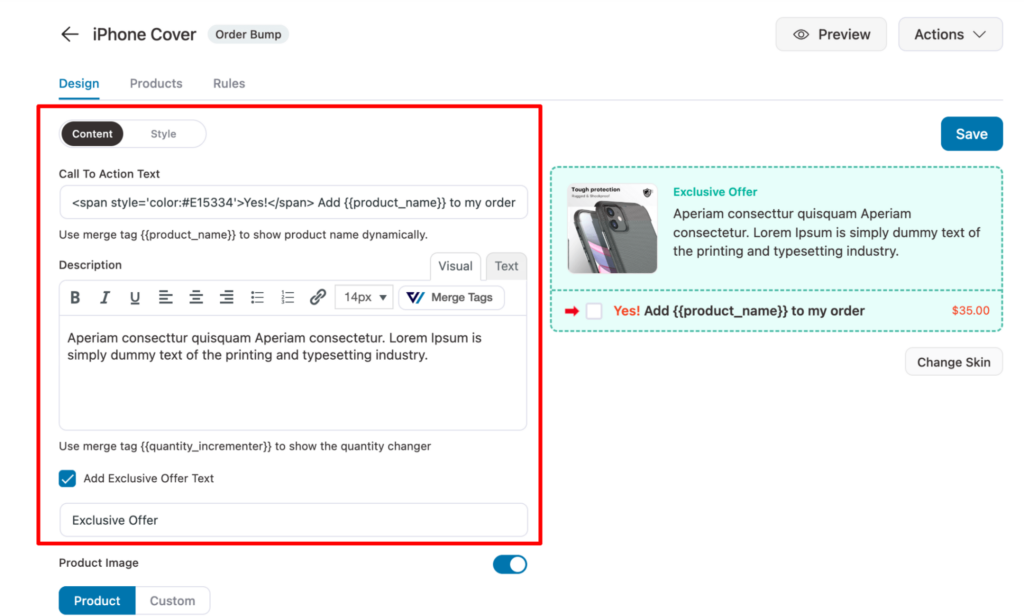
Customize the content, such as Call To Action Text, Description, etc. You can also add an exclusive offer text.
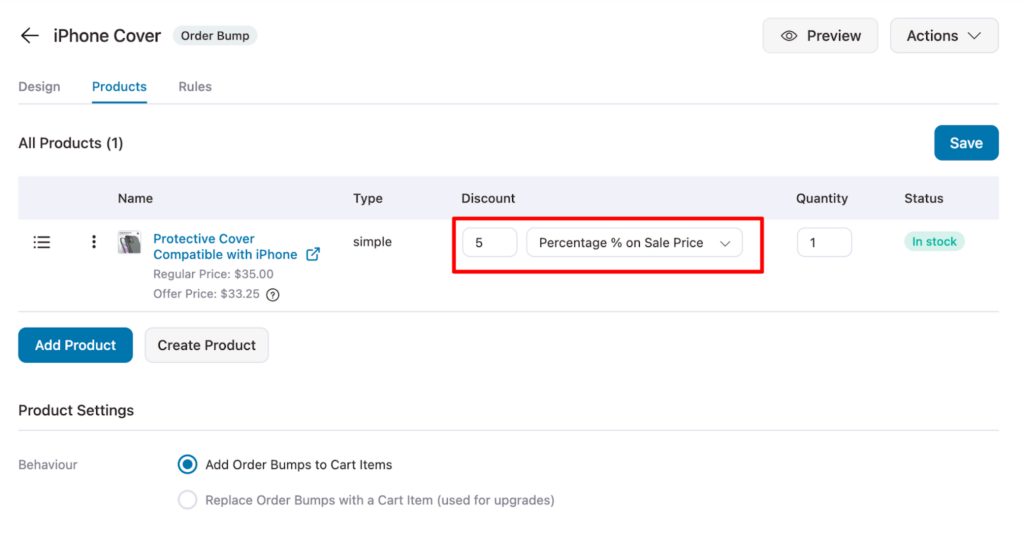
Move to the Products tab. Here, you can add multiple products as order bumps.
Moreover, you can offer a discount on your order bump if you want. Make sure to click on “Save”.
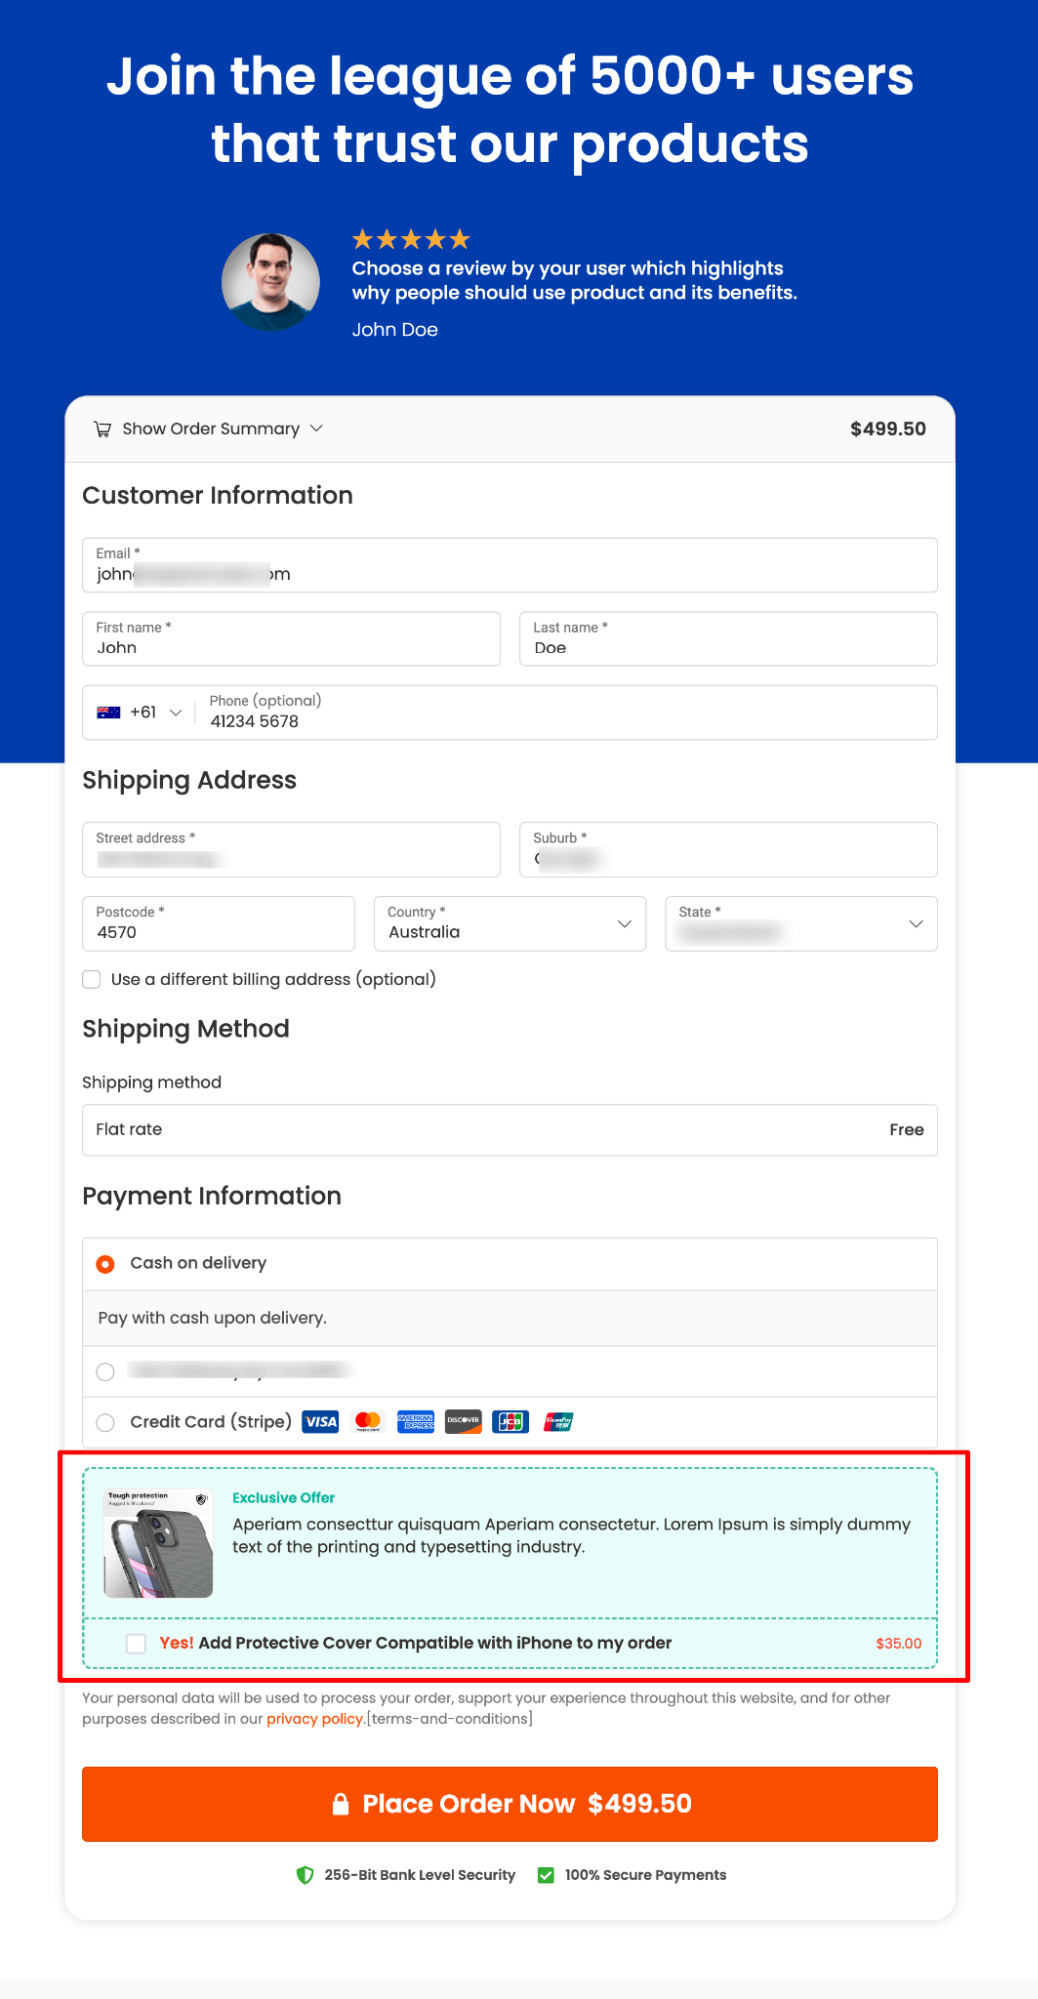
Here is how your order bump will look on the front end:
👉 For more details, read our post on offering order bumps in WooCommerce.
How to Set Up Exit-Intent Upsells in WooCommerce
An exit-intent upsell is a last-chance offer that triggers when a visitor is about to leave your site.
Unlike the other upsell methods we have covered, which are tied to specific points in the shopping journey (product page, cart, checkout, post-purchase), exit-intent upsells are triggered by behavior.
We'll use OptinMonster here.
Step 1: Create a new pop-up campaign
Navigate to OptinMonster ⇒ Campaigns and click on 'Create Campaign'.
Next, choose the Popup campaign template.
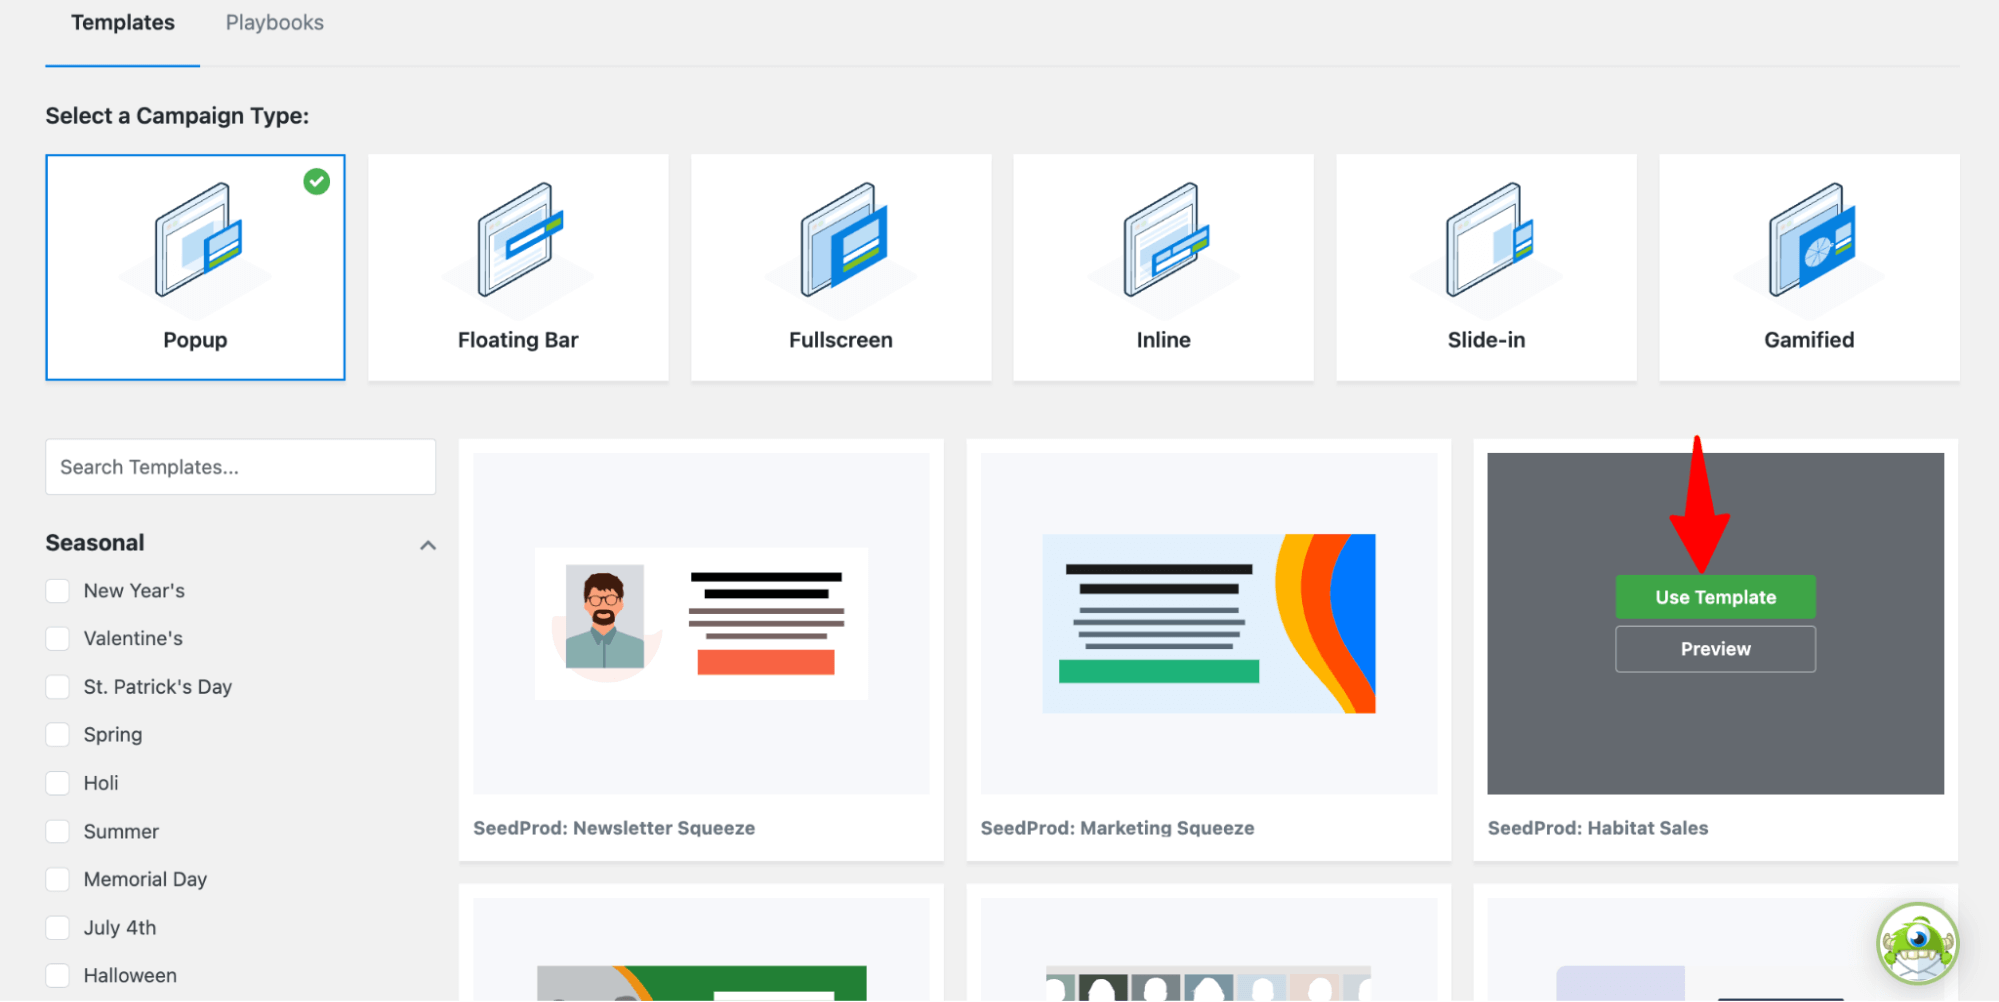
Enter the name of your campaign and start building.
Step 2: Design the offer
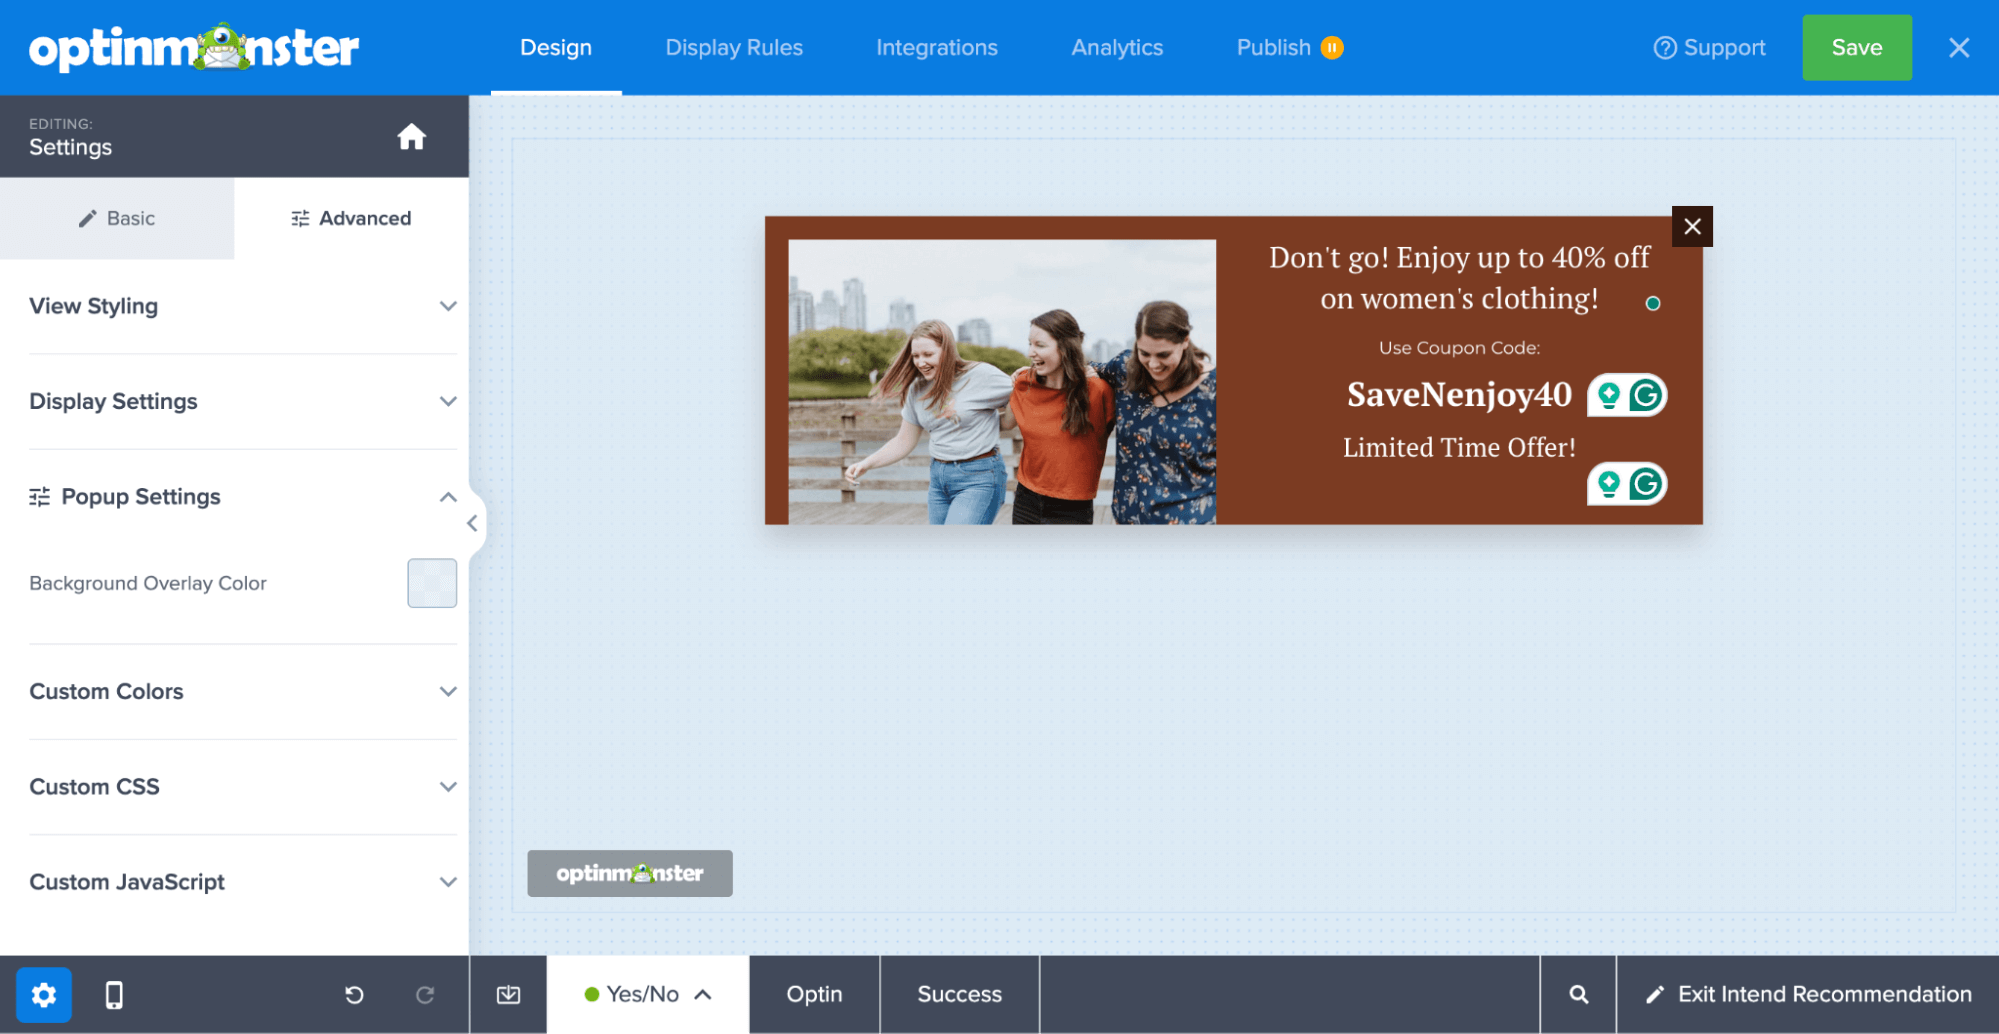
Next, customize the design of your offer to highlight products.
For example, offer a 40% sale on women's clothing and a limited-time discount.
Step 3: Set the exit-intent trigger
Next, under the Display Rules tab, select the 'Exit Intent' trigger.
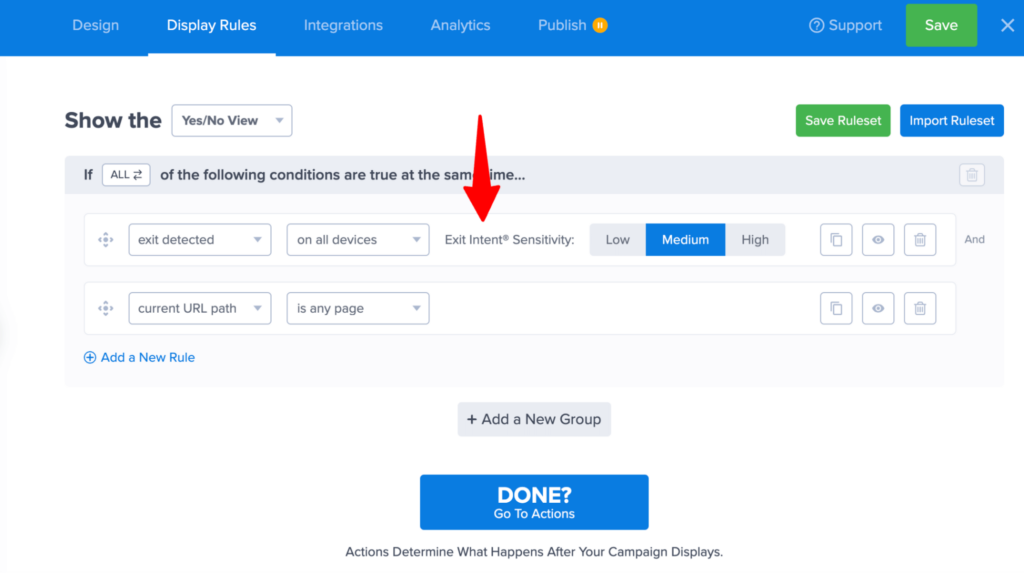
Once done, click on 'Publish' to activate your campaign.
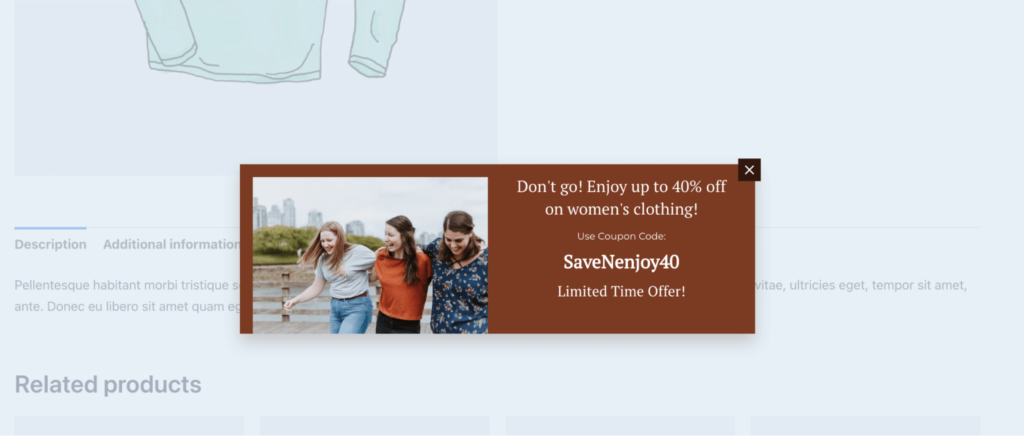
Here is what your popup offer will look like when a user tries to exit your store:
How to Offer Post-Purchase One-Click WooCommerce Upsells
When it comes to post-purchase one-click upsells, it’s important that you provide personalized offers so users find them irresistible.
We are going to offer one-click upsells using the same funnel we used for order bumps with FunnelKit.
Step 1: Customize the WooCommerce upsell template
First, we need to customize the upsell template. To do so, return to your sales funnel and click the “Offer” step.
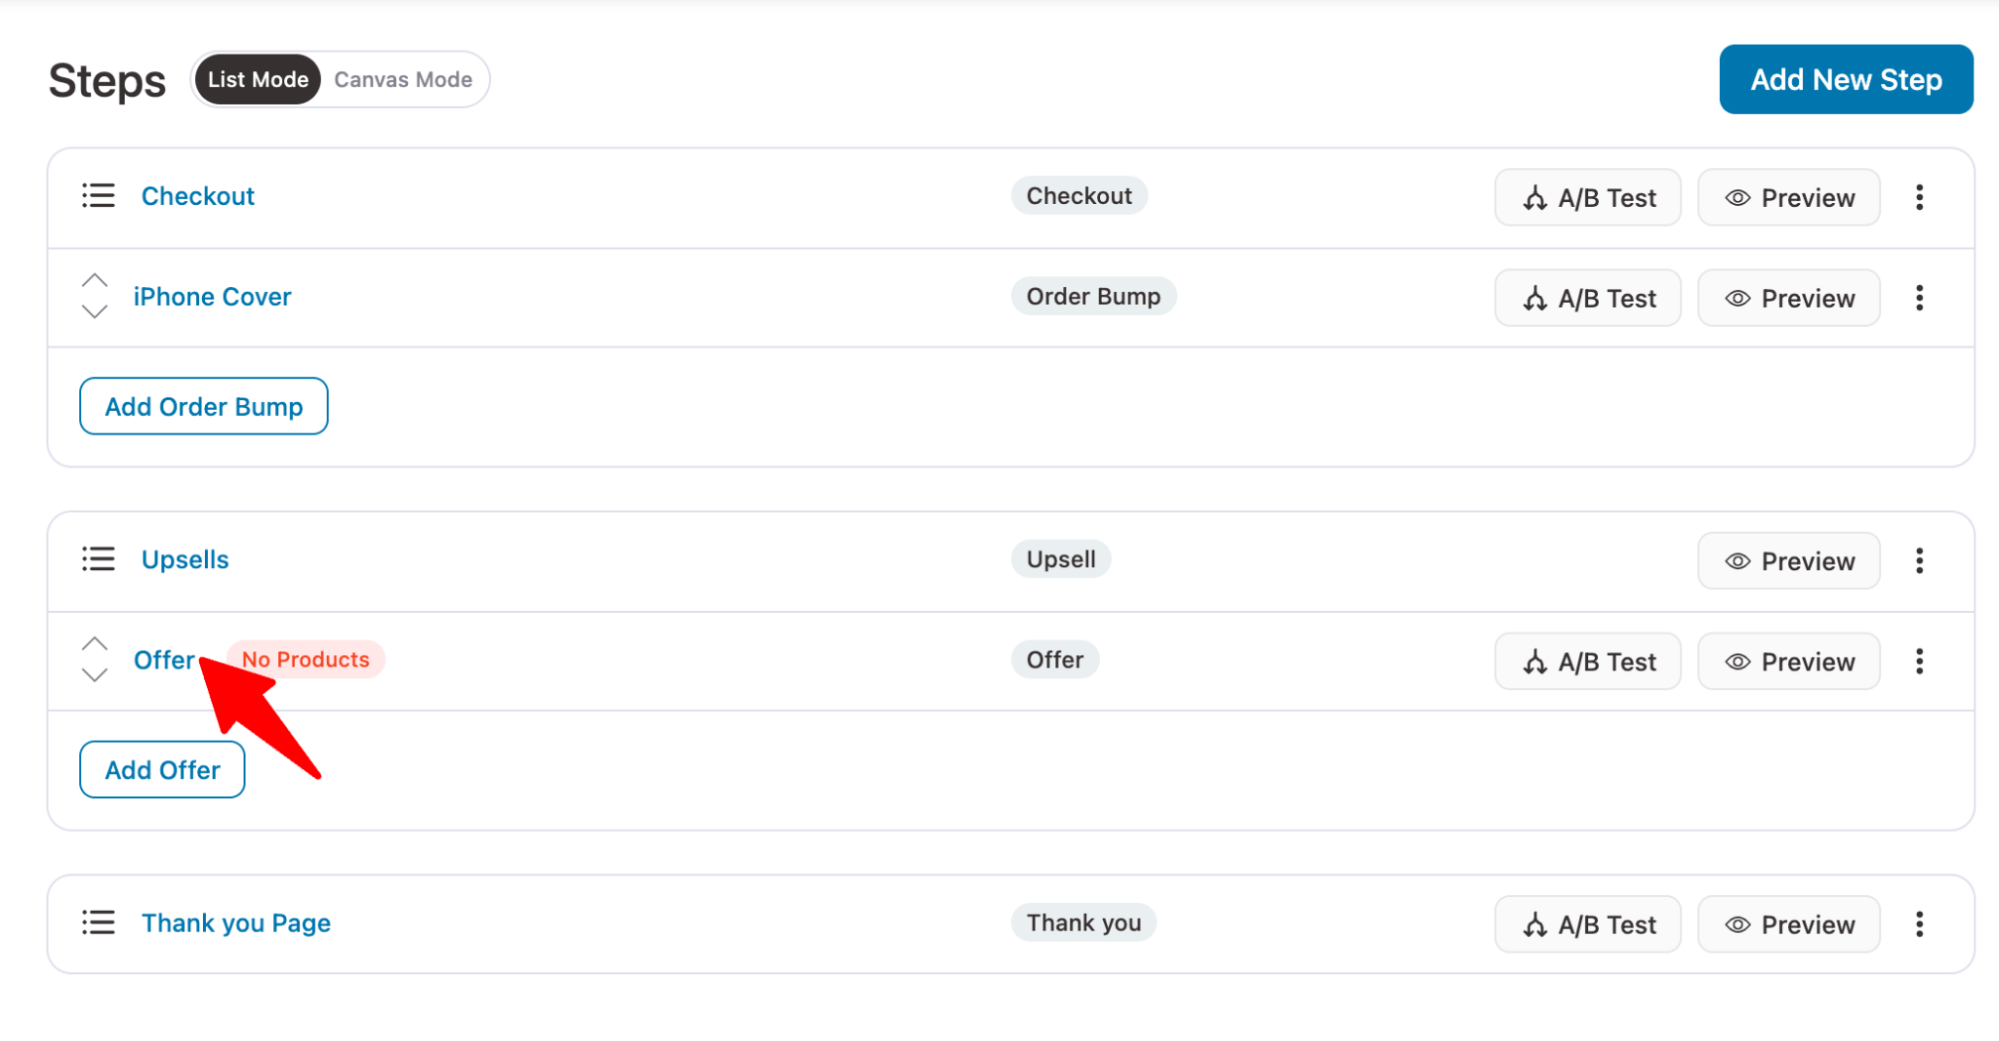
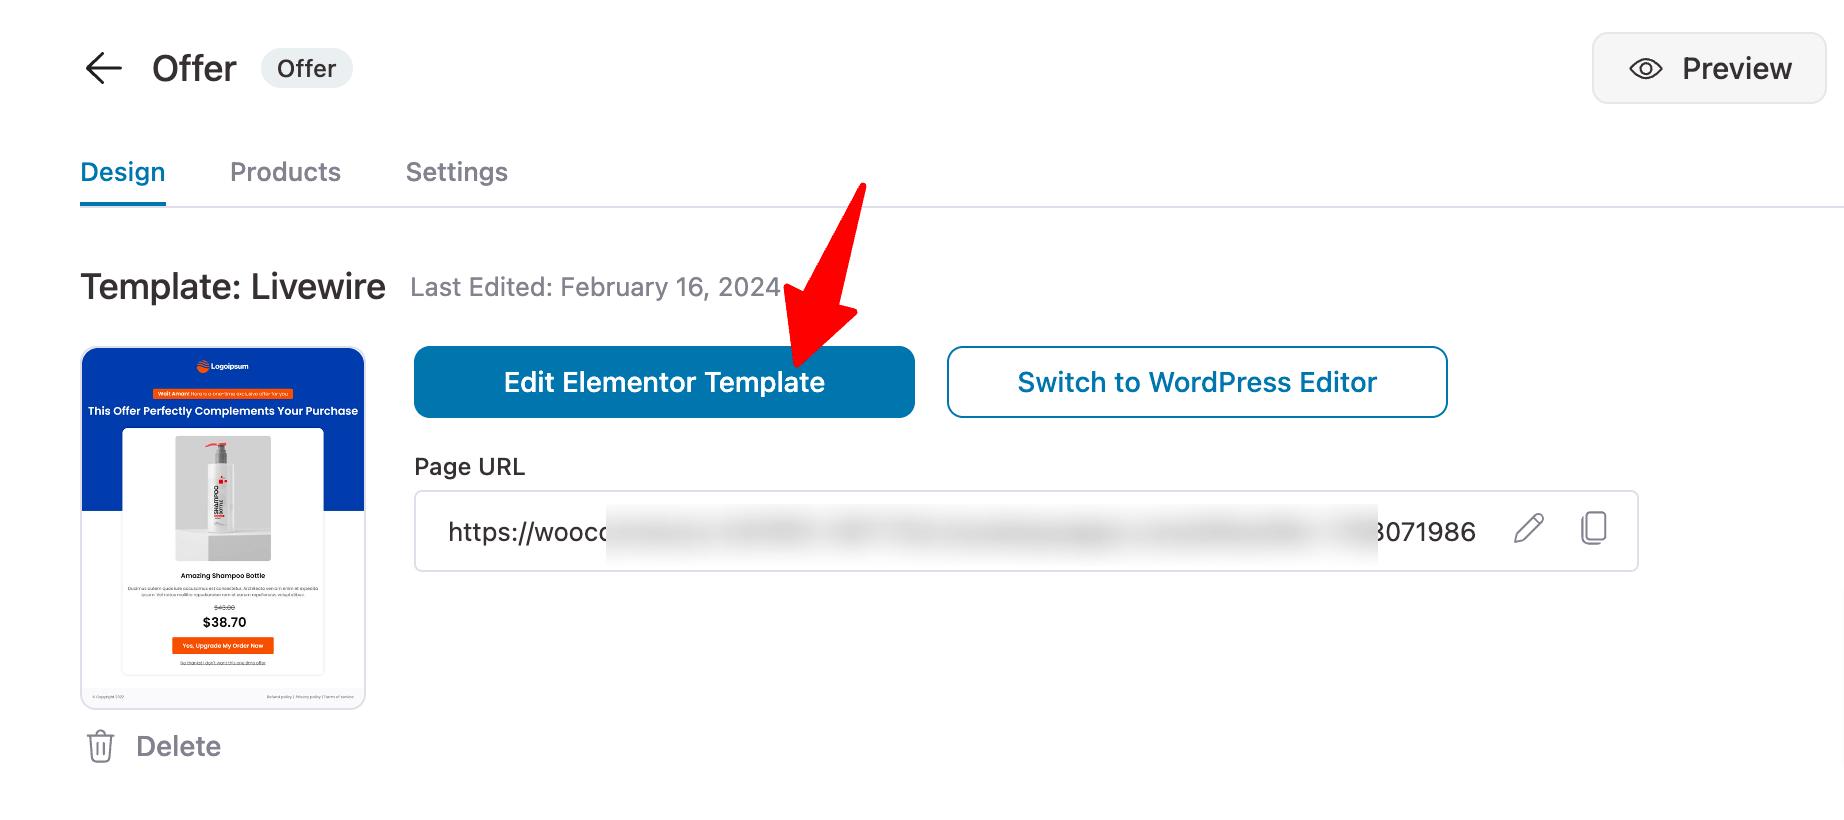
Now it’s time to customize the content of your upsell page. For that, click on “Edit Elementor Template”.
You can even customize the upsell page with any other page builders or using shortcodes.
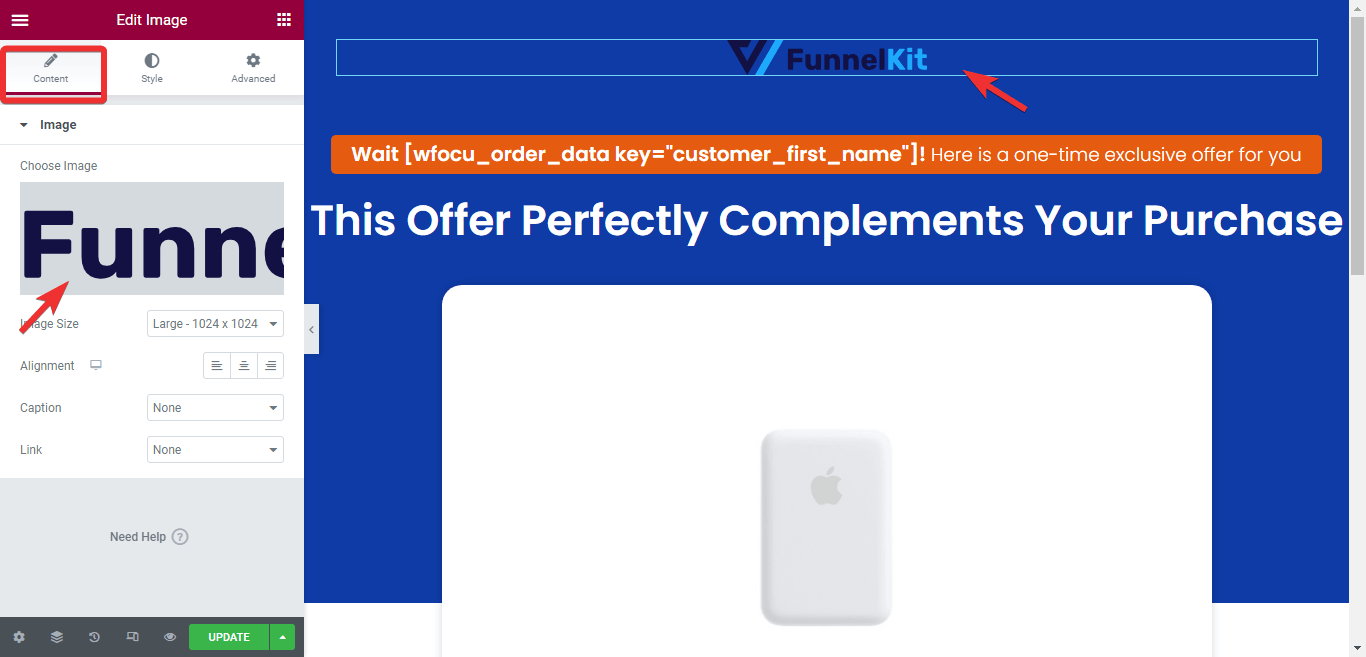
To customize any content, for example, click the section, then, on the left under the content tab, you will find the option to customize it.
For example, we have updated the logo here.
You can also add content if you want.
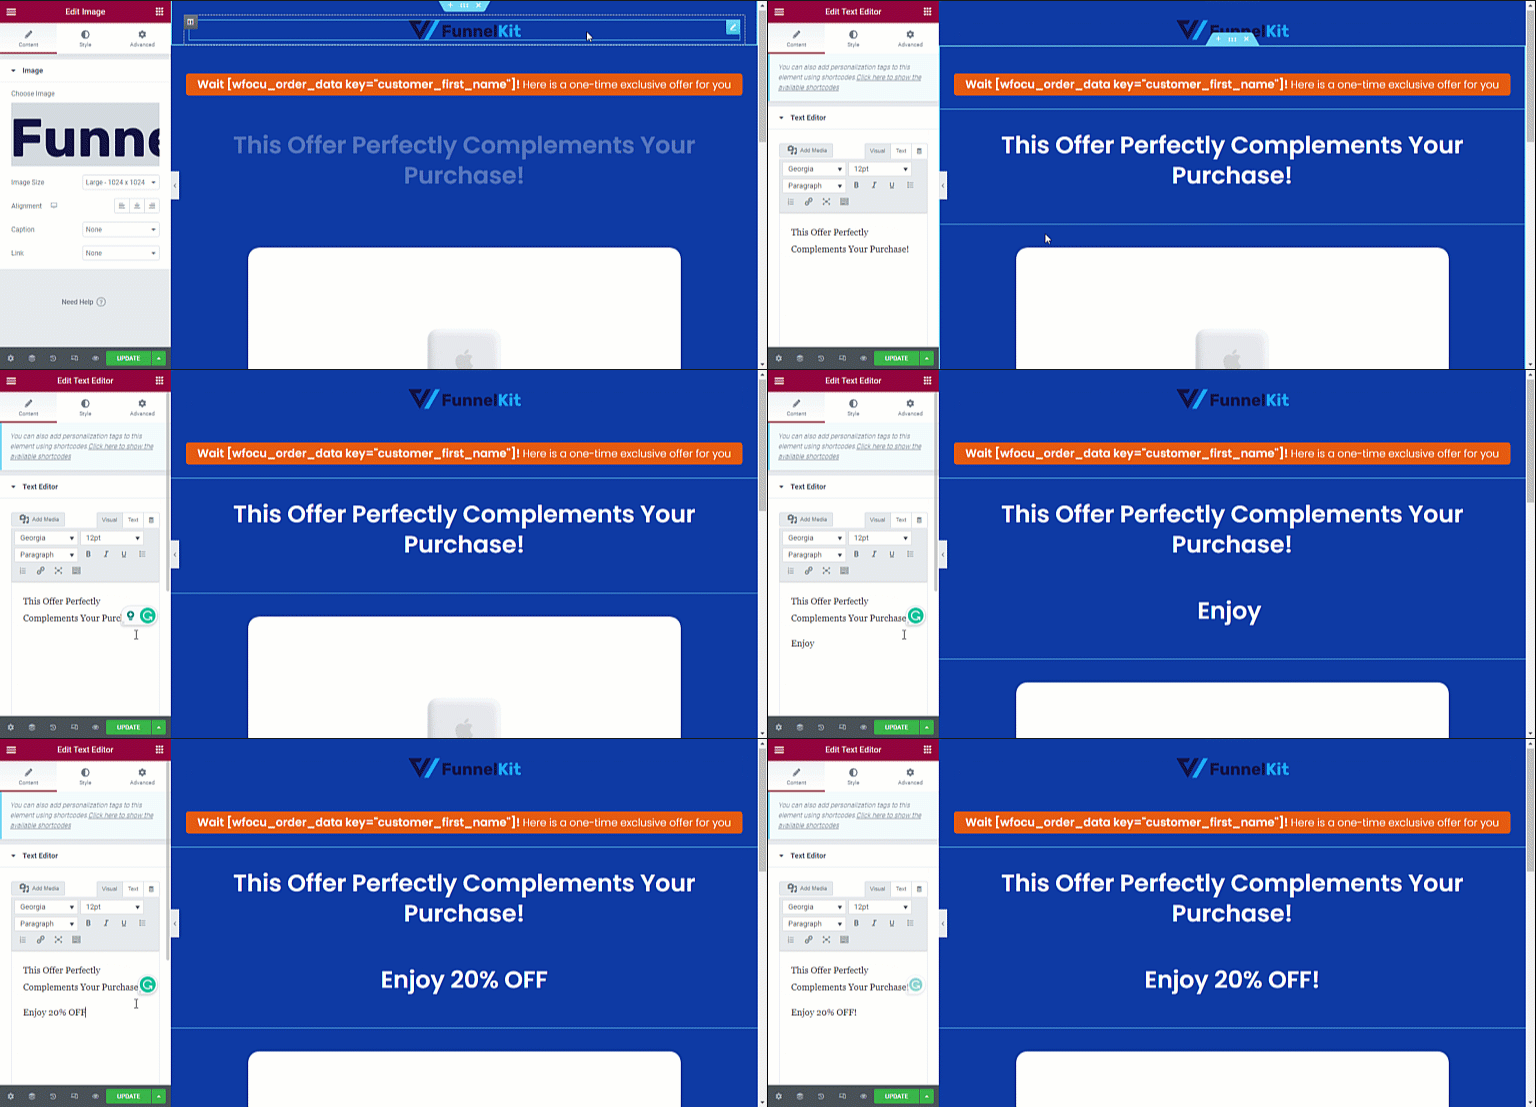
After making all the changes, click on Update to save.
Step 2: Add the upsell offer
Now make sure you are on the Products tab, then click on 'Add Product', and, as you did on the checkout page, add the product to the upsell.
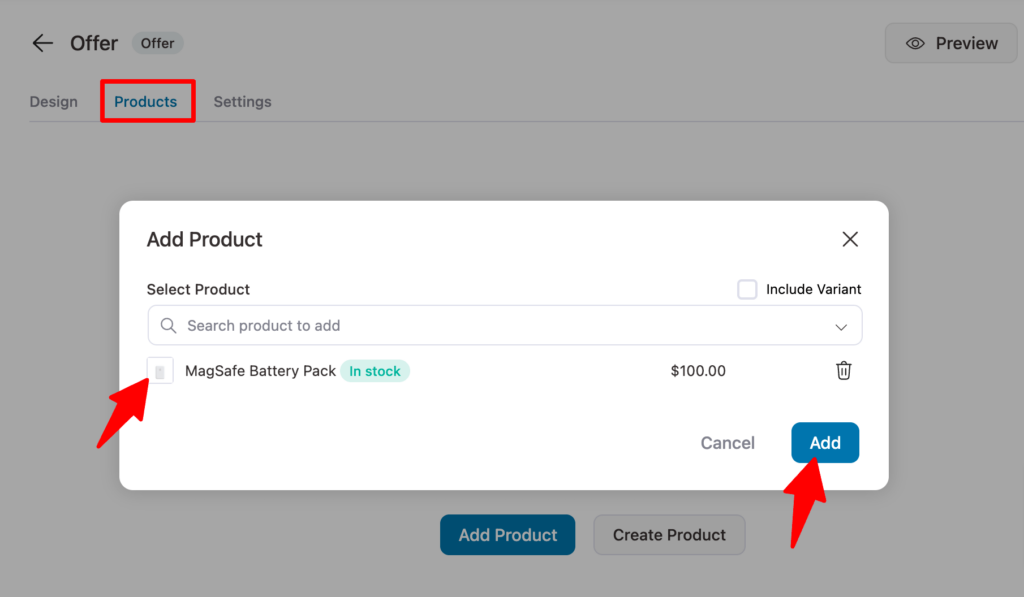
If you want, you can offer a discount on your upsell products.
Here, we’re configuring a 20% discount to make our upsell offer attractive. You can also control product selection settings.
We will skip this upsell offer if users already have the item in their cart. And we will also allow users to choose the quantity of the item they want to purchase.
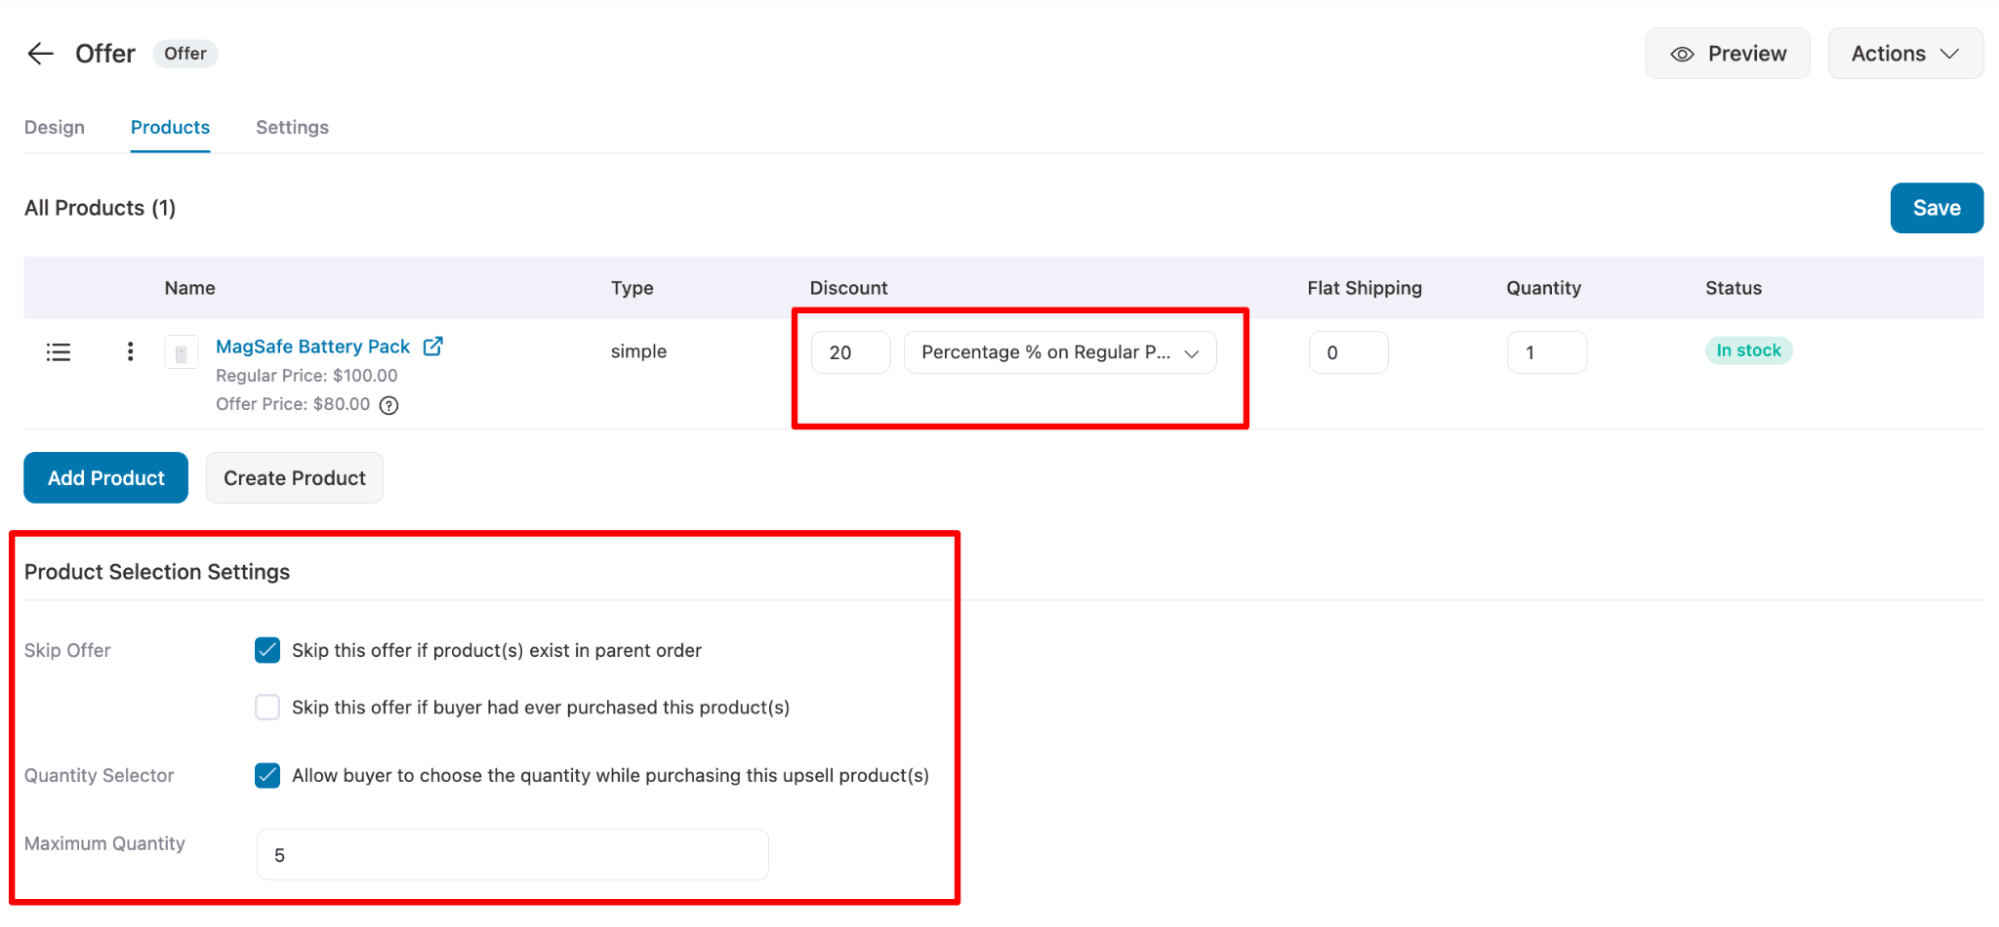
Make sure to click on “Save” to update.
Here is a preview of the Upsell offer.
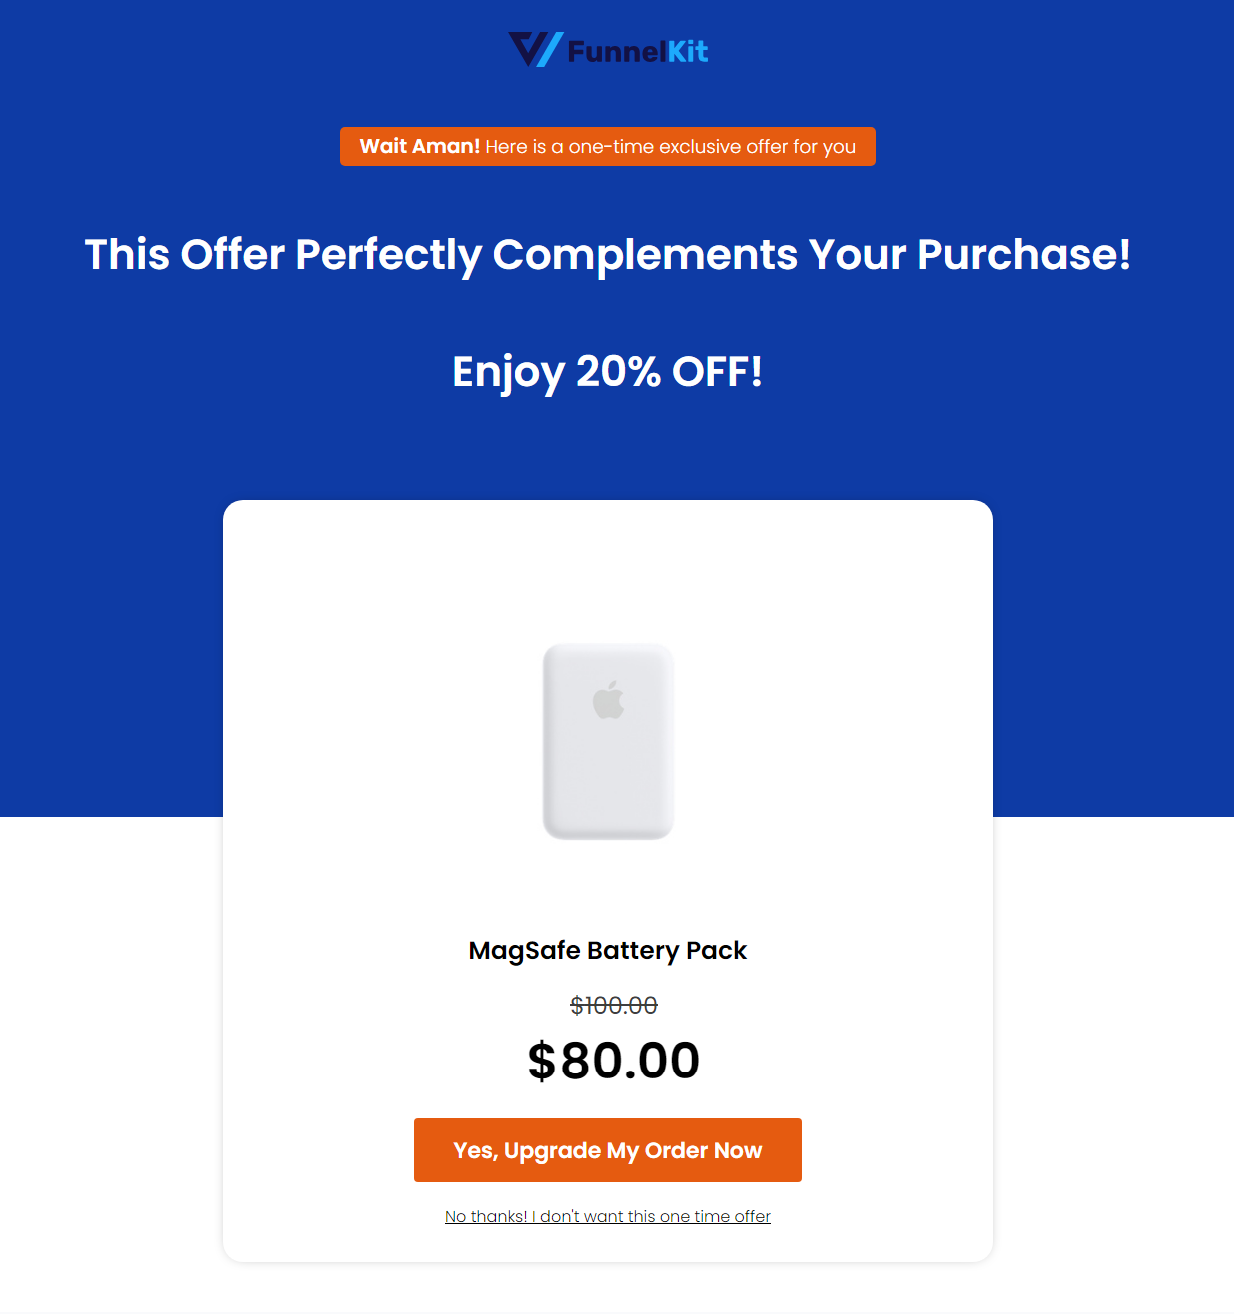
After making changes to the upsell page, you can also custom-design your order confirmation or thank-you page. For that, read our blog: Create a Woocommerce Custom Thank You Page Here
And that’s it; your sales funnel is ready with a proper upsell page and discount on the upsell.
How to Send Post-Purchase Upsell Emails in WooCommerce
We will use FunnelKit Automations to send users a post-purchase email with upsell offers. This ultimate automated email marketing tool lets you set up trigger-based email campaigns.
Let’s check how you can send emails to users after they make a purchase with relevant upsell offers:
First, you need to install and activate FunnelKit Automations, available in both free and premium versions. Make sure to activate both versions.
Step 1: Add a new automation
The first step is to create a new automation. For that, navigate to the Automations section and then click on ‘Create Automation’.
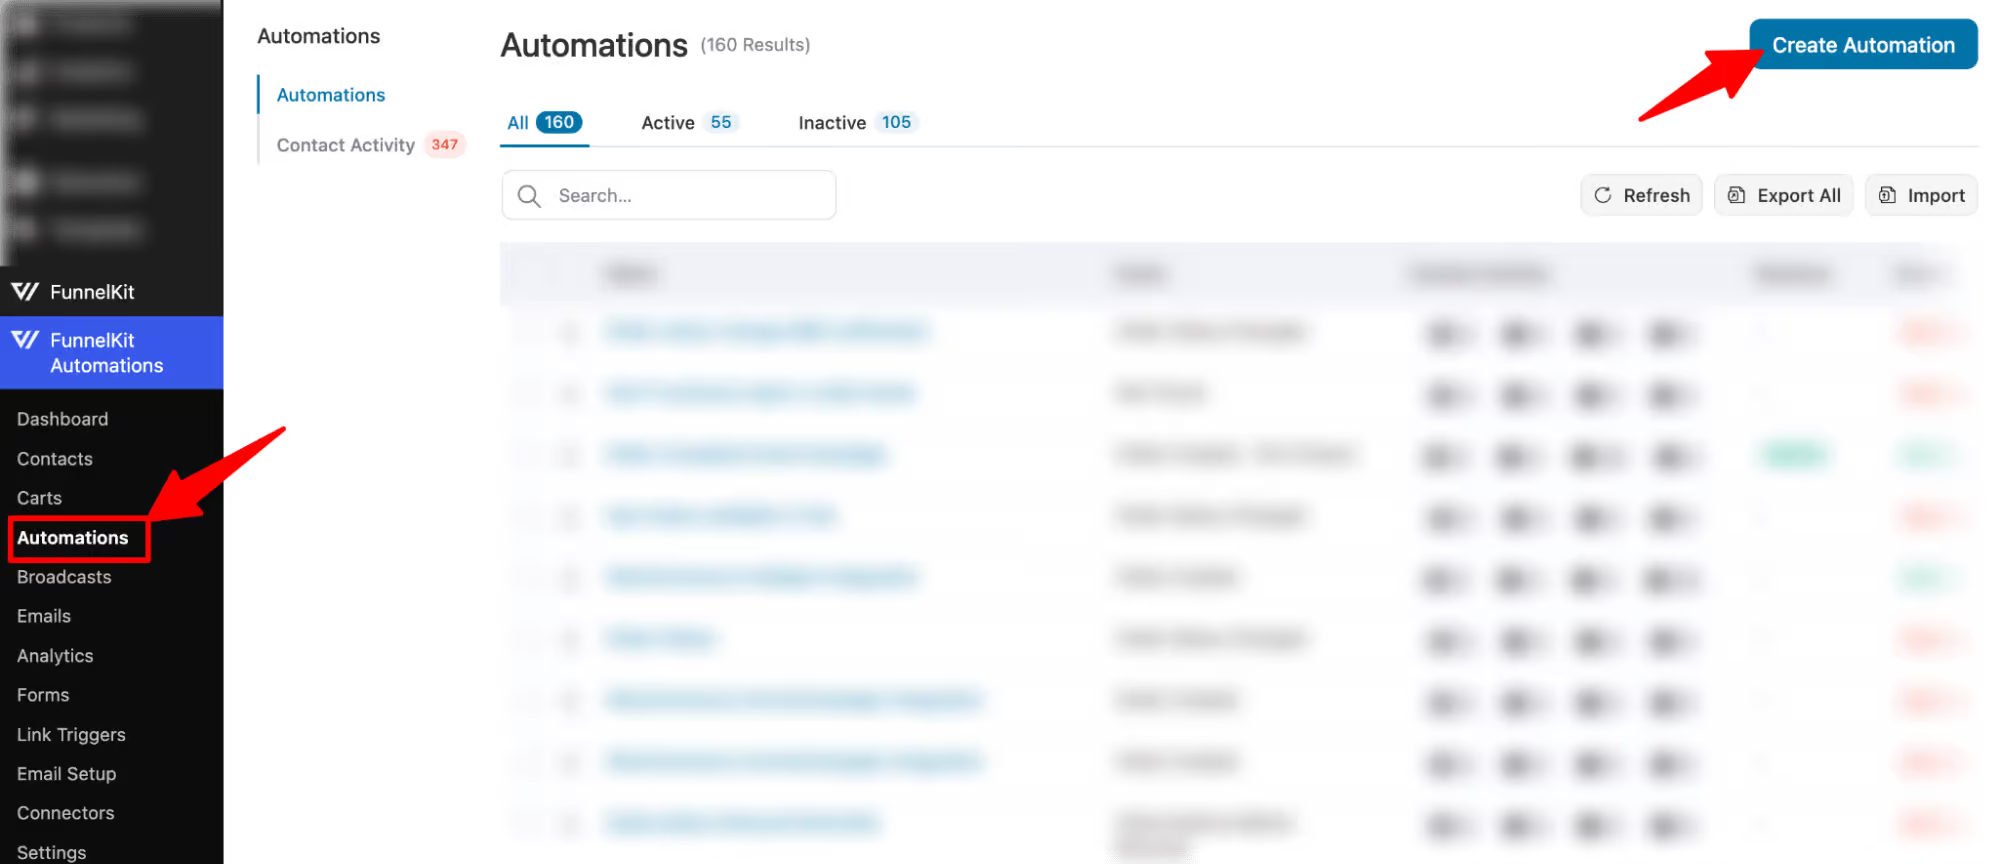
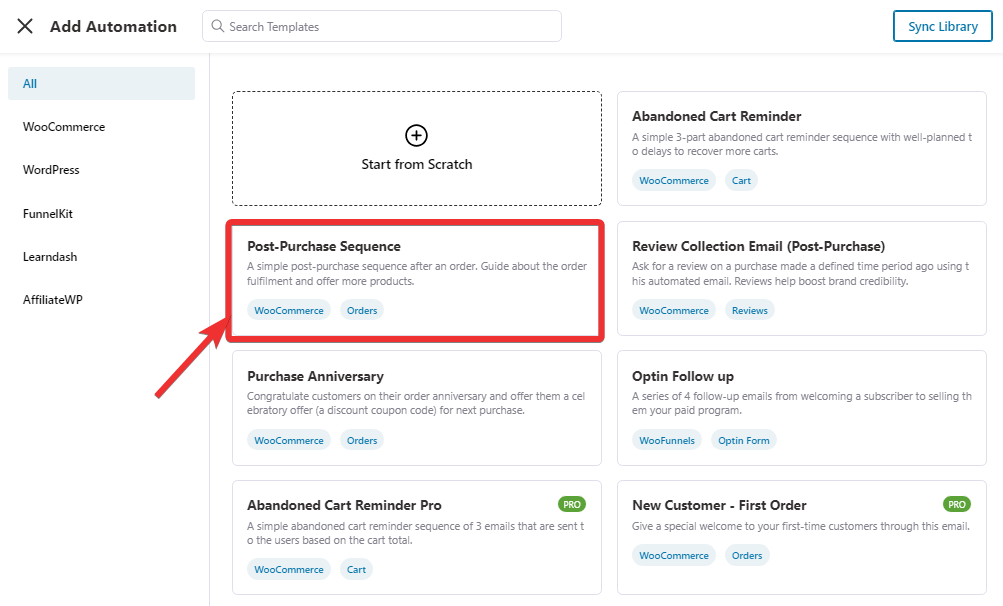
After that, click on the “Post-Purchase Sequence” pre-built recipe.
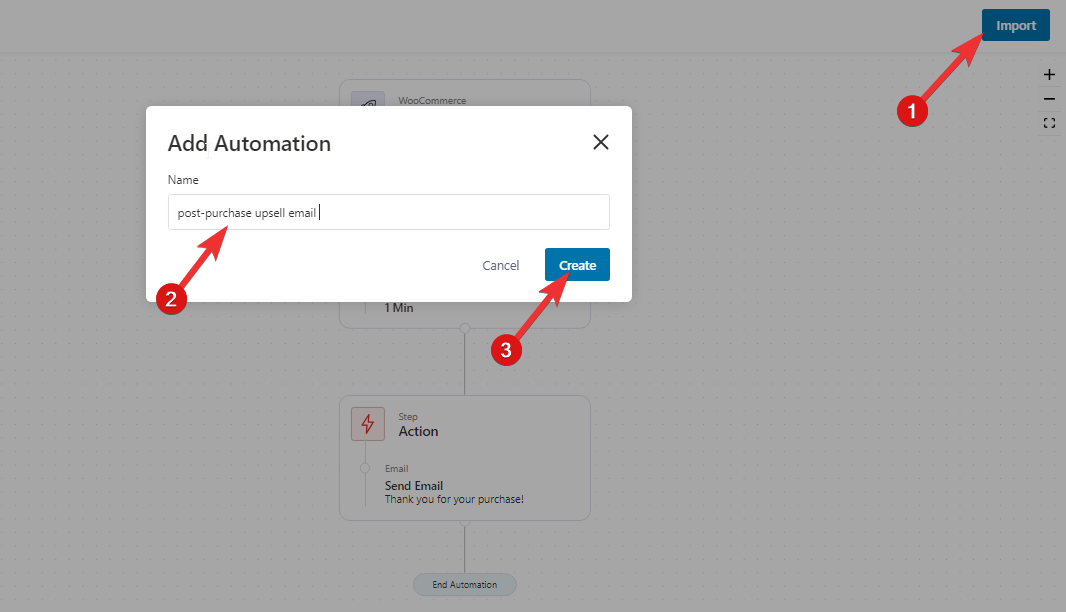
To import this template, click on " Import, " provide a name, and click Create.
This recipe will be triggered every time someone places an order and will send them a thank you email after a 1-minute delay.
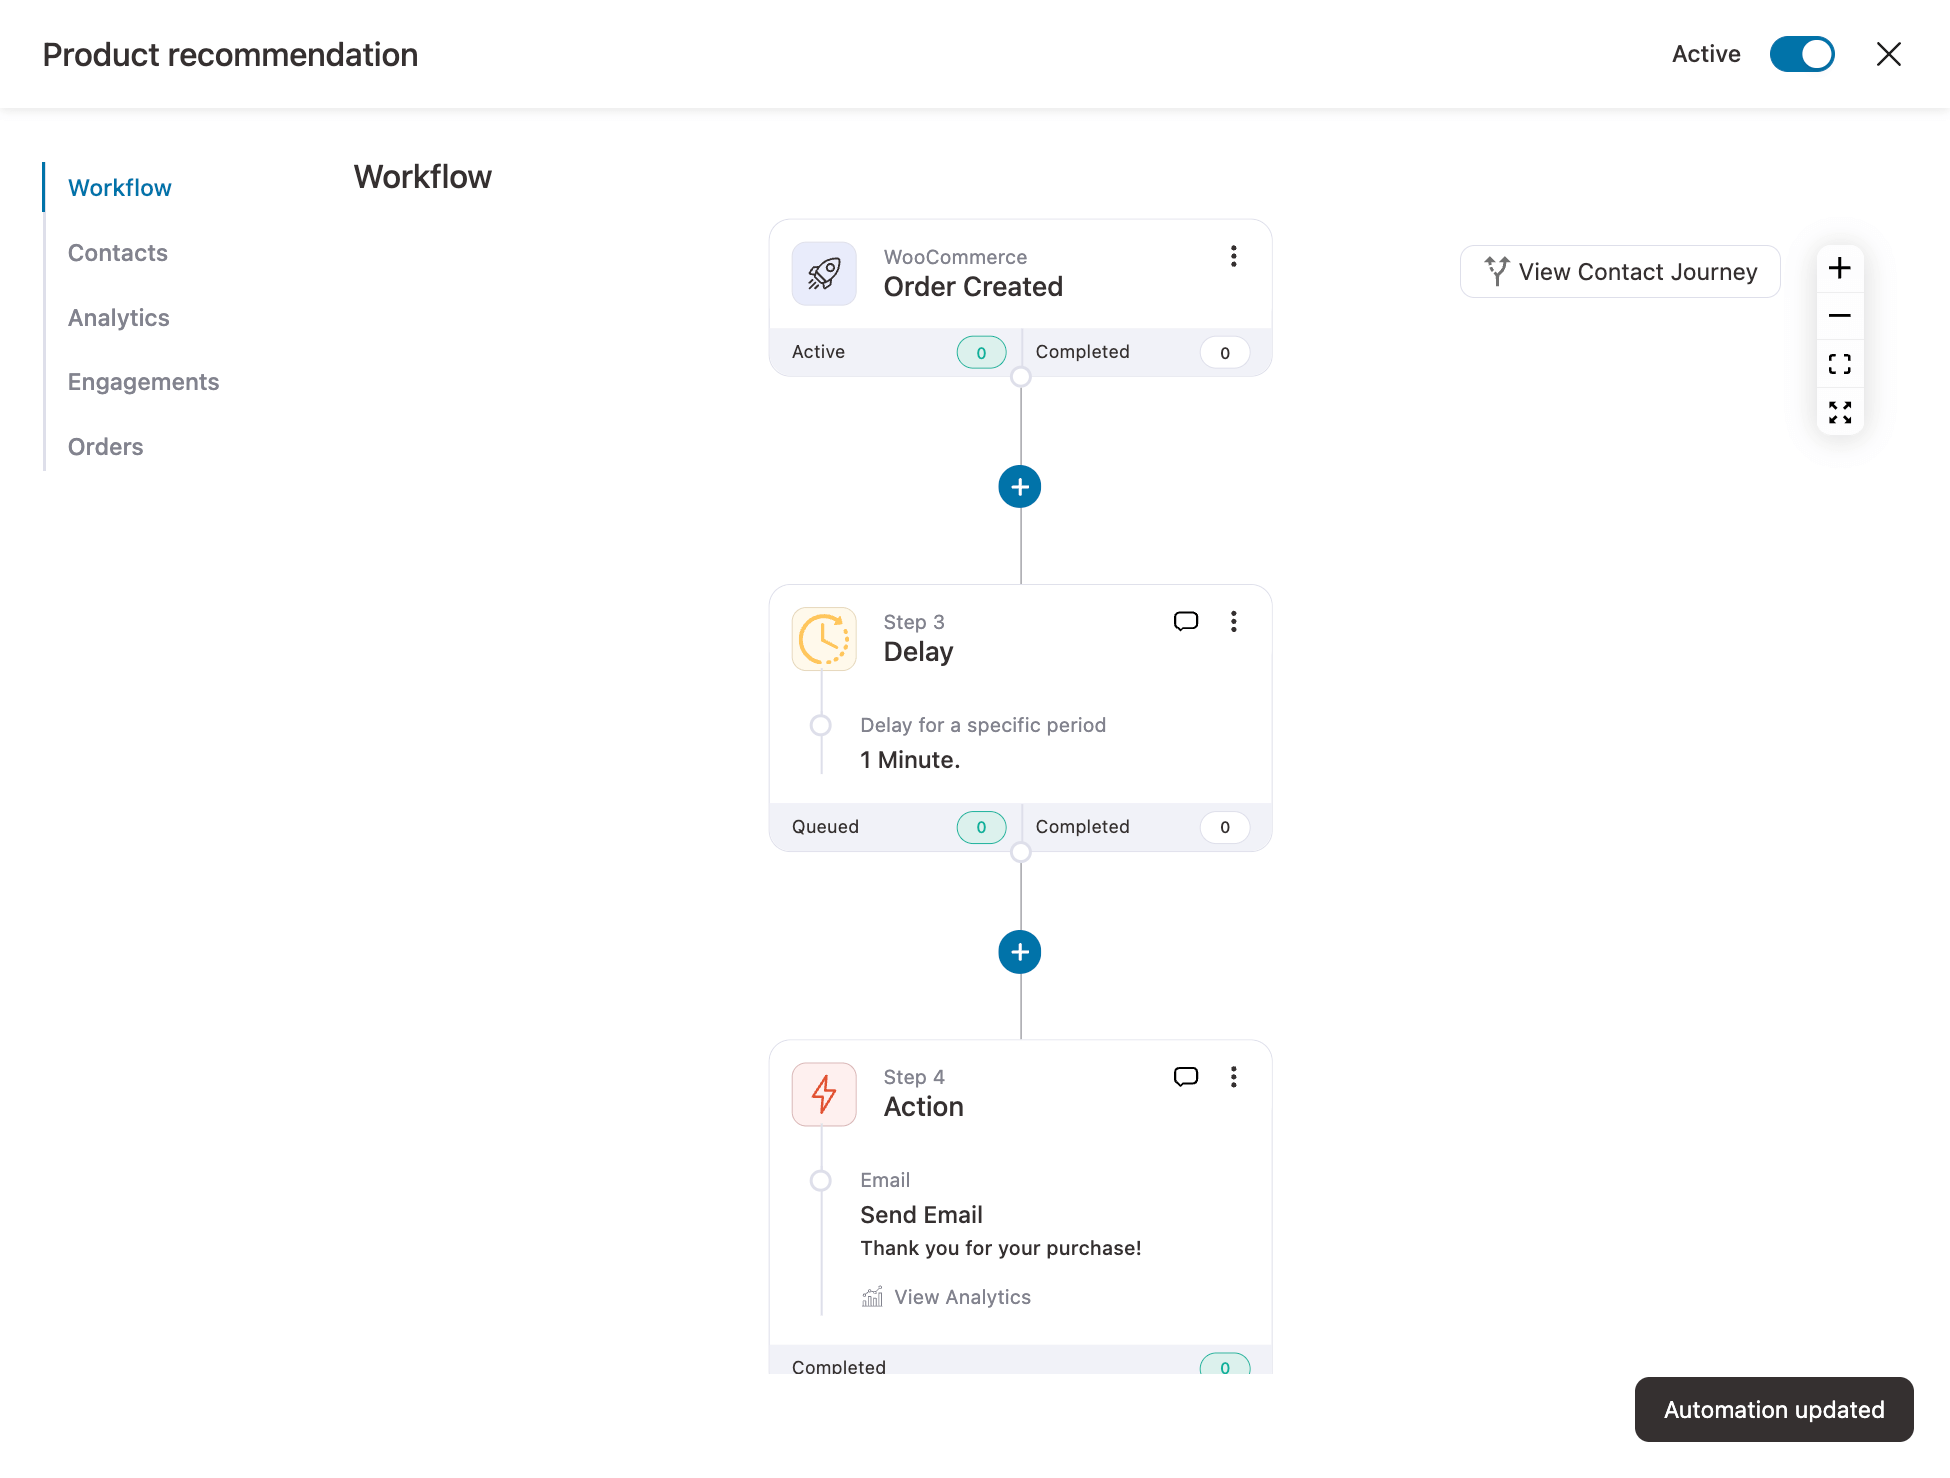
You can even upsell recommendations in your transactional emails, too.
Step 2: Customize email and add upsell offers
To customize the email, click on the step.
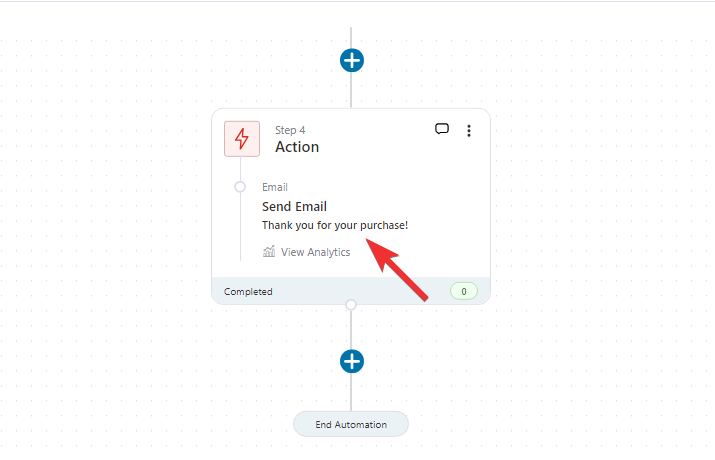
Now customize your email subject line and preview text. You can add customer information, such as the customer's first name, to personalize the experience using a merge tag.
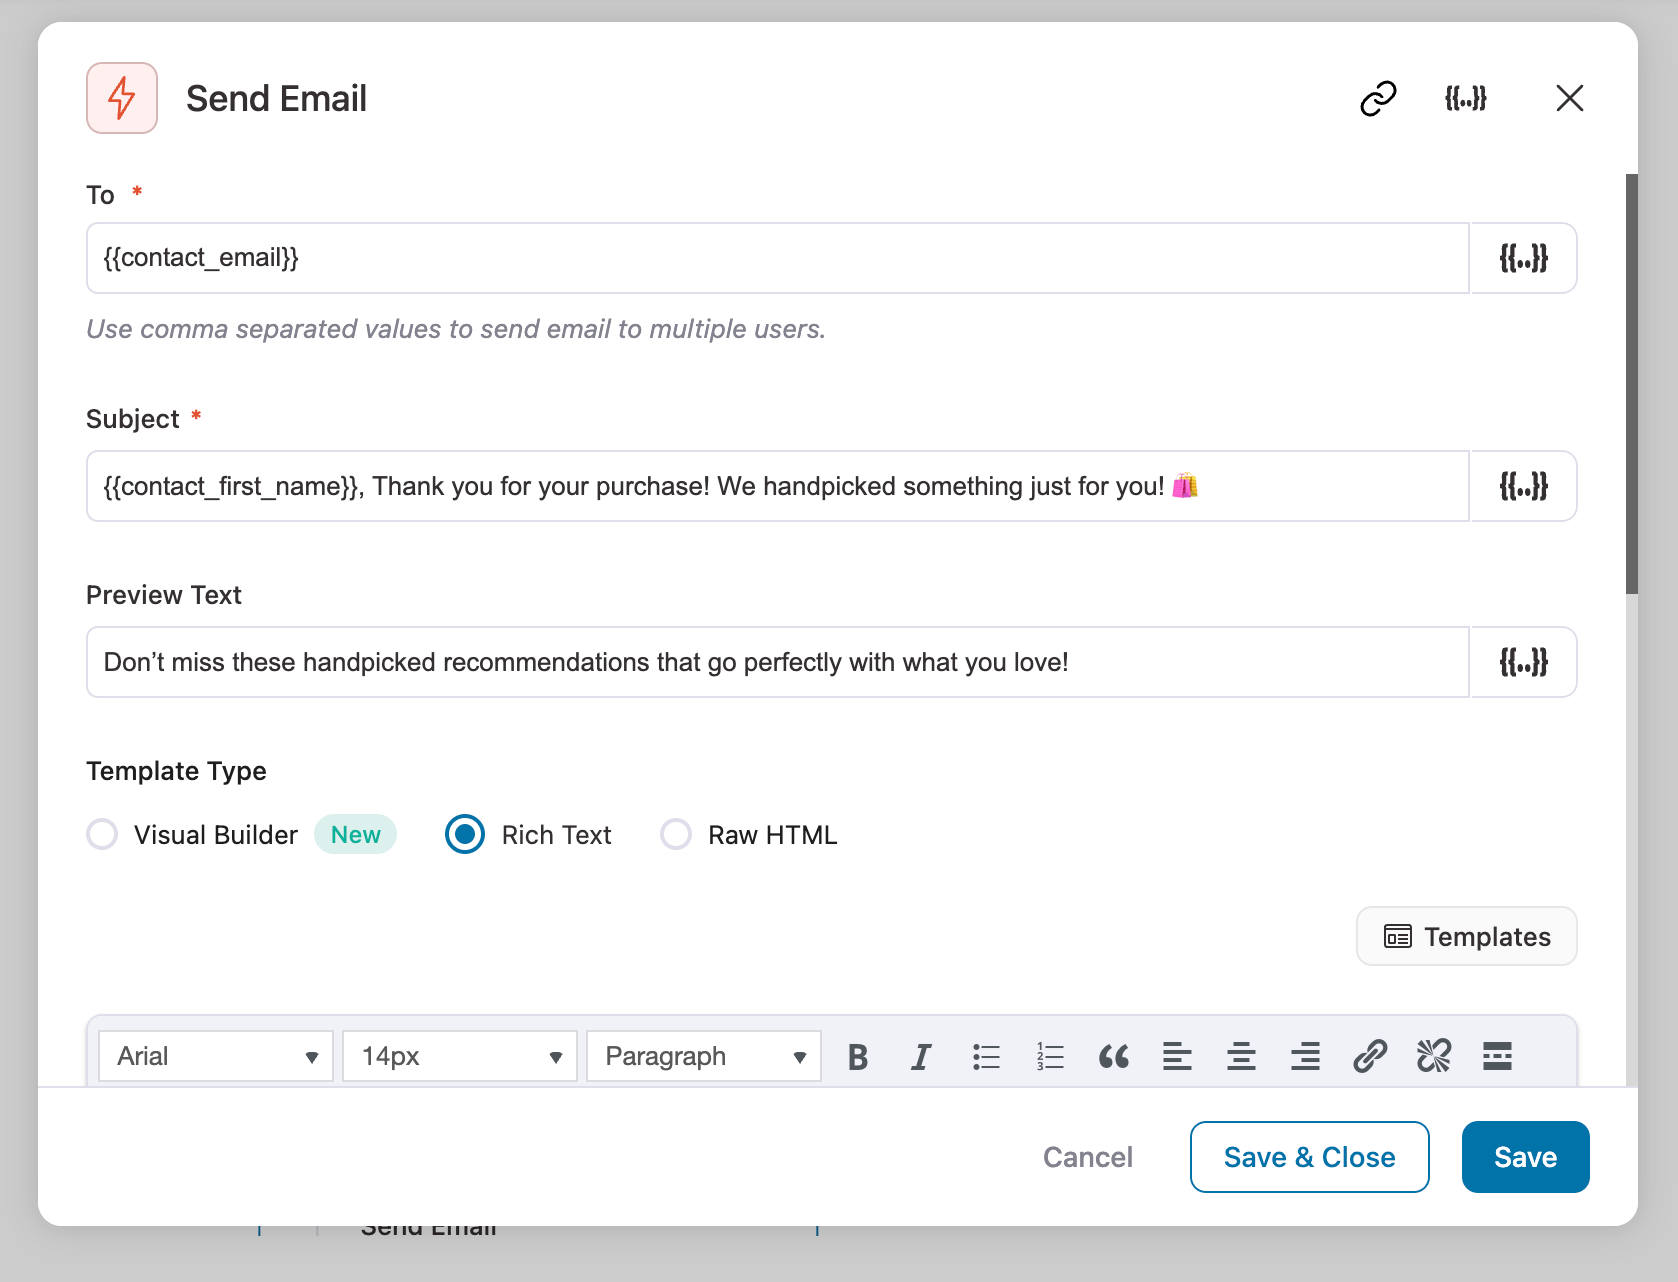
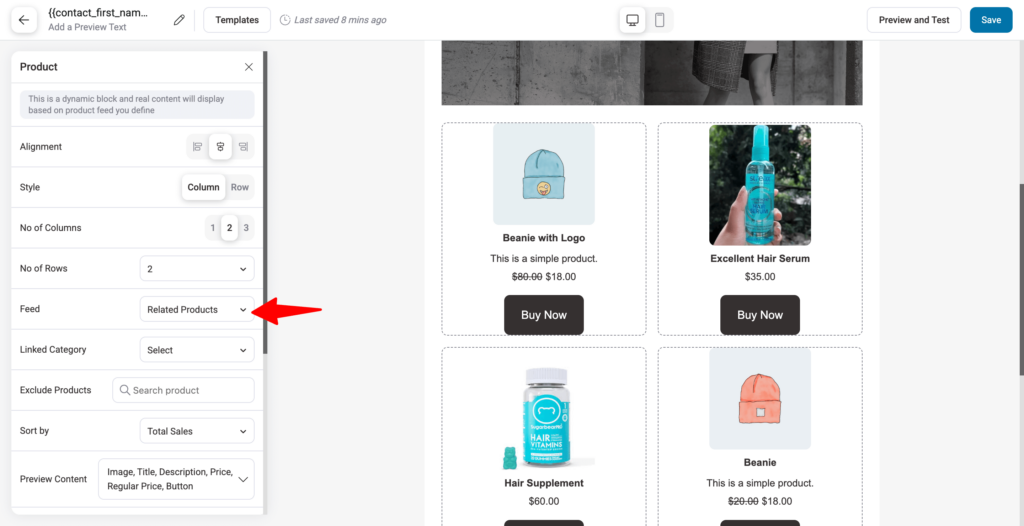
Now you can design your email with the built-in Visual Builder. It comes with many prebuilt templates.
Just import the Cross-sell products template and customize it. Use the Feed type related products to recommend upsells in your post-purchase email.
After creating your email, click on “Save & Close”.
Step 3: Activate the automation to send post-purchase to upsell recommendations
The final step is to activate the automation. For that, just turn on the toggle button in the top-right corner.
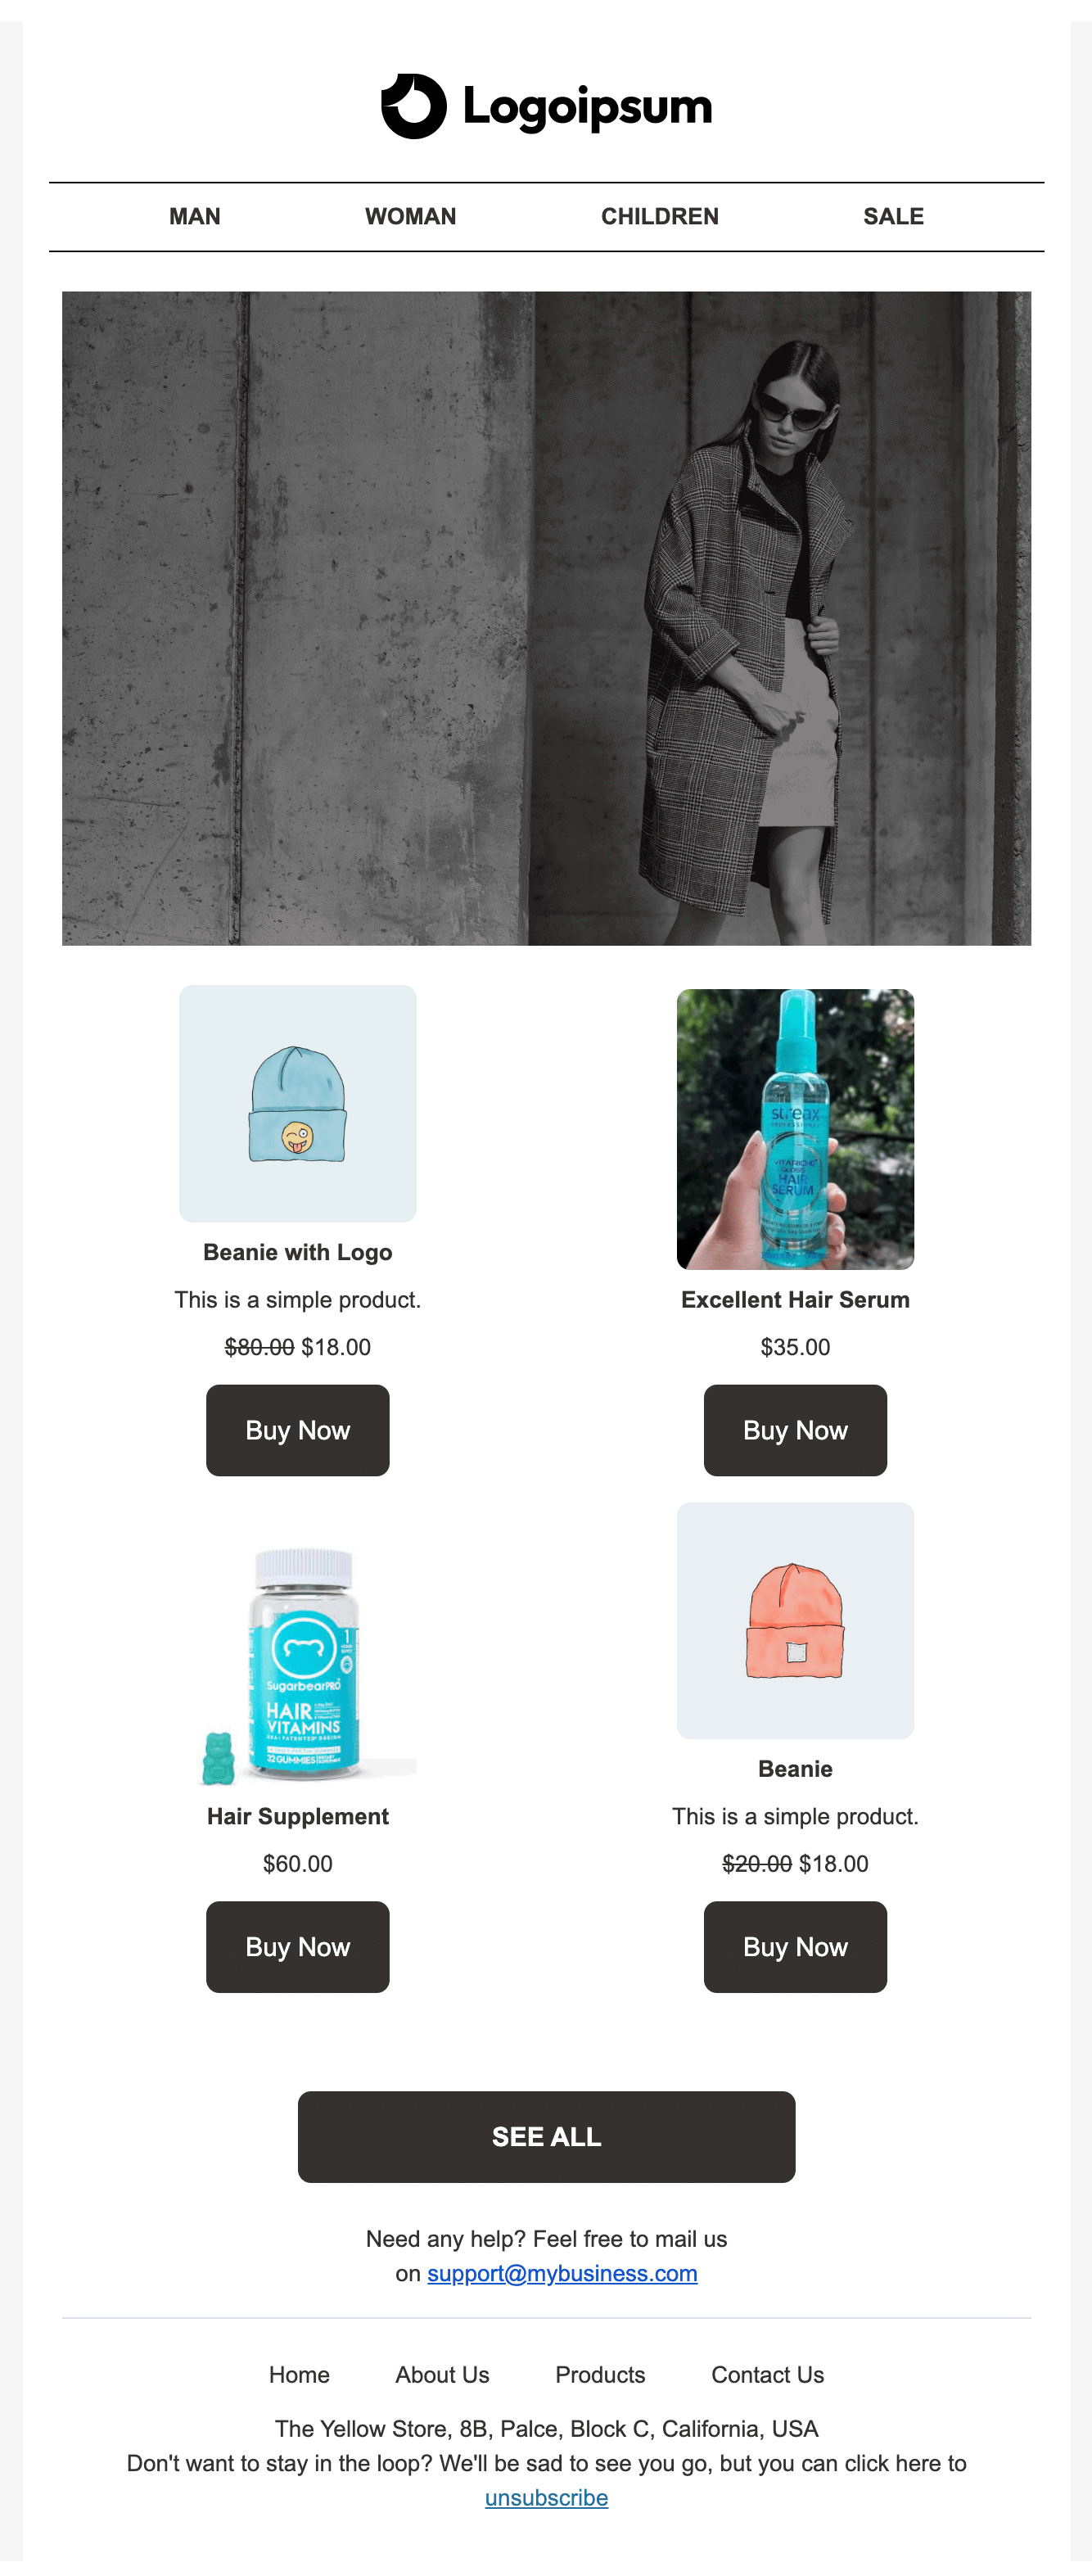
And that’s it, your automation is ready! Now, whenever someone orders from your store, they will receive an email with all the upsell product recommendations, as shown below:
Plugin Options for Each Upsell Placement
| Placement | What the plugin needs to do | Plugin |
|---|---|---|
| Side cart upsells | Replace the cart page with a sliding cart and show offers inside it | FunnelKit Cart (upsells on Plus and above) |
| Checkout order bumps | Add a one-click offer to the checkout form | FunnelKit Funnel Builder Pro |
| Exit-intent offers | Detect when a visitor is about to leave and show a popup | OptinMonster (Exit Intent on the Pro plan and above) |
| One-click post-purchase upsells | Show an offer after payment that shoppers accept with one click | FunnelKit Funnel Builder Pro |
| Post-purchase emails | Send automated emails after an order with product suggestions | FunnelKit Automations (post-purchase sequences in the free version) |
| Frequently bought together bundles | Show complementary items as a bundle on the product page | WPC Frequently Bought Together (free) |
10 Best Practices and Optimization Strategies for WooCommerce Upsells
You can set up upsell offers that seamlessly integrate with your store’s customer journey by combining best practices, advanced techniques, and ongoing optimization strategies.
1. Time your upsell offers wisely
The timing of your upsell offers is crucial. Presenting upsells at strategic locations, such as product pages, shopping carts, or the checkout, can greatly increase conversion rates.
The product page can be ideal for offering related add-ons, while the cart and checkout are best for offering complementary items or product upgrades.
2. Create compelling value propositions
Ensure your upsells have clear, attractive value propositions.
You should highlight the benefits of upgrading or adding additional products, especially for post-purchase one-click upsell offers.
3. Balance the price points
The price of your upsell offers should be closely aligned with the original product to avoid overwhelming the shopper.
Aim for low-priced products for checkout upsells, like order bumps. For product upgrades, keep the price close enough to the original that the step up feels small.
4. Develop tiered product bundles
Offer tiered product bundles as your upsell offers. This involves presenting different packages, such as basic, premium, and deluxe, where each successive tier offers more value at a slightly higher cost than the previous one.
It capitalizes on the psychological tendency to choose a higher-tier option when the added value is apparent.
5. Use conditional logic for personalized upsells
Incorporate conditional logic to present upsells tailored to your shopper’s preferences, purchase behavior, cart contents, and more.
An offer that matches what's already in the cart feels relevant instead of random.
6. Integrate upsells with subscriptions or loyalty programs
Encourage repeat business by integrating your upsells with subscription offers or loyalty programs.
For instance, offer shoppers an exclusive discount or bonus points for their next purchase if they accept the upsell. This way, you can provide long-term value beyond the current sale.
7. Set up A/B testing for upsells
Continuously test multiple upsell versions to find what works best.
Conduct A/B tests by experimenting with your upsells for different product pairings, pricing, offer copy, and visuals to see which combination drives higher conversions.
Track which variation outperforms the other and incorporate the winning strategy.
8. View key metrics
Monitor key performance indicators to assess how your upsells are performing, such as conversion rates, orders placed, average order value, and revenue generated.
FunnelKit taps into all these metrics and goes one step further to help you access order bumps and one-click upsell revenue. This way, you can measure the effectiveness of your upselling efforts and identify areas for improvement.
Additionally, it integrates with Google Analytics to provide you with detailed, real-time insights and page-by-page conversion data.
9. Track conversions from social media ads
Take advantage of WooCommerce upselling plugins like FunnelKit’s pixel tracking feature to get detailed reports on customer activities on your website after they click on social media ads, conversion paths, and the step-by-step funnel metrics.
You can track conversions from various social media ads such as Facebook, Google Ads, Pinterest, TikTok, Snapchat, and more.
10. Leverage social proof
Boost the credibility of your upsells by including product ratings, customer reviews, or testimonials for the upsell products to build trust and demonstrate their value.
This helps reassure shoppers that other customers have benefited from the upsell and that they should go for it without second-guessing.
By following these practices, you'll adhere to a crucial checklist for launching a successful WooCommerce upsell campaign.
Frequently Asked Questions (FAQs)
Upselling and cross-selling are both proven strategies to increase your WooCommerce store’s revenue, but they work in slightly different ways. Upselling encourages customers to purchase a higher-end or more expensive version of the product they’re already interested in. For instance, if someone is buying an iPhone with 128GB storage, you can upsell them to the 256GB model by highlighting the added value. The goal is to increase the average order value (AOV) by guiding customers toward a better version of what they already want.
On the other hand, cross-selling focuses on recommending complementary or related products that enhance the main purchase. For example, if a shopper adds an iPhone to their cart, you could suggest a protective case or a wireless charger. The idea is to help customers complete their experience while increasing the cart value with relevant add-ons.
- Boosts average order value: Turn every sale into a higher-value transaction.
- Improves customer experience: Help shoppers discover products that enhance what they already love.
- Builds brand loyalty: Smart, relevant upsells show you understand your customers’ needs.
- Enables personalization: Tailor upsell offers by purchase history, cart contents, or behavior.
- Increases lifetime value: Encourage customers to move toward premium products and repeat purchases.
- Promotes product discovery: Surface hidden gems from your catalog.
- Leverages buying intent: Upsell during checkout or post-purchase when customers are most ready to buy.
In short, WooCommerce upsells help you increase revenue, making every purchase more valuable for both you and your customer.
You can remove upsells from WooCommerce by deleting the items specified in the Linked Products section for each product. For order bumps and one-click upsells in FunnelKit, you can simply remove the product from them or delete the step. If you’ve assigned an automated upsell email, you can deactivate the automation to turn off or remove upsells in emails.
Here are some situations where you should not upsell or cross-sell:
1. If a shopper is not completely committed to the initial purchase, upselling or cross-selling may overwhelm them.
2. If the upsell or cross-sell items are not directly related or complementary to the main product, it could confuse the shoppers rather than help them.
3. Avoid upselling when a shopper has already decided to purchase a premium or high-ticket item.
Upselling and downselling work in tandem. If a customer rejects an upsell, you can offer a downsell at a lower price if they are not committing to buy a higher-end product. Check out our detailed article on downselling here.
Successful upselling is rooted in consumer psychology. There are two key principles that make it work:
- Decoy Effect: When you add a mid-range product between basic and premium options, the premium one suddenly looks like a better deal.
- Anchoring: By showing a higher-priced product first, you make other items seem more affordable, subtly nudging buyers to upgrade.
These psychological triggers guide customers toward better value choices without any pressure or marketing gimmicks.
Start With Native Upsells, Then Add One Placement at a Time
Start small. Open your best-selling products, add one clear upgrade to each in the Linked Products tab, and give it a few weeks before judging the results.
Once those are running, pick one plugin-based spot to add next.
Checkout and the page right after payment are good candidates, because the shopper has already decided to buy and adding one more item at that moment usually takes a single click instead of another trip back through the cart.
Why only one at a time? If your average order value changes, you'll know which placement caused it.
On the plugin side, FunnelKit splits the work across three tools. Order bumps and one-click upsells live in Funnel Builder. Side cart upsells come with FunnelKit Cart on the Plus plan and above, and post-purchase emails run through FunnelKit Automations.
Editorial Team
September 30, 2026WooCommerce makes it pretty simple to create and sell digital products like eBooks, software, and online courses etc from a single WordPress store. You don't need anything complex to get...
Editorial Team
September 23, 2026A tripwire funnel is one of the most powerful tools in digital marketing, and also one of the most misunderstood. In our experience helping thousands of WordPress businesses build sales...
Editorial Team
September 9, 2026Order Bump v/s One Click Upsell: Which one to choose? We got this question from a handful of our customers: "What's the difference between a one-click upsell and an order...






