


WooCommerce one-page checkout sounds like one thing, but it can mean four different things.
One tool puts products and payment on the same page. Another skips the cart. Another lets returning customers pay with a saved card. They target the same search, but they solve different problems.
That’s why most guides end up being plugin tutorials.
We’re taking a different approach: start with what you actually need, then choose the tool that fits.
But mind you, picking the wrong one can mean weeks of setup before you realize you need to rebuild the checkout.
If you’re wondering why bother with single-page checkouts, it’s because the default WooCommerce flow adds friction.
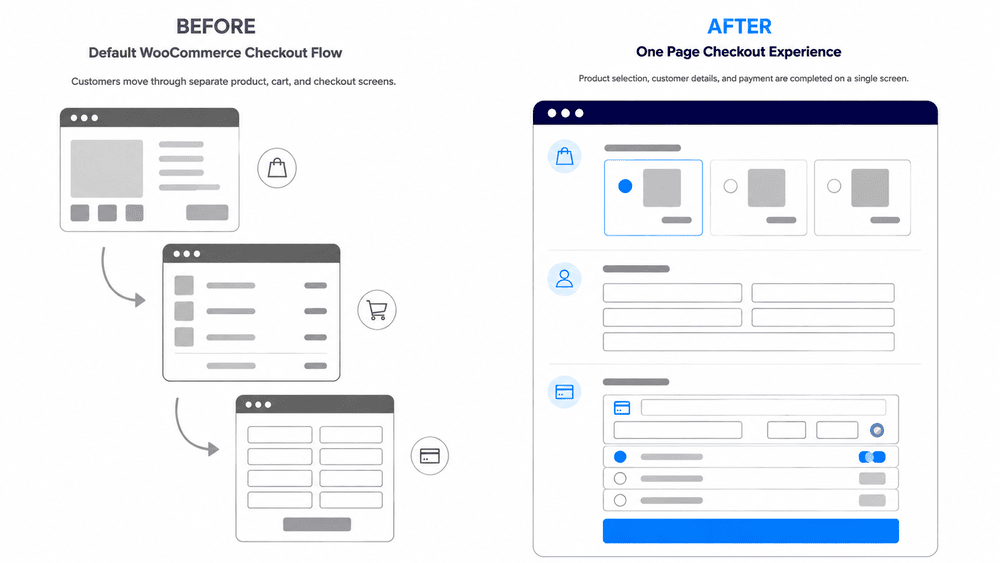
Customers have to move from product → cart → checkout, with multiple page loads and redirects, and fill out around 23-24 form fields.
Baymard puts average cart abandonment at around 70%, with 18% of shoppers abandoning because checkout feels too long or complicated.
That’s where a better checkout can help. That’s why we tested six one-page checkout tools on live WooCommerce stores using the same four scenarios: a variable product, a coupon, a subscription, and a real card payment from a phone.
Because getting the checkout live is only half the job. The real question is whether it works for how you sell.
Head straight to the following sections:
🎥 Watch this quick tutorial to get started:
Table of Contents
- 1 What is One Page Checkout?
- 2 Best WooCommerce One Page Checkout Plugins Compared
- 3 Pick Your Route Before You Build
- 4 Method 1: Build a WooCommerce One Page Checkout With Elementor and FunnelKit (No Code)
- 5 Method 2: Use the Official WooCommerce Extension
- 6 One-Page vs Multi-Step Checkout: Which Converts Better?
- 7 7 Ways to Lift Conversions On a One-Screen Checkout
- 8 Why Isn't Your One-Page Checkout Working? Here's How to Fix It
- 9 Frequently Asked Questions (FAQs)
- 10 Start Reducing Drop-Offs With a WooCommerce One Page Checkout!
What is One Page Checkout?
A one page checkout is a single-page layout that combines product selection, customer details, billing, shipping, and payment into one screen.
Instead of sending shoppers through Product → Cart → Checkout → Order Received, it brings the buying process together on one page.
Here, shoppers can easily add or adjust products and pay without even loading a new page.
That matters because every extra step gives a distracted buyer another chance to leave.
A one-page checkout removes those distractions and frees up space beside your buy button for what actually closes a sale, such as testimonials, trust symbols, and a visible guarantee.
That’s the basic idea. The confusion starts with the terminology.
One-page vs. one-click vs. direct checkout
Plugin listings, forums, and even competing guides often use these terms interchangeably. But they shouldn’t.
Each one removes a different piece of friction, and choosing the wrong approach can leave you rebuilding the checkout later.
| Terminology | What it does | Who it helps | Cart page? | Typical use |
|---|---|---|---|---|
| One-page checkout | Puts product selection and the checkout form on the same screen | First-time buyers on a landing page or single-offer store | Removed | Landing pages, single offers, small catalogs, or related items |
| One-click checkout | Completes a purchase from a saved card or wallet in a single tap | Returning, logged-in buyers, and wallet users | Kept | Repeat purchases and post-purchase upsells |
| Direct checkout | Sends Add to Cart straight to the checkout page | Stores whose only real friction is the cart page | Skipped | Single-product stores |
The easiest way to choose is to look at where your buyers are dropping off.
If first-time visitors are bouncing between the product page and payment form, a one-page checkout makes more sense.
If returning customers are tired of filling out the same details again, look at express or one-click payment. Our guide to WooCommerce one-click checkout covers that approach.
Moreover, if the cart page is the only thing slowing people down, a direct checkout may be all you need. See our direct checkout guide.
Please note that many stores use a combination of these. For example, a one-page checkout for first-time buyers and one-click payments for returning customers.
Best WooCommerce One Page Checkout Plugins Compared
Here’s a quick overview of the best single-page checkout plugins we shortlisted.
| Plugin | Embed on any page | Page builder support | A/B testing | Upsells | Rating on WordPress.org and other sites | Starting price |
|---|---|---|---|---|---|---|
| FunnelKit | ✅ Yes | Elementor, Divi, Bricks, Oxygen, Gutenberg | ✅ Yes (Pro) | ✅ Yes (Pro) | 5/5 (1015) | Free version available. Pro starts at $99.50/year. |
| WooCommerce One Page Checkout | ✅ Yes | Limited customization | ❌ No | ❌ No | 2.3/5 (10) on WooCommerce Marketplace | $79/year. |
| One Page Quick Checkout | ✅ Yes | Built-in customization settings | ❌ No | ❌ No | 4.3/5 (9) | Free plan. Pro starts at $49/year. |
| Fluid Checkout | ❌ No (rebuilds the default checkout) | Theme-dependent | ❌ No | ❌ No | 4.9/5 (159) | Free plan available. Premium plan starts at €99/year + taxes. |
| Direct Checkout for WooCommerce | ❌ No (has cart-to-checkout shortcut) | Built-in options | ❌ No | ❌ No | 4.8/5 (408) | Free version available. Pro starts at $49/year. |
| YITH One Click Checkout | ❌ No (adds a Buy Now button) | No | ❌ No | ❌ No | 4.49/5 (85) on YITH | $69.99/year. |
We ranked these by how directly each tool solves the single-page checkout problem, not by popularity.
Ratings also come from different platforms with very different review volumes, so treat them as a signal, rather than like-for-like scores.
How we tested these plugins:
We installed each plugin on a staging WooCommerce store with a default theme, then tested it again on a live store with a page builder active.
Here’s what we checked:
- True single-page checkout: Does product selection and payment happen on the same screen, or does the plugin simply skip the cart?
- Variable products: Does switching a variation update the existing item or create a duplicate?
- AJAX updates: Do totals, shipping, and coupons update without reloading the page?
- Classic vs. block checkout: Does it work with both the shortcode checkout and WooCommerce Checkout block?
- Field control: Can you remove unnecessary shipping fields for digital products without code?
- Payment gateways: Does it work with standard WooCommerce gateways as well as gateways that add their own checkout step?
- Mobile experience: We tested on physical devices, checking for horizontal scrolling, awkward layouts, and tap target size.
We also checked pricing against each vendor’s official pricing page. If a plugin offers introductory pricing, we’ve called out the renewal price separately.
1. FunnelKit - Conversion Optimized Checkout for WooCommerce
FunnelKit replaces the default WooCommerce checkout flow with a custom checkout page that supports both one-page and multi-step layouts.
You import a template, add the products you want selectable on the page, and edit the form with a drag-and-drop field editor.
We found that setup is done through a funnel wizard rather than a settings page, so you can customize your single-page checkout the way you want.
Once a template is imported, adding products and editing fields is visual, and removing shipping fields for a digital product requires no code.
Switching between a one-time payment and a payment-plan product updates totals over AJAX without a reload.
Checkout templates are the fastest path if you don't want to design from scratch.
Pros:
- Product selection, order bumps, and the payment form render on one screen with AJAX totals, so you don't need plugin stacking for the core job.
- Drag-and-drop field editor removes shipping fields for digital products, adds custom fields, and sets conditional visibility rules.
- Optimize your checkout with express payment options and address autocomplete. Increase average order value with order bumps and one-click upsells.
- The free version on WordPress.org includes importable checkout templates, so you can test the single-page layout before paying.
Cons:
- A/B testing, multiple order bumps, and one-click upsells require the Plus plan at $179.50/yr, not the Basic tier.
- No lifetime pricing plans are available.
Pricing:
- Lite version is available on WordPress.org for free.
- Paid plans start at $99.50/year.
2. WooCommerce One Page Checkout
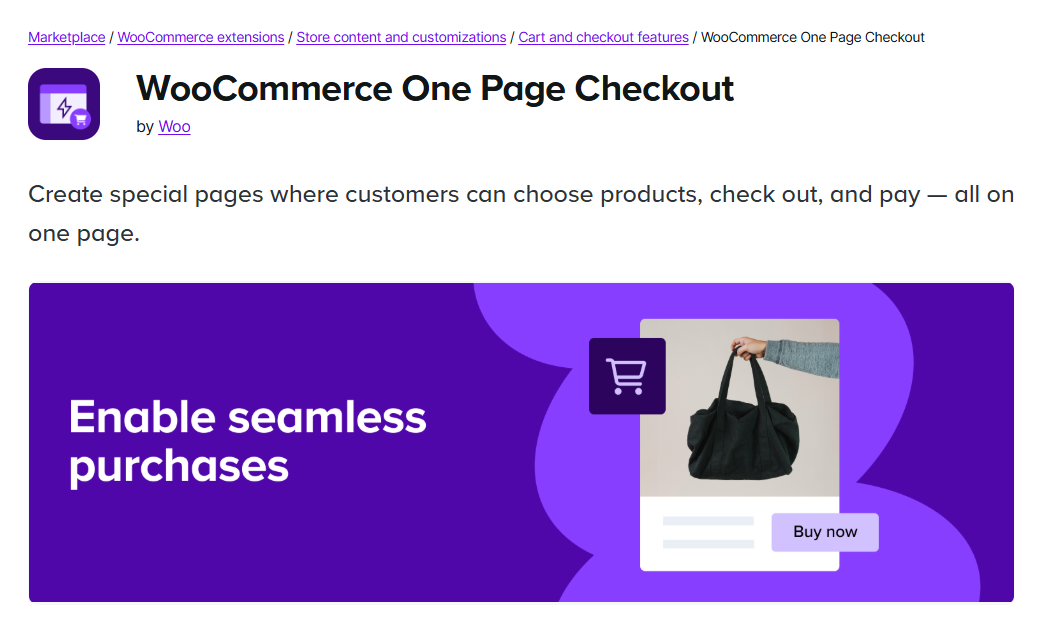
The official extension turns any page, post, or product into a checkout.
It works two ways: a checkbox on the product edit screen, or the [woocommerce_one_page_checkout] shortcode placed anywhere with product_ids and template attributes.
Plus, it also ships four product-selection templates.
You just need to install the WooCommerce One Page Checkout extension, tick a box, and the form loads under the product.
We found that there is no field editor, so removing shipping fields for digital products requires a separate plugin or code.
If you want to change the layout beyond the four bundled templates, see our guide to customizing the WooCommerce checkout page.
WooCommerce’s own docs note that the extension uses a custom product-selection template, which reduces out-of-the-box compatibility with other extensions.
Pros:
- First-party extension, so it tracks WooCommerce core releases directly.
- Shortcode attributes give precise control over which products appear and how they're laid out.
- Works on any post type, which suits promotional landing pages built outside the shop structure.
- A working checkout page (native layout) is ready within minutes of activation.
Cons:
- You can’t edit, reorder, or remove checkout fields or add custom ones. You need another plugin for that.
- The custom product-selection template reduces compatibility with other WooCommerce extensions, per the official docs, and the Product Add-On file upload field type is not supported.
- No free tier, so you cannot test the plugin before purchase.
Price:
- Costs $79/year and is available on the WooCommerce Marketplace.
3. One Page Quick Checkout for WooCommerce
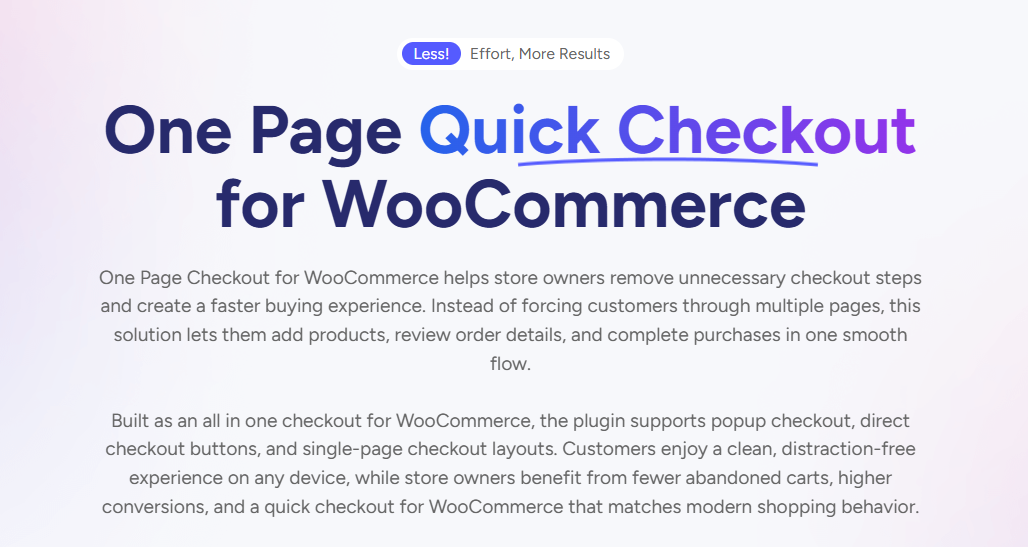
This checkout plugin places a basic single-page order form on any page with a shortcode.
Product selection sits above the checkout form, totals update over AJAX, and the purchase completes. It also bundles a popup checkout and a slide-out cart drawer.
We feel like the styling is the only thing you get here, but even then, it’s basic. To match your brand colors, you’ll need CSS.
There’s no field editor or page builder support, so the page will look like a plugin rather than your store.
Pros:
- Free tier delivers a functional single-page checkout.
- Bundles popup, direct, and one-page modes in one settings screen.
- Quick view with variation selection cuts clicks before checkout loads.
- Built-in customization settings mean no page builder dependency.
Cons:
- Styling is limited to built-in settings, so matching a custom brand system takes CSS
- No order bumps, upsells, or A/B testing
Pricing:
- Free plan available on WordPress.org
- Pro tier starts at $49/year for a single site.
4. Fluid Checkout
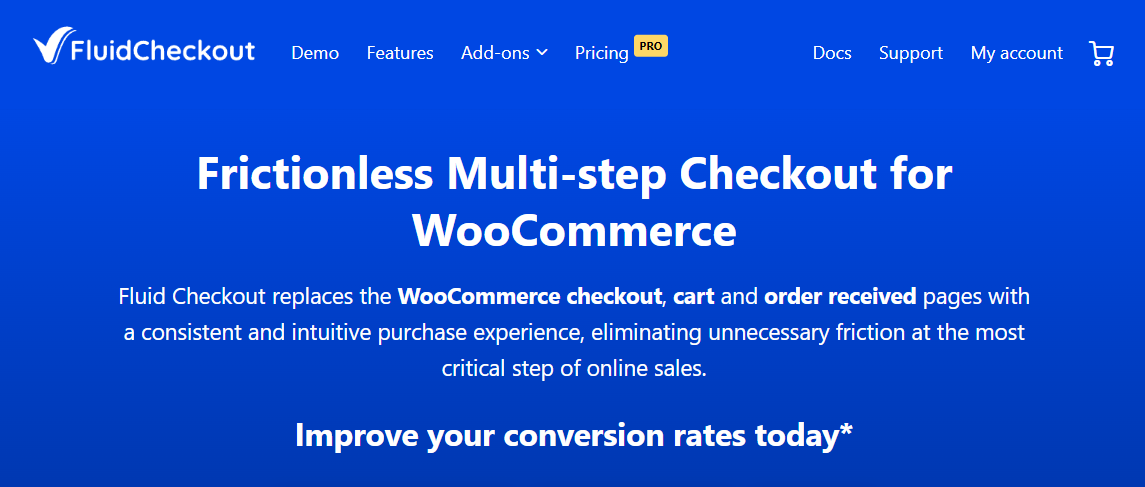
Fluid Checkout does not embed a checkout on other pages. It rebuilds the existing WooCommerce checkout into a streamlined, mobile-first layout with a sticky order summary.
If the cart page is the only thing in your way, this solves it without touching a page builder.
You can improve your checkout in an afternoon with no design work.
The sticky panel it uses is the pattern we cover in our WooCommerce order summary guide.
Because it rebuilds the theme’s checkout template rather than rendering independently, appearance depends more on the theme than on builder-based tools.
Pros:
- No page builder or funnel structure required.
- Sticky order summary keeps totals visible on long mobile forms.
- Runs on the existing checkout URL, so analytics and ad tracking need no remapping.
- A free version is available.
Cons:
- Cannot embed product selection on a landing page, so it does not solve the single-page job as most searchers define it.
- Rendering depends on the active theme’s checkout template, so heavily customized themes need testing.
- No order bumps or upsells, so average order value work needs a second plugin.
Pricing:
- Free version on WordPress.org.
- Pro starts at €99/year + taxes.
5. Direct Checkout for WooCommerce
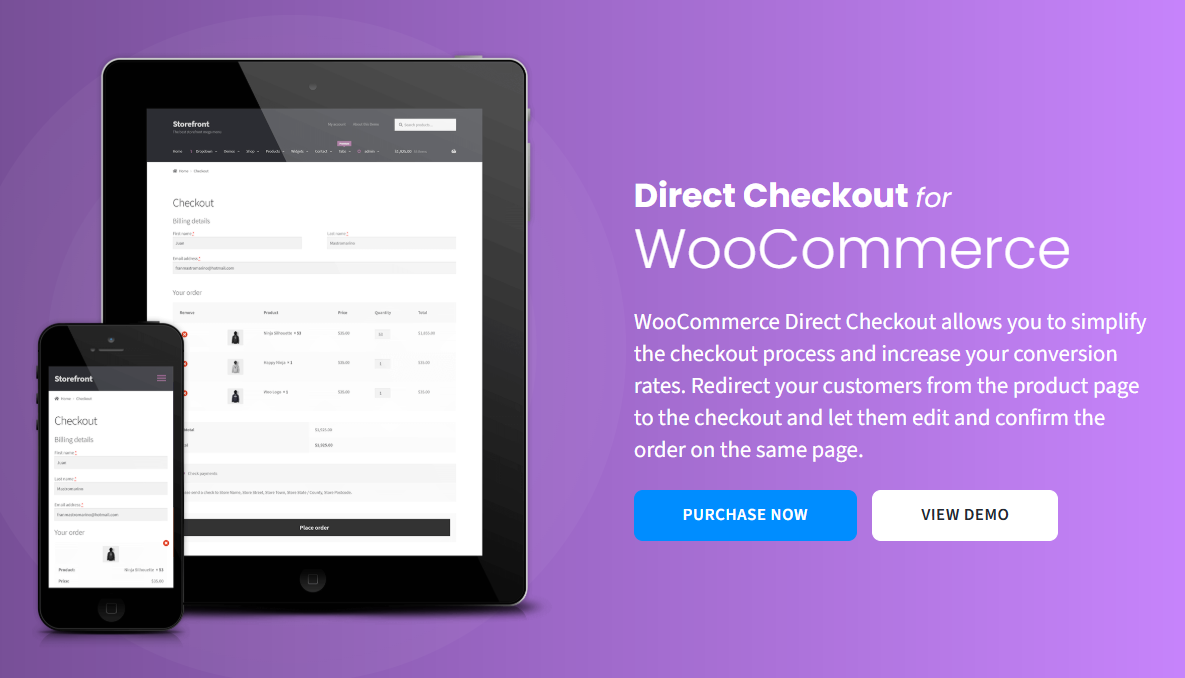
Direct Checkout by QuadLayers shortens the path to purchase rather than embedding a checkout elsewhere.
It replaces Add to Cart with a Buy Now button, redirects straight to checkout, and strips unnecessary fields.
We found it's a cart-skipping tool, not a true one-page checkout.
For a single-product store, that is often enough, and it is the least invasive option here because it leaves the checkout template alone.
Pros:
- Large free tier with the core cart-skip and field-removal features included.
- Leaves the checkout template untouched, so theme conflicts are rare.
- Field removal is toggled from a settings screen with no code.
- Works alongside a separate checkout design plugin without overlap.
Cons:
- Does not put product selection and payment on one screen, so it is not a true single-page checkout.
- Layout customization is limited to the plugin’s own options rather than a visual editor.
- No order bumps or upsells.
Pricing:
- A free version is available on WordPress.org.
- Premium plans cost $49/year.
6. YITH One-Click Checkout
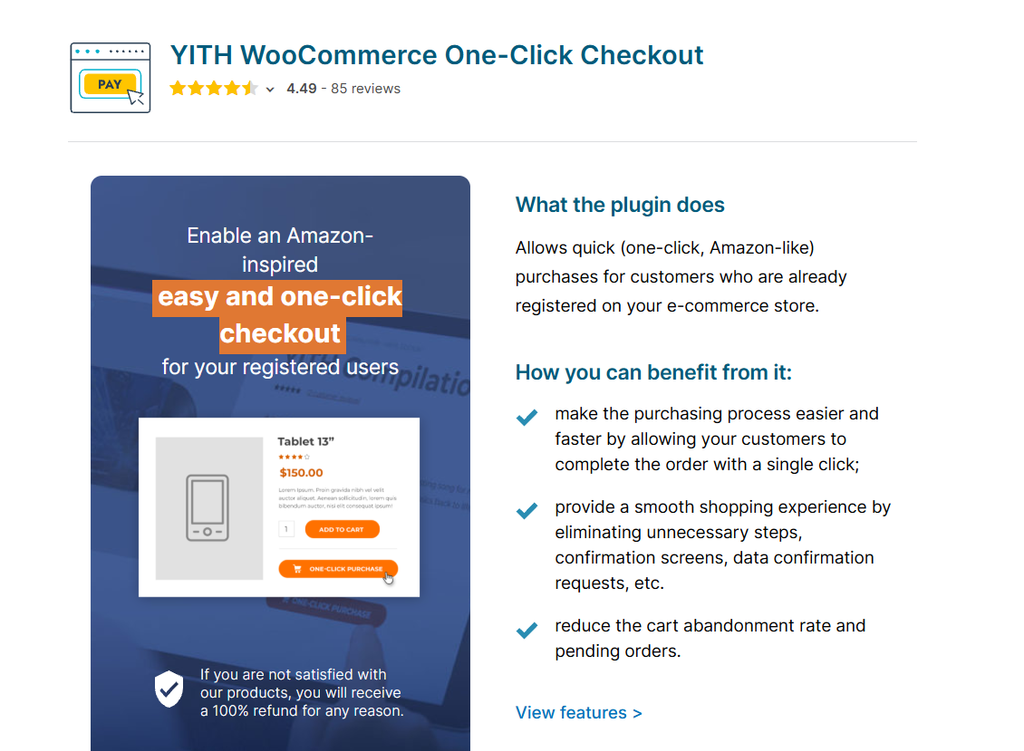
This plugin is not a true single-page checkout tool. It adds an Amazon-style buy button for customers who have already ordered once and have their billing and shipping details on file.
It doesn't put product selection and a payment form on one screen.
It removes the form entirely for people who have already filled it in.
We found that automatically skipping both the cart and checkout requires YITH Stripe to run alongside it. So, you need to buy two licenses to get one feature.
On any other gateway, the button creates the order and then sends the customer to the payment page, which skips the cart but isn't one-click.
Guests never see it at all because nothing is saved to charge them.
Pros:
- The automatic one-click button activates once a customer saves their payment and shipping details, and they can toggle it from My Account.
- The exclusion list keeps it off products where a silent instant order would cause trouble, like anything with awkward shipping.
- An optional form above the button lets customers choose between saved addresses or add a new one, without leaving the product page
- Button placement, color, text, and the post-purchase redirect are all configurable without code.
Cons:
- True one-click needs YITH Stripe as well, so budget for two licenses rather than one.
- First-time buyers never get the benefit, since guests are redirected to checkout instead of ordering in one click.
- No free version, so you cannot test it against your own gateway setup before paying.
Pricing:
- This plugin costs $69.99/year.
Which one fits your store?
- If you want order bumps, upsells, A/B testing, and abandoned cart recovery in one stack, FunnelKit does all four.
- If you only need products and a checkout form on the same page, the official WooCommerce extension does that with a single shortcode and almost no configuration. It is the shortest path, and for many stores, it is enough.
- If you want a basic checkout with the least setup, Fluid Checkout rebuilds the checkout you already have. The free version is production-grade, and you can be live in an afternoon without touching a page builder.
- If you are already building in Elementor, Divi, or Bricks, use a funnel builder so your checkout lives within the same design workflow as the landing page. Stitching a shortcode checkout onto a builder-designed offer page usually looks like what it is.
- If your problem is repeat buyers, not new ones, go with YITH.
Best when the cart page is the only problem: A sliding cart opens as a side panel on Add to Cart, letting shoppers adjust quantities and move to checkout without a page load.
Pick Your Route Before You Build
Three routes can get you to a single-screen checkout. They just take different amounts of work and give you different levels of control.
| Route | Setup effort | Free option | Product selection on the page | Best for |
|---|---|---|---|---|
| Funnel builder plus your page builder | 10-15 minutes | Yes | Yes | Controlling both the form and the design |
| Official extension shortcode | 10 minutes | No | Yes | One offer, thin plugin stack, no design work |
Let's go through each method one by one.
Method 1: Build a WooCommerce One Page Checkout With Elementor and FunnelKit (No Code)
This route gives you the most control over the layout and the form fields.
We’ll use FunnelKit Funnel Builder and Elementor, though the same steps work with Divi, Bricks, Oxygen, or the block editor.
This WordPress funnel builder lets you replace the default WooCommerce checkout flow with a high-converting custom checkout page, including both multi-step and one-page layouts.
You can create your one-page checkout in a few minutes. All you have to do is import a template and customize it with Elementor or any page builder of your choice.
It offers a free version that includes one-step templates and thank you pages.
The Pro plan lets you add features such as A/B testing, order bumps, one-click upsells, detailed analytics, and more.
Follow the step-by-step instructions below.
Step 1: Create a funnel and import a checkout template
Go to FunnelKit ⇨ Funnels and click on the ‘Create New Funnel’ button.
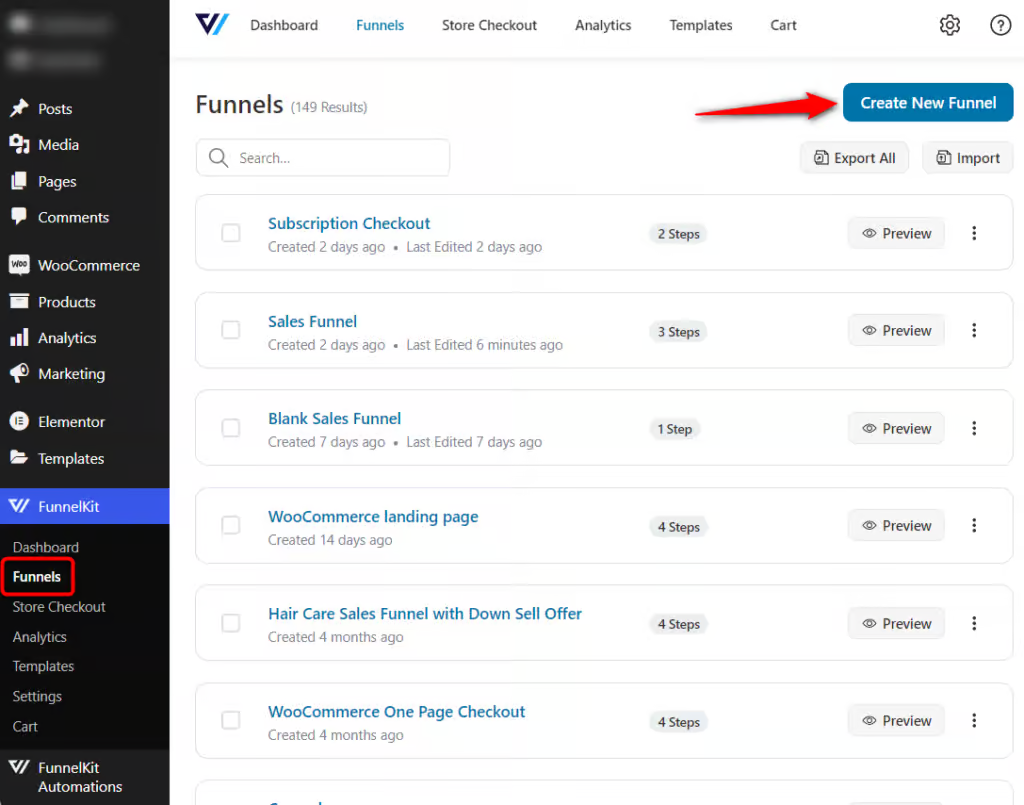
You’ll see a variety of ready-made one-page checkout templates. Choose one that fits your brand, or start from scratch.
Choose the page builder among Elementor, Bricks, Divi, Oxygen, and Gutenberg Block Editor.
If you want to create it with another builder (e.g., Beaver Builder, Thrive, or another), use shortcodes.
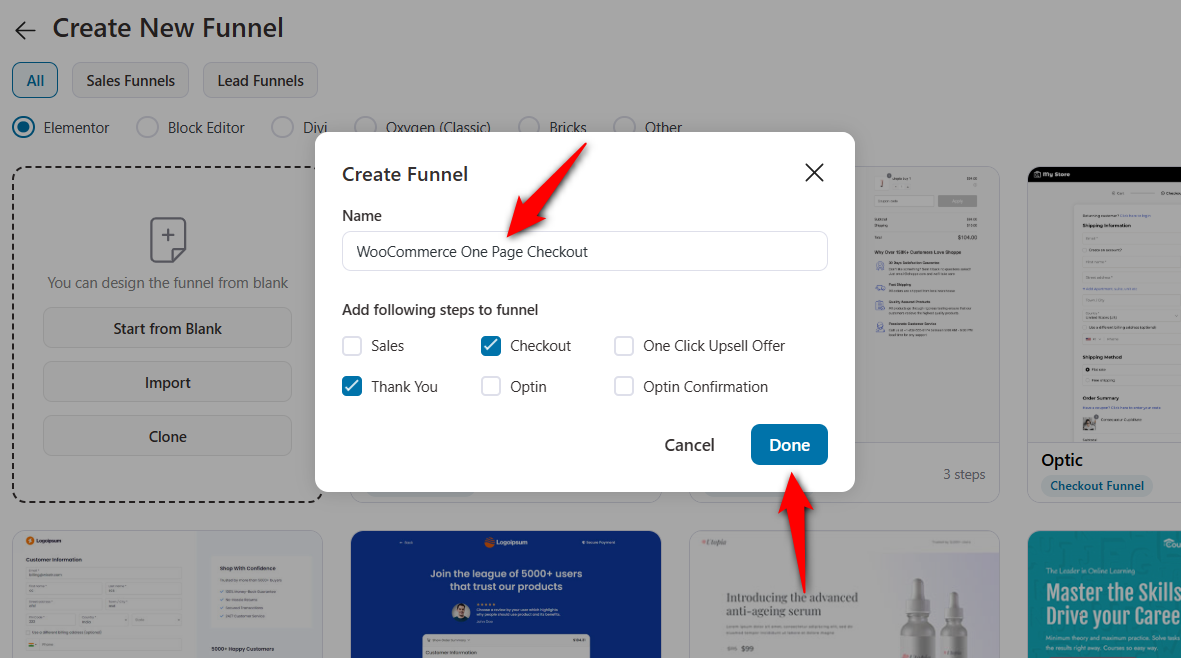
As an example, we’ll create this funnel from scratch. Give it a clear name, such as WooCommerce One Page Checkout.
You can also choose which steps to include in the funnel, such as:
- WooCommerce Checkout Page
- Thank You or Order Confirmation Page
Once done, click ‘Done’ to create your funnel.
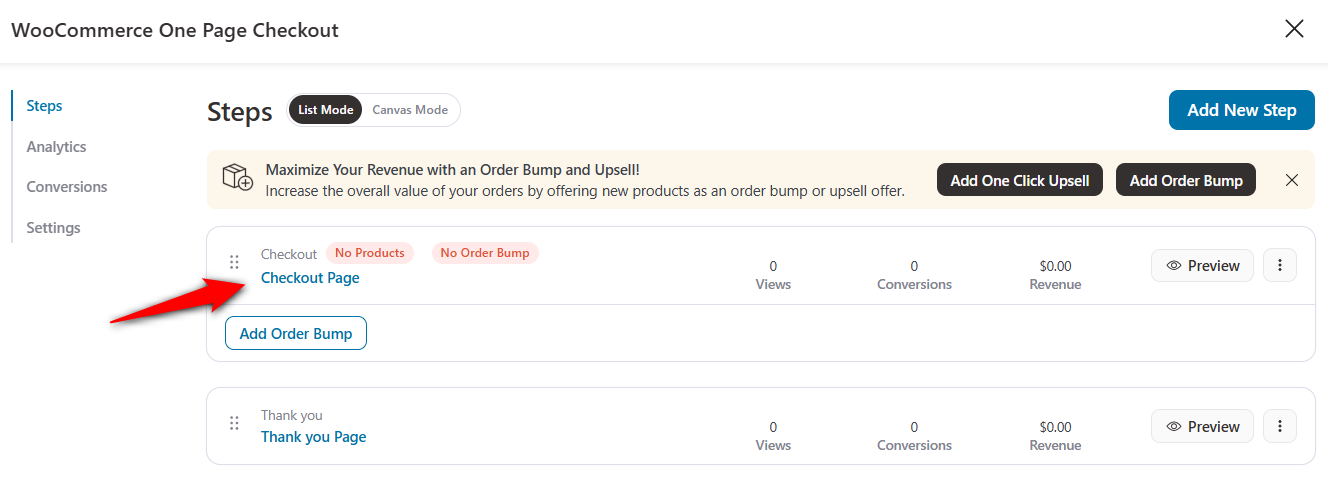
You now have a blank funnel set up in the workspace, ready to design your high-converting 1-page checkout!
Click on your checkout page to start customizing it.
It’ll open up the checkout page templates. As an example, we’ve selected the ‘Closer’ template.
Select the number of steps you want for your checkout, then click the 'Import This Template' button.
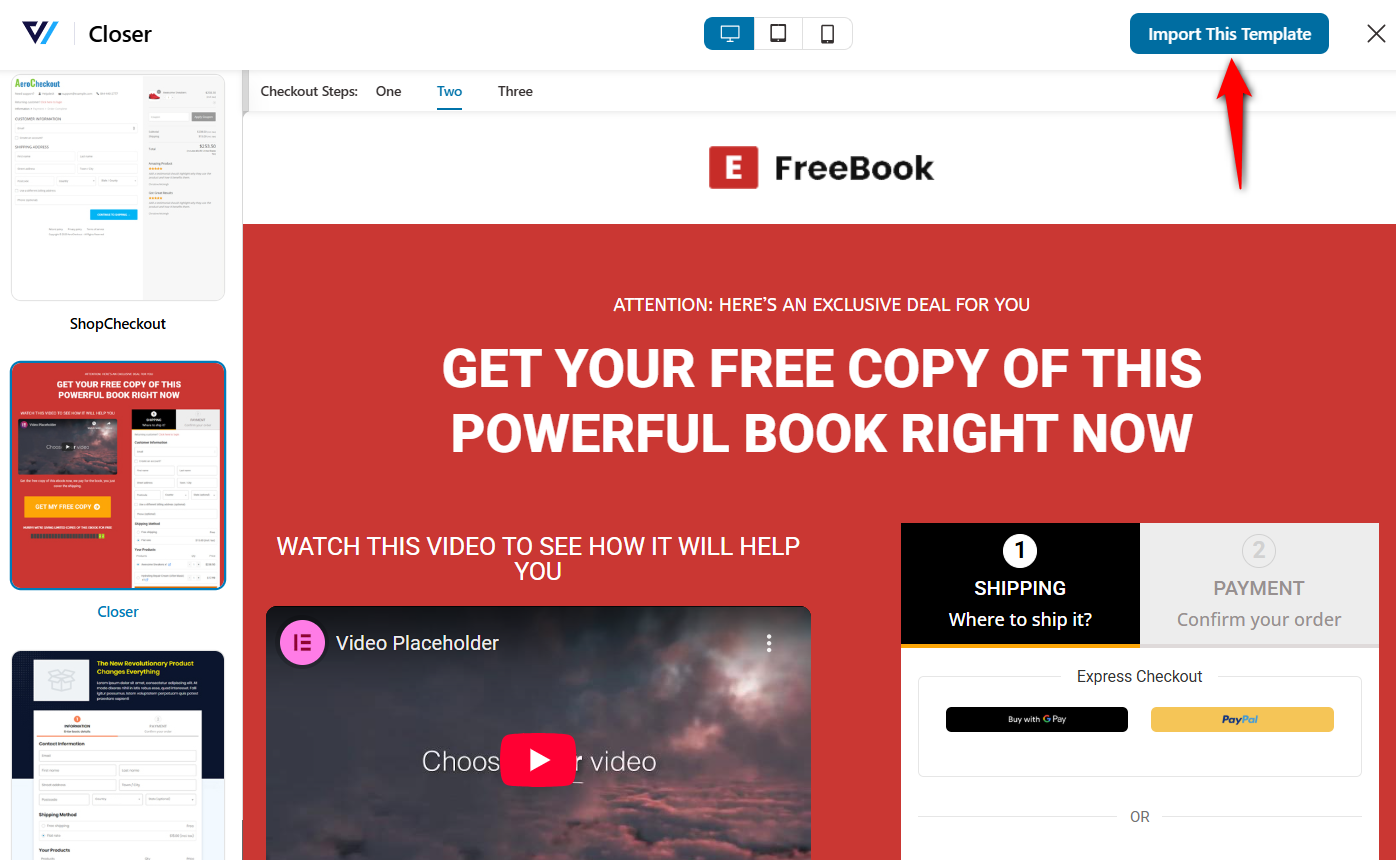
Your checkout page with this template will be imported.
Step 2: Add the products shoppers can choose from
Go to the Products tab and click on the ‘Add Product’ button.
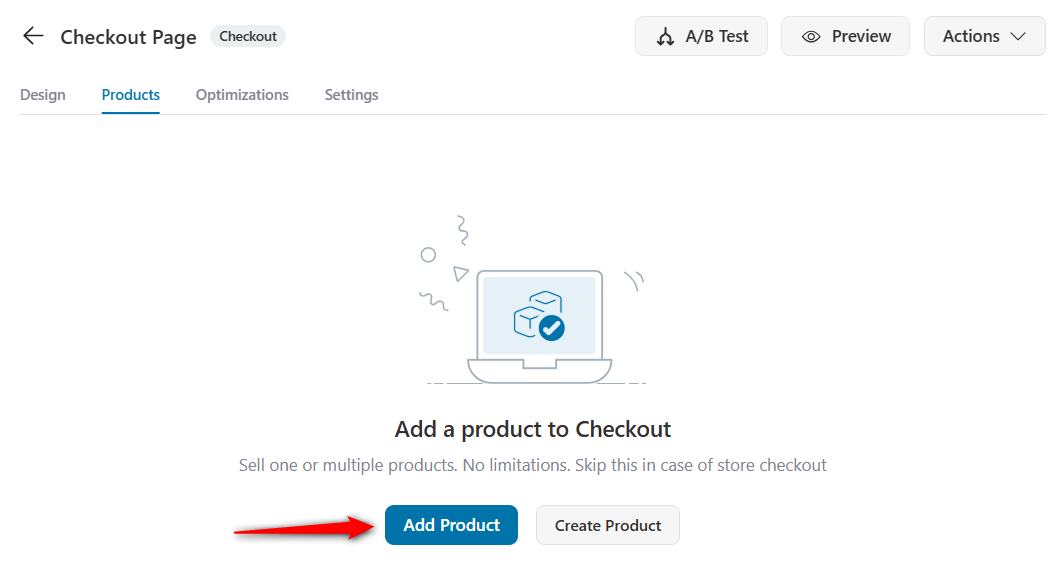
Enter the name of the product you want to offer on your 1-page checkout.
Click on 'Add' when done.
Add multiple products so shoppers can select, configure discounts, and even set quantities here.
You may choose to sell specific product variants.
Finally, you can use drag-and-drop to display the added products in a specific order.
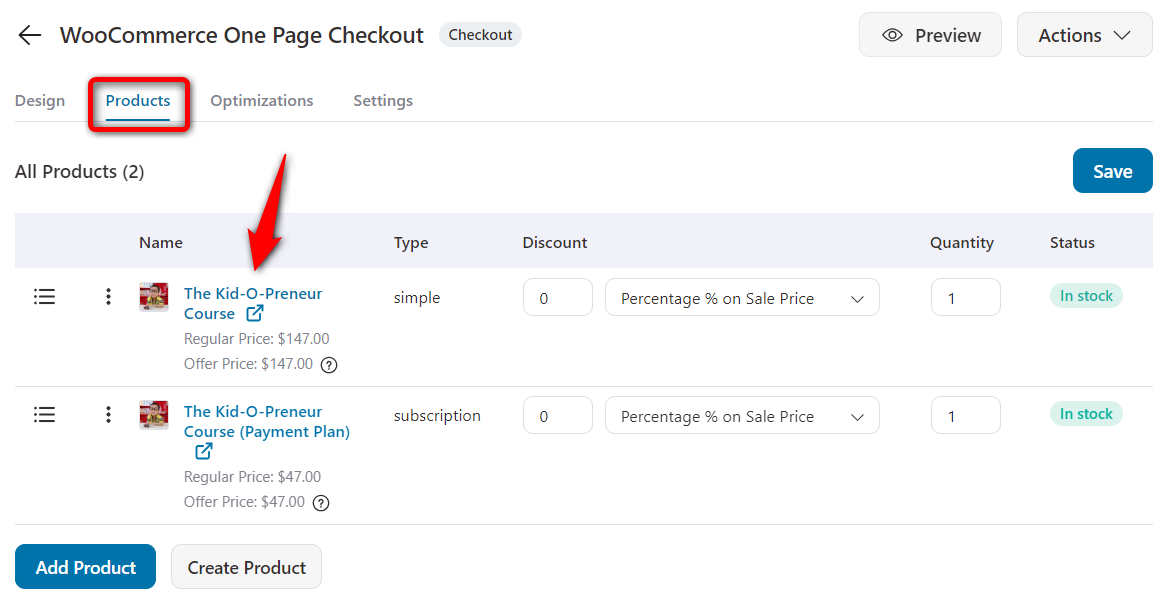
Here, we're adding the one-time course price. Then add the three-month plan as a second product.
Shoppers pick one on the same screen and get billed accordingly.
The recurring option needs to be a subscription product, created before you get here. WooCommerce Subscriptions or Sublium Subscriptions both work.
Price the plan so the single payment reads as the better deal.
If the installment total matches the one-time price exactly, most buyers take the installments, and you’ve handed away your cash flow for nothing.
Drag the two options into the order you want them displayed.
Step 3: Customize the checkout layout
Go back to the Design tab and click 'Edit Template'.
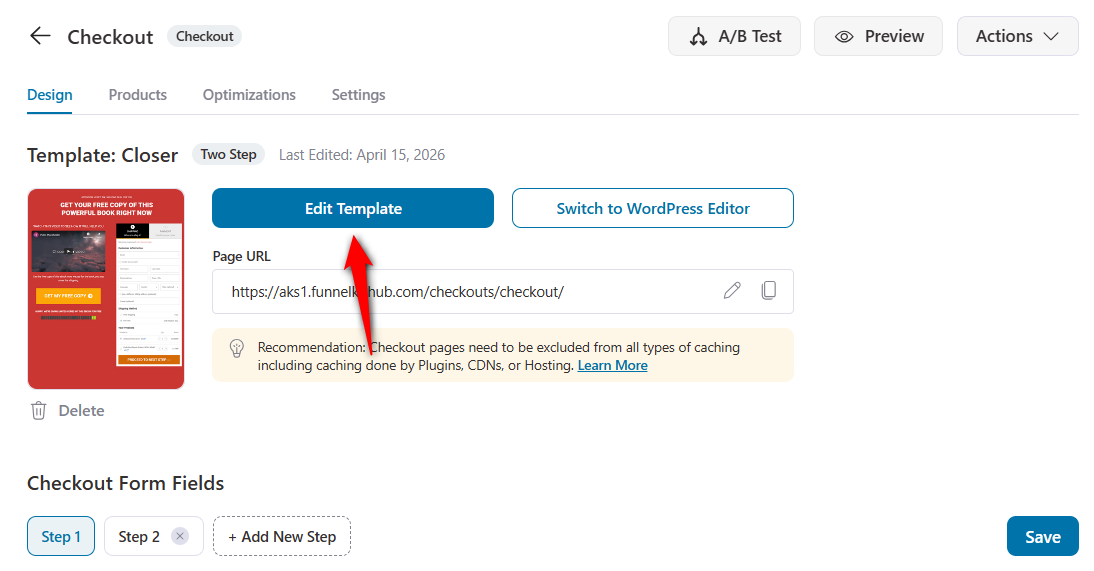
Change the logo, typography, colors, and spacing to match your store.
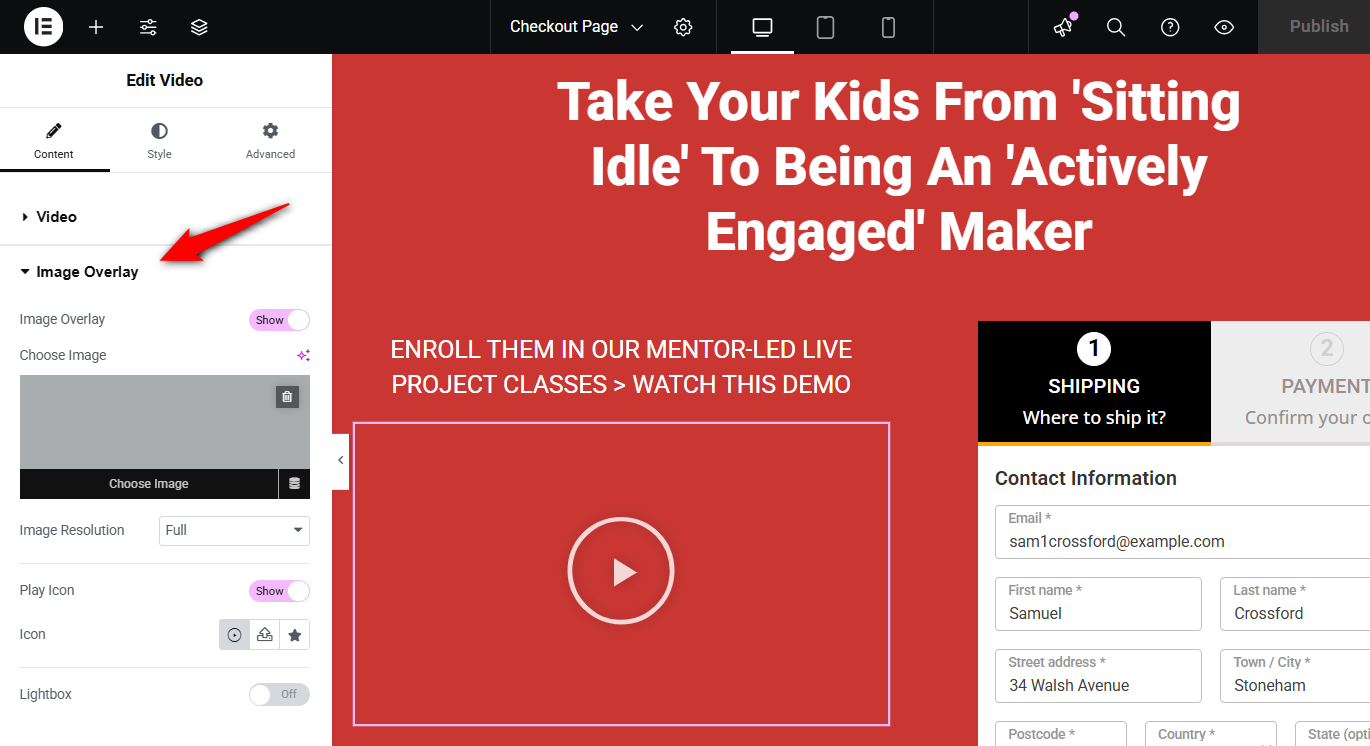
A short product demo video earns its place here; on a single-screen checkout, the video is doing the job your product page normally would.
Add an image overlay to the video widget so it doesn’t load as a blank black rectangle.
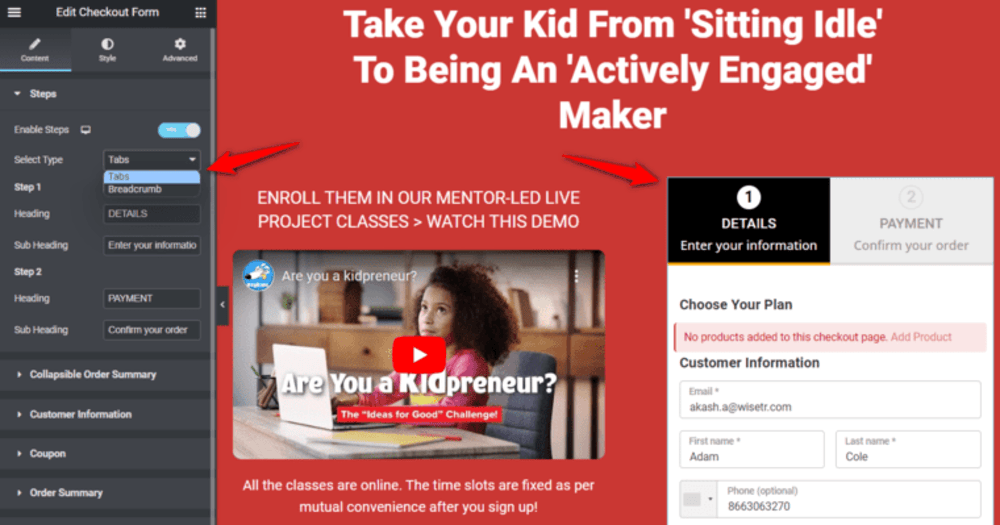
In the checkout form widget, choose whether to show breadcrumbs or tabs.
Even a single-page checkout benefits from a progress indicator when the form is long enough to scroll.
To carry the same design through the rest of the store, see our guide to customizing the WooCommerce checkout page, which covers both the classic and block editors.
Step 4: Edit the form fields
This is the step that moves the number. Everything above is its presentation.
Scroll to the checkout form fields in the Design tab and use the drag-and-drop editor to:
- Add custom fields (text, dropdowns, checkboxes, file uploads, etc.)
- Edit existing fields
- Remove unnecessary fields
- Rearrange fields and sections
Selling a course means no shipping address, no company name, and no order notes.
That alone takes a default 23-field form down toward the low teens.
Put product selection and basic details in the first section, then the order summary and payment in the second.
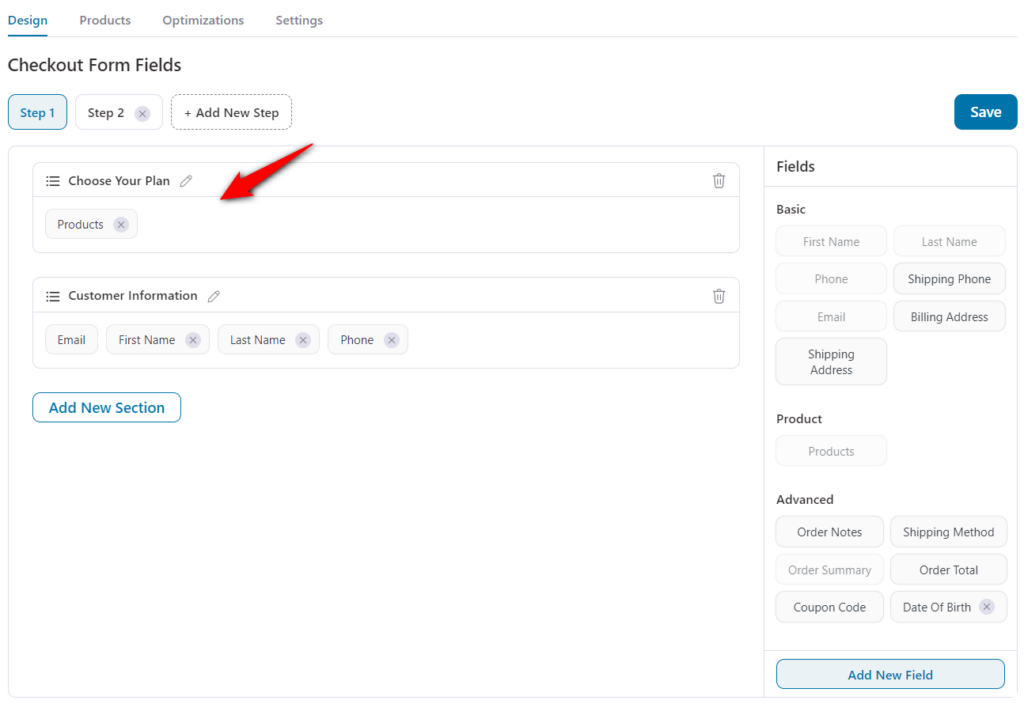
To add the ‘Best Value’ tag or description to a product, explore the advanced customization options to make it more appealing to shoppers.
In the ‘Products’ field, you would want to set an option as pre-selected by default.
You can also add a ‘Best Value’ tag or any custom tag to highlight other customers' most popular choices.
The tag could be ‘Money Saver’, ‘Power Bundle’, ‘Super Saver’, or anything you choose.
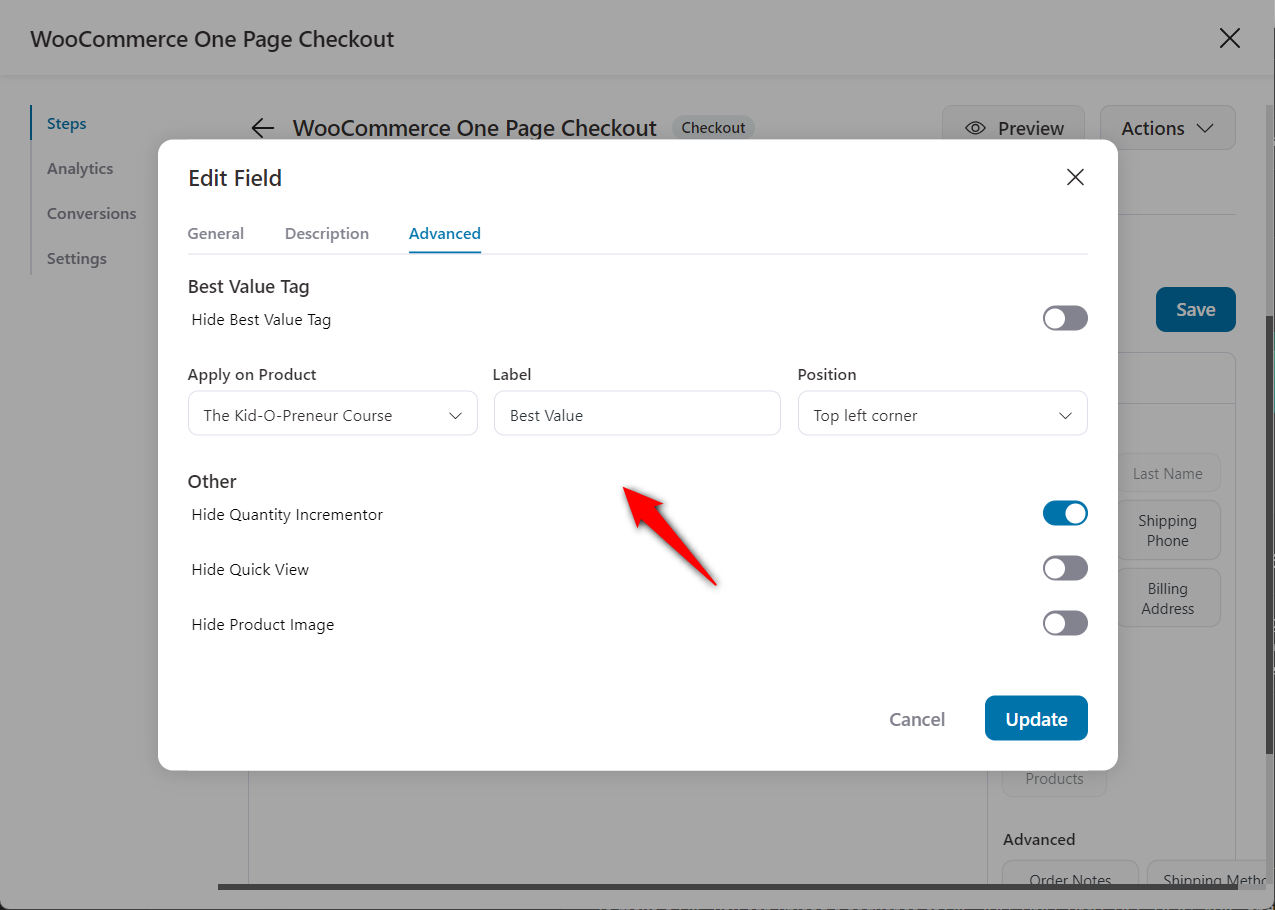

Click on ‘Update’ when done.
This is how your one page checkout looks:

Step 5: Add an order bump
You can add an order bump, i.e., a cross-sell offer, to make more dollars per transaction and make your ads profitable.
First, add the order bump and name it.
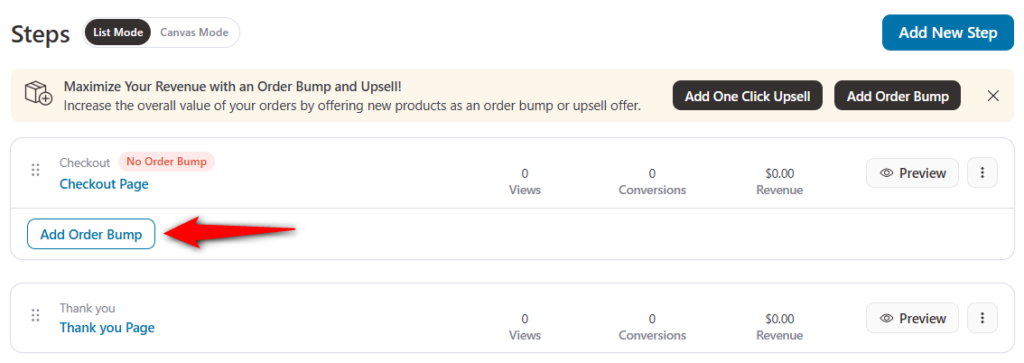
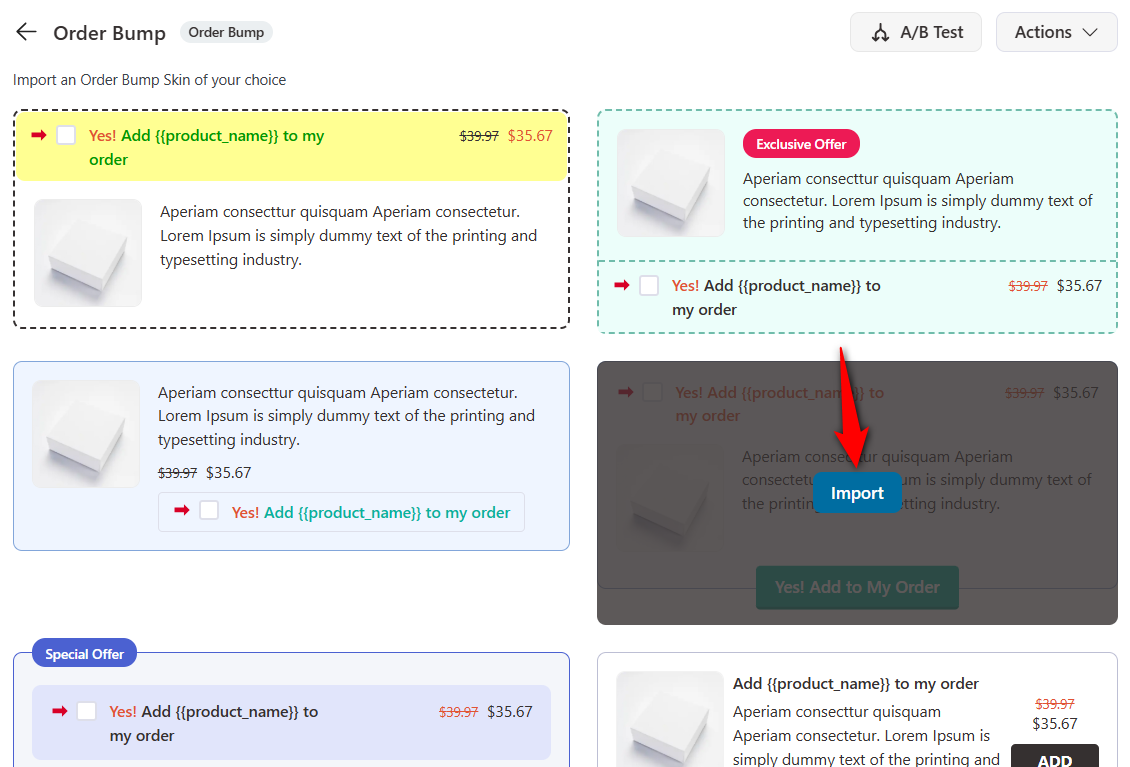
After adding and naming the bump, import the order bump skin you want.
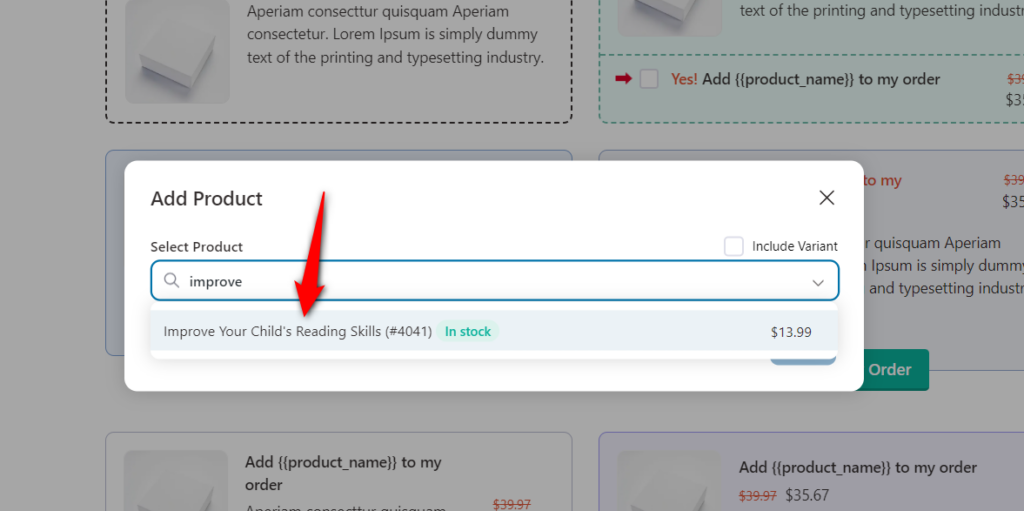
After importing the skin, add a product as your order bump offer.
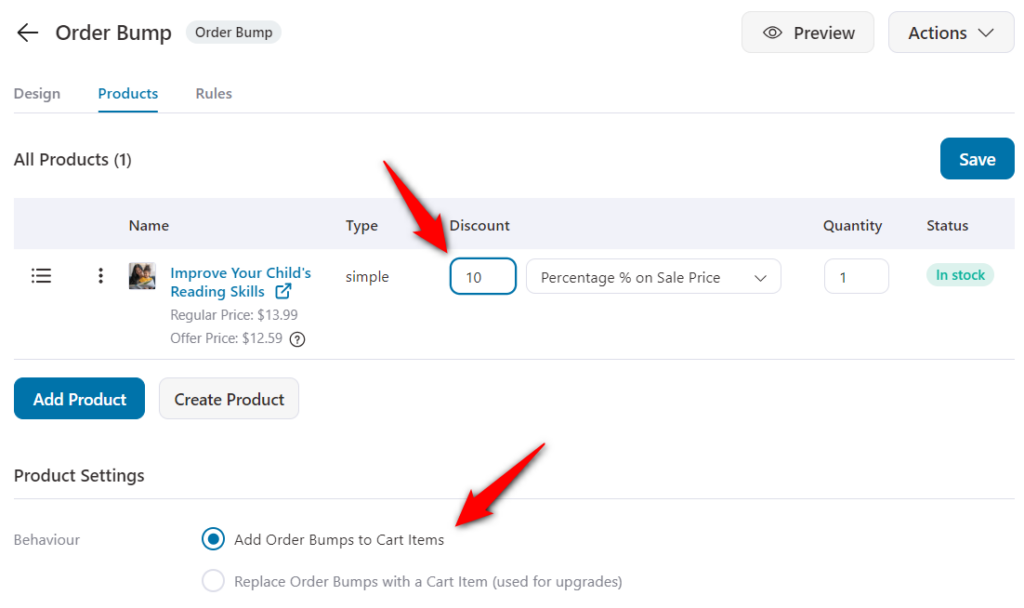
Once your products are added, you can apply a discount or configure additional settings in the Products section.
Once done, hit the ‘Save Changes’ button and move on to the next tab.
Customize the look and feel of your bump offer in the ‘Design’ tab.
Also, write a copy of your offer here:
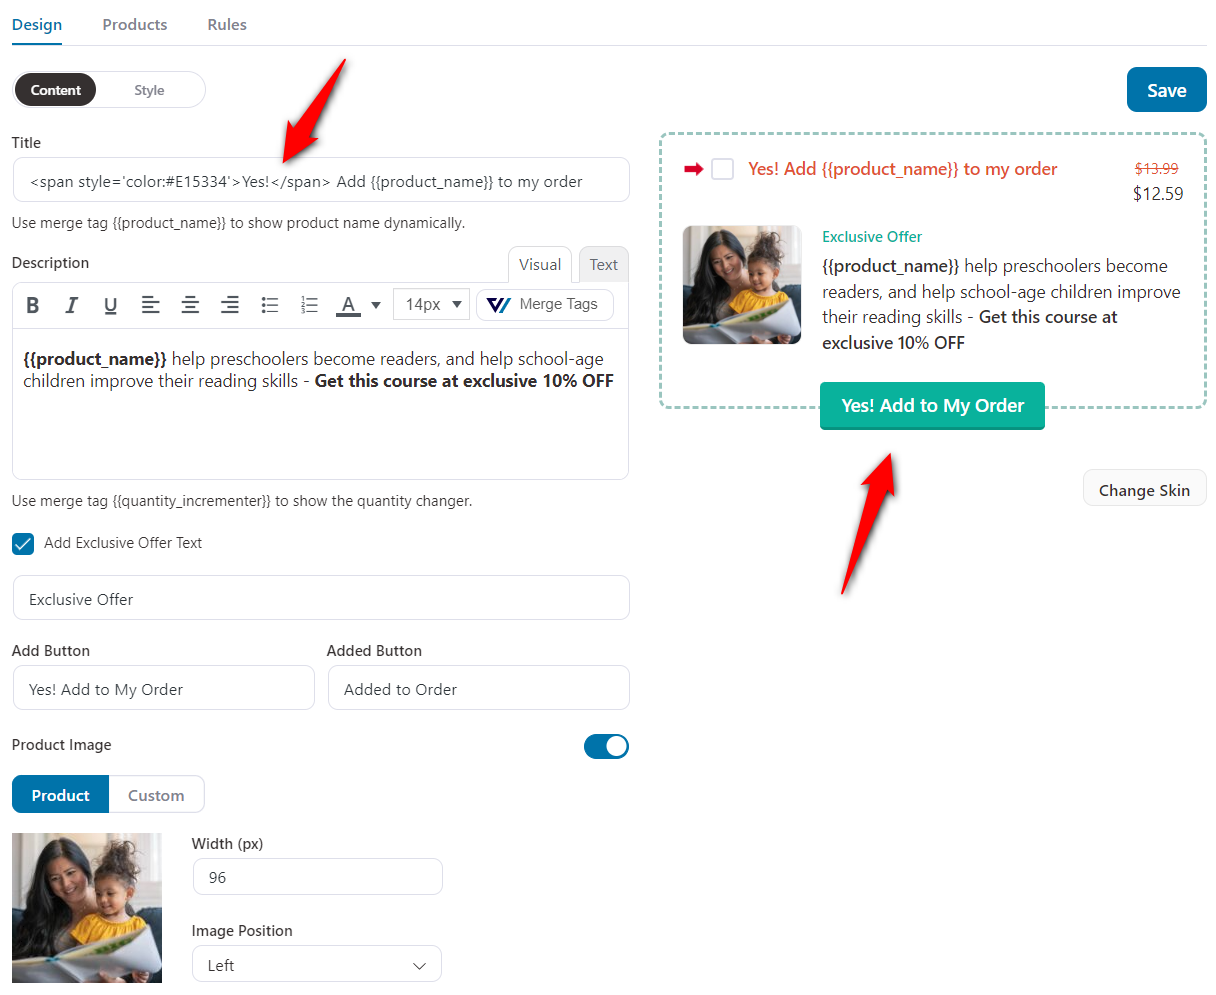
You can also change the title color, padding, price, and description colors, and more under the Style sub-tab.
Then set up the thank you page. It’s the last step in the funnel and the natural place for order details and an account-creation prompt.
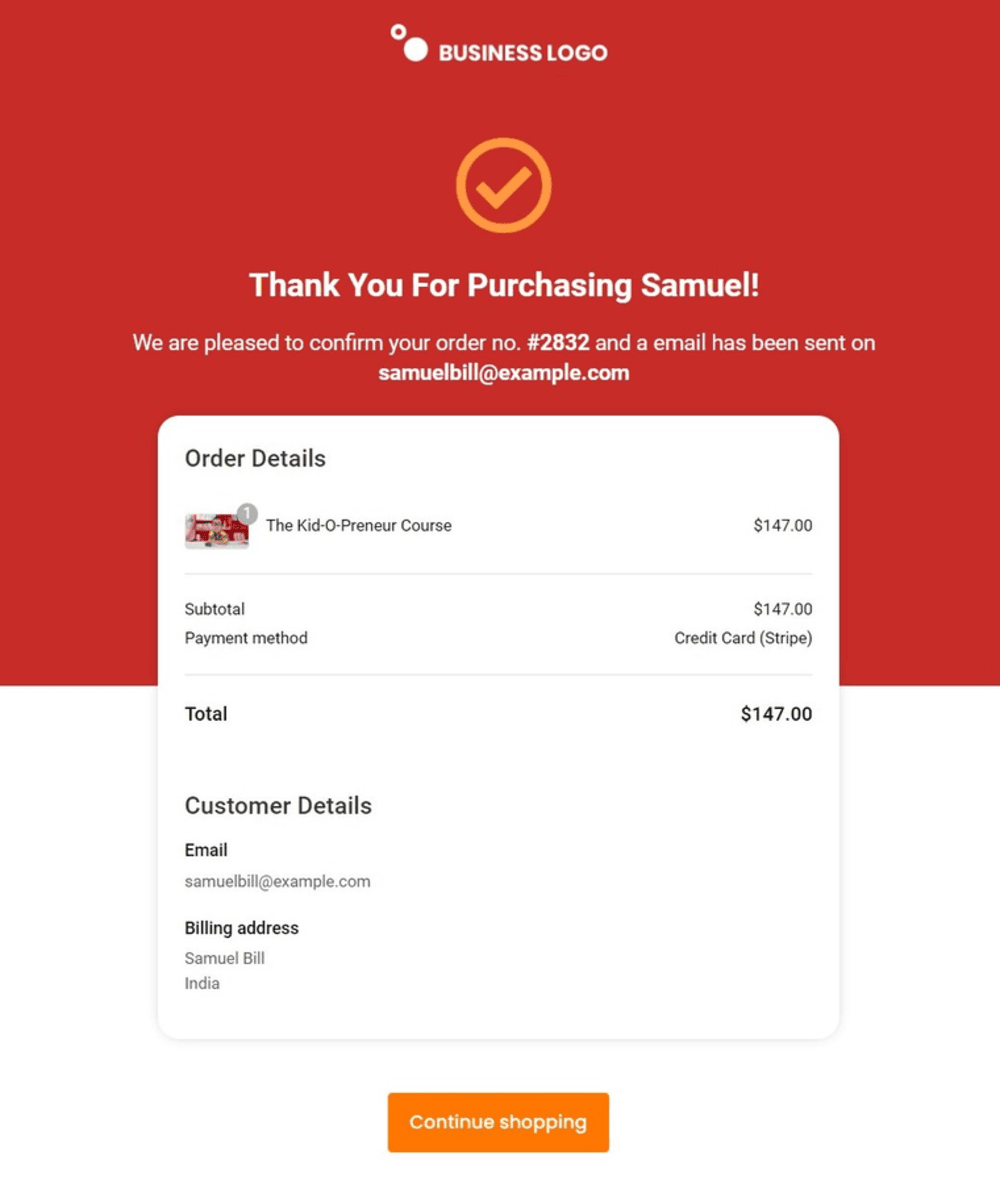
For what actually belongs on that page, see our guide to the WooCommerce thank you page.
Step 6: Place a real test order
Open the page in an incognito window and buy something with a live payment method.
Check that totals update without a reload when the pricing option changes. Check that the coupon field applies. Check that the confirmation page loads and the order appears in WooCommerce.
Then do it all again on an actual phone. Not a browser emulator. Confirm nothing scrolls sideways, and the pay button is reachable with a thumb.
Method 2: Use the Official WooCommerce Extension
If you prefer the first-party option, the official WooCommerce One Page Checkout extension lets you turn any page, post, or product into a checkout.
It is a paid extension sold on the WooCommerce marketplace, and it works in two ways.
Option A: Enable it on a product
After you install and activate the extension, a new One Page Checkout checkbox appears next to Virtual and Downloadable options when you edit a product. Check that box to enable it for that product.
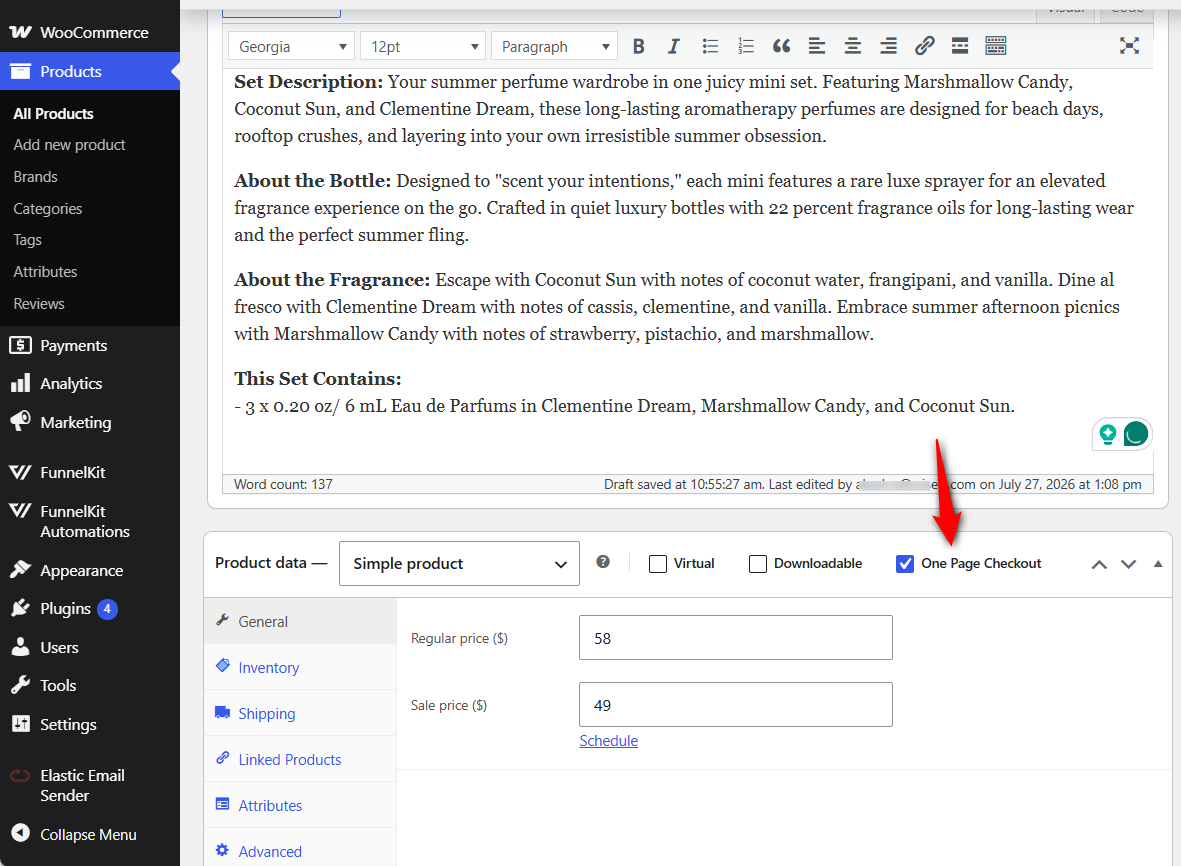
Now go to this product page; adding this item to your cart scrolls down to the checkout form, which loads directly here.
You can increase the quantity on the same page instead of redirecting to a separate checkout.
Option B: Use the shortcode and its four templates
For full control over placement, add the [woocommerce_one_page_checkout] shortcode to any page, post, or custom post type.
You then pass attributes to control which products show and how they are laid out.
- product_ids sets which products appear, using their comma-separated product IDs.
- template sets the layout, such as a single product, a product list, a product table, or a pricing table.
There are four templates, and most articles on this topic only mention two:
| Template | What it renders |
|---|---|
| product-single | One product with its full description |
| product-list | A list of products with add-to-order controls |
| product-table | A compact selectable table |
| pricing-table | Side-by-side pricing columns |
A basic example that displays a single product as a one-page checkout looks like this:
[woocommerce_one_page_checkout product_ids="47" template="product-single"]To show several products in a selectable table, you would list multiple IDs and switch the template:
[woocommerce_one_page_checkout product_ids="47,137,161" template="product-table"]Embed the shortcode inside a page builder, drop it into Elementor's Shortcode widget, Gutenberg's Shortcode block, or Divi's Code module.
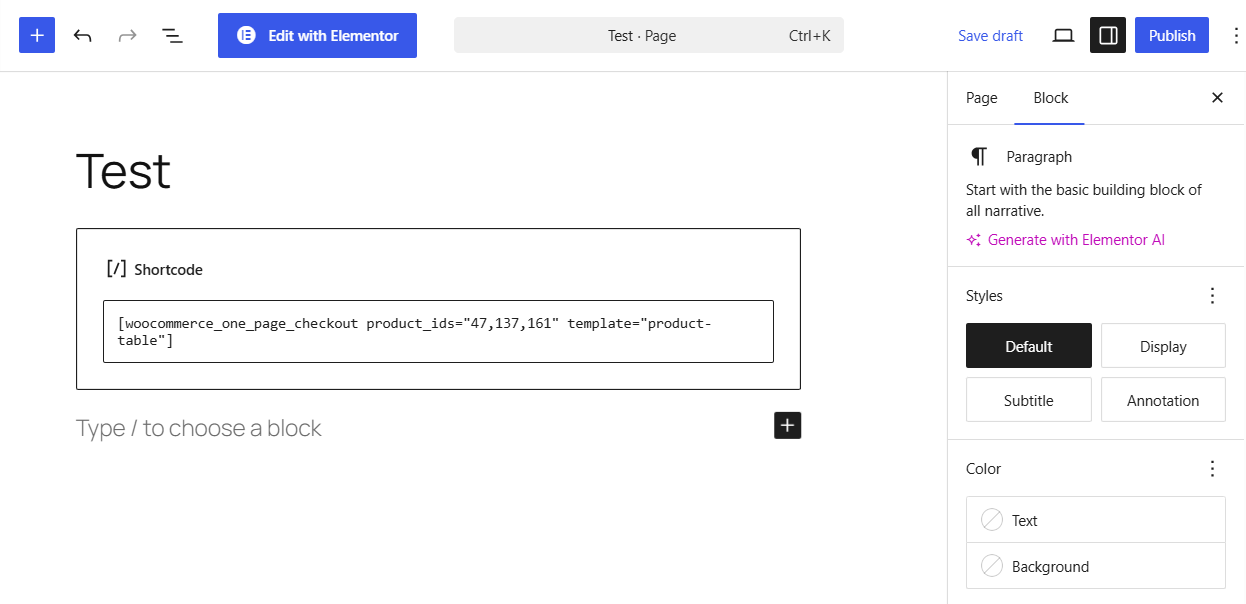
Once the shortcode is in place, the product selection and checkout form appear together on that page, and shoppers can adjust their order and pay without leaving the page.
You can adjust extension-wide options, such as the auto-scroll behavior, under WooCommerce ⇨ Settings ⇨ One Page Checkout.
What the official extension does not support
This is the part most comparisons leave out. These limitations come directly from WooCommerce’s own extension documentation, not our testing.
- Compatibility is more limited: The extension uses a custom template for product selection, which WooCommerce says reduces compatibility with other extensions. Only the extensions on its tested list are confirmed to work.
- Product Add-Ons file uploads aren’t supported: If customers need to upload files with their orders, this extension isn’t a fit.
- Payment gateways need to use WooCommerce’s standard payment section: Gateways that add their own checkout step can break the single-page flow.
This extension is a better fit for certain stores. If you have a lean plugin stack and sell simple or variable products, it can do the job for $79 a year.
If your store relies on many extensions, test compatibility before committing.
One-Page vs Multi-Step Checkout: Which Converts Better?
The honest answer to one-page checkout vs. multi-step depends on your products, and here is how to test it.
- One-page checkout tends to work best for fast-moving products and impulse purchases. Keeping everything in one view reduces drop-offs for low-consideration buys.
- Multi-step checkout can perform better for high-ticket or complex purchases, where splitting details into smaller steps reduces overwhelm and builds commitment gradually.
In split tests we’ve run across stores, the pattern broke down roughly by price point.
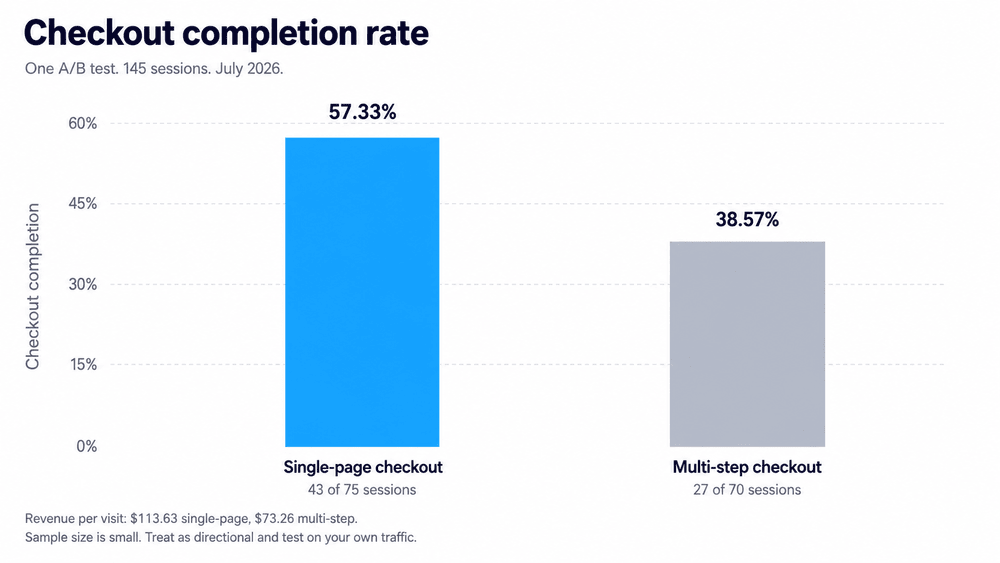
For impulse purchases, single-page layouts produced faster conversions and fewer drop-offs, while for higher-ticket items, the multi-step format spaced out commitment and performed better.
Results vary by store, traffic source, and product, so treat these as directional and run your own A/B test before committing. See the labeled results below.
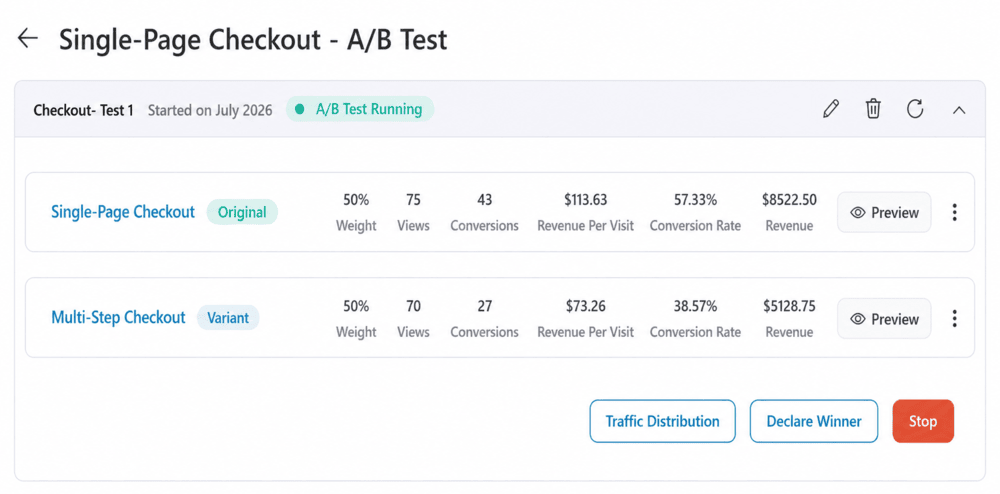
The takeaway isn’t always to use one page.
Match the layout to your product type, then validate with a real A/B test on your own traffic.
7 Ways to Lift Conversions On a One-Screen Checkout
Putting everything on one page is the structural change. These are the details that make that change pay off.
1. Cut the fields before you cut anything else
A default WooCommerce checkout has roughly 23-24 fields. A well-optimized one can get that down to 12-14.
For digital products, remove every shipping field.
For physical products, drop fields like company name, order notes, and usually address line two unless you actually need them.
2. Put express pay above the fold
Apple Pay, Google Pay, and other express options remove most of the form-filling altogether.
If you offer them, put them where shoppers can see them before they start typing.
3. Enable guest checkout
Forcing account creation is one of the oldest causes of abandonment.
Let first-timers buy without an account; you can still invite them to create one on the thank-you page.
4. Put trust signals next to the payment fields
Accepted-card icons, a security badge, or a short review work best where the customer is making the payment decision.
A trust badge buried in the footer is easy to ignore.
5. Design for mobile
Full-width buttons, a collapsible order summary, the right input types for numeric keyboards, and no horizontal scrolling at 360px should be non-negotiable.
See our guide to mobile checkout in WooCommerce for the full checklist.
6. Validate fields as shoppers fill them in
Don’t wait until they hit Place Order to show four errors.
Validate fields as they move through the form so mistakes are easy to fix.
7. Capture emails early and recover abandoned carts
Some shoppers will leave no matter how good your checkout is. Capturing their email before payment gives you a chance to recover the sale.
Send the first reminder within one to three hours and include a link that restores their cart.
Our guide to abandoned cart recovery covers the sequence, while FunnelKit Automations can run it directly from WordPress.
Why Isn't Your One-Page Checkout Working? Here's How to Fix It
When a one-page checkout breaks, it’s usually a conflict, not a plugin bug.
Work through these in order.
- Theme or template conflict
These plugins often use custom product-selection templates that don’t play nicely with every theme.
Temporarily switch to Storefront. If the checkout starts working, your theme is the likely culprit.
- Block vs classic checkout
If your store uses the Cart and Checkout blocks but the plugin expects the classic shortcode checkout, the page may render empty or only partially.
Check the plugin’s compatibility notes first.
- Payment gateway conflict
Gateways that add their own checkout step or redirect customers off-site can break the single-page flow.
Test with a standard WooCommerce gateway to narrow it down.
- Caching
Optimization plugins can serve stale or incomplete checkout pages.
Exclude the checkout page from caching, clear your caches, and test again in an incognito window.
- Plugin conflict
Other plugins that modify the cart or checkout can interfere.
Deactivate them one at a time, not all at once, so you can identify the culprit.
- AJAX isn’t working
If totals or shipping never update, check the browser console.
A security plugin or .htaccess rule blocking admin-ajax.php is a common cause.
- Shortcode or product settings
With the official WooCommerce extension, the checkout won’t display correctly if the shortcode is wrong or the products aren’t enabled in the extension settings.
Check both before assuming the plugin is broken.
Frequently Asked Questions (FAQs)
For most stores selling a small catalog, a single offer, or digital products, yes.
You remove three page loads and up to a dozen fields from the path between intent and payment, and that is the cheapest conversion work available.
If you sell wholesale, configurable products, or anything with complicated shipping rules, leave the multi-step layout alone.
Yes. One Page Quick Checkout, Direct Checkout, Fluid Checkout, and FunnelKit all have free versions.
The official WooCommerce extension has no free tier.
Yes, one page checkout usually works with variable products, but this is where plugins most often break.
Test that changing a variation replaces the cart item rather than adding a second one before you send traffic.
Yes. Create the subscription product first, then add it to the checkout page like any other product.
Shoppers pick between one-time and recurring on the same screen.
Support varies by plugin. Several third-party tools still expect the older shortcode checkout and need a fallback on block-based stores.
Check each plugin’s compatibility notes, as this is the most common cause of checkouts breaking after a WooCommerce update.
It depends on the job. For product selection, a payment form, and order bumps on one page, FunnelKit covers it.
For the shortest setup, the official WooCommerce extension does it with one shortcode.
Most well-coded themes work, including Storefront, Astra, Kadence, and GeneratePress. Builder-rendered checkouts sidestep theme conflicts entirely because they do not use the theme template. The official extension is more theme-sensitive.
Yes, and this is where the layout earns back its setup time. A single order bump beside the payment field converts well because the decision is already made.
Nobody can give you an honest number, because it depends on your price point, traffic source, and how bloated your current checkout is.
Baymard attributes 17% of checkout abandonment to a process that felt too long, so that is the slice you are competing for rather than a guaranteed lift.
A/B test it against your existing checkout rather than trusting any case study, including ours.
Start Reducing Drop-Offs With a WooCommerce One Page Checkout!
The layout matters less than what’s actually inside it. Moving 23 fields onto one page doesn’t make checkout better.
Trim the form first, move it second, and test it before you call it done.
None of these changes will transform your store overnight. A shorter form, express pay, an order bump, or a recovery email, can help a little.
But those small improvements add up because every customer goes through checkout.
So choose the tool based on where your buyers are getting stuck.
Start with the simplest setup that solves the problem, then place a real order on a real phone before sending more traffic.
If you want the checkout layout, order bumps, and split testing in one place, go with FunnelKit.
It lets you make your checkout distraction-free and focused, enhancing the shopping experience and maximizing conversions.
Editorial Team
October 9, 2026A downsell gives customers a cheaper option after they turn down your main offer. If you show it too soon, you might convince them to skip the original offer and...
Editorial Team
October 8, 2026WooCommerce guest checkout lets shoppers buy from your store without creating an account. They enter an email, their billing details, and payment, and the order goes through. It's a built-in...
Editorial Team
October 7, 2026WooCommerce upsells are products you recommend in place of the one a shopper is viewing, usually a better or higher-priced version of it. WooCommerce has a built-in upsell field for...






