
Utilizing the power of the WooCommerce sales funnel can boost your online sales and revenue.
According to a study by Marketo, 96% of visitors are not ready to buy. As a result, while many online stores receive a fair amount of traffic, conversions and sales remain disappointingly low.
The reason most people don’t convert is that they are not greeted with a clear path to purchase.
A sales funnel can guide your website and visitors from getting to know about a product to completing a purchase.
If your online store is built with WooCommerce, you can easily introduce a sales funnel to provide your users with a defined shopping experience.
The best part is that you can guide them to make additional purchases by strategically recommending relevant products at different stages.
In this blog, we will share how you can build a WooCommerce sales funnel that will boost your sales and simultaneously increase average order value.
So, let’s begin.
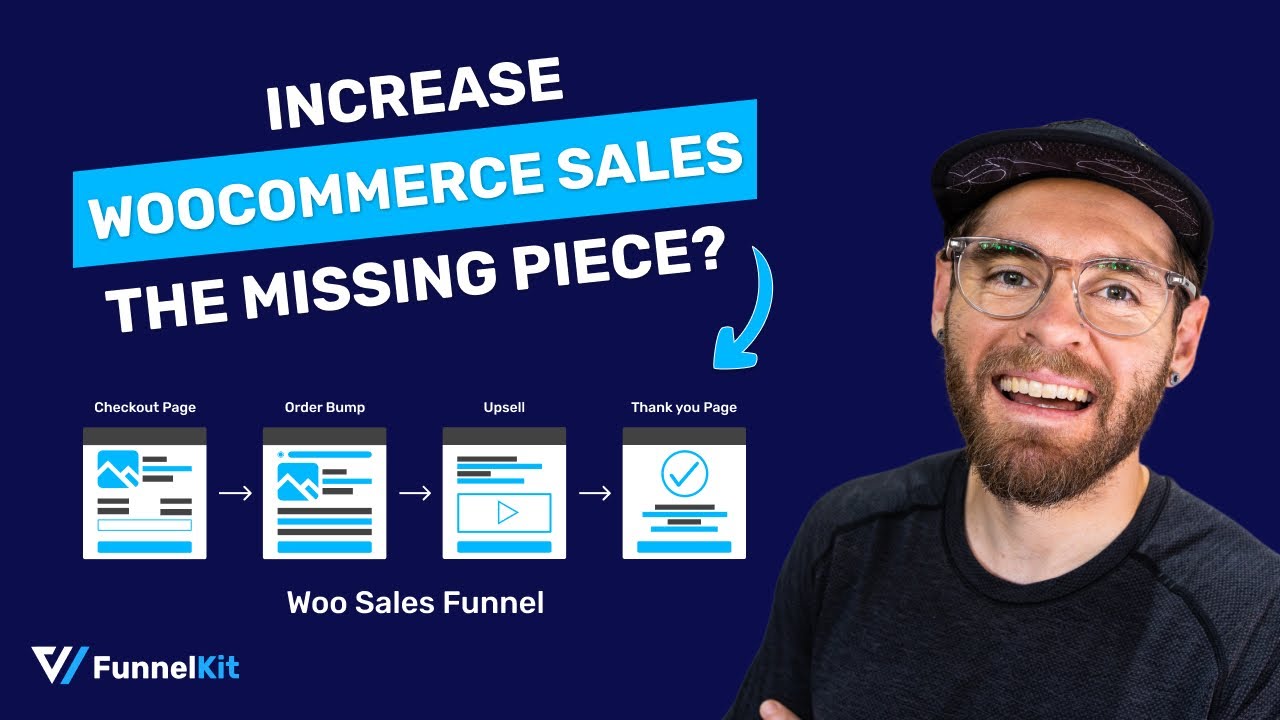
Table of Contents
- 1 What is a Sales Funnel?
- 2 What is a WooCommerce Sales Funnel?
- 3 Why Leverage WooCommerce Sales Funnels?
- 4 5 Best WooCommerce Sales Funnel Plugins
- 5 How To Create a Global Sales Funnel in the WooCommerce Store Using FunnelKit Funnel Builder?
- 5.1 Step 1: Activate and set in-cart upsell recommendations
- 5.2 Step 2: Create a store checkout
- 5.3 Step 3: Customize the checkout template
- 5.4 Step 4: Add order bump offers to the checkout page
- 5.5 Step 5: Add one-click upsell
- 5.6 Step 6: Customize the thank you page
- 5.7 Step 7: Enable the store checkout
- 6 When and How to Create a WooCommerce Sales Funnel for a Single Product?
- 7 How to Measure the Performance of a WooCommerce Sales Funnel?
- 8 What if Someone Abandons the WooCommerce Sales Funnel in the Middle?
- 9 How to Continue WooCommerce Sales Funnel Journey After Customers Exit the Store?
- 10 Ready to Build Your WooCommerce Sales Funnel?
What is a Sales Funnel?
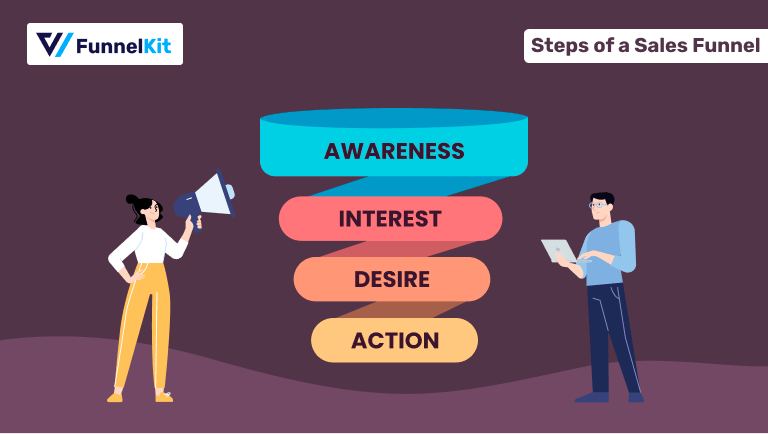
A sales funnel refers to the step-by-step process that a potential customer goes through when purchasing a product from a store.
It includes four stages: Awareness, Interest, Desire, and Action, At each stage, marketing strategies and tactics are employed to guide the customer smoothly through the funnel toward conversion.
Let’s learn about each step in a bit more detail:
- Awareness: In this stage, potential customers become aware of your products or services. They may discover your online store through various channels like social media, search engines, or email marketing.
- Interest: After capturing their attention, you aim to pique their "Interest.” This involves providing compelling content and showcasing product features on the product page to keep visitors engaged and interested in your offer.
- Desire: Once you have their interest, the next step is to create "Desire.” You do this by demonstrating the value and benefits of your products, emphasizing their uniqueness, and addressing potential customers' specific needs and wants with proper copy and media files.
- Action: The final stage is “Action,” where visitors take the desired action, which in WooCommerce is making a purchase. You want to make this step as easy and frictionless as possible by providing a smooth checkout process and various payment options. You may consider offering a discount to incentivize users to complete their purchase.
As you can see, the basic sales funnel is about four stages where it guides users. buy a specific product.
But why settle for minimum sales when you can make users buy more products with a single order?
Well, you shouldn’t!
That’s where the WooCommerce sale funnel comes into play. It takes the content of a basic sales funnel and utilizes the user’s interest to offer relevant products at different stages of the buying journey to maximize the order value.
Move to the next section to find out more about the WooCommerce sales funnel.
What is a WooCommerce Sales Funnel?
The WooCommerce sales funnel follows the same path as the basic sales funnel, taking users from an awareness stage to action.
But in this case, it extends users' journey to buy more product purchases, which results in an increased average order value.
Plus, with WooCommerce automation, you can keep the customers’s sales funnel going with post-purchase communication to ensure repeat sales.
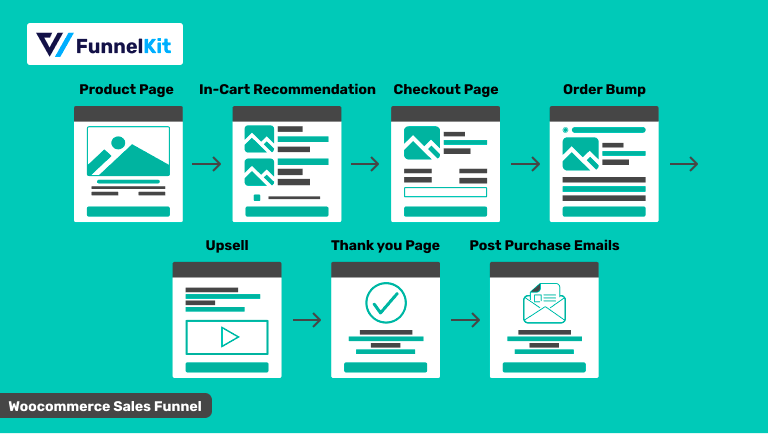
So, here are the steps that the WooCommerce sales funnel follows to make sure your customers order maximum value:
- Product Page: People land on the product page in the quest to learn more about the product. Therefore, you design your product page in a compelling way that piques the desire of users to buy your product.
- Upsell using Mini cart: Once users click on the “Add to Cart” button to buy the product, you offer them upsell in a sliding mini cart. As it’s an in-cart recommendation, people can check the basic product information such as product name, image, and price. Users can add products to their cart with a single click. From the mini cart, users can also directly go to the checkout page skipping the default WooCommerce cart page with a single click.
- Checkout page with pre-purchase offer: Once users are on the checkout, offer them a relevant low-cost product that users can add to their order with a single click. Make sure the checkout page design is clean, user-friendly, and nicely highlights the order bump.
- Post-purchase one-click upsells: Offer users a high-priced, relevant product right after they checkout. One-click upsells don’t require users to re-enter their order details as a result they can buy the upsell offer with a single click.
Optimize your sales strategy by introducing multiple conditional upsell opportunities. For instance, present another offer if users decline the initial upsell or present a different one if they accept it.
- Order confirmation page: The last step of the sales funnel on a WooCommerce store is the order confirmation page. Here, you can share all the order summary information with users so there is transparency regarding what they bought and for how much.
- Post-purchase email: You can continue making an impact with post-purchase emails, nurturing lasting connections with customers even after they complete placing an order and exit the site. This will bring back users to the WooCommerce store to make repeat purchases.
We hope now you understand how a WooCommerce sales funnel differs from a basic sales funnel and how it can help you to grow your business revenue faster.
Now, let’s look at some reasons why you should leverage this sales technique.
Why Leverage WooCommerce Sales Funnels?
To make the most of your e-commerce business, you need to use a WooCommerce sales funnel. Here are some of the benefits of leveraging a WooCommerce sales funnel:
- Reach the right customers: Using a WooCommerce sales funnel, you can offer different products to different people and thus offer people exactly what they want. For example, you can offer a different sales funnel for email marketing and a different one for Facebook ads.
- Improve the shopping experience: Since the sales funnel guides users to buy their desired product in a structured way, it improves the overall shopping experience.
- Grow sales: A well-done sales funnel doesn't just help you make sales right away. By taking care of your customers and giving them what they want, you can keep them coming back. This means a steady stream of income for your business.
- Increase average order value: Offering order bumps, upsells, and cross-sells can optimize the user's shopping experience and effectively increase the average order value in your store.
Hopefully, by now, you can comprehend the importance of using a sales funnel in your WooCommerce store.
5 Best WooCommerce Sales Funnel Plugins
Now let’s have a look at 5 of the best WooCommerce sales funnel plugins with their main features and prices:
1. FunnelKit
FunnelKit Funnel Builder is the ultimate solution for creating beautiful sales funnels in WooCommerce.
It’s considered one of the best WooCommerce sales funnel plugins because of its intuitive user interface and extensive functionality that helps you boost sales.
Along with a sales funnel, you can also create stunning global checkout and offer a frictionless checkout process to your users. Moreover, you can create opt-in lead generation funnels, too.

Here are some of the main features:
- Ready-to-use templates: FunnelKit comes with many prebuilt sales funnel templates that you can import and use with a few clicks. You can create a landing page, opt-in page, checkout page, thank you page, and so on.
- Multi-step checkouts: With FunnelKit, you can create multi-step checkouts for both global and product-specific checkout pages. If you want, you can also create a shopify style checkout.
- AOV-boosting feature: To increase the average order value, you can offer an order bump on the checkout page and post-purchase upsells and downsells.
- Integration with page builders: This WooCommerce sales funnel plugin is compatible with popular page builders like Elementor, Divi, Gutenberg, Oxygen, etc. You can create a sales funnel from scratch using any other page builders too.
- Express checkout: You can offer express checkout with a single-click payment option through methods like Google and Apple Pay.
- WooCommerce mini cart: You can add a mini cart on the checkout field so users can easily modify their cart items before placing an order without going to the cart page. You can also add a WooCommerce side cart where users can apply coupon codes.
- Cart Abandonment Tracking: You can track abandoned carts and use users’ emails for email marketing to recover lost carts.
- A/B testing: With FunnelKit, you can A/B test all the sales funnel pages and improve them for better conversions.
- In-depth analysis: You get an in-depth analysis of each funnel built with FunnelKit. You can view the number of visits, total revenue, revenue per visit, and more for each funnel separately.
Price: You can use FunnelKit Funnel Builder for free with limited features. The pro version starts with $99/per year. With a Plus package or above, you get access to the sliding mini cart.
2. FunnelKit Automations
FunnelKit Automations is the best solution for collecting leads and nurturing your audience with pre and post-purchase emails.
Basically, if you want your WooCommerce users to convert through an email marketing funnel, then this plugin should be your number one choice.
Here are some of the key features:
- Automated campaigns: With FunnelKit automations, you can automate your email campaign so it runs even when you are away. So, if someone optin, you can send them a series of email drip campaigns to convince them to make their first purchase on autopilot.
- Prebuilt recipes: You get a wide range of email autoresponders that you can import and use in a few clicks. Some prebuilt recipes include abandoned cart campaigns, win-back campaigns, post-purchase sequences, etc.
- Visual email builder: Funnelkit Automations has a built-in visual drag-and-drop email builder that you can use to create beautiful customized emails by dragging and dropping elements.
- Segmentation: You can segment your email list based on users’ demographics or purchase history and send them super-relevant content.
- Personalized email: FunnelKit has a merge tag feature that allows you to send personalized emails with dynamic customer information. You can also send personalized discount coupon codes.
- In-depth Analytics: You get in-depth analytics from active contacts, completed contacts, orders, revenue, AOV, etc.
Price: You can get started with FunnelKit Automations for free. The pro version starts from $249/Year.
3. Thrive Suite
Thrive suite is an all-in-one solution for creating a website, sales funnel, email list, scarcity campaign, and online course.
It consists of multiple plugins, including Thrive Theme Builder, Thrive Architect, Thrive Leads, Thrive Quiz Builder, and others.
Here are the key features:
- Prebuilt landing page templates: With this plugin, you get access to 271+ conversion-focused landing page templates. You will get upsell, confirmation, download, and thank you pages in the landing page templates.
- Drag-and-drop builder: Thrive Architect comes with the drag-and-drop landing page builder that’s included in the Thrive Suite.
- Smart color technology: You get a revolutionary technology that lets you change your landing page's color scheme with a single click, saving you hours of tinkering with settings.
- Build funnels from scratch: If you want, you can build sales funnel pages from scratch using blocks if you don’t want to use the prebuilt templates.
- Mobile optimization: All the templates and blocks available in Thrive Suite are optimized for different devices.
- A/B test landing page: You can A/B test your landing pages from the WordPress dashboard.
Price: Thrive Suite costs $299/year.
4. Elementor
Elementor is one of the most popular page builders that you can use to build stunning landing pages.
It also integrates with WooCommerce and allows you to customize its pages, such as the shop, checkout, and thank you pages.
Here are some of the key features:
- Drag and drop builder: Elementor is a drag-and-drop page builder with 60+ widgets and 20+ WooCommerce widgets that you can drag and drop to build your sales funnel pages.
- Template library: Elementor has a huge range of libraries that you can use to import Single Pages, Blocks, or Popup templates to your website and sales funnel.
- Responsive design: This sales funnel builder helps you to create fully device-responsive sales funnel pages.
- Fast-loading pages: With this plugin, you can create sales funnel pages that are super lightweight, which helps ensure a good user experience.
- Supports multiple languages: As Elementor supports 59+ languages, you can create WooCommerce sales funnels in multiple languages.
Price: You can use Elementor for free. The pro version starts at $59/year for a single site.
5. MonsterInsights
MonsterInsights is the best WordPress analytics plugin that makes it super easy to track the activity of your WooCommerce website.
It gives you more insights you can use to optimize your funnel and make more sales.
Here are some of the key features:
- Real-time analytics: You can set up proper website tracking with just a few clicks. The best part is you get real-time stats from the WordPress dashboard and see who is online, what they are doing, and more.
- Google analytics dashboard: You can access website analytics reports right inside your WordPress dashboard with actionable insights.
- Form tracking: You can instantly measure the performance of your website forms and then work accordingly to improve the revenue.
- Track user journey: Easily track which pages each user visited and how long they spent there before making a purchase in your store. This will give you a clear idea about your target audience's mindset.
Price: A free version of this plugin is available. The pro version starts at $99.50/year.
at $99.50/year.
As you can see, FunnelKit Funnel Builder is the most potent tool. With FunnelKit, you get almost everything you need to create and maintain successful sales funnels.
🔔 Note: The best part about FunnelKit Funnel Builder is that you can create a global sales funnel for your WooCommerce store and also create an individual sales funnel for each product of your store.
Now, move to the next section to find out how you can create a global WooCommerce Sales funnel using FunnelKit Funnel Builder.
How To Create a Global Sales Funnel in the WooCommerce Store Using FunnelKit Funnel Builder?
Here, we will create a WooCommerce sales funnel page that will take users through all the steps we talked about to make a purchase with maximum order value.
To follow along, you will need to install To follow along with the process, you need to install and activate both:
🔔 Note: Also keep in mind that to add the in-cart product recommendation step in your WooCommerce sales funnel, you will need to install the FunnelKit Funnel Builder package plus and above.
That’s because these packages include the premium features of FunnelKit Cart, like in-cart product recommendations and a mile-stone-based reward system.
🔔 You can refer to the documentation on how to install and activate FunnelKit Funnel Builder.
Step 1: Activate and set in-cart upsell recommendations
To offer in-cart product recommendations after users add a product to their cart, you need to activate the mini cart and also set up upsells.
Navigate to FunnelKit ⇒ Cart and turn on the “Enable Cart” option.
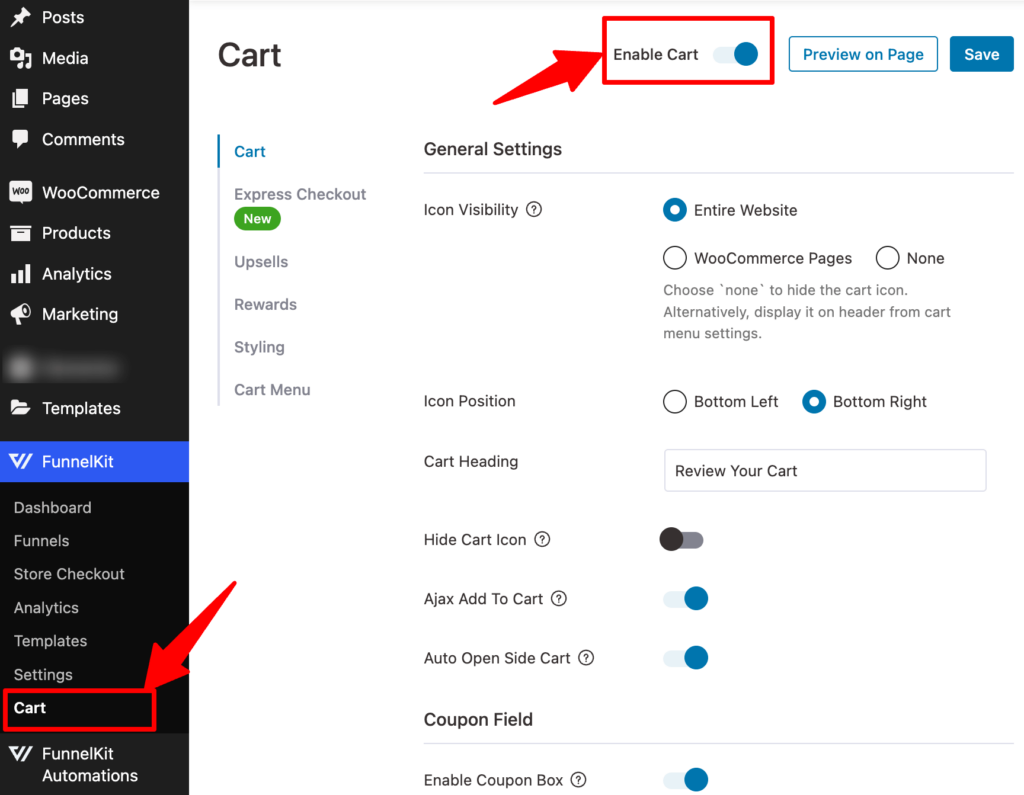
Move to the Upsells tab to set up the product recommendations.
FunnelKit Cart shows the assigned upsell or cross-sell products to each product as product recommendations.
Here you can choose whether you want to recommend cross-sell products, upsell, or both.
You can set how many product recommendations to show and set up default upsell products in case any product doesn’t have upsells assigned to it.
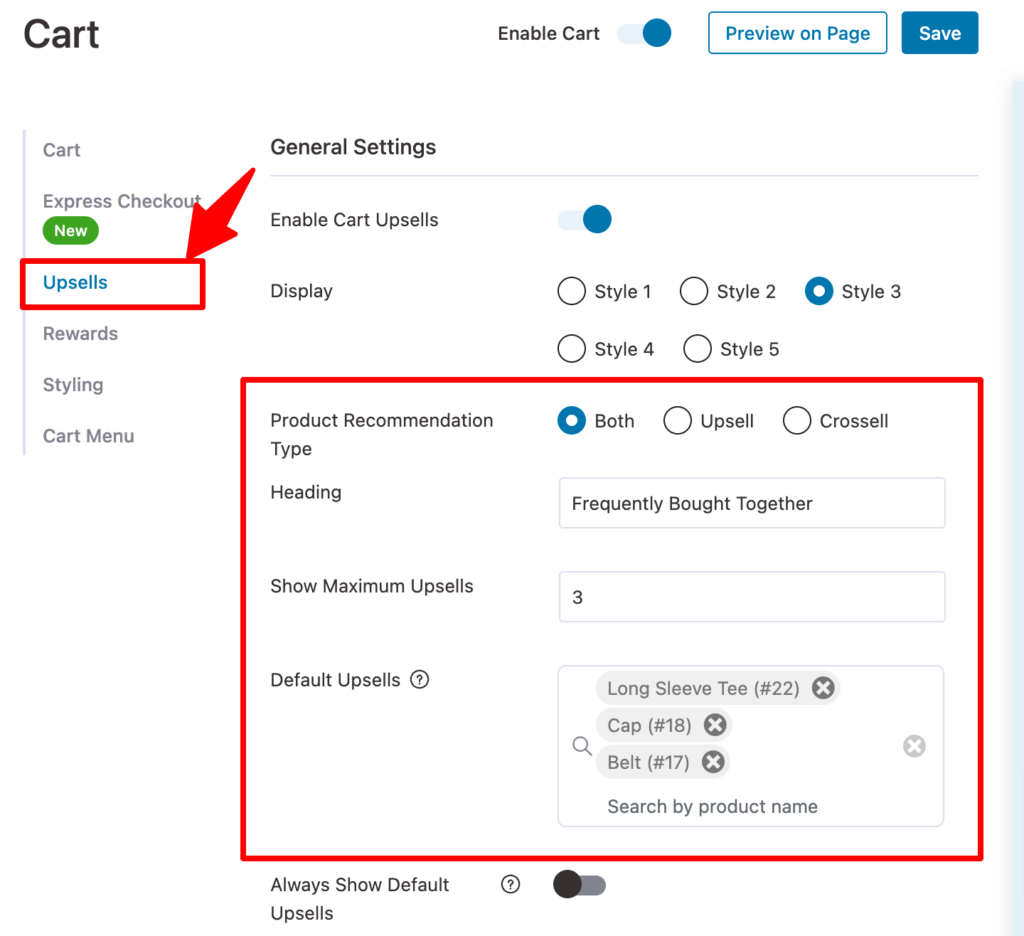
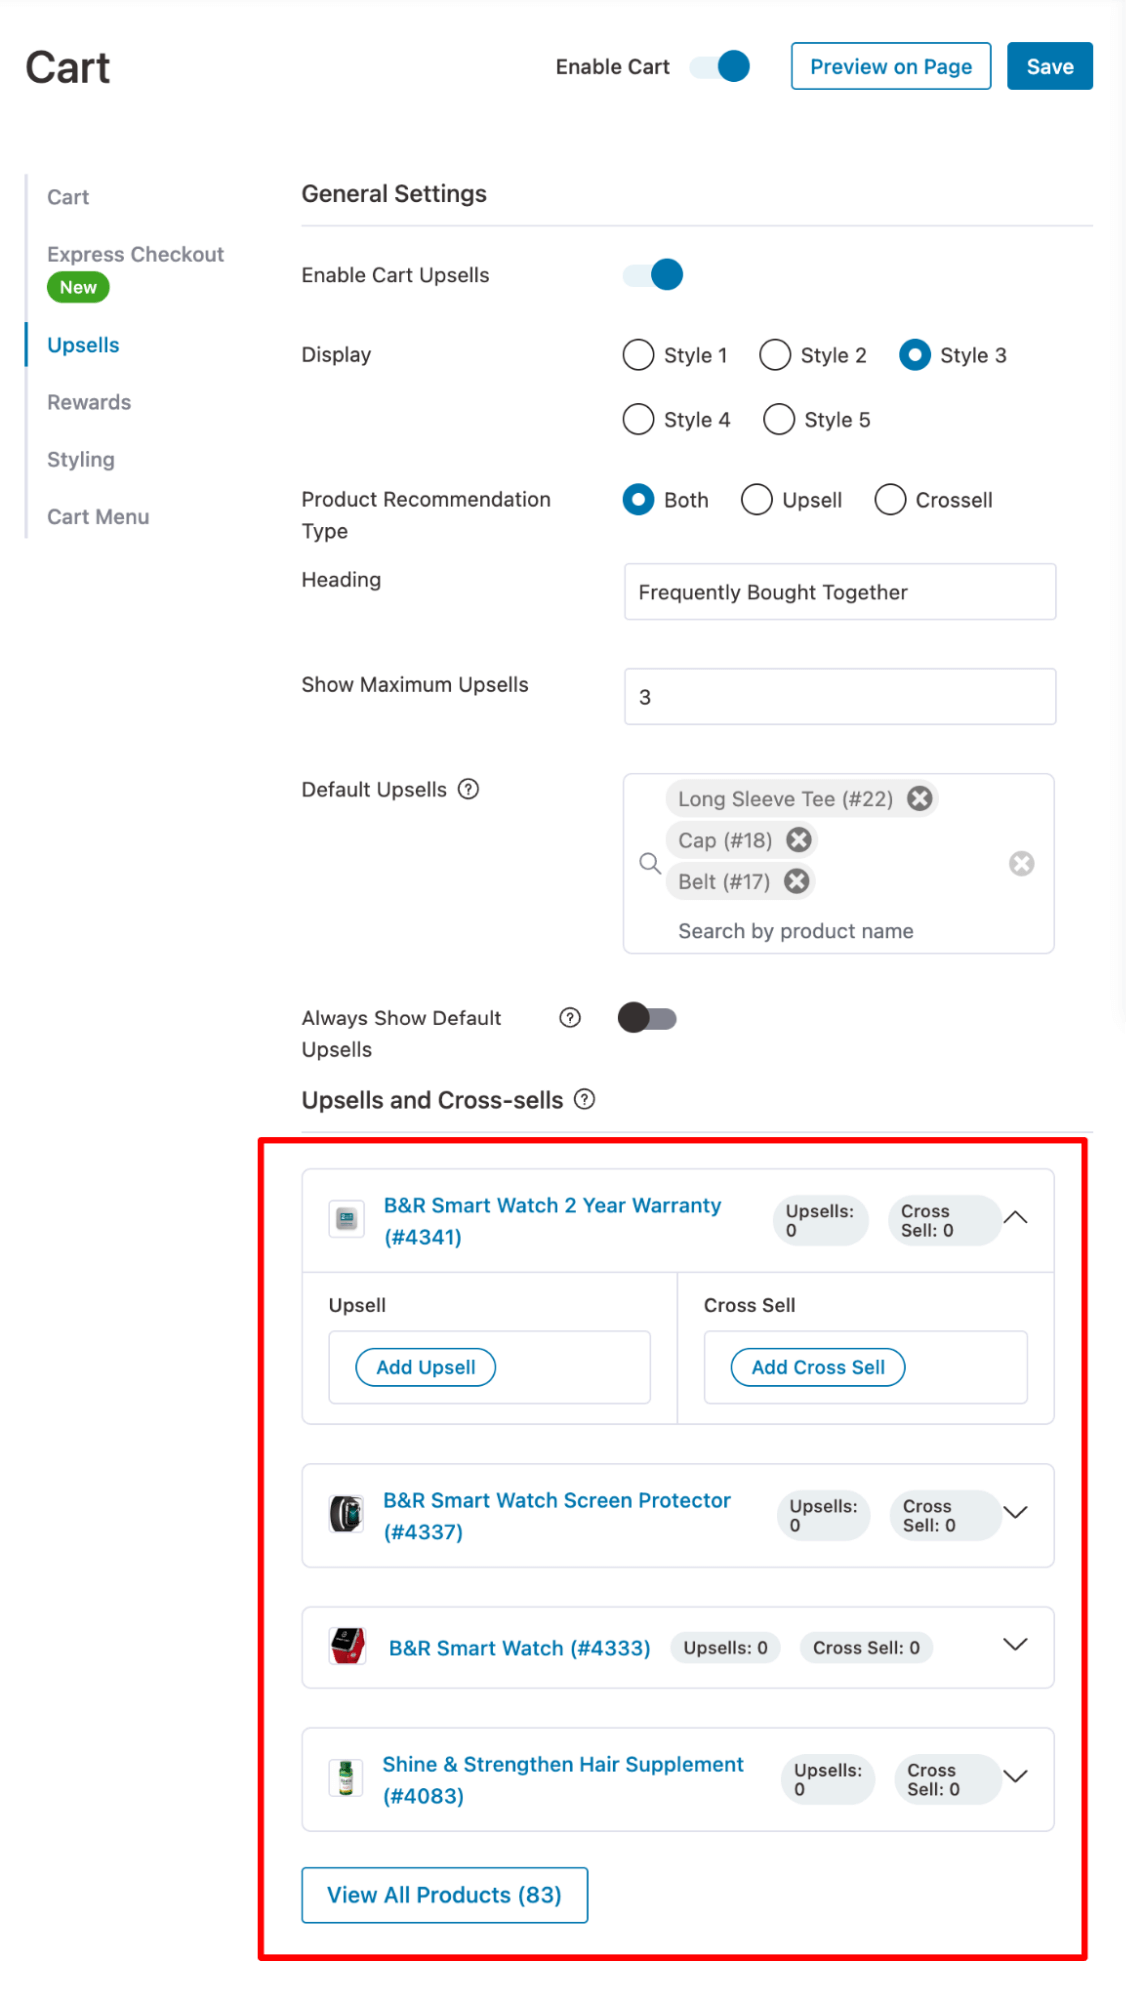
One unique yet useful feature of FunnelKit Cart is its sleek interface, you can assign upsell and cross-sell products right through this plugin settings without having to edit every single product separately.
⭐⭐ To learn more about how to recommend products in a sliding cart, check our blog on WooCommerce cart upsell.
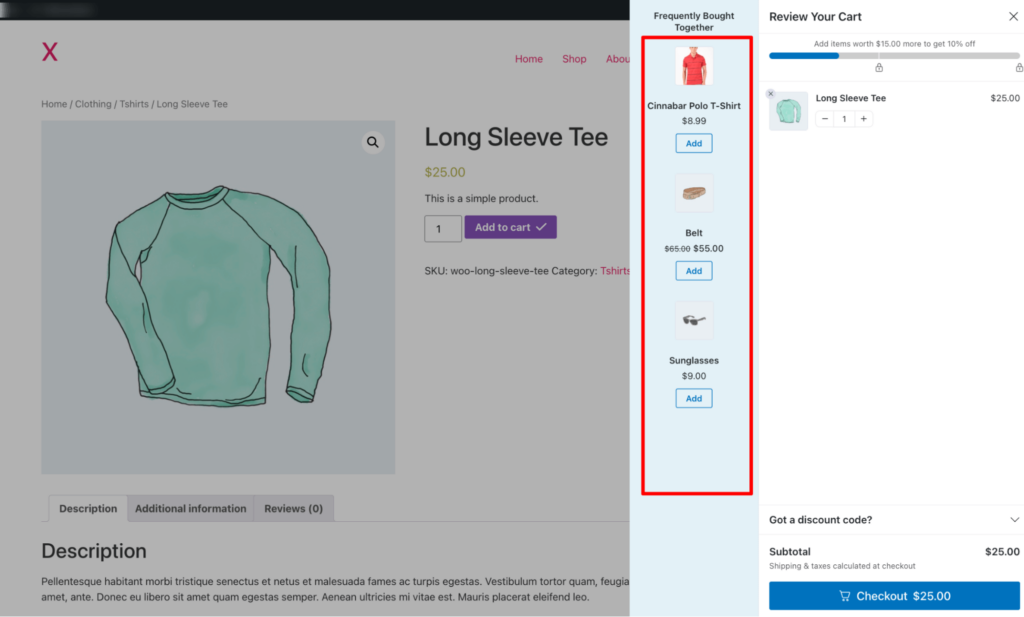
For example, for a round neck t-shirt, you can offer a polo as an upsell, a belt, or sunglasses as a cross-sell.
With FunnelKit Cart, as mentioned earlier, you can offer both cross-sell and upsell product recommendations in the cart.
Users can add products to their cart with a single click on the “Add” button. After that, you can go to the checkout page directly by clicking on the “Checkout” button.
For more details, you can check this video below as well 👇
Step 2: Create a store checkout
To create the rest of the steps of the WooCommerce sales funnel from checkout to thank you, we need to create a store checkout that will replace the default WooCommerce checkout page.
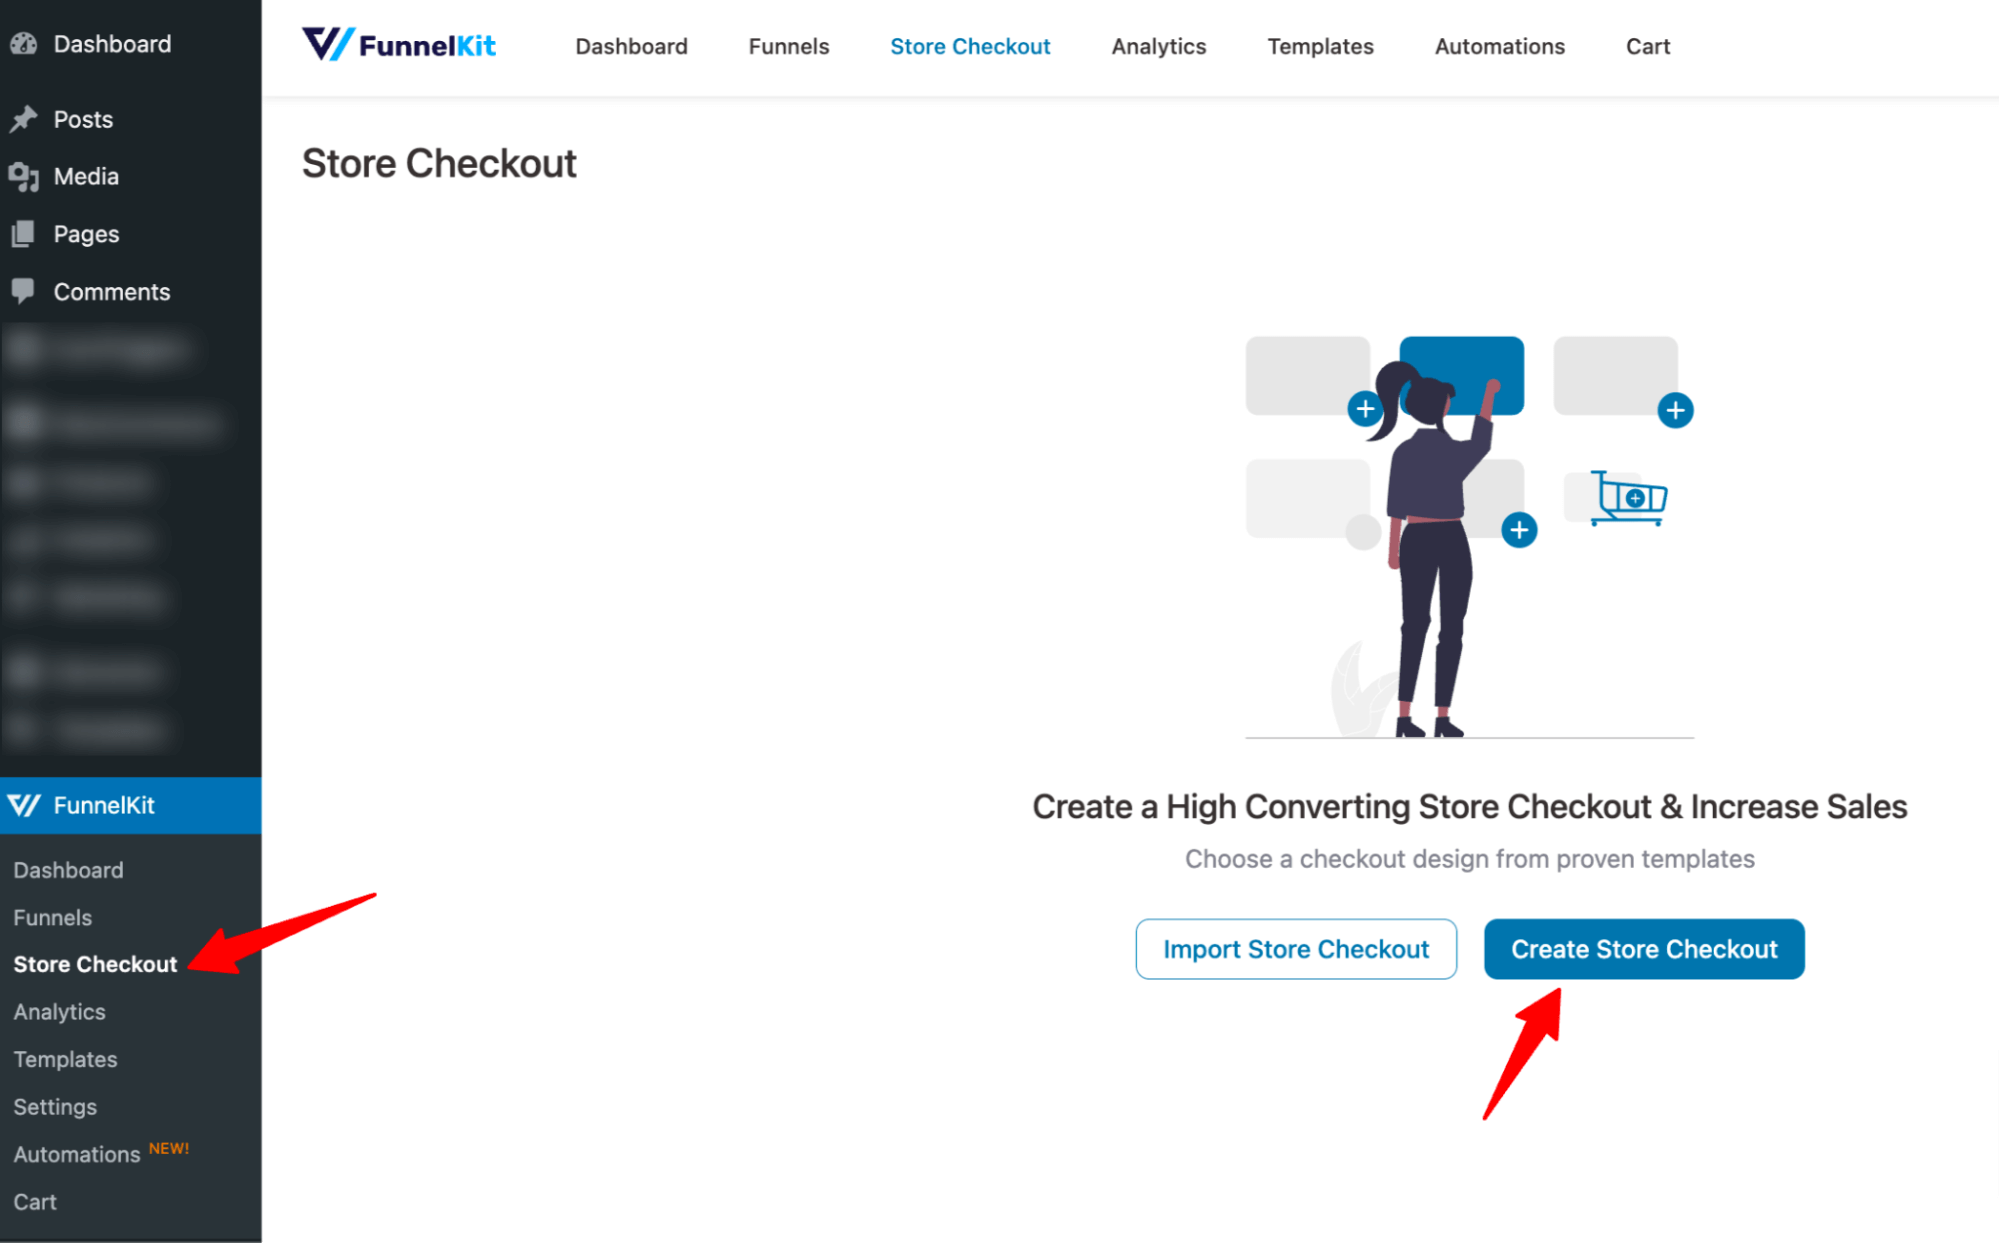
For that, navigate to FunnelKit ⇒ Store Checkout and click on the ‘Create Store Checkout’ button.
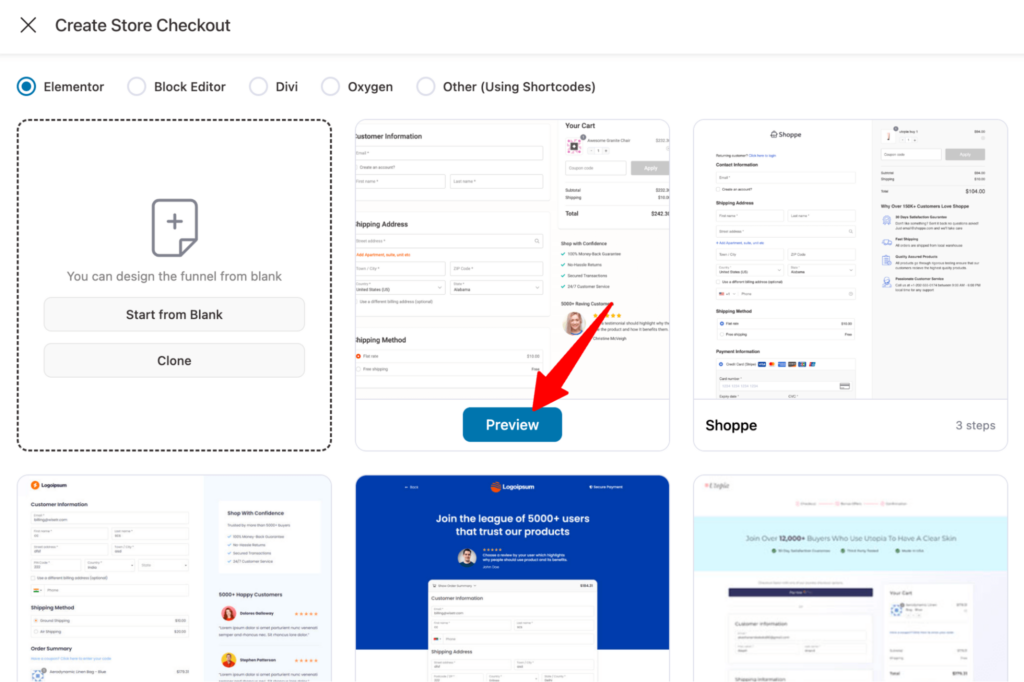
After that, select your favorite page builder. Now you can build your WooCommerce sales funnel from scratch by using one of the prebuilt templates.
Here we are going with the Elementor page builder and using a prebuilt template.
To select a template, hover on the template you like and click on Preview.
Now, choose whether you want a single-page checkout or a multi-page checkout.
After that, click on “Import This Funnel,” provide a name, and click on Done to import this funnel as your default checkout.
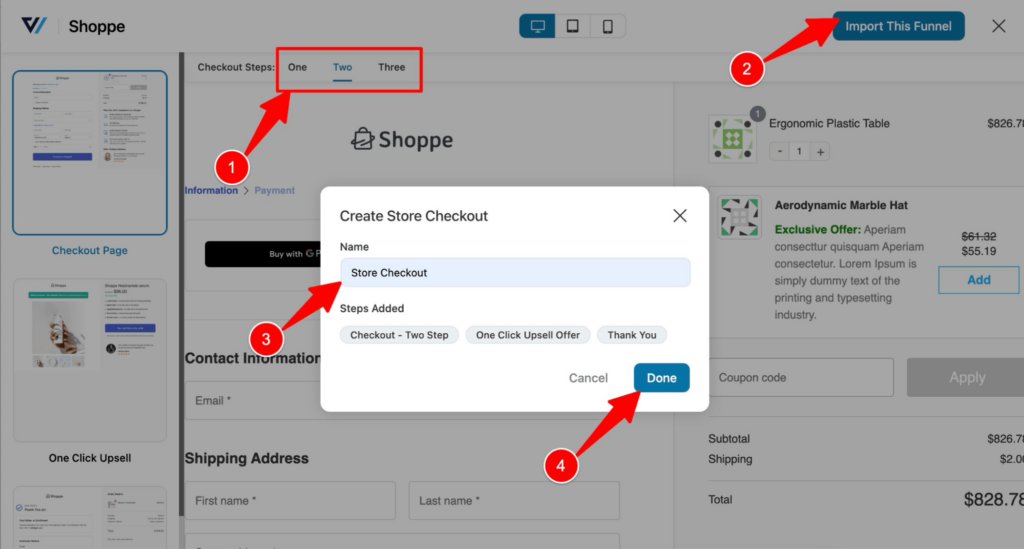
Now a WooCommerce sales funnel with three steps—checkout, one-click upsells, and thank you—should be imported.
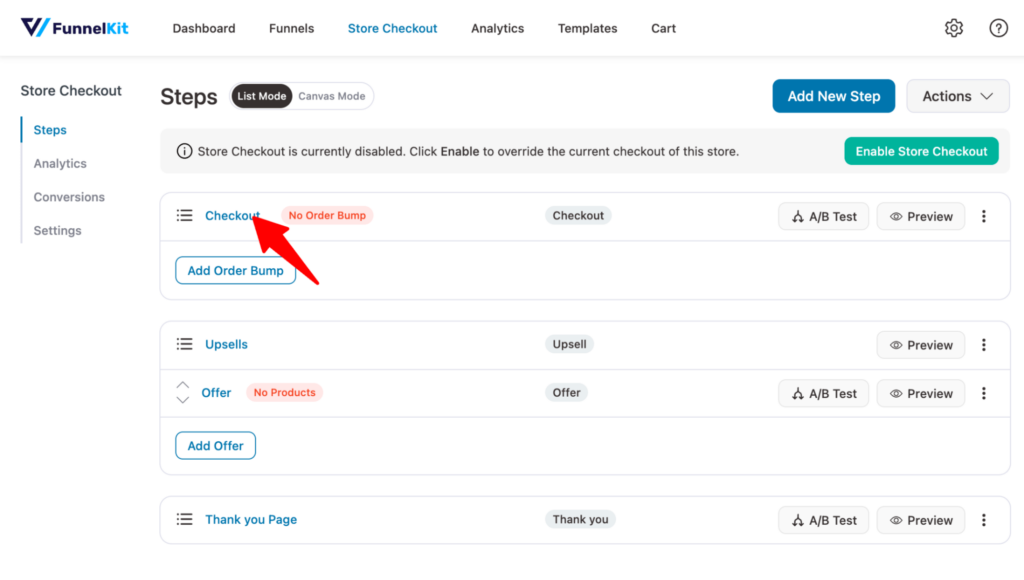
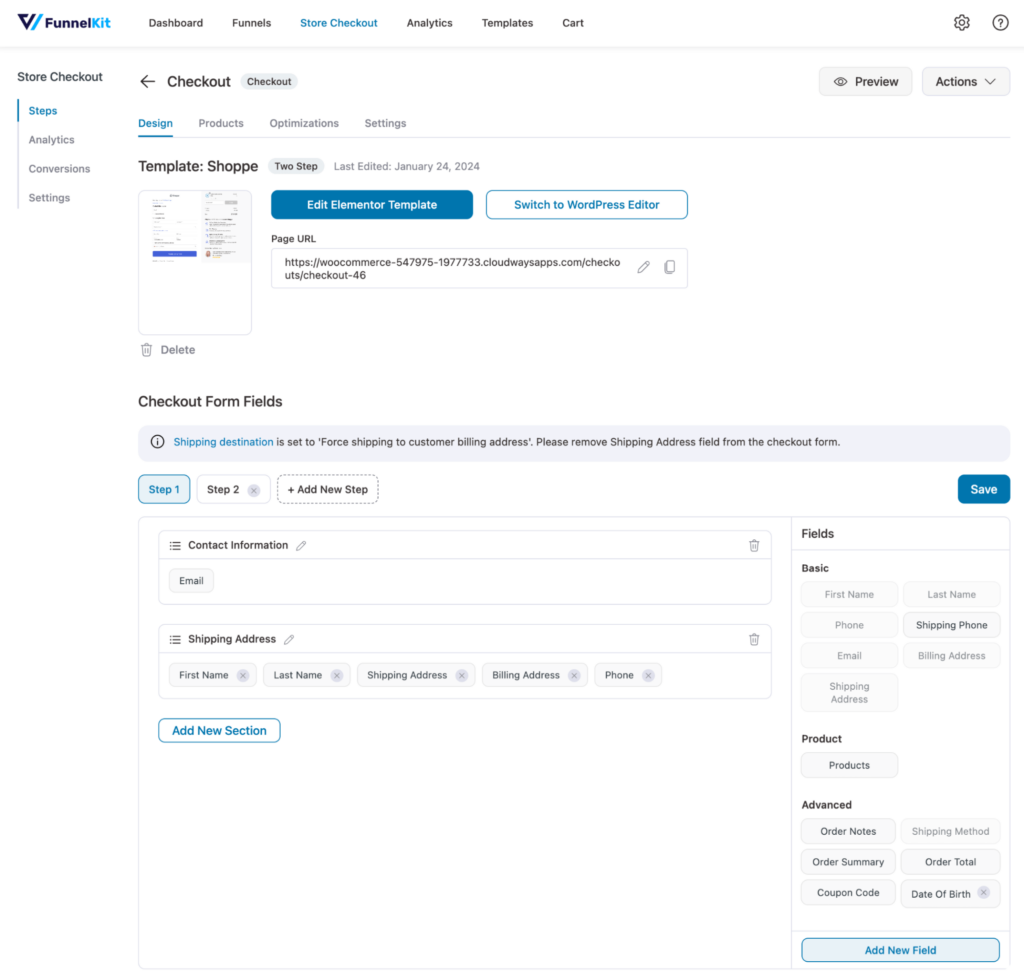
Step 3: Customize the checkout template
Click on the checkout step to edit it.
Now, you can click on the “Edit Elementor Template” button to customize the content and style of the checkout page.
Scroll down to the “Checkout Form Fields” section, you can edit the checkout fields. You reorganize the field and add, edit, or delete any field and sections within the checkout form according to your needs.
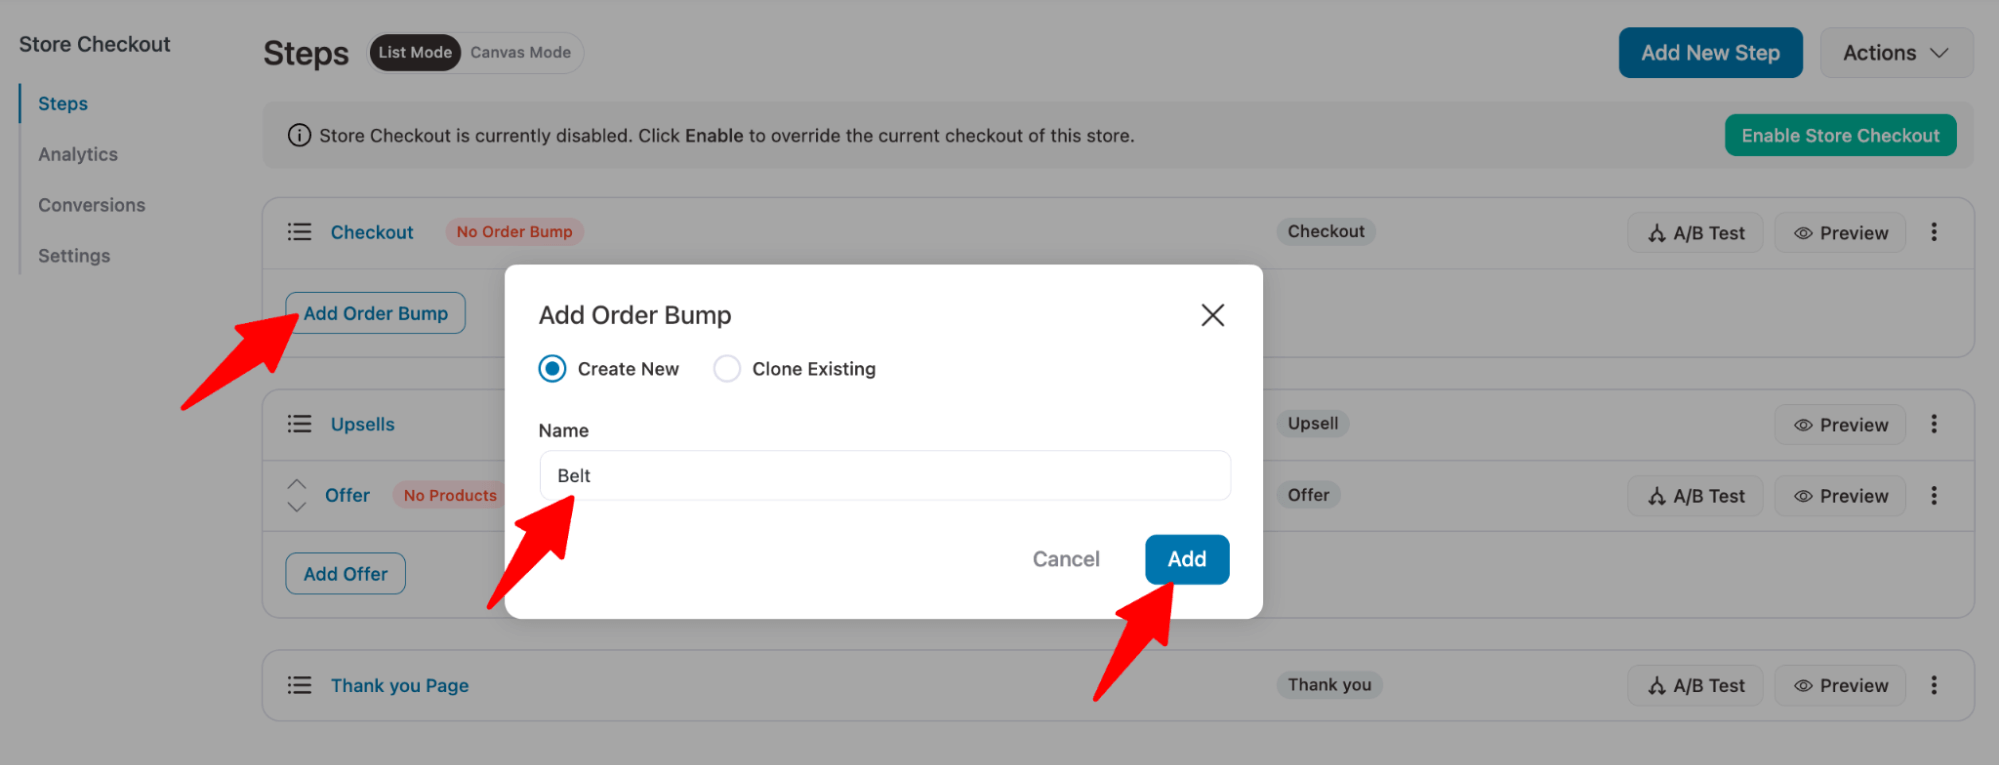
Step 4: Add order bump offers to the checkout page
To add an order bump offer, come back to the store checkout page and click on “Add Order Bump”. After that, provide a name and click on Add.
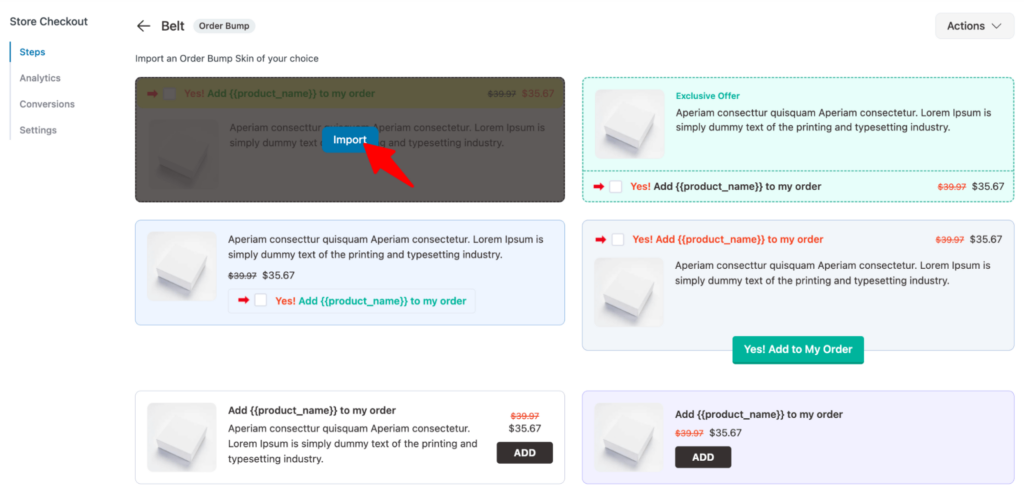
Now you will see different order bump skins, to import the one you like, hover on that and click on Import.
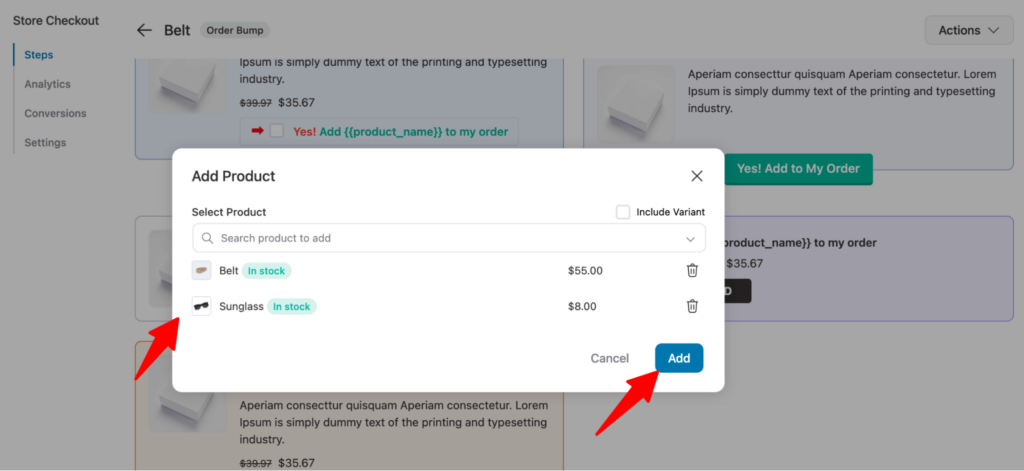
Search for the product and add an order bump. You can offer multiple products as order bumps here. After that, click on Add.
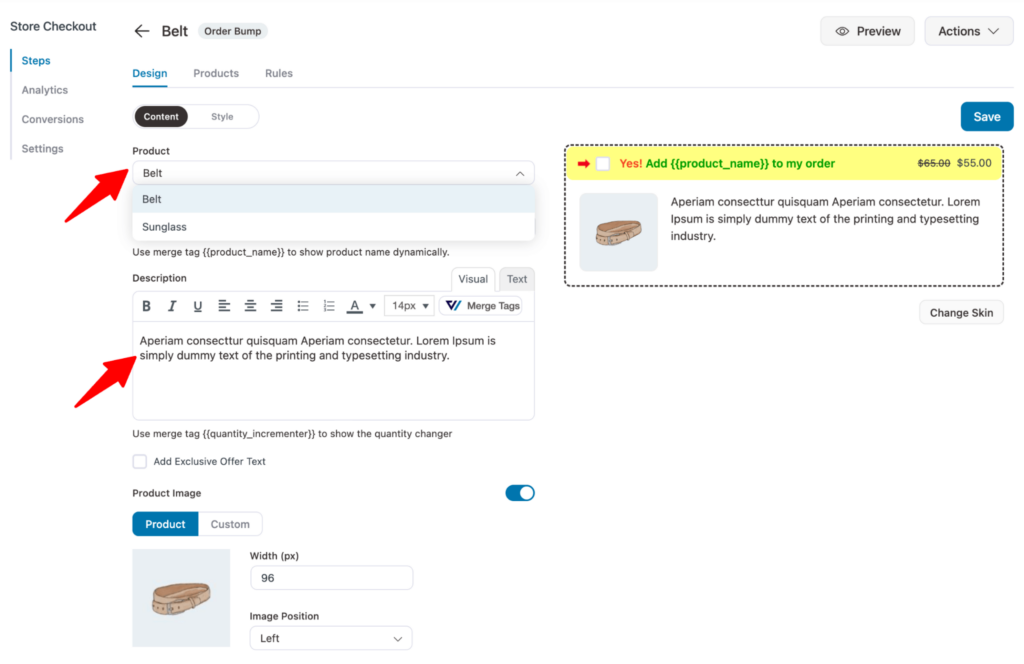
Choose the product, then add the product description, exclusive text, and image size. You can add custom images as well.
Click on “Save” to update.
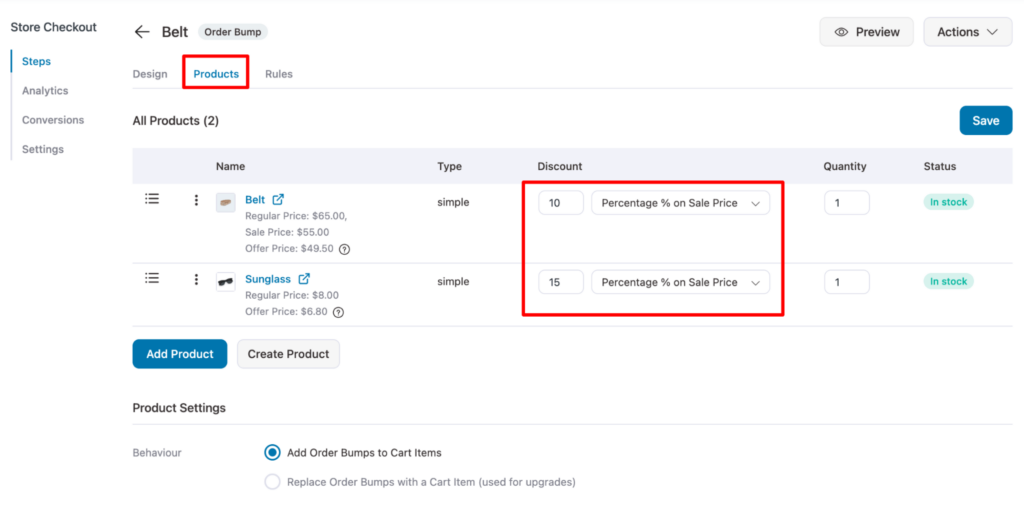
On the products tab, you can offer discounts on the order bump offers.
Now you must be thinking, will this order show up for all the customers that land on the checkout page?
Well, ideally, this offer shouldn’t be visible to all the users because this way, the order recommendations wouldn’t be relevant and hamper the user experience.
With FunnelKit Funnel Builder, you can solve this as well. You can set conditions on when to offer the order bump.
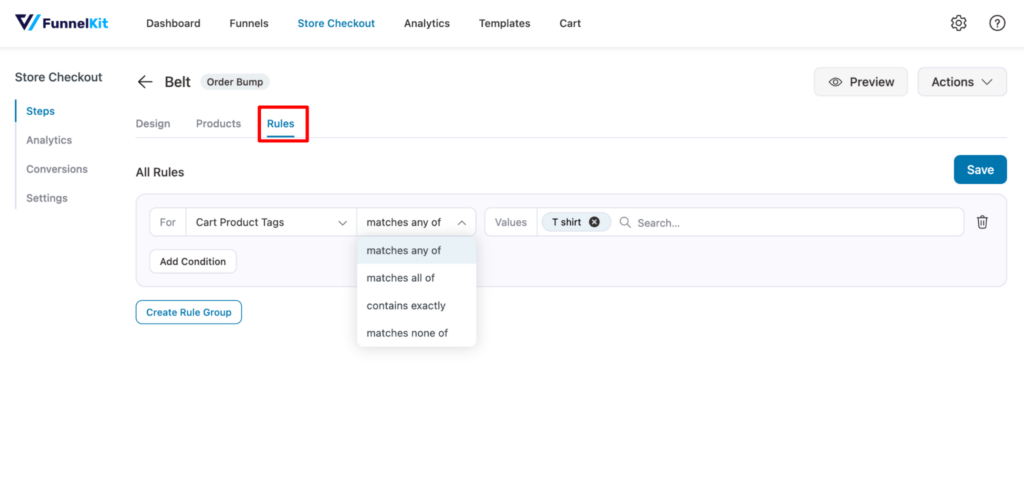
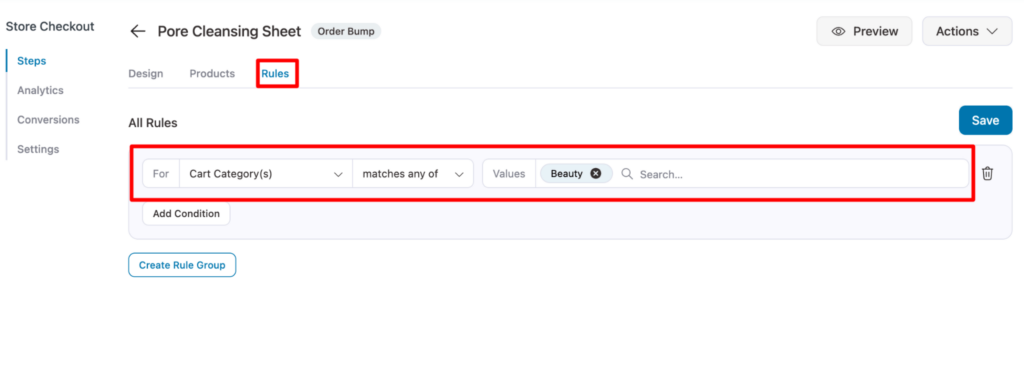
To set the condition, move to the Rules tab. Here you can set up conditions based on different metrics like Cart Total, Cart Category, Cart Item Count, User Role, Cart Product tags, etc.
Here we will use Cart Product tags. Using this, we can offer different order bumps based on product tags added to those products.
To set the condition, select Cart Product tags, then choose the match style, then search and add the tags.
Here we set the rule that if cart items have the product tag t-shirt, then this order bump will be offered.
Note: You can add multiple order bumps based on the products you offer on your WooCommerce store.
And use different rules like “Cart Product tags,” “Cart Category,” etc., to offer different order bumps for different products.
For instance, if you sell skincare like face wash, scrubber, etc., along with clothing, you can add another order bump like Pore Cleansing Sheet that will only be offered if users use any products from the beauty category.
You can add as many order bumps as you want and effectively offer relevant product recommendations using the rules feature of FunnelKit Funnel Builder.
For more details, check our blog on WooCommerce order bump.
Here is a preview of the multi-step checkout page with order bumps:
Step 5: Add one-click upsell
When you import the template, it also imports a one-click upsell offer. All you need to do is edit that and add the product you want to offer.
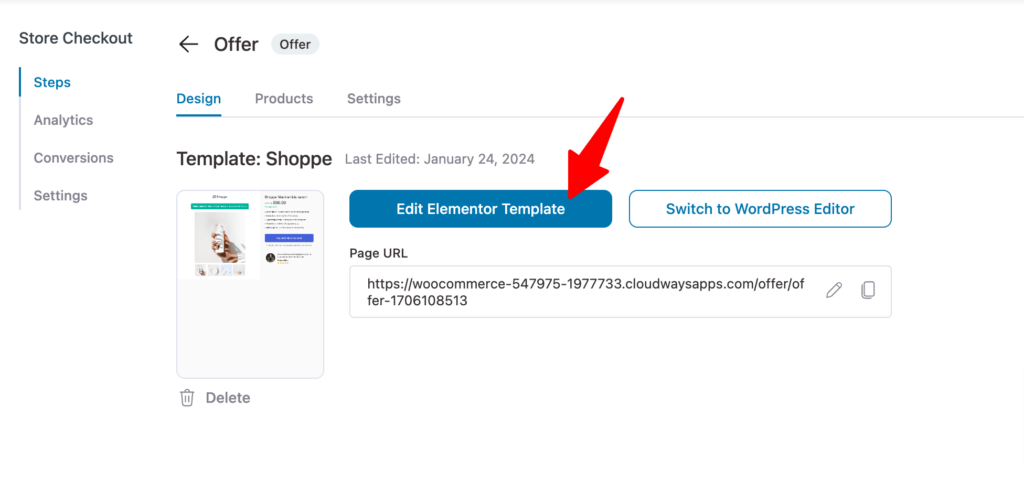
First, click on the existing Offer.

You will land on the Design tab; here, you can click on the “Edit Template” and customize the design and content of the upsell template.
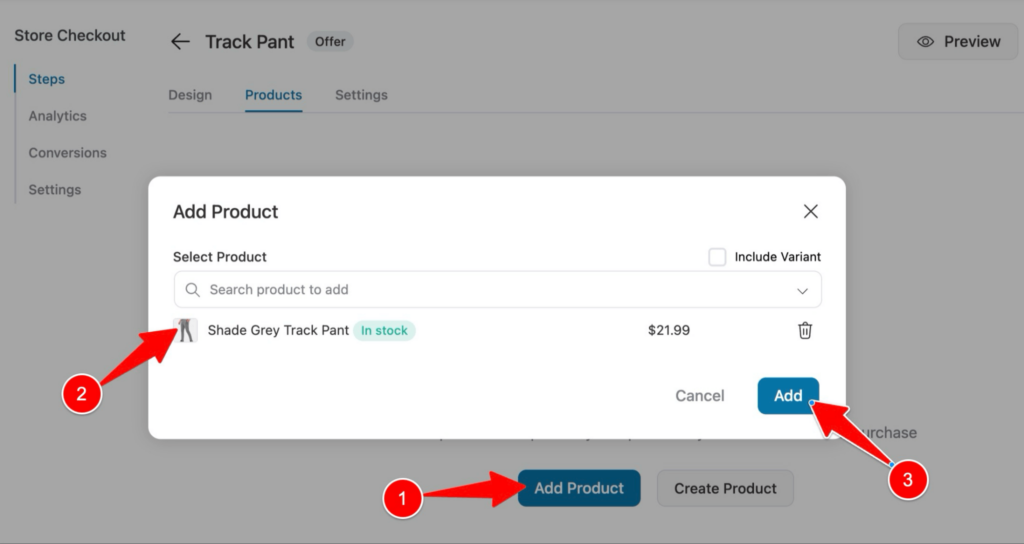
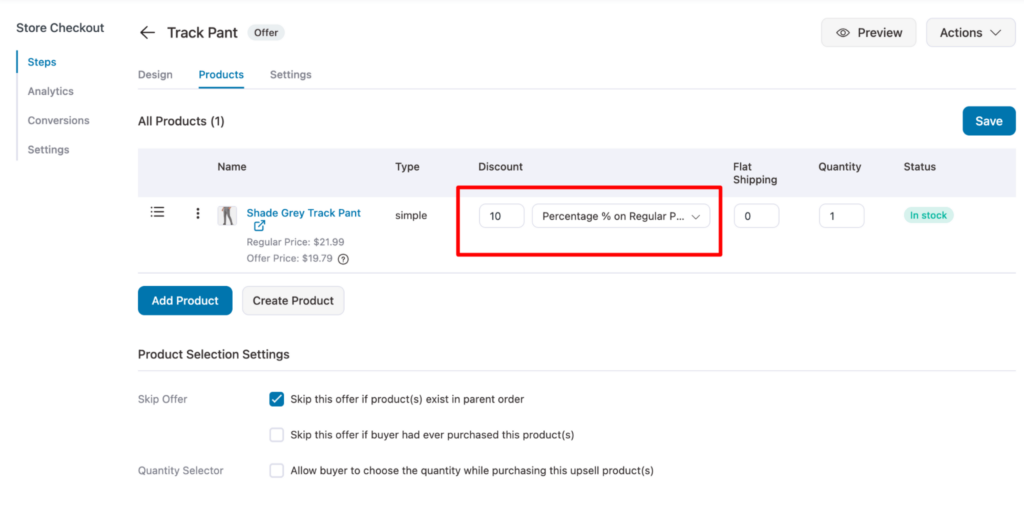
Move to the “Products” tab. Here you can add the upsell offer. For that click on “Add Product”, search and add product and click on Add.
Note: You can click on the upsell offer name and change it for convenience. Here we have renamed the offer as track pants to match the product we are offering.
Now you can add a discount to the offer as well. After that, on the “Product Selection Settings”, you can set different settings like:
- Skip Offer: Check these options so the store won’t show this upsell offer to users if the product already exists in the order or if they purchased it already in the past.
- Quantity Selector: You can check this option to allow users to select quantity as well.
Make sure to click on Save to update the settings.
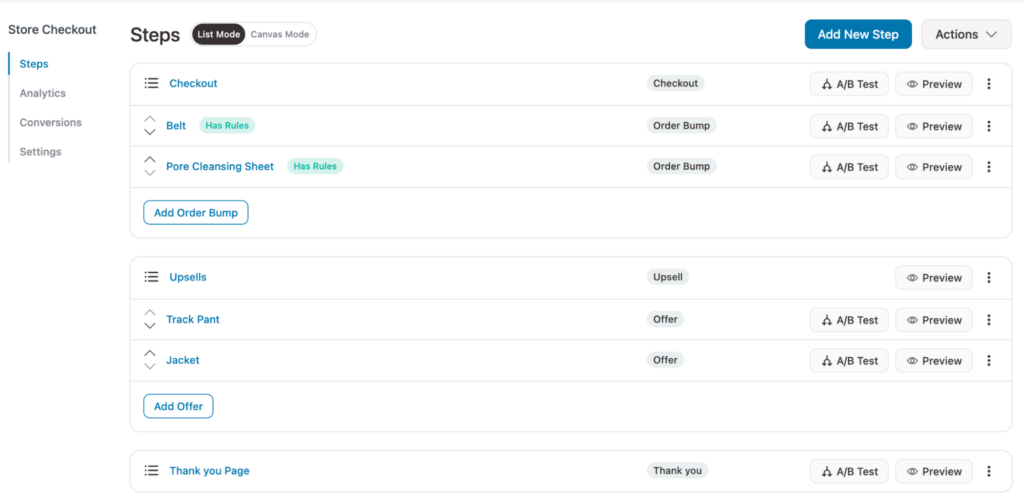
You can offer multiple upsell offers as well. On the sales page drag and drop to change the order. Here we have added another upsell named Jacket.
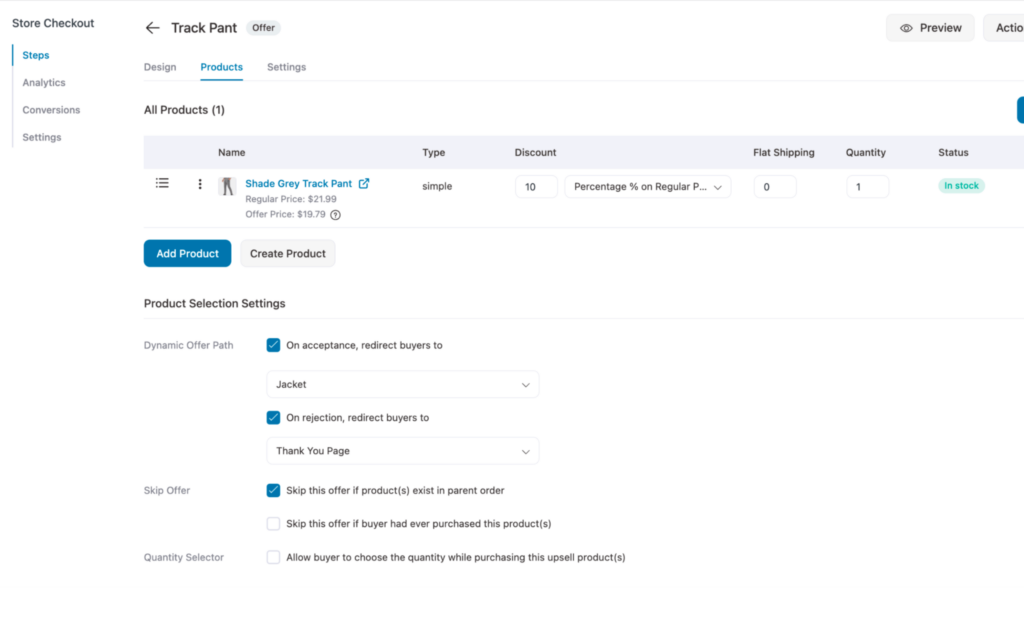
Once you add multiple upsells, on the top placed upsells, you will get additional product-related settings “Dynamic Offer Path” so the system knows what to do if users reject/ accept the first order.
Here for On Acceptance, we will redirect buyers to the next upsell offer Jacket, and incase they reject they will be redirected to the thank you page. This is how upsells and downsells work.
Again like Order bump, we need to set rules on which upsell to offer for which base product to maintain relevancy. For this come back and click on the Upsell step.
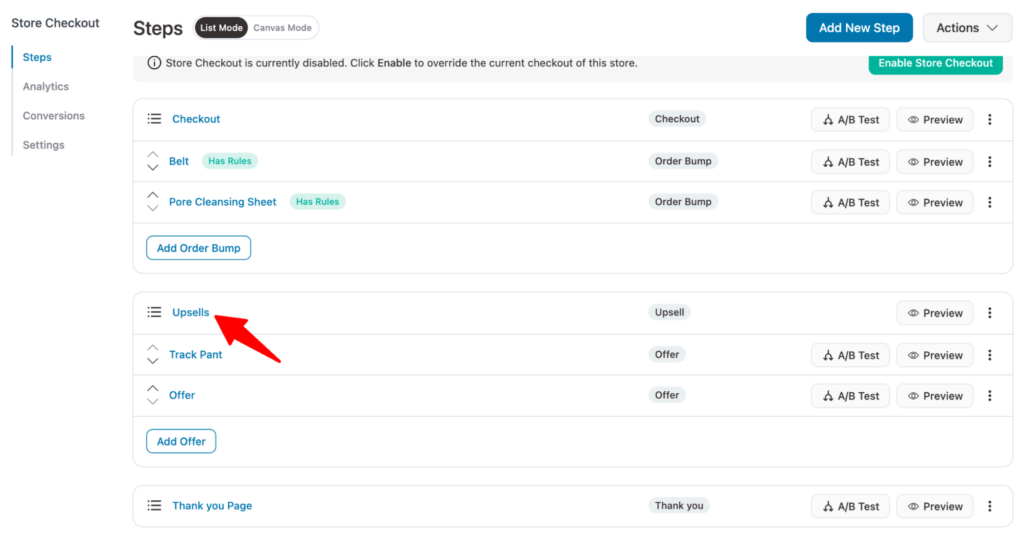
Here you can set the different rules. For instance, if the base product is from the “Tshirts” category then this upsell offer (track pants and Jacket) will be shown to them.
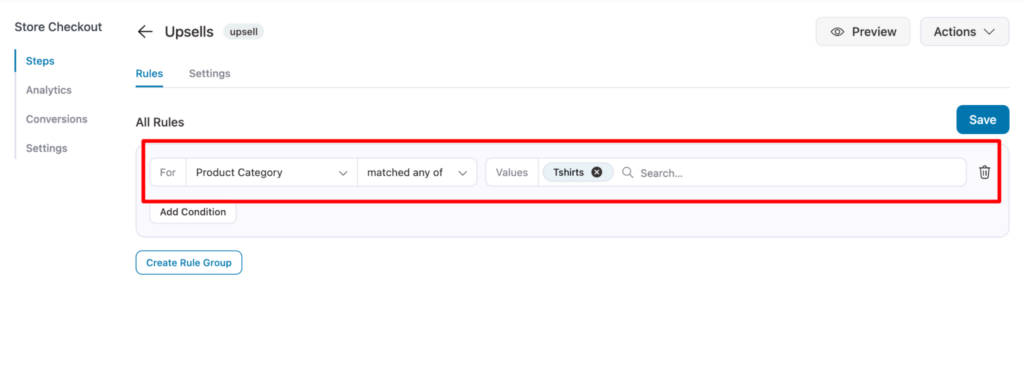
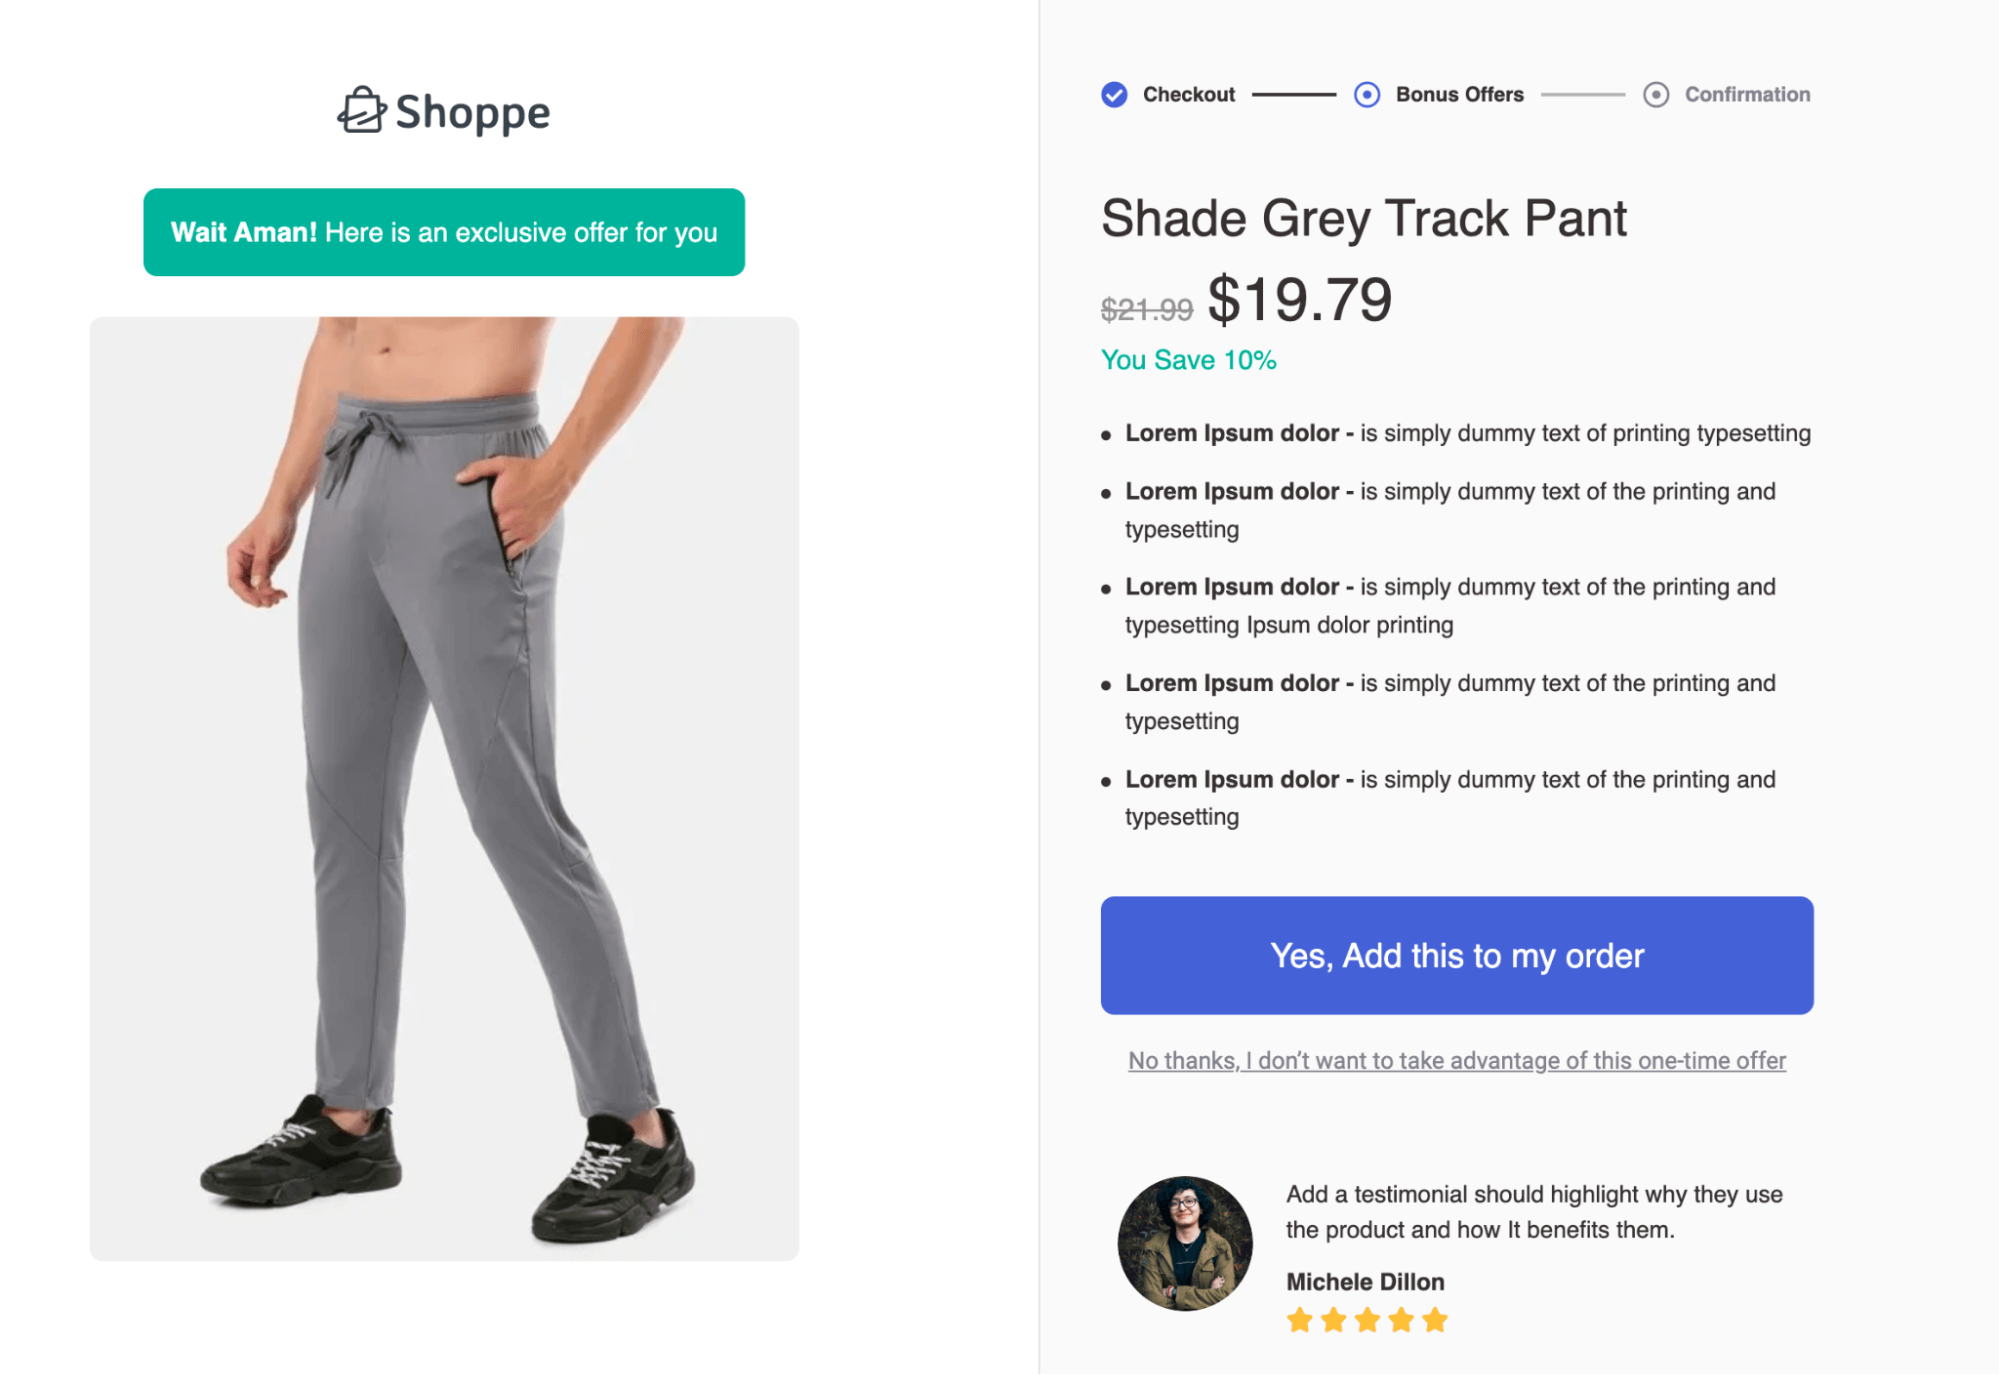
Here is what one of the one-click upsell offer looks like:
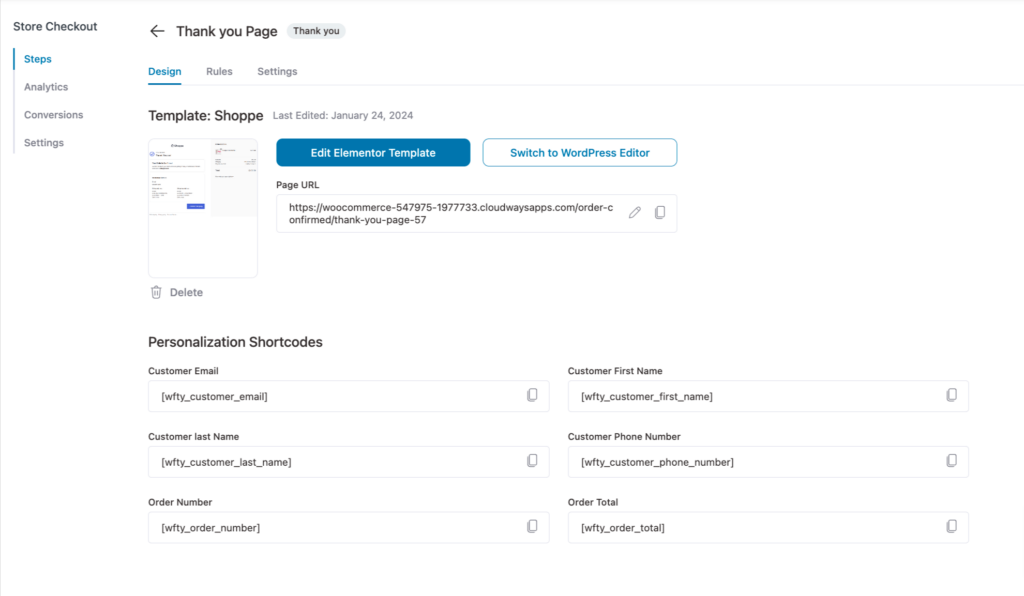
Step 6: Customize the thank you page
Like the other pages, you can customize the thank you page as well.
Here is a preview of the thank you page:
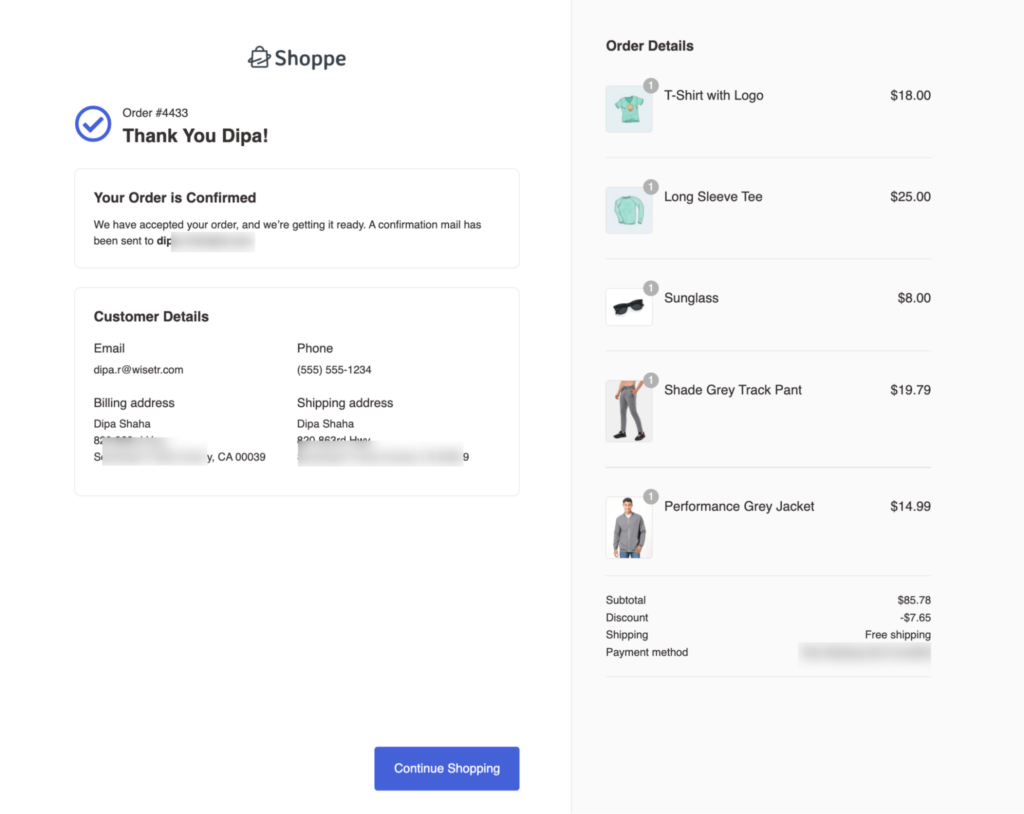
Note: You can see the power of the WooCommerce sales funnel in the screenshot above. Users can land on a product page worth $18.00 and end up purchasing products totaling $85.78, almost 5x more times.
Step 7: Enable the store checkout
The last step is to enable store checkout. For that, click on the Enable Store Checkout button.
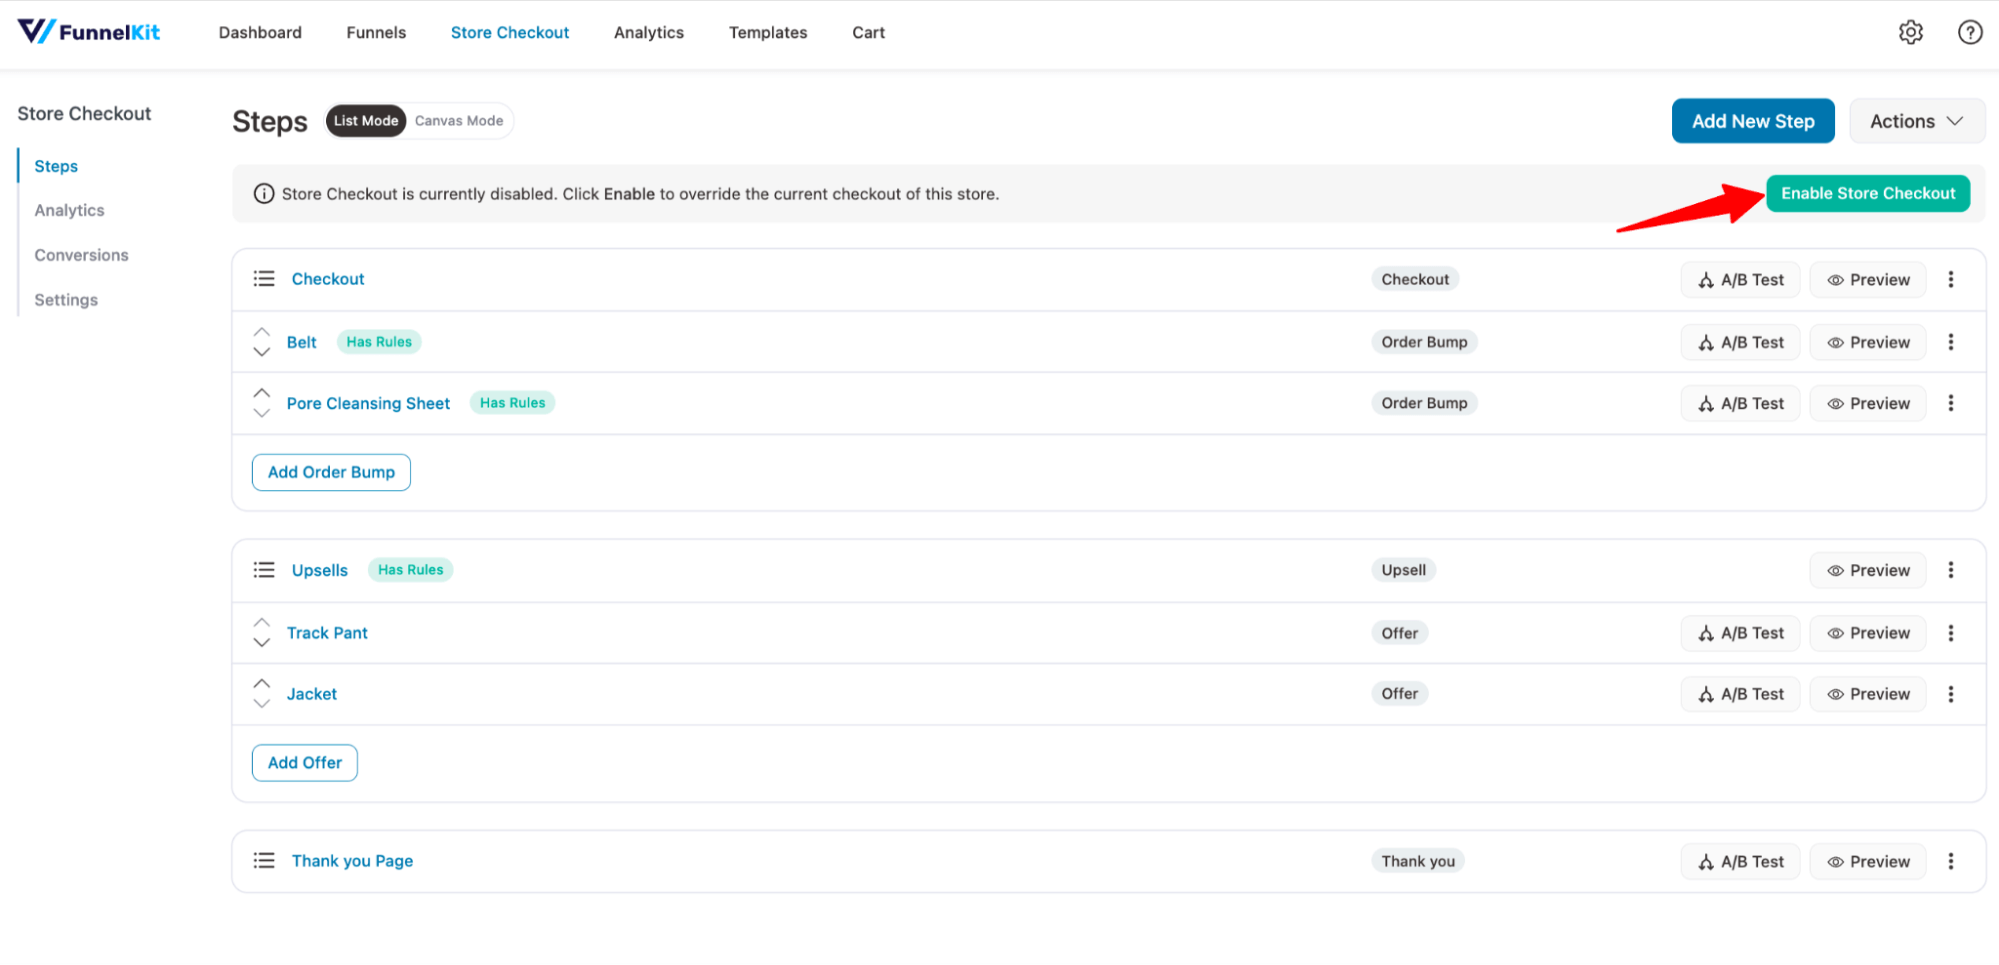
Now, your WooCommerce sales funnel is ready!
🔔 Note: We will cover how to continue the sales funnel with email communication after the order confirmation step later in this blog.
When and How to Create a WooCommerce Sales Funnel for a Single Product?
So you should build WooCommerce Sales Funnels for your store and add all the relevant Upsells along the path described above.
Now there may come a time when you have a newly launched product or have a specific product with a special discount for a specific segment of your customers or you are running a highly targeted Facebook ad that talks about a specific product.
In such situations, you should create a separate sales funnel for individual products that will take you to a custom-made product landing page rather than the default product page. Because It makes sense to create a landing page and make them land on a dedicated page and pitch only specific products.
However, the rest of the steps stay quite similar.
Here is a visual representation of how a WooCommerce sales funnel for an individual product works:
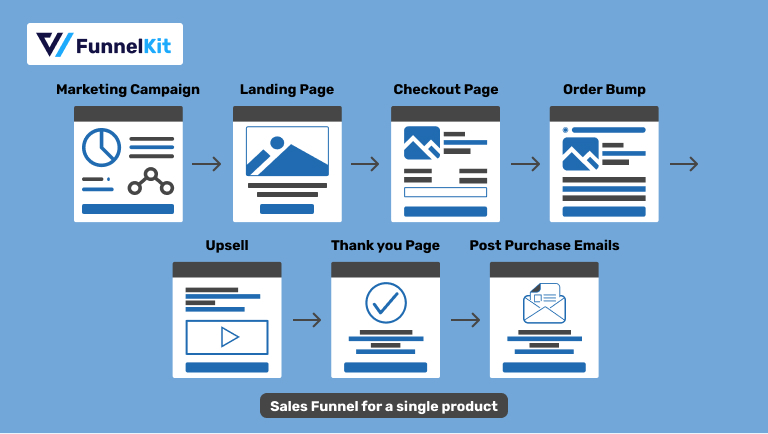
The process of creating a WooCommerce sales funnel for a single product is similar to creating a global checkout. You just need to create a separate funnel for each product.
⭐⭐ To learn about the process of creating a sales funnel for a single product, read our blog on how to create WooCommerce sales funnel for a single product.
Not just physical products, they can do in cases of digital products too - include this and hyperlink to digital product posts.
How to Measure the Performance of a WooCommerce Sales Funnel?
FunnelKit Automations comes with a clean interface that provides comprehensive insights into the performance of the WooCommerce sales funnel in a meaningful way.
You can check the performance of your global sales funnel or individual sales funnel separately in a structured way.
📈Check the performance of the global sales funnel
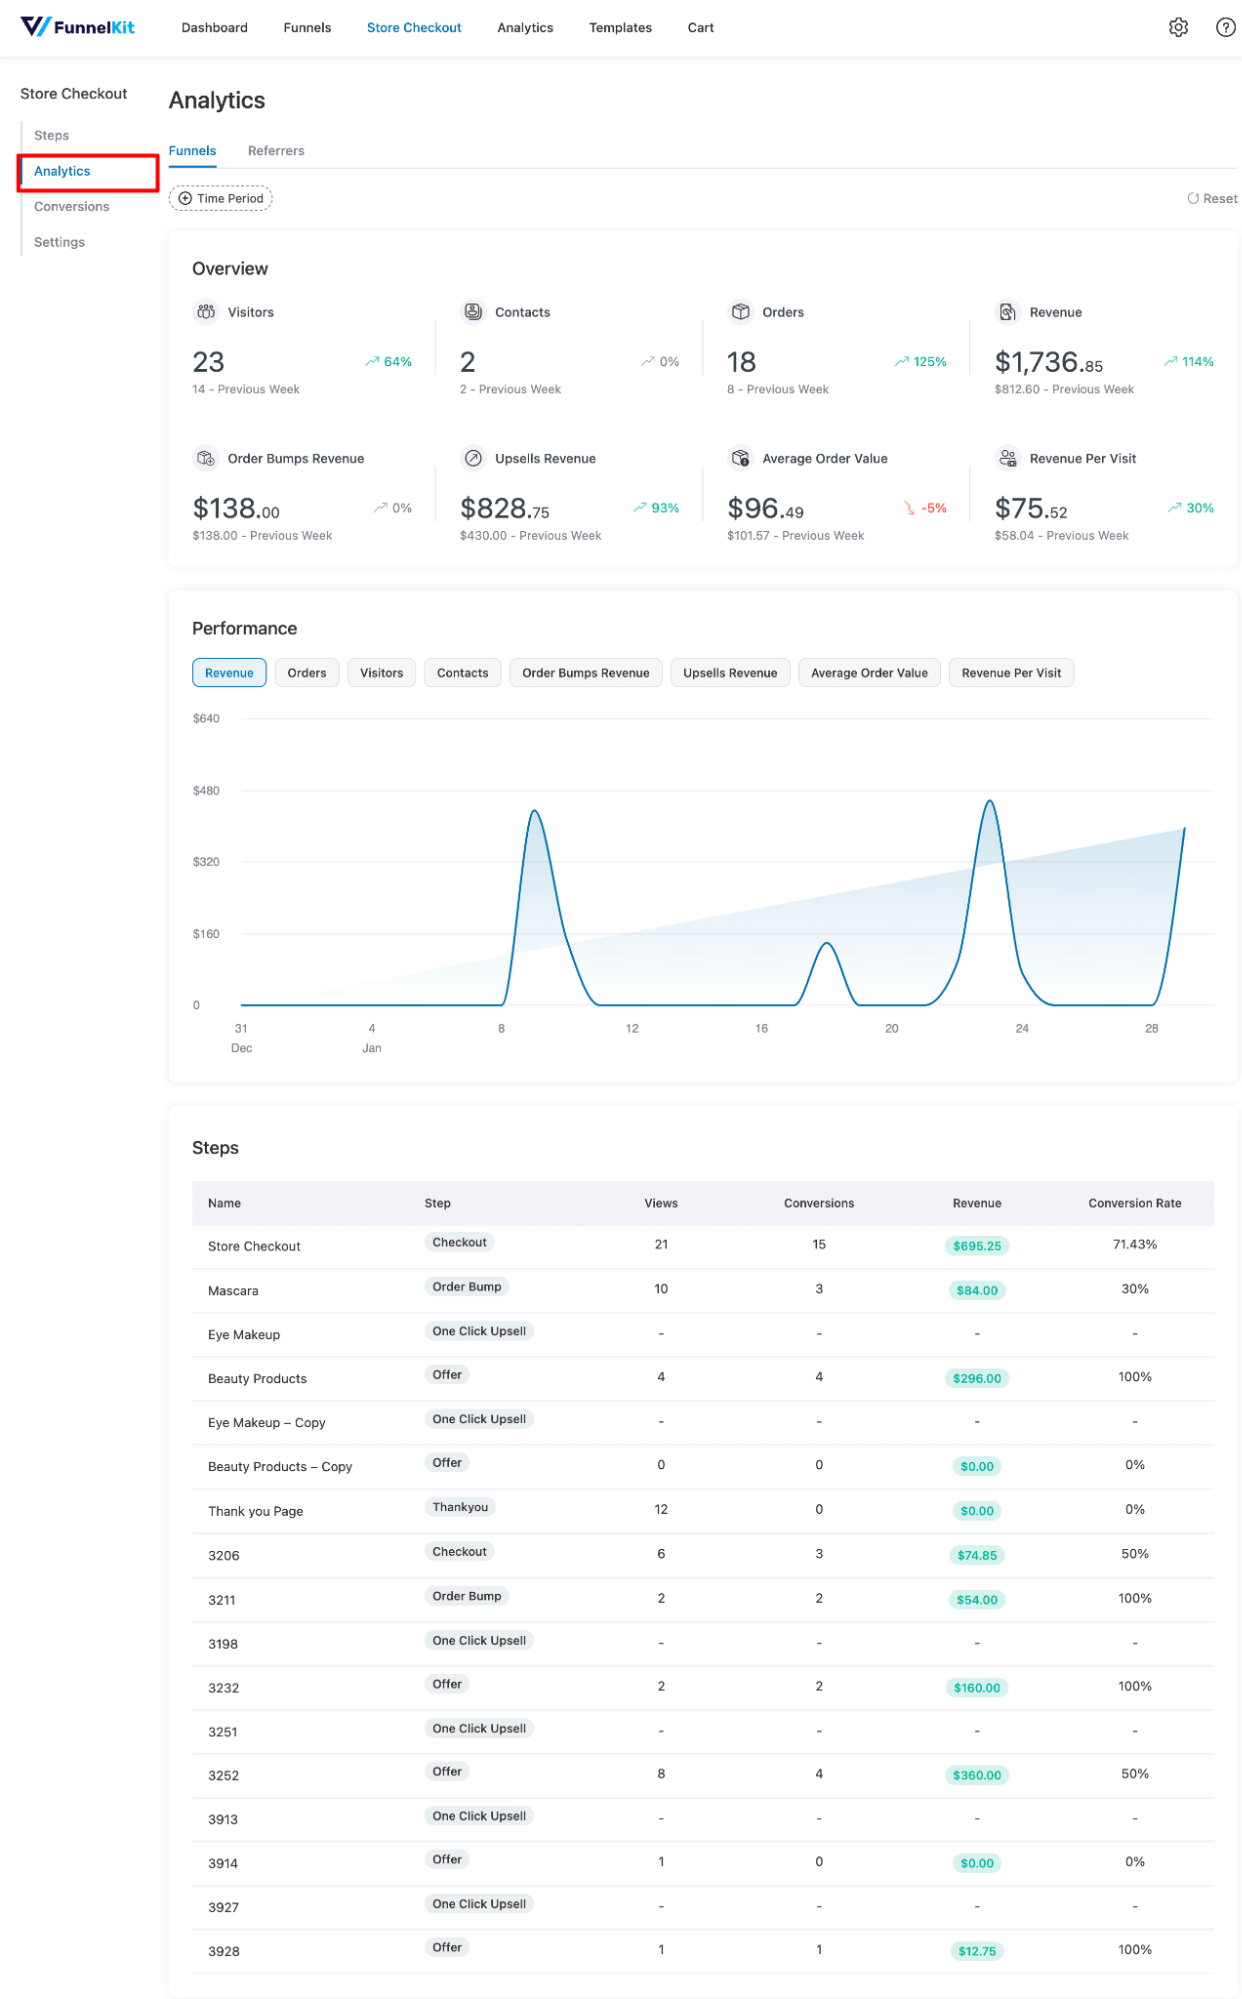
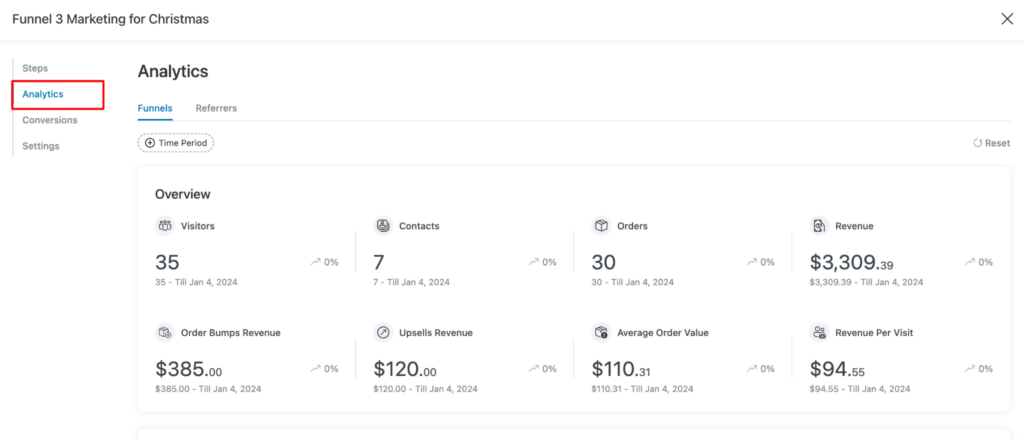
Navigate to FunnelKit Funnel Builder ⇒ Store Checkout and then to the Analytics Tab.
Here you will see the number of visitors, contacts, orders, revenue, order bumps revenue, upsell revenue, average order value, and revenue per visit.
Note: By default, FunnelKit shows data from the beginning to the current date. You can change the time period to see specific data for a specific timeframe.
If you scroll a little, you will find all the data in the form of a graph Below that, you can also find the different data like view, conversions, conversion rate, and revenue for each step.
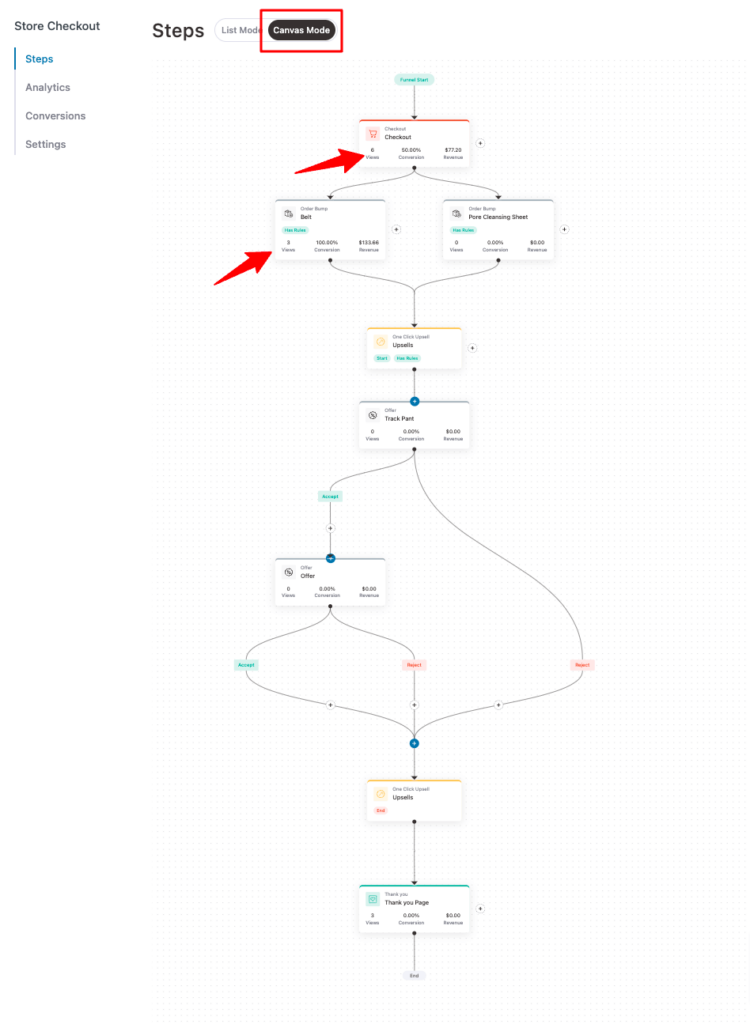
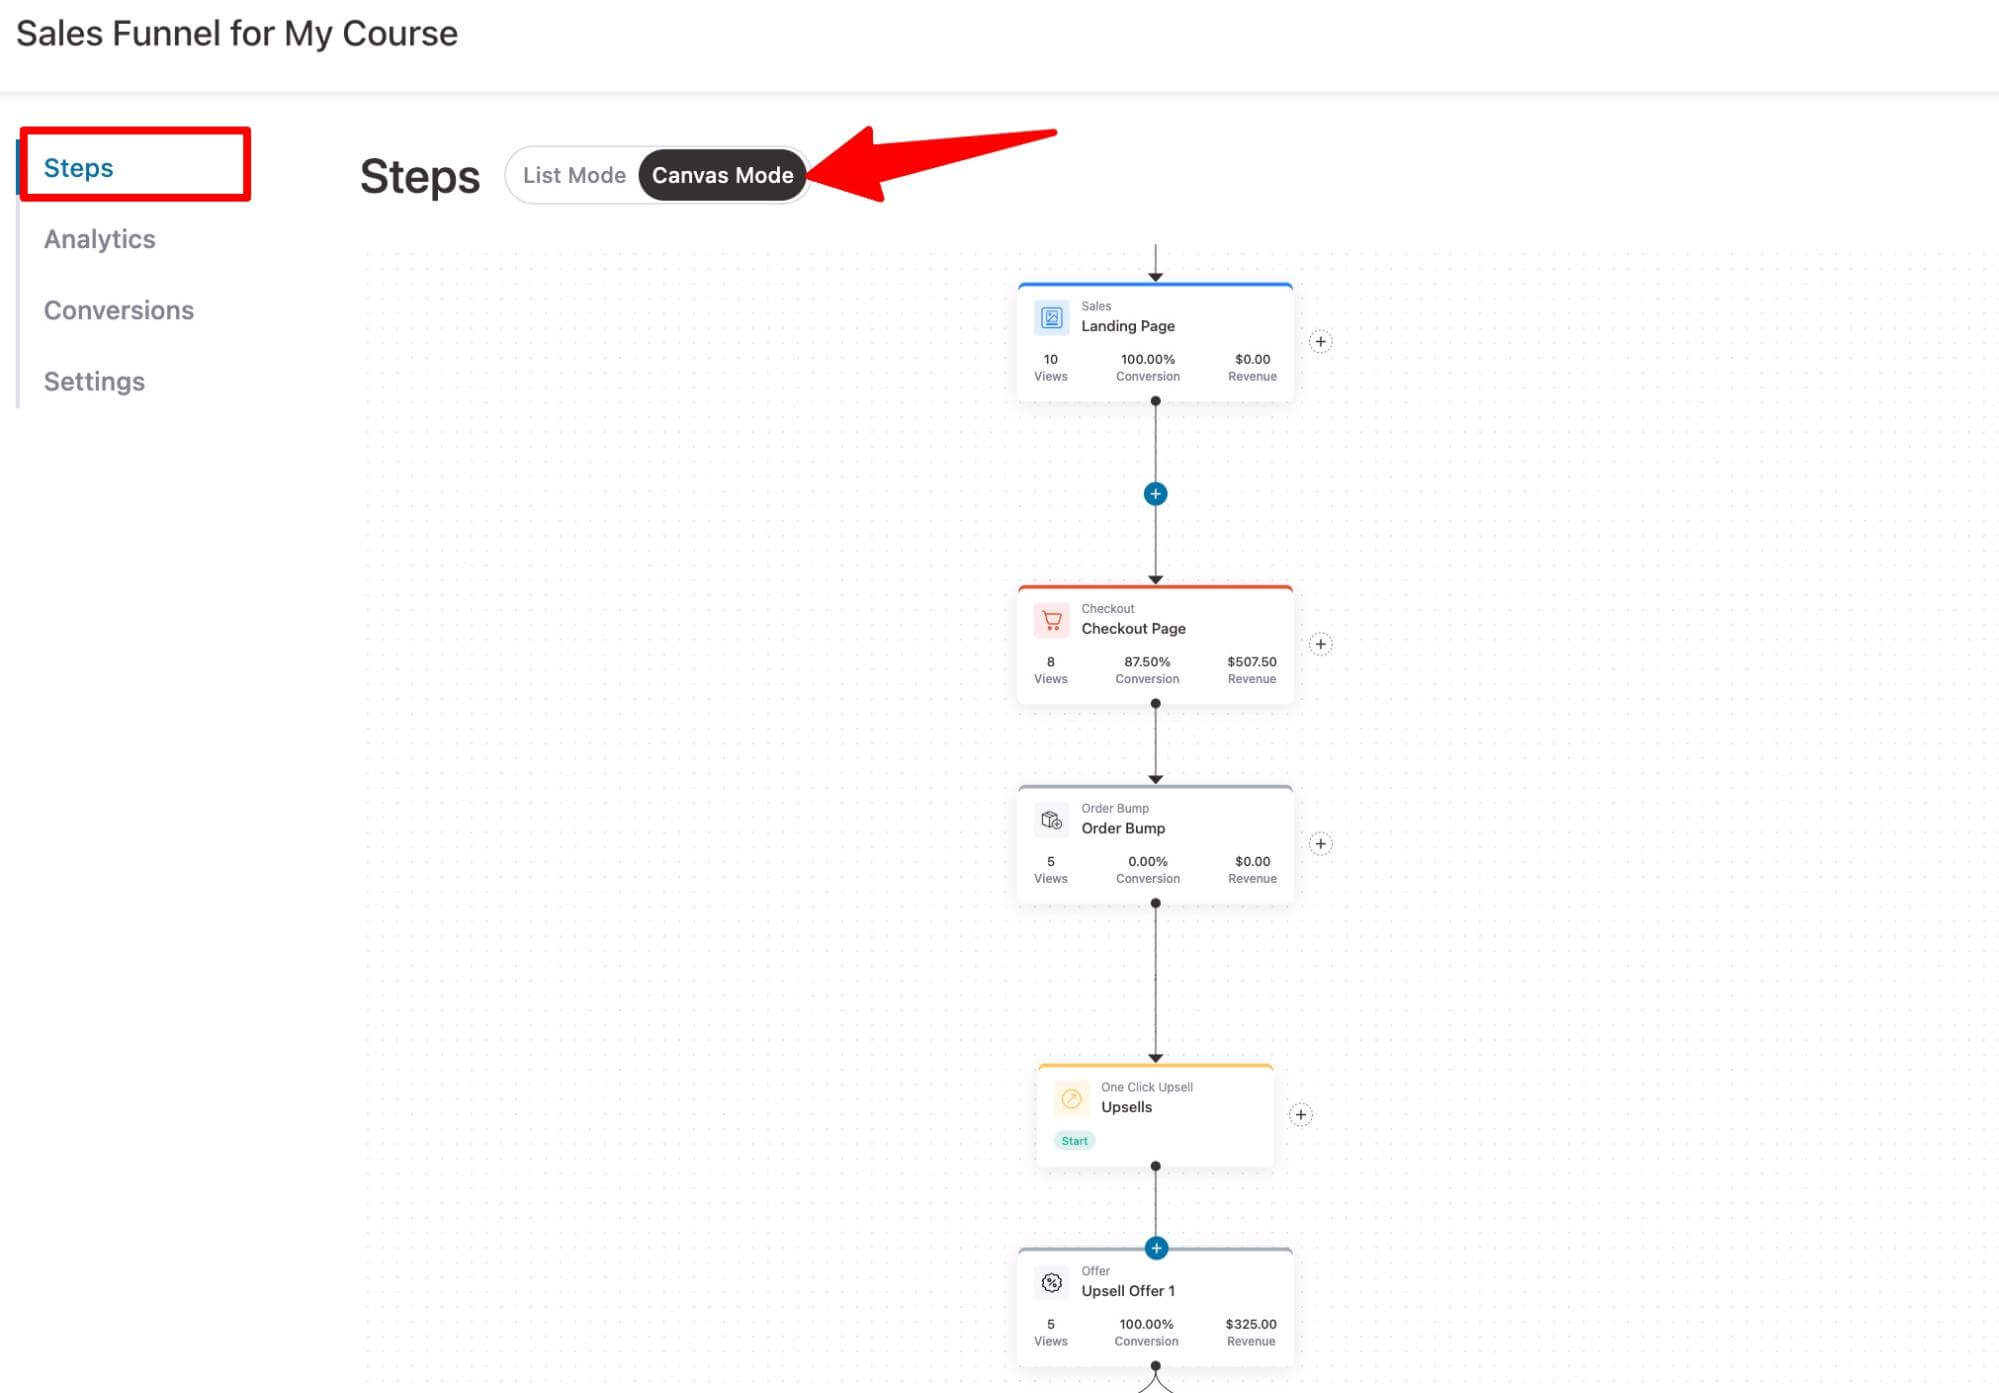
Another way of checking how different steps of your WooCommerce sales funnel are performing is to use the new Canvas mode by FunnelKit Funnel Builder.
For that, go to the Canvas tab on the funnel page. Here, you can check out views, conversion, and revenue for each step.
📈Check the performance of individual sales funnel
To check the performance of each individual sales funnel, you need to go to that funnel and then move to the Analytics tab.
Here like the Global funnel analytics, you can see the performance in the form of data and graphs
With the sales funnel also, you can go to the steps tab and move to the Canvas mode to see the in-line analytics for each step of the funnel.
As you have seen, it's really easy to measure the performance of the sales funnel using FunnelKit Funnel Builder.
What if Someone Abandons the WooCommerce Sales Funnel in the Middle?
As much as we would want every person who enters the sales funnel to convert it may not happen with every user.
Some may abandon the cart in the middle after adding products to their cart.
Does that mean, you lose the customer for good?
No! You can still get customers to come back and complete the purchase with the power of abandoned cart emails.
But before you can send emails, you need to track the user's email and their order details so you can send them emails later.
To track cart abandonment and recover them, you need to install and activate FunnelKit Automations.
With this plugin, you can enable cart tracking, set the wait period, cool period, lost cart (days), etc to activate the cart track.
After that, you can set up automation to send reminder emails to the user who abandons their cart and encourage them to come back to complete the order.
You can send multiple emails after different intervals. In addition, you can offer a discount for a limited time if they complete the order successfully to motivate them to come back and make the purchase.

For more details on how to set up a cart abandonment email campaign using FunnelKit Automations, read our blog on “WooCommerce Abandoned Cart Emails”
How to Continue WooCommerce Sales Funnel Journey After Customers Exit the Store?
Well, just because a user leaves your store doesn’t mean they are completely out of the sales funnel. You can still get them to come back and make repeat purchases.
Once users make a purchase, you need to send post-purchase follow-up emails to ensure a good shopping experience and as well as establish a strong relationship with customers. So, make sure you send
- Order confirmation email
- Shipment tracking email
- And other WooCommerce follow up emails like product education emails, etc.
These are mandatory emails you should send customers so they have a great shopping experience. If they like the shopping experience on your site, they are likely to come back.
However, there are other strategies you can use to bring back customers and make repeat sales. You can utilize different email campaigns like
- Send emails to users who made a purchase but didn’t offer the upsell
It can happen at times when someone enters your WooCommerce sales funnel and places an order, but how they didn't accept the upsell offer.
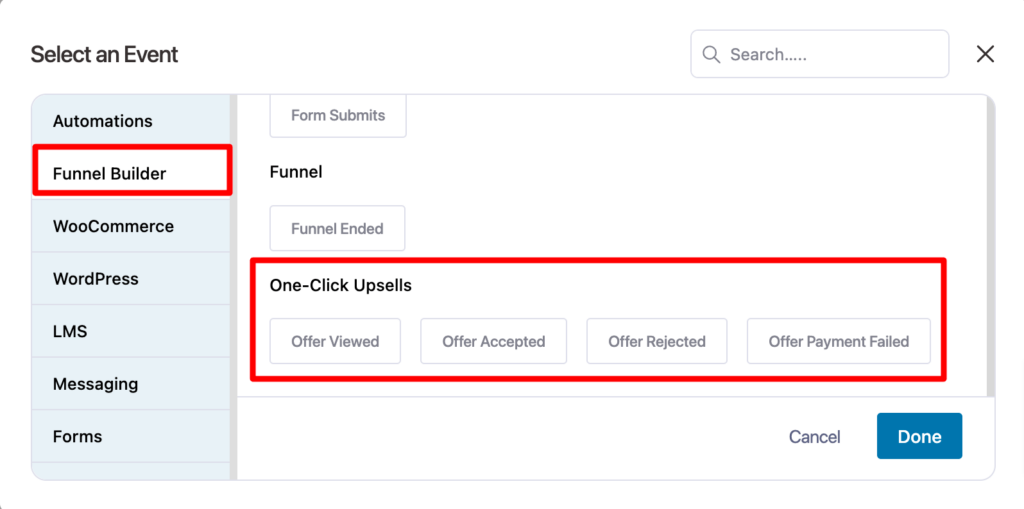
For such cases, FunnelKit Automation offers event triggers like one-click upsells offer rejected.
You can use this trigger to email users who rejected the upsell with a better upsell offer or maybe some discount to bring them back to make a repeat purchase.
- Send emails to users informing them about new collections/ popular products
Based on previous purchase history, you can email users informing them about the new collection of the same category they bought the last time. You can also share ther popular products from the same category to encourage them to make another purchase.
To learn more, read our blog on “product recommendations”
- Winback campaigns to bring back inactive customers
You can bring back customers who have been inactive for a long period of time with a winback campaign.
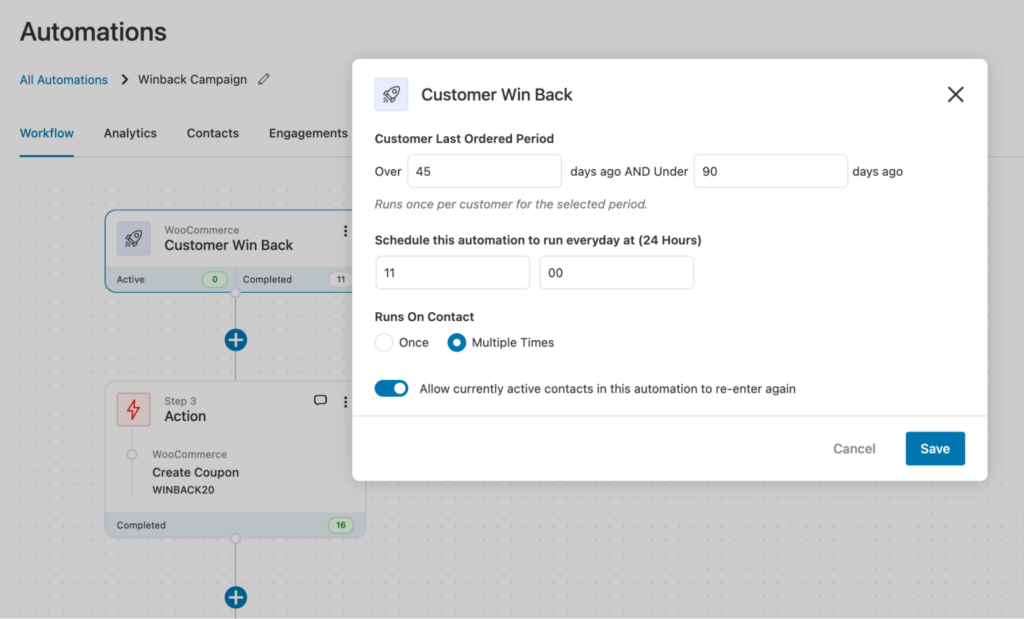
To learn how to run winback automation with FunnelKit Automations, read our blog on “WooCommerce winback campaign”.
- Send a 1-month purchase anniversary email
You can send a one-month purchase anniversary email to customers to remind them about the last purchase. This can make users want more products.
To learn more, read our blog on “purchase anniversary email”.
These are some of the strategies we mentioned, with FunnelKit Automations, you can implement any promotional automated email and SMS notifications to keep your customers in the loop and encourage more purchases.
Ready to Build Your WooCommerce Sales Funnel?
WooCommerce sales funnels are a game-changing strategy that can transform your online business.
Sales funnels aren't just about directing people to a product page; they're about nurturing, providing value, and building trust by offering relevant products and a smooth shopping experience.
As you have seen, with FunnelKit, you can easily create a WooCommerce sales funnel optimized to give your users the best shopping experience and thus boost your sales, increasing the average order value.
However, you need to remember that a sales funnel is not a one-size-fits-all solution. It's a dynamic process that requires continuous monitoring, testing, and refinement.
To know which sales funnel works for your audience, you can A/B test all your funnel pages using FunnelKit.
Overall, we can say FunnelKit is the most potent WooCommerce sales funnel builder that allows you to create, optimize, monitor, and refine your sales funnel effortlessly.
Plus, with FunnelKit Automations, you can continue to make sales even after users leave your WooCommerce store.
So, start building your sales funnel in WooCommerce using the best WordPress funnel builder today!
Editorial Team
May 8, 2026A WooCommerce Shopify checkout is a redesigned WooCommerce checkout page built around the design principles that make Shopify's checkout convert. It includes a clean layout, express payment options at the...

Editorial Team
May 6, 2026Square is one of the more popular payment options for WooCommerce, mainly because it handles both online and in-person sales from the same account. With over 4 million merchants relying...

Editorial Team
April 28, 2026You can stock the best products in the world, but it doesn't matter. Without solid WooCommerce SEO optimization, Google won't rank your store, and organic buyers will simply never be...


