Testing your WooCommerce checkout process ensures a smooth customer experience and helps you fix issues before they affect your customers.
If you’re a WooCommerce store owner or developer looking to enhance your online shopping experience, you’re in the right place.
Let’s imagine: You’ve spent countless hours building a visually appealing website, creating attractive products, and driving traffic to your store.
But at checkout, your shoppers encounter unexpected errors or slow-loading pages, leading to frustration and abandoned carts.
This scenario is familiar to many eCommerce businesses. The checkout process can make or break the conversion of visitors into customers. Even slight hiccups can result in lost sales and a damaged reputation.
That’s where testing your WooCommerce checkout page comes in. Thorough testing and evaluation can help you identify and address potential problems.
In this post, you’ll learn how to test WooCommerce checkout and payment processes, gaining valuable insights to improve your store’s performance.
Table of Contents
- 1 Why is Testing Your Checkout and Payment Process Important in WooCommerce?
- 2 Types of Tests to Perform for Your WooCommerce Checkout and Payments
- 3 How to Test WooCommerce Checkout Page Functionality for Seamless Buying Experience?
- 4 How to Test WooCommerce Checkout for Effortless Payment Processing Gateways?
- 5 How to Test WooCommerce Checkout with Real Transactions and Refunds?
- 6 How to Test WooCommerce Checkout for User Interface and Experience?
- 7 How to Test WooCommerce Checkout for Compatibility?
- 8 6 Best Practices to Follow During WooCommerce Checkout Testing
- 9 Frequently Asked Questions (FAQs) on How to Test WooCommerce Checkout and Payments
- 10 Are You Ready to Test WooCommerce Checkout and Payments in Your Store?
Why is Testing Your Checkout and Payment Process Important in WooCommerce?
WooCommerce checkout and payment testing refers to the process of evaluating and checking the checkout experience on your WooCommerce store.
This testing involves various aspects of the checkout process to ensure that it functions efficiently, securely, and smoothly.
Here are a few reasons why it’s crucial to test your WooCommerce checkout process:
- Optimized user experience: A cumbersome checkout leads to frustration and cart abandonment, resulting in lost sales. However, thorough testing ensures your store's checkout process is smooth, intuitive, and user-friendly.
- Identification of technical issues: Testing helps uncover any technical glitches or bugs in the buying process. These issues could include errors in the checkout page, processing payments, security vulnerabilities, and compatibility issues with different browsers or devices.
- Security assurance: Payments contain sensitive customer information, such as credit card or account number details. Testing helps ensure that you’ve taken all the security measures, such as encryption and data protection, to safeguard this information from unauthorized access.
- Conversion rate optimization: WooCommerce store owners can optimize the checkout page for conversion by testing different elements of the checkout page. This includes the placement and design of buttons, checkout form fields, and payment methods.
- Compliance: Businesses must adhere to various standards and regulations when handling payment information, such as PCI DSS (Payment Card Industry Data Security Standard). Testing your WooCommerce checkout ensures compliance with these standards and reduces the risk of legal consequences.
- Performance and speed optimization: Testing helps you evaluate the performance of your checkout process, including factors such as page load speed and server response times. It allows you to optimize your store’s performance to ensure the checkout process is fast and responsive.
Testing the WooCommerce checkout helps identify and address any issues hindering your online business’s success before ruining any customer’s shopping experience.
Types of Tests to Perform for Your WooCommerce Checkout and Payments
Here are some tests you should perform for your WooCommerce checkout to ensure a seamless shopping experience for your users:
1. Functionality testing
Verify that all essential functions of your store’s checkout work as expected. It includes adding items to the cart, going to the checkout page, applying coupons, selecting shipping options, entering billing and shipping information, and more.
Test different scenarios for successful transactions and potential error conditions, such as trying to checkout without agreeing to terms and conditions, etc.
2. Payment gateway testing
Ensure that transactions are processed securely and reliably on your WooCommerce store. This means that integrating your store with a reliable payment gateway holds the key.
Verify that your payment gateways linked to your store work as expected.
Test WooCommerce orders for each scenario carefully, such as doing successful transactions, making payments through expired cards, testing tokenization techniques with one-click upsells, canceling a transaction, etc.
If your store offers multiple payment methods (such as Debit or Credit cards, Buy Now Pay Later, Apple Pay, Google Pay, PayPal, etc.), test each method to ensure it functions correctly.
3. User interface and experience (UI/UX) testing
Evaluate the overall user experience of your checkout process. Focusing on clarity, intuitive design, and ease of use are crucial factors here.
Test different user flows and personas to locate any usability issues or friction. Also, collect regular feedback from your customers through surveys or usability testing sessions.
4. Compatibility testing
Ensure your store’s checkout process functions smoothly across devices (desktops, tablets, and smartphones) and web browsers (Google Chrome, Safari, Mozilla Firefox, Microsoft Edge, etc.).
Therefore, testing the WooCommerce checkout process on various operating systems and screen sizes is crucial to give shoppers the best user experience.
5. Regression testing
Periodically retest your checkout process after making any updates or changes to your WooCommerce setup, theme, plugins, or configuration.
Verify that the new features or bug-fix updates don’t inadvertently interfere with the existing functionality.
How to Test WooCommerce Checkout Page Functionality for Seamless Buying Experience?
Functionality testing is critical to ensure the smooth operation of your WooCommerce checkout process.
It involves systematically testing each function and feature to verify that they work as intended.
An aspect of testing involves improving your shoppers’ experience, so we’ll add recommendations from our experts wherever necessary.
Let’s look at how to test the WooCommerce checkout functionality.
1. Cart management
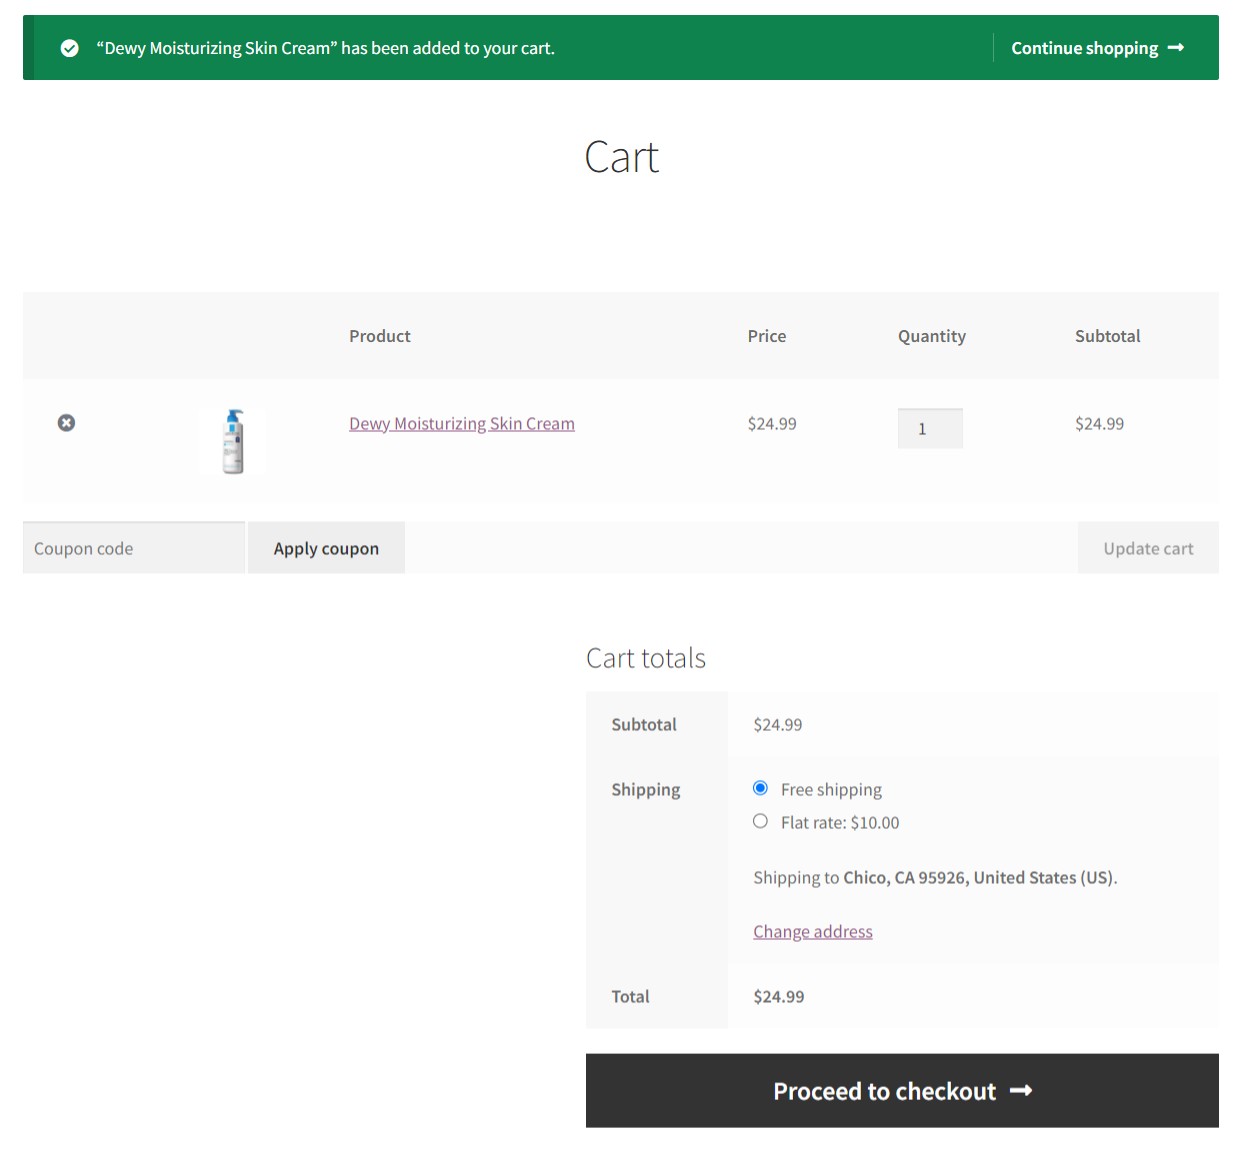
Test the ability to add products to the cart from product pages, category pages, and any other relevant areas of your WooCommerce website.
Additionally, verify that you can increase or decrease the quantity of items in your cart with accurate product prices and total amounts updated.
However, you can only update this quantity on the default cart page, which is an additional, redundant step in the checkout journey.
Our experts recommend you add a modern sliding cart to your WooCommerce store for a seamless buying experience.
Your shoppers will be able to add their items, see them in the cart, update the quantity, remove items, and more from anywhere on the website, as shown in the screenshot below:
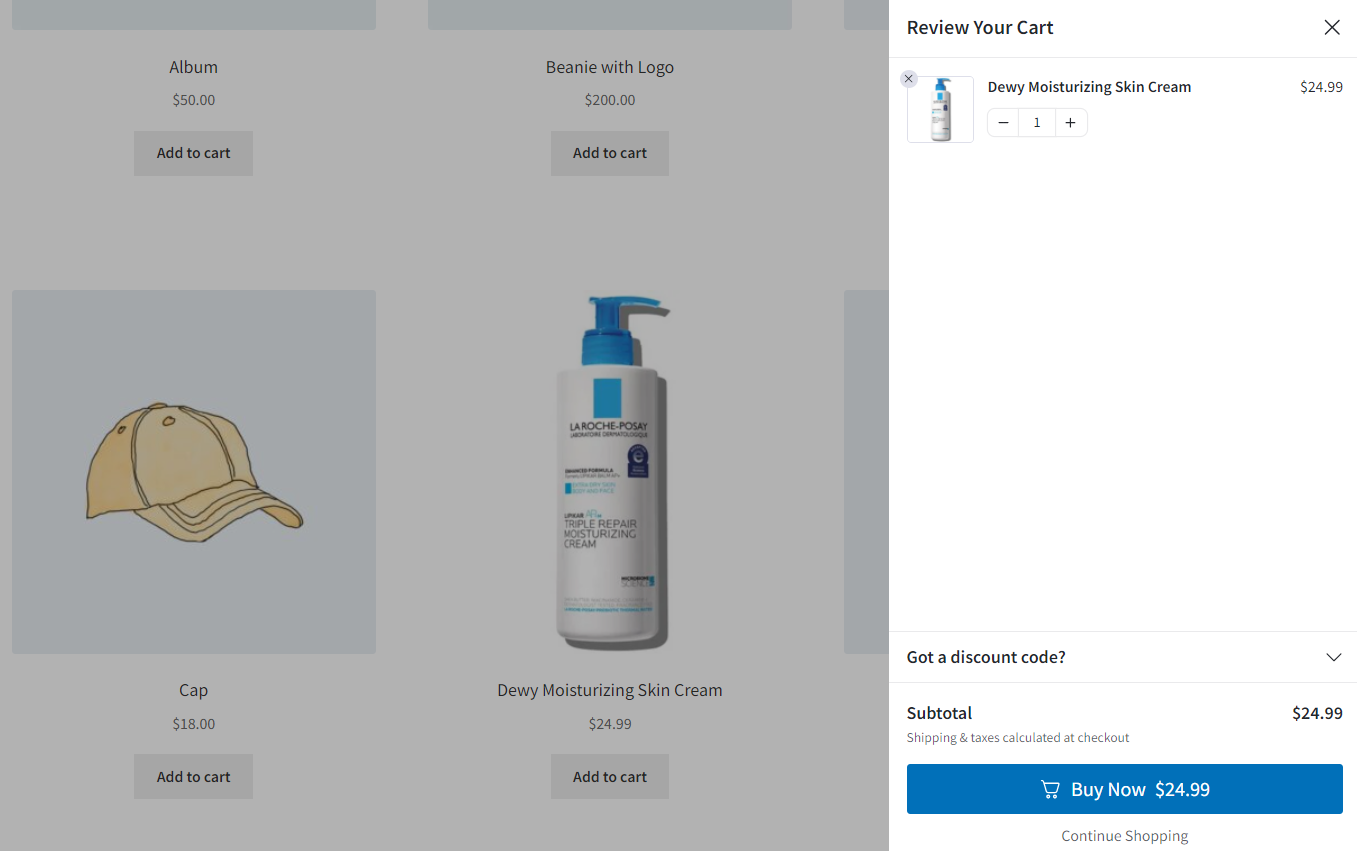
FunnelKit Cart for WooCommerce lets you do all that. Additionally, you can offer relevant upsells and cross-sells inside the shopping cart.
It allows you to skip the default cart page and directly head to the checkout page, eliminating one extra step in the buying journey.
Not just that, you can even set up smart rewards to encourage them to shop more in your store.
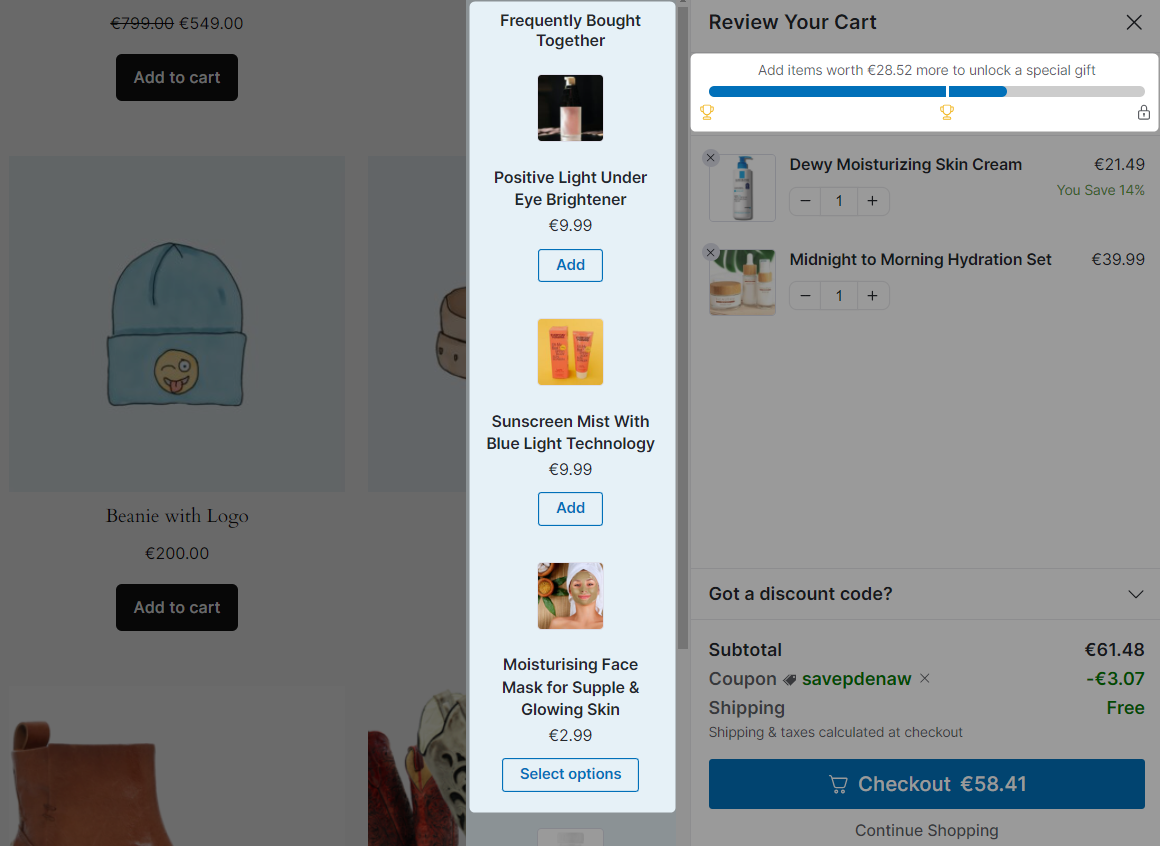
This way, you can check the complete cart functionality before you head to the checkout page testing.
2. Shipping and taxes
We’ve divided this section into two:
- Shipping
Test the selection and calculation of shipping fees based on the customer’s location, shipping method, and any more applicable rules.
Navigate to WooCommerce ⇨ Settings ⇨ Shipping and set the shipping methods for your store.
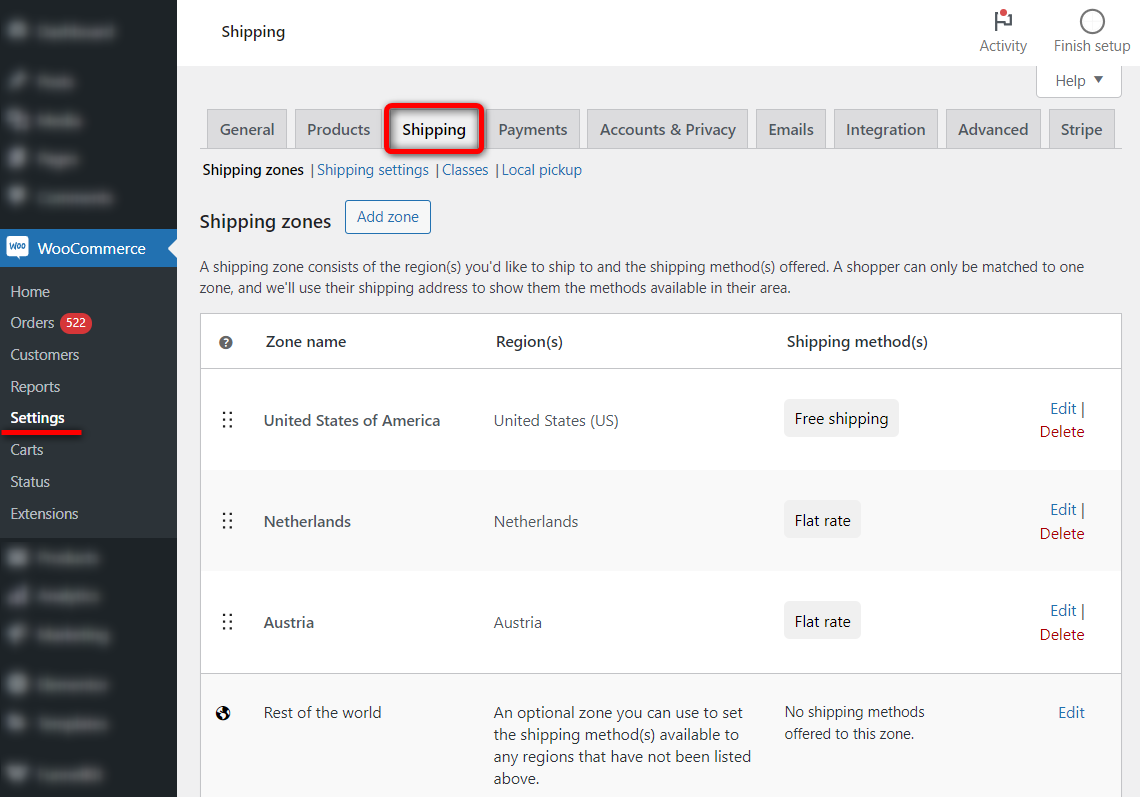
For example, we’ve set up free shipping in the United States and charged flat rate shipping for the Netherlands and Austria.
- Taxes
Verify that taxes are applied correctly based on the customer’s location, product type, and any relevant tax settings configured in your store.
To enable taxes, navigate to WooCommerce ⇨ Settings ⇨ General and enable tax rates and calculations from there.
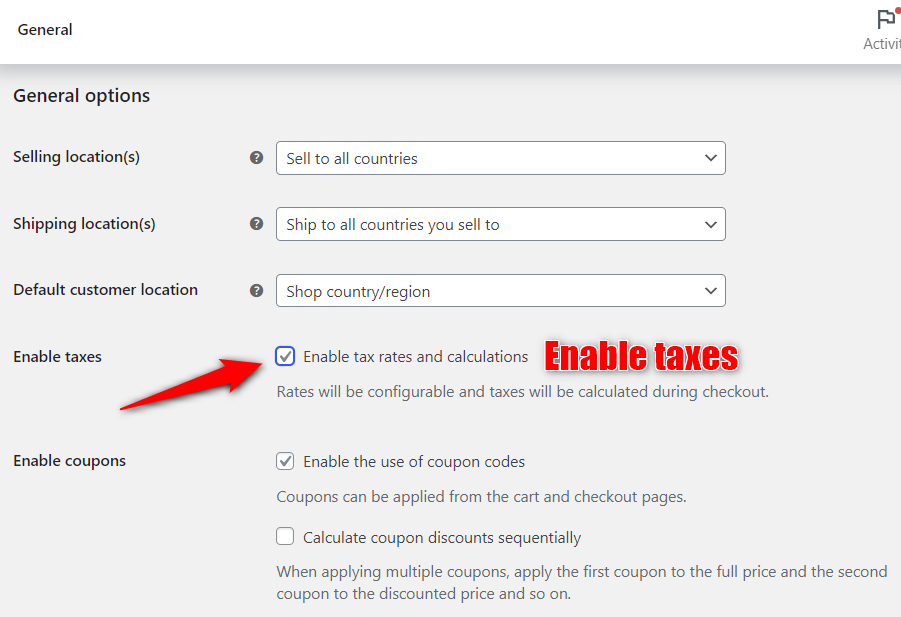
Next, go to the Taxes section under WooCommerce settings and set up taxes in your store.
3. Purchase or order placement
The checkout process is a crucial part of the shopping journey. Let’s look at the checkout testing process in detail.
We’ll discuss the payment gateways in the next section, but it’s important to test the order placement process first.
If you’re a FunnelKit Funnel Builder user, you can enable the test payment gateway to see if you can successfully place an order:
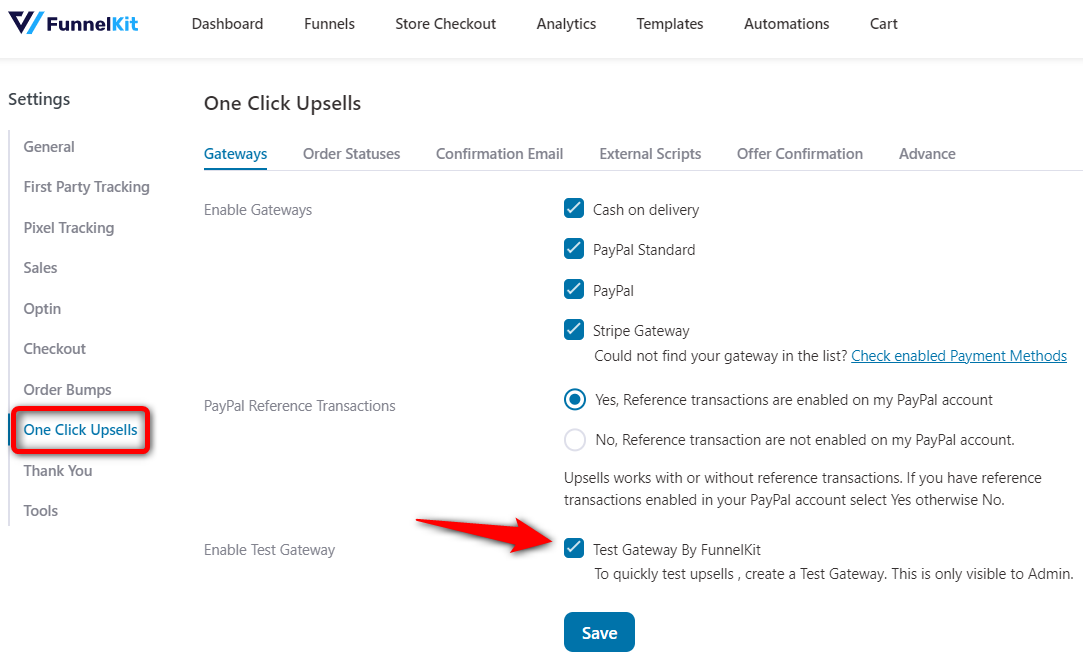
FunnelKit Funnel Builder is the most powerful sales funnel builder plugin that lets you create custom checkout pages, sales pages, opt-in pages, thank you pages, and more.
You can even add order bumps and one-click upsells to your checkout process to enhance your store’s average order value (AOV).
Our experts recommend you customize the default checkout page into a high-converting checkout.
Head to the checkout page once you’ve added items to your cart.
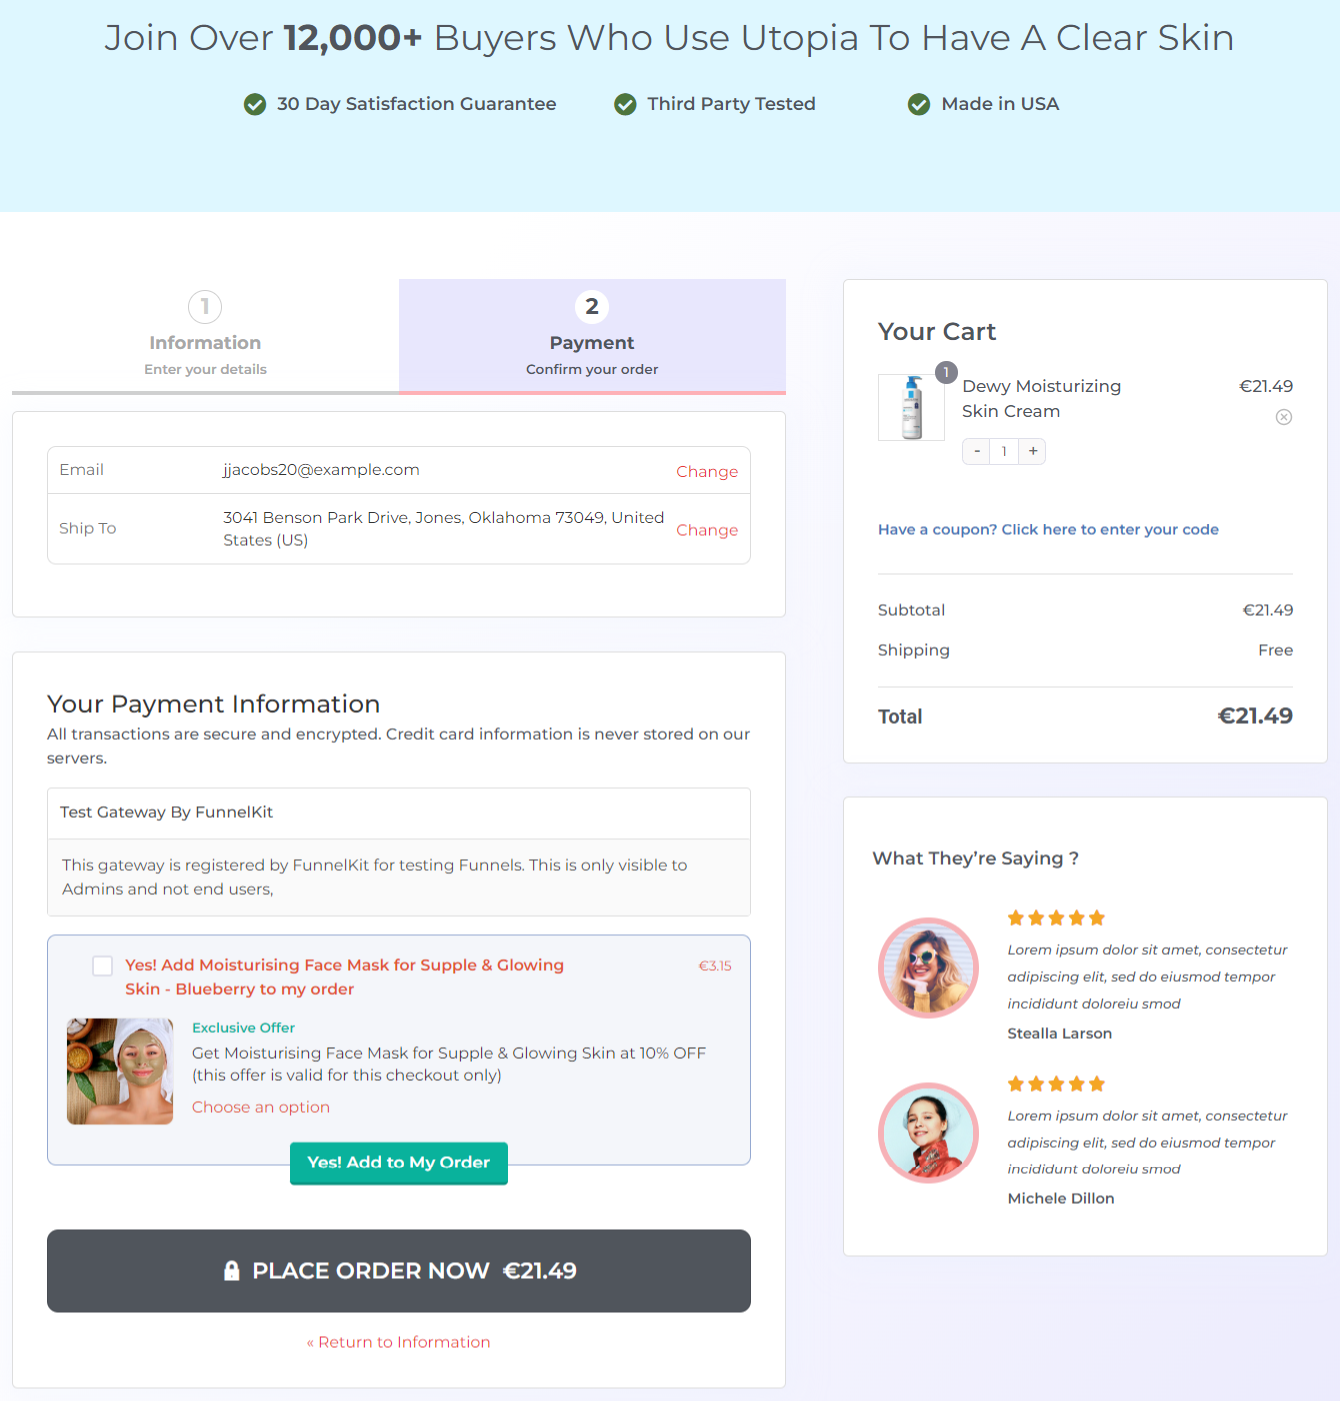
Enter your details, select the Test Payment Gateway option, and place your order.
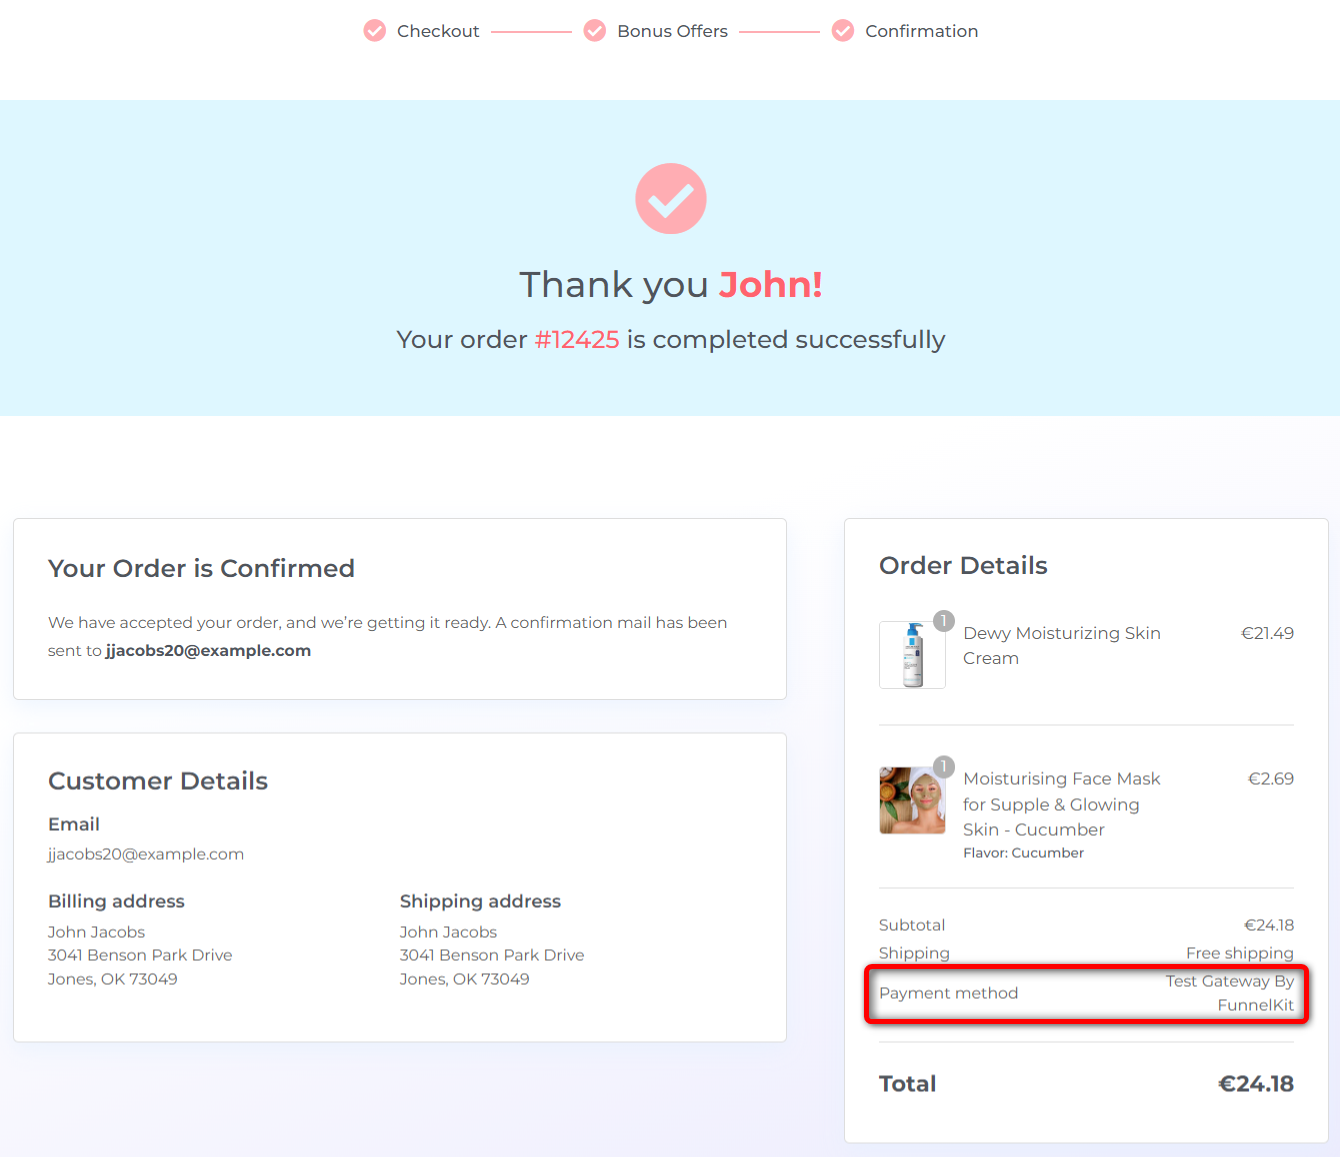
Make sure your order is successfully placed, and you are directed to the thank you page.
4. Guest checkout and user registration/login
Let’s look at both these checkout testing processes here.
- Guest checkout
Test the ability of customers to place a purchase order without creating an account.
This is only possible when guest checkout is enabled.

- User registration/login
Verify that existing customers can log in to their accounts or register for a new account during checkout.
You can find these settings in WooCommerce:
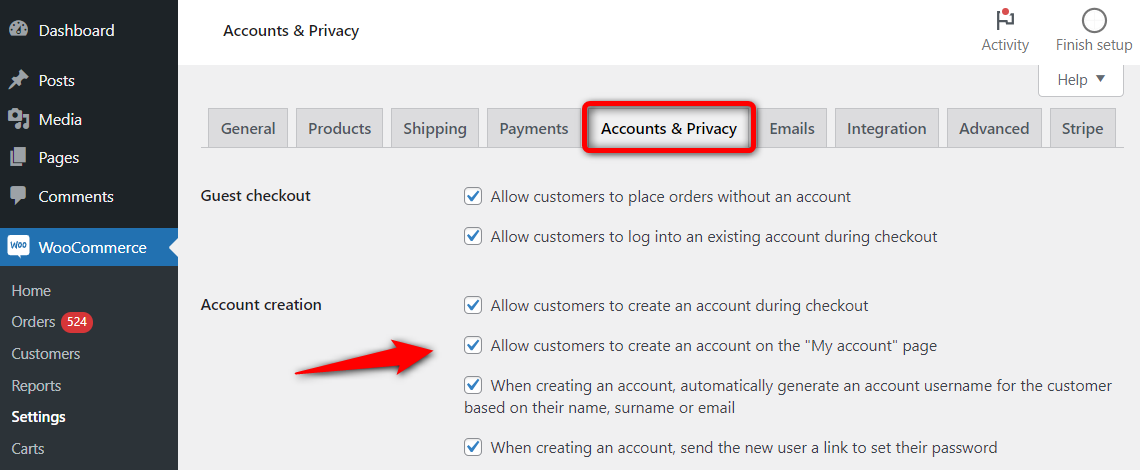
Make sure your checkout works as expected when you enable this option.
5. Billing and shipping address
Test the entry and validation of your billing and shipping addresses. Ensure that all the required fields are marked appropriately and that validation is done when you don’t enter those field values.
Many people make mistakes when filling out their addresses, which reduces operational efficiency and increases return rates.
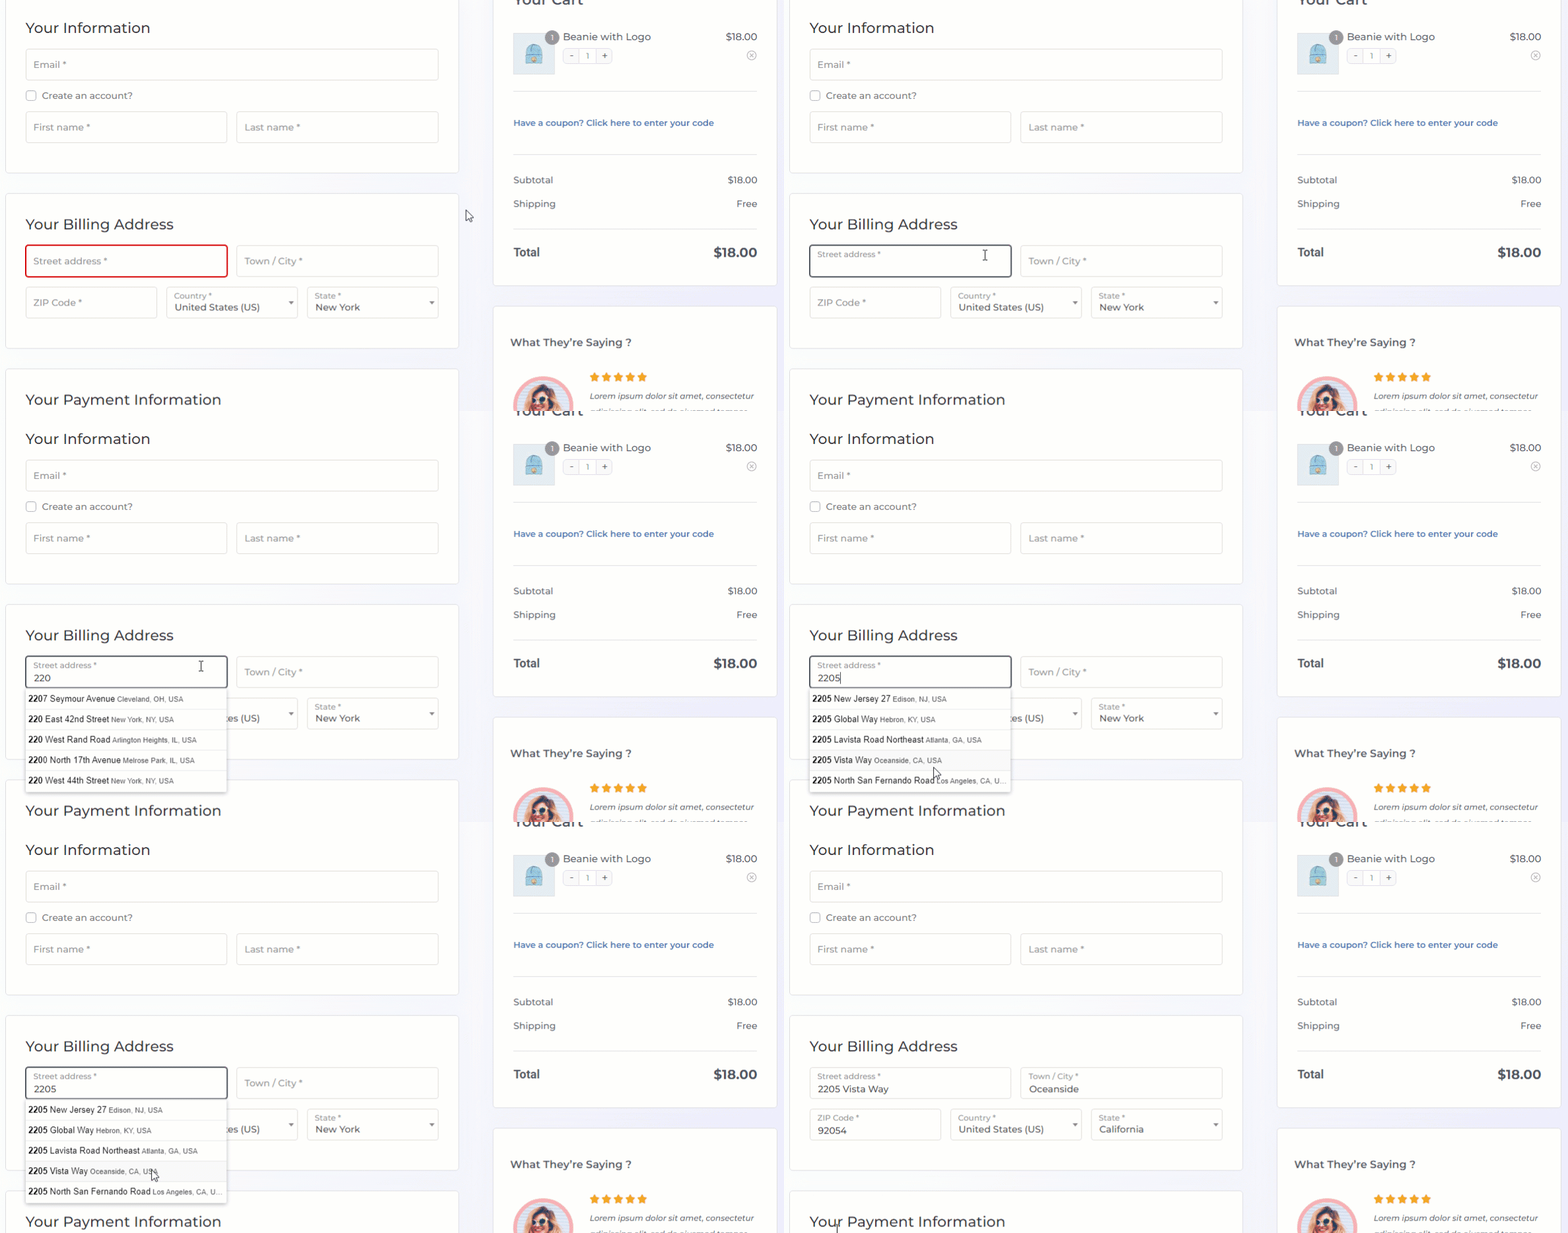
That’s why our experts recommend you use the Google Address autocomplete feature. It dynamically predicts and displays relevant addresses when users start typing.
When a user selects an address, the entire address, including the street names, cities, postal codes, countries, etc., is automatically filled out.
FunnelKit Funnel Builder lets you optimize your checkout pages with auto-fill address suggestions.
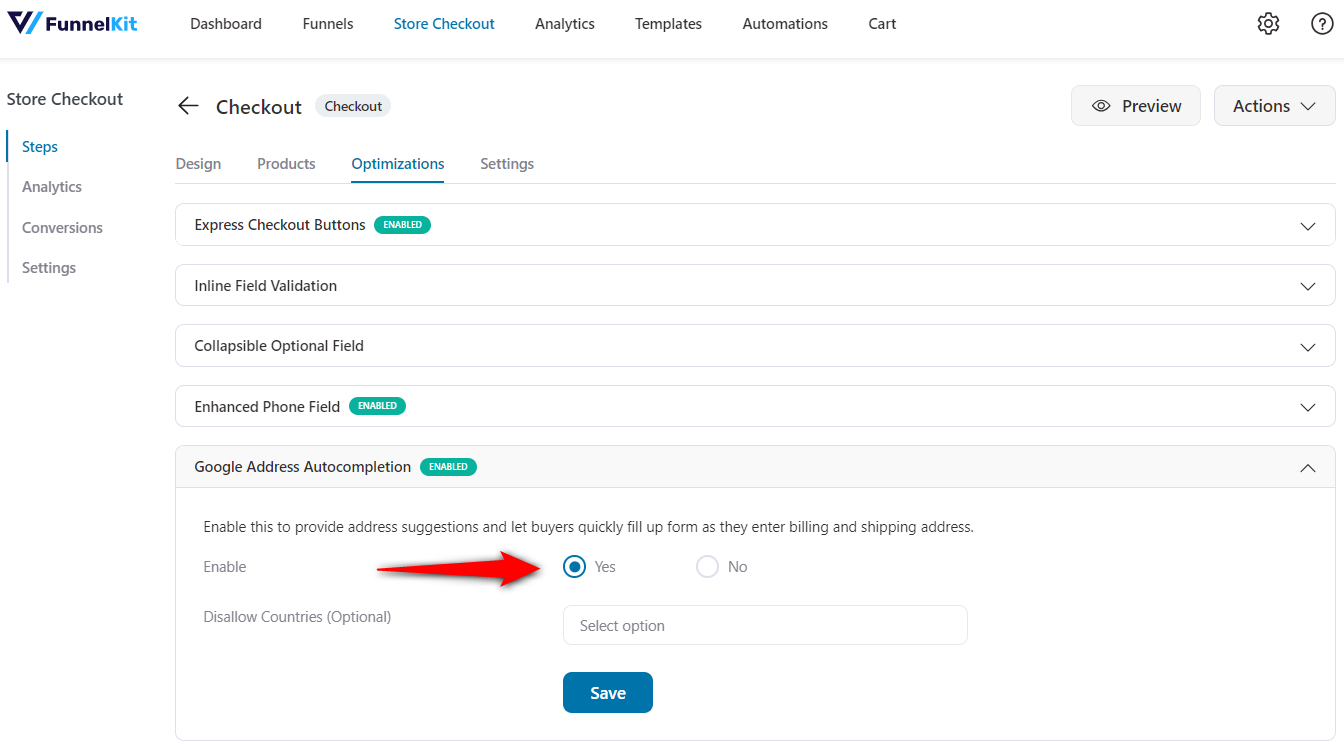
This is how it works on your WooCommerce checkout page:
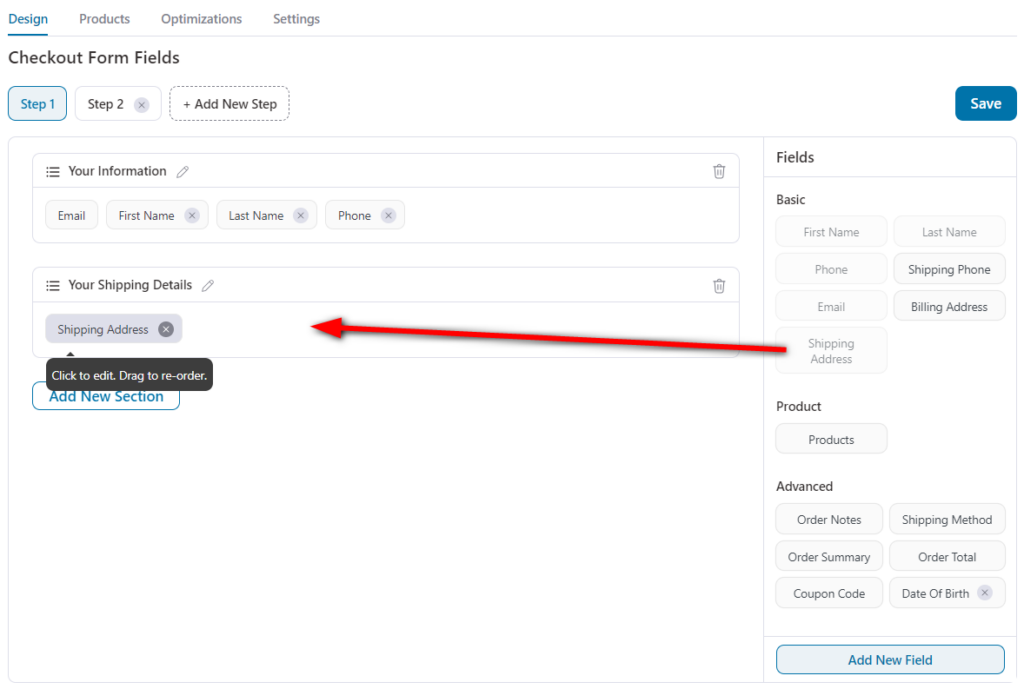
FunnelKit Funnel Builder comes with a drag-and-drop checkout form fields functionality, where you can re-arrange or edit your shipping and billing fields.
Whether your checkout page is one-page or multi-step, it works on both.
6. Coupons and discounts
Test the ability to apply coupon codes on the checkout page with discount validation and adjustment in order total as applicable.
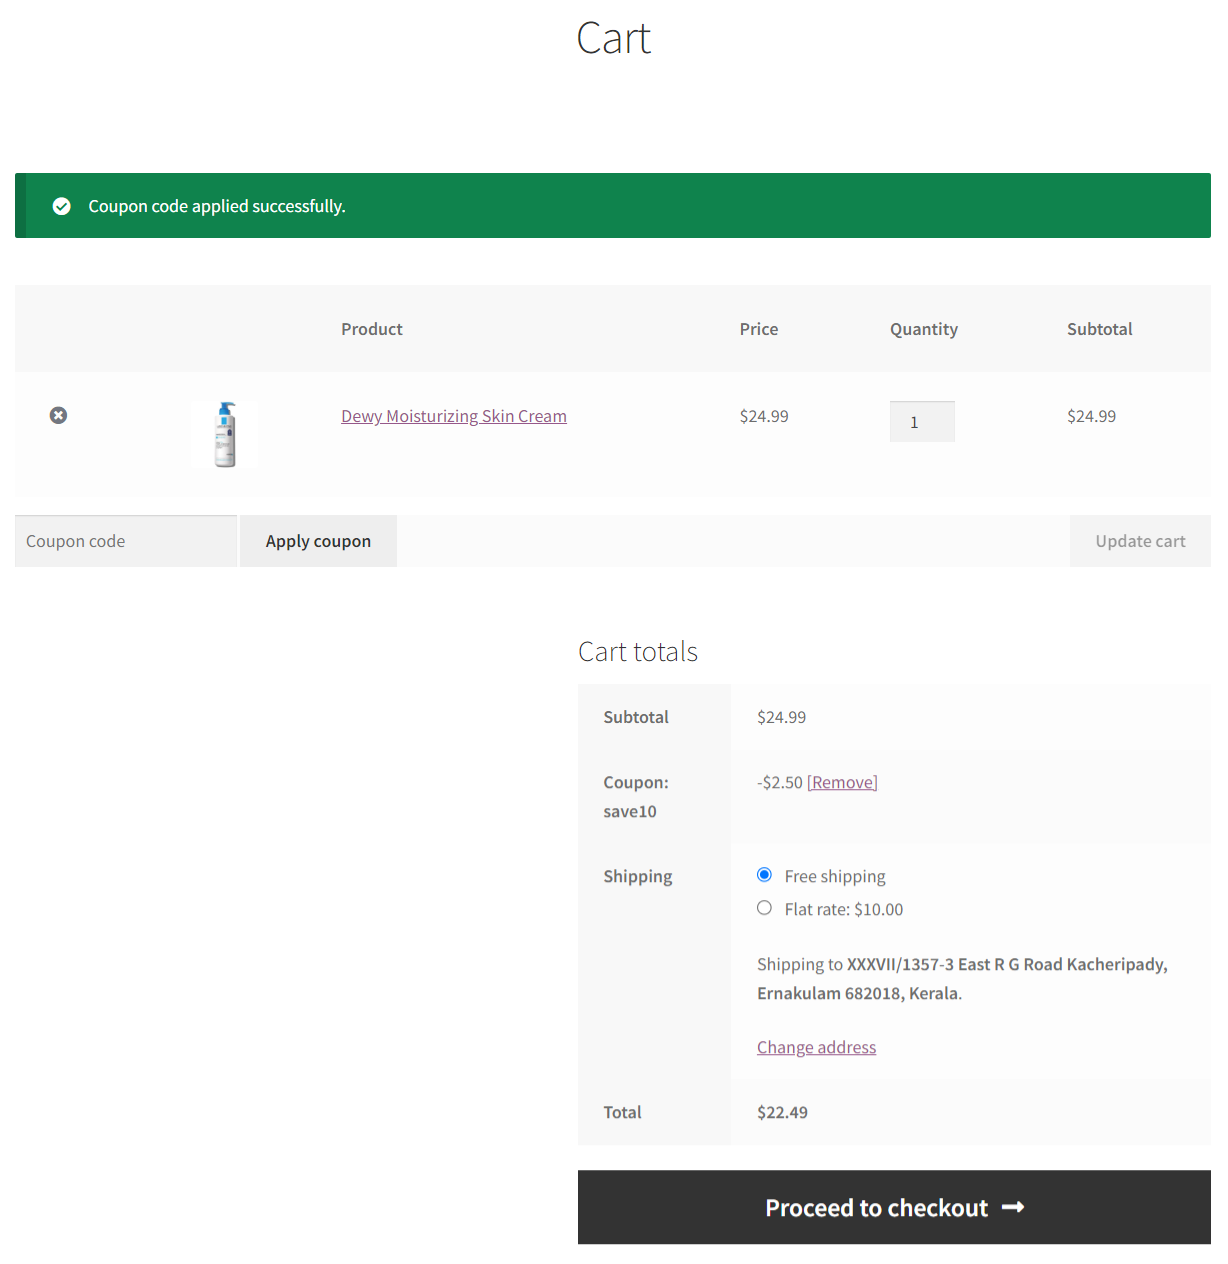
You’d need to enter your coupon code on the default cart page because the native WooCommerce checkout page doesn’t allow you to apply automatic coupon codes.
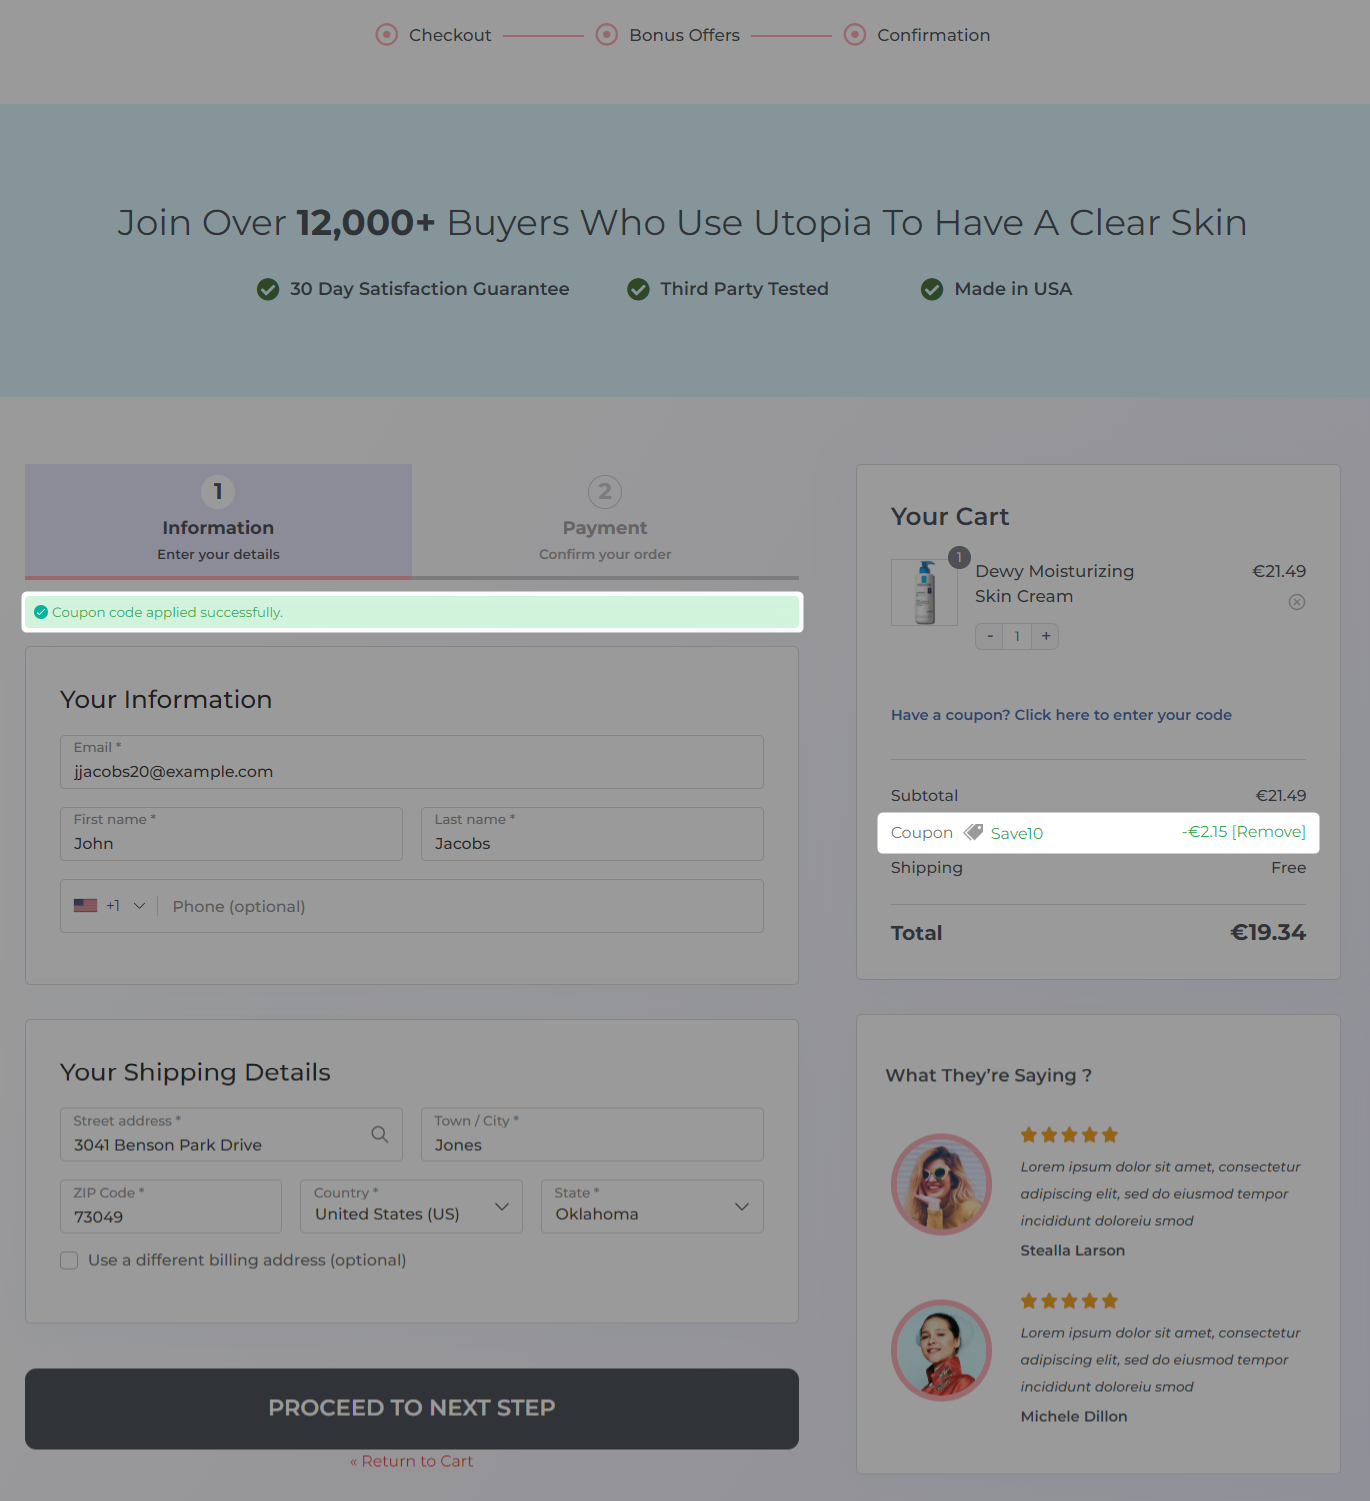
Our experts recommend automatically applying coupon codes to make your checkout experience effective.
By auto-applying coupons, you can save your shoppers time and effort, ensuring a good shopping experience.
The screenshot below is of how FunnelKit Checkout helps you to optimize the checkout page with auto-applied coupons:
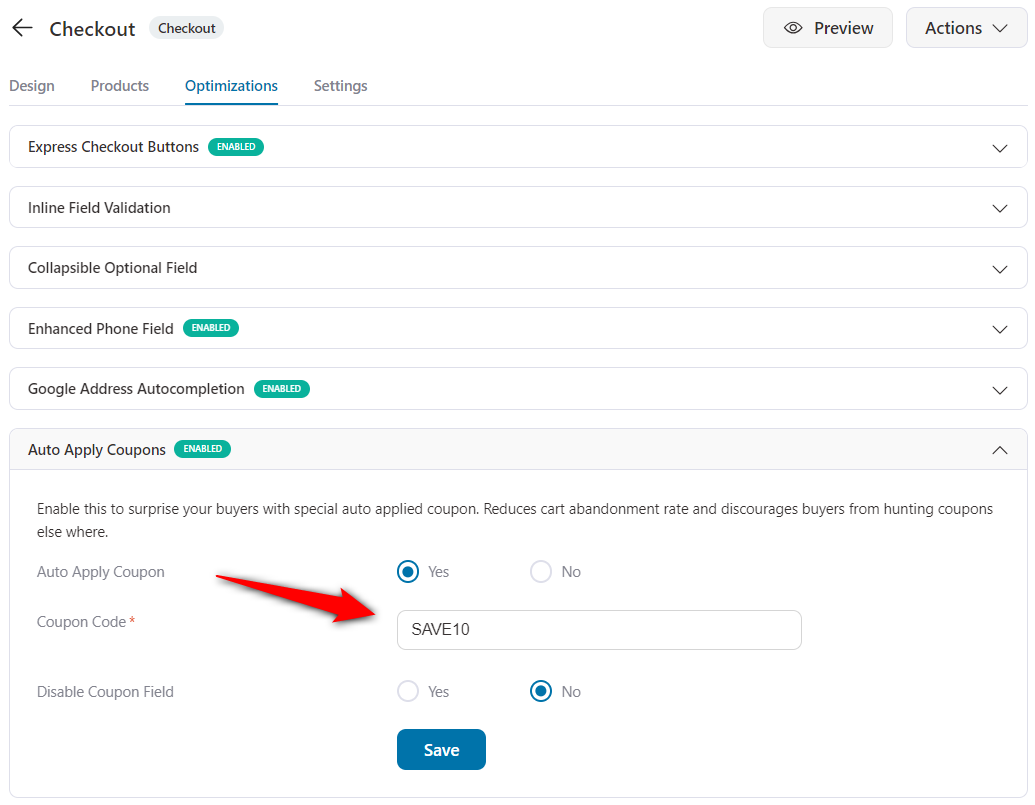
Find this option in the FunnelKit checkout optimization section:
7. Order review and confirmation
Verify that your checkout page accurately summarizes the shopper’s order. This includes item details, quantities, prices, shipping costs, taxes, and any applied discount coupons.
See the order summary inside the mini cart section on the WooCommerce checkout page:
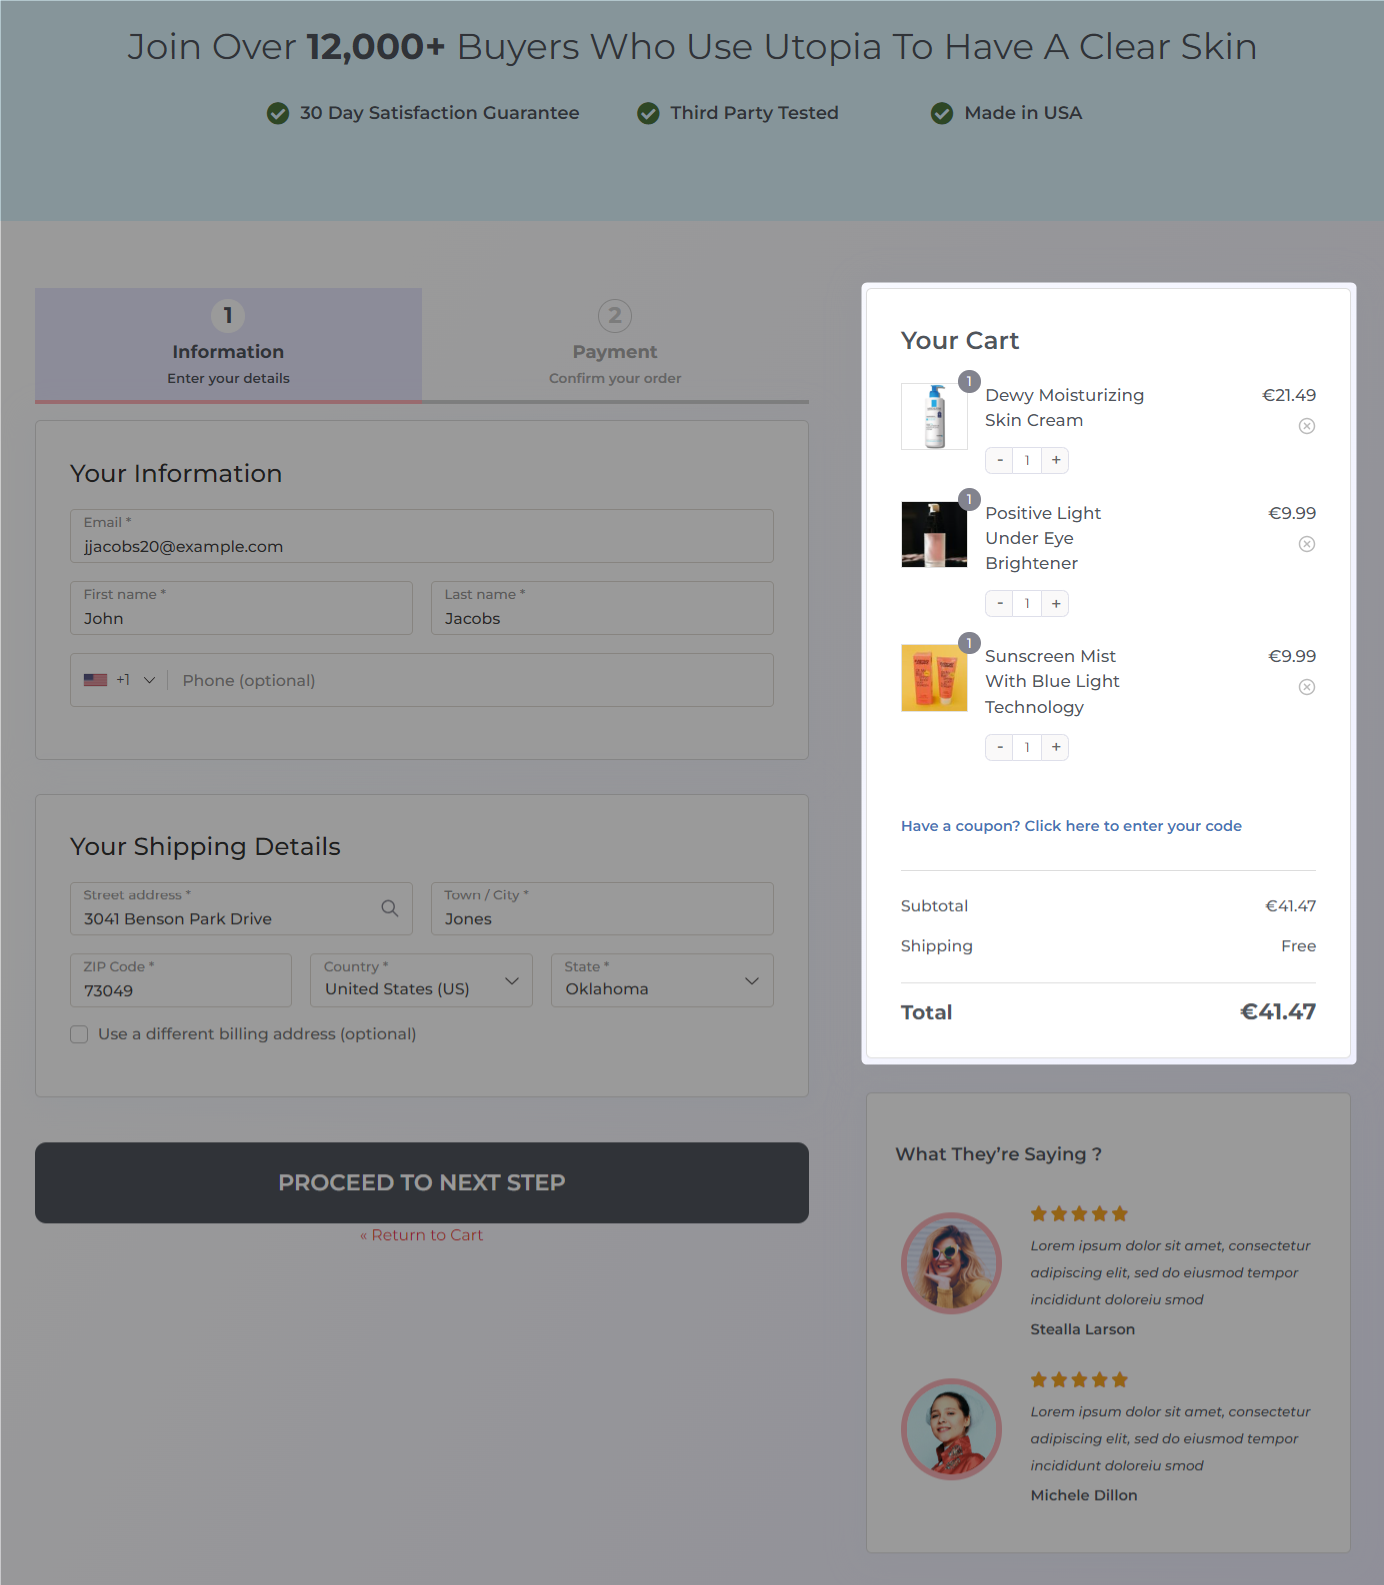
Once your order is successfully placed, you will land on the thank you or order confirmation page.
Verify that you’re presented with the correct order and customer details on the thank you page.
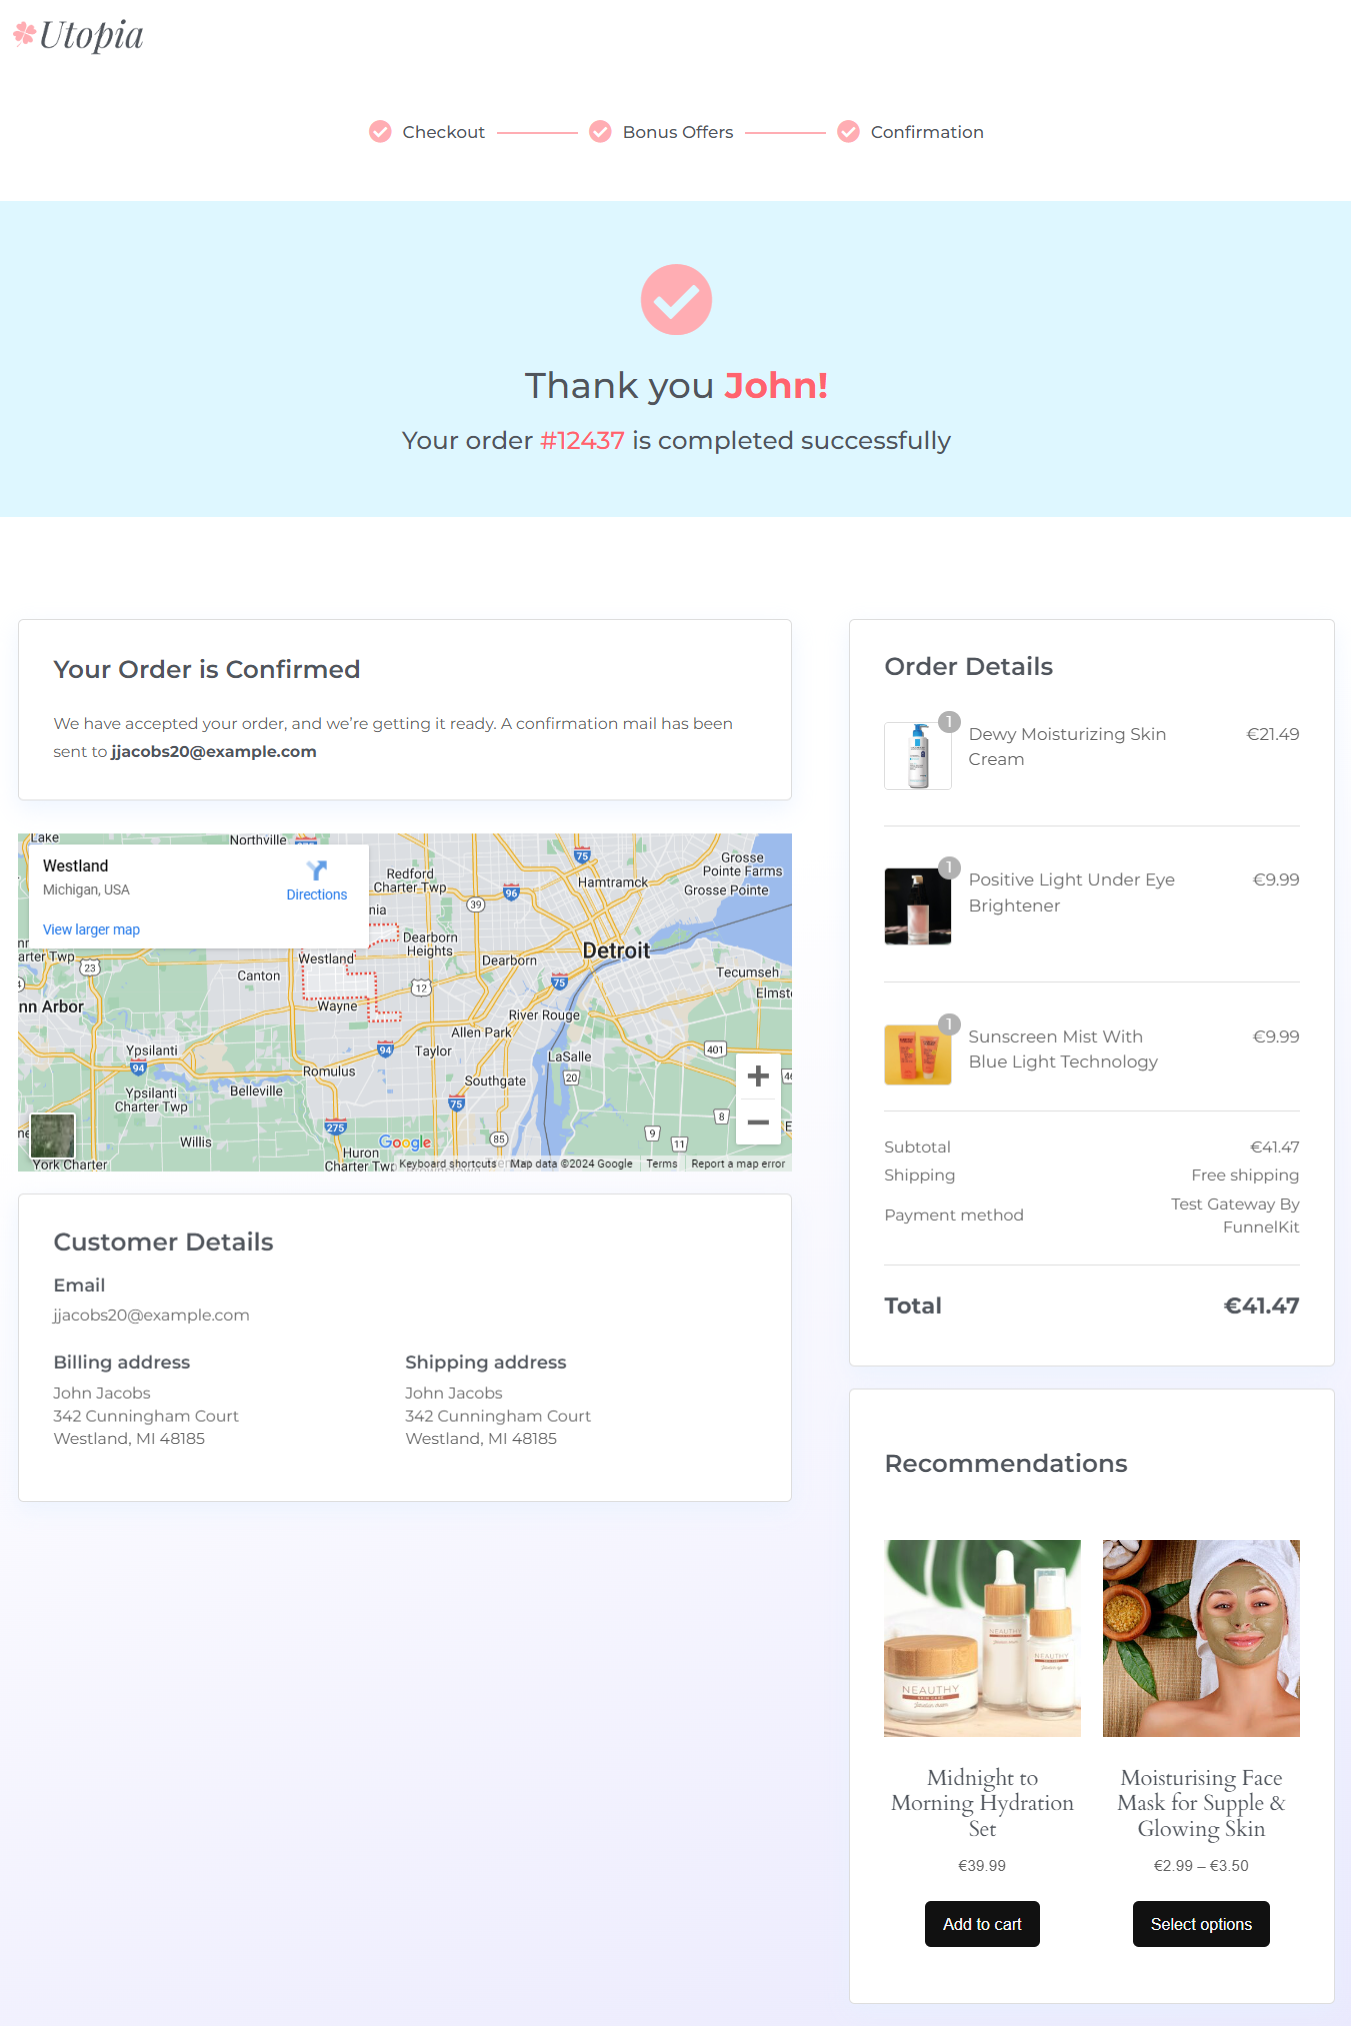
The above order confirmation page is created with FunnelKit Funnel Builder. It looks more modern, conversational, and branded than the default thank you page.
8. Email notifications
Test the delivery of order confirmation emails after completing a purchase. These emails contain relevant order information and a prompt that your order has been successfully placed.
Confirmation emails have one of the highest engagement rates, with an average open rate of 65% and an average click-through rate of 17%. [Source: Chamaileon]
That’s why it’s best to tap into this potential by sending custom order confirmation emails.
The default confirmation emails do not offer any engagement opportunities and cut the communication cord between you and your customer.
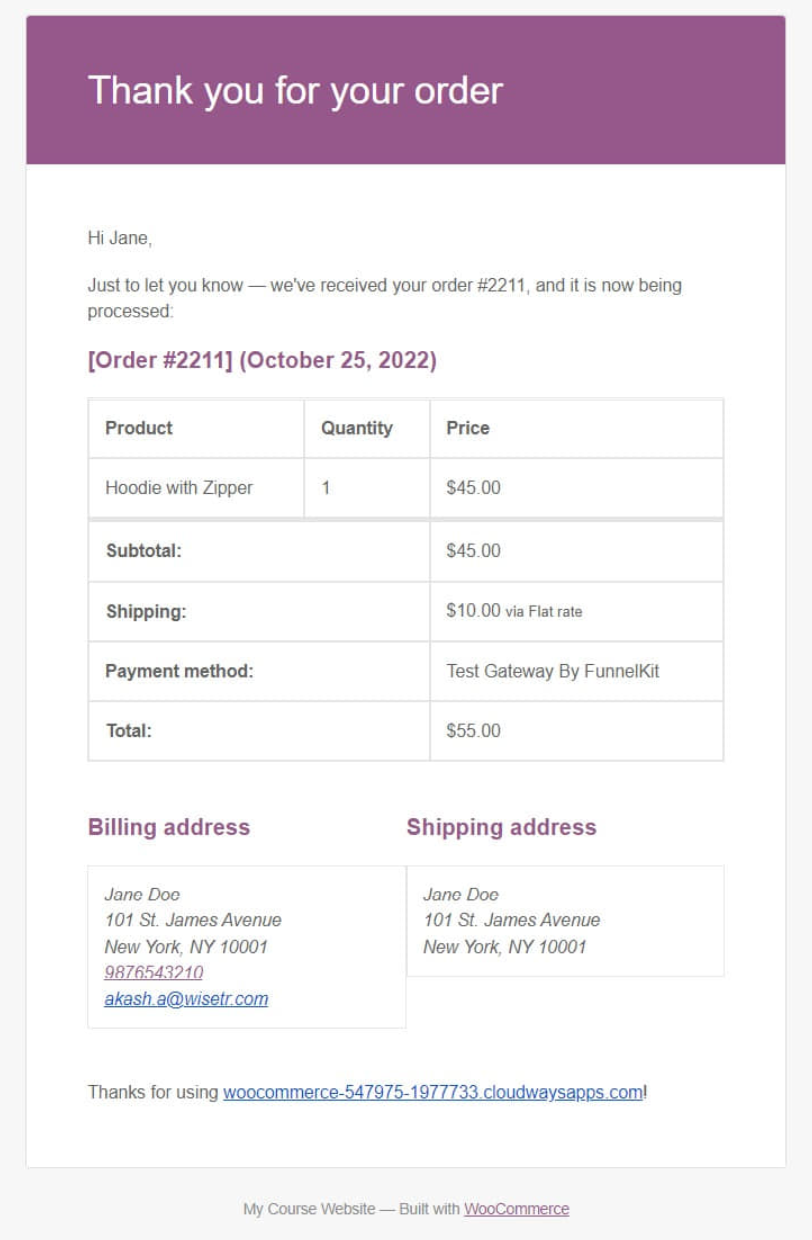
That’s where FunnelKit Automations comes in. It’s one of the best marketing automation and broadcast CRMs for WooCommerce and WordPress.
You can create beautiful order confirmation emails and automate them right in your store.

You can also send shipment tracking emails, cart abandonment emails, winback emails, product recommendation emails, anniversary and birthday emails, and more.
How to Test WooCommerce Checkout for Effortless Payment Processing Gateways?
Testing payment methods in your WooCommerce store ensures that customers can securely and successfully complete their transactions using various payment methods.
You can integrate your store with various payment gateways like Stripe, PayPal, Square, Authorize.net, Razorpay, and more.
We’ll use Stripe because it adheres to the security standards of PCI DSS, ensuring the protection of sensitive payment information. It uses advanced machine learning for top-notch fraud detection and prevention.
Additionally, it supports 135+ currencies and handles foreign currency conversions.
- Integrate your WooCommerce store with Stripe
To integrate Stripe with WooCommerce, use a free Stripe gateway plugin for WooCommerce. It automatically integrates with your website.
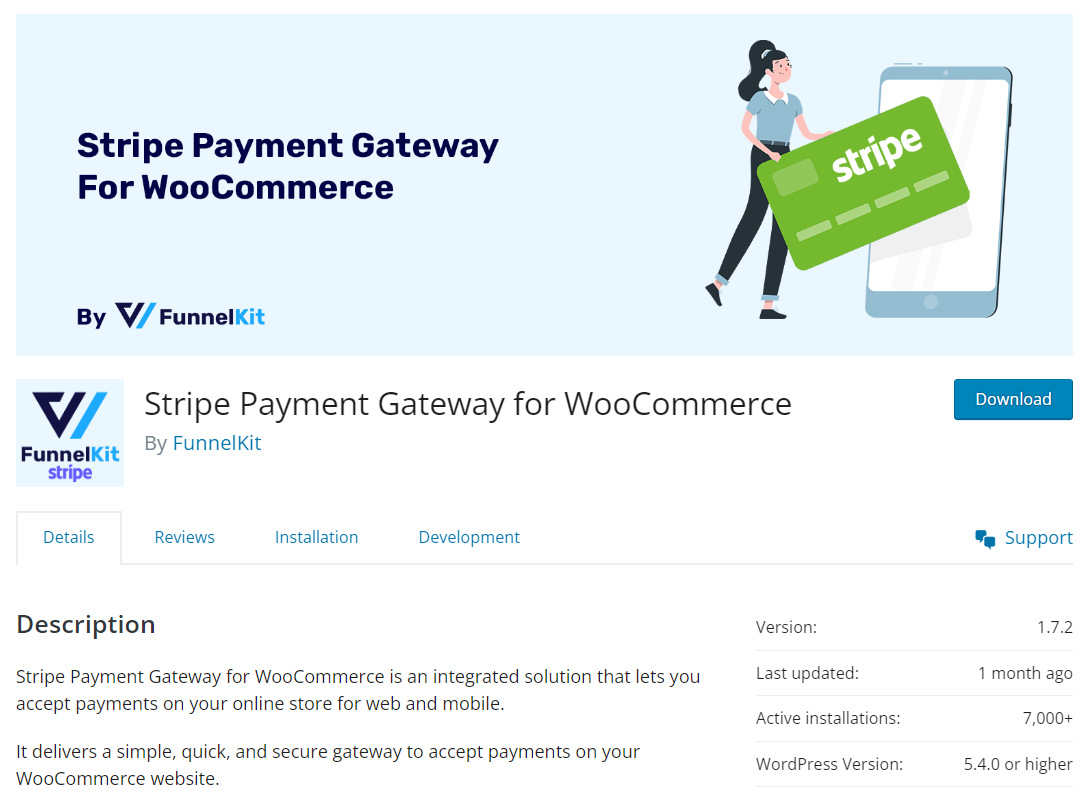
After successfully installing and activating the plugin, start the onboarding process and connect Stripe with WooCommerce.
- Activate the WooCommerce payment test mode
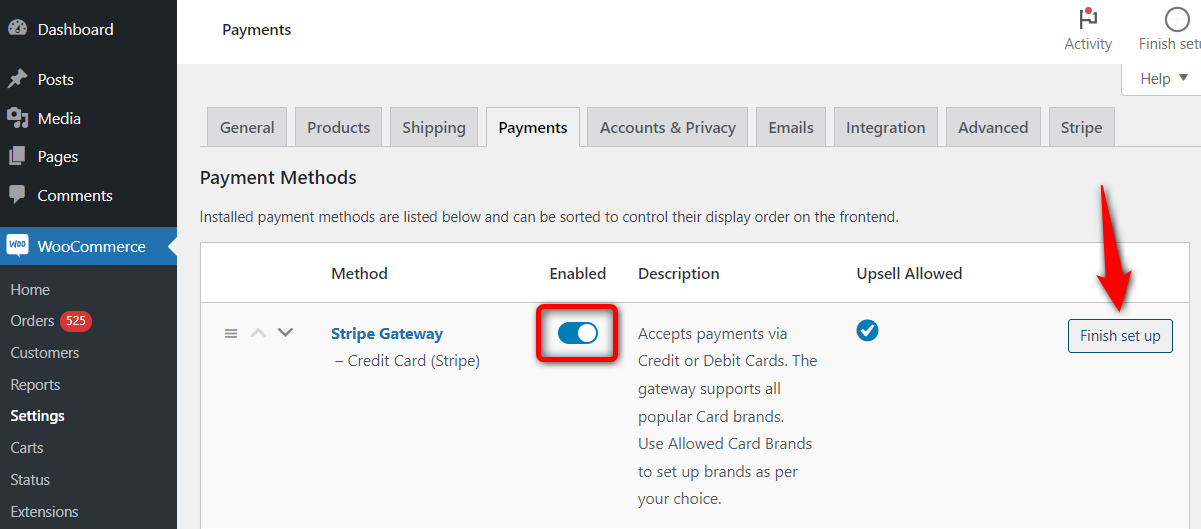
Next, navigate to WooCommerce ⇨ Settings ⇨ Payments.
Turn the toggle on and click on ‘Finish set up’ next to Stripe Gateway - Credit Card (Stripe).
Head to the Stripe API Settings section and select the ‘Test’ or ‘Admin Only Test’ mode.
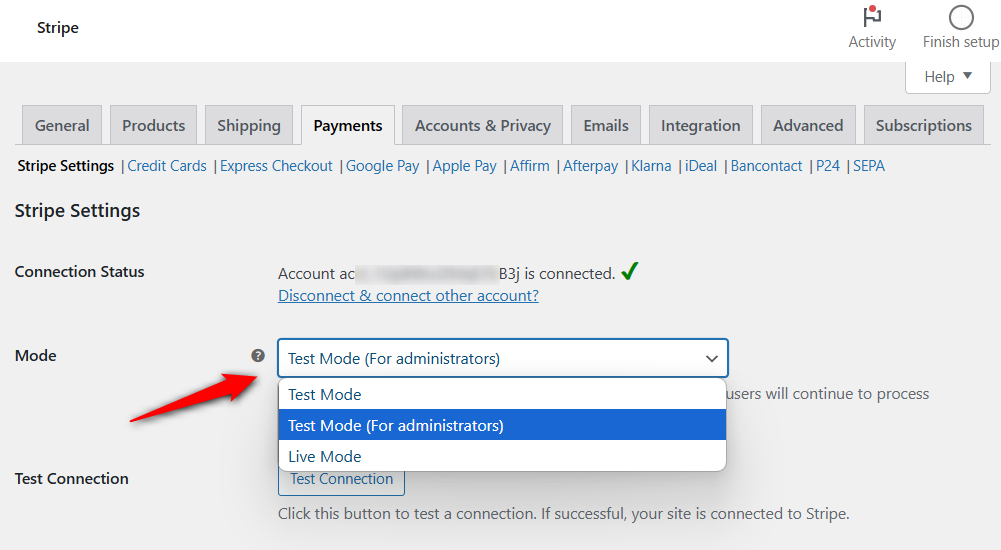
This will activate the test mode. Now, you can test payments in your WooCommerce store.
1. Credit or debit cards
Now that you’ve enabled test payment mode in your store; it’s time to test your WooCommerce checkout orders.
To do that, go to your store’s shop page, add items to your cart, and proceed to the checkout page.
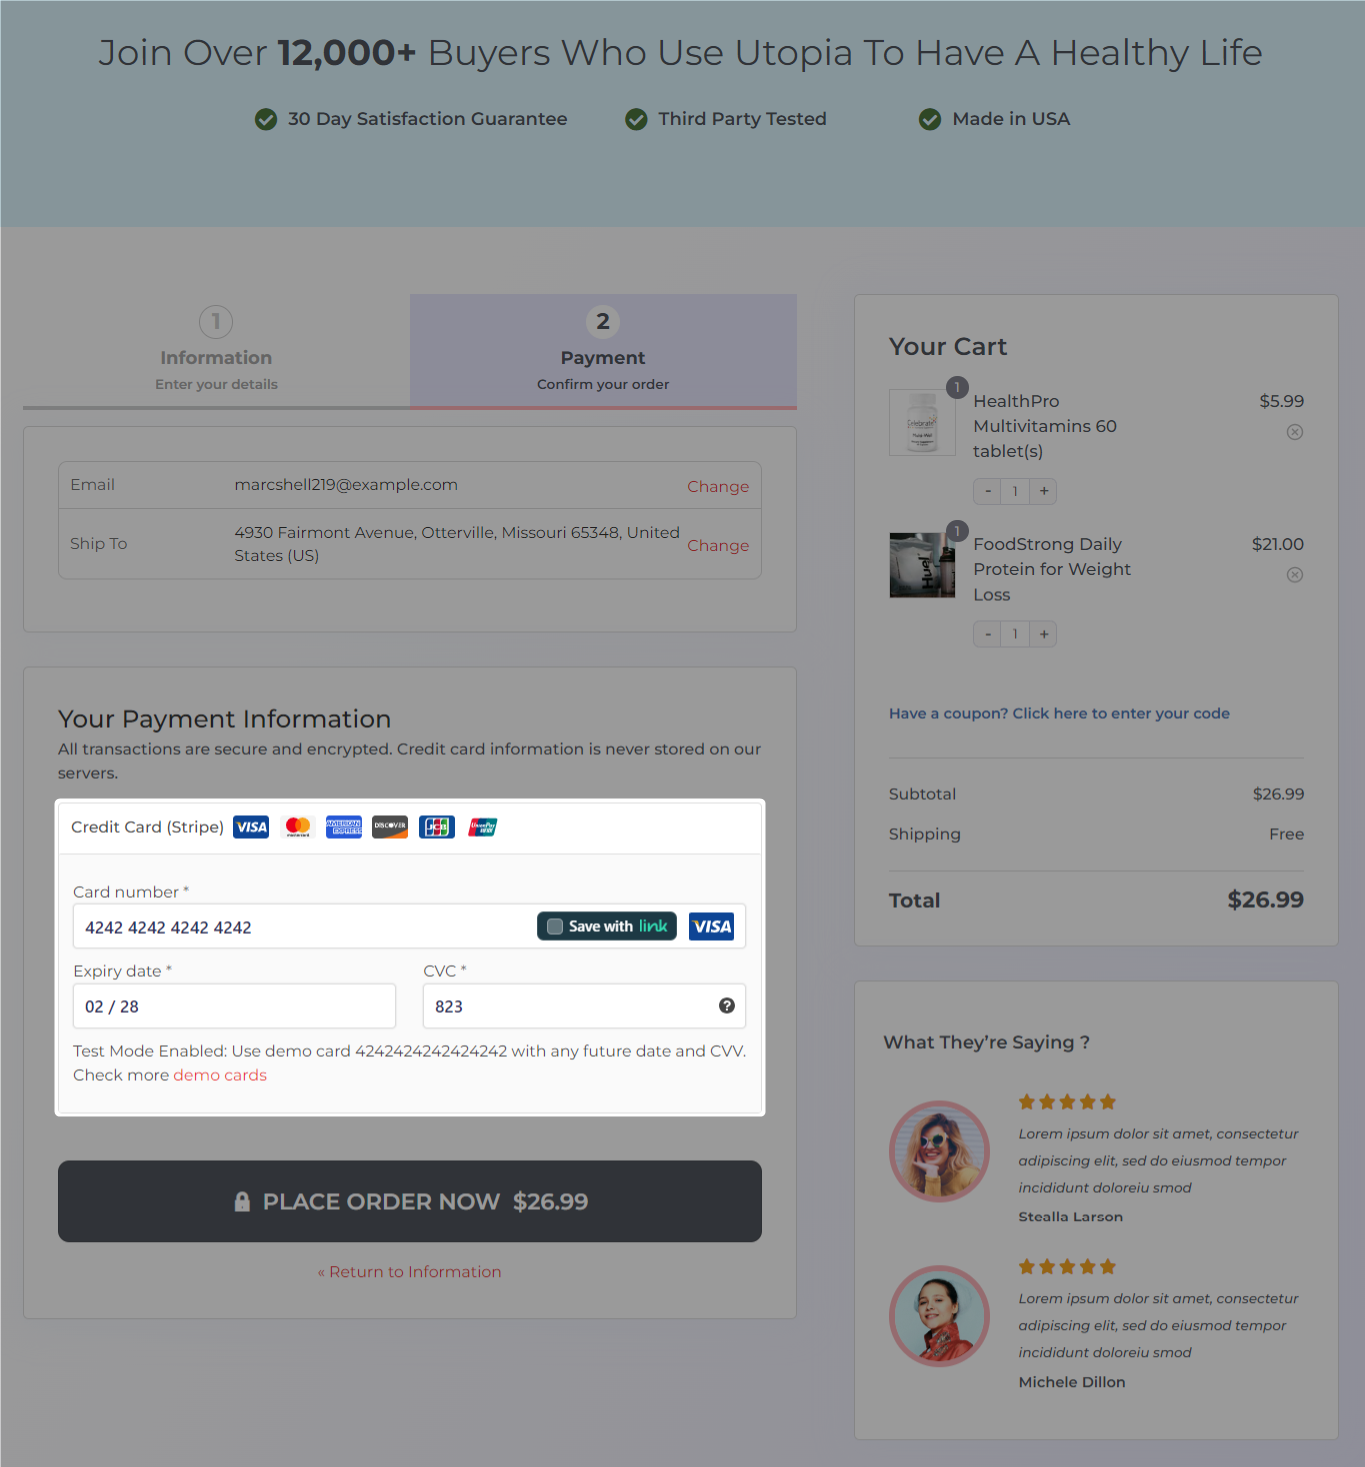
Enter all your personal details and shipping information, and include the credit or debit card details.
Since this is a test payment, you can enter any valid card details. You can also just enter the test card digits “4242424242424242” with any valid expiration date and CVC code.
Next, place the order by hitting the checkout button.
Go to your Stripe dashboard and open the Payments section. You’ll see the order you’ve just placed.
Or, you can go to WooCommerce orders and check the details:
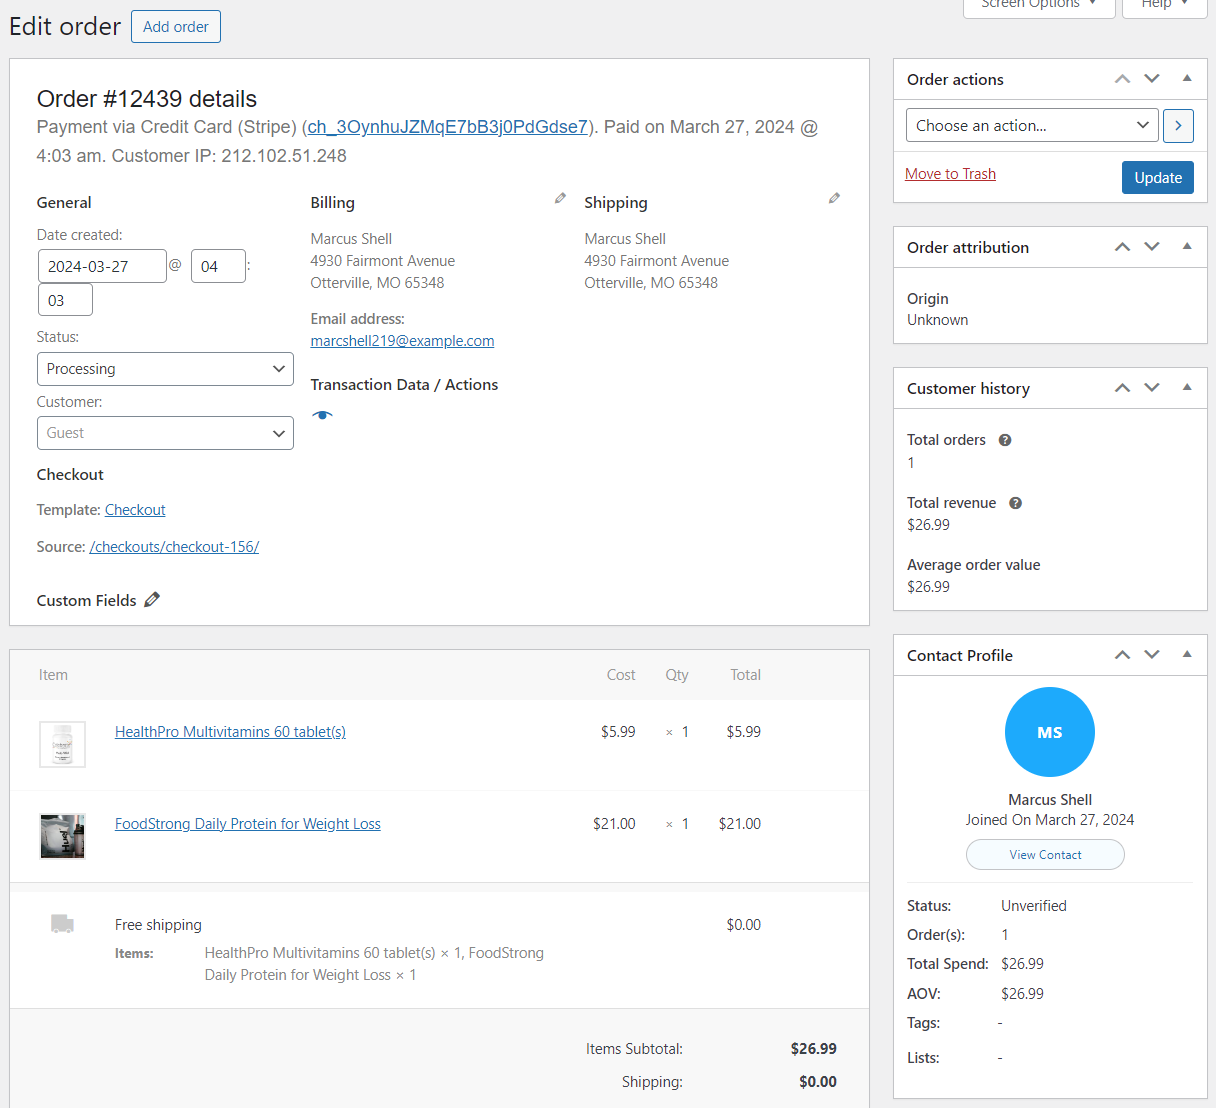
This shows that you’ve successfully placed your test order from the WooCommerce checkout page.
2. Cash on delivery payments
Navigate to the Payments section in WooCommerce settings and enable the ‘Cash on delivery’ payment method.
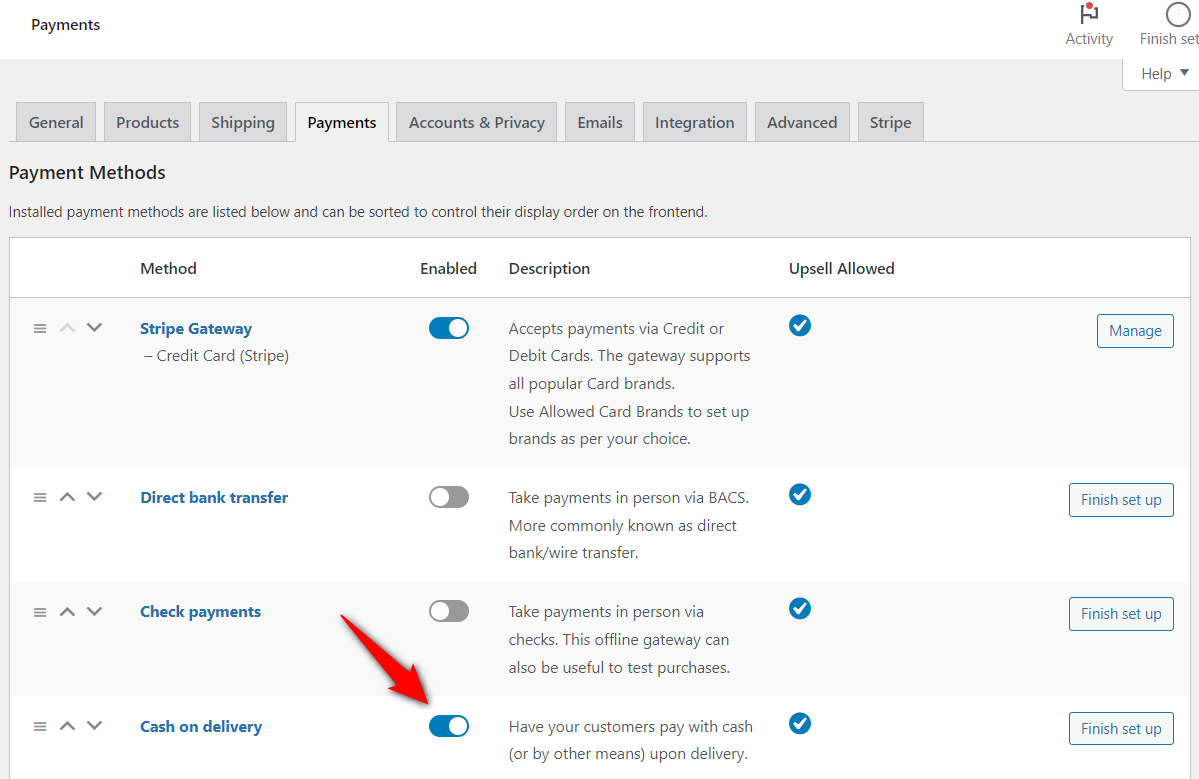
Test WooCommerce orders by adding items to the cart and heading to the checkout page.
Next, select the ‘Cash on Delivery’ option and hit the ‘Place Order’ button.
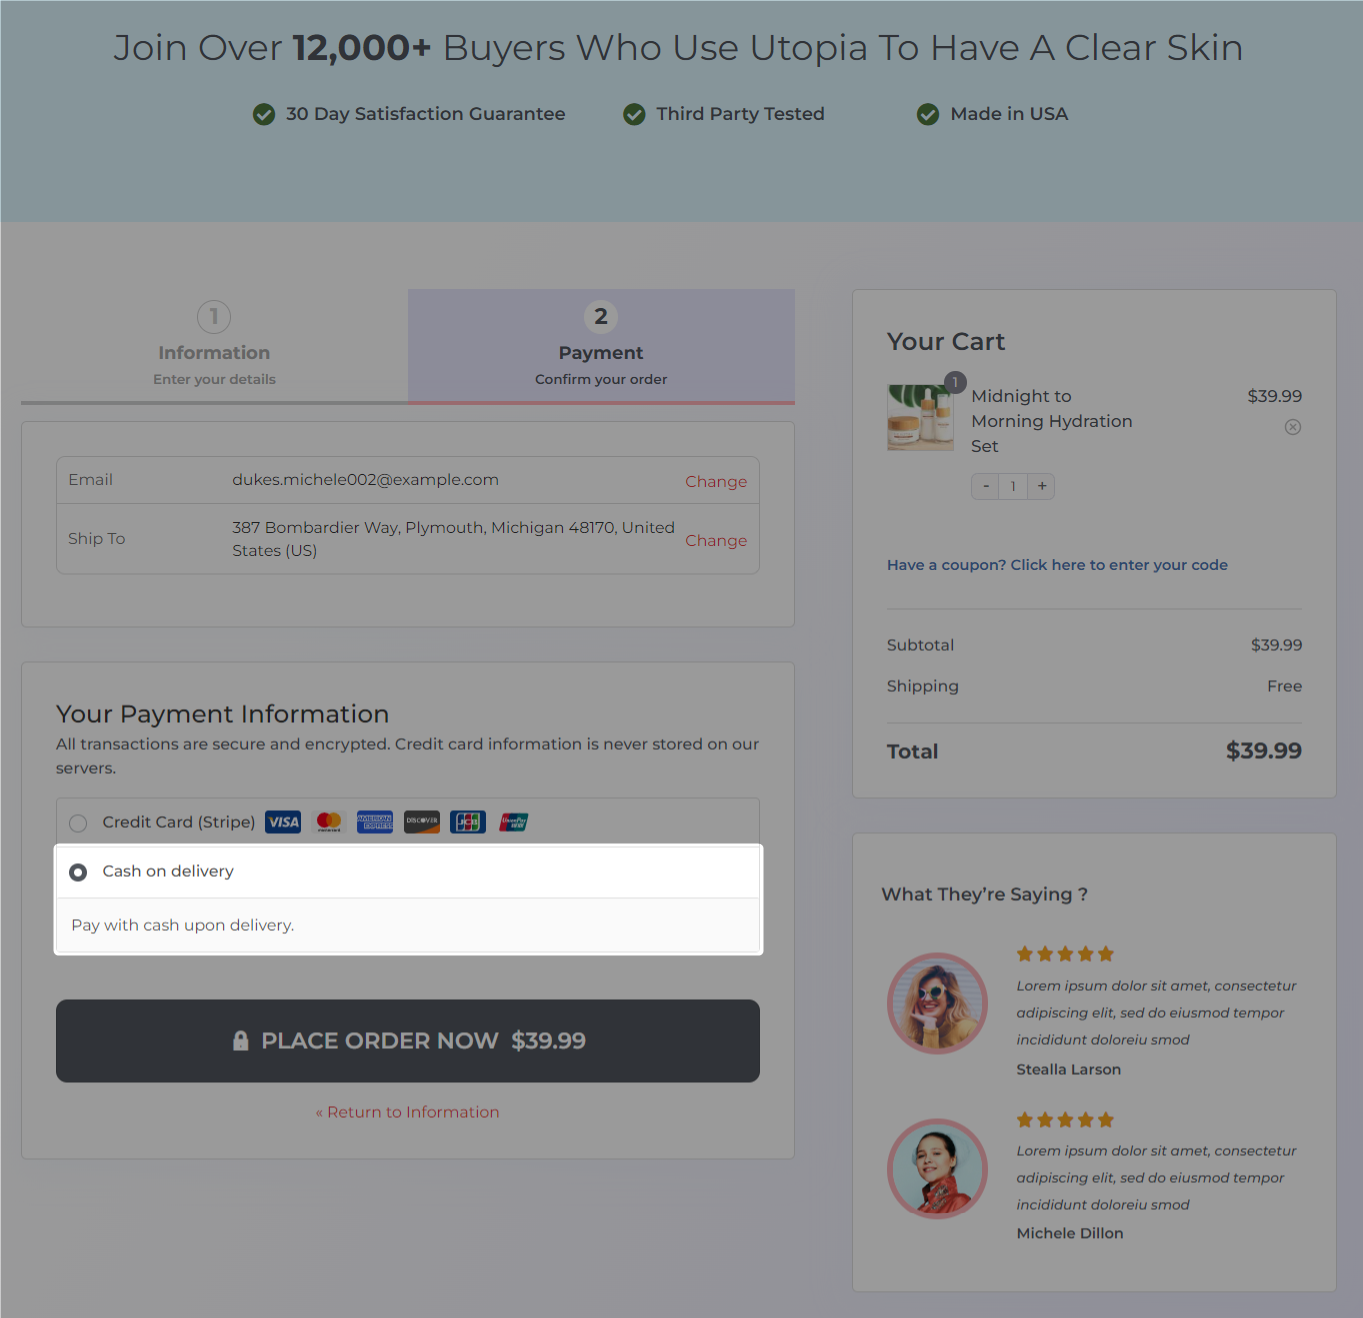
Verify that the order has been successfully placed and is reflected in WooCommerce.
3. Check payments
Check payments are considered an offline payment gateway that allows your customers to pay for their purchases in person with checks.
You don’t need a payment processor to place your order using this payment option.
Enable the Check payments option from WooCommerce payment settings.
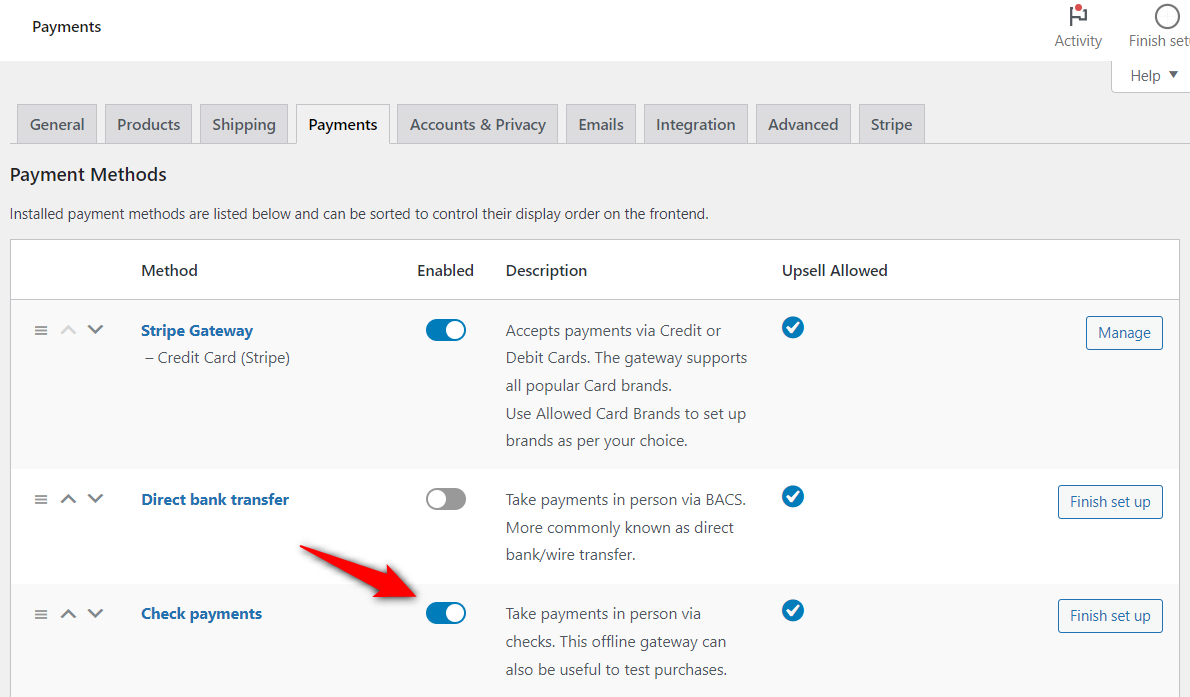
Test your WooCommerce checkout by selecting the check payment option and placing the order.
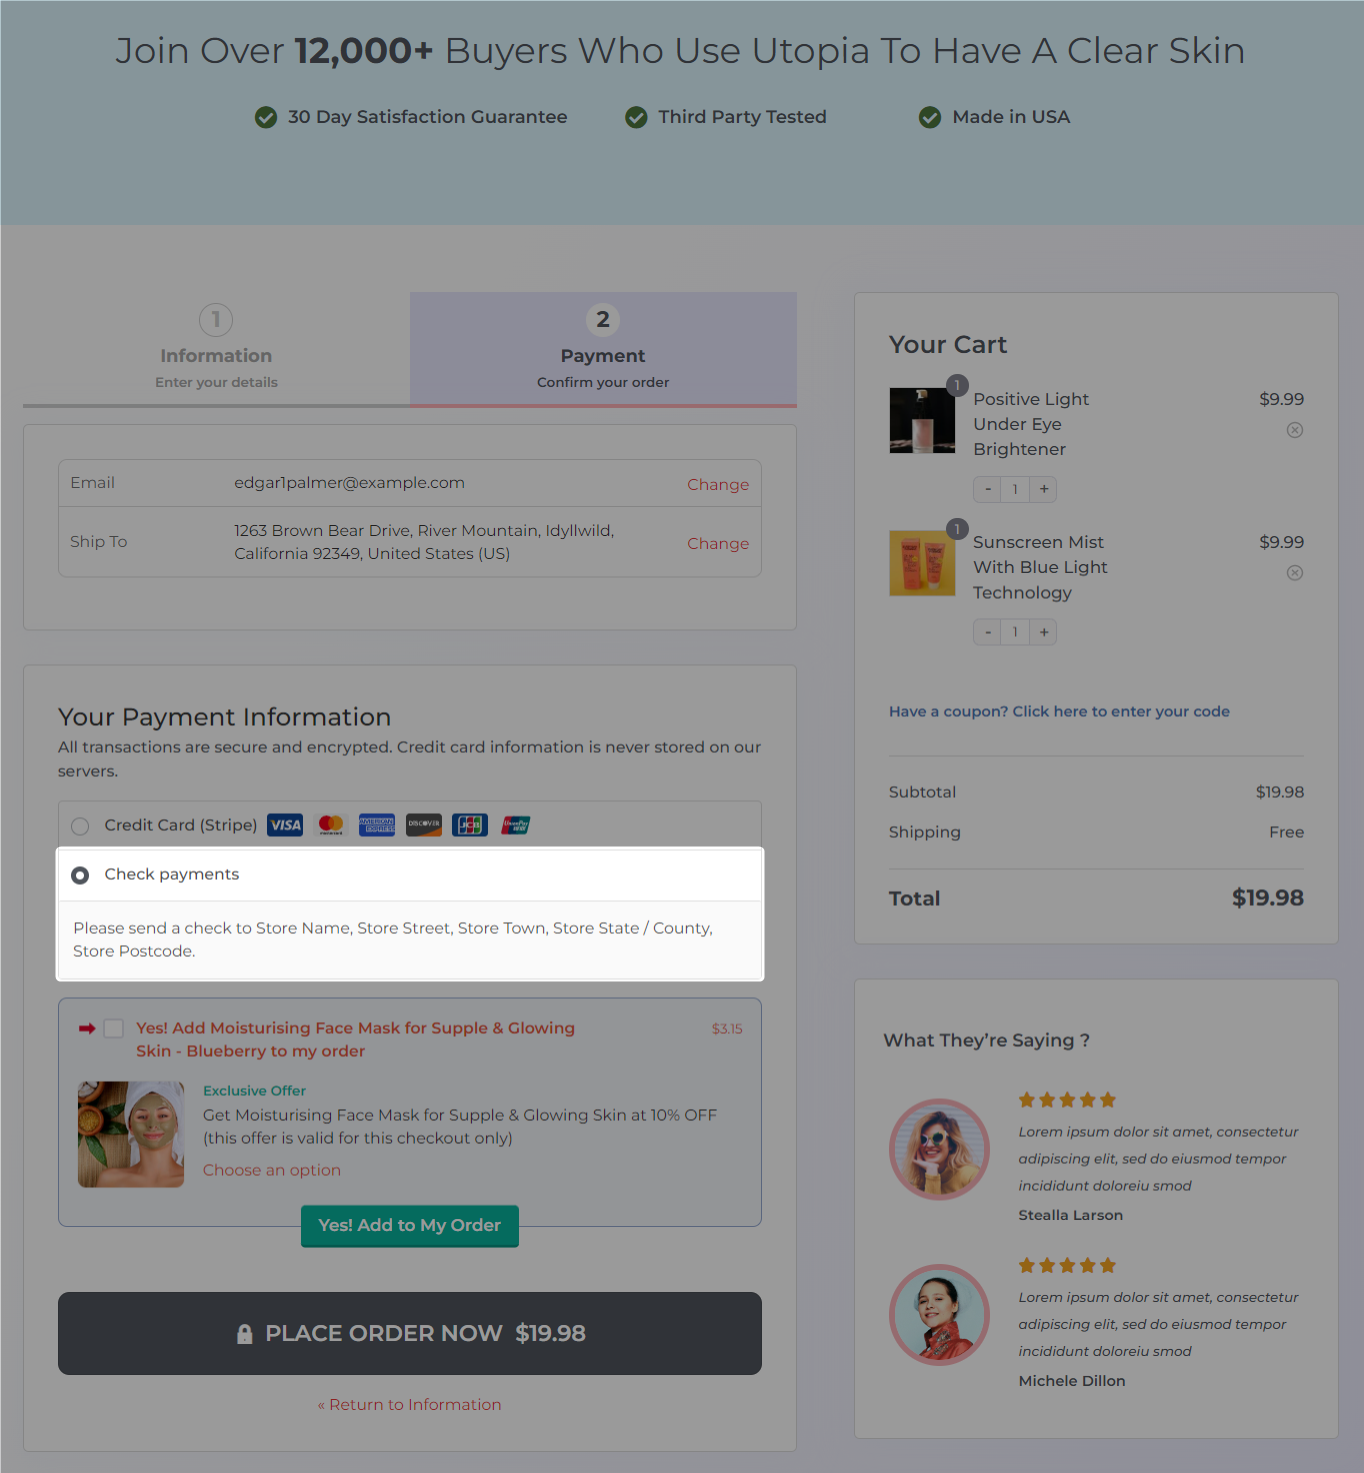
This is how you can use the check payments gateway to place a test order in your WooCommerce store.
4. Digital wallets like Apple Pay and Google Pay
Digital wallets accumulated a total value of $9 trillion globally in 2023 and are expected to increase massively in the coming years.
As a popular payment source, our experts recommend you set up express one-click checkout options such as Apple Pay and Google Pay.
This way, your customers can make purchases with a single click without having to enter their information in the checkout form fields.
To set up, navigate to WooCommerce payment settings and go to the Express Checkout section.
Enable the express checkout payment method.
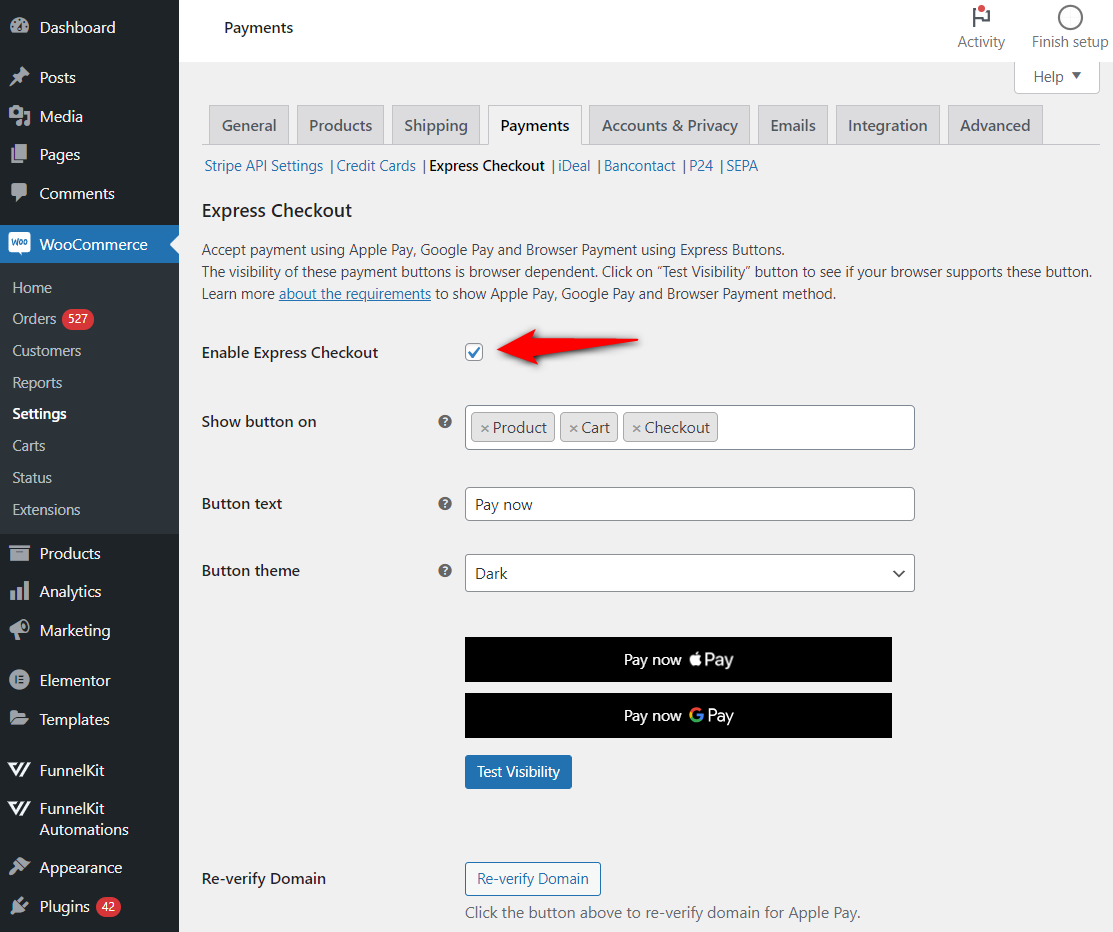
Next, configure the button visibility options:
- Pages you want to show this payment button
- Text on the express checkout button
- The theme of the express checkout button
- Additional product page, cart page, and checkout page options
Once done, your express checkout button will be displayed on the checkout page.
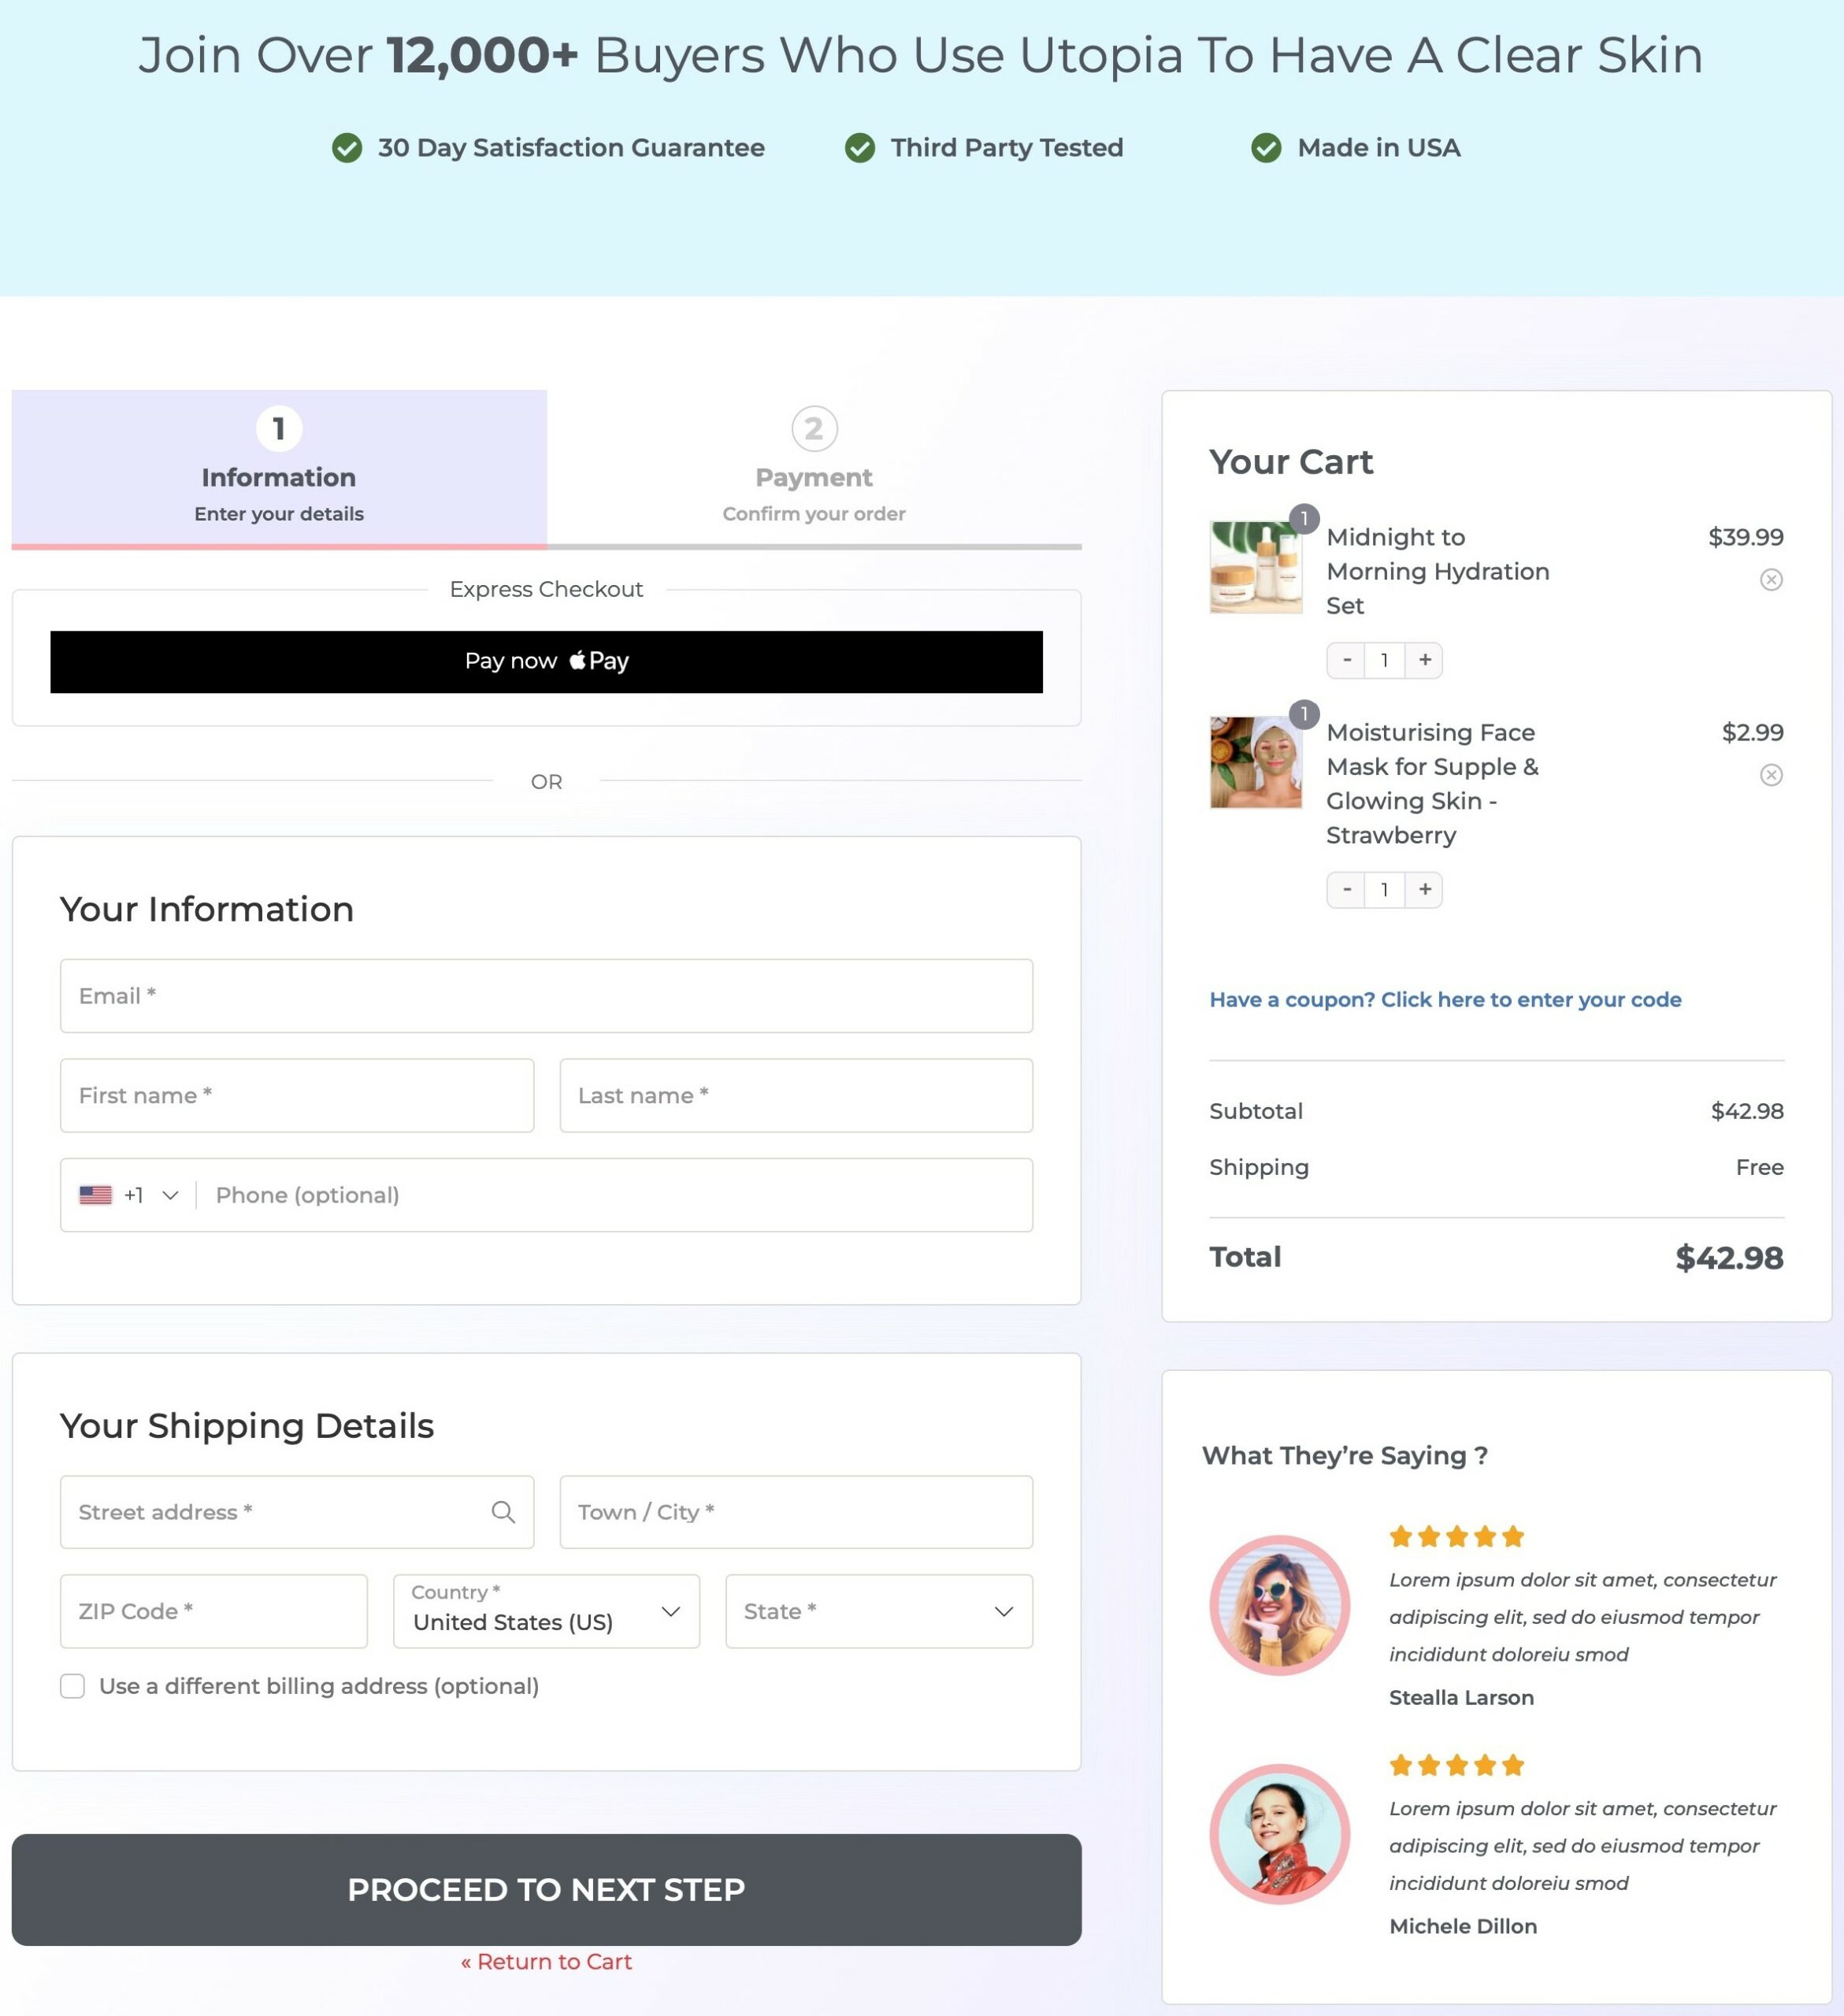
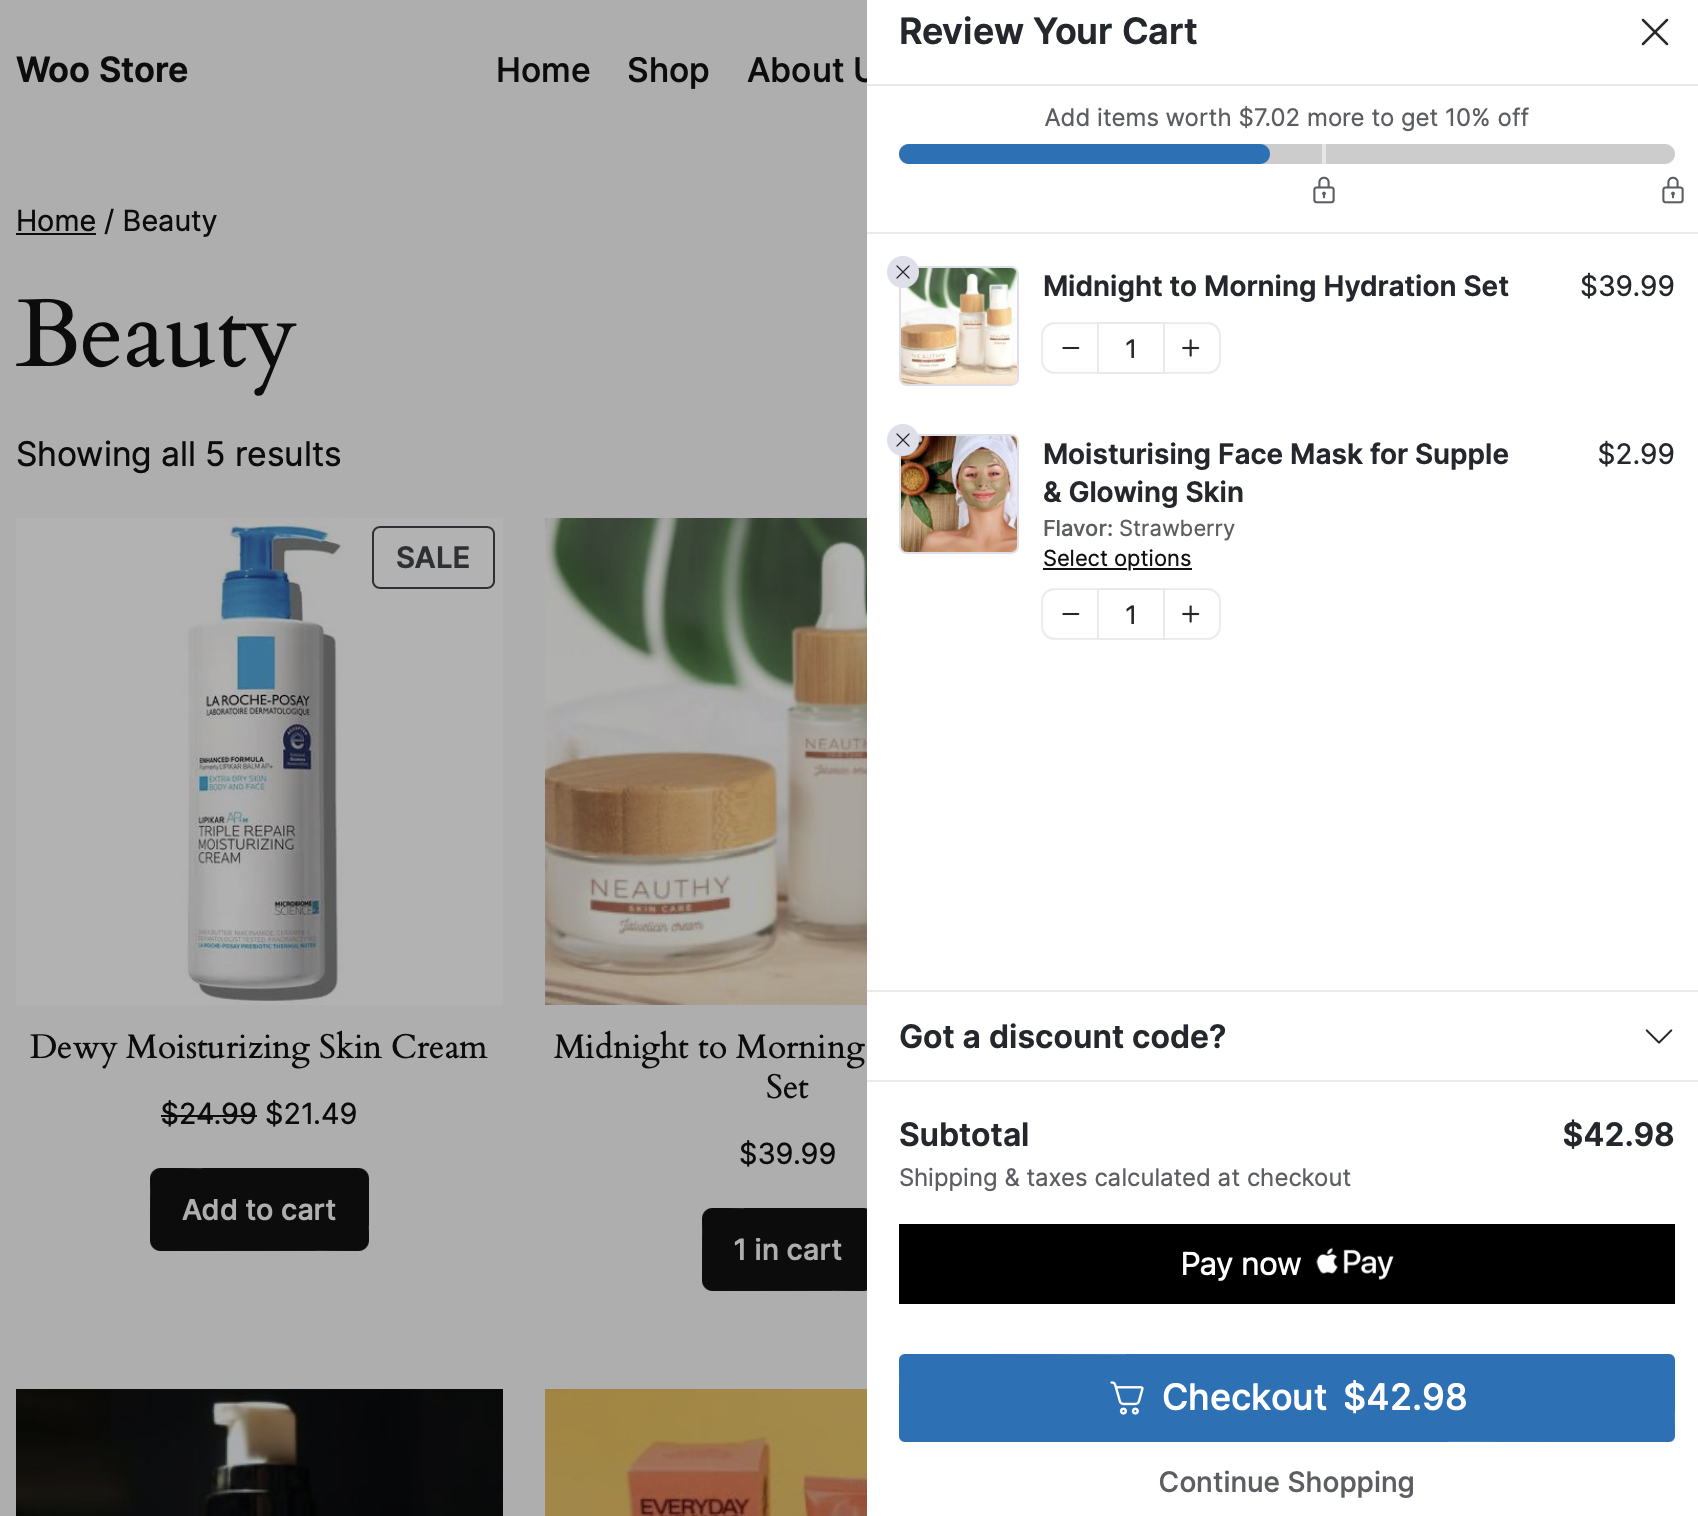
Your shoppers have the option to express checkout from the shopping cart using FunnelKit Cart:
If you face issues with your express payment button not displaying to your customers, check out the guide below.
5. Bank redirects
Bank redirects or local payment methods allow customers to purchase their favorite products using their bank accounts.
It’s quite popular among European and Asian consumers, offering a secure and intuitive checkout experience.
Some popular bank redirect payment methods include iDEAL, SEPA, Bancontact, P24, and more.
This WooCommerce Stripe gateway plugin offers all these payment methods, which can be enabled from the Payment Settings section.
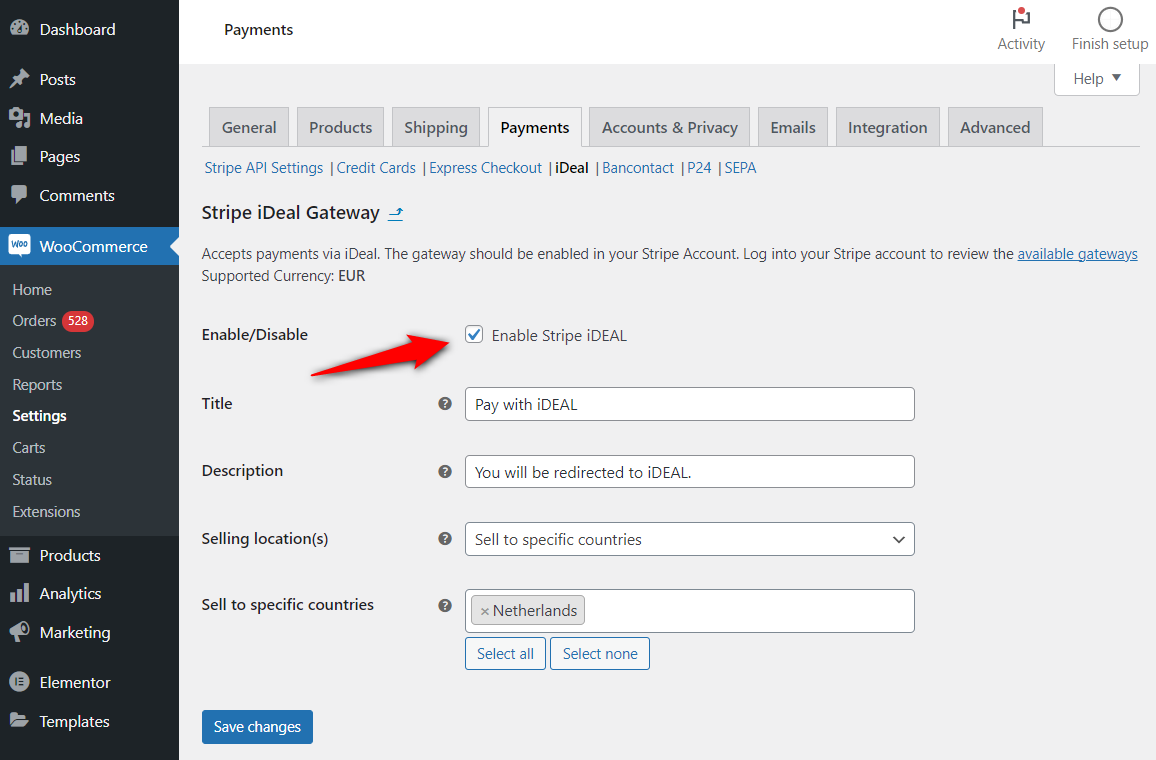
For example, we’ve enabled iDEAL, a popular payment mode in the Netherlands.
When you enter the Netherlands shipping address on the checkout page, you will see the iDEAL bank redirect option.
Select the bank and place your test order.
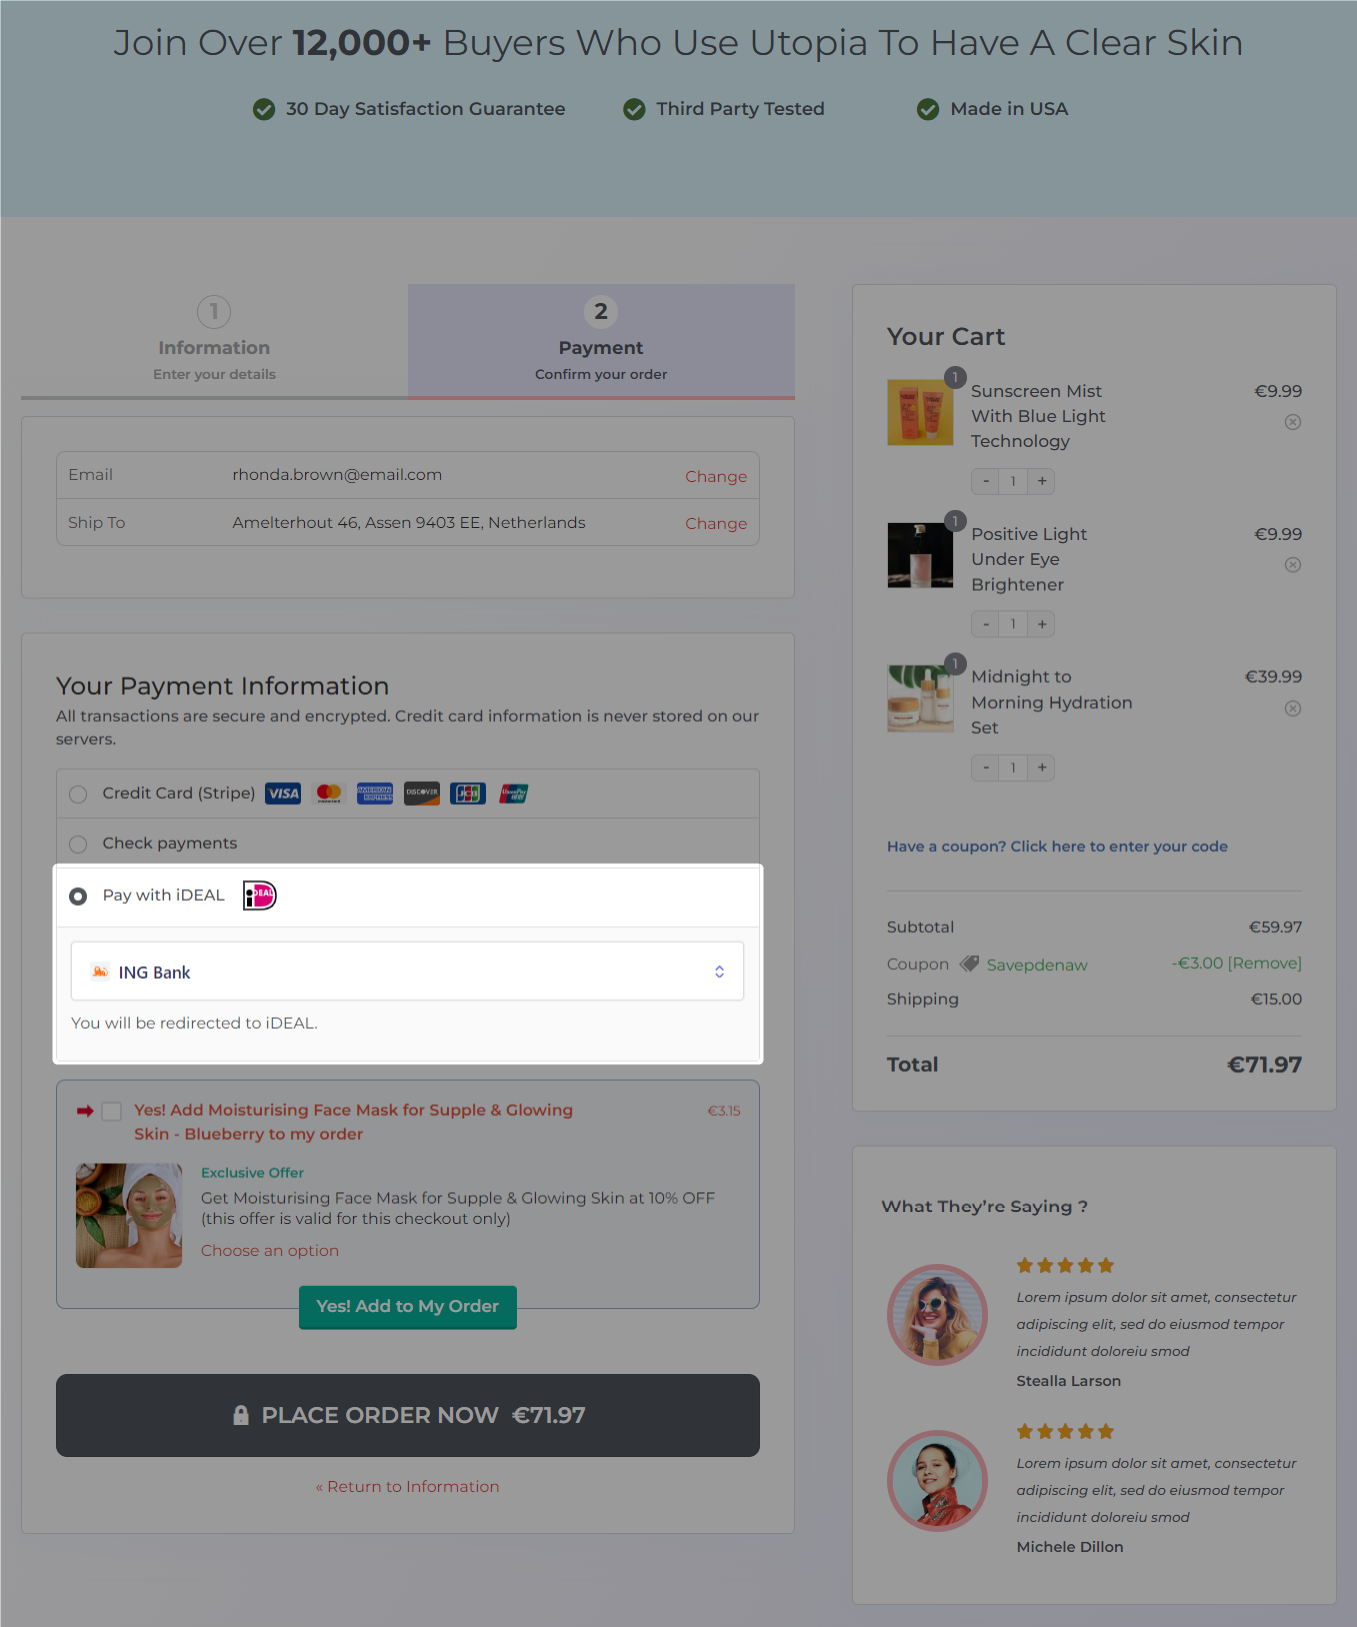
It’ll take you to the authorization page to confirm your payment. Once done, you’ll successfully land on the thank you page with your order placed.
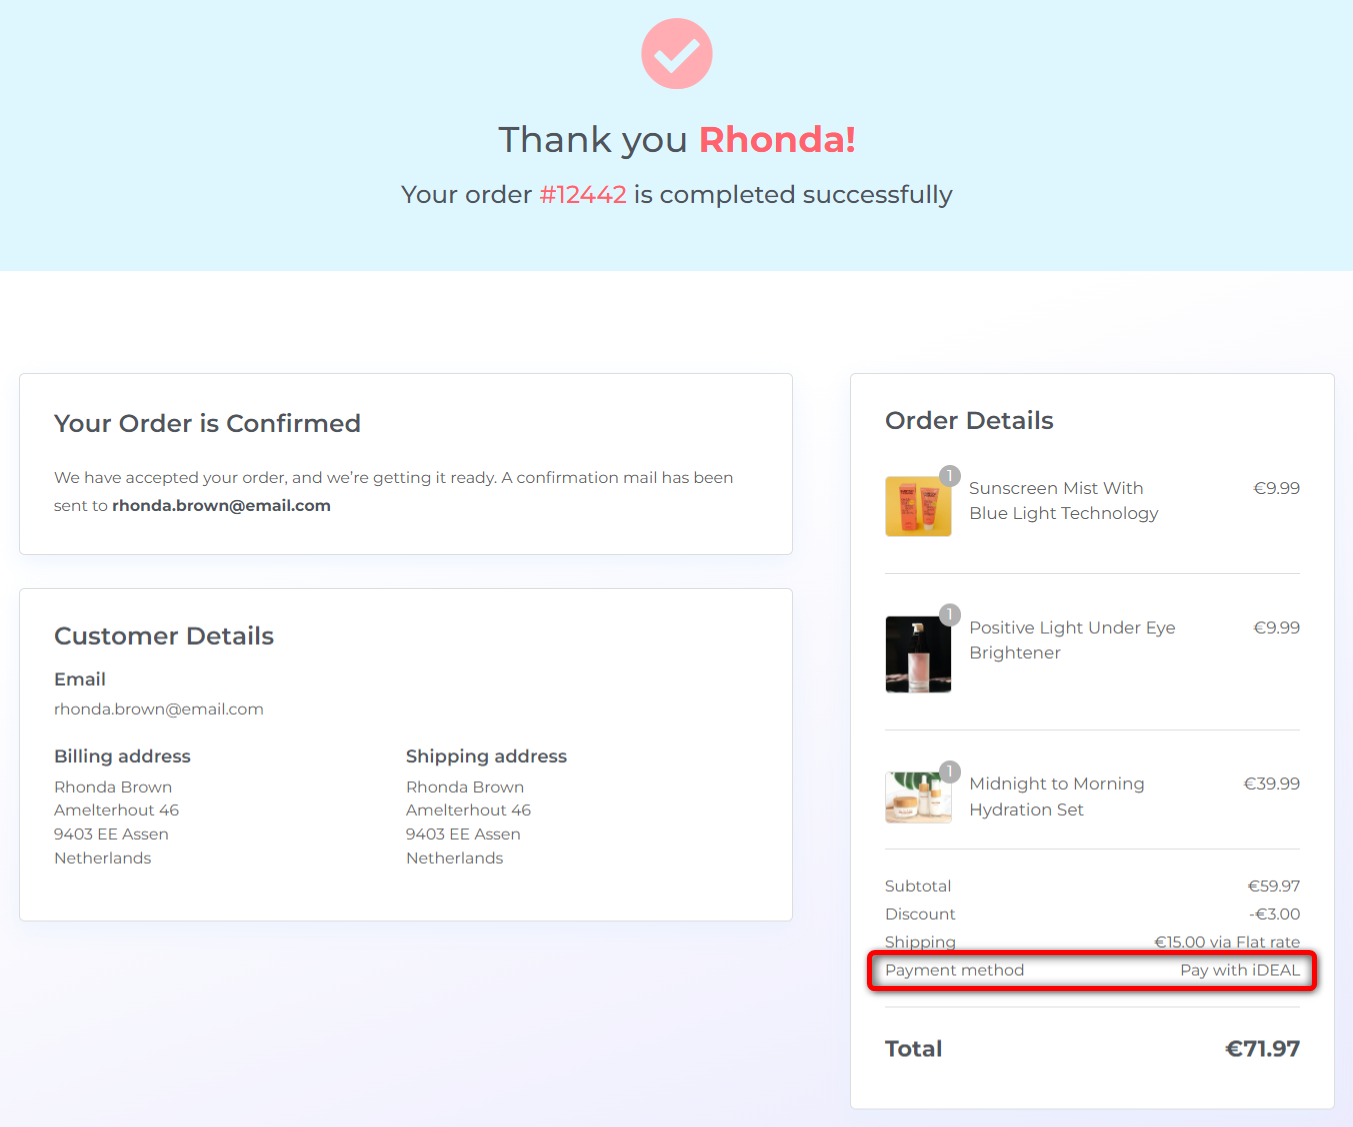
Repeat the same process for your additional bank redirect payment methods.
6. Buy now pay later (BNPL) options
Buy now pay later (BNPL) payments allow customers to make purchases and pay for them over time in installments.
These methods are quite convenient for shoppers with budget constraints and let them spread out the expensive product costs into small, manageable payments.
Use Affirm, Klarna, and Afterpay to provide BNPL options to your customers.
Make sure you’ve integrated Stripe with WooCommerce and enabled all the BNPL options from the Stripe dashboard.
Next, go to BNPL payment, such as Klarna, and enable it.
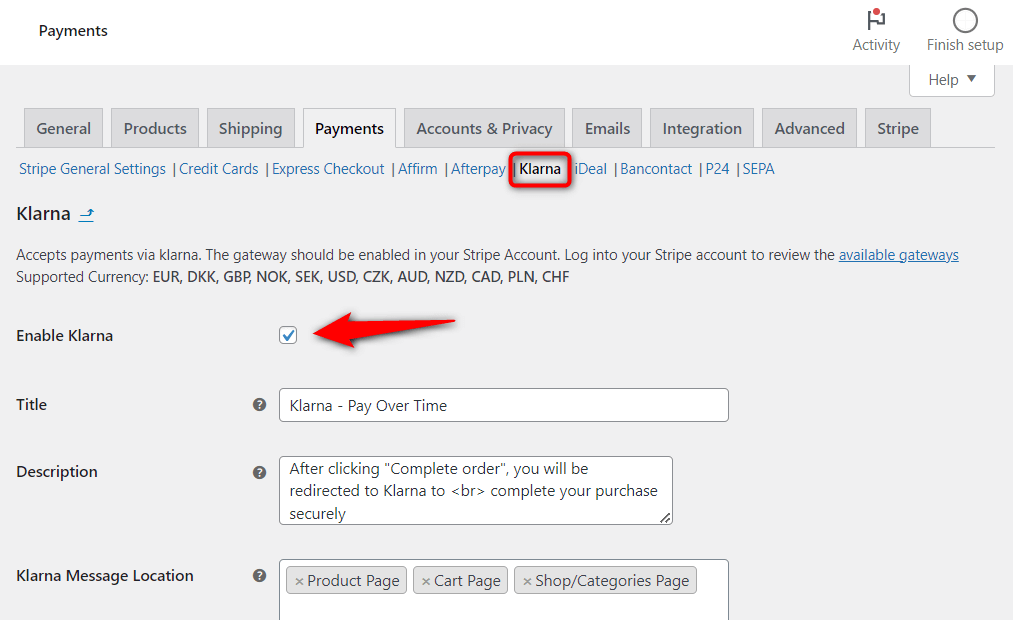
Once done, you’ll see the BNPL payment option on the checkout page:
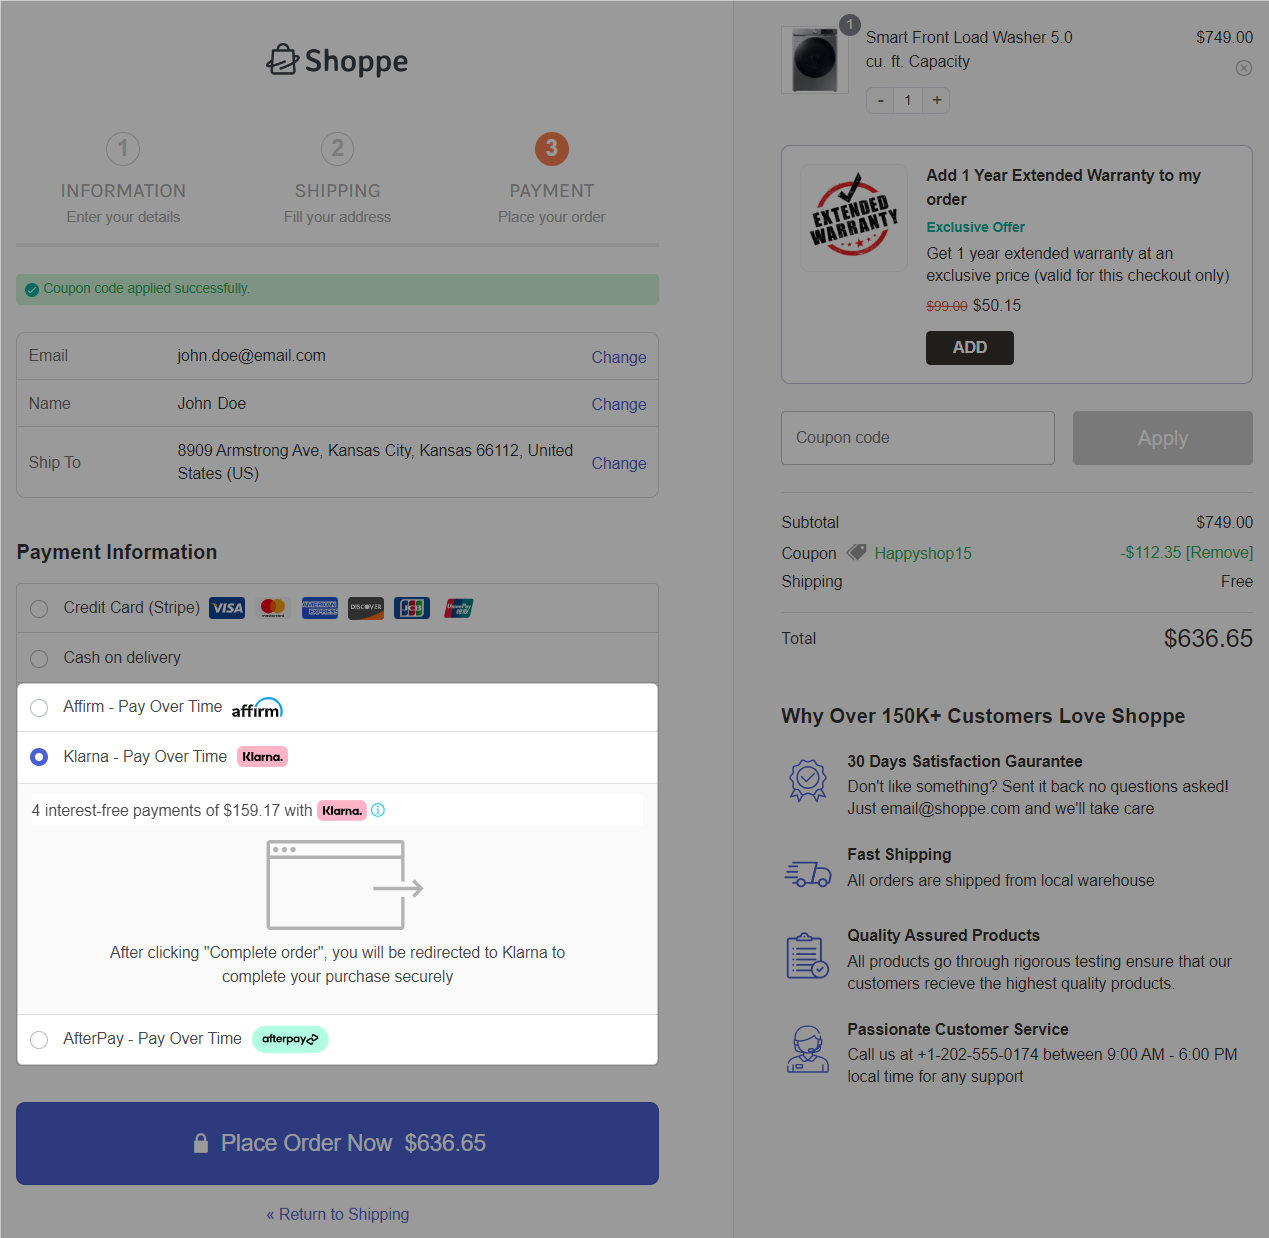
It’ll take you to a popup window to check your BNPL loan eligibility or purchasing power.
Choose a payment plan from the available options and choose the payment schedule:
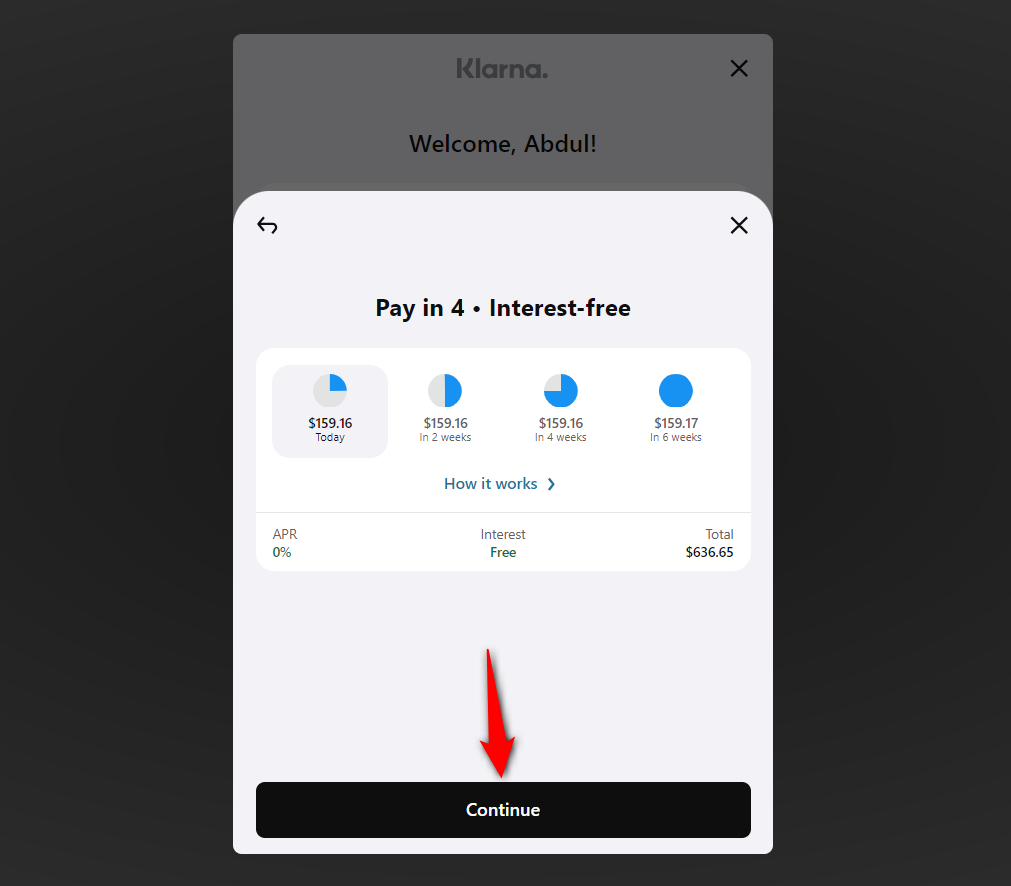
This will place your order and direct you to the thank you page with the confirmation of your order.
7. PayPal
PayPal is one of the most popular payment gateways, and you can easily integrate it with your WordPress website and offer it to your customers.
You can place your test orders using a PayPal Sandbox account, which you must create from their developer website.
Install and activate the WooCommerce PayPal Payments plugin on your website.
Follow the instructions to test your WooCommerce checkout orders using PayPal payment.
- Connect your PayPal account with WooCommerce
After you’ve installed the plugin, make sure to integrate your PayPal account into your WooCommerce store.
Here’s a Woo guide to connect PayPal with WooCommerce.
- Create a PayPal sandbox account
You need a PayPal sandbox account to generate mock transactions and test payments in your store.
Refer to the official PayPal guide to create a sandbox account.
- Enable PayPal payments in your WooCommerce store
Navigate to WooCommerce payment settings and enable PayPal Standard gateway.
Next, turn the toggle on next to ‘PayPal Standard - PayPal’.
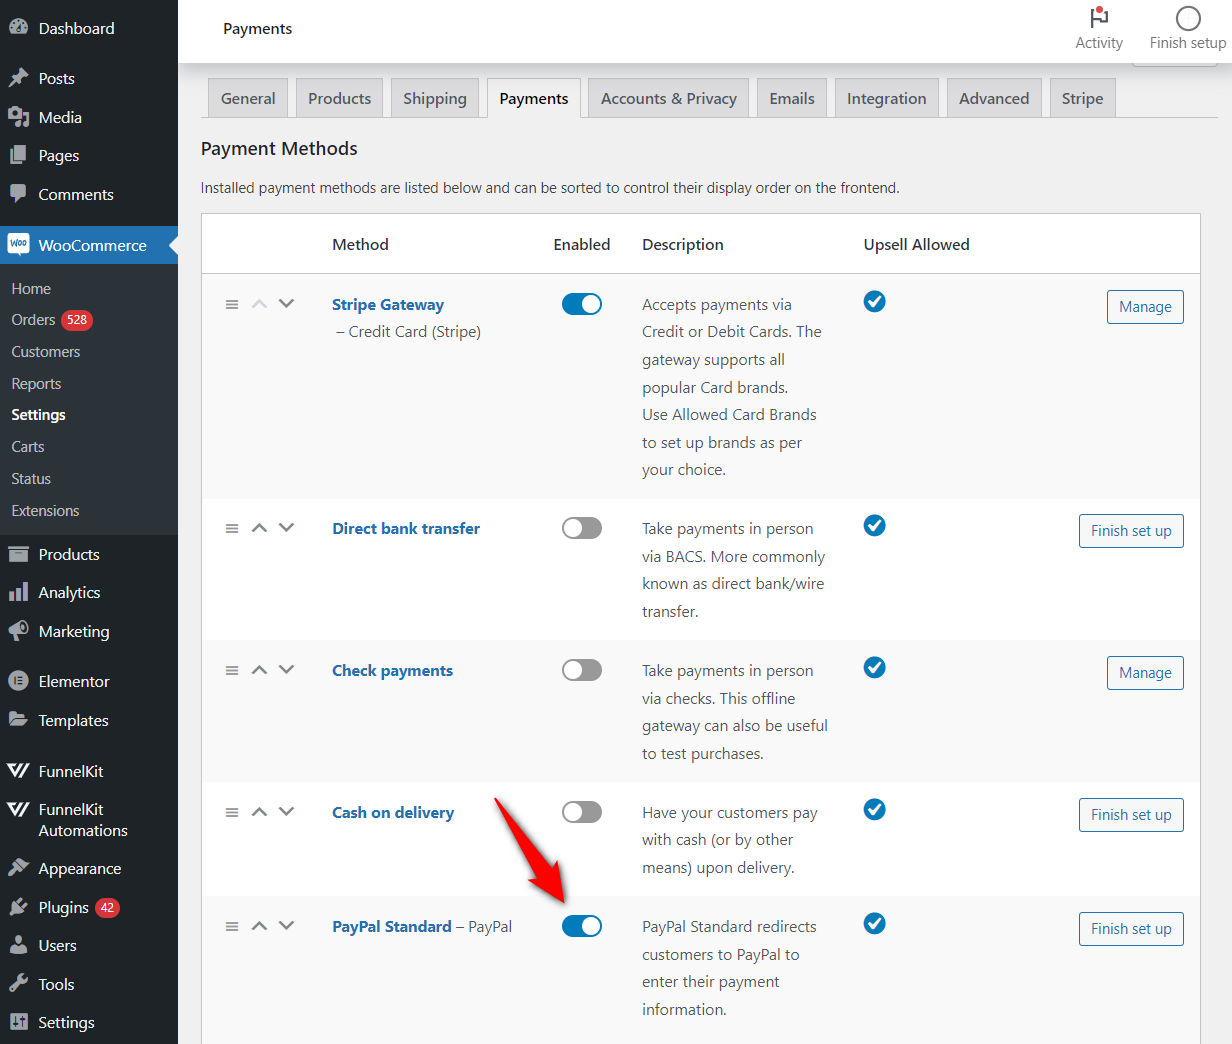
Enable the PayPal payment gateway and configure basic settings like:
- Enter the title and description of your PayPal payment gateway
- Enable PayPal sandbox
- Enable logging
Once done, hit the ‘Save changes’ button.
- Testing WooCommerce checkout orders with PayPal payments
Add items to your cart, head to the checkout page, and select PayPal payment gateway.
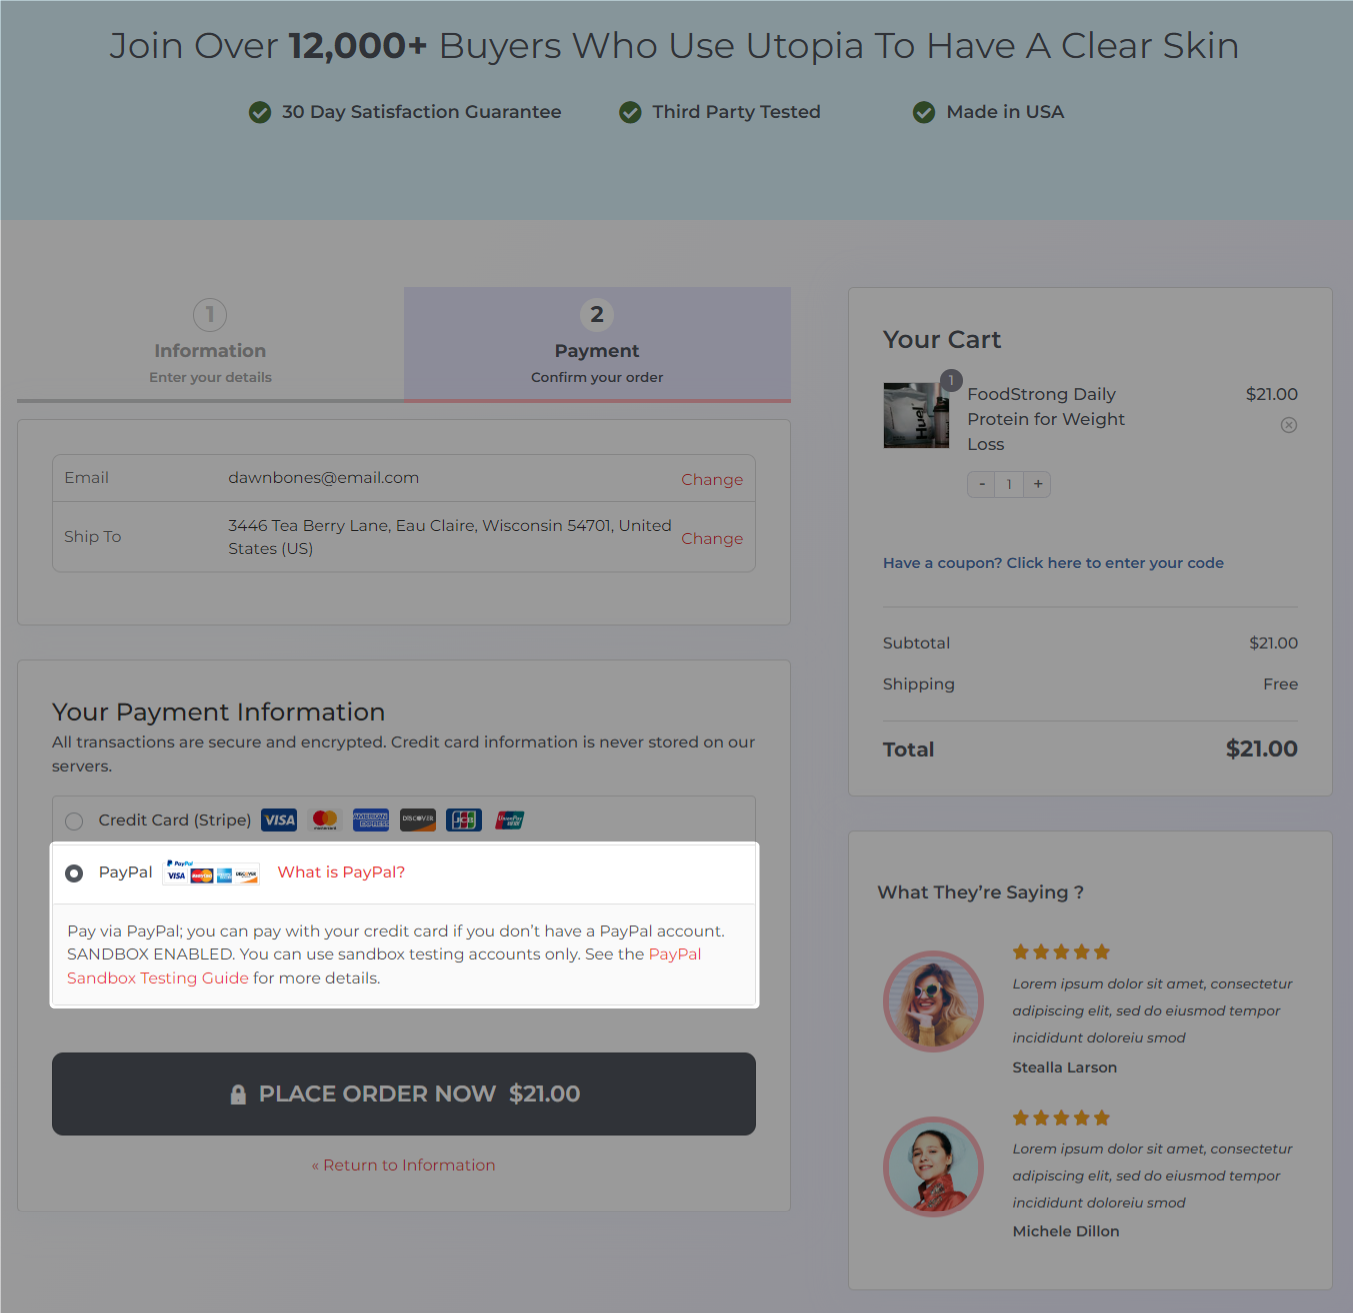
Clicking the place order button will open a new window to authorize your PayPal transaction.
Verify that it successfully places the order and you get directed to the order confirmation page.
How to Test WooCommerce Checkout with Real Transactions and Refunds?
Now, it’s time to test your WooCommerce checkout using real transactions and check out the refund process.
This process will help you verify real transactions from your account and then give a refund once the order is confirmed.
Our experts recommend proceeding with this checkout testing process only if you’re the website owner or store administrator.
Please note that if your store checkout has bugs, you may not be able to get your refund until the issue is resolved. Therefore, our experts recommend that you add products with low prices.
Use any payment method set up in your store.
1. Make real transactions
Add an item to your cart and proceed to the checkout page. Select Stripe and enter your credit card details, including the card number, expiration date, and CVC code.
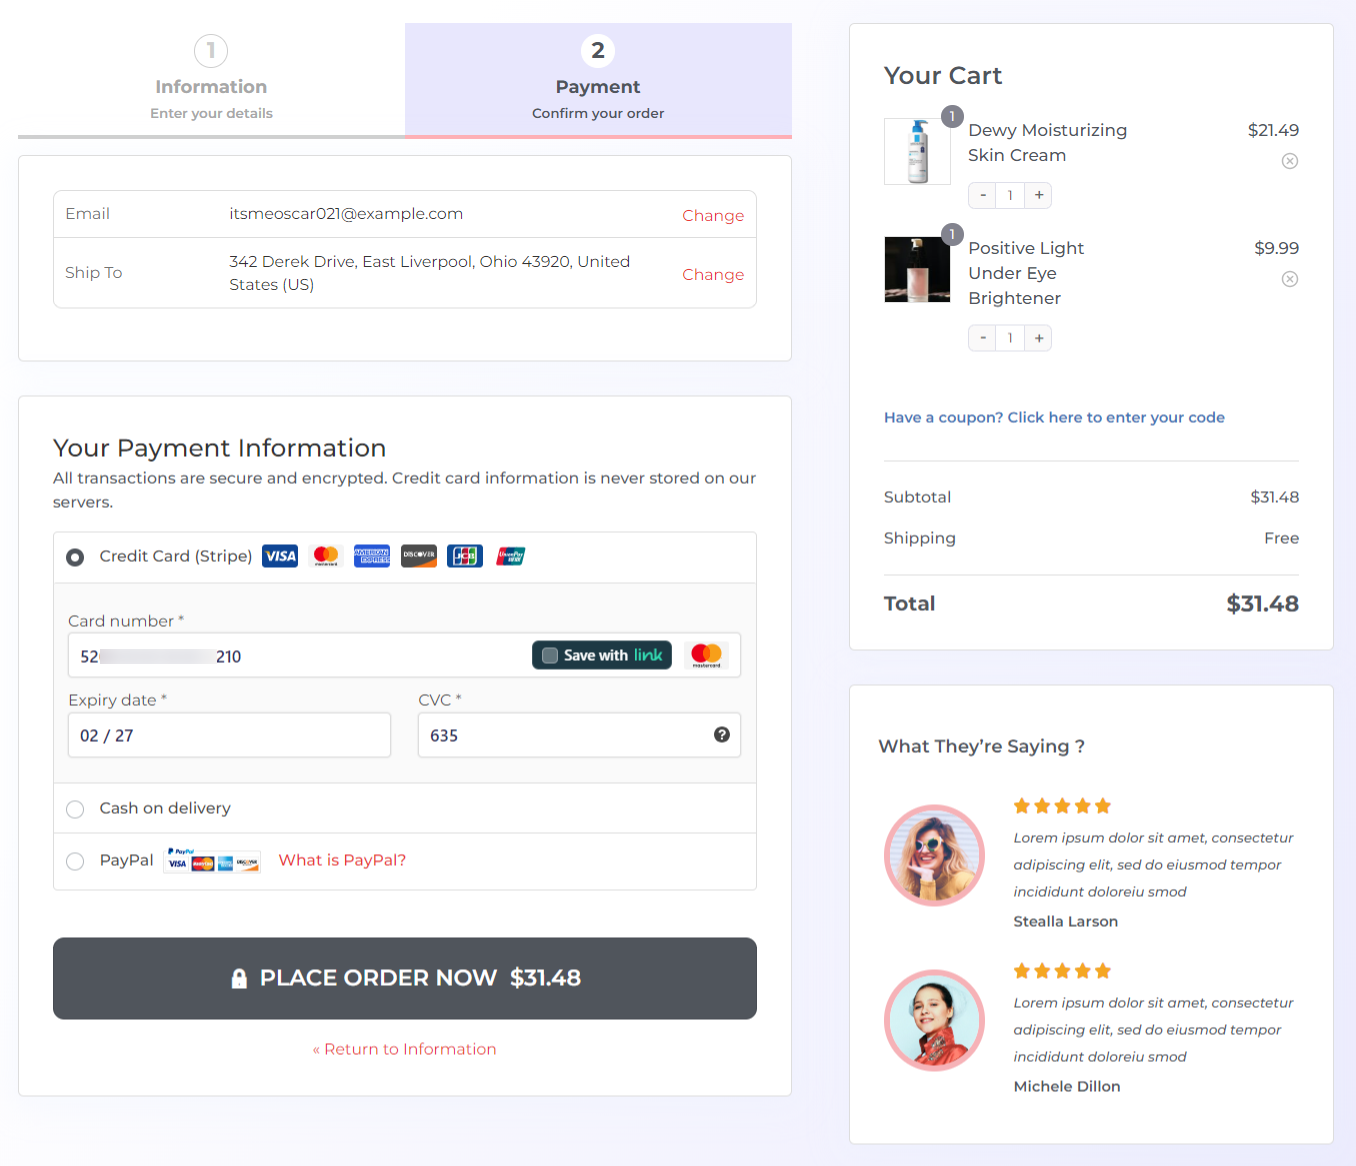
Once done, hit the buy now button.
If you get directed to the thank you page with all the correct order details, it means that your orders and transactions are working perfectly on your WooCommerce store.
You can now start selling on your WooCommerce store.
2. Test refunds for real transactions
Now that you have successfully made a real transaction, it’s time to test refunds for your order.
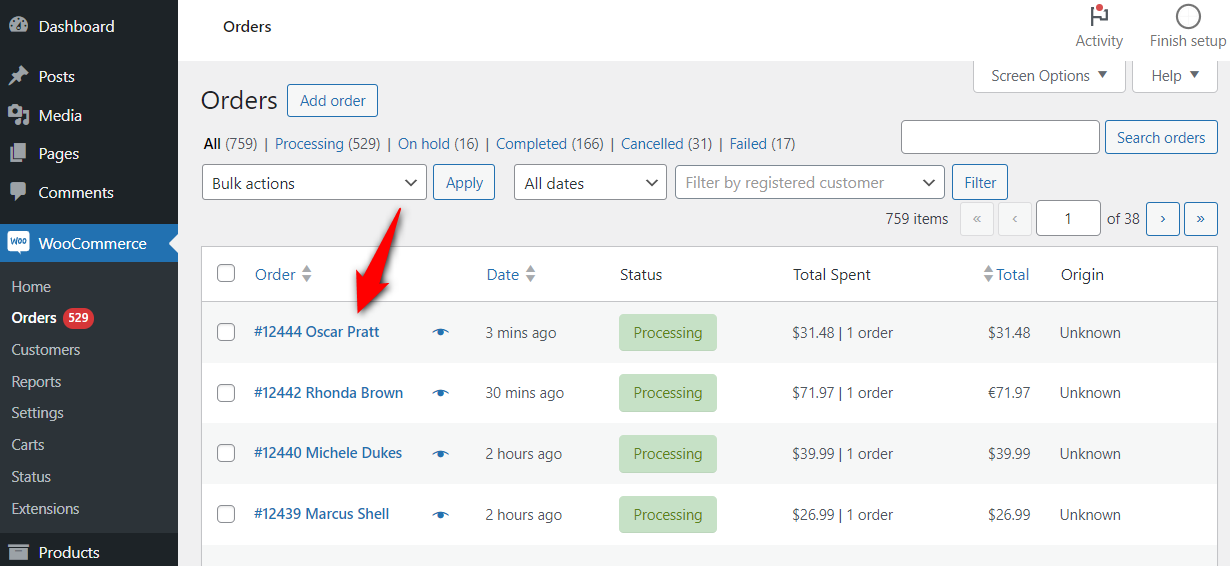
To get your refund, navigate to WooCommerce ⇨ Orders and click on the order you’ve just purchased.
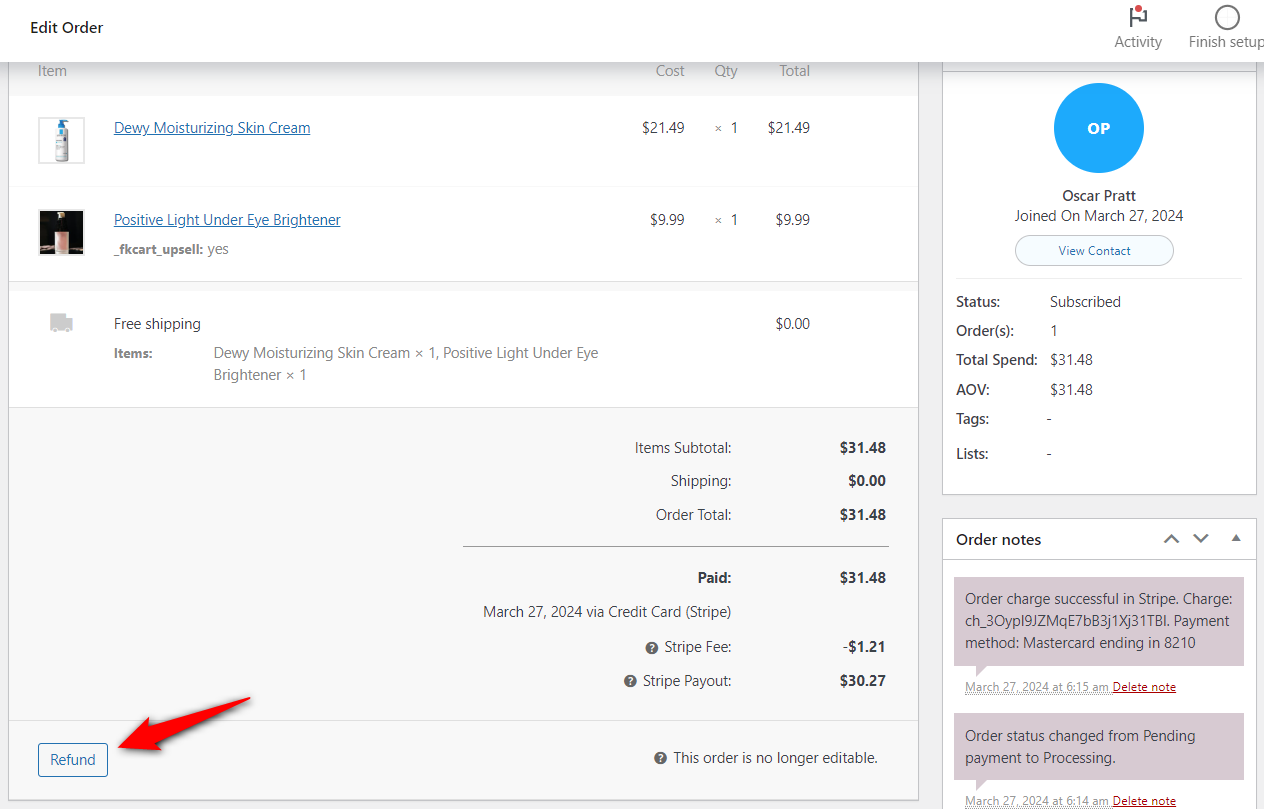
Scroll down and click on the ‘Refund’ button under the Items section.
After that, enter the total refund amount and hit the 'Refund via Stripe Gateway' button to complete the refund.
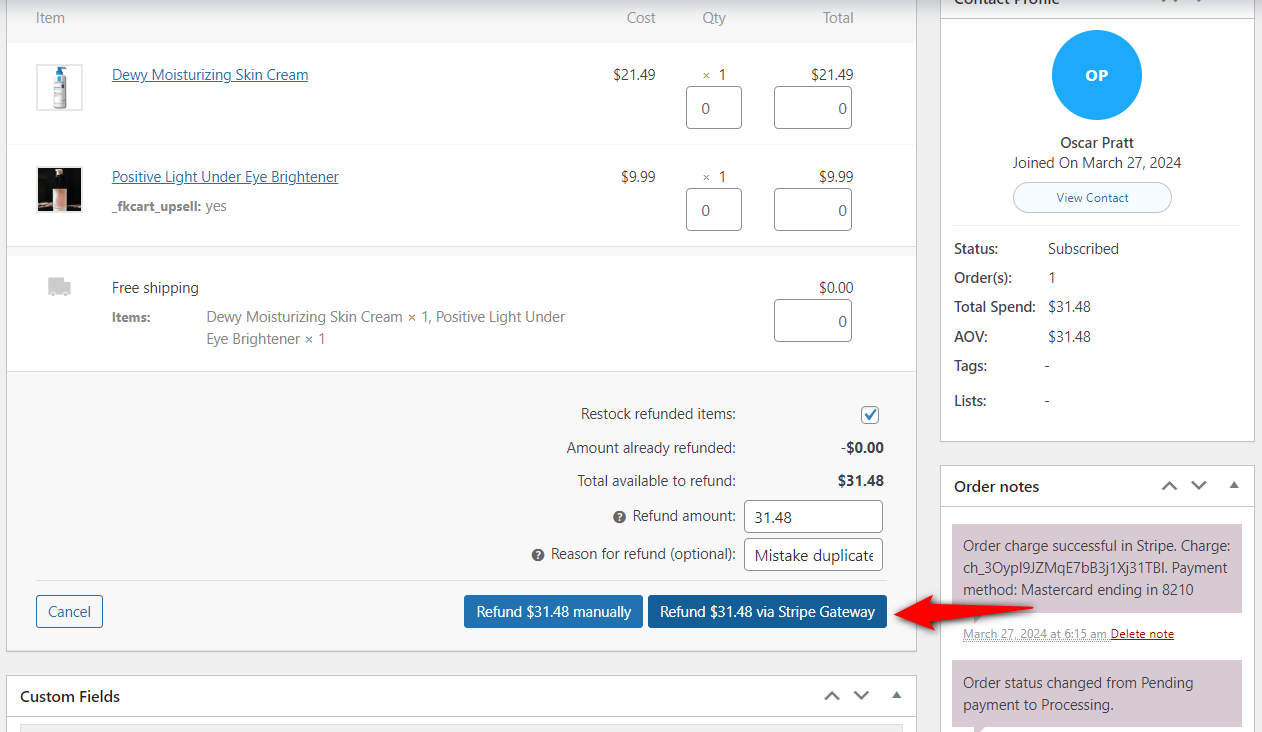
If you placed your test order through a different payment gateway, like PayPal, you’d see the option ‘Refund via PayPal’.
If the payment gets refunded to your account, then live transactions and refunds work flawlessly on your WooCommerce store.
Please note that some payment gateways take hours or days to process refunds, so you may need to wait to get your money back.
How to Test WooCommerce Checkout for User Interface and Experience?
Testing the WooCommerce checkout for user interface (UI) and user experience (UX) ensures a smooth, conversion-friendly process.
The default checkout page lacks branding and has limited customization elements.
That’s why experts recommend an advanced WooCommerce checkout manager like FunnelKit Funnel Builder to streamline the buying journey in your store.
FunnelKit has a wide array of pre-designed checkout templates to choose from. Different templates are built to serve different niches and goals. So, whatever your goal may be, we have a funnel template to help you achieve it!
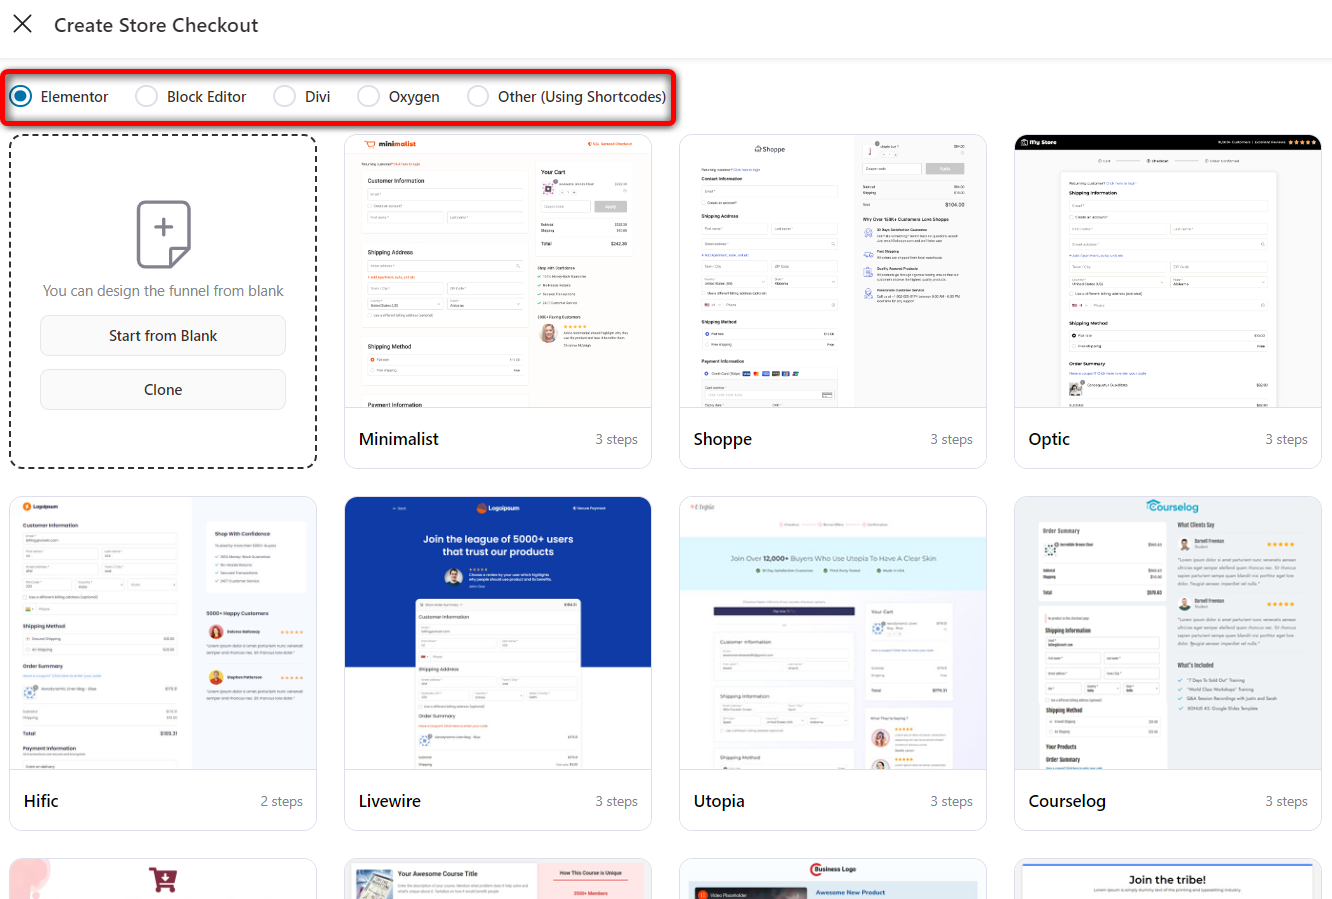
You can customize the checkout and sales funnel templates with all page builders, including Elementor, Bricks, Divi, Oxygen, and Gutenberg. You can create your pages using shortcodes if you want to use any other builder.
Test your checkout page for:
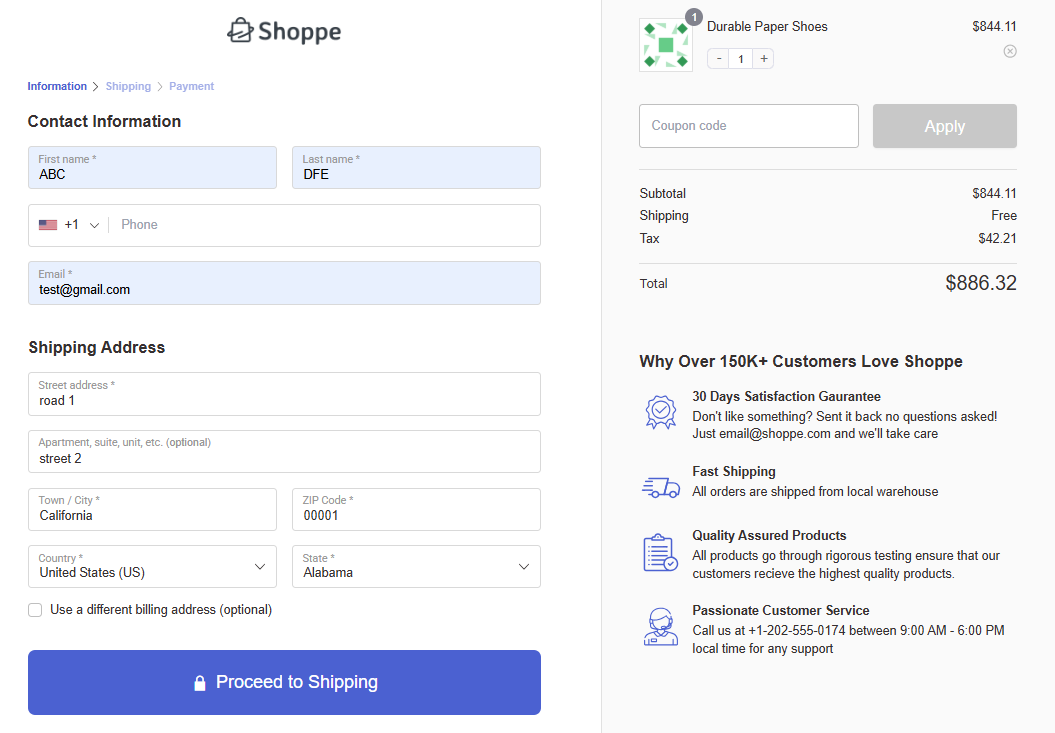
1. Simple and clutter-free design
Your checkout page should be easy to navigate, ensuring a smooth purchasing experience. Use ample white spaces, clear font style, and intuitive icons to create a seamless, distraction-free interface.
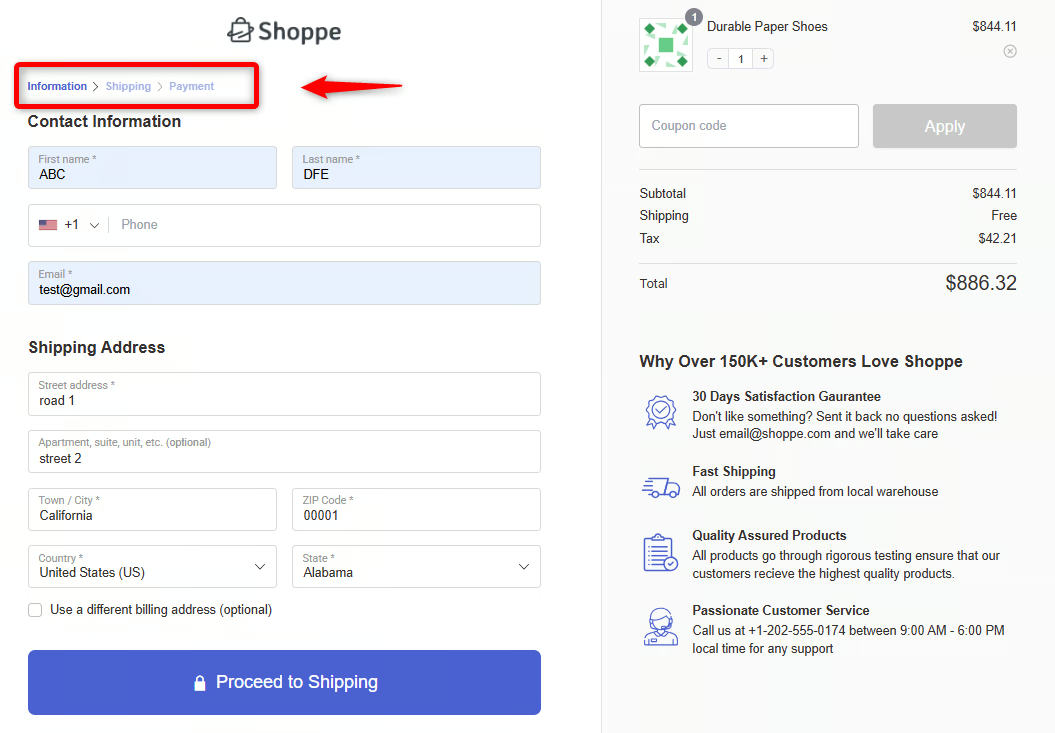
2. Progress indicators
A step-by-step progress bar allows shoppers to understand where they are in the checkout process and how many steps remain in the buying process.
This helps reduce uncertainty and improve the overall user experience in case of multi-step checkouts.
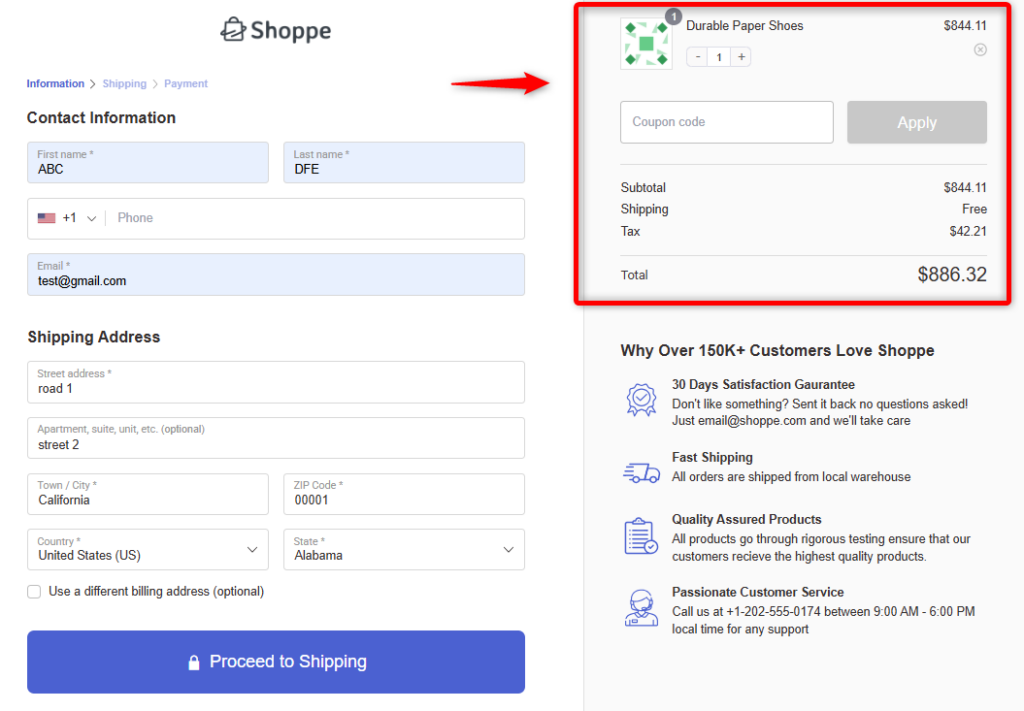
3. Order summary and item updates
A mini shopping cart on the checkout page reminds shoppers of their added cart items. Configure the order summary section to allow shoppers to review their order, update quantities, or remove items before finalizing their purchase.
4. Minimal checkout form fields
A streamlined checkout form reduces friction and speeds up the purchasing process. You should only ask for essential information. Remove unnecessary fields like company or order notes for a faster, hassle-free checkout if you sell digital products.
Further, you can even drag and drop the checkout form fields and rearrange them as per your business needs.
You can add custom fields, edit, and remove the fields and sections.
FunnelKit Funnel Builder integrates with WordPress plugins to add fields to your WooCommerce checkout page:
- EU VAT number
- CAPTCHA
- Terms and conditions
- Donation options
- File uploads
- Additional fees
- Checkout add-ons
5. Assurance, benefits and customer testimonials
Customers need reassurance that their purchase is secure and risk-free. That’s why FunnelKit Funnel Builder lets you add security badges, money-back guarantees, and trust seals on the checkout page using any page builder.
Not only that, you can highlight unique selling points to reinforce value, such as free shipping, exclusive discounts, hassle-free returns, etc.
Add short, compelling reviews on the checkout page and include real customer photos with star ratings.
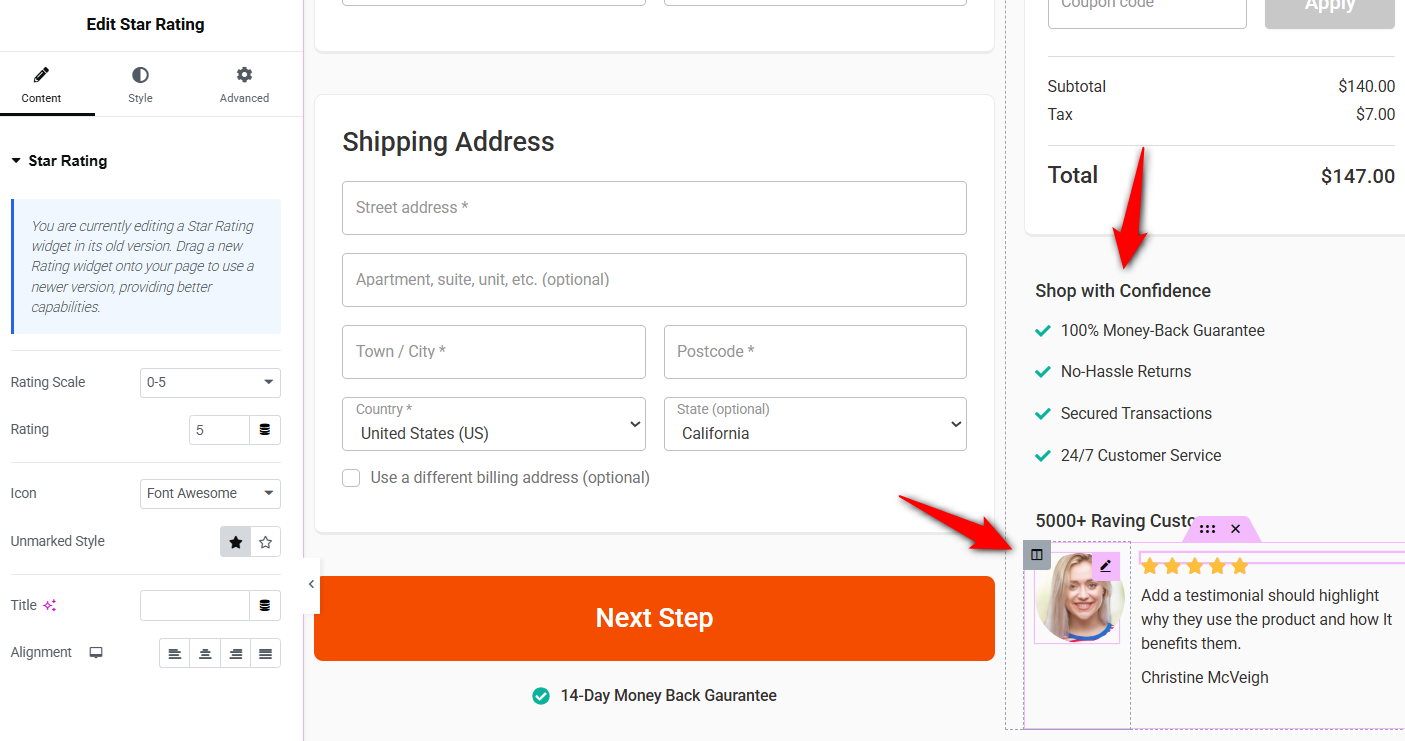
This is how you can test your WooCommerce checkout for user interface and experience.
How to Test WooCommerce Checkout for Compatibility?
Testing your WooCommerce checkout for compatibility makes sure it works seamlessly across different devices, browsers, themes, plugins, and payment gateways.
1. Test on multiple devices
The checkout and sales funnel templates available in FunnelKit Funnel Builder can be effortlessly customized and optimized for all devices, including desktops, tablets, and mobile devices.
When editing your template with page builders, you get the option of responsiveness:
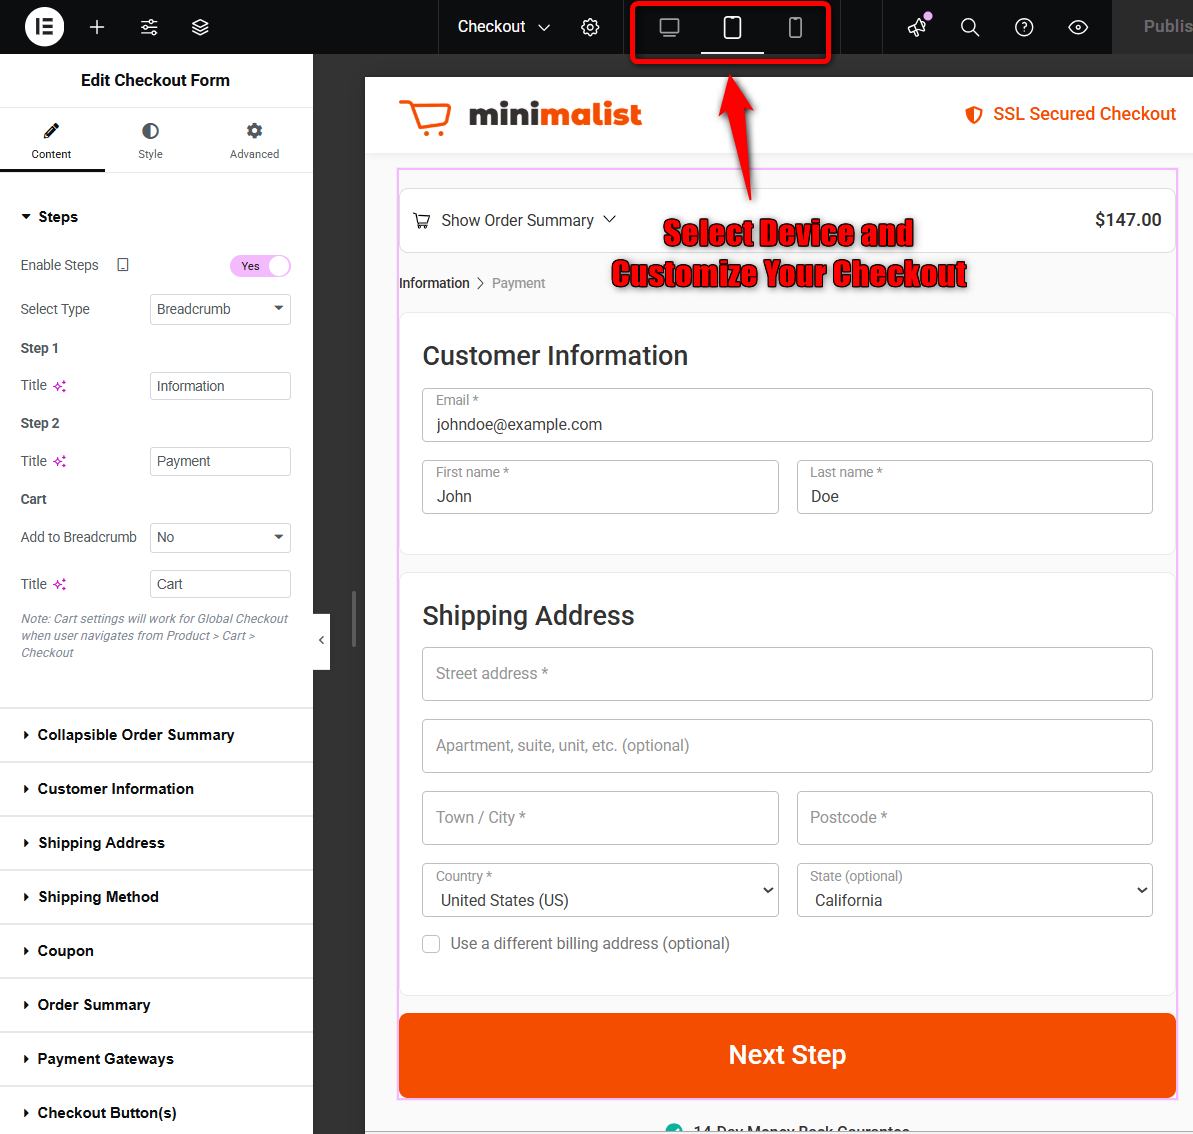
Select your device, such as desktop, tablet, or mobile, and customize the checkout page in real time.
2. Test on different themes
Choose the theme you like and check if:
- The checkout layout displays correctly
- Buttons and elements are working as expected
- There are no missing or misaligned fields
FunnelKit templates are compatible with every theme that WooCommerce supports.
3. Disable caching for checkout and upsell pages
Caching plugins such as WP Rocket, W3 Total Cache, and others may interfere with the checkout page.
Excluding the checkout and upsell pages from caching is mandatory to ensure its proper working.
4. Test WooCommerce checkout with different plugins and extensions
FunnelKit checkout is compatible with a majority of WordPress plugins and extensions. However, conflicts between plugins can break the checkout page.
Ensure the payment gateways are set up correctly. Make sure your cart and checkout page customizations work as expected.
Also, ensure that plugins for setting shipping, taxes, or multi-currency don’t cause any issues. If they do, deactivate them or reach out to the FunnelKit support team for advice.
6 Best Practices to Follow During WooCommerce Checkout Testing
When it comes to testing the WooCommerce checkout process, adhering to best practices is crucial for ensuring thorough evaluation and optimization.
Here’s a deeper dive into some key best practices:
- Regular testing schedule
Establish a routine testing schedule to maintain the reliability and functionality of the checkout process.
Regular testing lets you promptly identify and address any issues, preventing potential customer experience disruptions.
- Comprehensive test coverage
Ensure your testing covers all aspects of the checkout process, such as checkout form validation, tax calculation, payment gateway integration, and order processing.
Comprehensive test coverage helps identify potential issues across various stages of the checkout journey.
- Business automation tools
Utilize automation tools to streamline the testing process and improve the efficiency of your WooCommerce store.
The automated testing framework helps execute test cases like order confirmation, shipment tracking emails, post-purchase emails, etc.
- User feedback integration
Incorporating user feedback into your testing process helps you gain insights into real-world user experiences.
Conduct usability testing or gather feedback through surveys to identify users’ pain points and areas where you need to improve the checkout process.
- Scalability and performance testing
Conduct scalability and performance testing to assess how the system handles peak traffic and load testing to measure responsiveness and resource utilization.
Compressing images, reducing unnecessary scripts, and leveraging WooCommerce caching techniques can significantly enhance load times and improve user experience.
- A/B test multiple variations
Experiment with different checkout layouts, template designs, and optimization functionalities using A/B testing techniques.
FunnelKit lets you split-test multiple variants of your WooCommerce checkout page and compare their performance to identify optimal configurations to maximize conversions.
Frequently Asked Questions (FAQs) on How to Test WooCommerce Checkout and Payments
In this section, we’ll answer some commonly asked questions about how to test the WooCommerce checkout process:
1. How often should I test my WooCommerce checkout?
Our experts recommend you test your WooCommerce checkout regularly. A monthly audit is a good starting point, but make sure to test it more frequently during peak shopping seasons or after incorporating new changes.
2. What are some common pitfalls to avoid during checkout testing?
Some common pitfalls to avoid during checkout testing include overlooking mobile responsiveness, ignoring security vulnerabilities, neglecting to test different payment and shipping options, and failing to analyze performance metrics.
3. How do I test my payment gateway in WordPress?
Testing your payment gateway in WordPress involves several steps to ensure that transactions are processed smoothly. First, enable the sandbox mode. Next, add items to your cart, proceed to checkout, select the payment method, and place the order.
Verify that you’ve tested all the payment gateways enabled in your WordPress website.
4. How do I enable test mode in WooCommerce Stripe?
You can enable test mode in WooCommerce Stripe by installing the FunnelKit Stripe gateway plugin. Make sure you’ve completed the WooCommerce-Stripe connection process.
Next, go to the Stripe API section in your WooCommerce payment settings and click on ‘Test’ mode. This will enable the Stripe test mode in WooCommerce.
5. What should I do if I encounter errors during testing?
If you encounter errors during testing, document those issues thoroughly and collaborate with developers or support teams to address and resolve them as soon as possible.
6. How to do a test purchase in WooCommerce?
To do a test purchase in WooCommerce, add items to your cart, proceed to checkout, select the payment method, and place the order.
To test an order purchase, you can choose cash on delivery or check payments. If you have set up a payment integration plugin, you can enable the sandbox mode and test a WooCommerce order.
7. Is it necessary to test the checkout process on different devices and browsers?
Yes, it’s quite important to test the checkout process on various devices and browsers to ensure compatibility and provide insights into potential issues that may arise for different users.
8. How do I test Apple Pay in WooCommerce?
Make sure you’ve set up the Stripe gateway plugin for WooCommerce and connected it to your store. Then, enable the express checkout option.
Go to the Safari browser on your device and test the purchase.
Here’s a complete guide to setting up Apple Pay in your WooCommerce store.
Are You Ready to Test WooCommerce Checkout and Payments in Your Store?
Testing the WooCommerce checkout process is not just a routine task but a critical aspect of maintaining a successful online store.
Implementing thorough testing procedures and adhering to the guidelines mentioned in this article can help you identify and resolve issues that may impact the customer’s shopping experience.
From ensuring seamless functionality to optimizing performance and security, each element of the checkout process plays a significant role in driving conversions and fostering customer loyalty.
Regularly testing the checkout process can instill confidence in your customers, leading to increased sales.
With FunnelKit plugins, you can enhance your users’ shopping experience.
Funnel Builder can enhance your store’s buying experience by modifying the checkout page, adding a modern sliding cart, offering pre and post-checkout add-ons, and more.
With the FunnelKit Stripe plugin, you can offer additional payment options for a seamless ordering experience.
Using FunnelKit Automations, you can set up automated campaigns, send targeted email/SMS broadcasts, track shopping carts, view in-depth contact profiles, and more.
It’s a complete bang for your buck in helping you test your WooCommerce store and optimize it to generate massive revenue.
Start testing your WooCommerce checkout to ensure an optimized shopping experience on your store.

Editorial Team
February 20, 2026Offering a short-term promotion with steep discounts on selected products for a limited window can significantly boost sales. This works because it creates a sense of urgency and scarcity, prompting...
Editorial Team
February 20, 2026A WooCommerce Shopify checkout is a checkout page redesigned to match the clean, multi-step layout that Shopify stores use by default. It replaces the standard WooCommerce checkout with a streamlined...
Editorial Team
February 19, 2026WooCommerce product add-ons give your customers extra options on the product page. These can be custom text fields for engraving, checkboxes for gift wrapping, dropdown menus for material selection, color...


